the possibilities
Thank you for purcnasing this Samsung product.
To receive more complete serwce.
please register your _roduct at
www. samsu ng .co m/reg ister
,f
Sa ety Infolrmation
TOREDUCETHERISKOFELECTRICSHOCK,DO NOTREMOVETHECOVER(ORBACK).
NO USER-SERVICEABLEPARTSABEINSIDE.REFERSERVICINGTOQUALIFEDSERVICEPERSONNEL.
,a,
ThelightingflashandArrowheadwithin
TriangleIsawamingsign alertingyouof
dangerousvoltageInsidetheproduct.
CAUTION : TOREDUCETHERBKOFELECTRB
SHOCK,DONOTREMOVECOVER(ORBACK),
[10USERSERVBEABLEPARTSltqSIDEREFER
SERVBINGTOQUAUFEDSERVBEPERSONNEL.
,a
Theexplanationpoint withinthe triangb is
a warningsign alertingyouof important
instructionsaccompanyingtheproduct.
WARNING
To reduce the dsk of fire or electric shock, do not
expose this appliance to rain or moisture.
CAUTION
Apparatusshallnot be exposedto drippingor splashingand
no objectsfilledwith liquids,such asvases,shallbeplaced on
theapparatus.
TheMainsplug isused as adisconnectdeviceand shallstay
readilyoperableat anytime.
DANGER
CLASS 1 LASER PRODUCT
• This product is classified as a CLASS 1 LASER
product.
Use of controls, adjustments or performance of
procedures other than those specified herein may result
in hazardous radiation exposure.
Complies with 21CFR 1040.10 except for devbtions
pursuant to Laser Notice No. 50, dated ,June24, 2007.
VISIBLEAND INVISIBLELASERRADIATIONWHENOPEN.
AVOIDDIRECTEXPOSURETO BEAM.(FDA21 CFR)
CAUTION
• CLASS3B VISIBLEAND INVISIBLELASERRADIATION
WHENOPEN.AVOIDEXPOSURETOTHE BEAM (lEO
60825-1)
THISPRODUCTUTIUZESA LASER.USEOF CONTROLS
OR ADJUSTMENTSOR PERFORMANCEOFPROCEDURES
OTHERTHANTHOSESPECIFIEDHEREINMAY RESULTIN
HAZARDOUSRADIATIONEXPOSURE.DO NOTOPEN
COVERAND DONOT REPAIRYOURSELF.REFER
SERVICINGTOQUALIFED PERSONNEL.
This product satisfies FCC regulations when shielded cabbs and connectors are used to connect the unit to other
equipment. To prevent electromagnetic interference with ebctdc appliances, such as radios and televisions, use shielded
cables and connectors for connections.
FCC NOTE (for U.S.A)
This equipment has been tested and found to comply with the limits for a Class B digital device, pursuant to Part 15 of the
FCC Rules. These limits are designed to provide reasonable protection against harmful interference in a residential
installation.
This equipment generates, uses and can radiate radio frequency energy and, if not installed and used in accordance with the
instructions, may cause harmful interference to radio communications. However, there is no guarantee that interference will
not occur in a particular installation.
Ifthis equipment does cause harmful interference to radio or television reception, which can be determined by turning the
equipment off and on, the user is encouraged to try to correct the interference by one or more of the following measures:
Reorient or relocate the receiving antenna.
Increase the separation between the equipment and receiver.
Connect the equipment into an outlet on a circuit different from that to which the receiver is connected.
Consult the dealer or an experienced radio/TV technician for help.
CAUTION : FCC regulations state that any unauthorized changes or modifications to this equipment may void the user's
authority to operate it.
2 English
Read these operating instructionscarefully before
using the unit. Followall the safety instructionslisted
below. Keepthese operating instructionshandy for
future reference.
1)Read these instructions.
2) Keepthese instructions
3) Heed all warnings.
4) Followall instructions.
5) Do not use this apparatus near water.
6) Cleanonly with dry cloth
7) Do not block any ventilationopenings Installin
accordance with the manufacturer's instructions.
8) Do not install near any heat sources such as
radiators, heat registers,stoves, or other apparatus
(including amplifiers)that produce heat.
9) Do not defeat the safety purposeof the polarized
or grounding-type plug. A polarizedplug hastwo
blades with one wider than the other. A grounding
type plug has two blades and a third grounding
prong. The wide blade or the third prong are provided
for your safety. If the provided plug does not fit into
your outlet, consult an electricianfor replacement of
the obsolete outlet.
10) Protect the power cord from being walked on or
pinched particularlyat plugs, convenience
receptacles, and the point where they exit from the
apparatus.
11) Only useattachment/accessoriesspecified bythe
manufacturer.
12) Use only with the cart, stand,
tripod, bracket, or table specified by
the manufacturer,or sold with the
apparatus. Whena cart is used, use
caution when moving the cart/
apparatus combination to avoid injuryfrom tip-over.
13) Unplug this apparatus during lightningstorms or
when unused for long periods of time.
14) Refer all servicingto qualified servicepersonnel.
Servicing is required when the apparatus hasbeen
damaged in any way, such as power supplycord or
plug is damaged, liquidhas been spilled or objects
havefallen into the apparatus, the apparatus has
been exposedto rainor moisture,does not operate
normally, or has beendropped.
,, Ensure that the AC power supply in your house
complies with the identification sticker located on
the back of your product.
• Installyour product horizontally,on a suitablebase
(furniture),with enough space around it for
ventilation(3-4 inches).
,, Do not place the product on amplifiersor other
equipment which may become hot.
Make sure the ventilationslots are not covered.
,, Do not stack anythingon top of the product.
,, Before moving the product, ensurethe Disc Insert
Hole is empty.
,, In order to disconnect the product completelyfrom
the power supply, removethe main plug fromthe
wall outlet, especiallywhen left unused for a long
period of time.
,, During thunderstorms, disconnect the AC main
plug from the wall outlet. Voltage peaks due to
lightning could damagethe product.
,, Do not exposethe product to direct sunlight or
other heat sources.This could lead to overheating
and malfunctionof the product
,, Protect the product from moisture, and excess
heat or equipment creating strong magnetic or
electricfields (ie. speakers)
,, Disconnect the power cable from the AC supply if
the product malfunctions.
Your product is not intended for industrialuse Use
of this product is for personaluse only.
Condensation mayoccur ifyour product or disc
has been stored incold temperatures. If
transporting the product duringthe winter, wait
approximately 2 hours untilthe product has
reached roomtemperature before using.
,, The batteries usedwith this product contain
chemicals that are harmfulto the environment.
Do not dispose d batteries in the general
householdtrash.
English 3
,f
ety Ii form tioi
Small scratches on the disc may reduce sound
and picture quality or cause skipping.
Be especially careful not to scratch discs when
handling them,
Ho!d!ng d!scs........................................
,,Donottouchtheplaybacksideofthedisc.
,,Holdthediscbytheedgessothatfingerprintswillnot
getonthesurface.
,,Do notstickpaperortapeon the
disc.
Disc Storage
- Do not keep in direct sunlight
- Keep in a cool ventilated area
- Keep in a clean Protection jacket.
Store vertically.
NOTE
_ Do not allowthe discsto becomecontaminatedwith
dirt,
_ Do not loadcrackedorscratcheddiscs,
Handling and St©ring Discs ....................
Ifyou get fingerprintsor dirt on the disc, dean it with a
mild detergentdiluted inwater and wipe with a soft cloth.
- When cleaning, wipe gently from the inside to
the outside of the disc
NOTE
_ Condensationmayform ifwarm aircomes into
contact with cold partsinsidethe product.When
condensationforms insidethe product, it may not
operatecorrectly.If this occurs,remove the disc
and letthe productstand for 1 or 2 hourswiththe
power on.
ThisproductiscoveredbyoneormoreofthefollowingU.S.patents:
5,060,2205,457,6695,561,6495,705,7626,043,9126,438,099
6,467,0616,556,5216,578,1636,697,3076,728,4746,771,891
6,894,9636,895,5936,937,8156,996,3277,009,9267,085,221
7,088,6497,092,3277,099,5667,123,5647,142,4937,142,495
7,145,8617,146,6247,151,7297,161,8797,164,6477,167,437
7,173,8917,177,2507,194,1877,203,8917,209,4237,210,067
7,228,0627,245,5667,245,5677,257,0657,263,0457,269,110
7,272,0867,272,1067,280,4607,283,7297,286,4547,304,938
Thisproductincorporatescopyrightprotectiontechnologythatis
protededbyU.S.patentsandotherintellectualpropertyrights.Useof
thiscopyrightprotectiontechnologymustbeauthorizedby
Macrovision,andfsintendedforhomeandotherlimitedviewinguses
onlyunlessotherwiseauthorizedbyMacrovfsion.Reverseengineering
ordisassemblyfsprohibited.
ABOUTal'_ VIDEO:afvX@isa digitalvideoformat
createdbyDivX,lnc.ThisisanofficialaivXCertified
devicethatplaysDivXvideo.Visitwww,div:<,comfor
moreinformationandsoftwaretoolstoconvertyour
filesintoDivXvideo.
ABOUTal'cXVIDEO-ON-DEMAND:ThisDivXCertified@devicemustbe
registeredinordertophyFvXVideo-on-Demand(rOD)content,To
generatetheregistrationcode,locatetheDivXVODsedoninthe
devicesetupmenu.Gotovod,divx.comdth thiscodetocompletethe
registrationprocessandlearnmoreaboutDivXVOD.
Did CertifiedtophyDivXvideouptoHD1080p,inchdfngpredum
content,
iPodisatrademarkofApple
Inc.,registeredintheU.S.and
othercountries.
iPhoneisatrademarkof Appleinc.
ManufacturedunderlicensefromDobyLaboratories,Doby,
ProLogicandthedouble-Dsymbolaretrademarksof Dolby
Laboratories,
ManufacturedunderlicenseunderU,S,Patent#'s: 5,451,942;
5,956,674;5,974,380;5,978,762;6,226,616;6,487,535;
7,212,872;7,333,929;7,392,195;7,272,567& otherU,S,
andworldwidepatentsissued&pending,
DTSandtheSymbolareregisteredtrademarks,& DTS-ND,
DTS-HDMasterAudio,andtheDTSIogosaretrademarksof
DTS,Inc,Productincludessoftware,©DTS, Inc,AllRights
Reserved,
< OpenSourceLicenseNotice>
Inthecaseof usingopensourcesoftware,OpenSource
Licensesareavailableontheproductmenu,
© 2010 Samsung Electronics Co,, Ltd, All rights
reserved,
4' English
Colqt iqt
iiiiiiiiiiiiiiiiiiiiiiiiiiiiiiiiiiiiiiiiiiiiiiiiiiiiiiiiiiiiiiiiiiiiiiiiii
iiiiiiiiiiiiii
2 Safety Warnings
3 Important Safety Instructions
3 Precautions
4 Cautions on Handling and Storing Discs
4 License
4 Copyright
7 Key features of your new Blu-ray Home Theater
8 Icons that will be used in manual
9 Disc Types and Characteristics
13 Accessories
14 Description
14 Front Panel
15 Rear Panel
16 Remote control
18 Connecting the Speakers
20 Connecting the Optional Wireless Receiver Module
22 Connecting the Video Out to your TV
24 Connecting Audio from External Components
25 Connecting to the Network
26 Connecting the FM Antenna
27 Before Starting (Initial Settings)
28 Setting the Menu
29 Display
29 TV Aspect
29 BD Wise (Samsung Products only)
29 Resolution
31 HDMI Format
31 Movie Frame (24 Fs)
31 Progressive Mode
31 Still Mode
31 HDMI Deep Color
32 Audio
32 Speaker Setting
33 Musical Room Calibration
33 EQ Optimizer
33 HDMI Audio
34 Digital Output
35 Dynamic Range Control
35 AV Sync
35 System
35 initial Settings
35 Internet@TV Screen Size
35 Anynet+(HDMl-OEC)
35 BD Data Management
36 Clock
36 DivX(R) Registration
36 DivX(R) Deactivation
37 Network Setup
37 Network Settings
40 Network Status
40 BD-LIVE Intemet Connection
40 Language
41 Security
41 Parental Rating
41 Change Password
English 5
GONt Nt
41 General
41 Background
41 Energy Saving
41 Front Display
41 Power On/Off Sound
42 Support
42 Software Upgrade
42 Contact Samsung
43 Playing a Disc
43 Using the Disc menu /Title menu / Popup menu
44 Using the Search and Skip Functions
45 Slow Motion Play/Step Motion Play
45 Repeat Playback
46 Using the TOOLS button
48 Listening to Music
50 Sound Mode
51 Playing back a Picture
52 Playing back a USB Storage
52 Listening to Radio
53 Simple Playback to Intemet Radio(Pandora)
53 Using an iPod
55 Using Internet@TV
59 BD-LIVE TM
59 Software Upgrade Notification
59 Using the AlISharg Function
61 Troubleshooting
64 Index
65 Specifications
i TM
Rguresaridi!!ustrationsinthis UserMarluaJareprovidedfoxreferenceon!yaridmaydifferfromactua!productappearance.
6 English
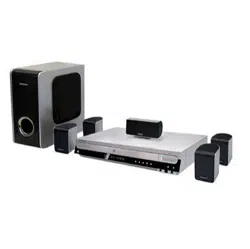
Product Features
Playback of many disc types, plus an FM tuner
This product allows you to play various discs, including BD-ROM/RE/R, DVD-VIDEO, DVD-RW/-R
(V mode), DVD+RW/+R, MP3/WMA, JPEG, DivX/MKV/MP4, and CD-R/RW, with a sophisticated
FM tuner, all in a single player.
Full HD audio decoding support (Dolby Digital, Dolby Pro Logic II, Dolby Digital Plus,
Dolby TrueHD, DTS, DTS-HD HRA, DTS-HD MA Essential)
Please refer to www.DOLBY.COM and DTS.COM for more detail.
HDMI
HDMI transmits Blu-Ray/DVD video and audio signals simultaneously, and provides a clearer picture.
The 1080p(Full HD) resolution provides even clearer pictures.
AV SYNC function
Video may lag behind the audio if the product is connected to a digital TV.
To compensate for this, you can adjust the audio delay time to sync up with the video.
iPod & iPhone support
You can enjoy music files by connecting your iPod to the product with the supplied iPod dock.
BD Wise
BD Wise automatically adjusts BD Wise-compliant Samsung products to the optimal settings between
them. This feature is enabled only if BD Wise-compliant Samsung products are connected to each other
using an HDMI cable.
Internet@TV
You can download various chargeable or free-of charge applications through network connection. Various
internet service and contents will be provided, which include news, weather forecast, stock market,
games, movies and music.
BI u-ray DiscF e at ures ..............................................................................................................................................................................................................................................................................................
Blu-ray Discs support the highest quality HD video available in the industry - Large capacity means no
compromise on video quality. Furthermore, a Blu-ray Disc has the same familiar size and look as a DVD.
* The following Blu-ray Disc features are disc dependant and will vary. Appearance and navigation of
features will also vary from disc to disc. Not all discs will have the features described below.
Video highlights
The BD-ROM format for movie distribution supports three highly advanced video codecs, including AVC,
VC-1, and MPEG-2.
HD video resolutions are also available:
1920 x 1080 HD
1280 x 720 HD
For high-definition playback
To view high-definition contents on a Blu-ray disc, an HDTV (High Definition Television) is required.
Some discs may require using the product's HDMI OUT to view high-definition content. The ability to view
high-definition content on Blu-ray disc may be limited depending on the resolution of your TV.
BD-LIVE
You can use a Blu-ray Disc supporting BD-LIVE through network connection to enjoy various contents
provided by the disc manufacturer.
English 7
etting Stai'ted
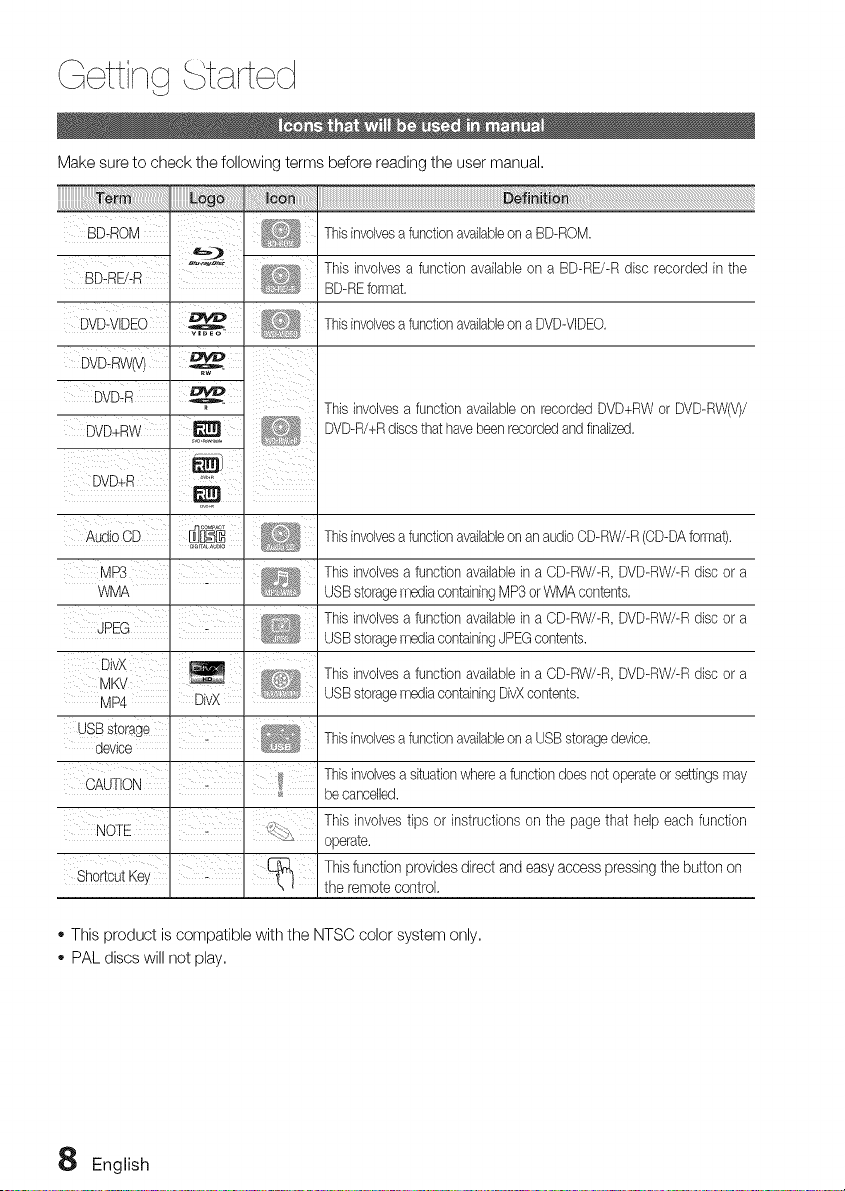
Make sure to check the following terms before reading the user manual.
BDuROM I
, ,r=,._, ,
BD-RE/-R
DVD-VIDEO
Thisinvolvesa functionavailableon a BD-ROM.
This involvesa function availableon a BD-RE/-Rdisc recorded in the
BD-REforrnat.
Thisinvolvesa functionavailableon a DVD-VIDEO.
DW
DVDR _° Thisinvolvesa function availableon recorded DVD+RWor DVD-RW(V)/
DVD_RW' DVD-R/+Rdiscsthat havebeenrecordedandfinalized.
I
DVD+R '*'_
Audio OD Thisinvolvesa functionavailableon an audioOD-RW/-R(OD-DAforrnat).
MP3
WMA
DivX
: MKV
MP4
Thisinvolvesa function availablein a CD-RW/-R,DVD-RW/-Rdisc or a
USBstoragemediacontainingMP3orWMA contents,
Thisinvolvesa function availablein a CD-RW/-R,DVD-RW/-Rdisc or a
USBstoragemediacontainingJPEGcontents.
USBStorage'
device .
I I
Thisinvolvesa function availablein a CD-RW/-R,DVD-RW/-Rdisc or a
USBstoragernediacontainingDivXcontents.
Thisinvolvesa functionavailableon a USBstoragedevice.
Thisinvolvesa situationwherea functiondoes not operateor settingsrnay
be cancelled.
This involvestips or instructions on the page that help each function
operate.
Thisfunction providesdirect and easyaccess pressing the button on
the remote control.
,, This product is compatible with the NTSC color system only.
,, PAL discs will not play.
English
B[u-ray Disc Compat!bility ....
Bb-ray is a new and evoMngformat. Accordingly, disc
compatibilityissues are possible. Not a[[discs are
compatible and not everydisc will play back. For
additional information,referto the DiscTypes and
Characteristicssection of this Manual. If youencounter
compatibilityproblems, pleasecontact the SAMSUNG
customer care center at 1-800 SAMSUNG.
NOTE
_ Playbackmay not work for some types of discs, or
when specificoperations,such as anglechange
and aspect ratioadjustment, arebeing performed.
Informationabout the discs is written in detailon
the box.Pleasereferto this if necessary.
_ Do not allow the discto becomedirty or scratched.
Fingerprints,dirt, dust, scratchesor depositsof
cigarette smokeon the recordingsurface may
make it impossibleto usethe discfor playback.
_ Whena BD-Javatitle is played,loadingmay take
longerthan a normaltitle, or somefunctions may
performslowly.
Discs that cannot be played .......................................
,, HD DVD Disc
- DVD-RAM
,, 3.9 GB DVD-R Disc for Authoring.
,, DVD-RW(VR mode)
,, Super Audio CD(except CD layer)
,, DVD-ROM/PD/MV-Disc, etc CVD/CD-ROM/
CDV/CD-G/CD-I/LD
,, CDGs play audio only, not graphics.
NOTE
_ Somecommercialdiscs and DVDdiscspurchased
outsideyour regionmaynot be playablewith this
product.Whenthesediscs are played,either"No
disc." or "Pleasecheckthe regionalcode of the
dfsc."will be displayed.
_ Ifa DVD-R/-RWdischasnot beenrecordedproperly
inDVDvideoformat,it will not be playable.
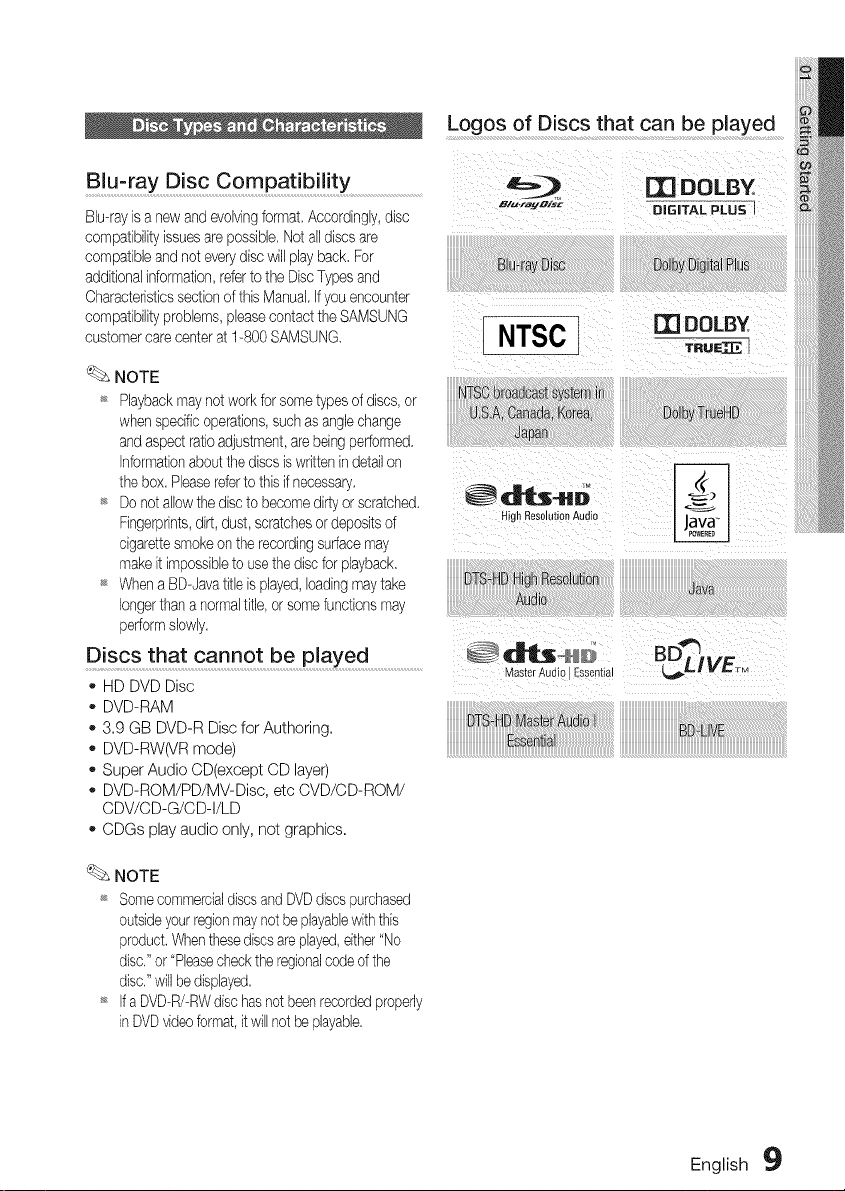
Logos of Discs that can be played
mDoLB
,y!
English 9
t rt ct
Region code ...................................................................................................................................................Disc Types
BD-ROM
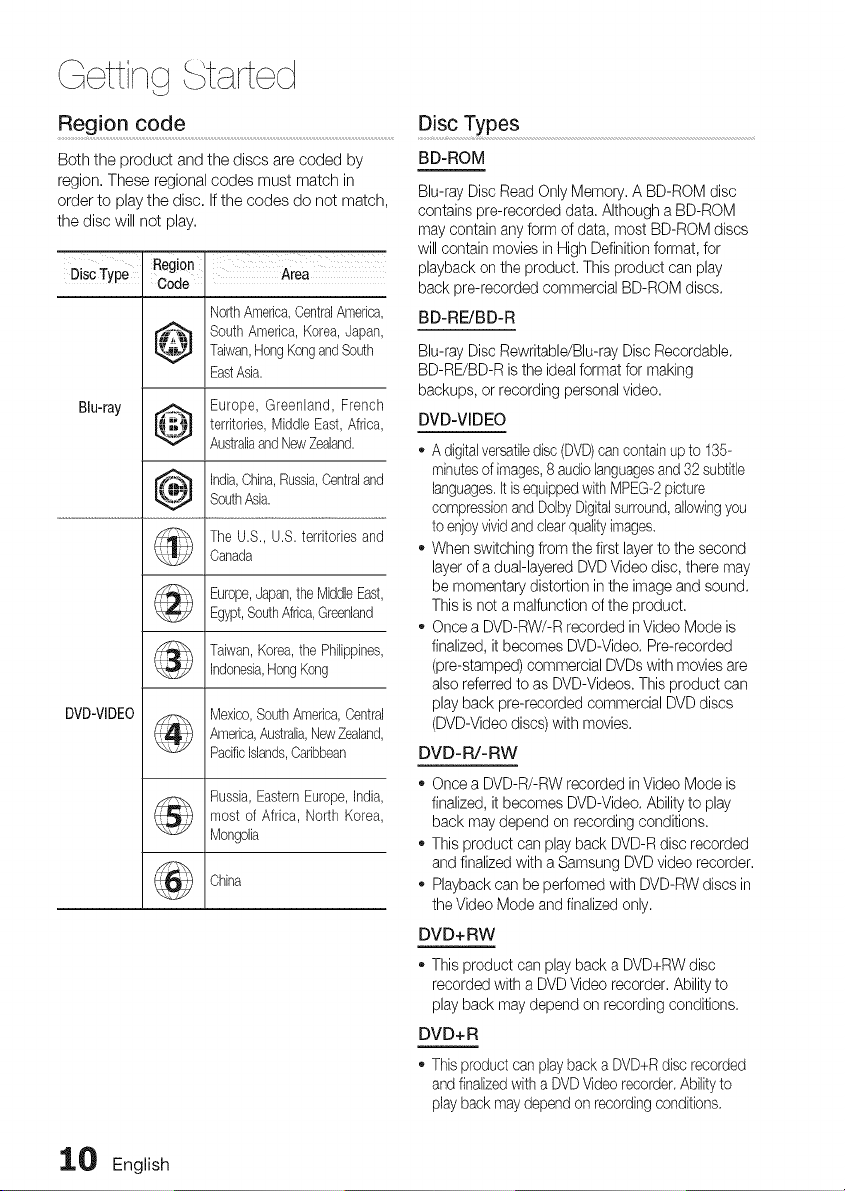
Both the product and the discs are coded by
region. These regional codes must match in
order to play the disc. If the codes do not match,
the disc will not play.
DiscType
Blu-ray
Region Area
Code
NorthAmerica,CentralAmerica,
_i!_ South America,Korea,Japan,
_..-.,.p._-,_--Taiwan,mongKongandSouth
EastAsia.
....... Europe, Greenland, French
I_it,_@l territories,MiddleEast,Africa,
AustraliaandNewZealand.
_-_"_-- india,China,Russia,Centraland
ah_
I...... I
,_-.v,_, SouthAsia.
The U.S., U.S.territories and
Canada
Europe,Japan,theMiddleEast,
Egypt,SouthAfrica,Greenland
Taiwan,Korea,the Philippines,
Indonesia,HongKong
Mexico,SouthAmerica,Central
America,Australia,NewZealand,
Pacificislands,Caribbean
Russia,EasternEurope,india,
most of Africa, North Korea,
Mongolia
China
DVD-VIDEO
Blu-ray Disc Read Only Memory. A BD-ROM disc
contains pre-recorded data. Although a BD-ROM
may contain any form of data, most BD-ROM discs
will contain movies in High Definition format, for
playback on the product. This product can play
back pre-recorded commercial BD-ROM discs.
BD-RE/BD-R
Blu-ray Disc Rewritable/Blu-ray Disc Recordable.
BD-RE/BD-R is the ideal format for making
backups, or recording personal video.
DVD-VIDEO
* A digitalversatiledisc (DVD)cancontain up to 135-
minutesof images,8 audio languagesand 32 subtitle
languages.It is equipped with MPEG-2picture
compressionand Dolby Digitalsurround,allowingyou
to enjoyvivid and clear qualityimages.
* When switching from the first layer to the second
layer of a dual-layered DVD Video disc, there may
be momentary distortion in the image and sound.
This is net a malfunction of the product.
* Once a DVD-RW/-R recorded in Video Mode is
finalized, it becomes DVD-Video. Pre-recorded
(pre-stamped) commercial DVDs with movies are
also referred to as DVD-Videos. This product can
play back pre-recorded commercial DVD discs
(DVD-Video discs) with movies.
DVD-R/-RW
* Once a DVD-R/-RW recorded in Video Mode is
finalized, it becomes DVD-Video. Ability to play
back may depend on recording conditions.
* This product can play back DVD-R disc recorded
and finalized with a Samsung DVD video recorder.
* Playback can be perfomed with DVD-RW discs in
the Video Mode and finalized only.
DVD+ RW
* This product can play back a DVD+RW disc
recorded with a DVD Video recorder. Ability to
play back may depend on recording conditions.
DVD+ R
* This product can play back a DVD+Rdisc recorded
and finalizedwith a DVDVideo recorder. Ability to
play back may depend on recording conditions.
_ English
Audio CD
o An audio disc on which 44.1 kHz PCM Audio is
recorded.
This product can play back CD-DA format audio
OD-R and CD-RW discs.
The product may not be ableto play some CD-R or
OD-RW discs due to the condition of the recording,
CD-R/-RW
,, Usea 700MB(80 minutes) CD-R/-RWdisc,
if possible,do not usea 800MB(90 minutes)or above
disc, asthe disc may not play back,
ifthe CD-R/-RW disc was not recorded as a closed
session, you mayexperience delayswhen playing
back the beginningof the disc or all recorded files
maynot play,
Some CD-R/-RW discs may not be playablewith this
product, depending on the devicewhich was usedto
burn them, For contents recorded on CD-R/-RW
media from CDs for your personaluse, playability
mayvary depending on contents and discs,
Disc Format
Using MP3 disc
CD-R/-RW, DVD-RW/-R recordedwith UDF,
ISO9660or JOLIETformat can be played back,
Only MP3 fileswith the ".mp3" or ".MP3" extension
can be played,
Playablebit raterange is from 56 Kbps to 320 Kbps.
Playablesample-rate is 32KHz to 48KHz,
The productcanhandlea maximumof 1500fliesand
foldersundera parentfolder,ForMP3filesrecordedwith
a VBR(VafiabieBit Rates),thesoundmaycutin andout,
Using JPEG disc
CD-R/-RW, DVD-RW/-R recorded with UDF,
ISO9660 or JOLIET format can be played back,
- Only JPEG files with the ",jpg", ".JPG", ".jpeg" or
"JPEG" extension can be displayed.
Progressive JPEG is supported,
DVD-RW/-R (V)
,, This is a format that is usedfor recordingdata on a
DVD-RWor DVD-Rdisc, The disc can be playedby
this product once it has been finalized,
If a disc that has been recorded in Video Mode by a
different maker's recorder but has not been finalized,
it cannot be playedby this product,
DivX(Digital video express)
DivXis a video file format developed by Microsoft and is
based on MPEG4compression technology to provide
audio and video data over the Intemetin real-time,
MPEG4is used for video encoding and MP3for audio
encoding so that the users can watch a movie at near
DVD-qualityvideo and audio.
Supported Formats(DivX)
This product only supports the following media formats,
if both video and audio formats are not supported, the
usermay experienceproblems such as broken images
or no sound,
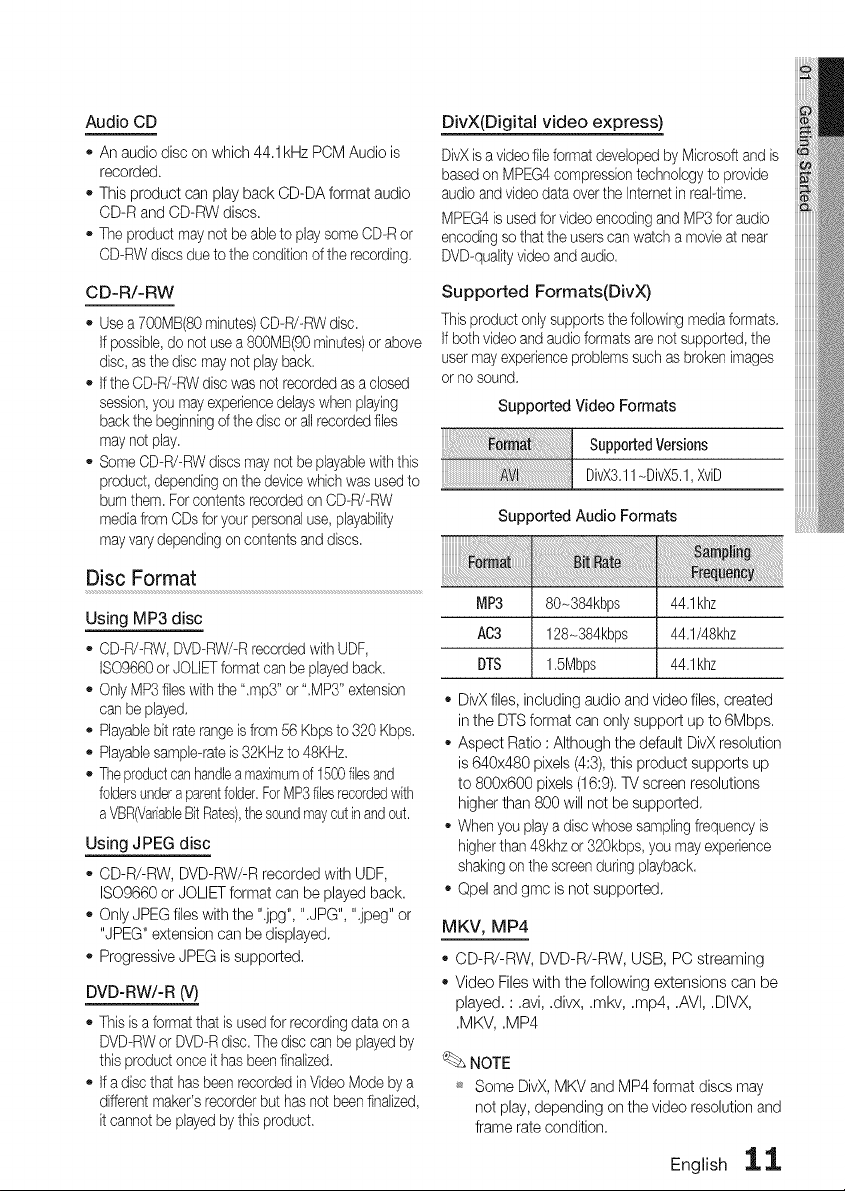
Supported Video Formats
suppo o vors,ons
DivX3,11-DivXS,1,XviD
Supported Audio Formats
MP3
AC3
DTS
80-384kbps
128_384kbps
1,5Mbps
44,1khz
44,1/48khz
44,1khz
DivX files, including audio and video files, created
in the DTS format can only support up to 6Mbps,
Aspect Ratio : Although the default DivX resolution
is 640x480 pixels (4:3), this product supports up
to 800x600 pixels (16:9), TV screen resolutions
higher than 800 will not be supported.
When you play a disc whose sampling frequency is
higherthan 48khz or 320kbps, you may experience
shaking on the screen during playback.
Opel and gmc is not supported.
MKV, MP4
CD-R/-RW, DVD-R/-RW,USB, PC streaming
Video Fileswith the following extensionscan be
played, : ,avi, ,divx,,mkv, ,mp4, ,AVI,,DIVX,
,MKV, ,MP4
NOTE
_ Some DivX, MKV and MP4 format discs may
not play, depending on the video resolution and
frame rate condition,
English 11

tart d
Supported File Formats
Video File Support
*,avi
*,mkv
*,wmv
*,mp4
*,mpg
*,mpeg
AVl
MKV
WMV
MP4
PS
Divx3,11/4,x/5,1/6,0
XviD
MP4v3
H,264BP/MP/HP
VC-1AP(wmvl)
DivX5,1/6,0
XviD
H,264BP/MP/HP
VC-1AP
VC-1SM
MP4(mp4v)
H,264BP/MP/HP
MPEG1
MPEG2
H,264BP/MP/HP
MP3
AC3
DTS
WMA
PCM
MP3
AC3
DTS
WMA
AAC
MP1,2
AC3
DTS
1920x1080
1920x1080
1920x1080
1920x1080
1920x1080
1920x1080
1920x1080
1920x1080
1920x1080
1920x1080
1920x1080
1920x1080
1920x1080
1920x1080
1920x1080
Music File Support
*,mp3 MP3
*,wma WMA
MP3
WMA
!i:i ! i i!i ii ii ii ii ii ii ii ii ii ii ii ii ii ii ii ii ii ii ii ii ii ii ii ii ii ii ii ii ii ii ii ii ii ii ii ii ii ii ii ii ii ii ii ii ii ii ii ii ii i i: : i! i! ! i! ! iiii i i!i i i!i i i!i i i!i i i!i i i!i i i!i i i!i i i!i i i!i i i!i i i!i i i!i i i!i i i!i i i!i i i!i i i!i i i!i i i!i i i!i i i!i i i!i i i!i i i!i i i!i i i!i i¸'¸¸'¸¸'
CompliantwithWMAversion10
* Samplingrates(in I¢lz)- 8, 11, 16, 22,32,
44,1, 48
* Bitrates- All bit-ratesintherange5kbpsto
384kbps
_-- English
USB Host Spec!fication
USB Host Specification
• Supports USB 1,1 or USB 2.0 compliant devices,
• Supports devices connected using the USB
A type cable.
• Supports UMS (USB Mass Storage Device)
V1.0 compliant devices.
• Supports FAT(FAT, FAT16, FAT32)file
system formatting.
Non-compliance
• Does not support a device that requires installing
a separate driver on the PC (Windows),
• Does not support connection to a USB hub.
• A USB device that is connected using an
USB extension cable may not be recognized.
Operational Limitations
• If the connected device has multiple drives
(or partitions) installed, only one drive
(or partition) can be connected.
• A device supporting USB 1.1 alone may
cause a difference in the picture quality,
depending on the device.
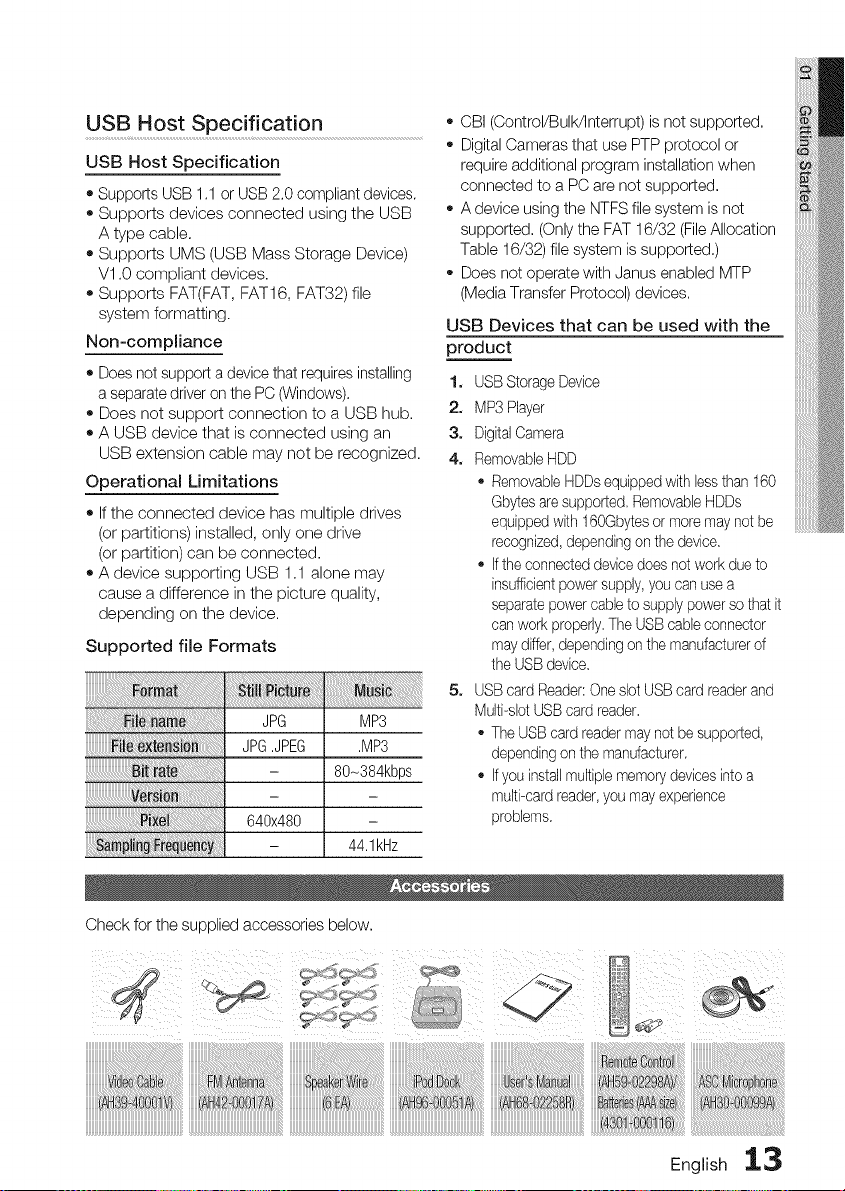
Supported file Formats
JPG MP3
JPG,JPEG ,MP3
- 80-384kbps
640x480
- 44,1kHz
,, CBI (Control/Bulk/Interrupt) is not supported.
o Digital Cameras that use PTP protocol or
require additional program installation when
connected to a PC are not supported.
A device using the NTFS file system is not
supported. (Only the FAT 16/32 (FileAllocation
Table 16/32) file system is supported.)
Does not operate with Janus enabled MTP
(Media Transfer Protocol) devices.
USB Devices that can be used with the
product
1, USB Storage Device
2, MP3 Player
3, DigitalCamera
4, RemovableHDD
RemovableHDDs equipped with lessthan 160
Gbytes are supported, RemovableHDDs
equipped with 160Gbytes or more may not be
recognized,depending on the device,
Ifthe connected device does not work due to
insufficientpower supply, you can use a
separate power cable to supply power so that it
can work properly,The USBcabb connector
maydiffer, depending on the manufacturer of
the USB device,
5, USB card Reader:One slot USB card reader and
Multi-slot USBcard reader,
The USB card reader may not be supported,
depending on the manufacturer,
Ifyou installmultiple memory devices intoa
multi-card reader,you may experience
problems,
Check for the supplied accessories below.
i¸¸ 3
English 13
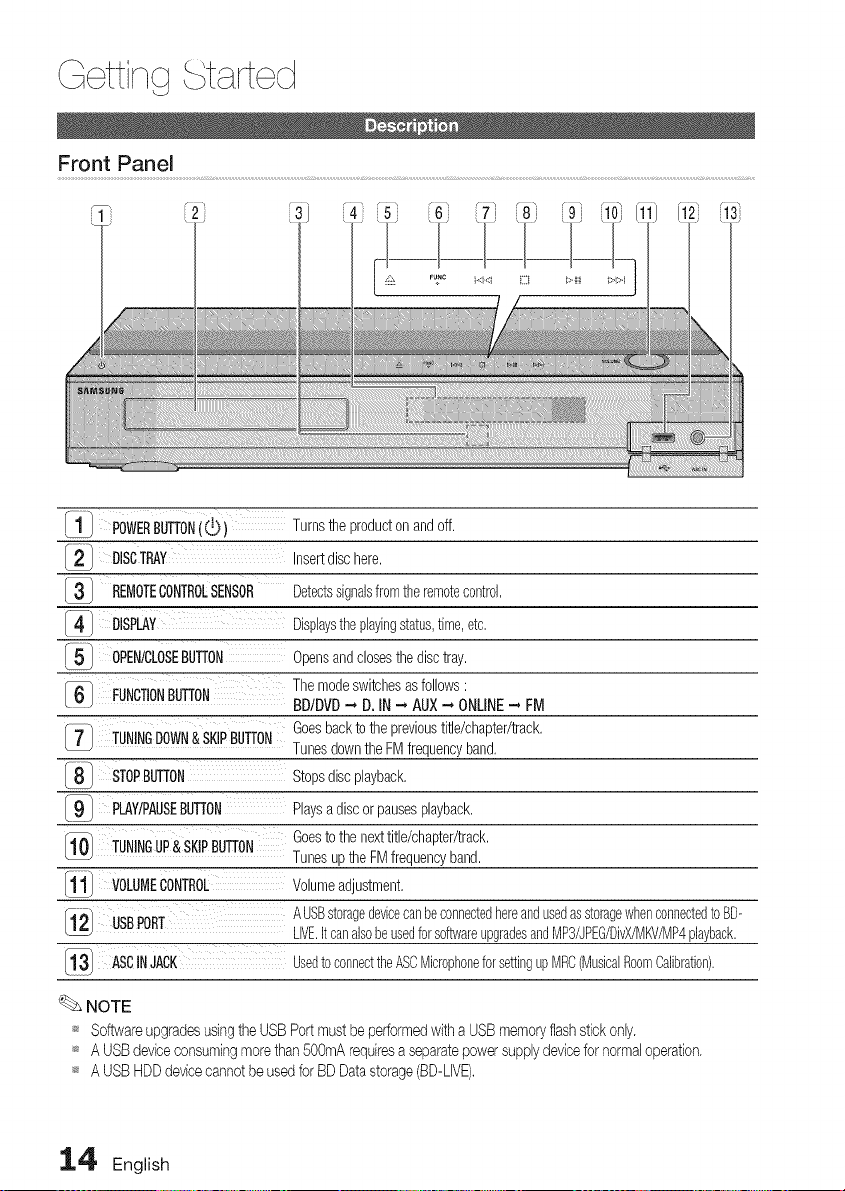
1 1 POWERBUTTON(_) Turnsthe producton andoff,
[2J DISCTRAY Insertdisc here,
REMOTECONTROLSENSOR Detectssignalsfromtheremotecontrol,
_-1 DISPLAY Displaysthe playingstatus,time, etc,
15 OPEN/CLOSEBUTTON Opensandclosesthe disctray,
(} FUNCTIONBUTTON Themodeswitchesasfollows:
BDIDVD-. D. IN --' AUX-. ONLINE- FM
Goesbackto the previoustitle/chapter/track,
_7 TUNINGDOWN&SKIPBUTTON TunesdowntheFM frequencyband,
_8_ STOPBUTTON Stopsdiscplayback,
l_- PLAY/PAUSEBUTTON Playsa discor pausesplayback,
TUNINGUP&SKIPBUTTON Goesto the nexttitle/chapter/track,
Tunesup the FMfrequencyband,
1_ VOLUMECONTROL Volumeadjustment,
_12 USBPORT AUSBstoragedevicecanbeconnectedhereandusedasstoragewhenconnectedtoBD-
LIVE.it canalsobeusedforsoftwareupgradesandMP3/JPEG/DivX/MKV/MP4playback.
l_l ASCINJACK Usedto connecttheASCMicrophoneforsettingupMRC(MusicalRoomCalibration).
NOTE
_ Softwareupgrades usingthe USBPort mustbe performedwith a USBmemoryflashstick only.
_ A USBdeviceconsumingmore than500mA requiresa separatepowersupplydevicefor normaloperation.
_ A USB HDDdevicecannot be usedfor BD Datastorage(BD-LIVE).
I-4 English
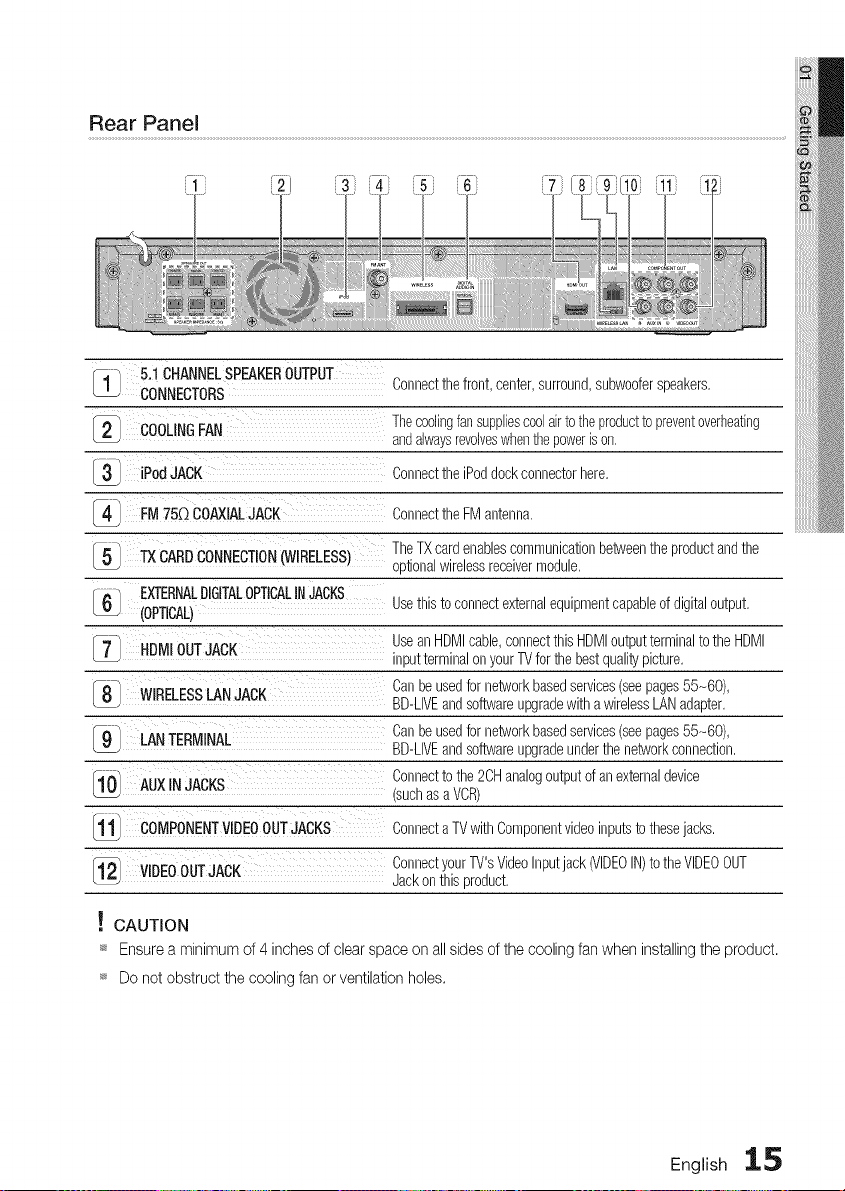
Rear Panel
5.1CHANNELSPEAKEROUTPUT
CONNECTORS
COOLINGFAN
iPod JACK
Connectthe front, center,surround,subwooferspeakers,
Thecoolingfansuppliescoo[airto theproductto preventoverheating
andalwaysrevolveswhenthepoweris on,
Connectthe iPoddockconnectorhere,
FM750 COAXIALJACK Connectthe FM antenna,
TheTXcardenablescommunicationbetweenthe productandthe
optionalwirelessreceivermodule,
3/
41
5_ TXCARDCONNECTION(WIRELESS)
_/ EXTERNALDIGITALOPTICALINJACKS Usethis to connectexternalequipmentcapableof digital output,
(OPTICAL)
7_ HDMIOUTJACK Usean HDMIcable,connectthis HDMIoutputterminalto the HDMI
inputterminalonyour11/forthe bestqualitypicture,
8_ WIRELESSLANJACK Canbe usedfornetworkbasedservices(seepages55-60),
BD-LIVEandsoftwareupgradewitha wirelessLANadapter,
LANTERMINAL Canbe usedfornetworkbasedservices(seepages55-60),
BD-LIVEandsoftwareupgradeunderthe networkconnection,
Connectto the 2CHanalogoutputof an externaldevice
1 0 AUXIN JACKS (suchasa VCR)
[111 COMPONENTVIDEOOUTJACKS Connecta TVwithComponentvideoinputsto thesejacks,
12 VIDEOOUTJACK ConnectyourTV'sVideoInputjack(VIDEOIN)to the VIDEOOUT
Jackonthis product,
! CAUTION
_ Ensure a minimum of 4 inches of clear space on all sides of the cooling fan when installing the product.
_ Do not obstruct the cooling fan or ventilation holes.
English 1,.5
ettirq t i ted
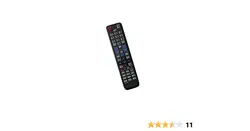
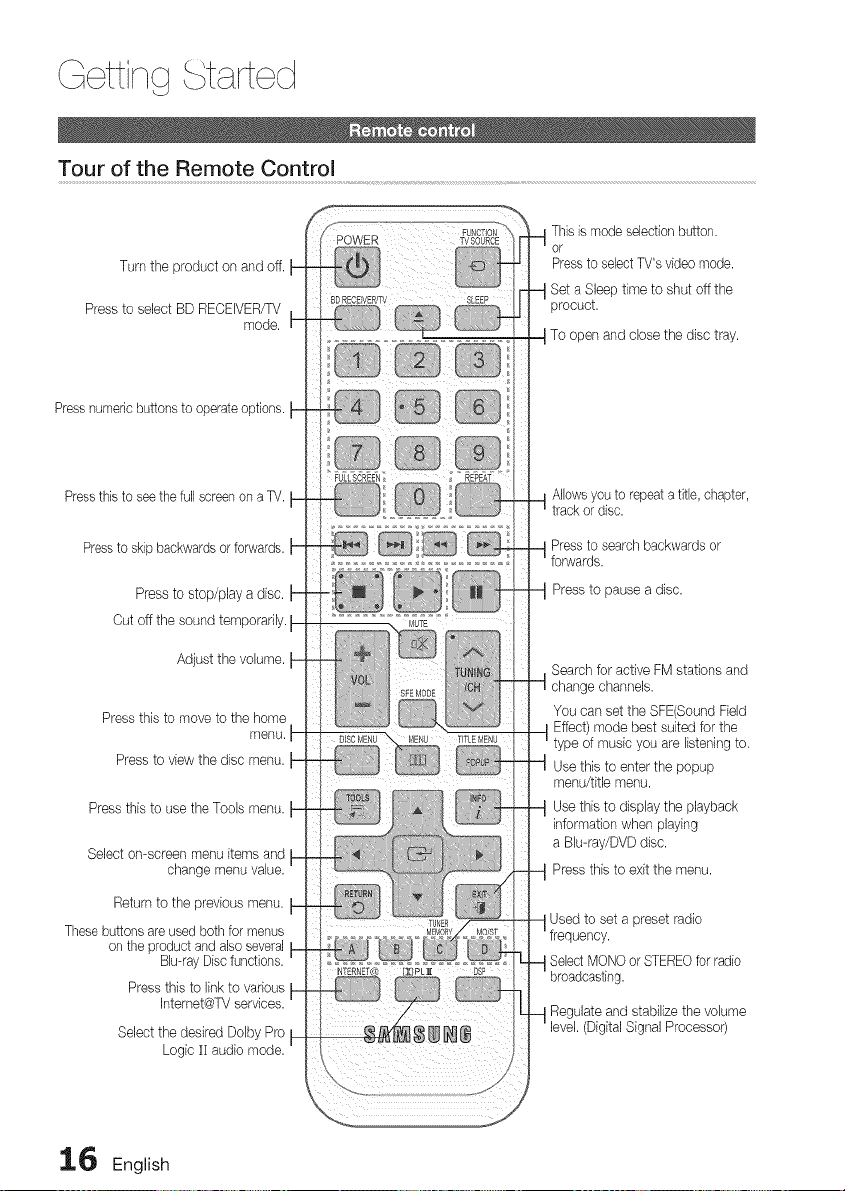
Tour of the Remote Control
Turn the product on and off.
Press to select BD RECEIVER/TV
mode.
Press numeric buttons to operate options.
Press this to see the full screen on a TV.
Press to skip backwards or forwards.
Press to stop/play a disc.
Cut off the sound temporarily.
Adjust the volume.
Press this to move to the home
menu.
Press to view the disc menu.
Press this to use the Tools menu.
Select on-screen menu items and
change menu value.
Return to the previous menu.
These buttons are used both for menus
on the product and also several
Blu-ray Disc functions.
Press this to link to various
Internet@TV services.
Select the desired Doby Pro __
Logic ][ audio mode.
This is mode selection button.
or
Press to select TV's video mode.
Set a Sleep time to shut off the
procuct.
I To open and close the disc tray.
_t Allows you to repeat a title, chapter,
track or disc.
Press to search backwards or
forwards.
Press to pause a disc.
Search for active FM stations and
change channels.
You can set the SFE(Sound Field
Effect) mode best suited for the
type of music you are listening to.
Use this to enter the popup
menu/title menu.
Use this to display the playback
information when playing
a Blu-ray/DVD disc.
Press this to exit the menu.
Used to set a preset radio
frequency.
SelectMONOor STEREOfor radio
broadcasting.
Regulateand stabilizethe volume
level.(DigitalSignalProcessor)
16 English
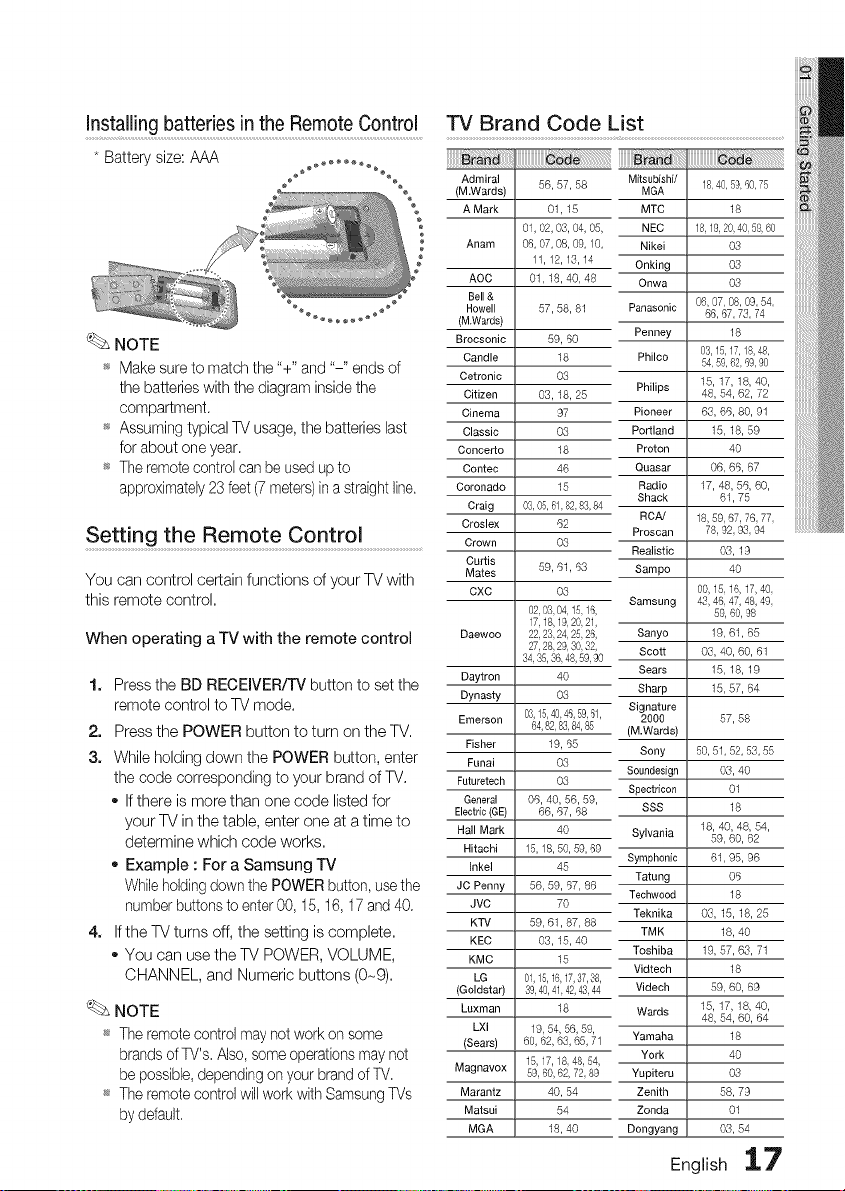
Insta!ling batteries in the Remote Control
* Batterysize:AAA
NOTE
_ Make sure to match the "+" and "-" ends of
the batteries with the diagram inside the
compartment.
_ Assuming typical TV usage, the batteries last
for about one year.
_ The remote control can be used up to
approximately 23 feet (7 meters)in a straight line,
Setting the Remote Control ...........................................
You can control certain functions of yourTV with
this remote control.
When operating a TV with the remote control
1. Press the BD RECEIVER/TV button to set the
remote control to TV mode.
2. Press the POWER button to turn on the TV,
3. While holding down the POWER button, enter
the code corresponding to your brand of TV.
o If there is more than one code listed for
your TV in the table, enter one at a time to
determine which code works,
Example : For a Samsung TV
While holding down the POWER button, use the
number buttons to enter 00, 15, 16, 17 and 40.
4. If the TV turns off, the setting is complete,
You can use the TV POWER, VOLUME,
CHANNEL, and Numeric buttons (0-9).
NOTE
_ The remote control may not work on some
brands of TV's, Also, some operations may not
be possible, depending on your brand of TV.
_sThe remote control will work with Samsung TVs
by ddault,
TV Brand Code L!st ...............................................................................................
_rana
Admiral
(M.Wards)
A Mark
Anam
AOC
Bell &
Howell
(M.Wards)
Brocsonic
Candle
Oetronic
Citizen
Cinema
Classic
Concerto
Contec
Coronado
Craig
Croslex
Crown
Curtis
Mates
CXC
Daewoo
Daytron
Dynasty
Emerson
Fisher
Funai
Futuretsch
General
Electric (GE)
Hall Mark
Hitachi
Inkel
JC Penny
JVC
KTV
KEC
KMC
LG
(Goldstar)
Luxman
LXI
(Sears)
Magnavox
Marantz
Matsui
MGA
56, 57, 58
01, 16
01,02,06,04,05,
06,07,08,09,10,
11,12,16,14
01,18,40,48
57, 58, 81
59, 60
18
03
03,18, 26
97
03
18
46
16
03,05,61,82,83,84
62
O3
59, 61,63
03
02,03,04,15,16,
17,18,19,20,21,
22,23,24,25,26,
27,28,29,30,32,
34,35,36,48,59,90
40
O3
03,15,40,46,59,_1,
64,82,83,84,85
19, 66
O3
O3
06,40,56,59,
66, 67, 68
40
15,18,50,59,69
46
56, 59, 67, 86
70
59,61,87,88
03,16,40
16
01,15,16,17,37,88,
39,40,41,42,43,44
18
19,54,56,59,
60,62,63,65,71
15,17,18,48,54,
59,60,62,72,89
40, 54
54
18,40
Mitsubishi/ 18,40,5&60,75
MGA
MTC 18
NEC 18,19,20,40,59,60
Nikei 03
Onking 03
Onwa 03
Panasonic 06,07,08,09,54,
66,67,73,74
Penney 18
Philco 03,15,17,18,48,
54,59,62,69,90
Philips 15, 17, 18, 40,
48,64,62, 72
Pioneer 66, 66, 80, 91
Po_land 15,18,69
Proton 40
Quasar 06, 66, 67
Radio 17, 48, 66, 60,
Shack 61, 75
RCA/ 18,59,67,76,77,
Proscan 78,92,93,94
Realistic 03, 1g
Sampo 40
00,15,16,17,40,
Samsung 43, 46,47, 48, 49,
59, 60,98
Sanyo 19, 61, 66
Scott 03, 40, 60, 61
Sears 15,18,19
Sharp 15, 67, 64
Signature
2000 67,68
(M.Wards)
Sony 50,51,52,53,55
Soundesign 03, 40
Spectdcon 01
SSS 18
Sylvania 18, 40, 48, 54,
69, 60, 62
Symphonic 61, 95, 96
Tatung 06
Teehwood 18
Teknika 06,15,18,26
TMK 18, 40
Toshiba 19, 67, 63, 71
Vidtech 18
Videch 69, 60, 69
Wards 15, 17, 18, 40,
48,64,60,64
Yamaha 18
York 40
Yupiteru 03
Zenith 68, 79
Zonda 01
Dongyang 03,64
English 17
Thissectior" involvesvarl'ousmethods of connectl'ngthe productto other external components,
Before movingor instalh'ngthe product, be sureto turn off the power and dl'sconnectthe power cord,
\
2.5to 3 timesthesizeef theTVscreen
f
s"
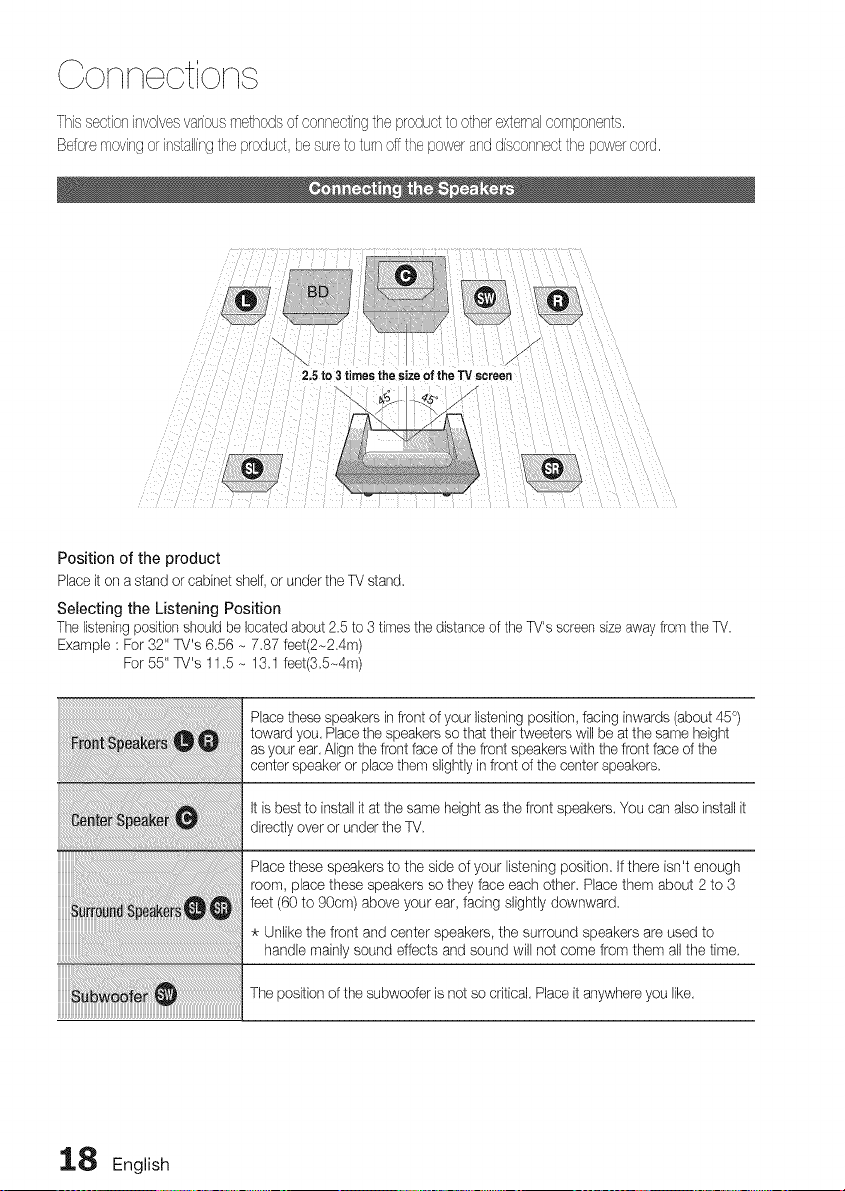
Position of the product
Placeit on a stand or cabinetshelf, or under the TV stand.
Selecting the Listening Position
The listeningpositionshould be locatedabout 2.5 to 3 times the distanceof the TV's screensizeaway fromthe TV.
Example : For 32" W's 6.56 - 7.87 feet(2-2.4m)
For 55" W's 11.5 - 13.1 feet(3.5_4m)
Placethese speakers infront of your listening position, facing inwards (about 45 °)
toward you. Placethe speakers so that their tweeters will be at the same height
asyour ear. Alignthe front face d the front speakerswith the front face of the
center speaker or place them slightlyinfront of the centerspeakers.
It is best to install it at the same height as the front speakers.You canalso install it
directlyover or under the TV.
Place these speakers to the side of your listening position. If there isn't enough
room, place these speakers so they face each other. Placethem about 2 to 3
feet (60 to 90cm) above your ear, facing slightly downward.
Unlikethe front and center speakers, the surround speakers are used to
handle mainlysound effects and sound will not come from them all the time.
The position of the subwoofer is not so critical. Placeit anywhereyou like.
1.8 English
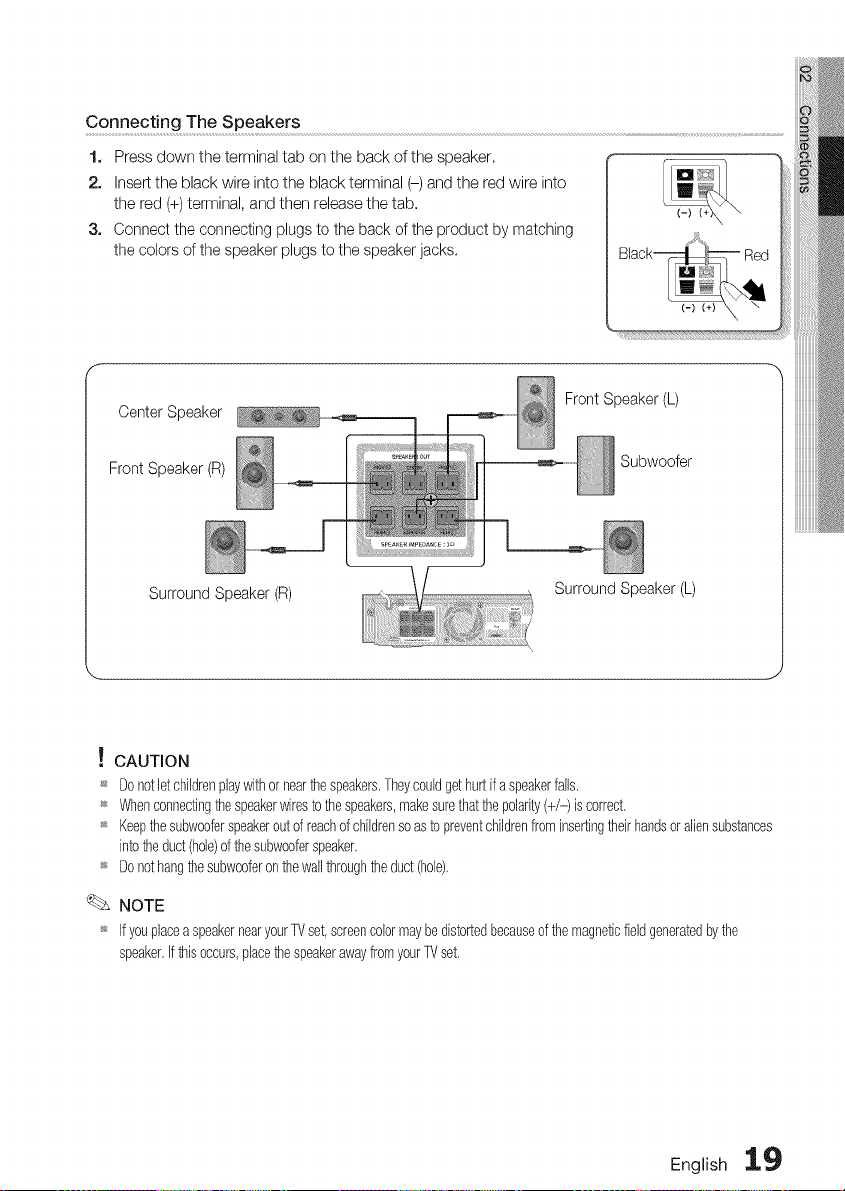
Connecting The Speakers
1. Press down the terminal tab on the back of the speaker.
2. Insert the black wire into the black terminal (-) and the red wire into
the red (+) terminal, and then release the tab.
3. Connect the connecting plugs to the back of the product by matching
the colors of the speaker plugs to the speaker jacks.
CenterSpeaker
Front Speaker(R)
Front Speaker (L)
Subwoofer
Surround Speaker (R)
Surround Speaker (L)
! CAUTION
_ Donotletchildrenplaywithor nearthespeakers,Theycouldgethurt ifa speakerfalls,
_ Whenconnectingthespeakerwiresto thespeakers,makesurethatthepolarity(+/-) is correct,
_ Keepthesubwooferspeakeroutof reachof childrensoasto preventchildrenfrominsertingtheirhandsor aliensubstances
intotheduct(hole)of thesubwooferspeaker,
_ Donothangthesubwooferon thewall throughtheduct(hole),
NOTE
_ Ifyouplacea speakernearyourTVset,screencolormaybedistortedbecauseofthe magneticfieldgeneratedbythe
speaker,If thisoccurs,placethespeakerawayfromyourTVset,
English 19
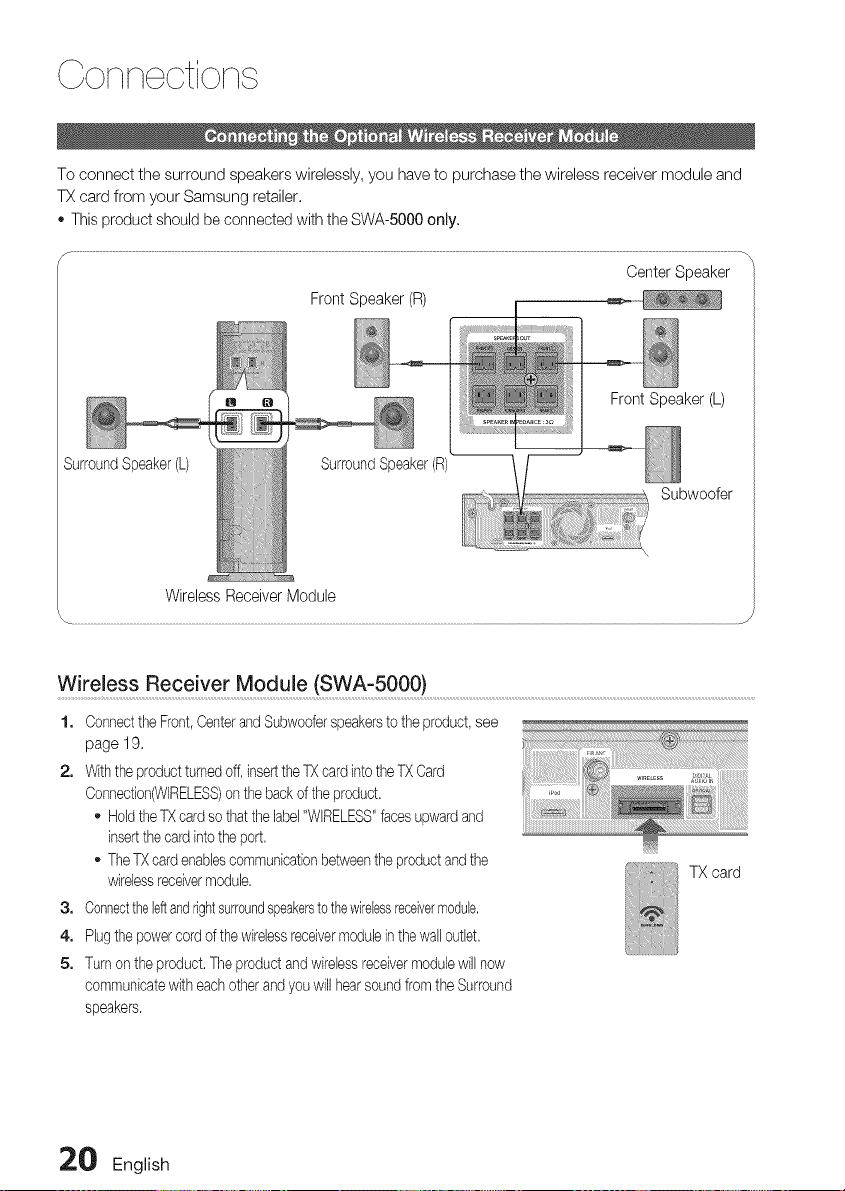
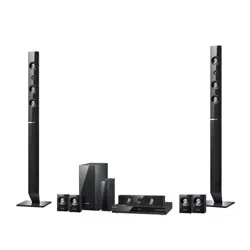
To connect the surround speakers wirelessly, you have to purchase the wireless receiver module and
TX card from your Samsung retailer.
o This product should be connected with the SWA-5000 only.
Center Speaker
Front Speaker (R)
Front Speaker (L)
Surround Speaker(L) SurroundSpeaker (R)
Subwoofer
Wireless Receiver Module
Wireless Receiver Module (SWA_5000) ...................................................................................................................................................................................................................................
1. Connectthe Front,Centerand Subwooferspeakersto the product, see
page 19.
2. With the productturnedoff, insertthe TX cardintothe TX Card
Connection(WIRELESS)on the back of the product.
HoldtheTX card sothat the label"WIRELESS"facesupwardand
insertthe card intothe port.
TheTX cardenablescommunicationbetweenthe productandthe
wirelessreceivermodule.
3. Connecttheleftandrightsurroundspeakersto thewirelessreceivermodule.
4. Plug the powercord of the wirelessreceivermoduleinthe wail outlet.
5. Turnon the product. The product and wireless receivermodule will now
communicatewith each other and you will hearsoundfrom the Surround
speakers.
TX card
20 English
NOTE
_ Place the wireless receiver module at the rear of the listening position. If the wireless receiver module is
too close to the product, some sound interruption may be heard due to interference.
_ If you use a device such as a microwave oven, wireless LAN Card or any other device that uses
the same frequency (2.4/5.8GHz) near the product, some sound interruption may be heard due
to interference.
_ The transmission distance from the product to the wireless receiver module is about 33 feet (10m),
but may vary depending on your operating environment. If a steel-concrete wall or metallic wall is
between the product and the wireless receiver module, the system may not operate at all, because
the radio wave cannot penetrate metal.
_ If the product doesn't make wireless connection, the system needs ID Setting between the
product and wireless receiver module. With the product turned off, press the remote control's
number buttons "0"->"1 "->"3"->"5" and turn on the product. With the wireless receiver module
turned on, press "ID SET" button on the back of the wireless receiver module for 5 seconds.
! CAUTION
_ Do not insert any other card except the TX card dedicated to the product.
If a different TX card is used, the product may be damaged or the card may not be removed
easily.
_ Do not insert the TX card upside down or in the reverse direction.
_ Insert the TX card when the product is turned off. Inserting the card when it is turned on may
cause a problem.
_ If the TX Card is inserted and wireless receiver module setting is complete, sound is not output
from the Surround Speaker connectors on the product.
_ The wireless receiving antenna is built into the wireless receiver module. Keep it away from water
and moisture.
_ For optimal listening performance, make sure that the area around the wireless receiver module
location is clear of any obstructions.
_ If no sound is heard from the wireless surround speakers, switch the mode to DVD 5.1
channel or Dolby Pro Logic II.
_ In 2-CH mode, no sound will be heard from the wireless surround speakers.
English 21
Colqlq otiolq
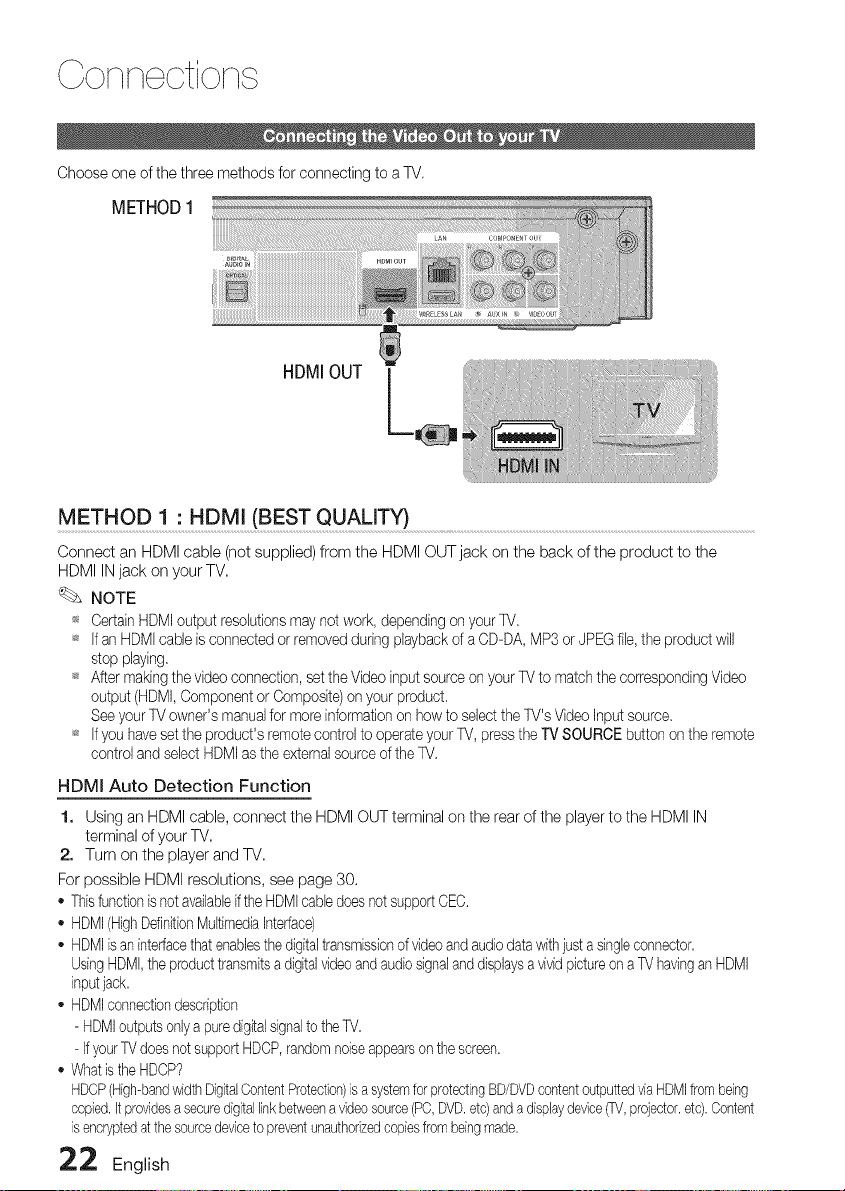
Choose one of the three methods for connecting to a TV.
METHOD1
HDMIOUT
METHOD 1 : HDMI (BEST QUALITY) .....................................................................................................................................................................................
Connect an HDMI cable (not supplied) from the HDMI OUT jack on the back of the product to the
HDMI IN jack on your TV.
NOTE
_ Certain HDMI output resolutions may not work, depending on your TV,
_ Ifan HDMI cable is connected or removed during playback of a CD-DA, MP3 or JPEGfile, the product will
stop playing,
_ After makingthe video connection, setthe Video inputsource on your TV to match the corresponding Video
output (HDMI, Component or Composite) on your product,
See your TV owner's manualfor more information on how to select the TV's Video Input source,
_ Ifyou have setthe product's remote control to operate your W, press the TV SOURCE button on the remote
control and select HDMIas the external source of the W.
HDMI Auto Detection Function
1. Using an HDMI cable, connect the HDMI OUT terminal on the rear of the player to the HDMI IN
terminal of your TV,
2. Turn on the player and TV,
For possible HDMI resolutions, see page 30.
o This functionis not availableifthe HDMIcable doesnot supportCEC.
- HDMI(HighDdinitionMultimedfaInterface)
- HDMIis aninterfacethat enablesthe digitaltransmissionof video andaudio datawith just a singleconnector.
UsingHDMI,the product transmitsa digitalvideoand audiosignalanddfsplaysa vivid pictureon a TV havingan HDMI
fnputjack.
- HDMIconnectiondescription
- HDMIoutputs onlya puredfgitalsignalto the W.
- If yourTV doesnot supportHDCP,randomnoiseappearson the screen.
- Whatis the HDCP?
HDCP(High-bandwidthDigitalContentProtection)is a systemfor protectingBD/DVDcontentoutputtedvia HDMIfrombeing
copied.It providesa securedigitallinkbetweena videosource(PC,DVD.etc)anda displaydevice_, projector,etc).Content
is encryptedat thesourcedeviceto preventunauthorizedcopiesfrombeingmade.
22 English
i
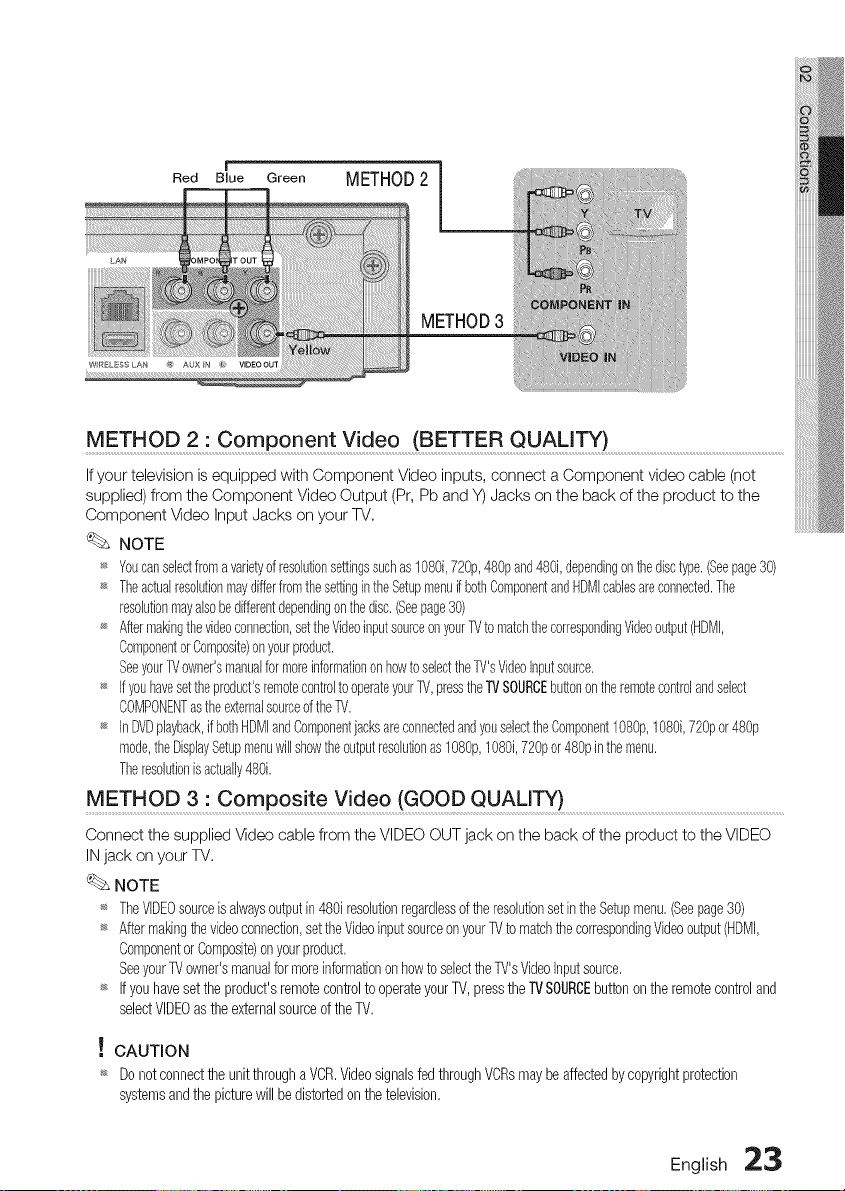
Red Blue Green
METHOD2
METHOD3
METH OD2: C o m pc nent Video (BETTE R QUALITY) ........................................................................................................................
If your television is equipped with Component Video inputs, connect a Component video cable (not
supplied) from the Component Video Output (Pr, Pb and Y) Jacks on the back of the product to the
Component Video Input Jacks on your TV,
NOTE
_ Youcanselectfroma varietyofresolutionsettingssuchas1080i,720p,480pand480i,dependingonthedisctype.(Seepage30)
_ TheactualresohtionmaydifferfromthesettingintheSetupmenuifbothComponentandHDMIcabbsareconnected.The
resolutionmayalsobedifferentdependingonthedisc.(Seepage30)
_ Aftermakingthevideoconnection,settheVideoinputsourceonyourTVtomatchthecorrespondingVideooutput(HDMI,
ComponentorComposite)onyourproduct.
SeeyourTVowner'smanualfor moreinformationonhowto selecttheTV'sVideoinputsource.
_ Ifyouhavesettheproduct'sremotecontroltooperateyourTV,presstheTVSOURCEbuttonontheremotecontrolandselect
COMPONENTastheexternalsourceoftheTV.
_ InDVDplayback,if bothHDMIandComponentjacksareconnectedandyouselecttheComponent1080p,1080i,720por 480p
mode,theDisplaySetupmenuwillshowtheoutputresolutionas1080p,1080i,720por 480pinthemenu.
Theresolutionis actually480i.
METHOD 3 : Composite Video (GOOD QUALITY) ..........................................................................................................................................................
Connect the supplied Video cable from the VIDEO OUT jack on the back of the product to the VIDEO
IN jack on your TV,
NOTE
,_ TheVIDEOsourceisalwaysoutputin480iresohtionregardlessof theresohtionsetintheSetupmenu,(Seepage30)
_ Aftermakhgthevideoconnection,settheVideoinputsourceonyourTVto matchthe correspondingVideooutput(HDMI,
Componentor Composite)onyourproduct,
SeeyourTVowner'smanualformoreinformationonhowto selecttheTV'sVideoInputsource,
_ Ifyouhavesetthe product'sremotecontrolto operateyourTV, pressthe TVSOURCEbuttononthe remotecontroland
selectVIDEOas theexternalsourceof theTV,
! CAUTION
_ Donotconnectthe unitthrougha VCR,Videosignalsfed throughVCRsmaybeaffectedbycopyrightprotection
systemsandthe picturewill bedistortedon thetelevision,
English :2:3
Connections
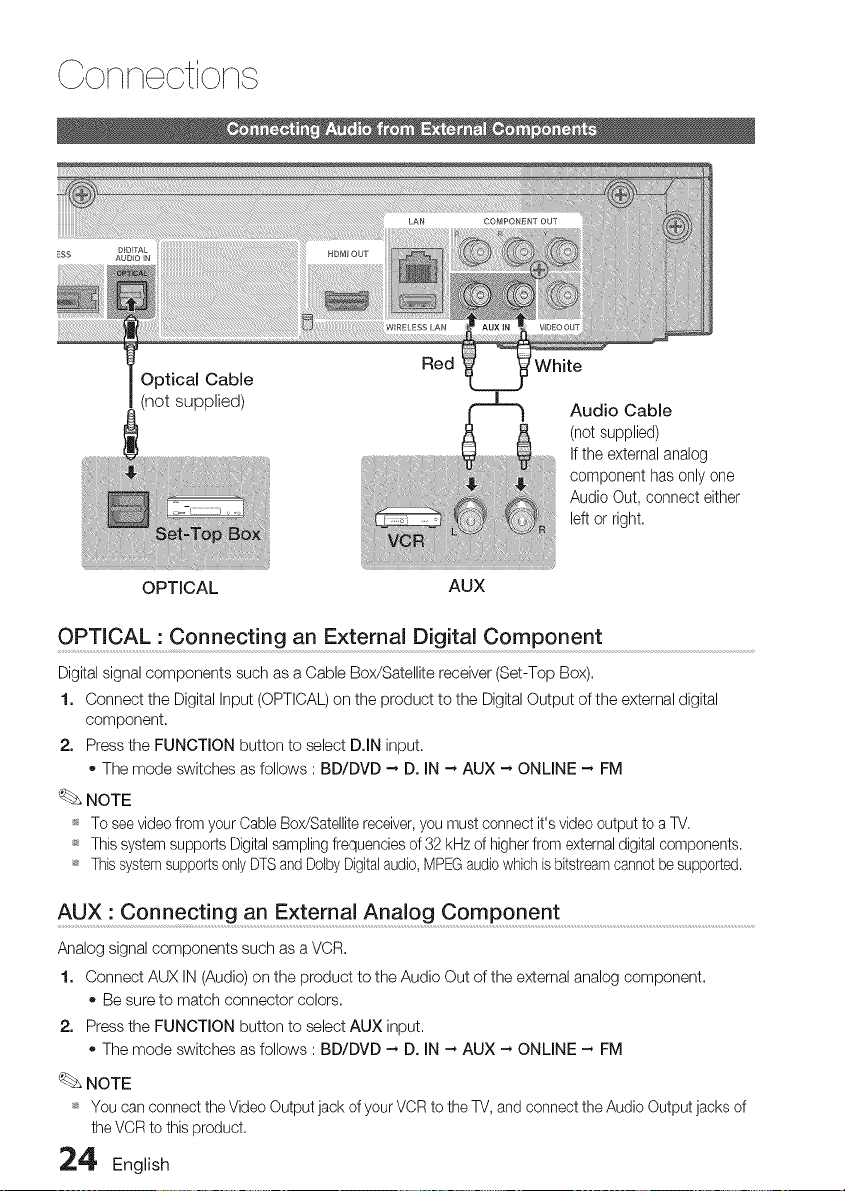
Optical Cable
(not supplied)
White
Audio Cable
(not supplied)
Ifthe externalanalog
componenthas onlyone
AudioOut, connecteither
left or right,
OPTICAL AUX
OPTICAL • Connecting an External Digital Component
Digital signal components such as a Cable Box/Satellite receiver (Set-Top Box).
1. Connect the Digital Input (OPTICAL) on the product to the Digital Output of the external digital
component.
2. Press the FUNCTION button to select D.IN input.
o The mode switches as follows : BD/DVD -, D. IN -, AUX -, ONLINE -, FM
NOTE
_ To see video from your Cable Box/Satellite receiver, you must connect it's video output to a TV.
_ This system supports Digital sampling frequencies of 32 kHz of higher from external digital components.
_ This system supports only DTSand Dolby Digitalaudio, MPEGaudio which is bitstreamcannot be supported.
AUX" Connecting an External Analog Component .......................................................................................................................................
Analog signal components such as a VCR.
1. Connect AUX IN (Audio) on the product to the Audio Out of the external analog component.
Be sure to match connector colors.
2. Press the FUNCTION button to select AUX input.
The mode switches as follows : BD/DVD -, D. IN -, AUX -, ONLINE -, FM
NOTE
_ You can connect the Video Output jack of your VCR to the TV, and connect the Audio Output jacks of
the VCR to this product.
24 English
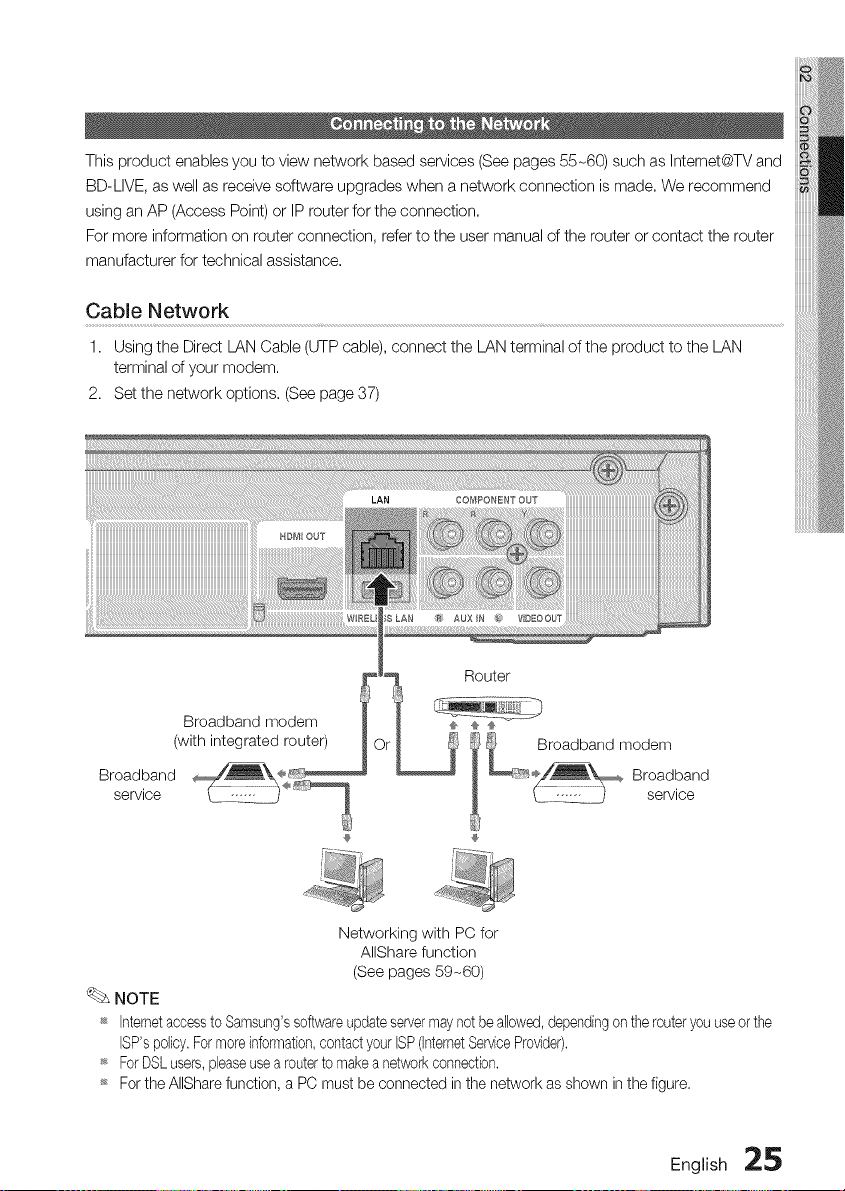
This product enables you to view network based services (See pages 55-60) such as Intemet@TV and
BD-LIVE, as well as receive software upgrades when a network connection is made, We recommend
using an AP (Access Point) or IP router for the connection,
For more information on router connection, refer to the user manual of the router or contact the router
manufacturer for technical assistance.
Cable Network
1. Using the Direct LAN Cable (UTP cable), connect the LAN terminal of the product to the LAN
terminal of your modem,
2. Set the network options, (See page 37)
Broadband modem
(withintegrated router)
Broadband _÷
service _ .-_1::::_.- ÷_,
Networking with PC for
AIIShare function
(See pages 59-60)
NOTE
_s Internetaccessto Samsung'ssoftwareupdateservermay not be allowed,dependingon the routeryou useor the
ISP'spolicy.For moreinformation,contact your ISP(InternetServiceProvider).
_s ForDSLusers,pleaseuse a routerto makea networkconnection.
_s For the AIISharefunction, a PC must be connected in the network as shown in the figure,
English 25
Coi i eotioi
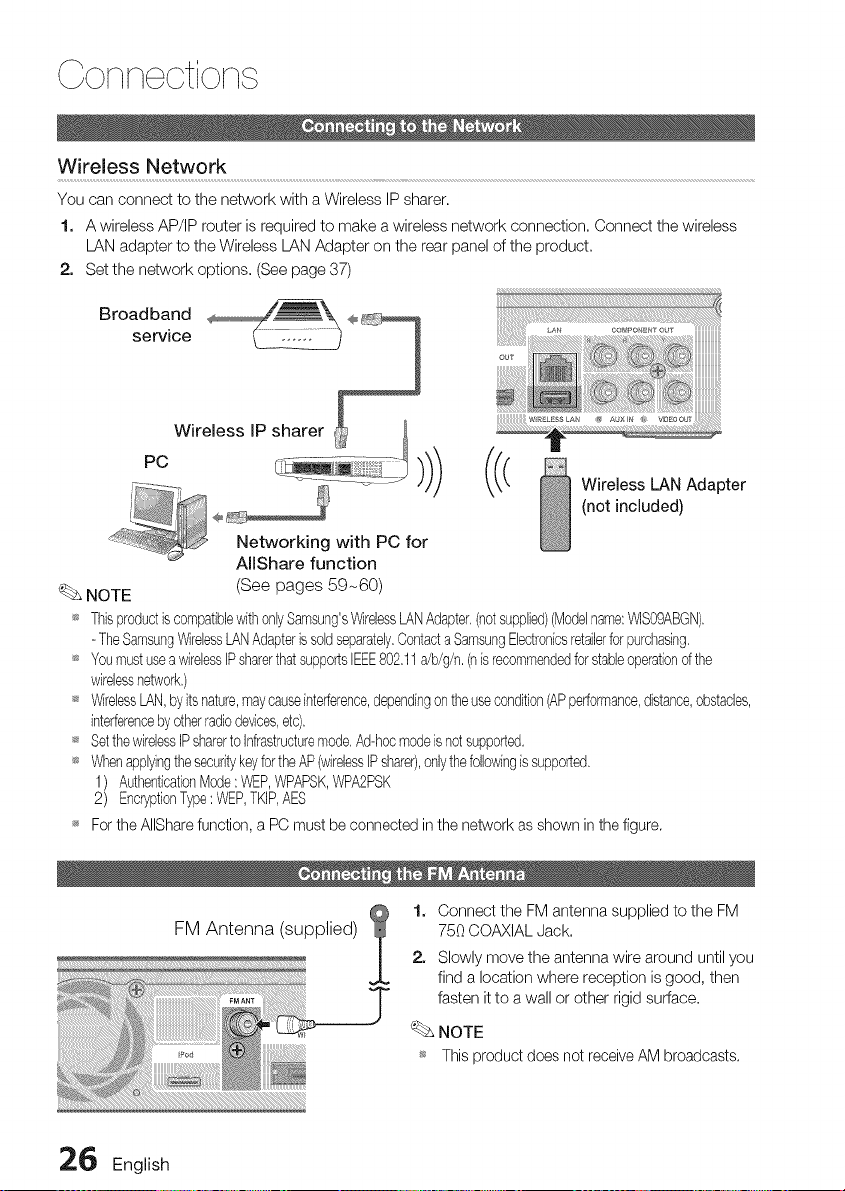
Wireless Network
You can connect to the network with a Wireless IP sharer.
1. A wireless AP/IP router is required to make a wireless network connection, Connect the wireless
LAN adapter to the Wireless LAN Adapter on the rear panel of the product.
2. Set the network options, (See page 37)
Broadbandservlee_ --_
l
W_EL_SSLA_ _ AUXm_ ;
Wireless IP sharer .......................
PC ))) ((< Wireless LAN Adapter
÷ (not included)
Networking with PC for
AIIShare function
NOTE (See pages 59-60)
_ ThisproductiscompatiblewithonlySamsung'sWirelessLANAdapter,(notsupplied)(Modelname:%S09ABGN),
- TheSamsungV_relessLANAdapteris soldseparately,Contacta SamsungElectronicsretailerfor purchasing,
_ YeumustuseawirelessIPsharerthatsuppertslEEES02,11a/b/g/n,(nis recommendedferstableeperationof the
wirelessnetwork,)
_ WirelessLAN,by itsnature,maycauseinterference,dependingontheusecondition(APperformance,distance,obstacles,
interferencebyotherradiodevices,etc),
_ SetthewirelessIPsharerto Infrastructuremode,Ad-hocmodeis not supported,
_ Whenapplyingthesecuritykeyfor theAP(wirelessIPshare&onlythefollowingis supported,
1) AuthenticatbnMode: WEP,WPAPSK,WPA2PSK
2) EncryptionType: WEP,TKIP,AES
For the AIIShare function, a PC must be connected in the network as shown in the figure.
FM Antenna (supplied)
1. Connect the FM antenna supplied to the FM
750 COAXIAL Jack.
2. Slowly move the antenna wire around until you
find a location where reception is good, then
fasten it to a wall or other rigid surface.
NOTE
_ This product does not receive AM broadcasts.
2_ English
Setup
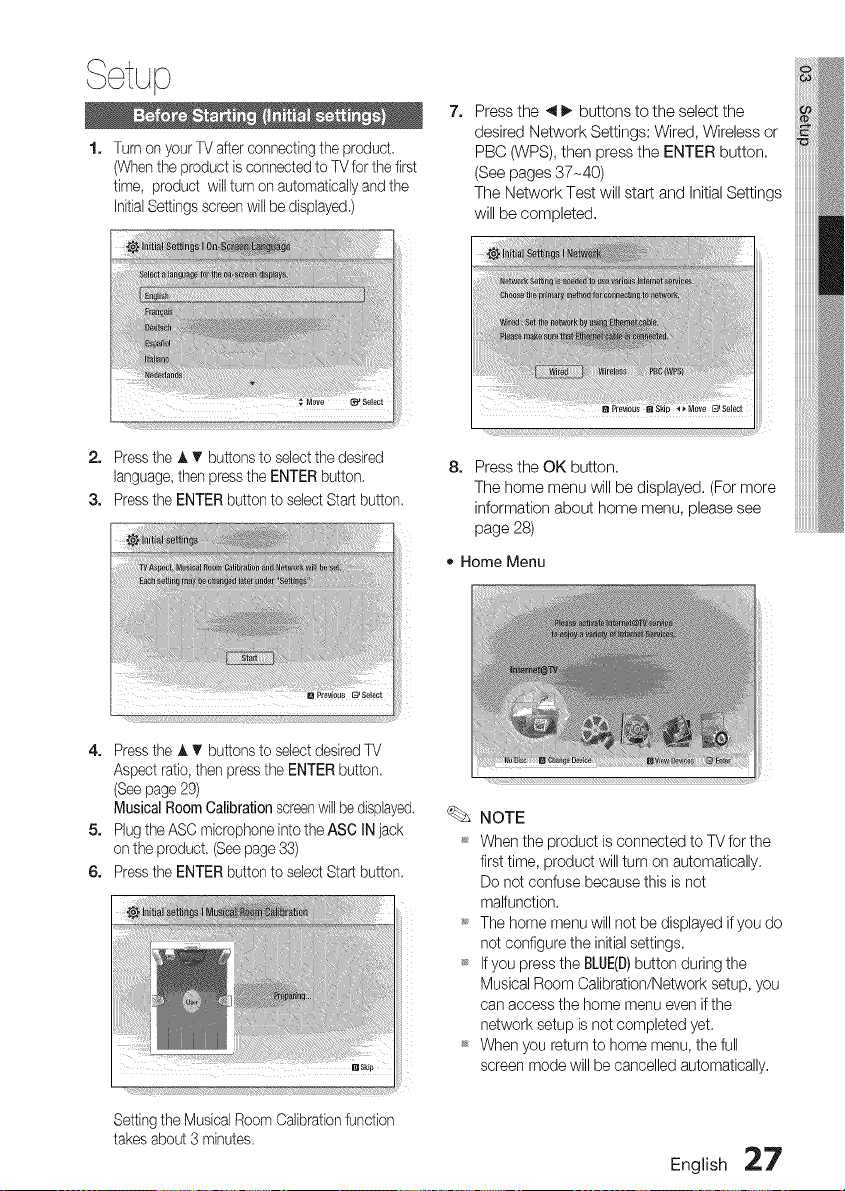
1. Turn on your TV after connecting the product
(Whenthe product is connected to TV for the first
time, product wi[[turn on automatbaHyand the
InitialSettings screen wii[ be displayed,)
7. Press the 4 _. buttons to the select the
desired Network Settings: Wired, Wireless or
PBC (WPS), then press the ENTER button,
(See pages 37-40)
The Network Test will staff: and Initial Settings
will be completed,
L (IL ILZZ ¸¸ _° Z} ÷s°!°°t
2. Press the J, T buttons to select the desired
language,then press the ENTER button.
3. Press the ENTER button to select Start button,
4. Press the A T buttons to select desired TV
Aspect ratio, then press the ENTER button,
(Seepage 29)
Musical Room Calibration screenwillbe displayed.
5. Plug the ASC mbrophone intothe ASC IN jack
on the product, (See page 33)
6. Press the ENTER button to select Start button.
Setting the Musbal Room Calibrationfunction
takes about 3 minutes.
8. Press the OK button,
The home menu will be displayed. (For more
information about home menu, please see
page 28)
• Home Menu
NOTE
When the product is connected to TV for the
first time, product will turn on automatically.
Do net confuse because this is net
malfunction.
_ The home menu will net be displayed if you do
net configure the initial settings.
t_ If you press the BLUE(D)button during the
Musical Room Calibration/Network setup, you
can access the home menu even if the
network setup is net completed yet.
_* When you return to home menu, the full
screen mode will be cancelled automatically.
English 27
_* If you want to display Initial Setting screen
again in order to make changes, press the
STOP(u) button on the front panel of the
product for more than 5 seconds with no disc
inserted.
_* Use the HDMI cable to connect the product to
an Anynet+(HDMI-CEC)-compliantSamsung TV.
If the TV uses a language supported by the
product, that language will be set to a
preferred language automatically.
However, the Anynet+(HDM!-CEC)feature
should be set to ORin both TV and the
product.
_ If the product is left in the stop mode for more
than 5 minutes without being operated, a
screen saver will appear on your TV. If the
product is left in the screen saver mode for
more than 25 minutes, the power will
automatically turn off except during playback
of a CD-DA (Automatic Power-Off Function).
0
flJA MENUButton: PressthLsto moveto thehomemenu.
0 RETURNButton: Returnto the prevbusmenu.
ENTER/ DIRECTIONButton:
Pressthe arrowbuttonsto movethecursorandselect
an Ltem.
Pressthe ENTERbutton to Launchtheselecteditemor
confirmthesetting.
EXITButton: PressthLsto exitthemenu.
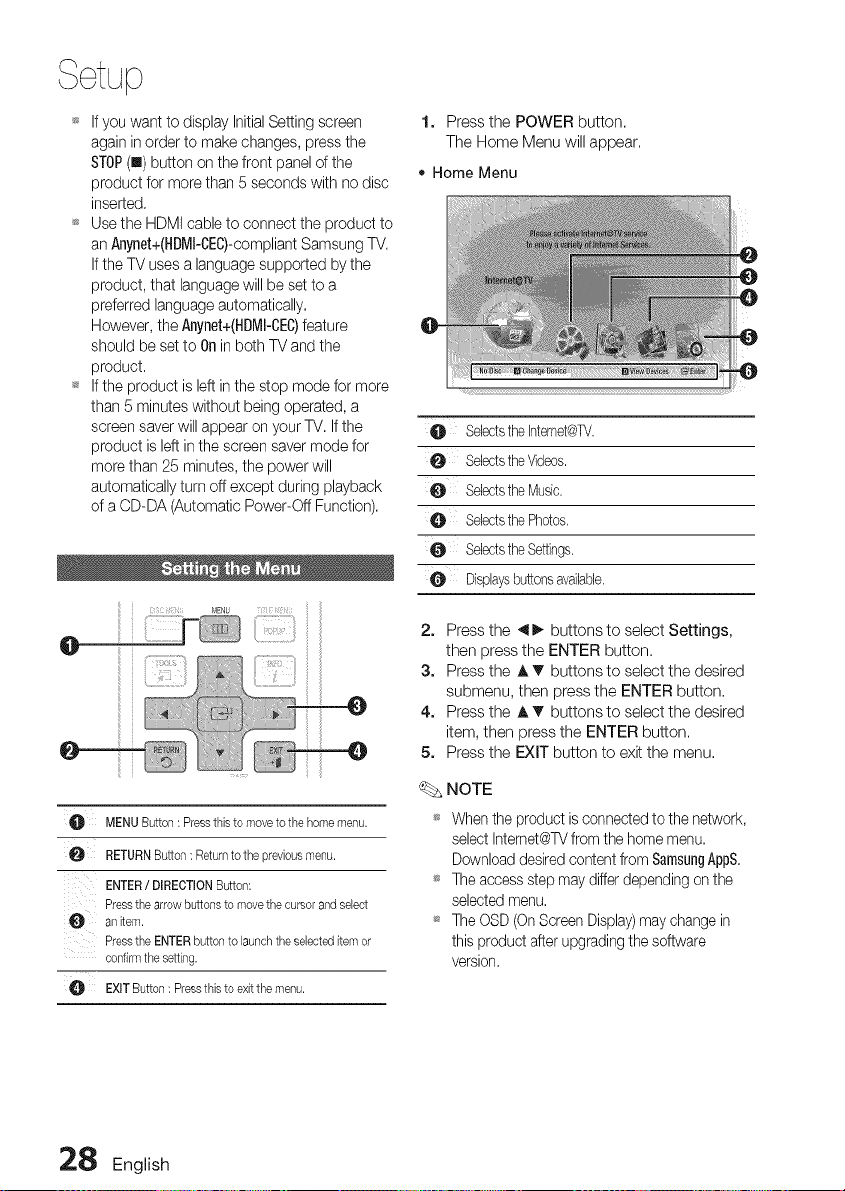
1. Press the POWER button.
The Home Menu will appear.
• Home Menu
e
0
0
Selectsthe Intemet@TV.
SelectstheVideos,
Selectsthe Music.
Selectsthe Photos,
Selectsthe Settings.
O Displaysbuttonsavailable.
2. Press the 41_ buttons to select Settings,
then press the ENTER button.
3. Press the A _' buttons to select the desired
submenu, then press the ENTER button.
4. Press the A T buttons to select the desired
item, then press the ENTER button.
5. Press the EXIT button to exit the menu.
NOTE
_ When the product is connected to the network,
select Internet@TVfrom the home menu.
Download desired content from SamsungAppS.
_ The access step may differ depending en the
selected menu.
_ The OSD (On Screen Display)may change in
this product after upgrading the software
version.
28 English
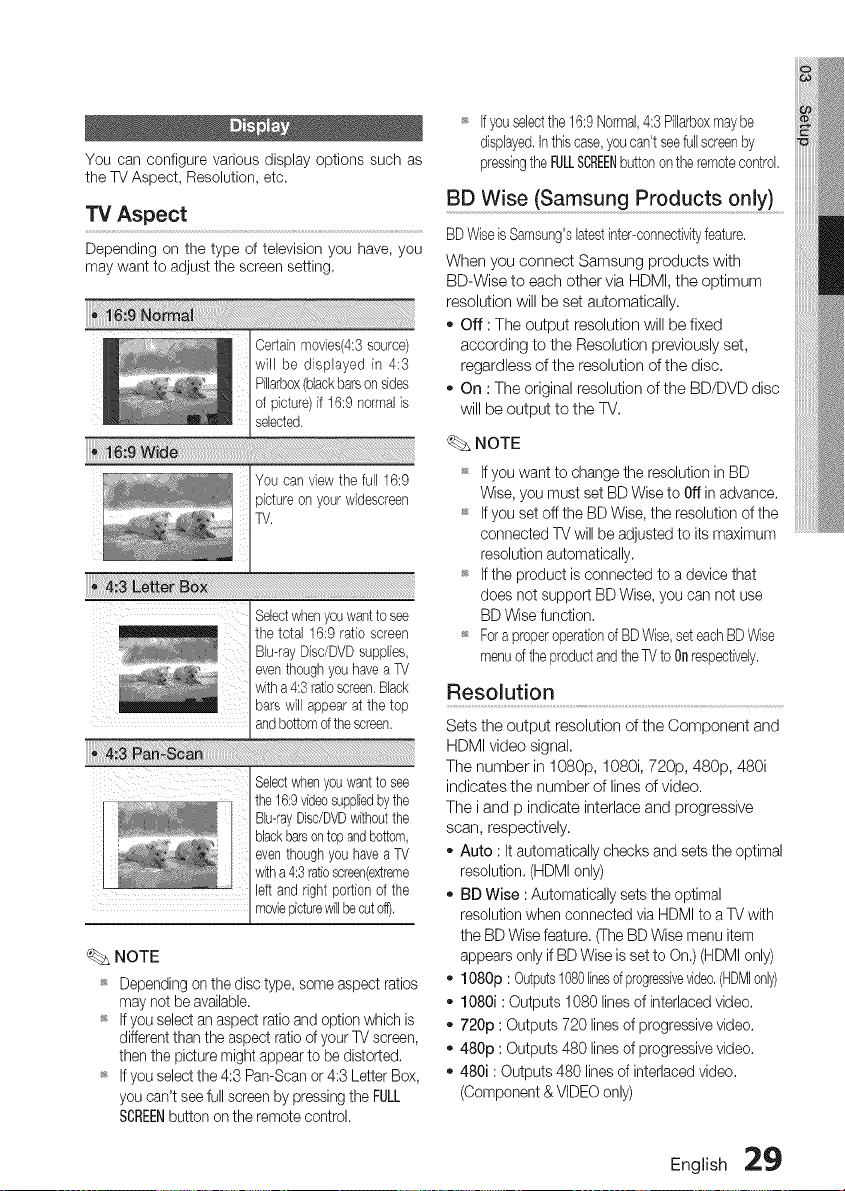
You can configure various display options such as
the TV Aspect, Resolution, etc.
TV Aspect
Depending on the type of television you have, you
may want to adjust the screen setting,
Certainmovies(4:3source)
will be displayed in 4:3
Pillarbex(blackbarsonsides
of picture)if 16:9normalis
selected.
Selectwhenyou wantto see
the 16:9videosuppliedbythe
Blu-rayDisdDVDwithoutthe
blackbarsontopandbottom,
eventhoughyouhavea TV
witha 4:3ratioscreen(extreme
left and right portionof the
moviepicturewillbecutoft),
NOTE
_ Depending on the disc type, some aspect ratios
may not be available.
_ If you select an aspect ratio and option which is
different than the aspect ratio of your TV screen,
then the picture might appear to be distorted,
_ If you select the 4:3 Pan-Scan or 4:3 Letter Box,
you can't see full screen by pressing the FULL
SCREENbutton on the remote control.
_ Ifyouselectthe 16:9Normal,4:3 Pillarboxmay be
displayed,Inthis case,youcan't seefullscreenby
pressingthe FULLSCREENbuttononthe remotecontrol,
BD Wise (Samsung Products only)
BDWiseis Samsung'slatestinter-connectivityfeature,
When you connect Samsung products with
BD-Wise to each other via HDMI, the optimum
resolution will be set automatically,
- Off : The output resolution will be fixed
according to the Resolution previously set,
regardless of the resolution of the disc,
- On : The original resolution of the BD/DVD disc
will be output to the TV,
NOTE
_ If you want to change the resolution in BD
Wise, you must set BD Wise to Offin advance.
_ If you set off the BD Wise, the resolution of the
connected TV will be adjusted to its maximum
resolution automatically.
_ If the product is connected to a device that
does net support BD Wise, you can net use
BD Wise function.
_ Fora properoperationof BDWise,seteachBDWise
menud the productandtheTV to Onrespectively.
Resolution
Sets the output resolution of the Component and
HDMI video signal,
The number in 1080p, 1080i, 720p, 480p, 480i
indicates the number of lines of video.
The i and p indicate interlace and progressive
scan, respectively.
- Auto : It automatically checks and sets the optimal
resolution. (HDMI only)
- BD Wise : Automatically sets the optimal
resolution when connected via HDMI to a TV with
the BD Wise feature. (TheBD Wise menu item
appears only if BD Wise is set to On.) (HDMI only)
- 1080p : Outputs1080linesofprogressiveddeo,(HDMIonly)
- 1080i : Outputs 1080 lines of interlaced video.
- 720p : Outputs 720 lines of progressive video.
- 480p : Outputs 480 lines of progressive video,
- 480i : Outputs 480 lines of interlaced video,
(Component & VIDEO only)
English 2_

Setup
Resolution according to the output mode
- Blu-ray Disc playback
Auto OptimalResolution
i080p, MovieFrame(24Fs)Off 1080p@60F
!080p/!0%i,
MovieFrame(24Fs)on 1080p@24F
1080i,MovieFrame(24Fs)off 1080i
720p 720p
480p 480p
480i
480i
480i
480i
480i
480i
480i
1080i
720p
480p
480i
480i
480i
480i
480i
_, DVD playback
Auto OptimalResolution
t080p 1080p@60F
1080i 1080i
720p 720p
480p 480p
480i
480i
480i
480i
480i
480i
480p
480p
480p
480i
480i
480i
480i
480i
NOTE
_* If the connected TV does not support Movie
Frame or the selected resolution, the message
"If no pictures are shown after the selection,
please wait for 15 seconds. And then, the
resolution will be reverted to the previous value
automatically. Would you like to make a
selection?" will be displayed.
If you select Yes and the resolution is not
supported, the TV's screen will be blank.
Pleasewait for 15 seconds and the resolution
will be reverted to the previous value
automatically.
_* If the screen is blank, press and hold the
STOP (m) button on the front of the product
for more than 5 seconds (no disc inserted).
All settings are restored to the factory default.
Follow the steps on the previous page to
access each mode and select the Display
Setup that your TV will support.
_s When the factory default settings are restored,
all the user data stored in the BD data will be
deleted.
30 English
_s The Blu-ray Disc must have the 24 frame
feature in order to use the Movie Frame (24Fs)
mode.
_s If both HDMI and Component jacks are
connected and you are currently viewing
component output, there is a difference
between resolution table and actual resolution
depending on your TV.
_s If the HDMI Auto Detection feature does not
work, you can't select the 1080p resolution or
Movie Frame (24Fs).
HDMI Format .............................................................................................................................................Progressive Mode .......................................................................................................
You can optimize the color setting from the HDMI
output. Select a connected device Type.
o TV : Select if connected to a TV via HDMk
Monitor : Select if connected to a Monitor via
HDMI.
NOTE
_ A TV or monitor has to be connected to the
product before you select this option.
Set to improve picture quality when viewing DVDs.
Auto : Select this to have the product
automatically set the best picture for the DVD
you're watching.
Video : Select this for the best picture from
Concert or TV show DVDs.
Still Mode
Movie Frame (24 Fs)
Setting the Movie Frame (24Fs) feature to On
allows you to adjust the product's HDMI output to
24 frames per second for improved picture quality.
You can enjoy the Movie Frame (24Fs) feature only
on a TV supporting this frame rate. This menu can
only be selected in 1080i or 1080p HDMI output
resolution modes.
o Off : Movie Frame (24Fs) functions will not
work.
On : Movie Frame (24Fs) functions will work.
NOTE
_ Two types of frame rates may be included,
depending on the disc: Movie material (24
frame) and Video material (30 frame). When the
setting switches between Movie (24 frame) and
Video (30 frame), the screen may blink for a
few seconds.
_ If your TV does net support Movie Frame
(24Fs)function, the pop-up message will be
displayed.
Set the type of picture shown when you pause
DVD playback.
o Auto: Automatically set the best still picture
depending on the content.
Frame : Select when pausing a scene with a
little action.
FieJd : Select when pausing a scene with a lot
of action.
HDMI Deep Color ..............................................................................................................
Set to output the picture from the HDMIOUT
jack with DeepColor or not, DeepColorallows
more accuratecolor reproductionwith deeper
color depth,
- Auto: The picture will be output with Deep
Color to the connected TV which supports
HDMI Deep Color.
Off : The picture will be output without Deep
Color.
English 3_
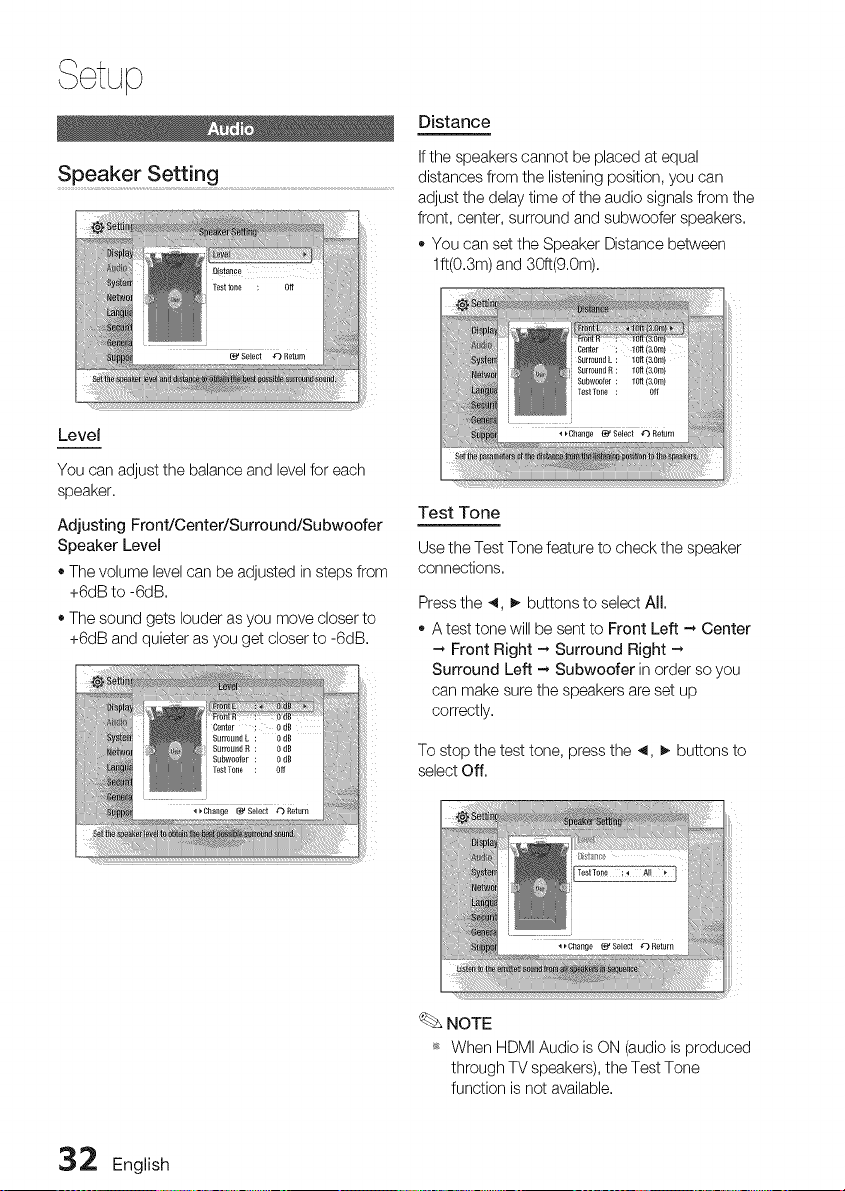
Level
You can adjust the balance and level for each
speaker.
Adjusting Front/Center/Surround/Subwoofer
Speaker Level
• The volume level can be adjusted in steps from
+6dB to -6dB.
• The sound gets louder as you move closer to
+6dB and quieter as you get closer to -6dB.
Distance
If the speakers cannot be placed at equal
distances from the listening position, you can
adjust the delay time of the audio signals from the
front, center, surround and subwoofer speakers.
o You can set the Speaker Distance between
lft(0.3m) and 30ft(9.0m).
iiiiiii
Test Tone
Use the Test Tone feature to check the speaker
connections.
Press the 4, I_ buttons to select All.
A test tone will be sent to Front Left --*Center
-_ Front Right - Surround Right -_
Surround Left - Subwoofer in order so you
can make sure the speakers are set up
correctly.
To stop the test tone, pressthe 4, _ buttons to
selectOff.
NOTE
_* When HDMI Audio is ON (audio is produced
through TV speakers), the Test Tone
function is not available.
32 English
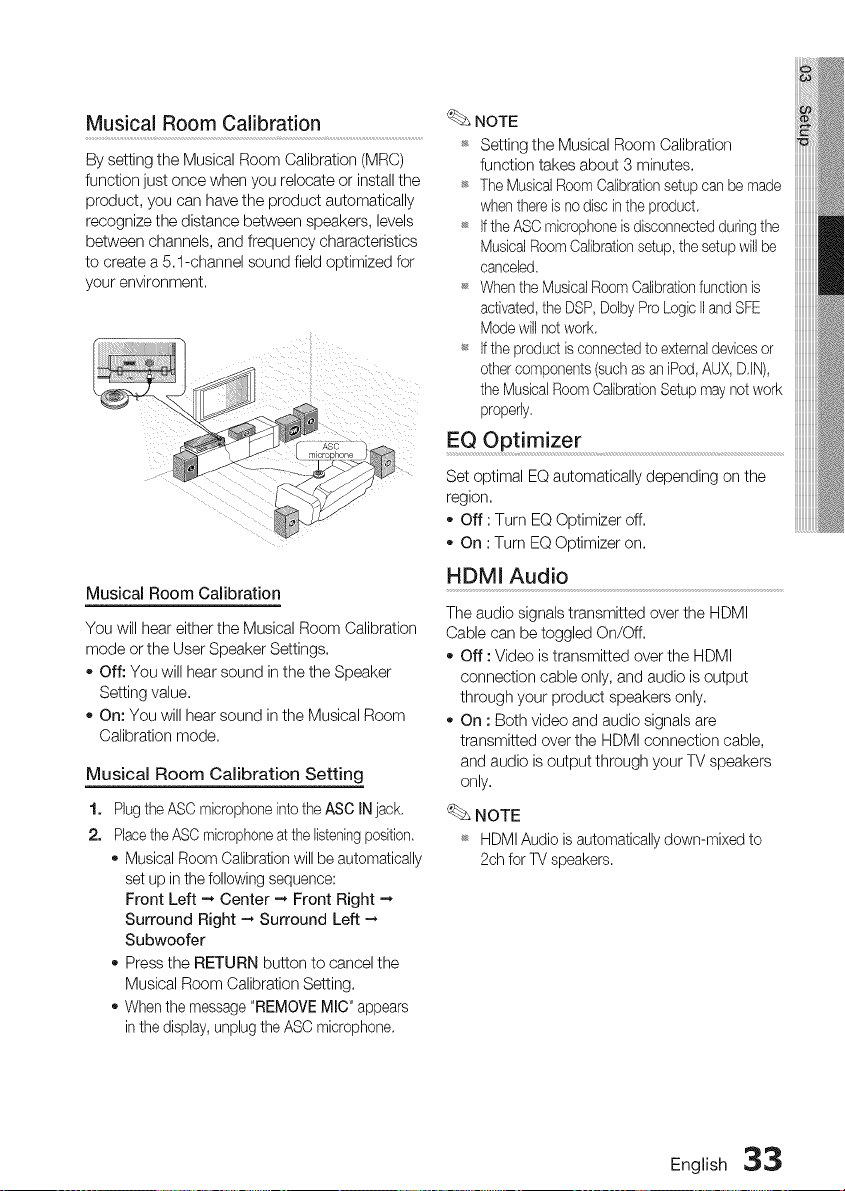
Musical Room Calibration
By setting the Musical Room Calibration (MRC)
function just once when you relocate or install the
product, you can have the product automatically
recognize the distance between speakers, levels
between channels, and frequency characteristics
to create a 5.1-channel sound field optimized for
your environment,
Musical Room Calibration
You will hear either the Musical Room Calibration
mode or the User Speaker Settings,
o Off: You will hear sound in the the Speaker
Setting value,
On: You will hear sound in the Musical Room
Calibration mode,
Musical Room Calibration Setting
1. Plug the ASC microphone into the ASC IN jack,
2. Placethe ASCmicrophoneat the listeningposition.
Musical Room Calibration will be automatically
set up in the following sequence:
Front Left _ Center --, Front Right --,
Surround Right -* Surround Left -,
Subwoofer
Press the RETURN button to cancel the
Musical Room Calibration Setting.
When the message "REMOVE MIC" appears
in the display, unplug the ASC microphone.
NOTE
_ Setting the Musical Room Calibration
function takes about 3 minutes.
_ The Musical Room Calibrationsetup can be made
when there is no disc inthe product,
_ If the ASC microphone is disconnected duringthe
Musical Room Calibrationsetup, the setup will be
canceled,
Whenthe MusicalRoom Calibrationfunction is
activated,the DSP, Dolby Pro Logic IIand SFE
Mode will not work,
_ If the product is connected to externaldevices or
other components (such as an iPod, AUX, DJN),
the Musical Room CalibrationSetup may not work
properly,
EQ OPtimizer ......................................................................................................
Set optimal EQ automatically depending on the
region,
- Off : Turn EQ Optimizer off,
o On : Turn EQ Optimizer on.
HDMI Audio
The audio signals transmitted over the HDMI
Cable can be toggled On/Off,
Off : Video is transmitted over the HDMI
connection cable only, and audio is output
through your product speakers only.
On : Both video and audio signals are
transmitted over the HDMI connection cable,
and audio is output through your TV speakers
only,
NOTE
_ HDMI Audio is automatically down-mixed to
2ch for TV speakers.
English 33
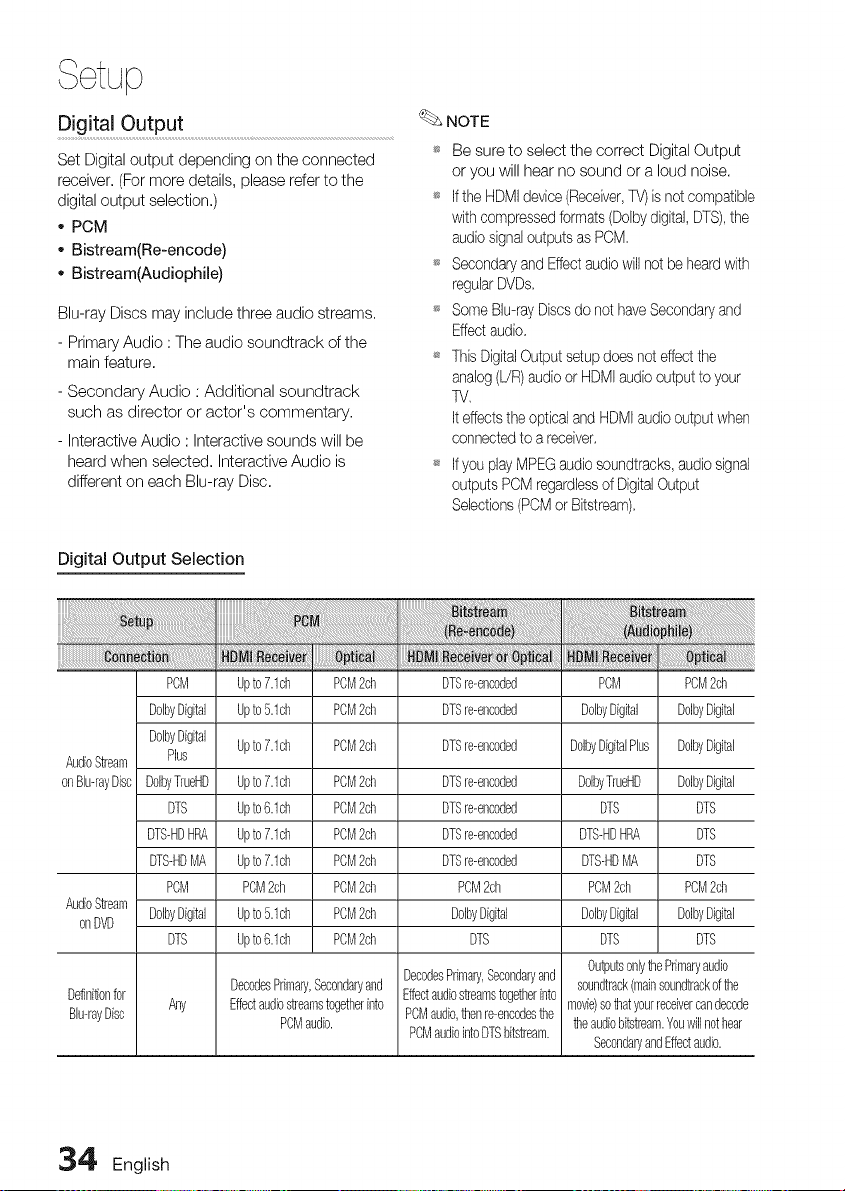
Digital Output ...................................................
Set Digital output depending on the connected
receiver. (For more details, please refer to the
digital output selection.)
* PCM
- Bistream(Re-encode)
* Bistream(Audiophile)
Blu-ray Discs may include three audio streams.
- Primary Audio : The audio soundtrack of the
main feature.
- Secondary Audio : Additional soundtrack
such as director or actor's commentary.
- Interactive Audio : Interactive sounds will be
heard when selected. Interactive Audio is
different on each Blu-ray Disc.
NOTE
_* Be sure to select the correct Digital Output
or you will hear no sound or a loud noise.
_* Ifthe HDMI device (Receiver,TV) isnot compatible
with compressed formats (Dolbydigital,DTS),the
audio signal outputs as PCM.
_ Secondaryand Effectaudio will not be heard with
regularDVDs.
_ Some BID-rayDiscs do not haveSecondary and
Effect audio.
_ This DigitalOutput setup does not effectthe
analog (L!R)audio or HDMI audio output to your
TV.
It effectsthe optical and HDMIaudio output when
connectedto a receiver.
_ If you play MPEGaudio soundtracks, audio signal
outputs PCM regardlessof DigitalOutput
Selections(POMor Bitstream).
Digital Output Selection
AudioStream
onBh-rayDisc
AudioStream
onDVD
PCM
DolbyDigital
DolbyDigital
Plus
UolbyTrueHU
DTS
DTS-HDHRA
DTS-HDMR
POM
DolbyDfgital
DTS
Upto7.1ch PCM2ch
Upto5.1ch PCM2ch
Upto7.1ch PCM2ch
Upto7.1ch PCM2ch
Upto6.1ch PCM2ch
Upto7.1ch PCM2ch
Upto7.1ch PCM2ch
POM2ch POM2ch
Upto5.1ch PCM2ch
Upto6.1ch PCM2ch
DTSre-encoded
DTSre-encoded
DTSre-encoded
DTSre-encoded
DTSre-encoded
DTSre-encoded
DTSre-encoded
PCM2ch
UolbyDigital
DTS
PCM
DolbyDigital
DolbyDigitalPlus
DolbyTrueHD
DTS
DTS-HDHRA
DTS-HDMR
PCM2ch
UolbyDigital
DTS
DecodesPrimary,Secondaryand
DecodesPrimary,Secondaryand Effectaudiostreamstogetherinto
Definitionfor Any Effectaudiostreamstogetherinto PCMaudio,thenre-encodesthe
BID-rayDisc POMaudio.
PCMaudiointoDTSbitstream.
PCM2ch
DolbyDigital
DolbyDigital
DolbyDigital
DTS
DTS
DTS
PCM2ch
DolbyDigital
DTS
OutputsonlythePrimaryaudio
soundtrack(mainsoundtrackofthe
movie)sothatyourreceivercandecode
theaudiobitstream.Youwillnothear
SecondaryandEffectaudio.
,34 English
Dynamic Range Control ....................................................................Anynet+(HDMI-CEC) ...........................................................................................
You can listen at low volumes but still hear dialog
clearly, This is only active when a Dolby Digital
signal is detected,
o Off : You can enjoy the movie with the
standard Dynamic Range,
On : When Movie soundtracks are played at
low volume or from smaller speakers, the
system can apply appropriate compression to
make low-level content more intelligible and
prevent dramatic passages from getting too
loud.
AV Sync
Video may look slower than the audio when the
product is connected to a digital TV, If this
occurs, adjust the audio delay time to match the
video,
You can set the audio delay time between
0 msec and 300 msec, Set it to the optimal
status,
initial Settings
By using the Initial Settings, you can set
language, TV aspect, Musical Room Calibration
and Network setting, etc.
For more information on the settings, refer to the
corresponding section in this user manual.
Internet@TV Screen Size
Anynet+ is a convenient function that offers linked
operations with other Samsung products with the
Anynet+ feature,
To operate this function, connect this product to
a Samsung TV with an HDMI cable.
You can operate this product using a Samsung
TV remote control and start disc playback simply
by pressing the PLAY (_) button on the TV's
remote control,
For more information, please see the TV user
manual,
Off : Anynet+ function will not work,
On : Anynet+ functions will work,
NOTE
_ This function is not available ifthe HDMI cable
does net support CEC.
_ If your Samsung W has an fA_x,,_t÷ logo, then
it supports the Anynet+ function.
_ Depending on your TV, certain HDMI output
resolutions may not work.
Please refer to the user manual of your TV.
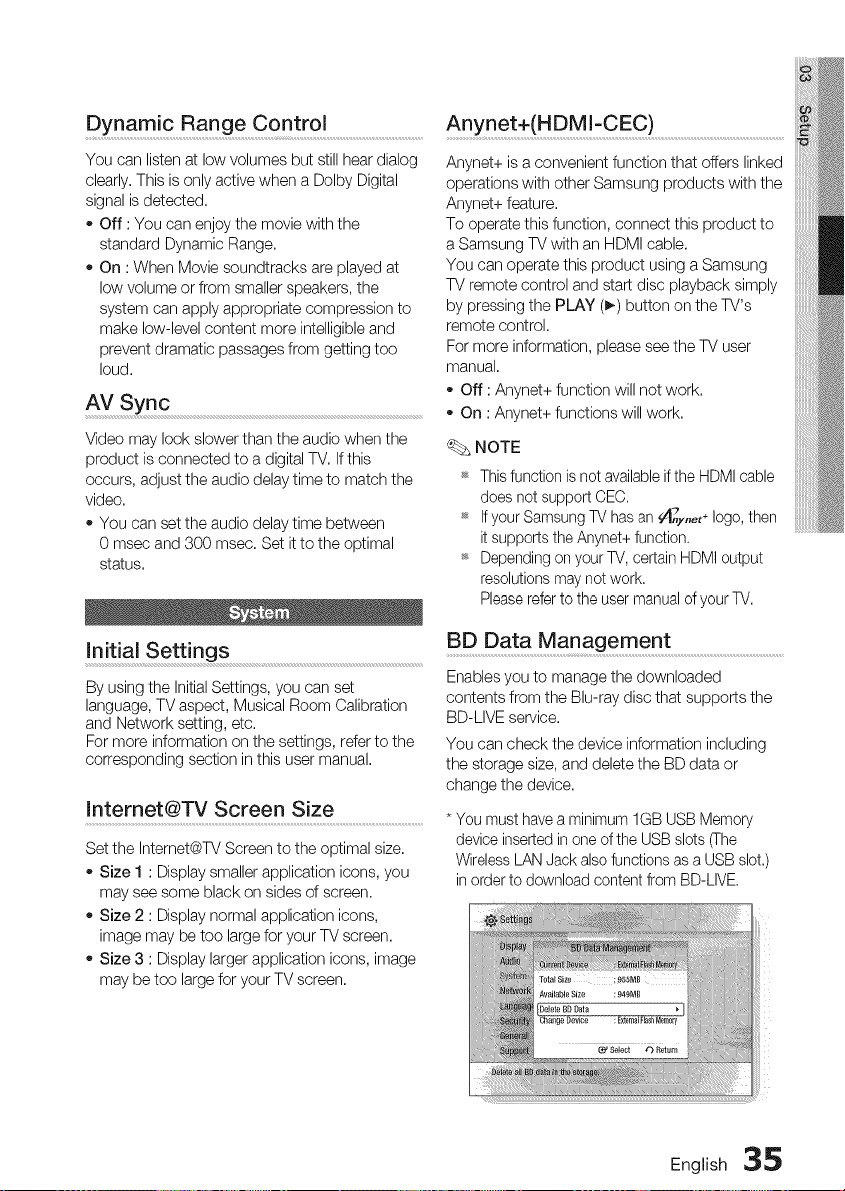
BD Data Management ...............................................................................
Enables you to manage the downloaded
contents from the Blu-ray disc that supports the
BD-LIVE service.
You can check the device information including
the storage size, and delete the BD data or
change the device.
* You must have a minimum 1GB USB Memory
Set the Intemet@TV Screen to the optimal size.
- Size 1 : Display smaller application icons, you
may see some black on sides of screen.
Size 2 : Display normal application icons,
image may be too large for your TV screen.
Size 3 : Display larger application icons, image
may be too large for your TV screen,
device inserted in one of the USB slots (The
Wireless LAN Jack also functions as a USB slot.)
in order to download content from BD-LIVE.
English 35
Setup
Description of Device(Storage) information on
the Product
o TotalSize: TotalsizeoftheDevice(Storage).
AvailableSize:AvailablesizeoftheDevice(Storage).
NOTE
_* Inthe externalmemorymode,disc playback
willbe stoppedif you disconnectthe USB
deviceinthe middleof the playback,
_* Onlythose USBdevicesformattedin FATfile
system(DOS8,3volumelabel)aresupported,
and it is recommendedto use USBdevices
that supportUSB2,0protocol,4 MB/secor
fasterread/writespeed.
_ A USBHDDdevicecannotbe usedfor BD
Datastorage(BD-LIVE),
_ The ResumePlayfunction maynotwork after
formattingthe storagedevice,
_ Thetotalsize of BDDataManagementmay
differ,dependingonthe softwareversion.
Clock
Set time-related functions.
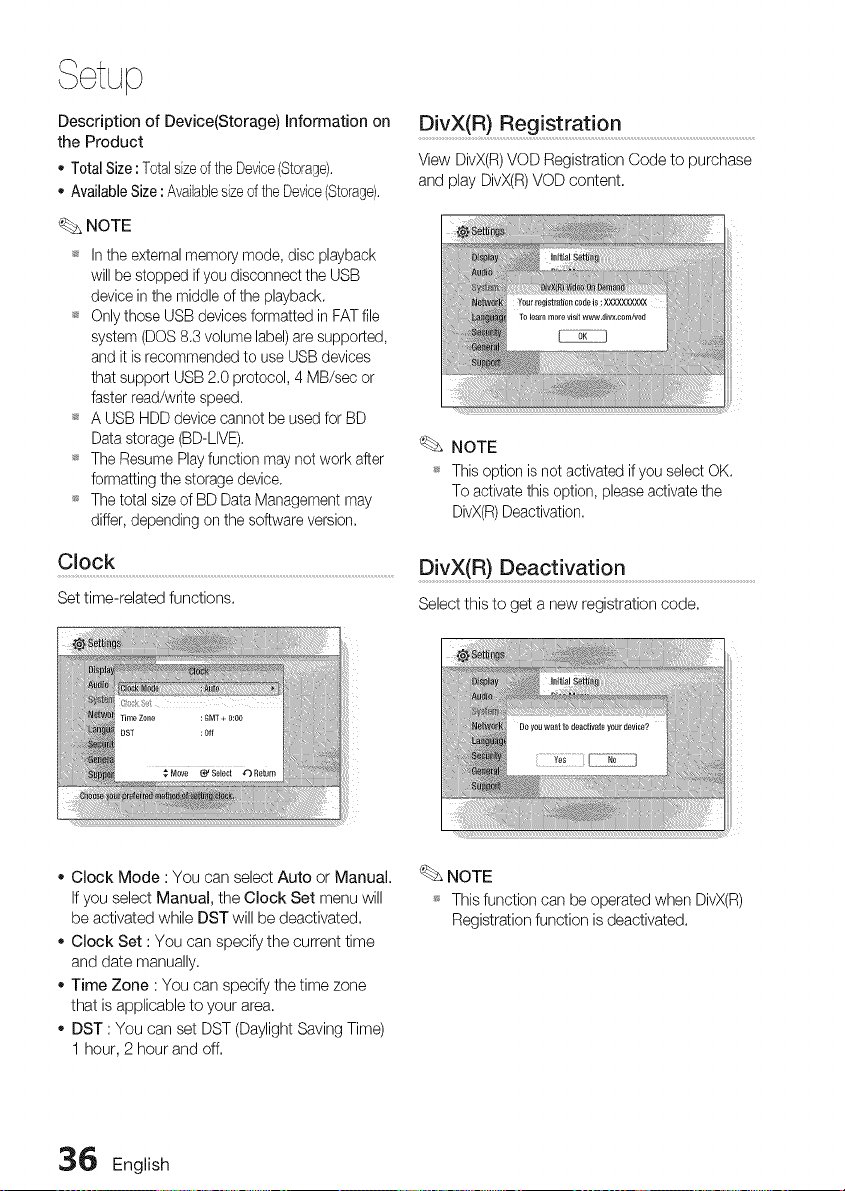
DivX(R) Registration ..............................................................................................
View DivX(R)VOD Registration Code to purchase
and play DivX(R) VOD content,
;iiii
NOTE
_ This option is not activated if you select OK.
To activate this option, please activate the
DivX(R)Deactivation.
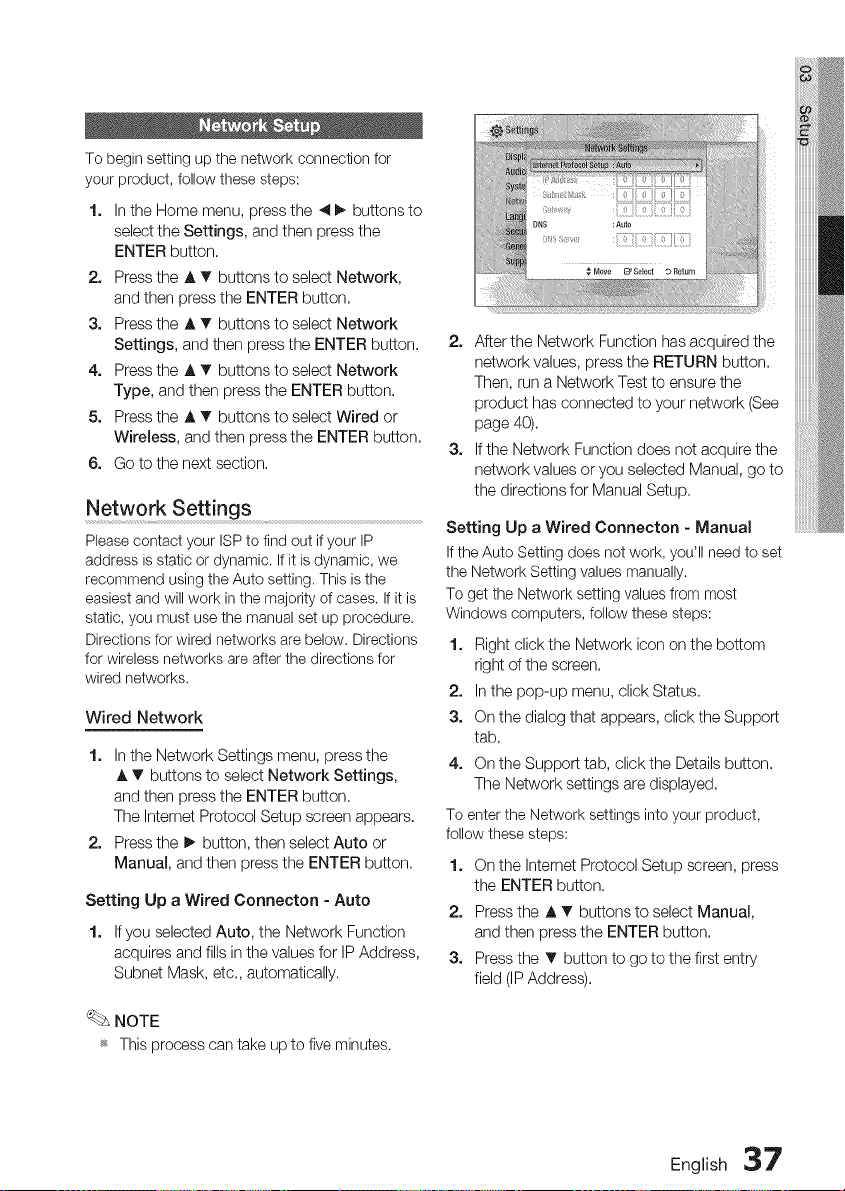
DivX(R) Deactivatio n...........................................................................................
Select this to get a new registration code,
Clock Mode : You can select Auto or Manual.
If you select Manual, the Clock Set menu will
be activated while DST will be deactivated.
Clock Set : You can specify the current time
and date manually.
Time Zone : You can specify the time zone
that is applicable to your area.
DST : You can set DST (Daylight Saving Time)
1 hour, 2 hour and off.
NOTE
_* This function can be operated when DivX(R)
Registration function is deactivated.
36 English
To begin setting up the network connection for
your product, follow these steps:
1. In the Home menu, press the _1_. buttons to
select the Settings, and then press the
ENTER button.
2. Press the A _' buttons to select Network,
and then press the ENTER button.
3. Press the A T buttons to select Network
Settings, and then press the ENTER button.
4. Press the A T buttons to select Network
Type, and then press the ENTER button.
5. Press the A T buttons to select Wired or
Wireless, and then press the ENTER button.
6. Go to the next section.
Network Settings
Please contact your ISPto find out if your IP
address is static or dynamic. If it is dynamic, we
recommend using the Auto setting. This is the
easiest and will work in the majority of cases. If it is
static, you must use the manual set up procedure.
Directions for wired networks are below. Directions
for wireless networks are after the directions for
wired networks.
Wired Network
1. In the Network Settings menu, press the
,& T buttons to select Network Settings,
and then press the ENTER button.
The Internet Protocol Setup screen appears.
2. Press the _ button, then select Auto or
Manual, and then press the ENTER button.
Setting Up a Wired Connecton - Auto
1. If you selected Auto, the Network Function
acquires and fills in the values for IP Address,
Subnet Mask, etc. automatically.
NOTE
_ This process can take upto fiveminutes.
2. After the Network Function has acquired the
network values, press the RETURN button.
Then, run a Network Test to ensure the
product has connected to your network (See
page 40).
3. If the Network Function does not acquire the
network values or you selected Manual, go to
the directions for Manual Setup.
Setting Up a Wired Connecton - Manual
If the Auto Setting does not work, you'll need to set
the Network Setting values manually.
To get the Network setting values from most
Windows computers, follow these steps:
1. Right click the Network icon on the bottom
right of the screen.
2. In the pop-up menu, click Status.
3. On the dialog that appears, click the Support
tab.
4. On the Support tab, click the Details button.
The Network settings are displayed.
To enter the Network settings into your product,
follow these steps:
1. On the Internet Protocol Setup screen, press
the ENTER button.
2. Press the A T buttons to select Manual,
and then press the ENTER button.
3. Press the T button to go to the first entry
field (IP Address).
English 37
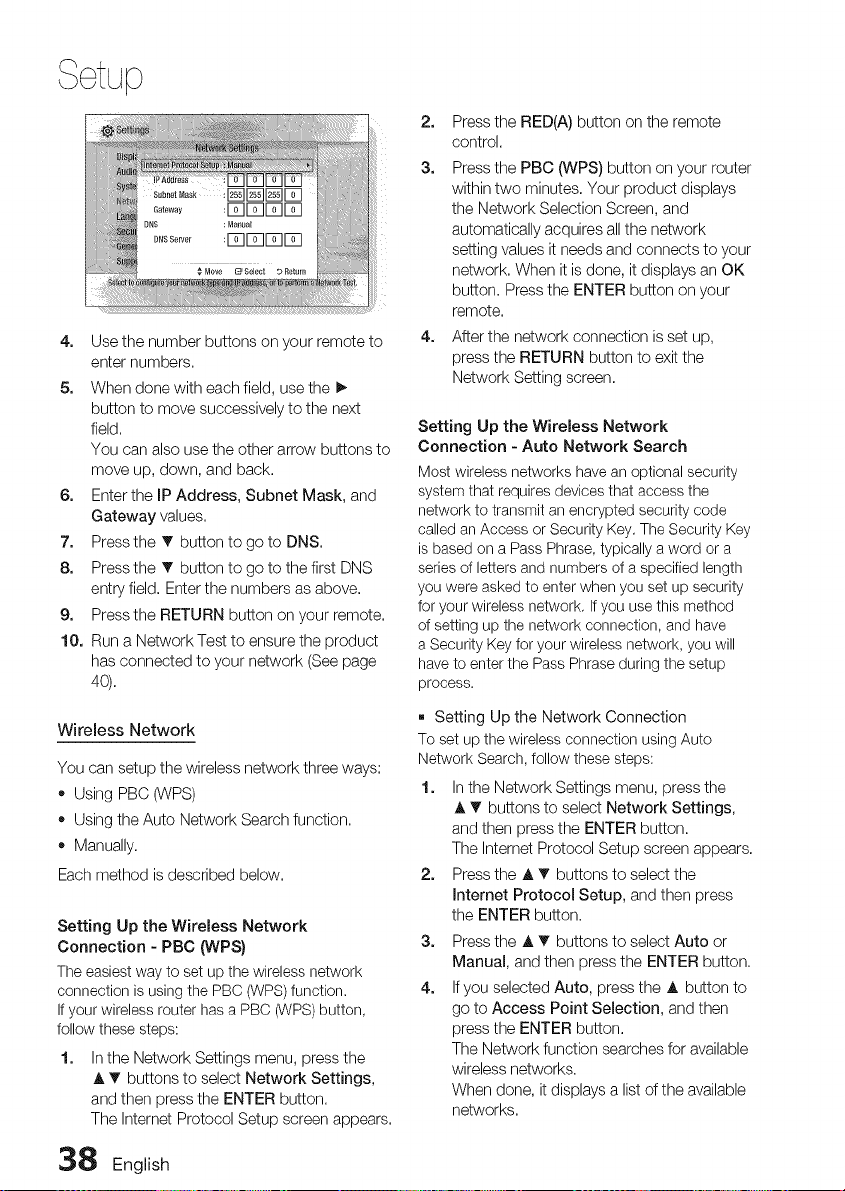
4. Use the number buttons on your remote to
enter numbers.
5. When done with each field, use the I_
button to move successively to the next
field.
You can also use the other arrow buttons to
move up, down, and back.
6. Enter the IP Address, Subnet Mask, and
Gateway values.
7. Press the T button to go to DNS.
8. Press the T button to go to the first DNS
entry field. Enter the numbers as above.
9. Press the RETURN button on your remote.
10. Run a Network Test to ensure the product
has connected to your network (See page
40),
Wireless Network
You can setup the wireless network three ways:
• Using PBC (WPS)
• Using the Auto Network Search function.
• Manually.
Each method is described below.
Setting Up the Wireless Network
Connection - PBC (WPS)
The easiest way to set up the wireless network
connection is using the PBC (WPS) function.
If your wireless router has a PBC (WPS) button,
follow these steps:
1. In the Network Settings menu, press the
A T buttons to select Network Settings,
and then press the ENTER button.
The Internet Protocol Setup screen appears.
38 English
2. Press the RED(A) button on the remote
control.
3. Press the PBC (WPS) button on your router
within two minutes. Your product displays
the Network Selection Screen, and
automatically acquires all the network
setting values it needs and connects to your
network. When it is done, it displays an OK
button. Press the ENTER button on your
remote.
4. After the network connection is set up,
press the RETURN button to exit the
Network Setting screen.
Setting Up the Wireless Network
Connection - Auto Network Search
Most wireless networks have an optional security
system that requires devices that access the
network to transmit an encrypted security code
called an Access or Security Key. The Security Key
is based on a Pass Phrase, typically a word or a
series of letters and numbers of a specified length
you were asked to enter when you set up security
for your wireless network. If you use this method
of setting up the network connection, and have
a Security Key for your wireless network, you will
have to enter the Pass Phrase during the setup
process.
[] Setting Up the Network Connection
To set up the wireless connection using Auto
Network Search, follow these steps:
1. In the Network Settings menu, press the
A T buttons to select Network Settings,
and then press the ENTER button.
The Internet Protocol Setup screen appears.
2. Press the A T buttons to select the
Internet Protocol Setup, and then press
the ENTER button.
3. Press the J, T buttons to select Auto or
Manual, and then press the ENTER button.
4. If you selected Auto, press the A button to
go to Access Point Selection, and then
press the ENTER button.
The Network function searches for available
wireless networks.
When done, it displays a list of the available
networks.
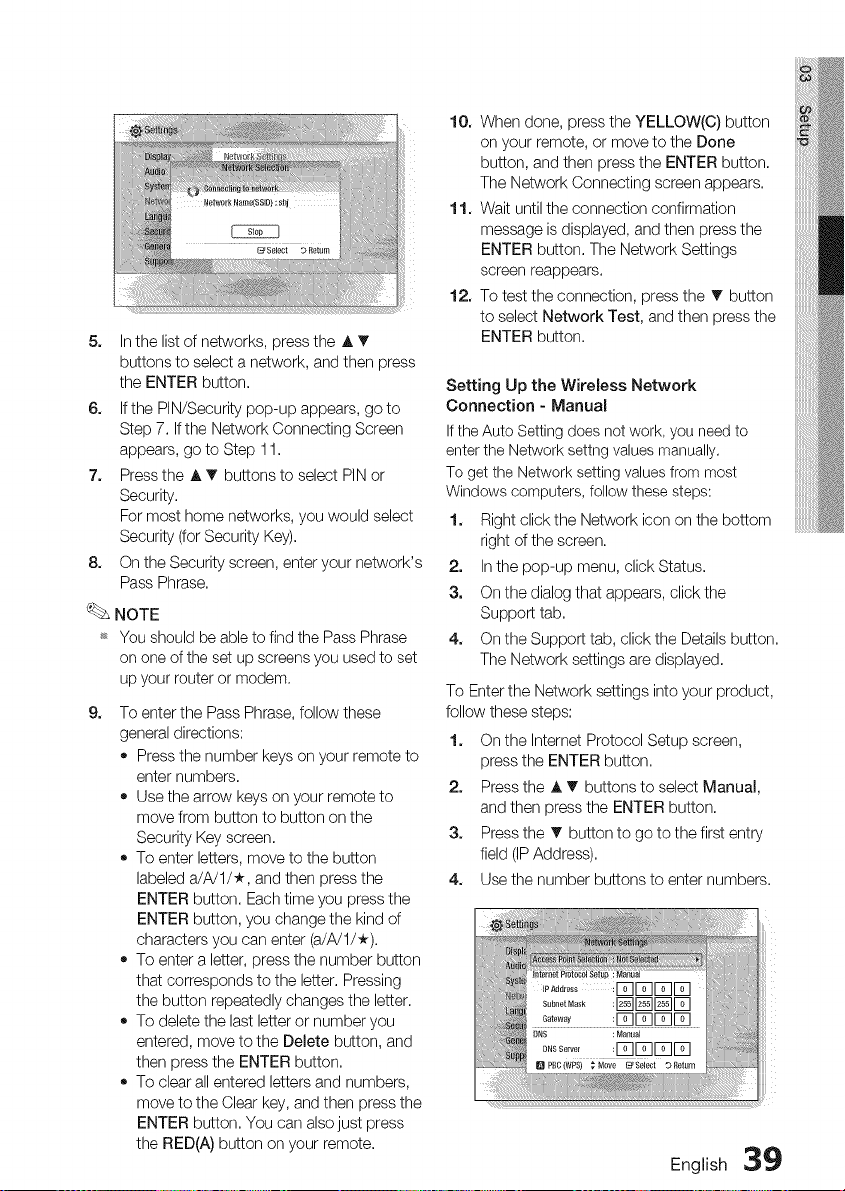
5. Inthelistofnetworks,presstheAT
buttonstoselectanetwork,andthenpress
theENTERbutton.
6. IfthePIN/Securitypop-upappears,goto
Step7.IftheNetworkConnectingScreen
appears,gotoStep11.
2. PresstheAT buttonstoselectPINor
Security.
Formosthomenetworks,youwouldselect
Security(forSecurityKey).
8. OntheSecurityscreen,enteryournetwork's
PassPhrase.
NOTE
_ YoushouldbeabletofindthePassPhrase
ononeofthesetupscreensyouusedtoset
upyourrouterormodem.
9,
To enter the Pass Phrase, follow these
general directions:
• Press the number keys on your remote to
enter numbers.
• Use the arrow keys on your remote to
move from button to button on the
Security Key screen.
• To enter letters, move to the button
labeled a/A/U*, and then press the
ENTER button. Each time you press the
ENTER button, you change the kind of
characters you can enter (a/A/U*).
• To enter a letter, press the number button
that corresponds to the letter. Pressing
the button repeatedly changes the letter.
• To delete the last letter or number you
entered, move to the Delete button, and
then press the ENTER button.
• To clear all entered letters and numbers,
move to the Clear key, and then press the
ENTER button. You can also just press
the RED(A) button on your remote.
10. When done, press the YELLOW(C) button
on your remote, or move to the Done
button, and then press the ENTER button.
The Network Connecting screen appears.
11. Wait until the connection confirmation
message is displayed, and then press the
ENTER button. The Network Settings
screen reappears.
12. To test the connection, press the T button
to select Network Test, and then press the
ENTER button.
Setting Up the Wireless Network
Connection - Manual
If the Auto Setting does not work, you need to
enter the Network settng values manually.
To get the Network setting values from most
Windows computers, follow these steps:
1. Right click the Network icon on the bottom
right of the screen.
2. In the pop-up menu, click Status.
3. On the dialog that appears, click the
Support tab.
4. On the Support tab, click the Details button.
The Network settings are displayed.
To Enter the Network settings into your product,
follow these steps:
1. On the Intemet Protocol Setup screen,
press the ENTER button.
2. Press the A T buttons to select Manual,
and then press the ENTER button.
3. Press the T button to go to the first entry
field (IP Address).
4. Use the number buttons to enter numbers.
English 39
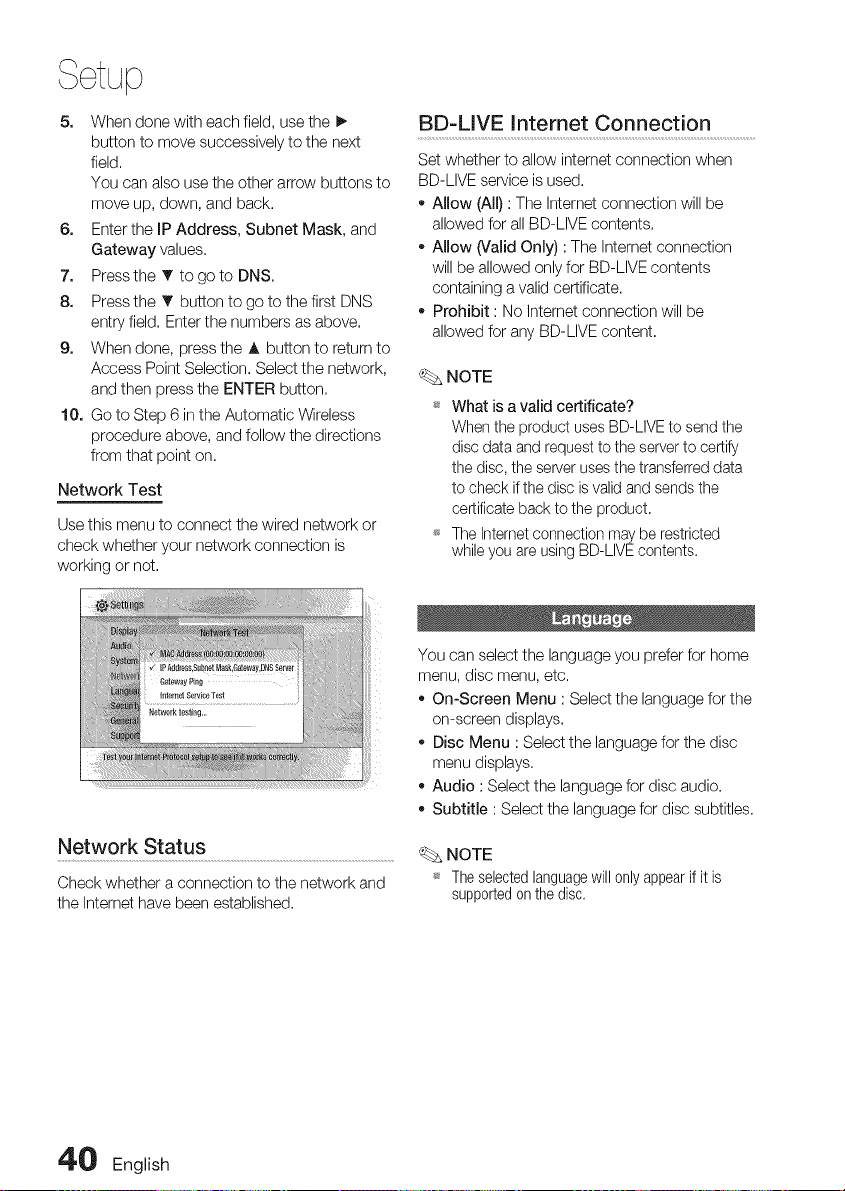
5. When done with each field, use the I_
button to move successively to the next
field.
You can also use the other arrow buttons to
move up, down, and back.
6. Enter the IP Address, Subnet Mask, and
Gateway values.
7. Press the T to go to DNS.
8. Press the T button to go to the first DNS
entry field. Enter the numbers as above.
9. When done, press the A button to return to
Access Point Selection. Select the network,
and then press the ENTER button.
10. Go to Step 6 in the Automatic Wireless
procedure above, and follow the directions
from that point on.
Network Test
Use this menu to connect the wired network or
check whether your network connection is
working or not.
Network Status
Check whether a connection to the network and
the Intemet have been established,
BD-LIVE Internet Connection
Set whether to allow intemet connection when
BD-LIVE service is used.
- Allow (All) : The Internet connection will be
allowed for all BD-LIVE contents,
- Allow (Valid Only) : The Intemet connection
will be allowed only for BD-LIVE contents
containing a valid certificate.
- Prohibit : No Intemet connection will be
allowed for any BD-LIVE content,
NOTE
_* What is a valid certificate?
When the product uses BD-LIVE to send the
disc data and request to the server to certify
the disc, the server uses the transferred data
to check if the disc is valid and sends the
certificate back to the product.
_* The Internet connection may be restricted
while you are using BD-LIVE contents.
You can select the language you prefer for home
menu, disc menu, etc.
• On-Screen Menu : Select the language for the
on-screen displays.
- Disc Menu : Select the language for the disc
menu displays.
o Audio : Select the language for disc audio.
Subtitle : Select the language for disc subtitles.
NOTE
_ The selected languagewill 0nly appear if it is
supported on the disc,
40 English
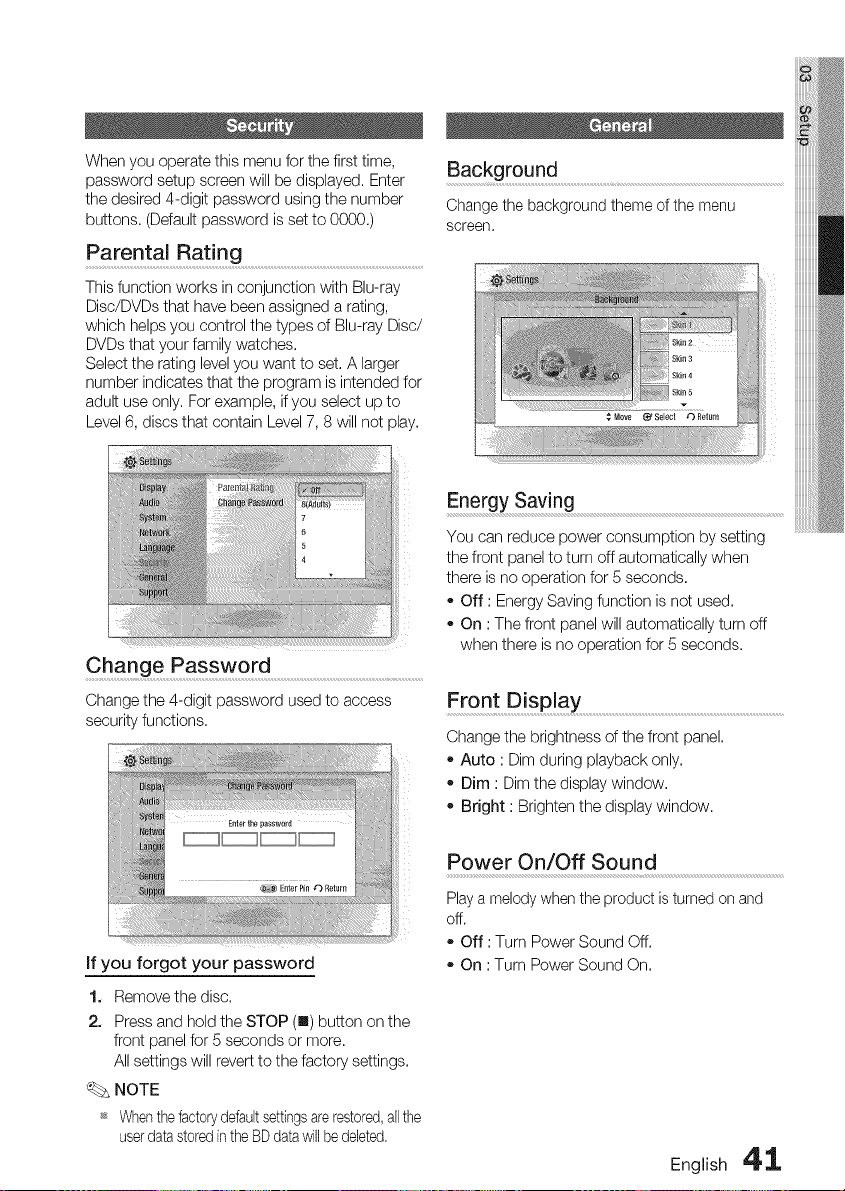
When you operate this menu for the first time,
password setup screen will be displayed. Enter
the desired 4-digit password using the number
buttons. (Default password is set to 0000.)
Parental Rating ...............................................................................................................................
This function works in conjunction with Blu-ray
Disc/DVDs that have been assigned a rating,
which helps you control the types of Blu-ray Disc/
DVDs that your family watches.
Select the rating level you want to set. A larger
number indicates that the program is intended for
adult use only. For example, if you select up to
Level 6, discs that contain Level 7, 8 will not play.
Background
Change the background theme of the menu
screen.
Change Password ..........................................................................................................
Change the 4-digit password used to access
security functions.
Energy Saving
You can reduce power consumption by setting
the front panel to turn off automatically when
there is no operation for 5 seconds.
- Off : Energy Saving function is not used.
- On : The front panel will automatically turn off
when there is no operation for 5 seconds.
Front Display .............................................................................................................................................
Change the brightness of the front panel,
• Auto : Dim during playback only,
• Dim : Dim the display window,
• Bright : Brighten the display window.
if you forgot your password
1. Remove the disc.
2. Press and hold the STOP (m) button on the
front panel for 5 seconds or more.
All settings will revert to the factory settings.
NOTE
_ Whenthe factorydefaultsettingsarerestored,all the
userdata storedinthe BDdata will bedeleted.
Power On/Off Sound
Play a melody when the product is turned on and
off.
* Off : Turn Power Sound Off.
* On : Turn Power Sound On.
English 4' 1,
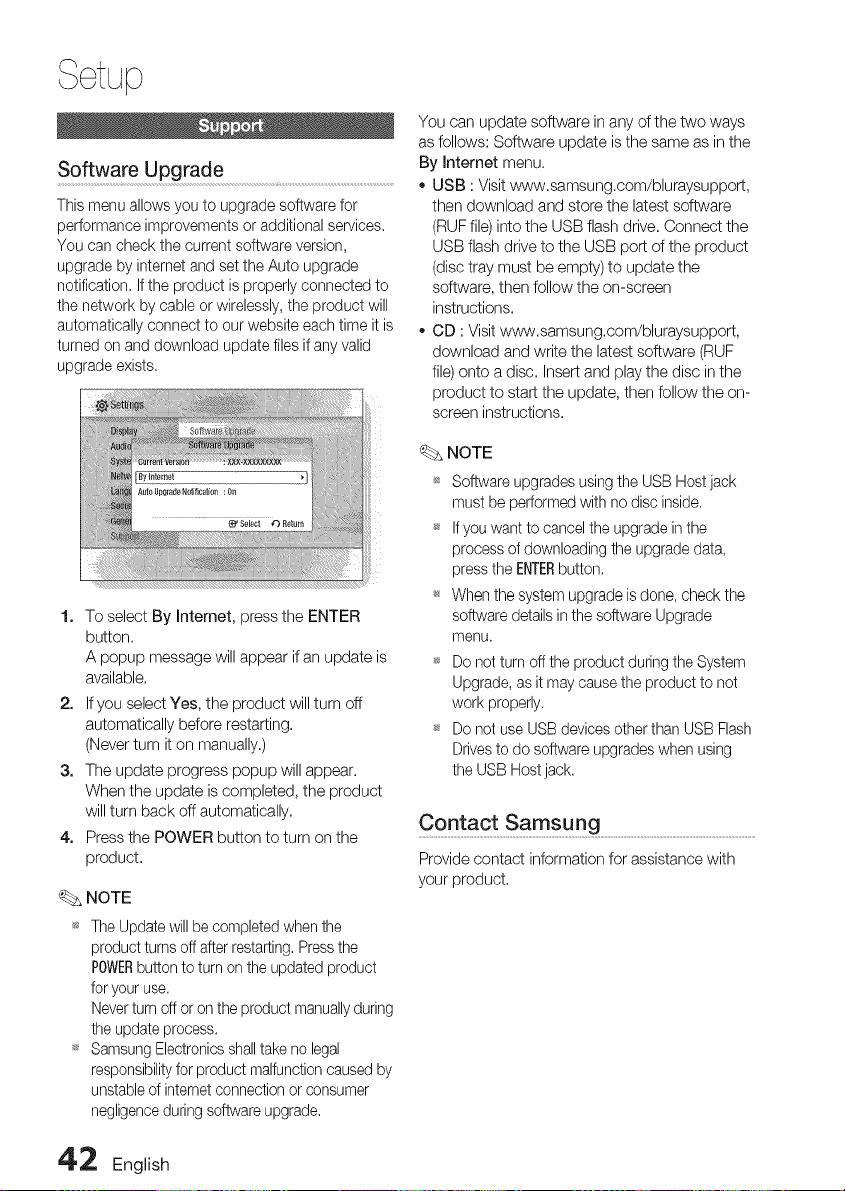
, ¢tup
Software Upgrade
This menu allows you to upgrade software for
performance improvements or additional services,
You can check the current software version,
upgrade by internet and set the Auto upgrade
notification, If the product is properly connected to
the network by cable or wirelessly, the product will
automatically connect to our website each time it is
turned on and download update files if any valid
upgrade exists.
1. To select By Internet, press the ENTER
button.
A popup message will appear if an update is
available.
2. If you select Yes, the product will turn off
automatically before restarting.
(Never turn it on manually.)
3. The update progress popup will appear.
When the update is completed, the product
will turn back off automatically.
4. Press the POWER button to turn on the
product.
NOTE
_* The Update will be completed when the
product turns off after restarting. Press the
POWERbutton to turn on the updated product
for your use.
Never turn off er on the product manuallyduring
the update process.
_* Samsung Electronics shalltake ne legal
responsibility for product malfunction caused by
unstable of internet connection or consumer
negligence during software upgrade.
You can update software in any of the two ways
as follows: Software update is the same as in the
By Internet menu.
o USB : Visit www.samsung.com/bluraysupport,
then download and store the latest software
(RUF file) into the USB flash drive. Connect the
USB flash drive to the USB port of the product
(disc tray must be empty) to update the
software, then follow the on-screen
instructions.
CD : Visit www.samsung.com/bluraysupport,
download and write the latest software (RUF
file) onto a disc. Insert and play the disc in the
product to start the update, then follow the on-
screen instructions.
NOTE
_ Software upgrades using the USB Host jack
must be performed with no disc inside.
_ If you want to cancel the upgrade inthe
process of downloading the upgrade data,
press the ENTERbutton.
When the system upgrade is done, check the
software details in the software Upgrade
menu.
_ Do not turn oft the product during the System
Upgrade, as it may cause the product to not
work properly.
_ Do not use USB devices other than USB Flash
Drives to do software upgrades when using
the USB Host jack.
Contact Samsung .............................................................................................................
Provide contact information for assistance with
your product.
42 English

BasicFunctions
Playback ........................................................................................
1. Press the OPEN/CLOSE (A) button to open
the disc tray,
2. Place a disc gently into the tray with the
disc's label facing up,
3. Press the PLAY (_) button or OPEN/
CLOSE (_A)button to close the disc tray,
Playback related buttons
Starts playback.
Stops playback.
• If pressing the button once:
The stop position will be
memorized.
STOP(m) • If pressing the button twice:
The stop position will be not
memorized.
(Withsome Blu-ray discs (BD-J),
this function maynot work.)
PAUSE (1|) Pauses playback.
NOTE
_s "Not Available" will appear when an invalid
button is pressed.
Disc Structure
The contents of disc are usually divided as below.
- Blu-ray Disc, DVD-VlDEO
titb I -__- titb2 4
1,-_ chapter2 -_, chapter1,_ chapter2-_ chapter3 ,_
- Audio CD (CD-DA)
_, track I _, track2 _, track 3 _[_ track 4 _ track 5 _[
,,MP3, WMA, DivX, MKV and MP4
--folder (group)I--4'_ folder(group)2 [
f,÷1¢ f,e2 f"÷1¢ f,e2¢
Using the Disc Menu
1. During playback, press the DISC
MENU button on the remote
control.
2. Press the A'v _ _ buttons to make
the desired selection, then press the
ENTER button.
NOTE
D4SCMENU
Depending on the disc, the menu items may
differ and this menu may not be available.
English 4'3
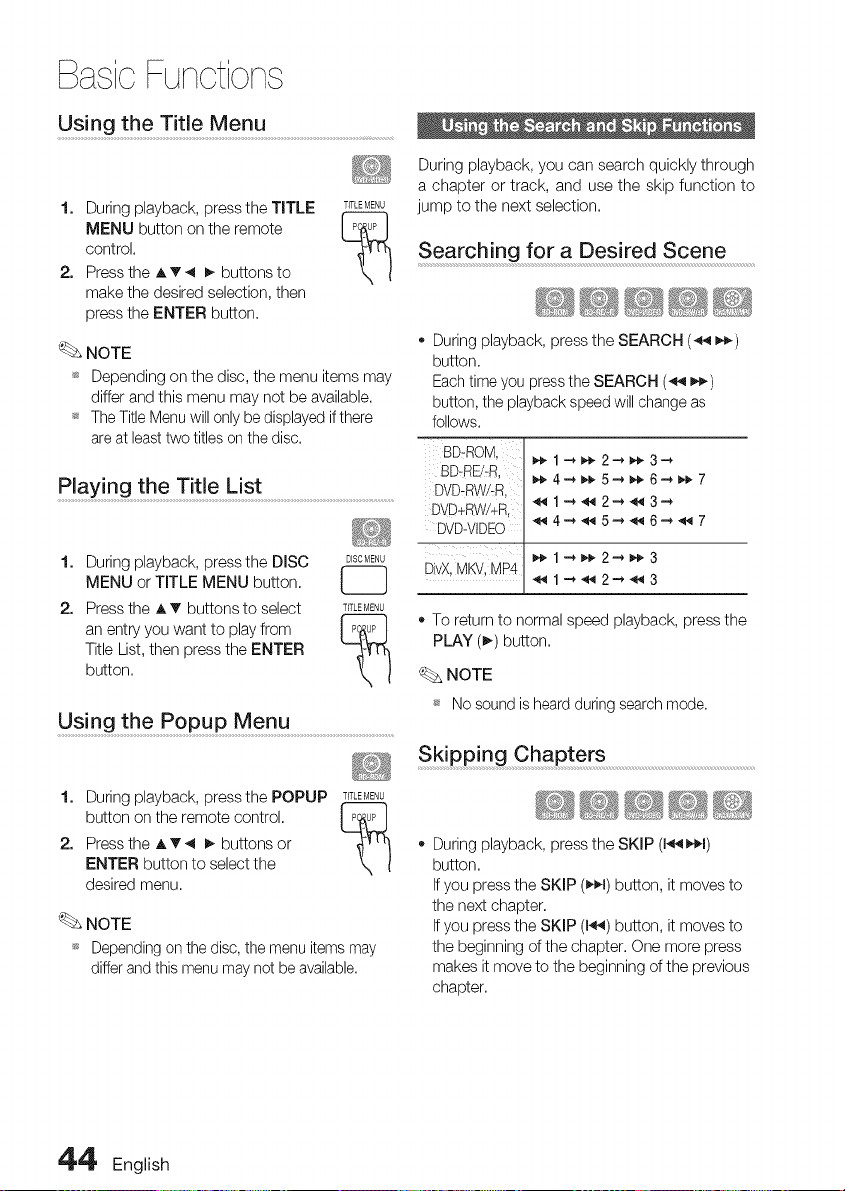
BasicFunctions
Using the Title Menu ................................................................................
1. During playback, press the TITLE T_T'-_-_ENU
t--"--"ih
MENU button on the remote l_u°l
Xl
control.
2. Press the A T _ _ buttons to
make the desired selection, then
press the ENTER button.
NOTE
_s Depending on the disc, the menu items may
differ and this menu may not be available.
_ The Title Menu will only be displayed if there
are at least two titles on the disc.
Play! ng th e Title List .............................................................................................
2.
During playback, press the DISC D_SOME,U
MENU or TITLE MENU button.
Press the A _' buttons to select TITLEMENU
an entry you want to play from I P_JPI
Title List, then press the ENTER
button.
Using the Popup Menu ..........................................................................
1. During playback, pressthe POPUP T_TLEMENU
button on the remote control. I p_JPI
2. Press the A v _1 I_ buttons or
ENTER button to select the
desired menu.
NOTE
_s Depending on the disc, the menu items may
differ and this menu may net be available.
During playback, you can search quickly through
a chapter or track, and use the skip function to
jump to the next selection.
Searching for a Desired Scene
- During playback, press the SEARCH (_ _)
button.
Each time you press the SEARCH (_ _)
button, the playback speed will change as
follows.
BD-ROM, _,_1_ _ 2_ _,_3--_
BD-REJ?R, _,_4_ _,_5_ _,_6-* _- 7
DVD:RW!:R, _ 1 _ _ 2_ _ 3-_
DVD+RW!+R,
DVD-VIDEO _4_5_6_7
U
_1_2_3
• To returnto normalspeed playback, press the
PLAY (_) button,
NOTE
_s No sound is heard during search mode.
Skipping Chapters
_44;: ................................
- During playback, press the SKIP (1_1)
button.
If you press the SKIP (_,€_1)button, it moves to
the next chapter.
If you press the SKIP (1_) button, it moves to
the beginning of the chapter. One more press
makes it move to the beginning of the previous
chapter.
4'4' English
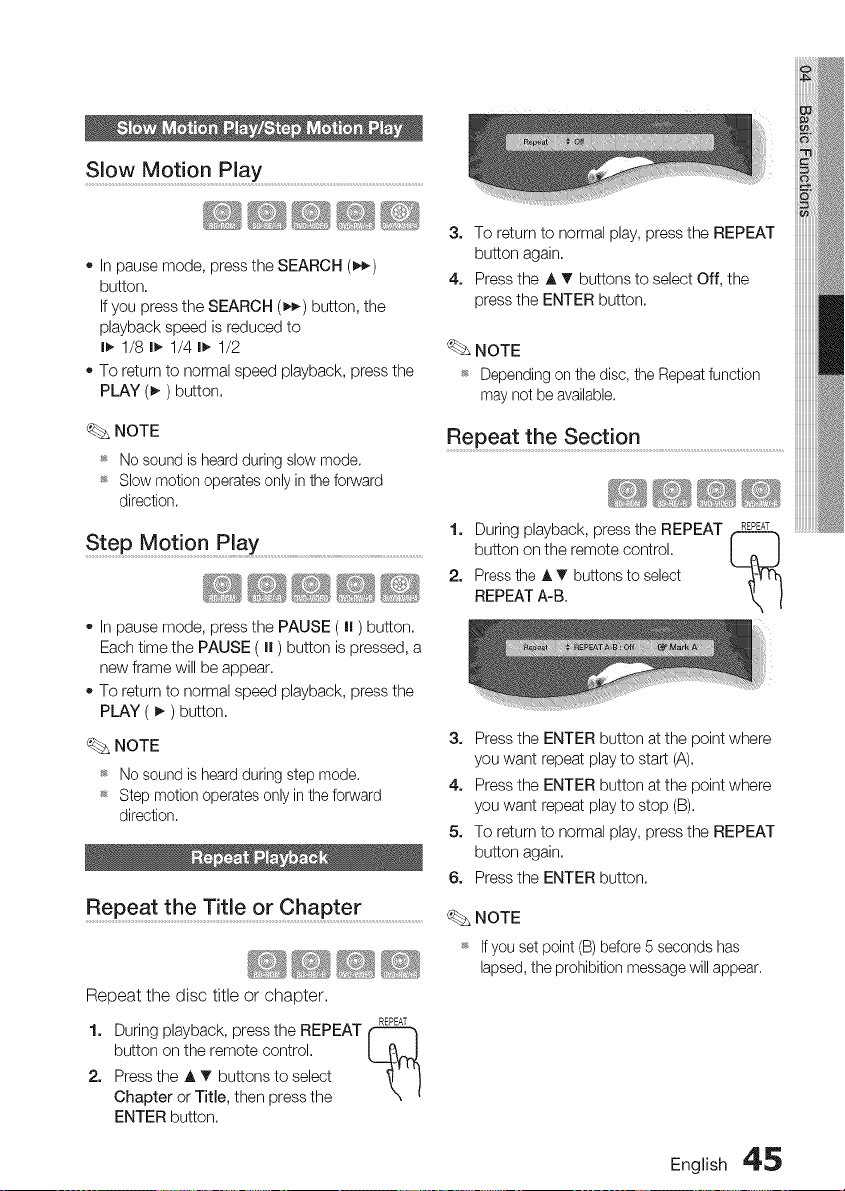
Slow Motion Play ................................................................................................................
In pause mode, press the SEARCH (_)
button.
If you press the SEARCH (D._) button, the
playback speed is reduced to
I_, 1/8 I_, 1/4 I_, 1/2
To return to normal speed playback, press the
PLAY (_) button.
3. To return to normal play, press the REPEAT
button again.
4. Press the A T buttons to select Off, the
press the ENTER button.
NOTE
_ Depending on the disc, the Repeat function
may net be available.
NOTE
_ No sound is heard during slow mode.
_ Slow motion operates only in the forward
direction.
Step Motion Play
In pause mode, press the PAUSE ( I| ) button.
Each time the PAUSE ( I| ) button is pressed, a
new frame will be appear.
To return to normal speed playback, press the
PLAY ( I_ ) button.
NOTE
_ No sound is heard during step mode,
_ Step motion operates only in the forward
direction.
Repeat the Title or Chapter
Repeat the disc title or chapter.
REPEAT
1. During playback, press the REPEAT
button on the remote control.
2. Press the A T buttons to select
Chapter or Title, then press the
ENTER button.
Repeat the Section .....................................................................................................,,,,,,,,,,,,,,
1. During playback, pressthe REPEAT R_T
r-'-"m
button on the remote control. I _ I
2. Press the _. T buttons to select
REPEAT A-B.
3. Press the ENTER button at the point where
you want repeat play to start (A).
4. Press the ENTER button at the point where
you want repeat play to stop (B).
5. To return to normal play, press the REPEAT
button again.
6. Press the ENTER button.
NOTE
_ Ifyou set point(B)before5 secondshas
lapsed,the prohibitionmessagewill appear.
English 4'_
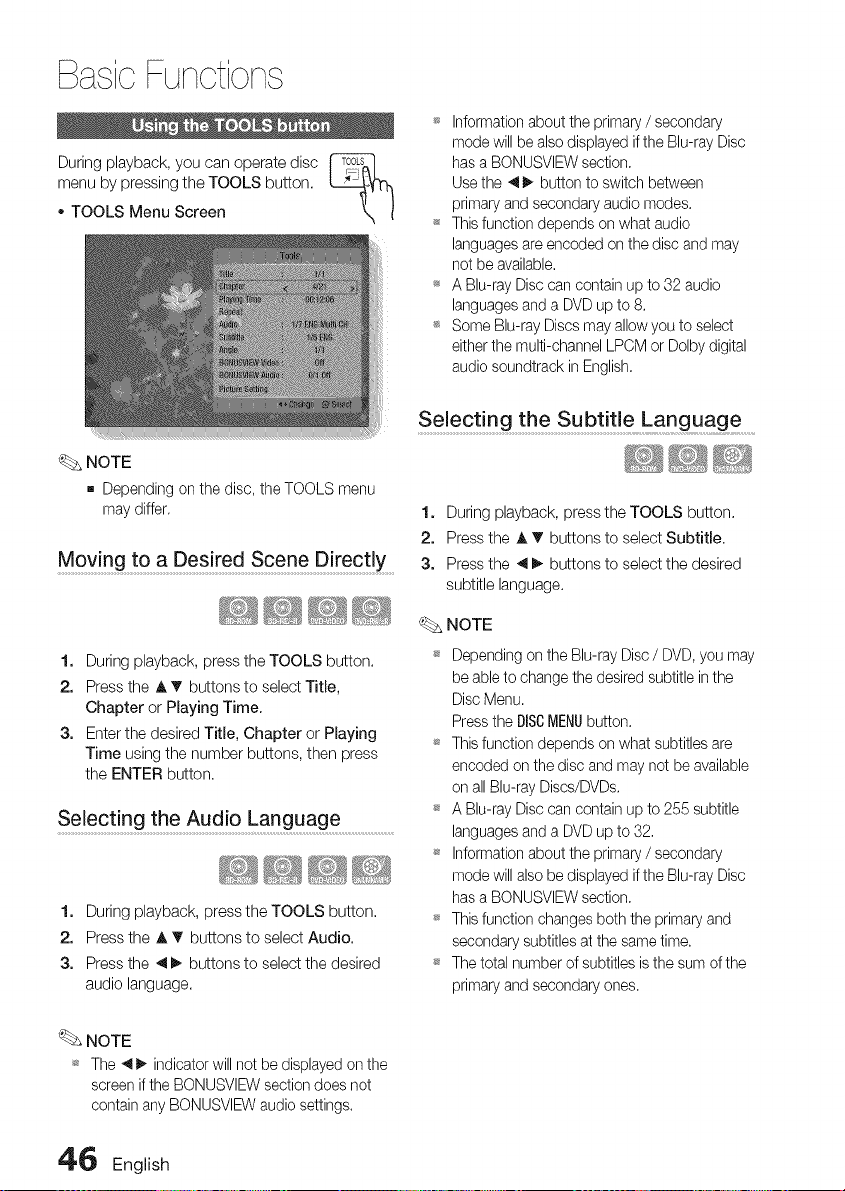
BasicFunctions
During playback, you can operate disc
menu by pressing the TOOLS button.
TOOLS Menu Screen
_s Information about the primary / secondary
mode will be also displayed if the Blu-ray Disc
has a BONUSVIEW section.
Use the _ _ button to switch between
primary and secondary audio modes.
_ This function depends on what audio
languages are encoded on the disc and may
not be available.
_ A Blu-ray Disc can contain up to 32 audio
languages and a DVD up to 8.
_ Some Blu-ray Discs may allow you to select
either the multi-channel LPCM or Dolby digital
audio soundtrack in English.
NOTE
m Dependingon the disc,the TOOLSmenu
maydiffer.
Mov!ng to a Des!red Scene DirectlY ......
1. During playback, press the TOOLS button.
2. Press the A _' buttons to select Title,
Chapter or Playing Time.
3. Enter the desired Title, Chapter or Playing
Time using the number buttons, then press
the ENTER button.
Se!ecting the Aud!o Languag e......................................
1. During playback, press the TOOLS button.
2. Press the A _' buttons to select Audio.
3. Press the .,qi_ buttons to select the desired
audio language.
Selecting the Subtitle Language ..........
1. During playback, press the TOOLS button.
2. Press the A _' buttons to select Subtitle.
3. Press the _1_ buttons to select the desired
subtitle language.
NOTE
_ Depending on the Blu-ray Disc / DVD, you may
be able to change the desired subtitle in the
Disc Menu.
Press the DISCMENUbutton.
_ This function depends on what subtitles are
encoded on the disc and may net be available
on all Blu-ray Discs/DVDs.
_ A Blu-ray Disc can contain up to 255 subtitle
languages and a DVD up to 32.
_ Information about the primary / secondary
mode will also be displayed if the Blu-ray Disc
has a BONUSVIEW section.
_ This function changes both the primary and
secondary subtitles at the same time.
_ The total number of subtitles is the sum of the
primary and secondary ones.
NOTE
_ The _11!_ indicator will not be displayed on the
screen if the BONUSVIEW section does not
contain any BONUSVIEW audio settings,
4'_ English
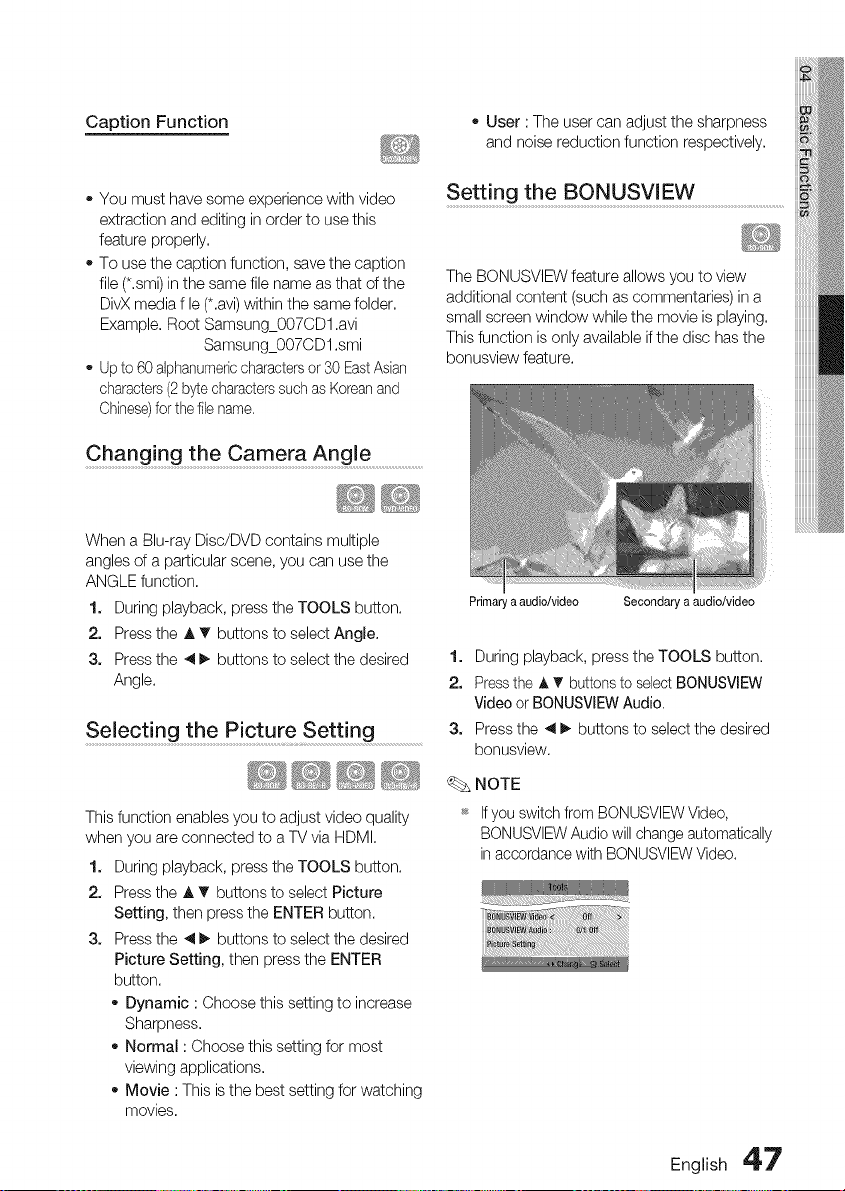
Caption Function - User : The user can adjust the sharpness
and noise reduction function respectively.
- You must have some experience with video
extraction and editing in order to use this
feature properly.
- To use the caption function, save the caption
file (*.smi) in the same file name as that of the
DivX media f le (*.avi)within the same folder.
Example. Root Samsung_OO7CDl.avi
Samsung_OO7CD1 .smi
- Up to 60 alphanumericcharacters or 30 EastAsian
characters (2 bytecharacters such as Koreanand
Chinese)for the file name.
Setting the BONUSVIEW ...............................................................
The BONUSVIEW feature allows you to view
additional content (such as commentaries) in a
small screen window while the movie is playing.
This function is only available if the disc has the
bonusview feature.
Changing the Camera Angle .....................................
When a Blu-ray Disc/DVD contains multiple
angles of a particular scene, you can use the
ANGLE function.
1. During playback, press the TOOLS button.
2. Press the A T buttons to select Angle.
3. Press the 4 _ buttons to select the desired
Angle.
Selecting the Picture S ettin g
This function enables you to adjust video quality
when you are connected to a TV via HDMI.
1. During playback, press the TOOLS button.
2. Press the A T buttons to select Picture
Setting, then press the ENTER button.
3. Press the 4 _ buttons to select the desired
Picture Setting, then press the ENTER
button.
- Dynamic : Choose this setting to increase
Sharpness.
- Normal : Choose this setting for most
viewing applications.
- Movie : This is the best setting for watching
movies.
Primaryaaudio/video Secondary a audio/video
1. During playback, press the TOOLS button.
2. Press the A T buttons to select BONUSVIEW
Video or BONUSVIEW Audio.
3. Press the _1_ buttons to select the desired
bonusview.
NOTE
_ If you switch from BONUSVIEW Video,
BONUSVIEW Audio will change automatically
in accordance with BONUSVIEW Video.
English 4'7
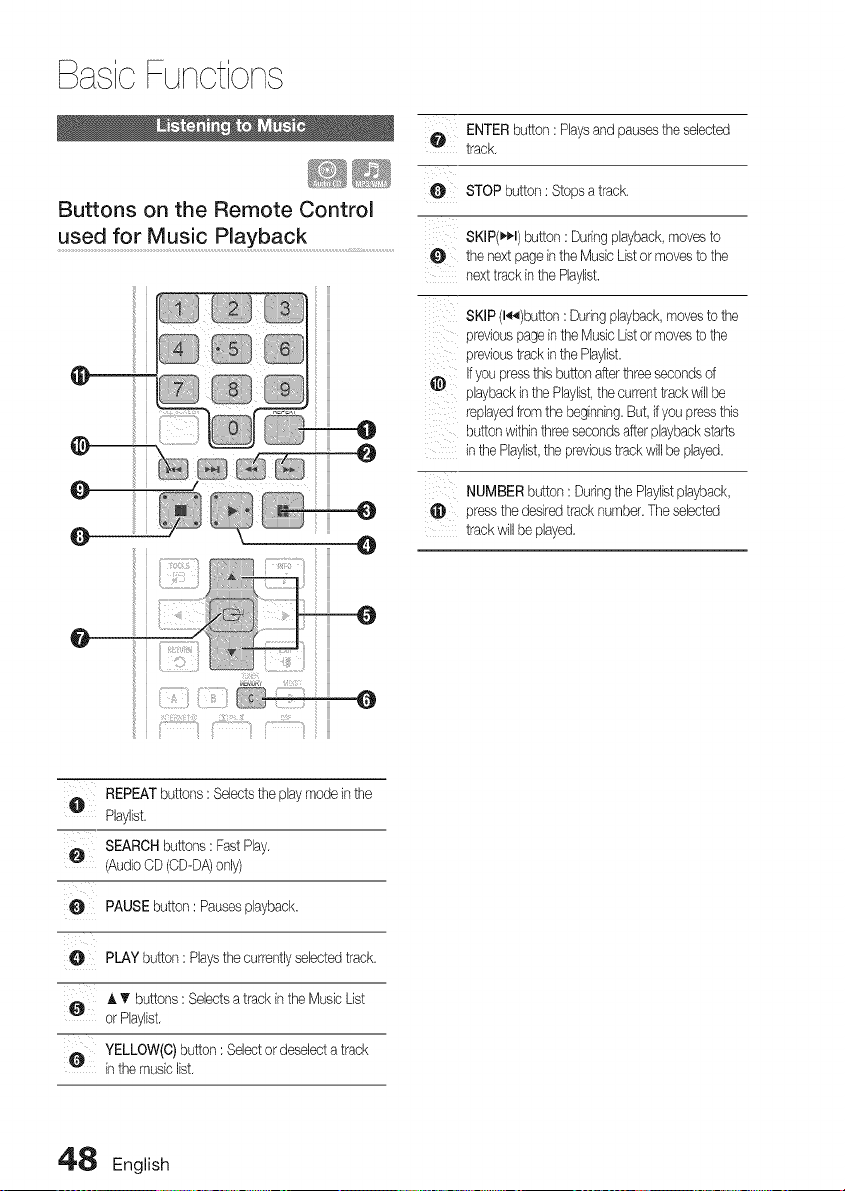
BasicFunctions
Buttons on the Remote Control
used for Music Playback
i iii
i iii
ii iii
o ENTERbutton:Playsandpausesthese,ect
track.
STOPbutton: Stopsa track.
SKiP(_l) button: Duringplayback,movesto
0 the next pageinthe MusicListor movesto the
nexttrackinthe Pbylist.
SKIP(l_)button : Duringplayback,movesto the
previouspagein theMusic Listormovesto the
previoustrackinthe Pbylist.
,#_, Ifyoupressthis buttonafterthreesecondsof
playbackinthe Pbylist,thecurrenttrackwillbe
repbyedfromthe beginning.But,ifyoupressthis
buttonwithinthreesecondsafterplaybackstarts
inthe Pbylist,the previoustrackwill be played.
NUMBERbutton: Duringthe Pbylistplayback,
pressthedesiredtrack number.The selected
trackwillbe played.
@
ii {_!iZ}}_{!_ZI_} _",_,_ 0
O REPEATbuttons: Selectsthe playmodein the
Pbylist.
0 SEARCHbuttons: FastPby.
(AudioCD(CD-DA)only)
O PAUSEbutton: Pausesplayback.
e PLAYbutton: Playsthecurrentlysebctedtrack.
O A T buttons : Selectsa track inthe MusicList
or Pbylist.
YELLOW(C)button: Selectordeselecta track
in themusic list.
4'8 English
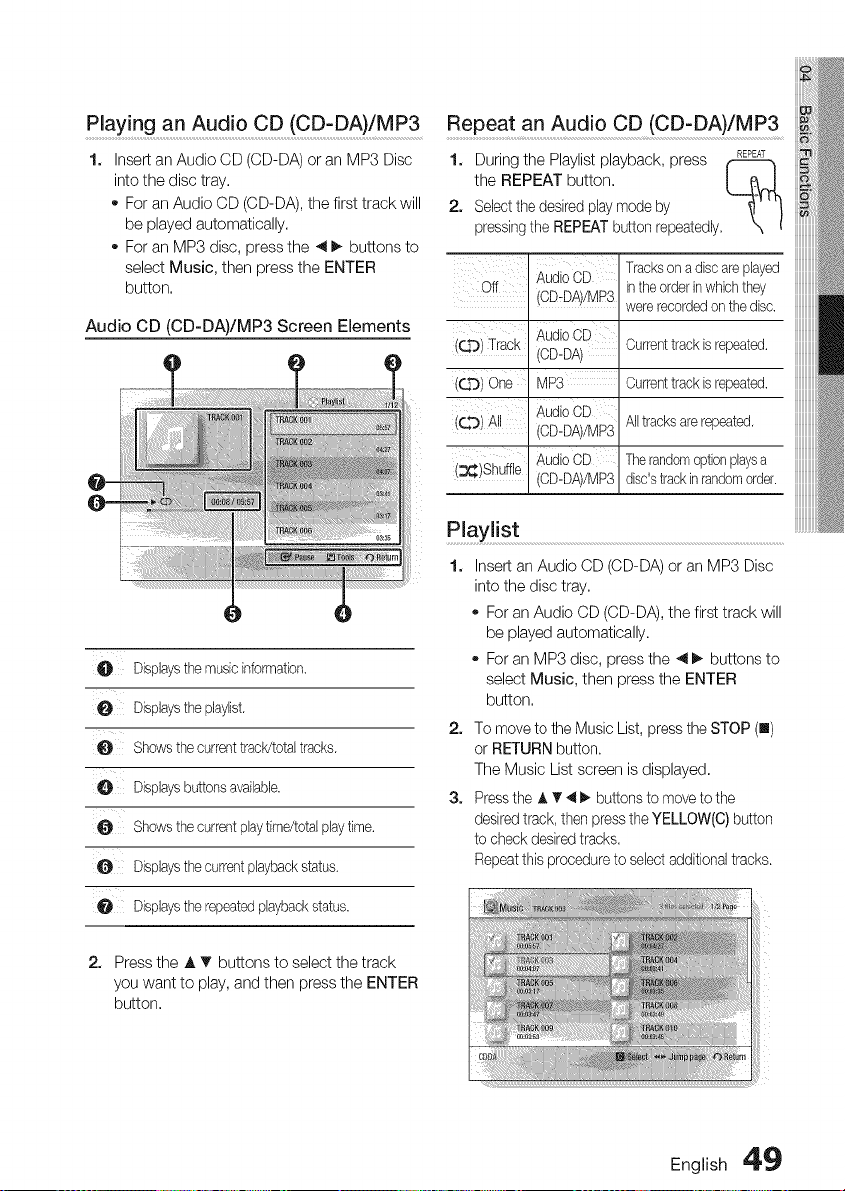
Playing an Audio CD (CD:DA)!MP3 Repeat an Audio CD(CD-DA)/MP3
1. 1. During the Playlist playback, press REPEAT
the REPEAT button, / _,_J
2. Selectthe desired play mode by
pressingthe REPEAT button repeatedly.
Insert an Audio CD (CD-DA) or an MP3 Disc
into the disc tray.
o For an Audio CD (CD-DA), the first track will
be played automatically.
For an MP3 disc, press the _ _. buttons to
select Music, then press the ENTER
button,
Audio CD (CD-DA)/MP3 Screen Elements
Off
((4"3)Track
(QO) One
(CO) AI
(:3_)Shuffle
AudioCD
/CD-DA//MP3
AudioCE
/CD-DA
_4P3
AudioCE
/CD-DA//MP3
AudioCD
/CD-DA//MP3
Trackson a discare played
intheorder inwhich they
wererecordedon thedisc.
Currenttrackis repeated.
Currenttrackis repeated.
All tracksare repeated.
Therandomoptionplaysa
disc'strackinrandomorder.
Displaysthe musicinformation.
Displaysthe phylist,
Shows thecurrenttrack/totaltracks,
Disphysbuttonsavaihble.
O Shows thecurrentplaytime/totalplaytime.
e Disphysthe currentplaybackstatus.
O Displaysthe repeatedplaybackstatus.
Playlist
1, nser_ an Audio CD CD-DA/or an MP3 Disc
n_o[ne (]lsc tray,
For an Audio CD (CD-DA), the first track will
be played automatically.
For an MP3 disc, press the _1_. buttons to
select Music, then press the ENTER
button,
2. To move to the Music List, press the STOP (n)
or RETURN button.
The Music List screen is displayed,
3. Press the A T 4 _- buttons to move to the
desired track, then press the YELLOW(C) button
to check desired tracks,
Repeatthis procedure to select additional tracks.
2. Press the A T buttons to select the track
you want to play, and then press the ENTER
button,
English 4'9
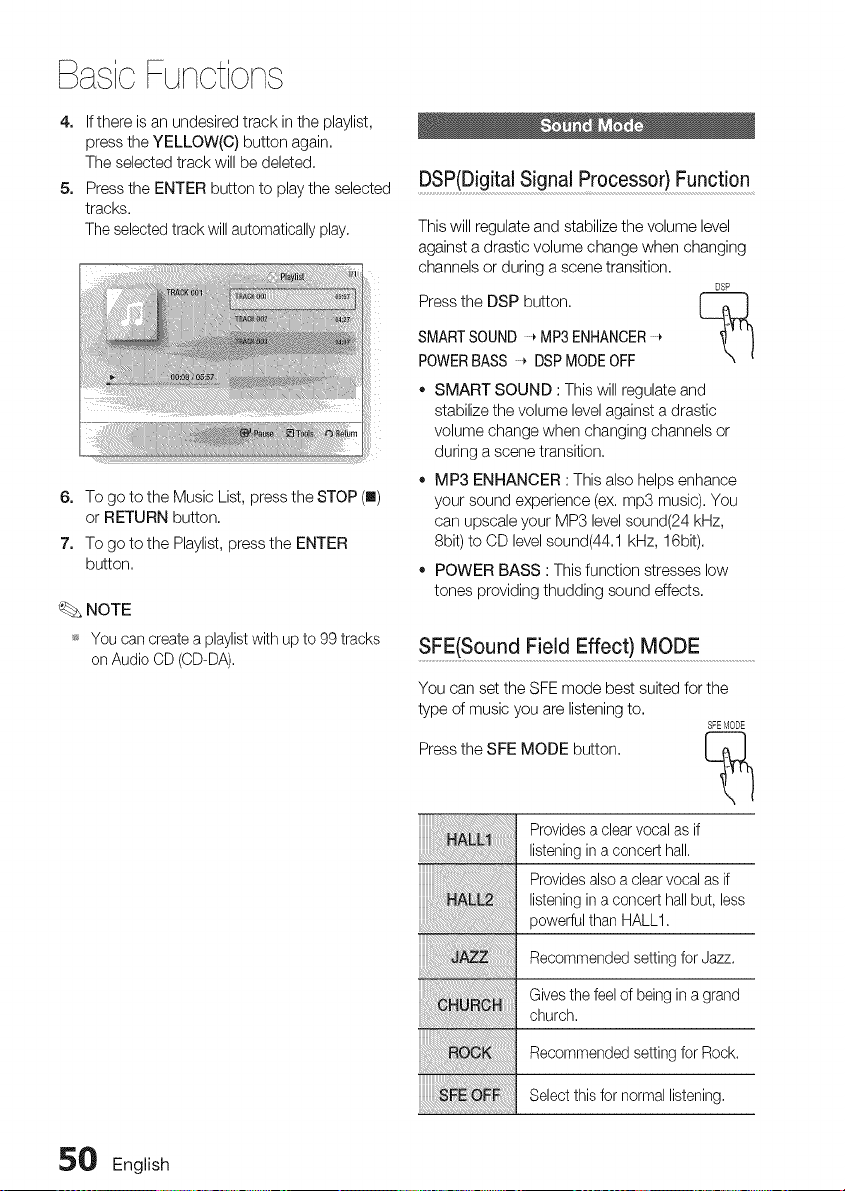
BasicFunctions
4. If there is an undesired track in the playlist,
press the YELLOW(C) button again.
The selected track will be deleted.
5. Press the ENTER button to play the selected
tracks.
The selected track will automatically play.
6. To go to the Music List, press the STOP (u)
or RETURN button.
7. To go to the Playlist, press the ENTER
button.
_. NOTE
_ You can create a playlist with up to 99 tracks
on Audio CD (CD-DA).
DSP(Digital Signal Processor) Function
This will regulate and stabilize the volume level
against a drastic volume change when changing
channels or during a scene transition.
DSP
Press the DSP button.
SMARTSOUND * MP3 ENHANCER
POWERBASS * DSPMODE OFF
• SMART SOUND : This will regulate and
stabilize the volume level against a drastic
volume change when changing channels or
during a scene transition.
• MP3 ENHANCER : This also helps enhance
your sound experience (ex. mp3 music). You
can upscale your MP3 level sound(24 kHz,
8bit) to CD level sound(44.1 kHz, 16bit).
• POWER BASS : This function stresses low
tones providing thudding sound effects.
SFE(Sound Field Effect) MODE ........................................
You can set the SFE mode best suited for the
type of music you are listening to.
SFEblODE
Press the SFE MODE button. L_
Provides a clear vocal as if
listening in a concert hall.
Provides also a clear vocal as if
listening in a concert hall but, less
powerful than HALL1.
Recommended setting for Jazz.
Gives the feel of being in a grand
church.
Recommended setting for Rock.
Select this for normal listening.
50 English
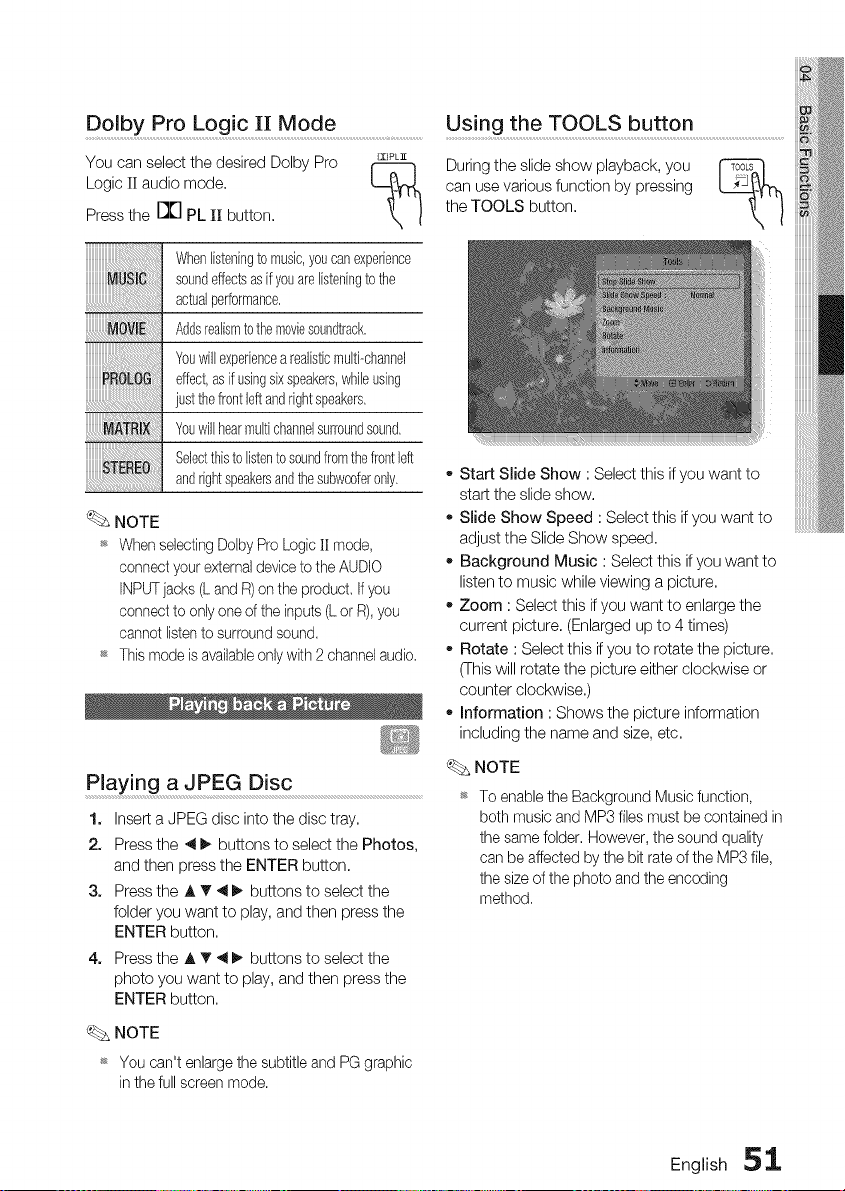
Dolby Pro Logic II Mode ............................................................Us!ng the TOOLS button .............................................................
You can select the desired Dolby Pro _PLx
Logic II audio mode.
Press the D["] PL ][][button.
During the slide show playback, you
can use various function by pressing
the TOOLS button.
%
Whenlisteningto music,youcanexperience
soundeffectsasifyouarelisteningto the
actualperformance,
Addsrealismto themoviesoundtrack.
Youwillexperiencea realisticmulti-channel
effect,asif usingsixspeakers,whileusing
just thefrontleftandrightspeakers,
Youwillhearmultichannelsurroundsound,
Selectthisto listentosoundfromthefrontleft
andrightspeakersandthesubwoofer0nly,
NOTE
_ When selecting Dolby Pro Logic H mode,
connect your external deviceto the AUDIO
INPUTjacks (L and R) on the product. Ifyou
connect to only one of the inputs (L or R),you
cannot listento surround sound.
_ This mode is availableonly with 2 channel audio.
Playing a JPEG Disc
1. Insert a JPEG disc into the disc tray.
2. Press the 4 _ buttons to select the Photos,
and then press the ENTER button.
3. Press the A T 4 _. buttons to select the
folder you want to play, and then press the
ENTER button.
4. Press the A T _ _. buttons to select the
photo you want to play, and then press the
ENTER button.
- Start Slide Show : Select this if you want to
start the slide show.
- Slide Show Speed : Select this if you want to
adjust the Slide Show speed.
- Background Music : Select this if you want to
listen to music while viewing a picture.
- Zoom : Select this if you want to enlarge the
current picture. (Enlarged up to 4 times)
- Rotate : Select this if you to rotate the picture.
(This will rotate the picture either clockwise or
counter clockwise.)
- Information : Shows the picture information
including the name and size, etc.
NOTE
_ To enablethe BackgroundMusicfunction,
bothmusicand MP3filesmust be containedin
the samefolder.However,the soundquality
canbe affectedbythe bit rateof theMP3file,
the sizeof the photo andthe encoding
method,
NOTE
_ You can't enlarge the subtitle and PG graphic
in the full screen mode.
English 51
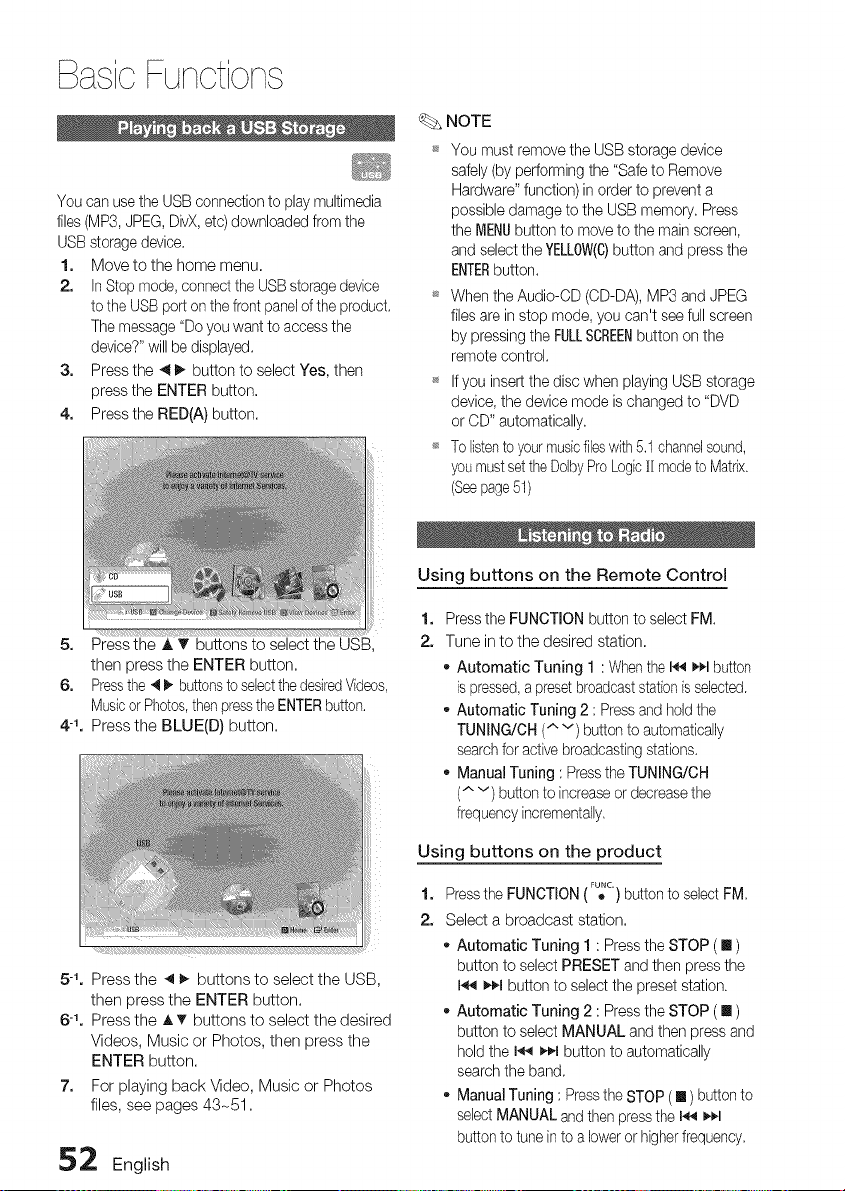
BasicFunctions
You can use the USB connection to play multimedia
files (MP3, JPEG, DivX, etc) downloaded from the
USB storage device.
1. Move to the home menu.
2. In Stop mode, connect the USBstorage device
to the USB port on the front panel of the product.
The message "Do you want to access the
device?" will be displayed.
3. Press the 411_ button to select Yes, then
press the ENTER button.
4. Press the RED(A) button.
S,
Press the A T buttons to select the USB,
then press the ENTER button.
6. Pressthe 4 I_ buttons to selectthe desiredVideos,
Musicor Photos,thenpressthe ENTERbutton.
4-1. Press the BLUE(D) button.
NOTE
You must remove the USB storage device
safely (by performing the "Safe to Remove
Hardware" function) in order to prevent a
possible damage to the USB memory. Press
the MENUbutton to move to the main screen,
and select the YELLOW(C)button and press the
ENTERbutton.
When the Audie-OD (CD-DA), MP3 and JPEG
files are in stop mode, you can't see full screen
by pressing the FULLSCREENbutton on the
remote control.
If you insert the disc when playing USB storage
device, the device mode is changed to "DVD
or CD" automatically.
To listento your musicfileswith 5.1 channelsound,
you mustset the DolbyPro LogicII modeto Matrix.
(Seepage51)
Using buttons on the Remote Control
1,
2.
Press the FUNCTION button to select FM.
Tune in to the desired station.
o Automatic Tuning 1 : When the I,_1i_1,1button
is pressed,a preset broadcaststationis selected.
Automatic Tuning 2 : Press and hold the
TUNING/CH (^ v) button to automatically
search for active broadcasting stations.
Manual Tuning : Press the TUNING/OH
(^ v) button to increase or decrease the
frequency incrementally.
5% Press the 4 I_ buttons to select the USB,
then press the ENTER button.
6-1, Press the AT buttons to select the desired
Videos, Music or Photos, then press the
ENTER button.
7. For playing back Video, Music or Photos
files, see pages 43-51.
52 English
Using buttons on the product
1,
2.
Pressthe FUNCTION (F_c.) button to select FM
Select a broadcast station.
Automatic Tuning 1 : Press the STOP ( [] )
button to select PRESET and then press the
I._q _1 button to select the preset station.
Automatic Tuning 2 : Press the STOP ( [] )
button to select MANUAL and then press and
hold the I.,_ _,€.1button to automatically
search the band.
Manual Tuning : Press the STOP ([] ) button to
sebct MANUAL and then press the I_ _,_,1
button to tune in to a lower or higherfrequency.
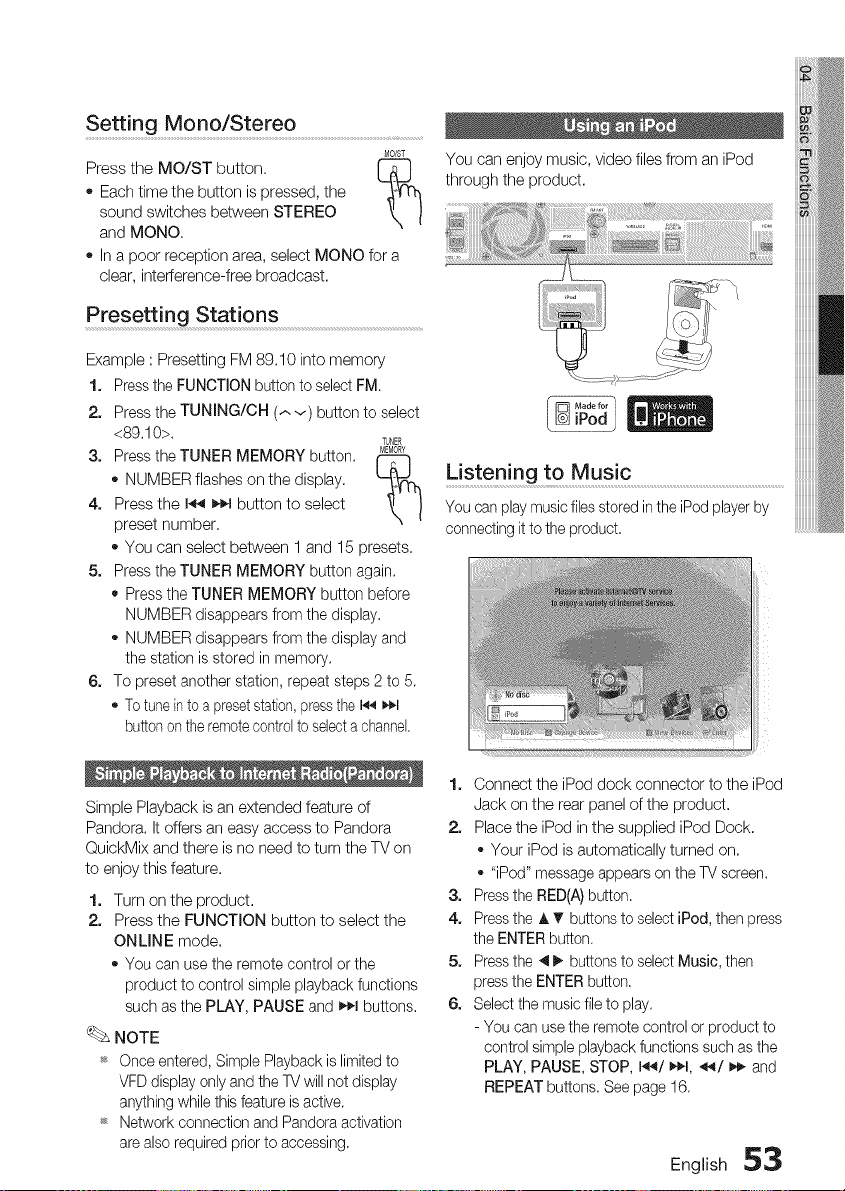
S ett in g Mono/Ster e o ............................................................................
MO/ST
Press the MO/ST button. [-_
o Each time the button is pressed, the
sound switches between STEREO
and MONO.
In a poor reception area, select MONO for a
clear, interference-free broadcast.
Presetting Stations .....................................................................................................
Example : Presetting FM 89.10 into memory
1. Press the FUNCTION button to select FM.
2. Press the TUNING/CH (.-.v) button to select
<89.10>.
TUNER
3. Press the TUNER MEMORY button. _EMOR¥
r-yq
- NUMBER flashes on the display, L__
4. Press the I_ _._1button to select
preset number,
- You can select between 1 and 15 presets,
5. Press the TUNER MEMORY button again.
• Press the TUNER MEMORY button before
NUMBER disappears from the display.
- NUMBER disappears from the display and
the station is stored in memory.
6. To preset another station, repeat steps 2 to 5.
- To tunein to a presetstation, press the I_ It¢.l
button on the remotecontrol to select a channel.
Simple Playback is an extended feature of
Pandora. It offers an easy access to Pandora
QuickMix and there is no need to turn the TV on
to enjoy this feature.
1. Turn on the product.
2. Press the FUNCTION button to select the
ONLINE mode.
o You can use the remote control or the
product to control simple playback functions
such as the PLAY, PAUSE and _,_1buttons.
NOTE
_ Once entered, Simple Playback is limited to
VFD display only and the TV will net display
anything while this feature is active.
_ Network connection and Pandora activation
are also required prior to accessing.
You can enjoymusic,video filesfrom an iPod
through the product.
Listening to Music
You can play music files stored in the iPod player by
connecting it to the product.
1. Connect the iPod dock connector to the iPod
Jack on the rear panel of the product.
2. Place the iPod in the supplied iPod Dock.
o Your iPod is automatically turned on.
o "iPod" message appears on the TV screen.
3. Press the RED(A) button.
4. Press the J, V buttons to select iPod, then press
the ENTER button.
5. Press the 4 _. buttons to select Music, then
press the ENTER button.
6. Select the music file to play.
- You can use the remote control or product to
control simple playback functions such as the
PLAY, PAUSE, STOP, 144/_1, ._.4/_ and
REPEAT buttons. See page 16.
English 53
BasicFunctions
NOTE
_s Adjust the volume to a moderate level before
you connect your iPod and product.
_s When the product is powered on and you
connect an iPod, the product will charge your
iPod's battery.
_s Make sure to connect the dock connector so
that the label "SAMSUNG" faces upward.
_ "Made for iPod" meansthat an electronicaccessory
has beendesignedto connectspecifballyto the
iPod and hasbeencertifiedby thedeveloperto meet
Apple performancestandards,
_s "WorkswithiPhone"meansthat an electronic
accessoryhas beendesignedto connectspecifically
to aniPhoneand hasbeencertifiedbythe developer
to meetApple performancestandards,
iPod Music categories
File information including the artist name, album
name, music title and genre will be displayed
according to the ID3 Tag information on the
appropriate music file.
_. NOTE
Plays a recently played file or
moves to the playback screen of
the current file.
To play by artist.
Toplayin numericor alphabetical
order
To play by Playlist.
To play by album.
To play by genre.
To play by composer.
_s The category list may differ, depending on the
iPod model.
_s What is an ID3 Tag?
This is what is attached to an MP3 to carry
information relevant to the file such as the title,
artist, album, year, genre and a comment field,
WatcMng a Movie ............................................................................................................
You can play video files stored in the iPod player
by connecting it to the product,
1. Connect the iPod dock connector to the
iPod Jack on the rear panel of the product.
2. In the iPod screen, move to Settings >
Videos, then set the TV Out option and the
TV signal.
3. Place the iPod in the supplied iPod Dock.
o "iPod" message appears on the TV
screen.
4. Press the RED(A) button,
5. Press the A T buttons to select iPod, then press
the ENTER button.
6. Press the 4 _ buttons to select Videos, then
press the ENTER button.
7. Select the video file to play.
- You can use the remote control or the
product to control simple playback functions
such as the PLAY, PAUSE, STOP, I_/_1
and_/_,€_buttons. (See page 16.)
iPod models that can be used with
this product
iPod nano iPod iPod nano
3rd generation 5th generation 4th generalion
(video) (video) (video)
iPod touch iPod touch
iPhone 3G
1st generation 2nd generation
iPod classic iPhone
NOTE
_ YoumusthavetheVIDEOoutput(Composite)
connectedto yourTVto viewiPedvideo(Seepage23),
_ Ifyouwantto iPodvideoviaVIDEOoutput,set
Anynet+(HDMI-CEC)to off,
_ Nootherscreenthantheplaybackonewillappearon
theTV screen,CheckotherscreensontheiPodplayer,
_ IftheconnectediPoddoes notsupportvideopbyback,
the "CannotplayvideofliessavedonthisiPed"
messageappearswhenyou selecttheVideomenu,
_ Appleis notresponsiblefortheoperationof thisdevice
oritscompliancewithsafetyandregulatorystandards,
5_' English
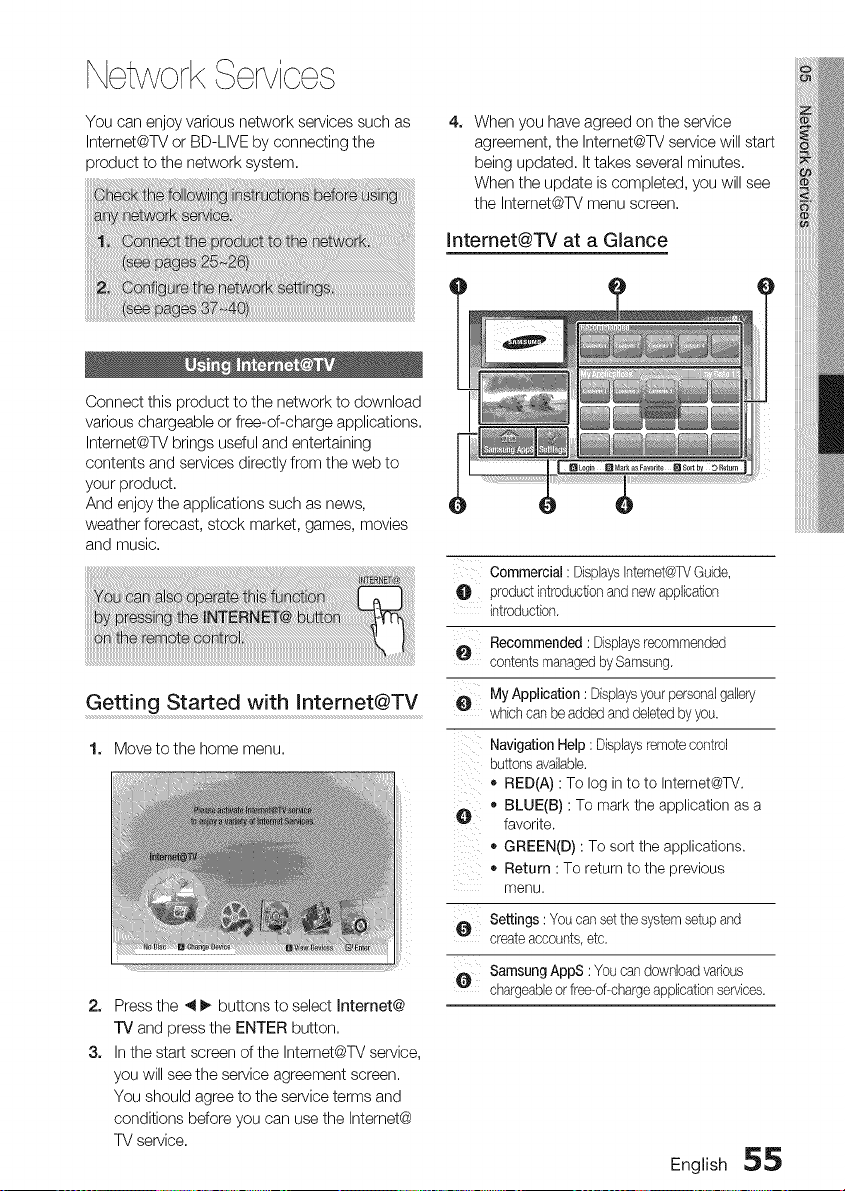
NetworkServices
You can enjoy various network services such as
Intemet@TV or BD-LIVE by connecting the
product to the network system.
4. When you have agreed on the service
agreement, the Intemet@TV service will start
being updated. It takes several minutes,
When the update is completed, you will see
the Intemet@TV menu screen,
Intemet@TV at a GJance
Connect this product to the network to download
various chargeable or free-of-charge applications,
Intemet@TV brings useful and entertaining
contents and services directly from the web to
your product.
And enjoy the applications such as news,
weather forecast, stock market, games, movies
and music.
Getting Started with Internet@TV
1. Move to the home menu,
iiii!
2.
3.
Press the _ I_ buttons to select Internet@
TV and press the ENTER button,
In the start screen of the Intemet@TV service,
you will see the service agreement screen,
You should agree to the service terms and
conditions before you can use the Intemet@
TV service,
Commercial: DisplaysInternet@TVGuide,
O productintroductionand newapplication
introduction.
Recommended: Displaysrecommended
contentsmanagedbySamsung.
•a, MyApplication : Displaysyourpersonalgallery
which canbe addedand deletedbyyou.
Navigation Help: Displaysremotecontrol
buttonsavailable.
o RED(A) : To log in to to Internet@TV.
v • BLUE(B) : To mark the application as a
favorite.
o GREEN(D) : To sort the applications.
o Return : To return to the previous
menu.
Settings: Youcan setthesystemsetupand
createaccounts,etc.
SamsungAppS : Youcandownloadvarious
chargeableor free-of-char%applicationservices.
English 55
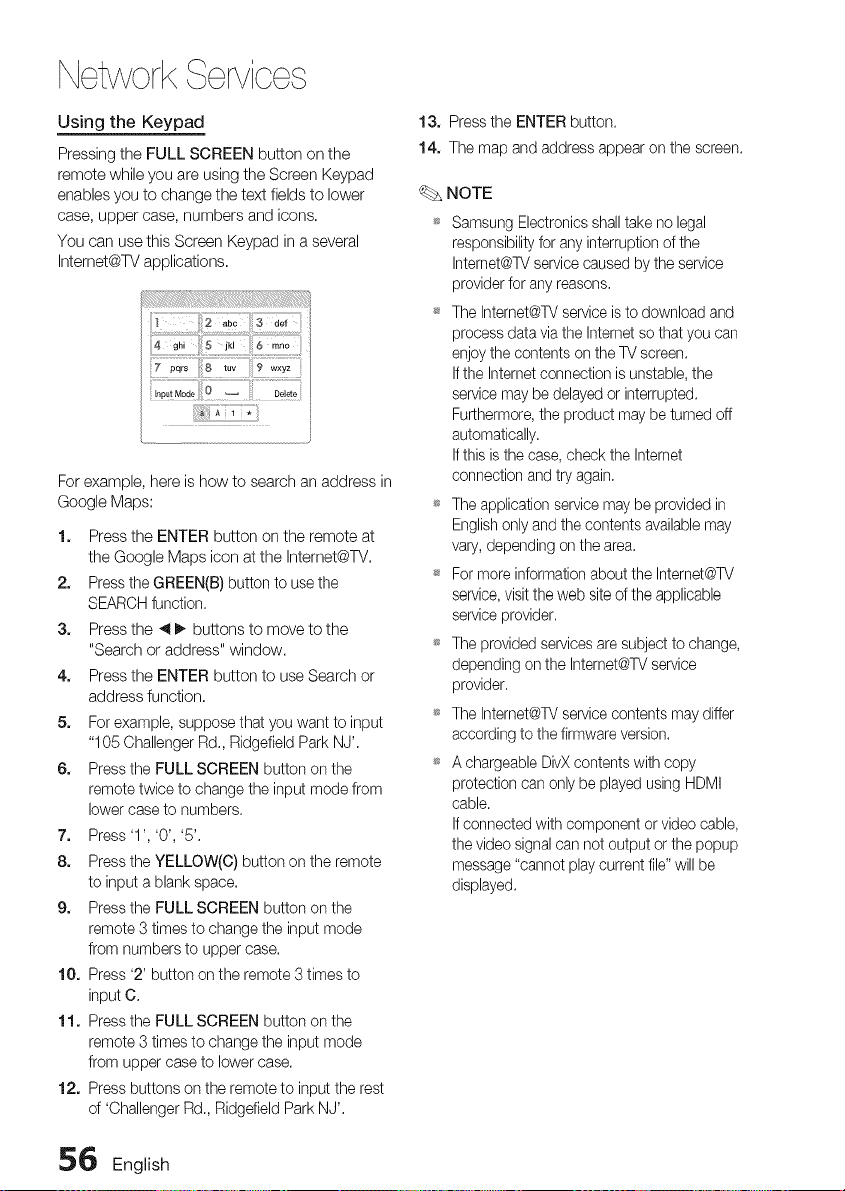
NetworkServices
Using the Keypad
Pressing the FULL SCREEN button on the
remote while you are using the Screen Keypad
enables you to change the text fields to lower
case, upper case, numbers and icons.
You can use this Screen Keypad in a several
Internet@TV applications.
For example,here is how to search an address in
Google Maps:
1. Press the ENTER button on the remote at
the Google Maps icon at the Internet@TV.
2. Press the GREEN(B) button to use the
SEARCH function.
3. Press the _1_ buttons to move to the
"Search or address" window.
4. Press the ENTER button to use Search or
address function.
5. For example, suppose that you want to input
"105 Challenger Rd., Ridgefield Park NJ'.
6. Press the FULL SCREEN button on the
remote twice to change the input mode from
lower case to numbers.
7. Press '1', '0', '5'.
8. Press the YELLOW(C) button on the remote
to input a blank space.
9. Press the FULL SCREEN button on the
remote 3 times to change the input mode
from numbers to upper case.
10. Press '2' button on the remote 3 times to
input C.
11. Press the FULL SCREEN button on the
remote 3 times to change the input mode
from upper case to lower case.
12. Press buttons on the remote to input the rest
of 'Challenger Rd., Ridgefield Park NJ'.
13. Press the ENTER button.
14. The map and address appear on the screen.
NOTE
_ Samsung Electronics shall take no legal
responsibility for any interruption of the
Intemet@TV service caused by the service
provider for any reasons,
_ The Intemet@TV service is to download and
process data via the Intemet so that you can
enjoy the contents on the TV screen.
If the Internet connection is unstable, the
service may be delayed or interrupted.
Furthermore, the product may be turned off
automatically.
If this is the case, check the Internet
connection and try again.
_ The application service may be provided in
English only and the contents available may
vary, depending on the area.
_ For more information about the Internet@TV
service, visit the web site of the applicable
service provider.
_ The provided services are subject to change,
depending on the Internet@TVservice
provider.
_ The Internet@TV service contents may differ
according to the firmware version.
_ A chargeable DivX contents with copy
protection can only be played using HDMI
cable.
If connected with component or video cable,
the video signal can not output or the popup
message "cannot play current file" will be
displayed.
56 English
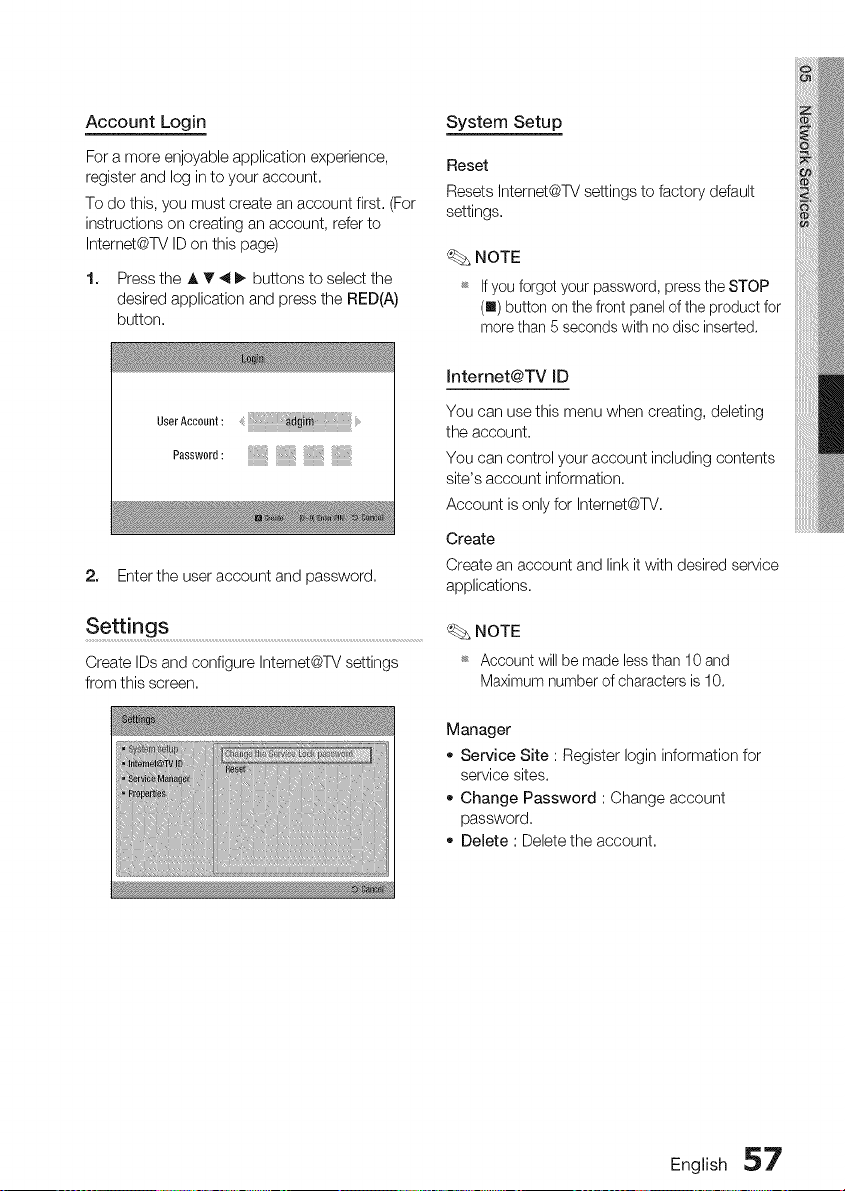
Account Login
For a more enjoyable application experience,
register and log in to your account.
To do this, you must create an account first. (For
instructions on creating an account, refer to
Intemet@TV ID on this page)
1. Press the A T 4 _. buttons to select the
desired application and press the RED(A)
button.
System Setup
Reset
Resets Intemet@TV settings to factory default
settings.
NOTE
_ Ifyou forgotyourpassword,pressthe STOP
(I) buttonon the front panelof theproductfor
morethan 5 secondswith no discinserted.
User Aceew_t : d_li :: : :
Passwer_:@iii!i@iii!i@iii!i@iii
2. Enter the user account and password.
Settings ...............................................................................................................................................................
Create IDs and configure Intemet@TV settings
from this screen.
Jnternet@TV JD
You can use this menu when creating, deleting
the account.
You can control your account including contents
site's account information.
Account is only for Intemet@TV.
Create
Create an account and link it with desired service
applications.
NOTE
_ Account will be made less than 10 and
Maximum number of characters is 10.
Manager
o Service Site : Register Iogin information for
service sites.
Change Password : Change account
password.
Delete : Delete the account.
English 57
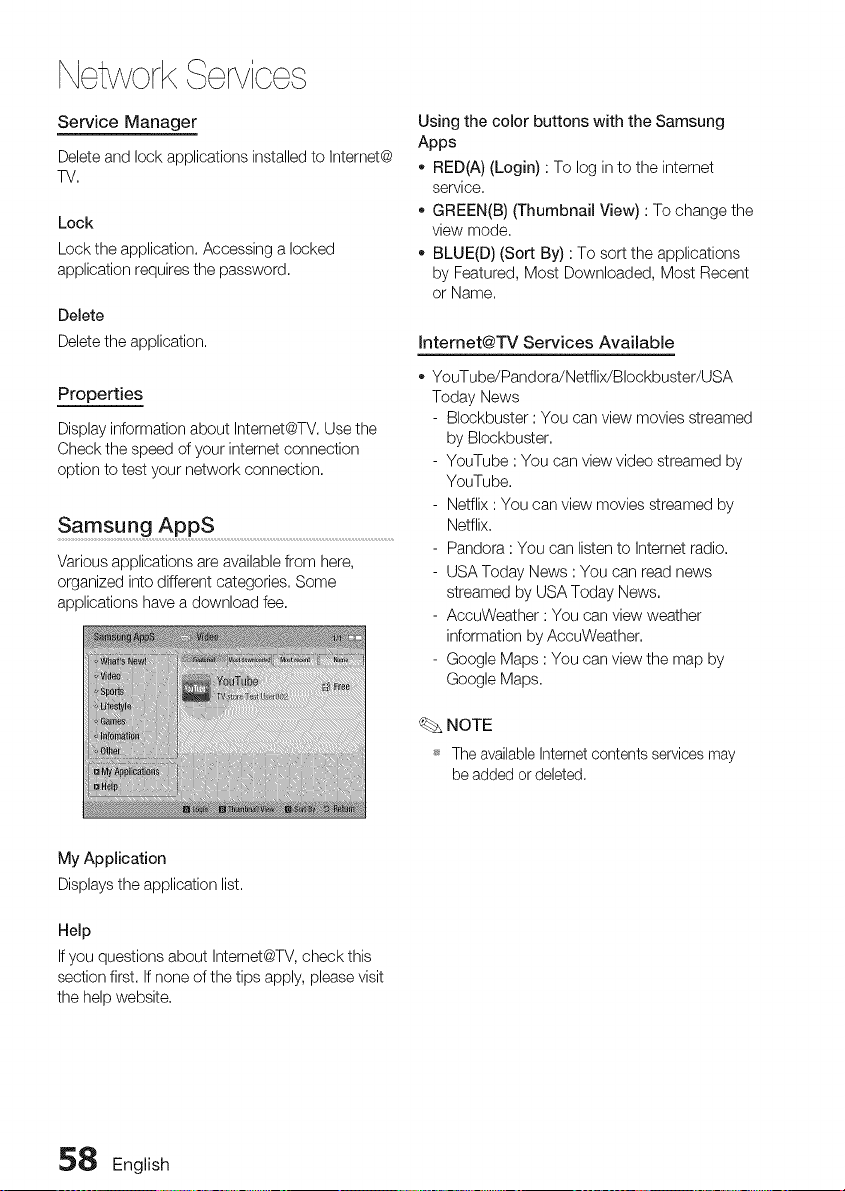
NetworkServices
Service Manager
Delete and lock applications installed to Internet@
TV.
Lock
Lock the application. Accessing a locked
application requires the password.
Delete
Delete the application.
Properties
Display information about Intemet@TV. Use the
Check the speed of your intemet connection
option to test your network connection.
Samsung AppS ..............................................................................................................................
Various applications are available from here,
organized into different categories. Some
applications have a download fee.
Using the color buttons with the Samsung
Apps
- RED(A) (Login) : To log in to the internet
service.
o GREEN(B) (Thumbnail View) : To change the
view mode.
BLUE(D) (Sort By) : To sort the applications
by Featured, Most Downloaded, Most Recent
or Name.
Intemet@TV Services Available
YouTube/Pandora!Netflix/Blockbuster/USA
Today News
- Blockbuster : You can view movies streamed
by Blockbuster.
- YouTube : You can view video streamed by
YouTube.
- Netflix : You can view movies streamed by
Netflix.
- Pandora : You can listen to Intemet radio.
- USA Today News : You can read news
streamed by USA Today News.
- AccuWeather : You can view weather
information by AccuWeather.
- Google Maps : You can view the map by
Google Maps.
NOTE
_ The available Internet contents services may
be added or deleted.
My Application
Displays the application list.
Help
If you questions about Intemet@TV, check this
section first. If none of the tips apply, please visit
the help website.
58 English
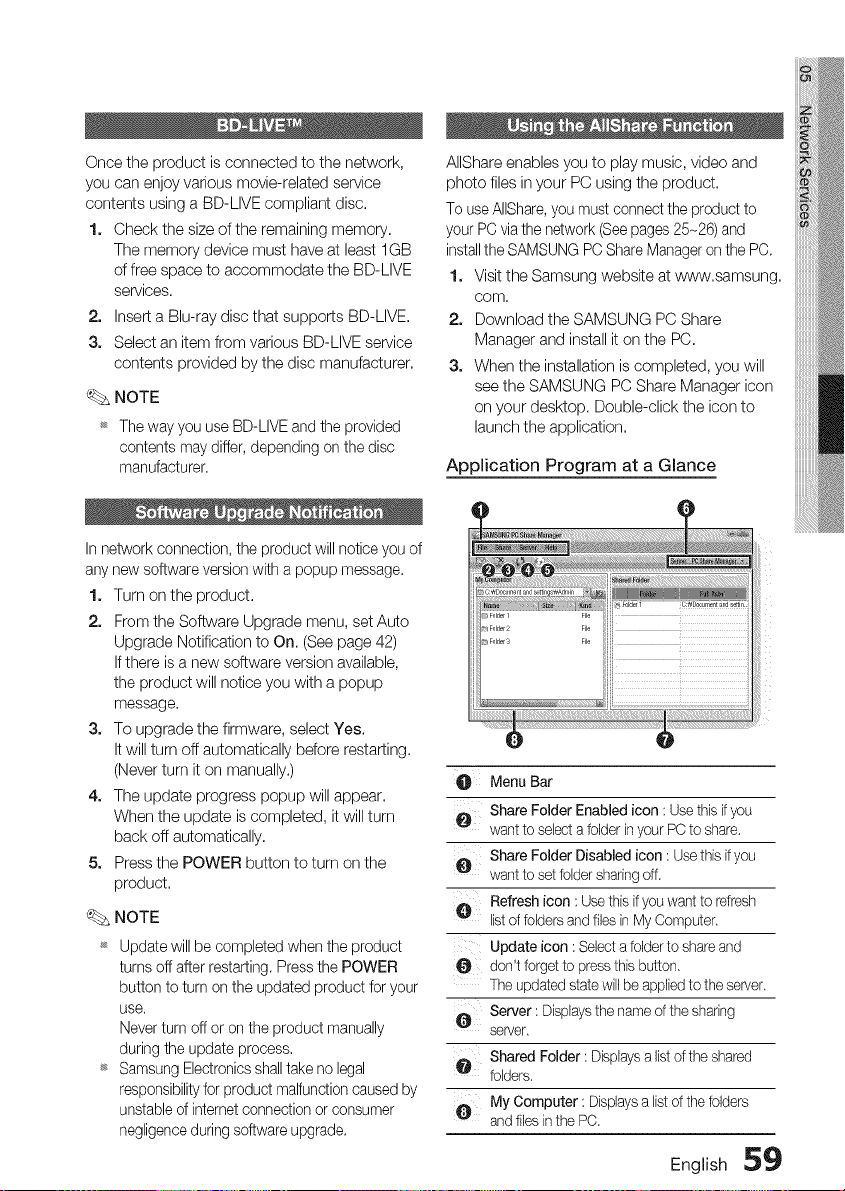
Once the product is connected to the network,
you can enjoy various movie-related service
contents using a BD-LIVE compliant disc.
1. Check the size of the remaining memory.
The memory device must have at least 1GB
of free space to accommodate the BD-LIVE
services.
2. Insert a Blu-ray disc that supports BD-LIVE.
3. Select an item from various BD-LIVE service
contents provided by the disc manufacturer.
_. NOTE
_ The way you use BD-LIVE and the provided
contents may differ, depending on the disc
manufacturer.
AIIShare enables you to play music, video and
photo files in your PC using the product.
To use AIIShare,you must connect the product to
your PC via the network (See pages 25-26) and
installthe SAMSUNG PC Share Manager on the PC.
1. Visit the Samsung website at www.samsung.
COrn,
2. Download the SAMSUNG PC Share
Manager and install it on the PC.
3. When the installation is completed, you will
see the SAMSUNG PC Share Manager icon
on your desktop. Double-click the icon to
launch the application.
Application Program at a Glance
In network connection, the product will notice you of
any new software version with a popup message.
1. Turn on the product.
2. From the Software Upgrade menu, set Auto
Upgrade Notification to On. (See page 42)
If there is a new software version available,
the product will notice you with a popup
message.
3. To upgrade the firmware, select Yes.
It will turn off automatically before restarting.
(Never turn it on manually.)
4. The update progress popup will appear.
When the update is completed, it will turn
back off automatically.
5. Press the POWER button to turn on the
product.
_. NOTE
_ Update will be completed when the product
turns off after restarting. Press the POWER
button to turn on the updated product for your
use.
Never turn off or on the product manually
during the update process.
_ Samsung Electronics shall take no legal
responsibilityfor product malfunction caused by
unstable of internet connection or consumer
negligence during software upgrade.
Menu Bar
O Share Folder Enabled icon : Usethis if you
want to selecta folder inyour PC to share.
e Share Folder Disabled icon: Usethis ifyou
want to setfolder sharingoff.
O Refresh icon: Use this ifyou want to refresh
listof folders and files inMy Computer.
Update icon : Selecta folder to shareand
O don't forget to pressthis button.
The updatedstate will be appliedto the server.
Server : Displaysthe name of the sharing
server.
@ Shared Folder : Displaysa listof the shared
folders.
My Computer : Displaysa listof the folders
andfiles inthe PC.
English 59
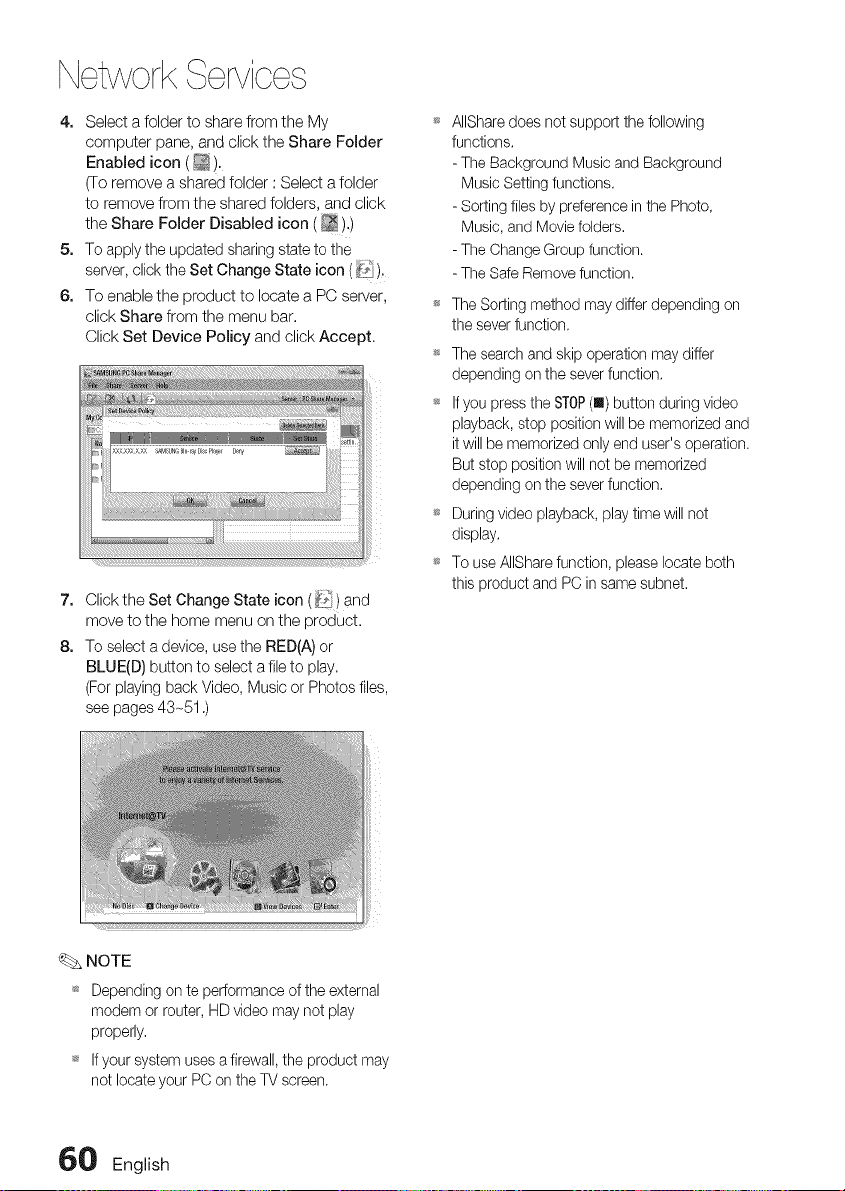
Network orvioo
4. Select a folder to share from the My
computer pane, and click the Share Folder
Enabled icon (_).
(To remove a shared folder : Select a folder
to remove from the shared folders, and click
the Share Folder Disabled icon (_),)
5, To apply the updated sharing state to the
server, click the Set Change State icon (_'),
6, To enable the product to locate a PC server,
click Share from the menu bar.
Click Set Device PoJicy and click Accept.
7. Click the Set Change State icon (_'_) and
move to the home menu on the product.
8. To select a device, use the RED(A) or
BLUE(D) button to select a file to play.
(For playing back Video, Music or Photos files,
see pages 43~51 .)
AIIShare does net support the following
functions.
- The Background Music and Background
Music Setting functions.
- Sorting files by preference in the Photo,
Music, and Movie folders.
- The Change Group function.
- The Safe Remove function.
The Sorting method may differ depending on
the sever function.
_ The search and skip operation may differ
depending on the sever function.
_ If you press the STOP(u) button during video
playback, stop position will be memorized and
it will be memorized only end user's operation.
But stop position will net be memorized
depending on the sever function.
_ During video playback, play time will not
display.
_ To use AIIShare function, please locate both
this product and PC in same subnet.
NOTE
_ Depending on te performance of the external
modem or router, HD video may not play
properly.
_ If your system uses a firewall, the product may
not locate your PC on the TV screen.
_ English
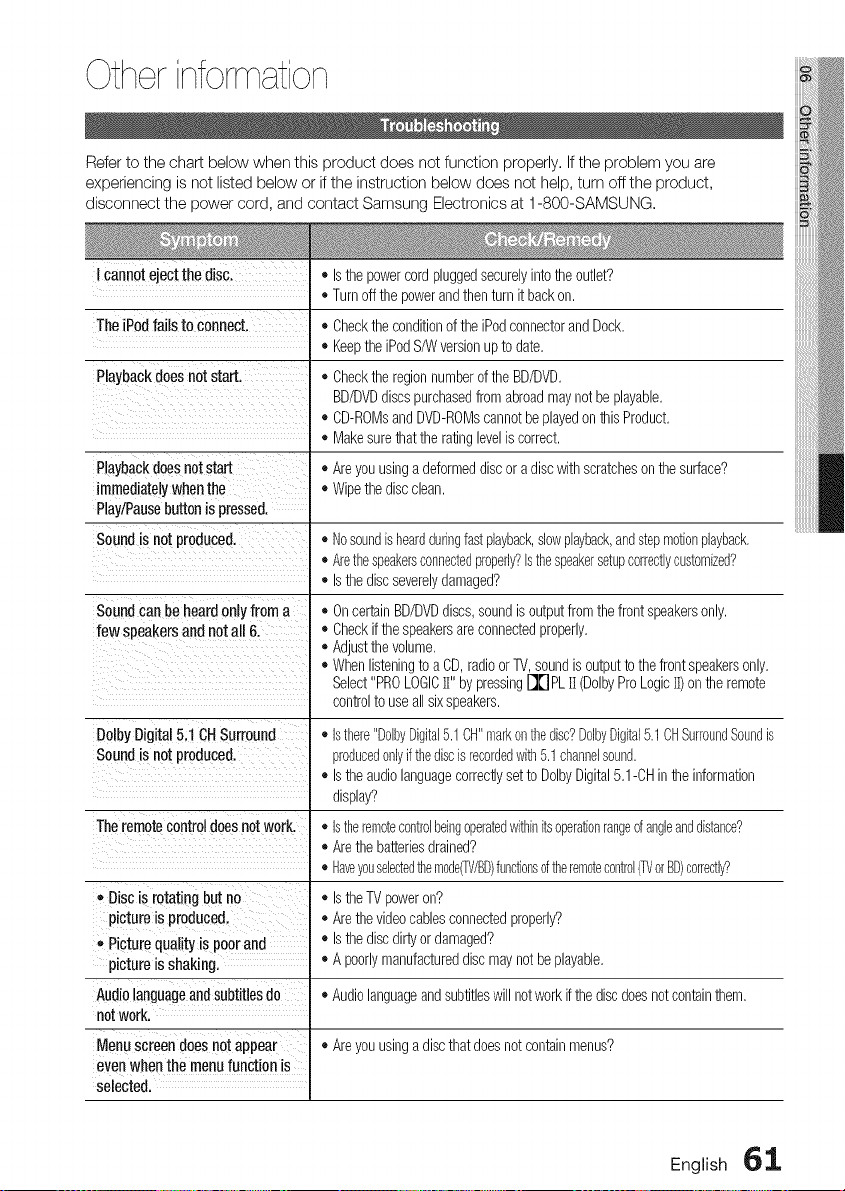
Otherinformation
Refer to the chart below when this product does not function properly. If the problem you are
experiencing is not listed below or if the instruction below does not help, turn off the product,
disconnect the power cord, and contact Samsung Electronics at 1-800-SAMSUNG.
I cannotejectthedisc,
TheiPodfailsto connect.
Playbackdoesnotstart.
• Isthe powercordpluggedsecurelyintothe outlet?
• Turnoff the powerandthenturn it backon.
• Checkthe conditionof the iPodconnectorandDock.
• Keepthe iPodS/W versionupto date.
• Checktheregionnumberof the BD/DVD.
BD/DVDdiscs purchasedfrom abroadmaynot beplayable.
• CD-ROMsandDVD-ROMscannotbe playedonthis Product.
• Makesurethatthe ratinglevelis correct.
Playbackdoesnotstart • Areyouusinga deformeddiscor a discwithscratcheson thesurface?
immediatelywhen the • Wipethediscclean.
Play/Pausebuttonis pressed.
Soundis not produced, • Nosoundis heardduringfastplayback,slowplayback,andstepmotionplayback.
• Arethespeakersconnectedproperly?Isthespeakersetupcorrectlycustomized?
• Isthe discseverelydamaged?
Soundcan be heard only from a
few speakers and not all 6.
DolbyDigital5.1CHSurround
Soundis not produced,
Theremotecontroldoesnotwork.
• Discis rotatingbut no
pictureis produced.
- Picturequalityis poorand
pictureis shaking.
Audiolanguageandsubtitlesdo
notwork.
Menuscreendoesnotappear
evenwhenthemenufunctionis
selected,
• On certainBD/DVDdiscs,soundis outputfrom thefront speakersonly.
• Checkifthe speakersare connectedproperly.
• Adjustthe volume.
• Whenlisteningto a CD, radioor TV,soundis outputtothe front speakersonly.
Select"PROLOGICII" by pressing[][] PLII (DolbyProLogicII) on the remote
controlto use all sixspeakers.
• Isthere"DolbyDigital5.1CH"markonthedisc?DdbyDigital5.1OHSurroundSoundis
producedonlyifthediscisrecordedwith5.1channelsound.
• IstheaudiolanguagecorrectlysettoDolbyDigital5,1-OHintheinformation
display?
• Istheremotecontrolbeingoperatedwithinitsoperationrangeofangleanddistance?
• Arethe batteriesdrained?
• Haveyouselectedthemode_/BD)functionsoftheremotecontrol_ orBD)correctly?
• Isthe TVpoweron?
• Arethe videocablesconnectedproperly?
• Isthe discdirtyordamaged?
• A poorlymanufactureddiscmaynotbe playable.
• Audiolanguageandsubtitleswill notworkif the discdoesnot containthem.
• Areyouusinga discthatdoesnotcontainmenus?
English 61

Otherinformation
Aspect ratio cannot be changed. • Youcan play16:9 BD/DVDsin 16:9Wide mode,4:3 LetterBoxmode,or 4:3
Pan- Scanmode,but 4:3 BD/DVDscan beseenin 4:3 ratioonly,Referto the
Blu-rayDiscjacket andthenselectthe appropriatefunction,
• Theproductis notworking.
(Example:Thepowergoesout
orastrangenoiseis heard.)
,,TheProductisnotworking
normally.
Theratinglevelpasswordhas
beenforgotten.
Can'treceiveradiobroadcasts.
Whilelisteningto TVaudio
throughthe Product.nosoundis
heard.
"NotAvailable"appearson
screen.
IftheNDMIoutputissettoa
resolutionyourTVcannotsupport
(forexample,1080p),youmaynot
seeapictureonyour'RL
NoHDMIoutput.
AbnormalHDMIoutputscreen.
IftheHDMIoutputissettoaresolution
yourTVcannotsupport(forexample,
1080p),youmaynotseeapictureon
yourTV
• Turnoff the power,andpressandhold theSTOP( [] ) buttonon the product
forlongerthan5 secondswith nodiscinserted,
- Usingthe RESETfunctionwill eraseall storedsettings,
Do not usethis unlessnecessary,
• Withno discinthe product,pressand holdthe product'sSTOP( [] ) buttonfor
longerthan5 seconds,INITappearson the displayand all settingswill return
to thedefaultvalues,
Andthen pressthe POWERbutton,
- Usingthe RESETfunctionwill eraseall storedsettings,
Do not usethis unlessnecessary,
• Isthe antennaconnectedproperly?
• If the antenna'sinputsignalis weak,installan externalFMantennainan area
withgoodreception,
• Ifthe OPEN/CLOSE(AA) buttonispressedwhilelisteningto TVaudiousingthe
D,INorAUXfunctions,theBD/DVDfunctionsareturnedonandtheTVaudiois
muted,
• Thefeaturesor actioncannotbe completedat thistime because:
1, TheBD/DVD'ssoftwarerestrictsit,
2, TheBD/DVD'ssoftwaredoesn'tsupportthe feature(e,g,,angles)
3, Thefeatureis notavailableat the moment,
4, You'verequesteda titleor chapternumberor searchtimethatis outofrange,
• Pressand holdtheSTOP( [] ) buttonon front panelfor morethan5 seconds
withno discinserted,All settingswill revertto the factorysettings,
• Checkthe connectionbetweenthe TVandthe HDMIjack of the Product,
• Checkif yourTVsupports480p/720p/1080i/1080pHDMIinputresolution,
• If randomnoiseappearsonthe screen,it meansthatTV doesnot support
HDCP(High-bandwidthDigitalContentProtection),
• Pressand holdtheSTOP(m) buttonon front panelfor morethan5 seconds
withno discinserted,All settingswill revertto the factorysettings,
• Whenthe factorydefaultsettingsare restored,all the userdatastoredin the
BDdatawill bedeleted,
62 English

IcanSeefoldersSharedthrough
thePCShareManageKbutl
cannotseetheflies.
Video is playedintermJttentlyl
iil i i ii iii ii¸¸iii
AllShareconnectionbetweenTV
and PCis unstablel
I cannotconnecttothe BD-LIVE
server.
WhenusingtheBD-LIVEservice,
anerroroccurs.
• Sinceit showsonlyfilescorrespondingto the Image,Music,and Movie
categories,filesthat do notcorrespondto thesecategoriesmay notbe
displayed,
• Checkifthe networkis stable,
• Checkifthe networkcableis properlyconnectedandif the networkis not
overloaded,
• Wirelessconnectionbetweenthe serverandthe productis unstable,
Checkthe connection,
• IPaddressunderthesamesubnetworkshouldbe unique,otherwiseIPcollision
canresultsinsucha phenomenon,
• Checkif youhavea firewallenabled,
If so,disablethefirewallfunction,
• Checkwhetherthe networkconnectionis successfulornot byusingNetwork
Testmenu,(Seepage40)
• Checkwhetherthe USBmemorydeviceisconnectedwith productor not,
• The memorydevicemusthaveat least 1GBof free spaceto accommodatethe
BD-LIVEservice,
Youcan checkthe availablesizeinBD DataManagement,(Seepage35)
• Pleasecheckwhetherthe BD-LIVEInternetConnectionmenuis setto
Allow(All),
• If all abovefails,contactthe contentsprovideror updatethe latestfirmware,
• Thememorydevicemusthaveat least1GBof free spaceto accommodatethe
BD-LIVEservice,
Youcan checkthe availablesizeinBDDataManagement,(Seepage35)
NOTE
_sWhenthefactorydefaultsettingsarerestored,allthe userdatastoredin the BDdatawillbe deleted,
English 63
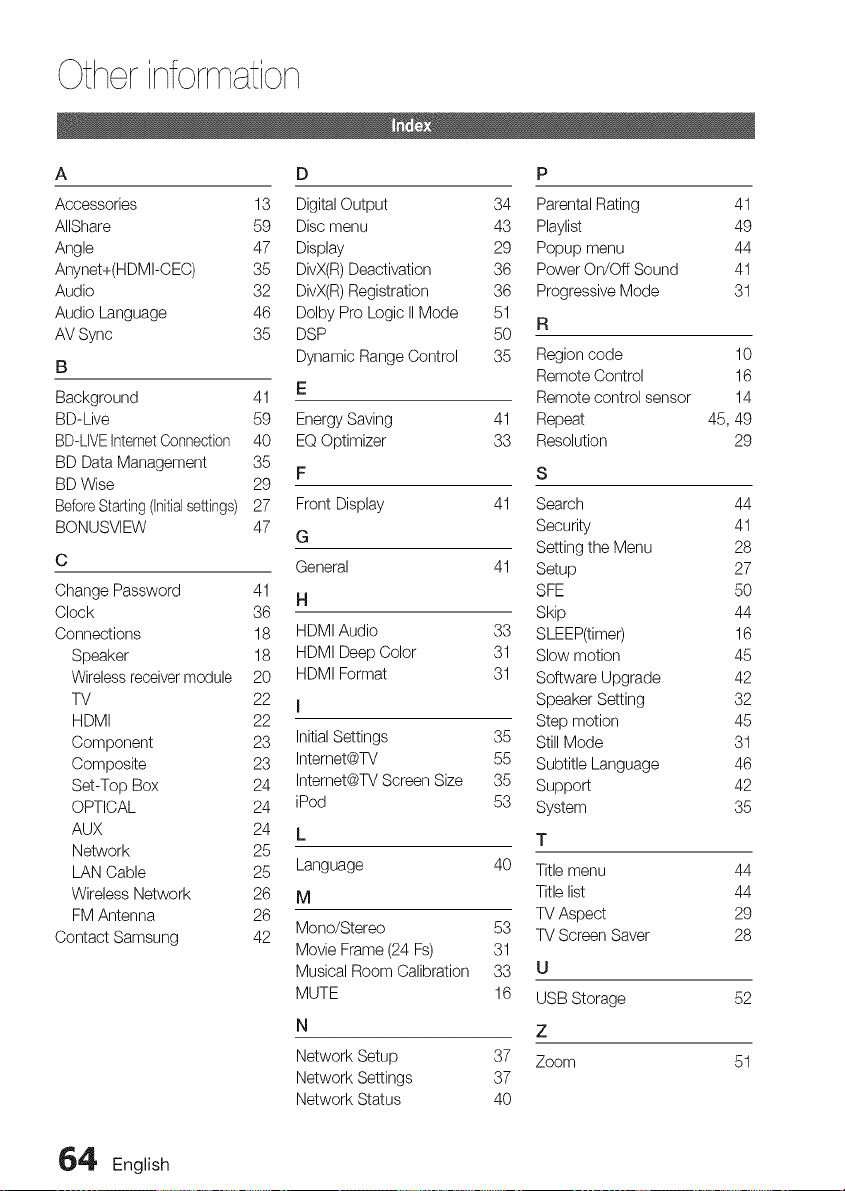
Otherinformation
A D P
Accessories 13 Digital Output 34 Parental Rating 41
AIIShare 59 Disc menu 43 Playlist 49
Angle 47 Display 29 Popup menu 44
Anynet+(HDMI-CEC) 35 DivX(R) Deactivation 36 Power On/Oft Sound 41
Audio 32 DivX(R) Registration 36 Progressive Mode 31
Audio Language 46 Dolby Pro Logic II Mode 51
R
AV Sync 35 DSP 50
B Dynamic Range Control 35 Region code 10
Remote Control 16
Background 41 E Remote control sensor 14
BD-Live 59 Energy Saving 41 Repeat 45, 49
BD-LIVEIntemet Connection 40 EQ Optimizer 33 Resolution 29
BD Data Management 35
F S
BD Wise 29
Before Starting (Initialsettings) 27 Front Display 41 Search 44
BONUSVIEW 47 G Security 41
Setting the Menu 28
C General 41 Setup 27
Change Password 41 H SFE 50
Clock 36 Skip 44
Connections 18 HDMI Audio 33 SLEEP(timer) 16
Speaker 18 HDMI Deep Color 31 Slow motion 45
Wireless receiver module 20 HDMI Format 31 Software Upgrade 42
TV 22 I Speaker Setting 32
HDMI 22 Step motion 45
Component 23 Initial Settings 35 Still Mode 31
Composite 23 Intemet@TV 55 Subtitle Language 46
Set-Top Box 24 Intemet@TV Screen Size 35 Support 42
OPTICAL 24 iPod 53 System 35
AUX 24 L T
Network 25
LAN Cable 25 Language 40 Title menu 44
Wireless Network 26 M Title list 44
FM Antenna 26 TV Aspect 29
Contact Samsung 42 Mono/Stereo 53 TV Screen Saver 28
Movie Frame (24 Fs) 31
Musical Room Calibration 33 U
MUTE 16 USB Storage 52
N Z
Network Setup 37 Zoom 51
Network Settings 37
Network Status 40
6_' English
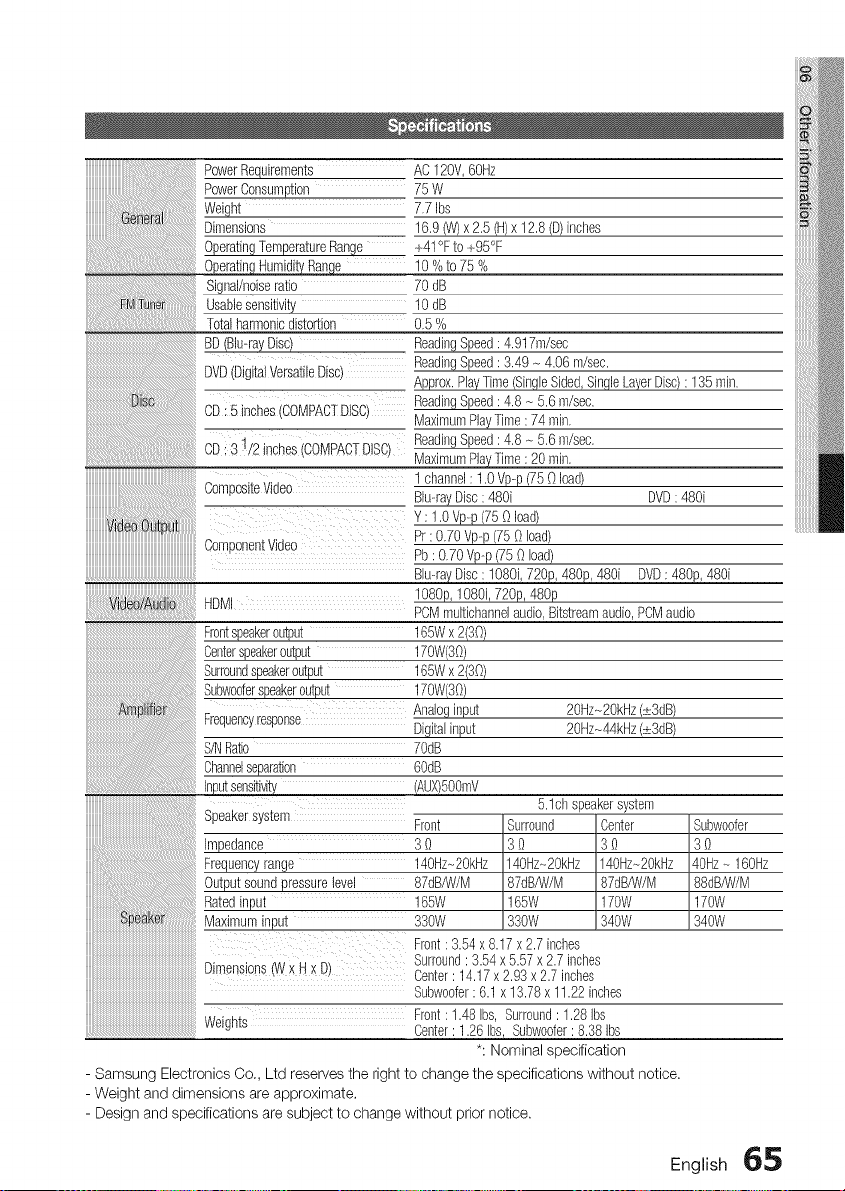
PowerRequirements AC120V,60Hz
PowerConsumption 75 W
Weight 7.7Ibs
Dimensions 16.9(W)x 2.5 (m)x 12.8(D)inches
OperatingTemperatureRange +41°Fto +95°F
10%to75%
Signal/noiseradio 70 dB
usablesenslwiP, 10 dB
Totalharmoniculs_or_ion 0.5%
BD(Blu-rayDisc) ReadingSpeed: 4.917m/sec
DVD(DigitalVersatileDisc ReadingSpeed: 3.49- 4.06m/sec.
Approx.PlayTime(SingleSided,SingleLayerDisc): 135 min.
DiSc 3D: 5 inches 3OMPAC[DISC MaximumPlayTime: 74 min.
ReadingSpeed: 4.8 - 5.6 m/sec.
}D : 31/2 inches COMPACTDISC, ReadingSpeed: 4.8 _ 5.6 m/sec.
MaximumPlayTime: 20 min.
1 channel:1.0Vp-p(75Oload)
3ompostteVloeo Blu-rayDisc: 480i DVD: 480i
Y: 1.0Vp-p(75Oload)
3omponentWdeo Pr : 0.70Vp-p(75 Oload)
Pb: 0.70Vp-p(75 Oload)
Blu-rayDisc: 1080i,_ 480i DVD: 480_
Vdeo/Audo HDMI 1080p,1080i,72%, 480p
PCMmultichannelaudio,Bitstreamaudio,PCMaudio
Frontspeakeroutput 165Wx2(30)
Centerspeakeroutput 170%30)
Surroundspeakeroutput 165Wx2(30)
Subwooferspeakeroutput 170%30)
Analoginput 20Hz_2OkHz(.s:3dB)
Frequencyresponse Digitalinput 20Hz_44kHz(.s:3dB)
S/NRatio 7OdD
Channelseparation 6OdD
Inputsensitivity (AUX)5OOmV
5.1ch speakersystem
Speakersystem Front Surround Center Subwoofer
Impedance 3 O 3 O 3 0 3 0
Frequencyrange 140Hz-20kHz 140Hz-20kHz 140Hz-20kHz 40Hz- 160Hz
Outputsoundpressurelevel 87dB/W/M 87dB/W/M 87dB/W/M 88dB/W/M
Ratedinput 165W 165W 17OW 170W
Speaker Maximuminput 330W 330W 340W 340W
Front: 3.54x 8.17x 2.7inches
Dimensions(Wx H x D) Surround: 3.54x5.57x 2.7inches
Center: 14.17x 2.93x 2.7inches
Subwoofer: 6.1 x 13.78x 11.22inches
Front: 1.48Ibs, Surround: 1.28Ibs
Weights
Center:1.26Ibs, Subwoofer: 8.38 Ibs
*: Nominal specification
- Samsung Electronics Co,, Ltd reserves the right to change the specifications without notice.
- Weight and dimensions are approximate.
- Design and specifications are subject to change without prior notice.
English 65

This SAMSUNG brand product, as supplied and distributed by Samsung Electronics America, Inc. (SAMSUNG) and delivered
new, in the originalcarton to the original consumer purchaser, is warranted by SAMSUNG against manufacturing defects in
materials and workmanship for a limited warranty period of:
One (1) Year Parts and Labor*
(*90 Days Parts and Labor for Commercial Use)
This limited warranty begins on the original date of purchase, and is valid only on products purchased and used in the United
States. To receive warranty service, the purchaser must contact SAMSUNG for problem determination and service procedures.
Warranty service can only be periormed by a SAMSUNG authorized service center. The original dated bill of sale must be
presented upon request as proof of purchase to SAMSUNG or SAMSUNG's authorized service center. Transportation of the
product to and from the service center is the responsibility of the purchaser.
SAMSUNG will repair or replace this product, at our option and at no charge as stipulated herein, with new or reconditioned
parts or products if found to be defective dudng the limited warranty period specified above. All replaced parts and products
become the property of SAMSUNG and must be returned to SAMSUNG. Replacement parts and products assume the
remaining original warranty, or ninety (90) days, whichever is longer.
SAMSUNG'sobligationswith respect to softwareproducts distributedby SAMSUNGunderthe SAMSUNGbrandname areset forth in
the applicableend user licenseagreement.Non-SAMSUNGhardware and softwareproducts, if provided,are on an "AS IS" basis.
Non-SAMSUNGmanufacturers,suppliers,publishers,and serviceprodders mayprovidetheir own warranties.
This limited warranty covers manufacturing defects in materials and workmanship encountered in normal, and except to
the extent otherwise expressly provided for in this statement, noncommercial use of this product, and shall not apply to the
following, including, but not limited to: damage which occurs in shipment; delivery and installation; applications and uses for
which this product was not intended; altered product or serial numbers; cosmetic damage or exterior finish; accidents, abuse,
neglect, fire, water, lightning or other acts of nature; use of products, equipment, systems, utilities, services, parts, supplies,
accessories, applications, installations, repairs, external wiring or connectors not supplied and authorized by SAMSUNG, or
which damage this product or result in service problems; incorrect electrical line voltage, fluctuations and surges; customer
adjustments and failure to follow operating instructions, cleaning, maintenance and environmental instructions that are covered
and prescribed in the instruction book; product removal or reinstallation; reception problems and distortion related to noise,
echo, interference or other signal transmission and delivery problems. SAMSUNG does not warrant uninterrupted or error4ree
operation of the product.
THEREARE NO EXPRESS WARRANTIES OTHER THAN THOSE LISTED AND DESCRIBED ABOVE, AND NO WARRANTIES
WHETHER EXPRESSOR iMPLIED, iNCLUDiNG, BUT NOT LIMITED TO, ANY IMPLIED WARRANTIES OF MERCHANTABILITY
OR FITNESS FORA PARTICULAR PURPOSE, SHALL APPLY AFTER THE EXPRESS WARRANTY PERIODS STATED
ABOVE, AND NO OTHER EXPRESSWARRANTY OR GUARANTY GIVEN BY ANY PERSON, FIRM OR CORPORATIONWITH
RESPECTTO THIS PRODUCT SHALL BE BiNDiNG ON SAMSUNG. SAMSUNG SHALL NOT BE LIABLE FOR LOSS OF
REVENUE OR PROFITS, FAILURETO REALIZE SAVINGS OR OTHER BENEFITS,OR ANY OTHER SPEDIAL, INCIDENTAL
OR CONSEQUENTIAL DAMAGES CAUSED BY THE USE, MISUSE OR INABILITYTO USE THIS PRODUCT, REGARDLESS
OF THE LEGAL THEORY ON WHICH THE CLAIM IS BASED, AND EVEN IF SAMSUNG HAS BEEN ADVISED OF THE
POSSIBILITY OF SUCH DAMAGES. NOR SHALL RECOVERYOF ANY KiND AGAINST SAMSUNG BE GREATER IN AMOUNT
THAN THE PURCHASE PRICE OF THE PRODUCT SOLD BY SAMSUNG AND CAUSING THE ALLEGED DAMAGE. WITHOUT
LIMITING THE FOREGOING, PURCHASER ASSUMES ALL RiSK AND LIABILITYFOR LOSS, DAMAGE OR INJURY TO
PURCHASER AND PURCHASER'S PROPERTY AND TO OTHERS AND THEIR PROPERTY ARISING OUT OF THE USE,
MISUSE OR INABILITY TO USE THIS PRODUCT SOLD BY SAMSUNG NOT CAUSED DIRECTLY BY THE NEGLIGENCEOF
SAMSUNG. THIS LIMITEDWARRANTY SHALL NOT EXTENDTO ANYONE OTHER THAN THE ORIGINAL PURCHASER OF
THIS PRODUCT, iS NONTRANSFERABLE AND STATESYOUR EXCLUSIVE REMEDY.
Some states do not allow limitations on how long an implied warranty lasts, or the exclusion or limitation of incidental or
consequential damages, so the above limitations or exclusions may not apply to you. This warranty gives you specific legal
rights, and you may also have other rights which vary from state to state.
To obtain warranty hardware service, please contact SAMSUNG at:
Samsung Electronics America, Inc.
105 Challenger Road Ridgefield Park, NJ 07660-0511
1-800-SAMSUNG (726-7864) and www.samsung.com/us
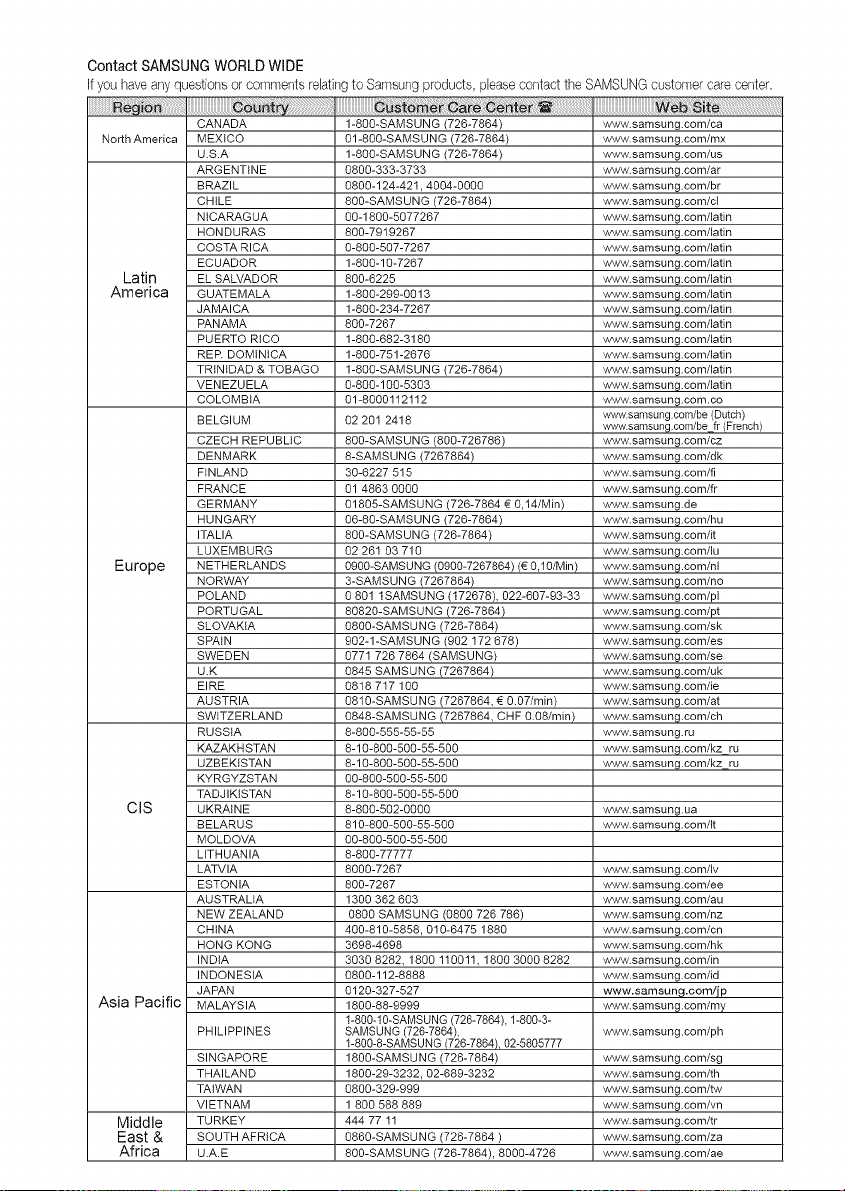
Contact SAMSUNG WORLDWIDE
If youhaveanyquestionsor comrnentsrelatingto Samsungproducts,pleasecontacttheSAMSUNGcustomercarecenter.
North America
Latin
America
Europe
CIS
Asia Pacific
Middle
East &
Africa
CANADA
MEXICO
U.S.A
ARGENTINE
BRAZIL
CHILE
NICARAGUA
HONDURAS
COSTA RICA
ECUADOR
EL SALVADOR
GUATEMALA
JAMAICA
PANAMA
PUERTO RICO
RER DOMtNICA
TRINIDAD & TOBAGO
VENEZUELA
COLOMBIA
BELGIUM
CZECH REPUBLIC
DENMARK
FINLAND
FRANCE
GERMANY
HUNGARY
ITALIA
LUXEMBURG
NETHERLANDS
NORWAY
POLAND
PORTUGAL
SLOVAKIA
SPAIN
SWEDEN
U.K
EIRE
AUSTRIA
SWITZERLAND
RUSSIA
KAZAKH STAN
UZBEKISTAN
KYRGYZSTAN
TADJIKISTAN
UKRAINE
BELARUS
MOLDOVA
LITHUANIA
LATVIA
ESTONIA
AUSTRALIA
NEW ZEALAND
CHINA
HONG KONG
INDIA
INDONESIA
JAPAN
MALAYSIA
PHILIPPINES
SINGAPORE
THAILAND
TAIWAN
VIETNAM
TURKEY
SOUTH AFRICA
U.A.E
1-800-SAMSUNG (726-7864)
01-800-SAMSUNG (726-7864)
1-800-SAMSUNG (726-7864)
0800-333-3733
0800-124-421,4004-0000
800-SAMSUNG (726-7864)
00-1800-5077267
800-7919267
0-800-507-7267
1-800-10-7267
800-6225
1-800-299-0013
1-800-234-7267
800-7267
1-800-682-3180
1-800-751-2676
1-800-SAMSUNG (726-7864)
0-800-100-5303
01-8000112112
02 201 2418
800-SAMSUNG (800-726786)
8-SAMSUNG (7267864)
30-6227 515
01 4863 0000
01805-SAMSUNG (726-7864 _ 0,14/Min)
06-80-SAMSUNG (726-7864)
800-SAMSUNG (726-7864)
02 261 03 710
0900-SAMSUNG (0900-7267864) (€ 0,10/Min)
3-SAMSUNG (7267864)
0 801 lSAMSUNG (172678), 022-607-93-33
80820-SAMSUNG (726-7864)
0800-SAMSU NG (726-7864)
902-1-SAMSUNG (902 172 678)
0771 726 7864 (SAMSUNG)
0845 SAMSUNG (7267864)
0818 717 100
0810-SAMSUNG (7267864, _ 0.07/min)
0848-SAMSUNG (7267864, CHF 0.08/min)
8-800-555-55-55
8-10-800-500-55-500
8-10-800-500-55-500
00-800-500-55-500
8-10-800-500-55-500
8-800-502-0000
810-800-500-55-500
00-800-500-55-500
8-800-77777
8000-7267
800-7267
1300 362 603
0800 SAMSUNG (0800 726 786)
400-810-5858, 010-6475 1880
3698-4698
3030 8282, 1800 110011, 1800 3000 8282
0800-112-8888
0120-327-527
1800-88-9999
1-800-10-SAMSUNG (726-7864), 1-800-3-
SAMSUNG (726-7864),
1-800-8-SAMSUNG/726-7864), 02-5805777
1800-SAMSU NG (726-7864)
1800-29-3232, 02-689-3232
0800-329-999
1 800 588 889
444 77 11
0860-SAMSUNG (726-7864)
800-SAMSUNG (726-7864), 8000-4726
www.samsung.com/ca
www.samsung.com/mx
www.samsung.com/us
www.samsung.com/ar
www.samsung.com/br
www.samsung.com/c{
www.samsung.com/latin
www.samsung.com/latin
www.samsung.com/latin
www.samsung.com/latin
www.samsung.com/latin
www.samsung.com/latin
www.samsung.com/latin
www.samsung.com/latin
www.samsung.com/latin
www.samsung.com/latin
www.samsung.com/latin
www.samsung.com/latin
www.samsung.com.co
www.samsung corn/be (Dutch)
v_vw.samsung corn/be fr (French)
www.samsung.com/cz
www.samsung.com/dk
www.samsung.com/fi
www.samsung.com/fr
www.samsung.de
www.samsung.com/hu
www.samsung.com/it
www.samsung.com/lu
www.samsung.com/nl
www.samsung.com/no
www.samsung.com/pl
www.samsung.com/pt
www.samsung.com/sk
www.samsung.com/es
www.samsung.com/se
www.samsung.com/uk
www.samsung.com/ie
www.samsung.com/at
www.samsung.com/ch
www.samsung.ru
www.samsung.com/kzju
www.samsung.com/kzju
www.samsung.ua
www.samsung.com/It
www.samsung.com/Iv
www.samsung.com/ee
www.samsung.com/au
www.samsung.com/nz
www.samsung.com/cn
www.samsung.com/hk
www.samsung.com/in
www.samsung.com/id
www.samsung.com/jp
www.samsung.com/my
www.samsung.com/ph
www.samsung.com/sg
www.samsung.com/th
www.samsung.com/tw
www.samsung.com/vn
www.samsung.com/tr
www.samsung.com/za
www.samsung.com/ae

QUESTIONS OR COMMENTS?
COUNTRY CALL OR ViSiT US ONLINE AT WRITE
1-800-SAMSUNG Samsung Electronics America, Inc.
IN THE US (7267864) www.samsung.com/us 105 Challenger Road Ridgefield Park,
NJ 07660-0511
Code No. AH68-02258R(1.0)