RATINGS
ST01/ST01K EI600
Operating
Voltage
120-277 VAC, 50/60 Hz
Resistive
(heater)
15 A, 120-277 VAC 20 A, 120-277 VAC
Tungsten
(incandescent)
15 A, 120 VAC; 6 A, 208-277 VAC
Ballast
(fluorescent)
8 A, 120 VAC;
4 A, 208-277 VAC
16 A, 120-277 VAC
Electronic
Ballast (LED)
5 A 120 VAC; 2 A 277 VAC
Load Rating
(Motor)
1 HP, 120 VAC; 2 HP, 240 VAC
DC Loads 4 A, 12 VDC; 2 A, 28 VDC
Operating
Temperature
32° F to 104° F (0° C to 40° C)
Dimensions 4 1⁄8” H x 1 3⁄4” W x 1 13⁄16” D
Neutral Not Required
SAFETY SECTION
WARNING
Risk of Fire or Electric Shock
• Disconnect power at the circuit breaker(s) or disconnect
switch(es) before installing or servicing (including replacing the
battery).
• Installation and/or wiring must be in accordance with national
and local electrical code requirements.
• Use COPPER conductors ONLY.
• Do Not recharge, disassemble, heat above 212° F (100° C),
crush, or incinerate the Lithium battery. Keep out of reach of
children.
• Replace battery with Type CR2 only that is certified by
Underwriters Laboratories (UL).
• Do NOT use timer to control devices that could have dangerous
consequences due to inaccurate timing, such as: sun lamps,
saunas, heaters, slow cookers, etc.
NOTICE
• Follow local electrical codes during installation.
• Risk of timer damage due to leakage if weak battery is not
replaced promptly.
• Dispose of product per local regulations for disposal of Lithium
batteries.
1. When you first enter the PGM menu, press the + or – to
advance to event # 01.
2. Press the ON/OFF button to confirm
3. Press the + or – to select if this will be an ON or OFF event
4. Press the ON/OFF button to confirm
5. Press the + or – to select if this will be a DAWN, DUSK or
Specific Time event (specific time will have a time flashing)
6. Press the ON/OFF button to confirm
7. For Specific Time: Press + or – to set the hour you want
(make sure the AM or PM is correct)
8. Press the ON/OFF button to confirm
the hours
9. Press the + or – to set the minutes
10. Press the ON/OFF button to confirm Press + or – button
to select what day or group of days you want this event
to happen.
PRO-TIP:
ALL- all seven days of the week
Individual Day- select: SUN, MON, TUE, WED,
THU, FRI or SAT
M-F- Monday through Friday
WKD- Saturday and Sunday
11. Press the ON/OFF button to confirm
12. If you need to set another event, Press the + button to
advance to the next event and repeat steps starting from
step 2.
13. When you’re finished adding events, Press the MODE
button to advance to AUTO (automatic) or RAND
(random) MODE.
EDIT, SKIP, DELETE STANDARD EVENTS
1. Press MODE until PGM appears on
the display.
2. Press ON/OFF to confirm.
3. Press + or – to select EDIT or ERASE
a. EDIT will let you make changes to
the schedule advance to step #4
b. ERASE will erase ALL programmed
events.
- If you select ERASE, press ON/
OFF to confirm, and advance to
PROGRAMMING STANDARD
EVENTS to program event(s), or
press MODE to go to MAN (Manual).
4. Press ON/OFF to confirm
5. Press the + button to find the event number you want to
Edit, Skip or Erase (ERAS).
6. Press ON/OFF to confirm.
7. Press the + button to select one of the options below.
a. ON – The timer will turn on at this time.
b. OFF – The timer will turn OFF at this time.
- If you selected ON or OFF, please go back to Step #5
under “PROGRAMMING SPECIFIC EVENTS”
c. SKIP – This will hide or bypass this event that you
might want to use at a later date. The timer will ignore
any “skipped” events. This is helpful for unusual
programming needs, like vacation settings.
d. ERAS (erase) – This will erase the selected event.
- If you selected SKIP or ERASE you can continue to
ST01/ST01K/EI600
In-Wall Timer with Astro or Countdown Feature
Installation and User Guide
Libertyville, Illinois 60048
www.intermatic.com
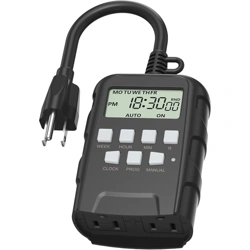
TIMER INTERFACE
Display
Mode button
On/Off button
– (Decrease) button
+ (Increase) button
Reset button
Access door to
battery tray
PRODUCT DESCRIPTION
The ST01 and EI600 series timers combine scheduling, and
countdown features into one simple-to-install unit. Features
include 7-day programming with optional Automatic Daylight-
Saving Time (DST) adjustment, 40 available event spaces
for building any combination of scheduled events (Dawn,
Dusk or Specific times), RAND (random) feature used to
deter unwanted visitors, providing an “occupied” look when
you’re away, and more. The DOWN (countdown) function is
designed for turning devices Off after activation, ranging from
one second up to 24 hours, and is incandescent, fluorescent,
CFL and LED compatible. The ST01/EI600 can handle most
load types, does not require a neutral wire connection, and
supports three languages, English (ENG), Spanish (SPAN),
and French (FRN), making it ideal for many applications.
IMPORTANT NOTES
Please read these notes before continuing.
• The timer is battery-powered and does not need AC power
for initial setup and programming; it also controls the
ON/OFF function (“clicking” sound) and maintains the time
and date.
• BATT LOW flashes on display when the battery strength
is low.
• When replacing the battery, first disconnect the AC power.
Once the old battery is removed, you’ll have a few minutes
to insert the new battery before the date and time settings
are lost. All other settings will remain in memory, without
battery or AC power.
• AUTO (automatic) and RAND (random) modes don’t appear
in the menu options until at least one ON or OFF event is
programmed.
• All menus “loop” (repeat options at end of menu). When in a
specific MENU, press ON/OFF to loop within that MENU.
• The + or - buttons change what is flashing on the screen.
Hold them down to scroll faster.
• Countdown (DOWN) function allows users to decide
between setting a 3-minute shut-off warning WARN
(warning) or turning WARN (warning) off.
PRE-INSTALLATION
Before programming, install the supplied battery.
• Gently pry open the access door, located below ON/OFF
button, and remove the battery tray from the timer. (Search
for YouTube video for “ST01 Programmable Timer Battery
Replacement”)
• Place the supplied CR2 battery into the tray. Make sure
to match the + and - markings on the battery to the tray.
Install the tray into the timer.
• The product initializes and enters the MAN (manual) MODE
of operation with the time blinking at 12:00 am
Note: If the display does not flash 12:00 am, check/replace
the battery before proceeding.
PROGRAMMING
Follow these steps for initial setup and programming of the
ST01 and EI600 series timers.
Factory Reset Timer
1. Press and hold ON/OFF (continue holding until step 3)
2. Using a paper clip or pen, press and release the RESET
button.
3. When you see INIT on the display then release the ON/
OFF button
PRO-TIP: Choice of languages are ENG (English), FRN
(French), and SPAN (Spanish)
4. Use the + or – to select desired language
5. Press ON/OFF to confirm
6. Use + or – to select the timer’s function you want to use
a. STD (Standard) timer operation (on and off times)
b. DOWN (Countdown) timer
7. Press ON/OFF to confirm
Next Step:
• For Standard Operation (STD): 12:00 am will flash showing
MAN after Factory Reset; to program, go to “Initial Setup.”
• For Countdown Operation (DOWN), the screen will display
OFF; to program, go to “COUNTDOWN OPERATION
ONLY.”
STANDARD OPERATION ONLY
Initial Setup
1. Press the MODE button until you see
SETUP on the display
2. Press the ON/OFF button to confirm
3. Use the + or – to set the current time
of day HOUR (make sure your AM or
PM is correct)
4. Press the ON/OFF button to confirm
5. Use the + or – to set the current time
of day MINUTE
6. Press the ON/OFF button to confirm
7. Press the + or – to set the current
YEAR
8. Press the ON/OFF button to confirm
9. Press + or – to set the current MONTH
10. Press the ON/OFF button to confirm
11. Press + or – to set the current DATE
12. Press the ON/OFF button to confirm
13. Make sure it is showing the correct DAY of WEEK (today)
14. Press the ON/OFF button to confirm
15. Press + or – to select if the timer will adjust for DAYLIGHT
SAVING TIME (DST) in spring and fall
a. AUTO means it will adjust
automatically
b. OFF means it will not change
16. Press the ON/OFF button to confirm
17. Press the + or – to select your TIME
ZONE
a. Alaska (AKT), Atlantic (AT), Central
(CT) (default), Eastern (ET), Hawaii
(HT), Mountain (MT), Newfoundland (NT), Pacific (PT))
18. Press the ON/OFF button to confirm
19. Press + or – to select your COUNTRY (CTRY)
a. USA (default), Mexico (MEX), Canada (CAN)
20. Press the ON/OFF button to confirm
PRO-TIP: Refer to QR code under warranty information for
latitude and longitude chart.
21. Press + or – button to select your LATITUDE (LAT)
22. Press the ON/OFF button to confirm
23. Press + or – button to select your LONGITUDE (LONG)
24. Press the ON/OFF button to confirm
NOTE: No decimal point will be
displayed. For example, LAT 48.0
should be entered as 480
PRO-TIP: You have the option to
“Offset” the Dusk and Dawn
settings from 0 to 99 minutes.
25. Press + or – button to adjust the
current DAWN time (you can include an offset here).
26. Press the ON/OFF button to confirm
27. Press + or – button to adjust the current DUSK time (you
can include an offset here).
28. Press the ON/OFF button to confirm (You will now see
your current time and SETUP) - Proceed to Programming
Setup
Programming Setup
PRO-TIP: Before Standard Programming Setup, you’ll need
to determine which type of schedule fits your
application from the list below
T1= Template 1 - On at DUSK. Off at Dawn
T2= Template 2 - On at DUSK. Off at 10:00 PM
T3= Template 3 - On at DUSK. Off at 10:00 PM.
On at 5:00 AM. Off at Dawn.
Specific Time - ON/OFF
1. Press the MODE button until you see PGM on the screen.
2. Press the ON/OFF button to enter the programming menu.
Advance to “Programming Template Events” or
“Programming Specific Events”.
Programming Template Events
PRO-TIP: Templates are set for all days
initially.
1. When you first enter the PGM menu
press the + or – to select a template.
2. Press the ON/OFF button on the template you wish to use
3. Last step is to press MODE to select AUTO to RAND
(random).
Programming Specific Events
PRO-TIP: You will need a minimum of 2 events
(one for ON and one for OFF)
rev 10/1/2022

RATINGS
ST01/ST01K EI600
Operating
Voltage
120-277 VAC, 50/60 Hz
Resistive
(heater)
15 A, 120-277 VAC 20 A, 120-277 VAC
Tungsten
(incandescent)
15 A, 120 VAC; 6 A, 208-277 VAC
Ballast
(fluorescent)
8 A, 120 VAC;
4 A, 208-277 VAC
16 A, 120-277 VAC
Electronic
Ballast (LED)
5 A 120 VAC; 2 A 277 VAC
Load Rating
(Motor)
1 HP, 120 VAC; 2 HP, 240 VAC
DC Loads 4 A, 12 VDC; 2 A, 28 VDC
Operating
Temperature
32° F to 104° F (0° C to 40° C)
Dimensions 4 1⁄8” H x 1 3⁄4” W x 1 13⁄16” D
Neutral Not Required
SAFETY SECTION
WARNING
Risk of Fire or Electric Shock
• Disconnect power at the circuit breaker(s) or disconnect
switch(es) before installing or servicing (including replacing the
battery).
• Installation and/or wiring must be in accordance with national
and local electrical code requirements.
• Use COPPER conductors ONLY.
• Do Not recharge, disassemble, heat above 212° F (100° C),
crush, or incinerate the Lithium battery. Keep out of reach of
children.
• Replace battery with Type CR2 only that is certified by
Underwriters Laboratories (UL).
• Do NOT use timer to control devices that could have dangerous
consequences due to inaccurate timing, such as: sun lamps,
saunas, heaters, slow cookers, etc.
NOTICE
• Follow local electrical codes during installation.
• Risk of timer damage due to leakage if weak battery is not
replaced promptly.
• Dispose of product per local regulations for disposal of Lithium
batteries.
1. When you first enter the PGM menu, press the + or – to
advance to event # 01.
2. Press the ON/OFF button to confirm
3. Press the + or – to select if this will be an ON or OFF event
4. Press the ON/OFF button to confirm
5. Press the + or – to select if this will be a DAWN, DUSK or
Specific Time event (specific time will have a time flashing)
6. Press the ON/OFF button to confirm
7. For Specific Time: Press + or – to set the hour you want
(make sure the AM or PM is correct)
8. Press the ON/OFF button to confirm
the hours
9. Press the + or – to set the minutes
10. Press the ON/OFF button to confirm Press + or – button
to select what day or group of days you want this event
to happen.
PRO-TIP:
ALL- all seven days of the week
Individual Day- select: SUN, MON, TUE, WED,
THU, FRI or SAT
M-F- Monday through Friday
WKD- Saturday and Sunday
11. Press the ON/OFF button to confirm
12. If you need to set another event, Press the + button to
advance to the next event and repeat steps starting from
step 2.
13. When you’re finished adding events, Press the MODE
button to advance to AUTO (automatic) or RAND
(random) MODE.
EDIT, SKIP, DELETE STANDARD EVENTS
1. Press MODE until PGM appears on
the display.
2. Press ON/OFF to confirm.
3. Press + or – to select EDIT or ERASE
a. EDIT will let you make changes to
the schedule advance to step #4
b. ERASE will erase ALL programmed
events.
- If you select ERASE, press ON/
OFF to confirm, and advance to
PROGRAMMING STANDARD
EVENTS to program event(s), or
press MODE to go to MAN (Manual).
4. Press ON/OFF to confirm
5. Press the + button to find the event number you want to
Edit, Skip or Erase (ERAS).
6. Press ON/OFF to confirm.
7. Press the + button to select one of the options below.
a. ON – The timer will turn on at this time.
b. OFF – The timer will turn OFF at this time.
- If you selected ON or OFF, please go back to Step #5
under “PROGRAMMING SPECIFIC EVENTS”
c. SKIP – This will hide or bypass this event that you
might want to use at a later date. The timer will ignore
any “skipped” events. This is helpful for unusual
programming needs, like vacation settings.
d. ERAS (erase) – This will erase the selected event.
- If you selected SKIP or ERASE you can continue to
ST01/ST01K/EI600
In-Wall Timer with Astro or Countdown Feature
Installation and User Guide
Libertyville, Illinois 60048
www.intermatic.com
TIMER INTERFACE
Display
Mode button
On/Off button
– (Decrease) button
+ (Increase) button
Reset button
Access door to
battery tray
PRODUCT DESCRIPTION
The ST01 and EI600 series timers combine scheduling, and
countdown features into one simple-to-install unit. Features
include 7-day programming with optional Automatic Daylight-
Saving Time (DST) adjustment, 40 available event spaces
for building any combination of scheduled events (Dawn,
Dusk or Specific times), RAND (random) feature used to
deter unwanted visitors, providing an “occupied” look when
you’re away, and more. The DOWN (countdown) function is
designed for turning devices Off after activation, ranging from
one second up to 24 hours, and is incandescent, fluorescent,
CFL and LED compatible. The ST01/EI600 can handle most
load types, does not require a neutral wire connection, and
supports three languages, English (ENG), Spanish (SPAN),
and French (FRN), making it ideal for many applications.
IMPORTANT NOTES
Please read these notes before continuing.
• The timer is battery-powered and does not need AC power
for initial setup and programming; it also controls the
ON/OFF function (“clicking” sound) and maintains the time
and date.
• BATT LOW flashes on display when the battery strength
is low.
• When replacing the battery, first disconnect the AC power.
Once the old battery is removed, you’ll have a few minutes
to insert the new battery before the date and time settings
are lost. All other settings will remain in memory, without
battery or AC power.
• AUTO (automatic) and RAND (random) modes don’t appear
in the menu options until at least one ON or OFF event is
programmed.
• All menus “loop” (repeat options at end of menu). When in a
specific MENU, press ON/OFF to loop within that MENU.
• The + or - buttons change what is flashing on the screen.
Hold them down to scroll faster.
• Countdown (DOWN) function allows users to decide
between setting a 3-minute shut-off warning WARN
(warning) or turning WARN (warning) off.
PRE-INSTALLATION
Before programming, install the supplied battery.
• Gently pry open the access door, located below ON/OFF
button, and remove the battery tray from the timer. (Search
for YouTube video for “ST01 Programmable Timer Battery
Replacement”)
• Place the supplied CR2 battery into the tray. Make sure
to match the + and - markings on the battery to the tray.
Install the tray into the timer.
• The product initializes and enters the MAN (manual) MODE
of operation with the time blinking at 12:00 am
Note: If the display does not flash 12:00 am, check/replace
the battery before proceeding.
PROGRAMMING
Follow these steps for initial setup and programming of the
ST01 and EI600 series timers.
Factory Reset Timer
1. Press and hold ON/OFF (continue holding until step 3)
2. Using a paper clip or pen, press and release the RESET
button.
3. When you see INIT on the display then release the ON/
OFF button
PRO-TIP: Choice of languages are ENG (English), FRN
(French), and SPAN (Spanish)
4. Use the + or – to select desired language
5. Press ON/OFF to confirm
6. Use + or – to select the timer’s function you want to use
a. STD (Standard) timer operation (on and off times)
b. DOWN (Countdown) timer
7. Press ON/OFF to confirm
Next Step:
• For Standard Operation (STD): 12:00 am will flash showing
MAN after Factory Reset; to program, go to “Initial Setup.”
• For Countdown Operation (DOWN), the screen will display
OFF; to program, go to “COUNTDOWN OPERATION
ONLY.”
STANDARD OPERATION ONLY
Initial Setup
1. Press the MODE button until you see
SETUP on the display
2. Press the ON/OFF button to confirm
3. Use the + or – to set the current time
of day HOUR (make sure your AM or
PM is correct)
4. Press the ON/OFF button to confirm
5. Use the + or – to set the current time
of day MINUTE
6. Press the ON/OFF button to confirm
7. Press the + or – to set the current
YEAR
8. Press the ON/OFF button to confirm
9. Press + or – to set the current MONTH
10. Press the ON/OFF button to confirm
11. Press + or – to set the current DATE
12. Press the ON/OFF button to confirm
13. Make sure it is showing the correct DAY of WEEK (today)
14. Press the ON/OFF button to confirm
15. Press + or – to select if the timer will adjust for DAYLIGHT
SAVING TIME (DST) in spring and fall
a. AUTO means it will adjust
automatically
b. OFF means it will not change
16. Press the ON/OFF button to confirm
17. Press the + or – to select your TIME
ZONE
a. Alaska (AKT), Atlantic (AT), Central
(CT) (default), Eastern (ET), Hawaii
(HT), Mountain (MT), Newfoundland (NT), Pacific (PT))
18. Press the ON/OFF button to confirm
19. Press + or – to select your COUNTRY (CTRY)
a. USA (default), Mexico (MEX), Canada (CAN)
20. Press the ON/OFF button to confirm
PRO-TIP: Refer to QR code under warranty information for
latitude and longitude chart.
21. Press + or – button to select your LATITUDE (LAT)
22. Press the ON/OFF button to confirm
23. Press + or – button to select your LONGITUDE (LONG)
24. Press the ON/OFF button to confirm
NOTE: No decimal point will be
displayed. For example, LAT 48.0
should be entered as 480
PRO-TIP: You have the option to
“Offset” the Dusk and Dawn
settings from 0 to 99 minutes.
25. Press + or – button to adjust the
current DAWN time (you can include an offset here).
26. Press the ON/OFF button to confirm
27. Press + or – button to adjust the current DUSK time (you
can include an offset here).
28. Press the ON/OFF button to confirm (You will now see
your current time and SETUP) - Proceed to Programming
Setup
Programming Setup
PRO-TIP: Before Standard Programming Setup, you’ll need
to determine which type of schedule fits your
application from the list below
T1= Template 1 - On at DUSK. Off at Dawn
T2= Template 2 - On at DUSK. Off at 10:00 PM
T3= Template 3 - On at DUSK. Off at 10:00 PM.
On at 5:00 AM. Off at Dawn.
Specific Time - ON/OFF
1. Press the MODE button until you see PGM on the screen.
2. Press the ON/OFF button to enter the programming menu.
Advance to “Programming Template Events” or
“Programming Specific Events”.
Programming Template Events
PRO-TIP: Templates are set for all days
initially.
1. When you first enter the PGM menu
press the + or – to select a template.
2. Press the ON/OFF button on the template you wish to use
3. Last step is to press MODE to select AUTO to RAND
(random).
Programming Specific Events
PRO-TIP: You will need a minimum of 2 events
(one for ON and one for OFF)
rev 10/1/2022

158--02515
Step #5 under “PROGRAMMING SPECIFIC EVENTS”
or Press MODE to return to AUTO, RAND (random) or
MAN (manual).
COUNTDOWN OPERATION ONLY
Countdown Setup
PRO-TIP: The time will move faster the
longer you hold down the
button.
1. Use the + or – button to set the
amount of countdown time you would like.
2. Press the ON/OFF button to confirm
3. Press and hold the MODE and ON/OFF buttons and hold
for 5 seconds. The display will show the WARN (warning)
menu.
4. Press the + or – to select FLASH or OFF.
a. Off — the warning function is
turned OFF.
b. Flash — when the timer reaches
3-minutes before shut-off, it will
flash the controlled lights (or other
circuit) for 1 second. A “sunburst” icon will appear on
the display
5. Press the MODE button to confirm
6. Press the + or – to select the desired LOCK option.
a. None — no locking function is set.
b. Pause — users cannot use the Pause function to
suspend the timer countdown.
c. Time — users can review but not change the time
setting. Users can adjust a running countdown but may
not exceed the locked shut-off setting.
d. All — both the pause and setting or changing of the
timer’s shut-off setting is locked.
7. Press the MODE button to confirm, the display will show
OFF
Change the Countdown Time
PRO-TIP: If timer is in LOCK MODE, you may not be able to
make any changes to the set time.
To start or stop countdown, press ON/OFF button.
To pause the countdown, press the Mode button.
1. Press the ON/OFF button until the screen shows OFF
2. Press and hold the + or – button to set the amount of
countdown time you want.
Countdown Operating Tips
• Checking Timer Setting — Press the + or – button to
check the timer setting. The display shows the timer setting
for 2 seconds.
• Setting Timer When Locked — To unlock the timer,
please see the Countdown Setup section.
• Setting Timer When NOT Locked — When timer is NOT
LOCKED, the user can adjust timer settings, but must turn
the timer OFF before adjusting
• Pausing a Countdown — When the timer is NOT locked,
press the MODE button to pause a countdown in progress.
Pause bars flash while the count holds steady. Press MODE
again to continue the countdown or press the ON/OFF
button to power the load OFF.
• Shortening or lengthening a Countdown in progress
— To change remaining countdown in progress, press
and hold the + or – button or the ON/OFF button until the
display shows the time setting you want for this cycle only.
When the timer begins its next cycle, the countdown will
return to the programmed setting.
• When locked you can only increase the amount of
time to the maximum time set.
• Using the Remote Switch in a 3-Way — When
controlling the timer with the remote switch, toggle the
remote switch once to toggle on or off.
INSTALLATION
PRO-TIP: When installing a timer with either a contractor
or motor load, a noise filter is recommended (ET-NF). An
example of single-pole and three-way wiring follow. For other
three-way wiring scenarios, go to www.
intermatic.com.
Disconnect the power at the service
panel.
1. Remove wall switches, if applicable.
2. Strip the existing wire ends to 7/16”.
3. Wire the timer into the wall box.
Single-Pole Wiring
Line Wire A
Wire D
Wire B
Wire C
Neutral
Load
Timer
A Black — Connects to the hot (black) wire from the Power
Source
B Blue — Connects to the other wire (black) from the load
C Red — This wire is not used in single-switch installations.
Capwith a twist connector
D Green — Connects to the supplied ground
Three-Way Wiring
PRO-TIP: The distance between the timer and the remote
switch must not exceed 100 feet.
The wiring shown below is for a timer replacing a three-way
switch at the line side.
Wire E
Line Wire A
Wire D
Wire B
Wire C
Neutral
Load
Timer
3-Way
Switch
A Black — Connect to the wire removed from the “COMMON”
terminal of the switch being replaced
B Blue — Connect to one of the other wires removed from
the switch being replaced. Record the wire color
connected to the blue wire for use during load-side
installation
C Red — Connect to the remaining wire removed from
the switch being replaced. Record the wire color
connected to the red wire for use during load-side
installation
D Green — Connect to the supplied ground
E Jumper Wire — At the other three-way switch, install the
supplied jumper wire between wire B and the
common terminal
FINALIZING INSTALLATION
1. Make sure the provided twist-on wire nuts are secure, then
tuck the wires into the timer wall box, leaving room for the
timer.
2. Using the provided screws, secure the timer to the wall
box.
3. Cover the timer with the wall plate and secure using the
provided screws.
4. For three-way wiring, install the remote switch in wall box.
5. Install the wall plate and secure.
6. Reconnect the power at the service panel.
Testing the Timer
Make sure the timer displays MAN (manual) MODE during
testing
Single-Pole Wiring Test
To test the timer, press ON/OFF several times. The timer
should “click” and the Controlled light or device (load) should
turn ON or OFF.
Three-Way Wiring Test
1. To test the timer, test with the remote switch in each of its
two positions.
2. Press ON/OFF several times. The timer should “click” and
the controlled light or device (load) should turn ON or OFF.
3. If the timer clicks, but the load does not operate:
a. Disconnect the power at the service panel.
b. Re-check wiring and make sure the load is functional.
c. Reconnect the power at the service panel.
d. Retest.
4. If timer clicks, but the load only operates when the remote
switch is in one of its two positions, repeat Step 3, a-d, but
interchange the two traveler wires (wires Between the timer
and the remote three-way switch) connected to red and
blue timer wires
PRO-TIP: Consult a qualified electrician if the switch and
timer fail to operate as intended
5. When the timer “clicks” and the controlled device turns
ON and OFF as programmed, the timer is successfully
installed!
TROUBLESHOOTING
Note: : For more troubleshooting tips, contact Intermatic
Technical Support at: 815-675-7000.
Observed
Problem
Possible Cause What to Do
Timer display is
blank, and the
timer does not
“click” when you
try to turn it on
or off.
• Battery is
missing
• Battery has no
charge
• Battery was
installed
incorrectly
• Install a battery
• Replace the
battery
• Make sure
the battery
is installed
correctly.
TROUBLESHOOTING CONT.
Timer does not
switch ON/OFF
but display looks
normal
• Timer is not
set in AUTO,
RAND, or MAN
MODE
• Battery is low
and needs
replaced
• Press MODE
to select the
operational
MODE you
want to use
• Replace battery
Timer resets to
12:00
• Timer is
installed in
conjunction
with a contactor
or motor load.
• Install a noise
filter (ET-NF) at
source of noise
Timer won’t
enter AUTO or
RAND mode
when “MODE” is
pressed
• No schedule is
selected
• Proceed to
“Programming
Standard
Events” section
Timer operates
at incorrect
times, or skips
programmed
EVENT times
• The active
schedule has
conflicting or
incorrect events
• Battery may be
weak.
• Timer is in
RAND mode,
which varies
switching times
up to +/- 15
minutes
• Review
programed
events, revise
as necessary.
• Replace
battery.
• Select “Auto
Mode”
Load only
operates when:
remote (three-
way) switch is in
one position, or
timer ignores the
remote switch.
• The remote
switch is wired
incorrectly.
• Recheck
the wiring,
especially for
the jumper
The timer ignores
three-way remote
switch even
though it is wired
correctly, or the
load turns off
immediately after
being turned ON
• The remote
switch or
timer is wired
incorrectly.
• There is an
excessive
length of wire
(greater than
100 feet).
• The remote
switch is not
functioning
properly or
worn out.
• Contact a
qualified
electrician
The battery tray
is difficult to
replace.
• Battery is not
seated in the
tray
• The tray is
misaligned
• The contact
tabs in tray are
bent
• Seat the battery
in the tray, then
reinstall.
TROUBLESHOOTING CONT.
The timer
operation is
sluggish, or not
switching ON/
OFF at all.
• Even though
the BATT”
message is
not displayed,
the battery is
getting weak.
• Test battery by
pressing the
ON/OFF button,
there should be
a “click” sound
on the timer
• Replace the
battery
Timer shows ON
but the light or
other controlled
device is OFF.
• The light or
controlled
device itself
may be
switched OFF.
• The breaker
may be tripped
• Loose wiring
connection
• Make sure
the light or
controlled
device is
switched ON
and plugged in.
• Check for a
tripped breaker
• Check wiring
The timer waits
1 second to
power OFF after
pressing the ON/
OFF button or
operating the
remote switch
• This is intentional to allow you to
operate the switch a second time
to restart without powering the load
OFF.
The timer is
acting erratically.
• Operating
software
has become
confused and
needs to be
reset.
• Perform a
Reset: Follow
instructions to
“Factory Reset
Timer”
The timer
setting cannot
be changed,
or the PAUSE
button does not
function.
• The timer
setting or pause
functions are
locked.
• Reset DOWN
(countdown)
MODE by
proceeding to
Step 1, under
“Countdown
Setup”
LIMITED WARRANTY
Warranty service is available by either (a) returning the
product to the dealer from whom the unit was purchased
or (b) completing a warranty claim online at https://www.
intermatic.com/Support/Warranty-Claims. This warranty is
made by: Intermatic Incorporated, 1950 Innovation Way,
Suite 300, Libertyville, IL 60048. For additional product or
warranty information go to: http://www.Intermatic.com or call
815-675-7000, M-F 8AM to 4:30pm
7/16"
Please scan QR code for longitude
and latitude chart