Loading ...
Loading ...
Loading ...
6
• Possible traces of coee in the grinder are the result of
operating tests performed on the appliance before sale,
proof of the meticulous care and attention we invest in
our products.
• The rst time the machine is used, the water circuit will
be empty and the appliance could be very noisy.The noise
becomes less as the circuit lls.
• When starting the machine for the rst time, make cer-
tain that the water spout (D5) is tted.
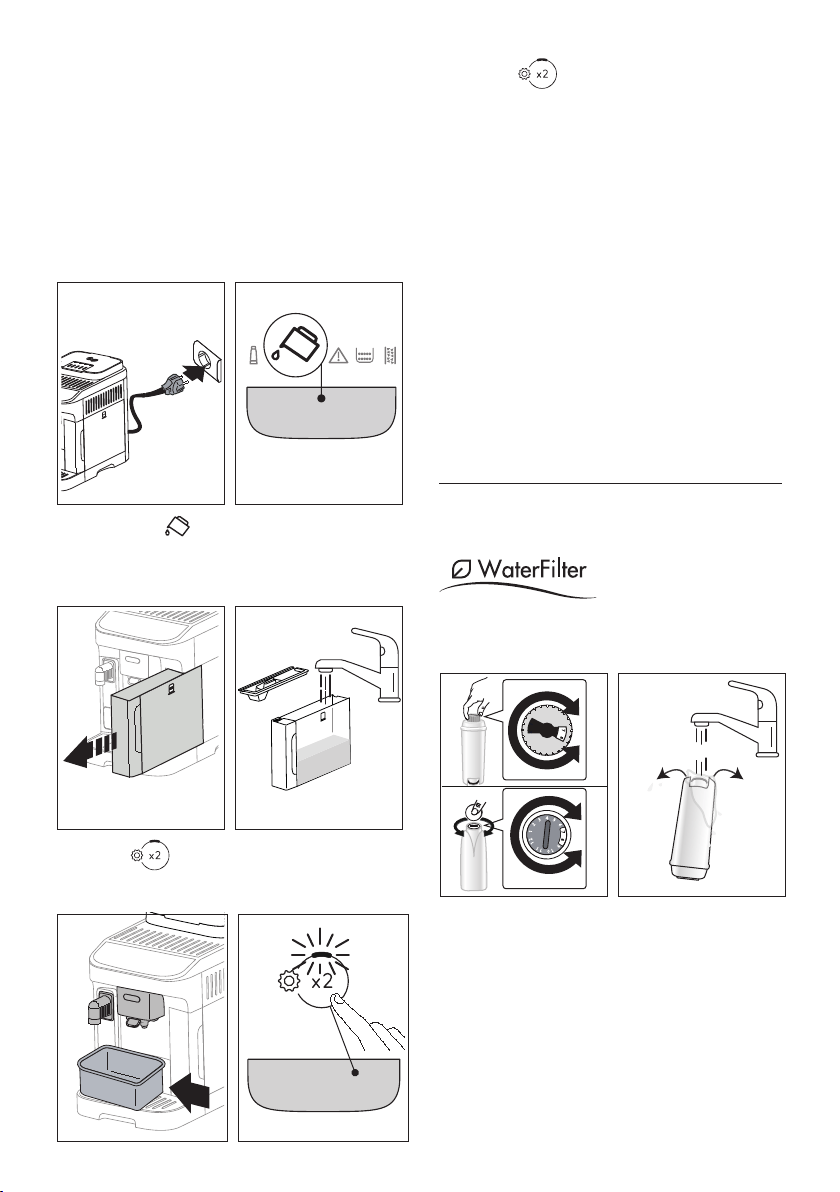
1. Connect the appliance to the mains supply (g. 1).
1 2
2. The indicator (C2)
will light up on the control panel
(B) (g. 2)
: remove the water tank (A9)
(g. 3)
, ll up to
the MAX level with fresh drinking water (
g. 4)
, then
reposition in the appliance.
4
MAX
3
3. The Led (B2)
on the control panel will blink rapidly.
4. Position a container under the coee spout
(A17) and
water spout (D5) (g. 5).
65
5. Press the
button (g. 6): the internal water circuits
start to ll
and the appliance will release hot water from
the water spout.
6. The ow will be interrupted, then after a few seconds, the
machine releases water from the coee spout.
When the ow of water stops completely,
the machine is ready
for use.
Please note:
• The rst time the appliance is used, it will be necessary to
make 4-5 cappuccinos before the drink in the cup tastes
as it should.
• It is recommended that the water lter supplied be in-
stalled immediately. After two months (see date indica-
tor), or after 3 weeks if the appliance has not been used,
the lter should be replaced or removed even if the warn-
ing indicator (C1)is not alight.
• Customise water hardness as soon as possible (section “5.
Measuring water hardness”).
4. WATER SOFTENER FILTER
To ensure the performance of the machine remains constant over
time, we recommend using a De’Longhi water softener lter.
For more information, visit the www.delonghi.com website.
EAN: 8004399327252
To use the lter correctly, follow the instructions below.
1. Remove the lter (D4) from the pack and turn the date
indicator so that it shows the next 2 months (g. 7);
87
0,5 L
2. To activate the lter, run drinking water through the hole
in the centre of the lter until water comes out of the
openings at the side for more than a minute (g. 8);
3. Remove the tank (A9)from the machine (g. 4) and ll with
fresh drinking water; insert the lter in the water tank, im-
mersing it completely for about ten seconds, while tilting it
and applying light pressure so that the air bubbles are able
to escape (g. 9);
Loading ...
Loading ...
Loading ...