Read this booklet thoroughly before using this coffee machine for the quick use.
INSTRUCTION BOOKLET
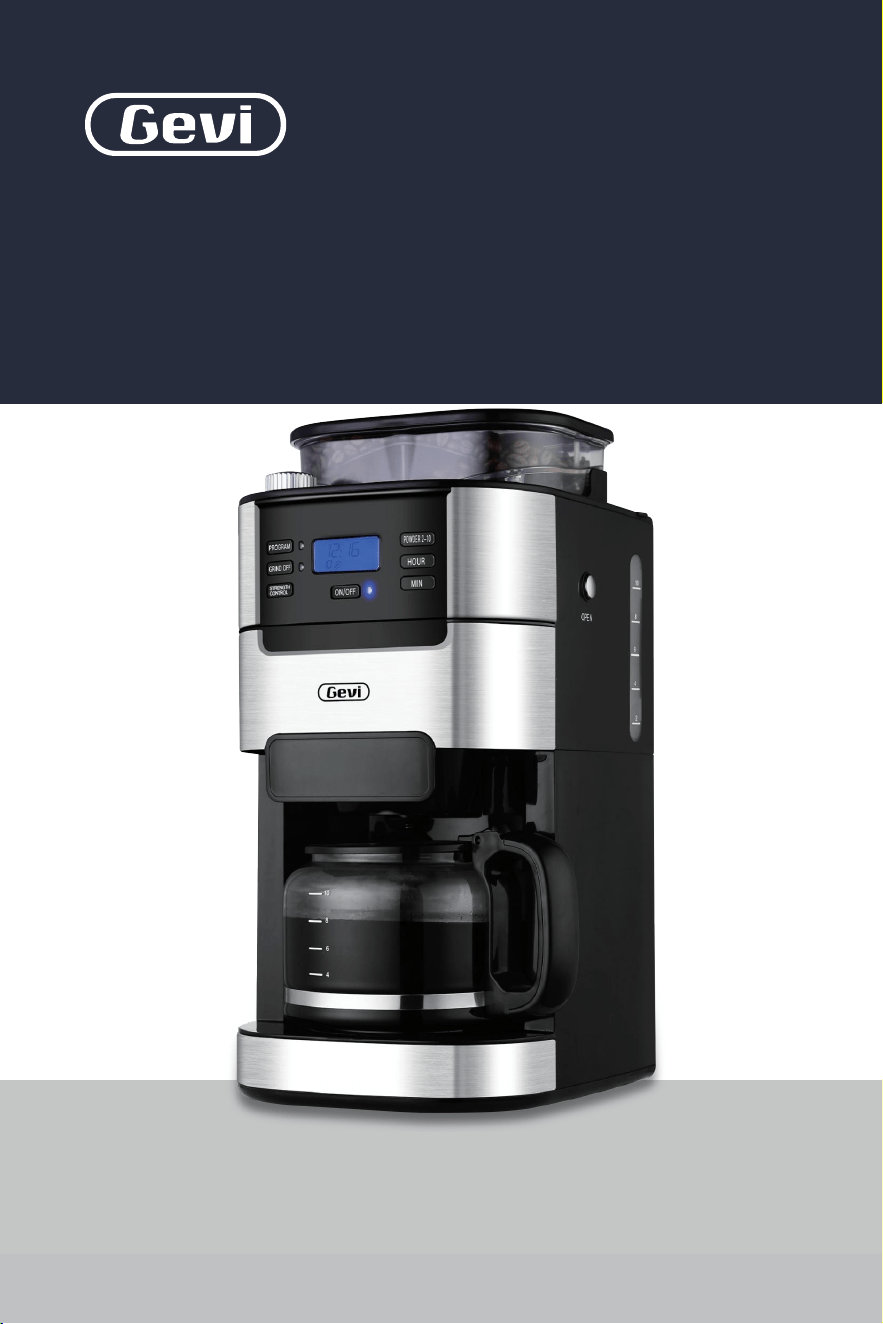
2-in-1 Smart
Drip Coffee Machine
Grinder | Brewer
GECMA025AK-U
Please read all the owner’s instruction booklet before use.

11
20
20
20
22
22
22
23
09
01
12
23
33
05
1. Important Safeguards
2. Know Your Machine
3. More Details
4. Before First Use
5. Making Perfect Coffee Guide
6. Other Functions
6.1 Switched On & Off
6.2 Programming the Time
6.3 Switch-Off Time Setting
6.4 Blooming Setting
6.5 Brew Pause Feature
6.6 Button Sound Setting
7. Cleaning & Maintenance
8. Troubleshooting
9. Warranty
Contents
. . . . . . . . . . . . . . . . . . . . . . . . . . . . . . . . . . . . . . . . .
. . . . . . . . . . . . . . . . . . . . . . . . . . . . . . . . . . . . . . . . . . . .
. . . . . . . . . . . . . . . . . . . . . . . . . . . . . . . . . . . . . . . . . . . . . . . . . . .
. . . . . . . . . . . . . . . . . . . . . . . . . . . . . . . . . . . . . . . . . . . . . . . .
. . . . . . . . . . . . . . . . . . . . . . . . . . . . . . . . . . .
. . . . . . . . . . . . . . . . . . . . . . . . . . . . . . . . . . . . . . . . . . . . . . .
. . . . . . . . . . . . . . . . . . . . . . . . . . . . . . . . . . . . . . . . . . . .
. . . . . . . . . . . . . . . . . . . . . . . . . . . . . . . . . . . . . . .
. . . . . . . . . . . . . . . . . . . . . . . . . . . . . . . . . . . . . . . . . . . . .
. . . . . . . . . . . . . . . . . . . . . . . . . . . . . . . . . . . . . . .
. . . . . . . . . . . . . . . . . . . . . . . . . . . . . . . . . . . . . . . . . .
. . . . . . . . . . . . . . . . . . . . . . . . . . . . . . . . . . . . . . .
. . . . . . . . . . . . . . . . . . . . . . . . . . . . . . . . . . . . . . .
. . . . . . . . . . . . . . . . . . . . . . . . . . . . . . . . . . . . . . . . . . . . . . .
39
. . . . . . . . . . . . . . . . . . . . . . . . . . . . . . . . . . . . . . . . . . . . . . . . . . . . . . .

21
1. Important Safeguards1. Important Safeguards
When using electrical machine, basic safety precautions should
always be followed, including the following:
1. Read all instructions.
2. Do not touch hot surfaces. Use handles or knobs.
3. To protect against fire, electric shock and injury to persons do not
immerse cord, plugs, base or the machine in water or other liquid.
4. Close supervision is necessary when any machine is used by or
near children.
5. Unplug from outlet when either the machine or display clock is
not in use, and before cleaning. Allow to cool before putting on or
taking off parts, and before cleaning the machine.
6. Do not operate any machine with a damaged cord or plug or after
the machine malfunctions, or has been damaged in any manner.
Return machine to the nearest authorized service facility for
examination, repair or adjustment.
7. The use of accessory attachments not recommended by the
machine manufacturer may result in fire, electric shock or injury
to persons.
8. Do not use outdoors .
9. Do not let cord hang over edge of table or counter, or touch hot
surfaces.
10.
Do not place on or near a hot gas or electric burner, or in a heated
oven.
11. Always attach plug to machine first, then plug cord into the wall
outlet. To disconnect, turn any control to off position, then
remove plug from wall outlet.
12.
Do not use machine for other than intended use.
13. Special instructions covering lid placement and removal. Wording
may vary.
14. Scalding may occur if the lid is removed during the brewing cycles.
15. The glass carafe is suitable for this machine only. Do not put it on a
range top unless specific instructions are provided and precautions
are observed.
16. Do not set a hot container on a wet or cold surface.
17. Do not use a cracked container or a container having a loose or
weakened handle.
18. Do not clean container with cleansers, steel wool pads, or other
abrasive material.Scalding may occur if the lid is removed during
the brewing cycles.
19. Check grinder basket for presence of foreign objects before using.
20. Avoid contacting with moving parts.
21. Use the coffee grinder to grind roasted coffee beans only.
Grinding other substances, such as nuts, spices or unroasted
beans, may dull the blade and cause poor grinding or injury.
22. Do not place cloth beneath machine or otherwise restrict
airflow.
23.
Use only the Gevi Filter with this unit. Other filters may cause
the machine to over flow.
24. Do not operate the machine in a machine garage or under a wall
cabinet. When storing in a machine garage, always unplug the
unit from the electrical outlet. Not doing so could create a risk of
43
1. Important Safeguards 1. Important Safeguards
fire, especially if the machine touches the walls of the garage or
the door touches the unit as it closes.
Power cord instructions:
A short power-supply cord (or detachable power-supply cord) may
be provided to reduce risks resulting from becoming entangled in
or tripping over a longer cord. Longer detachable power supply cords
or extension cords are available and may be used if care is exercised
in their use. If a long detachable power-supply cord or extension
cord is used:
a. The marked electrical rating of the detachable power-supply
cord or extension cord should be at least as great as the
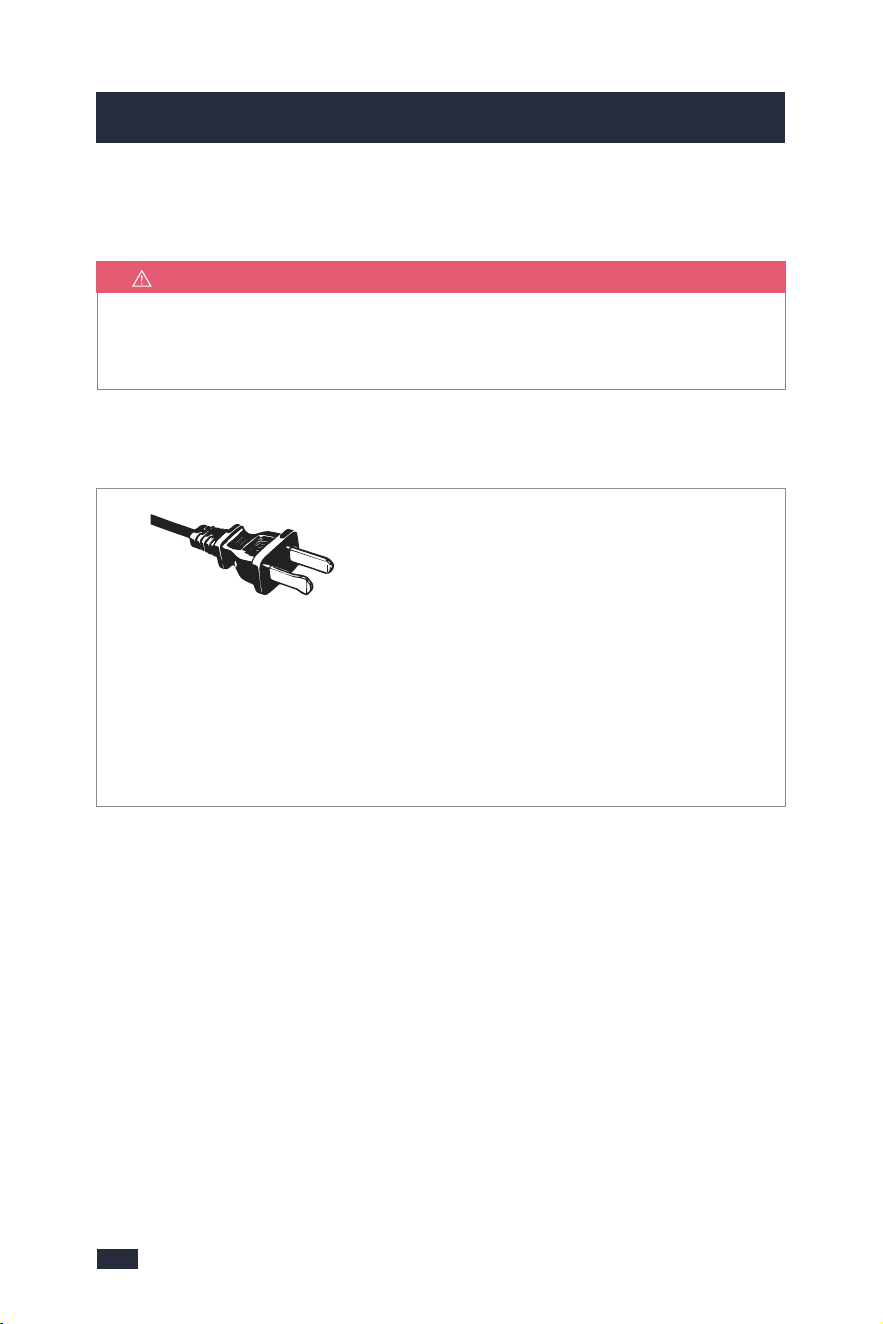
North American Models With Grounded Plugs:
This machine has a polarized plug, (one blade is
wider than the other). As a safety feature to reduce
the risk of electrical shock, this plug is intended to fit in a polarized outlet only one
way. If the plug does not fit fully in the outlet, reverse the plug. If it still does not fit,
contact a qualified electrician. Do not attempt to defeat this safety feature or modify
the plug in any way. If the plug fits loosely into the AC outlet or if the AC outlet feels
warm do not use that outlet.
Polarized Plug
NOTE
For electronic instruction booklet, please contact Gevi support team.
SAVE THIS INSTRUCTION BOOKLET
electrical rating of the machine.
b. If the machine is of the grounded type, the extension cord should
be a grounding type 3-wire cord.
c. The Longer cord should be arranged so that it will not drape
over the counter top or table top where it can be pulled on by
children or tripped over unintentionally.
Do not pull, twist or otherwise abuse the power cord.
Product notices:
a. Place the machine on a hard, flat, level surface to avoid
interruption of airflow underneath the machine.
b. Do not operate the machine with an empty water tank.

43
1. Important Safeguards 1. Important Safeguards
fire, especially if the machine touches the walls of the garage or
the door touches the unit as it closes.
Power cord instructions:
A short power-supply cord (or detachable power-supply cord) may
be provided to reduce risks resulting from becoming entangled in
or tripping over a longer cord. Longer detachable power supply cords
or extension cords are available and may be used if care is exercised
in their use. If a long detachable power-supply cord or extension
cord is used:
a. The marked electrical rating of the detachable power-supply
cord or extension cord should be at least as great as the
North American Models With Grounded Plugs:
This machine has a polarized plug, (one blade is
wider than the other). As a safety feature to reduce
the risk of electrical shock, this plug is intended to fit in a polarized outlet only one
way. If the plug does not fit fully in the outlet, reverse the plug. If it still does not fit,
contact a qualified electrician. Do not attempt to defeat this safety feature or modify
the plug in any way. If the plug fits loosely into the AC outlet or if the AC outlet feels
warm do not use that outlet.
Polarized Plug
NOTE
For electronic instruction booklet, please contact Gevi support team.
SAVE THIS INSTRUCTION BOOKLET
electrical rating of the machine.
b. If the machine is of the grounded type, the extension cord should
be a grounding type 3-wire cord.
c. The Longer cord should be arranged so that it will not drape
over the counter top or table top where it can be pulled on by
children or tripped over unintentionally.
Do not pull, twist or otherwise abuse the power cord.
Product notices:
a. Place the machine on a hard, flat, level surface to avoid
interruption of airflow underneath the machine.
b. Do not operate the machine with an empty water tank.

65
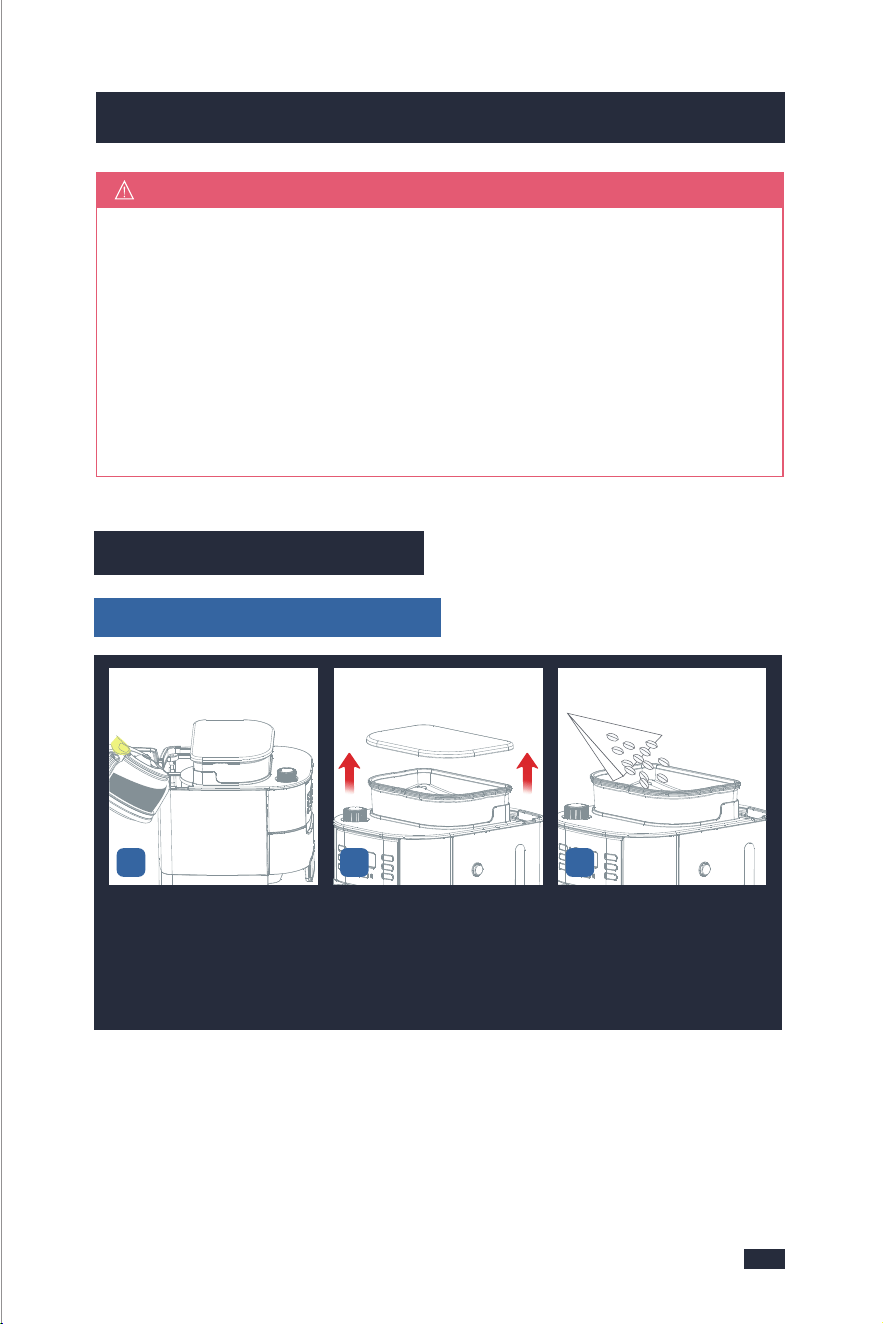
2. Know Your Machine 2. Know Your Machine
Used for adding coffee beans to the bean hopper
or adding the coffee powder to the filter.
Used to fix the filter insert.
- The easy-pour and dripless carafe is available
for making coffee for 2 to 10 cups.
- The cup markings on the carafe are the same
as that on the water tank. You can fill water
according to the markings to get the same
cups of coffee.
Filter Ring
Ensures no steam is leaking out when brewing
to stabilize the coffee temperature.
Holds paper filter or permanent filter.
Reusable for brewing coffee. Do not use it with
a paper filter together.
Comes with 8 grind settings for different needs
of powder sizes.
Prevents the coffee beans from splashing and
keeps the freshness of beans.
Holds a maximum of 250g of beans.
A crystal-clear LCD screen comes together with
highly-intuitive controls, more simple and
convenient to operate and bring you a perfect
coffee-making experience.
Can be pressed to release the filter basket.
⓬
⓬
Water Tank
1.5L Large Capacity Water Tank max to 10
cups.
Warming Plate
⓭
⓭
Available for setting the warm-keeping time
from 0 to 120min.
Re. Description Specification
❺
❺
Coffee Carafe
Grind Regulator
❼
❼
❾
❾
Bean Hopper
❿
❿
Control Panel
Measuring Spoon
❻
❻
⓫
⓫
Filter Basket Release
Button
❷
❷
Permanent Filter
❽
❽
Bean Hopper Lid
❶
❶
❸
❸
Filter Insert With
Drip Stop
❹
❹
Swing-out Filter
Basket
Electrical Parameters: 120V~ 60Hz 900W
Model: GECMA025AK-U
65
2. Know Your Machine 2. Know Your Machine
Used for adding coffee beans to the bean hopper
or adding the coffee powder to the filter.
Used to fix the filter insert.
- The easy-pour and dripless carafe is available
for making coffee for 2 to 10 cups.
- The cup markings on the carafe are the same
as that on the water tank. You can fill water
according to the markings to get the same
cups of coffee.
Filter Ring
Ensures no steam is leaking out when brewing
to stabilize the coffee temperature.
Holds paper filter or permanent filter.
Reusable for brewing coffee. Do not use it with
a paper filter together.
Comes with 8 grind settings for different needs
of powder sizes.
Prevents the coffee beans from splashing and
keeps the freshness of beans.
Holds a maximum of 250g of beans.
A crystal-clear LCD screen comes together with
highly-intuitive controls, more simple and
convenient to operate and bring you a perfect
coffee-making experience.
Can be pressed to release the filter basket.
⓬
⓬
Water Tank
1.5L Large Capacity Water Tank max to 10
cups.
Warming Plate
⓭
⓭
Available for setting the warm-keeping time
from 0 to 120min.
Re. Description Specification
❺
❺
Coffee Carafe
Grind Regulator
❼
❼
❾
❾
Bean Hopper
❿
❿
Control Panel
Measuring Spoon
❻
❻
⓫
⓫
Filter Basket Release
Button
❷
❷
Permanent Filter
❽
❽
Bean Hopper Lid
❶
❶
❸
❸
Filter Insert With
Drip Stop
❹
❹
Swing-out Filter
Basket
Electrical Parameters: 120V~ 60Hz 900W
Model: GECMA025AK-U

87
1. PROGRAM Button
Programmable time-setting for auto coffee.
2. GRIND OFF Button
For turning off the grinder if pre-ground coffee is used.
3. STRENGTH CONTROL Button
Three selectable strength levels - strong, medium and mild.
4. PROGRAM Indicator
The PROGRAM Indicator stays fully illuminated when in the PROGRAM
function.
5. GRIND OFF Indicator
The GRIND OFF Indicator stays fully illuminated after you turn off the
grinding function.
6. ON/OFF Button
Press the button to turn on the machine, and long press it for 2 seconds to
cut off the screen.
7. ON/OFF Indicator
The ON/OFF Indicator stays fully illuminated during grinding, brewing, or
keeping warm.
8. Display Screen
Easy to read LCD display, shows a 24-hour clock, auto-on program, current
cup quantity, and coffee strength.
9. POWDER 2-10 Button
Allows you to customize the powder quantities according to the cup
quantities.
10. HOUR Button
For programming the hour. Hold buttons down to scroll through the
digits quickly, or press and release to advance one digit at a time.
11. MIN Button
For programming the minute. Hold buttons down to scroll through the
digits quickly, or press and release to advance one digit at a time.
2. Know Your Machine
Control Panel
1
4
5
6
2
3
9
10
11
8
7

Brew with Whole Beans or Coffee Grinds
-Place the coffee beans in the bean hopper.
-Put the coffee grinds in the filter.
Keep Warm Function
After brewing, coffee in the carafe can be
warmed at around 158-176℉ on the
warming plate for up to 120 minutes.
2-10 Cup Grinding Selection
Accurately controls the bean or powder
amounts.
1.5L Large Capacity Tank
- Can brew up to 10 cups of coffee. Set
powder amount (2, 4, 6, 8 or 10 cups) by
pressing the POWDER 2-10 button
according to your need.
- The default value is 10 cups.
2-in-1 Smart Drip Coffee Machine
2-in-1 smart drip coffee grinder & brewer
machine,each element held to the most
exacting professional grade standards for
a quick cup of coffee.
Switch-Off Time Function
- The warming plate will remain on for
max. 120 minutes after the coffee is
prepared.
- The heat preservation time is customizable,
and the switch-off time can be set to: 0/15/
35/45/60/75/90/100/120 minutes.
24h Programmable Automatic
Start Function
Put coffee beans/powder and set the
time in advance, it will operate automatically.
8 Coffee Grind Size Settings
Choose the correct grind size for your
favorite brewing method.
Built-in Stainless Steel Burr Grinder
- Includes conical burrs.
- Produces perfectly consistent particle
sizes ideal for coffee brew.
Advanced Coffee Powder
Straight Drop Structure
Less coffee powder residue is produced
and is not likely to be blocked.
Blooming Function
In order to retain a more full-bodied
coffee aroma, the machine features
blooming function.
The coffee grounds are moistened with
hot water before brewing and they will
swell up, because of which the coffee
taste will become more intense.
Drip-Stop Function
Allows you to pull out coffee carafe
within 30 seconds before brewing is finished.
109
3. More Details

1211
Both Coffee Carafe and Filter Insert
With Drip Stop are NOT DISHWAS-
HER SAFE.
NOTE
Do not fill the water tank past the
10 cup mark of water level
indicator. Doing so could cause
carafe to overflow.
NOTE
These priming steps must be
completed prior to first use.
IMPORTANT
If there is no water flowing out in
Step 2, please refer to Troubles-
hooting, page 37.
NOTE
Step 1 - Press the ON/OFF Button to
start and the Indicator will be illumi-
nated. It will get into heating.
Step 2 - The machine starts processing
the water into the carafe.
Step 3 - After all of the water has passed
through, push the ON/OFF Button
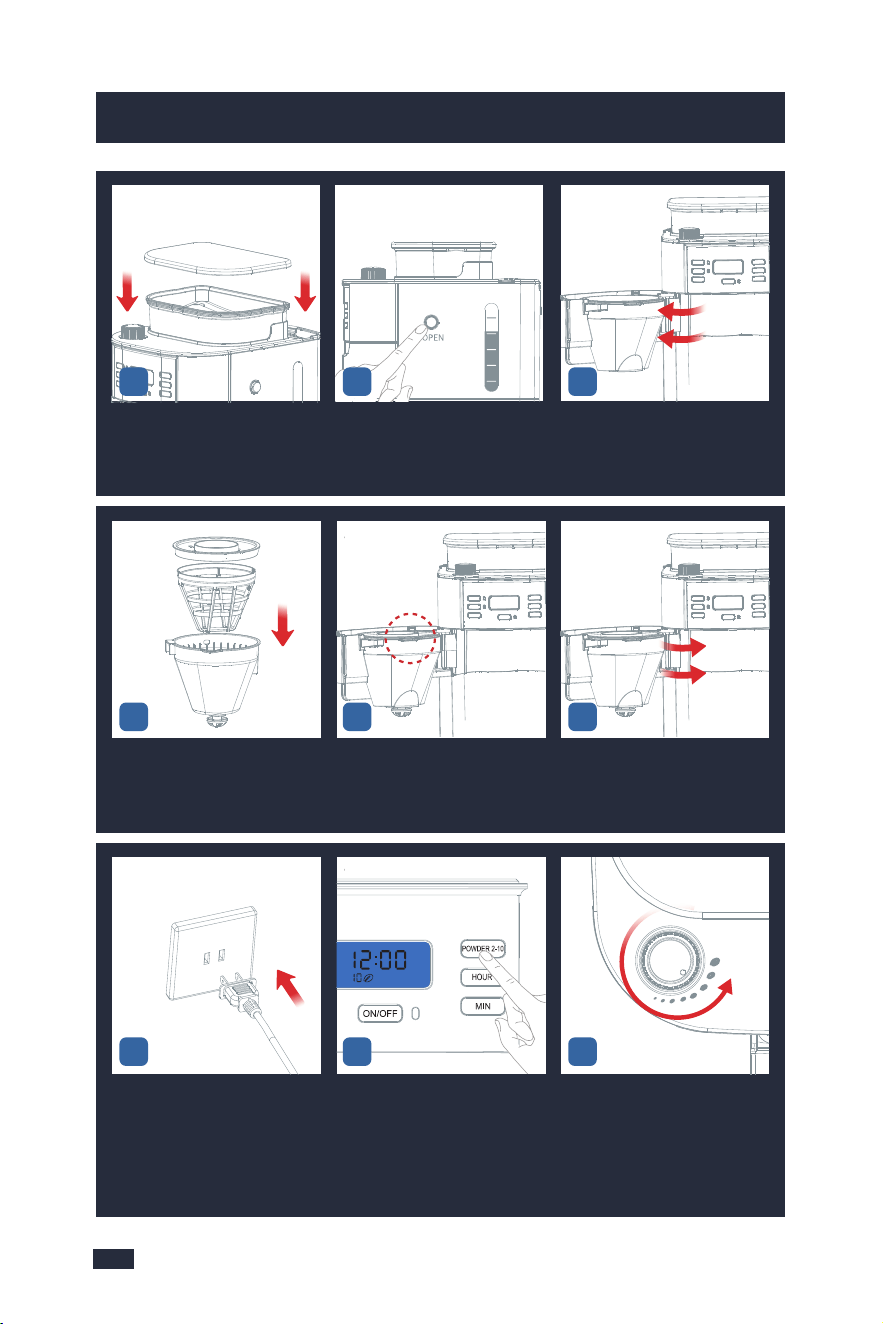
4. Before First Use 4. Before First Use
5. Making Perfect Coffee Guide
Ensure all packaging has been
removed.
4.1 Remove Packaging
Ensure the machine is always
positioned onto a dry, stable, flat
horizontal counter top.
4.2 Position Machine
Wash the parts listed below in warm
water:
- Filter Ring
- Permanent Filter
- Filter Insert With Drip Stop
- Bean Hopper Lid
- Measuring Spoon
- Coffee Carafe
Rinse & allow thorough air drying.
4.3 Wash & Dry Parts
5.1 Tips for Perfect
Coffee
4.4 Prime the Machine
- Open the lid and fill enough pure
water(recommended) in advance
then close it.
Place the Coffee Carafe on the Warming
Plate.
CleaningFill Water Tank
Place Coffee Carafe
1 - This machine is not suitable for
deep-roasted beans. Dark, greasy
beans can leave some greasy residue
on the burrs and in the feeder cha-
nnels. The oil residue can cause the
ground coffee to stick in the feeder
passages and clog the grinder. Over
time, this slows down the flow of
ground coffee. The amount of ground
coffee is controlled by the grinding
time after the selection of the coffee
cup. Therefore, it will not grind all the
beans at one time. If it continues to
Prepare the Beans
grind, the ground beans will not reach
the required fineness, and eventually,
the motor will get stuck and cannot
run, resulting in burnout.
2 - Do not fill the bean hopper with
frozen or coated beans, moisture will
seep onto the burr and feeder channels.
Over time this will cause the same result
as that of point 1.
3 - Do not add any liquid flavorings or
syrups to the beans, otherwise, it will
cause the same result as that of point 1.
4 - Add an appropriate amount of
coffee beans, no more than 250g each
time, because the coffee beans will
become wet overnight, and doing
this will cause the same result as that
of point 1.
- Insert the Power Plug into a 120V
AC power outlet & switch the power on.
- The default settings are grinding
beans and brewing 10 cups of coffee.
The time value on the screen will flash.
Power
MAX
to exist the Keep Warm Function.
Step 4 - Empty the carafe. Repeat the
above steps for 2 times.
2
6
4
8
10

1211
Both Coffee Carafe and Filter Insert
With Drip Stop are NOT DISHWAS-
HER SAFE.
NOTE
Do not fill the water tank past the
10 cup mark of water level
indicator. Doing so could cause
carafe to overflow.
NOTE
These priming steps must be
completed prior to first use.
IMPORTANT
If there is no water flowing out in
Step 2, please refer to Troubles-
hooting, page 37.
NOTE
Step 1 - Press the ON/OFF Button to
start and the Indicator will be illumi-
nated. It will get into heating.
Step 2 - The machine starts processing
the water into the carafe.
Step 3 - After all of the water has passed
through, push the ON/OFF Button
4. Before First Use 4. Before First Use
5. Making Perfect Coffee Guide
Ensure all packaging has been
removed.
4.1 Remove Packaging
Ensure the machine is always
positioned onto a dry, stable, flat
horizontal counter top.
4.2 Position Machine
Wash the parts listed below in warm
water:
- Filter Ring
- Permanent Filter
- Filter Insert With Drip Stop
- Bean Hopper Lid
- Measuring Spoon
- Coffee Carafe
Rinse & allow thorough air drying.
4.3 Wash & Dry Parts
5.1 Tips for Perfect
Coffee
4.4 Prime the Machine
- Open the lid and fill enough pure
water(recommended) in advance
then close it.
Place the Coffee Carafe on the Warming
Plate.
CleaningFill Water Tank
Place Coffee Carafe
1 - This machine is not suitable for
deep-roasted beans. Dark, greasy
beans can leave some greasy residue
on the burrs and in the feeder cha-
nnels. The oil residue can cause the
ground coffee to stick in the feeder
passages and clog the grinder. Over
time, this slows down the flow of
ground coffee. The amount of ground
coffee is controlled by the grinding
time after the selection of the coffee
cup. Therefore, it will not grind all the
beans at one time. If it continues to
Prepare the Beans
grind, the ground beans will not reach
the required fineness, and eventually,
the motor will get stuck and cannot
run, resulting in burnout.
2 - Do not fill the bean hopper with
frozen or coated beans, moisture will
seep onto the burr and feeder channels.
Over time this will cause the same result
as that of point 1.
3 - Do not add any liquid flavorings or
syrups to the beans, otherwise, it will
cause the same result as that of point 1.
4 - Add an appropriate amount of
coffee beans, no more than 250g each
time, because the coffee beans will
become wet overnight, and doing
this will cause the same result as that
of point 1.
- Insert the Power Plug into a 120V
AC power outlet & switch the power on.
- The default settings are grinding
beans and brewing 10 cups of coffee.
The time value on the screen will flash.
Power
MAX
to exist the Keep Warm Function.
Step 4 - Empty the carafe. Repeat the
above steps for 2 times.
2
6
4
8
10

1413
5. Making Perfect Coffee Guide 5. Making Perfect Coffee Guide
5.2 Operation
Use the correct method to adjust the
grind size settings. If you want to
adjust the grind size setting, there
are some notes listed below you
need to be aware of:
1 - When you want to adjust a fine
setting to a coarser setting, just
rotate the Grind Regulator directly
before grinding.
2 - When you want to adjust a coarse
setting to a finer setting.
a - If there are no coffee beans inside
the grinder, you can rotate the Grind
Regulator directly to achieve your
setting.
b - But if there are coffee beans inside
the grinder, you cannot rotate the
Grind Regulator forcibly, otherwise,
grinder damage may occur. In this
case, you can either grind all the
coffee beans inside the grinder and
then adjust the grind setting, or grind
beans and rotate the Grind Regulator
simultaneously to achieve your fine
setting.
1 - Do not let other objects enter the
water tank, and cover the lid in time
after adding water.
2 - You can also use a permanent filter
instead of a disposable coffee filter.
The permanent filter and filter paper
cannot be used at the same time.
3 - The amount of water added should
be the same as the amount of powder
cup you choose, for example, if you
choose 2 cups of coffee and you should
add 2 cups of water, otherwise the
machine will finish boiling all the water
in the water tank, which would make
the coffee weak.
Use the supplied Measuring Spoon for
purpose. Refer to the following table for
the required amount:
Adjust Grind Setting
Brewing Coffee
Make Coffee With Coffee Beans
5 - After adding the coffee beans, close
the lid again and press down hard to
prevent water from entering the bean
hopper, otherwise, it will cause the
same result as that of point 1.
2
4
6
8
10
1½ - 2
3 - 4
4½ - 6
6 - 8
8 - 10
Number of cups Number of scoops
- 7g or 1 spoon of powder for 1- cup coffee recommended, but you may
adjust according to personal taste.
- The maximum capacity for ground coffee is 70g coffee powder, using
either a disposable coffee filter or permanent filter. Exceeding that amount
may cause overflow if the coffee is too finely ground.
- Be sure the filter handle is facing away from the grinder basket, so it
does not interfere with the flow of ground coffee into the filter basket.
- Do not place parts of the body under the drip stop while the machine is
in operation.
TIPS
Put your desired amount of
water into the carafe according
to its markings, then open the
water tank lid and pour the
water in.
Open the lid of the bean hopper
and wipe it with a dry cloth to
make sure it is dry inside.
Add no more than 250g of coffee
beans to the bean hopper.
1 2 3
1615
5. Making Perfect Coffee Guide 5. Making Perfect Coffee Guide
Replace and firmly press down
the lid to prevent beans from
spilling out from the bean
hopper.
Press lightly and vertically the
Filter Basket release button to
open the swing-out filter basket.
The swing-out filter basket is
open.
Put the permanent filter or
paper filter and filter ring into
the filter insert to become a
whole filter assembly.
Make sure the tube of the filter
assembly aligns with the groove
of the swing-out filter basket.
Close the Swing-out Filter
Basket firmly.
Insert the Power Plug into a
120V AC power outlet.
According to added water volu-
me, press the POWDER 2-10 But-
ton to select the required amount
of coffee grinds.
Set the grind regulator to the
required grind.
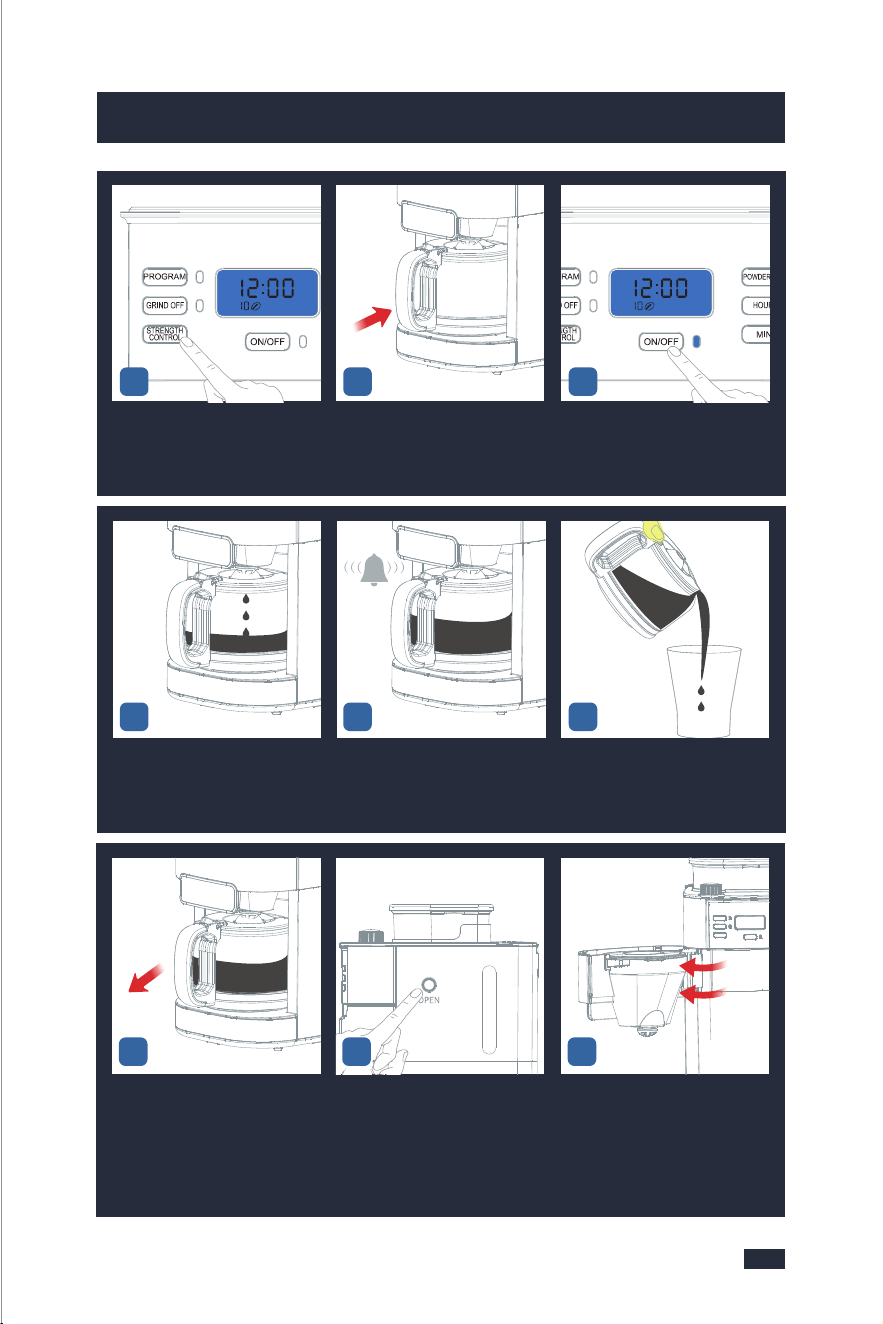
- Turn the regulator anticlock-
wise to grind the coffee coarser.
- Turn the regulator clockwise
to grind the coffee finer.
7 9
Press the "STRENGTH CONTROL"
button to select coffee strength.
There are 3 levels of strength,
and the default level is mild.
Place the coffee carafe on the
warming plate.
Press the ON/OFF Button to start
making coffee and the Indicator
will be illuminated. It will grind
beans first, then get into heating.
The machine begins to brew (
press the ON/OFF Button to
interrupt the flow of the coffee
from the basket ).
Buzzer will sound 3 times to
notice you when the coffee is
done.
Press the edge of the lid with
your thumb and pour the coffee
at the correct angle.
17
10 12
4
2
6
4
8
10
5 6
8
11
13 14 15
16 18
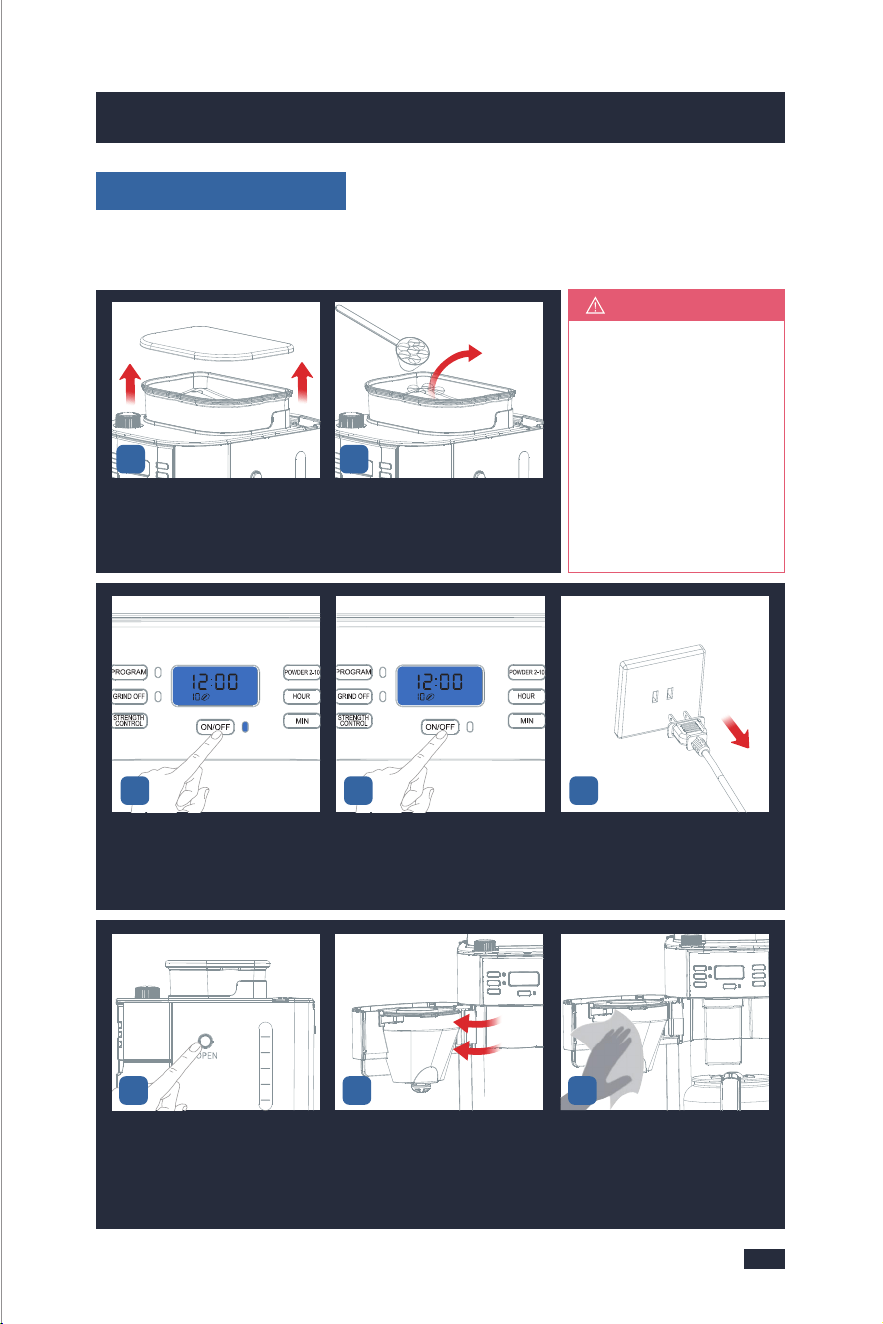
Take out the Coffee Carafe. Press the Filter Basket Release
Button.
Open the Swing-out Filter
Basket.
19 21
2
6
4
8
10
20
1615
5. Making Perfect Coffee Guide 5. Making Perfect Coffee Guide
Replace and firmly press down
the lid to prevent beans from
spilling out from the bean
hopper.
Press lightly and vertically the
Filter Basket release button to
open the swing-out filter basket.
The swing-out filter basket is
open.
Put the permanent filter or
paper filter and filter ring into
the filter insert to become a
whole filter assembly.
Make sure the tube of the filter
assembly aligns with the groove
of the swing-out filter basket.
Close the Swing-out Filter
Basket firmly.
Insert the Power Plug into a
120V AC power outlet.
According to added water volu-
me, press the POWDER 2-10 But-
ton to select the required amount
of coffee grinds.
Set the grind regulator to the
required grind.
- Turn the regulator anticlock-
wise to grind the coffee coarser.
- Turn the regulator clockwise
to grind the coffee finer.
7 9
Press the "STRENGTH CONTROL"
button to select coffee strength.
There are 3 levels of strength,
and the default level is mild.
Place the coffee carafe on the
warming plate.
Press the ON/OFF Button to start
making coffee and the Indicator
will be illuminated. It will grind
beans first, then get into heating.
The machine begins to brew (
press the ON/OFF Button to
interrupt the flow of the coffee
from the basket ).
Buzzer will sound 3 times to
notice you when the coffee is
done.
Press the edge of the lid with
your thumb and pour the coffee
at the correct angle.
17
10 12
4
2
6
4
8
10
5 6
8
11
13 14 15
16 18
Take out the Coffee Carafe. Press the Filter Basket Release
Button.
Open the Swing-out Filter
Basket.
19 21
2
6
4
8
10
20
1817
5. Making Perfect Coffee Guide 5. Making Perfect Coffee Guide
Make Coffee With Coffee Powder
Insert the Power Plug. The machine
switches on automatically.
Press lightly and vertically the
Filter Basket release button to
open the swing-out filter.
The swing-out filter is open. Put the permanent filter into
the filter insert.
Put your desired amount of
water into the carafe according
to its markings, then open the
water tank lid and pour the
water in.
Don't exceed the 10cups line of
the water tank, and also do not
add too little water.
Take out the Coffee Carafe.
Make sure the tube of the filter
assembly aligns with groove
of the swing-out filter basket.
Add your desired coffee powder
into the filter but not past the
max line.
Put the filter ring onto the swing-
out filter basket.
1 3
6
7 8 9
Wipe the top of the Swing-out
Filter Basket.
Take out the filter insert with
drip stop together with the
permanent filter and filter
ring.
Discard the used coffee grounds.
2422
Insert the Power Plug. The machine
switches on automatically.
Wipe the powder outlet and
the inside around with a clean
dry cloth. (Be careful not to
touch the Warming Plate).
Wash the accessories with clean
water and wipe them with a
cloth.
Install them back after
cleaning.
26 27
Insert the Power Plug. The machine
switches on automatically.
Close the Swing-out Filter
Basket lightly.
Put the coffee carafe back in
place.
2928
2
6
4
8
10
2
2
6
4
8
10
4
25
23
5

2019
5. Making Perfect Coffee Guide 5. Making Perfect Coffee Guide
Cleaning after every use guarantees the flavors of your coffee, refer to "Make
Coffee With Coffee Beans ",steps 19-29,on page 16.
NOTE
1 - Do not open the Swing-out Filter Basket while the machine is brewing
coffee, otherwise, the steam will wet the powder at the powder outlet
which possibly damages the grinding system.
2 - While the coffee is brewing you can remove the carafe to pour a cup
or two. The drip stop will close automatically. To avoid any overflow,
replace the carafe within 30 seconds.
NOTE
Insert the Power Plug. The machine
switches on automatically.
Press the "STRENGTH CONTROL"
button to select coffee strength.
There are 3 levels of strength,
and the default level is mild.
Place the coffee carafe on the
warming plate.
Press the ON/OFF Button to
start making coffee and the
Indicator will be illuminated.
It will get into heating.
Close the swing-out filter
basket firmly.
Insert the Power Plug into a
120V AC power outlet.
Press the GRIND OFF Button to
cancel grinding, and the GRIND
OFF Indicator will stay fully
illuminated.
The machine begins to brew (
press the ON/OFF Button to
interrupt the flow of the coffee
from the basket).
Buzzer will sound 3 times to
notice you when the coffee is
done.
Press the edge of the lid with
your thumb and pour the coffee
at the correct angle.
11
16 17 18
10 12
1413
6.2 Programming the Time
6. Other Functions
- To switch on the machine: Press the ON/OFF Button.
- To switch off the machine: Long press the ON/OFF Button button for 2 seconds
when the machine is not in use to cut off the screen.
6.1 Switched On & Off
- To switch on the machine: Press the ON/OFF Button.
- To switch off the machine: Long press the ON/OFF Button button for 2 seconds
when the machine is not in use to cut off the screen.
6.1 Switched On & Off
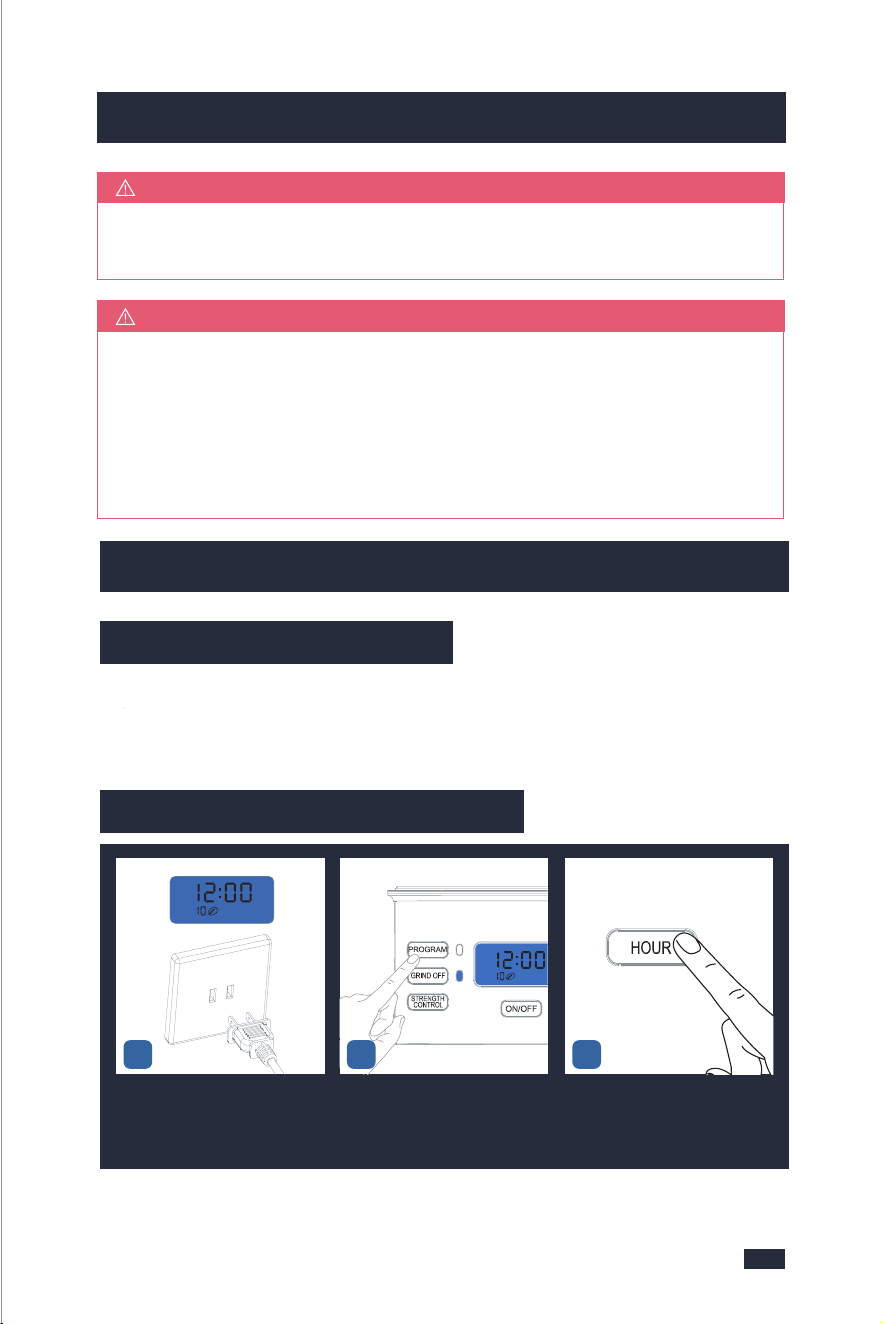
Insert the Power Plug into a
120V AC power outlet.
Long press the PROGRAM Bu-
tton to access the PROGRAM
function.
Press the "HOUR" button to
set the hour.
1 32
15
2019
5. Making Perfect Coffee Guide 5. Making Perfect Coffee Guide
Cleaning after every use guarantees the flavors of your coffee, refer to "Make
Coffee With Coffee Beans ",steps 19-29,on page 16.
NOTE
1 - Do not open the Swing-out Filter Basket while the machine is brewing
coffee, otherwise, the steam will wet the powder at the powder outlet
which possibly damages the grinding system.
2 - While the coffee is brewing you can remove the carafe to pour a cup
or two. The drip stop will close automatically. To avoid any overflow,
replace the carafe within 30 seconds.
NOTE
Insert the Power Plug. The machine
switches on automatically.
Press the "STRENGTH CONTROL"
button to select coffee strength.
There are 3 levels of strength,
and the default level is mild.
Place the coffee carafe on the
warming plate.
Press the ON/OFF Button to
start making coffee and the
Indicator will be illuminated.
It will get into heating.
Close the swing-out filter
basket firmly.
Insert the Power Plug into a
120V AC power outlet.
Press the GRIND OFF Button to
cancel grinding, and the GRIND
OFF Indicator will stay fully
illuminated.
The machine begins to brew (
press the ON/OFF Button to
interrupt the flow of the coffee
from the basket).
Buzzer will sound 3 times to
notice you when the coffee is
done.
Press the edge of the lid with
your thumb and pour the coffee
at the correct angle.
11
16 17 18
10 12
1413
6.2 Programming the Time
6. Other Functions
- To switch on the machine: Press the ON/OFF Button.
- To switch off the machine: Long press the ON/OFF Button button for 2 seconds
when the machine is not in use to cut off the screen.
6.1 Switched On & Off
- To switch on the machine: Press the ON/OFF Button.
- To switch off the machine: Long press the ON/OFF Button button for 2 seconds
when the machine is not in use to cut off the screen.
6.1 Switched On & Off
Insert the Power Plug into a
120V AC power outlet.
Long press the PROGRAM Bu-
tton to access the PROGRAM
function.
Press the "HOUR" button to
set the hour.
1 32
15

2221
6. Other Functions 6. Other Functions
1 - If you just want to check the auto-on time you set, long press the PROGRAM
Button then it will show on the display.
2 - Before starting the program, if you want to change the auto-on time, long
press the PROGRAM Button to get into the PROGRAM function. Press the
"HOUR" and"MIN" buttons you need respectively to change the auto-on time.
3 - If the program has already been selected and the PROGRAM Button has
turned blue, you can no longer modify the program time, coffee strength, or
the number of cups. To make any changes you need to turn off the program
settings by briefly pressing the PROGRAM Button, and reset it by following
the section of "5.2 Operation", page 14.
NOTE
The warming plate will remain on for 120 minutes(factory default) after the
coffee is prepared. At the end of the heating process you will hear three beeps.
The switch-off time can be configured as follows: 0/15/35/45/60/75/90/100/120
minutes.
Step1 - Press the POWDER 2-10 Button for 2 seconds. You will see "120" flashing
on the display.
Step2 - Press the POWDER 2-10 Button repeatedly to set your desired switch-off
time.
6.3 Switch-Off Time Setting
Step3 - Wait a few seconds. The most recent option displayed will be applied
and the switch-off time has been set.
In order to retain a more full-bodied coffee aroma, the machine is equipped
with a blooming function. The coffee grounds are moistened with hot water
before brewing. The coffee grounds can swell up, the coffee taste becomes
more intense.
TIPS
6.4 Blooming Setting
Step 1 - Press the PROGRAM Button and STRENGTH CONTROL Button for 2
seconds. You will see “ ” and “ ” flashing on the display.
Step 2 - Press the STRENGTH CONTROL Button.
: blooming function switched on.
: blooming function switched off.
Wait a few seconds. The most recent option displayed will be applied.
6.5 Brew Pause Feature
While the coffee is brewing you can remove the carafe to pour. The drip stop
will close automatically. To avoid any overflow, replace the carafe within 30
seconds.
Press the "MIN" button to set
the minute.
Press the PROGRAM Button aga-
in, the PROGRAM Indicator will
be illuminated and the coffee
machine gets into the PROGRAM
mode.
The display will show the act-
ual time and .
The machine automatically bre-
ws coffee at 7:00AM.
4 6
7
5

A beep is emitted to confirm each button press. These button sounds can be
switched off. The beeps emitted after the grinding/brewing/warming proces-
ses/descaling warning cannot be disabled.
TIPS
Be aware that using this feature will weaken the flavor strength of the finished
pot, because the flavor profile of coffee brewed at the beginning of the cycle
differs from coffee made at the end.
TIPS
6.6 Button Sound Setting
2423
6. Other Functions 7. Cleaning & Maintenance
Step 1 - Press the STRENGTH CONTROL Button for 2 seconds. You will see
“ ” or “ ” flashing on the display.
Step 2 - Press the STRENGTH CONTROL Button.
: button sounds switched on.
: button sounds switched off.
Wait a few seconds. The most recent option displayed will be applied.
7. Cleaning & Maintenance
The lack of maintenance of the machine would not only affect your coffee taste
but also lower the performance or even shorten the lifespan of your machine.
For you to better maintain your machine, we’ve prepared some helpful tips for
you as follows.
7.1 Before Use
Regarding the Grinding Part
1 - This machine is not suitable for deep-roasted beans. Dark, greasy beans can
leave some greasy residue on the burrs and in the feeder channels.
The oil residue can cause the ground coffee to stick in the feeder passages and
4 - Add an appropriate amount of coffee beans, no more than 250g each time,
because the coffee beans will become wet overnight, and doing this will cause
the same result as that of point 1.
5 - After adding the coffee beans, close the lid again and press down hard to
prevent water from entering the bean hopper, otherwise, it will cause the same
result as that of point 1.
1 - Do not let other objects enter the water tank, and cover the lid in time after
adding water.
2 - Do not place parts of the body under the drip stop while the machine is in
operation.
3 - You can also use a permanent filter instead of a disposable coffee filter. The
permanent filter and filter paper cannot be used at the same time.
4 - Be sure the filter handle is facing away from the grinder basket, so it does not
interfere with the flow of ground coffee into the filter basket.
5 - The amount of water added should be the same as the amount of powder cup
you choose, for example, if you choose 2 cups of powder and you should add
2 cups of water, otherwise, the machine will finish boiling all the water in the
water tank, which would make the coffee weak.
Regarding the Brewing Part
clog the grinder. Over time, this slows down the flow of ground coffee. The
amount of ground coffee is controlled by the grinding time after the selection
of the coffee cup. Therefore, it will not grind all the beans at one time. If it
continues to grind, the ground beans will not reach the required fineness, and
eventually, the motor will get stuck and cannot run, resulting in burnout.
2 - Do not fill the bean hopper with frozen or coated beans, moisture will seep
onto the burr and feeder channels. Over time this will cause the same result as
that of point 1.
3 - Do not add any liquid flavorings or syrups to the beans, otherwise, it will
cause the same result as that of point 1.

2625
7. Cleaning & Maintenance 7. Cleaning & Maintenance
After Each Use
Use the correct method to adjust the grind size settings.
1 - When you want to adjust a fine setting to a coarser setting, just rotate the
Grind Regulator directly before grinding.
2 - When you want to adjust a coarse setting to a finer setting.
a - If there are no coffee beans inside the grinder, you can rotate the Grind Reg-
ulator directly to achieve your setting.
b - But if there are coffee beans inside the grinder, you cannot rotate the Grind
Regulator forcibly, otherwise, grinder damage may occur. In this case, you can
either grind all the coffee beans inside the grinder and then adjust the grind se-
tting, or grind beans and rotate the Grind Regulator simultaneously to achieve
your fine setting.
7.2 In Use
7.3 After Use
Regarding the Grinding Part
1 - Do not open the Swing-out Filter Basket while the machine is brewing coffee,
otherwise, the steam will wet the powder at the powder outlet which possibly
damages the grinding system.
2 - While the coffee is brewing you can remove the carafe to pour a cup or two.
The drip stop will close automatically. To avoid any overflow, replace the carafe
within 30 seconds.
Regarding the Brewing Part
At the End of the Day
Please strictly follow the instructions and requirements below to clean the machi-
ne, otherwise, the flavors of your coffee will be affected or the lifespan of the
machine will be shortened.
Cleaning after every use guarantees the flavors of your coffee, for a cleaning guide,
refer to page 16, steps of 19-29 in section “5.2 Operation”.
To make sure your machine operates efficiently, you must clean the machine
after your last brew of every day.
53
Press the ON/OFF Button to gri-
nd the remaining coffee beans,
then press it again to stop when
you hear the motor idling sound.
When you hear the motor idling
sound, press the ON/OFF Button
to stop.
Unplug the power cord or power
off cpmpletely
4
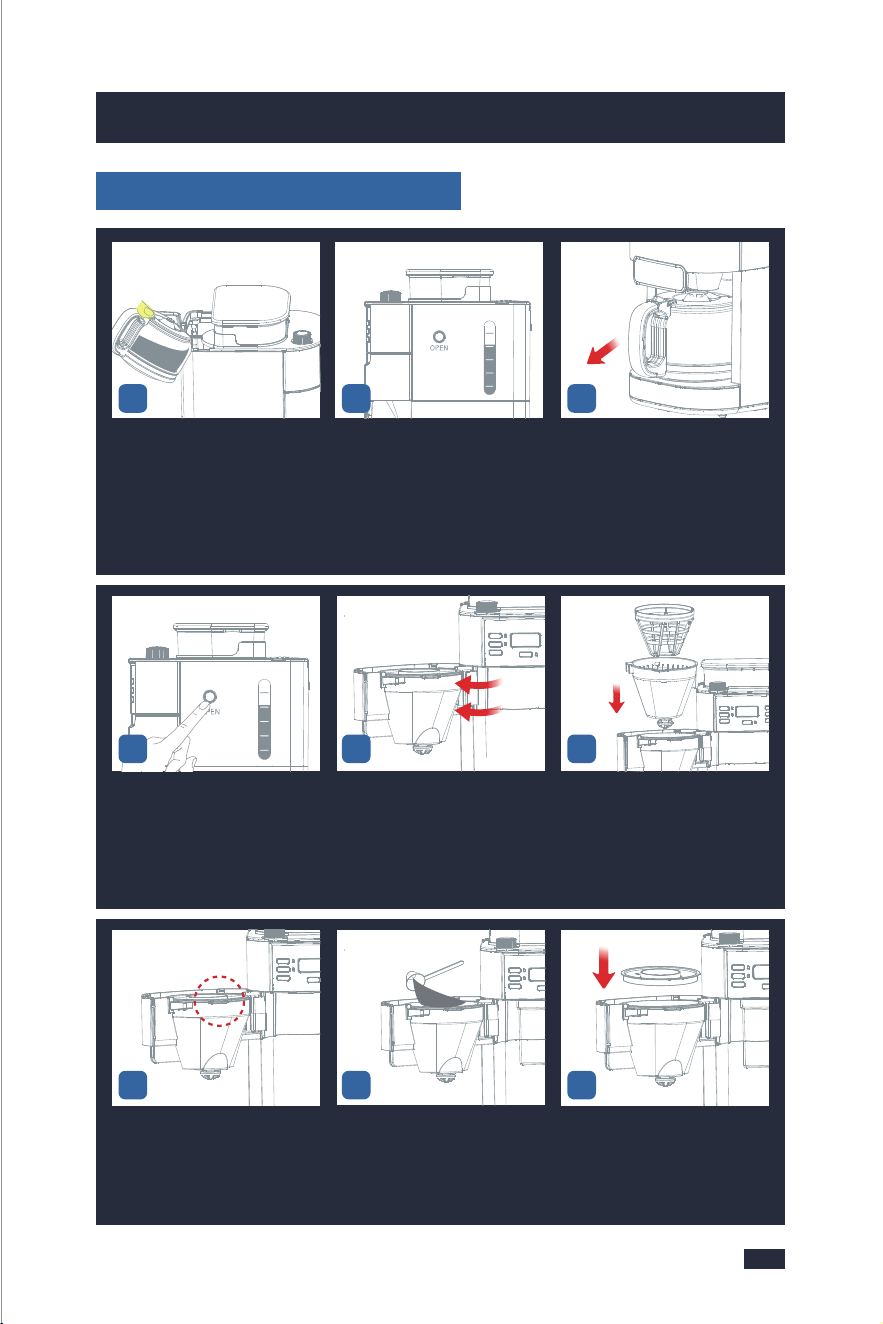
Open the lid of the bean hopper. Empty the coffee beans as much
as possible from the bean cont-
ainer with a spoon and put them
into a jar.
1 2
If there are too many co-
ffee beans, you can tilt
the machine and use a
spoon to empty the co-
ffee beans in the bean
container as much as
possible, but remember
to remove the Coffee
Carafe, otherwise, it co-
uld be easily damaged.
TIPS
Press the Filter Basket Release
Button.
Open the Swing-out Filter Basket. Wipe the top of the Swing-out
Filter Basket with a clean dry
cloth and wipe the inside aro-
und. (Be careful not to touch
the Warming Plate)
7
2
6
4
8
10
6 8
2625
7. Cleaning & Maintenance 7. Cleaning & Maintenance
After Each Use
Use the correct method to adjust the grind size settings.
1 - When you want to adjust a fine setting to a coarser setting, just rotate the
Grind Regulator directly before grinding.
2 - When you want to adjust a coarse setting to a finer setting.
a - If there are no coffee beans inside the grinder, you can rotate the Grind Reg-
ulator directly to achieve your setting.
b - But if there are coffee beans inside the grinder, you cannot rotate the Grind
Regulator forcibly, otherwise, grinder damage may occur. In this case, you can
either grind all the coffee beans inside the grinder and then adjust the grind se-
tting, or grind beans and rotate the Grind Regulator simultaneously to achieve
your fine setting.
7.2 In Use
7.3 After Use
Regarding the Grinding Part
1 - Do not open the Swing-out Filter Basket while the machine is brewing coffee,
otherwise, the steam will wet the powder at the powder outlet which possibly
damages the grinding system.
2 - While the coffee is brewing you can remove the carafe to pour a cup or two.
The drip stop will close automatically. To avoid any overflow, replace the carafe
within 30 seconds.
Regarding the Brewing Part
At the End of the Day
Please strictly follow the instructions and requirements below to clean the machi-
ne, otherwise, the flavors of your coffee will be affected or the lifespan of the
machine will be shortened.
Cleaning after every use guarantees the flavors of your coffee, for a cleaning guide,
refer to page 16, steps of 19-29 in section “5.2 Operation”.
To make sure your machine operates efficiently, you must clean the machine
after your last brew of every day.
53
Press the ON/OFF Button to gri-
nd the remaining coffee beans,
then press it again to stop when
you hear the motor idling sound.
When you hear the motor idling
sound, press the ON/OFF Button
to stop.
Unplug the power cord or power
off cpmpletely
4
Open the lid of the bean hopper. Empty the coffee beans as much
as possible from the bean cont-
ainer with a spoon and put them
into a jar.
1 2
If there are too many co-
ffee beans, you can tilt
the machine and use a
spoon to empty the co-
ffee beans in the bean
container as much as
possible, but remember
to remove the Coffee
Carafe, otherwise, it co-
uld be easily damaged.
TIPS
Press the Filter Basket Release
Button.
Open the Swing-out Filter Basket. Wipe the top of the Swing-out
Filter Basket with a clean dry
cloth and wipe the inside aro-
und. (Be careful not to touch
the Warming Plate)
7
2
6
4
8
10
6 8
7. Cleaning & Maintenance
28
7. Cleaning & Maintenance
27
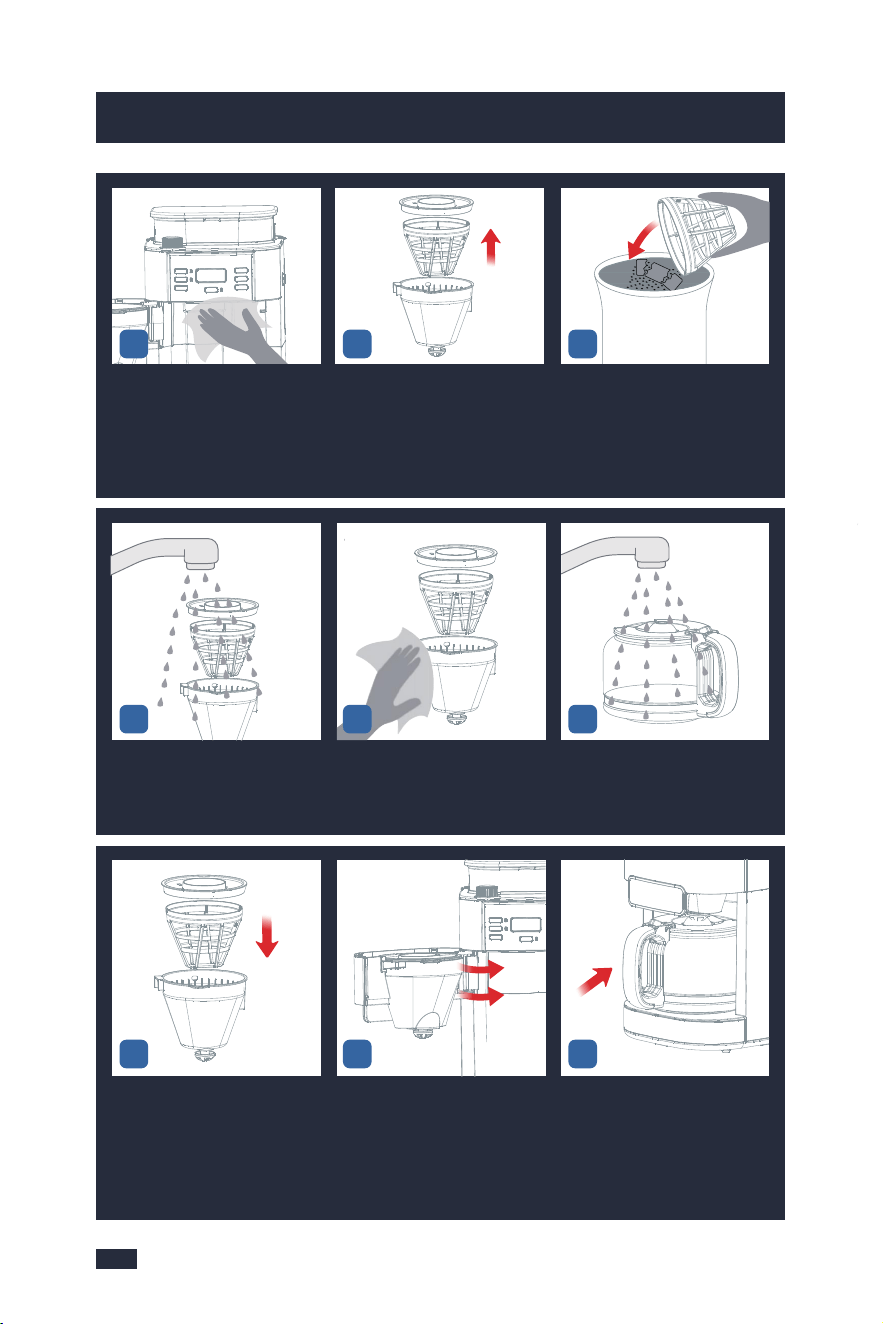
Wipe the inside around. Take out the filter insert with drip
stop together with the perma-
nent filter and filter ring.
Empty the coffee grounds out of
the permanent filter into the ho-
usehold waste.
10 11
Wash the accessories with clean
water.
Dry the filter insert with drip stop,
permanent filter and filter ring .
Clean the Coffee Carafe and wipe
them with a cloth.
12 14
171615
Install them back after cleaning. Close the Swing-out Filter Basket
lightly.
Put the Coffee Carafe back in
place.
13
9
If the brewing time increases or the machine becomes noisier, this is a sure
sign that the coffee machine needs to be descaled.
NOTE
1 - Decalcification refers to the removal of calcium deposits that form over time
on the metal parts of your machine. The mineral content of the tap water in
your area and the frequency of use affects the rate of the calcium buildup, which
can affect the functioning of your machine and the flavor of your coffee. To keep
your coffee machine operating efficiently, you should clean away the mineral
deposits left by the water regularly according to the water quality in your area
and the frequency of use.
2 - Descaling warning will be shown when the machine has cumulatively worked
for 30 brew cycles or 30 grind cycles. All the Indicators on the display will flash
at this point.
- Bean grinding reminder: the screen displays "g30" that means you have ach-
ieved 30 times of grinding since the last count and reminds you to descale.
- Brewing reminder: the screen displays "b30" that means it has brewed 30 times
since the last count and reminds you to descale.
The Descaling Cycle can be exited at any point by long pressing the GRIND OFF
button for 2 seconds. The screen displays "g00" or "b00" and then disappears to
enter a new round of usage statistics. Descaling should then be carried out as
soon as possible.
After 15 Days or After 100 Uses
You have 3 options:
a. One coffee machine descaling tablet.(Coffee Machine Cleaning Tablets are
available for purchase online or through major retailers.)
or
b. Liquid descaler.
or
c. White vinegar & warm water.
You can also use powder descalers or others to clean your machine as you like.
Descaling Solution

7. Cleaning & Maintenance
28
7. Cleaning & Maintenance
27
Wipe the inside around. Take out the filter insert with drip
stop together with the perma-
nent filter and filter ring.
Empty the coffee grounds out of
the permanent filter into the ho-
usehold waste.
10 11
Wash the accessories with clean
water.
Dry the filter insert with drip stop,
permanent filter and filter ring .
Clean the Coffee Carafe and wipe
them with a cloth.
12 14
171615
Install them back after cleaning. Close the Swing-out Filter Basket
lightly.
Put the Coffee Carafe back in
place.
13
9
If the brewing time increases or the machine becomes noisier, this is a sure
sign that the coffee machine needs to be descaled.
NOTE
1 - Decalcification refers to the removal of calcium deposits that form over time
on the metal parts of your machine. The mineral content of the tap water in
your area and the frequency of use affects the rate of the calcium buildup, which
can affect the functioning of your machine and the flavor of your coffee. To keep
your coffee machine operating efficiently, you should clean away the mineral
deposits left by the water regularly according to the water quality in your area
and the frequency of use.
2 - Descaling warning will be shown when the machine has cumulatively worked
for 30 brew cycles or 30 grind cycles. All the Indicators on the display will flash
at this point.
- Bean grinding reminder: the screen displays "g30" that means you have ach-
ieved 30 times of grinding since the last count and reminds you to descale.
- Brewing reminder: the screen displays "b30" that means it has brewed 30 times
since the last count and reminds you to descale.
The Descaling Cycle can be exited at any point by long pressing the GRIND OFF
button for 2 seconds. The screen displays "g00" or "b00" and then disappears to
enter a new round of usage statistics. Descaling should then be carried out as
soon as possible.
After 15 Days or After 100 Uses
You have 3 options:
a. One coffee machine descaling tablet.(Coffee Machine Cleaning Tablets are
available for purchase online or through major retailers.)
or
b. Liquid descaler.
or
c. White vinegar & warm water.
You can also use powder descalers or others to clean your machine as you like.
Descaling Solution

3029
7. Cleaning & Maintenance7. Cleaning & Maintenance
For specific cleaning methods, please refer to the instructions provided by your
descaler provider.
Descaling Cycle
53
Press the ON/OFF Button to gri-
nd the remaining coffee beans,
then press it again to stop when
you hear the motor idling sound.
When you hear the motor idling
sound, press the ON/OFF Button
to stop.
Unplug the power cord or power
off cpmpletely
4
Open the lid of the bean hopper. Empty the coffee beans as much
as possible from the bean cont-
ainer with a spoon and put them
into a jar.
1 2
If there are too many co-
ffee beans, you can tilt
the machine and use a
spoon to empty the co-
ffee beans in the bean
container as much as
possible, but remember
to remove the Coffee
Carafe, otherwise, it co-
uld be easily damaged.
TIPS
Push to open the movable valve,
Insert a cleaning brush (or similar
cleaning tool) into the powder
outlet to clean.
Then tap the machine lightly.
Repeat step 6 and 7 3-5 times.
Prepare 10 cups of water and
add 33 grams of desc aling agent.
Mix them evenly and pour the
descaling solution into the Water
Tank.
8
Wait until the machine beeps 3
times, press the ON/OFF Button
to exist the Keep Warm Function
and empty the Coffee Carafe.
Fill the Coffee Carafe with 10 cups
of clean water. Pour the water
from the Coffee Carafe into the
Water Tank.
Place the coffee carafe on the
warming plate.
15 1716
Press the ON/OFF Button to start
the cycle and the Indicator will
be illuminated. It will get into
heating.
When the water level of the water
tank reaches 2 cups, press the
ON/OFF Button button, and the
machine will stop pouring.
Wait 60 minutes, and press the
ON/OFF Button button again to
brew the remaining 2 cups of
water.
Place the coffee carafe on the
warming plate.
Insert the Power Plug into a 120V
AC power outlet.
Press the GRIND OFF Button and
GRIND OFF Indicator stays fully
illuminated.
9 10
141312
11
6 7

3231
7. Cleaning & Maintenance 7. Cleaning & Maintenance
Install them back after cleaning. Close the Swing-out Filter Bas-
ket lightly.
Put the coffee carafe back in
place.
27 29
Open the Swing-out Filter Basket. Take out the filter insert with
drip stop together with the
permanent filter and filter
ring.
Wash the accessories with clean
water and wipe them with a
cloth.
24 2625
Take out and empty the coffee
carafe.
Put clean water into the water
tank to repeat the steps 16-21
for 2-3 times to ensure that
the descaling solution has
been removed.
Press the Filter Basket Release
Button.
21 22
Repeat
Step 16-21
for 2-3 times
with clean water
2
6
4
8
10
23
Press the GRIND OFF Button and
GRIND OFF Indicator stays fully
illuminated.
Press the ON/OFF Button to start
the cycle and the Indicator will
be illuminated. It will get into
heating.
Wait until the machine beeps 3
times, press the ON/OFF Button
to exist the Keep Warm Function.
201918 28

3433
8. Troubleshooting
The powder
output is low
and does not
match the
powder out-
put setting
Failure to do daily or complete cleaning can
cause the grinder to clog.
Use deep-roasted beans. Dark, greasy beans can
leave some greasy residue in the burrs and feeder
channels. The oil residue can cause the ground
coffee to stick in the feeder passages and clog.
Over time, this slows down the flow of ground
coffee. The amount of ground coffee beans is
controlled by the selection of coffee cups for
grinding time. Therefore, it will not grind all the
beans at one time. If it continues to develop, the
ground beans will not reach the required fineness,
and eventually, the motor will get stuck and
cannot rotate, resulting in burnout.
The grinder ground substandard coffee beans,
such as moist coffee beans, coffee beans with
liquid flavorings or syrups, frozen or coated
beans, etc.
Suddenly switching from a coarse to a finer grind
setting with coffee beans in the grinder can damage
the grinder.
Severely clogged.
Followed the above
solutions but was
still unsuccessful.
Clean the grinder
with a coffee grinder
cleaner.
A deep descaling
is needed for your
machine, refer to
step 1-7 & 23-29 in
section of "Descaling
Cycle " on page 29.
Hear the sou-
nd of the
motor runinng
normally, but
the grinder
does not co-
me out of co-
ffee powder
The grinder ground substandard coffee beans,
such as moist coffee beans, coffee beans with
liquid flavorings or syrups, frozen or coated
beans, etc.
Use deep-roasted beans. Dark, greasy beans can
leave some greasy residue in the burrs and feeder
channels. The oil residue can cause the ground
coffee to stick in the feeder passages and clog.
Over time, this slows down the flow of ground-
A deep descaling is
needed for your
machine, refer to
step 1-7 & 23-29 in
section of "Descaling
Cycle " on page 29.
Hear the sou-
nd of the m-
otor runinng
normally, but
the grinder
does not co-
me out of co-
ffee powder
A deep descaling is needed for your
machine,refer to step 1-7 & 23-29
in section of "Descaling Cycle " on
page 29.
Use the correct me-
thod to adjust the
grind size settings.
If you want to adjust
the grind size setting,
refer to "5.1 Tips for
Perfect Coffee".
Problem Possible Cause What To Do
Failure to do daily or complete
cleaning can cause the grinder
to clog.
Problem Possible Cause What To Do
Error codes
E01
Error codes
E14
The powder outlet is blocked
A deep descaling is needed for your
machine,refer to step 1-7 & 23-29 in
section of "Descaling Cycle " on
page 29.
Please contact with the authorized
service facility for repairing
Make a loud
noise by the
grinder
Romove the stones before grinding
Note: occasionally small stones can
be found in between coffee beans.
Very small stones will be processed
through the burr grinder wit-hout
any harm (the stone will end up in
your filter, not in your brewed
coffee).
Coffee grinds
produced are
coarse
A long-term blockage deformed
the burrs or enlarged the space
between the burrs.
Push the On/Off Button to stop grin-
ding and here is how you can avoid
stones entering the bean container:
1. Shake your bean bag thoroughly
so that a stone will fall to the bottom
of the bag.
2. Before emptying the bottom half
of the bag of beans into the bean
container, check to see whether
there are any particles that look like
stones, and remove them.
Deep clean the grinder to see if
this works, otherwise, contact an au-
thorized service facility for repairing
8.1 Troubleshooting-Grinder 8.1 Troubleshooting-Grinder
8. Troubleshooting
coffee. The amount of ground coffee
beans is controlled by the selection
of coffee cups for grinding time.
Therefore, it will not grind all the
beans at one time. If it continues to
develop, the ground beans will not
reach the required fineness, and ev-
entually, the motor will get stuck and
cannot rotate, resulting in burnout.

Whenever the
water output
of the machine
is less than
usual, such as
6 cups are set
but only 4 cups
are poured out.
Whenever the
water output
of the machine
is extremely less
than usual, such
as 6 cups are
set but only
2 cups are
poured out.
There is a build-up of
limescale inside the
heating tubes, which
will result in a machine
premature shut-down
without brewing enough
coffee.
There is a build-up of
limescale inside the
heating tubes, which
will result in a machine
premature shut-down
without brewing enough
coffee.
Step1-Prepare 10 cups of water and add 20
grams of the descaling agent. Stir the stick
evenly and pour the descaling solution into
the Water Tank.
Step2-Press the GRIND OFF button, press the
ON/OFF Button button and the machine starts
to brew. When the water level of the water tank
reaches 2 cups, press the ON/OFF Button ,
and the machine will stop working.
Step3-Wait 60 minutes, and press the ON/
OFF Button again to brew the remaining 2
cups of water.
Step4-Repeat steps 1, step 2, and steps 3
three times. Then check if the machine can
be brewed normally.
Step5-If it still does not brew normally, please
repeat steps 1 and 2, then let the machine
stand for 3 days. Note that the water in the
water tank does not need to be poured out.
Step6-After 3 days, start the machine and
finish brewing the remaining water in the
water tank.
Step7-Fill the water tank with clean water
to the Max line and then brew all the water,
repeat at least 3 times.
8. Troubleshooting 8. Troubleshooting
35
36
Problem Possible Cause What To Do
leaking steam
Limescale clogging
causes the machine to
heat the water for a long
time
Step1-Prepare 10 cups of water and add 100
grams of the descaling agent. Mix them evenly
and pour the descaling solution into the Water
Tank.
Step2-Press the GRIND OFF button, press the
ON/OFF Button button and the machine starts
to brew. When the water level of the water tank
reaches 2 cups, press the ON/OFF Button and
the machine will stop working.
Step3-Wait 60 minutes, and press the ON/OFF
Button again to brew the remaining 2 cups of
water.
Step4-Repeat steps 1, step 2, and steps 3
three times. Then check if the machine can
be brewed normally.
Step5-If it still does not brew normally, please
repeat steps 1 and 2, then let the machine
stand for 5 days. Note that the water in the
water tank does not need to be poured out.
Step6-After 5 days, start the machine and
finish brewing the remaining water in the
water tank.
Step7-Fill the water tank with clean water
to the Max line and then brew all the water,
repeat at least 3 times.
Machine does
not pump
water
Coffee carafe not placed
correctly under outlet
Water pump failure
Check if the coffee carafe is placed correctly
on the warming plate and pressing up the
drip stop in the outlet.
Refer to the above cleaning method but
in Step 1 need to prepare 60 grams of
descaling agent.
Please contact with the authorized service
facility for repairing.
Weak coffee
Inappropriate coffee
beans are used
The coffee beans are
not fresh enough or use
longterm storage coffee
beans
Use freshly roasted beans to ensure the best
flavor of your coffee, the fresher the better.
Coffee beans are best consumed between 5
to 20 days after the "Roasted On" date.
Different coffee beans are suitable for different
brewing methods, please use the correct bean
variety well-suited for drip coffee. The deeper
the roast level, the stronger the coffee flavor
would be. But deep-roasted coffee beans are
not suitable for drip coffee, including your Gevi
one. So maybe you can choose medium-
roasted beans or ask the bean supplier for
a suggestion. These requirements apply to
coffee powder.
Problem Possible Cause What To Do
8.2 Troubleshooting-Brewer 8.2 Troubleshooting-Brewer

Whenever the
water output
of the machine
is less than
usual, such as
6 cups are set
but only 4 cups
are poured out.
Whenever the
water output
of the machine
is extremely less
than usual, such
as 6 cups are
set but only
2 cups are
poured out.
There is a build-up of
limescale inside the
heating tubes, which
will result in a machine
premature shut-down
without brewing enough
coffee.
There is a build-up of
limescale inside the
heating tubes, which
will result in a machine
premature shut-down
without brewing enough
coffee.
Step1-Prepare 10 cups of water and add 20
grams of the descaling agent. Stir the stick
evenly and pour the descaling solution into
the Water Tank.
Step2-Press the GRIND OFF button, press the
ON/OFF Button button and the machine starts
to brew. When the water level of the water tank
reaches 2 cups, press the ON/OFF Button ,
and the machine will stop working.
Step3-Wait 60 minutes, and press the ON/
OFF Button again to brew the remaining 2
cups of water.
Step4-Repeat steps 1, step 2, and steps 3
three times. Then check if the machine can
be brewed normally.
Step5-If it still does not brew normally, please
repeat steps 1 and 2, then let the machine
stand for 3 days. Note that the water in the
water tank does not need to be poured out.
Step6-After 3 days, start the machine and
finish brewing the remaining water in the
water tank.
Step7-Fill the water tank with clean water
to the Max line and then brew all the water,
repeat at least 3 times.
8. Troubleshooting 8. Troubleshooting
35
36
Problem Possible Cause What To Do
leaking steam
Limescale clogging
causes the machine to
heat the water for a long
time
Step1-Prepare 10 cups of water and add 100
grams of the descaling agent. Mix them evenly
and pour the descaling solution into the Water
Tank.
Step2-Press the GRIND OFF button, press the
ON/OFF Button button and the machine starts
to brew. When the water level of the water tank
reaches 2 cups, press the ON/OFF Button and
the machine will stop working.
Step3-Wait 60 minutes, and press the ON/OFF
Button again to brew the remaining 2 cups of
water.
Step4-Repeat steps 1, step 2, and steps 3
three times. Then check if the machine can
be brewed normally.
Step5-If it still does not brew normally, please
repeat steps 1 and 2, then let the machine
stand for 5 days. Note that the water in the
water tank does not need to be poured out.
Step6-After 5 days, start the machine and
finish brewing the remaining water in the
water tank.
Step7-Fill the water tank with clean water
to the Max line and then brew all the water,
repeat at least 3 times.
Machine does
not pump
water
Coffee carafe not placed
correctly under outlet
Water pump failure
Check if the coffee carafe is placed correctly
on the warming plate and pressing up the
drip stop in the outlet.
Refer to the above cleaning method but
in Step 1 need to prepare 60 grams of
descaling agent.
Please contact with the authorized service
facility for repairing.
Weak coffee
Inappropriate coffee
beans are used
The coffee beans are
not fresh enough or use
longterm storage coffee
beans
Use freshly roasted beans to ensure the best
flavor of your coffee, the fresher the better.
Coffee beans are best consumed between 5
to 20 days after the "Roasted On" date.
Different coffee beans are suitable for different
brewing methods, please use the correct bean
variety well-suited for drip coffee. The deeper
the roast level, the stronger the coffee flavor
would be. But deep-roasted coffee beans are
not suitable for drip coffee, including your Gevi
one. So maybe you can choose medium-
roasted beans or ask the bean supplier for
a suggestion. These requirements apply to
coffee powder.
Problem Possible Cause What To Do
8.2 Troubleshooting-Brewer 8.2 Troubleshooting-Brewer

Coffee grinds are too coarse
Coarse coffee grounds will make the coffee
weaker, so please use a finer coffee grind.
Coffee grinds are too few
If you use coffee powder, please add enough
ground coffee to the filter. The commonly
recommended dosage is 7 grams for one
cup. If you need a stronger flavor, it is
recommended that you can add more
powder but not past the maximum capacity
of the filter-70g, otherwise, it will cause
overflow. If you are using beans, you can
press the "Powder 2-10" button to choose
more powder but add a smaller amount of
water, such as choosing 6 cups but only
adding 4 cups of water.
8. Troubleshooting 8. Troubleshooting
37
38
Weak coffee
Low coffee strength
The Gevi machine has a choice of strong,
medium, and mild for your coffee strength,
if you want a stronger taste, you can change
the default setting of mild to a stronger
setting.
Coffee
Overflows
Overfilled coffee powder
Use filter paper and perma-
nent filter at the same time.
Misplacement of carafe.
Carafe is taken away for
more than 30s during the
brewing process.
7g powder for 1 cup is recommended. Do
not exceed 70g.
Use either filter paper or filter (the two
cannot beused at the same time)
Fully insert to contact the bottom of the drip
stop. Do not open the carafe lid.
The carafe should not be taken away for
more than 30 seconds during the brewing
process.
Problem Possible Cause What To Do
The Filter Bas-
ket Release
Button fails
Button broken
Please contact with the authorized service
facility for repairing.
8.2 Troubleshooting-Brewer
The warming
plate is not
working
Error codes
E12
Error codes
E13
PCB fault
PCB fault
The machine was turned
off or unplugged.
Plug and turn the machine on again
Please contact with the authorized service
facility for repairing
Please contact with the authorized service
facility for repairing
Problem Possible Cause What To Do
The machine
cannot be
switched on
The machine is not
connected to the power
supply.
Plug the power plug into a socket outlet
with earthing contact.
8.2 Troubleshooting-Brewer

39 40
9. Warranty
In order to make a claim under our warranty, you must have the original proof
of purchasing documentation for the product, including but not limited to Order
Number and QR Code, and present it when requested. This guarantee is valid
for the original retail purchaser from the date of initial retail purchase and is
not transferable.
Upon receipt of your claim, Gevi will seek to resolve your difficulties. Should
your product develop any defect within 12 months of purchase because of
faulty materials or workmanship, we will repair or replace this product or any
component of the product, at our discretion. Replacement will be made with
a refurbished product or component. Refurbished parts may be used to repair
the product.
Our replacement or repair warranty only applies where a defect arises as a
result of faulty material or workm anship during the warranty period. Your
warranty does not cover misuse or negligent handling (including damage caused
by failing to use the product in accordance with this instruction booklet),
accidental damage, normal wear and tear, or lack of maintenance. Do Not
attempt to repair or adjust any electrical or mechanical functions on this product.
Doing so will void this guarantee.
Your warranty does not:
cover freight or any other costs incurred in making a claim, consumable items,
accessories that by their nature and limited lifespan require periodic renewal
(such as filters and seals) or any consequential loss or damage; or
This Gevi product is covered by a 12-month
replacement or repair warranty after the order
is issued under normal use, and we will provide
customer service to answer technical questions
even after 12 months.
cover damage caused by:
- power surges, power dips, voltage supply problems, or use of the product on
incorrect voltage;
*
*
9. Warranty
For any questions relating to Gevi branded products(coffee machines, grinders,
milk frothers, toasters and air fryers and related accessories), please contact
us through information below:
- servicing or modification of the product other than by Gevi or an authorized
Gevi service center;
- use of the product with other accessories, attachments, product supplies,
parts or devices that do not confirm to Gevi specifications; or
- exposure of the product to abnormally corrosive condition.
extend beyond 3 months if the product is used in commercial, industrial,
educational or rental applications.
If your warranty claim is not accepted, we will inform you and if requested to
do so by you, repair the product provided you pay the usual charges for such
repair. You will also be responsible for all freight and other costs.
*
Web: https://www.gevilife.com
E-mail: gevi-home@gevi-home.com
Phone: 855-9922-888
FB: https://bit.ly/3qIgP5S
YT: https://bit.ly/3fxrFqq
Gevi headquarters
Web: www.gevi-tech.com
E-mail: service@gevi-tech.com
CONTACT INFORMATION

39 40
9. Warranty
In order to make a claim under our warranty, you must have the original proof
of purchasing documentation for the product, including but not limited to Order
Number and QR Code, and present it when requested. This guarantee is valid
for the original retail purchaser from the date of initial retail purchase and is
not transferable.
Upon receipt of your claim, Gevi will seek to resolve your difficulties. Should
your product develop any defect within 12 months of purchase because of
faulty materials or workmanship, we will repair or replace this product or any
component of the product, at our discretion. Replacement will be made with
a refurbished product or component. Refurbished parts may be used to repair
the product.
Our replacement or repair warranty only applies where a defect arises as a
result of faulty material or workm anship during the warranty period. Your
warranty does not cover misuse or negligent handling (including damage caused
by failing to use the product in accordance with this instruction booklet),
accidental damage, normal wear and tear, or lack of maintenance. Do Not
attempt to repair or adjust any electrical or mechanical functions on this product.
Doing so will void this guarantee.
Your warranty does not:
cover freight or any other costs incurred in making a claim, consumable items,
accessories that by their nature and limited lifespan require periodic renewal
(such as filters and seals) or any consequential loss or damage; or
This Gevi product is covered by a 12-month
replacement or repair warranty after the order
is issued under normal use, and we will provide
customer service to answer technical questions
even after 12 months.
cover damage caused by:
- power surges, power dips, voltage supply problems, or use of the product on
incorrect voltage;
*
*
9. Warranty
For any questions relating to Gevi branded products(coffee machines, grinders,
milk frothers, toasters and air fryers and related accessories), please contact
us through information below:
- servicing or modification of the product other than by Gevi or an authorized
Gevi service center;
- use of the product with other accessories, attachments, product supplies,
parts or devices that do not confirm to Gevi specifications; or
- exposure of the product to abnormally corrosive condition.
extend beyond 3 months if the product is used in commercial, industrial,
educational or rental applications.
If your warranty claim is not accepted, we will inform you and if requested to
do so by you, repair the product provided you pay the usual charges for such
repair. You will also be responsible for all freight and other costs.
*
Web: https://www.gevilife.com
E-mail: [email protected]
Phone: 855-9922-888
FB: https://bit.ly/3qIgP5S
YT: https://bit.ly/3fxrFqq
Gevi headquarters
Web: www.gevi-tech.com
E-mail: service@gevi-tech.com
CONTACT INFORMATION

Read this booklet thoroughly before using this coffee machine for the quick use.
INSTRUCTION BOOKLET
2-in-1 Smart
Drip Coffee Machine
Grinder | Brewer
GECMA025AK-U
Please read all the owner’s instruction booklet before use.