Safety and Instruction Manual Air Fryer
Specifications
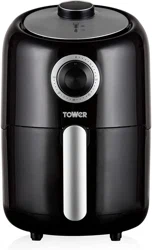
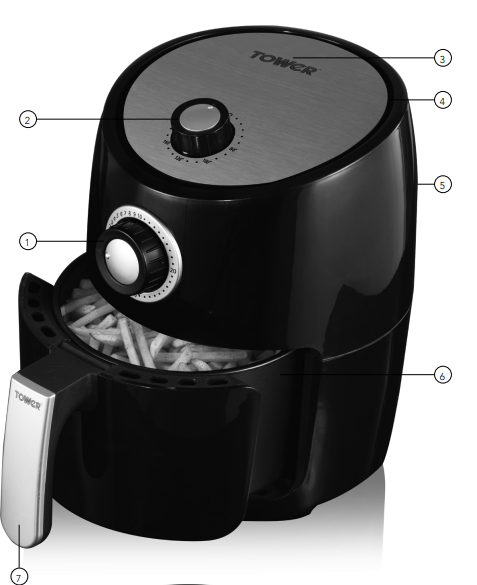
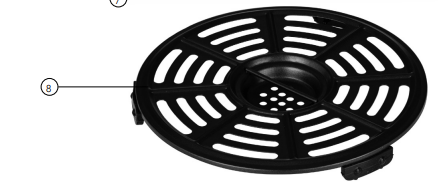
Structure of your appliance:
1. Timer Dial
2. Temperature Dial
3. Power Indicator
4. Air Inlet
5. Air Outlet
6. Frying Drawer
7. Handle
8. Cooking Grille
Technical Data:
Description: 2.2 Litre Air Fryer
Model: T17023
Rated Voltage: 220-240V 50/60Hz
Power Consumption: 1000W
Documentation We declare that this product conforms to the following product legislation in accordance with the following directive(s):
- 2014/30/EU: Electromagnetic Compatibility Directive.
- 2014/35/EU: Low Voltage Directive.
- 2011/65/EU: Restriction of Hazardous Substances Directive.
- 1935/2004/EC: Materials & Articles in Contact With Food (LFGB section 30 & 31).
- 2009/125/EC: Eco-Design of Energy Related Products.
RK Wholesale LTD Quality Assurance, United Kingdom.
Before First Use
- Remove your appliance from the packaging.
- Check that there is no damage to the cord or any visible damage to the body.
- Your appliance is now ready for normal use.
- Dispose of the packaging in a responsible manner.
- The Air Fryer uses hot air technology. Never pour oil or fat into the fryer.
Using Your Appliance
Automatic Switch Off:
- This Tower Air Fryer has a built in timer, which will automatically shut down the Air Fryer when the timer reaches zero. You can manually switch off the Air Fryer by turning the temperature and timer knob anti-clockwise to zero.
Air Fryer Drawer Safety Switch:
- For your safety, this Air Fryer contains a safety switch in the drawer designed to keep if from accidentally turning on when the drawer is not properly situated inside the appliance and the timer is not set. Before using the air fryer, please ensure that the drawer is fully closed and that the cooking timer has been set.
Removing the Drawer:
- The frying drawer can be removed fully from the Air Fryer.
- Pull on the handle to slide the drawer out of the Air Fryer.
- Lift the frying drawer upwards to remove it from the fryer.
Preparing For Use:
- Place the appliance on a stable, horizontal and even surface. Do not place the appliance on a non-heat-resistant surface.
- Do not fill the drawer with oil or any other liquid.
- Pre-heat the Air Fryer for 3 minutes when it is cold. After warming up, carefully pull the drawer out of the Air Fryer. The Air Fryer will stop heating after the drawer is pulled out.
- Place the ingredients into the frying drawer, then place the drawer back into the Air Fryer.
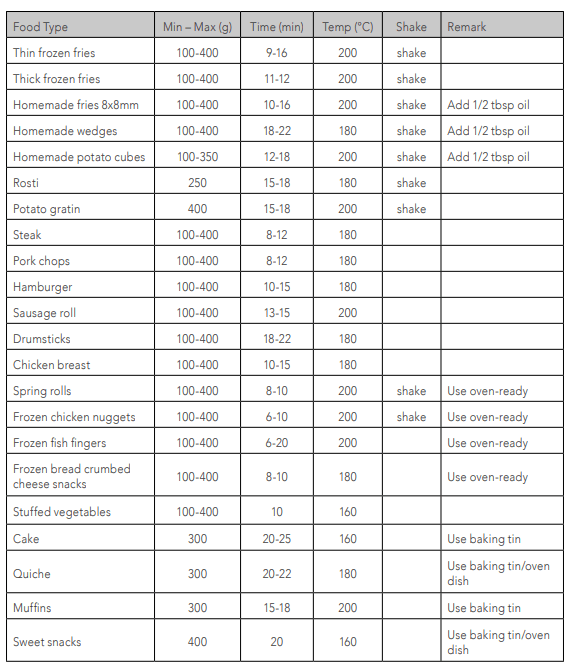
- Select the correct timings and temperature for the ingredients. Consult the reference table below to determine the correct temperature.
- To start the Air Fryer, turn the timer dial to the required time. Note: If the Air Fryer has not been pre-heated, add 3 minutes onto the required time setting.
- The power light and heat indicator light will come on, and the timer will begin counting down the set cooking time.
- During the cooking process the heat indicator light will cycle on and off as it maintains the set temperature.
- Some ingredients may require shaking in the drawer during cooking. Check the reference table for additional notes on this. To shake ingredients during cooking, pull the drawer out of the Air Fryer using the handle. CAUTION: Do not press the button on the handle during shaking.
- When cooking is finished, the timer bell will ring. Pull the drawer out of the Air Fryer using the handle and place it on a heat-resistant surface.
- If the food is ready, serve. To remove small ingredients (e.g. fries), pull out the drawer by the handle, lift it out of the fryer and pour. Lift large or fragile ingredients out of the drawer using a pair of tongs.
- If the food is not quite cooked enough, simply put the drawer back into the Air Fryer and set the timer for a few extra minutes.
Timer: The Air Fryer has a 30 minute manual timer with a bell. Turn the dial to set the required cooking time. When the cooking time has elapsed, a bell will sound to indicate that the cooking has finished.
Settings: The table on the next page will help you select the basic settings for a variety of common ingredients.
Note: Keep in mind that these settings are indications, as ingredients differ in origin, size, shape and brand. We cannot guarantee the best settings for your ingredients. Because the Rapid Air technology instantly reheats the air inside the appliance, pulling the drawer briefly out of the appliance during hot air frying barely disturbs the process.
Tips:
- The preparation time will depend on the size of your ingredients. Smaller sizes may require a shorter cooking time.
- Shake the ingredients halfway through cooking time to optimise the end result. This can help prevent unevenly fried ingredients.
- Be cautious of using greasy foods such as sausages in the Air Fryer.
- Any snacks that can be cooked in a conventional oven can also be cooked in the Air Fryer.
- You can use your Tower Air Fryer to easily reheat food. To do this, simply set the temperature to 150°C for up to 10 minutes.
Note: The Air Fryer uses hot air heating technology. Never pour oil or fat into the fryer.
Tips:
- Try soaking your raw cut fries in cold water for 30 minutes. Dry the fries thoroughly before putting them in the Air Fryer.
- Be careful not to overfill the Air Fryer drawer with food.
- For a great, even brown crisp, toss your fries multiple times during cooking.
- Remove the fries quickly once the cooking process is complete to ensure they stay crispy
- Thinly slice and separate onions.
- Cut all vegetables into small pieces to make sure they cook properly
Troubleshooting
1. How long should I leave the Air Fryer to cool before storing it?
- We recommend leaving the Air Fryer to cool for 30-45 minutes before storing.
2. My homemade fries are not crispy enough.
- Ensure that the fries are completely dry before adding oil to them and putting them in the Air Fryer.
- Try cutting the potatoes into thinner, smaller fries and adding slightly more oil for a crispier result.
3. The drawer will not fit in place correctly.
- You may have placed too many ingredients in the drawer. Make sure you do not fill the drawer beyond the maximum fill line.
4. How big is the Air Fryer pot?
- The Air Fryer pot has a 2.2 litre capacity.
5.My food has not cooked uniformly.
- The food may not be cut uniformly. Make sure everything is cut to the same shape and size for even cooking.
6. How much cooking oil do I need to use?
- Frozen part fried foods require no added oils. You only need to add ½ - 1 tbsp. of oil for other foods.
7. White smoke is coming out of the Air Fryer.
- This is normal if you are preparing greasy ingredients, because a large amount of oil leaks into the drawer. This does not affect the appliance or the end result.
8. The Air Fryer will not turn on after it’s been plugged in.
- For your safety, this Air Fryer contains a safety switch designed to keep it from accidentally turning on when the drawer is not properly situated inside the appliance and when the timer is not set. Before using the Air Fryer, please ensure that the drawer is inside of the appliance, and that it is fully closed once the cooking timer has been set.
Cleaning & Care
WARNING! DO NOT IMMERSE THE APPLIANCE IN WATER OR ANY OTHER LIQUID.
Clean the appliance after every use.
- Remove the plug from the mains socket, and allow the appliance to cool down before cleaning. Note: Removing the frying drawer from the Air Fryer will help the appliance cool faster.
- Do not immerse the unit’s lid in water and ensure no water enters the appliance.
- Clean the base unit by wiping it with a damp cloth. A little detergent can be added if the appliance is heavily soiled
- Do not use scouring pads, steel wool or any form of strong solvents or abrasive cleaning agents to clean the appliance, as they may damage the outer surfaces.
- Clean all accessories in warm soapy water. Do not use any scouring pads, steel wool or any strong solvents or abrasive cleaning agents when cleaning accessories.
- To remove stubborn dirt or oil from the frying drawer, soak them in hot water with some detergent for 10 minutes.
- Make sure that the appliance is cleaned after every use. Note: The pan and basket are hand-wash only. DO NOT place any part of this appliance in the dishwasher.
IMPORTANT!
- After cleaning, allow the appliance to dry fully before using it again.
- Do not use the appliance if damp. Ensure the appliance is completely clean and dry before storing. To store your appliance:
- Unplug the power cord from the power outlet and clean as instructed.
- Allow the appliance to dry fully.
- Store on a flat, dry level surface out of reach of children
Wiring Safety for UK Use Only
IMPORTANT
- As the colours in the mains lead of this appliance may not correspond with the coloured markings identifying the terminals in your plug, please proceed as follows:
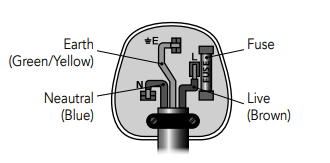
- The wires in the mains lead are labelled in accordance with the following code: Blue neutral [N] Brown live [L] Green/Yellow [EARTH]

- Plug Fitting Details (Where Applicable). The wire labelled blue is the neutral and must be connected to the terminal marked [N].
- The wire labelled brown is the live wire and must be connected to the terminal marked [L].
- The wire labelled green/yellow must be connected to the terminal marked with the letter [E].
- On no account must either the brown or the blue wire be connected to the [EARTH] terminal.
- Always ensure that the cord grip is fastened correctly.
- The plug must be fitted with a fuse of the same rating already fitted and conforming to BS 1362 and be ASTA approved.
- If in doubt consult a qualified electrician who will be pleased to do this for you.
Non-Rewireable Mains Plug
- If your appliance is supplied with a nonrewireable plug fitted to the mains lead and should the fuse need replacing, you must use an ASTA approved one (conforming to BS 1362 of the same rating).
- If in doubt, consult a qualified electrician who will be pleased to do this for you.
- If you need to remove the plug - disconnect it from the mains - then cut it off of the mains lead and immediately dispose of it in a safe manner. Never attempt to reuse the plug or insert it into a socket outlet as there is a danger of an electric shock.
WARNING: This appliance MUST be earthed!
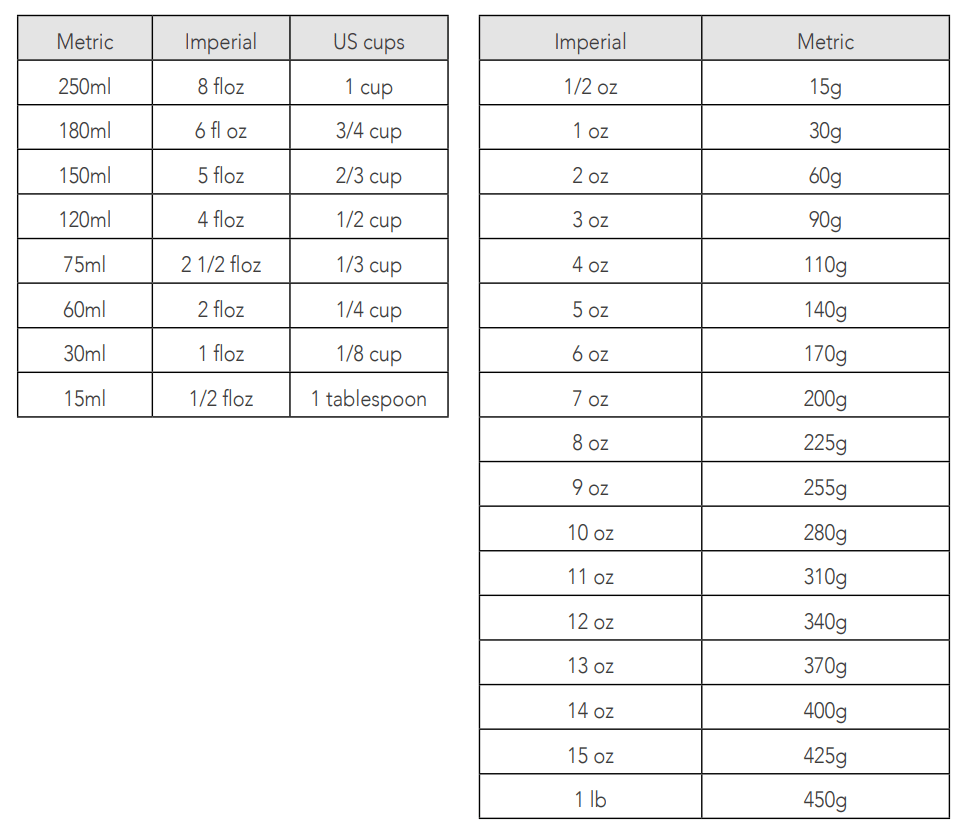
Weights & Measures
Check these charts for basic imperial to metric conversions of weights.