T17039
11 LITRE
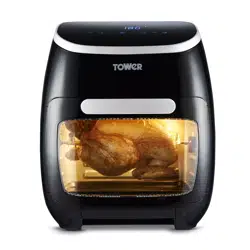
5-IN-1 DIGITAL AIR FRYER OVEN
WITH ROTISSERIE
SAFETY AND INSTRUCTION MANUAL
PLEASE READ CAREFULLY
*Subject to registering your Extended Guarantee online at
www.towerhousewares.co.uk.
2
Technical Data:
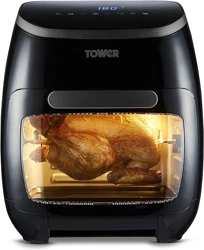
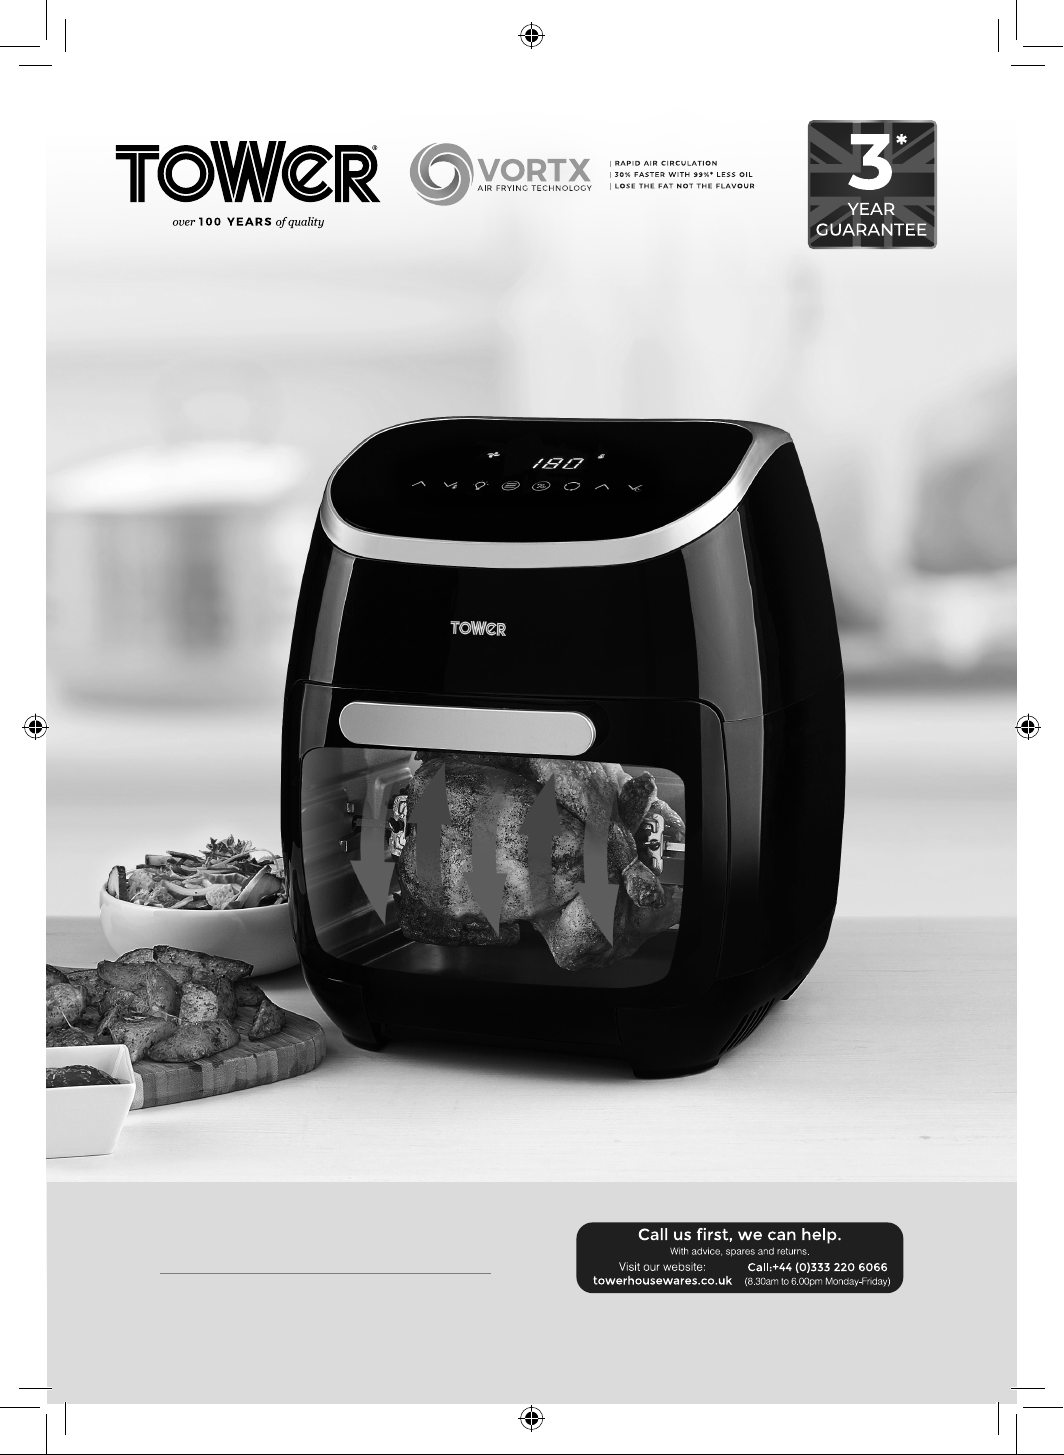
This box contains:
Instruction Manual
Tower Air Fryer
Air Flow Racks x 3
Rotisserie fork and handle
Oil drip tray
1. Control panel
2. Housing
3. Removable door
4. Oil drip tray
5. Rotisserie Fork and handle
6. Air flow racks
Specifications:
1
4 5 6
3
2
Description: 11 Litre 5-in-1 Digital Air Fryer Oven with Rotisserie
Model: T17039
Rated Voltage: 220-240V~
Frequency: 50/60Hz
Power Consumption: 2000W
Documentation
We declare that this product conforms to the following product legislation in accordance with
the following directive(s):
2014/30/EU Electromagnetic Compatibility (EMC)
2014/35/EU Low Voltage Directive (LVD)
1935/2004/EC Materials & Articles in Contact With Food (LFGB section 30 & 31)
2011/65/EU Restriction of Hazardous Substances Directive.
(Including amendment (EU) 2015/863).
2009/125/EC Eco-design of Energy related Products (ERP)
RK Wholesale LTD Quality Assurance, United Kingdom.
3
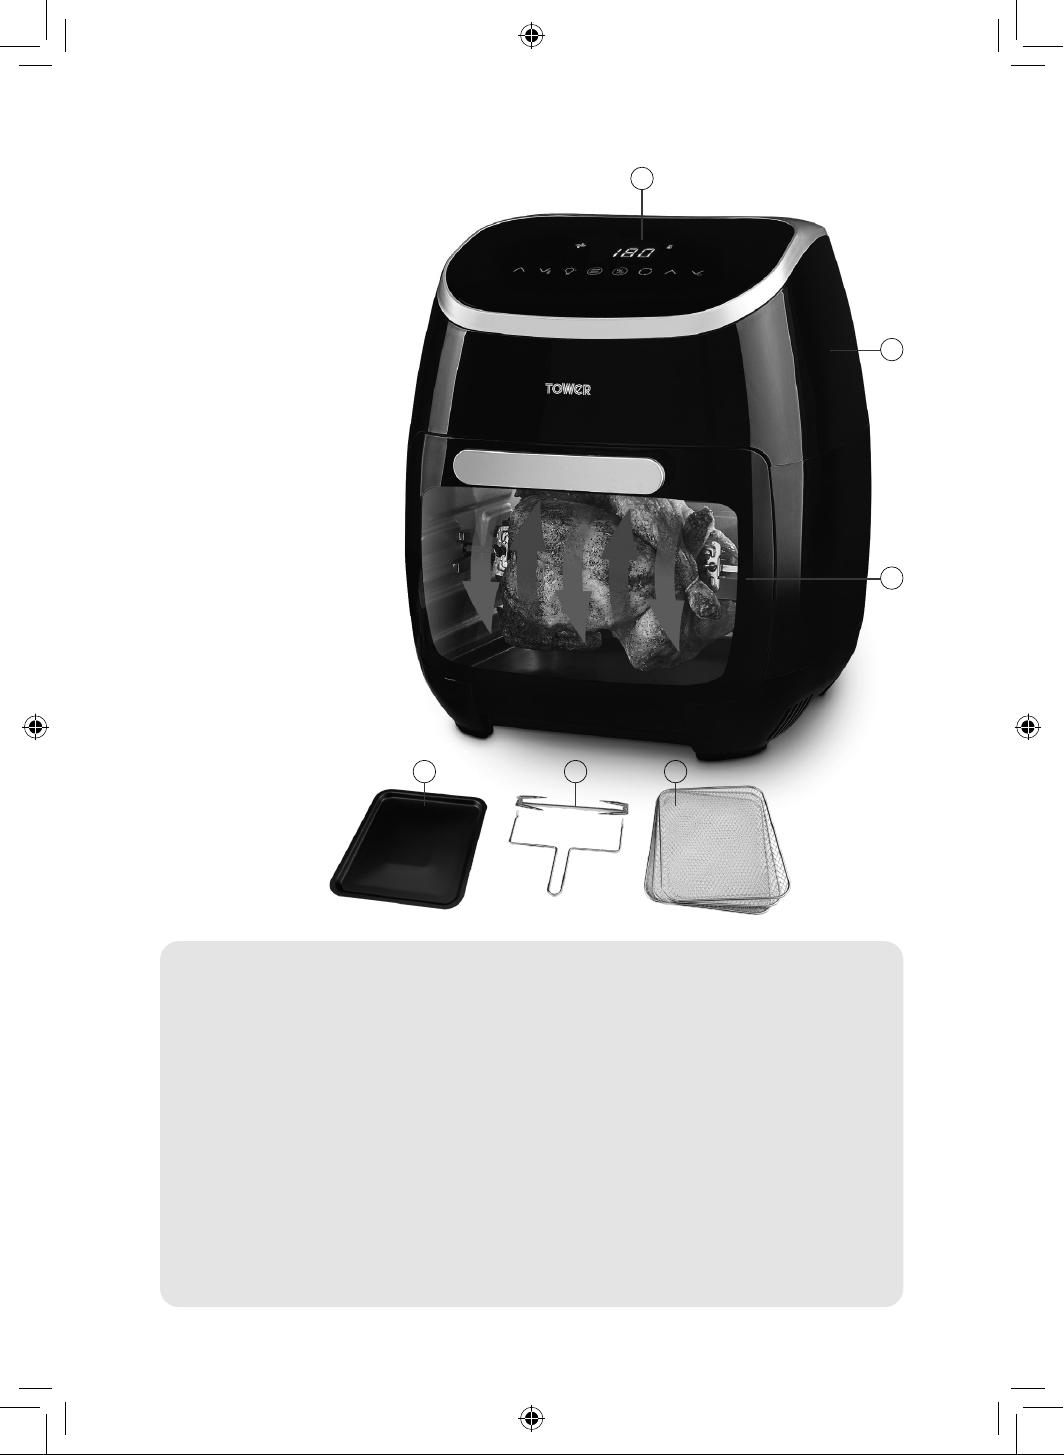
1. Auto-cooking program - Fries
2. Auto-cooking program - Steak
3. Auto-cooking program - Drumsticks
4. Auto-cooking program - Fish
5. Auto-cooking program - Shrimp
6. Auto-cooking program - Roast chicken
7. Auto-cooking program - Rotisserie
8. Auto-cooking program - Dehydrate
9. Fan indicator
10. Heating indicator
11. Temperature indicator
12. Timer indicator
13. Temperature up key
14. Temperature down key
15. Light ON/OFF key
16. Mode key
17. LCD screen
18. ON/Pause key
19. Rotating rotisserie key
20. Timer up button
21. Timer down button
Control Panel:
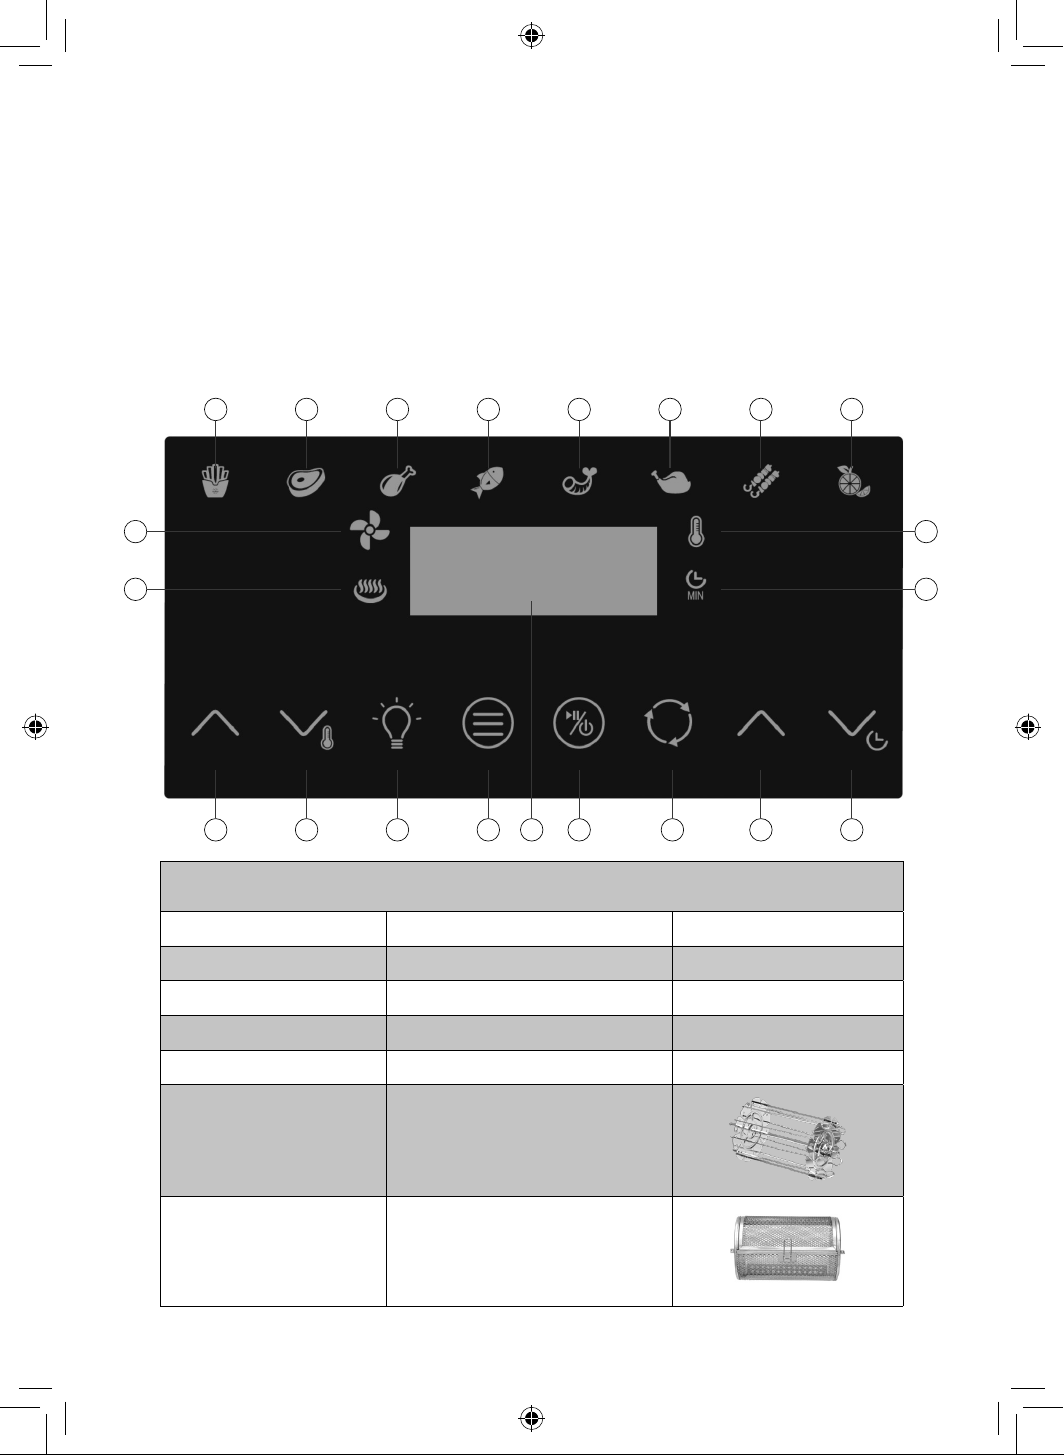
SPARE PARTS
(not included, available to order via website/customer service should you require replacements)
Part No Description Image
T17038001 Rotisserie Fork Spare
T17038002 Air Flow Rack Spare
T17038003 Oil Drip Tray Spare
T17038004 Cage Handle Spare
T17038005 Rotating Kebab Skewers
T17038006 Rotating Frying Basket
1
13 14 15 16 17 18 19
20
21
2 3 4 5 6 7 8
11
12
9
10
4
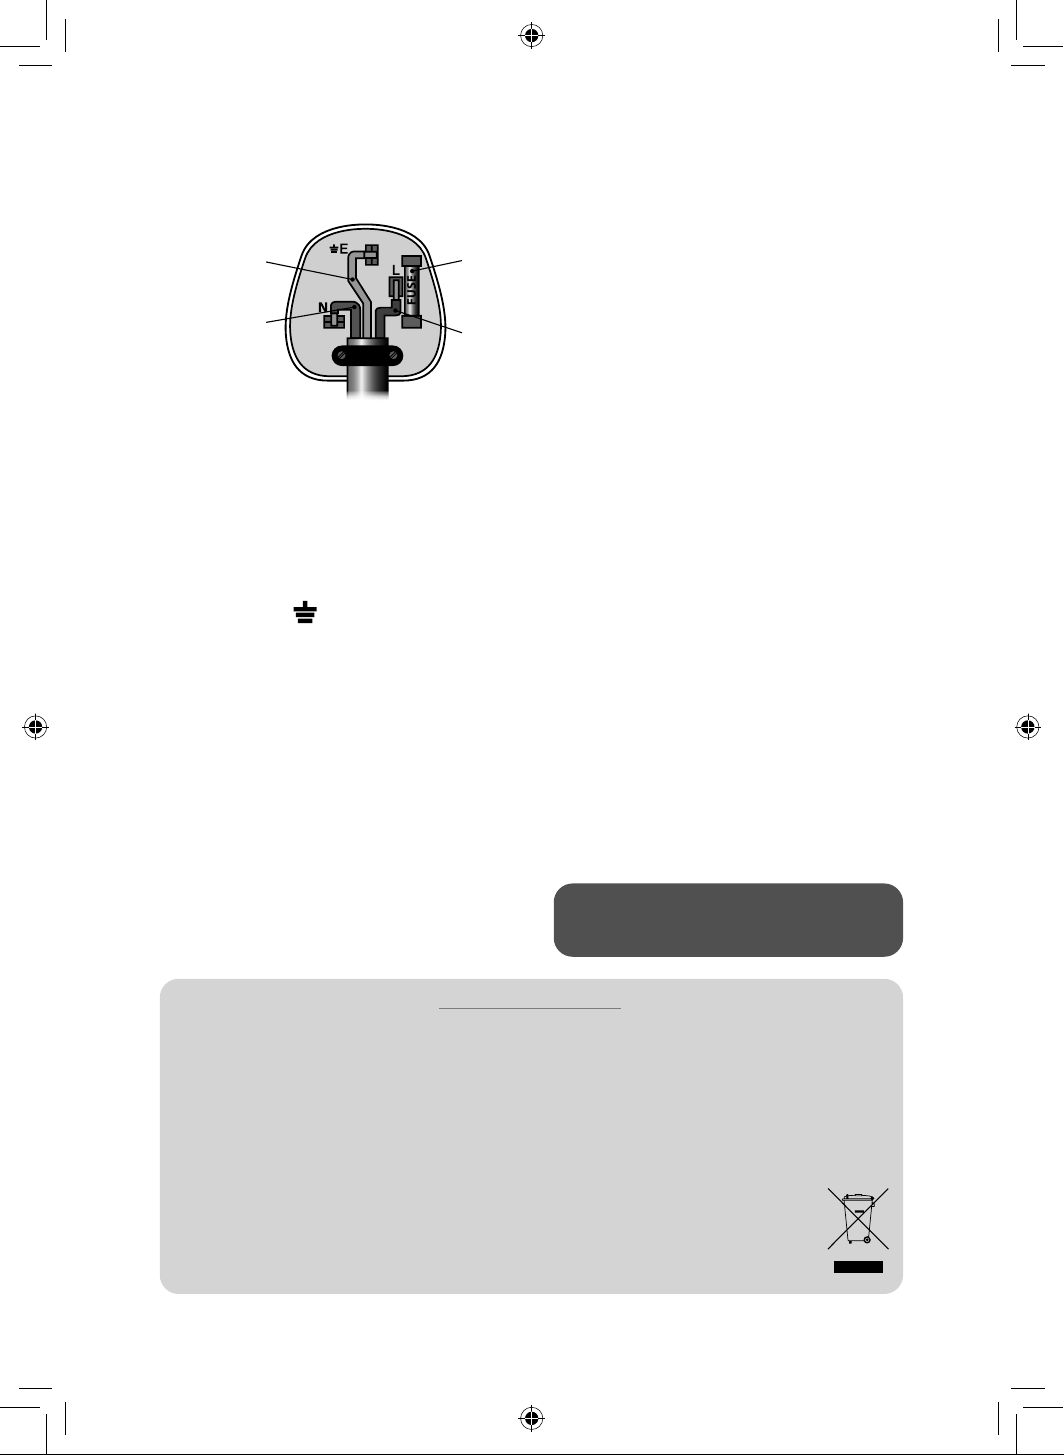
Wiring Safety for UK Use Only
IMPORTANT
As the colours in the mains lead of this
appliance may not correspond with the
coloured markings identifying the terminals in
your plug, please proceed as follows:
The wires in the mains lead are labelled in
accordance with the following code:
Blue neutral [N] Brown live [L] Green/
Yellow [EARTH]
Plug Fitting Details (Where Applicable).
The wire labelled blue is the neutral and must
be connected to the terminal marked [N].
The wire labelled brown is the live wire and
must be connected to the terminal marked [L].
The wire labelled green/yellow must be
connected to the terminal marked with the
letter [E].
On no account must either the brown or the
blue wire be connected to the [EARTH] terminal.
Always ensure that the cord grip is fastened
correctly.
The plug must be fitted with a fuse of the same
rating already fitted and conforming to BS 1362
and be ASTA approved.
If in doubt consult a qualified electrician who
will be pleased to do this for you.
Non-Rewireable Mains Plug.
If your appliance is supplied with a non-
rewireable plug fitted to the mains lead and
should the fuse need replacing, you must use
an ASTA approved one (conforming to BS 1362
of the same rating).
If in doubt, consult a qualified electrician who
will be pleased to do this for you.
If you need to remove the plug - disconnect it
from the mains - then cut it off of the mains
lead and immediately dispose of it in a safe
manner. Never attempt to reuse the plug or
insert it into a socket outlet as there is a danger
of an electric shock.
FUSE
Earth
(Green/Yellow)
Fuse
Neutral
(Blue)
Live
(Brown)
WARNING:
This appliance MUST be earthed!
DISPOSAL OF THE UNIT
Appliances bearing the symbol shown here may not be disposed of in domestic rubbish.
You are required to dispose of old electrical and electronic appliances like this separately.
Please visit www.recycle-more.co.uk or www.recyclenow.co.uk for access to information about the
recycling of electrical items.
Please visit www.weeeireland.ie for access to information about the recycling of
electrical items purchased in Ireland.
The WEEE directive, introduced in August 2006, states that all electrical items must be
recycled, rather than taken to landfill.
Please arrange to take this appliance to your local Civic Amenity site for recycling,
once it has reached the end of its life.

5
• Check that the voltage
of the main circuit
corresponds with the
rating of the appliance
before operating.
• If the supply cord or
appliance is damaged,
stop using the appliance
immediately and
seek advice from the
manufacturer, its service
agent or a similarly
qualified person.
• WARNING: DO NOT
let the cord hang over
the edge of a table or
counter, serious burns
may result from the air
fryer being pulled off the
counter where it may be
grabbed by children or
become entangled with
the user.
• DO NOT carry the
appliance by the power
cord.
• DO NOT use any
extension cord with this
appliance.
• DO NOT pull the plug
out by the cord as this
may damage the plug
and/or the cable.
• Switch off and
unplug before fitting
or removing tools/
attachments, after use
and before cleaning.
• Close supervision is
necessary when any
appliance is used by or
near children.
• Children should not play
with the appliance.
• This appliance can
be used by children
aged from 16 years and
above and persons with
reduced physical, sensory
or mental capabilities or
lack of experience and
knowledge if they have
been given supervision
or instruction concerning
use of the appliance in a
safe way and understand
the hazards involved.
• Cleaning and user
maintenance should
not be undertaken
by children without
supervision.
• Take care when any
appliance is used near
pets.
• DO NOT use this product
for anything other than
its intended use.
Please read these notes carefully BEFORE using your
Tower appliance
Important Safety Information:

6
• This appliance is for
household use only.
• Please ensure that the
appliance is used on a
stable, level, and heat
resistant surface.
• DO NOT immerse cords,
plugs or any part of the
appliance in water or any
other liquid.
• DO NOT use the
appliance outdoors.
• DO NOT place the
air fryer on or near
combustible materials
such as a tablecloth or
curtain.
• DO NOT place the air
fryer against a wall or
against other appliances.
Leave at least 10cm
free space on the back
and sides and 10cm
free space above the
appliance.
• Allow the air fryer to cool
down for approximately
30 minutes before you
handle or clean it.
• Make sure the food
prepared in the air fryer
comes out golden-yellow
instead of dark brown.
Remove burnt remnants.
• During hot air frying,
hot steam is released
through the air outlet
openings. Keep your
hands and face at a safe
distance from the steam
and from the air outlet
openings.
• Any baking trays or
oven dishes used in the
air fryer will become
hot. Always use oven
gloves when handling or
removing anything from
the air fryer.
• DO NOT place anything
on top of the air fryer.
• In the unlikely event
the appliance develops
a fault, stop using
it immediately and
seek advice from the
Customer Support Team.
+44 (0) 333 220 6066
7
Before First Use:
Read all instructions and safety information carefully before first use. Please retain this
information for future reference.
1. Remove your appliance from the packaging.
2. Check that there is no damage to the cord or any visible damage to the body.
3. Dispose of the packaging in a responsible manner.
4. Remove any stickers or labels from the appliance.
5. Thoroughly clean the fryer with hot water, some washing-up liquid and a non-
abrasive sponge.
6. Wipe the inside and outside of the appliance with a moist cloth.
7. Do not fill the fryer with oil or frying fat. This fryer operates using hot air and requires
very little to no oil.
8. Familiarise yourself with the control panel shown in the Specifications section above.
Using Your Appliance.
Preparing For Use:
1. Place the appliance on a stable, horizontal and even surface. Do not place the
appliance onto a non-heat-resistant surface.
2. Do not use oil or any other liquid.
3. Do not put anything on top of the appliance, as this will disrupt the airflow and the
hot air frying will be affected as a result.
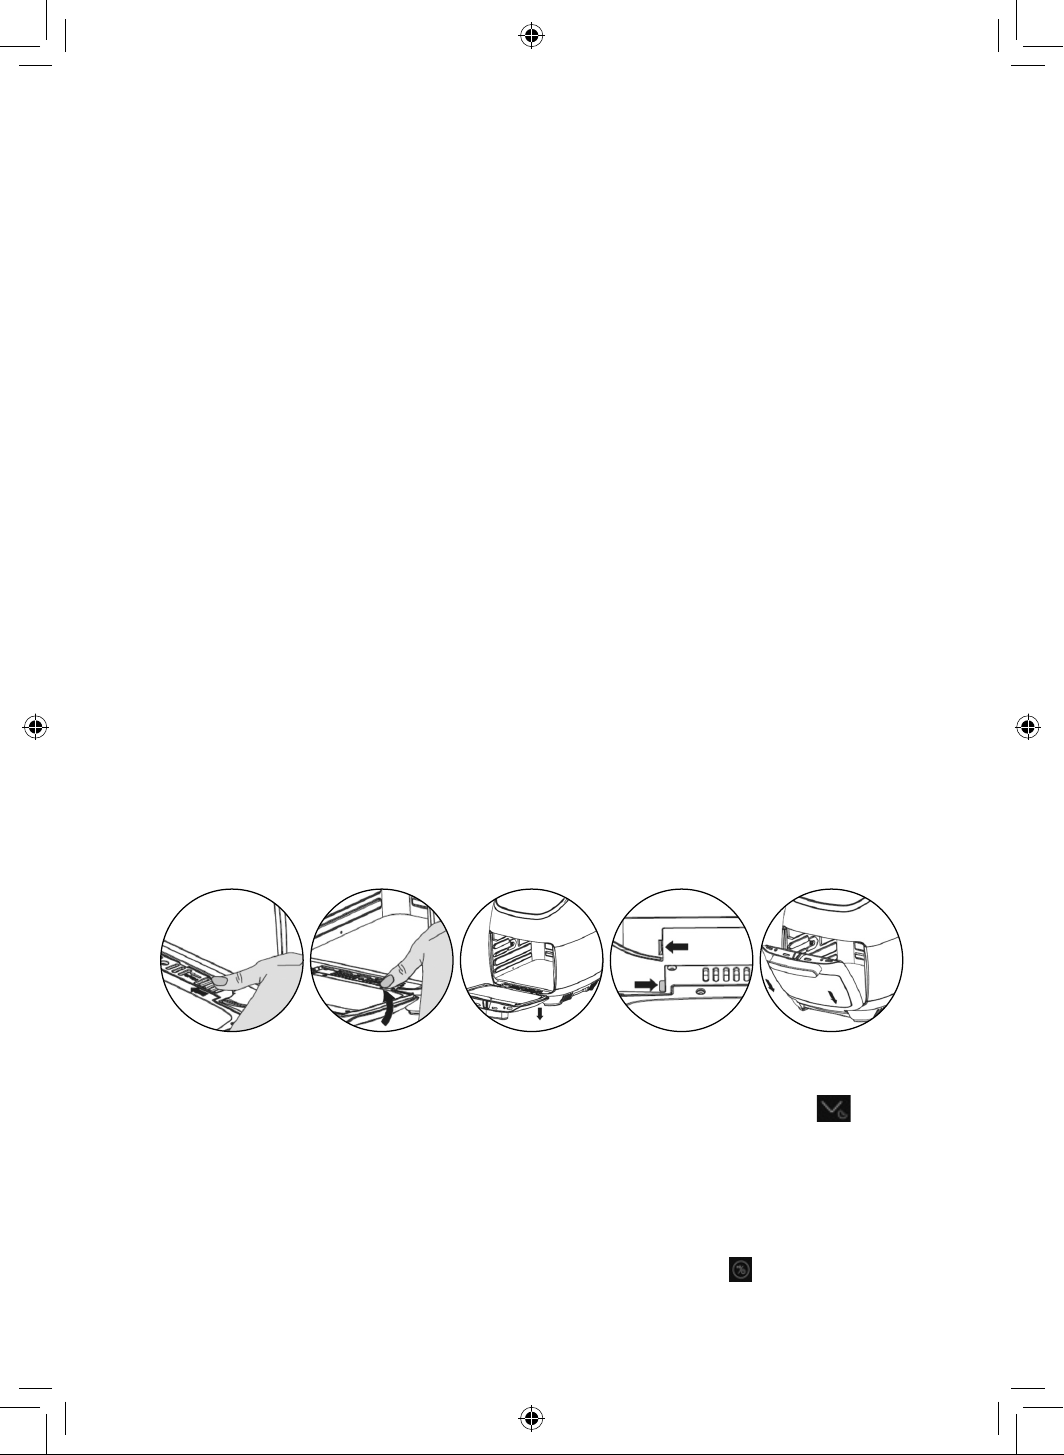
Removing the door:
1. The air fryer has a removable door, which can be pulled apart from the appliance for
easier cleaning.
2. To separate the door from the air fryer, push the door as far down as it will go (about
70 degrees), then push the grooved latch on the right-hand side of the hinge
horizontally to release the door. Once the door has been released, pull it downward to
separate it from the body of the fryer.
3. To reinstall the door, begin by pushing the locking tab to the side to unlock the
pins on either side of the door. Once the pins have been loosened, position the
door underneath the fryer and bring it up and inwards, aligning each pin with the
corresponding hole on the main body of the fryer so that they slot into place. Take
care to slot the pin on the left-hand side of the door in first; once that has securely
slotted into place, insert the right-hand pin into its corresponding hole in a similar
manner, and release the locking tab to secure the door into place.
Note: ALWAYS take care to come in from the bottom of the fryer and move from left
to right when installing the door. Attempting to install the door from the top down or
moving from right to left will cause it to be incorrectly fitted, and may cause damage to
the hinge mechanism.
Automatic Switch Off:
The Tower Air Fryer has a built in timer, which will automatically shut off the air fryer when
the timer reaches zero. You can manually switch off the air fryer by pressing the key
until the timer reaches zero.
Air Frying:
1. Connect the mains plug into an earthed wall socket.
2. Open the air fryer door.
3. Fit any relevant accessories to the air fryer before placing the food inside.
4. Put the ingredients into the air fryer.
5. Close the air fryer door. The fryer will give off a beeping sound and all the indicators
will light up momentarily.
6. After a few seconds, all of the indicators will go off except for the indicator, which
will remain illuminated to indicate the appliance is turned on but in Standby mode.
Press this key at any time while the fryer is in this mode to bring up the touch control
panel.

8
Note: If no keys are pressed or selections made after the control panel is lit, the air fryer
will automatically go into standby mode after 90 seconds of inactivity.
7. Determine the required preparation time for your desired ingredients (refer to the
‘Settings’ section below). Use the keys to adjust the cooking time accordingly.
The time will increase or decrease in increments of 1 minute, from 0 up to 60
minutes.
Note: Preparation times can be changed or adjusted even while the air fryer is in
operation.
8. Adjust to the required temperature. Refer to the ‘Settings’ section in this chapter to
learn how to determine the right temperature. Use the keys to adjust the
temperature accordingly. The temperature will increase or decrease in increments of
5 degrees, from 30 up to 200 degrees.
Note: The temperature can be adjusted or changed at any time, even while the air fryer is
in operation.
9. Once the correct time and temperature have been set, press the key. The electric
heating tube and fan will begin to work, the and indicators will illuminate and
the timer will begin counting down the remaining cooking time.
Note: Press the key again while the fryer is in operation to pause the cooking cycle.
The fan and electric tube will stop working and the corresponding indicators in the touch
control panel will go out to indicate operation has been paused. Press this key again while
the air fryer is in this state to resume cooking.
Note: If the door is opened during cooking, the screen and power light will go off, and the
heating tube and fan will stop working. When the door is closed again, the air fryer will
resume operation in its latest settings. The cooking time countdown will not be affected,
as the air fryer has a memory backup of up to 2 hours.
Note: During the frying process, food will get very hot and steam may escape from the air
fryer.
10. When the set preparation time has elapsed, the fryer will emit a series of beeps, the
screen will display ‘00’, and the screen and the indicator will begin to flash.
Note: You can also switch the appliance off manually by reducing the temperature to zero.
11. Check if the ingredients are ready. If the ingredients are not ready yet, simply
place your food back into the fryer, close the door, then set the timer to a few extra
minutes.
12. To remove ingredients (e.g. fries), open the air fryer door and pull out the food using
the insulated kitchen gloves or other suitable safety accessory such as tongs.
13. Once your food is cooked, the air fryer is instantly ready to be used again, to create
another delicious dish of your choice.
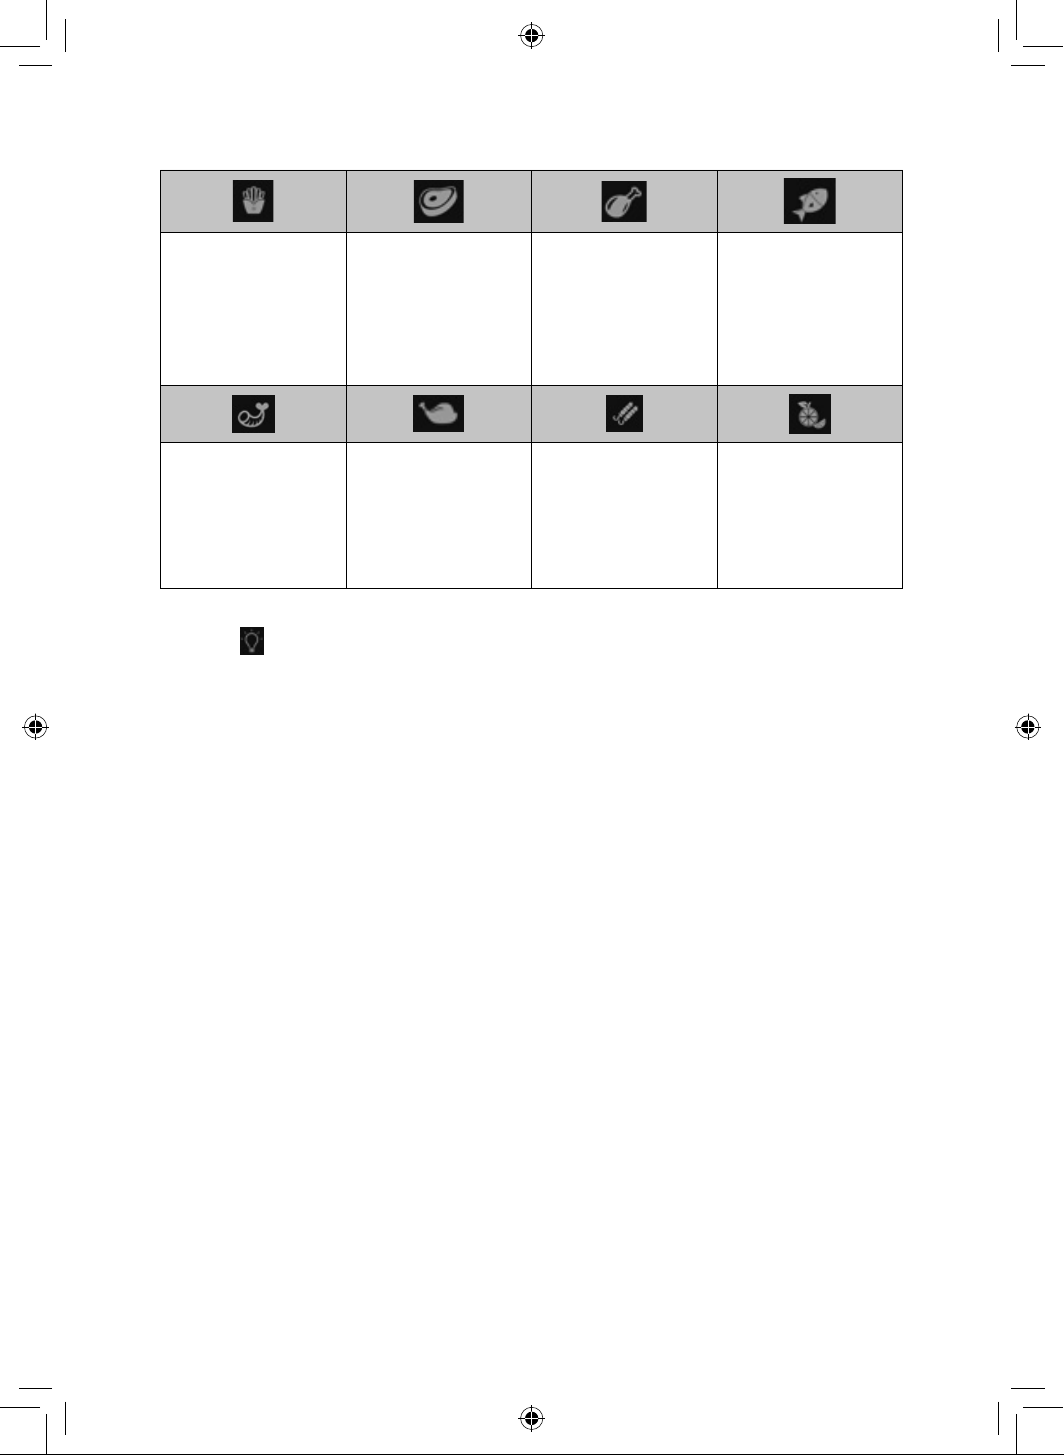
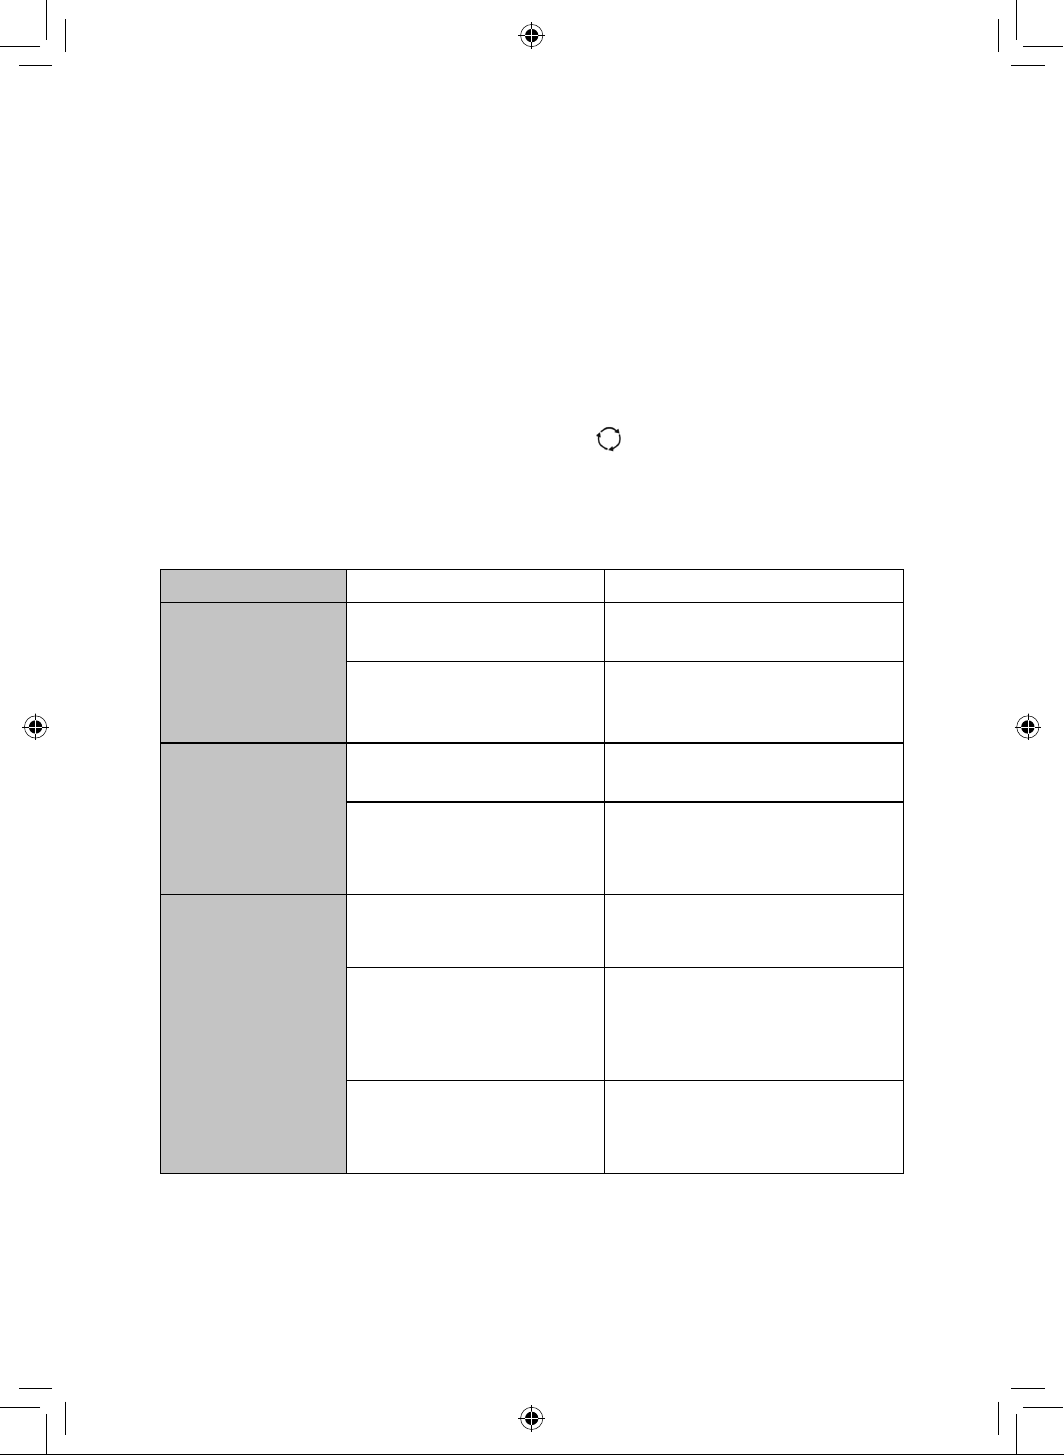
Auto-Cook Menus:
This air fryer is equipped with 8 auto-cook menus, pre-programmed with the ideal
settings to fit some of the most commonly air-fried meals. When one of these menus is
selected, the air fryer will automatically default to that program’s pre-set temperature and
time, and operate accordingly.
Each of these can be accessed by pressing the corresponding key in the unit’s control
panel. The corresponding indicator will light up to show each menu has been selected.
The full list of auto-cook menus is as follows:
9
Fries.
When this mode
is selected, the
screen will display
“200” - “20”, for
temperature and
cooking time
respectively.
Steak.
When this mode
is selected, the
screen will display
“180” - “20”, for
temperature and
cooking time
respectively.
Drumsticks.
When this mode
is selected, the
screen will display
“180” - “35”, for
temperature and
cooking time
respectively.
Fish.
When this mode
is selected, the
screen will display
“180”-”18”, for
temperature and
cooking time
respectively.
Shrimp.
When this mode
is selected, the
screen will display
“160” - “12”, for
temperature and
cooking time
respectively.
Roast Chicken.
When this mode
is selected, the
screen will display
“200” - “35”, for
temperature and
cooking time
respectively.
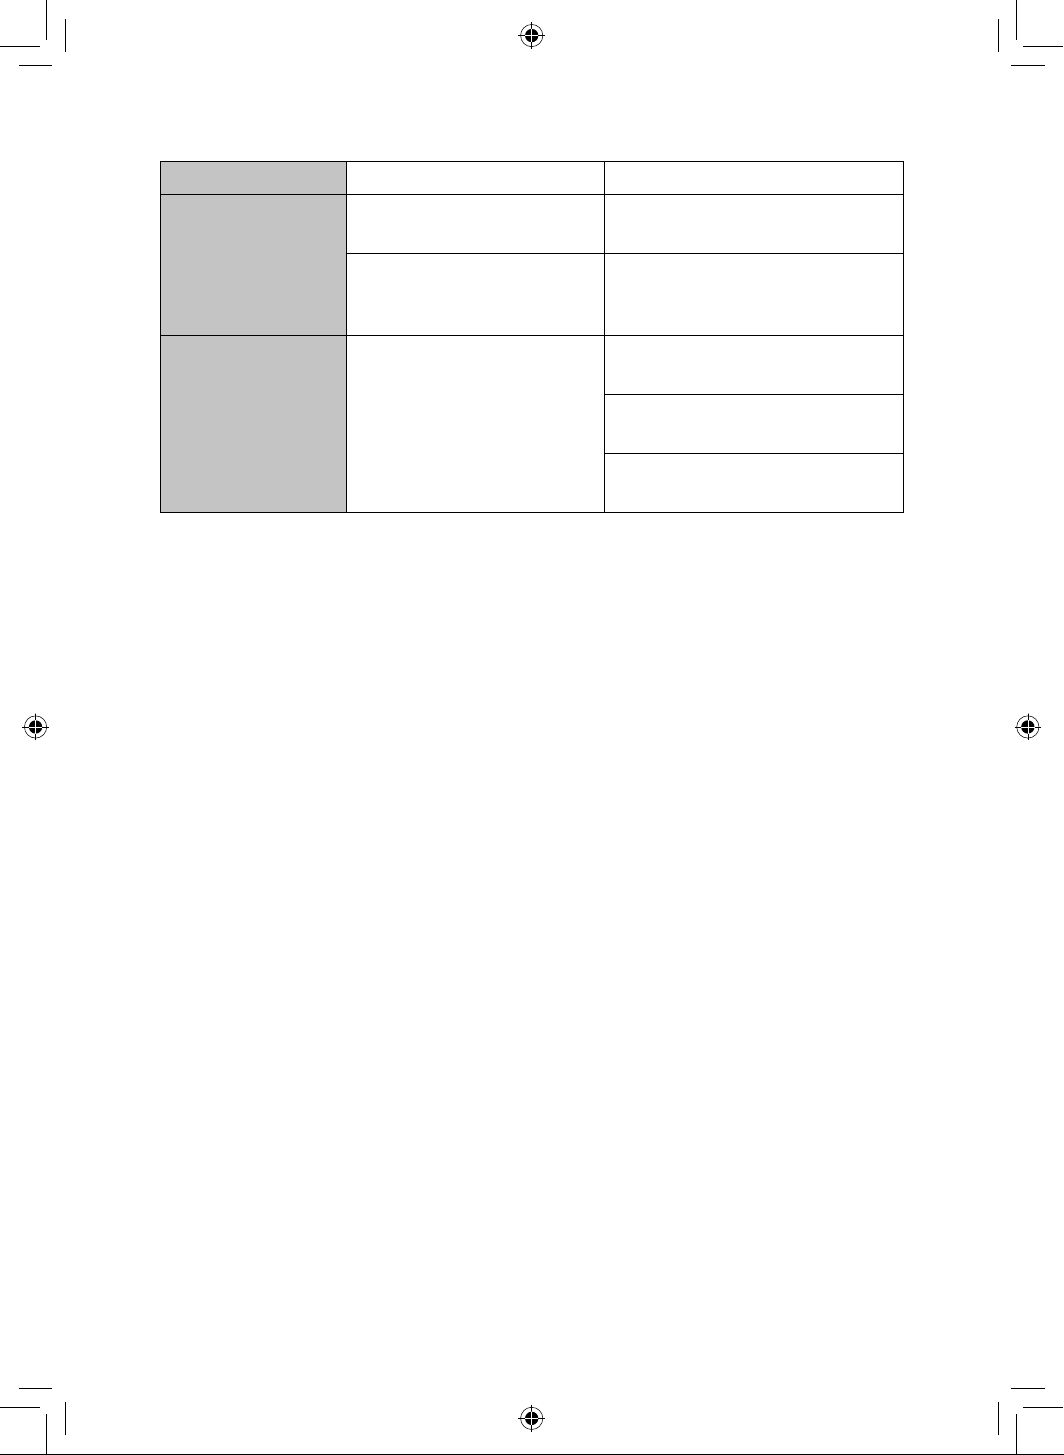
BBQ Rotisserie.
When this mode
is selected, the
screen will display
“200” - “20”, for
temperature and
cooking time
respectively.
Dried Fruit.
When this mode
is selected, the
screen will display
“40” - “04:00”, for
temperature and
cooking time
respectively.
Turning the Light On and Off:
Press the key to turn the air fryer’s inner light On or Off at any time.
Note: During the cooking cycle, the fryer’s inner light will turn on or off automatically.
Settings:
The table on the next page will help you to select the basic settings for the ingredients.
Note: Keep in mind that these settings are indications, as ingredients differ in origin, size,
shape and brand, we cannot guarantee the best settings for your ingredients. Because
the Rapid Air technology instantly reheats the air inside the appliance instantly, opening
the door briefly during hot air frying barely disturbs the process.
Tips:
• The preparation time will depend on the size of your ingredients. Smaller sizes may
require a shorter cooking time.
• Add some oil to fresh potatoes for a crispy result. Fry your ingredients in the Hot-air
fryer within a few minutes after you added the oil.
• Be cautious of using extremely greasy ingredients such as sausages in the air fryer.
• Snacks that can be prepared in an oven can also be prepared in the air fryer.
• The optimal amount for preparing crispy fries is 700 grams.
• Use pre-made dough to prepare filled snacks quickly and easily. Pre-made dough
also requires a shorter preparation time than home-made dough.
• Place a baking tin or oven dish if you want to bake a cake or quiche, or if you want to
fry fragile ingredients or filled ingredients.
• You can also use the air fryer to reheat ingredients. To reheat ingredients, set the
temperature to 150°C for up to 10 minutes.
10
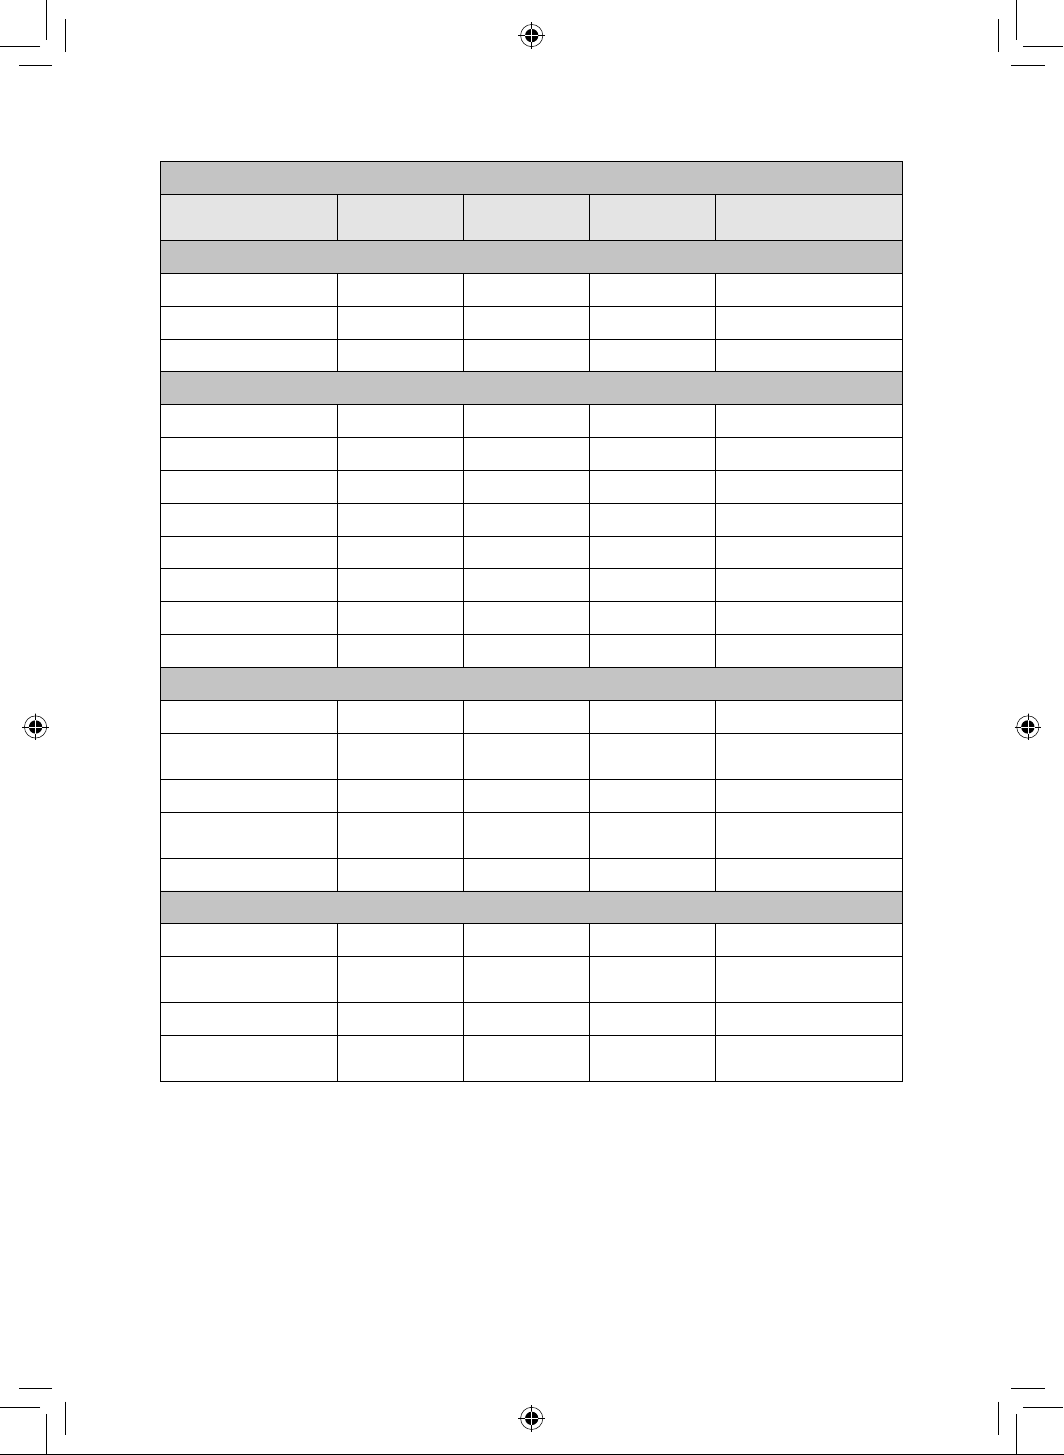
SETTINGS TABLE:
Min-max
Amount (g)
Time (min.)
Temperature
(ºC)
Extra information
Potato & fries
Thin frozen fries 600-700 15-20 200
Thick frozen fries 600-700 20-25 200
Potato gratin 800-1000 25-30 200
Meat & Poultry
Steak 500-800 10-15 180
Pork chops 500-800 10-15 180
Hamburger 400-800 10-15 180
Sausage roll 400-800 13-15 200
Drumsticks 400-800 25-30 180
Chicken breast 400-800 15-20 180
Rotisserie 400-600 18-25 200
Chicken 500-1000 30-40 200
Snacks
Spring rolls 500-800 8-10 200 Use oven-ready
Frozen chicken
nuggets
500-1000 6-10 200 Use oven-ready
Frozen fish fingers 500-800 6-10 200 Use oven-ready
Frozen bread crumbed
Cheese snacks
500-800 8-10 180 Use oven-ready
Stuffed vegetables 400-800 10 160
Baking
Cake 800 20-25 160 Use baking tin
Quiche 800 20-22 180
Use baking tin/oven
dish
Muffins 800 15-18 200 Use baking tin
Sweet snacks 800 20 160
Use baking tin/oven
dish
Using the accessories:
This air fryer comes complete with a range of accessories:
• Drip tray, to help collect fat and drippings for easy cleaning.
• Air flow racks, suitable for dehydrating, crisping or reheating food items.
• Rotisserie, for use with roast meat or fish.
• Handle, for use with the rotisserie.
11
Using the Rotisserie:
1. To assemble the rotisserie, first slide the rotisserie bar through the corresponding
slots on either of the rotisserie forks, so that the forks are on the inside of the rotisserie
bar.
2. Retrieve the two small keys provided with the unit and thread each of them through
its corresponding hole on the rotisserie forks. Rotate each key clockwise to tighten it
and secure the forks to the main body of the rotisserie bar.
3. Slot the rotisserie bar into the recessed gear notch on the right-hand side of the oven
cavity and the locating bracket on the left-hand side, ensuring it is pushed in all the
way.
4. Your rotisserie is now ready for use.
Note: Ensure the rotisserie bar is pushed all the way into the slot and that no part of it is
visible to the naked eye; otherwise the rotisserie will not rotate.
5. Once you have installed the rotisserie, press the button on the unit’s control
panel to activate the rotation function. If the rotisserie has been installed correctly, it
will begin to rotate.
6. If the rotisserie does not begin to rotate once the button has been pressed, pull it
out of the air fryer and repeat the steps detailed above, taking care to ensure the
rotisserie nut is pushed all the way into the slot on the body of the fryer.
Troubleshooting:
PROBLEM POSSIBLE CAUSE SOLUTION
The air fryer does not
work
The appliance is not plugged in.
Plug the appliance into an earthed wall
socket.
The appliance is not turned on.
Press the On/Off button to switch on the
appliance.
Fried snacks are not
crispy when they come
out of the air fryer.
Wrong type of snacks used.
Use oven snacks or lightly brush some
oil onto the snacks for a crispier result.
The fryer contains grease from
previous use.
White smoke is caused by grease
heating up inside the fryer. Make sure
you clean the fryer properly after each
use.
The fried ingredients
are not done.
Too much food has been added to
the air fryer.
Put smaller batches of ingredients in the
air fryer. Smaller batches are fried more
evenly.
The set temperature is too low.
Set the temperature to the required
temperature setting.
(Refer to the ‘Settings’ section under
‘Using the appliance’ for a temperature
reference guide).
The preparation time is too short.
Set unit to the required preparation
time (refer to the ‘Settings’ section
under ‘Using the Appliance’ for a timer
reference guide).
12
PROBLEM POSSIBLE CAUSE SOLUTION
Fresh fries are fried
unevenly in the air fryer.
Wrong type of potatoes used.
Use fresh potatoes and make sure they
stay firm during frying.
The potato sticks were not rinsed
adequately before frying
Rinse the potato sticks properly to
remove starch from the outside.
Fresh fries are not crispy
when they come out of
the air fryer.
The crispiness of the fries depends
on the amount of oil and water in
the fries.
Make sure you dry the potato sticks
properly before you add the oil.
Cut the potato sticks smaller for a crisp-
ier result.
Add slightly more oil for a crispier result.
Cleaning & Care:
WARNING! DO NOT IMMERSE THE APPLIANCE IN WATER OR ANY OTHER LIQUID.
• Clean the appliance after every use.
• Do not use metal kitchen utensils or abrasive cleaning materials to clean the oil drip
tray, as this may damage the non-stick coating.
1. Remove the mains plug from the wall socket and let the appliance cool down.
Note: Open the door to let the air fryer cool down more quickly.
2. Wipe the outside of the appliance with a moist cloth.
3. Clean the oil drip tray, airflow racks and accessories with hot water, some washing-up
liquid and a non-abrasive sponge.
4. You can use degreasing liquid to remove any remaining dirt.
5. Clean the inside of the appliance with hot water and a non-abrasive sponge.
• Ensure that the air fryer oven is cool, clean and dry before storing it.
• Store the appliance in a cool, dry place.
13
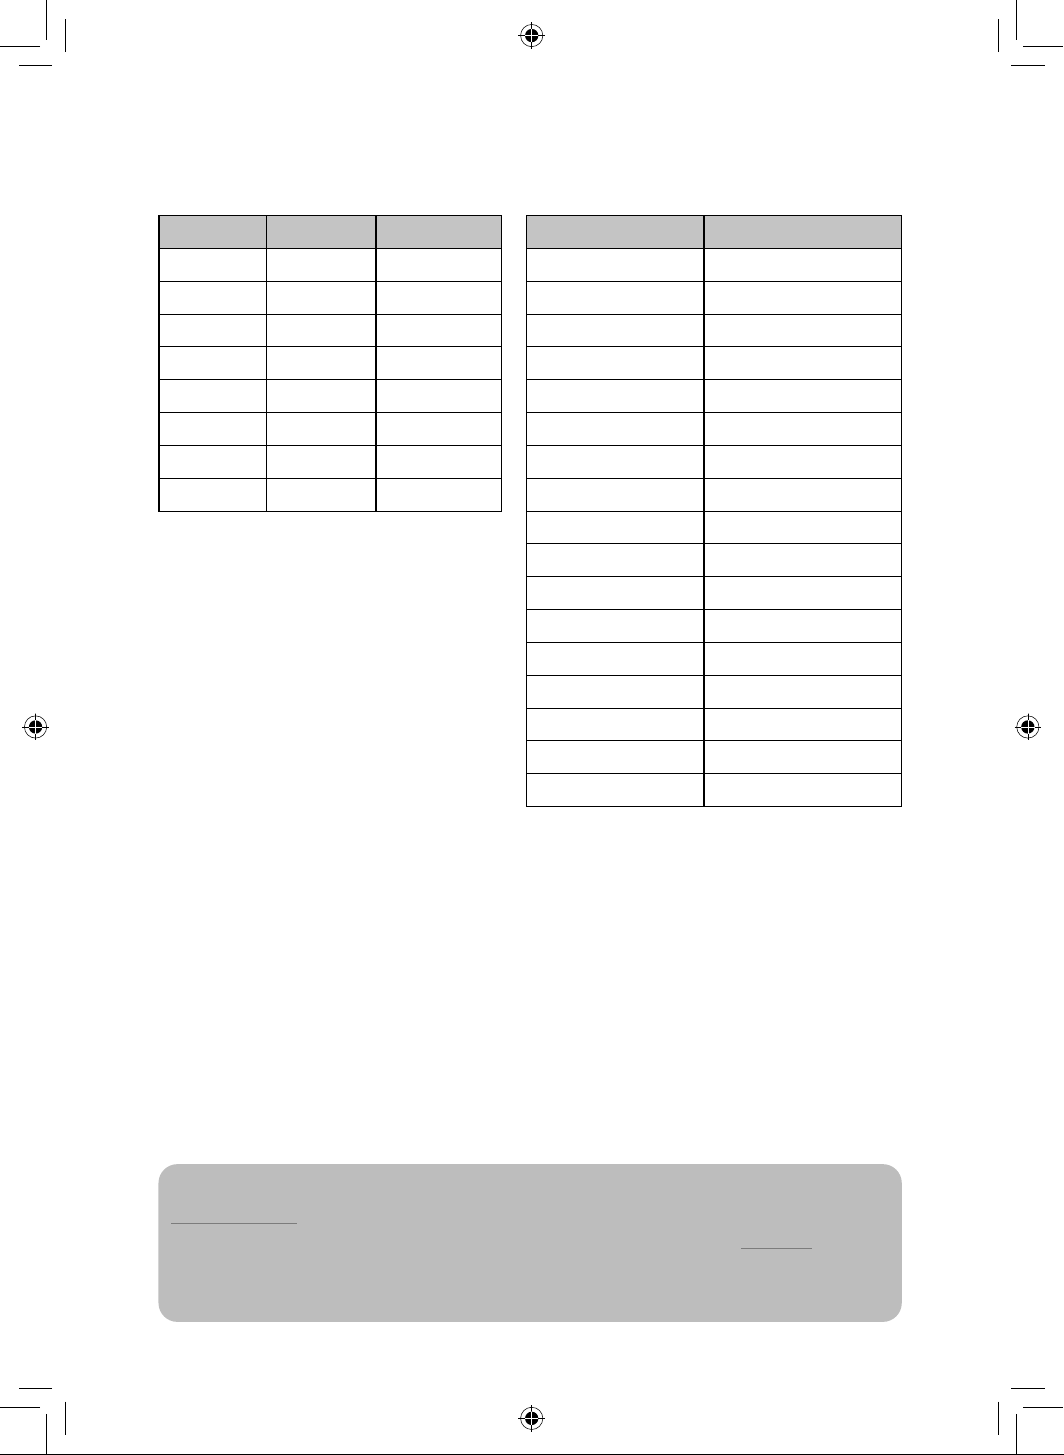
Weights & Measures:
Check these charts for basic imperial to metric conversions of weights.
Metric Imperial US cups
250ml 8 floz 1 cup
180ml 6 fl oz 3/4 cup
150ml 5 floz 2/3 cup
120ml 4 floz 1/2 cup
75ml 2 1/2 floz 1/3 cup
60ml 2 floz 1/4 cup
30ml 1 floz 1/8 cup
15ml 1/2 floz 1 tablespoon
Imperial Metric
1/2 oz 15g
1 oz 30g
2 oz 60g
3 oz 90g
4 oz 110g
5 oz 140g
6 oz 170g
7 oz 200g
8 oz 225g
9 oz 255g
10 oz 280g
11 oz 310g
12 oz 340g
13 oz 370g
14 oz 400g
15 oz 425g
1 lb 450g
Food Allergies
Important Note: Some of the recipes contained in this document may contain nuts and/or other
allergens. Please be careful when making any of our sample recipes that you ARE NOT allergic
to any of the ingredients. For more information on allergies, please visit the Food Standards
Agency’s website at: www.food.gov.uk

14
Ingredients
2 large potatoes
½ tbsp. paprika
Pinch of salt
Pinch of pepper
1 tbsp. Sunflower oil
Ingredients
1 whole chicken (1-1.5lbs /
500-700g)
1 tbsp olive oil
¼ tsp sea salt
1 tsp paprika
1tbsp dried thyme
1 tbsp dried mustard
½ tsp onion powder
½ tsp garlic powder
Ingredients
12 chicken wings
2 tbsp soy sauce
2 tbsp honey
1 ½ tsp salt
¼ tsp white pepper
¼ tsp black pepper
2 tbsp fresh lime juice
Homemade Fries
Classic Roast Chicken
Honey Lime Chicken Wings
Method
1. Wash, peel and slice the potatoes.
2. Dry with kitchen paper.
3. Cut the potatoes into your desired length and thickness.
4. Bring a large pot of water to the boil with a pinch of salt. Add the
chips and allow to part boil for 10 minutes.
5. Strain the fries and immediately run under cold water to stop
them from cooking any more.
6. Pour the oil in a bowl, with the paprika, salt and pepper. Put the
fries on top and mix until all the fries are coated.
7. Remove the fries from the bowl with your fingers or kitchen
utensil so that the excess oil stays behind in the bowl.
8. Place the fries in the air fryer and then set the fryer to the French
Fries setting.
Variations: Try replacing ½ tbsp. of paprika with ½ tbsp. garlic powder,
or ½ tbsp. of grated parmesan cheese.
Method
1. Place the chicken in a medium-sized bowl.
2. In a separate bowl, mix together the olive oil, sea salt, paprika,
dried thyme, dried mustard, onion powder and garlic powder.
3. Rub the chicken with the spice mix, put it on the rotisserie fork
and place the fork into the air fryer, as detailed in the Using the
Rotisserie section.
4. Cook on the Chicken pre-set.
5. Use a meat thermometer to ensure the chicken has reached a
safe internal temperature before removing from the rotisserie.
6. Allow 5 minutes’ standing time before serving.
Method
1. Place all the ingredients inside a large mixing bowl or zip-locked
sealing bag and mix them well. Marinate in the refrigerator for at
least 4 hours (preferably overnight)
2. Line a baking tray with baking paper and evenly scatter the
chicken wings across it.
3. Air-fry on the Wings setting, turning halfway through.
15
Ingredients
4 skin-on salmon fillets
4 tbsp butter
1 clove garlic, minced
1 tsp salt
1 tsp fresh dill, chopped
1 tbsp fresh parsley, chopped
Juice of 1 lemon
Ingredients
100g dark chocolate chips
100g unsalted butter
1 ½ tbsp. self-raising flour
2 eggs
2 ½ tbsp. sugar
Lemon Garlic Salmon
Molten Chocolate Lava Cake
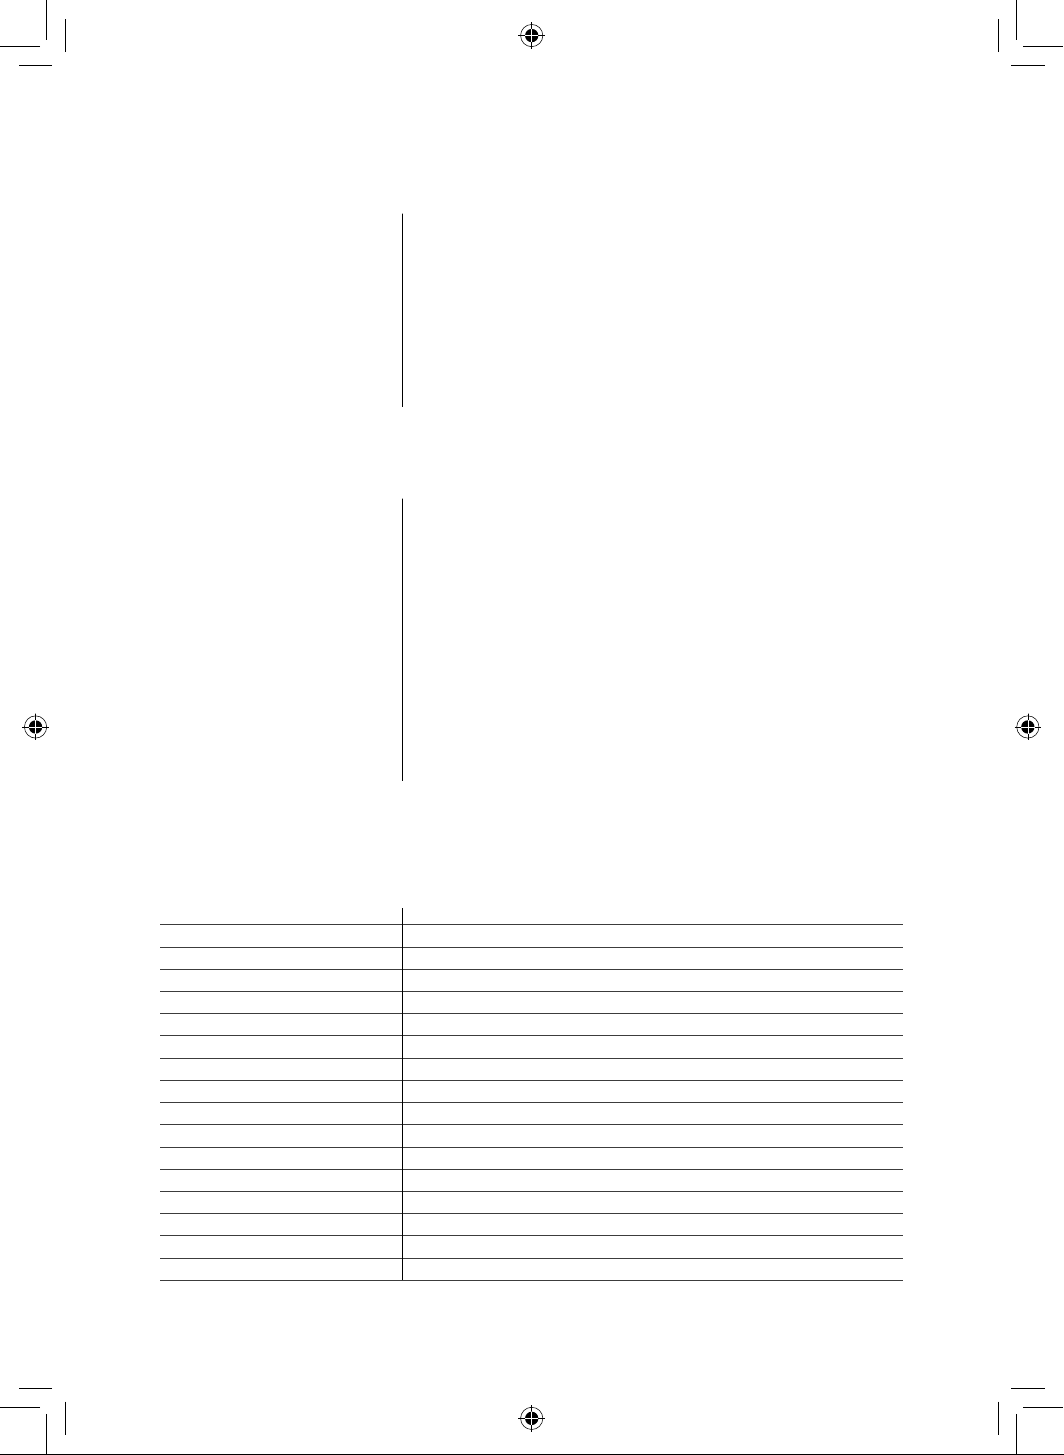
Add your own recipes Here
Method
1. Melt the butter and mix in the remaining ingredients to create
a butter sauce.
2. Coat the fish in the sauce on both sides and place it on a baking
tray lined with baking paper.
3. Place the baking tray inside the air fryer and cook on the Fish
setting.
Method
1. Melt the chocolate and the butter, stirring all the time.
2. Stir the flour into the mixture, mix it in lightly and set the
mixture aside.
3. In a separate mixing bowl, mix together the eggs and sugar
until light and frothy. Mix in the chocolate sauce slowly until the
ingredients are well blended together.
4. Pour the batter into an oven-safe cup or ramekin and place it
inside the air fryer.
5. Turn the air fryer on in the Cake setting or at 190 degrees for 6
minutes.
6. When ready, top with ice-cream and serve immediately.
Ingredients: Method:
0120.V1
0320.V3
thank you!
We hope you enjoy your appliance for many years.
This product is guaranteed for 12 months from the date of original purchase.
If any defect arises due to faulty materials of workmanship, the faulty products must be returned to the place
of purchase.
Refund or replacement is at the discretion of the retailer.
The Following Conditions Apply:
The product must be returned to the retailer with proof of purchase or a receipt.
The product must be installed and used in accordance with the instructions contained in
this instruction guide.
It must be used only for domestic purposes.
It does not cover wear and tear, damage, misuse or consumable parts.
Tower has limited liability for incidental or consequential loss or damage.
This guarantee is valid in the UK and Eire only.
The standard one year guarantee is only extended to the maximum available for each particular
product upon registration of the product within 28 days of purchase. If you do not register the product
with us within the 28 day period, your product is guaranteed for 1 year only.
To validate your extended warranty, please visit
www.towerhousewares.co.uk and register with us online.
Please note that length of extended warranty offered is dependent on product type and that each qualifying
product needs to be registered individually in order to extend its warranty past the standard 1 year.
Extended warranty is only valid with proof of purchase or receipt.
Your warranty becomes void should you decide to use non Tower spare parts.
Spare parts can be purchased from www.towerhousewares.co.uk
Should you have a problem with your appliance, or need any spare parts,
please call our Customer Support Team on:
+44 (0) 333 220 6066