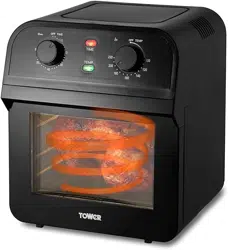
User Manual for Air Fryer
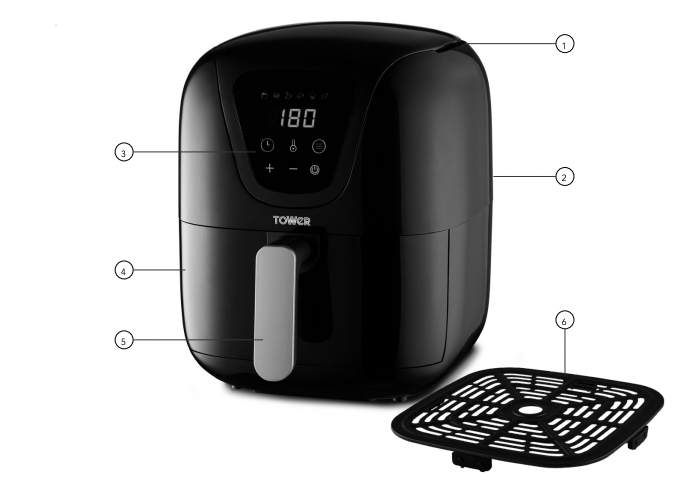
1. Air Inlet
2. Air Outlet
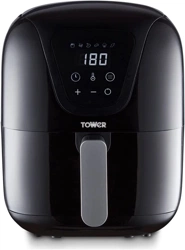
3. Control Panel
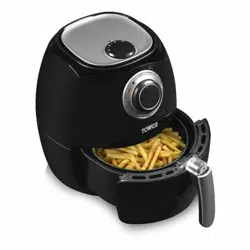
4. Drawer
5. Drawer Handle
6. Grill Plate
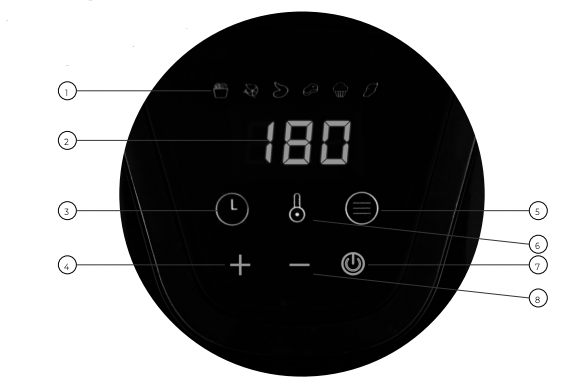
1. Preset Options
• French Fries
• Fish
• Chicken Wings
• Steak
• Cake
• Jacket Potato
2. LED Display
3. Timer Key
4. Increase Key
5. Pre-set Mode Selector Key
6. Temperature Key
7. ON/Standby Key
8. Decrease Key
Before First Use:
Read all instructions and safety information carefully before first use. Please retain this information for future reference.
- Remove your appliance from the packaging.
- Check that there is no damage to the cord or any visible damage to the body.
- Dispose of the packaging in a responsible manner.
- Remove any stickers or labels from the appliance. DO NOT remove the rating label.
- Thoroughly clean the grill plate and pan with hot water, some washing-up liquid and a non abrasive sponge. Dry thoroughly. Place the grill plate in to the bottom of the drawer.
- Wipe the inside and outside of the appliance with a damp cloth.
- Do not fill the fryer with oil or frying fat. This fryer operates using hot air and requires very little to no oil.
- Familiarise yourself with the control panel shown in the Specifications section.
- Situate your appliance according to the Important Safety Instructions section.
Note: This appliance uses very little oil or no oil.
Using Your Appliance.
Preparing For Use:
- Place the appliance on a stable, horizontal and even surface. Do not place the appliance onto a non-heat-resistant surface.
- Do not fill the drawer with oil or any other liquid.
- Do not put anything on top of the appliance, as this will disrupt the airflow and the hot air frying will be affected as a result.
Air Fryer Drawer Safety Switch:
For your safety, this air fryer contains a safety switch in the drawer, designed to keep if from accidentally turning on whenever the drawer is not properly situated inside the appliance or the timer is not set. Before using your air fryer, please ensure that the grill plate is inside the drawer, the drawer is fully closed and that the cooking timer has been set.
Removing the Drawer:
The drawer can be removed fully from the air fryer. Pull on the handle to slide the drawer out of the air fryer.
Note: If the drawer is removed from the main body of the fryer when in operation, the unit will automatically stop working. When the drawer is re-inserted, the air fryer will resume operation on the latest selected settings. Alternatively, if the drawer is removed while the unit is turned on but not in operation, all the indicators on the unit’s control panel will light up momentarily, then go out again. The On/Standby indicator will remain lit to show the unit is on Standby mode.
Air Frying:
- Ensure that the drawer, with grill plate, is fully inserted in the unit.
- Connect the mains plug in an earthed wall socket.
- Press the ON/Standby key.
- Press the Temperature key and then the increase/decrease keys to set the required temperature for cooking.
- Press the Timer key and then the decrease key to set 3 minutes for preheating. Press the ON/Standby key once more to start.
- Once pre-heated and the timer reaches 0 mins the device is ready for use. Carefully pull the drawer out of the appliance, place the ingredients inside the drawer, and slide the drawer back in to the appliance.
Note: DO NOT exceed the MAX (maximum) line.
Note: Never use the pan without the grill plate.
7. Press the mode selection key to select an appropriate cooking mode or click the temperature and/ or time keys and increase/decrease keys to choose an appropriate time and temperature.
8. Press the ON/Standby key once more to start cooking. The fan will begin to work.
CAUTION! DO NOT touch the drawer during and for some time after use, as it gets very hot. Only hold the drawer by the handle.
9. When the set preparation time has elapsed the appliance will emit an audible signal. Pull the drawer out of appliance and place it on a heat-resistant surface.
10. Check if the ingredients are ready:
• If the ingredients are not ready yet, simply slide the drawer back into the appliance and set the timer to a few extra minutes.
• If the ingredients are ready empty the drawer into a bowl or onto a plate. Take care if tilting the drawer as any excess oil that has collected on the bottom of the drawer will leak onto the ingredients.
11. When a batch of food is ready, the appliance is instantly ready for preparing another batch.
TIP: Shake the ingredients halfway through the cooking time to optimise the end result and help prevent unevenly fried ingredients. To shake the ingredients, pull the drawer out of the appliance by the handle and shake it. Then slide the drawer back into the appliance.
TIP: To remove large or fragile ingredients, lift the ingredients out of the drawer with a pair of tongs.
Setting the Timer:
- The Air Fryer has a 60 minute digital timer, which can be adjusted through the unit’s control panel.
- Press the Timer key and increase / decrease keys to set the required cooking time. The digits on the unit’s control panel will change accordingly.
- When the timer is set, press the On/Standby key on the unit’s control panel to start the cooking process.
- When the cooking time has elapsed, the unit will emit an audible signal to indicate that the cooking has finished.
Note: The time changes in increments of 1 minute, between 1-60 minutes.
Note: If the food is cold, increase the cooking time by 3 minutes.
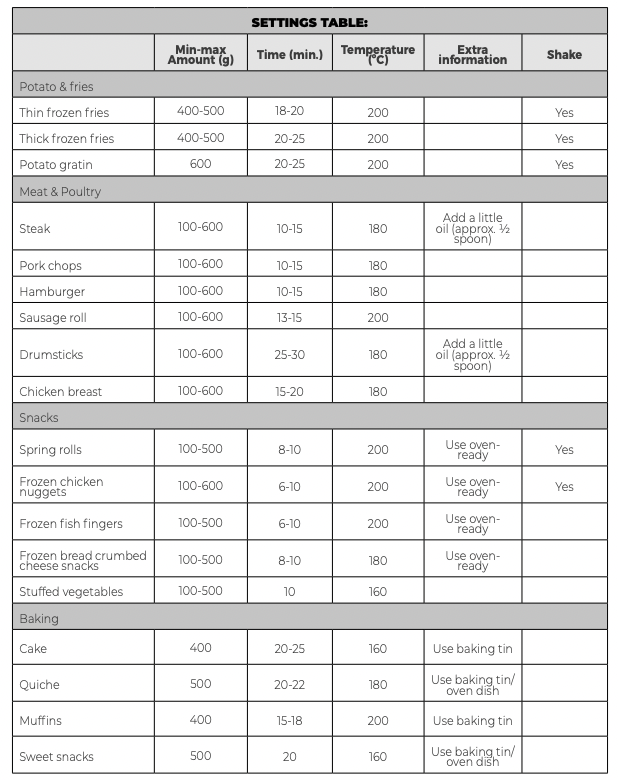
Note: The table on the next page will help you to select the basic settings for the ingredients.
Temperature Selection:
- Press the Temperature key and increase/ decrease keys to manually select the correct temperature for each dish. The digits on the unit’s control panel will change accordingly.
- When the temperature is set, press the On/Standby key on the unit’s control panel to start the cooking process.
Note: Keep in mind that these settings are indications. As ingredients differ in origin, size, shape and brand, we cannot guarantee the best settings for your ingredients. Because the Rapid Air technology instantly reheats the air inside the appliance instantly, pulling the drawer briefly out of the appliance during hot air frying barely disturbs the process.
Pre-set Menus:
- This air fryer is equipped with a choice of 6 pre-set menus, accessible through the MODE key.
- Repeatedly press this key to cycle through the available options. The corresponding indicator will light up and the pre-set time for that menu will be displayed on the unit’s LCD screen.
- When the correct pre-set has been selected, press the On/Standby key on the unit’s control panel to start the cooking process.
- The full list of pre-set menus is as follows: French Fries, Fish, Chicken Wings, Steak, Cake, Jacket Potato
CAUTION! DO NOT touch the drawer during and for some time after use, as it gets very hot. Only hold the drawer by the handle.
Tips:
- The cooking time will depend on the size of your ingredients. Smaller sizes may require a shorter cooking time.
- Shaking smaller ingredients halfway during the cooking time optimises the end result and can help prevent unevenly fried ingredients.
- For perfectly fluffy fries, it is recommended that potatoes be parboiled before frying
- Add some oil to fresh potatoes for a crispy result. Fry your ingredients in the air fryer within a few minutes after you added the oil.
- Be cautious of using extremely greasy ingredients such as sausages in the air fryer.
- Snacks that can be prepared in a oven can also be prepared in the air fryer
- Use pre-made dough to prepare filled snacks quickly and easily. Pre-made dough also requires a shorter cooking time than home-made dough.
- Place a baking tin or oven dish in the air fryer basket if you want to bake a cake or quiche, or if you want to fry fragile ingredients or filled ingredients.
- You can also use the air fryer to reheat ingredients. To reheat ingredients, set the temperature to 150°C for up to 10 minutes.
Troubleshooting
| PROBLEM |
POSSIBLE CAUSE |
SOLUTION |
| The air fryer does not work |
The appliance is not plugged in. |
Plug the appliance into an earthed wall socket. |
| The appliance is not turned on. |
Press the On/Off button to switch on the appliance. |
| The ON/Standby key has not been pressed after cook mode is selected. |
Press the ON/Standby key. |
| Fried snacks are not crispy when they come out of the air fryer. |
Wrong type of snacks used. |
Use oven snacks or lightly brush some oil onto the snacks for a crispier result. |
| The fryer contains grease from previous use. |
White smoke is caused by grease heating up inside the fryer. Make sure you clean the fryer properly after each use. |
| The fried food is not done. |
Too much food has been added to the air fryer. |
Put smaller batches of food in the air fryer. Smaller batches are fried more evenly. |
| The set temperature is too low. |
Set the temperature to the required temperature setting. (refer to the ‘Settings Table). |
| The food hasn’t been cooked for long enough. |
Set unit to the required cooking time (refer to the ‘Settings Table). |
| Fresh fries are fried unevenly in the air fryer. |
Wrong type of potatoes used. |
Use fresh potatoes and make sure they stay firm during frying. |
| The potato sticks were not rinsed adequately before frying |
Rinse the potato sticks properly to remove starch from the outside. |
| Fresh fries are not crispy when they come out of the air fryer. |
The crispiness of the fries depends on the amount of oil and water in the fries. |
Make sure you dry the potato sticks properly before you add the oil. |
| Cut the potato sticks smaller for a crispier result. |
| Add slightly more oil for a crispier result. |
Cleaning & Care:
WARNING! DO NOT IMMERSE THE APPLIANCE IN WATER OR ANY OTHER LIQUID.
Clean the appliance after every use.
Cleaning the appliance.
- Do not use metal kitchen utensils or abrasive cleaning materials to clean them, as this may damage the non-stick coating.
- Remove the mains plug from the wall socket and let the appliance cool down.
Note: Remove the drawer to let the air fryer cool down more quickly.
3. Wipe the outside of the appliance with a moist cloth.
4. Clean the drawer and grill plate with hot water, some washing-up liquid and a nonabrasive sponge.
5. You can use degreasing liquid to remove any remaining dirt.
Note: The drawer is NOT dishwasher-safe. NEVER place the drawer in the dishwasher
Tip: If dirt is stuck to the bottom of the drawer, fill the drawer with hot water with some washing-up liquid. Allow the drawer to soak for approximately 10 minutes.
6. Clean the inside of the appliance with hot water and non-abrasive sponge.
7. Clean the heating element with a cleaning brush to remove any food residues.
To store your appliance:
- Ensure that the air fryer is cool, clean and dry before you store it.
- Store the appliance in a cool and dry place.
Weights & Measures:
Check these charts for basic imperial to metric conversions of weights.

Food Allergies
Important Note: Some of the recipes contained in this document may contain nuts and/or other allergens. Please be careful when making any of our sample recipes that you ARE NOT allergic to any of the ingredients.
Homemade Fries
|
Ingredients
|
|
Method
|
|
2 large potatoes
½ tbsp. paprika
Pinch of salt
Pinch of pepper
1 tbsp. Sunflower oil
|
|
1. Wash, peel and slice the potatoes.
2. Dry with kitchen paper.
3. Cut the potatoes into your desired length and thickness.
4. Bring a large pot of water to the boil with a pinch of salt. Add the chips and allow to part boil for 10 minutes.
5. Strain the fries and immediately run under cold water to stop them from cooking any more.
6. Pour the oil in a bowl, with the paprika, salt and pepper. Put the fries on top and mix until all the fries are coated.
7. Remove the fries from the bowl with your fingers or kitchen utensil so that the excess oil stays behind in the bowl.
8. Place the fries in the air fryer and then set the fryer to cook as per the suggested times/temperature in the Settings Table.
Variations: Try replacing ½ tbsp. of paprika with ½ tbsp. garlic powder, or ½ tbsp. of grated parmesan cheese.
|
Bacon and Egg Breakfast Muffin
|
|
1 free range egg
1 strip of bacon
1 English muffin
Cheese to slice
Pinch of pepper and salt to taste
|
|
1. Crack the egg into a small ramekin or oven proof dish.
2. Cut the English muffin in half and layer cheese on one half.
3. Place the muffin, bacon and egg (in the ramekin) into the Air Fryer drawer.
4. Turn the Air Fryer to 200°C for 6 minutes.
5. Once it’s cooked, assemble your breakfast muffin and enjoy.
Tip: Try adding some mustard on the muffin for extra flavour.
|
Honey Lime Chicken Wings
|
|
12 chicken wings
2 tbsp soy sauce
2 tbsp honey
1 ½ tsp salt
¼ tsp white pepper
¼ tsp black pepper
2 tbsp fresh lime juice
|
|
1. Place all the ingredients inside a large mixing bowl or zip-locked sealing bag and mix them well. Marinate in the refrigerator for at least 4 hours (preferably overnight)
2. Line a baking tray with baking paper and evenly scatter the chicken wings across it.
3. Cook the wings, turning halfway through as per the suggested time and temperature most suitable in the Settings Table.
|
Lemon Garlic Salmon
|
|
4 skin-on salmon fillets
4 tbsp butter
1 clove garlic, minced
1 tsp salt
1 tsp fresh dill, chopped
1 tbsp fresh parsley, chopped
Juice of 1 lemon
|
|
1. Melt the butter and mix in the remaining ingredients to create a butter sauce.
2. Coat the fish in the sauce on both sides and place it on a baking tray lined with baking paper.
3. Place the baking tray inside the air fryer and cook through, as per the suggested time and temperature most suitable in the Settings Table.
|
Molten Chocolate Lava Cake
|
|
100g dark chocolate chips
100g unsalted butter
1 ½ tbsp. self-raising flour
2 eggs
2 ½ tbsp. sugar
|
|
1. Melt the chocolate and the butter, stirring all the time.
2. Stir the flour into the mixture, mix it in lightly and set the mixture aside.
3. In a separate mixing bowl, mix together the eggs and sugar until light and frothy. Mix in the chocolate sauce slowly until the ingredients are well blended together.
4. Pour the batter into an oven-safe cup or ramekin and place it inside the air fryer.
5. Turn the air fryer to 190ºC for 6 minutes.
6. When ready, top with ice-cream and serve immediately.
|