Loading ...
Loading ...
Loading ...
19
Operation
English
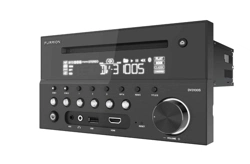
Common Operation
Turn the unit on or switch to
standby mode
Press to turn the unit on or switch to
standby mode.
Selecting a Source
1. Use
on the front panel
Press
repeatedly to select Tuner (AM/
FM), Disc (After inserting a disc), USB (After
inserting a USB storage), BT, AV IN, AUX or
HDMI mode.
Note: Press
to enter into the Bluetooth
mode directly. Press again to back to
current playback mode. When HDMI source
was selected, the video of HMDI will be
output from the video out both AV1 and
AV2.
2. Use the corresponding buttons on the
remote control
DVD / USB - Once a DVD is inserted into
the unit, the unit will automatically switch
to display this source menu. once a USB
is inserted into the unit, Then Press this
function button on the remote control to
select USB as a sound input mode.
AM / FM - Press and hold this button on the
remote control to scroll through FM1, FM2,
FM3, AM1, and AM2. To switch between
USA and Europe radio regions, press and
hold
on the front panel for 5 seconds until
the region is displayed on the screen.
AUX - Press this button on the remote
control to select the AUX inputs available
for the unit.
AV IN / HDMI - Press this button on the
remote control to scroll through the AV IN /
HDMI inputs available for the unit.
● AV IN - Connection on the rear of
the unit to connect an external audio
source.
● HDMI - Connection on the front of the
unit to connect an external HDMI OUT
device.
Adjust volume
Rotate the VOLUME -/+ knob clockwise
to increase volume, rotate anticlockwise to
decrease volume.
Mute
1. Press MUTE to mute sound output
in any source mode. 'MUTE' will be
displayed on the screen.
2. Press MUTE
again to resume.
Display and set the clock
1. To display the clock on the LCD display,
press CLOCK button on the remote
control.
2. To adjust or set the clock, press and hold
CLOCK on the remote control to enter
clock setup mode.
Rotate the VOLUME -/+ knob on the front
panel (or press +/- on the remote control)
to adjust the hour.
Press
the VOLUME -/+ knob on the
front panel (or press SEL on the remote
control) to enter minute setting.
Rotate the VOLUME -/+ knob (or press
+/- on the remote control) to adjust the
minute.
The time on the clock is set automatically
after a few seconds of inactivity.
Select a preset EQ mode
Press EQ on the remote control once or
more
directly (or push the VOLUME -/+ knob on
the front panel once or more to active EQ
mode, and then rotate the VOLUME-/+knob)
to select EQ, CINEMA, ROCK, CLASSIC, or
FLAT).
The sound effect will change accordingly.
Loading ...
Loading ...
Loading ...