
(˺Ġ»ĄĚ˚ŘŋœĪĠâŇâƐĄØâŰâŰĪҢØĪĠ
MULTIFUNCTIONAL DIGITAL
HEAT PRESS MACHINE
USER GUIDE

(˺Ġ»ĄĚ˚ŘŋœĪĠâŇâƐĄØâŰâŰĪҢØĪĠ
MULTIFUNCTIONAL DIGITAL
HEAT PRESS MACHINE
USER GUIDE
MULTIFUNCTIONAL DIGITAL
HEAT PRESS MACHINE
This is the original instruction, please read all manual instructions carefully before operating. VEVOR
reserves clear interpretation of our user manual. The appearance of the product shall be subject to the
product you received. Please forgive us that we won't inform you again if there is any technology or
software updates on our product.
NEED HELP? CONTACT US!
@»ŰâńŇĪÞŘØœņŘâŋœĄĪĢŋ˟]ââÞœâØĀĢĄØ»ĚŋŘńńĪƏ˟}Ěâ»ŋâ÷ââĚ÷ŇââœĪØĪĢœ»ØœŘŋ˚
ŘŋœĪĠâŇâƐĄØâŰâŰĪҢØĪĠ
01
02
CONTENTS
(}U(SC];c(
HEAT PRESS MACHINE PARTS INTRODUCTION
3
PARTS LIST
4
ASSEMBLY & USE STEPS
5
INTELLIGENT TEMPERATURE CONTROLLER OPERATION METHOD
6
˂˘}(}Cc](:c(C];
6
˃˘(([}(((C($
6
(}U(SC];¯[
8-9
(}U(SC];}[
10-12
13-14
˄˘}C]C];[(@c$
15
˅˘cU(@ccC];:c]:(UC¯
15-16
˘˘˘˘˘˘˘˘˘˘˘˘˘˘˘˘˘˘˘˘˘˘˘˘˘˘˘˘˘˘˘˘˘˘˘˘˘˘˘˘˘˘˘˘˘˘˘˘˘˘˘˘˘˘˘˘˘˘˘˘˘˘˘˘˘˘˘˘˘˘˘˘˘˘˘˘˘˘˘˘˘˘˘˘˘˘˘˘˘˘˘˘˘˘˘˘˘˘˘˘˘˘˘˘˘˘˘˘˘˘˘˘˘˘˘˘˘˘˘˘˘˘˘˘˘˘˘˘˘
˘˘˘˘˘˘˘˘˘˘˘˘˘˘˘˘˘˘˘˘˘˘˘˘˘˘˘˘˘˘˘˘˘˘˘˘˘˘˘˘˘˘˘˘˘˘˘˘˘˘˘˘˘˘˘˘˘˘˘˘˘˘˘˘˘˘˘˘˘˘˘˘˘˘˘˘˘˘˘˘˘˘˘˘˘˘˘˘˘˘˘˘˘˘˘˘˘˘˘˘˘˘˘˘˘˘˘˘˘˘˘˘˘˘˘˘˘˘˘˘˘˘˘˘˘˘˘˘
˘˘˘˘˘˘˘˘˘˘˘˘˘˘˘˘˘˘˘˘˘˘˘˘˘˘˘˘˘˘˘˘˘˘˘˘˘˘˘˘˘˘˘˘˘˘˘˘˘˘˘˘˘˘˘˘˘˘˘˘˘˘˘˘˘˘˘˘˘˘˘˘˘˘˘˘˘˘˘˘˘˘˘˘˘˘˘˘˘˘˘˘˘˘˘˘˘˘˘˘˘˘˘˘˘˘˘˘˘˘˘˘˘˘˘˘˘˘˘˘˘˘˘˘˘˘˘˘˘
˘˘˘˘˘˘˘˘˘˘˘˘˘˘˘˘˘˘˘˘˘˘˘˘˘˘˘˘˘˘˘˘˘˘˘˘˘˘˘˘˘˘˘˘˘˘˘˘˘˘˘˘˘˘˘˘˘˘˘˘˘˘˘˘˘˘˘˘˘˘˘˘˘˘˘˘˘˘˘˘˘˘˘˘˘˘˘˘˘˘˘˘˘˘˘˘˘˘˘˘˘˘˘˘˘˘˘˘˘˘˘˘˘˘˘˘˘˘˘˘˘˘˘˘˘
˘˘˘˘˘˘˘˘˘˘˘˘˘˘˘˘˘˘˘˘˘˘˘˘˘˘˘˘˘˘˘˘˘˘˘˘˘˘˘˘˘˘˘˘˘˘˘˘˘˘˘˘˘˘˘˘˘˘˘˘˘˘˘˘˘˘˘˘˘˘˘˘˘˘˘˘˘˘˘˘˘˘˘˘˘˘˘˘˘˘˘˘˘˘˘˘˘˘˘˘˘˘˘˘˘˘˘˘˘˘˘˘˘˘˘˘˘˘˘˘˘˘˘˘
˘˘˘˘˘˘˘˘˘˘˘˘˘˘˘˘˘˘˘˘˘˘˘˘˘˘˘˘˘˘˘˘˘˘˘˘˘˘˘˘˘˘˘˘˘˘˘˘˘˘˘˘˘˘˘˘˘˘˘˘˘˘˘˘˘˘˘˘˘˘˘˘˘˘˘˘˘˘˘˘˘˘˘˘˘˘˘˘˘˘˘˘˘˘˘˘˘˘˘˘˘˘˘˘˘˘˘˘˘˘˘˘˘˘˘˘˘˘˘˘˘˘˘˘˘˘˘˘˘˘˘˘˘˘˘˘˘˘˘˘˘˘˘
˘˘˘˘˘˘˘˘˘˘˘˘˘˘˘˘˘˘˘˘˘˘˘˘˘˘˘˘˘˘˘˘˘˘˘˘˘˘˘˘˘˘˘˘˘˘˘˘˘˘˘˘˘˘˘˘˘˘˘˘˘˘˘˘˘˘˘˘˘˘˘˘˘˘˘˘˘˘˘˘
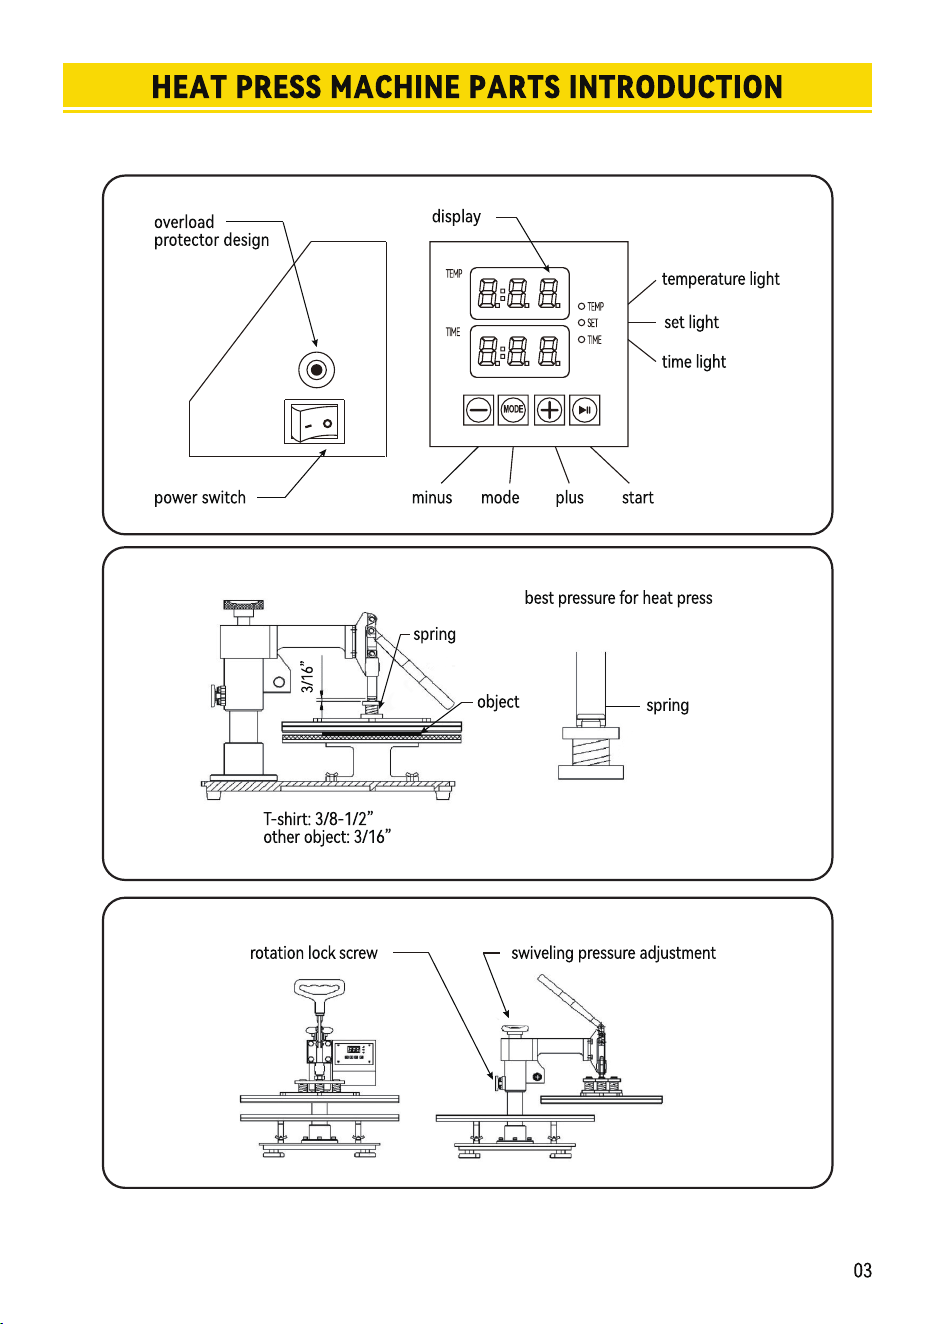

INTELLIGENT TEMPERATURE CONTROLLER OPERATION METHOD
Ċ6HWWHPSHraWXrHrHTXLrHG
ĉ
PrHSaraWLRQEHfRrH8VLQJ
Check the connection between power plug and electrical socket of electrical cabinet.
Be sure to operate with safe ground wire!!!
Heat press element must be securely plugged into the machine before you switch the machine
on.Plug your electrical cord into the machine. Plug electrical socket into wall plug.
temperature and timing setting.(Temperature is measured in Degrees Fahrenheit.)
Press the “MODE”button ONCE,see the “set light” turning red.Then press
the “plus/minus key” to set the initial heating temperature.
1.
2.
A.Initial Temperature Setting ( RDQJH
Press the “MODE” button for THE SECOND TIME;see the “temperature light” turning
red.Then press the “plus or minus key” to set the highest heating temperature.
B.Highest Temperature Setting ( RDQJHć
Press the “MODE” button for THE THIRD TIME;see the”time light” turning red.
Then press the “plus or minus key” to set the proper heating time.
C.Proper Heating Time Setting ( Range:0-999 sec
Press
Object
Mugs
Tiles
Metal board
Plate
230
230
230
230
330
330
300
355
40
40
40
150
Initial
Temperature
Highest
Temperature
Proper Heating
Time ( s )
Sublimation paper:30-50s
230 355
06
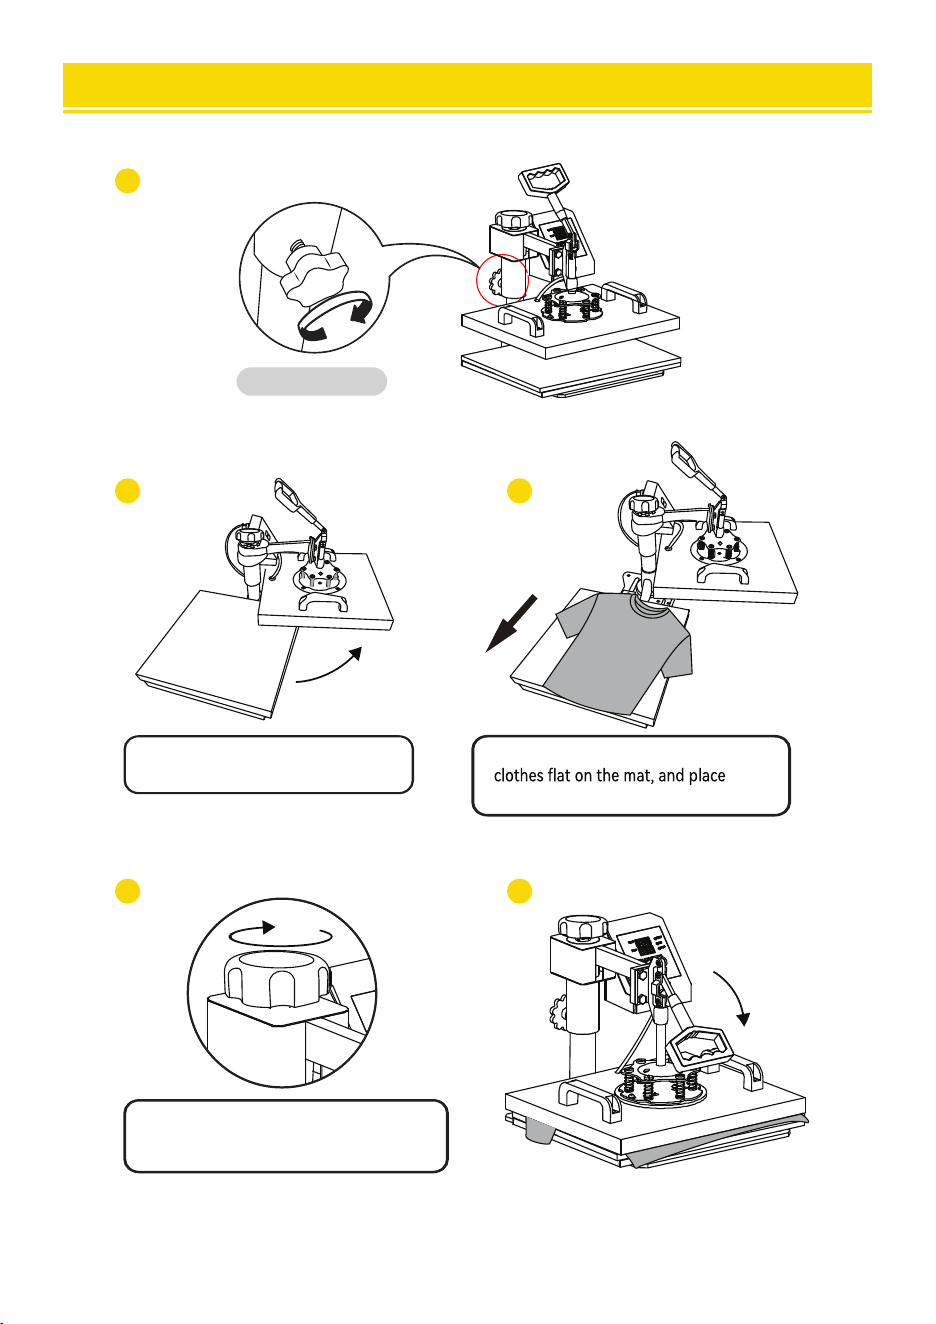
ASSEMBLY & USE STEPS
1
2 3
4 5
Tighten knob.
Rotate the heat transfer board
to the side.
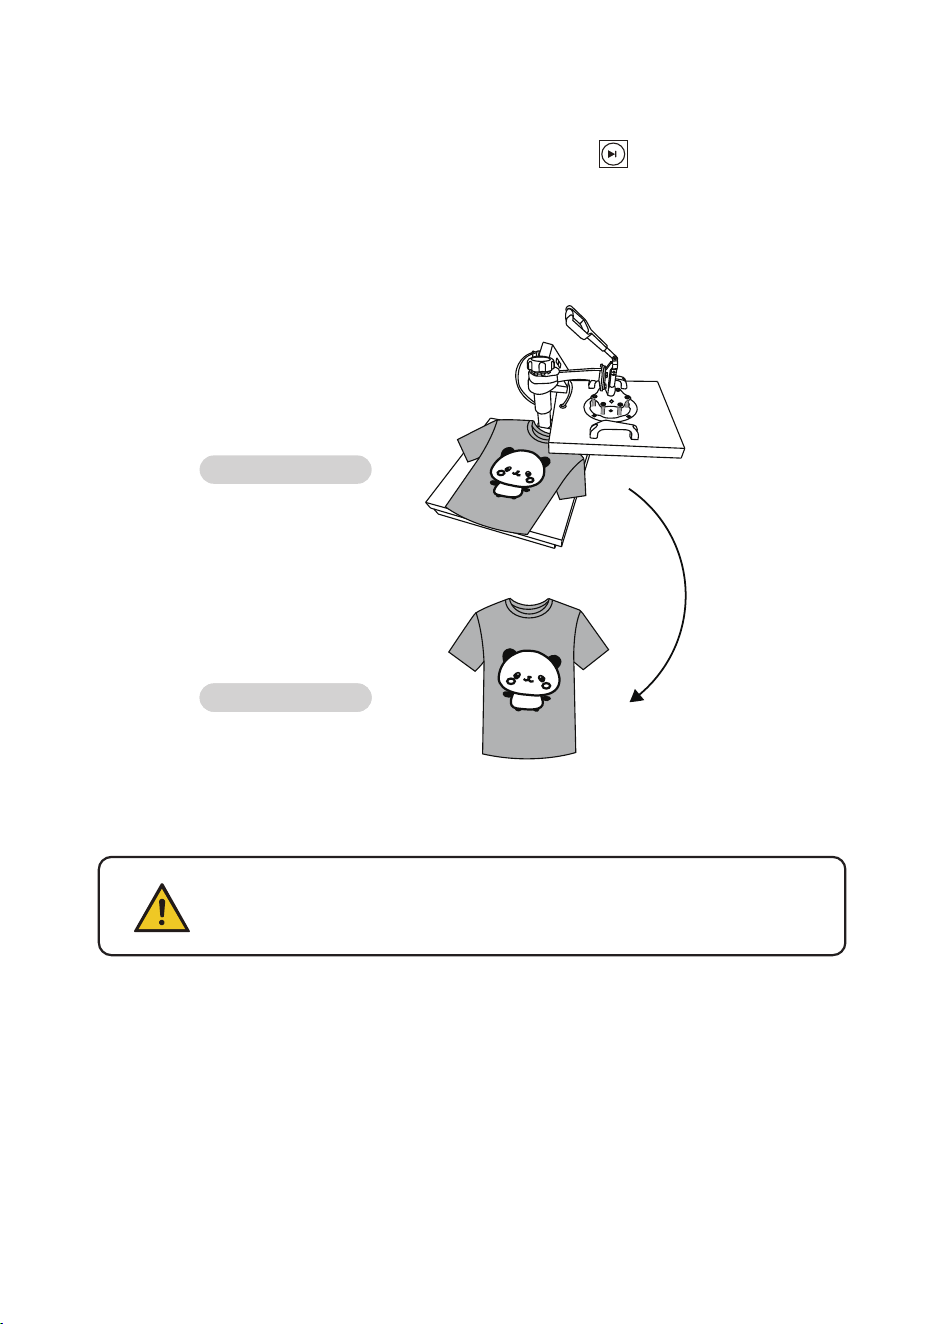
Pull out the mat below, place the
the pattern on the clothes.
Turn this adjustment switch
to adjust the pressure.
05
Turn the power.
on by flipping the on/off Switch on.
D. Fahrenheit to Celsius
After turning on the hot stamping machine, press the+and - buttons simultaneously for about five seconds.
When PAE is displayed, press the MODE key to display (F-C), and change F to C in the time display gear,
so that Fahrenheit is converted to Celsius.

INTELLIGENT TEMPERATURE CONTROLLER OPERATION METHOD
Ċ6HWWHPSHraWXrHrHTXLrHG
ĉ
PrHSaraWLRQEHfRrH8VLQJ
Check the connection between power plug and electrical socket of electrical cabinet.
Be sure to operate with safe ground wire!!!
Heat press element must be securely plugged into the machine before you switch the machine
on.Plug your electrical cord into the machine. Plug electrical socket into wall plug.
temperature and timing setting.(Temperature is measured in Degrees Fahrenheit.)
Press the “MODE”button ONCE,see the “set light” turning red.Then press
the “plus/minus key” to set the initial heating temperature.
1.
2.
A.Initial Temperature Setting ( RDQJH
Press the “MODE” button for THE SECOND TIME;see the “temperature light” turning
red.Then press the “plus or minus key” to set the highest heating temperature.
B.Highest Temperature Setting ( RDQJHć
Press the “MODE” button for THE THIRD TIME;see the”time light” turning red.
Then press the “plus or minus key” to set the proper heating time.
C.Proper Heating Time Setting ( Range:0-999 sec
Press
Object
Mugs
Tiles
Metal board
Plate
230
230
230
230
330
330
300
355
40
40
40
150
Initial
Temperature
Highest
Temperature
Proper Heating
Time ( s )
Sublimation paper:30-50s
230 355
06
ASSEMBLY & USE STEPS
1
2 3
4 5
Tighten knob.
Rotate the heat transfer board
to the side.
Pull out the mat below, place the
the pattern on the clothes.
Turn this adjustment switch
to adjust the pressure.
05
Turn the power.
on by flipping the on/off Switch on.
D. Fahrenheit to Celsius
After turning on the hot stamping machine, press the+and - buttons simultaneously for about five seconds.
When PAE is displayed, press the MODE key to display (F-C), and change F to C in the time display gear,
so that Fahrenheit is converted to Celsius.
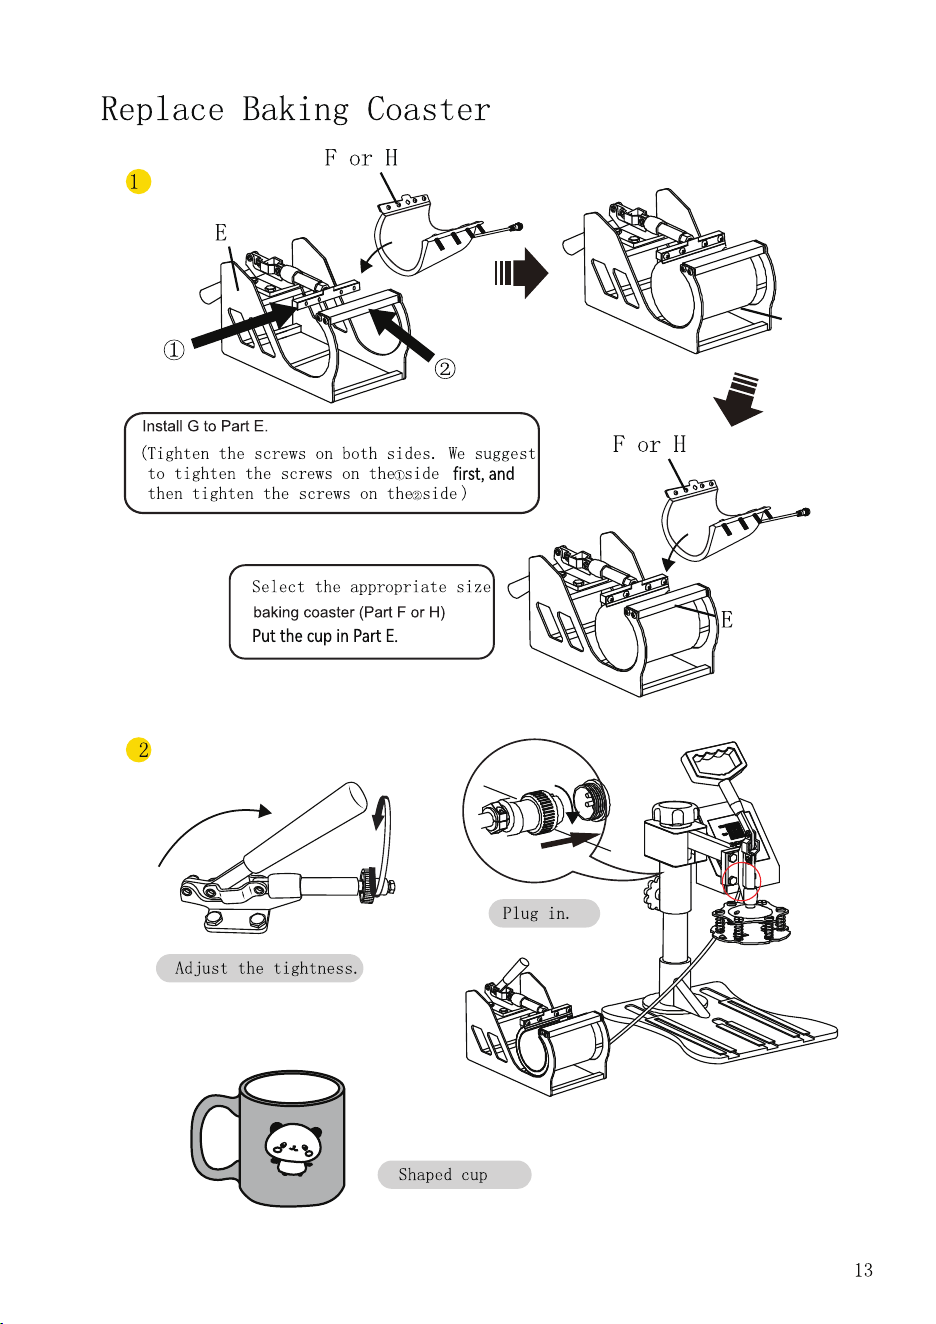
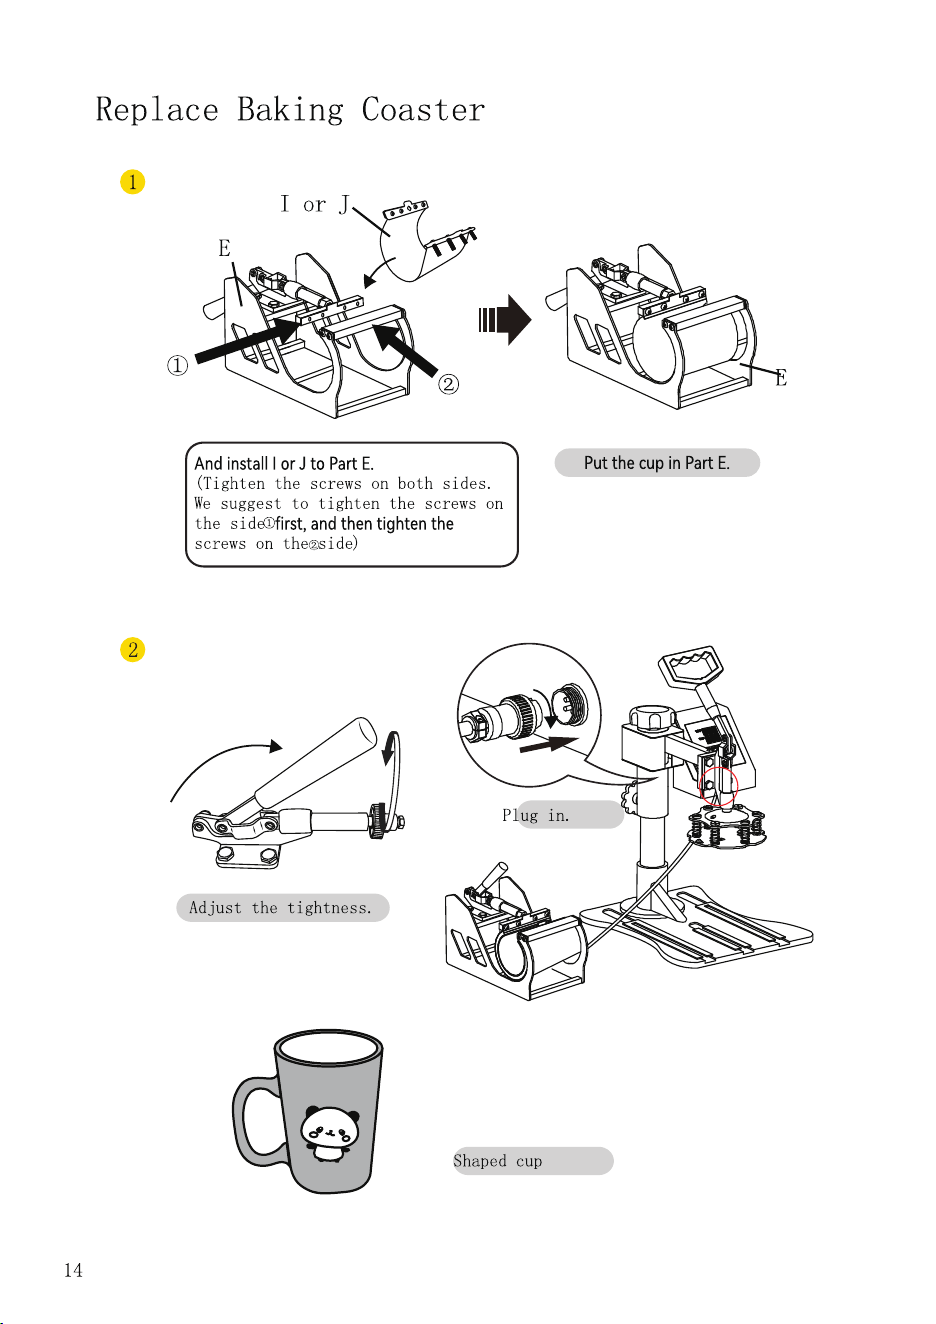
1
2
}ĚŘØĖœĀâńĚŘø˘
Īœ»œâœĀâĀ⻜œŇ»Ģŋ÷âŇ×Ī»ŇÞœĪœĀâŋĄÞâ˘
Replace Baking Tray Mat
ɠɨ07
ŘŇĢĪƄœĀâńĪűâŇ»ĢÞńŘĚĚĪŘœœĀâĠ»œ˘CœĄŋŇâØĪĠĠâĢÞâÞœĪűâ»ŇĀ⻜˺ŇâŋĄŋœ»ĢœøĚĪŰâŋ
űĀâĢŇâĠĪŰĄĢøØĚĪœĀâŋĪŇŇâĠĪŰâœĀâĠ»÷œâŇɢ˺ɣĠĄĢŘœâŋ˘âØ»Ňâ÷ŘĚĪ÷ĀĪœĀ⻜˘
}ŇĄĢœâÞń»œœâŇĢ
Note
ˢĀâĠ»ØĀĄĢâĀ»ŋ»ŋâĚ÷˺ĚĪØĖĄĢø÷ŘĢØœĄĪĢ÷ĪŇœâĠńâŇ»œŘŇâŋ✜ĄĢø˘
˺˺˺C÷œĀâŋœ»ƏĄĢøœâĠńâŇ»œŘŇâĄŋŋ✜Īɣɤɠ:˙œĀâĠ»ØĀĄĢâűĄĚĚ»ŘœĪĠ»œĄØ»ĚĚŷĚĄĠĄœœĀâ
Ġ»ŶĄĠŘĠœâĠńâŇ»œŘŇâŋ✜ĄĢøŇ»Ģøâ÷ŇĪĠɣɤɠœĪɤɣɠ:˘
˺˺˺ĪĢŰâŇŋâĚŷ˙Ą÷ŋ✜ĄĢøœĀâĠ»ŶĄĠŘĠœâĠńâŇ»œŘŇâ»ŋɢɥɠ:»œƋŇŋœ˙œĀâĠ»ØĀĄĢâűĄĚĚ
»ŘœĪĠ»œĄØ»ĚĚŷĚĄĠĄœœĀâŋœ»ƏĄĢøœâĠńâŇ»œŘŇâŋ✜ĄĢøŇ»Ģøâ÷ŇĪĠɢɠɠœĪɢɥɠ:˘
ˢCĢĄœĄ»ĚĀ⻜ĄĢøœâĠńâŇ»œŘŇâ»Ěű»ŷŋ@ĄøĀâŋœĀ⻜ĄĢøœâĠńâŇ»œŘŇâ
}ŇĄĢœâÞØĚĪœĀâŋ
}ŇâŋŋœĀâ[c$(×ŘœœĪĢ÷ĪŇ@(:c@C[(˛ƋĢĄŋĀœĀâŋ✜ĄĢø˙ĀâŋâœĚĄøĀœĄŋĪĢ˙
»ĢÞœĀâœâĠńâŇ»œŘŇâűĄĚĚØĪĢœĄĢŘâœĪŇĄŋ⢩ĀâĢœĀâŋâœĠ»ŶĄĠŘĠœâĠńâŇ»œŘŇâĄŋŇâ»ØĀâÞ˙œĀâ
ØĪŘĢœÞĪűĢŋœ»Əŋ˘÷œâŇœĀâØĪŘĢœÞĪűĢâĢÞŋ˙œĀâ((:ŋĪŘĢÞűĄĚĚ×ââĠĄœœâÞ˙œĀâĄĢÞĄØ»œĪŇ
ĚĄøĀœűĄĚĚœŘŇĢĪƄ˙»ĢÞœĀâĪńâŇ»œĄĪĢĄŋØĪĠńĚâœâ˘»ĢÞœĀâĠ»ØĀĄĢâŋœ»ĢÞŋ×ŷœĪűĪŇĖ˘
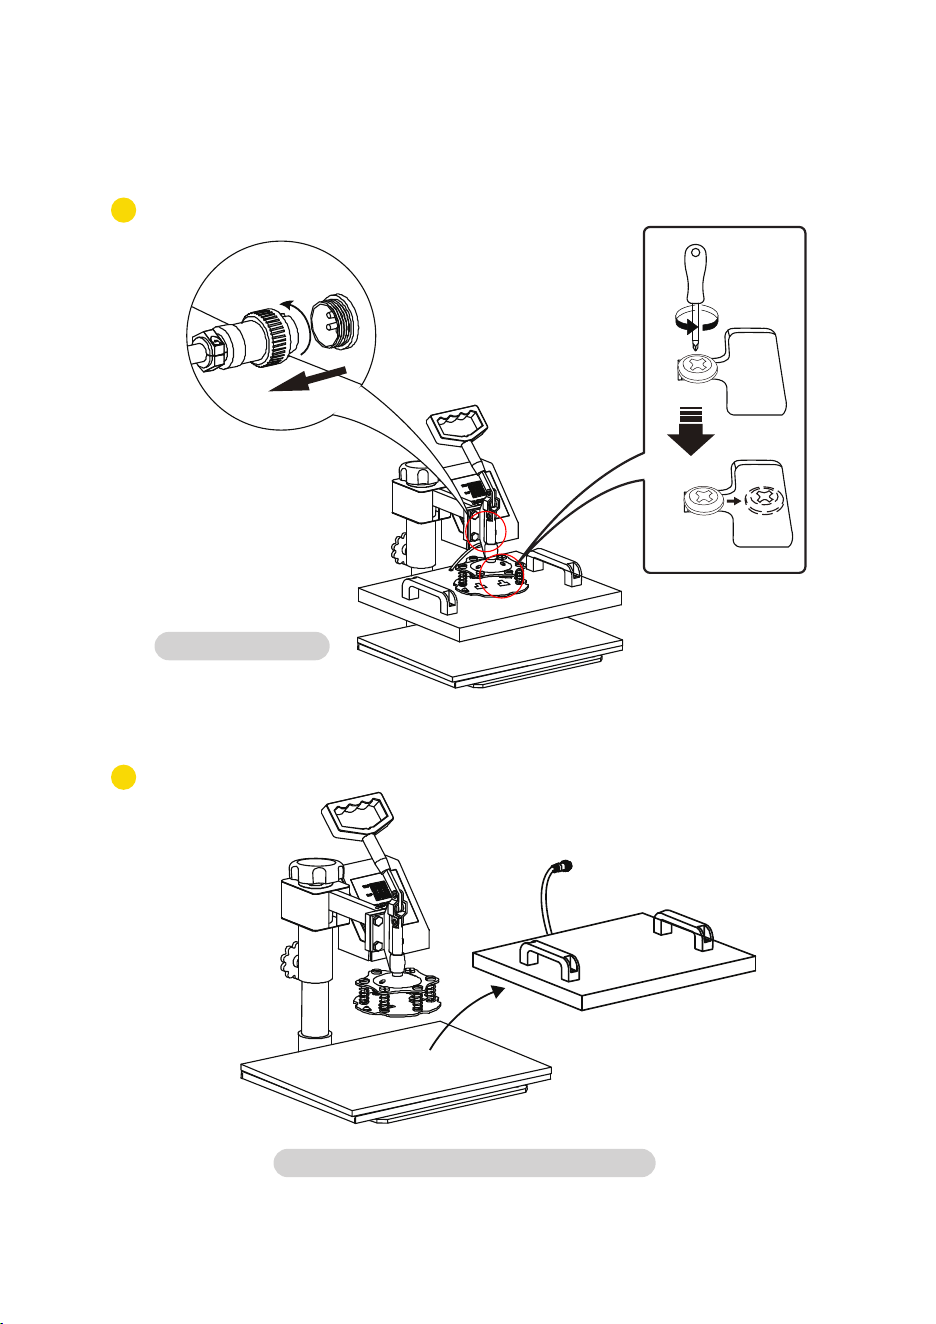
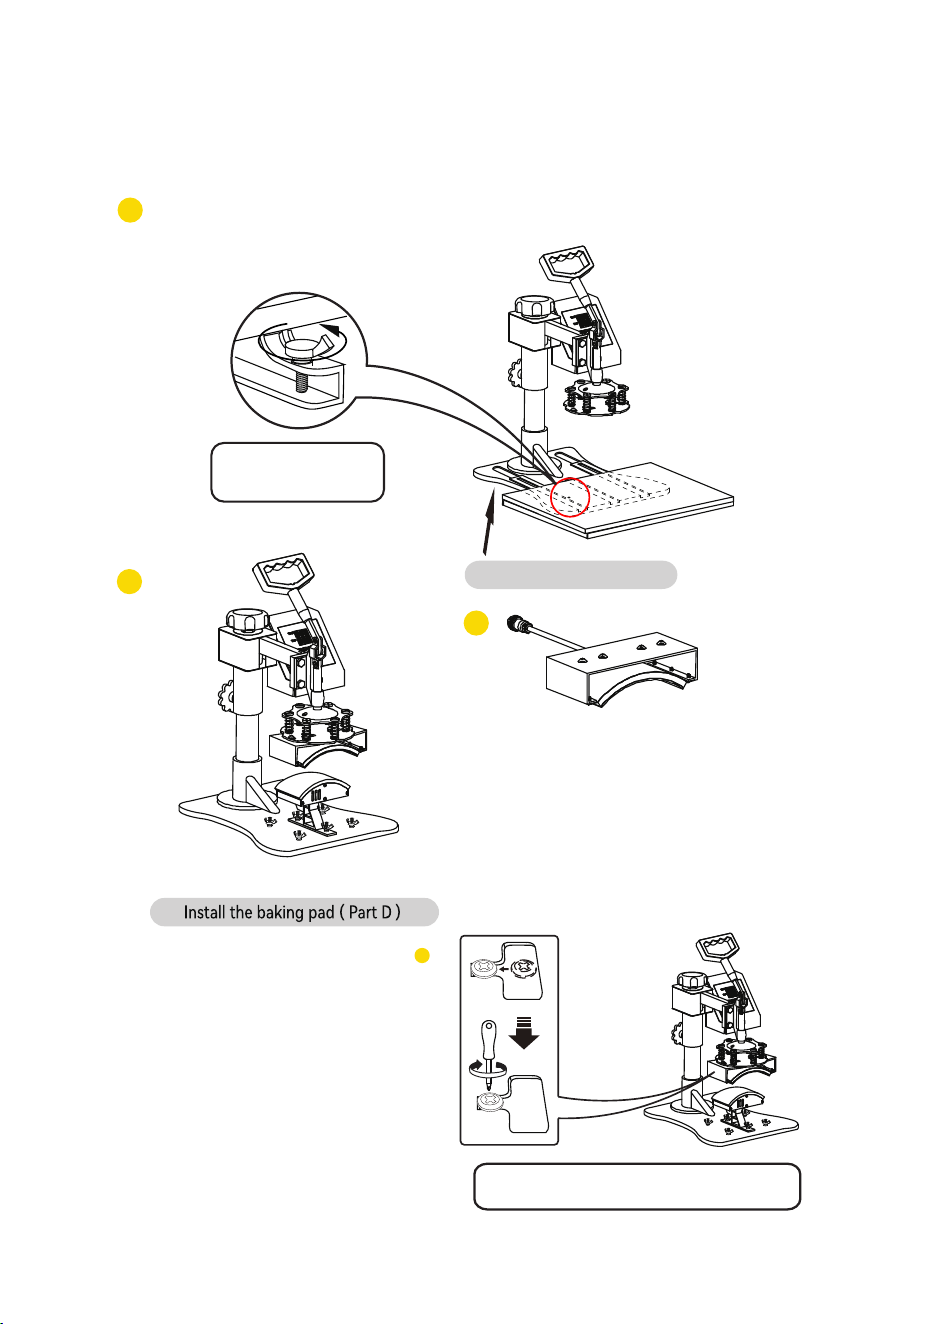
D.Finish the Setting and Stands by to Work
Use a Phillips screwdriver to unscrew the screws in the two holes on the
pressure plate to replace the accessories
1
2
}ĚŘØĖœĀâńĚŘø˘
Īœ»œâœĀâĀ⻜œŇ»Ģŋ÷âŇ×Ī»ŇÞœĪœĀâŋĄÞâ˘
Replace Baking Tray Mat
ɠɨ07
ŘŇĢĪƄœĀâńĪűâŇ»ĢÞńŘĚĚĪŘœœĀâĠ»œ˘CœĄŋŇâØĪĠĠâĢÞâÞœĪűâ»ŇĀ⻜˺ŇâŋĄŋœ»ĢœøĚĪŰâŋ
űĀâĢŇâĠĪŰĄĢøØĚĪœĀâŋĪŇŇâĠĪŰâœĀâĠ»÷œâŇɢ˺ɣĠĄĢŘœâŋ˘âØ»Ňâ÷ŘĚĪ÷ĀĪœĀ⻜˘
}ŇĄĢœâÞń»œœâŇĢ
Note
ˢĀâĠ»ØĀĄĢâĀ»ŋ»ŋâĚ÷˺ĚĪØĖĄĢø÷ŘĢØœĄĪĢ÷ĪŇœâĠńâŇ»œŘŇâŋ✜ĄĢø˘
˺˺˺C÷œĀâŋœ»ƏĄĢøœâĠńâŇ»œŘŇâĄŋŋ✜Īɣɤɠ:˙œĀâĠ»ØĀĄĢâűĄĚĚ»ŘœĪĠ»œĄØ»ĚĚŷĚĄĠĄœœĀâ
Ġ»ŶĄĠŘĠœâĠńâŇ»œŘŇâŋ✜ĄĢøŇ»Ģøâ÷ŇĪĠɣɤɠœĪɤɣɠ:˘
˺˺˺ĪĢŰâŇŋâĚŷ˙Ą÷ŋ✜ĄĢøœĀâĠ»ŶĄĠŘĠœâĠńâŇ»œŘŇâ»ŋɢɥɠ:»œƋŇŋœ˙œĀâĠ»ØĀĄĢâűĄĚĚ
»ŘœĪĠ»œĄØ»ĚĚŷĚĄĠĄœœĀâŋœ»ƏĄĢøœâĠńâŇ»œŘŇâŋ✜ĄĢøŇ»Ģøâ÷ŇĪĠɢɠɠœĪɢɥɠ:˘
ˢCĢĄœĄ»ĚĀ⻜ĄĢøœâĠńâŇ»œŘŇâ»Ěű»ŷŋ@ĄøĀâŋœĀ⻜ĄĢøœâĠńâŇ»œŘŇâ
}ŇĄĢœâÞØĚĪœĀâŋ
}ŇâŋŋœĀâ[c$(×ŘœœĪĢ÷ĪŇ@(:c@C[(˛ƋĢĄŋĀœĀâŋ✜ĄĢø˙ĀâŋâœĚĄøĀœĄŋĪĢ˙
»ĢÞœĀâœâĠńâŇ»œŘŇâűĄĚĚØĪĢœĄĢŘâœĪŇĄŋ⢩ĀâĢœĀâŋâœĠ»ŶĄĠŘĠœâĠńâŇ»œŘŇâĄŋŇâ»ØĀâÞ˙œĀâ
ØĪŘĢœÞĪűĢŋœ»Əŋ˘÷œâŇœĀâØĪŘĢœÞĪűĢâĢÞŋ˙œĀâ((:ŋĪŘĢÞűĄĚĚ×ââĠĄœœâÞ˙œĀâĄĢÞĄØ»œĪŇ
ĚĄøĀœűĄĚĚœŘŇĢĪƄ˙»ĢÞœĀâĪńâŇ»œĄĪĢĄŋØĪĠńĚâœâ˘»ĢÞœĀâĠ»ØĀĄĢâŋœ»ĢÞŋ×ŷœĪűĪŇĖ˘
D.Finish the Setting and Stands by to Work
Use a Phillips screwdriver to unscrew the screws in the two holes on the
pressure plate to replace the accessories
2
1
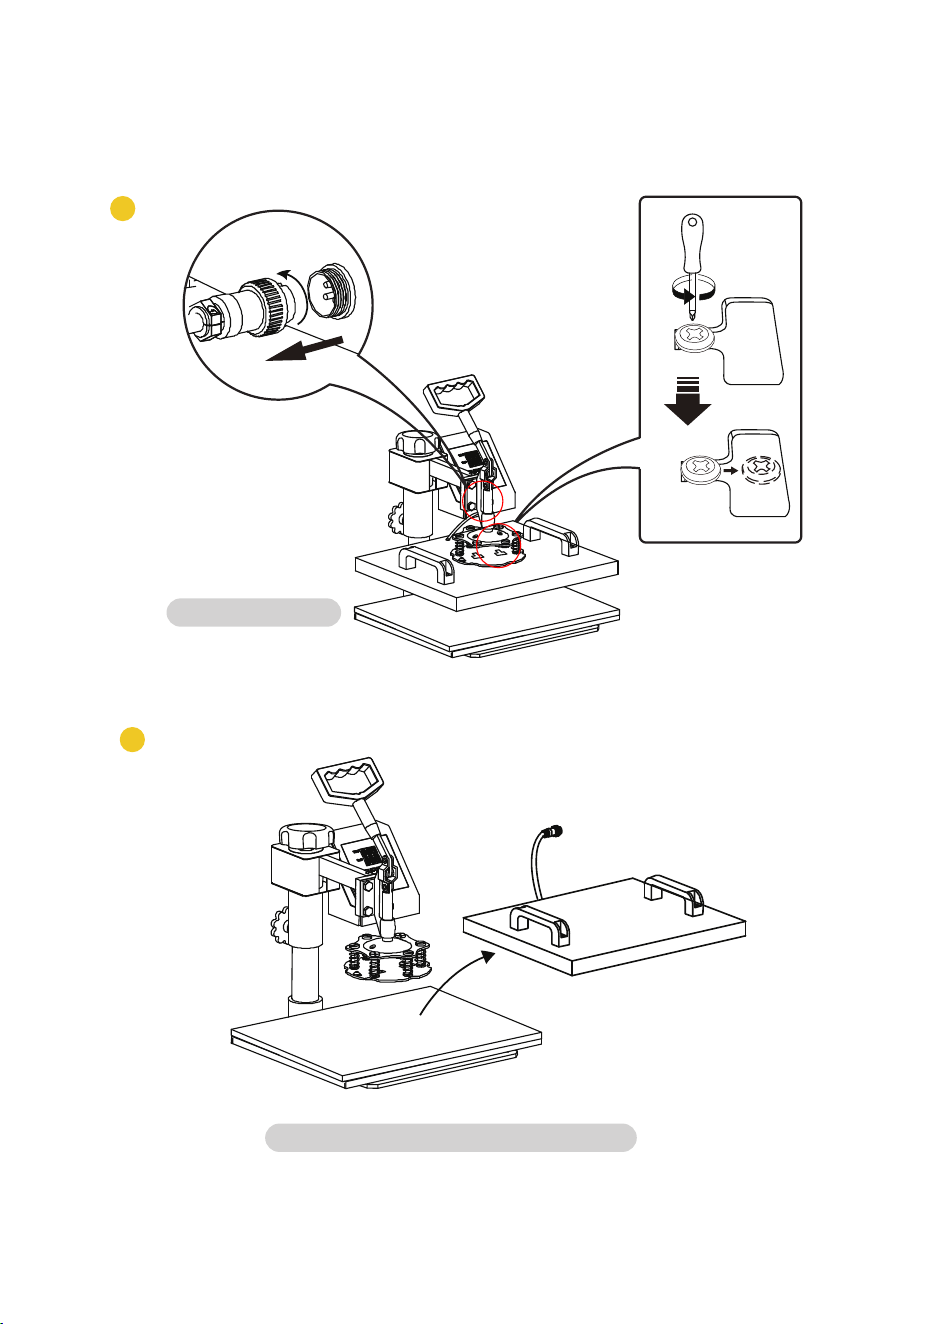
Replace Baking Cap Mat
}ĚŘØĖœĀâńĚŘø˘
Īœ»œâœĀâĀ⻜œŇ»Ģŋ÷âŇ×Ī»ŇÞœĪœĀâŋĄÞâ˘
10
âĚâØœœĀâ»ńńŇĪńŇĄ»œâŋĄſâ×»ĖĄĢøń»ĢĠ»œ˴}»ƏĪŇ˵˘
ɣ
4
}ĚŘøĄĢ˘
}»œœâŇĢâÞńĚ»œâ˘
Replace Baking Tray Mat
B
09
2
1
Replace Baking Cap Mat
}ĚŘØĖœĀâńĚŘø˘
Īœ»œâœĀâĀ⻜œŇ»Ģŋ÷âŇ×Ī»ŇÞœĪœĀâŋĄÞâ˘
10
âĚâØœœĀâ»ńńŇĪńŇĄ»œâŋĄſâ×»ĖĄĢøń»ĢĠ»œ˴}»ƏĪŇ˵˘
ɣ
4
}ĚŘøĄĢ˘
}»œœâŇĢâÞńĚ»œâ˘
Replace Baking Tray Mat
B
09
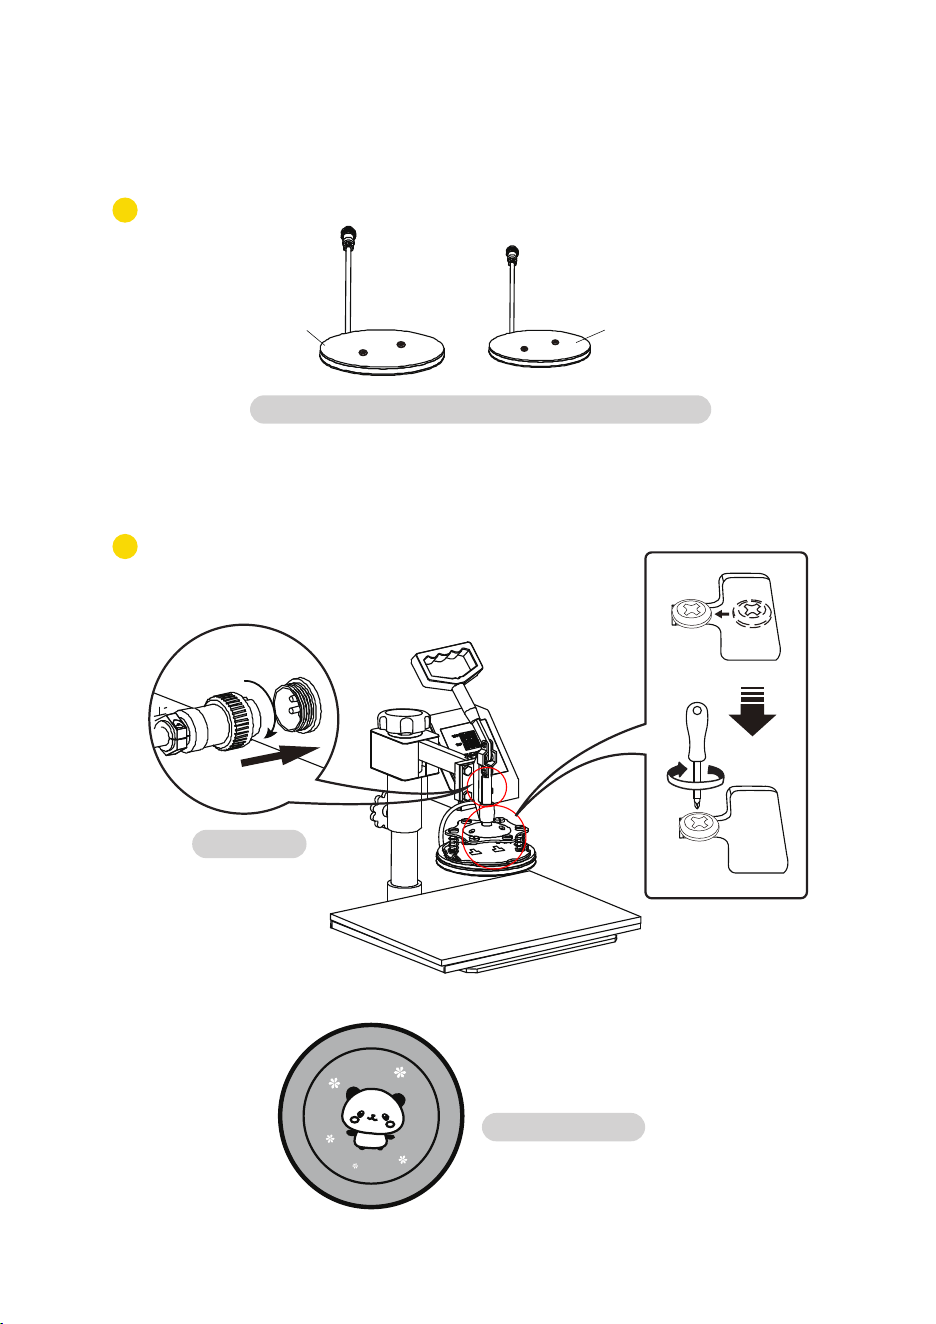
Use the screwdriver 4 to tighten the 2 screws just
removed and put the cap on.
Shaped hat
6
Replace Baking Cap Mat
12
Replace Baking Cap Mat
Loosen the bottom
screw and remove.
Lift the cushion up
4
5
3
11
Unscrew the four butterfly screws at the bottom
Use the screwdriver 4 to tighten the 2 screws just
removed and put the cap on.
Shaped hat
6
Replace Baking Cap Mat
12
Replace Baking Cap Mat
Loosen the bottom
screw and remove.
Lift the cushion up
4
5
3
11
Unscrew the four butterfly screws at the bottom