M2e
LED Smart Theater
User Guide
Model No. VS18294
P/N: M2e
IMPORTANT: Please read this User Guide to obtain important information on installing and using your product in
a safe manner, as well as registering your product for future service. Warranty information contained in this User
Guide will describe your limited coverage from ViewSonic® Corporation, which is also found on our web site at
http://www.viewsonic.com in English, or in specific languages using the Regional selection box in the upper right
corner of our website. “Antes de operar su equipo lea cu idadosamente las instrucciones en este manual”

2
Thank you for choosing ViewSonic®
As a world-leading provider of visual solutions, ViewSonic® is dedicated to exceeding
the world’s expectations for technological evolution, innovation, and simplicity.
At ViewSonic®, we believe that our products have the potential to make a positive
impact in the world, and we are confident that the ViewSonic® product you have
chosen will serve you well.
Once again, thank you for choosing ViewSonic®!

3
Safety Precauons
Please read the following Safety Precauons before you start using the projector.
• Keep this user guide in a safe place for later reference.
•
• Allow at least 20“ (50 cm) clearance around the projector to ensure proper
•
•
•
•
beam may damage your eyes.
•
•
inside which may cause death if you should come into contact with live parts.
• When moving the projector, be careful not to drop or bump the projector on
anything.
•
•
• Avoid exposing the projector to direct sunlight or other sources of sustained
of the projector to dangerous levels.
•
may cause it to fail. If the projector does become wet, disconnect it from the
power supply and call your local service center to have the projector serviced.
•
4
•
other. A grounding-type plug has two blades and a third grounding prong. The
outlet.
•
•
plug, and at the point where it emerges from the projector.
• In some countries, the voltage is NOT stable. This projector is designed to
operate safely within a voltage between 100 to 240 volts AC, but could fail if
or cut out, it is recommended that you connect your projector through a power
• If smoke, an abnormal noise, or a strange odor is present, immediately switch
using the projector.
•
•
•
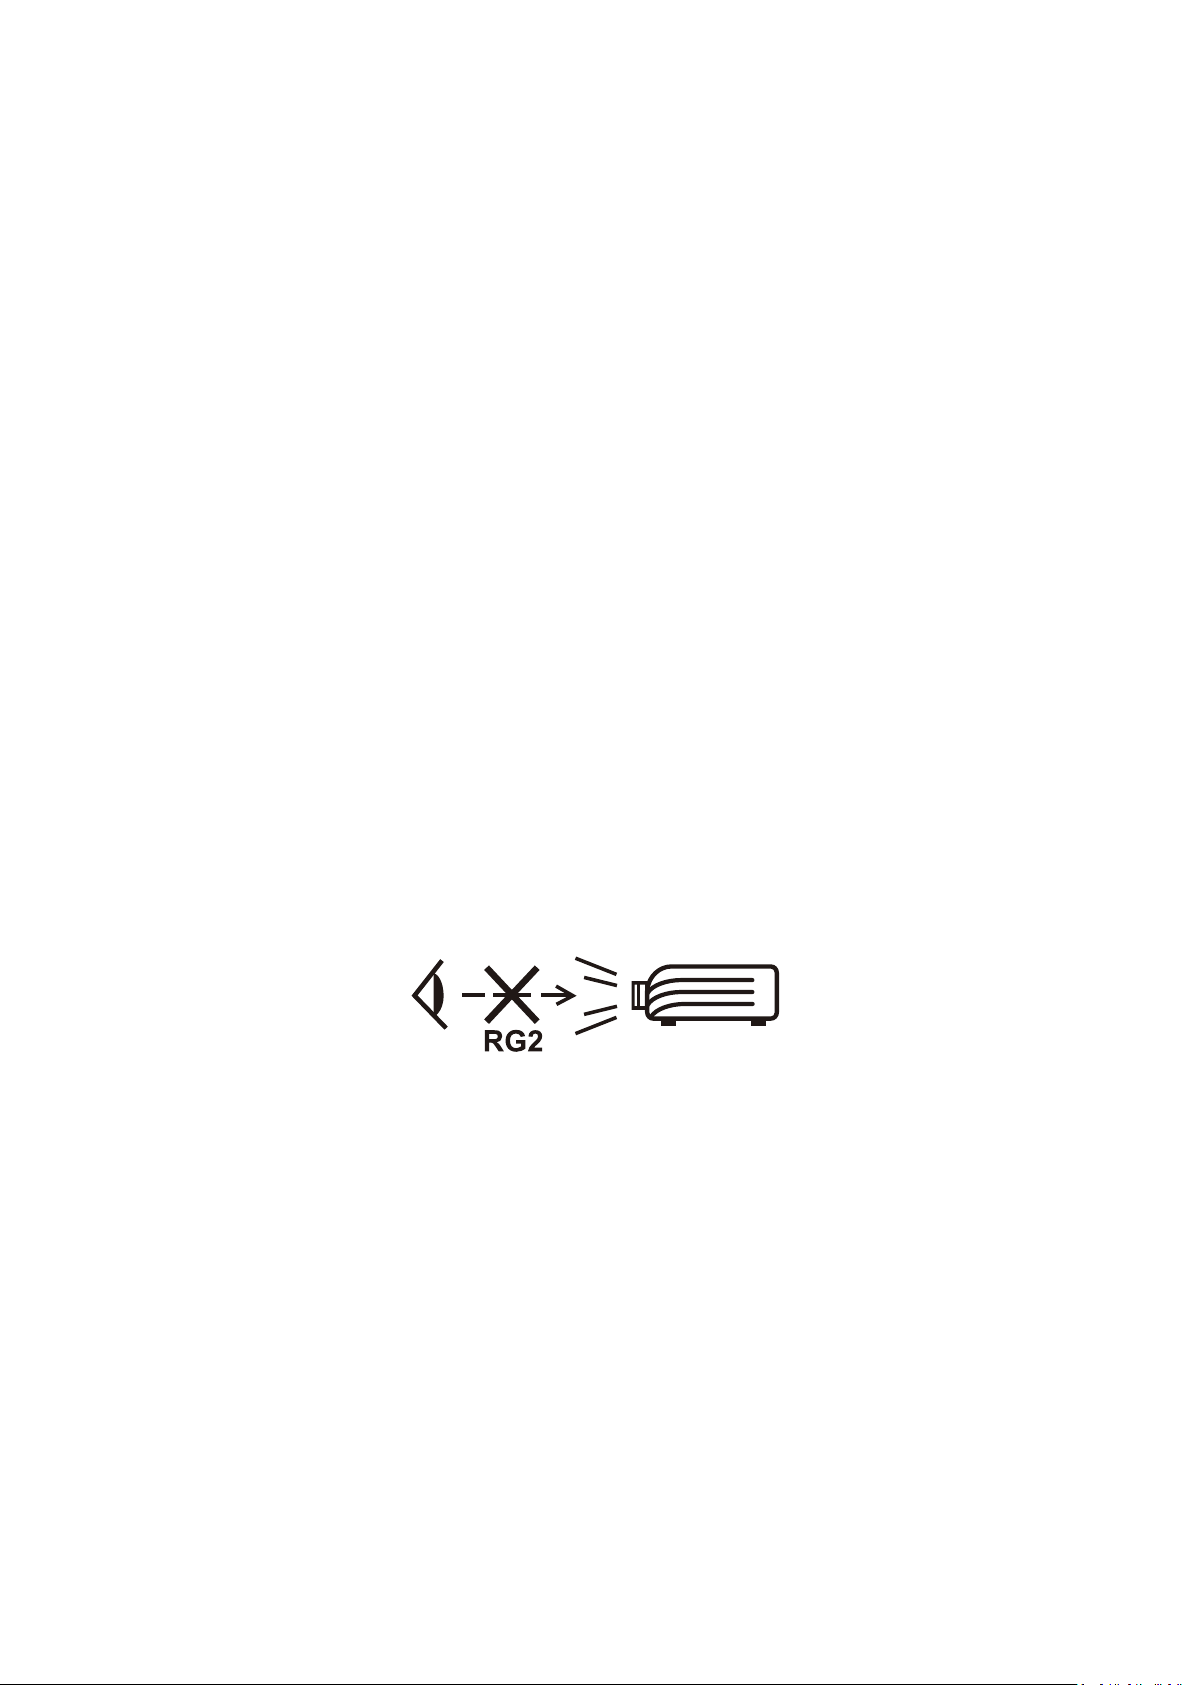
CAUTION:
with any bright light source, do not stare into the beam, RG2 IEC 62471-
5:2015

5
Contents
Safety Precautions ....................................................... 3
Introduction ................................................................ 8
Package Contents ...................................................................................................8
Product Overview ...................................................................................................9
Projector .................................................................................................................. 9
Connection Ports ................................................................................................... 10
Remote Control ..................................................................................................... 11
Initial Setup ............................................................... 13
.......................................................13
.................................................................... ......................14
Mounting the Projector ........................................................................................15
Making Connections .................................................. 16
Connecting to Power ............................................................................................16
...................................................................................... 16
USB-C Power Bank ................................................................................................. 17
............................................................................18
.................................................................................................. 18
USB Connection ..................................................................................................... 19
Wireless Screen Mirroring ..................................................................................... 20
Connecting to Audio .............................................................................................21
Bluetooth Speaker ................................................................................................. 21
Bluetooth Out ........................................................................................................ 23
Connecting to Networks .......................................................................................24
Wi-Fi Connection ................................................................................................... 24
.......................................................................................................... 26

6
Using the Projector .................................................... 27
Starting Up the Projector .................................................................... ..................27
First Time Activation ............................................................................................. 27
Auto Focus ............................................................................................................. 27
Projection Orientation .......................................................................................... 28
............................................................................................... 28
Network Settings ................................................................................................... 29
Source Input .......................................................................................................... 29
Selecting an Input Source .....................................................................................30
Adjusting the Projected Image .............................................................................31
Adjusting the Projector's Height and Projection Angle ......................................... 31
................................................................................32
......................................... 33
Operating the Projector ............................................. 45
Home Screen ..................................................................................................45
...........................................46
Menu Operations .................................................................................................50
File Management .................................................................................................. 50
Apps Center ........................................................................................................... 55
Aptoide .................................................................................................................. 56
Bluetooth .............................................................................................................. 58
Setting ................................................................................................................... 59
Screen Mirroring ................................................................................................... 76
Appendix ................................................................... 79
Specifications .................................................................... .................................... 79
............................................................................................ 80
Timing Chart .........................................................................................................80
............................................................................................... 80
................................................................................................................ 81
USB C Timing ......................................................................................................... 83
Troubleshooting ...................................................................................................84
........................................................................................................ 85
Maintenance.........................................................................................................86
General Precautions .............................................................................................. 86
.................................................................................................. 86
Cleaning the Case .................................................................................................. 86
Storing the Projector ............................................................................................. 86

7
Regulatory and Service Information .......................... 87
Compliance Information ....................................................................................... 87
FCC Compliance Statement ................................................................................... 87
Industry Canada Statement ................................................................................... 87
CE Conformity for European Countries ................................................................. 89
......................................................................... 90
......................................................... 91
................................................................ 91
Copyright Information ..........................................................................................92
Customer Service .................................................................................................. 93
.................................................................................................. 94
...................................................................................... 97
8
Introducon
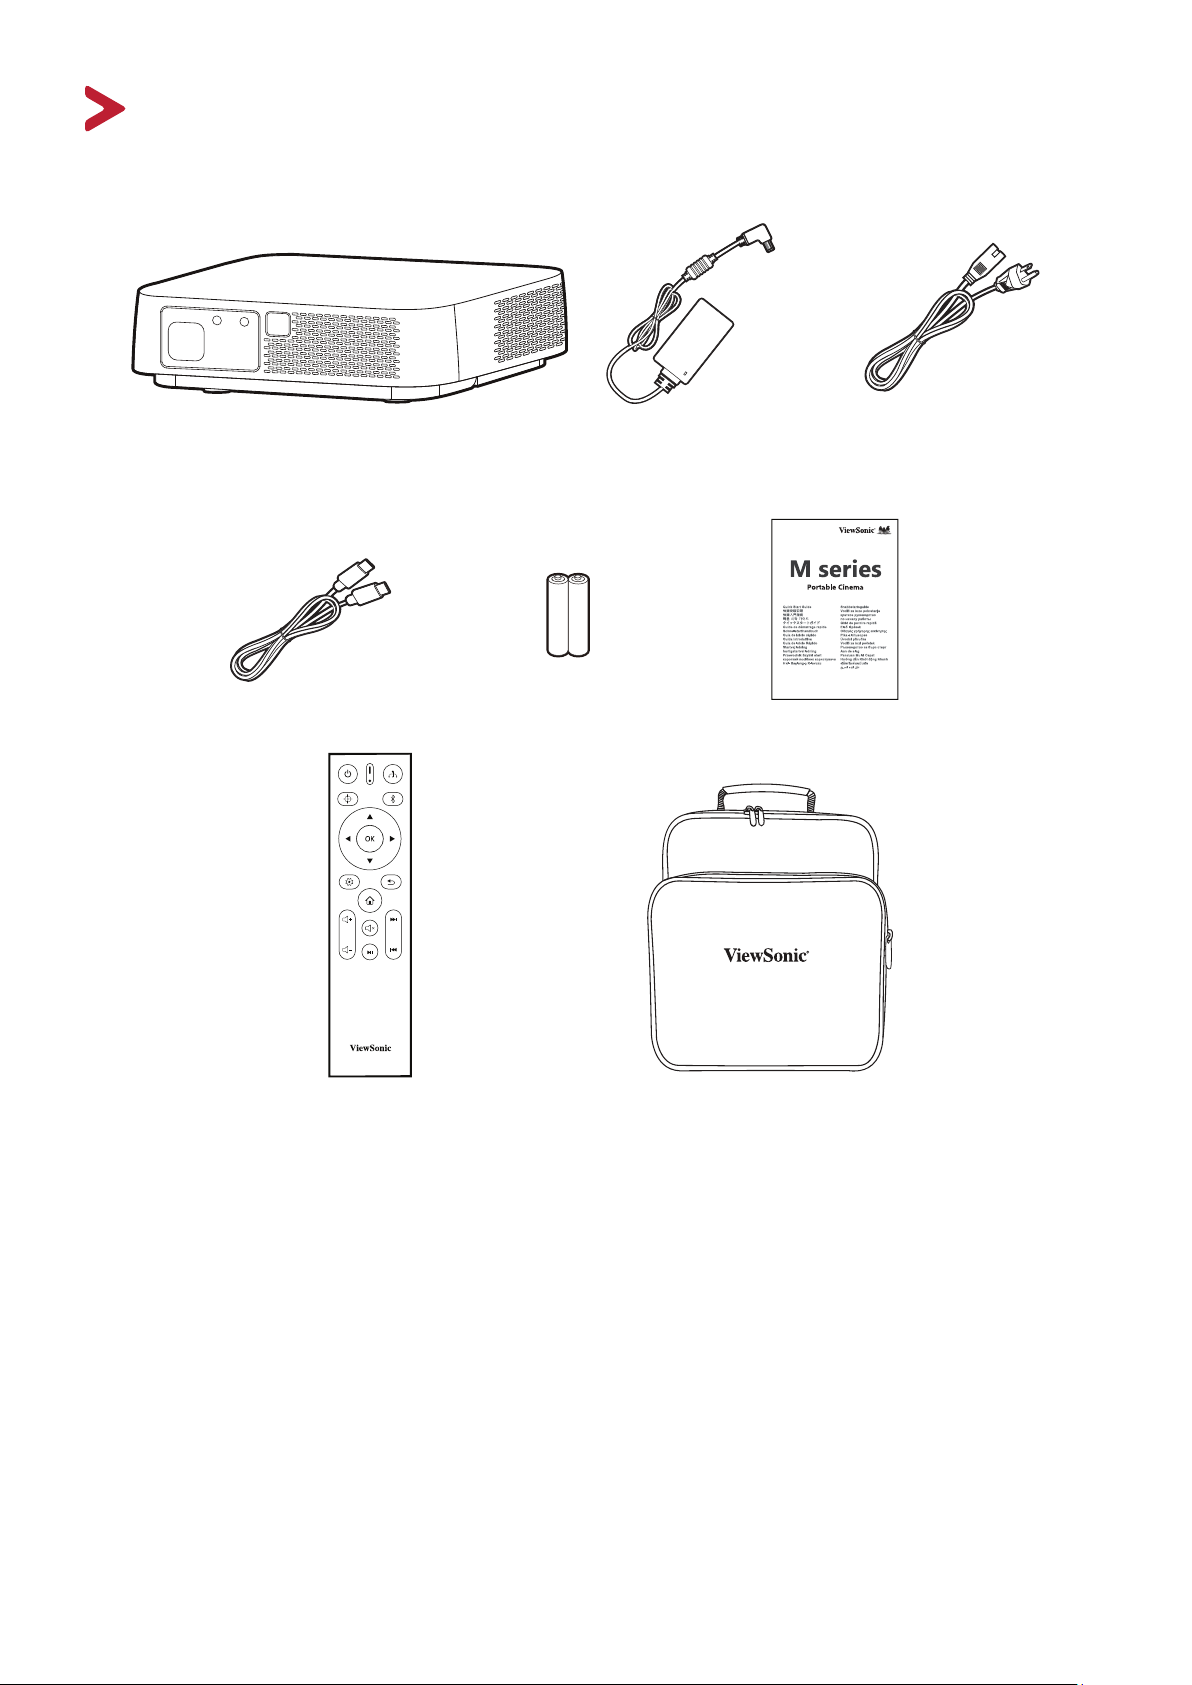
Package Contents
M2e Projector DC Power Adapter Power Cord
USB Type-C Cable Batteries
Quick Start Guide
Remote Control
Soft Carrying Bag
NOTE: The power cord and video cables included in your package may vary
depending on your country. Please contact your local reseller for more
9
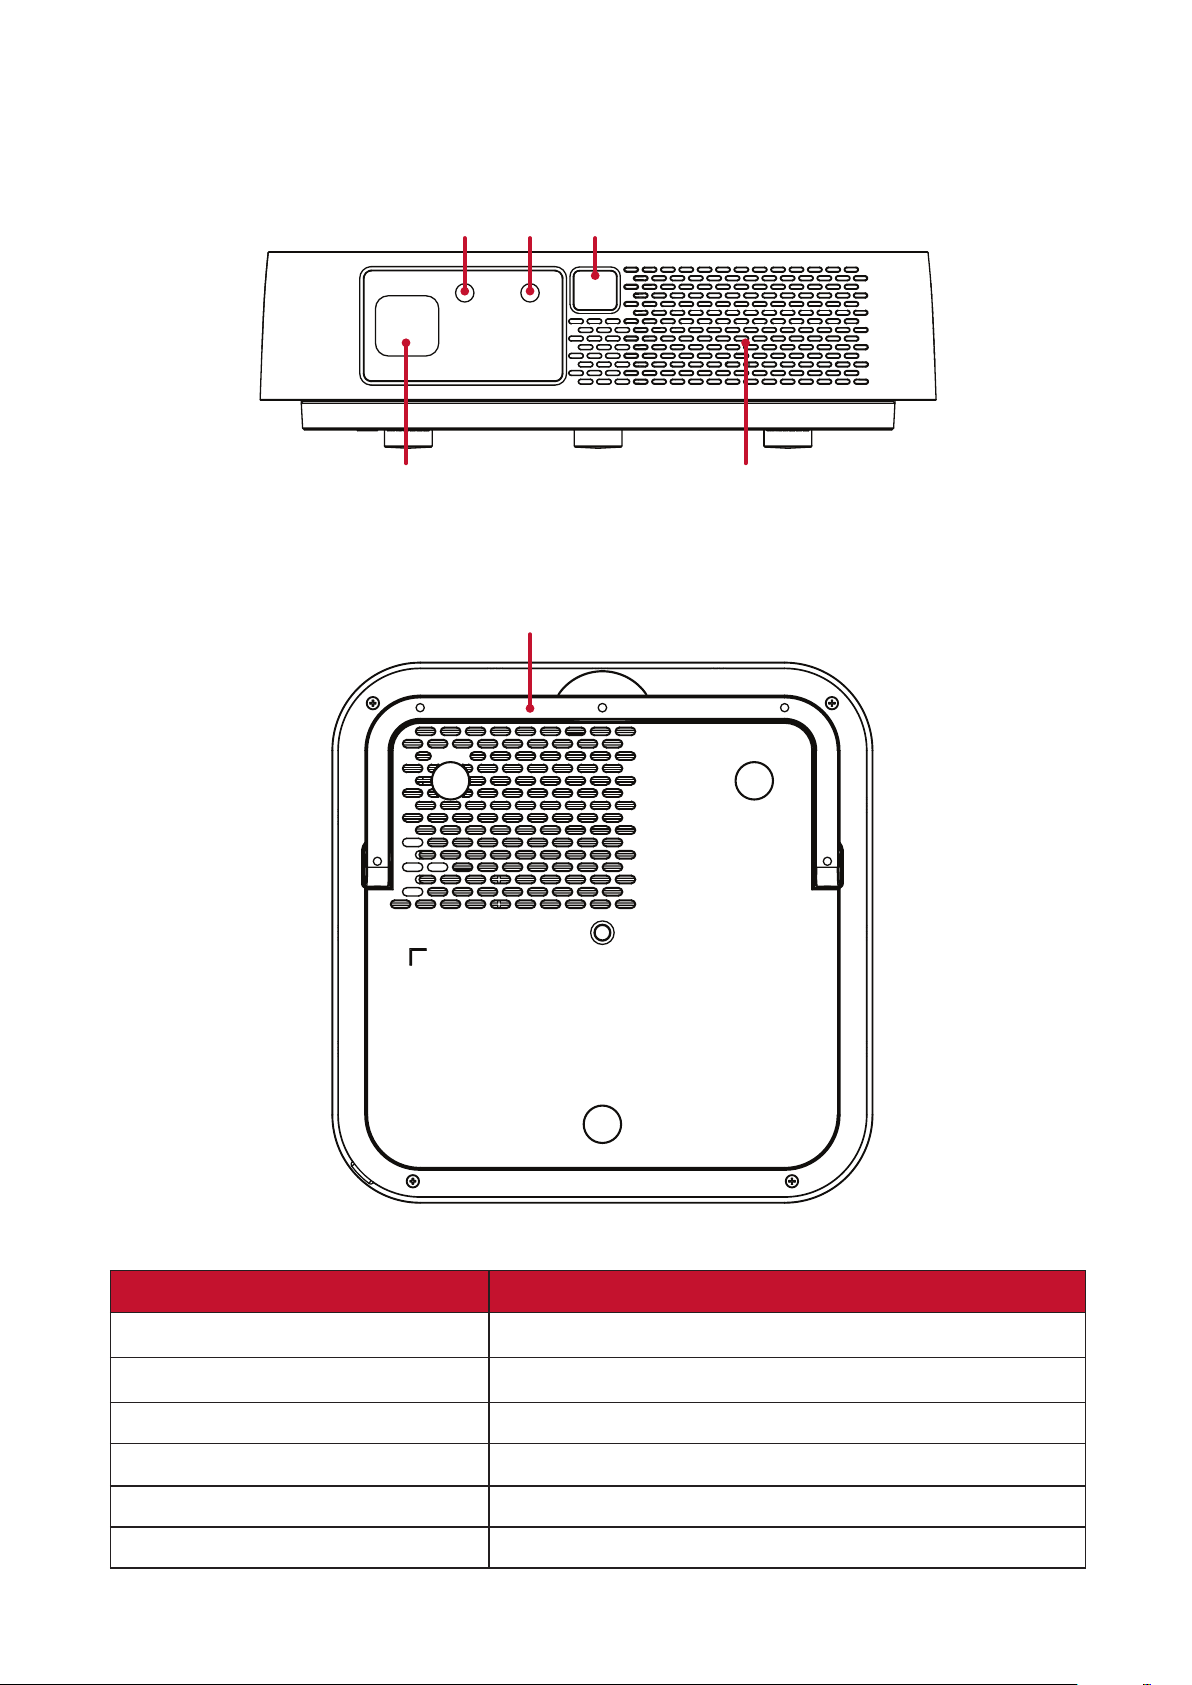
Product Overview
Projector
15
6
234
Item Descripon
[2] IR Sensor IR Sensor
[3] Auto Focus Camera Automatically adjusts the focus
[4] Auto Focus Sensor Automatically adjusts the focus
[5] harmon/kardon Speakers harmon/kardon speakers
[6] Adjustor Foot Stepless adjustment foot
10
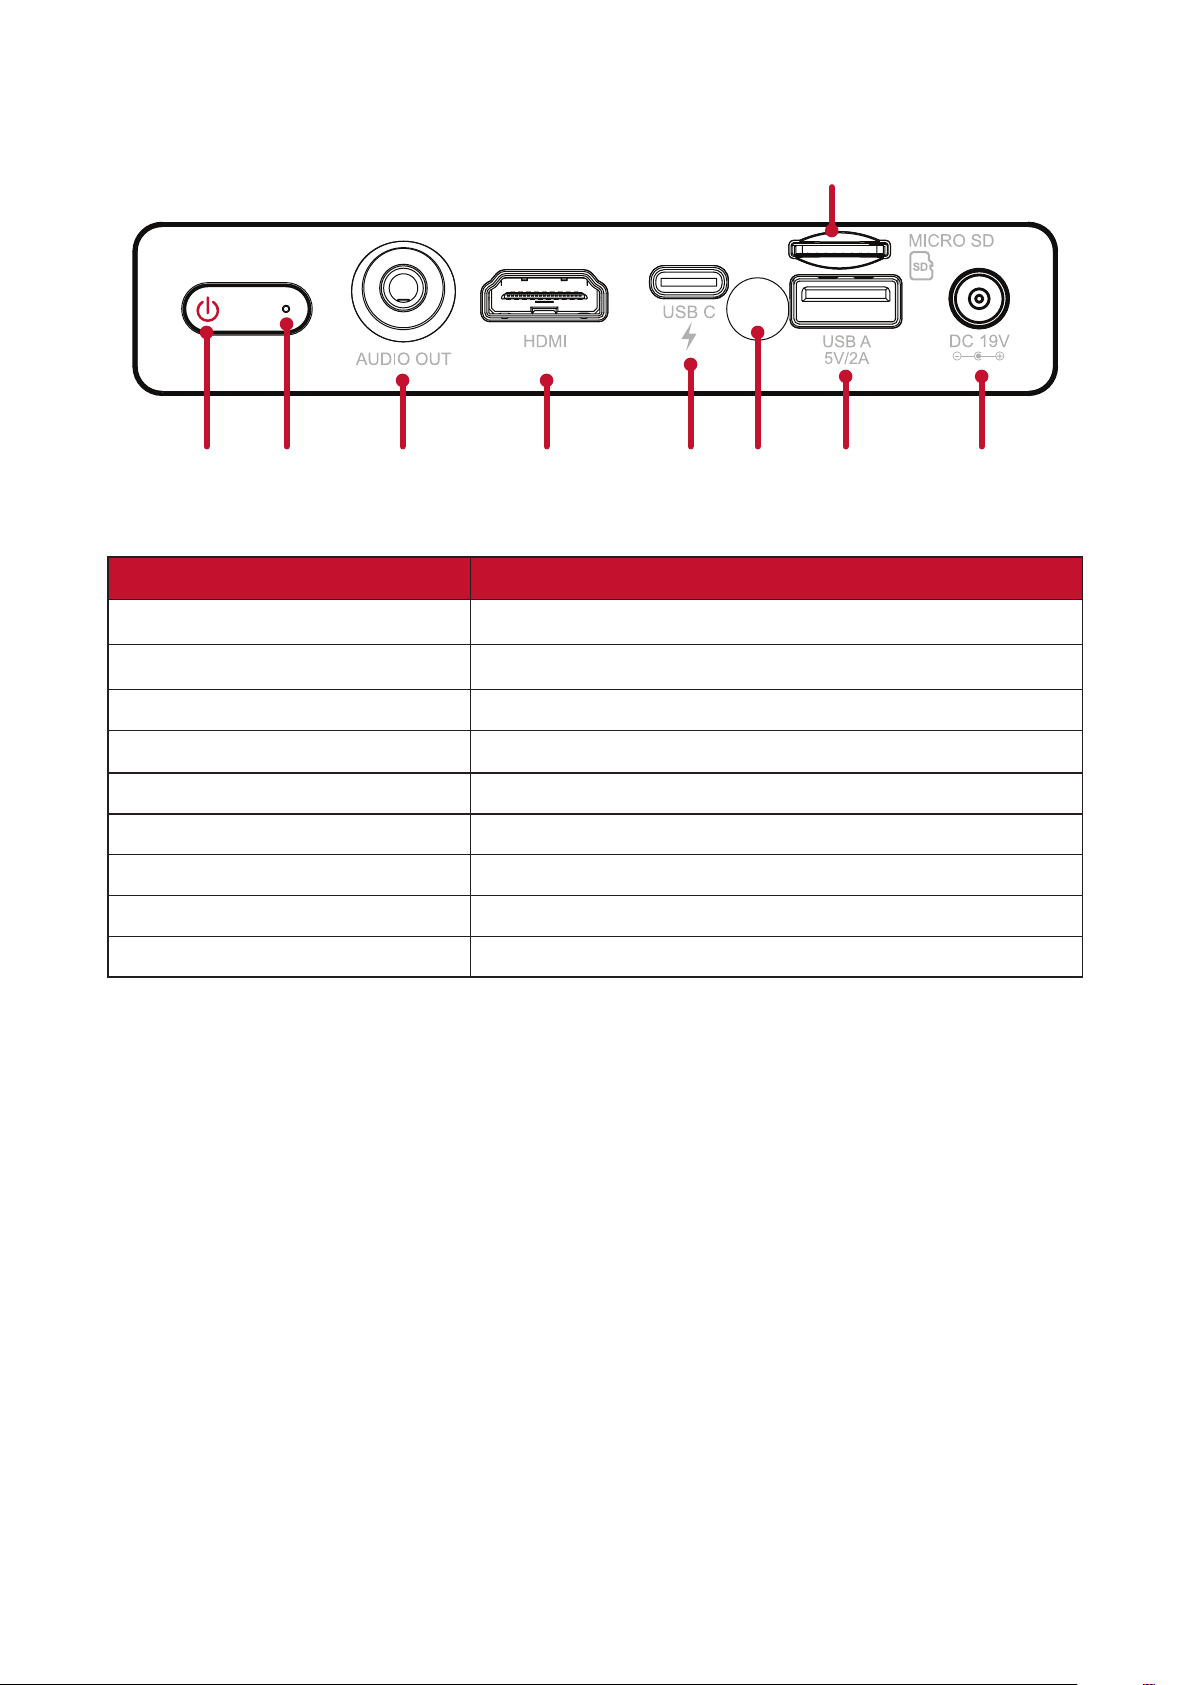
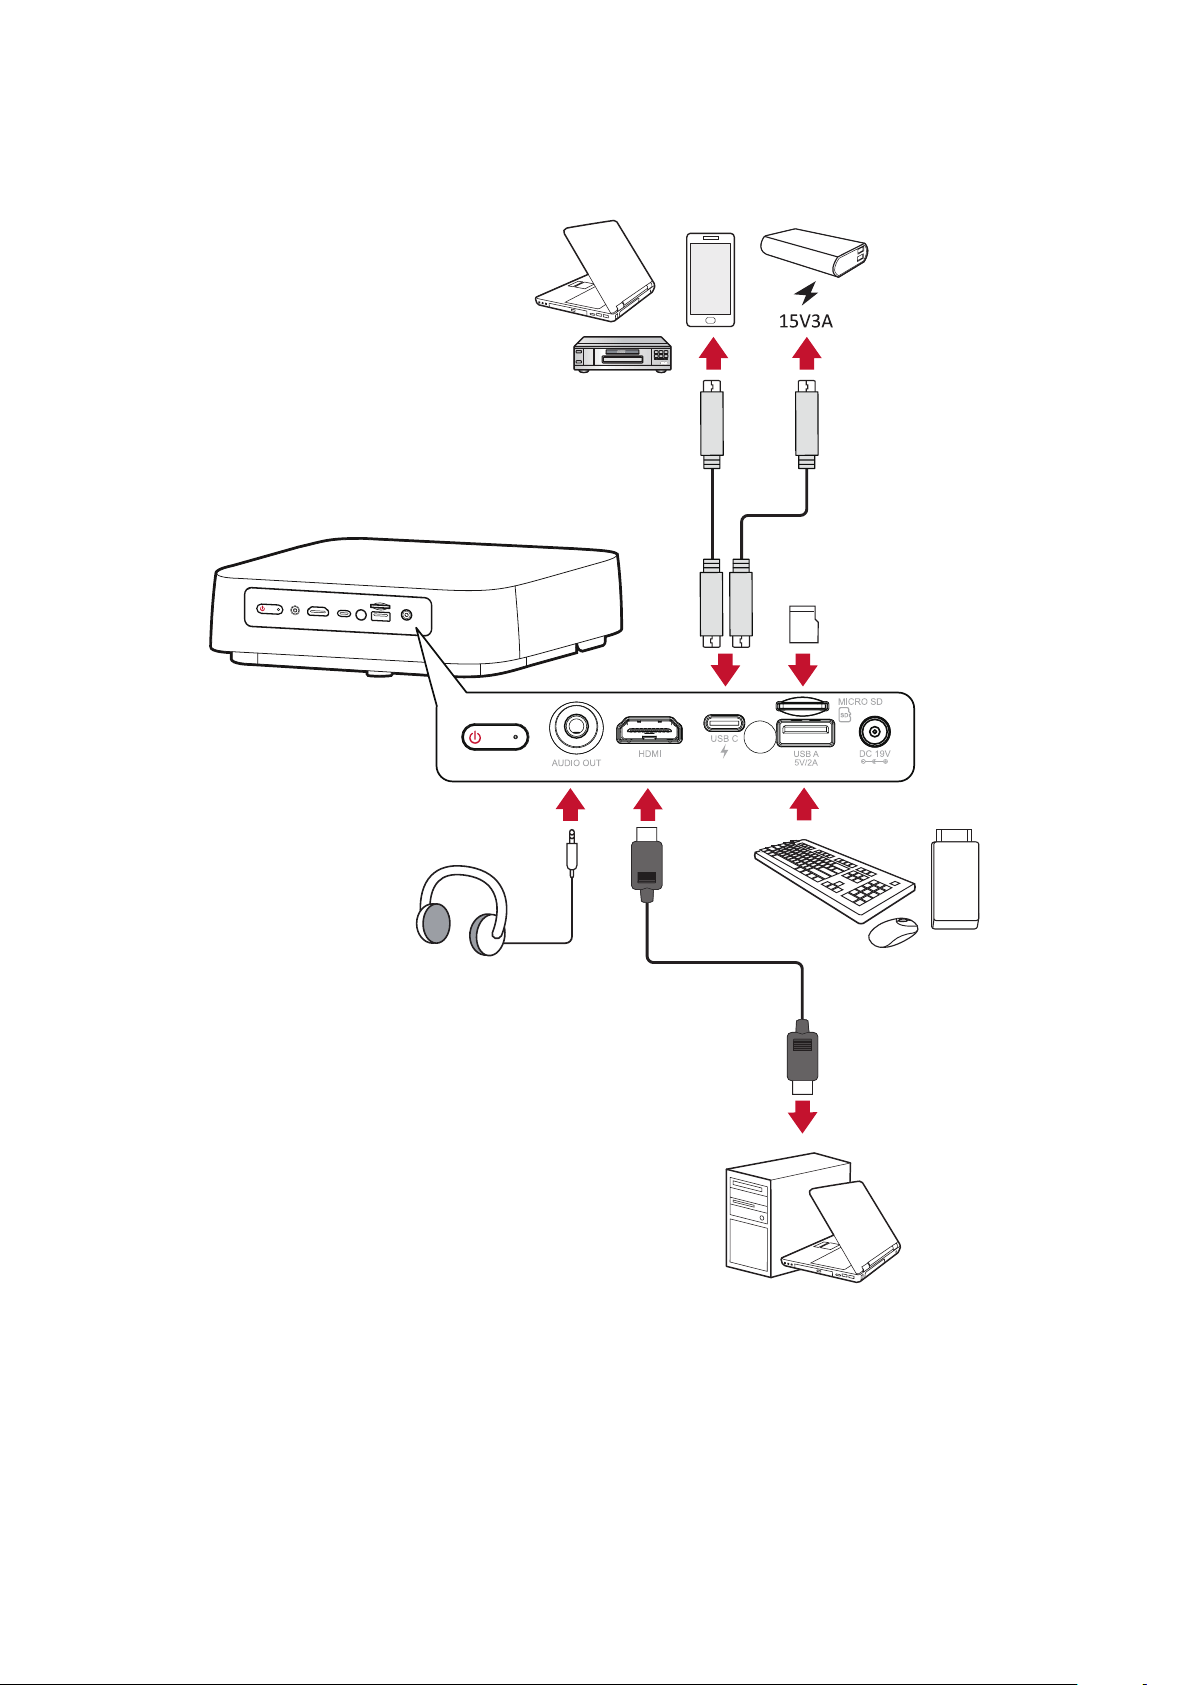
Connecon Ports
1568 9
7
23 4
Port Descripon
Power On/Off
[3] Audio Out (3.5 mm jack) 3.5 mm jack audio output socket
[5] USB-C³ USB-C port
[6] IR Sensor IR Sensor
[8] USB A (5V/2A Out) USB 2.0 Type A port (USB Reader - FAT32/NTFS)
Power input socket
iPhone/iPad users will need to buy an additional adapter. To avoid compatibility issues, please use Apple
Please use the supplied USB-C cable, and ensure your USB-C device can support video transmission as well as
charging.
11
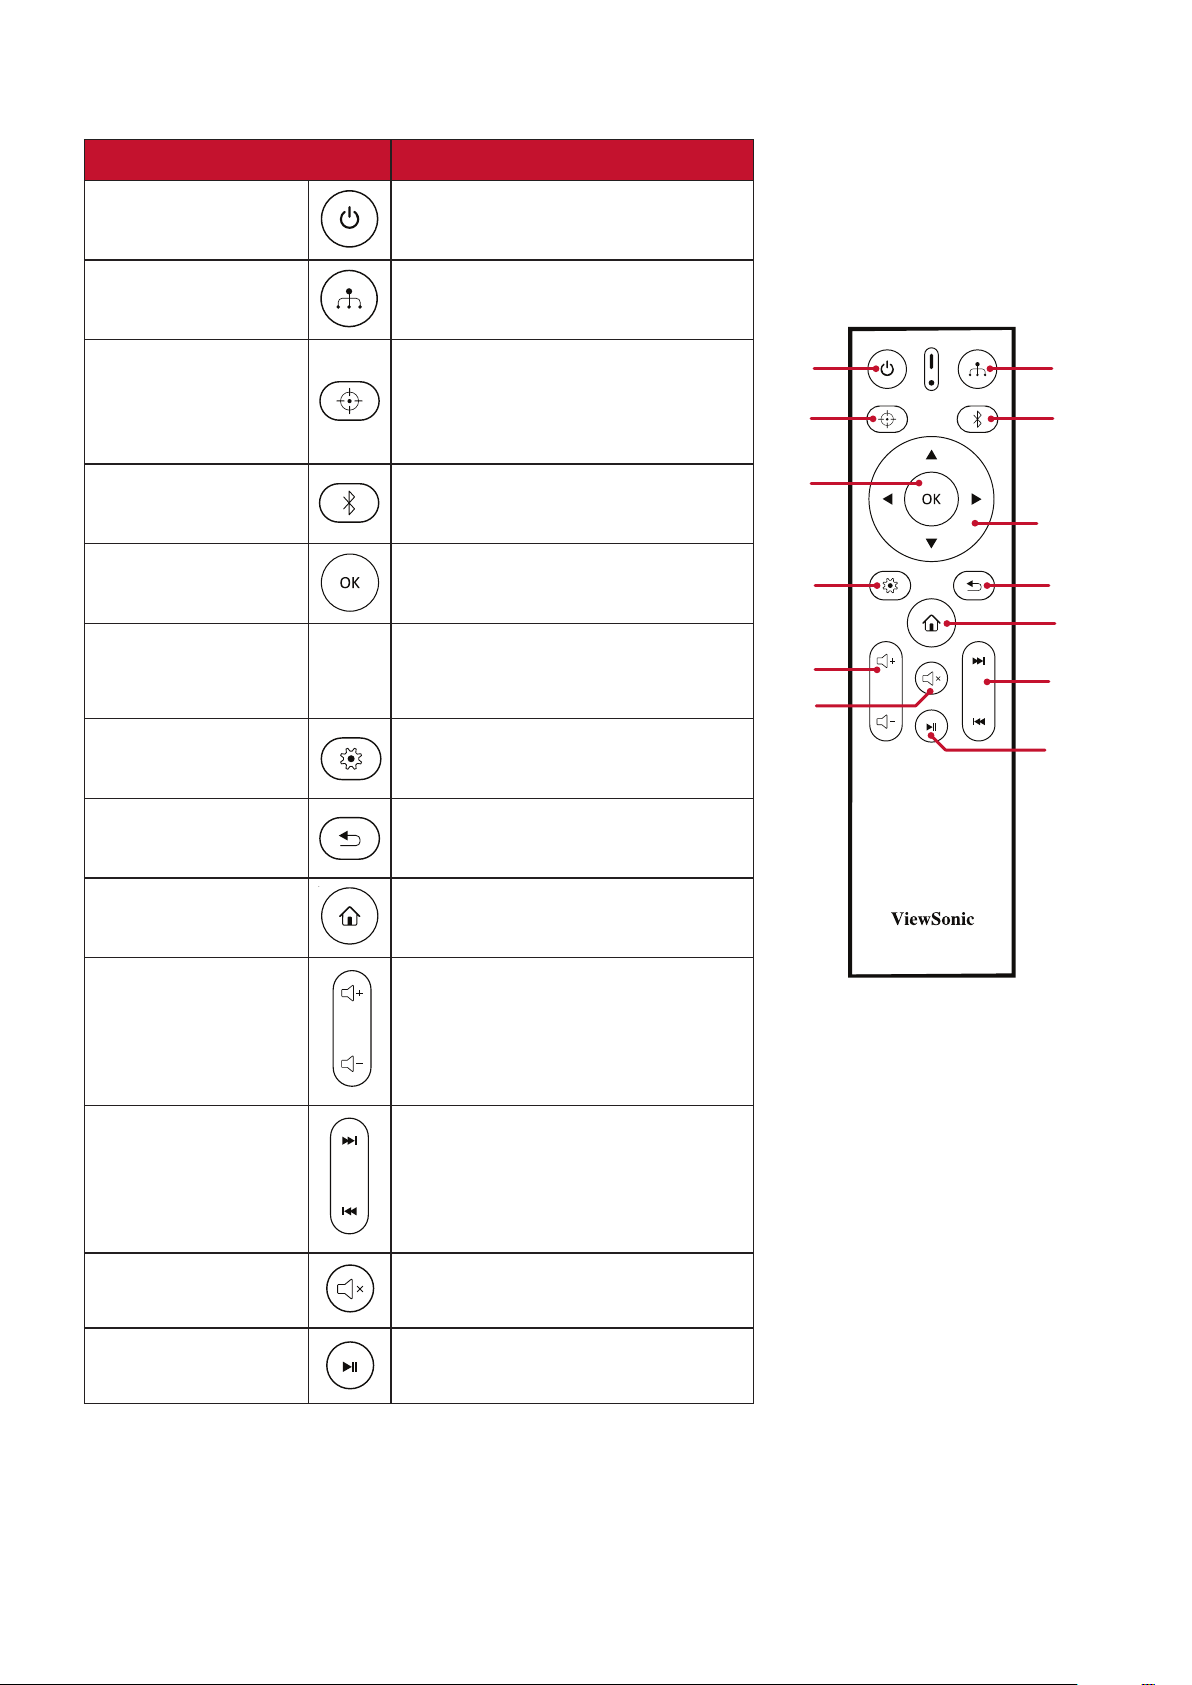
Remote Control
Buon Descripon
[1] Power
[2] Source
bar.
[3] Focus
To manually adjust, press and hold
the Focus
control for three (3) seconds
[4] Bluetooth
[5] OK
Right
pq
tu
Navigates and selects the
desired menu items and makes
adjustments.
Seng menu.
[8] Return Returns to the previous screen.
[9] Home Access the Home screen.
[10] Volume
level.
[11] Forwards/
Backwards
Move content forwards/
backwards.
[12] Mute Mute/Unmute.
[13] Play/Pause Play/Pause content.
1
3
5
7
10
12
11
13
2
4
6
8
9
12
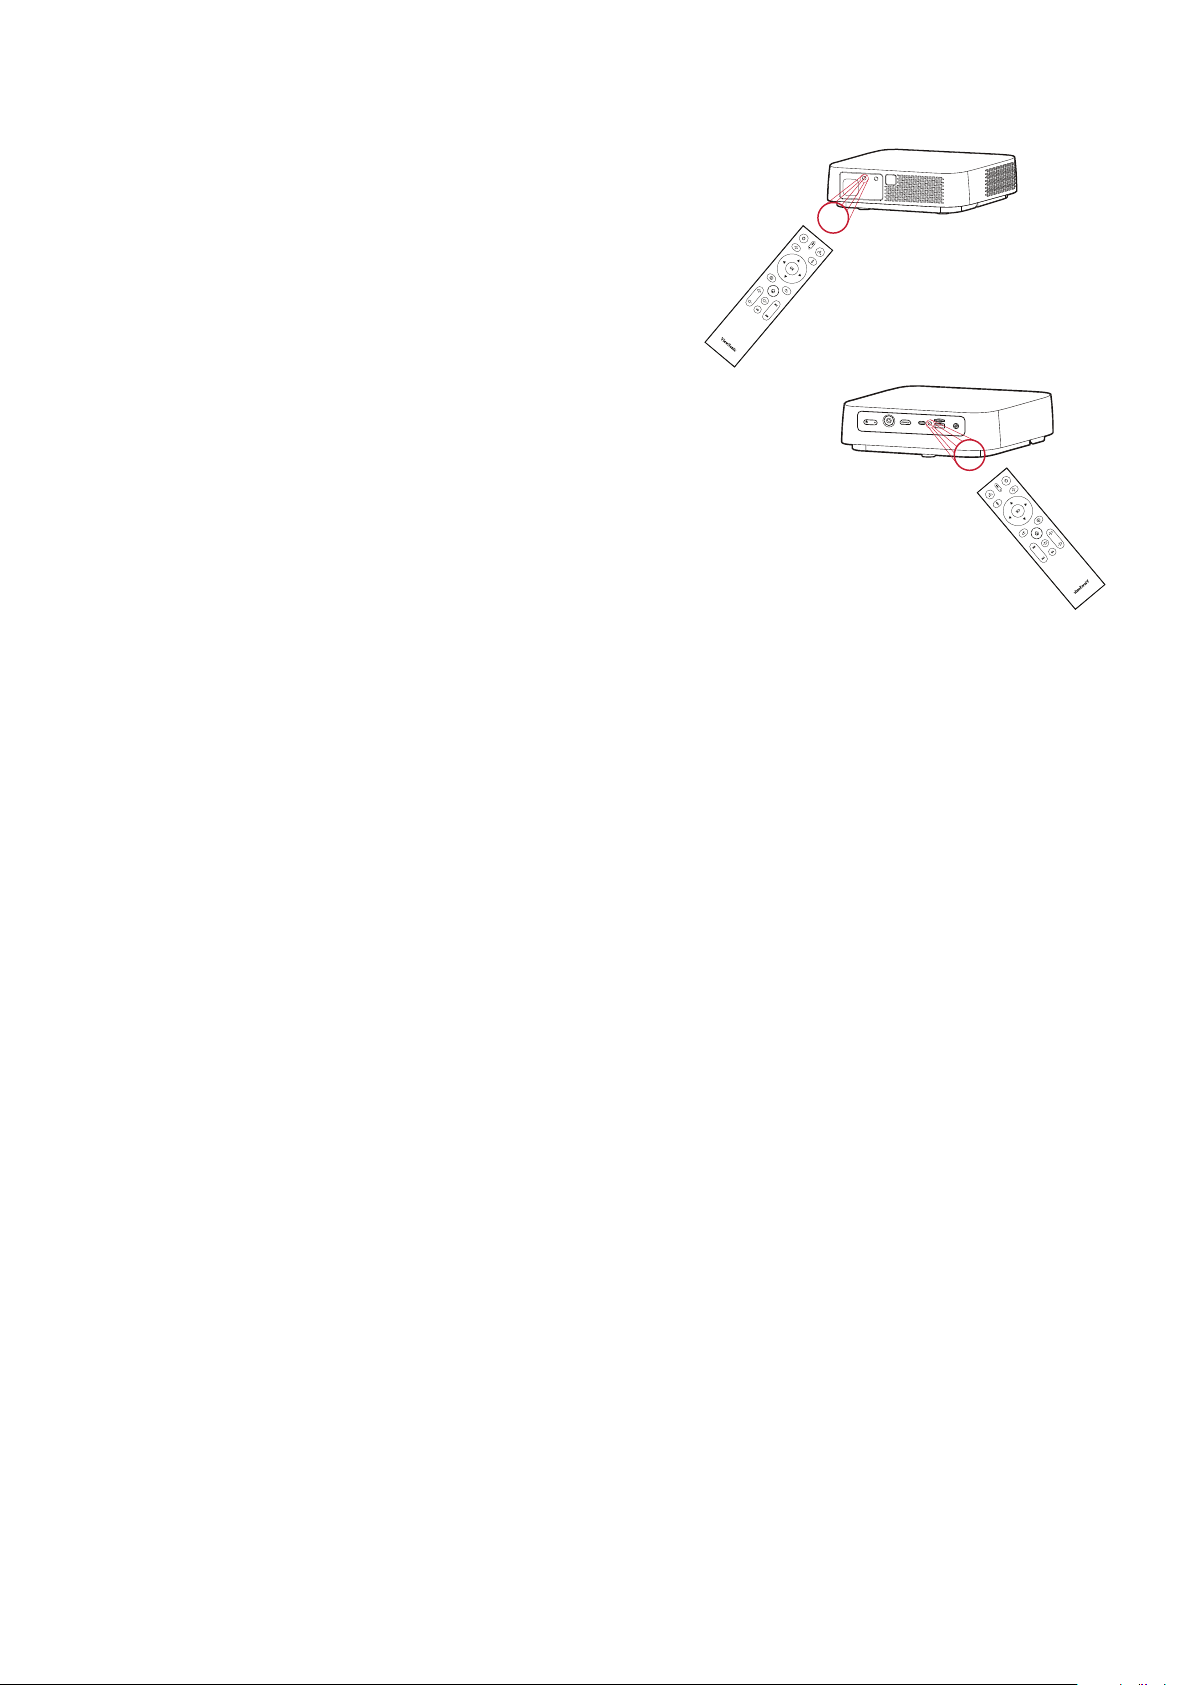
Remote Control - Eecve Range
follow the steps below:
1. The remote control must be held at an angle
remote control sensor(s).
2. The distance between the remote control and
NOTE:
control sensor(s).
Remote Control - Replacing the Baeries
3.
4.
NOTE:
5.
NOTE:
•
environment.
• Replace only with the same or equivalent type recommended by the
•
remote control.
•
Approx. 30°
Approx. 30°
13
Inial Setup
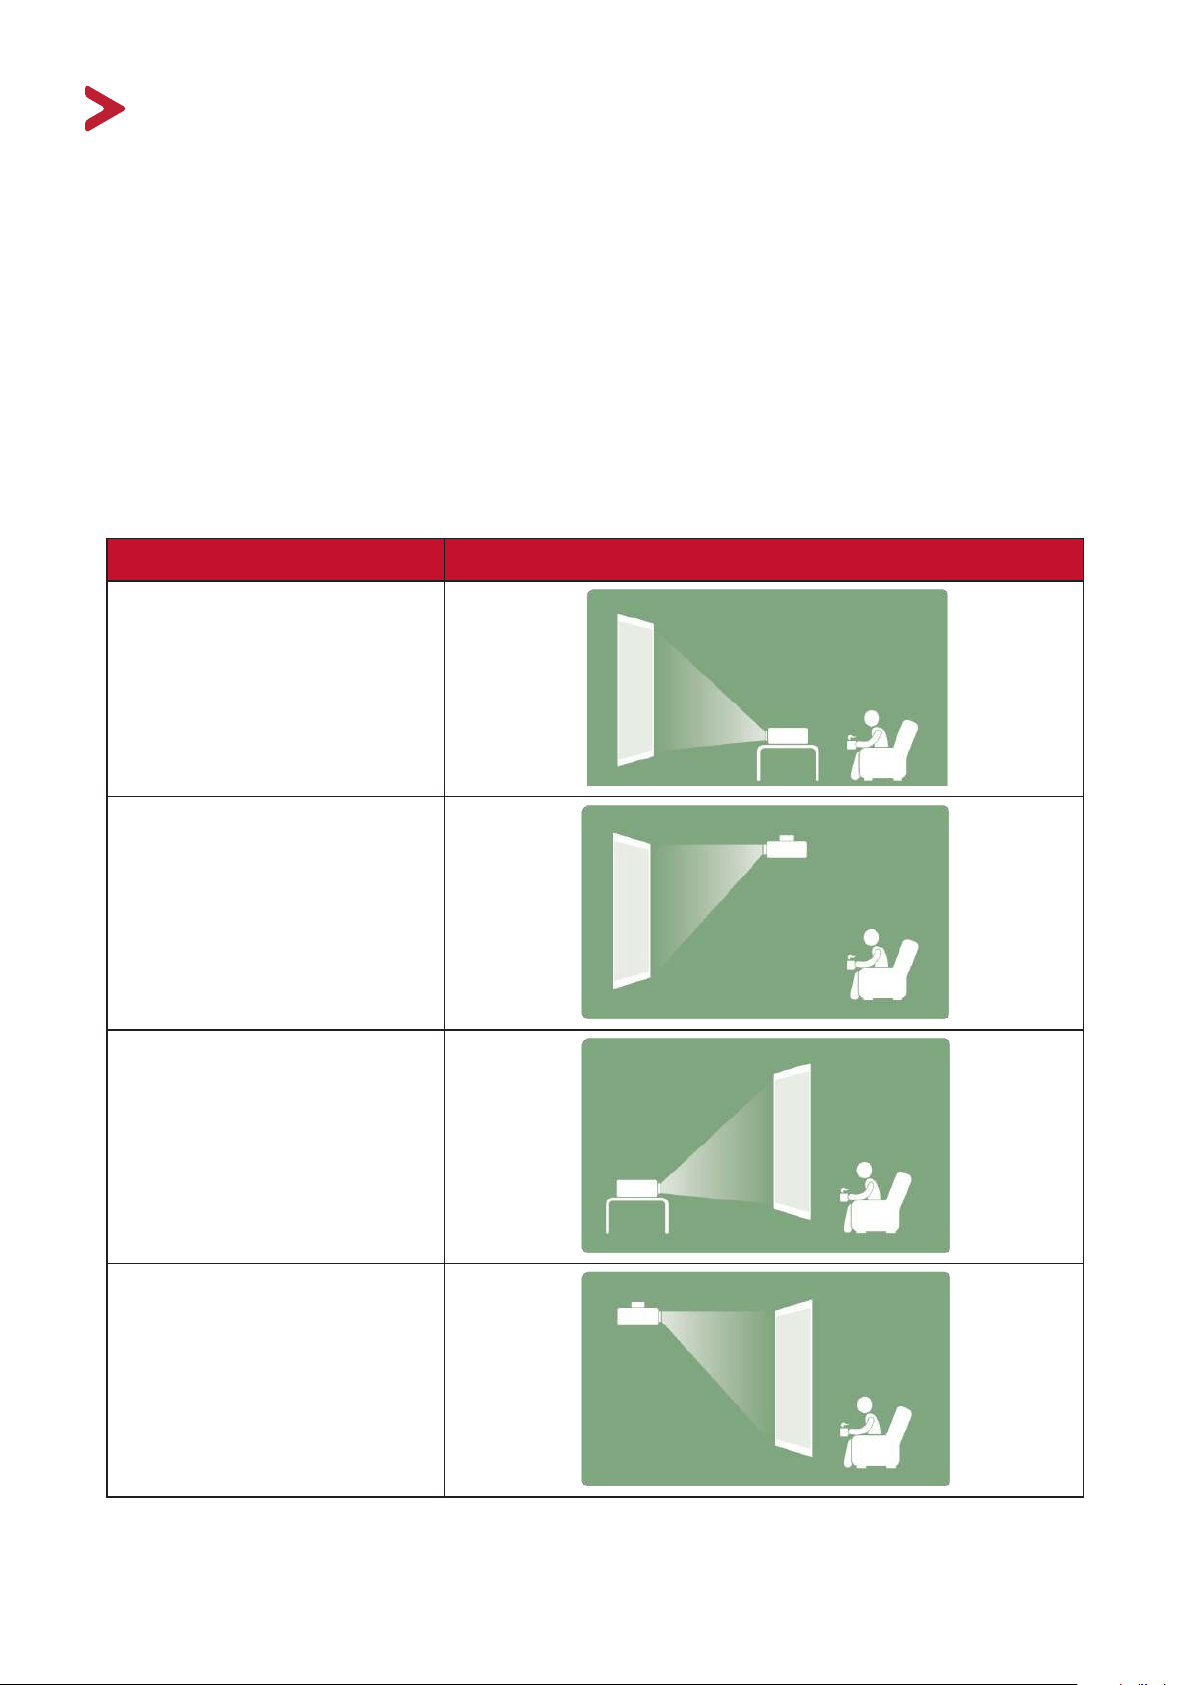
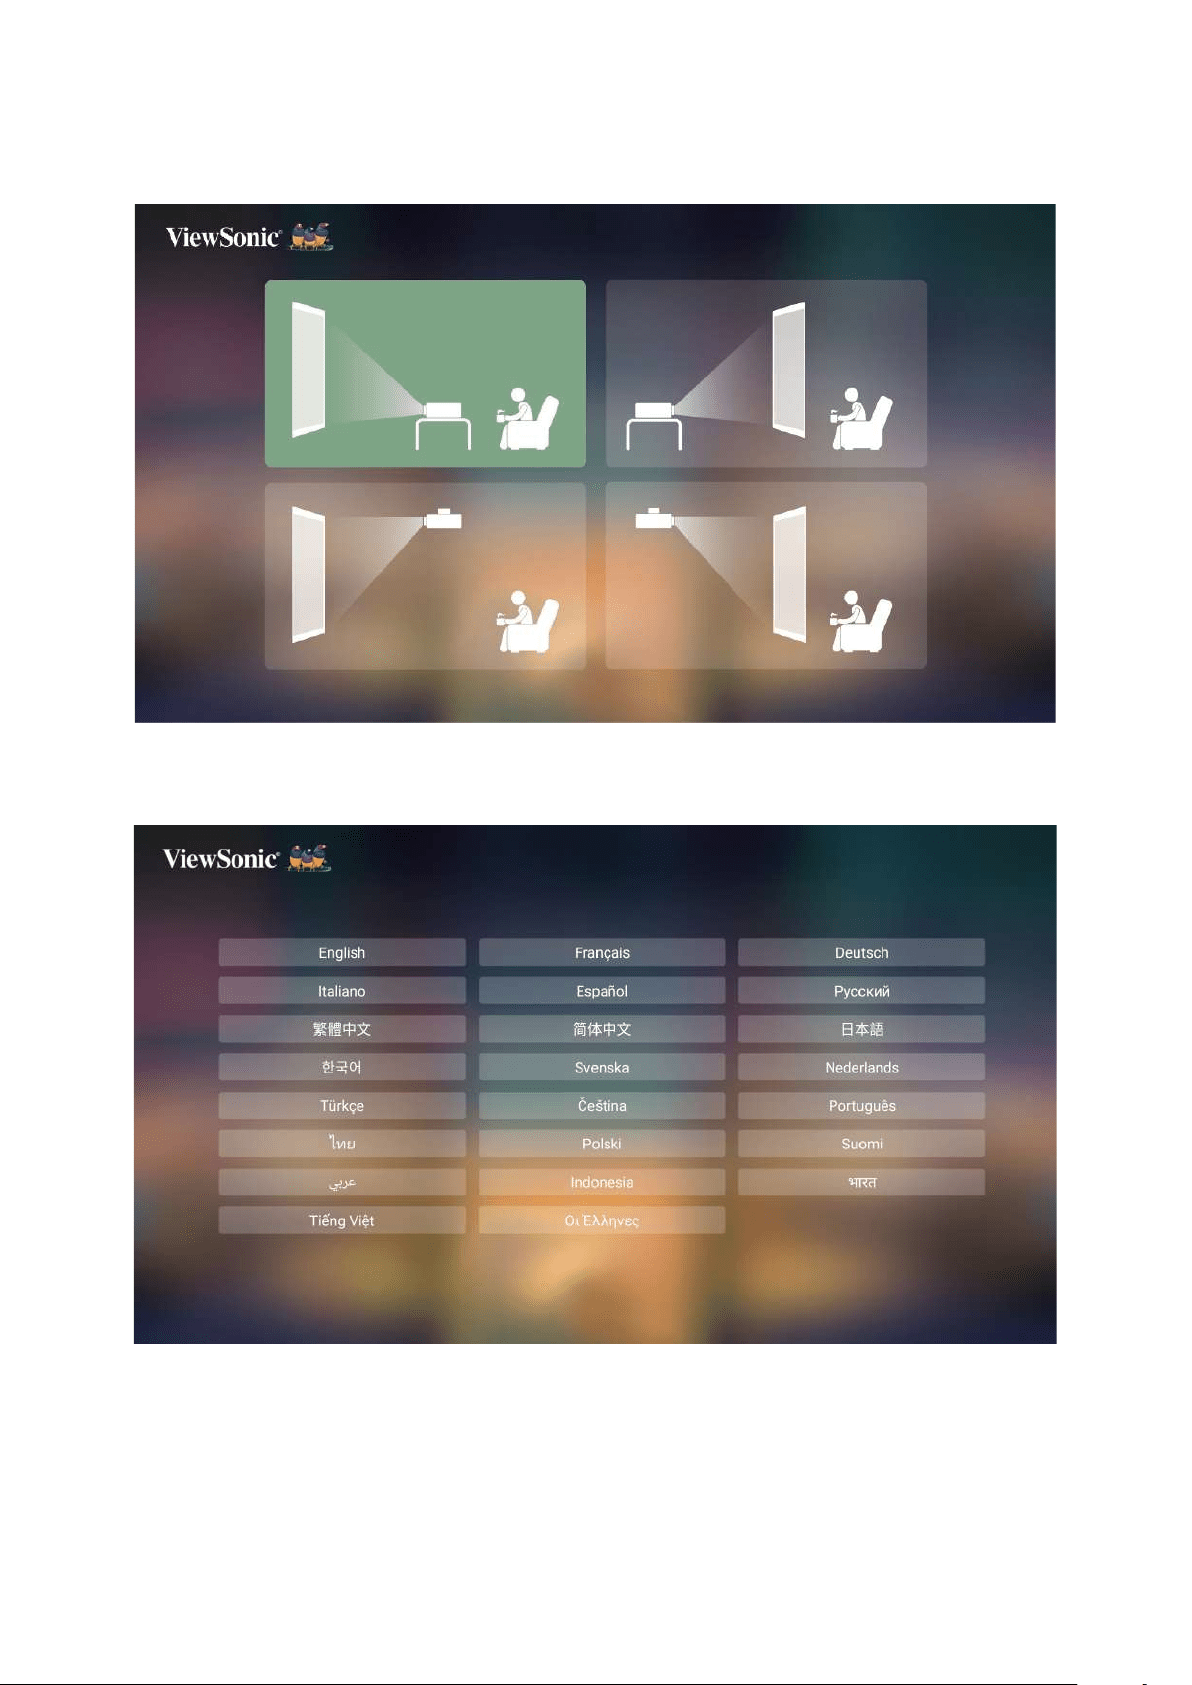
Choosing a Locaon - Projecon Orientaon
the following:
•
•
•
The projector is designed to be installed in one of the following locations:
Locaon
Front Table
The projector is placed near
Front Ceiling
The projector is suspended
upside-down from the ceiling
in front of the screen.
Rear Table
The projector is placed near
Rear Ceiling
The projector is suspended
upside-down from the ceiling
behind the screen.
14
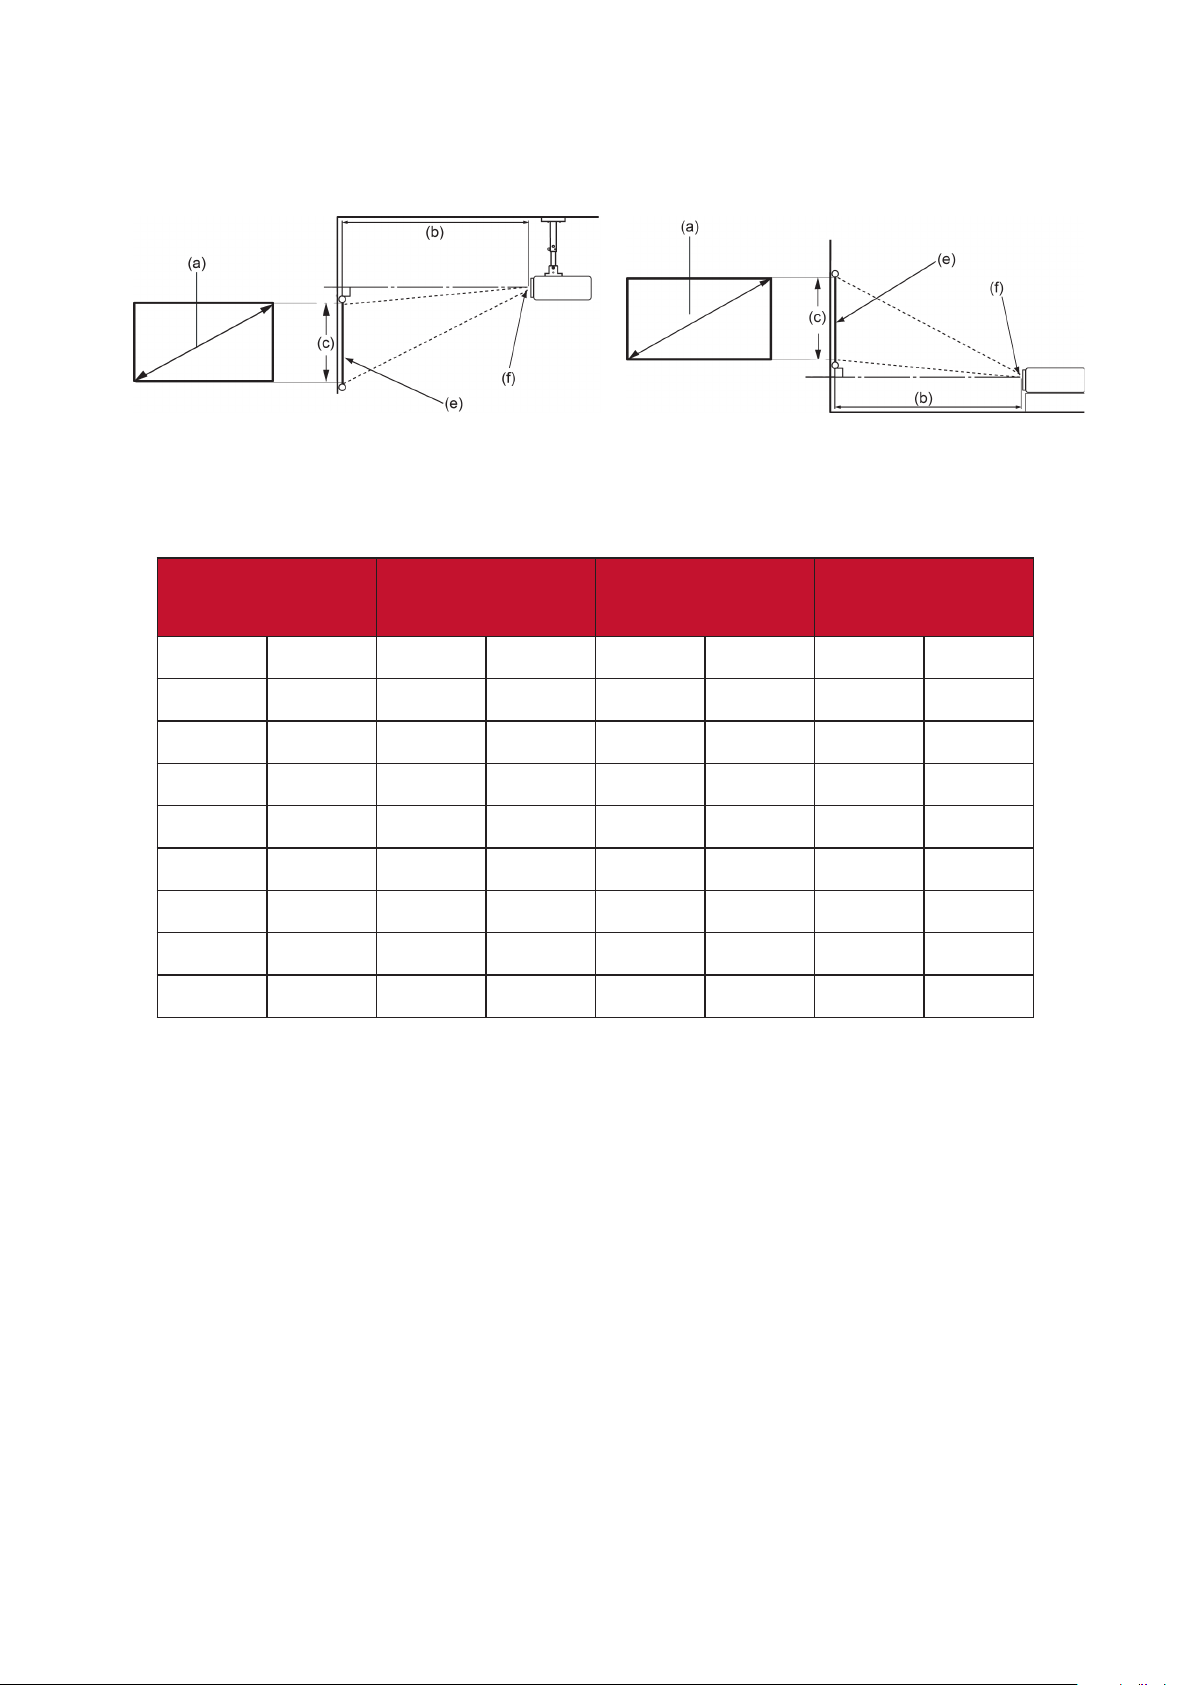
Projecon Dimensions
• 16:9 Image on a 16:9 Screen
NOTE:
16:9 Image on a 16:9 Screen
(a) Screen Size
(b) Projecon
Distance
(c) Image
Height
Image Width
in.
cm
in.
m.
in.
cm
in.
mm
30 76.2 31.64 0.80 14.71 37.36 26.15 664
40 101.6 42.18 1.07 19.61 49.81 34.86 886
50 127 52.73 1.34 24.51 62.26 43.58 1107
60 152.4 63.28 1.61 29.42 74.72 52.29 1328
70 177.8 73.82 1.88 34.32 87.17 61.01 1550
80 203.2 84.37 2.14 39.22 99.62 69.73 1771
90 228.6 94.91 2.41 44.12 112.07 78.44 1992
100 254 105.46 2.68 49.03 124.53 87.16 2214
NOTE: There is a 3% tolerance among these numbers due to optical component
distance before permanently installing the projector.
15
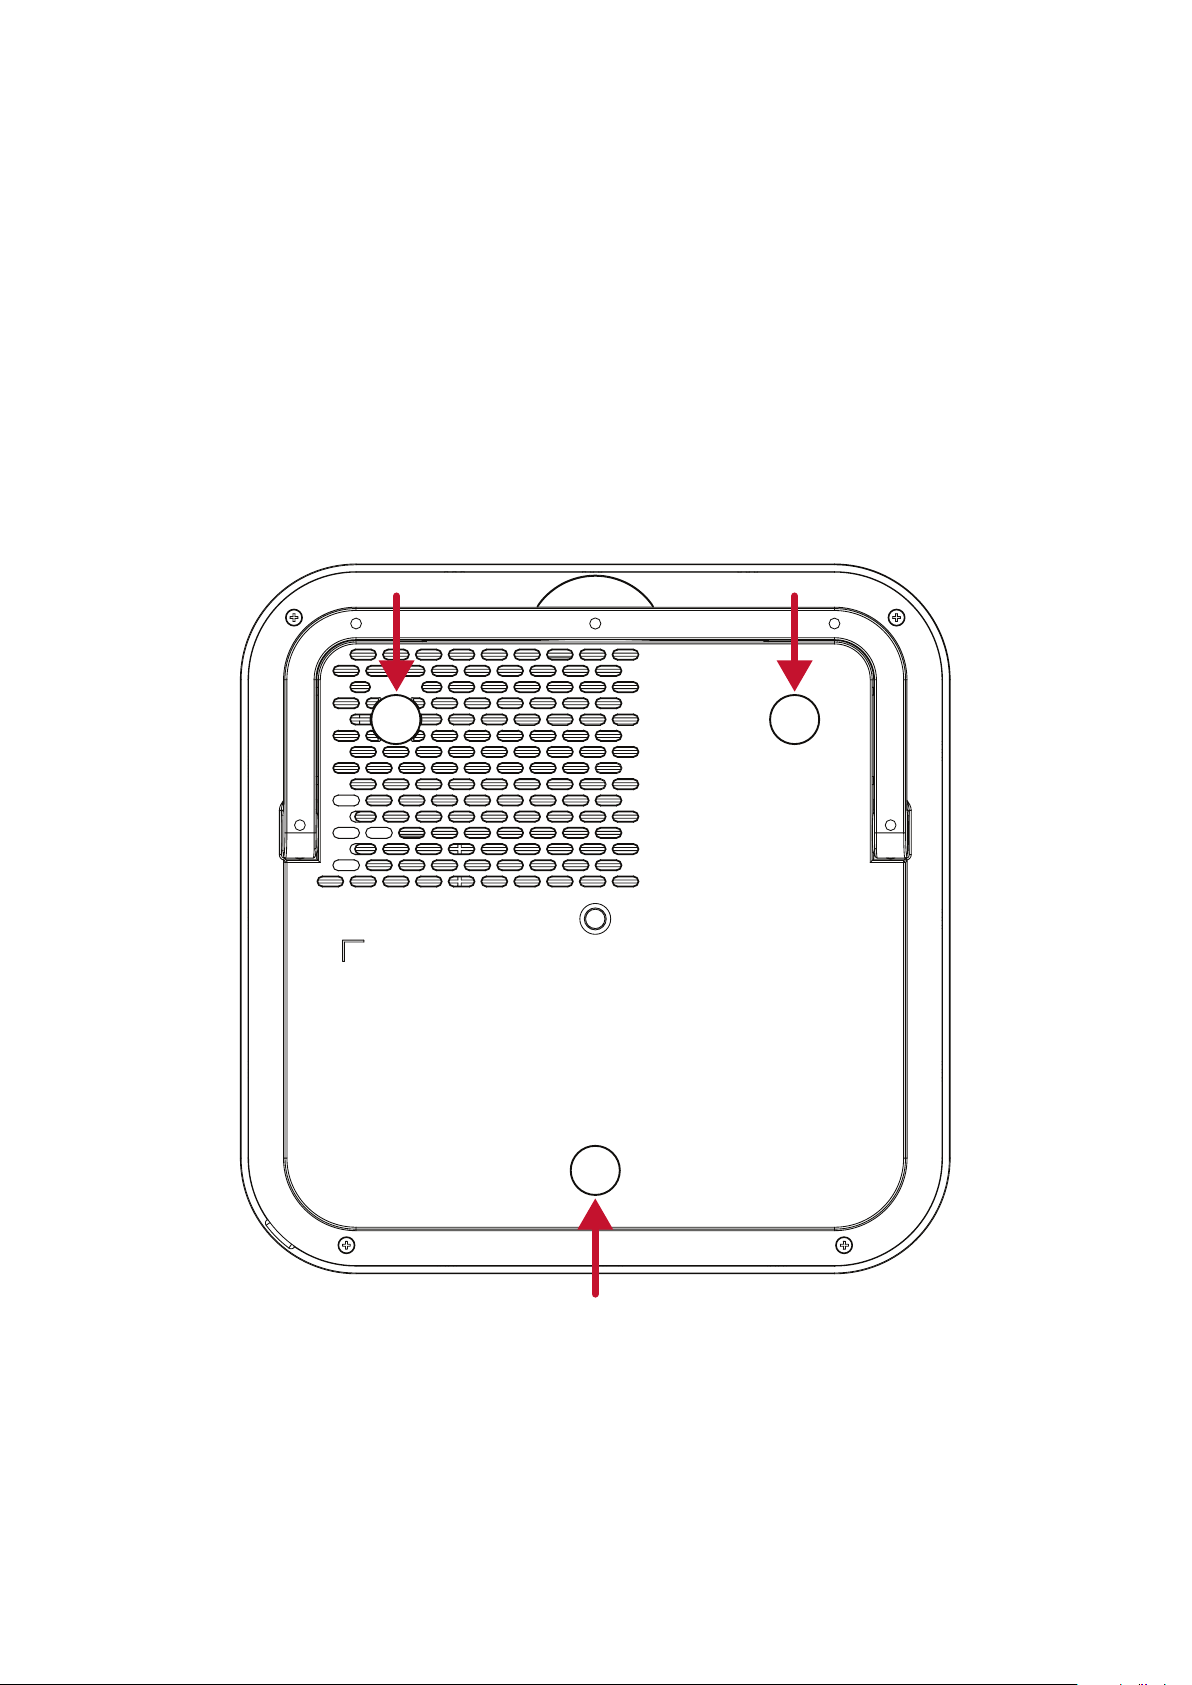
Mounng the Projector
NOTE:
1.
mount.
2.
• Screw type: M4 x 8
•
3.
of the projector.
CAUTION:
• Avoid installing the projector near a heat source.
•
the projector.
16
Making Connecons
This section guides you on how to connect the projector with other equipment.
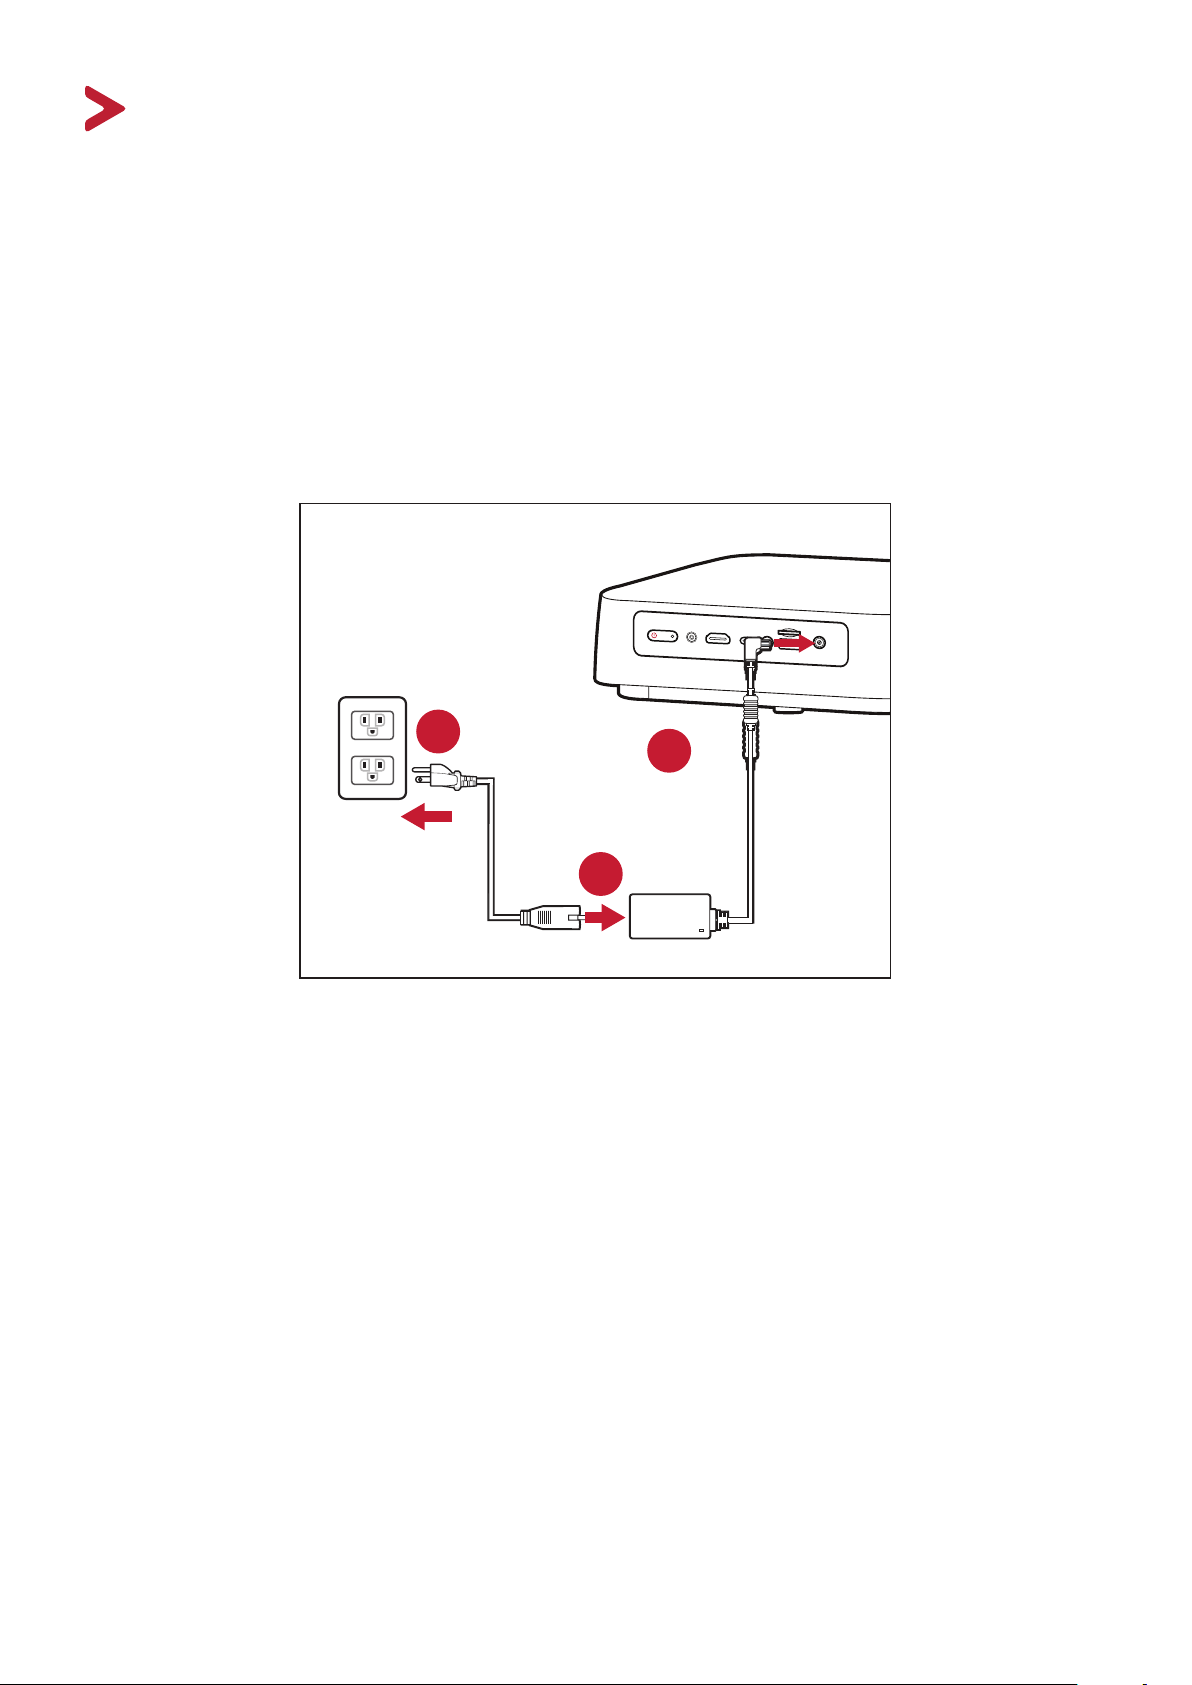
Connecng to Power
DC Power (Power Outlet)
1. Connect the power cord to the power adapter.
2.
3. Connect the power cord plug to a power outlet. When connected, the projector
1
2
3
NOTE: When installing the projector, incorporate a readily accessible disconnect
or disconnect the power plug.
17
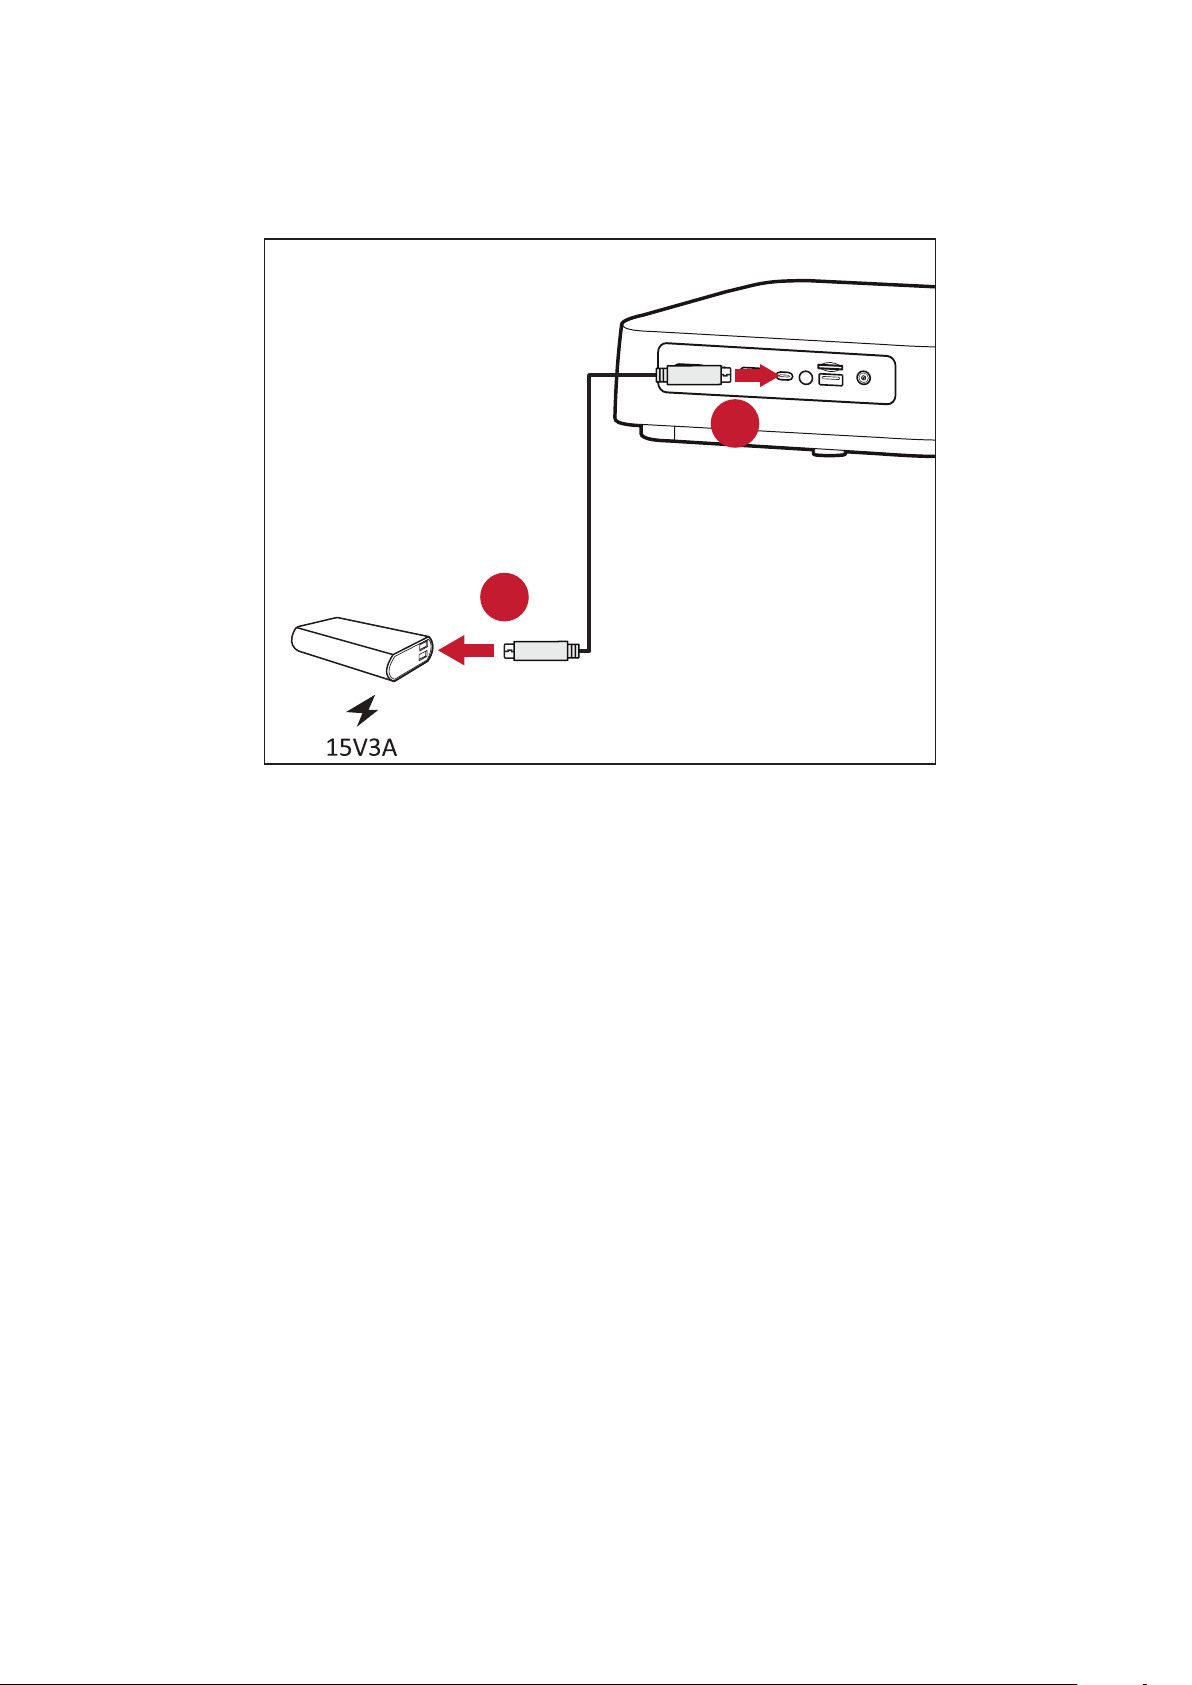
USB-C Power Bank
1. Connect one end of the USB Type-C cable to the USB-C port of the projector.
2. Connect the other end of the USB Type-C cable to the power bank.
1
2
NOTE: The power bank should be 45W (15V/3A) at least, and support Power
18
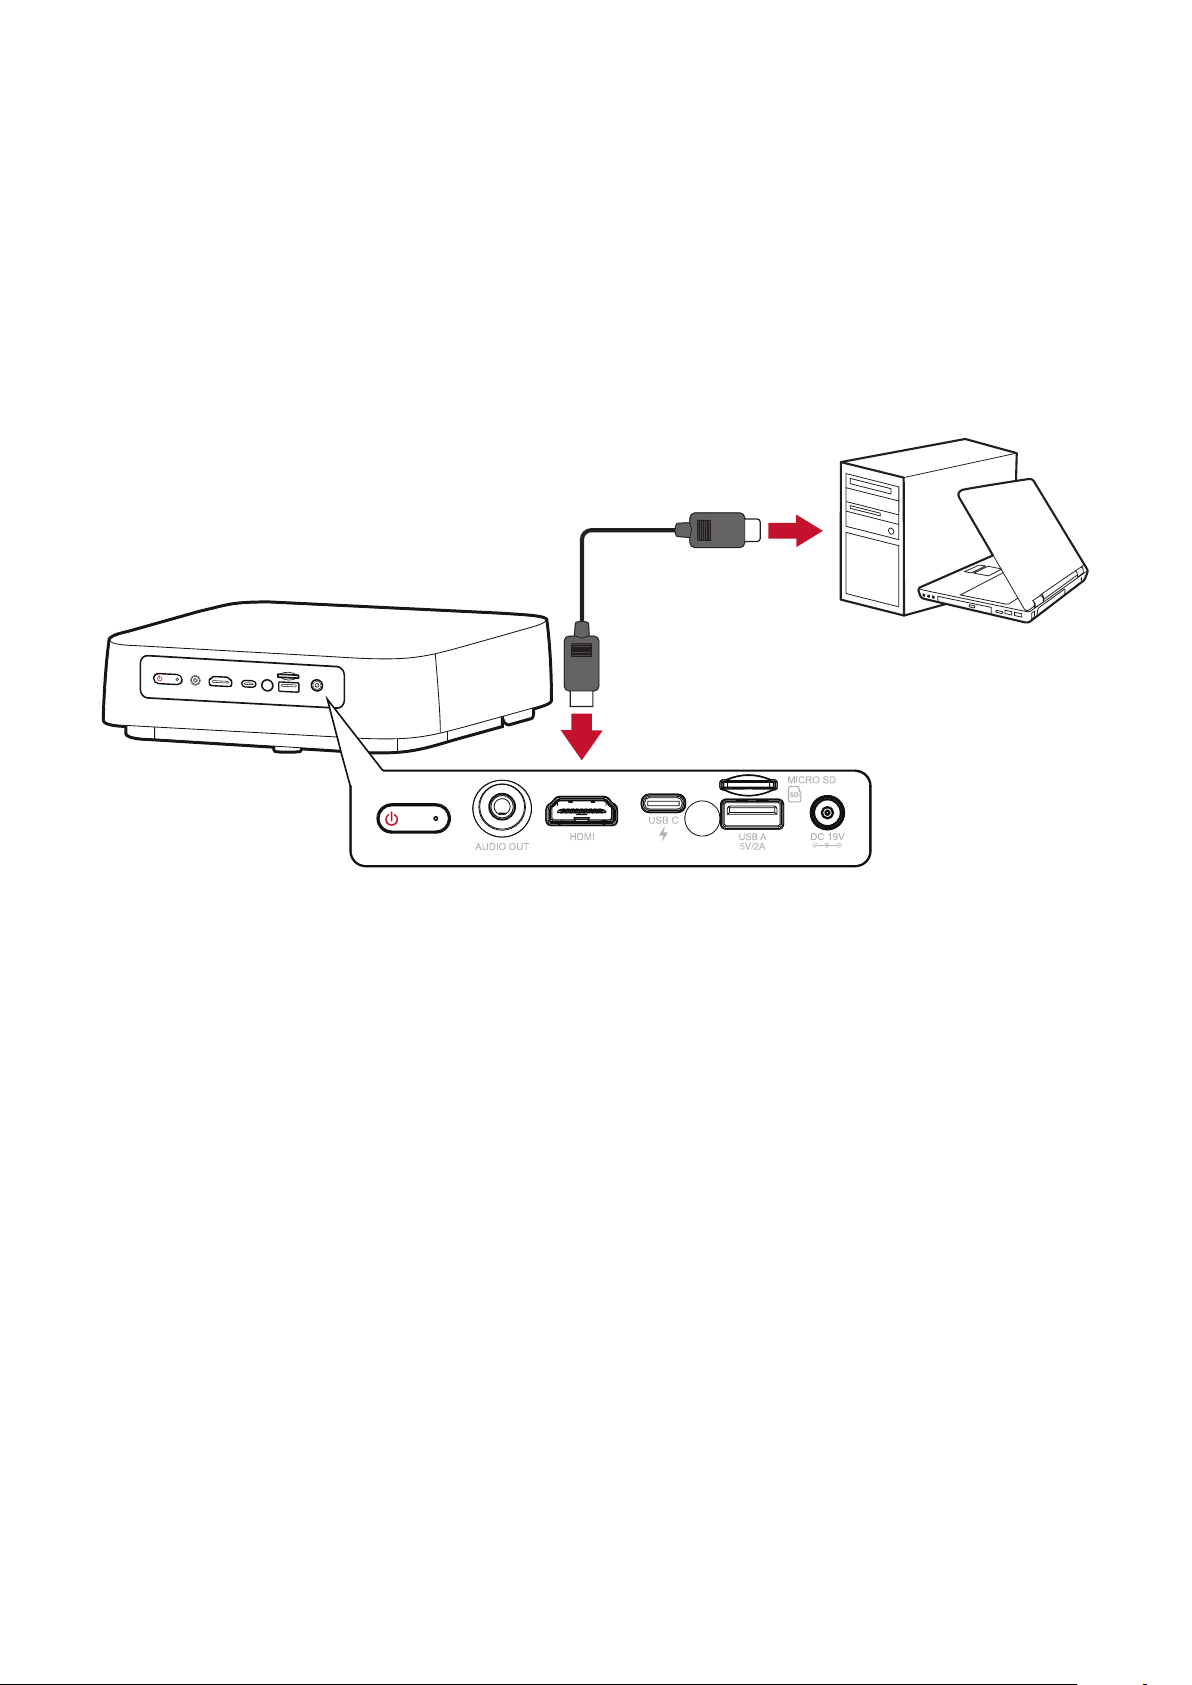
Connecng to External Devices
HDMI Connecon
connect the other end of the cable to the HDMI
1.4) of your projector.
NOTE:

19
USB Connecon
USB-C Connecon
Connect one end of a USB Type-C cable to the USB-C port of your device. Then
connect the other end of the cable to the USB-C port of your projector.
NOTE:
• Ensure your USB Type-C device can support video transmission.
• The M2e can also use a USB-C connected power bank to turn on the
system. However, the brightness level will be limited to 60% of Full.
USB Type-A Connecon
Connect one end of a USB Type-A cable to the USB-A port of your device (if
applicable). Then connect the other end of the cable to the USB A port of your
projector.
the projector’s USB-A port. To learn more about managing storage device, e.g. USB
page 50.
20
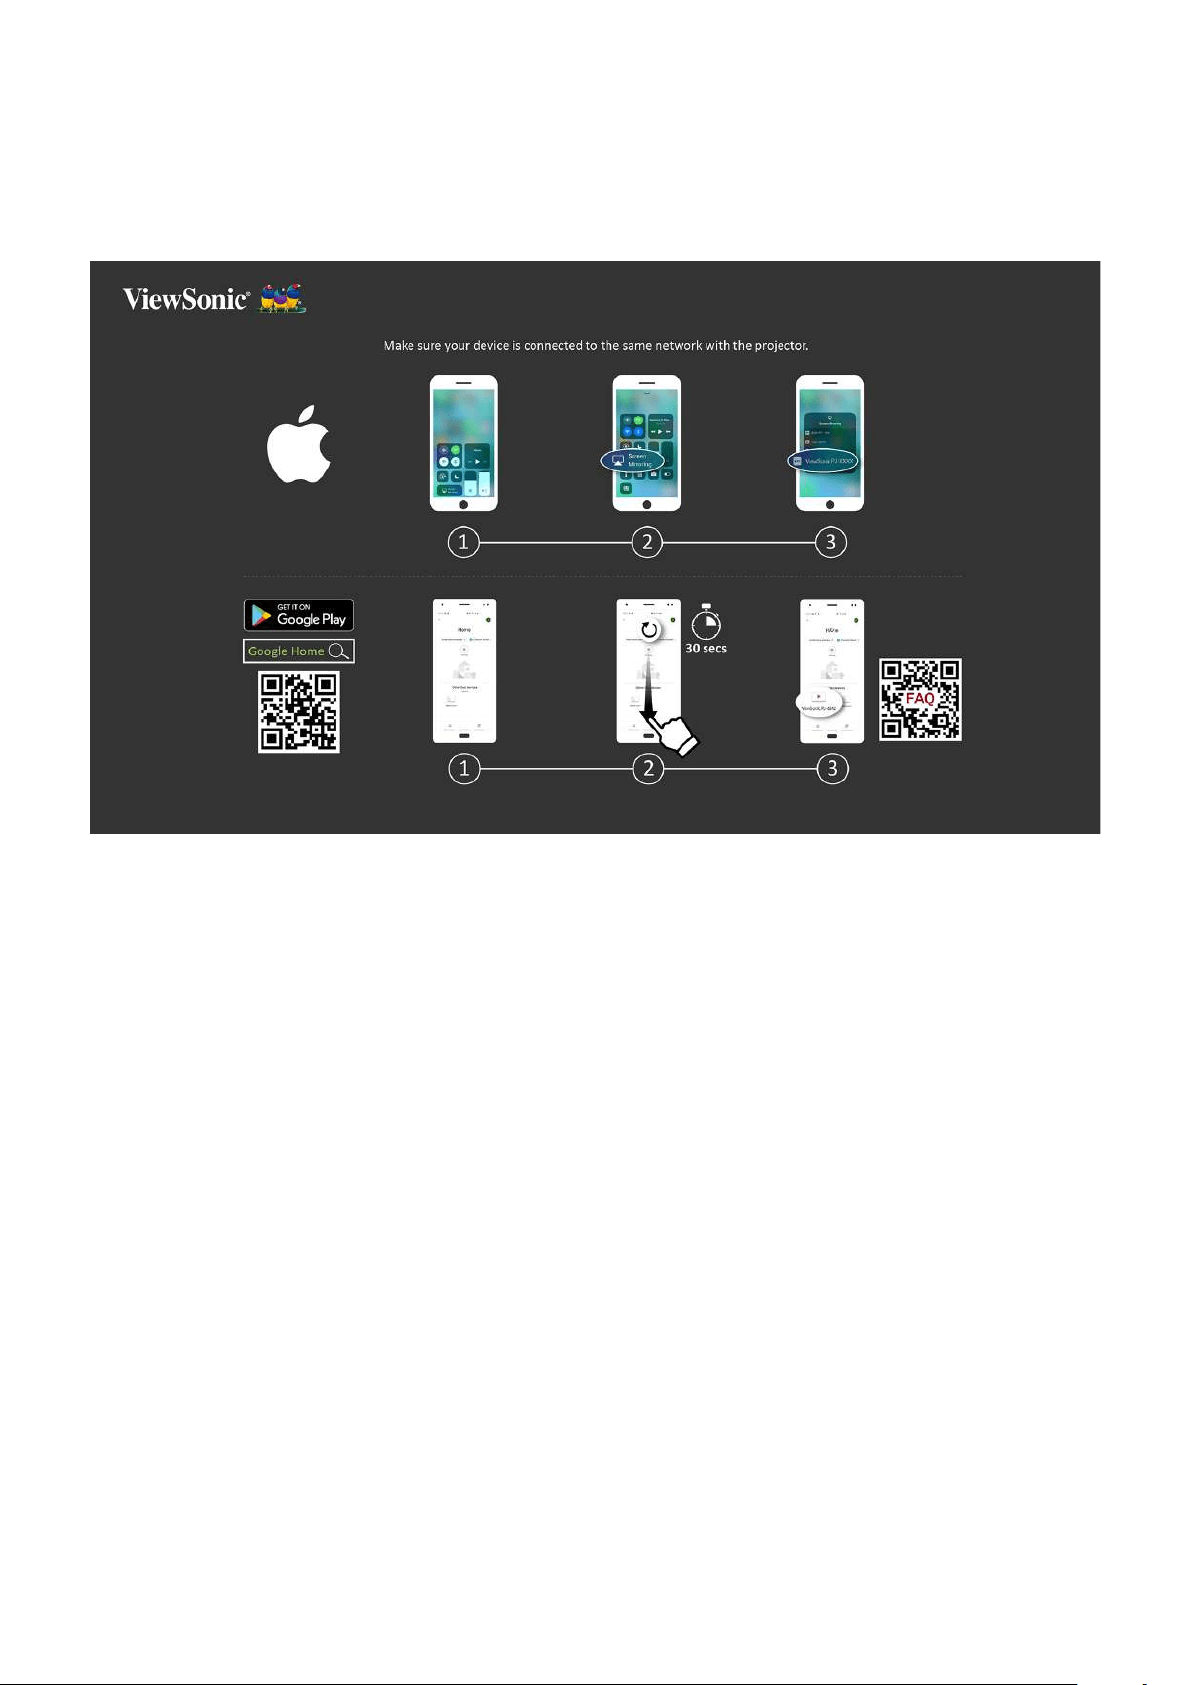
Wireless Screen Mirroring
on their personal device.
NOTE: Ensure your device is connected to the same network as the projector.
For iOS:
1. Access the drop down control menu.
2. Select the “Screen Mirroring” icon.
3.
For Android:
1.
2. Pull-to-refresh the app and wait for 30 seconds.
3.
NOTE:
of available devices. You can also scan the FAQ QR code and follow the
steps to directly cast your Android device.
21
Connecng to Audio
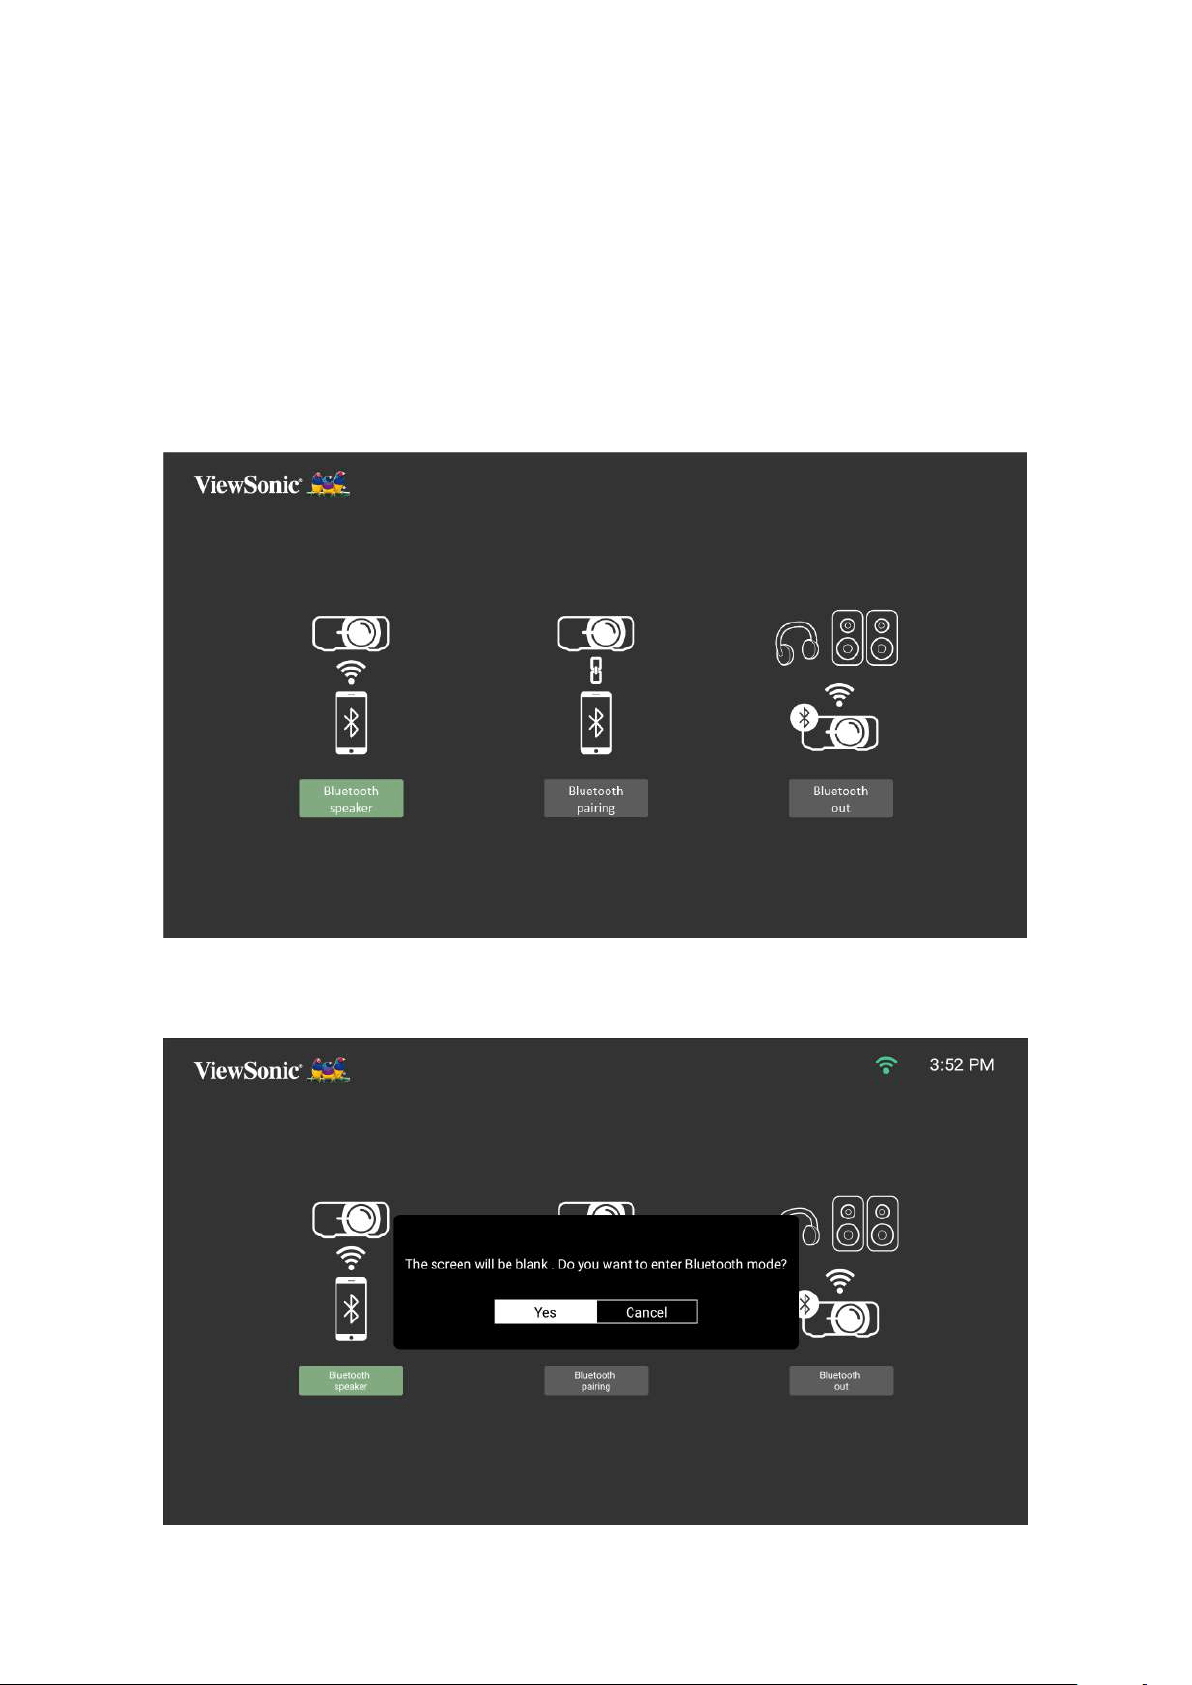
Bluetooth Speaker
The projector is equipped with Bluetooth that allows the user to connect their
device wirelessly for audio playback.
To connect and pair your device:
1. Go to: Home > Bluetooth.
2. Use the Le and Right
Bluetooth Speaker or Bluetooth Pairing. Then press OK on the remote control.
3. When the below dialogue box appears, select Yes and press OK on the remote
control to enter Bluetooth mode.

22
4.
5.
NOTE:
• Once paired, if both the projector and your device are powered on they will
• The projector’s name will be labeled as “M2e”.
•
23
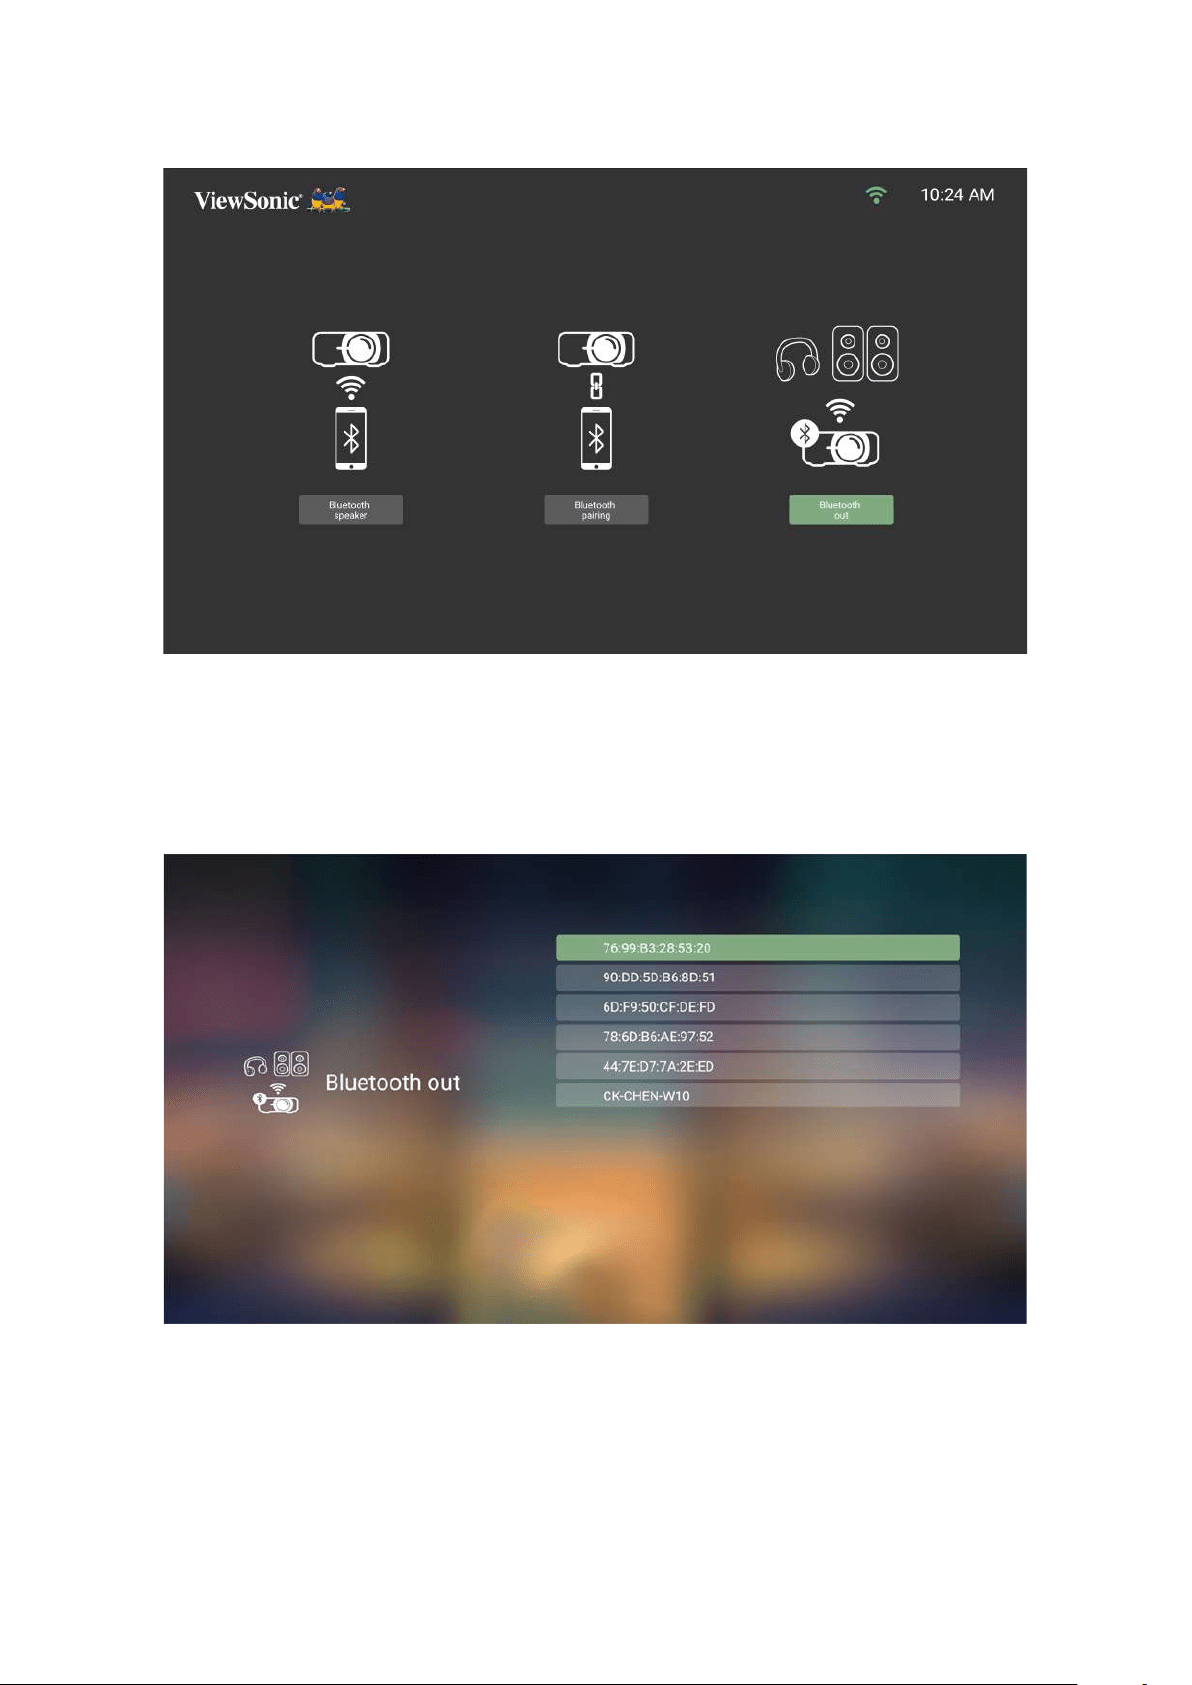
Bluetooth Out
Connect the projector to external headphones or speakers that support Bluetooth.
To connect and pair your device:
1. Go to: Home > Bluetooth.
2. Use the Le and Right
Bluetooth Out
3. The projector will search for nearby Bluetooth devices. Select your device from
the list and press OK on the remote control.
24
Connecng to Networks
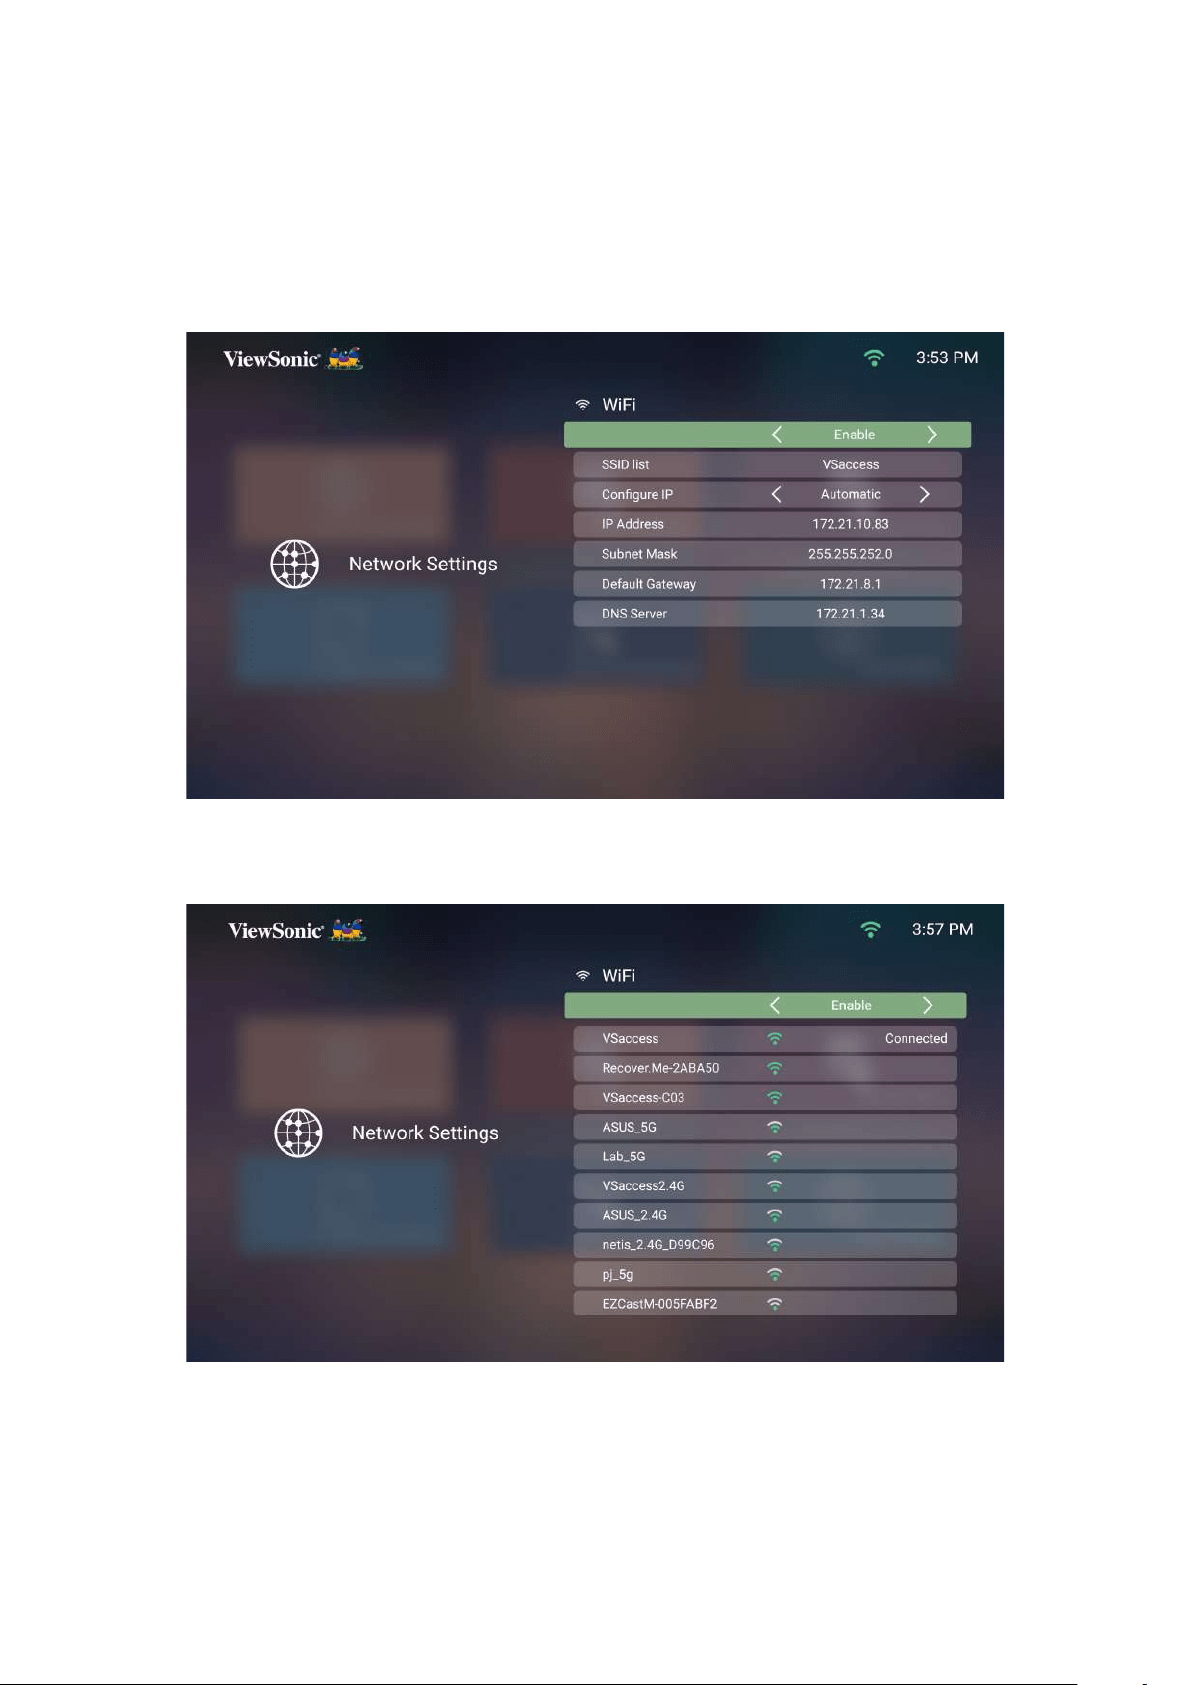
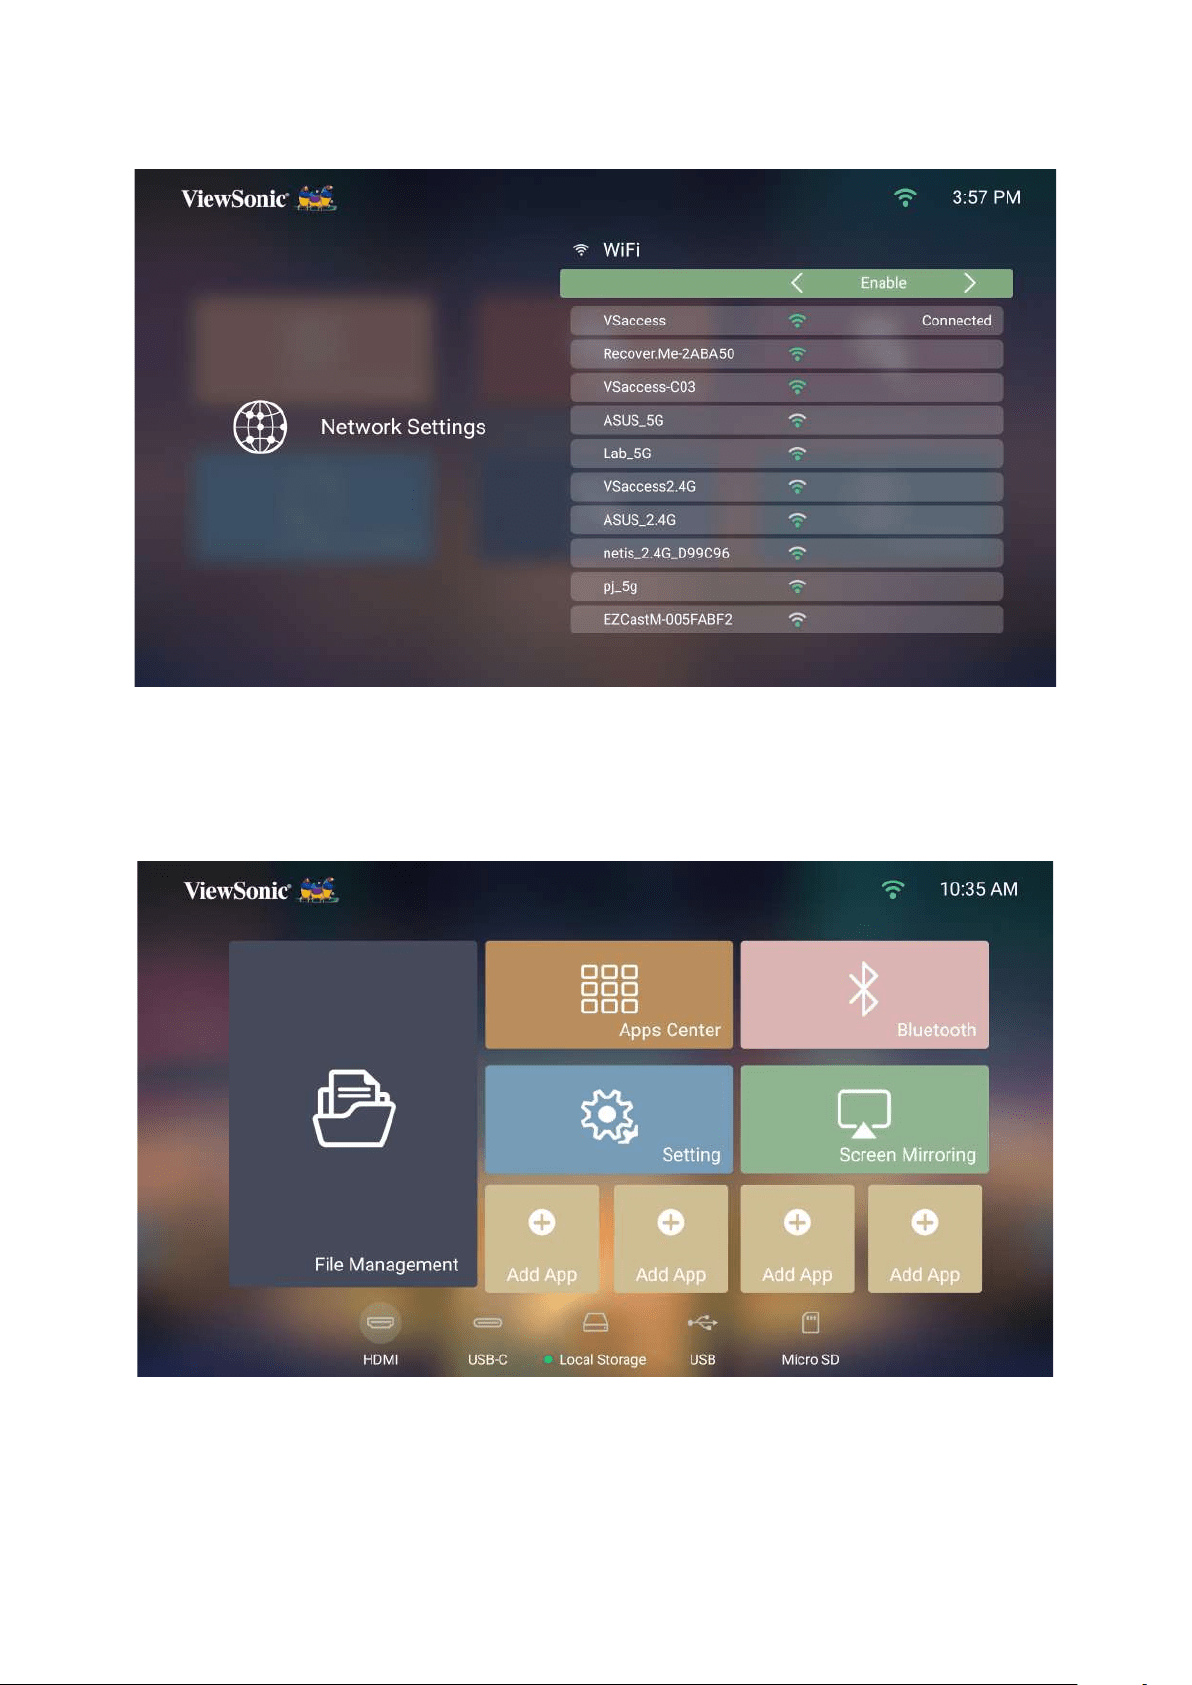
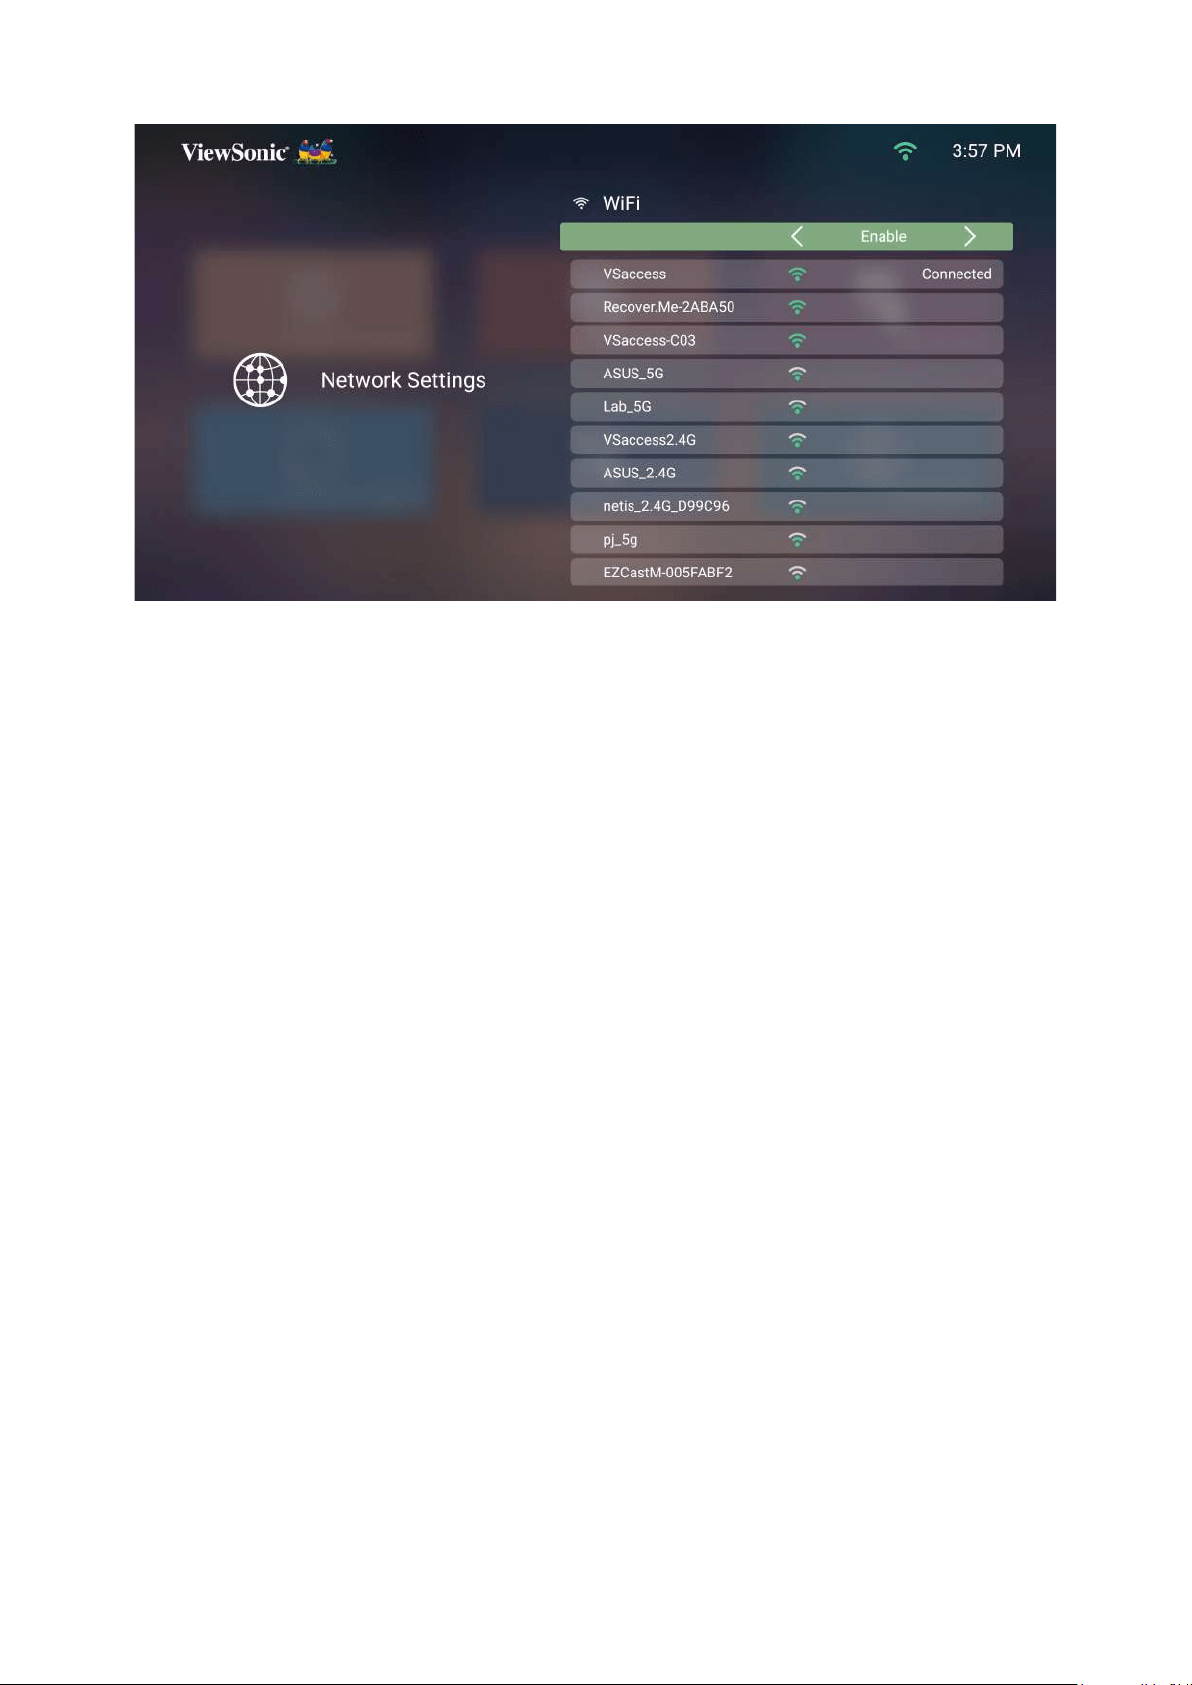
Wi-Fi Connecon
To connect to a Wi-Fi network:
1. Go to: Home > Seng > Network Sengs > Wi-Fi
2. Press Le or Right on the remote control to select Enable.
3. Available Wi-Fi networks will then be displayed. Select one of the available Wi-Fi
networks.
25
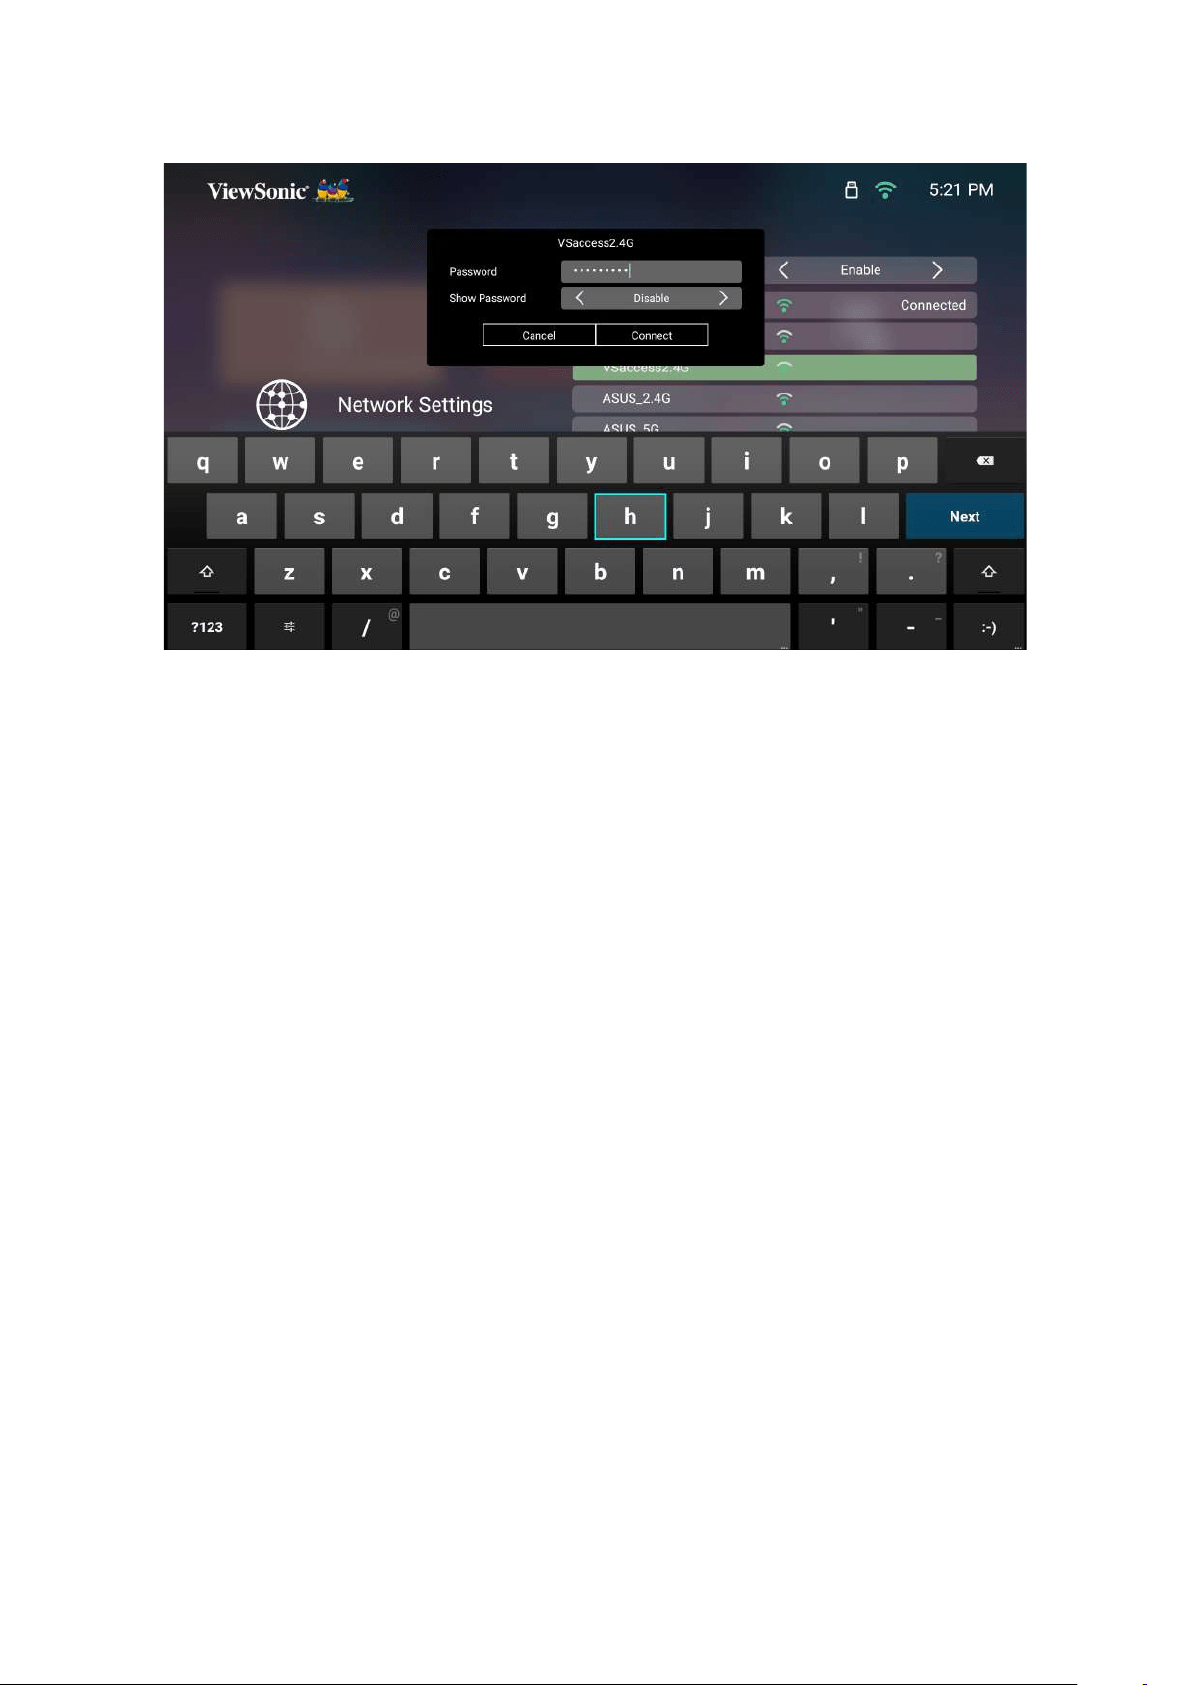
4. If you connect to a secure Wi-Fi network, you must enter the password when
prompted.
26
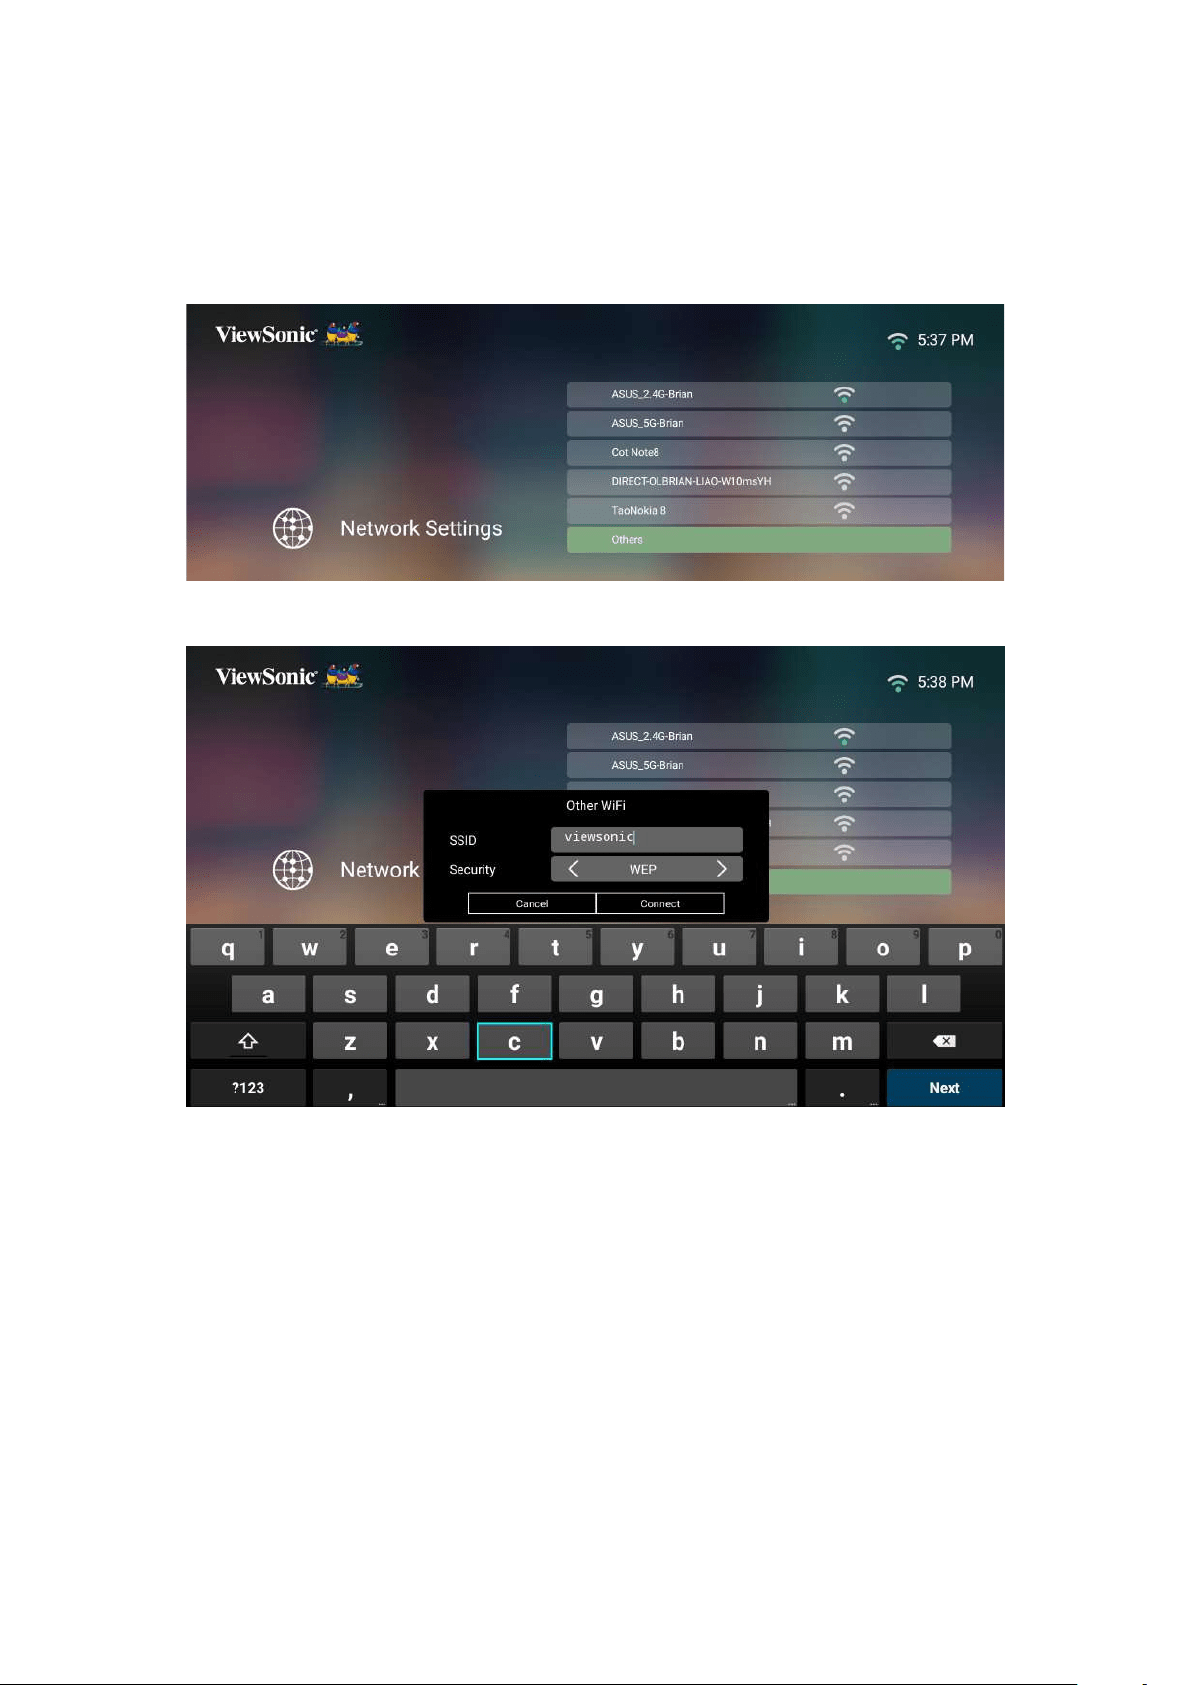
Custom SSID
1. Go to: Home > Seng > Network Sengs > Wi-Fi
2. Press Le or Right on the remote control to select Enable.
3. From the available Wi-Fi networks list select Others and press OK on the remote
control.
4.
5. Enter the password when prompted.
NOTE:
Automac for Congure IP.
27
Using the Projector
Starng Up the Projector
1. Ensure the projector’s power cord is properly connected to a power outlet.
2.
NOTE:
First Time Acvaon
OK and Up/Down/Le/Right
remote control. When the Finish screen appears, this indicates the projector is
ready to use.
Auto Focus
29
Network Sengs
page 24.
Source Input
Quickly access the Source Input menu by pressing the Down
control when at the Home ScreenSource
page 30.
30
Selecng an Input Source
connected, press the Source
input, or press the DownHome Screen
displayed.
NOTE: Ensure the connected sources are also turned on.
31
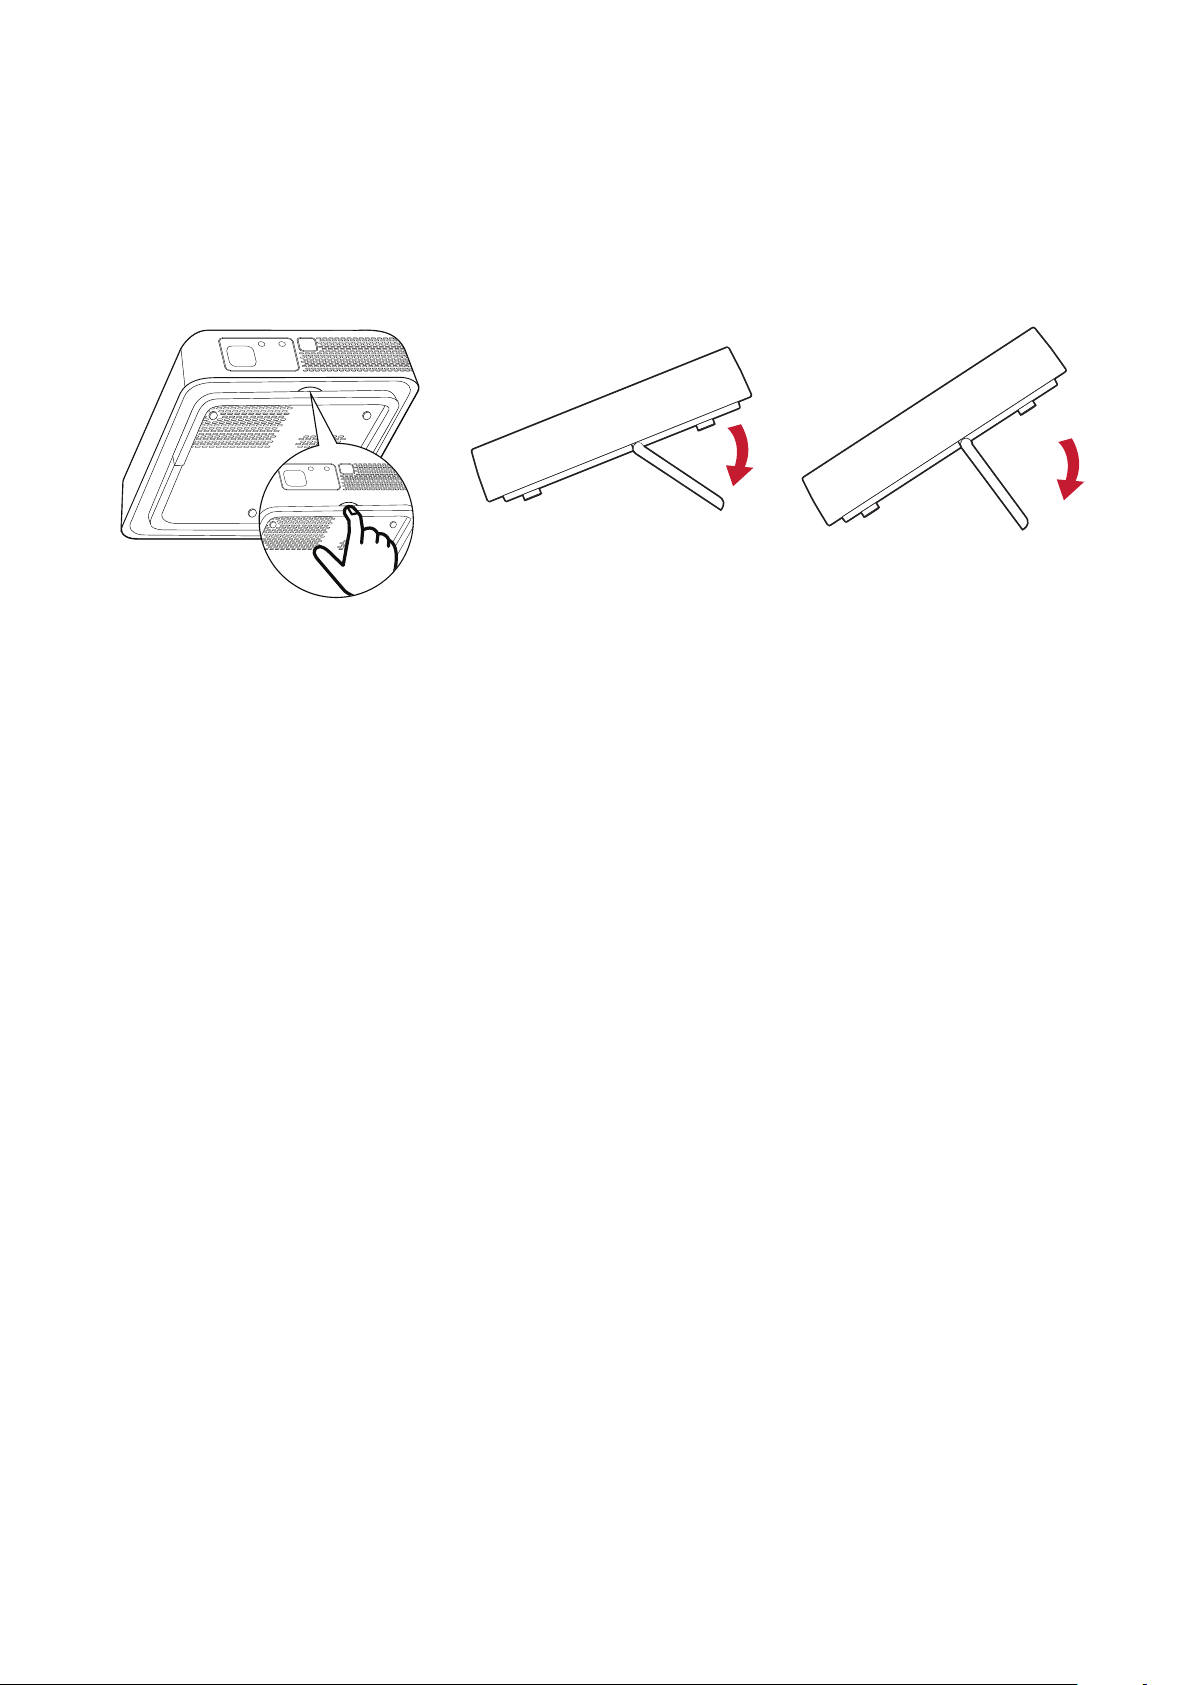
Adjusng the Projected Image
Adjusng the Projector's Height and Projecon Angle
NOTE:
projector are not perpendicular to each other, the projected image can
32
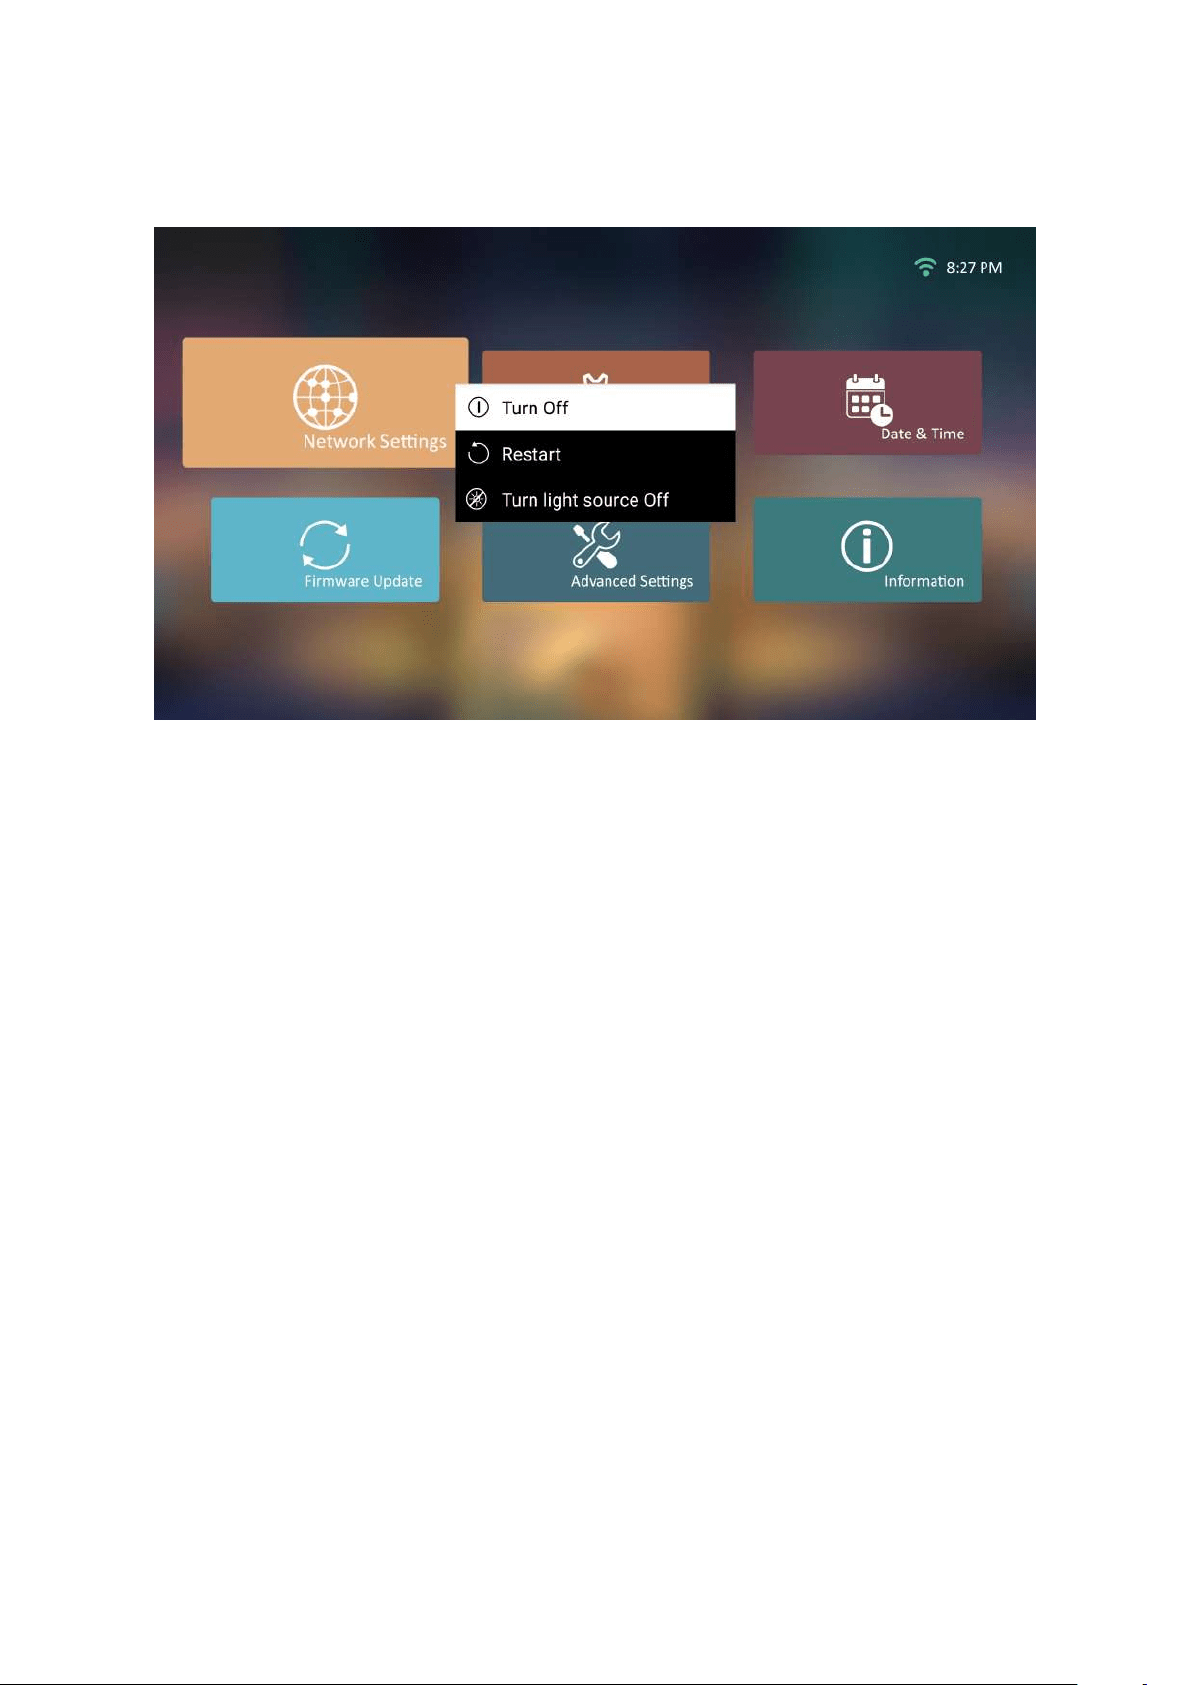
Shung Down the Projector
1. Press the Power
message will appear:
2. Press the Up/DownTurn O and press
OK on the remote control.
3.
NOTE: When pressing Power on the remote control, you can choose from three
33
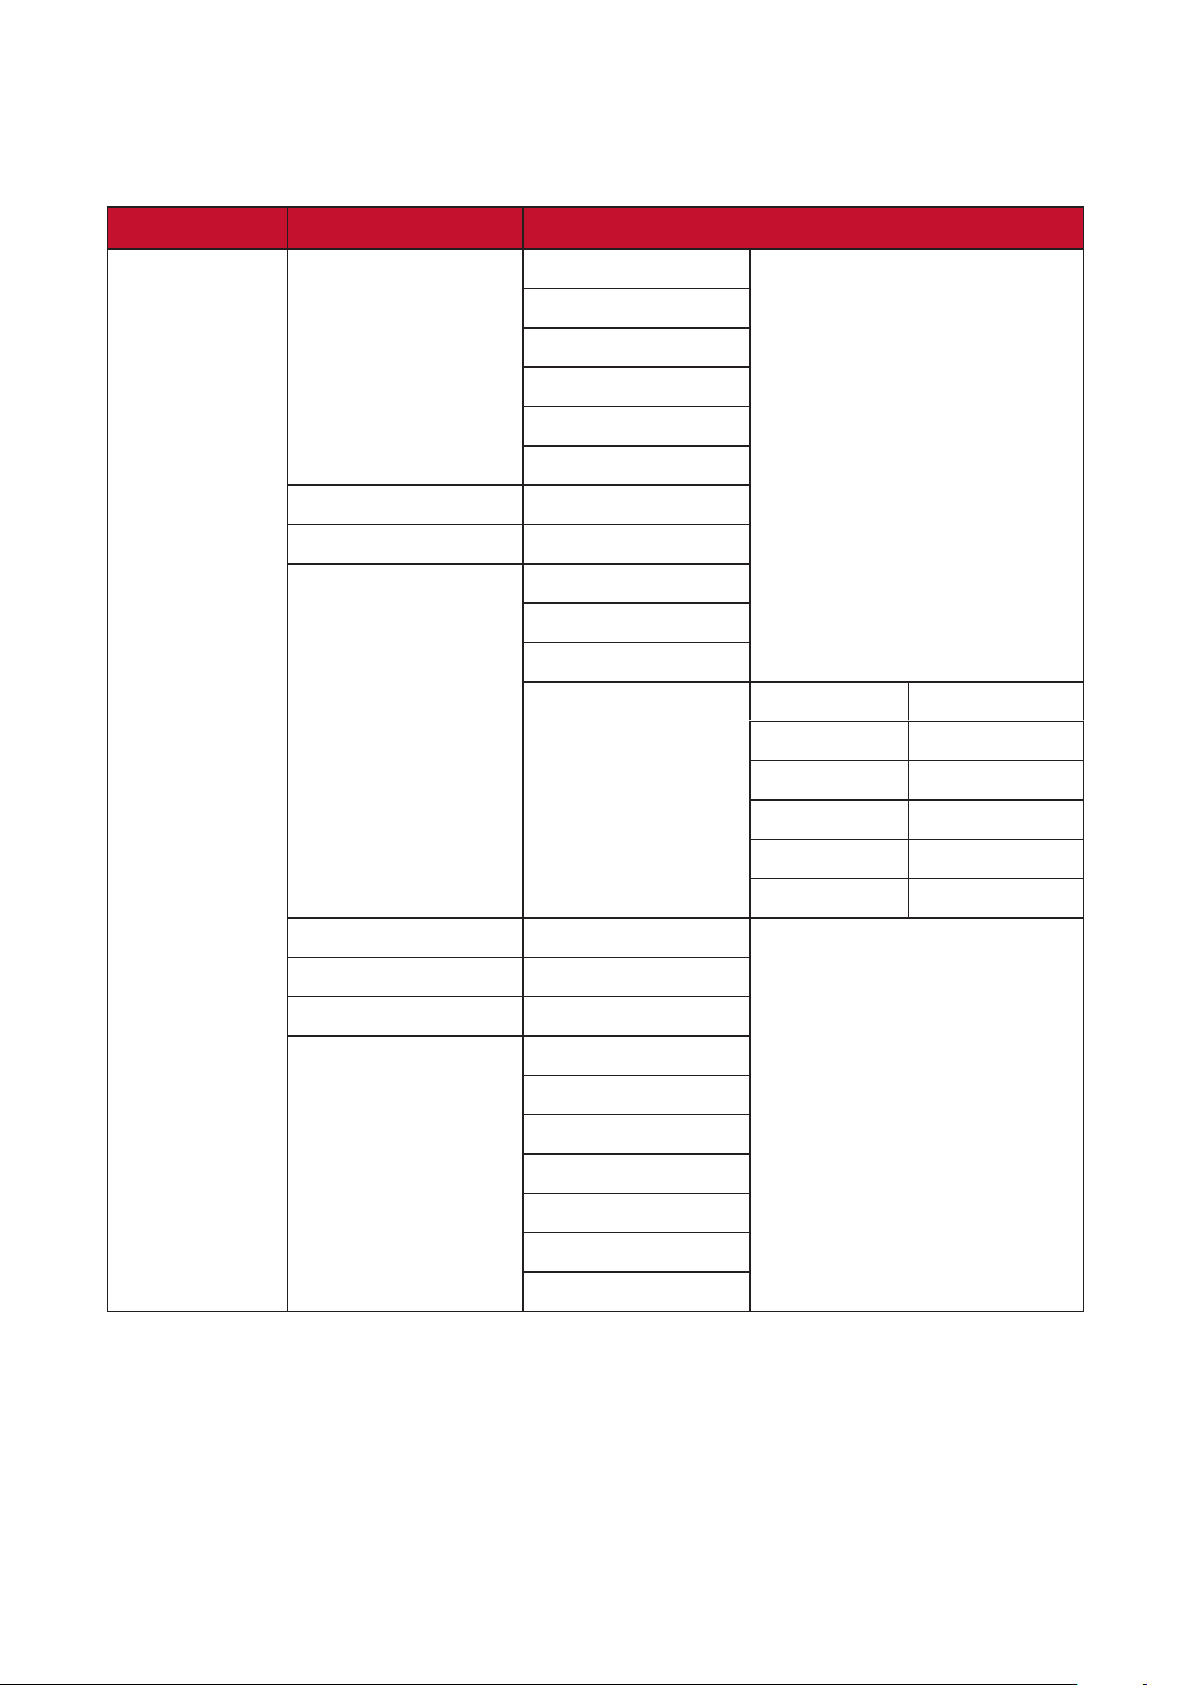
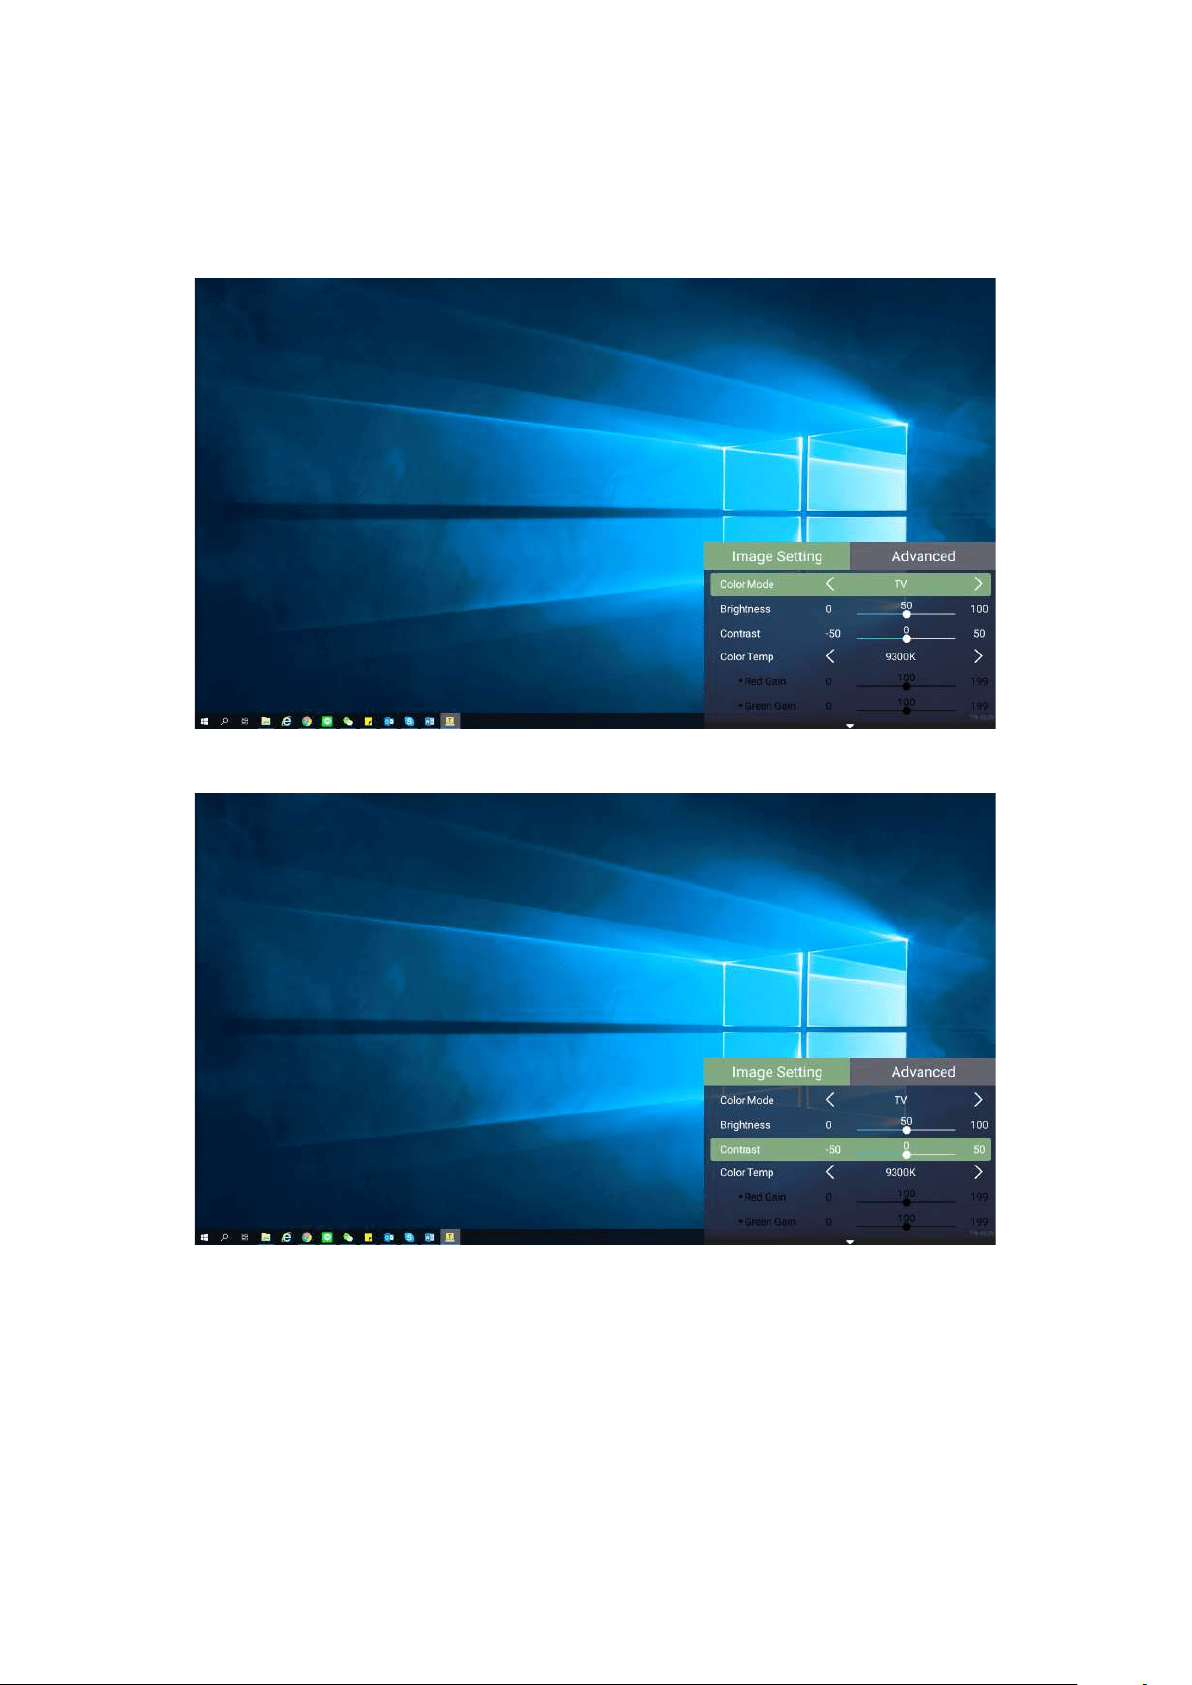
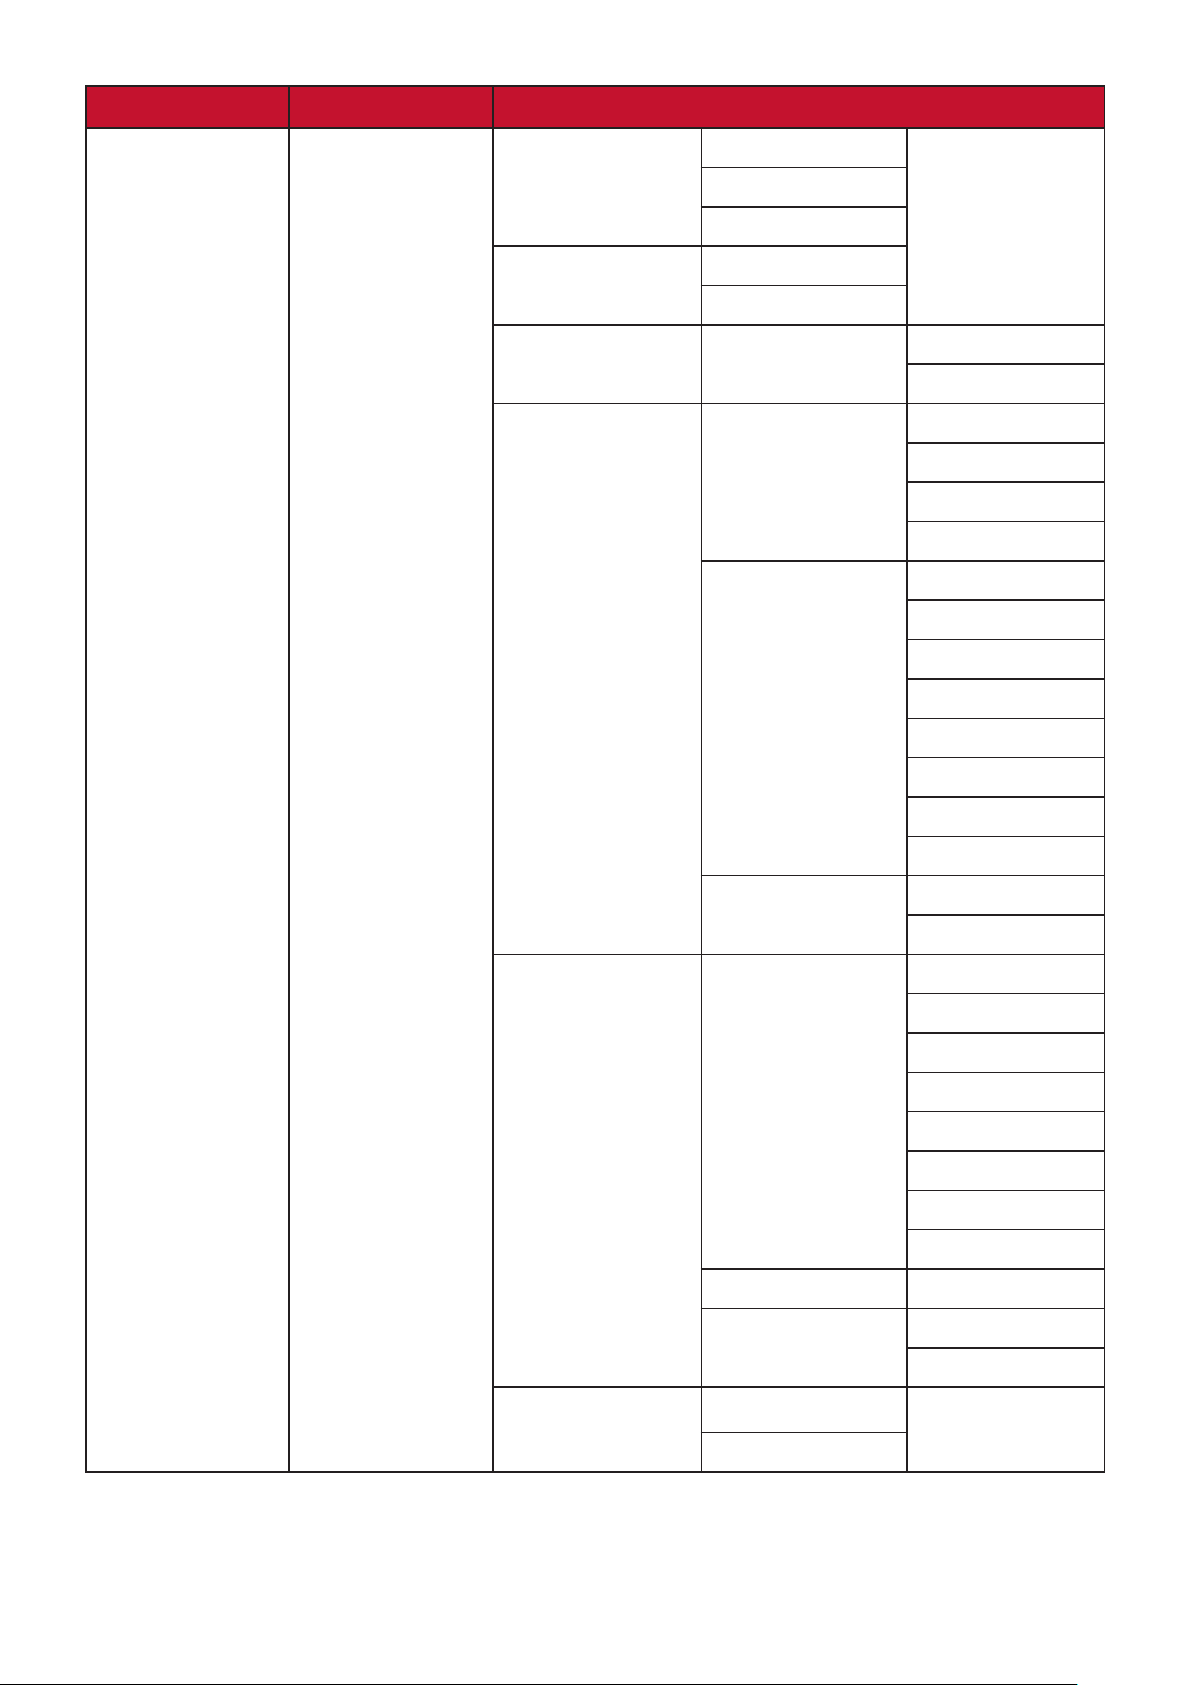
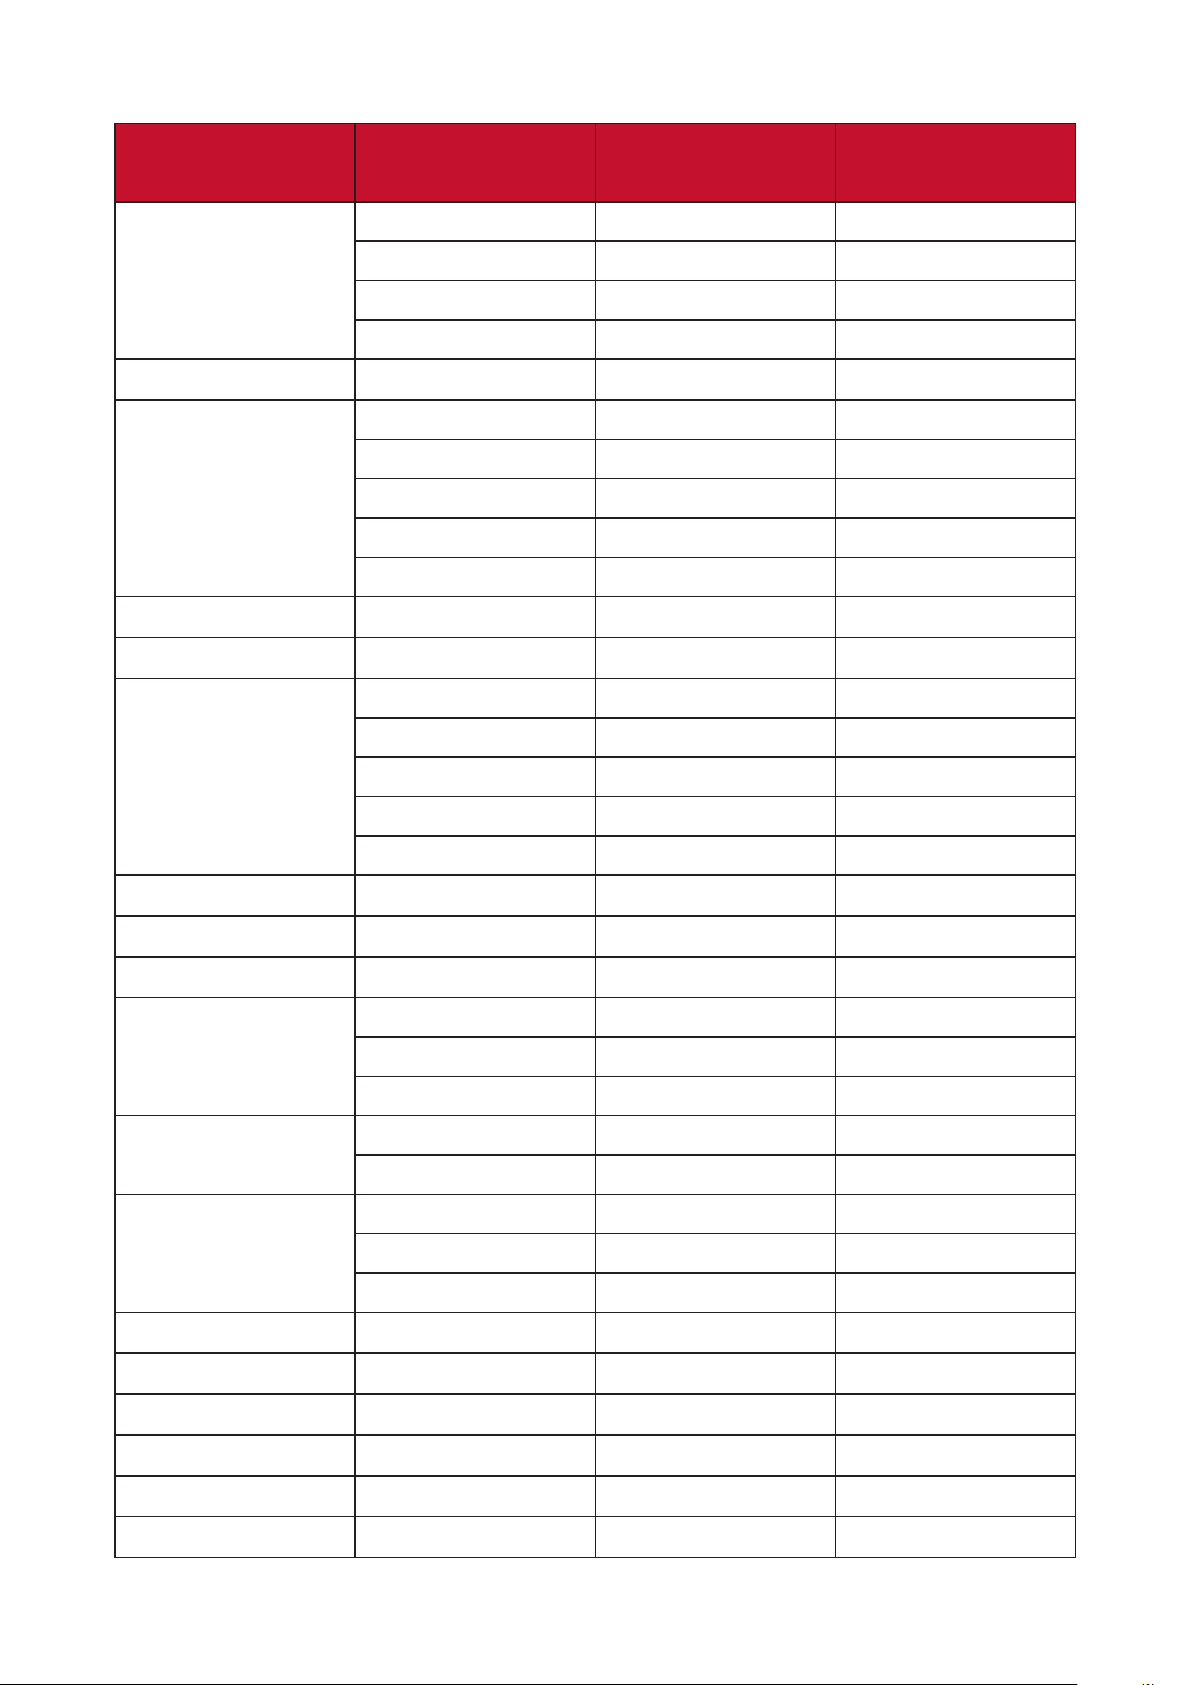
Input Source Selected - On-Screen Display (OSD) Tree
Image Seng and Advanced
menus.
Main Menu Sub-menu Menu Opon
Image Seng
Color Mode Brightest
TV
Movie
Gaming
User 1
User 2
Brightness (-/+, 0~100)
Contrast (-/+, 0~100)
Color Temp 6500K
7500K
9300K
User Red Gain (-/+, 0~199)
Green Gain (-/+, 0~199)
Blue Gain (-/+, 0~199)
(-/+, 0~199)
(-/+, 0~199)
(-/+, 0~199)
Tint (-/+, 0~100)
(-/+, 0~100)
Sharpness (-/+, 0~60)
Gamma 1.8
2.0
2.2
2.35
2.5
sRGB
Cubic
34
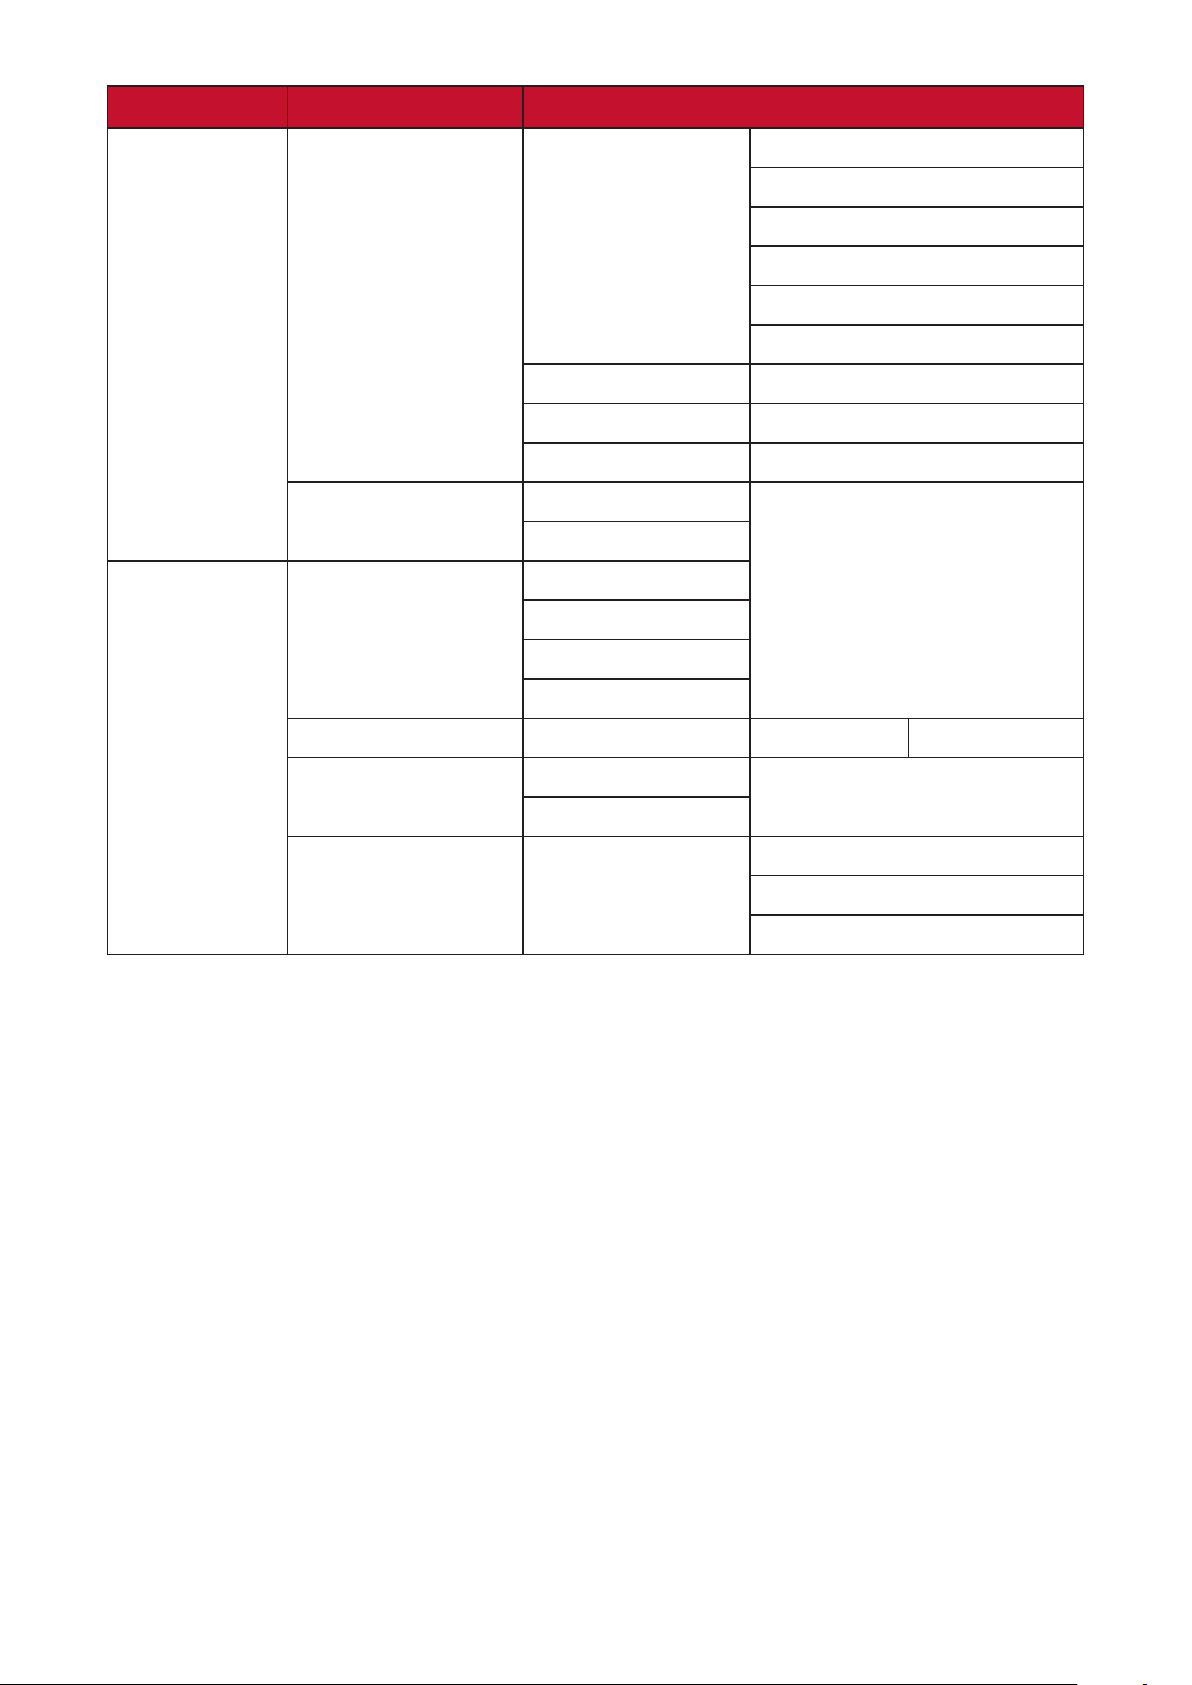
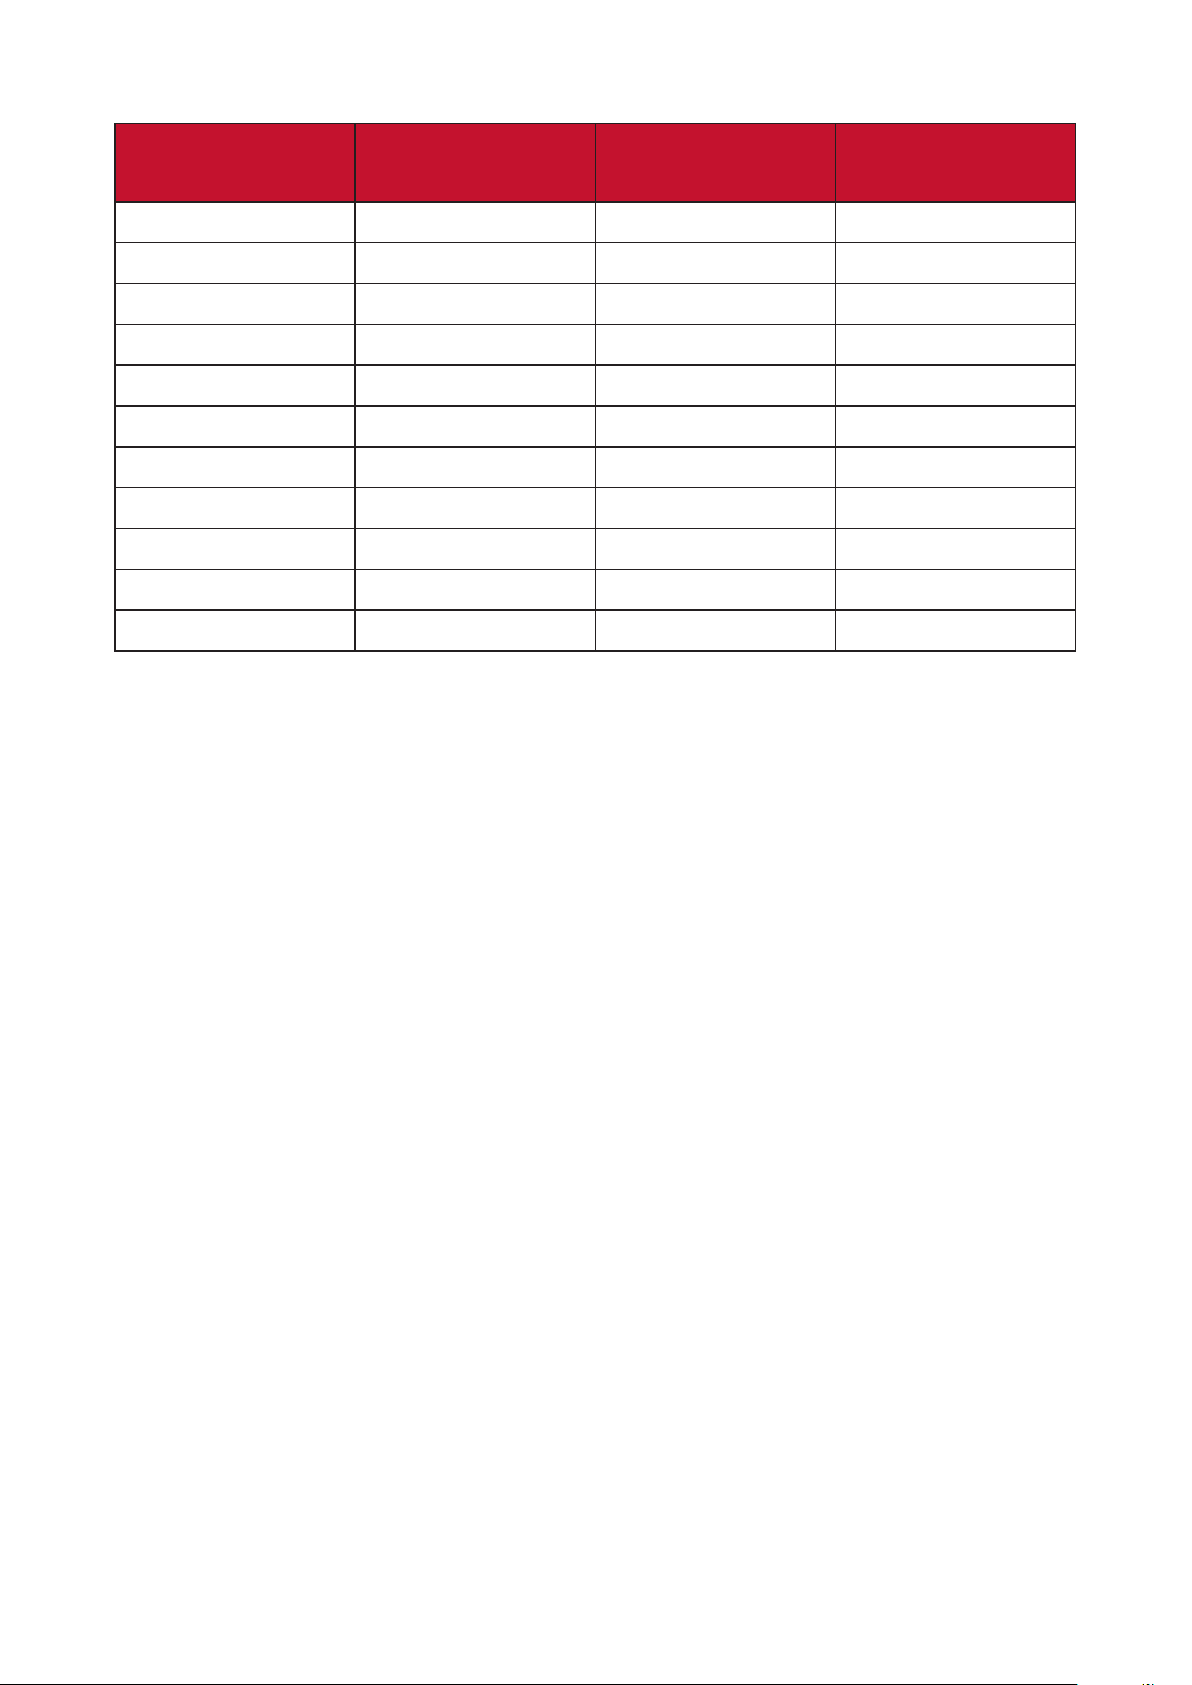
Main Menu Sub-menu Menu Opon
Image Seng
Color Management Primary Color Red
Green
Blue
Cyan
Magenta
Yellow
Hue (-/+, 0~100)
(-/+, 0~30)
Gain (-/+, 0~60)
Reset Current Color
Reset
Cancel
Advanced
Auto
4:3
16:9
16:10
Zoom OK 0.8x~1.0x
Full
Eco
Range Auto
Full
35
Main Menu Sub-menu Menu Opon
Advanced
Auto
Frame Packing
Side-by-Side
Invert
harman/kardon
Audio Mode
Movie
Music
User
Audio Volume (0~50)
Mute
Enable
Source
36
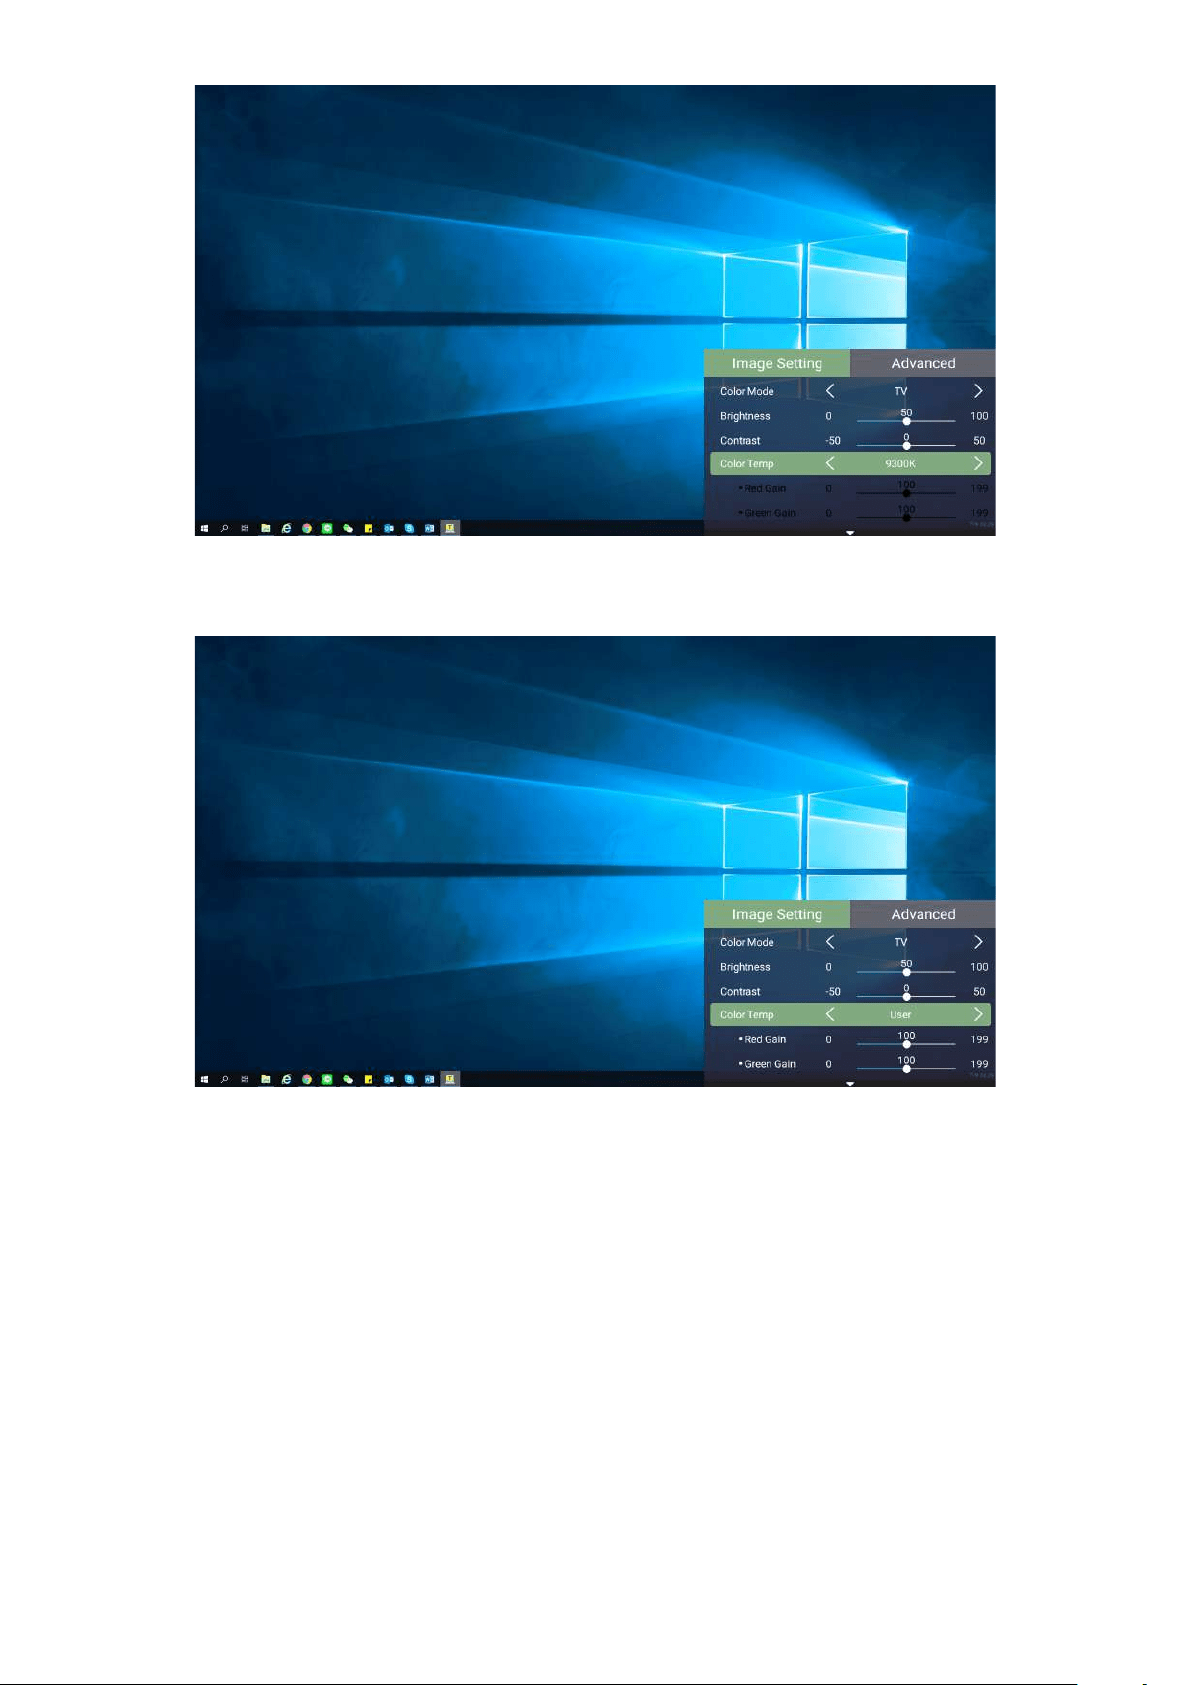
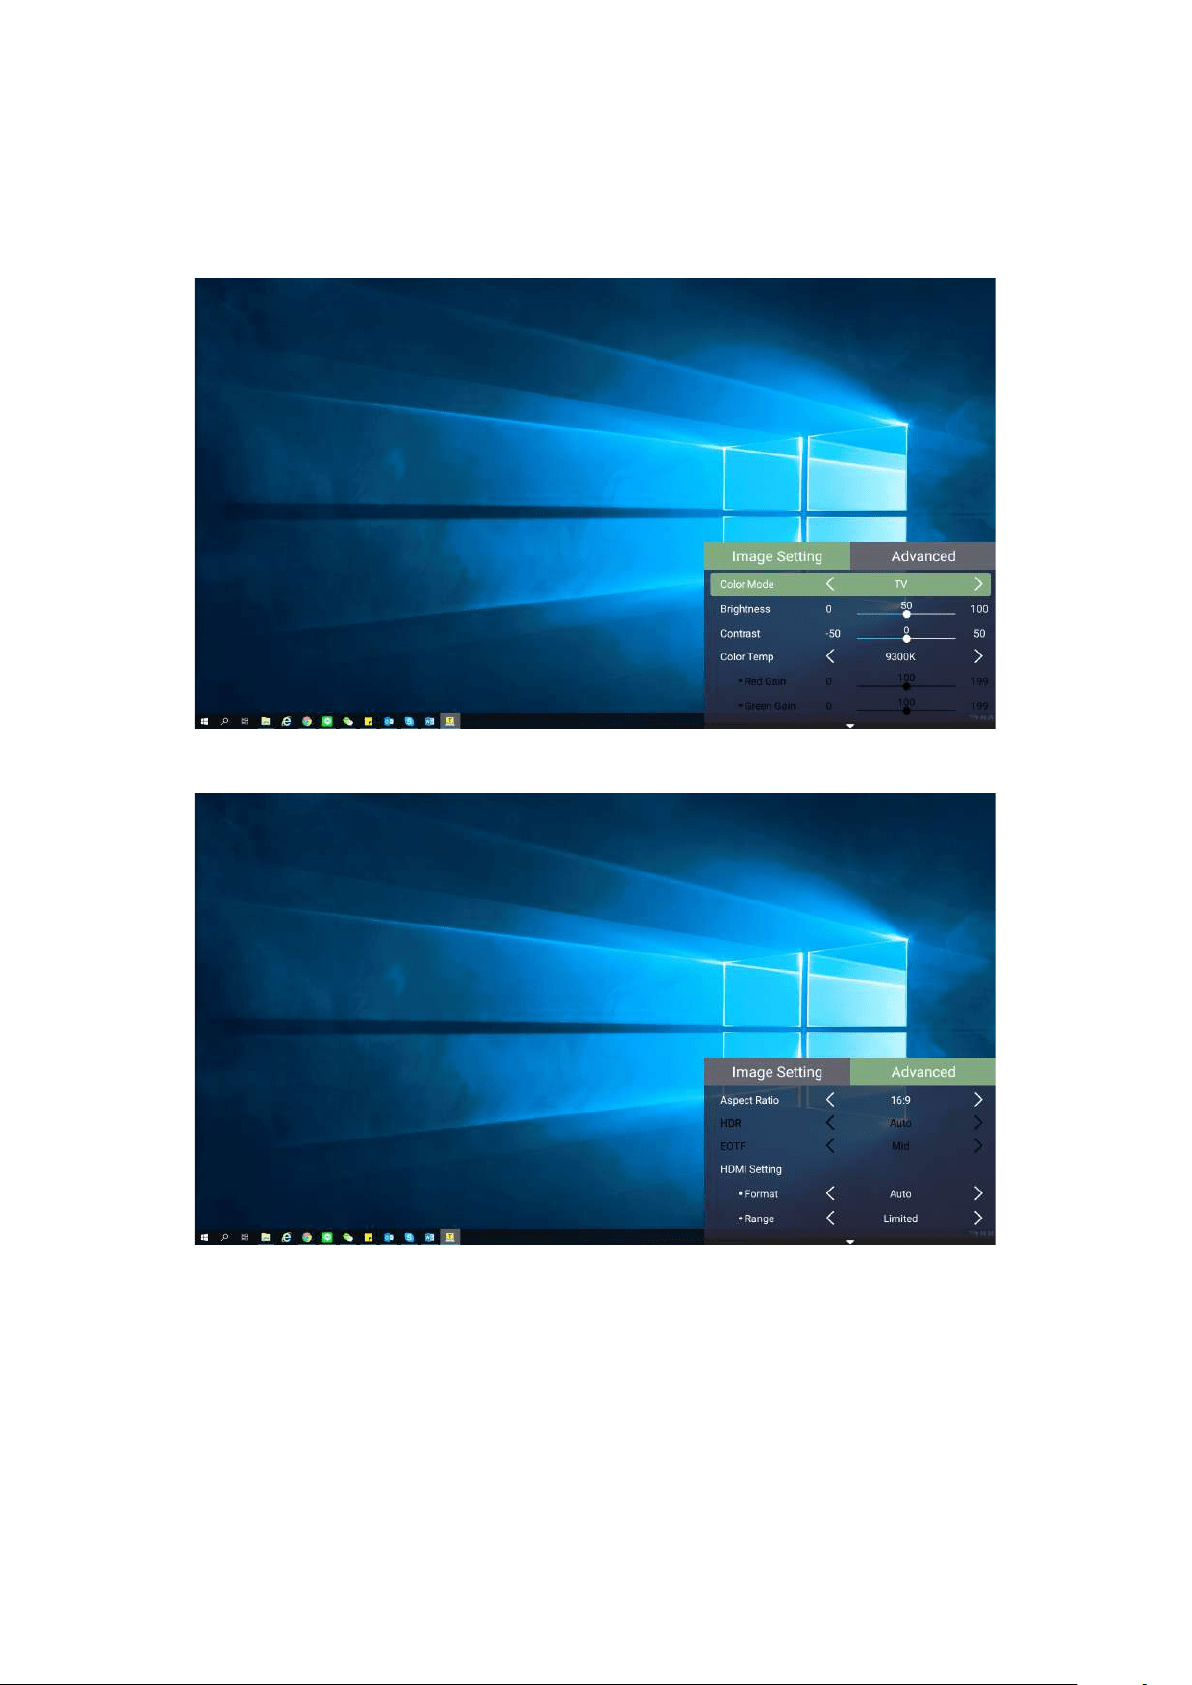
Image Seng Menu
Image Seng menu.
To access the Image Seng menu:
1. Press Seng on the remote control.
2. Use the Up/Down
37
3. Then use the Le/Right
4. Press the Return
38
Menu Opon Descripon
Color Mode
environment and input signal.
Brightest
mode is suitable for environments where extra-high
brightness is required, i.e. well-lit rooms.
TV
Gaming
Movie
Appropriate for colorful movies, video clips from digital
environments.
User 1/User 2
NOTE:
Brightness
values will result in a darker image.
Contrast
previously adjusted the Brightness
selected input and viewing environment.
39
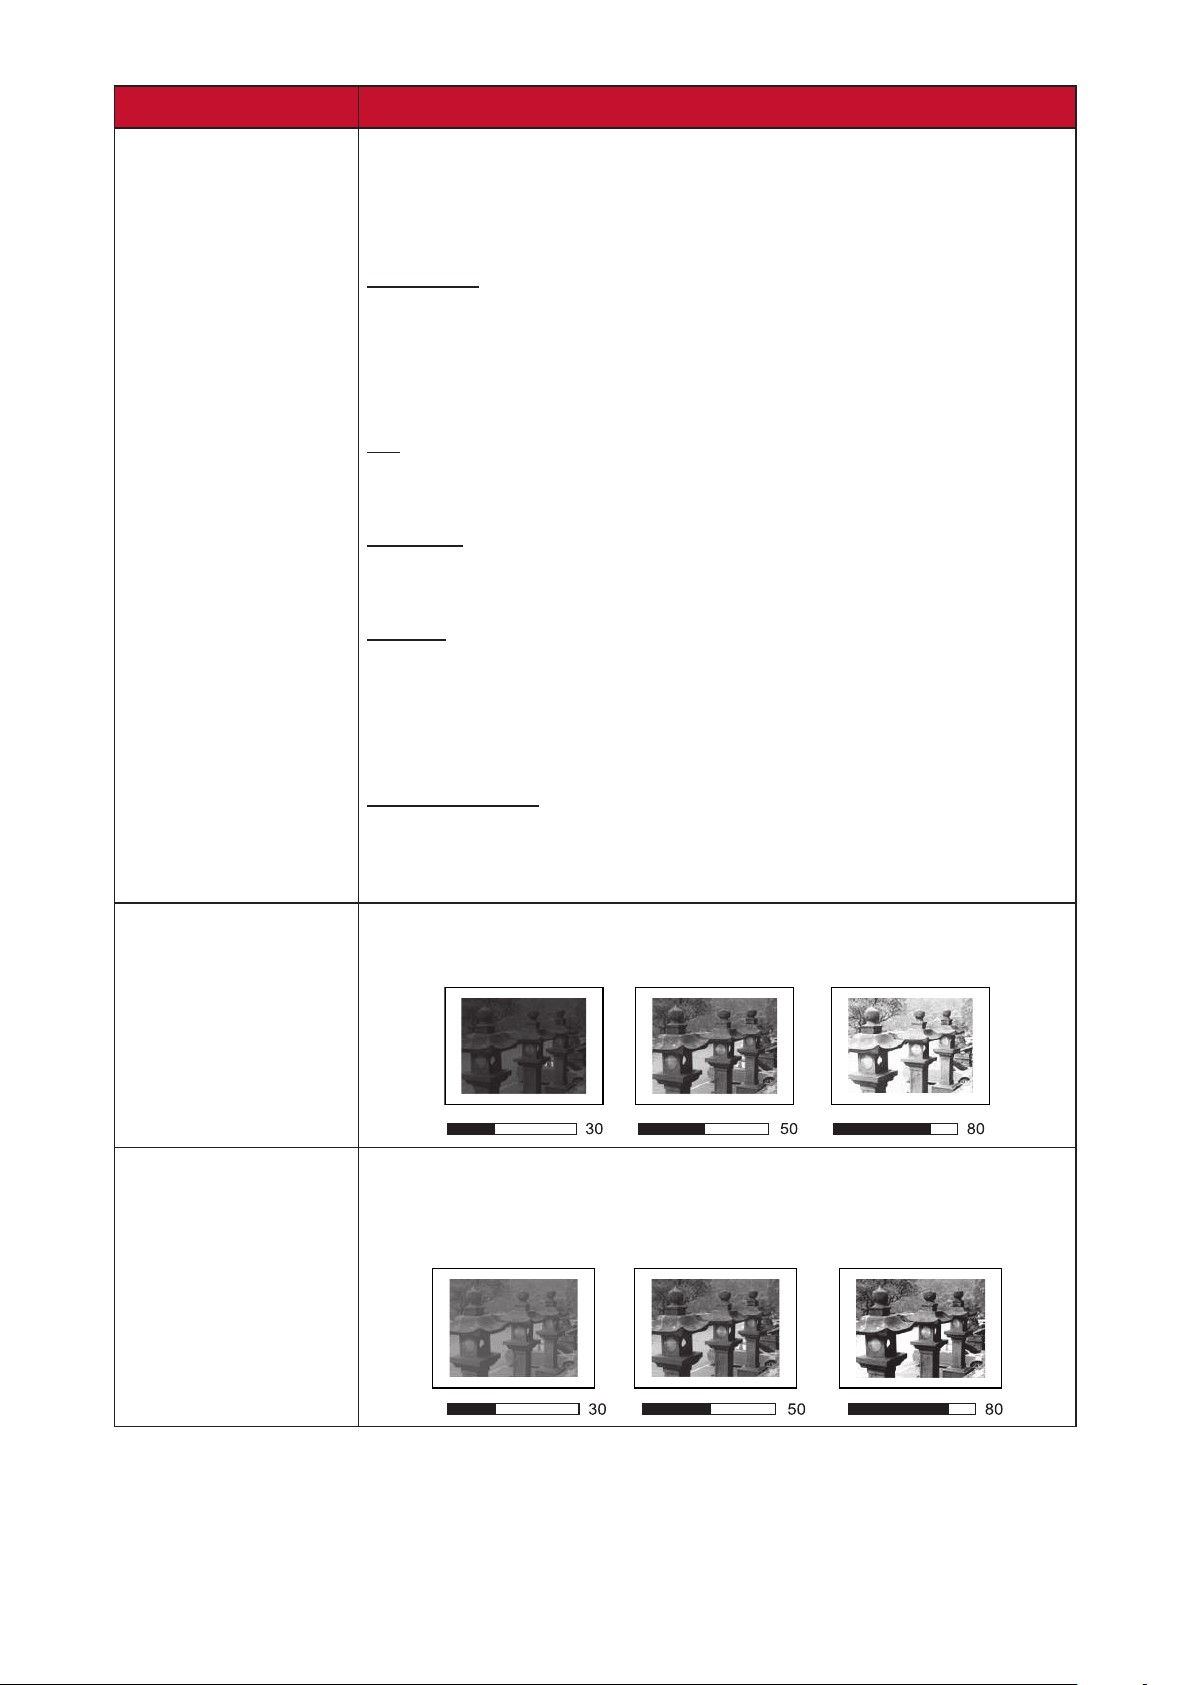
Menu Opon Descripon
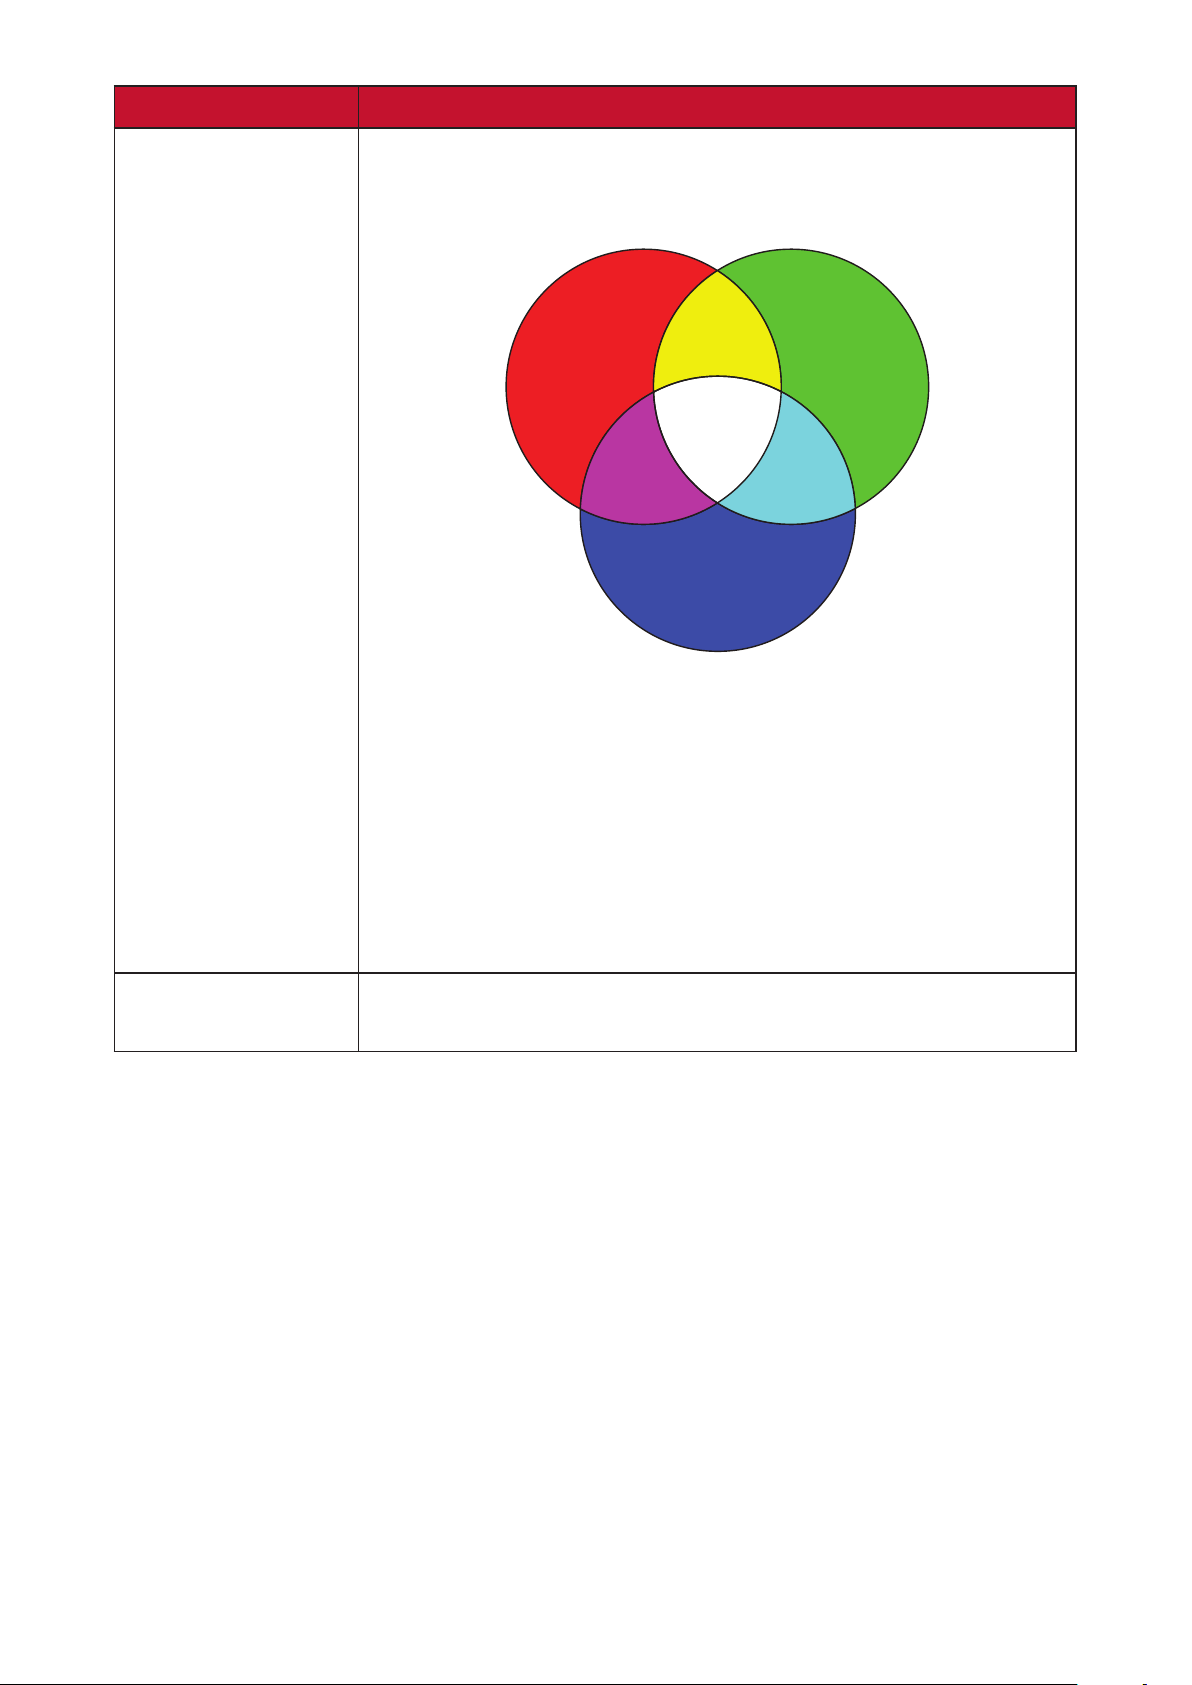
Color Temp
• 6500K: Maintains normal white coloring.
• 7500K: A higher, cooler color temperature than 6500K.
• 9300K: The highest color temperature; makes the
image appear the most bluish-white.
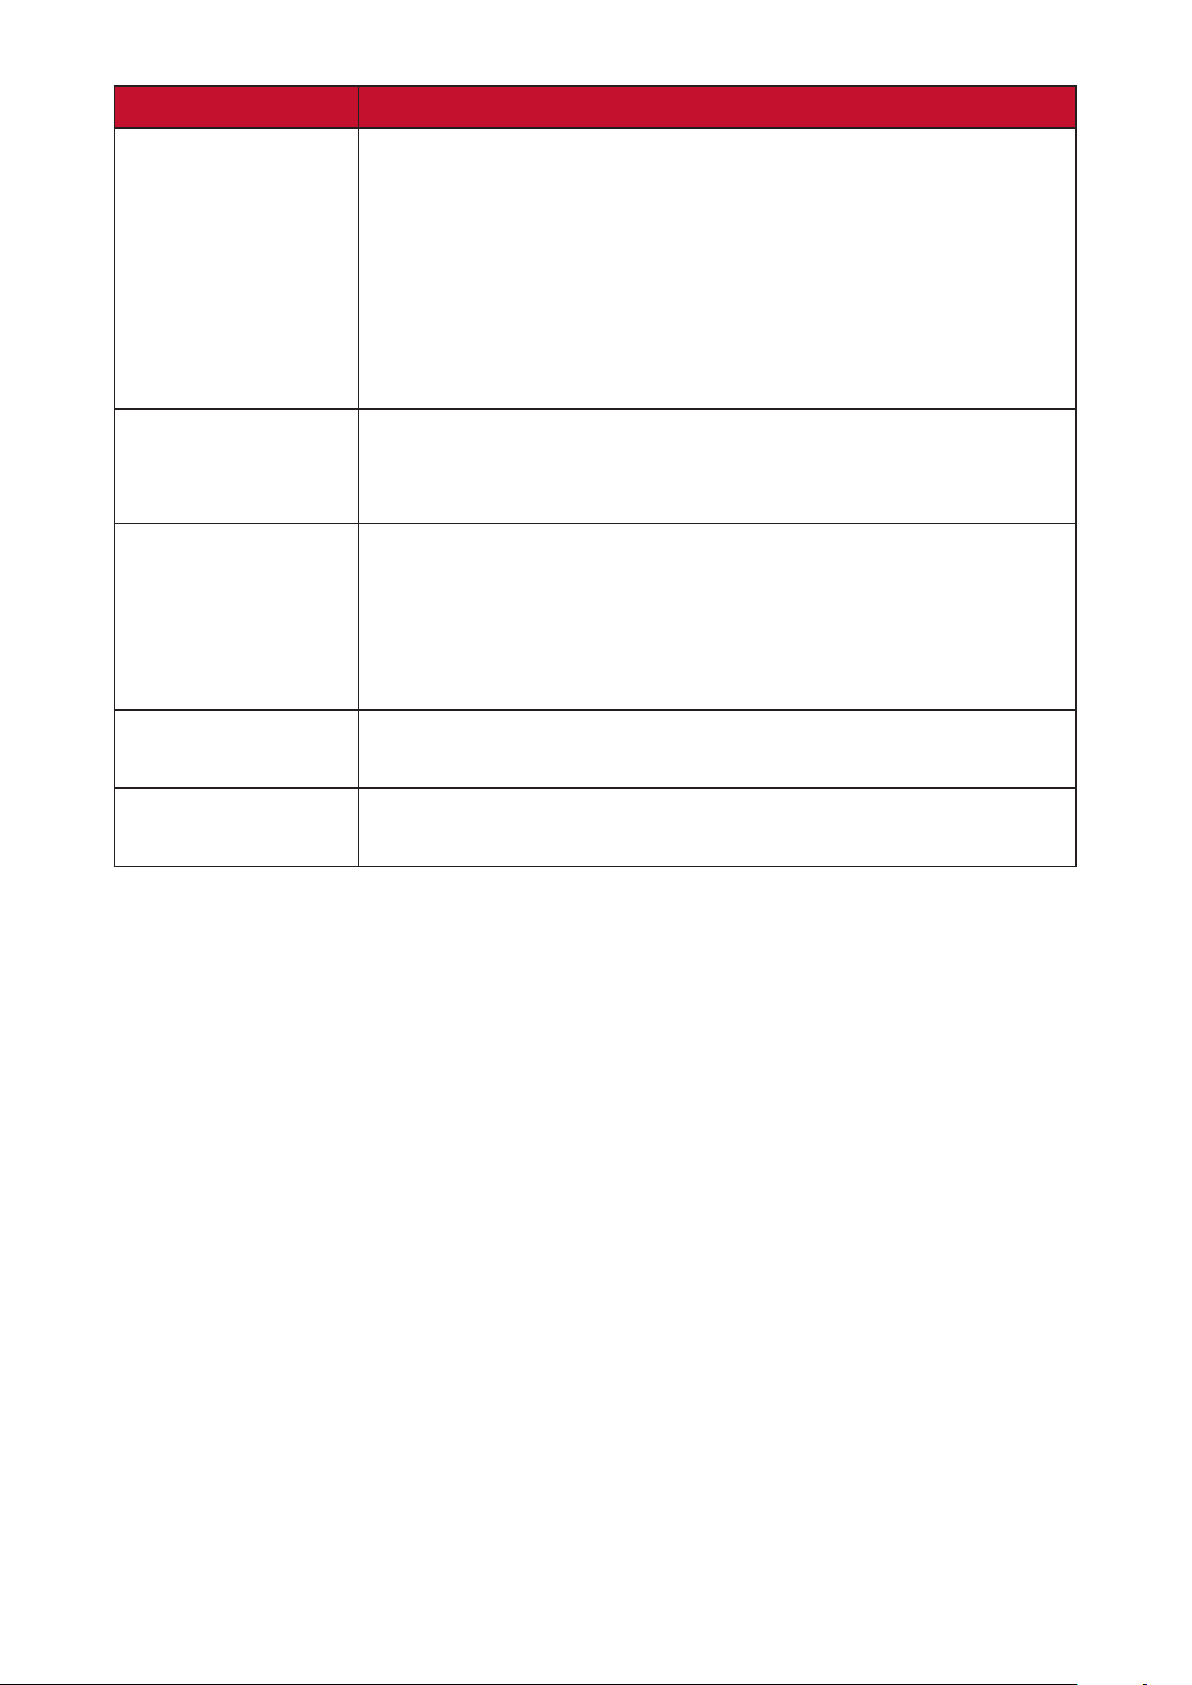
• User Color: Adjust red, green, and blue values as
desired.
Tint The higher the value, the more greenish the picture
becomes. The lower the value, the more reddish the
picture becomes.
Refers to the amount of that color in a video picture.
Sharpness A high value results in a sharper picture; a low value
Gamma
picture brightness.
40
Menu Opon Descripon
Color
Management
levels such as: boardrooms, lecture halls, or home
theaters should Color Management be considered.
Color Management
adjustment to allow for more accurate color
If you have purchased a test disc, which contains various
project any image from the disc on the screen and enter
the Color Management menu to make adjustments.
Reset Current
White
Red
Yellow
Green
Blue
Magenta Cyan
41
Advanced Seng Menu
Advanced menu.
To access the Advanced menu:
1. Press Seng on the remote control.
2. Press the RightAdvanced menu.
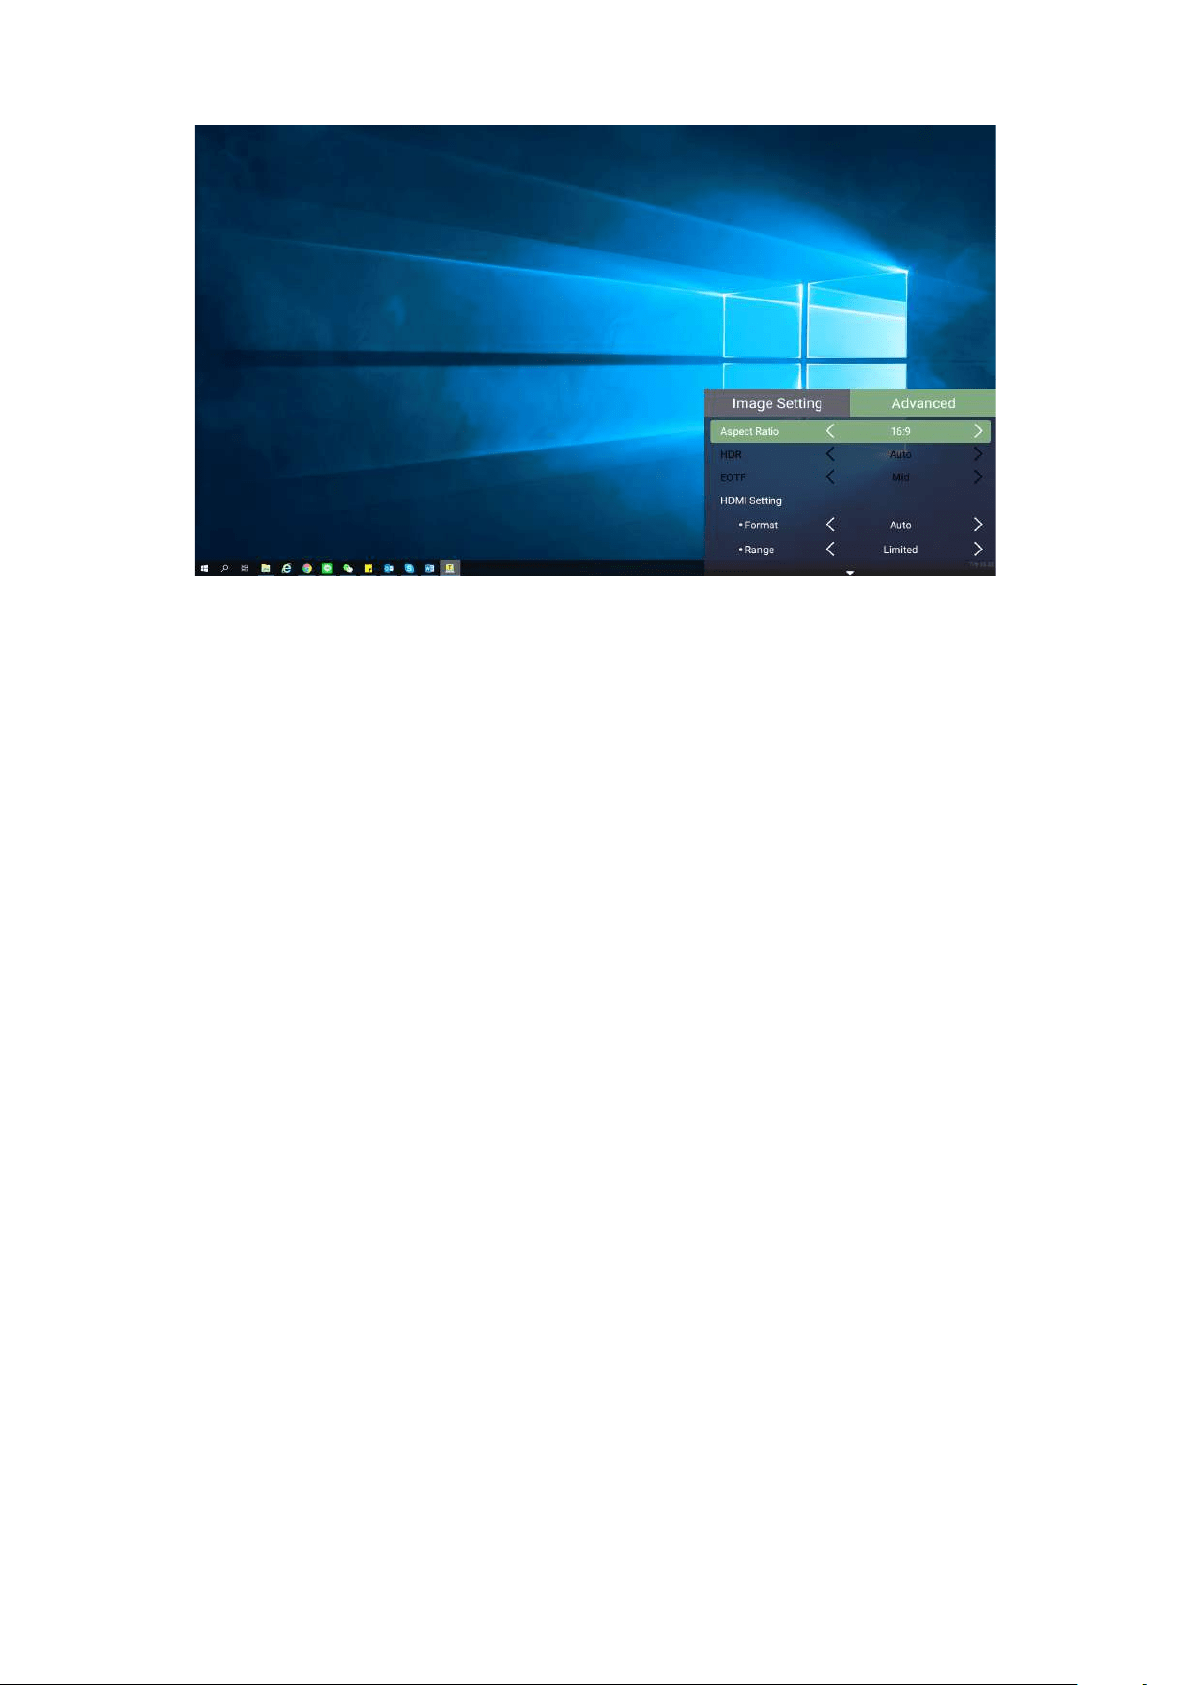
42
3. Use the Up/Down
4. Then use the Le/Right
5. Press the Return
43
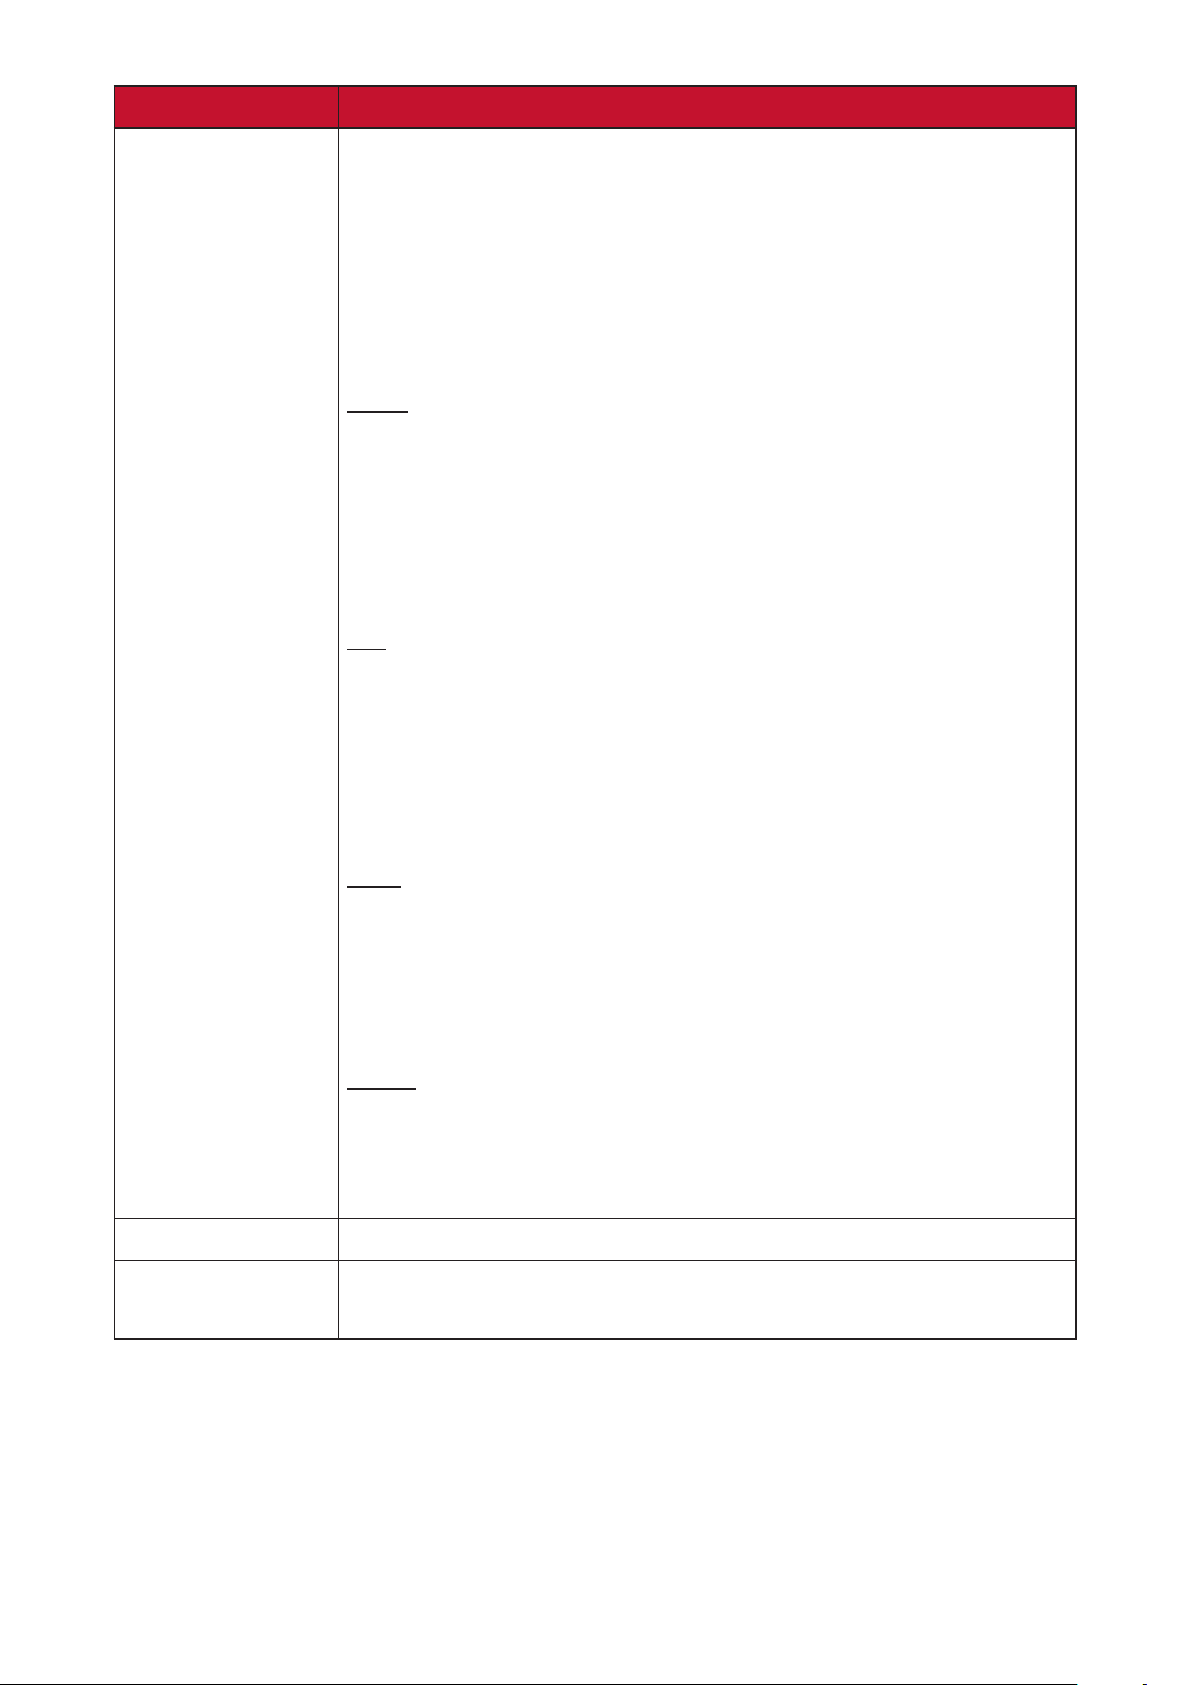
Menu Opon Descripon
The Aspect Rao
image height. With the advent of digital signal processing,
digital display devices, like this projector, can dynamically
than that of the image input signal.
NOTE:
Auto
incoming image which is neither 4:3 nor 16:9 and you want
to make the most use of the screen without altering the
4:3
Scales an image so that it is displayed in the center of the
16:9
Scales an image so that it is displayed in the center of
for images which are already in a 16:9 aspect, like high
16:10
Scales an image so that it is displayed in the center of the
images which are already in a 16:10 aspect.
Zoom
44
Menu Opon Descripon
Range
Select a suitable color range according to the color range
• Full: Sets the color range from 0~255.
•
• Auto: Sets the projector to detect the range of the input
3D Sync
3D Sync Invert
harman/kardon
45
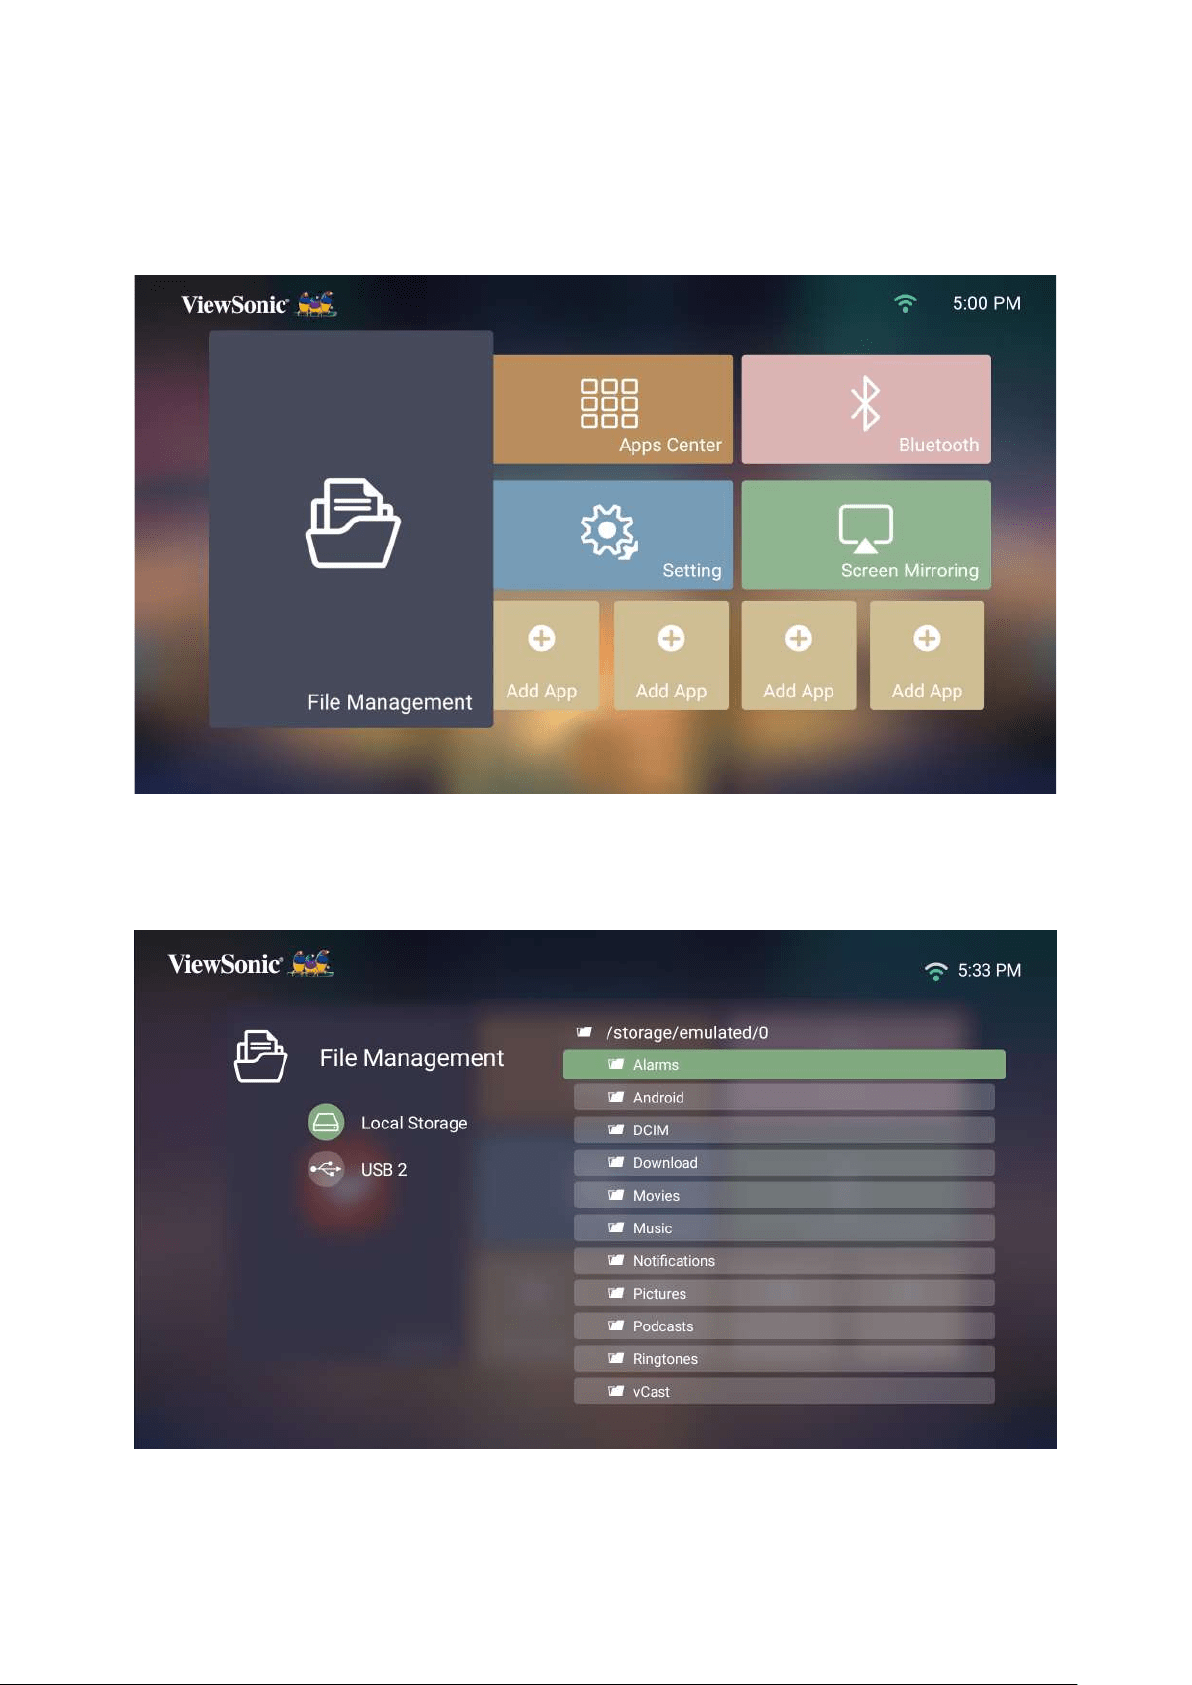
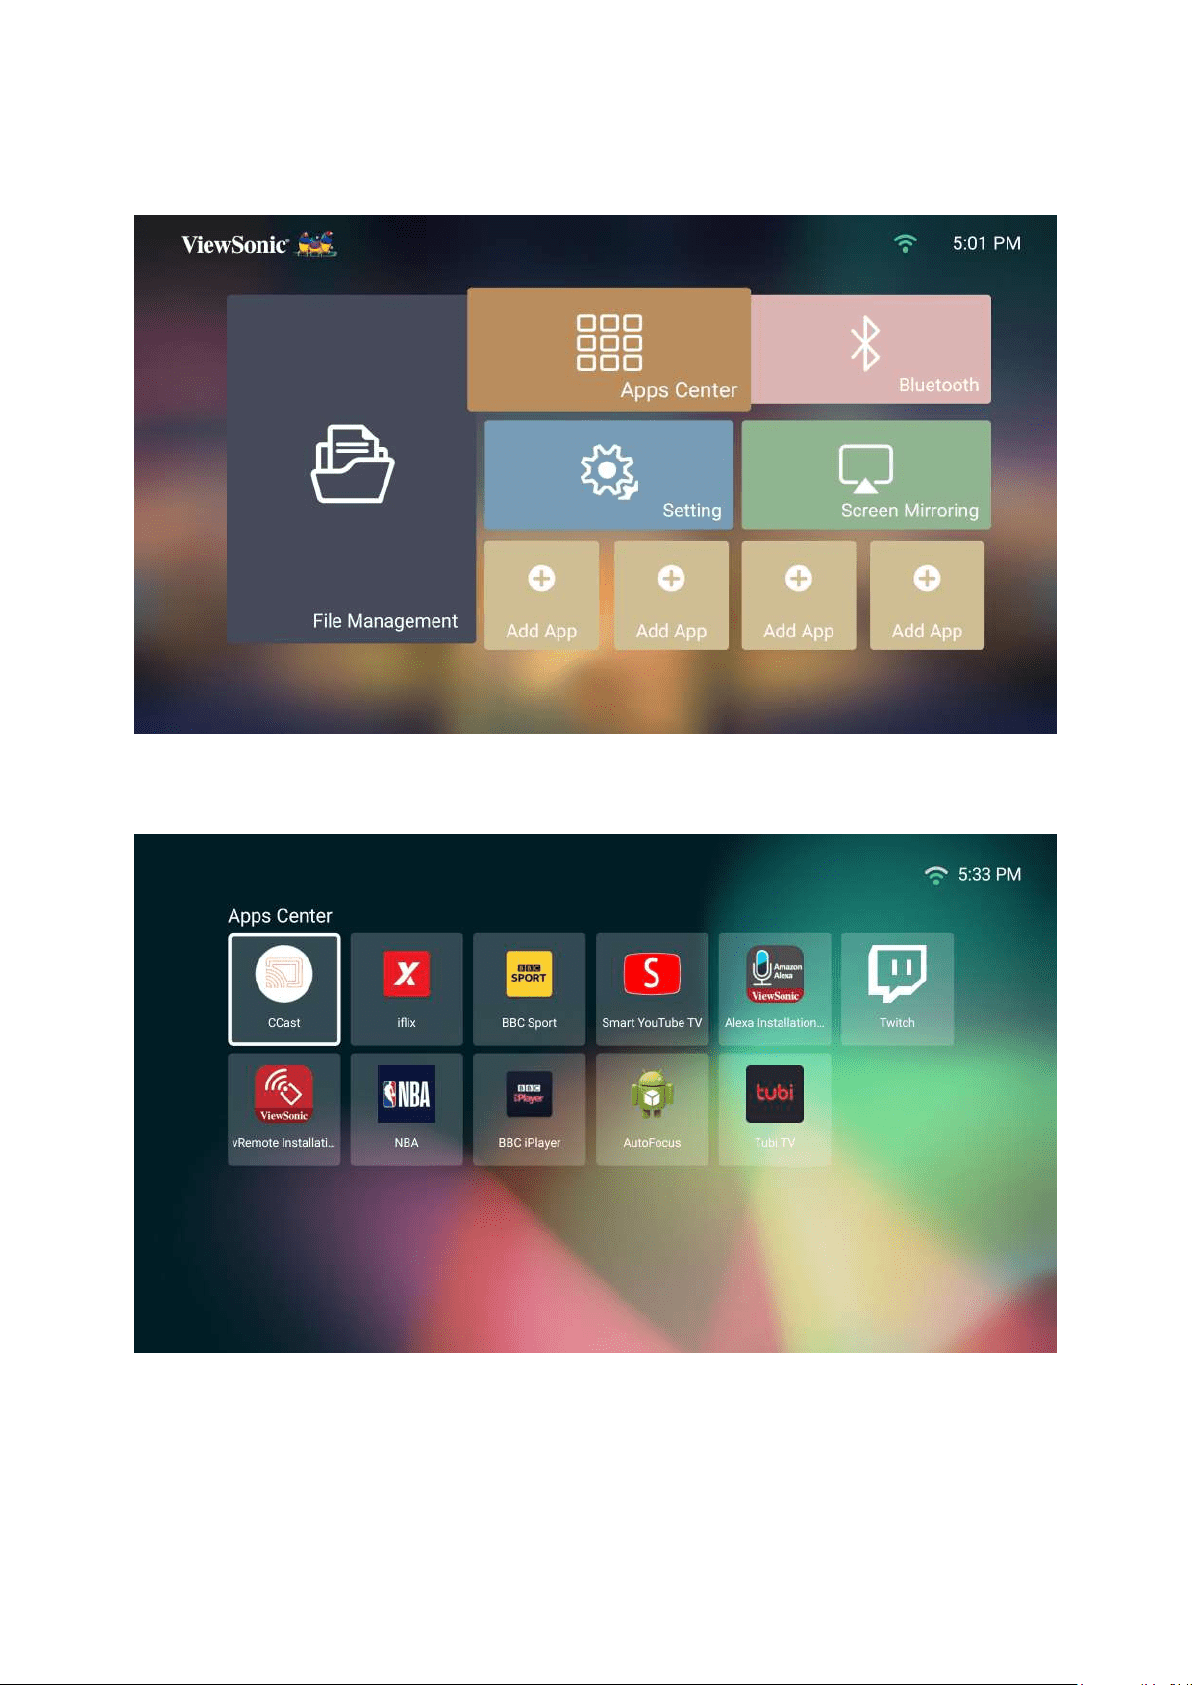
Operang the Projector
Home Screen and its menus.
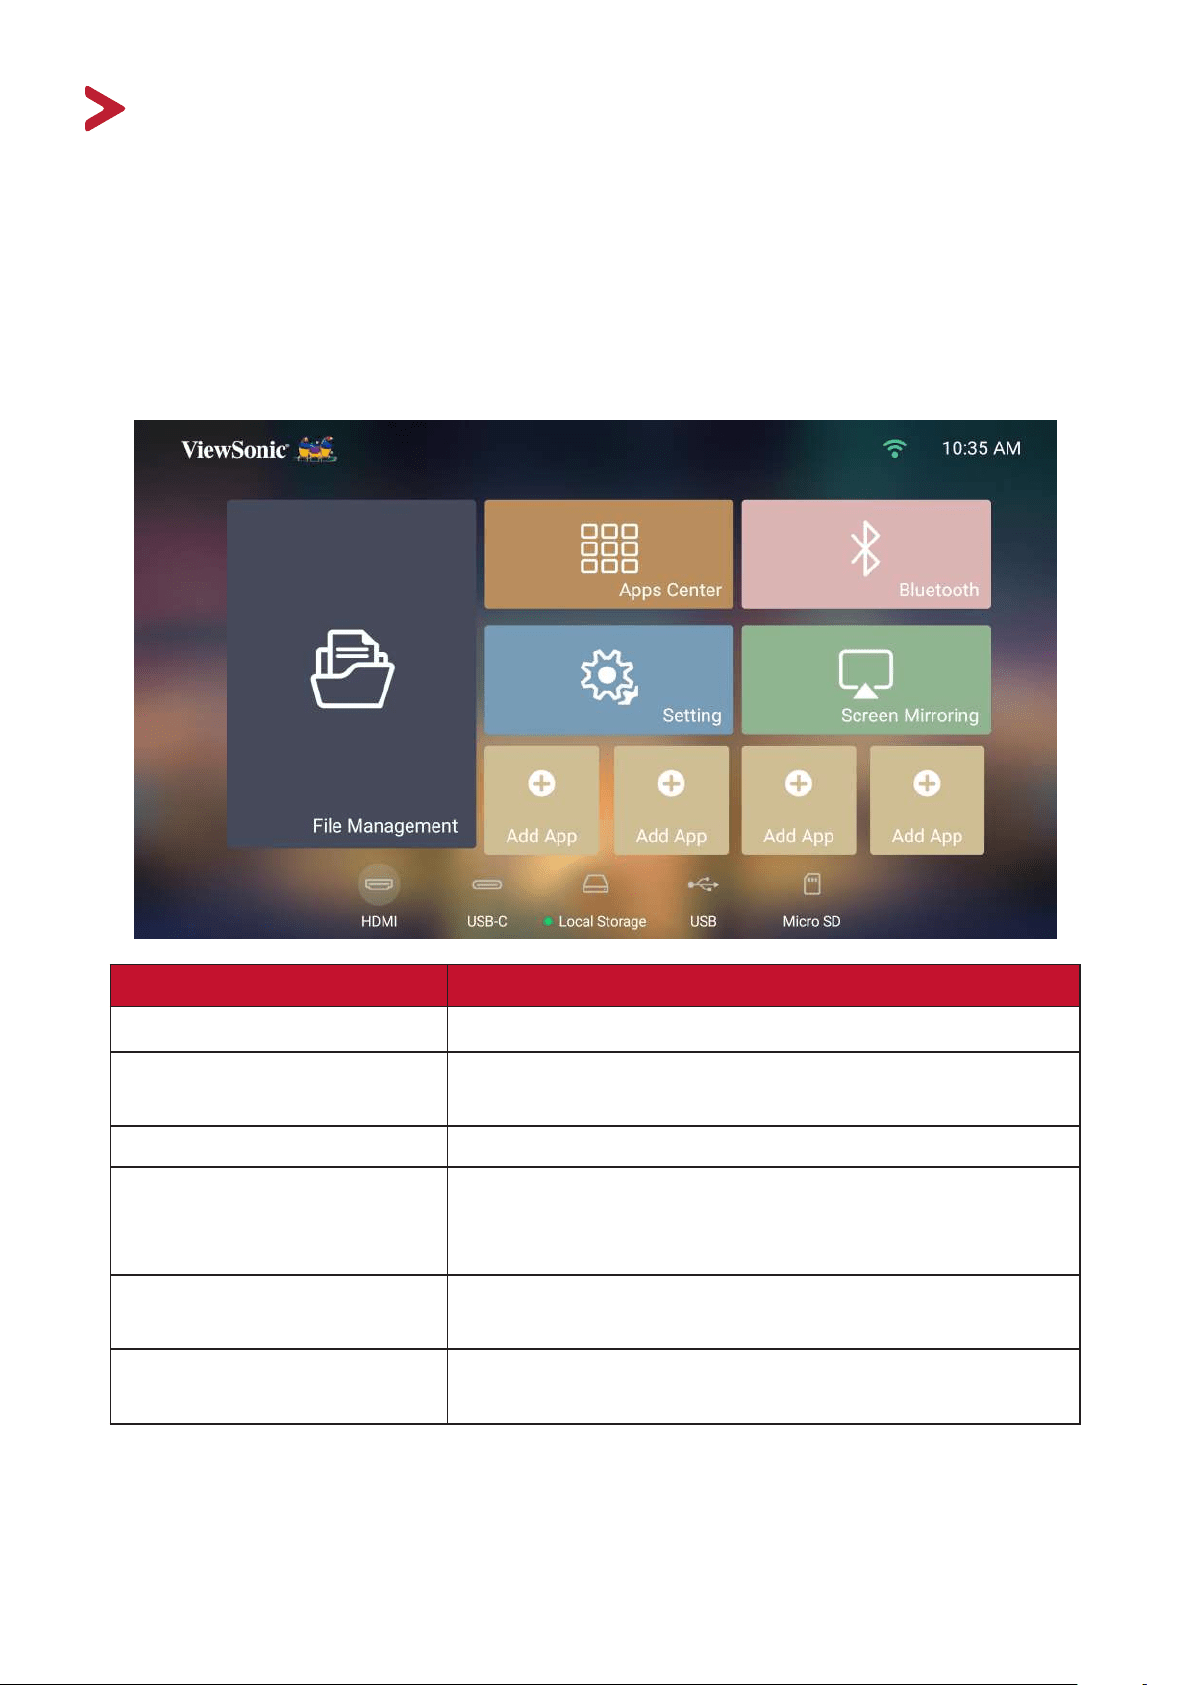
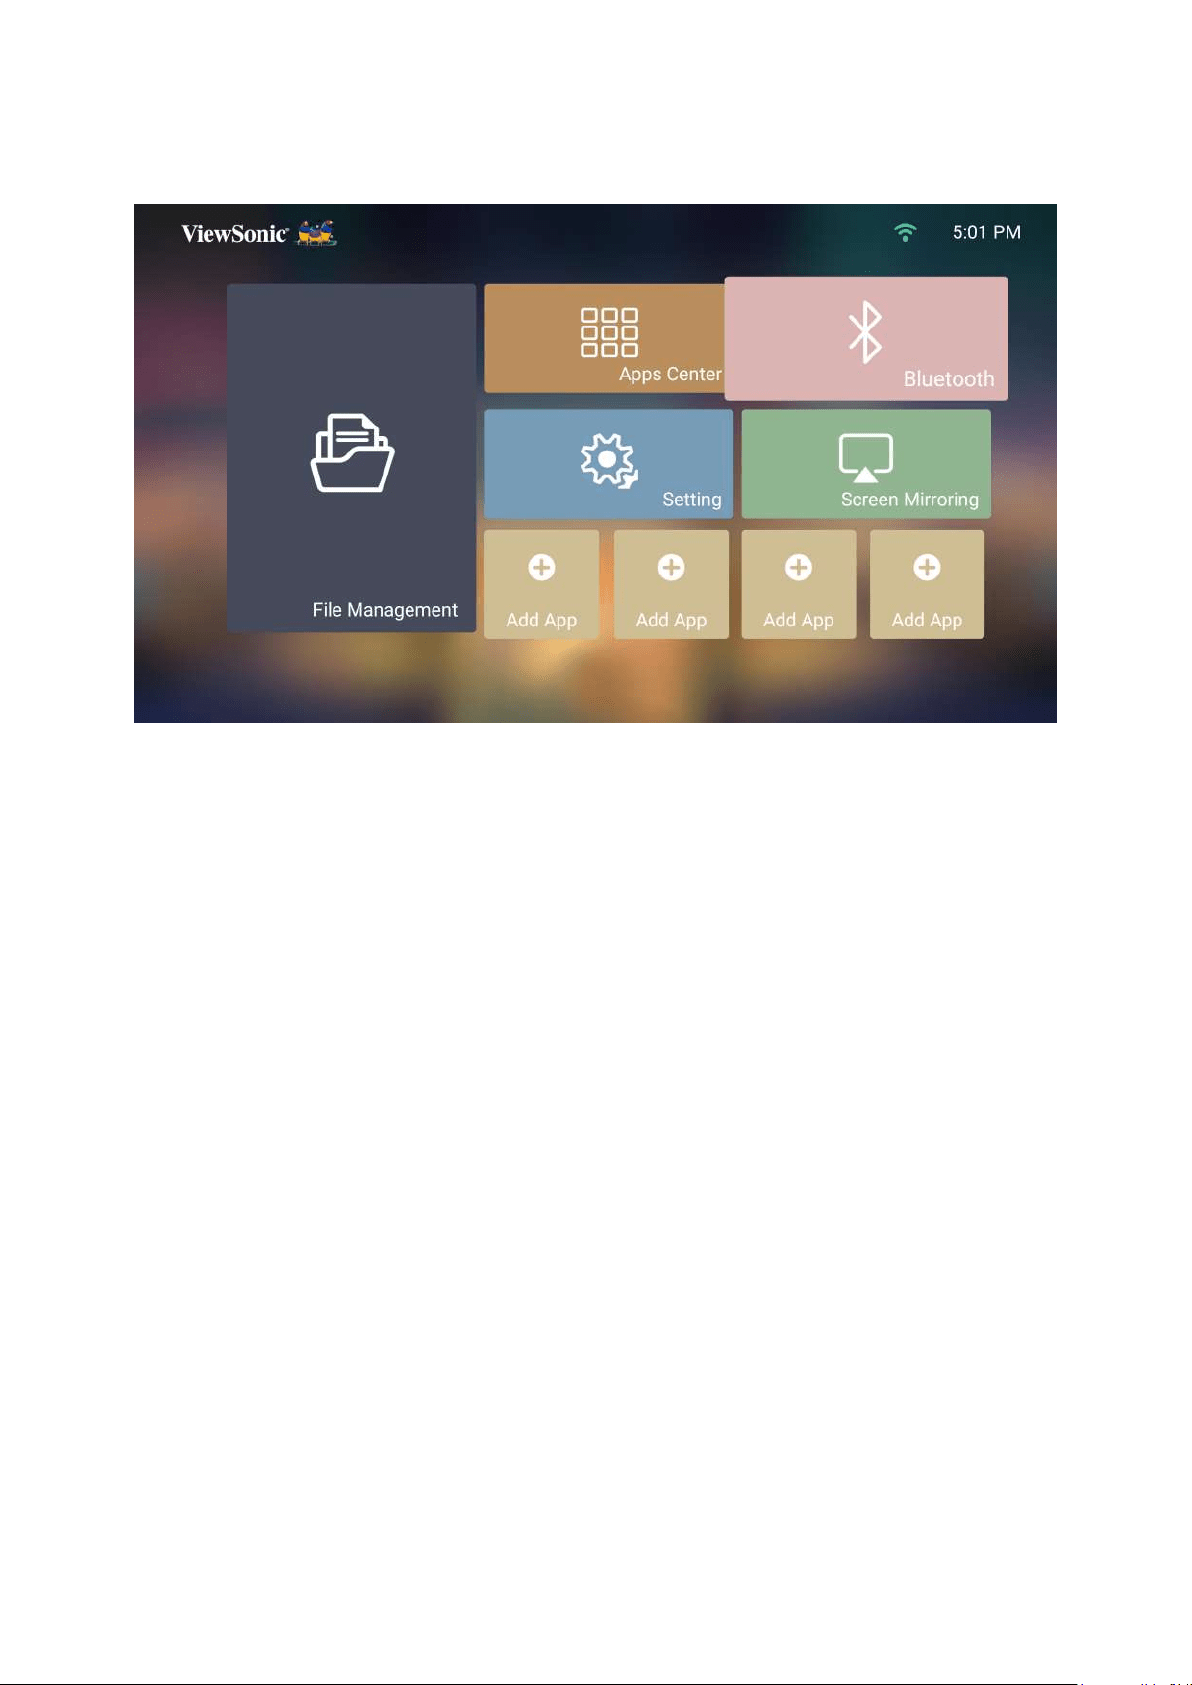
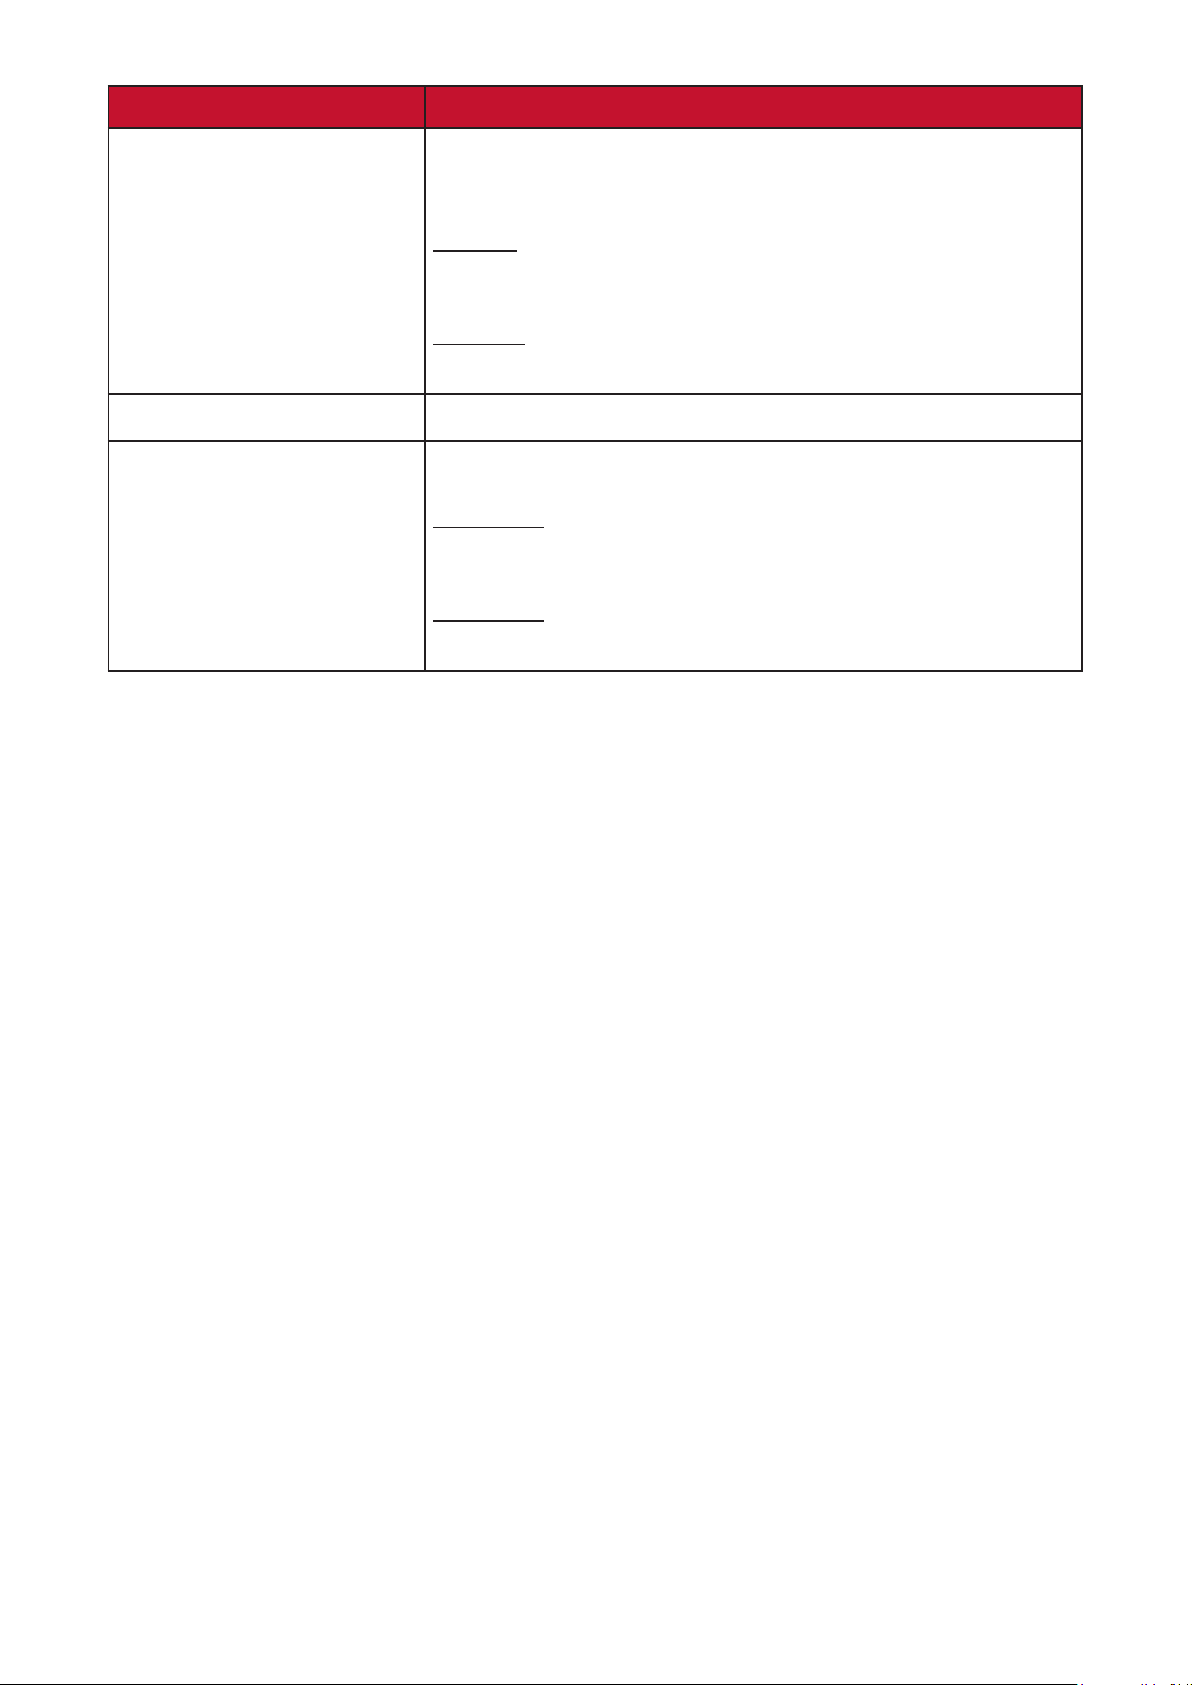
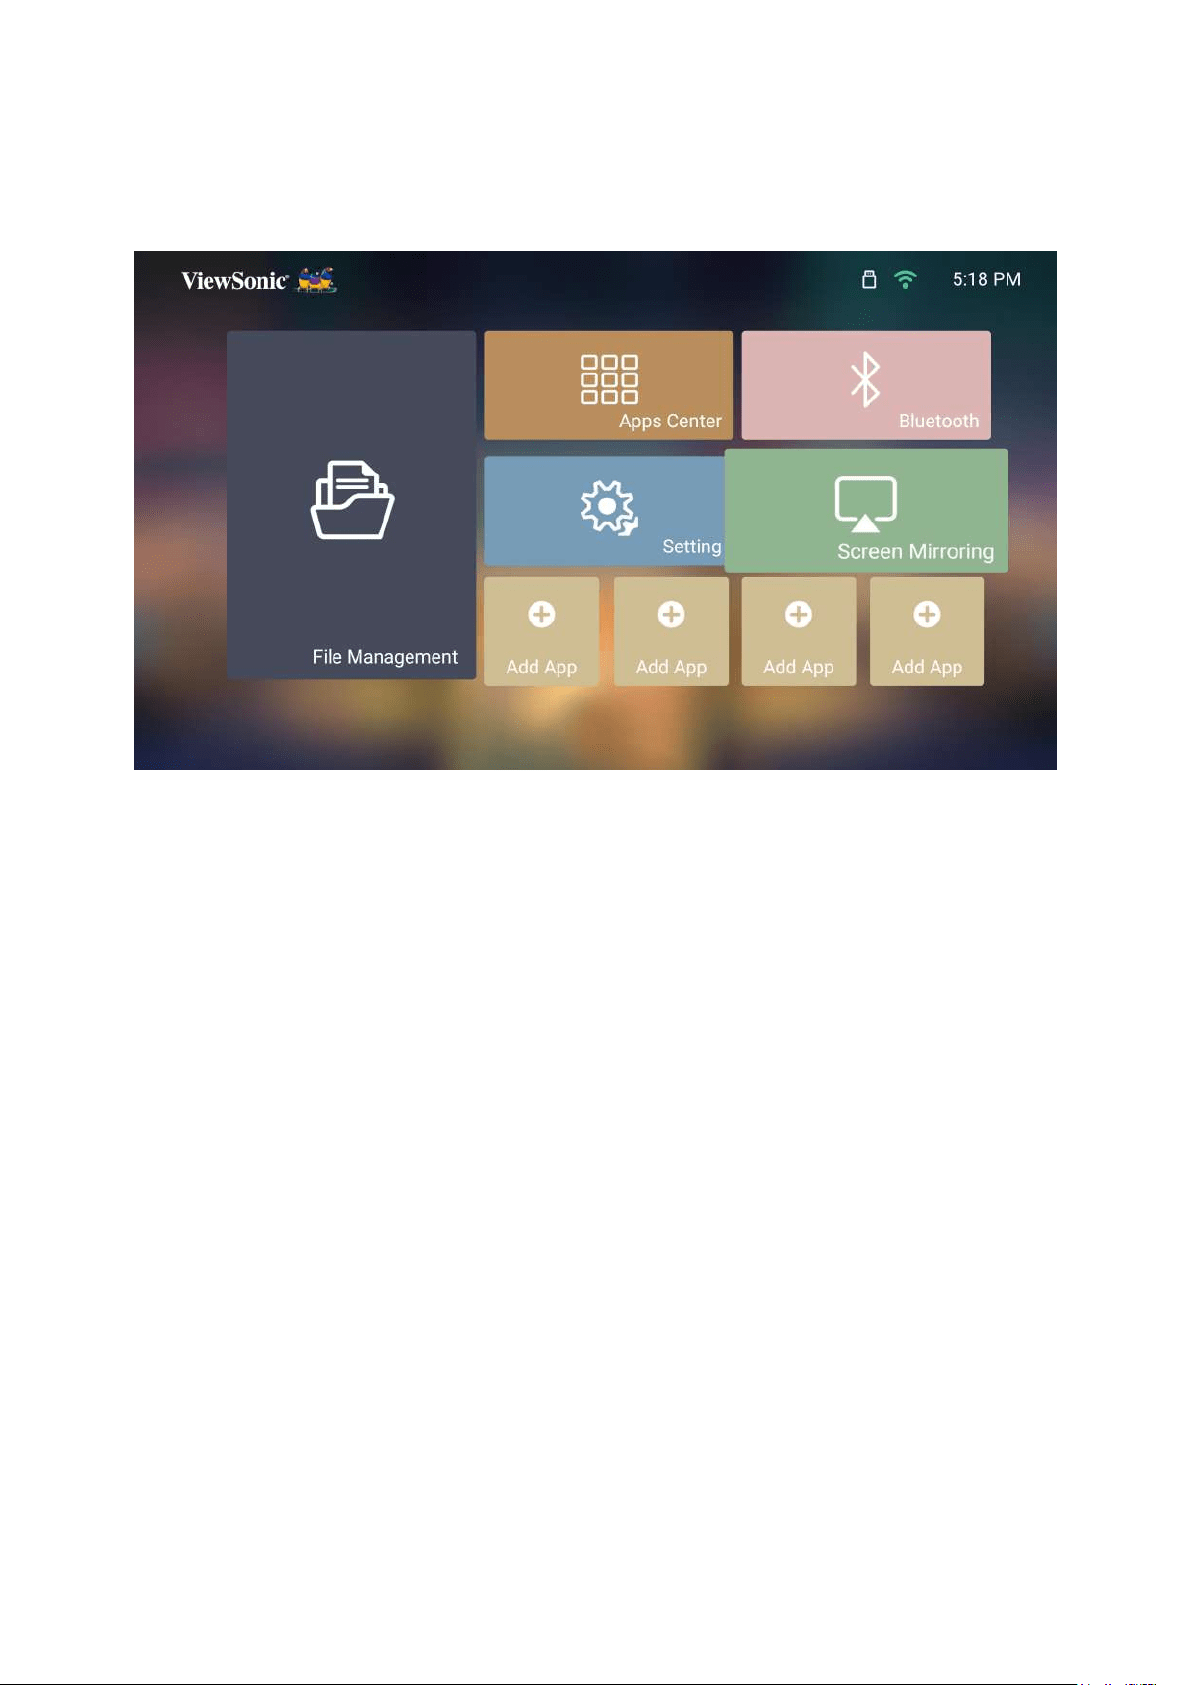
Home Screen
The Home Screen
Home Screen
return to the main Home ScreenHome
remote control, regardless of what page you are on.
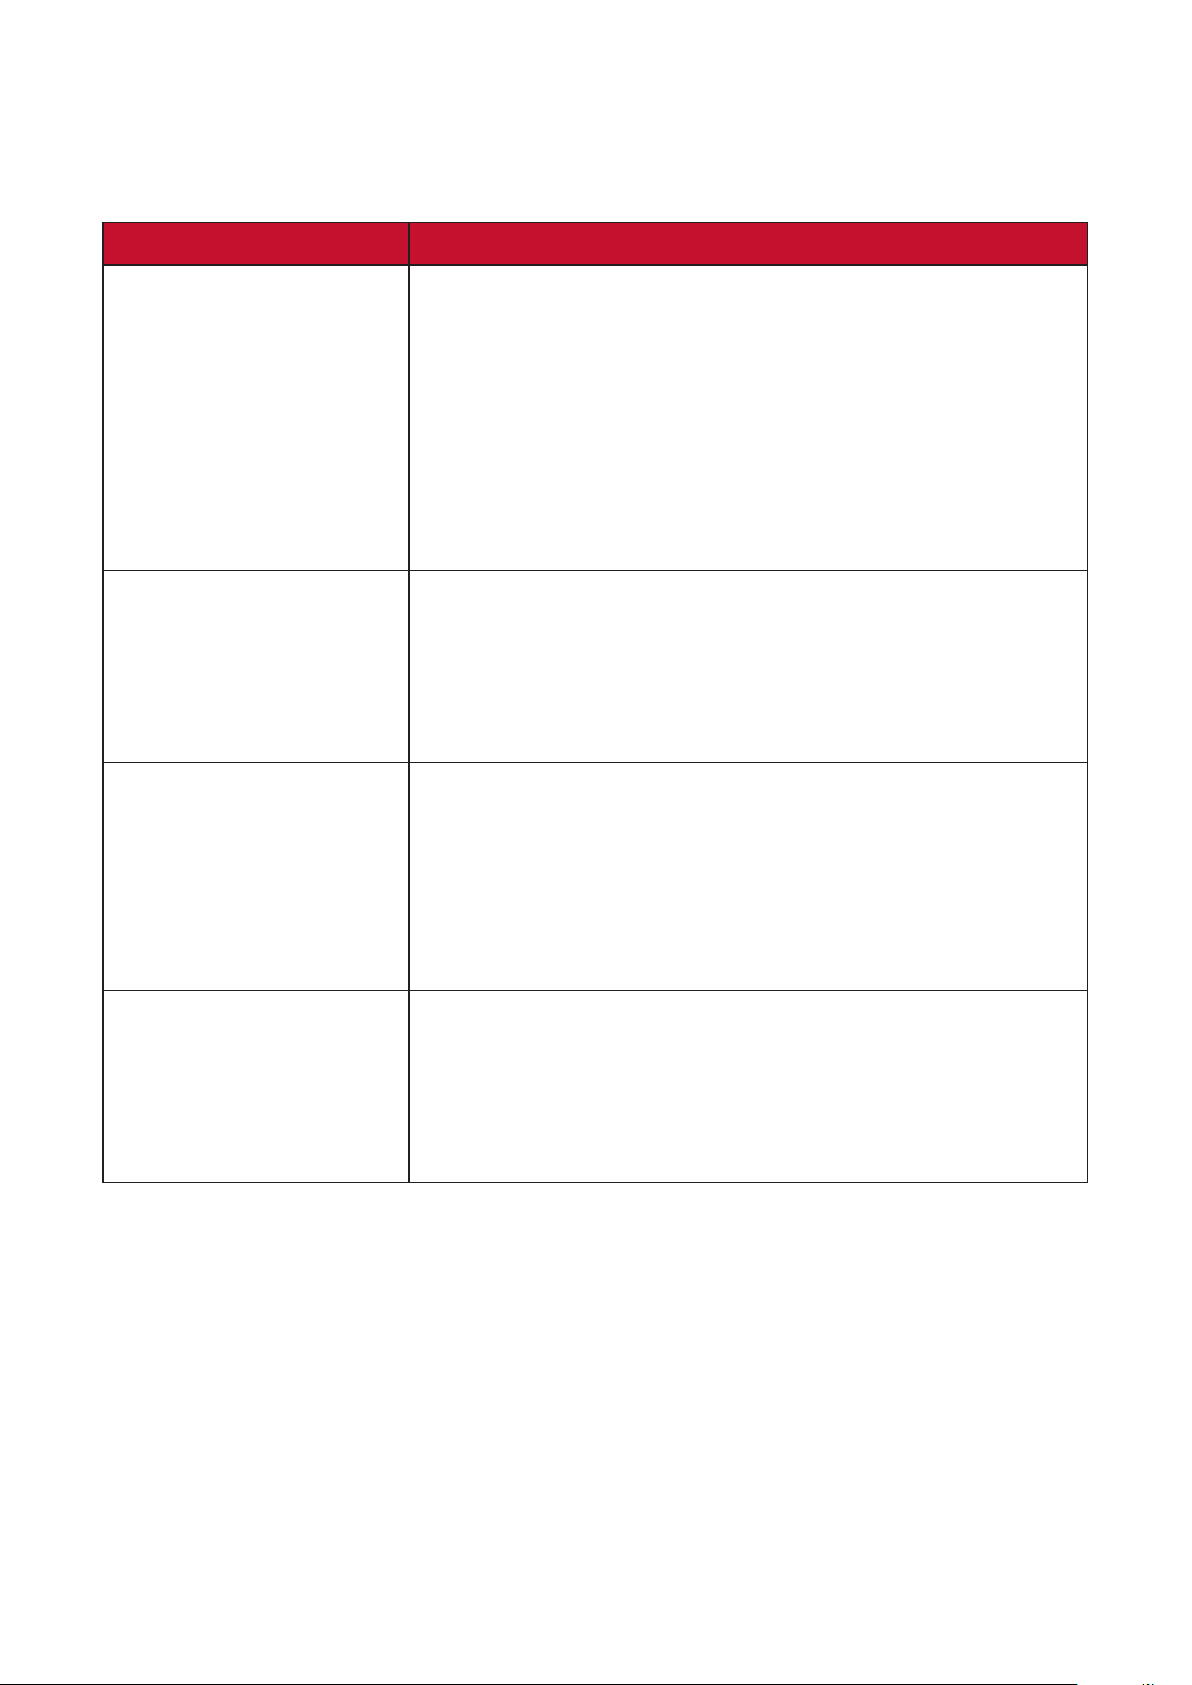
Menu Descripon
File Management
Provides a user interface to manage files and folders.
Apps Center
Access and view all the applications you have
installed.
Bluetooth Select the appropriate Bluetooth mode.
Manage various categories such as: Network settings,
update, and System Information.
Screen Mirroring
Mirror your personal device’s screen through the
projector.
Add App
Select your favorite Apps and add them to the Home
Screen.
46
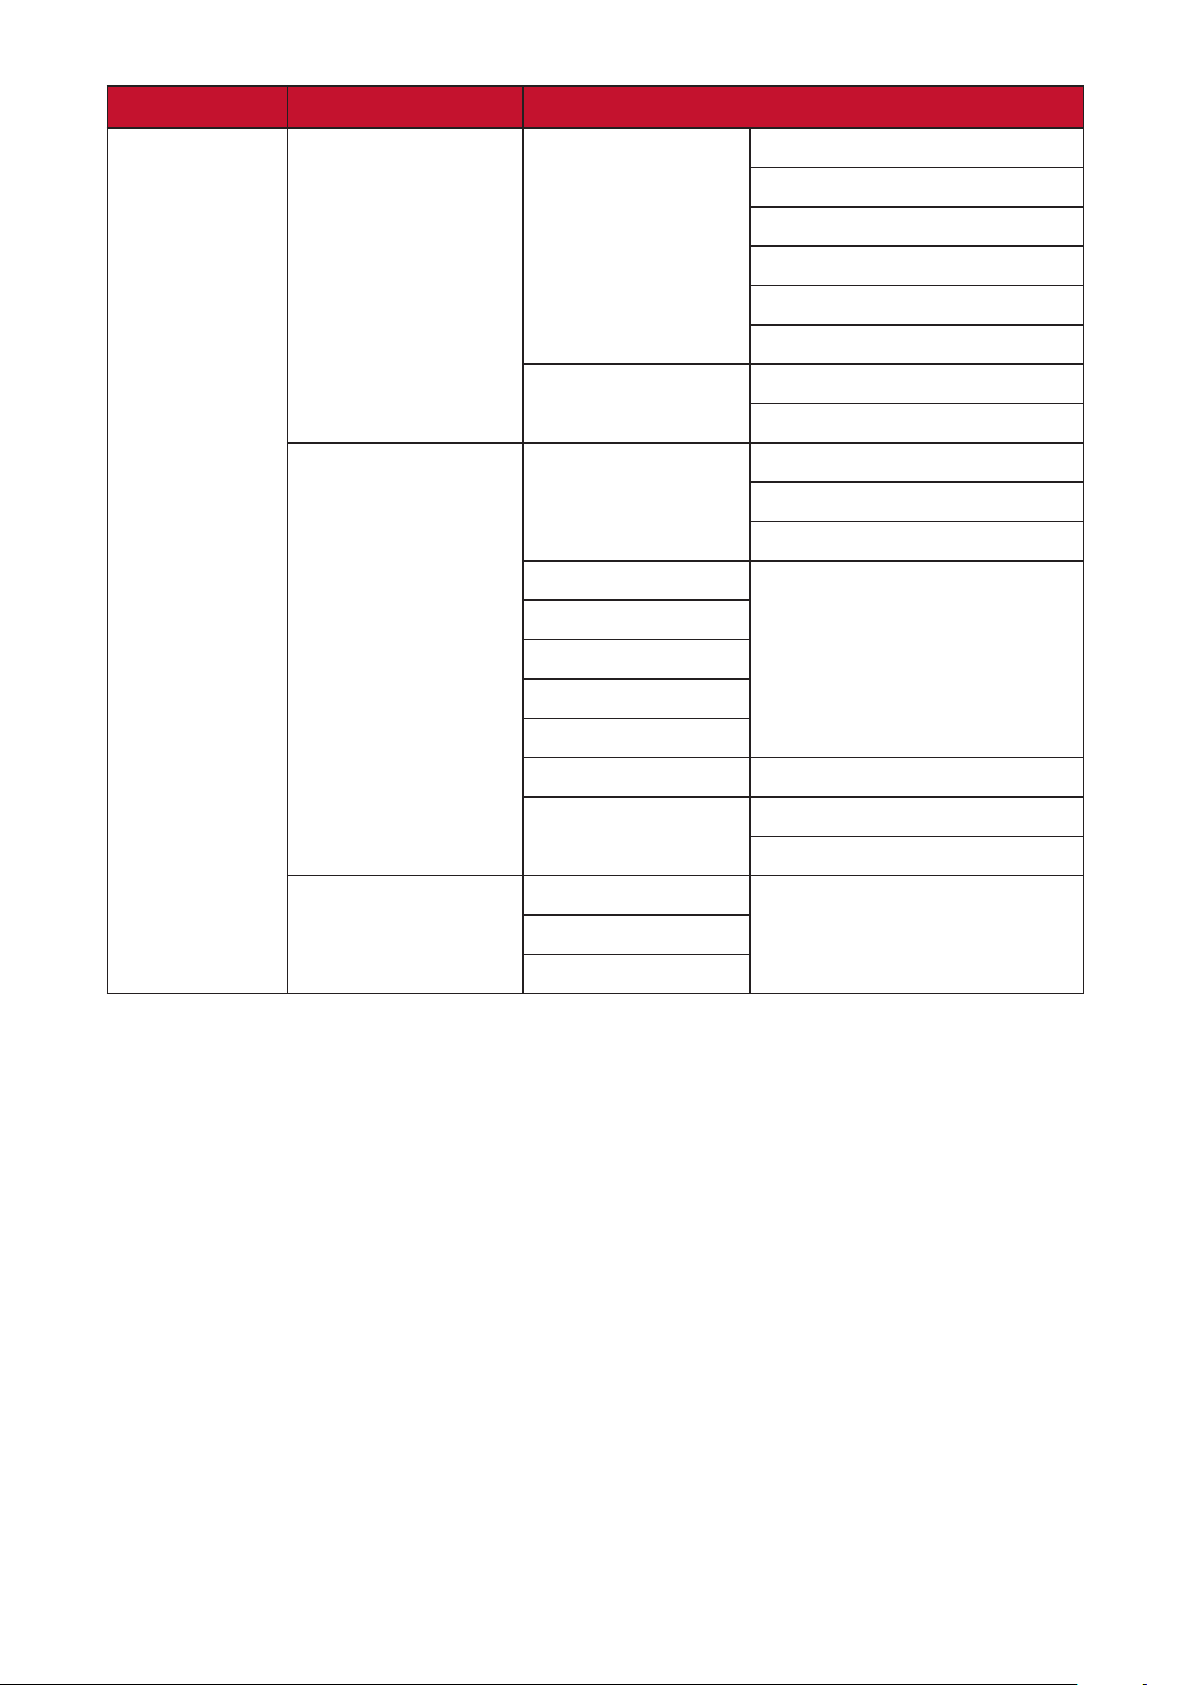
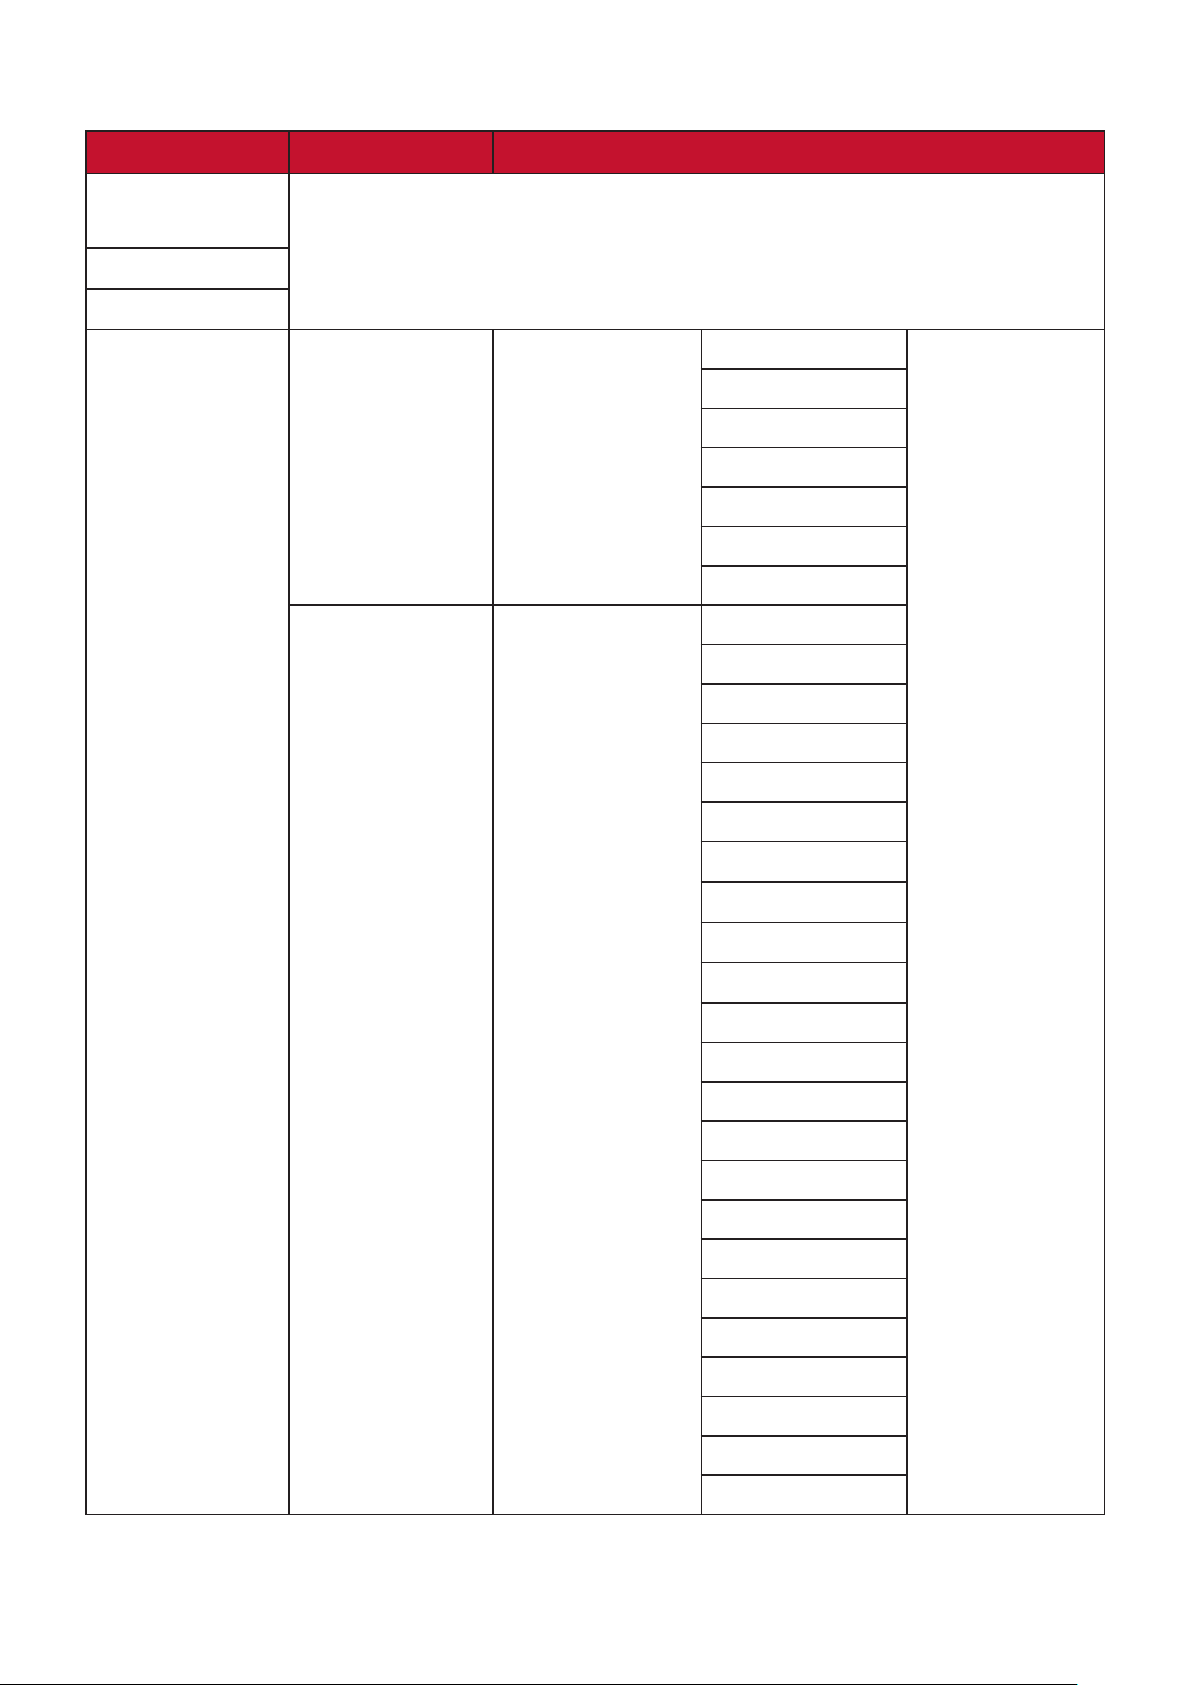
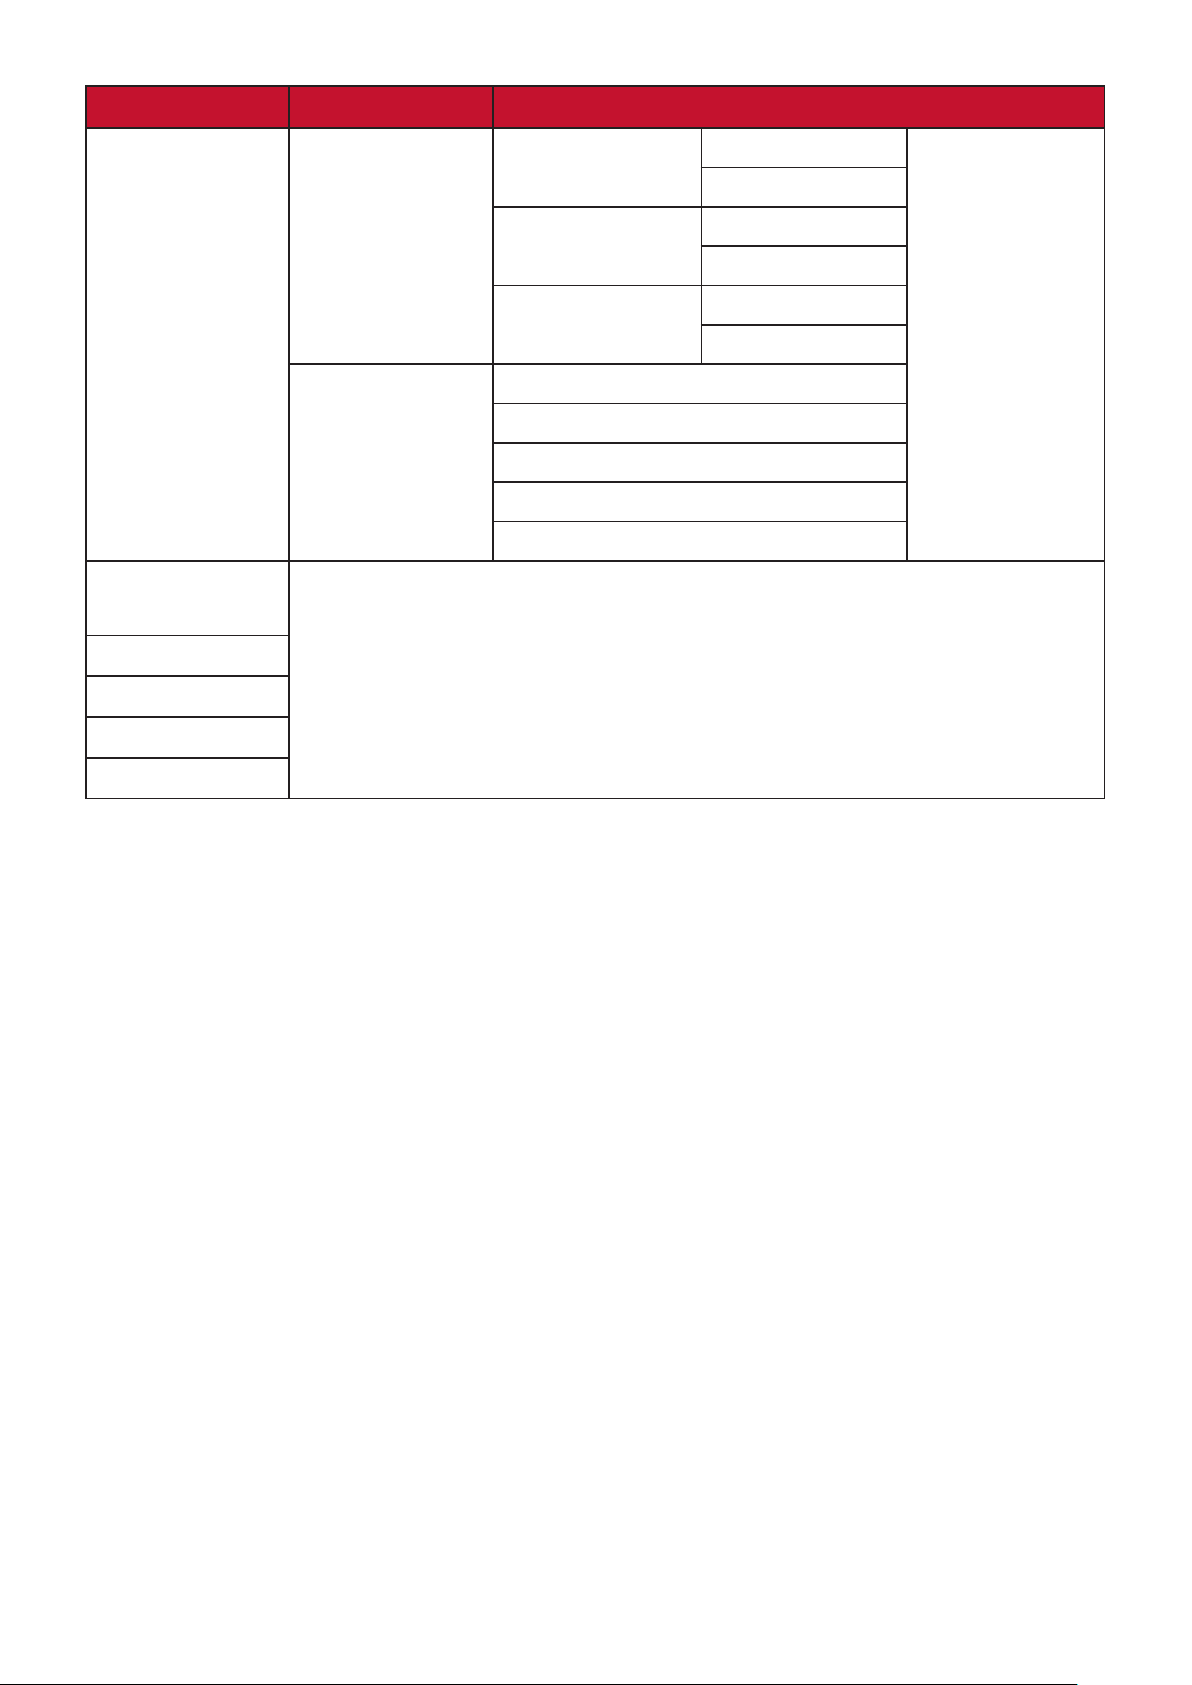
Home Screen - On-Screen Display (OSD) Menu Tree
Main Menu Sub-menu Menu Opon
File
Management
Apps Center
Bluetooth
Seng
Wi-Fi
IP Address
Subnet Mask
English
French
German
Italian
Spanish
Russian
繁體中文
簡體中文
日本語
韓語
Swedish
Turkish
Portuguese
Thai
Polish
Finnish
Arabic
Indonesian
Hindi
Vietnam
Greek
47
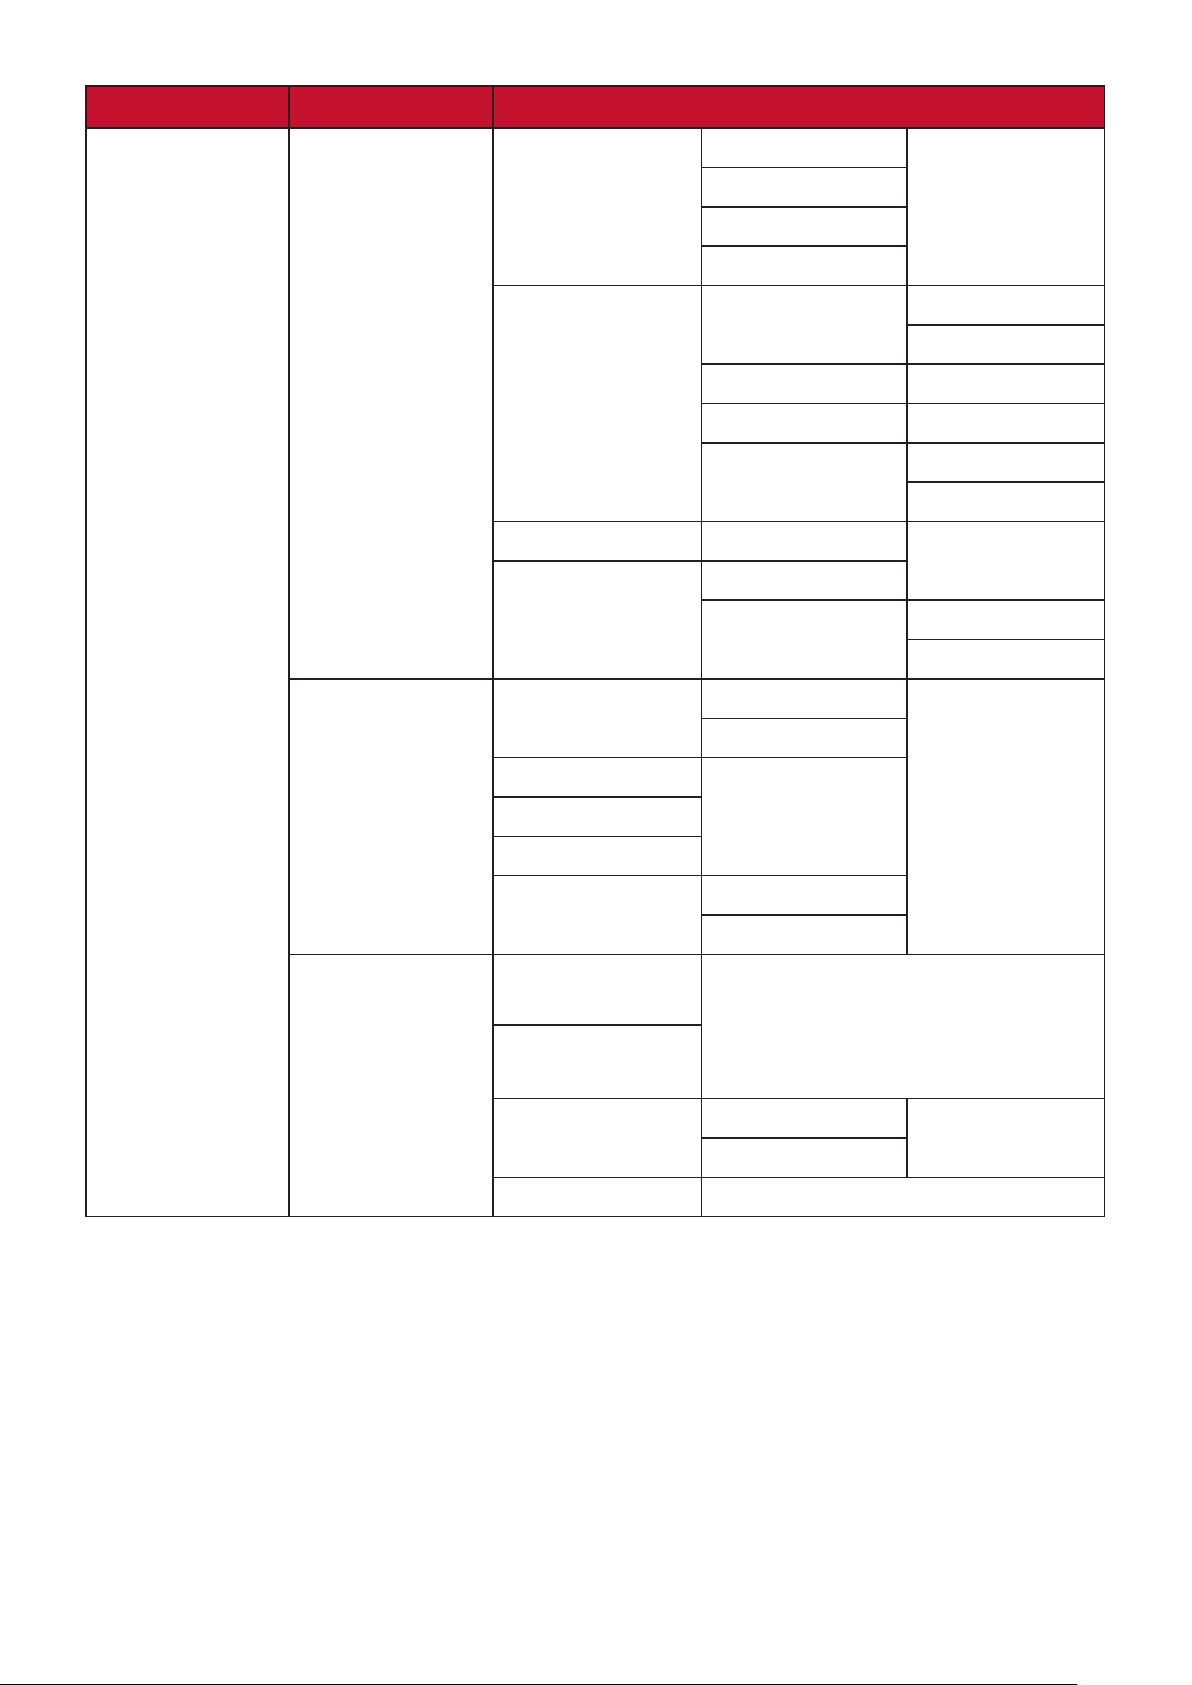
Main Menu Sub-menu Menu Opon
Seng
Projector
Front Table
Front Ceiling
Rear Table
Rear Ceiling
Keystone
Auto Keystone
Enable
V Keystone (-/+, -40~40)
H Keystone (-/+, -40~40)
4 Corner
Adjustment
Enable
Zoom 0.8x~1.0x
Focus
Manual Focus
Auto Focus
Enable
Enable
Time
Time Zone
Time Format 12 Hours
24 Hours
Firmware
Update
Online
by USB
OTA Reminder
Enable
48
Main Menu Sub-menu Menu Opon
Seng
Advanced
Power On Source
USB-C
Ring Tone
Enable
Auto Power On CEC
Enable
Smart Energy
10 minutes
20 minutes
30 minutes
Sleep Timer
30 minutes
1 hour
2 hours
3 hours
4 hours
8 hours
12 hours
Power Saving
Enable
harman/kardon
Audio Mode
Movie
Music
User
Audio Volume (0~50)
Mute
Enable
Full
Eco
49
Main Menu Sub-menu Menu Opon
Seng
Advanced
Mode
Enable
Reset
Cancel
Reset to Factory
Reset
Cancel
System Version
Wi-Fi Mac Address
Serial Number
Screen
Mirroring
Add App
Add App
Add App
Add App
50
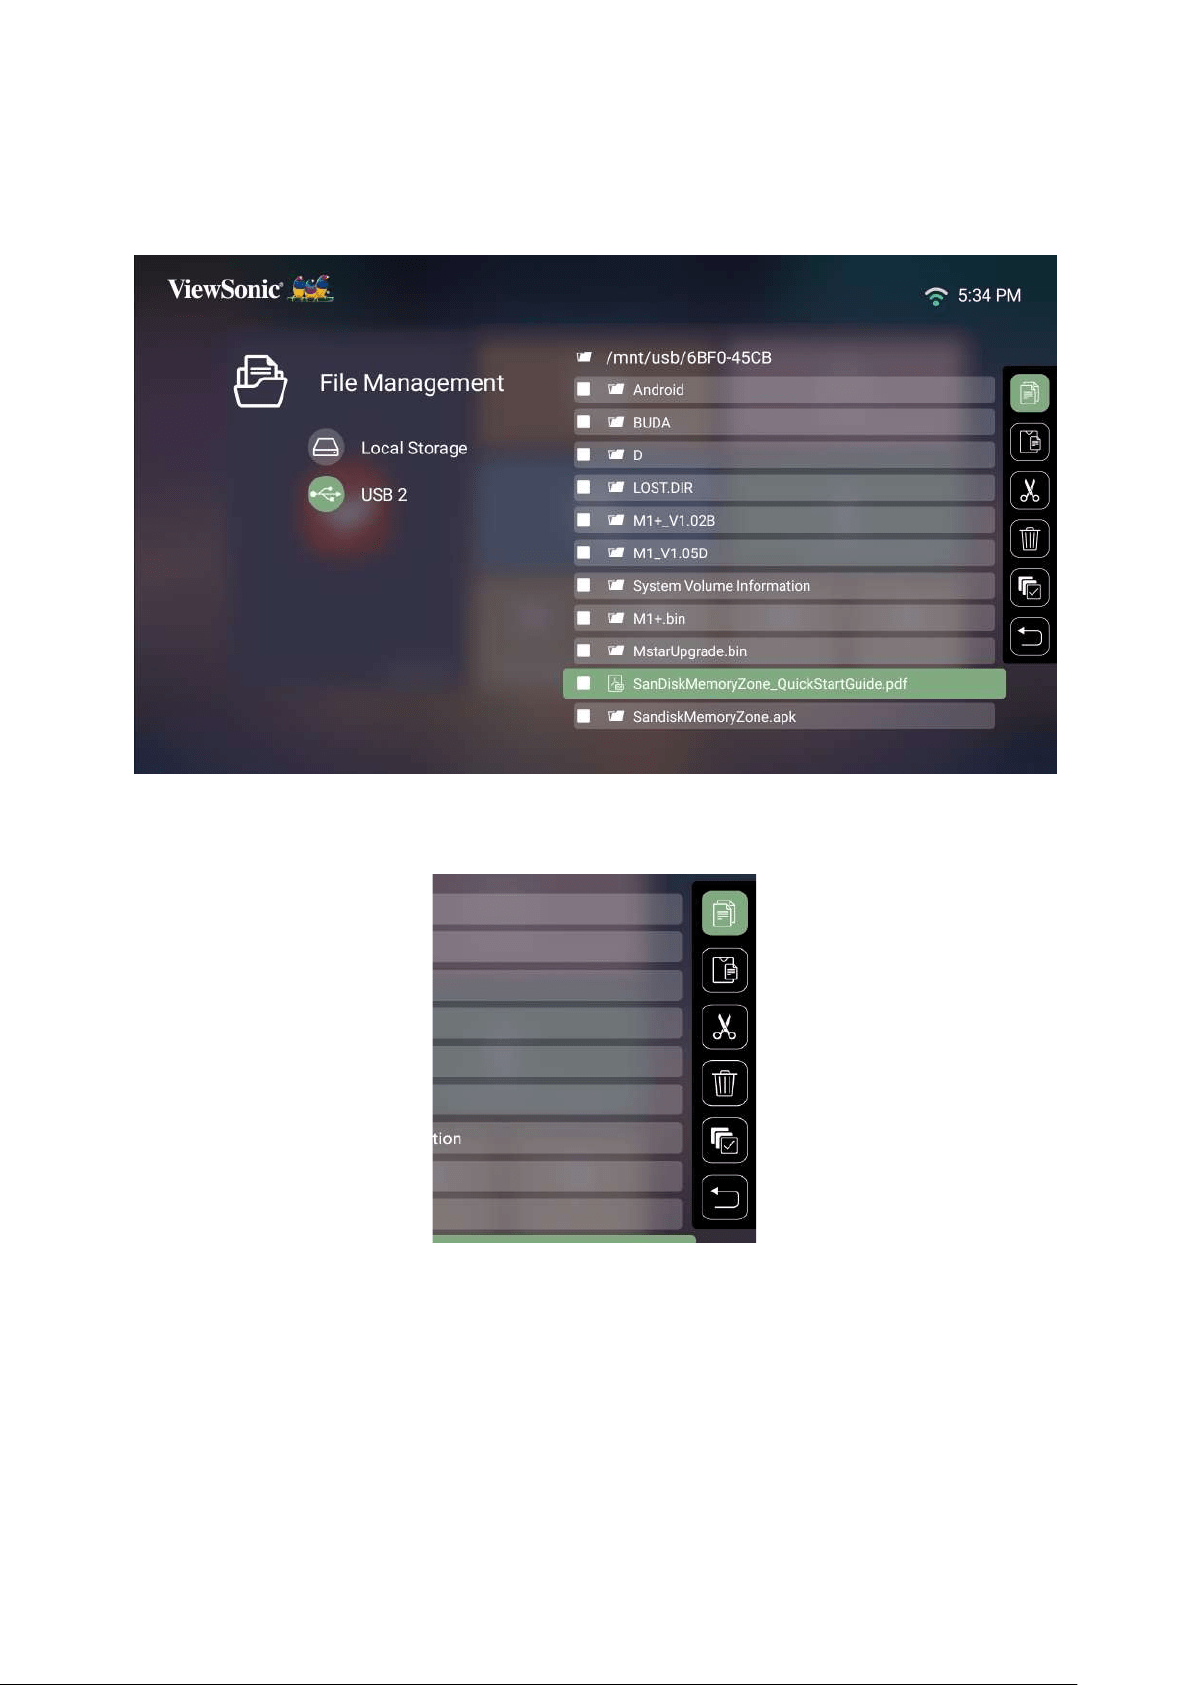
Menu Operaons
File Management
1. Select: Home > File Management.
2.
OK on the remote control
3. Press the Return
NOTE: Press the HomeHome
Screen
51
How to Edit a File
1. While in File Management, press and hold the OK
2.
press OK
3. By pressing the Right
boxes will be available for use.
4. OK to execute.
5.
process.

52
How to Use Control Bar Buons
selected to be opened.
Picture Video Music
Back Back Back
Play Rewind Play
Next Play Pause
Zoom in Pause Next
Zoom out Fast Forward
Next Repeat All
Rotate (right) Repeat One
Tips for Using USB
When using USB for reading and/or storage please keep in mind the following:
1.
2.
3.
system.
4.
5.
53
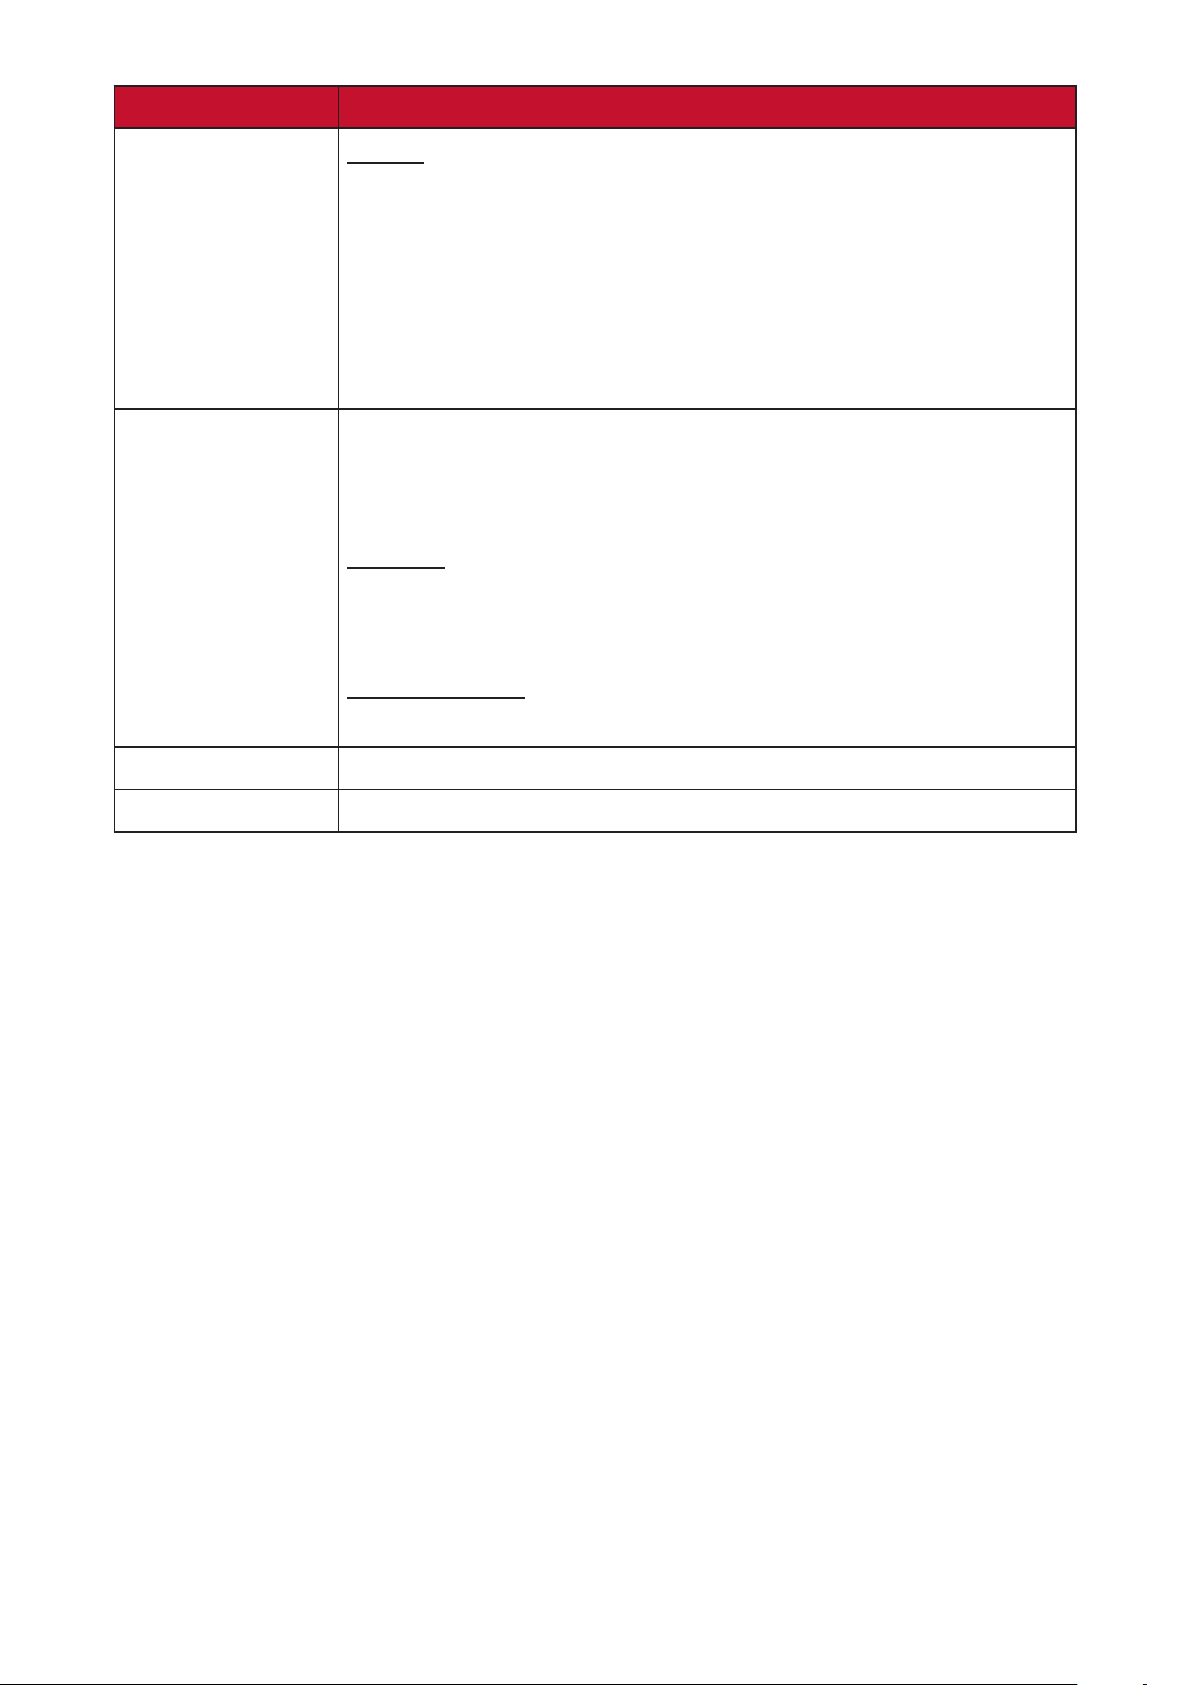
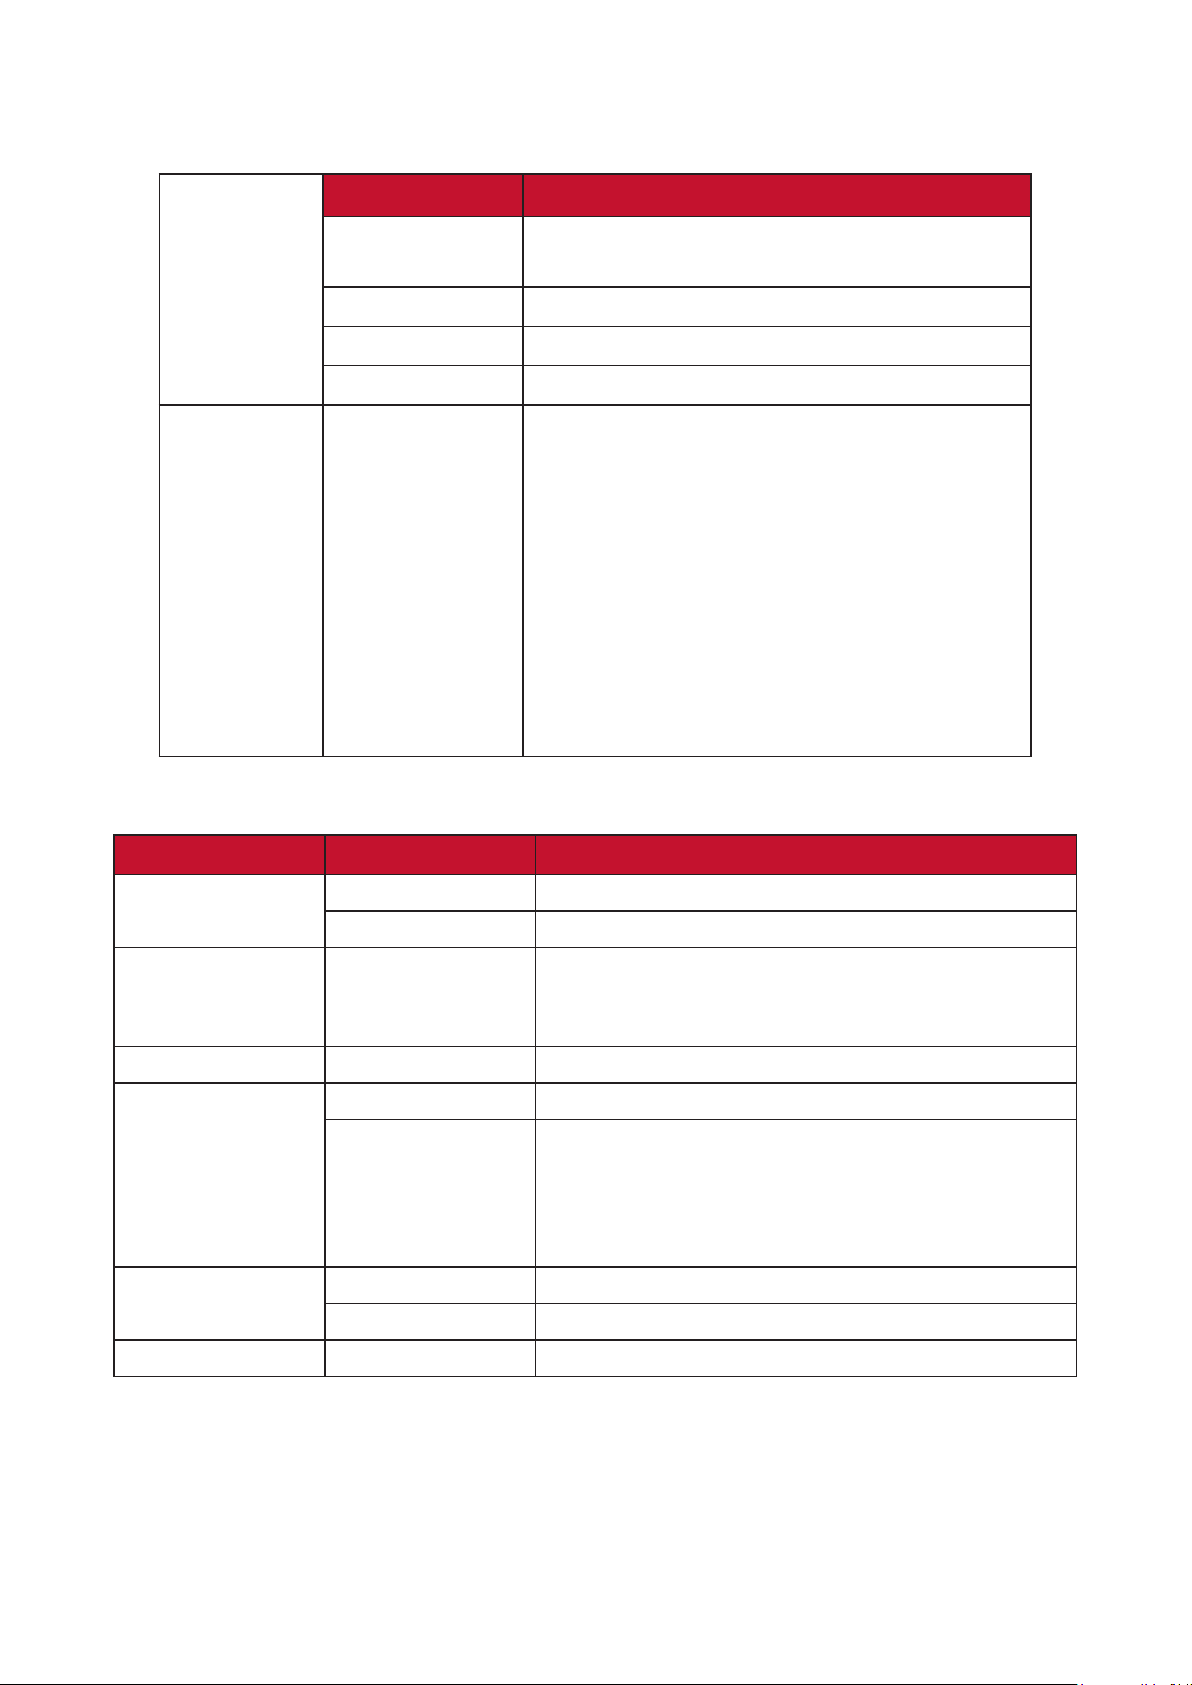
Supported File Formats
Document
viewing
funcon
Item Indicators
doc/docx
Able to open and read documents in doc/
docx
xls/xlsx Able to open and read documents in xls/xlsx
ppt/pptx Able to open and read documents in ppt/pptx
Pdf Able to open and read documents in pdf
Supporng
Interface
Language
Interface 44
languages
PT (EU), PT (BR), German, Russian, Italian,
Swedish, Spanish (EU), Korean, Arabic, Farsi,
Serbian, Bosnian, Macedonian, Bulgarian,
Hungarian, Slovak, Polish, Romanian, Finnish,
Hebrew, Burmese, Catalan.
Extension Type Codec
.xvid
.avi
Video
Audio MP3
.mp4
.m4v
.mov
Video H.264/MPEG 4
.mkv Video H.264
.ts
.trp
.tp
.mts
.m2ts
Video H.264, MPEG2
Audio MP3
.vob
Video MPEG1, MPEG2
Audio
.mpg Video MPEG1
NOTE: The AAC audio format is not supported.

54
Device
Supported Size
(Max. Size)
NTFS Format FAT32 Format exFAT
Read Write Read Write Read Write
USB Memory
256 GB V N/A V V N/A N/A
2 TB V N/A V V N/A N/A
256 GB V N/A V V N/A N/A
NOTE:
• Windows 10 built-in format tool only supports FAT32 format up to 32 GB.
• Firmware upgrade only supports FAT32 format.
55
Apps Center
View, launch, and uninstall Apps.
1. To view your Apps, select: Home > Apps Center.
2. OK on the remote
control to launch the App.
NOTE: Press the HomeHome
Screen
56
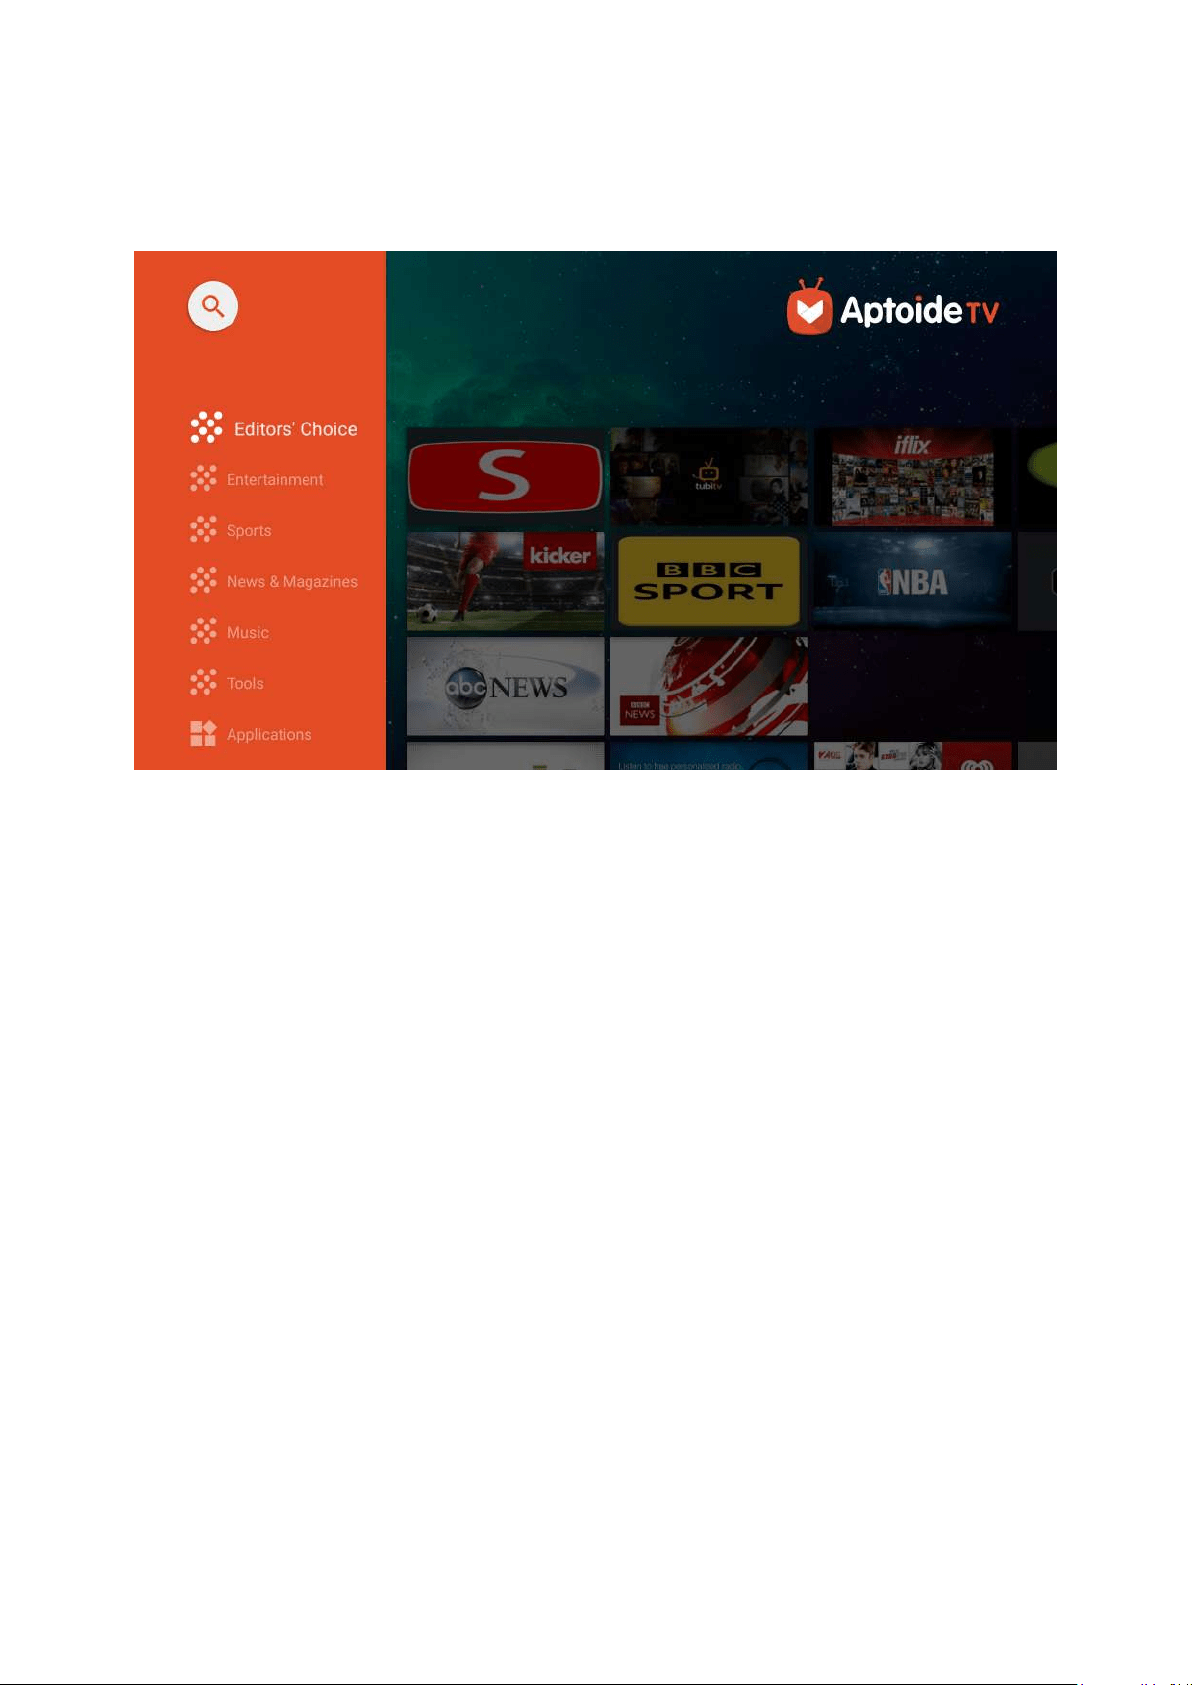
Aptoide
The projector is pre-loaded with the Aptoide store, which allows users to download
1. Select: Home > Apps Center > Aptoide.
2.
preferred App, press the OK
NOTE:
• File Management.
•
properly.
• Some Apps may require a keyboard or mouse.
•
57
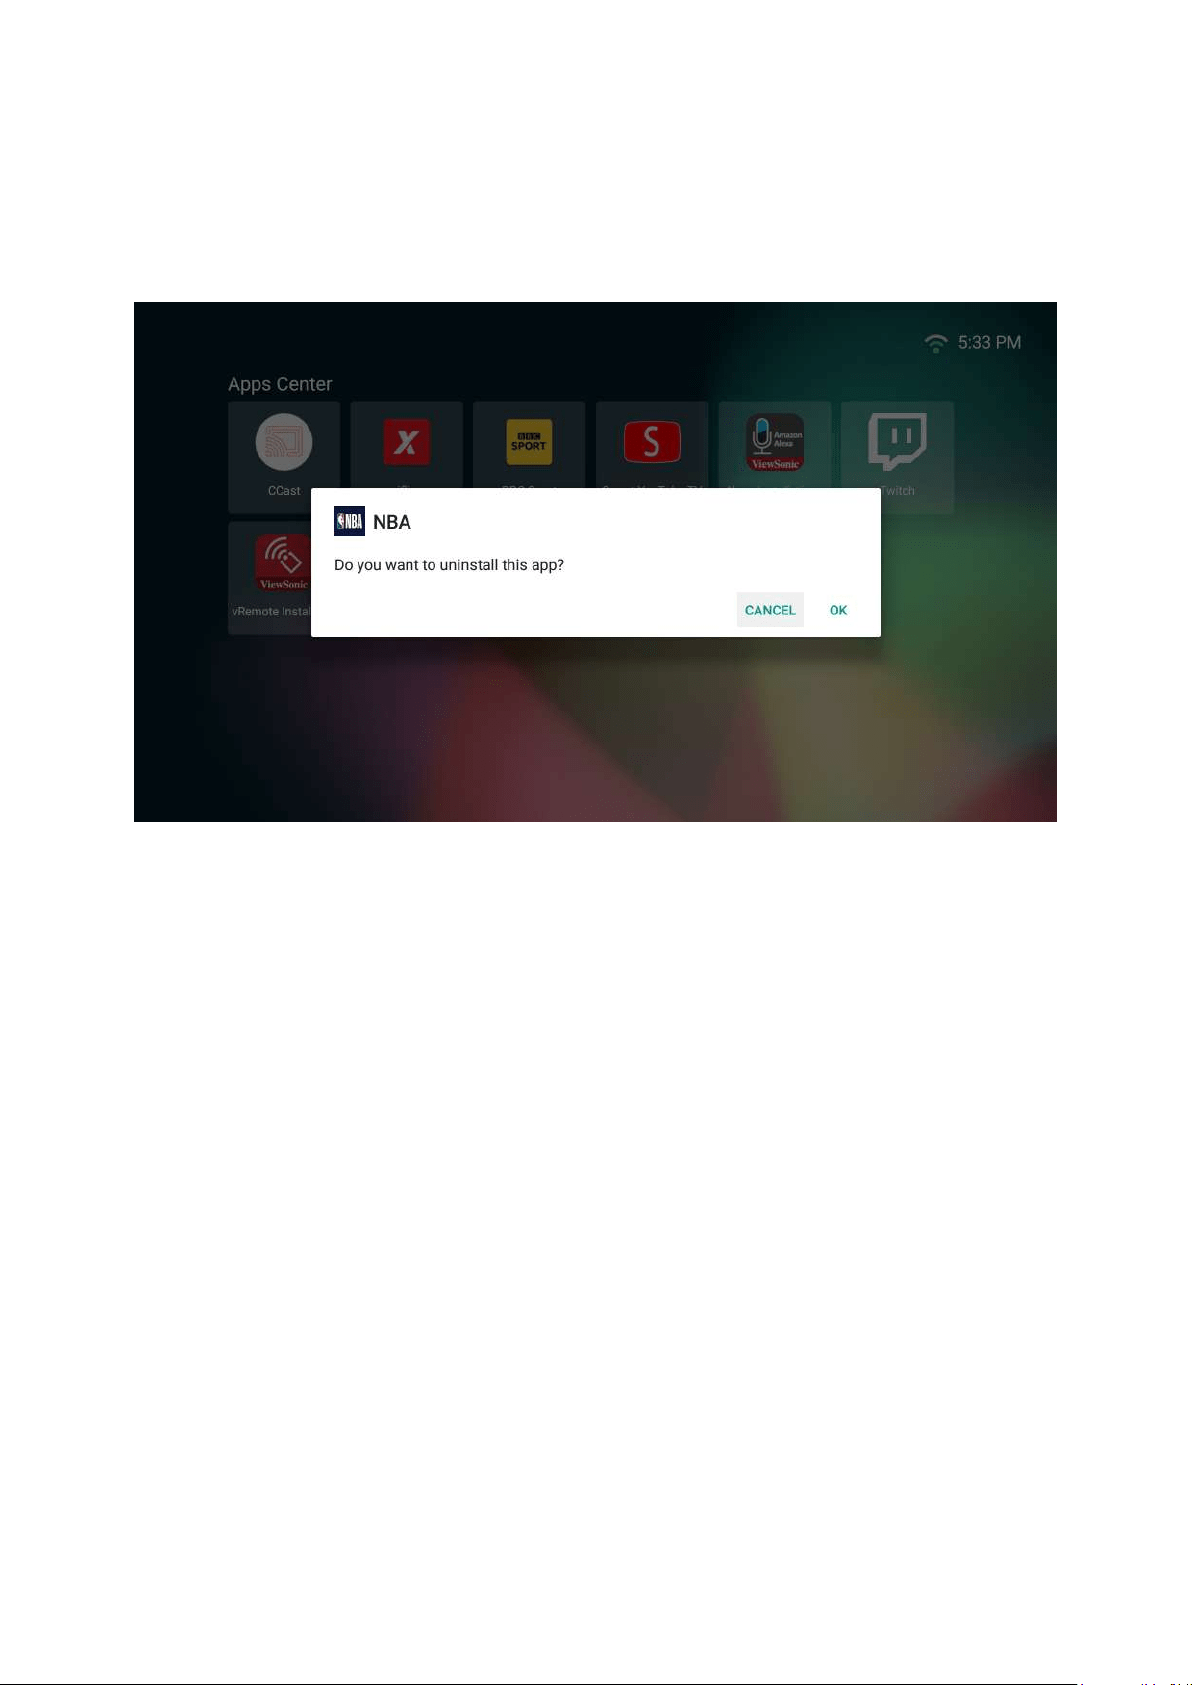
To Uninstall Apps
1. Open the Apps CenterHome > Apps Center.
2.
3. Press and hold OK on the remote control for three (3) seconds. The below
dialogue box will appear:
4. Select OK to uninstall the App.
NOTE: Press the HomeHome
Screen

59
Seng
Under Seng
Network Sengs
1. Select: Home > Seng > Network Sengs.

61
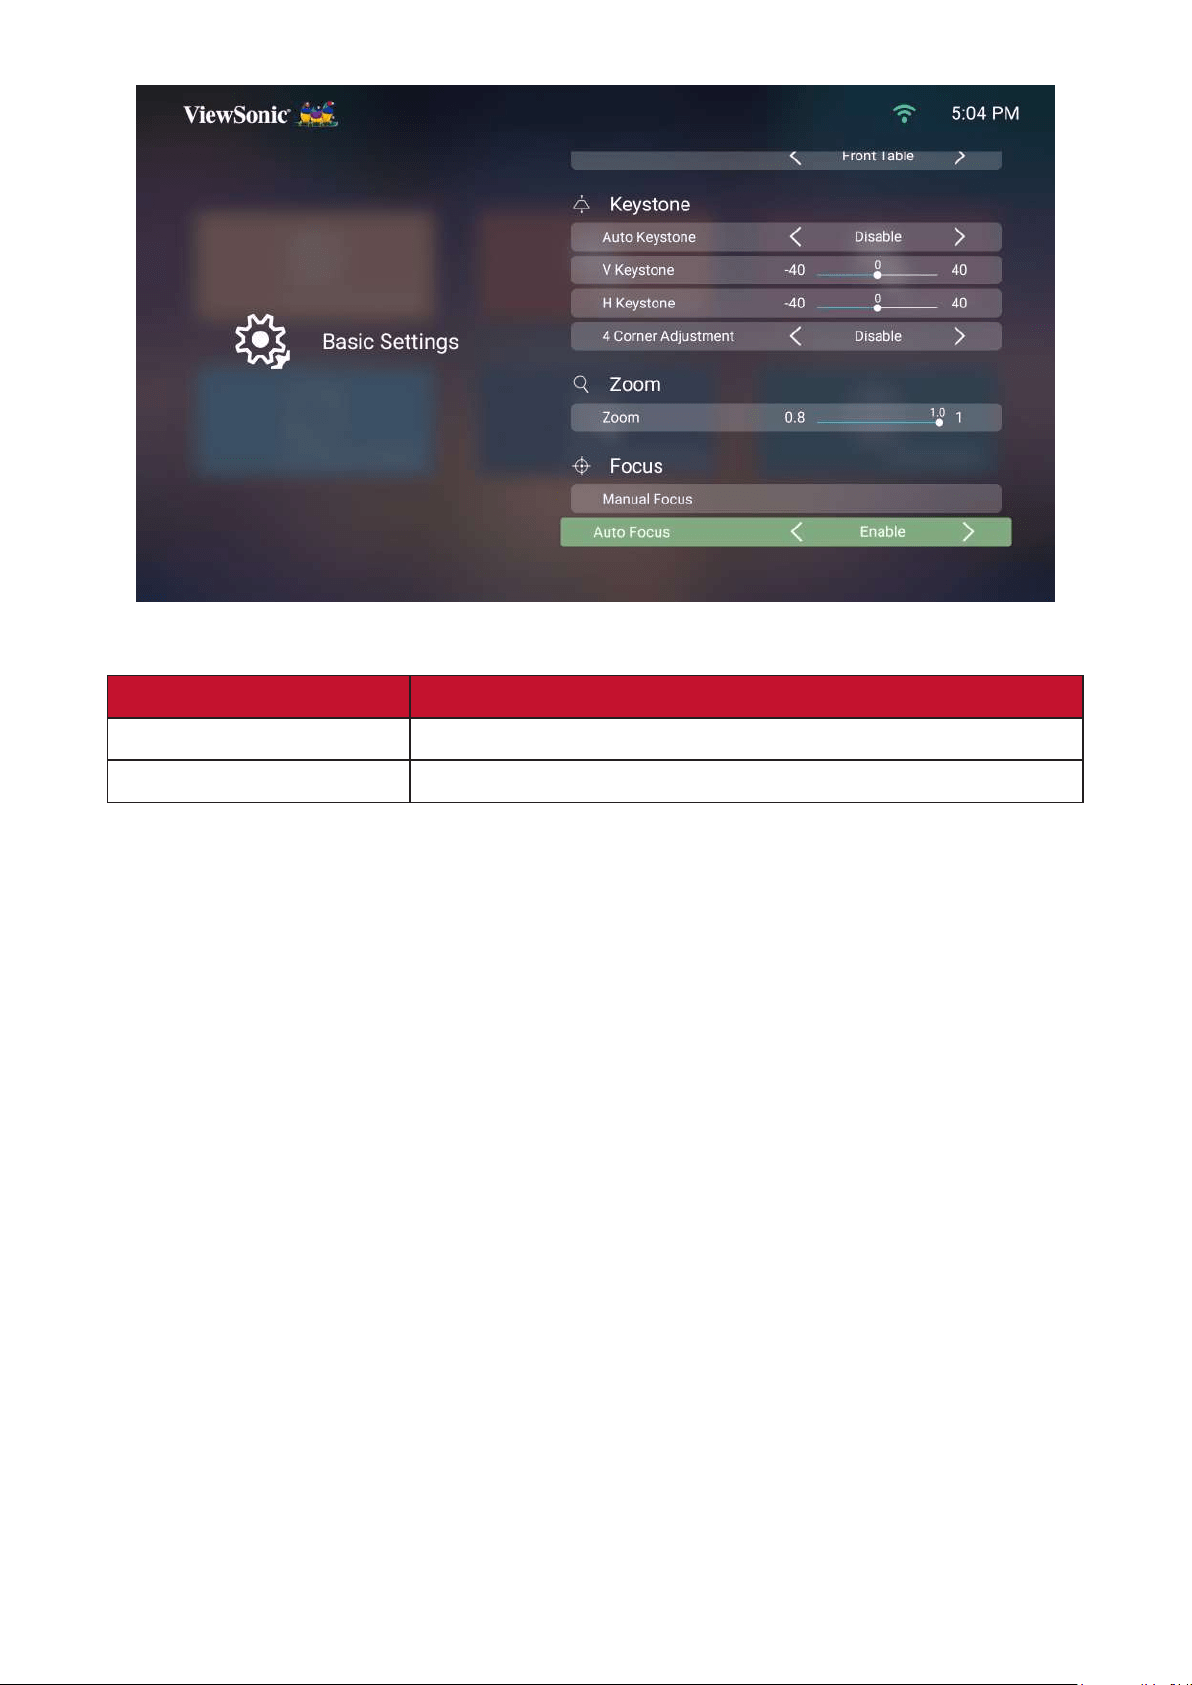
Basic Sengs
1. Select: Home > Seng > Basic Sengs.
2. Use the Up and DownOK, or use
the Le and Right
62
3. To return to a previous menu press the Return
Menu Descripon
Select your desired language.
63
Menu Descripon
Keystone
Auto Keystone
projector.
• Enable
• Disable: Manually adjust the keystone number.
Horizontal Keystone
Vercal Keystone
4 Corner Adjustment
Adjust each corner individually for maximum
Zoom
64
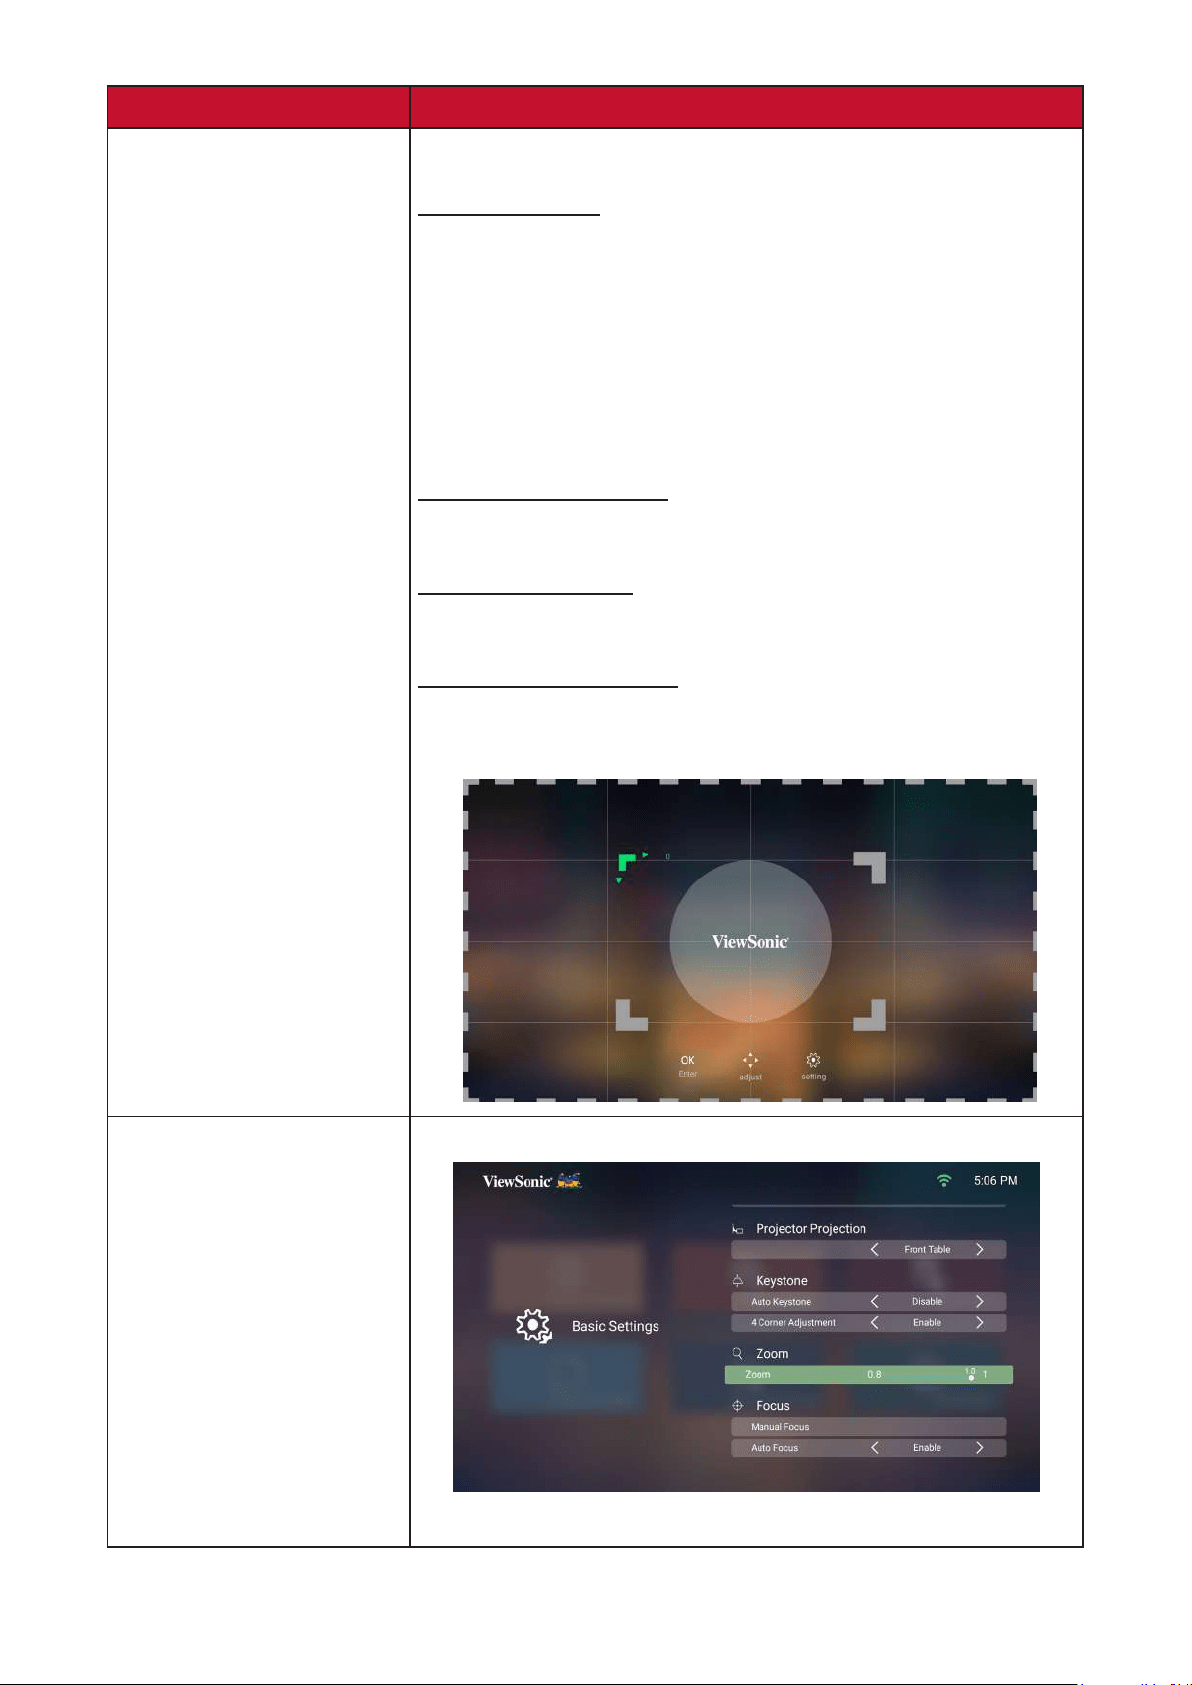
Menu Descripon
Focus Adjust the focus of the screen image.
Manual Focus
Adjust the focus with the Le and Right
the remote control.
Auto Focus
Choose from the following:
• Enable
without the remote control.
• Disable: Manually adjust the focus.
NOTE:
• If Auto Focus is Enabled, the projector will
projector is adjusted.
• Auto Focus will be the most accurate when
combine Auto Focus with Manual Focus.
• In the event Auto Focus
successively, Manual Focus adjustment will pop

65
Date & Time
NOTE:
Internet.
1. Select: Home > Seng > Date & Time.
2. Use the Up and DownOK, or use
the Le and Right
66
Menu Descripon
Enable
Disable
Time Zone
Time Format
12 Hours
12-hour clock.
24 Hours
24-hour clock.
67
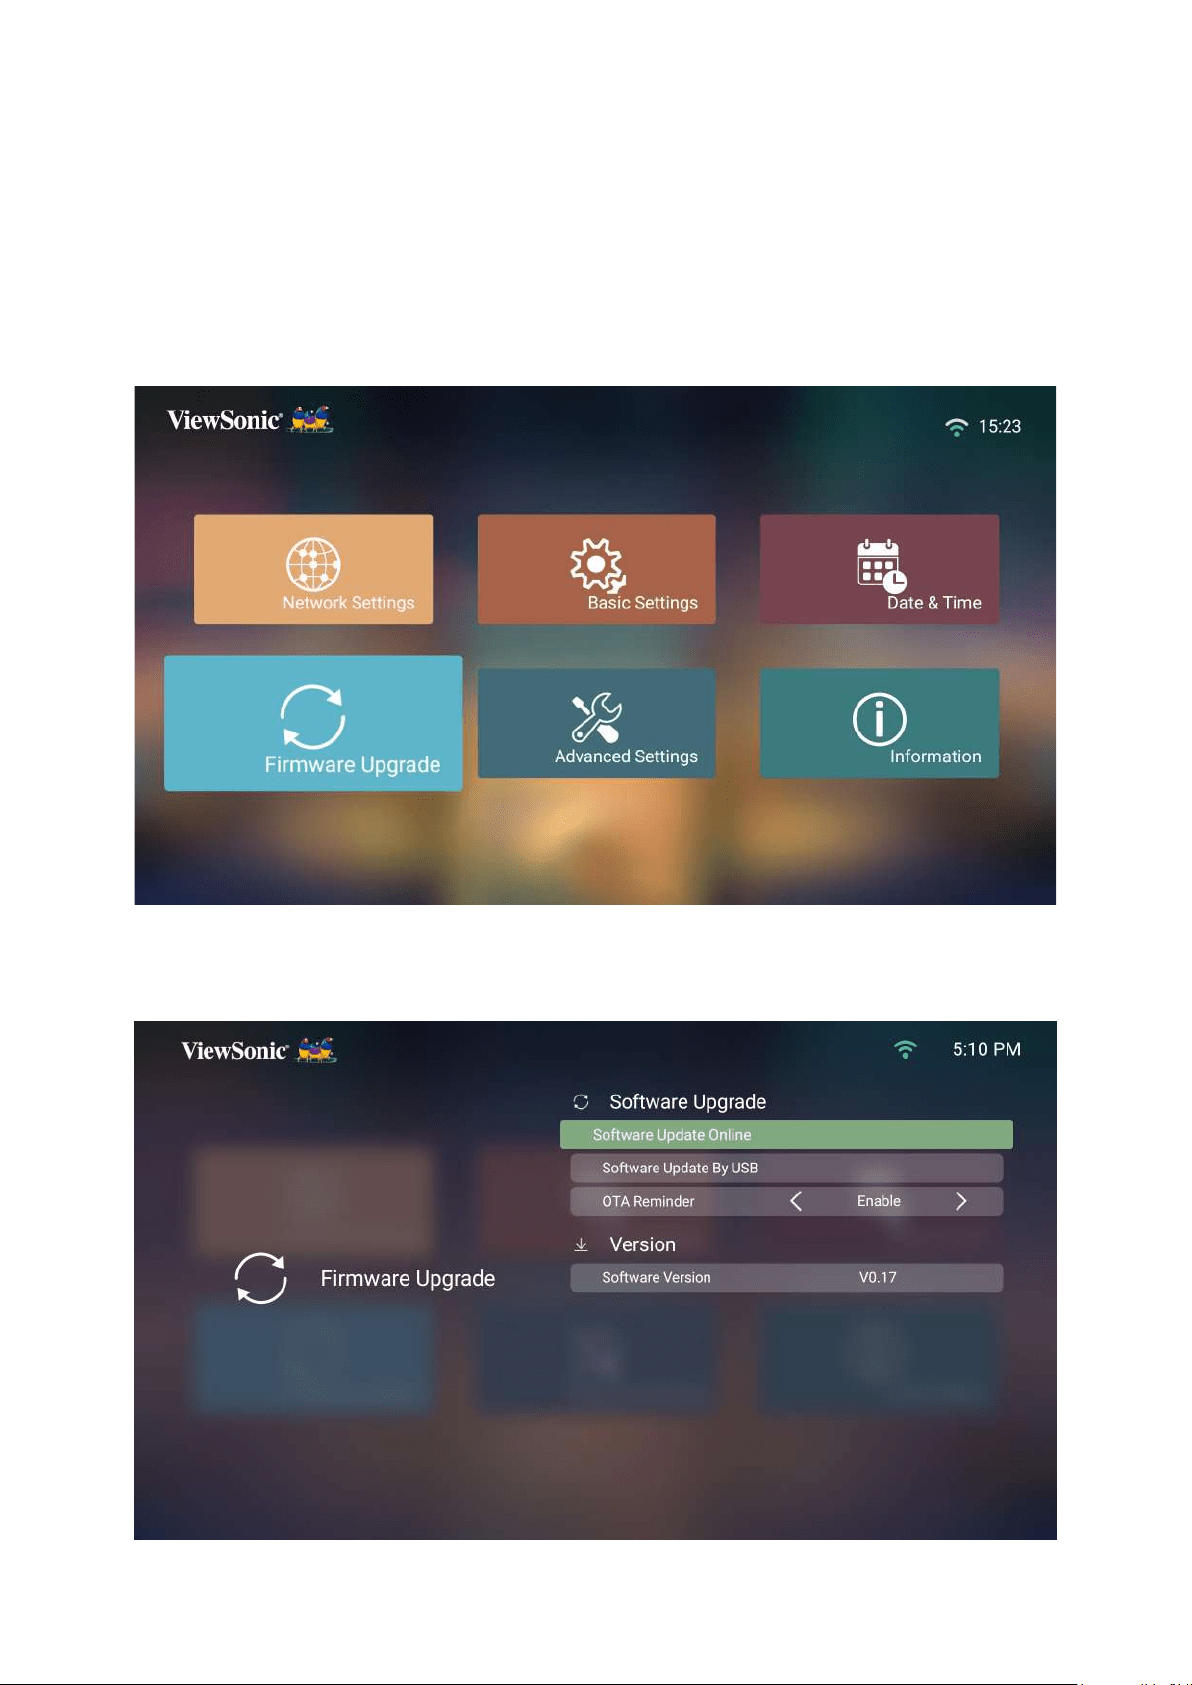
Firmware Upgrade
NOTE:
during the upgrading process.
1. Before entering the Firmware Upgrade menu, ensure the projector is connected
to the Internet.
2. To enter the menu, select: Home > Seng > Firmware Upgrade.
Firmware Update Online
1. Go to: Home > Seng > Firmware Upgrade > Soware Update Online.
68
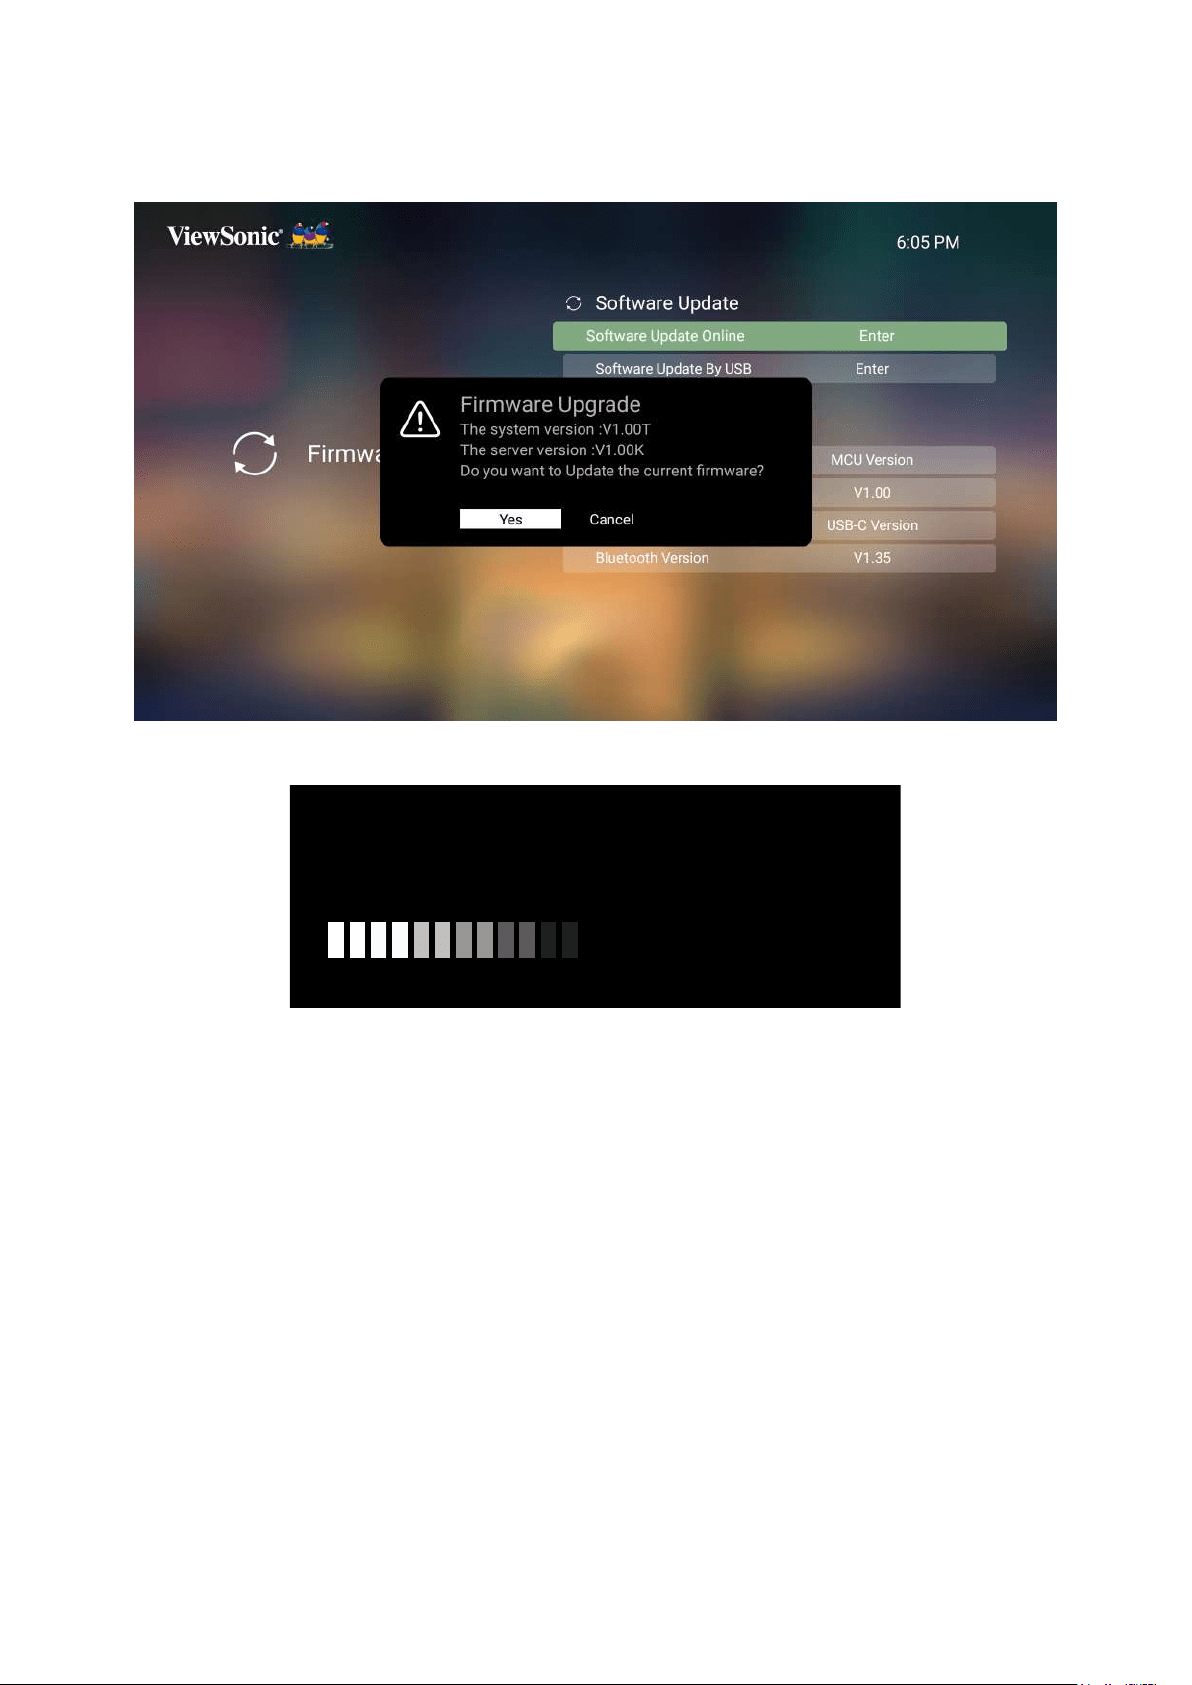
2. Select Enter by pressing OK on the remote control.
3. The system will check the ViewSonic website (OTA) and display the below dialog
message if there is new Firmware.
4. Yes, a progress bar will appear as the update process begins.
UPGRADING SOFTWARE
PLEASE DO NOT TURN OFF
52%
5. and the screen will turn to black
for a few minutes.
6.
69
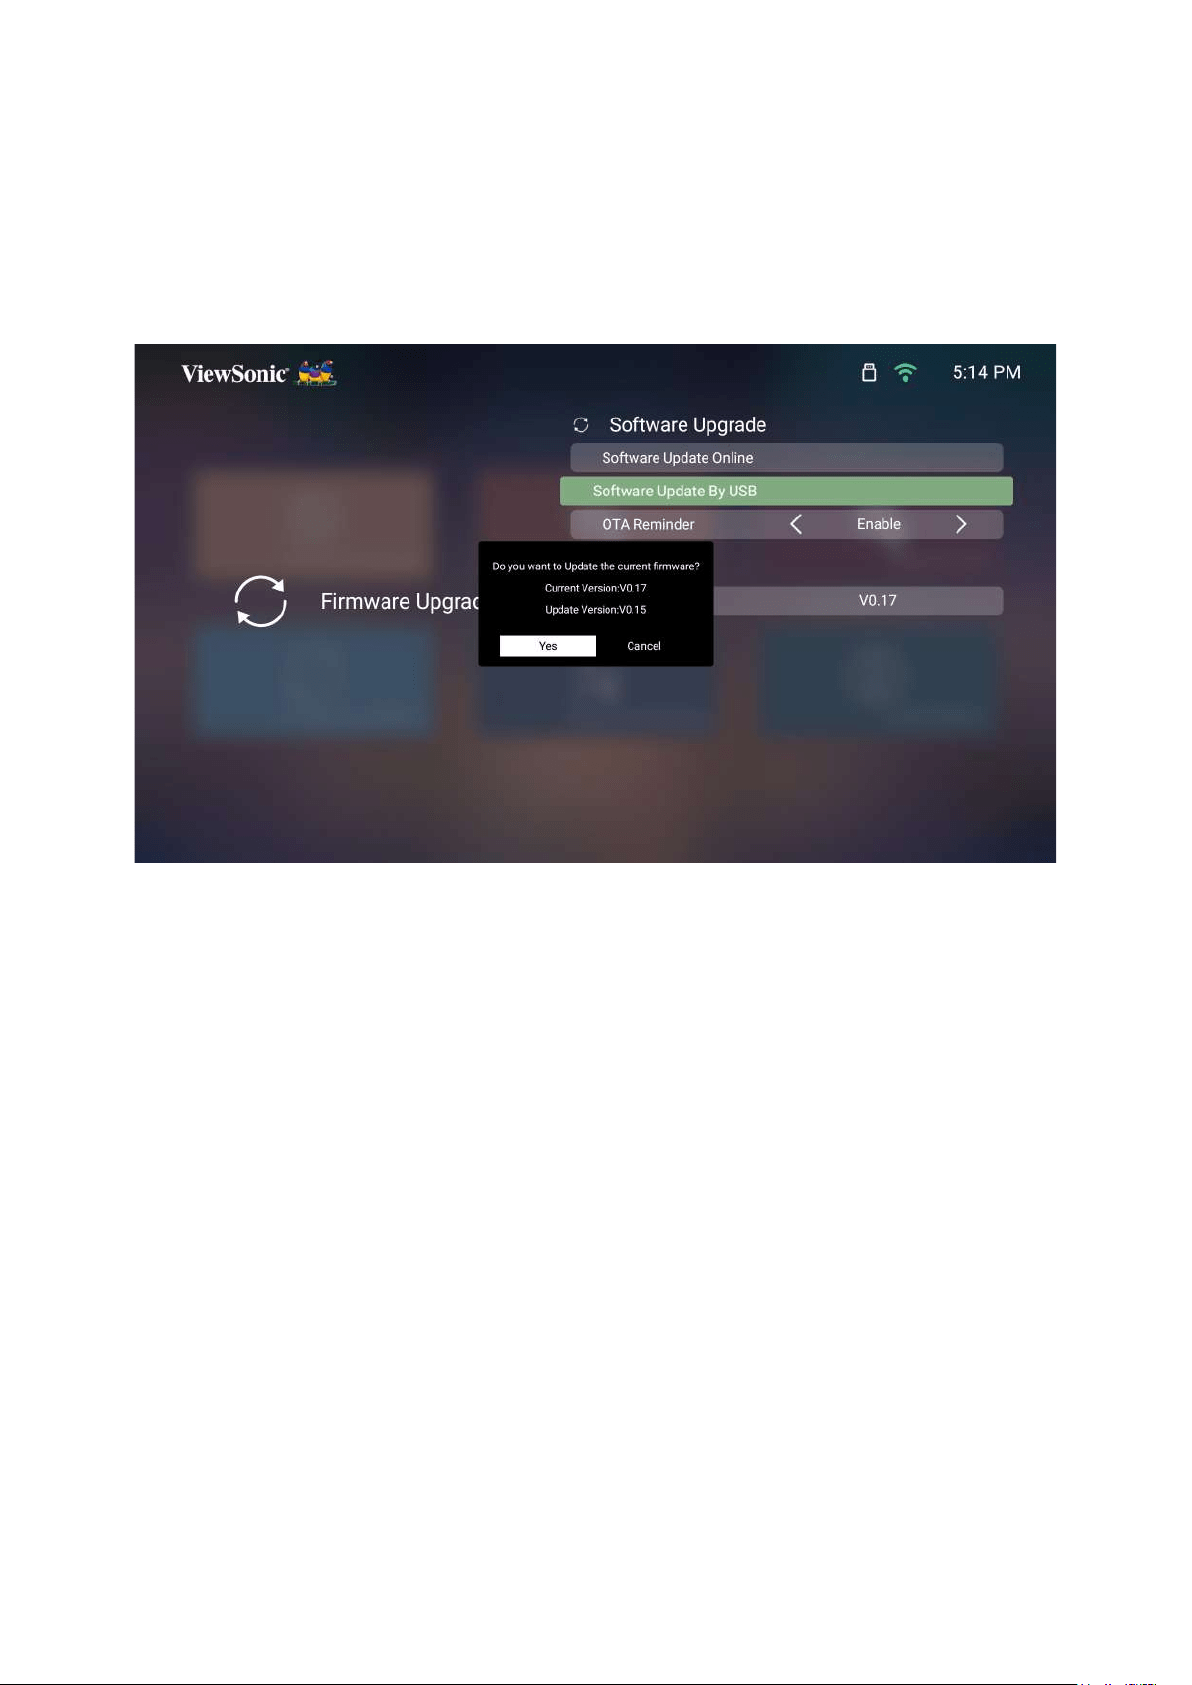
Firmware Update by USB
1.
USB device.
2. Plug the USB into the projector, then go to: Home > Seng > Firmware Upgrade
> Soware Update By USB.
3. Select Enter by pressing OK on the remote control.
4. The system will detect the Firmware version and display the above dialog
message.
5. Yes, a progress bar will appear as the update process begins.
6. and the screen will turn to black
for a few minutes.
7.
70
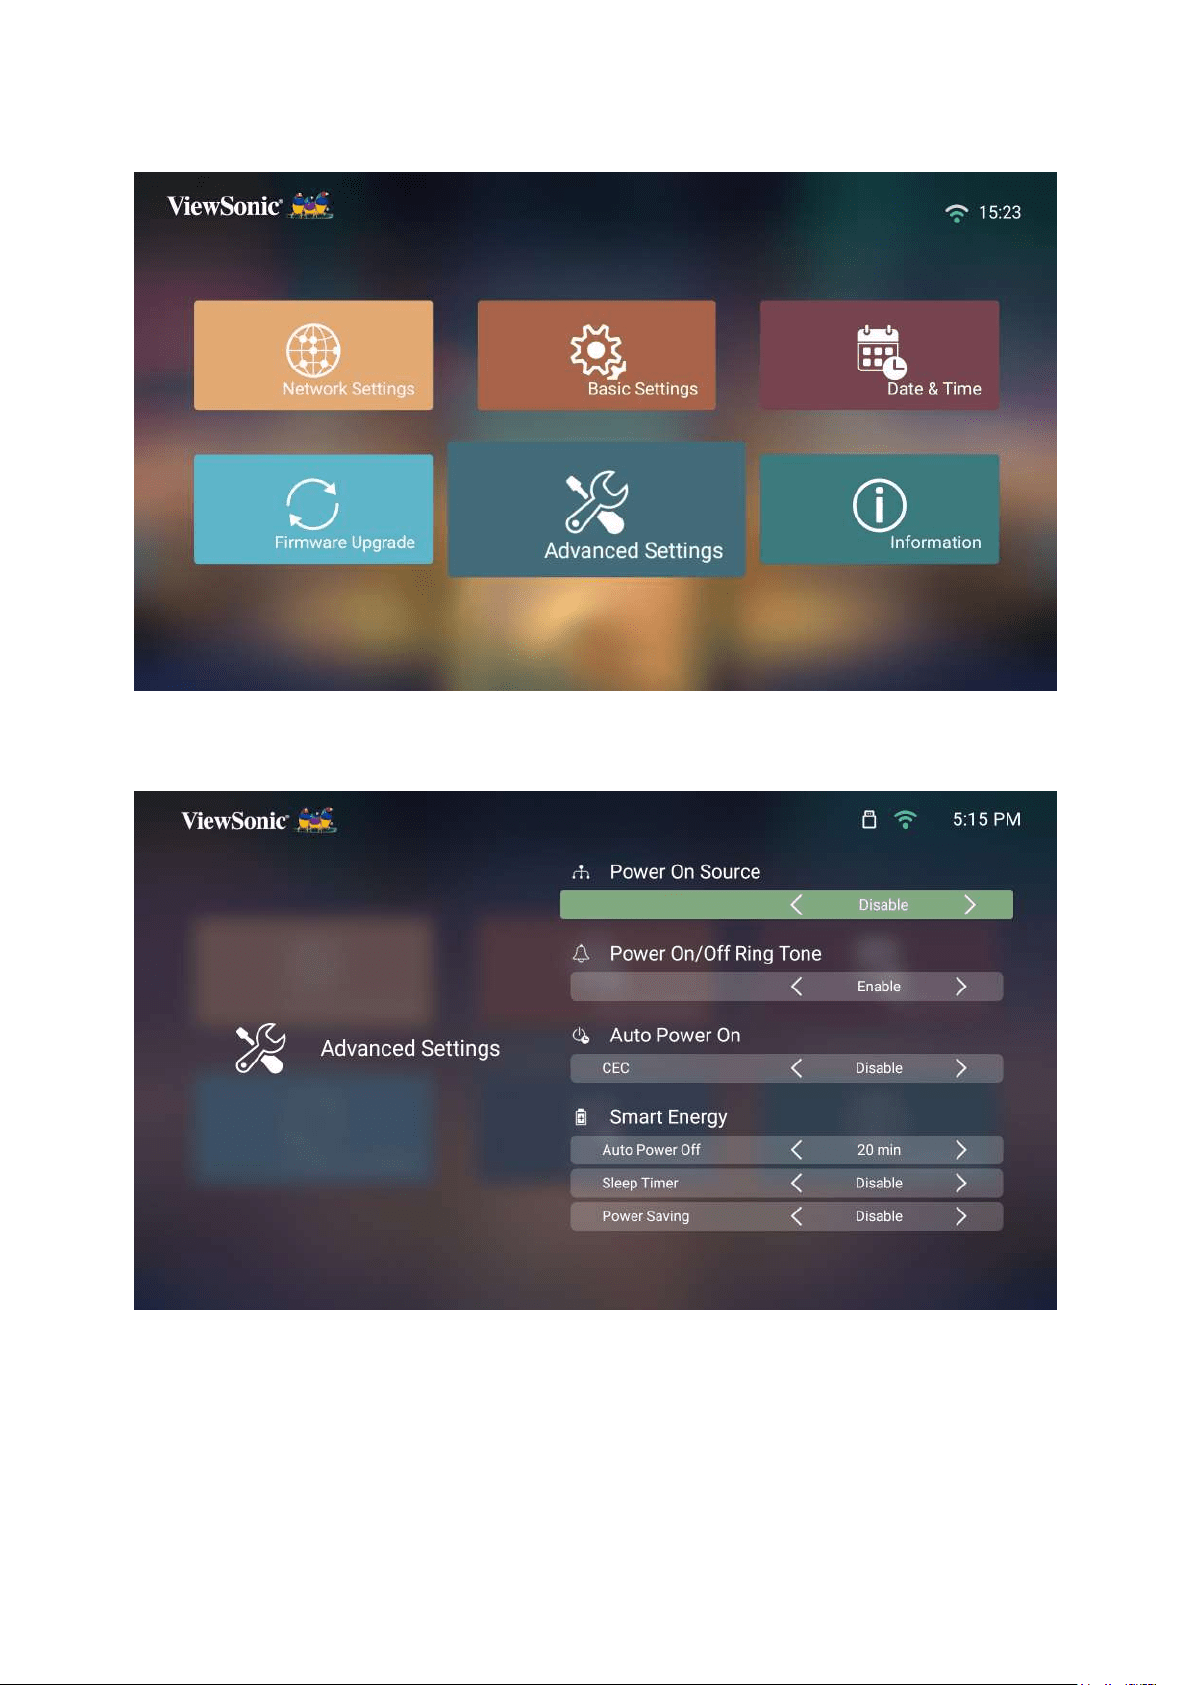
Advanced Sengs
1. Select: Home > Seng > Advanced Sengs.
2. Use the Up and DownOK, or use
the Le and Right

71
3. To return to a previous menu press the Return
Menu Descripon
Power On Source Allows the user to enter the desired source directly
Auto Power On CEC
This projector supports the CEC (Consumer
That is, if a device that also supports the CEC
projector, when the projector’s power is turned
the connected deice is turned on, the projector’s
NOTE: Ensure both the projector’s and the
turned on.
72
Menu Descripon
Smart Energy Auto Power O
Sleep Timer
Power Saving
NOTE:
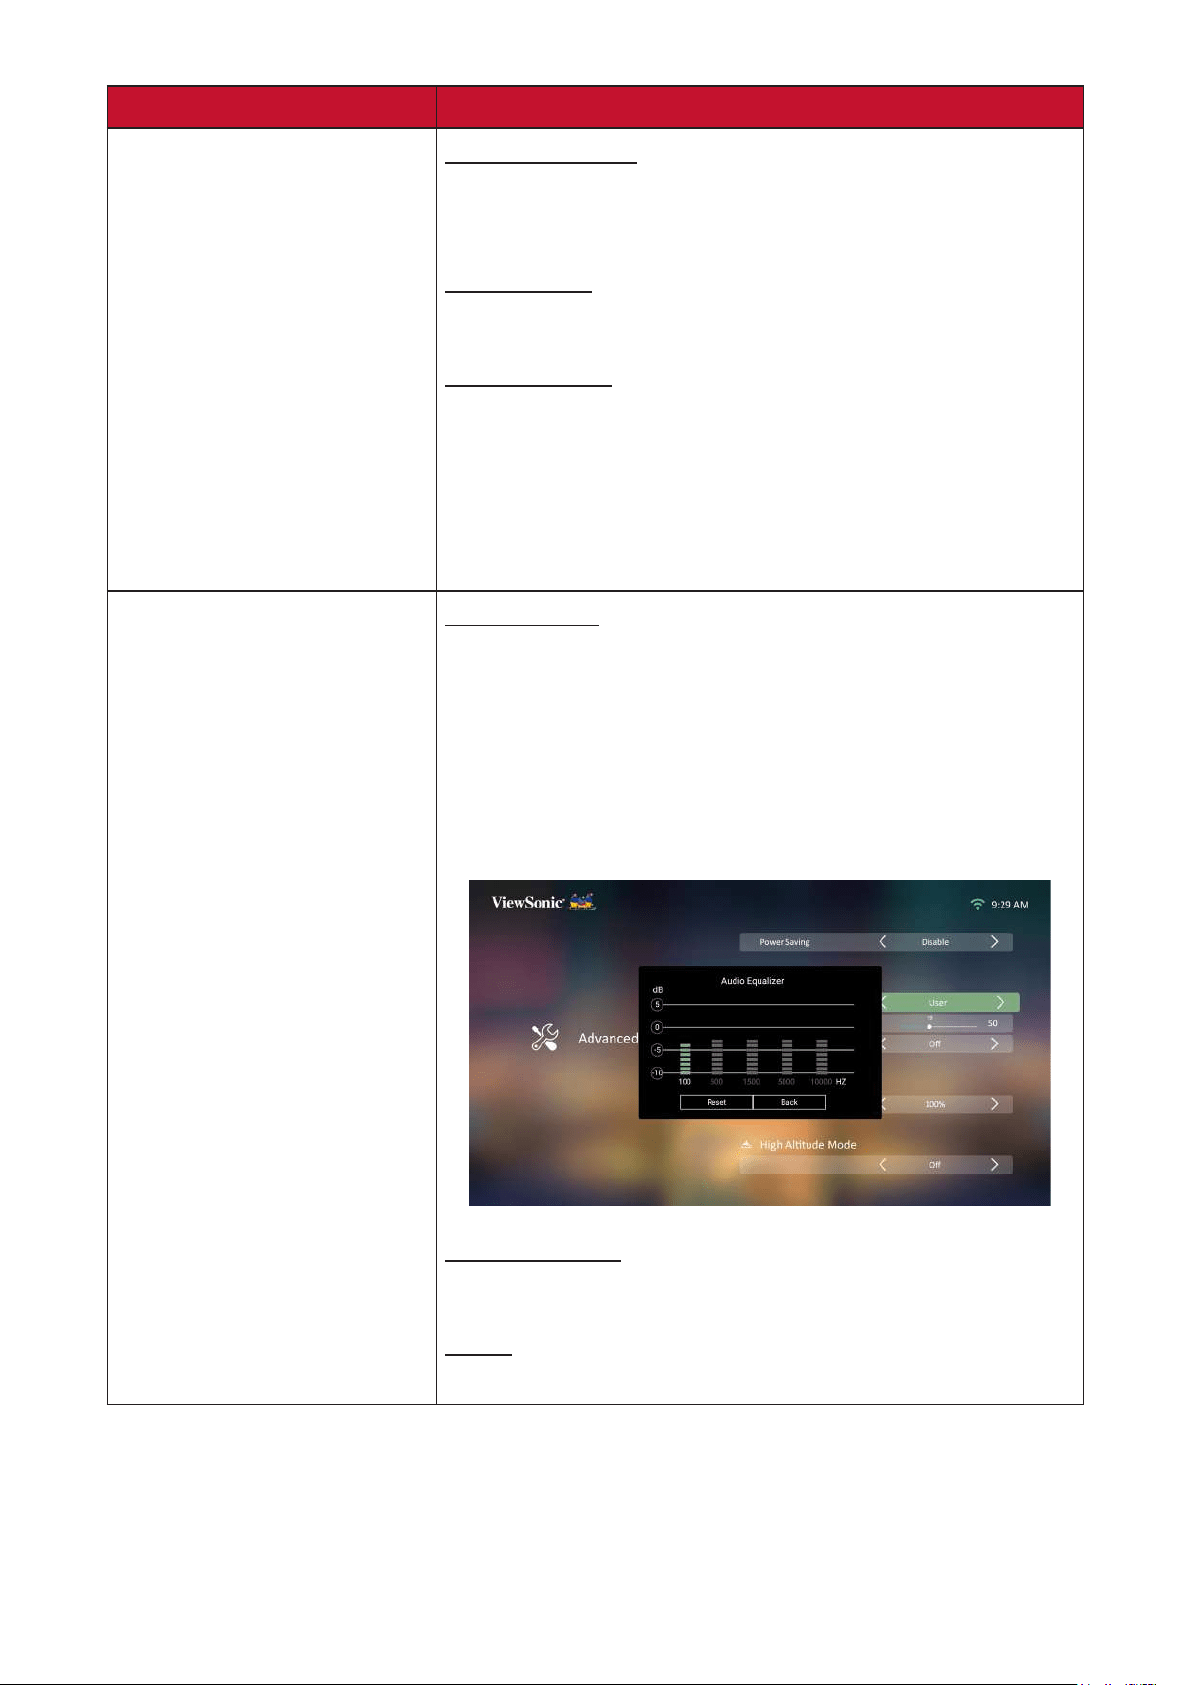
harmon/kardon Audio Mode
• Movie
• Music: Ideal for music playback.
• User
NOTE:
Audio Volume
Adjust the volume from 0 to 50.
Mute
Mute or unmute the volume.
73
Menu Descripon
Full
100%
Eco
70%
NOTE: If using a USB-C connected power bank
to charge the M2e, the light source level
will only have Full (60%).
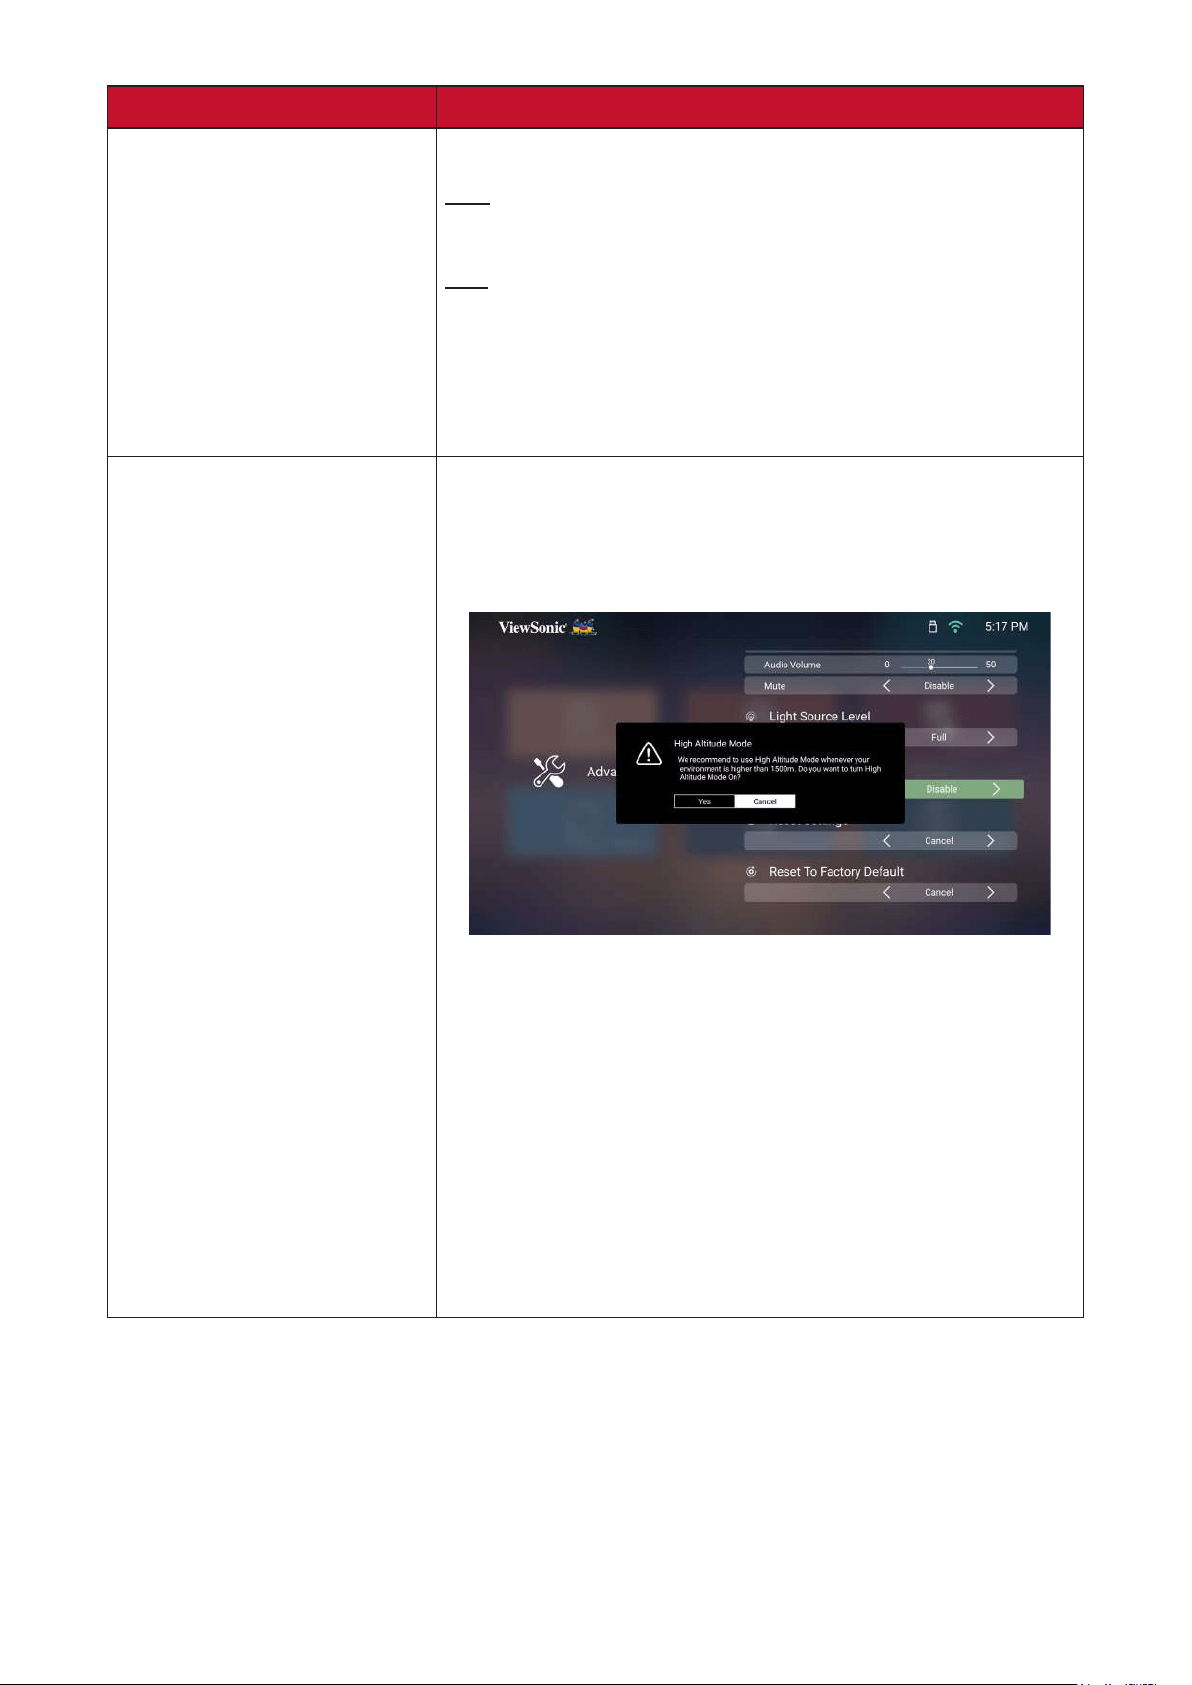
Mode when your environment is between 1,500-
3,000 m above sea level, and a temperature
NOTE: If you use this projector under other
above, it may display auto shut-down
symptoms, which is designed to protect
cases like this, you should switch to High
However, this is not to state that this
projector can operate under any and all

74
Menu Descripon
NOTE:
Apps in the Apps Center, Add App,
Bluetooth, Zoom, H/V Keystone, 4
Hours will remain unchanged.
Factory reset.
NOTE:
unchanged.
75
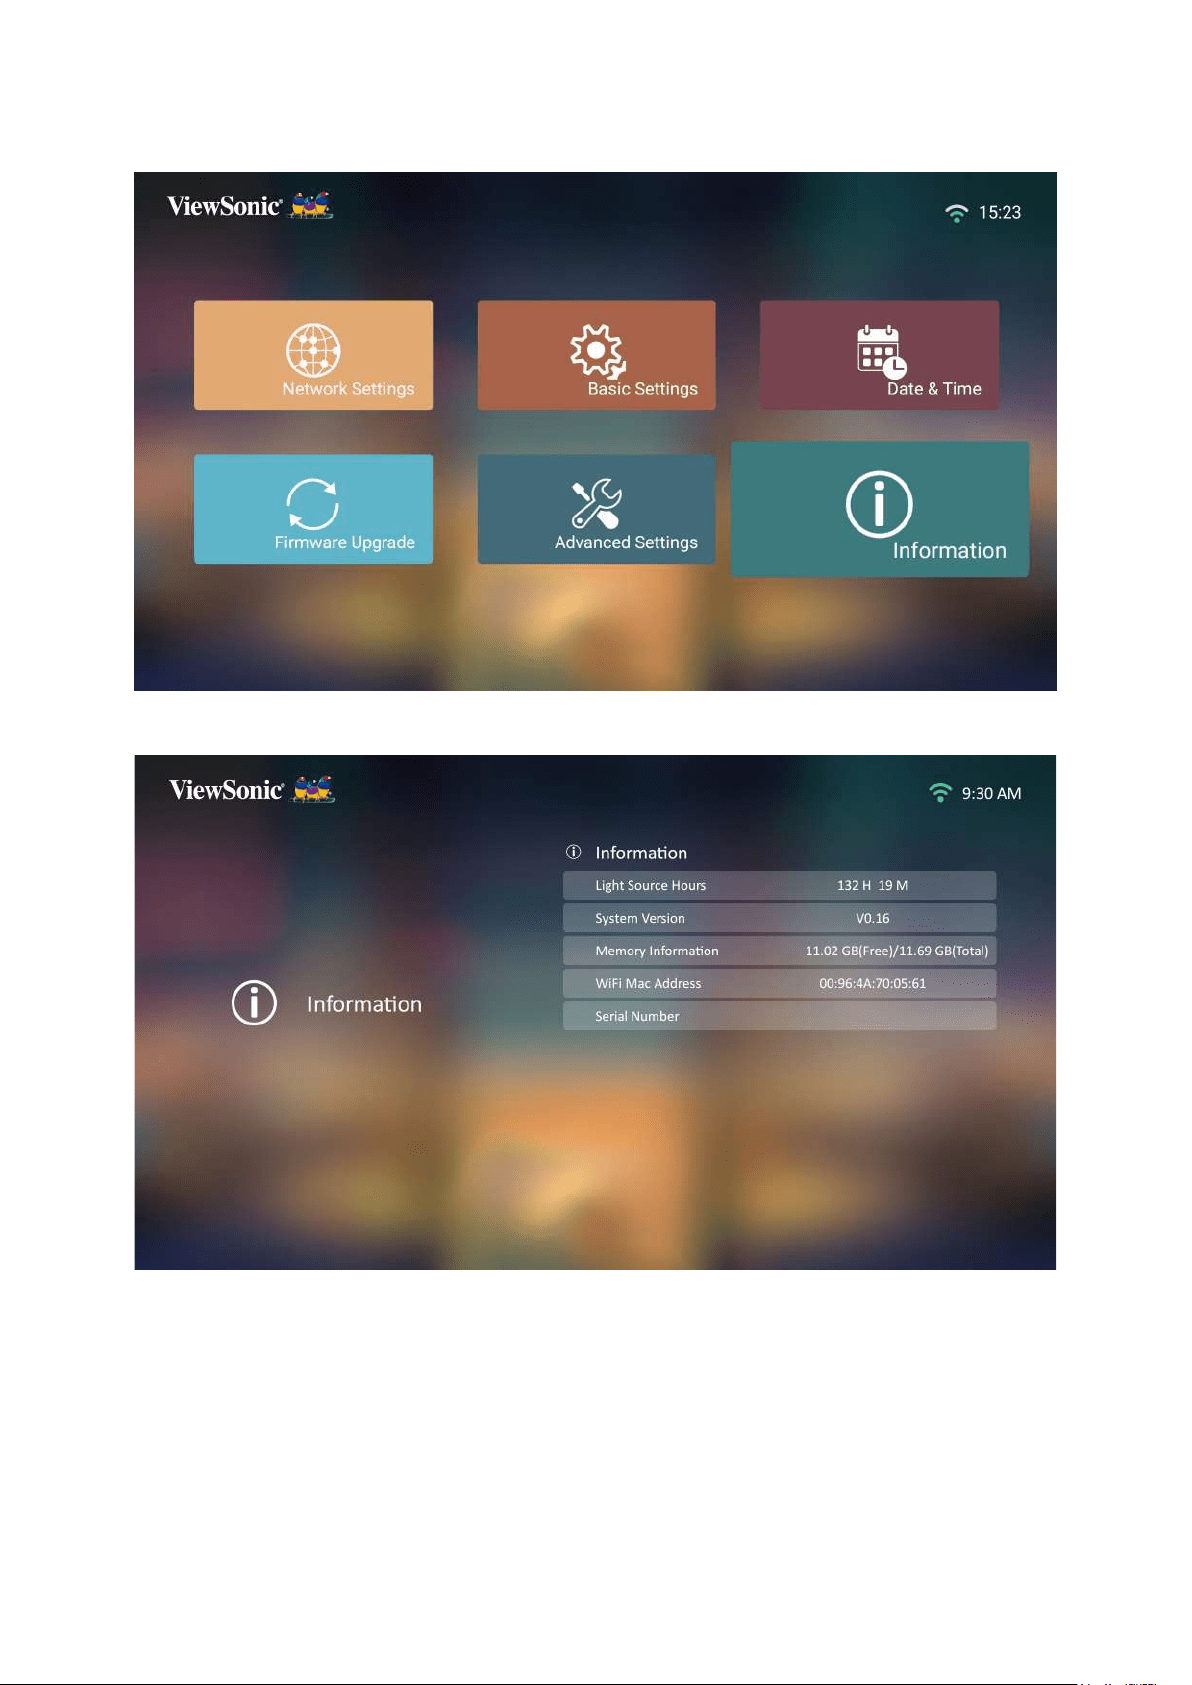
Informaon
1. Select: Home > Seng > Informaon.
2.
NOTE: Press the HomeHome
Screen
77
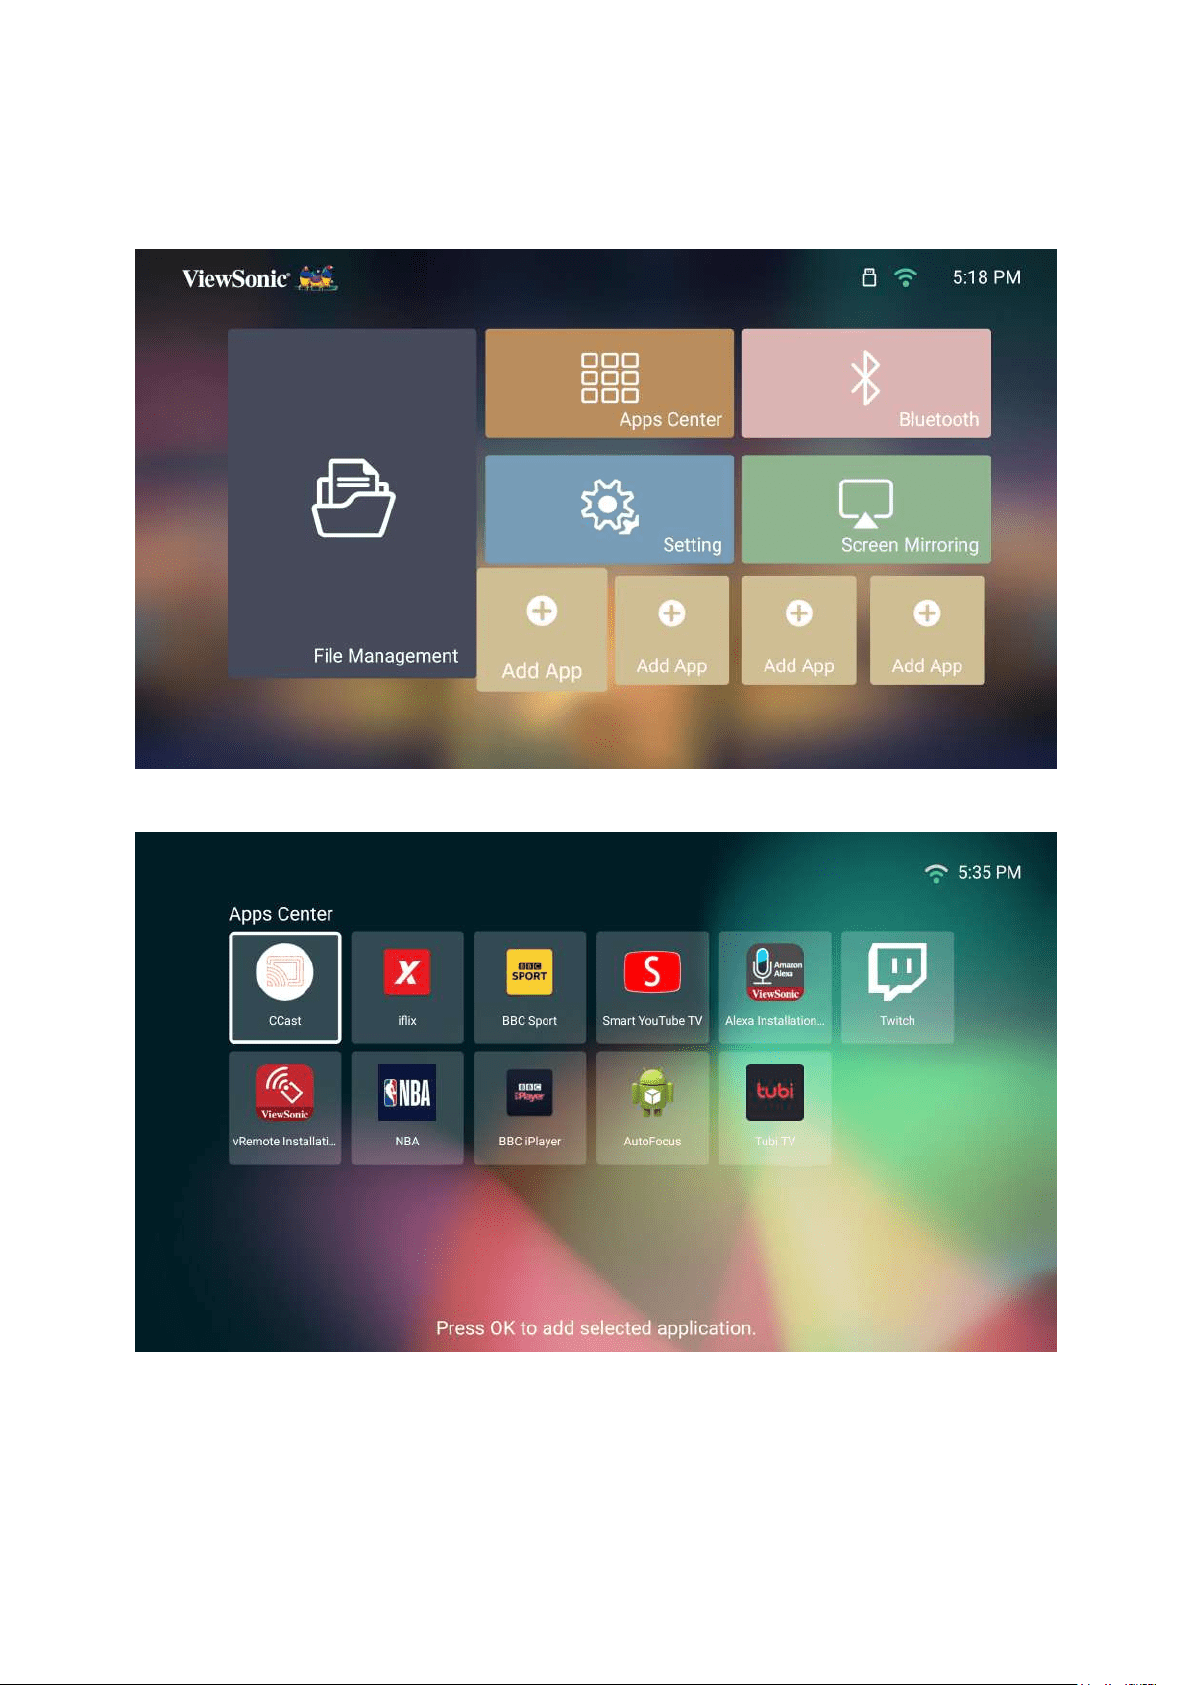
Adding Apps
Add your favorite Apps to the Home Screen.
1. From the Home Screen, select Add App and then press OK on the remote
control.
2. OK.
78
3. Now your favorite App will appear on the Home Screen.
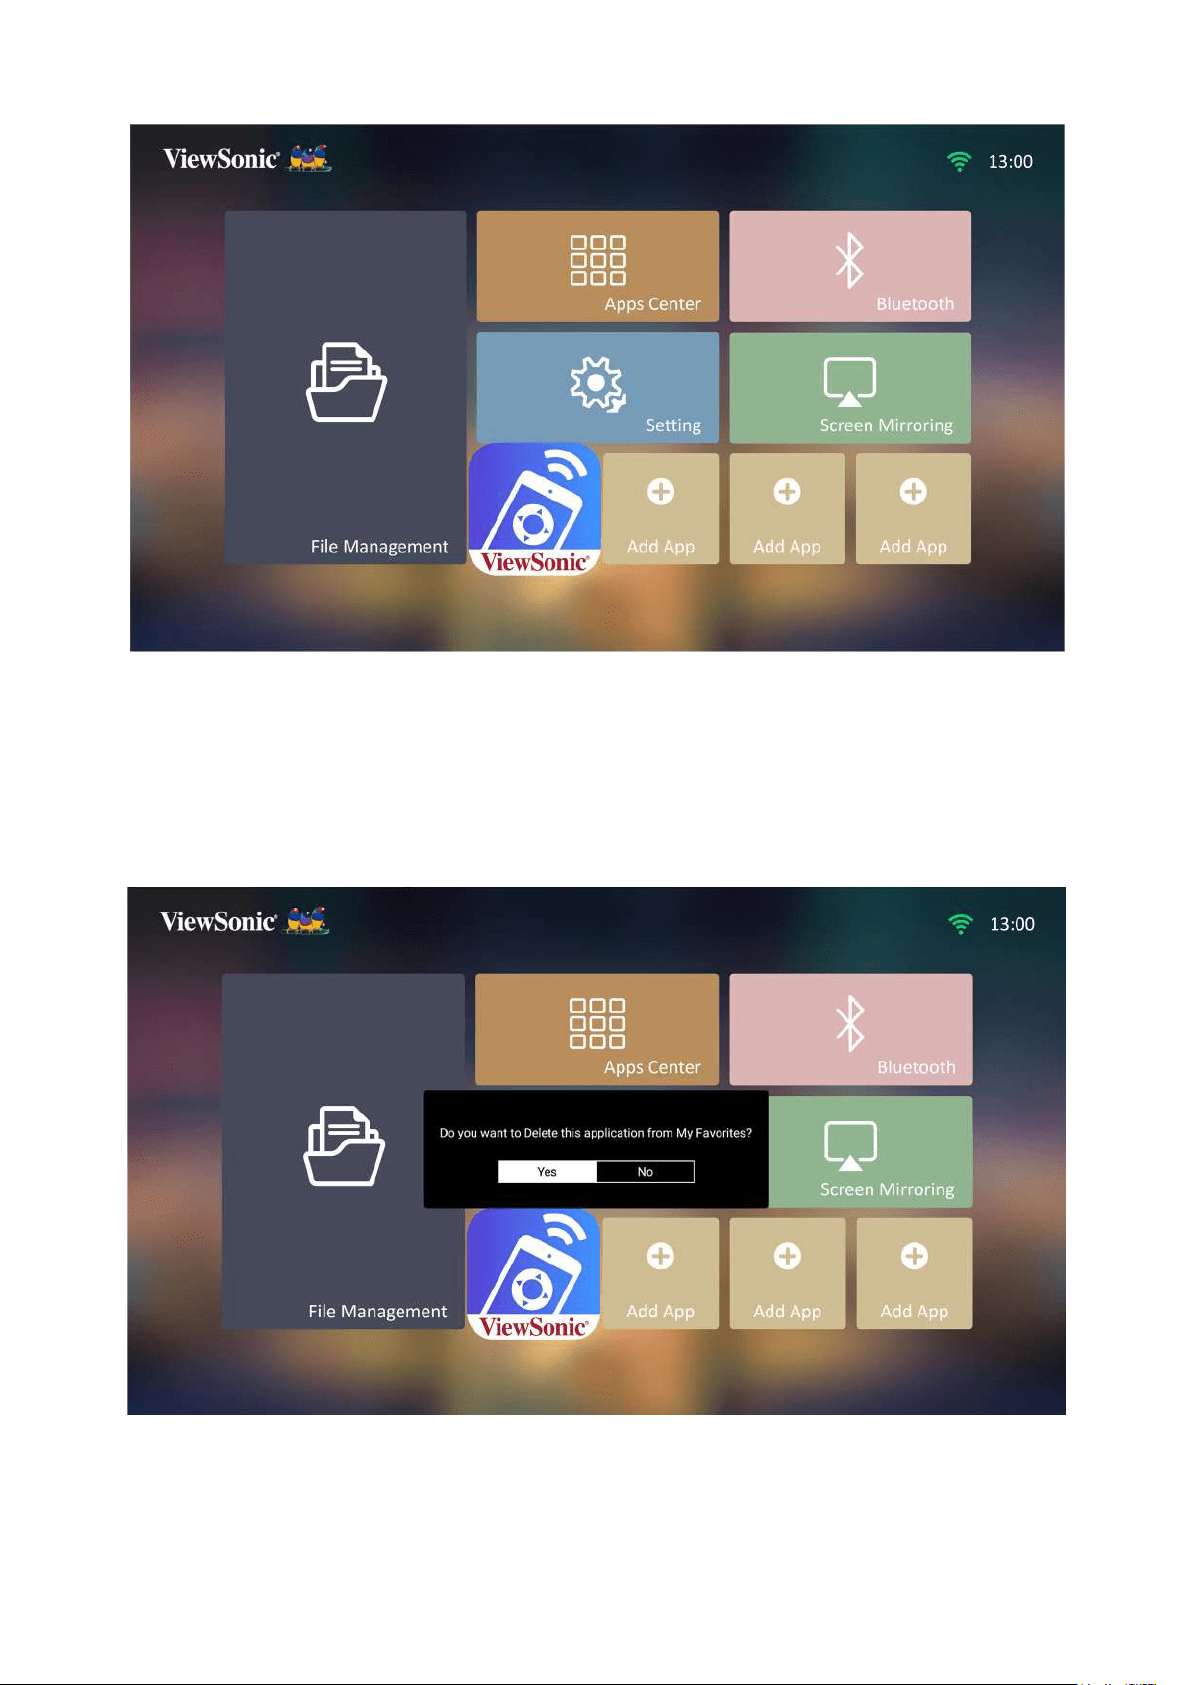
Delete Apps From the Home Screen
1. From the Home Screen, select the App you want to delete and press and hold OK
for three (3) seconds.
2.
appear.
3. Select Yes, and press OK to delete the App.

79
Appendix
Specicaons
Item Category Specicaons
Projector
Type
30”~100”
0.65-2.68 m (80”±3%@2.14 m)
F=1.7, f=6.35 mm
Fixed
(Normal)
up to 30,000 hours
1.07 Billion Colors
Keystone
Input Signal
f
h
v
1920 x 1080
Support
Total 16 GB
Available 10 GB
Input
USB Type-C 1 (5V/2A)
USB Type-A 1 USB 2.0 Reader
Wi-Fi Input 1 (5G and 2.4G)
Output
Audio-Out (3.5 mm) 1
Bluetooth Output 1 (BT 4.2/Audio Out)
Speaker 3W Cube x 2
USB Type A (Power) 1 (USB 2.0, 5V/2A, share with reader)
Power Adapter¹
Input Voltage
Temperature
Humidity 0% to 90% (non-condensing)
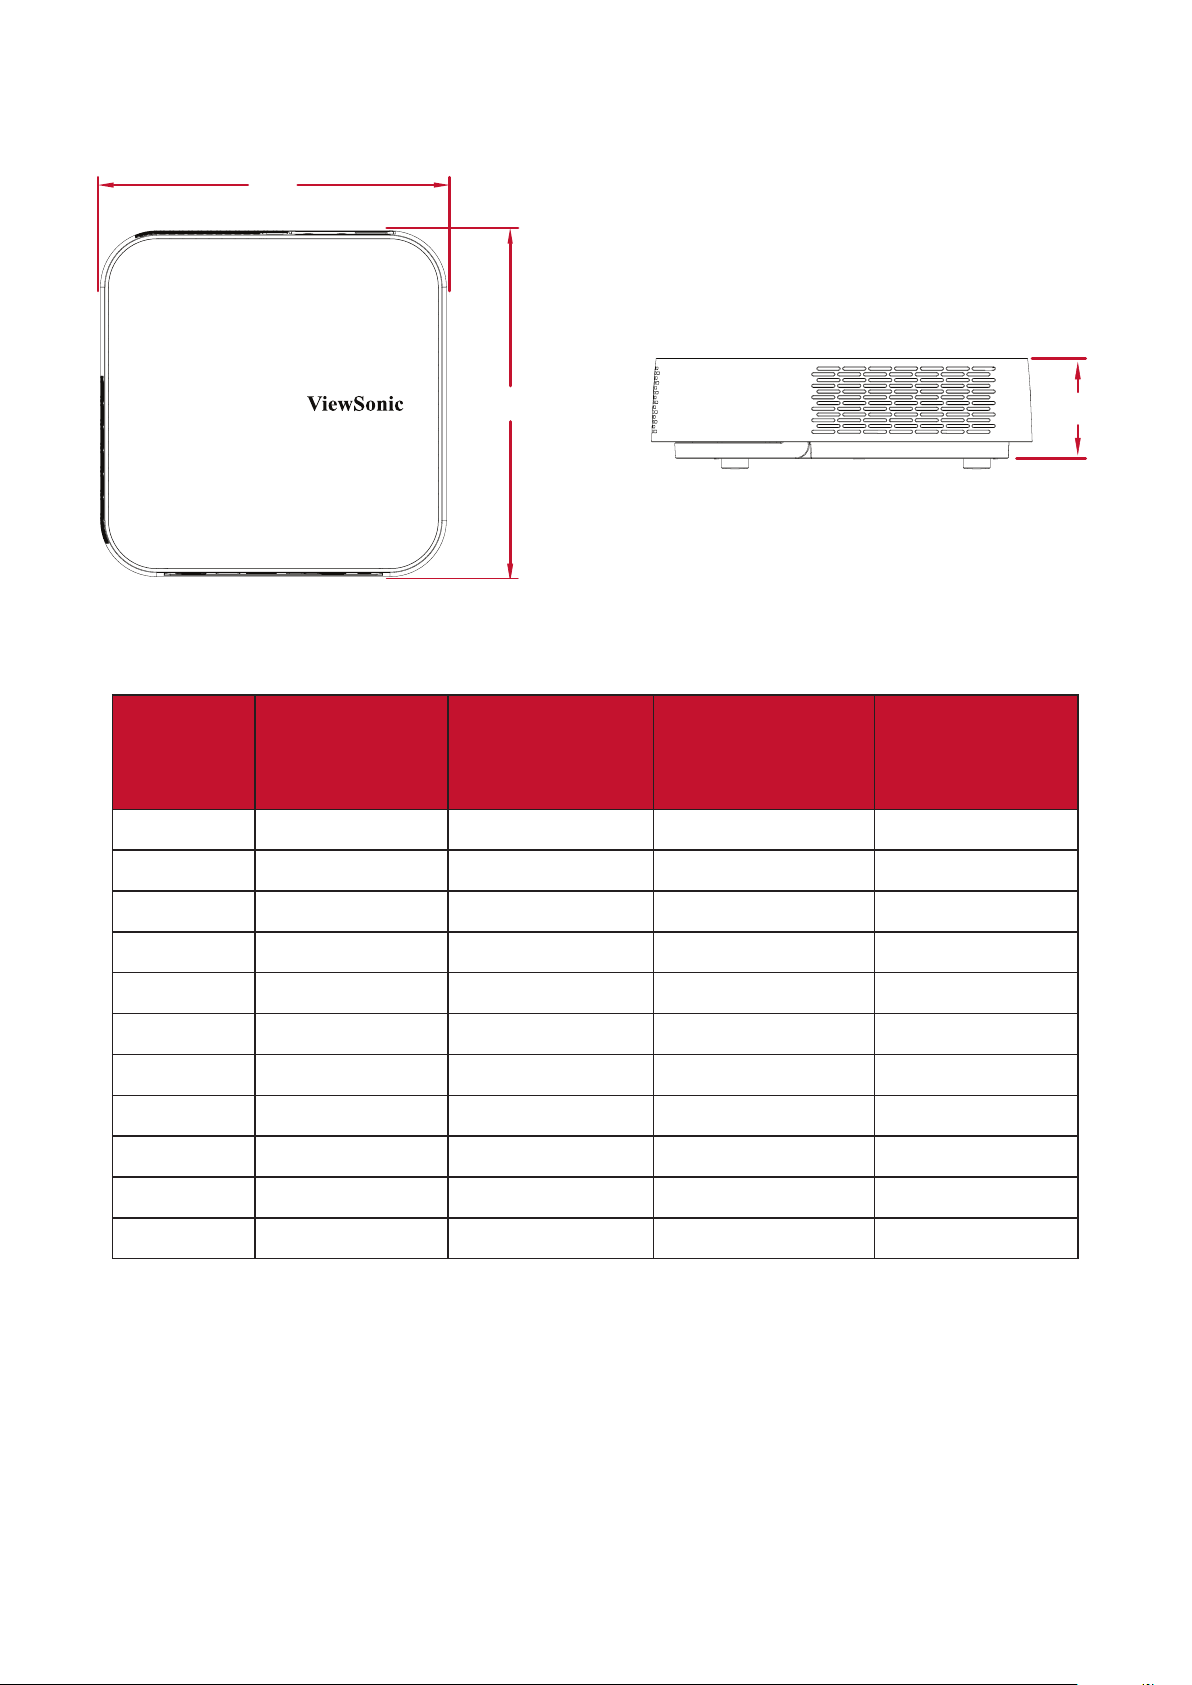
Physical
184 x 184 x 54 mm
(7.2” x 7.2” x 2.1”)
Weight
Physical 1.0 kg (2.20 lbs)
Power
On 54W (Typical)
< 0.5W (Standby)
¹
80
Projector Dimensions
184
184
54
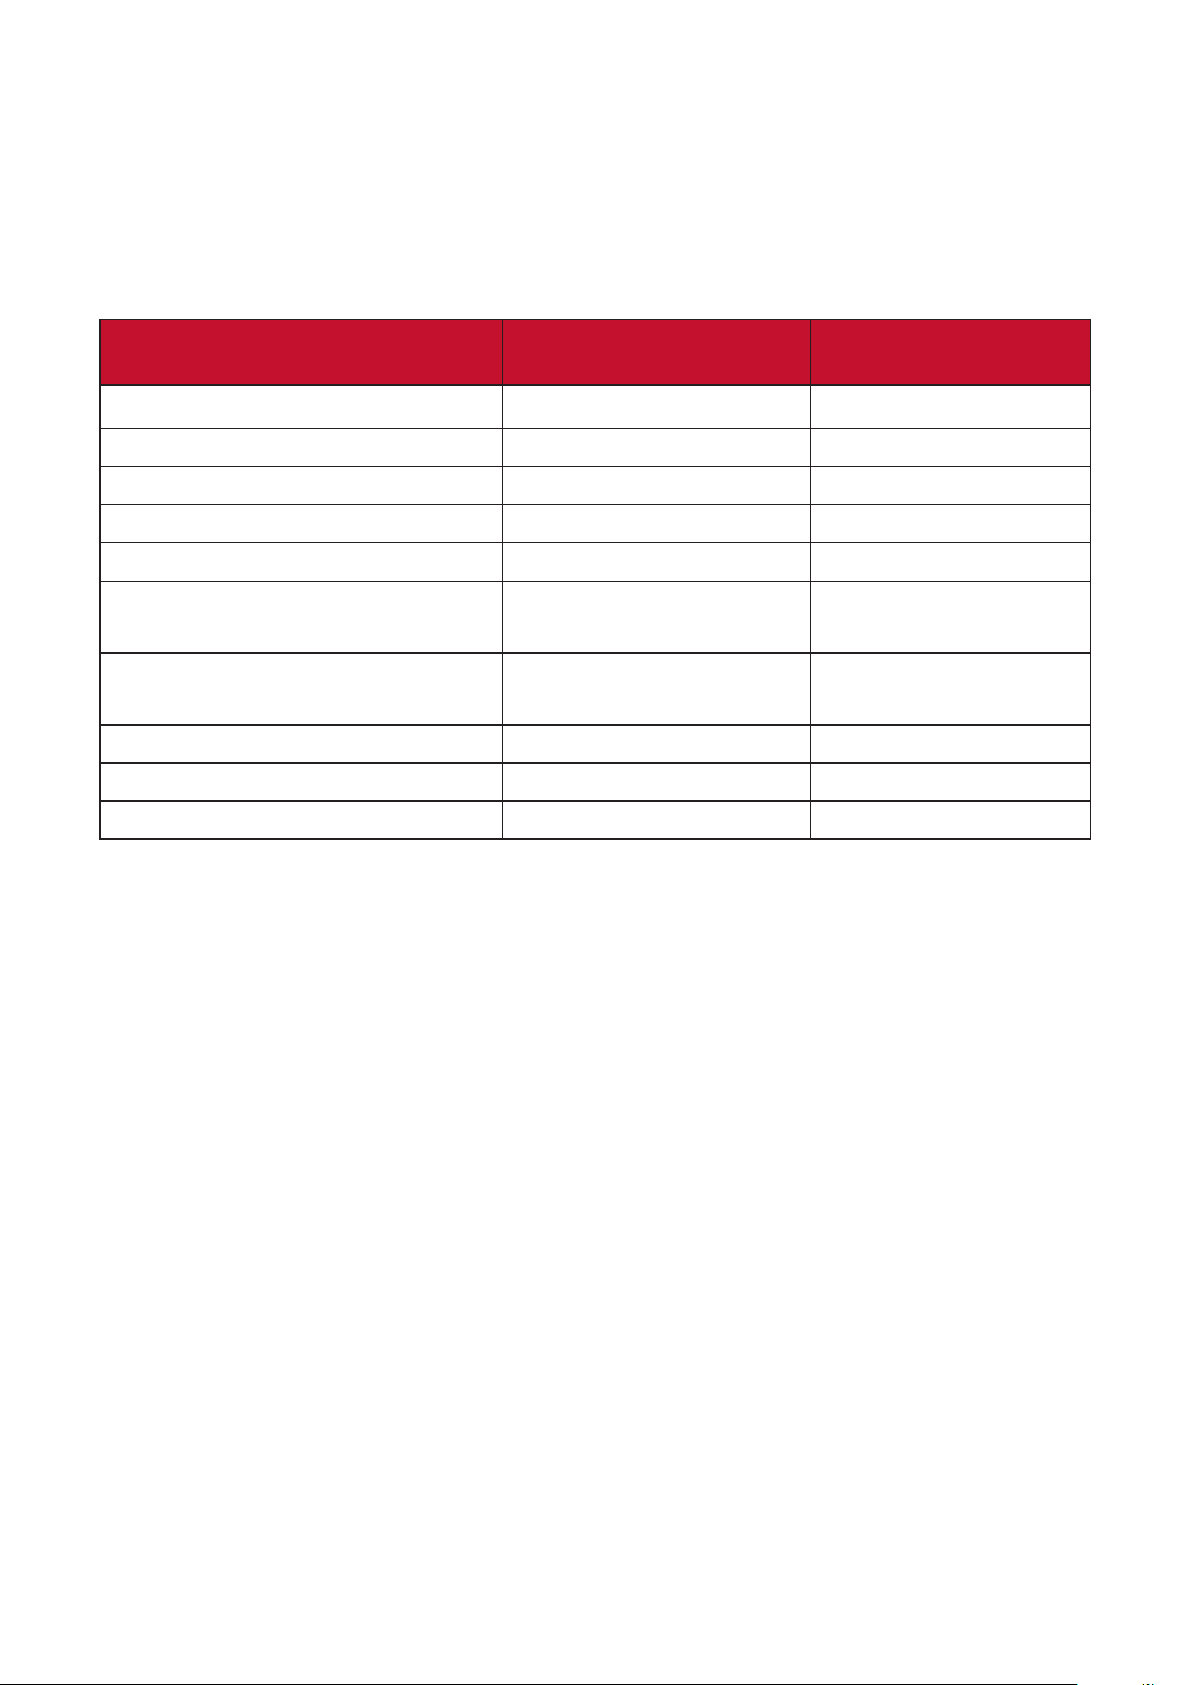
Timing Chart
HDMI Video Timing
Timing Resoluon
Horizontal
Frequency
(KHz)
Vercal
Frequency (Hz)
Dot Clock
Frequency
(MHz)
480i
720(1440) x 480 15.73 59.94 27
480p
720 x 480 31.47 59.94 27
576i
720(1440) x 576 15.63 50 27
576p
720 x 576 31.25 50 27
720/50p
1280 x 720 37.5 50 74.25
720/60p
1280 x 720 45 60 74.25
1080/50i
1920 x 1080 28.13 50 74.25
1080/60i
1920 x 1080 33.75 60 74.25
1080/24P
1920 x 1080 27 24 74.25
1080/50P
1920 x 1080 56.25 50 148.5
1080/60P
1920 x 1080 67.5 60 148.5
81
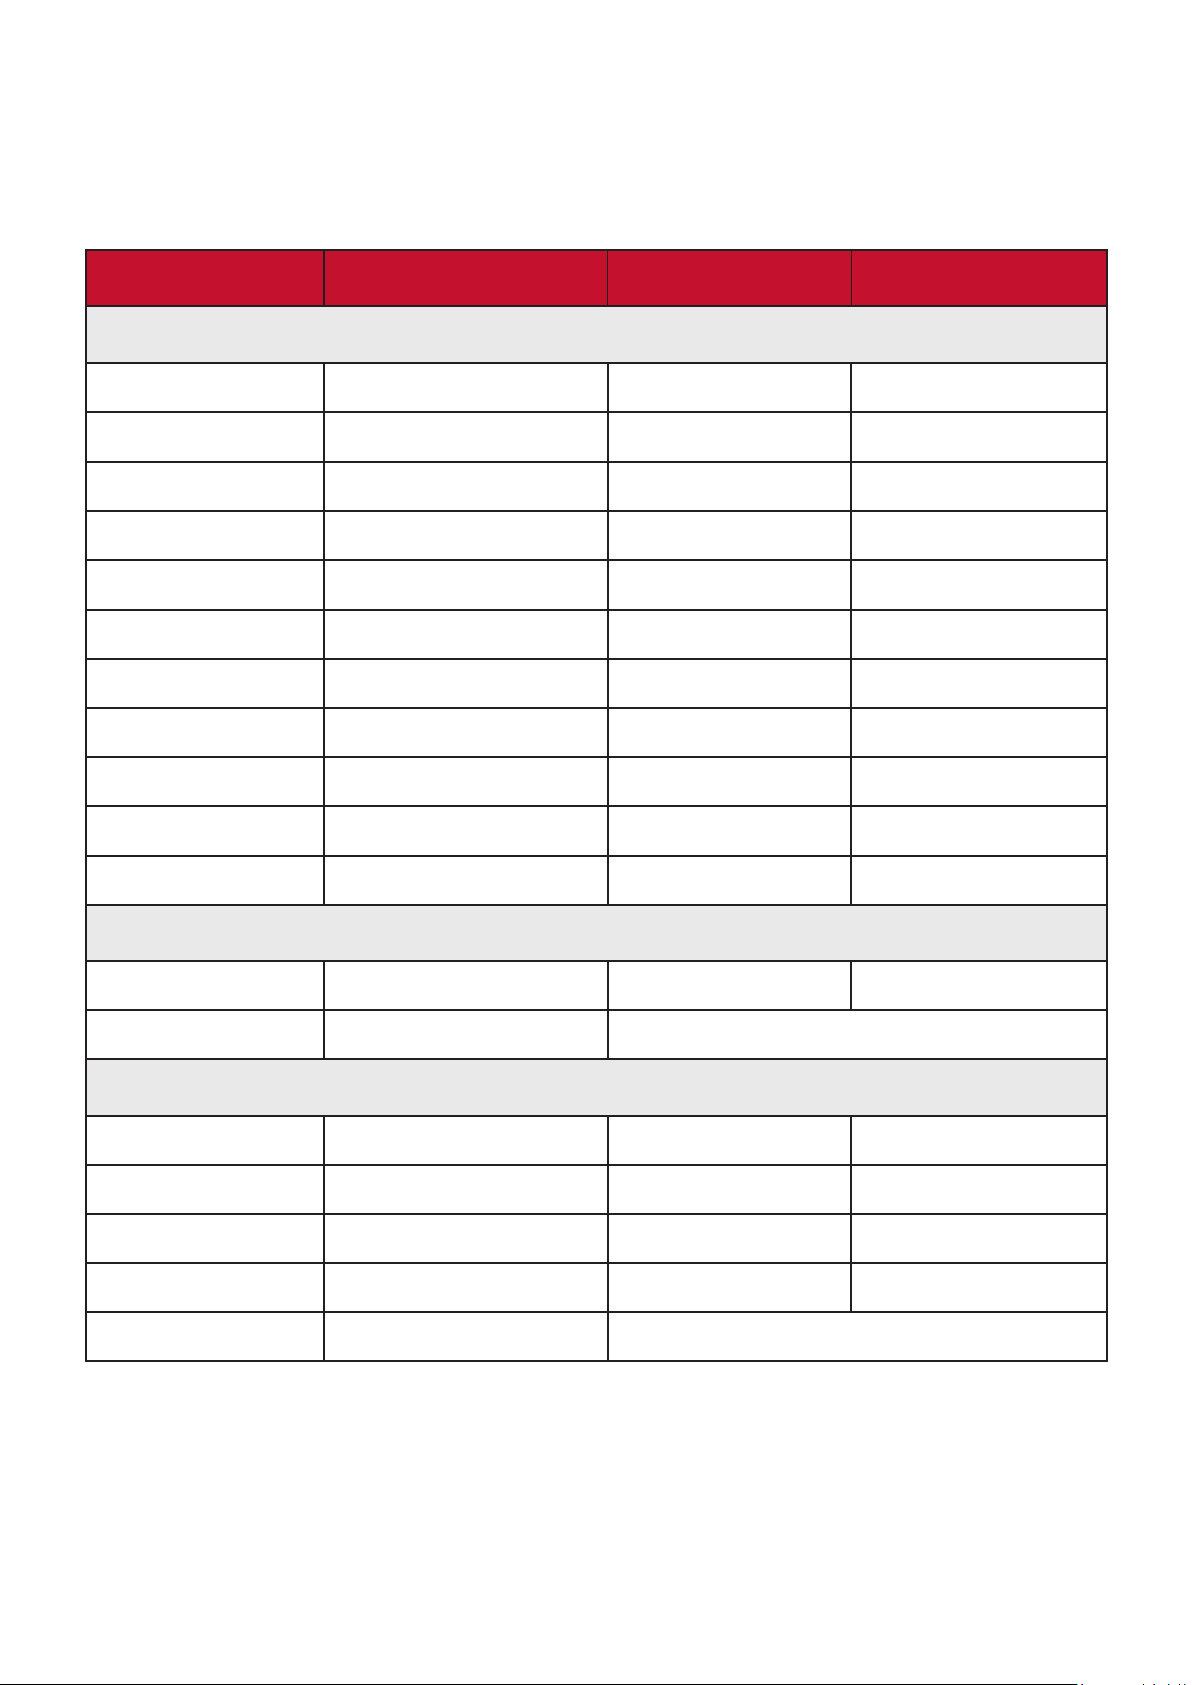
HDMI PC
Resoluon Refresh Rate (Hz)
Horizontal
Frequency (KHz)
Dot Clock
Frequency (MHz)
640 x 480
59.94 31.469 25.175
72.809 37.861 31.5
75 37.5 31.5
85.008 43.269 36
720 x 400
70.087 31.469 28.3221
800 x 600
60.317 37.879 40
72.188 48.077 50
75 46.875 49.5
85.061 53.674 56.25
119.854 77.425 83
1024 x 576
60 35.82 46.966
1024 x 600
64.995 41.467 51.419
1024 x 768
60.004 48.363 65
70.069 56.476 75
75.029 60.023 78.75
84.997 68.667 94.5
119.989 97.441 115.5
1152 x 864
75 67.5 108
1280 x 720
60 45 74.25
1280 x 768
59.87 47.776 79.5
1280 x 800
59.81 49.702 83.5
74.934 62.795 106.5
84.88 71.554 122.5
1280 x 960
60 60 108
85.002 85.938 148.5
1280 x 1024
60.02 63.981 108
75.025 79.976 135
85.024 91.146 157.5
1360 x 768
60.015 47.712 85.5
1400 x 1050
59.978 65.317 121.75
1440 x 900
59.887 55.935 106.5
1600 x 1200
60 75 162
1680 x 1050
59.954 65.29 146.25
1920 x 1080 (VESA)
60 67.5 148.5

82
Resoluon Refresh Rate (Hz)
Horizontal
Frequency (KHz)
Dot Clock
Frequency (MHz)
640 x 480 @ 67Hz
66.667 35 30.24
832 x 624 @ 75Hz
74.546 49.722 57.28
1024 x 768 @ 75Hz
75.02 60.241 80
1152 x 870 @ 75Hz
75.06 68.68 100
83
USB C Timing
Resoluon Refresh Rate (Hz)
Horizontal
Frequency (KHz)
Dot Clock
Frequency (MHz)
480i
59.94 15.73 27
480p
59.94 31.47 27
576i
50 15.63 27
576p
50 31.25 27
720/50p
50 37.5 74.25
720/60p
60 45 74.25
1080/50i
50 28.13 74.25
1080/60i
60 33.75 74.25
1080/24p
24 27 74.25
1080/50p
50 56.25 148.5
1080/60p
60 67.5 148.5
84
Troubleshoong
using the projector.
Problem or Issue Possible Soluons
The projector does not
turn on
•
projector and to the power outlet.
• If the cooling process has not completed, please
projector again.
• If the above does not work, try another power
outlet or another electrical device with the same
power outlet.
There is no picture • Ensure the video source cable is connected
properly, and that the video source is turned on.
•
select the correct source with the Source key on
either the projector or the remote control.
The image is blurred •
• Ensure the projector and screen are aligned
properly. If necessary, adjust the height of the
The remote control
does not work
• Ensure there are no obstacles between the remote
control and projector; and that they are within 8 m
•
and replace if necessary.

85
LED Indicators
Light Status and Descripon
Power
Red Stand-by mode (5 sec.) (< 0.5W)
Green Power On

86
Maintenance
General Precauons
•
power outlet.
• Never remove any parts from the projector. Contact ViewSonic® or a reseller
when any part of the projector needs replacing.
• Never spray or pour any liquid directly onto the case.
•
show marks more clearly than a lighter-colored projector.
Cleaning the Lens
• Use a canister of compressed air to remove dust.
•
lens cleaner and gently wipe the surface.
CAUTION: Never rub the lens with abrasive materials.
Cleaning the Case
•
•
the surface.
CAUTION:
Storing the Projector
• Ensure the temperature and humidity of the storage area are within the
recommend range.
• Retract the adjuster foot completely.
•
• Pack the projector in its original packaging or equivalent.
Disclaimer
• ViewSonic® does not recommend the use of any ammonia or alcohol-based
cleaners on the lens or case. Some chemical cleaners have been reported to
damage the lens and/or case of the projector.
•
alcohol-based cleaners.

87
Regulatory and Service Informaon
Compliance Informaon
and relevant markings on the unit.
FCC Compliance Statement
device must accept any interference received, including interference that may
with the limits for a Class B digital device, pursuant to part 15 of the FCC Rules.
can radiate radio frequency energy, and if not installed and used in accordance
is encouraged to try to correct the interference by one or more of the following
measures:
• Reorient or relocate the receiving antenna.
•
•
the receiver is connected.
• Consult the dealer or an experienced radio/TV technician for help.
Warning:
by the party responsible for compliance could void your authority to operate the
equipment.
Industry Canada Statement
FCC Radiaon Exposure Statement

88
party responsible for compliance could void the user’s authority to operate the
equipment.
IC Warning Statement
This device complies with Industry Canada license- exempt RSS standard(s).
cause interference, and (2) this device must accept any interference, including
Country Code Statement
For product available in the USA/Canada market, only channel 1~11 can be
IC Radiaon Exposure Statement
an uncontrolled environment. This equipment should be installed and operated
interference to co-channel mobile satellite systems.
brouillage

89
CE Conformity for European Countries
The following informaon is only for EU-member states:
The mark shown to the right is in compliance with the Waste Electrical
indicates the requirement NOT to dispose of the equipment as unsorted
municipal waste, but use the return and collection systems according to
local law.
90
Declaraon of RoHS2 Compliance
Substance Proposed Maximum
Concentraon
Actual Concentraon
0.1% < 0.1%
Mercury (Hg) 0.1% < 0.1%
Cadmium (Cd) 0.01% < 0.01%
0.1% < 0.1%
Polybrominated biphenyls (PBB) 0.1% < 0.1%
Polybrominated diphenyl ethers
0.1% < 0.1%
Bis(2-Ethylhexyl) phthalate
0.1% < 0.1%
0.1% < 0.1%
0.1% < 0.1%
0.1% < 0.1%
Certain components of products as stated above are exempted under the Annex
III of the RoHS2 Direcves as noted below. Examples of exempted components
are:
•
Short length (500 mm): maximum 3.5 mg per lamp.
Medium length (> 500 mm and 1,500 mm): maximum 5 mg per lamp.
•
•
•
• Copper alloy containing up to 4% lead by weight.
•
85% by weight or more lead).
• Electrical and electronic components containing lead in a glass or ceramic other
ceramic matrix compound.

91
Indian Restricon of Hazardous Substances
with the “India E-waste Rule 2011” and prohibits use of lead, mercury, hexavalent
chromium, polybrominated biphenyls or polybrominated diphenyl ethers in
Product Disposal at End of Product Life
ViewSonic® website to learn more.
USA & Canada:
http://www.viewsonic.com/company/green/recycle-program/
Europe:
http://www.viewsoniceurope.com/eu/support/call-desk/
Taiwan:
https://recycle.epa.gov.tw/

92
Copyright Informaon
Macintosh and Power Macintosh are registered trademarks of Apple Inc.
ViewSonic®, the three birds logo, OnView, ViewMatch, and ViewMeter are
Agency (EPA).
Disclaimer:
M2e_UG_ENG_1d_20210907
93
Customer Service
For technical support or product service, see the table below or contact your
reseller.
NOTE: You will need the product’s serial number.
Country/ Region Website Country/ Region Website
Asia Pacic & Africa
Australia www.viewsonic.com/au/ Bangladesh www.viewsonic.com/bd/
中国 (China)
www.viewsonic.com.cn
香港 (繁體中文)
www.viewsonic.com/hk/
Hong Kong (English) www.viewsonic.com/hk-en/ India www.viewsonic.com/in/
Indonesia www.viewsonic.com/id/ Israel www.viewsonic.com/il/
日本 (Japan)
www.viewsonic.com/jp/ Korea www.viewsonic.com/kr/
Malaysia www.viewsonic.com/my/ Middle East www.viewsonic.com/me/
Myanmar www.viewsonic.com/mm/ Nepal www.viewsonic.com/np/
New Zealand Pakistan www.viewsonic.com/pk/
Philippines www.viewsonic.com/ph/ Singapore www.viewsonic.com/sg/
臺灣 (Taiwan)
www.viewsonic.com/tw/
ประเทศไทย
www.viewsonic.com/th/
Việt Nam
www.viewsonic.com/vn/
Americas
United States www.viewsonic.com/us Canada www.viewsonic.com/us
www.viewsonic.com/la
Europe
Europe www.viewsonic.com/eu/ France www.viewsonic.com/fr/
www.viewsonic.com/de/ Ққ
www.viewsonic.com/ru/ España www.viewsonic.com/es/
Türkiye www.viewsonic.com/tr/ www.viewsonic.com/ua/
United Kingdom www.viewsonic.com/uk/

94
Limited Warranty
ViewSonic® Projector
What the warranty covers:
ViewSonic® warrants its products to be free from defects in material and
workmanship, under normal use, during the warranty period. If a product
Replacement product or parts may include remanufactured or refurbished parts or
components.
Limited Three (3) year General Warranty:
Subject to the more limited one (1) year warranty set out below, North and South
America: Three (3) years warranty for all parts excluding the lamp, three (3) years
purchase.
Other regions or countries: Please check with your local dealer or local ViewSonic®
Limited One (1) year Heavy Usage Warranty:
(14) hours average daily usage, North and South America: One (1) year warranty
for all parts excluding the lamp, one (1) year for labor, and ninety (90) days for the
warranty for all parts excluding the lamp, one (1) year for labor, and ninety (90) days
and approval. Applies to manufacturer’s installed lamp only. All accessory lamps
purchased separately are warranted for 90 days.
Who the warranty protects:
What the warranty does not cover:
1.
removed.
2.

95
with the product.
Any damage of the product due to shipment.
failure.
Normal wear and tear.
Any other cause which does not relate to a product defect.
3.
How to get service:
1.
Customer Support (Please refer to the “Customer Support” page). You will need
to provide your product’s serial number.
2. To obtain warranted service, you will be required to provide: (a) the original
and (e) the serial number of the product.
3. Take or ship the product, freight prepaid, in the original container to an
4.
contact ViewSonic®.
Limitaon of implied warranes:

96
Exclusion of damages:
ViewSonic’s liability is limited to the cost of repair or replacement of the product.
ViewSonic® shall not be liable for:
1.
or other commercial loss, even if advised of the possibility of such damages.
2.
3. Any claim against the customer by any other party.
Eect of state law:
you.
Sales outside the U.S.A. and Canada:
U.S.A. and Canada, contact ViewSonic® or your local ViewSonic® dealer.
The warranty period for this product in mainland China (Hong Kong, Macao,
Guarantee Card.
For users in Europe and Russia, full details of warranty provided can be found at:
http://www.viewsonic.com/eu/ under
Projector Warranty Term Template In UG
VSC_TEMP_2005

97
Mexico Limited Warranty
ViewSonic® Projector
What the warranty covers:
ViewSonic® warrants its products to be free from defects in material and
workmanship, under normal use, during the warranty period. If a product
Replacement product or parts may include remanufactured or refurbished parts or
How long the warranty is eecve:
3 years for all parts excluding the lamp, 3 years for labor, 1 year for the original
to manufacturer’s installed lamp only.
All accessory lamps purchased separately are warranted for 90 days.
Who the warranty protects:
What the warranty excludes and does not cover:
1.
2.
Any damage of the product due to shipment.
failure.
Normal wear and tear.
Any other cause which does not relate to a product defect.
3.
4.

98
How to get service:
will need to provide your product’s serial number, so please record the product
Please retain your receipt of proof of purchase to support your warranty claim.
For Your Records
Product Name: Model Number:
Serial Number:
(Y/N)
1. To obtain warranty service, you will be required to provide (a) the original dated
(e) the serial number of the product.
2.
ViewSonic® service center.
3.
ViewSonic®.
Limitaon of implied warranes:
Exclusion of damages:
ViewSonic®’s liability is limited to the cost of repair or replacement of the product.
ViewSonic® shall not be liable for:
1.
or other commercial loss, even if advised of the possibility of such damages.
2.
3. Any claim against the customer by any other party.
4.

99
Name, address, of manufacturer and importers:
Hermosillo:
Col. Bugambilias C.P: 83140
Tel: 01-66-22-14-9005
E-Mail: [email protected]ared.net.mx
Villahermosa:
Tel: 01 (993) 3 52 00 47 / 3522074 / 3 52 20 09
E-Mail: compumantenimientos@prodigy.net.mx
Puebla, Pue. (Matriz):
E-Mail: dat[email protected]x
Veracruz, Ver.:
Fracc. Reforma C.P. 91919
Tel: 01-22-91-00-31-67
E-Mail: g[email protected]x
Chihuahua:
Soluciones Globales en Computación
Chihuahua, Chih.
Tel: 4136954
E-Mail: Cef[email protected]
Cuernavaca:
Compusupport de Cuernavaca SA de CV
C.P. 62040, Cuernavaca Morelos
Tel: 01 777 3180579 / 01 777 3124014
E-Mail: aquev[email protected]
Distrito Federal:
Av. Coyoacán 931
Tel: 01(52)55-50-00-27-35
E-Mail : g[email protected]x
Guadalajara, Jal.:
SERVICRECE, S.A. de C.V.
44170, Guadalajara, Jalisco
Tel: 01(52)33-36-15-15-43
E-Mail: mmir[email protected]
Guerrero Acapulco:
GS Computación (Grupo Sesicomp)
39300 Acapulco, Guerrero
Tel: 744-48-32627
Monterrey:
Global Product Services
Fracc. Bernardo Reyes, CP 64280
Tel: 8129-5103
E-Mail: a[email protected]
MERIDA:
Av Reforma No. 403Gx39 y 41
Tel: (52) 999-925-1916
E-Mail: rrrb@sureste.com
Oaxaca, Oax.:
SERVICIO, S.A. de C.V.
Tel: 01(52)95-15-15-22-22
Fax: 01(52)95-15-13-67-00
E-Mail. [email protected]om
Tijuana:
Col 20 de Noviembr
Tijuana, Mexico
FOR USA SUPPORT:
ViewSonic®
381 Brea Canyon Road, Walnut, CA. 91789 USA
Tel: 800-688-6688
Projector Mexico Warranty Term Template In UG
VSC_TEMP_2006

C0 M91 Y72 K24
Process Color
C0 M0 Y0 K100
Process Color
C0 M91 Y72 K24
Process Color
Pantone Black C
Spot Color
Pantone 187 C
Spot Color
Pantone Black C
Spot Color
Pantone 187 C
Or Spot Color
