Owners' Guide Projector
Introduction
Projector features
The projector integrates high-performance optical engine projection and a user-friendly design to deliver high reliability and ease of use.
 Some of the features may not be available on your projector. Actual performance may vary and subject to model specifications.
- Power saving function decreasing the power consumption of the lamp by up to 70% when no input signal can be detected for a set period of time.
- Presentation timer for better control of time during presentations
- Supports 3D display
- Color Management allowing color adjustments to your liking
- Less than 0.5W power consumption when power saving mode is turned on
- Screen Color correction allowing projection on surfaces of several predefined colors
- Quick auto search speeding up the signal detecting process
- Color modes providing choices for different projection purposes
- One-key auto-adjustment to display the best picture quality (only for analog signal)
- Digital keystone correction to correct distorted images
- Adjustable color management control for data/video display
- Ability to display 1.07 billion colors
- Multi-language On-Screen Display (OSD) menus
- Switchable normal and economic modes to reduce the power consumption
- Component HDTV compatibility (YPbPr)
- HDMI CEC (Consumer Electronics Control) function allows synchronized power ON/ OFF operation between the projector and a CEC-compatible DVD player device connected to the HDMI input of the projector
 The apparent brightness of the projected image will vary depending on the ambient lighting conditions, selected input signal contrast/brightness settings, and is directly proportional to projection distance.
 The lamp brightness will decline over time and may vary within the lamp manufacturers specifications. This is normal and expected behavior.
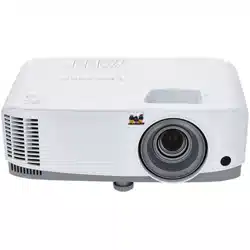
Shipping contents
- Projector
- Power Cord
- Quick Start Guide
- Remote Control & Batteries
- VGA Cable
- Replacement lamp (optional) (Please contact qualified service personnel for changing the lamp)
- Soft carry case (optional)
- Dust filter (optional)
Controls and functions
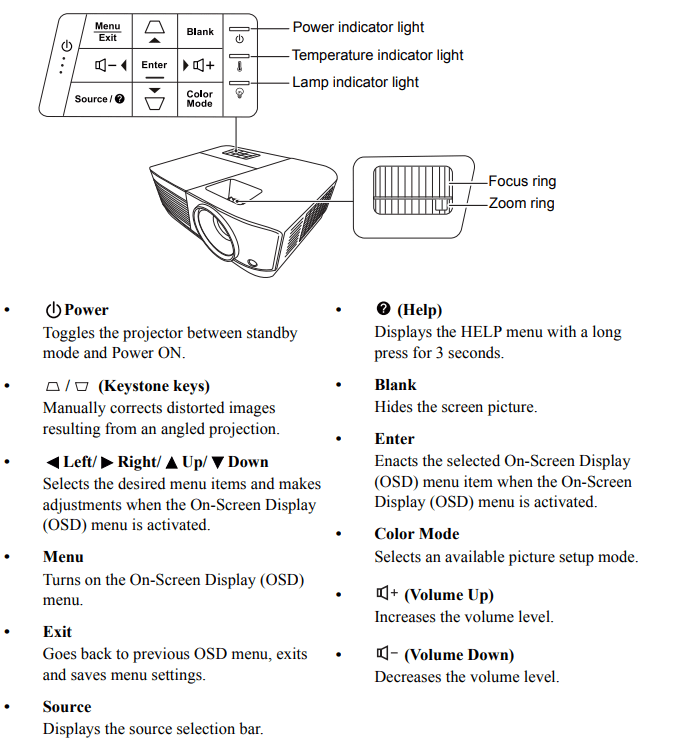
Projector
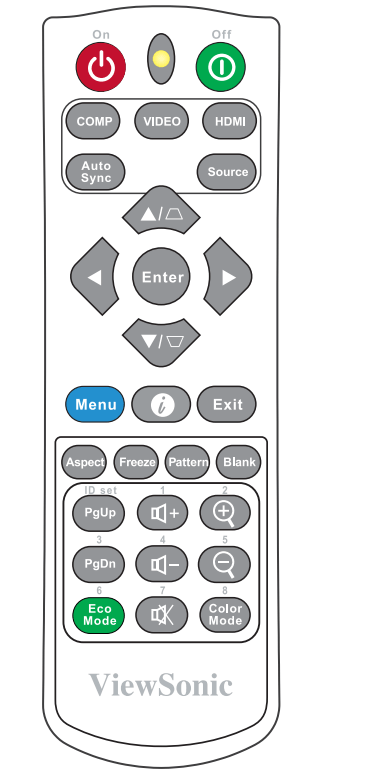
Remote control

Remote control code
The projector can be assigned to 8 different remote control codes, 1 to 8. When several adjacent projectors are in operation at the same time, switching the remote control codes can prevent interference from other remote controls. Set the remote control code for the projector first before changing that for the remote control.
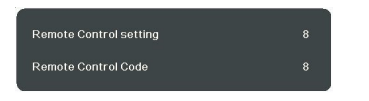
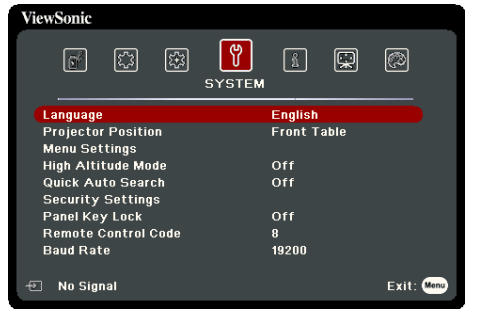
To switch the code for the projector, select from among 1 to 8 in the SYSTEM > Remote Control Code menu.
To switch the code for the remote control, press ID set and the number button corresponding to the remote control code set in the projector OSD together for 5 seconds or more. The initial code is set to 1. When the code is switched to 8, the remote control can control every projector.
 If different codes are set on the projector and remote control, there will be no response from the remote control. When that happens, a message will display to remind you to switch the code for the remote control.
Using the remote PgUp/PgDn function
The capability of operating your computer with the remote control gives you more flexibility when delivering presentations.
- Set the input signal to a PC signal.
- Connect the projector to your PC or notebook with a USB cable prior to using the remote control in place of your computer’s mouse. See "Connecting a computer or monitor" on page 14 for details.
- To operate your display software program (on a connected PC) which responds to page up/down commands (like Microsoft PowerPoint), press PgUp/PgDn.
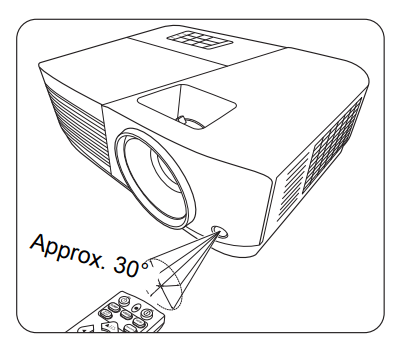
Remote control effective range
Refer to the illustration about the location of the InfraRed (IR) remote control sensor(s). The remote control must be held at an angle within 30 degrees perpendicular to the projector's IR remote control sensor(s) to function correctly. The distance between the remote control and the sensor(s) should not exceed 8 meters (~ 26 feet).
Make sure that there are no obstacles between the remote control and the IR sensor(s) on the projector that might obstruct the infra-red beam.
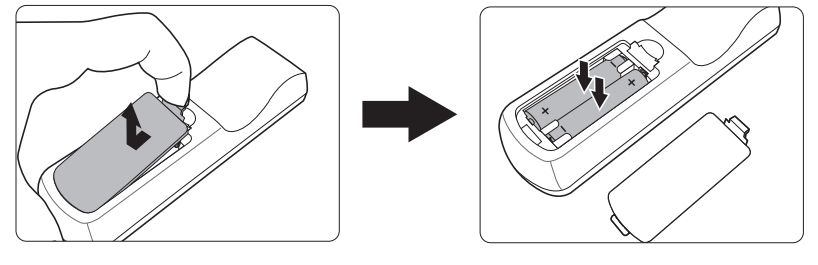
Replacing the remote control batteries
- To open the battery cover, turn the remote control over to view its back, press on the finger grip on the cover and slide it down in the direction of the arrow as illustrated.
- Remove any existing batteries (if necessary) and install two AAA batteries observing the battery polarities as indicated in the base of the battery compartment. Positive (+) goes to positive and negative (-) goes to negative.
- Refit the cover by aligning it with the base and pushing it back down into position. Stop when it clicks into place.
WARNING
- Avoid leaving the remote control and batteries in an excessive heat or humid environment like the kitchen, bathroom, sauna, sunroom or in a closed car.
- Replace only with the same or equivalent type recommended by the battery manufacturer.
- Dispose of the used batteries according to the manufacturer's instructions and local environment regulations for your region.
- Never throw the batteries into a fire. There may be danger of an explosion.
- If the batteries are drained or if you will not be using the remote control for an extended period of time, remove the batteries to avoid damage to the remote control from possible battery leakage.
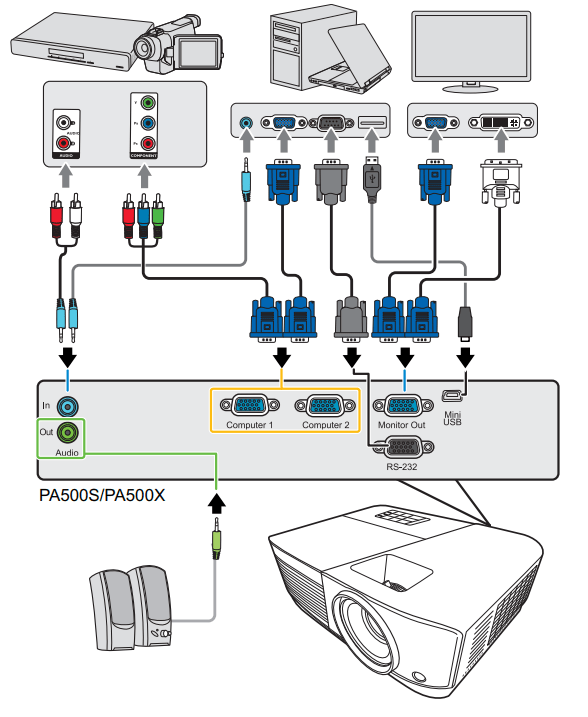
When connecting a signal source to the projector, be sure to:
- Turn all equipment off before making any connections.
- Use the correct signal cables for each source.
- Ensure the cables are firmly inserted.
 In the connections shown below, some cables may not be included with the projector (see "Shipping contents" on page 4). They are commercially available from electronics stores.
 The connection illustrations below are for reference only. The connecting jacks available on the projector vary with each projector model.
 For detailed connection methods, see pages 14-17.
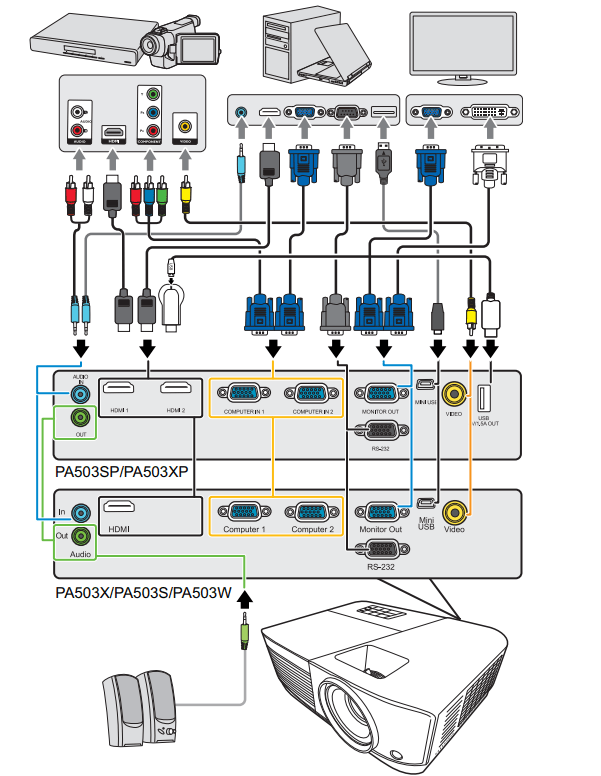
*USB Type A connector supports 5V/1.5A power output for HDMI dongle charging.
Connecting a computer or monitor
Connecting a computer
- Take the supplied VGA cable and connect one end to the D-Sub output socket of the computer.
- Connect the other end of the VGA cable to the Computer 1 or Computer 2 signal input socket on the projector.
- If you wish to use the remote mouse control function, take a USB cable and connect the larger end to the USB port of the computer, and smaller end to the Mini USB socket on the projector. See "Using the remote PgUp/PgDn function" on page 7 for details.
 Many notebooks do not turn on their external video ports when connected to a projector. Usually a key combo like FN + F3 or CRT/LCD key turns the external display on/off. Locate a function key labeled CRT/LCD or a function key with a monitor symbol on the notebook. Press FN and the labeled function key simultaneously. Refer to your notebook's documentation to find your notebook's key combination.
Connecting a monitor
If you want to view your presentation close-up on a monitor as well as on the screen, you can connect the Monitor Out signal output socket on the projector to an external monitor with a VGA cable following the instructions below:
- Connect the projector to a computer as described in "Connecting a computer" on page 14.
- Take a suitable VGA cable (only one supplied) and connect one end of the cable to the D-Sub input socket of the video monitor. Or if your monitor is equipped with a DVI input socket, take a VGA to DVI-A cable and connect the DVI end of the cable to the DVI input socket of the video monitor.
- Connect the other end of the cable to the Monitor Out socket on the projector.
 The Monitor Out output only works when Computer 1 connection is made to the projector. To use this connection method in the standby mode, turn on the Active VGA Out function under the POWER MANAGEMENT > Standby Settings menu.
Connecting Video source devices
You can connect your projector to various Video source devices that provide any one of the following output sockets:
- HDMI
- Component Video
- Video (composite)
You need only connect the projector to a Video source device using just one of the above connecting methods, however each provides a different level of video quality. The method you choose will most likely depend upon the availability of matching terminals on both the projector and the Video source device as described below:
Best video quality
The best available video connection method is HDMI. If your source device is equipped with an HDMI socket, you can enjoy uncompressed digital video quality.
See "Connecting an HDMI device" on page 16 for how to connect the projector to an HDMI source device and other details.
If no HDMI source is available, the next best video signal is Component video (not to be confused with composite video). Digital TV tuner and DVD players output Component video natively, so if available on your devices, this should be your connection method of choice in preference to (composite) video.
See "Connecting a Component Video source device" on page 16 for how to connect the projector to a component video device.
Least video quality
Composite Video is an analog video and will result in a perfectly acceptable, but less than optimal result from your projector, being the least video quality of the available methods described here.
See "Connecting a composite Video source device" on page 16 for how to connect the projector to a composite Video device.
Connecting audio
You can make use of the projector speaker in your presentations, and also connect separate amplified speakers to the Audio Out socket of the projector. The audio output is controlled by the projector Volume and Mute settings.
Connecting an HDMI device
You should use an HDMI cable when making connection between the projector and HDMI devices.
- Take an HDMI cable and connect one end to the HDMI output port of the video device.
- Connect the other end of the cable to the HDMI input port on the projector.
 In the unlikely event that you connect the projector to a DVD player via the projector’s HDMI input and the projected picture displays wrong colors, please change the color space to YUV. See "Changing HDMI input settings" on page 22 for details.
Connecting a Component Video source device
Examine your Video source device to determine if it has a set of unused Component Video output sockets available:
- If so, you can continue with this procedure.
- If not, you will need to reassess which method you can use to connect to the device.
- Take a VGA (D-Sub)-Component adaptor cable and connect the end with 3 RCA type connectors to the Component Video output sockets of the Video source device. Match the color of the plugs to the color of the sockets; green to green, blue to blue, and red to red.
- Connect the other end of the VGA (D-Sub)-Component adaptor cable (with a D-Sub type connector) to the Computer 1 or Computer 2 socket on the projector.
 If the selected video image is not displayed after the projector is turned on and the correct video source has been selected, check that the Video source device is turned on and operating correctly. Also check that the signal cables have been connected correctly.
Connecting a composite Video source device
Examine your Video source device to determine if it has a set of unused composite Video output sockets available:
- If so, you can continue with this procedure.
- If not, you will need to reassess which method you can use to connect to the device.
- Take a Video cable and connect one end to the composite Video output socket of the Video source device.
- Connect the other end of the Video cable to the Video socket on the projector.
 If the selected video image is not displayed after the projector is turned on and the correct video source has been selected, check that the Video source device is turned on and operating correctly. Also check that the signal cables have been connected correctly.
 You need only connect to this device using a composite Video connection if Component Video input is unavailable for use. See "Connecting Video source devices" on page 15 for details.
Playing sound through the projector
You can make use of the projector speaker in your presentations, and also connect separate amplified speakers to the Audio Out socket of the projector.
Operation
Starting up the projector
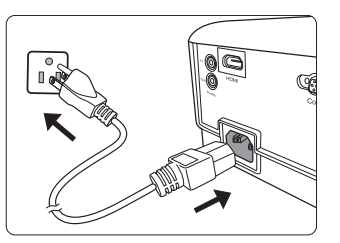
- Plug the power cord into the projector and into a wall socket. Turn on the wall socket switch (where fitted).
- Press
 Power to start the projector. As soon as the lamp lights up, a "Power On Ring Tone" will be heard. The Power indicator light stays blue when the projector is on. (If necessary) Rotate the focus ring to adjust the image clearness.
 If the projector is still hot from previous activity, it will run the cooling fan for approximately 90 seconds before energizing the lamp.
 To maintain the lamp life, once you turn the projector on, wait at least 5 minutes before turning it off.
 To turn off the ring tone, see "Turning off the Power On/Off Ring Tone" on page 32 for details.
- If the projector is activated for the first time, select your OSD language following the on-screen instructions.
- Switch all of the connected equipment on.
- The projector will start to search for input signals. The current input signal being scanned appears in the upper left corner of the screen. If the projector doesn't detect a valid signal, the message 'No Signal' will continue to be displayed until an input signal is found.
You can also press Source to select your desired input signal. See "Switching input signal" on page 22 for details.
 If the frequency/resolution of the input signal exceeds the projector's operating range, you will see the message 'Out of Range' displayed on a blank screen. Please change to an input signal which is compatible with the projector's resolution or set the input signal to a lower setting. See "Timing chart" on page 62 for details.
Using the menus
The projector is equipped with On-Screen Display (OSD) menus for making various adjustments and settings.
 The OSD screenshots below are for reference only, and may differ from the actual design.
Below is the overview of the OSD menu.
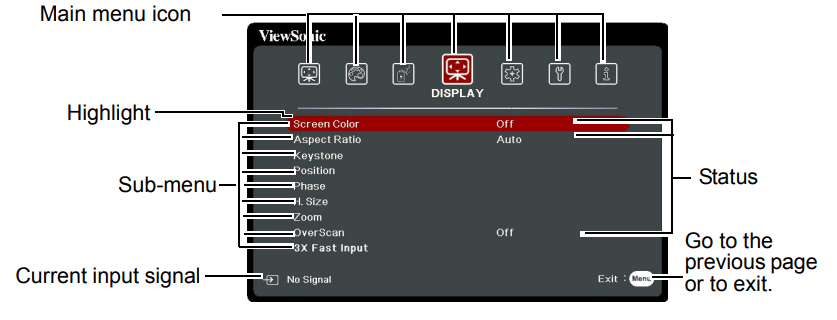
To use the OSD menus, please select your language first.
- Press Menu to turn the OSD menu on.
- Use
 to highlight the SYSTEM menu.
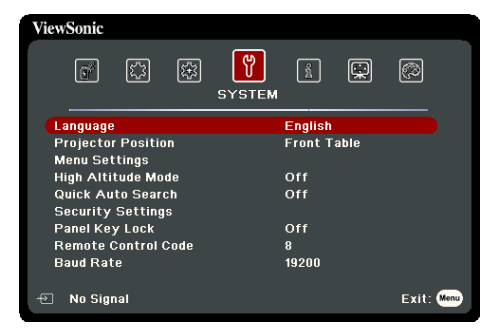
- Press
 to highlight Language and press Enter.
- Use
 to select a preferred language.
- Press Enter to go back to main menu and press Menu to leave the OSD menu.
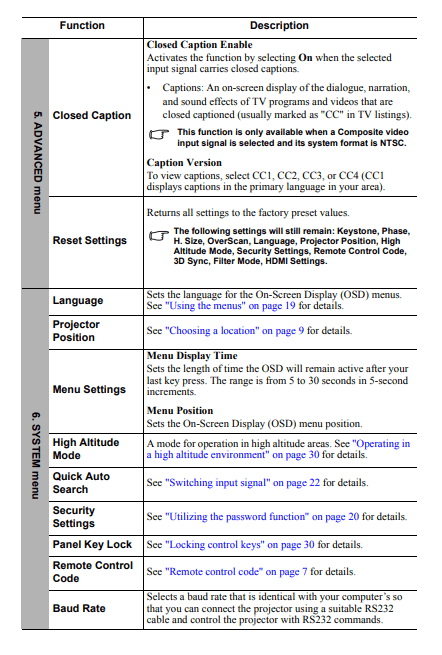
Utilizing the password function
For security purposes and to help prevent unauthorized use, the projector includes an option for setting up password security. The password can be set through the On-Screen Display (OSD) menu. For details of the OSD menu operation, please refer to "Using the menus" on page 19.
 You will be inconvenienced if you enable the password function yet forget the password somehow. Do make a note of your password, and keep the note in a safe place for later recall.
Setting a password
 Once a password has been set and the power on lock is enabled, the projector cannot be used unless the correct password is entered every time the projector is started.
- Open the OSD menu and go to the SYSTEM > Security Settings menu.
- Press Enter and the Security Settings page is displayed.
- Highlight Power On Lock and select On by pressing
 .
.
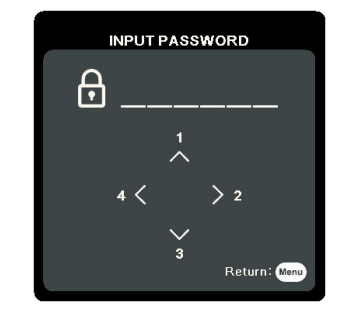
- As pictured to the right, the four arrow keys (
 ) respectively represent 4 digits (1, 2, 3, 4). According to the password you desire to set, press the arrow keys to enter six digits for the password.
- Confirm the new password by re-entering the new password. Once the password is set, the OSD menu returns to the Security Settings page.
- To leave the OSD menu, press Exit.
If you forget the password
If the password function is activated, you will be asked to enter the six-digit password every time you turn on the projector. If you enter the wrong password, the password error message as pictured to the right is displayed lasting for 5 seconds, and the message 'INPUT PASSWORD' follows. You can retry by entering another six-digit password, or if you did not record the password in this user manual, and you absolutely do not remember it, you can use the password recall procedure. See "Entering the password recall procedure" on page 21 for details.
If you enter an incorrect password 5 times in succession, the projector will automatically shut down in a short time.

Entering the password recall procedure
- Press and hold Auto Sync on the remote control for 3 seconds. The projector will display a coded number on the screen.
- Write down the number and turn off your projector.
- Seek help from the local service center to decode the number. You may be required to provide proof of purchase documentation to verify that you are an authorized user of the projector.
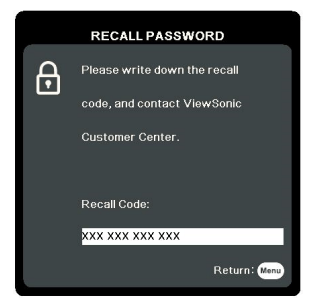
 The "XXX" shown in the above screenshot are numbers that vary depending on different projector models.
Changing the password
- Open the OSD menu and go to the SYSTEM > Security Settings > Change Password menu.
- Press Enter. The message 'INPUT CURRENT PASSWORD' is displayed.
- Enter the old password.
• If the password is correct, another message 'INPUT NEW PASSWORD' is displayed.
• If the password is incorrect, the password error message is displayed lasting for 5 seconds, and the message 'INPUT CURRENT PASSWORD' is displayed for your retry. You can press Exit to cancel or try another password.
- Enter a new password.
- Confirm the new password by re-entering the new password.
- You have successfully assigned a new password to the projector. Remember to enter the new password next time the projector is started.
- To leave the OSD menu, press Exit.
 The digits being input will be displayed as asterisks on-screen. Do make a note of your password, and then keep the note in a safe place for later recall.
Disabling the password function
- Open the OSD menu and go to the SYSTEM > Security Settings > Power On Lock menu.
- Press
 to select Off.
- The message 'INPUT PASSWORD' is displayed. Enter the current password.
• If the password is correct, the OSD menu returns to the Security Settings page with 'Off' shown in the row of Power On Lock. You will not have to enter the password next time you turn on the projector.
• If the password is incorrect, the password error message is displayed lasting for 5 seconds, and the message 'INPUT PASSWORD' is displayed for your retry. You can press Exit to cancel or try another password.
 Though the password function is disabled, you need to keep the old password in hand should you ever need to re-activate the password function by entering the old password.
Switching input signal
The projector can be connected to multiple devices at the same time. However, it can only display one full screen at a time.
Be sure the Quick Auto Search function in the SYSTEM menu is On if you want the projector to automatically search for the signals.
You can also manually select the desired signal by pressing one of the source selection keys on the remote control, or cycle through the available input signals.
- Press Source. A source selection bar is displayed.
- Press
 until your desired signal is selected and press Enter.
Once detected, the selected source information will be displayed on the screen for seconds. If there are multiple devices connected to the projector, repeat steps 1-2 to search for another signal.
 Please see "Projector specifications" on page 66 for the native display resolution of this projector. For best display picture results, you should select and use an input signal which outputs at this resolution. Any other resolutions will be scaled by the projector depending upon the 'aspect ratio' setting, which may cause some image distortion or loss of picture clarity. See "Selecting the aspect ratio" on page 24 for details.
Changing HDMI input settings
In the unlikely event that you connect the projector to a device (like a DVD or Blu-ray player) via the projector’s HDMI input and the projected picture displays wrong colors, please change the color space to an appropriate one that fits the color space setting of the output device.
To do this:
- Open the OSD menu and go to the ADVANCED > HDMI Settings menu.
- Press Enter.
- Highlight HDMI Format and press
 to select a suitable color space according to the color space setting of the output device connected.
• RGB: Sets the color space as RGB.
• YUV: Sets the color space as YUV.
• Auto: Sets the projector to detect the color space setting of the input signal automatically.
- Highlight HDMI Range and press
 to select a suitable HDMI color range according to the color range setting of the output device connected.
• Enhanced: Sets the HDMI color range as 0 - 255.
• Normal: Sets the HDMI color range as 16 - 235.
• Auto: Sets the projector to detect the HDMI range of the input signal automatically.
 This function is only available when the HDMI input port is in use.
 Refer to the documentation of the device for information on the color space and HDMI range settings.
Adjusting the projected image
Adjusting the projection angle
The projector is equipped with an adjuster foot. It changes the image height and vertical projection angle. Screw the adjuster foot to fine tune the angle until the image is positioned where you want it.
If the projector is not placed on a flat surface or the screen and the projector are not perpendicular to each other, the projected image becomes trapezoidal. To correct this situation, see "Correcting keystone" on page 23 for details.
Warning: Do not look into the lens while the lamp is on. The strong light from the lamp may cause damage to your eyes.
Auto-adjusting the image
In some cases, you may need to optimize the picture quality. To do this, press Auto Sync on the remote control. Within 5 seconds, the built-in Intelligent Auto Adjustment function will re-adjust the values of Frequency and Clock to provide the best picture quality.
The current source information will be displayed in the upper left corner of the screen for 3 seconds.
 The screen will display ViewSonic logo while auto adjustment is functioning.
 This function is only available when PC D-Sub input signal (analog RGB) is selected.
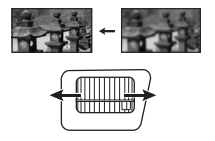
Fine-tuning the image clarity
- Adjust the projected image to the size that you need using the zoom ring.
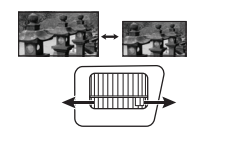
- If necessary, sharpen the image by rotating the focus ring.
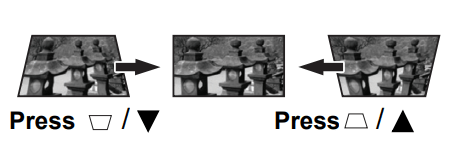
Correcting keystone
Keystoning refers to the situation where the projected image becomes a trapezoid due to angled projection.
To correct this, besides adjusting the height of the projector, you will need to manually correct it following one of these steps.
- Using the remote control
1. Press  to display the Keystone correction page.
2. Press  to correct keystoning at the top of the image. Press
  to correct keystoning at the bottom of the image.
- Using the OSD menu
1. Open the OSD menu and go to the DISPLAY > Keystone menu.
2. Press Enter.
- Press
 to correct keystoning at the top of the image or press
  to correct keystoning at the bottom of the image.
Magnifying and searching for details
If you need to find the details on the projected picture, magnify the picture. Use the direction arrow keys for navigating the picture.
- Using the remote control
1. Press on the remote control repeatedly to magnify the picture to a desired size.
2. Press  the directional arrows (
  ) to navigate the picture.
3. To reduce size of the picture, you can press Auto Sync on the remote control to restore the picture to its original size. Or you can press  repeatedly.
- Using the OSD menu
1. Open the OSD menu and go to the DISPLAY > Zoom menu.
2. Press Enter. The Zoom bar is displayed.
3. Repeat steps 2-3 in the section of Using the remote control above.
 This adjustable range may vary depending on different aspect ratios.
 The picture can only be navigated after it is magnified. You can further magnify the picture while searching for details.
Selecting the aspect ratio
The 'aspect ratio' is the ratio of the image width to the image height.
With the advent of digital signal processing, digital display devices like this projector can dynamically stretch and scale the image output to a different aspect than that of the image input signal.
To change the projected image ratio (no matter what aspect the source is):
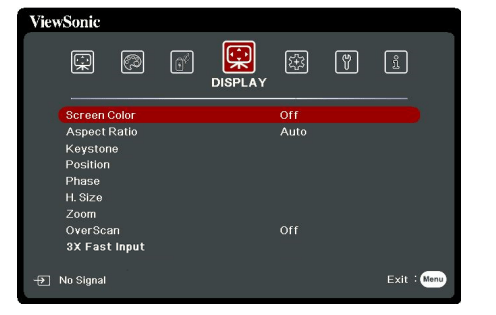
- Open the OSD menu and go to the DISPLAY > Aspect Ratio menu.
- Press Enter.
- Press
 to select an aspect ratio to suit the format of the video signal and your display requirements.
About the aspect ratio
- Auto: Scales an image proportionally to fit the projector's native resolution in its horizontal width. This is suitable for the incoming image which is neither in 4:3 nor 16:9 and you want to make most use of the screen without altering the image's aspect ratio.
- 4:3: Scales an image so that it is displayed in the center of the screen with a 4:3 aspect ratio. This is most suitable for 4:3 images like computer monitors, standard definition TV and 4:3 aspect DVD movies, as it displays them without aspect alteration.
- 16:9 (PA500S/PA503S/PA503SP/PA500X/PA503X/PA503XP): Scales an image so that it is displayed in the center of the screen with a 16:9 aspect ratio. This is most suitable for images which are already in a 16:9 aspect, like high definition TV, as it displays them without aspect alteration.
- 16:10 (PA503W): Scales an image so that it is displayed in the center of the screen with a 16:10 aspect ratio. This is most suitable for images which are already in a 16:10 aspect, as it displays them without aspect alteration.
- Panorama (PA503W): Scales the image proportionally to fit the projector's native resolution in its vertical height and fills the screen in a non-linear manner.
- 2.35:1: Scales an image so that it is displayed in the center of the screen with a 2.35:1 aspect ratio without aspect alteration.
- Anamorphic (PA503W): Scales a 2.35:1 aspect image so that it fills the screen.
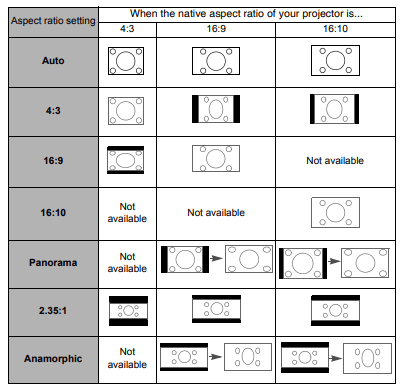
The table below demonstrates the effects of the aspect ratio settings on projectors with different native resolutions. Please see "Projector specifications" on page 66 for the native display resolution of your projector.
 In the pictures below, the black portions are inactive areas and the white portions are active areas. OSD menus can be displayed on those unused black areas.
Optimizing the image
Selecting a picture mode
The projector is preset with several predefined picture modes so that you can choose one to suit your operating environment and input signal picture type. To select an operation mode that suits your need, you can follow one of the following steps.
- Press Color Mode to display the selection bar and press
 to select a desired mode or press Color Mode repeatedly.
- Go to the IMAGE > Color Mode menu and press Enter. Press
 to select a desired mode.
Picture modes for different types of signals
The picture modes available for different types of signals are listed below.
- Brightest mode: Maximizes the brightness of the projected image. This mode is suitable for environments where extra-high brightness is required, such as using the projector in well lit rooms.
- Presentation mode: Is designed for presentations under daylight environment to match PC and notebook coloring.
- Standard mode: Is designed for normal circumstances under daylight environment.
- Photo mode: Is designed for photo viewing.
- Movie mode: Is appropriate for playing colorful movies, video clips from digital cameras or DVs through the PC input for best viewing in a blackened (little light) environment.
Using Screen Color
In the situation where you are projecting onto a colored surface such as a painted wall which may not be white, the Screen Color feature can help correct the projected picture’s colors to prevent possible color difference between the source and projected pictures.
To use this function, go to the DISPLAY > Screen Color menu and press Enter. Press  to select a color which is closest to the color of the projection surface. There are several precalibrated colors to choose from: Whiteboard, Greenboard, and Blackboard. The effects of these settings may vary depending on different models.
 This function is only available for PC timings from a VGA or HDMI input signal.
Fine-tuning the image quality in user modes
According to the detected signal type, there are some user-definable functions available. You can make adjustments to these functions based on your needs.
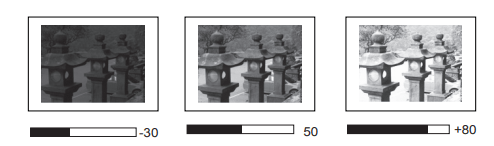
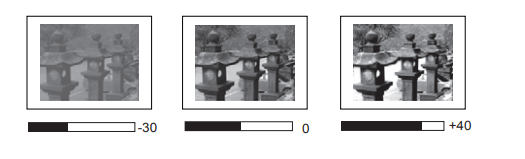
Adjusting Brightness
Go to the IMAGE > Brightness menu and press Enter.
The higher the value, the brighter the image. And the lower the setting, the darker the image. Adjust this control so the black areas of the image appear just as black and that detail in the dark areas is visible.
Adjusting Contrast
Go to the IMAGE > Contrast menu and press Enter.
The higher the value, the greater the contrast. Use this to set the peak white level after you have previously adjusted the Brightness setting to suit your selected input and viewing environment.
Adjusting Color
Go to the IMAGE > Advanced > Color menu and press  .
.
Lower setting produces less saturated colors. If the setting is too high, colors on the image will be overpowering, which makes the image unrealistic.
 This function is only available when the input signal is Video, YPbPr or YCbCr.
Adjusting Tint
Go to the IMAGE > Advanced > Tint menu and press  .
.
The higher the value, the more greenish the picture becomes. The lower the value, the more reddish the picture becomes.
 This function is only available when the input signal is Video, YPbPr or YCbCr.
Adjusting Sharpness
Go to the IMAGE > Advanced > Sharpness menu and press  .
.
The higher the value, the sharper the picture becomes. The lower the value, the softer the picture becomes.
 This function is only available when the input signal is Video, YPbPr or YCbCr.
Adjusting Brilliant Color
Go to the IMAGE > Advanced > Brilliant Color menu and press  .
.
This feature utilizes a new color-processing algorithm and system level enhancements to enable higher brightness while providing truer, more vibrant colors in the projected picture. It enables a greater than 50% brightness increase in mid-tone images, which are common in video and natural scenes, so the projector reproduces images in realistic and true colors. If you prefer images with that quality, select a level that suits your need. If you don’t need it, select Off.
Reducing image noise
Go to the IMAGE > Advanced > Noise Reduction menu and press  .
.
This function reduces electrical image noise caused by different media players. The higher the setting, the less the noise.
 This function is only available when a PC or Video input signal is selected.
Selecting a gamma setting
Go to the IMAGE > Advanced > Gamma menu and select a preferred setting by pressing  .
.
Gamma refers to the relationship between input source and picture brightness.
Selecting a Color Temperature
Go to the IMAGE > Color Temp. menu and press  .
.
The options available for color temperature settings vary according to the signal type selected.
- Cool: With the highest color temperature, Cool makes the image appear the most bluish white than other settings.
- Normal: Maintains normal colorings for white.
- Warm: Makes images appear reddish white.
Setting a preferred color temperature
- Go to the IMAGE > Color Temp. menu and press Enter.
- Press
 to select Cool, Normal or Warm and press Enter.
- Press
 to highlight the item you want to change and adjust the values by pressing
  .
.
• Red Gain/Green Gain/Blue Gain: Adjusts the contrast levels of Red, Green, and Blue.
• Red Offset/Green Offset/Blue Offset: Adjusts the brightness levels of Red, Green, and Blue.
 This function is only available for PC timings from a VGA or HDMI input signal.
Color Management
Only in permanent installations with controlled lighting levels such as boardrooms, lecture theaters, or home theaters, should color management be considered. Color management provides fine color control adjustment to allow for more accurate color reproduction, should you require it.
If you have purchased a test disc which contains various color test patterns and can be used to test the color presentation on monitors, TVs, projectors, etc., you can project any image from the disc on the screen and enter the Color Management menu to make adjustments.
To adjust the settings:
- Open the OSD menu and go to the IMAGE > Advanced > Color Management menu.
- Press Enter and the Color Management page is displayed.
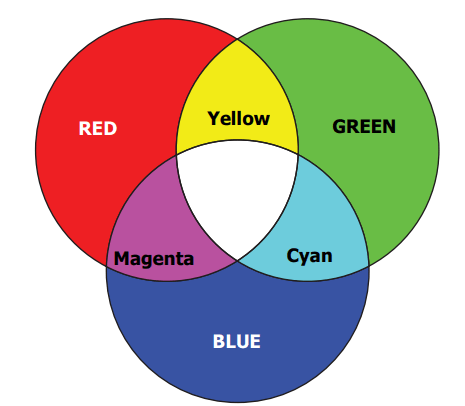
- Highlight Primary Color and press
 to select a color from among Red, Yellow, Green, Cyan, Blue, or Magenta.
- Press
 to highlight Hue and press
  to select its range. Increase in the range will include colors consisted of more proportions of its two adjacent colors. Please refer to the illustration to the right for how the colors relate to each other. For example, if you select Red and set its range at 0, only pure red in the projected picture will be selected. Increasing its range will include red close to yellow and red close to magenta.
- Press
 to highlight Saturation and adjust its values to your preference by pressing
  . Every adjustment made will reflect to the image immediately. For example, if you select Red and set its value at 0, only the saturation of pure red will be affected.
 Saturation is the amount of that color in a video picture. Lower settings produce less saturated colors; a setting of “0” removes that color from the image entirely. If the saturation is too high, that color will be overpowering and unrealistic.
- Press
 to highlight Gain and adjust its values to your preference by pressing
  . The contrast level of the primary color you select will be affected. Every adjustment made will reflect to the image immediately.
- Repeat steps 3 to 6 for other color adjustments.
- Make sure you have made all of the desired adjustments.
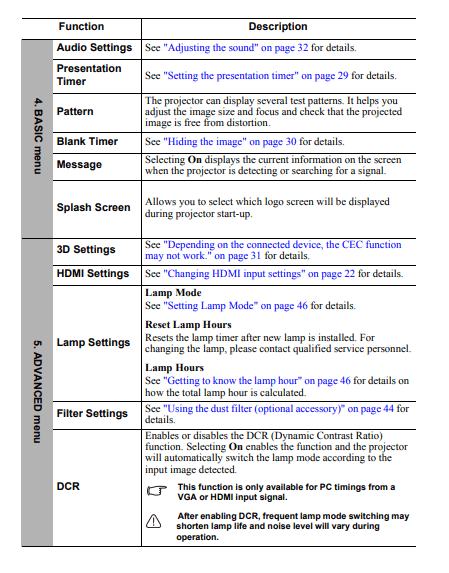
Setting the presentation timer
Presentation timer can indicate the presentation time on the screen to help you achieve better time management when giving presentations. Follow these steps to utilize this function:
- Go to the BASIC > Presentation Timer menu.
- Press Enter to display the Presentation Timer page.
- Highlight Timer Period and decide the time period by pressing
 . The length of time can be set from 1 to 5 minutes in 1-minute increments and 5 to 240 minutes in 5- minute increments.
 If the timer is already on, the timer will restart whenever the Timer Period is reset.
- Press
 to highlight Timer Display and choose if you want the timer to show up on the screen by pressing
  .
.
| Selection |
Description |
| Always |
Displays the timer on screen throughout the presentation time. |
| 1 min/2 min/3 min |
Displays the timer on screen in the last 1/2/3 minute(s) |
| Never |
Hides the timer throughout the presentation time. |
- Press
 to highlight Timer Position and set the timer position by pressing
  .
.
Top-Left > Bottom-Left > Top-Right > Bottom-Right.
- Press
 to highlight Timer Counting Direction and select your desired counting direction by pressing
  .
.
| Selection |
Description |
| Count Up |
Increases from 0 to the preset time. |
| Count Down |
Decreases from the preset time to 0. |
- Press
 to highlight Sound Reminder and decide if you want to activate sound reminder by pressing
  . If you select On, a double beep sound will be heard at the last 30 seconds of counting down/up, and a triple beep sound will be produced when the timer is up.
- To activate the presentation timer, press
 and press
  to highlight Start Counting and press Enter.
- A confirmation message displays. Highlight Yes and press Enter to confirm. You will see the message “Timer is On” displaying on the screen. The timer starts counting when the timer is on.
To cancel the timer, perform the following steps:
- Go to the BASIC > Presentation Timer menu.
- Highlight Off. Press Enter. A confirmation message displays.
- Highlight Yes and press Enter to confirm. You will see the message “Timer is Off” displaying on the screen.
Hiding the image
In order to draw the audience's full attention to the presenter, you can press Blank on the projector or remote control to hide the screen image. Press any key on the projector or remote control to restore the image. The word 'BLANK' appears at the lower right corner of the screen while the image is hidden.
You can set the blank time in the BASIC > Blank Timer menu to let the projector return the image automatically after a period of time when there is no action taken on the blank screen.
 Once Blank is pressed, the projector enters SuperEco mode automatically.
CAUTION
Do not block the projection lens from projecting as this could cause the blocking object to become heated and deformed or even cause a fire.
Locking control keys
With the control keys on the projector locked, you can prevent your projector settings from being changed accidentally (by children, for example). When the Panel Key Lock is on, no control keys on the projector will operate except  Power.
- Go to the SYSTEM > Panel Key Lock menu
- Press Enter and press
 to select On.
- A confirmation message is displayed. Select Yes to confirm.
To release panel key lock, press and hold  on the projector for 3 seconds.
You can also use the remote control to enter the SYSTEM > Panel Key Lock menu and select Off.
 Keys on the remote control are still functional when panel key lock is enabled.
 If you press
  Power to turn off the projector without disabling panel key lock, the projector will still be in locked status the next time it is turned on.
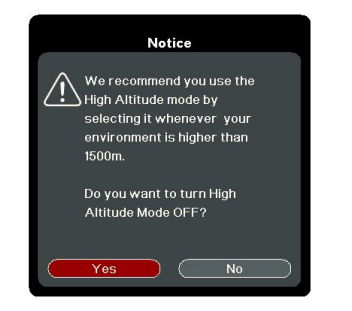
Operating in a high altitude environment
We recommend you use the High Altitude Mode when your environment is between 1500 m–3000 m above sea level, and temperature is between 0°C–30°C.
CAUTION
Do not use the High Altitude Mode if your altitude is between 0 m and 1499 m and temperature is between 0°C and 35°C. The projector will be over cooled, if you turn the mode on under such a condition.
To activate the High Altitude Mode:
- Open the OSD menu and go to the SYSTEM > High Altitude Mode menu.
- Press Enter and press
 to select On. A confirmation message is displayed.
- Highlight Yes and press Enter.
Operation under "High Altitude Mode" may cause a higher decibel operating noise level because of increased fan speed necessary to improve overall system cooling and performance.
If you use this projector under other extreme conditions excluding the above, it may display auto shut-down symptoms, which is designed to protect your projector from over-heating. In cases like this, you should switch to High Altitude Mode to solve these symptoms. However, this is not to state that this projector can operate under any and all harsh or extreme conditions.
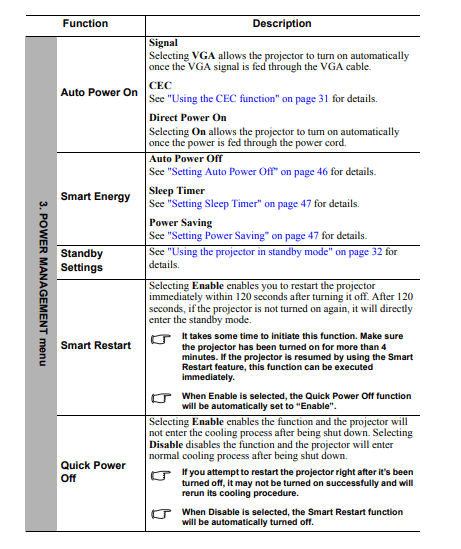
Using the CEC function
This projector supports CEC (Consumer Electronics Control) function for synchronized power on/off operation via HDMI connection. That is, if a device that also supports CEC function is connected to the HDMI input of the projector, when the projector’s power is turned off, the power of the connected device will also be turned off automatically. When the power of the connected device is turned on, the projector’s power will be turned on automatically.
To turn on the CEC function:
- Open the OSD menu and go to the POWER MANAGEMENT > Auto Power On > CEC menu.
- Press
 to select Enable.
 In order for the CEC function to work properly, make sure that the device is correctly connected to the HDMI input of the projector via an HDMI cable, and its CEC function is turned on.
 Depending on the connected device, the CEC function may not work.
Using the 3D functions
This projector features 3D function which enables you to enjoy 3D movies, videos, and sporting events in a more realistic way by presenting the depth of the images. You need to wear a pair of 3D glasses to view 3D images.
If the 3D signal is input from an HDMI 1.4a compatible device, the projector detects the signal for 3D Sync information and once detected, it projects images in 3D format automatically. In other cases, you may need to manually select a 3D Sync format for the projector to project 3D images correctly.
- Go to the ADVANCED > 3D Settings menu.
- Press Enter. The 3D Settings page is displayed.
- Highlight 3D Sync and press Enter.
- Press
 to select a 3D Sync setting and then press Enter to confirm.
 When the 3D Sync function is on:
- The brightness level of the projected image will decrease.
- The Color Mode cannot be adjusted.
- The Zoom function can only magnify the pictures to limited sizes.
If you discover the inversion of the 3D image depth, set the 3D Sync Invert function to “Invert” to correct the problem.
Using the projector in standby mode
Some of the projector functions are available in standby mode (plugged in but not turned on). To use these functions, be sure the cable connections are correctly made. For the connection methods, see the Connection chapter.
Active VGA Out
Selecting On in the POWER MANAGEMENT > Standby Settings > Active VGA Out outputs a VGA signal when the Computer 1 and Monitor Out sockets are correctly connected to devices. The projector outputs the signal received only from Computer 1.
Active Audio Out
Selecting On in the POWER MANAGEMENT > Standby Settings > Active Audio Out outputs an audio signal when the Audio In and Audio Out sockets are correctly connected to a proper device.
Adjusting the sound
The sound adjustments made as below will have an effect on the projector speaker. Be sure you have made a correct connection to the projector audio input/output jacks. See "Connection" on page 13 for more details.
Muting the sound
- Open the OSD menu and go to the BASIC > Audio Settings > Mute menu.
- Press
 to select On.
Adjusting the sound level
- Open the OSD menu and go to the BASIC > Audio Settings > Audio Volume menu.
- Press
 to select a desired sound level.
 If available, you can press
  S on the remote control to adjust the projector’s sound level.
Turning off the Power On/Off Ring Tone
- Open the OSD menu and go to the BASIC > Audio Settings > Power On/Off Ring Tone menu.
- Press
 to select Off.
 The only way to change Power On/Off Ring Tone is setting On or Off here. Setting the sound mute or changing the sound level will not affect the Power On/Off Ring Tone.
Shutting down the projector
- Press
 Power or
  Off and a confirmation message is displayed prompting you. If you don't respond in a few seconds, the message will disappear.
- Press
 Power or
  Off a second time.
- Once the cooling process finishes, a "Power Off Ring Tone" will be heard. Disconnect the power cord from the wall socket if the projector will not be used in an extended period of time.

 To turn off the ring tone, see "Turning off the Power On/Off Ring Tone" on page 32 for details.
CAUTION
- To protect the lamp, the projector will not respond to any commands during the cooling process.
- Do not unplug the power cord before the projector shutdown sequence is complete.
Menu operation
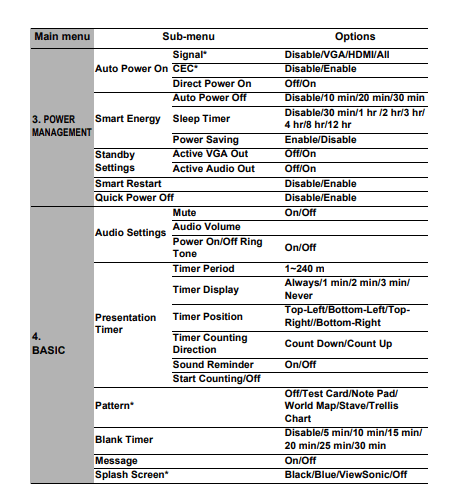
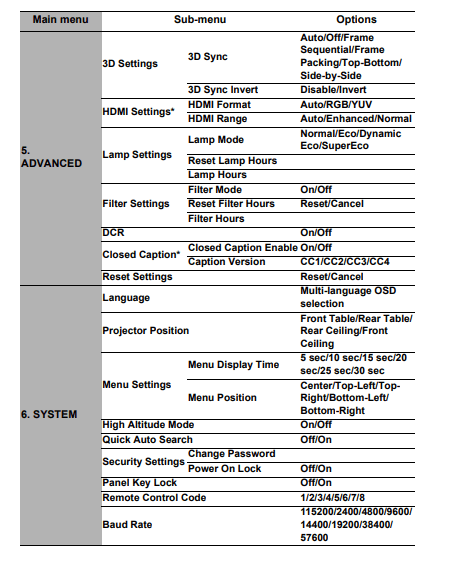
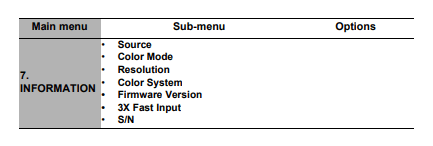
Menu system
Please note that the on-screen display (OSD) menus vary according to the signal type selected.
The menu items are available when the projector detects at least one valid signal. If there is no equipment connected to the projector or no signal detected, limited menu items are accessible.
 *The OSD settings vary according to the projector model you are using.
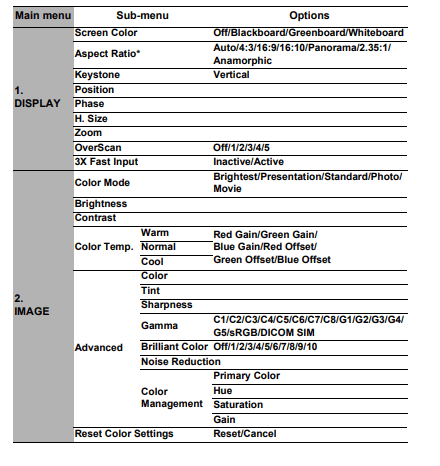
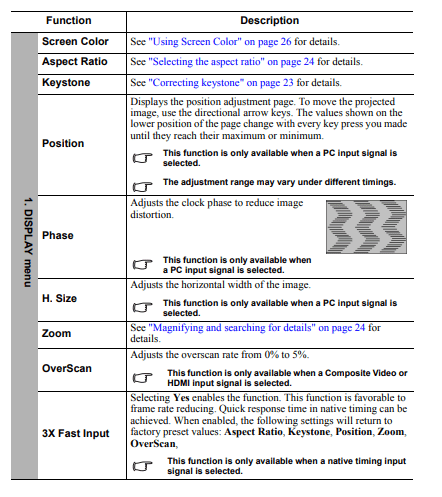
Description of each menu

Maintenance
Care of the projector
You need to keep the lens and/or filter (optional accessory) clean on a regular basis.
Never remove any parts of the projector. Contact your dealer when any part of the projector needs replacing.
Cleaning the lens
Clean the lens whenever you notice dirt or dust on the surface.
- Use a canister of compressed air to remove dust.
- If there is dirt or smears, use lens-cleaning paper or moisten a soft cloth with lens cleaner and gently wipe the lens surface.
CAUTION
Never rub the lens with abrasive materials.
Cleaning the projector case
Before you clean the case, turn the projector off using the proper shutdown procedure as described in "Shutting down the projector" on page 33 and unplug the power cord.
- To remove dirt or dust, wipe the case with a soft, lint-free cloth.
- To remove stubborn dirt or stains, moisten a soft cloth with water and a neutral pH detergent. Then wipe the case.
CAUTION
Never use wax, alcohol, benzene, thinner or other chemical detergents. These can damage the case.
Storing the projector
If you need to store the projector for an extended time, please follow the instructions below:
- Make sure the temperature and humidity of the storage area are within the recommended range for the projector. Please refer to "Specifications" on page 50 or consult your dealer about the range.
- Retract the adjuster foot.
- Remove the battery from the remote control.
- Pack the projector in its original packing or equivalent.
Transporting the projector
It is recommended that you ship the projector with its original packing or equivalent.
Using the dust filter (optional accessory)
CAUTION
- It is recommended to clean the dust filter every 100 hours after the dust filter is installed.
- Be sure to turn off the projector and unplug it from power source before installing or detaching the filter.
- If your projector is ceiling-mounted or is not easily accessible, pay special attention to your personal safety when replacing the dust filter.
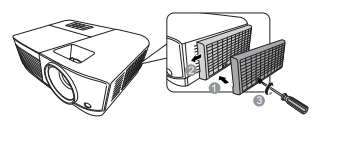
Installing the dust filter
- Be sure to turn off the projector and unplug it from power source.
- As the arrows shown to the right, fit the filter by aligning and inserting it into the projector slots.
- Tighten the screw the secures the dust filter.
For first time installation:
- Open the OSD menu and go to the ADVANCED > Filter Settings menu.
- Press Enter and the Filter Settings page is displayed.
- Highlight Filter Mode and press
 to select On. The filter timer starts counting.
Warning: Set Filter Mode to On only when using the projector after the dust filer (optional accessory) is properly attached. Failing to do so will result in a shorter lamp life.
Obtaining the filter hour information
- Open the OSD menu and go to the ADVANCED > Filter Settings menu.
- Press Enter. The Filter Settings page is displayed.
- You will see the Filter Hours information on the menu.
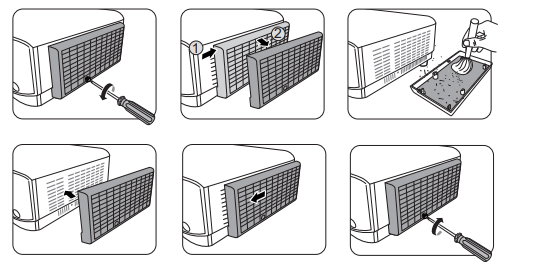
Cleaning the dust filter
- Be sure to turn off the projector and unplug it from power source.
- Loosen the screw the secures the dust filter.
- Use a small vacuum cleaner or a soft brush to sweep the dust on the filter away.
- Re-install the dust filter.
Resetting the filter timer
- Open the OSD menu and go to the ADVANCED > Filter Settings menu.
- Press Enter and the Filter Settings page is displayed.
- Highlight Reset Filter Hours and press Enter. A warning message is displayed asking if you want to reset the filter timer.
- Highlight Reset and press Enter.
CAUTION
Remember to set Filter Mode to Off in the ADVANCED > Filter Settings menu when using the projector with the dust filter removed. Setting Filter Mode to Off does not reset the filter timer. The timer will continue counting the next time you fit the filter back on and set Filter Mode to On.
Lamp information
Getting to know the lamp hour
When the projector is in operation, the duration (in hours) of lamp usage is automatically calculated by the built-in timer.
To obtain the lamp hour information:
- Open the OSD menu and go to the ADVANCED > Lamp Settings menu.
- Press Enter and the Lamp Settings page is displayed.
- You will see the Lamp Hours information on the menu.
- To leave the menu, press Exit.
Extending lamp life
The projection lamp is a consumable item. To keep the lamp life as long as possible, you can do the following settings via the OSD menu.
Setting Lamp Mode
Setting the projector in Eco/Dynamic Eco/SuperEco mode reduces system noise, power consumption and extends the lamp operation life.
| Lamp mode |
Description |
| Normal |
Provides full lamp brightness. |
| Eco |
Reduces lamp power consumption by 30% and lowers brightness to extend the lamp life and decreases the fan noise. |
| Dynamic Eco |
Reduces lamp power consumption by up to 70% depending on the content brightness level. |
| SuperEco |
Reduces lamp power consumption by 70% and lowers brightness to extend the lamp life and decreases the fan noise. |
 It is not recommended that you use SuperEco mode for a long time.
To set the lamp mode, go to the ADVANCED > Lamp Settings > Lamp Mode menu and press  to select. Or you can press Eco Mode on the remote control to select.
Setting Auto Power Off
This function allows the projector to turn off automatically after a set period of time once no input source is detected to prevent unnecessary waste of lamp life.
- Open the OSD menu and go to the POWER MANAGEMENT > Smart Energy menu.
- Press Enter and the Smart Energy page is displayed.
- Highlight Auto Power Off and press
 .
.
- If the preset time lengths are not suitable for your need, select Disable. The projector will not automatically shut down in a certain time period.
Setting Sleep Timer
This function allows the projector to turn off automatically after a set period of time to prevent unnecessary waste of lamp life.
- Open the OSD menu and go to the POWER MANAGEMENT > Smart Energy menu.
- Press Enter and the Smart Energy page is displayed.
- Highlight Sleep Timer and press
 .
.
- If the preset time lengths are not suitable for your presentation, select Disable. The projector will not automatically shut down in a certain time period.
Setting Power Saving
The projector lowers the power consumption if no input source is detected after 5 minutes to prevent unnecessary waste of lamp life. You can further decide if you would like the projector to turn off automatically after a set period of time.
- Open the OSD menu and go to the POWER MANAGEMENT > Smart Energy menu.
- Press Enter and the Smart Energy page is displayed.
- Highlight Power Saving and press
 .
.
- When Enable is selected, the projector lamp will be changed to Eco mode after no signal is detected for 5 minutes.

The lamp power will be changed to SuperEco mode after no signal is detected for 20 minutes.

Timing of replacing the lamp
Please install a new lamp or consult your dealer when the Lamp indicator light lights up. An old lamp may cause a malfunction in the projector and in some instances the lamp may explode.
CAUTION
The Lamp indicator light and Temperature indicator light will light up if the lamp becomes too hot. Turn the power off and let the projector cool for 45 minutes. If the Lamp indicator light or Temperature indicator light still lights up after turning the power back on, please contact your dealer. See "Indicators" on page 48 for details.
Replacing the lamp
Warning: Turn the power off and disconnect the projector from the power outlet. Please contact qualified service personnel for changing the lamp.
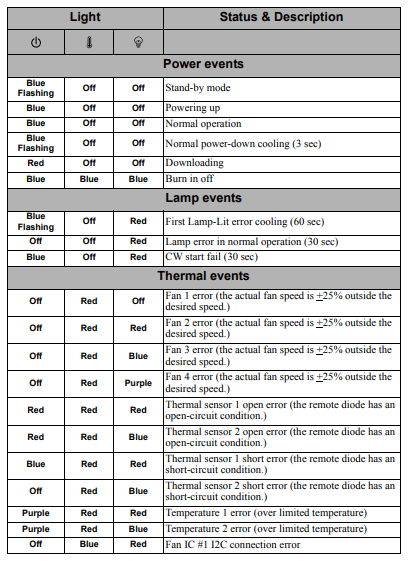
Indicators
Troubleshooting
The projector does not turn on.
| Cause |
Remedy |
| There is no power from the power cord. |
Plug the power cord into the AC inlet on the projector, and plug the power cord into the power outlet. If the power outlet has a switch, make sure that it is switched on. |
| Attempting to turn the projector on again during the cooling process. |
Wait until the cooling down process has completed. |
No picture
| Cause |
Remedy |
| The video source is not turned on or connected correctly. |
Turn the video source on and check that the signal cable is connected correctly. |
| The projector is not correctly connected to the input signal device. |
Check the connection. |
| The input signal has not been correctly selected. |
Select the correct input signal with the Source key on the projector or remote control. |
Blurred image
| Cause |
Remedy |
| The projection lens is not correctly focused. |
Adjust the focus of the lens using the focus ring. |
| The projector and the screen are not aligned properly. |
Adjust the projection angle and direction as well as the height of the projector if necessary. |
Remote control does not work
| Cause |
Remedy |
| The battery is out of power. |
Replace the battery with a new one. |
| There is an obstacle between the remote control and the projector. |
Remove the obstacle. |
| You are too far away from the projector. |
Stand within 8 meters (26 feet) from the projector. |
| The remote control code on the projector and that on the remote control are not consistent. |
Adjust the remote control code. |