Loading ...
Loading ...
Loading ...
INSTALLING
LEVELING
LEGS,
COIN
SLIDE,
AND
COIN
BOX
On
some
models:
The
console
houses
the
electronic
control
board.
The
board
is
factory
set
for
a
dry
time
of
45
minutes.
Consult
the
tech
sheet
found
inside
the
dryer
toe
panel
to
reset
dry
time
and
for
other
options.
The
card
reading
mechanism
is
not
included,
but
is
available
from
your
usual
industry
sources.
A
WARNING
Excessive
Weight
Hazard
Use
two
or
more
people
to
move
and
install
dryer.
Failure
to
do
so
can
result
in
back
or
other
injury.
1.
Prepare
dryer
for
leveling
legs
NOTE:
Slide
dryer
onto
cardboard
or
hardboard
before
moving
to
avoid
damaging
floor
covering.
Using two
or
more
people,
move
dryer
to
desired
installation
location.
Take
tape
off
front
corners
of
dryer.
Open
dryer
and
remove
the
literature
and
parts
packages.
Wipe
drum
interior
with
a
damp
cloth
to
remove
any
dust.
Take
two
cardboard
corners
from
the
dryer
carton
and place
them
on
the
floor
in
back
of
the
dryer.
Firmly
grasp
the
body
of
the
dryer
and
genily
lay
it
on
its
back
on
the
cardboard
corners.
Disconnect
power
before
making
electrical
connections.
\
(appearance
may
vary)
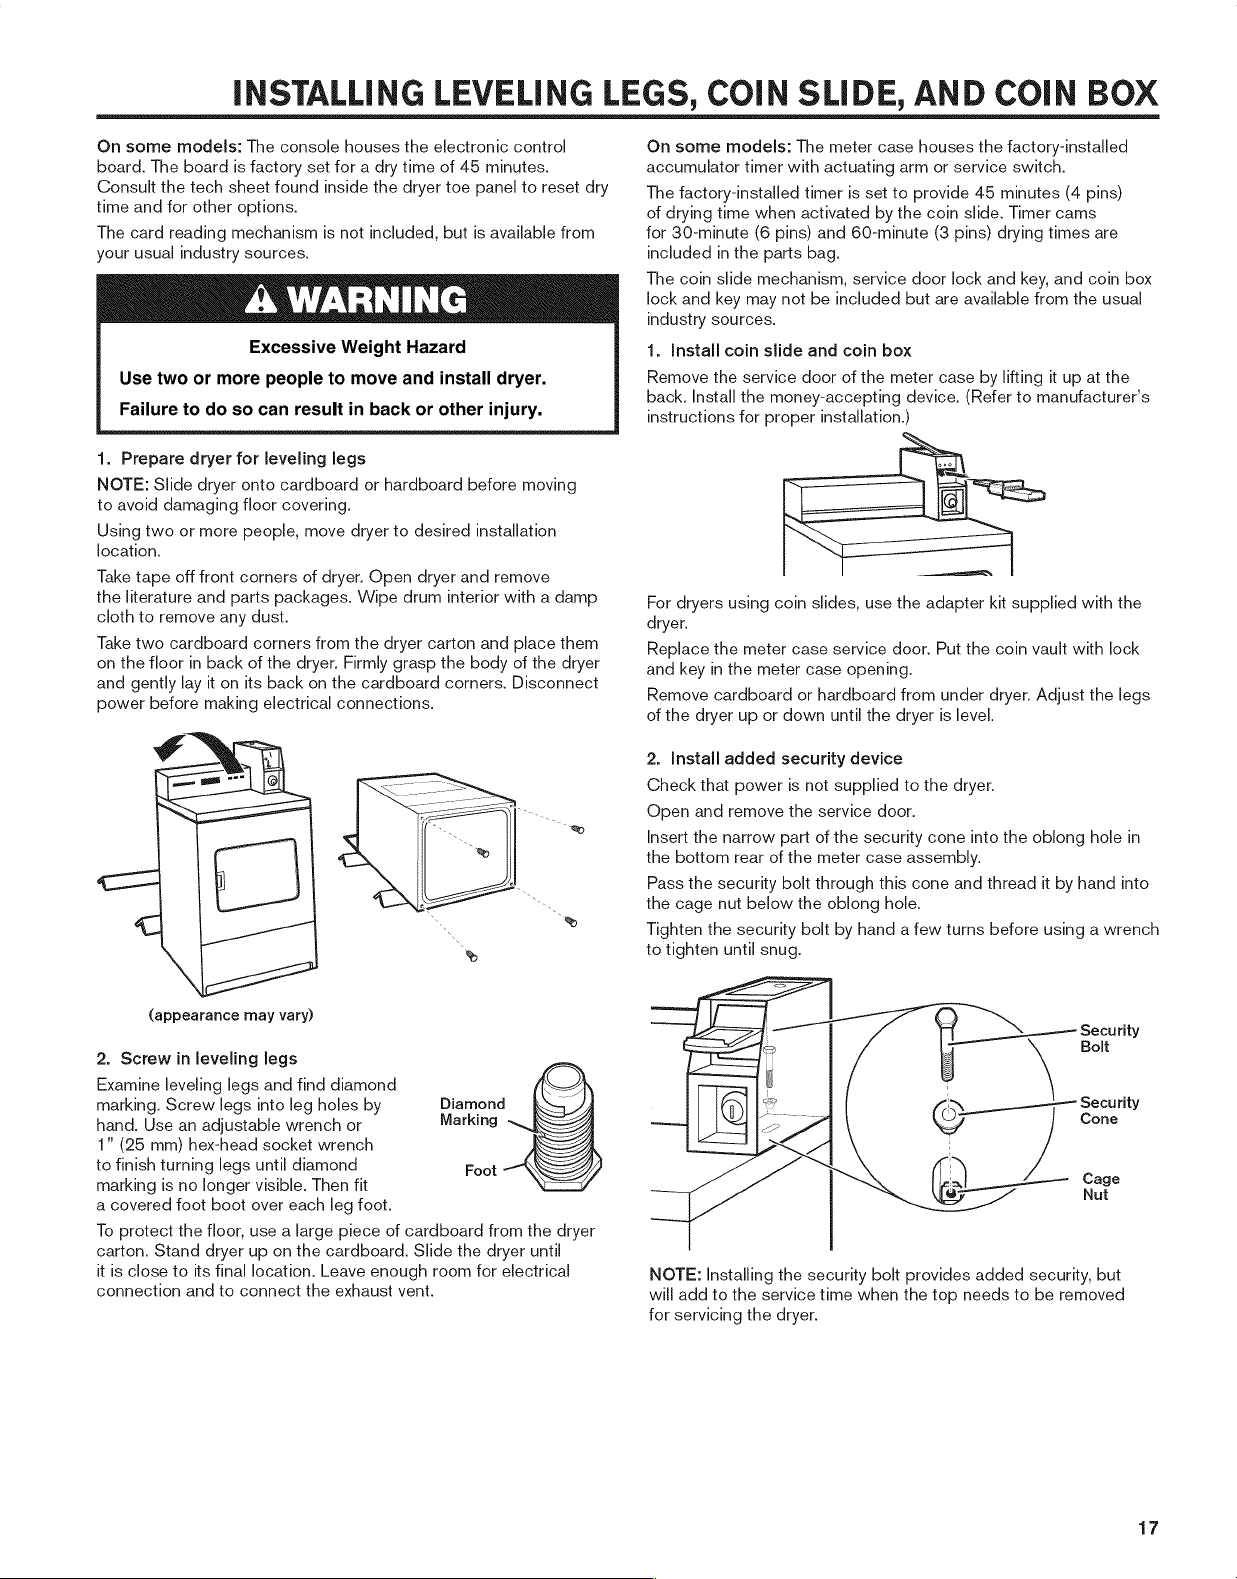
2.
Screw
in
leveling
legs
Examine
leveling
legs
and
find
diamond
marking.
Screw
legs
into
leg
holes
by
Diamond
hand.
Use
an
adjustable
wrench
or
Marking
1"
(25
mm)
hex-head
socket
wrench
to
finish
turning
legs
until
diamond
Foot
marking
is
no
longer
visible.
Then
fit
a
covered
foot
boot
over
each
leg
foot.
To
protect
the
floor,
use
a
large
piece
of
cardboard
from
the
dryer
carton.
Stand
dryer
up
on
the
cardboard.
Slide
the
dryer
until
it
is
close
to
its
final
location.
Leave
enough
room
for
electrical
connection
and
to
connect
the
exhaust
vent.
On
some
models:
The
meter
case
houses
the
factory-installed
accumulator
timer
with
actuating
arm
or
service
switch.
The
factory-installed
timer
is
set
to
provide
45
minutes
(4
pins)
of
drying
time
when
activated
by
the
coin
slide.
Timer
cams
for
30-minute
(6
pins)
and
60-minute
(3
pins)
drying
times
are
included
in
the
parts
bag.
The
coin
slide
mechanism,
service
door
lock
and
key,
and
coin
box
lock
and
key
may
not
be
included
but
are
available
from
the
usual
industry
sources.
1.
Install
coin
slide
and
coin
box
Remove
the
service
door
of
the
meter
case
by
lifting
it
up
at
the
back.
Install
the
money-accepting
device.
(Refer
to
manufacturer's
instructions
for
proper
installation.)
q
For
dryers
using
coin
slides,
use
the
adapter
kit
supplied
with
the
dryer.
Replace
the
meter
case
service
door.
Put
the
coin
vault
with
lock
and
key
in
the
meter
case
opening.
Remove
cardboard
or
hardboard
from
under
dryer.
Adjust
the
legs
of
the
dryer
up
or
down
until
the
dryer
is
level.
2.
Install
added
security
device
Check
that
power
is
not
supplied
to
the
dryer.
Open
and
remove
the
service
door.
Insert
the
narrow
part
of
the
security
cone
into
the
oblong
hole
in
the
bottom
rear
of
the
meter
case
assembly.
Pass
the
security
bolt
through
this
cone
and
thread
it
by
hand
into
the
cage
nut
below
the
oblong
hole.
Tighten
the
security
bolt
by
hand
a
few
turns
before
using
a
wrench
to
tighten
until
snug.
ee oe
a
te
Security
I
\
Bolt
:
\
ee
Security
ol
(C3
Cone
ea
Cage
a
Nut
NOTE:
Installing
the
security
bolt
provides
added
security,
but
will
add
to
the
service
time
when
the
top
needs
to
be
removed
for
servicing
the
dryer.
17
Loading ...
Loading ...
Loading ...