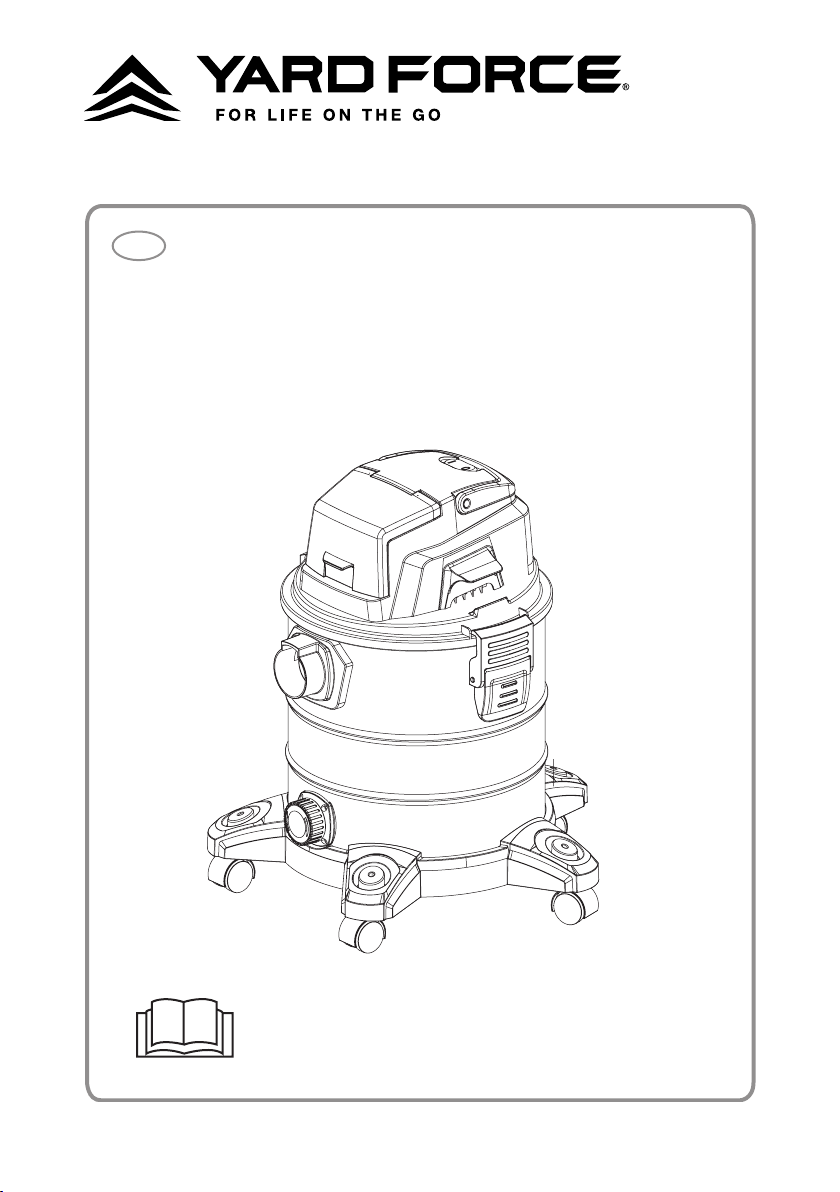
1
20V CORDLESS WET&DRY VACUUM
CLEANER
Original Instructions
GB
LW CVC1
BETRIEBSANLEITUNG AUFMERKSAM LESEN
Bewahren Sie alle Warnhinweise und Anleitungen zum
Nachlesen auf.

2
3
A
7
4321 5 6 7
8
9
10
11
12
13
14
15
20
19
18
17
16
21
22
23
24
25
26

4
B
D
F
E
G
C
H I
1
9 12
22
13
2
8
15
16
2
8
15
16
7
6
2
1
3
2
%
1
2
3
5
J K
L
7
6
3
2
19
20
2
19
20
2
1
2
3
3
1
2
3

6
LW CVC1 Original Instructions
CONTENT
Intended use 07
General safety warnings 07
Product safety warnings 14
Symbols 19
Technical data 23
Description of product 24
Operation 25
Maintenance and storage 29
Troubleshooting 31
Declaration of conformity 32

7
INTENDED USE
The device is intended for wet&dry vacuuming at home, e.g. in the household,
hobby room, car or garage using the appropriate filter.
It is intended exclusively for private use and not suitable for commercial use. Use
the device only as described in these operating instructions. Any other use is
considered improper and can lead to property damage or even personal injury. The
device is not a children's toy.
The manufacturer or dealer assumes no liability for damage caused by improper or
incorrect use.
Do not suck in any hot, burning, glowing, explosive or hazardous substances.
GENERAL SAFETY WARNINGS
WARNING
These operating instructions belong to this 20 V Li-Ion
cordless wet and dry vacuum cleaner (hereinafter also
referred to as "device"). It contains important information
on commissioning and operation.
Read the operating instructions carefully, especially the
safety instructions, before using the device. Failure to
follow these operating instructions can result in serious
injury or damage to the device.
The operating instructions are based on the standards
and rules applicable in the European Union. When
abroad, also observe country-specific guidelines and
laws.
Keep the operating instructions for future reference. If
you pass the device on to third parties, be sure to include
these operating instructions.

8
General safety information
1. Before commissioning, fully assemble the device in
accordance with these instructions.
2. Only use spare parts and accessories that are
supplied or recommended by the manufacturer. If
third-party parts are used, all guarantee claims are
immediately void.
3. Only have repairs carried out at customer service
centers authorized by the manufacturer.
Safety instructions
1. Children from 8 years of age and above as well as
people with reduced physical, sensory or mental
capabilities or a lack of experience and knowledge
may only use the device if they are supervised or
have been instructed in the safe use of the device
and understand the resulting dangers.
2. Do not leave the device unattended during operation.
3. Only allow others access to the device after they
have read the instructions in full and understood
them appropriately or have been instructed about its
intended use and the associated dangers.
4. Never allow people with reduced physical, sensory or
mental capabilities (e.g. children or drunk people) or a
lack of experience and knowledge (e.g. children) near
the device unsupervised.
5. Do not leave cleaning and user maintenance
unsupervised by children.
6. Children are not allowed to play with the device or
with the connection cable.
GENERAL SAFETY WARNINGS

9
Safety instructions for cordless tools
1. Only charge the batteries with chargers recommended
by the manufacturer. A charger designed for one type
of battery may present a fire hazard if used with other
batteries.
2. When the battery is not in use, keep it away from
paper clips, coins, keys, nails, screws, or other small
metal objects that could cause the contacts to be
bridged. A short circuit between the battery contacts
can result in burns or fire.
3. If used incorrectly, liquid can leak out of the battery.
Avoid contact with it. In the event of accidental
contact with water, rinse. If the liquid gets into your
eyes, get additional medical help. Leaking battery fl
uid can cause skin irritation or burns.
4. Do not use a damaged or modified battery. Damaged
or modified batteries can behave unpredictably and
lead to fire, explosion or risk of injury.
5. Do not expose a battery to fire or high temperatures.
Fire or temperatures above 45 ° C can cause an
explosion.
6. Follow all charging instructions and never charge the
rechargeable battery or the cordless device outside
of the temperature range specified in the operating
instructions. Incorrect charging or charging outside
the permitted temperature range can destroy the
battery and increase the risk of fire.
GENERAL SAFETY WARNINGS

10
GENERAL SAFETY WARNINGS
Safety instructions of wet&dry vacuum cleaner
1. People and animals must not be vacuumed with the
device.
2. Never point the suction hose and nozzles at your own
body or other people, especially not at your eyes or
ears, during operation.
3. When working, make sure that the nozzles and
suction tube are not at head height.
4. Do not work without a filter. The device could be
damaged.

11
SYMBOLS
Safety symbols
The purpose of safety symbols is to attract your attention
to possible dangers. The safety symbols and the
explanations with them require your careful attention
and full understanding. The symbol warnings do not, by
themselves, eliminate any danger. The instructions and
warnings they give are no substitutes for proper accident
prevention measures.
WARNING:
Be sure to read and understand all safety
instructions in this operator’s manual, including all safety
alert symbols such as “
DANGER
,” “
WARNING
,” and
“
CAUTION
” before using this tool. Failure to follow all
instructions listed below may result in electric shock, fire
and/or serious personal injury.
SAFETY ALERT SYMBOL
: Indicates
DANGER
,
WARNING
, or
CAUTION
. May be used in conjunction
with other symbols or pictographs.
Symbol meaning
This page depicts and describes safety symbols that may
appear on this product. Read, understand and follow
all instructions on the machine before attempting to
assemble and operate.
12
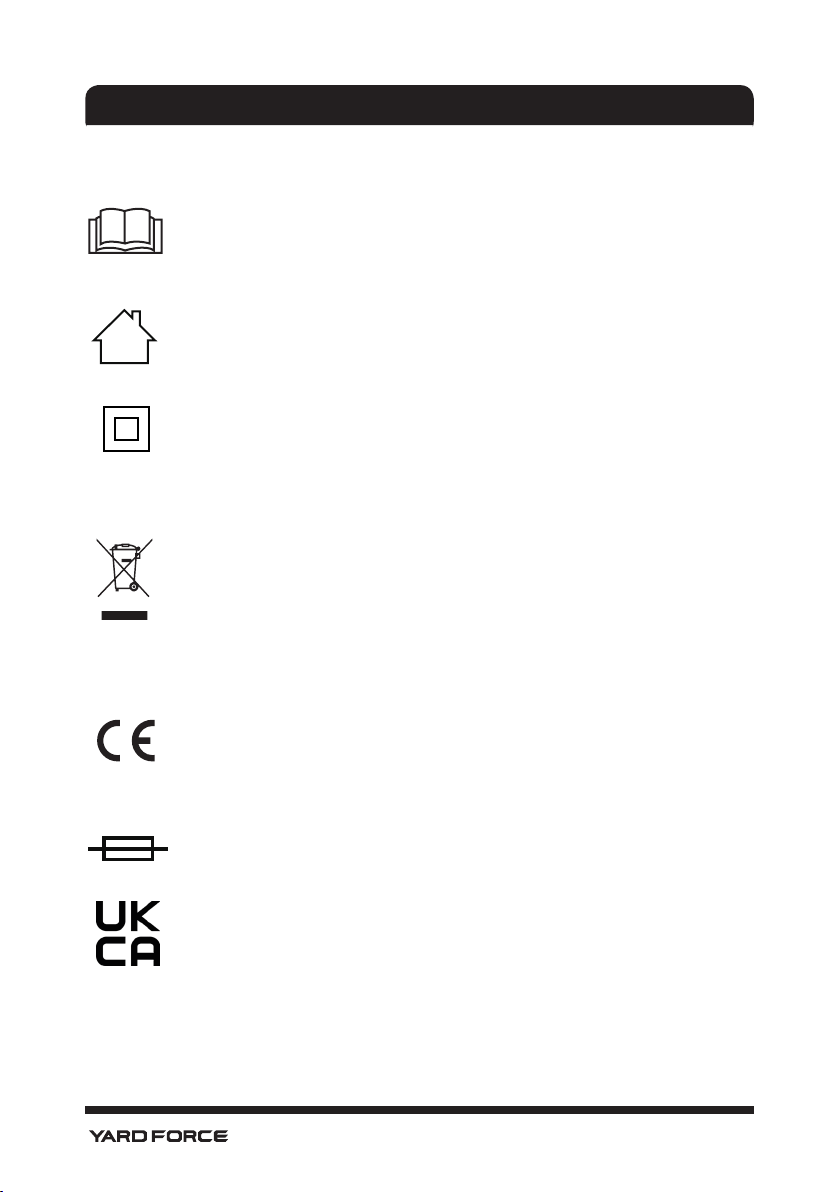
SYMBOLS
Read the instructions for use before use!
WEEE symbol. Waste electrical products should
not be disposed of with household waste. Please
recycle where facilities exist. Check with your
Local Authority or local store for recycling advice.
The product complies with the applicable
European directives and an evaluation method of
conformity for these directives was done.
A product placed on the United Kingdom market
meets the UKCA Marking requirements
Degree of protection against ingress of water.
IPX4
13
SYMBOLS
Warning symbols on the battery pack
To reduce the risk of injury, user must read the
instruction manual carefully.
Do not throw into water.
Do not throw into fire.
Do not subject the battery to strong sunlight over
long periods of time. Do not leave on a heater
(max.45
°
C).
Batteries contain Li-ion. Do not dispose of
waste batteries in domestic waste. Contact local
authority to find out how to dispose of batteries.
WEEE symbol. Waste electrical products should
not be disposed of with household waste. Please
recycle where facilities exist. Check with your
Local Authority or local store for recycling advice.
14
SYMBOLS
Warning symbols on the charger
To reduce the risk of injury, user must read the
instruction manual carefully.
The charger is for indoor use only.
Double insulation
WEEE symbol. Waste electrical products should
not be disposed of with household waste. Please
recycle where facilities exist. Check with your
Local Authority or local store for recycling advice.
The product complies with the applicable
European directives and an evaluation method of
conformity for these directives was done.
Protective 3.15 A limited
A product placed on the United Kingdom market
meets the UKCA Marking requirements
T3.15A

15
TECHNICAL DATA
Model LW CVC1
Mains voltage 20 V
Rated power 200 W
Protection class IPX4
Suction power 9 kPa
Tank volume 20 l
Working time on one battery charge 20 min
Sound pressure level: L
pA
75.1 dB(A) K=3 dB(A)
Sound power level: L
wA
85.1 dB(A) K=3 dB(A)
Weight: 5 kg
Battery pack model B0P-SP06-20ZL
Capacity 18V(Max.20) 4.0Ah
Charger model
VDE: B0Q-SP06-20ZA
BS: B0Q-SP06-20ZB
Input 220–240 V~, 50/60 Hz
Output: 20 V , 2,4 A
The vibration emission level stated in this instruction manual has been measured in
accordance with a standardized test given in EN 60745; it may be used to vibration when
using the tool for the applications mentioned.
• using the tool for different applications, or with different or poorly maintained accessories,
may significantly increase the exposure level
• the times when the tool is switched off or when it is running but not actually doing the job,
may significantly reduce the exposure level.
Protect yourself against the effects of vibration by maintaining the tool and its accessories,
keeping your hands warm, and organizing your work patterns.

16
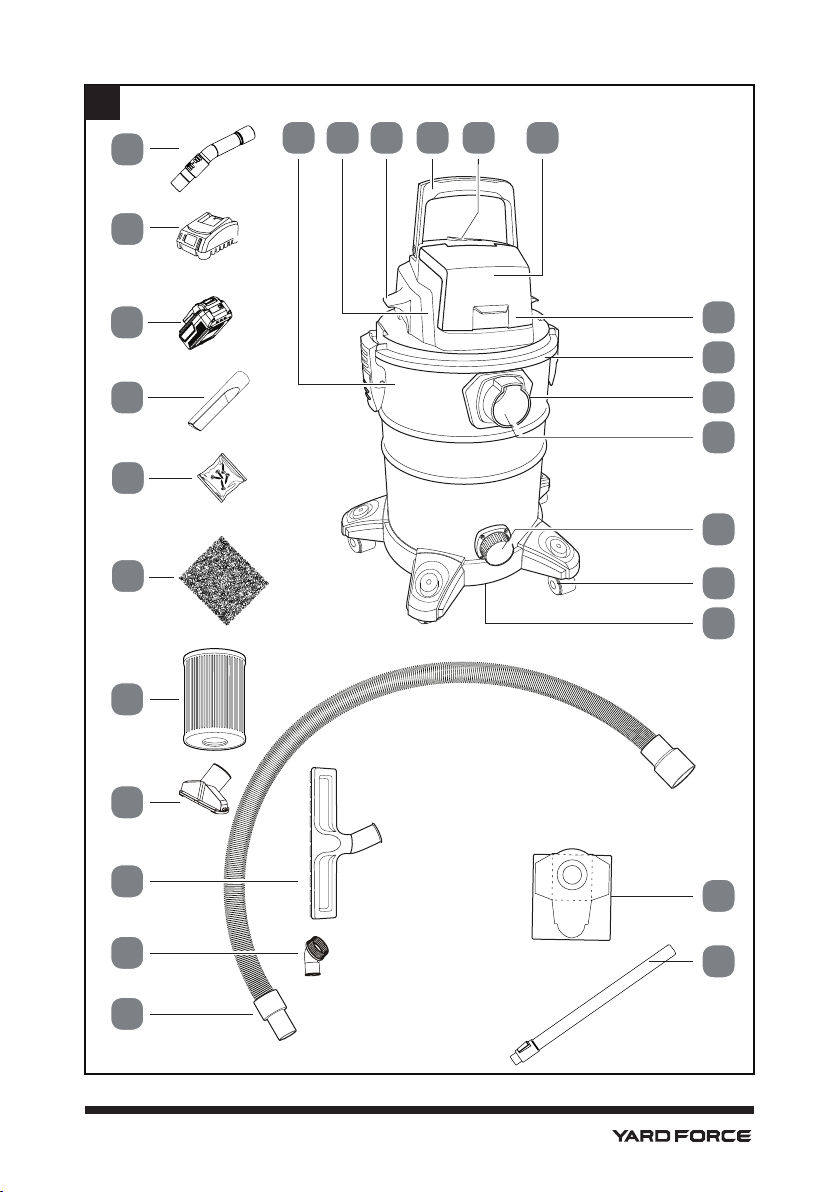
Parts description (Fig. A)
1. Wet&dry vacuum cleaner
2. Motor head
3. Motor head handle left / right
4. Carry handle
5. ON / OFF switch
6. Battery pack tank
7. Battery pack tank flap
8. Closing flap left / right
9. Stainless steel tank
10. Hose connection
11. Drain screw
12. Swivel castors (5x)
13. Anti static chain (not shown)
14. Dust bags
15. Suction pipe
16. Suction hose
17. Dust brush
18. Wide nozzle with rubber lip and brush
19. Utility nozzle
20. HEPA filter cartridge
21. Foam filter
22. Screws for swivel castors (8x)
23. Crevice nozzle
24. Battery pack
25. charger
26. Air regulation handle
DESCRIPTION OF PRODUCT

17
OPERATION
Charging the battery pack
NOTE:
Remove the battery pack from the charger after it has been fully charged.
NOTE:
Battery should be fully charged before first use.
NOTE:
Make sure the mains voltage is the same as rating label which is located on the
charger.
1. Connect the charger to a power supply. Red LED will light up.
2. To insert the battery pack into the charger, align the raised ribs of the battery pack with
the grooves of the charger then push it in. (Fig. B)
3. The red LED light of the charger will light up and then the green light flashes during
normal charging.
4. After charging is complete, the charger light will turn to a solid green light.
5. Once the battery is fully charged , depress the battery release button and then remove
the battery pack. (Fig. B)
Power indicator (Fig. C)
This Li-Ion battery pack is equipped with a power indicator which is used to show the battery
pack’s remaining charge. Press the power indicator button to check battery charge as picture
showed. The indicator will stay lit for approximately 4 seconds.
To obtain the best life from the battery
1. Never allow the battery to completely discharge before recharging. The battery pack
should be placed on the charger whenever the battery pack is noticeably running down
or the tool no longer performs a task it previously performed.
2. Avoid conducting short charges. Make sure that the battery is fully charged each time by
allowing the charger to complete its full charging cycle.
3. Avoid allowing loose items like screws or nails etc. to be stored with battery packs as
these or similar items can short battery packs and cause a fire or explosion.
4. Always unplug the charger when not in use and store in a dry and secure place.
5. Avoid charging or storing your battery in temperatures below 5°C and above 45°C.
6. After use, allow the battery pack to cool down for approximately 30 minutes before
attempting to recharge.
Assembling the swivel castors (Fig. D)
1. Detach the motor head 2 (see chapter Detaching the motor head).
2. Remove all accessories from the stainless steel tank 9.
3. Place the stainless steel container 9 upside down on a flat surface.
4. Press the castors 12 one after the other into the five openings provided on the underside
of the stainless steel container 9.
5. Tighten the castors 12 with one screw 22 each using the Phillips screwdriver.
6. Turn the stainless steel container over and place it on the castors 12.
7. Assemble the motor head 2 (see chapter Assembling the motor head).

18
Mount the motor head (Fig. E)
1. Align the motor head 2 with the locking flaps 8 and insert it into the stainless steel
container 9.
2. Position the locking flaps 8 in the recesses on the motor head 2.
3. Close the flaps 8 by pressing down the lower parts.
Connect the suction hose / accessories (Fig. F)
Connect the suction hose
Insert the suction hose 16 with the suction hose connector into the hose connection 10 until it
audibly clicks into place.
Connect accessories
Insert the remaining end of the suction hose 16 into:
- The thick end of a suction tube 15 or 26
- into one of the nozzles 17, 18, 19, 23
Use as needed: no, one suction tube.
Dismantling (Fig. G)
Detach the motor head
1. Fold up the lower part of the right flap.
2. Loosen the closing flap 8 by unhooking and folding down the upper part.
3. Repeat points 1 and 2 for the left side.
4. Use the motor head handles 3 to lift the motor head 2 off the stainless steel container 9.
Remove the suction hose / accessories (Fig. H)
Remove the suction hose
Press the release button on the suction hose 16 and pull it off the hose connector 10.
Remove accessories
Hold the parts to be separated in one hand at a time.
Pull the pieces apart.
By twisting the parts, you can pull them apart more easily. Repeat points 1 and 2 for all parts
to be removed.
Remove / insert battery
Remove the battery (Fig. I)
1. Open the battery flap 7 on the motor head 2.
2. Press and hold the battery release button.
3. Pull the battery out of the battery holder 6
If the battery does not pull out easily, the release button was not pressed firmly enough. Press
the release button more firmly.
4. Close the battery flap 7 on the motor head 2.
OPERATION

19
OPERATION
Insert the battery (Fig. J)
1. Open the battery flap 7 on the motor head 2.
2. Slide the battery into the battery holder 6.
3. Check that the battery is firmly seated.
4. Close the battery flap 7 on the motor head 2.
Filter
Usage
- For coarse debris and demolition waste, use the HEPA filter cartridge 20 only.
- For vacuuming water, sludge, or soaked debris, use the foam filter 21.
- For fine dust and for general household use, install both HPEA filter 20 and dust bag 14.
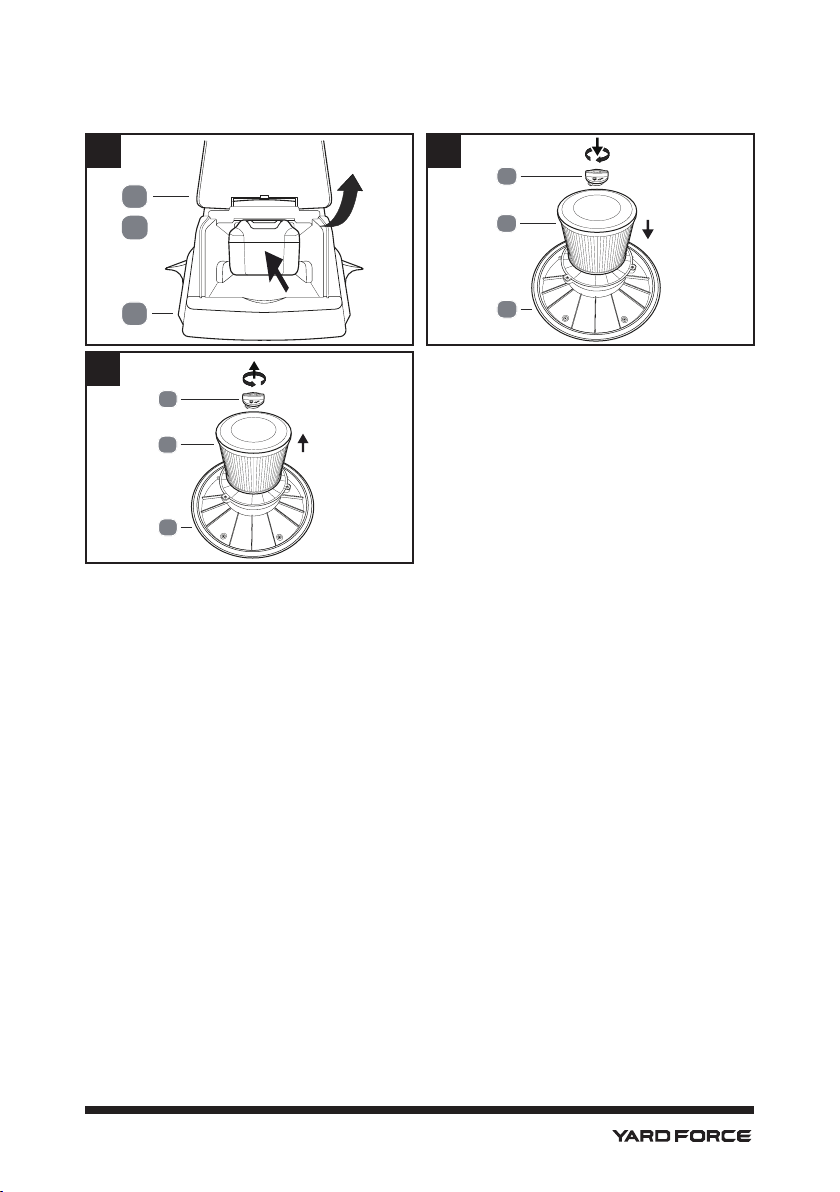
Insert the HEPA filter cartridge (Fig. K)
1. Dismantle the motor head 2 (see chapter Dismantling the motor head).
2. Place the motor head 2 upside down on a level surface. If a foam filter 21 is installed,
remove it (see chapter Removing the foam filter)
3. Place the HEPA filter cartridge 20 on the filter holder.
4. Insert the filter locking screw through the HEPA filter cartridge 20 into the filter holder.
5. Tighten the filter locking screw clockwise.
6. Assemble the motor head 2 (see chapter Assembling the motor head).
Remove the HEPA filter cartridge (Fig. L)
1. Dismantle the motor head 2 (see chapter Dismantling the motor head).
2. Place the motor head 2 upside down on a level surface.
3. Turn the filter locking screw 19 counterclockwise and pull it out.
4. Pull the HEPA filter cartridge 20 out of the filter holder.
Insert foam filter
1. Detach the motor head 2 (see chapter Detaching the motor head).
2. Place the motor head 2 upside down on a level surface.
If the HEPA filter cartridge 20 is installed, remove it (see chapter Removing the HEPA
filter cartridge)
3. Carefully pull the open side of the foam filter 21 onto the filter holder. Do not pull too
hard to prevent tearing.
4. Assemble the motor head 2 (see chapter Assembling the motor head).
Remove the foam filter
1. Detach the motor head 2 (see chapter Detaching the motor head).
2. Place the motor head 2 upside down on a level surface.
3. Carefully pull the foam filter 21 off the filter holder.

20
OPERATION
Insert fine dust bag
Risk of injury! Always use the fine dust bag 14 together with the HEPA filter cartridge 20.
Dismantle the motor head 2 (see chapter Dismantling the motor head).
1. Place the motor head 2 upside down on a level surface.
2. Unfold the fine dust bag 14.
3. Pull the fine dust bag 14 by its cardboard handle over the inner part of the hose
connector 10.
4. Make sure that the seal of the fine dust bag 14 is pulled tightly over the inner part of the
hose connector 10.
5. Assemble the motor head 2 (see chapter Assembling the motor head).
Remove the fine dust bag
1. Detach the motor head 2 (see chapter Detaching the motor head).
2. Place the motor head 2 upside down on a level surface.
3. Pull the fine dust bag 14 off the inner part of the hose connector 10 by its cardboard
handle.
4. Remove the fine dust bag 14 from the stainless steel container 9.
Operation
WARNING!
Risk of fire and explosion!
Certain substances can form explosive mixtures or vapors when they are swirled with suction
air.
- Do not pick up any flammable, flammable, explosive or corrosive gases, vapors, liquids
or dusts.
- Do not vacuum up organic solvents (e.g. benzine paint thinner or acetone).
- Do not suck up acids and bases undiluted.
- Do not vacuum up burning materials (e.g. wood)
- Do not vacuum up any smoldering materials (e.g. cigarette butts or ashes).
Risk of injury!
Before starting the device, unwind the suction hose 16 completely.
Do not use the vacuum cleaner without a filter!
Turn on a device
Press the ON / OFF switch 5 in the "I" position.
Switch off the device
Press the ON / OFF switch 5 in the "O" position.

21
Dry vacuuming
Risk of injury!
Do not use a wet or damp device for dry vacuuming!
1. Insert the HEPA filter cartridge 20 (see chapter Inserting the HEPA filter cartridge).
2. Connect the suction hose and the accessories (see chapter Connecting the suction hose
/ accessories) Floor suction: Connect suction tube 15 and the wide nozzle with rubber
lip and brush 18. Suction at table height or in tight spaces: Do not connect a suction
tube 15 or a suction tube 15 and the crevice nozzle 23. If necessary, use a fine dust bag
14 (see chapter Filters).
3. Hold the suction hose 16 tight.
4. Switch on the device (see chapter Switching on the device).
5. Vacuum the area to be cleaned.
6. Switch off the device (see chapter Switching off the device).
Wet vacuuming
Risk of injury!
Switch off the device immediately if liquid or wet dirt emerges from the housing.
1. Insert the foam filter 21 (see chapter Inserting the foam fi lter). Floor suction: Connect
suction tube 15 and the wide nozzle with rubber lip and brush 18. Suction at table height
or in tight spaces: Do not connect a suction tube 15 or a suction tube 15 and the crevice
nozzle 23.
2. Hold the suction hose 16 tight.
3. Switch on the device (see chapter Switching on the device).
4. Vacuum the area to be cleaned.
5. Switch off the device (see chapter Switching off the device).
6. Clean the device and the accessories (see chapter Cleaning after wet vacuuming).
Blow function
1. Remove all filters from the device (see chapter Filters).
2. Connect the suction hose 16 with the suction hose connector in the hose connection of
the motor head 2 until it audibly clicks into place. Connect suction tube 15 and / or the
crevice nozzle 23 as required.
3. Hold the suction hose 16 tight.
4. Switch on the device (see chapter Switching on the device).
5. Blow off an area or objects.
6. Switch off the device (see chapter Switching off the device).
7. Connect the suction hose (see chapter Connecting the suction hose).
OPERATION

22
MAINTENANCE AND STORAGE
Cleaning and storage
WARNING!
Risk of damage!
- Do not spray the device with water.
- Always check the device for obvious faults and defects before use; have them repaired if
necessary and defective parts replaced.
Cleaning
Risk of damage!
Improper handling of the device can lead to damage the device.
- Do not use any aggressive cleaning agents, brushes with metal or nylon bristles, or
sharp or metallic cleaning objects such as knives, hard spatulas and the like. These can
damage the surfaces.
Cleaning after dry vacuuming
- Remove the battery.
- Remove all accessories and the suction hose 16 (see chapter Removing the suction
hose / accessories).
- Detach the motor head 2 (see chapter Detaching the motor head).
- Knock the dust out of the HEPA filter cartridge 20.
- Clean the HEPA filter cartridge 20 with a paint brush or a brush.
- If a fine dust bag is used, remove it (see chapter Removing the fine dust bag).
- Empty the stainless steel container 9.
- Clean the motor head 2, the stainless steel container 9, the accessories and the suction
hose 16 with a slightly damp cloth.
- Insert a filter (see chapter Filters).
- Assemble the motor head 2 (see chapter Assembling the motor head).
Cleaning after wet vacuuming
- Remove the battery.
- Remove all accessories and the suction hose 16 (see chapter Removing the suction
hose / accessories).
- Dismantle the motor head 2 (see chapter Dismantling the motor head).
- Remove the foam filter 21.
- Clean the foam filter 21 with lukewarm water and soap.
- Position a collecting container of sufficient size under the drain screw.
- Open the drain screw 11.
- Empty the stainless steel container 9.
- Rinse the stainless steel container 9, the accessories and the suction hose 16 with a

23
MAINTENANCE AND STORAGE
mild soapy solution.
- Clean the motor head 2 with a slightly damp cloth.
- Let all parts of the device and all accessories dry.
- Close the drain screw 11.
- Insert a filter (see chapter Filters).
- Assemble the motor head 2 (see chapter Assembling the motor head).
Storage
- Remove the battery.
- Wrap the suction hose 16 around the stainless steel container 9.
- Insert the accessories in the accessory holder on the motor head 2.
- Keep the device in a clean, dry, frost-free place inaccessible to children.
Transport
- Only transport the device in the normal position, avoid a tilted transport position.
- When transporting the device in vehicles, it must be secured in accordance with the
applicable regulations (load securing).
24
MAINTENANCE AND STORAGE
WARNING:
Before performing any repair work, always ensure that the battery pack
has been removed.
WARNING:
Always wear heavy duty gloves when adjusting or cleaning, especially
when handling sharp objects.
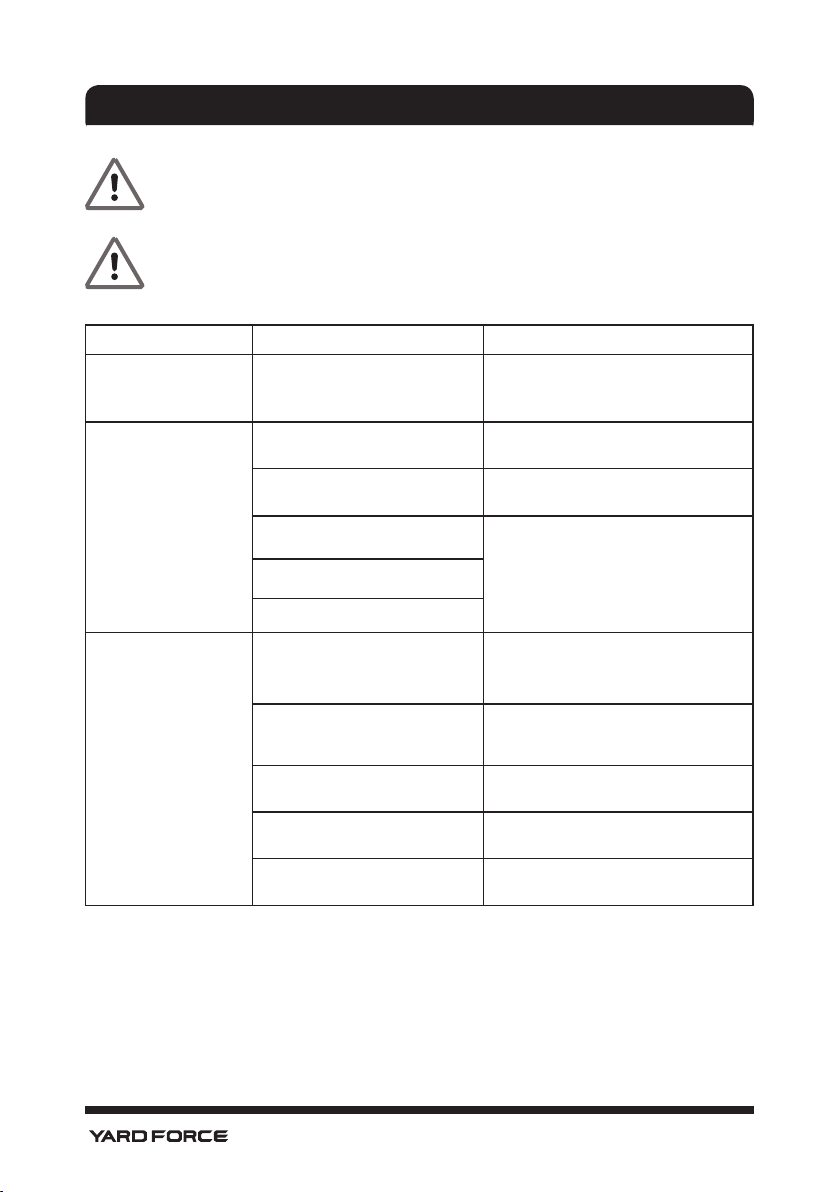
Fault/malfunction Cause Remedy
The extracted material
is blown out again at
the motor head.
Filter damaged Replace the filter (see chapter Filters).
The engine does
not run or it blocked
during operation.
Power supply interrupted
Remove and charge the battery
pack
Battery empty or without
function
Clean the air vents
Worn carbon brushes
Contact customer service
ON / OFF switch defective
Motor defekt
Low or no suction
power.
Suction hose, suction tube or
accessories clogged
Clean the suction hose, the suction
tube and the accessories (see chap-
ter Cleaning).
Incorrectly connected suction
hose
Connect the suction hose correctly
(see chapter Connecting the suction
hose / accessories).
Stainless steel tank does not
fitted in place
Close the stainless steel tank (see
chapter Mounting the motor head).
Stainless steel tank is full
Empty the stainless steel tank (see
chapter cleaning).
Filter capacity exhausted
Clean or replace the filter (see chap-
ter Filters).

25
To the provisions of Council Directives
We
MEROTEC GmbH
Otto-Brenner-Str. 8, 47877 Willich, Germany
Declare that the product:
Description: 20V Cordless wet&dry vacuum cleaner
Model No. LW CVC1
Function: vacuuming at home
Complies with the essential health and safety requirements of the
following directives:
Low Voltage Directive 2014/35/EU
Electromagnetic Compatibility Directive 2014/30/EU
EC Directive 2011/65/EU and its amendment Directive (EU) 2015/863 (RoHS)
Standards and technical specification referred to:
EN 60335-2-2:2010+A11:2012+A1:2013
EN 60335-1:2012+A11:2014+A13:2017+A1:2019+A14:2019+A2:2019+A15:2021
EN 62233:2008
EN 55014-1:2017
EN 55014-2:2015
Authorized Signatory
Date: 18.01.2022
Signature:________________________
Place: Willich
Name: Ronald Menken
General Manager
MEROTEC GmbH
Otto-Brenner-Str. 8
D-47877 Willich
DECLARATION OF CONFORMITY

26
To the provisions of Council Directives
We
SUMEC UK
Unit A&B Escrick Business Park Escrick, York YO19 6FD
United Kingdom
Declare that the product:
Description: 20V Cordless wet&dry vacuum cleaner
Model No. LW CVC1
Function: vacuuming at home
Complies with the essential health and safety requirements of the
following directives:
Electrical Equipment (Safety) Regulations 2016
The Restriction of the Use of Certain Hazardous Substances in Electrical and
Electronic Equipment Regulations 2012
Standards and technical specification referred to:
EN 60335-2-2:2010+A11:2012+A1:2013
EN 60335-1:2012+A11:2014+A13:2017+A1:2019+A14:2019+A2:2019+A15:2021
EN 62233:2008
EN 55014-1:2017
EN 55014-2:2015
Authorized Signatory
Date: 18.01.2022
Signature:________________________
Place:
York
Name: Mariana Hall
General Manager
SUMEC UK Co.,Ltd.
Unit A&B Escrick Business Park
Escrick,York YO19 6FD
United Kingdom
DECLARATION OF CONFORMITY