Loading ...
Loading ...
Loading ...
After Sales Support
(AU) 1300 886 649 (NZ) 0800 836 761 | tempo.org/support
16
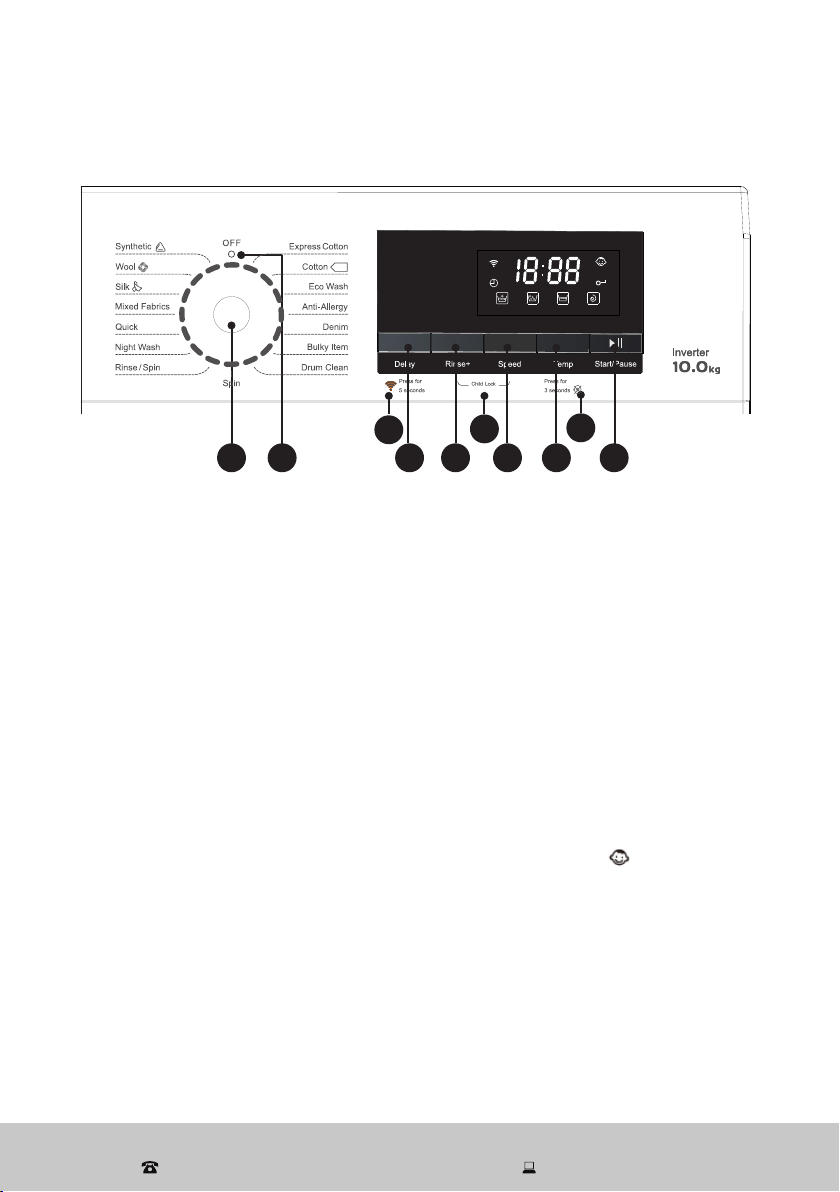
Control panel (Fig. 10)
1 Program dial: Turn the program dial (knob) clockwise or anticlockwise to switch on the
machine and select the required wash program (see page 18 for details). Once you press
the Start/Pause button and the machine is running, the program cannot be changed.
2 Start/Pause: Press this button to start a wash program or to pause it. The door cannot
be opened when the machine is paused.
3 Temp: Press this button to change a wash temperature (see page 18 for details).
4 Speed: Use this button to change a program’s default spin speed (see page 18 for
details).
5 Rinse+: Use this button to change the rinse times (see page 18 for the number of rinses).
6 Delay: Use this button to set the delay start time (from 1 to 24 hours) of a wash program.
7 Wi-Fi function: Turn on the machine and press and hold the Delay button for 5 seconds
to activate the Wi-Fi function, then follow the app prompts to connect the Wi-Fi.
8 Child lock
– To activate the child lock after the washing cycle has started, press and hold the Rise+
and Speed buttons simultaneously for 3 seconds. The child lock icon will light up
on the display, indicating that the control panel is locked to prevent misuse by children.
In an emergency you can power the machine off by turning the dial to the [ O ] position.
– To cancel the child lock, press and hold the Rinse+ and Speed buttons for 3 seconds.
– You can only activate the child lock after the washing cycle has started. It will release
automatically after the washing program has finished.
9 Mute: Press and hold the Temp. button for 3 seconds to mute the prompt tone and
alert sound. Press and hold the Temp. button again to restore the sound.
10 OFF [ O ] position
At the end of a program, turn the knob to the [ O ] position to switch the machine off.
Instructions
61 245
8
10 3
7
9
SY-XT5QG100-006
材料:油墨
中山格兰仕日用电器有限公司
设 计
校 对
审 核
工 艺
标准化
批 准
日 期
李东波
宾艺强
洪柳
傅玲
尹怀斌
2021.07.10
控制面板丝印
XQG100-T514VE/W
标记 更改文件号处数 签名 日期 阶 段 标 记
B
重量 比例
视 角
共1页 第1页
叶强
技术要求:
1.文字字体格式、大小尺寸必须与图纸相符合;
2.文字、图案排版必须与图纸一致;
3.未注公差按照IT14执行。
SY-XT5QG100-006 00
版本
大于
—
6
3
10
18
30
基本尺寸
公差值 ±
IT12
IT13 IT14 IT15 IT16 IT17 IT18
到
80
50
120
180
250
315
400
500
3
10
6
18
30
50
120
80
180
250
315
400
500
—
mm
0.1
0.14
0.25
0.4
0.6
1.0 1.4
0.12
0.18
0.3
0.48
0.75
1.2 1.8
0.15
0.22
0.36
0.58
0.9
1.5 2.2
0.18
0.27
0.43
0.7
1.1
1.8 2.7
0.21
0.33
0.52
0.84
1.3
2.1 3.3
0.25
0.39
0.62
1.0
1.6
2.5 3.9
0.3
0.46
0.74
1.2
1.9
3.0 4.6
0.35
0.54
0.87
1.4
2.2
3.5 5.4
0.4
0.63
1.0
1.6
2.5
4.0 6.3
0.46
0.72
1.15
1.85
2.9
4.6 7.2
0.52
0.81
1.3
2.1
3.2
5.2 8.1
0.57
0.89
1.4
2.3
3.6
5.7 8.9
0.63
0.97
1.55
2.5
4.0
6.3 9.7
0.7
1.1
1.75
2.8
4.4
7.0 11.0
公差值 ±
角度
IT12/13/14 IT15/16/17/18
大于 到
0°
90°
5′
90′
90°
180°
15′
1°
180°
270°
30′
2°
270°
360°
1°
6°
技术要求:
1.文字字体格式、大小尺寸必须与图纸相符合;
2.文字、图案排版必须与图纸一致;
3.未注公差按照IT14执行;
4.丝印图文清晰、正确光洁、颜色均匀;
5.丝印线条宽度一致,不允许有缺印、漏印;
6.丝印附着力:采用正己烷、1kg砝码,水拉动
15秒,测试完成后丝印油墨无脱落。
Loading ...
Loading ...
Loading ...