1
65
2
7
3
8
4
9
SAVE THESE INSTRUCTIONS
For Household Use Only
LITHIUM-ION BATTERY
REPLACEMENT, TRIMMER DISPOSAL
AND RECYCLING:
• For battery replacement send the entire, intact trimmer unit to:
Wahl Annex 3001 North Locust, P.O. Box 578, Sterling, IL 61081
• Do not attempt to remove the battery. Lithium-Ion batteries can
explode, catch fire, and/or cause burns if disassembled, damaged,
or exposed to water or high temperatures.
• If you choose not to replace the battery, the entire, intact trimmer
unit must be disposed. Do not attempt to remove the battery for
disposal. Lithium-Ion batteries may be subject to local disposal
regulations. Many locations prohibit disposal in standard waste
receptacles. Check your local laws and regulations.
• For recycling contact a government recycling agency, waste
disposal service, retailer, or visit online recycling sources, such as
www.batteryrecycling.com or www.rbrc.org.
RECHARGING
The trimmer cannot be overcharged, so you may charge it as often
as desired. However, periodic recharging of the trimmer, rather than
continuous recharging, will prolong battery life.
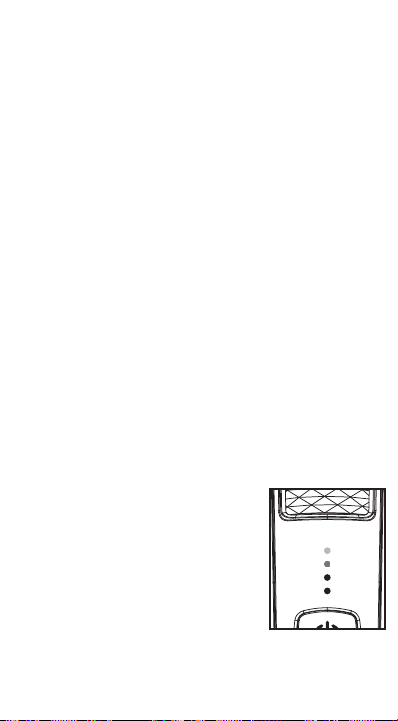
All 4 LEDs light up when the unit is powered
on and fully charged. These LED’s are also
battery level indicators and gradually turn off
based off the charge level.
The bottom LED lights up when there is
a low battery (less than 25% power). If
lower than 10% battery life, the bottom LED
flashes.
When charging the unit, the LEDs light up to show the charge level.
All 4 LEDs will be lit when the unit is fully charged.
unit “ON - I” and pinch or push the blades manually. (Oil may
have dried out between the blades, so they may be temporarily
stuck together.)
TRAVEL LOCK
The Wahl Manscaper® trimmer comes with an electronic travel
lock to avoid accidental activation while transporting.
Hold power button down for 3 seconds to engage travel lock.
Trimmer will turn on for those 3 seconds, and turn off once the
travel lock is engaged.
Hold power button down for 3 seconds to disengage travel lock.
Trimmer will turn on once the travel lock is disengaged.
WET/DRY USE
The Wahl trimmer is designed to be water resistant and shower
proof. This lets you use your Wahl trimmer in the shower or at the
sink without worry and makes it easy to clean under running water.
NOTE: The trimmer is for wet/dry use. The trimmer will not run
while the cord is attached for safety.
For best results use on damp or dry hair. Cutting hair while
it is saturated with water is not good for the hair and is not
recommended.
1. This trimmer is conveniently designed for household use. It
should be allowed to charge 60 minutes before first use.
2. Remove the trimmer, recharging transformer and accessories
from the packing material.
3. Connect the transformer to the trimmer. BE SURE TRIMMER IS
IN THE “OFF - 0” POSITION WHEN CHARGING.
4. Plug the recharging transformer into any convenient electrical
outlet at the correct voltage.
5. When trimmer is low in power, it should be connected to the
transformer and plugged into an outlet to assure maximum
power is available when it is next used. This transformer
is designed to completely charge the battery without
overcharging. Do not use the trimmer while it is charging.
6. The battery will take approximately 60 minutes to charge. The
lithium ion trimmer also has quick charge capability.
7. Insert only recharging transformer plug supplied by the
manufacturer into charger receptacle.
TROUBLESHOOTING
If your trimmer does not seem to take a charge, check the following
before returning it for repair:
1. Check outlet to make sure it is working by plugging in another
appliance.
2. Make sure the outlet simply is not connected to a light switch
which turns the power at the outlet off when lights are turned
off.
3. Be sure the trimmer is properly connected to the recharging
transformer, all connections are secure and the switch on the
trimmer is turned “OFF - 0.”
4. If your electricity is connected to a master power switch, we
suggest the trimmer be disconnected from the charger anytime
the master switch is off. Leaving the unit plugged into a dead
outlet or an unplugged charger will drain the battery.
5. If trimmer does not run and it is completely charged, turn the
WahlUSA.com
Operating Instructions for the
Wet/Dry Lithium Ion Grooming Kits
Instrucciones de Funcionamiento
para los Kits de Aseo de Iones de
Litio Húmedos y Secos
Detachable Blade Trimmer
Recortadora con Láminas Desmontable
Model 1065
3. Set the wrap-around guard dial to
its longest position. You will set it to
progressively shorter lengths as you
work your hair into the style you want,
but it’s best to take off a little at a time.
4. Gently trim in the direction your hair
naturally grows, and avoid cutting against
the grain as much as possible.
5. Using your free hand, pull your skin
taught as you get to shorter lengths to
avoid folds of skin entering the trimmer
blade. See illustrations for examples of
what to do and what not to do.
6. Do the job, but don’t over do it. To avoid
irritating sensitive skin, you will want
to make as few passes as possible as you get into the shorter
lengths. Remember to go gently and take light strokes.
7. TAKE YOUR TIME. A fully charged Manscaper® will run for up
to 100 minutes on a charge, so you have plenty of time to go
slow and get the job done right.
PRO TIP: After you perform your trimming, make sure to clean up
the mess. Nobody wants to walk into the bathroom and find that all
over the floor.
TRIMMING WITH
ATTACHMENT COMBS
These attachments are ideal for blending,
tapering and defining, as well as for
achieving a “close trim” stubble look. To use
the attachments, go with the hair direction.
To achieve closer looks, go against the hair
direction.
To attach guide combs, hold comb with
the teeth up. Snap guide comb attachment
firmly to the bottom of the trimmer blade.
TRIMMING PRIVATES
Manscaping can be easy and fun, but also a little intimidating. It
is certainly an area where you will want to take some extra time
and care to get the results you want with no discomfort. Wahl’s
Manscaper® with it’s wrap-around safety guards will help keep
your privates safe during the coming expedition, but you will still
want to observe some caution to avoid any mishaps along the way.
Before you even begin, it’s important to know what you want to
have your “NetherScape” look like when you are done. Are you
looking for an even trim all over, edging back excess hair that
sticks out around your briefs, or planning to use one of the more
whimsical stylings that can be found in an internet search? Once
you have decided what you want the finished result to look like,
follow the steps below to achieve your new look.
HOW TO MANSCAPE
1. Clean is important. Be sure your Manscaper® is clean and
ready to perform the task with plenty of power available to do
the job. Also, make sure your hair is clean and dry for best
results.
2. Use a comb to gently remove any snarls or tangles from your
pubic hair. Go slow at first until you get the hang of combing the
NetherScape to avoid painful pulls and jabs. After your hair is
clear of obstructing tangles, you are ready to start trimming.
SPECIAL FEATURES:
Your trimmer has been designed with
several advanced features to help you
get perfect results every time you trim.
Your trimmer may be used to neatly trim
anywhere you may need grooming.
A Detachable Blade System enables you
to quickly change from a standard-width
blade for full grooming to a narrow-width
blade for detail trimming.
To remove attachment, simply pull top edge
of blade away from body unit. To attach,
align back tab of attachment head to cavity
on the inner edge of trimmer unit and push
down on top of blade.
Should blades become damaged
or dull, or if you want additional
attachment heads for your trimmer,
you may purchase them from Wahl. Order attachments by part
number from our service and repair department by calling 1-800-
767-9245 or by going to our website at www.WahlUSA.com. The
replacement blade part number for this unit is
02145-500.
Self-Sharpening Blades are made to
maintain their shape and sharpness for
extended periods.
Wrap-Around Safety Guard makes achieving a consistent trim
easy every time. The guide has 19 cutting lengths, and can be
removed (providing an 20th cutting position). To attach the guide,
simply slide it on. Adjust the trimming length by turning the dial left
or right to the desired setting.
CARING FOR YOUR TRIMMER
OILING BLADES
For best results, use Wahl Clipper Oil on the blades only when
necessary, or approximately once a month. Motor bearings are
permanently lubricated—do not attempt to oil.
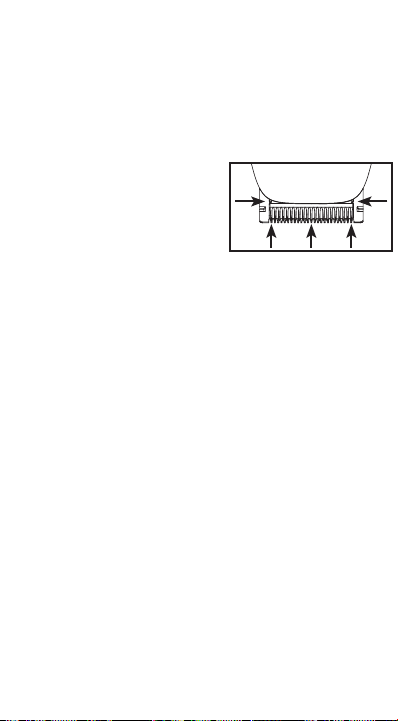
When oiling your trimmer, turn the trimmer “ON - I,” hold the unit
with the blades facing DOWN and
squeeze three drops across the front
of the blade and one drop on each
side on the heel of the blade. Wipe
off excess oil with soft cloth.
NOTICE—DO NOT OVER OIL!
Excessive oiling or application of liquids will cause damage if
allowed to seep back into motor.
BLADE CARE
Trimmer blades have precision-hardened, ground and lapped
cutting teeth. Blades should be handled carefully and never bumped
or used to cut dirty or abrasive material. Clean with the included
brush.
CLEANING/STORAGE
Before storing your trimmer, use the cleaning brush to whisk
any loose hairs from the unit and the blades. Store unit in such a
manner so that blades are protected from damage.
When the trimmer is not in use, the trimmer blade guard
attachment should be in place to protect the blades.
This appliance should be stored in a manner where it is not
subjected to crushing, heating above 100°C (212°F), or
incineration.
SERVICE AND REPAIR
If you have problems with your trimmer, send it prepaid with a note
explaining the problem to:
Wahl Clipper Corporation
Attn: Repair Department
3001 Locust Street
Sterling, IL 61081
Telephone (800) 767-9245
For products purchased outside the United States, contact your distributor.
If for any reason within 60 days of purchase of your Wahl
®
trimmer you are not satisfied with your trimmer and would like a
refund, just return your trimmer, together with the sales receipt, to
the retailer from whom you purchased it. Wahl will reimburse all
retailers who accept trimmers within 60 days of purchase. If you
have any questions regarding this money-back guarantee, please
call 1-800-767-9245 in the United States.
60 Day Money Back Guarantee!
© 2021 Wahl Clipper Corporation
Art No. 55556 (v.2021.03)
Printed in U.S.A.
For more information or Product Registration, visit WahlUSA.com
5-YEAR LIMITED WARRANTY
Valid in U.S.A. Only
If your Wahl product fails to operate satisfactorily within five (5)
years from the date of original purchase or receipt as a gift, Wahl
will, at our option, repair or replace the product and return it to
you FREE OF CHARGE. Do not return this product to store where
purchased. Products needing repair under this warranty should
be returned with postage pre-paid to the following address or call
1-800-767-9245 for assistance:
Wahl Clipper Corp.
Attn: Repair Department
3001 Locust Street
Sterling, Illinois 61081
When mailing, please include a note describing the defect and
the date of original purchase or receipt as a gift. Products out of
warranty will be repaired at our standard repair charges.
This warranty does not cover products damaged by:
1. Modification or repair by anyone other than Wahl Clipper
Corporation or a Wahl authorized service center;
2. Commercial (non-consumer) use or unreasonable use.
This warranty gives you specific legal rights, and you may also
have other rights which vary from state to state. No other written
express warranty is given. No responsibility is assumed for
incidental or consequential damages of any type or for the use
of unauthorized attachments. Some states may not allow the
exclusion or limitation of incidental or consequential damages, so
the limitation may not apply to you. Warranty valid in U.S.A. only.
Outside U.S.A., check with store for Wahl authorized distributor’s
warranty.
This symbol, located on the trimmer,
represents that the shaver is suitable
for use in the bath and shower.
NO
YES
Scan for Trimming 101

1
65
2
7
3
8
4
9
SAVE THESE INSTRUCTIONS
For Household Use Only
LITHIUM-ION BATTERY
REPLACEMENT, TRIMMER DISPOSAL
AND RECYCLING:
• For battery replacement send the entire, intact trimmer unit to:
Wahl Annex 3001 North Locust, P.O. Box 578, Sterling, IL 61081
• Do not attempt to remove the battery. Lithium-Ion batteries can
explode, catch fire, and/or cause burns if disassembled, damaged,
or exposed to water or high temperatures.
• If you choose not to replace the battery, the entire, intact trimmer
unit must be disposed. Do not attempt to remove the battery for
disposal. Lithium-Ion batteries may be subject to local disposal
regulations. Many locations prohibit disposal in standard waste
receptacles. Check your local laws and regulations.
• For recycling contact a government recycling agency, waste
disposal service, retailer, or visit online recycling sources, such as
www.batteryrecycling.com or www.rbrc.org.
RECHARGING
The trimmer cannot be overcharged, so you may charge it as often
as desired. However, periodic recharging of the trimmer, rather than
continuous recharging, will prolong battery life.
All 4 LEDs light up when the unit is powered
on and fully charged. These LED’s are also
battery level indicators and gradually turn off
based off the charge level.
The bottom LED lights up when there is
a low battery (less than 25% power). If
lower than 10% battery life, the bottom LED
flashes.
When charging the unit, the LEDs light up to show the charge level.
All 4 LEDs will be lit when the unit is fully charged.
unit “ON - I” and pinch or push the blades manually. (Oil may
have dried out between the blades, so they may be temporarily
stuck together.)
TRAVEL LOCK
The Wahl Manscaper® trimmer comes with an electronic travel
lock to avoid accidental activation while transporting.
Hold power button down for 3 seconds to engage travel lock.
Trimmer will turn on for those 3 seconds, and turn off once the
travel lock is engaged.
Hold power button down for 3 seconds to disengage travel lock.
Trimmer will turn on once the travel lock is disengaged.
WET/DRY USE
The Wahl trimmer is designed to be water resistant and shower
proof. This lets you use your Wahl trimmer in the shower or at the
sink without worry and makes it easy to clean under running water.
NOTE: The trimmer is for wet/dry use. The trimmer will not run
while the cord is attached for safety.
For best results use on damp or dry hair. Cutting hair while
it is saturated with water is not good for the hair and is not
recommended.
1. This trimmer is conveniently designed for household use. It
should be allowed to charge 60 minutes before first use.
2. Remove the trimmer, recharging transformer and accessories
from the packing material.
3. Connect the transformer to the trimmer. BE SURE TRIMMER IS
IN THE “OFF - 0” POSITION WHEN CHARGING.
4. Plug the recharging transformer into any convenient electrical
outlet at the correct voltage.
5. When trimmer is low in power, it should be connected to the
transformer and plugged into an outlet to assure maximum
power is available when it is next used. This transformer
is designed to completely charge the battery without
overcharging. Do not use the trimmer while it is charging.
6. The battery will take approximately 60 minutes to charge. The
lithium ion trimmer also has quick charge capability.
7. Insert only recharging transformer plug supplied by the
manufacturer into charger receptacle.
TROUBLESHOOTING
If your trimmer does not seem to take a charge, check the following
before returning it for repair:
1. Check outlet to make sure it is working by plugging in another
appliance.
2. Make sure the outlet simply is not connected to a light switch
which turns the power at the outlet off when lights are turned
off.
3. Be sure the trimmer is properly connected to the recharging
transformer, all connections are secure and the switch on the
trimmer is turned “OFF - 0.”
4. If your electricity is connected to a master power switch, we
suggest the trimmer be disconnected from the charger anytime
the master switch is off. Leaving the unit plugged into a dead
outlet or an unplugged charger will drain the battery.
5. If trimmer does not run and it is completely charged, turn the
WahlUSA.com
Operating Instructions for the
Wet/Dry Lithium Ion Grooming Kits
Instrucciones de Funcionamiento
para los Kits de Aseo de Iones de
Litio Húmedos y Secos
Detachable Blade Trimmer
Recortadora con Láminas Desmontable
Model 1065
3. Set the wrap-around guard dial to
its longest position. You will set it to
progressively shorter lengths as you
work your hair into the style you want,
but it’s best to take off a little at a time.
4. Gently trim in the direction your hair
naturally grows, and avoid cutting against
the grain as much as possible.
5. Using your free hand, pull your skin
taught as you get to shorter lengths to
avoid folds of skin entering the trimmer
blade. See illustrations for examples of
what to do and what not to do.
6. Do the job, but don’t over do it. To avoid
irritating sensitive skin, you will want
to make as few passes as possible as you get into the shorter
lengths. Remember to go gently and take light strokes.
7. TAKE YOUR TIME. A fully charged Manscaper® will run for up
to 100 minutes on a charge, so you have plenty of time to go
slow and get the job done right.
PRO TIP: After you perform your trimming, make sure to clean up
the mess. Nobody wants to walk into the bathroom and find that all
over the floor.
TRIMMING WITH
ATTACHMENT COMBS
These attachments are ideal for blending,
tapering and defining, as well as for
achieving a “close trim” stubble look. To use
the attachments, go with the hair direction.
To achieve closer looks, go against the hair
direction.
To attach guide combs, hold comb with
the teeth up. Snap guide comb attachment
firmly to the bottom of the trimmer blade.
TRIMMING PRIVATES
Manscaping can be easy and fun, but also a little intimidating. It
is certainly an area where you will want to take some extra time
and care to get the results you want with no discomfort. Wahl’s
Manscaper® with it’s wrap-around safety guards will help keep
your privates safe during the coming expedition, but you will still
want to observe some caution to avoid any mishaps along the way.
Before you even begin, it’s important to know what you want to
have your “NetherScape” look like when you are done. Are you
looking for an even trim all over, edging back excess hair that
sticks out around your briefs, or planning to use one of the more
whimsical stylings that can be found in an internet search? Once
you have decided what you want the finished result to look like,
follow the steps below to achieve your new look.
HOW TO MANSCAPE
1. Clean is important. Be sure your Manscaper® is clean and
ready to perform the task with plenty of power available to do
the job. Also, make sure your hair is clean and dry for best
results.
2. Use a comb to gently remove any snarls or tangles from your
pubic hair. Go slow at first until you get the hang of combing the
NetherScape to avoid painful pulls and jabs. After your hair is
clear of obstructing tangles, you are ready to start trimming.
SPECIAL FEATURES:
Your trimmer has been designed with
several advanced features to help you
get perfect results every time you trim.
Your trimmer may be used to neatly trim
anywhere you may need grooming.
A Detachable Blade System enables you
to quickly change from a standard-width
blade for full grooming to a narrow-width
blade for detail trimming.
To remove attachment, simply pull top edge
of blade away from body unit. To attach,
align back tab of attachment head to cavity
on the inner edge of trimmer unit and push
down on top of blade.
Should blades become damaged
or dull, or if you want additional
attachment heads for your trimmer,
you may purchase them from Wahl. Order attachments by part
number from our service and repair department by calling 1-800-
767-9245 or by going to our website at www.WahlUSA.com. The
replacement blade part number for this unit is
02145-500.
Self-Sharpening Blades are made to
maintain their shape and sharpness for
extended periods.
Wrap-Around Safety Guard makes achieving a consistent trim
easy every time. The guide has 19 cutting lengths, and can be
removed (providing an 20th cutting position). To attach the guide,
simply slide it on. Adjust the trimming length by turning the dial left
or right to the desired setting.
CARING FOR YOUR TRIMMER
OILING BLADES
For best results, use Wahl Clipper Oil on the blades only when
necessary, or approximately once a month. Motor bearings are
permanently lubricated—do not attempt to oil.
When oiling your trimmer, turn the trimmer “ON - I,” hold the unit
with the blades facing DOWN and
squeeze three drops across the front
of the blade and one drop on each
side on the heel of the blade. Wipe
off excess oil with soft cloth.
NOTICE—DO NOT OVER OIL!
Excessive oiling or application of liquids will cause damage if
allowed to seep back into motor.
BLADE CARE
Trimmer blades have precision-hardened, ground and lapped
cutting teeth. Blades should be handled carefully and never bumped
or used to cut dirty or abrasive material. Clean with the included
brush.
CLEANING/STORAGE
Before storing your trimmer, use the cleaning brush to whisk
any loose hairs from the unit and the blades. Store unit in such a
manner so that blades are protected from damage.
When the trimmer is not in use, the trimmer blade guard
attachment should be in place to protect the blades.
This appliance should be stored in a manner where it is not
subjected to crushing, heating above 100°C (212°F), or
incineration.
SERVICE AND REPAIR
If you have problems with your trimmer, send it prepaid with a note
explaining the problem to:
Wahl Clipper Corporation
Attn: Repair Department
3001 Locust Street
Sterling, IL 61081
Telephone (800) 767-9245
For products purchased outside the United States, contact your distributor.
If for any reason within 60 days of purchase of your Wahl
®
trimmer you are not satisfied with your trimmer and would like a
refund, just return your trimmer, together with the sales receipt, to
the retailer from whom you purchased it. Wahl will reimburse all
retailers who accept trimmers within 60 days of purchase. If you
have any questions regarding this money-back guarantee, please
call 1-800-767-9245 in the United States.
60 Day Money Back Guarantee!
© 2021 Wahl Clipper Corporation
Art No. 55556 (v.2021.03)
Printed in U.S.A.
For more information or Product Registration, visit WahlUSA.com
5-YEAR LIMITED WARRANTY
Valid in U.S.A. Only
If your Wahl product fails to operate satisfactorily within five (5)
years from the date of original purchase or receipt as a gift, Wahl
will, at our option, repair or replace the product and return it to
you FREE OF CHARGE. Do not return this product to store where
purchased. Products needing repair under this warranty should
be returned with postage pre-paid to the following address or call
1-800-767-9245 for assistance:
Wahl Clipper Corp.
Attn: Repair Department
3001 Locust Street
Sterling, Illinois 61081
When mailing, please include a note describing the defect and
the date of original purchase or receipt as a gift. Products out of
warranty will be repaired at our standard repair charges.
This warranty does not cover products damaged by:
1. Modification or repair by anyone other than Wahl Clipper
Corporation or a Wahl authorized service center;
2. Commercial (non-consumer) use or unreasonable use.
This warranty gives you specific legal rights, and you may also
have other rights which vary from state to state. No other written
express warranty is given. No responsibility is assumed for
incidental or consequential damages of any type or for the use
of unauthorized attachments. Some states may not allow the
exclusion or limitation of incidental or consequential damages, so
the limitation may not apply to you. Warranty valid in U.S.A. only.
Outside U.S.A., check with store for Wahl authorized distributor’s
warranty.
This symbol, located on the trimmer,
represents that the shaver is suitable
for use in the bath and shower.
NO
YES
Scan for Trimming 101
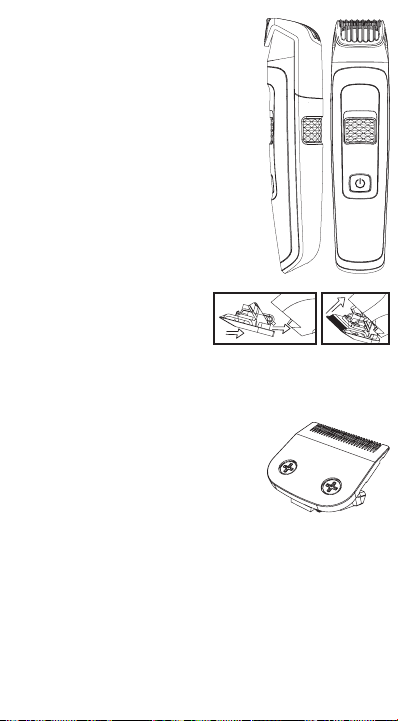
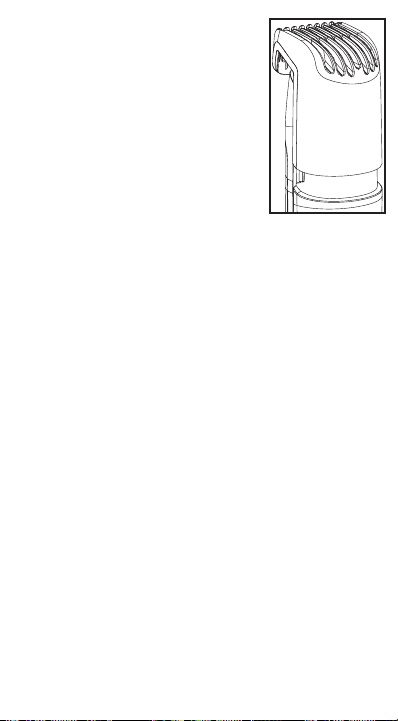
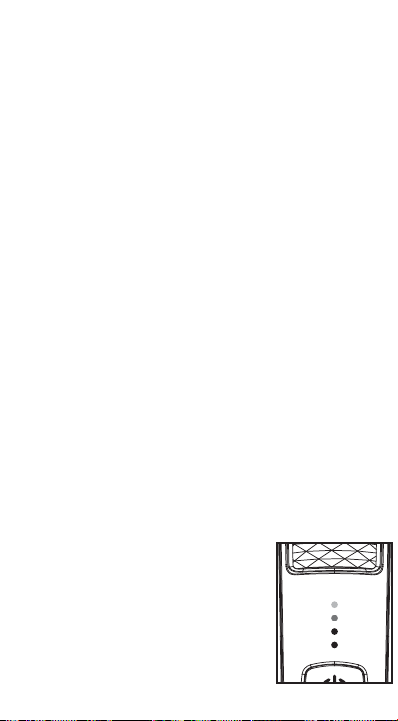
1
6
2
7
3
8 10
4 5
9
LOCALIZACIÓN Y REPARACIÓN
DE FALLAS
Si su recortadora no parece cargarse, compruebe lo siguiente antes
de enviarla para su reparación.
1. Compruebe la corriente del enchufe, enchufando otro aparato.
2. Asegúrese de que la toma no esté simplemente conectada a
un interruptor de luz que desconecte la corriente cuando se
apaguen las luces.
3. Asegúrese de que la recortadora esté bien conectada al
transformador de recarga, todas las conexiones sean buenas y
el interruptor de la recortadora esté apagado “OFF – 0”.
4. Si la electricidad está conectada a un interruptor de corriente
principal, sugerimos que se desconecte la recortadora del
cargador en cualquier momento en que el interruptor principal
esté en la posición de apagado. Al dejar la unidad enchufada en
una toma desconectada o cargador desenchufado se drenará la
pila.
5. Si la recortadora no funciona y está completamente cargada,
ponga la unidad en la posición de encendido “ON – I” y
pellizque o empuje las hojas manualmente. (Puede haber aceite
seco entre las hojas, por lo que pueden haberse quedado
atascadas temporalmente.)
GUARDE ESTAS INSTRUCCIONES
Solamente Para Uso Residencial
CAMBIO DE LA PILA DE LITIO ION,
DESECHO DE LA RECORTADORA Y
RECICLAJE:
• Para cambiar la pila, envíele toda la recortadora intacta a: Wahl
Annex 3001 North Locust, P.O. Box 578, Sterling, IL 61081
• No intente sacar la pila. Las pilas de litio ion pueden explotar,
incendiarse o causar quemaduras si se desarman, se dañan o las
exponen al agua o altas temperaturas.
• Si decide no cambiar la pila, debe desechar toda la recortadora.
No intente sacar la pila para desecharla. Las pilas de litio ion
están sujetas a reglamentos de desechos locales. Muchos lugares
prohíben el desecho en recipientes de basura corrientes. Consulte
las leyes y reglamentos locales.
• Para el reciclaje, contacte a la agencia de reciclaje gubernamental,
el servicio de basuras, el comerciante minorista o las fuentes de
reciclaje en línea, tal como www.batteryrecycling.com o
www.rbrc.org.
INSTRUCCIONES DE RECARGA
No es posible cargar la recortadora en exceso por lo que puede
cargarla tanto como lo desee. Sin embargo, recargando la
recortadora periódicamente, en vez de continuamente, prolongará
la vida útil de su batería.
Los 4 LED se iluminan cuando la unidad está encendida y
completamente cargada. Estos LED también
son indicadores de nivel de batería y se
apagan gradualmente dependiendo del nivel
de carga.
El LED inferior se enciende cuando la batería
está baja (menos de 25% de carga). Si la
batería tiene menos del 10% de carga, el
LED inferior parpadea.
Al cargar la unidad, los LED se encienden para mostrar el
nivel de carga. Los 4 LED se iluminarán cuando la unidad está
completamente cargada.
1. Esta recortadora está diseñada convenientemente para uso
casero. Debe dejar que se cargue de 60 minutos para otro antes
de usarse.
2. Saque la recortadora, transformador de recarga y accesorios del
material de empacado.
3. Conecte el transformador a la recortadora. ASEGÚRESE DE QUE
LA RECORTADORA ESTÉ EN LA POSICIÓN DE APAGADO “OFF
– 0” CUANDO ESTÉ CARGÁNDOSE.
4. Enchufe el transformador de recarga a cualquier toma de
corriente eléctrica conveniente al voltaje correcto.
5. Cuando la recortadora se está agotando, conectar el
transformador y enchufarse en una toma de corriente para
asegurarse de disponer de una máxima corriente cuando se
use la siguiente vez. Este transformador está diseñado para
cargar continuamente la pila sin sobrecargarla. No utilice la
desbastadora mientras se está cargando.
6. La carga de la pila se demora aproximadamente 60 minutos. La
desbastadora con pila de litio ion también es de carga rápida.
7. Inserte solamente la recarga del enchufe del transformador
suministrado por el fabricante en receptáculo del cargador.
SEGURO DE VIAJE
La recortadora Manscaper® de Wahl incluye un seguro electrónico
de viaje que evita que se encienda accidentalmente mientras se
transporta.
Mantenga oprimido el botón de encendido durante 3 segundos
para activar el seguro de viaje. La recortadora se encenderá esos 3
segundos, y se apagará cuando se active el seguro de viaje.
Mantenga oprimido el botón de encendido durante 3 segundos
para desactivar el seguro de viaje. La recortadora se encenderá
cuando se desactive el seguro de viaje.
USO MOJADO Y SECO
La recortadora Wahl está diseñada para ser a prueba de agua y de
duchas. Esto le permite utilizar su recortadora Wahl en la ducha
o en el lavabo sin preocupaciones, y facilita su limpieza bajo agua
corriente.
NOTA: La recortadora es para uso mojado y seco. La recortadora
no funcionará mientras el cable está conectado, para mayor
seguridad.
Para obtener mejores resultados, use en cabello húmedo o seco.
Cortar el cabello cuando está saturado de agua no es bueno para él
y no se recomienda.
CUIDADO DE LA RECORTADORA
LUBRICACIÓN DE LAS HOJAS
Para lograr resultados óptimos, use aceite para cortadora de Wahl
en las cuchillas solo cuando sea necesario o aproximadamente
una vez al mes. Los cojinetes del motor están lubricados
permanentemente. No trate de lubricarlos.
Cuando lubrique su recortadora, colóquela en posición de
encendido (“ON – I”), sostenga la
unidad con las cuchillas mirando
hacia ABAJO y escurra tres gotas
por la parte delantera de las
cuchillas y una en cada lado de la
parte plana de la cuchilla. Limpie el
exceso de aceite con un paño suave.
AVISO: ¡NO LUBRIQUE EXCESIVAMENTE!
La lubricación o aplicación de líquidos excesiva causará daños si se
deja que se filtre y llegue al motor.
CUIDADO DE LAS HOJAS
Las hojas de la recortadora tienen dientes de corte endurecidos
con precisión, rectificados y pulidos. Las hojas deben manipularse
con cuidado y no golpearse nunca ni usarse para cortar materiales
sucios o abrasivos. Limpiar con el cepillo incluido.
LIMPIEZA/ALMACENAMIENTO
Antes de guardar la recortadora, use el cepillo de limpieza para
retirar los pelos sueltos de la unidad y hojas. Guarde la unidad de
tal manera que las hojas estén protegidas contra los daños.
Cuando no se use la recortadora, el protector de hojas debe estar
colocado para proteger las hojas.
Este aparato se debe guardar de manera que no sea sometido
a aplastamiento, calentamiento a más de 100°C (212°F) o
incineración.
CUALIDADES ESPECIALES:
La recortadora fue hecha con varias cualidades
avanzadas para ayudarle a obtener resultados
perfectos cada vez que recorte. La recortadora
se puede usar para recortar en cualquier lugar.
El Sistema Desmontable de Cuchillas
permite el cambio rápido de una cuchilla de
longitud estándar para acicalado completo, a
una cuchilla angosta para recorte detallado.
Para quitar el accesorio, simplemente hale
el borde superior de la cuchilla. Para poner,
alinear detrás la lengüeta de la cuchilla con la
cavidad en el borde interno de la recortadora y
apriete el superior de la cuchilla.
Si las hojas se dañan o se desafilan,
puedes comprar un nuevo conjunto
de hoja en Wahl. Solicite los
documentos adjuntos por número
de pieza a nuestro departamento de servicio y reparación llamando
al 1-800-767-9245 o visitando nuestro sitio web en www.WahlUSA.
com. El número de pieza de la cuchilla de reemplazo para esta
unidad es 02145-500.
Las Cuchillas Autoafilantes hechas para
conservar su forma y agudeza durante
períodos prolongados.
La Protección Envolvente permite lograr un
recorte uniforme con facilidad en todas las ocasiones. La guía tiene
19 longitudes de corte y es extraíble (para ofrecer una 20.ª posición
de corte). Para conectar la guía, simplemente deslícela. Ajuste la
longitud de corte girando la perilla a la izquierda o derecha hasta el
ajuste deseado.
RECORTE CON PEINES
ACCESORIOS
Estos accesorios son ideales para matizar,
disminuir y definir, y para darle un “acabado
llano”. Para utilizar los accesorios, siga la
dirección de los pelos. Para que el corte sea
mayor, siga la dirección opuesta a los pelos.
Para insertar las peinetas de guía, sostenga
la peineta con los dientes hacia arriba.
Inserte firmemente el accesorio del peine de
guía en el fondo de la cuchilla de recorte.
RECORTE DE LAS PARTES PRIVADAS
Recortar el vello masculino puede ser fácil y divertido, pero
también un poco intimidante. Ciertamente es un área en la que
vale la pena invertir un poco más de tiempo y cuidado para lograr
los resultados deseados, sin molestias. La recortadora Wahl’s
Manscaper®, con sus protectores envolventes, le ayudarán a
mantener seguras sus zonas privadas durante la expedición, pero
aun así es recomendable aplicar ciertas precauciones para evitar
problemas.
Antes de comenzar, es importante que tenga claro el aspecto
que desea que tengan sus “regiones inferiores” cuando termine.
¿Quiere un recorte general, recortar el vello excesivo que
sobresale de la ropa interior, o planea usar uno de los estilos más
caprichosos que se encuentran en una búsqueda en internet? Una
vez que decida el resultado deseado, siga estos pasos para lograr
su nuevo aspecto.
CÓMO RECORTAR VELLO MASCULINO
1. La limpieza es importante. Asegúrese de que su Manscaper®
está limpia y preparada para llevar a cabo la tarea, y con
suficiente carga para terminar el trabajo. Además, asegúrese
de que su vello está limpio y seco para obtener los mejores
resultados.
2. Use un peine para desenredar suavemente y eliminar los nudos
de su vello púbico. Al principio hágalo
con lentitud hasta que aprenda a peinar
las regiones inferiores, para evitar jalones
dolorosos. Cuando su vello esté libre
de enredos, está listo para empezar a
recortar.
3. Coloque la perilla del protector en la
mayor longitud. La irá cambiando a
longitudes cada vez más cortas mientras
aplica el estilo que desea a su vello, pero
es mejor cortar muy poco al principio.
4. Recorte cuidadosamente en la dirección
en la que su vello crece naturalmente, y
evite cortar a contrapelo en la medida de
lo posible.
5. Usando su mano libre, estire su piel cuando haga cortes más
al ras, para evitar que entren pliegues de piel a la cuchilla. Las
ilustraciones muestran ejemplos de qué hacer y qué no hacer.
6. Haga el trabajo, pero no exagere. Para evitar irritar la piel
sensible, es mejor hacer la menor cantidad posible de pasadas
cuando haga cortes a menor longitud. Recuerde hacer
movimientos suaves y ligeros.
7. TÓMESE SU TIEMPO. Una Manscaper® totalmente cargada
funcionará hasta 100 minutos con la batería, así que tiene
tiempo más que suficiente para hacer el trabajo lentamente y
perfecto.
CONSEJO DE LOS PROFESIONALES: Después de terminar
el recorte, limpie los residuos. Nadie quiere entrar al baño y
encontrarse eso en el piso.
SERVICIO Y REPARACIÓN
Si tiene problemas con la recortadora, envíela con franqueo
prepagado y una nota explicando el problema a:
Wahl Clipper Corporation
Attn: Repair Department
3001 Locust Street • P.O. Box 578
Sterling, IL 61081
Teléfono (800) 767-9245
Para productos comprados fuera de Estados Unidos, póngase en
contacto con su distribuidor.
Si por cualquier razón entre los 60 días de la compra de su
recortadora de Wahl no esta satisfecho con su compra y desea
una devolución de su dinero, regrese la recortadora junto con su
recibo de compras a la tienda donde lo compro. Wahl reembolsara
a las tiendas quienes acepta las recortadoras entre los 60 días de
su compra. Si tiene preguntas tocantes esta Garantía, por favor
llamanos al 1-800-767-9245 en los Estados Unidos.
GARNATÍA 60 DIAS PARA DEVOLUCIÓN DE SU DINERO
Para mas informacion o Registracion de Producto
visite WahlUSA.com
GARANTÍA LIMITADA DE 5 AÑOS
Válida en EE. UU. Solamente
Si su producto Wahl no funciona de forma satisfactoria durante
un período de cinco (5) años contados a partir de la fecha
original de compra o de recibirlo como regalo, Wahl reparará
o reemplazará el producto a su criterio y se lo devolverá SIN
CARGO. No devuelva este producto a la tienda donde fue
adquirido. Los productos que necesiten ser reparados conforme
a esta garantía deben enviarse con franqueo pagado a la siguiente
dirección o llame al 1-800-767-9245 para obtener asistencia:
Wahl Clipper Corp.
Attn: Repair Department
3001 Locust Street
Sterling, Illinois 61081
Cuando envíe un correo, incluya una nota que describa el defecto
y la fecha original en que se compró o se recibió como regalo.
Los productos fuera de garantía se repararán aplicando nuestros
cargos de reparación estándar.
Esta garantía no cubre los productos dañados por las siguientes
causas:
1. Modificación o reparación efectuada por otra persona que
no pertenezca a Wahl Clipper Corporation ni a un centro de
servicio autorizado por Wahl;
2. Uso comercial (no de consumidor) o no razonable.
Esta garantía le otorga derechos legales específicos y usted
también puede tener otros derechos que varían en cada estado.
No se otorga ninguna otra garantía explícita por escrito. No
se asume responsabilidad alguna por daños indirectos o
consecuentes de cualquier tipo, ni por el uso de accesorios no
autorizados. Algunos estados pueden prohibir la exclusión o la
limitación de daños indirectos o consecuentes, de modo que esta
limitación puede no aplicarse a su caso. Garantía sólo válida en
EE. UU. Fuera de EE. UU., consulte en la tienda sobre la garantía
del distribuidor autorizado de Wahl.
Este símbolo, que se encuentra en la
recortadora, indica que es apta para
su uso en el baño y en la ducha.
NO
SÍ
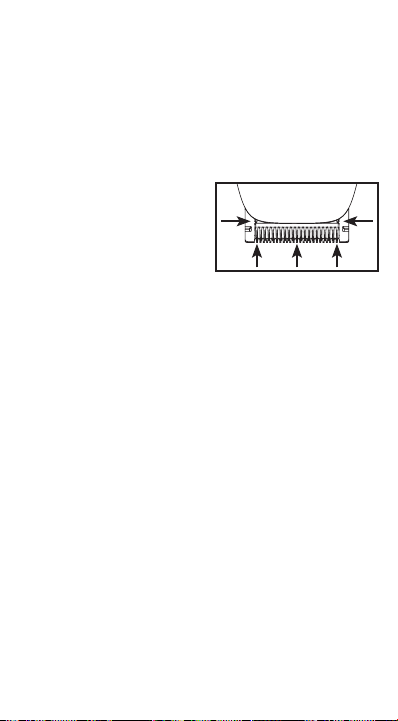
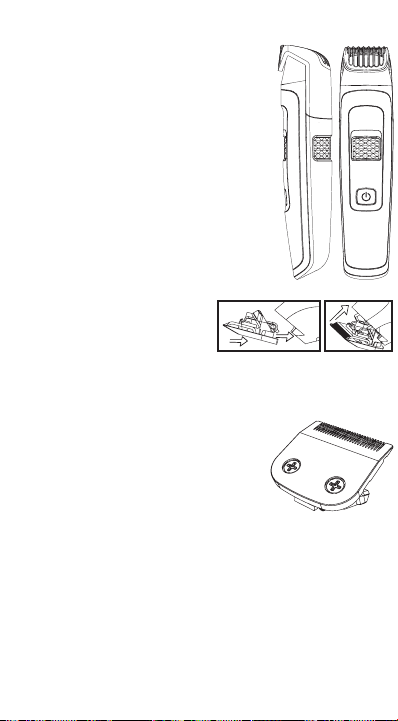
