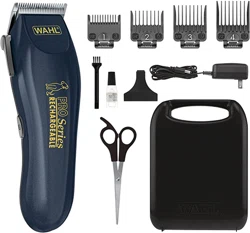
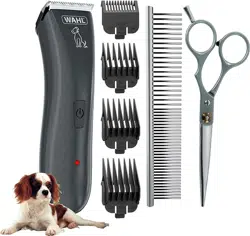
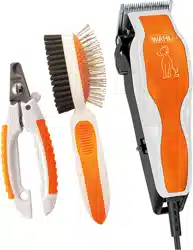
Clipper, oil, blades, slicker brush, attachment combs and comb, scissors, tear-free shampoo, dryer, rubber bath mat, nail cutters. Be sure all your equipment is in good working condition and easy to reach. Grooming should be done on a solid table (about 30” high) with a nonslip surface to give your dog a steady and secure footing. A grooming post to secure the dog would be of considerable aid. Good lighting is essential. The light should be adequately bright and evenly distributed; there should be no shadows.
BEFORE YOU CUT
Brush out coat thoroughly
a) Remove all snarls, knots, tangles and mats.
b) Part the hair and brush on 1” sections-brush from the skin out.
Bath Time
a) Soak the dog thoroughly.
b) Apply shampoo and work into a good lather.
c) Pay particular attention to the rectum and pads (bottom of the paws).
d) Be careful also not to get soap in the dog’s eyes (for safety use a “tear-free” shampoo).
e) Rinse very thoroughly.
f) Squeeze legs, ears and tail.
g) Towel dry
h) Fluff dry or brush and dry.
• Start with the legs using a wire brush and moving up to the body.
• Direct dryer to the area you are brushing. Do one spot at a time.
• Use light, fluffing strokes.
• There should be no snags or tangles when you are done.
CUTTING HAIR
The first time you cut hair, cut only a small amount until you become accustomed to how long each guide leaves the hair. Depending on your model, the following guide combs may be included in your kit.
Always start by placing the largest guide comb on the clipper, then use shorter combs if desired length is shorter.
Guide Comb #1—leaves hair approx. 1/8”
Guide Comb #2—leaves hair approx. 1/4”
Guide Comb #3—leaves hair approx. 3/8”
Guide Comb #4—leaves hair approx. 1/2”
To attach combs, hold comb with teeth up and snap it firmly to the bottom of the clipper blade.
For uniform cutting, allow the clipper to cut its way through the hair.
Do not force it through at a faster rate.
Tips For All Breeds of Dogs
1) Before clipping your puppy for the first time, run the clipper near the puppy’s ear for a short time so he gets used to the noise.
2) If clipping for the first time, the clipping process will be slow. Try to move with the dog when clipping. After a few grooming sessions, you will develop your own comfortable style and grooming will go faster.
3) Take your time when grooming, and use a lot of affection. Dogs know when you’re in a hurry and will react by getting nervous, making grooming more difficult.
4) It is very important to trim out excess hair on the pads. Otherwise the pads will become dirty and matted, causing painful walking for the dog.
Grooming Your Poodle
Because their hair grows so rapidly, poodles need to be groomed much more often than other breeds.
Feet:
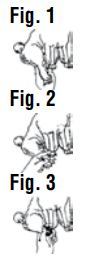
1) Have dog sit facing you. Bring rear leg forward (Fig. 1) and clip sides of foot from nail to end of toes. Clip on top of toes, stopping at ankle joint. Don’t trim up ankle. Spread toes apart with thumb and forefinger (Fig. 2). Cut hair between toes, being careful not to nick foot webbing.
2) Spread bottom pads with thumb and clip between toes and pads, being careful not to nick foot webbing (Fig. 3).
3) Repeat for other three feet. Touch up stray hair with scissors.
INSTRUCTIONS FOR THE USE AND CARE OF WAHL CLIPPERS
RECHARGEABLE OPERATION
CLIPPER USE AND MAINTENANCE
1. A fully charged Lithium Ion clipper can deliver up to 90 minutes of continuous use.
2. When clipper is not in use, it should be connected to the transformer to assure maximum power whenever it is used. The transformer is designed to charge the battery, without overcharging.
3. It is normal for the unit to become somewhat warm during normal use.
4. Avoid pressing the blades strongly against the skin, being especially careful around the ears. (The blades should be directed toward the skin at a right angle, but without significant pressure.)
5. After cutting damp hair, clean and oil the blades before storing the unit. Place a small drop of WAHL CLIPPER OIL ONLY on the ends of the blades then move the switch to the “1” (ON) position.
6. To clean the unit, use either a clean, dry or dampened cloth. DO NOT USE benzine or thinner to clean the unit.
7. Do not store the clipper in a wet or moist environment.
8. To prolong blade life, do not use clipper on hair that is coated with a permanent wave solution or hair spray.
9. Do not touch any of the internal mechanisms.
OIL
The blades of your new clipper should be oiled every few haircuts. Simply place a few drops of Wahl Clipper Oil on the teeth of the blades. Use only the Wahl Clipper Oil included in the pack. Due to the high speed of your Wahl clipper, the correct type of oil must be used. Do not use hair oil, grease or any oil mixed with kerosene or any solvent, as the solvent will evaporate and leave the thick oil, slowing down the blades. Wahl Clipper Oil is a very thin, natural oil which will not evaporate and will not slow down the blades.
CORD CARE
The cord should not be used to pull the clipper. Since freedom of movement needs to be maintained, care should be used to keep the cord untwisted and unobstructed. When stored, the cord should be coiled and the unit placed in original box or storage pouch (if provided), away from children.
LITHIUM-ION BATTERY DISPOSAL
Do not attempt to remove the battery from unit. Lithium-Ion batteries can explode, catch fire, and/or cause burns if disassembled, damaged, or exposed to water or high temperatures. Do not attempt to remove the battery for disposal. Lithium-Ion batteries may be subject to local disposal regulations. Many locations prohibit disposal in standard waste receptacles. Check your local laws and regulations. For recycling contact a government recycling agency, waste disposal service, retailer, or visit online recycling sources.
Tail:
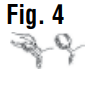
1) Stand dog with tail toward you. Hold tail with one hand and clip top and sides AGAINST the grain from the middle toward the body. Clip bottom WITH the grain from the bottom toward the middle (Fig. 4).
2) Comb out pompon at end of tail and use scissors to trim the largest ball possible.
3) With scissors, carefully clip around anal opening.
Face and Throat:
1) Be very careful around this area-too close of a cut may cause razor burns. Cut AGAINST grain. The area to be clipped is shown in Figs. 5-8. Bend ears back and use a cloth band to keep topknot (bangs) out of clipping area. The clipper is not to be used above eyes. Note: You may want to “rough trim” this area first, cutting WITH the grain.
2) Hold muzzle with your free hand. Cut from ear to the outside corner of eye in a straight line. Stretch the skin at the outside corner of left eye upward and backward. Clip CAREFULLY under the eye. (Use Fig. 5 and 6 as your guide.) Repeat on other side.
3) With free hand, stretch the corner of the mouth with your thumb, using the rest of your hand to hold mouth shut. Clip around mouth and side of face. Repeat on other side.
4) Holding muzzle, clip the area between the eyes and down the nose.
5) To clip the muzzle, clip away from the eyes toward the nose. Hold dog’s head, throat taut, and clip bottom of muzzle (Fig. 8). The Adam’s apple is usually the stopping point of the cut, but you may clip lower.
6) Clip the rest of the throat area toward the muzzle.
7) If you desire your poodle to have a mustache, clip to angle the top of the mustache even with the crack of the mouth. Then trim a straight cut around the chin.
Stomach:
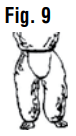
1) Stand dog facing you. Lift front legs and clip from a point above the testicles or vulva in a straight line to the end of the rib cage, using Fig. 9 as a guide. DO NOT clip up leg. Use light pressure, being careful to not nick vulva, penis, testicles or nipples. Cover them with your hand.
2) Clip the hair on penis with the grain.
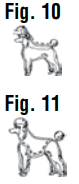
Body:
Tip: Stop frequently while clipping to fluff the hair. It will help keep the hair even.
1) Clip along the back, starting at the base of the skull, and cut down the middle of the back to the tail (Fig. 10). Shorten all hair as shown in the illustration, starting at the neck.
2) See Fig. 11. Clip hair between the shoulders and hips. Clip under the chest from behind the front legs to the end of the rib cage.
3) Scissor trim to touch up.
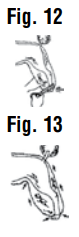
Rear Legs:
IMPORTANT: Be very careful when clipping around the “armpit” and the flank. These are areas of skin that are easy to cut; especially on older dogs whose skin has loosened.
1) Brush the hair on the back legs in an upward and outward motion to fluff. You can now shape the legs as full or as tapered as you wish.
2) Start by trimming any hair that falls over the foot (Fig.12).
3) Starting at ankle, cut up to hip a little hair at a time (Fig. 13). Once you are at the hip, blend hair so it tapers into shorter body hair. (When using guide combs on the legs, complete your stroke; don’t stop midway.)
4) Repeat with other back leg, making it the same size as the first leg.
5) Touch up with scissors.
Front Legs:
1) With dog facing you, comb hair up and out.
2) Trim front legs to match back legs.
3) Comb up hair at shoulders and blend it with shorter body hair.
4) Comb hair on chest and between front legs; trim it to the length of the shoulder and body hair.
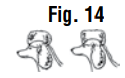
Head:
1) With dog facing you, comb hair on top of the head (topknot) upward and forward (Fig. 14).
2) Scissor cut a square or round topknot.
3) Blend lower topknot hair with the shorter neck hair.
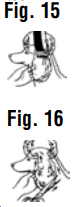
Ears:
1) With dog facing you, clip from top of the ear downward. NEVER turn clipper in other direction.
2) Lay the ear in the palm of your hand. Clip the outside of the ear first, and then the inside (Fig. 15).
3) Hold ear with your free hand and scissor cut the sides. Be careful not to cut the ear itself (Fig. 16).
4) Repeat with other ear, and touch up any stray hairs.
Schnauzer
IMPORTANT: Trim your Schnauzer at least once before cropping ears. Otherwise your dog will probably associate clipping with cropping and make grooming difficult.
1) With dog standing, clip top of back from the base of the skull to the base of the tail. Clip throat, front and sides of body and tail. Clip these areas with the grain. Clip sides and back of rear legs toward hock; curve the sides into the hock. Do not clip the front of the rear legs.
2) Clip stomach from rear to front. Clip penis hair carefully with the grain. Clip skull from point above eyebrows to the base of the skull and to the ears. Clip from the outside corner of the eyes to the base of the ears and to the corner of the mouth.
3) Clip both sides of ears from the base to the tip.
4) Scissor cut and trim front legs to gain a rounded and straight appearance. Scissor trim rear legs. Scissor trim eyebrows, muzzle and mustache to achieve a straight and square look.
Airedale, Irish, Lakeland, Welsh and Wire Fox Terriers
If you plan to show your terrier and he has a wire coat, stripping, not clipping, is required. However, clipping is a far easier method of grooming for both pet and groomer.
Clip the same way as the Schnauzer, except the rear legs which do not need clipping. Clip to blend sides of the dog into the hips. Scissor cut and trim the eyebrows, muzzle and mustache to the recognized standard of the particular breed of dog.
Cockers, Setters and Spaniels
Sporting dogs generally require little clipping. However, long-haire breeds can be more effective in the field when properly groomed. Dogs should be clipped several weeks in advance of the hunting season to facilitate better hunting,
offer greater comfort to the dog, and make coat care easier.
Clipping also allows growth of the shorter, denser coat that provides warmth and more resistance to burrs and stickers.
1) Clipping with the grain, clip the neck, shoulders and chest. Blend the hair into the body and lower chest. Clip legs and tail.
2) Clip body, if needed. It is suggested that dog’s hair be cut to 1/2” to 3/4” long. This may detract from the dog’s “looks,” but is sensible for a dog used in hunting.
3) After a day in the field, comb your dog’s coat. A “tangle-remover” spray will help get rid of burrs.
IMPORTANT SAFEGUARDS
When using an electrical appliance, basic precautions should always be followed, including the points listed below. Read all instructions and safeguards before using.
DANGER
To reduce the risk of injury or death by electric shock:
Do not reach for an appliance that has fallen into water. Unplug immediately from the outlet.
Do not use while bathing or in a shower.
Do not place or store appliance where it can fall or be pulled into a tub or sink. Do not place in or drop into water or other liquid.
Except when charging, always unplug this appliance from the electrical outlet immediately after using.
Always unplug this appliance before cleaning.
WARNING
To reduce the risk of burns, fire, electric shock or injury to persons:
Do not crush, disassemble, heat above 100ºC (212ºF), or incinerate the appliance, due to risk of fire, explosion, or burns.
Close supervision is necessary when this appliance is used by, on, or near children or disabled persons.
Use this appliance only for its intended use as described in this manual. Do not use attachments not recommended by the manufacturer.
Never operate this appliance if it has a damaged cord or plug, if it is not working properly, if it has been dropped or damaged, or if it has been dropped into water.
Keep the cord away from heated surfaces.
Insert only recharging transformer plug into charger receptacle.
Do not use outdoors or operate where aerosol (spray) products are being used or where oxygen is being administered.
Do not use this appliance with a damaged or broken comb nor with teeth missing from the blades, as injury may occur.
Always attach plug to appliance first, then to outlet. To disconnect, turn unit “OFF - 0,” then remove plug from outlet.
During use, do not place or leave the appliance where it is expected to be subject to damage by an animal, or exposed to weather.
SAVE THESE INSTRUCTIONS
This Clipper Has Been Designed For Household Use Only
RECHARGING
Remove the clipper, recharging transformer and accessories from the packing material.
Before the appliance is used for the first time, it should be charged for 3 to 5 hours. It then takes 3 to 5 hours to fully recharge the battery again. The appliance is charged by plugging directly into the appliance. During charging, the charging indicator is illuminated. The charging indicator will begin to flicker when almost fully charged and may shut off when fully charged.
Plug the recharging transformer into any convenient electrical outlet at the correct voltage. If clipper is on, turn to off position when charging.
When clipper is not in use, it may be connected to the transformer and plugged into an outlet to assure maximum power is available when it is next used. This transformer is designed to charge the battery without overcharging.
TROUBLESHOOTING
If your clipper does not seem to take a charge, check the following before returning it for repair:
Check outlet operation by plugging in another appliance.
Make sure the outlet is not connected to a switch which turns the power at the outlet off.
Be sure the clipper is properly connected to the recharging transformer, all connections are secure and the switch on the clipper is turned “OFF - 0.”
If your electricity is connected to a master power switch, we suggest the clipper be disconnected from the charger anytime the master switch is off. Leaving the unit plugged into a dead outlet or an unplugged charger will drain the battery.
If clipper does not run and it is completely charged, turn the unit “ON - I” and pinch or push the blades manually. (Oil may have dried out between the blades, so they may be temporarily stuck together.)