Fig. A
OPERATING INSTRUCTIONS & IMPORTANT SAFEGUARDS
SAVE THESE INSTRUCTIONS
For Household Use Only
When using your personal trimmer, basic precautions should always be followed,
including the following:
READ ALL INSTRUCTIONS BEFORE USING.
WARNING
1. This appliance can be used by children aged from 14 years and above and persons with
reduced physical, sensory or mental capabilities or lack of experience and knowledge if
they have been given supervision or instruction, by a person responsible for their safety,
concerning the use of the appliance in a safe way and understand the hazards involved.
Children should be supervised to ensure that they do not play with the appliance. Cleaning
and user maintenance shall not be made by children without supervision.
2. Use this appliance only for its intended use as described in this manual. Do not use
attachments not recommended by the manufacturer.
3. Do not use this appliance with a damaged or broken comb nor with teeth missing from
the blades, as injury may occur.
4. When discarding an old battery, do not throw it into fire where heat could cause it
to rupture or explode. Also, do not attempt to recharge alkaline, heavy-duty, or lithium
batteries in a battery charger. Dispose batteries properly.
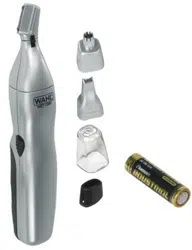
BATTERY INSTALLATION/REPLACEMENT
1. Holding the trimmer with the cutting head facing you place your thumb on the arrow
molded into the battery compartment cover, press lightly and slide the cover downward
to remove it.
2. Insert one AA battery, positive end first (toward the cutting head).
3. Replace the battery compartment cover.
4. To maximize battery life, turn the trimmer “OFF” immediately after each use.
5. Replace the battery as soon as you notice the trimmer running slower than normal, to
avoid pulling of hairs.
Installation of Trimming Heads
1. Make sure trimmer is turned “OFF”.
2. Turn trimmer head counterclockwise 1/4 turn and lift off.
3. Place trimmer head on trimmer and turn trimmer head
clockwise 1/4 turn to lock on.
Before Trimming: Remove the protective cap and turn the
trimmer “ON” by pushing the switch up.
Trimming Bikini Area: For detailing the bikini area, slowly
move the detailing attachment on the outside of the bikini area
to trim and shape until desired look is accomplished.
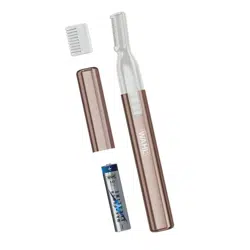
Trimming Eyebrows: All three attachments can be used.
For reciprocating or rotary head, slowly move head closer or
farther away from eyebrows to achieve desired length.
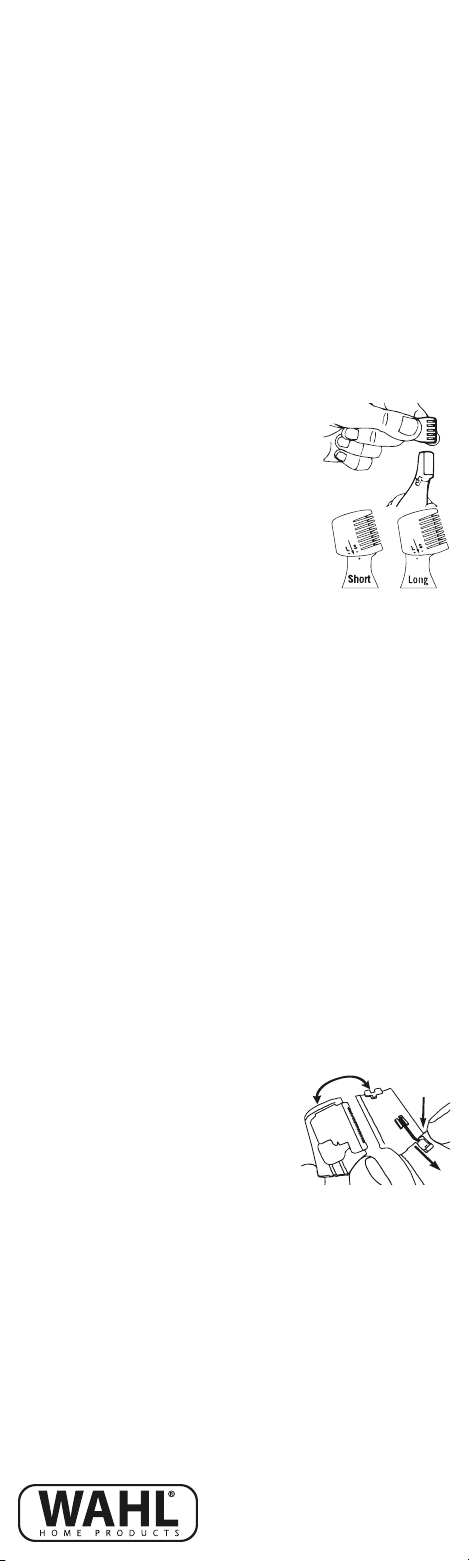
trimming with eyebrow attachment comb, place eyebrow
attachment comb over it (See Fig. A). The attachment comb allows you to trim and shape
eyebrows. Trim by following in the direction of hair growth.
NOTE: Only use on eyebrows. Be cautious around the eye area. Dots molded on the
detailing head attachment and on the eyebrow attachment may not always line up straight
with dots. The eyebrow attachment comb has two settings; approximately 2mm (S) and
4mm (L) (See Fig. B). The settings will create very short lengths to create a thin brow.
1. Choose the desired length. The shortest is nearest to the comb and the longest is the
furthest. Note: Be advised that you must align the dots for the settings with the dot on the
detailing trimmer head. The first time using the eyebrow attachment comb, it is better to
start with the longest setting to see what length works best.
2. Slide the track of the blade into the chosen slot on the eyebrow attachment comb by
following the direction of the arrow. The eyebrow attachment comb should slide in easily,
otherwise it may be misaligned.
3. Slide the eyebrow attachment comb until you feel it fasten. The entire length of the blade
should be covered.
Trimming Hair From Nose: Make sure the nasal passages are clean. Slowly move
rotary head in and out of each nostril, no more than 1/4-inch deep. Keep the side of the
cutting head firmly against the skin to prevent a tickling sensation. (The reciprocating or
detailing head may also be used.)
Trimming Hair From Ears: Make sure the outer areas of the ears do not contain any
wax. Hold the ear flat with one hand and carefully insert rotary head no more than 1/4-inch
into the outer ear. CAUTION: Do not insert the rotary head or any other foreign object
into the inner ear. For hair growing on the outside of the ear, simply move the rotary head
slowly along the edges of the ear (either cutting head may be used to trim hair from ears).
Sideburns and Mustache: For detailing sideburns and mustache, use detailing head
across desired areas. For trimming sideburns slowly move recipricating head across
desired area.
Cleaning Your Trimmer: Periodically after use, turn the trimmer “OFF” and rinse
both cutting heads under warm, running water. For more thorough cleaning, remove the
attached cutting head by turning it slightly counterclockwise. Then rinse the entire head
under running water. After cleaning, replace desired cutting head by turning slightly
clockwise and wipe the entire trimmer dry with a soft cloth. Always replace the protective
cap before storing.
NOTE: Press the release button downwards (See Fig. C) to remove the top
plastic housing and brush it out thoroughly.
SERVICE AND REPAIR
If you have problems with your trimmer, send it prepaid with
a note explaining the problem to:
Wahl Clipper Corporation Attn: Repair Department
3001 Locust Street P.O. Box 578 Sterling, IL 61081
2-YEAR LIMITED WARRANTY
(Valid in U.S.A. Only)
If your Wahl product fails to operate satisfactorily within
two (2) years from the date of original purchase or receipt
as a gift, Wahl will, at our option, repair or replace the product
and return it to you FREE OF CHARGE. Do not return this product to store where
purchased. Products needing repair under this warranty should be returned with postage
pre-paid to the following address or call 1-800-767-9245 for assistance: Wahl Clipper
Corp., Attn: Repair Department, 3001 Locust Street, Sterling, Illinois 61081.
When mailing, please include a note describing the defect and the date of original purchase or
receipt as a gift. Products out of warranty will be repaired at our standard repair charges. This
warranty does not cover products damaged by: (1) Modification or repair by anyone other than
Wahl Clipper Corporation or a Wahl authorized service center; (2) Commercial (non-consumer)
use or unreasonable use. This warranty gives you specific legal rights, and you may also have
other rights which vary from state to state. No other written express warranty is given. No
responsibility is assumed for incidental or consequential damages of any type or for the use of
unauthorized attachments. Some states may not allow the exclusion or limitation of incidental
or consequential damages, so the limitation may not apply to you. Warranty valid in U.S.A.
only. Outside U.S.A., check with store for Wahl authorized distributor’s warranty.
©2018 WAHL CLIPPER CORPORATION
World Headquarters
P.O. Box 578
Sterling, Illinois 61081
PHONE: 800.767.9245
FAX: 815.625.6780
WahlUSA.com
Printed in China
part no. 94660-001
Fig. C
Fig. B
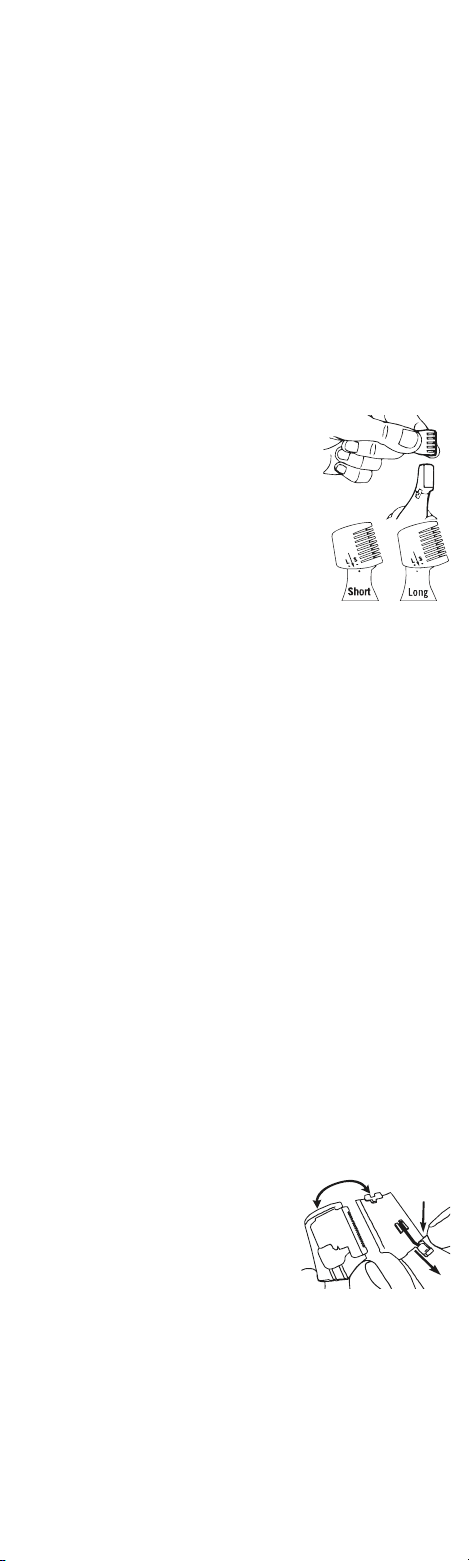
Fig. A
INSTRUCCIONES DE FUNCIONAMIENTO Y PRECAUCIONES IMPORTANTES
GUARDE ESTAS INSTRUCCIONES • Solamente Para Uso Residencial
Cuando esté usando su recortadora personal, han de seguirse siempre unas precauciones
básicas, incluyendo las siguientes:
LEA TODAS LAS INSTRUCCIONES ANTES DE USAR.
PELIGRO
1. Este artefacto lo pueden usar niños de 14 años o mayores y personas con capacidades
físicas, sensoriales o mentales reducidas, o sin experiencia y conocimiento, bajo la supervisión
e instrucción de una persona responsable por su seguridad, respecto al uso seguro del
artefacto y la comprensión de los peligros involucrados. Los niños deben ser supervisados
para asegurarse que no jueguen con el aparato. Los niños no deben realizar la limpieza ni el
mantenimiento sin supervisión.
2. Use este artefacto solo para su uso previsto, según se describe en este manual. No use
accesorios no recomendados por el fabricante.
3. No utilice este artefacto con un peine dañado o roto ni con cuchillas a las que le falten
dientes, ya que pueden provocar lesiones.
4. Cuando deseche una batería vieja, no la arroje al fuego ya que el calor puede causar ruptura
o explosión. Tampoco intente recargar baterías alcalinas, de alto rendimiento o baterías de litio
con un cargador para baterías. Deseche las baterías correctamente.
INSTALACIÓN DE LA PILA/REEMPLAZO
1. Sujete la recortadora con el cabezal mirando hacia usted, coloque su dedo pulgar en la
flecha que está moldeada en la cubierta del compartimento de las pilas, presione ligeramente y
deslice la cubierta hacia abajo para sacarla.
2. Inserte una pila AA, primero el polo positivo, en la dirección del cabezal.
3. Vuelva a colocar la cubierta del compartimento de las pilas.
4. Para obtener el mayor rendimiento en la vida de las pilas, apague la recortadora
inmediatamente después de cada uso.
5. Reemplace la pila tan pronto como empiece a notar un funcionamiento más lento de lo
normal en la recortadora, para evitar que llegue a arrancar el pelo.
Installciones de las Cabezas
1. Asegurase que el interruptor esta en la posicion de “OFF”.
2. Gira la cabeza a la dercha 1/4 y retiralo.
3. Coloque la cabeza y gira la cabeza la izquierda 1/4 para cerrar.
Antes de Empezar a Recortar: Retire la cubierta protectora y
encienda la recortadora empujando el interruptor.
Recorte en el Área de Bikini:
Para recortara el área de bikini, lentamente mueve el accesorio de
recortar alrededor del área de bikini para obtener un recorte y forma
deseado.
Recorte de Cejas: Los tres accesorios pueden ser utilizados.
Mueve lentamente el cabezal con la cuchilla reciproca, para recortar
limpiamente los pelos tiesos. Para un recorte mas preciso e
igualado, mueva lentamente el cabezal con la cuchilla reciproca
mas cerca o mas lejos de las cejas para conseguir el largo de corte
deseado. Puede también usar el cabezal con la cuchilla giratoria.
Recorte con el peine accesorio de la ceja, coloque el peine accesorio sobre él (Vea Fig.A). El
peine accesorio permite el ajuste y forma de las cejas. Recorte siguiendo en la dirección del
crecimiento del pelo.
AVISO: Sólo utilice en cejas. Tome precauciones alrededor del área del ojo. Los puntos
moldeados en el cabezal para recortar el área del Bikini y el peine de ceja no siempre estará
alineada directamente con los puntos.
El peine guía para cejas tiene aproximadamente dos modos de tamaño 2mm (S) y 4mm(L) (Vea
Fig. B). Cada modo crea tamaños muy cortos para adelgazar las cejas.
1. Escoja el modo del tamaño deseado. El punto (S) corto,
es más cercano al peine guía y el punto más largo (L) es el más lejano. Aviso: Es aconsejado
que usted debe alinear los puntos moldeados en el punto del cabezal de la recortadora. Si es su
primera vez utilizar el peine guía de ceja, es preferible que empiece con el tamaño más largo (L)
para ver cual tamaño va necesitar.
2. Coloque el peine guía de cejas sobre la cuchilla en las líneas moldeadas siguiendo la
dirección de la fl echa.
El peine guía de cejas debe deslizarse fácilmente, de otro modo, puede estar desalineado.
3. Deslice el peine guía de cejas hasta que usted sienta que se abrocha. El tamaño de la
cuchilla se debe cubrir.
Recorte del Pelo de la Nariz: Asegúrese de que las fosas nasales están limpias.
Lentamente mueva el cabezal con la cuchilla giratoria hacia dentro y hacia fuera de cada
fosa nasal, en una profundidad no superior a 1/4 de pulgada. Mantenga el lado del cabezal
firmemente contra la piel para evitar una sensación de cosquilleo. Puede usarse también el
cabezal con la cuchilla recíproca.
Recorte del Pelo de las Orejas: Asegúrese de que la parte exterior de la oreja no contenga
cera. Sujete la oreja totalmente plana con una mano, y cuidadosamente inserte el cabezal
con la cuchilla giratoria en una profundidad no superior a 1/4 de pulgada. PRECAUCIÓN: No
inserte el cabezal con la cuchilla giratoria o ningún otro objeto extraño dentro del oído. Para el
pelo que crece en la parte exterior de la oreja, simplemente mueva lentamente el cabezal con
la cuchilla giratoria alrededor de los extremos de la oreja. Cualquiera de los dos cabezales
pueden usarse para recortar el pelo de las orejas.
Recorte de las Patillas y Bigote: Para detallar las patillas y el bigote, utilice la cabeza
para detallar a través de las zonas deseadas. Para el recorte de las patillas mueva lentamente el
cabezal reciproca a través de las zonas deseadas para, limpiamente, recortar y dar forma.
Limpieza de Su Recortadora: Después de cada uso, periódicamente, apague la recortadora
y aclare ambos cabezales bajo un chorro de agua templada. Para una limpieza más profunda,
desmonte el cabezal, girándolo un poco en la dirección contraria a las agujas del reloj.
Después aclare el cabezal bajo un chorro de agua. Después de su limpieza, vuelva a colocar
el cabezal deseado, girándolo un poco en la dirección de las agujas del reloj y seque bien
la recortadora con un paño suave. Vuelva a colocar siempre la cubierta protectora antes de
guardar la recortadora.
AVISO: Aprieta el botón de lanzamiento para abajo para quitar la cubierta
superior y limpia la totalmente (Vea Fig. C).
SERVICIO Y REPARACIÓN
Si tiene problemas con su recortadora, por favor envíalo al:
Wahl Clipper Corporation, Attn: Repair Department, 3001
Locust St. P.O. Box 578 Sterling, IL 61081
GARANTÍA LIMITADA DE 2 AÑOS (Válida en EE.
UU. Solamente)
Si su producto Wahl no funciona de forma satisfactoria
durante un período de dos (2) años contados a partir de la
fecha original de compra o de recibirlo como regalo, Wahl reparará o reemplazará el producto a
su criterio y se lo devolverá SIN CARGO. No devuelva este producto a la tienda donde
fue adquirido. Los productos que necesiten ser reparados conforme a esta garantía deben
enviarse con franqueo pagado a la siguiente dirección o llame al 1-800-767-9245 para obtener
asistencia: Wahl Clipper Corp., Attn: Repair Department, 3001 Locust Street,
Sterling, Illinois 61081. Cuando envíe un correo, incluya una nota que describa el defecto
y la fecha original en que se compró o se recibió como regalo. Los productos fuera de garantía
se repararán aplicando nuestros cargos de reparación estándar. Esta garantía no cubre los
productos dañados por las siguientes causas: (1) Modificación o reparación efectuada por otra
persona que no pertenezca a Wahl Clipper Corporation ni a un centro de servicio autorizado
por Wahl; (2) Uso comercial (no de consumidor) o no razonable. Esta garantía le otorga
derechos legales específicos y usted también puede tener otros derechos que varían en cada
estado. No se otorga ninguna otra garantía explícita por escrito. No se asume responsabilidad
alguna por daños indirectos o consecuentes de cualquier tipo, ni por el uso de accesorios no
autorizados. Algunos estados pueden prohibir la exclusión o la limitación de daños indirectos
o consecuentes, de modo que esta limitación puede no aplicarse a su caso. Garantía sólo válida
en EE. UU. Fuera de EE. UU., consulte en la tienda sobre la garantía del distribuidor autorizado
de Wahl.
Fig. B
Fig. C