

NEED HELP? VISIT VERIFISAFE.COM OR CALL (407) 567-7361
i
TABLE OF CONTENTS
1. WHAT’S IN THE BOX ����������������������������������������������������������������������������������������������������������������������� 1
2. WELCOME TO FAST ACCESS BIOMETRICS ��������������������������������������������������������������������������������� 2
3. QUICK START GUIDE ����������������������������������������������������������������������������������������������������������������������� 2
3.1 Buttons and Features ��������������������������������������������������������������������������������������������������������� 2
3.2 Installing Batteries ��������������������������������������������������������������������������������������������������������������� 4
3.3 Enrolling Your Fingerprints ����������������������������������������������������������������������������������������������� 4
3.4 Proper Fingerprint Enrollment ����������������������������������������������������������������������������������������� 4
3.5 Opening/Closing Your Safe ���������������������������������������������������������������������������������������������� 6
4. SETTINGS MENU ������������������������������������������������������������������������������������������������������������������������������ 7
4.1 Accessing the Settings Menu ������������������������������������������������������������������������������������������� 7
4.2 Navigating Settings ������������������������������������������������������������������������������������������������������������ 8
4.3 Exiting Settings �������������������������������������������������������������������������������������������������������������������� 8
4.4 Settings Menu Options ����������������������������������������������������������������������������������������������������� 9
5. USER MANAGEMENT ��������������������������������������������������������������������������������������������������������������������� 10
5.1 User Privileges: Administrator vs. Standard User ������������������������������������������������������ 10
5.2 Understanding Users vs. Fingerprints �������������������������������������������������������������������������� 10
5.3 Maximum Number of Users/Fingerprints ������������������������������������������������������������������� 11
5.4 Adding Users/Fingerprints ��������������������������������������������������������������������������������������������� 12
5.5 Deleting Users/Fingerprints ������������������������������������������������������������������������������������������� 15
5.6 Customizing Username(s) ����������������������������������������������������������������������������������������������� 16

VERIFI SMART.SAFE.
®
S-SERIES • MODELS S4000, S5000, S6000, S7000ii
6. LIGHTING ���������������������������������������������������������������������������������������������������������������������������������������� 17
6.1 Internal LED ������������������������������������������������������������������������������������������������������������������������� 17
6.2 LCD Backlight ��������������������������������������������������������������������������������������������������������������������� 18
7. AUTOLOCK ������������������������������������������������������������������������������������������������������������������������������������� 20
7.1 Disabling/Enabling AutoLock ���������������������������������������������������������������������������������������� 20
8. SELF-DIAGNOSTICS ��������������������������������������������������������������������������������������������������������������������� 20
9. BATTERY MANAGEMENT ��������������������������������������������������������������������������������������������������������������� 21
10. NOTIFICATIONS ������������������������������������������������������������������������������������������������������������������������������ 21
10.1 ClearingTamperAlertNotications ����������������������������������������������������������������������������� 24
10.2 Using Snooze ��������������������������������������������������������������������������������������������������������������������� 24
10.3 Open Door Alert ���������������������������������������������������������������������������������������������������������������� 24
11. AUDIO ��������������������������������������������������������������������������������������������������������������������������������������������� 25
12. SYSTEM LOGS ������������������������������������������������������������������������������������������������������������������������������� 26
12.1 Access Logs ������������������������������������������������������������������������������������������������������������������������ 26
12.2 Event Logs ��������������������������������������������������������������������������������������������������������������������������� 27
12.3 Viewing Log Entries ���������������������������������������������������������������������������������������������������������� 27
13. FACTORY RESET ��������������������������������������������������������������������������������������������������������������������������� 28
13.1 Performing a Factory Reset with a Fingerprint ���������������������������������������������������������� 28
13.2 Performing a Factory Reset with a Backup Key ��������������������������������������������������������� 28
14. MOUNTING ������������������������������������������������������������������������������������������������������������������������������������� 29

NEED HELP? VISIT VERIFISAFE.COM OR CALL (407) 567-7361
iii
15. LONG GUN CONFIGURATIONS (S7000 ONLY) ������������������������������������������������������������������������� 30
15.1 Customizing the Gun Rack System ������������������������������������������������������������������������������ 30
15.2 Adjusting Shelf Height ����������������������������������������������������������������������������������������������������� 32
15.3 Slots and Butt Stock Clearance �������������������������������������������������������������������������������������� 32
15.4 Storing a Long-Barreled Gun ����������������������������������������������������������������������������������������� 33
15.5 ARs and AKs with Magazines ����������������������������������������������������������������������������������������� 33
16. CARE AND MAINTENANCE ����������������������������������������������������������������������������������������������������������� 35
17. BACKUP ACCESS �������������������������������������������������������������������������������������������������������������������������� 35
17.1 Using Backup Keys ������������������������������������������������������������������������������������������������������������ 36
18. FREQUENTLY ASKED QUESTIONS ����������������������������������������������������������������������������������������������� 37
19. TROUBLESHOOTING ��������������������������������������������������������������������������������������������������������������������� 38
20. SPECIFICATIONS ��������������������������������������������������������������������������������������������������������������������������� 41
21. WARRANTY ������������������������������������������������������������������������������������������������������������������������������������� 42
22. CUSTOMER SUPPORT ������������������������������������������������������������������������������������������������������������������� 44

NEED HELP? VISIT VERIFISAFE.COM OR CALL (407) 567-7361
1
1. WHAT’S IN THE BOX
● (1)VeriSmart.Safe.®
● (1) Quick Start Guide
● (1) User Manual
● (2) Backup keys
● (1) Fingerprint sensor cleaning cloth
● (4) AA batteries (models S4000, S5000, S6000) or (4) C batteries (model S7000)
● (1) #1 Phillips-head screwdriver / 3mm Allen wrench combo tool
● (1) Mounting hardware kit
WARNING! DO NOT LOCK YOUR BACKUP KEYS IN YOUR SAFE. KEEP THEM IN
ANOTHER SECURED LOCATION.
VERIFI SMART.SAFE.
®
S-SERIES • MODELS S4000, S5000, S6000, S70002
2. WELCOME TO FAST-ACCESS BIOMETRICS
Theheartofanybiometricsafeisitsngerprintsensor.That’swhywe’vedesignedyour
VeriSmart.Safe.®withthebest,mostreliablesensorforfastaccessyoucandependon:
theTouchChipTCS1capacitivengerprintsensor.
TheTouchChipTCS1sensorhasbeentestedandcertiedbytheFBItomeettheNext
GenerationIdentication(NGI)standardforngerprintimagequality.Itscansatahigh
resolution of 508 dots-per-inch to help capture more of the minute details in your
ngerprints,andtoenhancetheperformanceofthengerprintrecognitionsystem.
The TouchChip TCS1 sensor works below the surface of your skin to give you the best
ngerprintimage,evenifyourngerprintsaredamagedordirty.
Unlike 2D opticalsensorsthatmaybefooledbyaphotocopyofangerprint,the
TouchChipTCS1sensorinyourVeriSmart.Safe.®isa3Dcapacitive sensor that interacts
withlivingtissuetodetectthefeaturesofangerprint.It’ssecure, fast and reliable when
seconds count.
3. QUICK START GUIDE
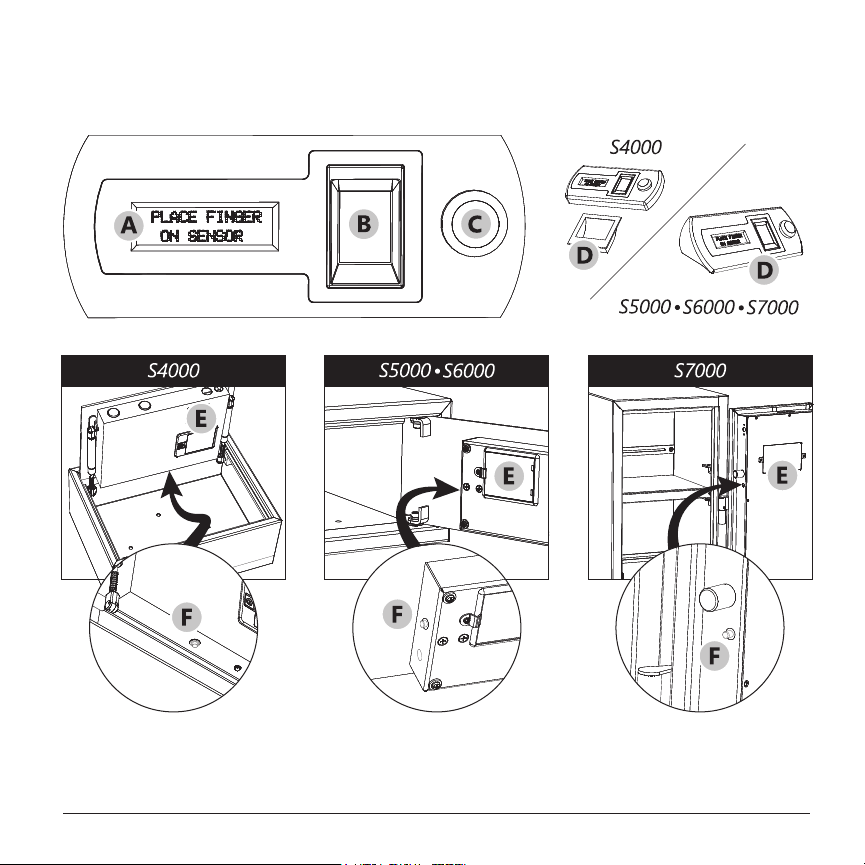
3.1 Buttons and Features
(A) LCD Screen
(B) Fingerprint Sensor
(C) Start/Enter Button
(D) Door Handle
(E) Battery Compartment
(F) Settings/Scroll Button

VERIFI SMART.SAFE.
®
S-SERIES • MODELS S4000, S5000, S6000, S70004
3.2 Installing Batteries
1
Remove Battery Compartment (E) {page 2} cover using the screwdriver
provided with your safe.
2
Insert four (4) batteries.
Note: LCD will illuminate indicating batteries have been correctly installed.
3
Replace Battery Compartment cover.
3.3 Enrolling Your Fingerprints
1
Press Settings/Scroll Button (F) {page 2}.
Note: LCD will display a welcome message.
2
Press Start/Enter Button (C) {page 2} to continue.
3
Follow on-screen enrollment wizard to complete setup.
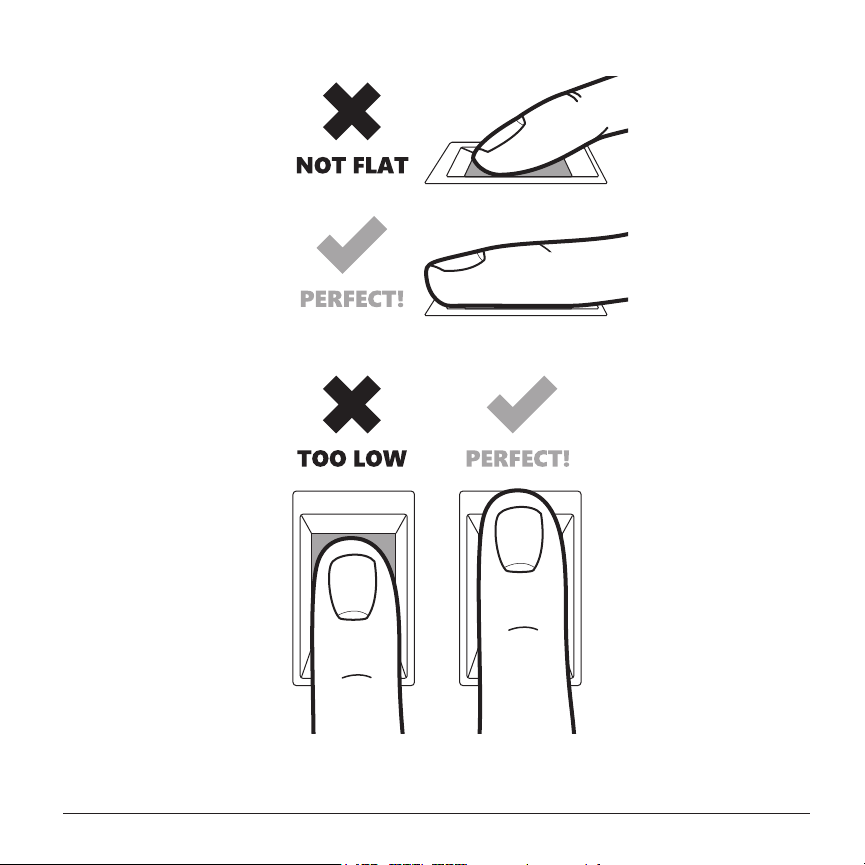
3.4 Proper Fingerprint Enrollment
WhenpromptedtoplaceyourngerontheFingerprint Sensor (B) {page 2},
besuretokeepyourngerFLAT AND FIRM.
Multipleimagesareneededtocreateahigh-qualityenrollment,sobesuretouse
thesamengerwhenpromptedtoPLACE FINGER.
Note: Additional ngers can be added to an existing user later through the Settings
Menu. See Adding Fingerprints to an Existing User on page 13.

VERIFI SMART.SAFE.
®
S-SERIES • MODELS S4000, S5000, S6000, S70006
3.5 Opening/Closing Your Safe
TO OPEN/UNLOCK
1
Press Start/Enter Button (C) {page 2} to wake up safe.
2
PlaceenrolledngerprintatandrmonFingerprint Sensor (B) {page 2}.
3
Fingerprintwillbeveriedandsafewillunlock.
4
Pull Door Handle (D) {page 2} to open door.
TO CLOSE/LOCK
1
Push door closed.
2
AutoLock feature will lock safe.
Note: AutoLock can be disabled through the Settings Menu. See Disabling/
Enabling AutoLock on page 20 for instructions.
NEED HELP? VISIT VERIFISAFE.COM OR CALL (407) 567-7361
7
4. SETTINGS MENU
To manage users, modify preferences, view logs and more, you need administrator
privilegestoaccessyoursafe’sSettingsMenu.
Note: The rst user/ngerprint enrolled during your safe’s initial setup has
administrator privileges by default.
4.1 Accessing the Settings Menu
1
Unlockandopensafewithanenrolledngerprint.
2
Press Settings/Scroll Button (F) {page 2}.
3
LCD will read:
PLACE FINGER
to Continue
4
Placeanenrolledadministrator'sngerprinton
Fingerprint Sensor (B) {page 2}.
Note: If you are accessing the Settings Menu for the rst time, you will be
shown a brief, one-time tutorial on how to navigate the menu.
5
Press Settings/Scroll Button again to enter Settings Menu.

VERIFI SMART.SAFE.
®
S-SERIES • MODELS S4000, S5000, S6000, S70008
4.2 Navigating Settings
Both the Start/Enter Button (C) {page 2} and the Settings/Scroll Button (F)
{page 2} are used to navigate the Settings Menu.
● The Start/Enter Button is used to select the item at the top of the menu next
to the cursor.
● The Settings/Scroll Button is used to navigate to the next menu item.
Note: Selecting -BACK- will take you back to the previous menu.
Note: While navigating the Settings Menu, be sure to keep your safe’s door open.
4.3 Exiting Settings
Select EXIT to close the Settings Menu or, if AutoLock is enabled, just close the
door. The Settings Menu will time-out and the door will lock.
Note: Depending on where you are in the menu, it may take several seconds for
the Settings Menu to time-out and for the door to lock once the door is closed.

NEED HELP? VISIT VERIFISAFE.COM OR CALL (407) 567-7361
9
4.4 Settings Menu Options
1. USER MANAGER
1. ADD NEW USER
2. EDIT USER1
ADD A FINGER
EDIT USER NAME
USER PRIVILEGES
DELETE USER1
----BACK----
----EXIT----
----BACK----
2. INSIDE LIGHT
1. DURATION
■
ON-SHORT
□
ON-LONG
□
OFF
----BACK----
2. INTENSITY
□
BRIGHT
■
NORMAL
□
NITE-LITE
□
NITE-LITE+
----BACK----
----BACK----
3. LCD LIGHT
□
BRIGHT
■
NORMAL
□
DIM
□
SUPER DIM
□
OFF
----BACK----
4. AUDIO
■
FULL AUDIO
□
ALARMS&ALERTS
□
ALARMS ONLY
□
MUTE
----BACK----
5. DOOROPEN ALRT
■
3 MINUTES
□
10 MINUTES
□
60 MINUTES
□
OFF
----BACK----
6. AUTO LOCK
■
ON
□
OFF
----BACK----
7. BATTERY LEVEL
8. SYSTEM LOGS
ACCESS LOG
EVENT LOG
----BACK----
9. ABOUT
10. FACTORY MENU
FACTORY RESET
FIRMWARE UPGRD
----BACK----
----EXIT----

VERIFI SMART.SAFE.
®
S-SERIES • MODELS S4000, S5000, S6000, S700010
5. USER MANAGEMENT
Whensettingupyoursafeforthersttime,youwillbeaskedtoenrollangerprint.
ThengerprintyouenrollwillbelongtoUser1 who will have administrative privileges by
default. Additional users are given standard privileges by default.
5.1 User Privileges: Administrator vs. Standard User
Both administrators and standard users can open and close your safe. Only
administrators may access and modify settings. Administrators may grant/revoke
administrator privileges to other users.
5.2 Understanding Users vs. Fingerprints
Enrolledngerprintsaregroupedtogetherasusers.
After the initial setup of your safe, you have two options when enrolling additional
ngerprints:
● Create a new userandenrolltheirngerprints
● Addnewngerprintstoanexisting user
Note: Up to four ngerprints can be enrolled per user.
Note: Fingerprints added to an existing user inherit that user’s privileges.
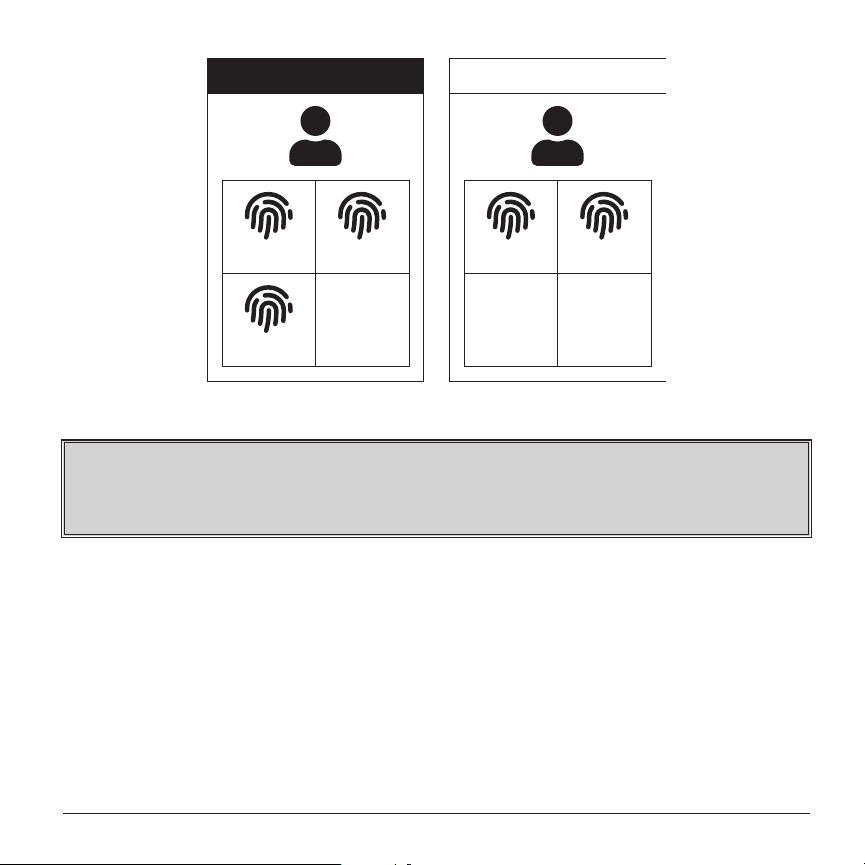
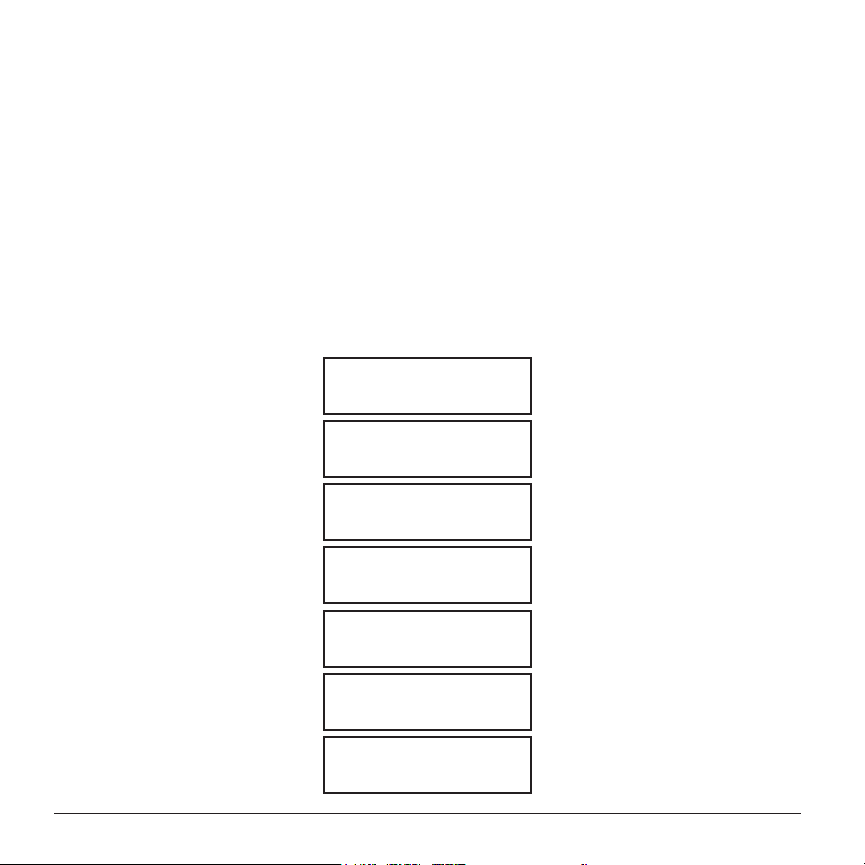
In the following example, John is a user with administrator privileges. He currently
hasthreengerprintsenrolledandcanaddonemore.Heatherisastandarduser
withonlytwongerprintsenrolled.Shecanaddtwomorengerprintstoheruser
but will need to contact John (the administrator) for assistance.
NEED HELP? VISIT VERIFISAFE.COM OR CALL (407) 567-7361
11
JOHN (ADMIN)
R. INDEX R. THUMB
L. INDEX
HEATHER
L. THUMB R. THUMB
OPENOPENOPEN
Figure 3 - Example of Users and Fingerprints
WARNING! WE STRONGLY RECOMMEND ENROLLING AT LEAST TWO DIFFERENT
FINGERPRINTS PER USER IN THE EVENT ONE IS DAMAGED AND BECOMES
UNRECOGNIZABLE TO THE FINGERPRINT MATCHING SYSTEM.
5.3 Maximum Number of Users/Fingerprints
Upto40totalngerprintscanbestoredinyoursafe.Thenumberofpossible
usersisonlylimitedbythenumberofngerprintsenrolled.
Examples:
● 40userswithonengerprinteach
● 10userswithuptofourngerprintseach
● 20userswithtwongerprintseach
VERIFI SMART.SAFE.
®
S-SERIES • MODELS S4000, S5000, S6000, S700012
5.4 Adding Users/Fingerprints
5.4.1 Adding a New User
1
Access the Settings Menu.
(See Accessing the Settings Menu on page 7.)
2
Press Start/Enter Button (C) {page 2} to enter
USER MANAGER.
3
Press Start/Enter Button to ADD NEW USER.
4
Press Start/Enter Button to CREATE USER.
5
Carefully read and follow on-screen instructions:
During Enroll
The Smart.Safe.
F.B.I. Certified
Finger Sensor
Will Need
Several Images
of Same Finger
to Analyze
While Enrolling
Keep Finger Flat
Now We Will
Practice
PLACE FINGER
NEED HELP? VISIT VERIFISAFE.COM OR CALL (407) 567-7361
13
6
PlacengertoenrollonFingerprint Sensor (B) {page 2}.
7
Followon-screenpromptstoholdngerstill,toliftitothesensor,
and then to place it on the sensor again. You will be instructed to do
this several times until practice is complete.
Practice
Complete
8
Yoursafeisnowreadytoenrollthenewuser’sngerprint.Followon-
screenpromptstoplace-lift-replacengeruntilngerprintimageis
captured 100%.
PLACE FINGER 100%
Successfully
Enrolled USER
9
Yournewuserhasbeencreatedandtheirrstngerprinthas
been enrolled.
Ifyouwouldliketocustomizethisnewuser’sname,youcandoso
at this time. (See Customizing Username(s) on page 16 for more
information.)
5.4.2 Adding Fingerprints to an Existing User
1
Access the Settings Menu.
(See Accessing the Settings Menu on page 7.)
2
Press Start/Enter Button (C) {page 2} to enter USER MANAGER.
VERIFI SMART.SAFE.
®
S-SERIES • MODELS S4000, S5000, S6000, S700014
3
Press Settings/Scroll Button (F) {page 2} to navigate to user to edit.
4
Press Start/Enter Button to edit user.
5
Press Start/Enter Button again to ADD A FINGER.
6
Carefully read and follow on-screen instructions:
Enrolling
Another Finger
Now We Will
Practice
PLACE FINGER
7
PlacengertoenrollonFingerprint Sensor (B) {page 2}.
8
Followon-screenpromptstoholdngerstill,toliftitosensor,and
then to place it on sensor again. You will be instructed to do this several
times until practice is complete.
Practice
Complete
9
Yoursafeisnowreadytoenrollanadditionalngerprintfortheuser
selected.Followon-screenpromptstoplace-lift-replacengeruntil
ngerprintimageiscaptured100%.
PLACE FINGER 100%
2nd Finger Added
for USER
NEED HELP? VISIT VERIFISAFE.COM OR CALL (407) 567-7361
15
q
Theuser’sadditionalngerprinthasbeenenrolled.
5.5 Deleting Users/Fingerprints
Administrators can delete other administrators and standard users but they
cannot delete themselves. The deletion of an administrator must be performed by
another administrator.
Note: Individual ngerprints cannot be deleted. You must delete a user to
remove their ngerprints.
5.5.1 Deleting a User
1
Access the Settings Menu.
(See Accessing the Settings Menu on page 7.)
2
Press Start/Enter Button (C) {page 2} to enter USER MANAGER.
3
Press Settings/Scroll Button (F) {page 2} to navigate to user to
edit/delete.
4
Press Start/Enter Button to edit/delete user.
5
Press Settings/Scroll Button to navigate to DELETE USER.
6
Press Start/Enter Button again to delete user.
7
LCD will read:
Press Button to
Delete This User
8
PressStart/EnterButtontoconrmdeletionofuser.

VERIFI SMART.SAFE.
®
S-SERIES • MODELS S4000, S5000, S6000, S700016
5.6 Customizing Username(s)
Note: Custom usernames can be up to seven characters long.
To customize your username:
1
Access the Settings Menu. (See Accessing the Settings Menu on page 7.)
2
Press the Start/Enter Button (C) {page 2} to enter the
USER MANAGER.
3
Press Settings/Scroll Button (F) {page 2} to navigate to user to edit.
4
Press Start/Enter Button to edit user.
5
Press Settings/Scroll Button to navigate to EDIT USER NAME.
6
Press Start/Enter Button to edit username.
7
Enter username:
● Use Start/Enter Button to cycle characters (letters A-Z; number 0-9;
symbols # and -).
● Use Settings/Scroll Button to advance to next character.
8
Once you have input username, press Settings/Scroll Button to navigate
to SAVE.
9
Press Start/Enter Button to SAVE username.
Note: Usernames are used to identify users when opening your safe and in
Access Logs. See Access Logs on page 26.

NEED HELP? VISIT VERIFISAFE.COM OR CALL (407) 567-7361
17
6. LIGHTING
6.1 Internal LED
Your safe uses an LED lighting system that can be varied in both duration and
intensity. Upon unlocking your safe, the internal LED will automatically illuminate
forashortperiodandthenturnotoconservebatterylife.Thislightcanbere-
enabled by pressing the Start/Enter Button (C) {page 2}.
6.1.1 Changing Internal LED Options
1
Access the Settings Menu.
(See Accessing the Settings Menu on page 7.)
2
Press Settings/Scroll Button (F) {page 2} to navigate to
2. INSIDE LIGHT.
3
Press Start/Enter Button (C) {page 2} to open
2. INSIDE LIGHT submenu.
4
Press Settings/Scroll Button to navigate to 1. DURATION or 2.
INTENSITY.
5
Press Start/Enter Button to open 1. DURATION or
2. INTENSITY options.
6
Press Settings/Scroll Button to navigate between the
following options:

VERIFI SMART.SAFE.
®
S-SERIES • MODELS S4000, S5000, S6000, S700018
1. DURATION
■ ON-SHORT (approx. 12 seconds; default setting)
□ ON-LONG (approx. 25 seconds)
□ OFF
----BACK----
2. INTENSITY
□ BRIGHT (expect 20% decrease in battery life)
■ NORMAL (default setting)
□ NITE-LITE (expect 20% increase in battery life)
□ NITE-LITE+ (±20% battery life)
----BACK----
7
Press Start/Enter Button to select desired option.
6.1.2 Nite-Lite and Nite-Lite+
Nite-Lite helps you avoid night blindness when opening your safe in
complete darkness while Nite-Lite+oersaconvenientwaytoincreasethis
brightness during other appropriate conditions.
With Nite-Lite+ enabled, press and hold the Start/Enter Button (C) {page
2} to increase the brightness of the LED. Release the
Start/Enter Button when the LED has reached the desired intensity.
6.2 LCD Backlight
The LCD screen backlight can be adjusted for various ambient conditions. For
example, in a very bright room, increasing the backlight can enhance the visibility
of text on the screen.

NEED HELP? VISIT VERIFISAFE.COM OR CALL (407) 567-7361
19
6.2.1 Changing LCD Backlight Options
Note: Changing the intensity of your safe's LCD backlighting will have
minimal impact on battery life.
1
Access the Settings Menu.
(See Accessing the Settings Menu on page 7.)
2
Press Settings/Scroll Button (F) {page 2} to navigate to
3. LCD LIGHT.
3
Press Start/Enter Button (C) {page 2} to open
3. LCD LIGHT submenu.
4
Press Settings/Scroll Button to navigate between the following options:
□ BRIGHT
■ NORMAL
□ DIM
□ SUPER DIM
□ OFF
5
Press the Start/Enter Button to select the desired option.
Note: When LCD LIGHT is set to OFF, it may be dicult to read the
LCD in a well-lit room. Be sure to position your eyes directly above the LCD
if you’re unable to view it from an angle or shine a ashlight on the display.

VERIFI SMART.SAFE.
®
S-SERIES • MODELS S4000, S5000, S6000, S700020
7. AUTOLOCK
For your peace of mind, we have designed your safe to automatically lock when you
closethedoor.Thisfeatureisenabledbydefaultbutcanbeturnedobyfollowing
these steps:
7.1 Disabling/Enabling AutoLock
1
Access the Settings Menu. (See Accessing the Settings Menu on page 7.)
2
Press Settings/Scroll Button (F) {page 2} to navigate to 6. AUTO LOCK.
3
Press Start/Enter Button (C) {page 2} to open 6. AUTO LOCK submenu.
4
Press Settings/Scroll Button to navigate between the following options:
■ ON
□ OFF
5
Press Start/Enter Button to select desired option.
Note: When AutoLock is set to OFF, the Start/Enter Button must be pressed to
lock the safe after the door has been closed.
8. SELF-DIAGNOSTICS
Every 24 hours and each time the door is locked, your safe runs a full set of diagnostic
tests to ensure its electronics, batteries and mechanical components are in proper
workingorder.Thisprocessiscompletelyautomaticanddoesnotrequireanyuserinput.
Thepass/failresultofeverypost-usediagnostictestisdisplayedonyoursafe’sLCD.
NEED HELP? VISIT VERIFISAFE.COM OR CALL (407) 567-7361
21
Intheunlikelyeventyoursafedetectsaproblem,itwilluseaudio/visualnoticationsto
bring it to your attention. (See Notications on page 21.)
9. BATTERY MANAGEMENT
Your safe was designed to operate for several years on one set of four (4) healthy lithium
or alkaline batteries under normal use.
A comprehensive test of the batteries is performed once a day. (See previous section for
Self-Diagnostics.) This test is also performed each time your safe is locked. The results are
then displayed on the LCD. For example:
LOCKED
Batteries: 98%
10. NOTIFICATIONS
Info, alerts and alarmsarethreelevelsofnoticationsyoursafeusestoinformyouof
itsbatterylevel,tamperattemptsandmore.Whenanoticationisactive,yoursafewill
beep intermittently to get your attention.
Infonoticationswillonlybeepwhenyouinteractwiththesafe.Thislevelofnotication
is to simply inform you of a mild issue or non-issue interaction.
Asnoticationsbecomemoresignicant(alerts and alarms) you safe will increase its
aggressiveness to get your attention with more audible beeping.
NoticationssuchasDOOR LEFT OPEN will be cleared automatically when their
cause is resolved (e.g. by closing the door). Others (e.g. tamper alerts) must be cleared
manually by an enrolled user. See Clearing Tamper Alert Notications on page 24.
VERIFI SMART.SAFE.
®
S-SERIES • MODELS S4000, S5000, S6000, S700022
NOTIFICATION ISSUE RESOLUTION
Info
INFO: BATTERIES
NEAR LOW
Batteries have reached 25%
capacity.
Replace with new batteries.
(See Installing Batteries on
page 4.)Noticationwill
clear automatically.
Alerts
ALERT: UNAUTH TRY
Tamper Alert: Someone with
angerprintnotenrolled
attempted to unlock safe.
Unlock safe with enrolled
ngerprint.PressStart/Enter
Button (C) {page 2} to read
alert. Press Start/Enter Button
again to clear.
ALERT: KEY USED
Tamper Alert: Backup key was
used to unlock safe.
Note: This may have been
performed by owner. Alert
informs owner if backup key
location was compromised.
ALERT: RESET TRY
Tamper Alert: Settings/Scroll
Button (F) {page 2} was
pressed while safe remained
locked.
ALERT: DOOR OPEN
Door was left open for several
minutes.
Close safe door. Alert will clear
automatically.
ALERT: LOW BATT
Batteries have reached 15%
capacity.
Replace with new batteries.
(See Installing Batteries on
page 4.)Noticationwill
clear automatically.

NEED HELP? VISIT VERIFISAFE.COM OR CALL (407) 567-7361
23
NOTIFICATION ISSUE RESOLUTION
Alarms
ALARM: DOOR ERROR
Object may have obstructed
locking bolts or possible error
with motor and/or switches.
Clear any obstructions from
door locking area. Attempt to
lock/unlock. If issue resolves,
alarm will clear automatically. If
issue does not resolve, please
contact Zvetco Technical
Support. (See Customer
Support on page 44.)
ALARM: DOOR OPEN
ALARM: DOOR JAM
Object may have obstructed
locking bolts.
ALARM: FPR ERROR
Communication error with
ngerprintsensor.
Reset safe by removing and
replacing batteries. (See
Installing Batteries on page
4.) If alarm persists, contact
Zvetco Technical Support. (See
Customer Support on page
44.)
FINGERPRINT ERROR
ALARM: BAD BATT
Batteries have reached 8%.
Replace with new batteries.
(See Installing Batteries on
page 4.)Noticationwill
clear automatically.
SYSTEM GLOBAL
TIMEOUT
Errorsrequiringtechnical
assistance.
Contact Zvetco Technical
Support. (See Customer
Support on page 44.)
FINGER GLOBAL
TIMEOUT
COMM GLOBAL TIMEOUT
VERIFI SMART.SAFE.
®
S-SERIES • MODELS S4000, S5000, S6000, S700024
10.1 Clearing Tamper Alert Notications
1
Unlockandopensafewithenrolledngerprint.
2
Viewsafe’sLCD.Afterafewseconds,itwillread:
Alerts!
Push to View
3
LCD will display name of alert or alarm followed by:
Push to Clear.
4
Press Start/Enter Button (C) {page 2} to clear alert/alarm.
Note: If there are multiple active alerts or alarms, continue to press the
Start/Enter Button to cycle through and clear each one.
5
Close and lock safe.
10.2 Using Snooze
Certainnoticationssuchas,LOW BATTERY, can be snoozed for up to three
days to temporarily disable beeping. Press the Start/Enter Button (C) {page 2}
when prompted to snooze.
10.3 Open Door Alert
By default, if your safe door remains open for three minutes, you will be alerted
tocloseit.Toadjustthedelayofthisalertortoturnifocompletely,follow
these steps:
1
Access the Settings Menu. (See Accessing the Settings Menu on page 7.)

NEED HELP? VISIT VERIFISAFE.COM OR CALL (407) 567-7361
25
2
Press Settings/Scroll Button (F) {page 2} to navigate to:
5. DOOROPEN ALRT.
3
Press Start/Enter Button (C) {page 2} to open
5. DOOROPEN ALRT submenu.
4
Press Settings/Scroll Button to navigate between the following options:
■ 3 MIN
□ 10 MIN
□ 60 MIN
□ OFF
----BACK----
5
Press Start/Enter Button to select desired option.
Note: If Audio is set to ALARMS ONLY or MUTE, Door Open Alert will not
be audible.
11. AUDIO
Bydefault,yoursafeissetforfullaudioforallnotications.Tochangewhich
noticationstriggeraudiblebeeps,followthesesteps:
1
Access the Settings Menu. (See Accessing the Settings Menu on page 7.)
2
Press Settings/Scroll Button (F) {page 2} to navigate to 4. AUDIO.
3
Press Start/Enter Button (C) {page 2} to open 4. AUDIO submenu.
4
Press Settings/Scroll Button to navigate between the following options:

VERIFI SMART.SAFE.
®
S-SERIES • MODELS S4000, S5000, S6000, S700026
■ FULL AUDIO
□ ALARMS&ALERTS
□ ALARMS ONLY
□ MUTE
----BACK----
5
Press the Start/Enter Button to select the desired option.
12. SYSTEM LOGS
YourVeriSmart.Safe.®storestwotypesoflogles:access and event logs. Logs are
timestamped with the amount of time that has elapsed since the log was triggered. The
previous 1,000 log entries for each type are stored and viewable by an administrator via
the Settings Menu. (See Settings Menu on page 7.) Entries are sorted descending by
datewiththemostrecententrylistedrst.
Note: Logs cannot be manually deleted or edited, except in the case of a full factory
reset of the safe. All factory resets are recorded in the event log to allow a permanent
record of any factory resets.
12.1 Access Logs
Accesslogsrecordeachtimeyoursafeisaccessedbyangerprintoritsbackup
keys.Eachngerprintaccesslogincludestheusernameunderwhichthe
ngerprintisenrolled.

NEED HELP? VISIT VERIFISAFE.COM OR CALL (407) 567-7361
27
12.2 Event Logs
Event logs record all system events such as tamper alerts, diagnostic results,
system alarms and other miscellaneous events.
12.3 Viewing Log Entries
1
Access the Settings Menu. (See Accessing the Settings Menu on page 7.)
2
Press Settings/Scroll Button (F) {page 2} to navigate to
8. SYSTEM LOGS.
3
Press Start/Enter Button (C) {page 2} to open
8. SYSTEM LOGS submenu.
4
Press Settings/Scroll Button to navigate to 1. ACCESS LOG or
2. EVENT LOG.
5
Press Start/Enter Button to view list of entries in
1. ACCESS LOG or 2. EVENT LOG.
6
Press Settings/Scroll Button to scroll to an entry.
7
Press Start/Enter Button to view entry.
Note: The time displayed in each log entry indicates the amount of time that
has elapsed since the log was triggered.

VERIFI SMART.SAFE.
®
S-SERIES • MODELS S4000, S5000, S6000, S700028
13. FACTORY RESET
Performingafactoryresetofyoursafewilldeleteallusers,theirngerprintenrollments,
and revert all settings to their default values.
Note: All factory resets are recorded in the event log to allow a permanent record of
any factory resets.
Afactoryresetcanbeperformedwithanadministrator’sngerprintor,ifyouareunable
toaccessyoursafewithangerprint,abackupkeycanbeused.
13.1 Performing a Factory Reset with a Fingerprint
1
Access the Settings Menu. (See Accessing the Settings Menu on page 7.)
2
Press Settings/Scroll Button (F) {page 2} to navigate to
10. FACTORY MENU.
3
Press Start/Enter Button (C) {page 2} to open
10. FACTORY MENU submenu.
4
Press Settings/Scroll Button to navigate to FACTORY RESET.
5
PressStart/EnterButtontoconrm.
13.2 Performing a Factory Reset with a Backup Key
1
Unlock safe with backup key and leave key inserted. (See Backup Access on
page 35.)
2
WaitforLCDtotime-outandturno.
3
Press and hold Settings/Scroll Button (F) {page 2} button for 7 seconds.
NEED HELP? VISIT VERIFISAFE.COM OR CALL (407) 567-7361
29
4
LCD will read Entering System Menu and then display two options:
FACTORY RESET and FIRMWARE UPGRD.
5
Press Start/Enter Button to enter FACTORY RESET
submenu.
6
PressStart/EnterButtontoconrmSTART RESET.
7
Without closing door, turn key counter-clockwise when LCD reads: Use Key
to Lock Door.
8
Remove key when LCD reads: Remove Key.
9
LCD will read: Factory Reset Complete.
14. MOUNTING
Your safe has been pre-drilled for mounting at the back and/or bottom. Each hole is
8mm in diameter. The included mounting hardware is suited for mounting your safe to
wooden surfaces. If you wish to mount your safe to another type of surface, please use
appropriateequipmentandprocedures.
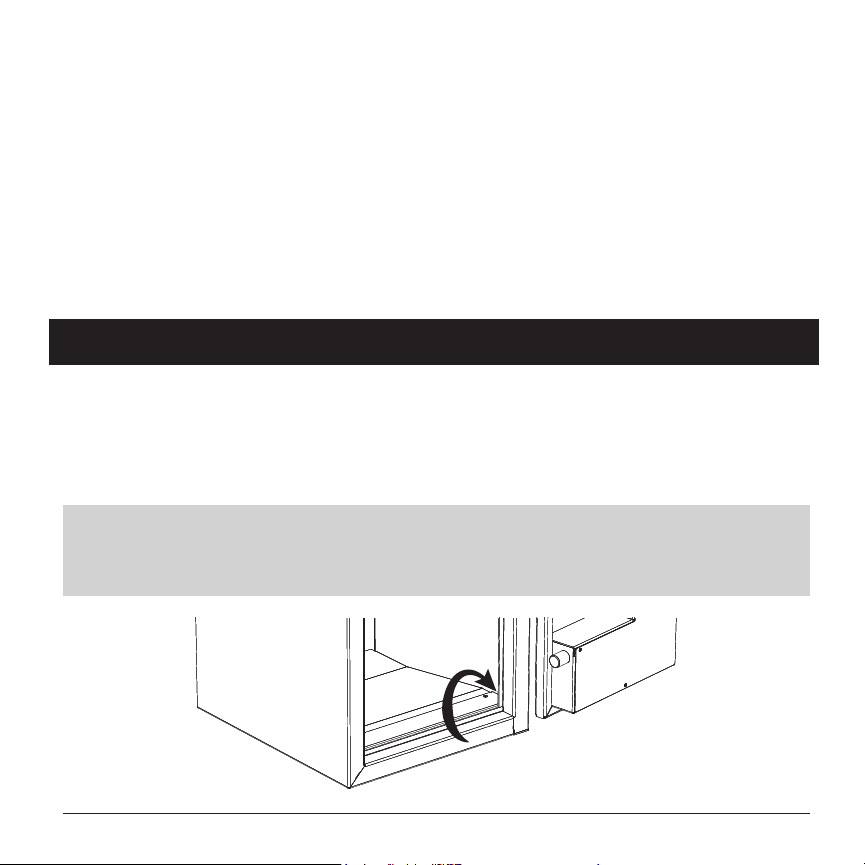
Note: For model S7000, the bottom tray must be removed in order to access the oor
mounting holes. Place your nger in the recess at the bottom front corner of the safe
(see black arrow below) then pull up to remove the tray.

VERIFI SMART.SAFE.
®
S-SERIES • MODELS S4000, S5000, S6000, S700030
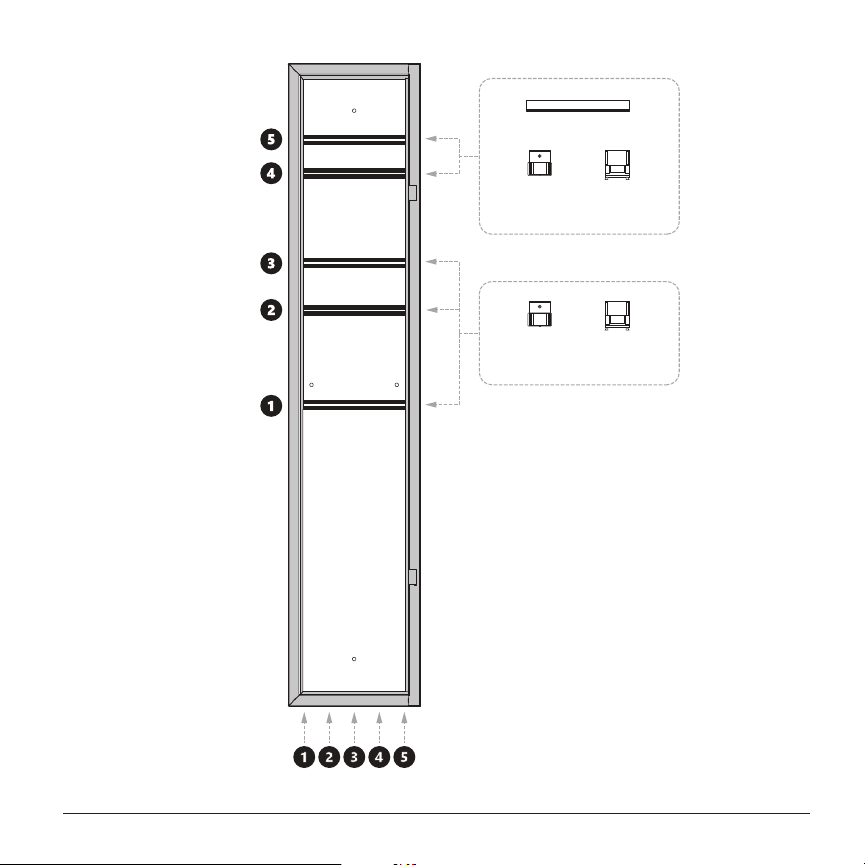
15. LONG GUN CONFIGURATIONS (S7000 ONLY)
15.1 Customizing the Gun Rack System
YourVeriSmart.Safe.®S7000containsacustomizablegunracksystemtoallow
exiblestorageforuptovelongguns.
Thesystemisdividedintoveheightlevelsandveverticalslots.Eachslothasa
gunbarrelholderthatcanbeadjustedtooneoftheveheightlevels.
Height levels 1, 2 and 3 can accommodate the included gun barrel holders or
AkroBin®orequivalentstoragebins(notincluded).
Only height levels 4 and 5 can accommodate the included storage shelf, but once
the shelf has been removed, they can also accommodate gun barrel holders or
storage bins.
Tosetupthebestconguration,placeyourlongguninthesafe.Visually
determinewhichoftheheightlevelsbesttsthebarrelandadjustthegunholder
to the height level for that slot.
To adjust the gun barrel holder, use the provided Allen wrench to remove the set
screw. Once the screw has been removed, remove the holder and reinstall it at
your preferred height level. Be careful not to overtighten the set screw.
Note: The oor of the Veri Smart.Safe.® S7000 utilizes a slanted tray designed
to better retain long guns in the gun rack system.
VERIFI SMART.SAFE.
®
S-SERIES • MODELS S4000, S5000, S6000, S700032
15.2 Adjusting Shelf Height
ThestorageshelfincludedintheVeriSmart.Safe.®S7000canbeinstalledat
height levels 4 or 5 (see Figure 6 - S7000 Gun Rack System on page 31) or it can
be removed entirely.
When installed in the lower position (level 4), long-barreled guns up to 43.5” in
total length can be stored below the shelf. When installed in the upper position
(level 5), long guns up to 46.5“ can be accommodated.
To adjust the storage shelf, use the included 3mm Allen wrench to remove the
two screws on the front of shelf and the one at the back. Reposition the shelf in
the new location (level 4 or 5) and reinstall the screws.
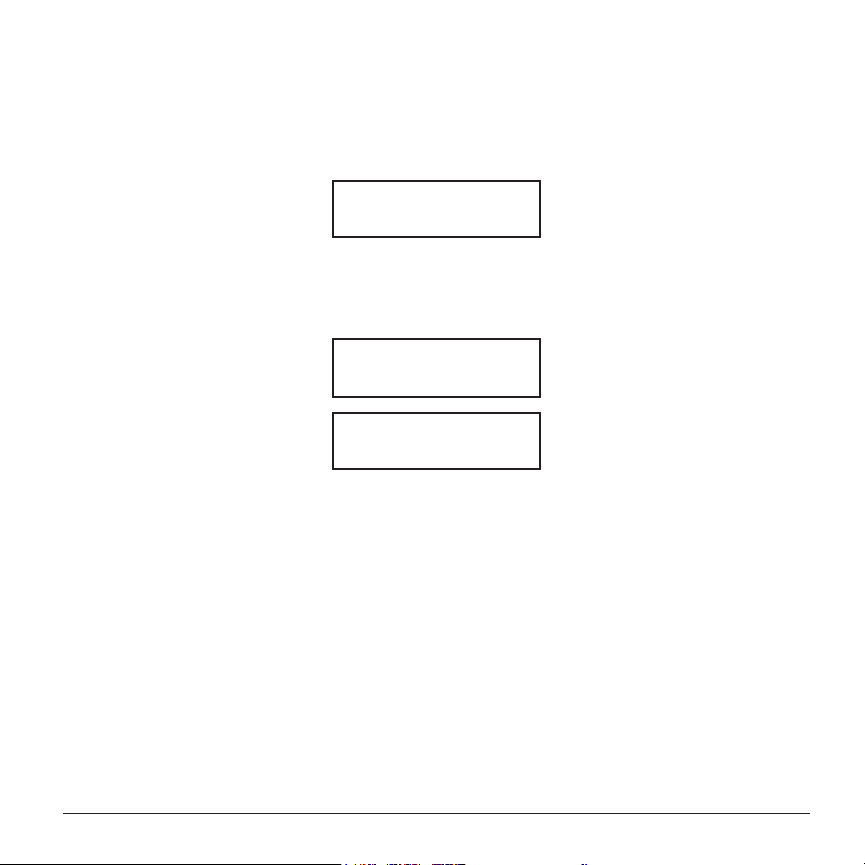
SHELF CONFIGURATION SLOT 1 SLOTS 2
-
5
Upper Position (Level 5) up to 52" up to 46.5"
Lower Position (Level 4 *default) up to 52" up to 43.5"
Removed up to 52" up to 52"
Figure 4 - Shelf Conguration and Slot Height
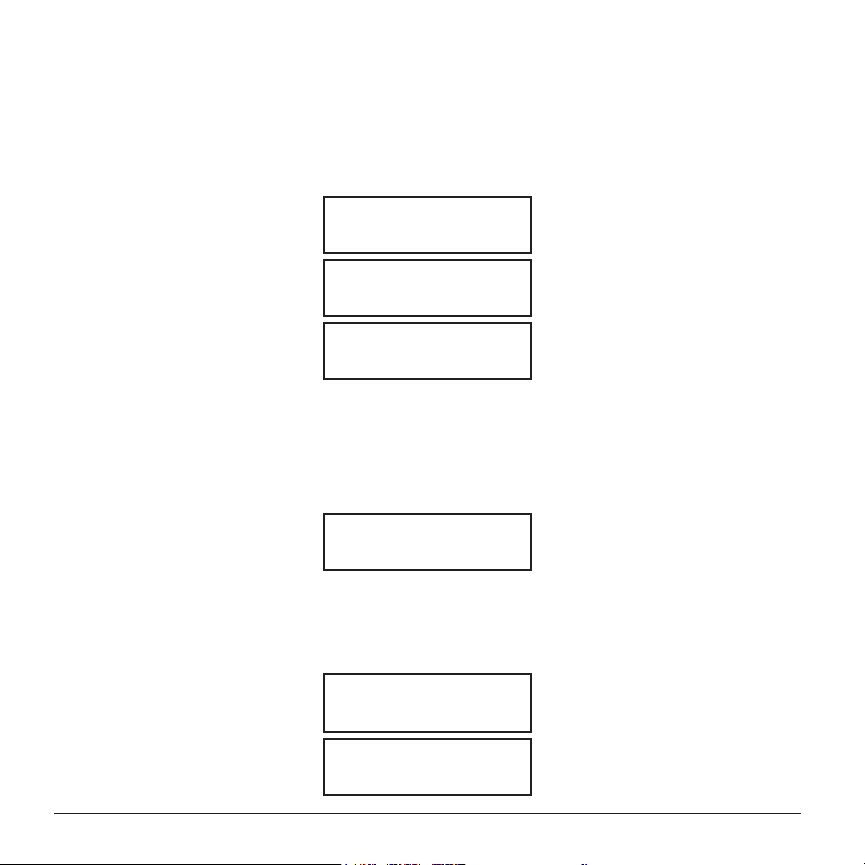
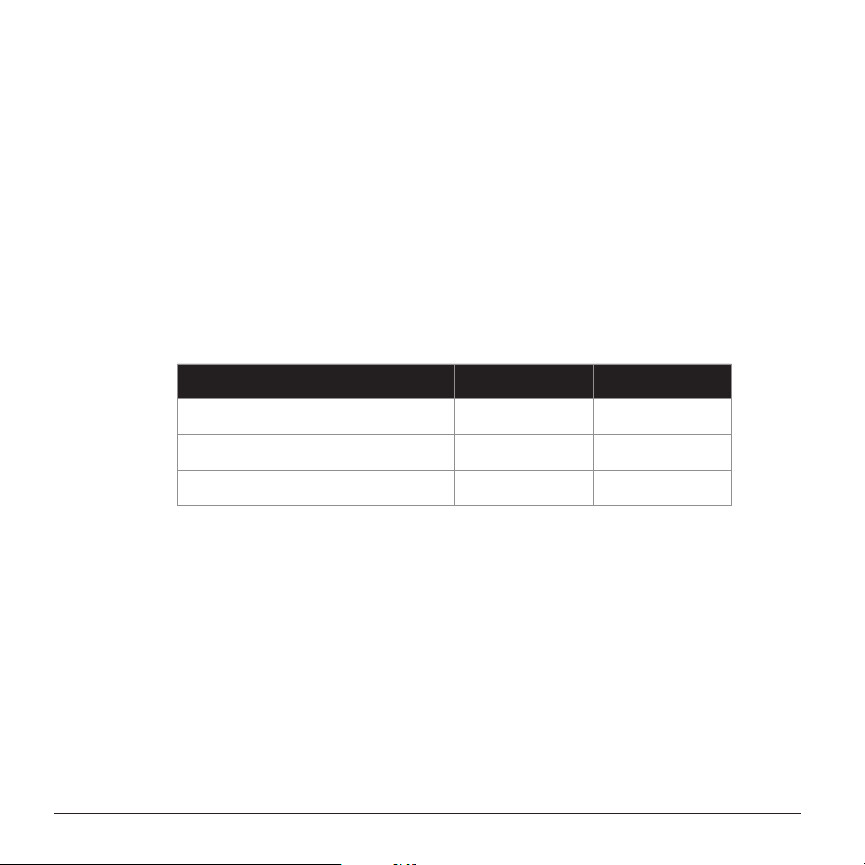
15.3 Slots and Butt Stock Clearance
ThebottomoftheVeriSmart.Safe.®S7000highlightseachslotanddisplaysa
butt stock clearance line (black line in Figure 5 - Slots and Butt Stock Clearance).
Use this line each time you place a long gun inside the safe to ensure the door will
close and lock without contacting the butt stock.
NEED HELP? VISIT VERIFISAFE.COM OR CALL (407) 567-7361
33
Figure 5 - Slots and Butt Stock Clearance
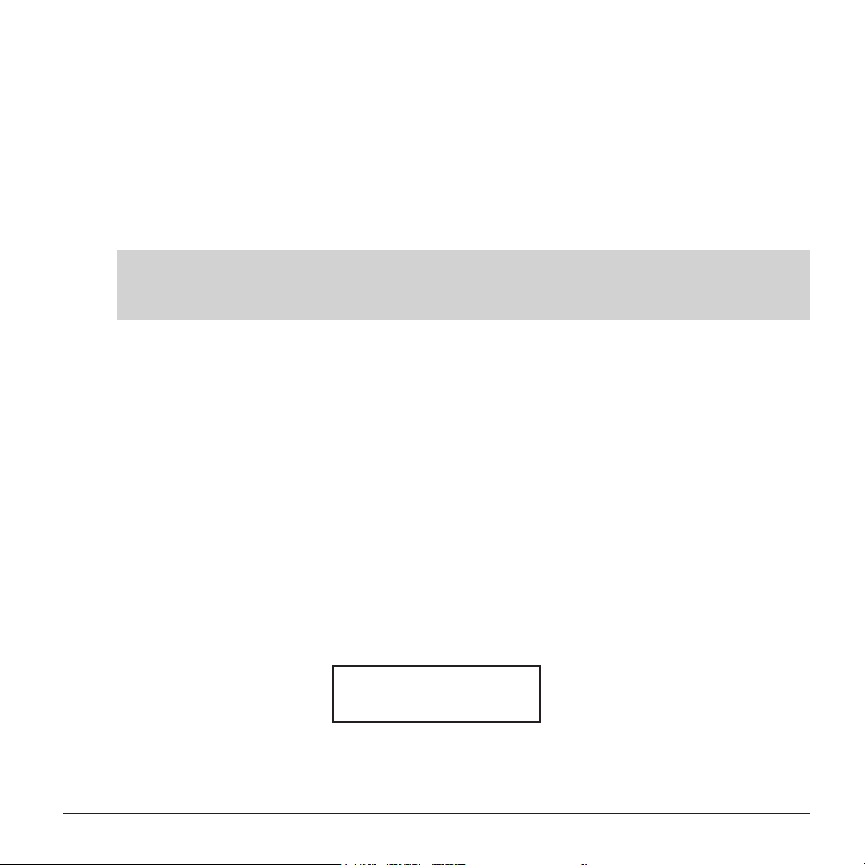
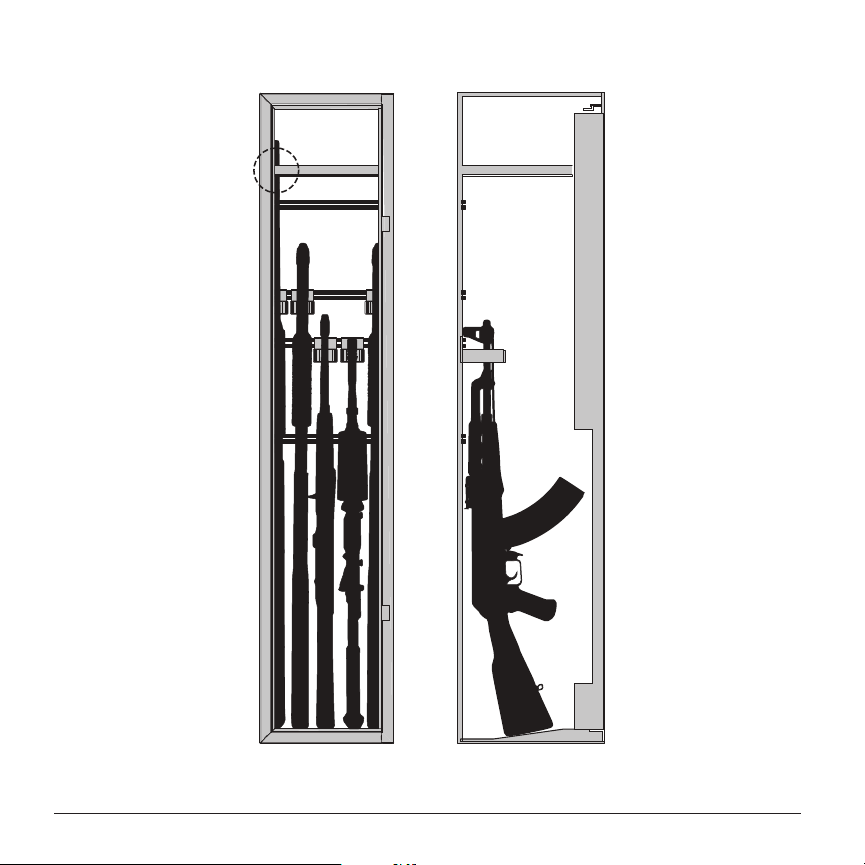
15.4 Storing a Long-Barreled Gun
The storage shelf has a single hole in alignment with slot 1 to allow for a long-
barreled gun up to 52“ in total length to be placed in the slot without the need to
remove the shelf. (See Figure 7 - Storage Shelf Hole and Door Clearance for Slots 3
and 4 on the following page.)
To store multiple long guns from 43.5” to 46.5” in total length, raise the storage
shelf to the upper position (level 5). Uninstall the shelf to store multiple long guns
up to 52“.
15.5 ARs and AKs with Magazines
ThegeneraldepthoftheVeriSmart.Safe.®S7000is9.9”.Thisenablessecure
storageofmostlonggunsfrom22stohuntingriesandmanymore.However,
storingAR-andAK-stylerieswithmagazinesattachedrequiresgreaterdepth.
Thegunracksystemisdesignedtoallowrieswithmagazinestobestoredin
slots 3 and 4 with a depth of 11.75“.
See Figure 7 - Storage Shelf Hole and Door Clearance for Slots 3 and 4 on the
following page.
VERIFI SMART.SAFE.
®
S-SERIES • MODELS S4000, S5000, S6000, S700034
BARREL
HOLDER
STORAGE
BIN
STORAGE SHELF
BARREL
HOLDER
STORAGE
BIN
HEIGHT
LEVELS
SLOTS
SLOTS
Barrel of long
gun in slot 1
passes through
hole in shelf
Door clearance
for rifles with
magazines in
slots 3 and 4
FRONT SIDE
Figure 7 - Storage Shelf Hole and Door Clearance for Slots 3 and 4

NEED HELP? VISIT VERIFISAFE.COM OR CALL (407) 567-7361
35
16. CARE AND MAINTENANCE
Yoursafe’sFingerprint Sensor (B) {page 2} has a silicon surface and should be
treatedwithcare.Damagetothengerprintsensorcancausethesensortobecome
nonfunctional.
Routinemaintenanceisnotrequired.However,ifthesensorbecomesdirtyorhas
residue from previous use, it should be cleaned to prevent reduced performance.
Tocleanyourngerprintsensor,useonlyisopropylalcoholandamicrobercloth.The
sensor should be gently swiped from top to bottom as needed. Do not scrub or apply
heavy pressure.
17. BACKUP ACCESS
WARNING! DO NOT LOCK YOUR BACKUP KEYS IN YOUR SAFE. KEEP THEM IN
ANOTHER SECURED LOCATION.
Your safe includes two high-security, crosscut backup keys for manual access in the
unlikelyeventyouareunabletounlockitwithangerprint.
Note: Backup keys t into the keyhole in only one orientation. The half-circle
indentation at the base of the key must be facing up before inserting key.

VERIFI SMART.SAFE.
®
S-SERIES • MODELS S4000, S5000, S6000, S700036
17.1 Using Backup Keys
1
For models S4000, S5000 and S6000:
RemovetwoofthreescrewsholdingVeriSmart.Safe.®logoplateontop
(S4000) or front (S5000 and S6000) of safe.
For model S7000:
Removeoneoftwoscrewsholdingthe“S7000|FBICertiedSensor”plateon
front of safe.
2
Rotate plate to expose keyhole.
3
Insert backup key into keyhole and turn clockwise.
Note: The keyhole has a thin metal disk in front of it that will move with
the key. This is a security feature and is normal.
4
Pull Door Handle (D) {page 2} to open safe door.
Note: After opening your safe with a backup key, the safe must be locked with
the key before the key can be removed.
Note: If your safe is unlocked with a ngerprint, it cannot be locked with a
backup key.

NEED HELP? VISIT VERIFISAFE.COM OR CALL (407) 567-7361
37
18. FREQUENTLY ASKED QUESTIONS
. Q Will replacing my safe’s batteries erase my settings or enrollments?
. A No.Allofyourngerprintenrollmentsandsettingscustomizationsarestoredin
yoursafe’smemoryandcanonlybedeletedorchangedbyanadministratororby
performing a factory reset.
. Q What kind of batteries can I use in my safe?
. A You can use regular alkaline or lithium ion batteries.
. Q Can I change the brightness of the LCD?
. A Yes. See LCD Backlight on page 18.
. Q Can I tether my safe with a security cable?
. A Yoursafewasdesignedformountingtowallsand/oroors.Thoughwedonot
recommend it, if you choose to use a security cable, be sure to purchase one that
willtthroughyoursafe’s8mmmountingholes.
. Q My safe’s batteries have died. How can I open it?
. A Refer to Using Backup Keys on page 36 for instructions. After you have unlocked
your safe, be sure replace its batteries as soon as possible.
. Q How often do I need to clean my safe’s ngerprint sensor?
. A Routinemaintenanceisnotrequiredforyoursafe’sngerprintsensor.However,
if the sensor becomes dirty, it should be cleaned in order to maintain optimal
performance. See Care and Maintenance on page 35.

VERIFI SMART.SAFE.
®
S-SERIES • MODELS S4000, S5000, S6000, S700038
. Q Why is my safe beeping? How do I stop it?
. A Beepingisindicativeofanactivenotication.Itmaybealowbatteryalarm,tamper
alertorothernotication.YoursafewilldisplayanyactivenoticationsonitsLCD
afterithasbeenopenedwithanenrolledngerprint.SeeNotications on page 21.
. Q I’ve misplaced my safe’s backup keys or my safe’s battery has died with the backup
keys locked inside. Can I get a set of replacement keys?
. A For security reasons, Zvetco Biometrics does not store duplicates of backup keys.
To receive a new set of keys, your safe will need to be re-keyed with a new lock and
matching set of keys. Please contact our Customer Support department for more
information. (See Customer Support on page 44.)
19. TROUBLESHOOTING
My safe is not locking automatically.
AutoLock may be disabled in the Settings Menu. Refer to AutoLock on page 20 to
ensure AutoLock is enabled.
My safe’s internal LED light is not turning on when I open the door.
Reviewyoursafe'sLEDsettingstoconrmthatLEDhasnotbeendisabled.(See
Changing Internal LED Options on page 17.)
IfNite-Litehasbeenenabled,yourLEDmaybetoodiculttonoticeinabrightlylit
room.Nite-Liteisspecicallyengineeredtobedimtoavoidcausingnightblindness.
ConsiderselectingNormalorBrightifNite-Liteistoodiculttoviewinyour
environment.

NEED HELP? VISIT VERIFISAFE.COM OR CALL (407) 567-7361
39
LCD reads “Fingerprint Timeout” and I'm not able to complete enrollment.
Theenrollmentprocesswilltimeoutwiththismessageifyourngerisnotdetected
or if you placed it on the sensor for more than 18 seconds without lifting it. During
enrollment,yoursafewillpromptyoutorepeatedlyliftandplacethesamengeron
the sensor. Be sure to respond promptly to these messages to avoid the setup session
timing out.
LCD reads “FPR Error” or “Fingerprint Error” or LCD is unresponsive.
Yoursafe’sbatteriesmayhaveabadcellormayberunningverylow.Replacebatteries
with a new set and try again. (See Installing Batteries on page 4.)
My safe does not recognize the ngerprints I’ve enrolled. LCD reads “No Match.”
Whileunusual,thismayhappenifyourngerhassignicantlychangedcharacteristics
duetodamageorothercauses.Thiscanalsoindicateaweakngerprintenrollment.
Note: Enrolling alternate ngers allows access to your safe in the event your primary
nger becomes heavily damaged.
You can factory reset the safe and start over with a new initial enrollment (see Factory
Reset on page 28),enrollnewngerprintsunderyourexistinguserorcreateanew
user. (See Adding Users/Fingerprints on page 12.)
LCD is not lighting up or I accidentally turned o my LCD backlight and can no longer
read the display.
IftheLCD’sbacklighthasbeenturnedo,shiningaashlightonthedisplaywillallow
you to read its text and navigate through the settings so you can turn it back on. (See
Changing LCD Backlight Options on page 19.)

VERIFI SMART.SAFE.
®
S-SERIES • MODELS S4000, S5000, S6000, S700040
Note: If your LCD’s backlight is not turned o but is still not displaying text, replace
your safe’s batteries. See Installing Batteries on page 4.
My safe's LCD says “Door Jam” and I am unable to open it with my ngerprint.
Open your safe with its backup keys and remove any objects that may be obstructing
the locking bolts. If your safe continues to show this error, contact Zvetco Technical
Support. (See Customer Support on page 44.)
I selected Firmware Upgrade while in the Settings Menu and now my safe is
unresponsive.
If you inadvertently chose FIRMWARE UPGRD
without connecting to a USB input
cable, your safe will appear to be unresponsive. The safe is searching for USB input
tobeginitsrmwareupgradeprocess.Toabortthisprocessandreturntonormal
operation, follow these steps:
1
Removeyoursafe’sbatteries.(SeeInstalling Batteries on page 4.)
2
Press the Start/Enter Button (C) {page 2}toconrmanylingeringbatterypower
is drained.
3
Replace batteries and the Battery Compartment (E) {page 2} cover.
Note: If your safe does not boot up, replace your batteries with a new set. Your
previous set may have been drained if your safe searched for USB input for an
extended period of time.

NEED HELP? VISIT VERIFISAFE.COM OR CALL (407) 567-7361
41
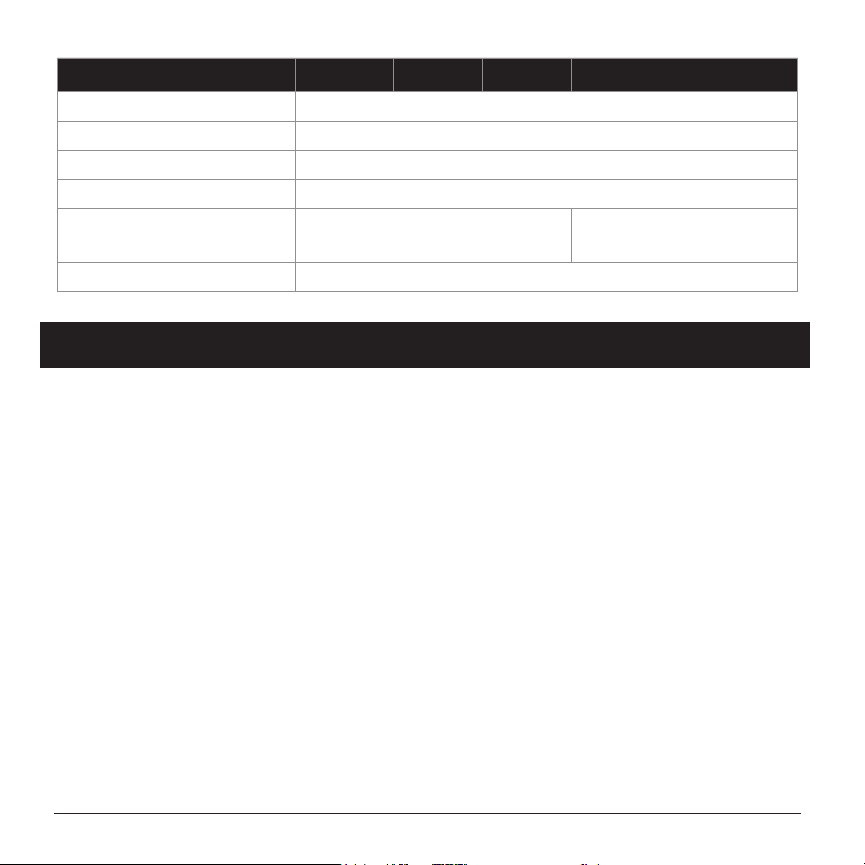
20. SPECIFICATIONS
SPECIFICATION S4000 S5000 S6000 S7000
Storage (cu. ft.) 0.28 0.52 0.85 3.3
External dimensions
(in.)
W 14.4 13.2 17.4 11
D 10.8 13.8 16.1 13.5
H 5.8 7.9 7.9 53.5
Internal dimensions
(in.)
W 14.0 13.0 17.1 10.75
D 10.5 9.5 11.8 9.9-11.75
H 3.3 7.3 7.3 52.5
Door opening (in.)
W 12.2 9.3 14.0 8.5
H 7.0 5.7 5.7 50.6
Door opening style Top Front
Weight (lbs) 22 21 31 92
Solid steel
construction
Door 4mm, ~8ga.
2mm
~ 14ga.
Walls 2mm, ~14ga.
Bolts
(2) 20mm motorized
locking bolts, ~ 3/4”
(3) 20mm motorized
locking bolts; (3) 16.2mm
static locking bolts
Powder coating Matte black industrial Hammered black industrial
Mounting holes (2)oor (2)oor,(2)wall (4)oor,(4)wall
Power (4) AA batteries (4) C batteries
Safe operating temps -20°C to 55°C (-4°F to 131°F)
Max.numberngerprints 40 enrollments
Tamper Alerts Unauthorizedngerprint,backupkeyused,resetattempt
VERIFI SMART.SAFE.
®
S-SERIES • MODELS S4000, S5000, S6000, S700042
SPECIFICATION S4000 S5000 S6000 S7000
Other alerts and alarms Open door, low battery
Self-check diagnostic Every 24 hours and after every use
Access and event logs Previous 1,000 entries
Fingerprint sensor TCS1siliconactivecapacitance,FBIcertied
California DOJ approved
Firearm Safety Device
Yes Pending
Warranty 12 months
21. WARRANTY
Zvetco LLC. (“Zvetco”) warrants this Biometric Safe product (“Product”) against defects in
materials or workmanship for a period of (12) months from the original date of purchase.
In the event of a defect, these are your exclusive remedies.
Labor: For the limited warranty period, Zvetco will repair defects in the Product at no
charge. After the applicable period you must pay for all labor charges.
Parts: For the limited warranty period, Zvetco will supply, at no charge, new or rebuilt,
atZvetco’soption,replacementpartsinexchangeforparts.Anyreplacementpartswill
be warranted for the remainder of the original warranty period. All parts replaced under
this Limited Warranty will become the property of Zvetco. In no event shall Zvetco or
ourrepresentativesbeliableforanyincidental,consequential,orspeciallossarising
from granting an access to persons from other than those who have registered their
ngerprints.
In no event shall our Zvetco or our representatives be liable for any incidental,
consequentialorspeciallossarisingfromanyuse,defect,malfunction,fault,orgranting
accesstopersonsotherthanthosewhohaveregisteredtheirngerprintsofthisproduct.

NEED HELP? VISIT VERIFISAFE.COM OR CALL (407) 567-7361
43
This Limited Warranty does not cover any consumable items supplied with this Product;
cosmetic damages; damage due to (1) acts of God, accident, misuse, abuse, negligence,
commercialuseormodicationsofthisProduct;(2)improperoperationormaintenance
of this product; (3) connection to improper voltage supply; (4) attempted repair by any
party other than a Zvetco authorized personal computer service facility; (5) tampering with
internalcomponents;or(6)directdamagetothengerprintsensor.ThisLimitedWarranty
is valid only in country of purchase, either the United States of America or Canada.
This Limited Warranty is invalid if the factory applied serial number has been altered or
removed from the product.
Repair or replacement of parts or hardware as provided under this Limited Warranty is the
exclusive remedy of the consumer. ZVETCO SHALL NOT BE LIABLE FOR ANY INCIDENTAL
OR CONSEQUENTIAL DAMAGES FOR BREACH OF CONTRACT, NEGLIGENCE, STRICT
LIABILITY OR ANY OTHER LEGAL THEORY RELATED TO THIS PRODUCT. SUCH DAMAGES
INCLUDE BUT ARE NOT LIMITED TO, LOSS OF PROFITS, LOSS OF REVENUE, LOSS OF
DATA, LOSS OF USE OF THE PRODUCT OR ANY ASSOCIATED EQUIPMENT, DOWN TIME
ANDPURCHASER’STIME.EXCEPTTOTHEEXTENTPROHIBITEDBYAPPLICABLELAW,ANY
IMPLIED WARRANTY OF MERCHANTABILITY OR FITNESS FOR A PARTICULAR PURPOSE
ON THIS PRODUCT IS LIMITED IN DURATION TO THE DURATION OF THIS WARRANTY.
Somestatesdonotallowtheexclusionorlimitationofincidentalorconsequential
damages or allow limitations on how long an implied warranty lasts, so the above
limitationsorexclusionsmaynotapplytoyou.ThisLimitedWarrantygivesyouspecic
legal rights, and you may have other rights which vary from state to state.
VERIFI SMART.SAFE.
®
S-SERIES • MODELS S4000, S5000, S6000, S700044
22. CUSTOMER SUPPORT
Yourcompletesatisfactionisourgoal.IfyouhaveanyquestionsaboutyourVeriSmart.
Safe.®orneedadditionalsupportnotfoundinthismanual,pleasecontactususingthe
information below.
(407) 567-7361 support@verisafe.com verisafe.com
Mon-Fri, 9am-7pm EST 365 days a year 24/7
Engineered in the U.S.A. by Zvetco Biometrics
489 State Road 436, Suite 109, Casselberry, Florida 32707
RevD