Loading ...
Loading ...
Loading ...
t is important that only the extreme heel should do the ¢ut-
:ing. This means that the bottom edge of the bevel next to the
cee must at all times be tangent to the arc of the bead being
formed.
Easier beads can be ehaped with the spear point chisel.
Use pencil marks and sizing cutsas before.
• Push the chisel stzaight into each cut and rotate horizontal-
ly to round oft the adjacent edges. It must be moved slight-
ly in the direction of rotation at the same time to keep the
point from digging into the adjacent bead.
Start Finish
Figure 33
CLrFI-ING COVES (CONCAVES)
This is the most difficult single cut to master - but one of the
most important in good wood turning.
• First, use pencil marks to indicate the edges.
• Then, rough out the cove, to within about 1/_,of thedesired fin-
ished surface, by scrapingwith the gouge or round nose chis-
el.tfthe cove isto be very'wide, sizingcuts can be made to
plot the roughing out. Once itis roughed out, _e covecan be
finished in twocuts,one from each sideto the bottom canter.
• At the start of either cut, gouge is held with handle high
and the two sides of blade held between the thumb and
forefinger of tool rest hand, just behind the be/at.
Position the fingers so that they are ready to roll the blade
into cove.
Hold blades so that bevel is at 90_angle to the work axis
with point touchingthe pencil line and pointed intowork axis.
From this start, depress poir_t sfighfiy to start cut, then con-
tinue to move point down in an are toward the bottom cen-
ter cove - at the same time rolling chisel uniformly so that,
at the end of the cut, it will be fiat at the bottom of the
cove.The o_Ject is to keep the extJ'eme point of gouge
doing the cutting trom start to finish. Reverse these move-
ments to cu! the opposite side.
Penci Mark
FigLire 34
Coves also can be scraped to finish using the round nose
chisel or a rattail file, These methods do not generally pro-
duce perfectly curved coves.
MA_NG LONG CONVEX CUTS
• First,turn work down to approximate size, using sizing cuts
(as required) to determine various diameters. Finish cuts
can then be made with either skew or gouge.
If the skew is used, the principles of the operation are the
same as those employed in cutting a bead - except that
the curve is longer and may be irregular. Use the extreme
heel throughout - start at longer end of curve (if curve is
irregular) and progress toward steeper end.
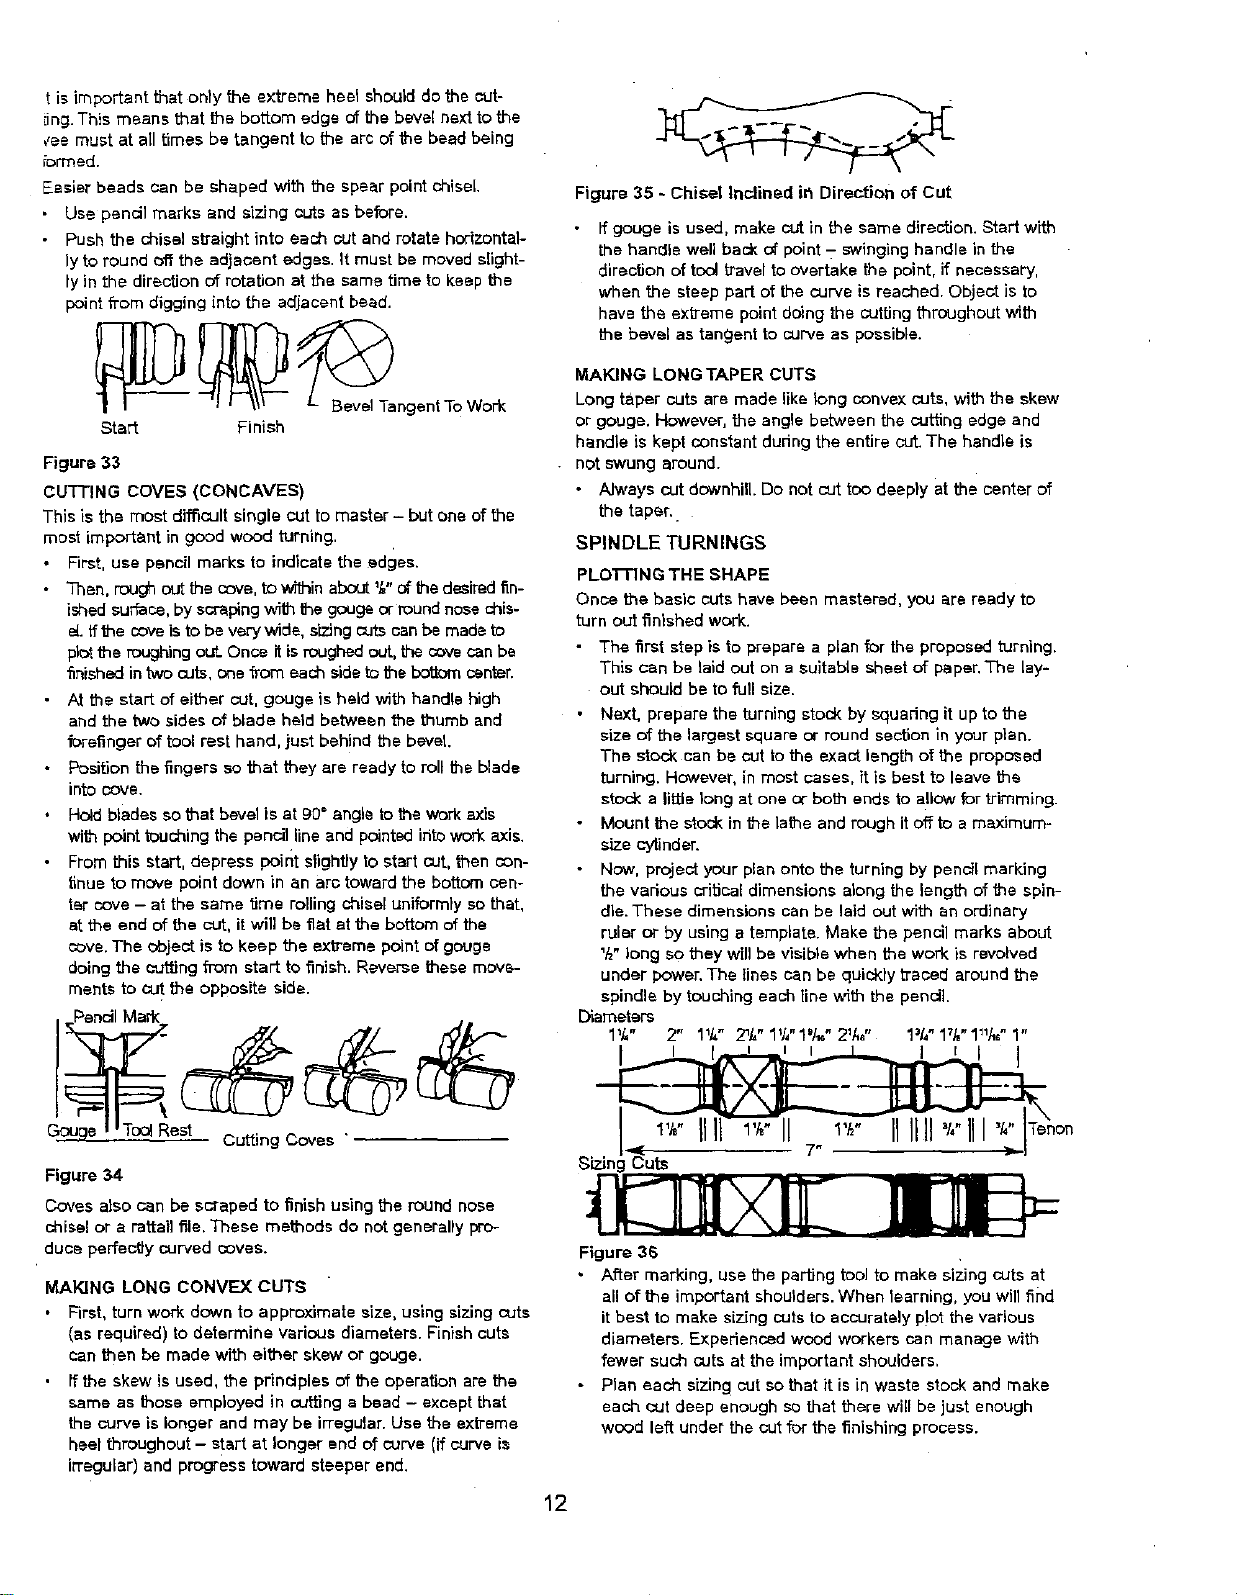
Figure 35 - Chisel Inclined in Direction of Cut
If gouge is used, make cut in the same direction. Start with
the handle well back o# point - _,vinging handle in the
direction of tool travel to overtake the point, if necessary,
when the steep part of the curve is reached. Object is to
have the extzeme point doing the cutting throughout with
the bevel as tangent to curve as possible.
MAKING LONG TAPER CUTS
Longtaper cuts are made like long convex cuts, with theskew
or gouge. However, the angle between the cutting edge and
handle is kept constant dudng the entire cut The handle is
not swung around.
Always cut downhill.Do not cut too deeply at the center of
the taper.
SPINDLE TURNINGS
PLO'FRNG THE SHAPE
Once the basic cuts have been mastered, you are ready to
turn out finished work.
The first step is to prepare a plan f_r the proposed turning.
This can be laid out on a suitable sheet of paper. The lay-
out should be to full size.
Next, prepare the turning stockby squadng it up to the
size of the largest square or round section in your plan.
The stock can be cut to the exact length of the proposed
turning. However, in most casee, it is best to leave the
stock a little long at one or both ends to allow for trimming.
Mount the stock in the lathe and rough it offto a maximum-
size cylinder.
Now, project your plan onto the turning by pencil marking
the various critical dimensions along the length of the spin-
dle. These dimensions can be laid out with an ordinary
ruler or by using a template. Make the pencil marks about
'/2"long so they will be visible when the work is revolved
under power. The lines can be quickly traced around the
spindle by touching each line with the pencil.
Diameters
11/," 2" 11k."2_L"1_I,"1%"2_A," 1=1,'1fl¢1_1_'1"
S_Jng Cuts .... __
Figure 36
• After marking, use the parting tool to make sizing cuts at
all of the important shoulders. When learning, you will find
it best to make sizing cuts to accurately p!ot the various
diameters. Experienced wood workers can manage with
fewer such cuts at the important shoulders.
• Plan each sizing cut so that it is in waste stock and make
each cut deep enough so that there will be just enough
wood left under the cut for the finishing process.
12
Loading ...
Loading ...
Loading ...