Owner's Guide Ice Cream, Yogurt Machines
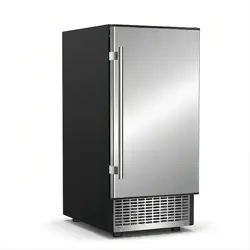
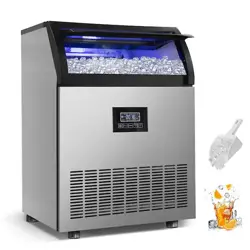
Main Unit Construction

- Top cover
- Door for ice taking
- Ice-making & its water tank assembly: Including ice-making evaporator, water tank, water pump and some detecting parts
- Front panel
- Operation panel
- Air outlet: Must keep the air circulate smoothly, hot air will blow out when unit running.
- Water inlet port for water supply: Use to connect the water supply pipe.
- Water draining port: Normal plugged with the cap. When need to drain the water, unplug the cap. And connect the white drain pipe.
Accessory: 2 meters long and white color water drain pipe, water quick connector of the water faucet, ¢6.35mm diameter and white color water supply pipe (3 meters long).
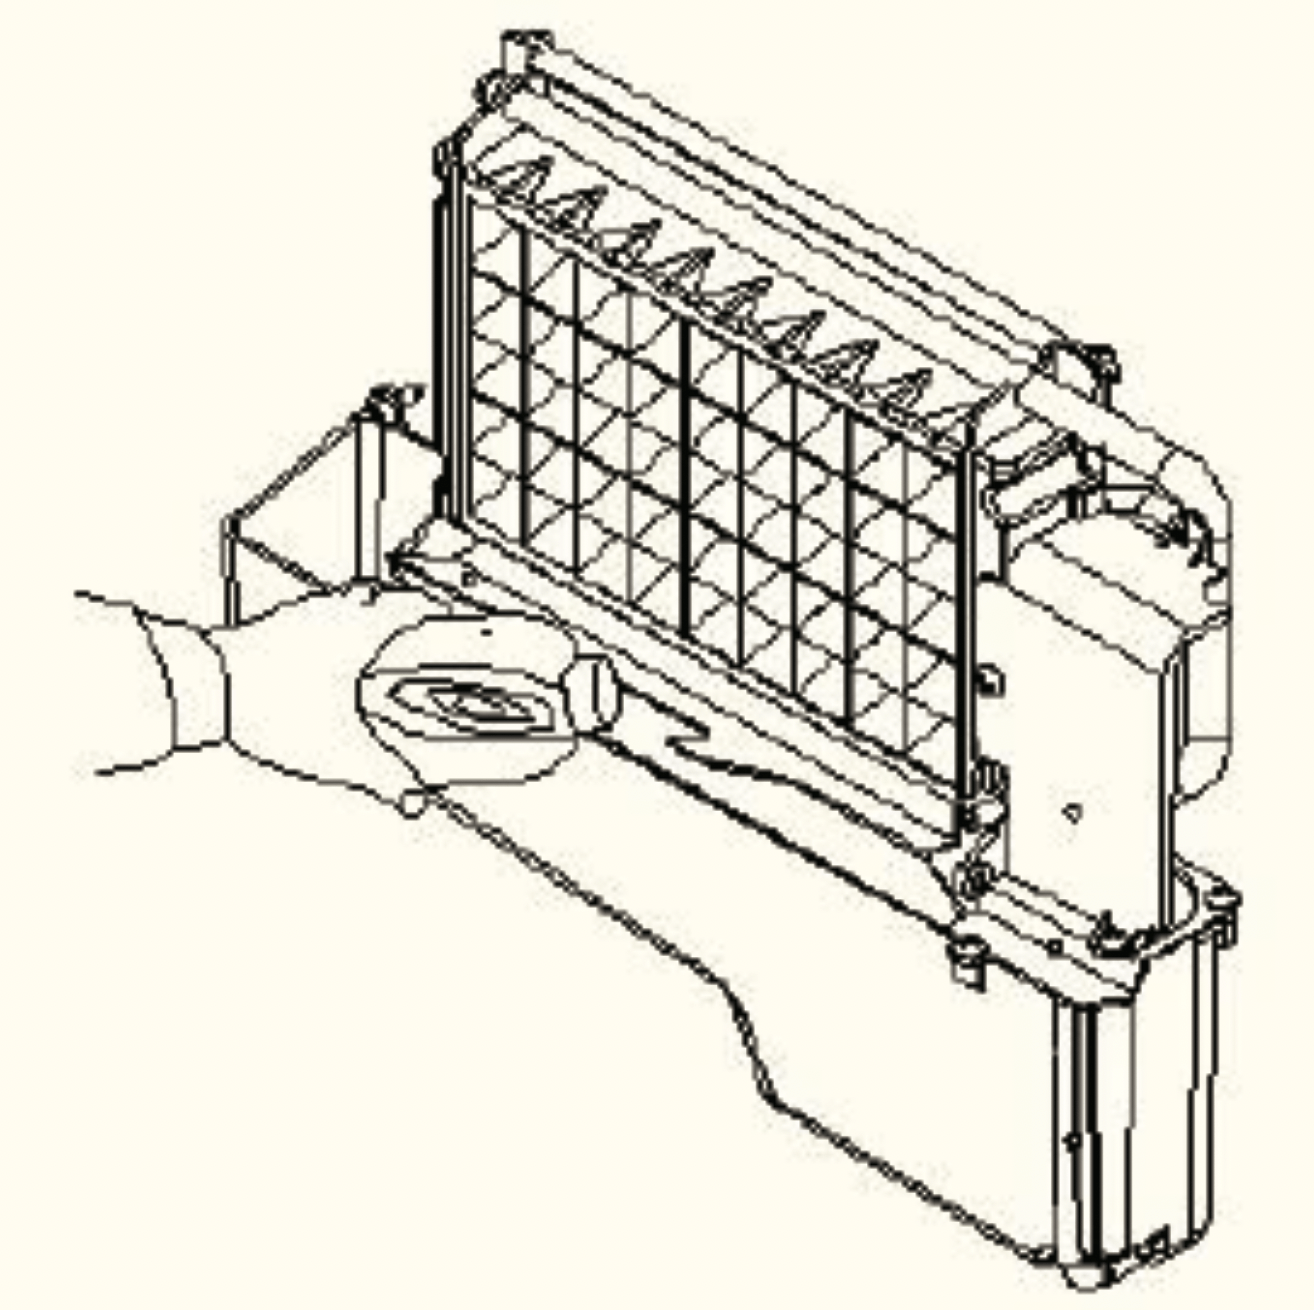
Ice-making and its water tank parts
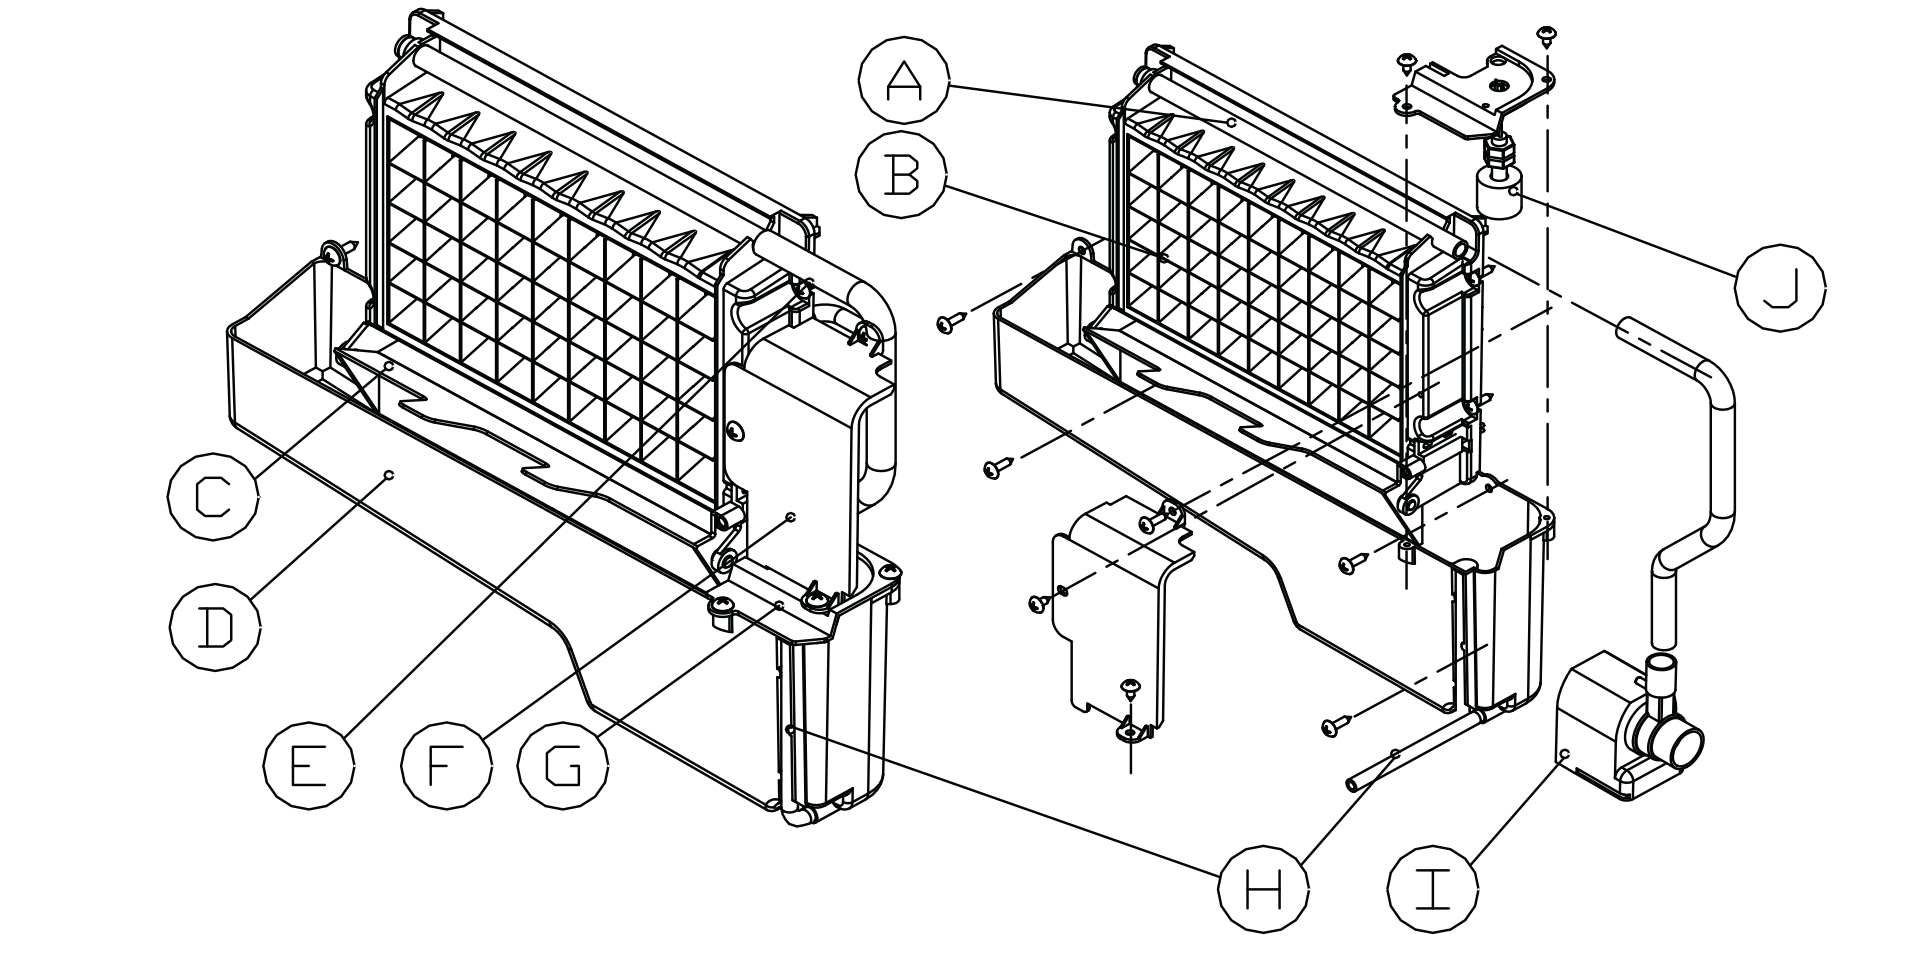
A. Water dividing pipe with nine little holes, water will flow out from these little holes. And if no water flows out, can be disassembled and cleaned.
B. Evaporator (ice-making module).
C. Ice full detecting board: Use to detect the inner cabinet is full of ice or not, and to check the ice-harvest process is over or not.
D. Water tank.
E. Water supplying pipe.
F. Cover board on the right side of the evaporator.
G. Water level switch installing plate.
H. Water drain pipe of the water tank: when ice-making, this pipe should be clamped in the slot of the water tank wall. And when draining, this pipe should be pulled out.
I. Water pump.
J. Water level detecting switch.
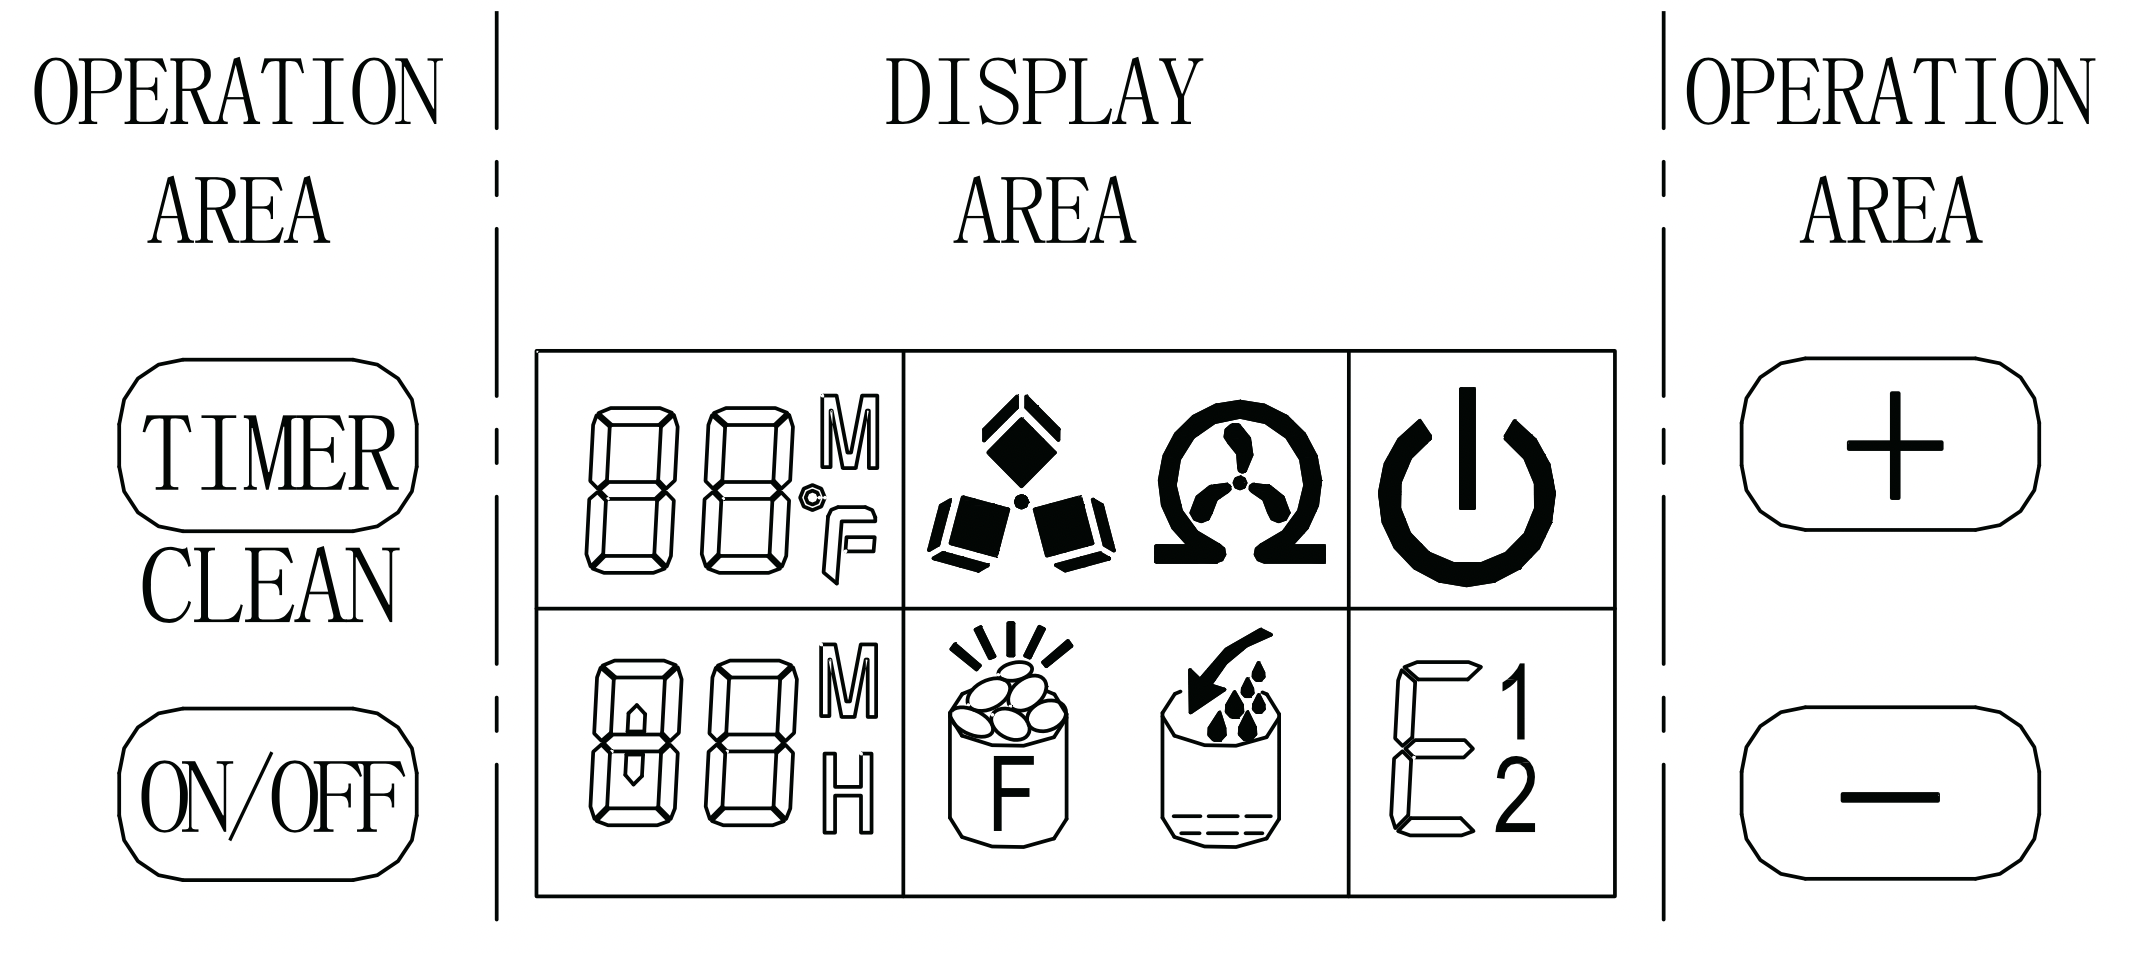
Operation Panel

A.“TIMER CLEAN"button:
Quickly press this button once, to enter the Timer setting program; and press this button for more than 5 seconds, to enter the Cleaning program.
B. "ON/OFF" button:
When the unit is off, press this button to turn on the unit; And during the Self-cleaning program, or normal ice-making state, press this button to turn off the unit at once; and also if the unit is set with the Timer, press this button to cancel the Timer setting. When the unit is making the ice cube, press this button for more than 5 seconds, the unit will switch to ice harvest process by force.
C. LCD display window
- Environmental temperature display and ice-making time countdown display. Display ice-making time countdown with M as the unit display, and display environmental temperature with F/C as the unit display.
- Making ice and deice symbol display, the machine is making ice when the symbol rotate, and the machine is deice when the symbol flash.
- Automatic self-cleaning symbol display
- On/off symbol display
- Error code display. E1 means the environmental temperature sensor is damaged. E2 means ice making anomaly or the refrigerant leaked.
- Water flow in and water shortage display, the arrow flashing indicates that the machine is in the water, the whole symbol is bright to indicate that the machine is short of water.
- Ice full alarm, the machine will making ice again when you take out the ice.
- Setting display. Display timing switch machine with the H as unit display. Display ice thickness setting with M as unit display, the larger the number, the thicker the ice cube (Adjustable range 0~+5).
D&E. “+” “-"button:
- Use to adjust the ice-making process duration period length, the default setting is zero, 1 minute adding or decreasing per each pressing of “+” or “-" button. Also to adjust the delay time of the timer, the default setting is zero, 1 hour adding or decreasing per each pressing of “+” or “-" button.
- Use to adjust ice thickness
- Press "+" or " - " button longer than 5s. It will automatically switch °F to °C.
Operation Your Unit
Operation the ice-making process
- Starting up: Plug in the power plug, the
 symbol will flash in the display window. Press the ON/OFF button on the control panel, the machine will start to make ice when the external pipe add water to reach the standard level on the water tank through the electromagnetic water valve. Then the
  symbol will change to light on always in display window and
  symbol rotate.
The ambient temperature will be displayed in the upper left of the display window. For example“80℉" means the ambient temperature is 80°F. A few minutes after starting ice-making, the number of Ice-Making time countdown will flashing in the ambient temperature display area. For example, the flashing number "10M" means still need 10 minutes to finish this ice making cycle.
- Every ice making cycle finished ,enter deicing process, the
 symbol flash, the external pipe can add water to the water tank through the electromagnetic valve, and the arrow on the
  will flash until the water reach the standard level, then the
  symbol extinguish, the unit enter the next ice making cycle;
When the water can not reach the standard level, the  symbol is always bright, the unit stop working. After water shortage, press the ON/OFF button to enter into standby mode, then press the ON/OFF button again to restarted the unit. Otherwise it will start up automatically after 15 minutes.
Note: Each ice making cycle is around 11-20 minutes, the ice making time will be changed according to the ambient temperature and the water temperature change. Especially the first ice making cycle, the ice making cycle will be longer because of the high water temperature in the water tank, but the ice making cycle will not over 30 minutes.
- Adjust the ice thickness: Press the"+", "-" button on the control panel to adjust the ice thickness. The number in the bottom left of the display window is the setting of the ice making mode, default is "0'', press "+" button one time the ice making mode will add one, the ice will be thicker (the highest ice making mode is 5). Press "-" button one time the ice making mode will reduce one, the ice will be thinner. Restart the machine it will go back to default "0".
Note: The mode currently set only changes the next and subsequent ice making cycle.
- When the
 symbol lights up, the machine stop working, it will work again after you take out the ice.
- Shut down the unit: During the unit making ice, press the “ON/OFF” button on the control panel, the unit shut down and into standby mode. If you press "ON/OFF" longer than 5S during ice making, then the unit enters the deicing process directly, this function can help remove the ice on the ice plate. Press "ON/OFF" to shut down the machine.
- Timing setting: Setting range: 1-24 hours
Set up shutdown timer: When the unit is running, it can be set up the timing to let the unit enter standby mode.
Set up on timer: When the unit is on standby mode, it can be set up the timing to let the unit enter ice-making mode.
How to set up the timing
Press the TIMER button, the default timing time is "1H" in display window, then press "+"button to adjust the timing time you need, every time you press the "+" button, the time add 1 hour. Press"-" button can reduce the timing time. During the process of time adjustment, the "H" in the lower corner of the number will flash, then after 5 seconds flashing without pressing, the "H" letter will change from flashing to always displaying, means the timer program has been completed.
In standby condition display 5H, it means the unit will start automatically after 5 hours; In ice making condition display 5H, it means the machine will shut down automatically after 5 hours, the "H" in the display screen indicates that the machine currently has timing function, and the number in front will be smaller and smaller. Until it becomes zero, the timing ends, and the machine enters the mode you need.
How to cancel timing
When the unit has a timing (the display window will display XX H), press "TIMER" button, the timing is canceled after the number on the screen and "H" are extinguished.
When the unit has a timing, the display area in the lower left corner will display the timing time and the ice making setting time, and the display content will be switched every 5S.
- Automatic self-cleaning program, the default cleaning time is 20 minutes. Start the self-cleaning program:
After connecting all of the water pipe, plug on the main power supply plug, then press "TIMER CLEAN" button on control panel for more than 5 seconds, to enter the Self-Cleaning program, the  symbol rotate on display screens, time count down area display 20M. And the "CLEAN" light will always be on during this period, the digit window will indicate the left time, the water pump runs for 8 minutes and stops for 3 minutes, always recycle. The total duration time is 20 minutes for one Self-Cleaning program. Also when the water pump stops, the water will supply to the water tank automatically.
Cancel the Self-Cleaning program: It takes about 20 minutes to complete one Self-Cleaning program. When the program is over, the system will be in off-state automatically. And also you can press the "ON/OFF" button on control panel to cancel the Self-Cleaning program by force.
- How to switch Fahrenheit (°F) to Celsius (°C)?
Press "+" or "-" button longer than 5S. It will automatically switch.
Cleaning & Maintenance
WARNING: Before carrying out any cleaning or maintenance operations, unplug the ice maker from the main power supply electricity. (EXCEPTION: Ice maker self-cleaning program).
Do not use any alcohol or fume for cleaning/sanitization of the ice maker. It may cause cracks on the plastic parts.
Ask a trained service person to check and clean the condenser at least once a year, in order to let the unit work properly.
This appliance must be cleaned by use of a water jet.
CAUTION: If the ice maker has been left unused for a long time, before the next use it must be thoroughly cleaned. Follow carefully any instructions provided for cleaning or use of sanitizing solution. Do not leave any solution inside the ice maker after cleaning.
Periodic cleaning and proper maintenance will ensure efficiency, top performance, hygienic, and long life. The maintenance intervals listed are based on normal conditions. You may want to shorten the intervals if you have pets, or the unit is used outdoors, or there are other special considerations.
What shouldn't be done
Never keep anything in the ice storage bin that is not ice: objects like wine and beer bottles are not only unsanitary, but also it's labels may slip off and obstruct the drain pipe.
Exterior Cleaning
The door and cabinet may be cleaned with a mild detergent and warm water solution such as 28g of dish washing liquid mixed with 7.5L (1 GAL) of warm water. Do not use solvent-based or abrasive cleaners. Use a soft sponge and rinse with clean water. Wipe with a soft clean towel to prevent water spotting.
Stainless steel models can discolor when exposed to chlorine gas and should be cleaned. Clean stainless steel models with a mild detergent and warm water solution and a damp cloth. Never use abrasive cleaning agents.
NOTICE: Stainless steel models exposed to chlorine gas and moisture, such as in areas with spas or swimming pools, may have some discoloration of stainless steel. Discoloration from chlorine gas is normal.
Interior Cleaning
For Ice Storage Bin
The ice storage bin should be sanitized occasionally. Clean the bin before the ice maker is used for the first time and reused after stopping for an extended period of time. It is usually convenient to sanitize the bin after the ice making system has been cleaned, and the storage bin is empty.
- Disconnect power to the unit.
- Open the door and with a clean cloth, wipe down the interior with a sanitizing solution made of 28g of household bleach or chlorine and 7.5L (1 GAL) of hot water (95°F to 115℉).
- Rinse thoroughly with clear water. The waste water will be drained out through the drain pipe.
- Reconnect power to the unit.
The ice scoop should be washed regularly. Wash it just like any other food container.
WARNING: DO NOT use solent cleaning agents or abrasives on the interior, these cleaners may transmit taste to the ice cubes, or damage or discolor the interior.
Ice Making Parts Cleaning
During the using, periodically to clean these main system of your ice-maker.
- Repeat above step to clean the water tank and other inner parts of the unit.
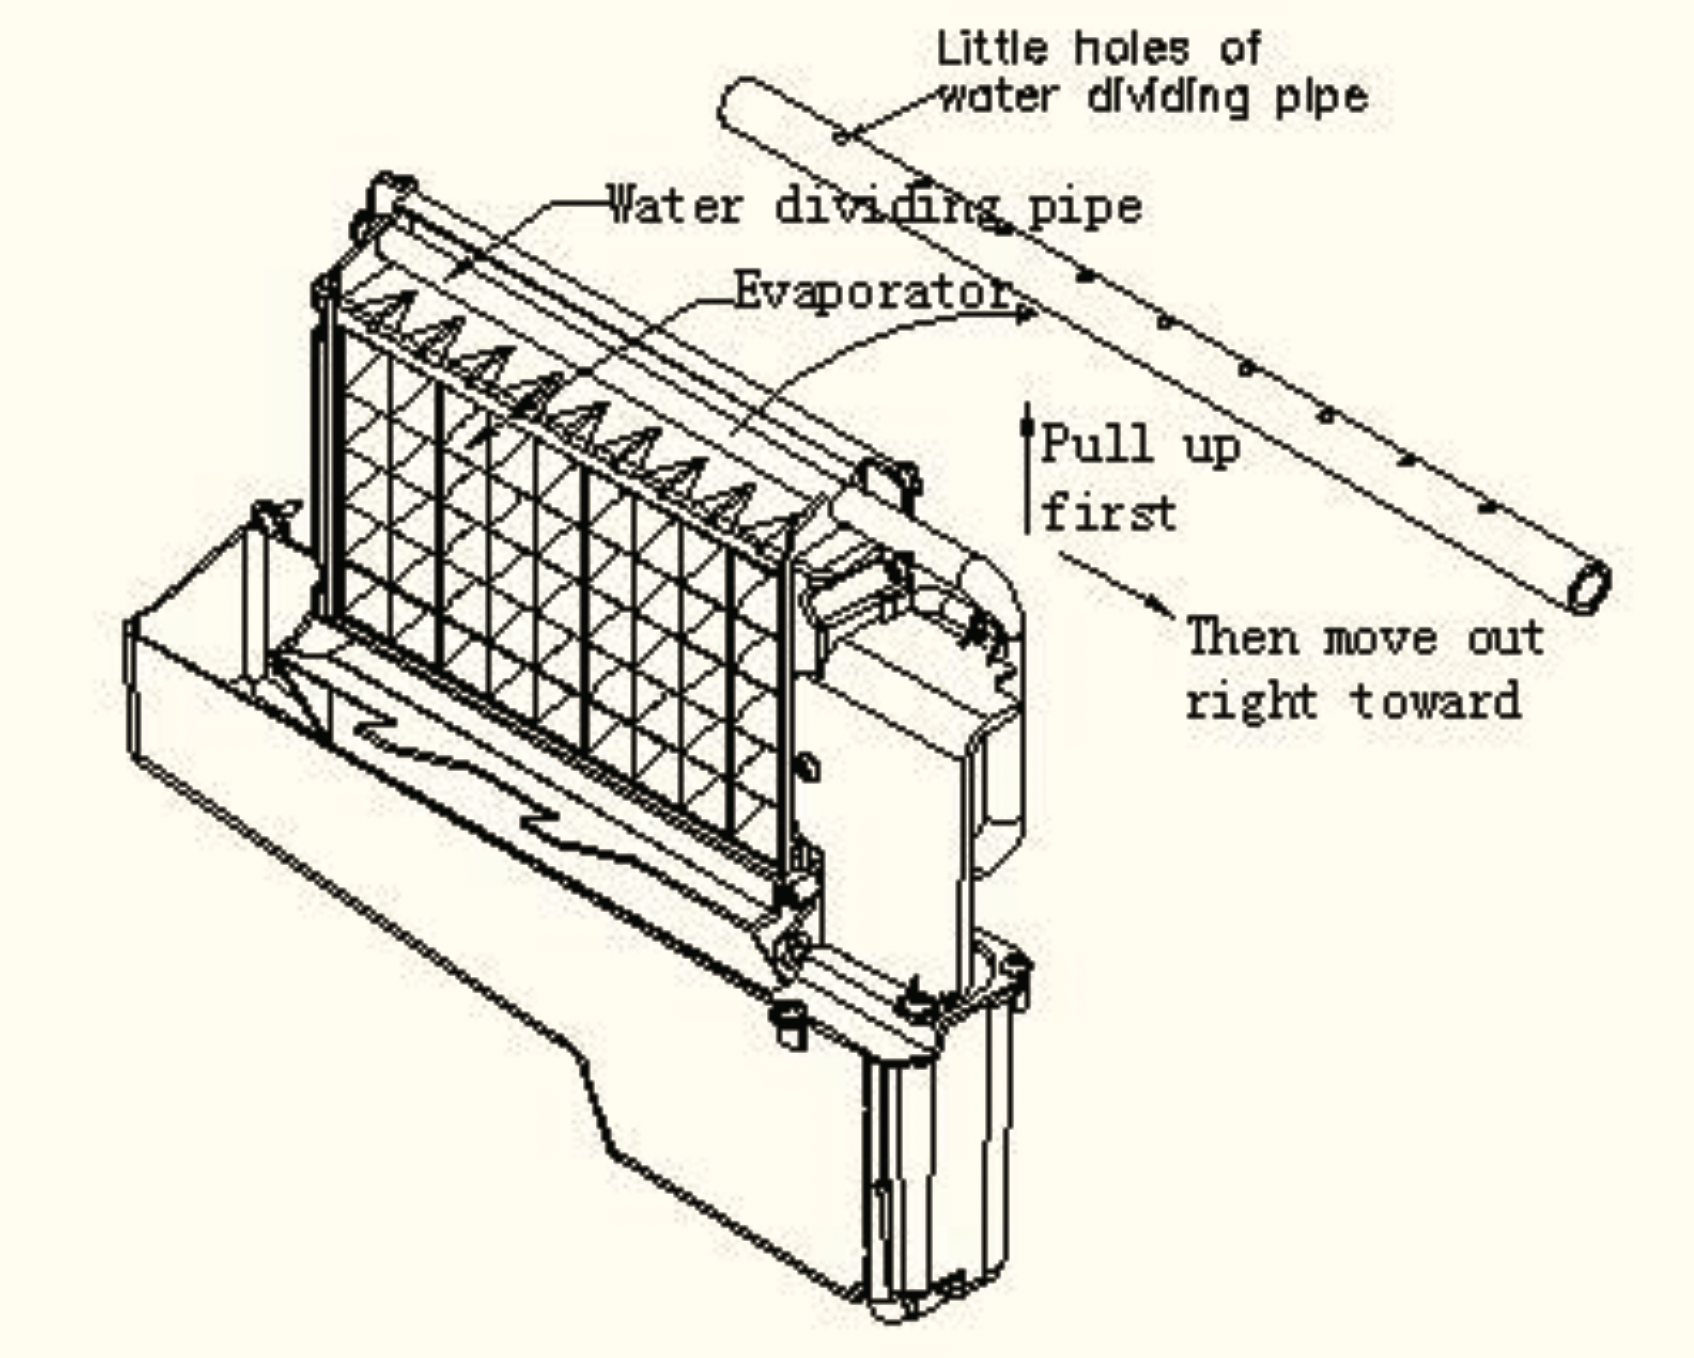
- Especially, to the water dividing pipe on the evaporator, when the compressor and the water pump run normally, but if there is no water flowing out from the water dividing pipe or the water flowing is very small, please discharge this water dividing pipe to clean carefully. Clean each little holes on the water dividing pipe displayed in the following illustration, make sure each hole is not clogged by something, then install back to the original location.
- When there are ice cubes on the surface of the evaporator, but can't fall down easily, do not use the mechanical substance to remove it by force. Only press the “ON/FF” button for more than 5 seconds, the unit will enter the ice melting process, after some while, the big ice-cubes will fall down, then turn off the unit and unplug the power cord to clean the surface of the evaporator.
- For the water tank and ice-full detecting plate

Also the water tank and the ice-full detecting plate is very important to keep your ice cube hygienic. Put mixture of neutral cleaner & water into a clean water jet, then spray to all the inner surface of tank & the ice detecting plate. Wipe these surfaces as far as possible with a clean cloth. And then, spray the surfaces with clean water, wiping with a dry clean cloth. Then drain out the cleaned water in the water tank by pulling out the Water drain pipe of the water tank indicating "H" in above illustration. When all of the cleaned water has been drained out, to reinstall back the water drain pipe of the water tank.
Suggestion: After cleaning the interior parts and install back to its respective position, and return machine to work, discard first batch of ice.
Ice Making Assembly System Cleaning by Using Nu-Calgon Nickle Safe Ice-machine Cleaner
Minerals that are removed from water during the freezing cycle will eventually form a hard scaly deposit in the water system. Cleaning the system regularly helps remove the mineral scale buildup. How often you need to clean the system depends upon how hard your water is. With hard water of 4 to 5 grains/liter, you may need to clean the system as often as every 6 months.
- Turn off the ice maker. Keep the ice maker connect to the water supply and drainpipe. But shut off the water faucet of main water supply.
- Open the door and scoop out all of the ice cubes. Either discard them or save them in an ice chest or cooler.
- Making the cleaning solution. Please mix the Nu-Calgon Nickle Safe Ice Machine Cleaner with water to make the cleaning solution.
WARNING: Wear rubber gloves and safety goggles (and/or face shield) when handing Ice Machine Cleaner or sanitizer.
Use a plastic or stainless container with more than 4 liters capacity, mix 300 ml Nu-Calgon Nickle Safe Ice-Machine Cleaner with 2.8 liters warm water about 120℉ - 140℉. Then divide them for 2 shares equally in 2 cups. It is better to keep the temperature of each cup of the cleaning solution.
- Check to be sure that the water drain pipe of the water tank has been installed properly in the slot of the tank wall. Then pour one cup of Nickel - Safe Ice Maker Cleaning Solution into the water tank. Wait about for 5 minutes.
- Turn on the power to the ice maker, then press "TIMER CLEAN" button on control panel for more than 5 seconds, to enter the Self - Cleaning program. Same as above explanation, the water pump runs for 8 minutes and stops for 3 minutes, one cycle, again one cycle. The total duration time is 20 minutes for one Self-Cleaning program.
During this process, the "CLEAN" light will always be on during this period, and the digit window will indicate the left time
- After 20 minutes of one Self-Cleaning program completing, pull out the drain pipe of the water tank, drain the cleaning solution down to the lower ice storage bin. Shake the unit slightly to drain out all of the cleaning solution completely. Then install back the drain pipe to the slot of the water tank.
- Repeat steps 4-6 to clean the ice making assembly system again.
WARNING:
The ice machine cleaner contains acids.
DO NOT use or mix with any other solvent-based cleaner products.
Use rubber gloves to protect hands. Carefully read the material safety instructions on the container of the ice machine cleaner.
- Then open the water faucet of the main water supply, Let the water flow in the unit. Again press the "TIMER CLEAN" button on control panel for more than 5 seconds, to enter the self-Cleaning program. Same as above explanation, the water pump runs for 8 minutes and stops for 3 minutes, one cycle, again one cycle. The total duration time is 20 minutes for one self-cleaning program.
During this process, the "CLEAN" light will always be on during this period, and the digit window will indicate the left time. Through this process, it will rinse the water dividing pipe, evaporator, water pump, silicone pipe, and water tank, etc..
- After one Self-Cleaning program complete, then pull out the drain pipe of the water tank, drain the cleaning solution down to the lower ice storage bin, also shake the unit slightly to drain out all of the water completely. Then install back the drain pipe to the water tank slot tightly.
- Repeat the step 8-9 again for 2 times.
- Following the above program to clean the ice storage bin.
- Then this special cleaning program finish, you can return to the regular ice making mode. And suggest to discard the first batch of ice cube.
Cleaning Suggestion
- DAILY CLEANING
The ice shovel, door and the water dividing pipe should be cleaned by yourself per each day. At the end of every day, rinse the ice shovel and wipe the both sides of the door with a clean cloth.
- SEMI-MONTHLY CLEANING
The ice shovel, ice bin, water tank, the ice-full detecting plate and the surface of the evaporator are to be cleaned by yourself semi-monthly according to interior cleaning program.
- SEMI-ANNUAL CLEANING
All the components & surfaces exposed to water or ice cubes, like ice storage bin, water tank, door, evaporator, water pump, silicone tube, water dividing pipe, etc. should be cleaned by using Nu-Calgon Nickle Safe Ice-machine Cleaner per each 6 months. They should be cleaned by the serviceman according to ice making assembly system cleaning program.
Troubleshooting
| Problem |
Possible Cause
|
Solution |
|
“ ” indicator is on.
|
No water supply |
Check the main water supply pressure or check the water supply hose is blocked or not, adding the water pressure or cleaning the hose necessary.
|
|
Floating ball of the water level detecting switch is blocked, can't be raised up.
|
Clean the water tank and the water level detecting switch.
|
| Water flows out from the water tank. |
Place the unit on the level position, not on the slope.
|
|
Water flows out from the water drain pipe of the water tank.
|
Pull out the pipe and install back to the slot of the water tank properly.
|
|
The unit start to enter the ice making process, but no water flowing in the unit, and the " " indicator flashes
|
Water supplying hose breakdown or water flows in very slowly. |
Check the main water supply pressure or check the water supply hose is blocked or not, adding the water pressure or cleaning the hose necessary.
|
|
Water pump is working, but no water flow out from the water dividing pipe
|
The little holes on the water dividing pipe is blocked.
|
Clean these little holes |
|
The transparency of the ice cube is not very good
|
Water quality is bad |
Change the water supply, or use the water filter to soften or filter the water. |
|
Ice cube shape is irregular
|
Water quality is not good or the water tank is very dirty.
|
Clean the water tank, and change with new water. |
|
The little holes on the water dividing pipe is some blocked.
|
Clean the water dividing pipe, make sure all nine holes are unclogged. |
|
Ice cube is very thin
|
Ambient temperature is too high
|
Move the unit to low temperature space, or lengthen the mode of each ice making cycle.
|
|
Air circulation around the unit is not good
|
Make sure there is more than 20CM space between the unit back & front and the obstacle
|
|
Ice cube is too thick
|
Ambient temperature is too low
|
Reduce the mode of each ice making cycle. |
|
" " indicator is on
|
The ice storage bin is full of the ice cube |
Take out some ice cube. |
|
Ice making cycle is normal, but there is no ice produced
|
The temperature of Ambient, or water in water tank is too high
|
Move to the place with temperature lower than 90 Fahrenheit, centigrade, and change to the low temperature water
|
| Refrigerant leakage |
Need to technical serviceman to maintain.
|
|
Cooling system tube is clogged.
|
Need the technical service person to maintain
|