●
This machine cannot be used in any other country
where the electric voltage for its power supply is not available.
●
This product is designed for indoor installation.
Please be sure to install it indoors.
●
The external appearance, design, color, and components
of this machine may be changed without prior notice.
A25B15 / A25O15 / A25G15

2
Contents
1. Safety Cautions 3
4
5
6
7~8
9
10
11
12~13
14
15~16
17~20
21
22
23
8. Washing the Ice Maker
Power supply related items
9. Maintenance of the Ice Maker
Installation related items
10. Specifications
11. Troubleshooting guide
2. Part names
3. Installation specifications
Gravity Drain Pipe Model
Drain Pump Model
4. What to check prior to installation
5. Installation of the Product
6. Specific Features
7. Guide to Operating the Ice Maker
2
3
1. Safety Cautions
To prevent any safety-related accident and to ensure convenient usage of this product
with better understanding, cautions and warnings are accompanied by symbols and figures.
Make sure you understand the symbols and figures below before proceeding.
※ Injury includes wound or burn that requires long-term outpatient treatment.
※ Property damage means damage or loss of one's house or furniture.
※ Label: If the caution label is corrupted, or its text is not legible enough,
contact the customer service center or the store
where the product was purchased.
Using the product without taking careful note of this symbol may cause
death or serious injury to the user or fire.
Using the product without taking careful note of this symbol may cause
death or serious injury to the user or fire.
Using the product without taking careful note of this symbol may cause
injury to the user or property damage.
Danger
Warning
Caution
Each figure has the following meaning:
General prohibition
Contact not allowed
The power cord must be disconnected from the outlet.
Must be grounded
Disassembly not allowed
Danger of electric shock
Must be followed
4
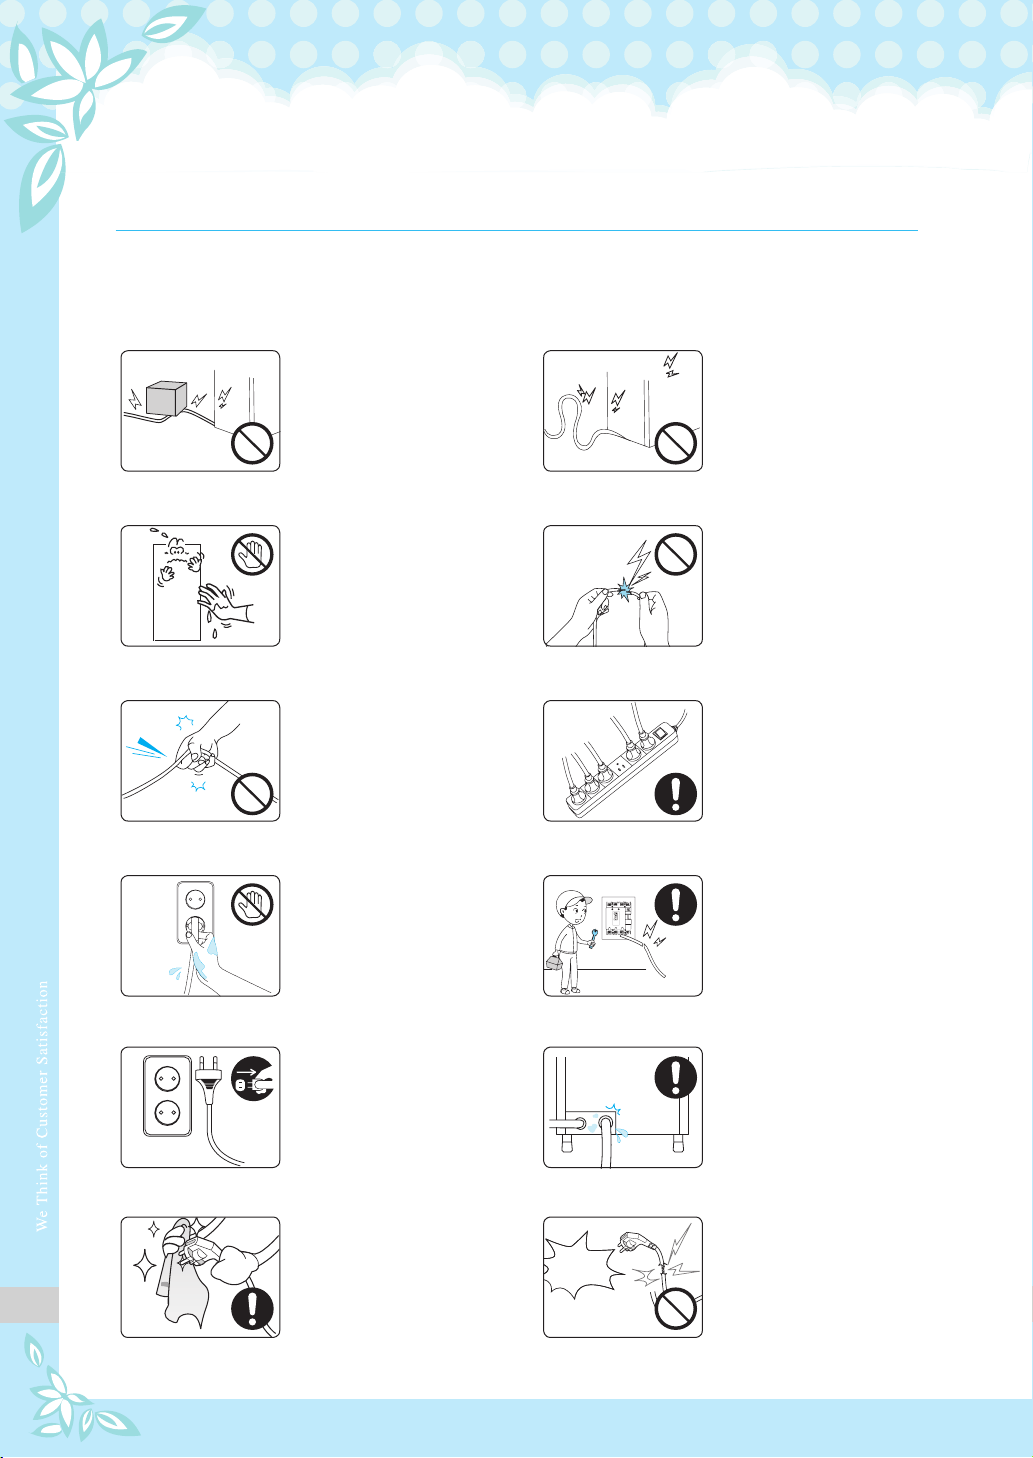
■ Power supply related items ■
Avoid putting any object on
the power cord and make
sure that the cord does not
get tangled or tied.
It may cause fire or electric
shock.
Oh! NO
Stop using the product
if the power cord
is damaged.
It may cause fire or
electric shock.
Oh! NO
Do not touch any electrical
component or the power
cord with wet hands.
It may cause electric shock.
Do not alter the power
cord or arbitrarily modify
it to connect to an
unauthorized power source.
Failure to do so may cause
electric shock or fire.
To replace or repair
the power cord, contact
a professional technician
or our customer service
center.
Clear the pin of the power
plug of any substance
including water or dust.
Failure to do so may cause
fire or electric shock.
If the power plug or cord
is damaged, do not try to
replace it arbitrarily; contact
the customer service center.
Failure to do so may cause
fire or electric shock.
Do not pull the power cord.
Failure to do so may cause
electric shock or fire.
Do not plug too many
appliances into one
outlet; only one
appliance per outlet is
recommended.
Otherwise, there is danger
of fire.
Do not touch the power
cord with wet hands.
Failure to do so may cause
electric shock or fire.
Close the water supply valve
and unplug the product
if it is not to be used for
an extended period of time.
It may cause electric shock
or fire.
If water got inside the power
components, immediately
unplug the cord and
completely dry the product
before using it.
Failure to do so may cause
electric shock or fire.
A/S
5
■ Installation related items ■
The ice maker provides
optimal functionality at
room temperature of
10~20℃ and supplied
water temperature of lower
than 10℃.
It may damage the product.
Room temperature of
10~20℃
Temperature of supplied
water: lower than 10℃
Keep away any heating
appliance from the power cord.
It may melt the coating of the
cord, causing fire or electric
shock.
Do not install the product
at a place where moisture
or dust gathers easily or
where rain or water spatters.
It may cause electric shock
or fire.
THINNER
GAS
GA
SOL
LIN
Combustible gas or flammable
material (benzene, gasoline,
thinner, LP gas, etc.) must be
kept away from the product
and should never be put on
the product.
It may explode or cause fire or
injury.
Do not install the product on
a tilted surface.
It may cause injury to the
user or damage to the
product.
Do not apply excessive force or
shock to the product.
It may damage the product.
Make sure no water comes
into contact with any electric
part or inside the product.
If the product has been
immersed in water due to
causes such as flood, be sure
to contact the customer service
center. Otherwise, the product
may short circuit and cause fire
or electric shock.
Do not store or use
combustible gas or
flammable material near
the product.
It may cause electric shock
or fire.
Do not disassemble or
modify the product.
It may cause electric shock,
fire, or injury.
Contact a professional
service supplier to repair
the product.
Incomplete repair may
cause electric shock, fire,
or injury.
6
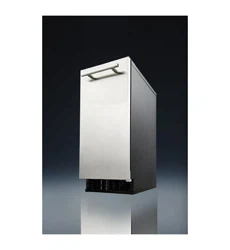
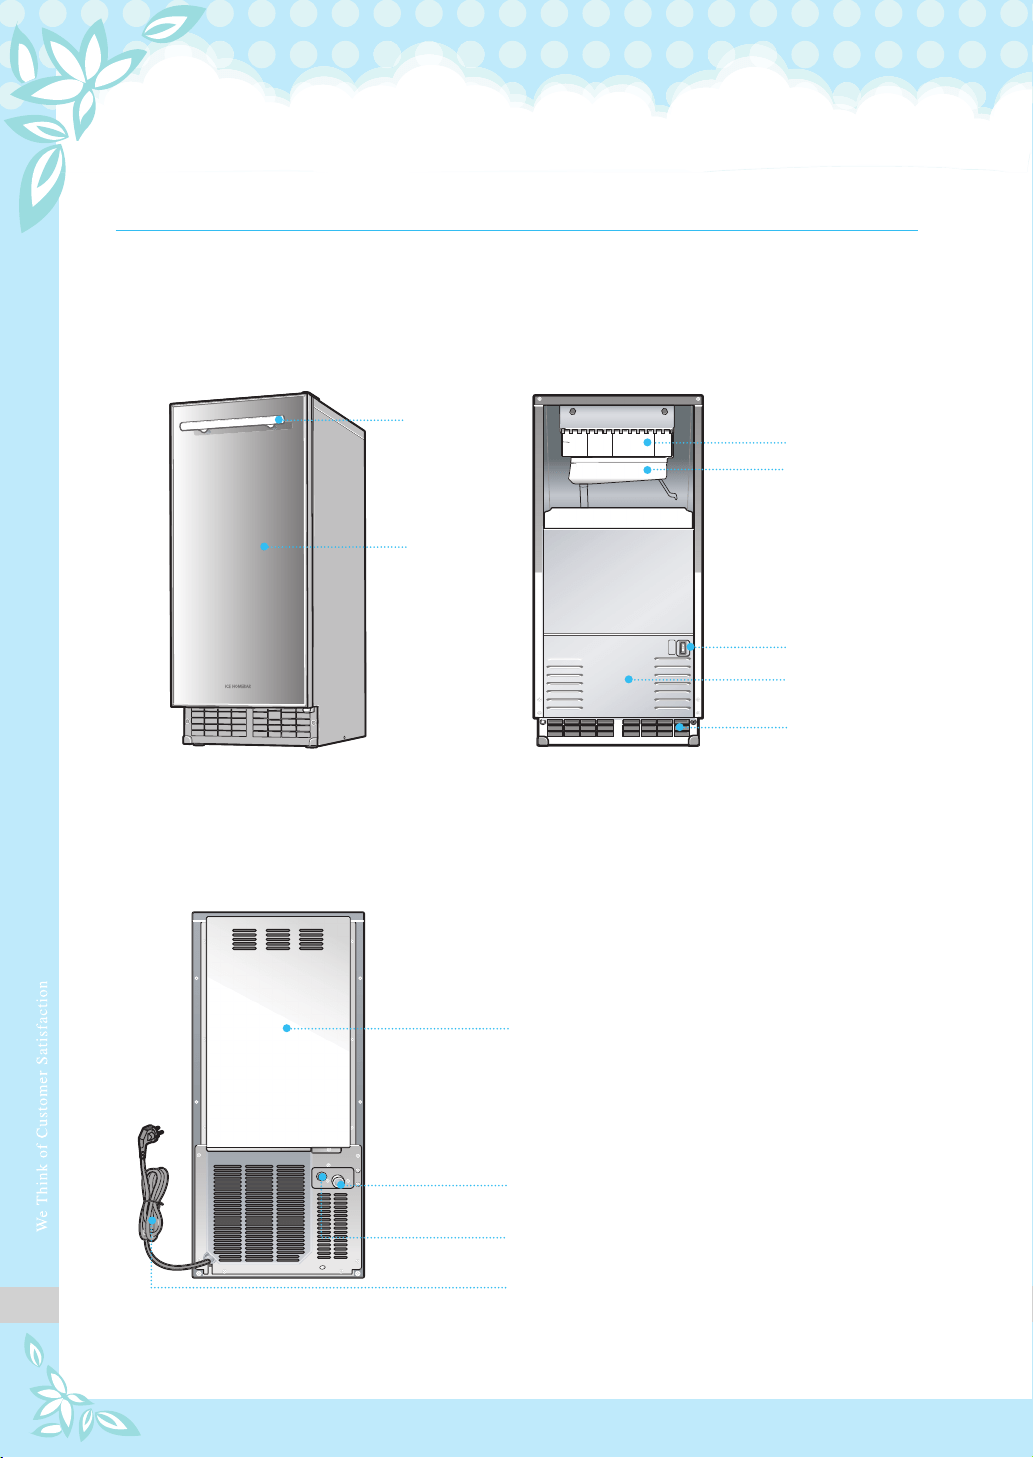
Door handle
Door
Back cover
Water supply socket (Inlet)
Water drain socket(Outlet)
Power cord
【 FRONT 】
【 BACK 】
2. Part names
Top cover
Water tank
Operation switch
Front panel
Bottom grill
7
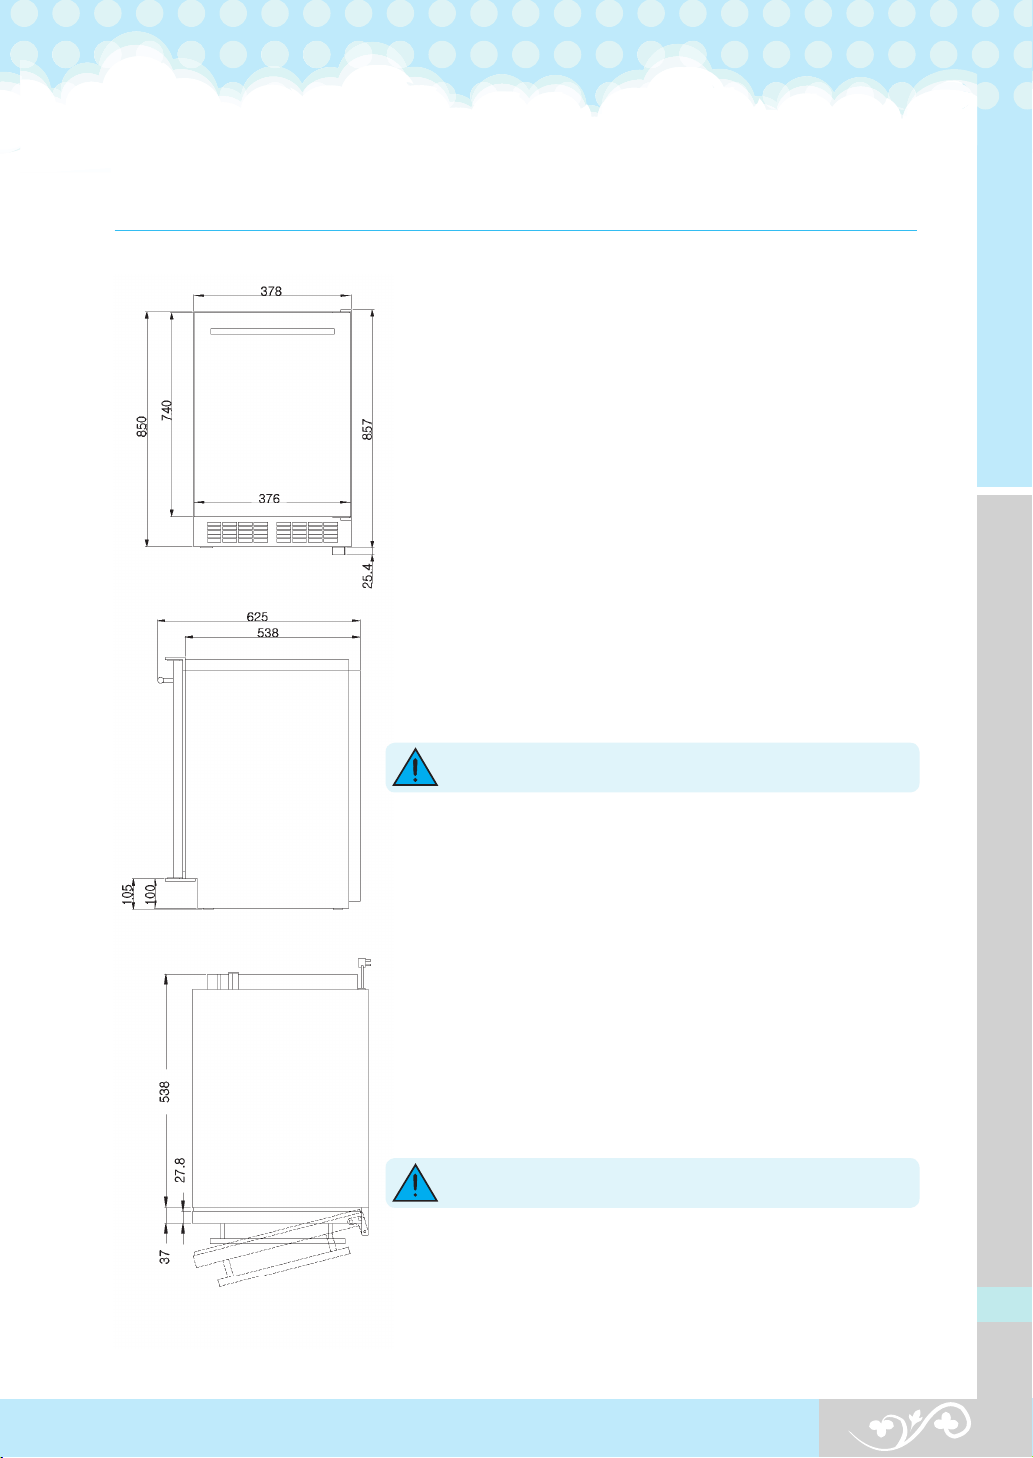
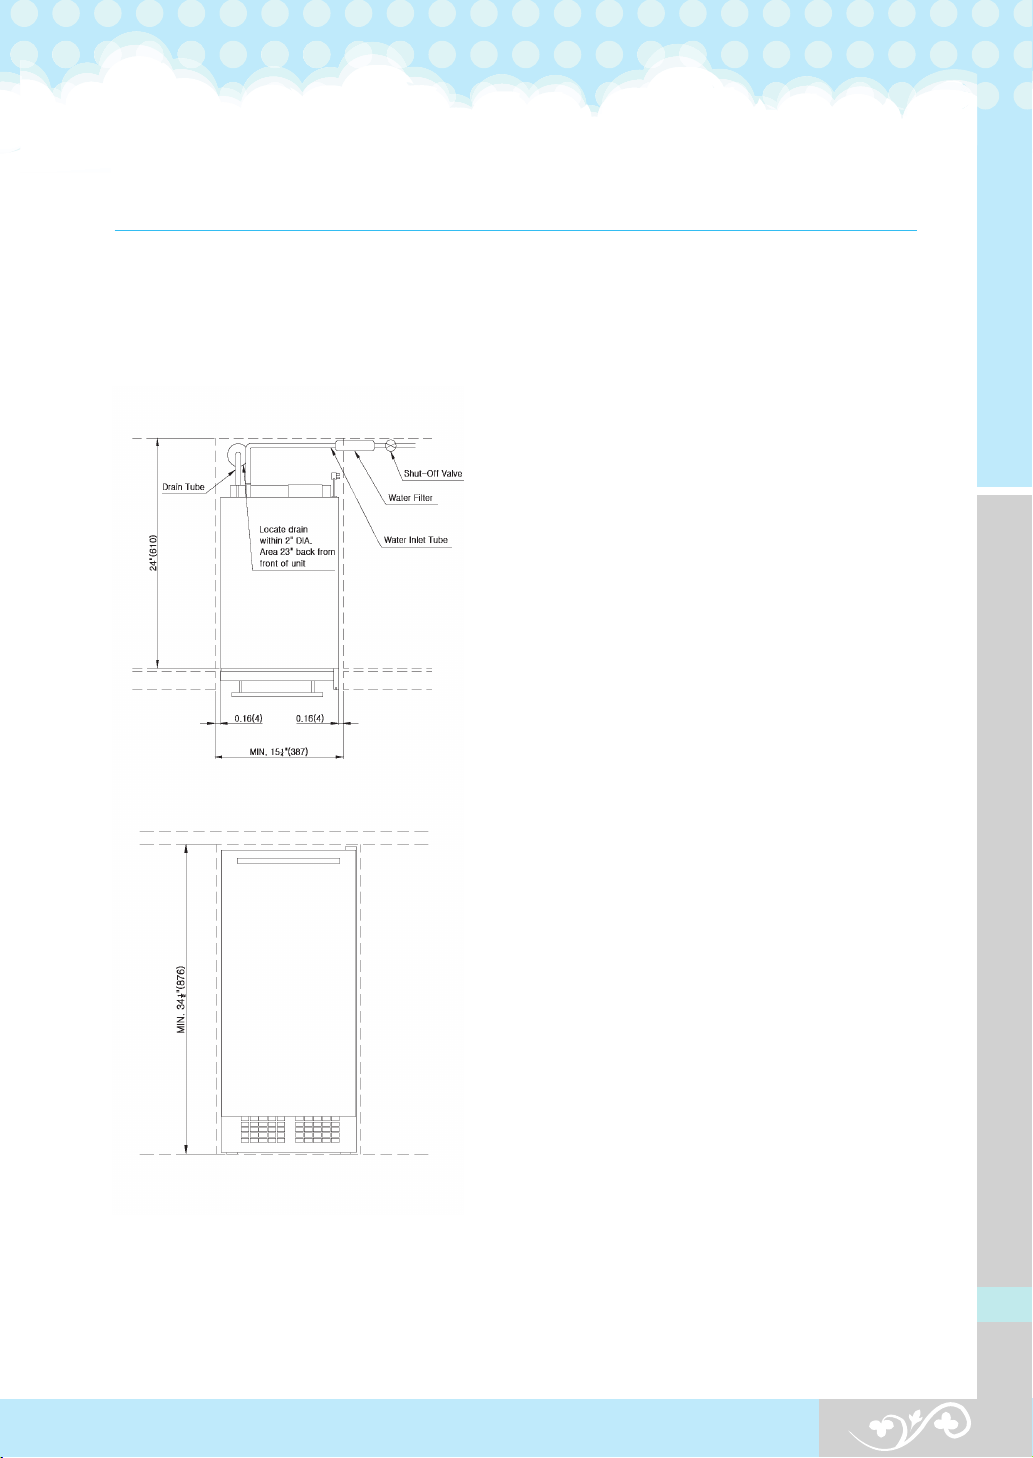
3. Installation specifications
Fig. 1 Front View
Fig. 2 Side View
Fig. 3 Top View
Space requirements for installation
When moving the ice maker, check whether the prepared
opening dimensions,electric power, and piping position are
correct.
Refer to the installation specifications and drawings shown
on pages 9 and 10.
Figures 4, 5, 6 and 7 show the entire dimensions of the product.
This product is a gravity drain pipe model that requires a
drain pipe to run from the exhaust hole at the back
of the product to appropriate drain pipe.
The optional drain pump to be installed an raised water
to a drainage point such as a neighboring sink.
Refer to the specifications shown on pages 9 and 10.
Important Information :
If the ice maker is installed at
a corner, the lever may be attached to a wall or the front side
of a cabinet, thereby limiting the opening of the door.
The bottom of the ice maker should be leveled.
When moving the product using a hand truck or dolly,
place the dolly at the side of the product and shut or fix
the door tightly to avoid possible opening during movement.
The finished bottom should be protected with a suitable material
to avoid possible damage when moving the product
Requirements for power supply
230VAC, 50Hz, 15-amp circuit breaker and electric
power are required. A separate circuit is required
for grounding.
The power cord of the product should be inserted into
a suitable 3-prong groundingtype consent.
Important Information :
A Ground Fault Circuit Interrupter
(GFCI) is not recommended because the operation
of the product may be stopped.
Important Information : The provisions of the National
Electric Code as well as any local laws and instructions
should be observed when installing the product
.
Do not use extension codes or 2-prong adapters.
The product should necessarily be grounded.
Do not use the grounding terminal of the 3-prong grounding
plug with cutting.
Caution
Warning

8
Requirements for plumbing
Plan the arrangement of the water supply pipes.
Connect a 1/4" diameter copper cable with the tap water pipe.
Install a shutoff valve between the tap water pipe and the product so that the user
can operate the valve. Do not install the shutoff valve at the back of the product.
“Do not use a self-piercing valve. If the tap water has a high level of minerals,
a pipeline filter will be required.
The pressure of the tap water should be maintained at a level between 20psi (1.4bar)
and 80psi (5.5bar). The tap water and drain pipeline should be planned and prepared
at the place of installation. If an electric outlet is available just at the back of the ice
maker, installation may be easier. The electric power, tap water pipeline and drain pipeline
should satisfy all the provisions under the local laws and regulations. For the position
of the tap water, refer to the installation specifications and drawings on pages 7 and 8.
Important Information :
The product is designed for use in a fixed condition but it
may be required to draw the product near for service. Therefore, do not install any material
at the front, upper or lower end of the product which may act as an obstacle
when drawing the product.
When preparing the bottom after installing the ice maker, place shims equivalent
to the thickness of the bottom under the product to keep the ice maker and bottom
horizontal. The lateral side should have at least 1/6" (4) of space for projection
of the screw head.
Installation of a slab :
Draw up the water to the drain position using the model with
a built-in drain pump. The drain pump model may raise the water up to about 8ft (2.4m)
in height. The more bent parts the pipeline has, the lower the raising height is.
Installation in a narrow or underground place : A gravity drain model or drain
pump model may be used. If there is no space for drainage/sewage at the back
of the ice maker, the drain tube should be placed under the bottom.
Important Information :
Piping should be carried out in accordance with all the provisions
laid out under the local laws and regulations.
9
Fig. 4 Top View
Fig. 5 Front View
Before connecting the drain tube and the water
supply pipe with the ice maker, pipes should
necessarily be arranged.
The horizontal distance of the drain tube should
be 1/4" at every 12" (305) distance.
An air gap is required between the drainage tube
of the ice maker and the drain pipe or sewage
container. A stand pipe fitted with a trap
at the lower part may be used as a drain pipe
or sewage container.
Important Information :
Installation of an incorrect
drainage pipe causes the ice in the ice container
to melt rapidly.
1) Arrange the ice maker at the front of the opening
of installation.
2) Adjust the horizontality leg so as to meet
the height.
3) Install the inlet pipe (1/4" diameter copper pipe)
on the wall and connect the water supply valve.
4) Connect the drain pipe from the wall to the ice
maker.
If the horizontal distance is 5' (1.5m) or longer,
the drain pipe should be arranged by drilling
the wall to the rear of the product.
5) If the electric outlet is at the back of the product,
insert the plug in the electric outlet.
6) Install the product so that the front of the product
is facing forwards.
7) Use the inlet pipe after cutting it to the required
length.
8) Wash the inlet pipe. Connect the inlet pipe
with the copper pipe using the flare nut.
9) Connect the inlet pipe with the water-supply
valve of the product using the flare nut.
10) Cut the required length of drain tube.
11) Connect the drain nipple
(with a diameter of 3/4" PT)
The drain tube should be placed at the upside
passing the drain fitting.
12) Turn on the tap and check for any leakage.
13) Adjust the horizontality of the product.
Gravity Drain Pipe Model
10
Drain pump kit
You may order the ice maker with or
without a drain pump. In the case of the
model with no drain pump, water is
drained by gravity.
However, it is possible to install a drain
pump kit on the gravity drain pipe model
if you wish convert the model to a
drain pump model.
You may obtain the necessary parts for
conversion from the distributor. You may
obtain information on the local agencies
and distributors in the store section of
the company’s website, .
A detailed description of installation is
included in the kit.
Fig. 6 Top View
Fig. 7 Front View
Drain Pump Model
1) Arrange the ice maker at the front of the opening
of installation.
2) Adjust the horizontality leg so as to meet the height.
3) Install the inlet pipe (copper pipe with a diameter
of 1/4”) on the wall and connect the water supply
valve.
4) Connect the drain pipe from the wall to the
ice maker.
Important Information :
An air gap may be required
between the drain tube of the ice maker and the container
of the drain pipe under the provision of local laws
and regulations. Refer to the drawing below.
5) If the electric outlet is at the back of the product,
nsert the plug into the electric outlet.
6) Install the product so that the front of the product is
facing forwards.
7) Use the inlet pipe after cutting the required length.
8) Wash the inlet pipe. Connect the inlet pipe
with the copper pipe using the flare nut.
9) Connect the inlet pipe with the water-supply valve
of the pro duct using the flare nut.
10) Cut the required length of drain tube.
11) Connect the drain tube (with a diameter of 5/8“)
with the drain pipe at the back of the product and
fix them together using a hose clamp. If required
for easy installation, immerse the drain hose
in warm water just before connection with the
fitting.
12) Turn on the tap and check where there is any
leakage.
13) Pour 3 quarters of the water into the ice container.
The drain pump should work and pump the water
upwards. Check whether the drain pump works
or not. Check for any leakage.
14) Turn the switch to the “ICE" position.
The compressor starts working 3-5 minutes.
15) Pour 3 quarters of water into the ice container
and block the drain tube while the drain pump
is operating. At this time, check whether
the operation has stopped and that the drain
pump works continuously.
16) Adjust the horizontality of the product.
Important Information :
Piping should be carried out
in accordance with all the provisions laid out under
the local laws and regulations.
11
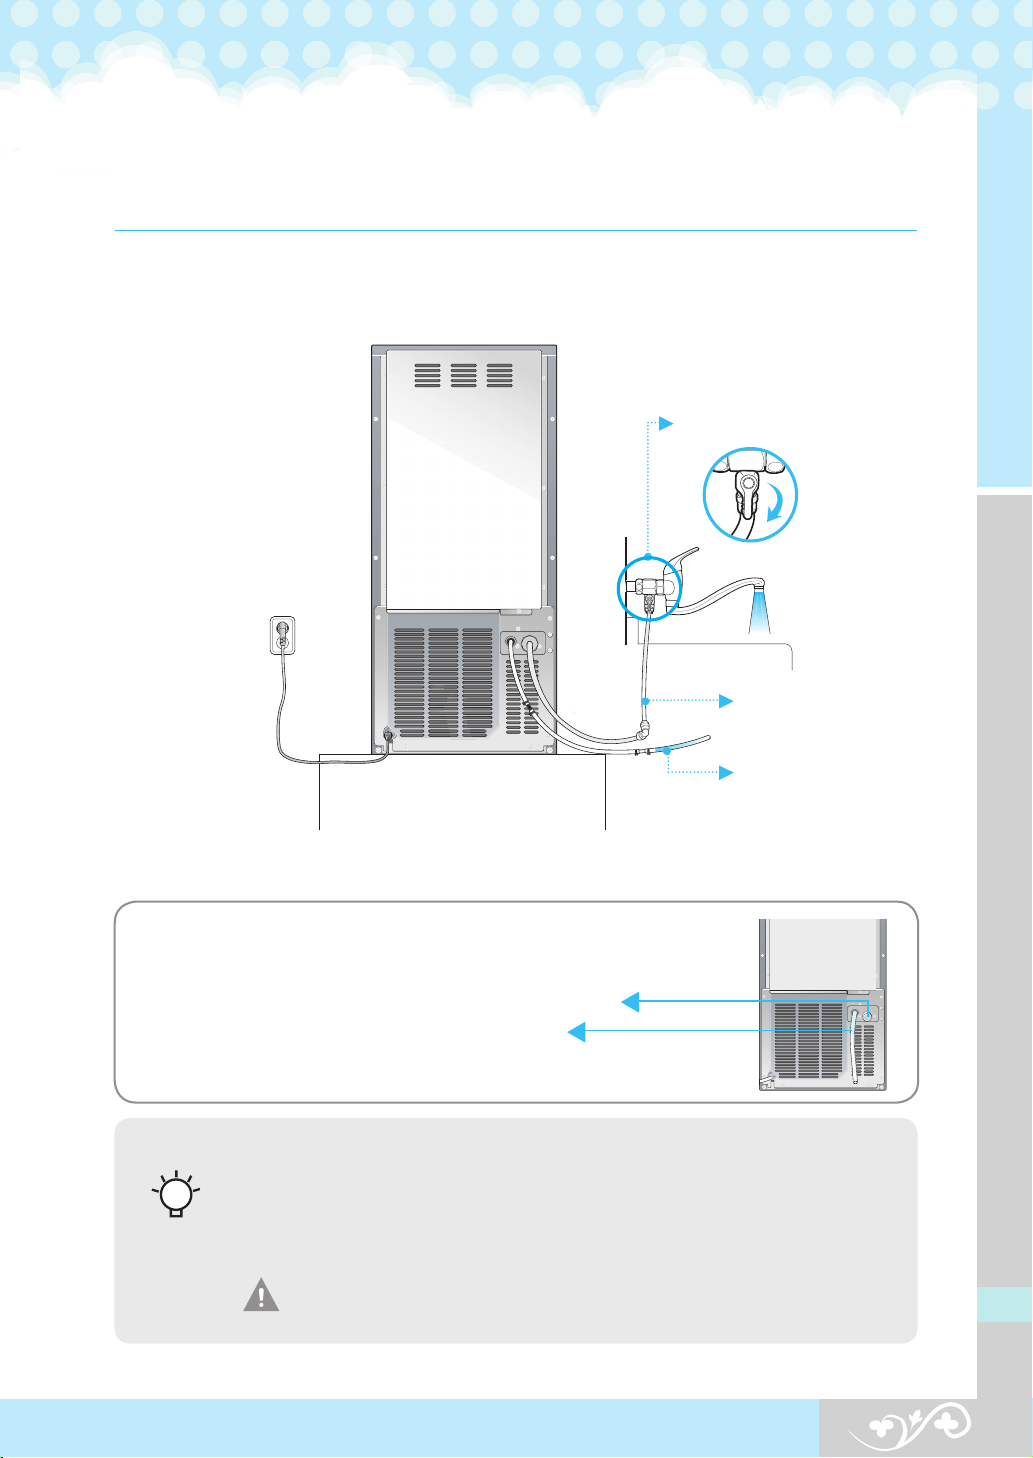
4. What to check prior to installation
■ Follow this process! ■
230V~50Hz
Water source valve
Water source tube
Drain hose
- The water supply valve may have different shapes depending on the installation condition.
- The filter may be located close to the water source or back of the product depending on the situation.
There may be some water inside the product, which is from the test procedure
of the manufacturing process.
It does not mean that the product has been used prior to installation, so rest
assured that you have a new product.
Avoid uneven surface or any place with too much moisture,
direct sunlight, too much dust, or spattering water.
For your
information
Water inlet: Connect the water tap adaptor to the water supply
connection port near the water supply valve.
Drain connect: 3/4" PT
- In order to guarantee optimal operation of the product, consult with our technician
on how to install the product. (Contact our authorized technician in case of moving
the product after the initial installation.)
- Be sure to connect the water supply adaptor to the cold water drainage pipe.
- The ice maker provides optimal functionality at room temperature of 10 ~ 20 ℃
and supplied water temperature of lower than 10 ℃.
12
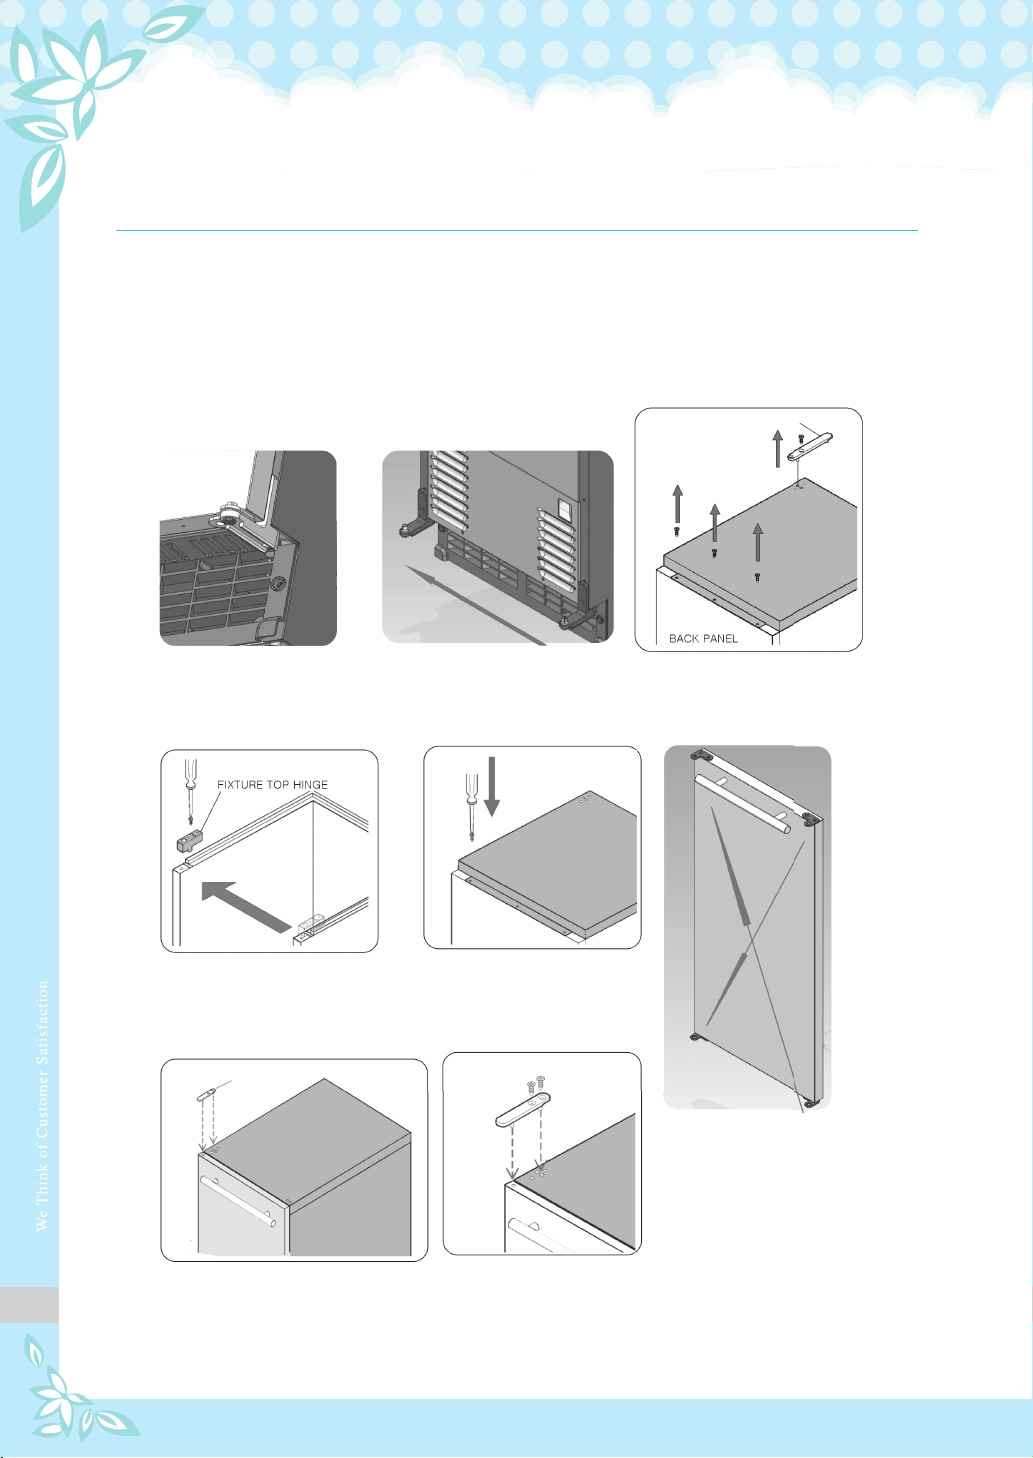
Changing Door-opening Method
The direction in which the door fixed with hinges opens may be changed.
The hinges are attached to the right-hand side of the door when the product is shipped
from the factory.
However, the ice maker is designed so that the hinges may be installed on either side.
If the hinges are moved to the holes on the left-hand side, the door will open to the left.
① Loosen the anchor
screws on the lower
hinge of the door
and separate the door.
④ After removing the fixture top
hinge on the right, move it to
the left and fasten the screws
as shown in the above figure.
⑦ After moving the upper door hinge to the left and inserting
it into the hole on the front door, fix it in the hole on the upper
cover and fasten the screws(two parts).
⑧ Check the movement of the door by opening and closing it.
② Loosen the anchor screws
on the lower hinge and
insert the hinge into the hole
on the left.
⑤ Place the upper cover
again and fasten the
screws. (three parts on
the back panel)
③ Release the screws
to remove the upper
door hinge and
upper cover.
⑥ Move the “L” shaped
door hinges of the
upper and lower
parts of the door
to the left.
5. Installation of the Product
Upper door hinge
Upper door hinge
TOP COVER

13
Installation Checklist
Important Information : The installation engineer should check whether any installation
part ha been omitted and follow the check list below to ensure safe and proper installation.
If you have any questions or problems regarding installation, address your queries
to the distributor or dealer. You may also seek information on the company's website.
■ Does the ice maker work properly?
If the ice maker does not work, check whether the plug has been inserted properly.
■ Did you remove all the packing materials and tapes from the inside of the ice maker?
■ Did you observe the instructions on installation?
■ Did you level the unit?
■ Is the front of the kick plate/grill adequately ventilated?
■ Did the user sufficiently understand the operation of the ice maker?
■ Be sure to follow any safety instruction for storing or disposing of an old ice maker.
Remove the door or fix the door firmly if the door is closed. If a child gets inside
the ice maker, and the door is closed, he/she may get injured.
◆ Be sure to observe the following:
■ Since the product makes use of water, proper water supply and draining facility
are required.
■ Be sure to use the product with a properly functioning drainage, since water may leak
due to diverse causes during installation or usage. Leaks may cause electric shock due to
moisture, so make sure that the following are always observed:
1. When installing the product indoors, be sure to have a natural drainage facility and make
the floor waterproof, especially if the floor gets damaged due to leaks.
2. A draining outlet must be available at the installation site; be sure to connect
the drain hose.
3. Make sure that the floor is sloped so that the leaking water may get drained away
even if the drain hose gets dislodged or damaged. Install a water overflow prevention wall
to prevent damage.
※ The manufacturer will not be liable for any issue arising from failure to comply with
the abovementioned warnings, dislodged / damaged water supply hose, or inappropriate
drain facility.
Warning

14
■ Sink-Mounted Ice Maker
■ The gravity drain-type naturally drains water, whereas the drain pump-type drains
water to an adjacent sink using a built-in pump.
■ A perfect and unified design system with 24" (610) of depth.
■ A decorative door panel may be installed.
■ The product supplies good-quality transparent ice.
■ The maximum capacity of the ice container is 26lbs(12kg).
■ Automatic ice-removal function.
■ Left/Right opening door system.
■ Front ventilation is possible using the attachable kick plate/grill in front of the ice maker.
■ The product incorporates a magnetic door attachment / detachment structure
and gasket, and an insulator foam system is used for insulation of the door.
Fig. 9 Solid figure
6. Specific Features
15
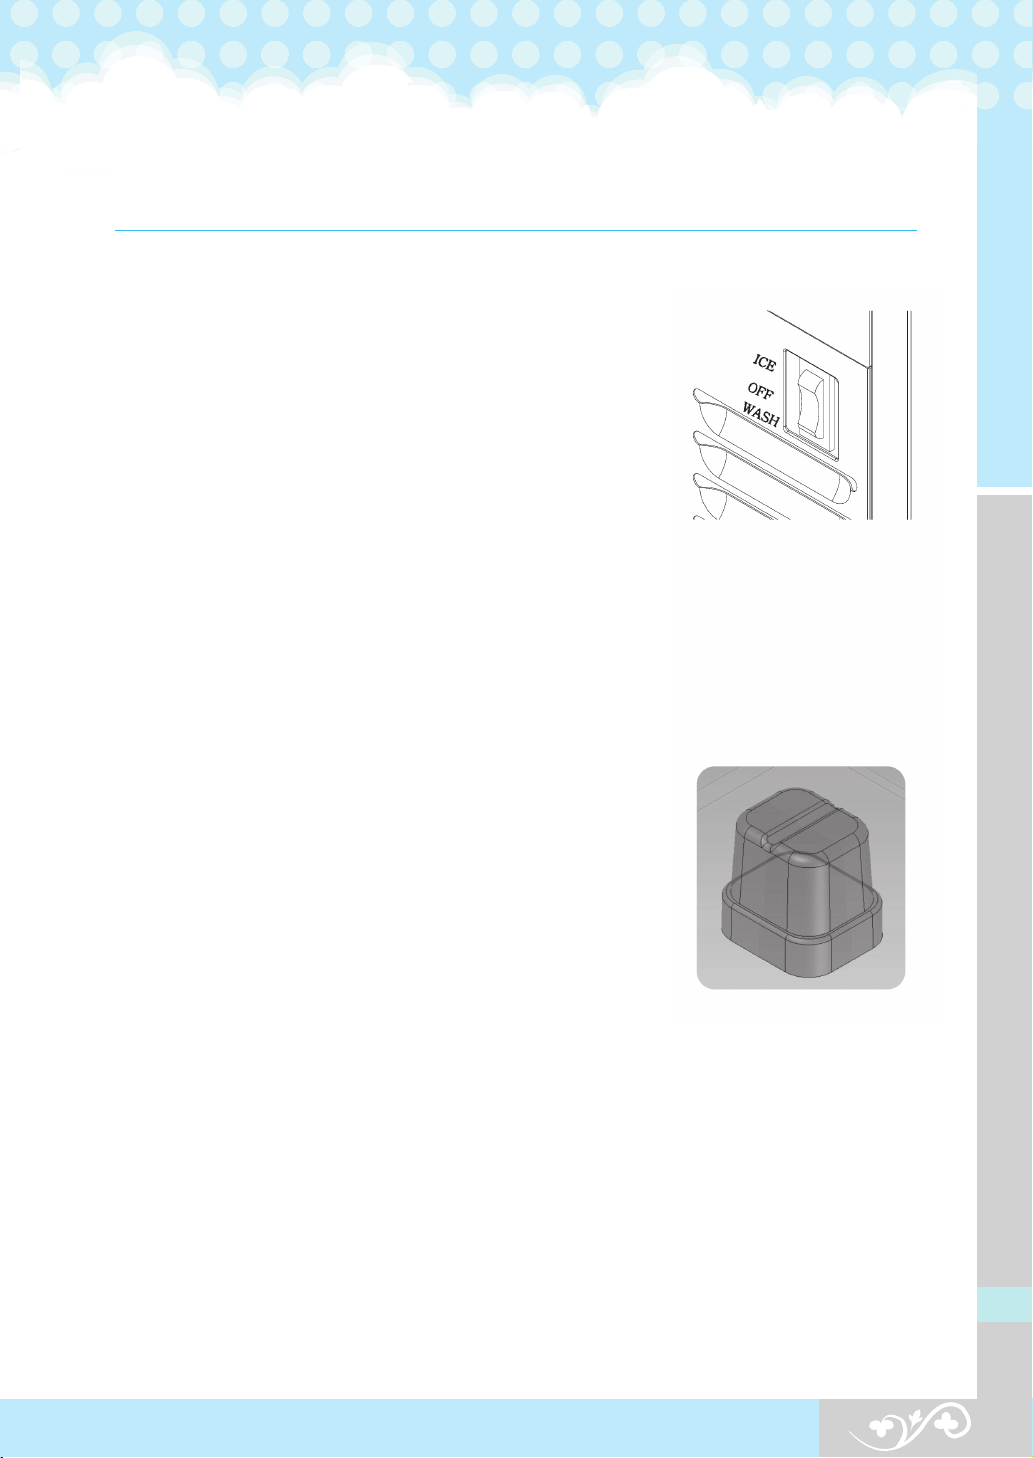
7. Guide to Operating the Ice Maker
Fig. 10 Switch
Fig. 11 Ice cube
Initial operation
① Open the water supply valve connected with the ice maker.
② Insert the plug of the ice maker into the electric outlet.
③ Open the door and turn the switch at the lower end of the
product to the “ICE” position.”
④ Discard the first batch of ice.
⑤ Good-quality ice is produced 1-2 hours later.
Using the ice maker
Use of the ice maker is very simple. Simply turn the switch at
the lower end of the product to the “ICE” position.
The product automatically starts ice production, which continues
until the ice container has been filled with ice. Remove the ice
using an ice gourd and insert the gourd into the holder on the
inside of the container (If you place the container in the ice,
it may be covered over by ice).
The ice maker produces 24 pieces of ice every 30 minutes.
Also, the produced ice drops down into the ice container;
water is supplied to the ice maker and the water is also
drained.
Important Information : Do not put anything other than
ice in the ice container. Wine or beer bottles are unsanitary
and a detached label may block the drain pipe.
Ice
The ice has a rectangular bell shape (refer to the figure).
Newlyproduced ice is clear and transparent. The inside of the ice
is sometimes cracked; however, such cracks commonly occur in
the production process and disappear with time.
Ice stored in the container for a long time may gather frost on
the outside and look muddy. This is normal ice and, once water
is poured on the ice, such frosting disappears.
Ice container
The product continues making ice until the level of ice reaches
the temperature sensing tube(right side). It then ceases operation.
The model with a drain pump drains away melted ice when the
ice maker is turned off. The pump works for only several seconds.

16
Operation time
It takes about 20-35 minutes to produce a set of 24 ice pieces. The length of one cycle
of the ice maker (ice production and ice removal) differs depending upon the cleanness
of the ice maker, the surrounding temperature, and the temperature of the water supplied
to the ice maker. It takes about 10-12 hours to fill the empty ice container with ice.
Ice production
The ice production process largely consists of two cycles-ice production and ice removal.
24 pieces of ice are produced with each cycle of ice production and ice removal.
When water is sprayed on to the surface of the frozen iceforming mold, the ice production
cycle is started. When ice is removed and water is supplied to ice maker, the ice removal
cycle is started. The time taken for both cycles together is about 20-35 minutes.
Ice production cycle
As the ice production cycle progresses, the compressor exhausts the refrigerant, the fan
motor circulates the air, and the pump motor circulates water. When the surface of
the ice-forming mold absorbs the heat from the water, the heat moves to the part to
which the fan supplies water. The heat is transferred to the air and the heated air is
removed from the ice maker. At the same time, ice is produced on the surface of the ice
-forming mold (at the upper end of the ice maker). When the surface of the ice-forming
mold has sufficiently cooled, the ice production cycle stops and ice removal is started by
the program installed in the ice maker.
Ice removal cycle
The compressor works during the progression of the ice removal cycle, but the pump motor
and fan motor are stopped. The hot gas valve and water supply valve work. When the two
valves are opened and the frozen surfaces are heated, ice drops down into the container.
Then the ice removal cycle is stopped and the ice production cycle is started again by
the program installed in the ice maker.
How to use water for ice maker
The ice maker starts its work with the fixed quantity that has been fed into the water
container. When water is sprayed on to the surface of the ice-forming mold, the water not
containing mineral impurities freezes and attaches to the ice-forming mold. The water
containing impurities drops down into the water container. During the progression of the ice
production cycle, the mineral impurity level in the water in the water container rises.
During the progression of the ice removal cycle, water is fed to the ice maker, thereby
diluting the water in the container, and washes a part of the concentrated minerals
through the drain pipe.
17
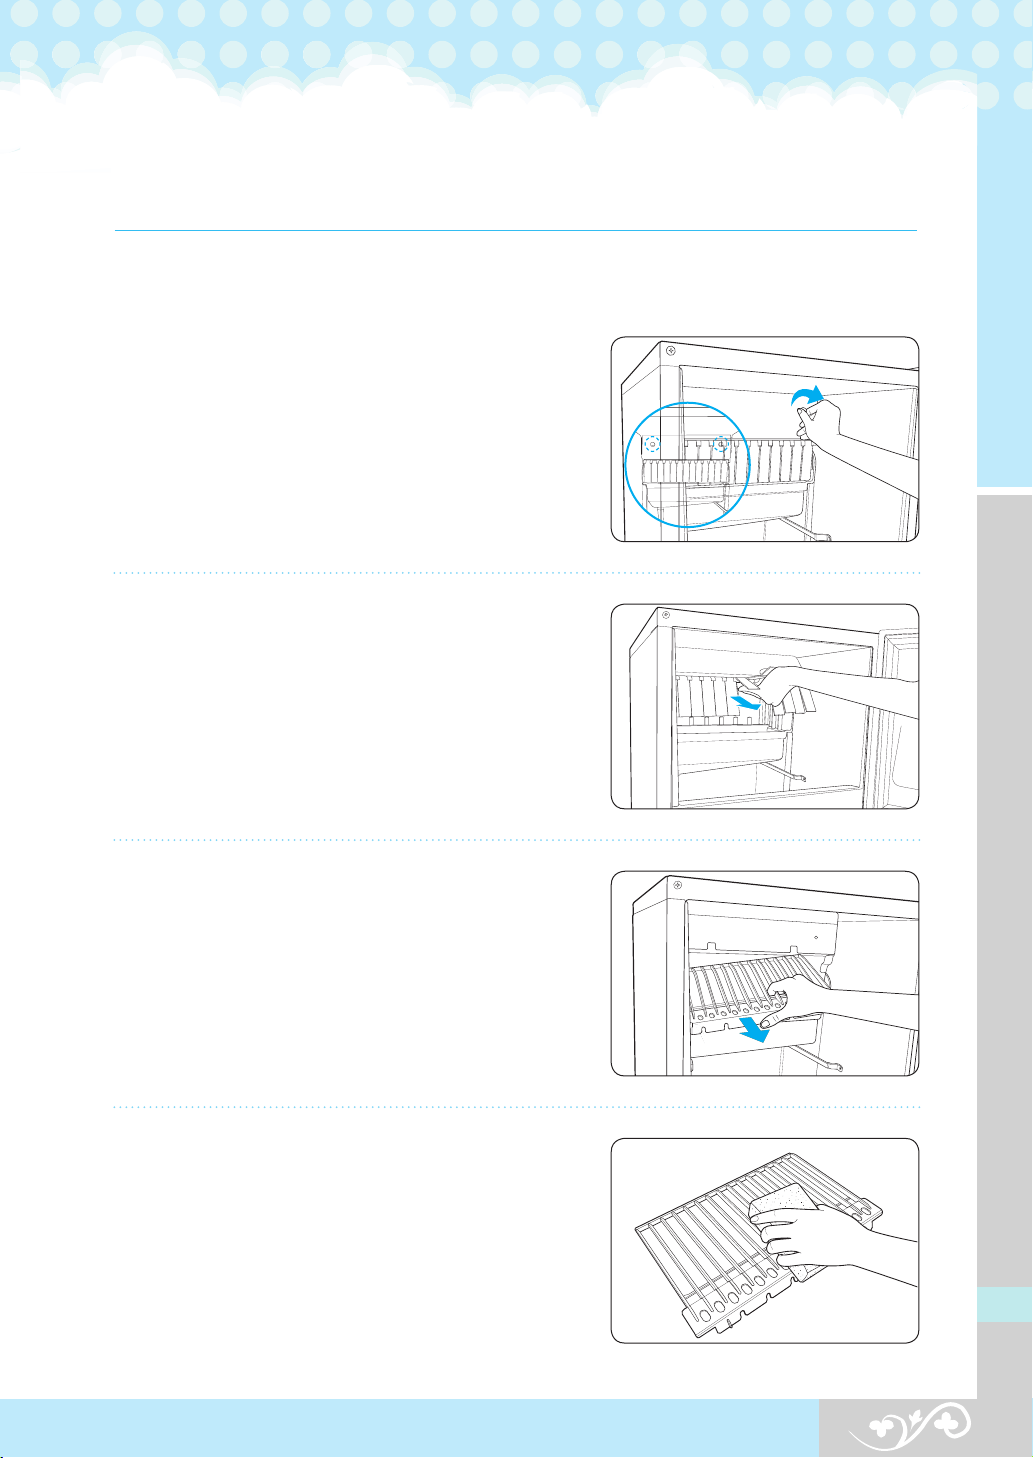
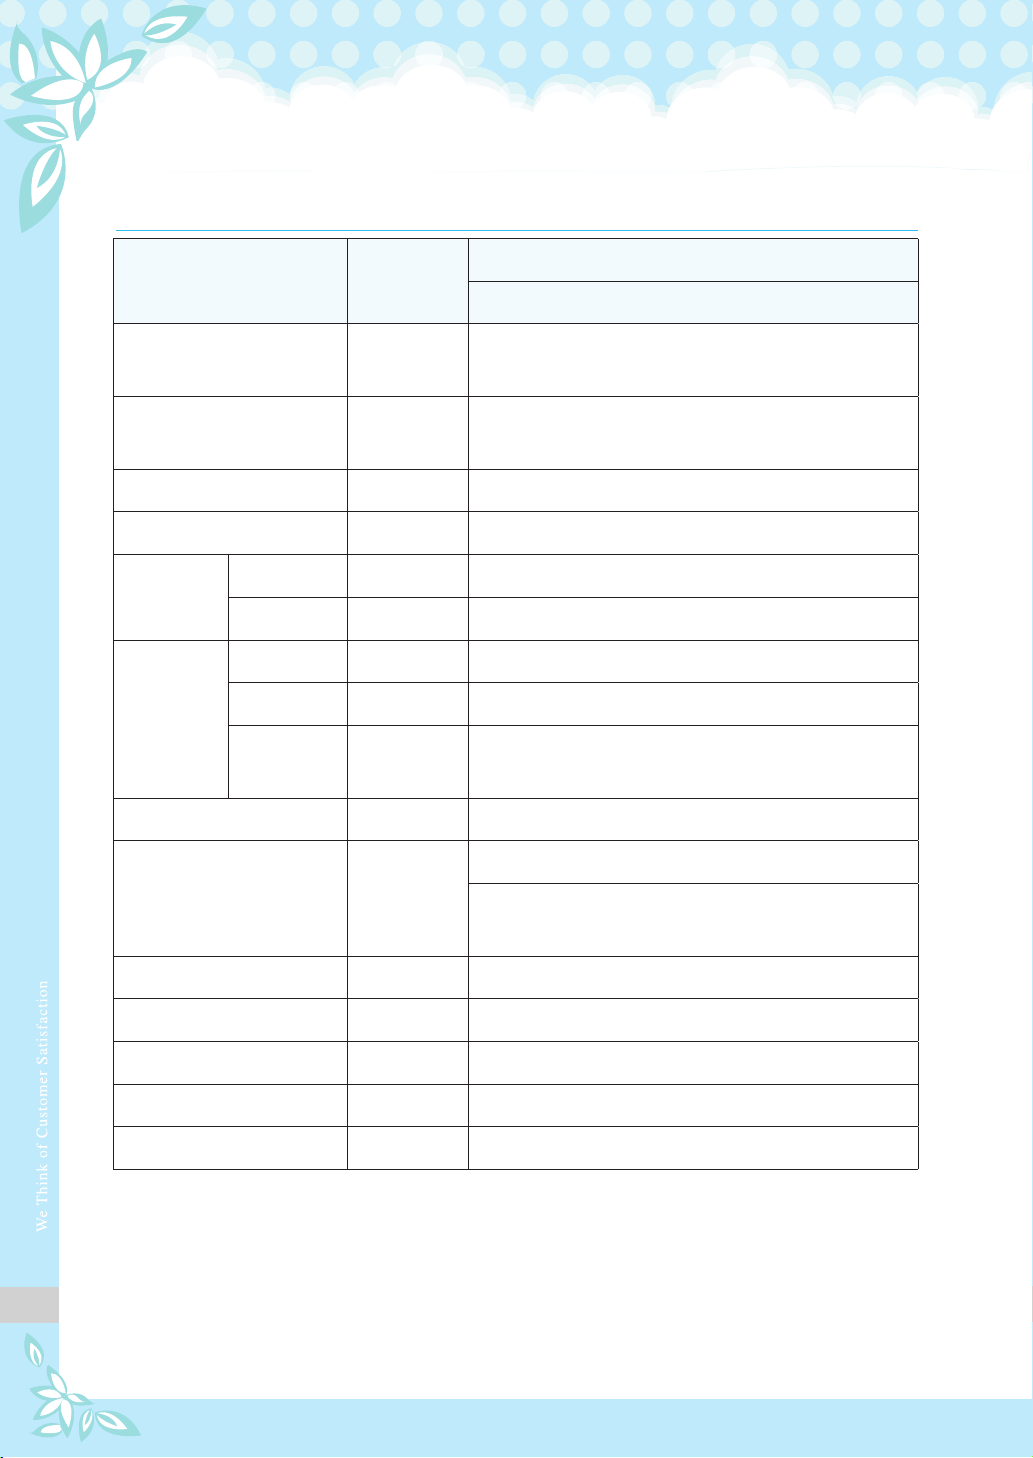
■ Cleaning the nozzle / ice slide / water tank ■
1. Open the door and remove two front
injection bolts on the top cover.
2. Pull the top cover to remove it.
3. Slightly lift the ice slide to remove it.
4. Clean the slide with soft plastic brush
or sponge.
8. Washing the Ice Maker
18
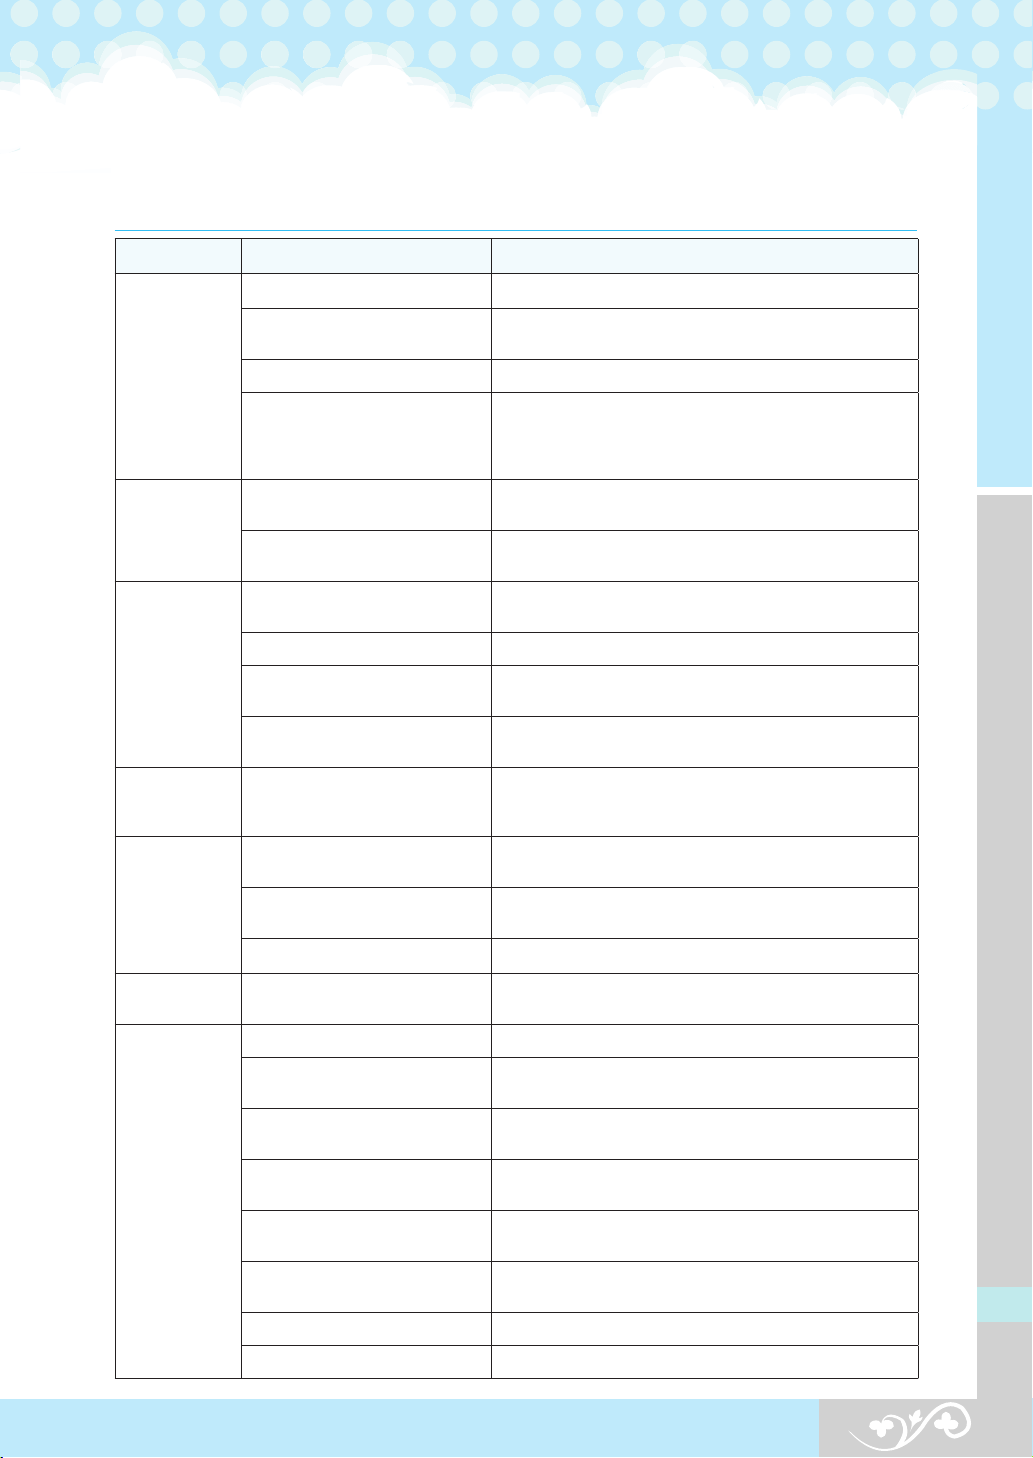
■ Cleaning the filters of the water tank and ice tank ■
5. Clean the gap of the nozzle frame fixed
on the vessel sheet (water tank).
6. Lift the drain projectile inside the vessel
sheet (water tank), clean it, and drain
the water.
* Make sure that the drain projectile is
assembled back in the correct position after
cleaning; otherwise, draining will not stop,
with the product rendered unable to make
ice cubes.
1. Empty the ice tank and prepare a cleaning
solution by distilling 30g of neutral
dishwashing detergent with 8L of warm water
(35~45℃). Soak a clean cloth in the solution
and clear the inside of the ice tank.
Pour an appropriate amount of the solution
into the draining pipe, and then wait until
it dries naturally.
* Press the switch to set it to “Ⅱ”(WASH) when cleaning the product;
this will repeat the process of supplying water for about 2 minutes and operating
the circulation pump 3 times, enabling easier cleaning.
Cleaning the nozzle / ice slide / water tank
- Cleaning at least once a month after turning off power
For your
information
19
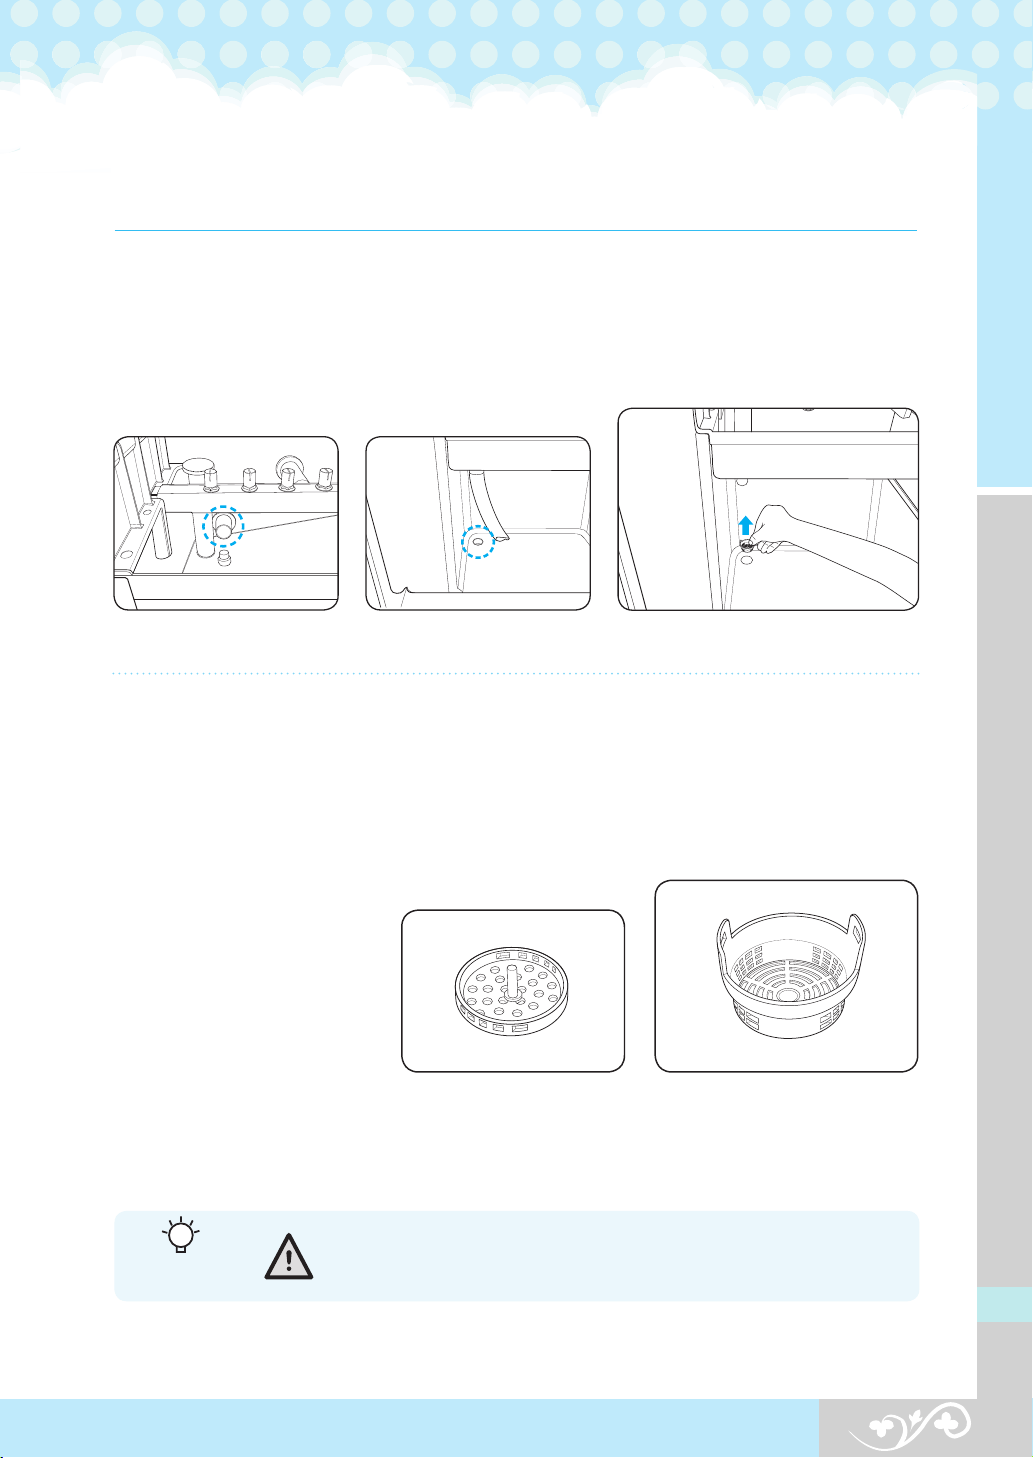
1. Empty the ice tank and prepare a cleaning
solution by distilling 30g of neutral
dishwashing detergent with 8L of warm water
(35~45℃). Soak a clean cloth in the solution
and clear the inside of the ice tank.
Pour an appropriate amount of the solution
into the draining pipe, and then wait until
it dries naturally.
* Press the switch to set it to “Ⅱ”(WASH) when cleaning the product;
this will repeat the process of supplying water for about 2 minutes and operating
the circulation pump 3 times, enabling easier cleaning.
2. Open the front door and remove the filter screens from the bottom
of the ice tank and water tank.
3. Rinse the screens with running water, and then assemble them back
to the tanks.
* Otherwise, the water nozzle will get clogged, or dregs inside the ice tank
may damage the product by clogging the draining part.
* Insert the bottom filter screen first, followed by the top screen.
< Water tank >
< Bottom filter screen > < Top filter screen >
< Ice tank >
Cleaning the filters of the water tank and ice tank
- Cleaning at least once a month after turning off power
For your
information
20
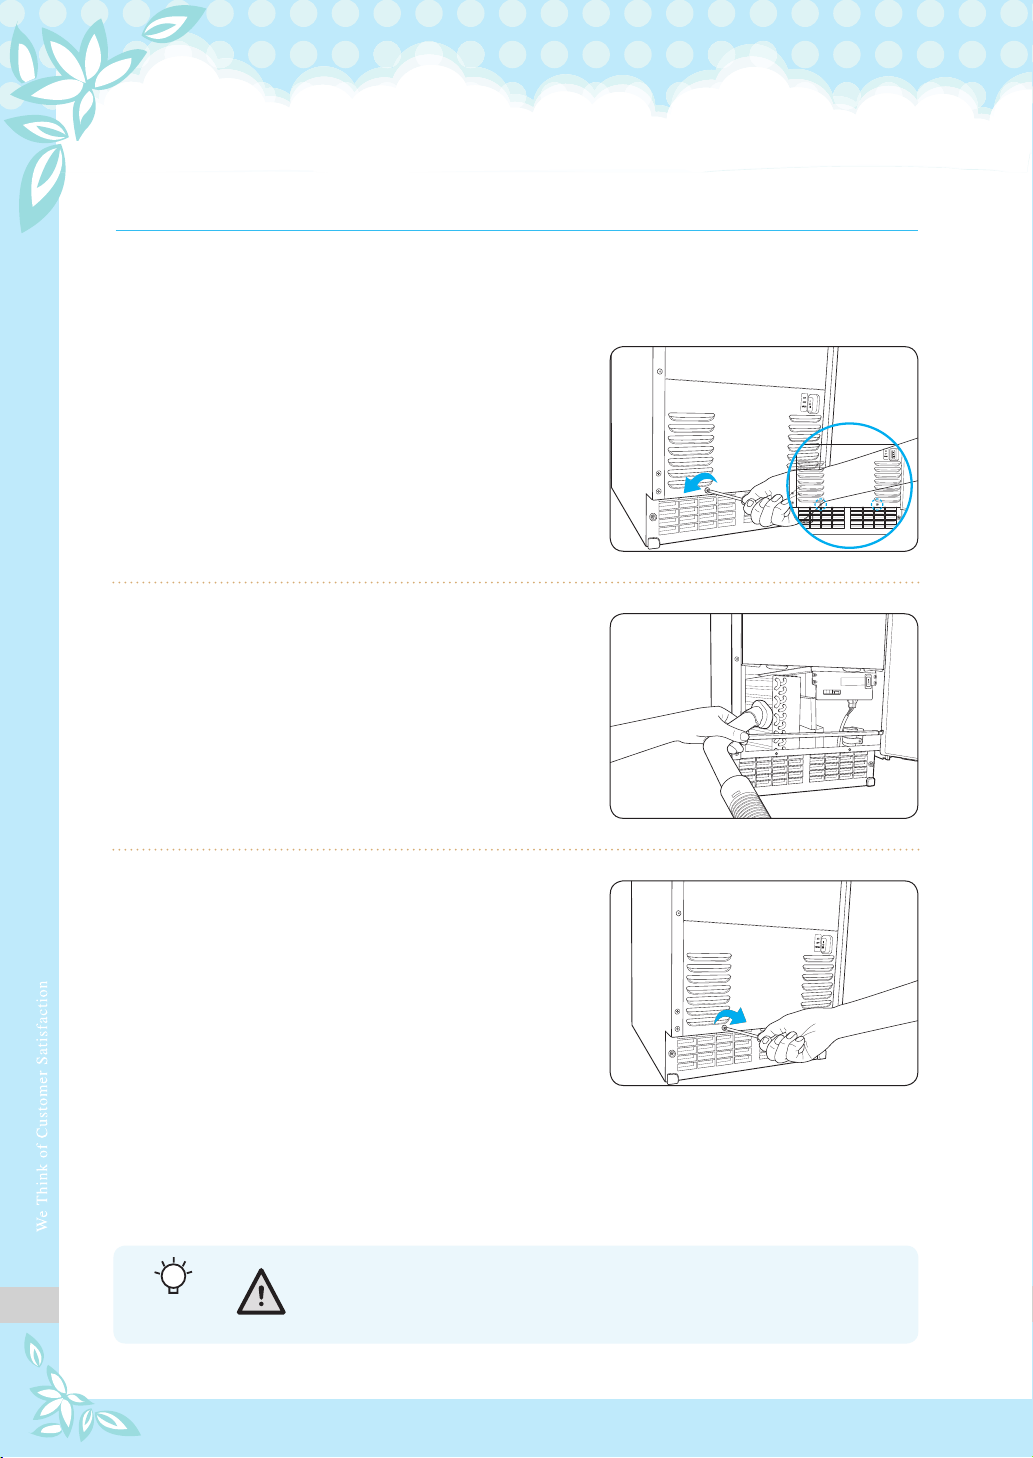
Cleaning the condenser - Cleaning at least once a month after turning off power
■ Cleaning the condenser ■
2. Remove dust from the surface of the
condenser with a vacuum cleaner for
home use or a portable cleaner.
1. Remove two screws on the front panel
at the center of the inside.
3. Reassemble the screw to the panel
after cleaning.
For your
information

21
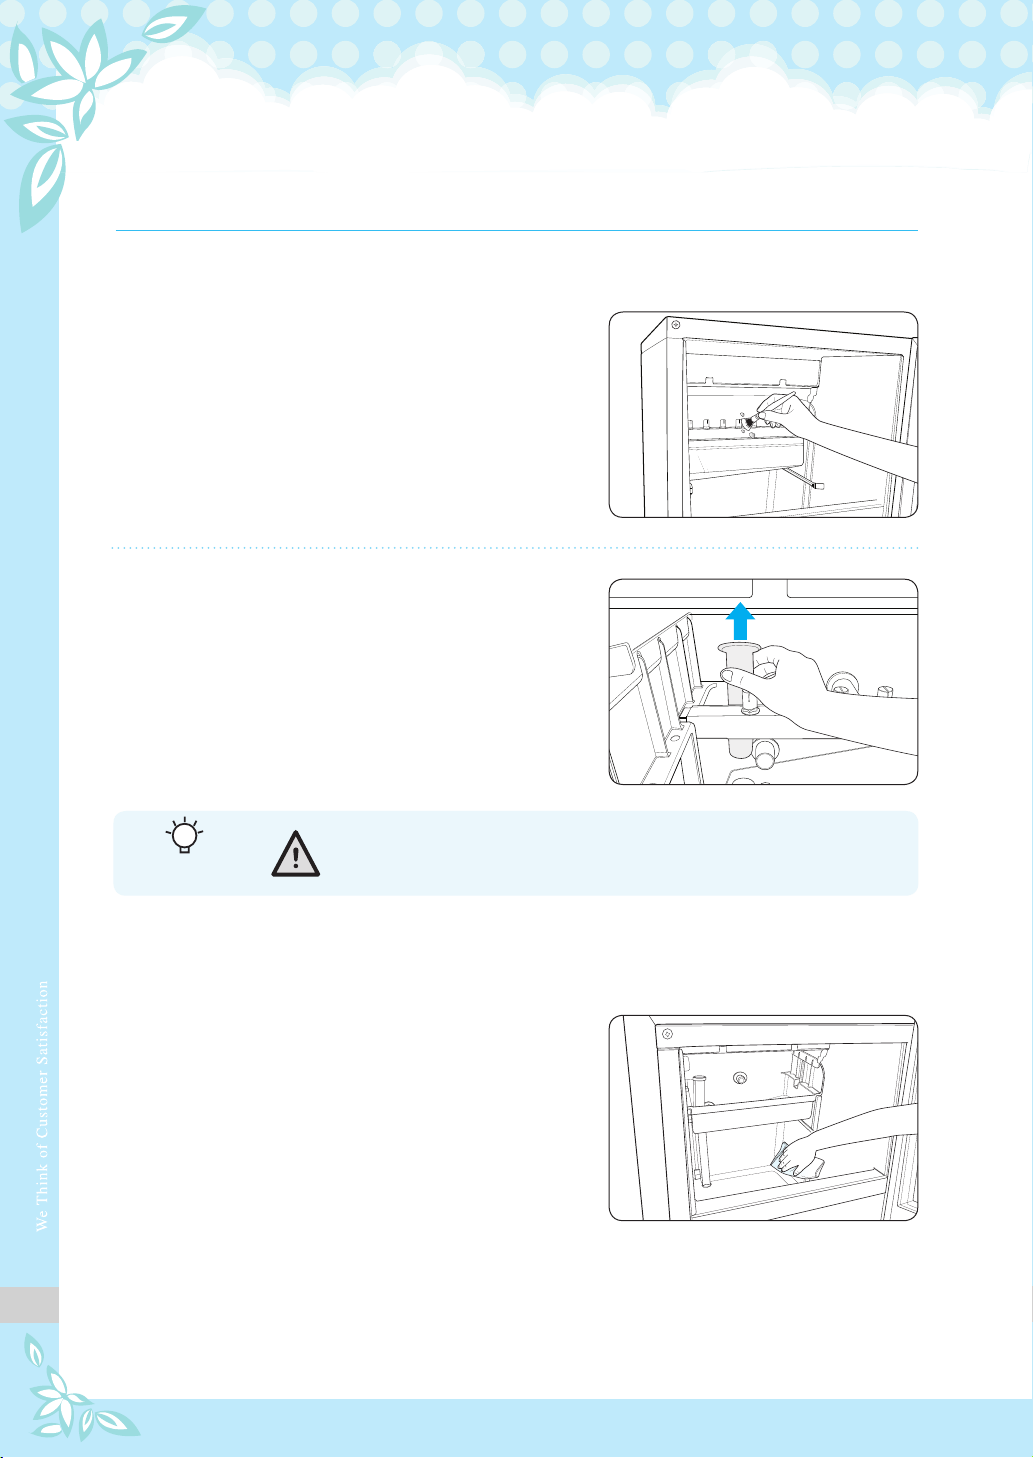
Management in the coldest season
① Clean the ice-production system.
② Turn off the power.
③ Empty the water container. Remove the pump hose.
The pump hose may be removed after removing the back panel from the
ice maker.
④ Separate the inlet pipe connected with the water supply valve.
⑤ Turn on the power and turn the switch to the “WASH”position to open
the water supply valve and to remove the water from the inlet pipe inside
the ice maker.
⑥ In the case of the drain pump model, pour 1/2 gallon of RV anti-freeze mixture
(propylene glycol) into the ice container.
Important Information :
Do not use an anti-freeze product intended
for automobiles.
⑦ Turn off the ice maker and pull the plug out of the electric outlet.
When using the ice maker after winter, re-connect the pump hose and
other hoses. Repeat the initial starting steps described on page 13.
Adjusting the ice maker
Three items may be adjusted: the detection temperature of the evaporator,
the delay time of the ice-production cycle, and the water supply time.
To adjust the three items, an inspection kit is required.
If the ice maker is adjusted by the user at his/her discretion, a serious incident
may occur.
Important Information : The three items mentioned above should be
adjusted by the engineer of an A/S center designated by ICETRO.
9. Maintenance of the Ice Maker
22
※ The maximum ice capacity is based on 10 ℃ ambient / water temperature but may
vary depending on the installation condition; high temperature in summer may severely
affect the capacity.
CATEGORY UNIT
BUILT-IN ICE MAKER
A25B15 / A25O15 / A25G15
Maximum
manufacturing capacitor
kg/day
(at 10 ℃)
29
Dimesion
W x D x H
(mm)
378 x 624 x 855 (exclude Handle, Leg, Hinge)
Quantity of Ice EA 24
Rated Power V/Hz 230 V / 50 Hz
Weight
Before Box kg 50
After Box kg 63.2
Cooling
UNIT
Refrigerant - R-134a
Capacity kcal/hr 1065 (at 7.2 ℃)
Cooling
method
- Air-cooled
Controlling the size of ice - Controlling the temperature with EVA SENSOR
Controlling the detection
of full ice
-
Controlling the temperature with electronic sensor
Differential application per ambient temperature
(automatic PCB control)
Refrigerant Controlled by - MICOM Control
Power Consumption W 500
Water Supply Condition ℃ 10 ~ 27
Water supply pressure psig 7~113
Ambient temperature ℃ 10 ~ 38
10. Specifications
23
11. Troubleshooting guide
PROBLEM POSSIBLE CAUSE POSSIBLE SOLUTION
Ice maker does
not operate
Ice maker is unplugged Plug ice maker in.
Breaker tripped
Reset breaker - if it happens again, call a authorized service
center.
Switch turned to “OFF” Turn switch to “ICE”.
The ice tank is full.
The ice maker has stopped since the ice detection sensor inside
the tank is activated.
The ice maker will not resume operation immediately after
removing ice - wait for 15~30 minutes.
Ice cubes are
too large
The ambient temperature is too low.
The lower the ambient temperature, the bigger the ice will be
and vice versa.
Ice thickness control does not work.
Contact the customer service center for details on how to control
the thickness of ice.
Ice cubes are
too small
The ambient temperature
is too high.
The lower ambient temperature is, the bigger the ice will be,
and vice versa.
Too little water in the water tank. Check the water supply.
The water nozzle does not eject
water.
Check the water supply and see if the nozzle is clogged with
foreign object.
Ice thickness control does not work.
Please contact customer service center for controlling thickness
of ice.
Ice is fragmented.
Water is not accurately sprayed
from the nozzle to the center of the
vaporizer cube.
Clean the ice maker - the nozzle may be clogged with foreign
object.
The tank is not
fully filled with
ice cubes.
Check the operation time.
The ice tank will be filled with ice after about 12 hours of
operation.
There is water in the ice tank.
Make sure the drain pipe of the water tank is properly connected
and clean the drain.
Hot air is blown to the tank. Check the site where the product is installed.
The ice cubes
are white.
Too little water in water tank.
Check the water supply as well as whether water leaks from the
tank.
The ice maker
is operating,
but no ice is made.
Too little water in water tank. Check the water supply. Check the water supply valve..
Ice cubes are stuck on the vaporizer.
Check the water supply. Check the water supply valve. Check
the hot gas valve.
The water does not get cold.
Check the water supply valve. Contact the customer service
center if the valve is fine.
Water is not sprayed.
Check the water in the water tank. Check if the circulation pump
is working.
Condensing is not done.
The condenser has too much dust. Clean the condenser.
Check the fan motor of the condenser.
The condenser does not work.
The ambient temperature is too high. Check the conditions where
the product is installed or contact the customer service center.
Hot gas leaks. Contact the customer service center.
Refrigerant needs to be refilled. Contact the customer service center.

3240230-02
Online Internet Service
http://
www.icetrousa.com