User Manual for AIR FRYER OVEN
Before Using Your Electric Oven
Before using your convection electric oven for the first time, be sure to:
- 1. Unpack the unit.
- 2. Remove all racks and pans. Wash the racks and pans in hot sudsy water or in dishwasher.
- 3. Thoroughly dry all accessories and re-assemble in oven. Plug oven into outlet and you are ready to use your new Electric Oven.
- 4. After re-assembling your oven, we recommend that you run it at MAX temperature for approximately 15 minutes to eliminate any packing oil that may remain after shipping.
- 5. Initial start-up operation may produce smell and smoke for about 15 minutes which is normal. This due to the protective substance on heating elements that protects them while they are stored. Cook slices of lemon at 300°F for 5-10 minutes to minimize the smell.
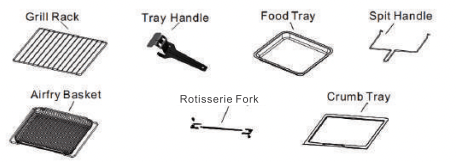
COMPONENTS:
USING YOUR ELECTRIC OVEN
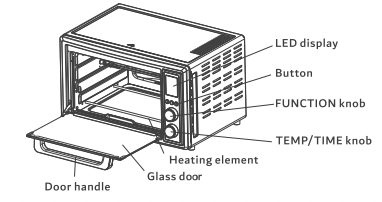
Please familiarize yourself with the following oven functions and accessories prior to first use:
- 1) Glass Door For front viewing of food.
- 2) Heating Element: For heating food.
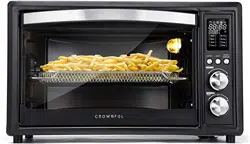
- 3) Air fry Basket For carrying food to be cooked for the Air Fry function.
- 4) Crumb Tray: For crumb or fallen food particles collection. Can be pulled out for easy cleaning.
- 5) Food Tray: For carrying food to be cooked.
- 6) Wire rack: For baking and cooking food.
- 7) Food Tray Handle: For removing basket or tray.
- 8) Rotisserie handle: For removing rotisserie rod assembly.
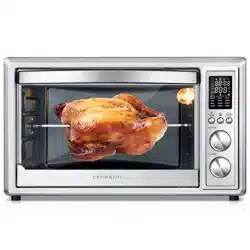
- 9) Rotisserie fbrlc For roasting chicken and other kinds of meats.
Noted: The maximum amount of French fries on the Air fry basket is 0.771b (350g). If need to go beyond that, please take it out and cook it as the next batch. If you are not going to use other accessories please make sure to shake the fries or turn it over to ensure that the pieces will be evenly cooked.
■ How to set the clock:
Standby state: Clock Display; clock is set to 12 hours
Clock Setting Method: Press and hold the "Temp/Timer" knob for 3 seconds in the standby mode to enter into the clock setting. When the clock flashes, turn the "Temp/Timer" knob to set the hour. Once set, quickly press the knob to switch to the minute setting. Once you see it flashes, turn the "Temp/Timer" knob to set the minutes. Quickly press the temp/time knob to switch the clock to hour and minute settings. After setting the hour and minutes, press the "Start/Cancel" button to confirm the time setting.
■ ROTISSERIE FORK INSTRUCTIONS /TIPS
- Insert the fork into the rod until near the end of the rod and then secure with thumbscrew
- Insert the food from the other side of the rod.
- Place second fork into other side of the rod, and then secure with thumbscrew. Check if that the food is in the center of the rod firmly.
- Insert the rod with food into the oven. Insert one side of the rod into the support-hole of the oven. And then place the other side of the rod into the support-bracket of the oven.
Notice: You can roast up to 5.5-pound whole chicken inside the oven using the roasting fork.
■ Useful Tips:
- Air fryers are popular for making healthy fried foods. People would assume that no oil is needed and so ended up with dry food. However, you still need to add 1 teaspoon to 1 tablespoon of oil each time you use your air fryer to help bring that flavor and moisture to your food.
- Turn your air fryer at 350-400 degrees F for just 3-4 minutes to reheat. Then your reheated leftovers will taste just as crispy as it was the night before. Just think - crispy, hot, and fresh reheated pizza in an air fryer (or any other food you want!).
CONTROL PANEL
 |
|
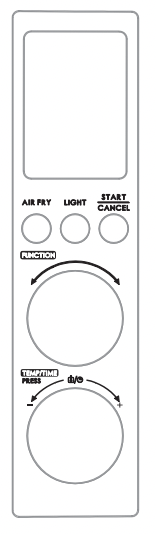
Function Buttons & Knobs
1. "AIR FRY": Quickly select Air Fry function.
2. "LIGHT": It can turn ON/OFF the lightThe light will be on automatically when the work is starting, it will be off after one minute, and it will be on automatically in the last minute before completion. Other times you can click the button to turn it on or off at any time. Some functions have the preheating. It goes out in 1 minute after starting preheating and doesn't light up until it starts to work.
3. "START/CANCEL" button:
- a. Once the function is selected, it can be activated by pressing the "START/CANCEL" button;
- b. During the operating press this button for about 1.5 seconds to cancel the cooking process and return to standby;
- c. When setting the cooking data, press and hold this button for about 1.5seconds to cancel all the setting and return to standby mode;
- d. During the preheating press this button to pass the preheating and start cooking operation
- e. When the preheating is complete, press this button to start cooking operation.
4. "FUNCTION" knob: This knob can be used to select the desired function. The icon of function will blink in the LED display when it is selected.
5. "TEMP/TIME" knob: The temperature/time can be adjusted by this knob.
- a. Turn the knob to set the desired cooking temperature.
- b. After temperature setting press the knob once to switch to time setting mode. Turn the knob to set the desired cooking time.
- c. For the Toast function, user can turn this knob to set the desired shade level.
- d. User can press the knob repeatedly to switch the time setting mode and temperature setting mode.
- e. In the standby mode, long press this button for about 3s to enter the unit time setting mode.
|
AUTOMATIC PREHEAT
|
1. When you first start the cooking function by pressing START/CANCEL,preheating will start automatically.The START/CANCEL button will blink,and the display will show "-wf"
Notice: Air fryer, Bake, Pizza and Conv preset with automatic preheat function. These cooking mode or presets has a built-in preheating function which means you can't skip it. When the preheating process is finished, you can just set the preset mode and start cooking or manually adjust the time and temperature according to your preference.
2. When preheating is finished,the oven will beep several times and the display will flash.The START/CANCEL button will blink continuously until pressed again.
Noted: When the air fryer oven does not operate after an hour,it will stop working.
3.Press START/CANCEL to begin cooking.The button will light up,and the display will show the timer counting down.
|
|
|
Setting Temperature
|
Automatic Preheat Time
|
|
300°F or below
|
2-4 min
|
|
325°F
|
3-5 min |
|
350°F
|
4-6 min
|
|
400°F and above
|
6-8 min
|
|
OPERATION INSTRUCTIONS
1. Toast
Different types of bread require different settings. Lighter breads and waffles require lighter shade setting. Darker breads, muffins and English muffins require a darker setting.
Baking Grade Guide Below:
- Baking grade 1-2 Light toast
- Baking grade 3-4 Medium toast
- Baking grade 5-6 Heavy toast
Operation
- Place the food to be cooked on the wire rack. Insert the rack into the middle support guide of the oven.
- Turn FUNCTION knob to "Toast".
- TurnTEMP/TIME knob to set the desired shade level. Note: Baking temperature setting and time setting are not available. Baking temperature and time are auto adjusted with the shade level adjustment.
- Press "START/CANCEL" button to start the operation. nNote: Baking level, time or temperature is nonadjustable while the oven is working. To cancel operation, press "START/CANCEL" button. No pause setting. To check or remove food, use the handle to help side food in and out.
- When the cooking cycle is complete, the unit will auto stop and return to standby mode. Open the door completely and remove the food immediately or the heat remaining in the oven will continue to toast and dry out your toast.
CAUTION: Cooked food, metal rack, and door can be very hot, handle with care. Do not leave the oven unattended.
2. Air Fry
The Air Fry function good for cooking a variety of French fries or chicken wings, under intense heat and maximized airflow to cook foods crispy and brown; food are ideally baked using this function.
Operation
- Turn FUNCTION knob to "Air Fry" or select by pressing "Air Fry" button.
- TurnTEMP/TIME knob to set desired baking temperature. To set the time, press the TEMP/TIME knob once and then turn it to set desired baking time. You can switch from temperature setting to time setting and vice versa by pressing TEMP/TIME knob.
- Press "START/CANCEL" button to start the preheating. "PrE" flashes in LED display.
- The unit produce beeps and the preheating is complete. "PrE" blinks in LED display. Place the food to be cooked on the Air fry Basket. Insert the basket into the middle support guide of the oven and close the door.
- Press "START/CANCEL" button to start the operating. The time count down. Note:
- a. The convection fan run with high speed during the operating.
- b. Baking time and temperature are nonadjustable during the preheating but adjustable during the operating.
- c. To cancel operation, press "START/CANCEL" button. No pause setting,
- d. To check or remove food, use the handle to help side food in and out.
- When the cooking cycle is complete, the unit will auto stop and emit beeps, "00:00" showing in the LED display until the user press "START/CANCEL" button. Open the door completely and remove the food with handle.
CAUTION: Cooked food, metal basket, and door can be very hot, handle with care. Do not leave the oven unattended.
3. Bake
The Bake function cooks food evenly throughout. This function is ideal for baking cakes, muffins, brownies and pastries.
Operation
- Turn FUNCTION knob to "Bake".
- TurnTEMP/TIME knob to set desired baking temperature. To set the time, press the TEMP/TIME knob once and then turn it to set desired baking time. You can switch from temperature setting to time setting and vice versa by pressing TEMP/TIME knob.
- Press" START/CANCEL" button to start the preheating. "PrE" flashes in LED display.
- The unit emits beeps when the preheating is complete or over 20 minutes. "PrE" blinks in LED display. Place the food to be cooked on the wire rack/food tray. Insert the rack/tray into the middle support guide of the oven and close the door.
- Press "START/CANCEL" button to start the operating. The time count down. Note:
- a. Baking time and temperature are nonadjustable during the preheating but adjustable during the operating.
- b. To cancel operation, press "START/CANCEL" button. No pause setting.
- c. To check or remove food, use the handle to help side food in and out.
- When the cooking cycle is complete, the unit will auto stop and emit beeps, "00:00" showing in the LED display until the user press "START/CANCEL" button. Open the door completely and remove the food with handle.
CAUTION: Cooked food, metal rack/tray, and door can be very hot, handle with care. Do not leave the oven unattended.
4. Rotisserie
The Rotisserie function is a rotating roast, good for whole chicken roasting.
- Place whole chicken on the rotisserie rod and fixed by the fork both side, insert the rod into the rotisserie hole position and close the door. Note: Need put the Food tray at bottom rack slot to collect oil drip during cooking, and put some water in food tray before cooking it will make good effect for rotisserie.
- Turn FUNCTION knob to "Rotiss".
- Turn TEMP/TIME knob to set desired baking time. To set the time, press the TEMP/TIME knob once and then turn it to set desired baking time. You can switch from temperature setting to time setting and vice versa by pressing TEMP/TIME knob.
- Press " START/CANCEL" button to start the operating. The time count down. Note:
- a. To cancel operation, press "START/CANCEL" button. No pause setting.
- b. To check or remove food, use the handle to help side food in and out.
- When the cooking cycle is complete, the unit will auto stop and emit beeps, "00:00" showing in the LED display until the user press "START/CANCEL" button. Open the door completely and remove the food with handle.
CAUTION: Cooked food, metal rod/tray, and door can be very hot, handle with care. Do not leave the oven unattended.
5. Broil
The Broil function is good for cooking open-feced sandwiches, thin cuts of meat (like Bacon), poultry and fish, sausages and vegetables. Broiling can also be used to brown the tops of casseroles, gratins and desserts.
Operation
- Place the food to be cooked on the wire rack/food tray. Insert the rack/ tray into the middle support guide of the oven and close the door.
- Turn FUNCTION knob to "Broil
- TurnTEMP/TIME knob to set desired baking time. The cooking temperature is default and nonadjustable for this function.
- Press" START/CANCEL" button to start the operating. The time count down. Note:
- a. To cancel operation, press "START/CANCEL" button. No pause setting
- b. To check or remove food, use the handle to help side food in and out.
- When the cooking cycle is complete, the unit will auto stop and emit beeps, "00:00" showing in the LED display until the user press "START/CANCEL" button. Open the door completely and remove the food with handle.
CAUTION: Cooked food, metal rack/tray, and door can be very hot, handle with care. Do not leave the oven unattended.
6. Pizza
The Pizza function melts and browns cheese and toppings, while crisping the pizza crust.
Operation
- Turn FUNCTION knob to "Pizza".
- Turn TEM P/TIM E knob to set desired baking temperature. To set the time, press the TEMP/TIME knob once and then turn it to set desired baking time. You can switch from temperature setting to time setting and vice versa by pressing TEMP/TIME knob.
- Press" START/CANCEL" button to start the preheating. "PrE" flashes in LED display.
- The unit emit beeps when the preheating is complete or over 20 minutes. "PrE" blinks in LED display. Place the food to be cooked on pizza pan, and then place on the wire rack. Insert the wire rack, into the middle support slot or guide of the oven and close the door. The time count down.
- Press "START/CANCEL" button to start the operating. The time count down. Note:
- a. Baking time and temperature are nonadjustable during the preheating but adjustable during the operating.
- b. To cancel operation, press "START/CANCEL" button. No pause setting,
- c. To check or remove food, use the handle to help side food in and out.
- When the cooking cycle is complete, the unit will auto stop and emit beeps, "00:00" showing in the LED display until the user press "START/CANCEL" button. Open the door completely and remove the food with handle.
CAUTION: Cooked food, metal rack/pan, and door can be very hot, handle with care. Do not leave the oven unattended.
7. Convection
Operation
- Turn FUNCTION knob to "Conv".
- TurnTEMP/TIME knob to set desired baking temperature. To set the time, press the TEMP/TIME knob once and then turn it to set desired baking time. You can switch from temperature setting to time setting and vice versa by pressing TEMP/TIME knob.
- Press" START/CANCEL" button to start the preheating. "PrE" flashes in LED display.
- The unit emit beeps and the preheating is complete. "PrE" blinks in LED display. Place the food to be cooked on the wire rack/food tray. Insert the rack/tray into the middle support guide of the oven and close the door.
- Press "START/CANCEL" button to start the operating. The time count down. Note:
- a. Baking time and temperature are nonadjustable during the preheating but adjustable during the operating.
- b. To cancel operation, press "START/CANCEL" button. No pause setting.
- c. To check or remove food, use the handle to help side food in and out.
When the cooking cycle is complete, the unit will auto stop and emit beeps, "00:00" showing in the LED display until the user press "START/CANCEL" button. Open the door completely and remove the food with handle.
CAUTION: Cooked food, metal rack/tray, and door can be very hot handle with care. Do not leave the oven unattended.
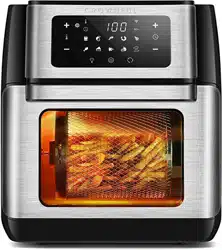
8. Dehydrate
The Dehydrate function combines low and stable heat to dry out foods without cooking. Good for drying fruit or vegetables chips.
Operation
- Place the food to be cooked on the wire rack/food tray. Insert the rack/ tray into the middle support guide of the oven and close the door.
- Turn FUNCTION knob to "Dehy".
- Turn TEMP/TIME knob to set desired baking time. The cooking temperature is default and nonadjustable for this function.
- Press" START/CANCEL" button to start the operating. The time count down. Note:
- a. To cancel operation, press "START/CANCEL" button. No pause setting.
- b. To check or remove food, use the handle to help side food in and out.
- When the cooking cycle is complete, the unit will auto stop and emit beeps, "00:00" showing in the LED display until the user press "START/CANCEL" button. Open the door completely and remove the food with handle.
Tips: The default temperature of this dehydrate function preset is 150°F/12 hours,
But you can adjust it according to you own preferences. We suggest that it can be adjusted to 150°F for 4-6 hours.
CAUTION: Cooked food, metal rack/tray, and door can be very hot, handle with care. Do not leave the oven unattended.
Default Cooking Time and Temperature
|
Cooking Mode
|
Temperature
|
Cooking Time
|
|
Air Fry
|
400 °F
|
22 min
|
|
Bake
|
350°F
|
30 min
|
|
Rotiss
|
400 °F
|
50 min
|
|
Broil
|
450°F
|
10 min
|
|
Pizza
|
400 °F
|
15 min
|
|
Conv
|
350°F
|
15 min
|
Notice: For Air fryer, Bake, Pizza and Conv cooking modes, there is a automatic preheating function. Once the temperature reaches the set default temperature, the unit emit beeps and "PrE" blinks in LED display,and then you can press press "START/CANCEL" Button to enter the working mode. So you can not skip the preheating and enter the working mode directly.
USE MAINTENANCE INSTRUCTIONS
This appliance requires little maintenance. It contains no user serviceable parts. Do not try to repair it yourself. Contact a qualified appliance repair technician if the product requires servicing.
CLEANING INSTRUCTIONS
CAUTION: To protect against electrical shock, DO NOT IMMERSE THE OVEN IN WATER OR ANY OTHER LIQUIDS.
Your toaster oven should be cleaned regularly for best performance and long life. Regular cleaning will also reduce the risk of fire hazard.
Step 1. Remove plug from electrical outlet. Allow it to cool.
Step 2. Remove the Removable Crumb Tray, Basket, Tray by pulling out of the oven. Clean them with damp, soapy cloth. Make sure to only use mild, soapy water.
Step 3. To clean inside of oven, wipe the oven walls, bottom of oven, and glass door with a damp, soapy cloth. Repeat with a dry, clean cloth.
Step 4. Wipe outside of oven with a damp cloth. CAUTION: DO NOT USE ABRASIVE CLEANERS OR METAL SCOURING PADS. Make sure to only use mild, soapy water. Abrasive cleaners, scrubbing brushes and chemical cleaners will damage the coating on this unit Pieces can break off the coating and touch electrical parts involving a risk of electrical shock.
Step 5. Allow the appliance to cool and dry completely before storing. If storing the oven for long periods of time make certain that the oven is clean and free of food particles. Store the oven in a dry location such as on a table or countertop or cupboard shelf. Other than the recommended cleaning, no further user maintenance should be necessary.
Any other servicing should be performed by an authorized service representative.
TO STORE
Unplug unit, allow it to cool, and clean before storing. Store the Electric Oven in its box in a clean, dry place. Never store appliance while it is hot or still plugged in. Never wrap cord tightly around the appliance. Do not put any stress on the cord where it enters the unit, as it could cause the cord to fray and break.
SPECIFICATIONS
| Model |
CF-AF30LSS-1 |
|
Rated volage
|
120V
|
| Rated frequency |
60Hz
|
| Rated power |
1800W
|
| Oven capacity |
20 Litres |
| Household use only, DO NOT IMMERSE IN WATER |