DOCUM EN T SCAN N ER
USER’S MAN UAL
Regulatory Model Num ber: DT- 1608H
w w w .avision.com

User’s Ma nua l
ii
Tradem ark s
Microsoft is a U.S. regist ered t radem ark of Microsoft Corporation.
Window s, Window s Vist a, Window s 7, Windows 8, and Windows 10
are eit her regist ered t radem arks or t radem arks of Microsoft
Corporat ion in t he Unit ed States and/ or ot her count ries.
Energy Star
®
is a regist ered t radem ark of t he U.S. governm ent .
I BM, I BM PC are regist ered t radem arks of I nternat ional Business
Machines Corp.
Ot her brands and product nam es herein are t radem arks or
regist ered t radem arks of t heir respect ive holders.
Copyright
All right s reserved. No part of t his publication m ay be
reproduced, transm it t ed, t ranscribed, st ored in a ret rieval
system , or t ranslat ed int o any language or com put er language, in
any form or by any m eans, electronic, m echanical, m agnetic,
opt ical, chem ical, m anual, or ot herwise, w it hout t he prior w rit t en
perm ission of Avision I nc.
Material scanned by t his product m ay be prot ect ed by
governm ental laws and other regulations, such as copyright
laws, t he custom er is solely responsible for com plying wit h all
such laws and regulat ions.
W arranty
The inform ation cont ained in this docum ent is subj ect t o
change wit hout notice.
Avision m akes no warrant y of any kind wit h regard t o t his
m aterial, including, but not lim it ed t o, t he im plied warrant ies
of fit ness for a part icular purpose.
Av ision shall not be liable for errors cont ained herein or for
incident al or consequential dam ages in connect ion with t he
furnishing, perform ance, or use of t his m at erial.

User’s Ma nua l
iii
Federal Com m unicat ions Com m ission ( FCC) com plia nce
inform at ion st at e m e nt
Pa rt 1 5
The product has been t ested and found t o com ply wit h t he lim it s
for a Class A digit al device pursuant to Part 15 of t he FCC Rules.
Operat ion is subj ect t o t he following t wo condit ions: ( 1) this
device m ay not cause harm ful interference and ( 2) t his device
m ust accept any int erference received including int erference t hat
m ay cause undesired operat ion.
The FCC Class A lim it s are designed to provide reasonable
prot ection against harm ful int erference when t he equipm ent is
operat ed in a com m ercial environm ent . This equipm ent
generat es, uses, and can radiat e radio frequency energy and, if
not installed and used in accordance wit h t he inst ruction m anual
m ay cause harm ful int erference in which case t he user will be
required t o correct t he int erference at his own expense.

User’s Ma nua l
iv
Europe a n Union Regula t ory N ot ice
Product s bearing the CE m arking com ply with t he following EU
Direct ives:
Low Volt age Direct ive 2014/ 35/ EC
EMC Directive 2014/ 30/ EC
Rest rict ion of t he use of cert ain hazardous subst ances ( RoHS)
Directive 2011/ 65/ EU
CE com pliance of t his product is valid if powered wit h t he correct
CE- m arked AC adapt er provide by Avision.
This product sat isfies t he Class A lim it s of EN55022, EN55024,
safety requirem ent s of EN 60950 and ROHS requirem ent s of
EN50581.
* This m achine is cert ified as Class 1 LED product .
CE W arning
This is a class A product. I n a dom est ic environm ent this product
m ay cause radio int erference in w hich case t he user m ay be
required t o t ake adequat e m easures.

User’s Ma nua l
v
Disposal of W aste Equipm ent by Users in Pr ivat e Union
This sym bol on t he product or on it s packaging indicat es t hat t he
product can not be disposed of wit h your other household waste.
I nst ead it should be sent t o appropriat e facilit ies for recovery
and recycling in an effort t o prot ect hum an health and the
environm ent . Fore m ore inform at ion about where you can drop
off your waste equipm ent for recycling, please cont act your local
cit y office, your household wast e disposal service or t he shop
where you purchased t he product.
As an ENERGY STAR
®
Partner, Avision I nc. has
det erm ined t hat t his product m eets t he ENERGY
STAR guidelines for energy efficiency.
Syst em Re quirem ent s
CPU: I nt el
®
Core™ 2 Duo or higher
Mem ory: 32 bit : 2 GB
64 bit: 4 GB
Opt ical Drive: DVD-ROM Drive
USB Port : USB port 2.0 ( com pat ible wit h USB 3.0)
Com pat ible
Operat ing
Syst em :
Microsoft Windows 10 ( 32- bit / 64-bit ) , Windows
8.x ( 32- bit / 64-bit ) , Windows 7, Window s Vista,
Window s XP( SP3)
User’s Ma nua l
vi
Pr odu ct Sa fet y Guide
Please clearly r ead all these instr uctions, and follow all instructions
and warnings before installing and using the device.
The follow ing indications are used in this docum ent t o obviate any
chance of accident or dam age t o you and/ or t he device.
W ARN I N G
I ndicat es pot ent ially hazardous situat ions, which
if inst r uctions are not followed, could result in
deat h or serious inj ury.
CAUTI ON
I ndicat es a potent ially hazardous situation
which, if instructions are not followed, m ay
result in m inor or m oder at e inj ury or dam age t o
propert y .
W ARN I N G
Use only t he AC power adapt er t hat cam e with your device.
Using any other AC power adapt er could cause fire, elect rical
shock , or inj ury.
Use only t he AC power cord and USB cable t hat cam e with your
device and avoid abr asions, cut s, fraying, crim ping, and kinking.
Using any other AC power cord and USB cable could cause fire,
elect rical shock , or inj ury.
Do not place obj ects on top of the AC pow er cord, and do not
allow t he AC pow er adapt er or t he AC power cord t o be st epped
on or run over .
Place t he device and it s AC pow er adapt er near an elect r ical
out let w here t he AC pow er adapt er can easily be unplugged.
I f you use an ext ension cor d w it h t he device, m ake sure t hat
the t otal am pere rating of t he devices plugged into t he
ext ension cord does not exceed t he cord's am pere rating.
Place t he device close enough to the com puter so t hat t he
interface cable can easily reach bet ween t he device and t he
com put er.

User’s Ma nua l
vii
Do not place or store t he device or it s AC pow er adapt er:
Out doors
Near excessive dirt or dust , w ater, or heat sources
I n locations subj ect t o shocks, v ibr ations, high
tem peratur e or hum idit y, dir ect sunlight , strong light
sources, or rapid changes in t em peratur e or hum idit y
Do not use t he device with w et hands.
Never disassem ble, m odify, or at t em pt to repair t he AC power
adapter, device, or device opt ion by yourself, except as
specifically ex plained in t he device's docum ent at ion. This could
cause fire, elect rical shock , or inj ury.
Do not insert obj ect s int o any opening, as t hey m ay t ouch
dangerous volt age point s or short - out com ponent s. Beware of
elect rical shock hazar ds.
Unplug the device and t he AC power adapt er, and refer
servicing t o qualified service personnel under t he following
condit ions:
The AC power adapt er or plug is dam aged.
Liquid has ent ered the device or the AC power adapt er.
Obj ect has ent ered t he device or t he AC power adapt er.
The device or the AC power adapt er has been dropped,
or t he case has been dam aged.
The device or t he AC pow er adapt er does not operat e
nor m ally ( i.e. appearance of sm oke, strange sm ell, odd
noise, et c.) , or exhibit s a distinct change in perform ance
Unplug the device and t he AC power adapt er before cleaning.

User’s Ma nua l
viii
CAUTI ON :
Do not locate t he device on rackety or aslope tables. Do not
locat e t he device on unstable sur face. The device m ay fall down
and t his m ay result in inj ury.
Do not place heavy object s on t he unit . I t m ay cause unbalance
and t he device m ay fall dow n. This m ay result in inj ury.
St or e t he AC Power cord/ USB cable bundled out of the reach of
children t o av oid t he r isk of inj ury .
Keep plastic bags bundled out of t he reach of children or throw
them away t o avoid t he danger of suffocat ion.
I f you are not going t o use t he device for a long period, unplug
the AC power adapt er from the electrical out let .

User’s Ma nua l
ix
This page is int entionally left blank.

User’s Ma nua l
1- 1
1 . I nt roduct ion
Congratulations on your purchase of the high speed docum ent
im age scanner. Wit h t his scanner, you can you scan your
m ult i- page docum ent s from t he aut o docum ent feeder at a
rat ed speed or scan irregular single- page docum ent from t he
flat bed.
Before you install and operat e t he new scanner, please t ake a
few m inutes t o read t hrough t his m anual. I t provides proper
instructions for you to unpack, inst all, operate and m aint ain
t he scanner.
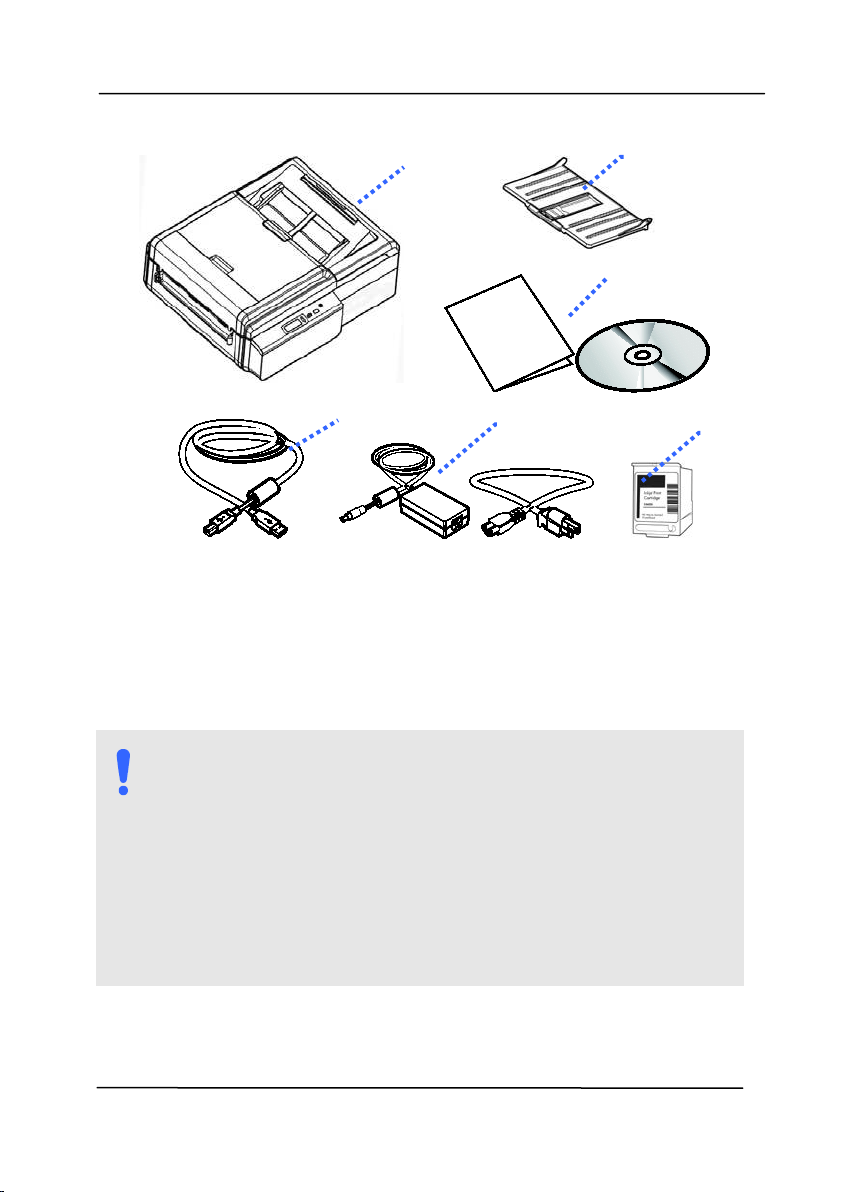
1 .1 Pa ckage I tem s
The following figure indicat es t he package cont ent s. Please
check all t he it em s against your checklist . I f you do not
receive all the it em s, please cont act your aut horized local
dealer im m ediat ely.
1
User’s Ma nua l
1- 2
1 . Scann er M ain Un it
2 . AD F Out pu t Tra y
3 . Quick Guide/ CD
4 . USB Ca ble
5 . Pow e r Ada pt er & Pow e r Cord
6 . Print Ca r t ridge
NOTE:
1 . Only use t he AC adapter DA-90F19 by APD included
in t he m achine. Using other AC adapt ers m ay
dam age the m achine and void the warrant y.
2. Please unpack t he packing carefully, and check t he
cont ent s against t he checklist . I f any it em s are
m issing or dam aged, please cont act your dealer
im m ediately.
3. To access m ore service support s, visit
ww w.avision.com t o regist er your Avision’s product .
2
5
1
4
3
6
User’s Ma nua l
1- 3
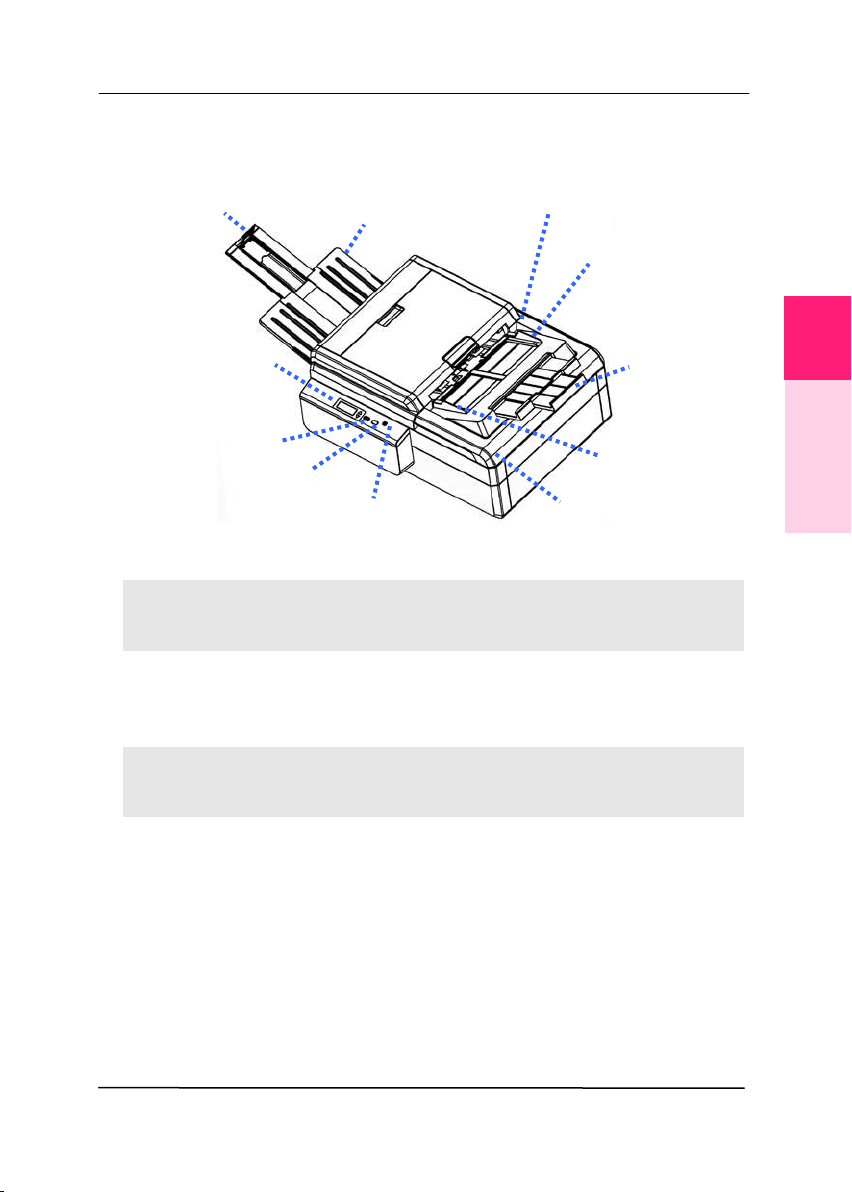
1 .2 Front View
N
AME DESCRI PTI ON
Ex t ension Can be pulled out and adj usted t o t he size of
the docum ent being scanned.
Pape r
W idth
Sw it ch
Slide it up or down t o fit your paper size.
AD F Pape r
Tray
Load t he docum ent onto t his part when
scanning docum ent.
Pape r
Guides
Adj usts t o the widt h of t he docum ent s t o
prevent skewing of t he scanned pages.
Ext ension
Paper Guide
Paper St opper
Power But t on
Paper Guide
ADF
Paper Tray
LCD Screen wit h
Up/ Down But tons
Scan Button
Cancel But ton
Out put Tray
Docum ent
Cover
1
Introduction

User’s Ma nua l
1- 4
Ope rat ion
Panel
LCD screen:
Shows a num ber indicating a scan-t o
dest inat ion via t he Up/ Down but t ons.
The Power But t on:
Press t o t urn on t he pow er.
The Scan Butt on:
Press t o start a scan.
The Cancel But t on:
Press t o cancel a scanning j ob during
operat ion.
Docum ent
Cover
Open it t o place t he docum ent on the glass
plat en.
Pape r
St opper
Adj ust t o t he lengt h of t he docum ent s t o
prevent t hem from falling apart .
AD F
Out put
Tray
Used t o collect docum ent s aft er scan.
User’s Ma nua l
1- 5
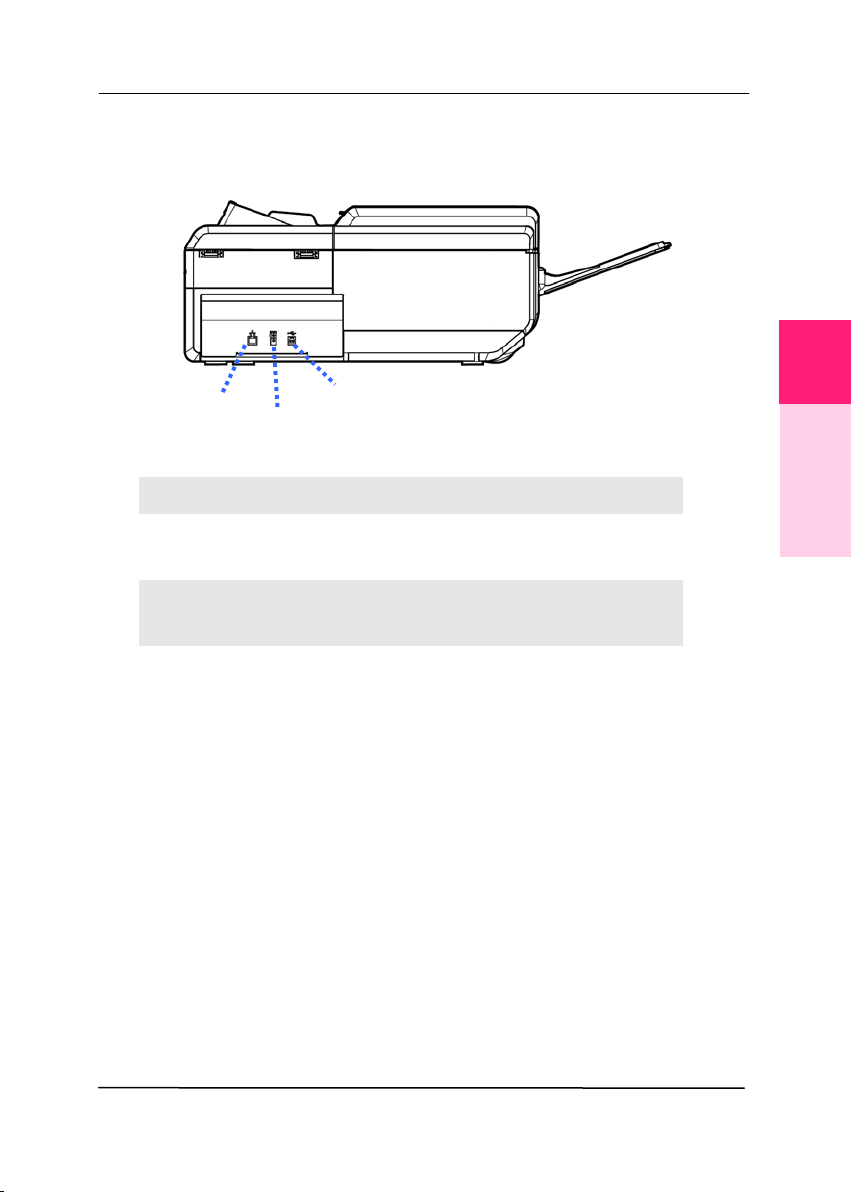
1 .3 Re a r Vie w
N
AME DESCRI PTI ON
USB Port Connect t o your com put er.
Pow er Jack Connect t he AC adapter t o t he
scanner.
LAN Port Connect t he product t o a
net w ork wit h an LAN cable.
Power Jack
USB Port
LAN Port
1
Introduction

User’s Ma nua l
1- 6
This page is intentionally left blank.

User’s Ma nua l
2- 1
2 . Scanner I nst a llation
2 .1 Pr ecaut ions
Keep t he scanner out of direct sunlight . Direct exposure
t o t he sun or excessive heat m ay cause dam age t o the
unit .
Do not inst all t he scanner in a hum id or dusty place.
Be sure t o use t he proper AC pow er source.
Place t he scanner securely on an even, flat surface.
Tilt ed or uneven surfaces m ay cause m echanical or
paper- feeding problem s.
Ret ain t he scanner box and packing m at erials for
shipping purposes.
2
User’s Ma nua l
2- 2
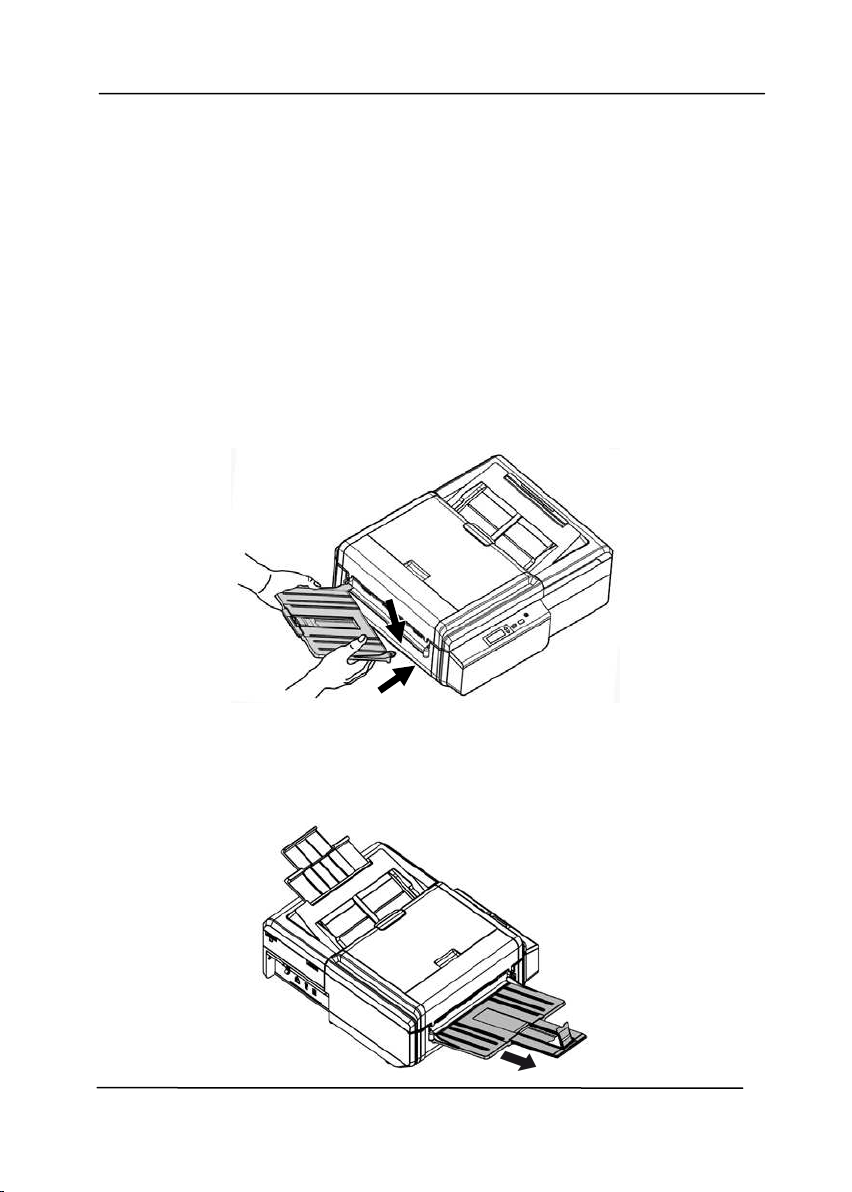
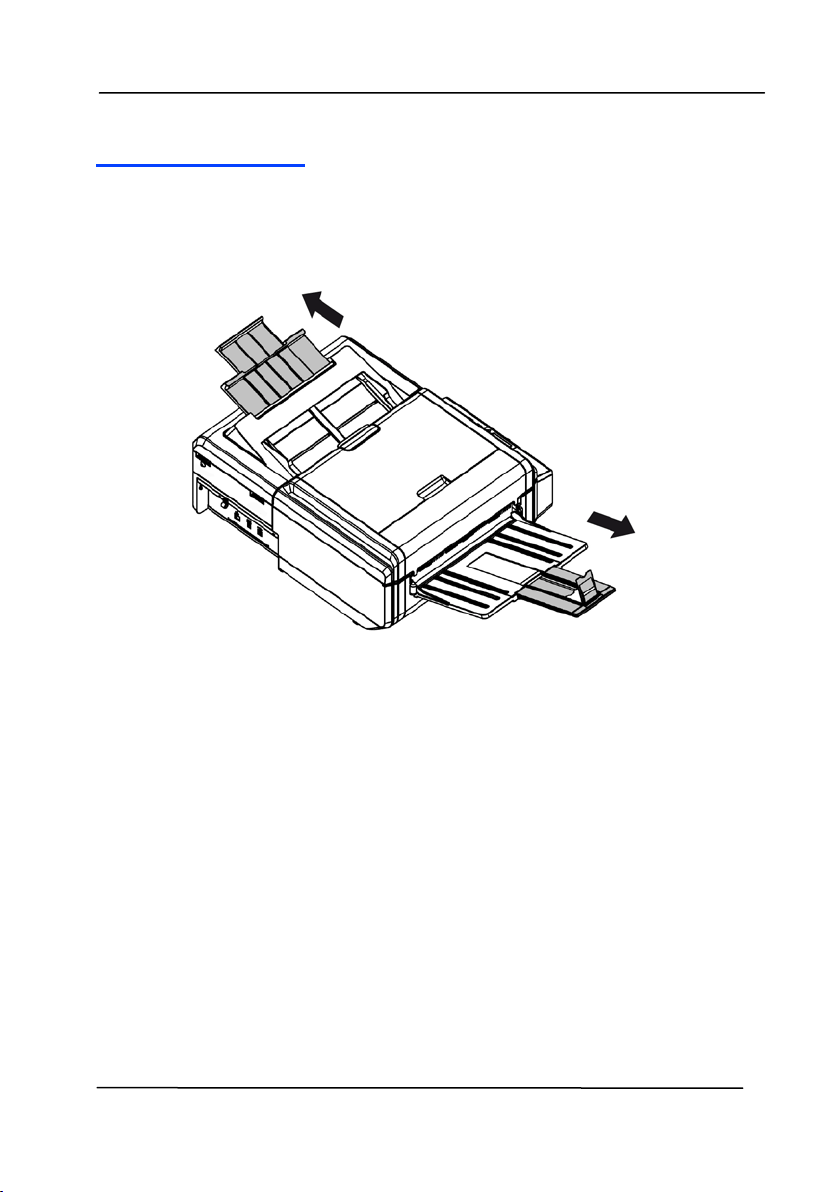
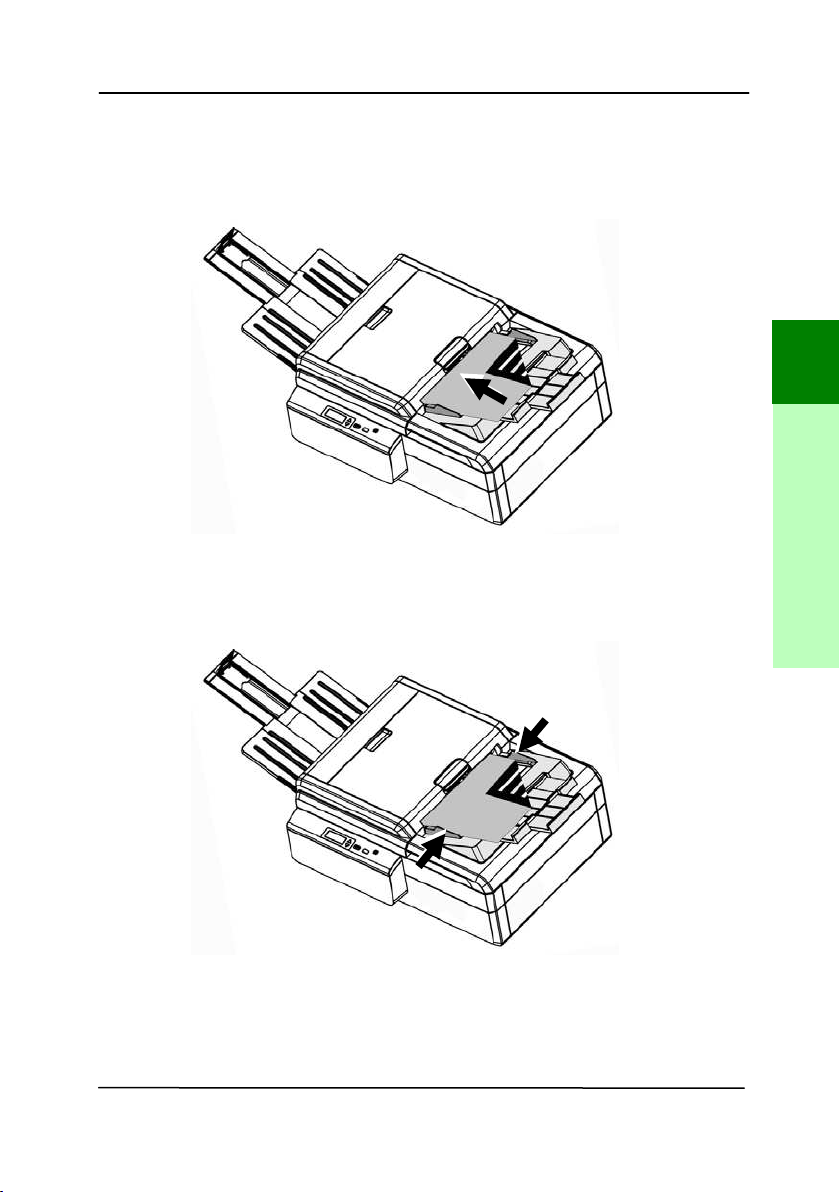
2 .2 I nst allin g t he AD F Out put Tray
1. Raise t he St acker Tray t o about 45 degrees and t hen insert
t he left pin of t he St acker Tray t o t he left hole in t he back of
the product as illustrat ed
.
2. Hold the left side of t he St acker Tray wit h your left hand and
press t he right end of t he St acker Tray inward
t o posit ion
the right pin above t he right hole in t he back of t he product
as illustrated. Press down t he right pin t o slide it int o t he
right hole
.
3. Pull out t he Stacker Extension t o t he lengt h of t he docum ent
(
) , and raise t he Stopper t o stop t he docum ent ( ) to
prevent docum ent s from falling.
User’s Ma nua l
2- 3
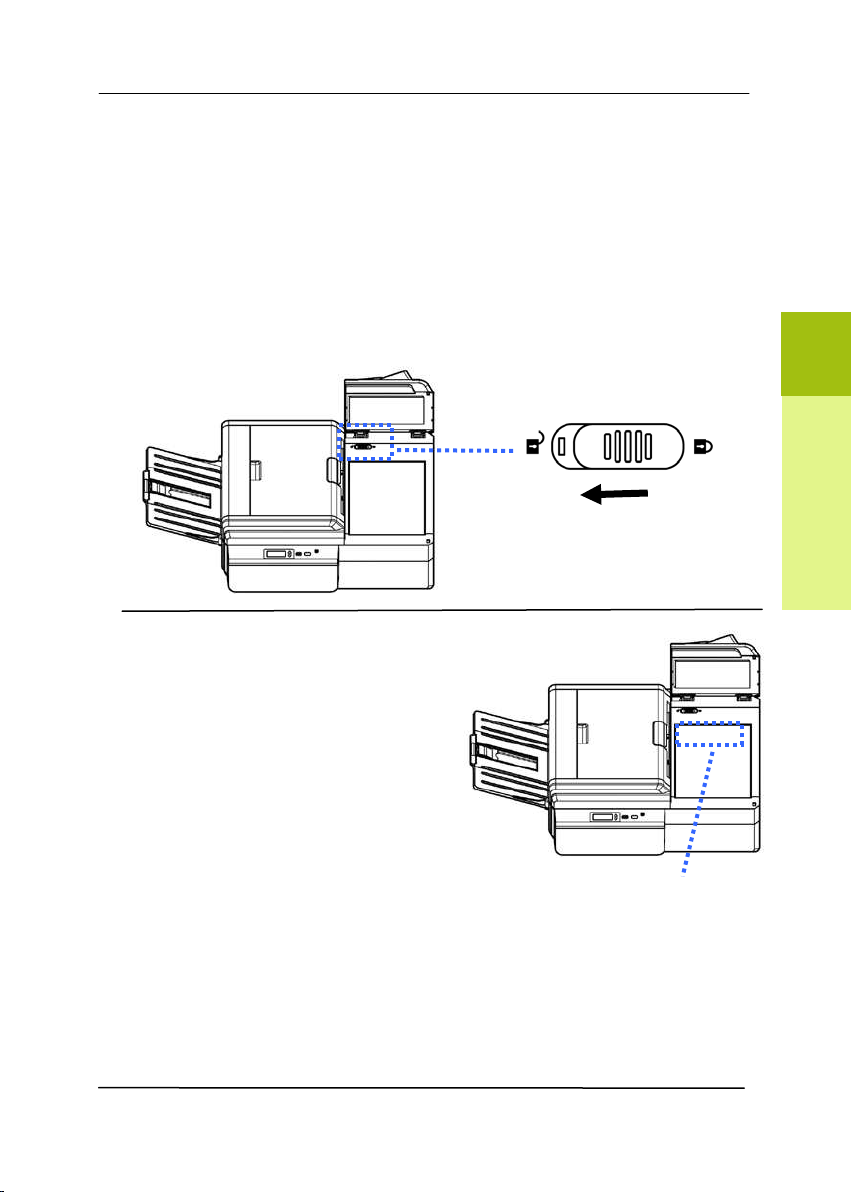
2 .3 Unlocking Your Scanner
The scan unit is locked during t ransport t o prot ect t he scanning
m echanism from being dam aged. Be sur e t o unlock t h e scan
unit befor e using t h e m a chine.
Open t he Flatbed Scanner
Backside Cover.
Move t he lock swit ch t o
the " unlocked posit ion".
I f you need to t ransport t he
m achine, please m ove t he lock
sw it ch t o the “ Locked” posit ion.
Before doing t his, m ake sure t he
scan unit at t he hom e posit ion
as indicated. ( I f not , please t urn
on the m achine. When the scan
unit m oves t o t he end, t urn off
the m achine.)
The scan unit
m ust be at
this posit ion
before being
locked.
2
Scanner Installation
User’s Ma nua l
2- 4
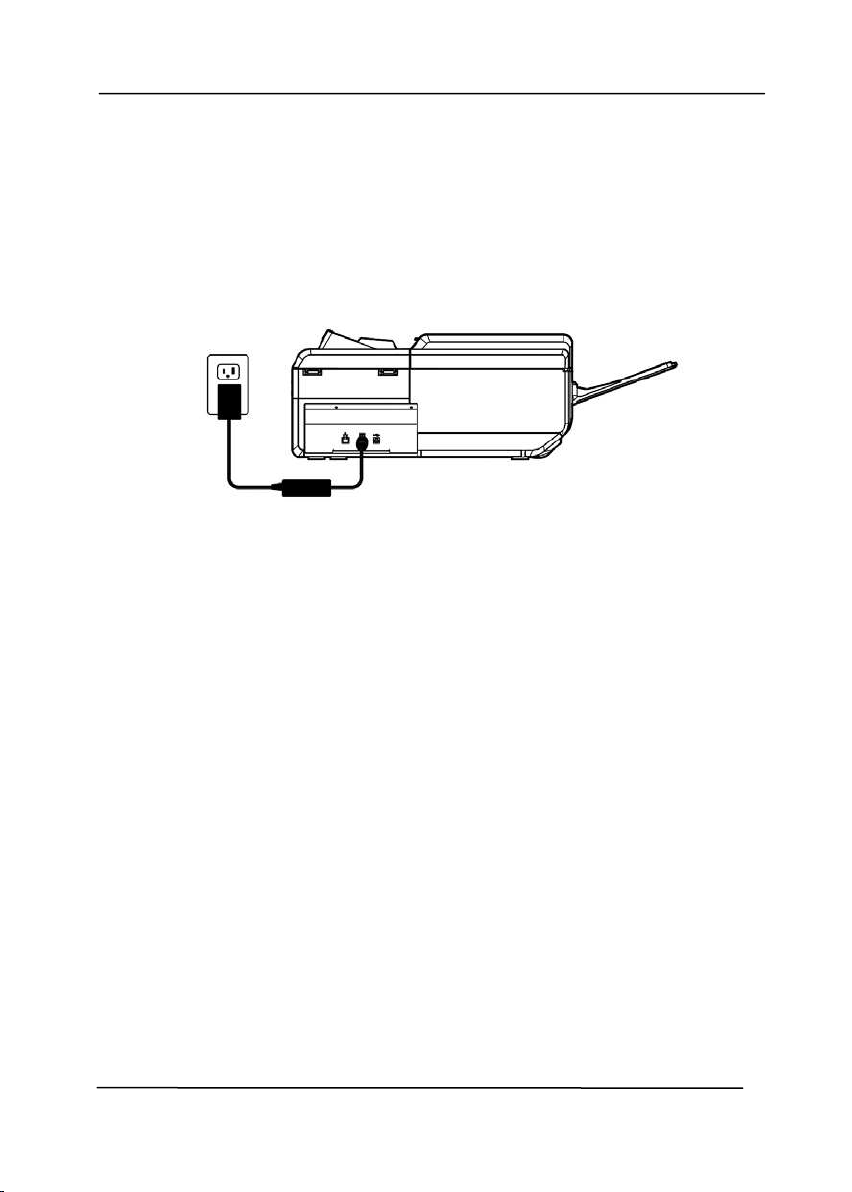
2 .4 Conne ct ing t o Pow er
Before connecting, m ak e sure t he pow er sw it ch is off.
Plug t he sm all end of t he power adapt or int o t he power j ack of
your scanner. I nsert t he ot her end t o an appropriat e pow er
outlet.
2 .5 Turning on t he Pow er
Press t he Pow er Swit ch button on t he front panel, t he Power
LED will flash. When it is finished and ready t o scan, t he LED
indicat or will stop flashing and becom e steadily on. To t urn
off t he scanner, press t he Power Sw it ch butt on for about 3
seconds, t he Power LED will be off.

User’s Ma nua l
2- 5
2 .6 I nstalling t he Sca nner D r iver
NOTE:
1 . To ensure your com put er can identify t he USB
scanner, please inst all scanner driver first before
connect ing the scanner to your com put er.
2. The scanner driver cont ains TWAI N, I SI S and WI A
driver. Aft er t he installation of
scanner driver is
com plet ed, this scanner
allows you to scan via a
TWAI N, I SI S, or a WI A int erface. Start your TWAI N-
com pliant im age edit ing soft ware application t o
select a TWAI N or WI A user int erface or your I SI S
soft w are t o select an I SI S user interface. You m ay
also launch Microsoft ’s Scanner and Cam era Wizard
t o scan via a WI A user interface.
1 . Place t he supplied CD- ROM ont o your CD- ROM drive.
2 . The soft ware installation graphic appears. I f not , run
“set u p.exe”.
2
Scanner Installation

User’s Ma nua l
2- 6
Cont e nt s on t he installat ion gr a phic:
I nstall Scanne r D r iver: To com m unicate wit h your
scanner, you need t o inst all t he scanner driver.
I nst all But t on M anager V2 : To use t he but tons on
the scanner, you need to install But ton Manager V2.
To ensure But t on Manager V2 works properly, please
FIRST install scanner driver before inst alling Button
Manager V2.
I nstall AVScan X: To scan and organize your m ult i-
page docum ent ( s) , you can install t he soft ware
application t o m anage them easily and effect ively.
Vie w M anual: Click “Vie w M a n ual” t o view or
print t he det ailed user m anual for the scanner and
But t on Manager V2 respectively.
3 . Click I n st all Scanne r D r iver to inst all t he scanner driver
and t hen click I nstall But t on M a nage r V2 to install the
But t on Manager V2 unto your com put er.
User’s Ma nua l
2- 7
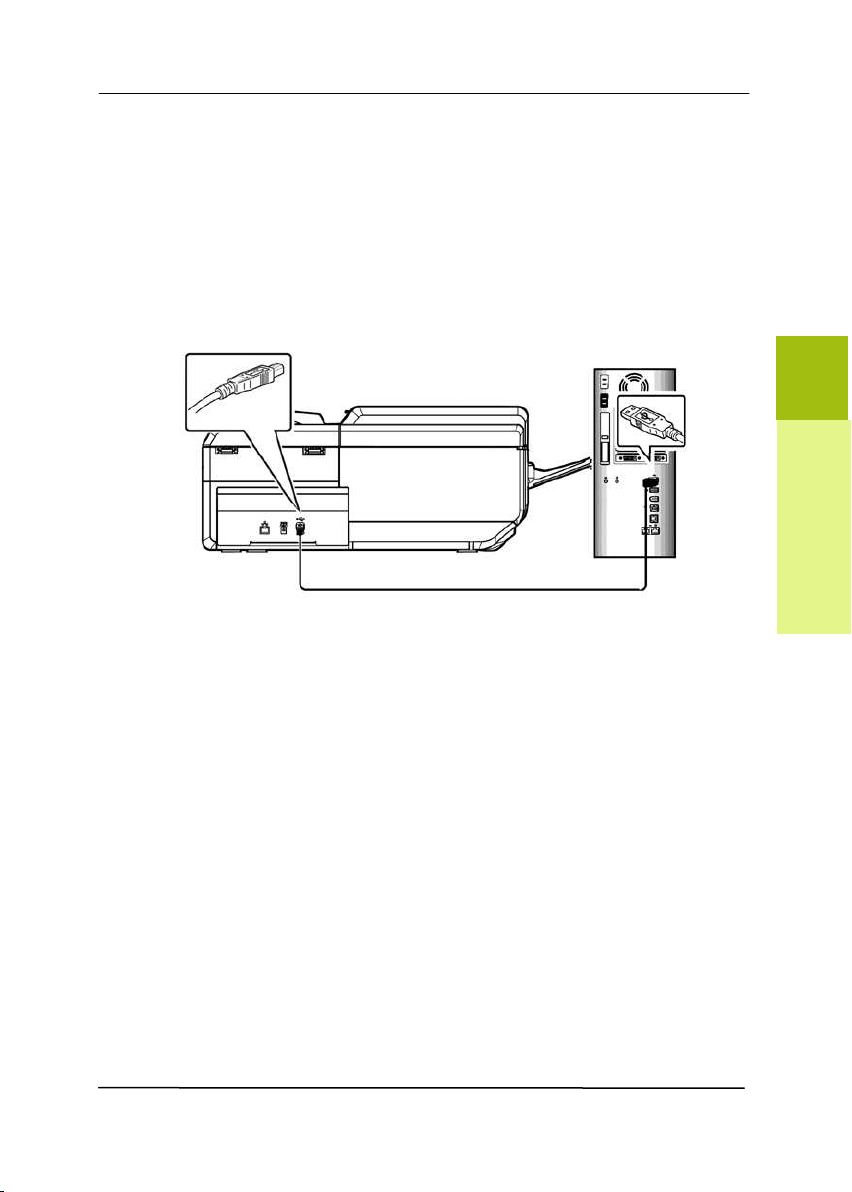
2 .7 Conne ct ing t o Com puter
1 . Connect t he squa r e e nd of t he USB cable t o t he USB port of
your scanner. Connect t he rectangle end t o t he USB port at
t he rear side of your com put er.
2 . The com put er should detect a new USB device and prom pt a
“N ew H a r dw ar e Found” m essage.
3 . By following t he on- screen instructions, click t he N e x t
but t on t o cont inue. When the cert ificat ion screen appears,
click Con t in ue Anyw a y t o com plete t he installation.
4 . When the Finish dialog is prom pt ed, click the Fin ish but t on.
2
Scanner Installation
User’s Ma nua l
2- 8
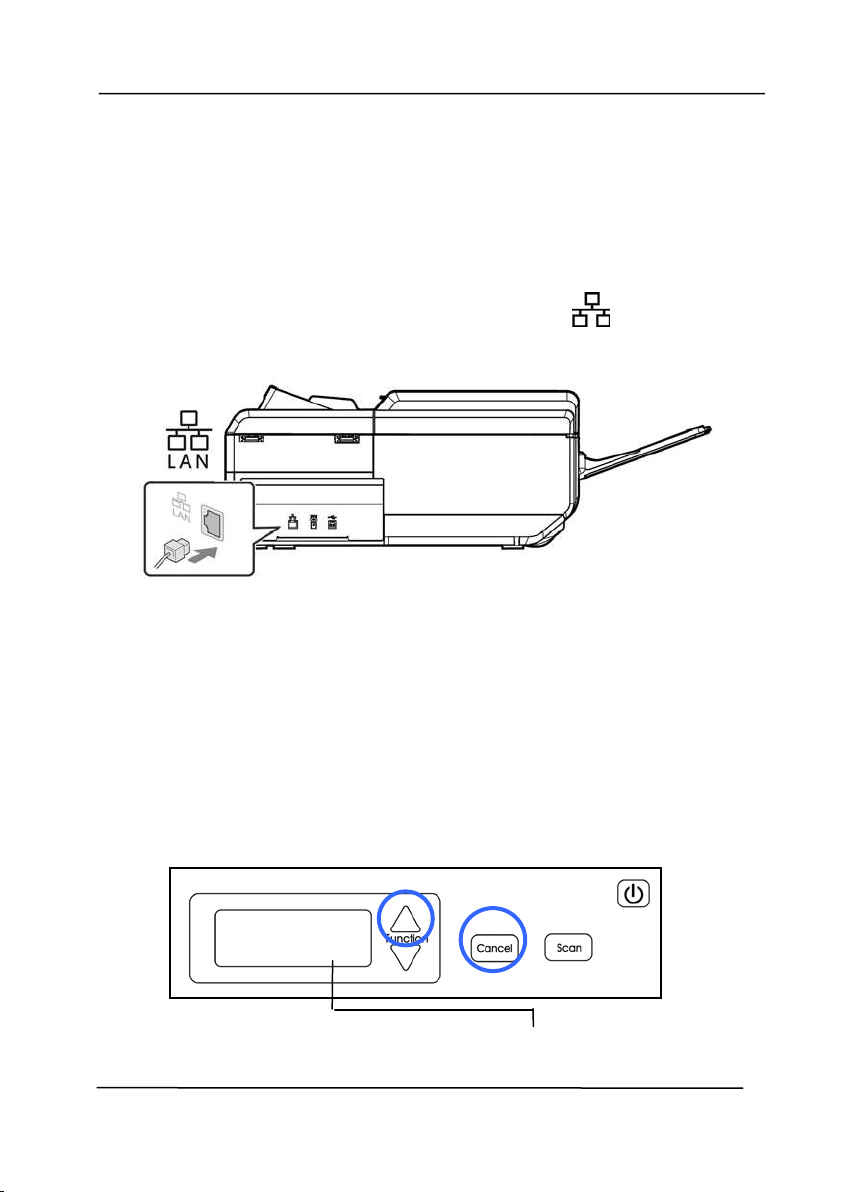
2 .8 Conne ct ing t o a W ired Net w or k
1 . Connect one end of your Ethernet LAN cable t o an available
port of your Et hernet Hub
.
2 . Connect t he ot her end t o t he port m arked
at the back
of t he product.
2 .9 Vie w ing t he Pr oduct’s I P Addr e ss from DH CP Se r ver
After connect ing t he Et hernet cable t o t he product, t he product’s
I P address can be aut om at ically obt ained from t he DHCP server.
To view t he product ’s I P address, follow t hese st eps:
Press and hold t he [ Cancel] key and [
] ( t he Up Arrow key) for
about 5 seconds, t he product’s I P address and Mac address will
be displayed in t he LCD screen.
[ Ca ncel] +
( 5 seconds) I P Address/ Mac Address
I P Address:
10.1.23.56
Mac Address:

User’s Ma nua l
2- 9
NOTE:
I f you wish t o specify a static I P address for t he product,
you m ay go t o t he product’s em bedded web page t o
change it s net work set t ings.
2 .1 0 Specifying t he Pr oduct’s I P Addr e ss
The m achine allow s t he system adm inist rat or t o specify an I P
address for t he product. Follow t hese steps t o specify t he
net w ork inform at ion.
1 . Open your browser.
2 . Type t he product’s I P address on t he URL address. A login
dialog box appears.
3 . Type t he default user nam e and password [ a dm in] and
click [ OK] .
You m ay change t he login user nam e and password lat er by
choosing t he [ Adm in Pr ofile ] t ab, ent er your new user
nam e and password, and t hen clicking [ Updat e ] to
com plet e t he sett ings.
4 . The product ’s web page will be displayed.
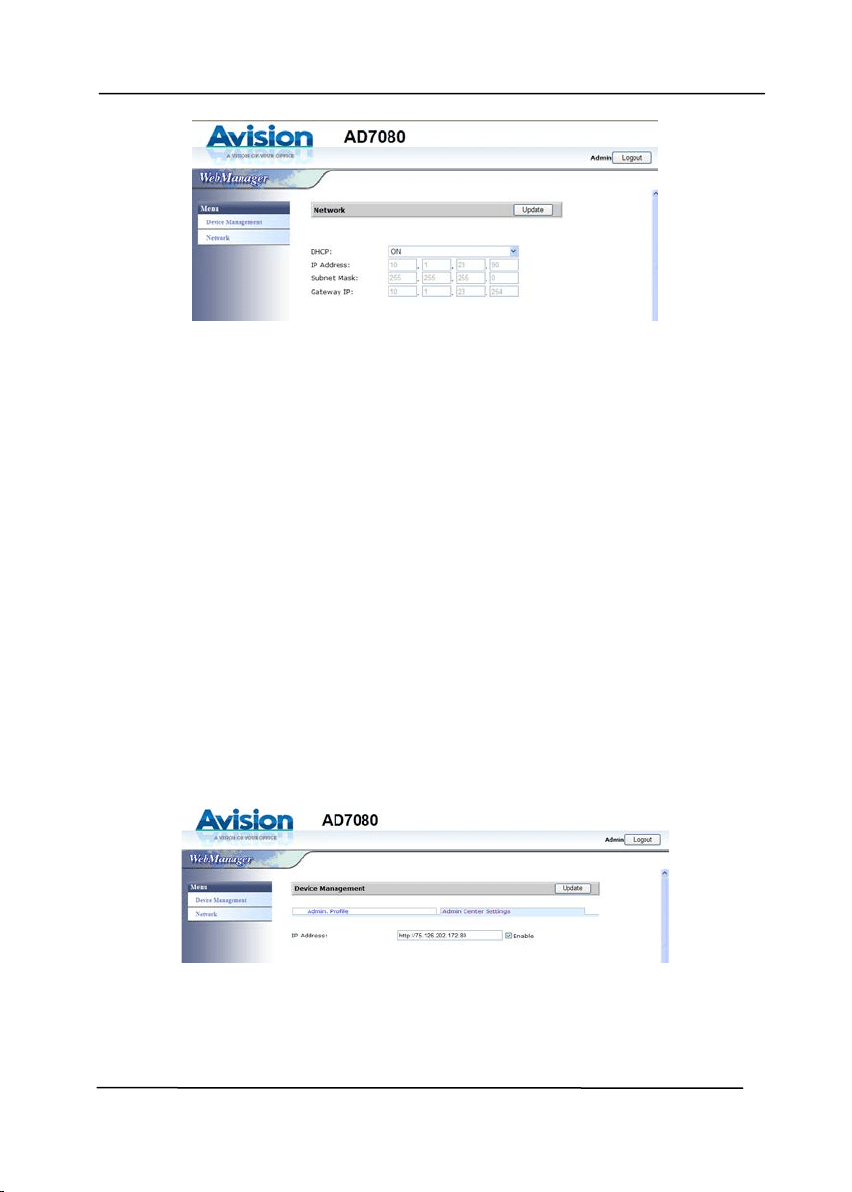
5 . Choose [ N e t w or k ] to prom pt t he following Net work Set ting
page.
User’s Ma nua l
2- 10
6 . Choose [ Off] from t he DHCP opt ion and t hen ent er your
network inform ation including I P address, Subnet Mask, and
Gateway I P.
7 . Click [ Upda t e] t o com plete t he set t ings.
2 .1 1 Sending t he System Log
The m achine allows t he system log file ( a file records all t he
event s/ j obs t hat occur in t he m achine) t o be sent t o a specified
server t o review t he log file for t roubleshoot ing purpose.
To send t he system log file,
1 . On t he product ’s web page, choose [ Device M a nage m ent ]
and t hen [ A
+
M anage r Set t ings] .
2 . Check [ Enable] and t hen ent er t he I P address of t he server
you wish t o send the log report .
3 . Click [ Updat e ] t o com plete and save t he sett ings. The
syst em log file will be sent t o t he server whenever t here is a
new j ob occurs in t he m achine.
User’s Ma nua l
2- 11
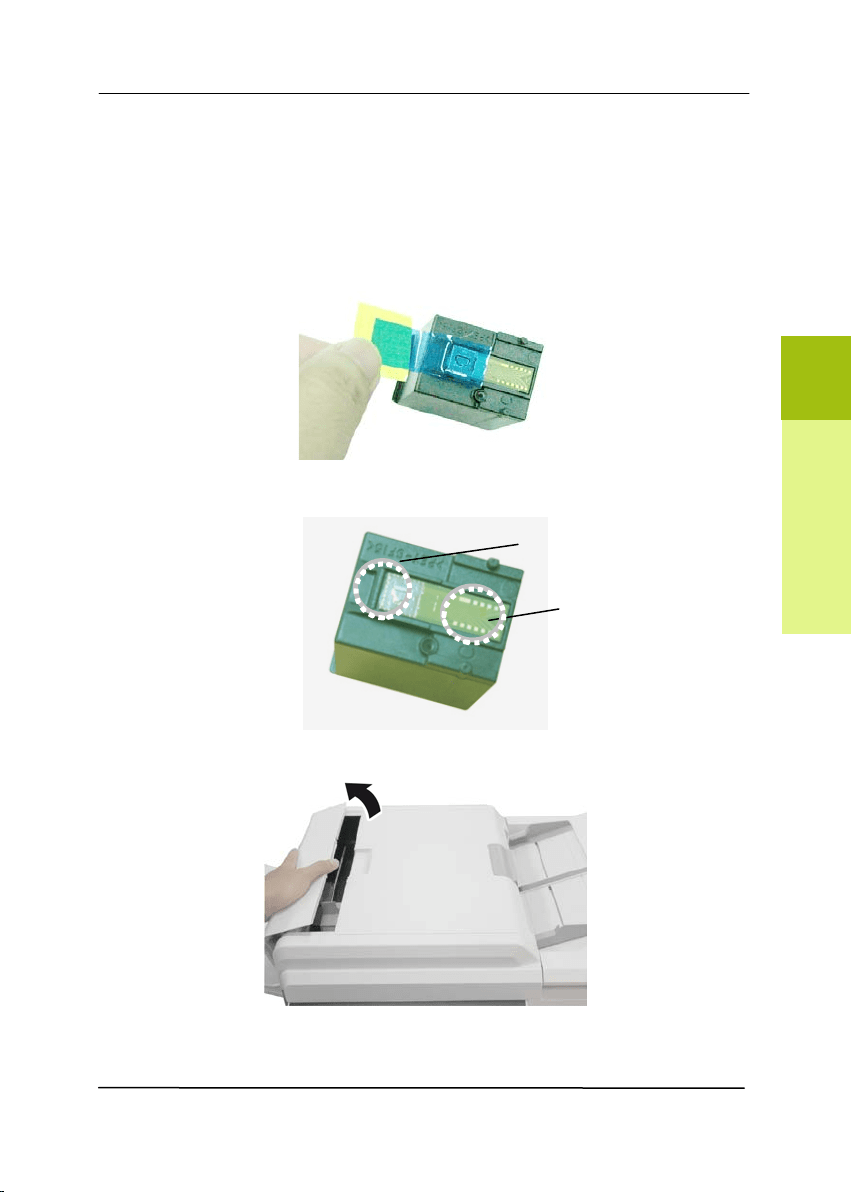
2 .1 2 I nst alling t he Printer Cart r idge
1 . Open t he box of t he print cart ridge and rem ove t he
protective t ape from t he bot t om of t he cartridge.
2 . Do not t ouch t he ink nozzles ( ) or t he gold cont act s ( )
aft er t he t ape has been rem oved.
3 . Open t he I m printer Cover.
2
Scanner Installation

User’s Ma nua l
2- 12
4 . Open t he Print Cart ridge Holder by lift ing up t he locking
lever w it h your finger.
5 . Grasp t he t ab of the cartridge and insert the cartridge into
t he holder wit h t he label facing up and t he tab point ing t o
t he left .
6 . Lower t he locking lever of t he Print Cart ridge Holder unt il it
locks in.
User’s Ma nua l
2- 13
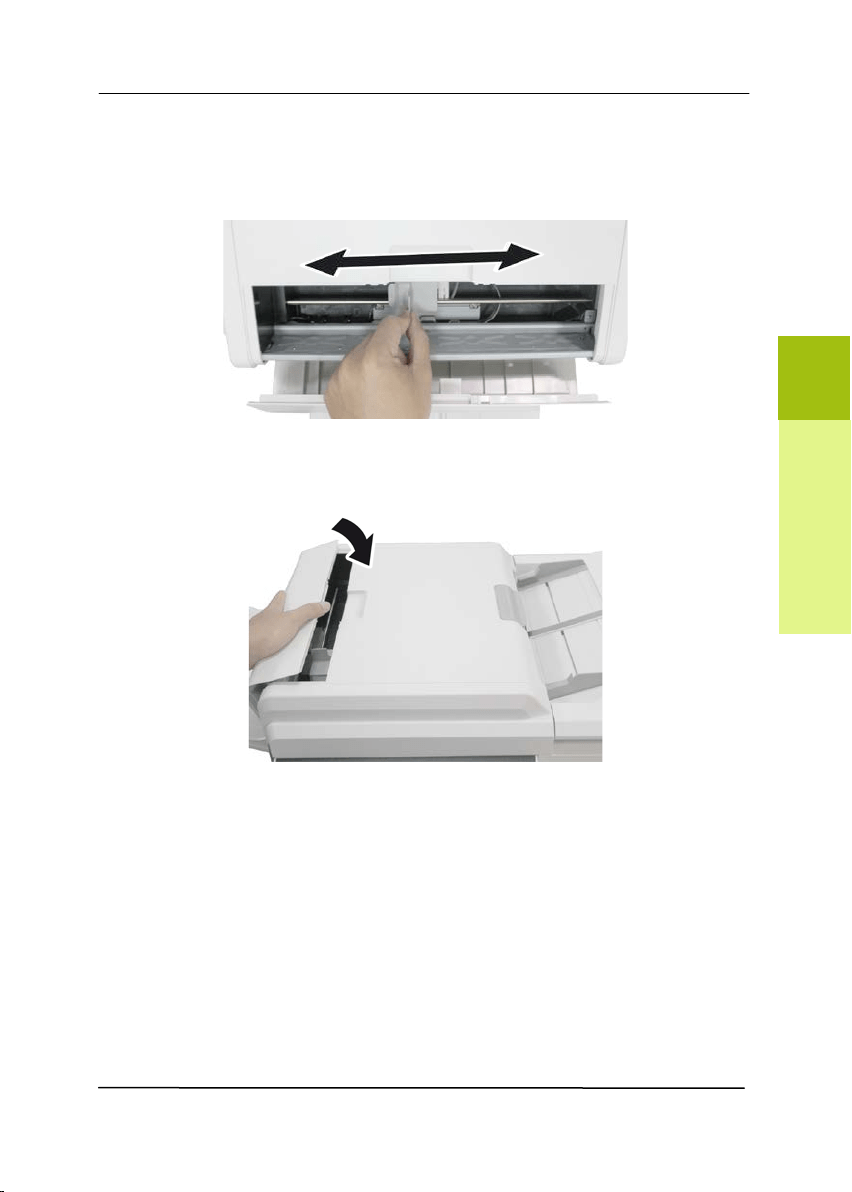
7 . Posit ion t he print cart ridge holder along where t he docum ent
will pass t hrough.
8 . Close t he I m print er Cover.
2
Scanner Installation

User’s Ma nua l
2- 14
This page is intentionally left blank.
User’s Ma nua l
3- 1
3 . COMPLETI N G YOUR FI RST
SCAN
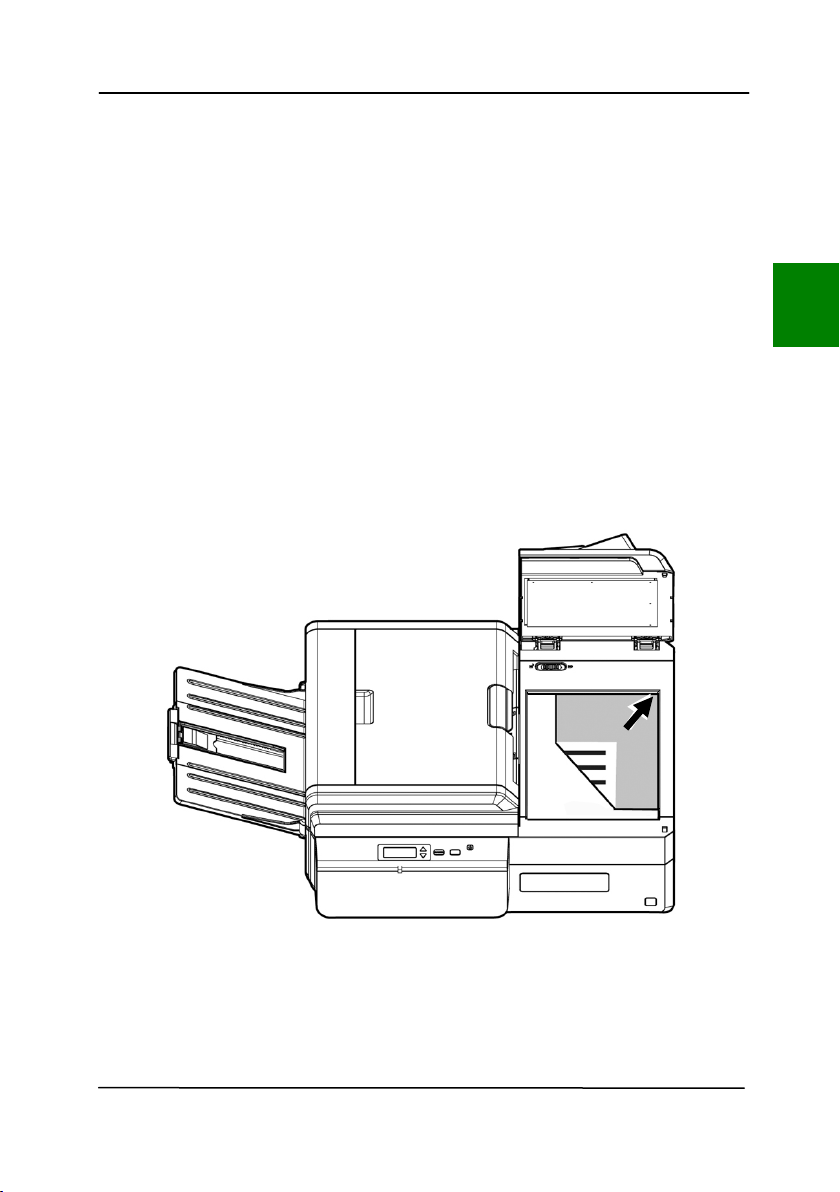
3 .1 Pla cing Your Docum ent on t he Flat bed
Open docum ent cover. Place your docum ent FACE DOW N on
the docum ent glass and align t he docum ent t o t he reference
m ark as indicated. Close docum ent cover.
3

User’s Ma nua l
3- 2
3 .2 Loading Your Docum ent in t h e ADF Pa per Tr a y
3 .2 .1 N ot ice on Using t h e ADF
Before using the ADF, please m ake sure t hat your paper m eet s
the following specifications:
• Docum ent ( s) can range in size from 50 x 88 m m (2 x 3.5
in.) t o 310 x 432 m m ( 12.2 x 17 in.) .
• Docum ent ( s) can range in weight from 28 ~ 209 g/ m
2
( 7
~ 56 lb.)
• ID cards up t o 1.25 m m ( 0.05 in.) t hick
• Docum ent ( s) should be square or rectangular and in good
condition ( not fragile or worn) .
• Docum ent ( s) should be free of curl, wrinkle, t ears, wet ink,
or punch holes.
• Docum ent ( s) should be free of staples, paper clips, paper
st icky not es.
User’s Ma nua l
3- 3
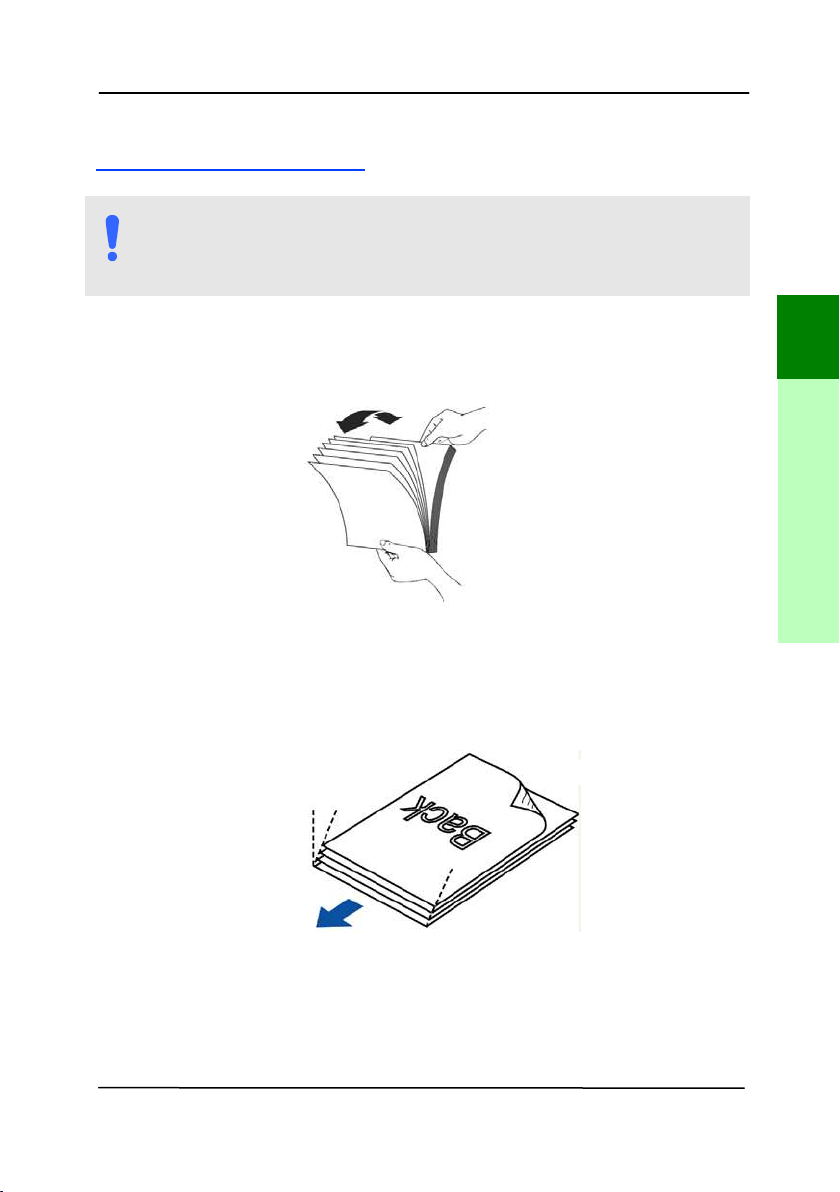
Fanning Your D ocum e nt
NOTE:
To avoid occasional m ult i- feeds or paper j am s, please fan
yo
ur docum ent s and align t he t op edges before feeding
them int o t he scanner.
1. Hold both ends of t he docum ent s and fan t hem a few
t im es.
2. Rotate t he docum ent s by 90 degrees and fan t hem in t he
sam e m anner.
3. Align the edges of t he docum ent s in a step- like patt ern
( see picture below) .
St ep- like
Scanning
Direct ion
3
Completing Your First Scan
User’s Ma nua l
3- 4
Docum ent Feeding
1. Unfold t he docum ent feeder and it s extension.
2. Unfold t he out put tray and raise t he paper stopper.
User’s Ma nua l
3- 5
3. Load t he stack of docum ent
face dow n wit h t he t op of
the pages pointing int o t he feeder.
4. Verify t hat t he paper guides are aligned wit h the edges
of t he stack.
3
Completing Your First Scan
User’s Ma nua l
3- 6
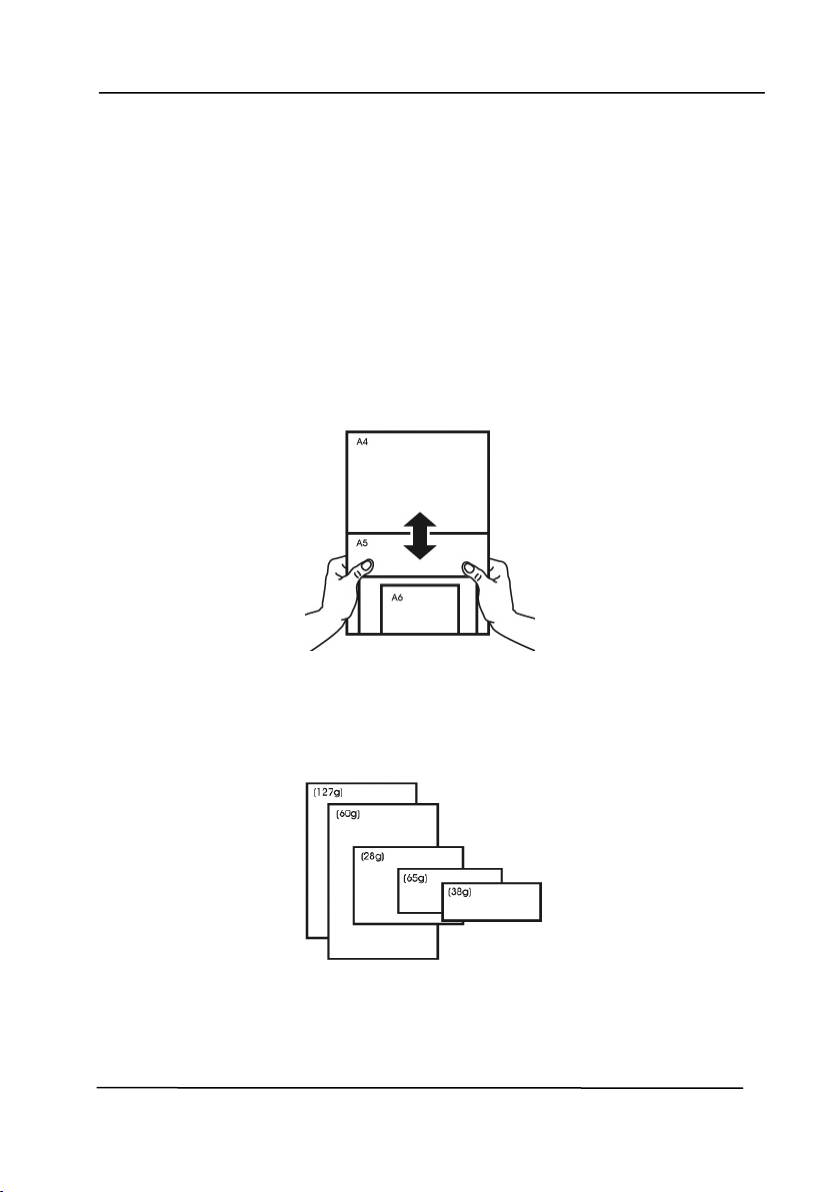
3 .2 .2 Scann ing a St ack of Docum ent w it h Various siz e s
and W eight s
When scanning a bat ch of docum ents wit h different sizes and
weight s, be sure t o follow t hese guidelines t o avoid a skewed
im age or a paper j am :
1 . Align the docum ent s TOP EDGE first in t he sequence of
paper size from large t o sm all.
2 . I f t w o pages are of t he sam e size yet w it h different weight ,
arrange t hese pages in t he sequence of paper w eight from
heavyweight t o light weight .

User’s Ma nua l
3- 7
3 . Align the edges of t he docum ent s by t apping the bott om of
the stack against t he table t op.
4 . Cent er t hese pages in t he docum ent feeder and m ake sure
that t he edges of page of the largest size slight ly t ouch the
Paper Guide.
3
Completing Your First Scan
User’s Ma nua l
3- 8
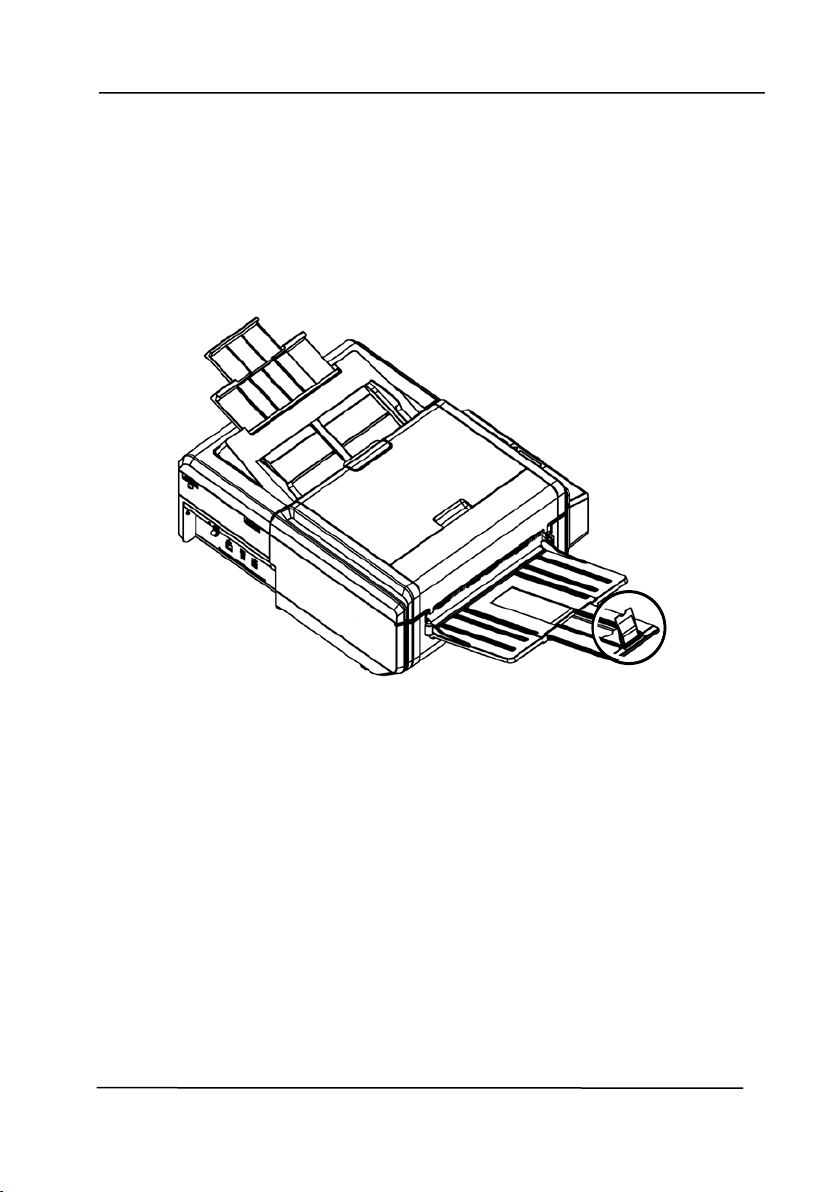
3 .3 Using t he Paper St opper
Raise t he Paper St opper and slide it t o t he right or t o t he left
according t o t he paper size you are loading from t he aut o
docum ent feeder. The paper stopper is used t o arrange your
docum ent so t he paper can be neat ly collect ed aft er scan.

User’s Ma nua l
3- 9
3 .4 Ve r ifying Your Scanne r I nstalla t ion
To verify if your scanner inst allat ion is correct, Avision provides
you a useful t est program called Avision Capt ure Tool. Wit h
this t ool, you can perform sim ple scans and view t he capt ured
im ages. I n addit ion, it helps you com plete your scan at a rated
speed.
The following procedure describes how t o verify your scanner
installation. I f t he inst allation is not correct, please review t he
preceding sect ion t o check if t he cable connect ion and scanner
driver have been successfully inst alled.
Before you begin, be sure t he scanner is on.
1. Select Start> Program s> Avision xxx Scanner> Avision
Capt ure Tool. The Select Scanner Model dialog box w ill be
displayed.
2. Select your driver t ype and scanner m odel and click OK.
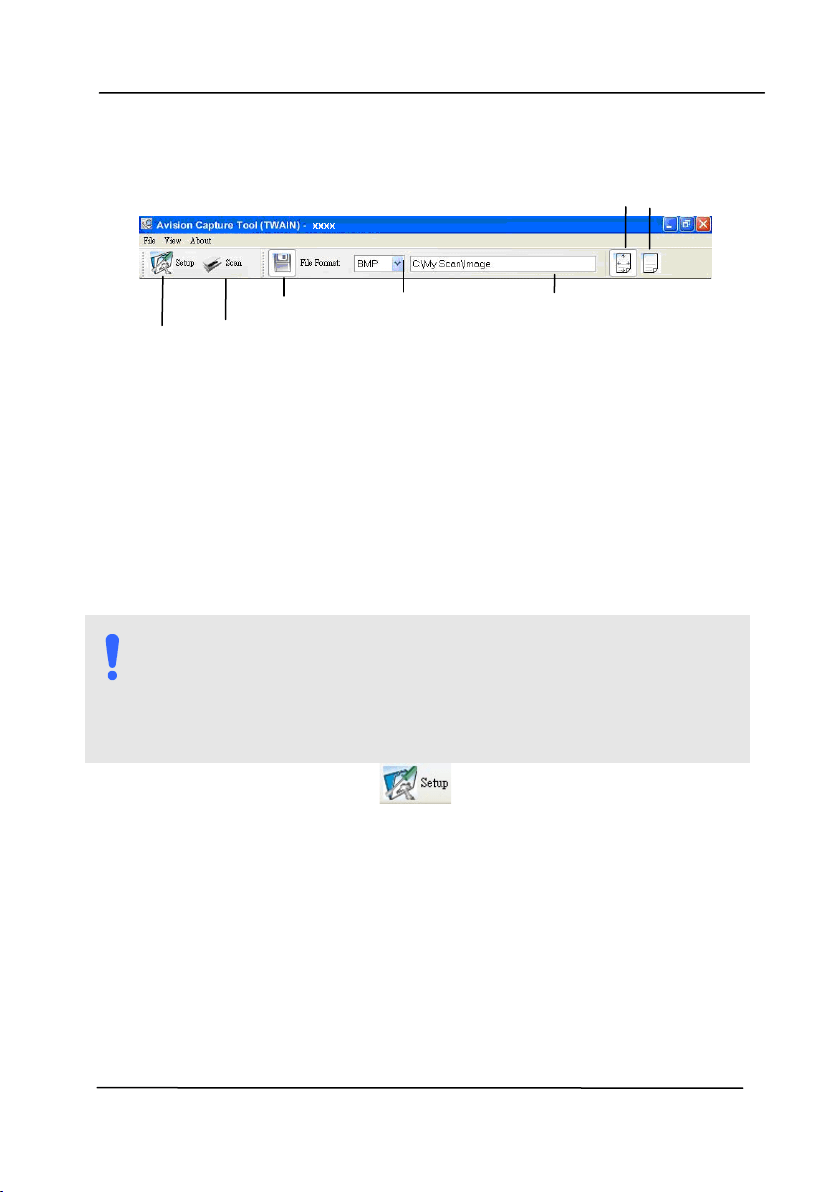
The following Avision Capt ure Tool dialog box will be
displayed.
3
Completing Your First Scan
User’s Ma nua l
3- 10
3. Choose your desired file form at from t he File Form at drop
down list box. ( Default is JPEG, ot her choice includes TI FF,
MTI FF, PDF, MPDF, GI F, and BMP.) The support ed file
form at s vary depending on your scanner m odel.
4. Type your desired folder nam e and file nam e in t he File
Path box. ( Default is C: \ Docum ents and Set tings\ User
Nam e\ My Docum ent s\ My Scan\ I m age.)
NOTE:
I f you do not wish t o save t he scanned im age, deselect
the Save but t on since default is Save Enable. I n this case,
t he t hum bnail view w ill be disabled. And therefore, aft er
viewing all t he scanned im ages, only t he last one will
rem ain on t he screen.
5. Click the Setup but t on ( ) or choose Setup from t he
File m enu t o prom pt t he Scanner Propert ies dialog box.
Set up
Actual
Size
Fit
Page
Scan
File Form at
Save File Path
User’s Ma nua l
3- 11
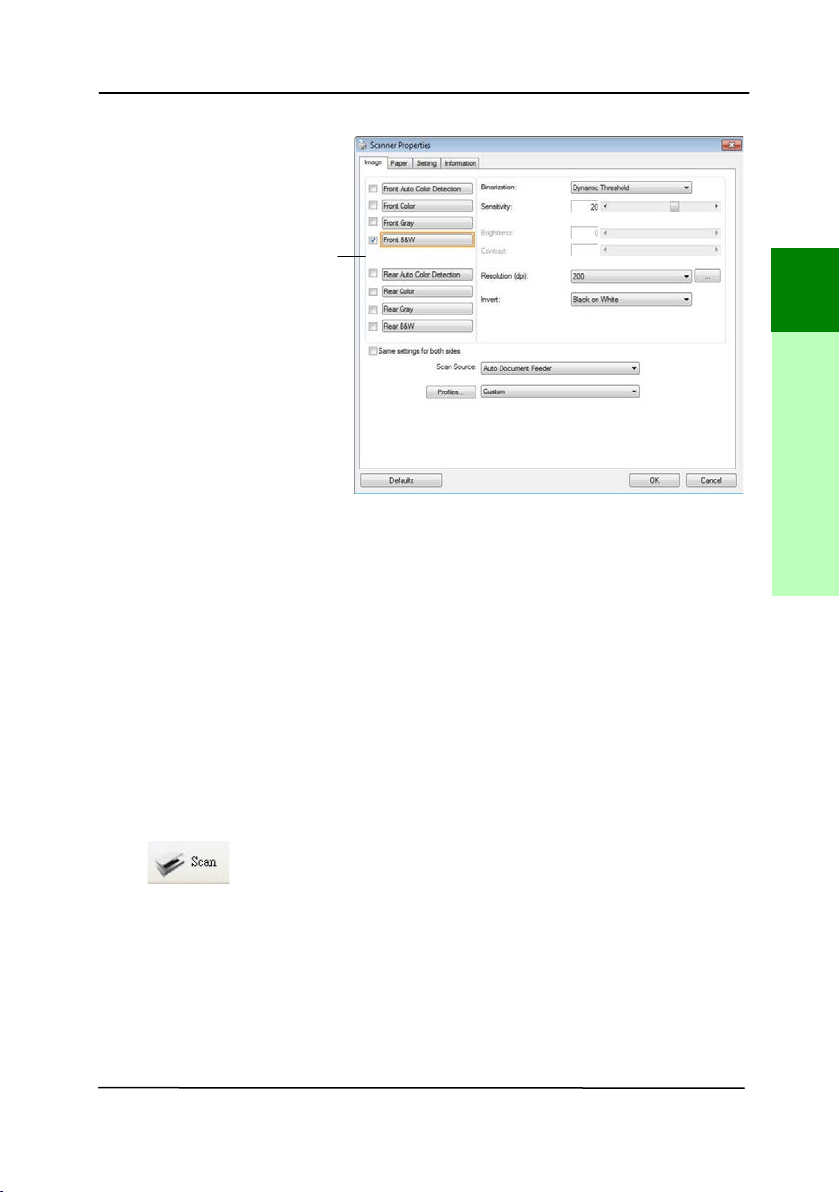
6. From t he I m age Selection Box, choose your desired im age
type for your scanned im age. ( Default is Front B&W) I f
you have a duplex scanner, choose Front and Rear t o scan
bot h sides of your docum ent .
7. Click OK t o quit t he Scanner Properties dialog box. ( To
learn m ore details about t he Scanner Propert ies dialog box,
please see t he subsequent chapt er, Using t he Scanner
Propert ies Dialog Box.)
8. Place your docum ent face down on t he docum ent glass or
face up in t he auto docum ent feeder.
9. I n the Scan Validat ion dialog box, click t he Scan but t on
(
) or choose Scan from t he File m enu.
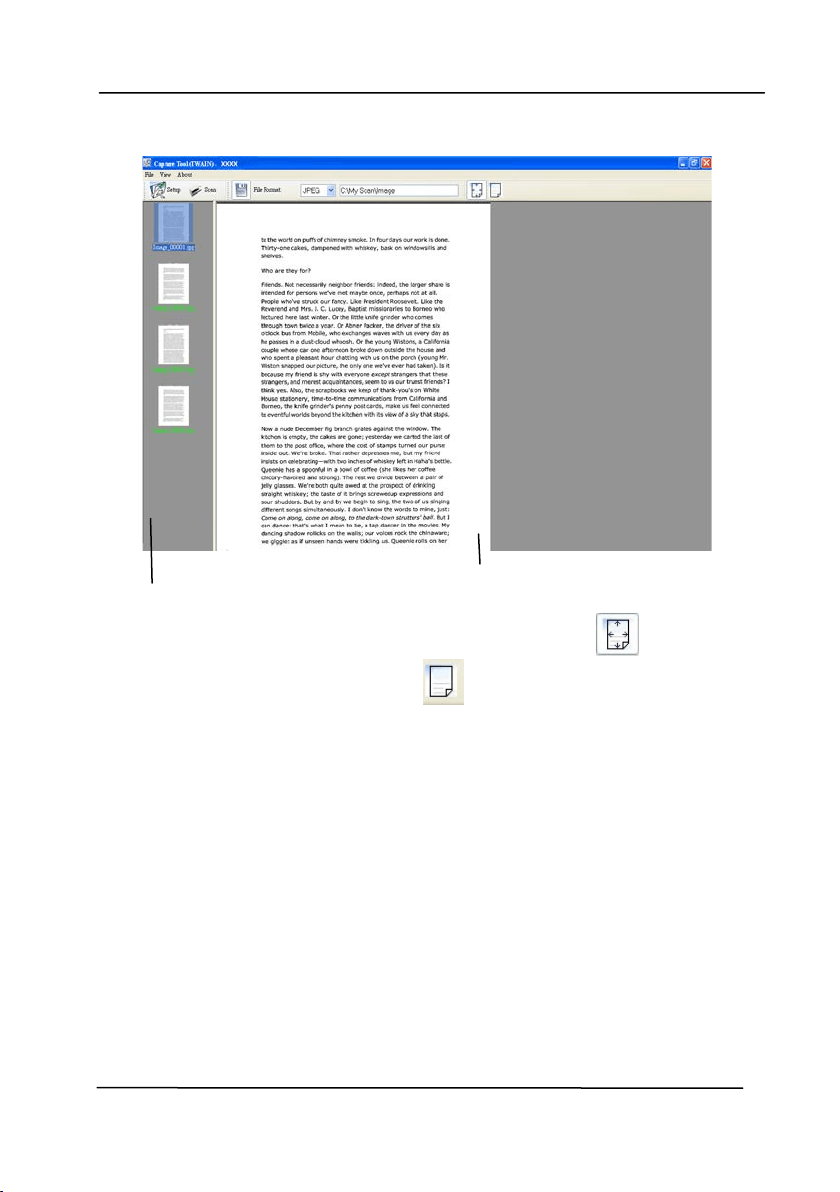
10. The docum ent will be scanned and displayed in t he Scan
Validat ion screen. Aft er t he scanned im ages have been
displayed, your scanner installation verification is
com pleted.
I m age
Selection
Box
3
Completing Your First Scan
User’s Ma nua l
3- 12
11. You can view t he scanned im age in Fit Page (
) or
Actual Size ( 100% ) but t on (
) from t he Viewing t oolbars
at the right side.
12. Click t he Close box or Quit from t he File m enu t o exit t he
Scan Validation Tool.
Display View
Thum bnail View
User’s Ma nua l
3- 13
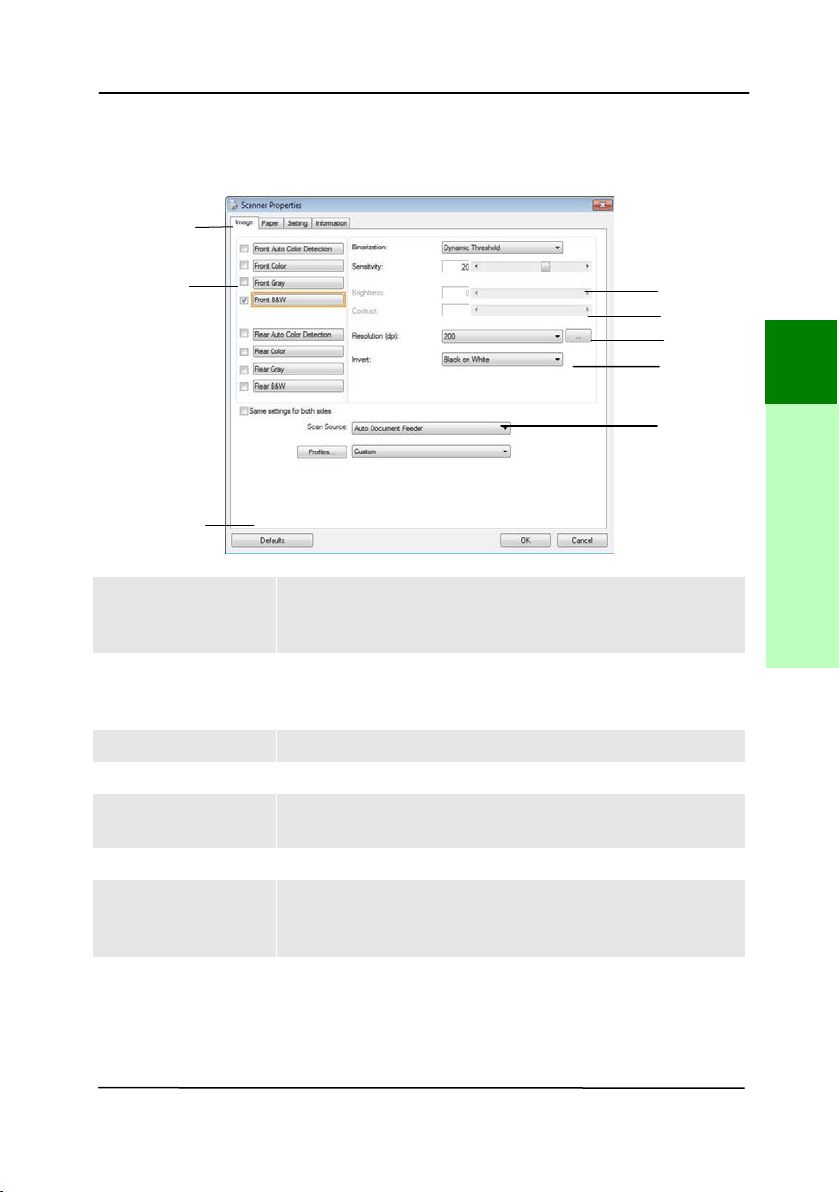
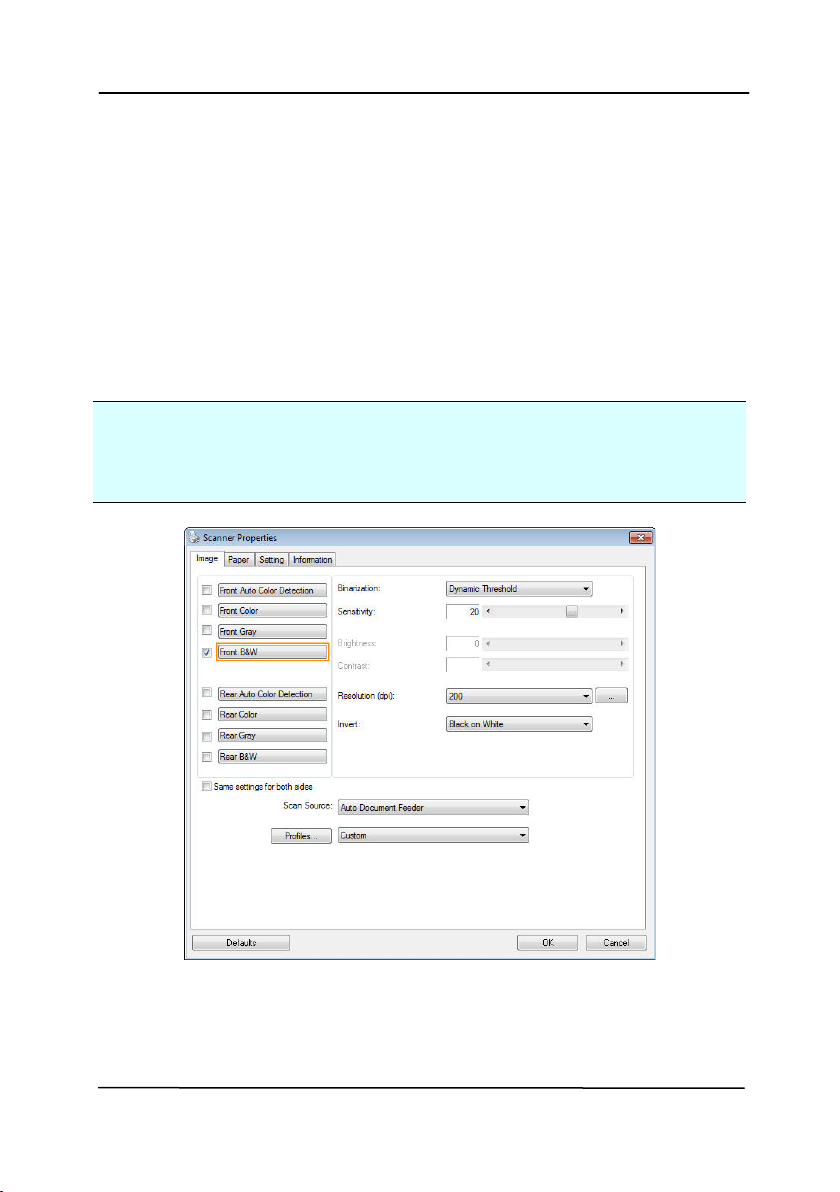
3 .5 A Gla nce of t h e Scan ner Prope r t ie s D ialog Box
1 . Ta b Opt ions Choice: I m age, Com pression, Color Dropout,
Paper, Mult i- Feed Detect ion, Preview, Opt ions,
Set t ings, I nform ation.
2 . I m a ge
Sele ction Box
Choose your im age t ype and t he side of
docum ent you wish t o scan. Opt ions vary
based on type of scanner.
3 . Brigh t ness Adj ust t he bright ness level from –100 t o + 100.
4 . Contrast Adj ust t he cont r ast level from –100 t o + 100.
5 . Re solut ion
Determ ine the quality of t he scanned im age.
The industr y standard is 200 dpi.
6 . I nvert Reverse t he color of your scanned im age.
7 . Scan Sour ce Choice: Aut o Docum ent Feeder, Flat bed,
Flatbed ( Book), Aut om at ic ( v aries due to
different scanner m odel)
8 . D efault s Reset all values on t he t abs t o t he fact ory
default set t ings.
3
4
5
6
7
1
2
8
3
Completing Your First Scan

User’s Ma nua l
3- 14
This page is intentionally left blank.
User’s Ma nua l
4- 1
4 . USI NG THE SCAN N ER
PROPERTI ES DI ALOG BOX
The Scanner Properties dialog box allow s you t o configure t he
scanner’s sett ings. I t consists of several t abbed windows each
of which will be described in t his chapt er.
N ot e : I n t his chapter, all options are available based on a
duplex ( double- side) scanner. I f you have purchased a sim plex
( single-side) scanner, all opt ions are available for single sided
only.
The Scanner Propert ie s dialog box
User’s Ma nua l
4- 2
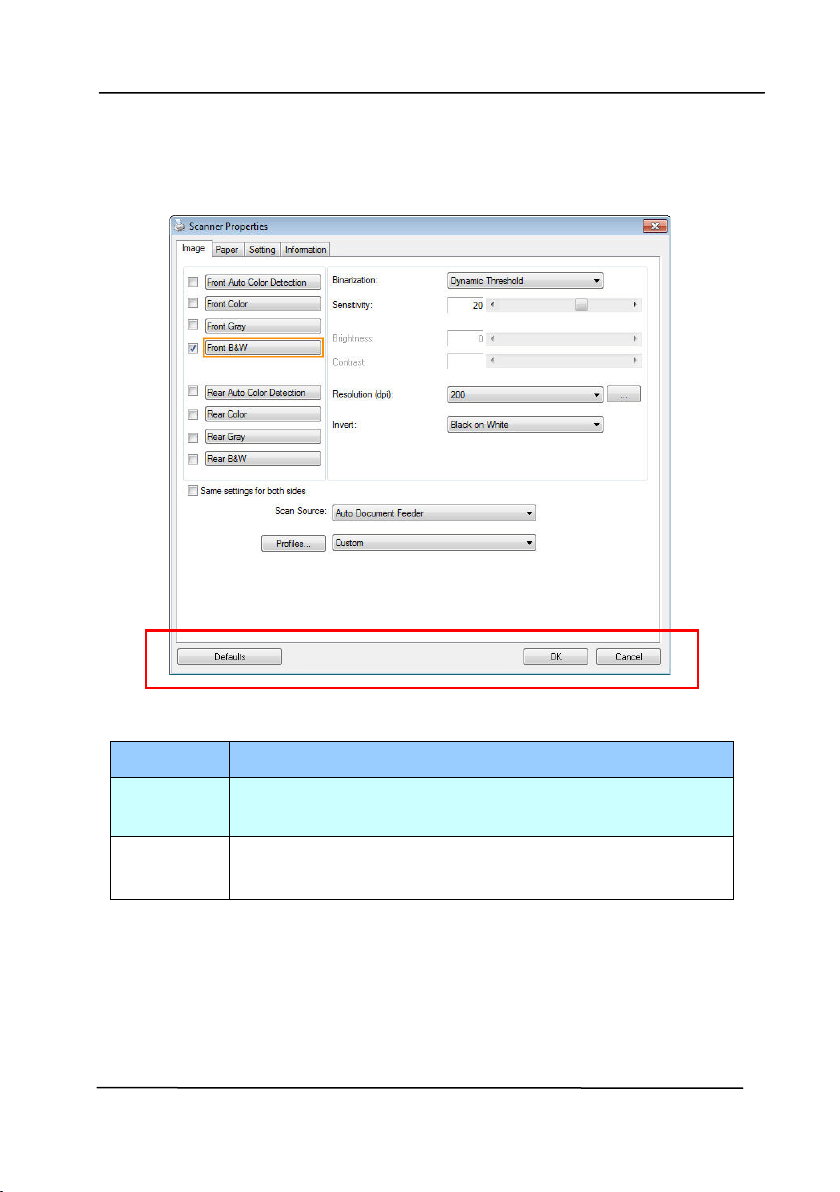
4 .1 But t ons on t h e Scan ner Prope rt ies D ialog Box
The bu t t ons on t he Scanne r Propertie s dialog box
But t ons
Description
Defa ult s Click t he Defau lt s but ton, t he factory default
set t ings will be shown on each t ab.
Cancel Click the Ca ncel but t on t o leave t he Scanner
Properties dialog box.

User’s Ma nua l
4- 3
The following t able shows t he default set t ings:
Tab nam e
Defa ult set t ings
I m age
I m age:Front B&W
Binarization:Dynam ic Threshold
Resolut ion:200 dpi
I nvert :Blank on Whit e
Scan Source:Aut o Docum ent Feeder
Threshold:None
Brightness:None
Cont rast:None
Com pression None
Color Dropou t
None
Pape r Cropping:Aut om at ic
Deskew:Yes
Orientat ion:Port rait
OverScan:0.00
Not e: The availabilit y of t his opt ion
varies due t o scanner m odel.
Unit :I nch
M ult i- Fe e d
Detection
None
Pr e vie w None
Opt ions
Rotat ion Degrees
:
None
Blank Page Rem oval:None
Edge Fill:Whit e,0 m m
I m age Cont rol Opt ion:None
Sett ing Enable Energy Saver:Enable, 15
m inutes aft er last scan act ion
Show Scanning Progress:Yes
Show Warning Message:Yes
Save Sett ings aft er Closing:Yes
I m print er Digital Im print er

User’s Ma nua l
4- 4
4 .2
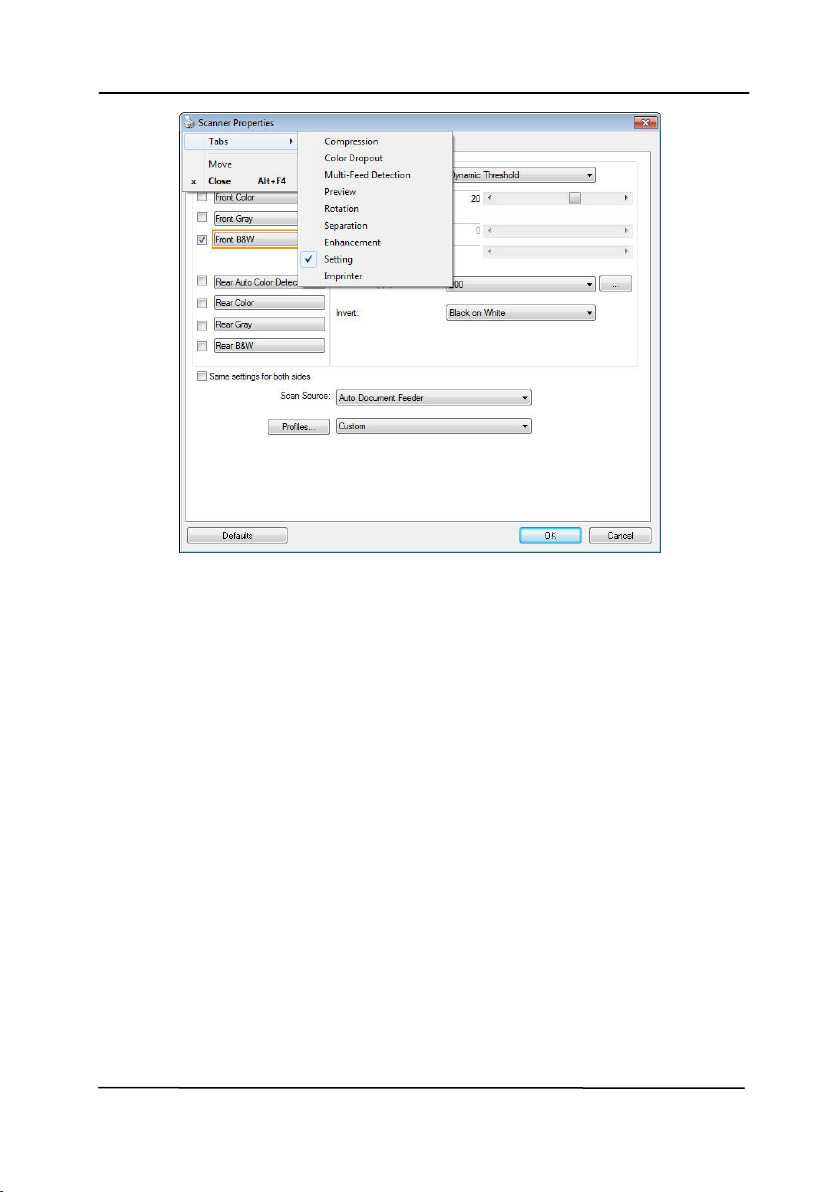
Show ing or H iding Tabs
The [ Scanne r Propertie s] dialog box is displayed in default
wit h t hree basic t abs - I m age, Paper, and I nform at ion. To
show m ore t abs, click t he [ Scanner Pr opert ie s] icon t o access
m ore scan sett ings.
To show m ore t abs,
1 . Click the [ Sca nner Pr opert ies] icon (
) on t he upper
left corner, and choose [ Ta b] t o show available t ab nam es.
The available t abs include Com pression, Color Drop out ,
Preview, Rotation, Separation, Mult i- Feed, Opt ions,
Sett ings, and I m print er. ( Not e: the opt ions vary based on
scanner m odel.)
2 . Choose the tab you want t o display. The select ed t ab will
be shown wit h a check m ark and t hen displayed in t he
[ Scanner Properties] dialog box.
3 . To access t he set tings, click t he select ed t ab on t he t op of
t he [ Scann e r Prope r t ies] dialog box. The page of t he
selected t ab will be displayed.
To hide a t ab window,
1 . Click the [ Sca nner Pr opert ies] icon (
) on t he upper
left corner, and choose [ Tabs] to show available t ab
nam es.
2 . Choose the tab you want t o hide. Then, t he select ed t ab
will be hided in the [ Scann e r Prope r t ies] dialog box.
Note: The [ I m a ge] , [ Pape r] , and [ I nfor m a t ion] t ab can
not be hided since t hey preprogram m ed to be displayed by
default .
User’s Ma nua l
4- 5
User’s Ma nua l
4- 6
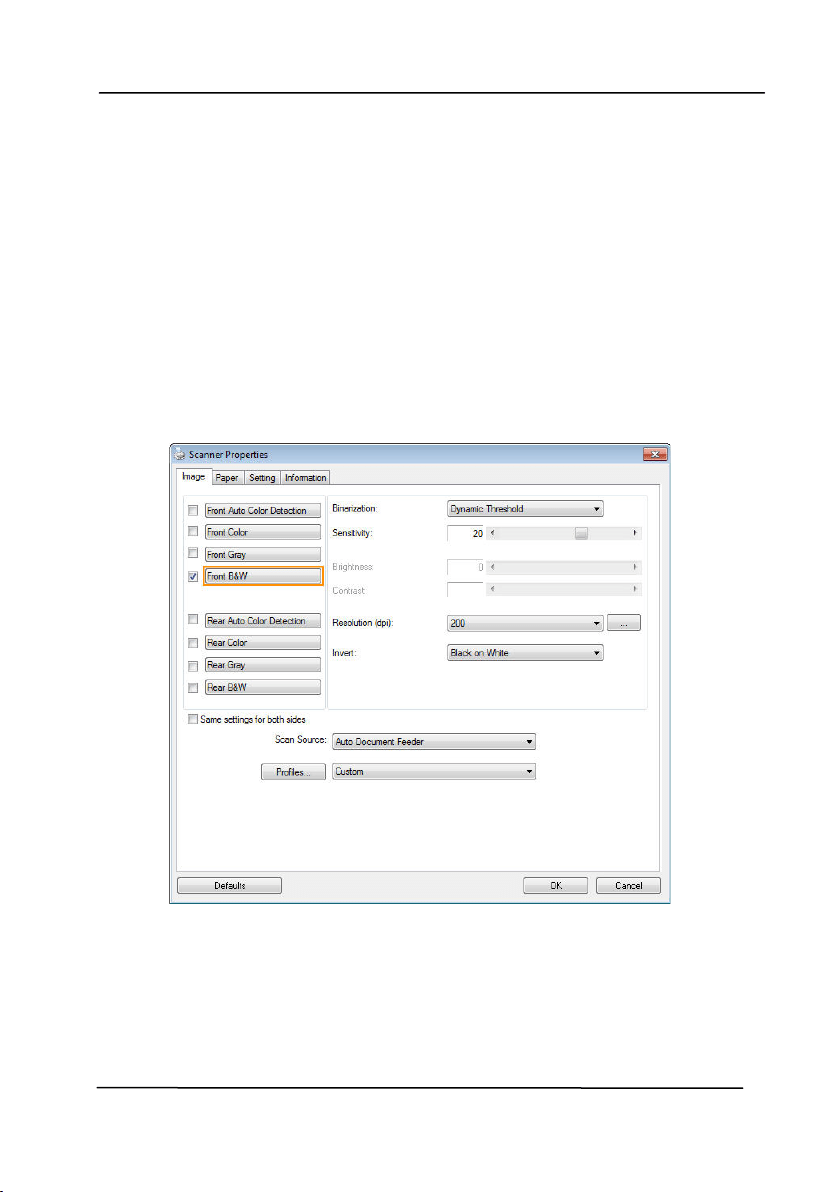
4 .3
Th e I m a ge Tab
The I m age t ab allows you t o choose t he front side and ( or) t he
rear side of your docum ent , t he t ype of im age, and t o set
several basic scan set t ings. Note t hat except for t he resolut ion,
you can set individual scan set t ings for t he front side and t he
rear side. For exam ple, all sett ings in the I m age t ab,
Com pression tab, Color Dropout tab can be set individually for
t he front and t he rear side. However, t he sett ings in t he Paper
tab, t he Opt ion t ab, and t he Set t ing t ab have t o be set the
sam e for t he front and rear side.
The I m age t a b dialog box
User’s Ma nua l
4- 7
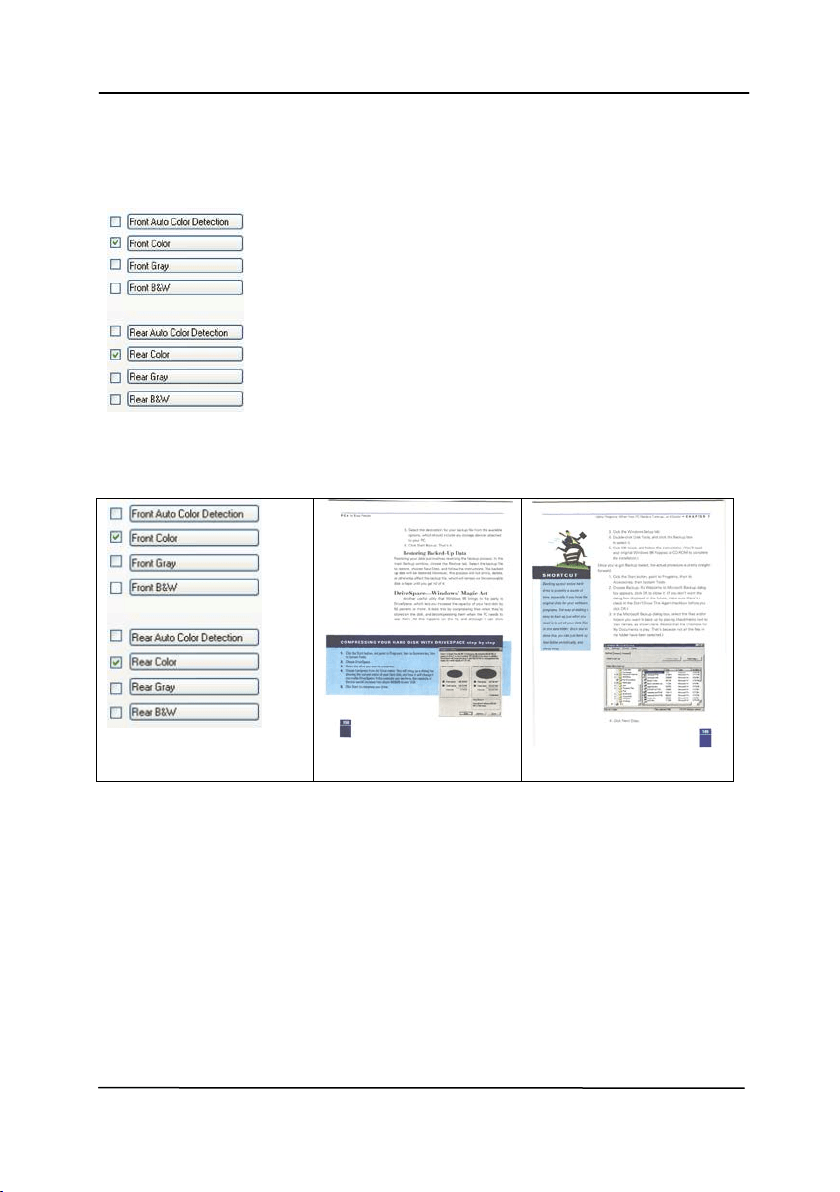
4 .3 .1 The I m age Se lection Box
The I m age Selection box includes t he
im age type and docum ent side opt ion. I f
you wish to scan bot h t he front side and
t he rear side of your color docum ent , you
can check bot h Front Color and Rear Color
at t he sam e t im e. Note t he opt ions vary
based on t ype of scanner.
Ex a m ple 1
:Scanning a t w o- sided color docum ent, bot h
sides in color
Side/ I m age
Sele ct ion
Front
Re a r
User’s Ma nua l
4- 8
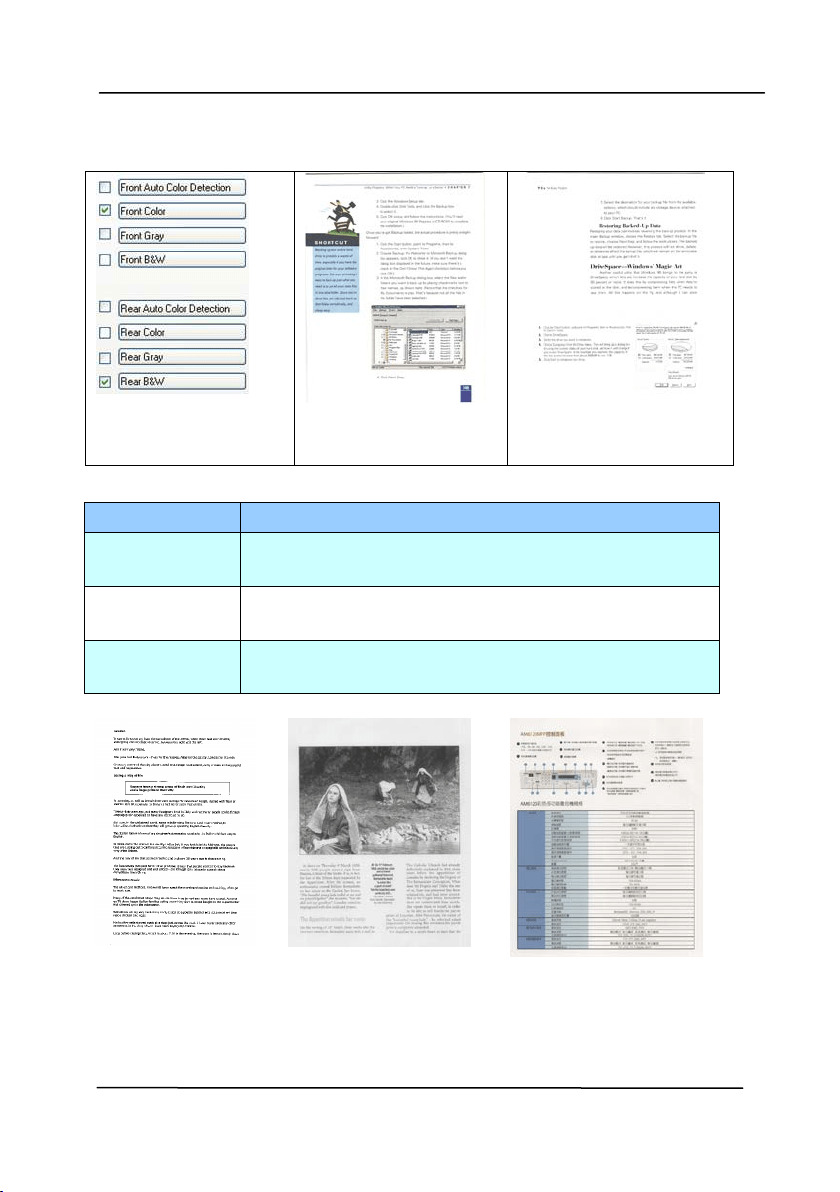
Ex a m ple 2 :Sca nning a t w o- side d color docum ent, one in
B& W , t he ot her in color
Side/ I m age
Sele ct ion
Front
Re a r
I m age Type Description
Color Choose Color if you wish to scan a color
im age for your original in color.
Gray Choose Gray im age if your original contains
act ual shades of gray.
B& W Choose B&W if your original cont ains only
t ext, pencil or ink sket ch.
B& W
Gray
Color
User’s Ma nua l
4- 9
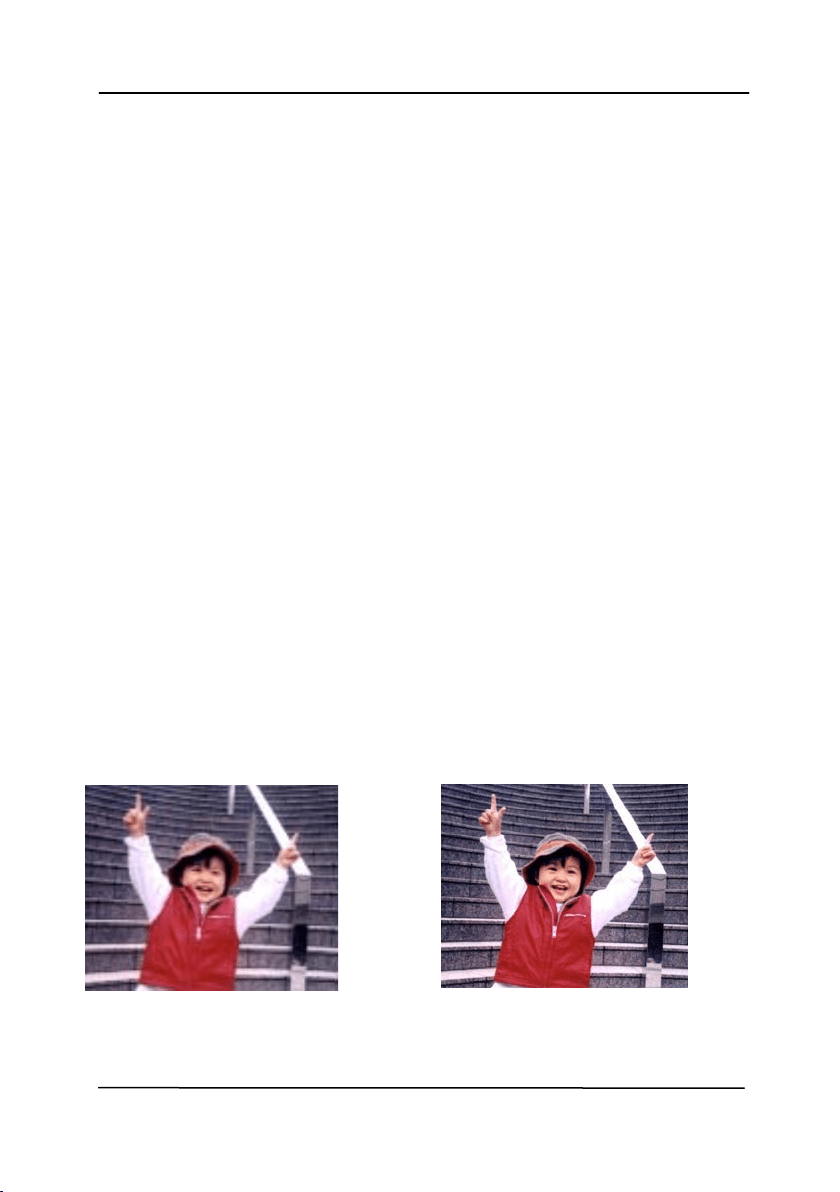
Front / Rear Aut o Color D et e ct ion:
Click to aut om at ically det ect and scan the front or t he rear page
of your color docum ent in color im age m ode. I f your docum ent
is in colors, t he scanner will aut om at ically scan t he docum ent
int o a color im age. I f your docum ent is non-color, you can
choose t he out put t o be eit her B&W or Gray from the Non- Color
Select ion opt ion. This option is useful when you have a m ixture
of color and non- color docum ent .
Note: I f you choose Front Rear Aut o Color Detect ion, you can
not specify t he im age m ode of your rear page and vice versas.
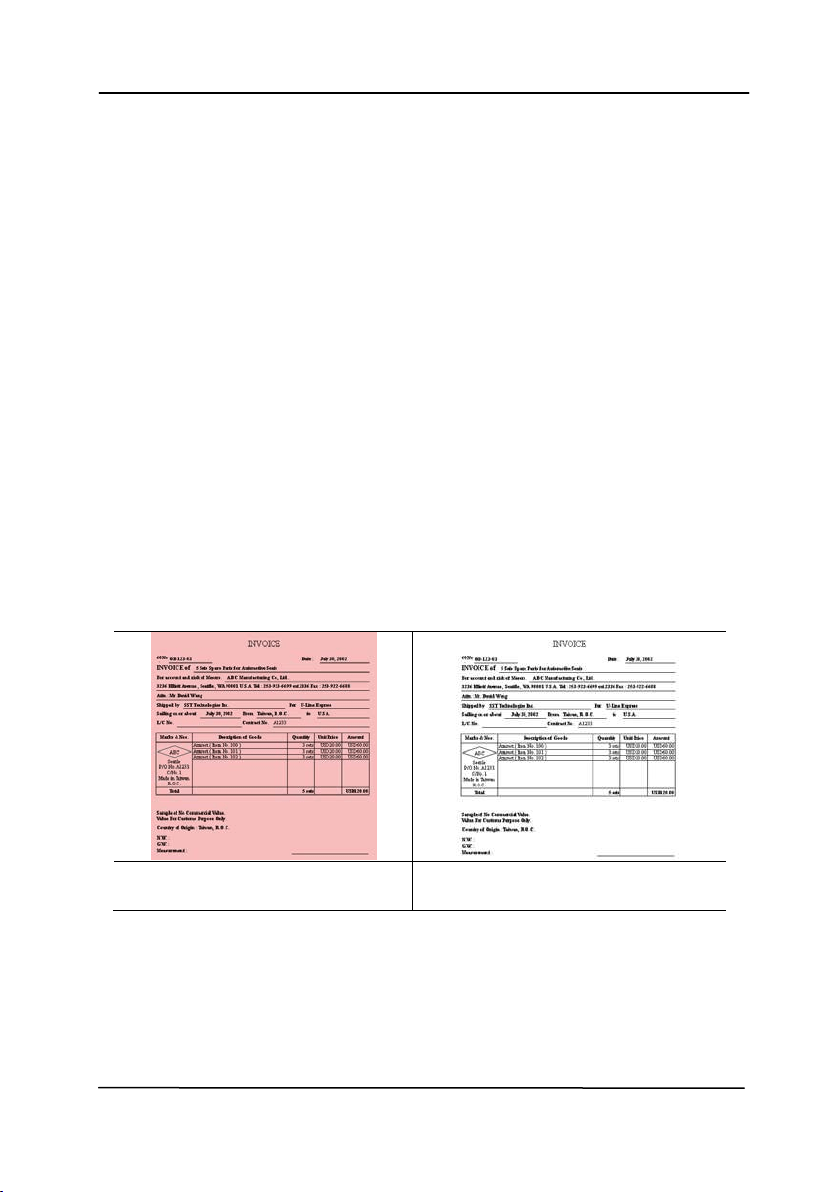
Modes of Aut o Color D et e ct ion:
I f [ Front/ Re ar Auto Color D et e ct ion] is selected, it s m odes
will be displayed. Choice includes N or m a l, I gnore Pape r
Color . For paper wit h background color such as invoices,
choosing [ I gnore Pape r Color ] will aut om atically remove t he
background color and enhance t he detection accuracy.
N or m al
I gnore single background
color
User’s Ma nua l
4- 10
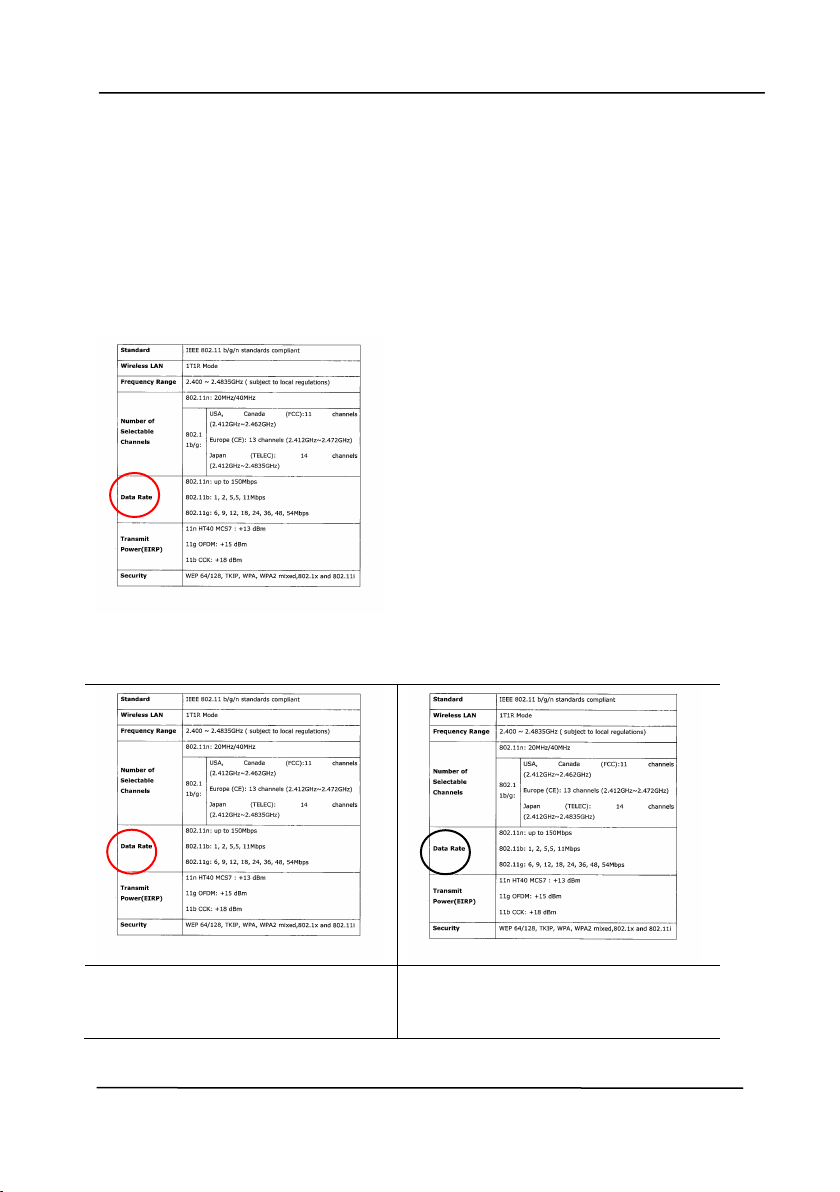
Sensit ivit y of Aut o Color D e t ection
I f your docum ent s contain prim arily B&W t ext and sm all
am ount of light or pale colors and you do not wish t hem t o be
recognized as color im age t o save t he file size, you can increase
the sensit ivit y value by m oving t he bar t o t he right t o let t hese
im ages t o be det ect ed as B&W. The value ranges from 1 t o 100.
The default is 37.
Original
Sensit ivit y: 1
( The im a ge is recognized
as a color one)
Sensit ivit y: 1 0 0
( The im a ge is recognized
as a black and w hit e on e )

User’s Ma nua l
4- 11
Sam e set t ings on bot h side s:
Click to apply sam e scan set t ings for bot h sides of your
docum ent s. Aft er checking t his option, any set t ings you have
changed will aut om at ically applied t o bot h t he front side and
t he rear side. For exam ple, if you choose your ideal resolut ion
to be 300 dpi, t his will be applied bot h t o the front side and
rear side of your docum ent .

User’s Ma nua l
4- 12
4 .3 .2 Ot her I m a ge Options
Binariz a t ion
This is t he process of convert ing a
grayscale or color im age t o a bi- t onal
im age. There are several different
m et hods of perform ing t his conversion.
Opt ions: Dyna m ic Threshold,
Dyna m ic Thr e shold ( AD) , Fix ed
Pr ocessing, H a lft one 1 ~ 5 , Error
Diffu sion.
Dynam ic Th reshold: Selecting
Dyna m ic Thr e shold allows t he scanner
to dynam ically evaluate each docum ent
t o det erm ine t he optim al t hreshold value
to produce t he highest qualit y im age.
This is used t o scan m ixed docum ent
cont aining faint t ext, shaded background,
or color background with a single set t ing.
I f Dynam ic Threshold is selected,
Threshold, Bright ness, and Contrast are
not available.
Dynam ic Th reshold ( AD) : Selecting
Dyna m ic Thr e shold ( AD) t o perform
the enhanced m ode of t he Dynam ic
Threshold feat ure. However, using t his
m ode m ay slow down your scanning
speed.
Sensit ivit y of D ynam ic Threshold
Occasionally your scanned im age m ay
cont ain sm all dot s or speckles. To rem ove
t hese spot s, increase t he sensit ivit y value
by m oving the bar t o the right . The value
ranges from 1 t o 30. The default is 20.
User’s Ma nua l
4- 13
Fix e d Processing: Used for black- and-
whit e and ot her high cont rast docum ent s. A
single level is set t o det erm ine t he black-
and- whit e t ransition. The threshold is
program m able over t he entire densit y
range. Fix ed Processing set s Cont rast t o
0. I f Fix e d Processing is selected,
Contrast is not available.
H a lft on e : I n addit ion t o t he black and
whit e display, Halftone can present a
som ehow gray shade of im age by using
different size of dot s. Halft one im age looks
like t he pict ure we have seen in t he
newspaper. Opt ions include H a lft one 1 ,
Halft one 2 , H alftone 3 , H alft one 4 ,
Halft one 5 .
Er r or D iffusion: Error Diffusion is a t ype of
Halft one. Error Diffusion gives good im age
t exture and m akes t ext in im ages m ore
readable t han Halft one.
H a lft on e I m a ge
User’s Ma nua l
4- 14
Er r or D iffusion I m age
Dyna m ic Thr e shold
Dyna m ic Thr e shold ( AD)
User’s Ma nua l
4- 15
Threshold Used t o convert a grayscale im age t o a
bi- t onal im age. The value ranges from 0 t o
255. A low t hreshold value produces a light er
im age, and can be used t o subdue
backgrounds and subt le, unneeded
inform at ion. A high t hreshold value produces
a darker im age, and can be used t o help pick
up faint im ages.
Adj ust t he t hreshold set t ing by dragging the
Threshold sliding bar t o the left or right t o
achieve t he desired t hreshold sett ing.
2 0 0 dpi,
Threshold:5 0 ,
Bright ness: 0
2 0 0 dpi,
Threshold:1 0 0 ,
Bright ness: 0

User’s Ma nua l
4- 16
Gray
Docum en t Type : Ch oice: N orm al, Phot o, Docum e nt
Three opt ions of docum ent t ype are provided w hen you choose
Gray as the im age t ype for your scanned docum ent. Choice:
Norm a l, Ph ot o, Docum ent .
• Docum ent: Choose Docum ent if your original cont ains
pure t ext or a m ixt ure of t ext and graphic since it is an
opt im al set t ing for regular business docum ent . When
using Docum ent, only Threshold can be adj usted.
• Ph ot o: Choose Phot o if your original cont ains photo t o
reproduce your phot o in vivid grayscale im age. When
using Phot o, no Threshold and Cont rast can be adj ust ed.
• Nor m al: When using N orm a l, Threshold, Bright ness, and
Contrast can be adj usted.
Threshold: The value ranges from 0 t o 255. The default is
230. A low t hreshold value produces a lighter im age, and can
be used t o subdue backgrounds and subt le, unneeded
inform at ion. A high t hreshold value produces a darker im age,
and can be used t o help pick up faint im ages. Adj ust t he
threshold sett ing by dragging the Threshold sliding bar t o t he
left or right t o achieve t he desired t hreshold sett ing.

User’s Ma nua l
4- 17
N or m al
Phot o
Docum ent
( Threshold: 2 3 0 )
N or m al
Phot o
Docum ent
( Threshold: 2 3 0 )
User’s Ma nua l
4- 18
Bright ness
Adj ust s t he lightness or darkness of an
im age. The higher t he value, t he bright er
t he im age. Drag t he slider t o t he right or
left t o increase or decrease t he bright ness.
The range is from –100 t o + 100.
Cont r a st
Adj usts t he range between t he darkest and
the light est shades in t he im age. The
higher t he cont rast , t he bigger t he different
grayscale. Drag t he slider t o t he right or left
t o increase or decrease t he cont rast . The
range is from –100 t o + 100.
Bright ness: - 5 0
Bright ness: 0
( N orm al)
Bright ness: + 5 0
Cont rast : - 5 0
Cont rast : 0
( N orm al)
Contrast: + 5 0
User’s Ma nua l
4- 19
Re solut ion A good cont rol of t he resolut ion result s a
good detail of an im age t hat scans. The
resolut ion is m easured by dot s per inch
( dpi) . Norm ally, t he great er t he dpi num ber,
t he higher t he resolut ion and t he im age file
size. Be aware t hat great er resolut ion t akes
m ore t im e t o scan, and m ore disk space for
the scanning im age. For your inform at ion,
an A4 size color im age scanned at 300 dpi at
True Color m ode consum es approxim at ely 25
MB of disk space. A higher resolut ion
(usually m eans over 600 dpi) is only
recom m ended w hen you need t o scan a
sm all area at True Color m ode.
Choose a resolut ion value from t he drop
down list. The default value is 200 dpi.
Available resolut ions are 75, 100, 150, 200,
300, 400 and 600. Or you m ay choose your
desired value by clicking t he box in t he right
side of t he drop down list and press t he
arrow key t o select your desired value and
then click t he Add but t on t o include it in t he
drop down list . N ot e : The resolution is up t o
300 dpi if an im printer or a MI CR reader is
installed or connected t o t he scanner.
Re solut ion: 7 5 dpi
Re solut ion: 1 5 0 dpi
User’s Ma nua l
4- 20
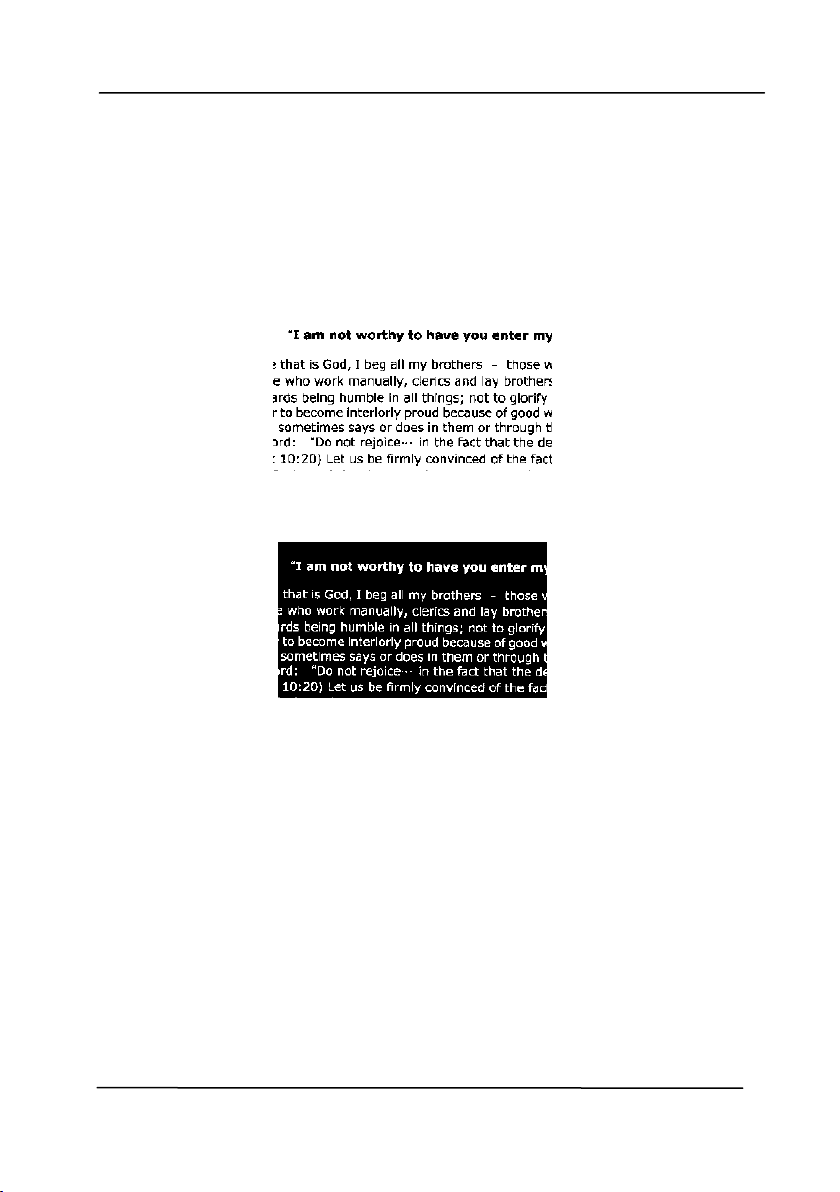
I nve r t
Reverses t he bright ness and the colors in t he
im age. The default sett ing is Black on a Whit e
background. Reverse m ode is Whit e on a Black
background. For color im ages, each pixel will be
changed int o it s com plem ent ary color at t he
com m and of I nvert.
Bla ck on W hit e
W hit e on Bla ck

User’s Ma nua l
4- 21
Scan
Source
Choice:
Auto Docum ent Fe e der:
Used to scan
m ultiple pages.
Flat bed:
Used t o scan a single page. For
exam ple, pages from newsp
aper clipping,
paper wit h wrinkles or curls.
Flat bed ( book ) :
Used to scan several
inside pages from book.
Autom at ic:
Allow t he scanner aut om atically
set it s scan source. I f Aut om at ic is selected
and there is docum ent in bot h t he aut o
docum ent feeder ( ADF) and t he flatbed, then
t he scan source w ill be aut om at ically set t o
ADF. I f Aut om a t ic is selected and t here is
docum ent only in flat bed, t hen t he scan
source will be set t o flatbed.
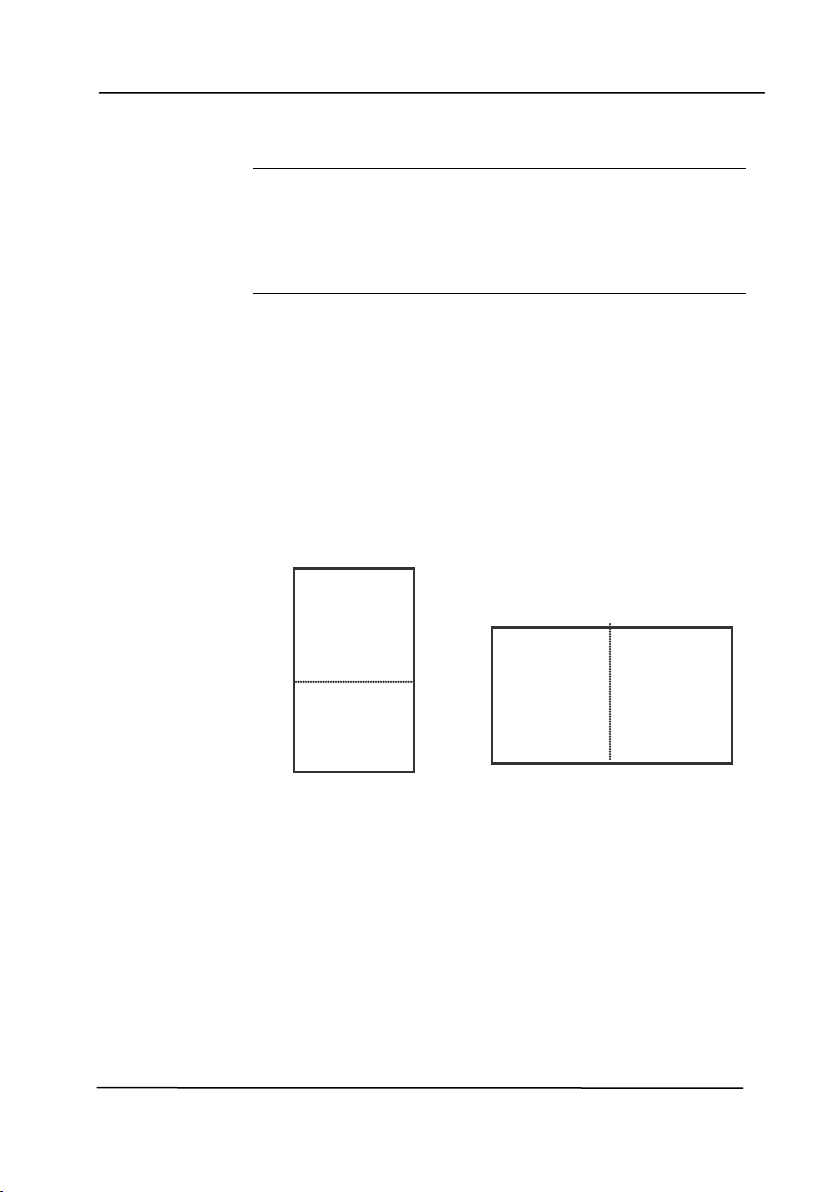
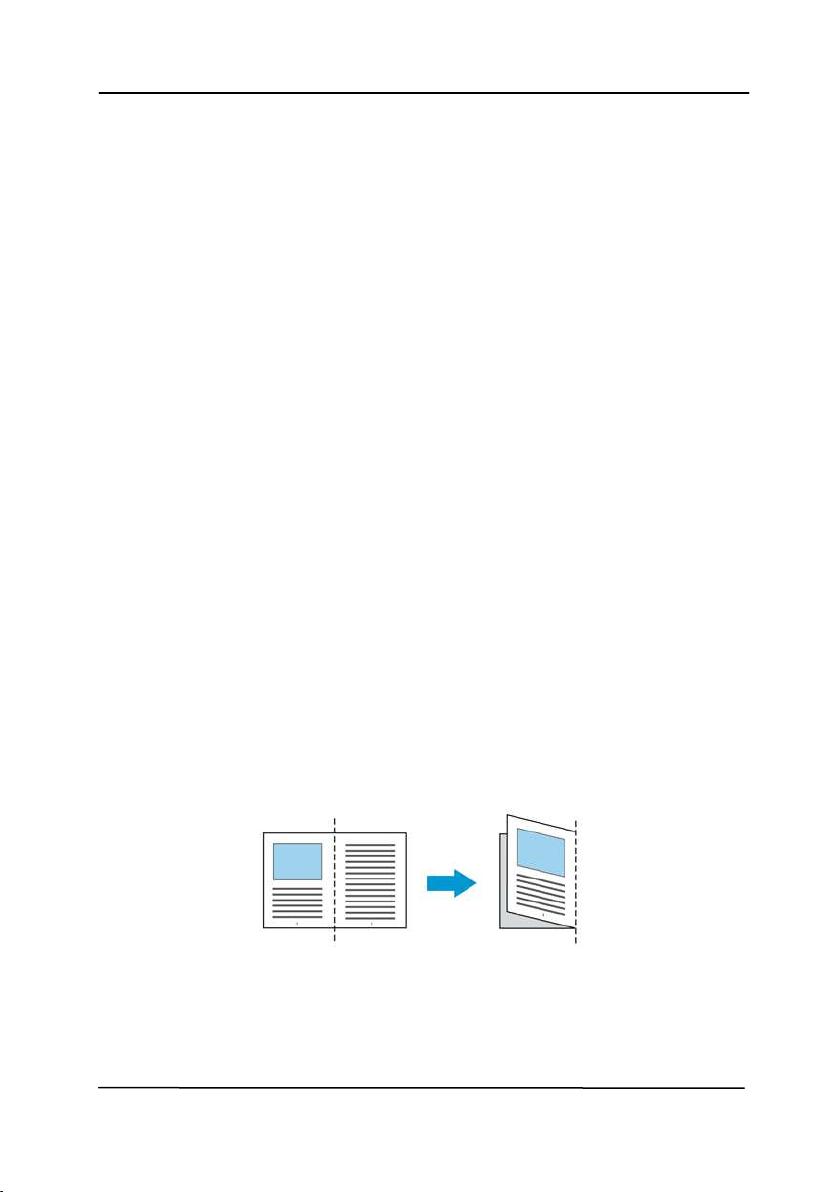
Merge Tw o Sides int o One I m a ge:
I f you have a sheet - fed duplex scanner w it h
front input t ray, you can scan an A3 size
docum ent with an innovat ive m ethod. Thus,
fold your A3 size docum ent into A4, and t hen
load t he paper in t he front t ray. Choose
Merge Two Sides from the Scan Source
opt ion and t hen t he scanner is able t o scan
bot h sides of your docum ent and m erge t wo
A4 im ages into one A3 im age.
When you select Merge Two Sides int o One
I m age, t he Cropping or Mult i- feed funct ion
will be disabled.
N ot e : This feature m ust be used wit h a
carrier sheet . Regarding how t o load a
docum ent wit h a Carrier Sheet , refer t o
Sect ion 4.6.2, Other Paper Selection.
Not e t he option s vary based on t ype of
scan ner.
User’s Ma nua l
4- 22
N ot e : I f you have purchased a duplex sheet - fed
scanner, choose [ Merge Two Sides] on t he
[ Scan Source] , t hen t he scanner is able t o scan
bot h sides of your docum ent and m erge t hem
into a single im age.
I f “ Merge Two Sides int o One I m age” is
select ed, its choice will be available including
“ Merge Horizontally” , “ Merge Vert ically” , “ Merge
Vertically (Back Side Flip) ” . I f t he reverse side
of your docum ent is upside down, choose
“ Merge Vert ically ( Back Side Flip) ” and the back
side will be aut om at ically rotated 180 degrees
and m erged.
Not e t he option s vary based on t ype of
scan ner.
Front
Side
Rear
Side
Merge Vert ically
Front
Side
Rear
Side
Merge Horizont ally
User’s Ma nua l
4- 23
Color
Mat ching
The purpose of Color Mat ching is gett ing t he
accurat e color. This opt ion uses t he default
param eters ( I CC profile) t o adj ust t he colors
of t he im age.
Choice: N one, Docum e nt , Phot o
• None:
Choose “ None” t o disable t his
opt ion.
• Docum ent : Choose “ Docum ent ” if your
original cont ains pure t ext or a m ixt ure of
text and graphic since it is an opt im al
set t ing for regular business docum ent .
• Phot o: Choose “ Photo” if your original
cont ains phot o t o reproduce your phot o in
vivid color im age.
N or m al
Aft er Color M at ching

User’s Ma nua l
4- 24
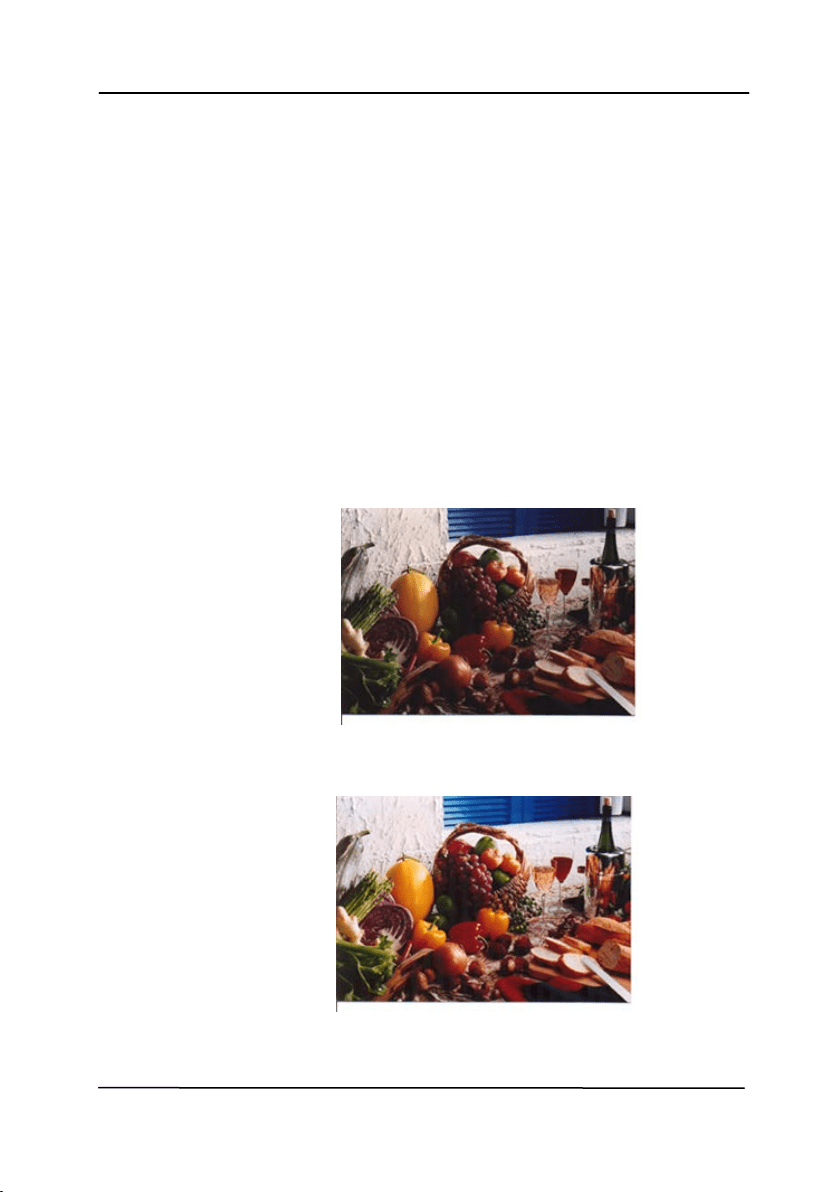
4 .3 .3 Scanning color im ages
The following options are available for scanning color im ages.
Brightness
Cont rast
Resolut ion
Invert
4 .3 .4 Scanning gra yscale im ages
The following options are available for scanning gray im ages.
Brightness
Cont rast
Resolut ion
Invert
4 .3 .5 Scann ing B& W im a ges
The following options are available for scanning B&W im ages.
Binarization ( Dynam ic Threshold)
Resolut ion
Invert
Or
Binarizat ion (Fix Processing)
Threshold
Bright ness
Resolution
I nvert
User’s Ma nua l
4- 25
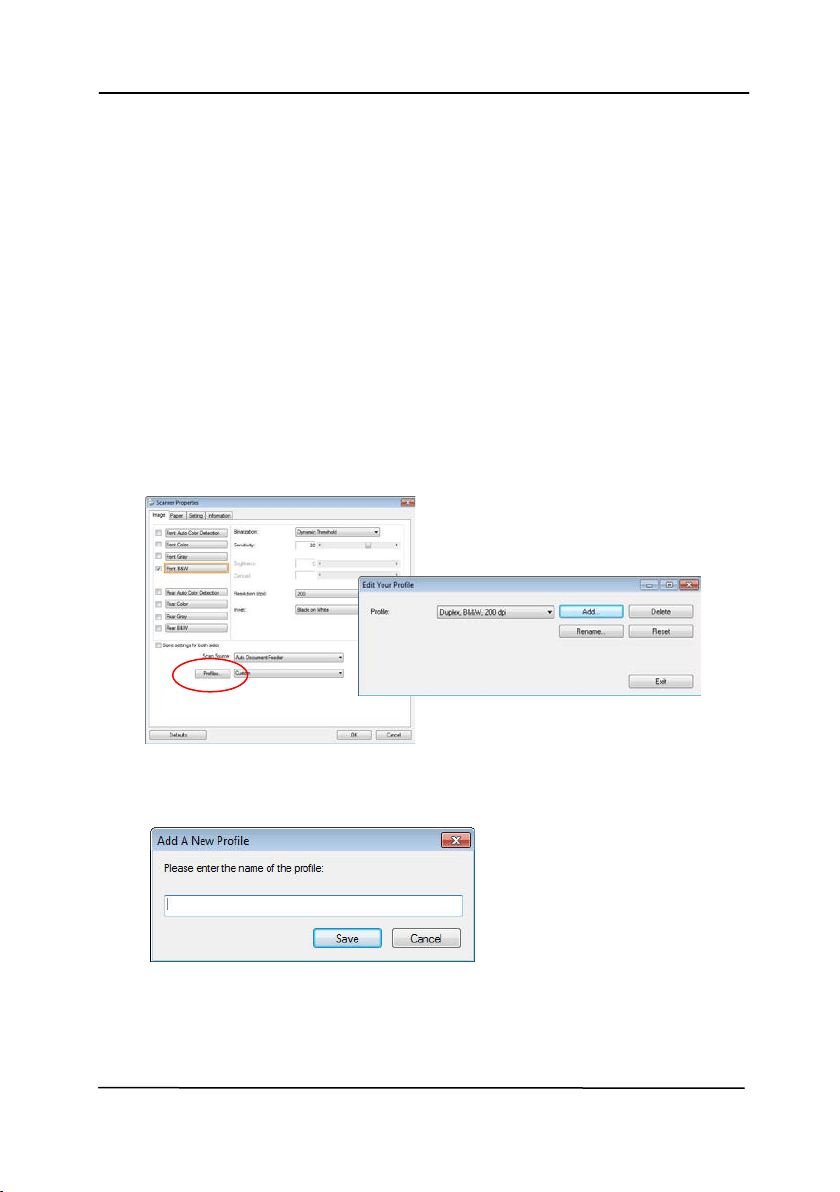
4 .3 .6 Edit ing Profiles
The Scanner Properties dialog box allow s you t o change and
save your frequent ly used scan set t ings int o a profile. You can
edit t hese profiles by renam ing or delet ing t hem .
To add a new profile,
1. Cust om ize your set tings. ( For exam ple, change your
resolut ion, im age t ype, cropping m ethod, scan size, or
other scan set tings.)
2. Click the I m age t ab and t hen choose “ Profiles” t o prom pt
the “ Edit Your Profile” dialog box.
3. Click “ Add” t o ent er t he nam e of t he profile and t hen
choose “ Save” .
4. The new profile will be saved and show n in t he “ Profiles”
dropdown list box.
User’s Ma nua l
4- 26
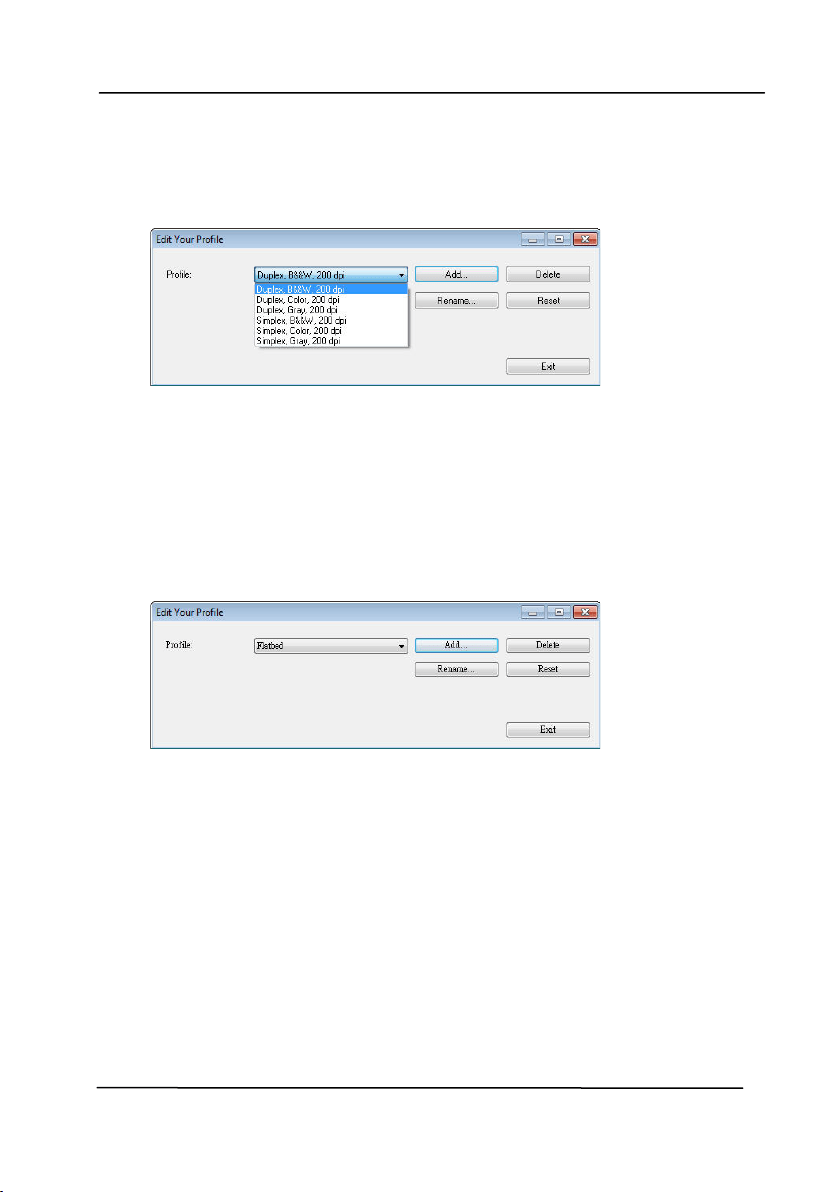
To loa d a profile ,
1. From t he I m age tab dialog box, choose your favorable
profile from t he “ Profiles” dropdown list box.
2. Your favorable profile will be im m ediately loaded and
displayed on Scanner Properties dialog box.
To de let e a profile ,
1. From t he I m age tab dialog box, click “ Profiles” t o prom pt
the Edit Your Profile dialog box.
2. Choose t he profile you w ant t o delet e from t he dropdow n
list box.
3. Click “ Delet e” . A Confirm m essage “ Are you sure you want
to delete t his profile?” is prom pt ed.
4. Choose “ Yes” t o delet e or “ Cancel” t o quit .
User’s Ma nua l
4- 27
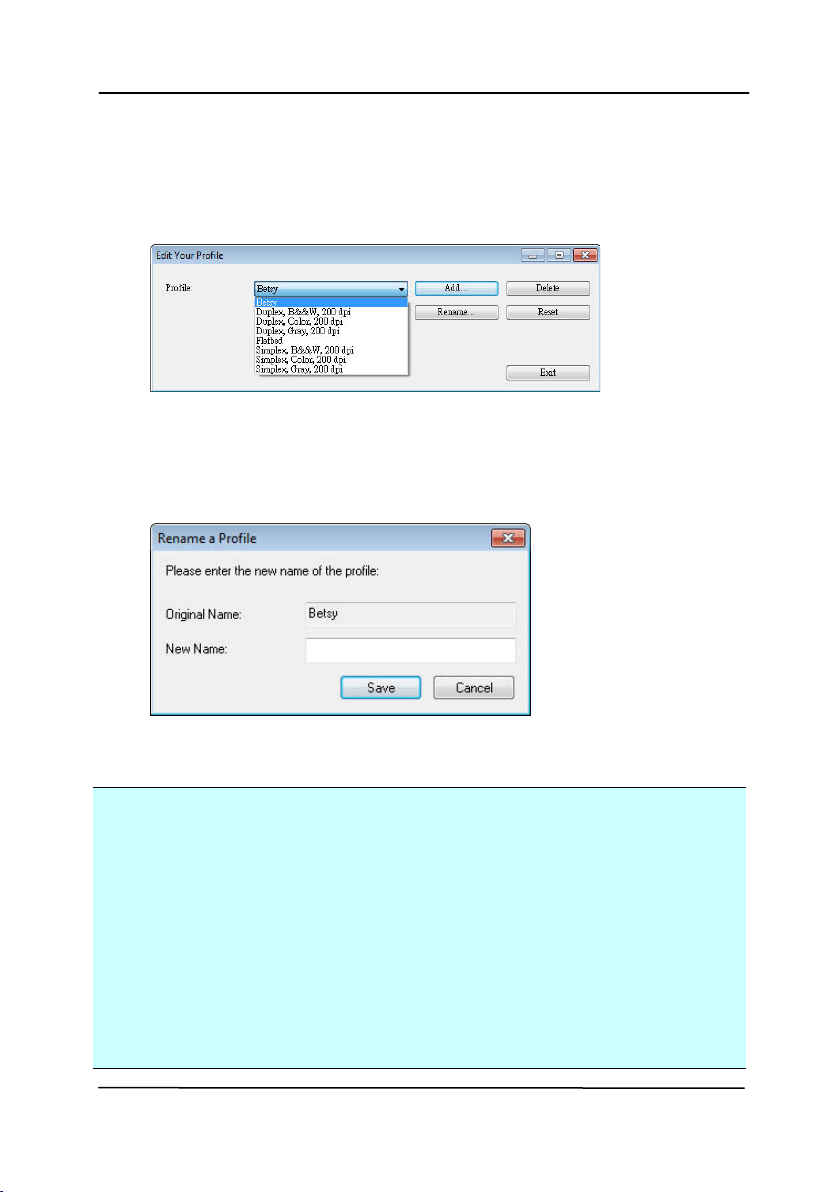
To rena m e a profile ,
1. From t he I m age tab dialog box, click “ Profiles” t o prom pt
the Edit Your Profile dialog box.
2. Choose t he profile you w ant t o renam e from t he dropdown
list box and t hen click t he Renam e button.
3. Ent er new nam e for t he profile.
4. Choose “ Save” t o save t he new profile or “ Cancel” t o quit .
N ot e :
The preset default profiles include Flat bed, Sim plex- B&W,
200 dpi, Sim plex-Gray, 200 dpi, Sim plex- Color, 200 dpi,
Duplex- B&W, 200 dpi, Duplex- Gray, 200 dpi, Duplex- Color,
200 dpi. I f you have a sim plex or a sheet fed scanner, t he
duplex or t he flat bed opt ion will not be available.
I f any sett ing for a current profile has been changed, a [ * ]
sign will be m arked before t he nam e of current profile, for
exam ple, [ * Duplex, Color, 2 0 0 dpi] . I f desire, click the
[ OK] or [ Scan] but t on and a dialog box will be prom pt ed to
let you save t he new profile.

User’s Ma nua l
4- 28
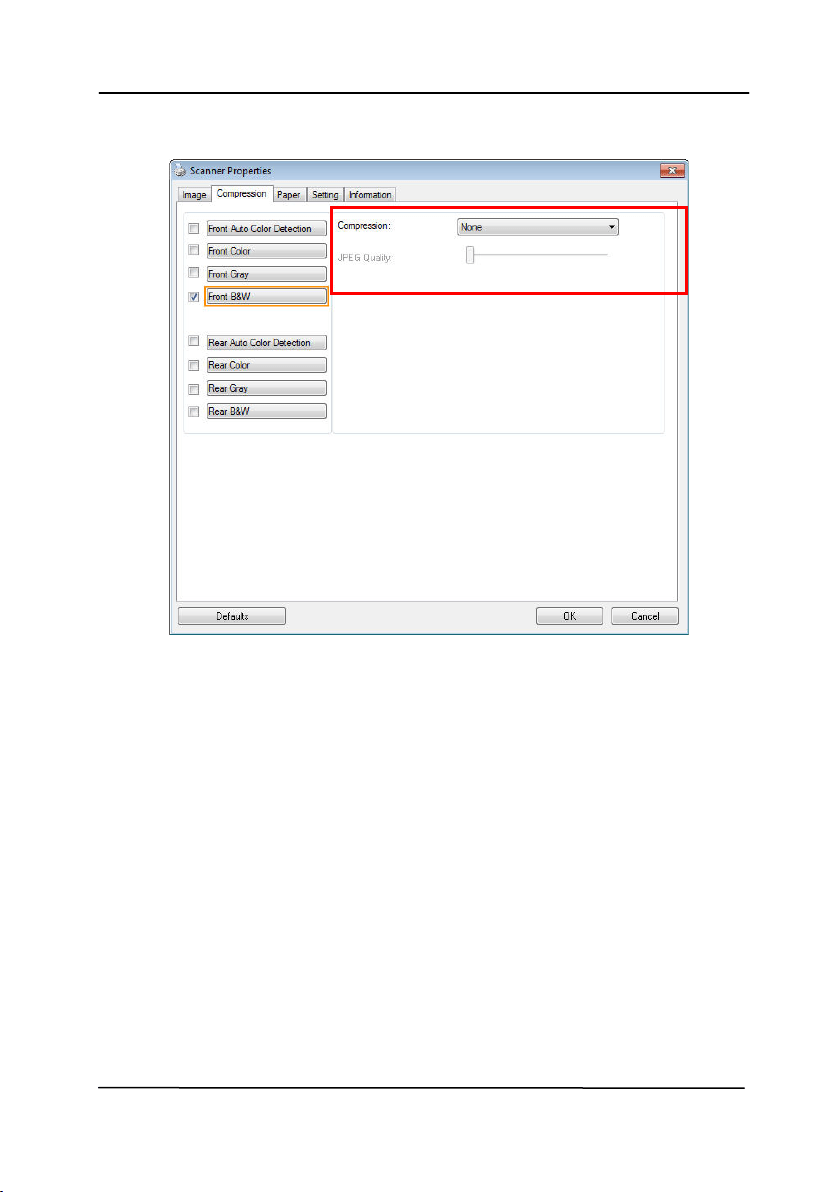
4 .4 The Com pr e ssion Ta b
The Com pression t ab allows you t o com press your scanned
im age and choose t he level of com pression. Bi- t onal im ages
are norm ally com pressed using CCI TT st andard called Group 4
( G4) . Color and grayscale im ages are oft en com pressed using
JPEG t echnology. Move t he JPEG Qu a lit y slider t o t he right or
left t o increase or decrease t he level of com pression. Not e t he
great er t he com pression level, t he low er im age qualit y. Default
is 50% .
Not e t hat t he com pression depends on your im age edit ing
application. I f your im age edit ing application does not support
t he t ype of com pression form at , t hen eit her a warning m essage
will appear or the im age qualit y of t he com pressed file will not
be accept able.
JPEG ( Joint Phot ographic Edit or Group) . This group developed
and lent t heir nam e t o a file com pression st andard for color and
grayscale im ages t hat is w idely used by scanners, and soft ware
applications. On Microsoft Windows- based system s, a file wit h
t he extension .j pg has norm ally been com pressed using t his
st andard.
For scanning color or gray im ages, t he following com pressions
are available:
None
JPEG
For scanning B&W im ages, t he following com pressions are
available:
None
G4
User’s Ma nua l
4- 29
The Com pression t a b dialog box
User’s Ma nua l
4- 30
Com pression:
To com plet e your scan at a rated speed, t he scanned im age is
com pressed by default during t ransm ission. However, if you
wish t o obt ain t he highest im age qualit y, you can choose t o
uncom press t he im age data before it is out put .
To Applicat ion:
Choose if you wish to com press t he im age dat a and t ransfer it
from t he TWAIN driver t o t he application. Note Bi- t onal im ages
are norm ally com pressed using CCI TT st andard called Group 4
( G4) . Color and grayscale im ages are oft en com pressed using
JPEG t echnology. Move t he [ I m age Qualit y] slider t o t he right
or left t o increase or decrease your im age qualit y. Not e t he
great er t he im age quality, the low er t he com pression level.
Default is 50% .
Not e t hat t he com pression depends on your im age edit ing
application. I f your im age edit ing applicat ion does not support
t he t ype of com pression form at , t hen t he im age of t he
com pressed file will look abnorm al.
From Scanner: ( N ot e: The a vaila bilit y of t h is feat u r e
varie s due t o scan n er m ode l.)
Choose if you wish t o com press t he scanned im age and t ransfer
it from t he scanner to t he TWAI N driver.
Choice: Uncom pressed, * Best I m age Qualit y ( Low Com pression
Level) , Bet t er I m age Qualit y ( Norm al Com pression Level) ,
Norm al I m age Qualit y ( High Com pression Level) . ( * : Factory
Default )
Scanned
I m age
Scanned
I m age
Scanner Scanner Dr iver
I m age Editing
Applicat ion

User’s Ma nua l
4- 31

User’s Ma nua l
4- 32
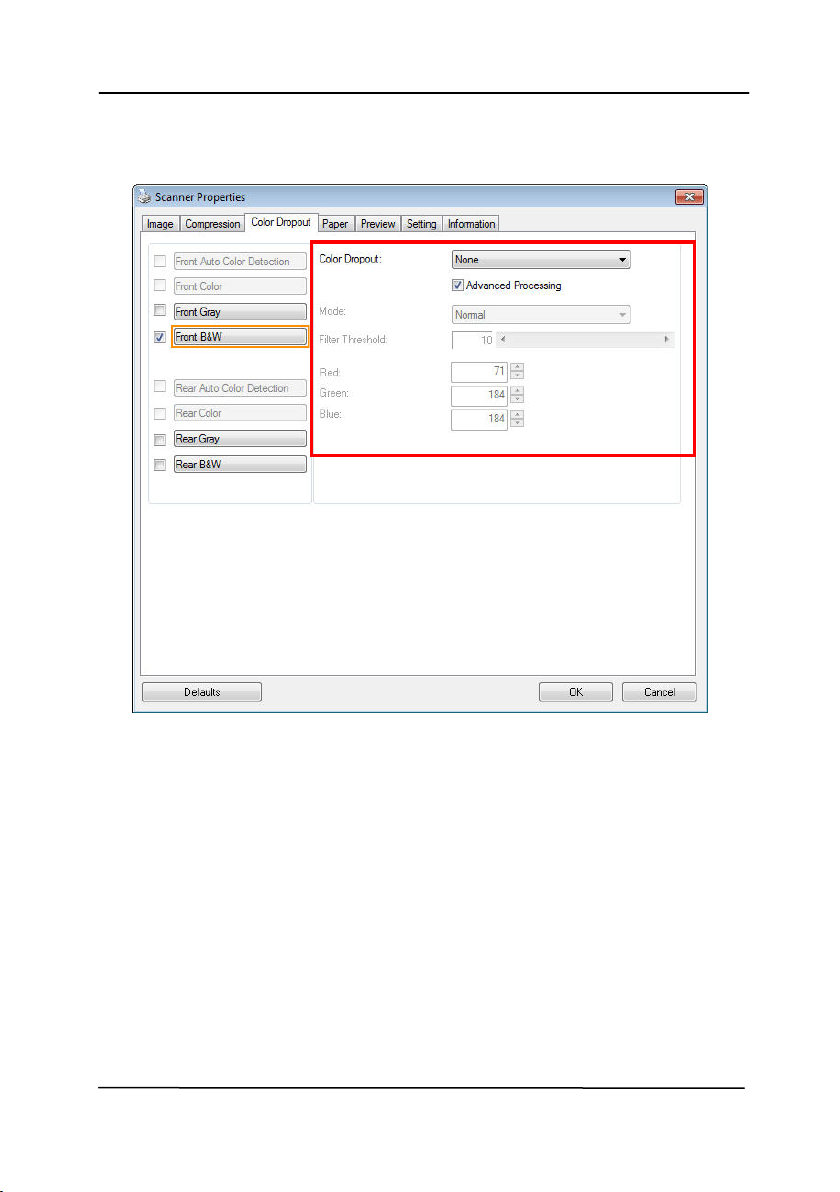
4 .5 Th e Color D ropout Ta b
4 .5 .1 Color Dropout Se lection
The [ Color Dropout ] t ab allows you t o select eit her green, red,
blue, or a color of your choice t o rem ove t he det ails of the
selected color from a scanned im age. This feat ure is used t o
sharpen your text when using OCR ( Opt ical Character
Recognit ion) soft ware. Not e t his feature applies only t o the gray
or black and whit e im age.
Choice: N one , Aut o, Re m ove Red, Rem ove Green, Re m ove
Blue, Custom
- N one: Does not rem ove any color.
- Aut o: Aut om atically output s t he im age wit h t he details of
t he prim ary color rem oved.
- Rem ove Red/ Rem ove Green/ Rem ove Blu e: Output s t he
im age wit h t he det ails of t he specified color rem oved.
- Cu st om : Specify t he color you wish t o rem ove by ent ering
it s RGB ( Red, Green, and Blue) value respect ively.
Advanced Opt ions:
- Qualit y M ode: Range: 0~ 20. Default: 10
When [ Qualit y Mode] is select ed, you can det erm ine t he
color t o be dropped out using t he [ Filt er Threshold] slider. A
lower value will drop m ore of t he selected color out , w hile a
higher value will leave m ore of t he selected color in.
- Norm a l M ode : Use an opt im ized set t ing t o determ ine t he
color.
User’s Ma nua l
4- 33
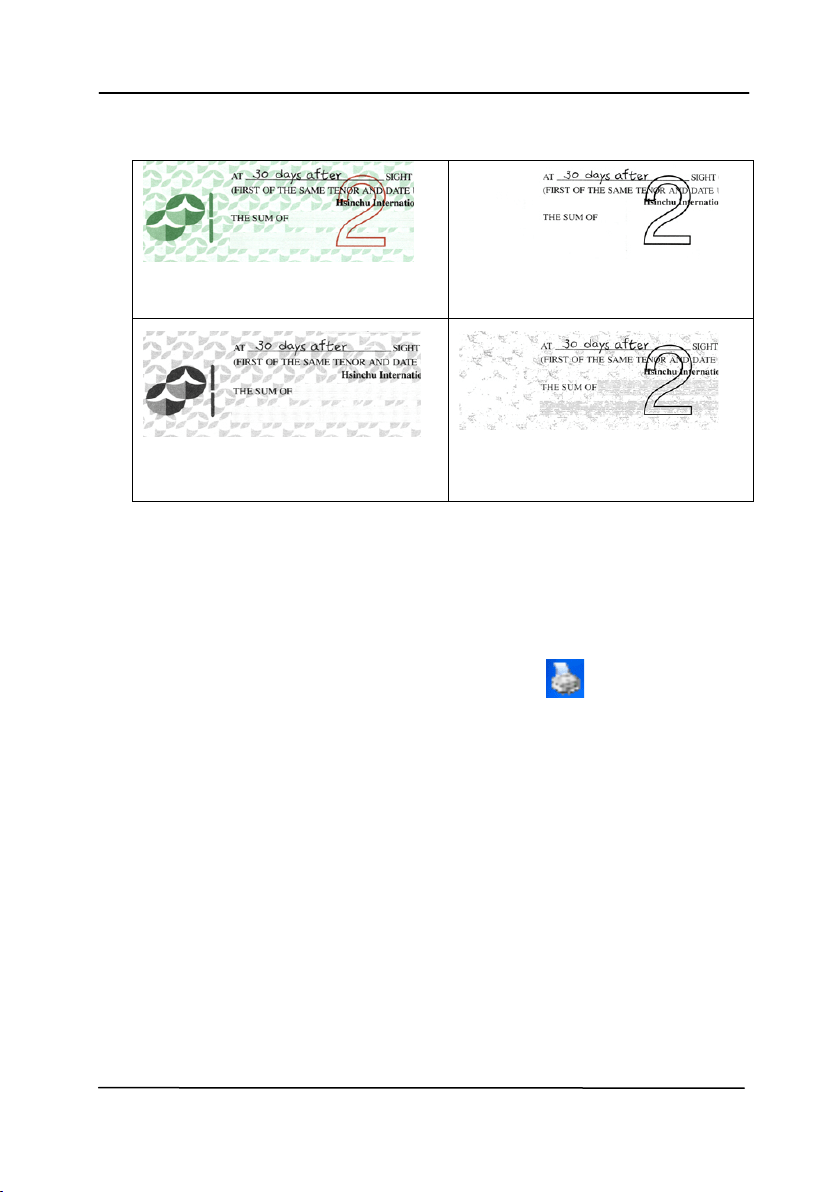
Original
Aut o/ Rem ove Green
( norm al m ode)
Rem ove Red (norm al m ode)
Rem ove Green ( qualit y
m ode: Threshold: 18)
Preview t he color dropout result :
To preview t he color dropout result , please follow t hese steps:
1. Click the [ Sca nner Pr opert ies] icon (
) on t he upper
left corner, and choose [ Tab] t o show available t ab
nam es.
2. Choose [ Preview ] t o show the Preview t ab.
3. Click the [ Pr e view ] t ab t o show t he Preview page.
4. Load your docum ent t o t he scanner and click the
[ Preview ] but t on to get a preview im age.
5. On t he [ I m age] tab, click [ Gray] or [ Black and Whit e]
im age m ode and t hen choose [ Custom ] on t he [ Color
Dropout ] t ab. A [ Preview window] but t on will be
displayed.
6. Click the [ Pr e view w indow ] but t on t o prom pt t he
[ Preview ] window wit h t he previewed im age.
User’s Ma nua l
4- 34
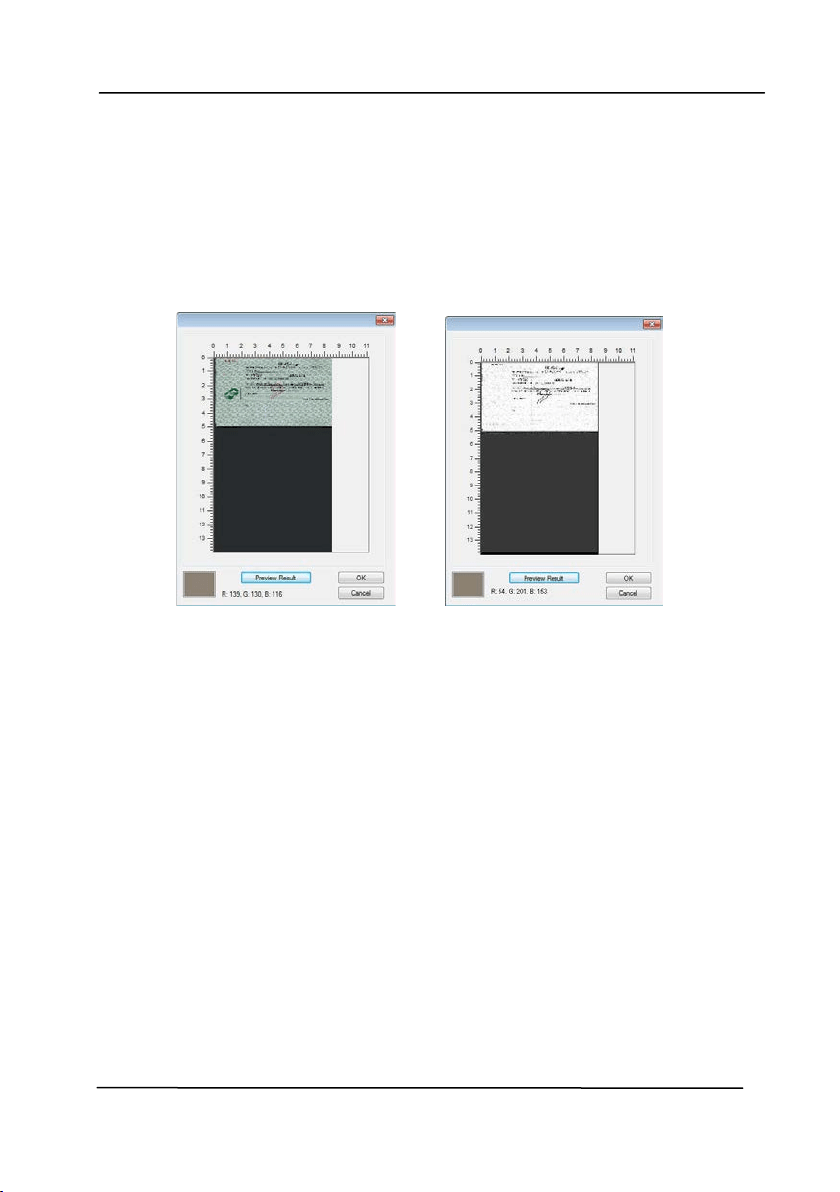
7. Move your cursor over t he preview im age. Your m ouse
cursor now becom es an Eyedropper.
8. Click t o select a color w hich you wish t o rem ove.
9. Click and hold your m ouse but t on to view t he result
aft er rem oving t he specified color. I f t he result is
sat isfactory, click [ OK] t o close t he Preview window.
The Preview Window The Color dropout result
User’s Ma nua l
4- 35
The Color D ropout dialog box
User’s Ma nua l
4- 36
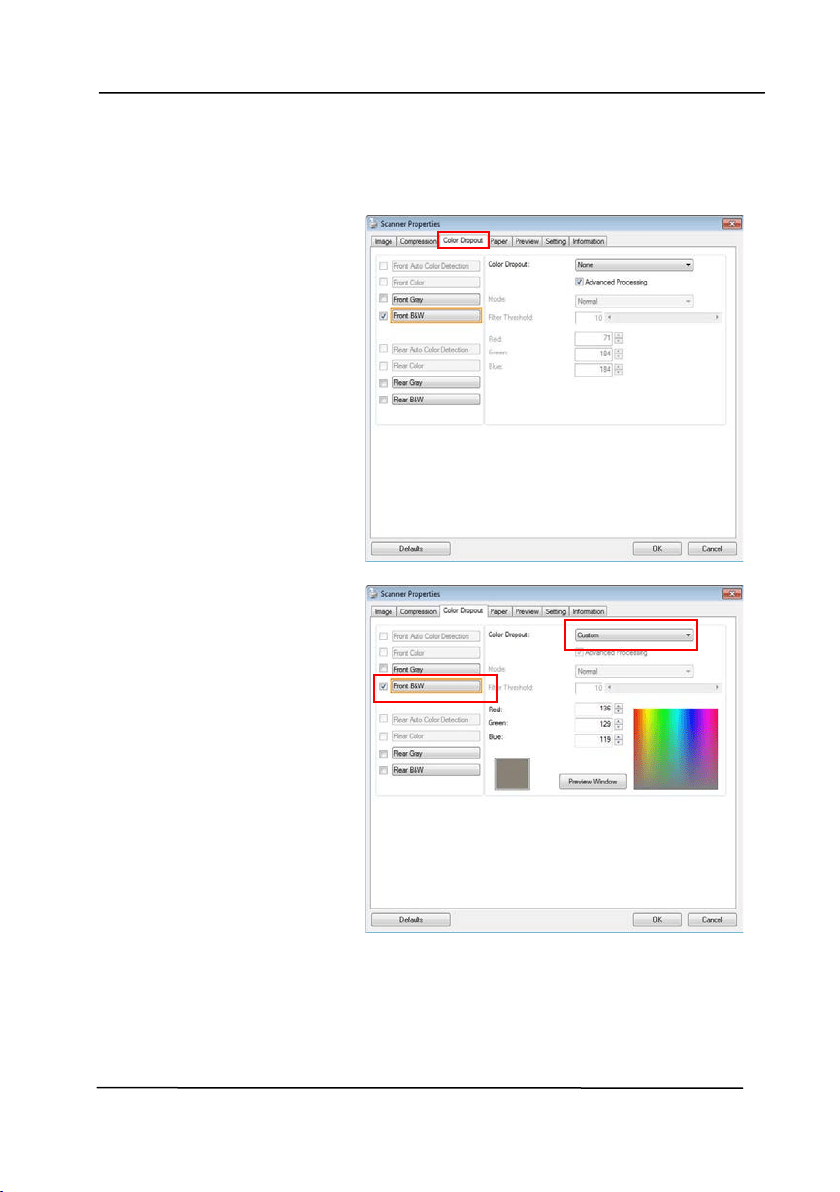
To select a color on t he Color palet t e,
1.
Click the Color
Dropout t ab from
t he Scanner
Propert ies dialog
box.
2.
Choose Gray or
B&W from the
I m age Selection
box and click
“ Custom ” from t he
Color Dropout
drop- down m enu.
The Color palet t e
appears.
User’s Ma nua l
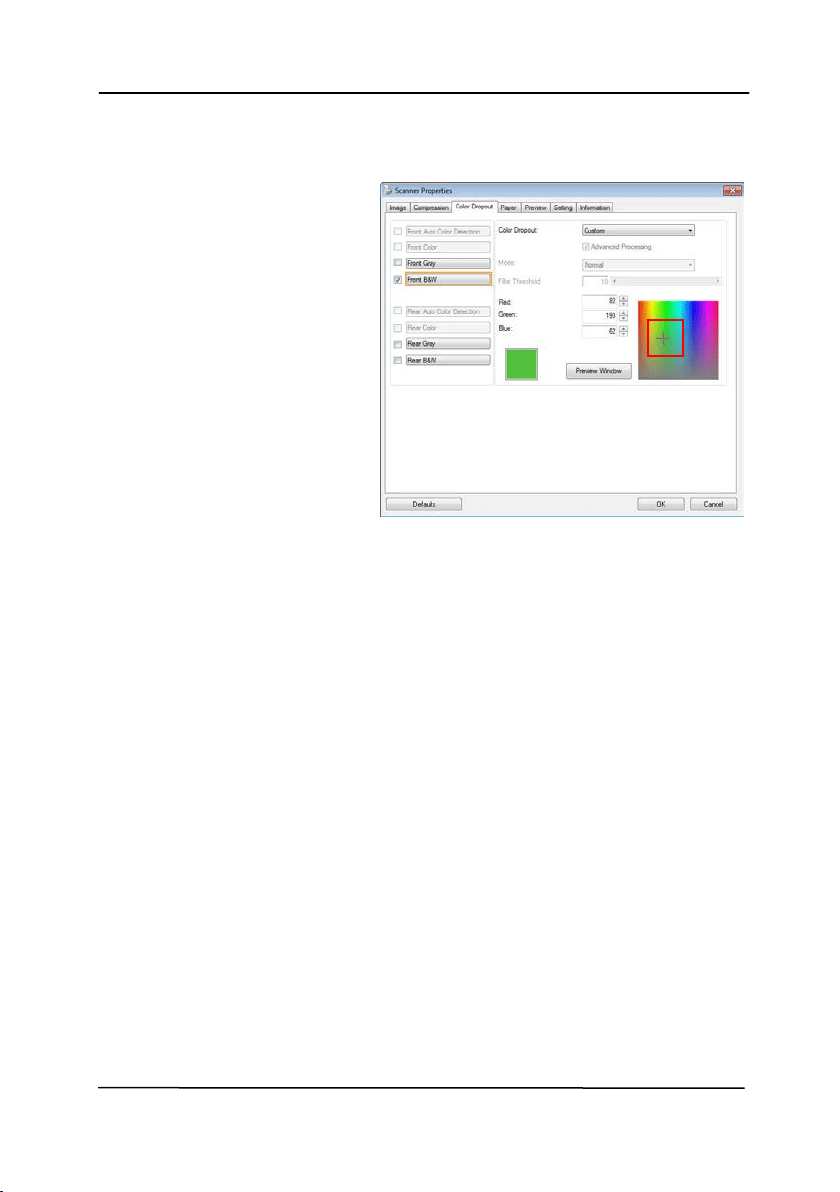
4- 37
3. Move your cursor
over t he palet t e. The
cursor becom es a
cross sign.
4. Click t o choose a color. The RGB values are changed
sim ult aneously.
User’s Ma nua l
4- 38
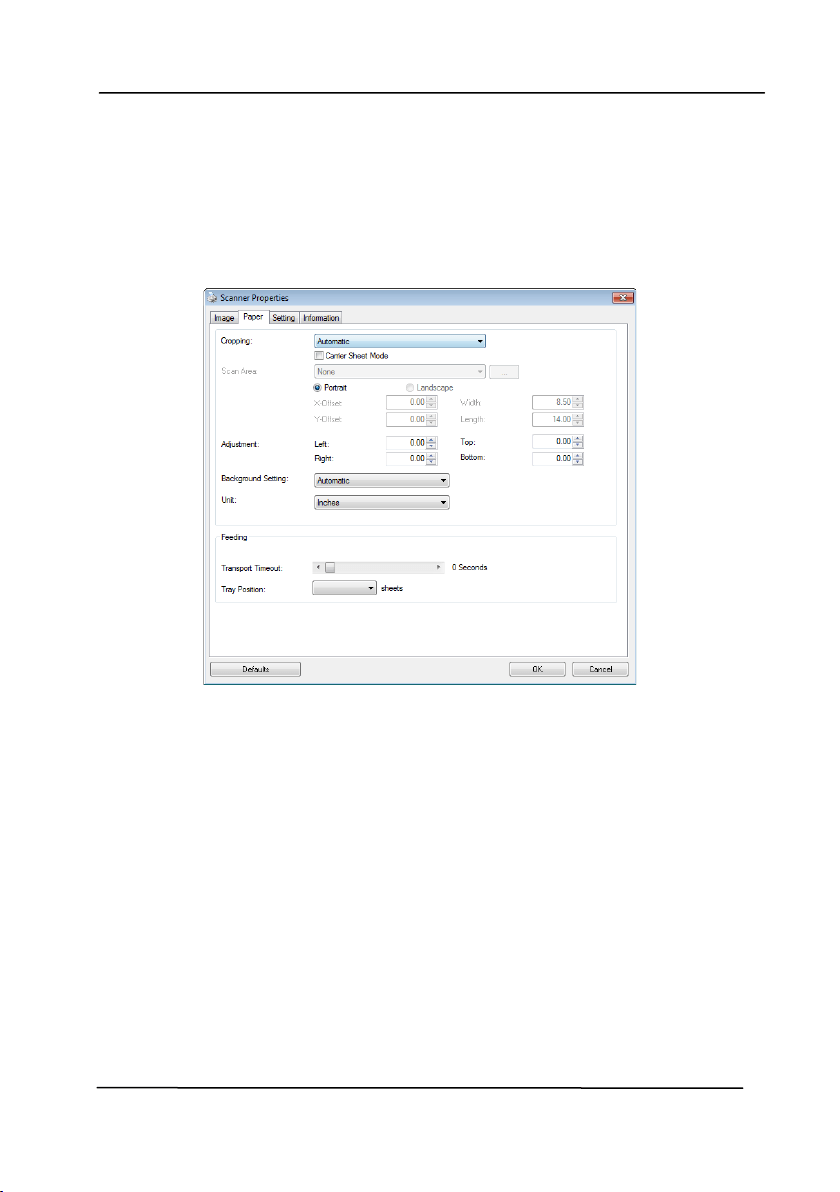
4 .6
Th e Paper Ta b
The Paper t ab allows you t o define values relat ing t o im age
output ( i.e., Aut o Crop or not, Scan Area, OverScan, Multi- Feed
Detection) .
The Pape r t ab dialog box

User’s Ma nua l
4- 39
4 .6 .1 Cropping
Cropping allow s you t o capt ure a port ion of t he docum ent
being scanned. Choice: Aut om at ic, Aut om a t ic ( 3 6 ”) ,
Fix e d t o Transport , EOP ( End of Page ) D et e ct ion,
Autom at ic M ult iple, Rela t ive t o Docum e nt s.
Opt ions Description
Autom at ic
Aut om atic adj ust s the cropping window
according t o different docum ent sizes and
autom at ically st raight en a skewed
docum ent. Use t his opt ion for batches of
m ixed- sized docum ent s.
Autom at ic
( 3 6 ”)
Aut om atically adj usts t he cropping window
according t o different docum ent sizes
sm aller t han 36” and aut om at ically
st raight en a skewed im age. Use t his opt ion
for bat ches of m ixed- sized docum ent .
N ot e : The a v a ila bilit y of t his feat ure
varie s due t o scan n er m ode l.
Fix e d t o
Transport
This feat ure allows you t o define t he area
or zone t o be im aged. Use for bat ches of
sam e- sized docum ents. I f you select t his
opt ion, you can use t he arrow keys t o
define t he x and y offset values, widt h and
lengt h t o redefine your scanned area. The
Display window will show im age placem ent
as you change t he values.
EOP ( End of
Pa ge)
Detection
This feat ure allows you t o define t he area
or zone t o be im aged. Use for bat ches of
sam e- widt h but different lengt h
docum ent s. I f you select t his opt ion, you
can use t he arrow keys t o define t he x and
y offset values, widt h and lengt h t o
redefine your scanned area. The Display
window will show im age placem ent as you
change t he values.

User’s Ma nua l
4- 40
Autom at ic
M ult iple
This opt ion allows you t o place various
sized docum ent s such as photos, I D Cards,
or business cards on t he flatbed ( if
available) and let s you creat e m ult iple
individually cropped im ages in one scan.
Note: To correctly creat e m ult iple im ages,
please m ake sure t here is at least 12m m
( 0.5”) of space between each docum ent .
Re la t iv e t o
Docum ent
This opt ion allows you t o crop different
areas on your docum ents and deliver t hese
im ages in B&W, Gray, or Color separat ely.
For exam ple, t here are applicat ions w hich
require you t o store t he entire docum ent in
B&W and a part of t he docum ent in color t o
save st orage space. This is useful for
docum ent s w here a photograph or
signat ure appears in a consistent area on
the docum ent such as resum es, and so on.
The following options are only available when Fixed t o
Transport is selected.
X- Offset — t he distance from t he left end of t he
scanner t o t he left edge of t he scanning area.
Y- Offset — t he posit ion from t he t op end of t he
docum ent t o the top end of the scanning area.
W idth — the widt h of the scanning area.
Len gth — t he length of the scanning area.
Center: aut om at ically calculat es t he x- offset for cent er-fed
feeding based upon docum ent size selected.
— relocat e t he scan area by click t he arrow key on
t he cross sign w hile retain t he scan size. View t he result
from t he Display w indow.

User’s Ma nua l
4- 41
The Adj ust m ent opt ion is available when Autom at ic is
selected.
Adjust m ent —adds a positive/ negat ive m argin value
Top/ Bot t om or t oward left / right of the im age.
Adj ust m ent is used w hen t he aut om at ic docum ent feeder is
used. Adj ustm ent reduces the possibilit y of corner clipping
on skewed im ages. To set Adj ustm ent values, use t he
UP/ Down but tons t o select where you w ant t o apply
Adj ust m ent values: Top/ Bottom or Left / Right , and then
select t he am ount of inches/ m m / pixels applied. Select a
value wit hin t he range of 0.00 t o 1.00 / - 1.00.

User’s Ma nua l
4- 42
Rela t ive t o Docum e nt : ( used for bat ches of sam e- sized
docum ent s)
This opt ion allows you t o crop different areas on your
docum ent s and deliver t hese im ages in B&W, Gray, or Color
separat ely. For exam ple, t here are applicat ions which require
you t o store t he ent ire docum ent in B&W and a part of t he
docum ent in color t o save storage space. This is useful for
docum ent s w here a photograph or signat ure appears in a
consist ent area on t he docum ent such as resum es, and so on.
The following procedure describes how t o reproduce t he entire
docum ent in B&W and a port ion of docum ent ( picture) in color.
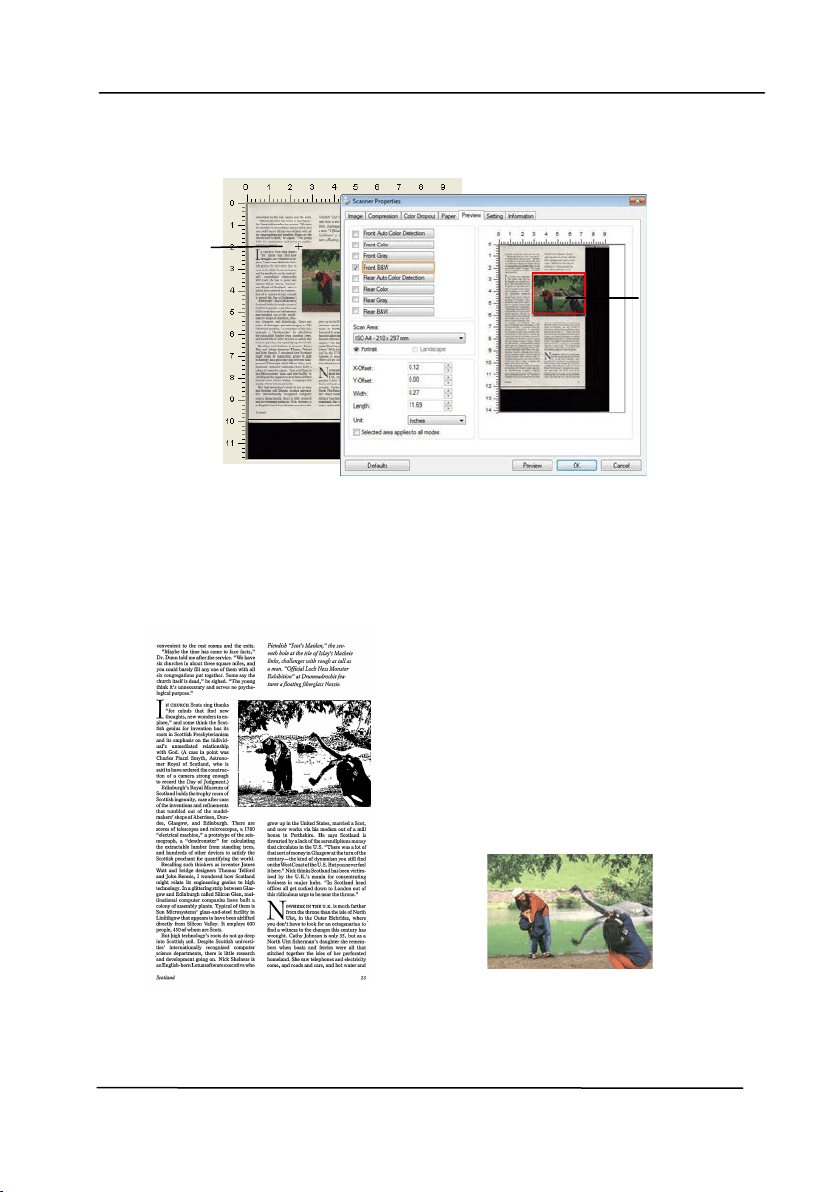
1. On t he Paper t ab, choose “ Relative t o Docum ent ” or “ Fixed
to Transport ” from t he Cropping opt ion.
2. Choose your scan size from t he Scan Area option. The
selected scan size w ill be displayed in a red rect angular
box. This is also t he scan size of your entire docum ent .
( For exam ple, I SO B5. I f you have not chosen a scan area
and leave t he selection as None, t hen t he default area will
be t he scanner’s m axim um .)
A red
rectangular
box
User’s Ma nua l
4- 43
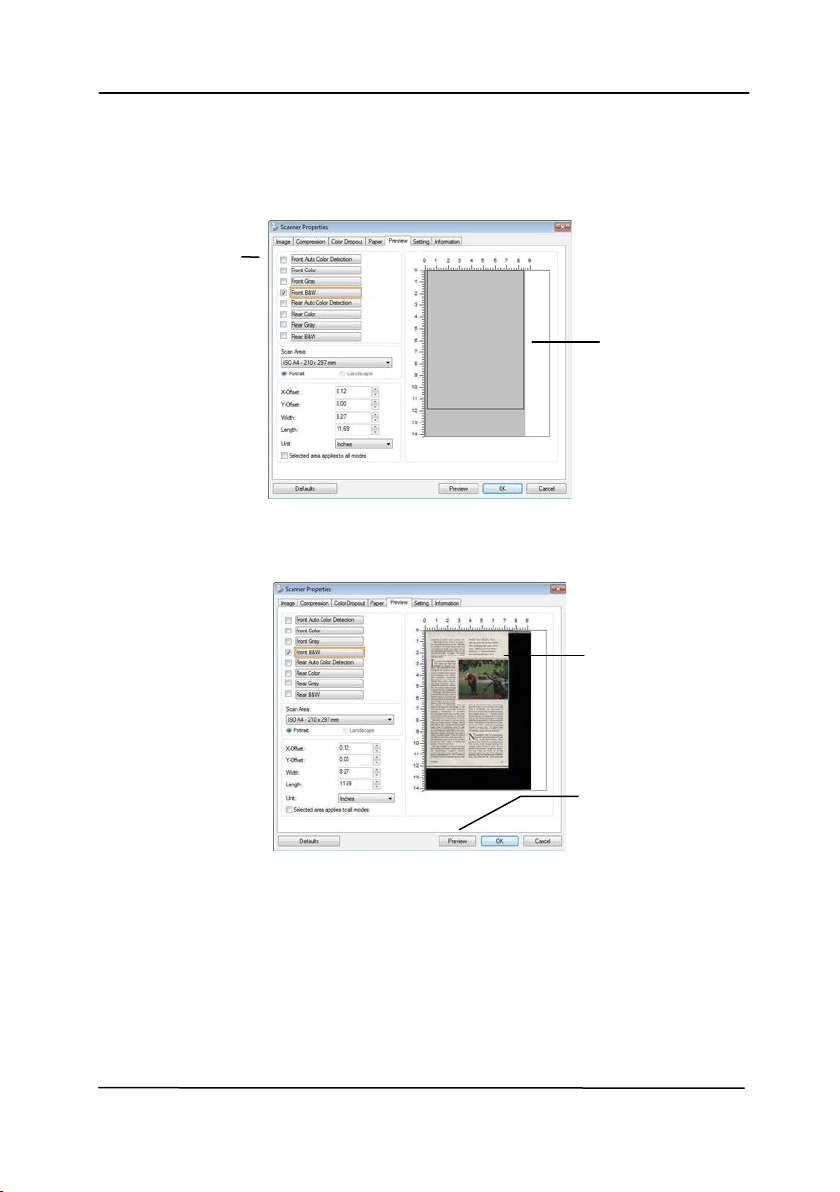
3. Click t he Preview t ab t o display t he Preview window. A
black rect angular box appears t o indicat e t he m ax. scan
size your have j ust selected.
4. Click t he Preview but t on to view t he entire im age in low
resolut ion t o correct ly crop your relat ive scan area.
5. Select im age t ype from t he I m age Select ion box. The
select ed im age will appear in highlight ed color. ( For
exam ple, Front Color)
6. Place your cursor on t he Preview window and click your left
m ouse but t on. A cross sign will appear as illustrat ed.
Create your relative scan size diagonally by dragging t he
left m ouse but t on t o your preferable size. The selected
area will appear in a red box as illustrat ed.
A black
rectangular
box
The Preview
I m age
The Preview
But ton
The I m age
Selection
Box
User’s Ma nua l
4- 44
7. Check t he B&W im age from t he I m age Selection box t o
scan t he ent ire docum ent .
8. Click the Scan but t on to st art scanning the docum ent in
two im age t ypes and sizes. ( See t he result in below.)
The ent ire docum ent in B&W The relat ive area in color
The
Relat ive
Area
A Cross
Sign
User’s Ma nua l
4- 45
4 .6 .2 Ot h er Pa per Sele ct ion
Carrier Sheet M ode:
Check t his opt ion t o aut om at ically crop t he scan window
according t o your docum ent size when scanning non- st andard
docum ent ( fragile, irregular- size docum ent) wit h a carrier sheet
( optional) . Note: The availabilit y of t his opt ion varies due t o
scanner m odel.
Loading D ocu m e nt s Using a Carrier Sheet
A Carrier Sheet is a plast ic sheet specifically used for loading
non- st andard docum ent ont o the scanner. It allows you t o scan
docum ent t hat can not be scanned in t he regular way. Also,
docum ents larger than A4 size, such as A3 and B4, can be
scanned by folding in half, insert ing int o t he Carrier Sheet, and
scanning in duplex m ode. You can also scan docum ent s t hat
can be dam aged quit e easily such as phot ographs, or irregular
size docum ent s t hat are difficult t o load direct ly such as
clippings.
To scan docum e nt using a Car rier Sheet ,
For docum ent s la r ger t han A4 / Let t er size, such as A3
a. Fold the sheet t o be scanned in half.
b. Fold the sheet t ight ly and sm oot h out crease. Ot herwise,
t he sheet m ay be skewed during scanning.
1 . Ope n t he Ca r r ier Sheet and place t h e docum ent
in side.
Align the t op of the docum ent t o t he t op of t he Carrier
Sheet ( t he print ed area) .
User’s Ma nua l
4- 46
For docum ent s la rger t han A4 / let t er size, such as A3
Align the t op of the docum ent t o the top of t he Carrier
Sheet ( t he print ed section) and t he folded port ion t o t he
right edge of t he Carrier Sheet so t hat t he docum ent fit s
int o t he Carrier Sheet at t he upper corner.
For non- standard docu m e nt
Cent er your docum ent in t he Carrier Sheet .
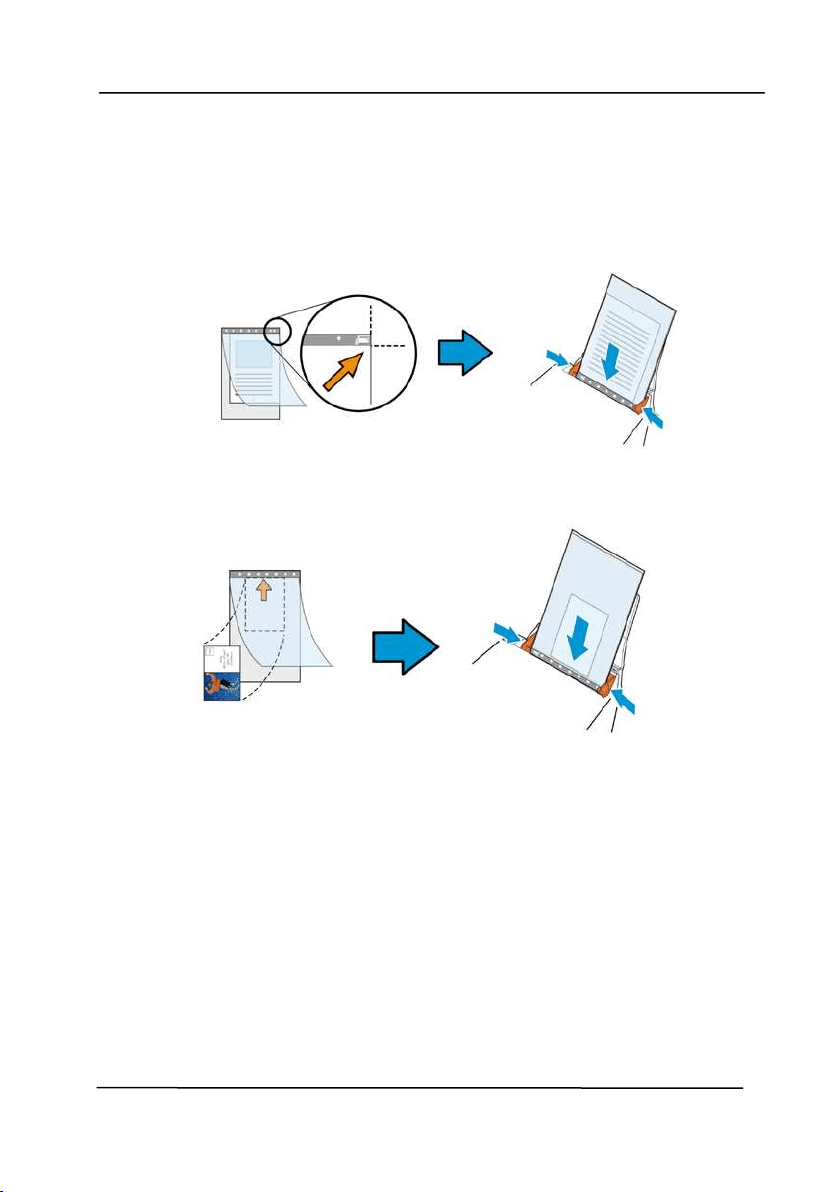
2. Load t he Carrier Sheet w it h t he gray sect ion ( print ed
sect ion) facing downwards.
3. Adj ust t he paper guides t o t he widt h of t he Carrier Sheet .
Adj ust t he paper guides so t hat t here is no space between
t he guides and t he Carrier sheet . Space bet ween t he
guides and Carrier Sheet m ay cause t he Carrier Sheet t o
becom e unaligned during scanning, and skew t he
scanned im age.
4. Start t he scan.
User’s Ma nua l
4- 47
Not ice:
[ Carrier Sheet ] is available for t he m odels t hat support t he
Carrier Sheet.
Som e functions are disabled when [ Carrier Sheet] is
checked.
This opt ion m ay not work properly on som e applications.
Scan Ar e a
Choose your desired paper size wit h t he drop- down list box. Or
you m ay select a cust om paper size by clicking t he Scan Ar e a
box and t hen click Add t o include in t he choice.
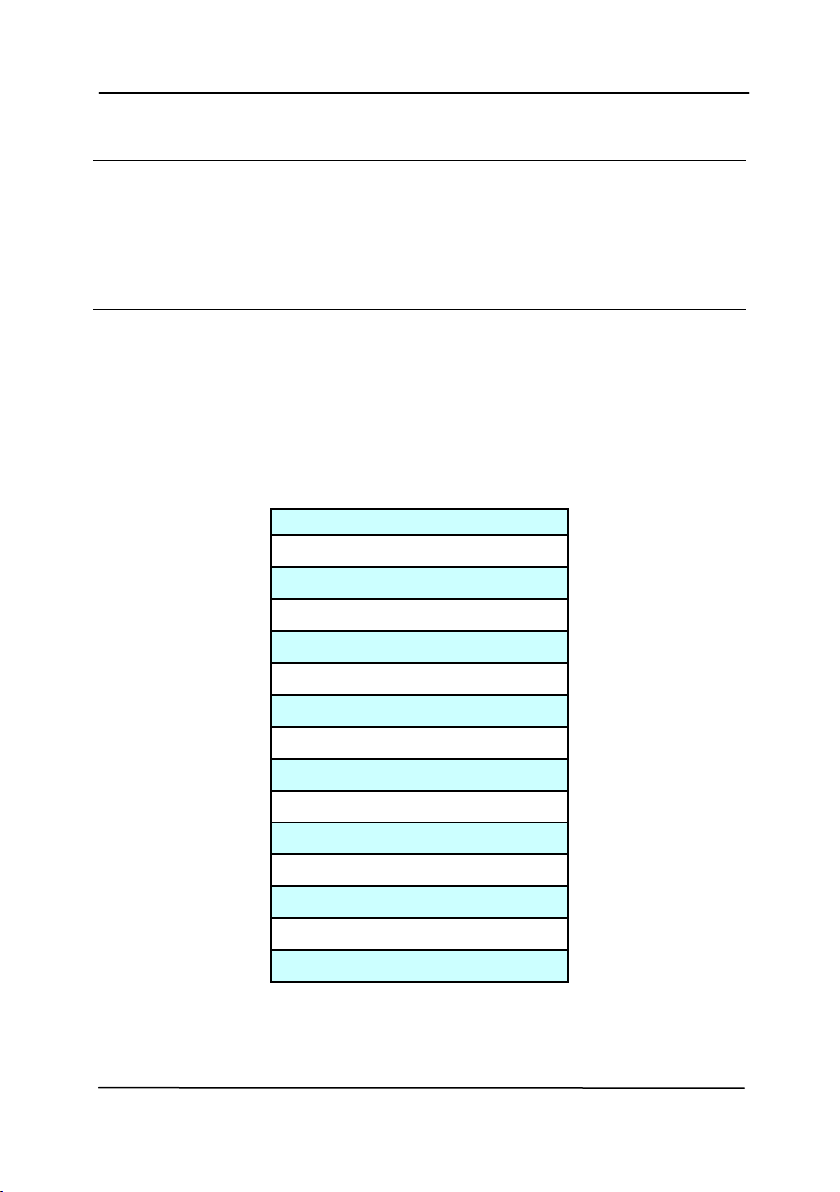
Choice s are list e d below :
N on e
US Let t er- 8 .5 ”x 1 1 ”
US Lega l – 8 .5 ” x 1 4 ”
I SO A4 – 2 1 x 2 9 .7 cm
I SO A5 – 1 4 .8 x 2 1 cm
I SO A6 – 1 0 .5 x 1 4 .8 cm
I SO A7 – 7 .4 x 1 0 / 5 cm
I SO B5 – 1 7 .6 x 2 5 cm
I SO B6 – 1 2 .5 x 1 7 .6 cm
I SO B7 – 8 .8 x 1 2 .5 cm
JI S B5 – 1 8 .2 x 2 5 .7 cm
JI S B6 – 1 2 .8 x 1 8 .2 cm
JI S B7 – 9 .1 x 1 2 .8 cm
Scann er M ax im um
Long Page ( < 1 1 8 ”)

User’s Ma nua l
4- 48
Long Page ( < 1 1 8 ”) :
When you need t o scan docum ents whose lengt h exceeds
scanner m axim um , please choose Long Page . Not e if Lon g
Page is selected, t he M ult i- Feed D et ection will not be
available. ( Not e: This opt ion and t he m axim um allowable
docum ent length vary due t o type of scanner.)
When Long Pa ge ( < 1 1 8 ”) is selected, be sure t o specify your
docum ent size in t he Lengt h and W idt h field.
N ot ice w hen scanning lon g pa ge docum ent:
1. Pull out t he extension in t he ADF Paper Tray.
2. Secure enough space around t he Out put Tray t o prevent
the ej ect ed paper from falling off t he Output Tray.
3. To ensure t he perform ance, in color m ode, set t he
resolut ion t o be 300 dpi or lower; in Black and White
m ode, set t he resolut ion t o be 600 dpi or lower.
4. Depending on your system environm ents, application, or
your specified paper size, t here m ay be insufficient
m em ory t o perform scanning.
OverScan
Overscan allow s you t o add a specific m argin at t op and bottom
or right and left ( Opt ions vary based on t he type of scanner) of
t he edge of t he im age. This is used t o reduce possible corner
clipping on t he skewed im ages and oft en applied t o a bat ch of
skewed docum ent t o be scanned in t he aut o docum ent feeder.
Select a value bet w een 0 and + 5 m m . Not e t he overscan
result will not be shown in t he Display window and t hat t he
availabilit y of t he function varies based on type of scanner.
Pre- Feed

User’s Ma nua l
4- 49
Choice: Enable, Disable. I f enable is selected, you can set t he
am ount of t im e t he scanner start s pre- feeding your paper aft er
your docum ent s has been loaded int o t he feeder. The default is
disable. Not e: The availabilit y of t his option varies due t o
scanner m odel.
Transport Tim e ou t
Set t he am ount of t im e the scanner will wait and t hen start
auto scan aft er t he first scan j ob is com pleted. I f you have
m any separat e docum ent s need t o be scanned at t he sam e
scan settings, t his feat ure is especially useful. The default is 0.
The value ranges from 0 t o 30 seconds.
N ot e :
1 Wit hin t he specified tim eout period, if you load your
docum ent t o t he feeder, t he scanner st art s scanning
aut om at ically.
2 I f your scanner has a flat bed opt ion and you place your
paper on t he flat bed, after t he t im eout period, you need
to click t he Scan but t on on t he TWAIN user int erface t o
st art scanning.
User’s Ma nua l
4- 50
Back gr ound
Sett ing
This opt ion allows you t o set your scan
background. Choice: W hit e Background,
Bla ck Background.
Note: For a sheet - fed scanner wit h an aut o
docum ent feeder, t his opt ion is current ly
available only in t he “ Auto crop” m ode. For a
scanner wit h a flatbed plat en, t his opt ion is
available eit her in t he “ Aut o crop” or t he
“ Fixed t o Transport ” m ode.
Whit e Background
Black Background
User’s Ma nua l
4- 51
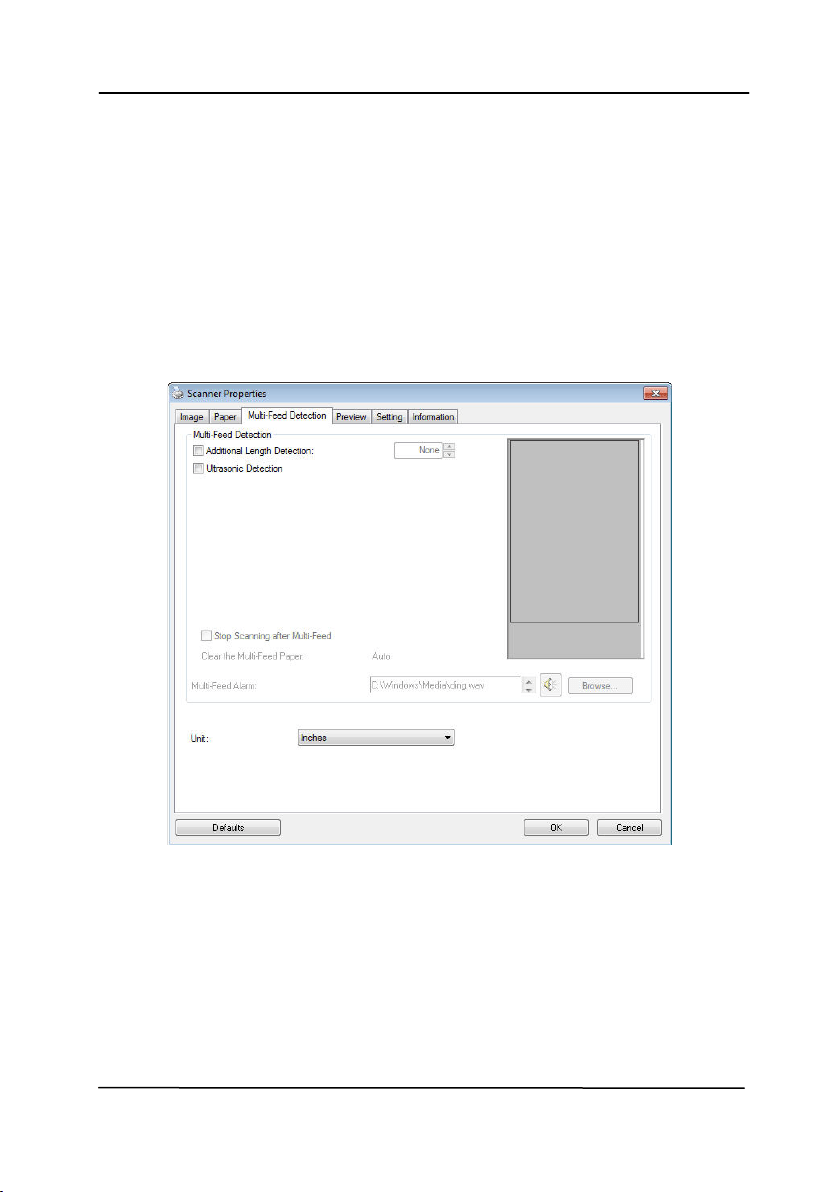
4 .7 The M u lt i- Fe e d Det e ct ion Tab
M ult i- Fe e d Det e ct ion
Mult i- Feed Detection allows you t o det ect overlapped docum ent
that go t hrough t he auto docum ent feeder. Mult i- Feed usually
occurs due t o st apled docum ent s, adhesives on docum ents, or
electro- stat ically charged docum ent . Note: The availability of
t he function varies based on t ype of scanner.

User’s Ma nua l
4- 52
Addit ional Length D et ection
Addit ional Lengt h Det ect ion allows you t o define t he lengt h of
docum ent being m ult i- fed. This value indicat es t he addit ional
lengt h exceeding your scan area. The Display window will show
the size of the docum ent as you change t he value. A value of 0
indicat es no addit ional length detection. The Additional Lengt h
Det ect ion is best used when scanning sam e- size docum ent s in
t he aut o docum ent feeder.
Ult rasonic D et e ct ion
Ult rasonic Det ection allows you t o set overlapped docum ent by
det ect ing paper t hickness between docum ent s. Not e: The
availabilit y of t he function varies based on type of scanner.
There are t wo opt ions available if Mult i- Feed is detected.
St op Scann ing aft er M ult i- Fe e d
I f t his is selected, t he scanner will stop t he feeder and
prom pt a m ult i- feed warning m essage. In addit ion,
the m ult i- feed paper will be ej ect ed from t he scanner
aut om at ically.
Not e: The availabilit y of t he [ Aut o Clear M ult i- Fe e d
Pape r ] feat ure varies based on scanner t ype. I f your
scanner does not support t his feat ure, rem ove t he
m ult i- feed paper m anually.
I f t his is not selected, t he scanner will continue
scanning the ent ire docum ent though m ulti- feed is
det ected. Aft er t he entire docum ent has been scanned,
a m ult i- feed dialog box will be prom pt ed to indicat e
the page num ber which has been det ect ed m ult i- feed
and need t o be rescanned.

User’s Ma nua l
4- 53
M ult i- Fe e d Alarm
I f a wave file is added, t he scanner will m ake a sound
alarm if m ult i- feed is detect ed yet no Warning dialog box
will be displayed.
How t o add t he sound alarm
:
1. Click t he Browse butt on on t he right side of t he speaker icon.
The Open dialog box appears.
2. Choose your wave file.
3. Click t he Open but ton. The wave file is added.
Un it s
Defines t he prim ary m easurem ent system . I nche s,
M illim e t ers, and Pix e ls are available.
User’s Ma nua l
4- 54
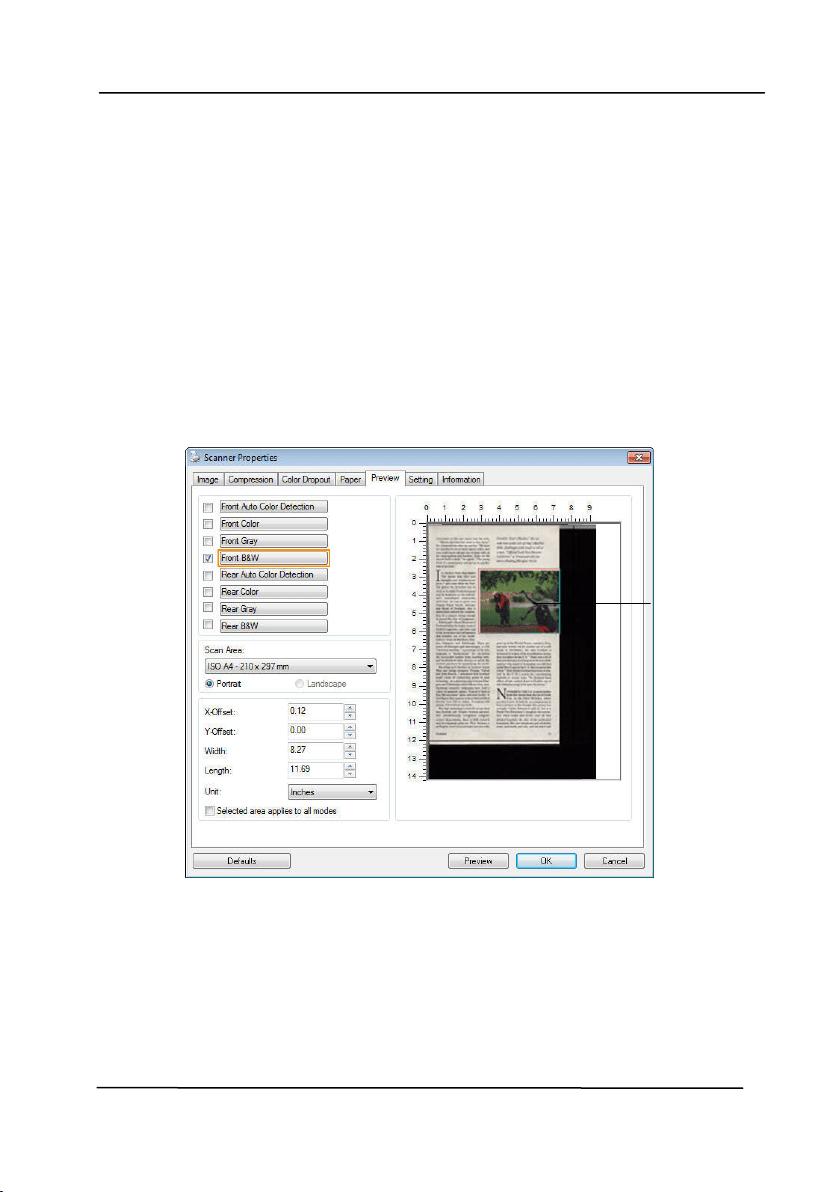
4 .8 The Pr e vie w Tab
The Preview t ab allow s you t o preview ( a low - resolut ion scan)
your im age before final scan. This preview im age let s you
allocat e your scan area. You can choose your scan area by t he
“ Scan Area” drop dow n list box or placing your cursor on t he
Display window and dragging it diagonally on t he Display
window. Then, a red rectangle box will appear t o indicate t he
selected area.
Not e: I f you choose “ Aut om atic Cropping” on t he “ Paper Tab” ,
t hen t o select a scan area on t he Preview t ab is not allow ed.
The Preview Tab
The Display
Window
User’s Ma nua l
4- 55
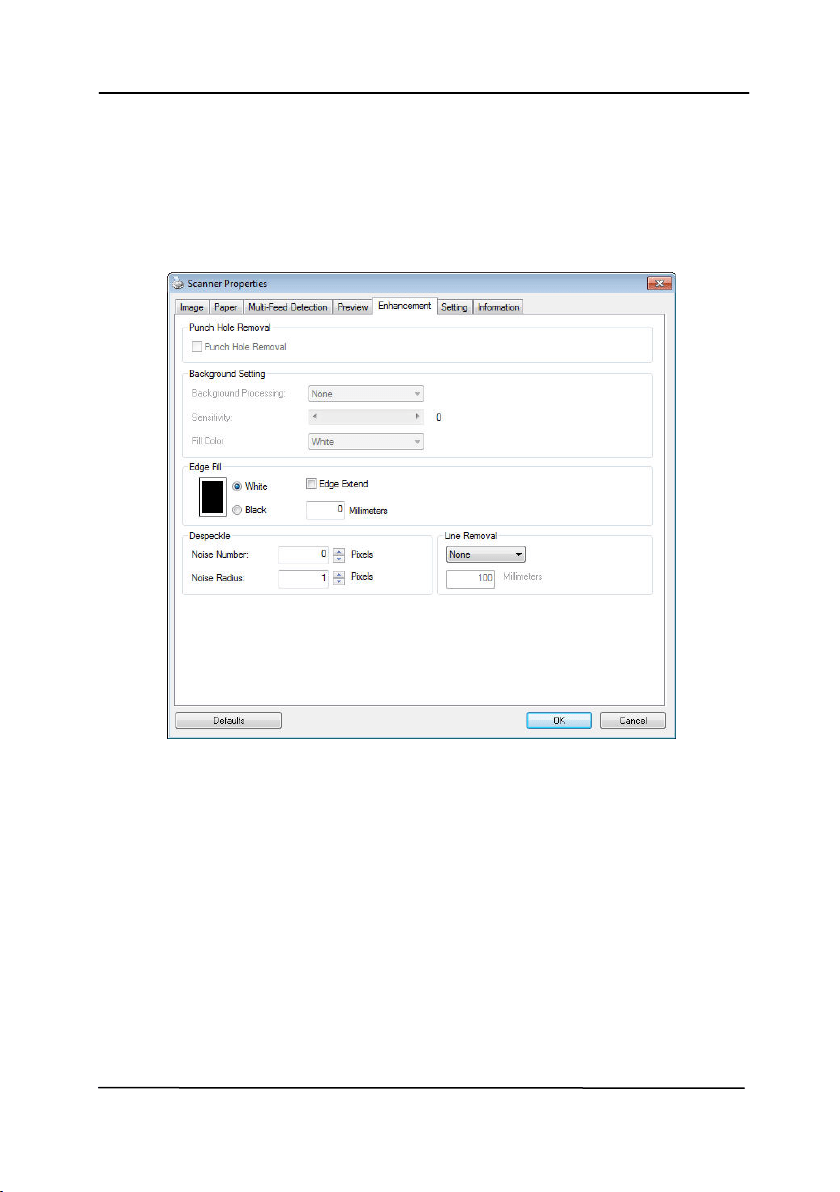
4 .9
The Enhancem ent Tab
The Enhancem ent t ab allows you t o set following addit ional
im age processing set t ings.
The Option t a b dialog box
User’s Ma nua l
4- 56
Punch
H ole
Rem oval
You can rem ove punch holes from t he output
scanned im age when scanning punched docum ent.
Note t he availabilit y of t his feat ure varies
depending on your scanner m odel.
Punch holes can not be r em oved w hen:
• Resolut ion is set lower t han 150dpi
• The hole is near t he edge of t he docum ent
• The holes are not aligned along t he edge of t he
docum ent
• Punch Hole Rem oval is available only when
“ Aut o Crop” is enabled. I f eit her “ Fixed t o
Transport ” , “ EOP ( End of Page) Detection”,
“ Aut om at ic Mult iple” , “Relative t o Docum ent s” is
select ed from t he Cropping opt ion on t he Paper
tab, t he Punch Hole Rem oval option will be
disabled.
Original
Out put im age
User’s Ma nua l
4- 57
Shadow Rem oval When 「Fla t be d」on t he 「Sca n
Source 」 opt ion is select ed on t he
「I m a ge」tab, t he 「Shadow
Rem oval」option will be enabled. Click
t o rem ove t he shadow on t he book spine
when scanning a book.
Before Shadow Rem oval
Aft er Shadow Rem oval

User’s Ma nua l
4- 58
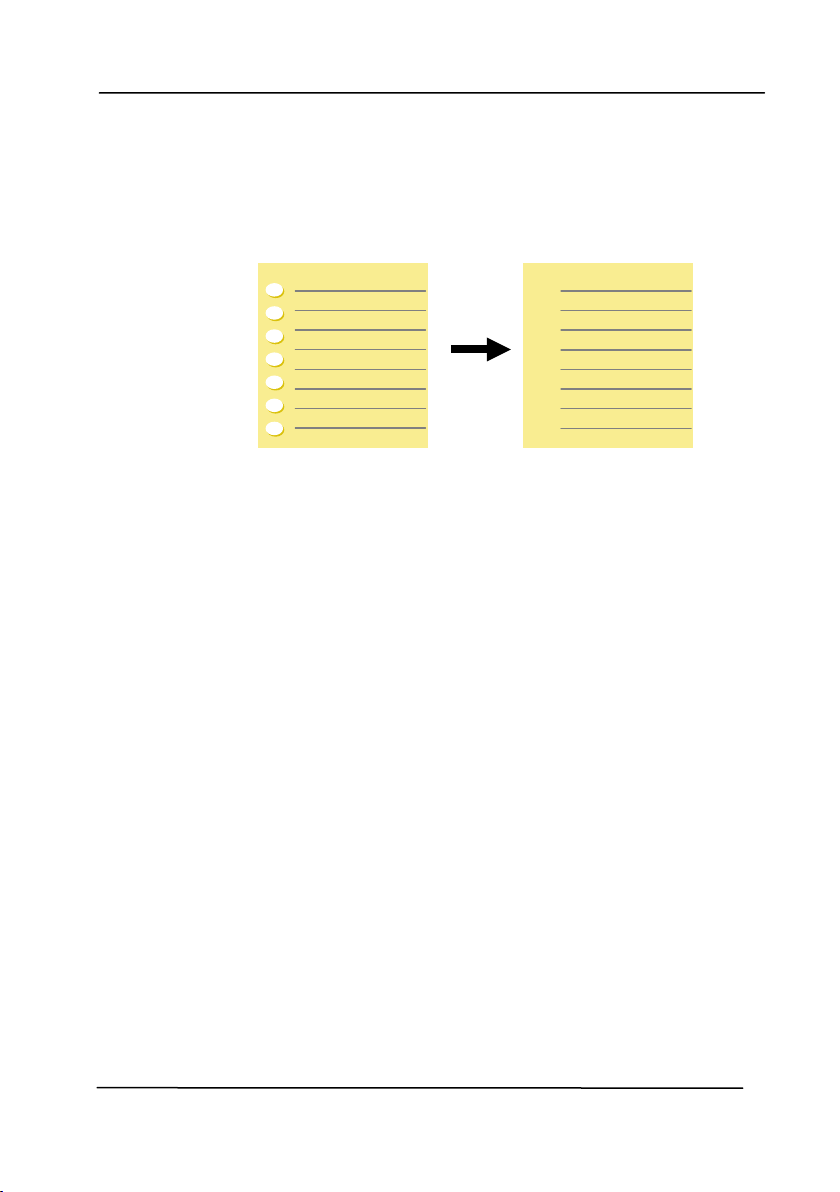
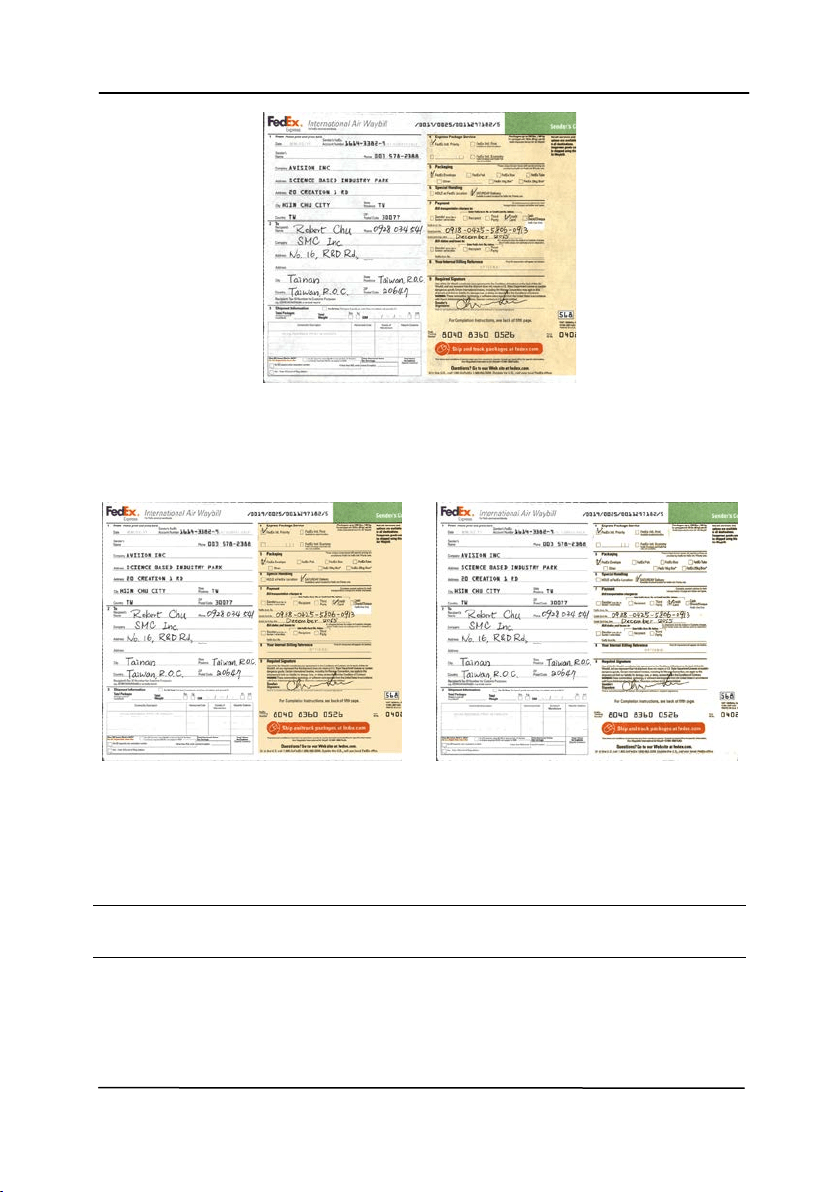
Back gr ound Processing: The [ Backgr ou nd Pr ocessing]
opt ion allows you t o sm oot h background color or rem ove it t o
m ake im age clearer. The opt ion is especially useful for
docum ent s wit h color form s such as invoices.
Choices: N one ( default ) , Sm oot h, Re m oval
- N on e - no background processing w ill be perform ed
( default )
- Sm oot h - produces im ages wit h a m ore uniform
background color. This opt ion im proves im age quality.
- Rem oval - ident ifies t he background color and t hen
rem oves it .
Sensit ivit y: Choice: 0 , 1 , 2 , 3 , 4 . Defa ult : 0
- The higher t he value, t he m ore background color will be
kept .
Mode: Aut o, M oiré
I f [ Sm oot h] is selected in t he [ Backgr ound Processing]
opt ion, t hen t he choices for t he [ M ode] opt ion includes Aut o,
and Moiré.
- Aut o - uses t he fact ory preprogram m ed m ode t o proceed
background sm oot hing.
- M oiré – Rem ove t he m oiré patt erns t hat appear on t he
background of t he im age when scanning print ed m aterial.
I f [ Re m oval] is select ed in t he [ Backgr ou nd Pr ocessing]
opt ion, then t he [ Mode ] opt ion will be replaced wit h [ Fill
Color ] . Choices: Whit e, Auto.
- W hit e - ident ifies t he background color and subst it ut es it
wit h white.
- Aut o - ident ifies t he background color and subst it ut es it
wit h t he color of t he largest background zone.
User’s Ma nua l
4- 59
Backgr ou nd Pr ocessing: N one
Backgr ou nd Pr ocessing:
Sm oot h
Backgr ou nd Pr ocessing:
Rem oval
Fill Color: Whit e
N ot e : Background color in sm all zone will not be processed or
rem oved.
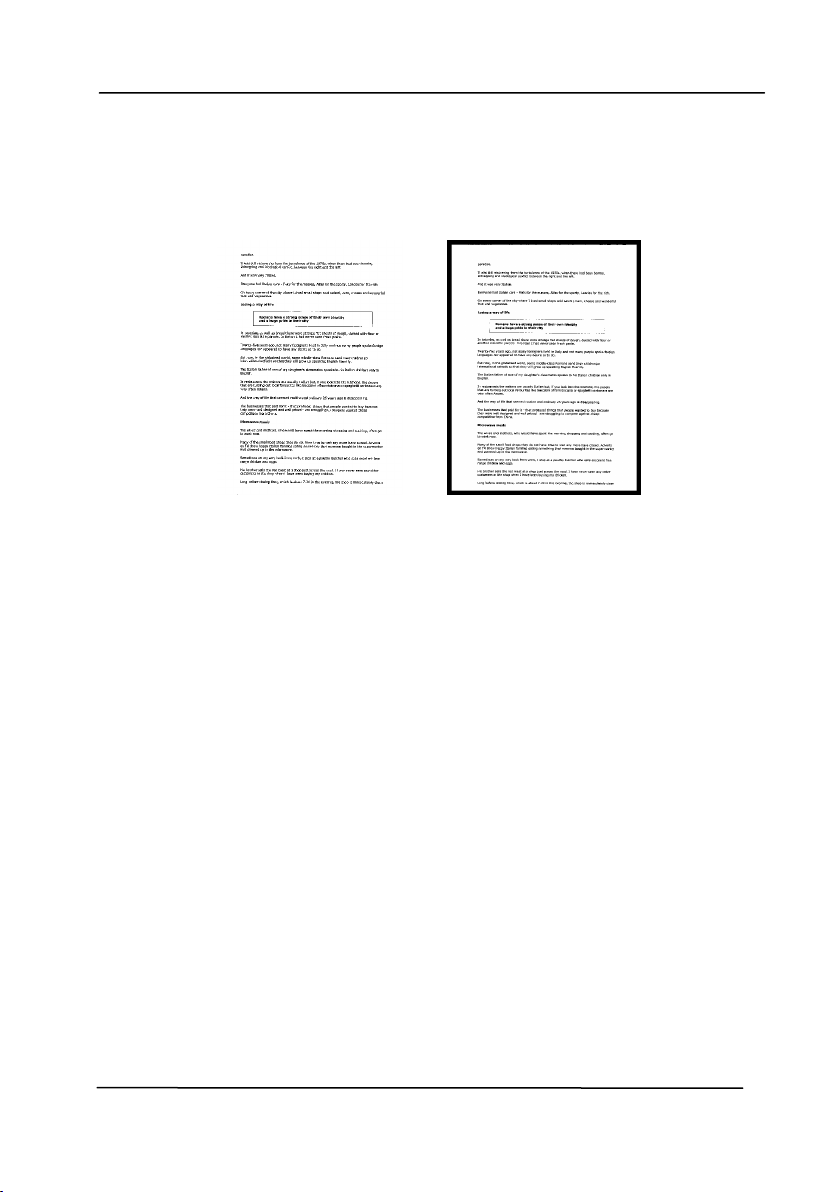
User’s Ma nua l
4- 60
Edge
Fill
Check Whit e or Black if you wish to add whit e or
black edge on t he border of your scanned im age.
Ent er t he value from 0 t o 5 m m . Default value is 0.
Original
Edge Fill: 5 m m ( Black)
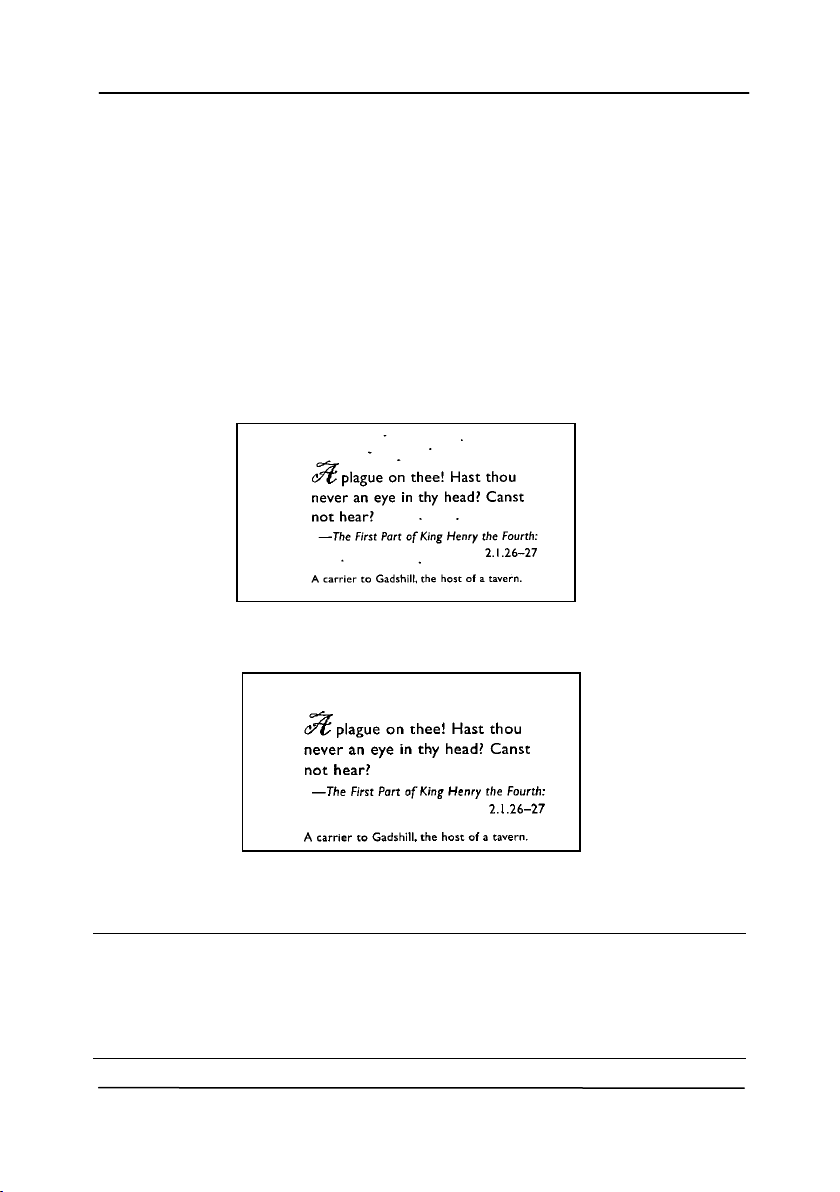
User’s Ma nua l
4- 61
Despeckle
Occasionally sm all dot s or specks appear in t he background of a
scanned im age. Rem ove unwanted speckles provides a cleaner
im age for OCR ( Optical Character Recognit ion) processing, and
also helps t o reduce com pressed file size.
Define t he speckles ( also known as im age noise) you w ish t o
rem ove by specifying its num ber ( size) and radius ( range). The
m easuring unit is pixel. The higher t he num ber, t he m ore
speckles will be rem oved.
Before Despeckle
( noise num ber: 0, noise radius: 1)
After Despeckle
( noise num ber: 22, noise radius: 10)
N ot e :
• The function is current ly available for Black and White
im age only.
• To scan at rat ed speed, it is recom m ended t o set t he noise
radius up t o 10 pixels.
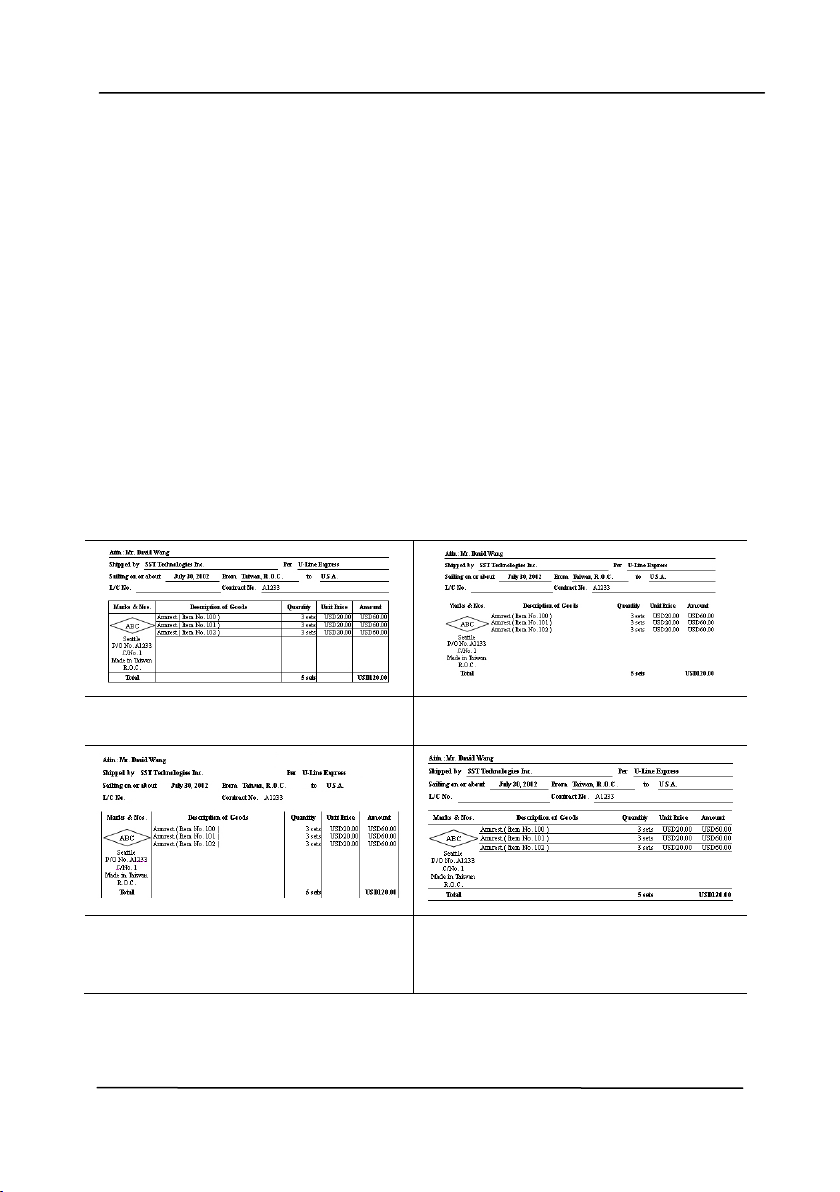
User’s Ma nua l
4- 62
Line Re m oval: When Black and W hit e im age m ode is
selected on t he [ I m age] tab, t he [ Line Rem oval] option will
be enabled. Line Rem oval erases lines on t he im age and t hen
reconstructs characters so t he OCR ( Opt ical Character
Recognit ion) accuracy can be im proved.
Choices: N one, For m , H orizont al, Vert ical
N on e – t he default m ode which does not rem ove any line.
Form – rem ove any form in t he docum ent .
Horiz ont a l – select [ H oriz ont a l] and t hen ent er the lengt h of
horizont al line t o rem ove only t he horizontal line exceeding
your specified lengt h.
Ve rt ical – select [ Ve r t ical] and t hen ent er t he lengt h of
vert ical line t o rem ove only t he vert ical line exceeding your
specified lengt h.
N on e Re m ove For m
Re m ove H orizont a l Line
( over 3 0 m m )
Re m ove Vertical Line
( over 7 0 m m )
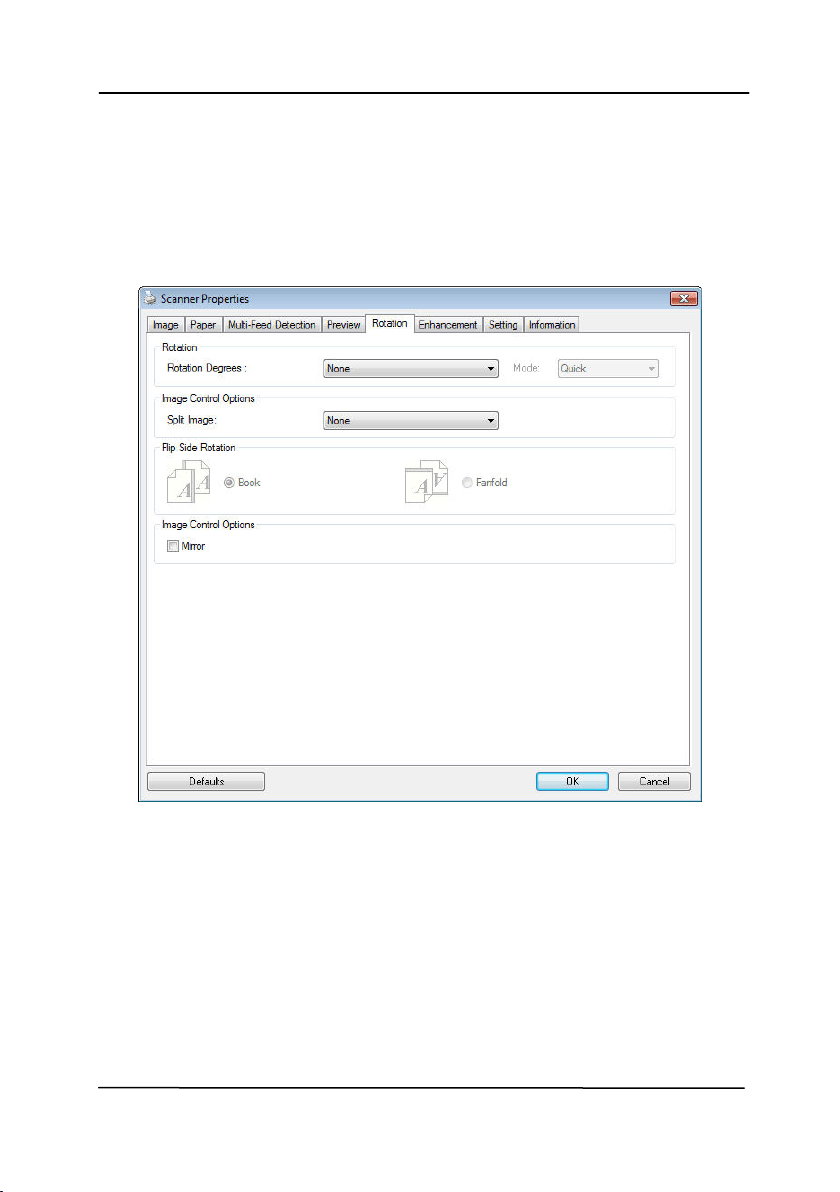
User’s Ma nua l
4- 63
4 .1 0 The Rot a t ion Tab
The Rotation t ab allows you to set t he following im age rot ating
opt ions:
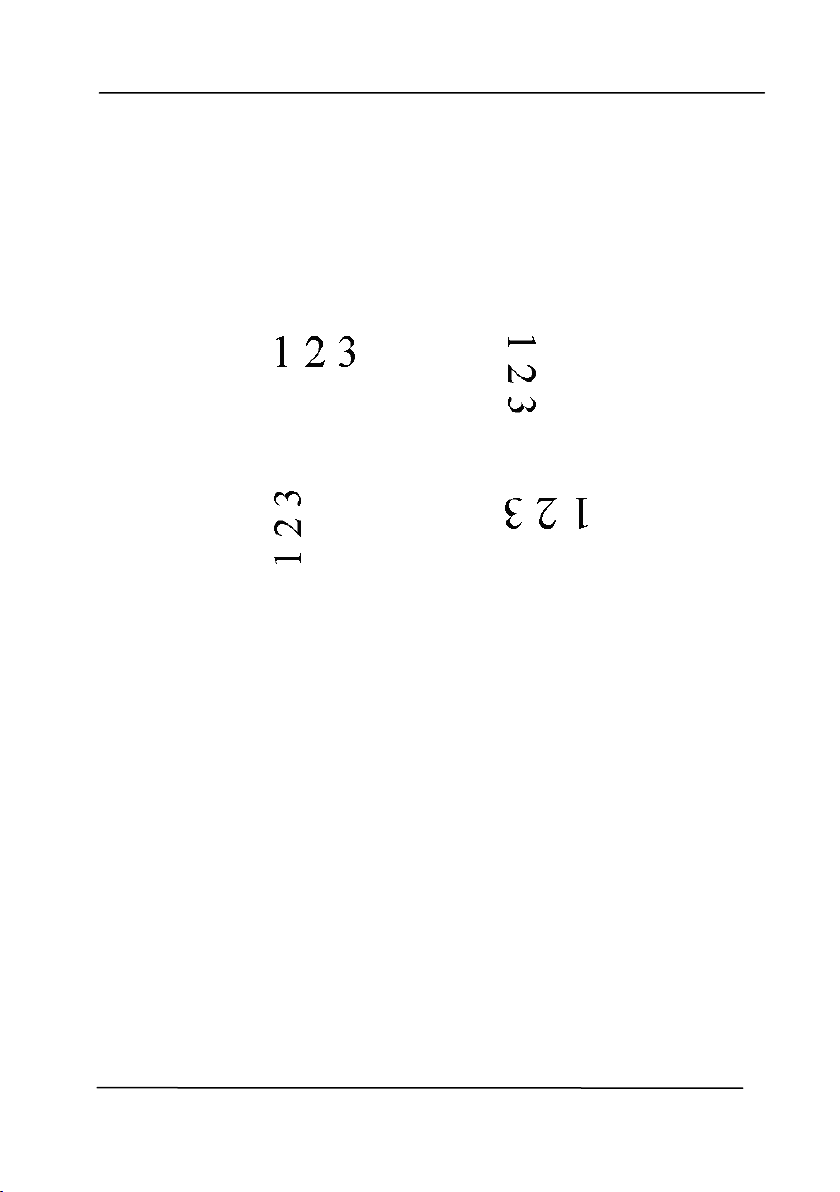
User’s Ma nua l
4- 64
Rot ate
I m age
Choose the rot at ion angle from t he drop down
list if you wish t o rotate your scanned im age.
Choice: N one , 9 0 ° CW ( clock w ise) ,
9 0 ° CCW ( counter clock w ise) , 1 8 0 ° , Au t o
ba sed on cont ent s. Aut o rot a t e e very
eve n pa ge.
Original
Rot at e 9 0 ° CW
Rot at e 9 0 ° CCW
Rot at e 1 8 0 °

User’s Ma nua l
4- 65
Auto ba sed on cont e nt s: Aut om atically
rot at e im ages based on t he cont ent s of
docum ent . When「Aut o based on
cont ents」 is selected, its m odes will be
enabled t o let you select m ore opt ions.
Mode: Quick , Full Te x t , Com plex it y
Quick – t he default m ode to let you rotate
im ages at t he fastest speed.
Full Text – t he enhanced m ode for
docum ent s wit h m ixed t ext orientation.
Com ple x it y – t he enhanced m ode yet at t he
slowest speed for docum ent wit h com plex
im age or t ext orient at ion.
Auto rot a t e eve r y e ven pa ge:
Aut om at ically rotate 180° on every even
page. This is especially useful w hen you scan
t he inside pages from a book . As a result , if
you choose “ Flat bed ( book) ” from t he “ Scan
Source” opt ion, “ auto rot at e every even page”
will be selected as default .
Not e: This opt ion varies base d on t ype of
scan ner.
Docum ent w it h various
t ex t or ie nt a t ions
Docum ent w it h dark or
com ple x back gr ound
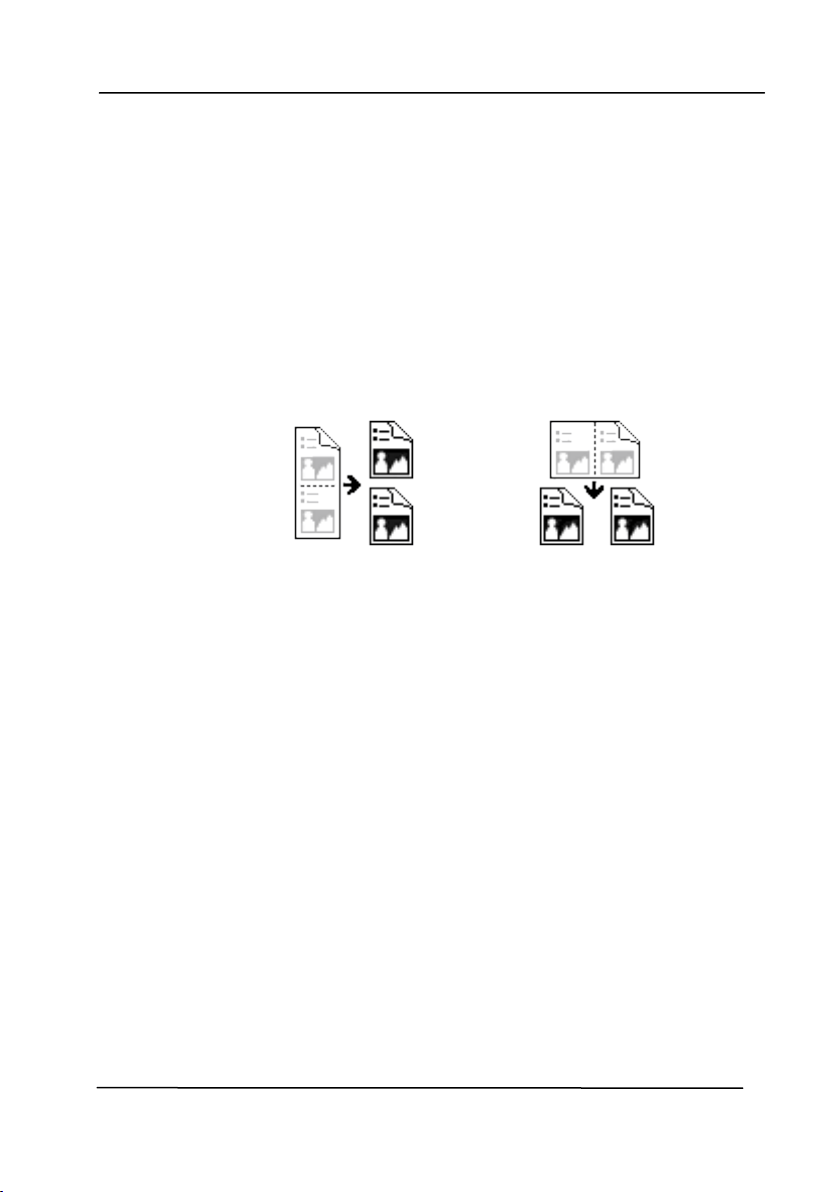
User’s Ma nua l
4- 66
Split
I m age
By split t ing an im age, t wo separat e im ages are
created horizontally or vert ically. This is useful
for docum ent s containing t wo pages per im age
when you want t o save t hem as t wo im ages
( one page for one im age) . Choice: N one,
Horiz ont al, Vert ica l. Default is None.
H or iz on t al: Divide one im age into t he upper
half and the lower half.
Ve rt ical: Divide one im age into t he left half and
the right half.
Split H orizont a lly
Split Vert ical
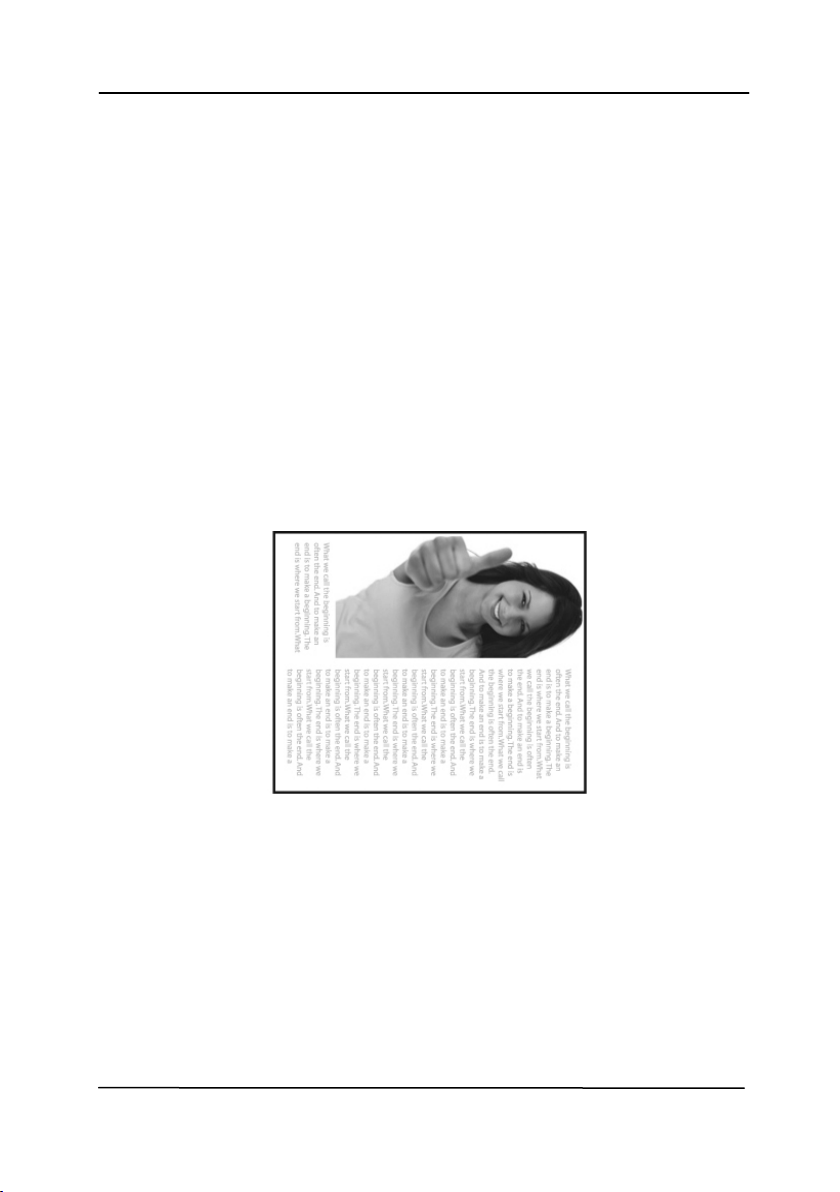
User’s Ma nua l
4- 67
Flip Side
Rot at ion
Select “ fanfold” t o rot at e t he im age of t he
reverse side t o 180 degrees.
This is applied t o double-sided docum ent
which are viewed in port rait are som et im e
fed int o t he scanner in landscape or vice
versa.
Choice: Book , Fanfold.
I f “ Book” is selected, t he im age of t he
reverse side w ill not be rot at ed.
The following illust ration shows t he docum ents which should
be v iewed in portrait are fed into t he scanner in landscape
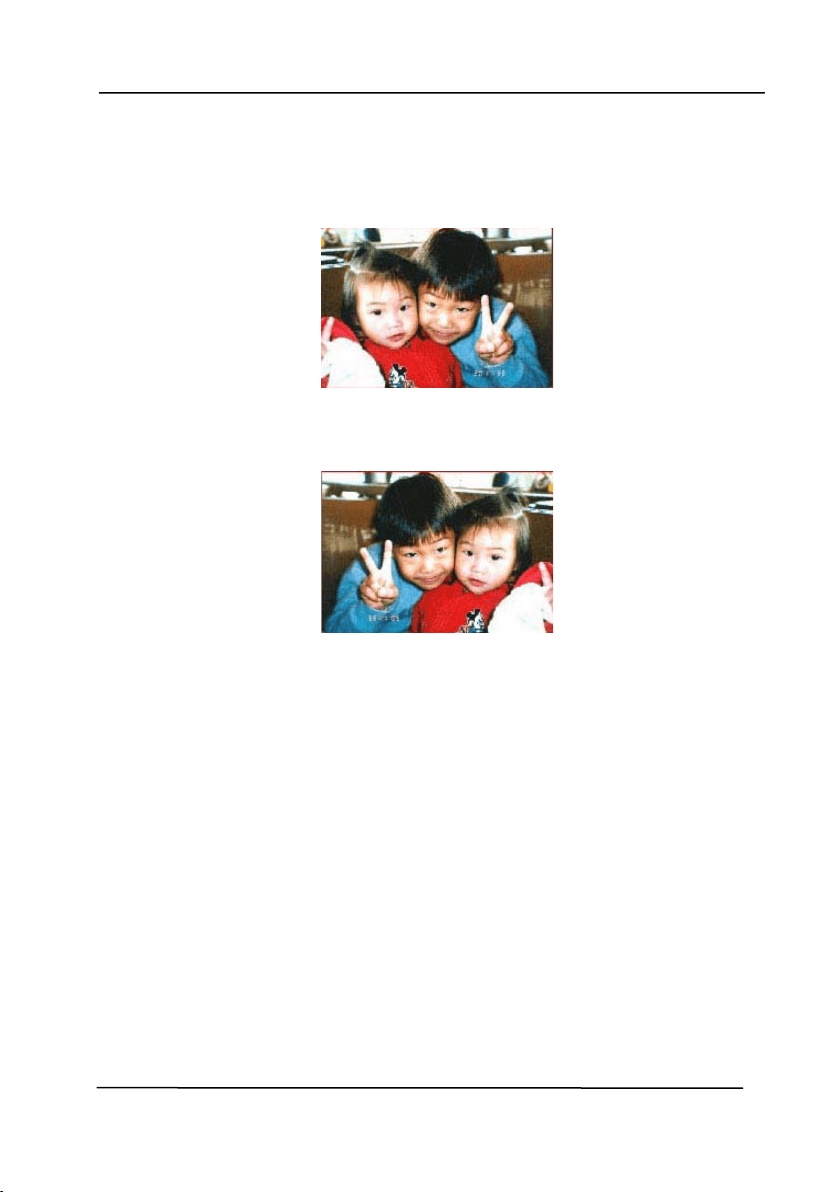
User’s Ma nua l
4- 68
I m age
Control
Opt ion
Check t he Mirror box if you w ish t o reverse t he right
and left side of your im age.
Original
The M irror Effect
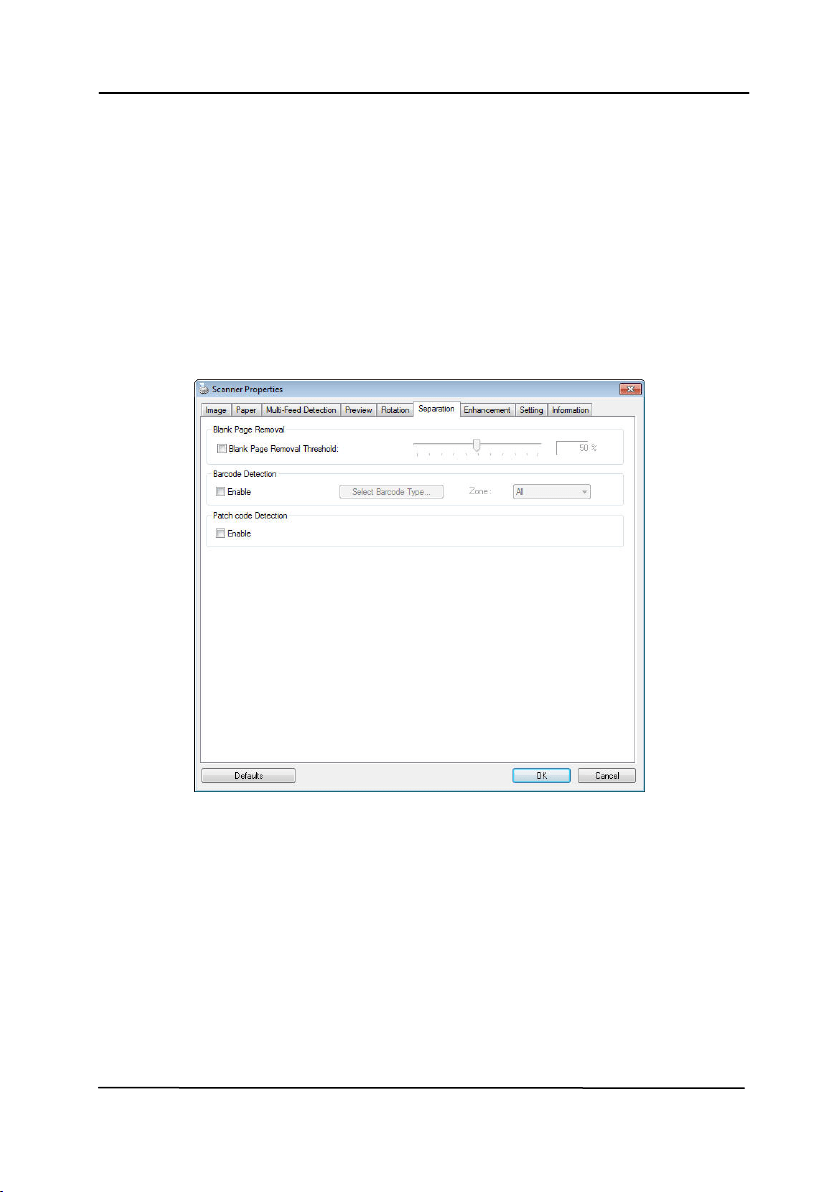
User’s Ma nua l
4- 69
4 .1 1 Th e Separat ion Ta b
The Separat ion t ab allows you t o enable t he detection engine to
det ect t he blank page, barcode, and pat ch code and t hen not ify
t he soft ware applicat ion which support s docum ent separation t o
separat e your m ult i- page docum ent s. Choices: Blank Page
Rem oval, Barcode Det ect ion, Pat ch Code Det ection.
Bla n k Pa ge
Rem oval
Choices: None, Blank Page Rem oval Threshold,
I m age Size.
N on e – Do not rem ove t he blank pages.
Threshold - Move t he slider t o the left or right
t o define your t hreshold for t he blank page.
I m age Size – Range: 1~ 10000 KB. Specify
your desired im age size t o det ect t he page as a
blank page. For exam ple, if 3 KB is selected,
any page less t han 3 KB will be recognized as
blank page.

User’s Ma nua l
4- 70
Barcode
Detection
Check [ Enable] t o det ect barcode and notify
the soft ware application for advanced
processing. Please not e t he w hole docum ent
will be checked and no specific det ection area
needs t o be designat ed.
When t he bar code has been det ected successfully ,a file
[ avbarcode.ini] will be creat ed and st ored in t he following path:
Window s XP:
C: \ Docum ent s and Set t ings\ All Users\ Application
Dat a\ % PRODUCTNAME%
Vista, Window s 7, Windows 8, Windows 10:
C: \ Program Dat a\ % PRODUCTNAME%
Barcode Types:
The following barcode t ypes can be detect ed.
Tw o- dim ensional codes
Azt ec
DataMat rix
PDF417
QR Code
One- dim ensional barcodes:
Add- 2
Add- 5
Airline 2 of 5
Aust ralian Post 4- State Code
BCD Mat rix
Codabar
Code 128 ( A,B,C)
Code 2 of 5
Code 32
Code 39
Code 39 Ext ended
Code 93
Code 93 Ext ended
Dat aLogic 2 of 5

User’s Ma nua l
4- 71
EAN 128 ( GS1, UCC)
EAN- 13
EAN- 8
GS1 Dat aBar
I ndustrial 2 of 5
Intelligent Mail ( One Code)
I nt erleaved 2 of 5
I nvert ed 2 of 5
I TF- 14 / SCC- 14
Mat rix 2 of 5
Patch Codes
PostNet
Royal Mail ( RM4SCC)
UCC 128
UPC- A
UPC- E
Barcode Zone :
Specify the barcode zone t o be detected.
Select 「All」 t o checks t he whole docum ent and detects
barcodes. Or you m ay speed up t he process by specifying a
det ection area since only t he specified area is checked.
Choice: All, Top, Bot t om , Left , Right , Bot t om Right ,
Bot t om Left , Top Right, Top Left
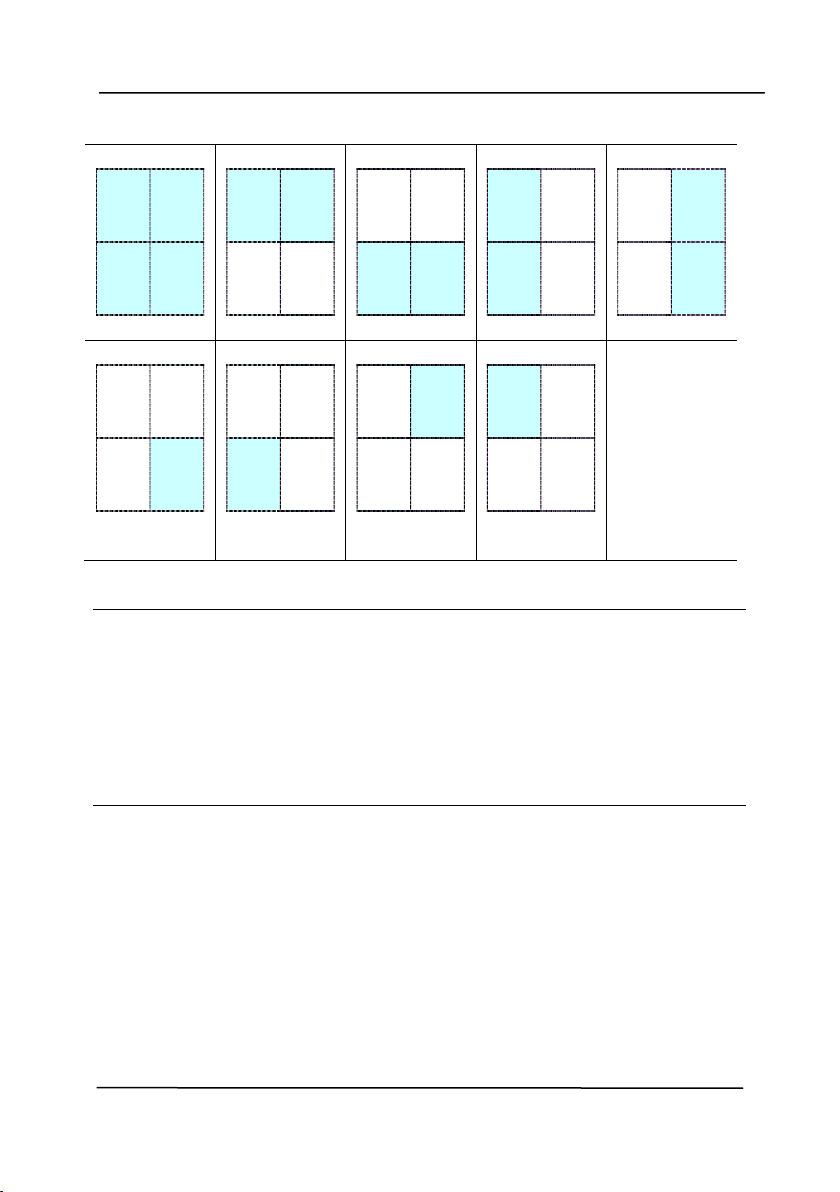
User’s Ma nua l
4- 72
Choice for bar code zone on a page:
All
Top
Bot t om
Left
Right
Bot t om
Right
Bot t om
Left
Top Right
Top Left
N ot e :
Recom m ended resolut ion: 200~ 600 dpi for regular
barcode, 300~ 600 dpi for QR code
Sk ewed barcodes m ay not be recognized correct ly.
Using t he sam e sheet repeat edly m ay decrease t he
recognition accuracy due t o accum ulated dirt on the sheets.
I f t he sheet is not recognized correct ly or get s sm udged,
replace it wit h a new sheet.
Pa t ch code Det ection:
Check [ Enable] t o det ect pat ch codes and not ify t he soft ware
application for advanced processing.
A pat ch code is a pat t ern of parallel, alt ernat ing black bars and
spaces ( i.e. a barcode) that is print ed on a docum ent . Pat ch
code sheet is m ost com m only used as a docum ent separat or in
a stack of docum ent .
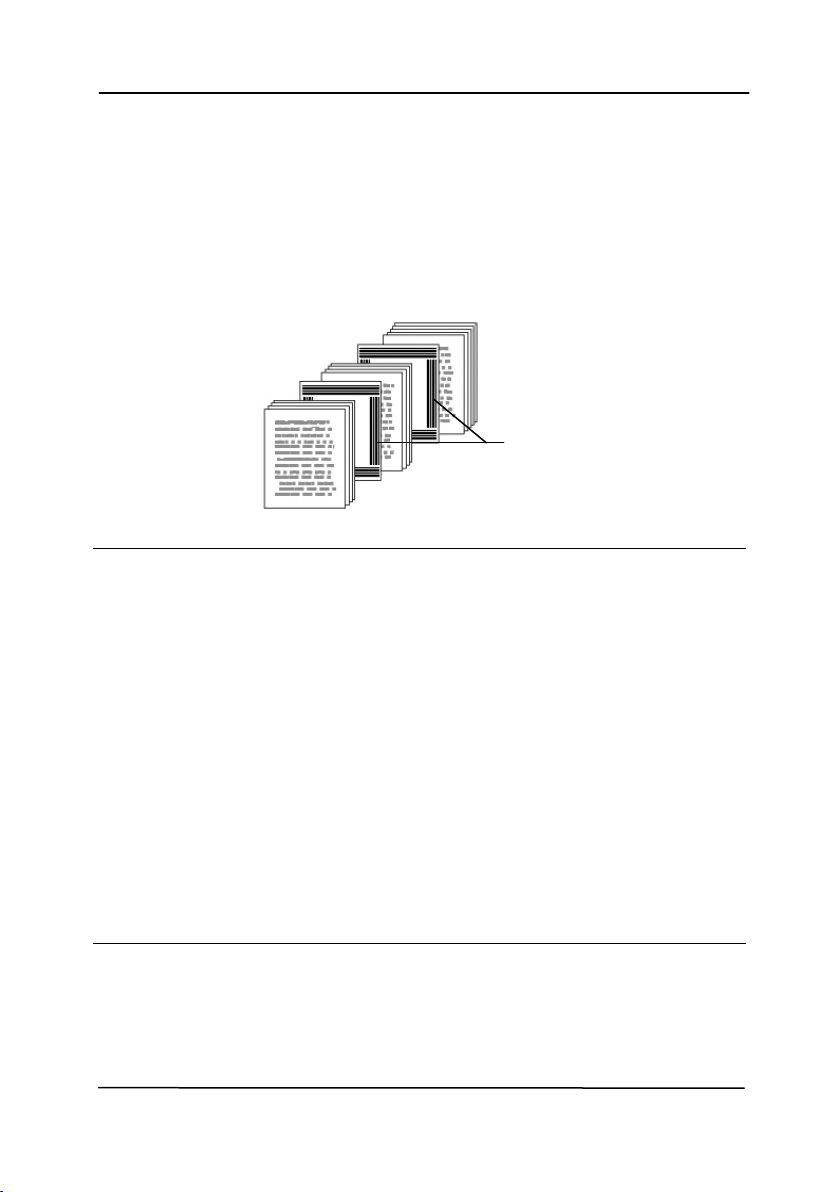
User’s Ma nua l
4- 73
You can find various sizes of pat ch codes ( PDF) by choosing
[ St a r t ] m enu> [ All Program s] > [ Avision Scann e r
Series] > [ Pat ch code] in succession.
Sim ply print the PDF file t o produce t he pat ch code sheet.
I nsert t he pat ch code sheet s t o wherever you want t he file t o
separat e.
Not e s t o print t he patch codes:
Use blank whit e paper.
Set t he scaling t o 100% . The sheet is not recognized
correct ly when print ed in a size sm aller than the original.
Do not use t oner saving m ode. The sheet is not recognized
correctly when t he print is t oo light .
Do not use t hin paper in order t o avoid bleed- t hrough from
the back.
When you copy a pat ch code sheet t hat you print ed out,
m ake sure t o copy by t he sam e size and bright ness as t he
original copy.
Use t he sam e sheet repeat edly m ay decrease t he
recognition accuracy due t o accum ulated dirt on the sheets.
I f t he sheet is not recognized correct ly or get s sm udged,
replace it wit h a new sheet.
Pat ch code sheet
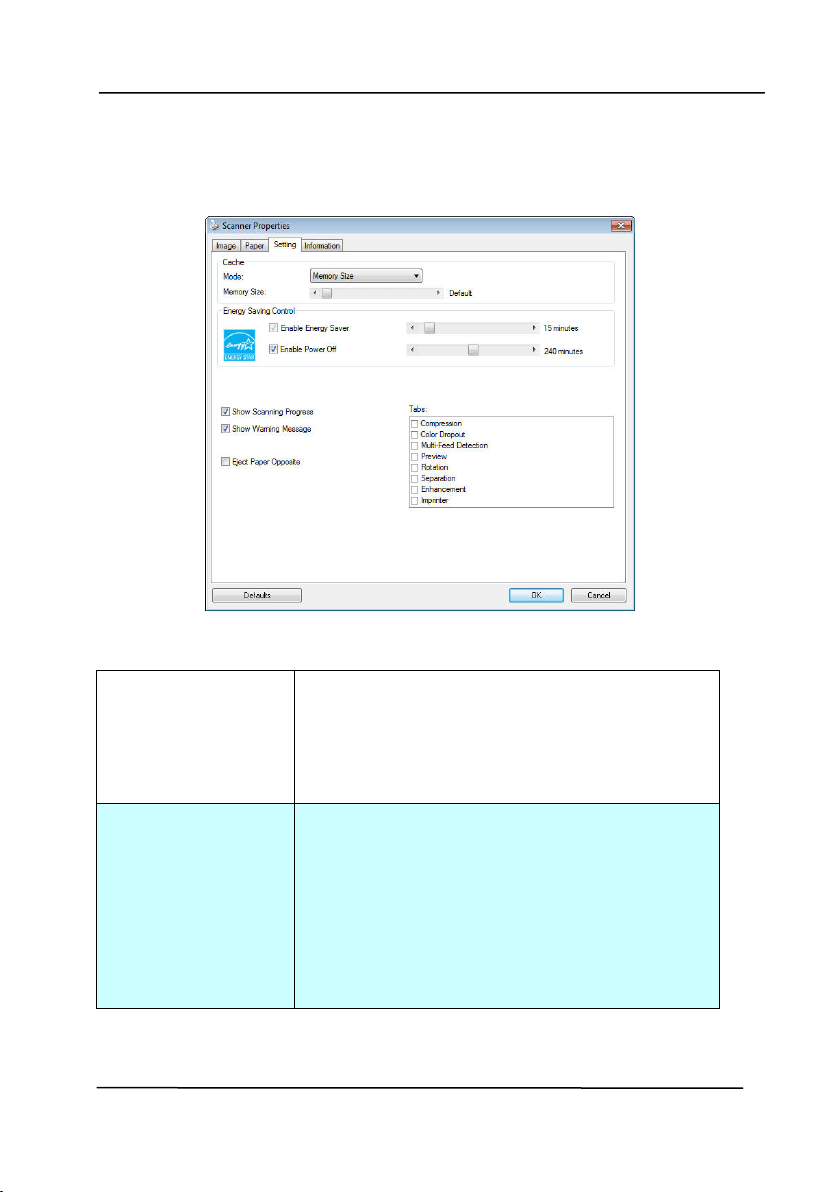
User’s Ma nua l
4- 74
4 .1 2 Th e Set t ing Tab
The Set t ing t ab allows you t o set the following set t ings:
The Set t ing t a b dialog box
Energy Sa ving
Control
Check t he Ena ble Ene r gy Save r box
and m ove t he slider t o set t he am ount
of t im e t o st art t he energy saver aft er
your last action. The range is from 1 t o
60 m inut es.
En a ble Pow e r
Off
Check t he
En a ble
Pow er Off
box and
m ove t he slider t o set t he am ount of
tim e t o aut om atically turn off t he
scanner after your last act ion. The
range is from 1 t o 60 m inut es. Not e
t he value of “Pow er Off” has t o be
great er t han or equal t o t he value of
“ Energy Saving” .

User’s Ma nua l
4- 75
Cache
Mode: N on e, Page N um ber, M e m ory
Siz e .
This opt ion allows you t o assign a specified
m em ory size from t he available RAM t o
process t he im age dat a. By specifying a
sm aller m em ory size, you can free m ore
m em ory for other applicat ions you are
running. By specifying a larger m em ory
size, you can have m ore m em ory t o process
t he im age dat a especially w hen you have a
large am ount of docum ent s needed t o be
scanned.
You can also specify your m em ory size by
t he page num ber. For your inform at ion, an
A4 color docum ent scanning at 300 dpi
consum es approxim at es 24MB.
I m age Count
When t he selected cache m ode is “ none” ,
the im age count opt ion allows you t o assign
num ber of pages you need t o scan. For
exam ple, if you wish to scan t he first t wo
pages, sim ply m ove t he page slider t o 2,
and the scan act ion will be st opped when
the scanning of t he first two pages have
been com plet ed.

User’s Ma nua l
4- 76
Show Scanning
Progr e ss
Check and t he scanning progress bar
will be shown during scanning.
Show W arning
Message
Check t o show t he warning m essages
such as “ ADF pad count exceeds 50,000
scans ( t he num ber varies based on t ype
of scanner). Please replace t he ADF pad
and reset t he pad count .”
Save Set t ings
aft er Closing
Check t o save your scanner properties
sett ings aft er leaving t he dialog box.
Next t im e w hen you open t he Scanner
Properties dialog box, t he previously
saved sett ings will be shown.
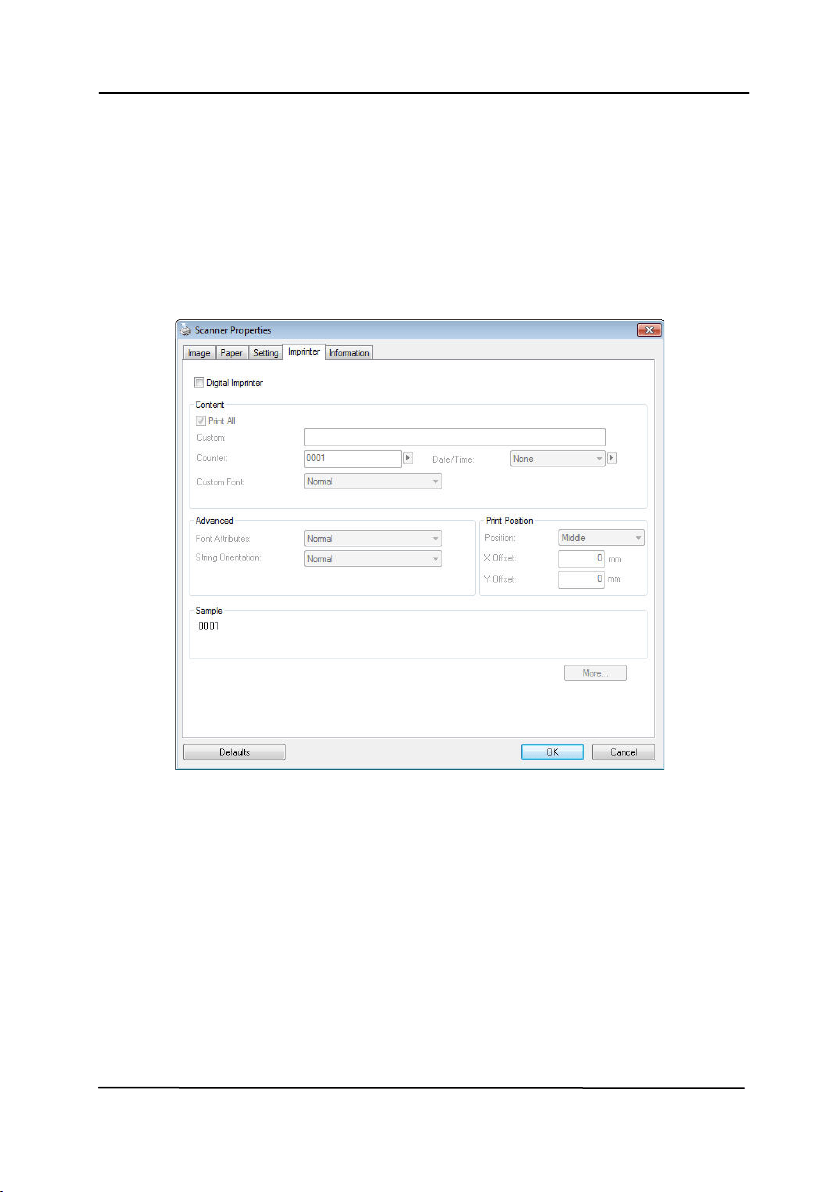
User’s Ma nua l
4- 77
4 .1 3 The I m print er Tab
The I m printer tab allow s you t o print alphanum eric characters,
dat e, t im e, docum ent count and cust om m essage on your
scanned im age if digit al im print er is selected or at the back of
your docum ent if external im print er is selected.
Choice : Ex t ernal I m print er, Digit al I m print er. I f you have
installed an ext ernal im print er, choose external im print er. I f
you do not have an im print er, choose digit al im print er. Note
Ext ernal I m print er provides a vert ical and rear-side print
capabilit y while digital print er provides a horizontal and front -
side print capability.
User’s Ma nua l
4- 78
Cont e nt s
Print All
Check Print All t o aut om at ically print t he
text at all pages of your docum ent s.
Uncheck Pr int All t o print the text for t he
first page of your docum ent s only.
Custom
Enter your custom t ext to be included in your
print string.
Counter
Show t he docum ent count for t he scan
session. This value is increased sequent ially
by t he scanner.
Date/ Tim e
Choose if you wish t o include t he dat e and
tim e in your print string.
Form at: YYYYMMDDHHSS For exam ple,
20090402170645- check0001 indicates year,
m ont h, dat e, hour, seconds, your custom t ext
and t he count er.
Cust om
Font
Choose your desired font.
Choice: N or m a l, Fix e d W idth
Fix e d W idth ( Mono spaced) font s have a
fixed charact er spacing. So each charact er
occupies t he sam e widt h.
Adva n ced
Font
At t ribut e s
Choose your font at tribut es.
Choice:
Norm a l, Unde rline, Double , and Bold.
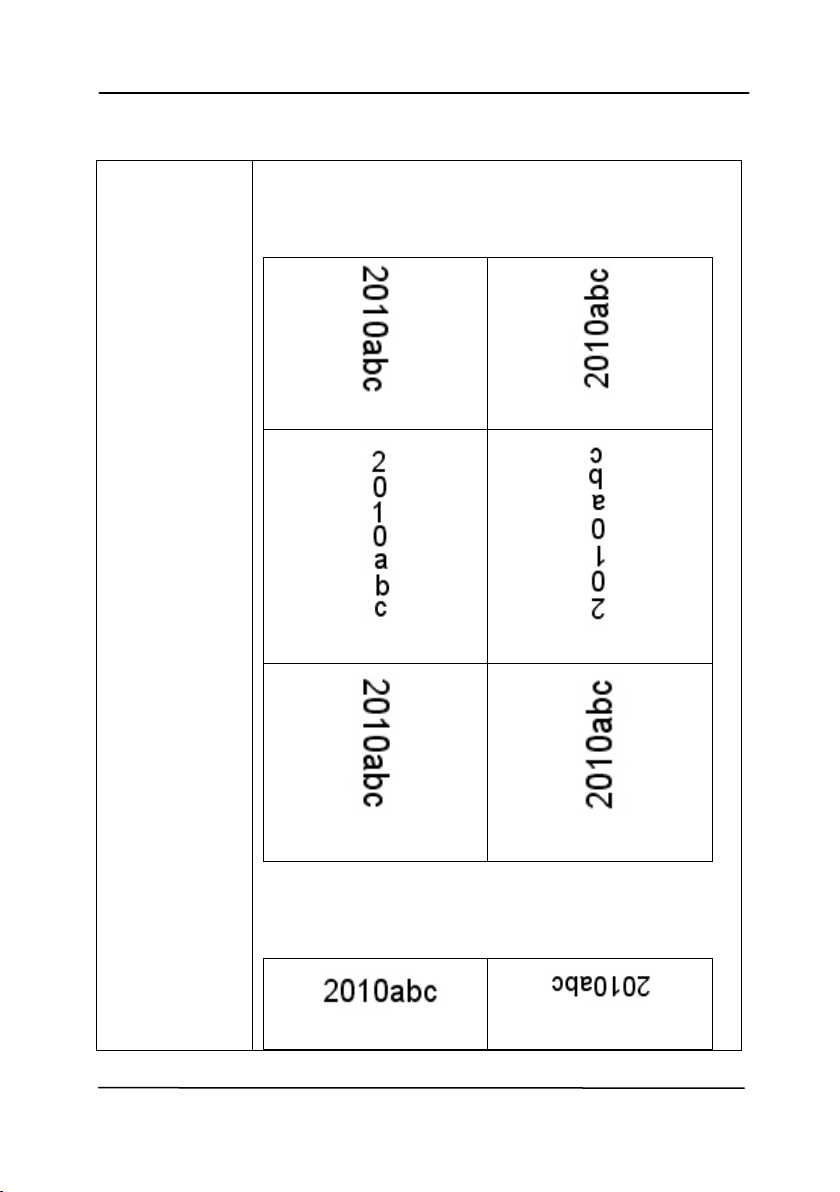
User’s Ma nua l
4- 79
St rin g
Orientat ion
Choose your st ring orientat ion.
Choice: N or m a l, Rotated, Vert ical,
Ve rt ical I nversion, 9 0 degrees CW , 9 0
de gree s CCW
N or m al
Rot ated
Ve rt ical
Ve r t ical I nve r sion
9 0 de grees CW
9 0 de grees CCW
I f you check the digit al im print er t o stam p
text on your scanned im age, the illust rat ion of
norm al and rot ated string is shown below:
N or m al
Rot ated

User’s Ma nua l
4- 80
Pr int
Posit ion
Choose t he posit ion you w ish t o print your
st ring. Move t he slider t o t he right t o increase
t he value or t o t he left t o decrease t he value.
Range: 0~ 355m m , default : 0 m m
The value indicat es t he height from t he
bot t om of your paper to t he last letter of your
string. This option is available only if an
ext ernal im print er is inst alled.
Print Posit ion ( for digit a l im prin t er)
Choose t he posit ion of your print ed st ring. Choice: Top,
Middle, Bot t om , Custom . I f Custom is select ed, enter t he X
and Y offset value to specify t he posit ion.
The value of
Print Position
0001abc 2010
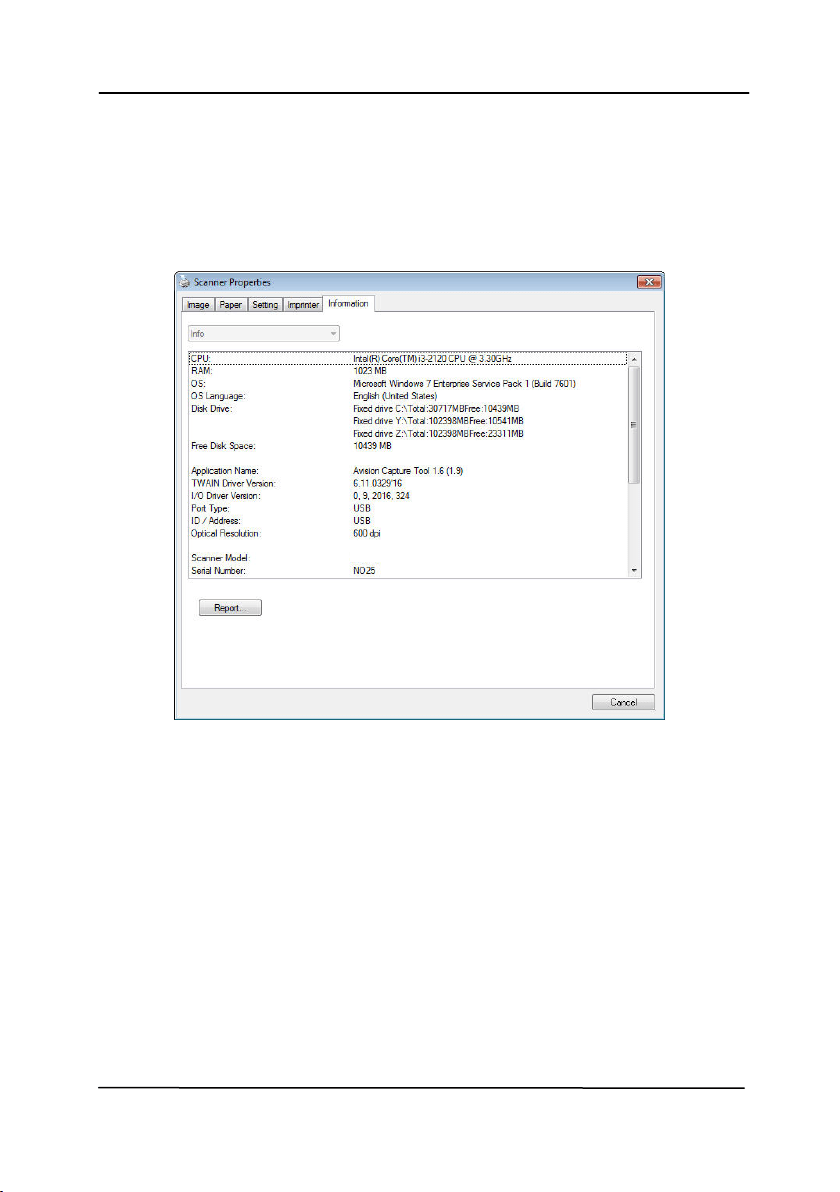
User’s Ma nua l
4- 81
4 .1 4 Th e I nform a t ion Ta b
The I nform at ion tab displays t he following syst em and scanner
inform at ion.
The I nfor m ation t a b dialog box
The “Repor t ” but t on
:
I f you encount er any error m essage while using t he scanner,
click t he Report but t on. A report .t xt file [
Window s XP:
C: \ Docum ent s and Set t ings\ All Users\ Applicat ion
Dat a\ % PRODUCTNAME% ;
Vista, Window s 7, Windows 8,
Windows 10: C: \ Program Dat a\ % PRODUCTNAME% ( C: syst em
drive) ] will be generat ed. Please send t his file t o t he nearest
service cent er for t rouble shoot ing.
xxx

User’s Ma nua l
4- 82
The “Reset Rolle r Count” but t on:
Aft er scanning over a recom m ended num ber of pages ( refer t o
subsequent sect ion 7.4 Replacing t he ADF Roller) t hrough t he
ADF, t he ADF roller m ay be w orn out and you m ay experience
problem s wit h docum ent feeding. I n t his case, it is highly
recom m ended t o replace t he ADF roller w it h a new one. ( Note
t he replacem ent of t he ADF roller has t o be perform ed only by
aut horized service cent er. Therefore, please return your
scanner for roller replacem ent .) Aft er replacing t he ADF roller,
click t he “ Re set Roller Count ” but t on t o reset t he roller count .
N ot e:
The lifet im e and t he replacing procedure vary based on t ype of
scanner.
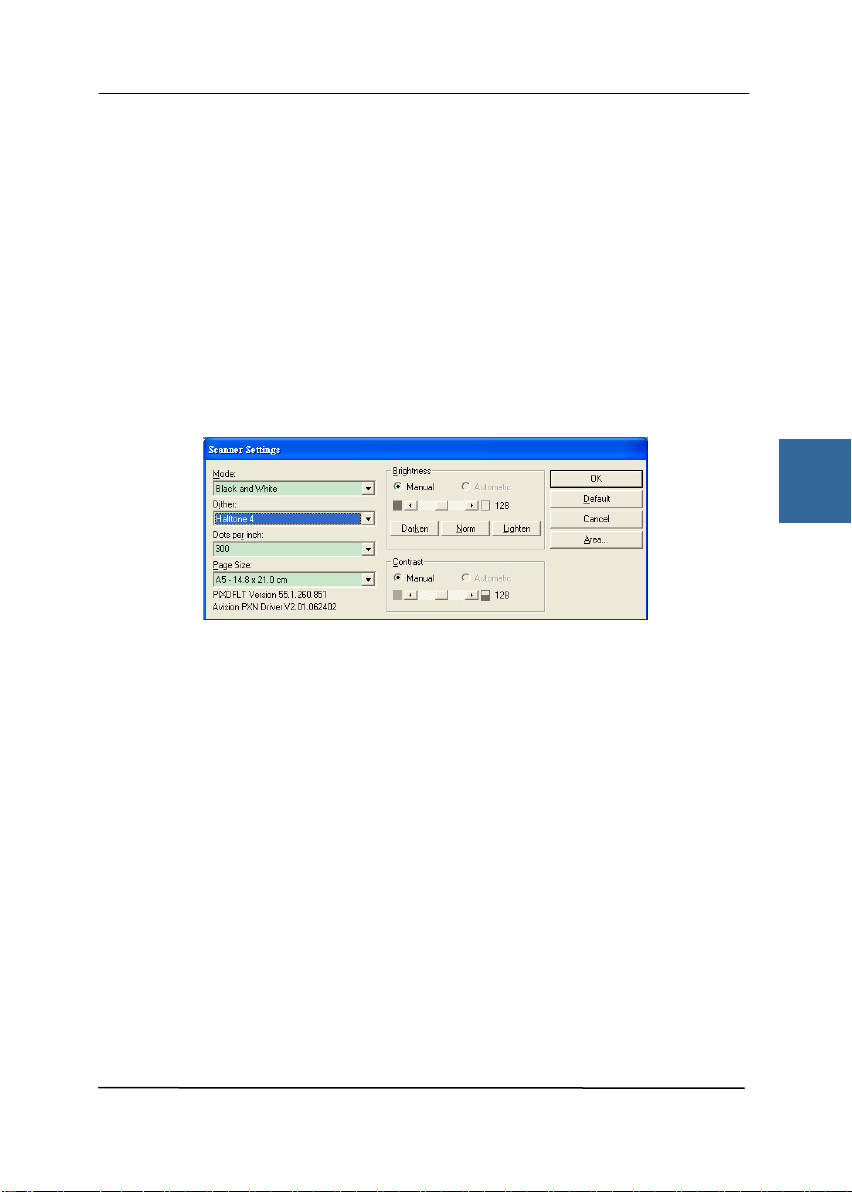
User’s Ma nua l
5- 1
5 . I SI S I nterface Opera t ion
* Please refer t o t he preceding chapt er, Scanner I nstallat ion, t o
install I SI S scanner driver. You m ay st art t he supplied QuickScan
soft ware applicat ion t o scan via t he I SI S user int erface.
The I SI S driver operat ion m et hod is sim ilar t o t he TWAIN’s.
Every function on t he I SI S interface screen is briefly described as
below:
Mode: Select one of scan m odes, including B&W, gray, color
opt ions.
Dit her: 5 halftone levels available, can be disabled.
Dot s per in ch: Select your desired resolut ion.
Pape r Size: Select your desired paper size.
Bright ness: Adj ust your scan im age bright ness or darkness.
Cont rast : Adj ust t he range bet w een t he darkest and the light est
shades in the im age.
Default : Click t o reset all set tings.
Area: Select your desired scan area or posit ion.
5

User’s Ma nua l
5- 2
This page is intentionally left blank.
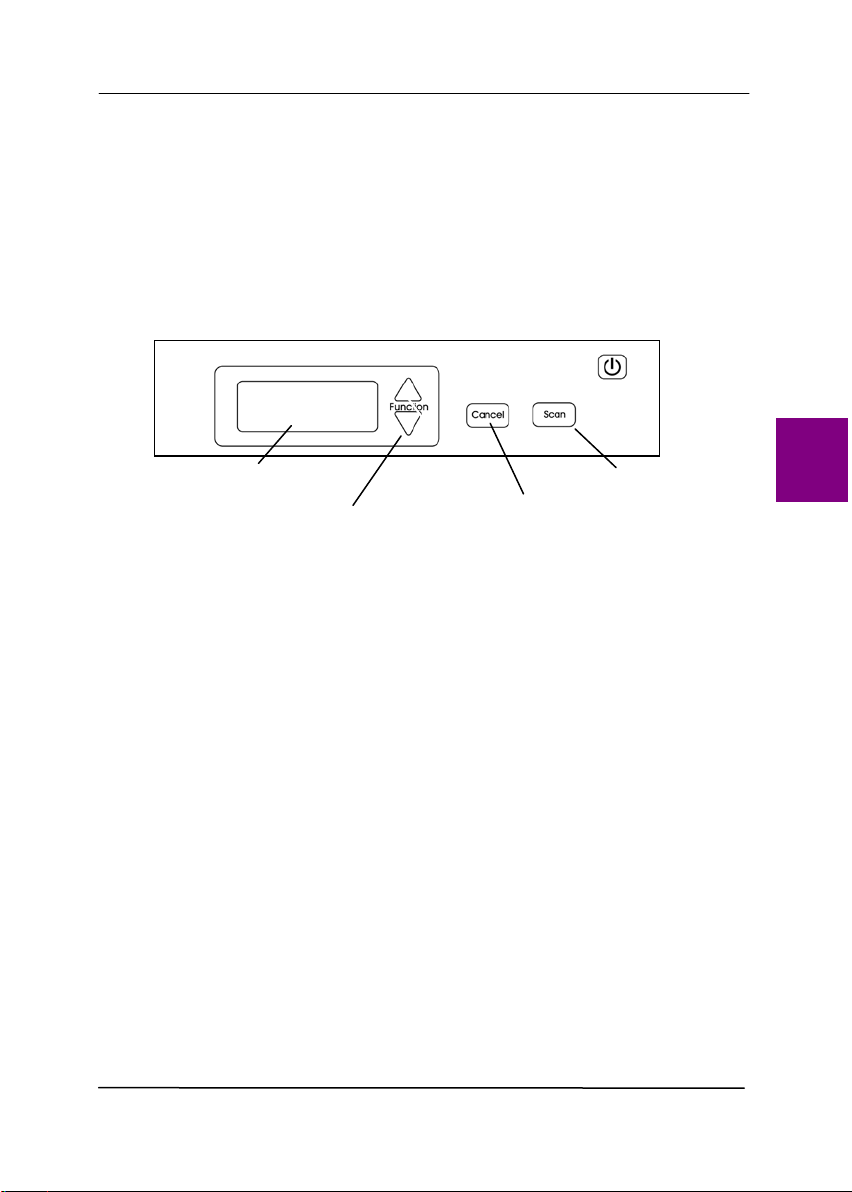
User’s Ma nua l
6- 1
6 . USI N G THE BUTTON S
The following pict ure shows t he 4 but t ons and 1 funct ion
screen on t he scanner.
6 .1 I nst allin g But t on M anager V2
But t on Manager V2 provides you an easy way to scan your
docum ent and t hen link t he scanned im age to your designat ed
soft ware applicat ion. All this can be done by a sim ple t ouch of
the button on t he scanner. Yet, before you scan, it is
recom m ended t o check t he but t on configurat ions first t o ensure
a proper file form at and a destination application.
Funct ion Screen
Function- Select Button
Cancel Button
Scan But t on
6
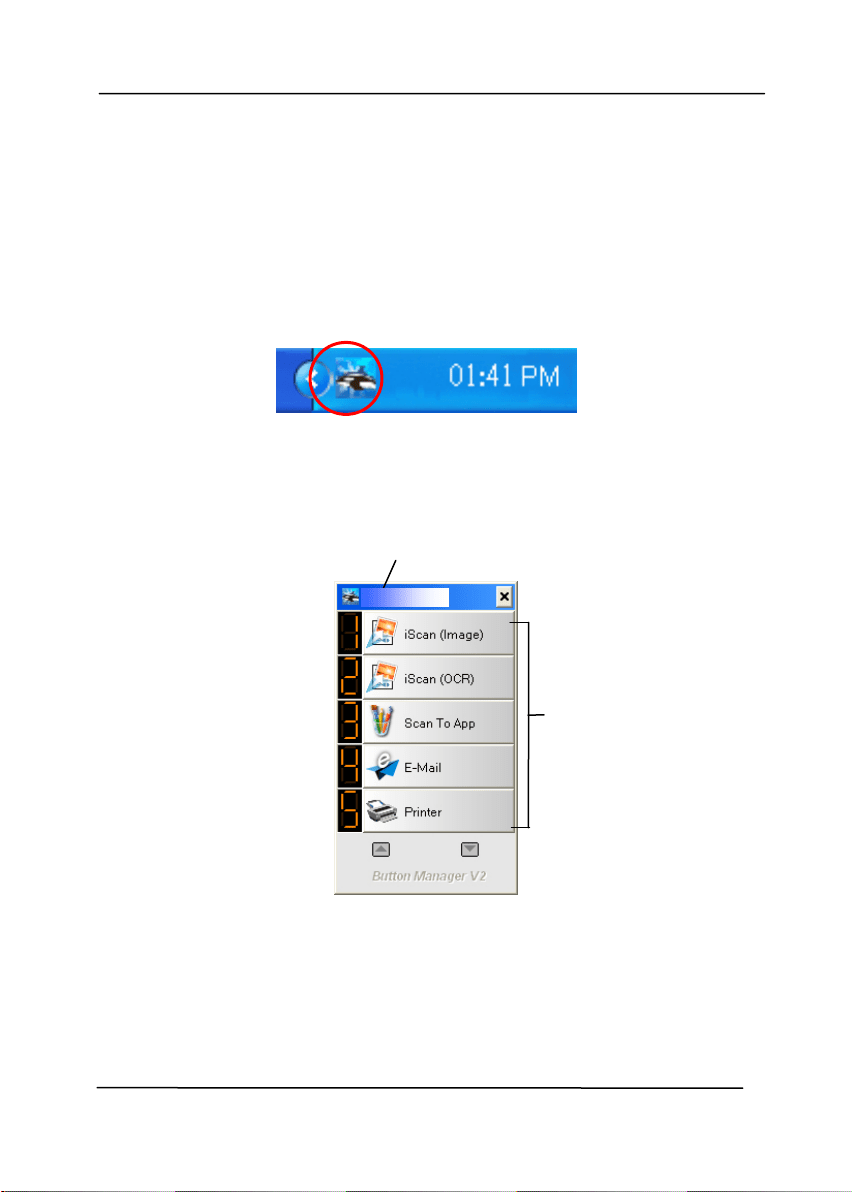
User’s Ma nua l
6- 2
6 .2 Checking t he But t on Configur a t ions be fore Sca nning
1. But t on Manager V2 runs from t he system t ray. Aft er But ton
Manager V2 and t he scanner driver are properly inst alled,
But ton Manager V2 is start ed and t he But ton icon will be
displayed on t he syst em t ray at t he bott om right corner of
your com put er screen.
2. Left - click t he Butt on Manager V2 icon t o prom pt t he
following Button Panel.
The But t on Panel
This indicat es t he scanner m odel
The Funct ion
I con
( The num ber of
function icons
vary based on
t ype of
scanner.)

User’s Ma nua l
6- 3
3. The But t on Panel shows t he first five scanning butt ons.
Right - click t he butt on ( function) you wish t o check. The
But ton Propert ies window appears.
I f you wish t o change t he set ting, use t his window t o reset
the set ting for t he file form at , dest inat ion applicat ion, or
ot her scan sett ings.
4. Click t he OK but t on t o leave the window.
Folder and
file nam e
for the
scanned
im age
I m age Mode
Selection
Box
Nam e of t he Selected But ton
Scan To
destinat ion
and sett ings
But ton
Nam e
OCR
set tings
Basic Scan
Param et ers
6
Using the Buttons
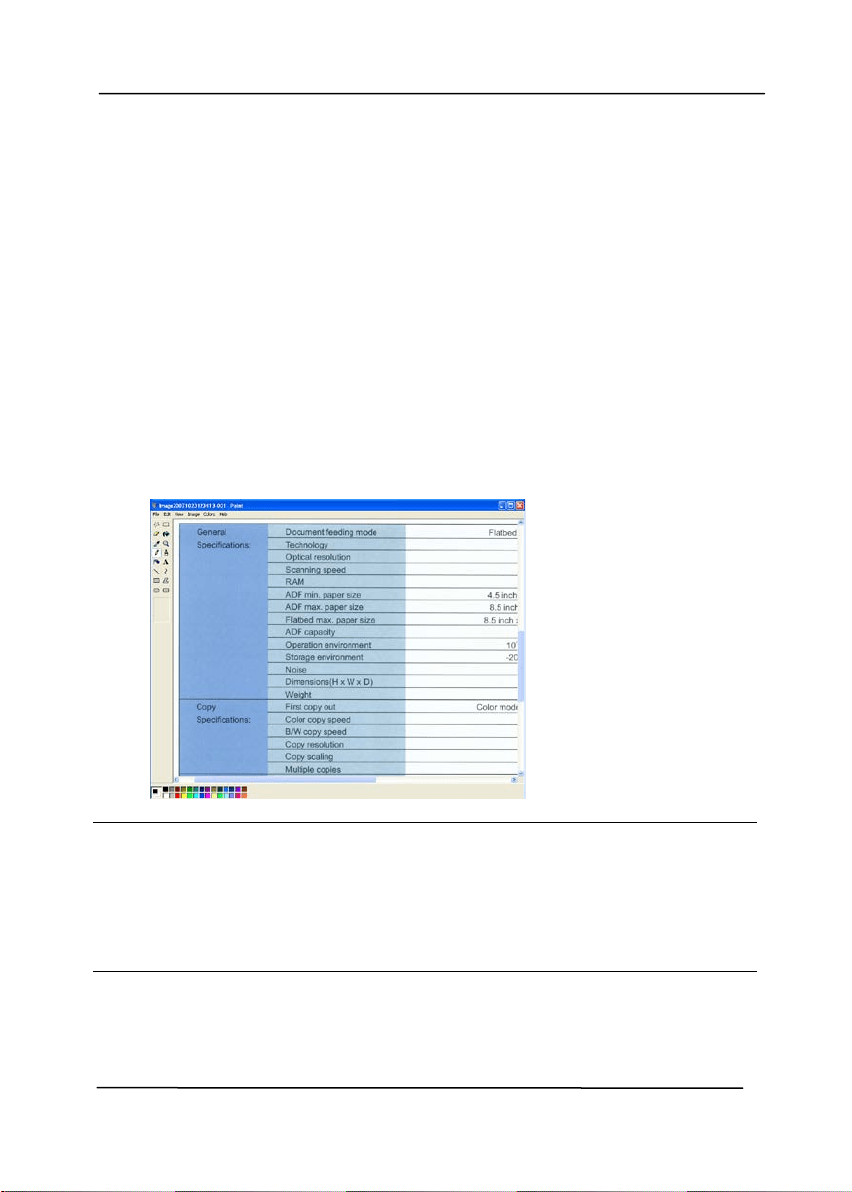
User’s Ma nua l
6- 4
6 .3 Scann ing From One Touch of t he But t on s
1. Adj ust t he paper guide for t he widt h of paper and load the
docum ent wit h t heir tops int o t he aut om atic docum ent feeder.
2. Check t he but t on nam e on t he LCD screen t o ensure if you
are selecting t he proper scan sett ings and dest inat ion
application. ( For exam ple, if you wish t o scan wit h But t on,
“ Scan t o App” , which opens Microsoft Paint and displays t he
scanned im age in t he window of Microsoft Paint , t he LCD
screen should show “ Scan t o App” ) .
3. Press t he Sca n but t on on t he scanner.
4. After t he scanning is finished, t he Microsoft Paint soft w are
will be launched and t he scanned im age appears in t he m ain
window of Microsoft Paint as below.
N ot e :
1. For det ails inform at ion on how t o use t he But t on Manager
V2, please refer t o t he user’s m anual in t he supplied CD.
2. You m ay also use But t on Manager V2 on your deskt op by
st arting But ton Manager V2 from All Program s or double
clicking the Avision Scanner Ut ility from t he Control Panel.
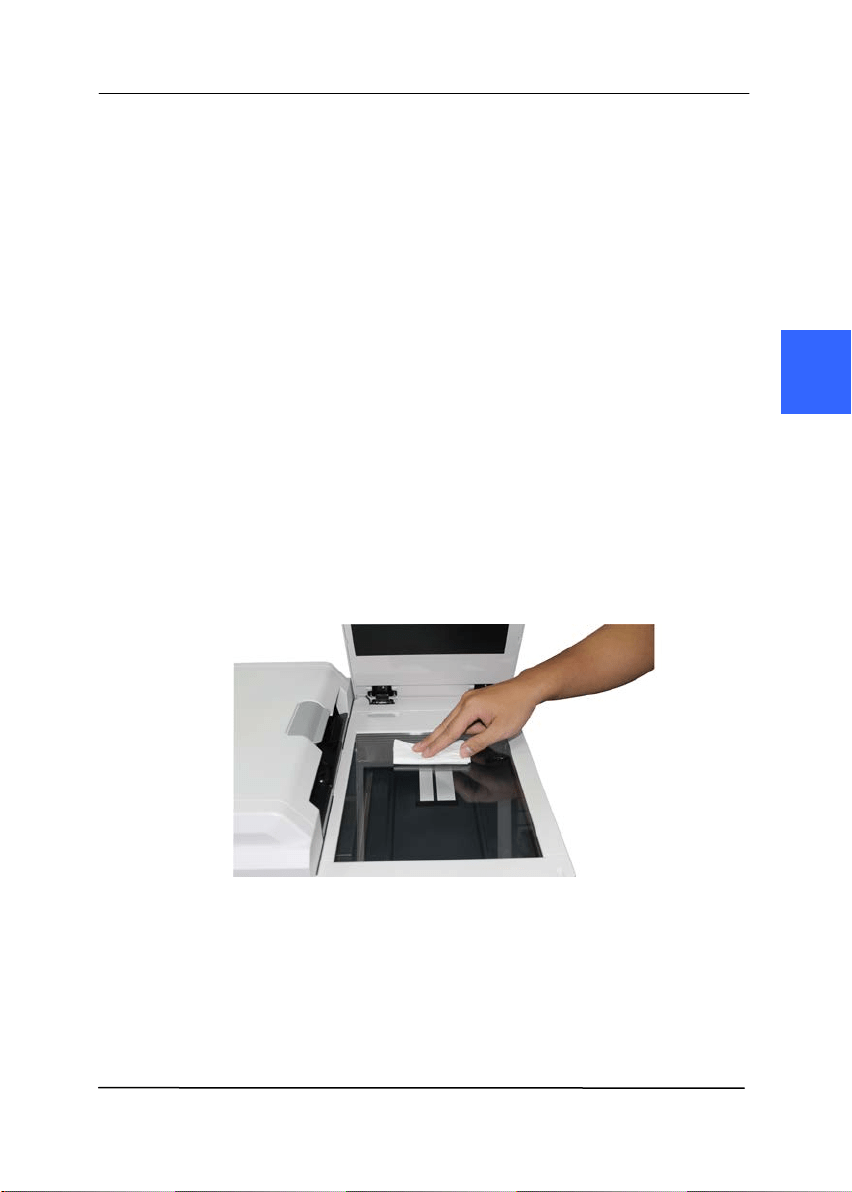
User’s Ma nua l
7- 1
7 . Maint enance
7 .1 Cle a n ing t he Flat be d Glass
The pr ocedur e s
1. Wet a soft lint - free clot h wit h som e isopropyl alcohol. ( 95% )
2. Open t he docum ent cover as show n below . Gent ly wipe t he
surface of t he glass of flatbed t o clean t he sm udges and
fingerprint s on t he platen glass. I f t he platen glass is dirt y,
dirt will appear on t he scanned im age.
3. Close t he docum ent cover. Your scanner is now ready for
use.
7
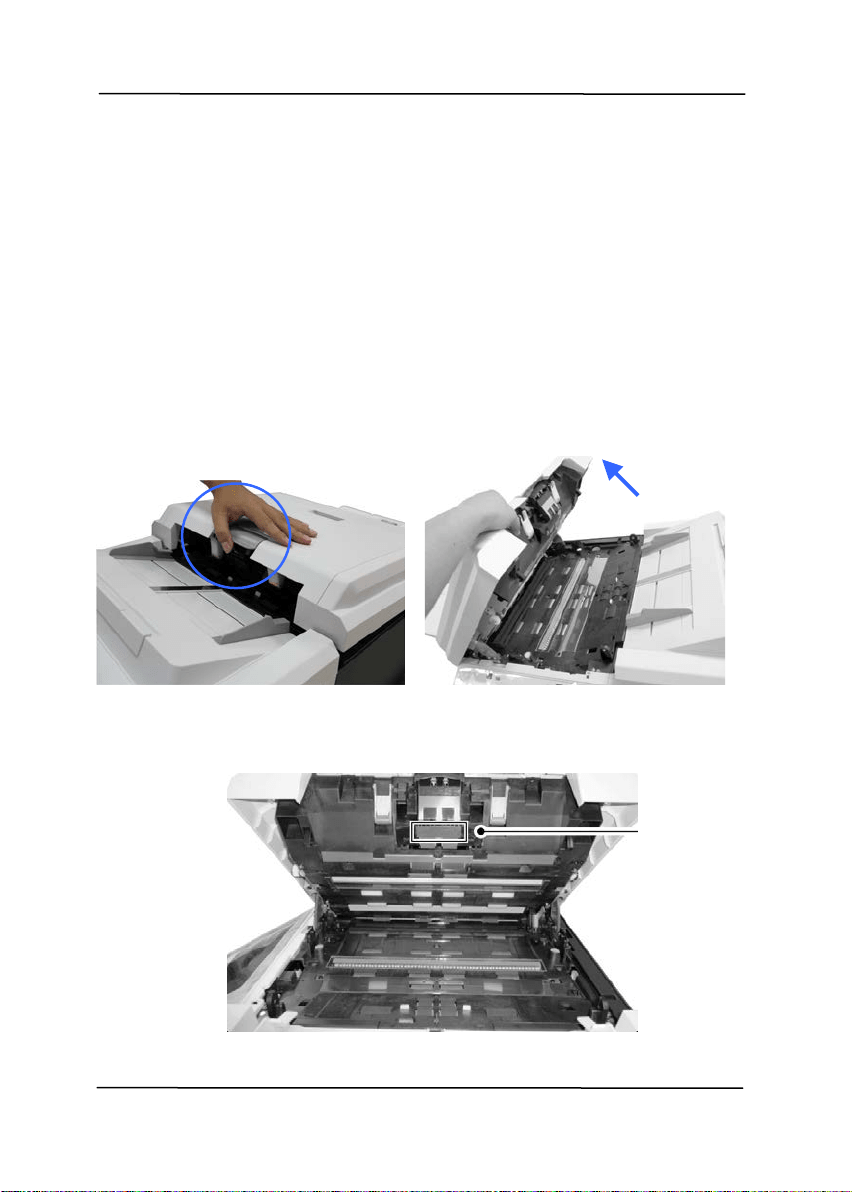
User’s Ma nua l
7- 2
7 .2 Cle a nin g t he AD F
From tim e t o t im e, t he Reverse roller and t he Feeding Rollers
m ay be cont am inated wit h ink, toner part icles, or paper dust .
I n t his case, t he paper m ay not be fed sm oot hly. Please follow
the following st eps t o clean t he Reverse roller and t he Feeding
Rollers t o ensure t he best of t he scanner.
The Cleaning St eps:
1. Soak a clean clot h wit h som e isopropyl alcohol ( 95% ) .
2. Pull t he Handle and open t he ADF cover w it h a light force.
3. Wipe t he feeding rollers unt il t hey are cleaned.
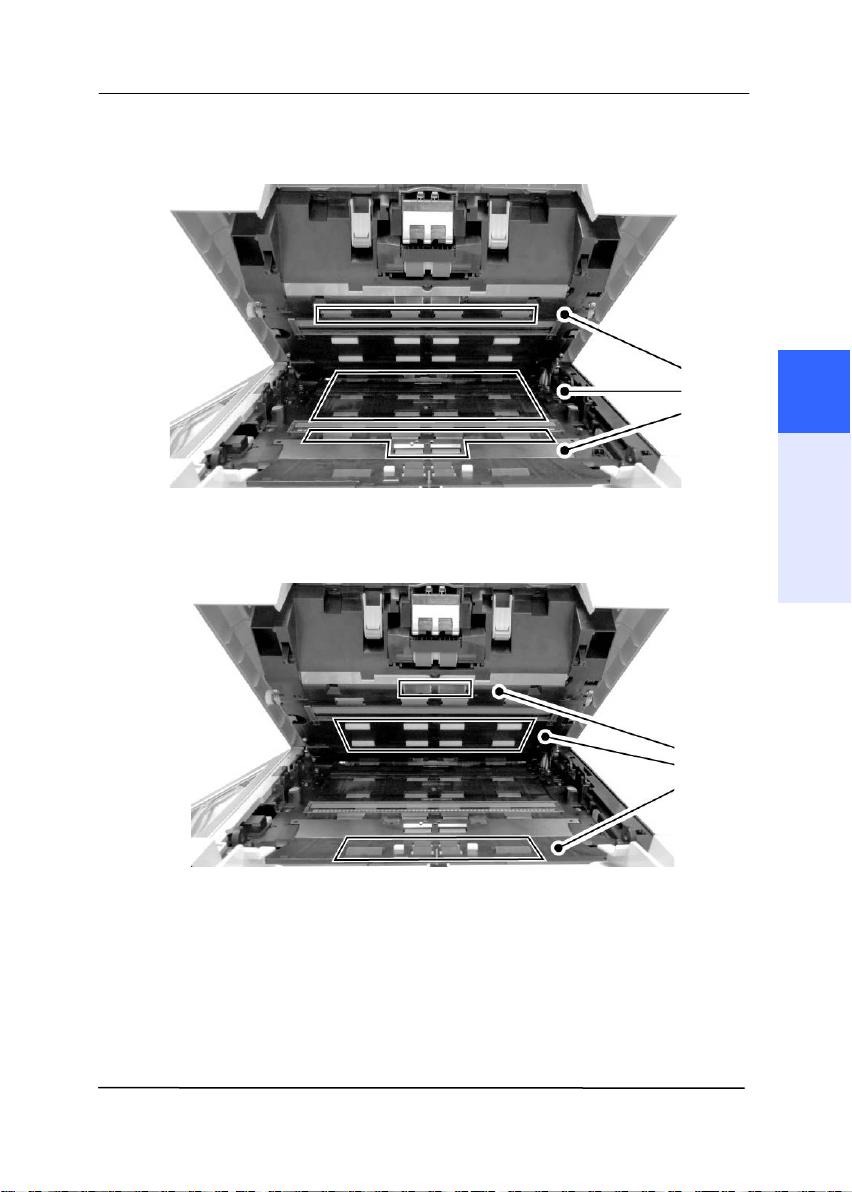
User’s Ma nua l
7- 3
7
Maintenance
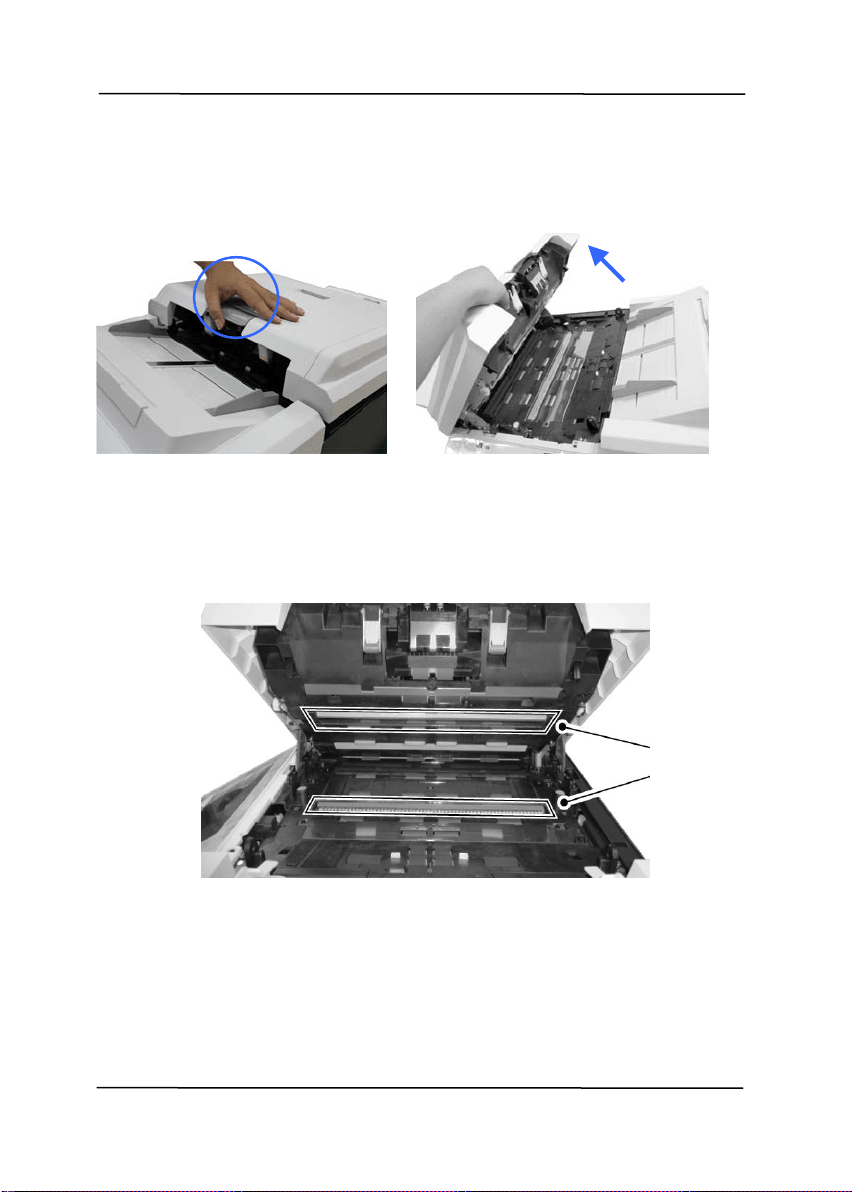
User’s Ma nua l
7- 4
7 .3 Cle a nin g t he Gla ss
1. Pull t he Handle and open the ADF cover wit h a light force.
2. Wet a clean clot h w it h som e isopropyl alcohol. ( 95% )
3. Wipe t he glass
as illustrat ed below to side t o rid t he dust
or dirt .
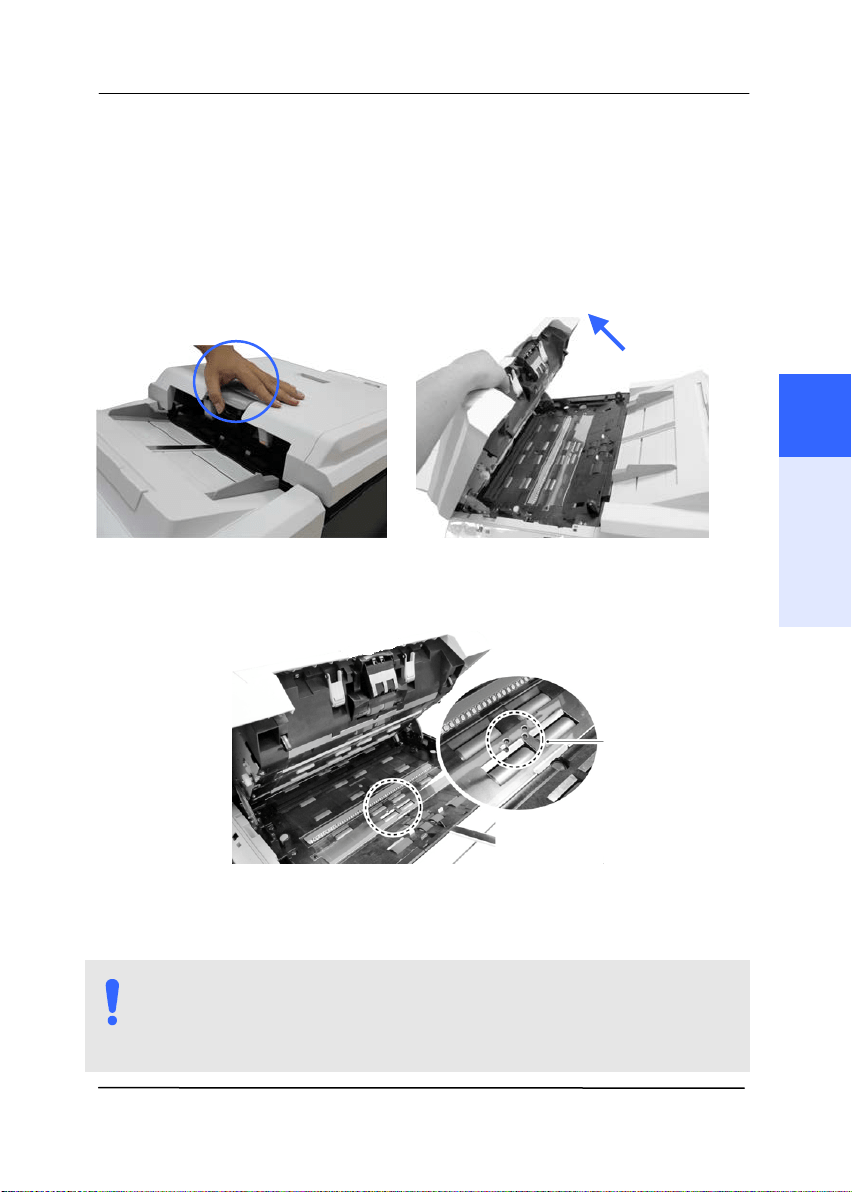
User’s Ma nua l
7- 5
7 .4 Cle a ning t he Sk e w Sensor
Dust or paper residue on t he skew sensors can cause scan
qualit y issues or false paper j am m essages. Make sure t here is
no residue on t he surface of the skew sensors.
1 . Pull the Handle and open t he ADF cover wit h a light force.
2 . Rem ove t he dust or paper residue left on t he surface of t he
Skew Sensors ( x4 pcs,
) wit h an air blower.
3 . Close t he ADF by pressing down on t he center of t he ADF t o
ret urn it to its original position until it clicks int o place.
NOTE:
When t he ADF has returned to it s original posit ion, m ake
sure that it is com plet ely closed. Feeding errors m ay
occur if t he ADF is not com plet ely closed.
7
Maintenance
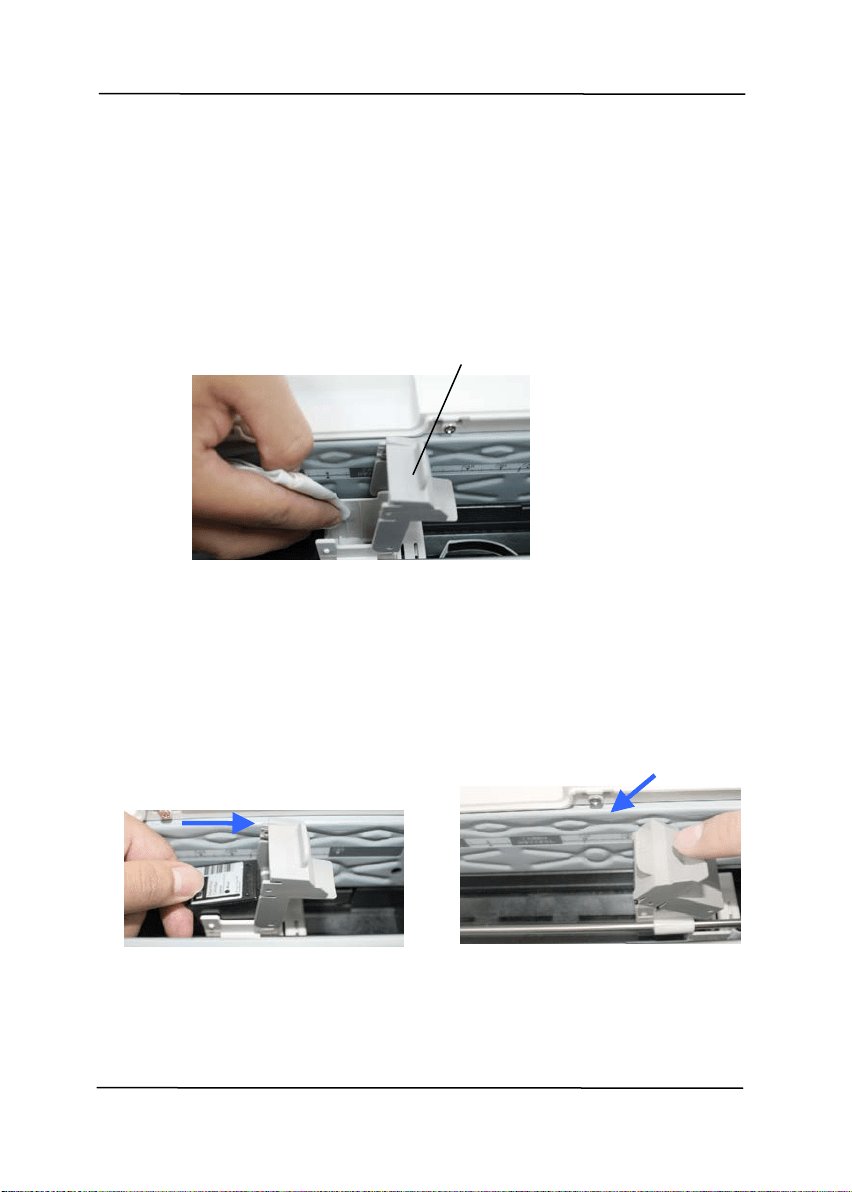
User’s Ma nua l
7- 6
7 .5 Cle a n ing t he I m prin t er
After frequent use, t he w ast e ink will begin t o accum ulat e on t he
base surface of t he print cart ridge holder w hich can dam age t he
print out s. Make sure t o m aint ain t he base surface clean.
Wipe off any dirt or dust on t he base surface of t he Print
Cart ridge Holder wit h a soft lint - free clot h.
Reinsert t he Print Cart ridge and close t he Print Cart ridge Cover.
a. Grasp t he t ab of the
Cart ridge and insert t he
Cart ridge int o t he holder
wit h t he t ext side facing up
and t he tab point ing t o t he
left .
b. Lower t he locking lever of
t he Print Cart ridge Holder
unt il it locks in.
Print Cart ridge Holder

User’s Ma nua l
7- 7
7 .6 Cle a nin g t he Prin t er Car t ridge
Poor qualit y print s m ay occur due t o blocked ink em ission holes
in t he I nk Nozzles of t he Print Cart ridge. Leaving t he im printer
unused for a long period of tim e can also cause t he ink em ission
holes t o becom e blocked. When t hese holes are blocked, clean
t he I nk Nozzles.
1 . Rem ove t he Print Cart ridge.
a. Open t he Print Cart ridge
Holder by lifting up the locking
lever w it h your finger.
b. Hold the t ab of the
cart ridge and rem ove t he
Cart ridge from it s holder.
2 . Wipe the I nk Nozzles at the bot t om of t he Print Cartridge
wit h a clean, dam p lint - free cloth light ly m oistened wit h
clean distilled wat er.
3 . Once again, gent ly and slowly wipe t he residual ink off of t he
I nk Nozzle wit h a clean cot t on swab.
I nk
Nozzles
7
Maintenance
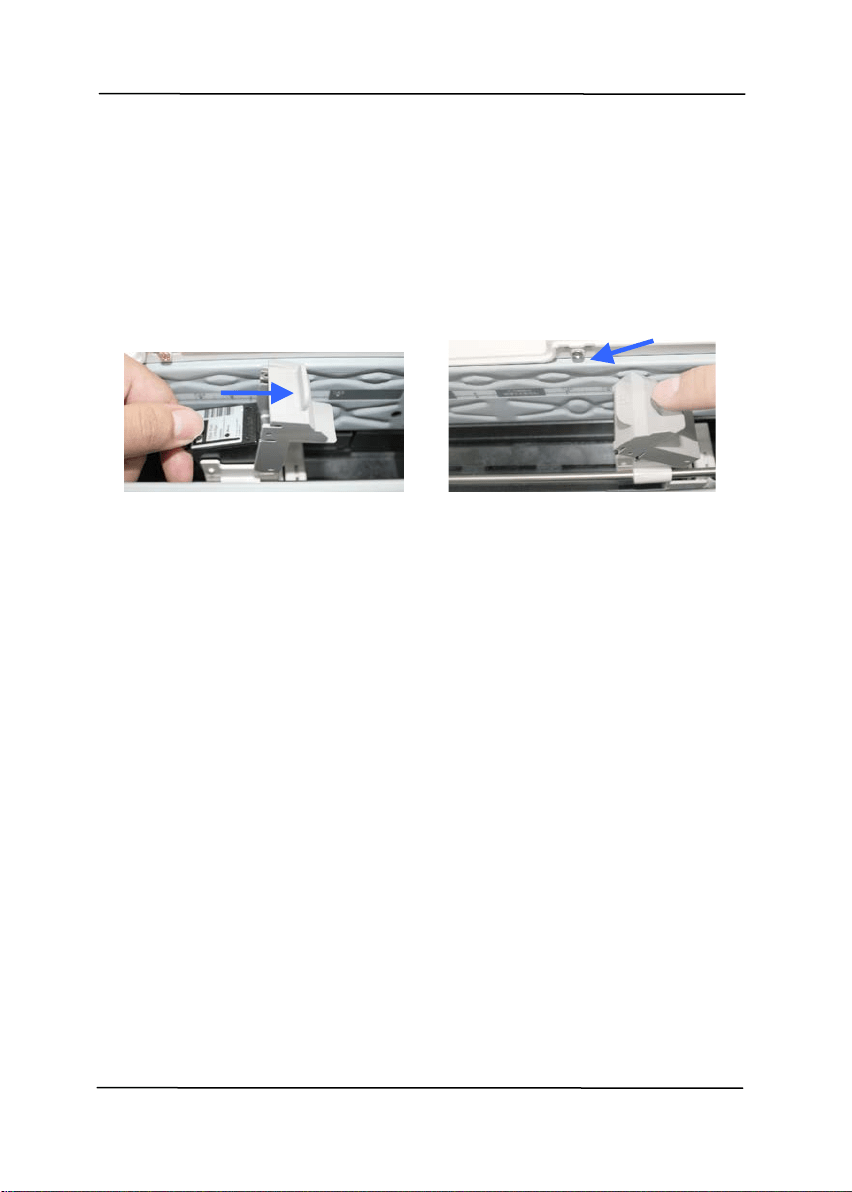
User’s Ma nua l
7- 8
4 . Reinsert t he Print Cart ridge and close t he Print Cart ridge
Cover.
a. Grasp t he t ab of the
Cart ridge and insert t he
Cart ridge int o t he holder
wit h t he t ext side facing up
and the t ab point ing t o t he
left .
b. Low er t he locking lever
of t he Print Cart ridge
Holder until it locks in.

User’s Ma nua l
7- 9
7 .7 Consum a ble s a nd Re placem ent Cycles
The following t able shows t he consum ables and t heir standard
replacem ent cycle.
C
ON SUMABLES STAN D ARD
REPLACEMENT
CYCLE
ADF Frict ion Rolle r
Assem bly
100,000 sheets
ADF Pick- Up Roller
Assem bly
200,000 sheets
Print Cartridge ( Black
I nk)
Over 7 m illion
charact ers
( econom ical, non-
st op print ing)
or 6 m onths aft er
the package is
opened
At t ract I nk box
Assem bly
2 years
7
Maintenance
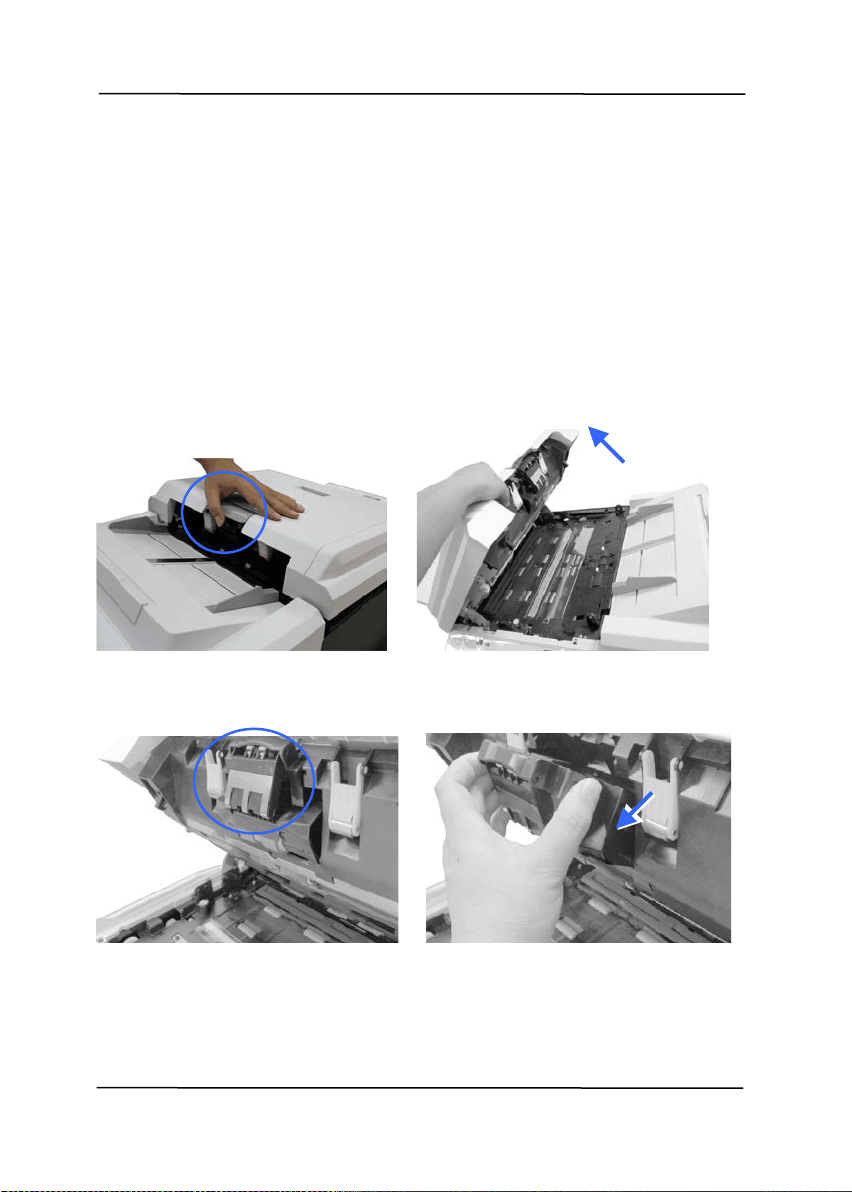
User’s Ma nua l
7- 10
7 .7 .1 Re pla cing t he AD F Fr ict ion Roller
The replacem ent cycles above are rough guidelines for t he case
using A4/ Let t er sized woodfree or wood cont aining paper of 80
g/ m
2
(20 lbs) in weight . These cycles vary according t o t he t ype
of paper used and how frequently the product is used and
cleaned. Please replenish t he consum ables from t he st ore w here
you purchased the product or a Avision aut horized service
provider.
1. Pull t he Handle and open t he ADF cover wit h a light force.
2 . Pinch t he ADF Friction Roller Assem bly and slide it out ward to
rem ove it .
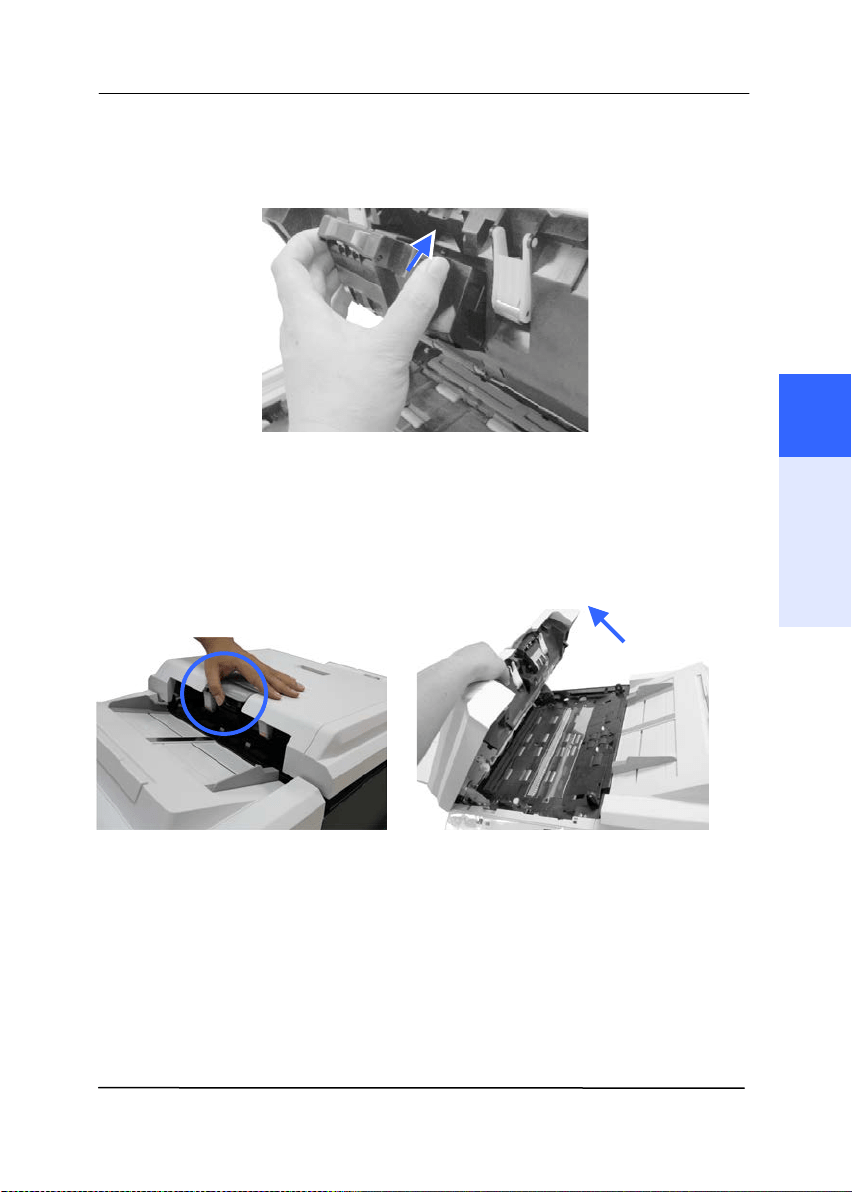
User’s Ma nua l
7- 11
3 . Reinsert t he new ADF Separat or Roller Assem bly t o it s
original slot and slide it inward.
7 .7 .2 Re placing t he AD F Pick u p Roller
1 . Pull t he Handle and open t he ADF cover with a light force.
2 . Open t he Pick Roller Cover.
7
Maintenance
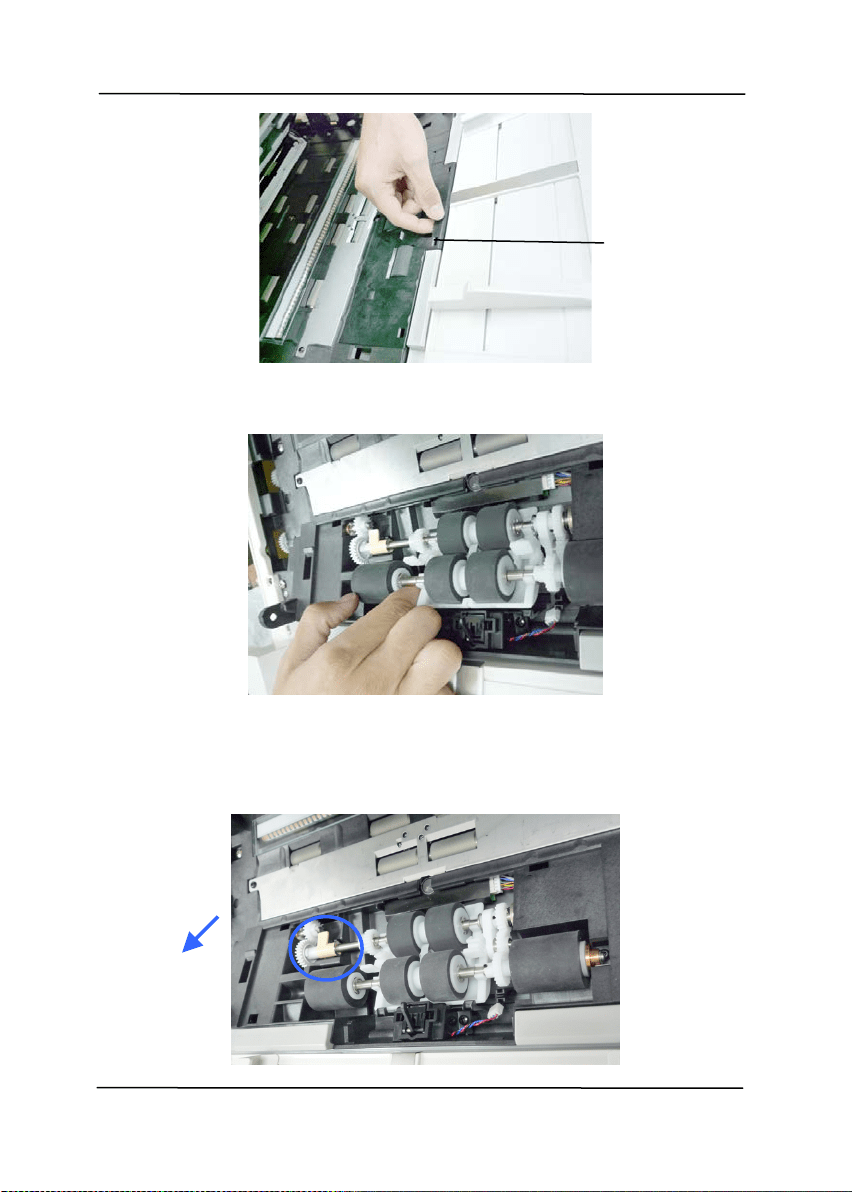
User’s Ma nua l
7- 12
3 . Loosen t he low er roller from it s slot .
4 . Move t he t ab of t he Upper Pickup Roller out ward t o rem ove
it from t he scanner.
Pickup Roller
Cover

User’s Ma nua l
7- 13
5 . Reinsert t he new ADF Pick Rollers by first insert t he right end
of t he Upper Pick Roller to it s slot.
6 . Move t he t ab of t he Upper Pickup Roller inward as shown.
Pickup Roller
Upper
Pickup
Roller
7
Maintenance
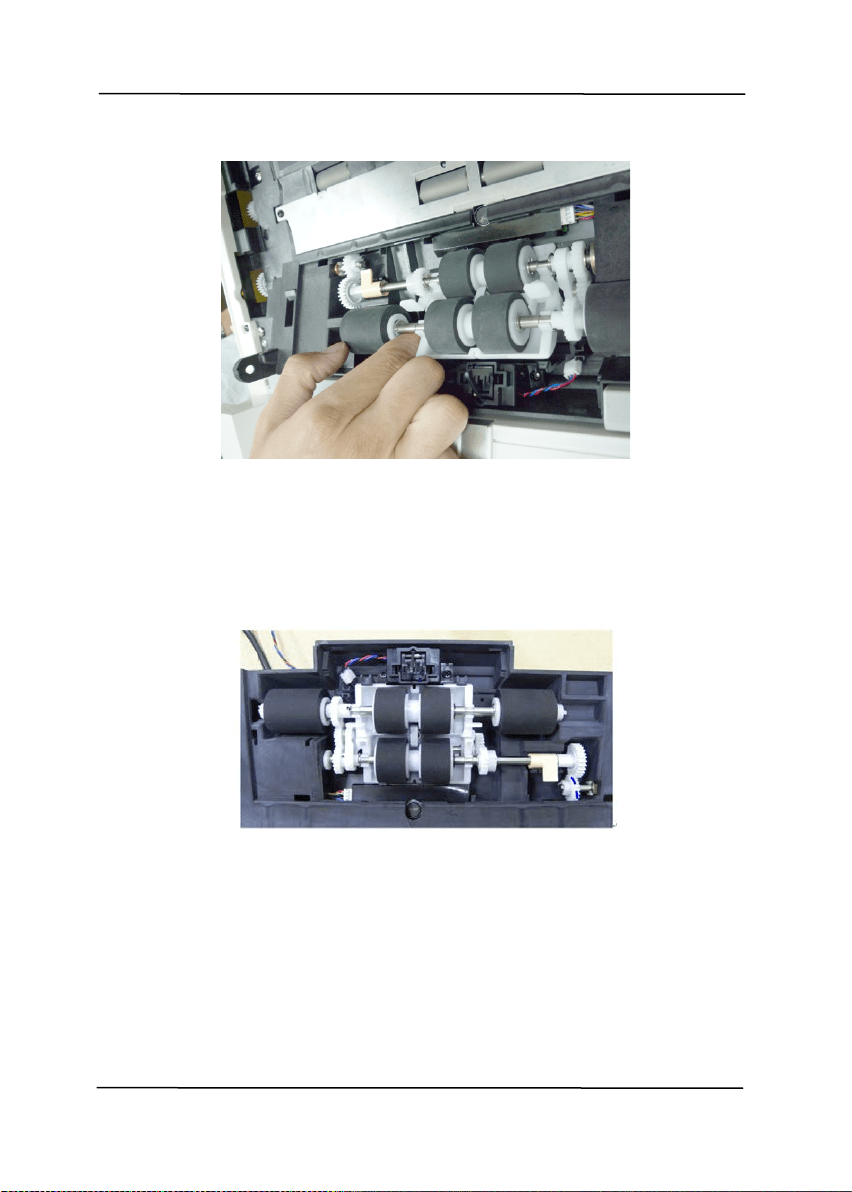
User’s Ma nua l
7- 14
7 . Posit ion t he lower ADF Pickup Roller t o it s slot .
8 . Aft er installing ADF Pickup Roller to t he slot, lubricat e t he
corresponding gear on the m achine as shown with EM- D110
P/ N 076- 0010A- 0- SP. Rot at e t he gear unt il all surface is
com pleted lubricat ed.
9 . Close t he ADF Pickup Roller Cover.

User’s Ma nua l
7- 15
9. Reset t he ADF Pick Roller count er from t he t ouch panel
( login> Menu> Inform at ion/ Report).
NOTE:
Do not close t he ADF while t he Pickup Roller Cover is
kept open.
Note: Make sure t he ADF is com plet ely closed. Feeding
errors m ay occur if t he ADF is not closed com plet ely.
Confirm t hat t he Pickup Rollers are at t ached firm ly. I f
not , paper feed errors such as paper j am s will occur.
Pick Roller
Cover
7
Maintenance
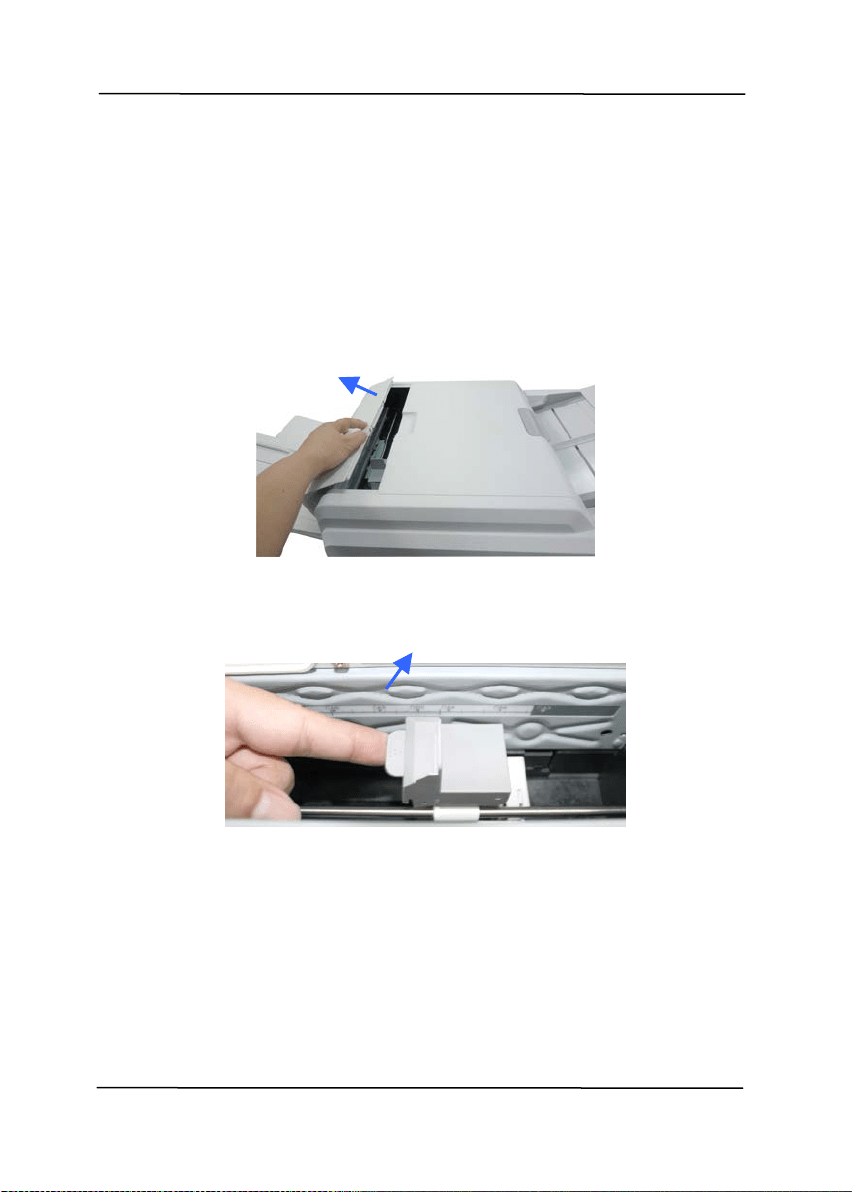
User’s Ma nua l
7- 16
7 .7 .3 Replacing t he Print Cart ridge
When print ed charact ers appear light or m issing charact ers are
evident, com plet e t he following steps t o replace your print
cart ridge:
1 . Open t he I m printer Cover.
2 . Open t he Print Cart ridge Holder by lift ing up t he locking lever
wit h your finger.
3 . Hold t he t ab of t he cart ridge and rem ove t he Cart ridge from
it s holder.
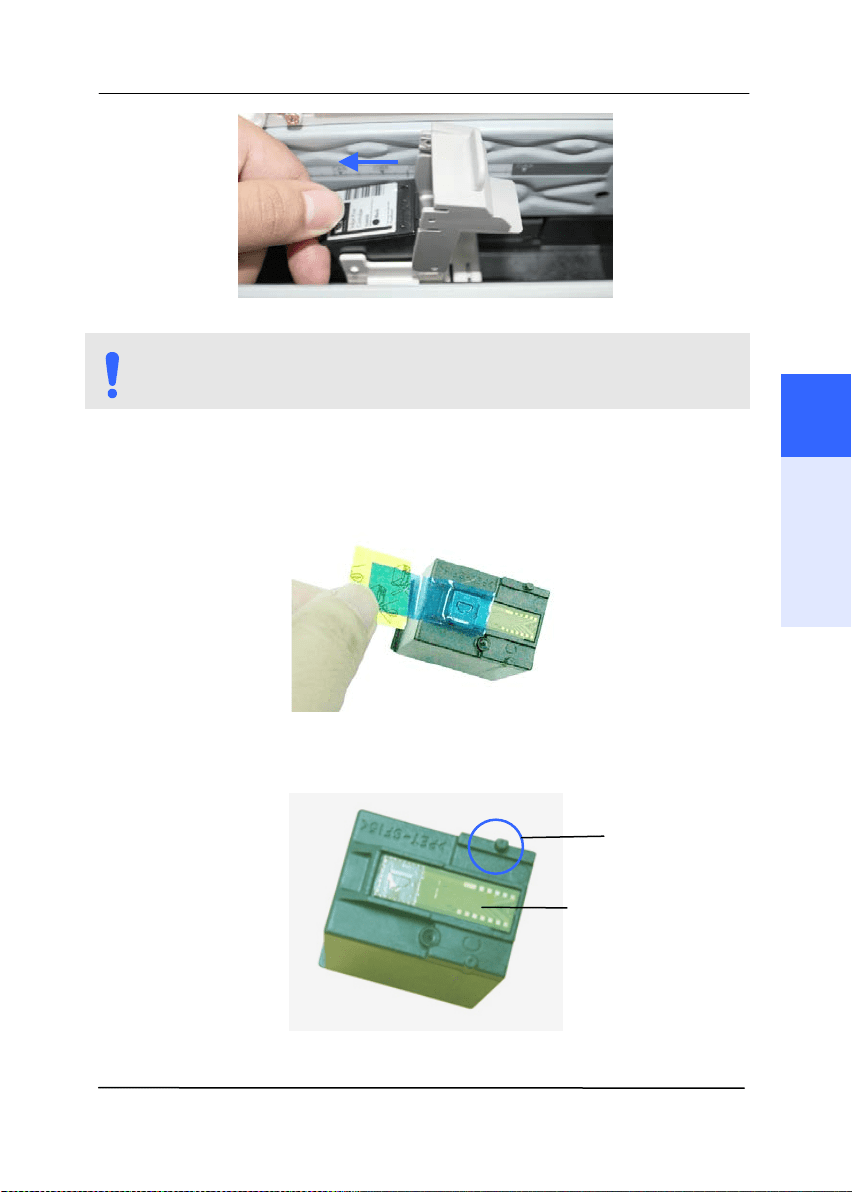
User’s Ma nua l
7- 17
NOTE:
A Dispose t he em pt y Print Cartridge according t o t he local
regulat ions.
4 . Open t he box of t he print cart ridge and rem ove t he
protective t ape from t he bot t om of t he cartridge.
5 . Do not touch t he ink nozzles ( ) or t he gold cont acts ( )
aft er t he t ape has been rem oved.
7
Maintenance
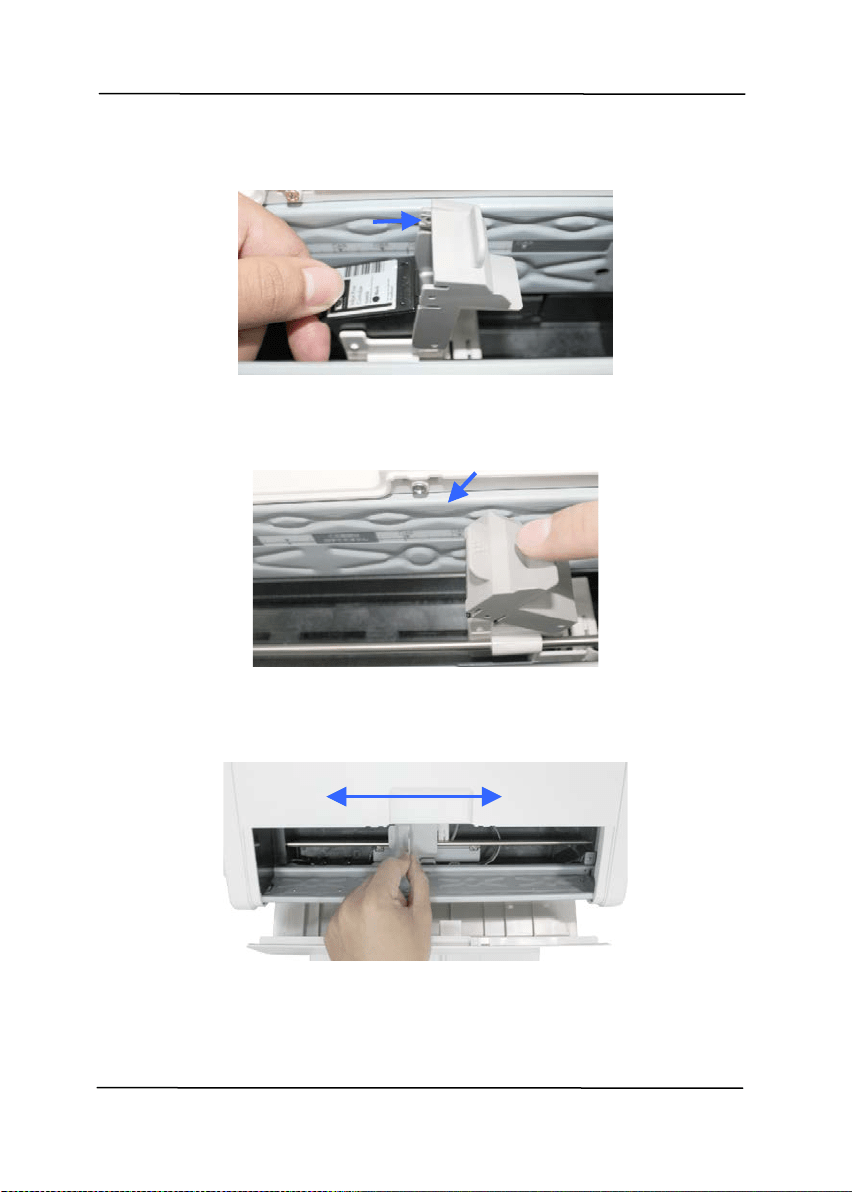
User’s Ma nua l
7- 18
6 . Grasp t he t ab of the cartridge and insert the cart ridge int o
the holder wit h the print side face up and t he t ab point ing t o
t he left .
7 . Lower t he locking lever of t he Print Cart ridge Holder unt il it
locks in.
8 .
Posit ion t he print cart ridge holder along where t he docum ent
will pass t hrough.
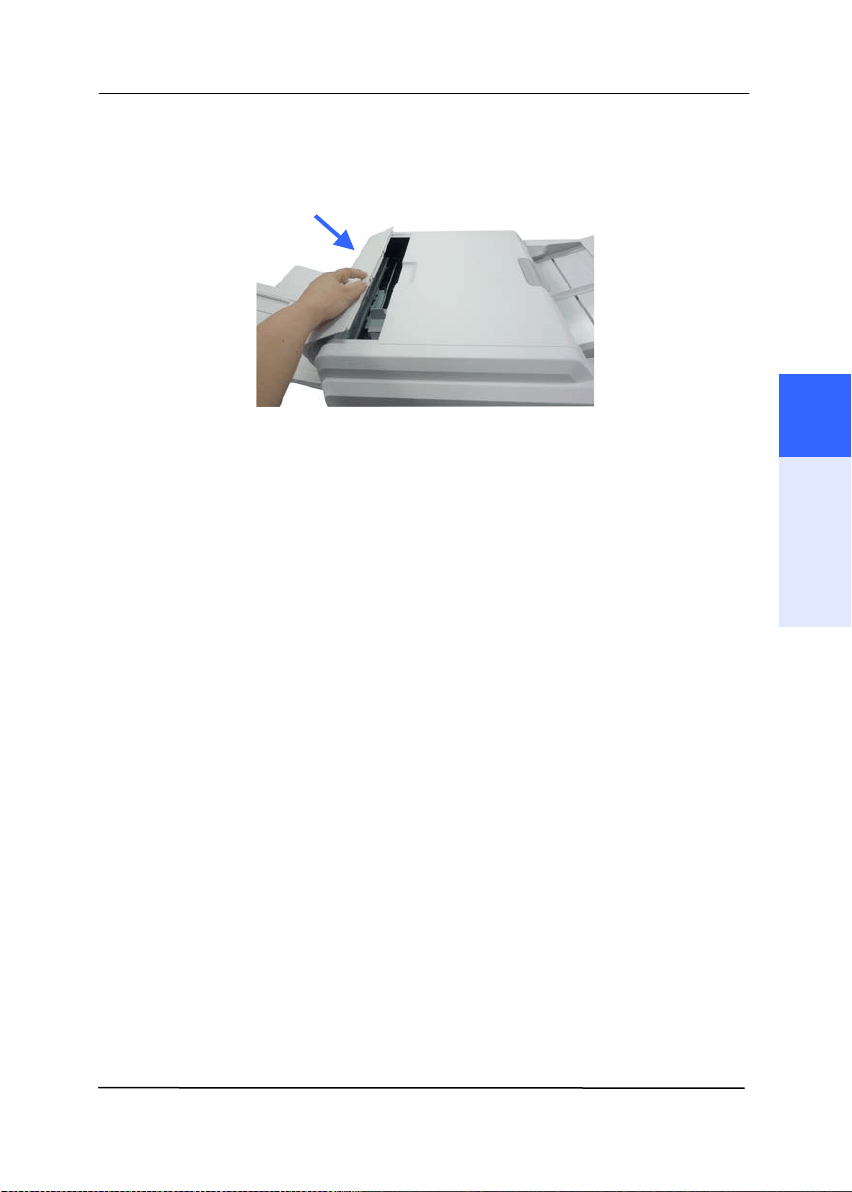
User’s Ma nua l
7- 19
9 . Close t he I m printer Cover.
7
Maintenance
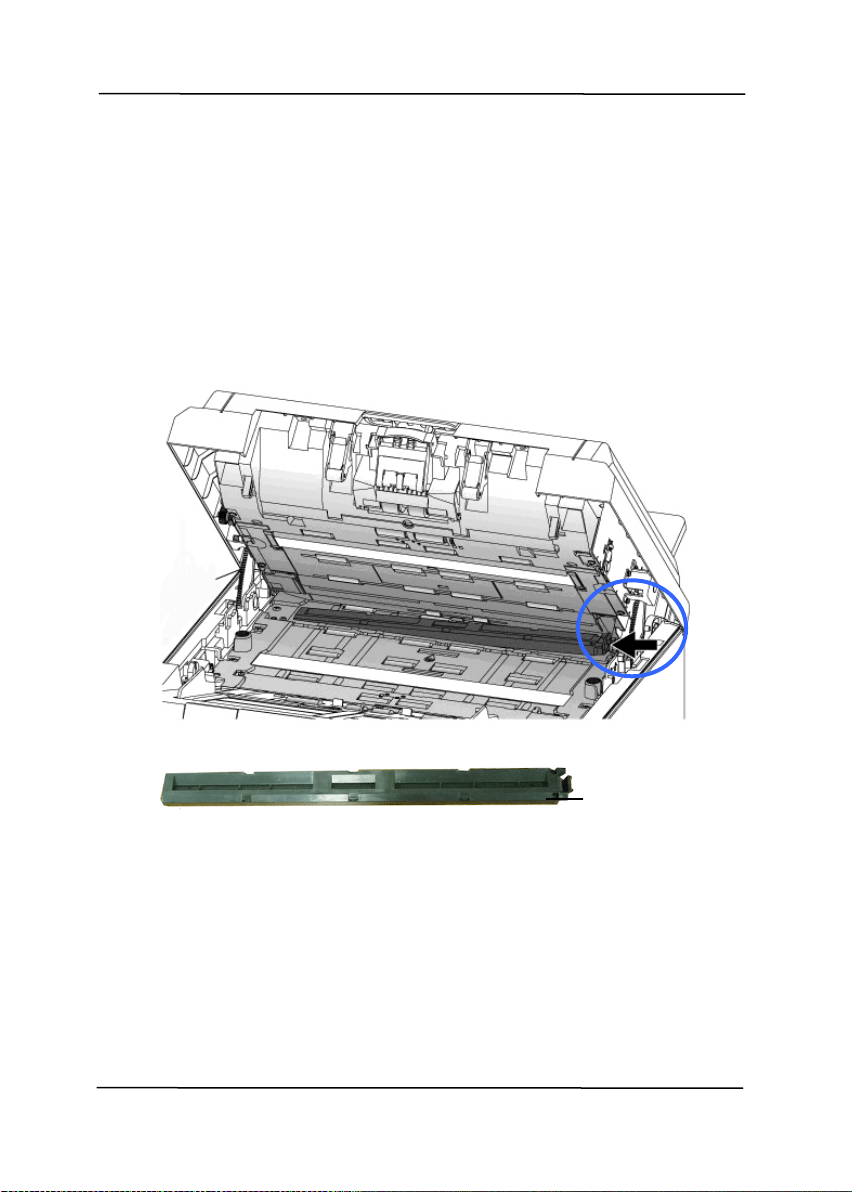
User’s Ma nua l
7- 20
7 .7 .4 Re pla cing t he At t ract I nbox Assem bly
To rem ove t he At t ract I nk Box,
1 . Pull t he ADF Handle and open the ADF cover wit h a light
force.
2 . Press t he right end of the Attract I nk Box Assem bly and lift it
up t o rem ove it from t he device.
At t ract I nk
Box
Assem bly
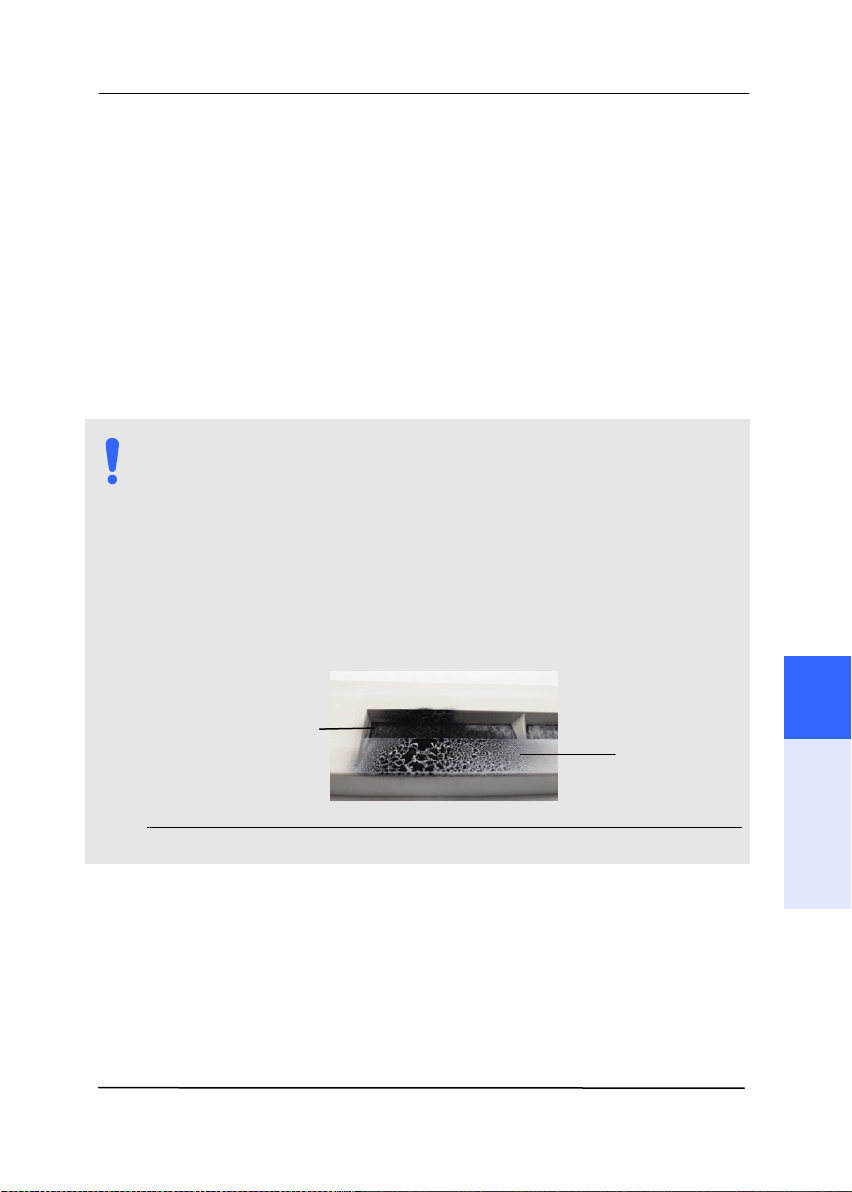
User’s Ma nua l
7- 21
To reassemble the Attract Ink Box,
Insert the left end of the Attract Ink Box Assembly first to its original place in the
device.
NOTE:
How t o j udge t he At t ract I nk Box Assem bly is near
it s life t im e :
The life t im e of t he Att ract I nk Box Assem bly is
approxim at ely t w o years. When t he assem bly is near it s
life t im e, t here will be a lot of ink on t he surface of t he
assem bly as shown i
n t he following figure. I f so, it is tim e
to replace t he At t ract I nk Box Assem bly.
I nk
At t ract I nk
Box Assem bly
7
Maintenance

User’s Ma nua l
7- 22
This page is intentionally left blank.
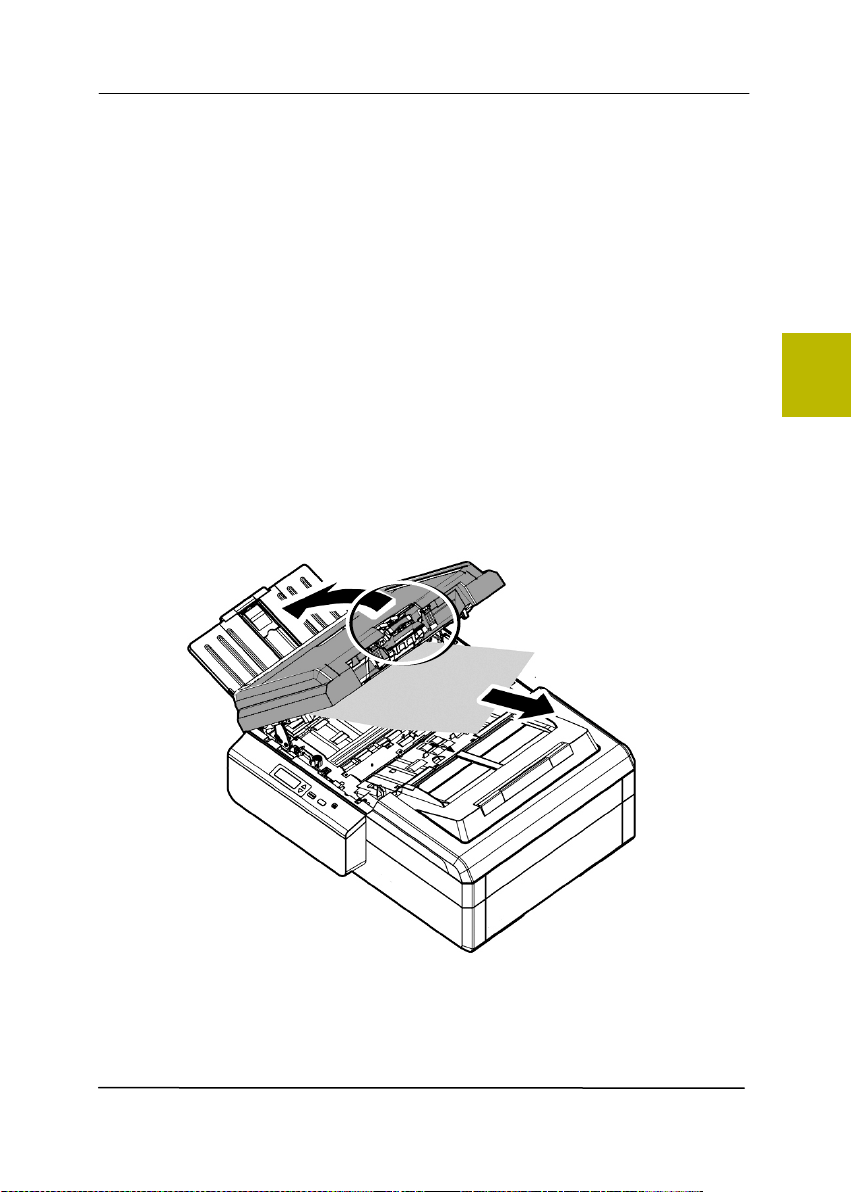
User’s Ma nua l
8- 1
8 . Troubleshoot ing
8 .1 Clearin g a Paper Ja m
I n t he event of a paper j am , follow t he procedures below t o
rem ove t he paper:
1.
Pull the Handle of the ADF t o open t he ADF cover.
2. Carefully pull the paper out of t he ADF unit .
3. Close t he front door. Your scanner is now ready t o use.
8

User’s Ma nua l
8- 2
8 .2 Questions and Answ ers
Q
:
W he n t he scanne r is pow e r e d on, it
m ak e s noise s a n d w on’t stand ready.
A:
There are t wo possibilit ies:
1) You m ight fail t o push t he scanner shipping
lock to it s “ unlocked” posit ion. I f this is the
case, pull t he scanner stat us swit ch t o it s
“ unlocked” posit ion first.
2) The scanner is not placed on an even, flat
desktop surface. This m ay cause t he scanner
to m alfunction.
Q
:
Pa per be com e s j am m e d durin g scanning.
A:
1) Open the front door.
2) Pull out t he j am m ed paper carefully.
3) Close t he front door.
Q
:
More t han one sheet of paper a r e fe d into
t he scanner.
A:
1) Open t he scanner front door.
2) Rem ove t he m ult i- fed sheet s.
3) Close t he front door.
4) Flat t en t he corners and edges. Loosen t he
paper before put t ing it int o t he paper guide
again.
5) Check t he feeding roller condit ion. I f
necessary, follow t he cleaning direct ions in
sect ion 7.1 and perform t he cleaning.

User’s Ma nua l
8- 3
Q
:
Pa per becom e s skew ed in t he scanne r.
A:
1) Use t he slide guide t o keep t he paper path
st raight .
2) Check t he condit ion of t he feeding roller. I f
necessary, follow t he cleaning direct ions in
Sect ion 7.1 and perform t he cleaning.
Q
:
W h y doe s m y scan ned im age a lw ays
com e out t oo da rk ?
A:
1) Please adj ust t he screen set tings t o sRGB.
2) Please adj ust t he brightness set t ings on t he
screen from application soft w are.
Q
:
W he n I choose optical resolution t o be
6 0 0 dpi, t he " aut o crop" a nd "desk e w "
fu nct ions w ill be disabled.
A:
Since t o perform auto crop and deskew
consum es great deal of syst em m em ory, it is
suggest ed if you wish t o perform "aut o crop"
and "deskew" functions, please choose your
opt ical resolut ion t o be sm aller t han 600 dpi
t o prevent a error m essage.
8
Troubleshooting

User’s Ma nua l
8- 4
8 .3 Technical Se rvice
Before cont acting Avision, please prepare t he following
inform at ion by referring t o Section 4.14, The I nform at ion Tab:
Scanner serial & revision num ber ( locat ed on t he bot t om of
t he scanner) ;
Hardware configurat ion ( e.g., your host CPU type, RAM size,
free disk space, display card, int erface card) ;
The nam e and version of your scanning soft ware application;
The version of your scanner driver.
Please call us at :
H e a dqu a r t e r
Avision I nc.
No. 20, Creat ion Road I , Science-Based I ndust rial Park,
Hsinchu 300, Taiwan, ROC
TEL: + 886 ( 3) 578- 2388
FAX: + 886 (3) 577-7017
E-MAI L: service@avision.com .t w
Web Sit e: ht tp: / / www.avision.com .t w
US a nd Ca na da Ar e a
Avision Labs, I nc.
6815 Mowry Ave., Newark CA 94560, USA
TEL: + 1 ( 510) 739- 2369
FAX: + 1 ( 510) 739-6060
E-MAI L: support @avision- labs.com
Web Sit e: ht tp: / / www.avision.com

User’s Ma nua l
8- 5
Chin a Ar e a
Hongcai Technology Lim it ed
7A, No.1010, Kaixuan Road, Shanghai 200052 P.R.C.
TEL :+ 86- 21- 62816680
FAX :+ 86- 21- 62818856
E-MAI L :sales@avision.net.cn
Web Sit e: ht t p: / / www.avision.com .cn
Eu r ope Ar e a
Avision Eur ope Gm bH
Bischofst r. 101 D- 47809 Krefeld Germ any
TEL: + 49-2151- 56981- 40
FAX: + 49-2151- 56981- 42
E-MAIL: info@avision- europe.com
Web Sit e: ht tp: / / www.avision.de
Espaço Brasil
Avision Brasil Lt da .
Avenida Jabaquara, 2958 - Cj. 75 - Mirandópolis –
CEP: 04046- 500 - São Paulo, Brasil
TEL: + 55- 11- 2925-5025
E-MAI L: suporte@avision.com .br
Web Sit e: ht t p: / / www.avision.com .br
8
Troubleshooting

User’s Ma nua l
8- 6
This page is intent ionally left blank.

User’s Ma nua l
a
9 . Specifications
All spe cificat ions are subject t o change w it hout not ice. For
the m ost up- t o- dat e and det ailed specificat ions, please refer t o
our web sit e at ht t p: / / www.avision.com
Model Num ber: DT- 1608H
Opt ical Resolut ion: 600 dpi
Out put Resolut ion: 72~ 1200 dpi ( adj ustable in 1 dpi
increm ents)
Scanning Modes: Black & Whit e / Gray / Color
ADF Capacity: Up to 100 pages ( 70 g/ m
2
) ( 20 lb.)
Max. Docum ent Size: 310 x 432 m m ( 12.2 x 17 in.)
Min. Docum ent Size: 50 x 88 m m ( 2 x 3.5 in.)
Paper Weight : 28 ~ 209 g/ m
2
( 7 ~ 56 lb.)
I D Card Thickness: < 1.25 m m ( 0.05 in.)
I nt erface: USB 2.0, RJ45 Etherent 10/ 100Mb
Power Source: 19V, 4.74A
Operat ing Tem perat ure: 10º C ~ 35º C
Dim ensions: ( WxDxH):
Max.: 1192 x 526 x 378 m m
( 46.93 x 20.71 x 14.88 in.)
Min.: 646 x 526 x 388 m m
( 25.43 x 20.71 x 15.28 in.)
Weight: 23.44 kg ( 51.68 lb.)
9
