SHEET- FED SCAN NER
USER’S MAN UAL
Regulat ory Model Num ber: FL-1602B
w w w .avision.com

User ’s Ma nua l
ii
Trade m arks
Microsoft is a U.S. regist ered tradem ark of Microsoft Corporat ion.
Windows, Windows Vist a, Windows 7, Windows 8, and Windows 10
are eit her regist ered t radem arks or tradem arks of Microsoft
Corporat ion in t he Unit ed Stat es and/ or ot her count ries.
Energy St ar
®
is a regist ered tradem ark of t he U.S. governm ent.
I BM, I BM PC are regist ered tradem arks of I nt ernational Business
Machines Corp.
Ot her brands and product nam es herein are tradem arks or
regist ered t radem arks of t heir respect ive holders.
Copyright
All right s reserved. No part of this publication m ay be
reproduced, transm it t ed, transcribed, stored in a retrieval
syst em , or t ranslat ed into any language or com puter language,
in any form or by any m eans, elect ronic, m echanical, m agnetic,
opt ical, chem ical, m anual, or otherwise, wit hout t he prior writ t en
perm ission of Avision I nc.
Material scanned by this product m ay be protected by
governm ent al laws and other regulations, such as copyright
laws, the cust om er is solely responsible for com plying w ith all
such laws and regulations.
W arrant y
The inform at ion cont ained in t his docum ent is subject t o
change without notice.
Avision m akes no warranty of any kind wit h regard t o t his
m at erial, including, but not lim ited t o, t he im plied warrant ies
of fit ness for a part icular purpose.
Avision shall not be liable for errors cont ained herein or for
incidental or consequent ial dam ages in connect ion with t he
furnishing, perform ance, or use of this m aterial.

User ’s Ma nua l
iii
Feder a l Com m u nicat ions Com m ission ( FCC) com plia nce
inform ation st atem ent
Part 1 5
This equipm ent has been t est ed and found t o com ply wit h the
lim its for a Class B digital device, pursuant t o Part 15 of the FCC
Rules. These lim its are designed t o provide reasonable
prot ect ion against harm ful int erference in a residential
inst allation. This equipm ent generates, uses and can radiate
radio frequency energy and, if not inst alled and used in
accordance wit h t he inst ruct ions, m ay cause harm ful
interference to radio com m unications.
However, there is no guarant ee that interference w ill not occur
in a part icular inst allation. I f this equipm ent does cause harm ful
interference t o radio or television reception, which can be
det erm ined by turning the equipm ent off and on, the user is
encouraged t o try to correct t he int erference by one of t he
following m easures:
Reorient or relocate t he receiving antenna.
I ncrease the separation between the equipm ent and
receiver.
Connect t he equipm ent into an outlet on a circuit
different from t hat to which the receiver is connect ed.
Consult t he dealer or an experienced radio/ TV t echnician
for help.
This device com plies w ith Part 15 of the FCC Rules. Operat ion is
subject t o the following t wo condit ions: ( 1) This device m ay not
cause harm ful interference, and ( 2) this device m ust accept any
interference received, including interference that m ay cause
undesired operation.

User ’s Ma nua l
iv
Europe a n Un ion Regulatory N otice
Product s bearing the CE m arking com ply w ith t he following EU
Direct ives:
Low Volt age Direct ive 2014/ 35/ EC
EMC Direct ive 2014/ 30/ EC
Rest rict ion of t he use of cert ain hazardous subst ances ( RoHS)
Direct ive 2011/ 65/ EU
CE com pliance of t his product is valid if powered w ith t he correct
CE- m arked AC adapter provide by Avision.
This product satisfies t he Class B lim it s of EN55022, EN55024,
safet y requirem ents of EN 60950 and ROHS requirem ent s of
EN50581.
* This m achine is cert ified as Class 1 LED product .

User ’s Ma nua l
v
Disposa l of W ast e Equipm ent by Use r s in Priva t e Union
This sym bol on the product or on its packaging indicat es t hat t he
product can not be disposed of with your other household wast e.
I nst ead it should be sent to appropriate facilit ies for recovery
and recycling in an effort t o protect hum an health and the
environm ent . Fore m ore inform ation about w here you can drop
off your wast e equipm ent for recycling, please cont act your local
city office, your household wast e disposal service or the shop
where you purchased the product .
As an ENERGY STAR
®
Partner, Avision I nc. has
det erm ined t hat t his product m eets t he ENERGY
STAR guidelines for energy efficiency.
Syst e m Require m ents
CPU: I nt el
®
Core™ 2 Duo or higher
Mem ory: 32 bit : 2 GB
64 bit : 4 GB
Opt ical Drive: DVD- ROM Drive
USB Port : USB port 2.0 ( com pat ible with USB 3.0)
Com pat ible
Operat ing
Syst em :
Microsoft Windows 10 (32 bit s/ 64 bit s) ,
Windows 8 (32 bit s/ 64 bit s) , Windows 7,
Windows Vist a, Windows XP( SP3)
User ’s Ma nua l
vi
Product Sa fet y Gu ide
Please clearly read all t hese inst ruct ions, and follow all inst ruct ions
and warnings before inst alling and using the device.
The following indications are used in this docum ent t o obviate any
chance of accident or dam age t o you and/ or t he device.
W ARN I N G
I ndicates potentially hazardous situat ions, which
if inst ructions are not followed, could r esult in
deat h or serious injury.
CAUTI ON
I ndicates a pot ent ially hazardous situation
which, if inst ructions are not followed, m ay
result in m inor or m oderat e inj ury or dam age to
propert y.
W ARN I N G
Use only the AC power adapter t hat cam e wit h your device.
Using any ot her AC power adapt er could cause fire, elect rical
shock, or injury.
Use only the AC power cord and USB cable t hat cam e w ith your
device and avoid abrasions, cut s, fraying, crim ping, and kinking.
Using any ot her AC power cord and USB cable could cause fire,
elect rical shock, or injury.
Do not place obj ect s on t op of t he AC power cord, and do not
allow t he AC power adapt er or t he AC power cord t o be st epped
on or run over.
Place the device and it s AC power adapt er near an elect rical
outlet where t he AC power adapt er can easily be unplugged.
I f you use an extension cord with the device, m ake sure t hat
the t otal am pere rat ing of t he devices plugged into t he
extension cord does not exceed t he cord's am pere rat ing.
Place the device close enough t o the com put er so that t he
interface cable can easily reach between the device and the
com put er.

User ’s Ma nua l
vii
Do not place or store t he device or its AC power adapt er:
Out doors
Near excessive dirt or dust , wat er, or heat sources
I n locations subj ect t o shocks, vibrat ions, high
tem perature or hum idit y, direct sunlight , strong light
sources, or rapid changes in tem perat ure or hum idit y
Do not use t he device with wet hands.
Never disassem ble, m odify, or att em pt to repair t he AC power
adapt er, device, or device option by yourself, except as
specifically explained in t he device's docum ent ation. This could
cause fire, elect rical shock, or injury.
Do not insert obj ect s into any opening, as t hey m ay t ouch
dangerous voltage point s or short - out com ponents. Beware of
elect rical shock hazards.
Unplug the device and the AC power adapter, and refer
servicing to qualified service personnel under the following
condit ions:
The AC power adapt er or plug is dam aged.
Liquid has entered t he device or t he AC power adapt er.
Obj ect has ent ered t he device or the AC power adapt er.
The device or t he AC power adapt er has been dropped,
or the case has been dam aged.
The device or t he AC power adapter does not operat e
norm ally ( i.e. appearance of sm oke, st range sm ell, odd
noise, et c.) , or exhibits a dist inct change in perform ance
Unplug the device and the AC power adapter before cleaning.

User ’s Ma nua l
viii
CAUTI ON:
Do not locat e the device on rackety or aslope t ables. Do not
locate t he device on unstable surface. The device m ay fall
down and t his m ay result in inj ury.
Do not place heavy obj ect s on the unit. I t m ay cause
unbalance and the dev ice m ay fall down. This m ay result in
injury.
St ore the AC Power cord/ USB cable bundled out of t he reach of
children t o avoid the risk of injury.
Keep plast ic bags bundled out of t he reach of children or throw
them away to avoid the danger of suffocation.
I f you are not going to use t he device for a long period, unplug
the AC power adapter from t he elect rical out let.

User ’s Ma nua l
1- 1
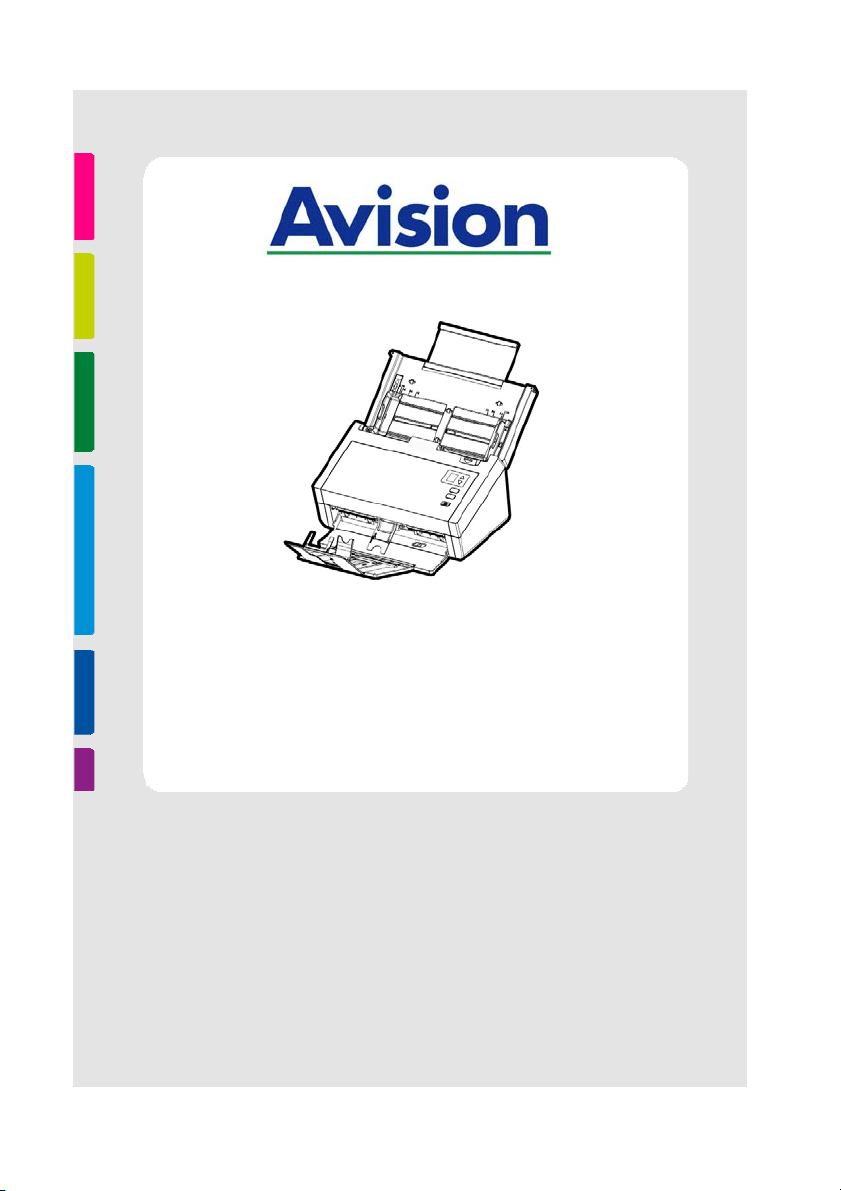
1 . I ntroduct ion
Congrat ulat ions on your purchase of t he color sheet -fed
im age scanner. Wit h this scanner, you can scan docum ents
from t he auto docum ent feeder increase your product ivity.
Before you inst all and operat e t he new scanner, please take a
few m inutes to read through this m anual. I t provides proper
inst ruct ions for you t o unpack, inst all, operate and m aintain
the scanner.
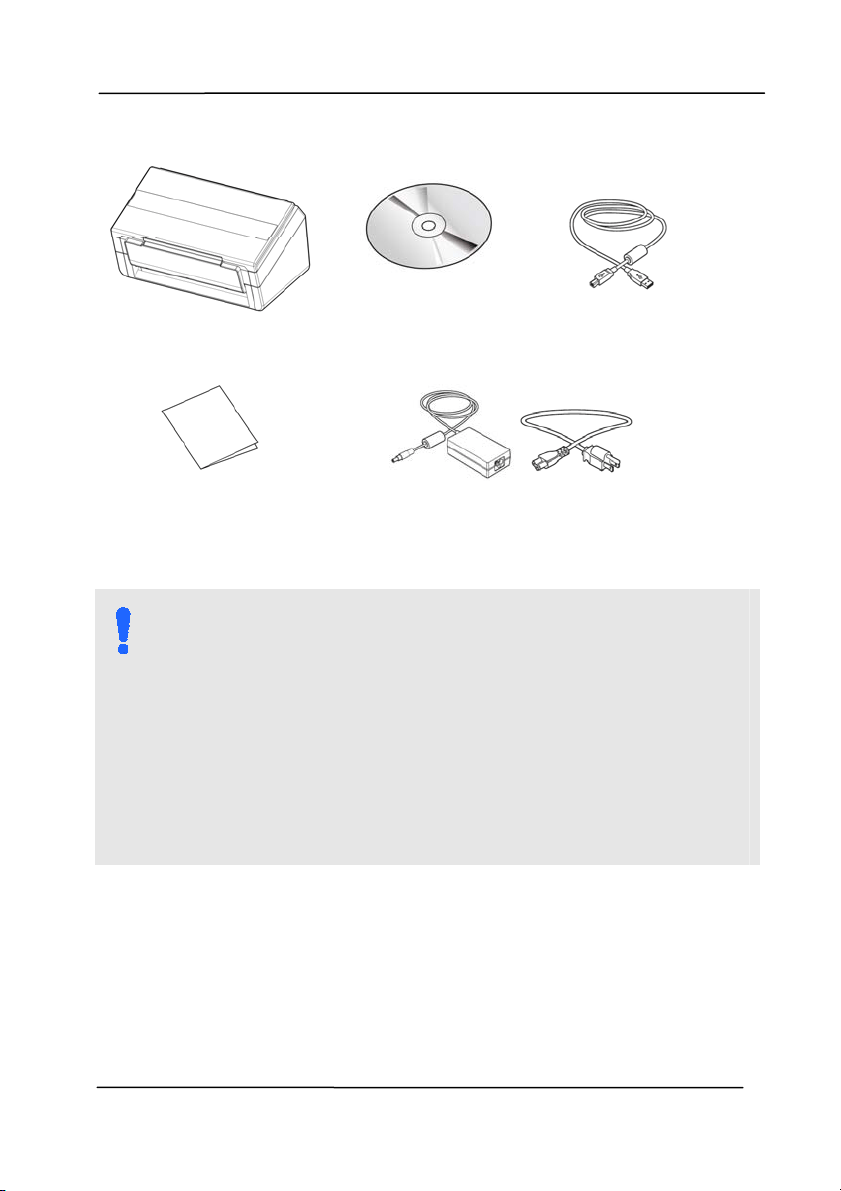
1 .1 Package I t em s
T
he following figure indicates t he package contents. Please
check all the it em s against your checklist . I f you do not
receive all t he it em s, please cont act your aut horized local
dealer im m ediately.
1
User ’s Ma nua l
1- 2
Scanner
Software CD
USB Cable
Quick Guide
Power Adapter/ Power Cor d
N OTE:
1 . Only use the AC adapter DA- 48M24 by APD included
in the m achine. Using other AC adapters m ay
dam age t he m achine and void t he warrant y.
2. Please unpack the packing carefully, and check the
cont ents against the checklist . I f any item s are
m issing or dam aged, please contact your dealer
im m ediat ely.
3. To access m ore service support s, visit
www.avision.com to regist er your Avision’s product .
User ’s Ma nua l
1- 3
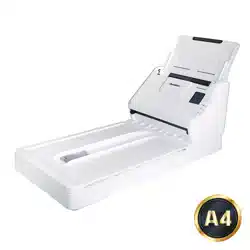
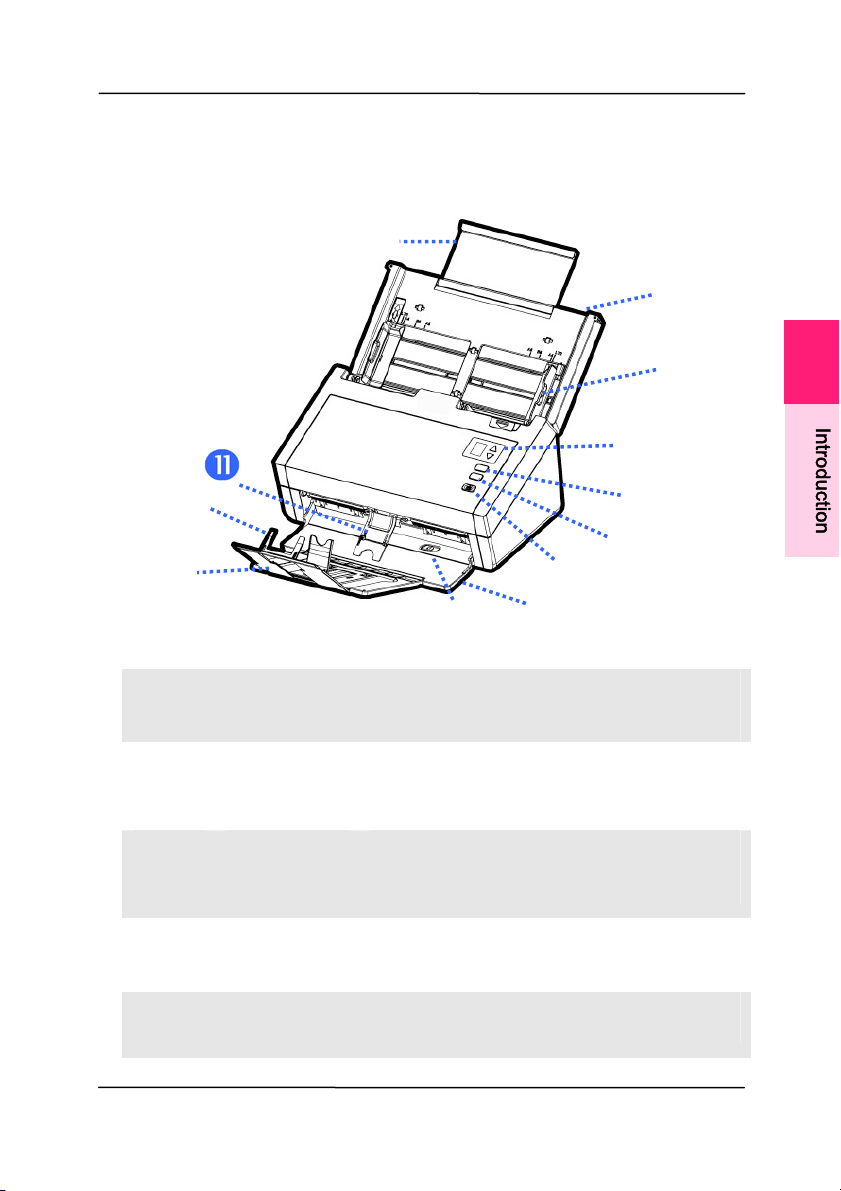
1 .2 Front View
I
TEM NAM E DESCRI PTI ON
1
Ex t ension Can be pulled out and adj ust ed to
the size of the docum ent being
scanned.
2
ADF Paper
Tray
Load t he docum ent onto this part
when scanning docum ent.
3
Pape r
Guides
Adj ust s t o the width of the
docum ents t o prevent skewing of
the scanned pages.
4
LCD
Scr e en
Shows a num ber indicating a scan-
to dest inat ion via t he Up/ Down
but t ons.
5
Cance l Press t o cancel a scanning job
during operat ion.
1
I
n
t
r
o
d
u
c
t
i
o
n

User ’s Ma nua l
1- 4
6
Sca n
Press t o start a scan.
7
Pow e r Press t o t urn on t he power.
8
Output Tray Open to collect t he docum ent
aft er scanned.
9
Posit ion
Adj ust e r
Slide the adj ust er inward to
m ake t he Out put Tray in a flat
position.
1 0
Pape r
St opper
Adj ust t o t he length of the
docum ents t o prevent them
from falling apart.
1 1
Pape rw e ight Used t o hold down a st ack of
output paper.
User ’s Ma nua l
1- 5
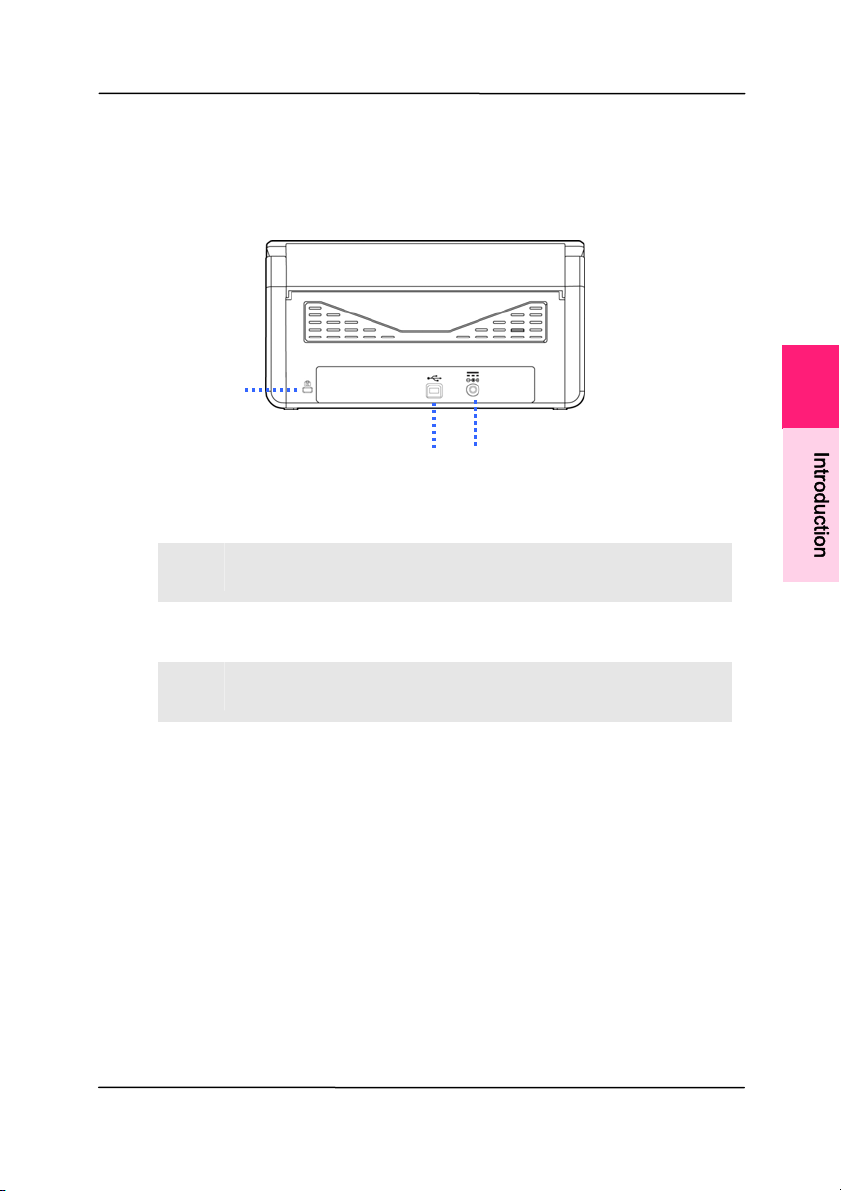
1 .3 Rear View
I TEM NAM E DESCRI PTI ON
1
Ke nsingt on
Se curity Slot
At t ach to a lock to secure t he
scanner.
2
USB Port Connect t o your com put er.
3
Pow e r Jack Connect t he AC adapt er t o t he
scanner.
1
I
n
t
r
o
d
u
c
t
i
o
n

User ’s Ma nua l
2- 1
2 . Scanner I nst allation
2 .1 Preca ut ions
Keep the scanner out of direct sunlight. Direct exposure
to the sun or excessive heat m ay cause dam age to t he
unit.
Do not inst all the scanner in a hum id or dust y place.
Be sure to use the proper AC power source.
Place the scanner securely on an even, flat surface.
Tilt ed or uneven surfaces m ay cause m echanical or
paper- feeding problem s.
Retain the scanner box and packing m aterials for
shipping purposes.
2
User ’s Ma nua l
2- 2
2 .2 I nstalling the Sca n ner Dr iver a nd Connect ing t he
Cable s
N OTE:
1 . To ensure your com put er can ident ify the USB
scanner, please inst all scanner driver first before
connect ing t he scanner to your com puter.
2. The scanner driver contains TWAI N, I SI S and WI A
driver. Aft er t he inst allat ion of scanner driver is
com pleted, this scanner allows you to scan via a
TWAI N, I SI S, or a WI A int erface. St art your TWAI N-
com pliant im age edit ing software application t o
select a TWAI N or WI A user int erface or your I SI S
software to select an ISIS user interface. You may
also launch Microsoft’s Scanner and Cam era Wizard
to scan via a WI A user int erface.
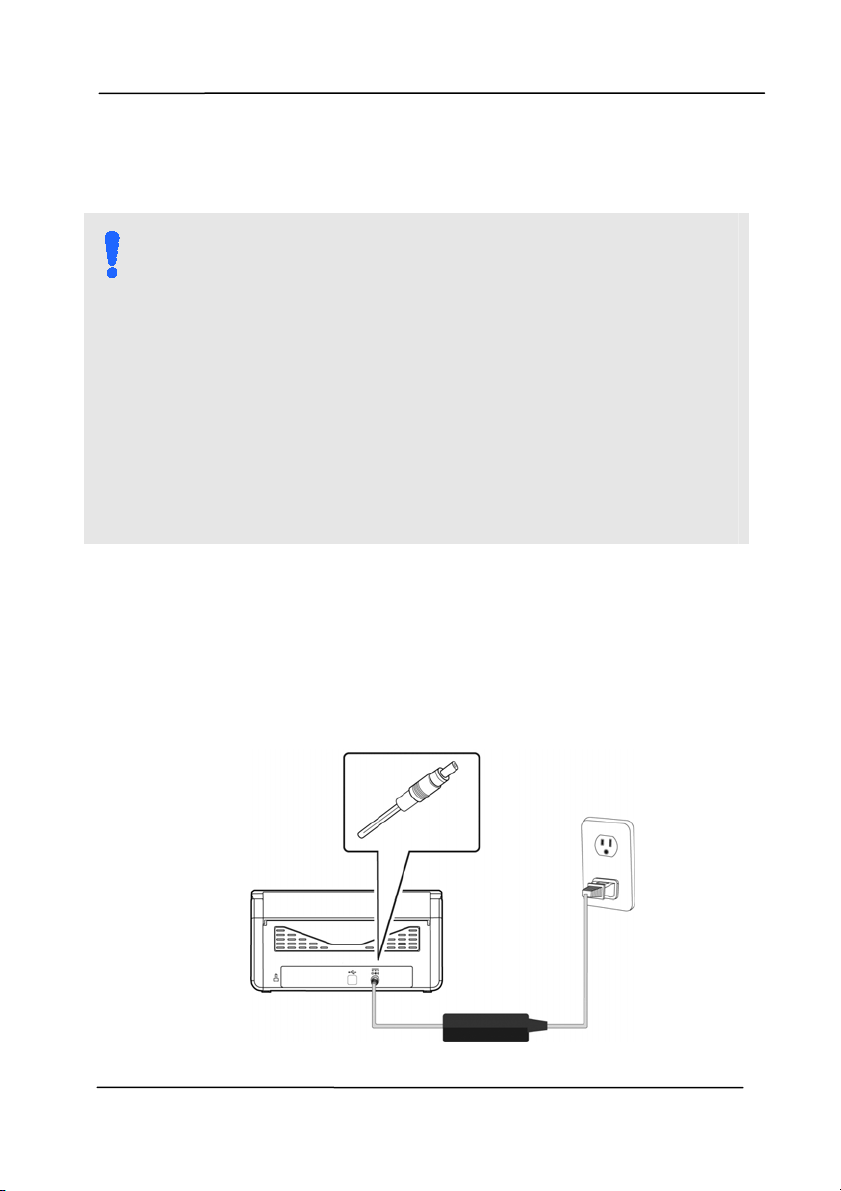
2 .2 .1 Conn ect ing t o the Pow er
Be fore conn ect ing, m a k e sure the pow e r sw it ch is off.
Pl
ug t he sm all end of t he power adapt or into the power j ack of
your scanner. I nsert t he ot her end to an appropriat e power
outlet.
User ’s Ma nua l
2- 3
2 .2 .2 Tur ning on the Pow er
Press t he Pow er Swit ch button on the front panel, the Power
LED will flash. When it is finished and ready t o scan, t he LED
indicator will st op flashing and becom e st eadily on. To t urn
off the scanner, press t he Power Switch button for about 3
seconds, the Power LED will be off.
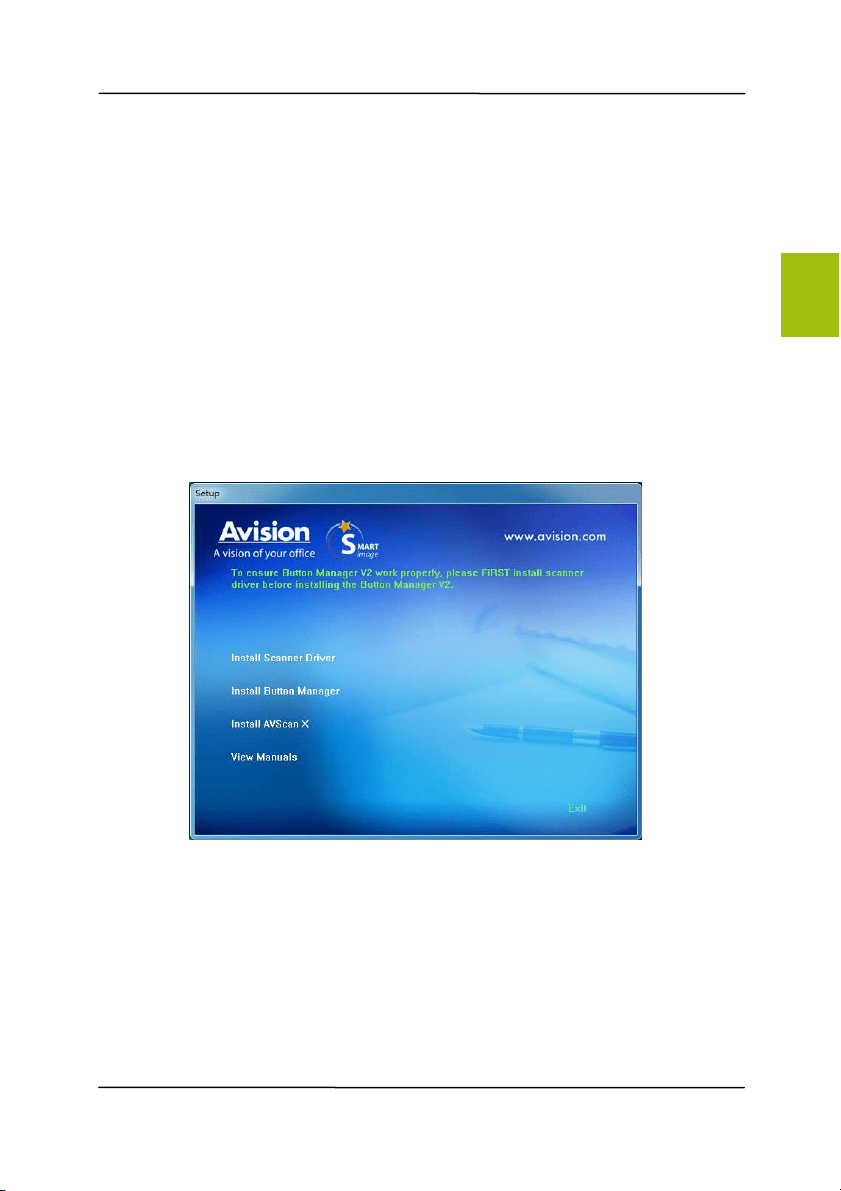
2 .2 .3 I nst a lling t he Sca nner D r iver
1 . Place the supplied CD- ROM ont o your CD- ROM drive.
2 . The soft ware inst allat ion graphic appears. I f not , run
“setup.exe”.
2

User ’s Ma nua l
2- 4
Contents on the inst allation graphic:
I nst a ll Sca nner D r iver : To com m unicat e wit h your
scanner, you need to inst all the scanner driver.
I nst a ll Butt on Manager V2 : To use the buttons on
the scanner, you need to inst all But t on Manager V2.
To ensure But t on Manager V2 w orks properly, please
FI RST inst all scanner driver before inst alling Button
Manager V2.
I nst all AVSca n X: To scan and organize your m ulti-
page docum ent(s) , you can inst all t he soft ware
applicat ion to m anage them easily and effect ively.
View M a nual: Click “View Manua l” to view or
print t he det ailed user m anual for the scanner and
Button Manager V2 respect ively.
3 . Click I nst all Sca nner Drive r t o inst all the scanner driver
and then click I nst all Bu t t on Mana ger V2 t o inst all t he
Button Manager V2 unto your com put er.
User ’s Ma nua l
2- 5
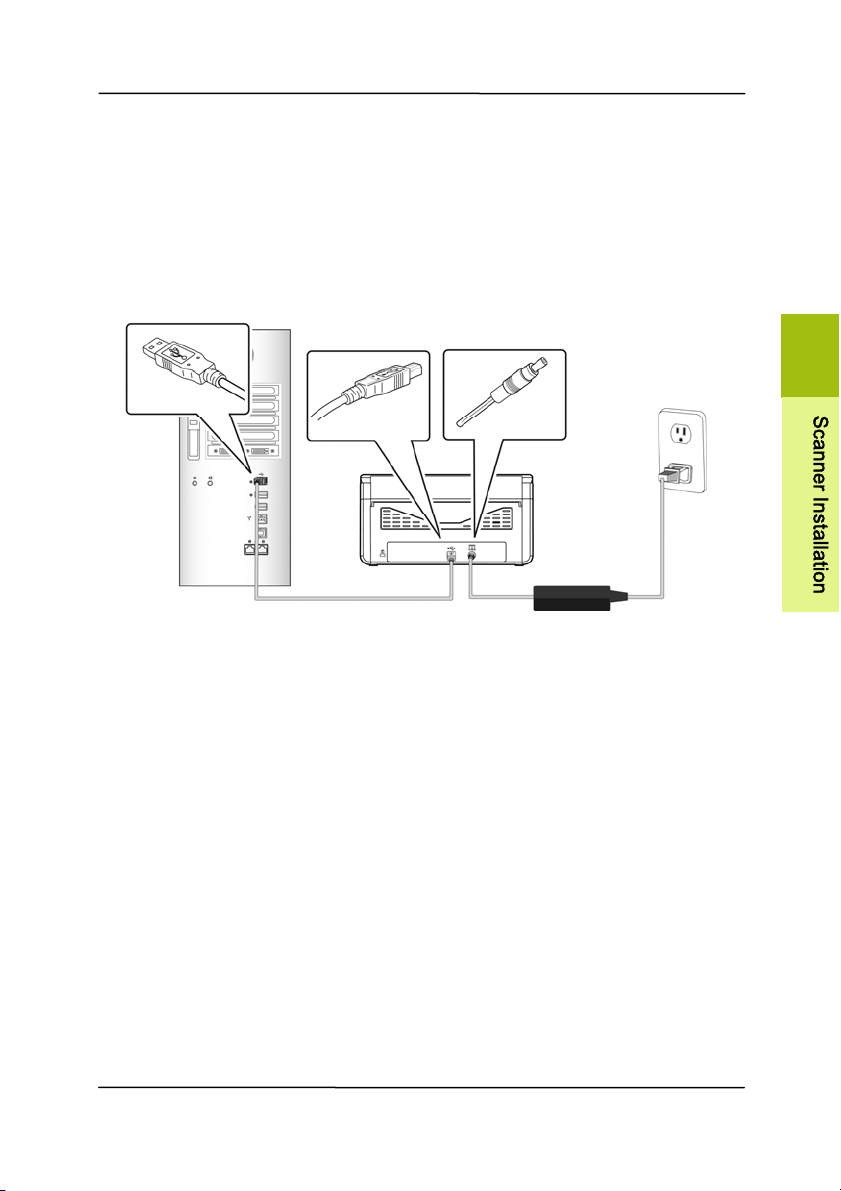
2 .2 .4 Conn ect ing t o Com put er
1 . Connect t he square e nd of t he USB cable to the USB port of
your scanner. Connect t he r e ct angle en d to the USB port at
the rear side of your com put er.
2 . The com puter should detect a new USB device and prom pt a
“N ew Hardw are Foun d” m essage.
3 . By following t he on- screen inst ructions, click the Next
but t on t o cont inue. When the certification screen appears,
click Continue Anyw ay t o com plete t he installation.
4 . When the Finish dialog is prom pt ed, click the Fin ish but t on.
2
S
c
a
n
n
e
r
I
n
s
t
a
l
l
a
t
i
o
n

User ’s Ma nua l
3- 1
3 . Com pleting Your First
Scan
3 .1 Loading Your Pape r
3 .1 .1 Not ice on Using t he ADF
Before using the ADF, please m ake sure t hat your paper m eet s
t
he following specificat ions:
Docum ent(s) can range in size from 50 x 50 m m ( 2 x 2
in.) t o 216 x 356 m m ( 8.5 x 14 in.).
Docum ent(s) can range in weight from 27~ 413 g/ m
2
( 7~
110 lb.)
I D cards up to 1.25 m m ( 0.05 in.) thick
Docum ent(s) should be square or rectangular and in good
condit ion (not fragile or torn) .
Docum ent(s) should be free of curl, wrinkle, wet ink, or
punch holes.
Docum ent(s) should be free of st aples, paper clips, paper
st icky notes.
3
User ’s Ma nua l
3- 2
3 .1 .2 Loa ding Your D ocu m ent in t he ADF Pape r Tray
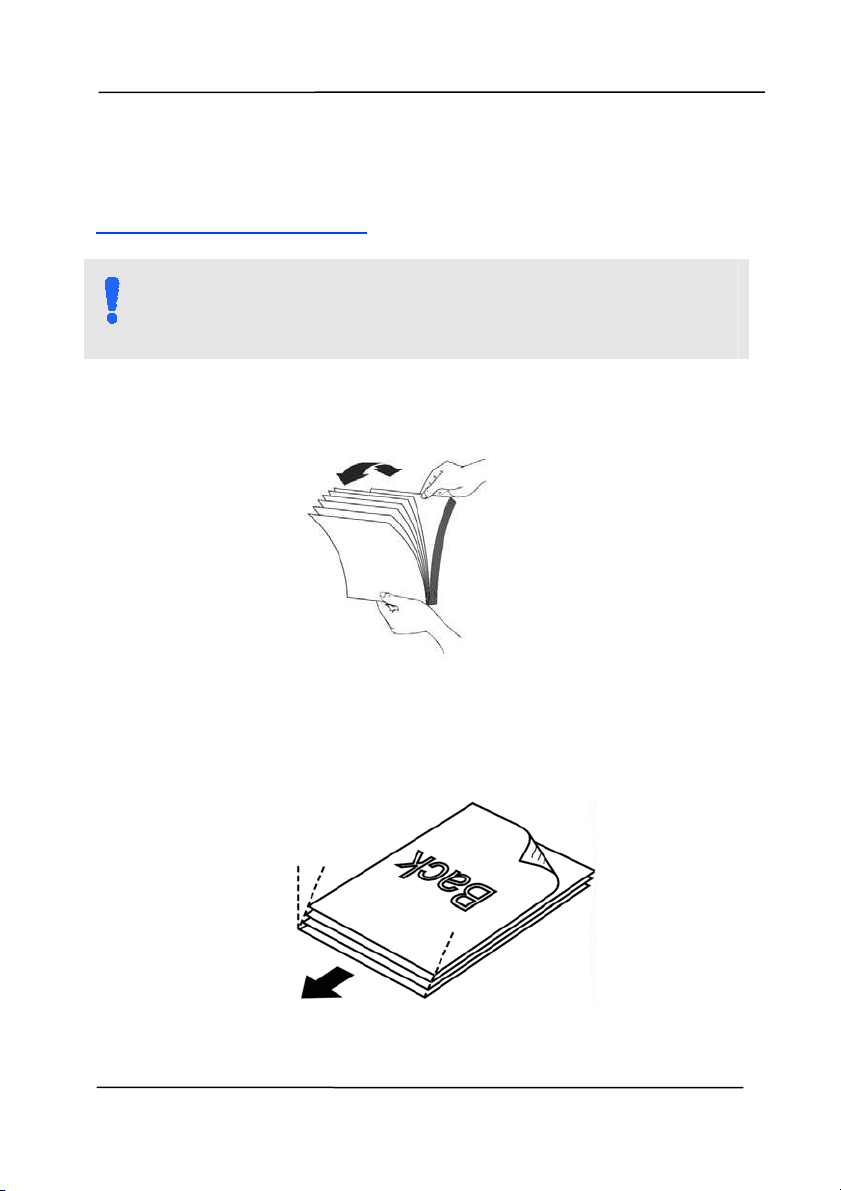
Fa nning Your D ocu m ent
N OTE:
To avoid occasional m ult i-feeds or paper j am s, please fan
your docum ents and align the top edges before feeding
them into the scanner.
1. Hold both ends of t he docum ents and fan t hem a few
tim es.
2. Rotat e the docum ents by 90 degrees and fan t hem in the
sam e m anner.
3. Align the edges of the docum ents in a st ep- like pat t ern
( see pict ure below).
St ep-like
Scanning
Direct ion
User ’s Ma nua l
3- 3
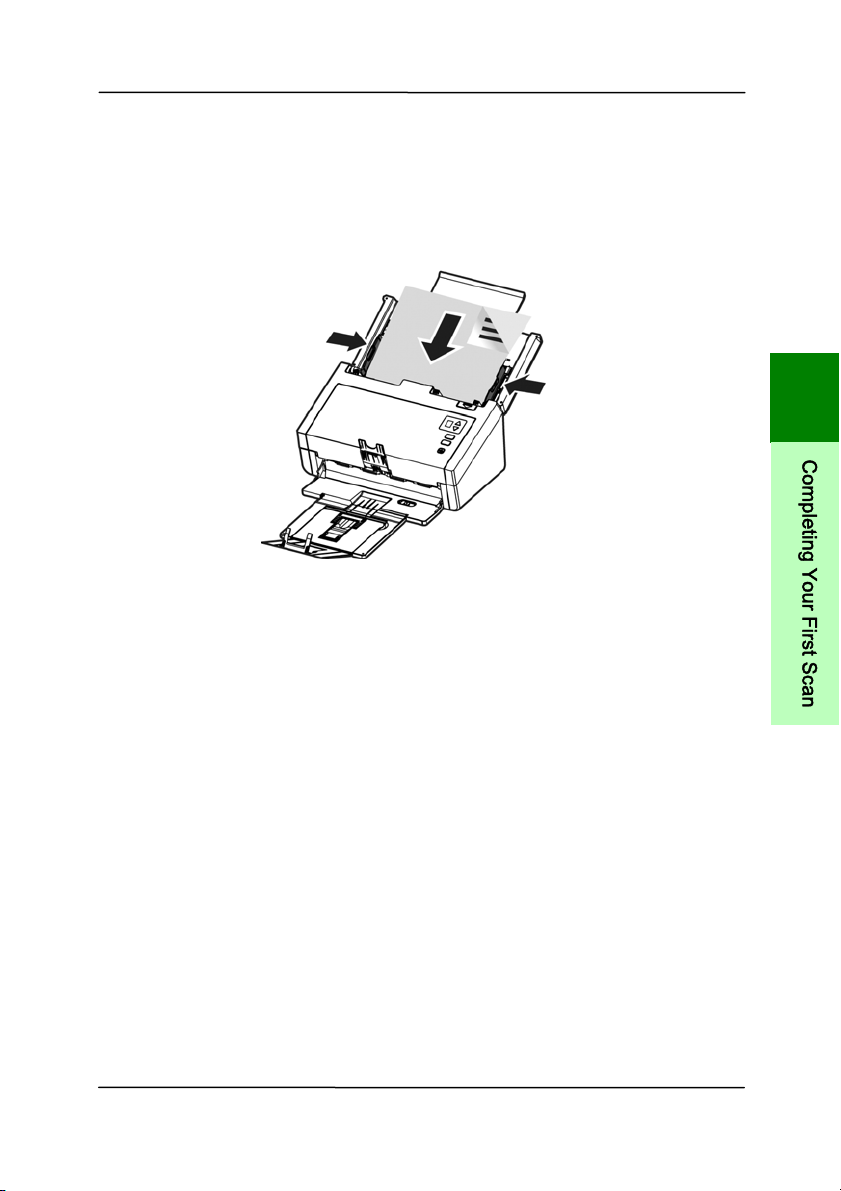
Docum e nt Fe e din g
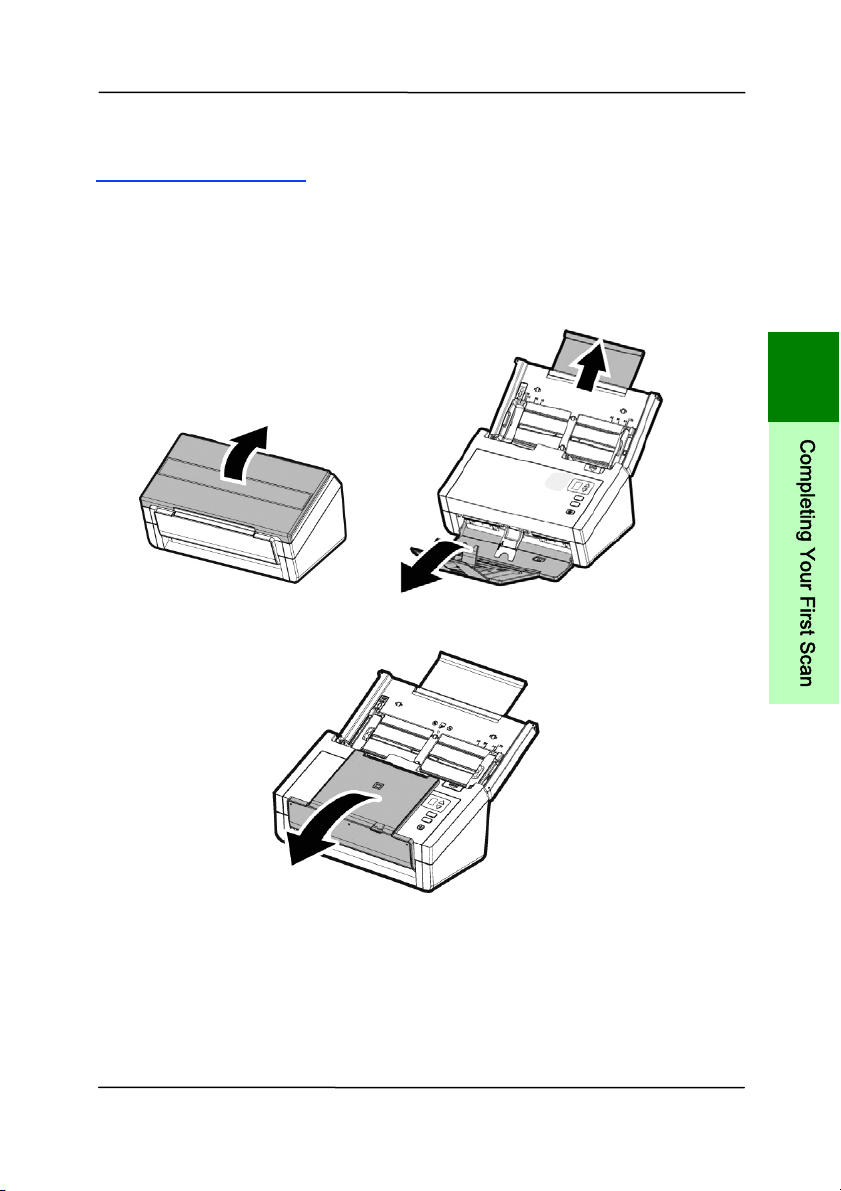
1. Unfold the docum ent feeder and it s extension.
2. Unfold the out put tray and raise the paper st opper.
3
C
o
m
p
l
e
t
i
n
g
Y
o
u
r
F
i
r
s
t
S
c
a
n
User ’s Ma nua l
3- 4
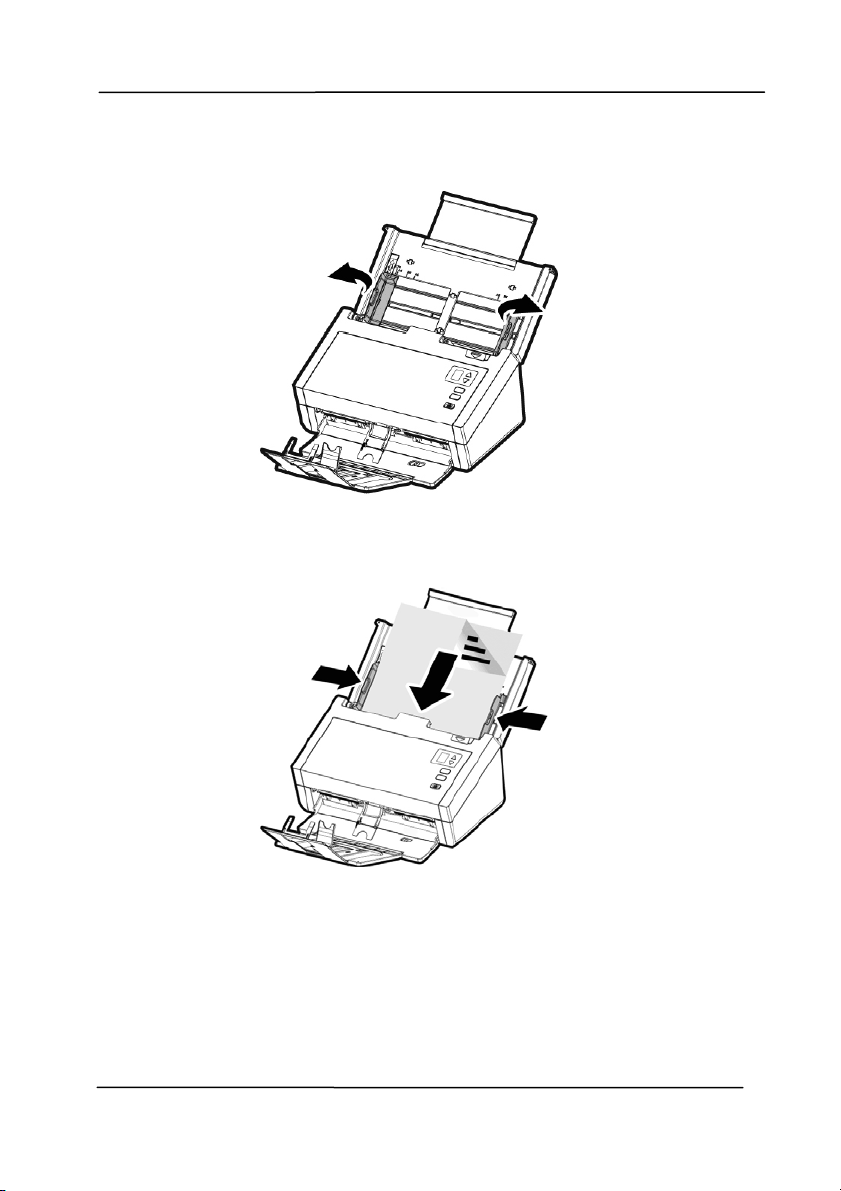
3. Raise the paper guide t o hold your m ult i-page docum ent.
4. Load a st ack of docum ent
face down wit h the t op of the
pages pointing int o t he feeder.
5. Verify that t he paper guides are aligned with t he edges
of the st ack.
User ’s Ma nua l
3- 5
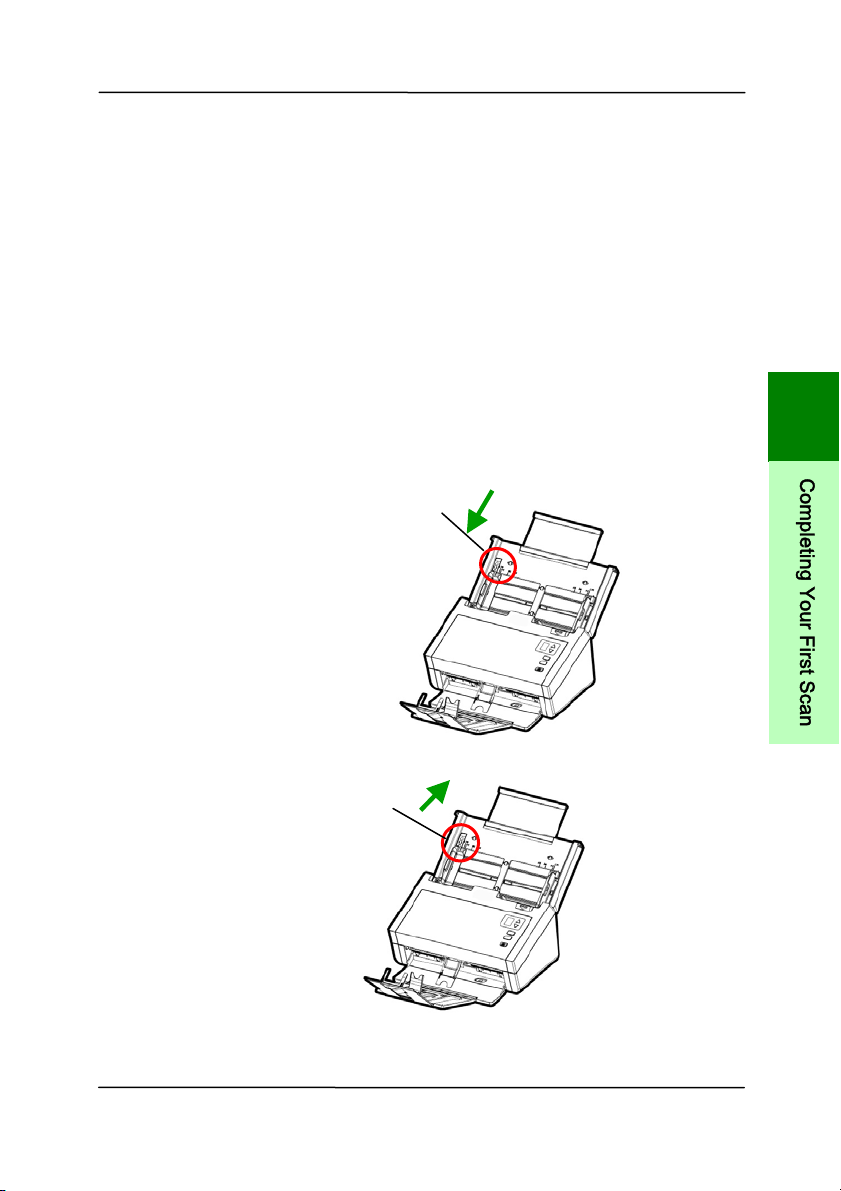
Note: The [ Pa per W idth] switch:
I f your docum ent widt h is 216 m m (8.5 in.) :
I f your docum ent widt h is 216 m m ( 8.5 in.), slide the
[ Paper W idt h] switch D OW N to fix your paper guide to
conveniently load the letter- size docum ent .
I f your docum ent widt h is larger than 216 m m ( 8.5 in.):
I f your docum ent width is larger t han 216 m m ( 8.5 in.)
such as invoices w ith punch holes, slide the [ Pa per
W idt h ] swit ch UP and m ove the paper guide t o the right
end to load your docum ents.
Slide DOW N t he [ Pape r
W idt h ] swit ch to set your
paper widt h t o 216 m m
( 8.5 in.)
Slide UP t he [ Pa per
W idt h ] swit ch to set
your paper widt h larger
than 216 m m ( 8.5 in.)
3
C
o
m
p
l
e
t
i
n
g
Y
o
u
r
F
i
r
s
t
S
c
a
n
User ’s Ma nua l
3- 6
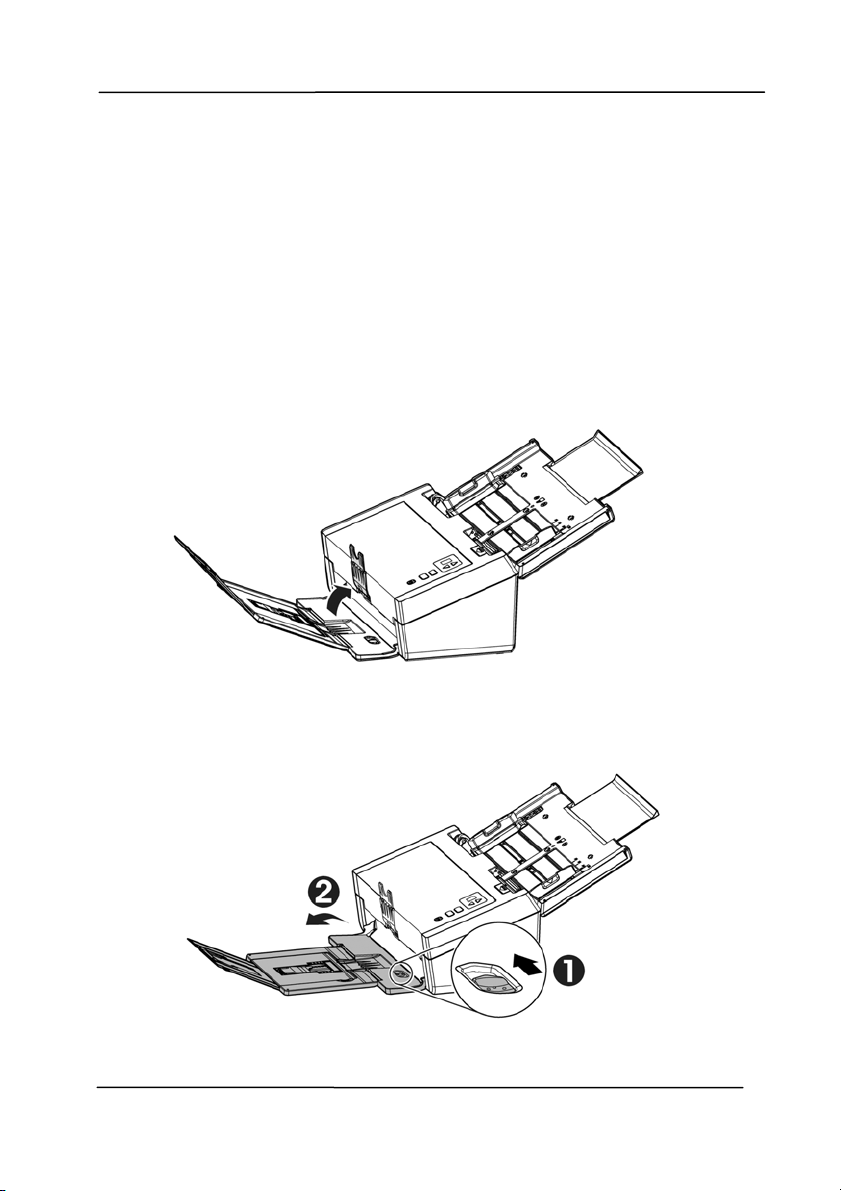
3 .1 .3 Scanning Thin Pa per
To scan a st ack of thin paper, it is recom m ended t o raise the
paper weight and then m ake the out put tray in a flat position to
keep the paper from rolling or possible paper j am s due to the
paper st ack in the out put tray.
For norm al docum ent scanning, press down the paperweight
and keep the out put tray in an angled position t o prevent paper
from falling apart.
To scan thin paper,
1. Lift up the paperweight as shown.
2. Slide the position adjust er of t he output tray to m ake the
output t ray in a flat position.
User ’s Ma nua l
3- 7
3. Load a st ack of thin paper into t he paper tray. Align t he
paper guides and m ake sure t he edges of paper slight ly
touch the paper guides on both side as illust rat ed.
8B
3
C
o
m
p
l
e
t
i
n
g
Y
o
u
r
F
i
r
s
t
S
c
a
n
User ’s Ma nua l
3- 8
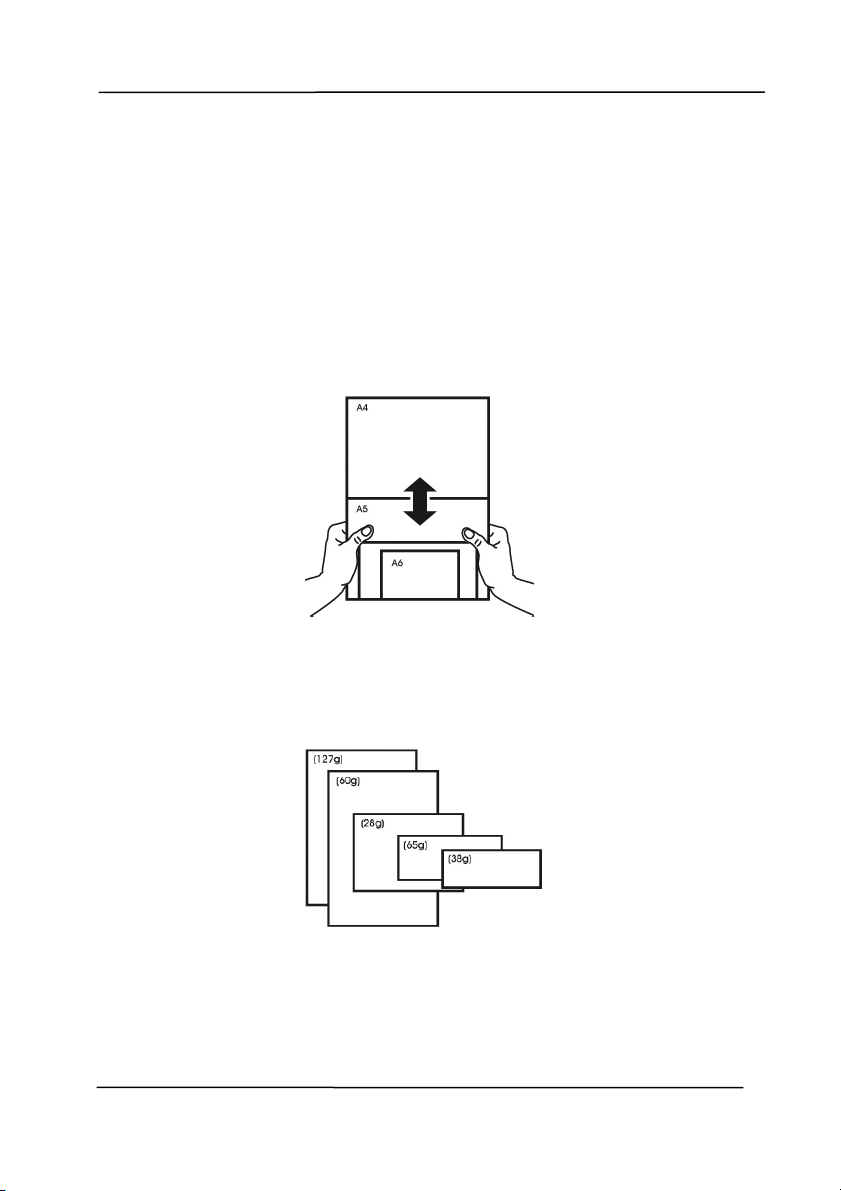
3 .1 .4 Scanning a St a ck of Docum e nt w ith Va r ious sizes
and W eights
When scanning a batch of docum ents wit h different sizes and
weight s, be sure to follow t hese guidelines t o avoid a skewed
im age or a paper jam :
1. Align the docum ents TOP ED GE first in t he sequence of
paper size from large to sm all.
2. I f t wo pages are of the sam e size yet with different weight ,
arrange these pages in t he sequence of paper weight from
heavyweight t o light weight.
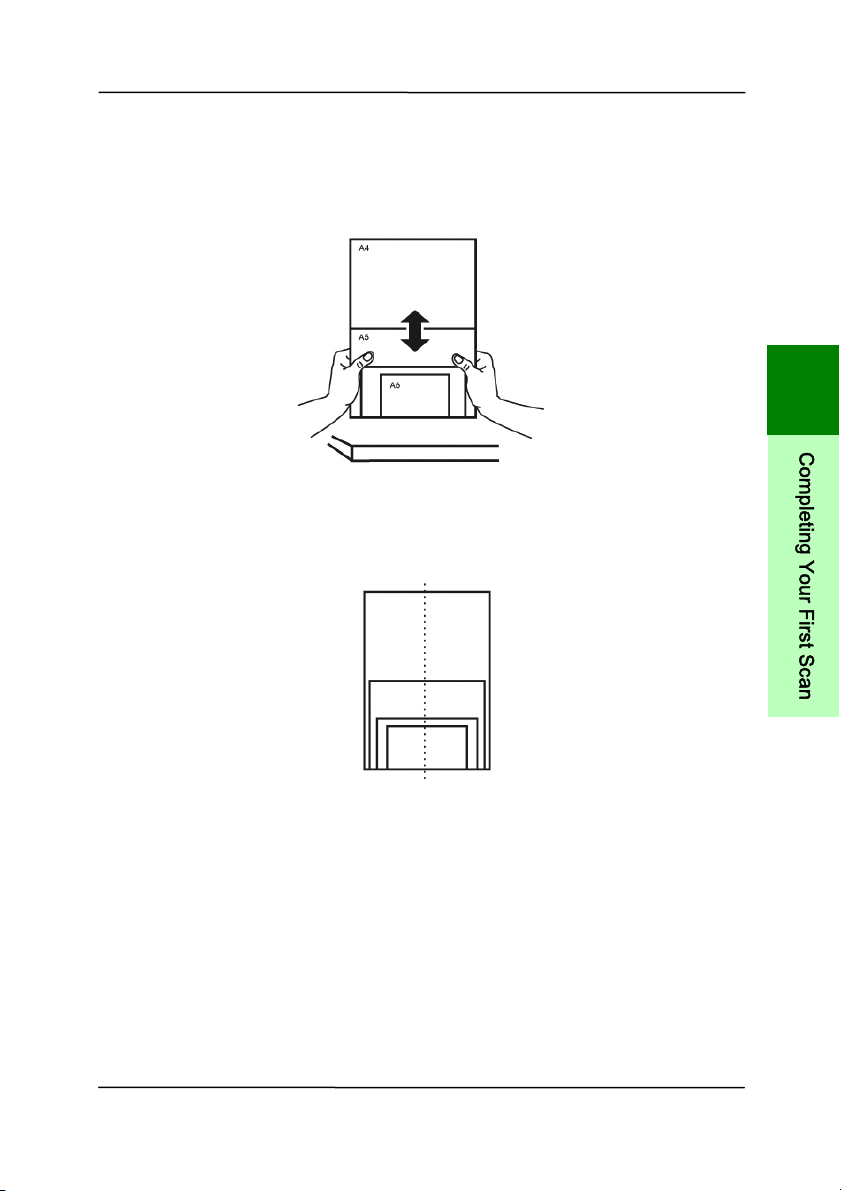
User ’s Ma nua l
3- 9
3. Align the edges of the docum ents by tapping t he bot t om of
the st ack against t he table top.
4. Center t hese pages in t he docum ent feeder and m ake sure
that the edges of page of the largest size slight ly touch the
Paper Guide.
3
C
o
m
p
l
e
t
i
n
g
Y
o
u
r
F
i
r
s
t
S
c
a
n
User ’s Ma nua l
3- 10
3 .2 Ver ifying Your Sca nner I nst a llat ion
T
o verify if your scanner installat ion is correct , Avision provides
you a useful t est program called Avision Capture Tool. Wit h
this t ool, you can perform sim ple scans and view t he capt ured
im ages. I n addit ion, it helps you com plet e your scan at a rat ed
speed.
The following procedure describes how to verify your scanner
inst allation. I f t he inst allat ion is not correct , please review the
preceding sect ion to check if the cable connect ion and scanner
driver have been successfully installed.
Before you begin, be sure t he scanner is on.
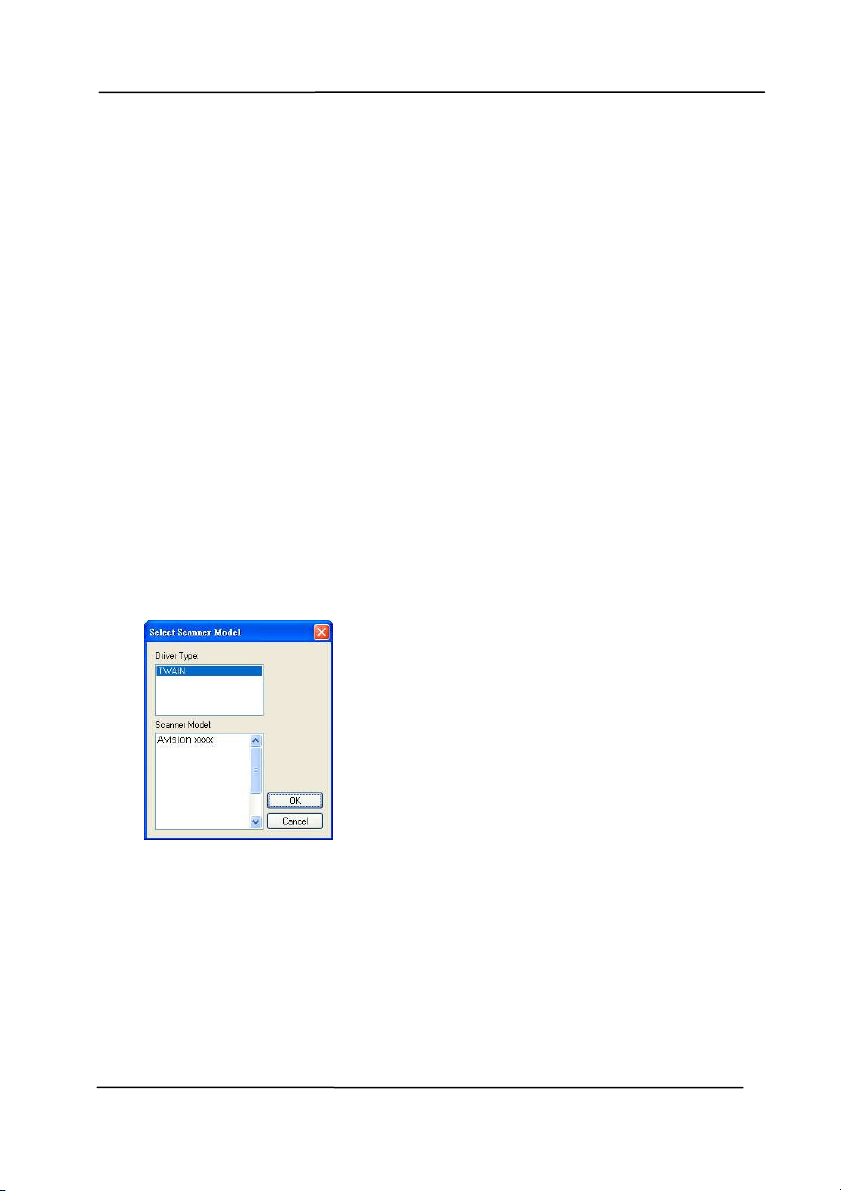
1. Select St art > Program s> Avision xxx Scanner> Avision
Capture Tool. The Select Scanner Model dialog box will be
displayed.
2. Select your driver type and scanner m odel and click OK.
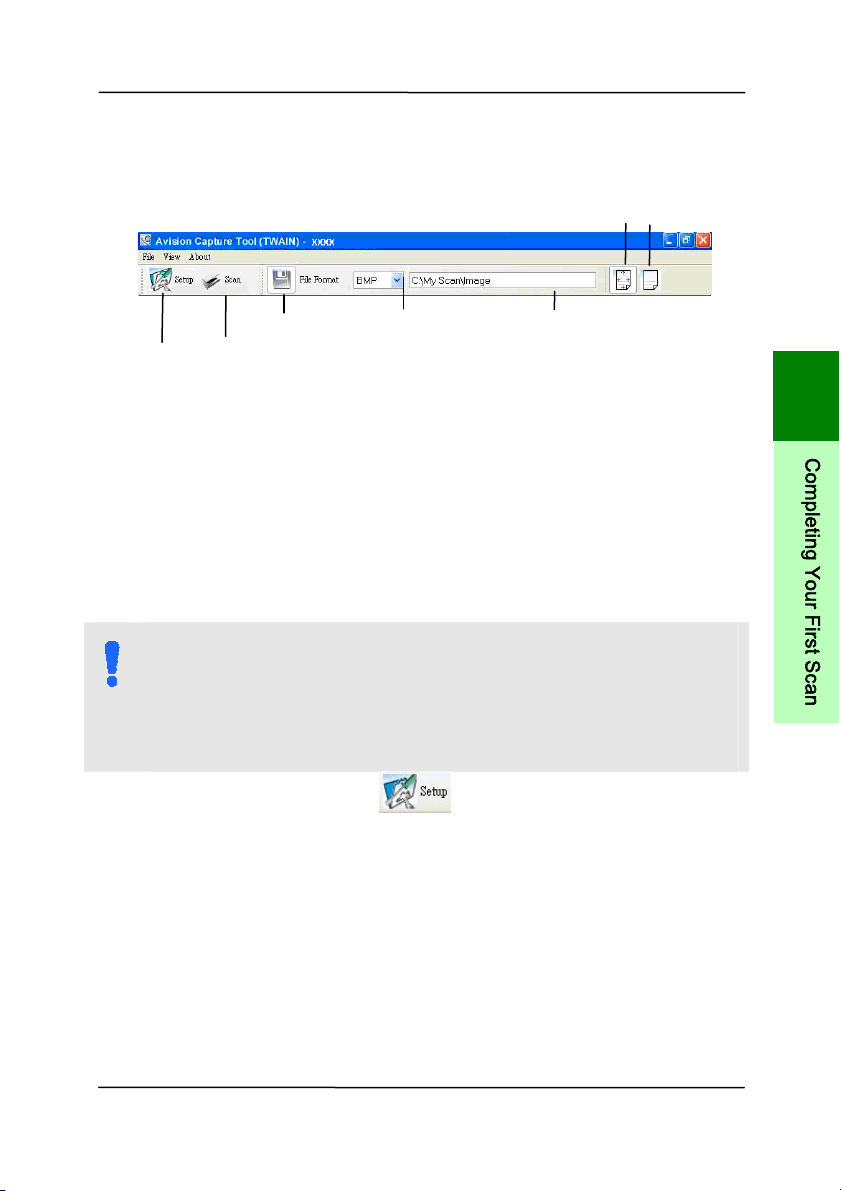
The following Avision Capt ure Tool dialog box will be
displayed.
User ’s Ma nua l
3- 11
3. Choose your desired file form at from t he File Form at drop
dow n list box. ( Default is JPEG, ot her choice includes TI FF,
MTI FF, PDF, MPDF, GI F, and BMP.) The supported file
form ats vary depending on your scanner m odel.
4. Type your desired folder nam e and file nam e in t he File
Path box. (Default is C: \ Docum ents and Settings\ User
Nam e\ My Docum ents\ My Scan\ I m age.)
N OTE:
I f you do not wish to save t he scanned im age, deselect
the Save button since default is Save Enable. I n this case,
t he thum bnail view w ill be disabled. And therefore, after
view ing all t he scanned im ages, only t he last one w ill
rem ain on the screen.
5. Click t he Set up but t on (
) or choose Set up from t he
File m enu to prom pt t he Scanner Propert ies dialog box.
Set up
Act ual
Size
Fit
Page
Scan
File Form at
Save
File Path
3
C
o
m
p
l
e
t
i
n
g
Y
o
u
r
F
i
r
s
t
S
c
a
n
User ’s Ma nua l
3- 12
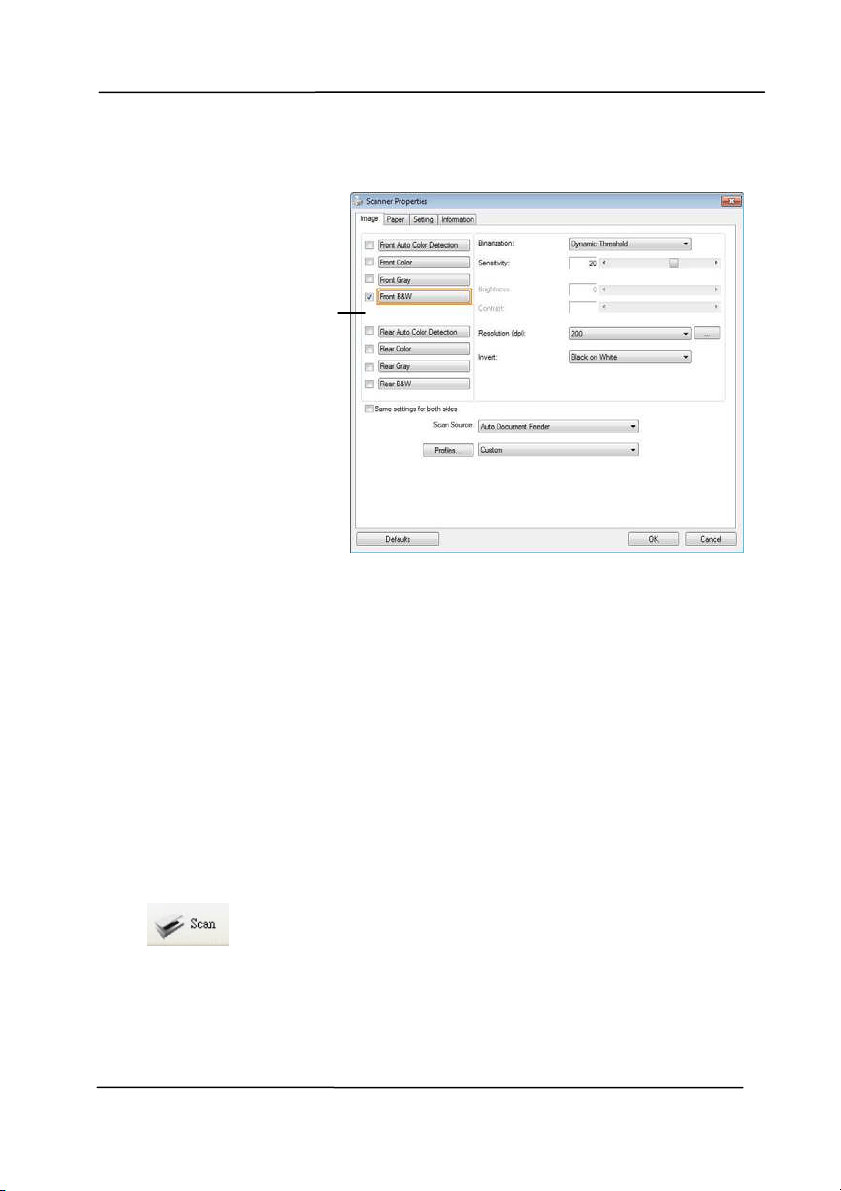
6. From t he I m age Select ion Box, choose your desired im age
type for your scanned im age ( Default is Front B&W). I f
you have a duplex scanner, choose Front and Rear t o scan
bot h sides of your docum ent.
7. Click OK t o quit the Scanner Propert ies dialog box. ( To
learn m ore details about the Scanner Propert ies dialog box,
please see the subsequent chapter, Using t he Scanner
Propert ies Dialog Box.)
8. Place your docum ent face down on the docum ent glass or
face up in the aut o docum ent feeder.
9. I n t he Scan Validat ion dialog box, click the Scan but t on
(
) or choose Scan from t he File m enu.
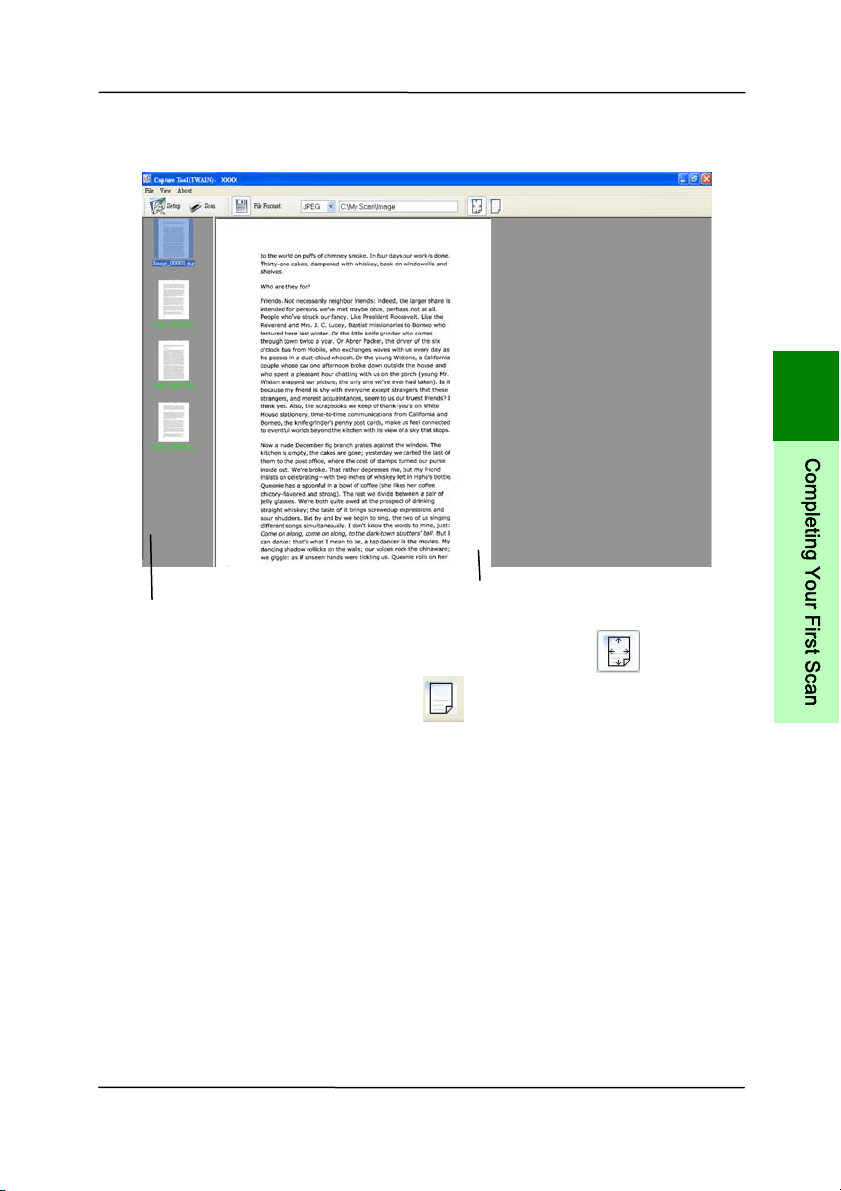
10. The docum ent will be scanned and displayed in t he Scan
Validat ion screen. Aft er t he scanned im ages have been
displayed, your scanner inst allat ion verification is
com pleted.
I m age
Select ion
Box
User ’s Ma nua l
3- 13
11. You can view t he scanned im age in Fit Page (
) or
Act ual Size (100% ) but t on (
) from the Viewing t oolbars
at the right side.
12. Click the Close box or Quit from t he File m enu to exit the
Scan Validation Tool.
Display View
Thum bnail View
3
C
o
m
p
l
e
t
i
n
g
Y
o
u
r
F
i
r
s
t
S
c
a
n
User ’s Ma nua l
3- 14
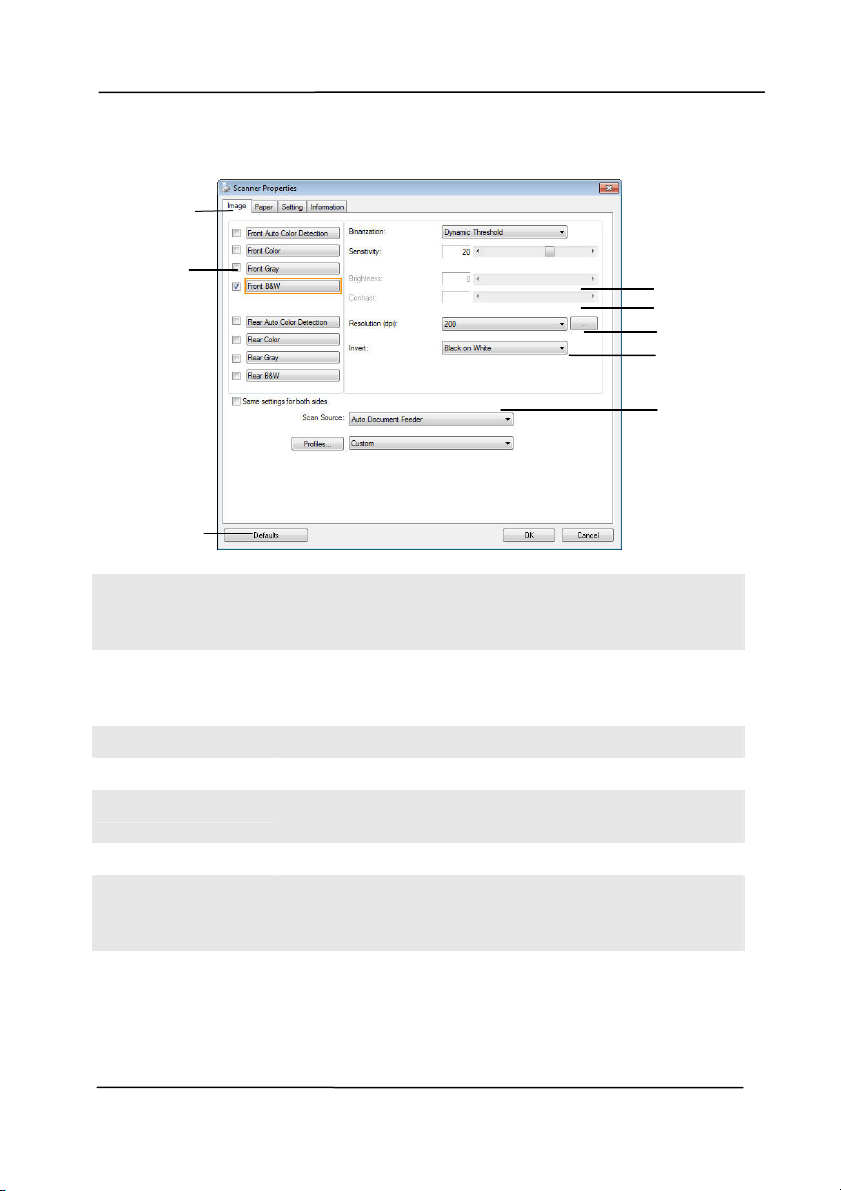
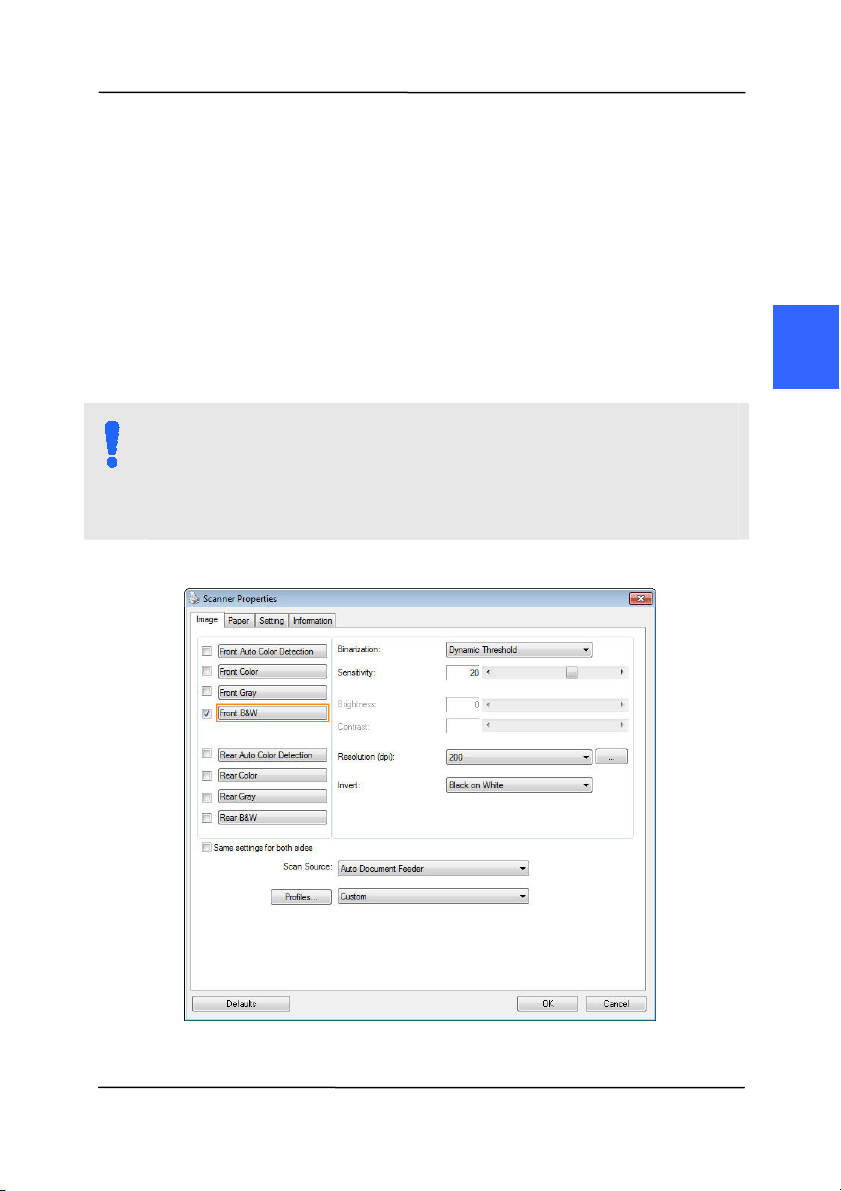
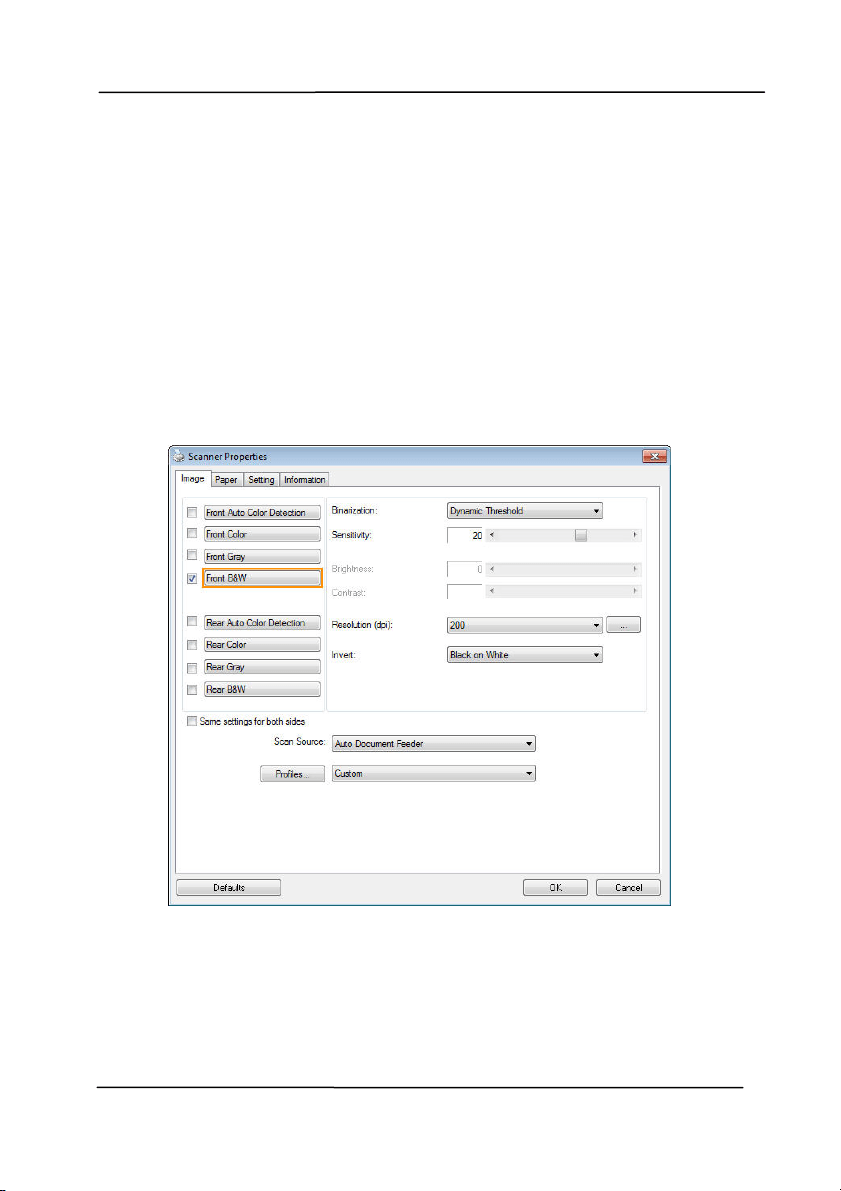
3 .3 A Glance of the Scanne r Prope r t ie s D ialog Box
1 . Ta b Options Choice: I m age, Com pression, Color Dropout,
Paper, Multi- Feed Detection, Preview, Opt ions,
Settings, I nform at ion.
2 . I m a ge
Se lect ion Box
Choose your im age type and the side of
docum ent you w ish t o scan. Options vary
based on type of scanner.
3 . Br ightne ss Adj ust t he bright ness level from –100 to + 100.
4 . Contrast Adj ust t he contrast level from –100 to + 100.
5 . Resolution
Determ ine t he qualit y of the scanned im age.
The industry st andard is 200 dpi.
6 . I nvert Reverse the color of your scanned im age.
7 . Sca n Source
Choice: Aut o Docum ent Feeder, Flat bed,
Flat bed ( Book), Aut om atic ( varies due to
different scanner m odel)
3
4
5
6
7
1
2
8
User ’s Ma nua l
4- 1
4 . USI N G THE SCAN N ER
PROPERTI ES DI ALOG BOX
The Scanner Propert ies dialog box allows you to configure the
scanner’s set t ings. I t consist s of several t abbed windows each
of which will be described in t his chapter.
N OTE:
I n t his chapter, all options are available based on a
duplex (double- side) scanner. I f you have purchased a
sim plex ( single- side) scanner, all opt ions are available for
single sided only.
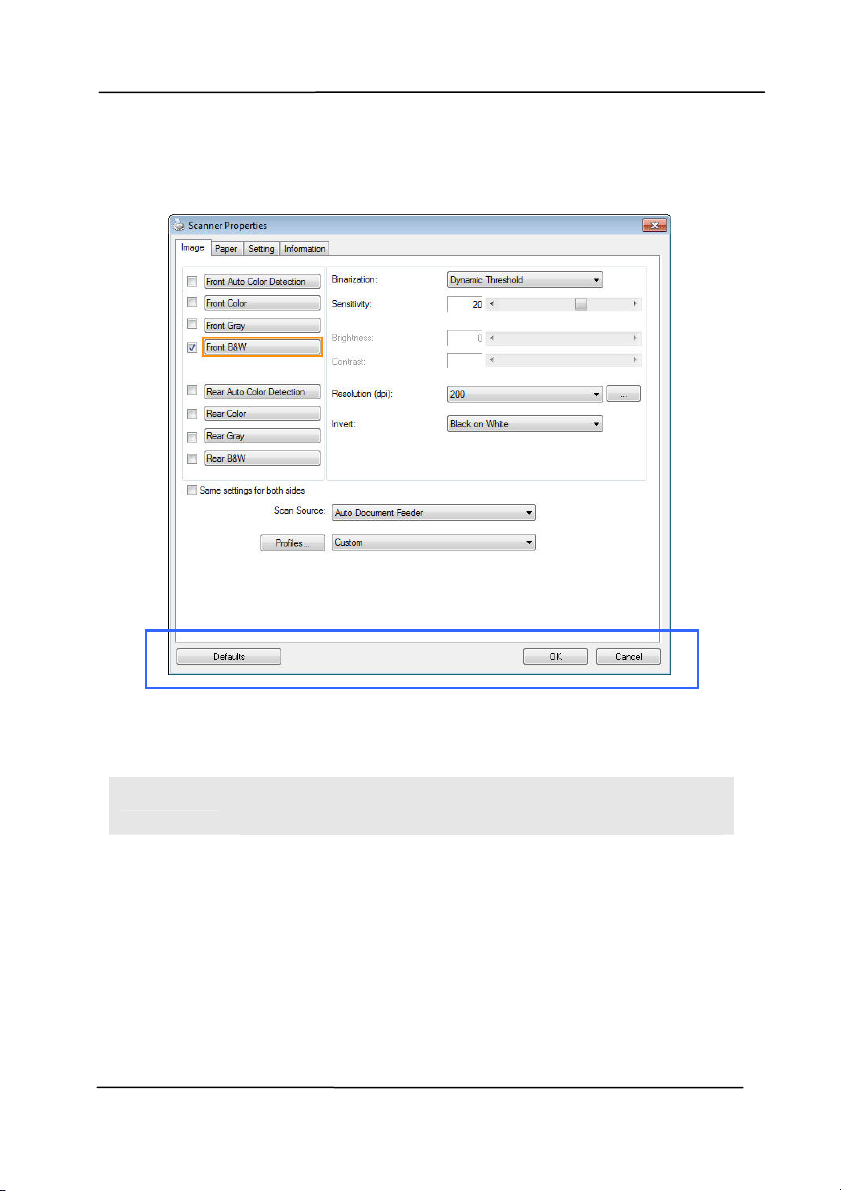
The Scanne r Prope r t ie s dialog box
4
User ’s Ma nua l
4- 2
4 .1 But t ons on t h e Sca n ner Pr operties D ialog Box
The buttons on the Scanne r Proper t ie s dialog box
B
UTTON S
D
ESCRI PTI ON
Defaults Click the Defaults but t on, t he factory default
settings w ill be shown on each t ab.
Cance l Click t he Cance l but t on t o leave t he Scanner
Propert ies dialog box.
User ’s Ma nua l
4- 3
The following t able shows t he default set t ings:
T
AB N AM E DEFAULT SETTI N GS
I m a ge I m age:Front B&W
Binarization:Dynam ic Threshold
Resolution:200 dpi
I nvert:Blank on White
Scan Source:Aut o Docum ent Feeder
Threshold:None
Brightness:None
Cont rast :None
Com pression None
Color Dropou t
None
Pape r Cropping:Aut om atic
Deskew:Yes
Orient ation:Port rait
OverScan:0.00
Note: The av ailabilit y of this opt ion
varies due to scanner m odel.
Unit :I nch
Multi- Feed
Detect ion
None
Preview None
Opt ions Rotat ion Degrees:None
Blank Page Rem oval:None
Edge Fill:Whit e,0 m m
I m age Cont rol Opt ion:None
Se t t ing Enable Energy Saver:Enable, 15
m inutes after last scan act ion
Show Scanning Progress:Yes
Show Warning Message:Yes
Save Set tings after Closing:Yes
I m prin t e r
Digital I m printer
4
U
s
i
n
g
t
h
e
S
c
a
n
n
e
r
P
r
o
p
e
r
t
i
e
s
D
i
a
l
o
g
B
o
x

User ’s Ma nua l
4- 4
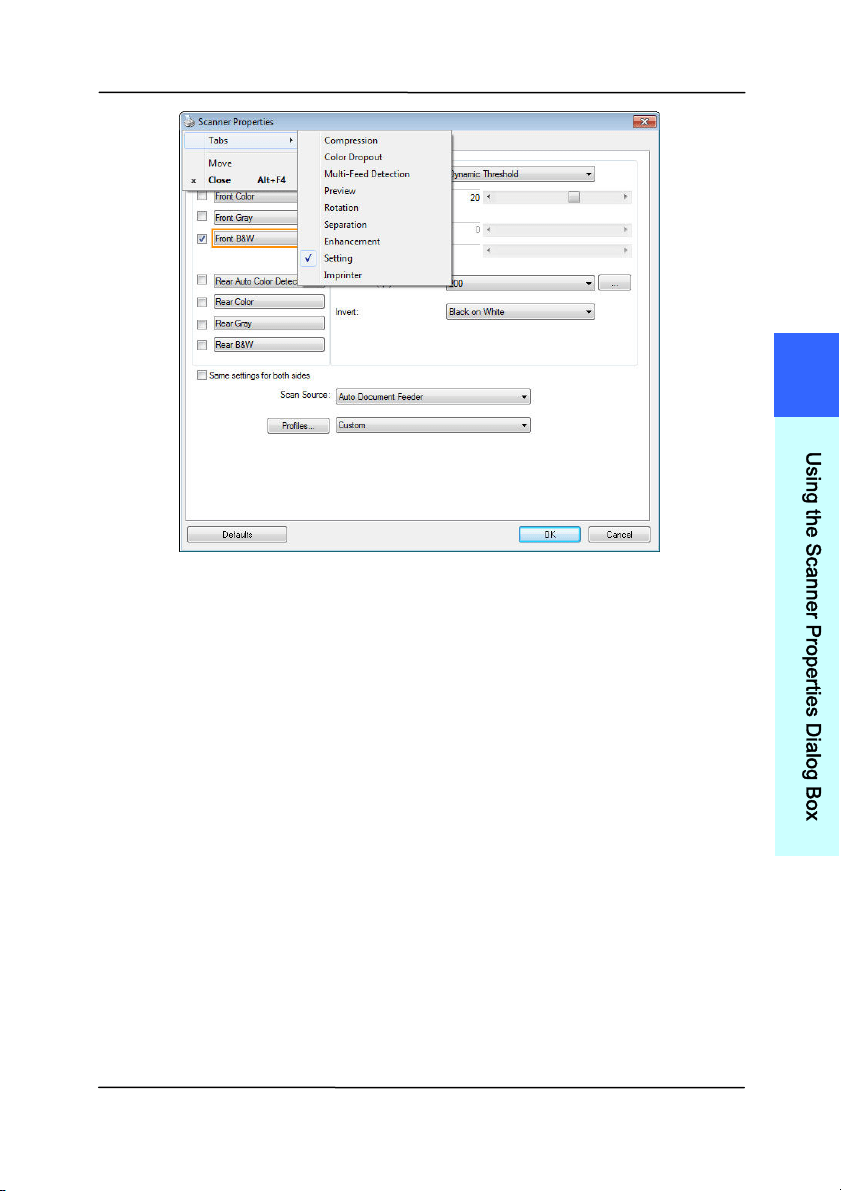
4 .2 Show ing or H iding Tabs
The [ Scanner Proper t ies] dialog box is displayed in default
with t hree basic tabs - I m age, Paper, and I nform ation. To
show m ore t abs, click t he [ Scanne r Prope r t ie s] icon t o access
m ore scan settings.
To show m ore tabs,
1. Click t he [ Sca nner Pr operties] icon (
) on t he upper
left corner, and choose [ Ta b] to show available tab nam es.
The available tabs include Com pression, Color Drop out,
Preview, Rot ation, Separation, Multi- Feed, Options,
Settings, and I m print er. (Note: the opt ions vary based on
scanner m odel.)
2. Choose the tab you want to display. The select ed tab will
be shown wit h a check m ark and t hen displayed in t he
[ Sca nner Pr operties] dialog box.
3. To access t he settings, click the select ed tab on t he top of
the [ Scanne r Prope r t ie s] dialog box. The page of t he
select ed tab will be displayed.
To hide a t ab window,
1. Click the [ Sca nner Propert ies] icon (
) on t he upper
left corner, and choose [ Ta bs] t o show available t ab
nam es.
2. Choose the t ab you want to hide. Then, t he select ed tab
will be hided in the [ Sca nner Propert ies] dialog box.
Note: The [ I m age] , [ Paper ] , and [ I nform ation] tab can
not be hided since they preprogram m ed to be displayed by
default .
User ’s Ma nua l
4- 5
4
U
s
i
n
g
t
h
e
S
c
a
n
n
e
r
P
r
o
p
e
r
t
i
e
s
D
i
a
l
o
g
B
o
x
User ’s Ma nua l
4- 6
4 .3 The I m age Tab
The I m age t ab allows you to choose the front side and ( or) t he
rear side of your docum ent, t he type of im age, and to set
several basic scan set t ings. Note t hat except for t he resolution,
you can set individual scan settings for the front side and t he
rear side. For exam ple, all settings in t he I m age tab,
Com pression tab, Color Dropout t ab can be set individually for
the front and the rear side. However, the settings in t he Paper
tab, the Option t ab, and the Set t ing tab have t o be set the
sam e for t he front and rear side.
The I m age t a b dialog box
User ’s Ma nua l
4- 7
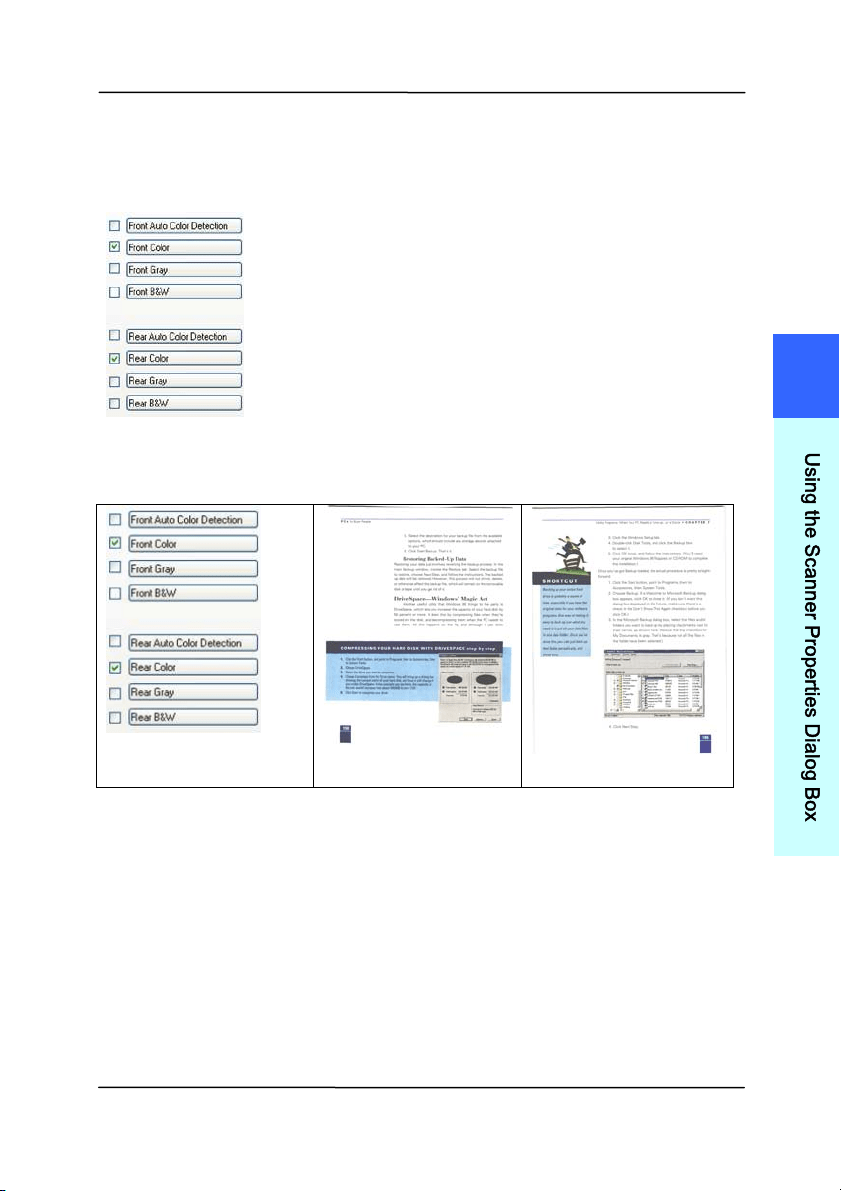
4 .3 .1 The I m a ge Select ion Box
The I m age Selection box includes the
im age type and docum ent side option. I f
you wish to scan bot h t he front side and
the rear side of your color docum ent, you
can check bot h Front Color and Rear Color
at the sam e tim e. Not e t he options vary
based on type of scanner.
Ex a m ple 1
:Scanning a tw o- sided color docum e nt, bot h
sides in color
Side/ I m a ge
Se lect ion
Front
Rear
4
U
s
i
n
g
t
h
e
S
c
a
n
n
e
r
P
r
o
p
e
r
t
i
e
s
D
i
a
l
o
g
B
o
x
User ’s Ma nua l
4- 8
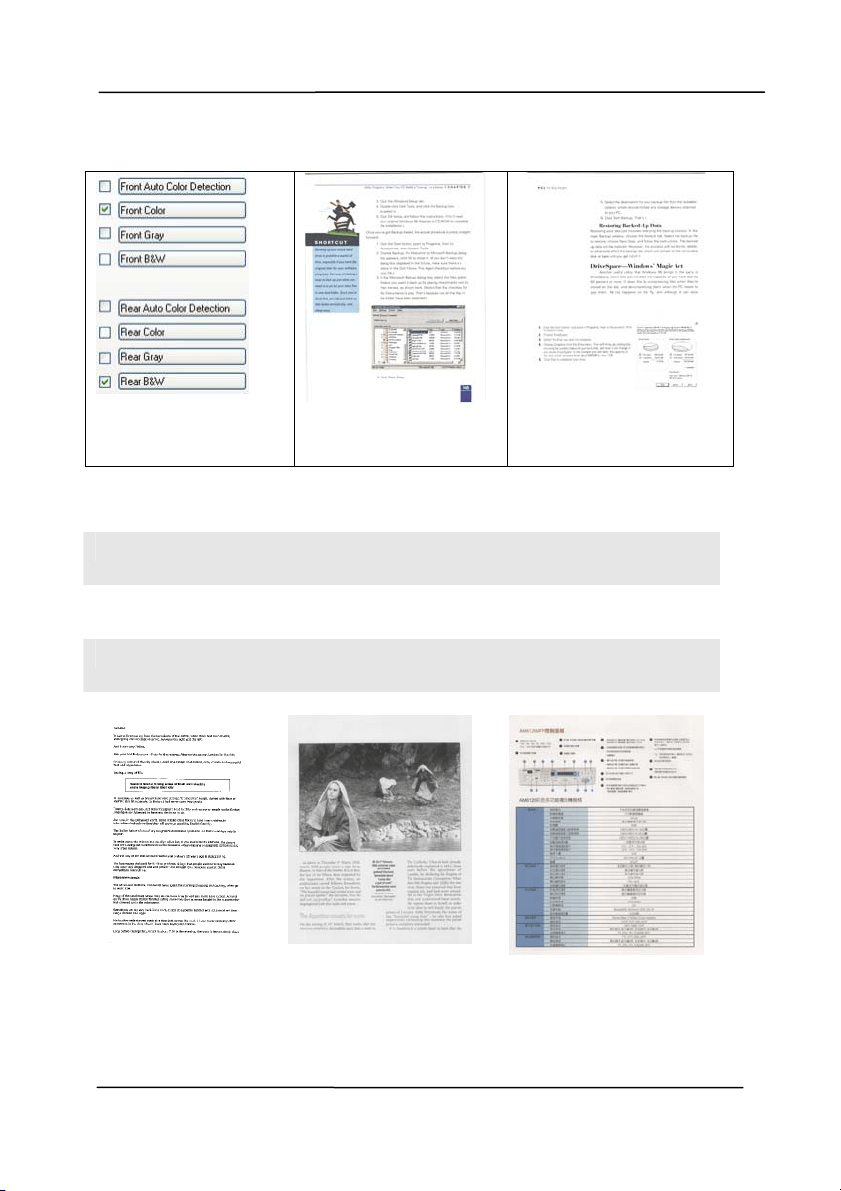
Ex a m ple 2
:Scanning a tw o- sided color docum e nt, one
in B& W , the ot her in color
Side/ I m a ge
Se lect ion
Front
Rear
I
MAGE TYPE DESCRI PTI ON
Color Choose Color if you wish to scan a color
im age for your original in color.
Gray Choose Gray im age if y our original cont ains
act ual shades of gray.
B& W Choose B&W if your original cont ains only
text , pencil or ink sket ch.
B& W Gra y Color
User ’s Ma nua l
4- 9
Front / Rear Auto Color Detect ion:
Click t o aut om atically detect and scan the front or t he rear
page of your color docum ent in color im age m ode. I f your
docum ent is in colors, the scanner will autom atically scan the
docum ent int o a color im age. I f your docum ent is non- color,
you can choose the out put to be eit her B&W or Gray from t he
Non- Color Select ion opt ion. This option is useful when you
have a m ixture of color and non- color docum ent.
Note: I f you choose Front Rear Aut o Color Det ect ion, you can
not specify the im age m ode of your rear page and vice versas.
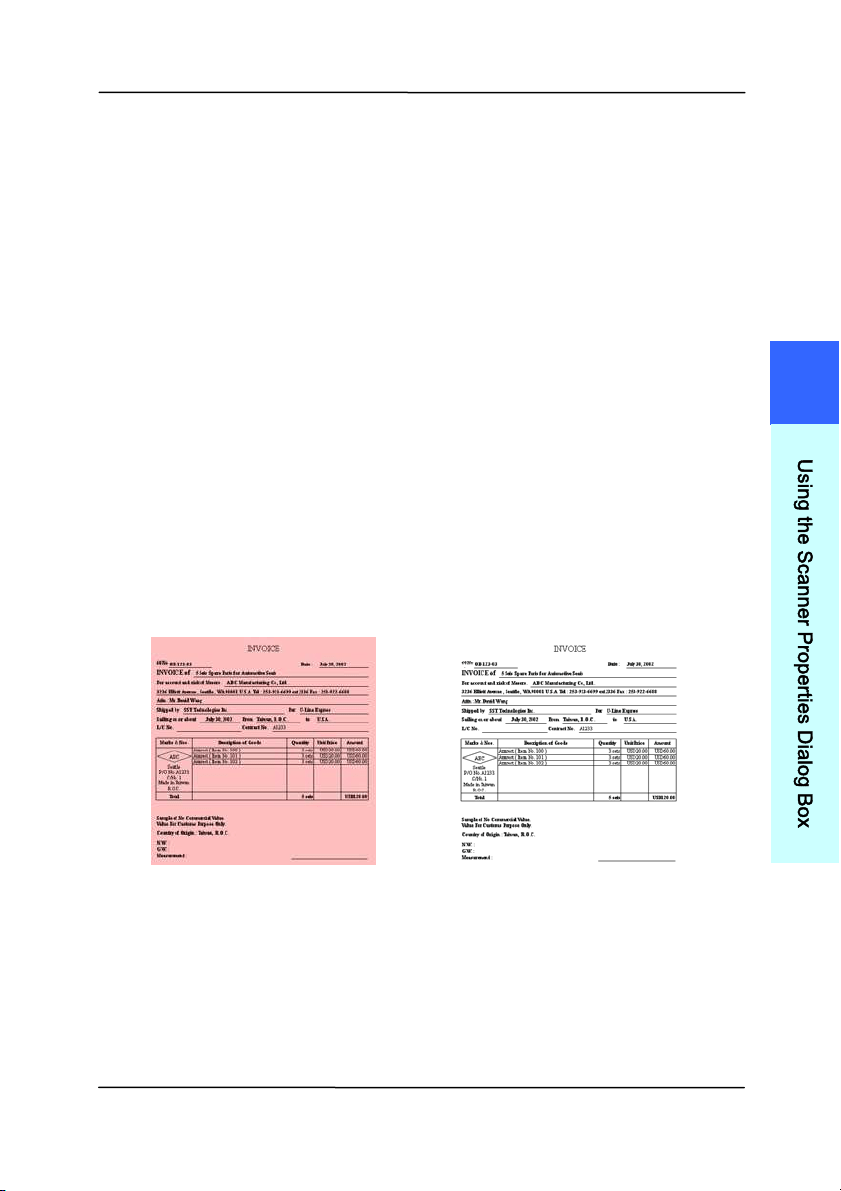
Modes of Auto Color Detect ion:
I f [ Front / Rear Auto Color Detect ion] is select ed, its m odes
will be displayed. Choice includes N or m al, I gnore Paper
Color. For paper wit h background color such as invoices,
choosing [ I gnore Paper Color] will aut om at ically rem ove the
background color and enhance the detection accuracy.
N or m al I gnore single
ba ck gr ound color
4
U
s
i
n
g
t
h
e
S
c
a
n
n
e
r
P
r
o
p
e
r
t
i
e
s
D
i
a
l
o
g
B
o
x
User ’s Ma nua l
4- 10
Se nsit ivity of Au t o Color D e t e ct ion
I f your docum ents cont ain prim arily B&W t ext and sm all
am ount of light or pale colors and you do not wish them t o be
recognized as color im age to save the file size, you can
increase the sensitivity value by m oving the bar to t he right to
let these im ages t o be detect ed as B&W. The value ranges from
1 t o 100. The default is 37.
Original
Se nsit ivity: 1
( The im age is recognized
as a color one)
Se nsit ivity: 1 0 0
( The im age is recognized
as a bla ck a nd w hite one)

User ’s Ma nua l
4- 11
Sa m e sett ings on both side s:
Click to apply sam e scan settings for bot h sides of your
docum ents. Aft er checking this option, any settings you have
changed will aut om at ically applied to bot h the front side and
the rear side. For exam ple, if you choose your ideal resolution
to be 300 dpi, t his w ill be applied both t o the front side and
rear side of your docum ent.
4
U
s
i
n
g
t
h
e
S
c
a
n
n
e
r
P
r
o
p
e
r
t
i
e
s
D
i
a
l
o
g
B
o
x

User ’s Ma nua l
4- 12
4 .3 .2 Othe r I m a ge Opt ions
Binariza t ion Thi
s is t he process of convert ing a
grayscale or color im age to a bi-tonal
im age. There are several different
m et hods of perform ing this conversion.
Opt ions: Dynam ic Thr eshold,
Dynam ic Threshold ( AD) , Fixed
Processing, Halft on e 1 ~ 5 , Error
Diffusion.
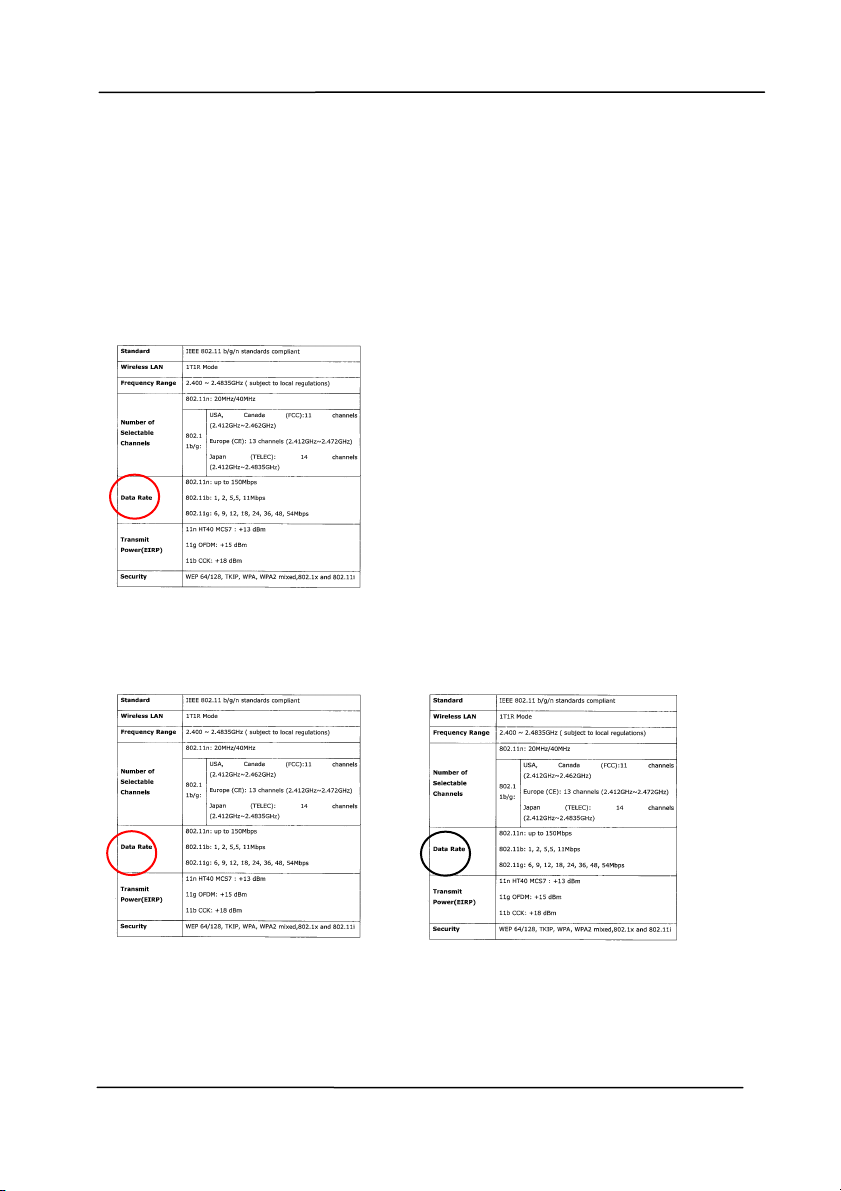
Dynam ic Th reshold: Select ing
Dynam ic Threshold allows t he scanner
to dynam ically evaluat e each docum ent
to determ ine t he opt im al threshold value
to produce the highest qualit y im age.
This is used t o scan m ixed docum ent
cont aining faint text, shaded background,
or color background wit h a single set ting.
I f Dynam ic Threshold is select ed,
Threshold, Brightness, and Cont rast are
not available.
Dynam ic Th reshold ( AD) : Select ing
Dynam ic Threshold ( AD) t o perform
the enhanced m ode of t he Dynam ic
Threshold feature. However, using t his
m ode m ay slow down your scanning
speed.
Se nsit ivity of Dynam ic Threshold
Occasionally your scanned im age m ay
cont ain sm all dot s or speckles. To rem ove
these spots, increase t he sensitivit y value
by m oving the bar to the right . The value
ranges from 1 to 30. The default is 20.
User ’s Ma nua l
4- 13
Fixed Pr oce ssing: Used for black-and-
whit e and ot her high contrast docum ents. A
single level is set t o det erm ine the black-
and- whit e transit ion. The t hreshold is
program m able over t he entire density
range. Fixed Proce ssing sets Cont rast to
0. I f Fix e d Pr ocessing is select ed,
Cont rast is not available.
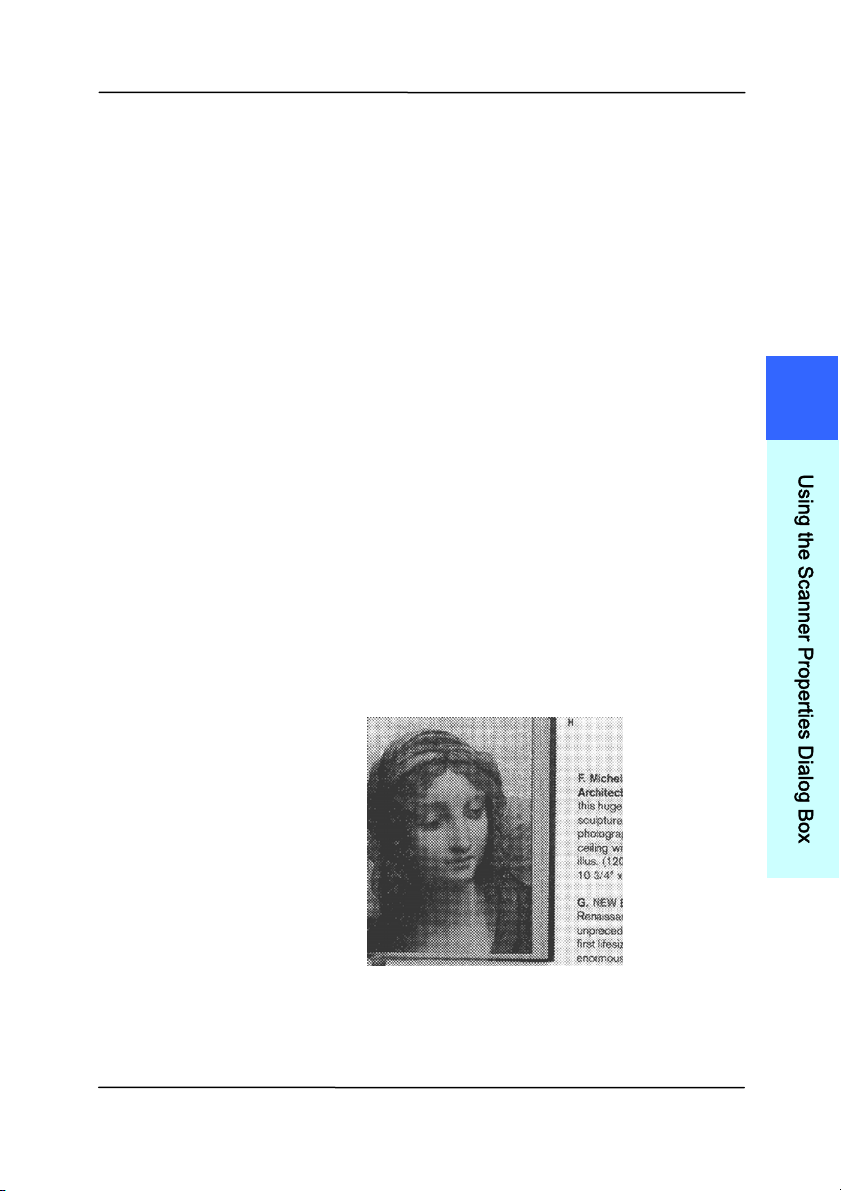
Halft one: I n addition t o the black and
white display, Halftone can present a
som ehow gray shade of im age by using
different size of dot s. Halft one im age looks
like t he pict ure we have seen in the
newspaper. Opt ions include Halft one 1 ,
Halft one 2 , Halft one 3 , Halft one 4 ,
Halft one 5 .
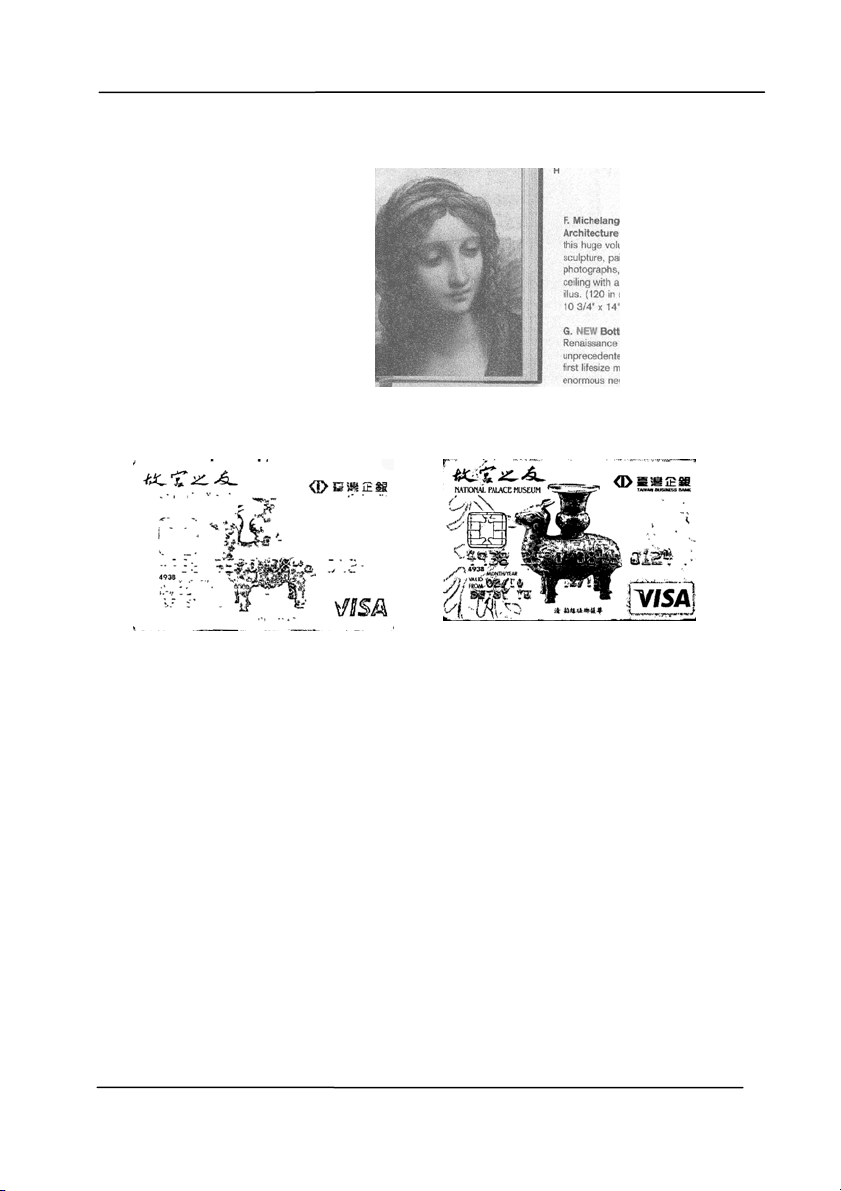
Er ror Diffusion: Error Diffusion is a t ype
of Halftone. Error Diffusion gives good
im age t ext ure and m akes t ext in im ages
m ore readable t han Halft one.
Halft one I m age
4
U
s
i
n
g
t
h
e
S
c
a
n
n
e
r
P
r
o
p
e
r
t
i
e
s
D
i
a
l
o
g
B
o
x
User ’s Ma nua l
4- 14
Er ror Diffusion I m age
Dynam ic Threshold
Dynam ic Threshold ( AD)
User ’s Ma nua l
4- 15
Threshold Used t o convert a grayscale im age t o a
bi- tonal im age. The value ranges from 0 to
255. A low t hreshold value produces a
light er im age, and can be used to subdue
backgrounds and subtle, unneeded
inform ation. A high t hreshold value produces
a darker im age, and can be used to help pick
up faint im ages.
Adj ust t he threshold set t ing by dragging the
Threshold sliding bar to t he left or right t o
achieve t he desired threshold set ting.
2 0 0 dpi,
Threshold:5 0 ,
Br igh t ness: 0
2 0 0 dpi,
Threshold:1 0 0 ,
Br igh t ness: 0
4
U
s
i
n
g
t
h
e
S
c
a
n
n
e
r
P
r
o
p
e
r
t
i
e
s
D
i
a
l
o
g
B
o
x

User ’s Ma nua l
4- 16
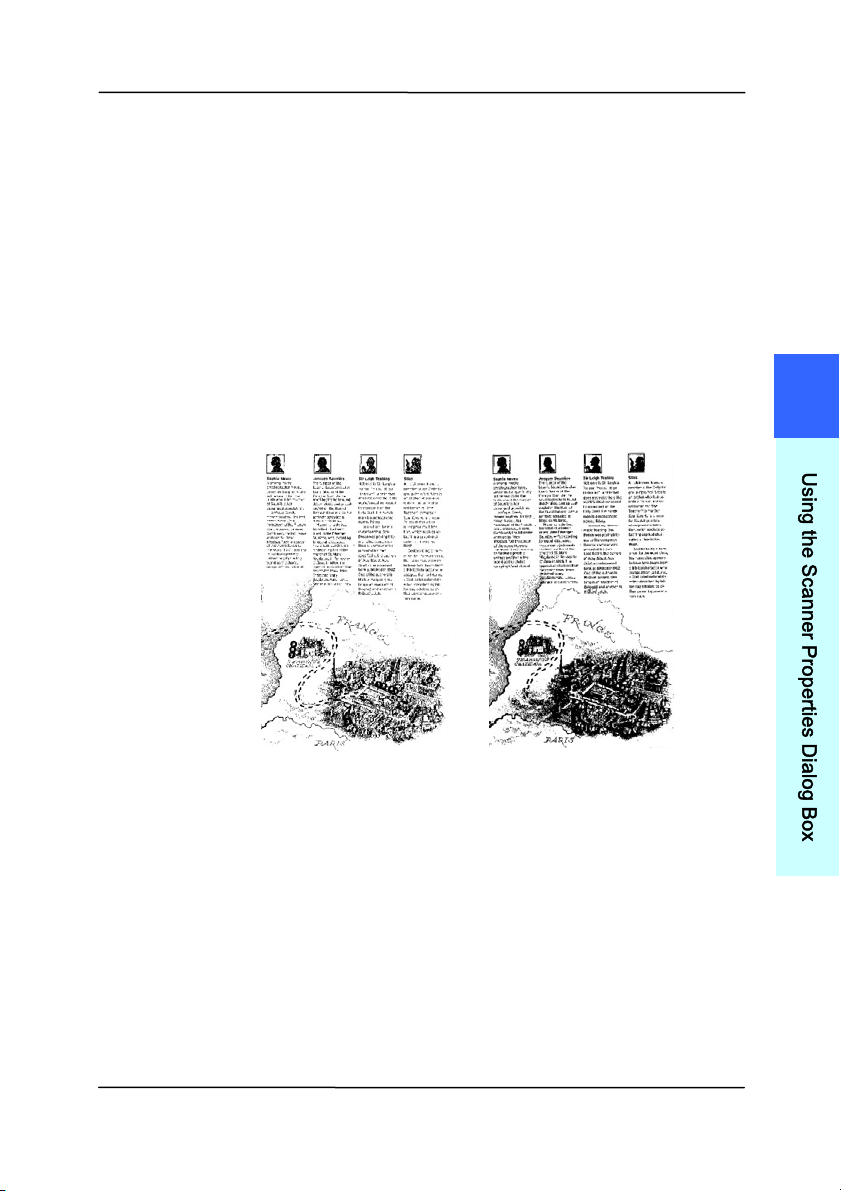
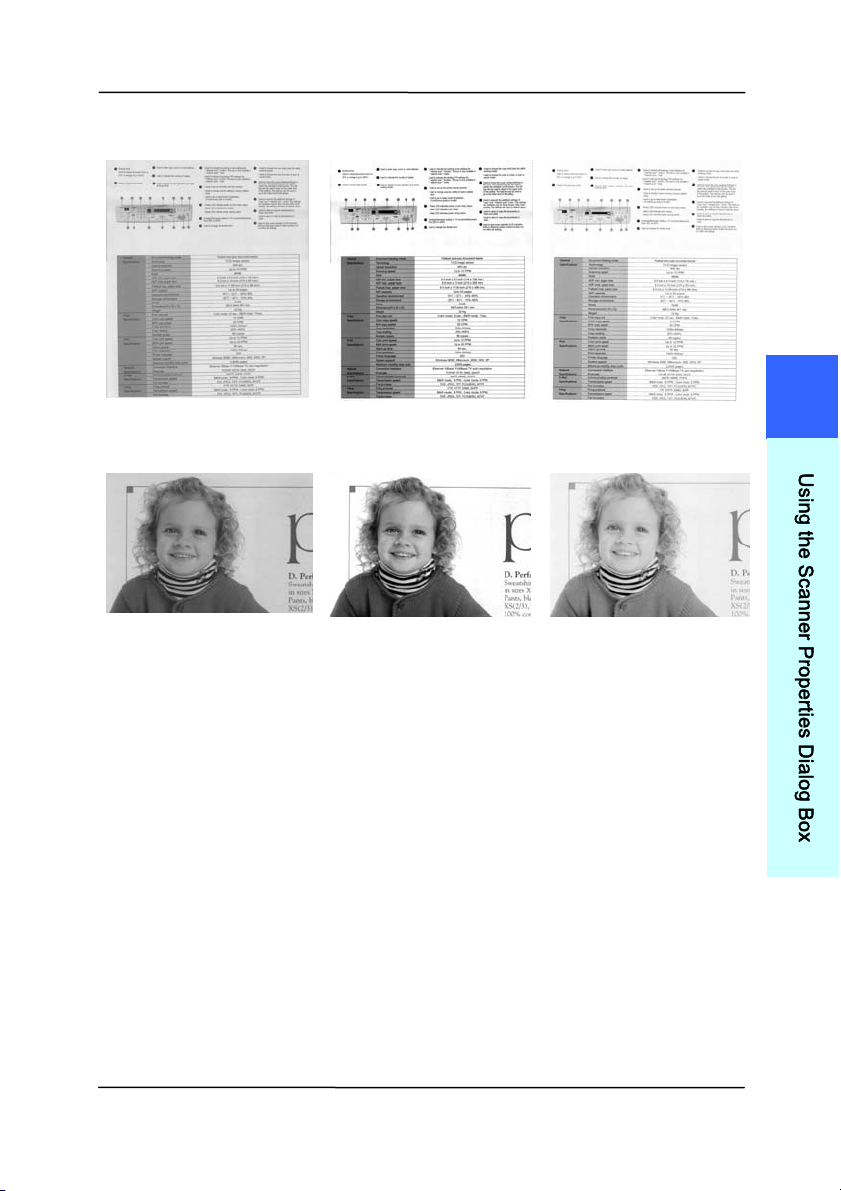
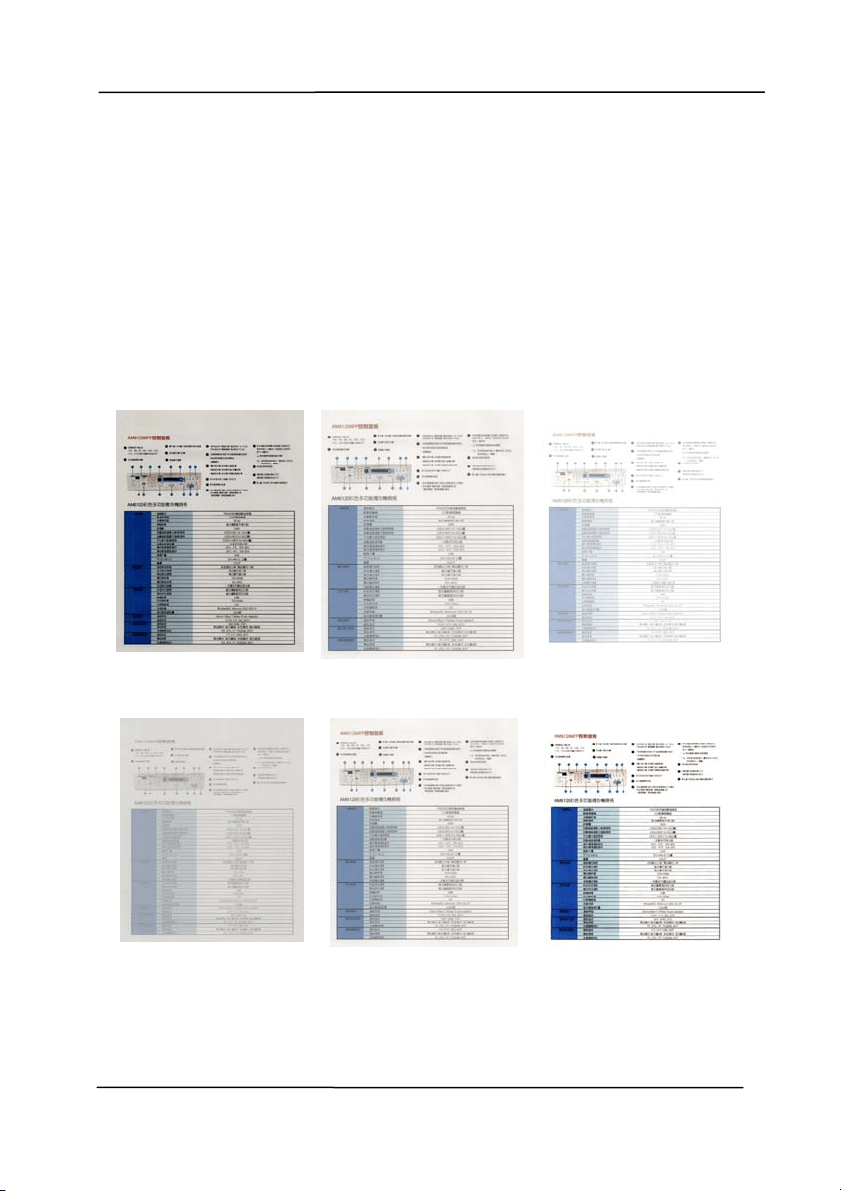
Gray
Docum e nt Type: Choice : N or m al, Photo, D ocum ent
Three opt ions of docum ent type are provided when you choose
Gray as the im age t ype for your scanned docum ent. Choice:
N or m al, Photo, D ocum ent.
Docum ent : Choose Docum ent if your original contains
pure t ext or a m ixture of text and graphic since it is an
opt im al set t ing for regular business docum ent. When
using Docum ent, only Threshold can be adjusted.
Ph ot o: Choose Photo if your original contains photo to
reproduce your phot o in vivid grayscale im age. When
using Phot o, no Threshold and Contrast can be adjust ed.
Norm a l: When using N or m al, Threshold, Bright ness, and
Cont rast can be adjust ed.
Threshold: The value ranges from 0 to 255. The default is
230. A low t hreshold value produces a light er im age, and can
be used t o subdue backgrounds and subt le, unneeded
inform ation. A high t hreshold value produces a darker im age,
and can be used to help pick up faint im ages. Adj ust t he
threshold setting by dragging the Threshold sliding bar t o t he
left or right to achieve t he desired t hreshold setting.
User ’s Ma nua l
4- 17
N or m al
Photo
Docum e nt
( Threshold: 2 3 0 )
N or m al
Photo
Docum e nt
( Threshold: 2 3 0 )
4
U
s
i
n
g
t
h
e
S
c
a
n
n
e
r
P
r
o
p
e
r
t
i
e
s
D
i
a
l
o
g
B
o
x
User ’s Ma nua l
4- 18
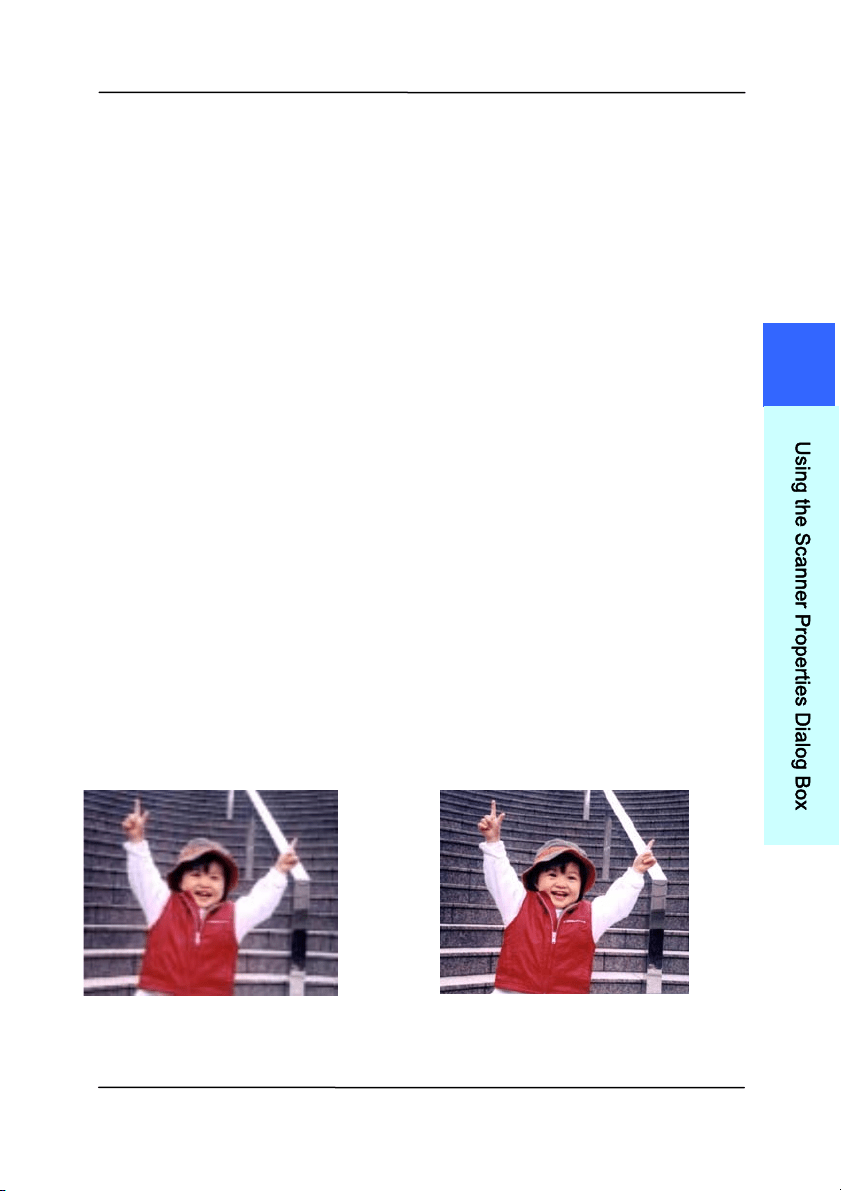
Br igh t ness Adj ust s t he light ness or darkness of an
im age. The higher the value, the brighter
the im age. Drag the slider t o the right or
left to increase or decrease the brightness.
The range is from –100 to + 100.
Contrast Adj ust s t he range between t he darkest and
the lightest shades in t he im age. The
higher the contrast , the bigger the different
grayscale. Drag the slider t o the right or
left to increase or decrease the contrast.
The range is from –100 to + 100.
Br igh t ness: - 5 0 Br ight n ess: 0
( N or m al)
Br igh t ness: + 5 0
Contrast : - 5 0 Contrast : 0
( N or m al)
Contrast : + 5 0
User ’s Ma nua l
4- 19
Resolu t ion A good control of the resolut ion results a
good det ail of an im age t hat scans. The
resolution is m easured by dot s per inch
( dpi). Norm ally, the greater the dpi num ber,
the higher t he resolution and the im age file
size. Be aware t hat great er resolution t akes
m ore t im e t o scan, and m ore disk space for
the scanning im age. For your inform ation,
an A4 size color im age scanned at 300 dpi at
True Color m ode consum es approxim ately 25
MB of disk space. A higher resolution
( usually m eans over 600 dpi) is only
recom m ended when you need t o scan a
sm all area at True Color m ode.
Choose a resolut ion value from t he drop
down list . The default value is 200 dpi.
Available resolutions are 75, 100, 150, 200,
300, 400 and 600. Or you m ay choose your
desired value by clicking t he box in the right
side of t he drop down list and press t he
arrow key t o select your desired value and
then click the Add but t on t o include it in the
drop down list . Not e: The resolution is up to
300 dpi if an im printer or a MI CR reader is
inst alled or connect ed to the scanner.
Resolu t ion : 7 5 dpi
Resolu t ion : 1 5 0 dpi
4
U
s
i
n
g
t
h
e
S
c
a
n
n
e
r
P
r
o
p
e
r
t
i
e
s
D
i
a
l
o
g
B
o
x
User ’s Ma nua l
4- 20
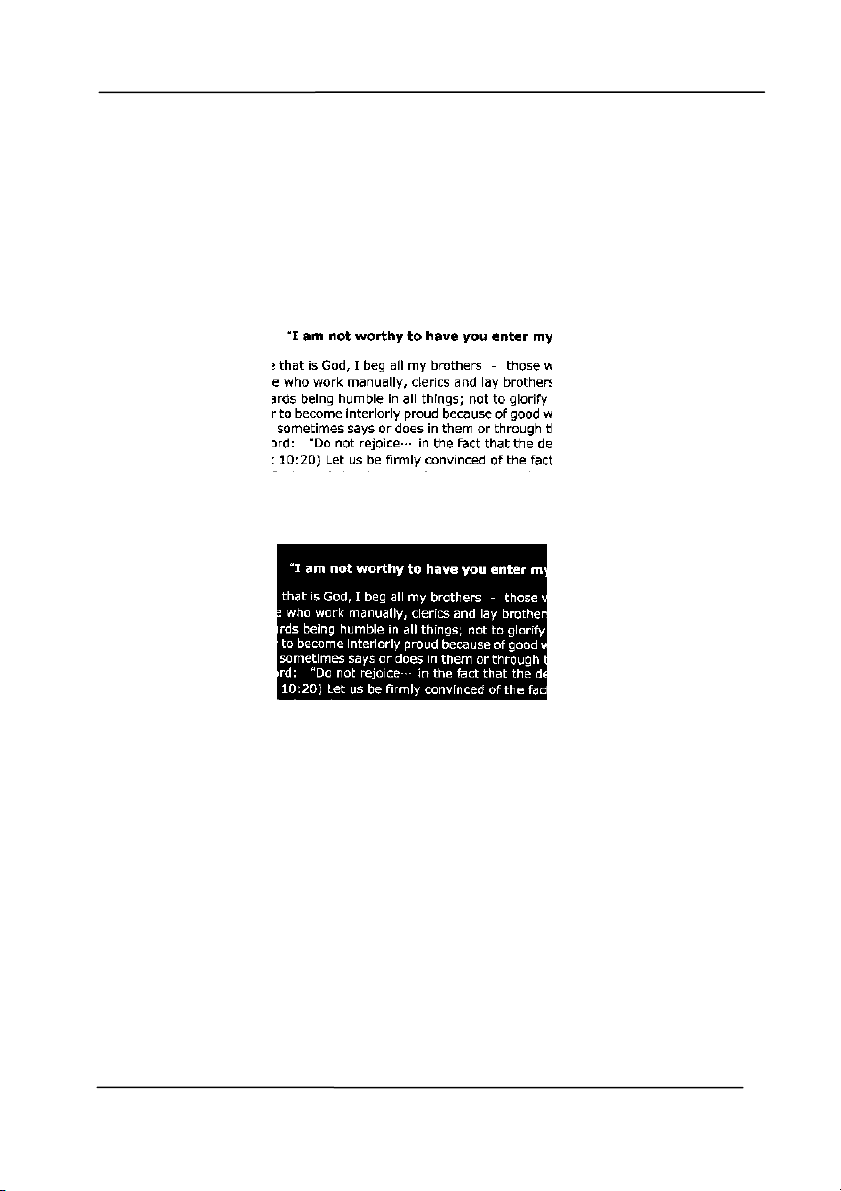
I nvert Reverses t he brightness and the colors in t he
im age. The default setting is Black on a Whit e
background. Reverse m ode is White on a Black
background. For color im ages, each pixel will be
changed int o its com plem entary color at t he
com m and of I nvert.
Black on W hite
W hite on Black
Sca n
Sou rce
Choice :
Auto Docum ent Feeder: Used to scan
m ultiple pages.
Flat bed: Used to scan a single page. For
exam ple, pages from new spaper clipping,
paper with wrinkles or curls.
Flat bed ( book ) : Used to scan several
inside pages from book.
Aut om atic: Allow t he scanner autom atically
set it s scan source. I f Autom a t ic is select ed
and there is docum ent in bot h the auto

User ’s Ma nua l
4- 21
docum ent feeder ( ADF) and t he flat bed, then
t he scan source will be autom atically set t o
ADF. I f Autom a t ic is select ed and there is
docum ent only in flatbed, t hen t he scan
source will be set to flat bed.
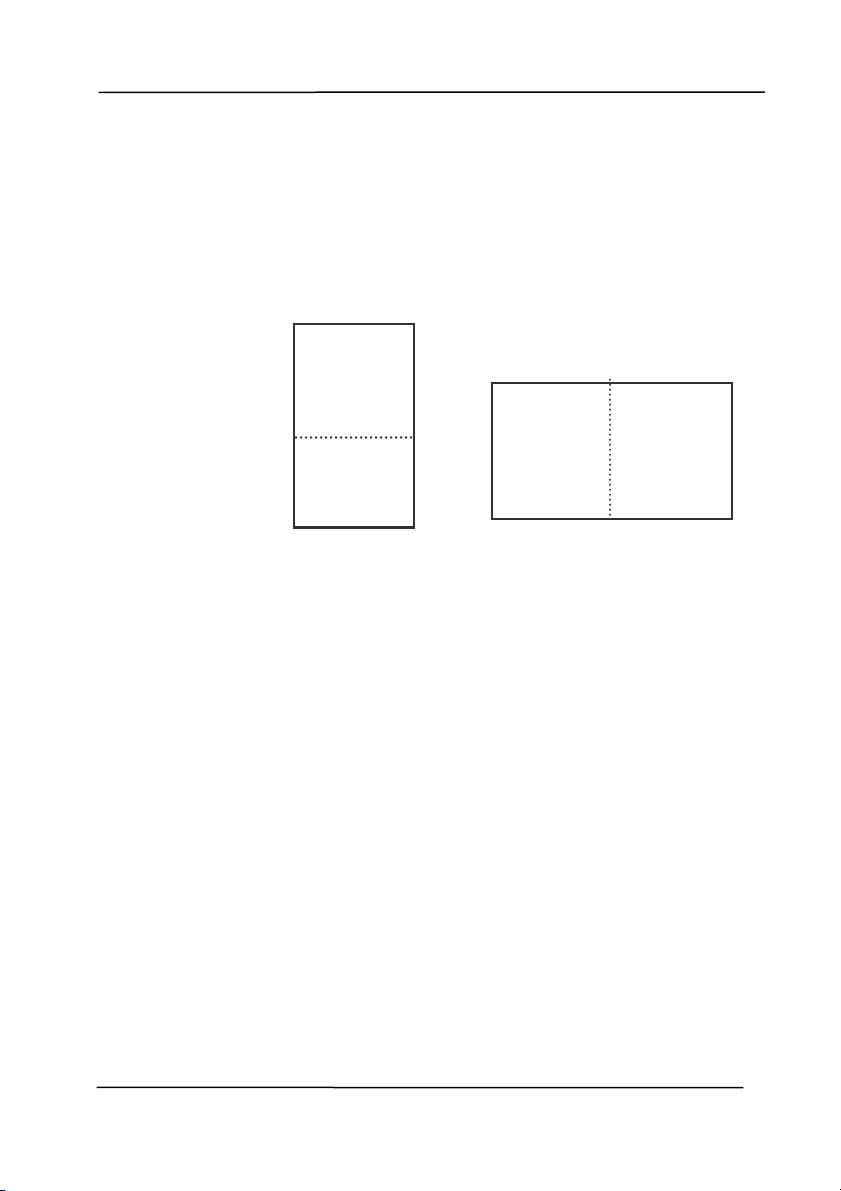
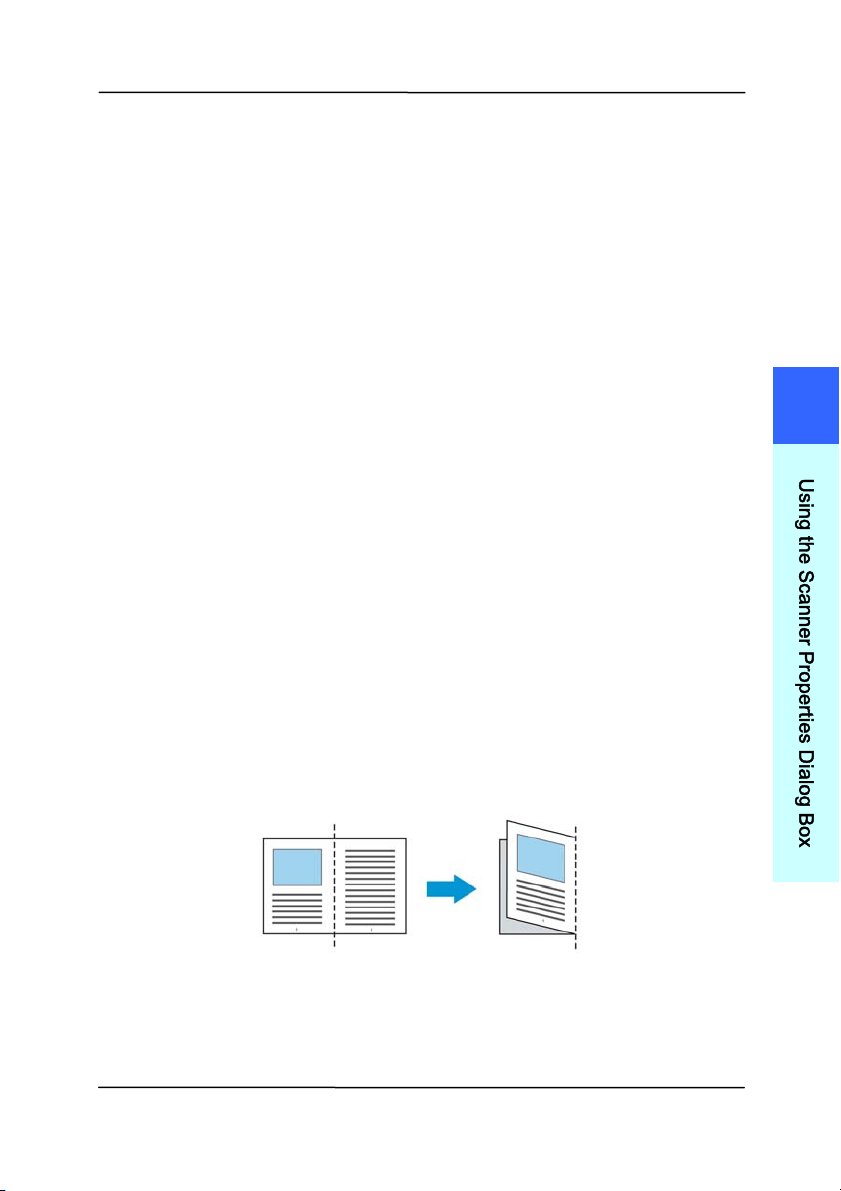
Merge Tw o Sides into One I m age :
I f you have a sheet - fed duplex scanner wit h
front input tray, you can scan an A3 size
docum ent with an innovat ive m et hod. Thus,
fold your A3 size docum ent into A4, and t hen
load t he paper in the front t ray. Choose
Merge Two Sides from the Scan Source
opt ion and then the scanner is able to scan
bot h sides of your docum ent and m erge two
A4 im ages int o one A3 im age.
When you select Merge Two Sides into One
I m age, t he Cropping or Mult i-feed funct ion
will be disabled.
N ot e: This feature m ust be used with a
carrier sheet. Regarding how to load a
docum ent wit h a Carrier Sheet, refer t o
Sect ion 4.6.2, Other Paper Selection.
N ot e the opt ions vary ba sed on type of
sca nner.
N OTE:
I f you have purchased a duplex sheet- fed
scanner, choose [ Merge Two Sides] on the
[ Scan Source] , then t he scanner is able t o
scan both sides of your docum ent and
m erge t hem int o a single im age.
User ’s Ma nua l
4- 22
I f “ Merge Tw o Sides into One I m age” is
select ed, its choice w ill be available including
“ Merge Horizontally”, “Merge Vert ically”, “ Merge
Vert ically ( Back Side Flip)” . I f t he reverse side
of your docum ent is upside down, choose
“ Merge Vert ically (Back Side Flip)” and t he back
side will be aut om atically rotat ed 180 degrees
and m erged.
N ot e the opt ions vary ba sed on type of
sca nner.
Front
Side
Rear
Side
Merge Vertically
Front
Side
Rear
Side
Merge Horizont ally
User ’s Ma nua l
4- 23
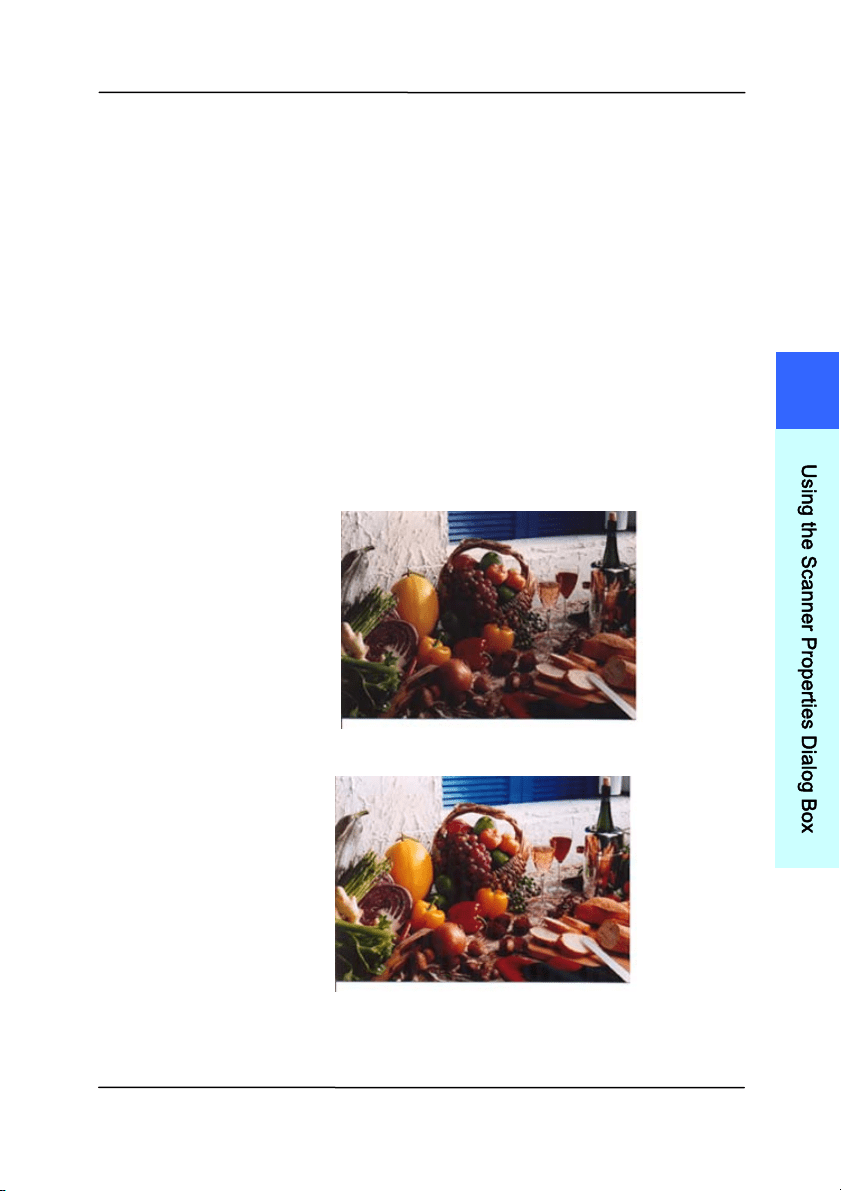
Color
Mat ching
The purpose of Color Mat ching is getting the
accurat e color. This option uses t he default
param eters ( I CC profile) t o adjust the colors
of the im age.
Choice : N one, Docum e nt, Phot o
N one: Choose “None” t o disable t his
opt ion.
D ocu m ent : Choose “Docum ent” if your
original cont ains pure t ext or a m ixt ure of
text and graphic since it is an optim al
setting for regular business docum ent.
Phot o: Choose “ Phot o” if your original
cont ains phot o to reproduce your phot o
in vivid color im age.
N or m al
Aft e r Color Mat ching
4
U
s
i
n
g
t
h
e
S
c
a
n
n
e
r
P
r
o
p
e
r
t
i
e
s
D
i
a
l
o
g
B
o
x

User ’s Ma nua l
4- 24
4 .3 .3 Scanning color im age s
T
he following opt ions are available for scanning color im ages.
Brightness
Cont rast
Resolution
I nvert
4 .3 .4 Scanning grayscale im ages
The follow ing options are available for scanning gray im ages.
Brightness
Cont rast
Resolution
I nvert
4 .3 .5 Scanning B& W im ages
T
he following options are available for scanning B&W im ages.
Binarization ( Dynam ic Threshold)
Resolution
I nvert
Or
Binarization ( Fix Processing)
Threshold
Bright ness
Resolution
I nvert

User ’s Ma nua l
4- 25
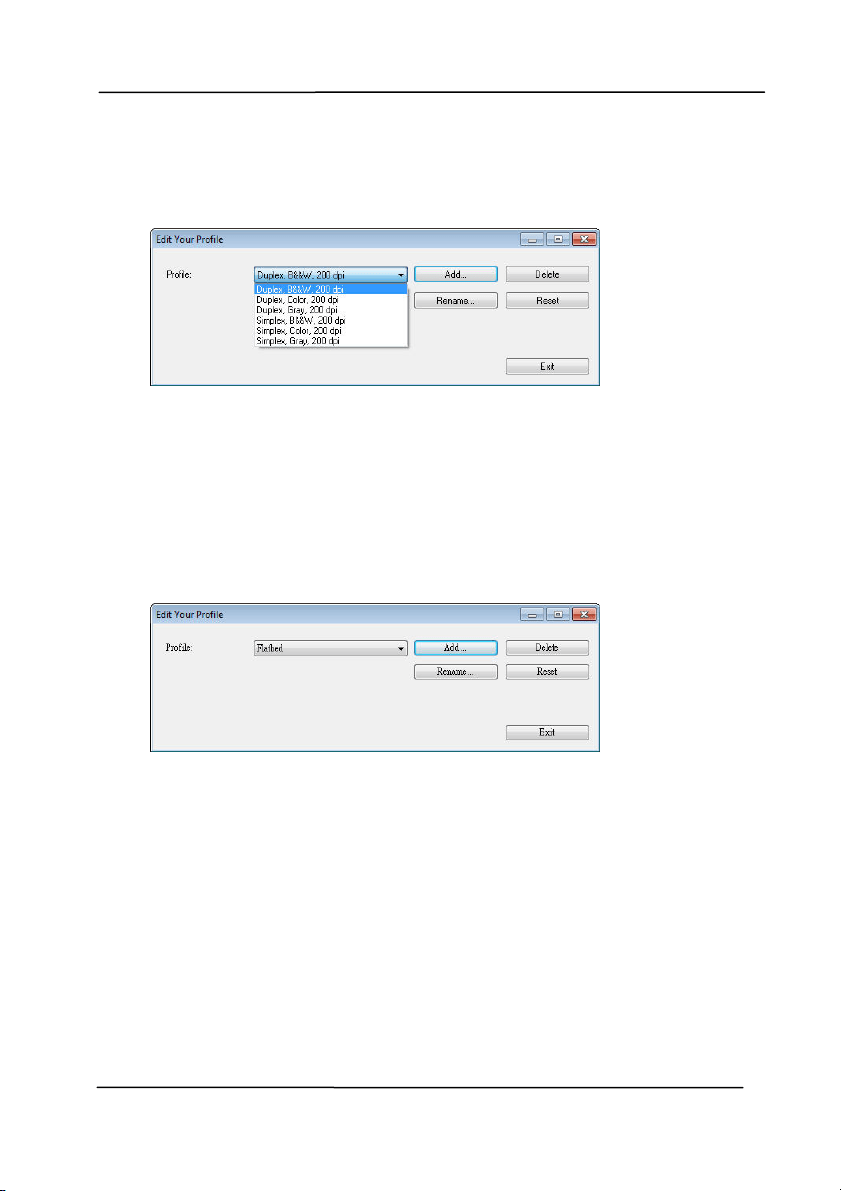
4 .3 .6 Editing Profiles
The Scanner Propert ies dialog box allows you to change and
save your frequentl
y used scan settings int o a profile. You can
edit these profiles by renam ing or delet ing them .
To add a ne w pr ofile,
1. Cust om ize your settings. (For exam ple, change your
resolution, im age t ype, cropping m et hod, scan size, or
other scan settings.)
2. Click t he I m age t ab and then choose “Profiles” t o prom pt
the “Edit Your Profile” dialog box.
3. Click “ Add” t o enter the nam e of t he profile and t hen
choose “Save”.
4. The new profile will be saved and shown in t he “ Profiles”
dropdown list box.
4
U
s
i
n
g
t
h
e
S
c
a
n
n
e
r
P
r
o
p
e
r
t
i
e
s
D
i
a
l
o
g
B
o
x
User ’s Ma nua l
4- 26
To load a profile,
1. From t he I m age tab dialog box, choose your favorable
profile from t he “ Profiles” dropdown list box.
2. Your favorable profile will be im m ediately loaded and
displayed on Scanner Propert ies dialog box.
To de let e a pr ofile,
1. From t he I m age tab dialog box, click “ Profiles” t o prom pt
t he Edit Your Profile dialog box.
2. Choose the profile you want t o delet e from t he dropdown
list box.
3. Click “Delet e” . A Confirm m essage “Are you sure you want
to delet e this profile?” is prom pt ed.
4. Choose “Yes” to delet e or “ Cancel” t o quit.
User ’s Ma nua l
4- 27
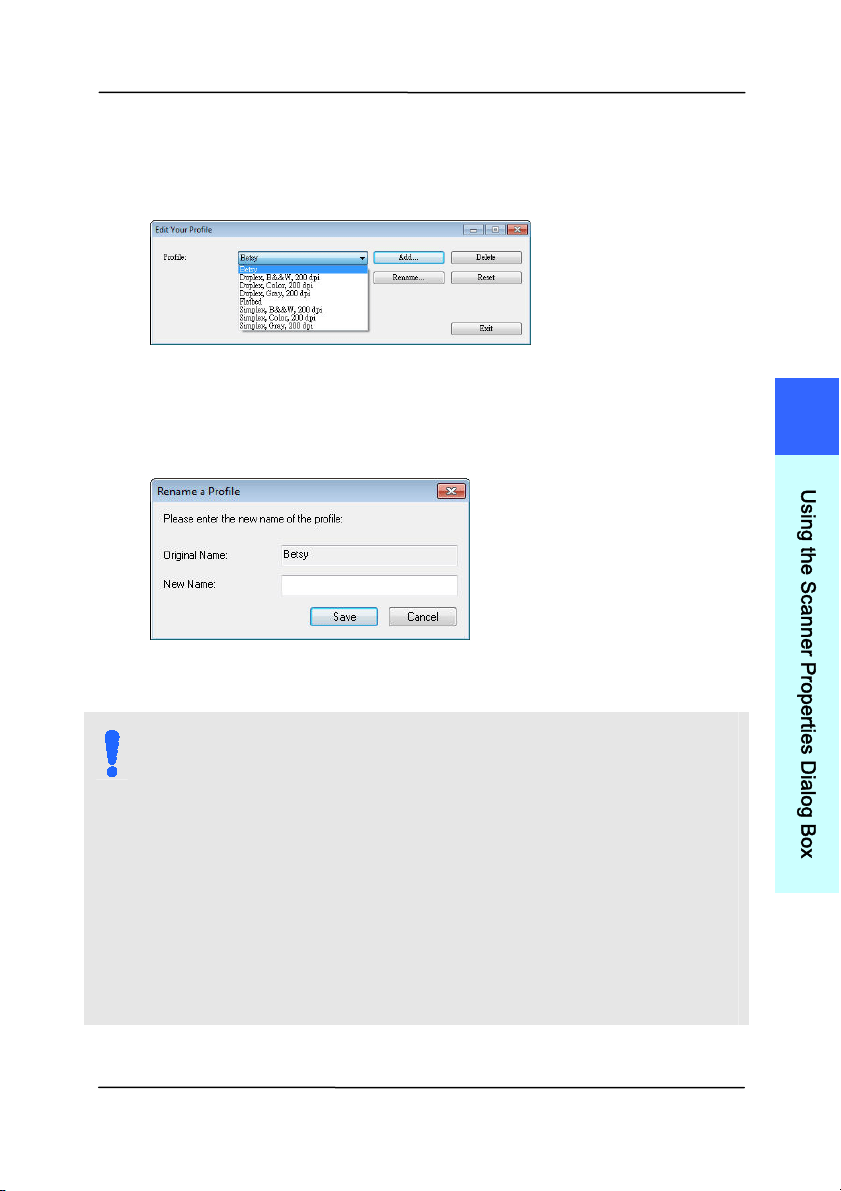
To renam e a profile ,
1. From t he I m age tab dialog box, click “ Profiles” t o prom pt
t he Edit Your Profile dialog box.
2. Choose the profile you want t o renam e from the dropdown
list box and t hen click the Renam e butt on.
3. Enter new nam e for the profile.
4. Choose “ Save” t o save the new profile or “ Cancel” t o quit .
N OTE:
1 . The preset default profiles include Flatbed, Sim plex-
B&W, 200 dpi, Sim plex- Gray, 200 dpi, Sim plex-
Color, 200 dpi, Duplex- B&W, 200 dpi, Duplex- Gray,
200 dpi, Duplex- Color, 200 dpi. I f you have a
sim plex or a sheetfed scanner, t he duplex or t he
flat bed opt ion will not be available.
2 . I f any setting for a current profile has been changed,
a [ * ] sign will be m arked before the nam e of current
profile, for exam ple, [ * Duplex, Color , 2 0 0 dpi] . I f
desire, click the [ OK] or [ Sca n] but t on and a dialog
box will be prom pt ed to let you save the new profile.
4
U
s
i
n
g
t
h
e
S
c
a
n
n
e
r
P
r
o
p
e
r
t
i
e
s
D
i
a
l
o
g
B
o
x

User ’s Ma nua l
4- 28
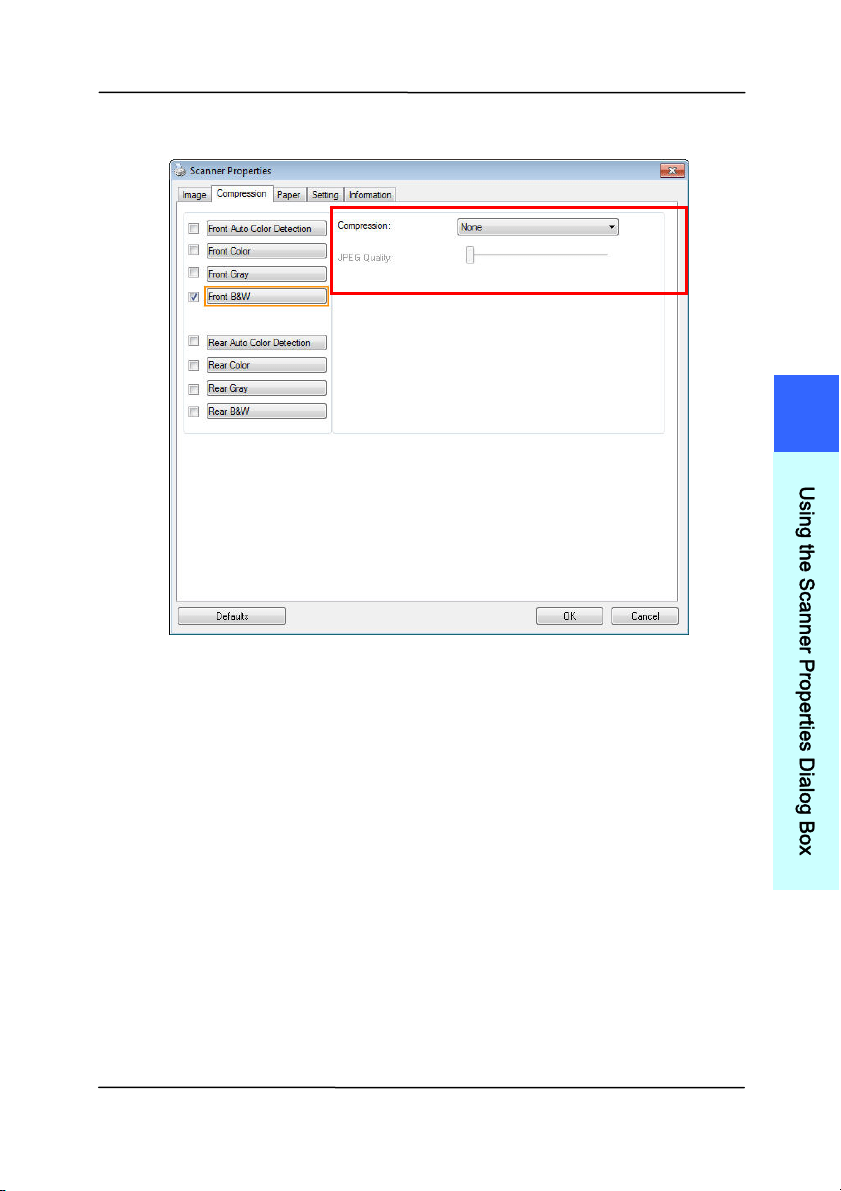
4 .4 The Com pression Tab
The Com pression tab allows you t o com press your scanned
im age and choose t he level of com pression. Bi-tonal im ages
are norm ally com pressed using CCITT st andard called Group 4
( G4) . Color and grayscale im ages are often com pressed using
JPEG technol
ogy. Move t he JPEG Quality slider t o t he right or
left to increase or decrease the level of com pression. Note t he
great er t he com pression level, the lower im age quality. Default
is 50% .
Note t hat the com pression depends on your im age edit ing
applicat ion. I f your im age editing application does not support
the type of com pression form at, t hen eit her a warning
m essage will appear or the im age quality of t he com pressed file
will not be acceptable.
JPEG (Joint Phot ographic Editor Group) . This group developed
and lent t heir nam e t o a file com pression standard for color and
grayscale im ages t hat is widely used by scanners, and software
applicat ions. On Microsoft Windows- based system s, a file wit h
the ext ension .j pg has norm ally been com pressed using this
st andard.
For scanning color or gray im ages, the following com pressions
are available:
None
JPEG
For scanning B&W im ages, the following com pressions are
available:
None
G4
User ’s Ma nua l
4- 29
The Com pression tab dia log box
4
U
s
i
n
g
t
h
e
S
c
a
n
n
e
r
P
r
o
p
e
r
t
i
e
s
D
i
a
l
o
g
B
o
x

User ’s Ma nua l
4- 30
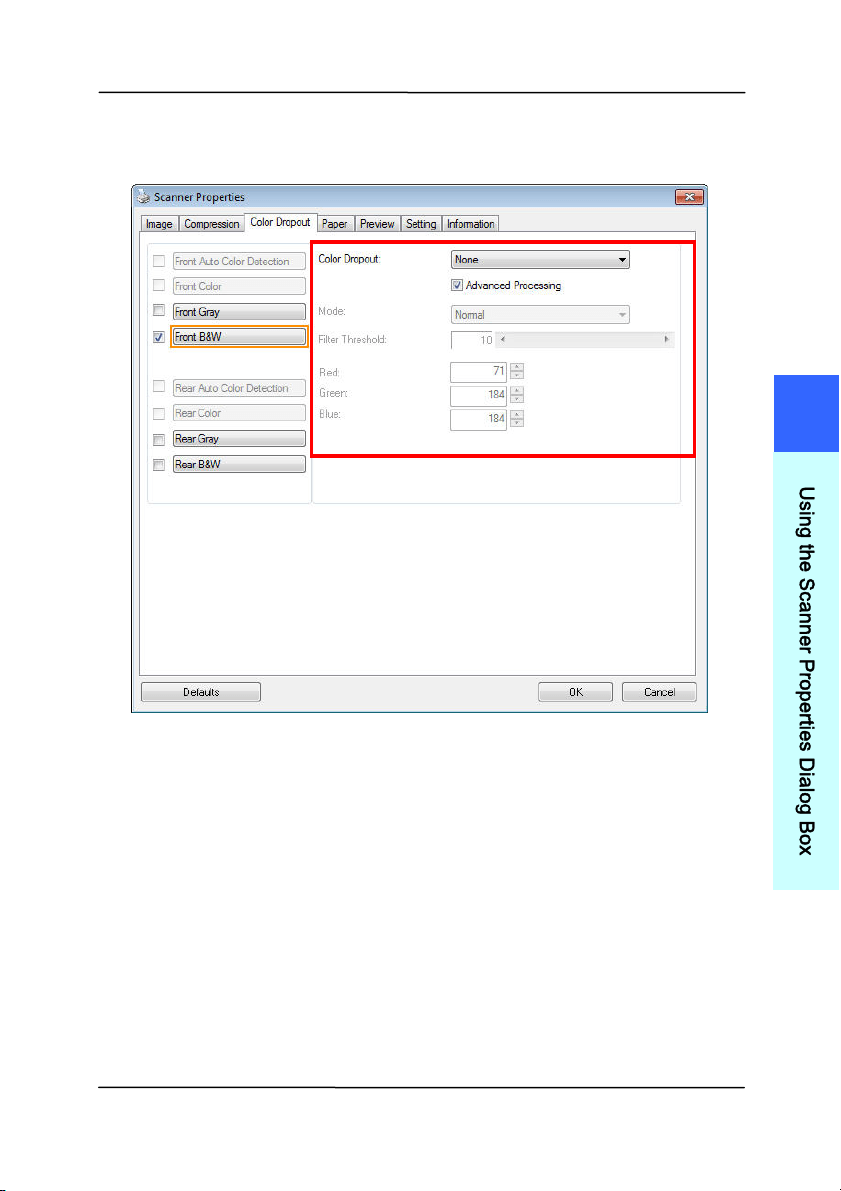
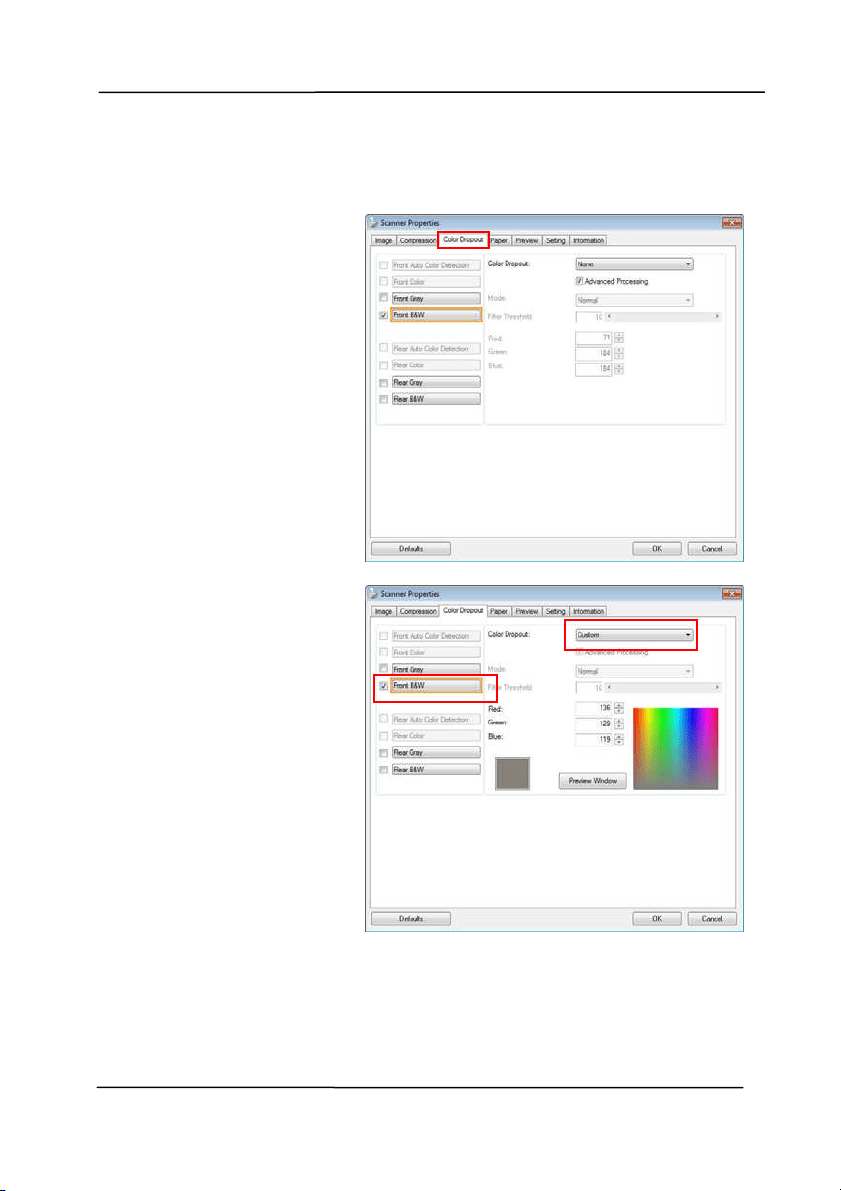
4 .5 The Color D r opout Tab
4 .5 .1 Color D r opout Select ion
The [ Color Dropout] tab allows you to select eit her green,
red, blue, or a color of your choice to rem ove the detai
ls of t he
select ed color from a scanned im age. This feature is used to
sharpen your text when using OCR (Optical Charact er
Recognition) software. Note t his feature applies only t o the
gray or black and white im age.
Choice : N one, Au t o, Rem ove Re d, Rem ove Gr een,
Rem ove Blue, Custom
- None: Does not rem ove any color.
- Aut o: Aut om at ically out put s t he im age wit h t he det ails of
the prim ary color rem oved.
- Re m ove Re d/ Rem ove Gr e en/ Rem ove Blue: Out put s
the im age wit h t he det ails of t he specified color rem oved.
- Custom : Specify t he color you wish t o rem ove by entering
its RGB ( Red, Green, and Blue) value respect ively.
Advanced Options:
- Quality M ode: Range: 0~ 20. Default: 10
When [ Qualit y Mode] is select ed, you can det erm ine the
color to be dropped out using the [ Filter Threshold] slider. A
lower value will drop m ore of the select ed color out , while a
higher value will leave m ore of the select ed color in.
- N or m al Mode : Use an opt im ized setting t o determ ine the
color.
User ’s Ma nua l
4- 31
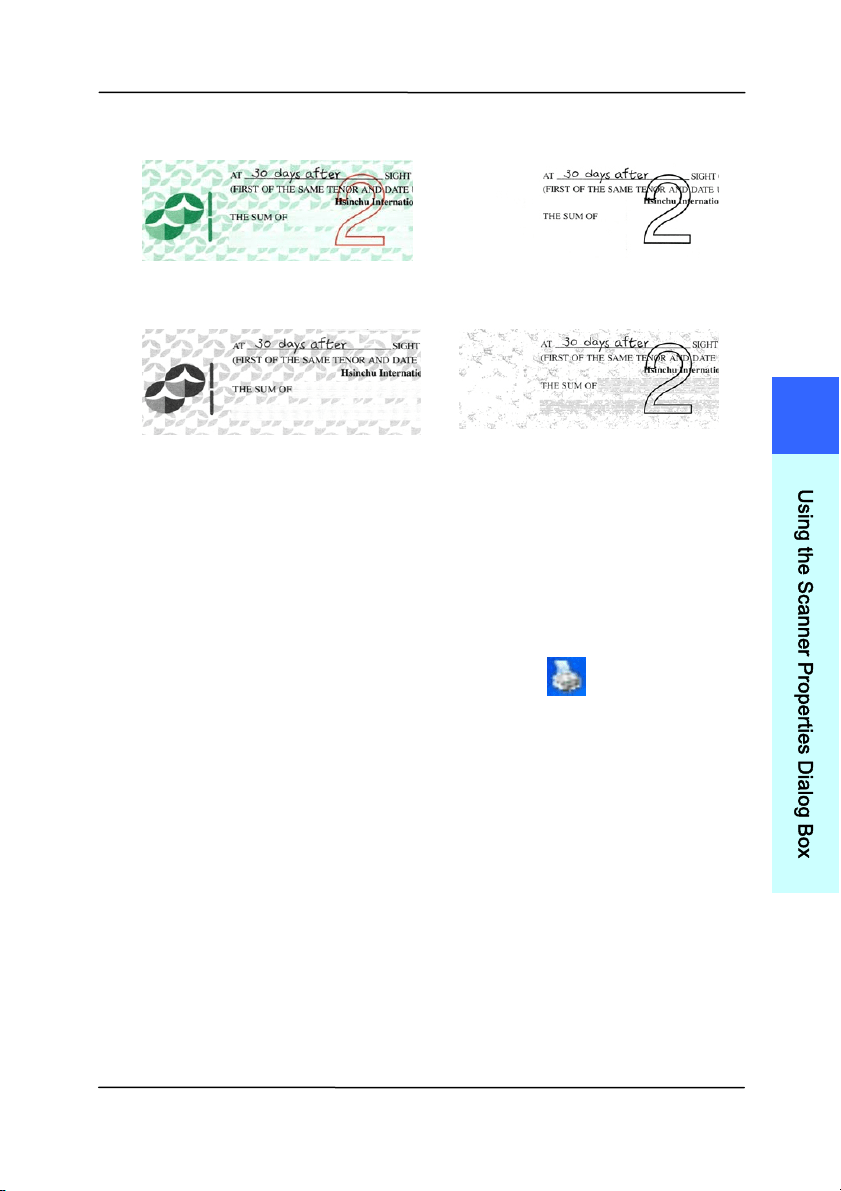
Original
Aut o/ Rem ove Gr e en
( norm a l m ode )
Rem ove Re d ( norm al
m ode)
Rem ove Gr e en ( qua lit y
m ode: Threshold: 1 8 )
Preview t he color dropout result :
To preview the color dropout result, please follow these steps:
1. Click t he [ Sca nner Pr operties] icon (
) on t he upper
left corner, and choose [ Ta b] to show available t ab
nam es.
2. Choose [ Pr e view ] to show the Preview t ab.
3. Click t he [ Preview ] t ab to show the Preview page.
4. Load your docum ent to the scanner and click t he
[ Preview ] but t on to get a preview im age.
5. On t he [ I m age] t ab, click [ Gray] or [ Black and White]
im age m ode and then choose [ Cust om ] on the [ Color
Dropout] tab. A [ Preview window] button will be
displayed.
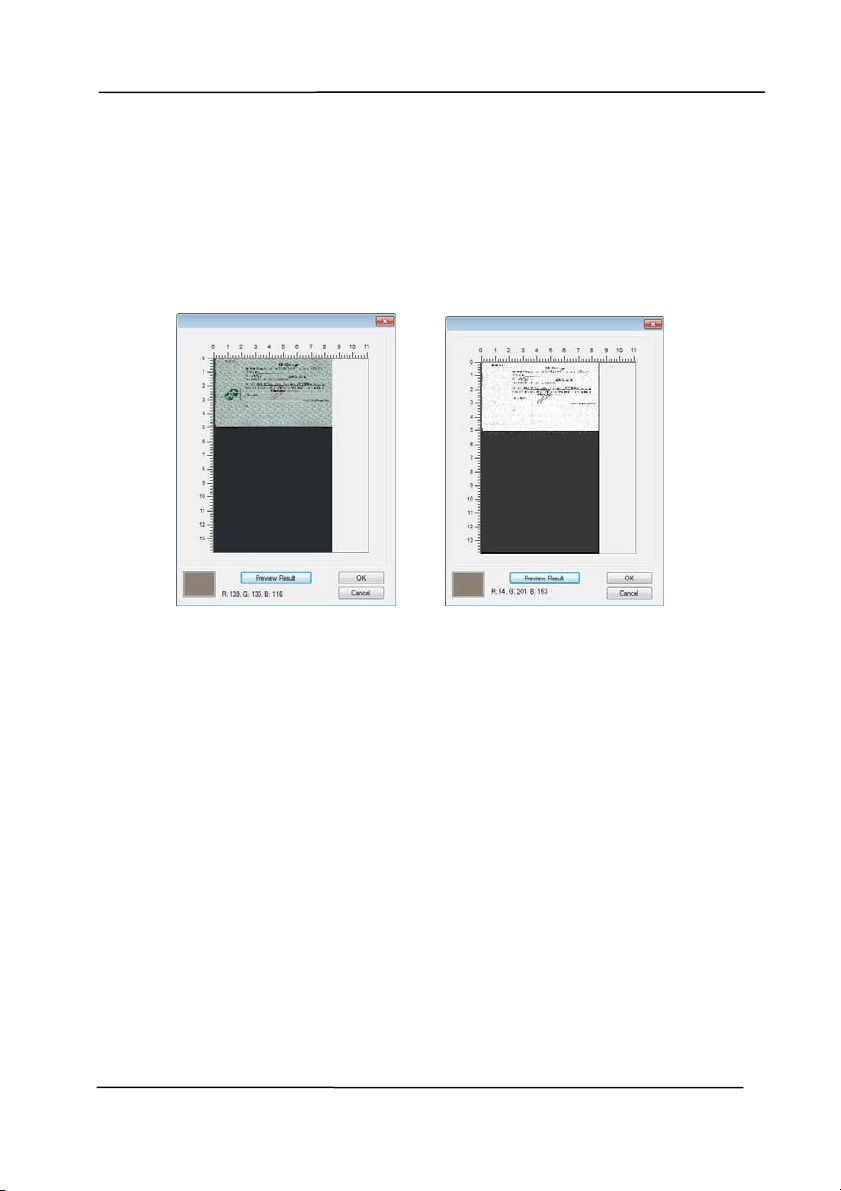
6. Click t he [ Preview w indow ] but t on t o prom pt t he
[ Preview ] window with t he previewed im age.
4
U
s
i
n
g
t
h
e
S
c
a
n
n
e
r
P
r
o
p
e
r
t
i
e
s
D
i
a
l
o
g
B
o
x
User ’s Ma nua l
4- 32
7. Move your cursor over the preview im age. Your m ouse
cursor now becom es an Eyedropper.
8. Click to select a color w hich you wish t o rem ove.
9. Click and hold your m ouse button to view the result
after rem oving t he specified color. I f t he result is
satisfact ory, click [ OK] t o close t he Preview window.
The Pr e view W indow The Color dr opout result
User ’s Ma nua l
4- 33
The Color D r opout dialog box
4
U
s
i
n
g
t
h
e
S
c
a
n
n
e
r
P
r
o
p
e
r
t
i
e
s
D
i
a
l
o
g
B
o
x
User ’s Ma nua l
4- 34
To select a color on the Color palette,
1. Click the Color
Dropout tab from
the Scanner
Propert ies dialog
box.
2. Choose Gray or
B&W from t he
I m age Select ion
box and click
“ Cust om ” from t he
Color Dropout
drop- down m enu.
The Color palet t e
appears.
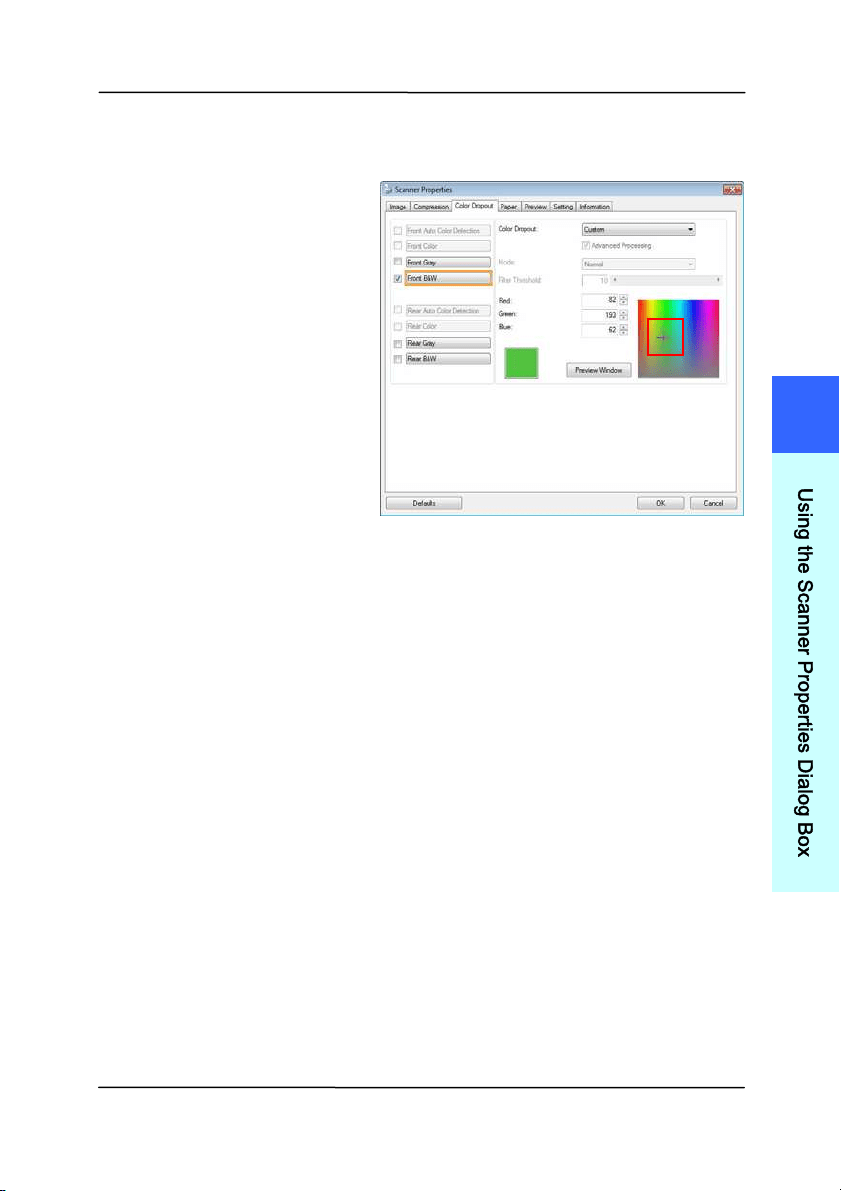
User ’s Ma nua l
4- 35
3. Move your cursor
over t he palet t e. The
cursor becom es a
cross sign.
4. Click to choose a color. The RGB values are changed
sim ultaneously.
4
U
s
i
n
g
t
h
e
S
c
a
n
n
e
r
P
r
o
p
e
r
t
i
e
s
D
i
a
l
o
g
B
o
x
User ’s Ma nua l
4- 36
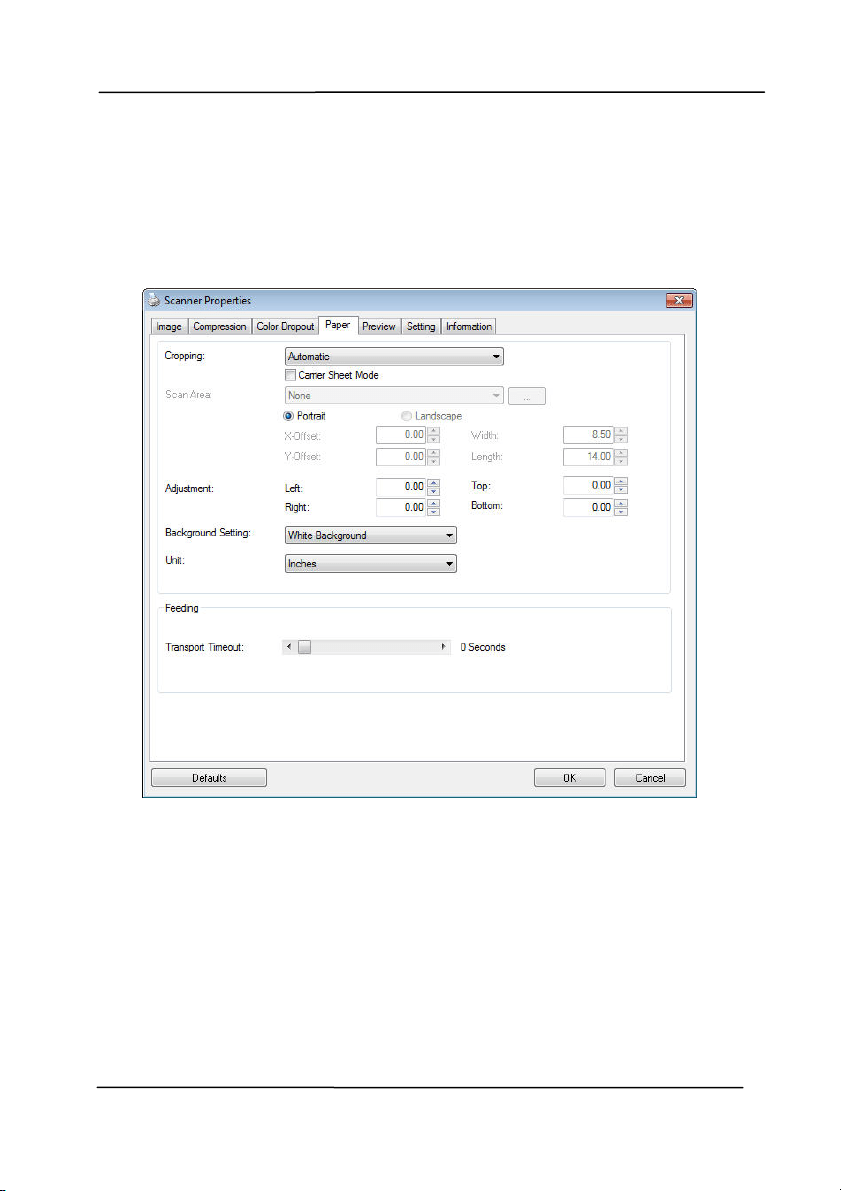
4 .6 The Pa per Ta b
The Paper t ab allows you to define values relat ing t o im age
output ( i.e., Aut o Crop or not, Scan Area, OverScan, Mult i-Feed
Detect ion) .
The Pa per t ab dialog box

User ’s Ma nua l
4- 37
4 .6 .1 Cr opping
Croppi
ng allows you to capt ure a port ion of the docum ent
being scanned. Choice: Aut om at ic, Autom atic ( 3 6 ”) ,
Fixed t o Transport, EOP ( End of Page) Detect ion,
Aut om atic M ult iple , Re lat ive t o Docum e nt s.
O
PTI ON S DESCRI PTI ON
Aut om atic
Autom at ic adjust s t he cropping window
according t o different docum ent sizes and
autom atically st raight en a skewed
docum ent. Use this option for batches of
m ixed- sized docum ents.
Aut om atic
( 3 6 ”)
Autom at ically adj ust s t he cropping window
according t o different docum ent sizes
sm aller than 36” and aut om atically
st raight en a skewed im age. Use this option
for batches of m ixed- sized docum ent.
N ot e: The a vaila bilit y of t his fe a t u re
va r ie s due t o sca nner m odel.
Fixed t o
Transport
This feat ure allows you t o define t he area
or zone t o be im aged. Use for batches of
sam e-sized docum ents. I f you select t his
opt ion, you can use the arrow keys t o
define the x and y offset values, width and
length t o redefine your scanned area. The
Display window will show im age placem ent
as you change t he values.
EOP ( End of
Page )
Detect ion
This feat ure allows you t o define t he area
or zone t o be im aged. Use for batches of
sam e-width but different length
docum ents. I f you select t his option, you
can use the arrow keys t o define the x and
y offset values, width and length t o
redefine your scanned area. The Display
window will show im age placem ent as you
4
U
s
i
n
g
t
h
e
S
c
a
n
n
e
r
P
r
o
p
e
r
t
i
e
s
D
i
a
l
o
g
B
o
x

User ’s Ma nua l
4- 38
change the values.
Aut om atic
Multiple
This option allows you to place various
sized docum ents such as phot os, I D Cards,
or business cards on t he flatbed ( if
available) and let s you create m ult iple
individually cropped im ages in one scan.
Note: To correct ly creat e m ult iple im ages,
please m ake sure t here is at least 12m m
( 0.5” ) of space bet ween each docum ent.
Rela t ive t o
Docum e nt
This option allows you to crop different
areas on your docum ents and deliver t hese
im ages in B&W, Gray, or Color separately.
For exam ple, t here are applicat ions which
require you to st ore the entire docum ent in
B&W and a part of the docum ent in color to
save st orage space. This is useful for
docum ents where a photograph or
signature appears in a consistent area on
the docum ent such as resum es, and so on.
The follow ing options are only available when Fixed t o
Transport is select ed.
X- Offset — the dist ance from the left end of t he
scanner t o the left edge of t he scanning area.
Y- Offse t — the position from the t op end of t he
docum ent to the t op end of t he scanning area.
W idt h — t he width of the scanning area.
Lengt h — the lengt h of the scanning area.
Center: aut om atically calculat es t he x- offset for cent er-
fed feeding based upon docum ent size select ed.
— relocat e t he scan area by click the arrow key on
the cross sign while ret ain the scan size. View the result
from t he Display window.
The Adj ustm ent opt ion is available when Aut om atic is
select ed.

User ’s Ma nua l
4- 39
Adj ust m ent —adds a positive/ negative m argin value
Top/ Bottom or toward left/ right of the im age.
Adj ust m ent is used when the autom atic docum ent feeder
is used. Adj ust m ent reduces t he possibilit y of corner
clipping on skewed im ages. To set Adj ust m ent values, use
the UP/ Down but t ons t o select where you want t o apply
Adj ust m ent values: Top/ Bottom or Left / Right , and t hen
select t he am ount of inches/ m m / pixels applied. Select a
value wit hin the range of 0.00 to 1.00 / -1.00.
4
U
s
i
n
g
t
h
e
S
c
a
n
n
e
r
P
r
o
p
e
r
t
i
e
s
D
i
a
l
o
g
B
o
x
User ’s Ma nua l
4- 40
Rela t ive t o D ocum ent: ( used for bat ches of sam e-sized
docum ents)
This opt ion allows you to crop different areas on your
docum ents and deliver t hese im ages in B&W, Gray, or Color
separat ely. For exam ple, t here are applications which require
you t o st ore the entire docum ent in B&W and a part of the
docum ent in color t o save storage space. This is useful for
docum ents where a photograph or signat ure appears in a
consist ent area on the docum ent such as resum es, and so on.
The following procedure describes how to reproduce the entire
docum ent in B&W and a portion of docum ent ( pict ure) in color.
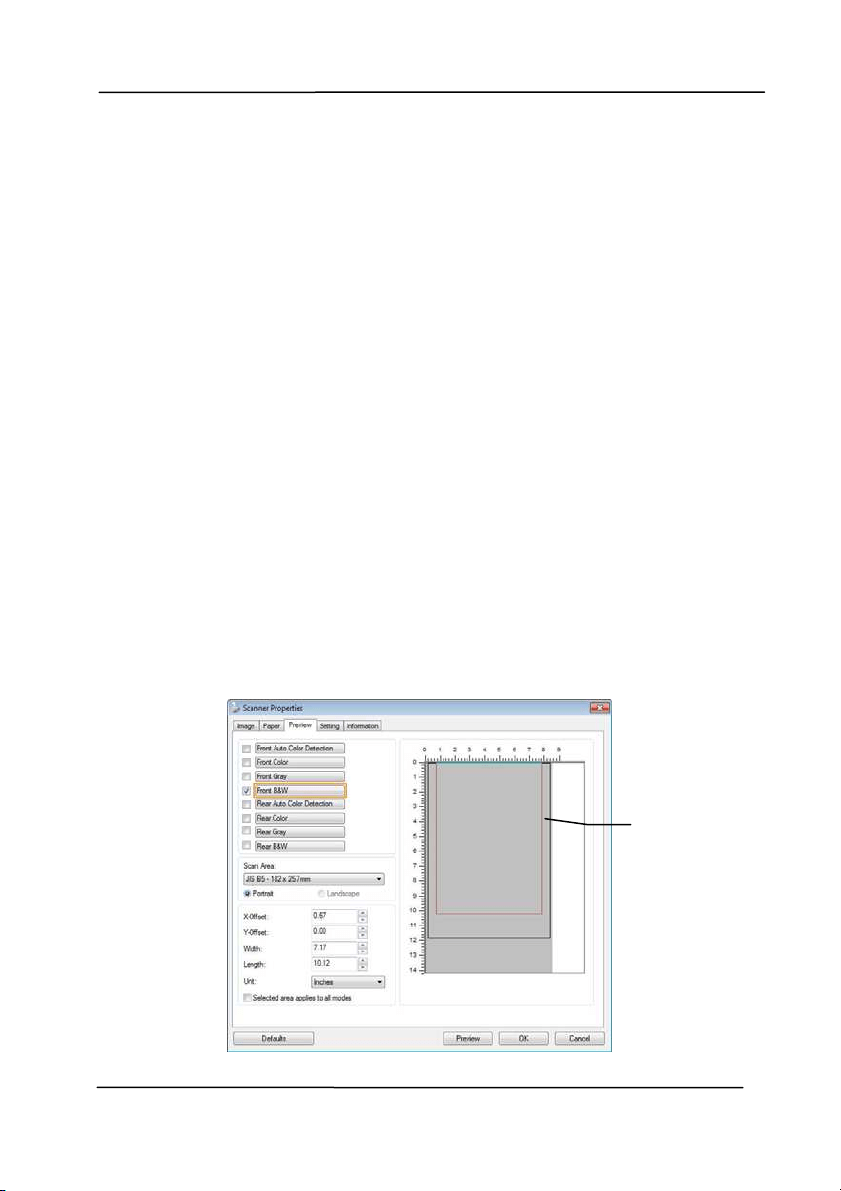
1. On t he Paper tab, choose “ Relat ive t o Docum ent” or “ Fixed
to Transport ” from t he Cropping option.
2. Choose your scan size from t he Scan Area opt ion. The
select ed scan size will be displayed in a red rect angular
box. This is also the scan size of your entire docum ent.
( For exam ple, I SO B5. I f you have not chosen a scan area
and leave t he select ion as None, t hen t he default area will
be t he scanner’s m axim um .)
A red
rect angular
box
User ’s Ma nua l
4- 41
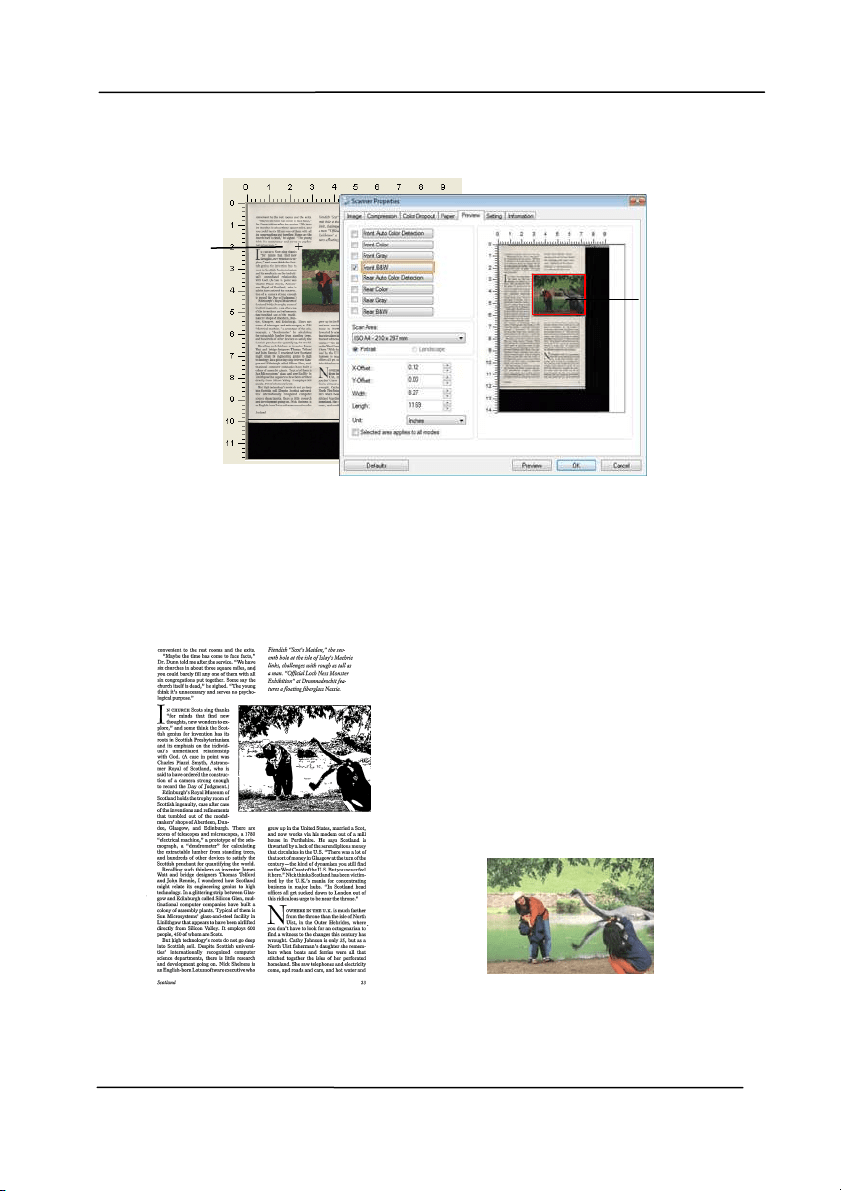
3. Click the Preview t ab t o display t he Preview window. A
black rect angular box appears t o indicate t he m ax. scan
size your have just select ed.
4. Click the Preview button to view t he entire im age in low
resolution t o correctly crop your relative scan area.
5. Select im age type from t he I m age Select ion box. The
select ed im age will appear in highlight ed color. ( For
exam ple, Front Color)
6. Place your cursor on t he Preview window and click your
left m ouse but t on. A cross sign will appear as illust rat ed.
Create your relative scan size diagonally by dragging the
left m ouse button to your preferable size. The select ed
area will appear in a red box as illust rat ed.
A black
rect angular
box
T
he Preview
I m age
T
he Preview
Button
The I m age
Select ion
Box
4
U
s
i
n
g
t
h
e
S
c
a
n
n
e
r
P
r
o
p
e
r
t
i
e
s
D
i
a
l
o
g
B
o
x
User ’s Ma nua l
4- 42
7. Check the B&W im age from t he I m age Select ion box t o
scan t he ent ire docum ent.
8. Click t he Scan butt on to st art scanning t he docum ent in
two im age types and sizes. (See t he result in below.)
The entire docum ent in B&W The relat ive area in color
T
he
Relat ive
Area
A Cross
Sign
User ’s Ma nua l
4- 43
4 .6 .2 Othe r Pape r Se lect ion
Carrier She e t M ode:
Check thi
s opt ion t o aut om atically crop the scan window
according t o your docum ent size when scanning non- st andard
docum ent (fragile, irregular- size docum ent) wit h a carrier sheet
( optional) . Note: The availability of t his opt ion varies due to
scanner m odel.
Loading D ocum ents Using a Carrier She et
A Carrier Sheet is a plast ic sheet specifically used for loading
non-standard docum ent onto t he scanner. I t allows you to scan
docum ent that can not be scanned in t he regular way. Also,
docum ents larger than A4 size, such as A3 and B4, can be
scanned by folding in half, insert ing int o t he Carrier Sheet , and
scanning in duplex m ode. You can also scan docum ents t hat
can be dam aged quit e easily such as phot ographs, or irregular
size docum ents t hat are difficult t o load direct ly such as
clippings.
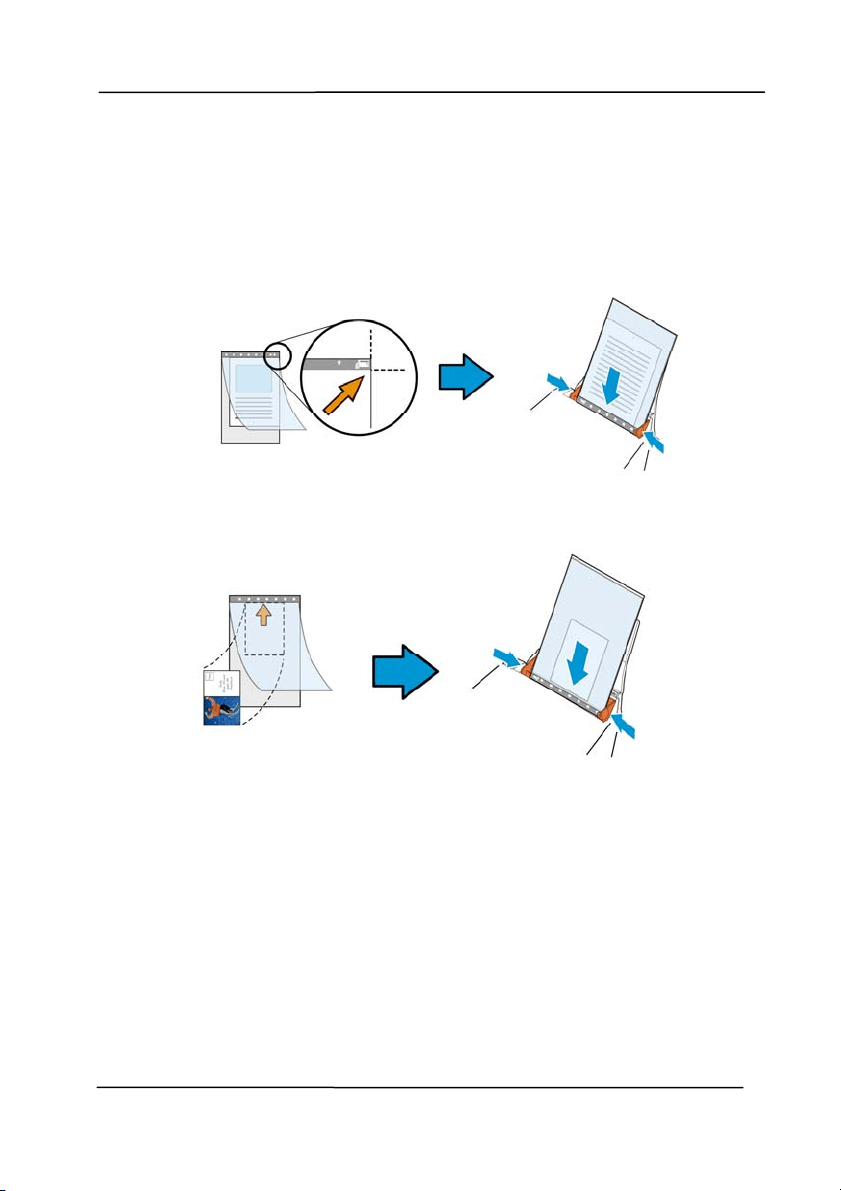
To sca n docum ent using a Carr ier Sheet,
For docu m ent s large r t han A4 / Let t e r size, such as A3
a. Fold the sheet t o be scanned in half.
b. Fold t he sheet tight ly and sm ooth out crease. Ot herwise,
the sheet m ay be skewed during scanning.
1 . Ope n t he Carrie r Sheet and pla ce t he docum ent
inside.
Align the t op of the docum ent to t he t op of t he Carrier
Sheet ( t he print ed area) .
4
U
s
i
n
g
t
h
e
S
c
a
n
n
e
r
P
r
o
p
e
r
t
i
e
s
D
i
a
l
o
g
B
o
x
User ’s Ma nua l
4- 44
For docu m ent s large r t han A4 / lett e r size, such as
A3
Align the t op of the docum ent to t he t op of t he Carrier
Sheet ( t he print ed sect ion) and the folded portion t o t he
right edge of the Carrier Sheet so t hat the docum ent fits
into t he Carrier Sheet at the upper corner.
For non- st a nda r d docum ent
Cent er your docum ent in the Carrier Sheet.
2. Load t he Carrier Sheet with the gray sect ion (print ed
sect ion) facing downwards.
3. Adj ust t he paper guides t o t he width of t he Carrier Sheet .
Adj ust t he paper guides so that there is no space
bet ween the guides and the Carrier sheet . Space between
the guides and Carrier Sheet m ay cause the Carrier Sheet
to becom e unaligned during scanning, and skew t he
scanned im age.
4. Start t he scan.
User ’s Ma nua l
4- 45
N OTI CE:
[ Carrier Sheet ] is available for t he m odels t hat
support the Carrier Sheet.
Som e funct ions are disabled when [ Carrier Sheet] is
checked.
This opt ion m ay not work properly on som e
applicat ions.
Sca n Area
Choose your desired paper size wit h the drop- down list box. Or
you m ay select a cust om paper size by clicking the Sca n Are a
box and then click Add t o include in the choice.
Choice s are list e d below :
N one
US Le t t er- 8 .5 ”x 1 1 ”
US Le gal – 8 .5 ” x 1 4 ”
I SO A4 – 2 1 x 2 9 .7 cm
I SO A5 – 1 4 .8 x 2 1 cm
I SO A6 – 1 0 .5 x 1 4 .8 cm
I SO A7 – 7 .4 x 1 0 / 5 cm
I SO B5 – 1 7 .6 x 2 5 cm
I SO B6 – 1 2 .5 x 1 7 .6 cm
I SO B7 – 8 .8 x 1 2 .5 cm
JI S B5 – 1 8 .2 x 2 5 .7 cm
JI S B6 – 1 2 .8 x 1 8 .2 cm
JI S B7 – 9 .1 x 1 2 .8 cm
Sca n ner M axim um
Long Page ( < 1 1 8 ”)
4
U
s
i
n
g
t
h
e
S
c
a
n
n
e
r
P
r
o
p
e
r
t
i
e
s
D
i
a
l
o
g
B
o
x

User ’s Ma nua l
4- 46
Long Page ( < 1 1 8 ”) :
When you need t o scan docum ents whose length exceeds
scanner m axim um , please choose Long Page. Note if Long
Page is select ed, t he Multi- Feed Det ect ion will not be
available. (Not e: This opt ion and the m axim um allow able
docum ent length vary due to type of scanner.)
When Lon g Pa ge ( < 1 1 8 ”) is select ed, be sure t o specify your
docum ent size in the Le ngt h and W idth field.
N ot ice w hen sca nning long pa ge docum e nt :
1. Pull out the ext ension in t he ADF Paper Tray.
2. Secure enough space around the Out put Tray t o prevent
the ej ect ed paper from falling off t he Out put Tray.
3. To ensure t he perform ance, in color m ode, set the
resolution t o be 300 dpi or lower; in Black and White
m ode, set the resolut ion to be 600 dpi or lower.
4. Depending on your syst em environm ent s, application, or
your specified paper size, there m ay be insufficient
m em ory to perform scanning.
Over Sca n
Overscan allows you t o add a specific m argin at top and bott om
or right and left ( Opt ions vary based on t he t ype of scanner) of
the edge of t he im age. This is used to reduce possible corner
clipping on t he skewed im ages and often applied t o a batch of
skewed docum ent t o be scanned in t he aut o docum ent feeder.
Select a value bet ween 0 and + 5 m m . Note t he overscan
result w ill not be shown in t he Display window and that t he
availability of the funct ion varies based on type of scanner.

User ’s Ma nua l
4- 47
Pre- Feed
Choice: Enable, Disable. I f enable is select ed, you can set the
am ount of t im e the scanner st art s pre- feeding your paper after
your docum ents has been loaded int o t he feeder. The default is
disable. Not e: The availability of t his opt ion varies due to
scanner m odel.
Transport Tim e out
Set the am ount of t im e the scanner will wait and then st art
auto scan aft er the first scan j ob is com plet ed. I f you have
m any separate docum ents need to be scanned at the sam e
scan set t ings, this feature is especially useful. The default is 0.
The value ranges from 0 to 30 seconds.
N OTE:
Wit hin t he specified t im eout period, if you load your
docum ent to the feeder, t he scanner st art s scanning
autom atically.
I f your scanner has a flat bed opt ion and you place
your paper on t he flatbed, aft er t he t im eout period,
you need to click the Scan button on the TWAI N user
interface t o start scanning.
4
U
s
i
n
g
t
h
e
S
c
a
n
n
e
r
P
r
o
p
e
r
t
i
e
s
D
i
a
l
o
g
B
o
x
User ’s Ma nua l
4- 48
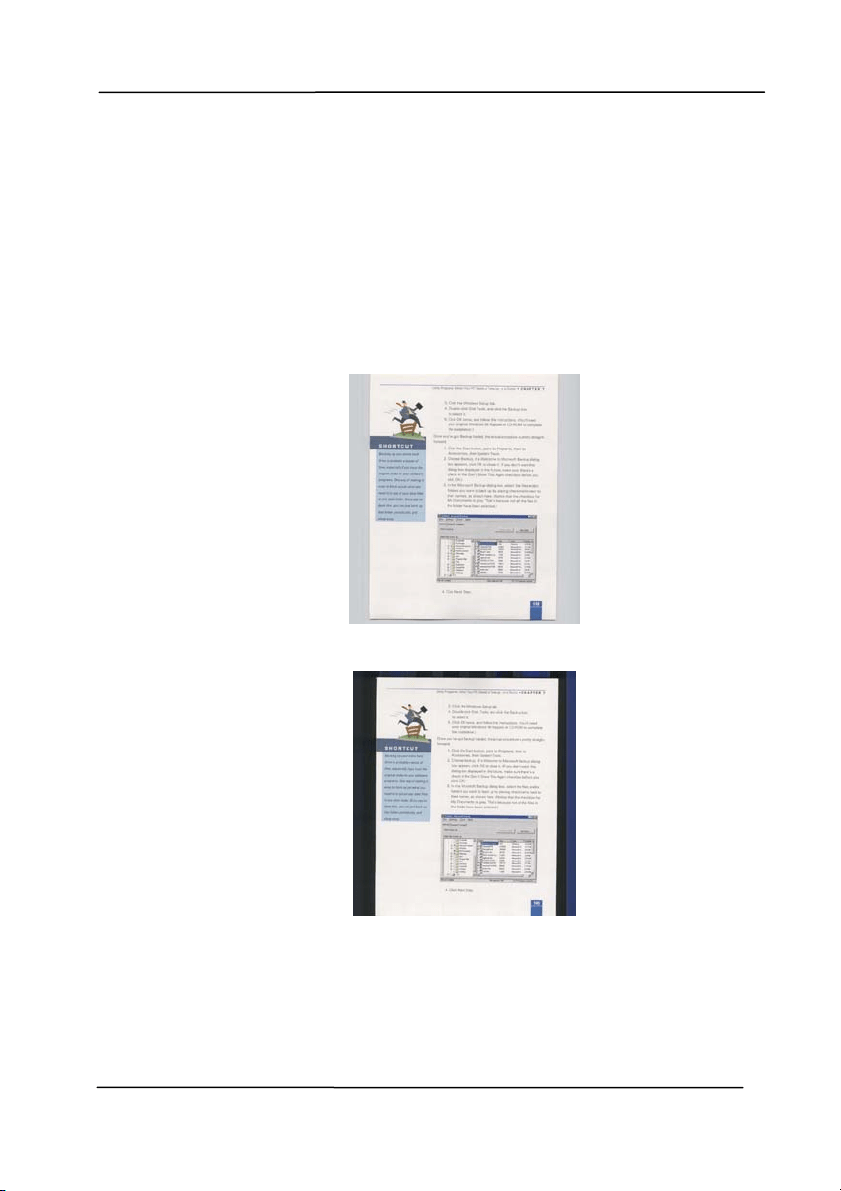
Ba ck ground
Se t t ing
This option allows you to set your scan
background. Choice: W hit e Ba ck ground,
Black Back groun d.
Note: For a sheet- fed scanner wit h an auto
docum ent feeder, t his option is current ly
available only in t he “ Auto crop” m ode. For a
scanner wit h a flat bed platen, this option is
available either in the “ Auto crop” or t he
“ Fixed t o Transport” m ode.
Whit e Background
Black Background
User ’s Ma nua l
4- 49
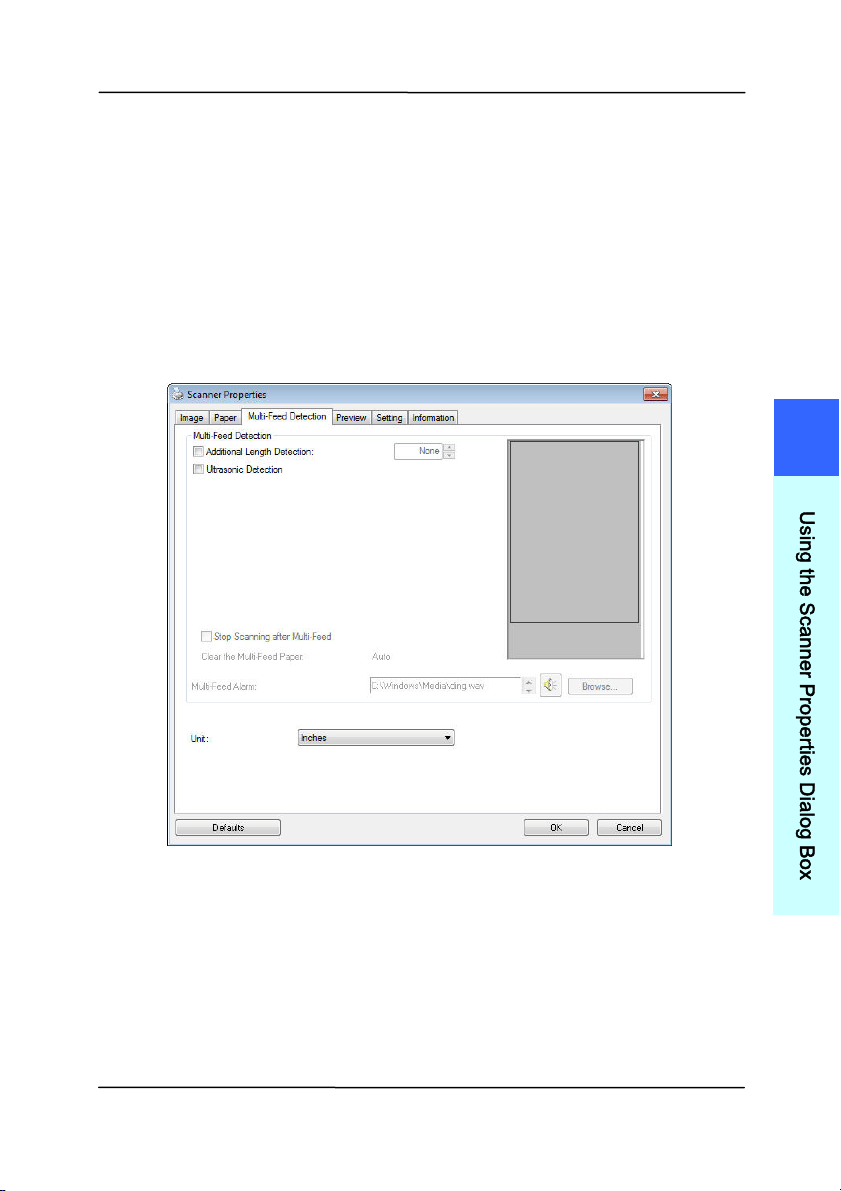
4 .7 The M u lt i- Fee d Det ect ion Tab
Multi- Feed Detect ion
M
ulti-Feed Det ect ion allows you to detect overlapped docum ent
that go t hrough the auto docum ent feeder. Multi-Feed usually
occurs due to st apled docum ents, adhesives on docum ents, or
elect ro- st atically charged docum ent. Not e: The availabilit y of
the funct ion varies based on type of scanner.
4
U
s
i
n
g
t
h
e
S
c
a
n
n
e
r
P
r
o
p
e
r
t
i
e
s
D
i
a
l
o
g
B
o
x

User ’s Ma nua l
4- 50
Addit ional Le ngt h De t ect ion
Additional Length Det ect ion allows you to define the lengt h of
docum ent being m ulti- fed. This value indicates t he additional
length exceeding your scan area. The Display window will
show the size of the docum ent as you change t he value. A
value of 0 indicates no additional lengt h detect ion. The
Additional Length Det ect ion is best used when scanning sam e-
size docum ents in t he auto docum ent feeder.
Ult rasonic D et e ct ion
Ultrasonic Det ect ion allows you t o set overlapped docum ent by
det ect ing paper t hickness between docum ents. Not e: The
availability of the funct ion varies based on type of scanner.
There are two options available if Multi-Feed is detect ed.
St op Sca n ning aft e r M ulti- Feed
I f t his is select ed, t he scanner will st op t he feeder and
prom pt a m ult i-feed warning m essage. I n addition,
the m ult i- feed paper will be ej ect ed from t he scanner
autom atically.
Note: The availabilit y of the [ Auto Clear M u lt i- Fee d
Pape r ] feature varies based on scanner t ype. I f your
scanner does not support this feat ure, rem ove the
m ulti- feed paper m anually.
I f t his is not select ed, t he scanner w ill continue
scanning the entire docum ent t hough m ulti-feed is
det ect ed. Aft er the entire docum ent has been scanned,
a m ult i- feed dialog box w ill be prom pt ed to indicat e
the page num ber which has been det ect ed m ult i-feed
and need to be rescanned.

User ’s Ma nua l
4- 51
Multi- Feed Ala r m
I f a wave file is added, the scanner will m ake a sound
alarm if m ulti-feed is detect ed yet no Warning dialog box
will be displayed.
How to add the sound a larm
:
1. Click the Browse button on the right side of t he speaker
icon. The Open dialog box appears.
2. Choose your wave file.
3. Click the Open button. The wave file is added.
Un it s
Defines t he prim ary m easurem ent syst em . I nches,
Millim et ers, and Pixels are available.
4
U
s
i
n
g
t
h
e
S
c
a
n
n
e
r
P
r
o
p
e
r
t
i
e
s
D
i
a
l
o
g
B
o
x
User ’s Ma nua l
4- 52
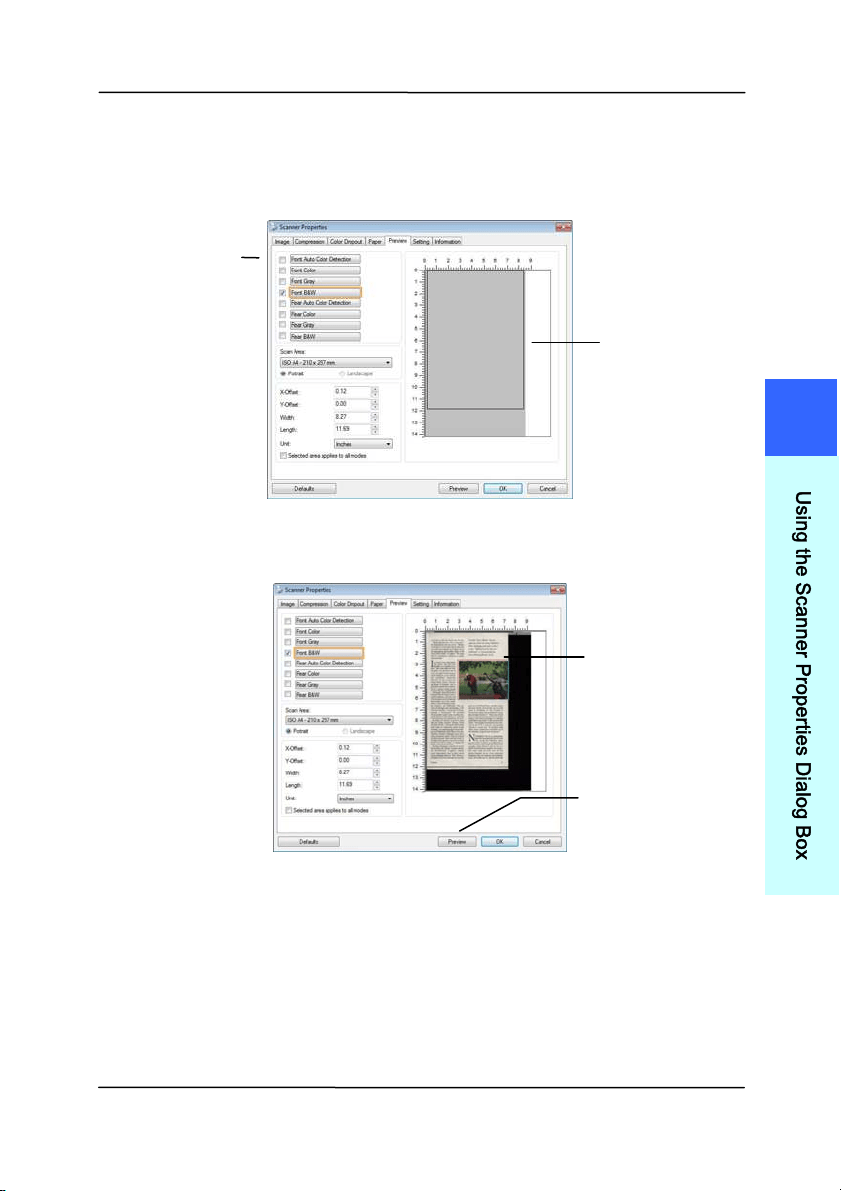
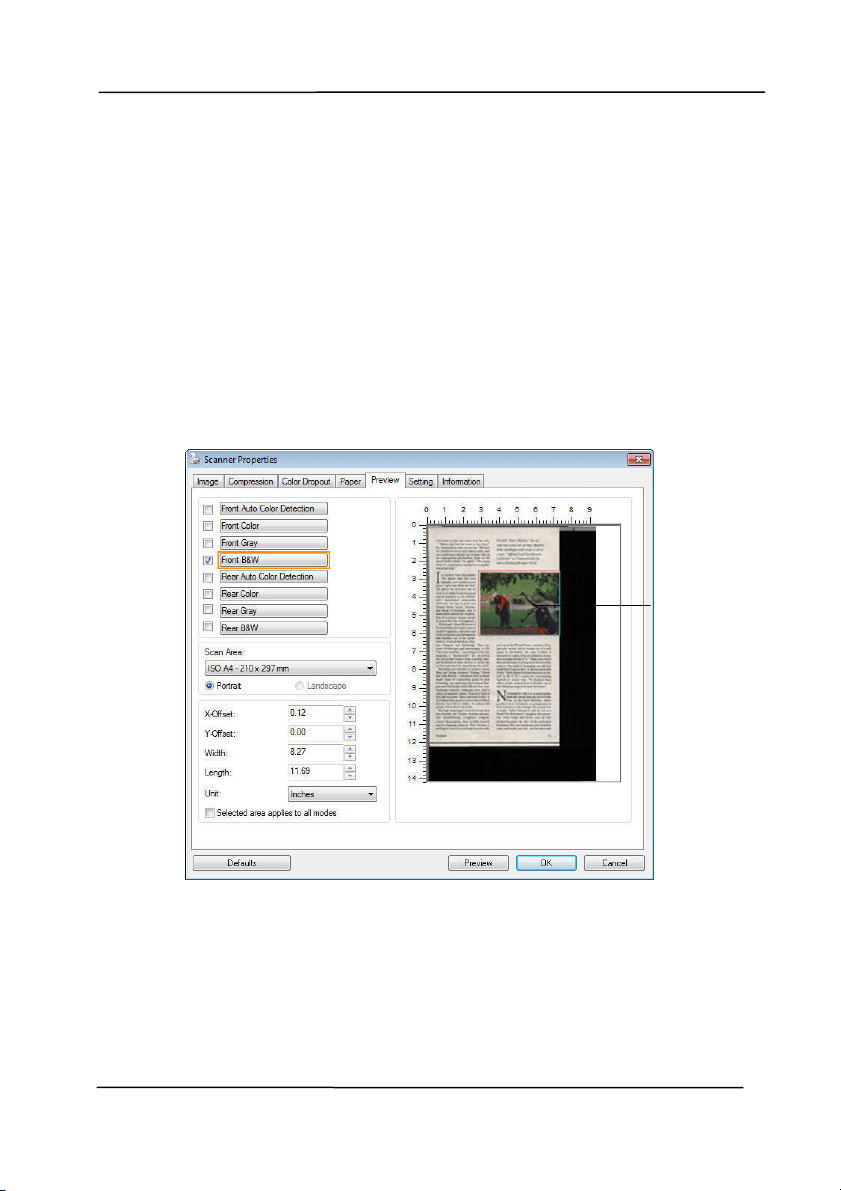
4 .8 The Preview Ta b
The Preview tab allows you t o preview ( a low-resolution scan)
your im age before final scan. This preview im age let s you
allocate your scan area. You can choose your scan area by t he
“ Scan Area” drop down list box or placing your cursor on t he
Display window and dragging it diagonally on the Display
window. Then, a red rect angle box will appear t o indicate t he
select ed area.
Note: I f you choose “Autom atic Cropping” on the “Paper Tab” ,
then to select a scan area on the Preview tab is not allowed.
The Pr e view Ta b
The Display
Window
User ’s Ma nua l
4- 53
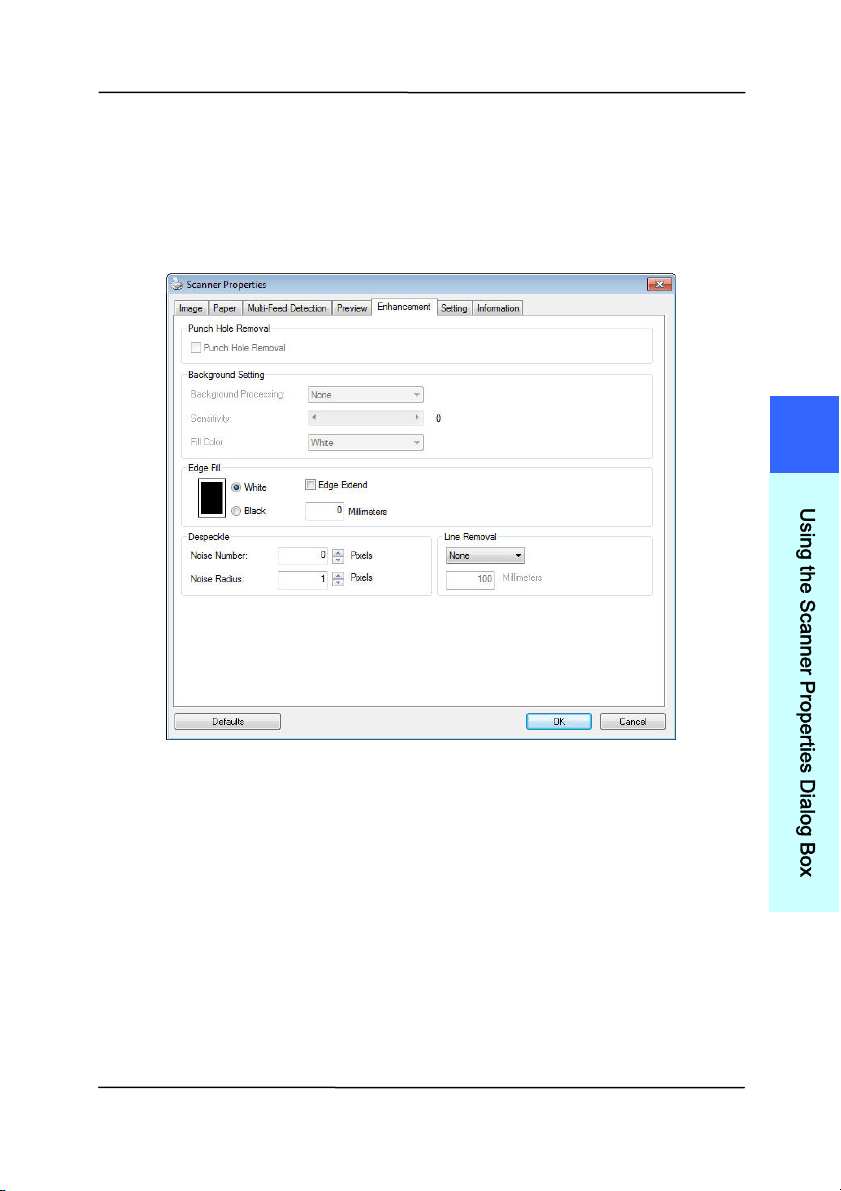
4 .9 The Enha n ce m ent Tab
The Enhancem ent t ab allows you t o set following additional
im age processing settings.
The Opt ion tab dialog box
4
U
s
i
n
g
t
h
e
S
c
a
n
n
e
r
P
r
o
p
e
r
t
i
e
s
D
i
a
l
o
g
B
o
x
User ’s Ma nua l
4- 54
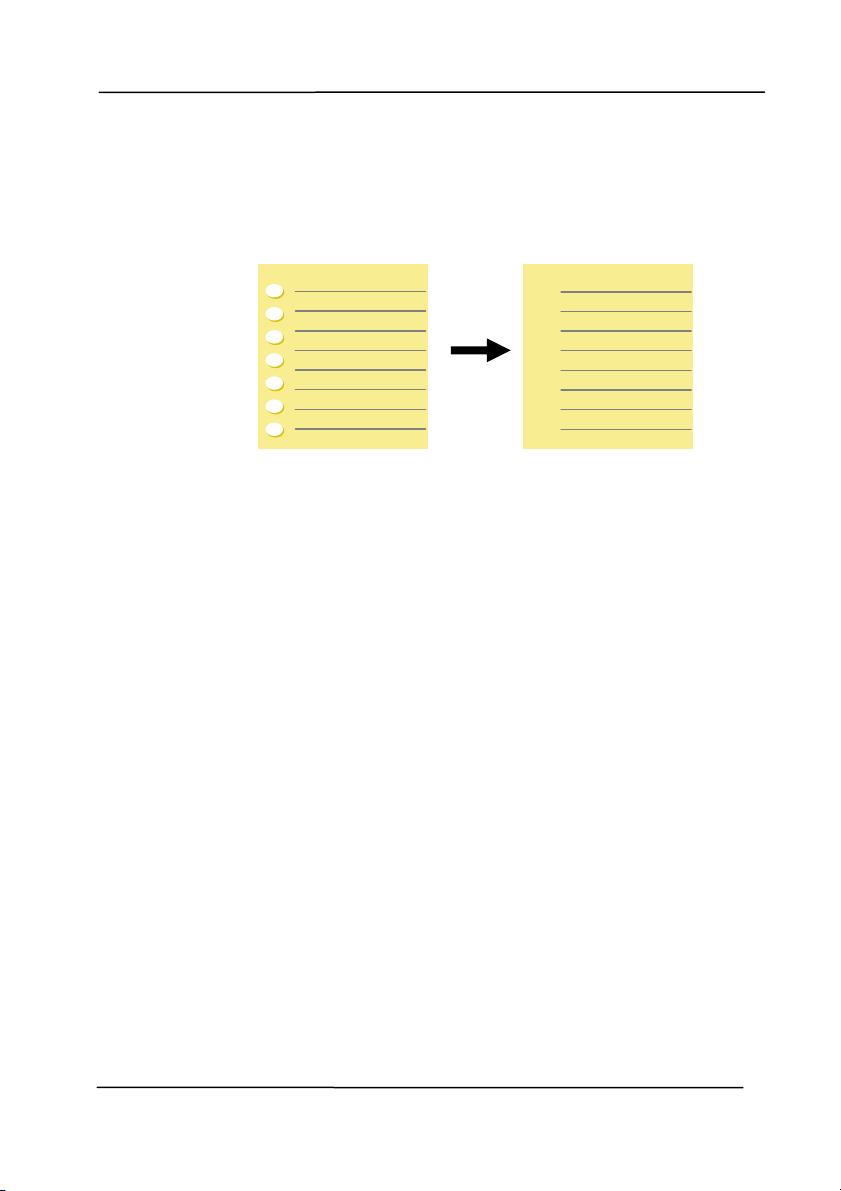
Punch
Hole
Rem oval
You can rem ove punch holes from t he output
scanned im age when scanning punched docum ent.
Note t he availabilit y of this feature varies
depending on your scanner m odel.
Punch holes can not be rem oved w hen:
Resolution is set lower than 150dpi
The hole is near the edge of the docum ent
The holes are not aligned along the edge of t he
docum ent
Punch Hole Rem oval is available only when
“ Aut o Crop” is enabled. I f eit her “Fixed to
Transport ” , “ EOP ( End of Page) Detect ion” ,
“ Aut om atic Mult iple” , “Relat ive to Docum ents” is
select ed from the Cropping option on t he Paper
tab, t he Punch Hole Rem oval opt ion will be
disabled.
Original
Out put im age
User ’s Ma nua l
4- 55
Shadow Rem oval When 「Flatbed」on the 「Scan
Sou rce」 option is select ed on the
「I m a ge」t ab, the 「Shadow
Rem oval」opt ion will be enabled. Click
to rem ove the shadow on the book spine
when scanning a book.
Be fore Shadow
Rem oval
Aft e r Shadow Rem oval
4
U
s
i
n
g
t
h
e
S
c
a
n
n
e
r
P
r
o
p
e
r
t
i
e
s
D
i
a
l
o
g
B
o
x

User ’s Ma nua l
4- 56
Ba ck ground Proce ssing: The [ Back ground Proce ssing]
opt ion allows you to sm oot h background color or rem ove it to
m ake im age clearer. The option is especially useful for
docum ents wit h color form s such as invoices.
Choice s: None ( defa ult) , Sm ooth, Re m oval
- N on e - no background processing w ill be perform ed
( default)
- Sm oot h - produces im ages wit h a m ore uniform
background color. This option im proves im age quality.
- Rem oval - identifies t he background color and then
rem oves it.
Se nsit ivity: Choice: 0 , 1 , 2 , 3 , 4 . D efa u lt : 0
- The higher t he value, the m ore background color will be
kept.
Mode: Auto, M oir é
I f [ Sm oot h] is select ed in the [ Back ground Proce ssing]
opt ion, then t he choices for the [ M ode] opt ion includes Aut o,
and Moiré.
- Aut o - uses t he fact ory preprogram m ed m ode t o proceed
background sm oot hing.
- Moiré – Rem ove the m oiré patterns that appear on t he
background of t he im age when scanning print ed m aterial.
I f [ Rem oval] is select ed in the [ Background Pr oce ssing]
opt ion, then t he [ M ode] opt ion will be replaced wit h [ Fill
Color] . Choices: Whit e, Aut o.
- W hite - ident ifies t he background color and subst itut es it
with white.
- Aut o - identifies t he background color and subst itut es it
with t he color of t he largest background zone.
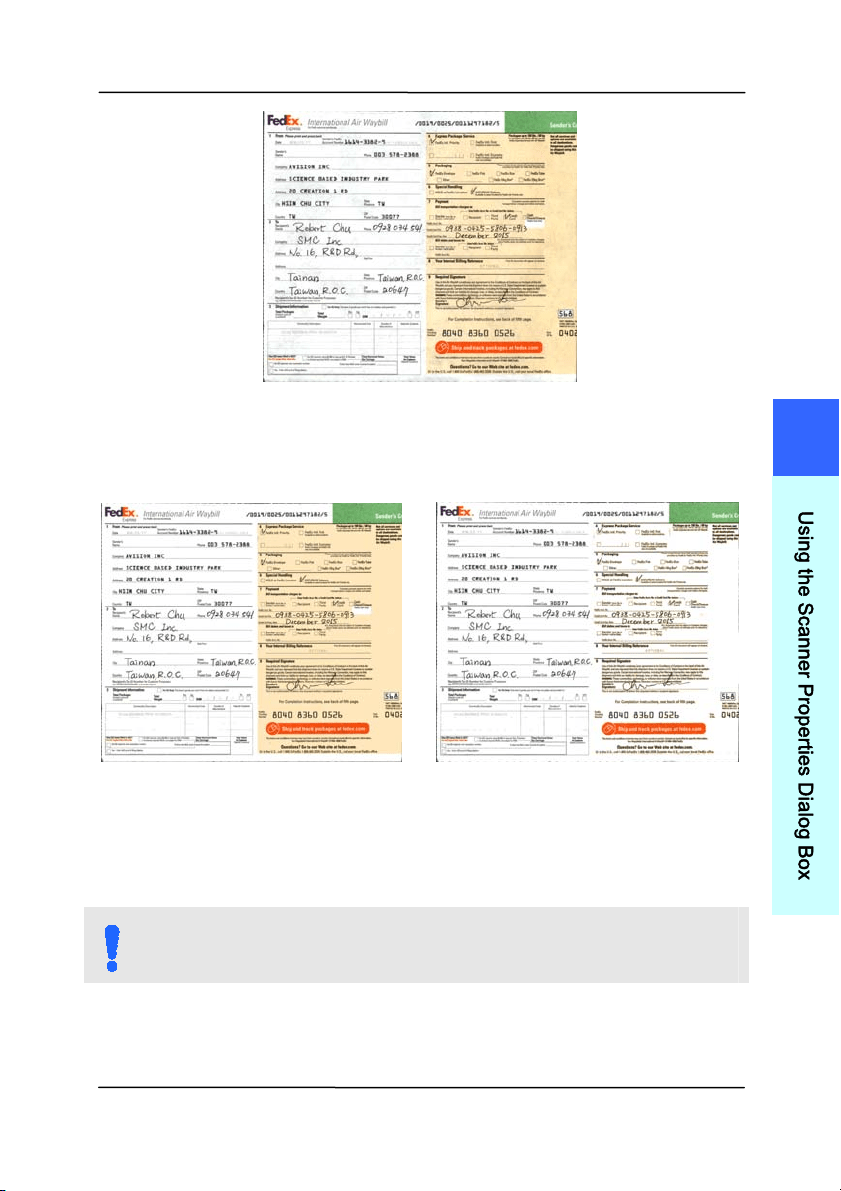
User ’s Ma nua l
4- 57
Ba ck ground Proce ssing: None
Ba ck ground Proce ssing:
Sm oot h
Ba ck ground Proce ssing:
Rem oval
Fill Color: White
N OTE:
Background color in sm all zone will not be processed or
rem oved.
4
U
s
i
n
g
t
h
e
S
c
a
n
n
e
r
P
r
o
p
e
r
t
i
e
s
D
i
a
l
o
g
B
o
x
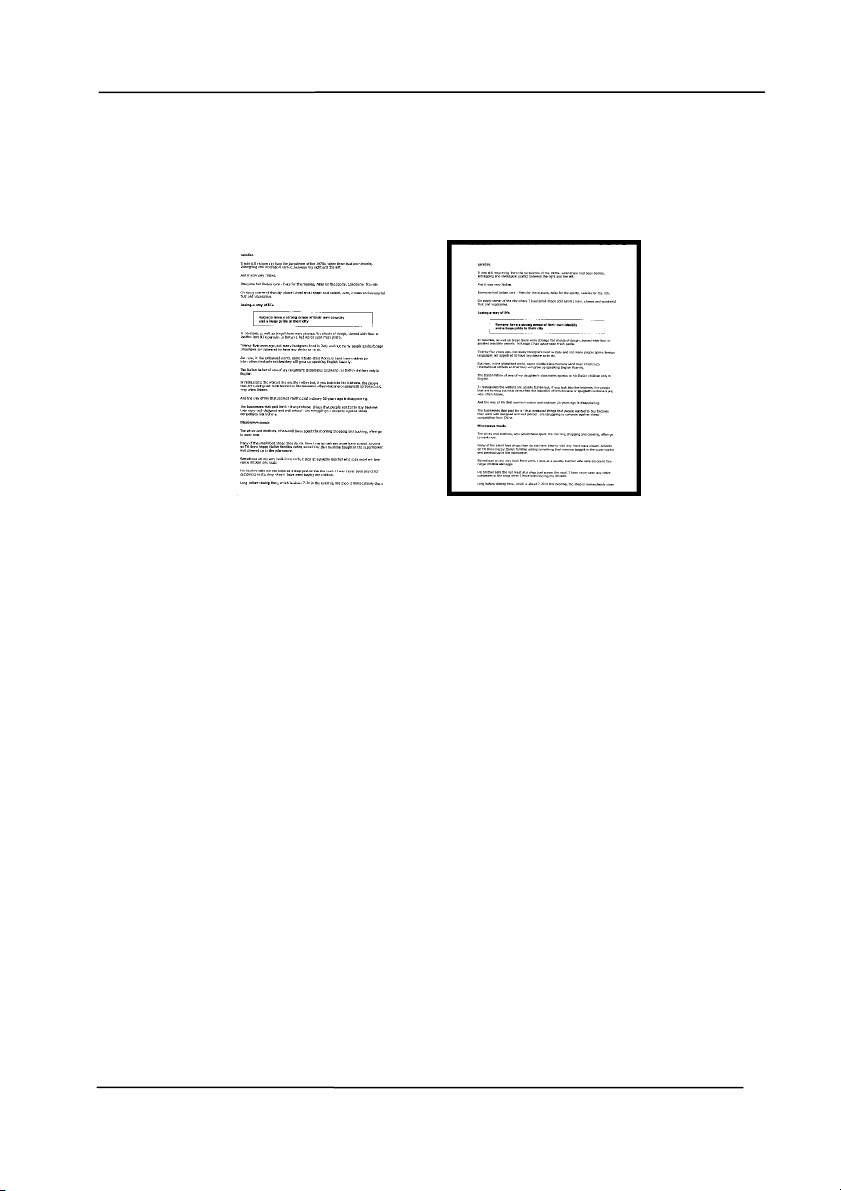
User ’s Ma nua l
4- 58
Edge
Fill
Check Whit e or Black if you wish t o add white or
black edge on the border of your scanned im age.
Enter the value from 0 to 5 m m . Default value is 0.
Original
Edge Fill: 5 m m ( Bla ck)
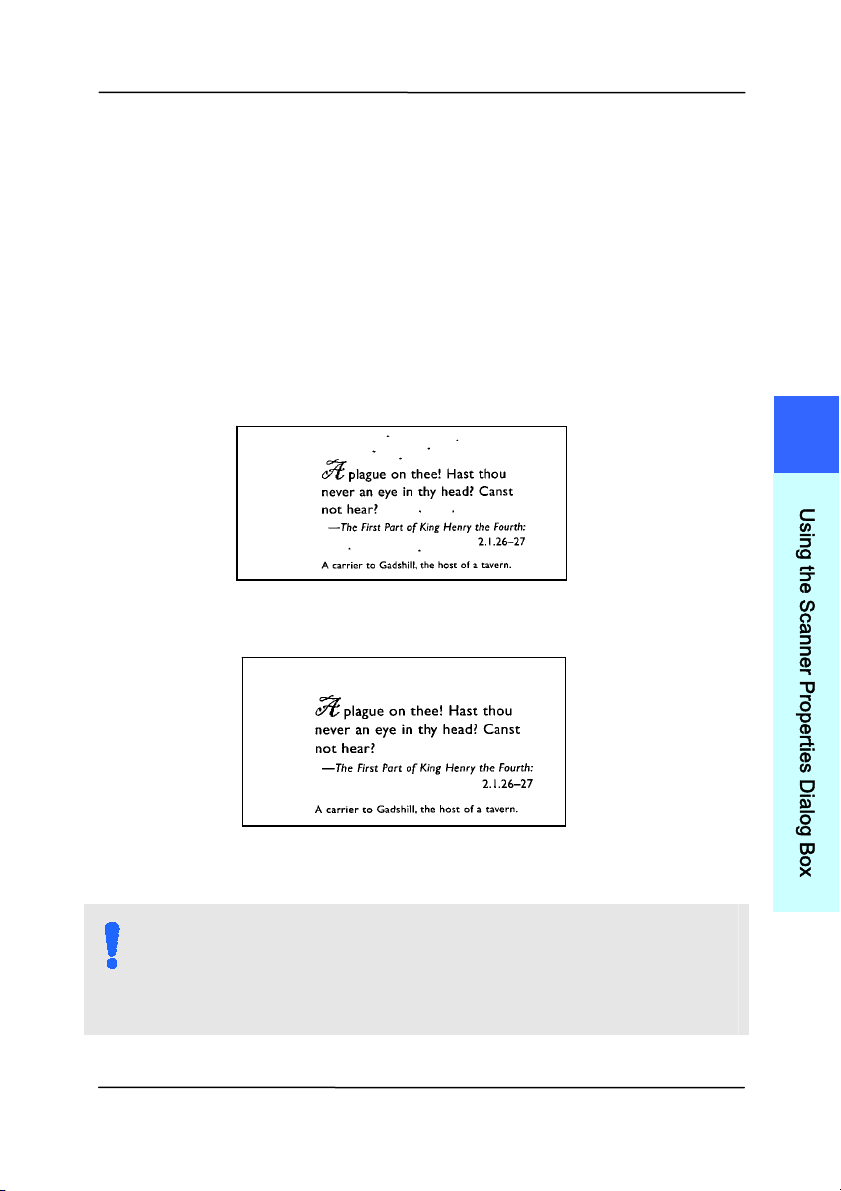
User ’s Ma nua l
4- 59
Despe ck le
Occasionally sm all dots or specks appear in t he background of
a scanned im age. Rem ove unwant ed speckles provides a
cleaner im age for OCR ( Opt ical Charact er Recognition)
processing, and also helps t o reduce com pressed file size.
Define t he speckles ( also known as im age noise) you wish t o
rem ove by specifying its num ber ( size) and radius ( range) . The
m easuring unit is pixel. The higher t he num ber, the m ore
speckles will be rem oved.
Before Despeckle
( noise num ber: 0, noise radius: 1)
Aft er Despeckle
( noise num ber: 22, noise radius: 10)
N OTE:
The funct ion is current ly available for Black and Whit e
im age only.
To scan at rated speed, it is recom m ended t o set the
noise radius up t o 10 pixels.
4
U
s
i
n
g
t
h
e
S
c
a
n
n
e
r
P
r
o
p
e
r
t
i
e
s
D
i
a
l
o
g
B
o
x
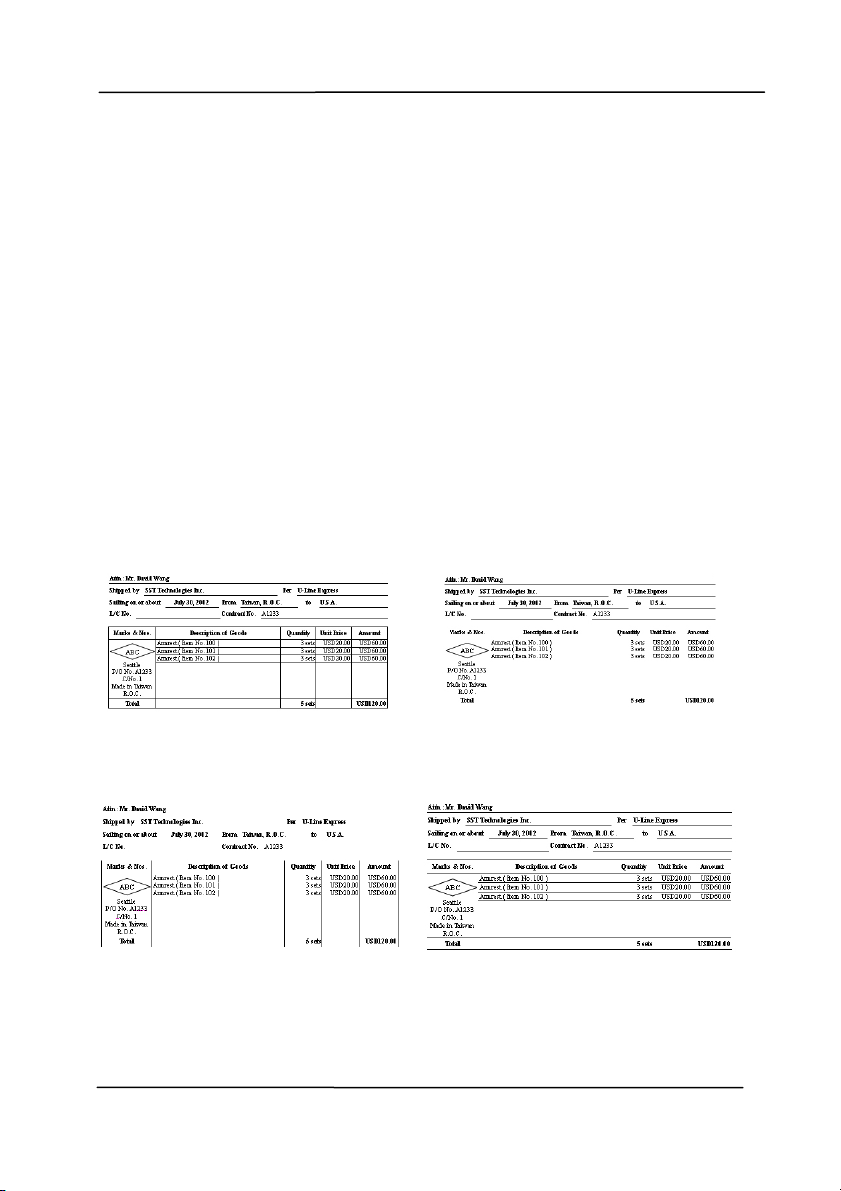
User ’s Ma nua l
4- 60
Line Rem ova l: When Black a nd W hite im age m ode is
select ed on the [ I m a ge] t ab, t he [ Line Re m oval] opt ion will
be enabled. Line Rem oval erases lines on t he im age and then
reconstruct s charact ers so the OCR ( Opt ical Charact er
Recognition) accuracy can be im proved.
Choice s: None, Form , Horizont al, Vert ical
N one – t he default m ode which does not rem ove any line.
For m – rem ove any form in t he docum ent.
Horizont al – select [ H or izontal] and t hen enter the lengt h of
horizont al line t o rem ove only t he horizont al line exceeding
your specified lengt h.
Ver t ica l – select [ Vertica l] and then ent er t he length of
vert ical line t o rem ove only the vert ical line exceeding your
specified lengt h.
N one Rem ove Form
Rem ove Horizon t a l Line
( over 3 0 m m )
Rem ove Ve rt ica l Line
( over 7 0 m m )
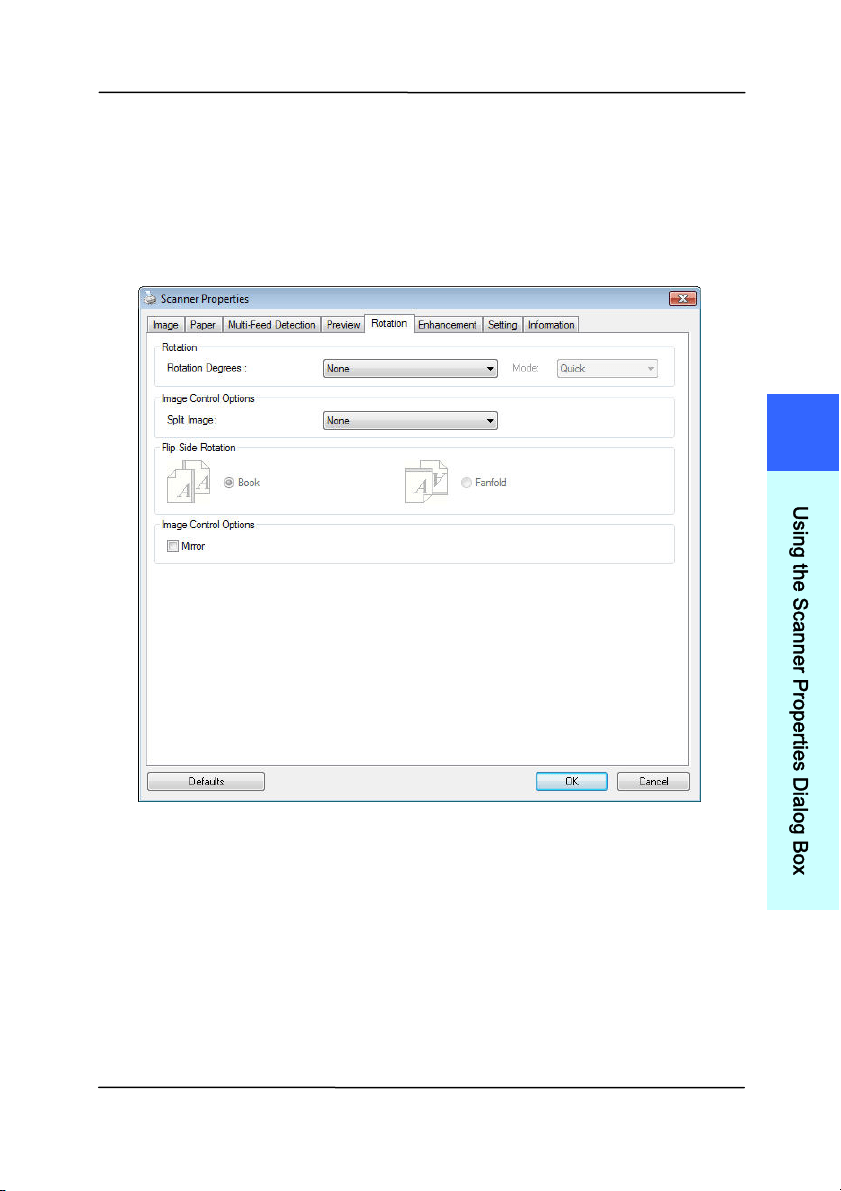
User ’s Ma nua l
4- 61
4 .1 0 The Rotation Tab
The Rotat i
on tab allows you to set the following im age rot ating
opt ions:
4
U
s
i
n
g
t
h
e
S
c
a
n
n
e
r
P
r
o
p
e
r
t
i
e
s
D
i
a
l
o
g
B
o
x
User ’s Ma nua l
4- 62
Rotat e
I m a ge
Choose the rotat ion angle from the drop down
list if you wish t o rotate your scanned im age.
Choice : N one, 9 0 ° CW ( clock w ise ) ,
9 0 ° CCW ( counter clockw ise) , 1 8 0 ° , Auto
ba sed on con t e nt s. Aut o r ot ate eve ry
eve n pa ge.
Original
Rotat e 9 0 ° CW
Rotat e 9 0 ° CCW
Rotat e 1 8 0 °
Aut o ba sed on con t e nt s: Aut om atically
rot ate im ages based on the cont ents of
docum ent. When
「Aut o ba sed on
cont ents
」 is select ed, its m odes will be
enabled to let you select m ore opt ions.
Mode: Qu ick , Full Text , Com ple x it y
Quick – the default m ode to let you rotat e
im ages at t he fast est speed.
Full Text – t he enhanced m ode for
docum ents wit h m ixed text orientat ion.
Com plexity – t he enhanced m ode yet at the
slowest speed for docum ent wit h com plex
im age or text orientat ion.
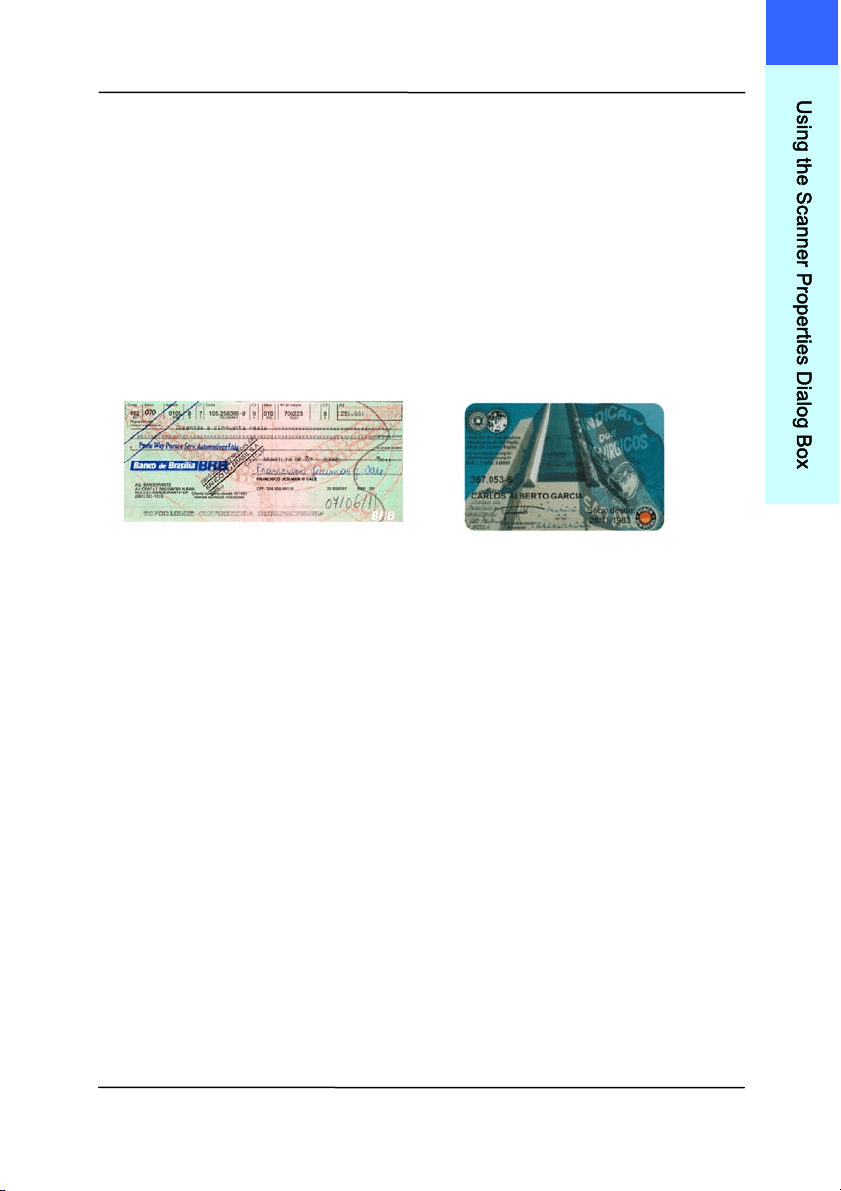
User ’s Ma nua l
4- 63
Aut o rot a t e ever y even page:
Autom at ically rot at e 180° on every even
page. This is especially useful w hen you scan
the inside pages from a book. As a result , if
you choose “Flat bed (book) ” from t he “Scan
Source” option, “auto rot ate every even page”
will be select ed as default .
N ot e: This opt ion va r ies base d on t ype of
sca nner.
Docum e nt w it h various
t ext or ientations
Docum e nt w it h dark or
com plex ba ckground
4
U
s
i
n
g
t
h
e
S
c
a
n
n
e
r
P
r
o
p
e
r
t
i
e
s
D
i
a
l
o
g
B
o
x
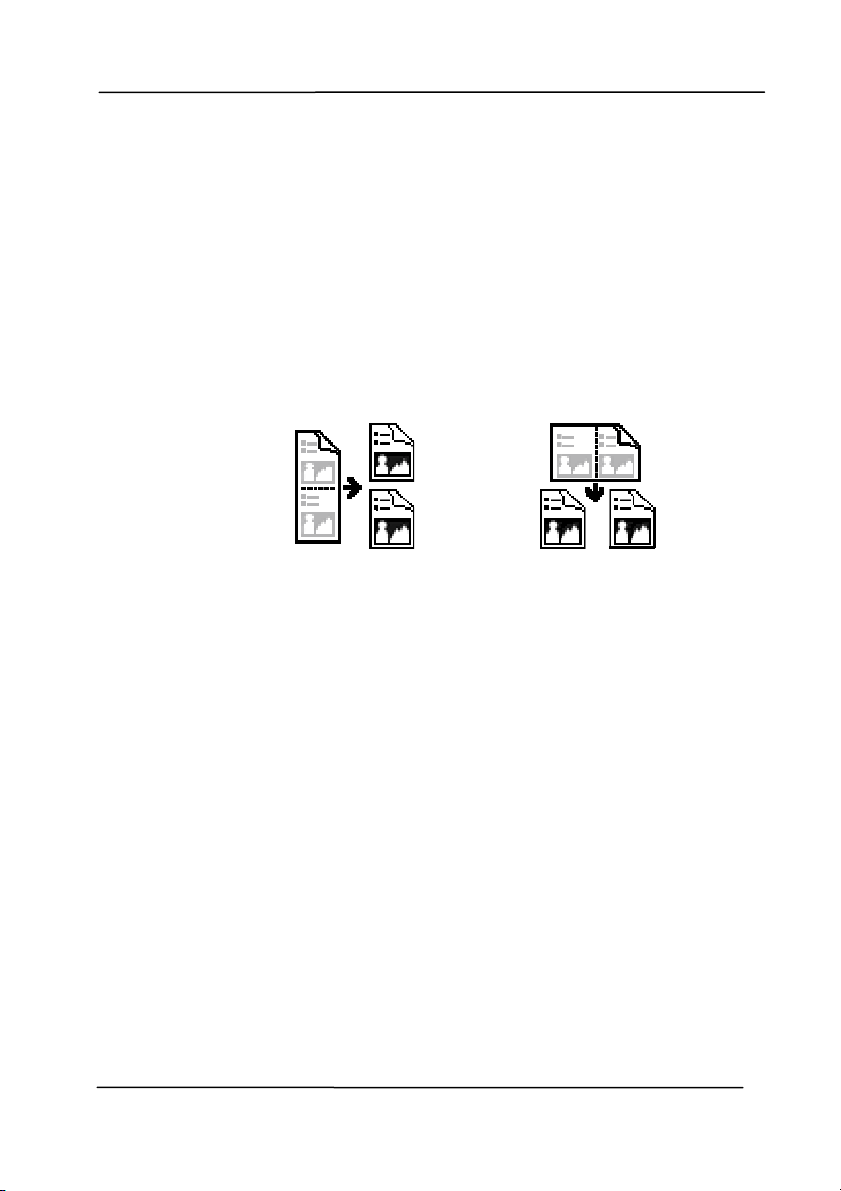
User ’s Ma nua l
4- 64
Split
I m a ge
By splitting an im age, t wo separat e im ages are
created horizont ally or vertically. This is useful
for docum ents containing two pages per im age
when you want t o save them as two im ages
( one page for one im age) . Choice : N one ,
Horizont al, Vert ical. Default is None.
Horizont al: Divide one im age int o t he upper
half and t he lower half.
Ver t ica l: Divide one im age int o the left half and
the right half.
Split Horizont a lly
Split Ve rt ica l
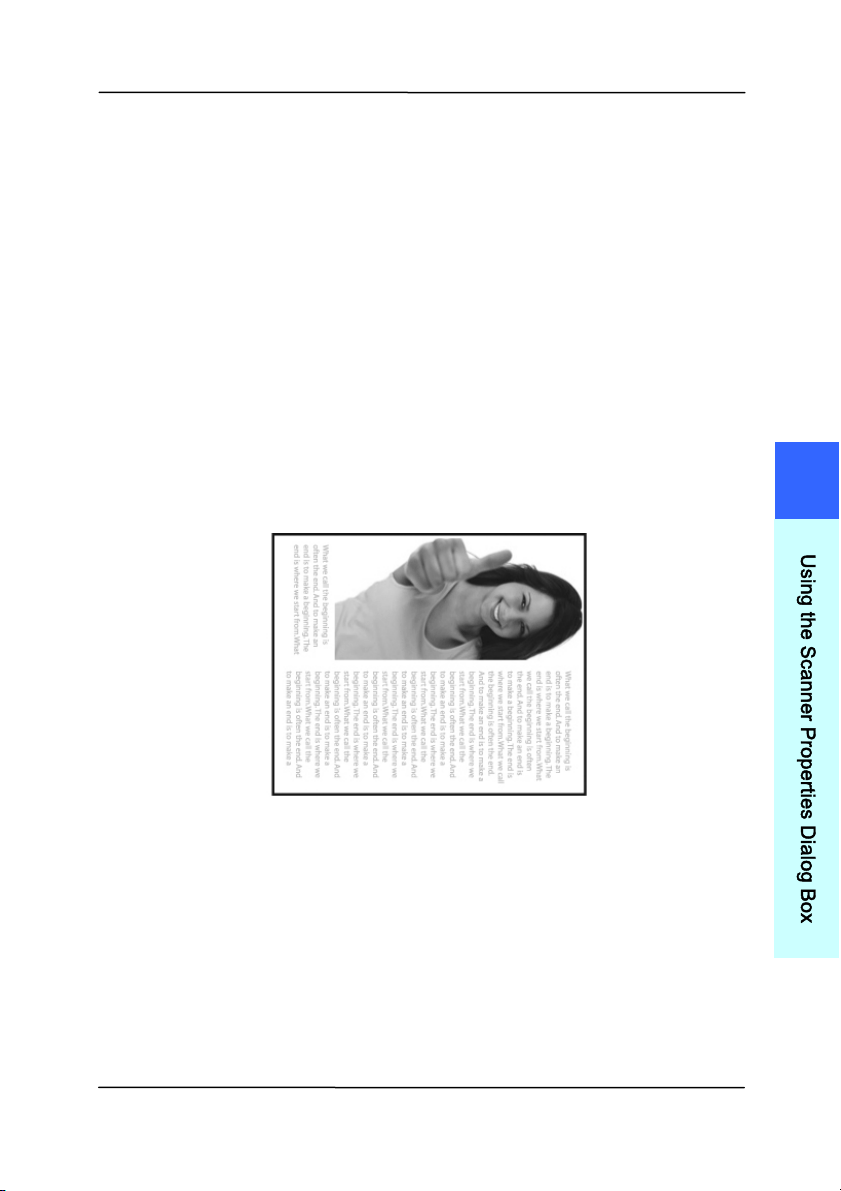
User ’s Ma nua l
4- 65
Flip Side
Rotat ion
Select “ fanfold” t o rot ate t he im age of the
reverse side t o 180 degrees.
This is applied t o double- sided docum ent
which are viewed in portrait are som etim e
fed int o t he scanner in landscape or vice
versa.
Choice : Book, Fa n fold.
I f “ Book” is select ed, t he im age of the
reverse side will not be rotat ed.
The follow ing illust rat ion shows the docum ents which should
be viewed in portrait are fed into t he scanner in landscape
4
U
s
i
n
g
t
h
e
S
c
a
n
n
e
r
P
r
o
p
e
r
t
i
e
s
D
i
a
l
o
g
B
o
x
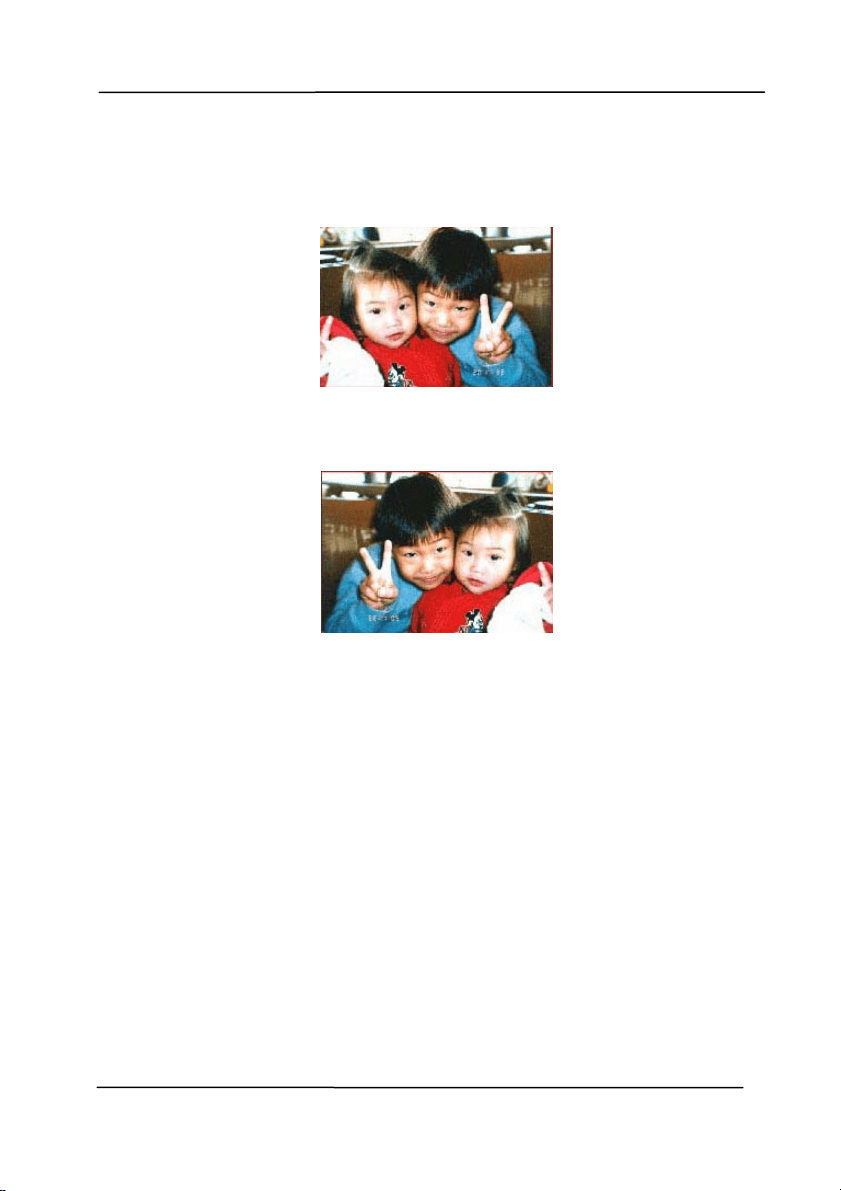
User ’s Ma nua l
4- 66
I m a ge
Control
Opt ion
Check the Mirror box if you wish t o reverse the right
and left side of your im age.
Original
The M ir ror Effe ct
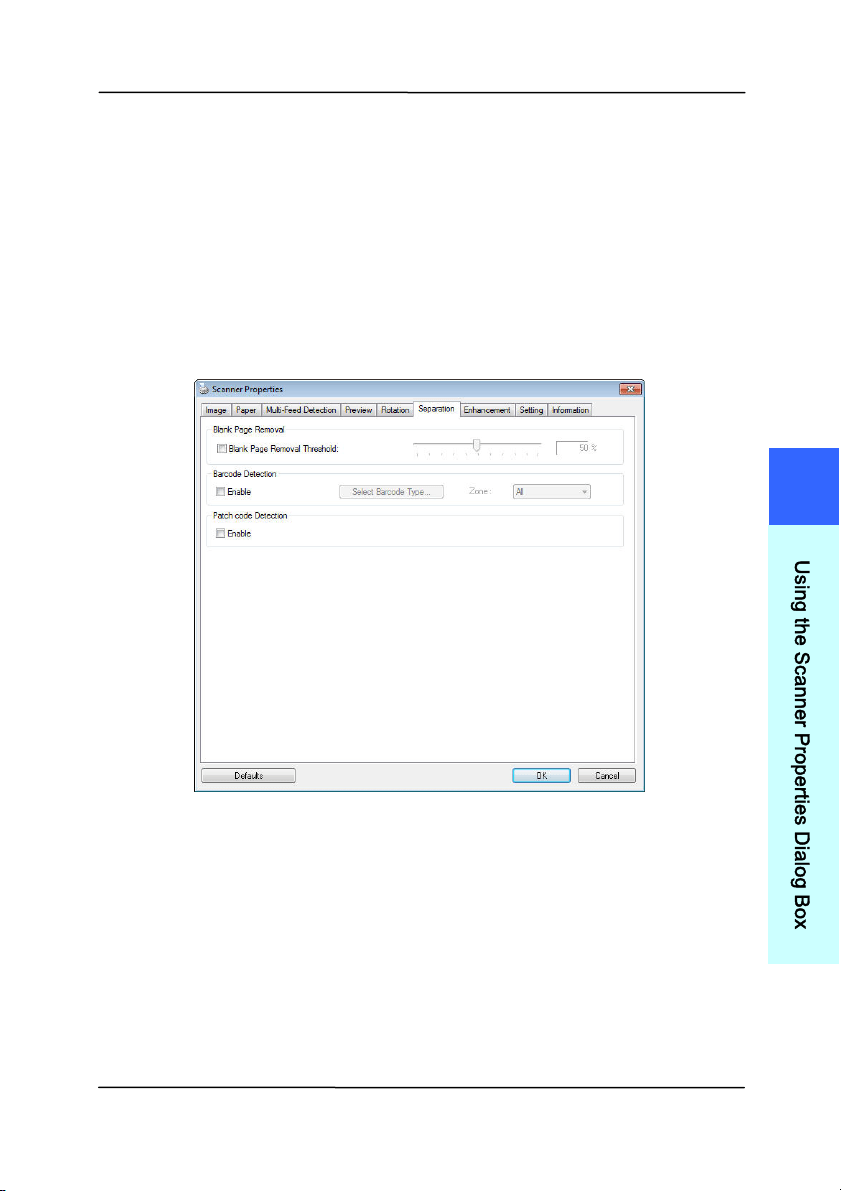
User ’s Ma nua l
4- 67
4 .1 1 The Sepa r a t ion Ta b
The Separation t ab allows you t o enable t he det ect ion engine t o
det ect t he blank page, barcode, and patch code and then notify
t
he soft ware application w hich supports docum ent separat ion to
separat e your m ult i-page docum ents. Choices: Blank Page
Rem oval, Barcode Det ect ion, Pat ch Code Det ect ion.
Blank Page
Rem oval
Choices: None, Blank Page Rem oval Threshold,
I m age Size.
N one – Do not rem ove the blank pages.
Threshold - Move the slider to the left or right
to define your t hreshold for the blank page.
I m a ge Size – Range: 1~ 10000 KB. Specify
your desired im age size to det ect t he page as a
blank page. For exam ple, if 3 KB is select ed,
any page less than 3 KB will be recognized as
blank page.
4
U
s
i
n
g
t
h
e
S
c
a
n
n
e
r
P
r
o
p
e
r
t
i
e
s
D
i
a
l
o
g
B
o
x

User ’s Ma nua l
4- 68
When the bar code has been detect ed successfully,a file
[ avbarcode.ini] will be created and st ored in the following pat h:
Windows XP:
C: \ Docum ents and Set tings\ All Users\ Applicat ion
Data\ % PRODUCTNAME%
Vist a, Windows 7, Windows 8, Windows 10:
C: \ Program Dat a\ % PRODUCTNAME%
Ba rcode De t ect ion:
Check [ Enable] to detect barcode and notify t he software
applicat ion for advanced processing. Please not e the whole
docum ent will be checked and no specific detect ion area needs
to be designated.
Ba rcode Types:
The following barcode t ypes can be det ect ed.
Tw o- dim ensional codes
Azt ec
DataMatrix
PDF417
QR Code
One- dim ensional barcodes:
Add- 2
Add- 5
Airline 2 of 5
Australian Post 4-St ate Code
BCD Mat rix
Codabar
Code 128 ( A,B,C)
Code 2 of 5
Code 32
Code 39
Code 39 Extended
Code 93
Code 93 Extended
DataLogic 2 of 5

User ’s Ma nua l
4- 69
EAN 128 ( GS1, UCC)
EAN- 13
EAN- 8
GS1 DataBar
I ndust rial 2 of 5
I nt elligent Mail ( One Code)
I nt erleaved 2 of 5
I nverted 2 of 5
I TF- 14 / SCC- 14
Matrix 2 of 5
Patch Codes
PostNet
Royal Mail ( RM4SCC)
UCC 128
UPC-A
UPC-E
Ba rcode Zone:
Specify t he barcode zone to be det ect ed.
Select 「All」 to checks t he whole docum ent and detect s
barcodes. Or you m ay speed up t he process by specifying a
det ect ion area since only the specified area is checked.
Choice : All, Top, Bot t om , Left , Right , Bott om Right,
Bot t om Le ft, Top Right, Top Left
4
U
s
i
n
g
t
h
e
S
c
a
n
n
e
r
P
r
o
p
e
r
t
i
e
s
D
i
a
l
o
g
B
o
x

User ’s Ma nua l
4- 70
Choice for barcode zone on a page:
All
Top
Bot t om
Left
Right
Bot t om
Right
Bot t om
Left
Top Right
Top Le ft
N OTE:
Recom m ended resolut ion: 200~ 600 dpi for regular
barcode, 300~ 600 dpi for QR code.
Skewed barcodes m ay not be recognized correct ly.
Using the sam e sheet repeatedly m ay decrease t he
recognition accuracy due t o accum ulat ed dirt on t he
sheets. I f t he sheet is not recognized correct ly or gets
sm udged, replace it wit h a new sheet .
Patch code D et e ct ion:
Check [ Enable] to detect patch codes and not ify the software
application for advanced processing.
A patch code is a pat t ern of parallel, alt ernating black bars and
spaces ( i.e. a barcode) t hat is print ed on a docum ent. Patch
code sheet is m ost com m only used as a docum ent separator in
a st ack of docum ent.
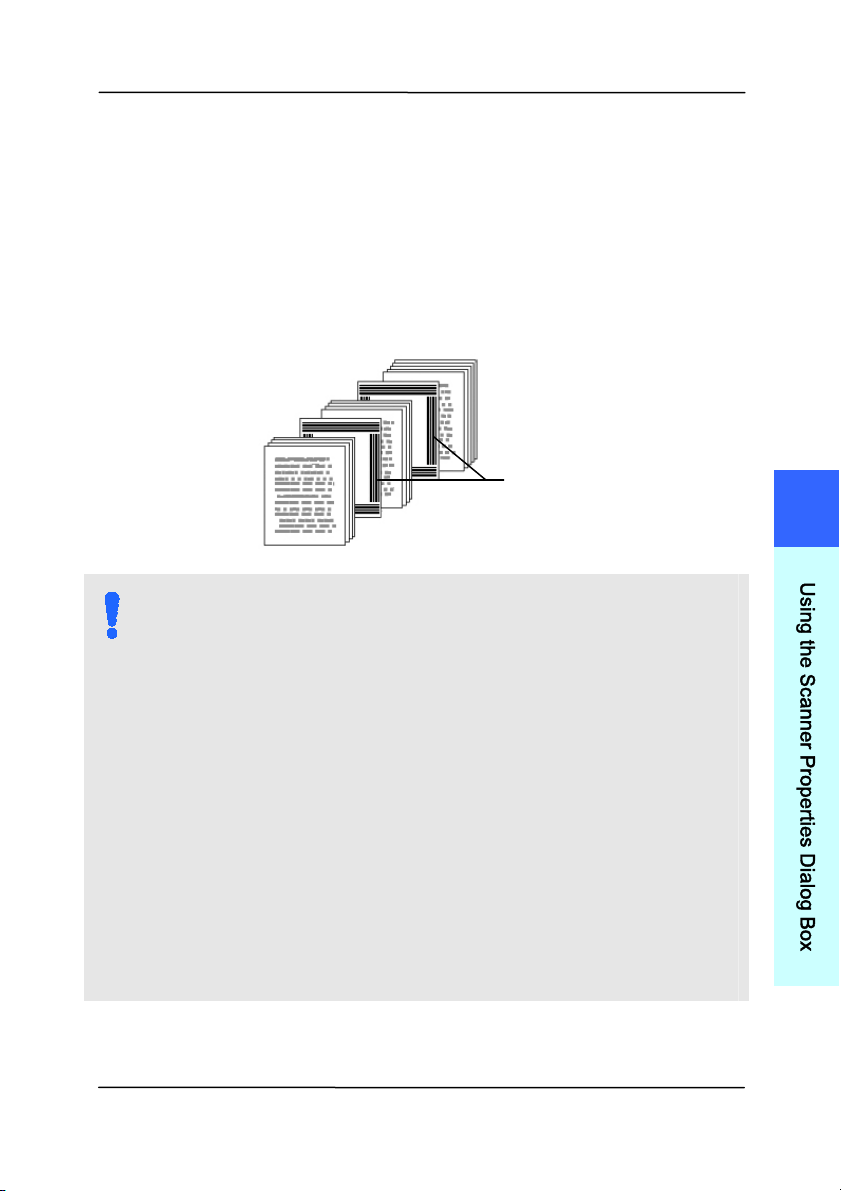
User ’s Ma nua l
4- 71
You can find various sizes of patch codes ( PDF) by choosing
[ St a r t ] m enu> [ All Progr a m s] > [ Avision Sca nner
Se ries] > [ Pa t ch code] in succession.
Sim ply print the PDF file to produce the patch code sheet.
I nsert t he pat ch code sheet s t o wherever you want t he file to
separat e.
N OTES TO PRI NT TH E PATCH CODES:
Use blank white paper.
Set the scaling t o 100% . The sheet is not recognized
correct ly when print ed in a size sm aller t han t he
original.
Do not use toner saving m ode. The sheet is not
recognized correct ly when t he print is too light .
Do not use thin paper in order to avoid bleed-through
from t he back.
When you copy a pat ch code sheet that you printed
out, m ake sure t o copy by the sam e size and
bright ness as the original copy.
Use the sam e sheet repeat edly m ay decrease the
recognition accuracy due t o accum ulat ed dirt on t he
sheets. I f t he sheet is not recognized correct ly or gets
sm udged, replace it wit h a new sheet .
Patch code sheet
4
U
s
i
n
g
t
h
e
S
c
a
n
n
e
r
P
r
o
p
e
r
t
i
e
s
D
i
a
l
o
g
B
o
x
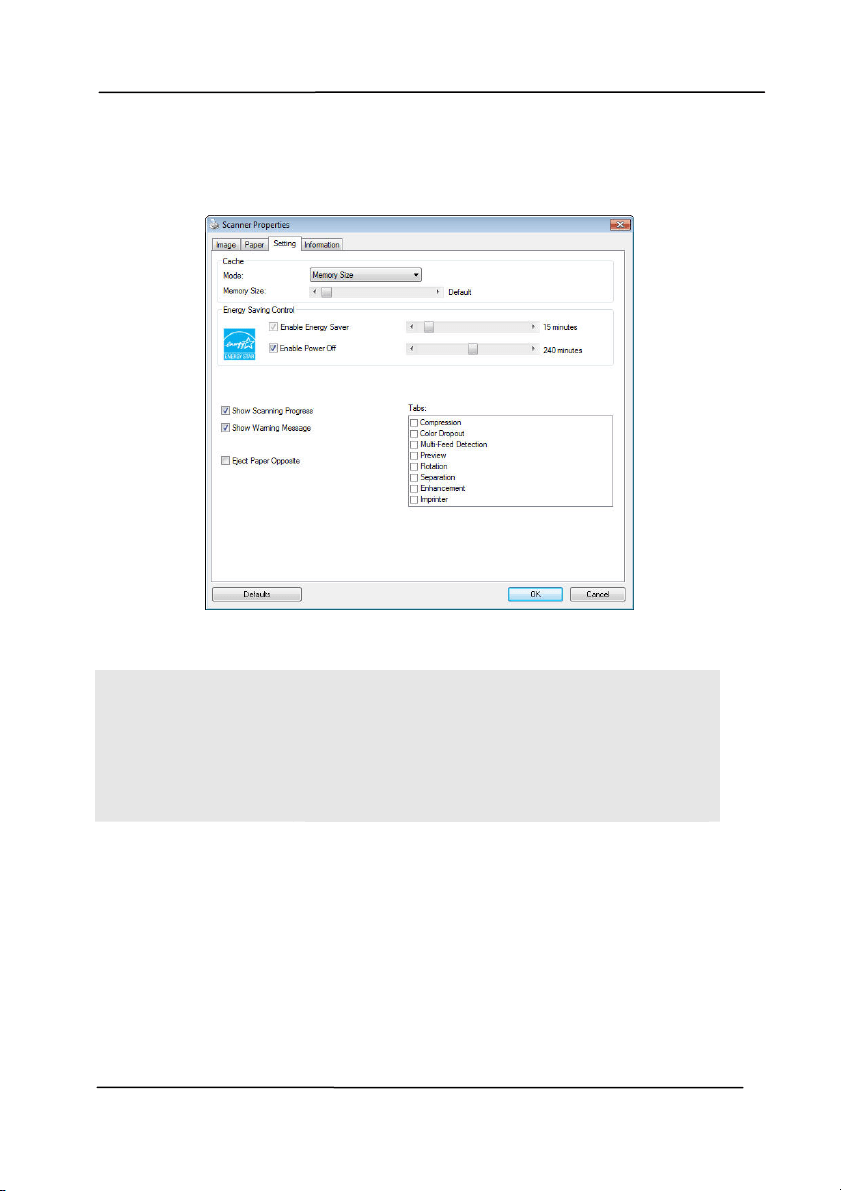
User ’s Ma nua l
4- 72
4 .1 2 The Set t ing Ta b
The Set t i
ng t ab allows you to set the following set t ings:
The Sett ing t a b dialog box
Energy Savin g
Control
Check t he Enable Energy Saver box
and m ove the slider t o set the am ount
of tim e to st art the energy saver after
your last act ion. The range is from 1 to
240 m inut es. The default value is 15
m inutes.
Enable Pow er
Off
Check t he Enable Pow er Off box and
m ove t he slider to set the am ount of
tim e to aut om atically t urn off the
scanner after your last act ion. The
range is from 1 to 480 m inut es. The
default is 240 m inut es ( 4 hours) . Note
the value of “Power Off” has t o be
great er t han or equal t o the value of
“ Energy Saving” .

User ’s Ma nua l
4- 73
Cache
Mode: N one, Page N um ber, M em ory
Size.
This opt ion allows you to assign a specified
m em ory size from t he available RAM to
process t he im age data. By specifying a
sm aller m em ory size, you can free m ore
m em ory for other applications you are
running. By specifying a larger m em ory
size, you can have m ore m em ory to
process t he im age data especially when you
have a large am ount of docum ents needed
to be scanned.
You can also specify your m em ory size by
the page num ber. For your inform ation, an
A4 color docum ent scanning at 300 dpi
consum es approxim ates 24MB.
I m a ge Count
When the select ed cache m ode is “ none” ,
the im age count option allows you t o assign
num ber of pages you need to scan. For
exam ple, if you wish t o scan t he first t wo
pages, sim ply m ove the page slider t o 2,
and the scan act ion will be st opped when
the scanning of t he first t wo pages have
been com pleted.
Show
Sca n ning
Progr ess
Check and t he scanning progress bar will
be shown during scanning.
4
U
s
i
n
g
t
h
e
S
c
a
n
n
e
r
P
r
o
p
e
r
t
i
e
s
D
i
a
l
o
g
B
o
x

User ’s Ma nua l
4- 74
Show W arning
Messa ge
Check to show the warning m essages
such as “ ADF pad count exceeds
50,000 scans ( t he num ber varies based
on type of scanner). Please replace the
ADF pad and reset the pad count .”
Sa ve Sett ings
aft er Closing
Check to save your scanner properties
settings aft er leaving t he dialog box.
Next tim e when you open t he Scanner
Propert ies dialog box, t he previously
saved settings will be shown.
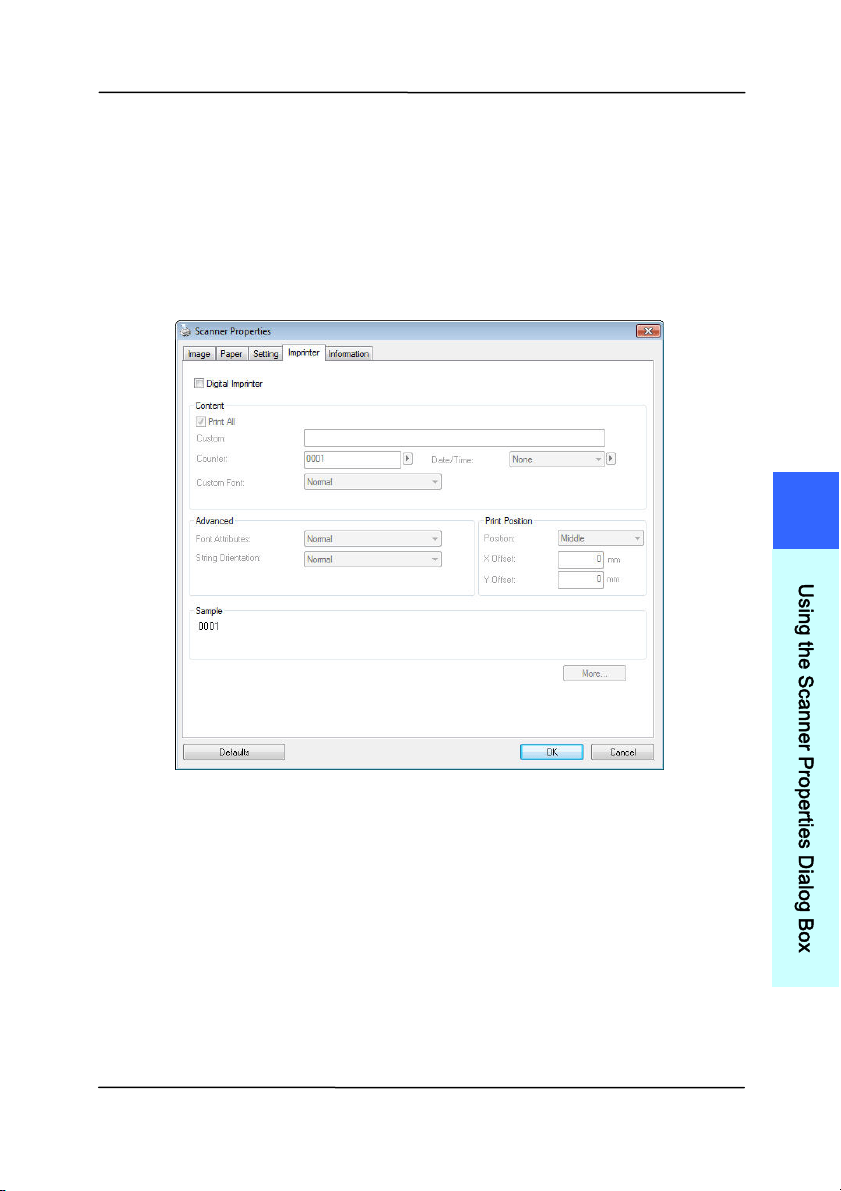
User ’s Ma nua l
4- 75
4 .1 3 The I m print er Tab
The I m pri
nt er t ab allows you to print alphanum eric charact ers,
dat e, t im e, docum ent count and cust om m essage on your
scanned im age if digit al im print er is select ed or at the back of
your docum ent if ext ernal im print er is select ed.
Choice : Ext ernal I m printer, Digit a l I m prin t e r . I f you have
inst alled an ext ernal im printer, choose ext ernal im print er. I f
you do not have an im printer, choose digital im printer. Note
External I m print er provides a vert ical and rear-side print
capabilit y while digital print er provides a horizont al and front -
side print capability.
4
U
s
i
n
g
t
h
e
S
c
a
n
n
e
r
P
r
o
p
e
r
t
i
e
s
D
i
a
l
o
g
B
o
x

User ’s Ma nua l
4- 76
Contents
Print All Check Print All to aut om atically print the
text at all pages of your docum ents.
Uncheck Print All t o print t he text for the
first page of your docum ents only.
Cust om Enter your cust om text to be included in your
print st ring.
Counter Show the docum ent count for t he scan
session. This value is increased sequent ially
by the scanner.
Date/ Tim e Choose if you wish t o include the date and
tim e in your print st ring.
Form at: YYYYMMDDHHSS For exam ple,
20090402170645- check0001 indicates year,
m onth, date, hour, seconds, your cust om
text and the count er.
Cust om
Font
Choose your desired font.
Choice : N orm a l, Fixed W idt h
Fixed W idth ( Mono spaced) fonts have a
fixed charact er spacing. So each charact er
occupies t he sam e widt h.
Advance d
Font
Attribut es
Choose your font at t ribut es. Choice :
N or m al, Un der line, Double, and Bold.
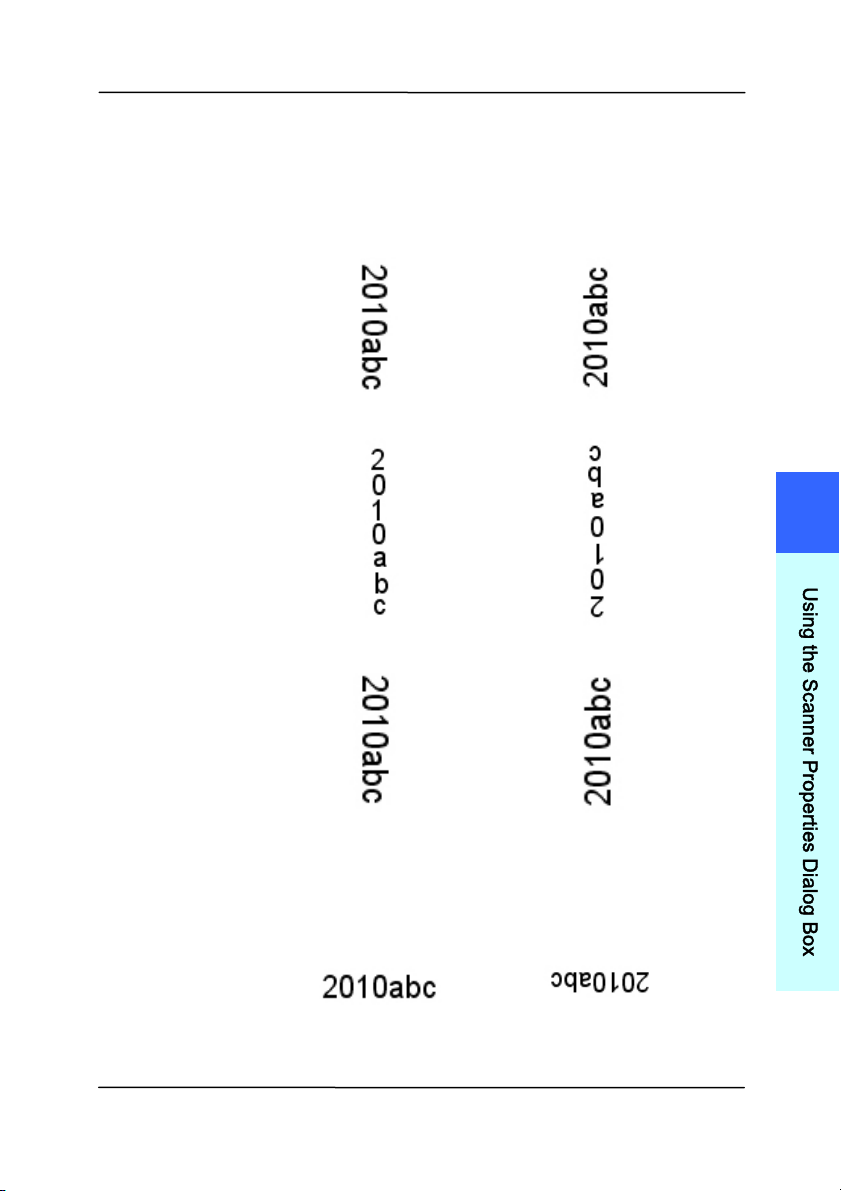
User ’s Ma nua l
4- 77
St ring
Orient ation
Choose your st ring orientat ion.
Choice : N orm a l, Rot at ed, Ve rt ica l,
Ver t ica l I nve rsion, 9 0 degre e s CW , 9 0
de gree s CCW
N or m al
Rotat e d
Ver t ica l
Ver t ica l I nve rsion
9 0 degrees CW
9 0 degrees CCW
I f you check the digit al im printer to st am p
text on your scanned im age, t he illust rat ion of
norm al and rot ated st ring is shown below:
N or m al
Rotat e d
4
U
s
i
n
g
t
h
e
S
c
a
n
n
e
r
P
r
o
p
e
r
t
i
e
s
D
i
a
l
o
g
B
o
x
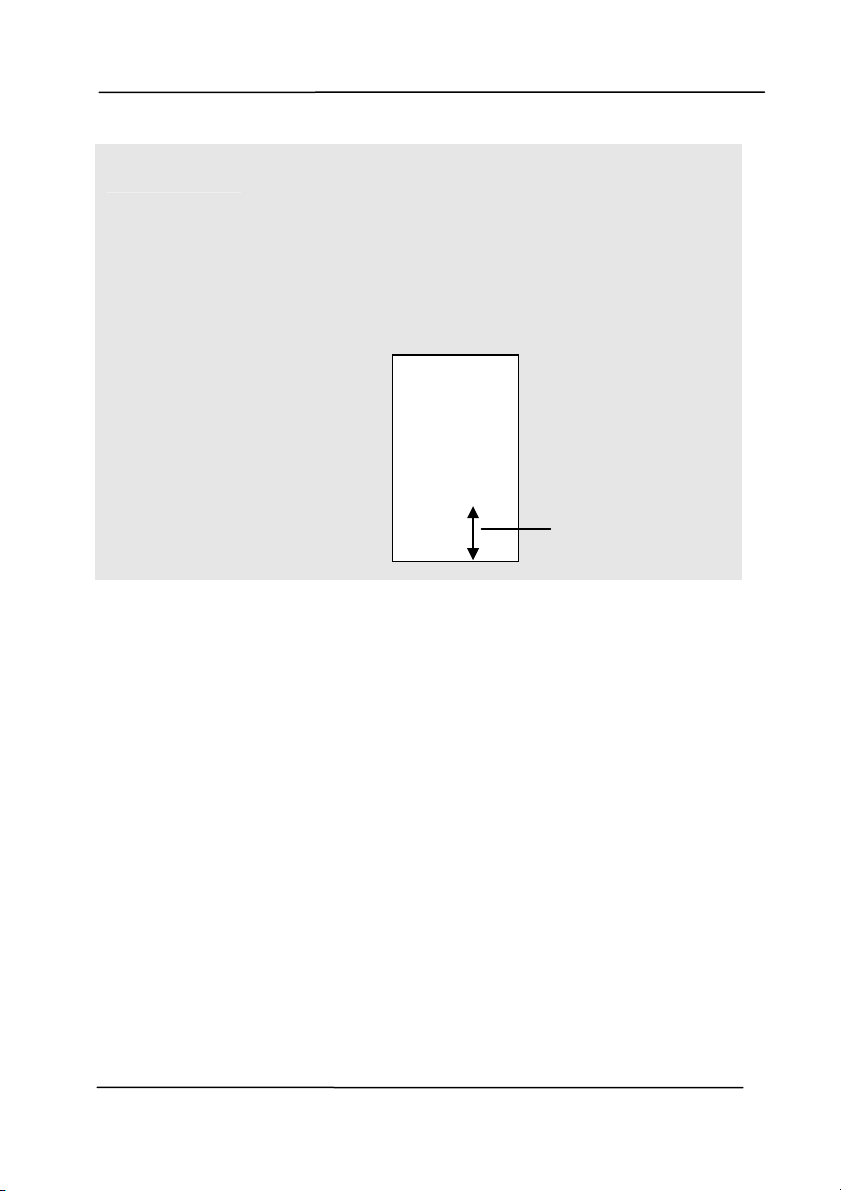
User ’s Ma nua l
4- 78
Print
Posit ion
Choose the position you wish to print your
st ring. Move the slider t o the right to increase
the value or t o the left to decrease the value.
Range: 0~ 355m m , default : 0 m m
The value indicates t he height from the
bot tom of your paper to t he last letter of your
st ring. This opt ion is available only if an
external im print er is inst alled.
Print Posit ion ( for digit a l im print er)
Choose the posit ion of your printed st ring. Ch oice : Top,
Middle, Bot t om , Cust om . I f Custom is select ed, enter the X
and Y offset value to specify the posit ion.
T
he value o
f
Print Posit ion
0001abc 2010
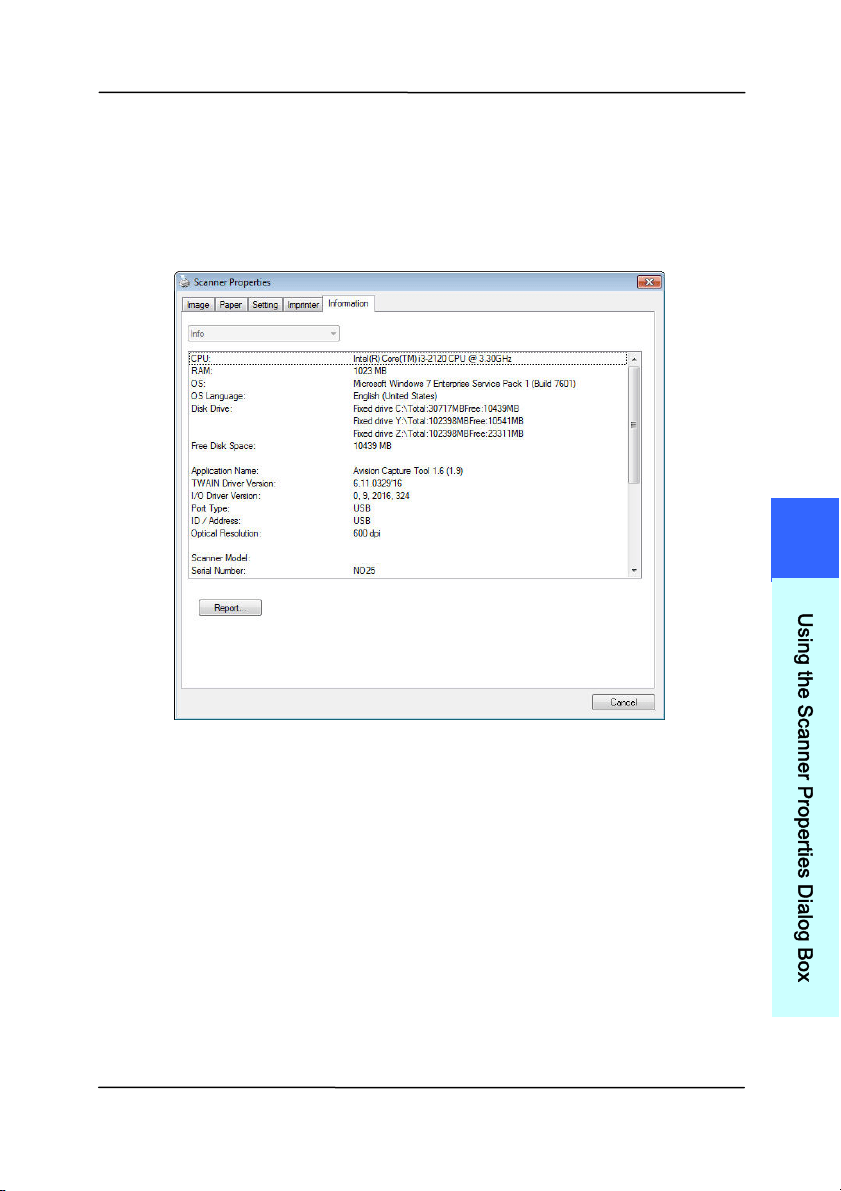
User ’s Ma nua l
4- 79
4 .1 4 The I nform a t ion Ta b
The I nform ation t ab displays t he following syst em and scanner
in
form ation.
The I nform at ion t a b dialog box
The “Report ” button
:
I f you encount er any error m essage while using t he scanner,
click the Report button. A report.t xt file [
Windows XP:
C: \ Docum ents and Set tings\ All Users\ Applicat ion
Data\ % PRODUCTNAME% ;
Vist a, Windows 7, Windows 8,
Windows 10:
C: \ Program Data\ % PRODUCTNAME% ( C: syst em
drive) ] will be generat ed. Please send this file t o t he nearest
service center for t rouble shooting.
4
U
s
i
n
g
t
h
e
S
c
a
n
n
e
r
P
r
o
p
e
r
t
i
e
s
D
i
a
l
o
g
B
o
x

User ’s Ma nua l
4- 80
The “Rese t Roller Count ” but ton:
Aft er scanning over a recom m ended num ber of pages ( refer to
subsequent sect ion 7.4 Replacing the ADF Roller) t hrough t he
ADF, the ADF roller m ay be worn out and you m ay experience
problem s w ith docum ent feeding. I n t his case, it is highly
recom m ended t o replace the ADF roller with a new one. ( Note
the replacem ent of the ADF roller has t o be perform ed only by
authorized service center. Therefore, please return your
scanner for roller replacem ent.) Aft er replacing t he ADF roller,
click the “ Reset Roller Count ” but t on t o reset the roller count .
N OTE:
The lifet im e and t he replacing procedure vary based on
type of scanner.
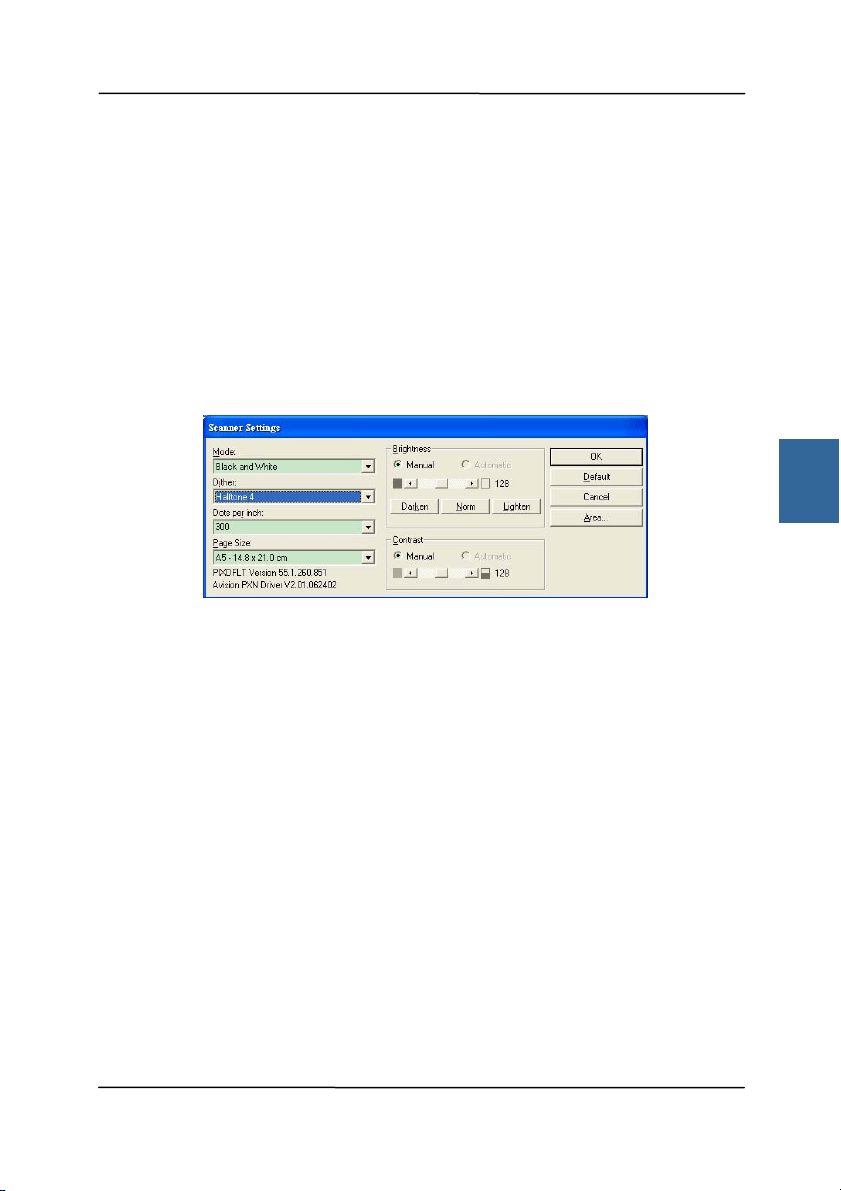
User ’s Ma nua l
5- 1
5 . I SI S I nt erface Operat ion
* Please refer to t he preceding chapter, Scanner I nstallation, to
inst all I SI S scanner driver. You m ay st art your I SI S- com pliant
soft ware applicat ion t o scan via t he I SI S user int erface.
The I SI S driver operation m ethod is sim ilar t o t he TWAI N’s.
Every funct ion on the I SI S interface screen is briefly described
as below:
Mode: Select one of scan m odes, including B&W, gray, color
opt ions.
Dither: 5 halft one levels available, can be disabled.
Dot s per inch: Select your desired resolut ion.
Pape r Size: Select your desired paper size.
Br igh t ness: Adj ust your scan im age bright ness or darkness.
Contrast : Adj ust the range bet ween the darkest and the light est
shades in t he im age.
Default: Click to reset all set t ings.
Are a : Select your desired scan area or position.
5
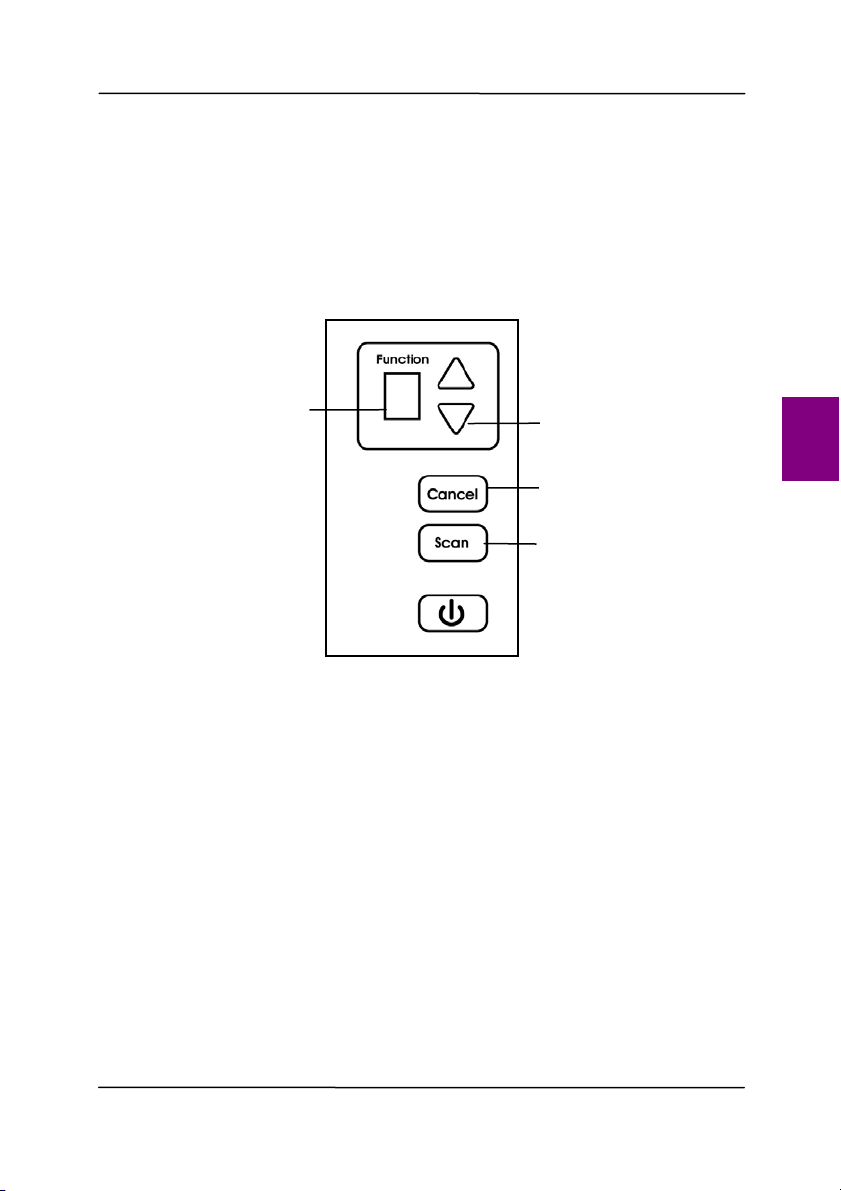
User ’s Ma nua l
6- 1
6 . Using t he But t ons
The following pict ure shows t he 4 but t ons and 1 funct ion
screen on the scanner.
6 .1 I nstalling Button Manager V2
Button Manager V2 provi
des you an easy way to scan your
docum ent and then link t he scanned im age t o your designat ed
soft ware applicat ion. All this can be done by a sim ple t ouch of
the button on the scanner. Yet, before you scan, it is
recom m ended t o check the button configurations first t o ensure
a proper file form at and a dest inat ion application.
Function Screen
Function-Select
But t on
Cancel But t on
Scan But t on
6
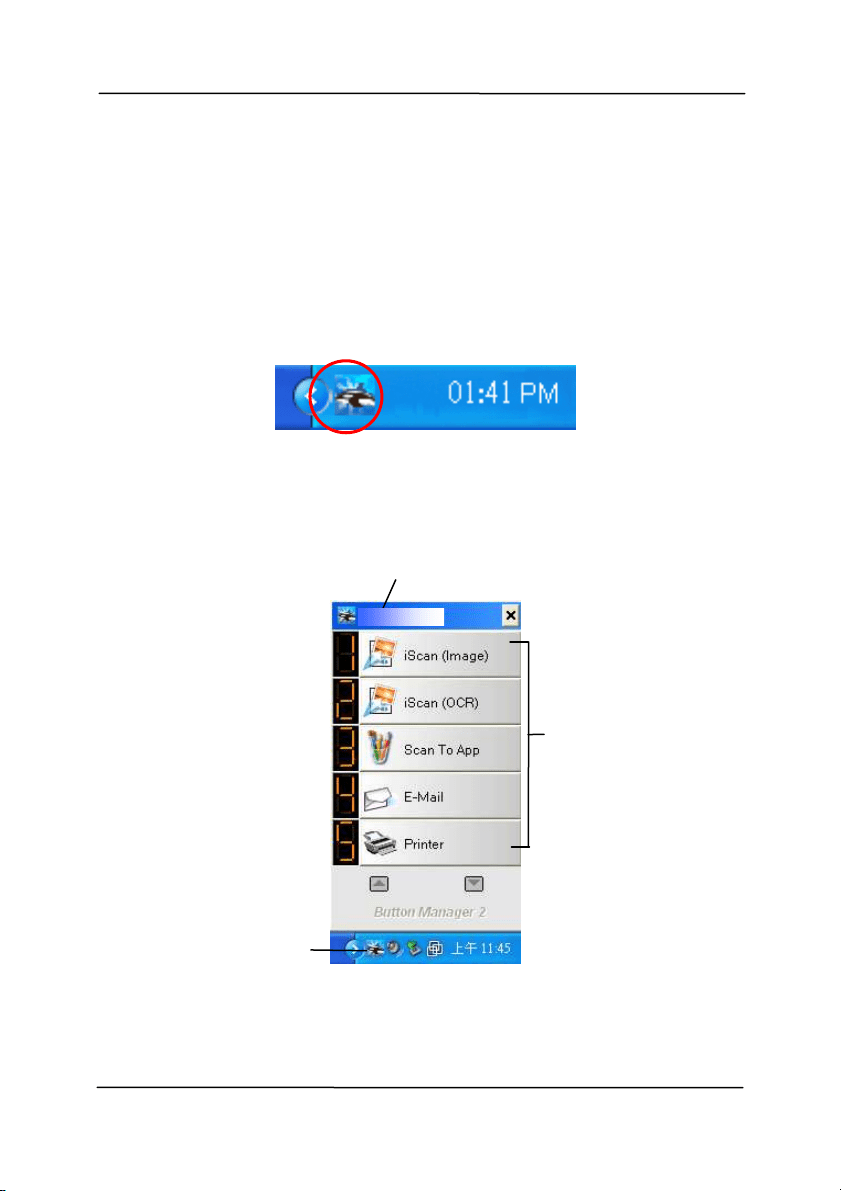
User ’s Ma nua l
6- 2
6 .2 Check ing t h e But t on Con figura t ions be fore Scanning
1. But t on Manager V2 runs from t he syst em t ray. Aft er Button
Manager V2 and t he scanner driver are properly inst alled,
Bu
tt on Manager V2 is start ed and t he But t on icon will be
displayed on the syst em t ray at the bottom right corner of
your com put er screen.
2. Left - click the But t on Manager V2 icon t o prom pt t he
following But ton Panel.
The But t on Panel
T
his indicates
the scanner m odel
The But ton
I con
The Funct ion
I con
( The num ber of
funct ion icons
vary based on
type of
scanner.)
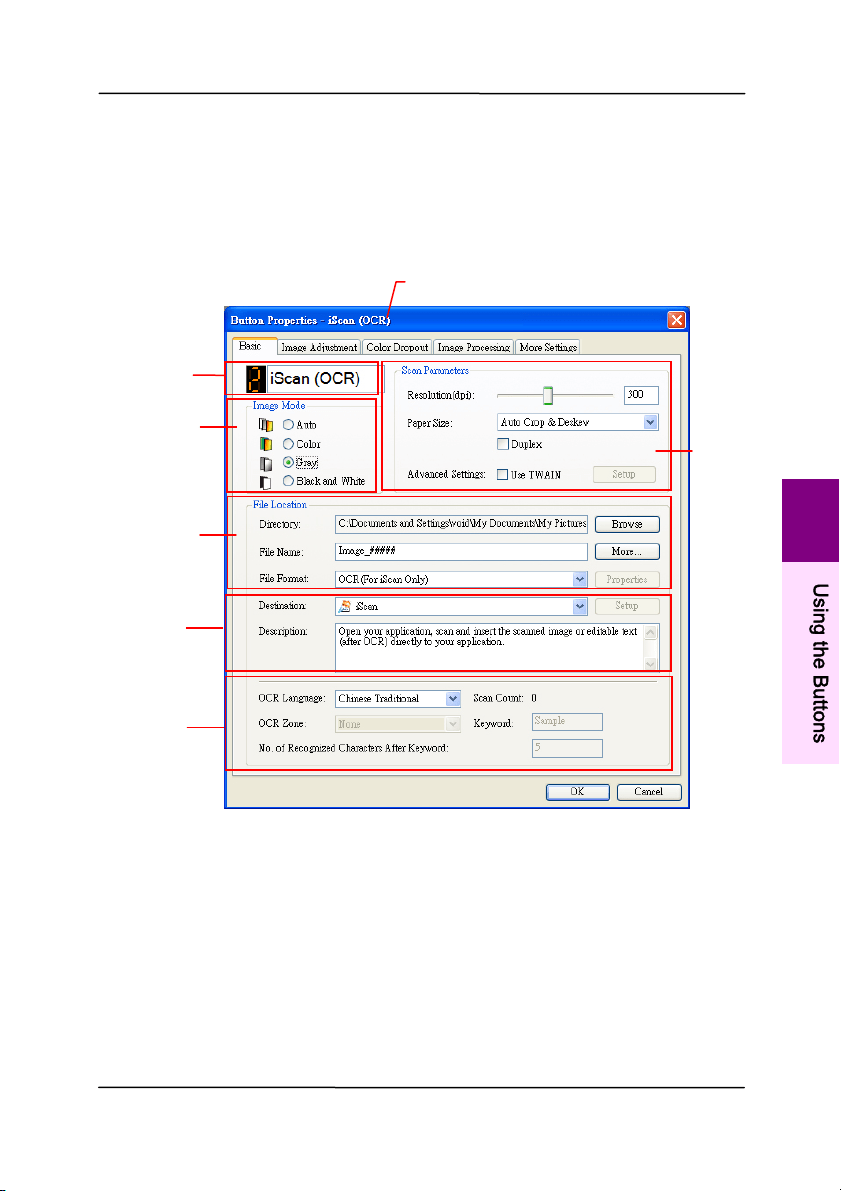
User ’s Ma nua l
6- 3
3. The But t on Panel shows t he first five scanning buttons.
Right-click the button (funct ion) you wish to check. The
Button Propert ies window appears.
I f you wish t o change t he set t ing, use this window to reset
t he setting for t he file form at, dest ination applicat ion, or
other scan settings.
4. Click t he OK but t on t o leave the window.
Folder and
file nam e
for the
scanned
im age
I m age Mode
Select ion
Box
Nam e of t he Select ed Button
Scan To
dest inat ion
and set tings
But ton
Nam e
OCR
set tings
Basic Scan
Param et ers
6
U
s
i
n
g
t
h
e
B
u
t
t
o
n
s
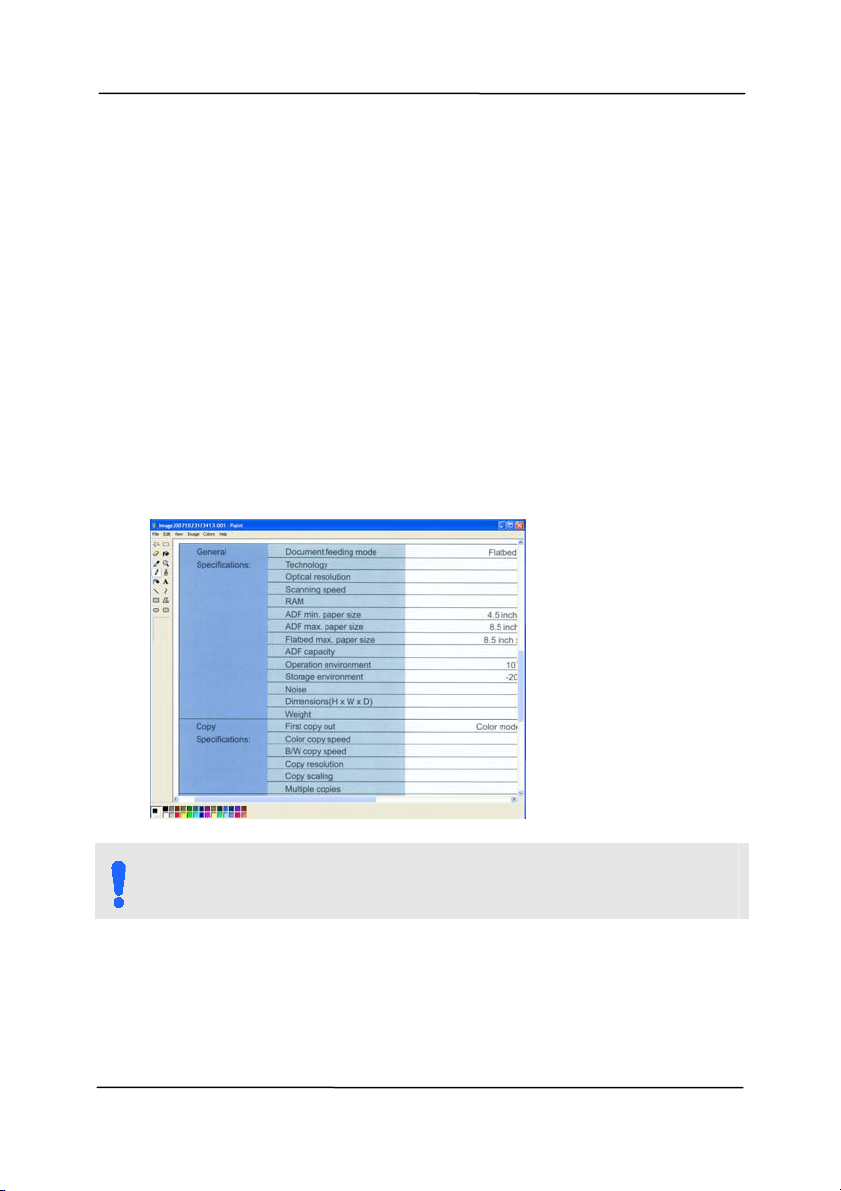
User ’s Ma nua l
6- 4
6 .3 Sca n ning From One Tou ch of t he Buttons
1. Adj ust t he paper guide for t he width of paper and load the
docum ent wi
th t heir tops into the aut om at ic docum ent feeder.
2. Check t he button nam e on the LCD screen to ensure if you
are select ing the proper scan settings and dest inat ion
application. ( For exam ple, if you wish to scan wit h But ton,
“ Scan t o App” , which opens Microsoft Paint and displays t he
scanned im age in the window of Microsoft Paint , the LCD
screen should show “ Scan t o App” ).
3. Press t he Scan button on t he scanner.
4. Aft er the scanning is finished, the Microsoft Paint software
will be launched and the scanned im age appears in t he m ain
window of Microsoft Paint as below.
N OTE:
For det ails inform ation on how to use the But t on Manager
V2, please refer to the user’s m anual in t he supplied CD.
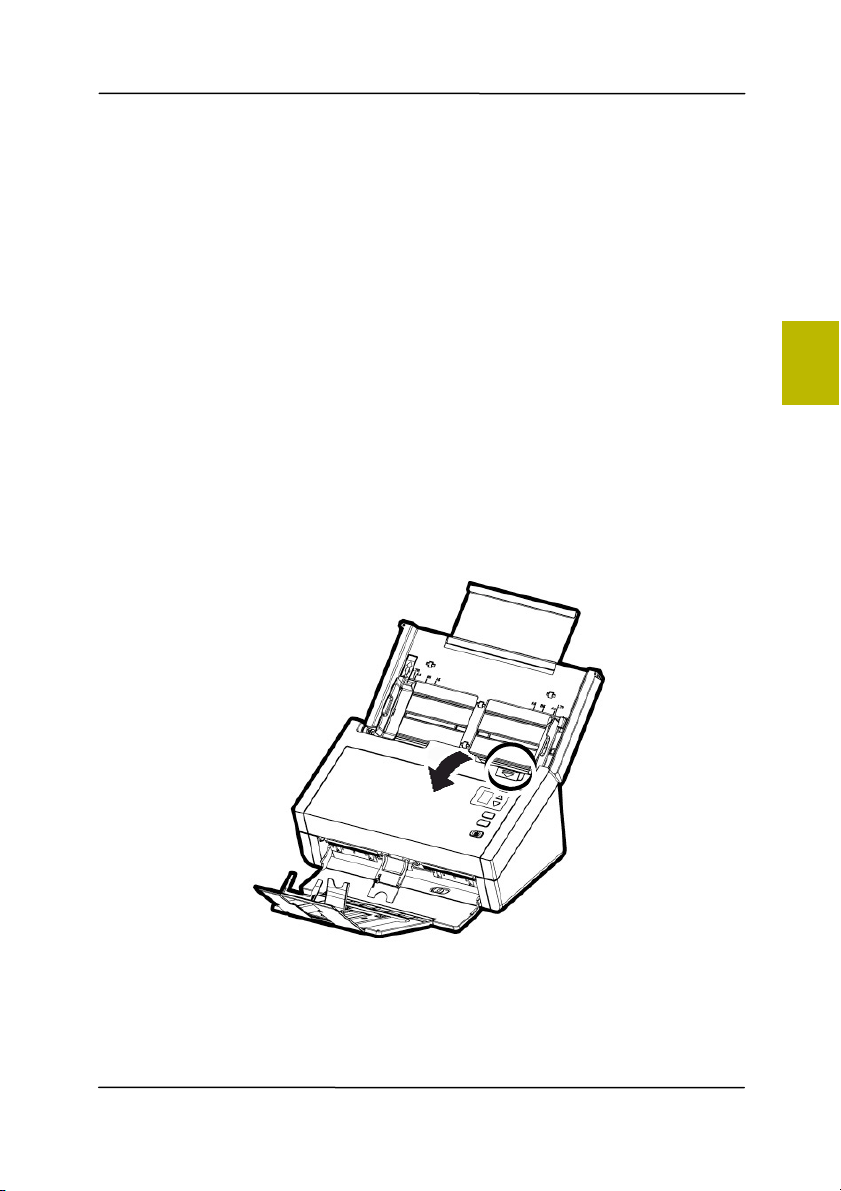
User ’s Ma nua l
7- 1
7 . Maint enance
7 .1 Cleaning t he ADF
From t i
m e t o t im e, t he Reverse roller and the Feeding Rollers
m ay be contam inat ed wit h ink, toner particles, or paper dust .
I n t his case, t he paper m ay not be fed sm oot hly. Please follow
the following st eps t o clean the Reverse roller and t he Feeding
Rollers t o ensure t he best of t he scanner.
The Cle a ning St e ps:
1. Soak a clean cloth wit h som e isopropyl alcohol (95% ) .
2. Press t he ADF release button and open t he front door.
7

User ’s Ma nua l
7- 2
3. Wipe the feeding rollers unt il they are cleaned.
4. Press both sides of the cover of the ADF reverse roller and
pull t he cover down.
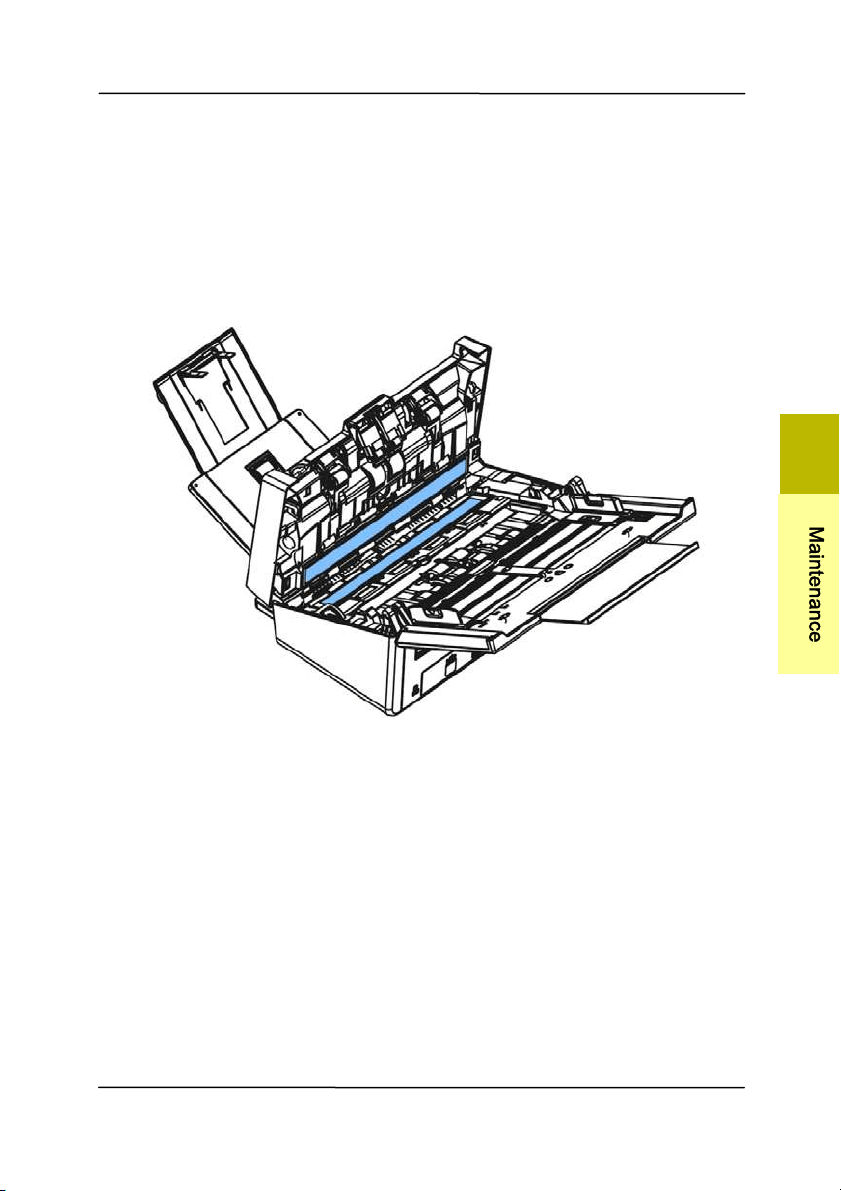
User ’s Ma nua l
7- 3
7 .2 Cleaning t he Gla ss
1. Press t he ADF release button. Open the front door.
2. Wet a clean clot h with som e isopropy
l alcohol. ( 95% )
3. Wipe the glass as illust rat ed below by m oving t he swab from
side t o side t o rid the dust or dirt.
7
M
a
i
n
t
e
n
a
n
c
e
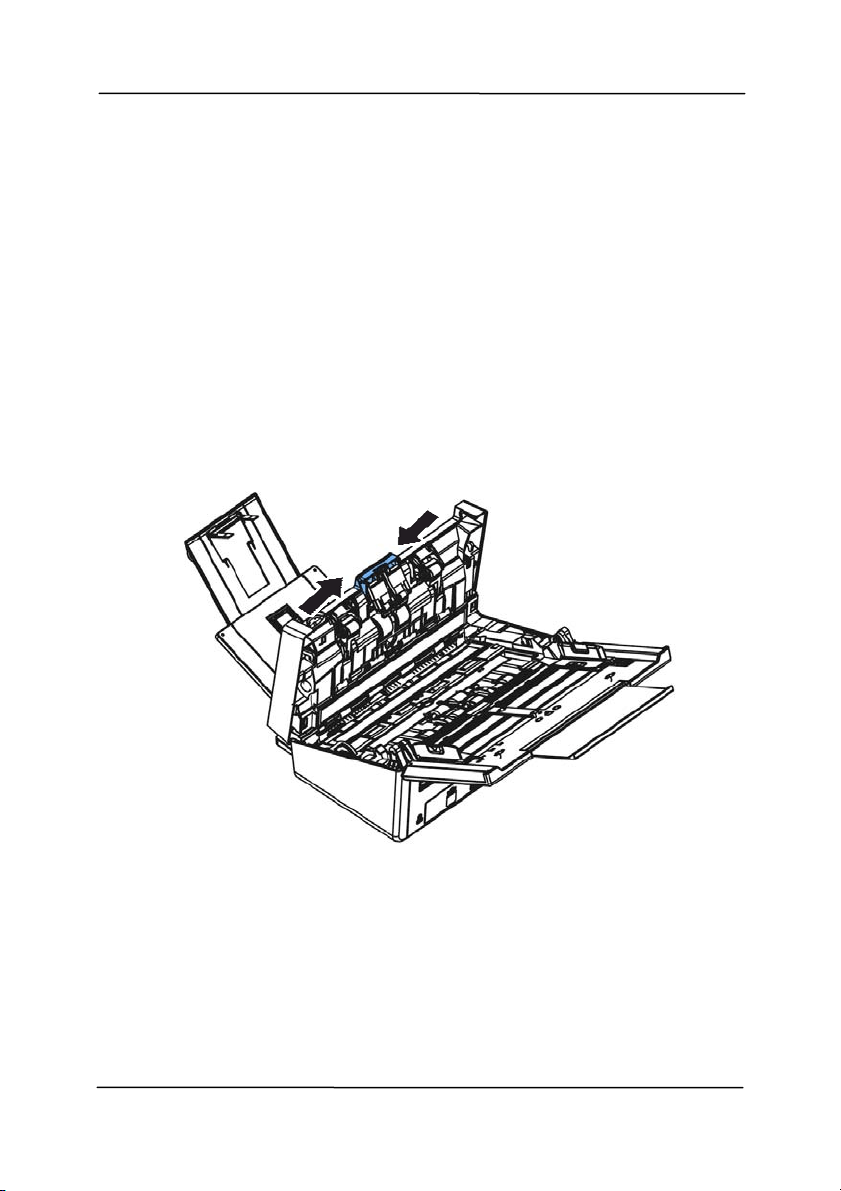
User ’s Ma nua l
7- 4
7 .3 Replacing t he AD F Reverse Roller
Aft er scanning approxim ately 100,000 pages t hrough t he ADF,
t
he reverse roller will be worn out and you m ay have problem s
with docum ent feeding. I t is t im e t o replace t he Reverse roller.
For ordering the replacem ent, please cont act your dealer.
Disasse m bling Proce dur e
1. Press t he ADF release button.
2. Gently open the ADF front door t o t he left.
3. Hold t he reverse roller cover wit h your fingers as shown and
place it down.

User ’s Ma nua l
7- 5
4. Press t he right end of t he reverse roller externally t o det ach
it from the slot and t hen det ach the left end from its hole.
Reassem bling Pr oce dure
1. I nsert t he left end of t he reverse roller t o t he hole of it s
original place.
2. I nsert t he right end of t he reverse roller to it s slot .
7
M
a
i
n
t
e
n
a
n
c
e
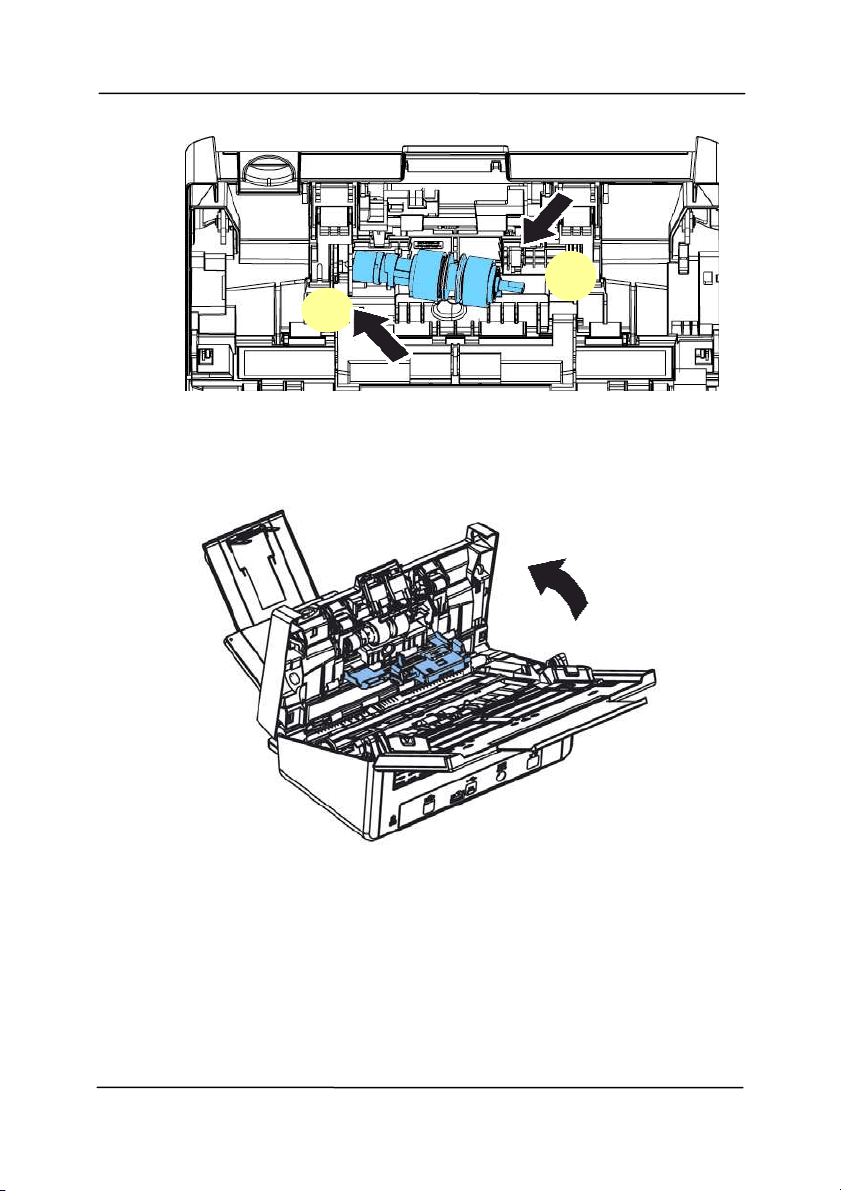
User ’s Ma nua l
7- 6
3. Close the reverse roller Cover.
4. Close t he ADF cover.
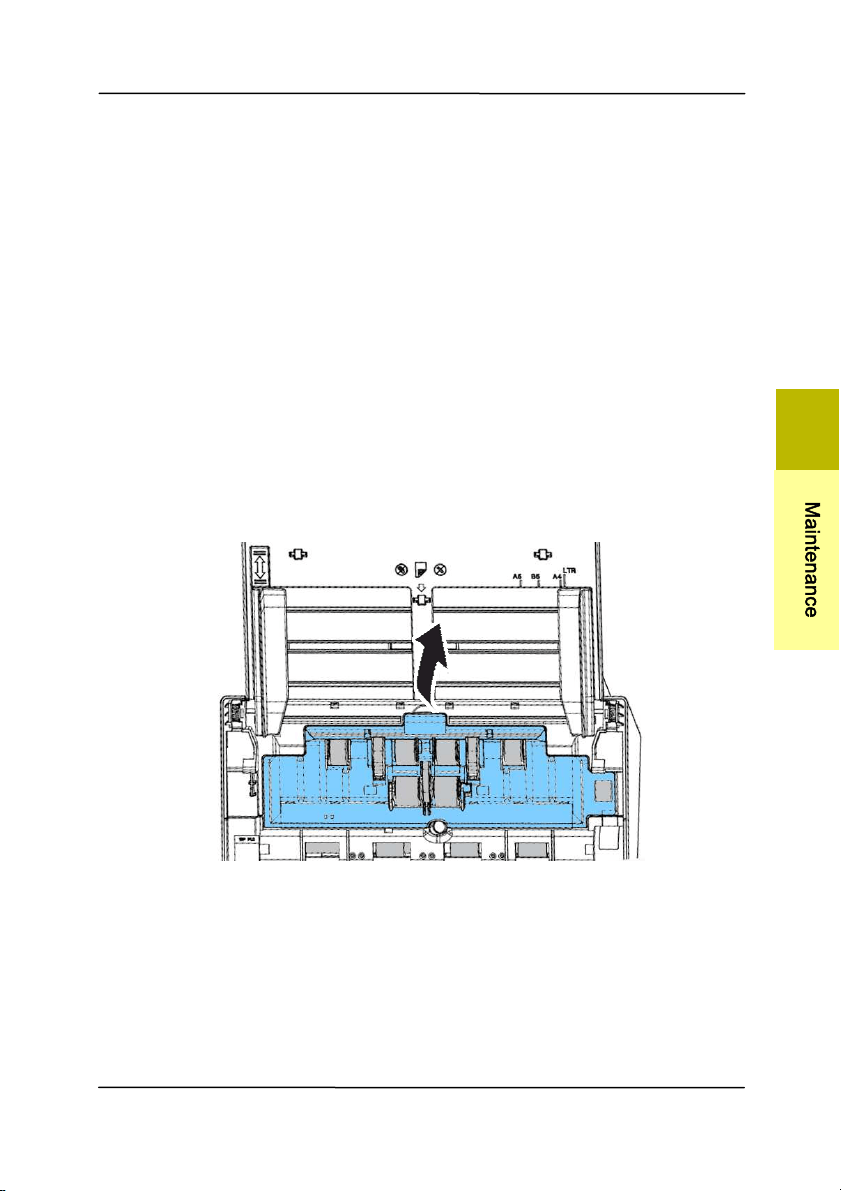
User ’s Ma nua l
7- 7
7 .4 Replacing t he AD F Roller
Aft er scanning approxim ately 200,000 pages t hrough t he ADF,
the ADF roller m ay be worn out and you m ay experience
probl
em s wit h docum ent feeding. I n this case, you m ay need t o
replace a new ADF roller. For ordering t he ADF roller, please
consult your nearest dealer and follow the procedure below to
replace it .
Disasse m bling Proce dur e
1. Press t he ADF release butt on to open the front door.
2. Pull t he center of the roller cover t o open it.
7
M
a
i
n
t
e
n
a
n
c
e
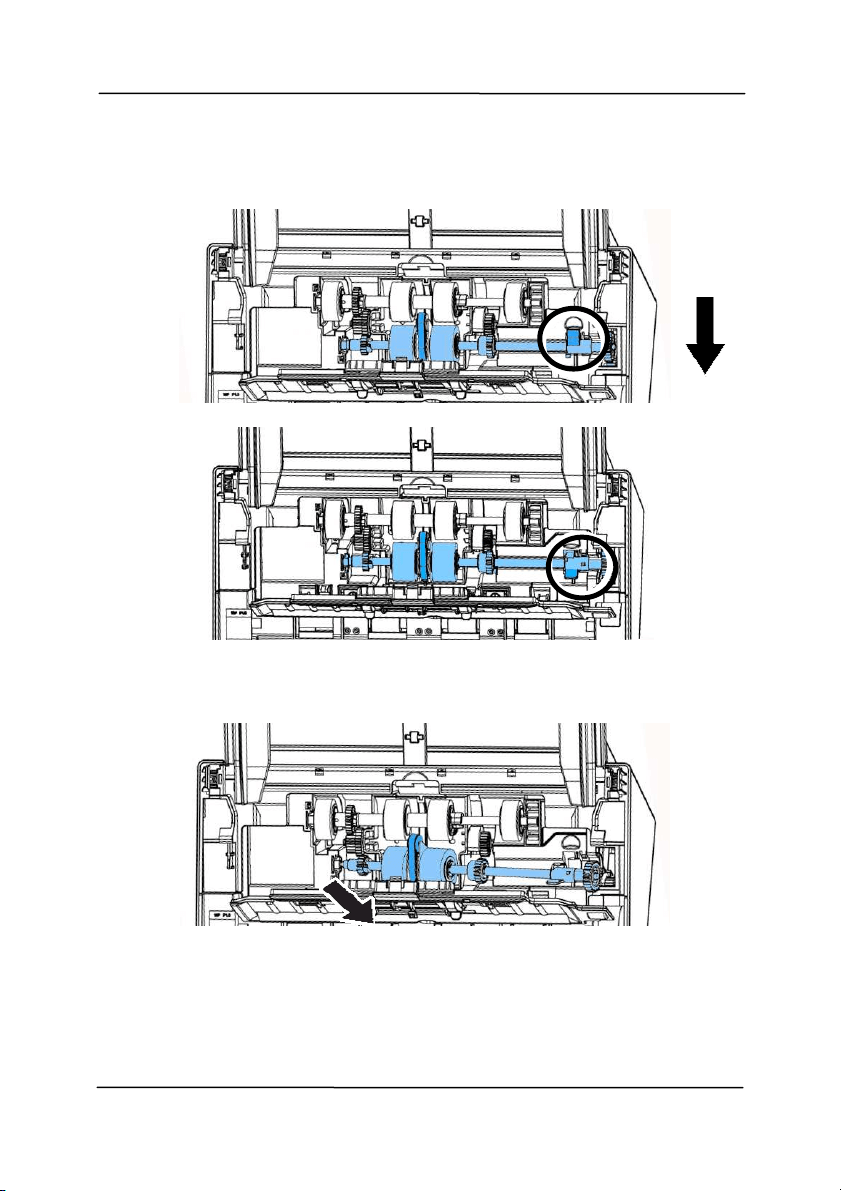
User ’s Ma nua l
7- 8
3. Move the tab of the ADF roller DOW N as indicated.
4. Detach the right end of t he ADF roller from the slot and
rem ove the ADF roller.
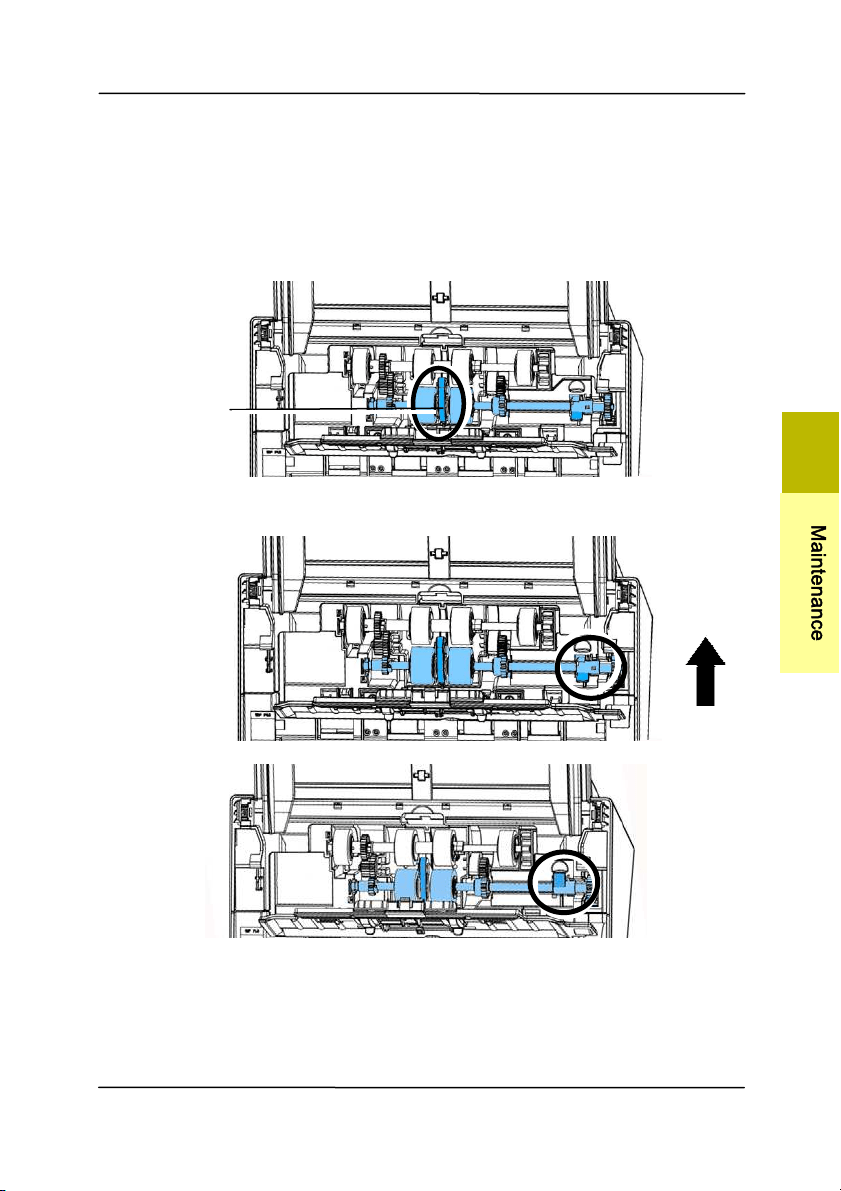
User ’s Ma nua l
7- 9
Assem bling Pr oce dure
1. I nsert t he left end of t he ADF roller first t o it s slot and place
the ADF roller t o its proper position.
Make sure the belt in the cent er of t he ADF roller is inst alled
horizont ally wit h the ot her rollers as indicated.
2. Move the tab of the ADF roller UP.
3. Close the ADF roller cover. A snap-in sound could be heard if
correct ly inst alled.
The Belt
7
M
a
i
n
t
e
n
a
n
c
e
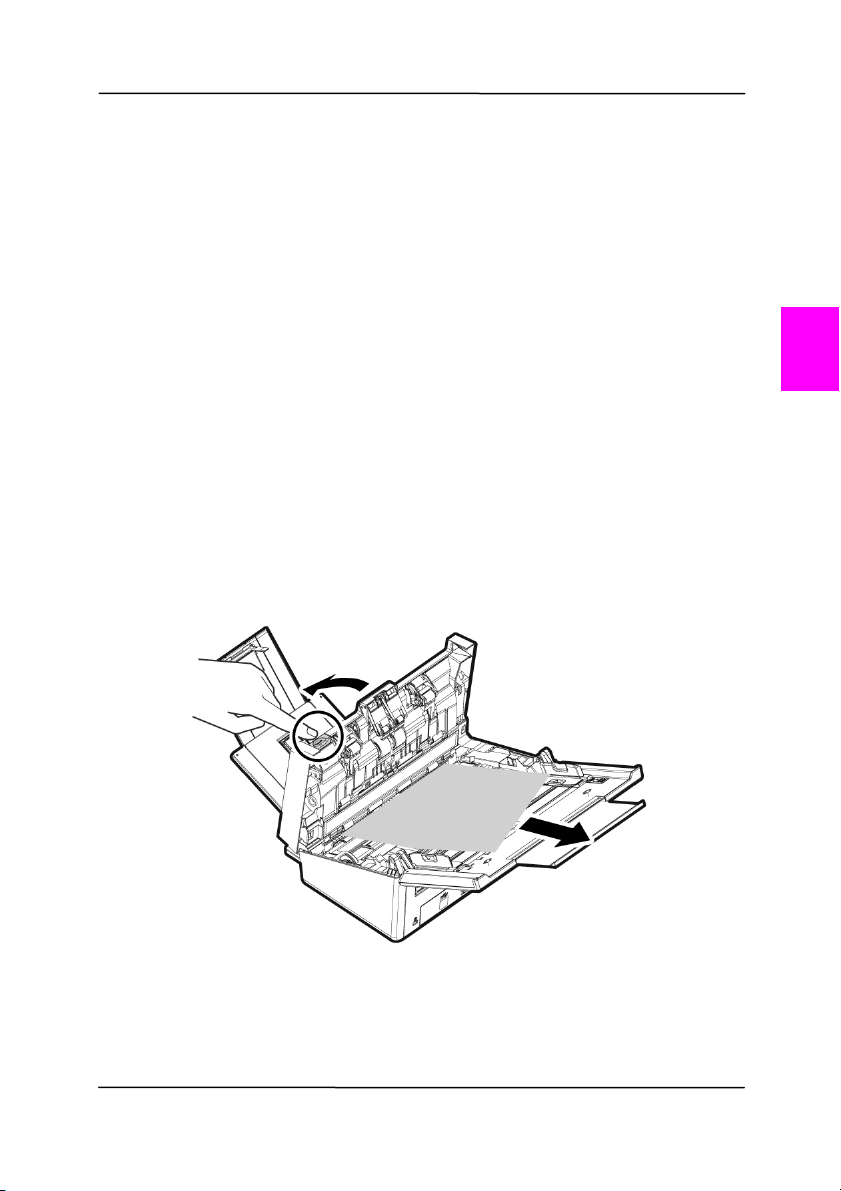
User ’s Ma nua l
8- 1
8 . Troubleshoot ing
8 .1 Clearin g a Pa per Ja m
I n t he event of a paper j am , follow the procedures below to
rem ove the paper:
1. Press the ADF rel
ease button on the right side. Gently
open t he front door.
2. Carefully pull t he paper out of the ADF unit .
3. Close the front door. Your Scanner is now ready to use.
4.
8

User ’s Ma nua l
8- 2
8 .2 Quest ions and Answ ers
Quest ion:
Pape r be com es j a m m ed during
sca nning.
Answ er:
1) Open the front door.
2) Pull out the j am m ed paper carefully.
3) Close t he front door.
Quest ion:
More than on e sheet of paper are
fe d in t o t he sca nner.
Answ er:
1) Open the scanner front door.
2) Rem ove the m ult i-fed sheets.
3) Close t he front door.
4) Flatten t he corners and edges.
Loosen the paper before putting it
into t he paper guide again.
5) Check t he feeding roller condition.
I f necessary, follow the cleaning
direct ions in sect ion 7.1 and
perform t he cleaning.
Quest ion:
Pape r be com es sk e w ed in the
sca nner.
Answ er:
1) Use t he slide guide to keep the
paper path straight.
2) Check the condition of t he feeding
roller. I f necessary, follow the
cleaning direct ions in Sect ion 7.1
and perform t he cleaning.

User ’s Ma nua l
8- 3
Quest ion: W hy does m y sca n ned im age
alw a ys com e out too da r k ?
Answ er:
1) Please adj ust the screen set t ings t o
sRGB.
2) Please adj ust the bright ness
settings on t he screen from
applicat ion soft ware.
Quest ion:
W hen I choose optica l resolut ion
t o be 6 0 0 dpi, t he "aut o crop" and
"de sk ew " fu nct ions w ill be
disabled.
Answ er:
Since t o perform auto crop and deskew
consum es great deal of syst em
m em ory, it is suggest ed if you wish to
perform "aut o crop" and "deskew"
funct ions, please choose your opt ical
resolution t o be sm aller than 600 dpi
to prevent a error m essage.
8
T
r
o
u
b
l
e
s
h
o
o
t
i
n
g

User ’s Ma nua l
8- 4
8 .3 Technica l Service
Before cont act ing Avision, please prepare the following
inform at ion by referring t o Section 4.14, The I nform ation Tab:
Scanner serial & revision num ber ( located on t he bot tom of
the scanner);
Hardware confi
gurat ion ( e.g., your host CPU type, RAM size,
free disk space, display card, interface card) ;
The nam e and version of your scanning software application;
The version of your scanner driver.
Please call us at:
Headqua r t e r
Avision I nc.
No. 20, Creation Road I , Science- Based I ndust rial Park,
Hsinchu 300, Taiwan, ROC
TEL: + 886 ( 3) 578-2388
FAX: + 886 (3) 577- 7017
E- MAI L:
2service@avision.com .tw
Web Site: ht t p: / / www.avision.com .t w
US and Cana da Ar ea
Avision Labs, I nc.
6815 Mowry Ave., Newark CA 94560, USA
TEL: + 1 (510) 739-2369
FAX: + 1 ( 510) 739-6060
E- MAI L:
2support@avision- labs.com
Web Site: ht t p: / / ww w.avision.com

User ’s Ma nua l
8- 5
China Area
Shanghai Technica l Su pport Center
7A, No.1010, Kaixuan Road, Shanghai 200052 P.R.C.
TEL :+ 86-21- 62816680
FAX :+ 86- 21-62818856
E- MAI L :sales@avision.net.cn
Web Site:
2ht t p: / / www.avision.com .cn
Europe Area
Avision Europe Gm bH
Bischofst r. 101 D-47809 Krefeld Germ any
TEL: + 49-2151- 56981-40
FAX: + 49- 2151- 56981- 42
E- MAI L: info@avision- europe.com
Web Site:
2ht t p: / / www.avision.de
Espaço Bra sil
Avision Br a sil Lt da.
Avenida Jabaquara, 2958 - Cj. 75 - Mirandópolis –
CEP: 04046-500 - São Paulo, Brasil
TEL: + 55-11-2737-6062
E-MAI L: suporte@avisionbrasil.com .br
Web Site: ht t p: / / www.avisionbrasil.com .br
8
T
r
o
u
b
l
e
s
h
o
o
t
i
n
g

User ’s Ma nua l
8- 6
This page is int entionally left blank.

User ’s Ma nua l
9- 1
9 . Specificat ions
All specifica t ions a r e subj ect t o cha nge w ithout notice. For
the m ost up-to- dat e and detailed specificat ions, please refer to
our web site at ht t p: / / www.avision.com
Model Num ber: FL- 1602B
Opt ical Resolut ion: 600 dpi
Scanning Modes: Black & White
Gray
Color
ADF Capacity: Up t o 80 pages ( 70 g/ m
2
) ( 20 lb.)
Max. Docum ent Size: 216 x 356 m m ( 8.5 x 14 in.)
Min. Docum ent Size: 50 x 50 m m ( 2 x 2 in.)
Paper Weight : 27 ~ 413 g/ m
2
( 7 ~ 110 lb.)
I D Card Thickness: < 1.25 m m ( 0.05 in.)
I nt erface: Hi-speed USB 2.0
Power Source: 24V, 2.0A
Operat ing Tem perature: 10º C~ 35º C
Dim ensions: ( WxDxH)
Min. 316 x 191 x 168 m m
( 12.4 x 7.5 x 6.6 in.)
Max. 316 x 680 x 239 m m
( 12.4 x 26.8 x 9.4 in.)
Weight : 3.9 kg ( 8.6 lb.)
9