
Online User's Guide
MFC-J2340DW
MFC-J2740DW
MFC-J5340DW
MFC-J5740DW
MFC-J5855DW
MFC-J5955DW
© 2021 Brother Industries, Ltd. All rights reserved.

Table of Contents
Before You Use Your Machine ............................................................................................................. 1
Definitions of Notes ........................................................................................................................................ 2
Trademarks .................................................................................................................................................... 3
Open Source Licensing Remarks .................................................................................................................. 4
Copyright and License ................................................................................................................................... 5
Important Notes.............................................................................................................................................. 6
Introduction to Your Machine............................................................................................................... 7
Before Using Your Machine ........................................................................................................................... 8
Control Panel Overview ................................................................................................................................. 9
Touchscreen LCD Overview......................................................................................................................... 12
Settings Screen Overview ................................................................................................................. 15
Set the Ready Screen ........................................................................................................................ 17
Set Default Function Screens............................................................................................................. 18
Enter Text on Your Brother Machine ............................................................................................................ 19
Access Brother Utilities (Windows) .............................................................................................................. 20
Uninstall the Brother Software and Drivers (Windows) ...................................................................... 21
Access Brother iPrint&Scan (Windows/Mac) ............................................................................................... 22
USB / Ethernet Port Locations on Your Brother Machine ............................................................................ 23
Paper Handling.................................................................................................................................... 24
Load Paper................................................................................................................................................... 25
Loading Paper Overview .................................................................................................................... 26
Load Paper in Paper Tray #1 / Paper Tray #2.................................................................................... 29
Load Paper in the Multi-purpose Tray (MP Tray) ............................................................................... 45
Load Paper in the Manual Feed Slot.................................................................................................. 53
Unprintable Area ................................................................................................................................ 56
Paper Settings.................................................................................................................................... 57
Acceptable Print Media ...................................................................................................................... 63
Load Documents .......................................................................................................................................... 70
Load Documents in the Automatic Document Feeder (ADF) ............................................................. 71
Load Documents on the Scanner Glass ............................................................................................ 73
Unscannable Area.............................................................................................................................. 74
Print ...................................................................................................................................................... 75
Print from Your Computer (Windows)........................................................................................................... 76
Print a Photo (Windows)..................................................................................................................... 77
Print a Document (Windows).............................................................................................................. 78
Cancel a Print Job (Windows) ............................................................................................................ 79
Print More Than One Page on a Single Sheet of Paper (N in 1) (Windows)...................................... 80
Print as a Poster (Windows)............................................................................................................... 81
Print on Both Sides of the Paper Automatically (Automatic 2-sided Printing) (Windows) .................. 82
Print as a Booklet Automatically (Windows)....................................................................................... 85
Secure Print (Windows)...................................................................................................................... 87
Print a Colour Document in Greyscale (Windows) ............................................................................. 88
Print a Long Paper (Windows) ........................................................................................................... 89
Prevent Smudged Printouts and Paper Jams (Windows) .................................................................. 90
Use a Preset Print Profile (Windows) ................................................................................................. 91
Home > Table of Contents
i

Change the Default Print Settings (Windows) .................................................................................... 94
Print Settings (Windows) .................................................................................................................... 95
Print from Your Computer (Mac) .................................................................................................................. 99
Print Using Brother iPrint&Scan (Windows/Mac) ....................................................................................... 100
Print Photos or Documents Using Brother iPrint&Scan (Windows/Mac).......................................... 101
Print on Both Sides of the Paper Automatically Using Brother iPrint&Scan (Automatic 2-sided
Printing) (Windows/Mac) .................................................................................................................. 103
Print More Than One Page on a Single Sheet of Paper Using Brother iPrint&Scan (N in 1)
(Windows/Mac)................................................................................................................................. 105
Print a Colour Document in Greyscale Using Brother iPrint&Scan (Windows/Mac) ........................ 106
Print Data Directly from a USB Flash Drive ............................................................................................... 107
Compatible USB Flash Drives.......................................................................................................... 108
Print Photos Directly from a USB Flash Drive .................................................................................. 109
Print a PDF File Directly from a USB Flash Drive ............................................................................ 119
Print an Email Attachment.......................................................................................................................... 121
Scan.................................................................................................................................................... 122
Scan Using the Scan Button on Your Machine .......................................................................................... 123
Scan Photos and Graphics............................................................................................................... 124
Save Scanned Data to a Folder as a PDF File ................................................................................ 126
Save Scanned Data to a USB Flash Drive....................................................................................... 128
Scan Multiple Business Cards and Photos (Auto Crop)................................................................... 131
Scan to an Editable Text File Using OCR......................................................................................... 132
Save Scanned Data as an Email Attachment .................................................................................. 134
Send Scanned Data to an Email Recipient ...................................................................................... 136
Scan to FTP ..................................................................................................................................... 138
Scan to SSH FTP (SFTP) ................................................................................................................ 142
Scan to Network (Windows) ............................................................................................................. 149
Scan to SharePoint .......................................................................................................................... 153
Web Services for Scanning on Your Network (Windows 7, Windows 8.1, and Windows 10) .......... 157
Change Scan Settings Using Brother iPrint&Scan........................................................................... 161
Scan Using Brother iPrint&Scan (Windows/Mac) ...................................................................................... 162
Scan from Your Computer (Windows)........................................................................................................ 163
Scan Using Nuance
™
PaperPort
™
14SE or Other Windows Applications....................................... 164
Scan Using Windows Fax and Scan ................................................................................................ 169
Scan from Your Computer (Mac)................................................................................................................ 173
Configure Scan Settings Using Web Based Management......................................................................... 174
Set the Scan File Name Using Web Based Management................................................................ 175
Set the Scan Job Email Report Using Web Based Management .................................................... 176
Copy ................................................................................................................................................... 177
Copy a Document ..................................................................................................................................... 178
Enlarge or Reduce Copied Images ............................................................................................................ 180
Sort Copies ................................................................................................................................................ 182
Make Page Layout Copies (N in 1 or Poster)............................................................................................. 183
Copy on Both Sides of the Paper (2-sided Copy) ...................................................................................... 186
Copy an ID Card ........................................................................................................................................ 189
Use the A3 Copy Shortcuts........................................................................................................................ 191
Copy Settings............................................................................................................................................. 193
Home > Table of Contents
ii

Fax ...................................................................................................................................................... 196
Send a Fax................................................................................................................................................. 197
Send a Fax from Your Brother Machine ........................................................................................... 198
Send a 2-sided Fax from the ADF.................................................................................................... 200
Send a Fax Manually........................................................................................................................ 201
Send a Fax at the End of a Conversation ........................................................................................ 202
Send the Same Fax to More than One Recipient (Broadcasting) .................................................... 203
Send a Fax in Real Time .................................................................................................................. 206
Send a Fax at a Specified Time (Delayed Fax)................................................................................ 207
Change the Fax Auto Redial Setting ................................................................................................ 208
Cancel a Fax in Progress ................................................................................................................. 209
Check and Cancel a Pending Fax.................................................................................................... 210
Fax Options ...................................................................................................................................... 211
Receive a Fax ............................................................................................................................................ 212
Receive Mode Settings .................................................................................................................... 213
Set Fax Detect.................................................................................................................................. 218
Fax Preview...................................................................................................................................... 219
Shrink Page Size of an Oversized Incoming Fax ............................................................................. 223
Set the Fax Receive Stamp.............................................................................................................. 224
Receive a Fax at the End of a Telephone Conversation .................................................................. 225
Memory Receive Options ................................................................................................................. 226
Remote Fax Retrieval....................................................................................................................... 233
Voice Operations and Fax Numbers .......................................................................................................... 239
Voice Operations .............................................................................................................................. 240
Store Fax Numbers .......................................................................................................................... 243
Set up Broadcasting Groups ............................................................................................................ 248
Telephone Services and External Devices................................................................................................. 252
Distinctive Ring................................................................................................................................. 253
Caller ID ........................................................................................................................................... 257
Set the Telephone Line Type............................................................................................................ 259
FaxAbility.......................................................................................................................................... 261
Voice Over Internet Protocol (VoIP/Telephone Line Interference).................................................... 263
External TAD (Telephone Answering Device)................................................................................... 264
External and Extension Telephones ................................................................................................. 268
Fax Reports ............................................................................................................................................... 274
Set the Transmission Verification Report's Style .............................................................................. 275
Set the Fax Journal's Interval Period................................................................................................ 276
PC-FAX ...................................................................................................................................................... 277
PC-FAX for Windows ....................................................................................................................... 278
PC-FAX for Mac .............................................................................................................................. 297
Network .............................................................................................................................................. 298
Supported Basic Network Features ........................................................................................................... 299
Configure Network Settings ....................................................................................................................... 300
Configure Network Settings Using the Control Panel....................................................................... 301
Wireless Network Settings ......................................................................................................................... 302
Use the Wireless Network ................................................................................................................ 303
Use Wi-Fi Direct
®
............................................................................................................................. 316
Home > Table of Contents
iii

Enable/Disable Wireless LAN .......................................................................................................... 320
Print the WLAN Report..................................................................................................................... 321
Network Features....................................................................................................................................... 325
Print the Network Configuration Report............................................................................................ 326
Fax Using the Internet (I-Fax) .......................................................................................................... 327
Configure and Operate LDAP Search .............................................................................................. 347
Synchronize Time with the SNTP Server Using Web Based Management ..................................... 351
Reset the Network Settings to Factory Default ................................................................................ 354
Security .............................................................................................................................................. 355
Before Using Network Security Features ................................................................................................... 356
Configure Certificates for Device Security ................................................................................................. 357
Supported Security Certificate Features .......................................................................................... 358
Step by Step Guide for Creating and Installing a Certificate ............................................................ 359
Create a Self-signed Certificate ....................................................................................................... 360
Create CSR and Install a Certificate from a Certificate Authority (CA) ............................................ 361
Import and Export the Certificate and Private Key ........................................................................... 365
Import and Export a CA Certificate................................................................................................... 368
Manage Multiple Certificates ............................................................................................................ 371
Use SSL/TLS ............................................................................................................................................. 372
Introduction to SSL/TLS ................................................................................................................... 373
Manage Your Network Machine Securely Using SSL/TLS............................................................... 376
Print Documents Securely Using SSL/TLS ...................................................................................... 381
Use SNMPv3.............................................................................................................................................. 383
Manage Your Network Machine Securely Using SNMPv3 ............................................................... 384
Use IPsec................................................................................................................................................... 386
Introduction to IPsec......................................................................................................................... 387
Configure IPsec Using Web Based Management ............................................................................ 388
Configure an IPsec Address Template Using Web Based Management ......................................... 390
Configure an IPsec Template Using Web Based Management ....................................................... 392
Use IEEE 802.1x Authentication for a Wired or a Wireless Network ......................................................... 400
What Is IEEE 802.1x Authentication? .............................................................................................. 401
Configure IEEE 802.1x Authentication for a Wired or a Wireless Network Using Web Based
Management (Web Browser)............................................................................................................ 402
IEEE 802.1x Authentication Methods............................................................................................... 404
Use Active Directory Authentication........................................................................................................... 405
Introduction to Active Directory Authentication................................................................................. 406
Configure Active Directory Authentication Using Web Based Management .................................... 407
Log On to Change the Machine Settings Using the Machine's Control Panel (Active Directory
Authentication) ................................................................................................................................. 409
Use LDAP Authentication........................................................................................................................... 410
Introduction to LDAP Authentication ................................................................................................ 411
Configure LDAP Authentication Using Web Based Management.................................................... 412
Log On to Change the Machine Settings Using the Machine's Control Panel (LDAP
Authentication) ................................................................................................................................. 413
Use Secure Function Lock 3.0 ................................................................................................................... 414
Before Using Secure Function Lock 3.0........................................................................................... 415
Configure Secure Function Lock 3.0 Using Web Based Management ............................................ 416
Scan Using Secure Function Lock 3.0 ............................................................................................. 417
Home > Table of Contents
iv

Configure Public Mode for Secure Function Lock 3.0 ...................................................................... 418
Additional Secure Function Lock 3.0 Features................................................................................. 419
Register a new IC Card Using the Machine's Control Panel ............................................................ 420
Register an External IC Card Reader............................................................................................... 421
Send or Receive an Email Securely........................................................................................................... 422
Configure Email Sending or Receiving Using Web Based Management......................................... 423
Send an Email with User Authentication .......................................................................................... 424
Send or Receive an Email Securely Using SSL/TLS ....................................................................... 425
Administrator..................................................................................................................................... 426
Network Features....................................................................................................................................... 427
Security Features ....................................................................................................................................... 428
Network Security .............................................................................................................................. 429
User Authentication .......................................................................................................................... 431
Brother Management Tools ........................................................................................................................ 432
Mobile/Web Connect......................................................................................................................... 433
Brother Web Connect................................................................................................................................. 434
Brother Web Connect Overview....................................................................................................... 435
Online Services Used with Brother Web Connect............................................................................ 438
Set Up Brother Web Connect........................................................................................................... 440
Scan and Upload Documents Using Brother Web Connect............................................................. 447
Upload a Document from an External Memory Device Using Brother Web Connect ...................... 448
Download and Print Documents Using Brother Web Connect ......................................................... 449
Download and Save a Document to an External Memory Device Using Brother Web Connect...... 452
FaxForward to Cloud or E-mail ........................................................................................................ 453
AirPrint ....................................................................................................................................................... 456
AirPrint Overview.............................................................................................................................. 457
Before Using AirPrint (macOS) ........................................................................................................ 458
Print Using AirPrint ........................................................................................................................... 459
Scan Using AirPrint (macOS)........................................................................................................... 462
Send a Fax Using AirPrint (macOS)................................................................................................. 463
Mopria
™
Print Service and Mopria
™
Scan................................................................................................. 464
Brother Mobile Connect ............................................................................................................................. 465
Troubleshooting ................................................................................................................................ 466
Error and Maintenance Messages ............................................................................................................. 467
Transfer Your Faxes or Fax Journal Report ..................................................................................... 475
Error Messages When Using the Brother Web Connect Feature..................................................... 479
Document Jams ......................................................................................................................................... 481
Document is Jammed in the Top of the ADF Unit ............................................................................ 482
Document is Jammed in the Bottom of the ADF Unit....................................................................... 483
Document is Jammed inside the ADF Unit....................................................................................... 484
Remove Paper Scraps Jammed in the ADF .................................................................................... 485
Printer Jam or Paper Jam .......................................................................................................................... 486
Paper is Jammed in the Front of the Machine.................................................................................. 487
Paper is Jammed in the Back of the Machine .................................................................................. 492
Remove Paper Scraps ..................................................................................................................... 497
If You Are Having Difficulty with Your Machine .......................................................................................... 498
Paper Handling and Printing Problems ............................................................................................ 499
Home > Table of Contents
v

Telephone and Fax Problems........................................................................................................... 505
Other Problems ................................................................................................................................ 511
Network Problems ............................................................................................................................ 513
AirPrint Problems ............................................................................................................................. 521
Check the Machine Information ................................................................................................................. 522
Reset Your Machine ................................................................................................................................... 523
Reset Functions Overview ............................................................................................................... 524
Routine Maintenance ........................................................................................................................ 525
Replace the Ink Cartridges......................................................................................................................... 526
Clean Your Brother Machine ...................................................................................................................... 529
Clean the Print Head from Your Brother Machine ............................................................................ 530
Clean the Print Head Using Web Based Management .................................................................... 531
Clean the Print Head from Your Computer (Windows)..................................................................... 532
Automatically Detect and Improve the Condition of Print Head Nozzles.......................................... 533
Clean the Scanner............................................................................................................................ 534
Clean the Machine's LCD................................................................................................................. 536
Clean the Outside of the Machine .................................................................................................... 537
Clean the Machine's Printer Platen .................................................................................................. 539
Clean the Paper Feed Rollers .......................................................................................................... 540
Clean the Base Pad ......................................................................................................................... 542
Clean the Paper Pick-up Rollers for Paper Tray #1 ......................................................................... 543
Clean the Paper Pick-up Rollers for Paper Tray #2 ......................................................................... 545
Check Your Brother Machine ..................................................................................................................... 546
Check the Print Quality..................................................................................................................... 547
Check the Print Alignment from Your Brother Machine .................................................................... 549
Check the Ink Volume (Page Gauge)............................................................................................... 550
Monitor Machine Status from Your Computer (Windows) ................................................................ 552
Monitor Machine Status Using Brother iPrint&Scan (Windows/Mac) ............................................... 557
Correct the Paper Feed to Clear Vertical Lines.......................................................................................... 559
Change the Print Options to Improve Your Print Results ........................................................................... 560
Pack and Ship Your Machine ..................................................................................................................... 561
Machine Settings............................................................................................................................... 564
Change Machine Settings from the Control Panel ..................................................................................... 565
In the Event of Power Failure (Memory Storage) ............................................................................. 566
General Settings............................................................................................................................... 567
Save Your Favourite Settings as a Shortcut..................................................................................... 584
Print Reports .................................................................................................................................... 591
Settings and Features Tables........................................................................................................... 594
Change Machine Settings Using Web Based Management ...................................................................... 616
What is Web Based Management?.................................................................................................. 617
Access Web Based Management .................................................................................................... 618
Set or Change a Login Password for Web Based Management...................................................... 621
Set Up Your Machine's Address Book Using Web Based Management.......................................... 622
Appendix............................................................................................................................................ 623
Specifications ............................................................................................................................................. 624
Supply Specifications ................................................................................................................................. 633
Brother Help and Customer Support.......................................................................................................... 635
Home > Table of Contents
vi

Home > Before You Use Your Machine > Definitions of Notes
Definitions of Notes
We use the following symbols and conventions throughout this User's Guide:
WARNING
WARNING indicates a potentially hazardous situation which, if not avoided, could
result in death or serious injuries.
CAUTION
CAUTION indicates a potentially hazardous situation which, if not avoided, may
result in minor or moderate injuries.
IMPORTANT
IMPORTANT indicates a potentially hazardous situation which, if not avoided, may
result in damage to property or loss of product functionality.
NOTE
NOTE specifies the operating environment, conditions for installation, or special
conditions of use.
Tips icons indicate helpful hints and supplementary information.
Electrical Hazard icons alert you to possible electrical shock.
Bold Bold style identifies buttons on the machine's control panel or computer screen.
Italics Italicised style emphasises an important point or refers you to a related topic.
Courier New
Courier New font identifies messages shown on the machine's LCD.
Related Information
• Before You Use Your Machine
2

Home > Before You Use Your Machine > Trademarks
Trademarks
Apple, App Store, AirPrint, Mac, macOS, iPadOS, iPad, iPhone, iPod touch and Safari are trademarks of Apple
Inc., registered in the U.S. and other countries.
Nuance and PaperPort are trademarks or registered trademarks of Nuance Communications, Inc. or its affiliates
in the United States and/or other countries.
Wi-Fi
®
, Wi-Fi Alliance
®
and Wi-Fi Direct
®
are registered trademarks of Wi-Fi Alliance
®
.
WPA
™
, WPA2
™
, WPA3
™
, and Wi-Fi Protected Setup
™
are trademarks of Wi-Fi Alliance
®
.
Android, Google Chrome, Google Drive and Google Play are trademarks of Google LLC.
EVERNOTE is a trademark of Evernote Corporation and used under a license.
The Bluetooth
®
word mark is a registered trademark owned by Bluetooth SIG, Inc. and any use of such marks by
Brother Industries, Ltd. is under license. Other trademarks and trade names are those of their respective owners.
Mopria
™
and the Mopria
™
Logo are registered and/or unregistered trademarks and service marks of Mopria
Alliance, Inc. in the United States and other countries. Unauthorised use is strictly prohibited.
Adobe
®
is a registered trademark of Adobe Systems Incorporated in the United States and/or other countries.
Each company whose software title is mentioned in this manual has a Software Licence Agreement specific to its
proprietary programs.
Software Trademarks
FlashFX
®
is a registered trademark of Datalight, Inc.
FlashFX
®
Pro
™
is a trademark of Datalight, Inc.
FlashFX
®
Tera
™
is a trademark of Datalight, Inc.
Reliance
™
is a trademark of Datalight, Inc.
Reliance Nitro
™
is a trademark of Datalight, Inc.
Datalight
®
is a registered trademark of Datalight, Inc.
Any trade names and product names of companies appearing on Brother products, related documents
and any other materials are all trademarks or registered trademarks of those respective companies.
Related Information
• Before You Use Your Machine
3

Home > Before You Use Your Machine > Open Source Licensing Remarks
Open Source Licensing Remarks
This product includes open-source software.
To view Open Source Licensing Remarks and Copyright Information, go to your model's Manuals page at
support.brother.com/manuals.
Related Information
• Before You Use Your Machine
4

Home > Before You Use Your Machine > Copyright and License
Copyright and License
©2021 Brother Industries, Ltd. All rights reserved.
This product includes software developed by the following vendors:
This product includes the “KASAGO TCP/IP” software developed by ZUKEN ELMIC, Inc.
Copyright 1989-2020 Datalight, Inc., All Rights Reserved.
FlashFX
®
Copyright 1998-2020 Datalight, Inc.
Related Information
• Before You Use Your Machine
5

Home > Before You Use Your Machine > Important Notes
Important Notes
• Check support.brother.com for Brother driver and software updates.
• To keep your machine performance up to date, check support.brother.com for the latest firmware upgrade.
Otherwise, some of your machine's functions may not be available.
• Do not use this product outside the country of purchase as it may violate the wireless telecommunication and
power regulations of that country.
• Before giving your machine to anyone else, replacing it, or disposing of it, we strongly recommend resetting it
to its factory settings to remove all personal information.
• Windows 10 in this document represents Windows 10 Home, Windows 10 Pro, Windows 10 Education and
Windows 10 Enterprise.
• Windows Server 2008 in this document represents Windows Server 2008 and Windows Server 2008 R2.
• In this User's Guide, the LCD messages of the MFC-J5340DW are used unless otherwise specified.
• In this User's Guide, the illustrations of the MFC-J5340DW are used unless otherwise specified.
• The screens or images in this User's Guide are for illustration purposes only and may differ from those of the
actual products.
• Unless otherwise specified, the screens in this manual are from Windows 10. Screens on your computer may
vary depending on your operating system.
• The contents of this guide and the specifications of this product are subject to change without notice.
• In this document XXX-XXXX represents your machine's model name.
Related Information
• Before You Use Your Machine
Related Topics:
• Reset Your Machine
6

Home > Introduction to Your Machine
Introduction to Your Machine
• Before Using Your Machine
• Control Panel Overview
• Touchscreen LCD Overview
• Enter Text on Your Brother Machine
• Access Brother Utilities (Windows)
• Access Brother iPrint&Scan (Windows/Mac)
• USB / Ethernet Port Locations on Your Brother Machine
7

Home > Introduction to Your Machine > Before Using Your Machine
Before Using Your Machine
Before attempting any printing operation, confirm the following:
• Make sure you have installed the correct software and drivers for your machine.
• For USB or network cable users: Make sure the interface cable is physically secure.
Selecting the correct type of paper
For high quality printing, it is important to select the correct type of paper. Be sure to read the information about
acceptable paper before buying paper, and to determine the printable area depending on the settings in the
printer driver or in the application you use to print.
Simultaneous printing, scanning and faxing
Your machine can print from your computer while sending or receiving a fax into memory or while scanning a
document into the computer. Fax sending will not be stopped during printing from your computer. However, when
the machine is copying or receiving a fax on paper, it pauses the printing operation, and then continues printing
when copying or fax receiving has finished.
Firewall (Windows)
If your computer is protected by a firewall and you are unable to network print, network scan, or PC-FAX, you
may need to configure the firewall settings. If you are using the Windows Firewall and you installed the drivers
using the steps in the installer, the necessary firewall settings have been already set. If you are using any other
personal firewall software, see the User's Guide for your software or contact the software manufacturer.
Related Information
• Introduction to Your Machine
8
Home > Introduction to Your Machine > Control Panel Overview
Control Panel Overview
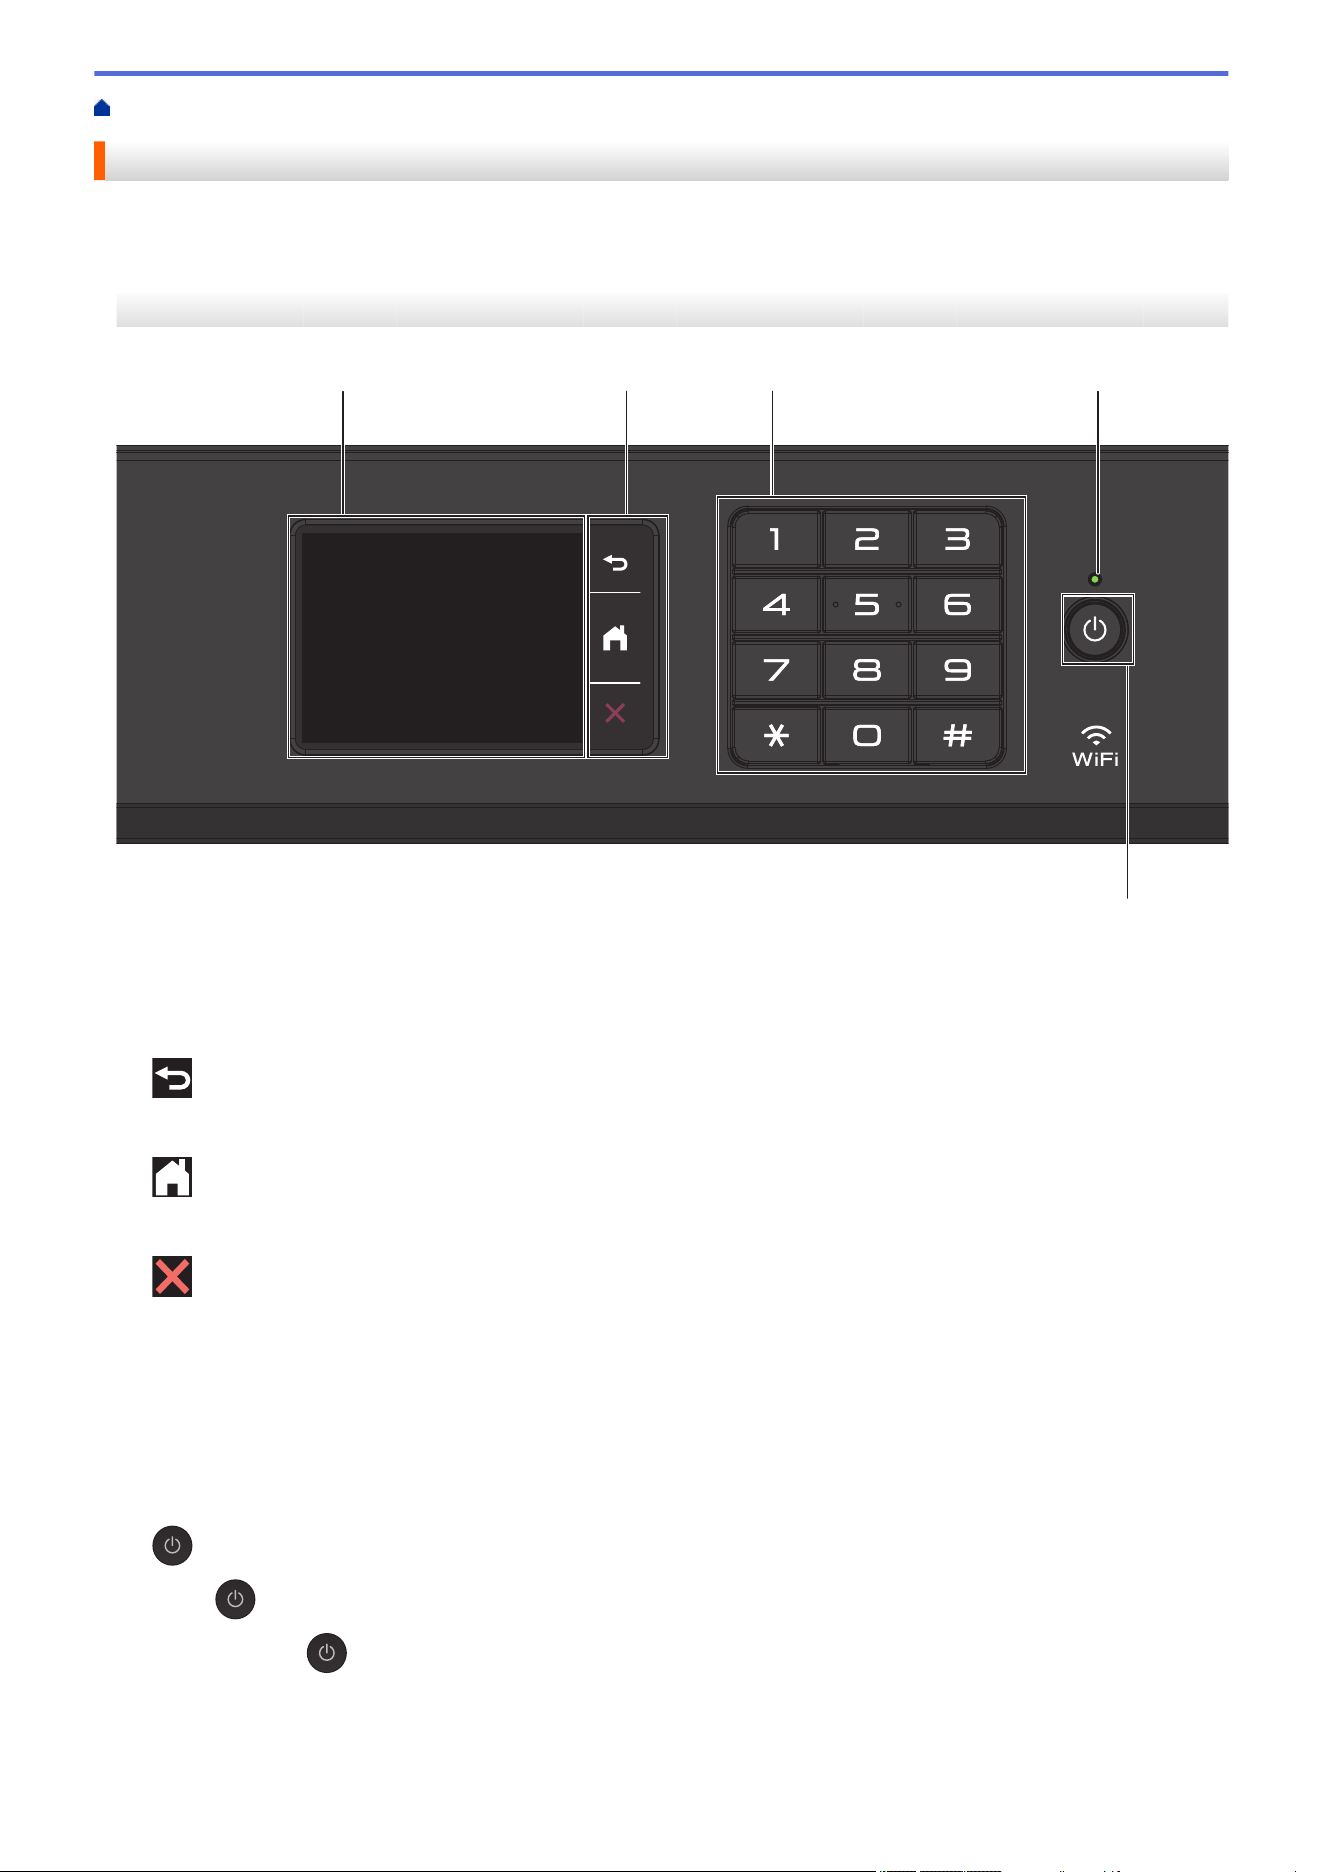
>> MFC-J2340DW/MFC-J5340DW
>> MFC-J2740DW/MFC-J5740DW/MFC-J5855DW/MFC-J5955DW
MFC-J2340DW/MFC-J5340DW
2
3
5
41
1. Touchscreen Liquid Crystal Display (LCD)
Access menus and options by pressing them on the touchscreen.
2. Menu Buttons
(Back)
Press to go back to the previous menu.
(Home)
Press to return to the Home screen.
(Cancel)
Press to cancel an operation.
3. Dial Pad
Press the numbers to dial telephone or fax numbers and to enter the number of copies.
4. LED Power Indicator
The LED lights up depending on the machine’s power status.
When the machine is in Sleep Mode, the LED blinks.
5.
Power On/Off
Press
to turn the machine on.
Press and hold to turn the machine off. The touchscreen displays [Shutting Down] and stays on for a
few seconds before turning itself off. A connected external telephone or Telephone Answering Device (TAD)
will always remain available.
9
If you turn the machine off using , it will still clean the print head periodically to maintain print quality. To
prolong print head life, provide better ink efficiency, and maintain print quality, keep your machine connected
to a power source at all times.
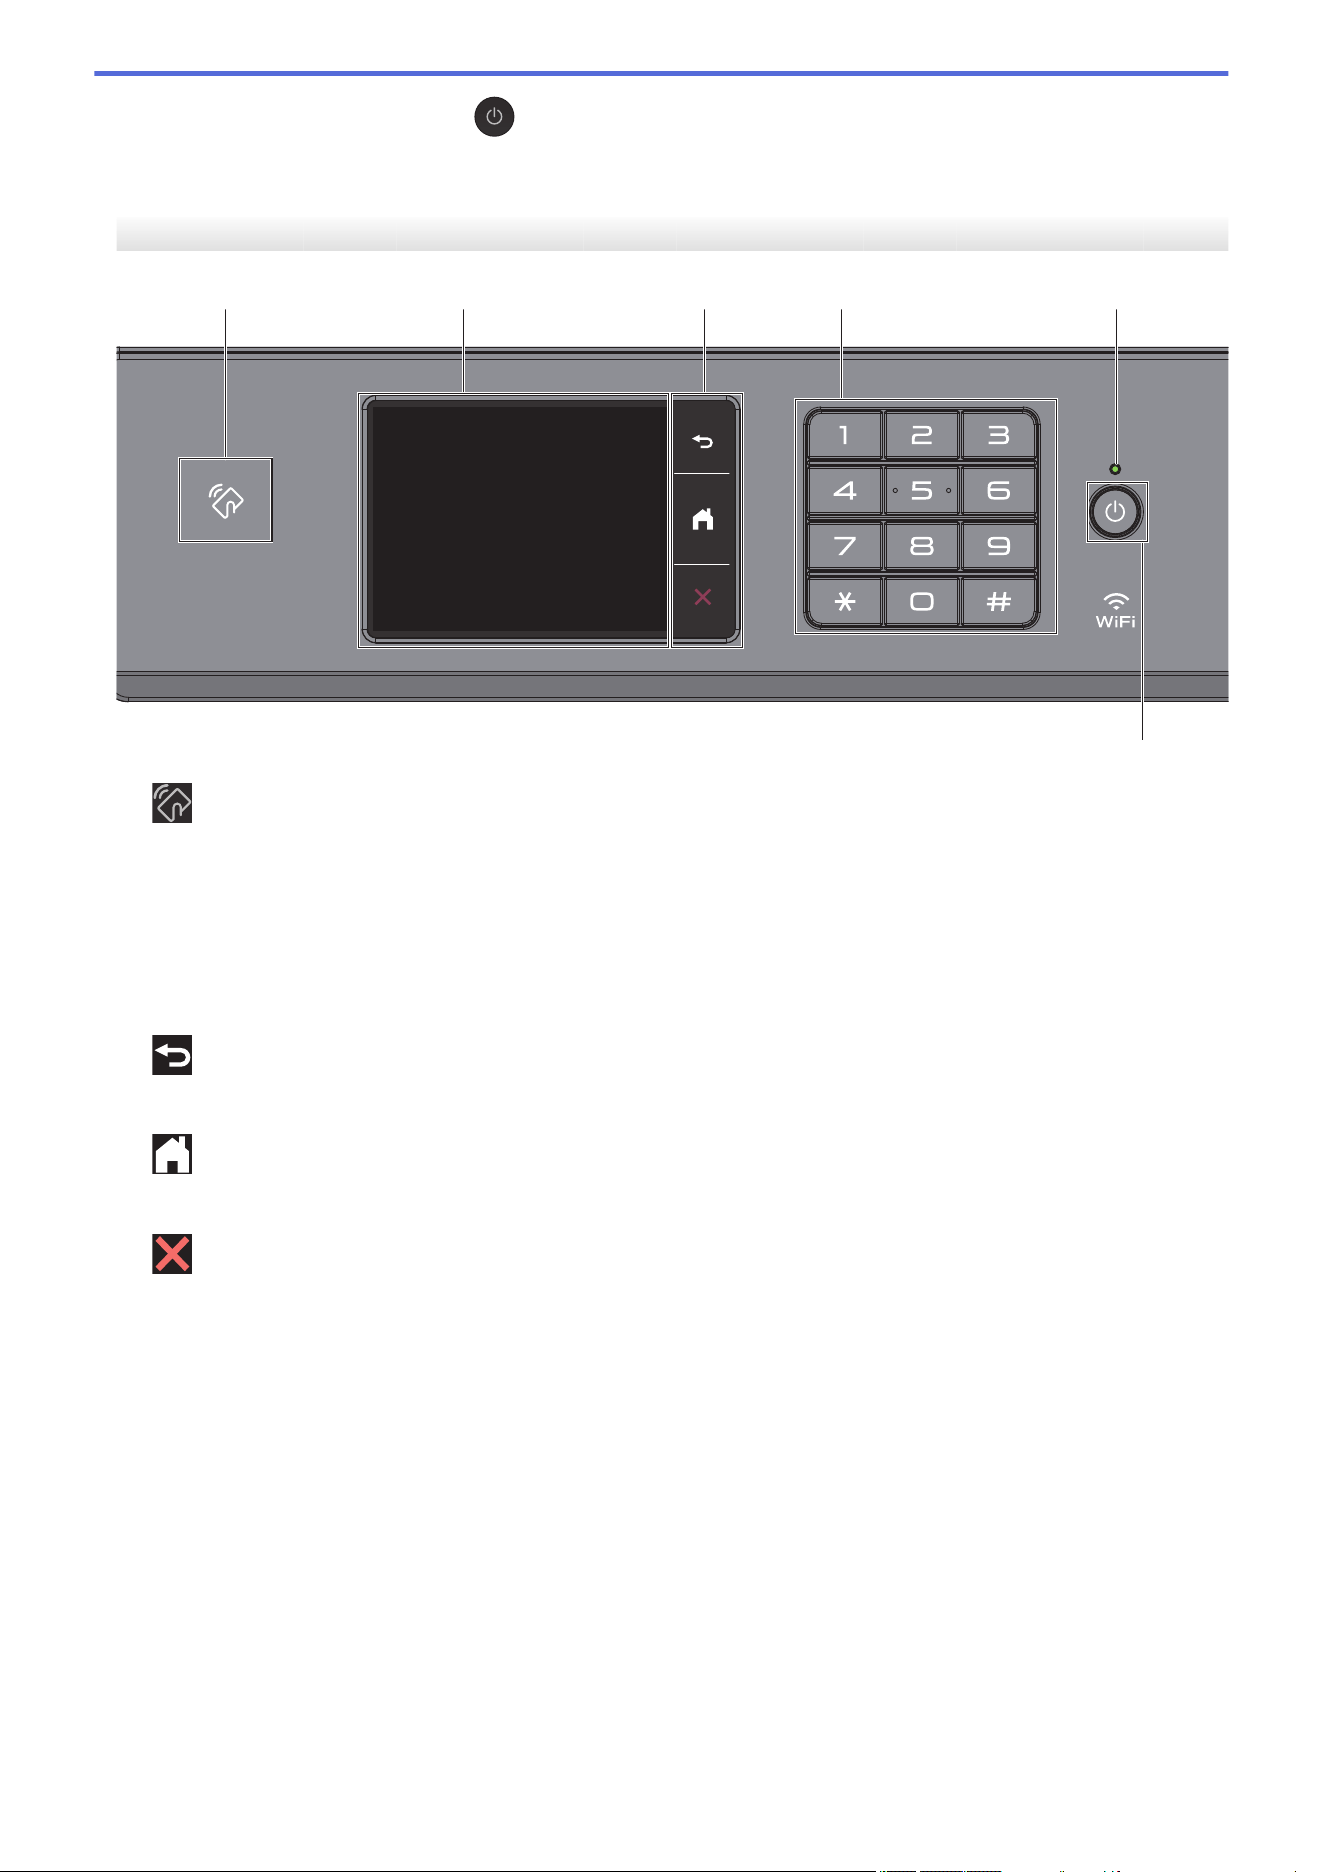
MFC-J2740DW/MFC-J5740DW/MFC-J5855DW/MFC-J5955DW
3
4
6
52
1
1. NFC (Near Field Communication) symbol
(MFC-J5955DW)
You can use card authentication by touching the IC card to the NFC symbol on the control panel.
2. Touchscreen Liquid Crystal Display (LCD)
Access menus and options by pressing them on the touchscreen.
3. Menu Buttons
(Back)
Press to go back to the previous menu.
(Home)
Press to return to the Home screen.
(Cancel)
Press to cancel an operation.
4. Dial Pad
Press the numbers to dial telephone or fax numbers and to enter the number of copies.
5. LED Power Indicator
The LED lights up depending on the machine’s power status.
When the machine is in Sleep Mode, the LED blinks.
10

6. Power On/Off
Press to turn the machine on.
Press and hold
to turn the machine off. The touchscreen displays [Shutting Down] and stays on for a
few seconds before turning itself off. A connected external telephone or Telephone Answering Device (TAD)
will always remain available.
If you turn the machine off using , it will still clean the print head periodically to maintain print quality. To
prolong print head life, provide better ink efficiency, and maintain print quality, keep your machine connected
to a power source at all times.
Related Information
• Introduction to Your Machine
11
Home > Introduction to Your Machine > Touchscreen LCD Overview
Touchscreen LCD Overview
Using your finger, press d c or a b on the LCD to display and access the machine options.
(MFC-J2740DW/MFC-J5740DW/MFC-J5855DW/MFC-J5955DW) You can also access all machine options
by swiping left, right, up, or down on the LCD to scroll through them.
You can switch Home screens by pressing d or c.
From the Home screens, you can access the various settings.
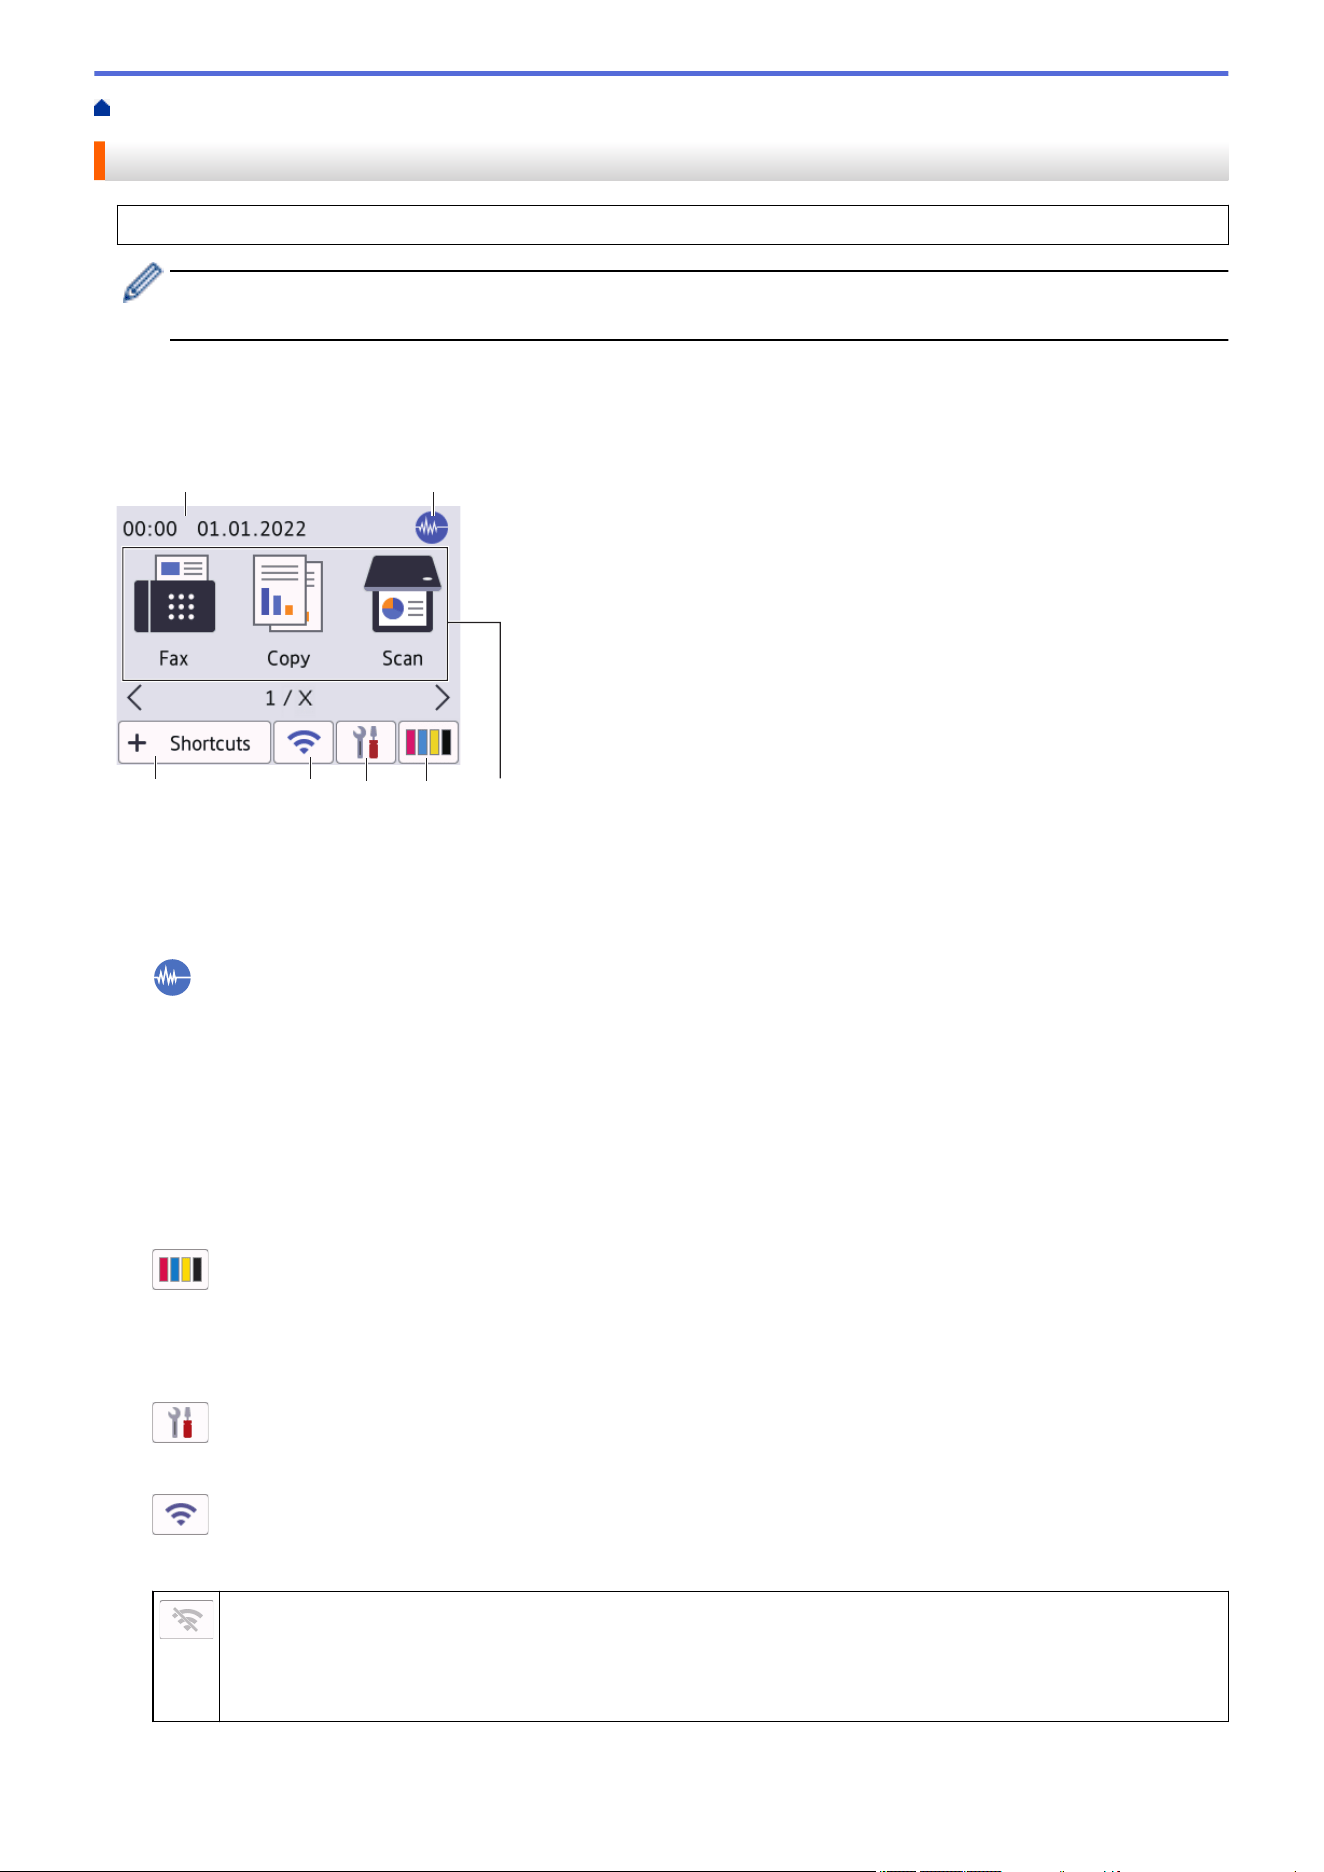
Home Screen
1
3
5
2
7
6
4
This screen shows the machine’s status when the machine is idle. When displayed, it indicates that your
machine is ready for the next command.
1. Date & Time
Displays the date and time set on the machine.
2.
Quiet Mode
This icon appears when the [Quiet Mode] setting is set to [On].
The Quiet Mode setting can reduce printing noise. When Quiet Mode is turned on, the print speed becomes
slower.
3. Modes:
Press to switch to each mode.
[Fax] / [Copy] / [Scan] / [Secure Print] (MFC-J5955DW) / [Web] / [Apps] / [USB] / [A3 Copy
Shortcuts] / [Download Software] / [Print Head Cleaning]
4.
[Ink]
Displays the approximate available ink volume. Press to access the [Ink] menu.
When an ink cartridge is near the end of its life or having a problem, an error icon is displayed on the ink
colour indicator.
5. [Settings]
Press to access the [Settings] menu.
6. Wireless Status
Each icon in the following table shows the wireless network status:
• Your machine is not connected to the wireless access point/router.
Press this button to configure wireless settings. For more detailed information, see the Quick Setup
Guide.
• The wireless setting is disabled.
12
The wireless network is connected.
A three-level indicator in each of the Home screens displays the current wireless signal strength.
The wireless access point/router cannot be detected.
You can configure wireless settings by pressing the Wireless Status button.
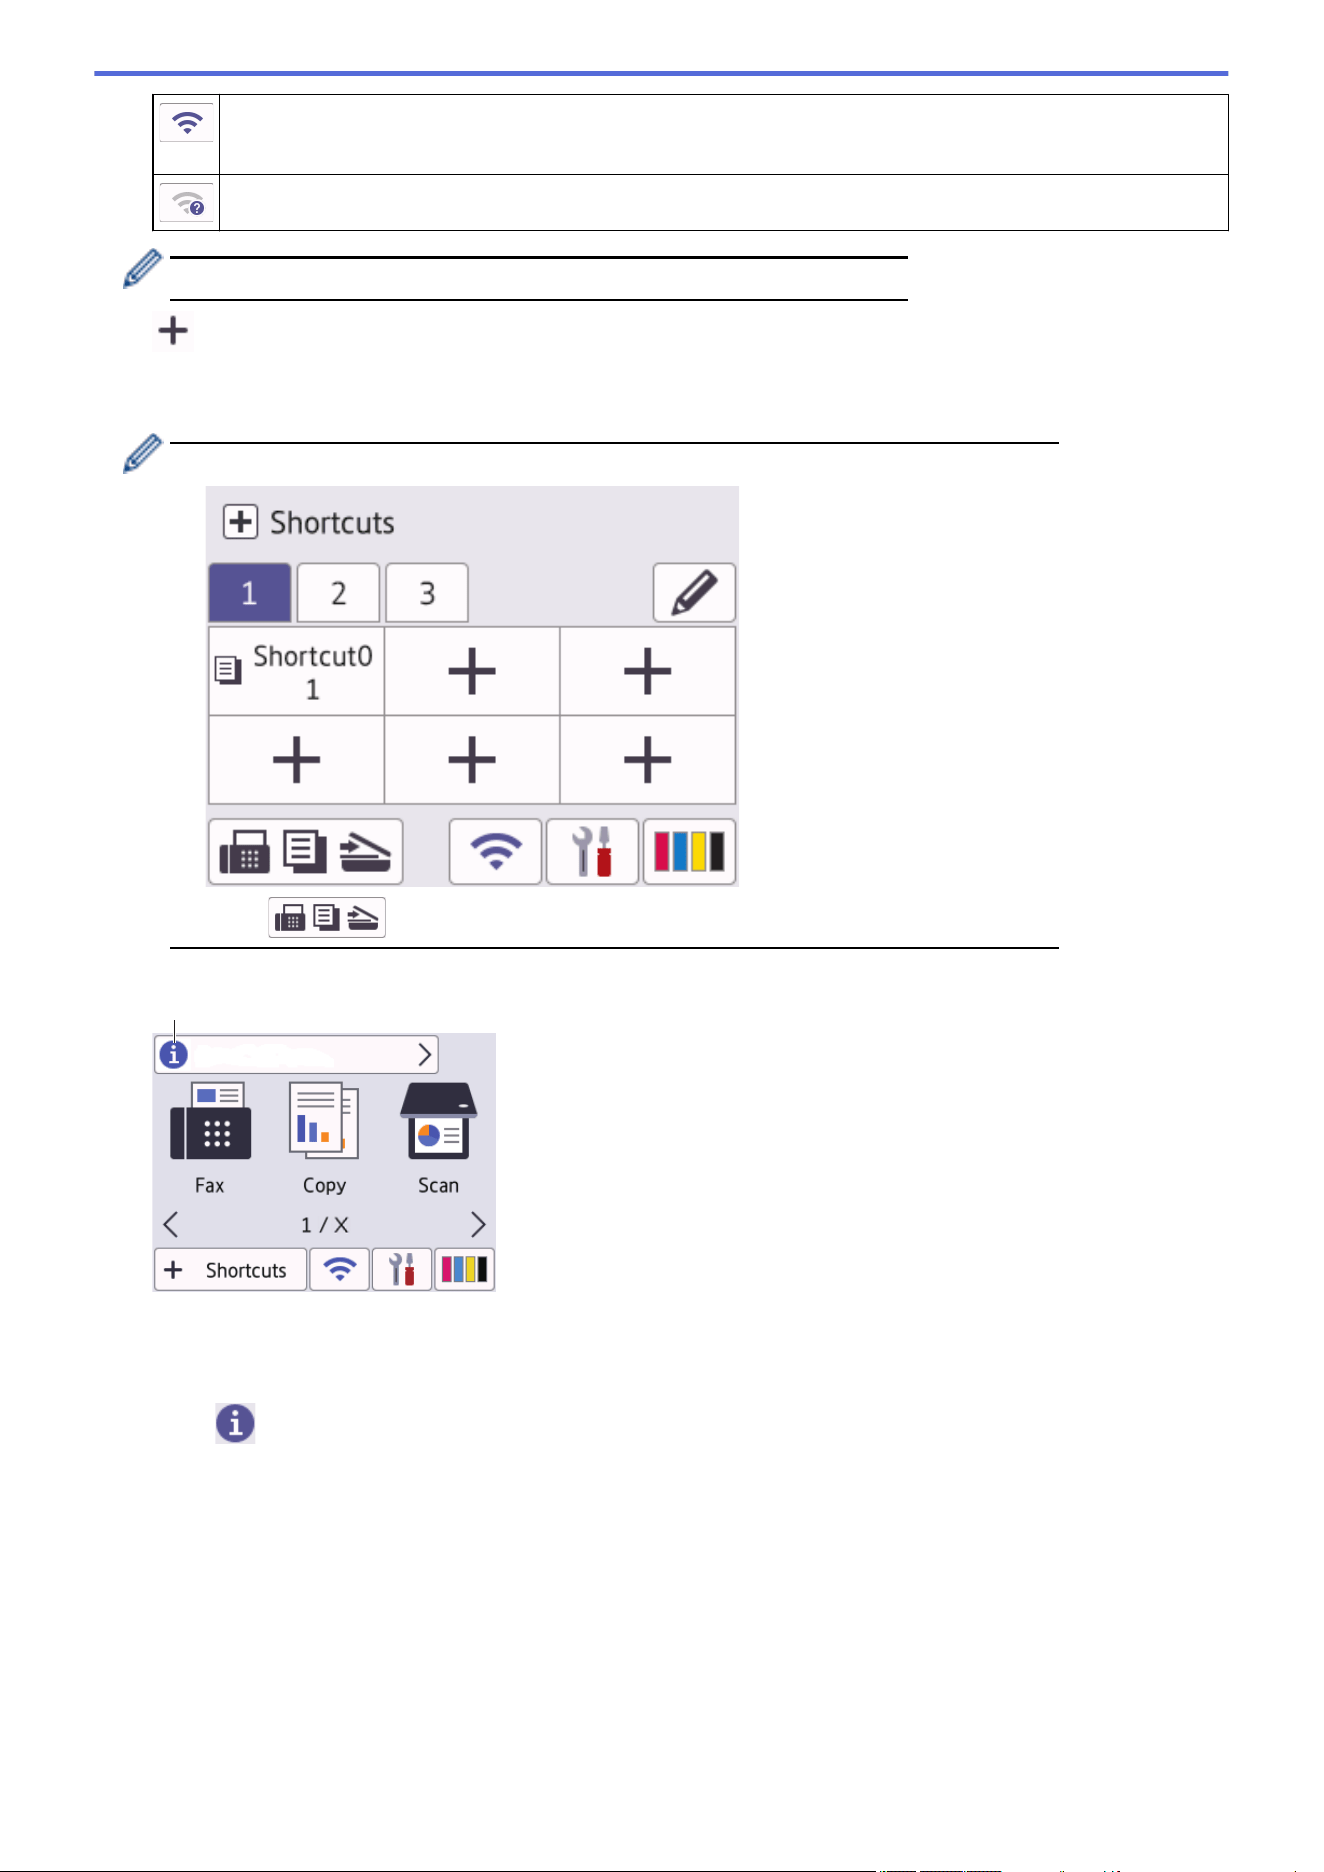
7. [Shortcuts]
Create Shortcuts for frequently-used operations, such as sending a fax, copying, scanning, Web Connect and
Apps services.
• Three Shortcuts tabs are available with six Shortcuts on each tab.
• Press , displayed at the bottom of the screen to access the Home Screens.
8. Information icon
8
New information from Brother appears in the information bar when the notification settings such as
[Message from Brother] and [Firmware Auto Check] are set to [On].
(An internet connection is needed, and data rates may apply.)
Press to view the details.
13
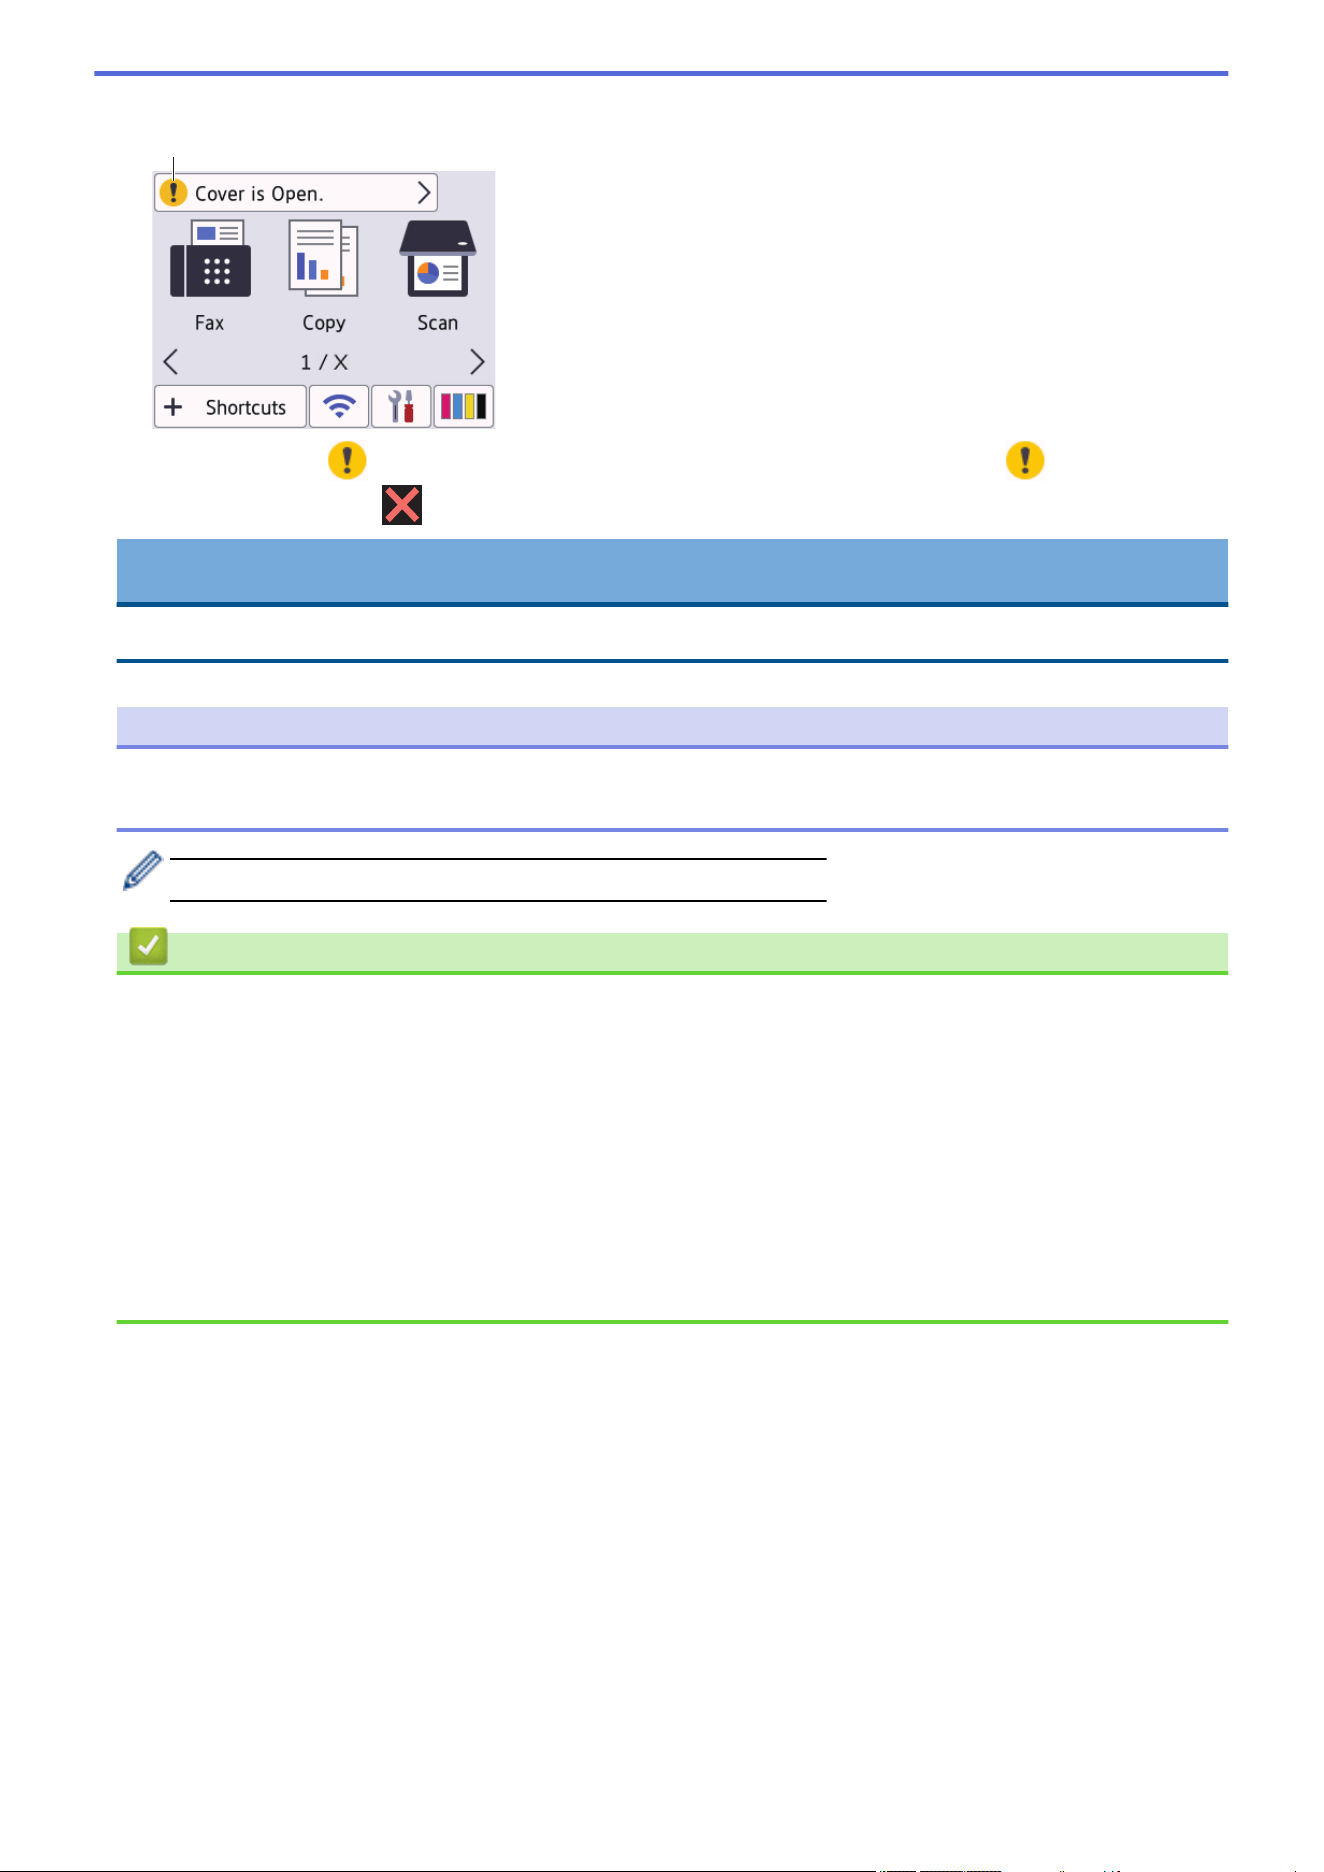
9. Warning icon
9
The warning icon appears when there is an error or maintenance message; press to view the
details, and then press to return to the Home screen.
IMPORTANT
DO NOT press the LCD with a sharp object such as a pen or stylus. It may damage the machine.
NOTE
DO NOT touch the LCD immediately after plugging in the power cord or turning on the machine. Doing this
may cause an error.
This product adopts the font of ARPHIC TECHNOLOGY CO., LTD.
Related Information
• Introduction to Your Machine
• Settings Screen Overview
• Set the Ready Screen
• Set Default Function Screens
Related Topics:
• Reduce Printing Noise
• Check the Ink Volume (Page Gauge)
• Use the A3 Copy Shortcuts
• Error and Maintenance Messages
14
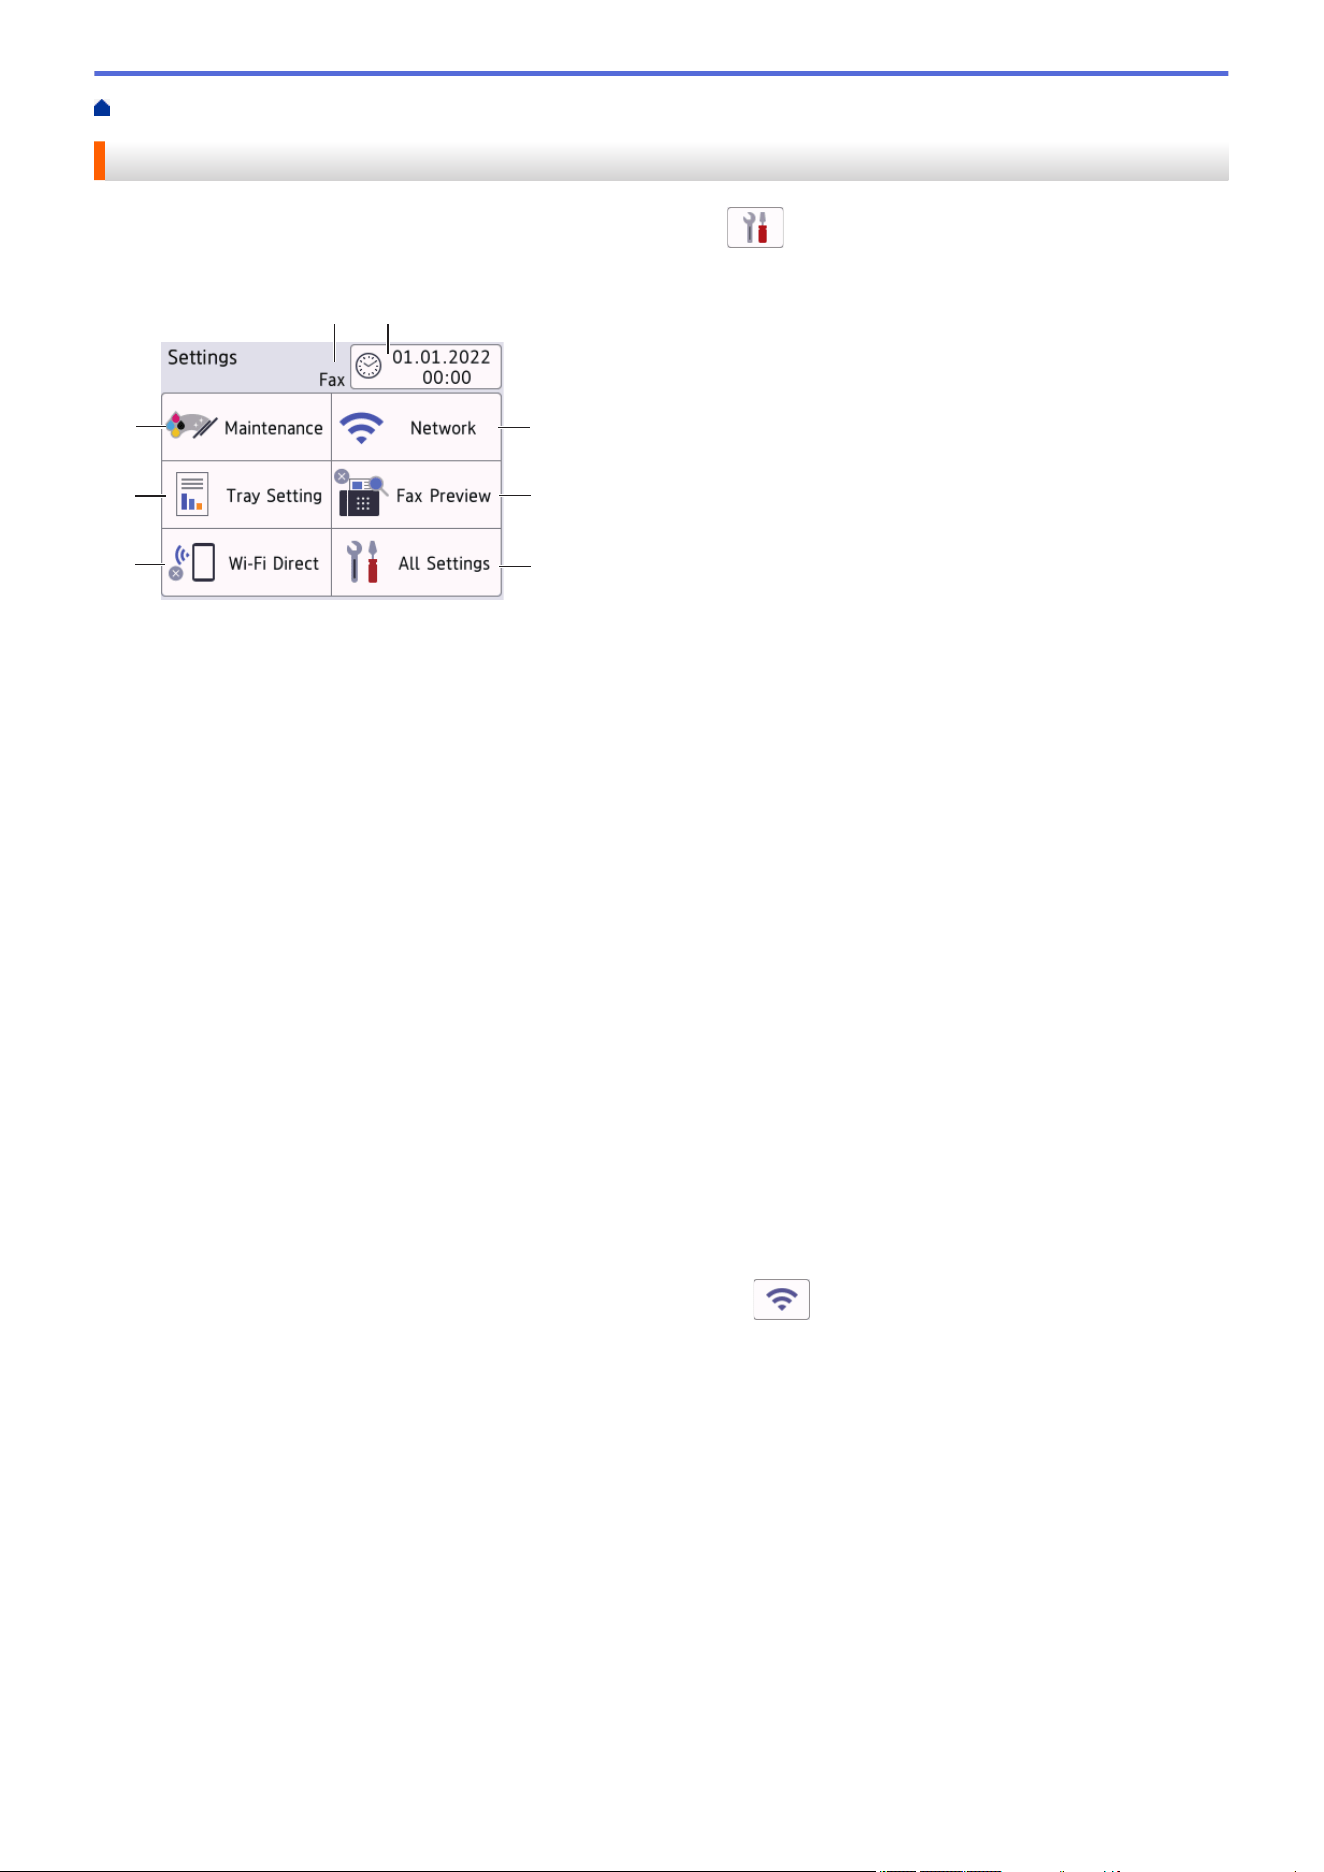
Home > Introduction to Your Machine > Touchscreen LCD Overview > Settings Screen Overview
Settings Screen Overview
The touchscreen shows the machine's status when you press [Settings].
Use the Settings menu to access all of your Brother machine's settings.
2
1
7
8
4
5
6
3
1. [Maintenance]
Press to access the following menus:
• [Improve Print Quality]
• [Print Head Cleaning]
• [Remove Paper Scraps]
• [Clean Paper Pick-up Roller] (Available only for some countries.)
• [Ink Volume]
• [Ink Cartridge Model]
• [Print Options]
• [Ink Cartridge Check]
• [Print Quality Auto Check]
2. Receive Mode
Displays the current Receive Mode.
3. [Date & Time]
Displays the date and time.
Press to access the [Date & Time] menu.
4. [Network]
Press to set up a network connection.
If you are using a wireless connection, a three-level indicator
on the screen displays the current
wireless signal strength.
5. [Fax Preview]
Displays the Fax Preview setting.
Press to access the [Fax Preview] menu.
6. [All Settings]
Press to access a menu of all of your machine's settings.
7. [Wi-Fi Direct]
Press to set up a Wi-Fi Direct network connection.
8. [Tray Setting]
Press to access the [Tray Setting] menu.
Use these options to change the paper size and type.
15

Home > Introduction to Your Machine > Touchscreen LCD Overview > Set the Ready Screen
Set the Ready Screen
You can change the Ready screen to display a specific Home screen or Shortcut screen.
When the machine is idle or you press
, the machine will go back to the screen that you have set.
1. Press [Settings] > [All Settings] > [General Setup] > [Screen Settings] > [Home
Screen].
2. Press a or b to display the screen options, and then select the option you want.
3. Press .
The machine will go to your new Home screen.
Related Information
• Touchscreen LCD Overview
17

Home > Introduction to Your Machine > Touchscreen LCD Overview > Set Default Function Screens
Set Default Function Screens
You can set the Scan default screen using the Screen Settings.
1. Press [Settings] > [All Settings] > [General Setup] > [Screen Settings] > [Scan
Screen].
2. Press a or b to display the scan options, and then select the option you want to set as the default screen.
3. Press
.
Related Information
• Touchscreen LCD Overview
18

Home > Introduction to Your Machine > Enter Text on Your Brother Machine
Enter Text on Your Brother Machine
• The characters that are available may differ depending on your country.
• The keyboard layout may differ depending on the function you are setting.
When you need to enter text on your Brother machine, a keyboard will appear on the touchscreen.
• Press to cycle between letters, numbers and special characters.
• Press to cycle between lowercase and uppercase letters.
• To move the cursor to the left or right, press d or c.
Inserting spaces
• To enter a space, press [Space]. Or, you can press c to move the cursor.
Making corrections
• If you entered an incorrect character and want to change it, press d or c to highlight the incorrect character.
Press
, and then enter the correct character.
• To insert a character, press d or c to move the cursor to the correct place, and then enter the character.
• Press
for each character you want to erase, or press and hold to erase all the characters.
Related Information
• Introduction to Your Machine
Related Topics:
• Send the Same Fax to More than One Recipient (Broadcasting)
• Save Outgoing Call Numbers to the Address Book
• Save Caller ID History Numbers to the Address Book
• Change a Broadcasting Group Name
• Set Your Station ID
• Change or Delete Shortcuts
19
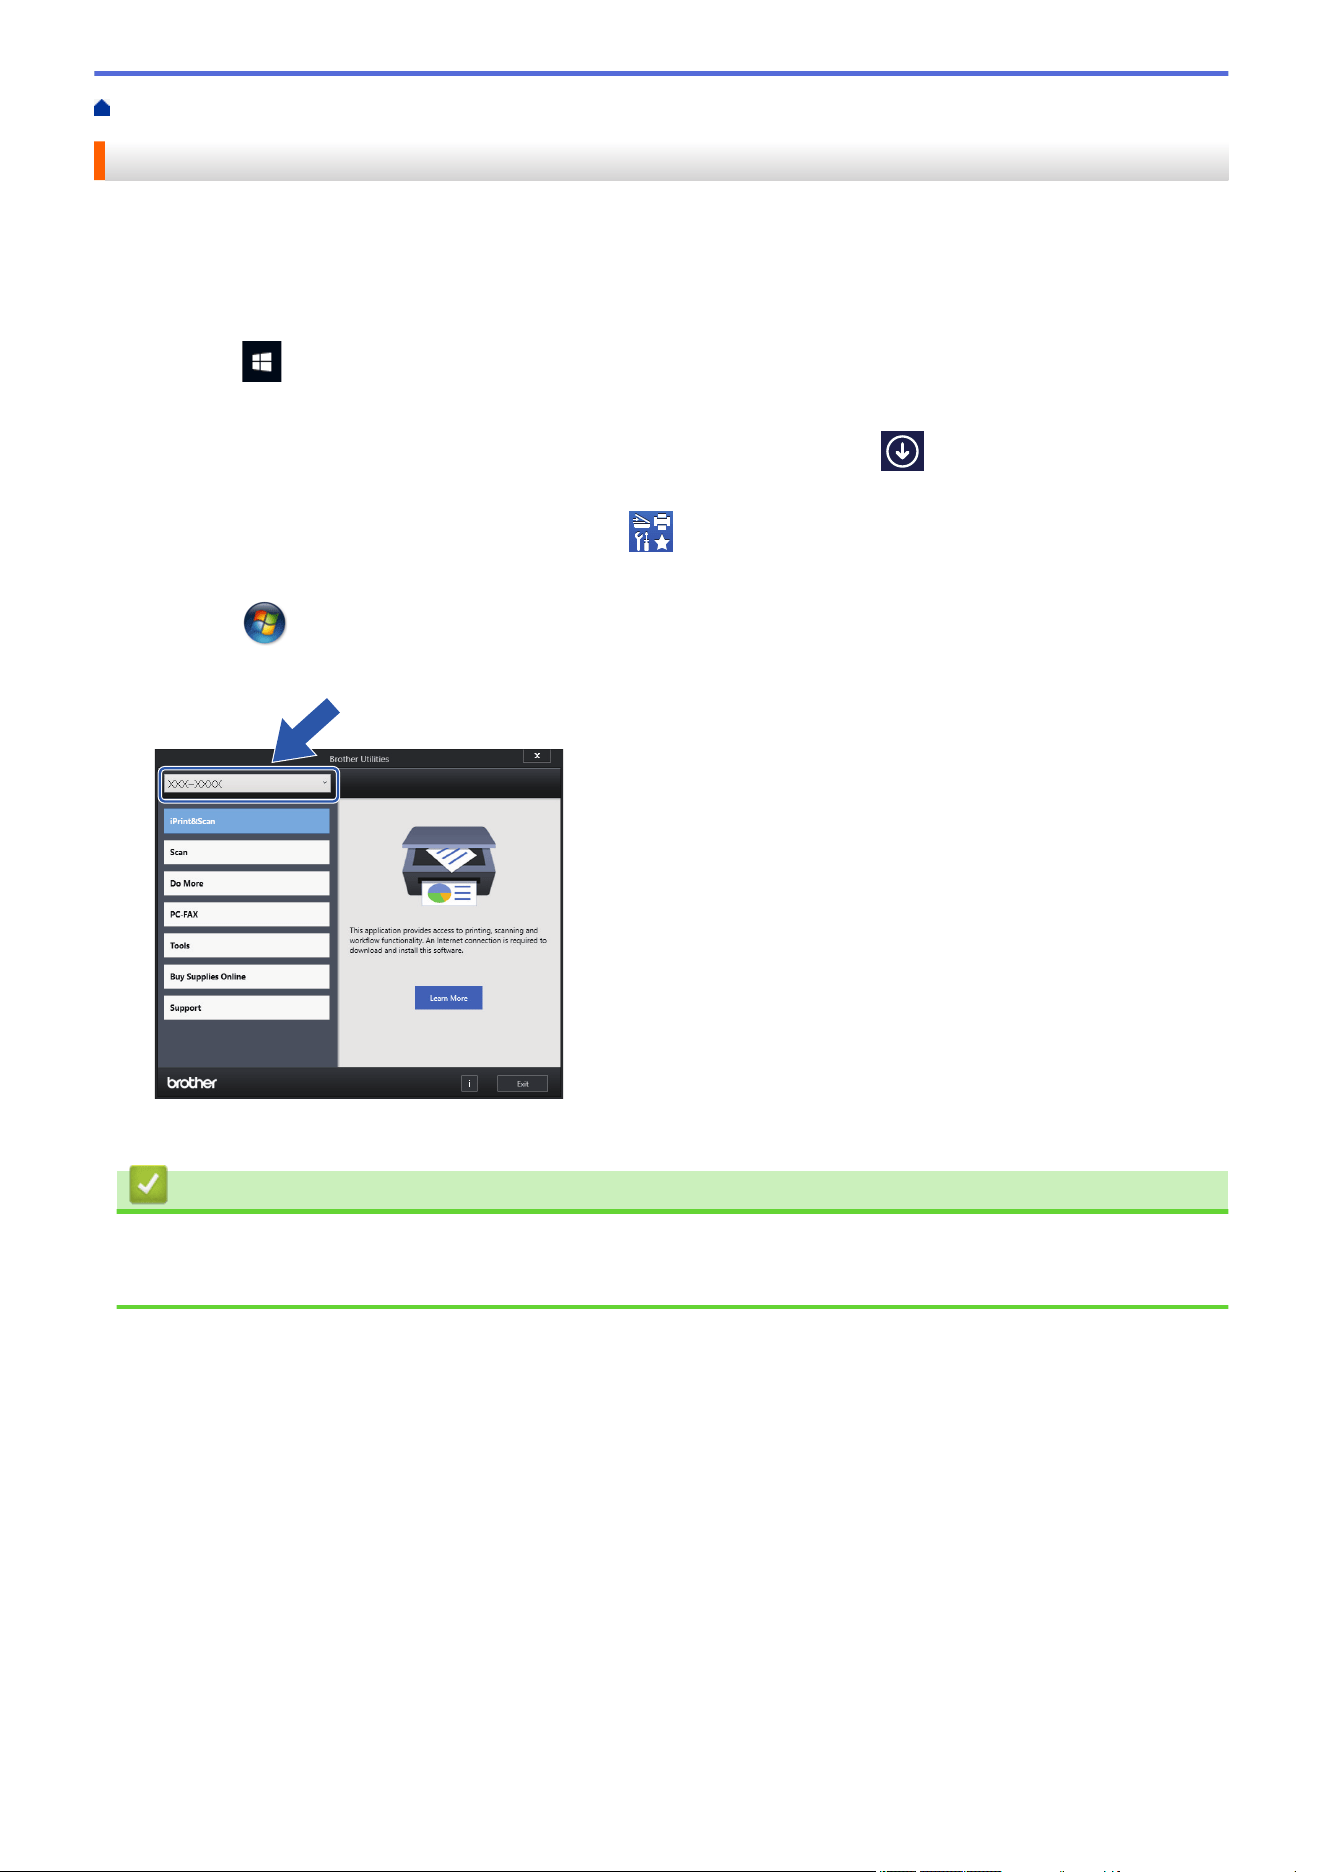
Home > Introduction to Your Machine > Access Brother Utilities (Windows)
Access Brother Utilities (Windows)
Brother Utilities is an application launcher that offers convenient access to all Brother applications installed on
your computer.
1. Do one of the following:
• Windows 10
Click
> Brother > Brother Utilities.
• Windows 8.1
Move your mouse to the lower left corner of the Start screen and click (if using a touch-based
device, swipe up from the bottom of the Start screen to bring up the Apps screen).
When the Apps screen appears, tap or click (Brother Utilities).
• Windows 7
Click
(Start) > All Programs > Brother > Brother Utilities.
2. Select your machine.
3. Select the operation you want to use.
Related Information
• Introduction to Your Machine
• Uninstall the Brother Software and Drivers (Windows)
20
Home > Introduction to Your Machine > Access Brother Utilities (Windows) > Uninstall the Brother Software
and Drivers (Windows)
Uninstall the Brother Software and Drivers (Windows)
1. Do one of the following:
• Windows 10
Click
> Brother > Brother Utilities.
• Windows 8.1
Move your mouse to the lower left corner of the Start screen and click (if using a touch-based
device, swipe up from the bottom of the Start screen to bring up the Apps screen).
When the Apps screen appears, tap or click
(Brother Utilities).
• Windows 7
Click (Start) > All Programs > Brother > Brother Utilities.
2. Click the drop-down list, and then select your model name (if not already selected). Click Tools in the left
navigation bar, and then click Uninstall.
Follow the instructions in the dialog box to uninstall the software and drivers.
Related Information
• Access Brother Utilities (Windows)
21
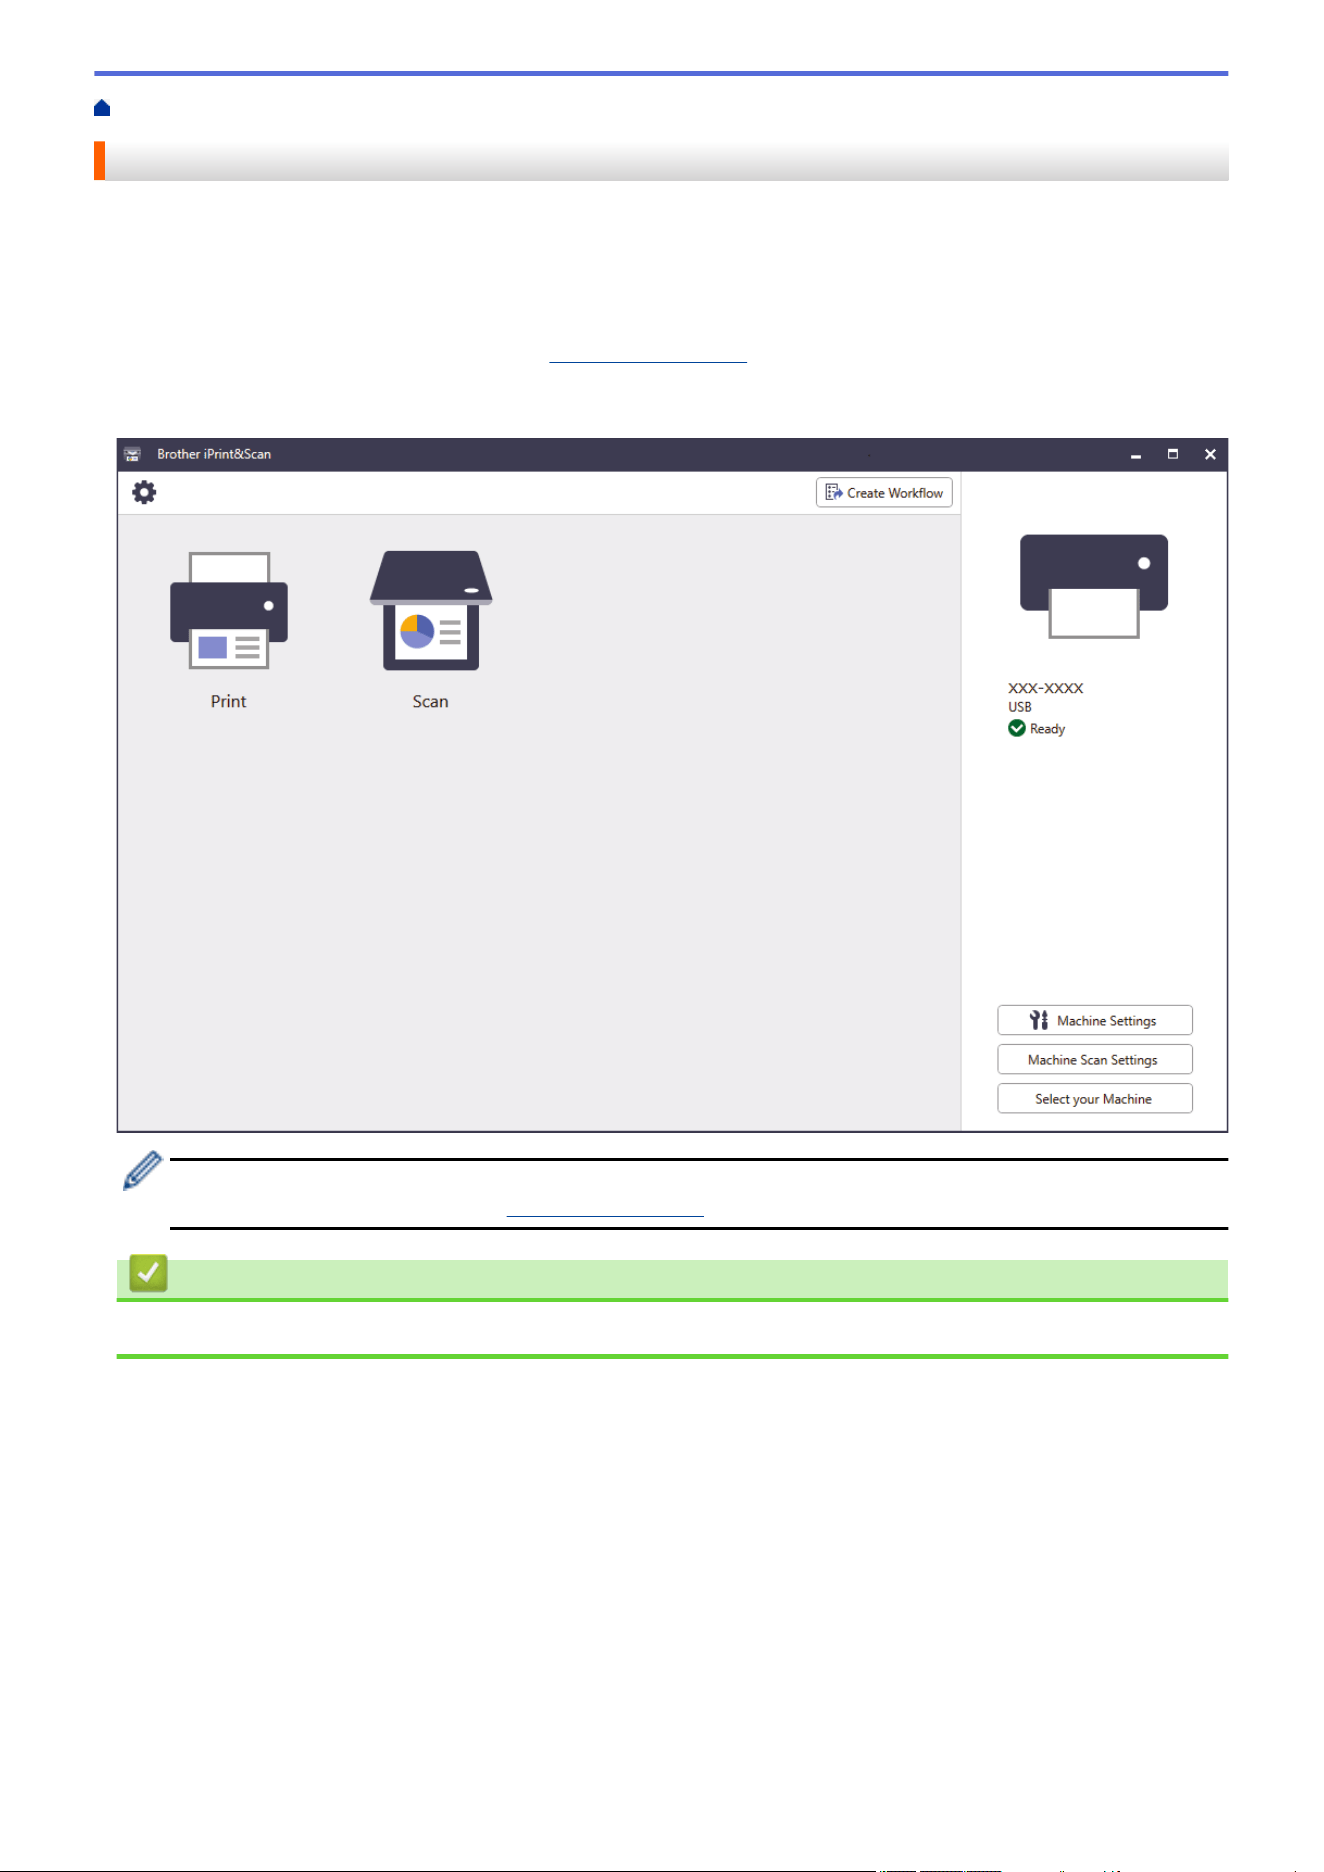
Home > Introduction to Your Machine > Access Brother iPrint&Scan (Windows/Mac)
Access Brother iPrint&Scan (Windows/Mac)
Use Brother iPrint&Scan for Windows and Mac to print and scan from your computer.
The following screen shows an example of Brother iPrint&Scan for Windows. The actual screen may differ
depending on the version of the application.
• For Windows
Go to your model's Downloads page at
support.brother.com to download the latest application.
• For Mac
Download and install Brother iPrint&Scan from the App Store.
If prompted, install the driver and software necessary to use your machine. Download the installer from
your model's Downloads page at support.brother.com.
Related Information
• Introduction to Your Machine
22
Home > Introduction to Your Machine > USB / Ethernet Port Locations on Your Brother Machine
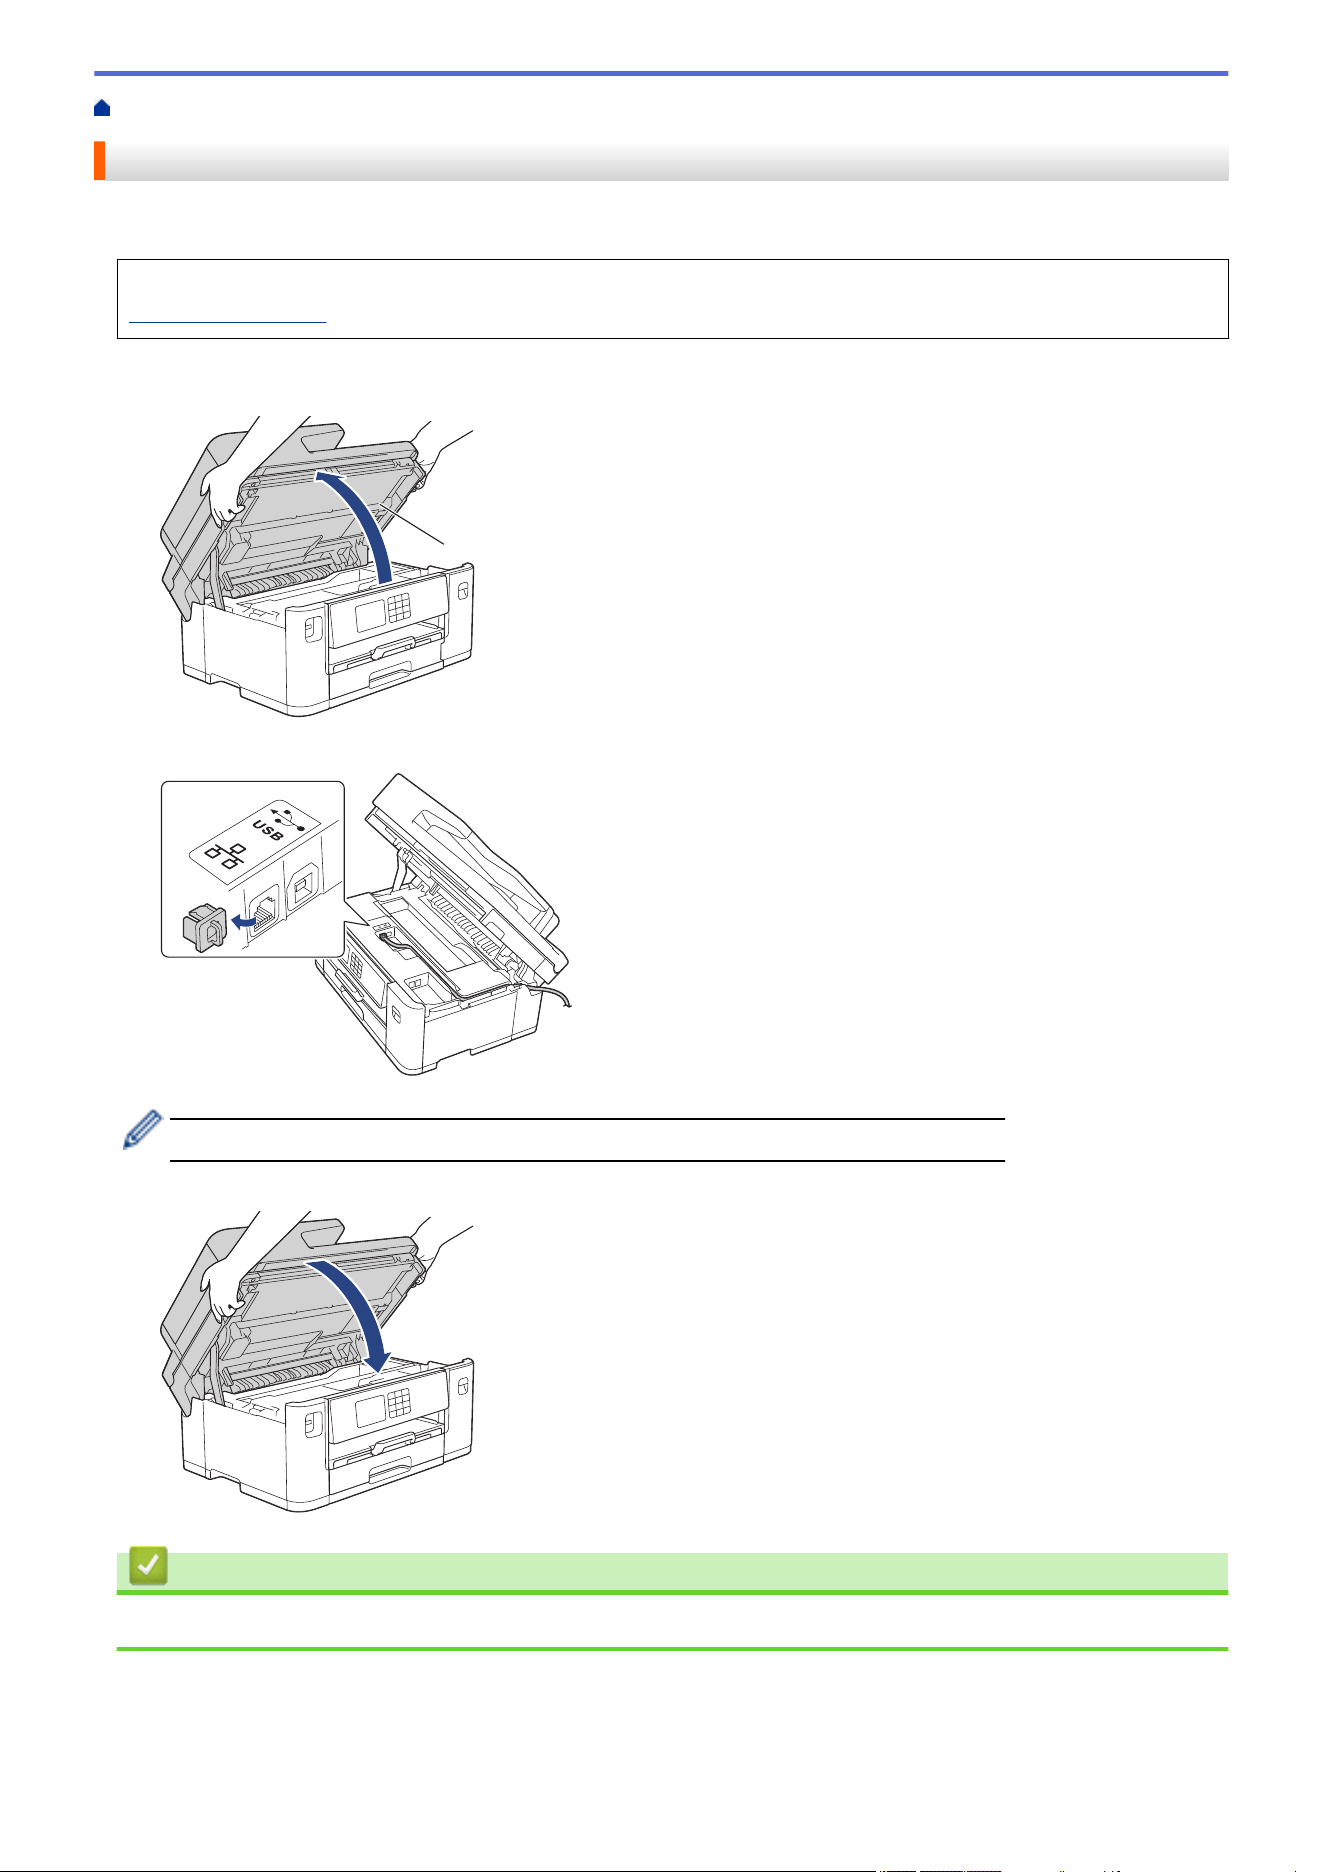
USB / Ethernet Port Locations on Your Brother Machine
The USB and Ethernet ports are located inside the machine.
To install the driver and software necessary to use your machine, go to your model's Downloads page at
support.brother.com.
1. Using both hands, use the finger holds on each side of the machine to lift the scanner cover (1) into the open
position.
1
2. Locate the correct port (based on the cable you are using) inside the machine as shown.
Carefully guide the cable through the cable channel and out the back of the machine.
3. Gently close the scanner cover using the finger holds on each side.
Related Information
• Introduction to Your Machine
23


Home > Paper Handling > Load Paper
Load Paper
• Loading Paper Overview
• Load Paper in Paper Tray #1 / Paper Tray #2
• Load Paper in the Multi-purpose Tray (MP Tray)
• Load Paper in the Manual Feed Slot
• Unprintable Area
• Paper Settings
• Acceptable Print Media
• Error and Maintenance Messages
• Paper Handling and Printing Problems
25
Home > Paper Handling > Load Paper > Loading Paper Overview
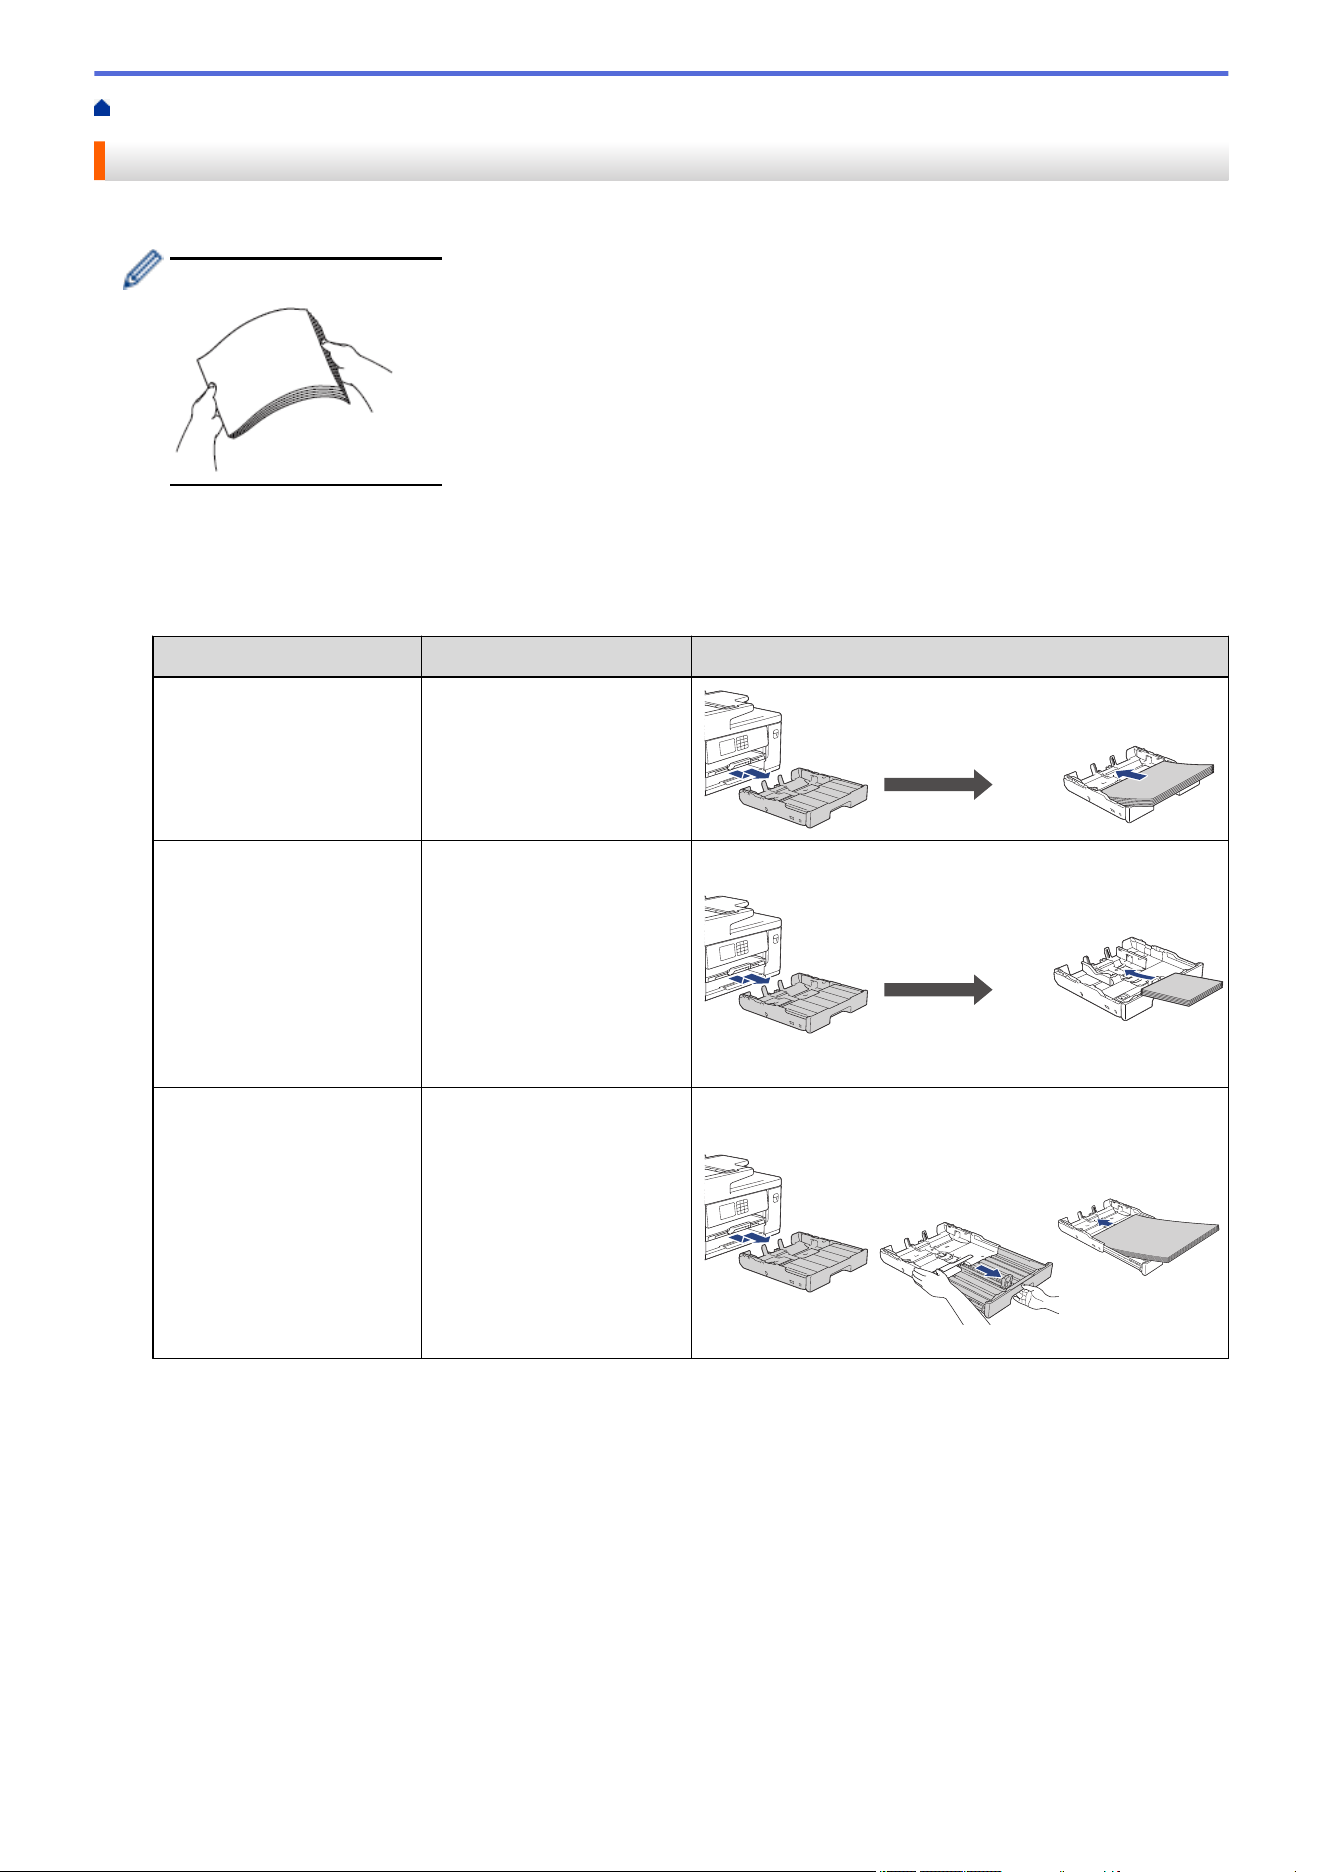
Loading Paper Overview
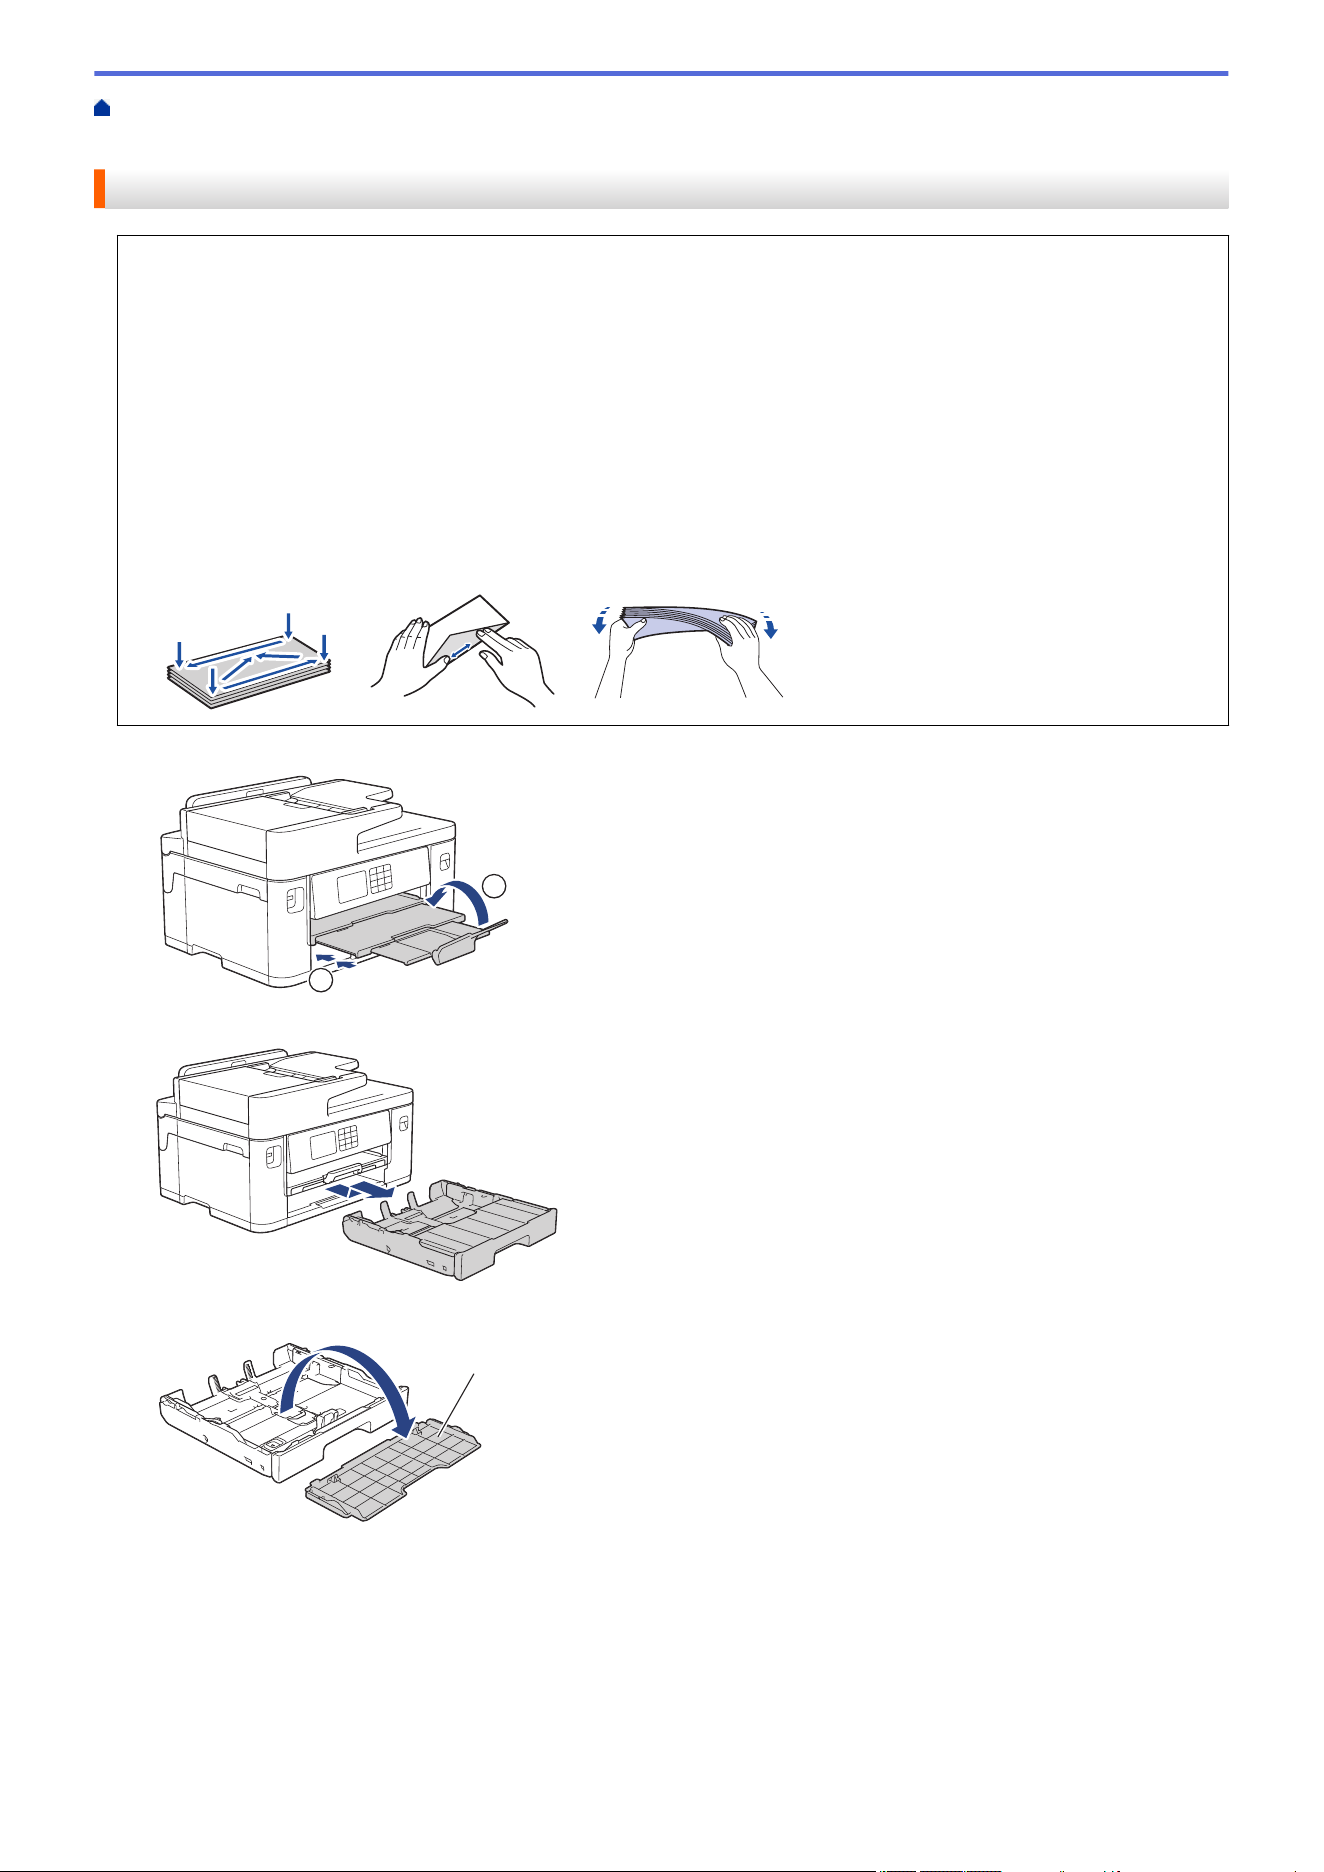
1. Load the paper in the paper tray as follows.
Fan the stack of paper well.
The paper size determines the orientation when loading paper.
Paper Tray
Tray #1
Tray #2
1
How to Load Paper
A4
Letter
Executive
B5 (JIS) ♦
A4
Letter
(Plain paper and Recycled
paper only)
Adjust the paper
guides.
Landscape
orientation
A5
A6
Photo
Photo L
Photo 2L
B6 (JIS) ♦
Index card
Envelopes
-
Adjust the paper
guides.
Portrait orientation
A3
Ledger
B4 (JIS) ♦
Legal
Folio
Mexico Legal
India Legal
(Glossy photo paper is not
available.)
A3
Ledger
B4 (JIS) ♦
Legal
Folio
Mexico Legal
India Legal
(Plain paper and Recycled
paper only)
Extend the tray
using the green
slider, then adjust
the paper guides.
Portrait orientation
1
Tray #2 is available only for MFC-J2740DW/MFC-J5740DW/MFC-J5955DW.
♦ Supported only in some countries.
26
MP Tray
MP Tray
1
How to Load Paper
A4
Letter
Executive
B5 (JIS) ♦
Adjust the MP tray paper
guides.
Landscape orientation
A3
Ledger
B4 (JIS) ♦
Legal
Folio
Mexico Legal
India Legal
A5
A6
Photo
Photo L
Photo 2L
B6 (JIS) ♦
Index card
Envelopes
Long Paper
2 3
1
2
Adjust the MP tray paper
guides.
Portrait orientation
1 MP tray is available only for MFC-J2740DW/MFC-J5740DW/MFC-J5855DW/MFC-J5955DW.
2 Width: 88.9 - 297 mm / Height: 431.9 - 1200 mm.
3 Load only one sheet of Long paper into the MP tray at a time. To avoid damaging the paper, DO NOT pull up the paper support (2)
when loading Long paper.
♦ Supported only in some countries.
27
Manual Feed Slot
Manual Feed Slot
1 2
How to Load Paper
A4
Letter
Executive
B5 (JIS) ♦
Adjust the manual feed slot
paper guides.
Landscape orientation
A3
Ledger
B4 (JIS) ♦
Legal
Folio
Mexico Legal
India Legal
A5
A6
Photo
Photo L
Photo 2L
B6 (JIS) ♦
Index card
Envelopes
Adjust the manual feed slot
paper guides.
Portrait orientation
1 Manual Feed Slot is available only for MFC-J2340DW/MFC-J5340DW.
2 You can load only one sheet of paper into the manual feed slot at a time.
♦ Supported only in some countries.
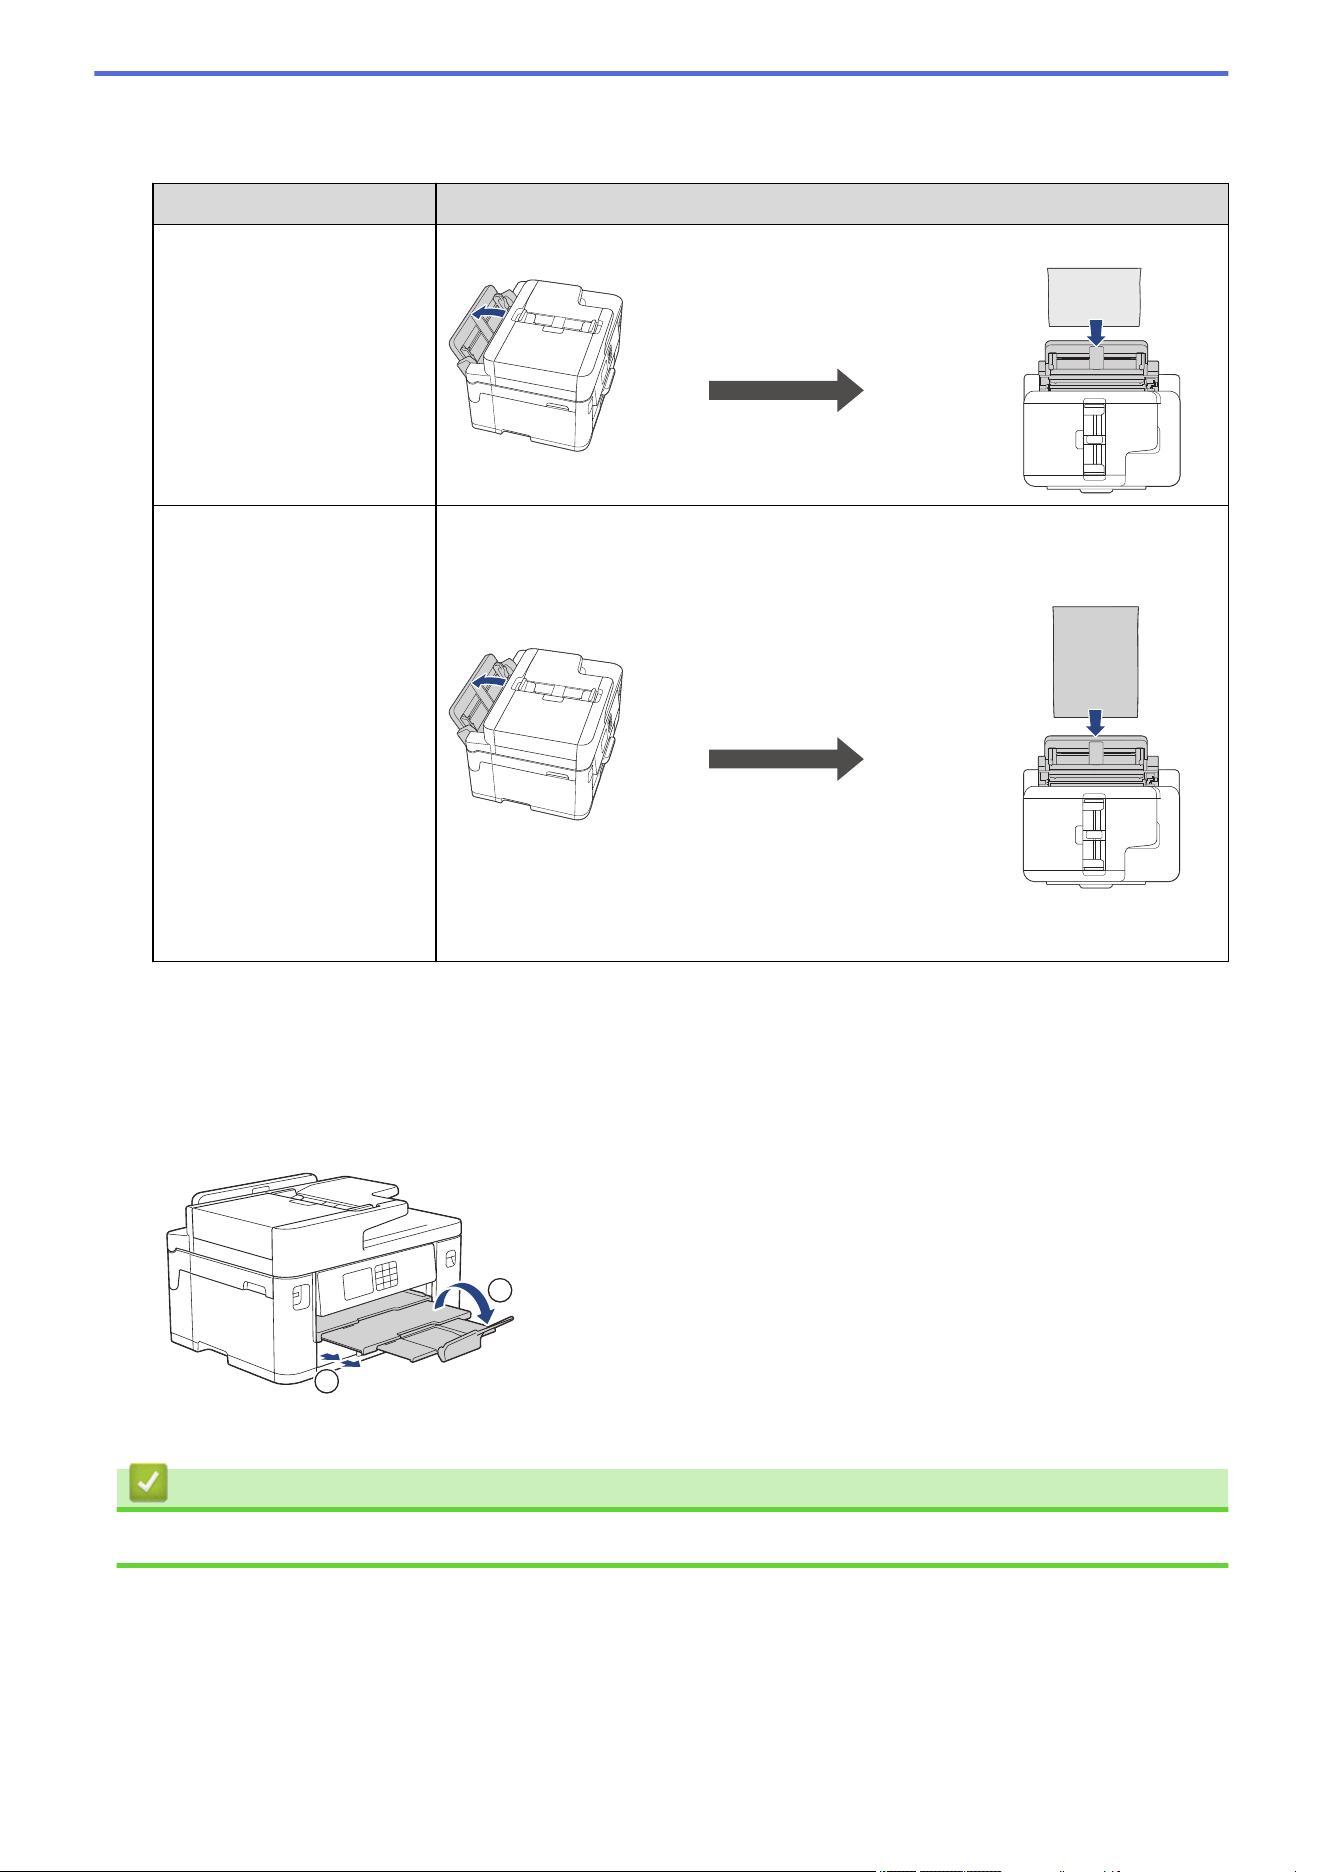
2. Unfold the paper support flap.
2
1
3. Change the paper size setting in the machine's menu, if needed.
Related Information
• Load Paper
28

Home > Paper Handling > Load Paper > Load Paper in Paper Tray #1 / Paper Tray #2
Load Paper in Paper Tray #1 / Paper Tray #2
• Load A4, Letter, or Executive Size Paper in Paper Tray #1 / Paper Tray #2
• Load A3, Ledger, or Legal Size Paper in Paper Tray #1 / Paper Tray #2
• Load Photo Paper in Paper Tray #1
• Load Envelopes in Paper Tray #1
29
Home > Paper Handling > Load Paper > Load Paper in Paper Tray #1 / Paper Tray #2 > Load A4, Letter,
or Executive Size Paper in Paper Tray #1 / Paper Tray #2
Load A4, Letter, or Executive Size Paper in Paper Tray #1 / Paper Tray
#2
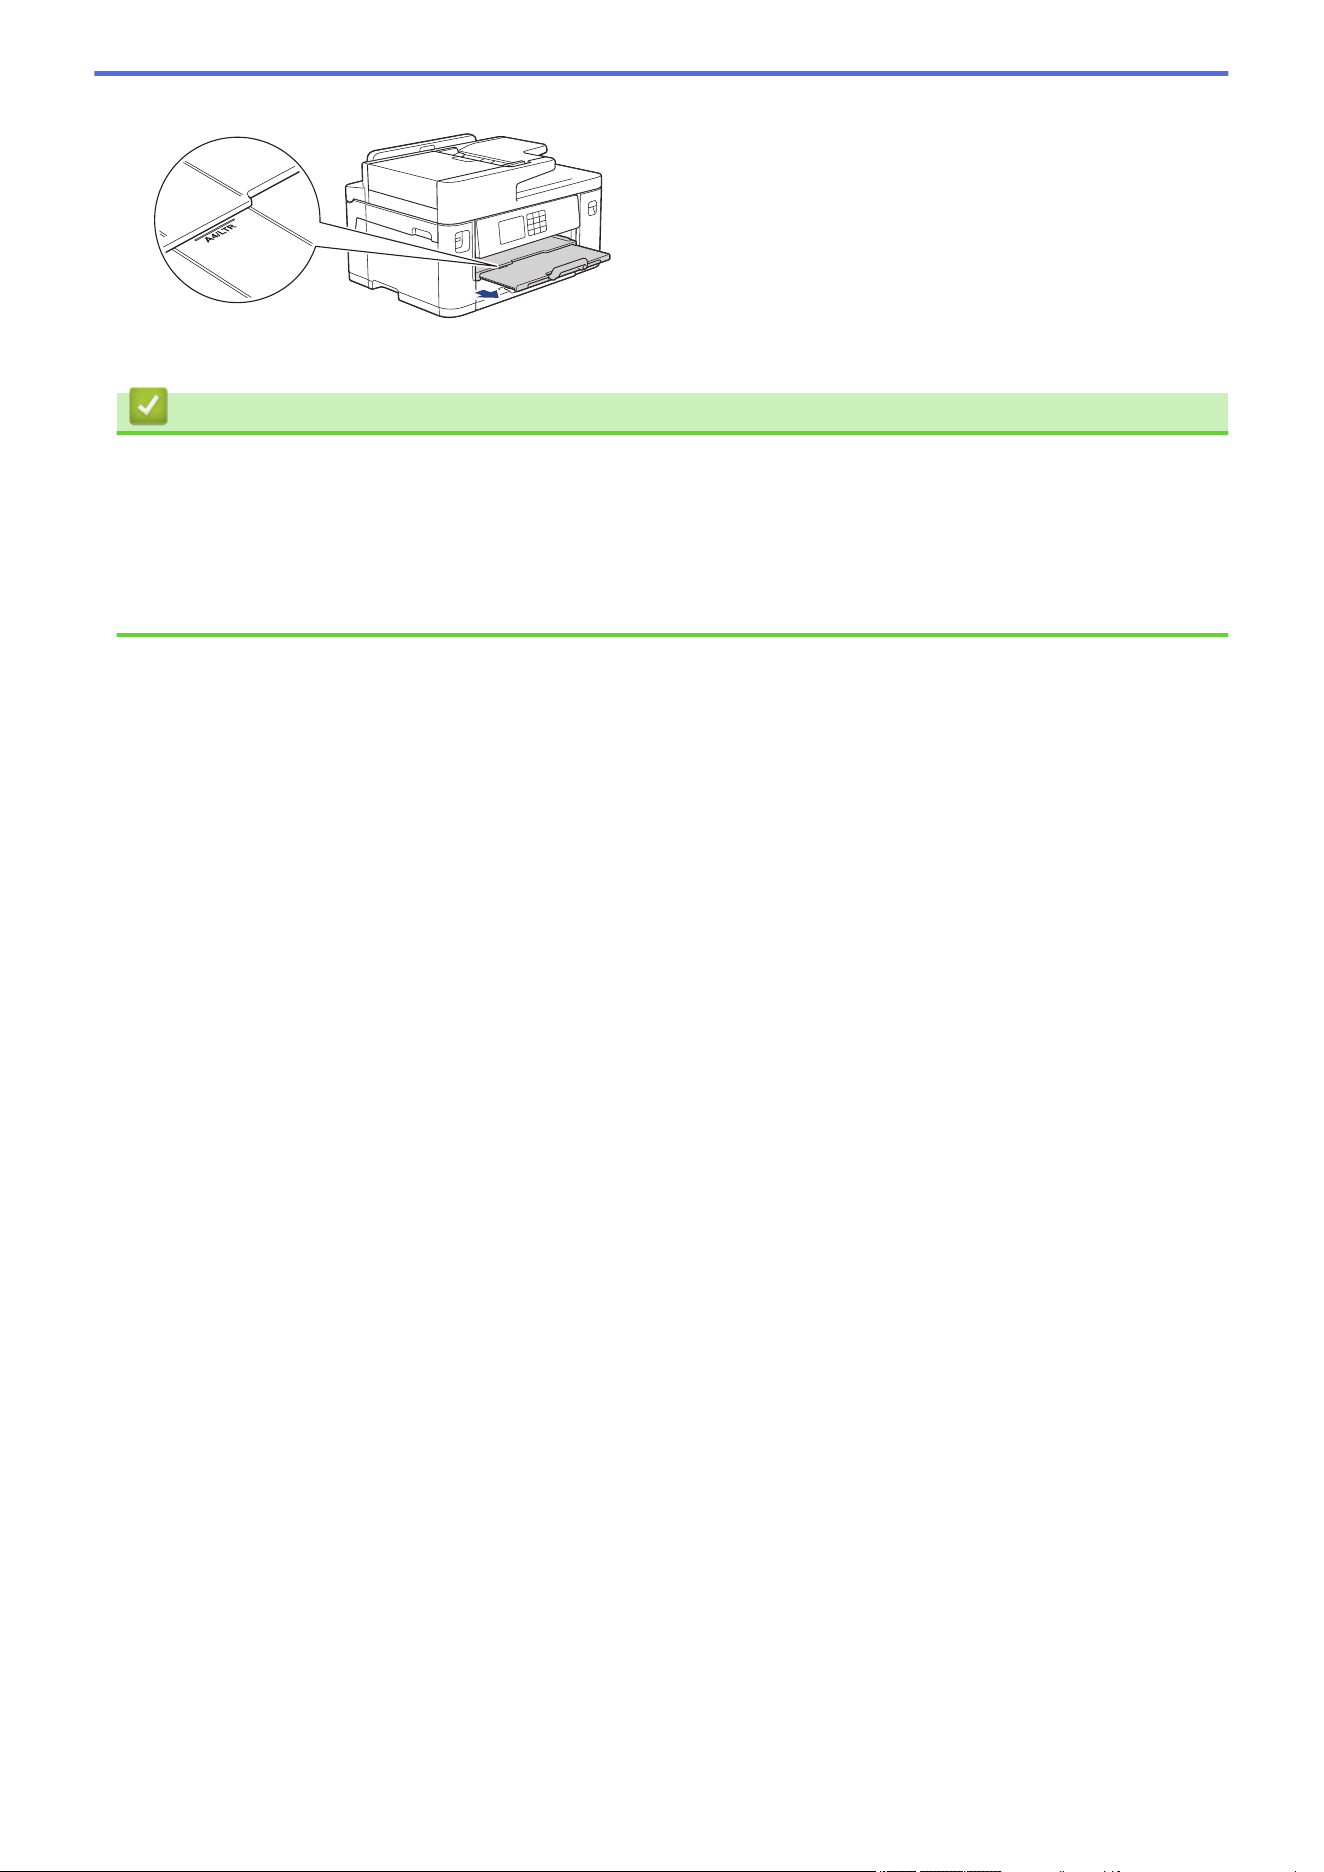
• If the [Check Paper] setting is set to [On] and you pull the paper tray out of the machine, a message
appears on the LCD, allowing you to change the paper size and paper type.
• When you load a different paper size in the tray, you must change the Paper Size setting in the machine or
the paper size setting on your computer.
Doing this enables the machine to automatically feed paper from the appropriate tray if Auto Tray Select
has been set in the printer driver (Windows) or on the machine. (MFC-J2740DW/MFC-J5740DW/
MFC-J5855DW/MFC-J5955DW)
• You can use only plain paper in Tray #2. (MFC-J2740DW/MFC-J5740DW/MFC-J5955DW)
These instructions describe how to load paper in Tray #1.
(MFC-J2740DW/MFC-J5740DW/MFC-J5955DW) The steps for Tray #2 are very similar.
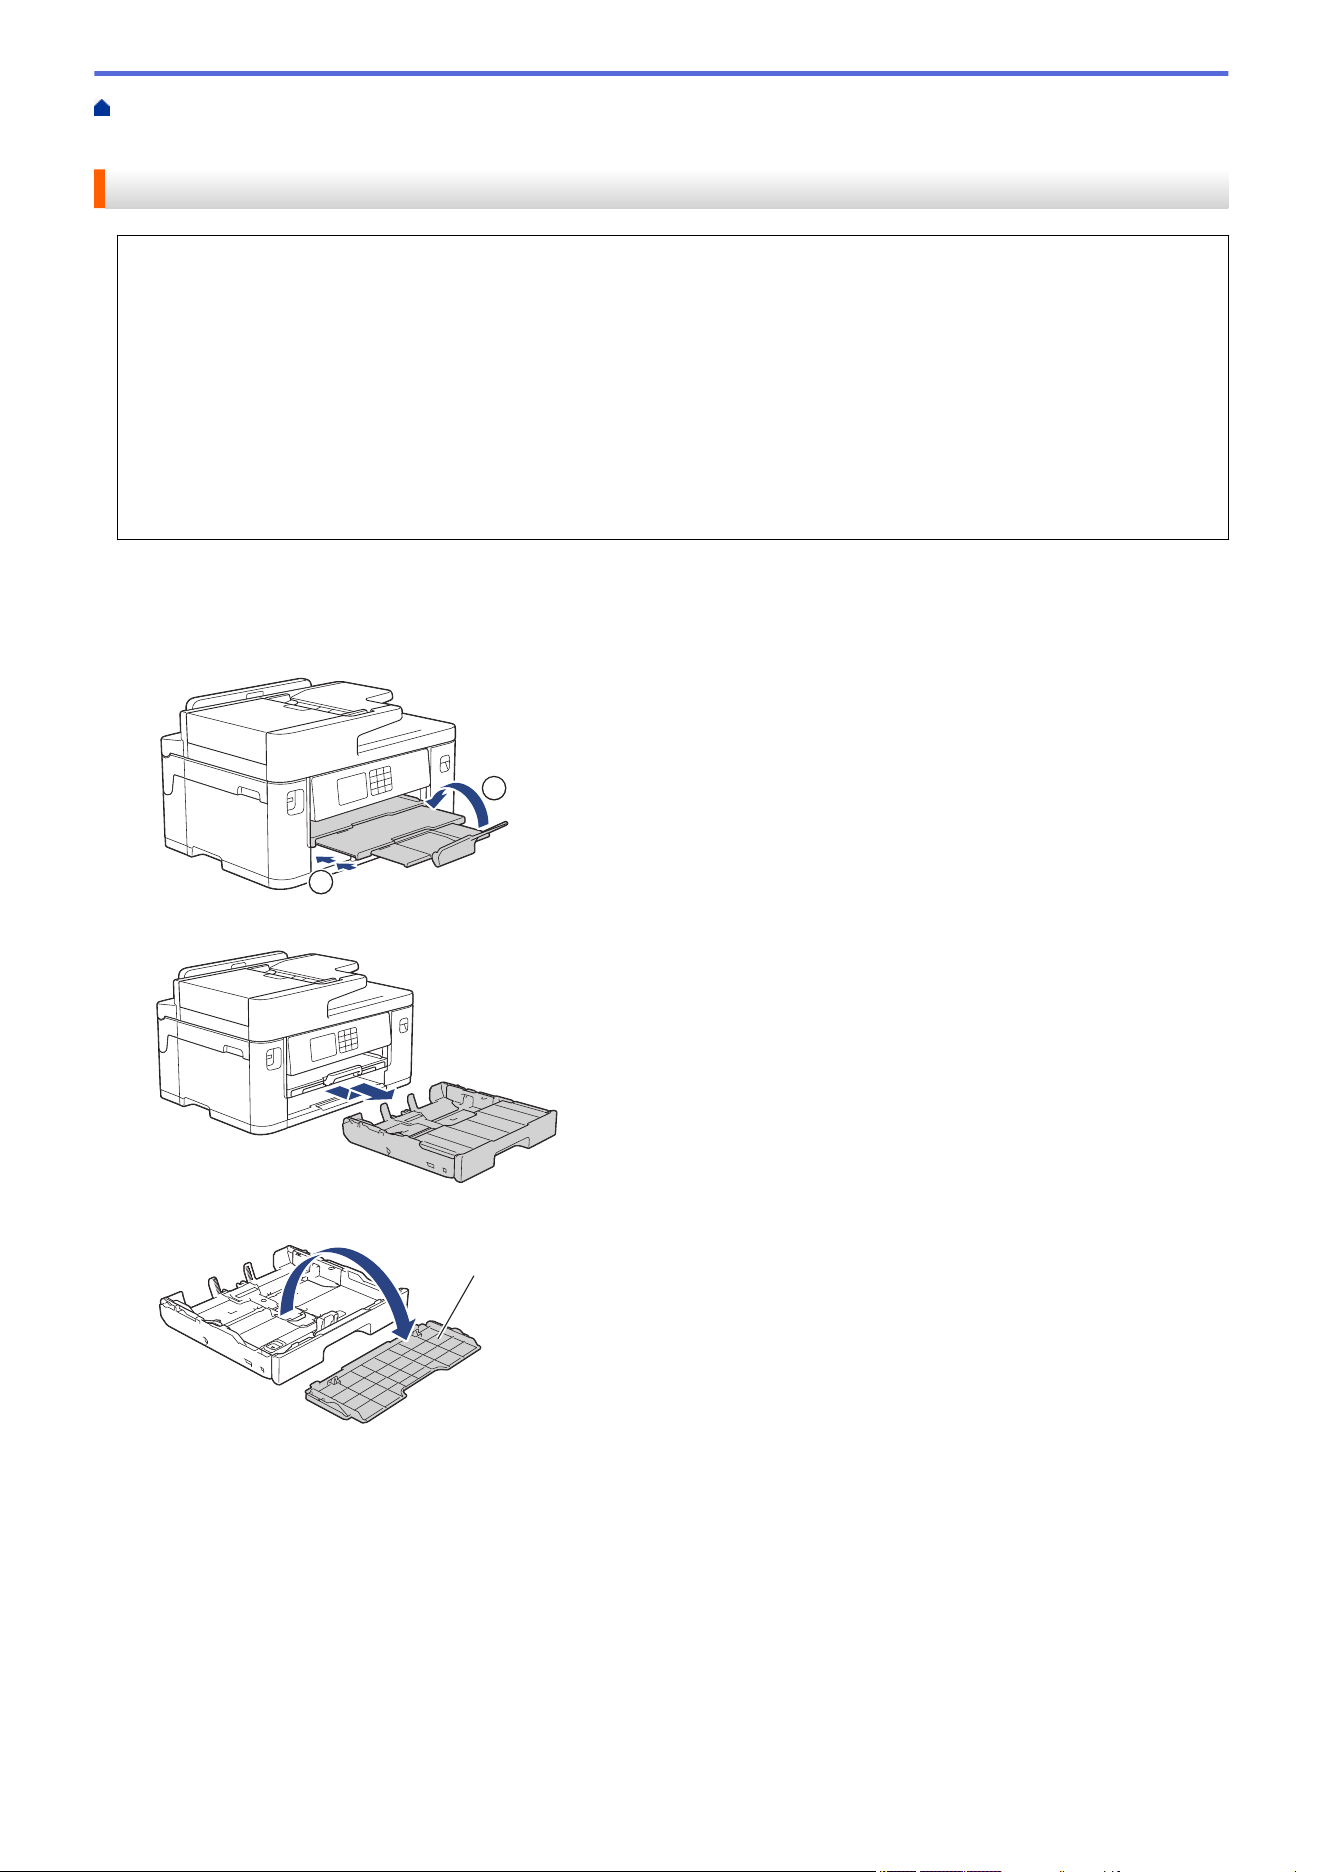
1. If the paper support flap (1) is open, close it, and then close the paper support (2).
2
1
2. Pull the paper tray completely out of the machine as shown by the arrow.
3. Remove the tray top cover (1).
1
4. Gently press and slide the paper width guides (1) and then the paper length guide (2) to fit the paper size.
Make sure the triangular mark (3) on the paper width guide (1) and paper length guide (2) line up with the
marks for the paper you are using.
30
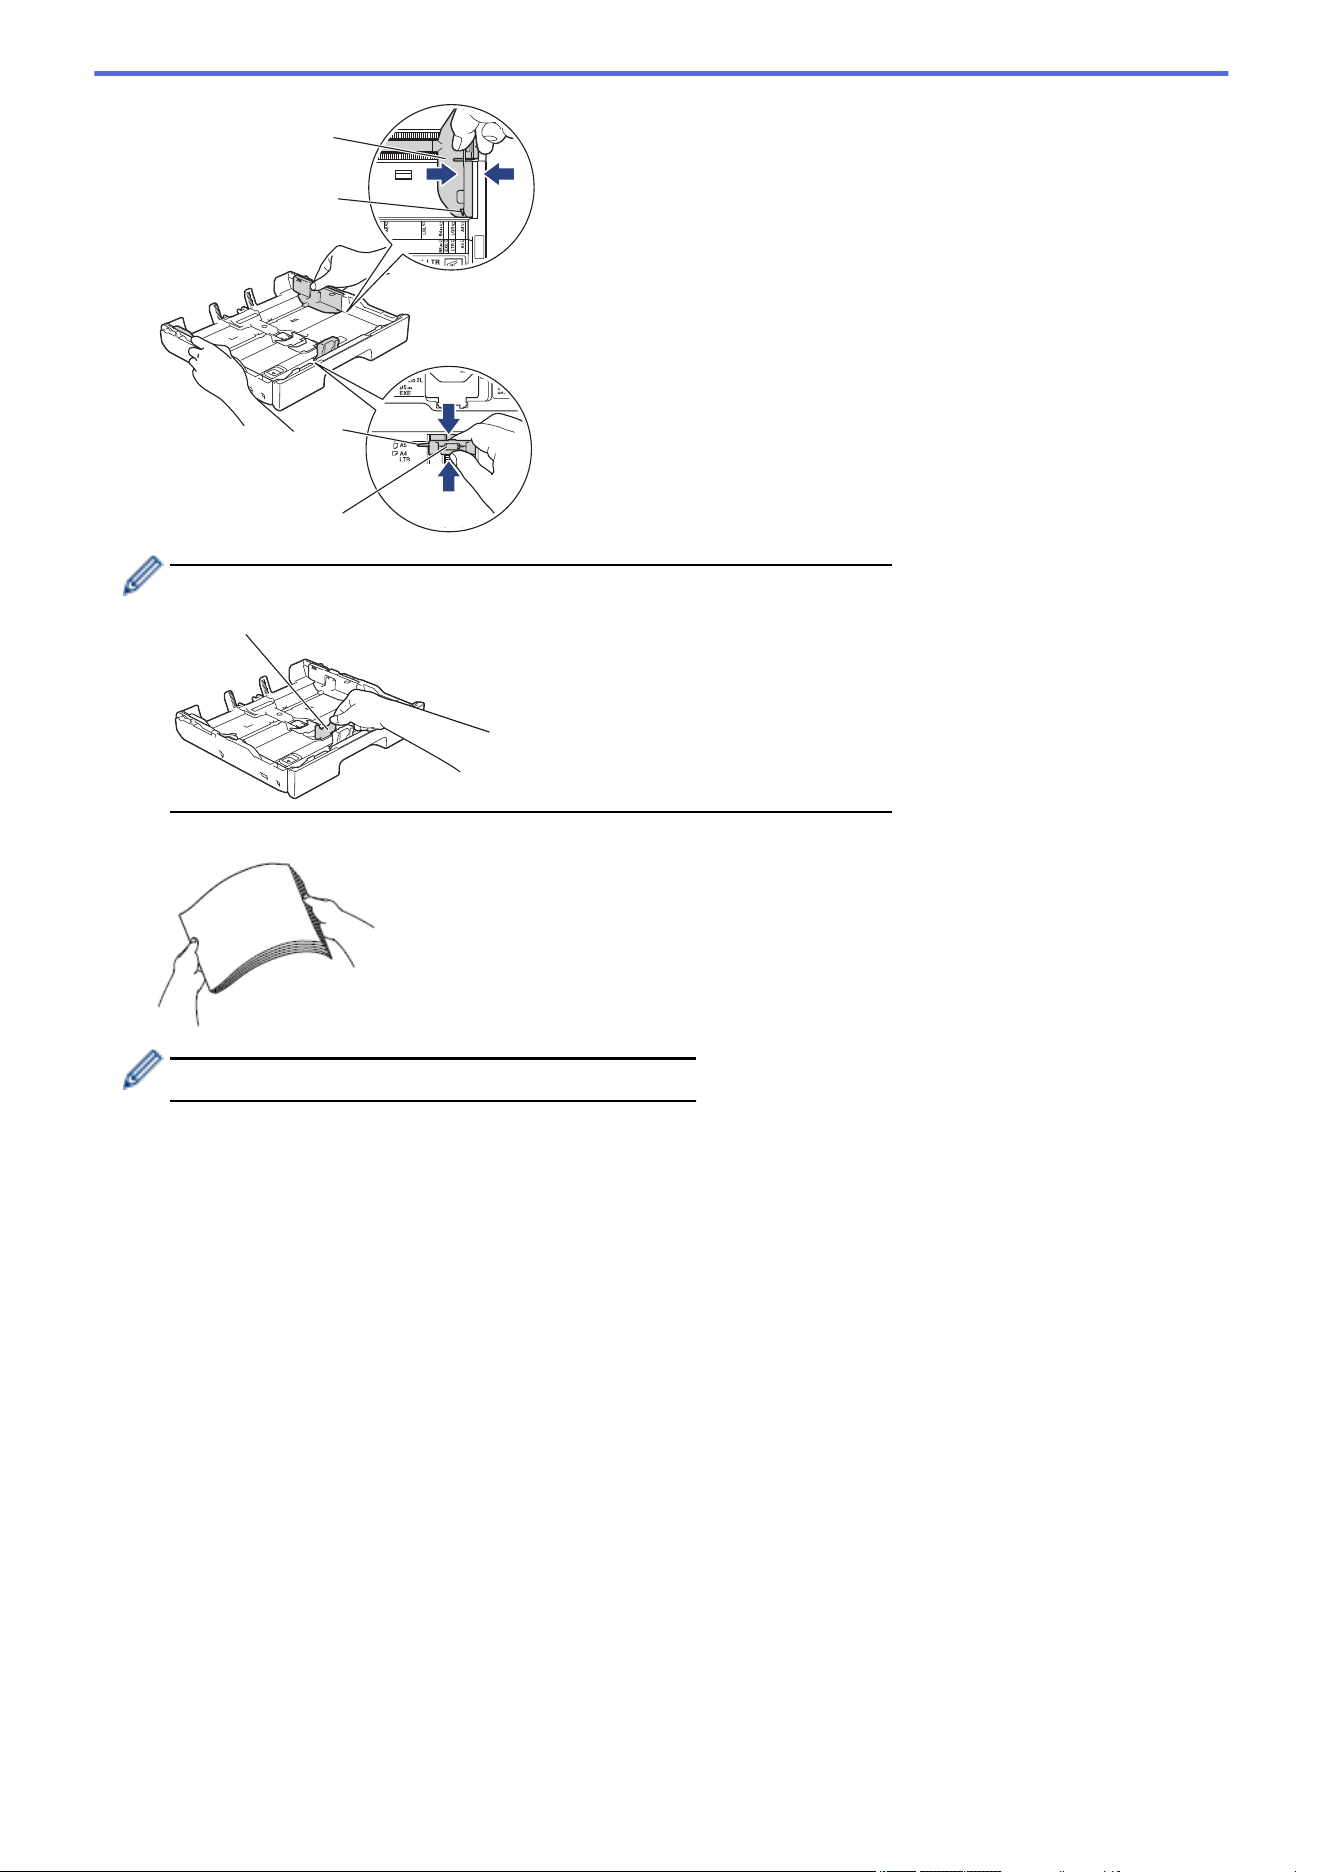
1
3
2
3
If you load Executive or B5 (JIS) size paper in Tray #1, lift the stopper (4).
4
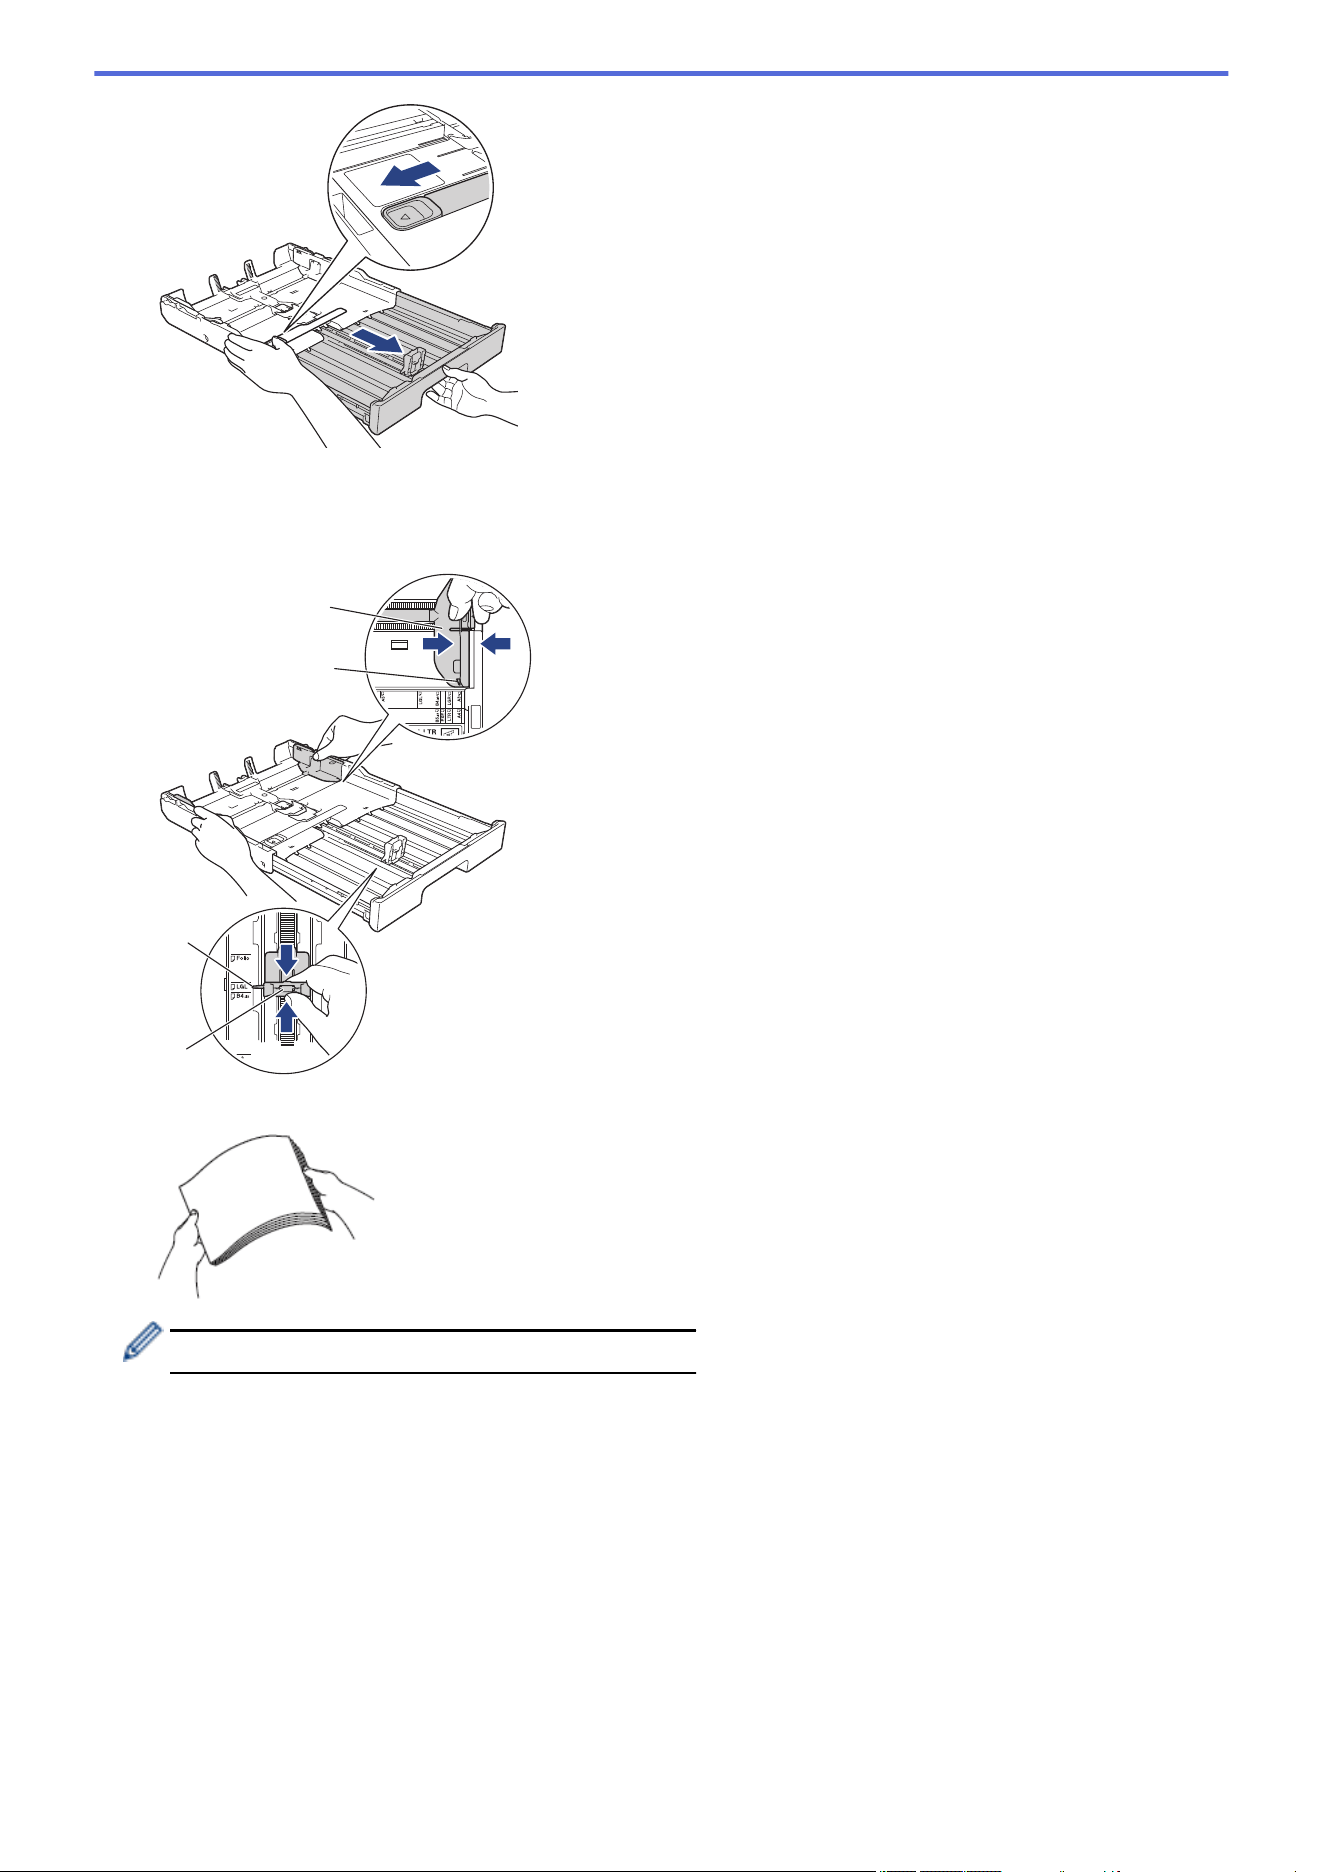
5. Fan the stack of paper well to avoid paper jams and misfeeds.
Always make sure the paper is not curled or wrinkled.
31
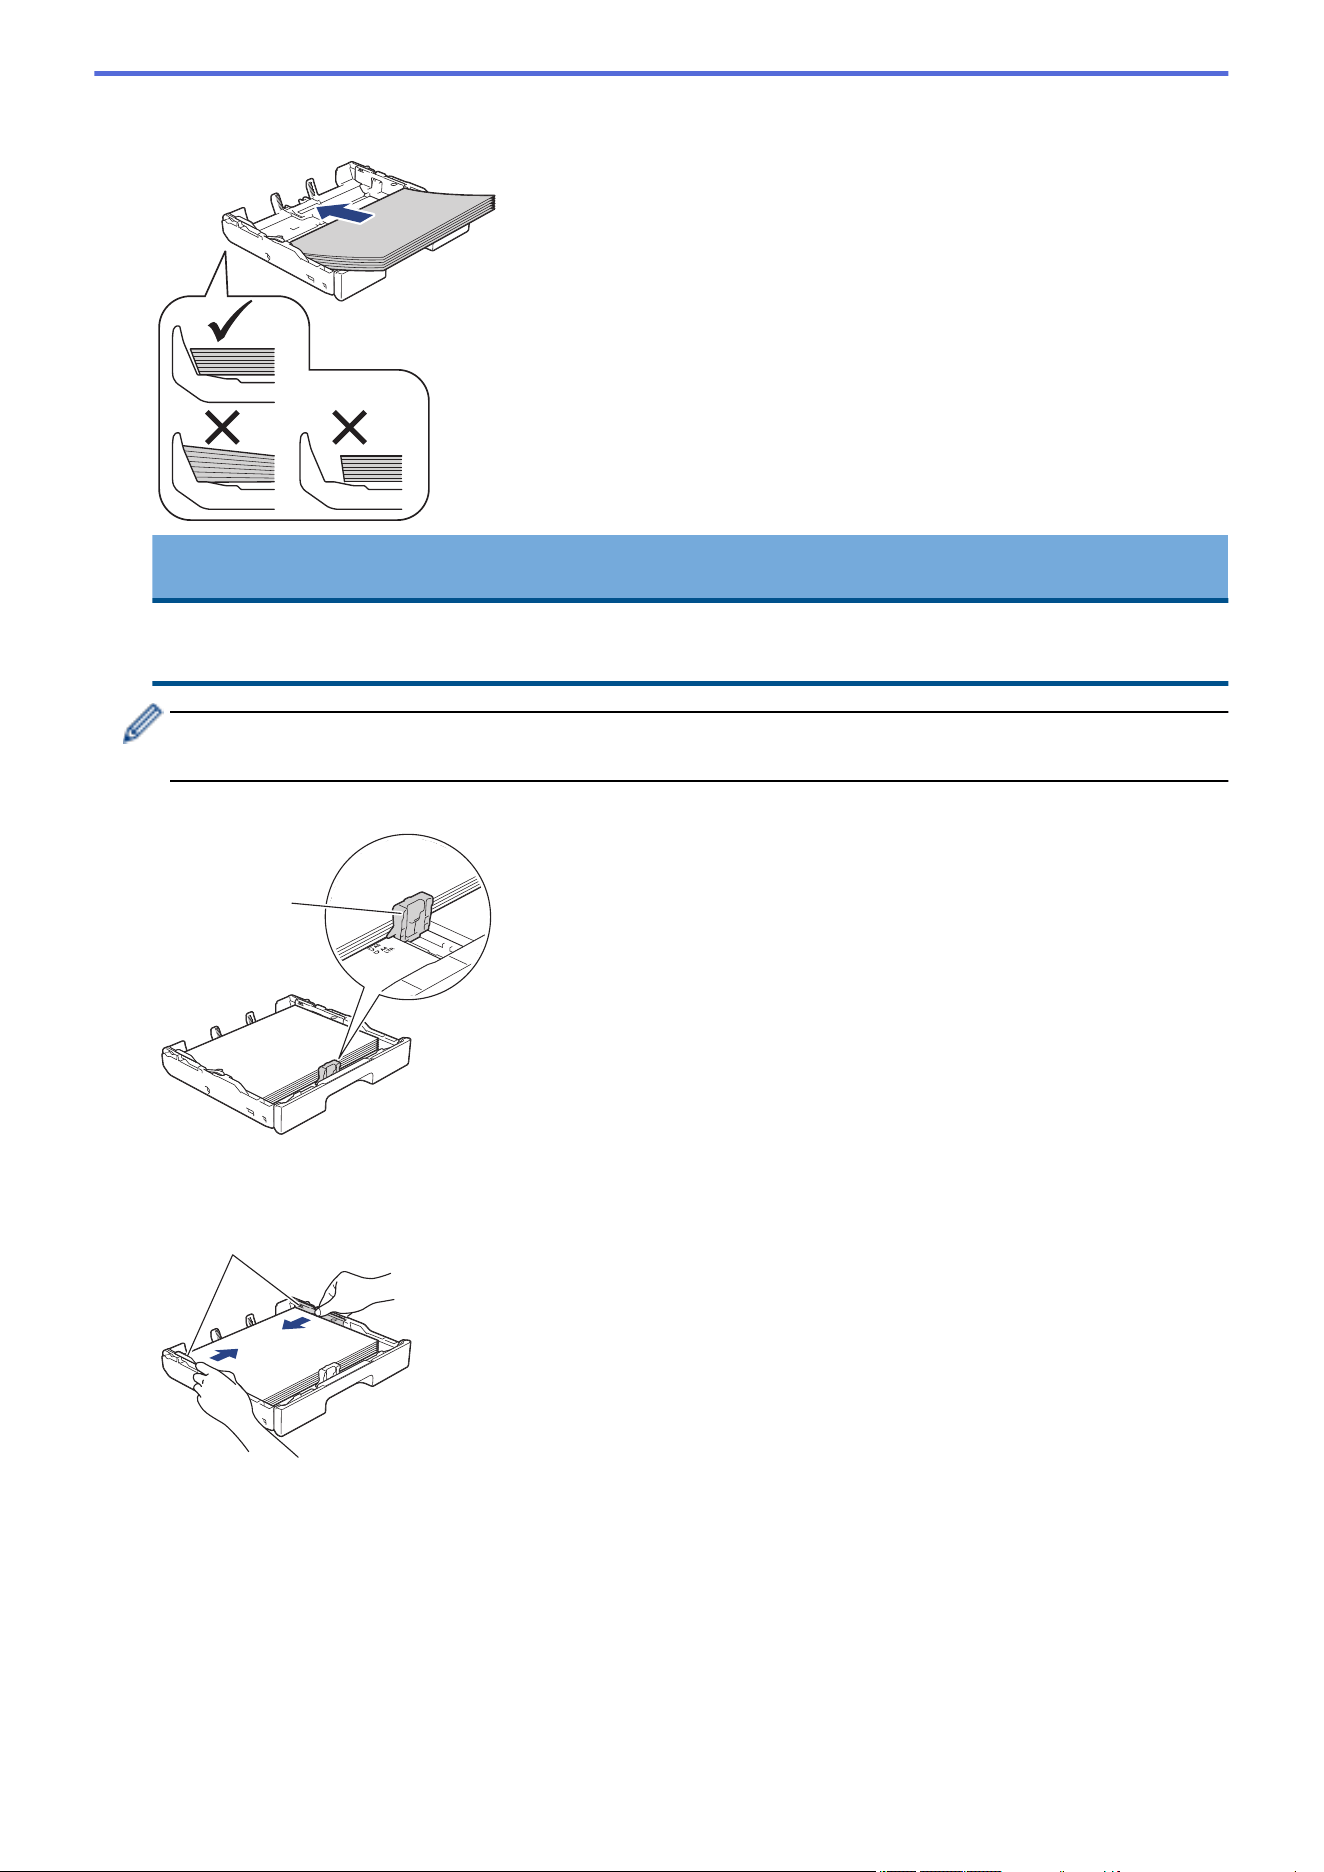
6. Gently load paper in the paper tray with the printing surface face down.
Landscape orientation
IMPORTANT
Be careful not to push the paper in too far; it may lift at the back of the tray and cause paper feed
problems.
To add paper before the tray is empty, remove the paper from the tray and combine it with the paper you
are adding. Always fan the stack of paper well to prevent the machine from feeding multiple pages.
7. Make sure the paper length guide (1) touches the edges of the paper.
1
8. Gently adjust the paper width guides (1) to fit the paper.
Make sure the paper guides touch the edges of the paper.
1
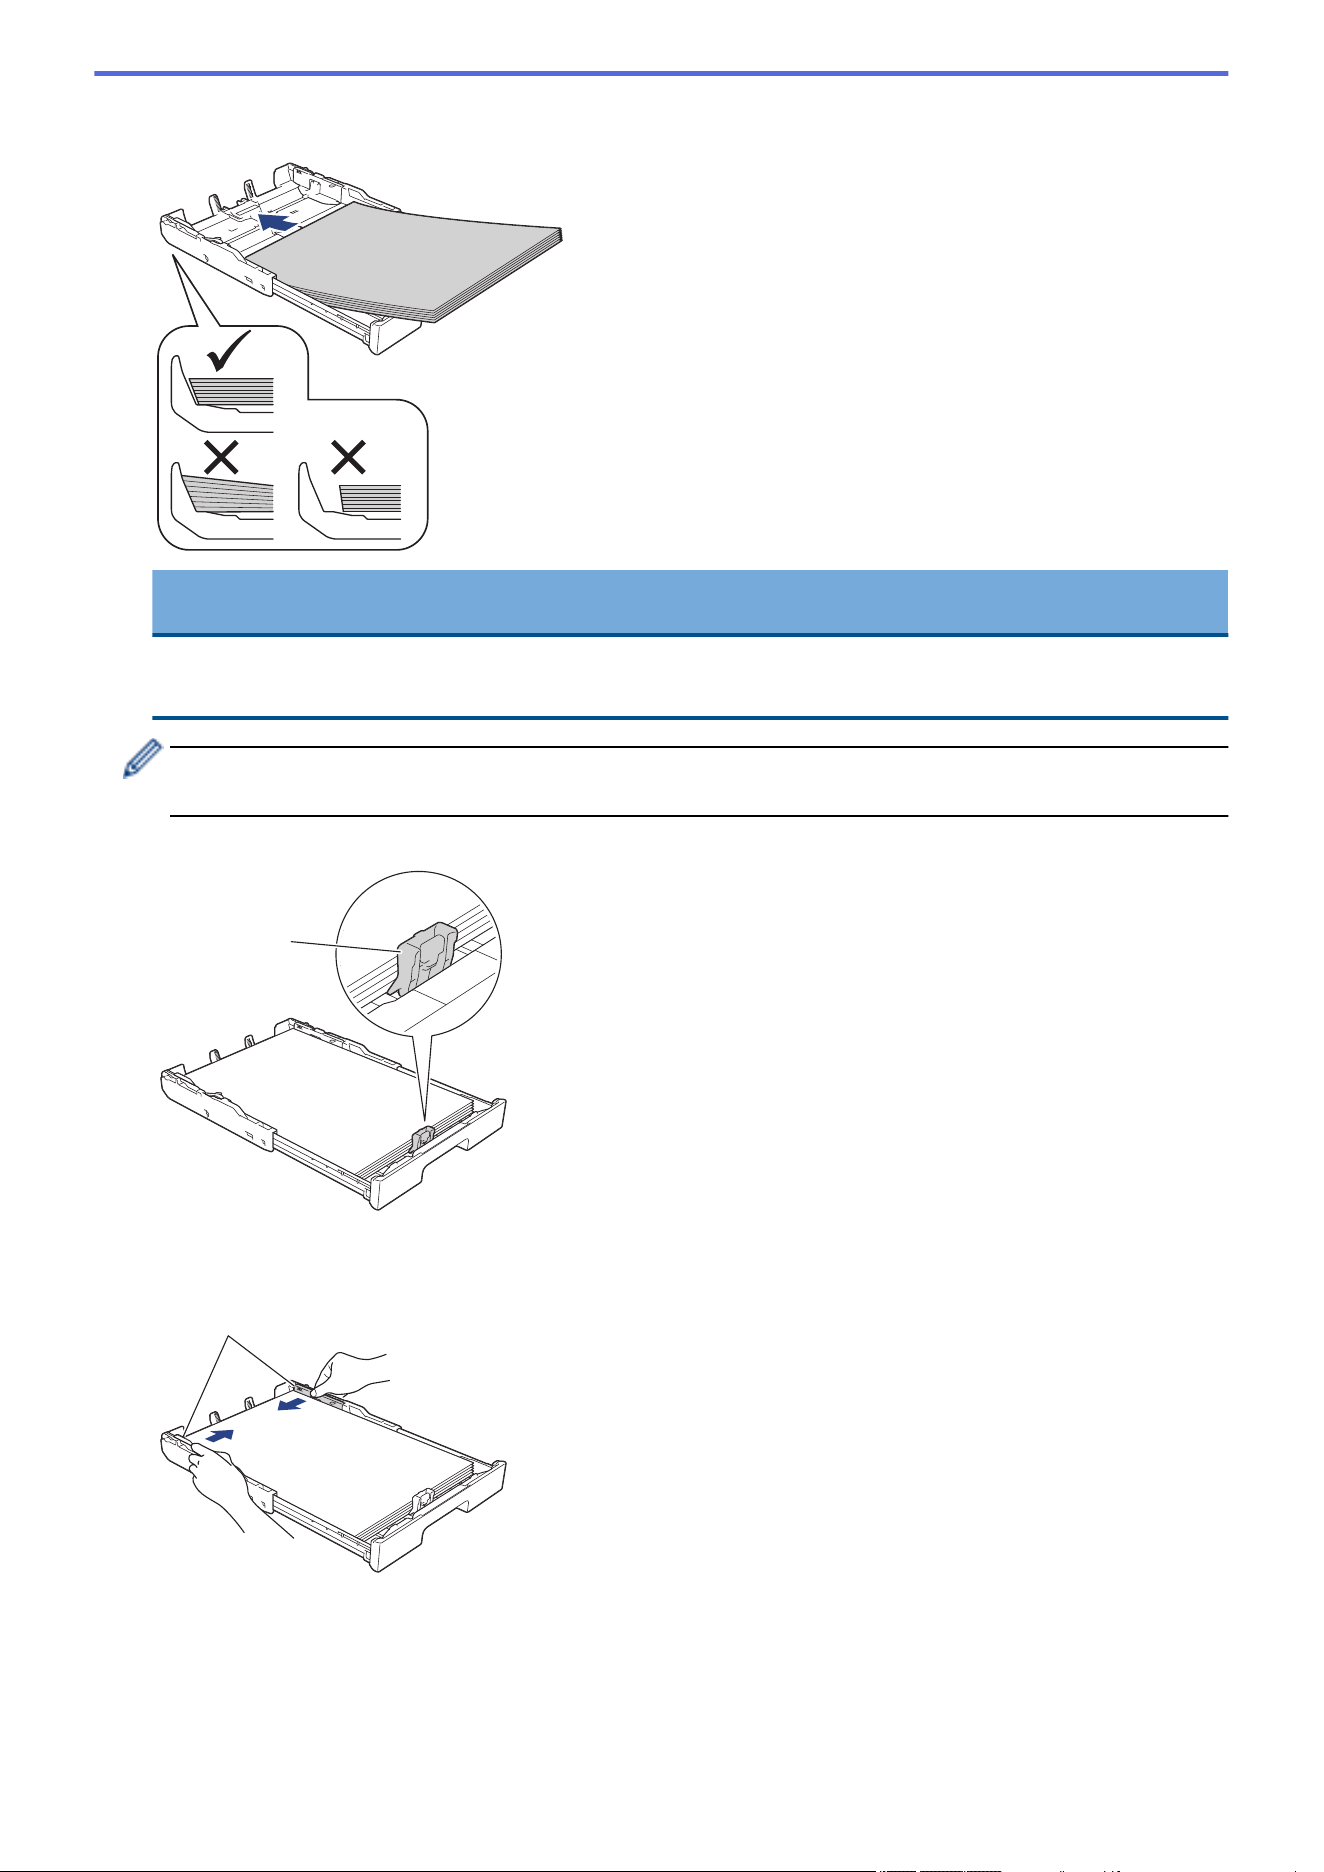
9. Make sure the paper is flat in the tray and below the maximum paper mark (1).
Overfilling the paper tray may cause paper jams.
32
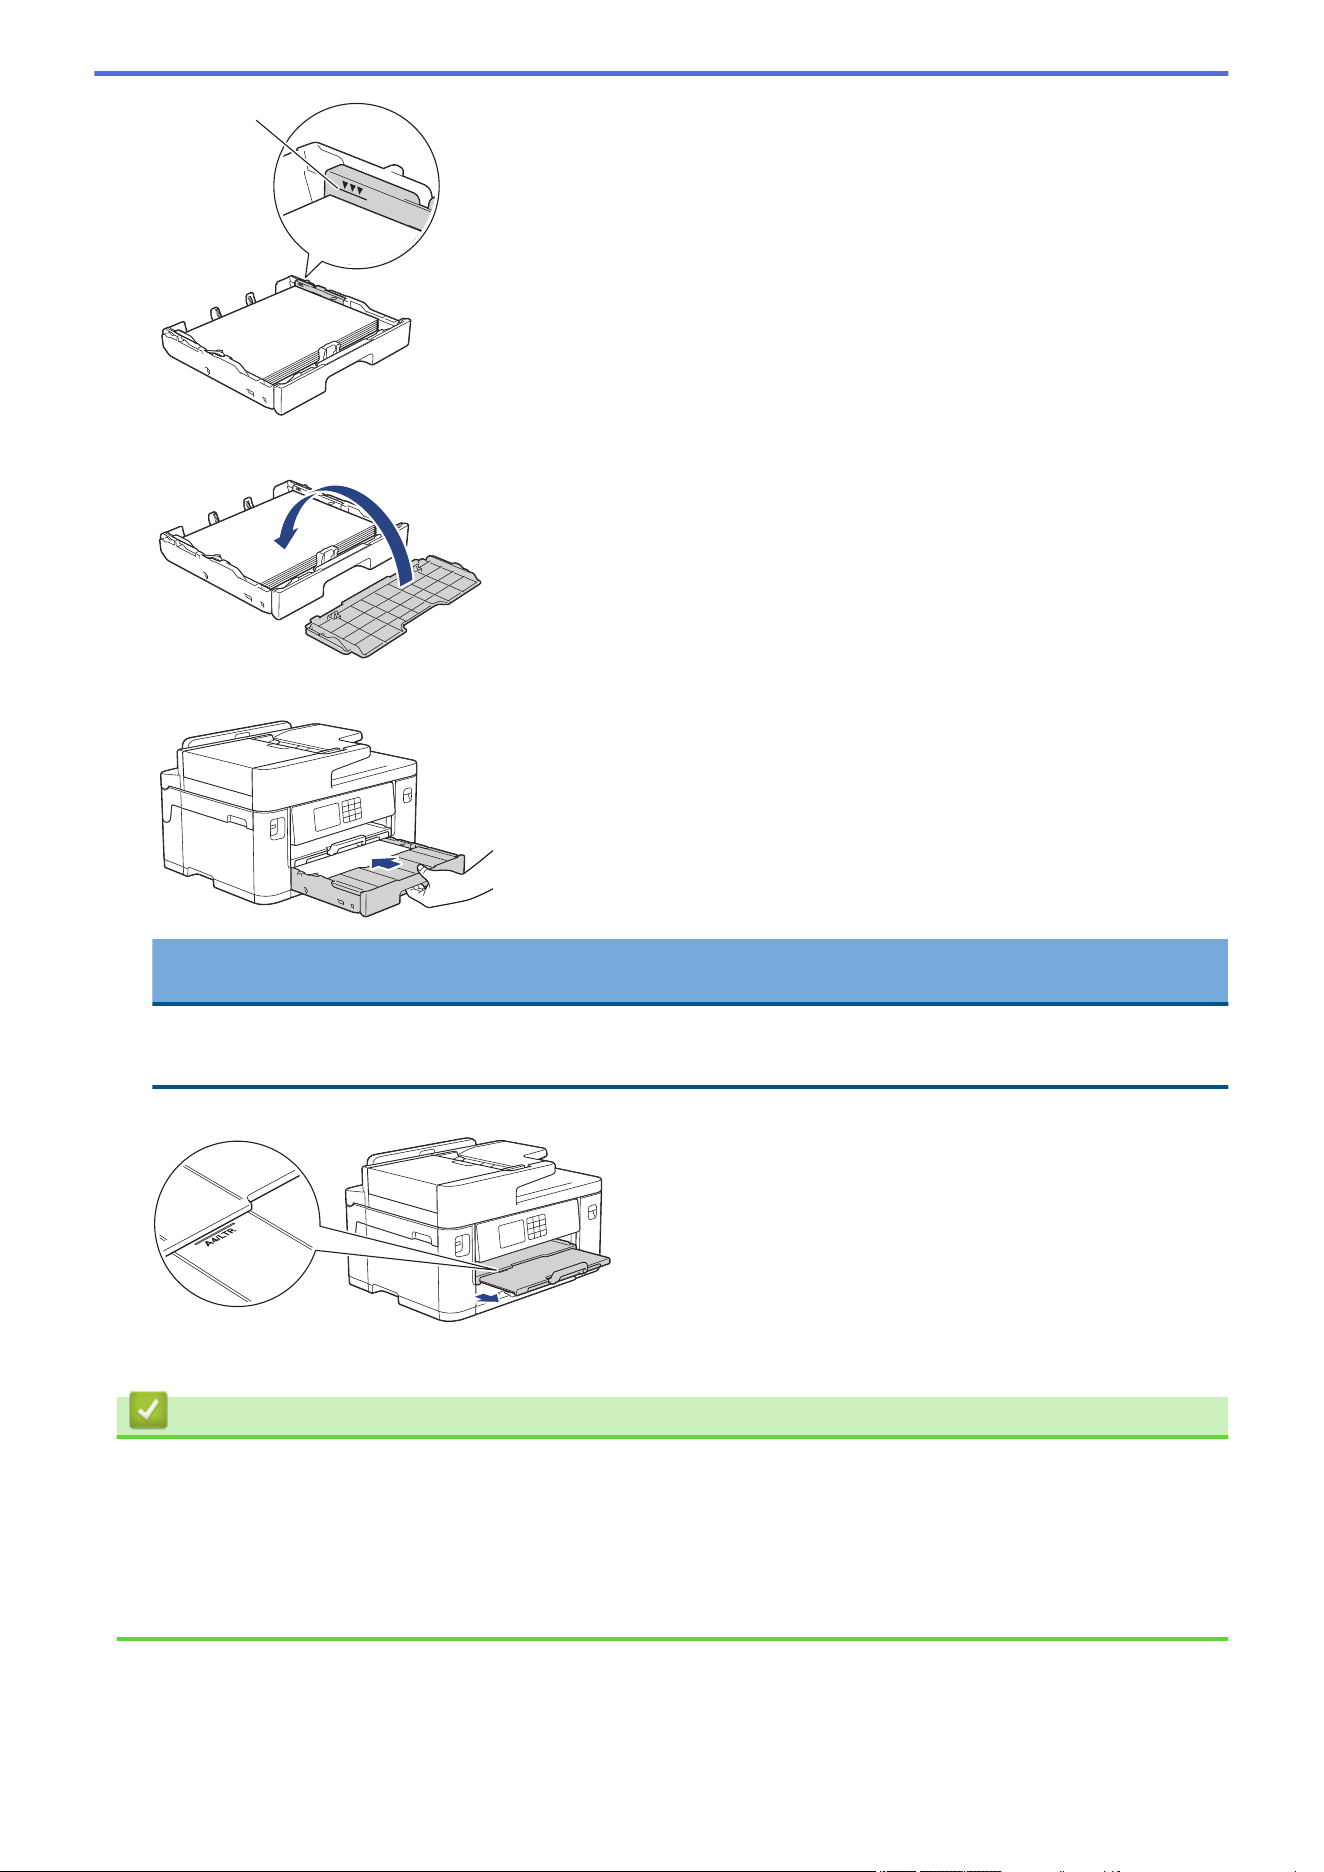
1
10. Replace the tray top cover.
11. Slowly push the paper tray completely into the machine.
IMPORTANT
DO NOT push the paper tray into the machine forcefully or quickly. Doing this may cause paper jams or
paper feed problems.
12. Pull out the paper support until it locks into place.
13. Change the paper size setting in the machine's menu, if needed.
Related Information
• Load Paper in Paper Tray #1 / Paper Tray #2
Related Topics:
• Change the Check Paper Setting
• Change the Paper Size and Paper Type
• Choose the Right Print Media
33
Home > Paper Handling > Load Paper > Load Paper in Paper Tray #1 / Paper Tray #2 > Load A3, Ledger,
or Legal Size Paper in Paper Tray #1 / Paper Tray #2
Load A3, Ledger, or Legal Size Paper in Paper Tray #1 / Paper Tray #2
• If the [Check Paper] setting is set to [On] and you pull the paper tray out of the machine, a message
appears on the LCD, allowing you to change the paper size and paper type.
• When you load a different paper size in the tray, you must change the Paper Size setting in the machine or
the paper size setting on your computer.
Doing this enables the machine to automatically feed paper from the appropriate tray if Auto Tray Select
has been set in the printer driver (Windows) or on the machine. (MFC-J2740DW/MFC-J5740DW/
MFC-J5855DW/MFC-J5955DW)
• Glossy photo paper will not be an option in Tray #1 when using this method.
• You can use only plain paper in Tray #2. (MFC-J2740DW/MFC-J5740DW/MFC-J5955DW)
These instructions describe how to load paper in Tray #1.
(MFC-J2740DW/MFC-J5740DW/MFC-J5955DW) The steps for Tray #2 are very similar.
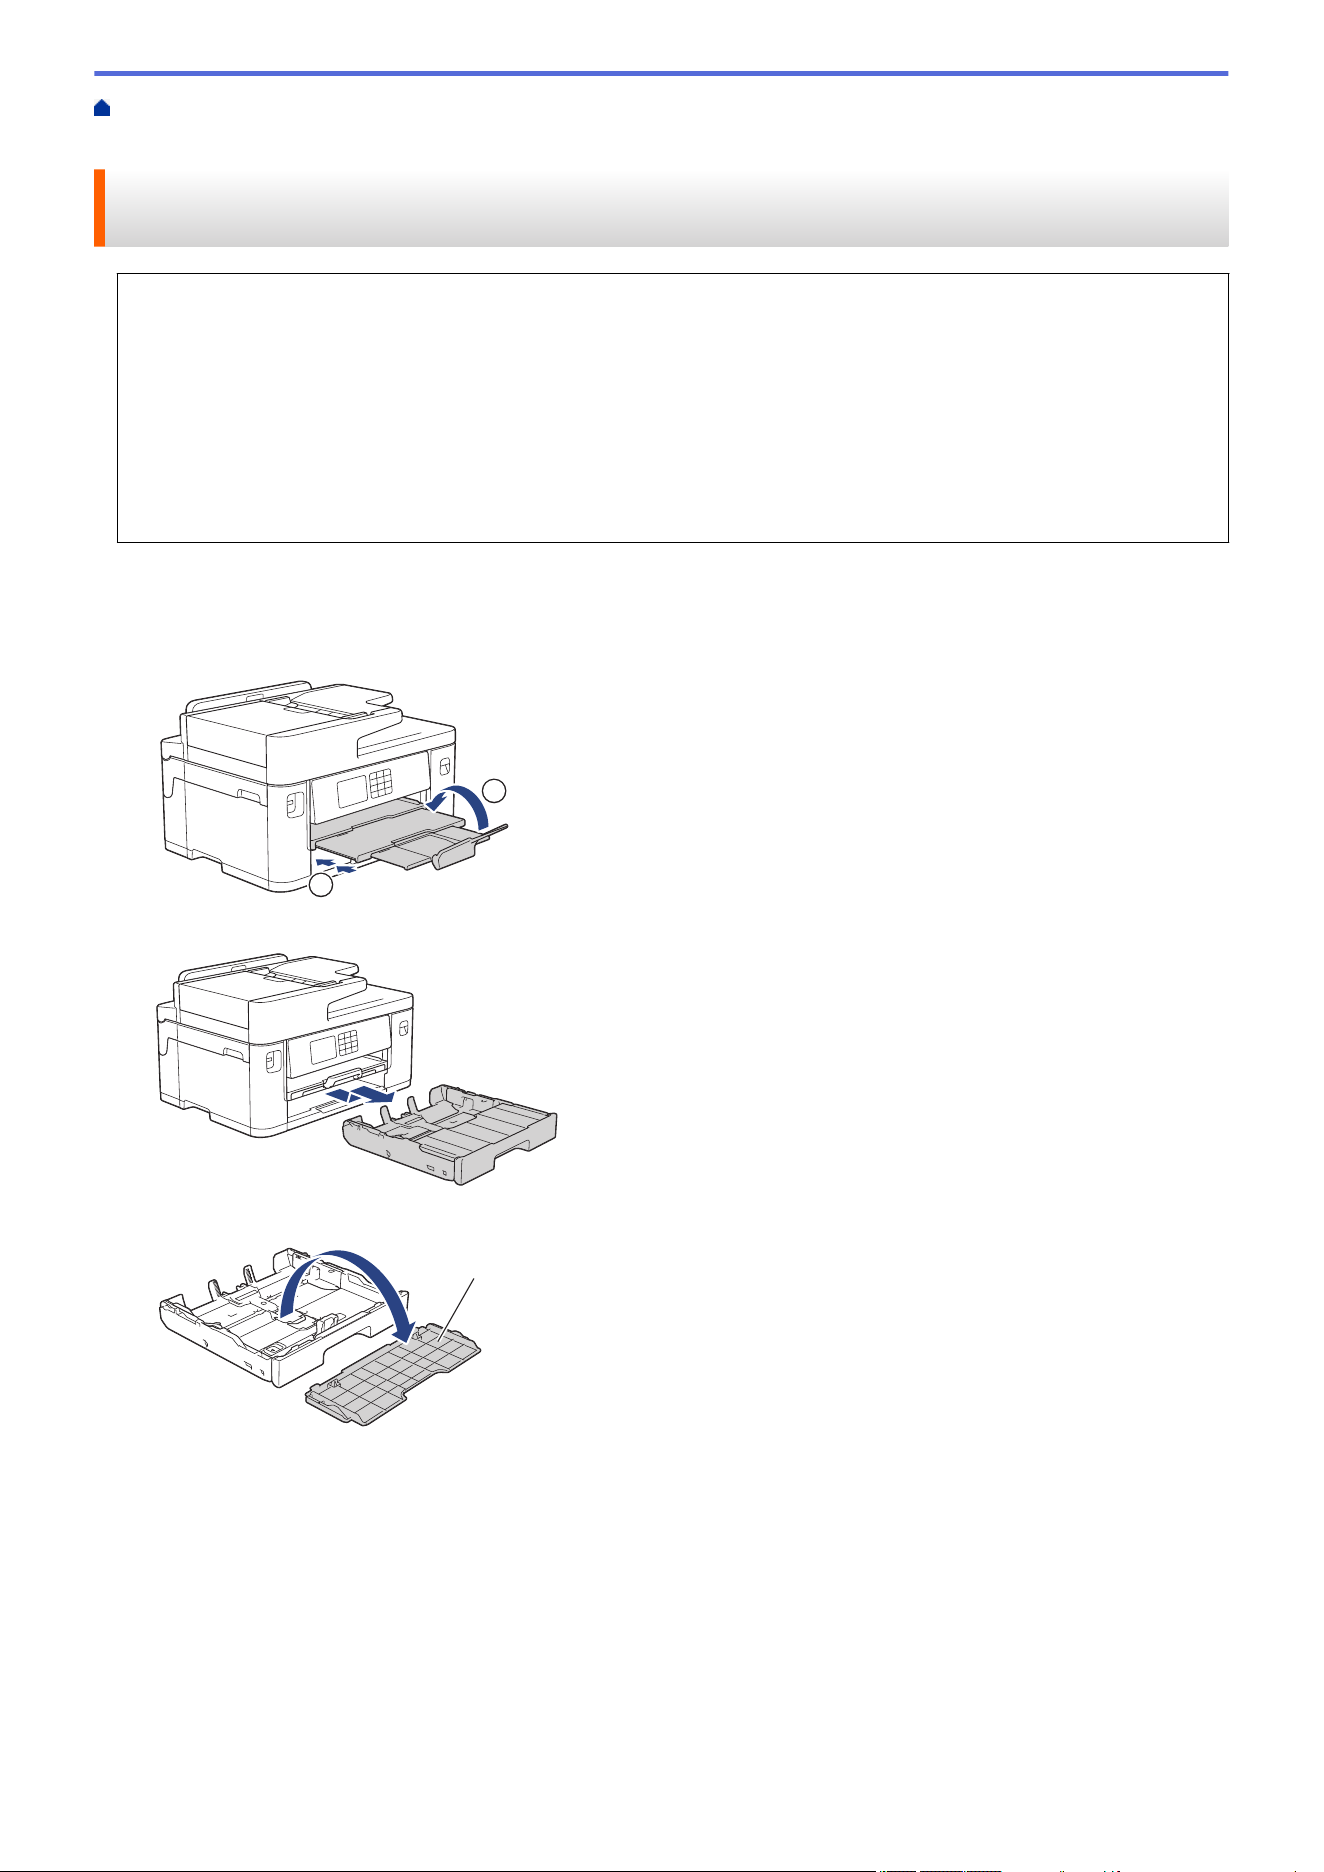
1. If the paper support flap (1) is open, close it, and then close the paper support (2).
2
1
2. Pull the paper tray completely out of the machine as shown by the arrow.
3. Remove the tray top cover (1).
1
4. Rest the tray on a flat surface.
Push the green slider to the left and then extend the tray until it locks into place.
34
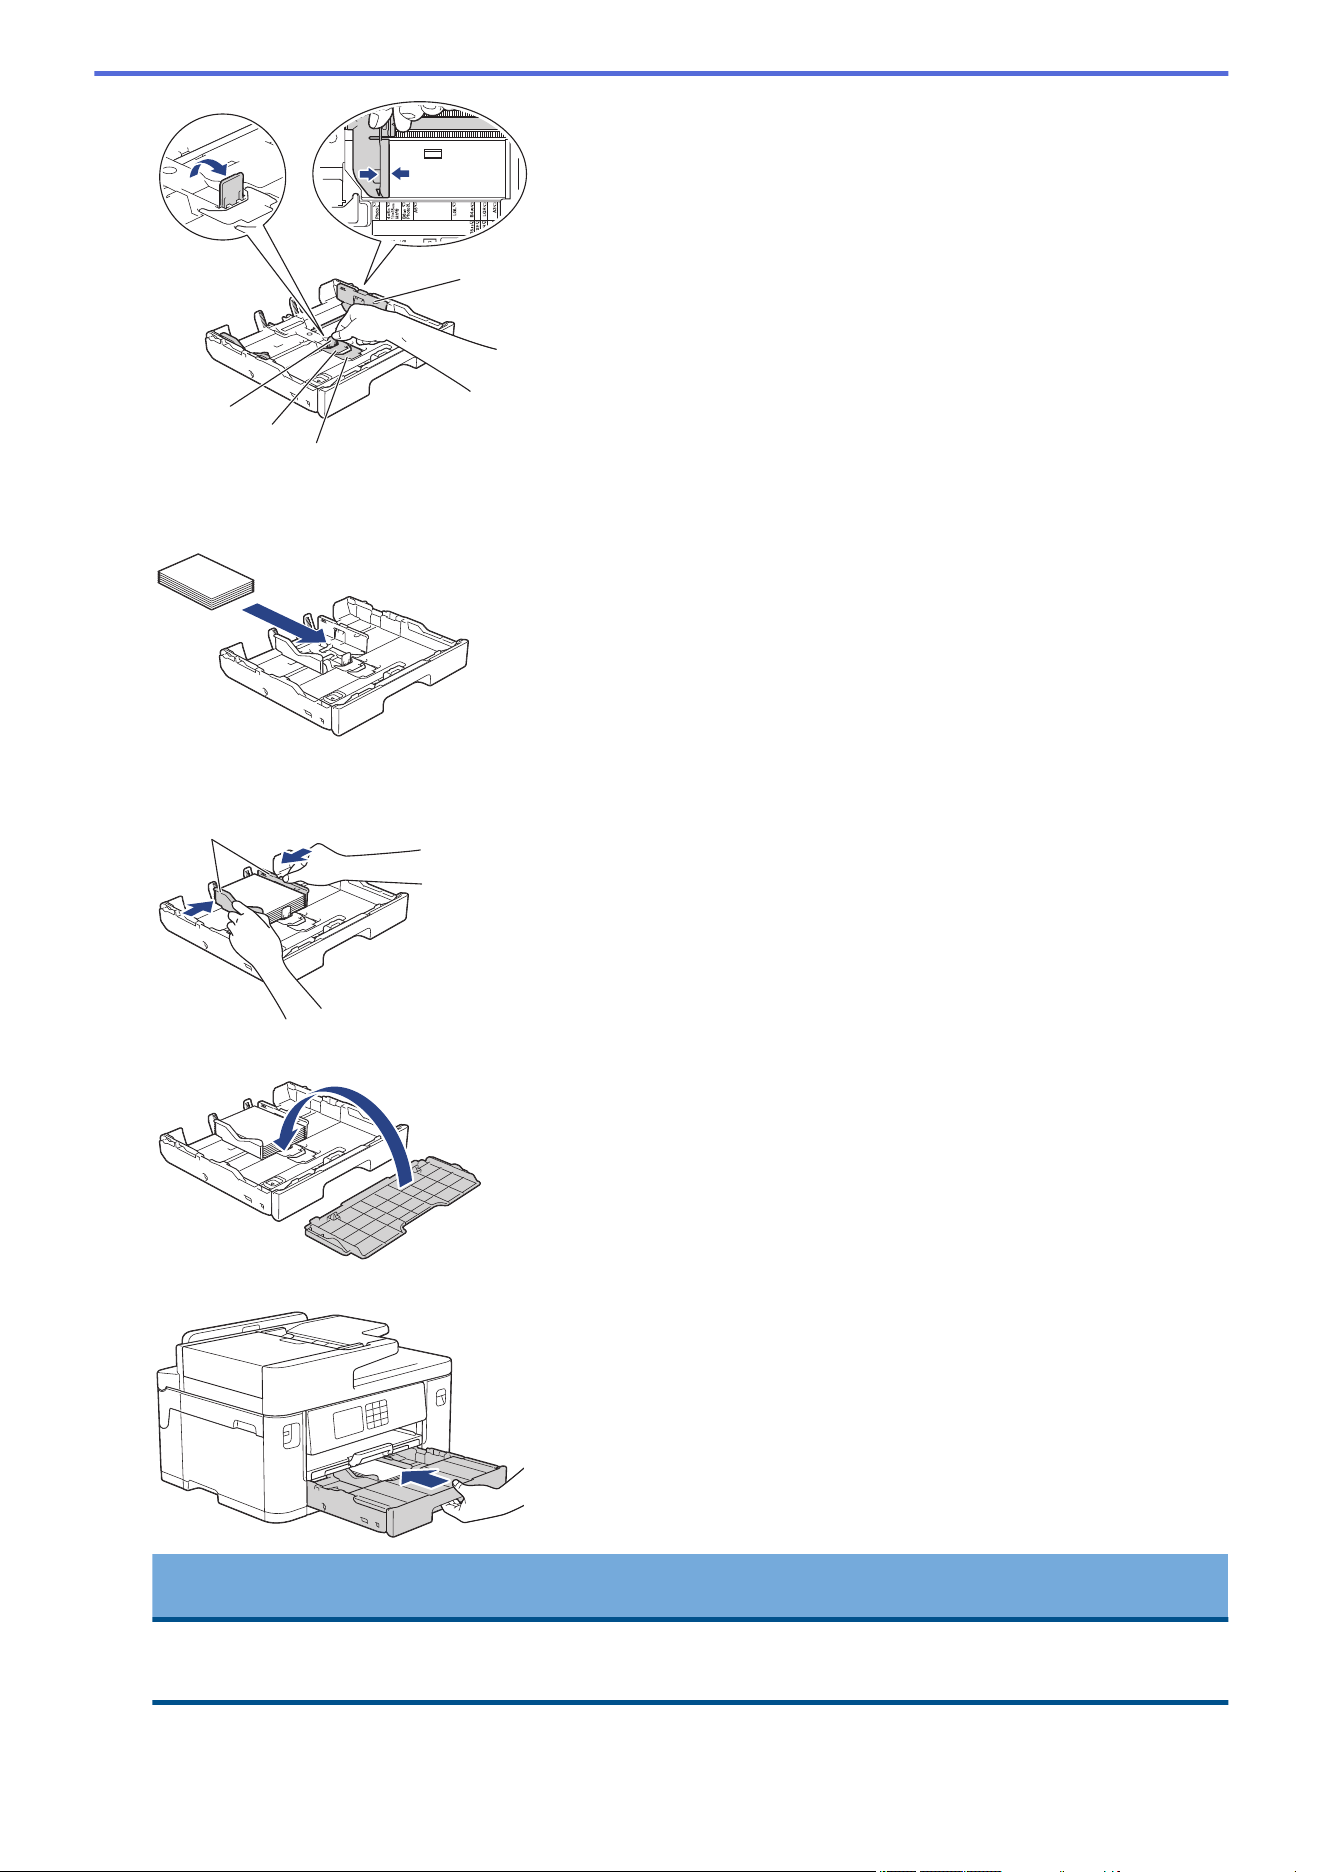
5. Gently press and slide the paper width guides (1) and then the paper length guide (2) to fit the paper size.
Make sure the triangular mark (3) on the paper width guide (1) and paper length guide (2) line up with the
marks for the paper you are using.
1
3
2
3
6. Fan the stack of paper well to avoid paper jams and misfeeds.
Always make sure the paper is not curled or wrinkled.
35
7. Gently load paper in the paper tray with the printing surface face down.
Portrait orientation
IMPORTANT
Be careful not to push the paper in too far; it may lift at the back of the tray and cause paper feed
problems.
To add paper before the tray is empty, remove the paper from the tray and combine it with the paper you
are adding. Always fan the stack of paper well to prevent the machine from feeding multiple pages.
8. Make sure the paper length guide (1) touches the edges of the paper.
1
9. Gently adjust the paper width guides (1) to fit the paper.
Make sure the paper guides touch the edges of the paper.
1
10. Make sure the paper is flat in the tray and below the maximum paper mark (1).
Overfilling the paper tray may cause paper jams.
36
1
11. Replace the tray top cover.
12. Slowly push the paper tray completely into the machine.
IMPORTANT
DO NOT push the paper tray into the machine forcefully or quickly. Doing this may cause paper jams or
paper feed problems.
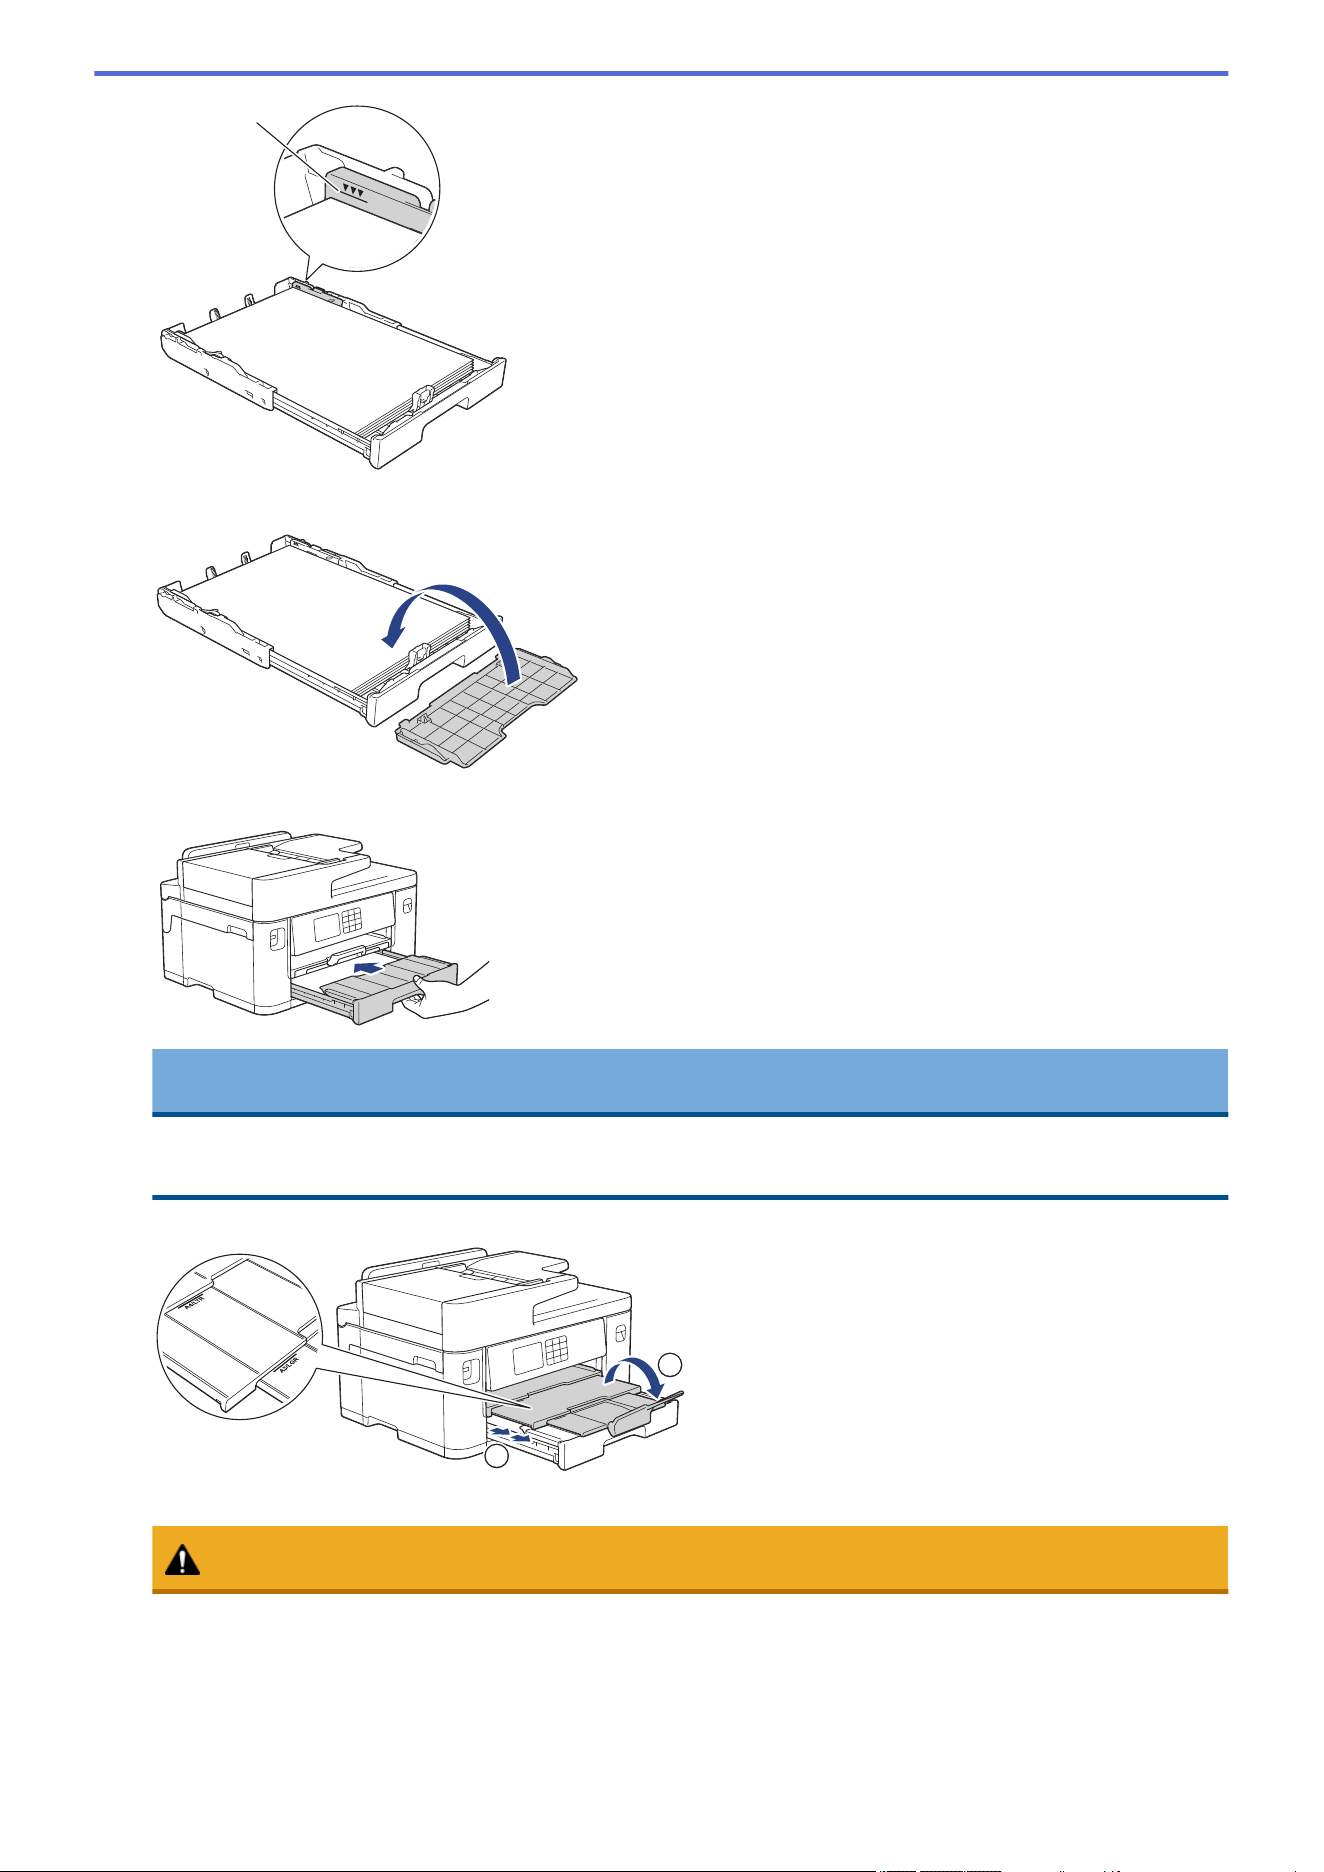
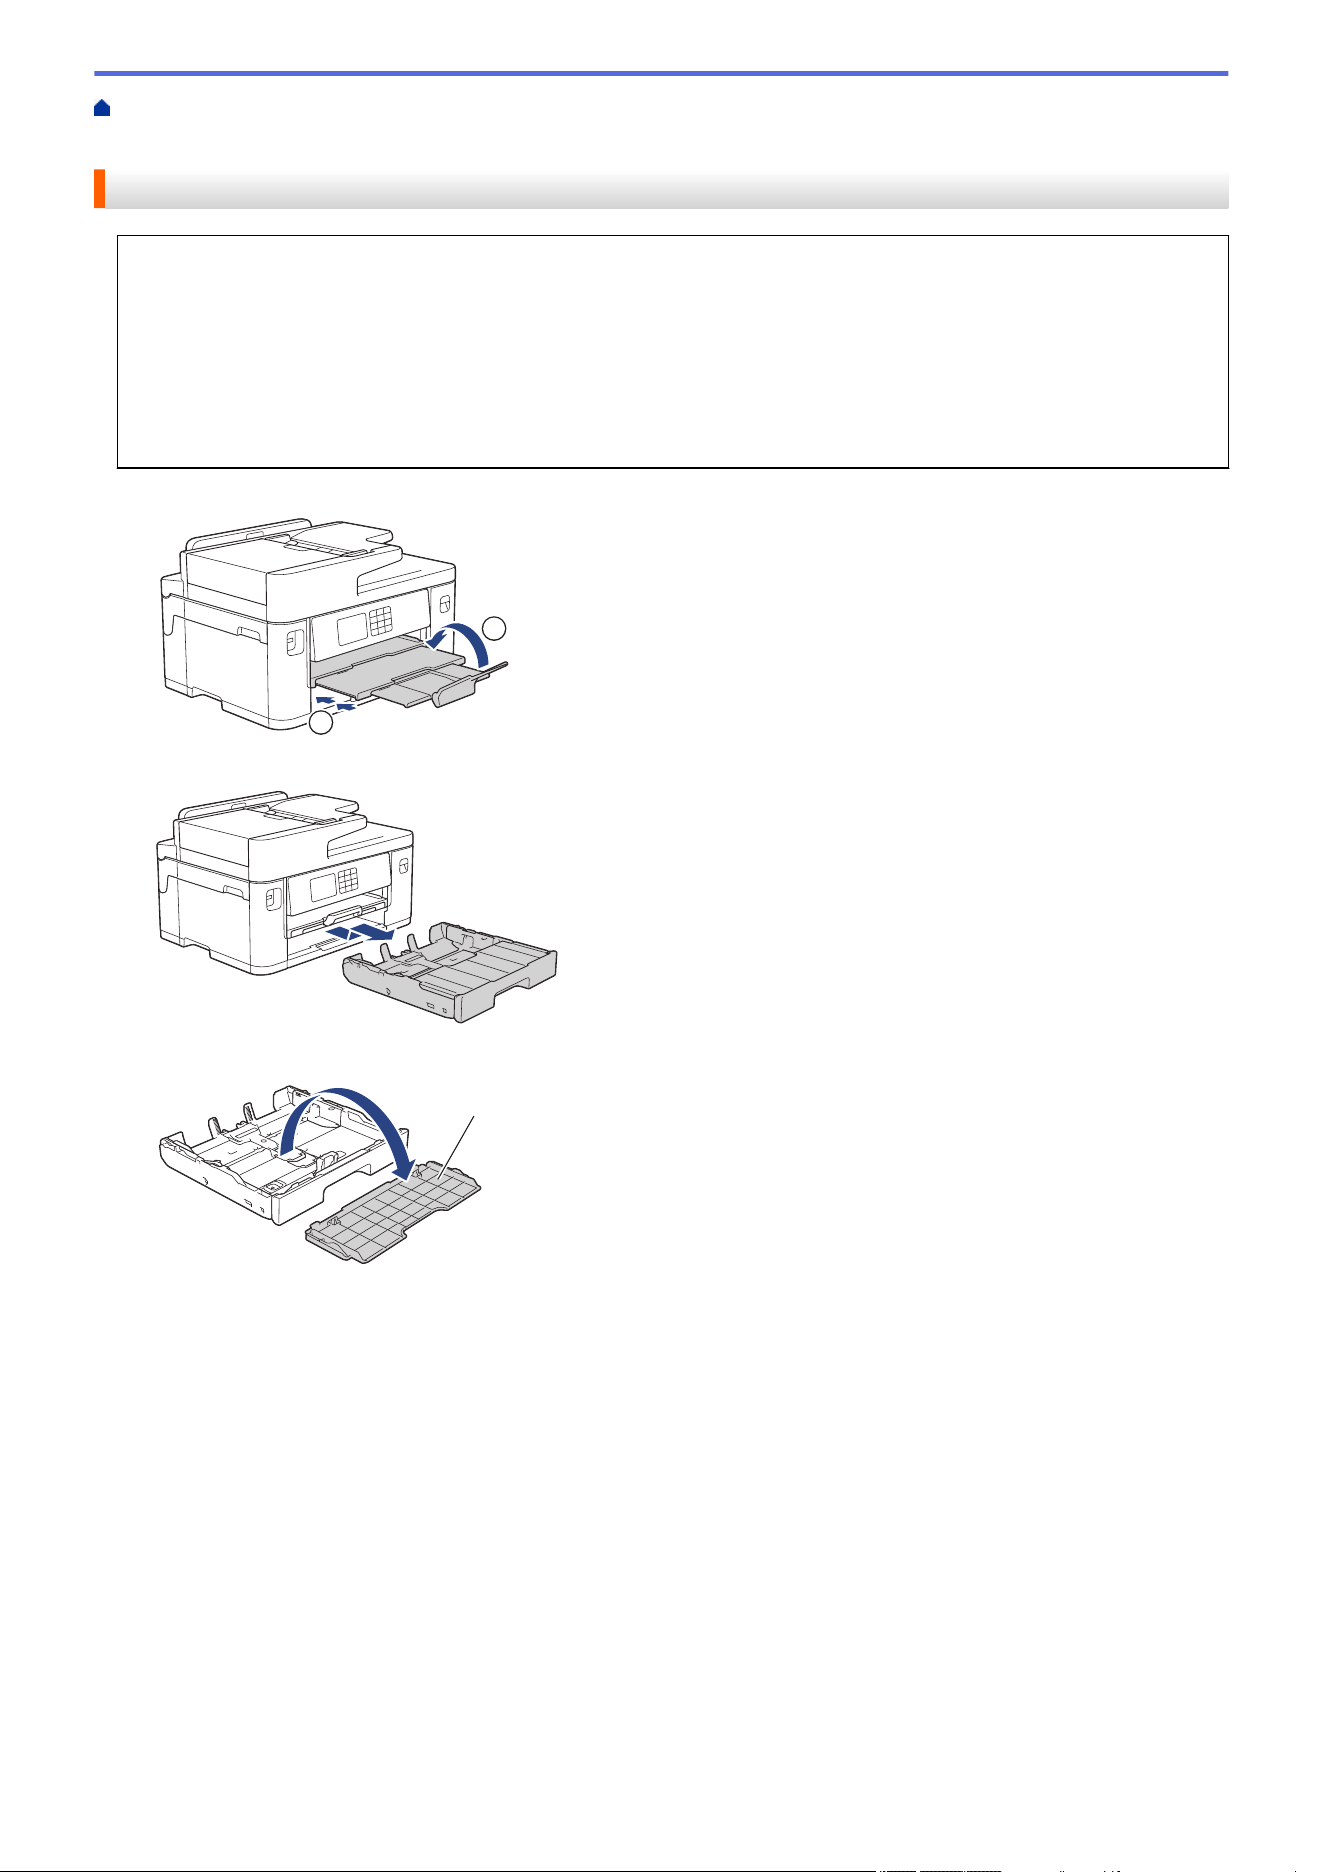
13. Pull out the paper support (1) until it locks into place, and then unfold the paper support flap (2).
2
1
14. Change the paper size setting in the machine's menu, if needed.
CAUTION
Position the machine so the tray will not protrude past the edge of the table or desk where someone may
bump into it. The machine could fall and cause injury.
37
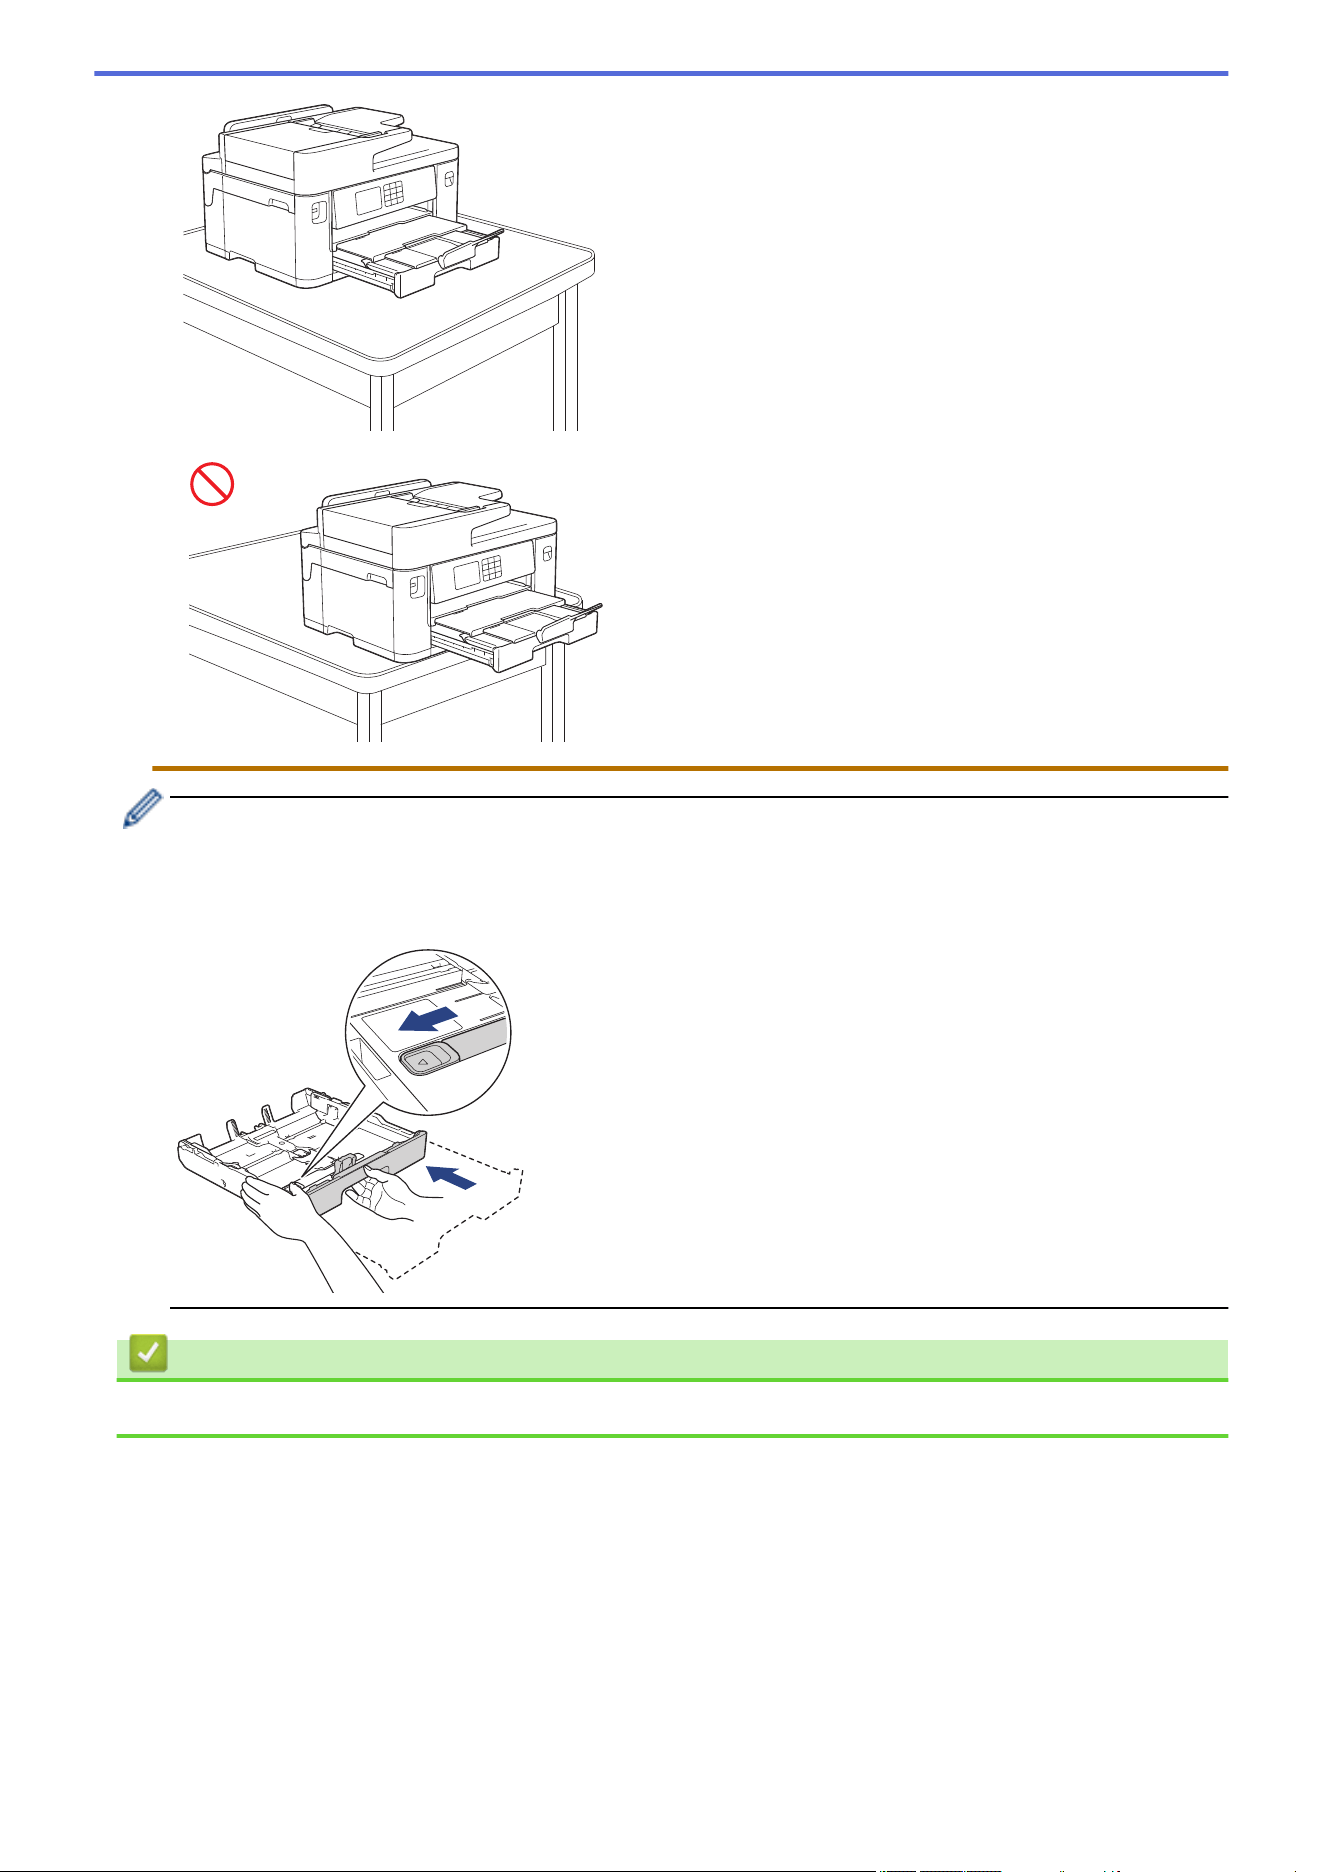
Before you collapse the paper tray, take the paper out of the tray.
Rest the tray on a flat surface.
Push the green slider to the left and then push in the front of the tray to collapse it until it locks into place.
Put the paper in the tray.
Related Information
• Load Paper in Paper Tray #1 / Paper Tray #2
38
Home > Paper Handling > Load Paper > Load Paper in Paper Tray #1 / Paper Tray #2 > Load Photo Paper
in Paper Tray #1
Load Photo Paper in Paper Tray #1
• If the [Check Paper] setting is set to [On] and you pull the paper tray out of the machine, a message
appears on the LCD, allowing you to change the paper size and paper type.
• When you load a different paper size in the tray, you must change the Paper Size setting in the machine or
the paper size setting on your computer.
Doing this enables the machine to automatically feed paper from the appropriate tray if Auto Tray Select
has been set in the printer driver (Windows) or on the machine. (MFC-J2740DW/MFC-J5740DW/
MFC-J5855DW/MFC-J5955DW)
1. If the paper support flap (1) is open, close it, and then close the paper support (2).
2
1
2. Pull the paper tray completely out of the machine as shown by the arrow.
3. Remove the tray top cover (1).
1
4. Do one of the following:
• If you load Photo L (9 x 13 cm) in the paper tray, lift the Photo L stopper (1).
• If you load Photo (10 x 15 cm) in the paper tray, lift the Photo stopper (2).
• If you load Photo 2L (13 x 18 cm) in the paper tray, lift the Photo 2L stopper (3).
Gently press and slide the paper width guides (4) to fit the paper size.
39
1
2
3
4
5. Load up to 20 sheets of photo paper in the paper tray with the printing surface face down.
Loading more than 20 sheets of photo paper may cause paper jams.
6. Gently adjust the paper width guides (1) to fit the paper.
Make sure the paper guides touch the edges of the paper and the paper is flat in the tray.
1
7. Replace the tray top cover.
8. Slowly push the paper tray completely into the machine.
IMPORTANT
DO NOT push the paper tray into the machine forcefully or quickly. Doing this may cause paper jams or
paper feed problems.
40
9. Pull out the paper support until it locks into place.
10. Change the paper size setting in the machine's menu, if needed.
Related Information
• Load Paper in Paper Tray #1 / Paper Tray #2
Related Topics:
• Change the Check Paper Setting
• Change the Paper Size and Paper Type
• Choose the Right Print Media
41
Home > Paper Handling > Load Paper > Load Paper in Paper Tray #1 / Paper Tray #2 > Load Envelopes
in Paper Tray #1
Load Envelopes in Paper Tray #1
• If the [Check Paper] setting is set to [On] and you pull the paper tray out of the machine, a message
appears on the LCD, allowing you to change the paper size and paper type.
• You can load envelopes in a variety of sizes. See Related Information: Paper Type and Paper Size for
Each Operation.
• When you load a different paper size in the tray, you must change the Paper Size setting in the machine or
the paper size setting on your computer.
Doing this enables the machine to automatically feed paper from the appropriate tray if Auto Tray Select
has been set in the printer driver (Windows) or on the machine. (MFC-J2740DW/MFC-J5740DW/
MFC-J5855DW/MFC-J5955DW)
• Before loading envelopes in the tray, press the corners and sides of the envelopes to make them as flat as
possible.
1. If the paper support flap (1) is open, close it, and then close the paper support (2).
2
1
2. Pull the paper tray completely out of the machine as shown by the arrow.
3. Remove the tray top cover (1).
1
42
4. Load up to 10 envelopes in the paper tray with the printing surface face down. Loading more than 10
envelopes may cause paper jams.
5. Gently press and slide the paper width guides (1) and paper length guide (2) to fit the size of the envelopes.
Make sure the envelopes are flat in the tray.
1
2
IMPORTANT
If envelopes are multi-feeding, load one envelope in the paper tray at a time.
If you are using envelopes that are longer than the tray length, such as Com-10 envelopes, extend the tray
as follows, and then load the envelopes.
Rest the tray on a flat surface. Push the green slider to the left and then extend the tray until it locks into
place.
43
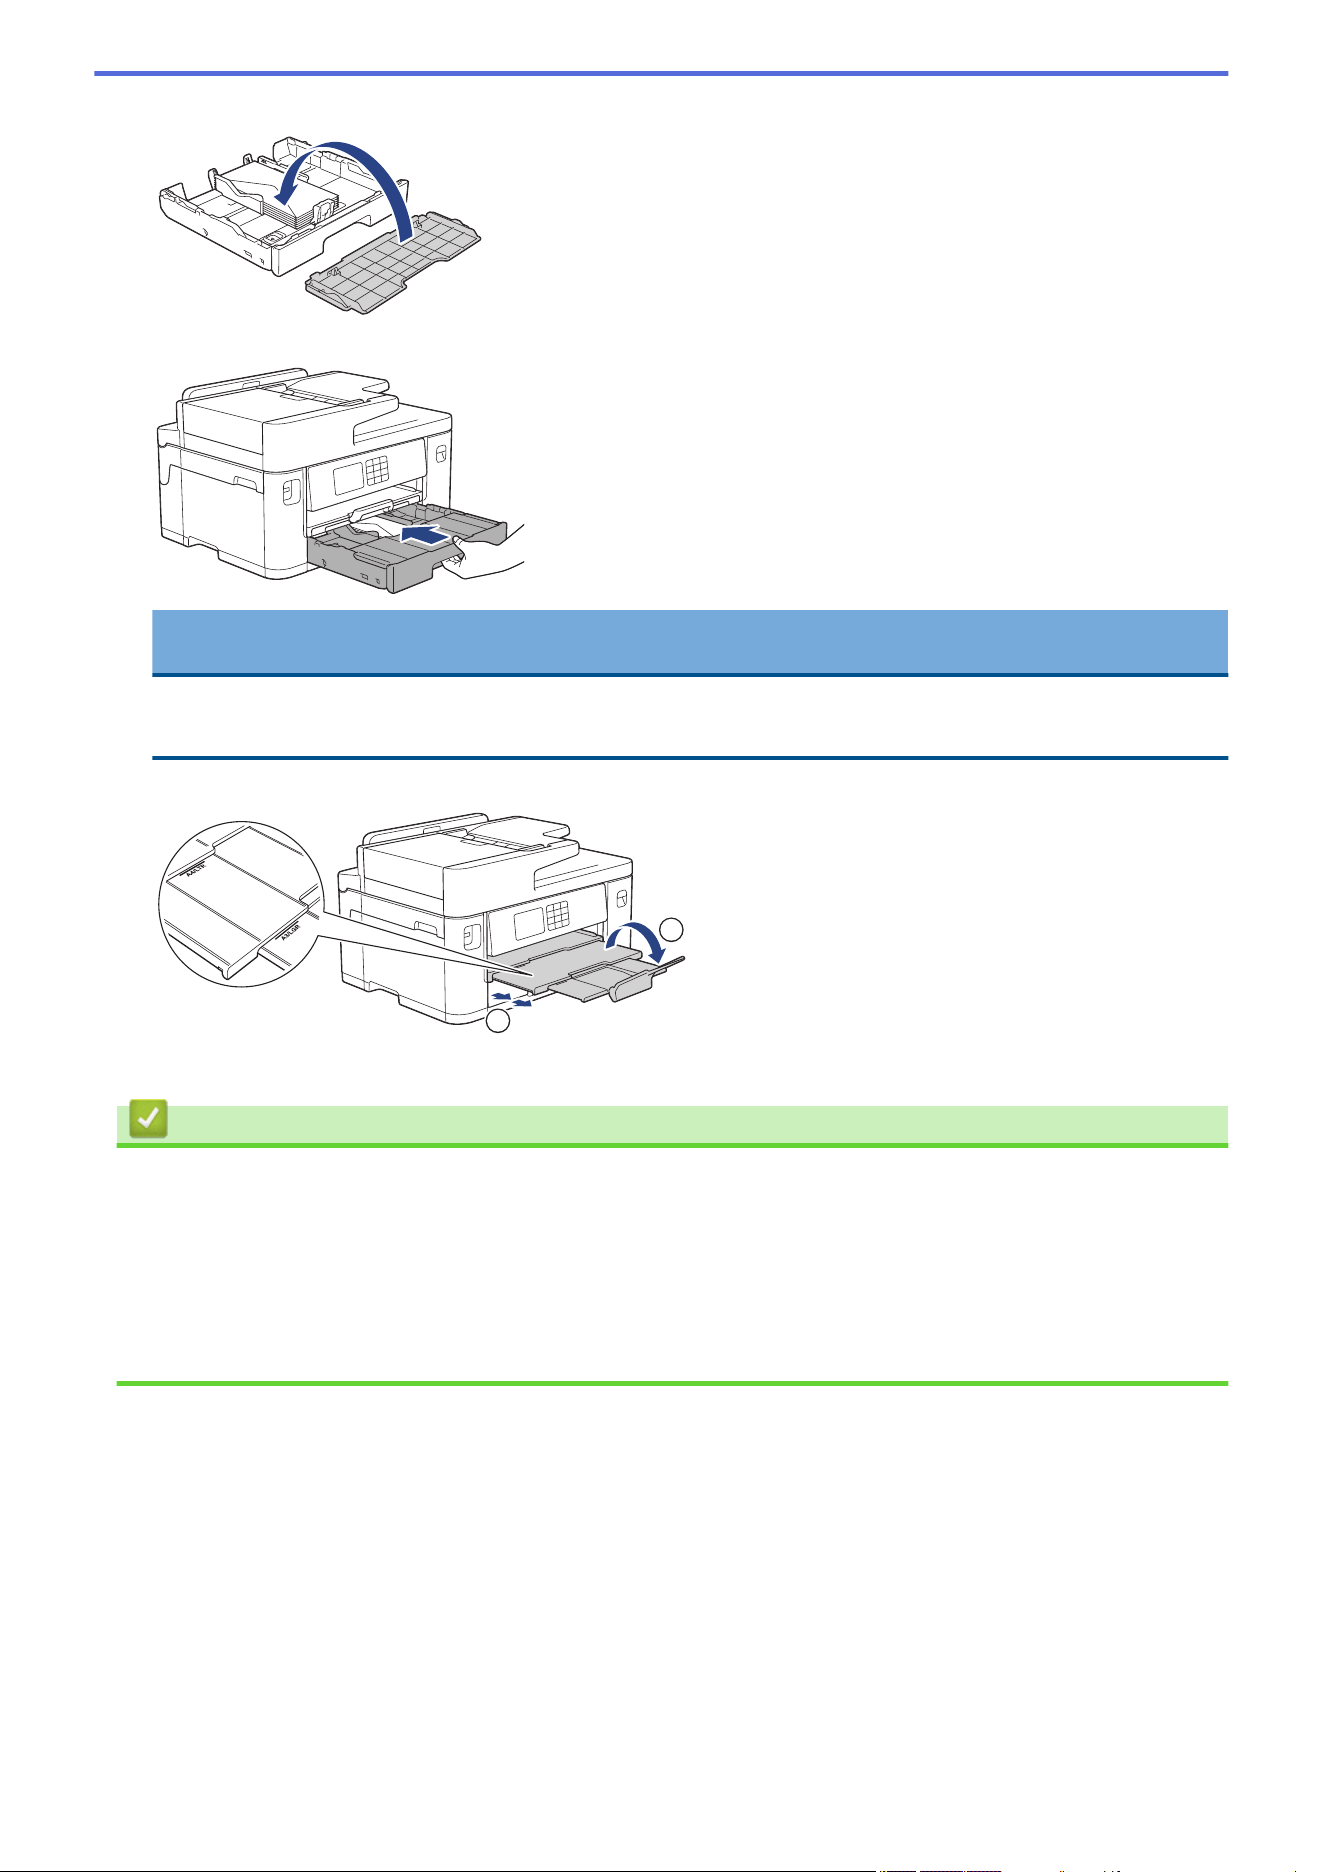
6. Replace the tray top cover.
7. Slowly push the paper tray completely into the machine.
IMPORTANT
DO NOT push the paper tray into the machine forcefully or quickly. Doing this may cause paper jams or
paper feed problems.
8. Pull out the paper support (1) until it locks into place, and then unfold the paper support flap (2).
2
1
9. Change the paper size setting in the machine's menu, if needed.
Related Information
• Load Paper in Paper Tray #1 / Paper Tray #2
Related Topics:
• Paper Type and Paper Size for Each Operation
• Change the Check Paper Setting
• Change the Paper Size and Paper Type
• Choose the Right Print Media
44

Home > Paper Handling > Load Paper > Load Paper in the Multi-purpose Tray (MP Tray)
Load Paper in the Multi-purpose Tray (MP Tray)
Related Models: MFC-J2740DW/MFC-J5740DW/MFC-J5855DW/MFC-J5955DW
• Load Cut-Sheet Paper, Photo Paper, or Envelopes in the Multi-purpose Tray (MP Tray)
• Load Long Paper in the Multi-purpose Tray (MP Tray)
45
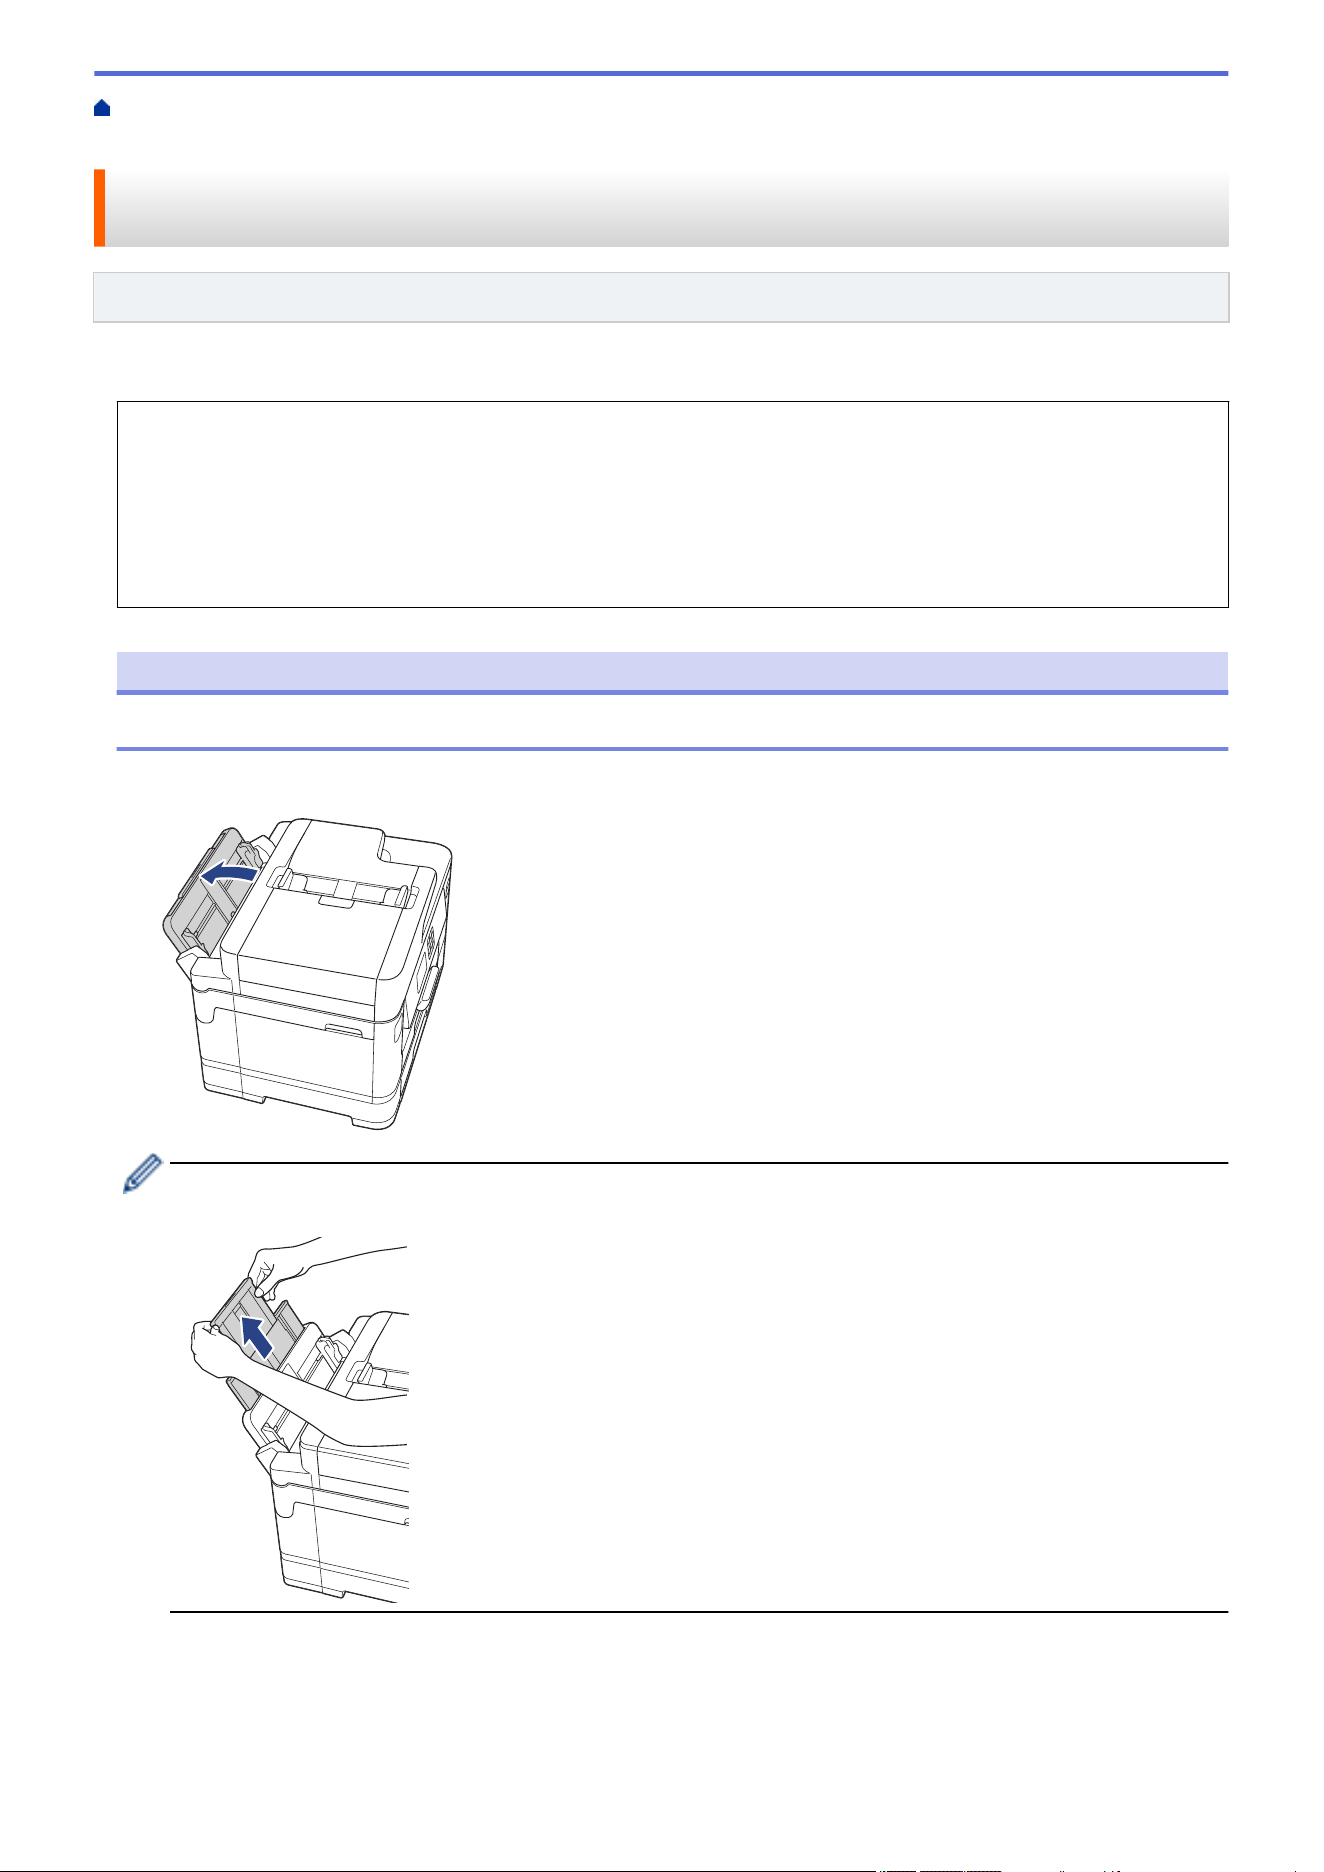
Home > Paper Handling > Load Paper > Load Paper in the Multi-purpose Tray (MP Tray) > Load Cut-Sheet
Paper, Photo Paper, or Envelopes in the Multi-purpose Tray (MP Tray)
Load Cut-Sheet Paper, Photo Paper, or Envelopes in the Multi-purpose
Tray (MP Tray)
Related Models: MFC-J2740DW/MFC-J5740DW/MFC-J5855DW/MFC-J5955DW
Use the MP tray for special print media, such as photo paper or envelopes.
• If the [Check Paper] setting is set to [On] and you set the paper in the MP tray, a message appears on
the LCD, allowing you to change the paper size and paper type.
• When you load a different paper size in the tray, you must change the Paper Size setting in the machine or
the paper size setting on your computer.
Doing this enables the machine to automatically feed paper from the appropriate tray if Auto Tray Select
has been set in the printer driver (Windows) or on the machine.
NOTE
To prevent dust from entering the machine, be sure to close the MP tray if you are not using it.
1. Open the MP tray.
When you want to load paper larger than A4 or Letter size paper, pull up the paper support using both
hands until it locks into place.
46
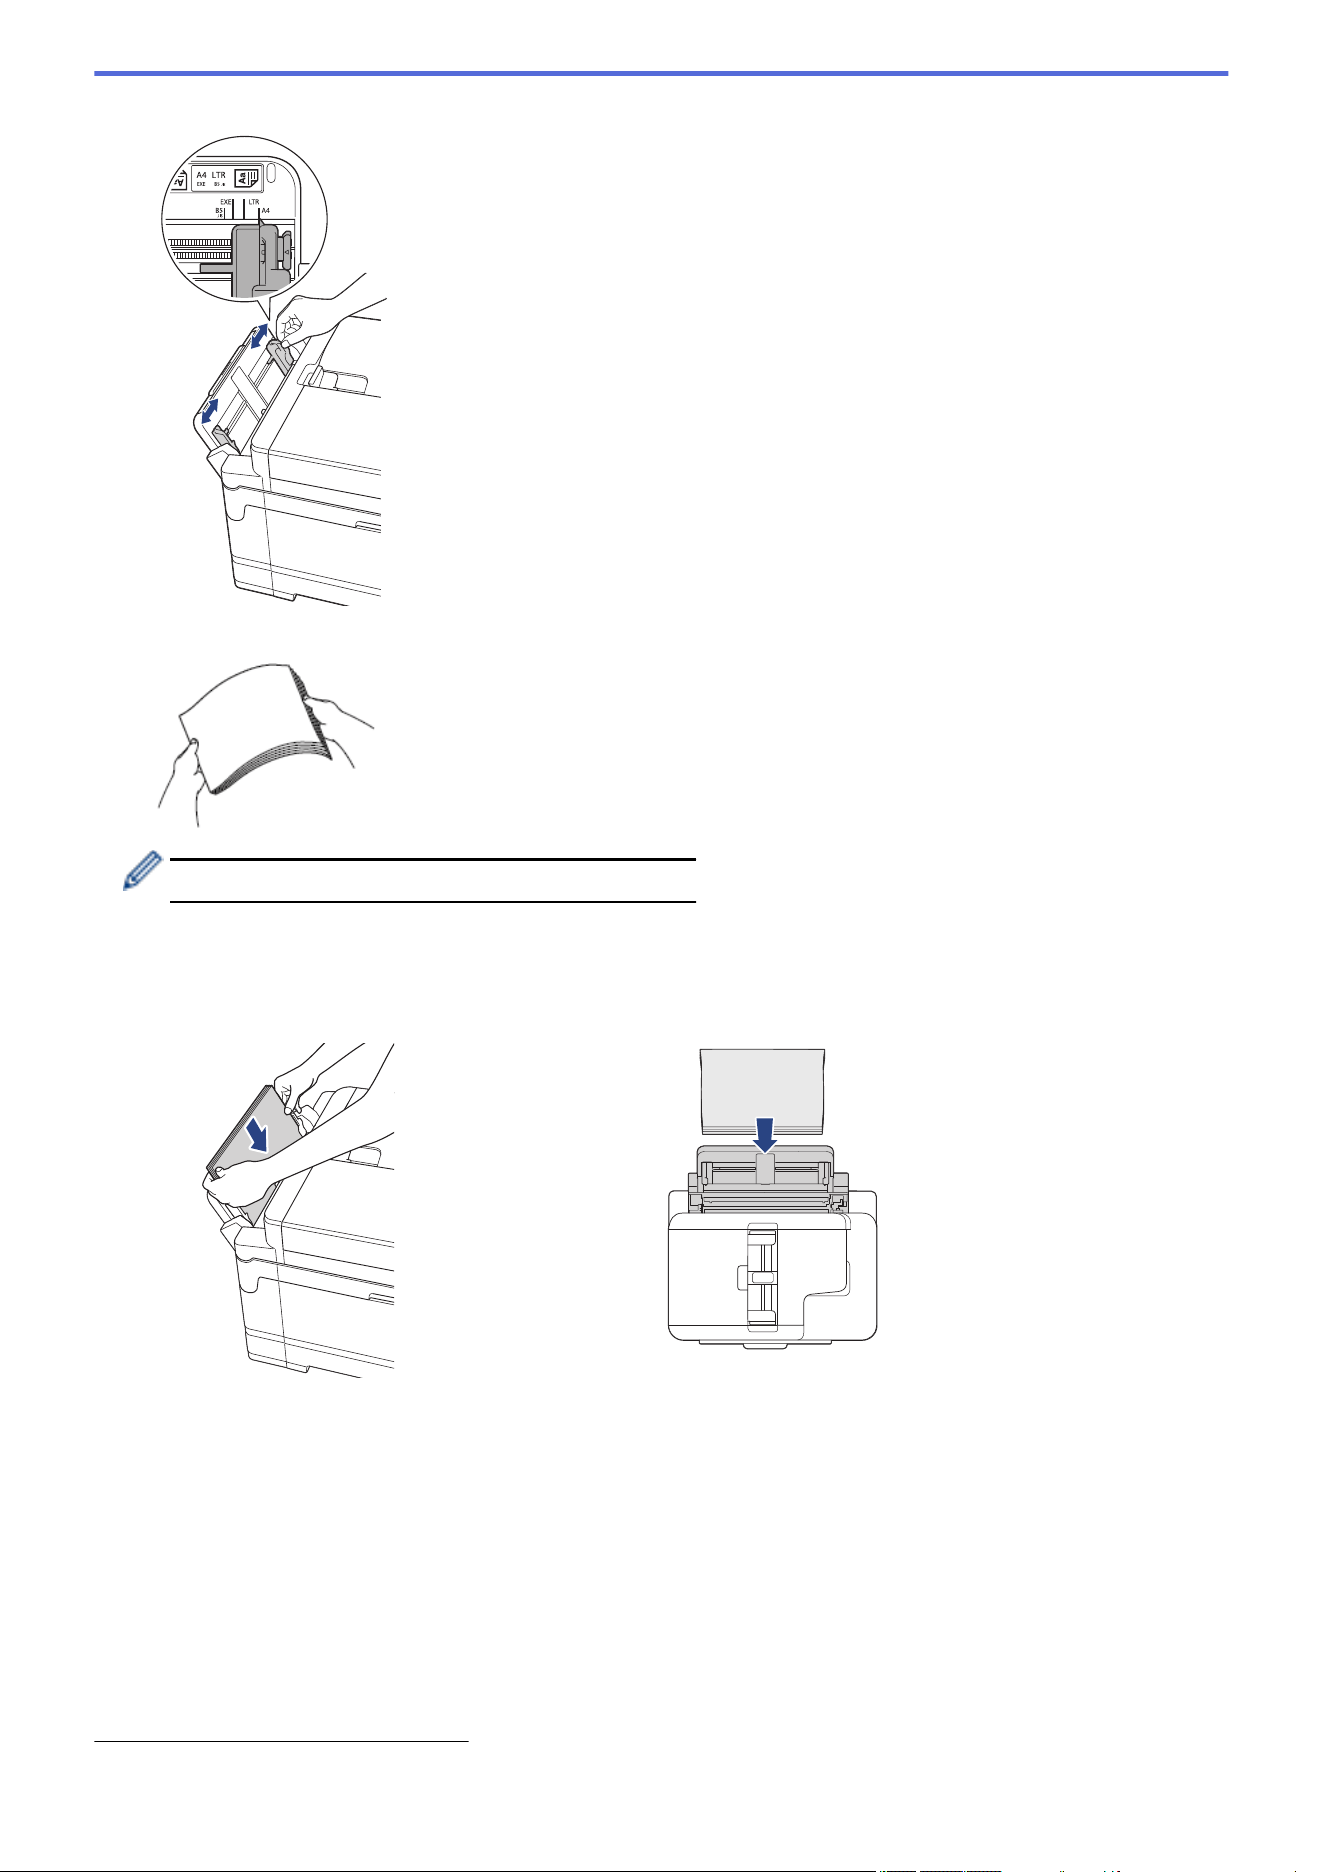
2. Gently press and slide the MP tray paper guides to match the width of the paper you are using.
3. Fan the stack of paper well to avoid paper jams and misfeeds.
Always make sure the paper is not curled or wrinkled.
4. Gently load the paper in the MP tray with the printing surface face up.
• Using A4, Letter, Executive, or B5 (JIS)
1
Landscape orientation
• Using A3, Ledger, B4 (JIS)
1
, Legal, Folio, Mexico Legal, India Legal, A5, A6, envelopes, Photo, Photo L,
Photo 2L, B6 (JIS)
1
, or Index Card
Portrait orientation
1 Supported only in some countries.
47
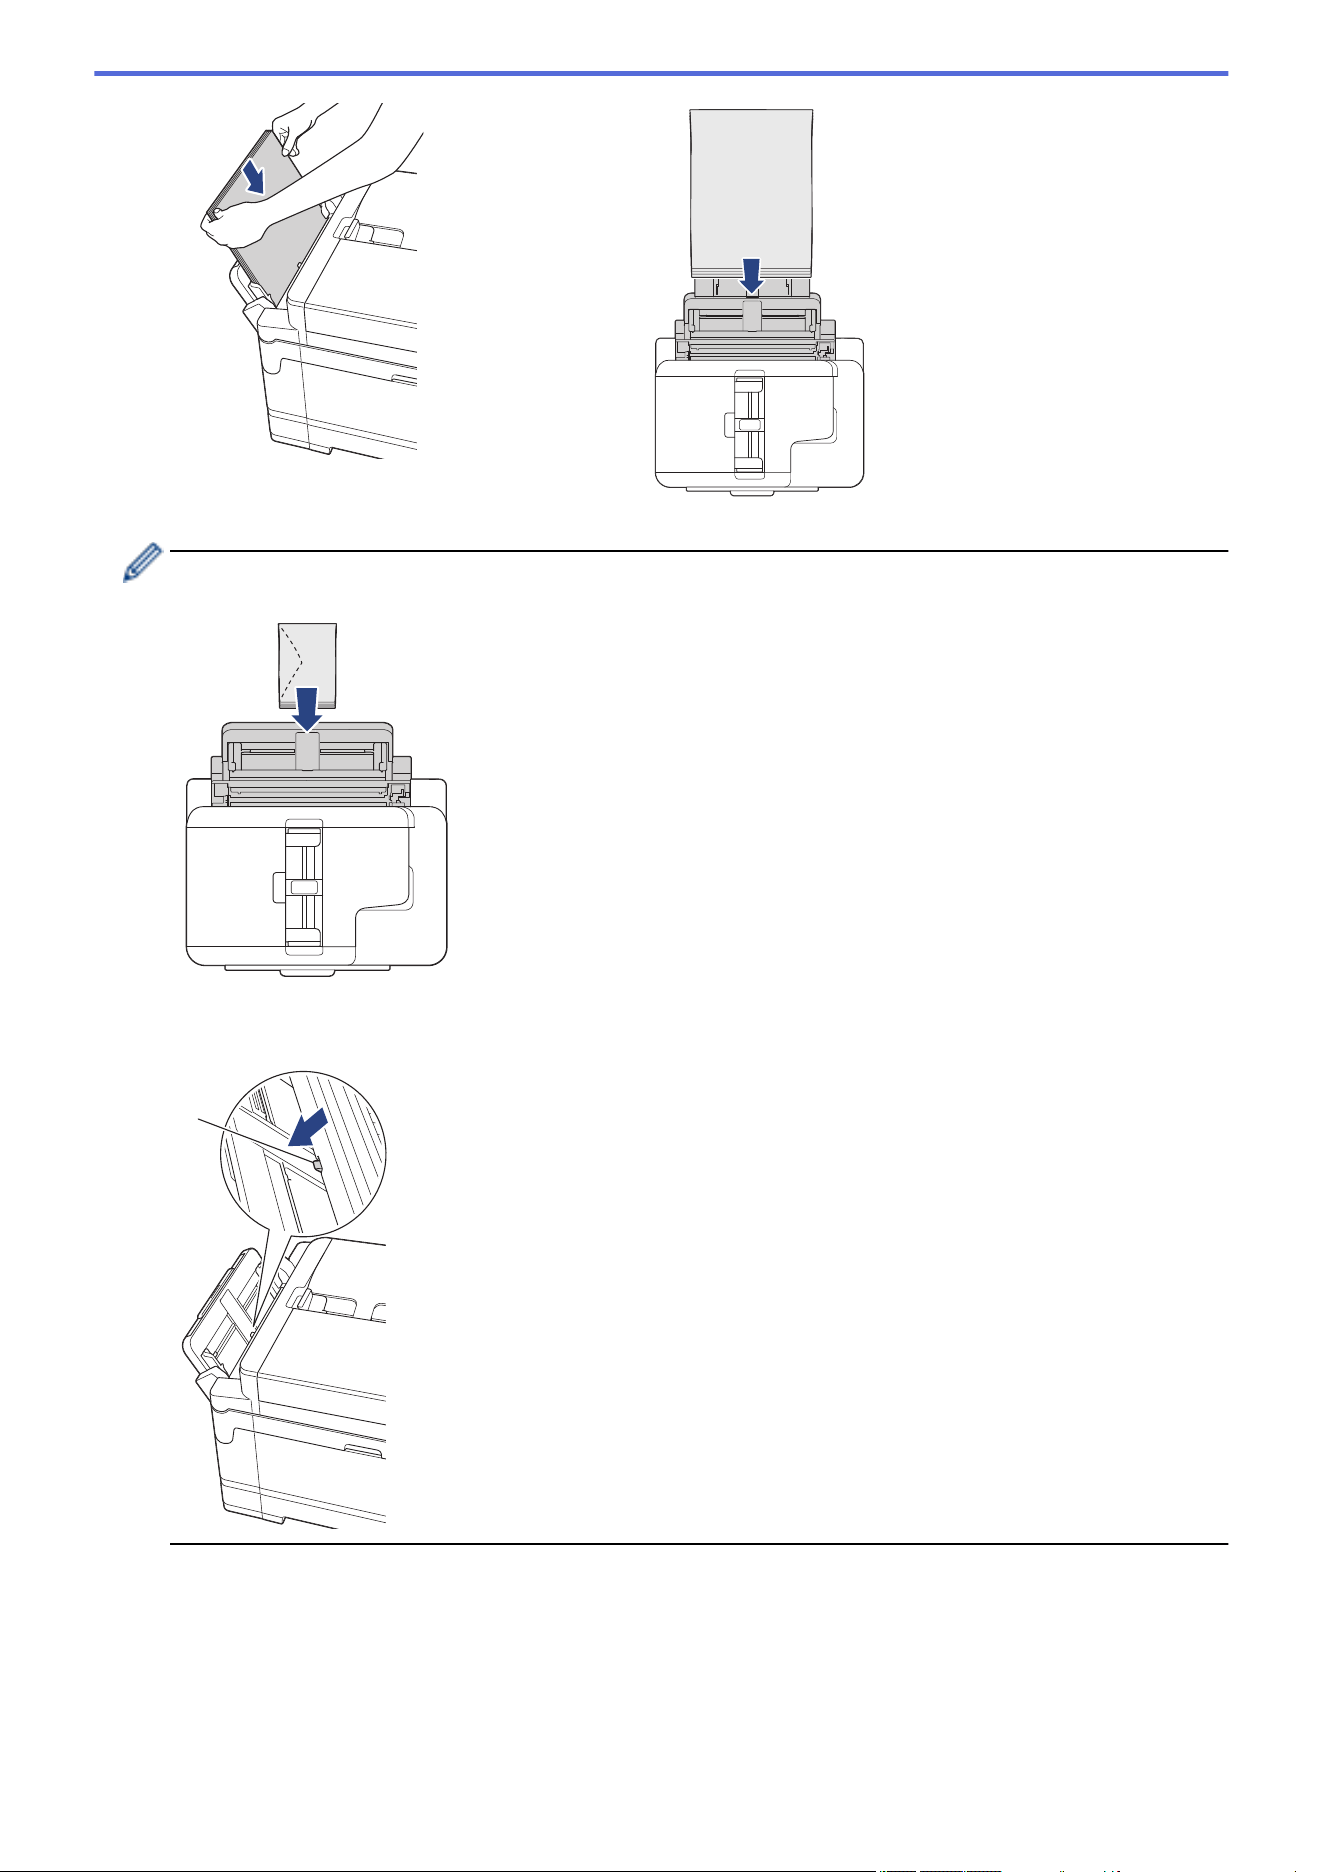
When using envelopes, load the envelopes with the printing surface face up and the flap on the left as
shown in the illustration.
If you are having difficulty loading paper in the MP tray, push the release lever (1) towards the back of the
machine, and then load the paper.
1
48
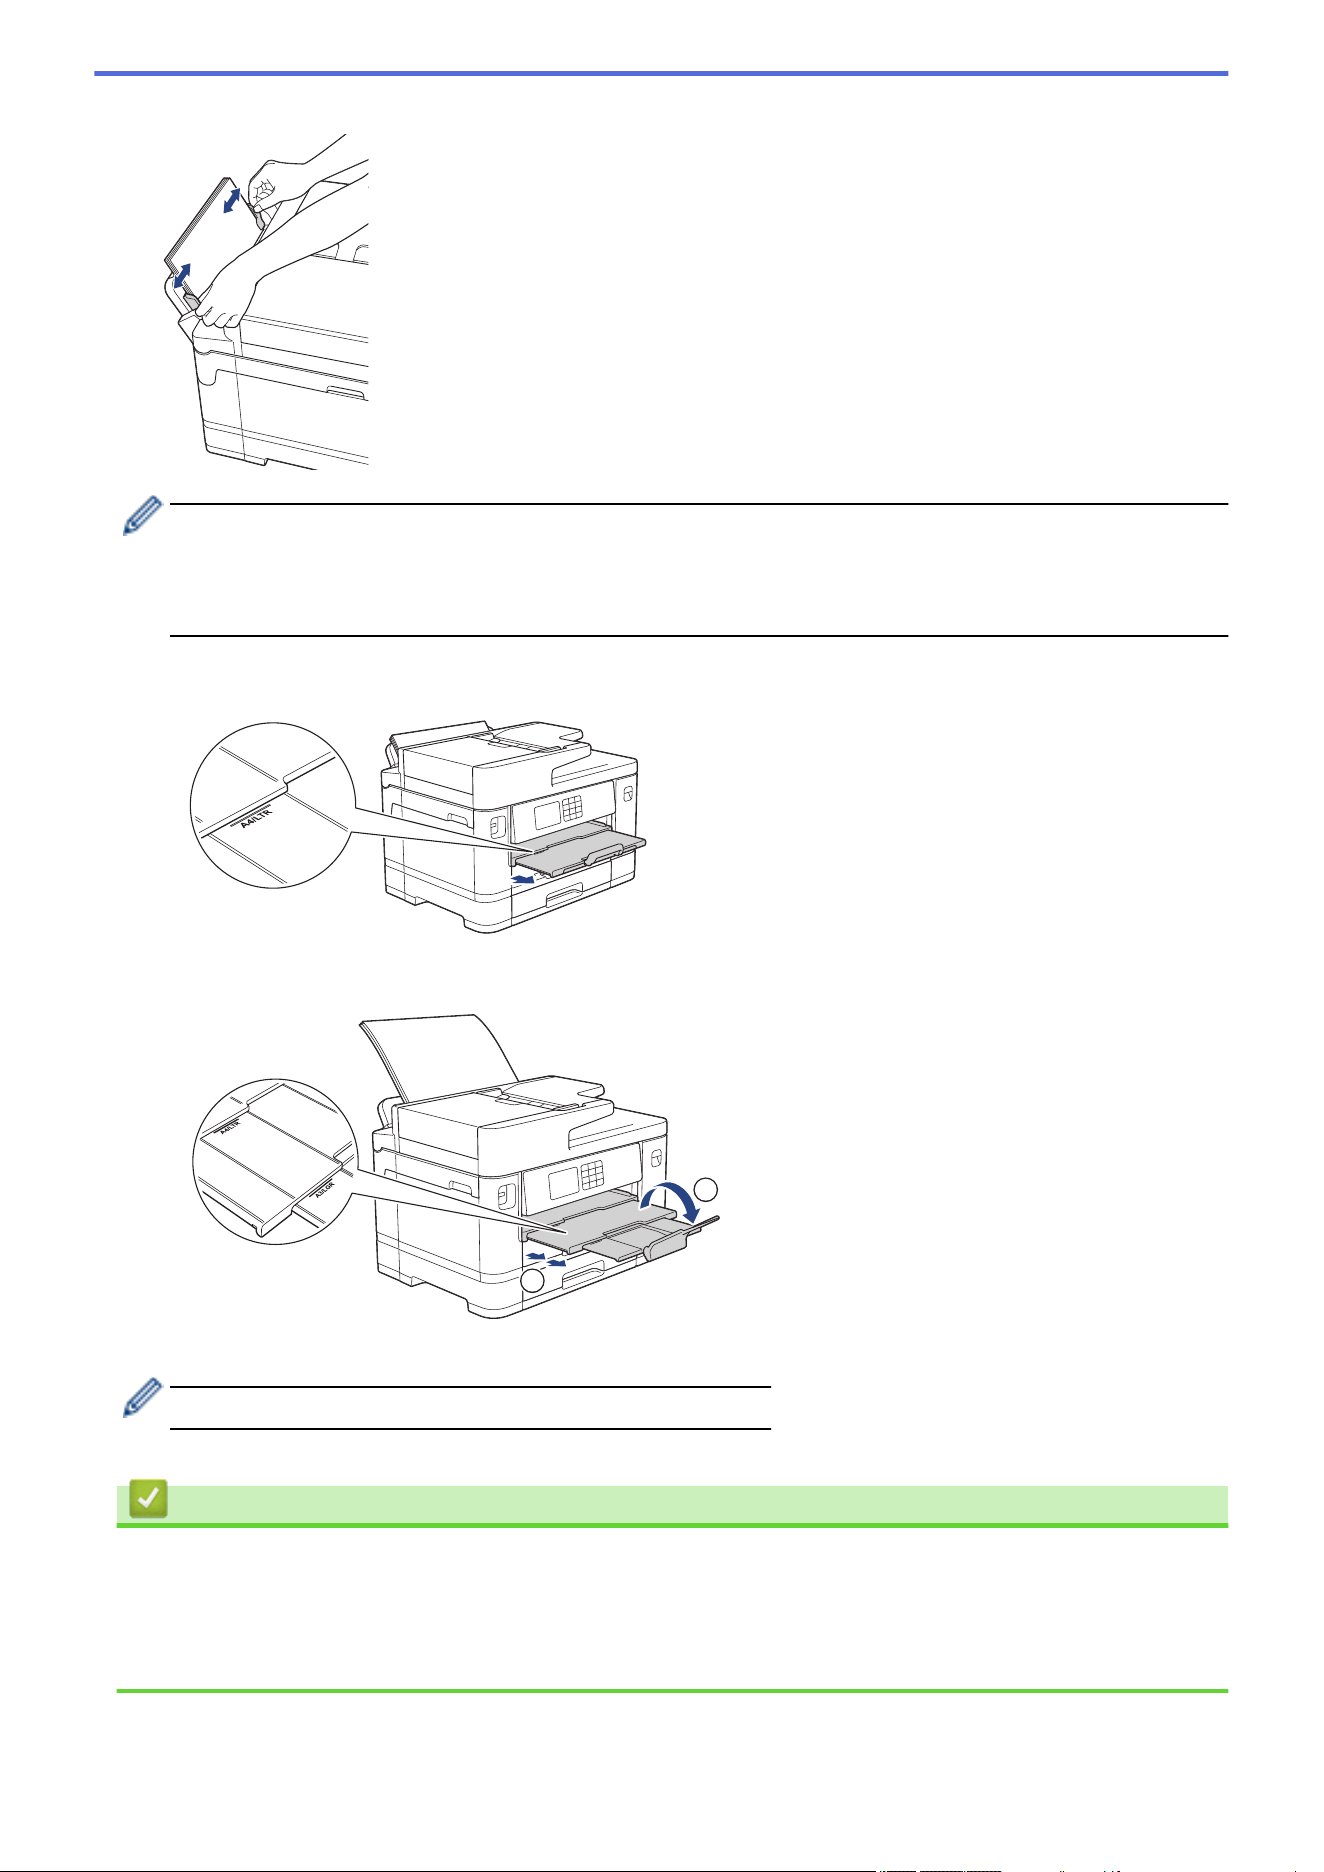
5. Using both hands, gently adjust the MP tray paper guides to fit the paper.
• DO NOT press the paper guides too tightly against the paper. Doing this may cause the paper to fold
and jam.
• Place the paper in the centre of the MP tray between the paper guides. If the paper is not centred, pull it
out and insert it again at the centre position.
6. Do one of the following:
• When using A4 or Letter, or smaller size paper, pull out the paper support until it locks into place.
• When using paper larger than A4, Letter, or envelopes, pull out the paper support (1) until it locks into
place, and then unfold the paper support flap (2).
2
1
7. Change the paper size setting in the machine's menu, if needed.
Make sure printing has finished before you close the MP tray.
Related Information
• Load Paper in the Multi-purpose Tray (MP Tray)
Related Topics:
• Choose the Right Print Media
• Error and Maintenance Messages
49
Home > Paper Handling > Load Paper > Load Paper in the Multi-purpose Tray (MP Tray) > Load Long
Paper in the Multi-purpose Tray (MP Tray)
Load Long Paper in the Multi-purpose Tray (MP Tray)
Related Models: MFC-J2740DW/MFC-J5740DW/MFC-J5855DW/MFC-J5955DW
Load one sheet of Long paper at a time using the MP tray.
• Use the MP tray to print a Long paper (Width: 88.9 - 297 mm / Height: 431.9 - 1200 mm).
• Use Long paper only when printing from your computer or when printing using AirPrint. Do not use Long
paper when copying or faxing.
• If the [Check Paper] setting is set to [On] and you set the paper in the MP tray, a message appears on
the LCD, allowing you to change the paper size and paper type.
• When you load a different paper size in the tray, you must change the Paper Size setting in the machine or
the paper size setting on your computer.
Doing this enables the machine to automatically feed paper from the appropriate tray if Auto Tray Select
has been set in the printer driver (Windows) or on the machine.
NOTE
To prevent dust from entering the machine, be sure to close the MP tray if you are not using it.
1. Open the MP tray.
IMPORTANT
To avoid damaging the paper, DO NOT pull up the paper support when loading Long paper.
50
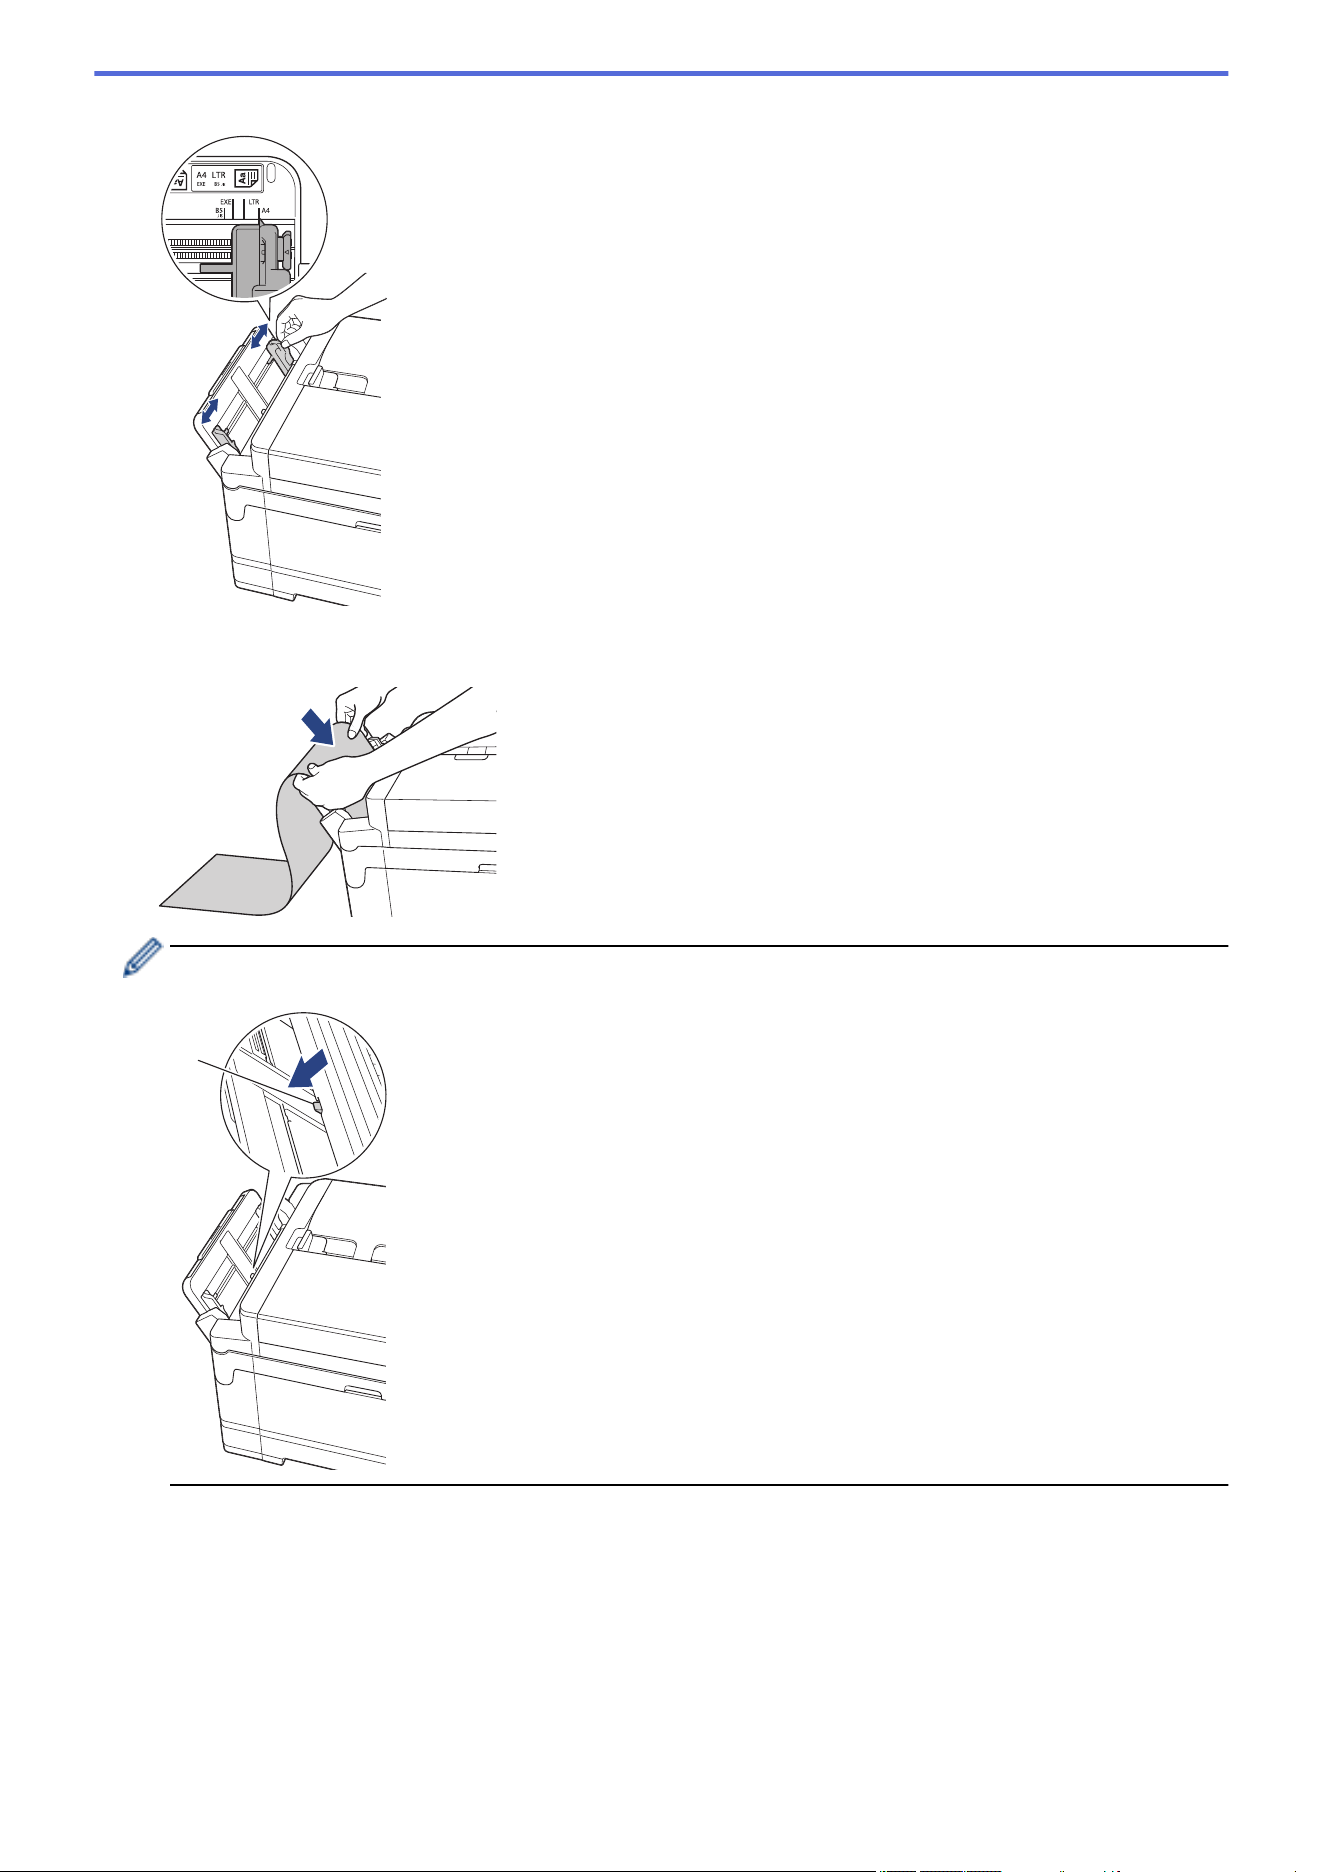
2. Gently press and slide the MP tray paper guides to match the width of the paper you are using.
3. Load only one sheet of paper in the MP tray with the printing surface face up. Using both hands, push one
sheet of paper into the MP tray until the front edge touches the paper feed rollers.
If you are having difficulty loading paper in the MP tray, push the release lever (1) towards the back of the
machine, and then load the paper.
1
51
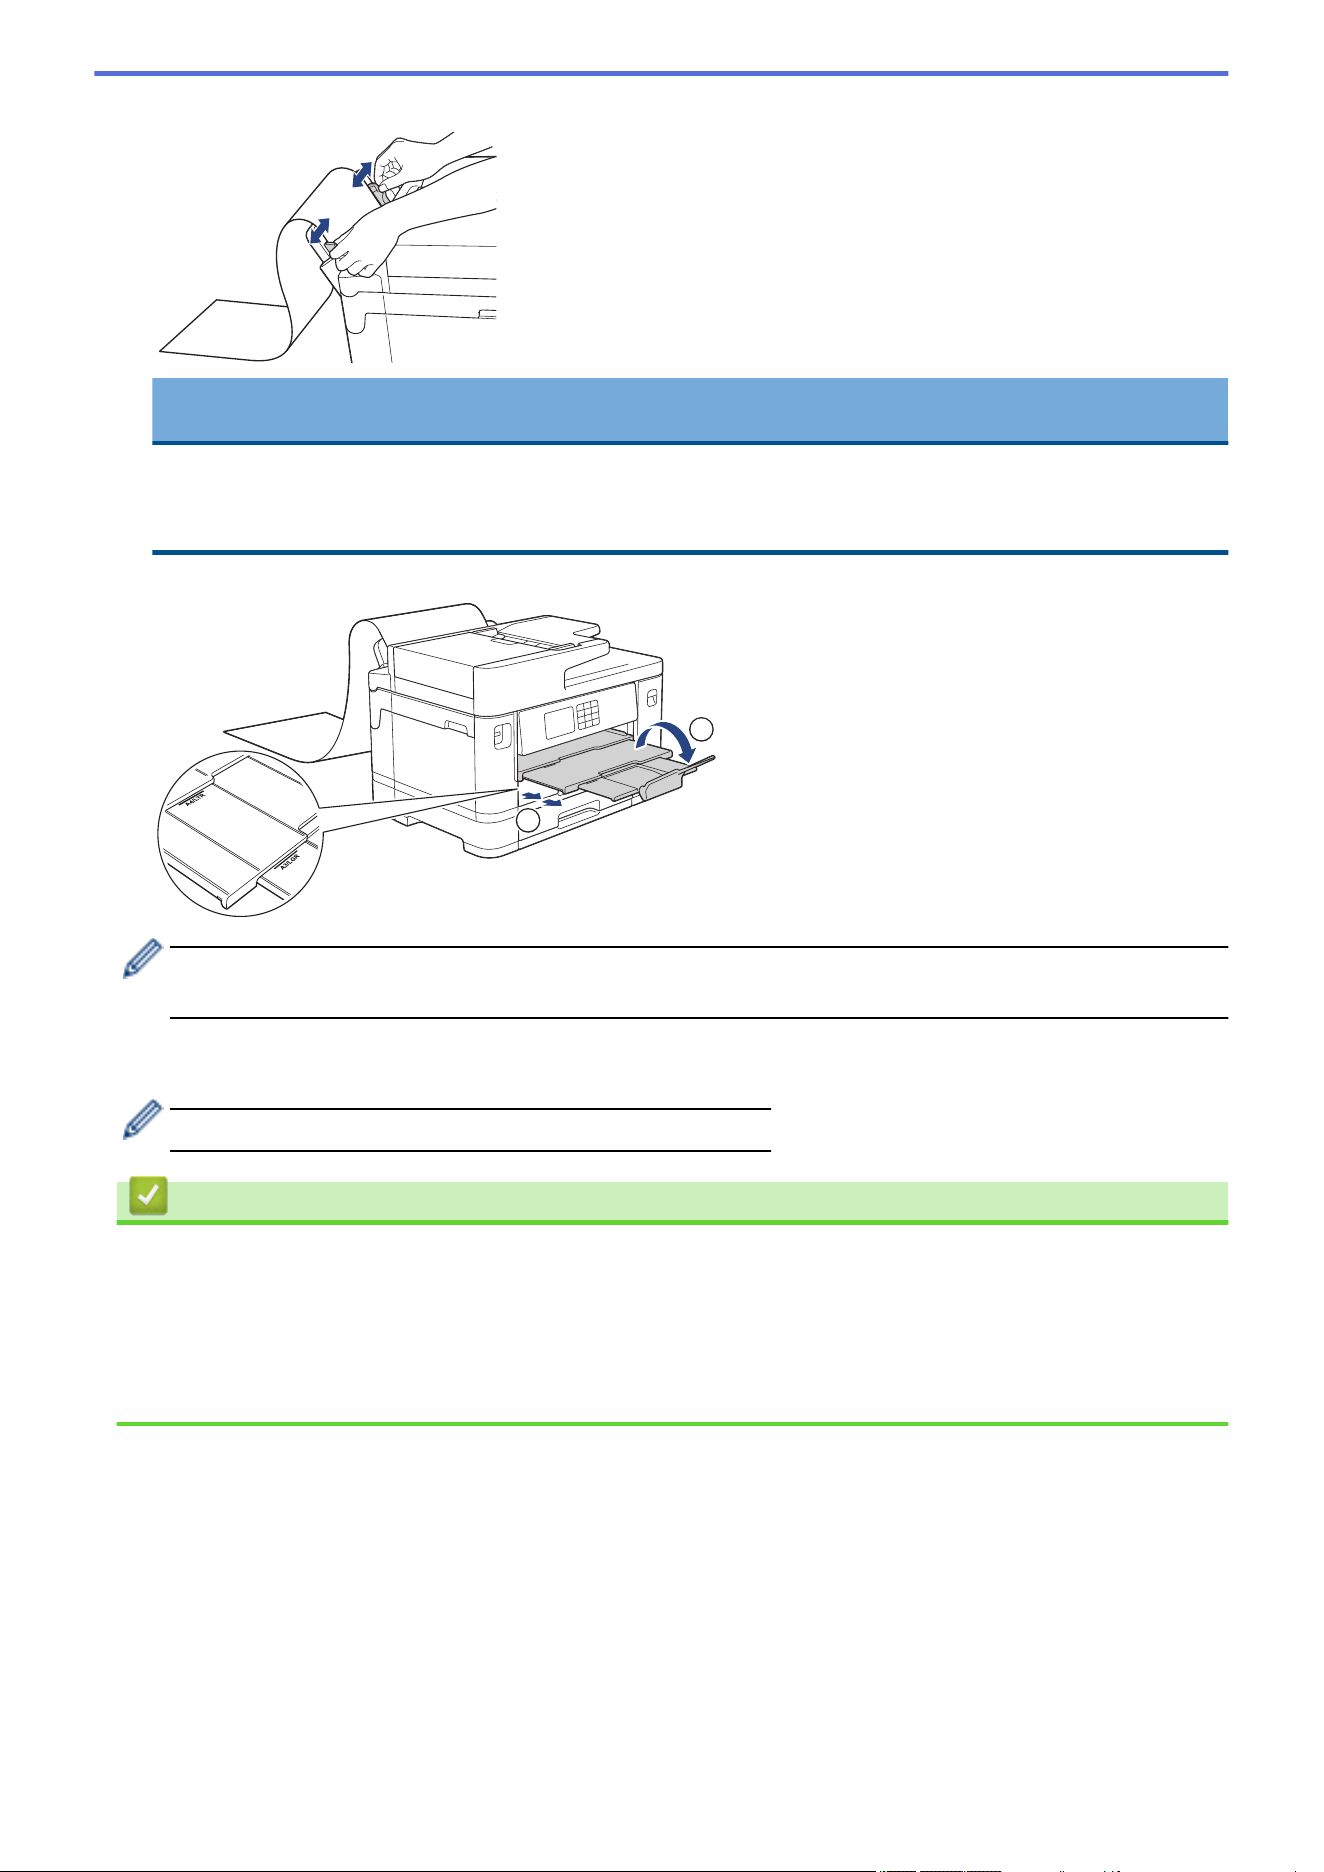
4. Using both hands, gently adjust the MP tray paper guides to fit the paper.
IMPORTANT
DO NOT load more than one sheet of Long paper in the MP tray at any time. Doing this may cause a
paper jam. When printing multiple pages, do not feed the next sheet of paper until the touchscreen
displays a message instructing you to feed the next sheet.
5. Pull out the paper support (1) until it locks into place, and then unfold the paper support flap (2).
2
1
When you feed Long paper into the MP tray, the machine holds the printed page after printing so it does not
fall. When printing is complete, remove the printed page and press [OK].
6. Change the paper size setting to [User Defined Size] and enter the actual size using the machine's
touchscreen.
Make sure printing has finished before you close the MP tray.
Related Information
• Load Paper in the Multi-purpose Tray (MP Tray)
Related Topics:
• Choose the Right Print Media
• Error and Maintenance Messages
• Print a Long Paper (Windows)
52
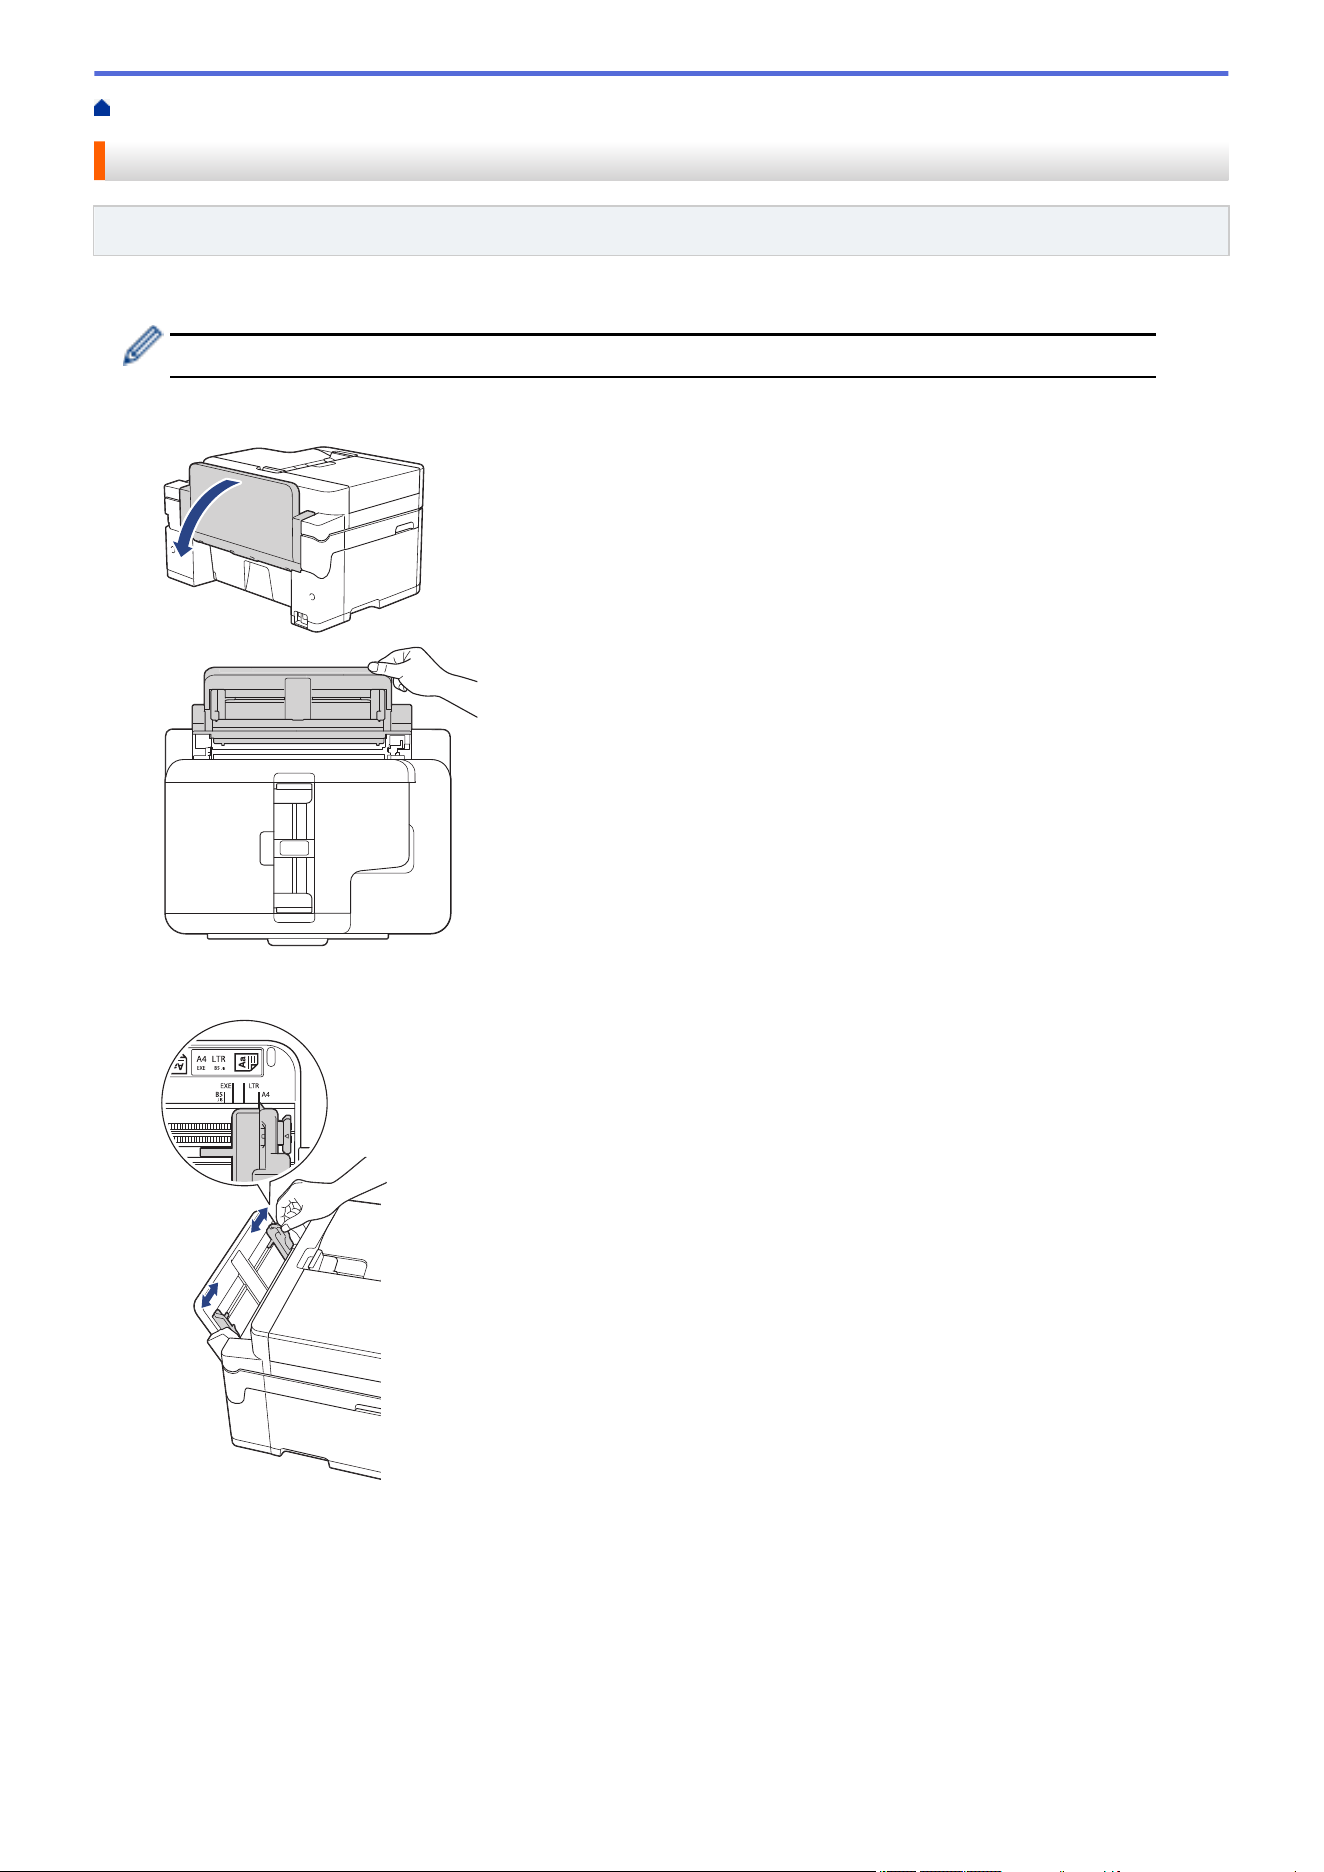
Home > Paper Handling > Load Paper > Load Paper in the Manual Feed Slot
Load Paper in the Manual Feed Slot
Related Models: MFC-J2340DW/MFC-J5340DW
Load special print media in this slot, one sheet at a time.
The machine automatically turns on Manual Feed mode when you put paper in the manual feed slot.
1. Open the manual feed slot cover.
2. Slide the manual feed slot paper guides to fit the width of the paper you are using.
3. Load only one sheet of paper in the manual feed slot with the printing surface face up.
Using both hands, push one sheet of paper into the manual feed slot until the front edge touches the paper
feed rollers. Let go of the paper when you feel the machine pull it. The LCD displays [Manual Feed Slot
ready].
Read the instruction displayed on the LCD, and then press [OK].
53
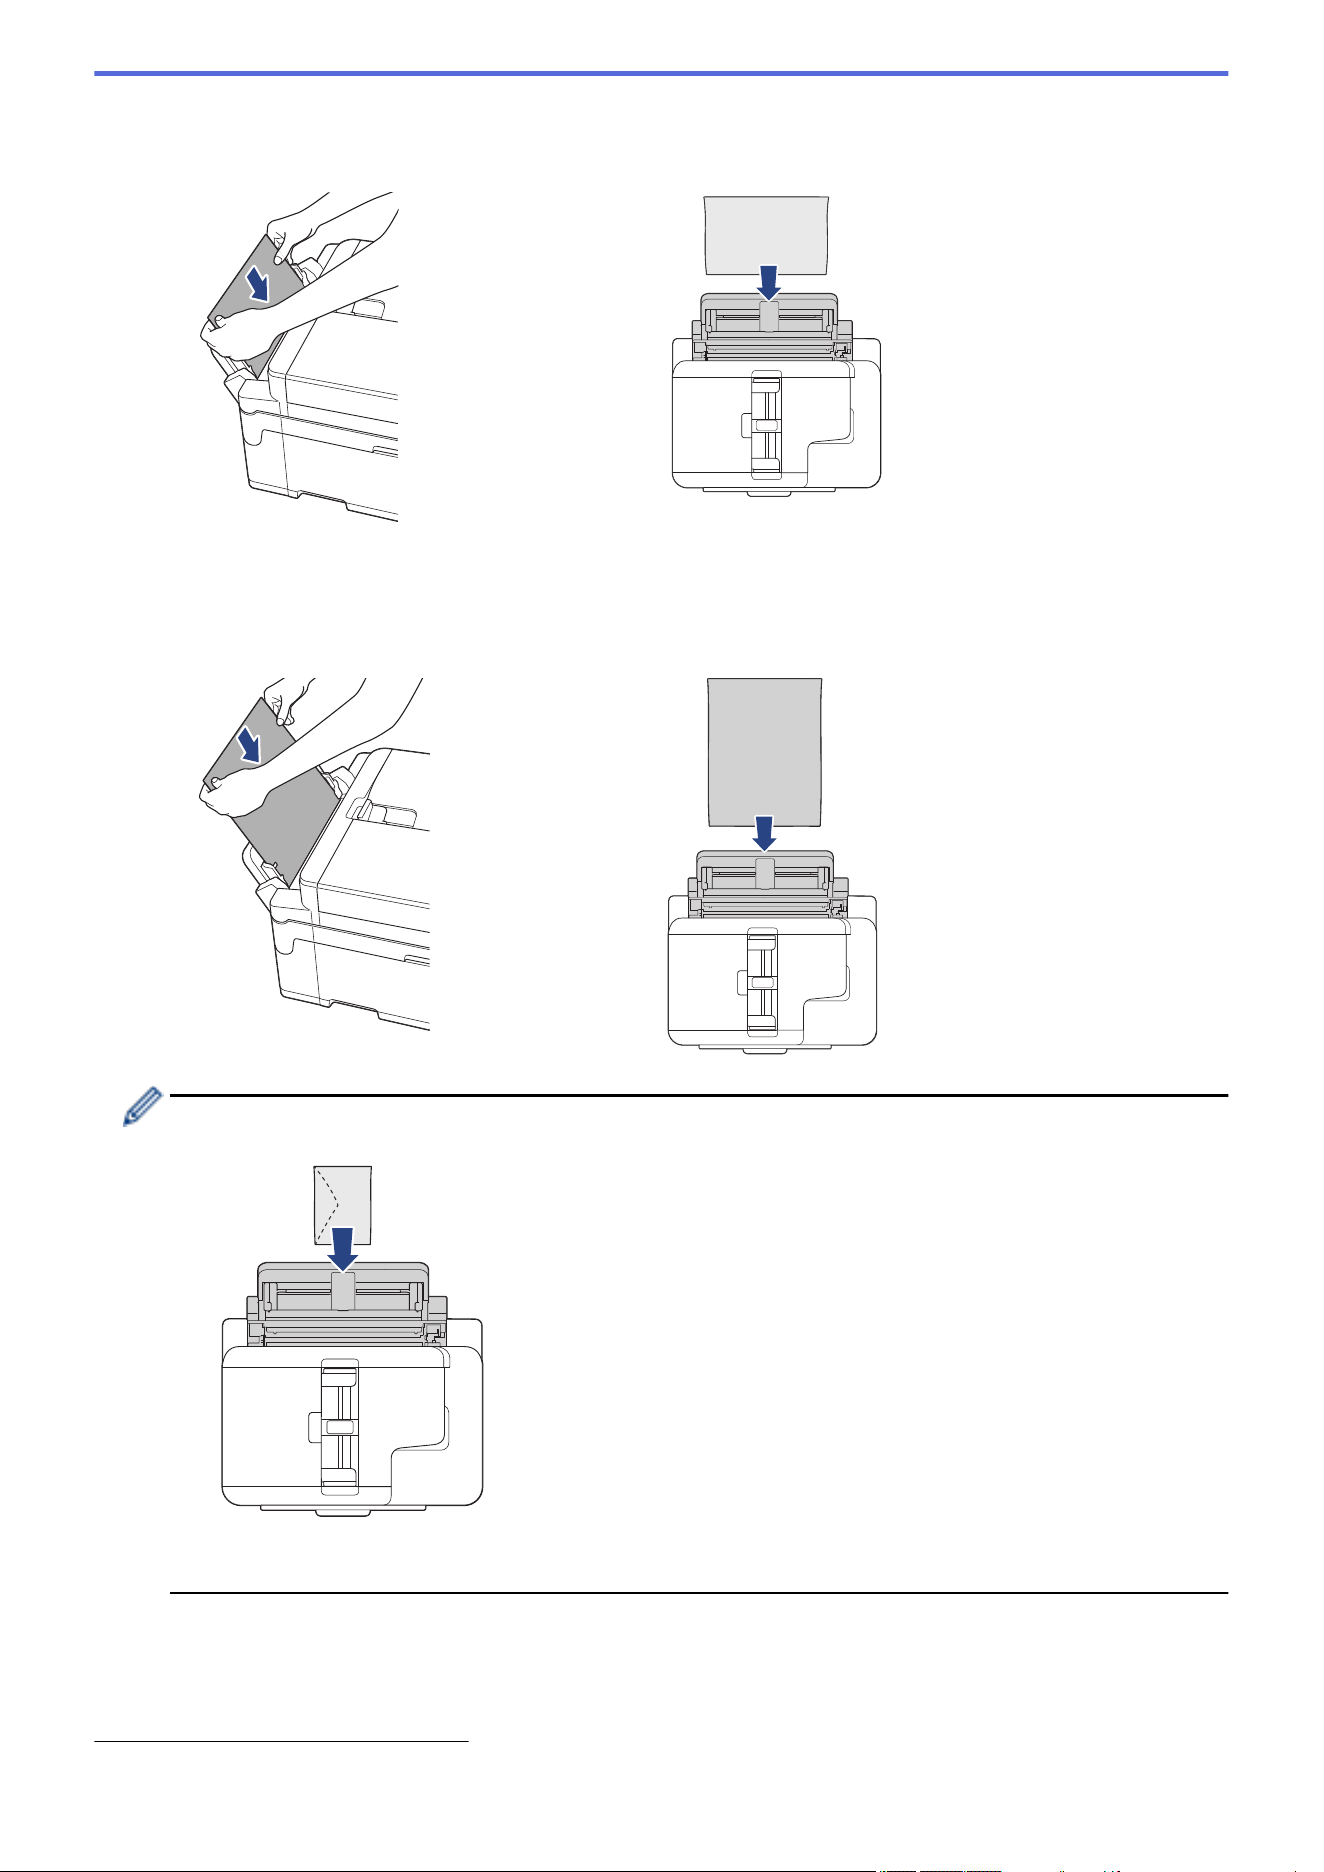
• Using A4, Letter, Executive, or B5 (JIS)
1
Landscape orientation
• Using A3, Ledger, B4 (JIS)
1
, Legal, Folio, Mexico Legal, India Legal, A5, A6, envelopes, Photo, Photo L,
Photo 2L, B6 (JIS)
1
, or Index Card
Portrait orientation
• When using envelopes, load the envelopes with the printing surface face up and the flap on the left as
shown in the illustration.
• When loading an envelope, or a sheet of thick paper, push the envelope into the manual feed slot until
you feel the paper feed rollers grab it.
1 Supported only in some countries.
54
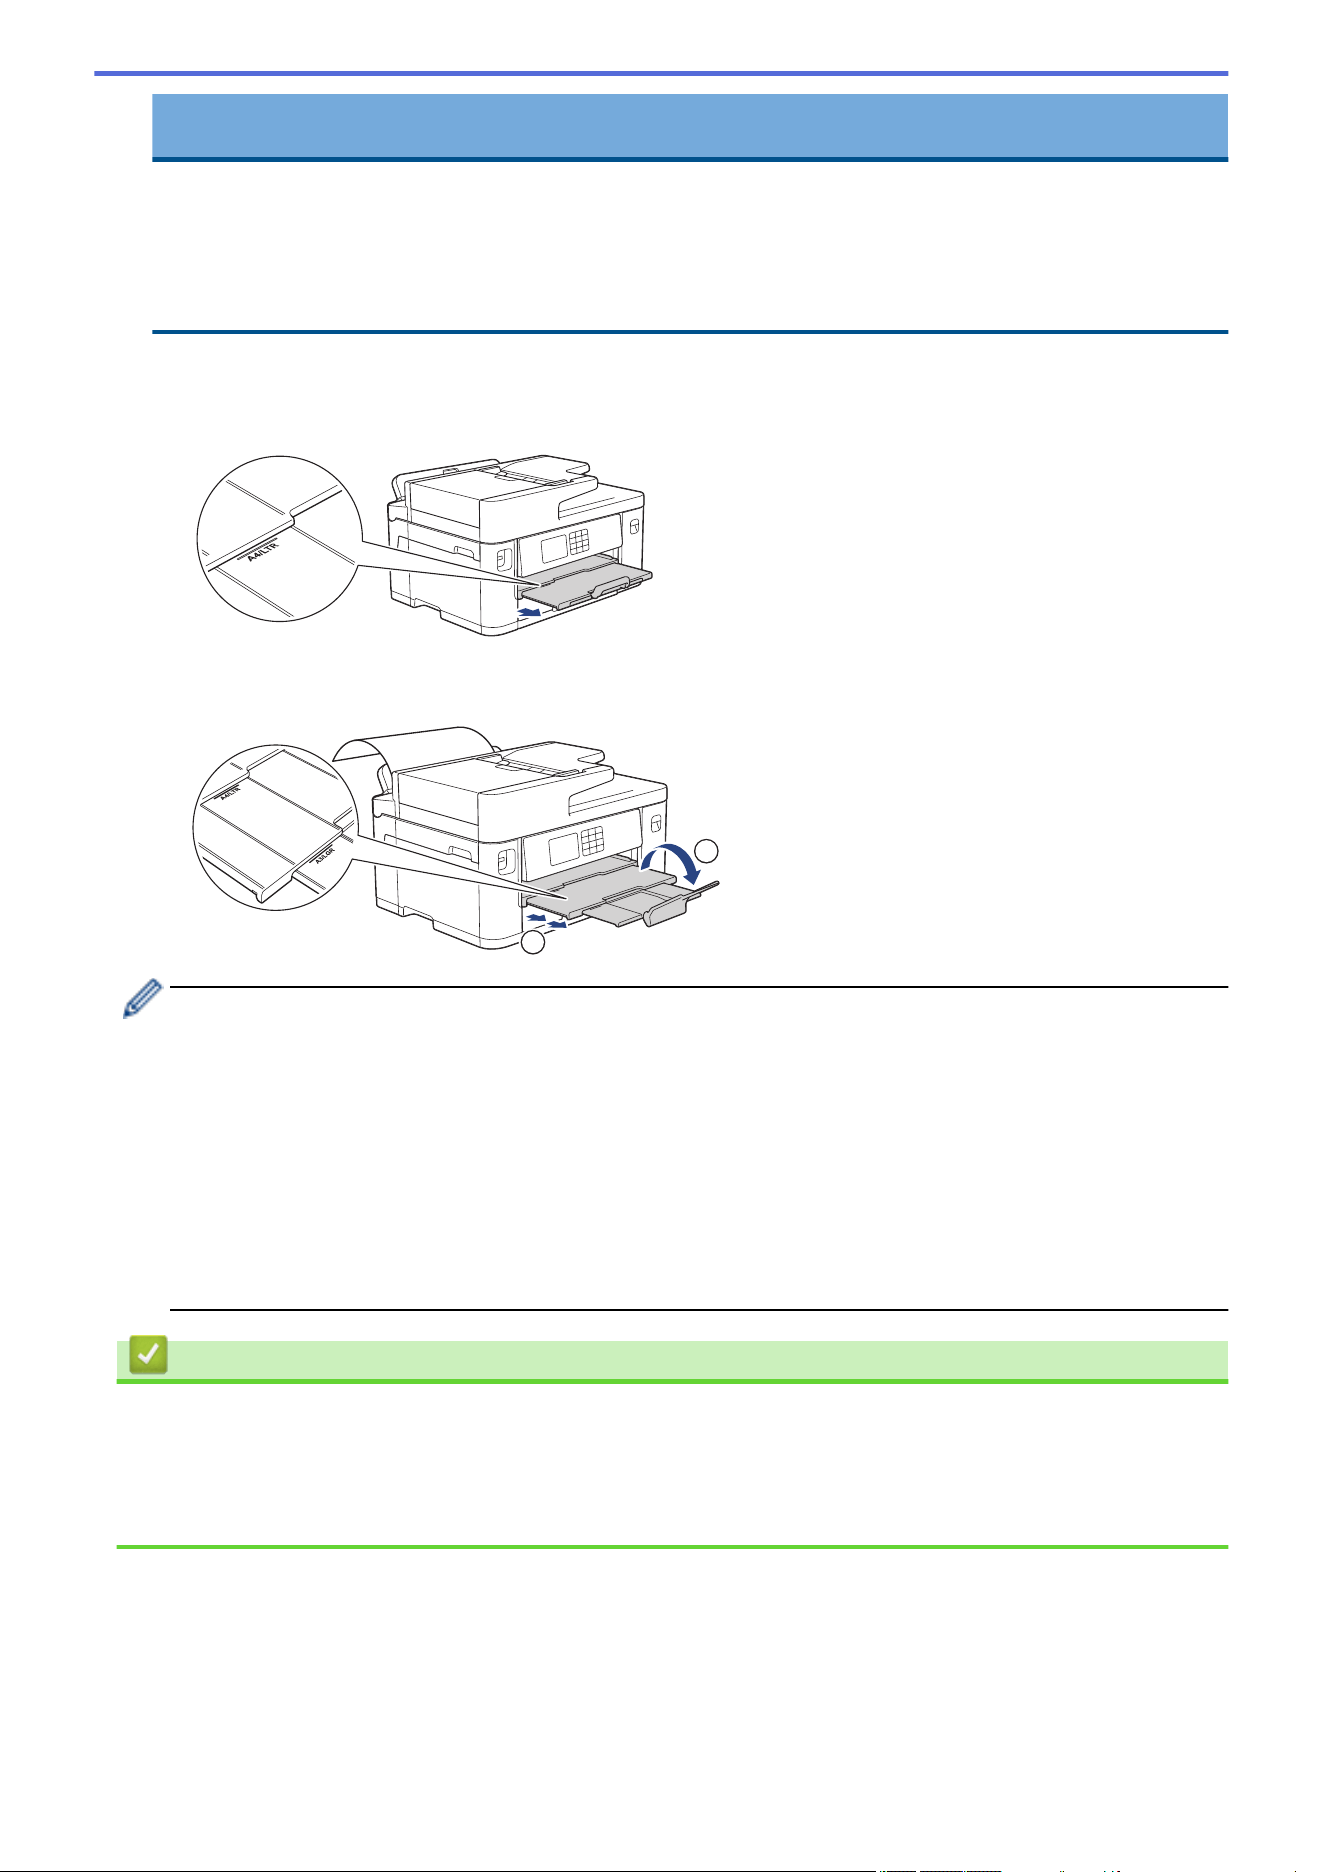
IMPORTANT
• DO NOT load more than one sheet of paper in the manual feed slot at any time. Doing this may cause
a paper jam. When printing multiple pages, do not feed the next sheet of paper until the touchscreen
displays a message instructing you to feed the next sheet.
• DO NOT load paper in the manual feed slot when you are printing from the paper tray. Doing this may
cause a paper jam.
4. Do one of the following:
• When using A4 or Letter size, or smaller size paper
Pull out the paper support until it locks into place.
• When using paper larger than A4 or Letter size, or envelopes
Pull out the paper support (1) until it locks into place, and then unfold the paper support flap (2).
2
1
• If the document does not fit on one sheet, the LCD will prompt you to load another sheet of paper. Place
another sheet of paper in the manual feed slot, and then press [OK].
• When you feed paper larger than A4 or Letter size into the manual feed slot, the machine holds the
printed page after printing so it does not fall. When printing is complete, remove the printed page and
press [OK].
• Make sure printing has finished before you close the manual feed slot cover.
• The machine will eject paper loaded in the manual feed slot while a test page, fax, or report is being
printed.
• The machine will eject paper loaded in the manual feed slot during the machine's cleaning process.
Wait until the machine finishes its cleaning, and then load paper in the manual feed slot.
Related Information
• Load Paper
Related Topics:
• Error and Maintenance Messages
• Choose the Right Print Media
55
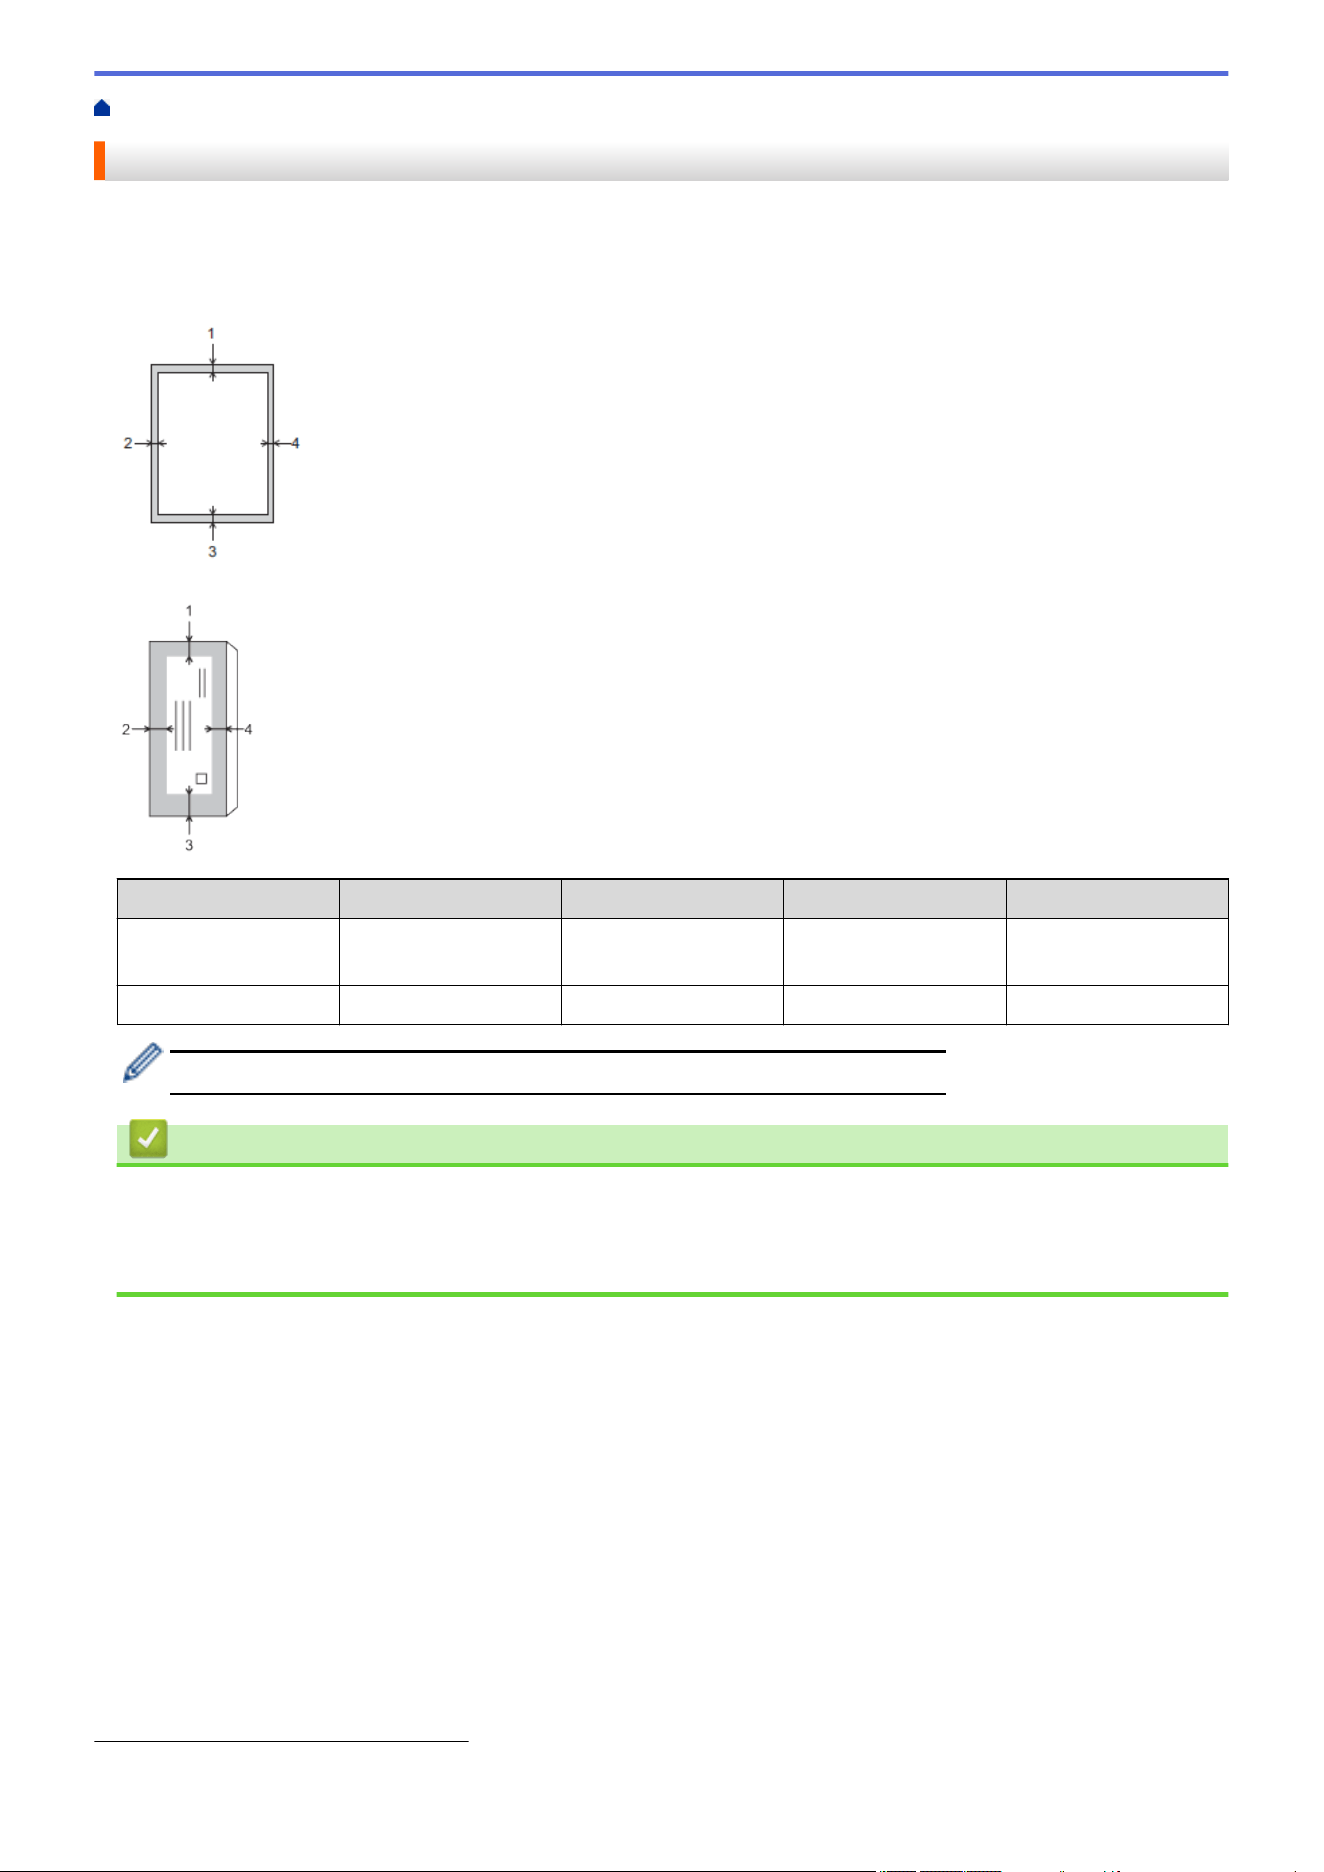
Home > Paper Handling > Load Paper > Unprintable Area
Unprintable Area
The unprintable area depends on the settings in the application you are using. The figures below show the
unprintable areas on cut-sheet paper and envelopes. The machine can print in the shaded areas of cut-sheet
paper only when the Borderless print feature is available and turned on.
Cut-Sheet Paper
Envelopes
Top (1)
Left (2) Bottom (3) Right (4)
Cut-Sheet 3 mm 3 mm
3 mm
1
3 mm
Envelopes 12 mm 3 mm 12 mm 3 mm
The Borderless print feature is not available for envelopes and 2-sided printing.
Related Information
• Load Paper
Related Topics:
• Paper Handling and Printing Problems
1
(MFC-J2740DW/MFC-J5740DW/MFC-J5855DW/MFC-J5955DW) 5 mm when using the Long paper.
56

Home > Paper Handling > Load Paper > Paper Settings > Change the Paper Size and Paper Type
Change the Paper Size and Paper Type
Set the Paper Size and Paper Type settings for the paper tray.
• To get the best print quality, set the machine for the type of paper you are using.
• When you change the size of the paper you load in the tray, you must change the Paper Size setting on the
LCD at the same time.
1. (MFC-J2740DW/MFC-J5740DW/MFC-J5855DW/MFC-J5955DW) Press [Settings] > [All
Settings] > [General Setup] > [Tray Setting]. Press the tray option you want.
2. (MFC-J2340DW/MFC-J5340DW) Press [Settings] > [All Settings] > [General Setup].
3. Press [Paper Type].
4. Press a or b to display the paper type options, and then press the option you want.
(MFC-J2740DW/MFC-J5740DW/MFC-J5955DW) Use plain paper only in Tray #2.
5. Press [Paper Size].
6. Press a or b to display the paper size options, and then press the option you want.
7. Press .
The machine ejects paper with the printed surface face up onto the paper tray at the front of the machine.
When you use glossy paper, remove each sheet at once to prevent smudging or paper jams.
Related Information
• Paper Settings
Related Topics:
• Load Photo Paper in Paper Tray #1
• Load Envelopes in Paper Tray #1
• Acceptable Print Media
• Error and Maintenance Messages
• Paper Handling and Printing Problems
• Load A4, Letter, or Executive Size Paper in Paper Tray #1 / Paper Tray #2
58
Home > Paper Handling > Load Paper > Paper Settings > Change the Check Paper Setting
Change the Check Paper Setting
If this setting is set to [On] and the paper tray is removed or you load paper in the MP tray, the LCD displays a
message allowing you to change the Paper Size and Paper Type settings.
The default setting is [On].
1. Press
[Settings] > [All Settings] > [General Setup].
2. (MFC-J2740DW/MFC-J5740DW/MFC-J5855DW/MFC-J5955DW) Press [Tray Setting].
3. Press a or b to display the [Check Paper] option, and then press it.
4. Press [On] or [Off].
5. Press
.
Related Information
• Paper Settings
Related Topics:
• Load Photo Paper in Paper Tray #1
• Load Envelopes in Paper Tray #1
• Error and Maintenance Messages
• Load A4, Letter, or Executive Size Paper in Paper Tray #1 / Paper Tray #2
59
Home > Paper Handling > Load Paper > Paper Settings > Set a Default Tray Based on Your Task
Set a Default Tray Based on Your Task
Related Models: MFC-J2740DW/MFC-J5740DW/MFC-J5855DW/MFC-J5955DW
Change the default tray the machine uses for each mode.
The machine feeds paper from the most appropriate tray using the tray priority order you have set.
Some trays are not available depending on your model.
1. Press [Settings] > [All Settings] > [General Setup] > [Tray Setting].
• For printing in Copy mode, press [Tray Setting: Copy] > [Tray Select].
• For printing received faxes, press [Tray Setting: Fax] > [Tray Select].
• For printing photos, press [Tray Setting: JPEG Print (Media)] > [Tray Select].
2. Press the tray option you want.
[Auto Tray Select] sets your machine to feed paper from the most appropriate tray for the paper type
and size you have set.
3. Press .
Related Information
• Paper Settings
60
Home > Paper Handling > Load Paper > Paper Settings > Change Paper Tray Priority
Change Paper Tray Priority
Related Models: MFC-J2740DW/MFC-J5740DW/MFC-J5855DW/MFC-J5955DW
Change the default tray priority the machine uses for each mode.
When [Auto Tray Select] is selected in the tray select settings, the machine feeds paper from the most
appropriate tray for the paper type and size according to the tray priority setting.
1. Press
[Settings] > [All Settings] > [General Setup] > [Tray Setting].
2. Press the [Tray Setting: Copy], [Tray Setting: Fax], [Tray Setting: Print], or [Tray
Setting: JPEG Print (Media)] option.
3. Press [Tray Priority].
4. Press the option you want.
5. Press
.
Related Information
• Paper Settings
61

Home > Paper Handling > Load Paper > Paper Settings > Change the Paper Low Notice Setting
Change the Paper Low Notice Setting
Related Models: MFC-J5955DW
If the Paper Low Notice setting is set to [On], the machine displays a message telling you that the paper tray is
nearly empty.
The default setting is [On].
In addition, you can see the icon that displays the remaining amount of paper in the Tray Select option of the
Copy mode.
1. Press [Settings] > [All Settings] > [General Setup] > [Tray Setting] > [Paper Low
Notice].
2. Press [On] or [Off].
3. Press
.
Related Information
• Paper Settings
62

Home > Paper Handling > Load Paper > Acceptable Print Media
Acceptable Print Media
The print quality can be affected by the type of paper you use in the machine.
To get the best print quality for the settings you have selected, always set the Paper Type to match the type of
paper you load.
You can use plain paper, inkjet paper (coated paper), glossy paper, recycled paper, and envelopes.
We recommend testing various paper types before buying large quantities.
For best results, use Brother paper.
• When you print on inkjet paper (coated paper) and glossy paper, be sure to select the correct print media in
the printer driver or in the application you use to print, or the Paper Type setting on the machine.
• When you print on photo paper, load one extra sheet of the same photo paper in the paper tray.
• When using photo paper, remove each sheet at once to prevent smudging or paper jams.
• Avoid touching the printed surface of the paper immediately after printing; the surface may not be completely
dry and may stain your fingers.
Related Information
• Load Paper
• Recommended Print Media
• Handle and Use Print Media
• Choose the Right Print Media
Related Topics:
• Paper Handling and Printing Problems
• Change the Paper Size and Paper Type
63

Home > Paper Handling > Load Paper > Acceptable Print Media > Recommended Print Media
Recommended Print Media
For the best print quality, we recommend using the Brother paper listed in the table.
Brother paper may not be available in all countries.
If Brother paper is not available in your country, we recommend testing various paper types before purchasing
large quantities.
Brother paper
Paper Type
Item
A3 Plain BP60PA3
A3 Glossy Photo BP71GA3
A3 Inkjet (Matte) BP60MA3
A4 Plain BP60PA
A4 Glossy Photo BP71GA4
A4 Inkjet (Matte) BP60MA
10 x 15 cm Glossy Photo BP71GP
Related Information
• Acceptable Print Media
64
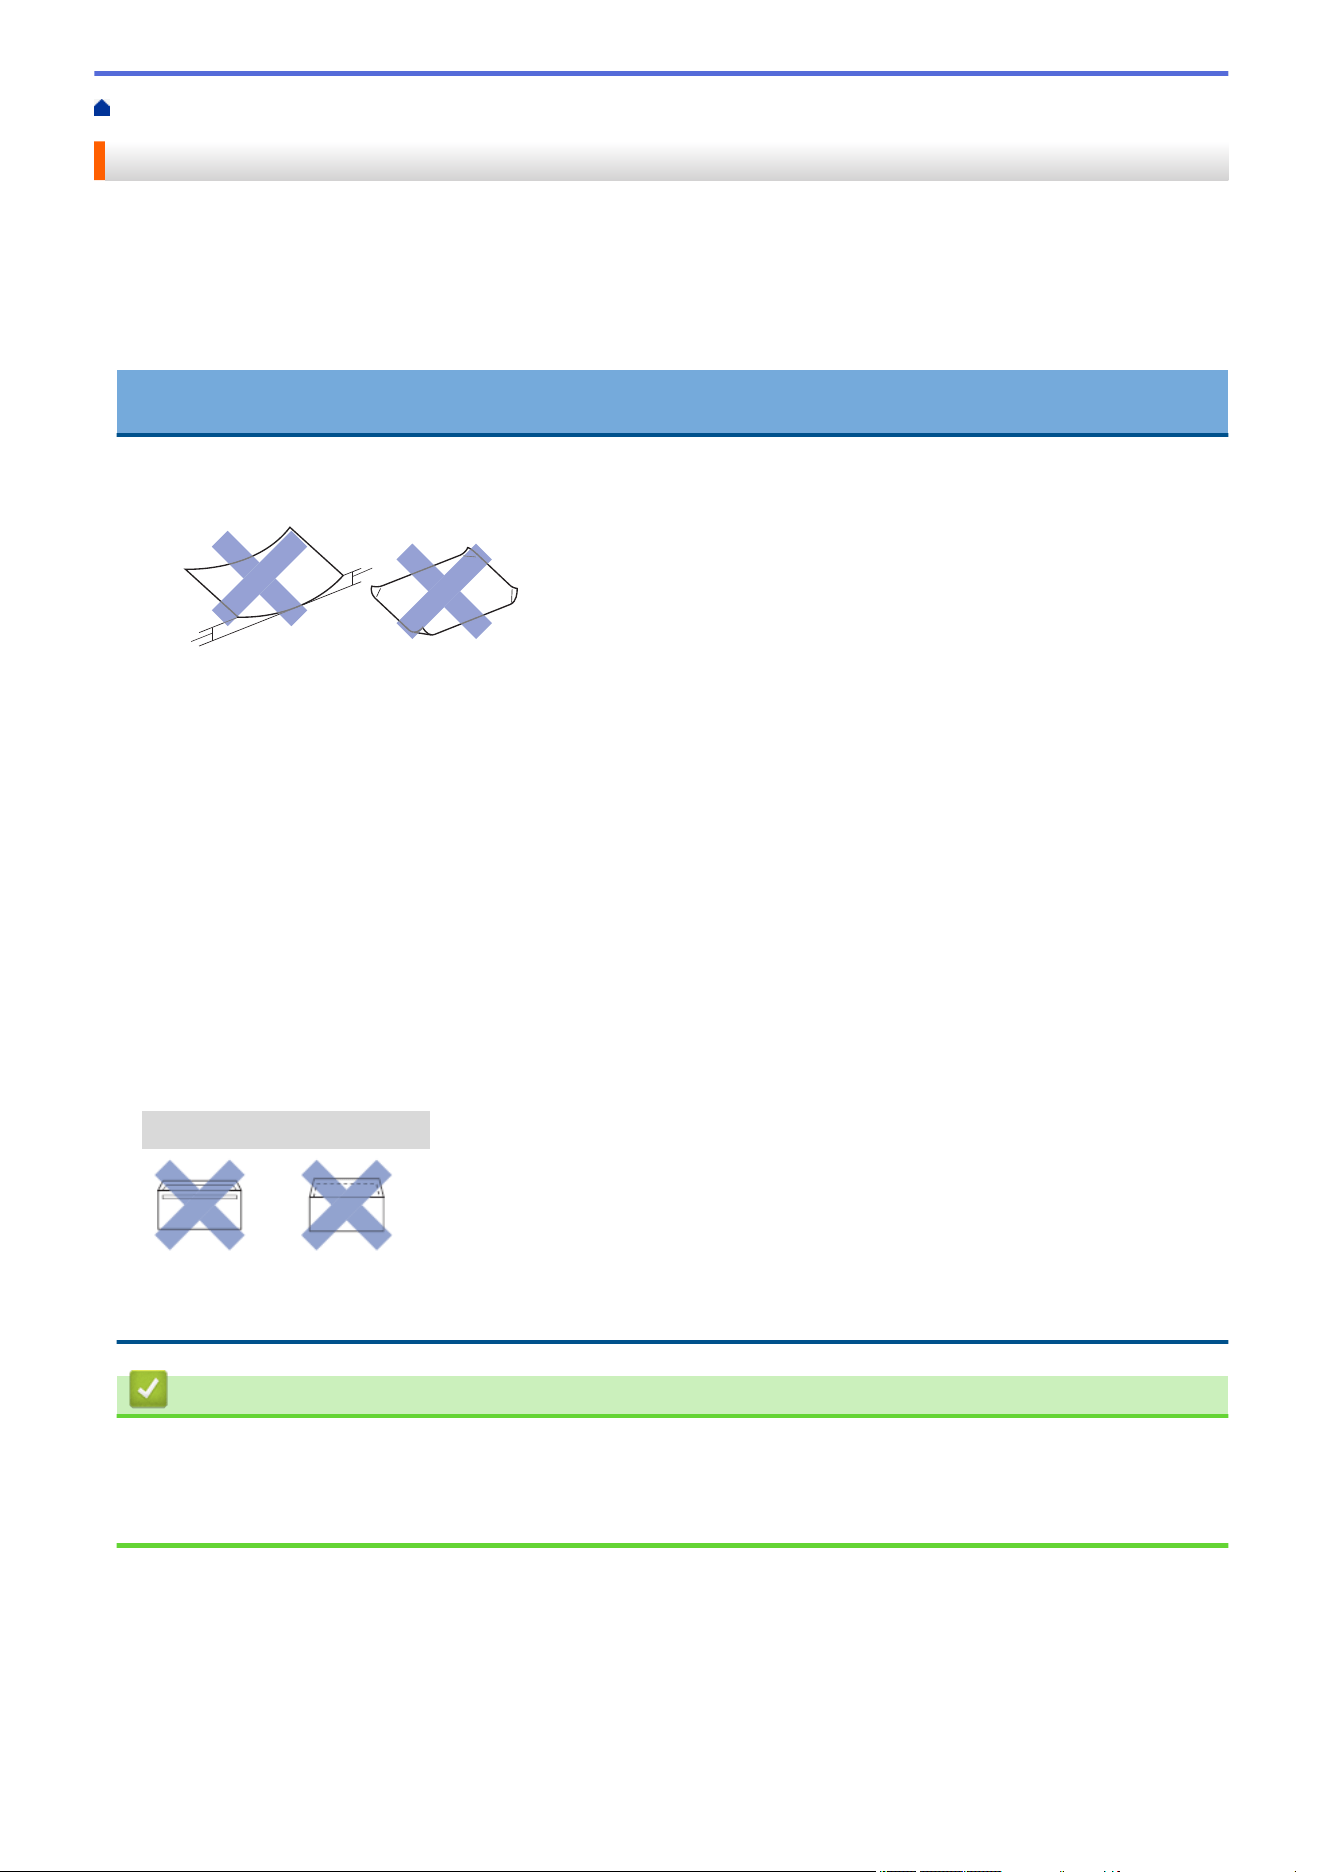
Home > Paper Handling > Load Paper > Acceptable Print Media > Handle and Use Print Media
Handle and Use Print Media
• Store paper in its original packaging and keep it sealed. Keep the paper flat and away from moisture, direct
sunlight and heat.
• Avoid touching the shiny (coated) side of photo paper.
• Some envelope sizes require that you set margins in the application. Make sure you do a test print first before
printing many envelopes.
IMPORTANT
DO NOT use the following types of paper:
• Damaged, curled, wrinkled, or irregularly shaped
1
1
1. 2 mm or greater curl may cause jams to occur.
• Extremely shiny or highly textured
• Paper that cannot be arranged uniformly when stacked
• Paper made with a short grain
DO NOT use envelopes that:
• Are loosely constructed
• Have windows
• Are embossed (have raised writing on them)
• Have clasps or staples
• Are pre-printed on the inside
• Are self-adhesive
• Have double flaps
Self-adhesive
Double flaps
You may experience paper feed problems caused by the thickness, size and flap shape of the envelopes you
are using.
Related Information
• Acceptable Print Media
Related Topics:
• Load Paper in Paper Tray #1 / Paper Tray #2
65

Home > Paper Handling > Load Paper > Acceptable Print Media > Choose the Right Print Media
Choose the Right Print Media
• Paper Type and Paper Size for Each Operation
• Paper Orientation and Capacity of the Paper Trays
• Load A4, Letter, or Executive Size Paper in Paper Tray #1 / Paper Tray #2
• Load A3, Ledger, or Legal Size Paper in Paper Tray #1 / Paper Tray #2
• Load Photo Paper in Paper Tray #1
• Load Envelopes in Paper Tray #1
• Load Cut-Sheet Paper, Photo Paper, or Envelopes in the Multi-purpose Tray (MP Tray)
• Load Long Paper in the Multi-purpose Tray (MP Tray)
• Load Paper in the Manual Feed Slot
66
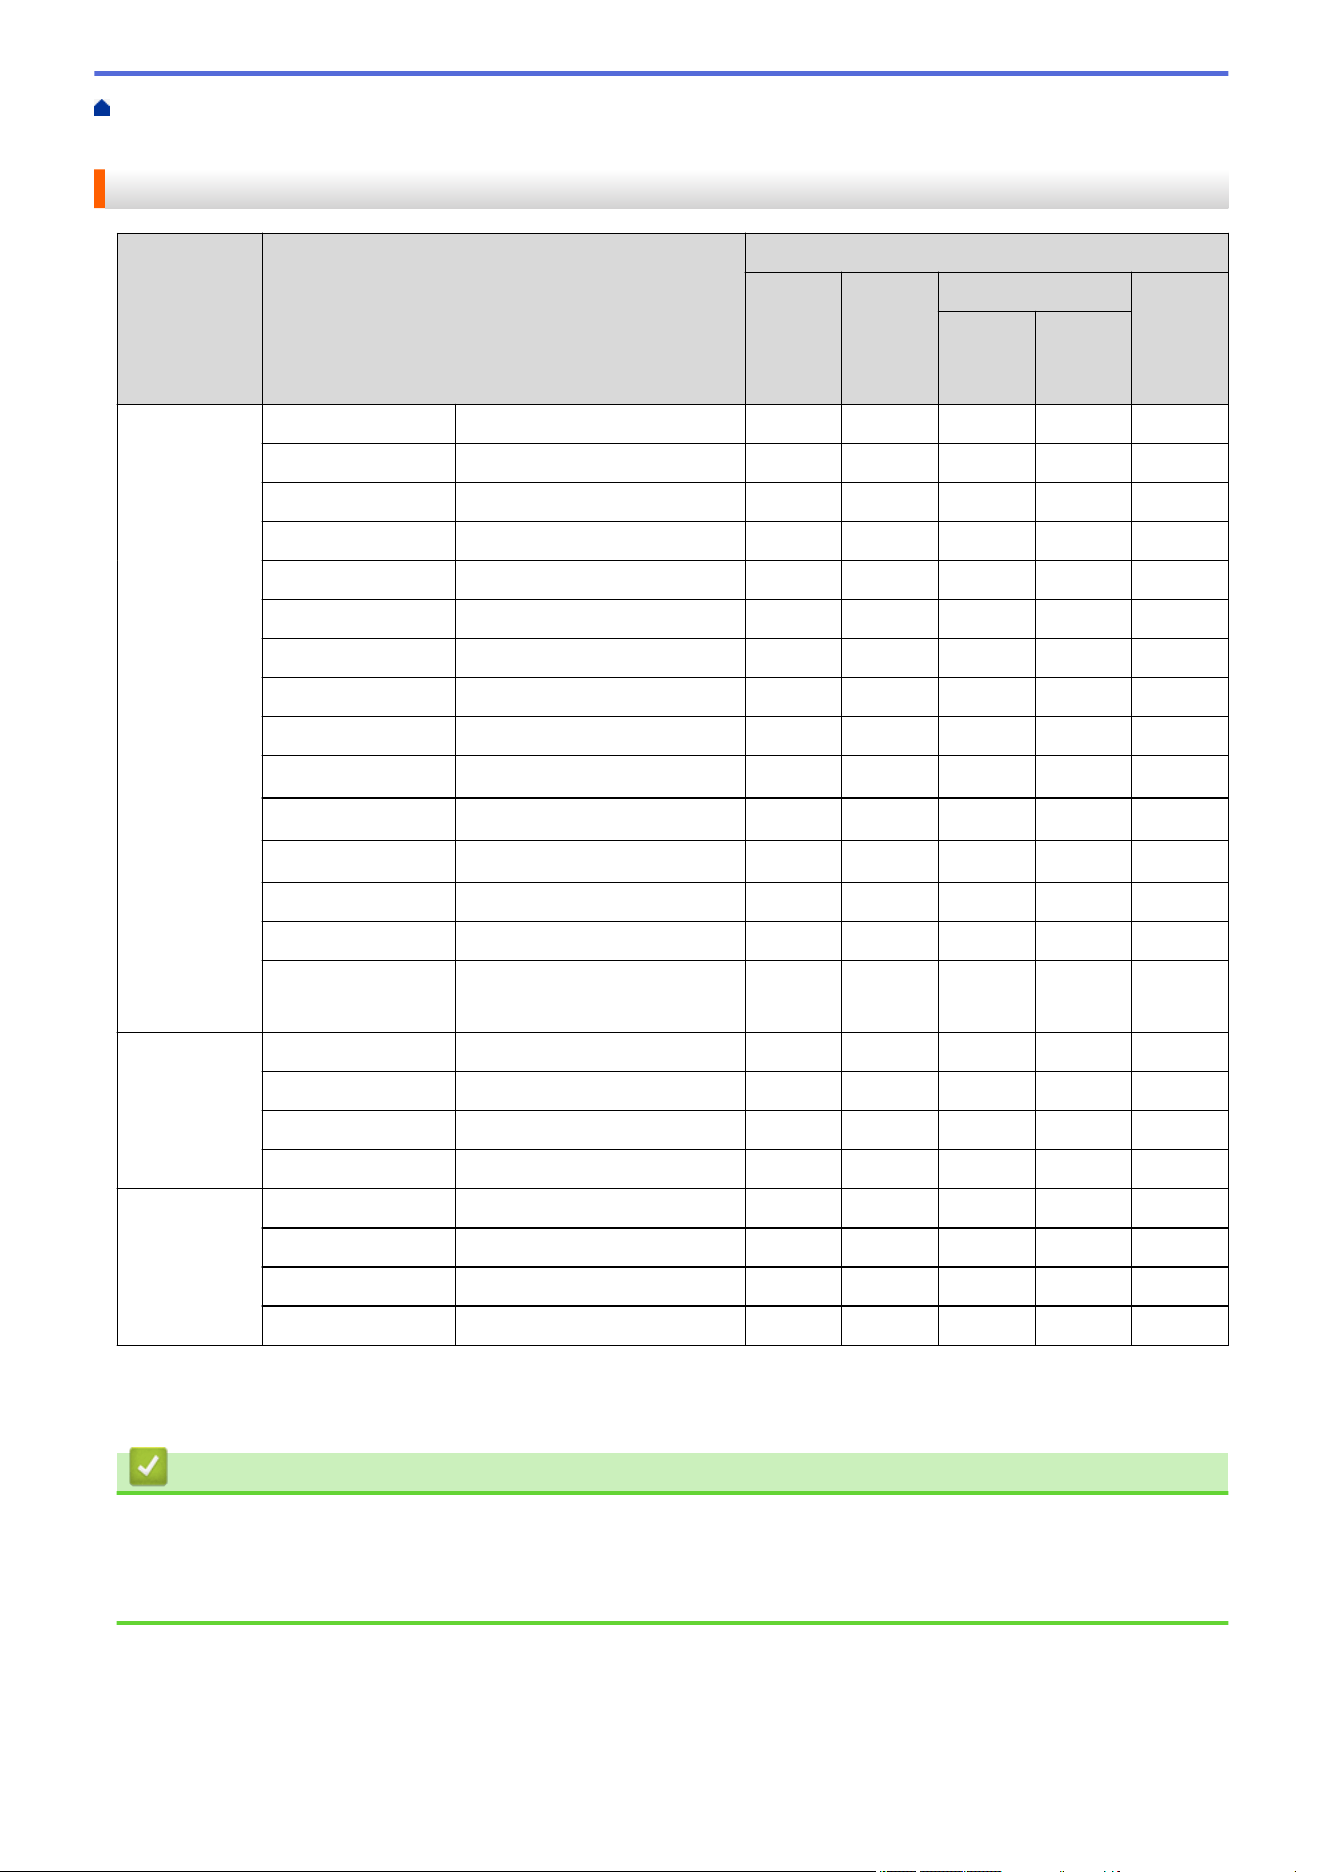
Home > Paper Handling > Load Paper > Acceptable Print Media > Choose the Right Print Media > Paper
Type and Paper Size for Each Operation
Paper Type and Paper Size for Each Operation
Paper Type Paper Size Usage
Fax Copy Direct Print Printer
JPEG
Print
PDF
Print
2
Cut-Sheet A3 297 x 420 mm Yes Yes Yes Yes Yes
A4 210 x 297 mm Yes Yes Yes Yes Yes
Ledger 279.4 x 431.8 mm Yes Yes Yes Yes Yes
Letter 215.9 x 279.4 mm Yes Yes Yes Yes Yes
Legal 215.9 x 355.6 mm Yes Yes - Yes Yes
Mexico Legal 215.9 x 339.85 mm Yes Yes - Yes Yes
India Legal 215 x 345 mm Yes Yes - Yes Yes
Folio 215.9 x 330.2 mm Yes Yes - Yes Yes
Executive 184.1 x 266.7 mm - - - - Yes
B4 (JIS)
1
257 x 364 mm Yes - - Yes Yes
B5 (JIS)
1
182 x 257 mm - - - Yes Yes
B6 (JIS)
1
128 x 182 mm - - - - Yes
A5 148 x 210 mm - Yes - Yes Yes
A6 105 x 148 mm - Yes - Yes Yes
Long Paper Width: 88.9 - 297 mm
Height: 431.9 - 1200 mm
- - - - Yes
Cards Photo 10 x 15 cm - Yes Yes - Yes
Photo L 9 x 13 cm - - - - Yes
Photo 2L 13 x 18 cm - - Yes - Yes
Index Card 13 x 20 cm - - - - Yes
Envelopes C5 Envelope 162 x 229 mm - - - - Yes
DL Envelope 110 x 220 mm - - - - Yes
Com-10 104.7 x 241.3 mm - - - - Yes
Monarch 98.4 x 190.5 mm - - - - Yes
1
Supported only in some countries.
2
PDF Print is available only for MFC-J5955DW.
Related Information
• Choose the Right Print Media
Related Topics:
• Load Envelopes in Paper Tray #1
67
Home > Paper Handling > Load Paper > Acceptable Print Media > Choose the Right Print Media > Paper
Orientation and Capacity of the Paper Trays
Paper Orientation and Capacity of the Paper Trays
Paper Size
1
Paper Types No. of
sheets
Weight Thickness
Paper Tray #1 <Landscape>
A4, Letter, Executive, B5
(JIS)
<Portrait>
A3, Ledger, B4 (JIS),
Legal, Mexico Legal, India
Legal, Folio, A5, B6 (JIS),
A6, Envelopes (C5,
Com-10, DL, Monarch),
Photo (10 x 15 cm), Photo
L (9 x 13 cm), Photo 2L
(13 x 18 cm), Index card
(13 x 20 cm)
Plain Paper, Recycled
Paper
250
2
64 to 120
gsm
0.08 to 0.15
mm
Inkjet Paper 20 64 to 200
gsm
0.08 to 0.25
mm
Glossy Paper
3
20 (Up to
A4/Letter)
Up to 220
gsm
Up to 0.25
mm
Photo Card
3
20 (Up to
A4/Letter)
Up to 200
gsm
Up to 0.25
mm
Index Card 30 Up to 120
gsm
Up to 0.15
mm
Envelopes 10 80 to 95
gsm
Up to 0.52
mm
Paper Tray #2
(MFC-J2740DW/
MFC-J5740DW/
MFC-J5955DW)
<Landscape>
A4, Letter
<Portrait>
A3, Ledger, B4 (JIS),
Legal, Mexico Legal, India
Legal, Folio
Plain Paper, Recycled
Paper
250
2
64 to 120
gsm
0.08 to 0.15
mm
Multi-purpose tray
(MP tray)
4
(MFC-J2740DW/
MFC-J5740DW/
MFC-J5855DW/
MFC-J5955DW)
<Landscape>
A4, Letter, Executive, B5
(JIS)
<Portrait>
A3, Ledger, B4 (JIS),
Legal, Mexico Legal, India
Legal, Folio, A5, B6 (JIS),
A6, Envelopes (C5,
Com-10, DL, Monarch),
Photo (10 x 15 cm), Photo
L (9 x 13 cm), Photo 2L
(13 x 18 cm), Index card
(13 x 20 cm)
Plain Paper, Recycled
Paper
100
2
64 to 120
gsm
0.08 to 0.15
mm
Inkjet Paper 20 (Up to
A4/Letter)
5 (Over A4/
Letter)
64 to 200
gsm
0.08 to 0.25
mm
Glossy Paper, Photo Card
3
20 (Up to
A4/Letter)
5 (Over A4/
Letter)
Up to 220
gsm
Up to 0.3
mm
Index Card 50 Up to 120
gsm
Up to 0.15
mm
Envelopes 20 (Up to
A4/Letter)
5 (Over A4/
Letter)
80 to 95
gsm
Up to 0.52
mm
Long Paper (Width: 88.9 -
297 mm / Height: 431.9 -
1200 mm)
Plain Paper, Recycled
Paper, Inkjet Paper,
Glossy Paper
1 64 to 220
gsm
0.08 to 0.25
mm
Manual Feed Slot
(MFC-J2340DW/
MFC-J5340DW)
<Landscape>
A4, Letter, Executive, B5
(JIS)
<Portrait>
A3, Ledger, B4 (JIS),
Legal, Mexico Legal, India
Legal, Folio, A5, B6 (JIS),
A6, Envelopes (C5,
Com-10, DL, Monarch),
Photo (10 x 15 cm), Photo
Plain Paper, Recycled
Paper
1 64 to 120
gsm
0.08 to 0.15
mm
Inkjet Paper 1 64 to 200
gsm
0.08 to 0.25
mm
Glossy Paper
3
1 Up to 220
gsm
Up to 0.25
mm
Photo Card
3
1 Up to 200
gsm
Up to 0.25
mm
68

Paper Size
1
Paper Types No. of
sheets
Weight Thickness
L (9 x 13 cm), Photo 2L
(13 x 18 cm), Index card
(13 x 20 cm)
Index Card 1 Up to 120
gsm
Up to 0.15
mm
Envelopes 1 80 to 95
gsm
Up to 0.52
mm
1
B6 (JIS), B5 (JIS) and B4 (JIS) size paper are supported only in some countries.
2
When using plain paper 80 gsm
3
BP71 260 gsm paper is specially designed for Brother inkjet machines.
4
We recommend using the MP tray for glossy paper.
Related Information
• Choose the Right Print Media
69

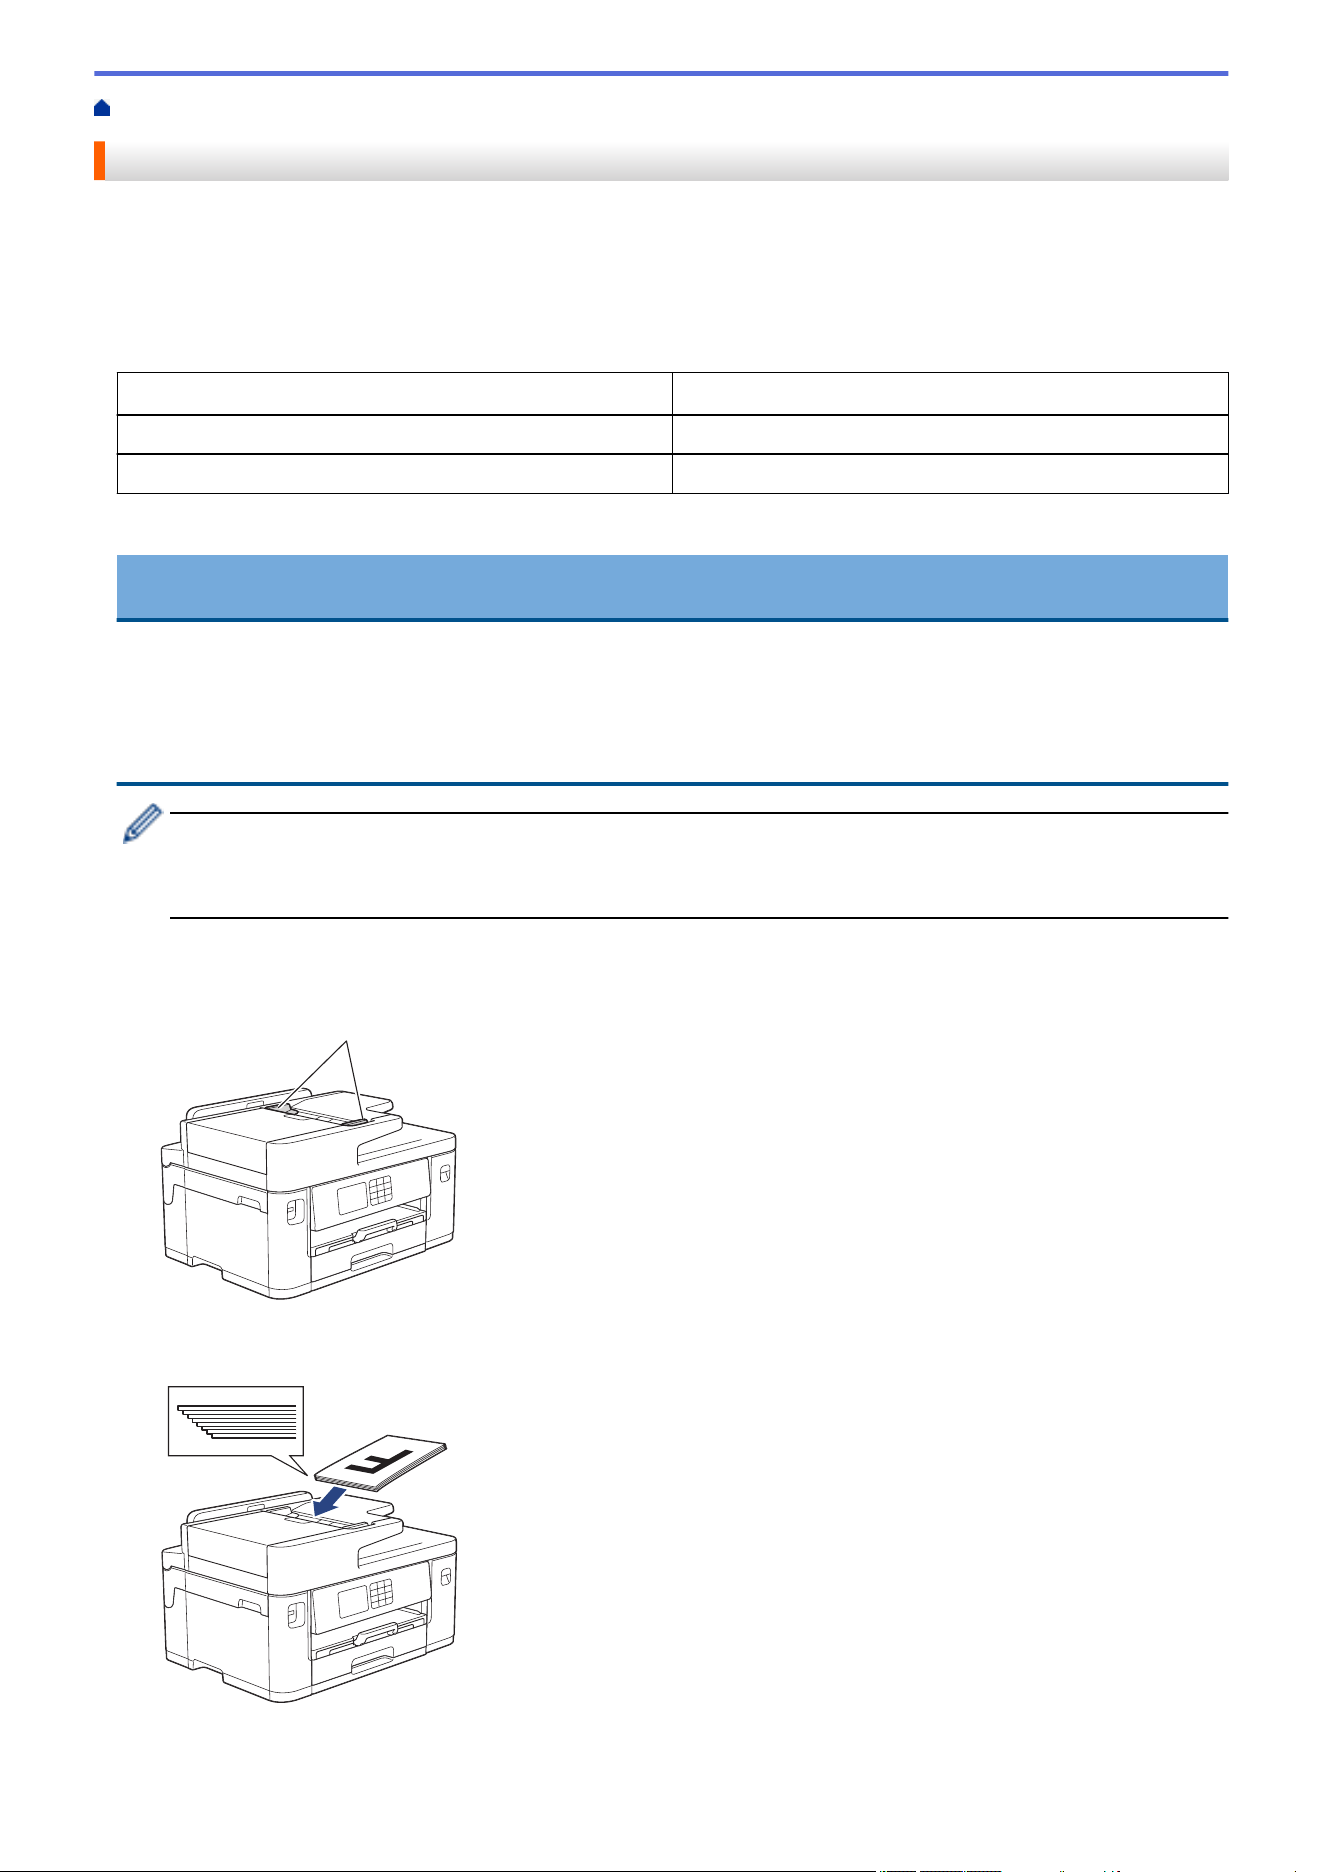
Home > Paper Handling > Load Documents > Load Documents in the Automatic Document Feeder (ADF)
Load Documents in the Automatic Document Feeder (ADF)
The ADF can hold multiple pages and feeds each sheet individually.
Use paper that is within the sizes and weights shown in the table. Always fan the pages before placing them in
the ADF.
Document Sizes and Weights
Length:
1
148 to 355.6 mm
Width: 105 to 215.9 mm
Paper Weight: 64 to 120 gsm
1
Up to 900 mm when using the long paper function.
IMPORTANT
• DO NOT pull on the document while it is feeding.
• DO NOT use paper that is curled, wrinkled, folded, ripped, stapled, paper clipped, pasted or taped.
• DO NOT use cardboard, newspaper or fabric.
• Make sure documents with correction fluid or written in ink are completely dry.
(MFC-J2740DW/MFC-J5740DW/MFC-J5955DW)
Your 2-sided documents can be copied up to A4 size, and can be faxed or scanned up to Legal size using
the ADF.
1. Fan the pages well.
2. Adjust the paper guides (1) to fit the document size.
1
3. Place your document face up in the ADF, as shown in the illustration, until you feel the document touch the
feed stoppers and the machine beeps.
71
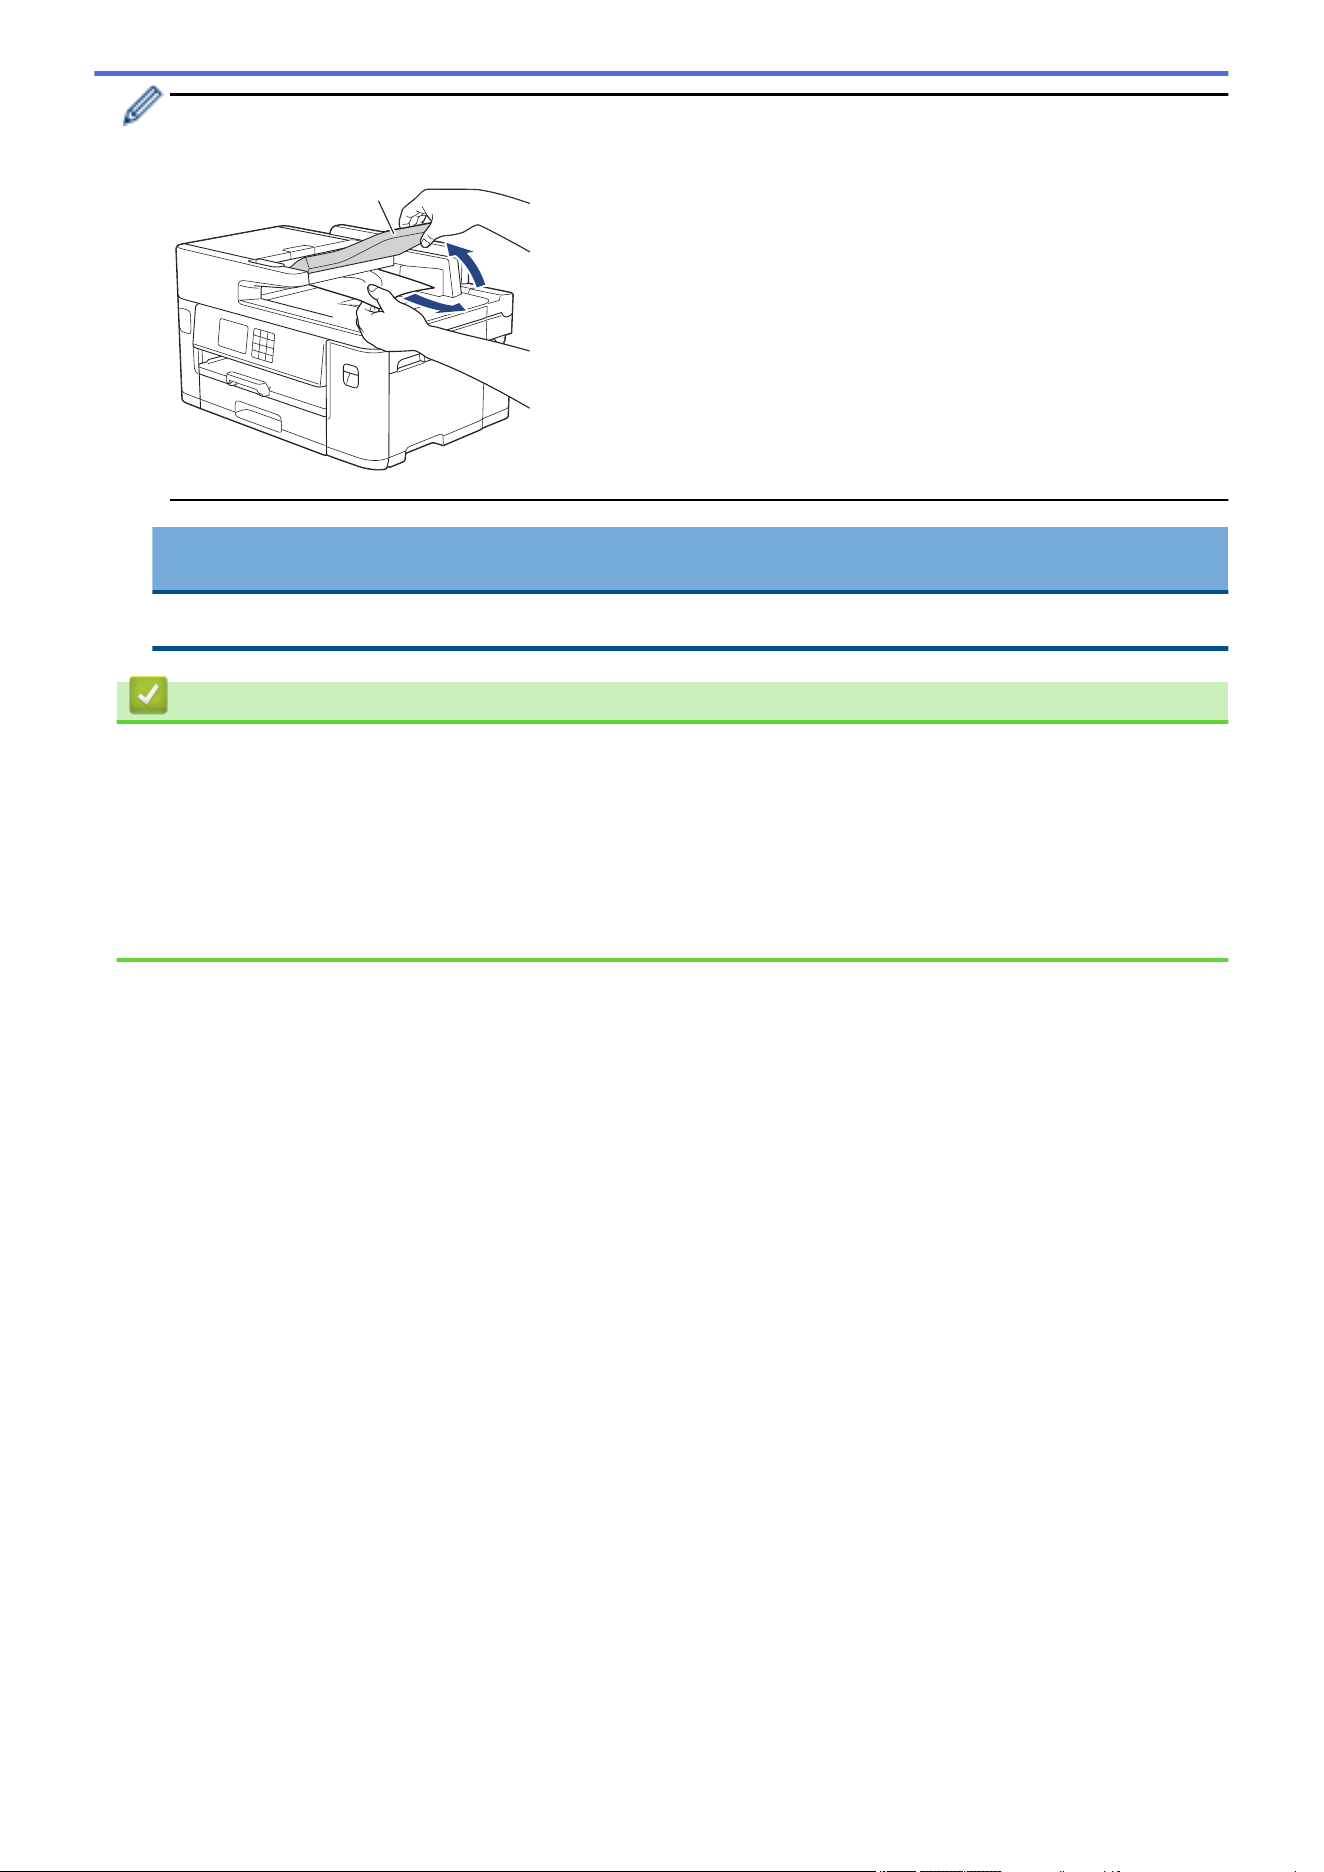
If you loaded a small size document and cannot remove it, lift the ADF document support (1), and then
remove the document.
1
IMPORTANT
DO NOT leave any documents on the scanner glass. If you do this, the ADF may jam.
Related Information
• Load Documents
Related Topics:
• Error and Maintenance Messages
• Telephone and Fax Problems
• Other Problems
• Copy a Document
72
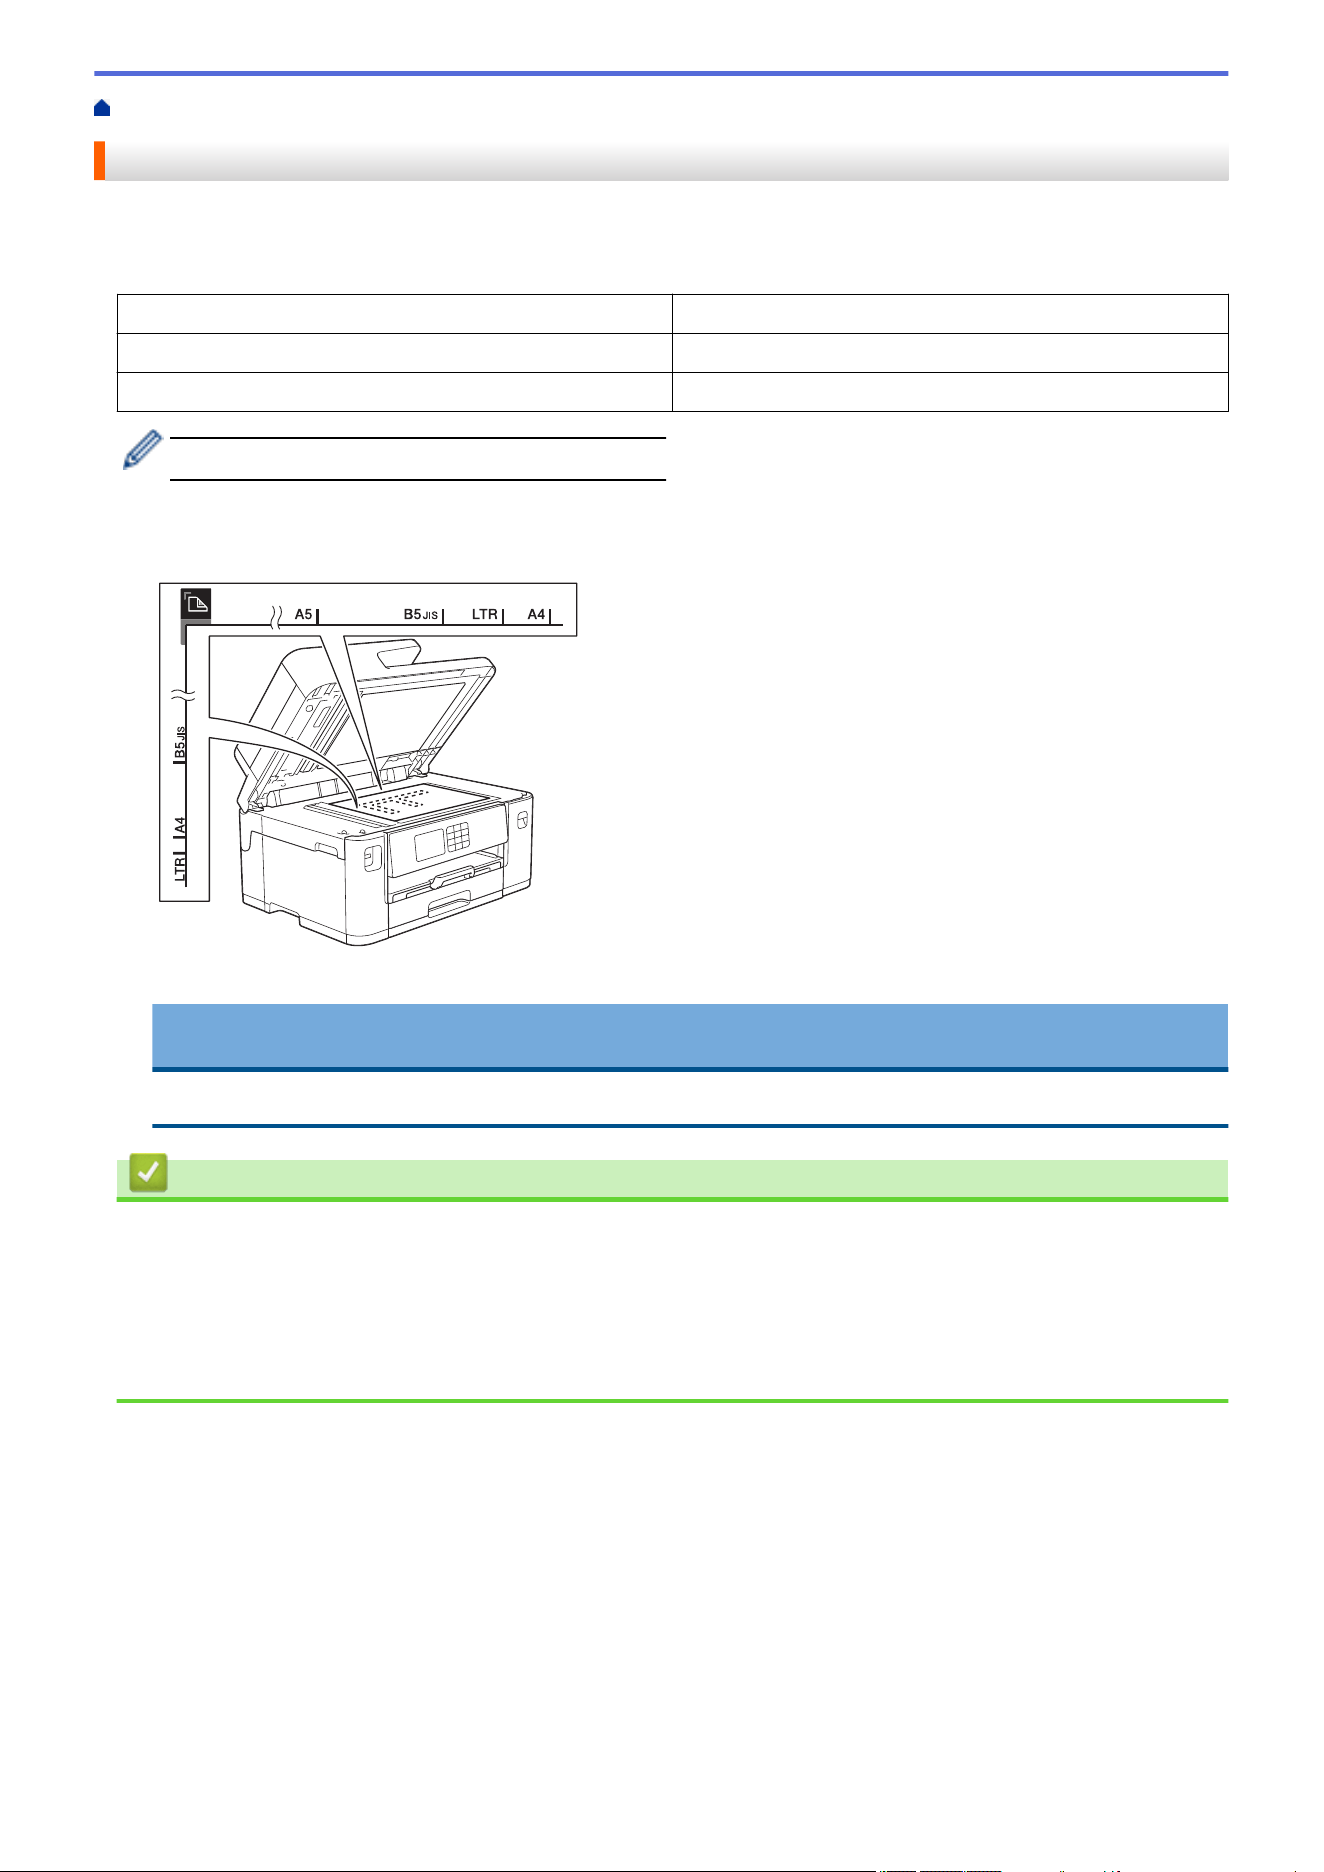
Home > Paper Handling > Load Documents > Load Documents on the Scanner Glass
Load Documents on the Scanner Glass
Use the scanner glass to fax, copy, or scan one page at a time.
Document Sizes Supported
Length:
Up to 297 mm
Width: Up to 215.9 mm
Weight: Up to 2 kg
To use the scanner glass, the ADF must be empty.
1. Lift the document cover.
2. Place the document face down in the upper left corner of the scanner glass as shown in the illustration.
3. Close the document cover.
IMPORTANT
If you are scanning a book or thick document, DO NOT forcefully close or press on the document cover.
Related Information
• Load Documents
Related Topics:
• Telephone and Fax Problems
• Other Problems
• Copy a Document
73
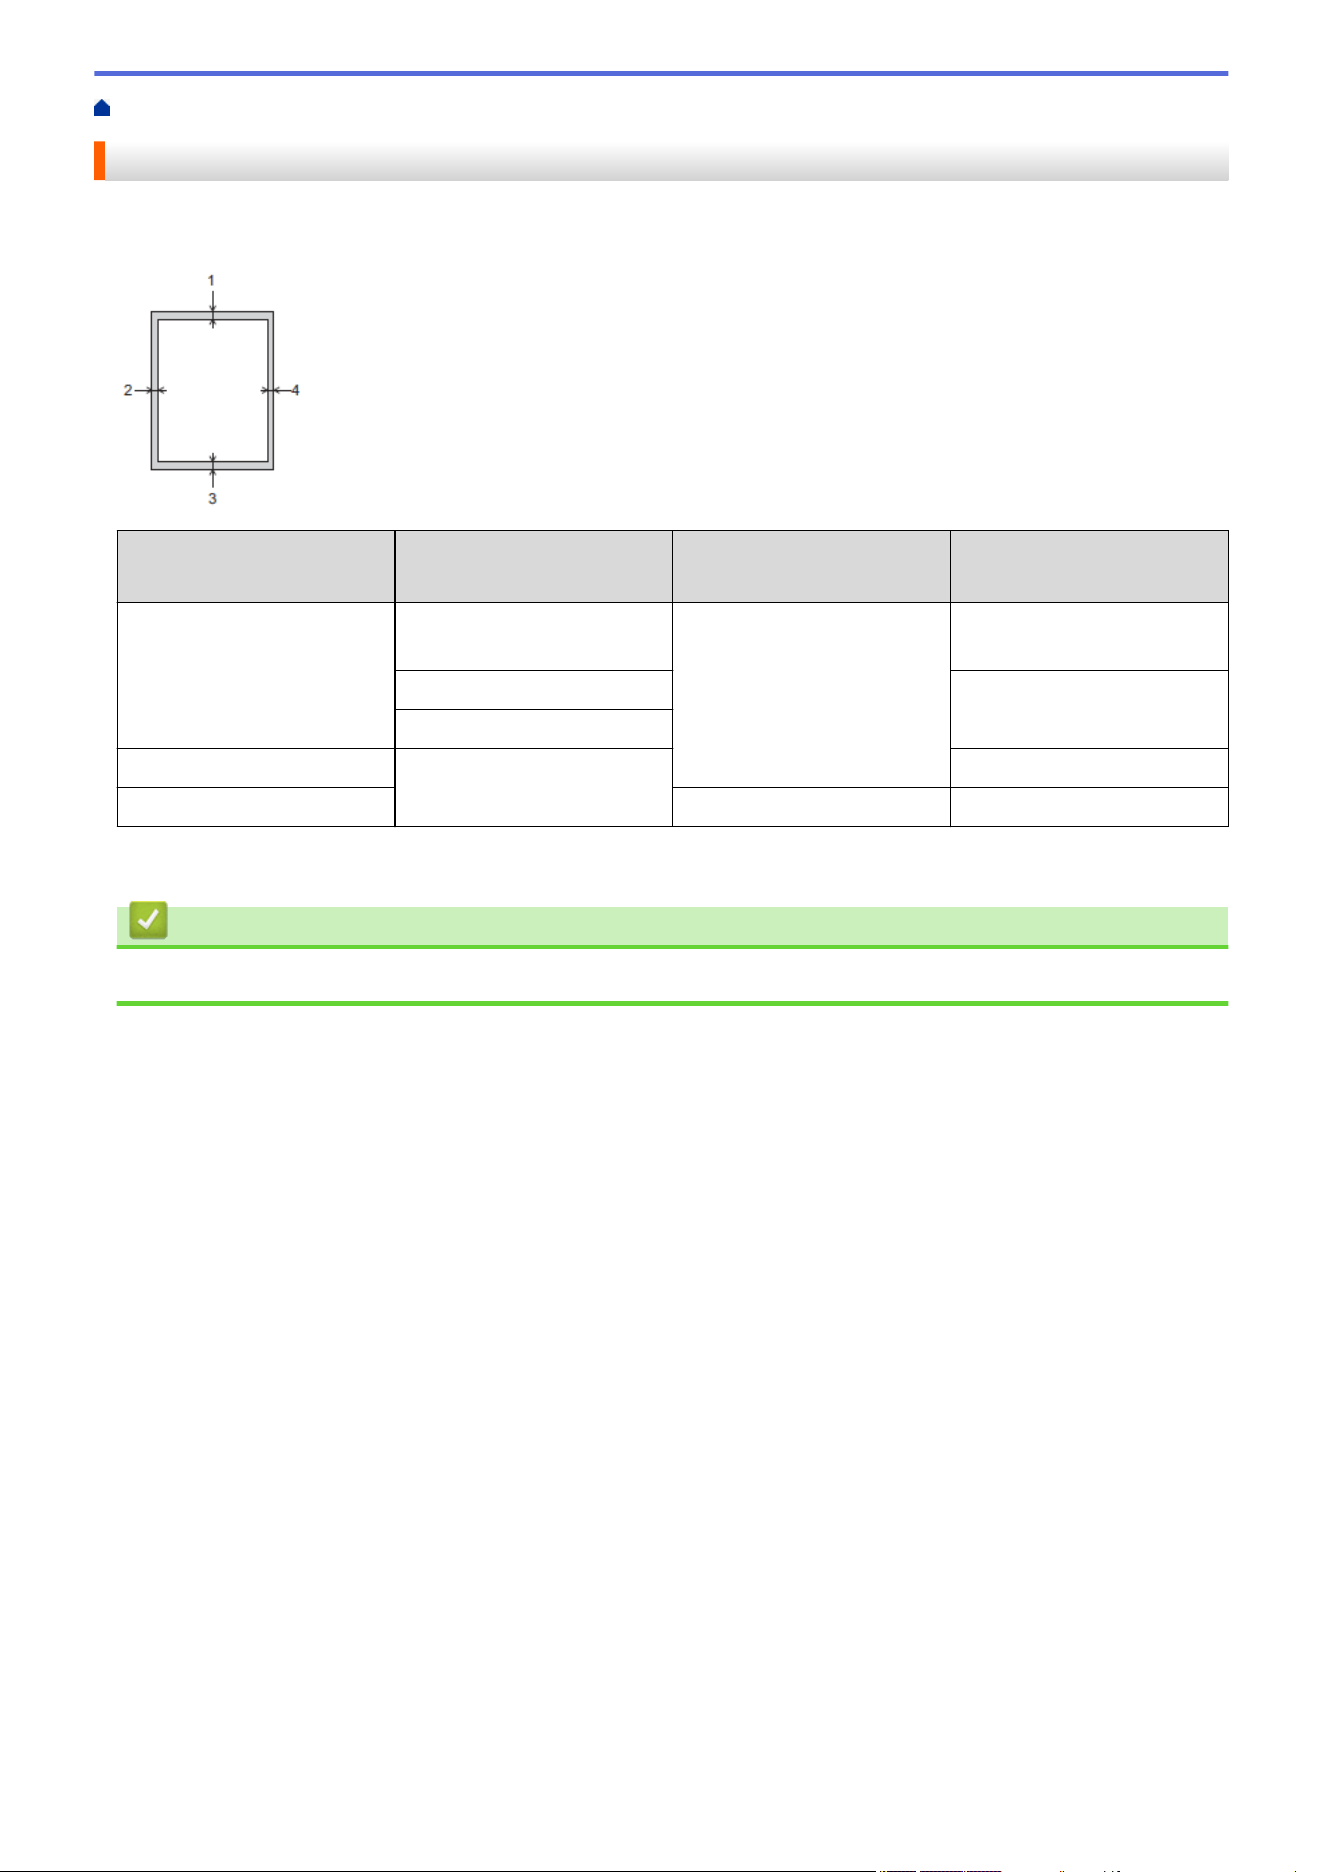
Home > Paper Handling > Load Documents > Unscannable Area
Unscannable Area
The unscannable area of a page depends on the settings in the application you are using. The figures below
show the typical unscannable measurements.
Usage Document Size Top (1)
Bottom (3)
Left (2)
Right (4)
Fax A4 3 mm
3 mm
1
Letter 4 mm
Legal
Copy All paper sizes 3 mm
Scan 1 mm 1 mm
1
The unscannable area is 1 mm when using the ADF.
Related Information
• Load Documents
74


Home > Print > Print from Your Computer (Windows)
Print from Your Computer (Windows)
• Print a Photo (Windows)
• Print a Document (Windows)
• Cancel a Print Job (Windows)
• Print More Than One Page on a Single Sheet of Paper (N in 1) (Windows)
• Print as a Poster (Windows)
• Print on Both Sides of the Paper Automatically (Automatic 2-sided Printing) (Windows)
• Print as a Booklet Automatically (Windows)
• Secure Print (Windows)
• Print a Colour Document in Greyscale (Windows)
• Print a Long Paper (Windows)
• Prevent Smudged Printouts and Paper Jams (Windows)
• Use a Preset Print Profile (Windows)
• Change the Default Print Settings (Windows)
• Print Settings (Windows)
76
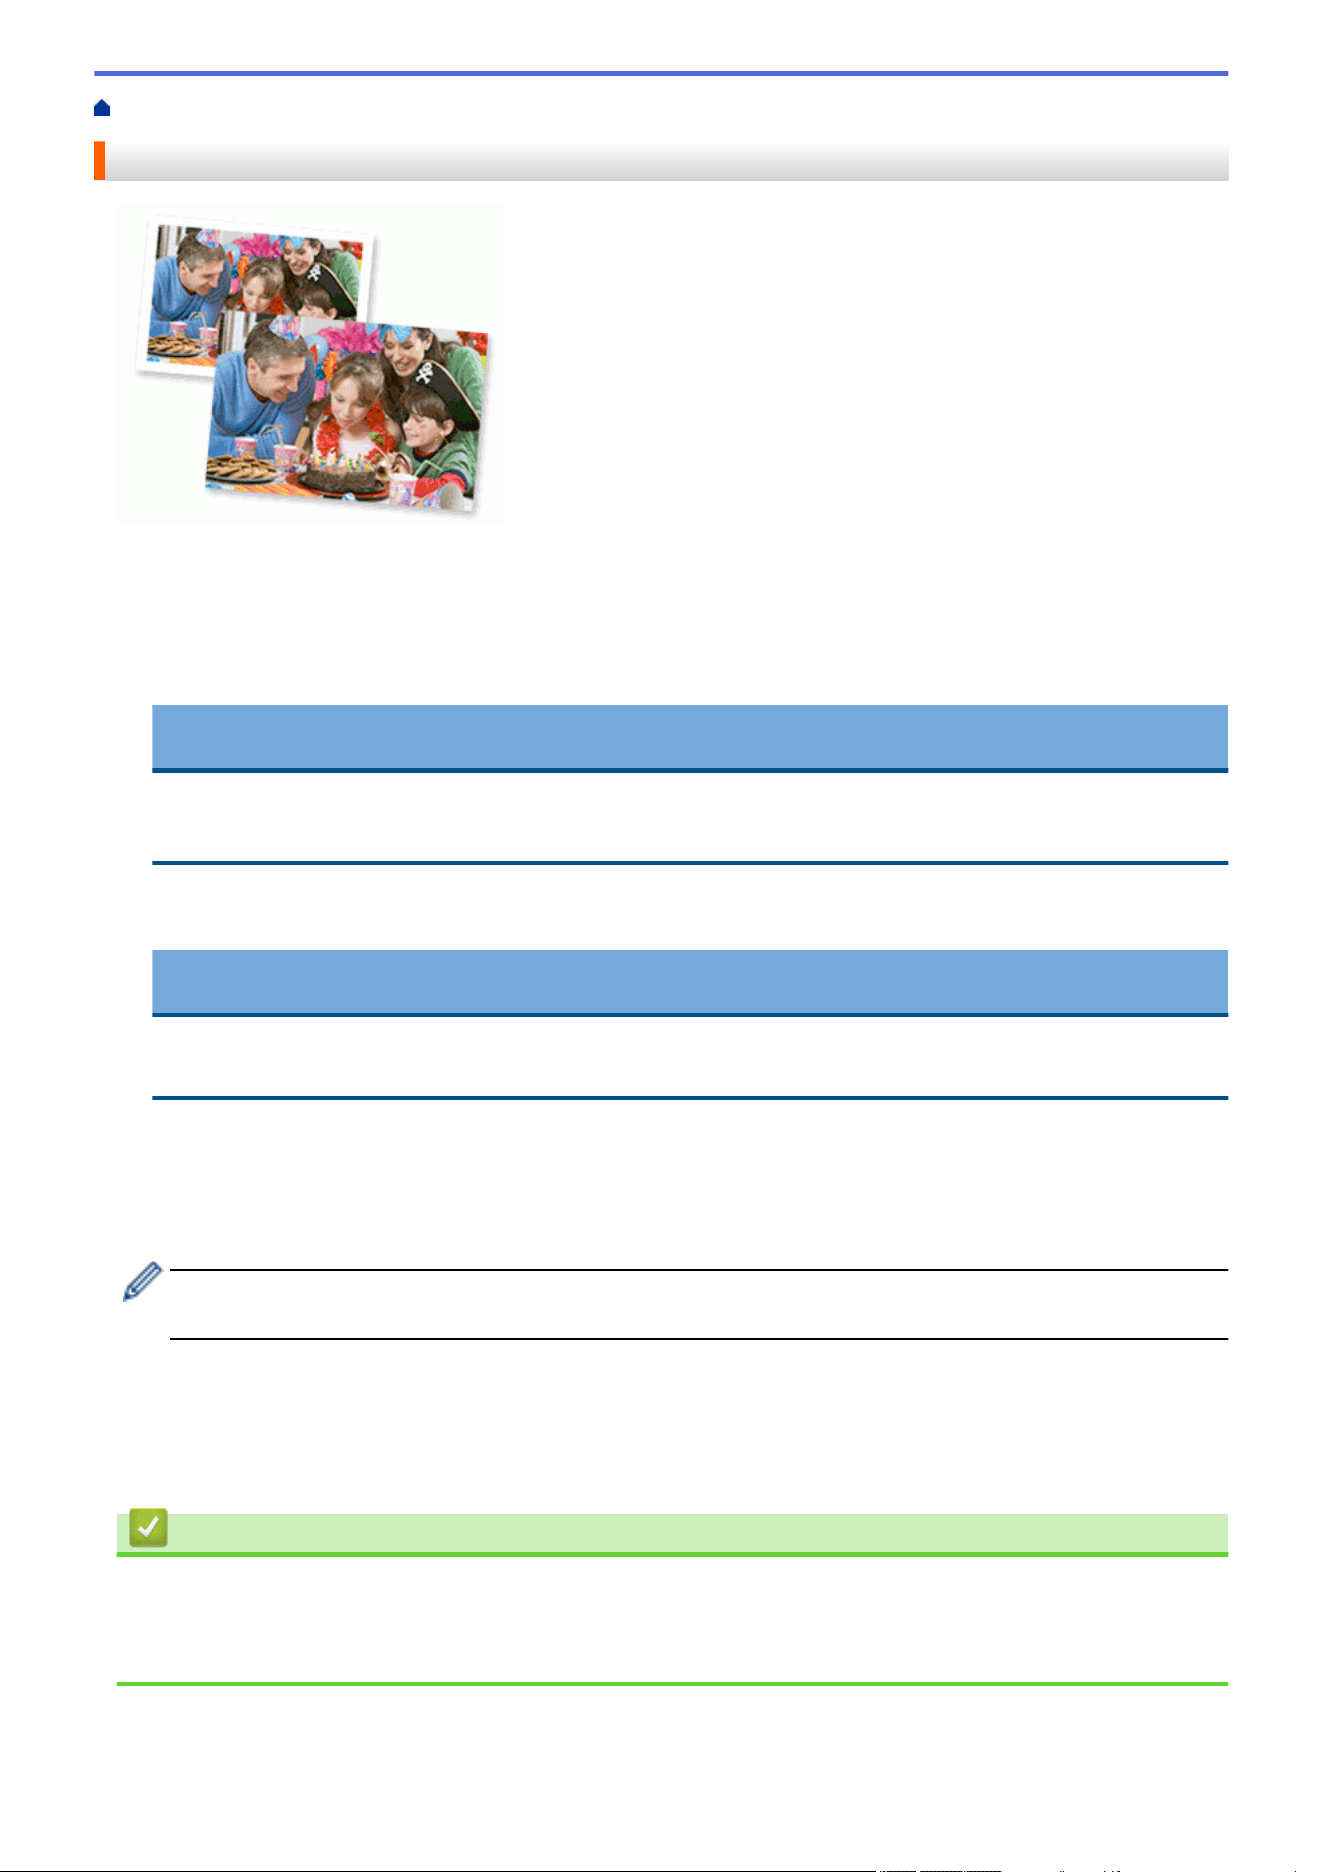
Home > Print > Print from Your Computer (Windows) > Print a Photo (Windows)
Print a Photo (Windows)
1. Select the print command in your application.
2. Select Brother XXX-XXXX Printer (where XXX-XXXX is the name of your model), and then click the printing
properties or preferences button.
The printer driver window appears.
3. Make sure you have loaded the correct media in the paper tray.
IMPORTANT
• For best results, use Brother paper.
• When you print on photo paper, load one extra sheet of the same photo paper in the paper tray.
4. Click the Basic tab.
5. Click the Media Type drop-down list, and then select the type of paper you are using.
IMPORTANT
To get the best print quality for the settings you have selected, always set the Media Type option to
match the type of paper you load.
6. Click the Paper Size drop-down list, and then select your paper size.
7. Select the Borderless checkbox, if needed.
8. For Colour / Greyscale, select Colour.
9. In the Orientation field, select the Portrait or Landscape option to set the orientation of your printout.
If your application contains a similar setting, we recommend that you set the orientation using the
application.
10. Type the number of copies (1-999) you want in the Copies field.
11. Change other printer settings, if needed.
12. Click OK.
13. Complete your print operation.
Related Information
• Print from Your Computer (Windows)
Related Topics:
• Print Settings (Windows)
77
Home > Print > Print from Your Computer (Windows) > Print a Document (Windows)
Print a Document (Windows)
1. Select the print command in your application.
2. Select Brother XXX-XXXX Printer (where XXX-XXXX is the name of your model), and then click the printing
properties or preferences button.
The printer driver window appears.
3. Make sure you have loaded the correct size paper in the paper tray.
4. Click the Basic tab.
5. Click the Media Type drop-down list, and then select the type of paper you are using.
IMPORTANT
To get the best print quality for the settings you have selected, always set the Media Type option to
match the type of paper you load.
6. Click the Paper Size drop-down list, and then select your paper size.
7. For Colour / Greyscale, select the Colour or Greyscale option.
8. In the Orientation field, select the Portrait or Landscape option to set the orientation of your printout.
If your application contains a similar setting, we recommend that you set the orientation using the
application.
9. Type the number of copies (1-999) you want in the Copies field.
10. To print multiple pages on a single sheet of paper or print one page of your document on multiple sheets,
click the Multiple Page drop-down list, and then select your options.
11. Change other printer settings, if needed.
12. Click OK.
13. Complete your print operation.
Related Information
• Print from Your Computer (Windows)
Related Topics:
• Check the Ink Volume (Page Gauge)
• Print Settings (Windows)
78

Home > Print > Print from Your Computer (Windows) > Cancel a Print Job (Windows)
Cancel a Print Job (Windows)
If a print job was sent to the print queue and did not print, or was sent to the print queue in error, you may have to
delete it to allow subsequent jobs to print.
1. Double-click the printer icon in the task tray.
2. Select the print job you want to cancel.
3. Click the Document menu.
4. Select Cancel.
5. Click Yes.
Related Information
• Print from Your Computer (Windows)
Related Topics:
• Monitor Machine Status from Your Computer (Windows)
79
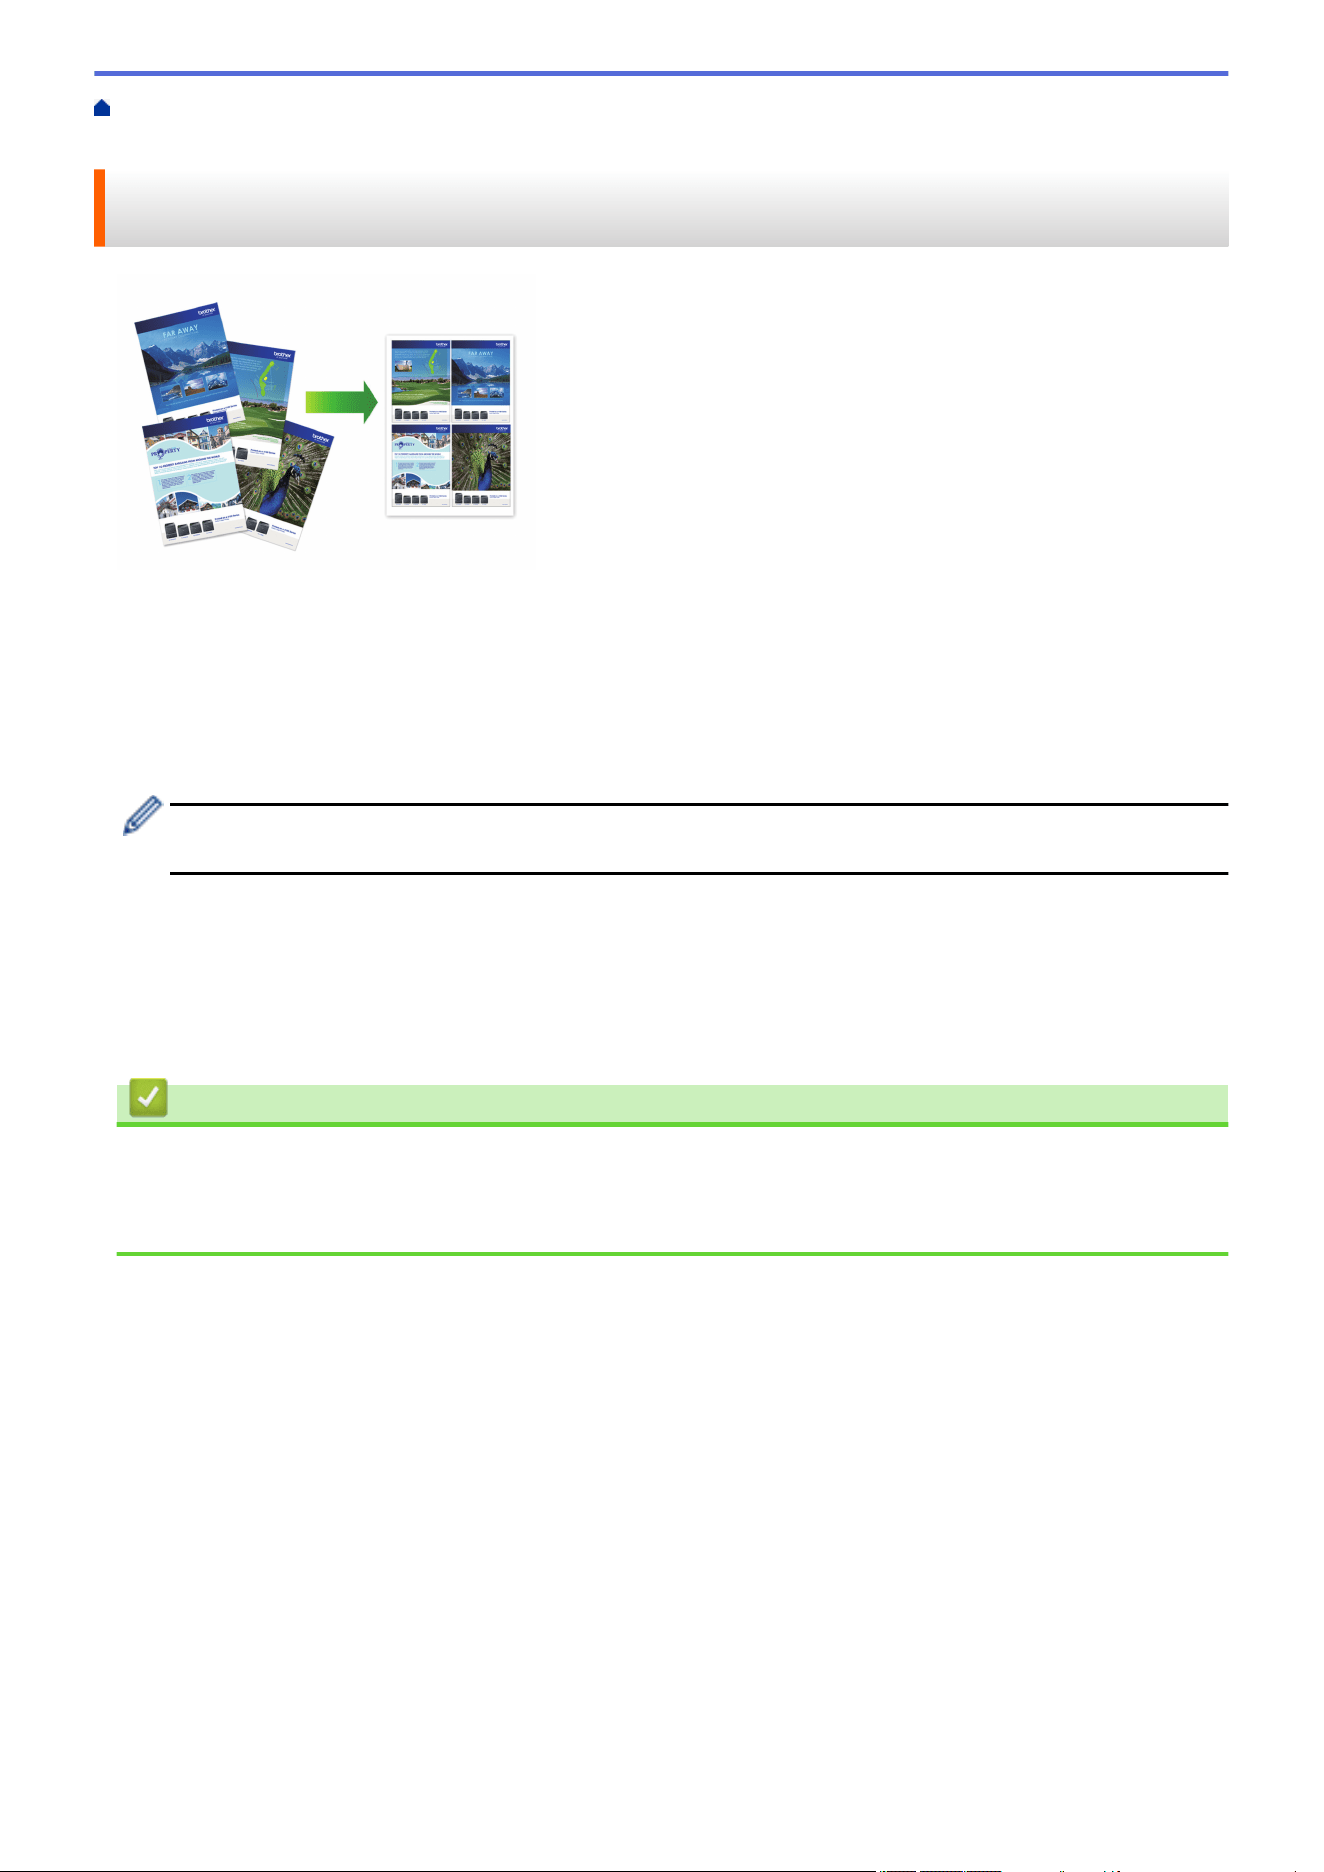
Home > Print > Print from Your Computer (Windows) > Print More Than One Page on a Single Sheet of
Paper (N in 1) (Windows)
Print More Than One Page on a Single Sheet of Paper (N in 1)
(Windows)
1. Select the print command in your application.
2. Select Brother XXX-XXXX Printer (where XXX-XXXX is the name of your model), and then click the printing
properties or preferences button.
The printer driver window appears.
3. Click the Basic tab.
4. In the Orientation field, select the Portrait or Landscape option to set the orientation of your printout.
If your application contains a similar setting, we recommend that you set the orientation using the
application.
5. Click the Multiple Page drop-down list, and then select the 2 in 1, 4 in 1, 9 in 1, or 16 in 1 option.
6. Click the Page Order drop-down list, and then select your page order.
7. Click the Border Line drop-down list, and then select your border line type.
8. Change other printer settings, if needed.
9. Click OK, and then complete your print operation.
Related Information
• Print from Your Computer (Windows)
Related Topics:
• Print Settings (Windows)
80
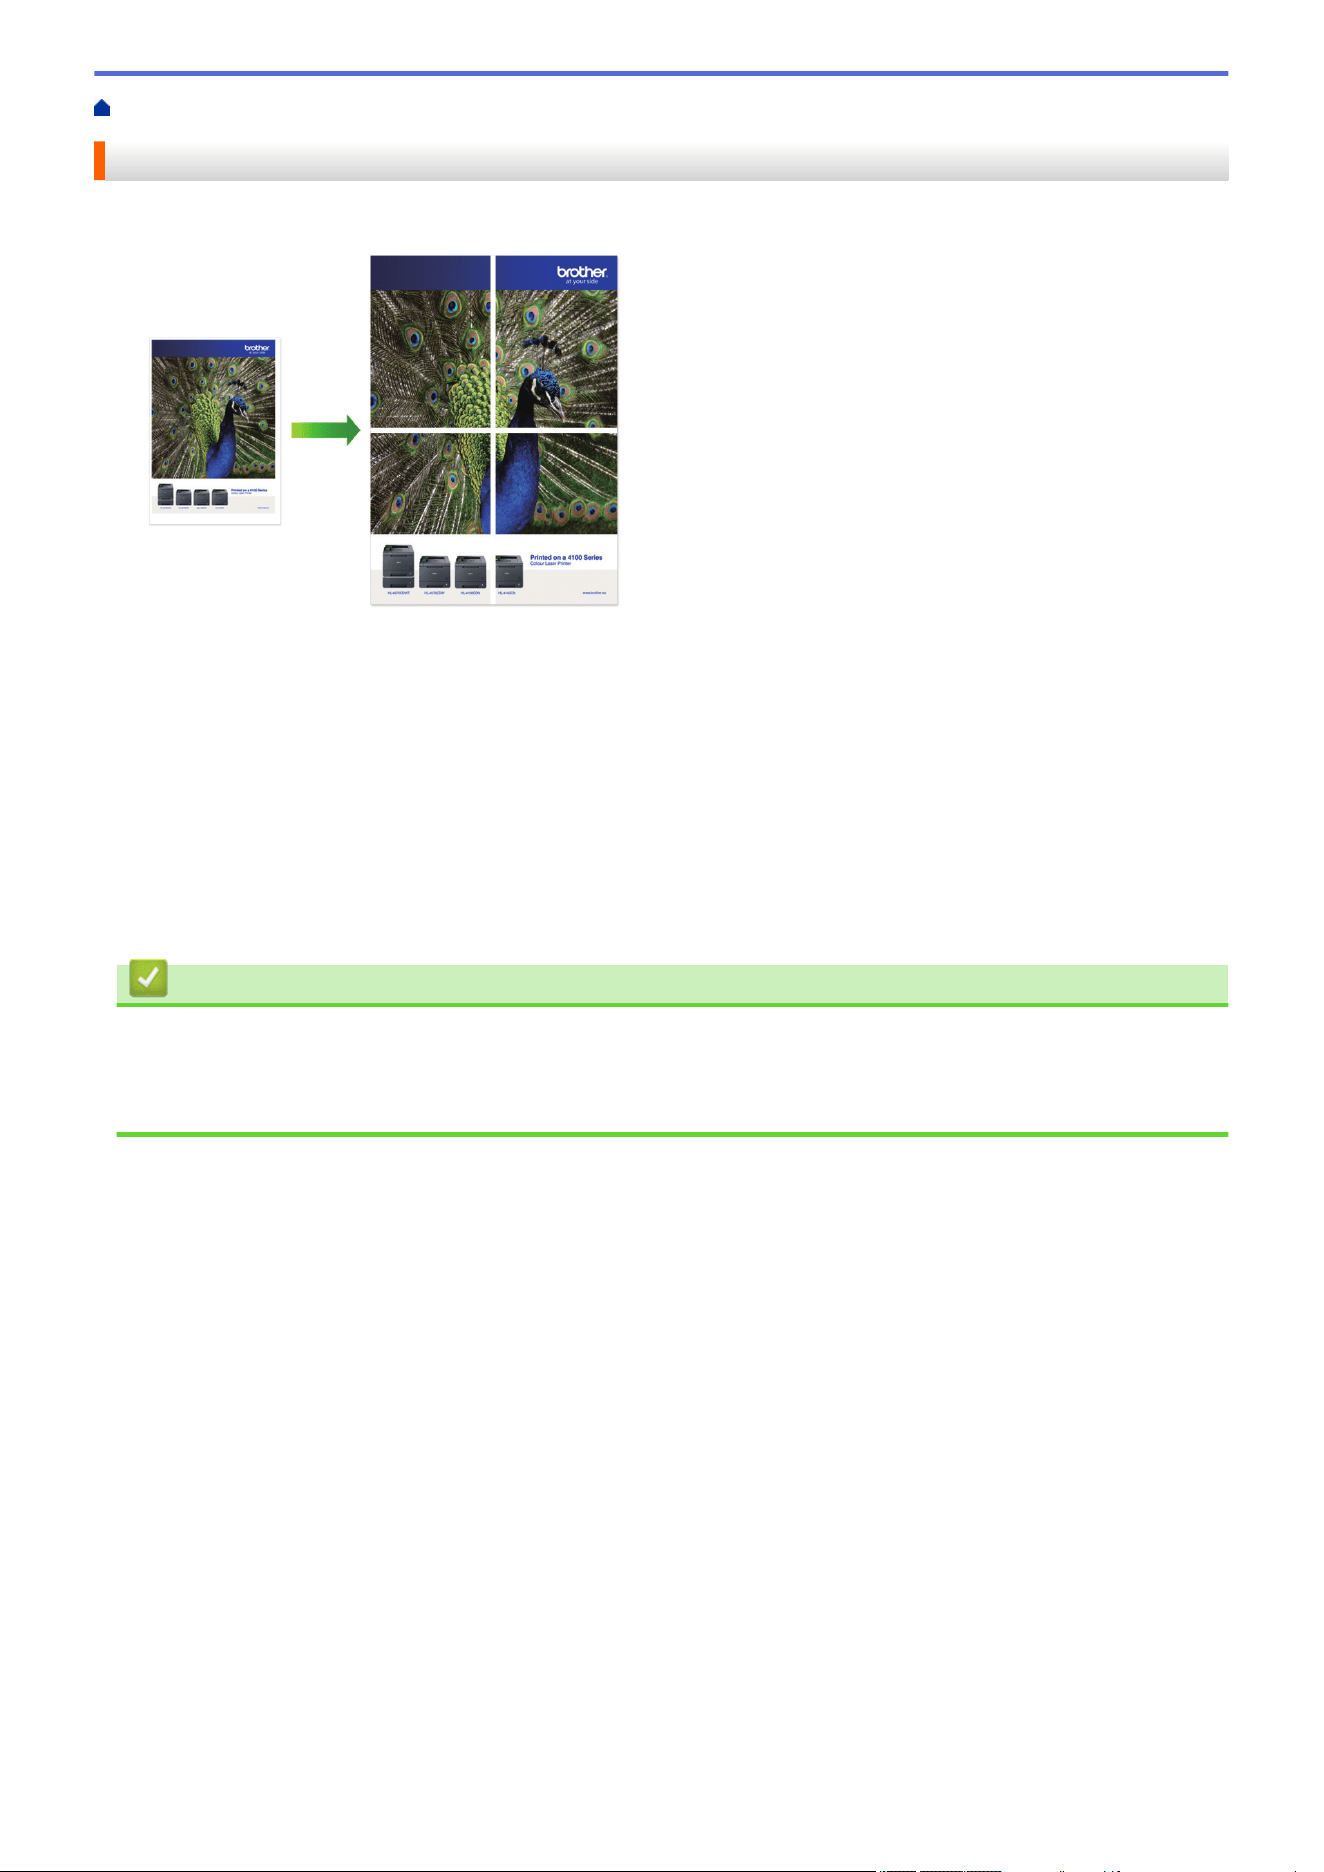
Home > Print > Print from Your Computer (Windows) > Print as a Poster (Windows)
Print as a Poster (Windows)
Enlarge your print size and print the document in poster mode.
1. Select the print command in your application.
2. Select Brother XXX-XXXX Printer (where XXX-XXXX is the name of your model), and then click the printing
properties or preferences button.
The printer driver window appears.
3. Click the Basic tab.
4. Click the Multiple Page drop-down list, and then select the 1 in 2x2 Pages or 1 in 3x3 Pages option.
5. Change other printer settings, if needed.
6. Click OK.
7. Complete your print operation.
Related Information
• Print from Your Computer (Windows)
Related Topics:
• Print Settings (Windows)
81
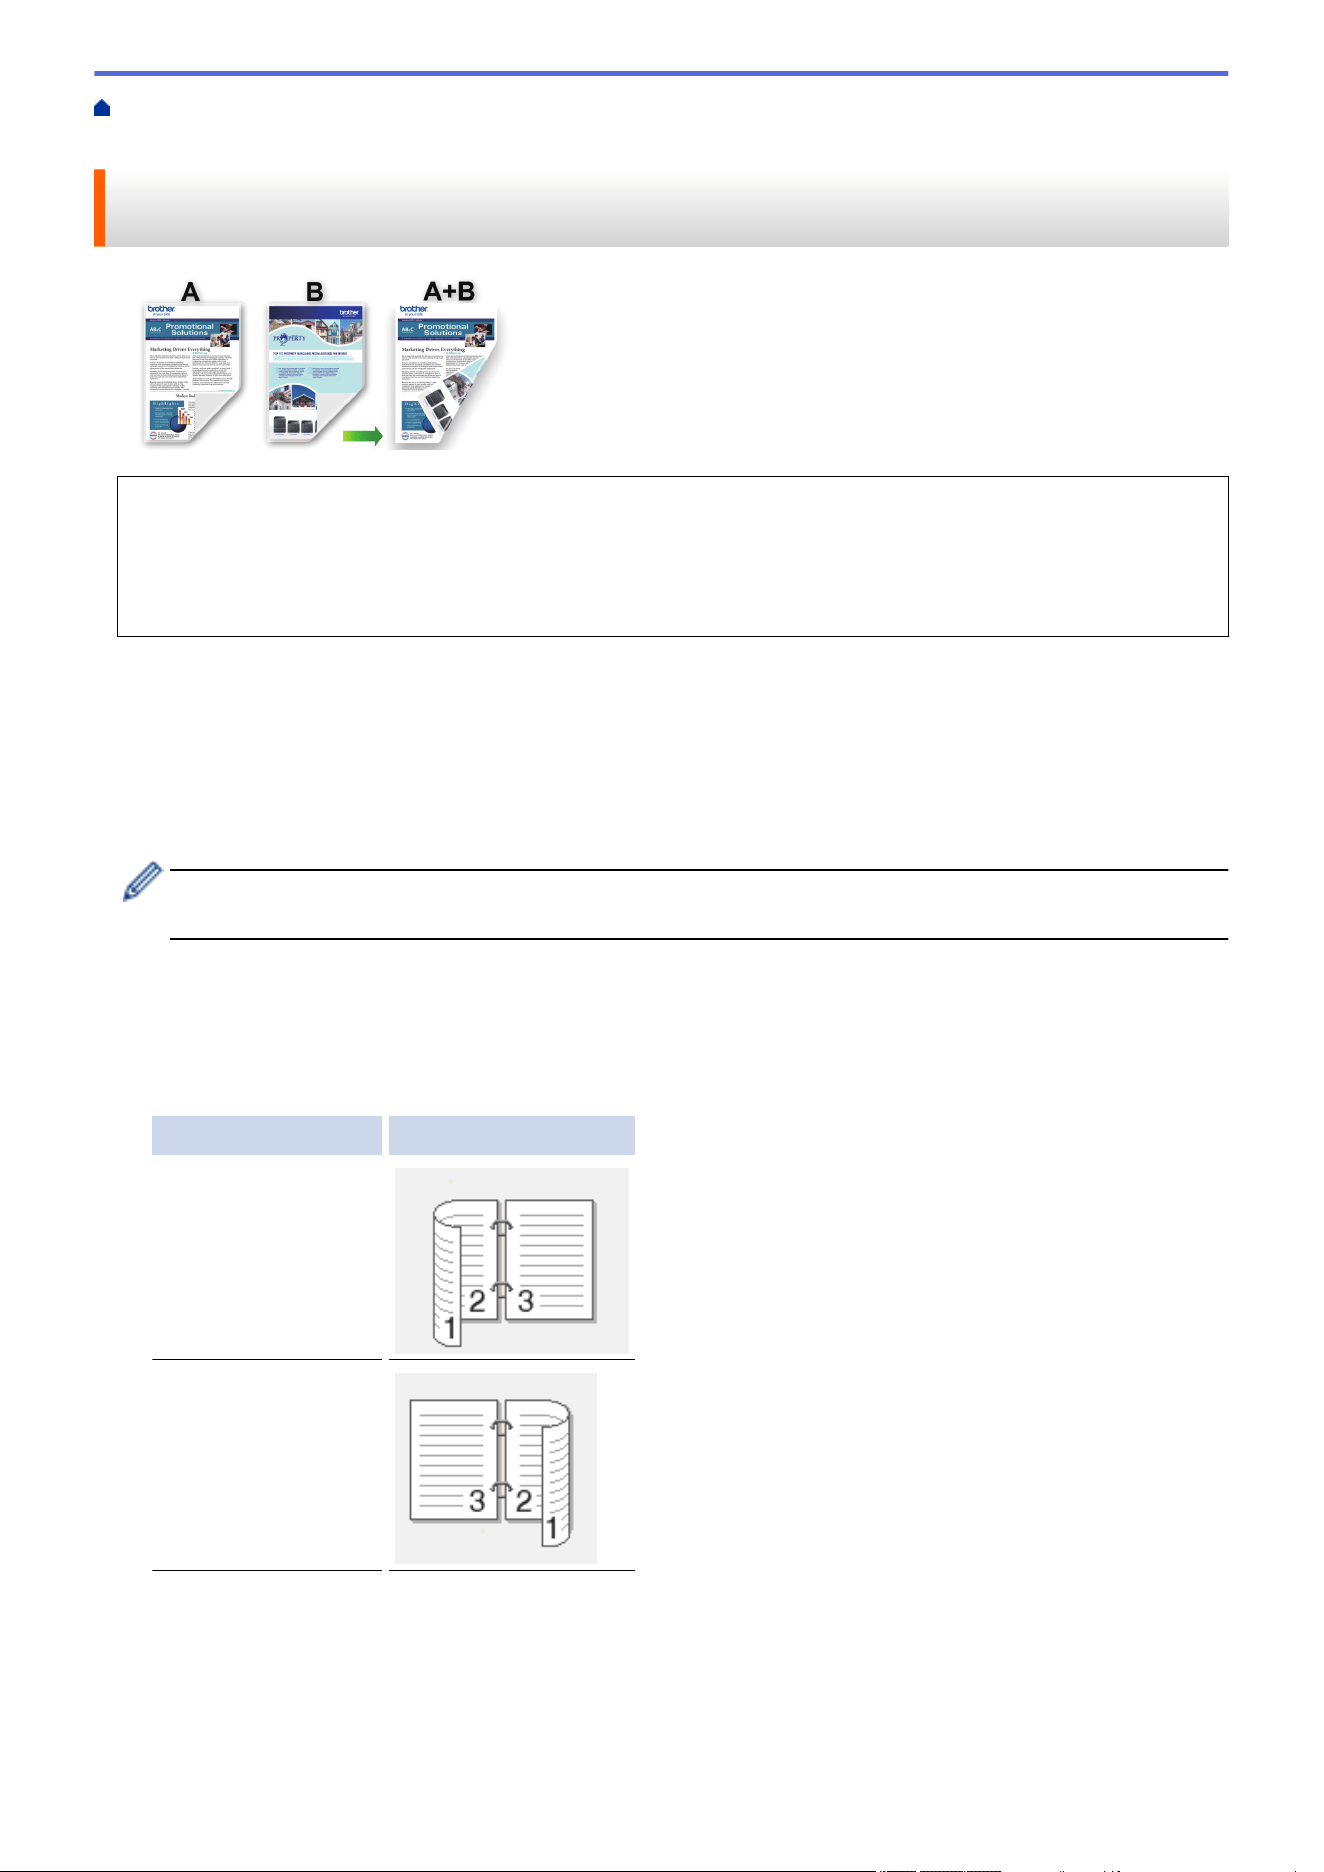
Home > Print > Print from Your Computer (Windows) > Print on Both Sides of the Paper Automatically
(Automatic 2-sided Printing) (Windows)
Print on Both Sides of the Paper Automatically (Automatic 2-sided
Printing) (Windows)
• Make sure the jam clear cover is closed.
• If paper is curled, straighten it and put it back in the paper tray.
• Use regular paper. DO NOT use bond paper.
• If the paper is thin, it may wrinkle.
1. Select the print command in your application.
2. Select Brother XXX-XXXX Printer (where XXX-XXXX is the name of your model), and then click the printing
properties or preferences button.
The printer driver window appears.
3. Click the Basic tab.
4. In the Orientation field, select the Portrait or Landscape option to set the orientation of your printout.
If your application contains a similar setting, we recommend that you set the orientation using the
application.
5. Click the 2-sided / Booklet drop-down list, and then select 2-sided.
6. Click the 2-sided Settings button.
7. Select one of the options from the 2-sided Type menu.
When 2-sided is selected, four types of 2-sided binding are available for each orientation:
Option for Portrait Description
Long Edge (Left)
Long Edge (Right)
82

Option for Portrait Description
Short Edge (Top)
Short Edge (Bottom)
Option for Landscape Description
Long Edge (Top)
Long Edge (Bottom)
Short Edge (Right)
Short Edge (Left)
8. Select the Binding Offset checkbox to specify the offset for binding in inches or millimetres.
9. Click OK to return to the printer driver window.
10. Change other printer settings, if needed.
The Borderless feature is not available when using this option.
11. Click OK again, and then complete your print operation.
83


Home > Print > Print from Your Computer (Windows) > Print as a Booklet Automatically (Windows)
Print as a Booklet Automatically (Windows)
Use this option to print a document in booklet format using 2-sided printing. The document's pages will be
arranged according to the correct page number and will allow you to fold at the centre of the print output without
having to change the order of the printed pages.
• Make sure the jam clear cover is closed.
• If paper is curled, straighten it and put it back in the paper tray.
• Use regular paper. DO NOT use bond paper.
• If the paper is thin, it may wrinkle.
1. Select the print command in your application.
2. Select Brother XXX-XXXX Printer (where XXX-XXXX is the name of your model), and then click the printing
properties or preferences button.
The printer driver window appears.
3. Click the Basic tab.
4. In the Orientation field, select the Portrait or Landscape option to set the orientation of your printout.
If your application contains a similar setting, we recommend that you set the orientation using the
application.
5. Click the 2-sided / Booklet drop-down list, and then select the Booklet option.
6. Click the 2-sided Settings button.
7. Select one of the options from the 2-sided Type menu.
There are two types of 2-sided binding directions available for each orientation:
Option for Portrait Description
Left Binding
Right Binding
85
Option for Landscape Description
Top Binding
Bottom Binding
8. Select one of the options from the Booklet Printing Method menu.
Option Description
All Pages at
Once
Every page will be printed in booklet format (four pages to every piece of paper, two pages
per side). Fold your printout in the middle to create the booklet.
Divide into
Sets
This option prints the whole booklet in smaller individual booklet sets, allowing you to fold at
the centre of the smaller individual booklet sets without having to change the order of the
printed pages. You can specify the number of sheets in each smaller booklet set (from
1-15). This option can be helpful when folding a printed booklet that has a large number of
pages.
9. Select the Binding Offset checkbox to specify the offset for binding in inches or millimetres.
10. Click OK to return to the printer driver window.
11. Change other printer settings, if needed.
The Borderless feature is not available when using this option.
12. Click OK.
13. Complete your print operation.
Related Information
• Print from Your Computer (Windows)
Related Topics:
• Print Settings (Windows)
• Print on Both Sides of the Paper Automatically (Automatic 2-sided Printing) (Windows)
86
Home > Print > Print from Your Computer (Windows) > Secure Print (Windows)
Secure Print (Windows)
Related Models: MFC-J5955DW
Use Secure Print to ensure that confidential or sensitive documents do not print until you enter a password on
the machine's control panel.
The secure data is deleted from the machine when you turn off the machine.
1. Select the print command in your application.
2. Select Brother XXX-XXXX Printer (where XXX-XXXX is the name of your model), and then click the printing
properties or preferences button.
The printer driver window appears.
3. Click the Advanced tab.
4. Click the Settings button in the Secure Print field.
5. Select the Secure Print checkbox.
6. Type your four-digit password in the Password field.
7. Type the User Name and Job Name in the text field, if needed.
8. Click OK, to close the Secure Print Settings window.
9. Click OK.
10. Complete your print operation.
11. On the machine's control panel, press d or c to display the [Secure Print] option, and then press
[Secure Print].
12. Press a or b to display user names, and then press your user name.
13. Enter your four-digit password, and then press [OK].
14. Press a or b to display the print job, and then press it.
15. Enter the number of copies you want.
16. Press [Start].
The machine prints the data.
After you have printed the secured data, it will be cleared from the machine's memory.
Related Information
• Print from Your Computer (Windows)
87
Home > Print > Print from Your Computer (Windows) > Print a Colour Document in Greyscale (Windows)
Print a Colour Document in Greyscale (Windows)
Greyscale mode makes the print processing speed faster than colour mode. If your document contains colour,
selecting Greyscale mode prints your document in 256 levels of greyscale.
1. Select the print command in your application.
2. Select Brother XXX-XXXX Printer (where XXX-XXXX is the name of your model), and then click the printing
properties or preferences button.
The printer driver window appears.
3. Click the Basic tab.
4. For Colour / Greyscale, select Greyscale.
5. Change other printer settings, if needed.
6. Click OK.
7. Complete your print operation.
Related Information
• Print from Your Computer (Windows)
88
Home > Print > Print from Your Computer (Windows) > Print a Long Paper (Windows)
Print a Long Paper (Windows)
Related Models: MFC-J2740DW/MFC-J5740DW/MFC-J5855DW/MFC-J5955DW
1. Select the print command in your application.
2. Select Brother XXX-XXXX Printer (where XXX-XXXX is the name of your model), and then click the printing
properties or preferences button.
The printer driver window appears.
3. Make sure you have loaded only one sheet of Long paper (Width: 88.9 - 297 mm / Height: 431.9 - 1200 mm)
in the MP tray.
4. Click the Basic tab.
5. Click the Media Type drop-down list, and then select the type of paper you are using.
IMPORTANT
To get the best print quality for the settings you have selected, always set the Media Type option to
match the type of paper you load.
6. Click the Paper Size drop-down list, select User Defined.... Enter the width, height, and other information in
the User Defined Size window, and then click OK.
7. For Colour / Greyscale, select the Colour or Greyscale option.
8. In the Orientation field, select the Portrait or Landscape option to set the orientation of your printout.
If your application contains a similar setting, we recommend that you set the orientation using the
application.
9. Type the number of copies (1-999) you want in the Copies field.
10. Change other printer settings, if needed.
11. Click OK.
12. Complete your print operation.
Related Information
• Print from Your Computer (Windows)
Related Topics:
• Load Long Paper in the Multi-purpose Tray (MP Tray)
89
Home > Print > Print from Your Computer (Windows) > Prevent Smudged Printouts and Paper Jams
(Windows)
Prevent Smudged Printouts and Paper Jams (Windows)
Some types of print media may need more drying time. Change the Reduce Smudge option if you have
problems with smudged printouts or paper jams.
1. Select the print command in your application.
2. Select Brother XXX-XXXX Printer (where XXX-XXXX is the name of your model), and then click the printing
properties or preferences button.
The printer driver window appears.
3. Click the Advanced tab.
4. Click the Other Print Options button.
5. Select the Reduce Smudge option on the left side of the screen.
6. Select one of the following options:
Media Type
Option Description
Plain Paper 2-sided Printing or
Simplex Printing
Off / On Select Off to print at normal speed, using a
standard amount of ink.
Select On to print at a slower speed, using less
ink. Printouts may be lighter than they appear in
Print Preview.
Glossy Paper Off / On Select Off to print at normal speed, using a
standard amount of ink.
Select On to print at a slower speed, using less
ink. Printouts may be lighter than they appear in
Print Preview.
7. Click OK to return to the printer driver window.
8. Click OK.
9. Complete your print operation.
Related Information
• Print from Your Computer (Windows)
Related Topics:
• Paper Handling and Printing Problems
• Change the Print Options to Improve Your Print Results
90
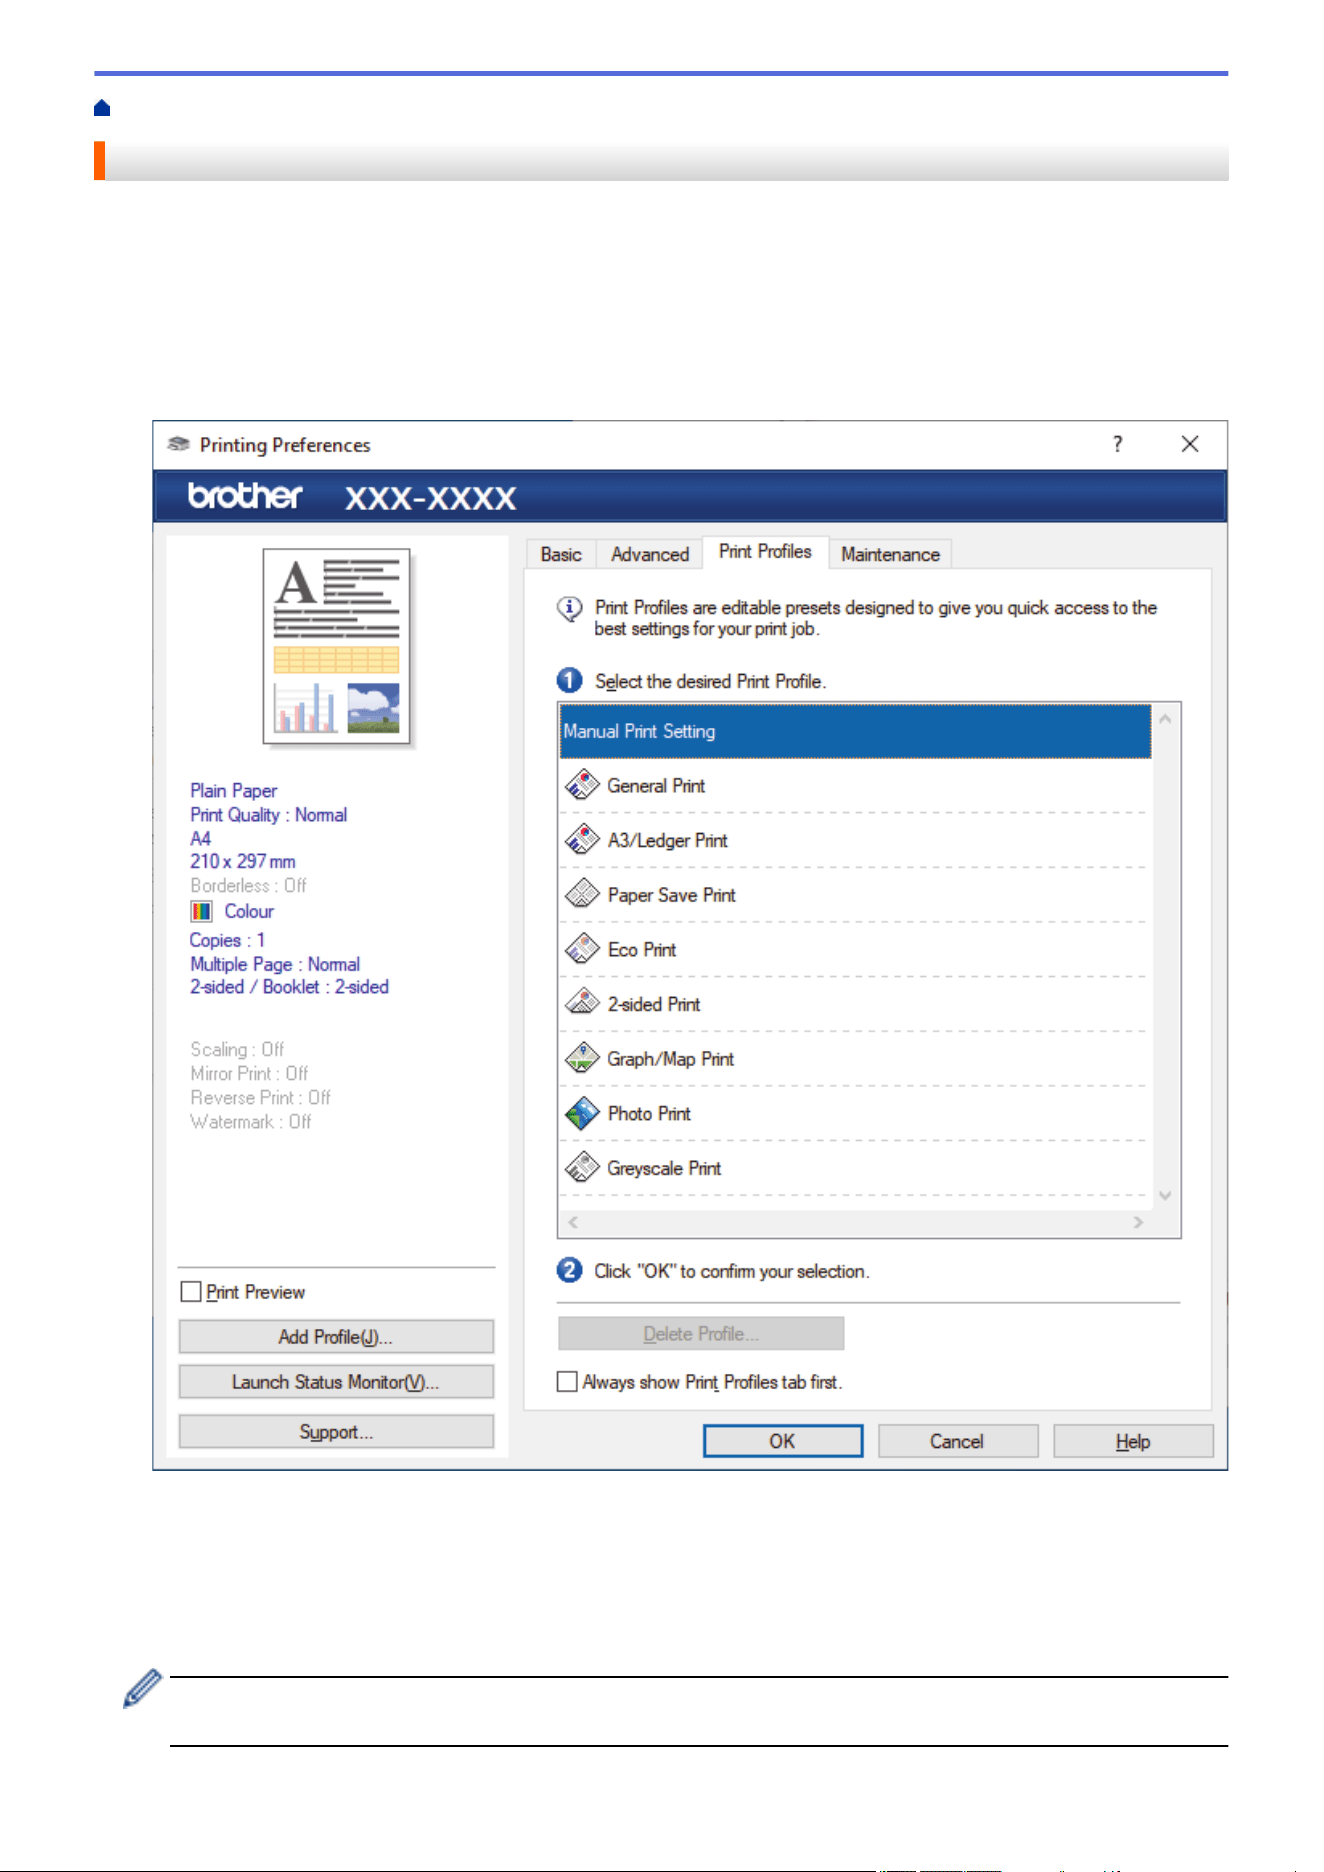
Home > Print > Print from Your Computer (Windows) > Use a Preset Print Profile (Windows)
Use a Preset Print Profile (Windows)
Print Profiles are presets designed to give you quick access to frequently-used printing configurations.
1. Select the print command in your application.
2. Select Brother XXX-XXXX Printer (where XXX-XXXX is the name of your model), and then click the printing
properties or preferences button.
The printer driver window appears.
3. Click the Print Profiles tab.
4. Select your profile from the print profile list.
The profile settings are shown on the left side of the printer driver window.
5. Do one of the following:
• If the settings are correct for your print job, click OK.
• To change the settings, go back to the Basic or Advanced tab, change settings, and then click OK.
To display the Print Profiles tab at the front of the window the next time you print, select the Always show
Print Profiles tab first. checkbox.
91


Home > Print > Print from Your Computer (Windows) > Use a Preset Print Profile (Windows) > Create or
Delete Your Print Profile (Windows)
Create or Delete Your Print Profile (Windows)
Add up to 20 new print profiles with customised settings.
1. Select the print command in your application.
2. Select Brother XXX-XXXX Printer (where XXX-XXXX is the name of your model), and then click the printing
properties or preferences button.
The printer driver window appears.
3. Do one of the following:
To create a new print profile:
a. Click the Basic tab and the Advanced tab, and configure the print settings you want for the new Print
Profile.
b. Click the Print Profiles tab.
c. Click Add Profile.
The Add Profile dialog box appears.
d. Type the new profile name in the Name field.
e. Click the icon you want to use to represent this profile from the icon list.
f. Click OK.
The new Print Profile name is added to the list in the Print Profiles tab.
To delete a print profile that you created:
a. Click the Print Profiles tab.
b. Click Delete Profile.
The Delete Profile dialog box appears.
c. Select the profile you want to delete.
d. Click Delete.
e. Click Yes.
f. Click Close.
Related Information
• Use a Preset Print Profile (Windows)
93

Home > Print > Print from Your Computer (Windows) > Change the Default Print Settings (Windows)
Change the Default Print Settings (Windows)
When you change an application's print settings, the changes only apply to documents printed with that
application. To change print settings for all Windows applications, you must configure the printer driver
properties.
1. Do one of the following:
• For Windows Server 2008
Click
(Start) > Control Panel > Hardware and Sound > Printers.
• For Windows 7 and Windows Server 2008 R2
Click (Start) > Devices and Printers.
• For Windows 8.1
Move your mouse to the lower right corner of your desktop. When the menu bar appears, click Settings,
and then click Control Panel. In the Hardware and Sound group, click View devices and printers.
• For Windows 10, Windows Server 2016 and Windows Server 2019
Click
> Windows System > Control Panel. In the Hardware and Sound group, click View devices
and printers.
• For Windows Server 2012
Move your mouse to the lower right corner of your desktop. When the menu bar appears, click Settings,
and then click Control Panel. In the Hardware group, click View devices and printers.
• For Windows Server 2012 R2
Click Control Panel on the Start screen. In the Hardware group, click View devices and printers.
2. Right-click the Brother XXX-XXXX Printer icon (where XXX-XXXX is the name of your model), and then
select Printer properties. If printer driver options appear, select your printer driver.
The printer properties dialog box appears.
3. Click the General tab, and then click the Printing Preferences... or Preferences... button.
The printer driver dialog box appears.
4. Select the print settings you want to use as defaults for all of your Windows programs.
5. Click OK.
6. Close the printer properties dialog box.
Related Information
• Print from Your Computer (Windows)
Related Topics:
• Print Settings (Windows)
94
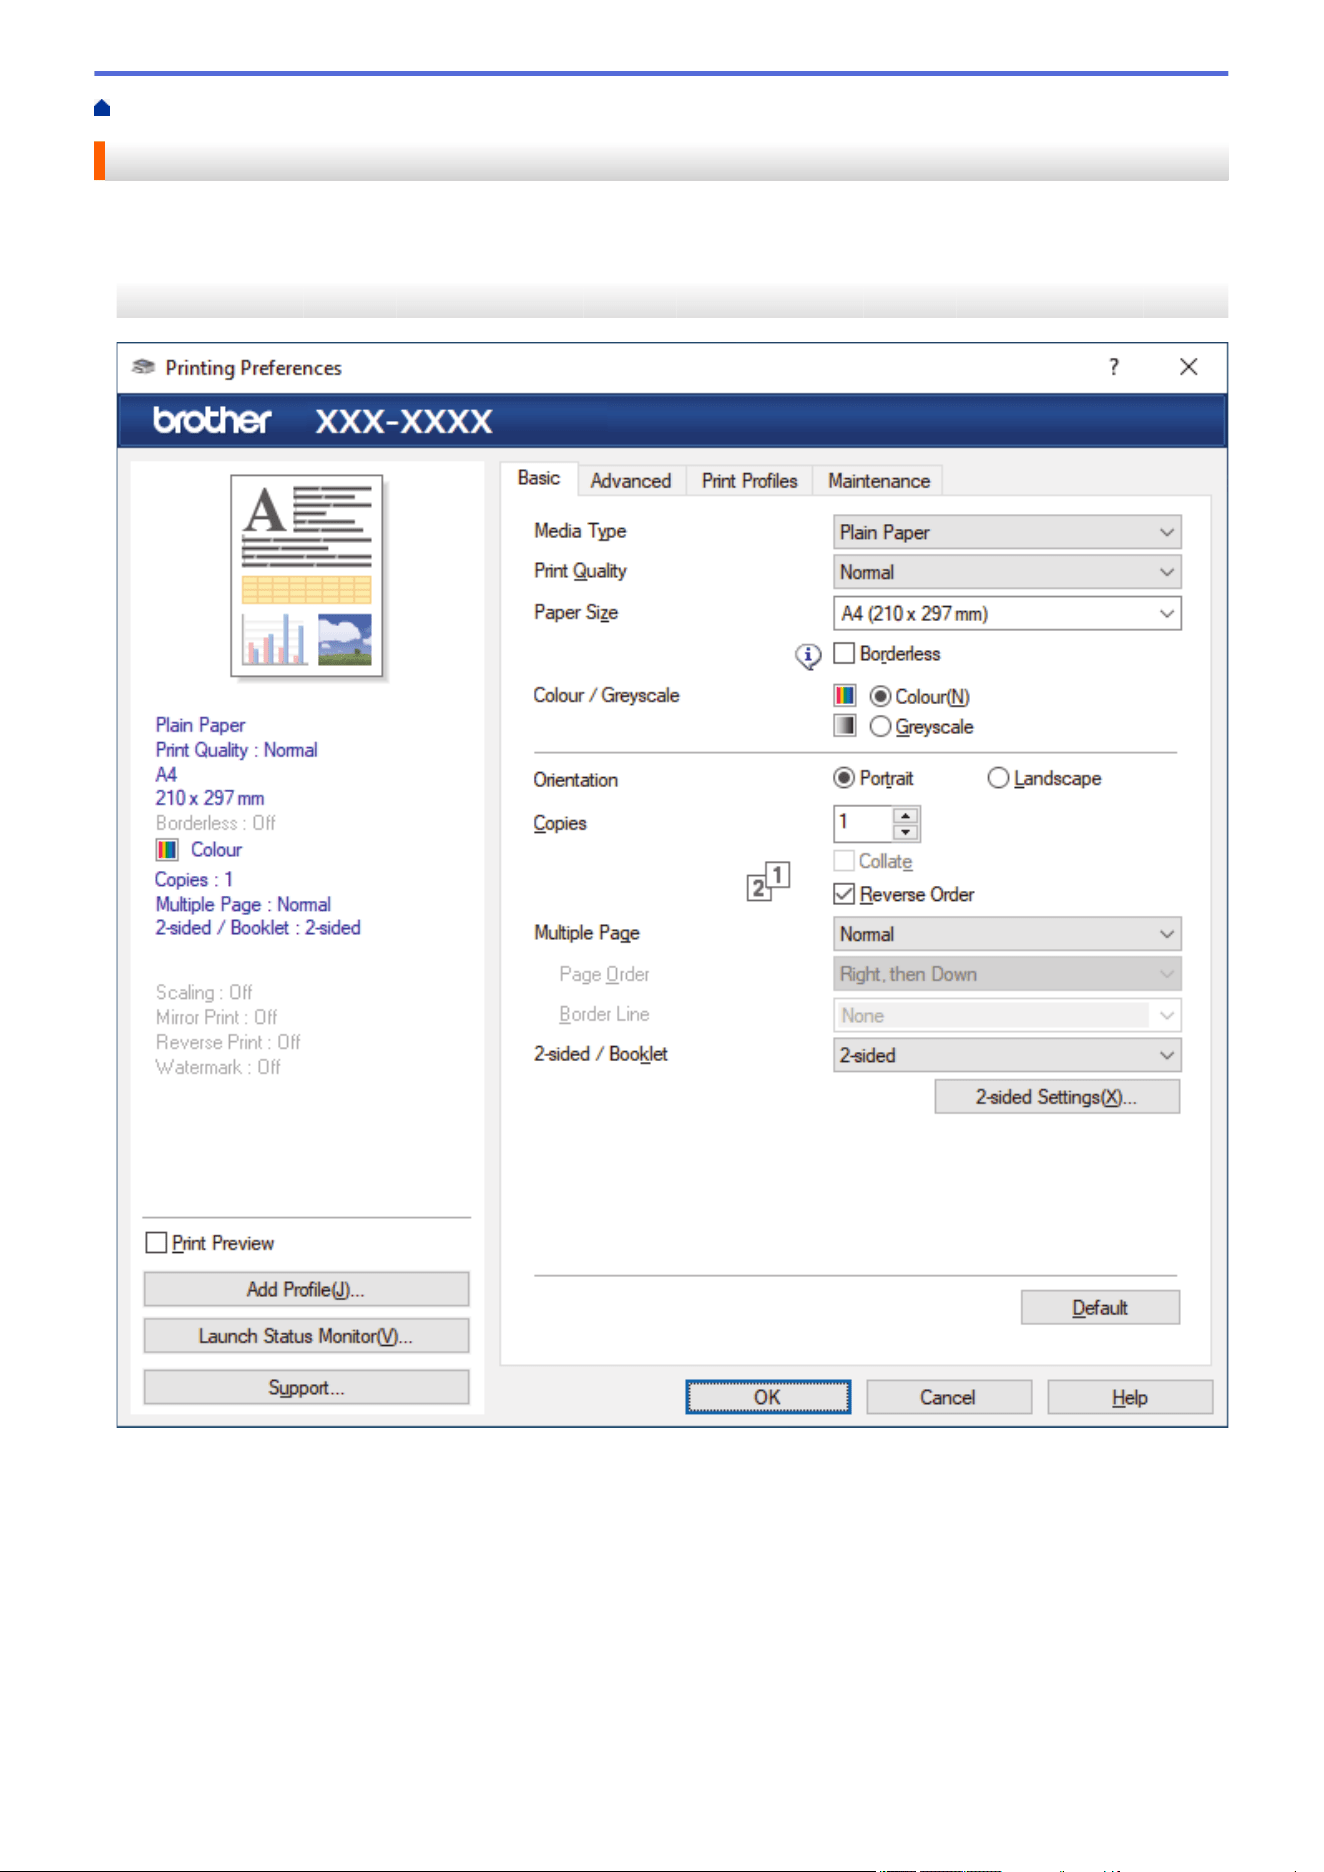
Home > Print > Print from Your Computer (Windows) > Print Settings (Windows)
Print Settings (Windows)
>> Basic Tab
>> Advanced Tab
Basic Tab
1. Media Type
Select the media type you want to use. To achieve the best print results, the machine automatically adjusts its
print settings according to the selected media type.
2. Print Quality
Select the print quality you want. Because print quality and speed are related, the higher the quality, the
longer it will take to print the document.
3. Paper Size
Select the paper size you want to use. You can either choose from standard paper sizes or create a custom
paper size.
95

Borderless
Select this option to print photos without borders. Because the image data is created slightly larger than
the paper size you are using, this will cause some cropping of the photo edges.
You may not be able to select the Borderless option for some combinations of media type and quality, or
from some applications.
4. Colour / Greyscale
Select colour or greyscale printing. The print speed is faster in greyscale mode than it is in colour mode. If
your document contains colour and you select greyscale mode, your document will be printed using 256
levels of greyscale.
5. Orientation
Select the orientation (portrait or landscape) of your printout.
If your application contains a similar setting, we recommend that you set the orientation using the application.
6. Copies
Type the number of copies (1-999) that you want to print in this field.
Collate
Select this option to print sets of multi-page documents in the original page order. When this option is
selected, one complete copy of your document will print, and then reprint according to the number of
copies you choose. If this option is not selected, then each page will print according to the number of
copies chosen before the next page of the document is printed.
Reverse Order
Select this option to print your document in reverse order. The last page of your document will be printed
first.
7. Multiple Page
Select this option to print multiple pages on a single sheet of paper, or print one page of your document on
multiple sheets.
Page Order
Select the page order when printing multiple pages on a single sheet of paper.
Border Line
Select the type of border to use when printing multiple pages on a single sheet of paper.
8. 2-sided / Booklet
Select this option to print on both sides of the paper, or print a document in booklet format using 2-sided
printing.
2-sided Settings button
Click this button to select the type of 2-sided binding. Four types of 2-sided bindings are available for each
orientation.
9. (MFC-J2740DW/MFC-J5740DW/MFC-J5855DW/MFC-J5955DW) Paper Source
Select the paper source setting according to your print conditions or purpose.
96
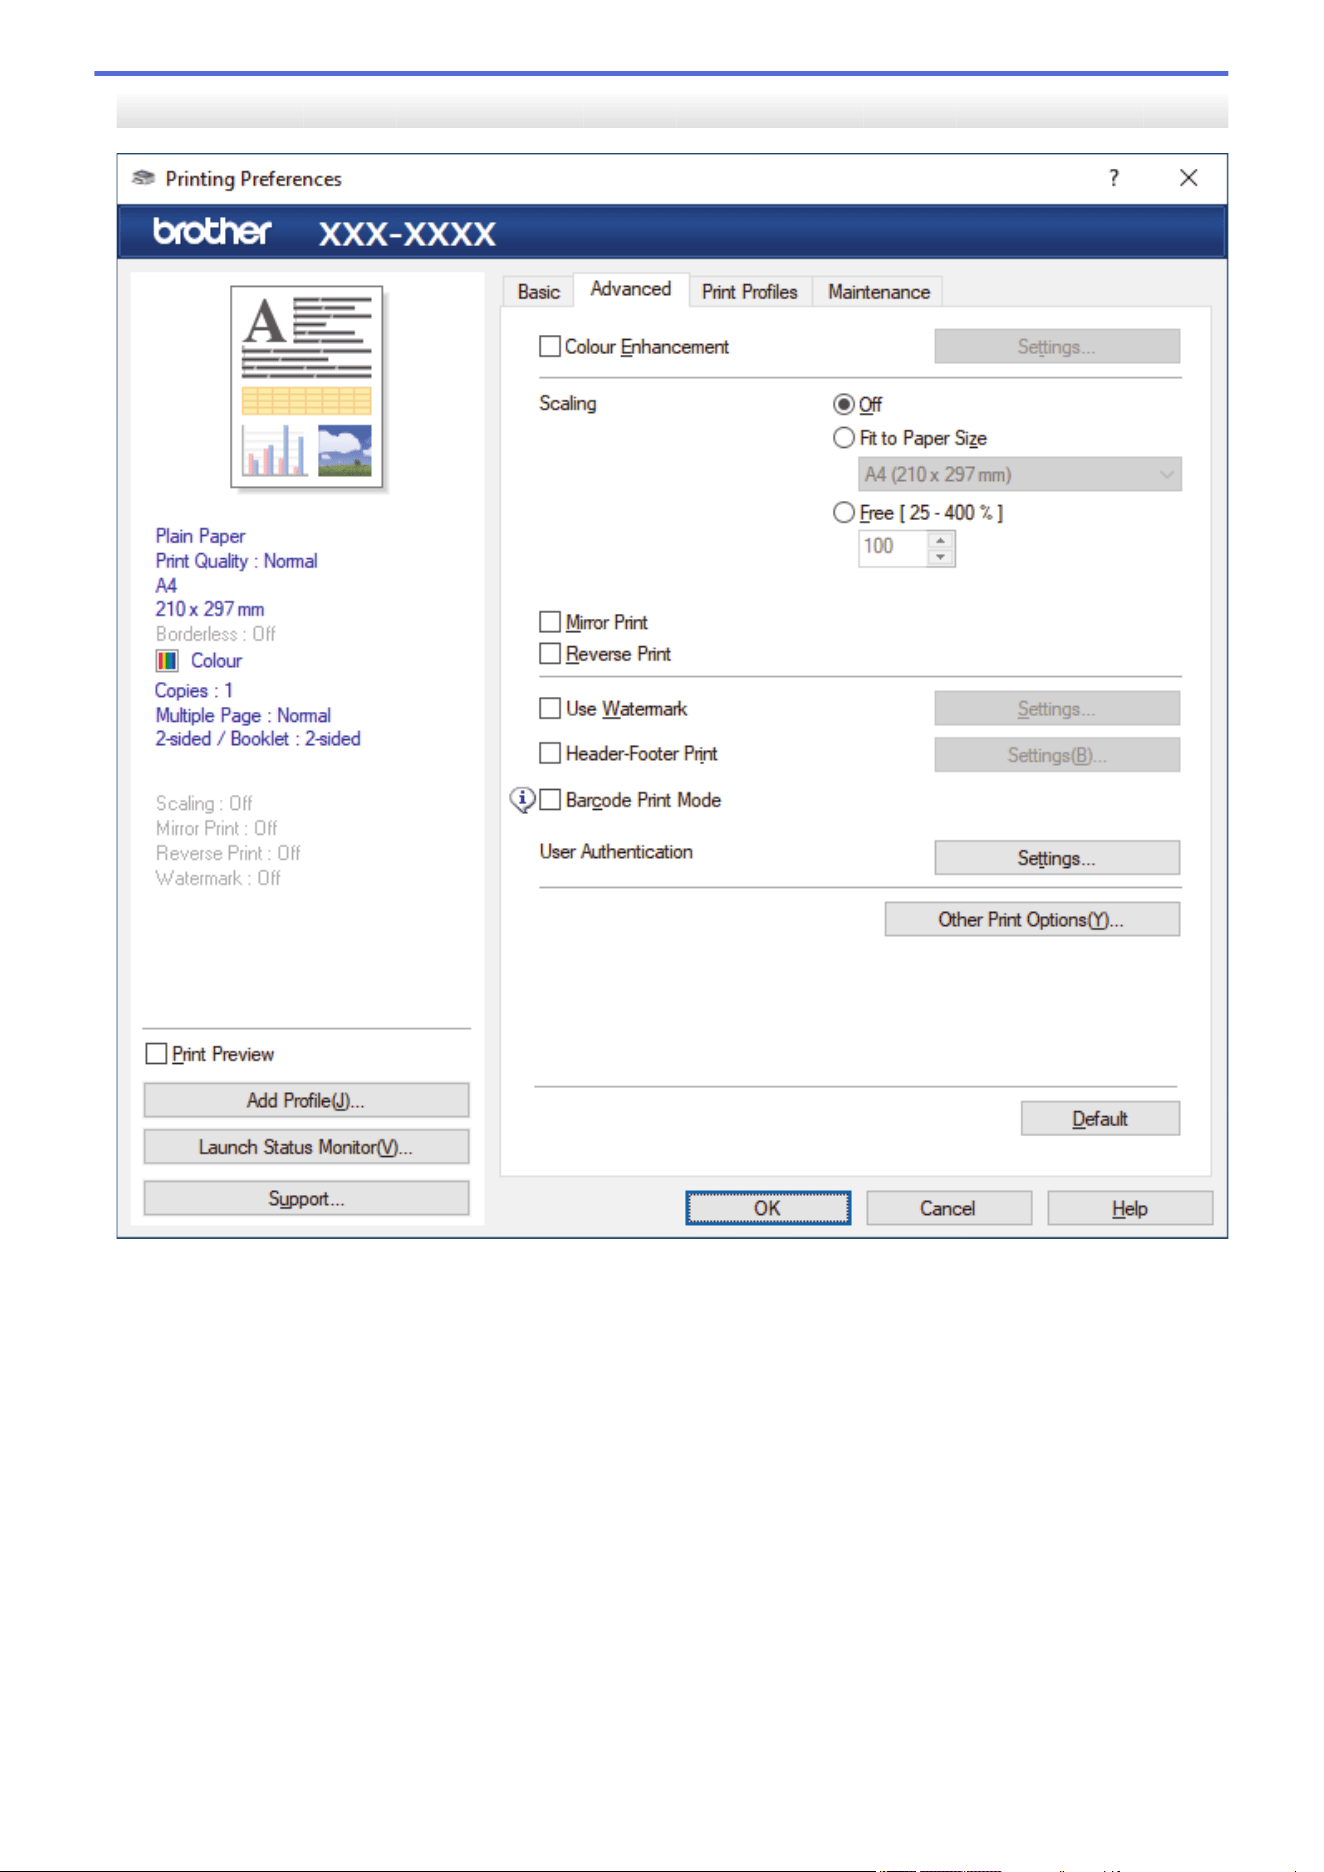
Advanced Tab
1. Colour Enhancement
Select this option to use the Colour Enhancement feature. This feature analyses your image to improve its
sharpness, white balance and colour density. This process may take several minutes depending on the
image size and your computer's specifications.
2. Scaling
Select these options to enlarge or reduce the size of the pages in your document.
Fit to Paper Size
Select this option to enlarge or reduce the document pages to fit a specified paper size. When you select
this option, select the paper size you want from the drop-down list.
Free [ 25 - 400 % ]
Select this option to enlarge or reduce the document pages manually. When you select this option, type a
value into the field.
3. Mirror Print
Select this option to reverse the printed image on the page horizontally from left to right.
97

4. Reverse Print
Select this option to rotate the printed image 180 degrees.
5. Use Watermark
Select this option to print a logo or text on your document as a watermark. Select one of the preset
watermarks, add a new watermark, or use an image file you have created.
6. Header-Footer Print
Select this option to print the date, time and PC login user name on the document.
7. Barcode Print Mode
Select this option to print barcodes at the most suitable quality and resolution.
8. (MFC-J5955DW) Secure Print
This feature ensures that confidential or sensitive documents do not print until you enter a password on the
machine's control panel.
9. User Authentication
This feature allows you to confirm the restrictions for each user.
10. Other Print Options button
Advanced Colour Settings
Select the method that the machine uses to arrange dots to express halftones.
The printout colour can be adjusted to achieve the closest match to what appears on your computer
screen.
Reduce Smudge
Some types of print media may need more drying time. Change this option if you have problems with
smudged printouts or paper jams.
Retrieve Printer's Colour Data
Select this option to optimise the print quality using the machine's factory settings, which are set
specifically for your Brother machine. Use this option when you have replaced the machine or changed the
machine's network address.
Print Archive
Select this option to save the print data as a PDF file to your computer.
Reduce Uneven Lines
Select this option to adjust the print alignment if your printed text becomes blurred or images become
faded.
Related Information
• Print from Your Computer (Windows)
Related Topics:
• Error and Maintenance Messages
• Paper Handling and Printing Problems
• Print a Photo (Windows)
• Print a Document (Windows)
• Print More Than One Page on a Single Sheet of Paper (N in 1) (Windows)
• Print as a Poster (Windows)
• Print on Both Sides of the Paper Automatically (Automatic 2-sided Printing) (Windows)
• Print as a Booklet Automatically (Windows)
• Use a Preset Print Profile (Windows)
• Change the Default Print Settings (Windows)
• Change the Print Options to Improve Your Print Results
98


Home > Print > Print Using Brother iPrint&Scan (Windows/Mac)
Print Using Brother iPrint&Scan (Windows/Mac)
• Print Photos or Documents Using Brother iPrint&Scan (Windows/Mac)
• Print on Both Sides of the Paper Automatically Using Brother iPrint&Scan (Automatic 2-
sided Printing) (Windows/Mac)
• Print More Than One Page on a Single Sheet of Paper Using Brother iPrint&Scan (N in
1) (Windows/Mac)
• Print a Colour Document in Greyscale Using Brother iPrint&Scan (Windows/Mac)
100
Home > Print > Print Using Brother iPrint&Scan (Windows/Mac) > Print Photos or Documents Using Brother
iPrint&Scan (Windows/Mac)
Print Photos or Documents Using Brother iPrint&Scan (Windows/Mac)
1. Make sure you have loaded the correct media in the paper tray.
IMPORTANT
For photo printing:
• For best results, use Brother paper.
• When you print on photo paper, load one extra sheet of the same photo paper in the paper tray.
2. Start Brother iPrint&Scan.
• Windows
Launch (Brother iPrint&Scan).
• Mac
In the Finder menu bar, click Go > Applications, and then double-click the iPrint&Scan icon.
The Brother iPrint&Scan screen appears.
3. If your Brother machine is not selected, click the Select your Machine button, and then select your model
name from the list. Click OK.
4. Click Print.
5. Do one of the following:
• Windows
Click Photo or Document.
• Mac
Click Photo or PDF.
6. Select the file you want to print, and then do one of the following:
• Windows
Click Next.
• Mac
Click Open, and then click Next if prompted.
101
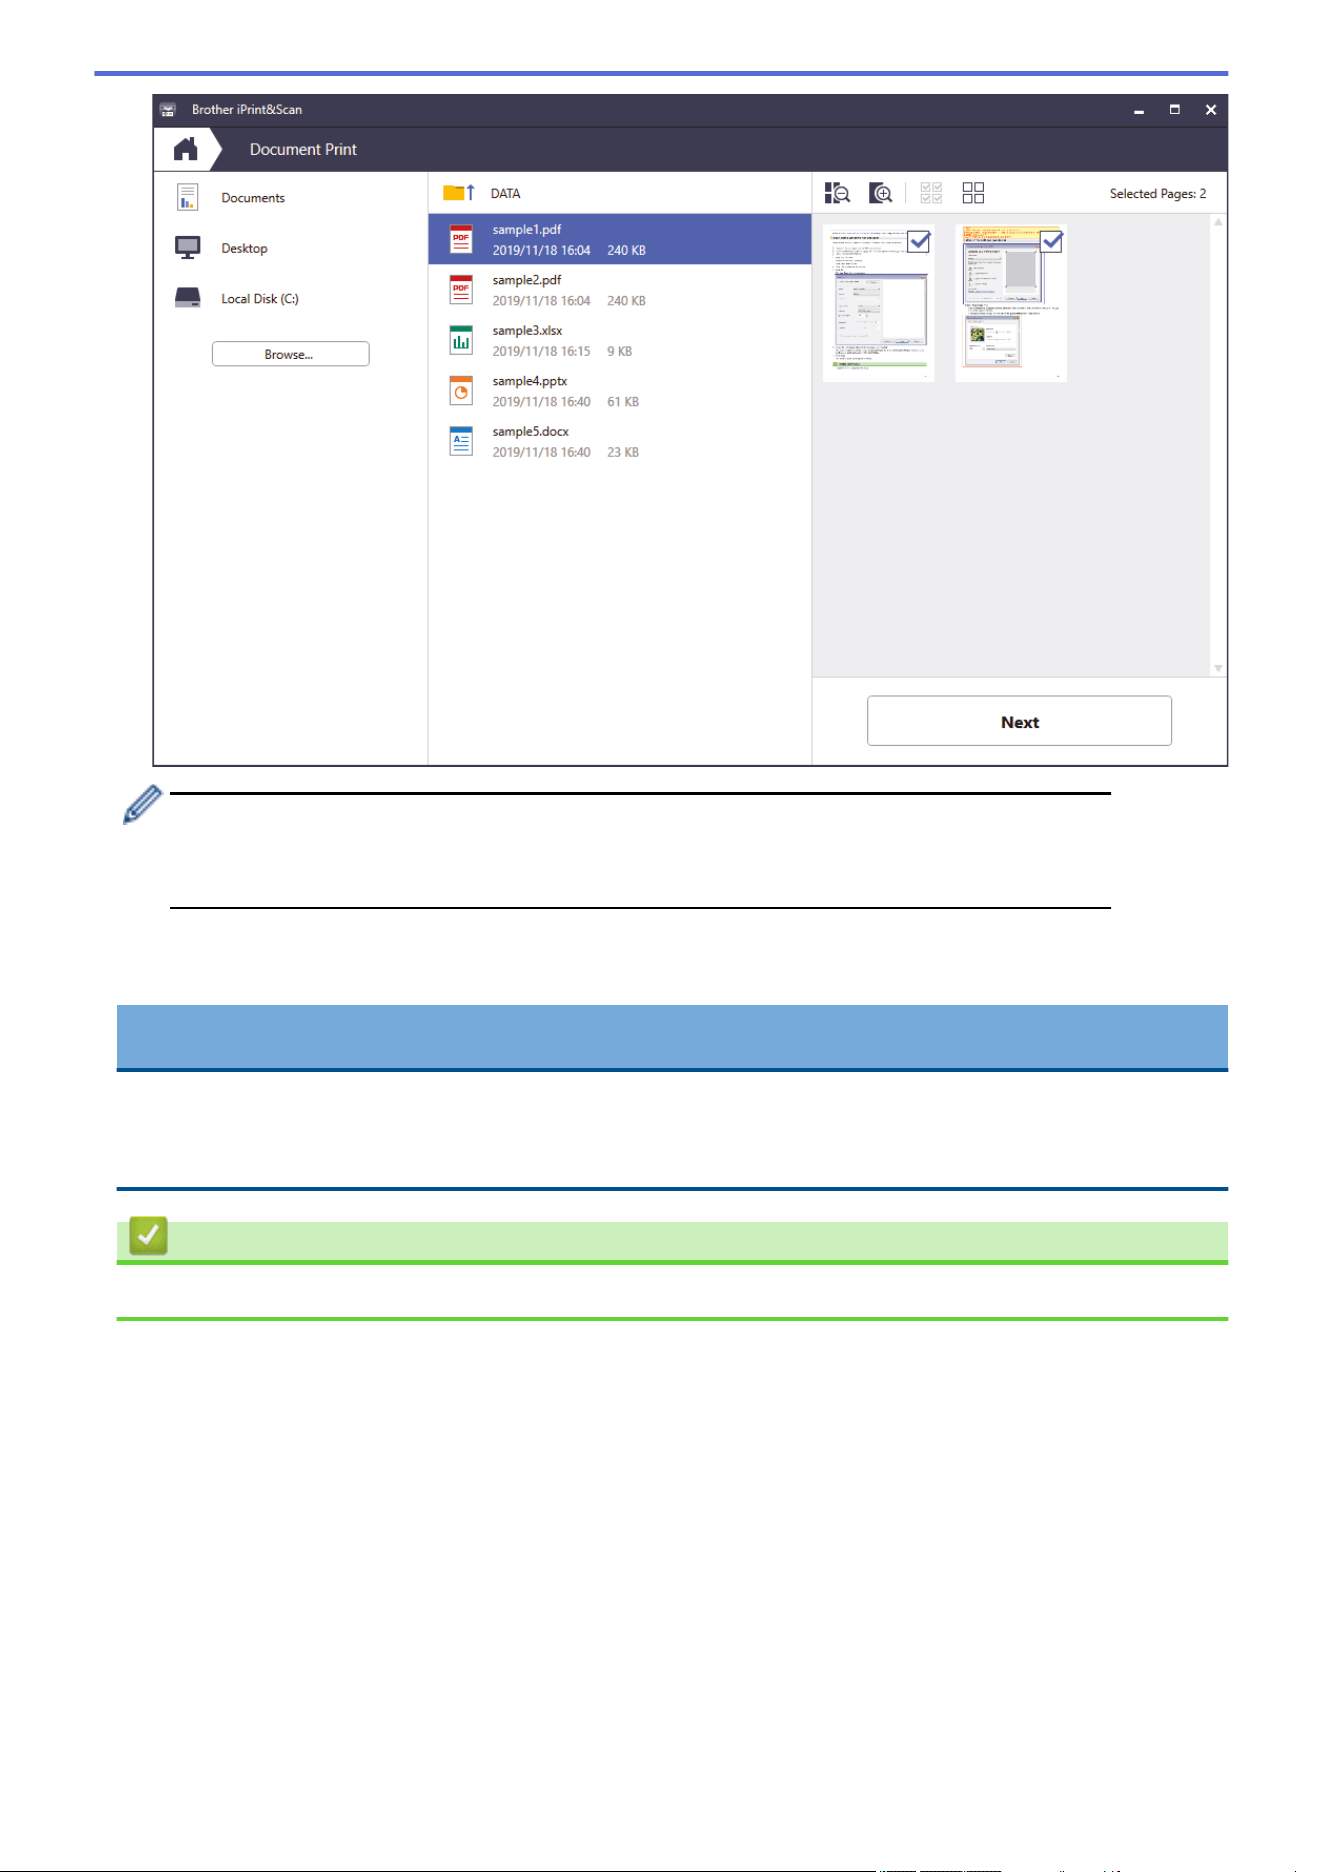
• The actual screen may differ depending on the version of the application.
• Use the latest application. See Related Information.
• When printing documents with many pages, you can also select the pages you want to print.
7. Change other printer settings, if needed.
8. Click Print.
IMPORTANT
For photo printing:
To get the best print quality for the settings you have selected, always set the Media Type option to match
the type of paper you load.
Related Information
• Print Using Brother iPrint&Scan (Windows/Mac)
102
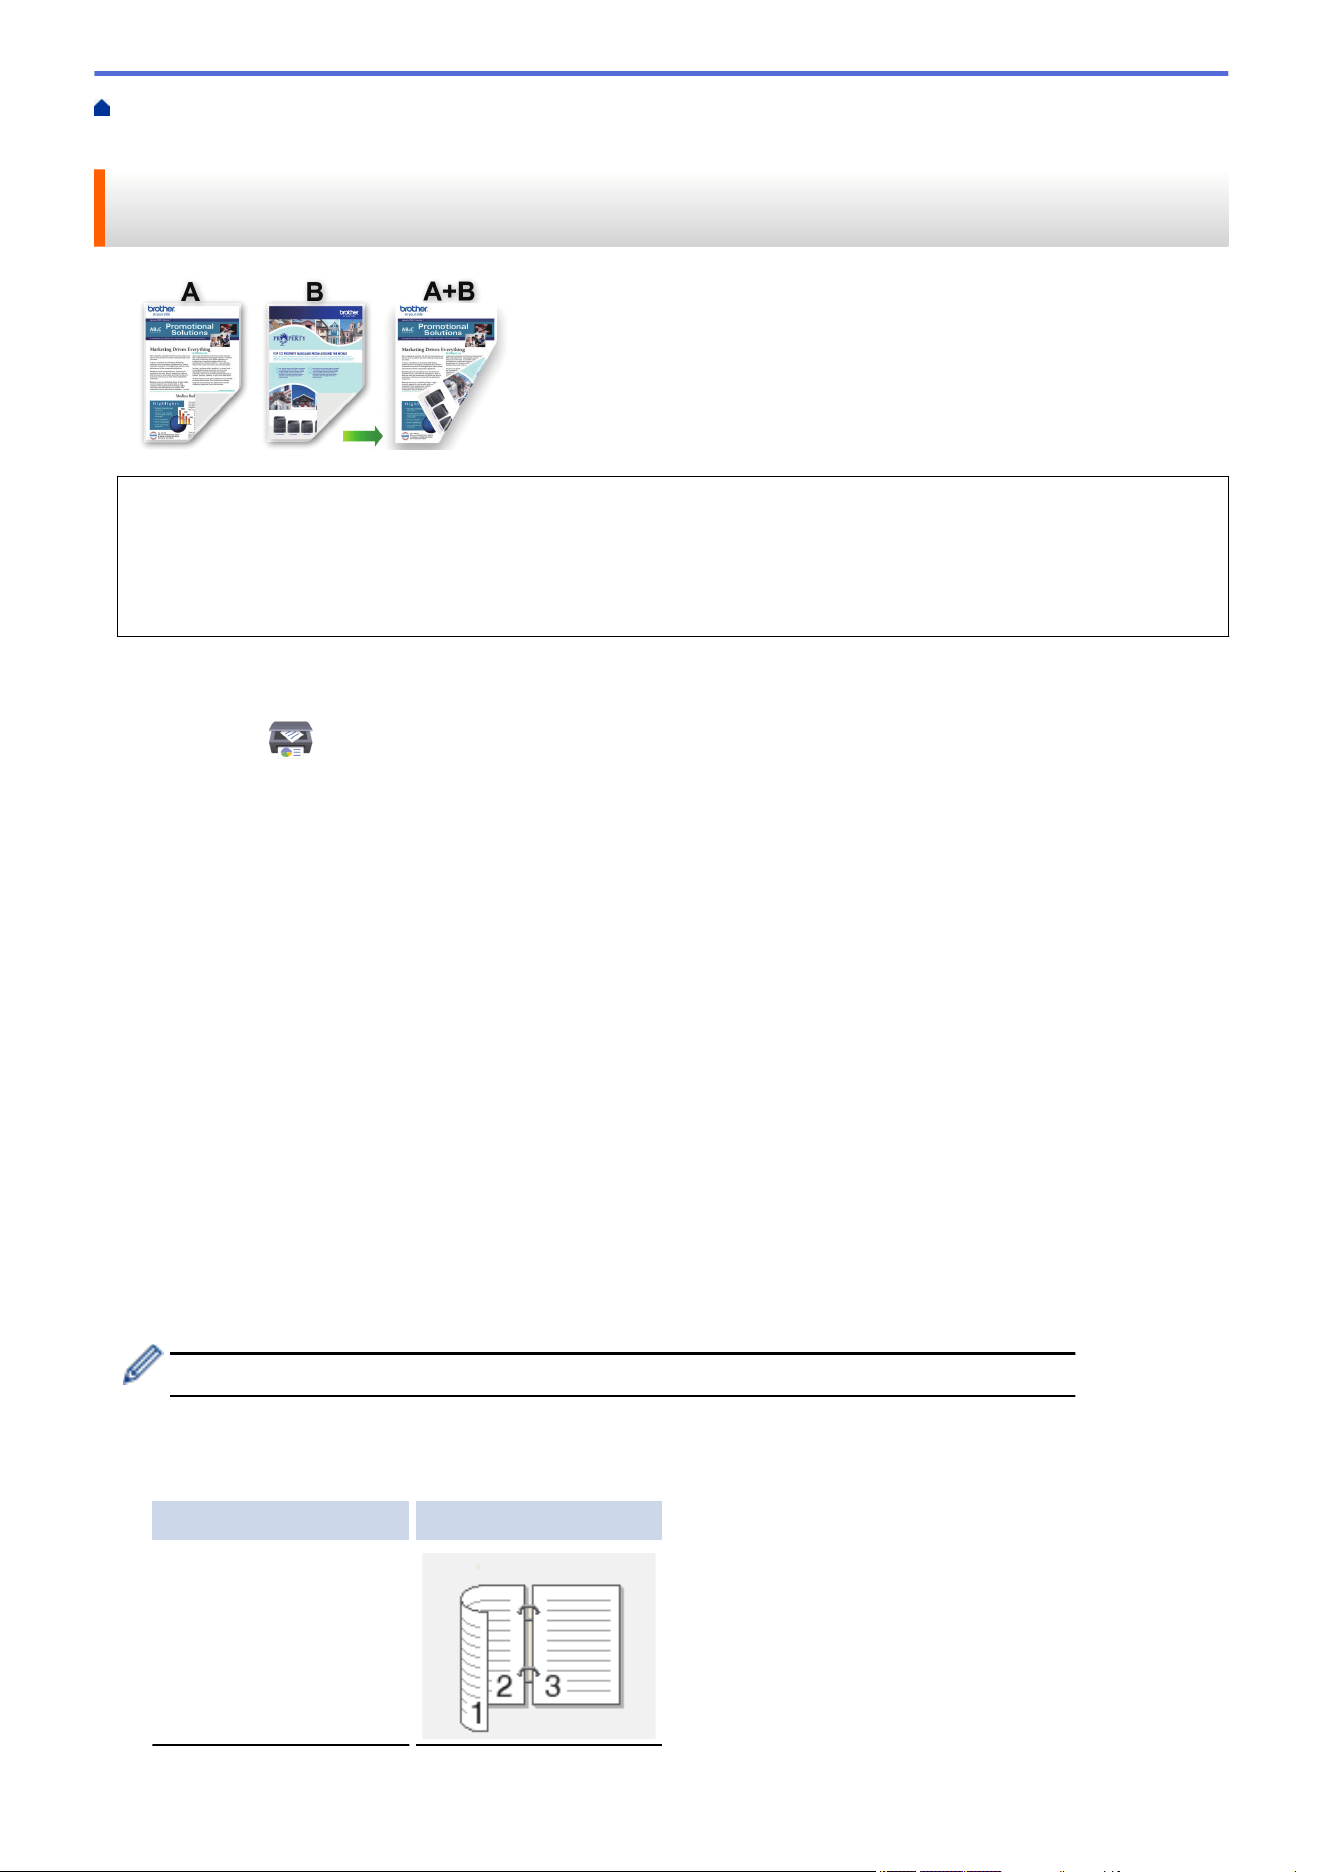
Home > Print > Print Using Brother iPrint&Scan (Windows/Mac) > Print on Both Sides of the Paper
Automatically Using Brother iPrint&Scan (Automatic 2-sided Printing) (Windows/Mac)
Print on Both Sides of the Paper Automatically Using Brother
iPrint&Scan (Automatic 2-sided Printing) (Windows/Mac)
• Make sure the jam clear cover is closed.
• If paper is curled, straighten it and put it back in the paper tray.
• Use regular paper. DO NOT use bond paper.
• If the paper is thin, it may wrinkle.
1. Start Brother iPrint&Scan.
• Windows
Launch (Brother iPrint&Scan).
• Mac
In the Finder menu bar, click Go > Applications, and then double-click the iPrint&Scan icon.
The Brother iPrint&Scan screen appears.
2. If your Brother machine is not selected, click the Select your Machine button, and then select your model
name from the list. Click OK.
3. Click Print.
4. Do one of the following:
• Windows
Click Document.
• Mac
Click PDF.
5. Select the file you want to print, and then do one of the following:
• Windows
Click Next.
• Mac
Click Open, and then click Next if prompted.
When printing documents with many pages, you can also select the pages you want to print.
6. Select one of the options from the 2-sided drop-down list.
Two types of 2-sided binding are available:
Option Description
On (Flip on long edge)
103

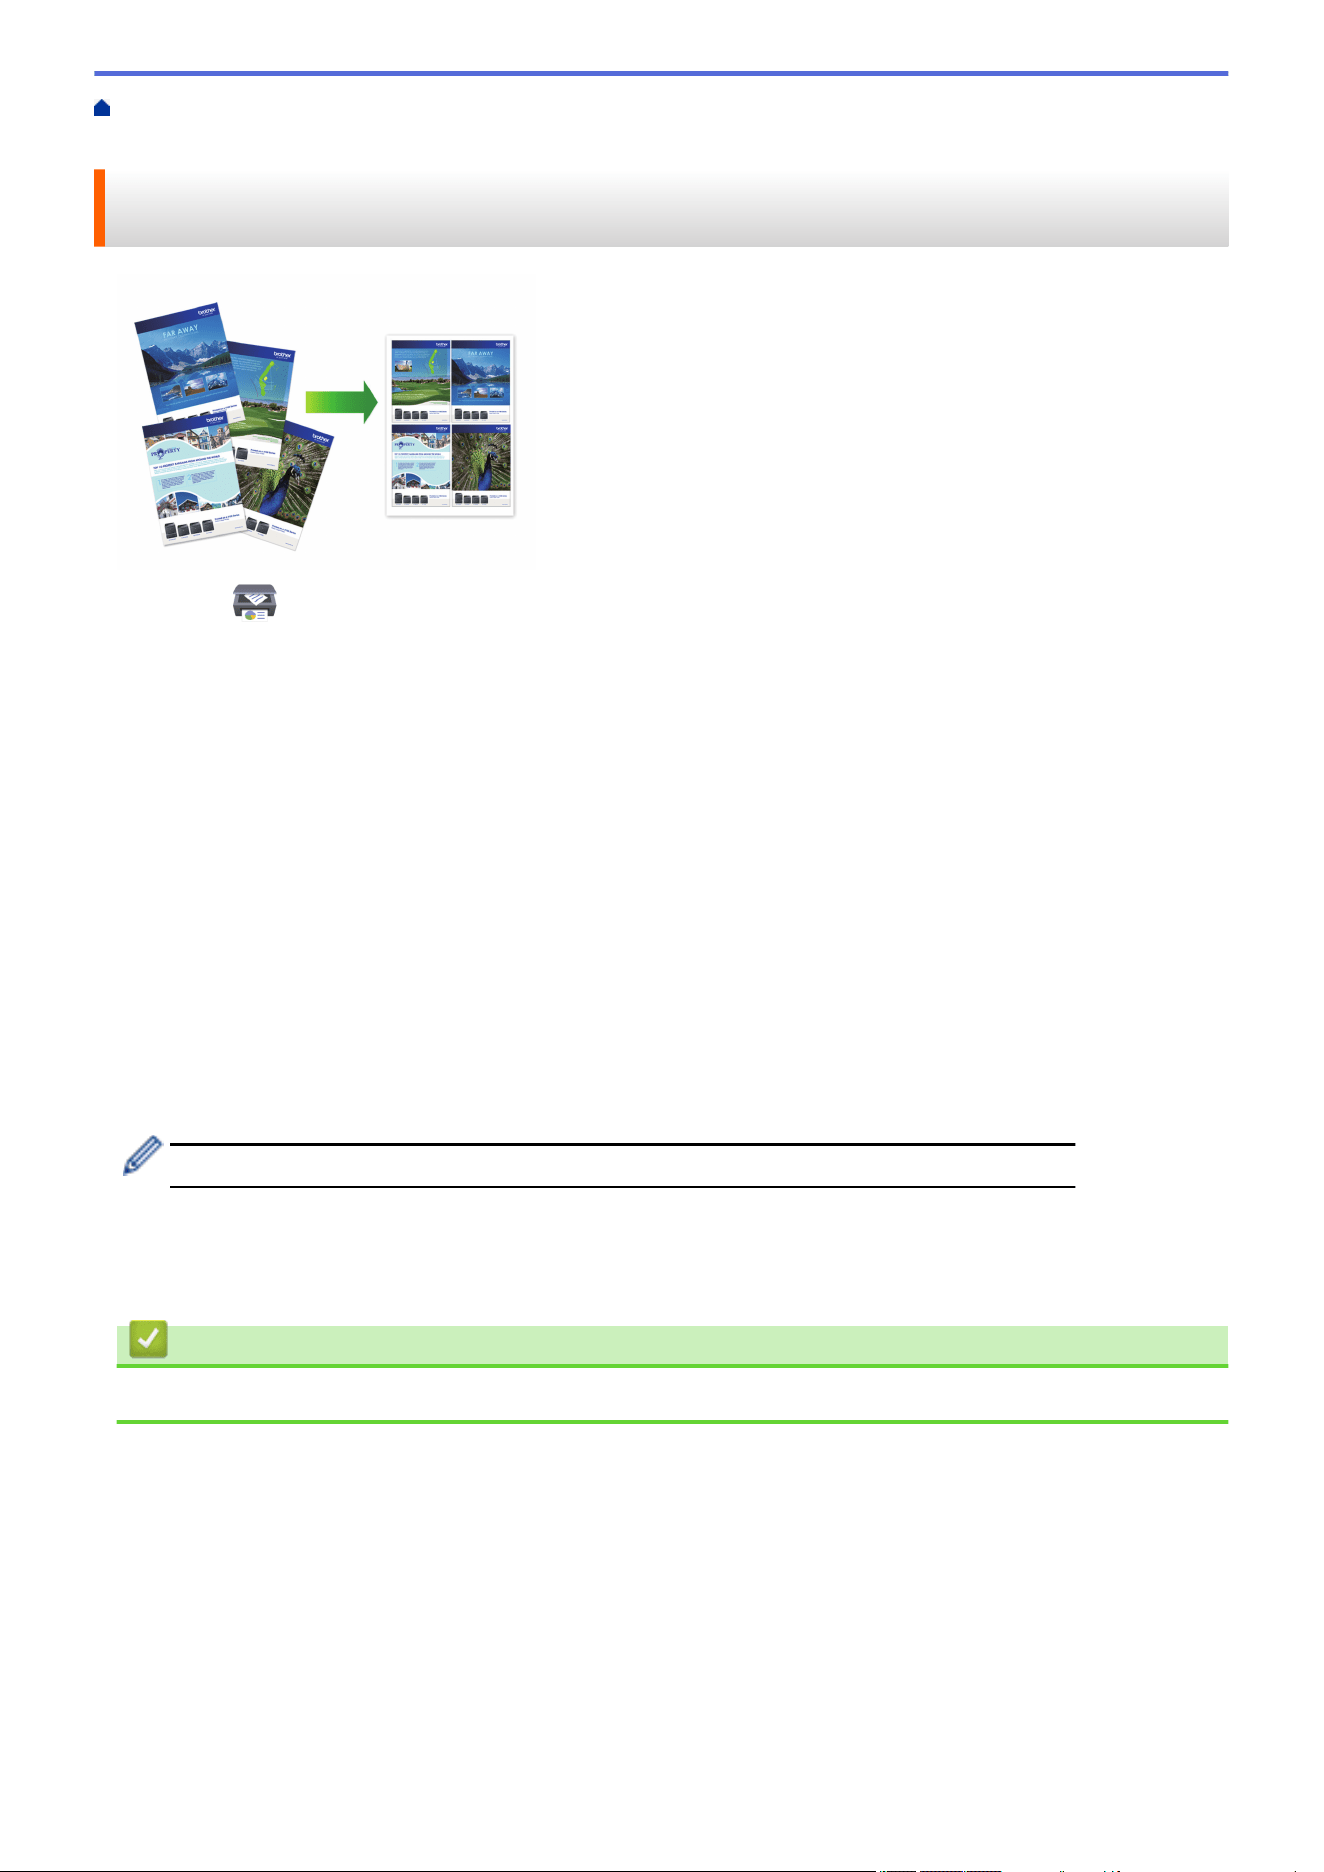
Home > Print > Print Using Brother iPrint&Scan (Windows/Mac) > Print More Than One Page on a Single
Sheet of Paper Using Brother iPrint&Scan (N in 1) (Windows/Mac)
Print More Than One Page on a Single Sheet of Paper Using Brother
iPrint&Scan (N in 1) (Windows/Mac)
1. Launch (Brother iPrint&Scan).
The Brother iPrint&Scan screen appears.
2. If your Brother machine is not selected, click the Select your Machine button, and then select your model
name from the list. Click OK.
3. Click Print.
4. Do one of the following:
• Windows
Click Document.
• Mac
Click PDF.
5. Select the file you want to print, and then do one of the following:
• Windows
Click Next.
• Mac
Click Open, and then click Next if prompted.
When printing documents with many pages, you can also select the pages you want to print.
6. Click the Layout drop-down list, and then select the number of pages to print on each sheet.
7. Change other printer settings, if needed.
8. Click Print.
Related Information
• Print Using Brother iPrint&Scan (Windows/Mac)
105

Home > Print > Print Using Brother iPrint&Scan (Windows/Mac) > Print a Colour Document in Greyscale
Using Brother iPrint&Scan (Windows/Mac)
Print a Colour Document in Greyscale Using Brother iPrint&Scan
(Windows/Mac)
Greyscale mode makes the print processing speed faster than colour mode. If your document contains colour,
selecting Greyscale mode prints your document in 256 levels of greyscale.
1. Start Brother iPrint&Scan.
• Windows
Launch (Brother iPrint&Scan).
• Mac
In the Finder menu bar, click Go > Applications, and then double-click the iPrint&Scan icon.
The Brother iPrint&Scan screen appears.
2. If your Brother machine is not selected, click the Select your Machine button, and then select your model
name from the list. Click OK.
3. Click Print.
4. Do one of the following:
• Windows
Click Photo or Document.
• Mac
Click Photo or PDF.
5. Select the file you want to print, and then do one of the following:
• Windows
Click Next.
• Mac
Click Open, and then click Next if prompted.
When printing documents with many pages, you can also select the pages you want to print.
6. Click the Colour / Mono drop-down list, and then select the Mono option.
7. Change other printer settings, if needed.
8. Click Print.
Related Information
• Print Using Brother iPrint&Scan (Windows/Mac)
106

Home > Print > Print Data Directly from a USB Flash Drive > Compatible USB Flash Drives
Compatible USB Flash Drives
Your Brother machine has a media drive (slot) for use with common data storage.
IMPORTANT
The USB direct interface supports only USB flash drives and USB devices that use the USB mass storage
standard. Other USB devices are not supported.
Compatible Media
USB Flash Drive
Compatible USB Flash Drives
USB Class USB Mass Storage Class
USB Mass Storage Sub Class SCSI or SFF-8070i
Transfer protocol Bulk transfer Only
Format
1
FAT12/FAT16/FAT32/exFAT
Sector size Max. 4096 Byte
Encryption Encrypted devices are not supported.
1
NTFS format is not supported.
Related Information
• Print Data Directly from a USB Flash Drive
• Save Scanned Data to a USB Flash Drive
108

Home > Print > Print Data Directly from a USB Flash Drive > Print Photos Directly from a USB Flash Drive
Print Photos Directly from a USB Flash Drive
Even if your machine is not connected to your computer, you can print photos directly from a USB Flash memory
drive.
• Important Information about Photo Printing
• Print Photos from a USB Flash Drive on the Brother Machine
109

Home > Print > Print Data Directly from a USB Flash Drive > Print Photos Directly from a USB Flash
Drive > Important Information about Photo Printing
Important Information about Photo Printing
Your machine is designed to be compatible with modern digital camera image files and USB flash drives. Read
the points below to avoid photo printing problems:
• The image file extension must be .JPG (other image file extensions like .JPEG, .TIF, .GIF and so on will not
be recognised).
• Direct photo printing must be performed separately from photo printing operations using the computer.
(Simultaneous operation is not available.)
• The machine can read up to 999 files
1
on a USB flash drive.
Be aware of the following:
• When printing an index sheet or image, the machine will print all the valid images, even if one or more
images have been corrupted. Corrupted images will not be printed.
• Your machine supports USB flash drives that have been formatted by Windows.
Related Information
• Print Photos Directly from a USB Flash Drive
1 The folder inside USB flash drives is also counted.
110

Home > Print > Print Data Directly from a USB Flash Drive > Print Photos Directly from a USB Flash
Drive > Print Photos from a USB Flash Drive on the Brother Machine
Print Photos from a USB Flash Drive on the Brother Machine
• Preview and Print Photos from a USB Flash Drive
• Print a Photo Index Sheet (Thumbnails) from a USB Flash Drive
• Print Photos by Image Number
• Print Photos with Auto Cropping
• Print Borderless Photos from a USB Flash Drive
• Print the Date from Your Photo's Data
• Print Settings for Photos
111
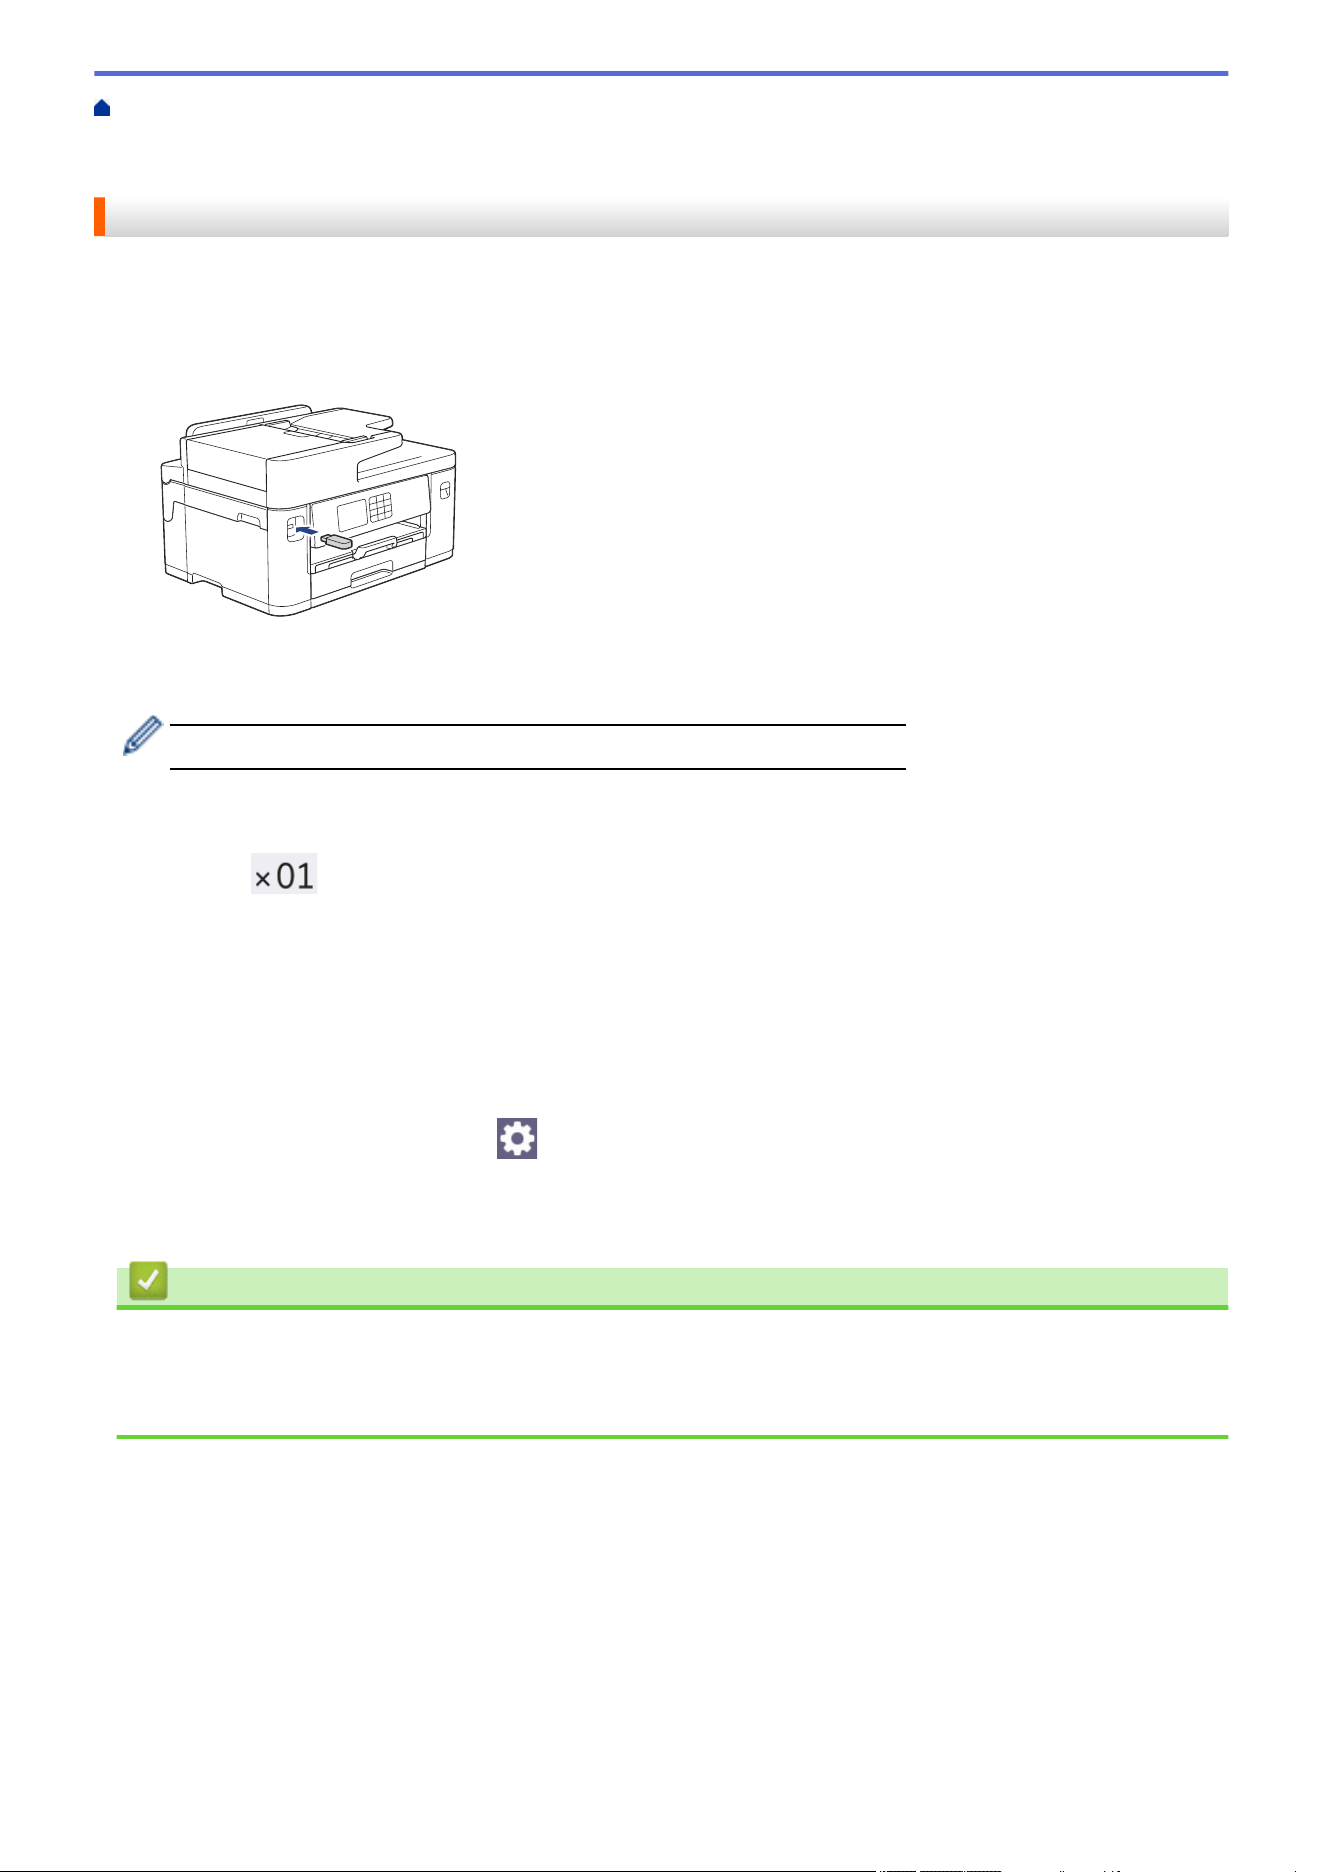
Home > Print > Print Data Directly from a USB Flash Drive > Print Photos Directly from a USB Flash
Drive > Print Photos from a USB Flash Drive on the Brother Machine > Preview and Print Photos from a USB
Flash Drive
Preview and Print Photos from a USB Flash Drive
You can preview your photos on the LCD before printing them, or print images stored on a USB flash drive.
If your photos are large files, there may be a delay before each photo is displayed.
1. Insert a USB flash drive in the USB slot.
2. Press [JPEG Print] > [Select Files].
3. Press d or c to display the photo you want to print, and then press it.
To print all photos, press [Print All], and then press [Yes] to confirm.
4. Enter the number of copies in one of the following ways:
• Press [-] or [+] on the touchscreen.
• Press
to display the keyboard on the touchscreen, and then enter the number of copies using the
touchscreen keyboard. Press [OK].
• Enter the number of copies using the dial pad.
5. Press [OK].
6. Repeat the last three steps until you have selected all the photos you want to print.
7. Press [OK].
8. Read and confirm the displayed list of options.
9. To change the print settings, press [Print Settings].
When finished, press [OK].
10. Press [Start].
Related Information
• Print Photos from a USB Flash Drive on the Brother Machine
Related Topics:
• Print Settings for Photos
112
Home > Print > Print Data Directly from a USB Flash Drive > Print Photos Directly from a USB Flash
Drive > Print Photos from a USB Flash Drive on the Brother Machine > Print a Photo Index Sheet
(Thumbnails) from a USB Flash Drive
Print a Photo Index Sheet (Thumbnails) from a USB Flash Drive
Print a photo Index Sheet to see small preview versions of all pictures on your USB flash drive.
• The machine assigns numbers for images (such as No.1, No.2, No.3, and so on).
The machine does not recognise any other numbers or file names that your digital camera or computer
has used to identify the pictures.
• Only file names that are 20 characters or less will be printed correctly on the index sheet.
• File names cannot be printed correctly if they contain non-alphanumeric characters, but non-
alphanumeric characters do not affect photo print settings.
1. Insert a USB flash drive in the USB slot.
2. Press [JPEG Print] > [Index Print] > [Print Index Sheet].
3. If you want to change the print settings, press
[Print Settings].
When finished, press [OK].
Option Description
Paper Type
Select the paper type.
Paper Size
Select the paper size.
4. Press [Start].
Related Information
• Print Photos from a USB Flash Drive on the Brother Machine
Related Topics:
• Print Photos by Image Number
113
Home > Print > Print Data Directly from a USB Flash Drive > Print Photos Directly from a USB Flash
Drive > Print Photos from a USB Flash Drive on the Brother Machine > Print Photos by Image Number
Print Photos by Image Number
Before you can print an individual image, you must print the photo Index Sheet (thumbnails) to know the image
number.
1. Insert a USB flash drive in the USB slot.
2. Press [JPEG Print] > [Index Print] > [Print Photos].
3. Enter the image numbers you want to print using the photo Index Sheet. After you have selected the image
numbers, press [OK].
• Enter multiple numbers at one time using a comma or a hyphen. For example, enter 1, 3, 6 to print
images No.1, No.3 and No.6. Print a range of images using a hyphen. For example, enter 1-5 to print
images No.1 to No.5.
• Enter up to 12 characters (including commas and hyphens) for the image numbers you want to print.
4. Enter the number of copies in one of the following ways:
• Press [-] or [+] on the touchscreen.
• Press to display the keyboard on the touchscreen, and then enter the number of copies using the
touchscreen keyboard. Press [OK].
• Enter the number of copies using the dial pad.
5. To change the print settings, press [Print Settings].
When finished, press [OK].
6. Press [Start].
Related Information
• Print Photos from a USB Flash Drive on the Brother Machine
Related Topics:
• Print a Photo Index Sheet (Thumbnails) from a USB Flash Drive
• Print Settings for Photos
114
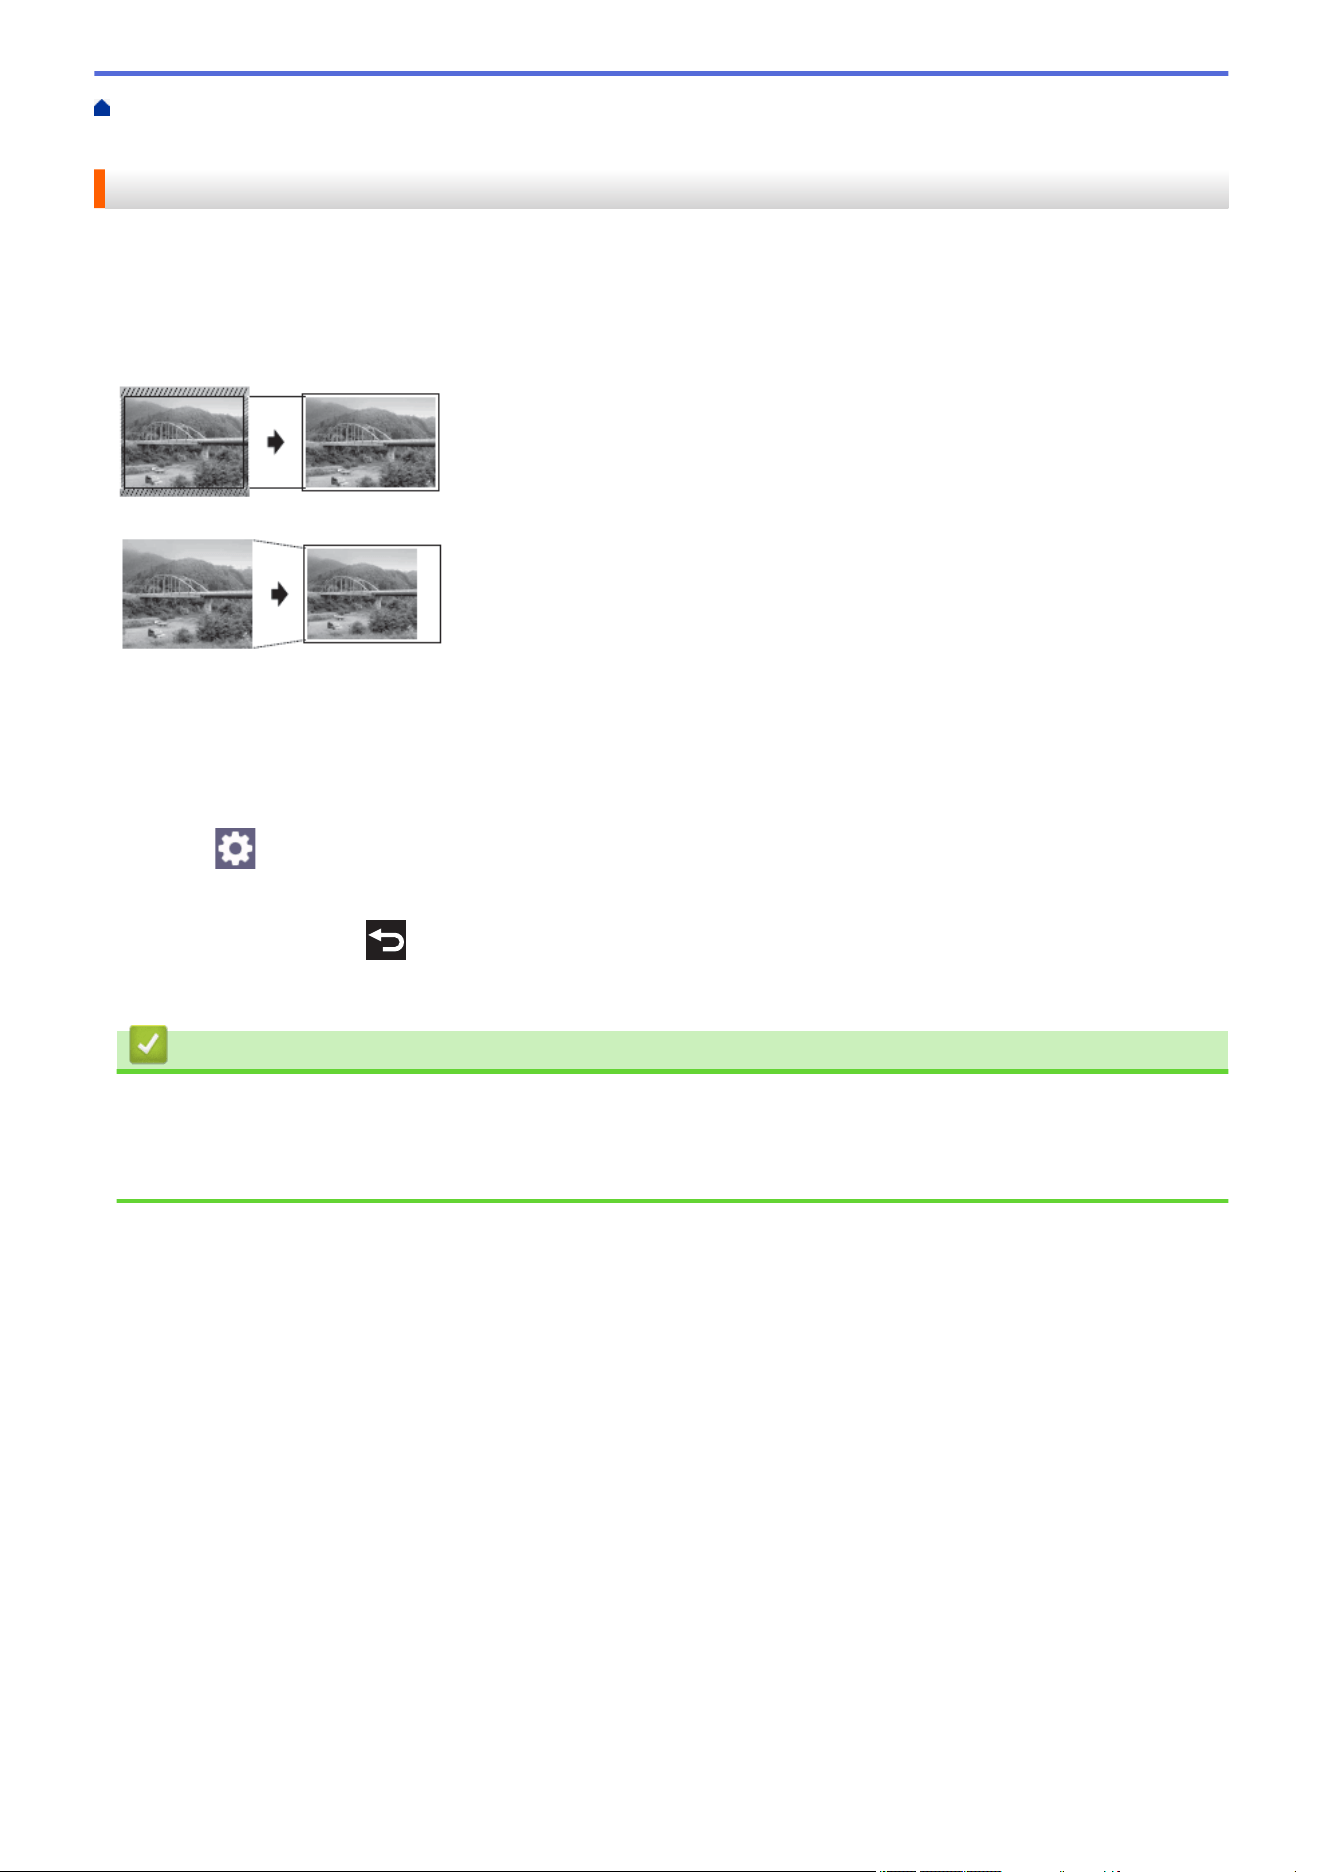
Home > Print > Print Data Directly from a USB Flash Drive > Print Photos Directly from a USB Flash
Drive > Print Photos from a USB Flash Drive on the Brother Machine > Print Photos with Auto Cropping
Print Photos with Auto Cropping
If your photo is too long or too wide to fit within the layout space, part of the image will be cropped.
• The factory setting is On. To print the entire image, change this setting to Off.
• If you set the [Cropping] setting to Off, set the [Borderless] setting to Off, also.
Cropping: On
Cropping: Off
1. Insert a USB flash drive in the USB slot.
2. Press [JPEG Print] > [Select Files].
3. Press d or c to display each photo. When the photo you want appears, press it, and then press [OK].
4. Press [OK].
5. Press
[Print Settings] > [Cropping].
6. Press [On] (or [Off]).
7. When finished, press or [OK].
8. Press [Start].
Related Information
• Print Photos from a USB Flash Drive on the Brother Machine
Related Topics:
• Other Problems
115

Home > Print > Print Data Directly from a USB Flash Drive > Print Photos Directly from a USB Flash
Drive > Print Photos from a USB Flash Drive on the Brother Machine > Print Borderless Photos from a USB
Flash Drive
Print Borderless Photos from a USB Flash Drive
This feature expands the printable area to the edges of the paper. Printing time will be slower.
1. Insert a USB flash drive in the USB slot.
2. Press [JPEG Print] > [Select Files].
3. Press d or c to display each photo. When the photo you want appears, press it, and then press [OK].
4. Press [OK].
5. Press [Print Settings] > [Borderless].
6. Press [On] (or [Off]).
7. When finished, press or [OK].
8. Press [Start].
Related Information
• Print Photos from a USB Flash Drive on the Brother Machine
Related Topics:
• Other Problems
116
Home > Print > Print Data Directly from a USB Flash Drive > Print Photos Directly from a USB Flash
Drive > Print Photos from a USB Flash Drive on the Brother Machine > Print the Date from Your Photo's Data
Print the Date from Your Photo's Data
Print the date if it is already in your photo’s information. The date will be printed in the lower-right corner. To use
this setting, the photo data must include the date.
1. Insert a USB flash drive in the USB slot.
2. Press [JPEG Print] > [Select Files].
3. Press d or c to display each photo. When the photo you want appears, press it, and then press [OK].
4. Press [OK].
5. Press
[Print Settings] > [Date Print].
6. Press [On] (or [Off]).
7. When finished, press or [OK].
8. Press [Start].
Related Information
• Print Photos from a USB Flash Drive on the Brother Machine
117
Home > Print > Print Data Directly from a USB Flash Drive > Print Photos Directly from a USB Flash
Drive > Print Photos from a USB Flash Drive on the Brother Machine > Print Settings for Photos
Print Settings for Photos
Press [Print Settings] to display the settings shown in the table.
Option
Description
Print Quality
Select the print resolution for your type of document.
When you select the Inkjet Paper option in the Paper Type
setting, you can select only Fine.
(MFC-J2740DW/MFC-J5740DW/
MFC-J5855DW/MFC-J5955DW) Tray
Select
Select the tray.
Paper Type
Select the paper type.
Paper Size
Select the paper size.
Print Layout
Select the print layout.
Brightness
Adjust the brightness.
Contrast
Adjust the contrast.
Increasing the contrast will make an image look sharper and more
vivid.
Cropping
Crop the image around the margin to fit the paper size or print size.
Turn this feature off when you want to print whole images or prevent
unwanted cropping.
Borderless
Expand the printable area to fit the edges of the paper.
Date Print
Print the date on your photo.
Set New Default
Save the print settings you use most often by setting them as the
defaults.
Factory Reset
Restore any changed print settings back to the factory settings.
Related Information
• Print Photos from a USB Flash Drive on the Brother Machine
Related Topics:
• Preview and Print Photos from a USB Flash Drive
• Print Photos by Image Number
118
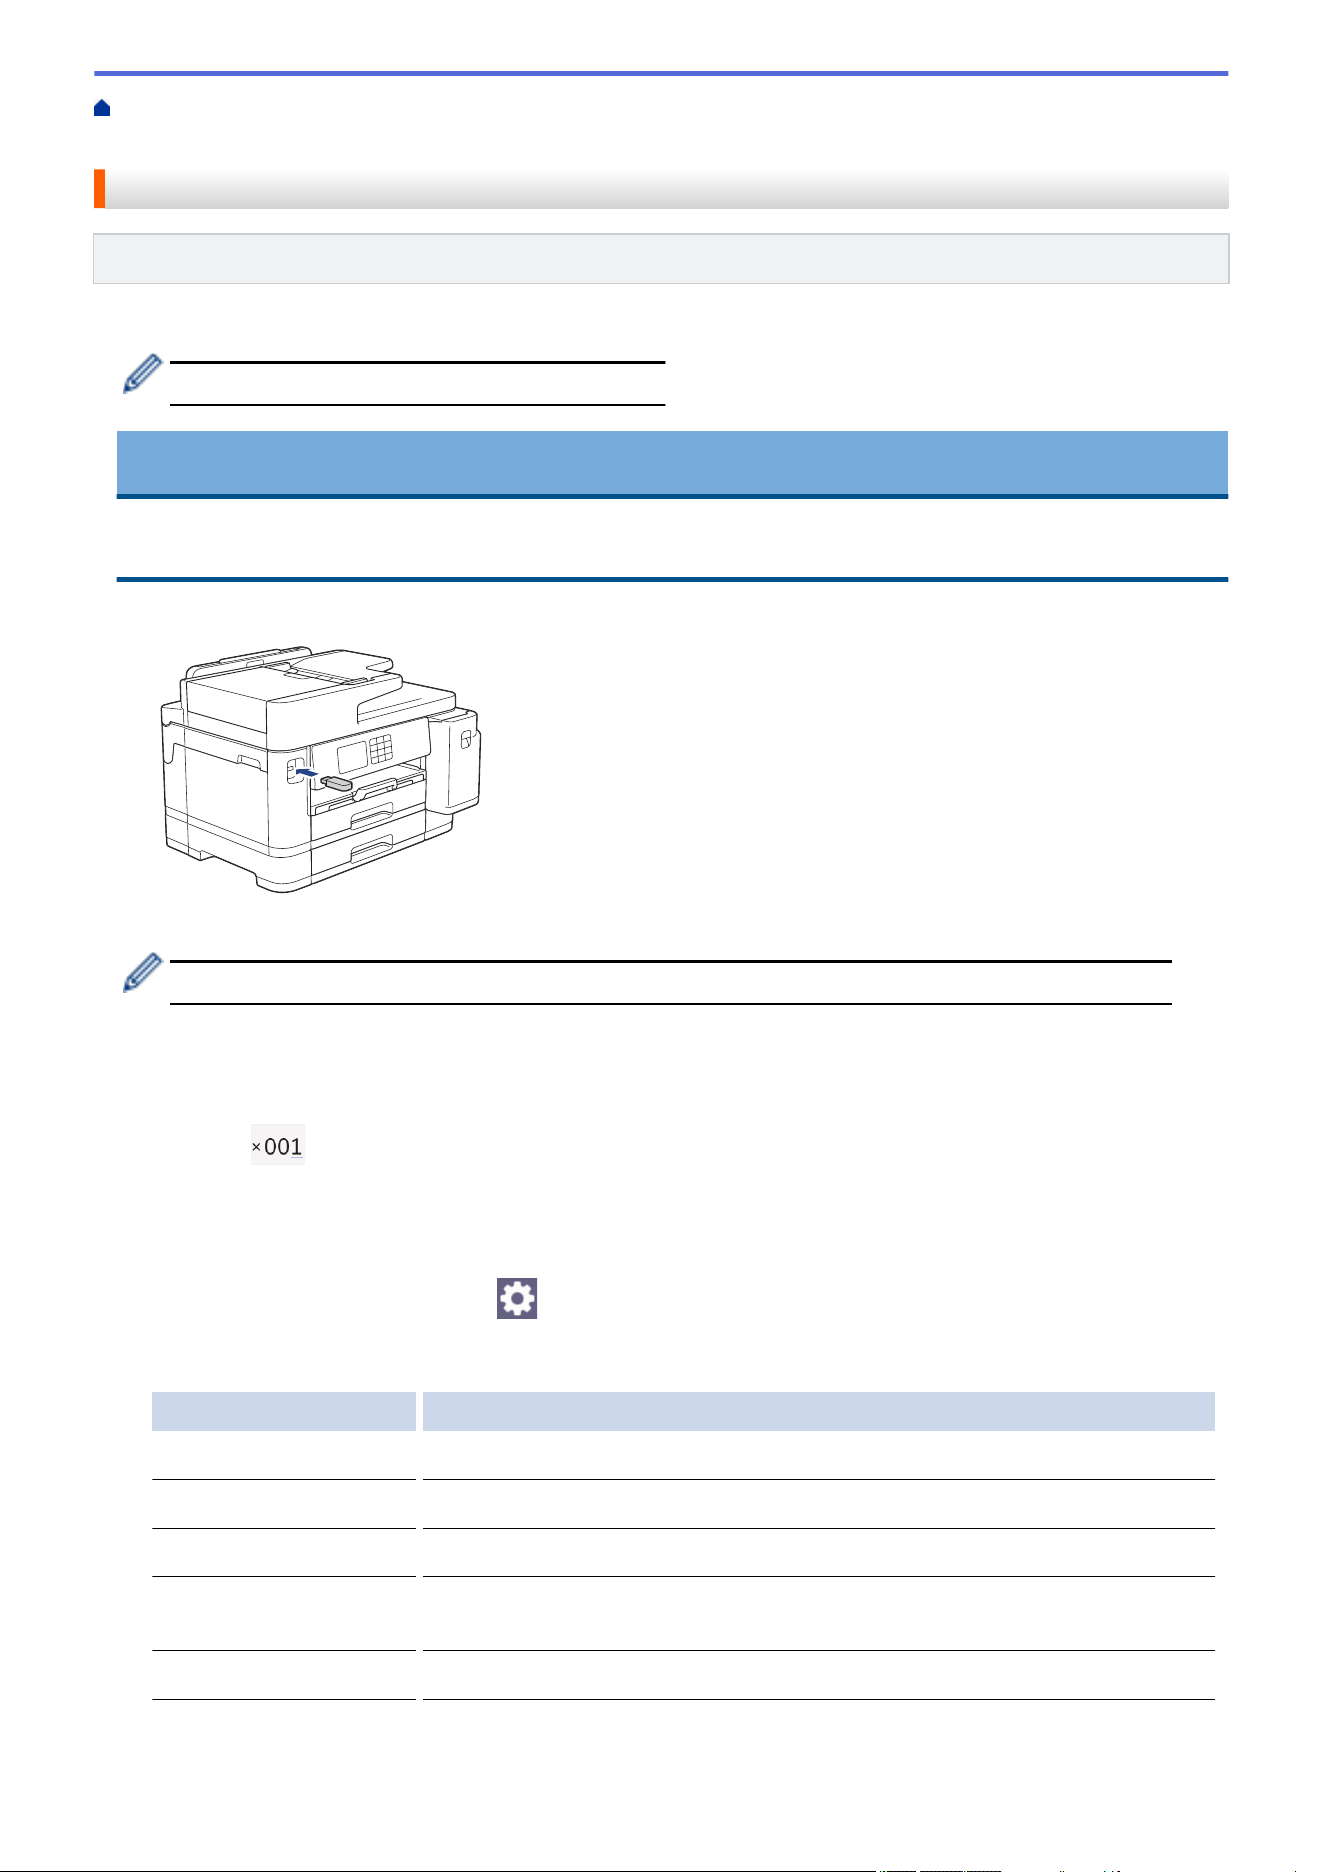
Home > Print > Print Data Directly from a USB Flash Drive > Print a PDF File Directly from a USB Flash
Drive
Print a PDF File Directly from a USB Flash Drive
Related Models: MFC-J5955DW
You can print a PDF file directly from a USB flash drive.
PDF files that are 2 GB or more cannot be printed.
IMPORTANT
To prevent damage to your machine, DO NOT connect any device other than a USB flash drive to the USB
direct interface.
1. Insert a USB flash drive in the USB slot.
2. Press [PDF Print].
If your machine has been set to Secure Function Lock On, you may not be able to access Direct Print.
3. Press a or b to display the PDF file you want to print, and then press it.
4. Enter the number of copies in one of the following ways:
• Press [-] or [+] on the touchscreen.
• Press to display the keyboard on the touchscreen, and then enter the number of copies using the
touchscreen keyboard. Press [OK].
• Enter the number of copies using the dial pad.
5. Read and confirm the displayed list of options.
6. To change the print settings, press [Print Settings].
When finished, press [OK].
Option Description
Print Quality
Select the print resolution for your type of document.
Tray Select
Select the tray.
Paper Size
Select the paper size.
Multiple Page
Set this option to print multiple pages on a single sheet of paper or print one
page of your document on multiple sheets.
2-sided
Select the type of 2-sided binding.
119

Option Description
Collate
Set this option to On to print sets of multi-page documents in the original page
order.
PDF Option
Select this option to print a PDF file with the markups or stamps.
Set New Default
Save the print settings you use most often by setting them as the defaults.
Factory Reset
Restore any changed print settings back to the factory settings.
7. Press [Mono Start] or [Colour Start].
IMPORTANT
DO NOT remove the USB flash drive from the USB direct interface until the machine has finished
printing.
Related Information
• Print Data Directly from a USB Flash Drive
120
Home > Print > Print an Email Attachment
Print an Email Attachment
You can print files by emailing them to your Brother machine.
• You can attach up to 10 documents, 20 MB in total, to an email.
• This feature supports the following formats:
- Document files: PDF, TXT, Microsoft Word files, Microsoft Excel files, and Microsoft PowerPoint files
- Image files: JPEG, BMP, GIF, PNG, and TIFF
• The machine prints both the email content and attachments by default. To print only email attachments,
change the settings as necessary.
1. Press d or c to display [Apps].
Press [Apps].
• If information regarding the Internet connection appears on the machine’s LCD, read it, and then press
[OK].
• Occasionally, updates or announcements about Brother Web Connect's features will appear on the
LCD. Read the information, and then press [OK].
2. Press a or b to display the [Online Functions] option, and then press it.
• If this function is locked, contact your Network Administrator for access.
• If information regarding [Online Functions] appears, read it, and then press [OK].
3. Press [Enable].
Follow the on-screen instructions. Online Functions are enabled.
4. Press a or b to display the [Email Print] option, and then press it.
If information regarding [Email Print] appears, read it, and then press [OK].
5. Press [Enable].
Follow the on-screen instructions. The machine prints the Instruction Sheet.
6. Send your email to the email address included on the sheet. The machine prints the email attachments.
To change settings, including email address and printer settings, access Web Based Management, click
Online Functions > Online Functions Settings in the left navigation menu, and then click the Online
Functions Settings Page button.
Related Information
• Print
Related Topics:
• Access Web Based Management
121


Home > Scan > Scan Using the Scan Button on Your Machine
Scan Using the Scan Button on Your Machine
• Scan Photos and Graphics
• Save Scanned Data to a Folder as a PDF File
• Save Scanned Data to a USB Flash Drive
• Scan Multiple Business Cards and Photos (Auto Crop)
• Scan to an Editable Text File Using OCR
• Save Scanned Data as an Email Attachment
• Send Scanned Data to an Email Recipient
• Scan to FTP
• Scan to SSH FTP (SFTP)
• Scan to Network (Windows)
• Scan to SharePoint
• Web Services for Scanning on Your Network (Windows 7, Windows 8.1, and Windows
10)
• Change Scan Settings Using Brother iPrint&Scan
123
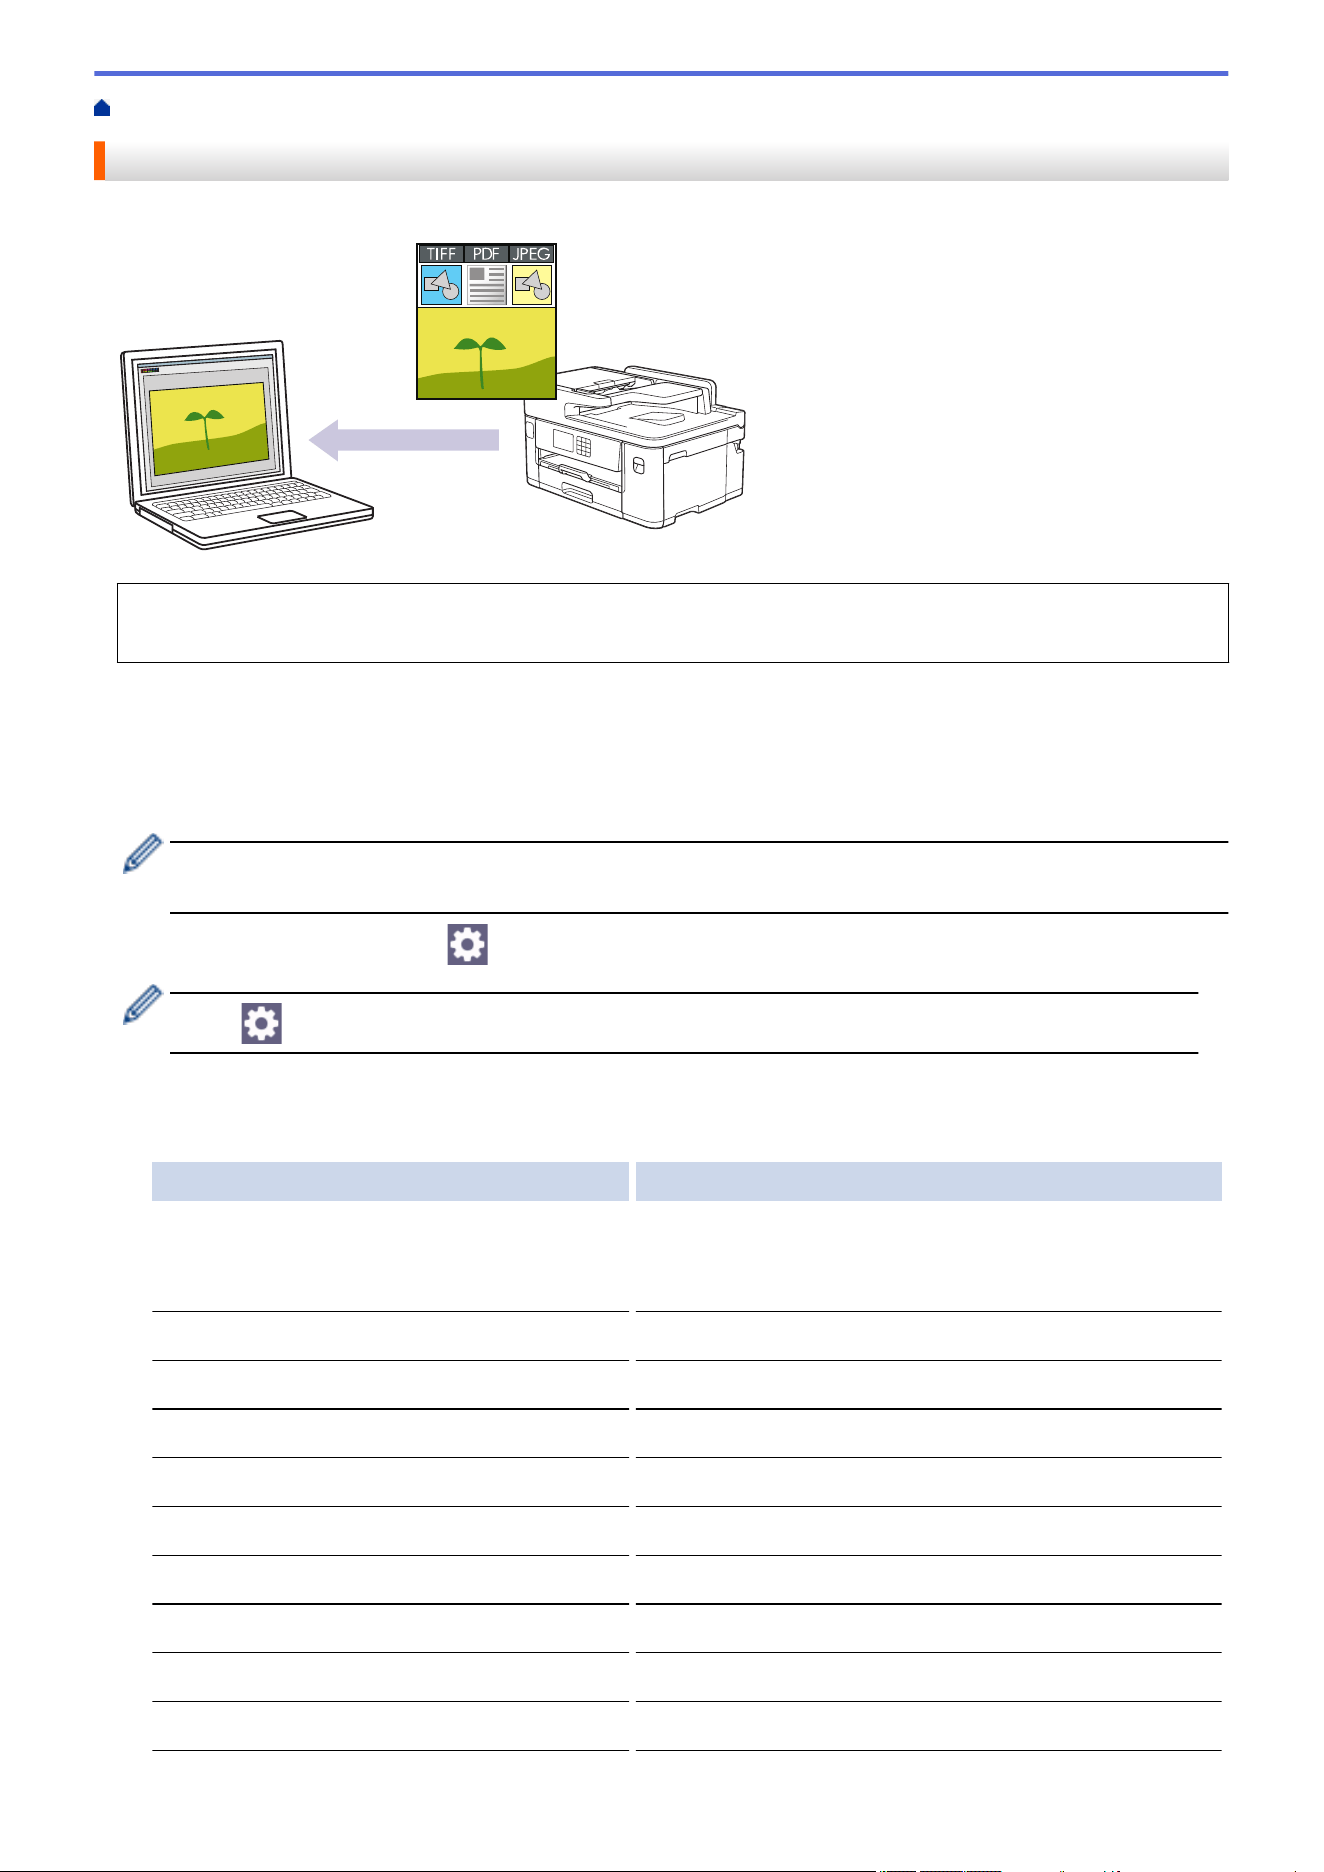
Home > Scan > Scan Using the Scan Button on Your Machine > Scan Photos and Graphics
Scan Photos and Graphics
Send scanned photos or graphics directly to your computer.
Use the Scan button on the machine to make temporary changes to the scan settings. To make permanent
changes, use Brother iPrint&Scan.
1. Load your document.
2. Press [Scan] > [to PC] > [to Image].
3. If the machine is connected over the network, press a or b to display the computer where you want to send
data, and then select the computer name.
If the LCD message prompts you to enter a PIN, use the LCD to enter the four-digit PIN for the computer,
and then press [OK].
4. To change the settings, press [Options].
To use [Options], you must connect a computer with Brother iPrint&Scan installed to the machine.
5. Press [Scan Settings] > [Set at Device].
6. Select the scan settings you want to change, and then press [OK].
Option Description
2-sided Scan
(MFC-J2740DW/MFC-J5740DW/
MFC-J5955DW)
Select the 2-sided scan mode.
Colour Setting
Select the colour format for your document.
Resolution
Select the scan resolution for your document.
File Type
Select the file format for your document.
Document Size
Select your document size.
Brightness
Select the brightness level.
Contrast
Select the contrast level.
Auto Deskew
Correct any skewed documents when they are scanned.
Skip Blank Page
When On is selected, blank pages are skipped.
Remove Background Colour
Change the amount of background colour that is removed.
124

To save the settings as a shortcut, press [Save as Shortcut]. You will be asked if you want to make
this a One Touch Shortcut. Follow the LCD instructions.
7. Press [Start].
The machine starts scanning. If using the machine's scanner glass, follow the LCD instructions to complete
the scanning job.
Related Information
• Scan Using the Scan Button on Your Machine
125
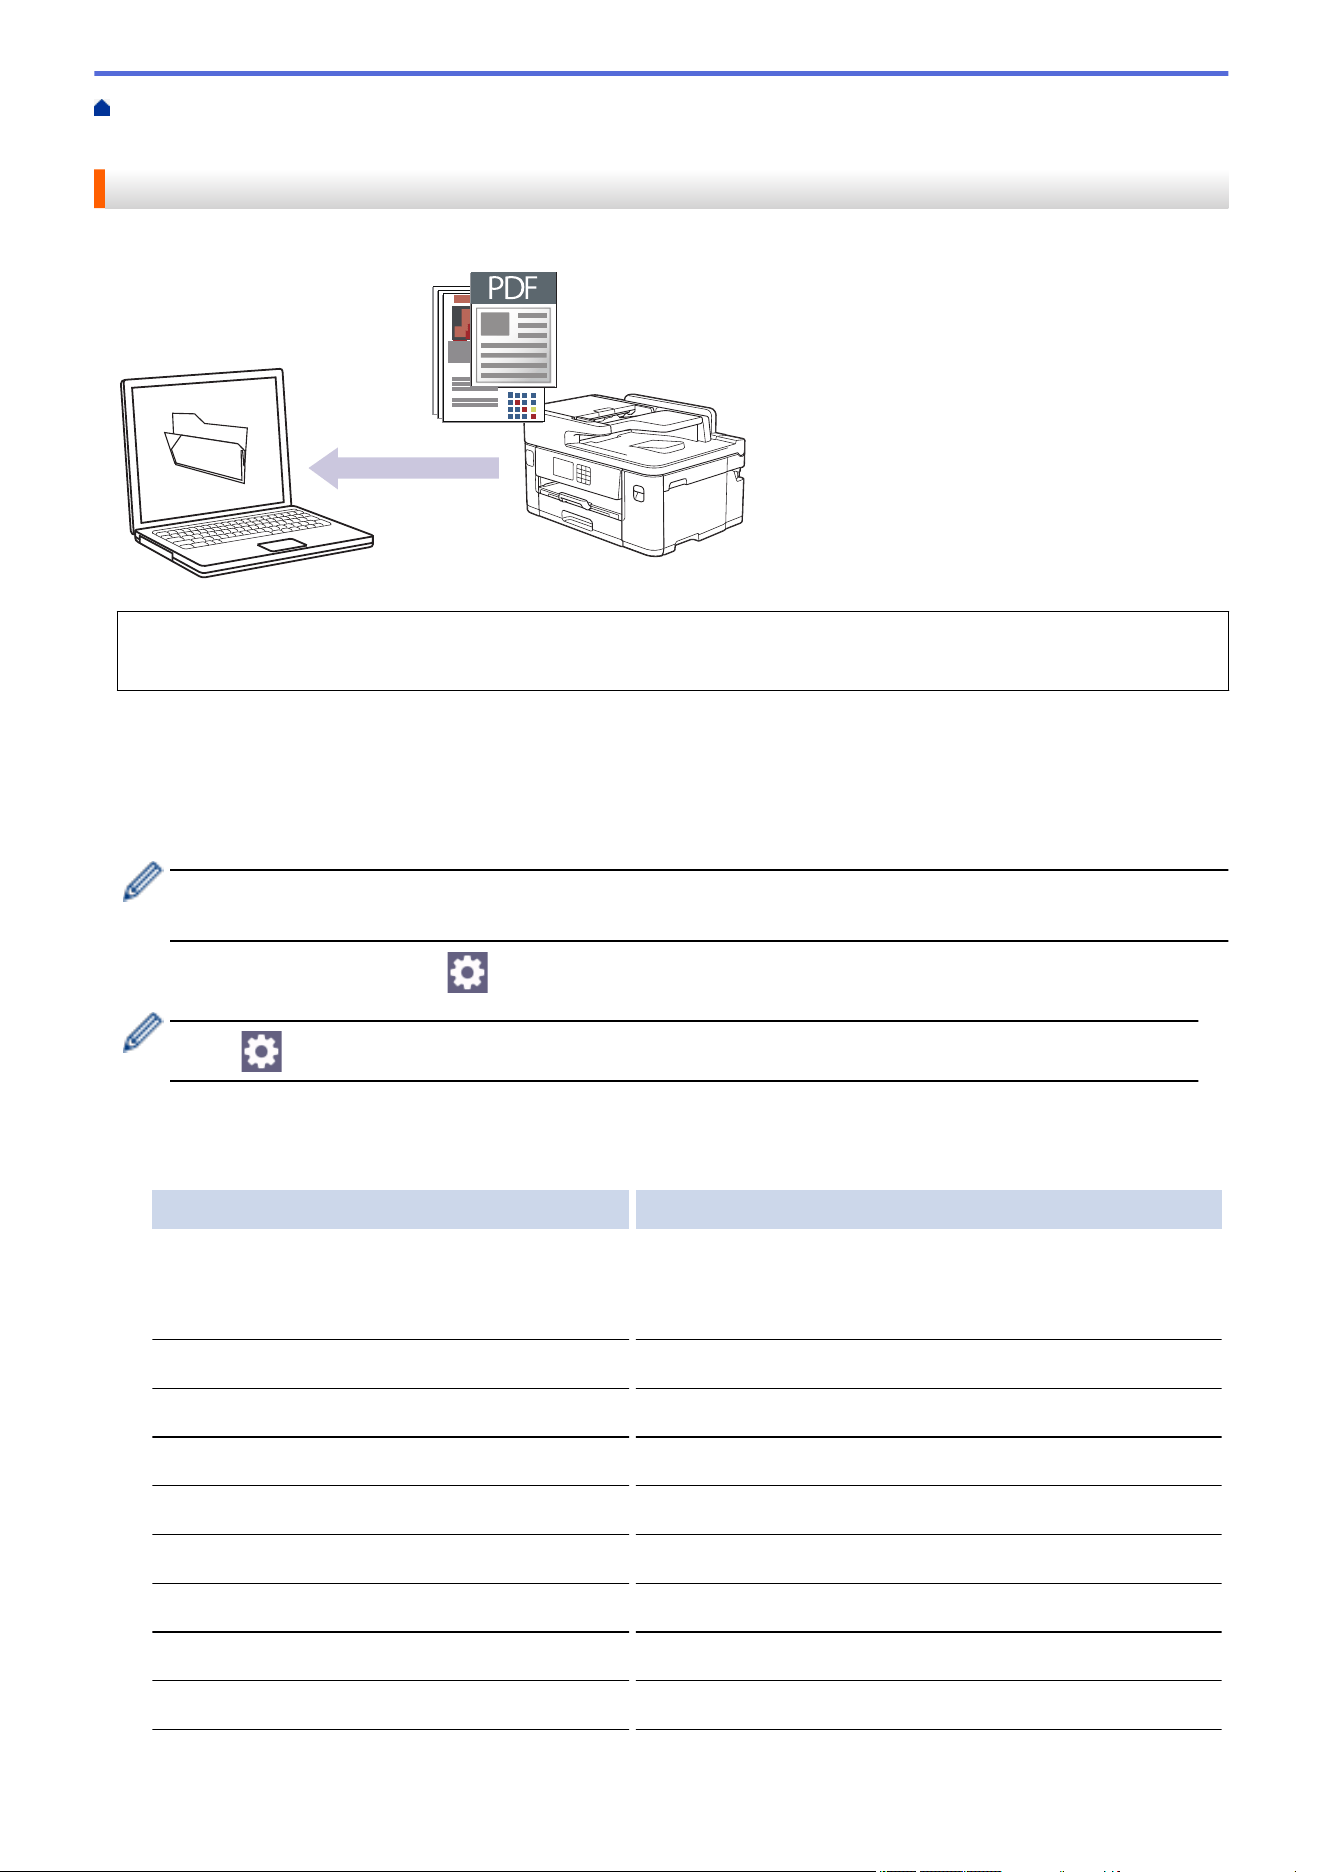
Home > Scan > Scan Using the Scan Button on Your Machine > Save Scanned Data to a Folder as a PDF
File
Save Scanned Data to a Folder as a PDF File
Scan documents and save them to a folder on your computer as PDF files.
Use the Scan button on the machine to make temporary changes to the scan settings. To make permanent
changes, use Brother iPrint&Scan.
1. Load your document.
2. Press [Scan] > [to PC] > [to File].
3. If the machine is connected over the network, press a or b to display the computer where you want to send
data, and then select the computer name.
If the LCD message prompts you to enter a PIN, use the LCD to enter the four-digit PIN for the computer,
and then press [OK].
4. To change the settings, press [Options].
To use [Options], you must connect a computer with Brother iPrint&Scan installed to the machine.
5. Press [Scan Settings] > [Set at Device].
6. Select the scan settings you want to change, and then press [OK].
Option Description
2-sided Scan
(MFC-J2740DW/MFC-J5740DW/
MFC-J5955DW)
Select the 2-sided scan mode.
Colour Setting
Select the colour format for your document.
Resolution
Select the scan resolution for your document.
File Type
Select the file format for your document.
Document Size
Select your document size.
Brightness
Select the brightness level.
Contrast
Select the contrast level.
Auto Deskew
Correct any skewed documents when they are scanned.
Skip Blank Page
When On is selected, blank pages are skipped.
126

Option Description
Remove Background Colour
Change the amount of background colour that is removed.
To save the settings as a shortcut, press [Save as Shortcut]. You will be asked if you want to make
this a One Touch Shortcut. Follow the LCD instructions.
7. Press [Start].
The machine starts scanning. If using the machine's scanner glass, follow the LCD instructions to complete
the scanning job.
Related Information
• Scan Using the Scan Button on Your Machine
127
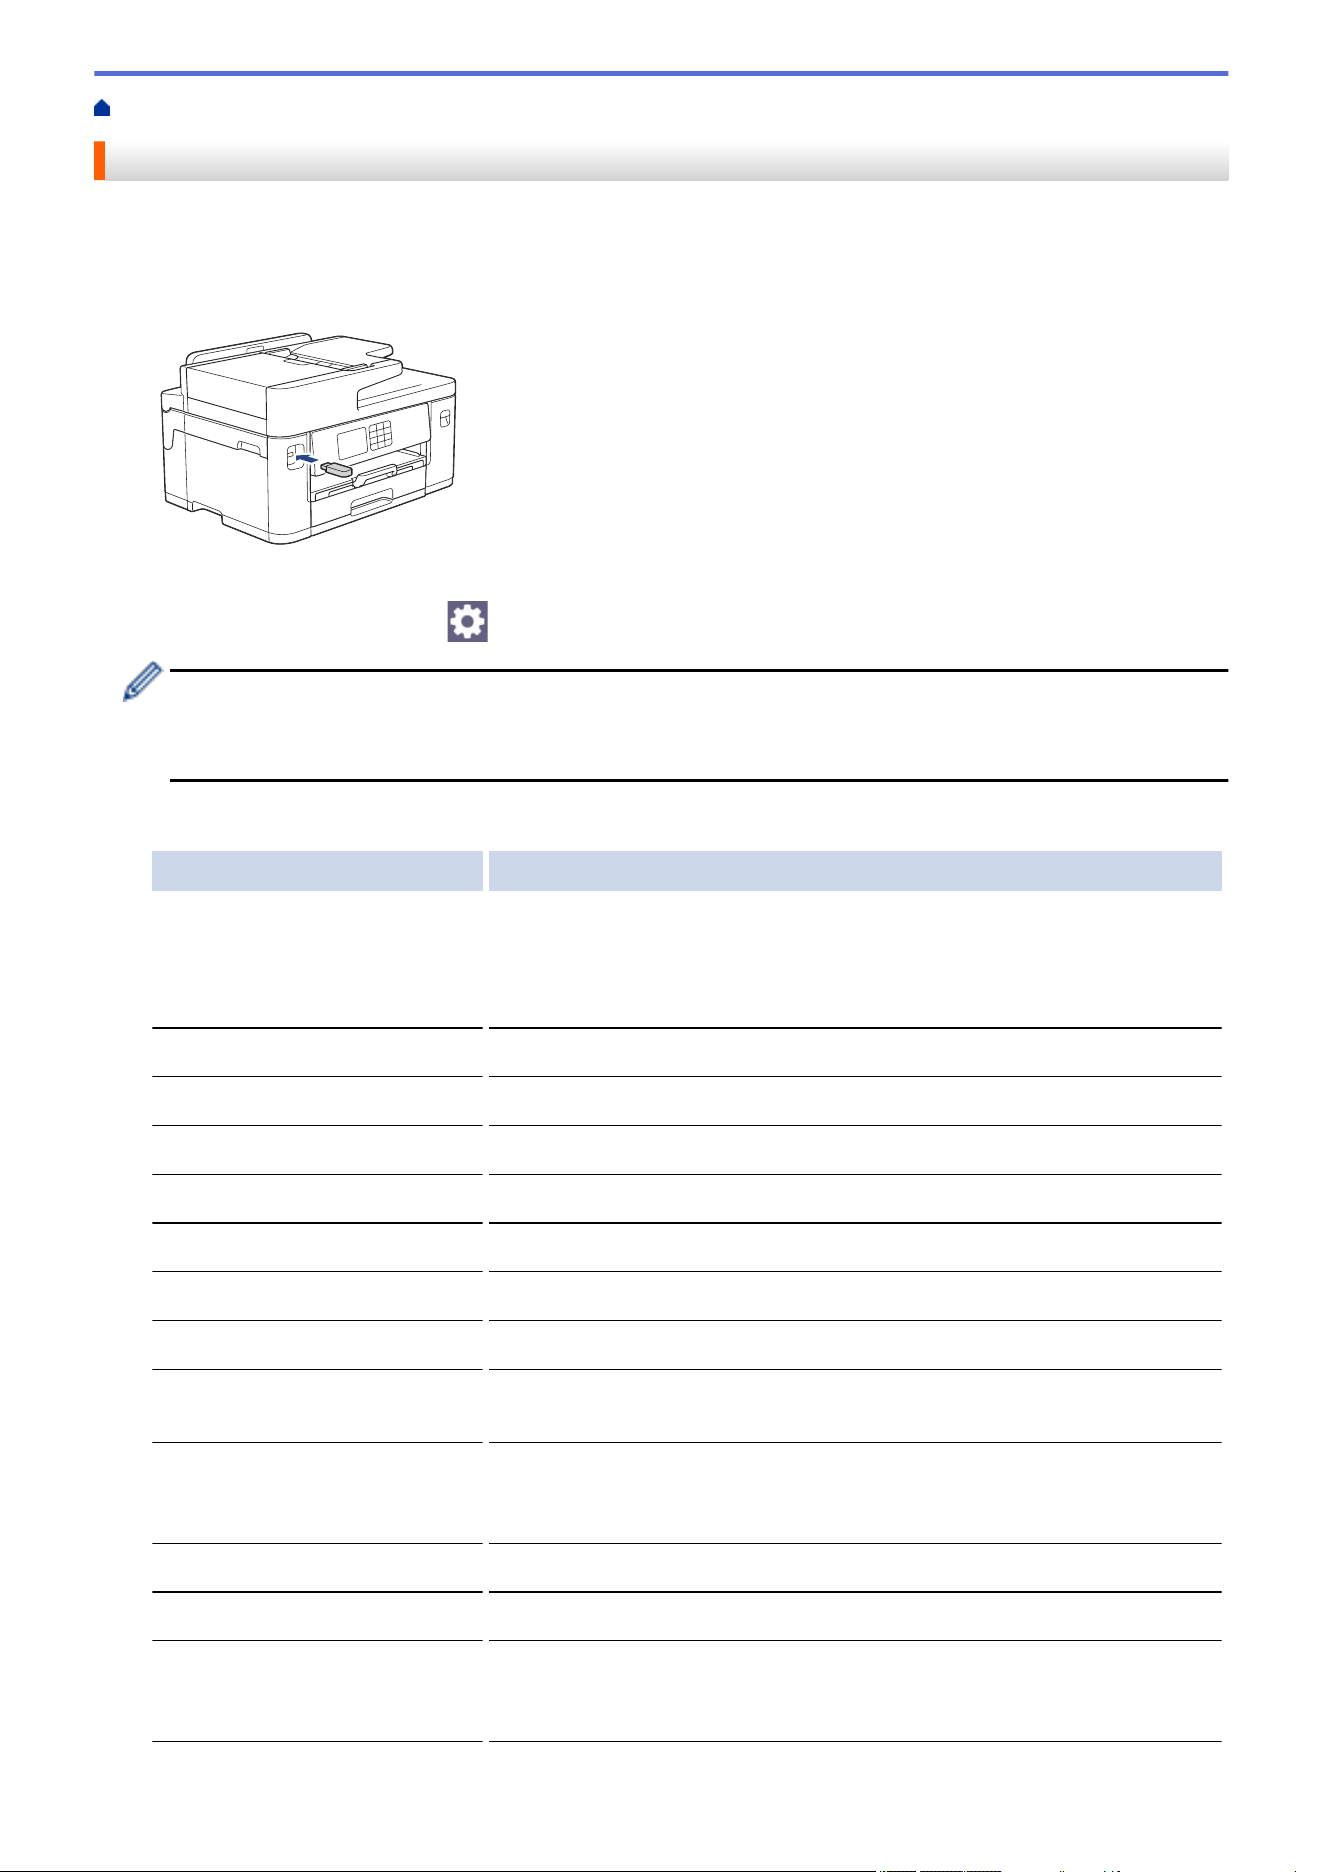
Home > Scan > Scan Using the Scan Button on Your Machine > Save Scanned Data to a USB Flash Drive
Save Scanned Data to a USB Flash Drive
Scan documents and save them directly to a USB flash drive without using a computer.
1. Load your document.
2. Insert a USB flash drive in the USB slot.
3. Press a or b to display the [Scan to Media] option, and then press it.
4. To change the settings, press [Options], and then go to the next step.
• To set your own default settings: after making changes to settings, press the [Set New Default]
option, and then press [Yes].
• To restore the factory settings: press the [Factory Reset] option, and then press [Yes].
5. Select the scan settings you want to change, and then press [OK].
Option Description
2-sided Scan
(MFC-J2740DW/
MFC-J5740DW/
MFC-J5955DW)
Select the 2-sided scan mode.
Colour Setting
Select the colour format for your document.
Resolution
Select the scan resolution for your document.
File Type
Select the file format for your document.
Document Size
Select your document size.
Brightness
Select the brightness level.
Contrast
Select the contrast level.
File Name
Rename the file.
File Name Style
Select the order in which the date, counter number, and other items
appear in the file names.
Auto Crop
Scan multiple documents placed on the scanner glass to a USB flash
drive. The machine will scan each document and create separate files or
a single multi-page file.
Auto Deskew
Correct any skewed documents when they are scanned.
Skip Blank Page
When On is selected, blank pages are skipped.
Skip Blank Page
Sensitivity
Select the sensitivity level for detecting blank pages in the scanned data.
The higher the sensitivity, the easier it is for the machine to detect blank
pages.
128
Option Description
Remove Background
Colour
Change the amount of background colour that is removed.
Margin Settings
Adjust your document's margins.
To save the settings as a shortcut, press [Save as Shortcut]. You will be asked if you want to make
this a One Touch Shortcut. Follow the LCD instructions.
6. Press [Start].
7. If you are using the scanner glass, set the next page and then press [Continue]. If there are no more
pages to scan, press [Finish]. After you finish scanning, make sure you choose [Finish] before
removing the USB flash drive from the machine.
IMPORTANT
The LCD displays a message while reading the data. DO NOT unplug the power cord or remove the USB
flash drive from the machine while it is reading the data. You could lose your data or damage the USB
flash drive.
Related Information
• Scan Using the Scan Button on Your Machine
• Compatible USB Flash Drives
129
Home > Scan > Scan Using the Scan Button on Your Machine > Save Scanned Data to a USB Flash
Drive > Compatible USB Flash Drives
Compatible USB Flash Drives
Your Brother machine has a media drive (slot) for use with common data storage.
IMPORTANT
The USB direct interface supports only USB flash drives and USB devices that use the USB mass storage
standard. Other USB devices are not supported.
Compatible Media
USB Flash Drive
Compatible USB Flash Drives
USB Class USB Mass Storage Class
USB Mass Storage Sub Class SCSI or SFF-8070i
Transfer protocol Bulk transfer Only
Format
1
FAT12/FAT16/FAT32/exFAT
Sector size Max. 4096 Byte
Encryption Encrypted devices are not supported.
1
NTFS format is not supported.
Related Information
• Print Data Directly from a USB Flash Drive
• Save Scanned Data to a USB Flash Drive
130
Home > Scan > Scan Using the Scan Button on Your Machine > Scan Multiple Business Cards and Photos
(Auto Crop)
Scan Multiple Business Cards and Photos (Auto Crop)
You can scan multiple documents placed on the scanner glass. The machine will scan each document and use
the Auto Crop feature to create separate files or a single multi-page file.
Guidelines for Auto Crop
1. 10 mm or greater
2. 20 mm or greater (bottom)
• This setting is available only for documents that are rectangular or square.
• If your document is too long or wide, this feature will not work as described here.
• You must place the documents away from the edges of the scanner glass as shown in the illustration.
• You must place the documents at least 10 mm away from each other.
• Auto Crop adjusts the skew of the document on the scanner glass; however, if your document is skewed
more than 45 degrees at less than 300 x 300 dpi or 10 degrees at 600 x 600 dpi, this feature will not work.
• The ADF must be empty to use Auto Crop.
• The Auto Crop feature is available for a maximum of 16 documents, depending on the size of the documents.
To scan documents using the Auto Crop feature, you must place the documents on the scanner glass.
1. Load documents on the scanner glass.
2. Insert a USB flash drive into your machine.
3. Press [Scan to Media] > [Options] > [Auto Crop].
4. Press [On].
5. Press [OK].
6. Press [Start].
The machine starts scanning. Follow the LCD instructions to complete the scanning job.
Related Information
• Scan Using the Scan Button on Your Machine
131
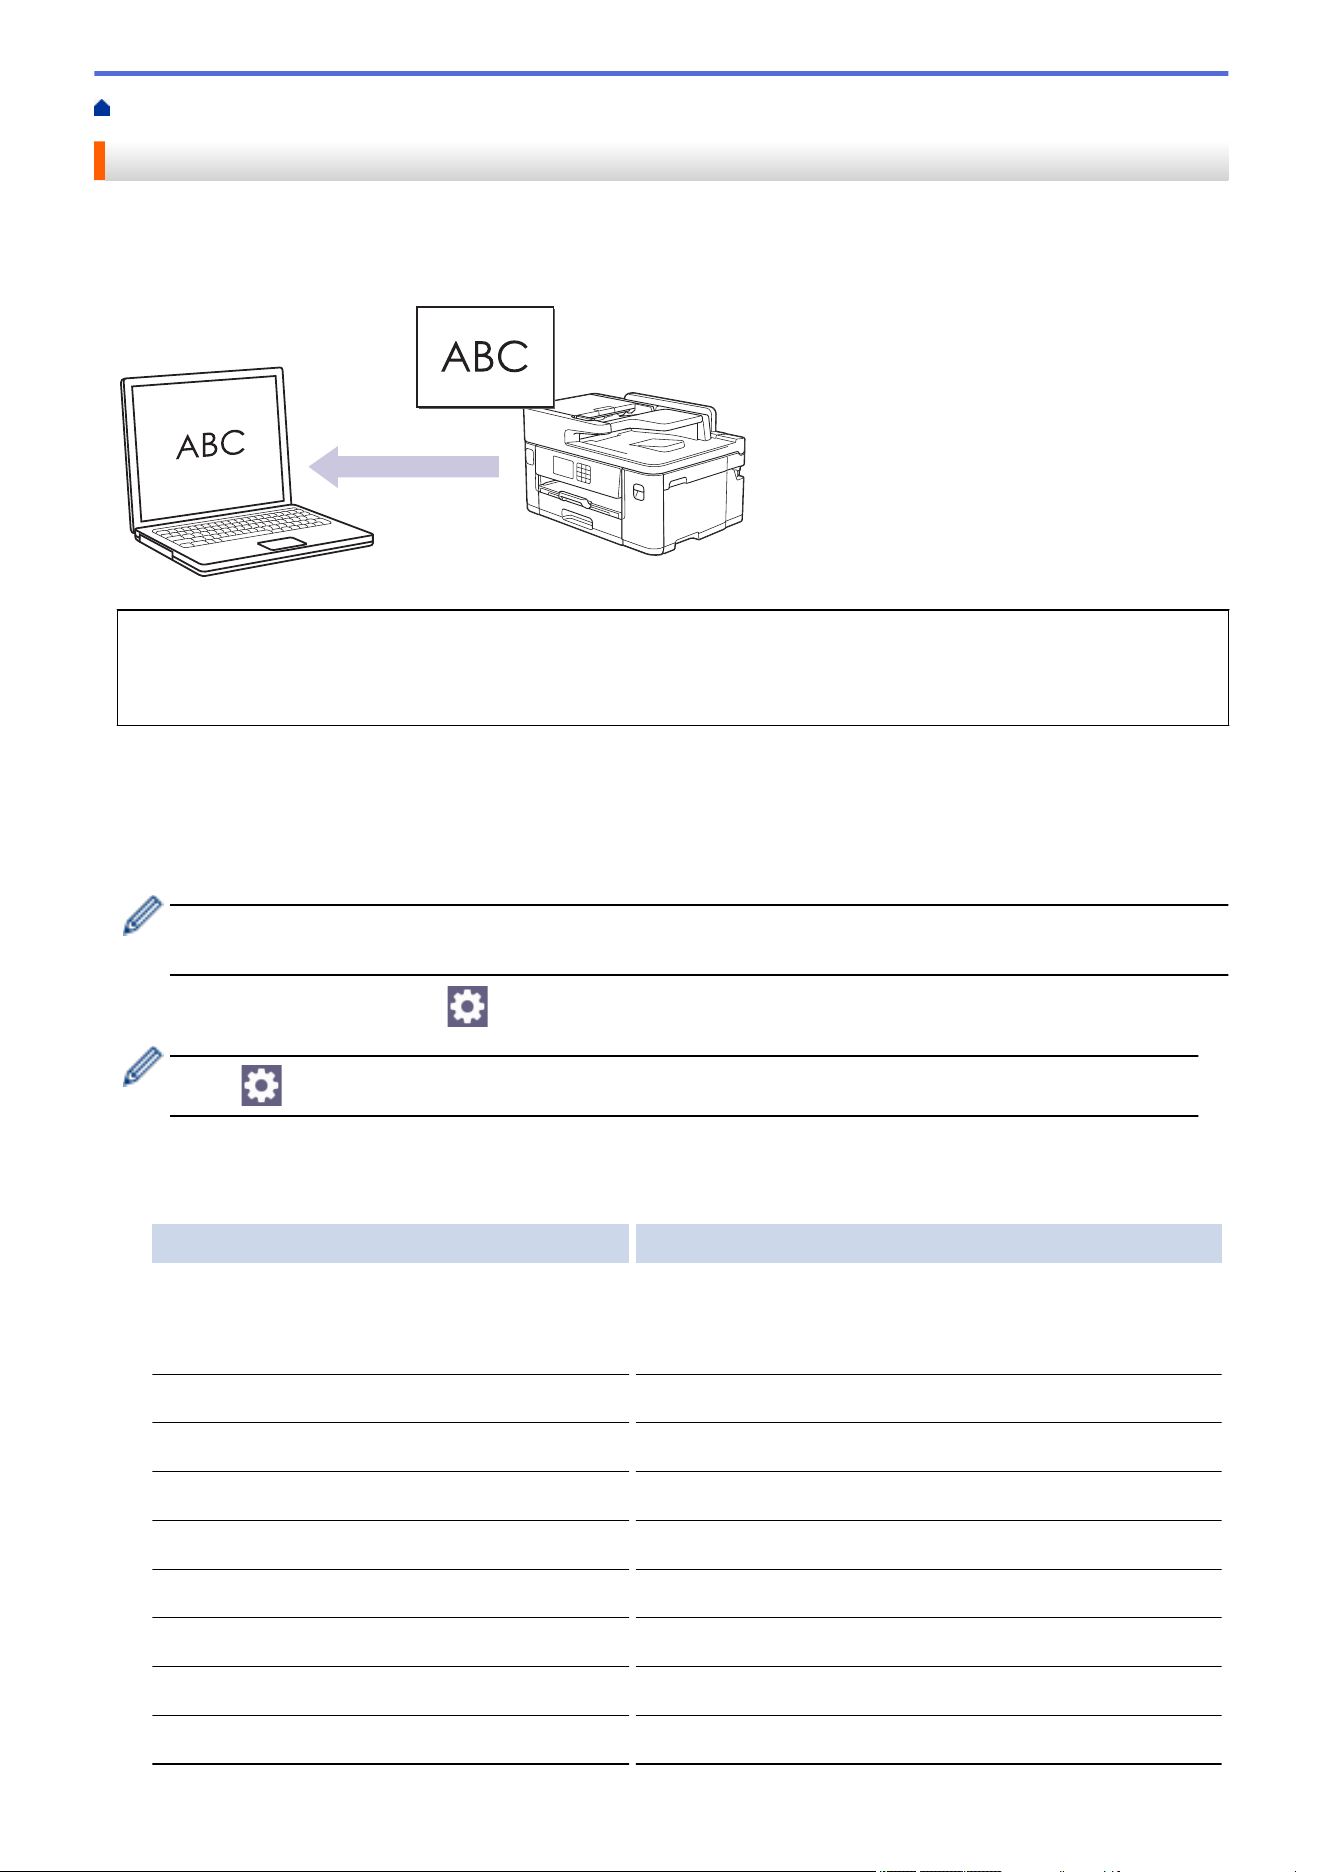
Home > Scan > Scan Using the Scan Button on Your Machine > Scan to an Editable Text File Using OCR
Scan to an Editable Text File Using OCR
Your machine can convert characters in a scanned document to text using optical character recognition (OCR)
technology. You can edit this text using your preferred text-editing application.
• The Scan to OCR feature is available for certain languages.
• Use the Scan button on the machine to make temporary changes to the scan settings. To make permanent
changes, use Brother iPrint&Scan.
1. Load your document.
2. Press [Scan] > [to PC] > [to OCR].
3. If the machine is connected over the network, press a or b to display the computer where you want to send
data, and then select the computer name.
If the LCD message prompts you to enter a PIN, use the LCD to enter the four-digit PIN for the computer,
and then press [OK].
4. To change the settings, press [Options].
To use [Options], you must connect a computer with Brother iPrint&Scan installed to the machine.
5. Press [Scan Settings] > [Set at Device].
6. Select the scan settings you want to change, and then press [OK].
Option Description
2-sided Scan
(MFC-J2740DW/MFC-J5740DW/
MFC-J5955DW)
Select the 2-sided scan mode.
Colour Setting
Select the colour format for your document.
Resolution
Select the scan resolution for your document.
File Type
Select the file format for your document.
Document Size
Select your document size.
Brightness
Select the brightness level.
Contrast
Select the contrast level.
Auto Deskew
Correct any skewed documents when they are scanned.
Skip Blank Page
When On is selected, blank pages are skipped.
132

Option Description
Remove Background Colour
Change the amount of background colour that is removed.
To save the settings as a shortcut, press [Save as Shortcut]. You will be asked if you want to make
this a One Touch Shortcut. Follow the LCD instructions.
7. Press [Start].
The machine starts scanning. If using the machine's scanner glass, follow the LCD instructions to complete
the scanning job.
Related Information
• Scan Using the Scan Button on Your Machine
133
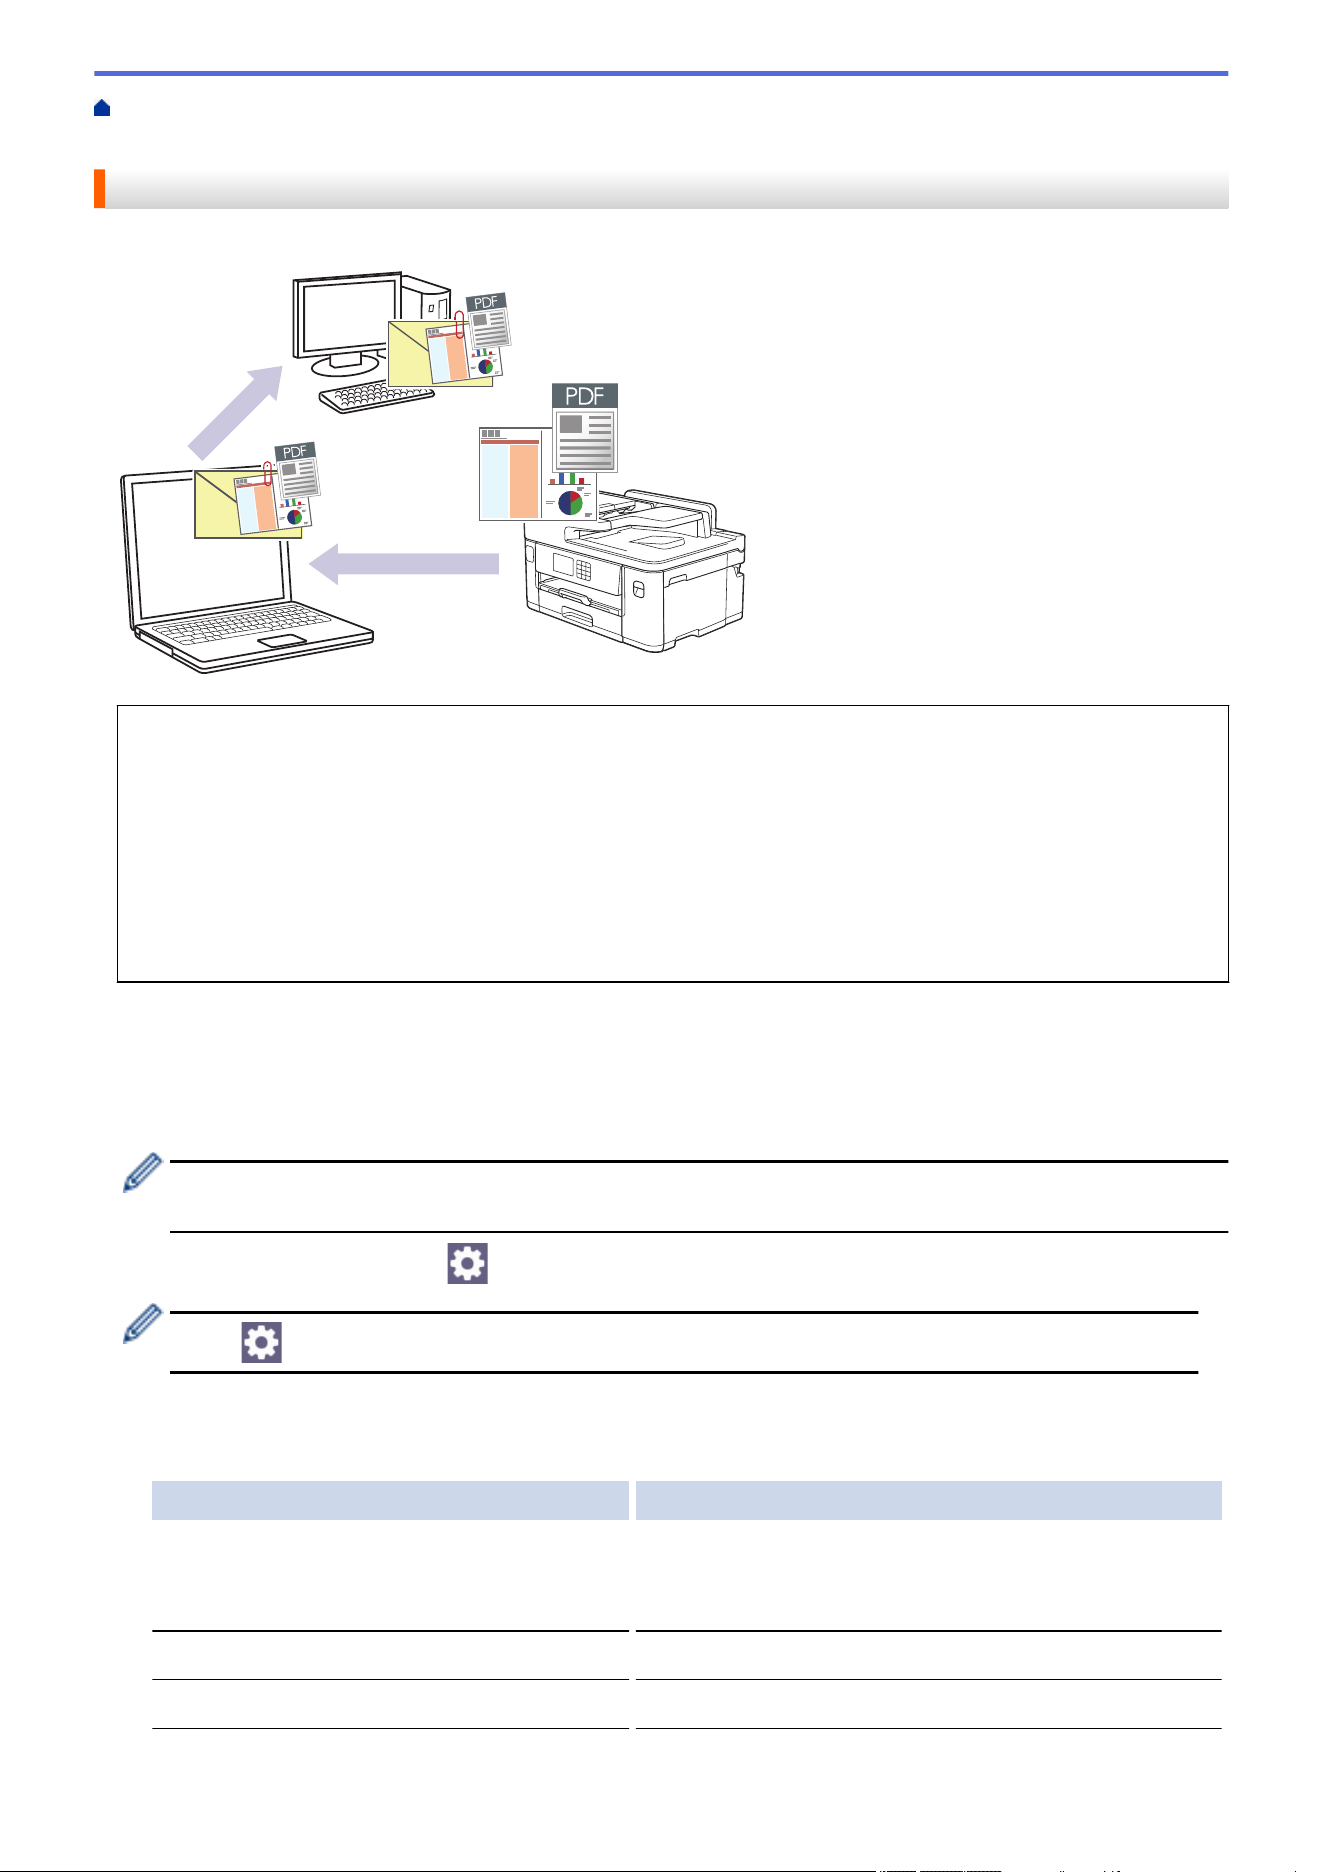
Home > Scan > Scan Using the Scan Button on Your Machine > Save Scanned Data as an Email
Attachment
Save Scanned Data as an Email Attachment
Send the scanned data from your machine to your email application as an attachment.
• Use the Scan button on the machine to make temporary changes to the scan settings. To make permanent
changes, use Brother iPrint&Scan.
• To scan to email using the machine's Scan Button, make sure you select one of these applications in
Brother iPrint&Scan:
- Windows: Microsoft Outlook
- Mac: Apple Mail
For other applications and Webmail services, use the Scan to Image or Scan to File feature to scan a
document, and then attach the scanned file to an email message.
1. Load your document.
2. Press [Scan] > [to PC] > [to E-mail].
3. If the machine is connected over the network, press a or b to display the computer where you want to send
data, and then select the computer name.
If the LCD message prompts you to enter a PIN, use the LCD to enter the four-digit PIN for the computer,
and then press [OK].
4. To change the settings, press [Options].
To use [Options], you must connect a computer with Brother iPrint&Scan installed to the machine.
5. Press [Scan Settings] > [Set at Device].
6. Select the scan settings you want to change, and then press [OK].
Option Description
2-sided Scan
(MFC-J2740DW/MFC-J5740DW/
MFC-J5955DW)
Select the 2-sided scan mode.
Colour Setting
Select the colour format for your document.
Resolution
Select the scan resolution for your document.
134
Option Description
File Type
Select the file format for your document.
Document Size
Select your document size.
Brightness
Select the brightness level.
Contrast
Select the contrast level.
Auto Deskew
Correct any skewed documents when they are scanned.
Skip Blank Page
When On is selected, blank pages are skipped.
Remove Background Colour
Change the amount of background colour that is removed.
To save the settings as a shortcut, press [Save as Shortcut]. You will be asked if you want to make
this a One Touch Shortcut. Follow the LCD instructions.
7. Press [Start].
The machine scans the document and saves it as a file attachment. It then launches your email application
and opens a new, blank email message with the scanned file attached.
Related Information
• Scan Using the Scan Button on Your Machine
135
Home > Scan > Scan Using the Scan Button on Your Machine > Send Scanned Data to an Email Recipient
Send Scanned Data to an Email Recipient
Send scanned data directly from your Brother machine to an email recipient without using a computer.
• To send scanned data to an email recipient, you must configure your machine to communicate with your
network and email server, which is used to send and receive emails.
• You can configure these items from the machine's control panel or Web Based Management.
• To use the Scan to Email Server function, your machine needs to be connected to a network and have
access to an SMTP server. You will need the following SMTP email settings before you can proceed:
- Server address
- Port number
- User name
- Encryption type (SSL or TLS)
- Email server certificate (if used)
If you do not have these settings, contact your email service provider or network administrator.
1. Load your document.
2. Press [Scan] > [to E-mail Server].
(MFC-J5855DW/MFC-J5955DW)
• If you have registered your email address with your user ID, the [to My E-mail] button appears
when you log on to the machine using Secure Function Lock, Active Directory Authentication or LDAP
Authentication.
• To send scanned data to your email address, press [to My E-mail]. When your email address
appears on the LCD, press [Next].
• To enable this feature in Web Based Management, click Scan > Scan to E-mail Server in the left
navigation menu. In the Send to My E-mail field, select On.
3. Do one of the following to enter the destination email address:
• To enter the email address manually, press [Manual], and then enter the email address using the
character buttons on the LCD. When finished, press [OK].
• If the email address is stored in the machine's address book, press [Address Book], and then select
the email address.
Press [OK].
4. Confirm the email address, and then press [Next].
5. To change the settings, press [Options], and then go to the next step.
• To set your own default settings: after making changes to settings, press the [Set New Default]
option, and then press [Yes].
• To restore the factory settings: press the [Factory Reset] option, and then press [Yes].
6. Select the scan settings you want to change, and then press [OK].
Option Description
2-sided Scan
(MFC-J2740DW/MFC-J5740DW/
MFC-J5955DW)
Select the 2-sided scan mode.
Colour Setting
Select the colour format for your document.
136
Option Description
Resolution
Select the scan resolution for your document.
File Type
Select the file format for your document.
Document Size
Select your document size.
Brightness
Select the brightness level.
Contrast
Select the contrast level.
Margin Settings
Adjust your document's margins.
Preview
(MFC-J5955DW)
Preview a scan result on the LCD, before the scanned data is
saved.
• To save the settings as a shortcut, press [Save as Shortcut]. You will be asked if you want to
make this a One Touch Shortcut. Follow the LCD instructions.
• (MFC-J5955DW) To preview the scanned results before the scanned data is saved, press
and
then press [Preview]. The machine scans the document and displays the scanned results on the
LCD. If the scanned results are fine, press [Start] to save it and to finish processing.
7. Press [Start].
The machine starts scanning. If using the machine's scanner glass, follow the LCD instructions to complete
the scanning job.
Related Information
• Scan Using the Scan Button on Your Machine
137
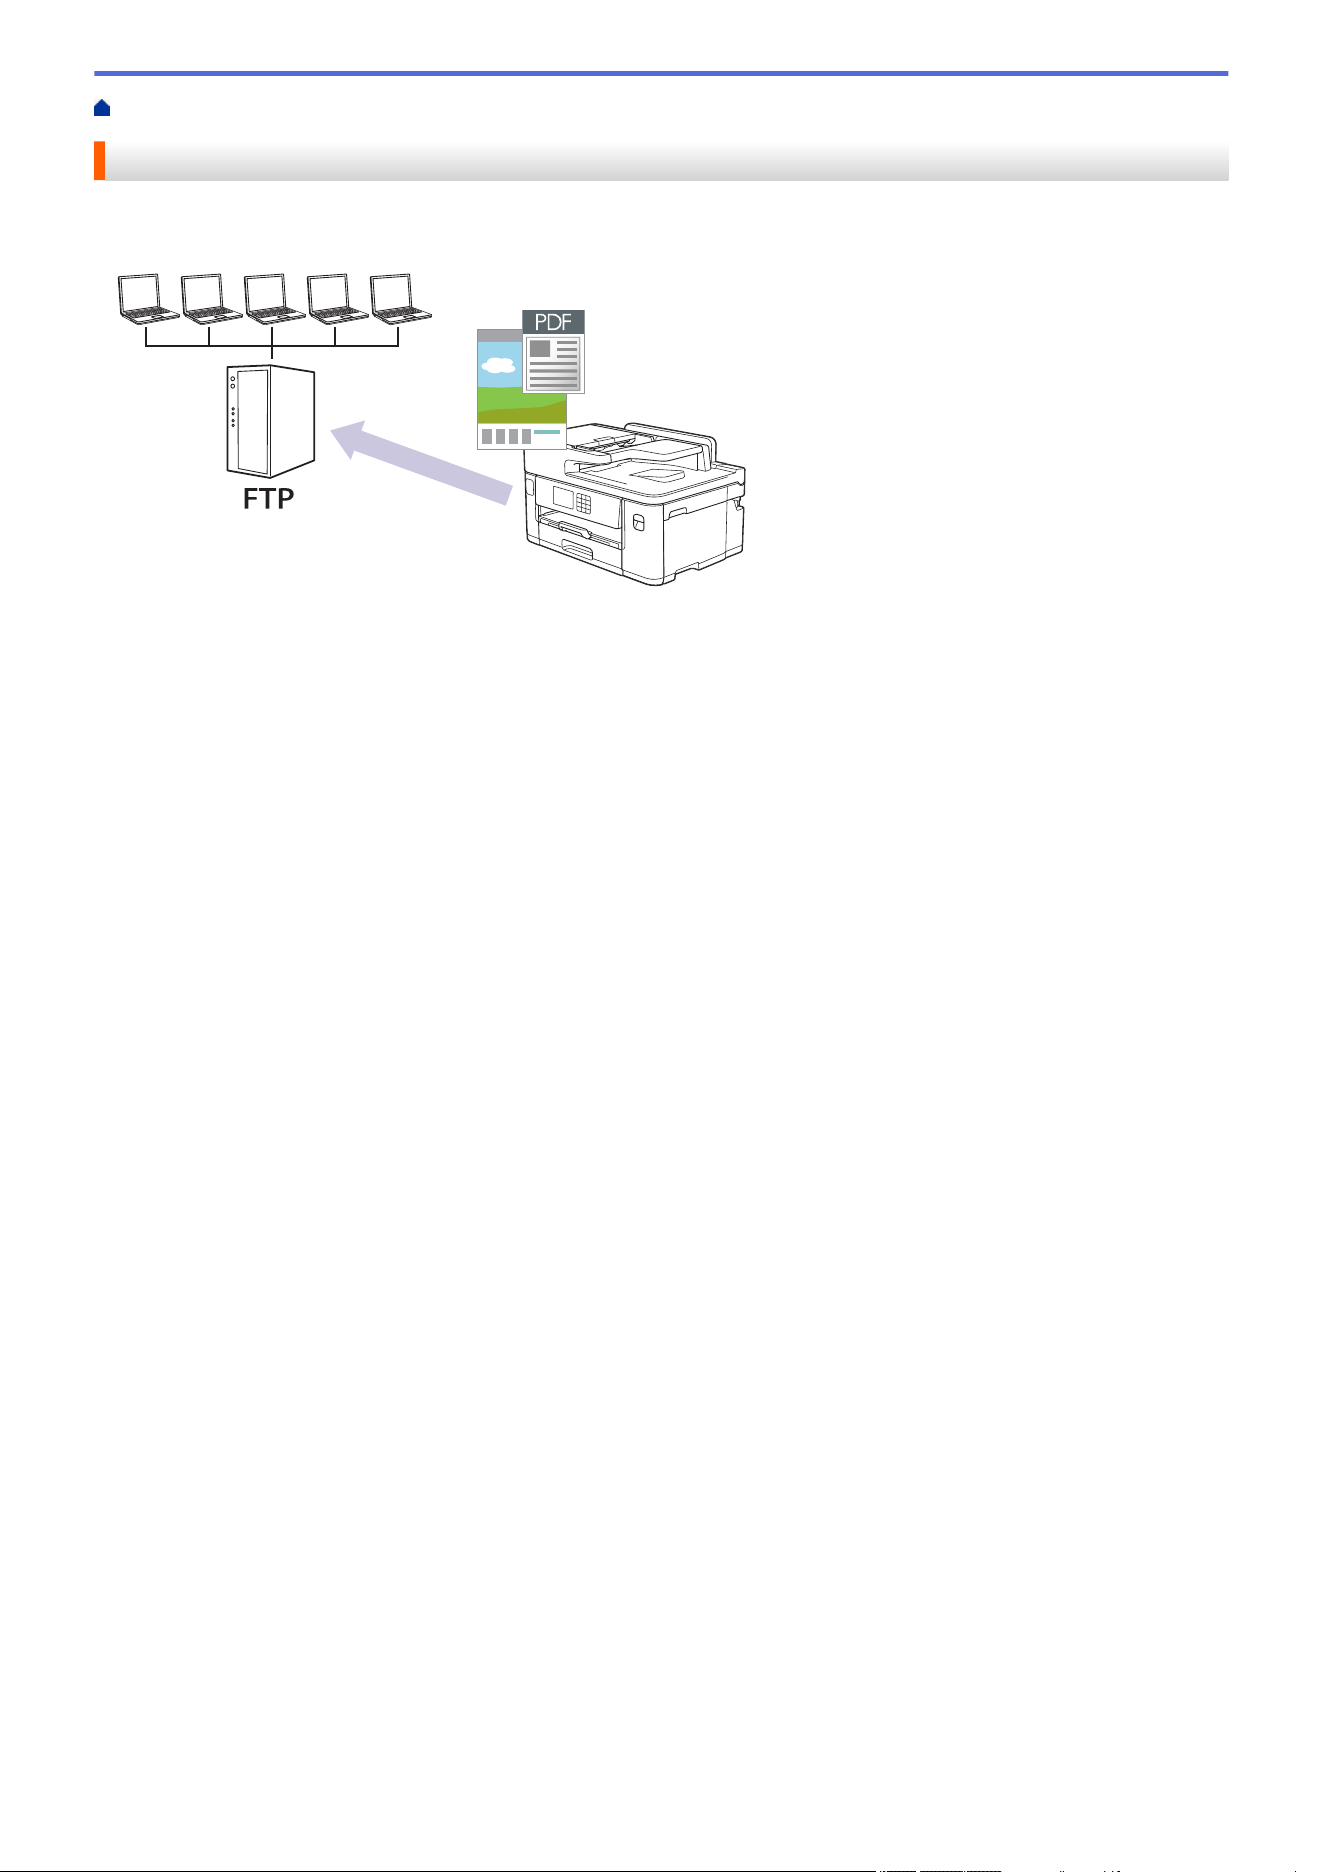
Home > Scan > Scan Using the Scan Button on Your Machine > Scan to FTP
Scan to FTP
Scan documents directly to an FTP server when you need to share the scanned information. For added
convenience, configure different profiles to save your favourite Scan to FTP destinations.
• Set up a Scan to FTP Profile
• Upload Scanned Data to an FTP Server
138
Home > Scan > Scan Using the Scan Button on Your Machine > Scan to FTP > Set up a Scan to FTP
Profile
Set up a Scan to FTP Profile
Set up a Scan to FTP Profile to scan and upload the scanned data directly to an FTP location.
We recommend Microsoft Internet Explorer 11/Microsoft Edge for Windows, Safari 13 for Mac, Google
Chrome
™
for Android (4.x or later), and Google Chrome
™
/Safari for iOS (10.x or later). Make sure that
JavaScript and Cookies are always enabled in whichever browser you use.
1. Start your web browser.
2. Type "https://machine's IP address" in your browser's address bar (where "machine's IP address" is the
machine's IP address).
For example:
https://192.168.1.2
3. If required, type the password in the Login field, and then click Login.
The default password to manage this machine’s settings is located on the back of the machine and marked
"Pwd".
4. (MFC-J2340DW/MFC-J2740DW/MFC-J5340DW/MFC-J5740DW) Go to the navigation menu, and then click
Scan > Scan to FTP/Network.
Start from
, if the navigation menu is not shown on the left side of the screen.
5. (MFC-J5855DW/MFC-J5955DW) Go to the navigation menu, and then click Scan > Scan to FTP/SFTP/
Network/SharePoint.
Start from
, if the navigation menu is not shown on the left side of the screen.
6. Select the FTP option, and then click Submit.
7. (MFC-J2340DW/MFC-J2740DW/MFC-J5340DW/MFC-J5740DW) Click the Scan to FTP/Network Profile
menu.
8. (MFC-J5855DW/MFC-J5955DW) Click the Scan to FTP/SFTP/Network/SharePoint Profile menu.
9. Select the profile you want to set up or change.
Using the following characters: ?, /, \, ", :, <, >, | or * may cause a sending error.
Option Description
Profile Name Type a name for this server profile (up to 15 alphanumeric
characters). The machine will display this name on the LCD.
Host Address Type the Host Address (for example: ftp.example.com; up to 64
characters) or the IP address (for example: 192.23.56.189).
Port Number Change the Port Number setting used to access the FTP server.
The default for this setting is port 21. In most cases this setting does
not need to be changed.
Username Type a user name (up to 32 characters) that has permission to write
data to the FTP server.
Password Type the password (up to 32 characters) associated with the user
name you entered in the Username field. Type the password again in
the Retype password field.
SSL/TLS Set the SSL/TLS option to scan securely using SSL/TLS
communication. Change the CA Certificate setting, if needed.
139
Option Description
Store Directory Type the path (up to 60 characters) to the folder on the FTP server
where you want to send your scanned data. Do not type a slash mark
at the beginning of the path (for example: brother/abc).
File Name Select a file name from the preset names provided, or from user-
defined names. You can set the user-defined names and file name
style in the Scan File Name menu in the navigation menu.
Quality Select a quality setting. If you choose the User Select option, the
machine will prompt users to select a setting each time they use the
scan profile.
File Type Select the file type you want to use for the scanned document. If you
choose the User Select option, the machine will prompt users to
select a setting each time they use the scan profile.
Document Size Select your document size from the list. This is necessary to make
sure the scanned file is the correct size.
Auto Deskew Select On to set the machine to correct document skewing
automatically as the pages are scanned.
Skip Blank Page Select the On option to remove blank pages of the document from
the scanning results.
Skip Blank Page Sensitivity Select the sensitivity level for detecting blank pages in the scanned
data. The higher the sensitivity, the easier it is for the machine to
detect blank pages.
2-sided Scan(MFC-J2740DW/
MFC-J5740DW/MFC-J5955DW)
Select Long Edge or Short Edge to scan both sides of the
document, depending on the layout of your original.
Remove Background Colour Change the amount of background colour that is removed.
Margin Settings Adjust your document's margins.
Brightness Select the brightness level.
Contrast Select the contrast level.
Passive Mode Set the Passive Mode option to off or on depending on your FTP
server and network firewall configuration. The default setting is on. In
most cases this setting does not need to be changed.
10. Click Submit.
Related Information
• Scan to FTP
Related Topics:
• Access Web Based Management
140
Home > Scan > Scan Using the Scan Button on Your Machine > Scan to FTP > Upload Scanned Data to an
FTP Server
Upload Scanned Data to an FTP Server
>> MFC-J2340DW/MFC-J2740DW/MFC-J5340DW/MFC-J5740DW
>> MFC-J5855DW/MFC-J5955DW
MFC-J2340DW/MFC-J2740DW/MFC-J5340DW/MFC-J5740DW
1. Load your document.
2. Press [Scan] > [to FTP].
3. The server profiles you have set up using Web Based Management are listed. Select the profile you want. If
the profile is not complete (for example, if the logon account name and password are missing, or if the quality
or file type is not specified), you will be prompted to enter any missing information.
4. Press [Start].
The machine starts scanning. If you are using the scanner glass, follow the Touchscreen instructions to
complete the scanning job.
MFC-J5855DW/MFC-J5955DW
1. Load your document.
2. Press [Scan] > [to FTP/SFTP].
3. The server profiles you have set up using Web Based Management are listed. Select the profile you want. If
the profile is not complete (for example, if the logon account name and password are missing, or if the quality
or file type is not specified), you will be prompted to enter any missing information.
(MFC-J5955DW) To preview the scanned results before the scanned data is saved, press and then
press [Preview]. The machine scans the document and displays the scanned results on the LCD. If the
scanned results are fine, press [Start] to save it and to finish processing.
4. Press [Start].
The machine starts scanning. If you are using the scanner glass, follow the Touchscreen instructions to
complete the scanning job.
Related Information
• Scan to FTP
141
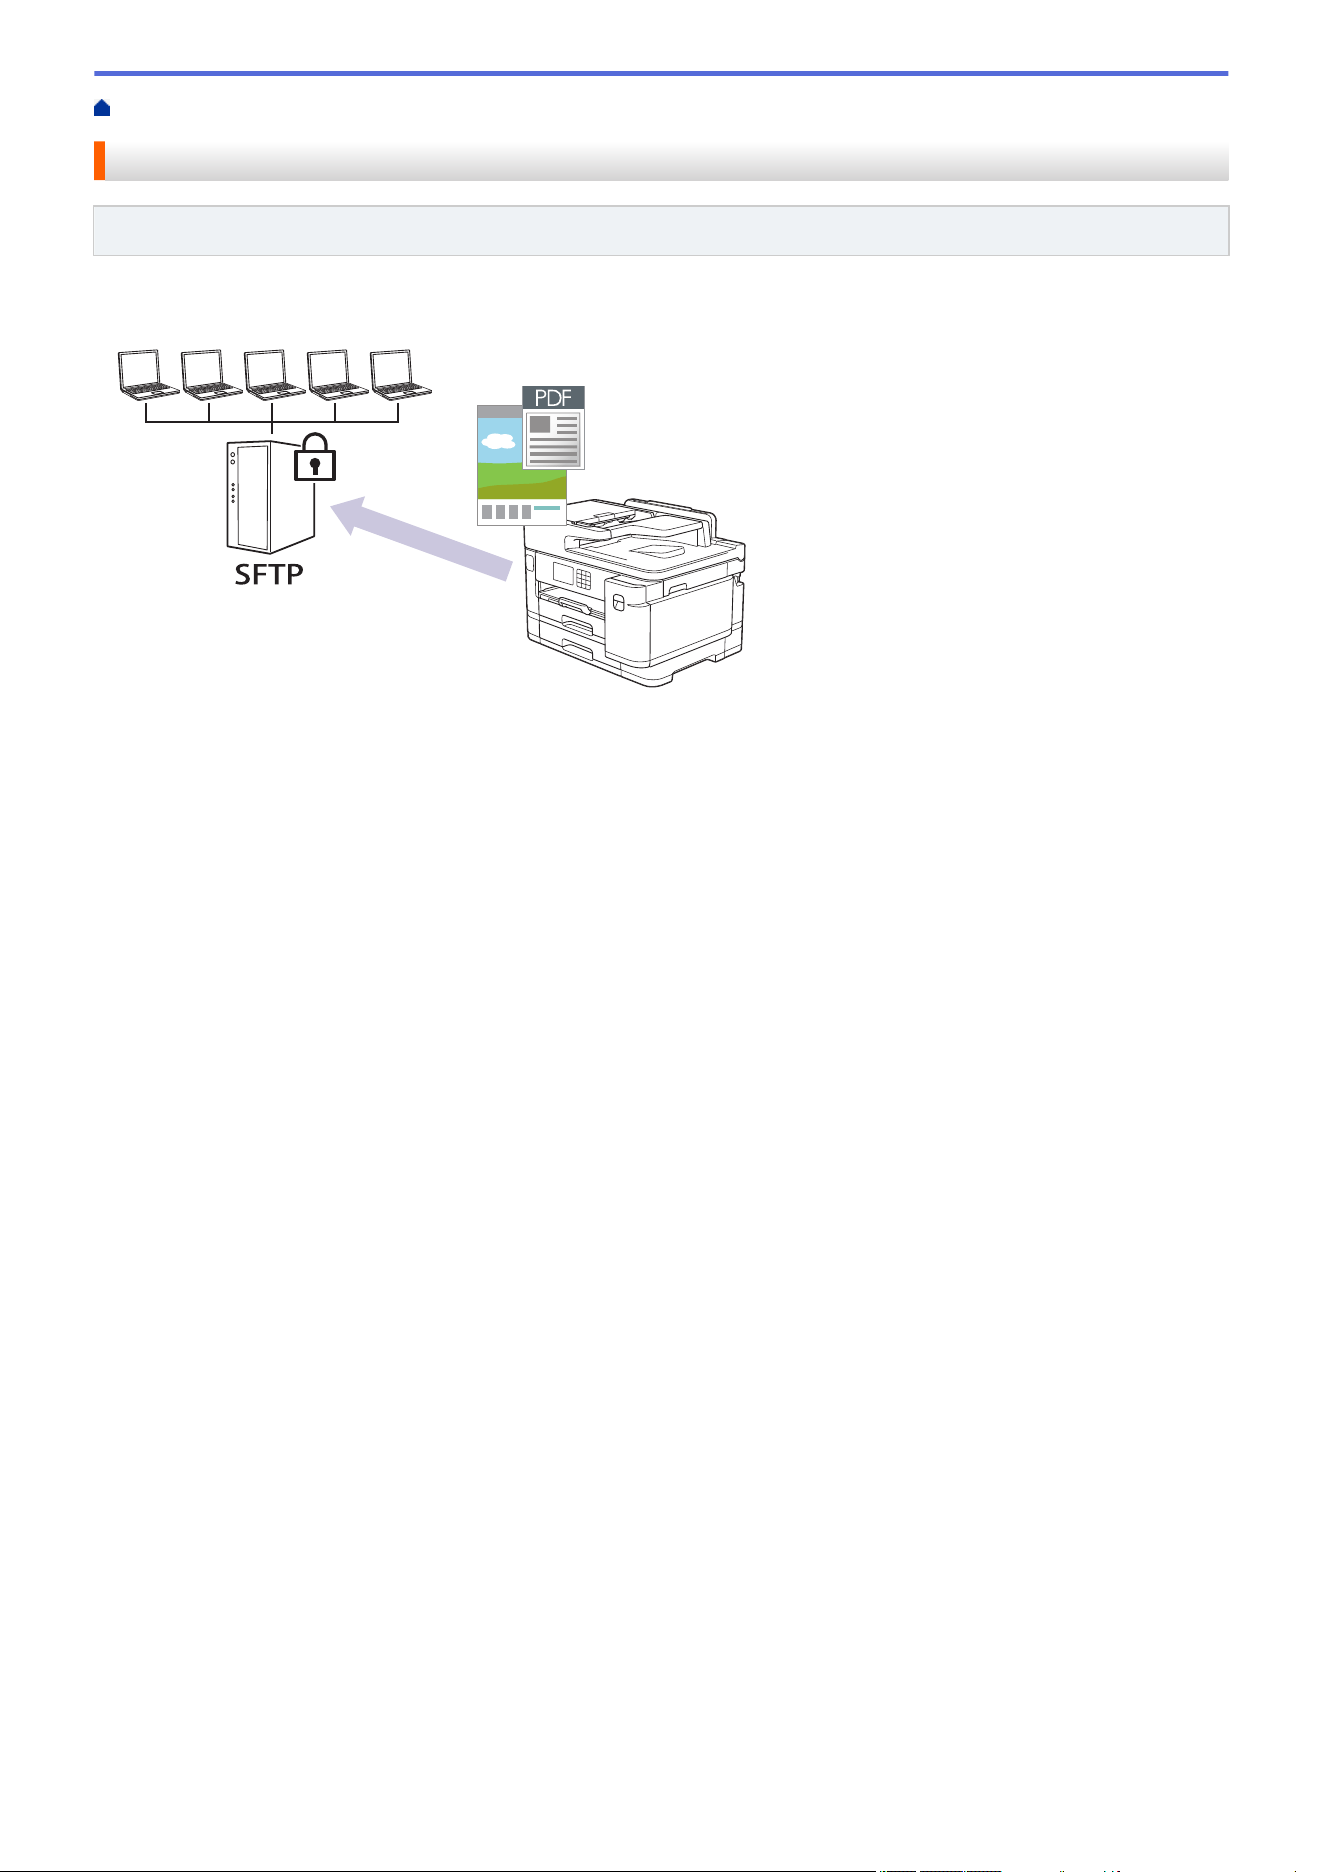
Home > Scan > Scan Using the Scan Button on Your Machine > Scan to SSH FTP (SFTP)
Scan to SSH FTP (SFTP)
Related Models: MFC-J5855DW/MFC-J5955DW
Scan documents directly to an SFTP server, a secure version of an FTP server. For added convenience,
configure different profiles to save your favourite Scan to SFTP destinations.
• Set up a Scan to SFTP Profile
• Create a Client Key Pair Using Web Based Management
• Export a Client Key Pair Using Web Based Management
• Import a Server Public Key Using Web Based Management
• Upload Scanned Data to an SFTP Server
142
Home > Scan > Scan Using the Scan Button on Your Machine > Scan to SSH FTP (SFTP) > Set up a Scan
to SFTP Profile
Set up a Scan to SFTP Profile
Related Models: MFC-J5855DW/MFC-J5955DW
Set up a Scan to SFTP Profile to scan and upload scanned data directly to an SFTP location.
We recommend Microsoft Internet Explorer 11/Microsoft Edge for Windows, Safari 13 for Mac, Google
Chrome
™
for Android (4.x or later), and Google Chrome
™
/Safari for iOS (10.x or later). Make sure that
JavaScript and Cookies are always enabled in whichever browser you use.
1. Start your web browser.
2. Type "https://machine's IP address" in your browser's address bar (where "machine's IP address" is the
machine's IP address).
For example:
https://192.168.1.2
3. If required, type the password in the Login field, and then click Login.
The default password to manage this machine’s settings is located on the back of the machine and marked
"Pwd".
4. Go to the navigation menu, and then click Scan > Scan to FTP/SFTP/Network/SharePoint.
Start from
, if the navigation menu is not shown on the left side of the screen.
5. Select the SFTP option, and then click Submit.
6. Click the Scan to FTP/SFTP/Network/SharePoint Profile menu.
7. Select the profile you want to set up or change.
Using the following characters: ?, /, \, ", :, <, >, | or * may cause a sending error.
Option Description
Profile Name Type a name for this server profile (up to 15 alphanumeric
characters). The machine will display this name on the LCD.
Host Address Type the Host Address (for example: ftp.example.com; up to 64
characters) or the IP address (for example: 192.23.56.189).
Username Type a user name (up to 32 characters) that has permission to write
data to the SFTP server.
Auth. Method Select Password or Public Key.
Do one of the following:
• When you select Password, type the password (up to 32
characters) associated with the user name you typed in the
Username field. Type the password again in the Retype
password field.
• When you select Public Key, select the authentication type from
the Client Key Pair drop-down list.
Server Public Key
Select the authentication type.
Store Directory Type the path (up to 60 characters) to the folder on the SFTP server
where you want to send your scanned data. Do not type a slash mark
at the beginning of the path (for example: brother/abc).
143
Option Description
File Name Select a file name from the preset names provided, or from user-
defined names. You can set the user-defined names and file name
style in the Scan File Name menu in the navigation menu.
Quality Select a quality setting. If you choose the User Select option, the
machine will prompt users to select a setting each time they use the
scan profile.
File Type Select the file type you want to use for the scanned document. If you
choose the User Select option, the machine will prompt users to
select a setting each time they use the scan profile.
Document Size Select your document size from the list. This is necessary to make
sure the scanned file is the correct size.
Auto Deskew Select On to set the machine to correct document skewing
automatically as the pages are scanned.
Skip Blank Page Select the On option to remove blank pages of the document from
the scanning results.
Skip Blank Page Sensitivity Select the sensitivity level for detecting blank pages in the scanned
data. The higher the sensitivity, the easier it is for the machine to
detect blank pages.
2-sided Scan (MFC-J5955DW) Select Long Edge or Short Edge to scan both sides of the
document, depending on the layout of your original.
Remove Background Colour Change the amount of background colour that is removed.
Margin Settings Adjust your document's margins.
Brightness Select the brightness level.
Contrast Select the contrast level.
Port Number Change the Port Number setting used to access the SFTP server.
The default for this setting is port 22. In most cases this setting does
not need to be changed.
8. Click Submit.
Related Information
• Scan to SSH FTP (SFTP)
Related Topics:
• Access Web Based Management
144
Home > Scan > Scan Using the Scan Button on Your Machine > Scan to SSH FTP (SFTP) > Create a
Client Key Pair Using Web Based Management
Create a Client Key Pair Using Web Based Management
Related Models: MFC-J5855DW/MFC-J5955DW
1. Start your web browser.
2. Type "https://machine's IP address" in your browser's address bar (where "machine's IP address" is the
machine's IP address).
For example:
https://192.168.1.2
If you are using a Domain Name System or enable a NetBIOS name, you can type another name, such as
"SharedPrinter" instead of the IP address.
For example:
https://SharedPrinter
If you enable a NetBIOS name, you can also use the node name.
For example:
https://brnxxxxxxxxxxxx
The NetBIOS name can be found in the Network Configuration Report.
3. If required, type the password in the Login field, and then click Login.
The default password to manage this machine’s settings is located on the back of the machine and marked
"Pwd".
4. Go to the navigation menu, and then click Network > Security > Client Key Pair.
Start from
, if the navigation menu is not shown on the left side of the screen.
5. Click Create New Client Key Pair.
6. In the Client Key Pair Name field, type the name (up to 20 characters) you want.
7. Click the Public Key Algorithm drop-down list, and then select the algorithm you want.
8. Click Submit.
The client key pair is created and saved in your machine's memory. The client key pair name and public key
algorithm will be displayed in the Client Key Pair List.
Related Information
• Scan to SSH FTP (SFTP)
Related Topics:
• Access Web Based Management
145

Home > Scan > Scan Using the Scan Button on Your Machine > Scan to SSH FTP (SFTP) > Export a
Client Key Pair Using Web Based Management
Export a Client Key Pair Using Web Based Management
Related Models: MFC-J5855DW/MFC-J5955DW
1. Start your web browser.
2. Type "https://machine's IP address" in your browser's address bar (where "machine's IP address" is the
machine's IP address).
For example:
https://192.168.1.2
If you are using a Domain Name System or enable a NetBIOS name, you can type another name, such as
"SharedPrinter" instead of the IP address.
For example:
https://SharedPrinter
If you enable a NetBIOS name, you can also use the node name.
For example:
https://brnxxxxxxxxxxxx
The NetBIOS name can be found in the Network Configuration Report.
3. If required, type the password in the Login field, and then click Login.
The default password to manage this machine’s settings is located on the back of the machine and marked
"Pwd".
4. Go to the navigation menu, and then click Network > Security > Client Key Pair.
Start from
, if the navigation menu is not shown on the left side of the screen.
5. Click Export Public Key shown with Client Key Pair List.
6. Click Submit.
7. Specify the location where you want to save the file.
The client key pair is exported to your computer.
Related Information
• Scan to SSH FTP (SFTP)
Related Topics:
• Access Web Based Management
146

Home > Scan > Scan Using the Scan Button on Your Machine > Scan to SSH FTP (SFTP) > Import a
Server Public Key Using Web Based Management
Import a Server Public Key Using Web Based Management
Related Models: MFC-J5855DW/MFC-J5955DW
1. Start your web browser.
2. Type "https://machine's IP address" in your browser's address bar (where "machine's IP address" is the
machine's IP address).
For example:
https://192.168.1.2
If you are using a Domain Name System or enable a NetBIOS name, you can type another name, such as
"SharedPrinter" instead of the IP address.
For example:
https://SharedPrinter
If you enable a NetBIOS name, you can also use the node name.
For example:
https://brnxxxxxxxxxxxx
The NetBIOS name can be found in the Network Configuration Report.
3. If required, type the password in the Login field, and then click Login.
The default password to manage this machine’s settings is located on the back of the machine and marked
"Pwd".
4. Go to the navigation menu, and then click Network > Security > Server Public Key.
Start from
, if the navigation menu is not shown on the left side of the screen.
5. Click Import Server Public Key.
6. Specify the file that you want to import.
7. Click Submit.
The server public key is imported to your machine.
Related Information
• Scan to SSH FTP (SFTP)
Related Topics:
• Access Web Based Management
147
Home > Scan > Scan Using the Scan Button on Your Machine > Scan to SSH FTP (SFTP) > Upload
Scanned Data to an SFTP Server
Upload Scanned Data to an SFTP Server
Related Models: MFC-J5855DW/MFC-J5955DW
1. Load your document.
2. Press [Scan] > [to FTP/SFTP].
3. The server profiles you have set up using Web Based Management are listed. Select the profile you want. If
the profile is not complete (for example, if the logon account name and password are missing, or if the quality
or file type is not specified), you will be prompted to enter any missing information.
(MFC-J5955DW) To preview the scanned results before the scanned data is saved, press and then
press [Preview]. The machine scans the document and displays the scanned results on the LCD. If the
scanned results are fine, press [Start] to save it and to finish processing.
4. Press [Start].
The machine starts scanning. If you are using the scanner glass, follow the Touchscreen instructions to
complete the scanning job.
Related Information
• Scan to SSH FTP (SFTP)
148

Home > Scan > Scan Using the Scan Button on Your Machine > Scan to Network (Windows)
Scan to Network (Windows)
Scan documents directly to a CIFS server on your local network. For added convenience, you can configure
different profiles to save your favourite Scan to Network destinations.
• Set up a Scan to Network Profile
• Upload Scanned Data to a CIFS Server
149
Home > Scan > Scan Using the Scan Button on Your Machine > Scan to Network (Windows) > Set up a
Scan to Network Profile
Set up a Scan to Network Profile
Set up a Scan to Network Profile to scan and upload scanned data directly to a folder on a CIFS server.
We recommend Microsoft Internet Explorer 11/Microsoft Edge for Windows, Safari 13 for Mac, Google
Chrome
™
for Android (4.x or later), and Google Chrome
™
/Safari for iOS (10.x or later). Make sure that
JavaScript and Cookies are always enabled in whichever browser you use.
1. Start your web browser.
2. Type "https://machine's IP address" in your browser's address bar (where "machine's IP address" is the
machine's IP address).
For example:
https://192.168.1.2
3. If required, type the password in the Login field, and then click Login.
The default password to manage this machine’s settings is located on the back of the machine and marked
"Pwd".
4. (MFC-J2340DW/MFC-J2740DW/MFC-J5340DW/MFC-J5740DW) Go to the navigation menu, and then click
Scan > Scan to FTP/Network.
Start from
, if the navigation menu is not shown on the left side of the screen.
5. (MFC-J5855DW/MFC-J5955DW) Go to the navigation menu, and then click Scan > Scan to FTP/SFTP/
Network/SharePoint.
Start from
, if the navigation menu is not shown on the left side of the screen.
6. Select the Network option, and then click Submit.
(MFC-J5855DW/MFC-J5955DW)
If you want to send the data to your designated folder on the CIFS server, select On for the Send to My
Folder option.
7. (MFC-J2340DW/MFC-J2740DW/MFC-J5340DW/MFC-J5740DW) Click the Scan to FTP/Network Profile
menu.
8. (MFC-J5855DW/MFC-J5955DW) Click the Scan to FTP/SFTP/Network/SharePoint Profile menu.
9. Select the profile you want to set up or change.
Using the following characters: ?, /, \, ", :, <, >, | or * may cause a sending error.
Option Description
Profile Name Type a name for this server profile (up to 15 alphanumeric
characters). The machine will display this name on the LCD.
Network Folder Path Type the path to the folder on the CIFS server where you want to
send your scanned data.
File Name Select a file name from the preset names provided, or from user-
defined names. You can set the user-defined names and file name
style in the Scan File Name menu in the navigation menu.
Quality Select a quality setting. If you choose the User Select option, the
machine will prompt users to select a setting each time they use the
scan profile.
150
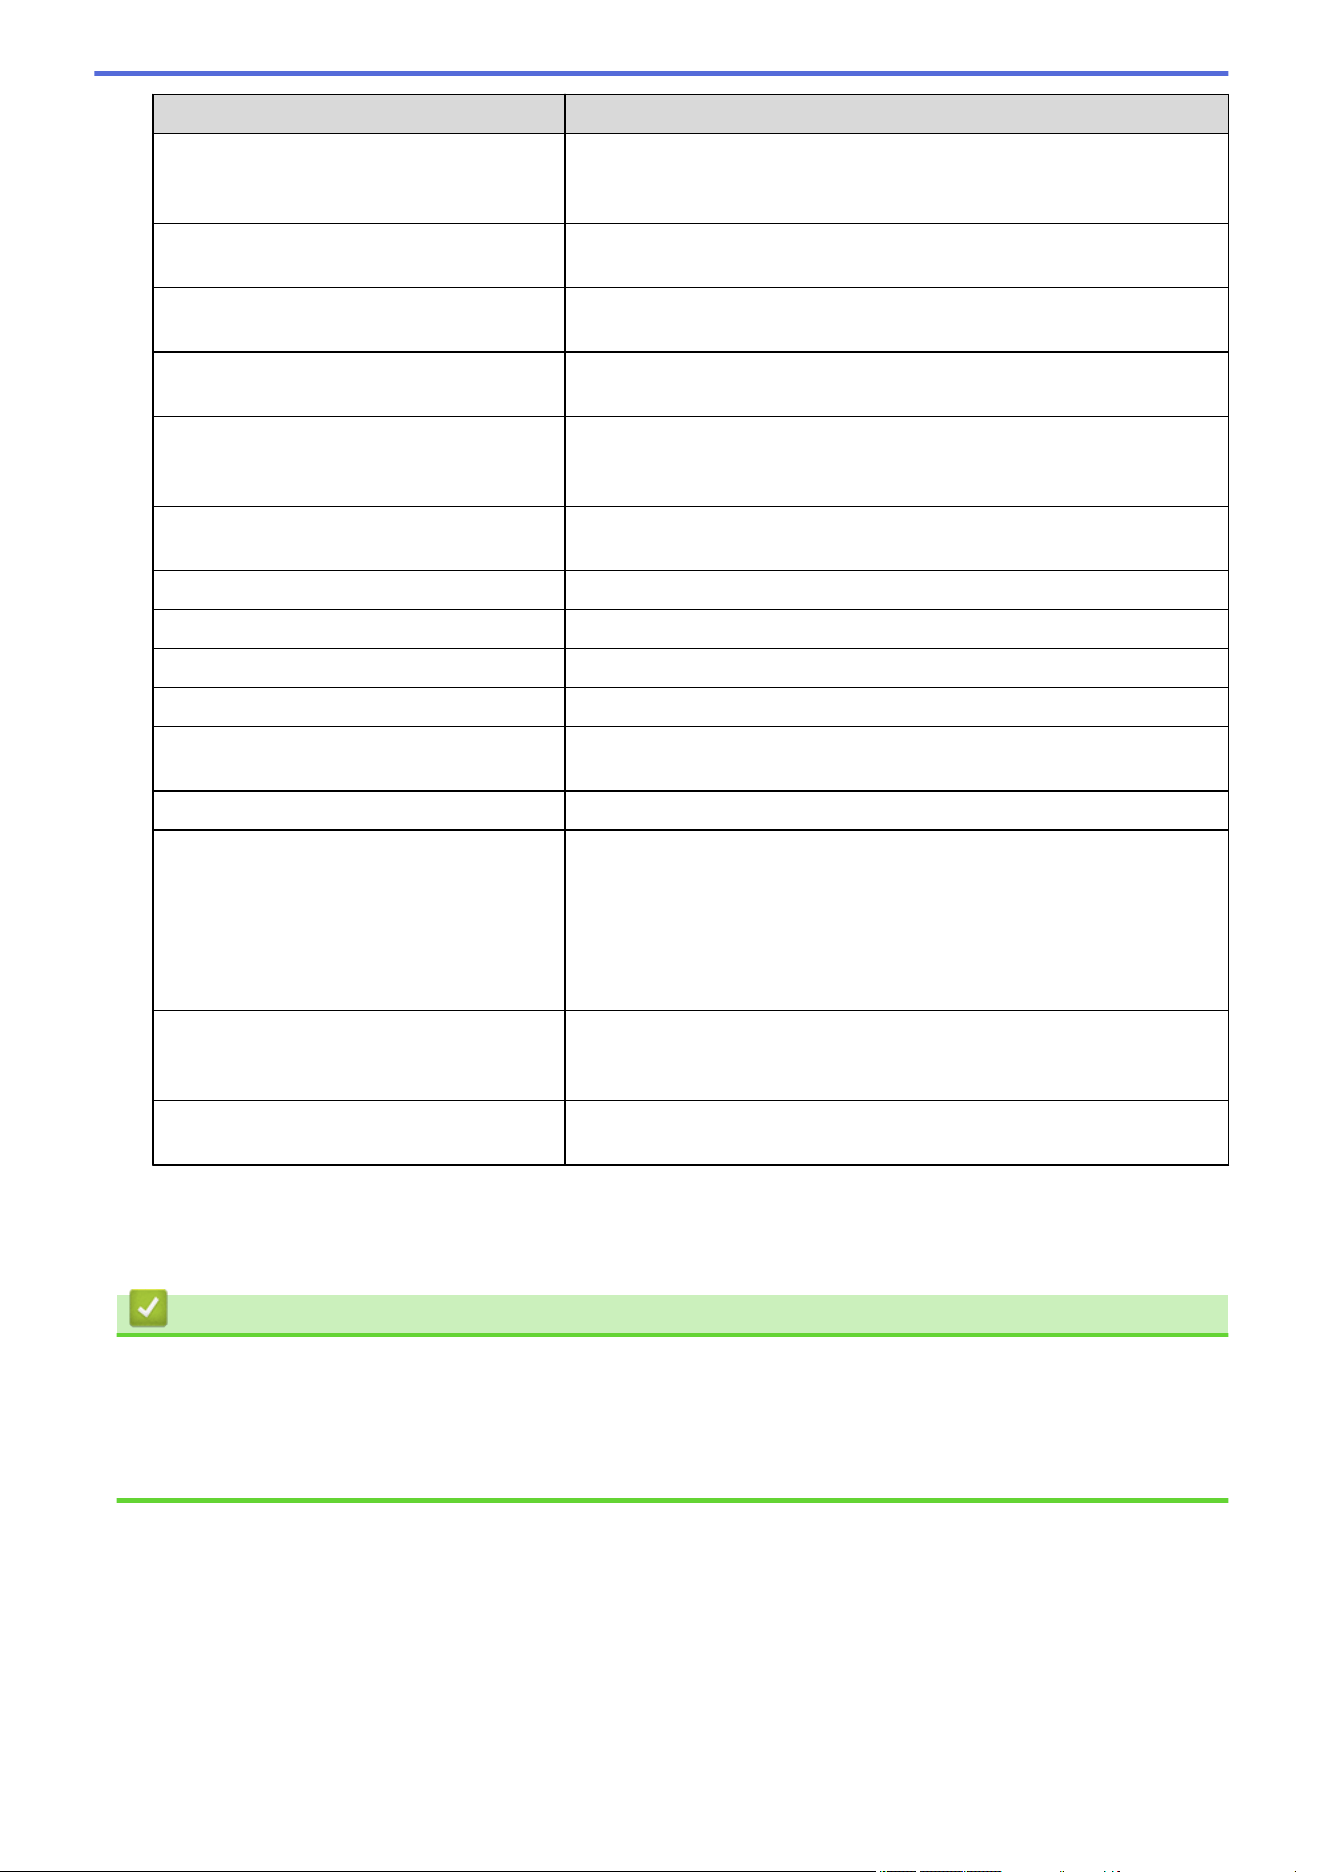
Option Description
File Type Select the file type you want to use for the scanned document. If you
choose the User Select option, the machine will prompt users to
select a setting each time they use the scan profile.
Document Size Select your document size from the list. This is necessary to make
sure the scanned file is the correct size.
Auto Deskew Select On to set the machine to correct document skewing
automatically as the pages are scanned.
Skip Blank Page Select the On option to remove blank pages of the document from
the scanning results.
Skip Blank Page Sensitivity Select the sensitivity level for detecting blank pages in the scanned
data. The higher the sensitivity, the easier it is for the machine to
detect blank pages.
2-sided Scan(MFC-J2740DW/
MFC-J5740DW/MFC-J5955DW)
Select Long Edge or Short Edge to scan both sides of the
document, depending on the layout of your original.
Remove Background Colour Change the amount of background colour that is removed.
Margin Settings Adjust your document's margins.
Brightness Select the brightness level.
Contrast Select the contrast level.
Use PIN for Authentication To PIN-protect this profile, select On, and then type a four-digit PIN in
the PIN Code field.
Auth. Method Select the authentication method.
Username Type a user name (up to 96 characters) that has permission to write
data to the folder specified in the Network Folder Path field. If the
user name is part of a domain, type the user name in one of the
following styles:
user@domain
domain\user
Password Type the password (up to 32 characters) associated with the user
name you entered in the Username field. Type the password again in
the Retype password field.
Kerberos Server Address Type the Kerberos Server Address (for example:
kerberos.example.com; up to 64 characters).
10. Click Submit.
11. You must configure the SNTP (network time server) or you must set the date, time and time zone correctly on
the control panel. The time must match the time used by the Kerberos Server and CIFS Server.
Related Information
• Scan to Network (Windows)
Related Topics:
• Configure Date and Time Using Web Based Management
• Access Web Based Management
151
Home > Scan > Scan Using the Scan Button on Your Machine > Scan to Network (Windows) > Upload
Scanned Data to a CIFS Server
Upload Scanned Data to a CIFS Server
1. Load your document.
2. Press [Scan] > [to Network].
(MFC-J5855DW/MFC-J5955DW)
• If you registered your user ID, the [to My Folder] option appears when you log on to the machine
using Active Directory Authentication or LDAP Authentication.
• To send scanned data to your designated folder on the CIFS server, press [to My Folder].
• To enable this feature in Web Based Management, go to the navigation menu, and then click Scan >
Scan to FTP/SFTP/Network/SharePoint. In the Send to My Folder field, select On.
3. The server profiles you have set up using Web Based Management are listed. Select the profile you want. If
the profile is not complete (for example, if the logon account name and password are missing, or if the quality
or file type is not specified), you will be prompted to enter any missing information.
(MFC-J5955DW) To preview the scanned results before the scanned data is saved, press and then
press [Preview]. The machine scans the document and displays the scanned results on the LCD. If the
scanned results are fine, press [Start] to save it and to finish processing.
4. Press [Start].
The machine starts scanning. If you are using the scanner glass, follow the Touchscreen instructions to
complete the scanning job.
Related Information
• Scan to Network (Windows)
152

Home > Scan > Scan Using the Scan Button on Your Machine > Scan to SharePoint
Scan to SharePoint
Related Models: MFC-J5855DW/MFC-J5955DW
Scan documents directly to a SharePoint server when you need to share the scanned information. For added
convenience, configure different profiles to save your favourite Scan to SharePoint destinations.
• Set up a Scan to SharePoint Profile
• Upload Scanned Data to a SharePoint Server
153
Home > Scan > Scan Using the Scan Button on Your Machine > Scan to SharePoint > Set up a Scan to
SharePoint Profile
Set up a Scan to SharePoint Profile
Related Models: MFC-J5855DW/MFC-J5955DW
Set up a Scan to SharePoint Profile to scan and upload the scanned data directly to a SharePoint location.
We recommend Microsoft Internet Explorer 11/Microsoft Edge for Windows, Safari 13 for Mac, Google
Chrome
™
for Android (4.x or later), and Google Chrome
™
/Safari for iOS (10.x or later). Make sure that
JavaScript and Cookies are always enabled in whichever browser you use.
1. Start your web browser.
2. Type "https://machine's IP address" in your browser's address bar (where "machine's IP address" is the
machine's IP address).
For example:
https://192.168.1.2
3. If required, type the password in the Login field, and then click Login.
The default password to manage this machine’s settings is located on the back of the machine and marked
"Pwd".
4. Go to the navigation menu, and then click Scan > Scan to FTP/SFTP/Network/SharePoint.
Start from
, if the navigation menu is not shown on the left side of the screen.
5. Select the SharePoint option, and then click Submit.
6. Click the Scan to FTP/SFTP/Network/SharePoint Profile menu.
7. Select the profile you want to set up or change.
Using the following characters: ?, /, \, ", :, <, >, | or * may cause a sending error.
Option Description
Profile Name Type a name for this server profile (up to 15 alphanumeric
characters). The machine will display this name on the LCD.
SharePoint Site Address Copy and paste the full destination address shown in the address bar
of your browser (for example: http://SharePointSiteAddress/Shared
%20Documents/Forms/AllItems.aspx) or the IP address (for example:
http://192.168.0.1/Shared%20Documents/Forms/AllItems.aspx).
File Name Select a file name from the preset names provided, or from user-
defined names. You can set the user-defined names and file name
style in the Scan File Name menu in the navigation menu.
Quality Select a quality setting. If you choose the User Select option, the
machine will prompt users to select a setting each time they use the
scan profile.
File Type Select the file type you want to use for the scanned document. If you
choose the User Select option, the machine will prompt users to
select a setting each time they use the scan profile.
Document Size Select your document size from the list. This is necessary to make
sure the scanned file is the correct size.
Auto Deskew Select On to set the machine to correct document skewing
automatically as the pages are scanned.
Skip Blank Page Select the On option to remove blank pages of the document from
the scanning results.
154
Option Description
Skip Blank Page Sensitivity Select the sensitivity level for detecting blank pages in the scanned
data. The higher the sensitivity, the easier it is for the machine to
detect blank pages.
2-sided Scan(MFC-J5955DW) Select Long Edge or Short Edge to scan both sides of the
document, depending on the layout of your original.
Remove Background Colour Change the amount of background colour that is removed.
Margin Settings Adjust your document's margins.
Brightness Select the brightness level.
Contrast Select the contrast level.
Use PIN for Authentication To PIN-protect this profile, select On, and then type a four-digit PIN in
the PIN Code field.
Auth. Method Select the authentication method. If you select Auto, the
authentication method will be automatically detected.
Username Type a user name (up to 96 characters) that has permission to write
data to the folder specified in the SharePoint Site Address field. If
the user name is part of a domain, type the user name in one of the
following styles:
user@domain
domain\user
Password Type the password (up to 32 characters) associated with the user
name you entered in the Username field. Type the password again in
the Retype password field.
Kerberos Server Address Type the Kerberos Server Address (for example:
kerberos.example.com; up to 64 characters).
8. Click Submit.
Related Information
• Scan to SharePoint
Related Topics:
• Access Web Based Management
155

Home > Scan > Scan Using the Scan Button on Your Machine > Scan to SharePoint > Upload Scanned
Data to a SharePoint Server
Upload Scanned Data to a SharePoint Server
Related Models: MFC-J5855DW/MFC-J5955DW
1. Load your document.
2. Press [Scan] > [to SharePoint].
3. The server profiles you have set up using Web Based Management are listed. Select the profile you want. If
the profile is not complete (for example, if the logon account name and password are missing, or if the quality
or file type is not specified), you will be prompted to enter any missing information.
(MFC-J5955DW) To preview the scanned results before the scanned data is saved, press and then
press [Preview]. The machine scans the document and displays the scanned results on the LCD. If the
scanned results are fine, press [Start] to save it and to finish processing.
4. Press [Start].
The machine starts scanning. If you are using the scanner glass, follow the Touchscreen instructions to
complete the scanning job.
Related Information
• Scan to SharePoint
156

Home > Scan > Scan Using the Scan Button on Your Machine > Web Services for Scanning on Your
Network (Windows 7, Windows 8.1, and Windows 10)
Web Services for Scanning on Your Network (Windows 7, Windows 8.1,
and Windows 10)
The Web Services protocol enables Windows 7, Windows 8.1 and Windows 10 users to scan using a Brother
machine on the network. You must install the driver via Web Services.
• Use Web Services to Install Drivers Used for Scanning (Windows 7, Windows 8.1, and
Windows 10)
• Scan Using Web Services from Your Machine (Windows 7, Windows 8.1, and Windows
10)
• Configure Scan Settings for Web Services
157
Home > Scan > Scan Using the Scan Button on Your Machine > Web Services for Scanning on Your
Network (Windows 7, Windows 8.1, and Windows 10) > Use Web Services to Install Drivers Used for
Scanning (Windows 7, Windows 8.1, and Windows 10)
Use Web Services to Install Drivers Used for Scanning (Windows 7,
Windows 8.1, and Windows 10)
• Make sure you have installed the correct software and drivers for your machine.
• Verify that the host computer and the Brother machine are on the same subnet, or that the router is
correctly configured to pass data between the two devices.
• You must configure the IP address on your Brother machine before you configure this setting.
1. Do one of the following:
• Windows 10
Click
> Windows System > Control Panel. In the Hardware and Sound group, click Add a device.
• Windows 8.1
Move your mouse to the lower right corner of your desktop. When the menu bar appears, click Settings >
Change PC settings > PC and devices > Devices > Add a device.
The machine's Web Services Name appears.
• Windows 7
Click
(Start) > Control Panel > Network and Internet > View network computers and devices.
The machine's Web Services Name appears with the printer icon.
Right-click the machine you want to install.
• The Web Services Name for the Brother machine is your model name and the MAC Address (Ethernet
Address) of your machine (for example, Brother XXX-XXXX (where XXX-XXXX is the name of your
model) [XXXXXXXXXXXX] (MAC Address / Ethernet Address)).
• Windows 8.1/Windows 10
Move your mouse over the machine name to display the machine's information.
2. Do one of the following:
• Windows 8.1/Windows 10
Select the machine you want to install, and then follow the on-screen instructions.
• Windows 7
Click Install in the displayed menu.
To uninstall drivers, click Uninstall or (Remove device).
Related Information
• Web Services for Scanning on Your Network (Windows 7, Windows 8.1, and Windows 10)
158
Home > Scan > Scan Using the Scan Button on Your Machine > Web Services for Scanning on Your
Network (Windows 7, Windows 8.1, and Windows 10) > Scan Using Web Services from Your Machine
(Windows 7, Windows 8.1, and Windows 10)
Scan Using Web Services from Your Machine (Windows 7, Windows 8.1,
and Windows 10)
If you have installed the driver for scanning via Web Services, you can access the Web Services scanning menu
on your Brother machine's LCD.
• Certain characters in the messages displayed on the LCD may be replaced with spaces if the language
settings of your OS and your Brother machine are different.
• If the LCD displays an insufficient memory error message, choose a smaller size in the Paper size setting
or a lower resolution in the Resolution (DPI) setting.
1. Load your document.
2. Press [Scan] > [WS Scan].
3. Press a or b to select the type of scan you want, and then press it.
4. Press a or b to display the computer where you want to send data, and then select the computer name.
5. Press [Start].
The machine starts scanning.
Related Information
• Web Services for Scanning on Your Network (Windows 7, Windows 8.1, and Windows 10)
159
Home > Scan > Scan Using the Scan Button on Your Machine > Web Services for Scanning on Your
Network (Windows 7, Windows 8.1, and Windows 10) > Configure Scan Settings for Web Services
Configure Scan Settings for Web Services
1. Do one of the following:
• Windows 10
Click
> Windows System > Control Panel. In the Hardware and Sound group, click View devices
and printers.
• Windows 8.1
Move your mouse to the lower right corner of your desktop. When the menu bar appears, click Settings,
and then click Control Panel. In the Hardware and Sound group, click View devices and printers.
• Windows 7
Click
(Start) > Devices and Printers.
2. Right-click the machine icon, and then select Scan profiles.... The Scan Profiles dialog box appears.
3. Select the scan profile you want to use.
4. Make sure the scanner selected in the Scanner list is a machine that supports Web Services for scanning,
and then click the Set as Default button.
5. Click Edit....
The Edit Default Profile dialog box appears.
6. Select the Source, Paper size, Colour format, File type, Resolution (DPI), Brightness and Contrast
settings.
7. Click the Save Profile button.
These settings will be applied when you scan using the Web Services protocol.
If you are requested to select a scanning application, select Windows Fax and Scan from the list.
Related Information
• Web Services for Scanning on Your Network (Windows 7, Windows 8.1, and Windows 10)
160

Home > Scan > Scan Using the Scan Button on Your Machine > Change Scan Settings Using Brother
iPrint&Scan
Change Scan Settings Using Brother iPrint&Scan
Brother iPrint&Scan allows you to change the machine's Scan Button settings.
1. Start Brother iPrint&Scan.
• Windows
Launch
(Brother iPrint&Scan).
• Mac
In the Finder menu bar, click Go > Applications, and then double-click the iPrint&Scan icon.
The Brother iPrint&Scan screen appears.
2. If your Brother machine is not selected, click the Select your Machine button, and then select your model
name from the list. Click OK.
3. Click the Machine Scan Settings button, and then follow the on-screen instructions to change the scan
settings, such as document size, colour, and resolution.
Related Information
• Scan Using the Scan Button on Your Machine
Related Topics:
• Scan Using Brother iPrint&Scan (Windows/Mac)
161
Home > Scan > Scan Using Brother iPrint&Scan (Windows/Mac)
Scan Using Brother iPrint&Scan (Windows/Mac)
1. Start Brother iPrint&Scan.
• Windows
Launch (Brother iPrint&Scan).
• Mac
In the Finder menu bar, click Go > Applications, and then double-click the iPrint&Scan icon.
The Brother iPrint&Scan screen appears.
2. If your Brother machine is not selected, click the Select your Machine button, and then select your model
name from the list. Click OK.
3. Click the Scan icon, and then follow the on-screen instructions to scan your documents.
Related Information
• Scan
162

Home > Scan > Scan from Your Computer (Windows)
Scan from Your Computer (Windows)
There are several ways you can use your computer to scan photos and documents on your machine. Use the
software applications we provide or use your favourite scanning application.
•
Scan Using Nuance
™
PaperPort
™
14SE or Other Windows Applications
• Scan Using Windows Fax and Scan
163
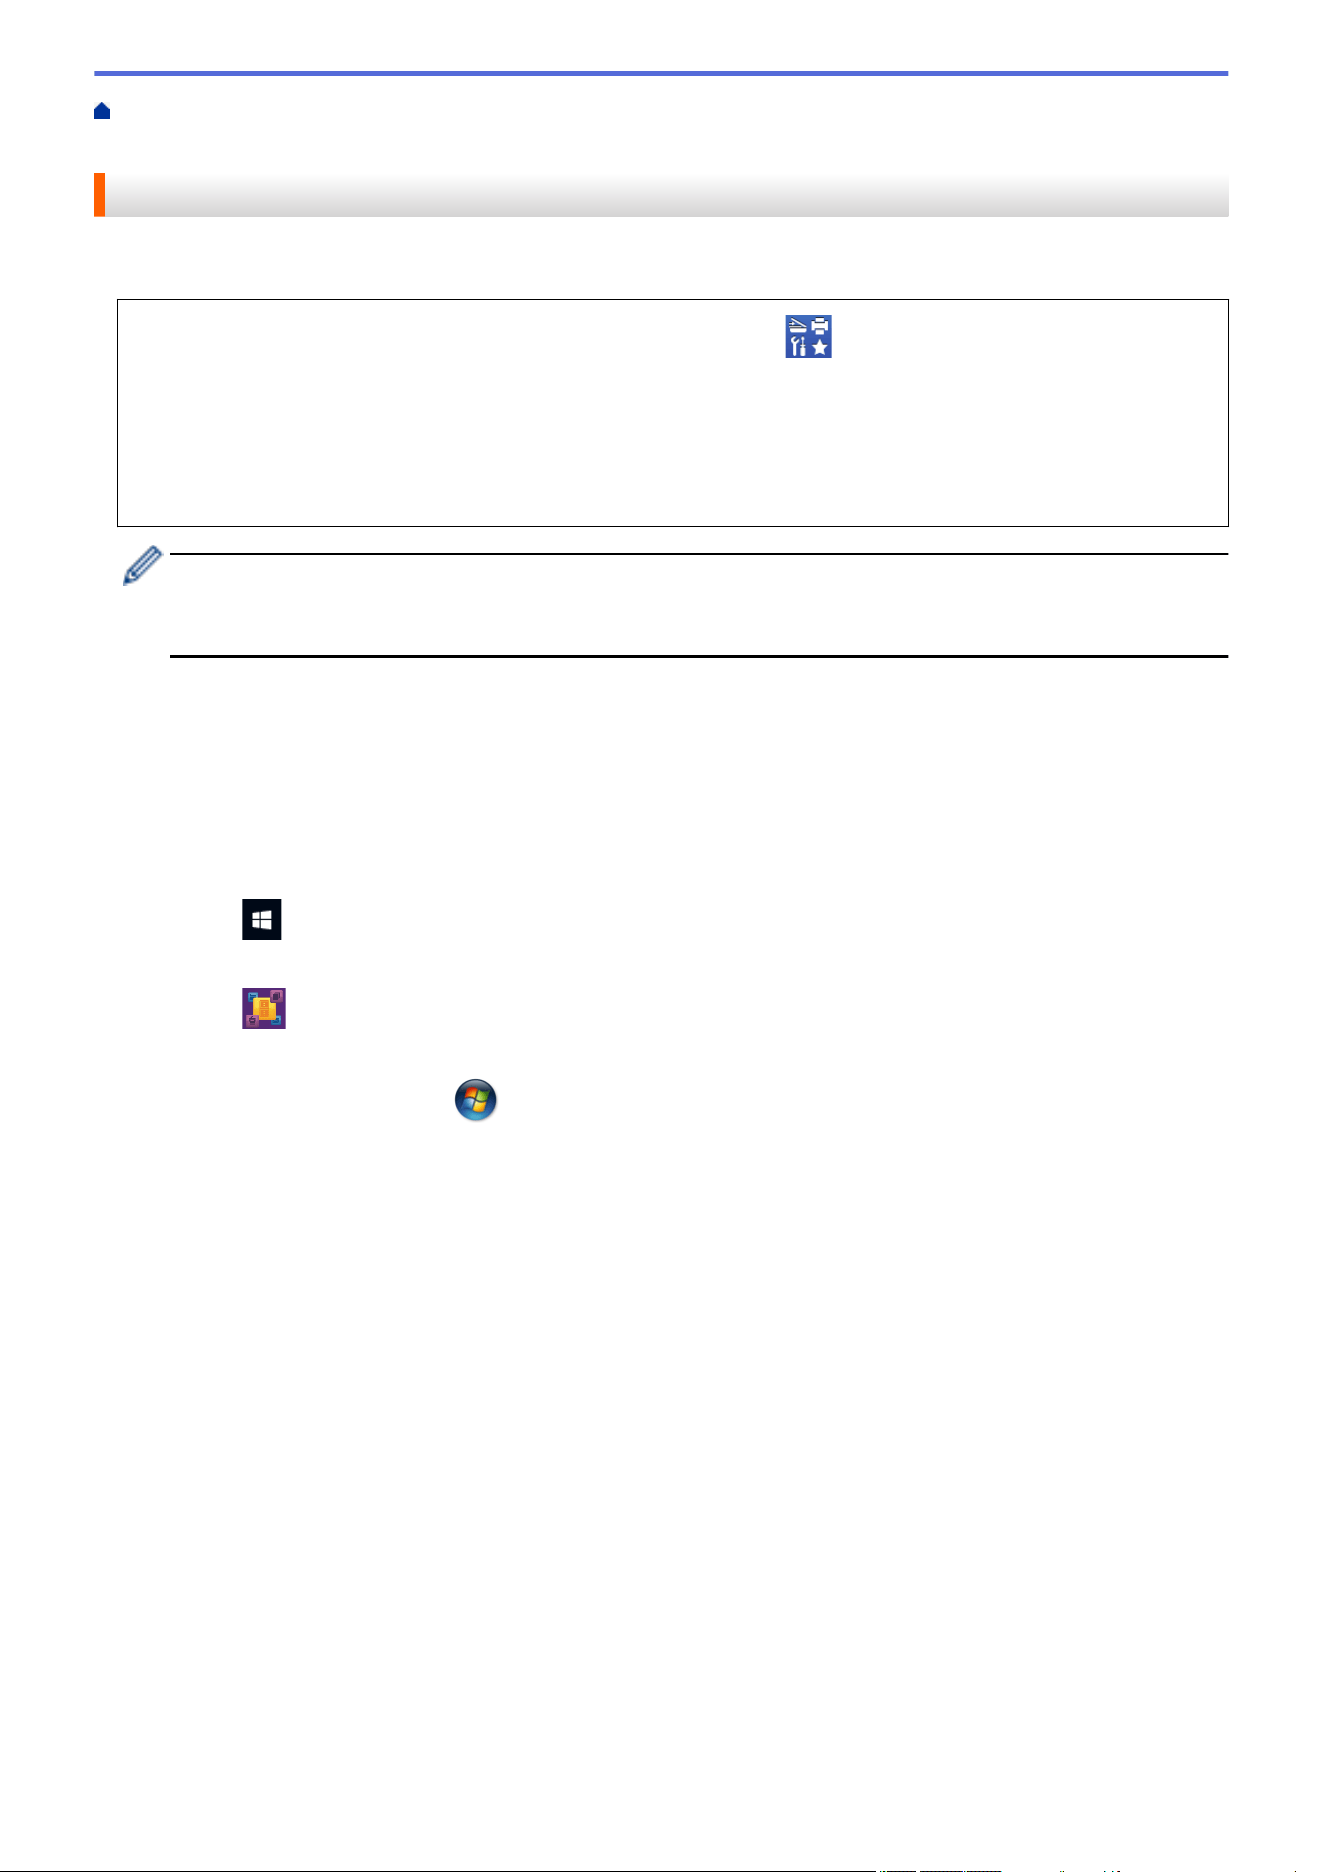
Home > Scan > Scan from Your Computer (Windows) > Scan Using Nuance
™
PaperPort
™
14SE or Other
Windows Applications
Scan Using Nuance
™
PaperPort
™
14SE or Other Windows Applications
You can use the Nuance
™
PaperPort
™
14SE application for scanning.
• To download the Nuance
™
PaperPort
™
14SE application, click (Brother Utilities), select Do More in
the left navigation bar, and then click PaperPort.
• Nuance
™
PaperPort
™
14SE supports Windows 7, Windows 8.1, Windows 10 Home, Windows 10 Pro,
Windows 10 Education and Windows 10 Enterprise.
• For detailed instructions on using each application, click the application's Help menu, and then click
Getting Started Guide in the Help ribbon.
The instructions for scanning in these steps are for PaperPort
™
14SE. For other Windows applications, the
steps will be similar. PaperPort
™
14SE supports both TWAIN and WIA drivers; the TWAIN driver
(recommended) is used in these steps.
Depending on the model of your machine, Nuance
™
PaperPort
™
14SE may not be included. If it is not included,
you can use other software applications that support scanning.
1. Load your document.
2. Start PaperPort
™
14SE.
Do one of the following:
• Windows 10
Click
> Nuance PaperPort 14 > PaperPort.
• Windows 8.1
Click (PaperPort).
• Windows 7
Using your computer, click
(Start) > All Programs > Nuance PaperPort 14 > PaperPort.
3. Click the Desktop menu, and then click Scan Settings in the Desktop ribbon.
The Scan or Get Photo panel appears on the left side of the screen.
4. Click Select.
5. From the available Scanners list, select TWAIN: TW-Brother XXX-XXXX or TWAIN: TW-Brother XXX-XXXX
LAN (where XXX-XXXX is the name of your model).
6. Select the Display scanner dialog box checkbox in the Scan or Get Photo panel.
7. Click Scan.
The Scanner Setup dialog box appears.
164
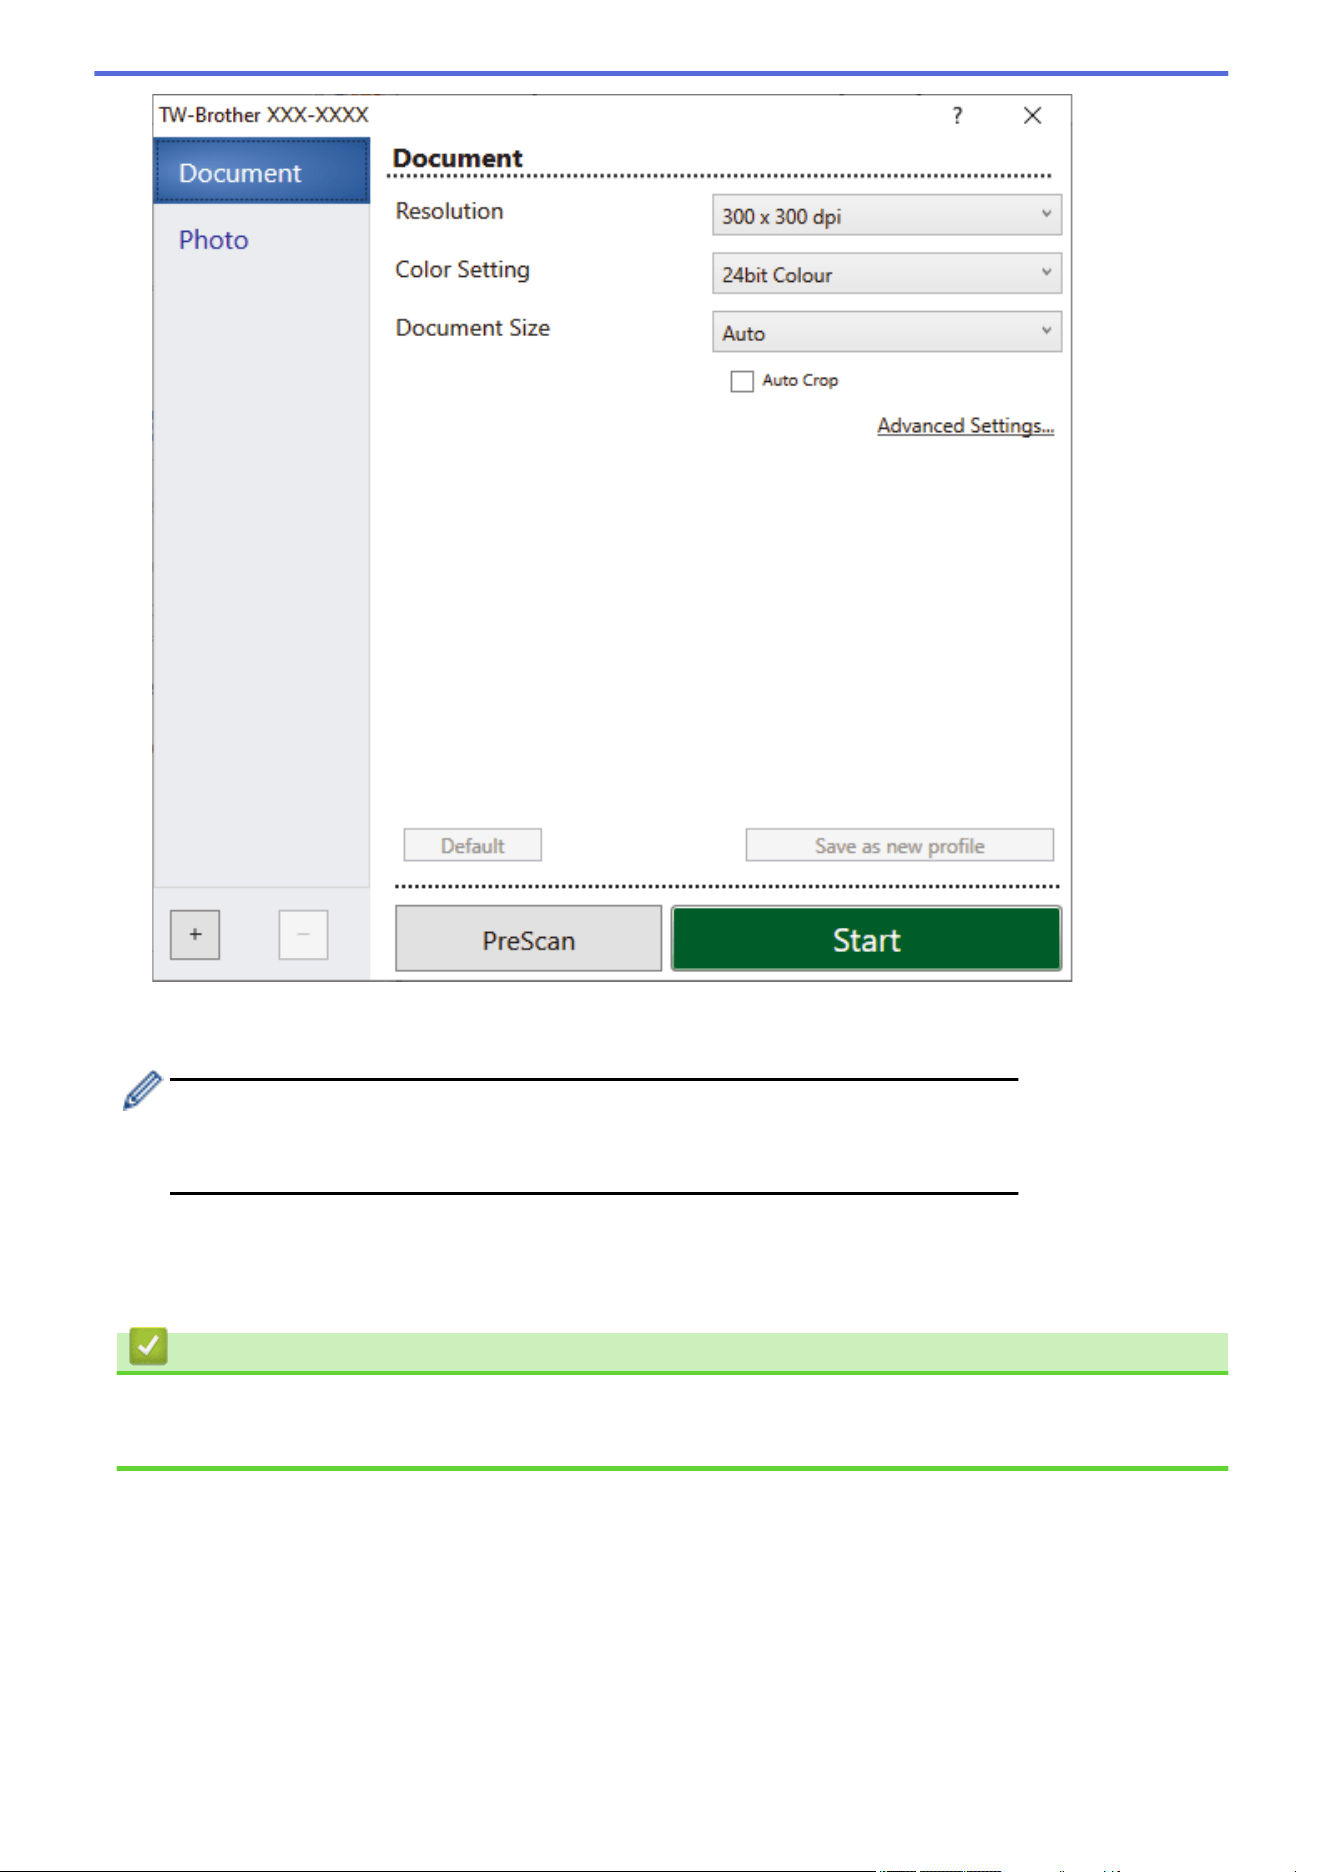
8. Adjust the settings in the Scanner Setup dialog box, if needed.
9. Click the Document Size drop-down list, and then select your document size.
To scan both sides of the document (MFC-J2740DW/MFC-J5740DW/MFC-J5955DW):
Automatic 2-sided scan is available only when using the ADF.
You cannot use PreScan to preview an image.
10. Click PreScan to preview your image and crop unwanted portions before scanning.
11. Click Start.
The machine starts scanning.
Related Information
• Scan from Your Computer (Windows)
• TWAIN Driver Settings (Windows)
165
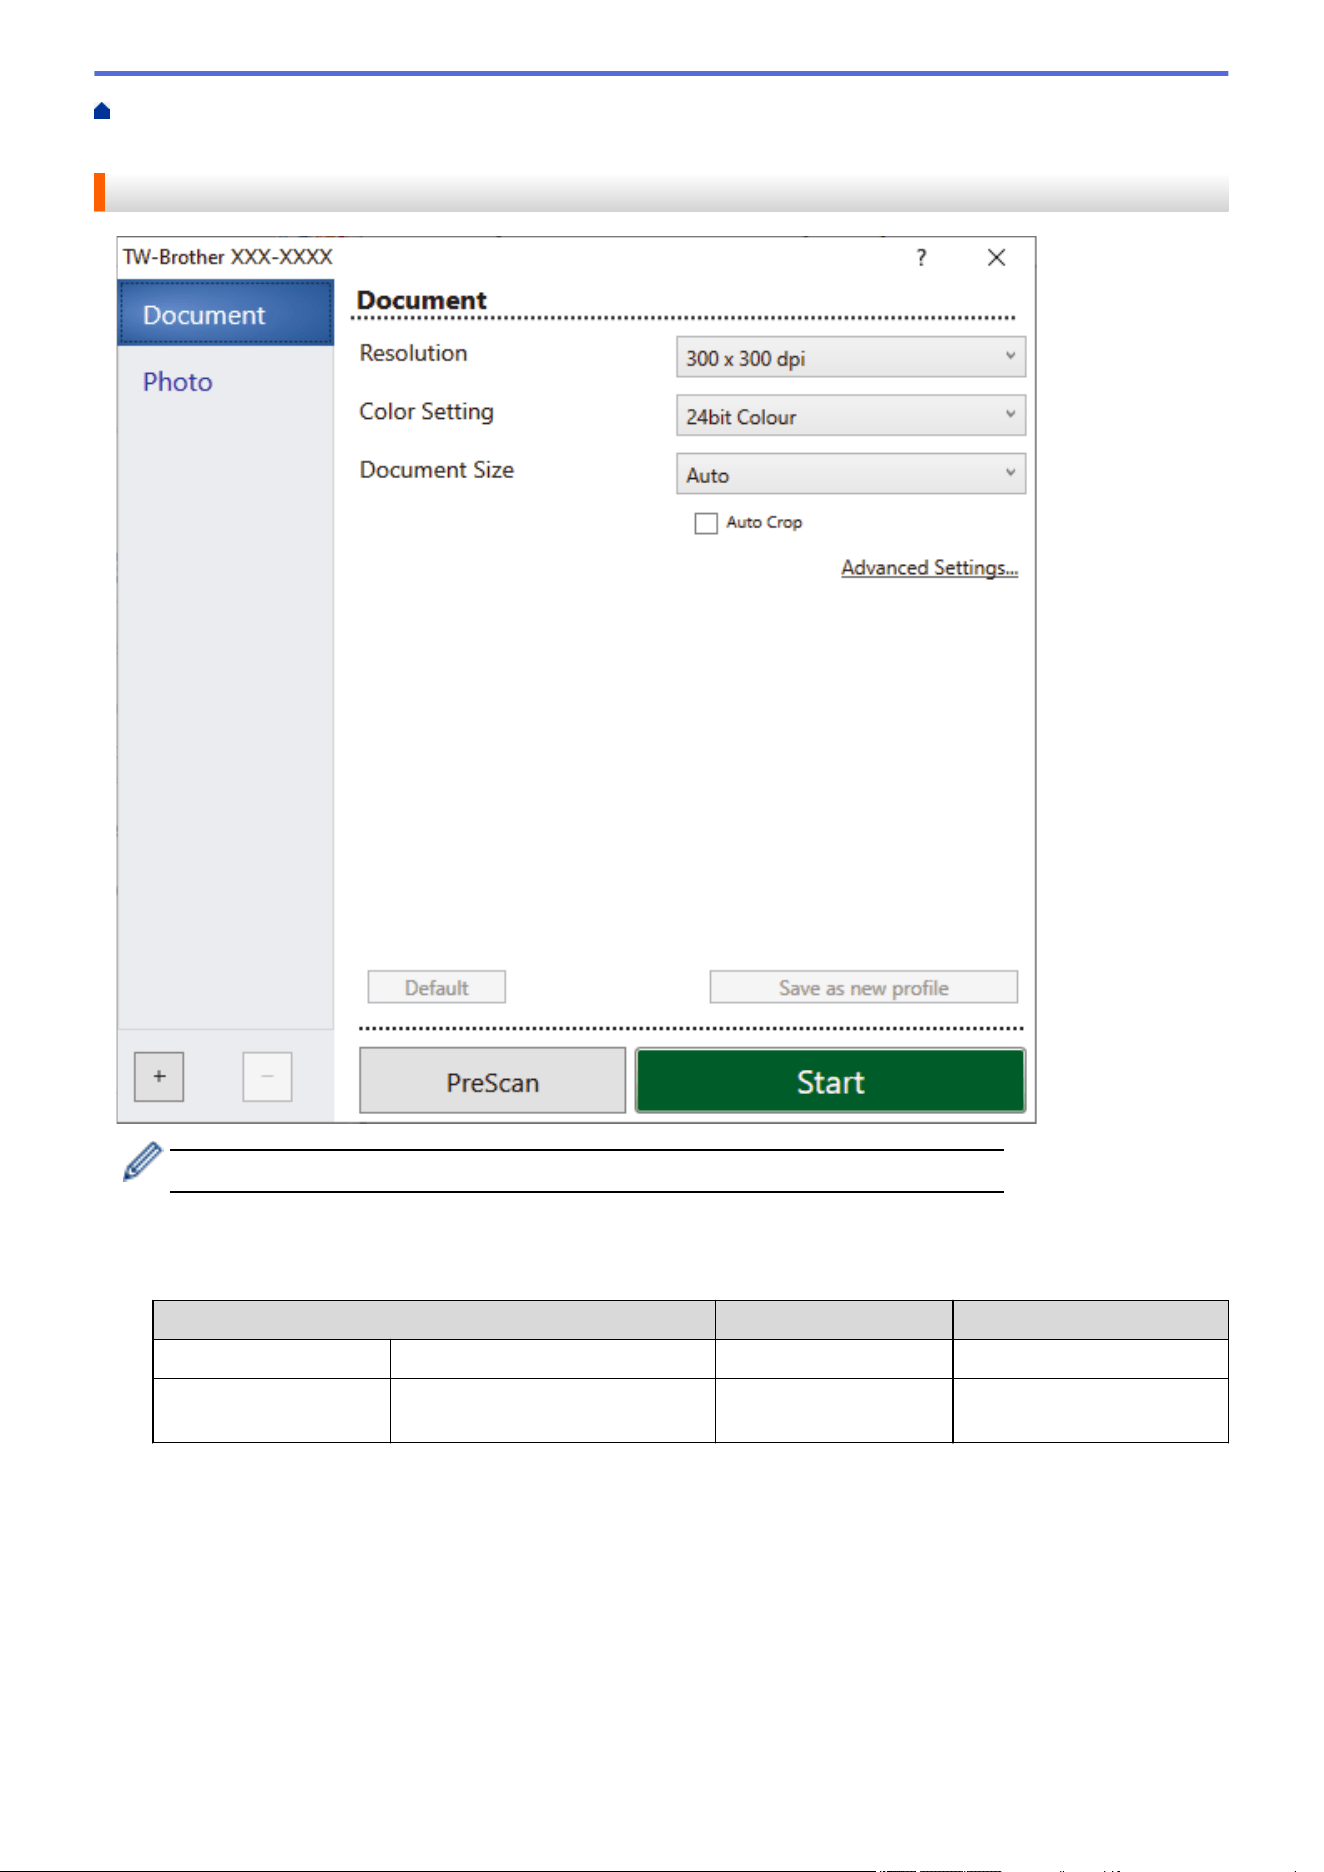
Home > Scan > Scan from Your Computer (Windows) > Scan Using Nuance
™
PaperPort
™
14SE or Other
Windows Applications > TWAIN Driver Settings (Windows)
TWAIN Driver Settings (Windows)
Note that the item names and assignable values will vary depending on the machine.
1. Scan
Select the Photo or Document option depending on the type of document you want to scan.
Scan (Image Type)
Resolution Colour Setting
Photo Use for scanning photo images. 300 x 300 dpi 24bit Colour
Document Use for scanning text
documents.
300 x 300 dpi 24bit Colour
2. Resolution
Select a scanning resolution from the Resolution drop-down list. Higher resolutions take more memory and
transfer time, but produce a finer scanned image.
3. Color Setting
Select from a range of scan colour depths.
• Black & White
Use for text or line art images.
166

• Grey (Error Diffusion)
Use for photographic images or graphics. (Error Diffusion is a method for creating simulated grey
images without using true grey dots. Black dots are put in a specific pattern to give a grey
appearance.)
• True Grey
Use for photographic images or graphics. This mode is more accurate because it uses up to 256
shades of grey.
• 24bit Colour
Use to create an image with the most accurate colour reproduction. This mode uses up to 16.8 million
colours to scan the image, but it requires the most memory and has the longest transfer time.
4. Document Size
Select the exact size of your document from a selection of preset scan sizes.
If you select Custom, the Custom Document Size dialog box appears and you can specify the document
size.
5. Auto Crop
Scan multiple documents placed on the scanner glass. The machine will scan each document and create
separate files or a single multi-page file.
6. (MFC-J2740DW/MFC-J5740DW/MFC-J5955DW) 2-sided Scanning
Scan both sides of the document. When using the Automatic 2-sided Scan feature, you must select the
Long-edge binding or Short-edge binding option from the 2-sided Scanning drop-down list, so when you
turn the pages, they are facing the way you want.
7. Advanced Settings
Configure advanced settings by clicking the Advanced Settings link in the Scanner Setup dialog box.
• Document Correction
- Auto Deskew
Set the machine to correct document skewing automatically as the pages are scanned from the
scanner glass.
- Margin Settings
Adjust your document's margins.
- Rotate Image
Rotate the scanned image.
- Edge Fill
Fill in the edges on four sides of the scanned image using the selected colour and range.
- Skip Blank Page
Remove the document's blank pages from the scanning results.
• Image Quality
- Diffusion Adjustment -Grey
Adjust the diffusion when selecting the Grey (Error Diffusion) option from the Color Setting drop-
down list.
- Colour Tone Adjustment
Adjust the colour tone.
- Background Processing
• Remove Bleed-through / Pattern
Prevent bleed-through.
• Remove Background Colour
Remove the base colour of documents to make the scanned data more legible.
- Colour Drop
Select a colour to remove from the scanned image.
- Edge Emphasis
167

Sharpen the characters in the original.
- Reduce Noise
Improve and enhance the quality of your scanned images with this selection. The Reduce Noise
option is available when selecting the 24bit Colour option and the 300 x 300 dpi, 400 x 400 dpi, or
600 x 600 dpi scan resolution.
• B&W Image Quality
- B&W Threshold Adjustment
Adjust the threshold to generate a monochrome image.
- Character Correction
Correct the broken or incomplete characters of the original to make them easier to read.
- B&W Inversion
Invert black and white in the monochrome image.
• Feed Control
- Layout
Select the layout.
- Continuous Scan
Select this option to scan multiple pages. After a page is scanned, select whether to continue
scanning or finish.
Related Information
• Scan Using Nuance
™
PaperPort
™
14SE or Other Windows Applications
168
Home > Scan > Scan from Your Computer (Windows) > Scan Using Windows Fax and Scan
Scan Using Windows Fax and Scan
Windows Fax and Scan application is another option that you can use for scanning.
• Windows Fax and Scan uses the WIA scanner driver.
• If you want to crop a portion of a page after pre-scanning the document, you must scan using the scanner
glass (also called the flatbed).
1. Load your document.
2. Launch Windows Fax and Scan.
3. Click File > New > Scan.
4. Select the scanner you want to use.
5. Click OK.
The New Scan dialog box appears.
6. Adjust the settings in the dialog box, if needed.
The scanner resolution can be set to a maximum of 1200 dpi. If you want to scan at higher resolutions, use
the Scanner Utility software from Brother Utilities.
If your machine supports 2-sided Scan and you want to scan both sides of your document, select Feeder
(Scan both sides) as Source.
7. Click Scan.
The machine starts scanning the document.
169

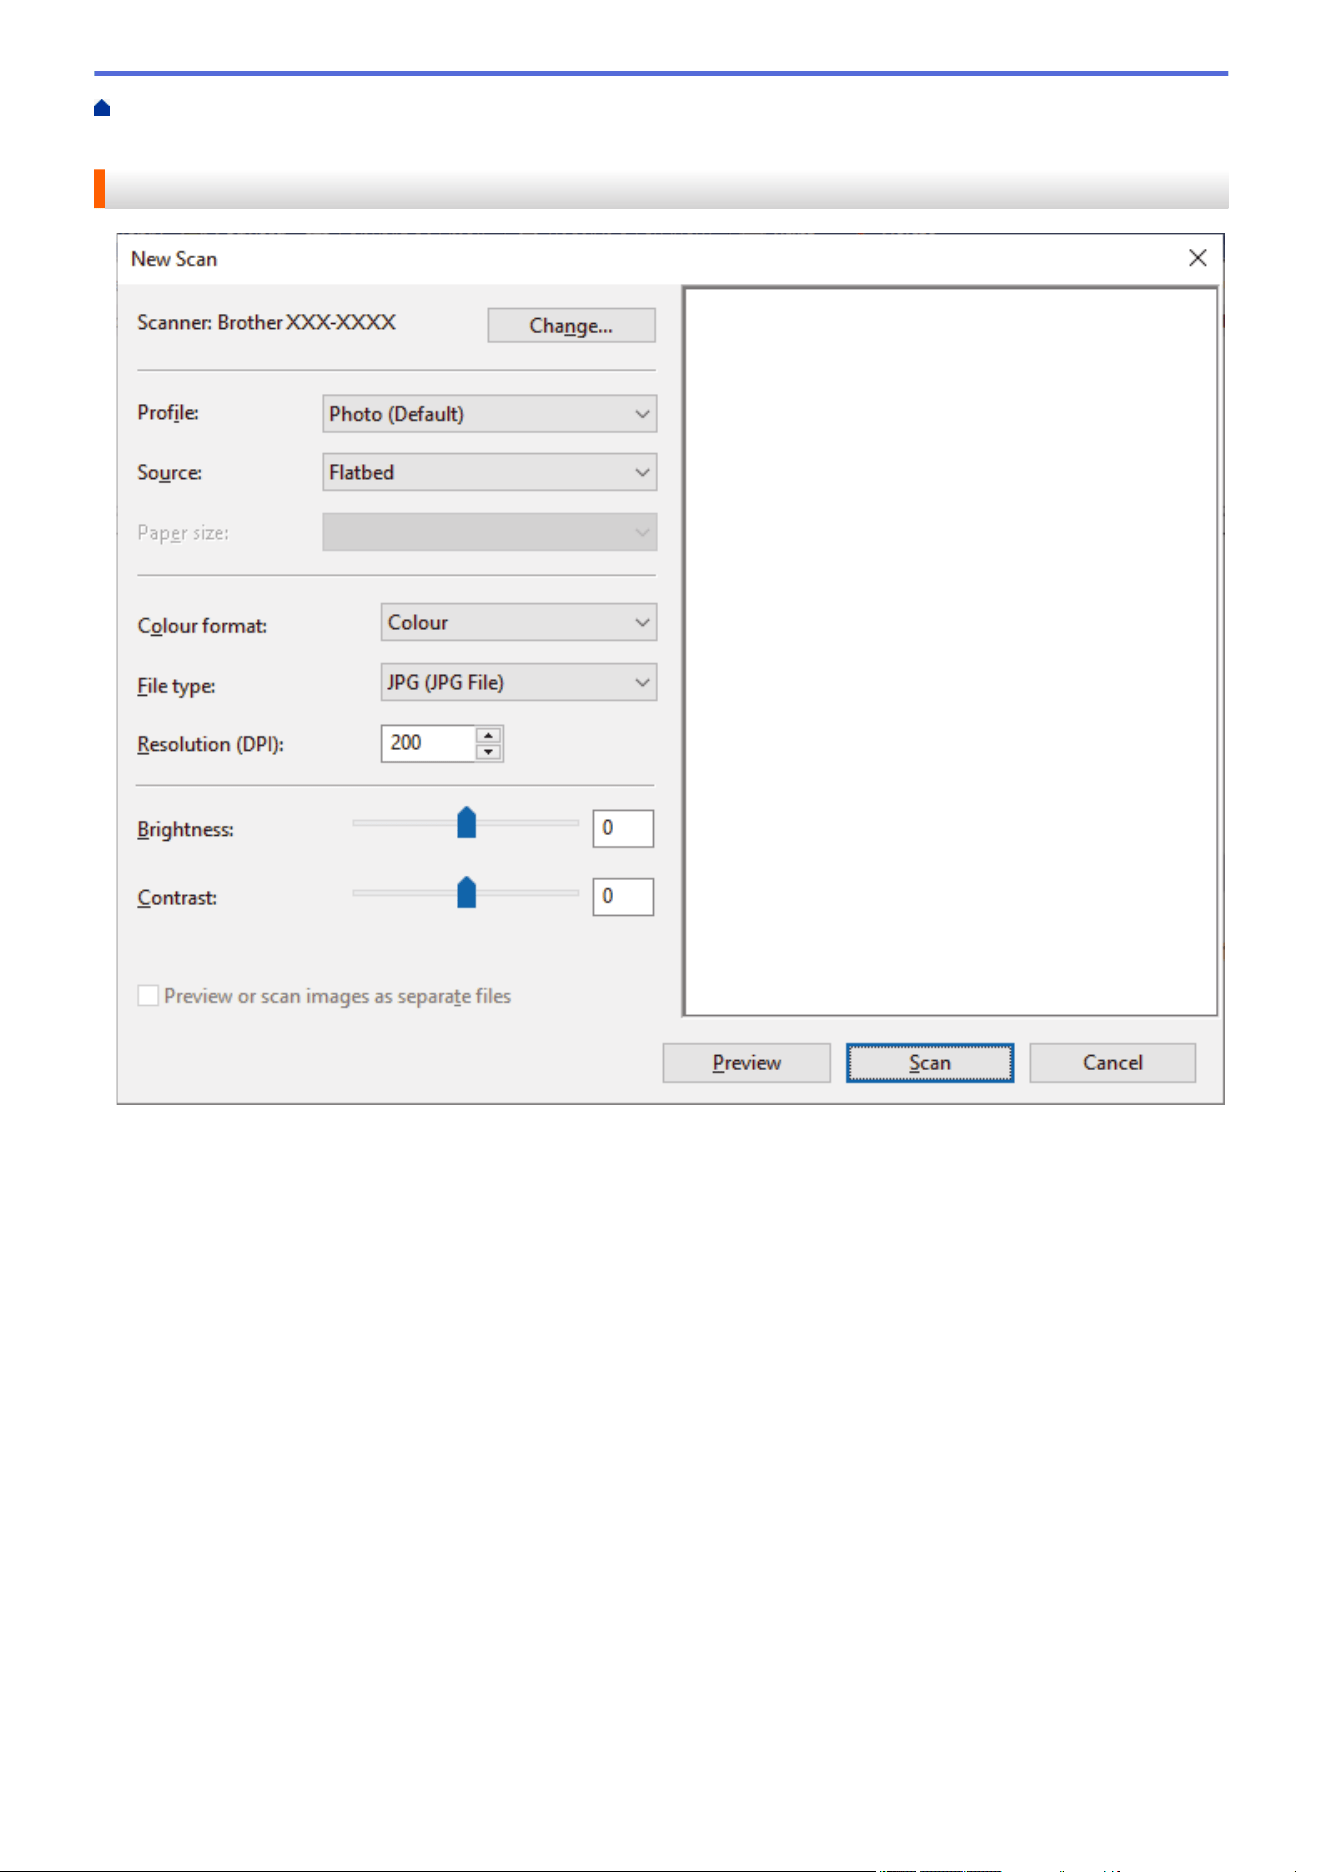
Home > Scan > Scan from Your Computer (Windows) > Scan Using Windows Fax and Scan > WIA Driver
Settings (Windows)
WIA Driver Settings (Windows)
Profile
Select the scan profile you want to use from the Profile drop-down list.
Source
Select the Flatbed, Feeder (Scan one side), or Feeder (Scan both sides) option from the drop-down list.
Paper size
The Paper size option is available if you select the Feeder (Scan one side) or Feeder (Scan both sides)
option from the Source drop-down list.
Colour format
Select a scan colour format from the Colour format drop-down list.
File type
Select a file format from the File type drop-down list.
Resolution (DPI)
Set a scanning resolution in the Resolution (DPI) field. Higher resolutions take more memory and transfer
time, but produce a finer scanned image.
Brightness
Set the Brightness level by dragging the slider to the right or left to lighten or darken the image. If the
scanned image is too light, set a lower brightness level and scan the document again. If the image is too dark,
171

set a higher brightness level and scan the document again. You can also type a value in the field to set the
brightness level.
Contrast
Increase or decrease the Contrast level by moving the slider to the right or left. An increase emphasises dark
and light areas of the image, while a decrease reveals more details in grey areas. You can also type a value in
the field to set the contrast level.
Related Information
• Scan Using Windows Fax and Scan
172


Home > Scan > Configure Scan Settings Using Web Based Management > Set the Scan File Name Using
Web Based Management
Set the Scan File Name Using Web Based Management
Set up a file name for scanned data using Web Based Management.
1. Start your web browser.
2. Type "https://machine's IP address" in your browser's address bar (where "machine's IP address" is the
machine's IP address).
For example:
https://192.168.1.2
3. If required, type the password in the Login field, and then click Login.
The default password to manage this machine’s settings is located on the back of the machine and marked
"Pwd".
4. Go to the navigation menu, and then click Scan > Scan File Name.
Start from , if the navigation menu is not shown on the left side of the screen.
5. Select the File Name Style from the drop-down list.
6. If you selected the option to include the date in File Name Style field, select the Date format from the drop-
down list.
7. In the Time field, select On to include the time information in the file name.
8. In the Counter field, select Continuous or Reset after each job.
When you select Reset after each job, duplication of file names may occur.
9. If you want to create a user-defined file name prefix, type a file name in the user-defined fields of each scan
function.
Do not use the following characters to avoid sending errors: ? / \ *
10. Click Submit.
Related Information
• Configure Scan Settings Using Web Based Management
175
Home > Scan > Configure Scan Settings Using Web Based Management > Set the Scan Job Email Report
Using Web Based Management
Set the Scan Job Email Report Using Web Based Management
When you scan a document, the machine will send a scan job email report automatically to the registered email
address.
1. Start your web browser.
2. Type "https://machine's IP address" in your browser's address bar (where "machine's IP address" is the
machine's IP address).
For example:
https://192.168.1.2
3. If required, type the password in the Login field, and then click Login.
The default password to manage this machine’s settings is located on the back of the machine and marked
"Pwd".
4. Go to the navigation menu, and then click Scan > Scan Job e-mail report.
Start from , if the navigation menu is not shown on the left side of the screen.
5. In the Administrator Address field, type the email address.
6. For the scan functions you want, select On to send a scan job email report.
7. Click Submit.
Related Information
• Configure Scan Settings Using Web Based Management
Related Topics:
• Access Web Based Management
176

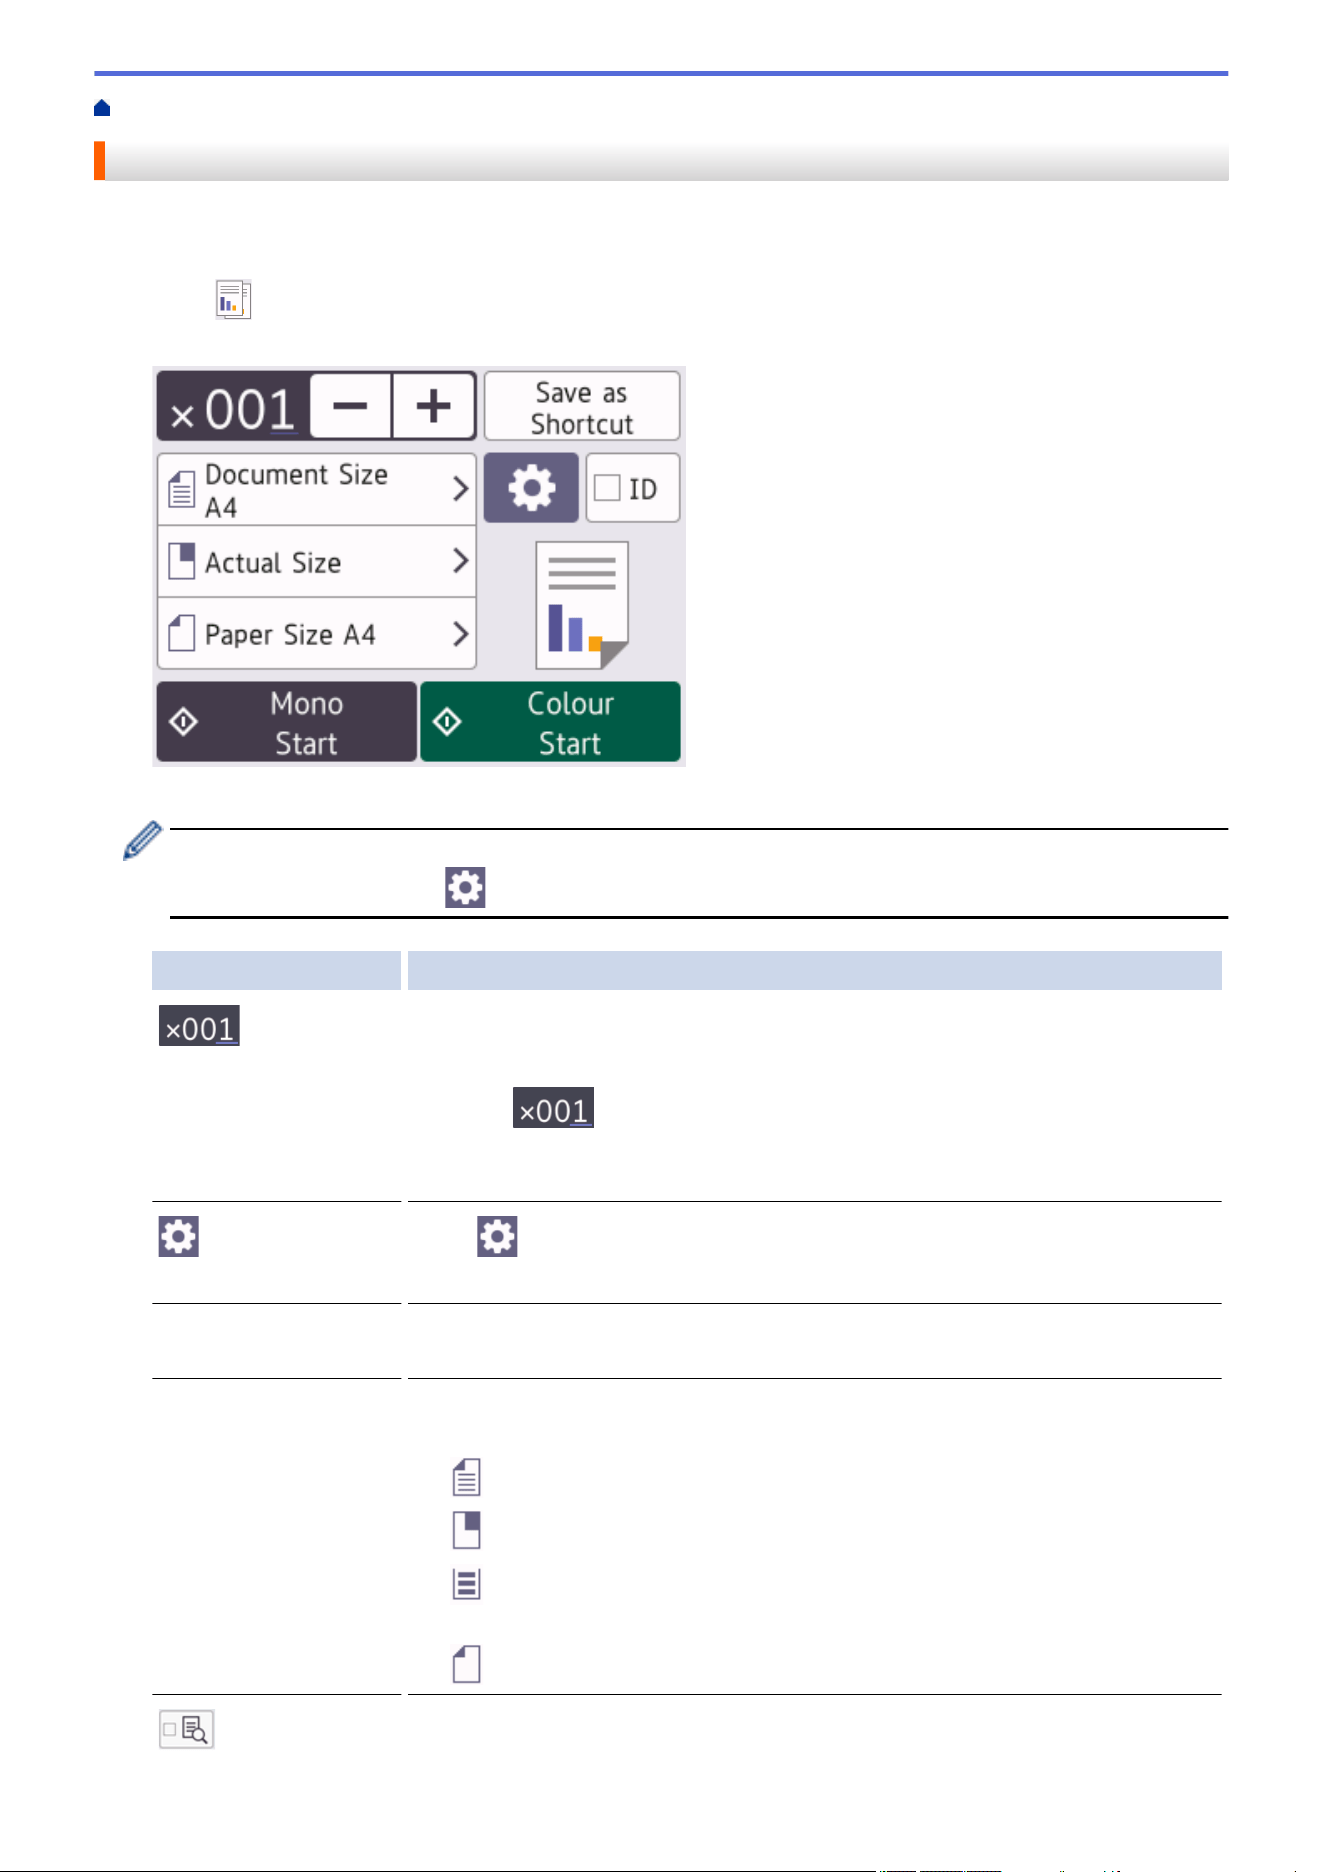
Home > Copy > Copy a Document
Copy a Document
1. Make sure you have loaded the correct size paper in the paper tray.
2. Load your document.
3. Press
[Copy].
The touchscreen displays:
4. Change the copy settings, if needed.
When you load paper other than A4 size plain paper, you must change the [Paper Size] and [Paper
Type] settings by pressing [Options].
Option Description
(No. of
Copies)
Enter the number of copies in one of the following ways:
• Press - or + on the touchscreen.
• Press
to display the keyboard on the touchscreen, and then enter
the number of copies using the touchscreen keyboard. Press OK.
• Enter the number of copies using the dial pad.
(Options) Press [Options] to change the copy settings for the next copy only.
When you have finished changing settings, press OK.
ID
To make an ID card copy with the [2in1 ID Vertical] layout, select the [ID]
checkbox.
Current setting
indications
Press the area indicated on the screen to change copy settings for the next copy
only.
• Document Size
•
Enlarge/Reduce
• Tray Select (MFC-J2740DW/MFC-J5740DW/MFC-J5855DW/
MFC-J5955DW)
• Paper Size (MFC-J2340DW/MFC-J5340DW)
(Preview)
Preview the copied result on the LCD, before the machine starts printing.
178
Option Description
(MFC-J5955DW)
• After you have finished selecting new options, you can save them by pressing [Save as Shortcut].
• (MFC-J5955DW) To preview the copied result before the machine starts printing, press and then
press [Mono Preview] or [Colour Preview]. The machine scans the document and displays only
the first page (one side) of the copied result on the LCD. If the copied result is fine, press [Start] to
print it and to finish processing.
5. Press [Mono Start] or [Colour Start].
To interrupt copying, press .
Related Information
• Copy
Related Topics:
• Load Documents in the Automatic Document Feeder (ADF)
• Load Documents on the Scanner Glass
• Copy Settings
179
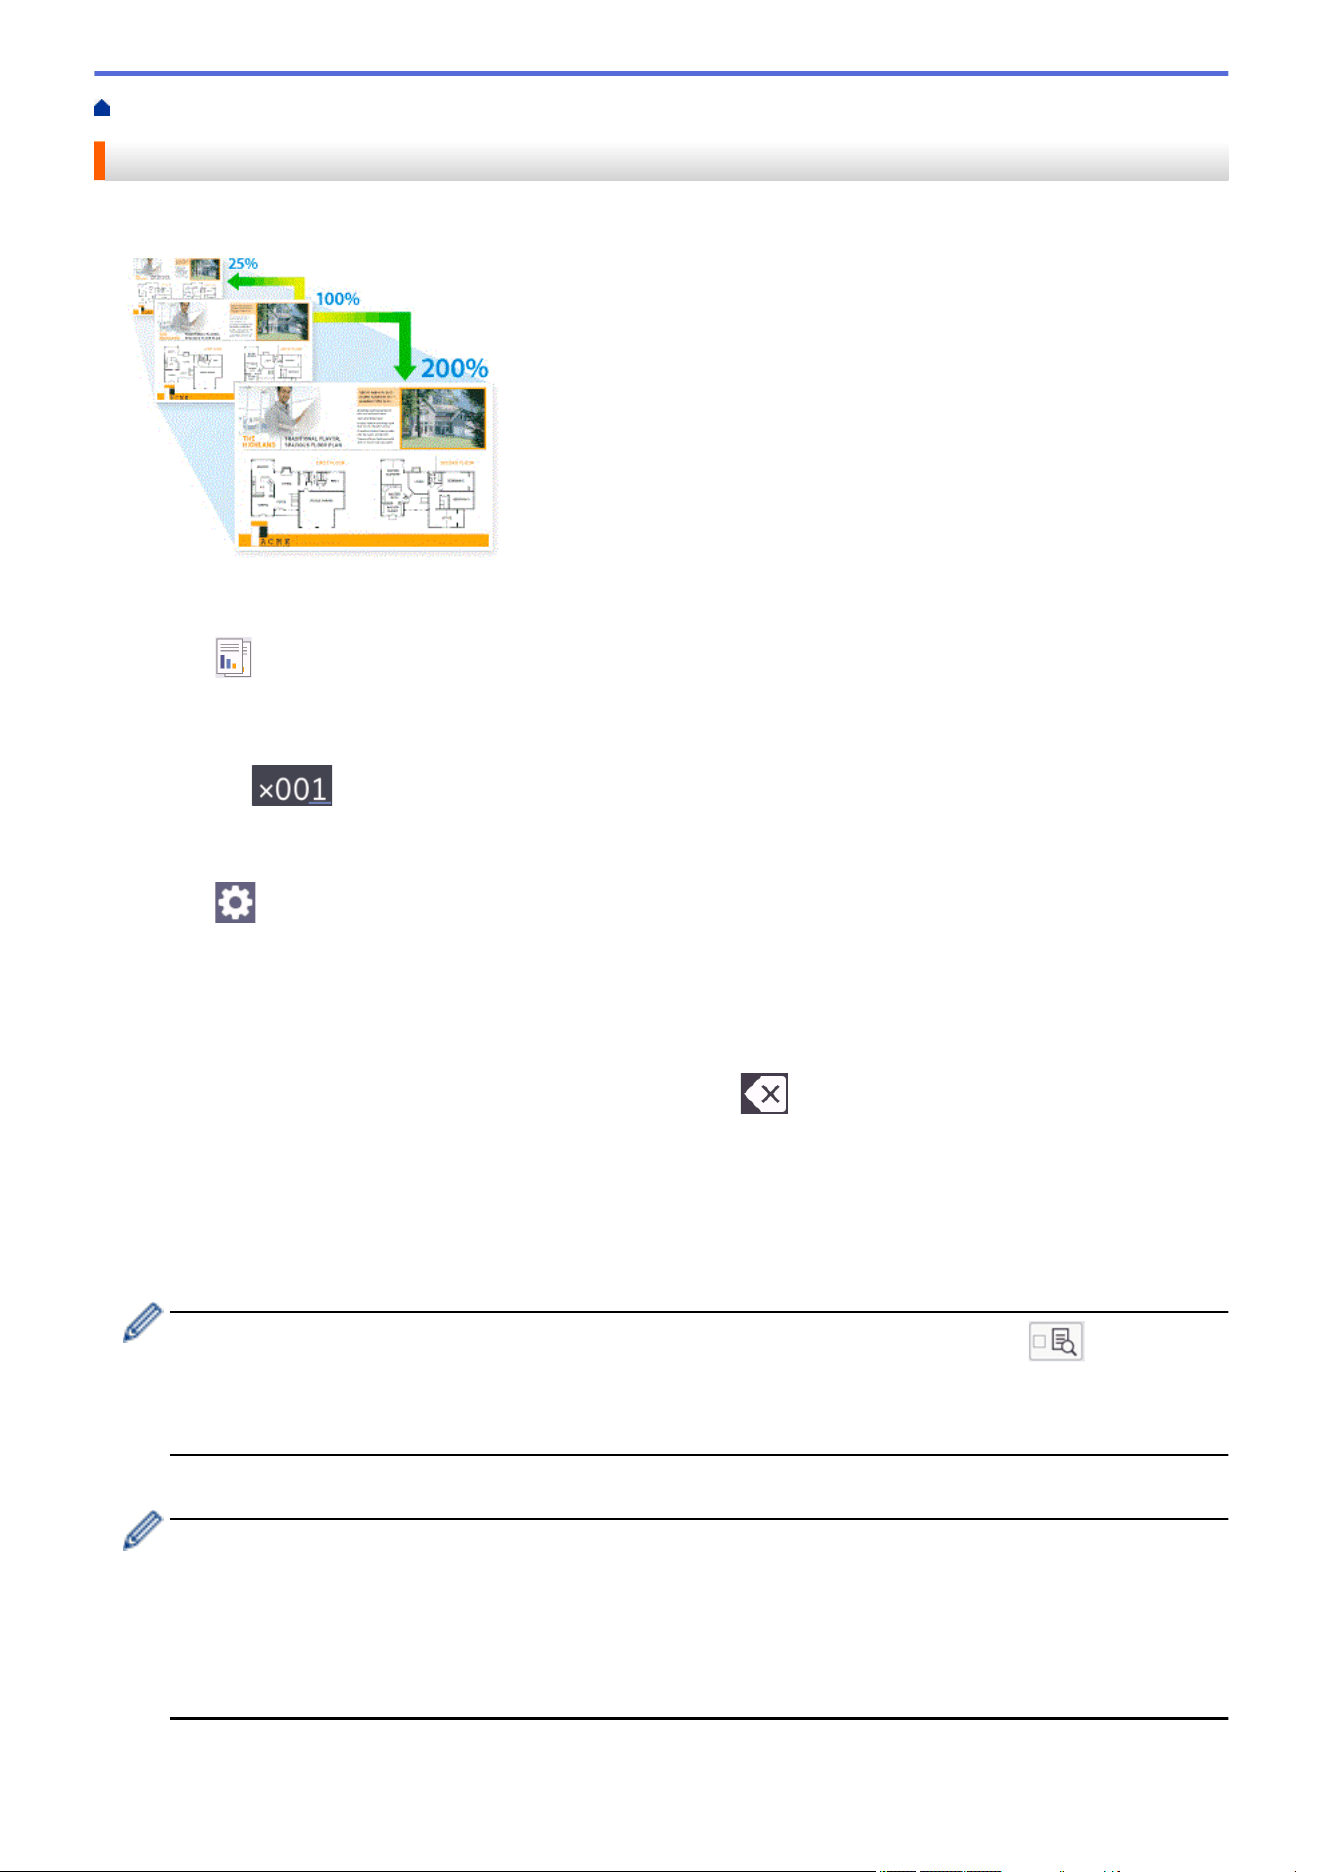
Home > Copy > Enlarge or Reduce Copied Images
Enlarge or Reduce Copied Images
Select an enlargement or reduction ratio to resize your copied data.
1. Load your document.
2. Press
[Copy].
3. Enter the number of copies in one of the following ways:
• Press [-] or [+] on the touchscreen.
• Press to display the keyboard on the touchscreen, and then enter the number of copies using the
touchscreen keyboard. Press [OK].
• Enter the number of copies using the dial pad.
4. Press [Options] > [Enlarge/Reduce].
5. Press a or b to display the available options, and then press the option you want to change.
6. Do one of the following:
• If you selected the [Enlarge] or [Reduce] option, press the enlargement or reduction ratio you want to
use.
• If you selected the [Custom(25-400%)] option, press
(backspace) to erase the displayed
percentage, or press d to move the cursor, and then enter an enlargement or reduction ratio from [25%]
to [400%].
Press [OK].
• If you selected [100%] or the [Fit to Page] option, go to the next step.
7. Read and confirm the displayed list of options you have selected, and then press [OK].
(MFC-J5955DW) To preview the copied result before the machine starts printing, press and then
press [Mono Preview] or [Colour Preview]. The machine scans the document and displays only
the first page (one side) of the copied result on the LCD. If the copied result is fine, press [Start] to
print it and to finish processing.
8. When you have finished changing settings, press [Mono Start] or [Colour Start].
If you selected the [Fit to Page] option, your machine adjusts the copy size to fit the paper size set in
the machine.
• The [Fit to Page] option does not work correctly when the document on the scanner glass is
skewed. Using the document guidelines on the left and top, place the document face down in the upper-
left corner of the scanner glass.
• The [Fit to Page] option is not available for Legal size documents.
180


Home > Copy > Sort Copies
Sort Copies
Sort multiple copies. Pages will be stacked in the order they are fed, that is: 1, 2, 3, and so on.
1. Load your document.
2. Press [Copy].
3. Enter the number of copies in one of the following ways:
• Press [-] or [+] on the touchscreen.
• Press to display the keyboard on the touchscreen, and then enter the number of copies using the
touchscreen keyboard. Press [OK].
• Enter the number of copies using the dial pad.
4. Press [Options] > [Stack/Sort] > [Sort].
5. Read and confirm the displayed list of settings you have selected, and then press [OK].
(MFC-J5955DW) To preview the copied result before the machine starts printing, press and then
press [Mono Preview] or [Colour Preview]. The machine scans the document and displays only
the first page (one side) of the copied result on the LCD. If the copied result is fine, press [Start] to
print it and to finish processing.
6. When you have finished changing settings, press [Mono Start] or [Colour Start]. If you placed the
document in the ADF, the machine scans the document and starts printing.
7. If you are using the scanner glass, repeat the following steps for each page of the document:
• Place the next page on the scanner glass, and then press [Continue] to scan the page.
• After scanning all the pages, press [Finish].
Related Information
• Copy
182
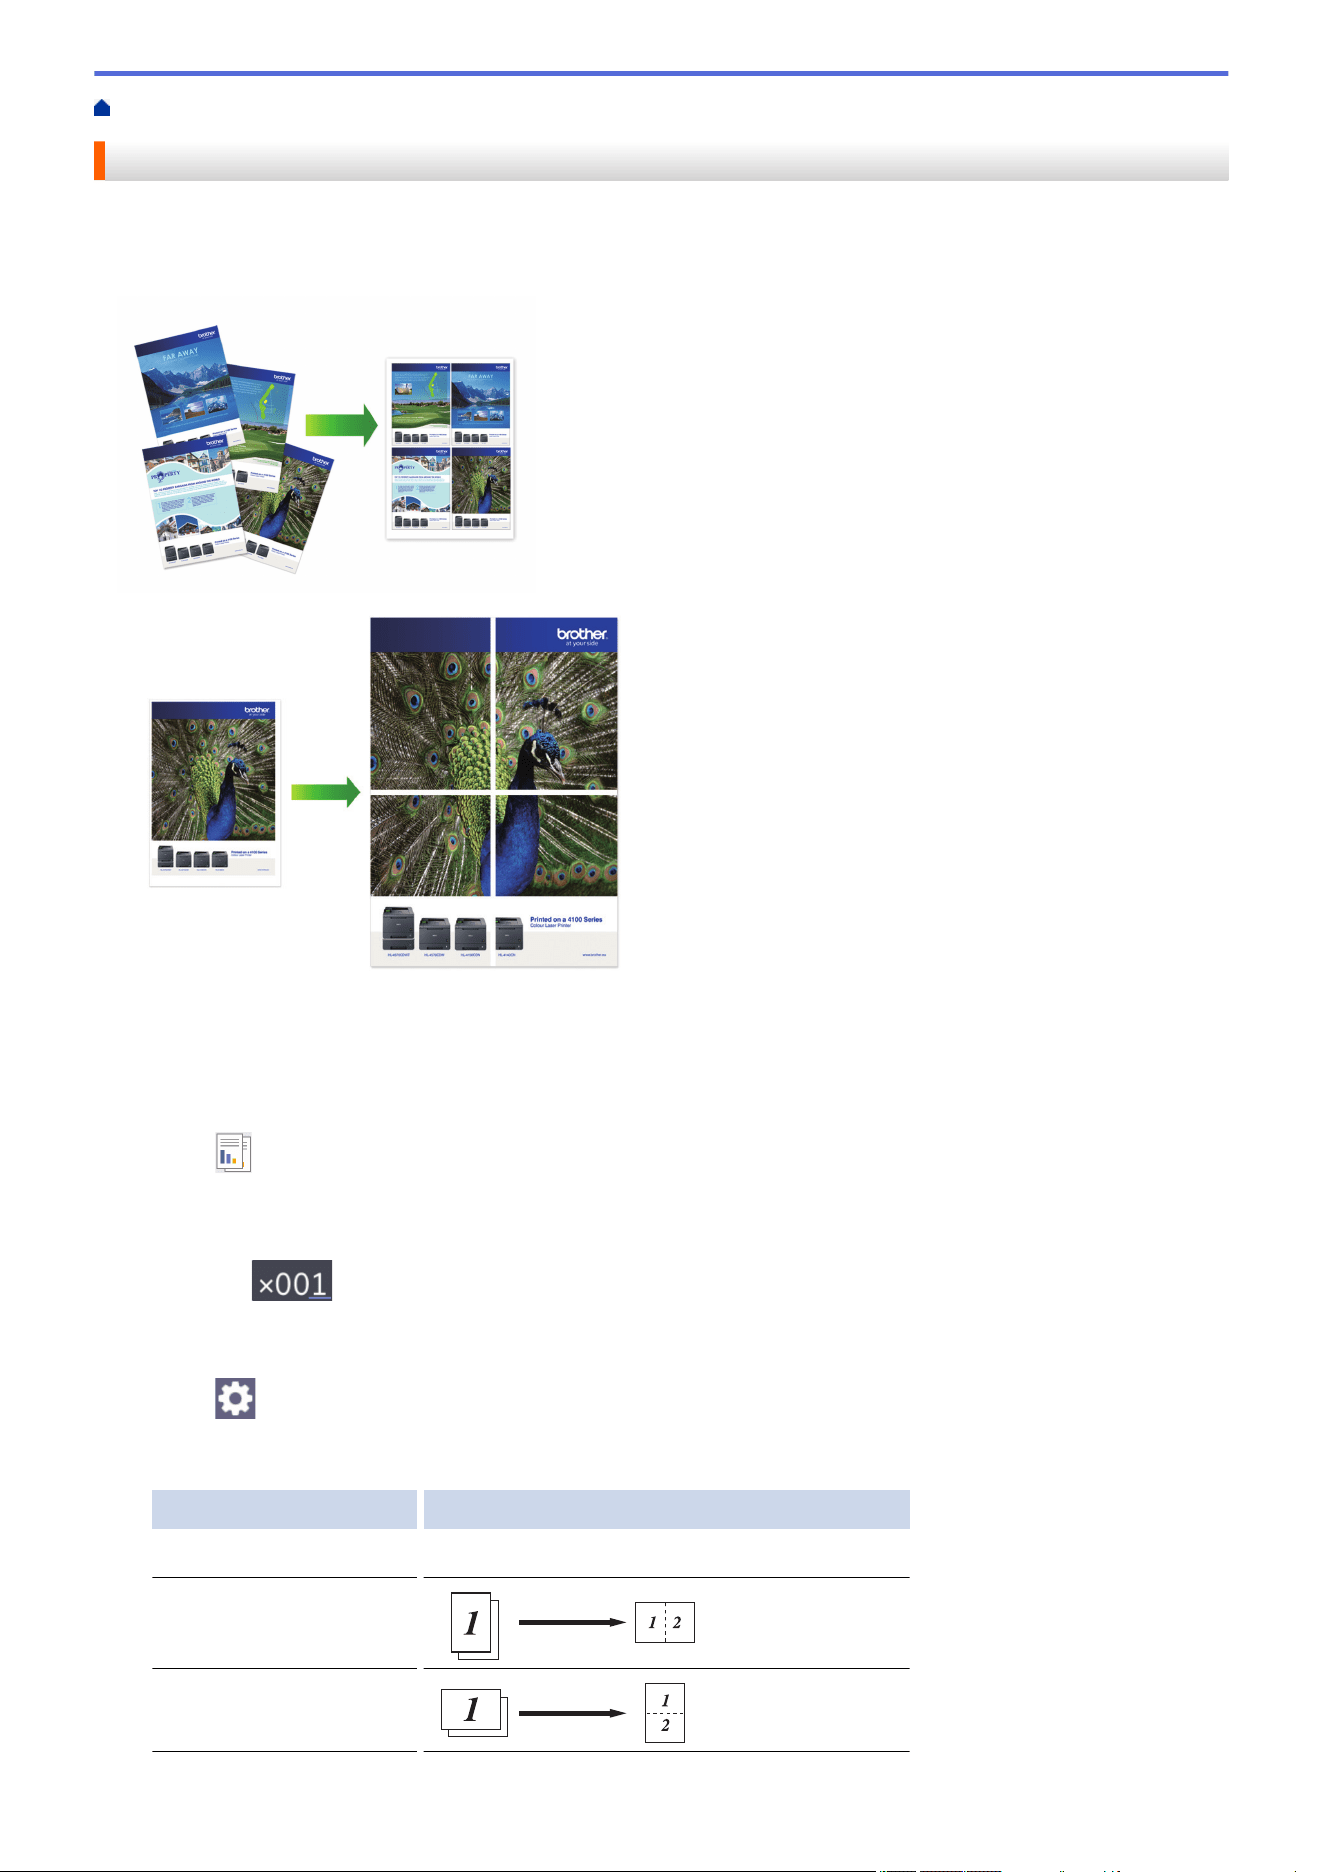
Home > Copy > Make Page Layout Copies (N in 1 or Poster)
Make Page Layout Copies (N in 1 or Poster)
The N in 1 copy feature saves paper by copying two or four pages of your document onto one page of the copy.
The poster feature divides your document into sections, then enlarges the sections so you can assemble them
into a poster. To print a poster, use the scanner glass.
• Make sure the paper size is set to A4, A3, Letter, or Ledger.
• You can make only one Poster copy at a time.
1. Load your document.
2. Press
[Copy].
3. Enter the number of copies in one of the following ways:
• Press [-] or [+] on the touchscreen.
• Press to display the keyboard on the touchscreen, and then enter the number of copies using the
touchscreen keyboard. Press [OK].
• Enter the number of copies using the dial pad.
4. Press [Options] > [Page Layout].
5. Press a or b to display the options, and then press the option you want.
Option Description
Off(1in1)
-
2in1(Portrait)
2in1(Landscape)
183
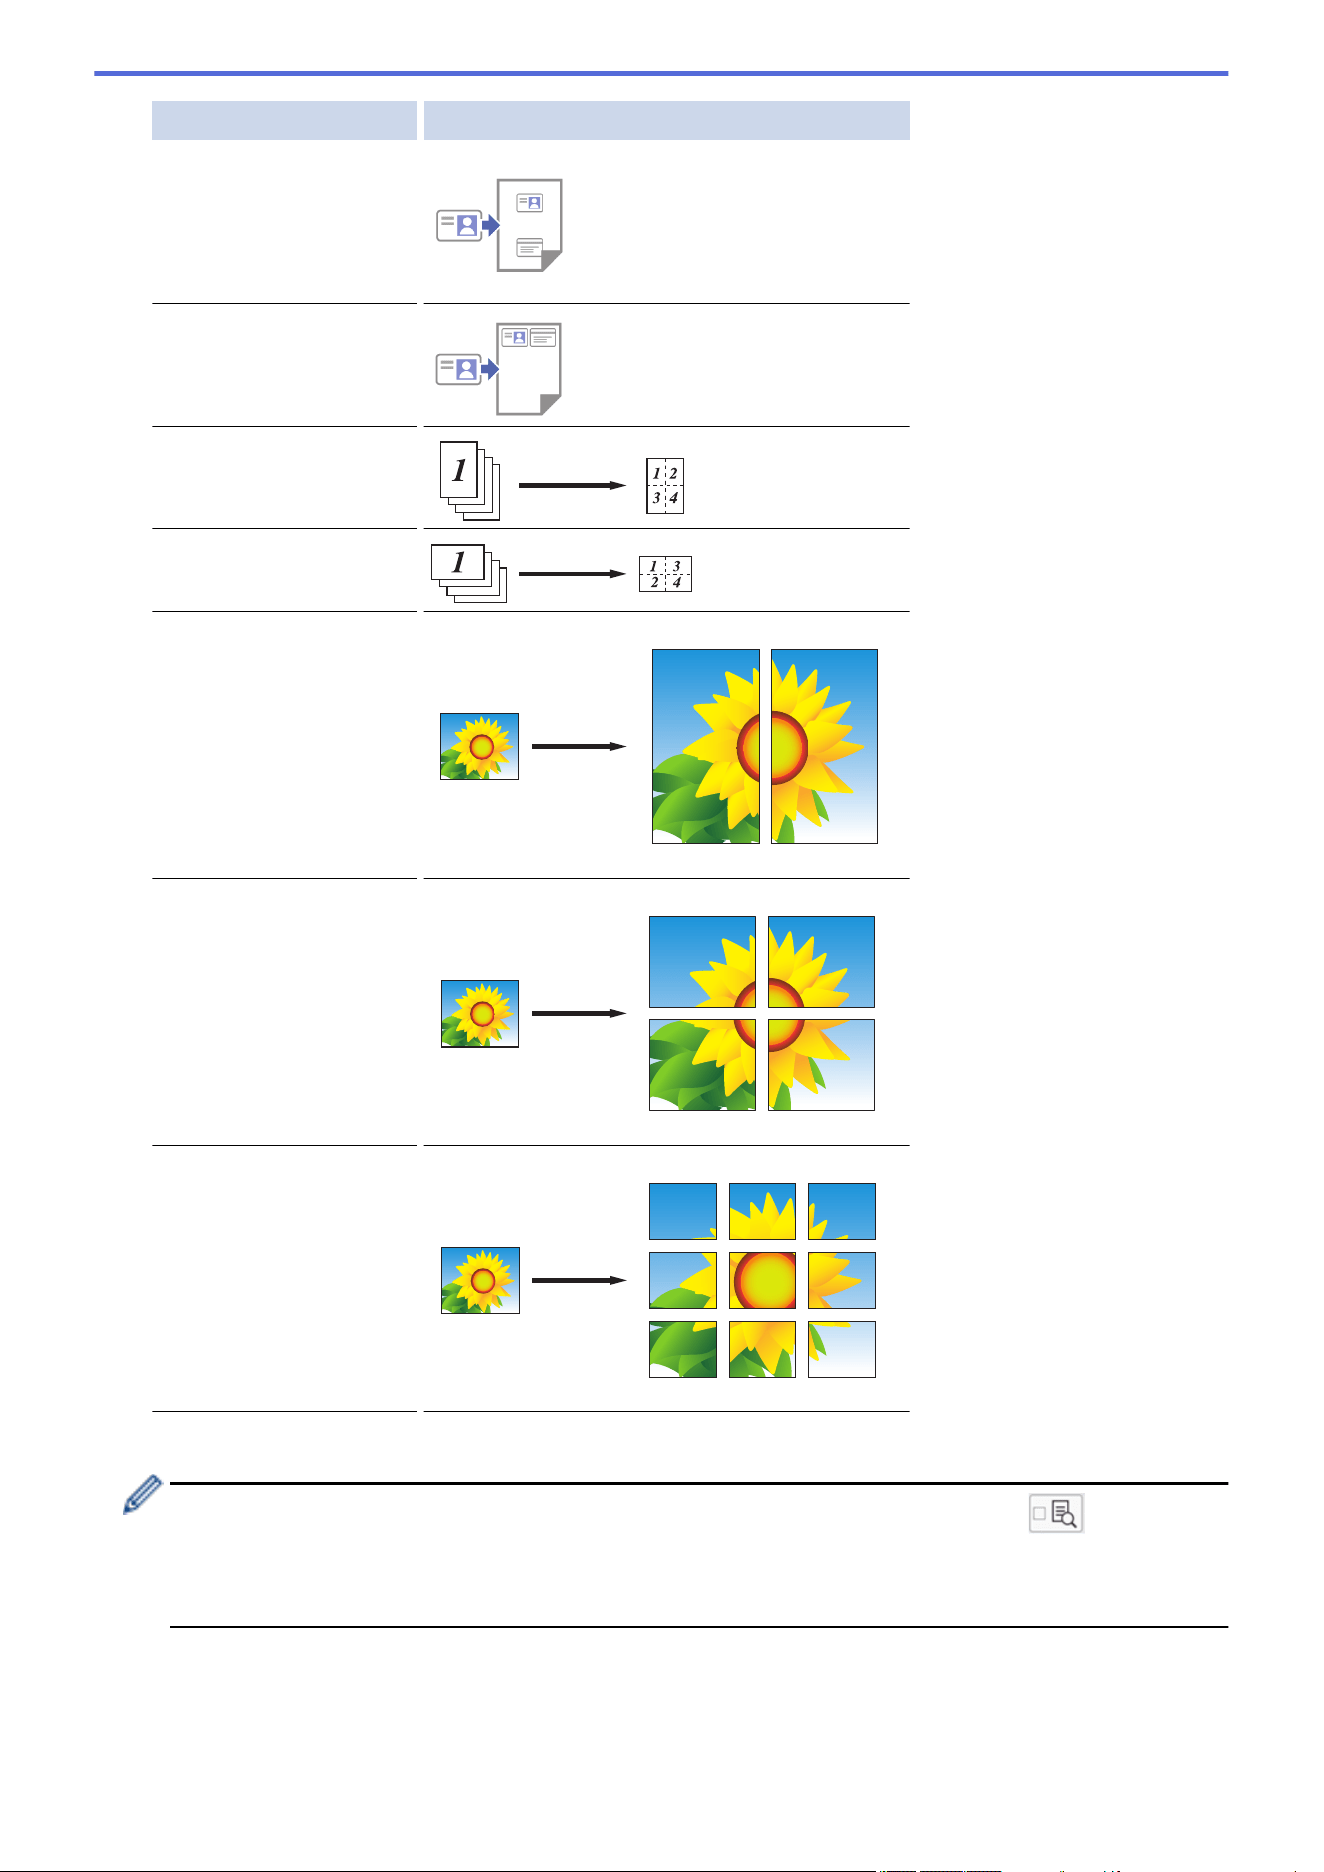
Option Description
2in1 ID Vertical
(Using the scanner glass)
2in1 ID Horizontal
(Using the scanner glass)
4in1(Portrait)
4in1(Landscape)
Poster(2x1)
(Using the scanner glass)
Poster(2x2)
(Using the scanner glass)
Poster(3x3)
(Using the scanner glass)
6. Read and confirm the displayed list of settings you have selected, and then press [OK].
(MFC-J5955DW) To preview the copied result before the machine starts printing, press and then
press [Mono Preview] or [Colour Preview]. The machine scans the document and displays only
the first page (one side) of the copied result on the LCD. If the copied result is fine, press [Start] to
print it and to finish processing.
7. When you have finished changing settings, press [Mono Start] or [Colour Start]. If you placed the
document in the ADF or are making a poster, the machine scans the pages and starts printing.
8. If you are using the scanner glass, repeat the following steps for each page of the document:
• Place the next page on the scanner glass, and then press [Continue] to scan the page.
184

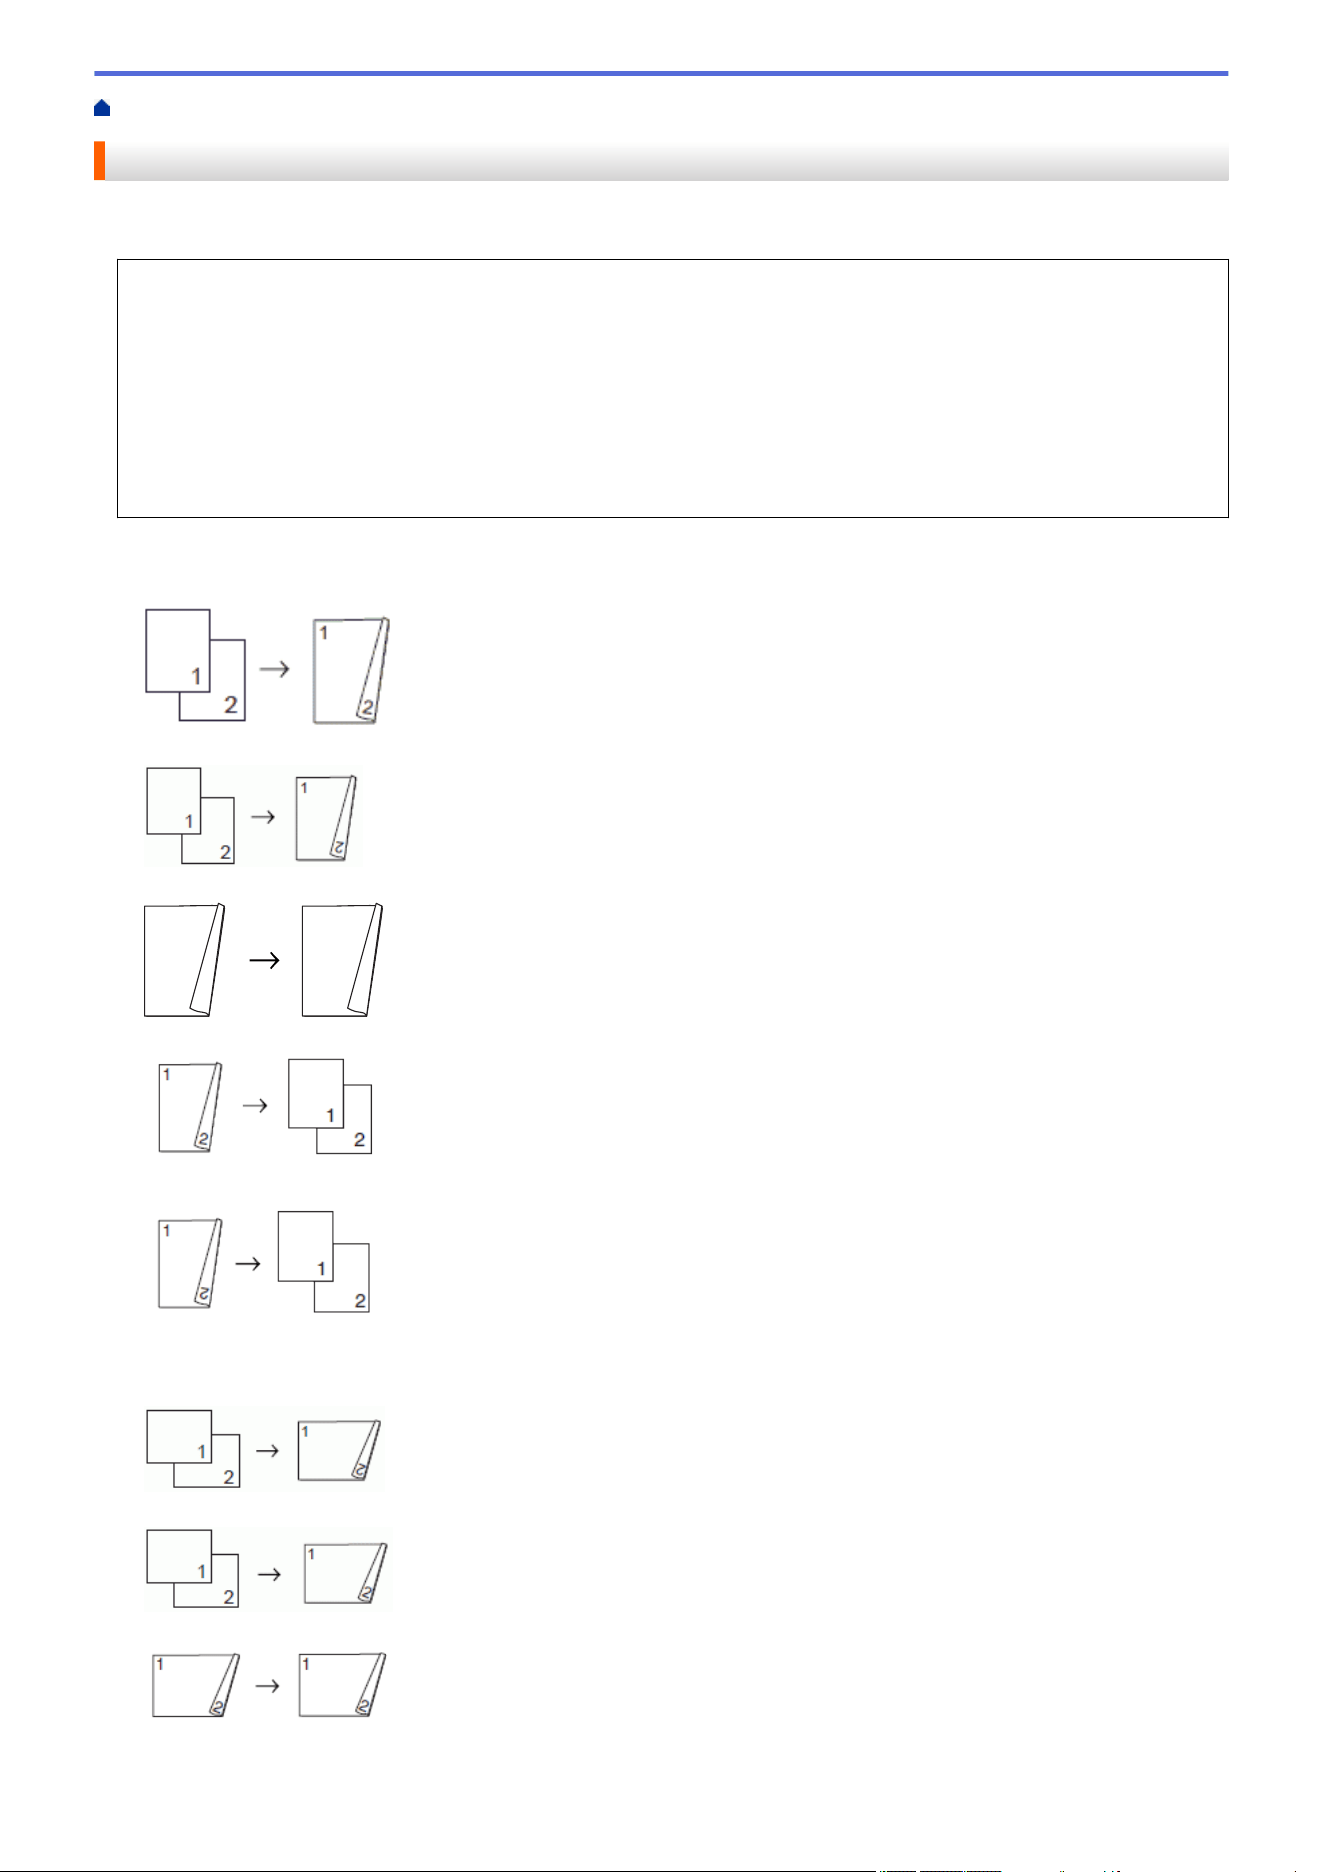
Home > Copy > Copy on Both Sides of the Paper (2-sided Copy)
Copy on Both Sides of the Paper (2-sided Copy)
Reduce the amount of paper you use by copying onto both sides of the paper.
• You must choose a 2-sided copy layout from the following options before you can start 2-sided copying.
• The layout of your original document determines which 2-sided copy layout you should choose.
• (MFC-J2740DW/MFC-J5740DW/MFC-J5955DW)
You can copy 2-sided documents automatically up to A4 size using the ADF.
• (MFC-J2340DW/MFC-J5340DW/MFC-J5855DW)
When you manually make 2-sided copies from a 2-sided document, use the scanner glass.
• You can use only A4, A5, or Letter size plain paper.
Portrait
1–sided to 2–sided (Long Edge Flip)
1–sided to 2–sided (Short Edge Flip)
2–sided to 2–sided
1
1
2
1
1
2
2–sided to 1–sided (Long Edge Flip)
2–sided to 1–sided (Short Edge Flip)
Landscape
1–sided to 2–sided (Long Edge Flip)
1–sided to 2–sided (Short Edge Flip)
2–sided to 2–sided
2–sided to 1–sided (Long Edge Flip)
186
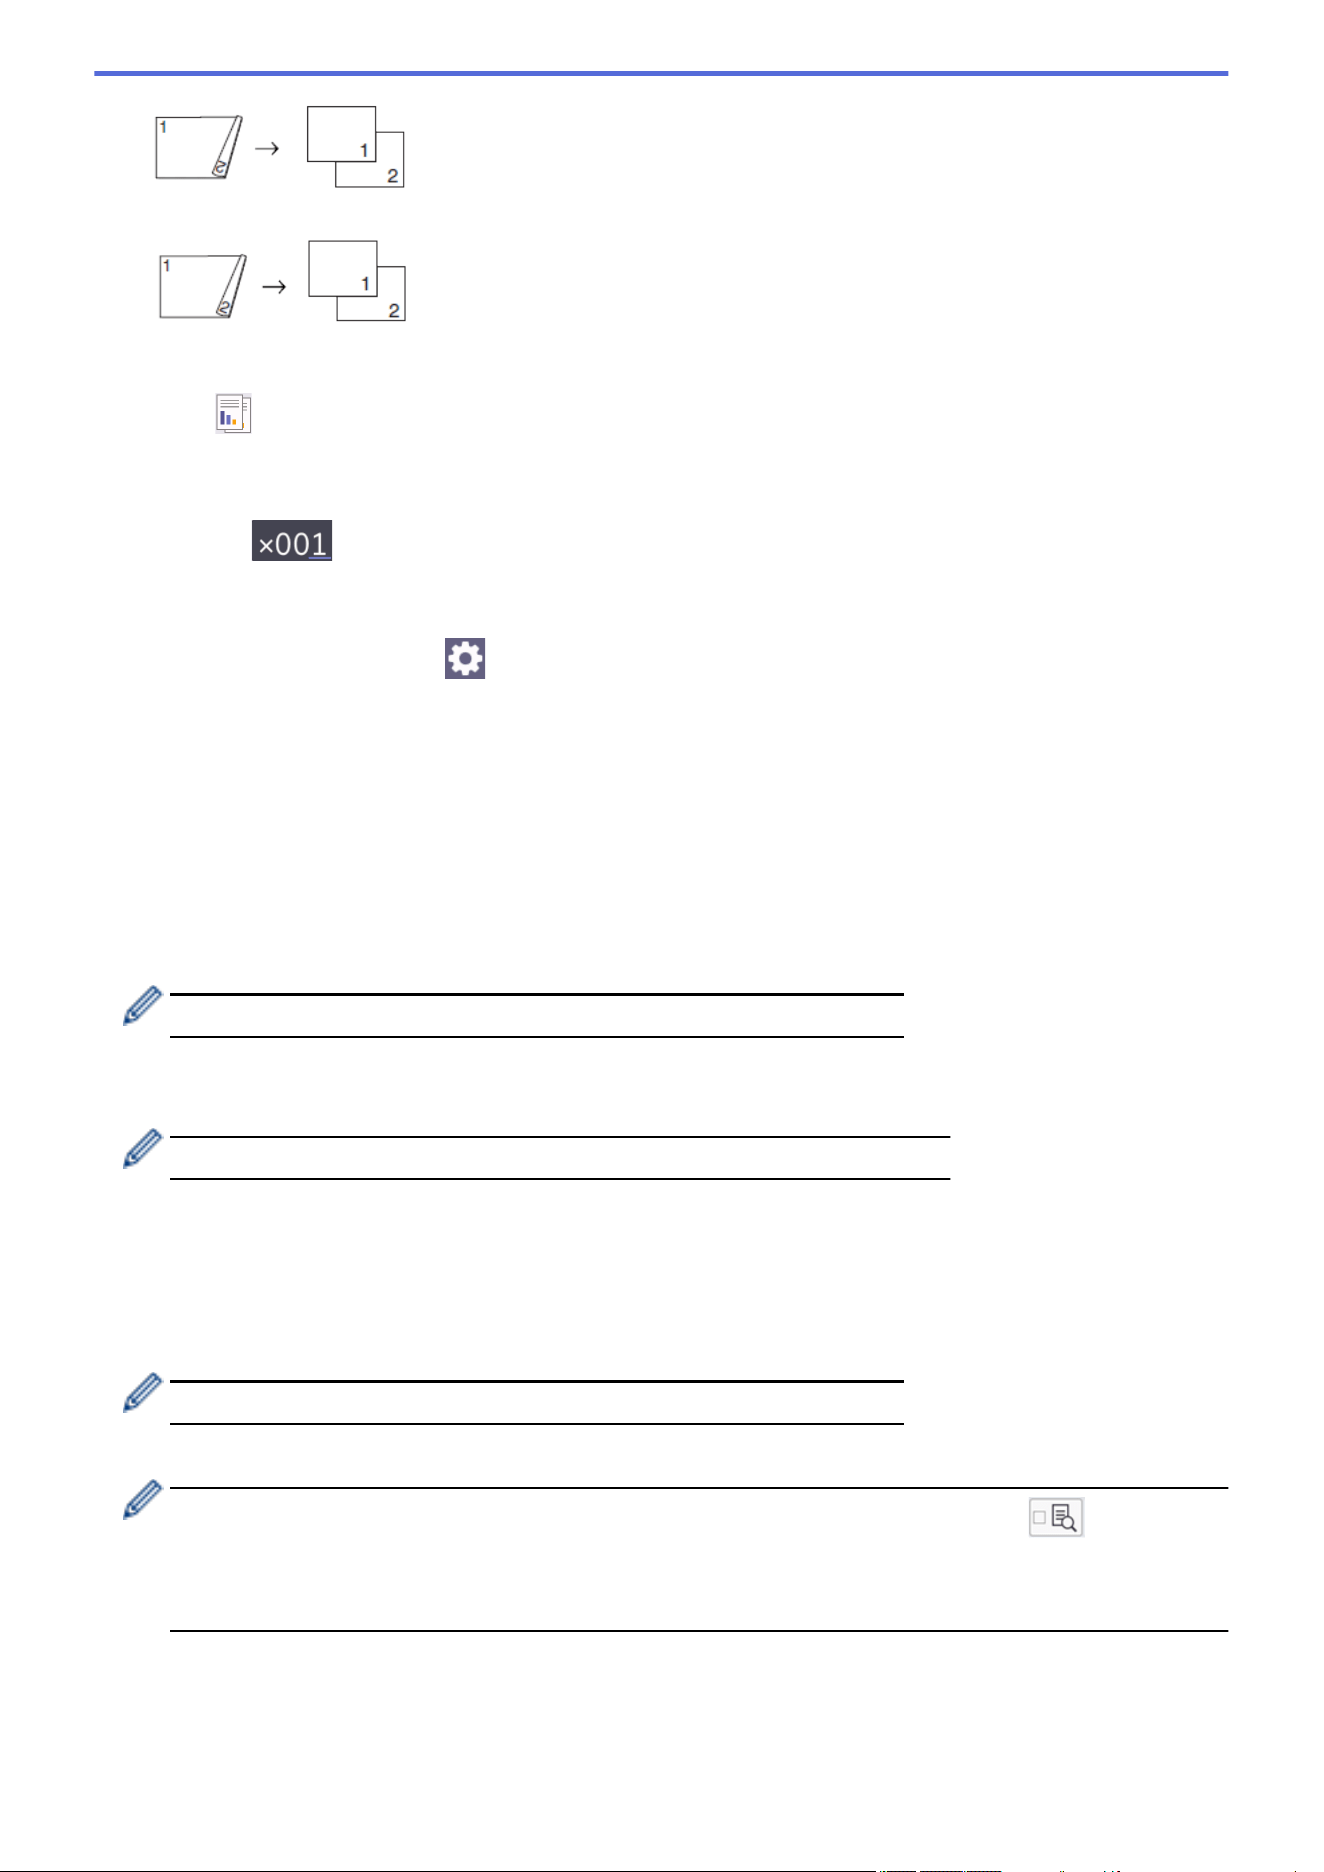
2–sided to 1–sided (Short Edge Flip)
1. Load your document.
2. Press [Copy].
3. Enter the number of copies in one of the following ways:
• Press [-] or [+] on the touchscreen.
• Press to display the keyboard on the touchscreen, and then enter the number of copies using the
touchscreen keyboard. Press [OK].
• Enter the number of copies using the dial pad.
4. To sort multiple copies, press [Options] > [Stack/Sort] > [Sort].
5. Press a or b to display the [2-sided Copy] option, and then press it.
6. Do one of the following:
• To make 2-sided copies from a 1-sided document, follow these steps:
a. To change the layout options, press [Layout], and then press [Long Edge Flip] or [Short
Edge Flip].
b. Press [1-sided⇒2-sided].
• (MFC-J2740DW/MFC-J5740DW/MFC-J5955DW)
To make 2-sided copies of a 2-sided document automatically, press [2-sided⇒2-sided].
Load your document in the ADF to use the automatic 2-sided copy feature.
• (MFC-J2340DW/MFC-J5340DW/MFC-J5855DW)
To make 2-sided copies of a 2-sided document manually, press [2-sided⇒2-sided].
Use the scanner glass to make 2-sided copies of a 2-sided document manually.
• (MFC-J2740DW/MFC-J5740DW/MFC-J5955DW)
To make 1-sided copies from a 2-sided document, follow these steps:
a. To change the layout options, press [Layout], and then press [Long Edge Flip] or [Short
Edge Flip].
b. Press a or b to display the [2-sided⇒1-sided] option, and then press it.
Load your document in the ADF to use the automatic 2-sided copy feature.
7. Review your settings on the touchscreen, and then press [OK].
(MFC-J5955DW) To preview the copied result before the machine starts printing, press and then
press [Mono Preview] or [Colour Preview]. The machine scans the document and displays only
the first page (one side) of the copied result on the LCD. If the copied result is fine, press [Start] to
print it and to finish processing.
8. Press [Mono Start] or [Colour Start]. If you placed the document in the ADF, the machine scans the
pages and starts printing.
9. If you are using the scanner glass, repeat the following steps for each page of the document:
• Place the next page on the scanner glass, and then press [Continue] to scan the page.
187

• After scanning all the pages, press [Finish].
DO NOT touch the printed page until it is ejected the second time. The machine will print the first side and eject
the paper, and then pull the paper in to print the second side.
If you experience smudged printouts or paper jams, press [Ink] > [Print Options] > [Reduce
Smudging], and then change settings.
Related Information
• Copy
Related Topics:
• Change the Print Options to Improve Your Print Results
188
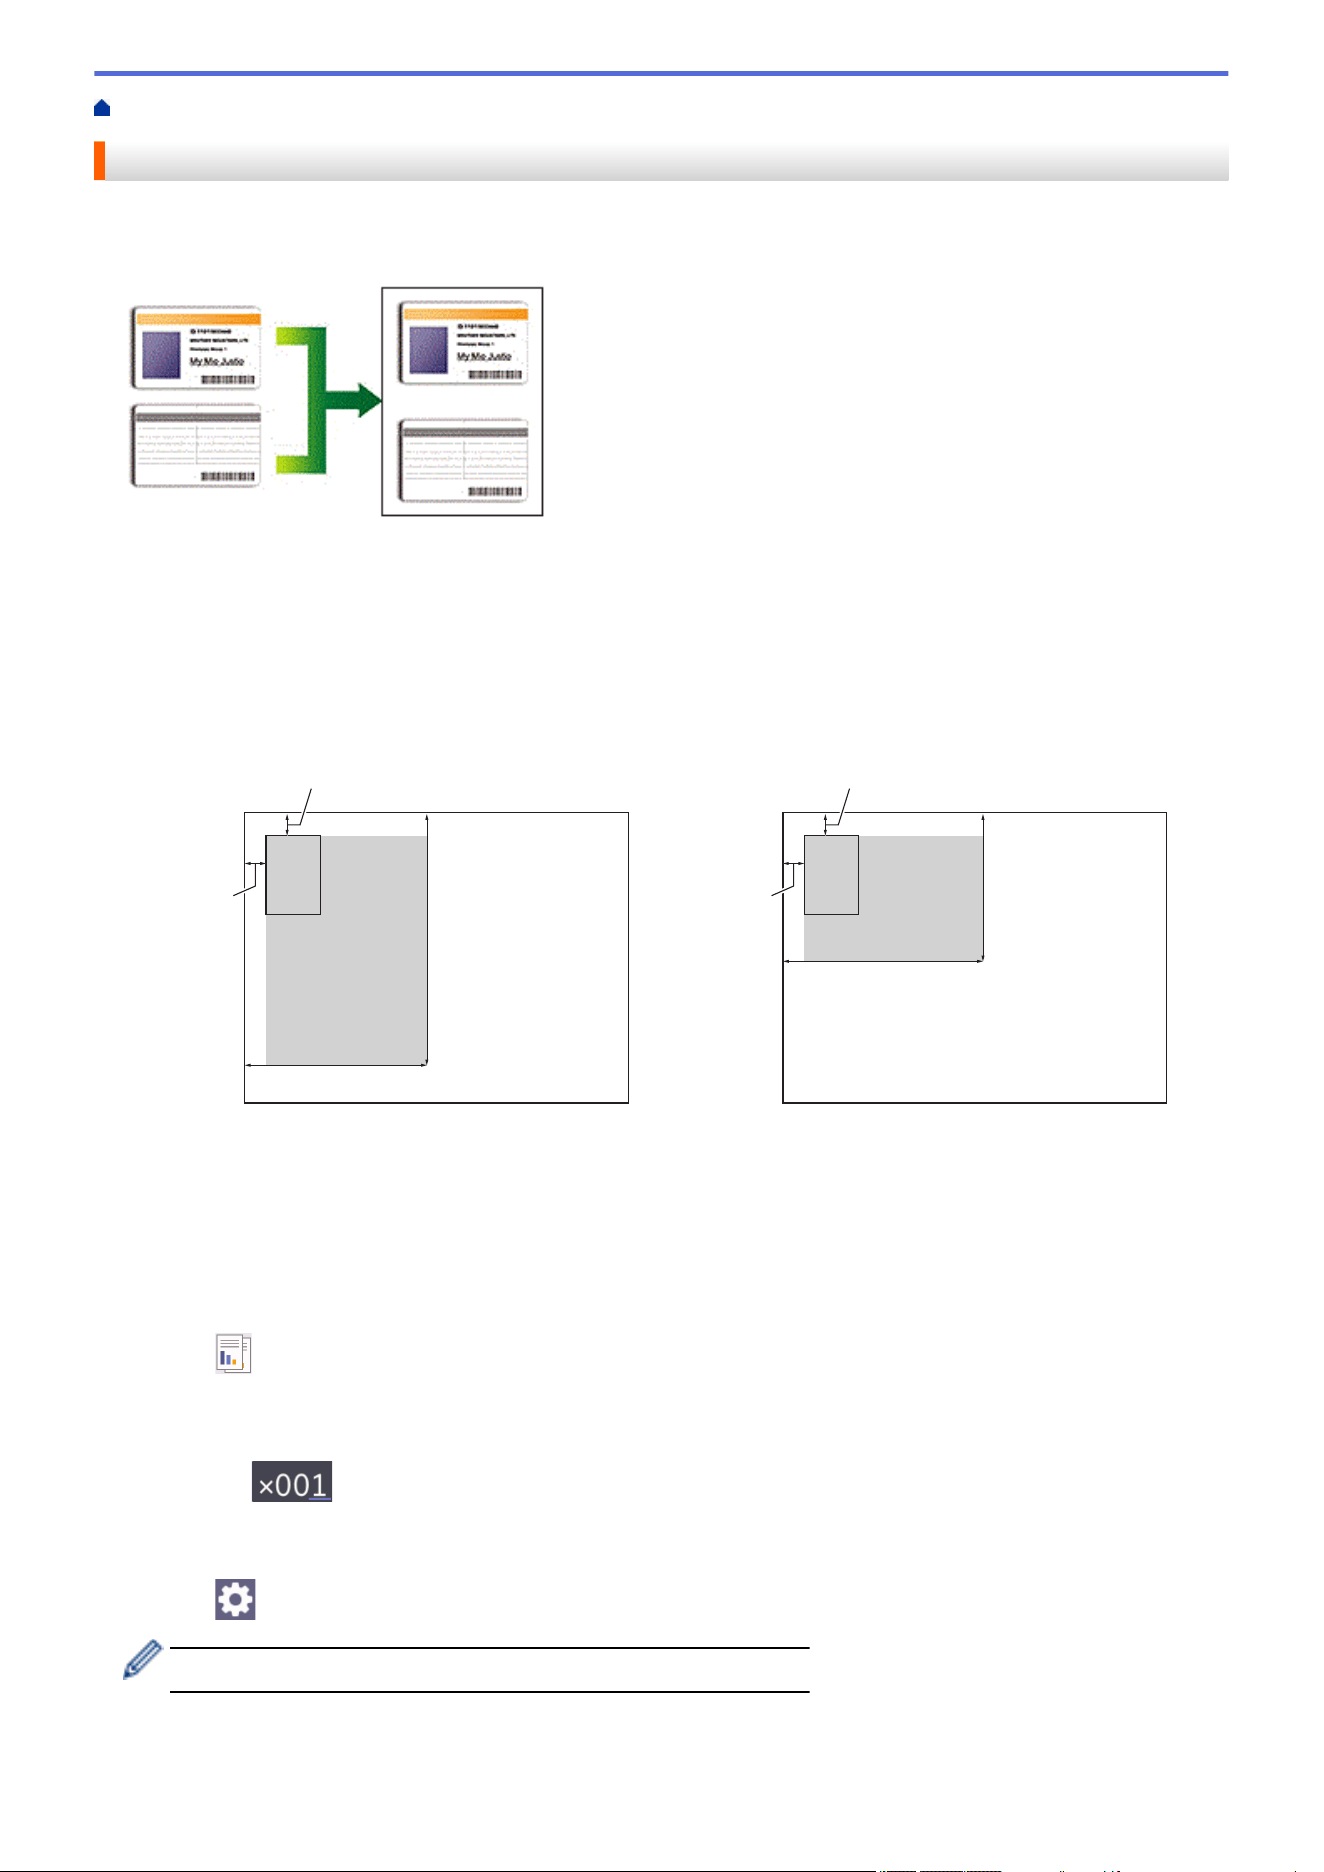
Home > Copy > Copy an ID Card
Copy an ID Card
Use the [2in1(ID)] feature to copy both sides of an identification card onto one page, keeping the original
card size.
• Make sure the paper size is set to A4 or Letter.
• You may copy an identification card to the extent permitted under applicable laws. For more detailed
information, see the Product Safety Guide.
1. Place your identification card face down near the upper-left corner of the scanner glass.
2 in 1 ID (Vertical)
2 in 1 ID (Horizontal)
a
b
cd
a
a
b
cd
a
a. 3 mm or greater (top, left)
b. 145 mm
c. 2 in 1 ID (Vertical): 207 mm
2 in 1 ID (Horizontal): 102 mm
d. Scannable area
2. Press
[Copy].
3. Enter the number of copies in one of the following ways:
• Press [-] or [+] on the touchscreen.
• Press to display the keyboard on the touchscreen, and then enter the number of copies using the
touchscreen keyboard. Press [OK].
• Enter the number of copies using the dial pad.
4. Press [Options] > [Page Layout] > [2in1 ID Vertical] or [2in1 ID Horizontal].
You can also press [ID] for the [2in1 ID Vertical] setting.
5. Read and confirm the displayed list of settings you have selected. When you have finished changing settings,
press [OK].
189

(MFC-J5955DW) To preview the copied result before the machine starts printing, press and then
press [Mono Preview] or [Colour Preview]. The machine scans the document and displays only
the first page (one side) of the copied result on the LCD. If the copied result is fine, press [Start] to
print it and to finish processing.
6. Press [Mono Start] or [Colour Start].
The machine starts scanning one side of the identification card.
7. After the machine has scanned the first side, turn over the identification card and press [Continue] to scan
the other side.
Related Information
• Copy
190
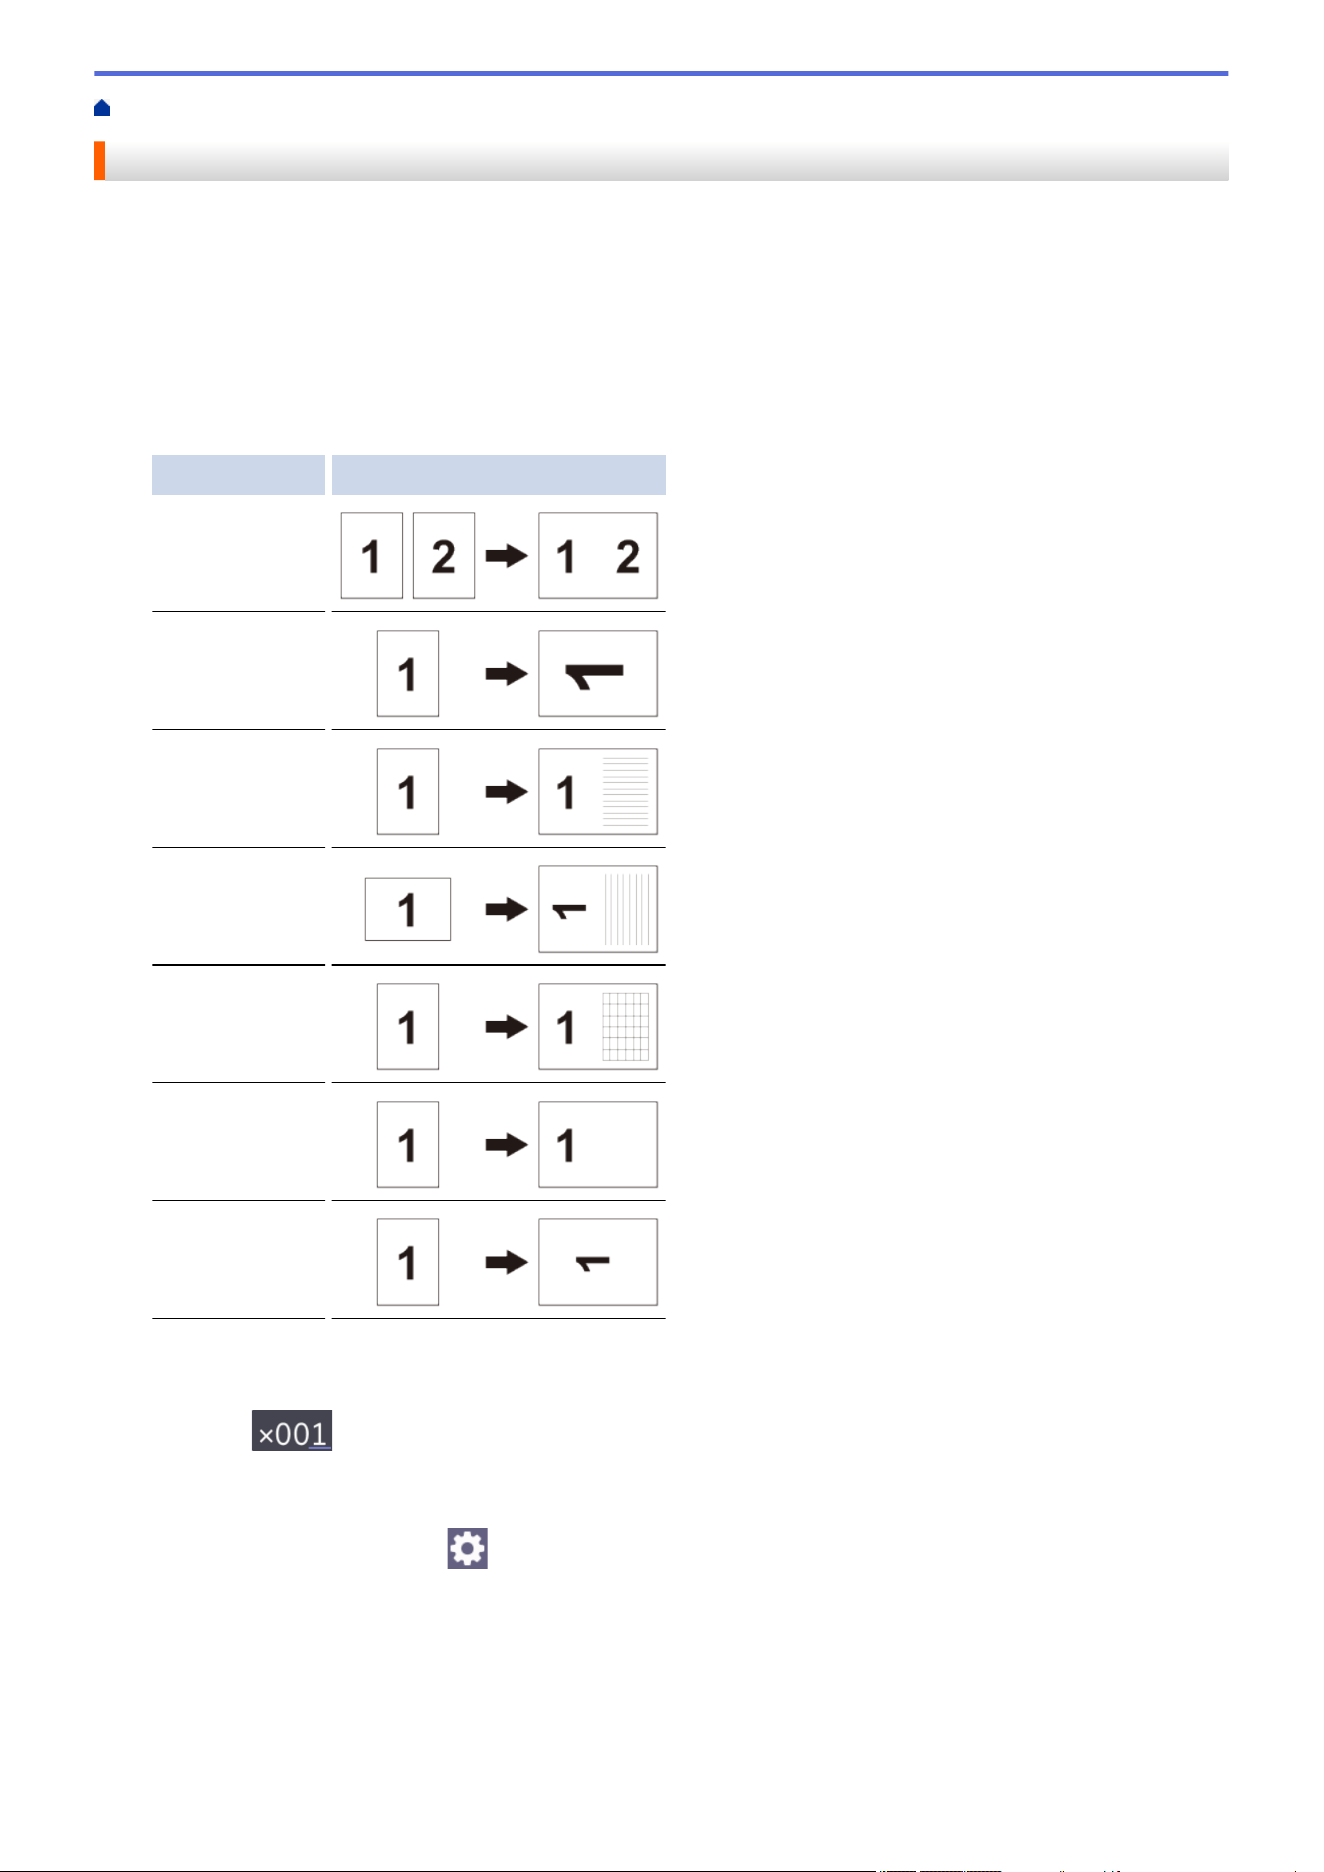
Home > Copy > Use the A3 Copy Shortcuts
Use the A3 Copy Shortcuts
You can copy your document in A3 or Ledger size paper with a format, such as Note style. Also you can make 2
in 1 and enlarged copies.
1. Load your document.
2. Press d or c to display the [A3 Copy Shortcuts] option, and then press it.
3. If information appears on the touchscreen, read it, and then press [OK] to confirm.
4. Press d or c to display options, and then press the option you want.
Option Description
A3 2in1
A4⇒A3
A4 + Note(L)
A4 + Note(P)
A4 + Grid
A4 + Blank
A4 Centre
5. Enter the number of copies in one of the following ways:
• Press [-] or [+] on the touchscreen.
• Press to display the keyboard on the touchscreen, and then enter the number of copies using the
touchscreen keyboard. Press [OK].
• Enter the number of copies using the dial pad.
6. To change the settings, press [Options].
7. When you have finished changing settings, press [OK].
8. Press [Mono Start] or [Colour Start].
9. If you are using the scanner glass when choosing the [A3 2in1] option, repeat the following steps for each
page of the document:
• Place the next page on the scanner glass, and then press [Continue] to scan the page.
191

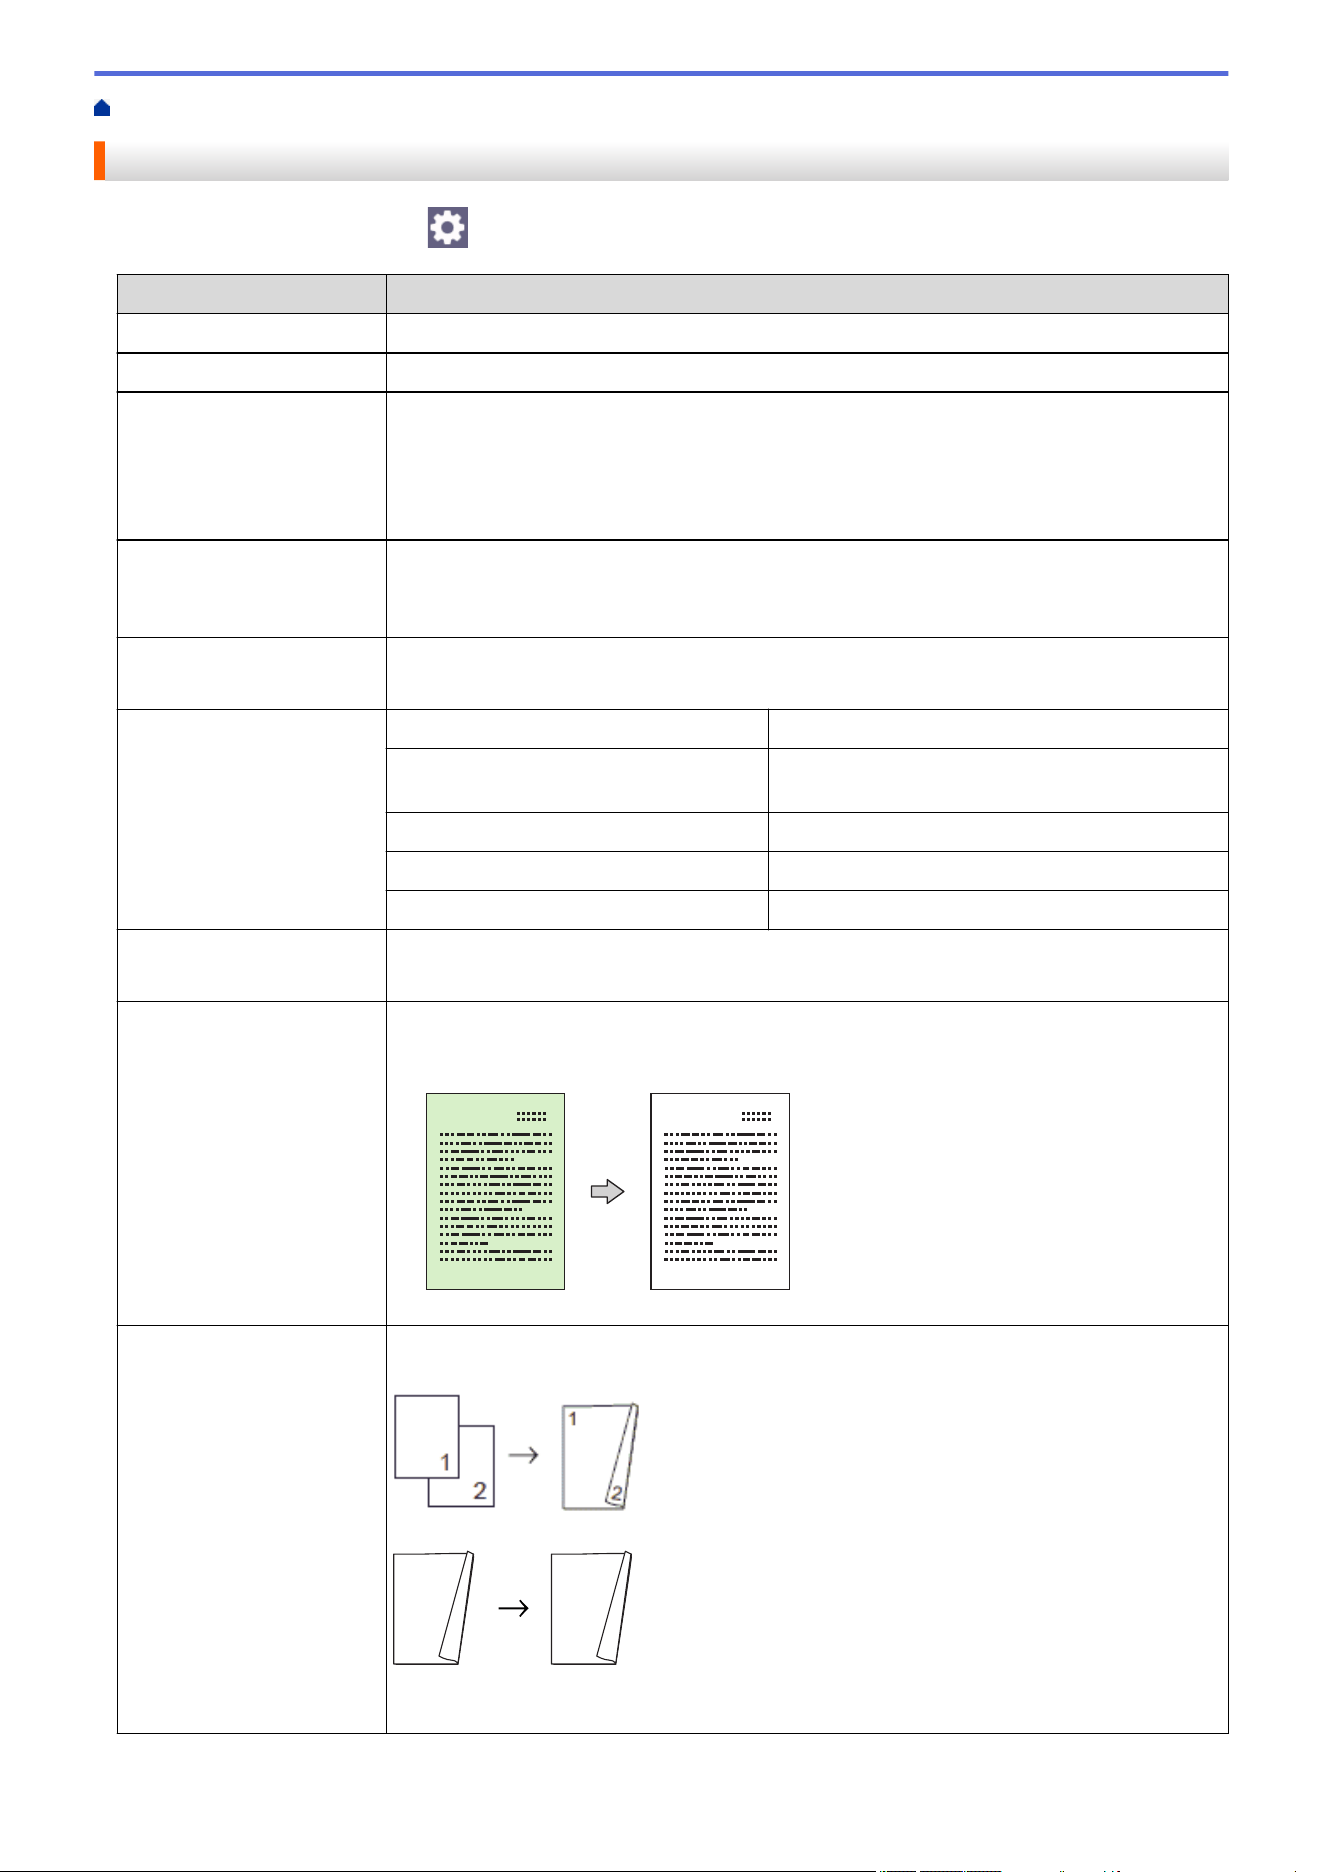
Home > Copy > Copy Settings
Copy Settings
To change copy settings, press [Options].
Option Description
Quality
Select the Copy resolution for your type of document.
Document Size
Select your document size.
Tray Select
(MFC-J2740DW/
MFC-J5740DW/
MFC-J5855DW/
MFC-J5955DW)
Select the tray with the best paper type and size for your document.
Paper Type
Select a paper type.
If copying on special paper, set the machine for the type of paper you are using to get
the best print quality.
Paper Size
Select a paper size.
If copying on paper other than A4 size, you must change the Paper Size setting.
Enlarge/Reduce 100%
-
Fit to Page
Adjusts the copy size to fit on the paper size
you have set.
Enlarge
Select an enlargement ratio for the next copy.
Reduce
Select a reduction ratio for the next copy.
Custom(25-400%)
Enter an enlargement or reduction ratio.
Density
Increase the density to make the text darker.
Decrease the density to make the text lighter.
Remove Background
Colour
Removes the document's background colour in copies. The white becomes more
apparent. This saves some ink and may make certain copies easier to read.
2-sided Copy
Select to copy on both sides of the paper.
1-sided→2-sided
2-sided→2-sided
1
1
2
1
1
2
2-sided→1-sided
(MFC-J2740DW/MFC-J5740DW/MFC-J5955DW)
193
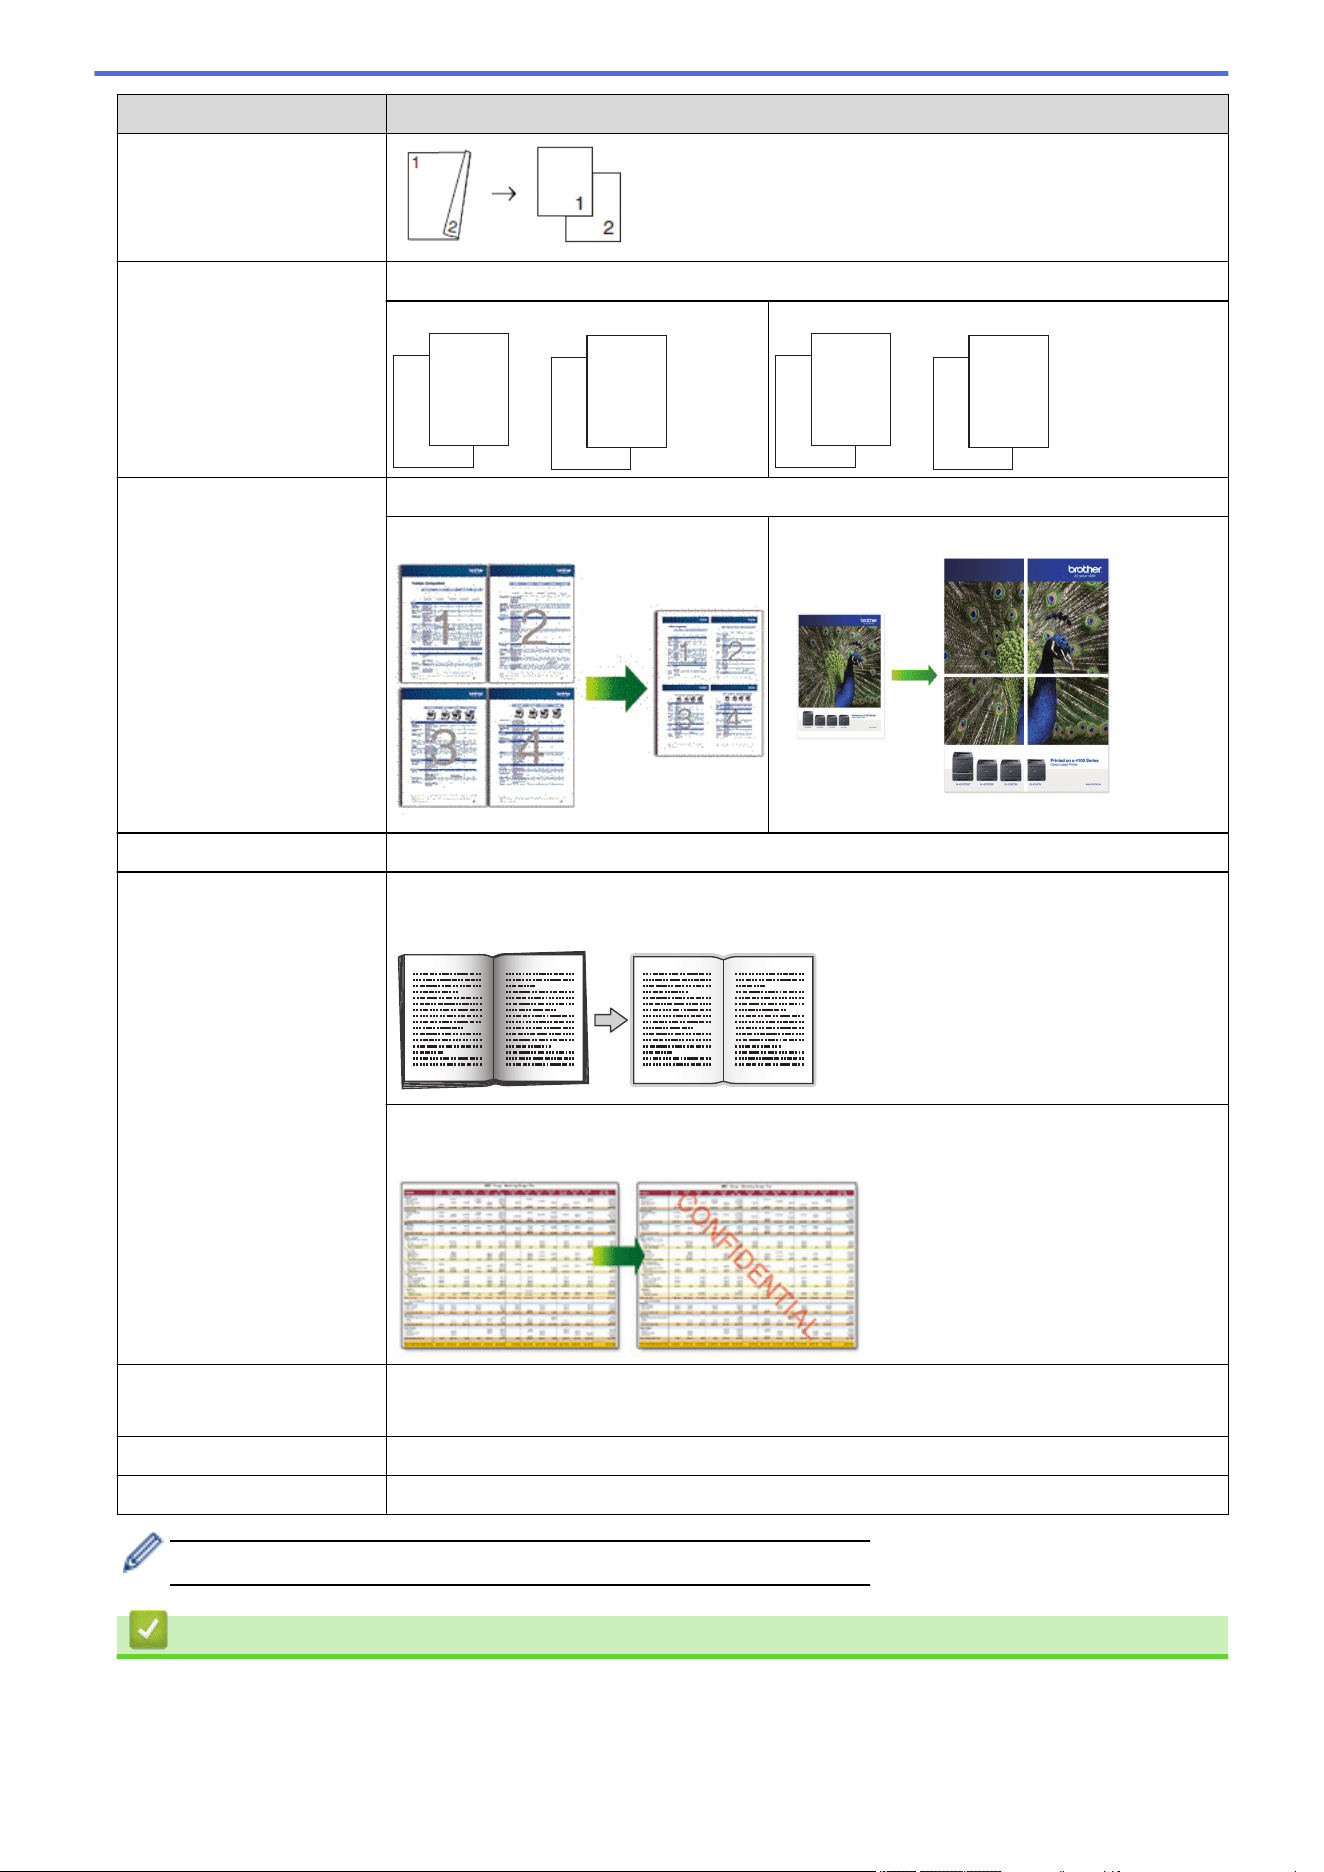
Option Description
Stack/Sort
Select to stack or sort multiple copies.
Stack
1
1
2
2
Sort
2
1
2
1
Page Layout
Make N in 1, 2 in 1 ID, or Poster copies.
4 in 1 Poster
Auto Deskew
Set the machine to automatically correct skewed copies.
Advanced Settings Book Copy
Corrects dark borders and skew when copying from the scanner glass.
Watermark Copy
Places text in your document as a watermark.
Preview
(MFC-J5955DW)
Preview the copied result on the LCD, before the machine starts printing.
Set New Default
Saves the copy settings that you use most often by setting them as the default settings.
Factory Reset
Restores any changed copy settings to the factory settings.
You can save the current settings by pressing [Save as Shortcut].
Related Information
• Copy
194


Home > Fax > Send a Fax
Send a Fax
• Send a Fax from Your Brother Machine
• Send a 2-sided Fax from the ADF
• Send a Fax Manually
• Send a Fax at the End of a Conversation
• Send the Same Fax to More than One Recipient (Broadcasting)
• Send a Fax in Real Time
• Send a Fax at a Specified Time (Delayed Fax)
• Change the Fax Auto Redial Setting
• Cancel a Fax in Progress
• Check and Cancel a Pending Fax
• Fax Options
197
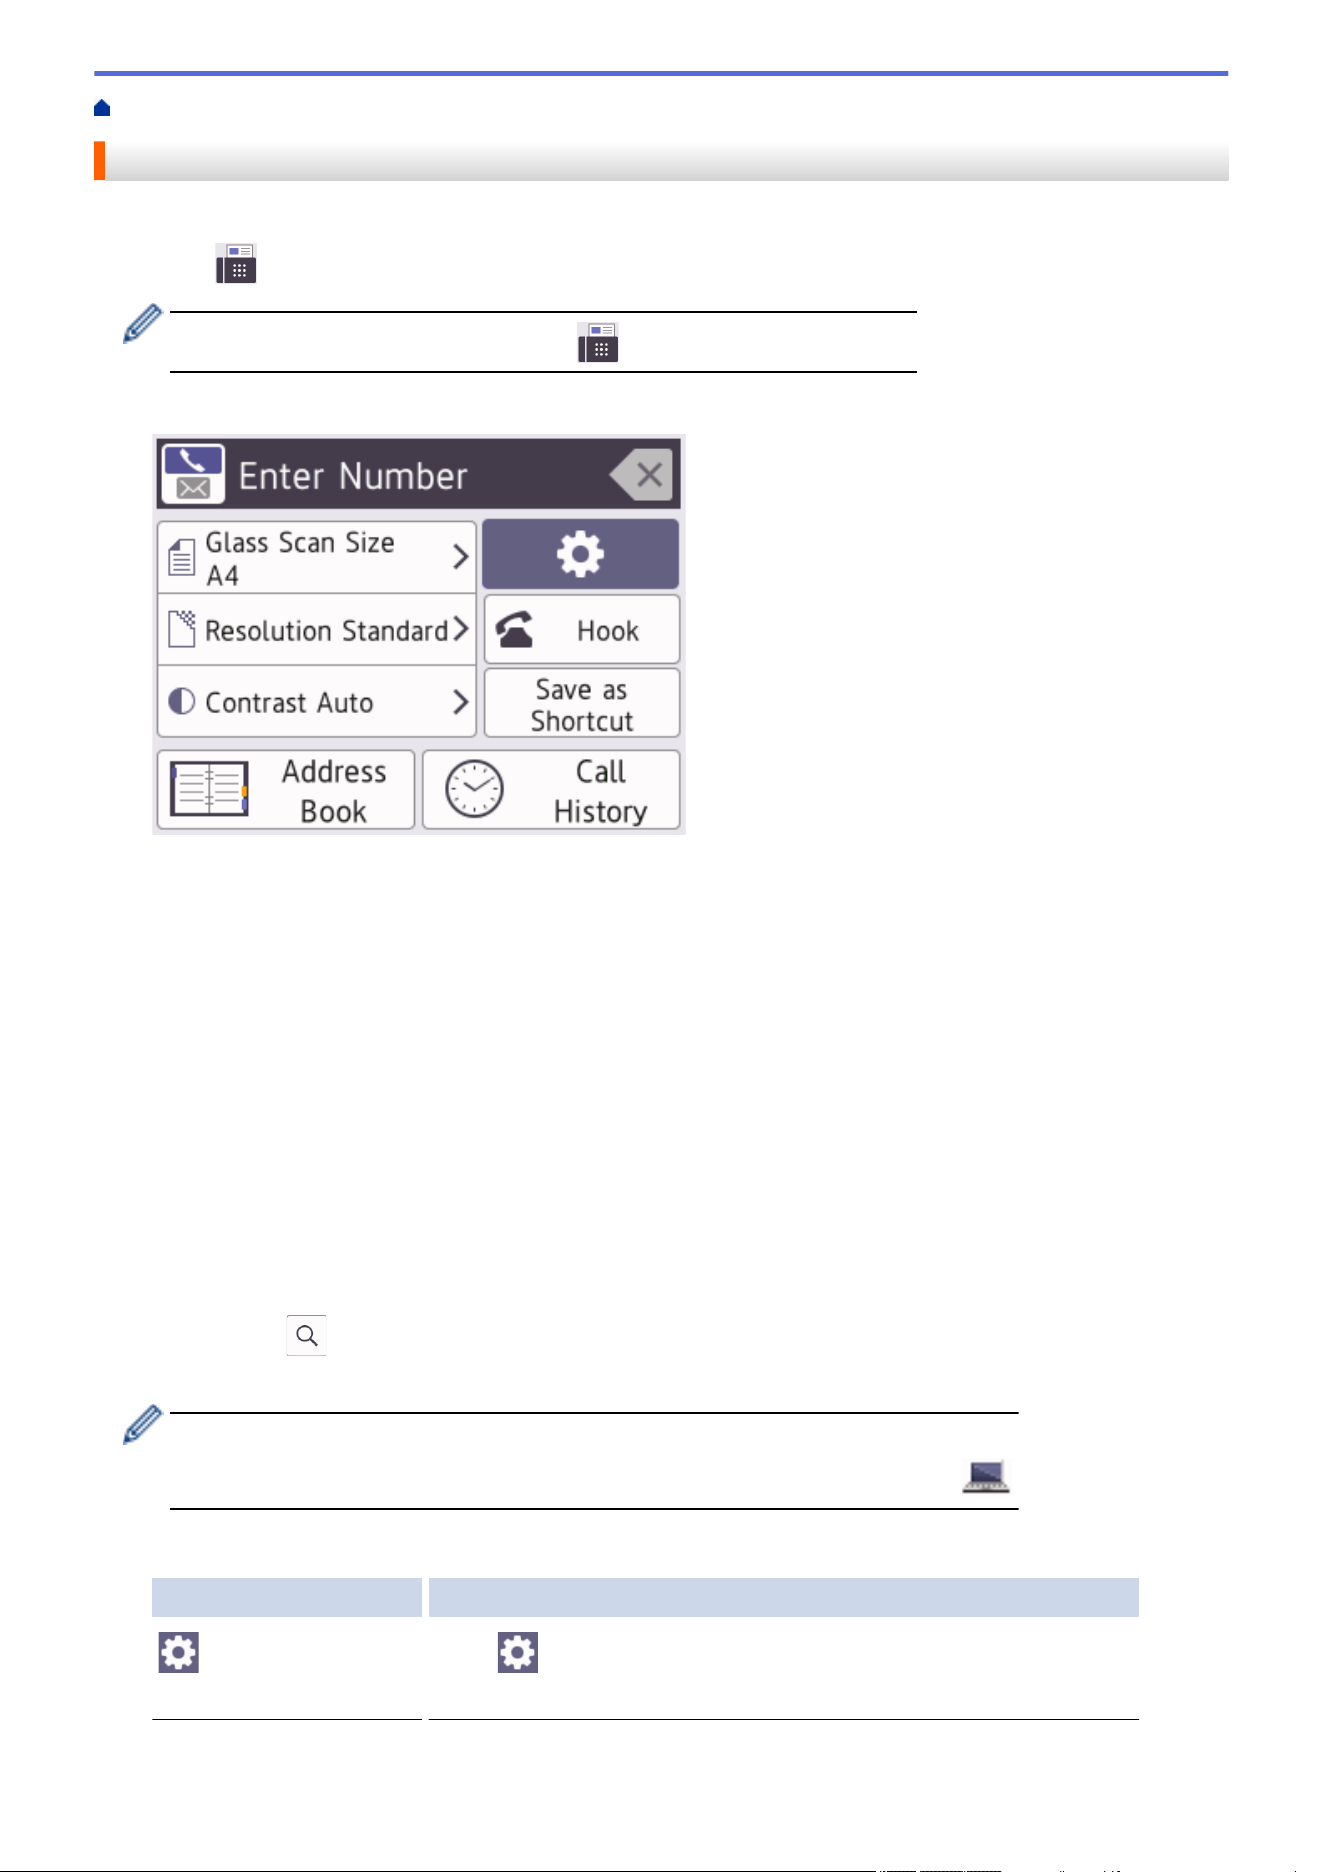
Home > Fax > Send a Fax > Send a Fax from Your Brother Machine
Send a Fax from Your Brother Machine
1. Load your document in the ADF or place it on the scanner glass.
2. Press [Fax].
If [Fax Preview] is set to [On], press [Fax] > [Sending Faxes].
The touchscreen displays:
3. Enter the fax number in one of the following ways:
• Dial Pad (Enter the fax number manually.)
Press all digits of the number using the dial pad.
• Call History (Select a number from the Call History.)
Press [Call History].
Press [Redial], [Outgoing Call] or [Caller ID History].
If you select [Outgoing Call] or [Caller ID History], select the number you want, and then
press [Apply].
(Caller ID feature is not available for Taiwan and some countries)
• [Address Book] (Select a number from the Address Book.)
Press [Address Book].
Do one of the following:
- Select the number you want, and then press [Apply].
- Press , and then enter the first letter of the name and press [OK]. Press the name you want to
dial. If the name has two numbers, press the number you want. Press [Apply].
(available only for some countries)
If the LDAP search is available, the result will be shown on the touchscreen with .
4. Change the fax settings, if needed.
Option Description
Options Press Options to change the fax settings for the next fax only.
When finished, press OK.
Current setting indications Press the following icons to change these settings for the next fax only:
198
Option Description
• Glass Scan Size
• Fax Resolution
•
Contrast
5. Press [Fax Start].
• If you are using the ADF, the machine starts scanning and sending the document.
• If you are using the scanner glass and selected [Mono] in [Colour Setting], the machine starts
scanning the first page.
Go to the next step.
• If you are using the scanner glass and selected [Colour] in [Colour Setting], the touchscreen
asks if you want to send a colour fax.
Press [Yes (Colour fax)] to confirm. The machine starts dialling and sending the document.
6. When the touchscreen displays [Next page?], do one of the following:
• Press [No] when finished scanning pages. The machine starts sending the document.
• Press [Yes] to scan another page. Place the next page on the scanner glass, and then press [OK]. The
machine starts scanning the page.
Repeat this step for each additional page.
Related Information
• Send a Fax
Related Topics:
• Fax Options
199
Home > Fax > Send a Fax > Send a 2-sided Fax from the ADF
Send a 2-sided Fax from the ADF
Related Models: MFC-J2740DW/MFC-J5740DW/MFC-J5955DW
You must select a 2-sided scanning format before sending a 2-sided fax. Select either Long Edge or Short Edge,
depending on the layout of your document.
1. Load your document in the ADF.
2. Press [Fax].
If [Fax Preview] is set to [On], press [Fax] > [Sending Faxes].
3. Press [Options] > [2-sided Fax].
4. Do one of the following:
• If your document is flipped on the Long edge, press the [2-sided Scan: Long Edge] option.
• If your document is flipped on the Short edge, press the [2-sided Scan: Short Edge] option.
5. Press [OK].
6. Enter the fax number.
7. Press [Fax Start].
Related Information
• Send a Fax
200
Home > Fax > Send a Fax > Send a Fax Manually
Send a Fax Manually
Manual fax transmission lets you hear the dialling, ringing and fax-receiving tones while sending a fax.
(Not available in South Africa)
1. Load your document.
2. Press [Fax].
If [Fax Preview] is set to [On], press [Fax] > [Sending Faxes].
3. Press [Hook] and listen for a dial tone.
4. Enter the fax number.
5. When you hear fax tones, press [Fax Start].
If using the scanner glass, press [Send].
(For South Africa only)
To send a fax manually, do the following:
Load your document. To listen for a dial tone, pick up the handset of the external telephone. Dial the fax number
using the external telephone. When you hear fax tones, press and then press [Fax Start]. If you are
using the scanner glass, press [Send]. Replace the handset of the external phone.
Related Information
• Send a Fax
201

Home > Fax > Send a Fax > Send a Fax at the End of a Conversation
Send a Fax at the End of a Conversation
At the end of a conversation, you can send a fax to the other party before you both hang up.
1. Ask the other party to wait for fax tones (beeps) and to press the Start key before hanging up.
2. Load your document.
3. Press to display the [Fax Start] button.
4. Press [Fax Start].
If using the scanner glass, press [Send].
5. Replace the handset of the external telephone.
Related Information
• Send a Fax
202
Home > Fax > Send a Fax > Send the Same Fax to More than One Recipient (Broadcasting)
Send the Same Fax to More than One Recipient (Broadcasting)
Use the Broadcasting feature to send the same fax to multiple fax numbers at the same time.
• This feature is available only for monochrome faxes.
• Address Book numbers must be stored in the machine’s memory before they can be used in a broadcast.
• Group numbers must also be stored in the machine’s memory before they can be used in a broadcast.
Group numbers include many stored Address Book numbers for easier dialling.
You can include Groups, Address Book numbers, and up to 50 manually-dialled numbers in the same
broadcast.
If you did not use any of the Address Book numbers for Groups, you can broadcast faxes to as many as 250
different numbers.
1. Load your document.
2. Press
[Fax].
If [Fax Preview] is set to [On], press [Fax] > [Sending Faxes].
3. Press [Options] > [Broadcasting].
4. Press [Add Number].
You can add numbers to the broadcast in the following ways:
• Press [Add Number] and enter a fax number using the dial pad. Press [OK].
To broadcast using an email address, press , enter the email address, and press [OK].
• Press [Add from Address book]. Press a or b to display the numbers you want to add to the
broadcast. Select the checkboxes of the numbers you want to add.
When finished, press [OK].
• Press [Search in Address book]. Press the first letter of the name and press [OK]. Press the
name, and then press the number you want to add.
Repeat this step to enter additional fax numbers.
5. When finished, press [OK].
6. Press [Fax Start].
7. Do one of the following:
• If you are using the ADF, the machine starts scanning and sending the document.
• If you are using the scanner glass, the machine starts scanning the first page.
When the touchscreen displays [Next page?], do one of the following:
- Press [No] when finished scanning pages. The machine starts sending the document.
- Press [Yes] to scan another page. Place the next page on the scanner glass, and then press [OK].
The machine starts scanning the page.
Repeat this step for each additional page.
Related Information
• Send a Fax
• Cancel a Broadcast in Progress
203

Home > Fax > Send a Fax > Send the Same Fax to More than One Recipient (Broadcasting) > Cancel a
Broadcast in Progress
Cancel a Broadcast in Progress
While broadcasting multiple faxes, you can cancel just the fax currently being transmitted or cancel the whole
broadcast job.
1. Press to return to the Home screen.
2. Press .
3. Do one of the following:
• To cancel the entire broadcast, press [Entire Broadcast]. Press [Yes] to confirm or press [No] to
exit without cancelling.
• To cancel the current number being dialled, press the name or number on the touchscreen. Press [Yes]
to confirm or press [No] to exit without cancelling.
• To exit without cancelling, press
.
Related Information
• Send the Same Fax to More than One Recipient (Broadcasting)
205
Home > Fax > Send a Fax > Send a Fax in Real Time
Send a Fax in Real Time
When sending a fax, the machine scans the document into the memory before sending it. As soon as the
telephone line is free, the machine starts dialling and sending. If you want to send an important document
immediately without waiting for the machine to retrieve the scan from its memory, turn on [Real Time TX].
• If you are sending a colour fax or if the machine's memory is full and you are sending a monochrome fax
from the ADF, the machine sends the document in real time (even if [Real Time TX] is set to [Off]).
• In Real Time Transmission, the automatic redial feature does not work when using the scanner glass.
1. Load your document.
2. Press [Fax].
If [Fax Preview] is set to [On], press [Fax] > [Sending Faxes].
3. Press [Options] > [Real Time TX].
4. Press [On].
5. Press [OK].
6. Enter the fax number.
7. Press [Fax Start].
Related Information
• Send a Fax
206
Home > Fax > Send a Fax > Send a Fax at a Specified Time (Delayed Fax)
Send a Fax at a Specified Time (Delayed Fax)
You can store up to 50 faxes in the machine's memory to be sent within the next twenty-four hour period.
This feature is available only for monochrome faxes.
1. Load your document.
2. Press [Fax].
If [Fax Preview] is set to [On], press [Fax] > [Sending Faxes].
3. Press [Options] > [Delayed Fax].
4. Press [Delayed Fax].
5. Press [On].
6. Press [Set Time].
7. Enter the time you want the fax to be sent using the touchscreen. Press [OK].
The number of pages you can scan into the memory depends on the amount and type of data.
8. Press [OK].
9. Enter the fax number.
10. Press [Fax Start].
If you are using the scanner glass, go to the next step.
11. When the touchscreen displays [Next page?], do one of the following:
• Press [No] when finished scanning pages.
• Press [Yes] to scan another page. Place the next page on the scanner glass, and then press [OK]. The
machine starts scanning the page.
Repeat this step for each additional page.
Related Information
• Send a Fax
207

Home > Fax > Send a Fax > Change the Fax Auto Redial Setting
Change the Fax Auto Redial Setting
If the line is busy when you are sending a fax automatically, and the Fax Auto Redial is set to [On], the machine
redials up to three times at five-minute intervals.
The default setting for Fax Auto Redial is [On].
1. Press
[Settings] > [All Settings] > [Initial Setup] > [Fax Auto Redial].
2. Press [On] or [Off].
3. Press .
Related Information
• Send a Fax
208

Home > Fax > Send a Fax > Cancel a Fax in Progress
Cancel a Fax in Progress
1. Press to return to the Home screen.
2. Press to cancel a fax that is already in progress.
3. When you press
while the machine is dialling or sending, the touchscreen displays [Cancel Job?].
Press [Yes].
Related Information
• Send a Fax
Related Topics:
• Telephone and Fax Problems
209
Home > Fax > Send a Fax > Check and Cancel a Pending Fax
Check and Cancel a Pending Fax
Follow these steps to view or to cancel faxes stored in the machine's memory and waiting to be sent. If there are
no fax jobs in memory, the LCD displays [No Jobs Waiting]. You can cancel a fax job before it is sent.
1. Press [Settings] > [All Settings] > [Fax] > [Remaining Jobs].
2. Do the following for each fax job you want to check or cancel:
a. Press a or b to scroll through the waiting jobs. If needed, press the job you want to cancel.
b. Press [OK].
c. Press [Yes] to confirm or press [No] to exit without cancelling.
3. When finished, press .
Related Information
• Send a Fax
Related Topics:
• Telephone and Fax Problems
210
Home > Fax > Send a Fax > Fax Options
Fax Options
To change fax-sending settings, press [Options].
Option Description
Fax Resolution
Set the resolution for outgoing faxes.
The fax quality often can be improved by changing the Fax
Resolution.
Contrast
Adjust the contrast.
If your document is very light or very dark, changing the contrast
may improve the fax quality.
2-sided Fax
(MFC-J2740DW/MFC-J5740DW/
MFC-J5955DW)
Set the 2-sided scanning format.
Glass Scan Size
Adjust the scan area of the scanner glass to the size of the
document.
See Related Information: Scanner Specifications in Specifications.
Broadcasting
(monochrome only)
Send the same fax message to more than one fax number at the
same time.
Preview
(monochrome only)
Preview a fax message before you send it.
Colour Setting
Set whether faxes are sent in monochrome or colour.
• Colour faxes cannot be stored in the machine’s memory and the
machine sends them immediately.
• Use the ADF to send colour faxes with multiple pages.
• You cannot send a colour fax when Preview is set to On.
Delayed Fax
(monochrome only)
Set the time of day the delayed faxes will be sent.
Batch TX
(monochrome only)
Economise by sending all delayed faxes scheduled for the same
time and fax number as one fax to save transmission time.
Real Time TX
Send a fax immediately without waiting for the machine to retrieve
the scan from its memory.
Overseas Mode
Set to On if you have difficulty sending faxes overseas.
Call History
Select a number from the Call History.
Address Book
Select a number from the Address Book.
Set New Default
Save your settings as the default.
Factory Reset
Restore all settings back to the factory settings.
You can save the current settings by pressing [Save as Shortcut].
You will be asked if you want to make this a One Touch Shortcut. Follow the LCD instructions.
Related Information
• Send a Fax
Related Topics:
• Specifications
• Send a Fax from Your Brother Machine
211


Home > Fax > Receive a Fax > Receive Mode Settings > Receive Modes Overview
Receive Modes Overview
Some receive modes answer automatically ([Fax Only] and [Fax/Tel]). You may want to change the Ring
Delay before using these modes.
Fax Only
[Fax Only] mode automatically answers every call as a fax.
Fax/Tel
[Fax/Tel] mode helps you manage incoming calls, by recognising whether they are fax or voice calls and
handling them in one of the following ways:
• Faxes are received automatically.
• Voice calls start the F/T ring to tell you to pick up the line. The F/T ring is a pseudo/double-ring made by
your machine.
Manual
To receive a fax in [Manual] mode, lift the handset of the external telephone or press the Hook
1
button.
When you hear fax tones (short repeating beeps), press the Start button, and then select [Receive] to
receive a fax. You can also use the Fax Detect feature to receive faxes by lifting a handset on the same line
as the machine.
External TAD
[External TAD] mode lets an external answering device manage your incoming calls.
Incoming calls are handled in the following ways:
• Faxes are received automatically.
• Voice callers can record a message on the external TAD.
Related Information
• Receive Mode Settings
Related Topics:
• Set the Number of Rings Before the Machine Answers (Ring Delay)
• Set the F/T Ring Time (Pseudo/Double-ring)
• Set Fax Detect
• Connect an External TAD
1
Not available in South Africa
214
Home > Fax > Receive a Fax > Receive Mode Settings > Choose the Correct Receive Mode
Choose the Correct Receive Mode
You must choose a Receive Mode depending on the external devices and telephone services you have on your
line.
By default, your machine automatically will receive any faxes that are sent to it. The diagram below will help you
select the correct mode.
1. Press [Settings] > [All Settings] > [Fax] > [Setup Receive] > [Receive Mode].
(For some countries)
If you cannot change the [Receive Mode] option, make sure the Distinctive Ring feature is set to [Off].
(For New Zealand)
If you cannot change the [Receive Mode] option, make sure the FaxAbility feature is set to [Off].
2. Press a or b to display the [Fax Only], [Fax/Tel], [External TAD], or [Manual] option, and then
press the option you want.
3. Press .
Related Information
• Receive Mode Settings
Related Topics:
• Distinctive Ring
• Connect an External TAD
• Telephone and Fax Problems
• Remote Retrieval Commands
215
Home > Fax > Receive a Fax > Receive Mode Settings > Set the Number of Rings Before the Machine
Answers (Ring Delay)
Set the Number of Rings Before the Machine Answers (Ring Delay)
When somebody calls your machine, you will hear the normal telephone ring sound. The number of rings is set in
the Ring Delay option.
• The Ring Delay setting sets the number of times the machine rings before it answers in [Fax Only] and
[Fax/Tel] modes.
• If you have external or extension telephones on the same line as the machine, select the maximum
number of rings.
1. Press [Settings] > [All Settings] > [Fax] > [Setup Receive] > [Ring Delay].
2. Press the number of times you want the line to ring before the machine answers.
If you select [0], the machine answers immediately and the line will not ring at all. (available only for some
countries)
3. Press .
Related Information
• Receive Mode Settings
Related Topics:
• Receive Modes Overview
• Operation from External and Extension Telephones
• Set Fax Detect
• Telephone and Fax Problems
216
Home > Fax > Receive a Fax > Receive Mode Settings > Set the F/T Ring Time (Pseudo/Double-ring)
Set the F/T Ring Time (Pseudo/Double-ring)
When you set the Receive Mode to [Fax/Tel], if the call is a fax, your machine will receive it automatically.
However, if it is a voice call, the machine will sound the F/T ring (pseudo/double-ring) for the time you set in the
F/T Ring Time option. When you hear the F/T ring, it means that a voice caller is on the line.
Because the F/T ring is a setting only on your Brother machine, extension and external telephones will not ring;
however, you can still answer the machine's call on any telephone.
1. Press [Settings] > [All Settings] > [Fax] > [Setup Receive] > [F/T Ring Time].
2. Press how long the machine will double-ring to alert you to a voice call.
3. Press
.
Even if the caller hangs up during the pseudo/double-ringing, the machine will continue to ring for the set
time.
Related Information
• Receive Mode Settings
Related Topics:
• Receive Modes Overview
• Operation from External and Extension Telephones
217
Home > Fax > Receive a Fax > Set Fax Detect
Set Fax Detect
If Fax Detect is On: The machine receives a fax call automatically, even if you answer the call. When the
message that your machine is receiving a fax appears on the LCD or when you hear “chirps” through the
handset you are using, just replace the handset. Your machine will do the rest.
If Fax Detect is Off: If you are at the machine and answer a fax call by lifting the handset, press the Start button,
and then select [Receive] to receive the fax. If you answered at an extension or external telephone, press *51
(*91 for New Zealand).
• If Fax Detect is set to [On], but your machine does not connect a fax call when you lift an extension or
external telephone handset, press the remote activation code *51 (*91 for New Zealand).
• If you send faxes from a computer on the same telephone line and the machine intercepts them, set
Fax Detect to [Off].
1. Press [Settings] > [All Settings] > [Fax] > [Setup Receive] > [Fax Detect].
2. Press [On] (or [Off]).
3. Press .
Related Information
• Receive a Fax
Related Topics:
• Receive Modes Overview
• Set the Number of Rings Before the Machine Answers (Ring Delay)
• Operation from External and Extension Telephones
• Use the Remote Codes
• Telephone and Fax Problems
218

Home > Fax > Receive a Fax > Fax Preview > Set Fax Preview to On
Set Fax Preview to On
• This feature is available only for monochrome faxes.
• When Fax Preview is turned on, a backup copy of received faxes will not be printed for Fax Forwarding,
PC-Fax Receiving and Forward to Cloud operations, even if you set Backup Print to On.
• Although printed faxes show the received date and time when Fax Receive Stamp is turned on, the Fax
Preview screen will not display the received date and time.
1. Press [Settings].
2. Press [Fax Preview].
3. Press [On] (or [Off]).
The touchscreen displays a message saying future received faxes will not be printed.
4. Press [Yes].
5. Press .
If faxes are stored in the memory when you change Fax Preview to Off, do one of the following:
• If you do not want to print the stored faxes, press [Continue].
Press [Yes] to confirm.
Your faxes will be deleted.
• To print all the stored faxes, press [Print All Faxes Before Delete].
• If you do not want to turn off Fax Preview, press [Cancel].
Related Information
• Fax Preview
220
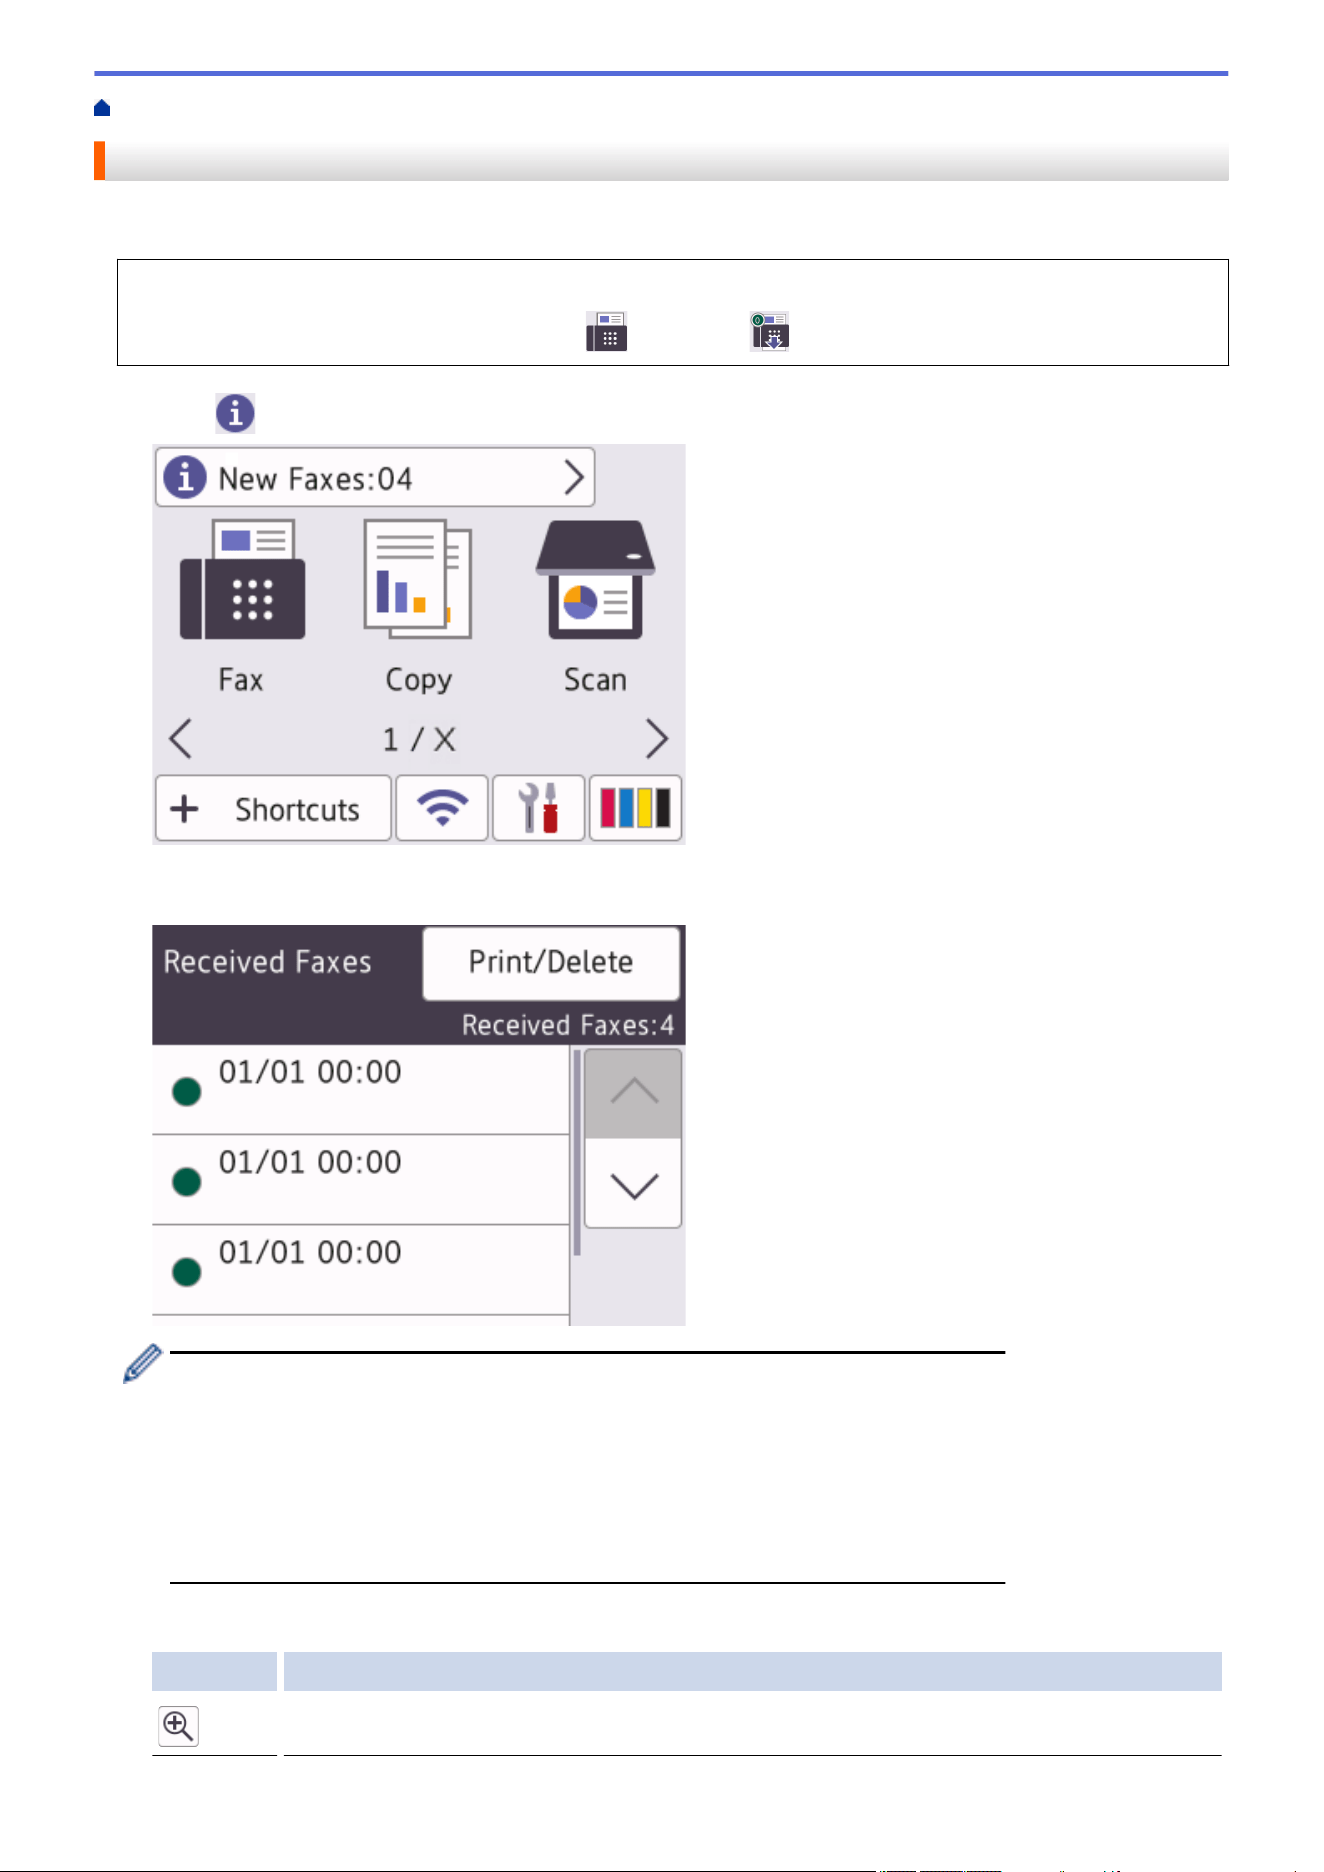
Home > Fax > Receive a Fax > Fax Preview > Preview New Faxes
Preview New Faxes
When a fax is received, a message appears on the LCD.
• This feature is available only for monochrome faxes.
• To see a fax you already previewed, press
[Fax] and [Received Faxes].
1. Press to view new faxes.
2. The fax list includes old and new faxes. A green mark appears next to new faxes.
Press the fax you want.
If you want to print or delete all the faxes in the list, press [Print/Delete].
Do one of the following:
• Press [Print All(New Faxes)] to print all faxes you have not yet viewed.
• Press [Print All(Old Faxes)] to print all faxes you have viewed.
• Press [Delete All(New Faxes)] to delete all faxes you have not yet viewed.
• Press [Delete All(Old Faxes)] to delete all faxes you have viewed.
3. Perform the following operations by pressing the buttons shown in the table:
Button Result
Enlarge the fax.
221
Button Result
Reduce the fax.
or Scroll vertically.
or Scroll horizontally.
Rotate the fax clockwise.
Delete the fax.
Press Yes to confirm.
Go back to the previous page.
Go to the next page.
Go back to the fax list.
Start
Print the fax.
If the fax is a single page, it starts printing. A touchscreen message asks if you want to delete
the fax from the machine's memory. To delete the fax, press Yes. To keep the fax in the
machine's memory, press No.
If the fax has multiple pages, do one of the following:
• Press Print All Pages to print the whole message. A touchscreen message asks if
you want to delete the fax from the machine's memory. To delete the fax, press Yes. To
keep the fax in the machine's memory, press No.
• Press Print Displayed Only to print only the displayed page.
• Press Print From Displayed to print from the displayed page to the last page.
• If your fax is large there may be a delay before it is displayed.
• The touchscreen displays the current page number and total pages of the fax message.
4. Press
.
Related Information
• Fax Preview
222

Home > Fax > Receive a Fax > Shrink Page Size of an Oversized Incoming Fax
Shrink Page Size of an Oversized Incoming Fax
When the [Auto Reduction] feature is [On], your Brother machine reduces any oversized incoming fax page
to fit on your paper. The machine calculates the reduction ratio using the page size of the fax, and your Paper
Size setting.
1. Press [Settings] > [All Settings] > [Fax] > [Setup Receive] > [Auto Reduction].
2. Press [On] (or [Off]).
3. Press .
Related Information
• Receive a Fax
Related Topics:
• Paper Settings
• Paper Handling and Printing Problems
223
Home > Fax > Receive a Fax > Set the Fax Receive Stamp
Set the Fax Receive Stamp
Set the machine to print the date and time of receipt at the top of each incoming fax page. Make sure you have
set the current date and time on the machine.
This feature is available only for monochrome faxes.
1. Press [Settings] > [All Settings] > [Fax] > [Setup Receive] > [Fax Rx Stamp].
2. Press [On] (or [Off]).
3. Press .
Related Information
• Receive a Fax
224
Home > Fax > Receive a Fax > Receive a Fax at the End of a Telephone Conversation
Receive a Fax at the End of a Telephone Conversation
If you are speaking on the telephone connected to your machine and the other party is also speaking on a
telephone connected to his fax machine, at the end of the conversation, the other party can send you a fax
before you both hang up.
Your machine's ADF must be empty.
1. Ask the other party to load the fax and to press the Start or Send key.
2. Press to display the [Fax Start] button.
3. When you hear CNG tones (slow, repeated beeps), press [Fax Start].
4. Press [Receive] to receive the fax.
5. Replace the external handset.
Related Information
• Receive a Fax
225

Home > Fax > Receive a Fax > Memory Receive Options
Memory Receive Options
Use Memory Receive options to direct incoming faxes while you are away from the machine. You can use only
one Memory Receive option at a time.
Memory Receive can be set to:
• Fax Forwarding
• Fax Storage
• PC-Fax Receive
• Forward to Cloud
The machine forwards your received faxes to the online services.
• Off
This feature is available only for monochrome faxes.
• Forward Incoming Faxes to Another Machine
• Store Incoming Faxes in the Machine's Memory
• Use PC-Fax Receive to Transfer Received Faxes to Your Computer (Windows only)
• Change Memory Receive Options
• Turn Off Memory Receive
• Print a Fax Stored in the Machine's Memory
• Turn On FaxForward to Cloud or E-mail
226
Home > Fax > Receive a Fax > Memory Receive Options > Forward Incoming Faxes to Another Machine
Forward Incoming Faxes to Another Machine
Use the Fax Forwarding feature to automatically forward your incoming faxes to another machine.
This feature is available only for monochrome faxes.
1. Press [Settings] > [All Settings] > [Fax] > [Setup Receive] > [Memory Receive].
2. Press a or b to display the [Fax Forward] option, and then press it.
3. Enter the forwarding fax number (up to 20 digits) using the dial pad.
Press [OK].
To forward a fax to an email address, press , enter the email address, and then press [OK].
4. Press [Backup Print: On] or [Backup Print: Off].
• If you select [Backup Print: On], the machine prints received faxes at your machine so you will
have a copy.
• When Fax Preview is turned on, a backup copy of received faxes will not be printed.
• If you receive a colour fax, your machine only prints the colour fax and does not forward it to the Fax
Forwarding number you programmed.
5. Press .
Related Information
• Memory Receive Options
227
Home > Fax > Receive a Fax > Memory Receive Options > Store Incoming Faxes in the Machine's Memory
Store Incoming Faxes in the Machine's Memory
Use the Fax Storage feature to store incoming faxes in the machine's memory. Retrieve your stored fax
messages from your fax machine when you are at another location using the Remote Retrieval commands. Your
machine prints a backup copy of each stored fax.
This feature is available only for monochrome faxes.
1. Press [Settings] > [All Settings] > [Fax] > [Setup Receive] > [Memory Receive].
2. Press a or b to display the [Fax Storage] option, and then press it.
3. Press .
Related Information
• Memory Receive Options
Related Topics:
• Forward Faxes Remotely
• Print a Fax Stored in the Machine's Memory
• Remote Retrieval Commands
228
Home > Fax > Receive a Fax > Memory Receive Options > Use PC-Fax Receive to Transfer Received
Faxes to Your Computer (Windows only)
Use PC-Fax Receive to Transfer Received Faxes to Your Computer
(Windows only)
Turn on the PC-Fax Receive feature to automatically store incoming faxes to your machine's memory, and then
send them to your computer. Use your computer to view and store these faxes.
• This feature is available only for monochrome faxes. When you receive a colour fax, your machine prints
the colour fax but does not send the fax to your computer.
• Before you can set up PC-Fax Receive, you must install the Brother software and drivers on your
computer. Make sure your computer is connected and turned on. You must have the PC-FAX Receiving
software running on your computer.
Even if your computer is turned off, your machine will receive and store faxes in its memory. When you start your
computer and the PC-FAX Receiving software runs, your machine transfers faxes to your computer
automatically.
1. Press [Settings] > [All Settings] > [Fax] > [Setup Receive] > [PC Fax Receive].
2. Press [On].
The touchscreen displays the message [Run the PC-Fax Receive program on your computer.].
3. Press [OK].
4. Press [<USB>] or press the name of the destination computer you want to receive faxes if you are on a
network. Press [OK].
5. Press [Backup Print: On] or [Backup Print: Off].
When Fax Preview is turned on, a backup copy of received faxes will not be printed.
6. Press .
To change the destination computer, repeat these steps.
Related Information
• Memory Receive Options
Related Topics:
• Transfer Your Faxes or Fax Journal Report
• Transfer Faxes to Your Computer
• Receive Faxes Using PC-FAX Receive (Windows)
229
Home > Fax > Receive a Fax > Memory Receive Options > Change Memory Receive Options
Change Memory Receive Options
If there are faxes in your machine's memory when you change any Memory Receive option, the LCD displays
one of the following questions:
• If received faxes have already been printed, the touchscreen displays [Erase all documents?]
- If you press [Yes], faxes in the memory will be erased before the setting changes.
- If you press [No], faxes in the memory will not be erased and the setting will be unchanged.
• If unprinted faxes are in the machine's memory, the touchscreen displays [Print all faxes?]
- If you press [Yes], faxes in the memory will be printed before the setting changes.
- If you press [No], faxes in the memory will not be printed and the setting will be unchanged.
• If received faxes are left in the machine’s memory when you change to [PC Fax Receive] from another
option ([Fax Forward], [Forward to Cloud], or [Fax Storage]), press [<USB>] or the name of the
computer if you are on a network, and then press [OK]. You will be asked if you want to turn on Backup
Print.
The touchscreen displays:
[Send Fax to PC?]
- If you press [Yes], faxes in the memory will be sent to your computer before the setting changes.
- If you press [No], faxes in the memory will not be erased and the setting will be unchanged.
Related Information
• Memory Receive Options
Related Topics:
• Turn Off Memory Receive
230
Home > Fax > Receive a Fax > Memory Receive Options > Turn Off Memory Receive
Turn Off Memory Receive
Turn off Memory Receive if you do not want the machine to save or transfer incoming faxes.
1. Press
[Settings] > [All Settings] > [Fax] > [Setup Receive] > [Memory Receive].
2. Press [Off].
The touchscreen displays [Print all faxes?] or [Erase all documents?] if received faxes are in
your machine's memory.
3. Press .
Related Information
• Memory Receive Options
Related Topics:
• Change Memory Receive Options
• Error and Maintenance Messages
• Telephone and Fax Problems
231

Home > Fax > Receive a Fax > Memory Receive Options > Print a Fax Stored in the Machine's Memory
Print a Fax Stored in the Machine's Memory
• This feature is available only for monochrome faxes.
• After you print the fax, it is erased from the machine's memory.
If you select [Fax Storage], you can print all faxes from the memory.
1. Press
[Settings] > [All Settings] > [Fax] > [Print Document].
You can also print the faxes from the memory by pressing [Stored Faxes] on the touchscreen.
2. Press [Yes].
Related Information
• Memory Receive Options
Related Topics:
• Store Incoming Faxes in the Machine's Memory
• Error and Maintenance Messages
• Telephone and Fax Problems
232

Home > Fax > Receive a Fax > Remote Fax Retrieval
Remote Fax Retrieval
Use Remote Retrieval to call your machine from any touch-tone telephone or fax machine, and use a remote
access code and remote commands to retrieve fax messages.
• Set a Remote Access Code
• Use Your Remote Access Code
• Remote Retrieval Commands
• Forward Faxes Remotely
• Change the Fax Forwarding Number
233
Home > Fax > Receive a Fax > Remote Fax Retrieval > Set a Remote Access Code
Set a Remote Access Code
Set a Remote Access Code to access and control your machine even when you are away from it.
1. Press
[Settings] > [All Settings] > [Fax] > [Remote Access].
2. Enter a three-digit code using the numbers [0] through [9], [*], or [#] using the dial pad (The preset '*'
cannot be changed).
Press [OK].
• DO NOT use the same code used for your Remote Activation Code (*51) (*91 for New Zealand) or
Remote Deactivation Code (#51) (#91 for New Zealand).
• To delete your code, press and hold to restore the inactive setting (- - - *), and then press [OK].
3. Press .
Related Information
• Remote Fax Retrieval
Related Topics:
• Use Your Remote Access Code
• Operation from External and Extension Telephones
• Use the Remote Codes
234
Home > Fax > Receive a Fax > Remote Fax Retrieval > Use Your Remote Access Code
Use Your Remote Access Code
1. When away from your Brother machine, dial your fax number from a touch-tone telephone or fax machine.
2. When your machine answers, immediately enter your three-digit Remote Access Code, followed by *.
3. Your Brother machine signals if it has received faxes:
• One long beep - the machine received at least one fax
• No beeps - the machine has not received a fax
4. When the machine gives two short beeps, enter a command.
• The machine will hang up if you wait longer than 30 seconds to enter a command.
• The machine will beep three times if you enter an invalid command.
5. When finished, press 9, and then press 0 to deactivate your machine.
6. Hang up.
This feature may not be available in some countries or supported by your local telephone company.
Related Information
• Remote Fax Retrieval
Related Topics:
• Set a Remote Access Code
235
Home > Fax > Receive a Fax > Remote Fax Retrieval > Remote Retrieval Commands
Remote Retrieval Commands
Use the Remote Commands in this table to access fax commands and options when you are away from your
machine. When you call the machine and enter your remote access code (three digits followed by *), the system
will sound two short beeps and you must enter a Remote Command (column 1), followed by one of the options
(column 2) for that command.
Remote
commands
Options Operation details
95 Change the Fax Forwarding, or Fax
Storage settings
1 OFF You can select Off after you retrieve or erase all
your messages.
2 Fax Forwarding One long beep means the change is accepted. If
you hear three short beeps, you cannot make a
change because something has not been set up
(for example, a Fax Forwarding number has not
been registered). You can register your Fax
Forwarding number by entering 4. After you
register the number, Fax Forwarding will work.
4 Fax Forwarding number
6 Fax Storage
96 Retrieve a fax
2 Retrieve all faxes Enter the fax number of a remote fax machine to
receive stored fax messages.
3 Erase faxes from memory If you hear one long beep, fax messages have
been erased from memory.
97 Check the receiving status
1 Fax Check whether your machine has received any
faxes. If yes, you will hear one long beep. If not,
you will hear three short beeps.
98 Change the Receive Mode
1 External TAD One long beep means the change has been
accepted.
2 Fax/Tel
3 Fax Only
90 Exit Press 9 0 to stop remote retrieval. Wait for the long
beep, then hang up.
Related Information
• Remote Fax Retrieval
Related Topics:
• Change the Fax Forwarding Number
• Store Incoming Faxes in the Machine's Memory
• Forward Faxes Remotely
236
Home > Fax > Receive a Fax > Remote Fax Retrieval > Forward Faxes Remotely
Forward Faxes Remotely
Call your machine from any touch-tone telephone or fax machine to forward incoming faxes to another machine.
You must turn on Fax Storage, or Fax Preview before you use this feature.
1. Dial your fax number.
2. When your machine answers, enter your Remote Access Code (three digits followed by *). If you hear one
long beep, you have messages.
3. When you hear two short beeps, press 9 6 2.
4. Wait for the long beep, and then use the dial pad to enter the fax number (up to 20 digits) of the remote fax
machine where you want your fax messages sent, followed by # #.
You cannot use * and # as dial numbers but you can press # to insert a pause in the fax number.
5. Hang up after you hear one long beep. Your Brother machine will forward any incoming faxes to the fax
number you entered. The other fax machine will then print your fax messages.
Related Information
• Remote Fax Retrieval
Related Topics:
• Store Incoming Faxes in the Machine's Memory
• Remote Retrieval Commands
237
Home > Fax > Receive a Fax > Remote Fax Retrieval > Change the Fax Forwarding Number
Change the Fax Forwarding Number
1. Dial your fax number.
2. When your machine answers, enter your Remote Access Code (three digits followed by *). If you hear one
long beep, you have messages.
3. When you hear two short beeps, press 9 5 4.
4. Wait for the long beep, enter the new number (up to 20 digits) of the remote fax machine you want your fax
messages forwarded to using the dial pad, then enter # #.
You cannot use * and # as dial numbers but you can press # to insert a pause in the fax number.
5. Press 9 0 to stop Remote Access when finished.
6. Hang up after you hear one long beep.
Related Information
• Remote Fax Retrieval
Related Topics:
• Remote Retrieval Commands
238


Home > Fax > Voice Operations and Fax Numbers > Voice Operations > Send Tone Signals
Send Tone Signals
If you have a Pulse dialling service, but must send Tone signals (for example, for telephone banking), follow
these steps. If you have a Touch Tone service, you will not need this feature to send tone signals.
This feature is not available in the New Zealand.
1. Press [Fax].
If [Fax Preview] is set to [On], press [Fax] > [Sending Faxes].
2. Press [Hook].
3. Press # using the dial pad. Any digits dialled after this will send tone signals.
When you are finished with the call, the machine will return to the Pulse dialling service.
Related Information
• Voice Operations
241

Home > Fax > Voice Operations and Fax Numbers > Voice Operations > Pick up a Voice Call in Fax/Tel
Receive Mode
Pick up a Voice Call in Fax/Tel Receive Mode
When the machine is in Fax/Tel mode, it will use the F/T Ring (pseudo/double-ringing) to alert you to pick up a
voice call.
If you are at the machine, lift the external telephone’s handset, and then press [Pickup] button to answer.
If you are at an extension telephone, lift the handset during the F/T Ring and then press #51 (#91 for New
Zealand) between the pseudo/double rings. If no one is on the line, or if someone wants to send you a fax, send
the call back to the machine by pressing *51 (*91 for New Zealand).
Related Information
• Voice Operations
242

Home > Fax > Voice Operations and Fax Numbers > Store Fax Numbers > Store Address Book Numbers
Store Address Book Numbers
1. Press [Fax] > [Address Book].
2. Do the following steps:
a. Press [Edit] > [Add New Address] > [Name].
b. Enter the name (up to 16 characters) using the touchscreen. Press [OK].
c. Press [Address 1].
d. Enter the first fax or telephone number (up to 20 digits) using the touchscreen. Press [OK].
• Press [Pause] to insert a pause between numbers. You can press [Pause] as many times as needed
to increase the length of the pause.
• Be sure to include the area code when entering a fax or telephone number. Depending on the country,
the Caller ID names and history may not be displayed correctly if the area code is not registered with
the fax or telephone number.
• To store an email address to use with Internet Fax or Scan to E-mail server, press
and enter the
email address, and then press [OK].
e. To store the second fax or telephone number, press [Address 2]. Enter the second fax or telephone
number (up to 20 digits) using the touchscreen. Press [OK].
f. Press [OK] to confirm.
To store another Address Book number, repeat these steps.
3. Press
.
Related Information
• Store Fax Numbers
Related Topics:
• Set up Broadcasting Groups
244
Home > Fax > Voice Operations and Fax Numbers > Store Fax Numbers > Save Outgoing Call Numbers to
the Address Book
Save Outgoing Call Numbers to the Address Book
You can copy numbers from your Outgoing Call history and save them in your Address Book.
1. Press [Fax] > [Call History] > [Outgoing Call].
2. Press a or b to display the number you want to store, and then press it.
3. Press [Edit] > [Add to Address Book] > [Name].
To delete the number from the Outgoing Call history list, press [Edit] > [Delete]. Press [Yes] to
confirm.
4. Enter the name (up to 16 characters) using the touchscreen. Press [OK].
5. To store the second fax or telephone number, press [Address 2]. Enter the second fax or telephone
number (up to 20 digits) using the touchscreen. Press [OK].
6. Press [OK] to confirm the fax or telephone number you want to store.
7. Press
.
Related Information
• Store Fax Numbers
Related Topics:
• Enter Text on Your Brother Machine
245
Home > Fax > Voice Operations and Fax Numbers > Store Fax Numbers > Save Caller ID History Numbers
to the Address Book
Save Caller ID History Numbers to the Address Book
If you have a Caller ID subscriber service with your telephone company, you can copy numbers from your Caller
ID History and save them in your Address Book.
This feature is not available for Taiwan and some countries.
1. Press [Fax] > [Call History] > [Caller ID History].
2. Press a or b to display the name or number you want to store, and then press it.
3. Press [Edit] > [Add to Address Book] > [Name].
To delete the number from the Caller ID History list, press [Edit] > [Delete]. Press [Yes] to confirm.
4. Enter the name (up to 16 characters) using the touchscreen. Press [OK].
5. To store the second fax or telephone number, press [Address 2]. Enter the second fax or telephone
number (up to 20 digits) using the touchscreen. Press [OK].
6. Press [OK] to confirm the fax or telephone number you want to store.
7. Press
.
Related Information
• Store Fax Numbers
Related Topics:
• Caller ID
• Enter Text on Your Brother Machine
246
Home > Fax > Voice Operations and Fax Numbers > Store Fax Numbers > Change or Delete Address
Book Names or Numbers
Change or Delete Address Book Names or Numbers
1. Press [Fax] > [Address Book] > [Edit].
2. Do one of the following:
• Press [Change] to edit the names or fax or telephone numbers.
Press a or b to display the number you want to change, and then press it.
- To change the name, press [Name]. Enter the new name (up to 16 characters) using the
touchscreen. Press [OK].
- To change the first fax or telephone number, press [Address 1]. Enter the new fax or telephone
number (up to 20 digits) using the touchscreen. Press [OK].
- To change the second fax or telephone number, press [Address 2]. Enter the new fax or telephone
number (up to 20 digits) using the touchscreen. Press [OK].
Press [OK] to finish.
To change a character, press d or c to position the cursor to highlight the character you want to change,
and then press . Enter the new character.
• To delete numbers, press a or b to display [Delete], and then press it.
Select the fax or telephone numbers you want to delete by pressing them to display check marks, and
then press [OK].
3. Press .
Related Information
• Store Fax Numbers
247
Home > Fax > Voice Operations and Fax Numbers > Set up Broadcasting Groups
Set up Broadcasting Groups
Creating and sending to a Group, which can be stored in the Address Book, allows you to send the same fax
message to many fax numbers, or Broadcast.
First, you must store each fax number in the Address Book. Then, you can include them as numbers in the
Group. Each Group uses up an Address Book number. You can store up to six Groups or you can assign up to
198 numbers to a large Group.
1. Press [Fax] > [Address Book].
2. Do the following steps:
a. Press [Edit] > [Setup Groups] > [Name].
b. Enter the Group name (up to 16 characters) using the touchscreen. Press [OK].
c. Press [Add/Delete].
d. Add Address Book numbers to the Group by pressing them to display a checkmark. Press [OK].
e. Read and confirm the displayed list of names and numbers you have selected, and then press [OK] to
save your Group.
To store another Group for broadcasting, repeat these steps.
3. Press .
Related Information
• Voice Operations and Fax Numbers
• Change a Broadcasting Group Name
• Delete a Broadcasting Group
• Add or Delete a Broadcasting Group Member
Related Topics:
• Send the Same Fax to More than One Recipient (Broadcasting)
• Store Address Book Numbers
248
Home > Fax > Voice Operations and Fax Numbers > Set up Broadcasting Groups > Change a
Broadcasting Group Name
Change a Broadcasting Group Name
1. Press [Fax] > [Address Book] > [Edit] > [Change].
2. Press a or b to display the Group you want to change, and then press it.
3. Press [Name].
4. Enter the new Group name (up to 16 characters) using the touchscreen. Press [OK].
To change a character, press d or c to position the cursor to highlight the incorrect character, and then
press .
Enter the new character.
5. Press [OK].
6. Press .
Related Information
• Set up Broadcasting Groups
Related Topics:
• Enter Text on Your Brother Machine
249

Home > Fax > Voice Operations and Fax Numbers > Set up Broadcasting Groups > Delete a Broadcasting
Group
Delete a Broadcasting Group
1. Press [Fax] > [Address Book] > [Edit] > [Delete].
2. Press a or b to display the Group you want to delete, and then press it.
3. Press [OK].
4. Press .
Related Information
• Set up Broadcasting Groups
250
Home > Fax > Voice Operations and Fax Numbers > Set up Broadcasting Groups > Add or Delete a
Broadcasting Group Member
Add or Delete a Broadcasting Group Member
1. Press [Fax] > [Address Book] > [Edit] > [Change].
2. Press a or b to display the Group you want to change, and then press it.
3. Press a or b to display [Add/Delete], and then press it.
4. Press a or b to display the number you want to add or delete.
5. Do the following for each number you want to change:
• To add a number to the Group, press the checkbox of the number to add a check mark.
• To delete a number from the Group, press the checkbox of the number to remove the check mark.
6. Press [OK].
7. Press [OK].
8. Press
.
Related Information
• Set up Broadcasting Groups
251

Home > Fax > Telephone Services and External Devices
Telephone Services and External Devices
• Distinctive Ring
• Caller ID
• Set the Telephone Line Type
• FaxAbility
• Voice Over Internet Protocol (VoIP/Telephone Line Interference)
• External TAD (Telephone Answering Device)
• External and Extension Telephones
252
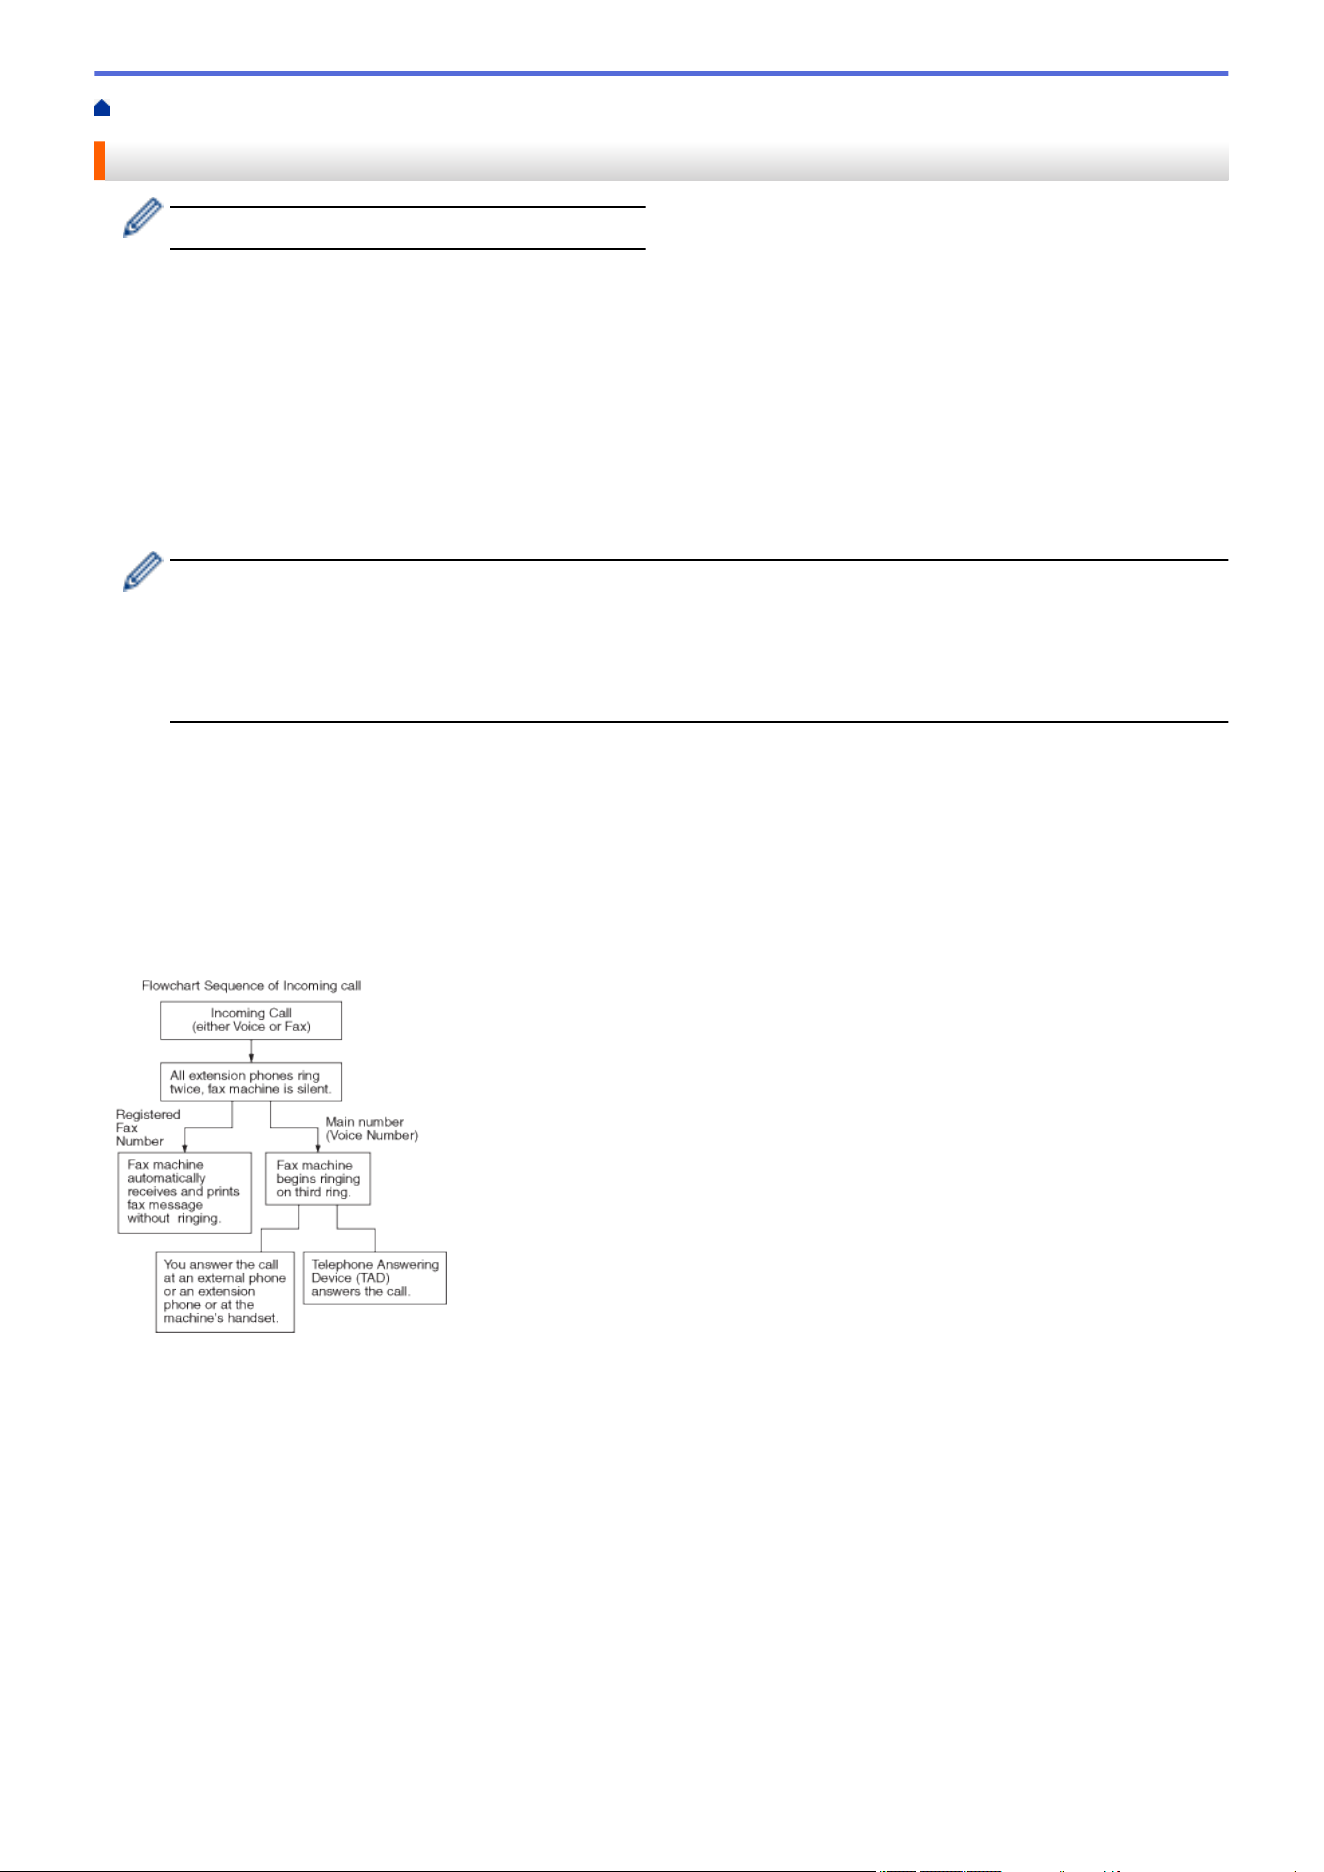
Home > Fax > Telephone Services and External Devices > Distinctive Ring
Distinctive Ring
This feature is available only for some countries.
For Australia
Distinctive Ring is a function of your Brother machine that allows a person with one line to receive fax and voice
calls through two different phone numbers on that one line. Brother uses the term “Distinctive Ring”, but
telephone companies market the service under a variety of names. This service establishes a second telephone
number on the same line as your existing telephone number, and each number has its own ring pattern.
Typically, the original number rings with the standard ring pattern and is used for receiving voice calls, and the
second number rings with a different ring pattern and is used for receiving faxes. Only one call can be answered
(or made) at any one time and while this call is in progress, incoming calls to either number will be presented with
a busy tone.
• Contact your Telephone Service Provider to determine Distinctive Ring availability and any other related
details.
• After you have set the Distinctive Ring feature to On, the receive mode is set to [Manual]
automatically. Your Distinctive Ring Number does not allow Voice calls - only Faxes. You can not
change the receive mode from [Manual] mode while the Distinctive Ring is set to on.
How does your telephone company’s ‘Distinctive Ring’ service work?
Using “Distinctive Ring” service of your telephone company is the most efficient way to receive both fax and
telephone calls on the same line. When the voice call comes in, all phones (extension and external) and the fax
machine will ring to alert you to pick it up. If a fax call comes in, the fax machine will answer automatically without
ringing, whereas the extension and external phones will ring twice with a Distinctive Ring pattern. It is also a
more efficient way of operating a Fax machine with an extension phone as you do not have to use the remote
activation codes. It gives you two independent numbers without the higher cost of a second line.
Flowchart Sequence of Incoming call
What does Brother’s ‘Distinctive Ring’ do?
The Brother machine has a Distinctive Ring feature that allows you to use your machine to take full advantage of
the telephone company’s Distinctive Ring service. The new telephone number on your line can just receive
faxes.
For Singapore and Hong Kong
This machine feature lets you use the Distinctive Ring subscriber service offered by some telephone companies,
which allows you to have several telephone numbers on one phone line. Each phone number has its own
Distinctive Ring pattern, so you will know which phone number is ringing. This is one way you can have a
separate phone number for your machine.
Your machine has a Distinctive Ring function, allowing you to dedicate one phone number just for receiving
faxes. You will need to set Distinctive Ring to On.
253

• You can switch it off temporarily, then turn it back on. When you get a new fax number, make sure you
reset this function.
• The machine will answer only calls to the Distinctive Ring number.
Related Information
• Telephone Services and External Devices
• Turn on Distinctive Ring
• Turn off Distinctive Ring
Related Topics:
• Settings Screen Overview
• Choose the Correct Receive Mode
254
Home > Fax > Telephone Services and External Devices > Distinctive Ring > Turn on Distinctive Ring
Turn on Distinctive Ring
This feature is available only for some countries.
For Australia
After you set the Distinctive Ring feature to [On], the receive mode is automatically set to [Manual]. Your
Distinctive Ring Number does not allow Voice calls - only Faxes. You cannot change the receive mode to another
mode while the Distinctive Ring is set to on.
For Singapore and Hong Kong
After you set the Distinctive Ring feature to [On], the receive mode is automatically set to [Manual]. Unless
you have a TAD or Voice Mail set up on the Distinctive Ring number, Manual mode means you must answer all
the calls yourself. You cannot change the receive mode to another mode while the Distinctive Ring is set to on.
When Distinctive Ring is on, the touchscreen will show [D/R] as the Receive Mode.
1. Press [Settings] > [All Settings] > [Fax] > [Miscellaneous] > [Distinctive].
2. Press [On].
3. Press .
Distinctive Ring is now set to [On].
Related Information
• Distinctive Ring
255
Home > Fax > Telephone Services and External Devices > Distinctive Ring > Turn off Distinctive Ring
Turn off Distinctive Ring
This feature is available only for some countries.
1. Press [Settings] > [All Settings] > [Fax] > [Miscellaneous] > [Distinctive].
2. Press [Off].
3. Press .
When you turn off Distinctive Ring, the machine will stay in [Manual] mode. You must set the Receive Mode
again.
Related Information
• Distinctive Ring
Related Topics:
• Error and Maintenance Messages
256

Home > Fax > Telephone Services and External Devices > Caller ID
Caller ID
This feature is not available for Taiwan and some countries.
For Australia and New Zealand
Caller ID is a telephone service that allows the subscriber to see a display of the caller’s phone number or name
as the telephone rings. It is a fast way to screen your calls. You can respond quickly to calls you missed,
because Caller IDs are received and stored in your machine memory.
To get the Caller ID Service: apply for the Caller ID service at your local telephone company, if available.
Advantages of Caller ID
For Business
All businesses profit from a quicker response to customer calls. Businesses that provide mail order services,
money-lending services or provide confidential information, can protect themselves from false orders or
acceptance of false identification.
At Home
Residential customers can protect themselves from unwanted calls.
How Does the Caller ID Work?
The Caller ID appears on the display when your telephone rings.
As your telephone rings, the display shows you the caller’s phone number or name if the name has been
stored in the Address Book. Once you answer the call, the caller’s ID disappears.
• If [ID Unknown] appears on the display, it means that the call came from outside your caller ID
service area or a public phone. (Depends on network function.)
• If [ID Withheld] appears on the display, it means the caller intentionally blocked the transmission of
his/her ID. (Depends on network function.)
The Caller ID is Stored in Your Machine Memory
The machine can store a maximum of the last 30 incoming caller IDs in the memory, along with the time and
date of reception. The 31st call will cause the oldest ID to be erased.
The Caller ID information stored in the memory can be used for the following:
Printing the Caller ID List.
You can review calls you received by checking the Caller IDs in memory. This report will list the Date, Time,
Phone Number (Caller ID) name, and type of Call (Comment) if available.
For Singapore and Hong Kong
The Caller ID feature of this machine lets you use the Caller ID subscriber service offered by many local phone
companies. Call your telephone company for details. This service provides you, by means of the screen display,
the telephone number (or name) of your caller as the line rings.
After a few rings, the screen displays the telephone number of your caller (or name, if available). Once you
answer the call, the Caller ID information disappears from the screen, but the call information remains stored in
the Caller ID memory.
• The [ID Unknown] message means the call originated outside your Caller ID service area.
• The [ID Withheld] message means the caller has intentionally blocked transmission of Caller ID
information.
• You can print a list of Caller ID information received by your machine.
• Caller ID service varies with different carriers. Call your local phone company to determine the kind of
service available in your area.
257

Home > Fax > Telephone Services and External Devices > Set the Telephone Line Type
Set the Telephone Line Type
This feature is available only in South Africa.
If you are connecting the machine to a line that features PBX or ISDN to send and receive faxes, you must select
a Telephone Line Type that matches your line's features.
1. Press [Settings] > [All Settings] > [Initial Setup] > [Phone Line Set].
2. Press [Normal], [PBX], or [ISDN].
3. If you selected [PBX], do the following steps:
a. Press [On] or [Always].
• If you select [On], the machine dials a prefix number before the fax number only when [R] is pressed.
• If you select [Always], the machine always dials a prefix number before the fax number.
b. Press [Dial Prefix].
c. Enter the prefix number using the touchscreen, and then press [OK].
Use the numbers 0 to 9, #, * and !. You cannot use ! with any other numbers or characters.
4. Press .
Related Information
• Telephone Services and External Devices
• PBX and TRANSFER
Related Topics:
• Telephone and Fax Problems
259
Home > Fax > Telephone Services and External Devices > Set the Telephone Line Type > PBX and
TRANSFER
PBX and TRANSFER
This feature is available only in South Africa.
The machine's [Phone Line Set] default setting is [Normal], which lets the machine connect to a standard
Public Switched Telephone Network (PSTN) line. However, many offices use a central telephone system or
Private Branch Exchange (PBX). Your machine can be connected to most types of PBX. The machine's recall
feature supports timed break recall only (TBR). TBR will work with most PBX systems allowing you to gain
access to an outside line, or transfer calls to another extension. Press [R] to use this feature.
Program a press of the [R] button as part of a number stored in the Address Book. When programming the
Address Book number, press [R] first (the LCD displays ‘!’), then enter the telephone number. This avoids
having to press [R] each time before you dial from the Address Book. However, your Telephone Line Type
must be set to PBX on the machine for you to use this feature.
Related Information
• Set the Telephone Line Type
260
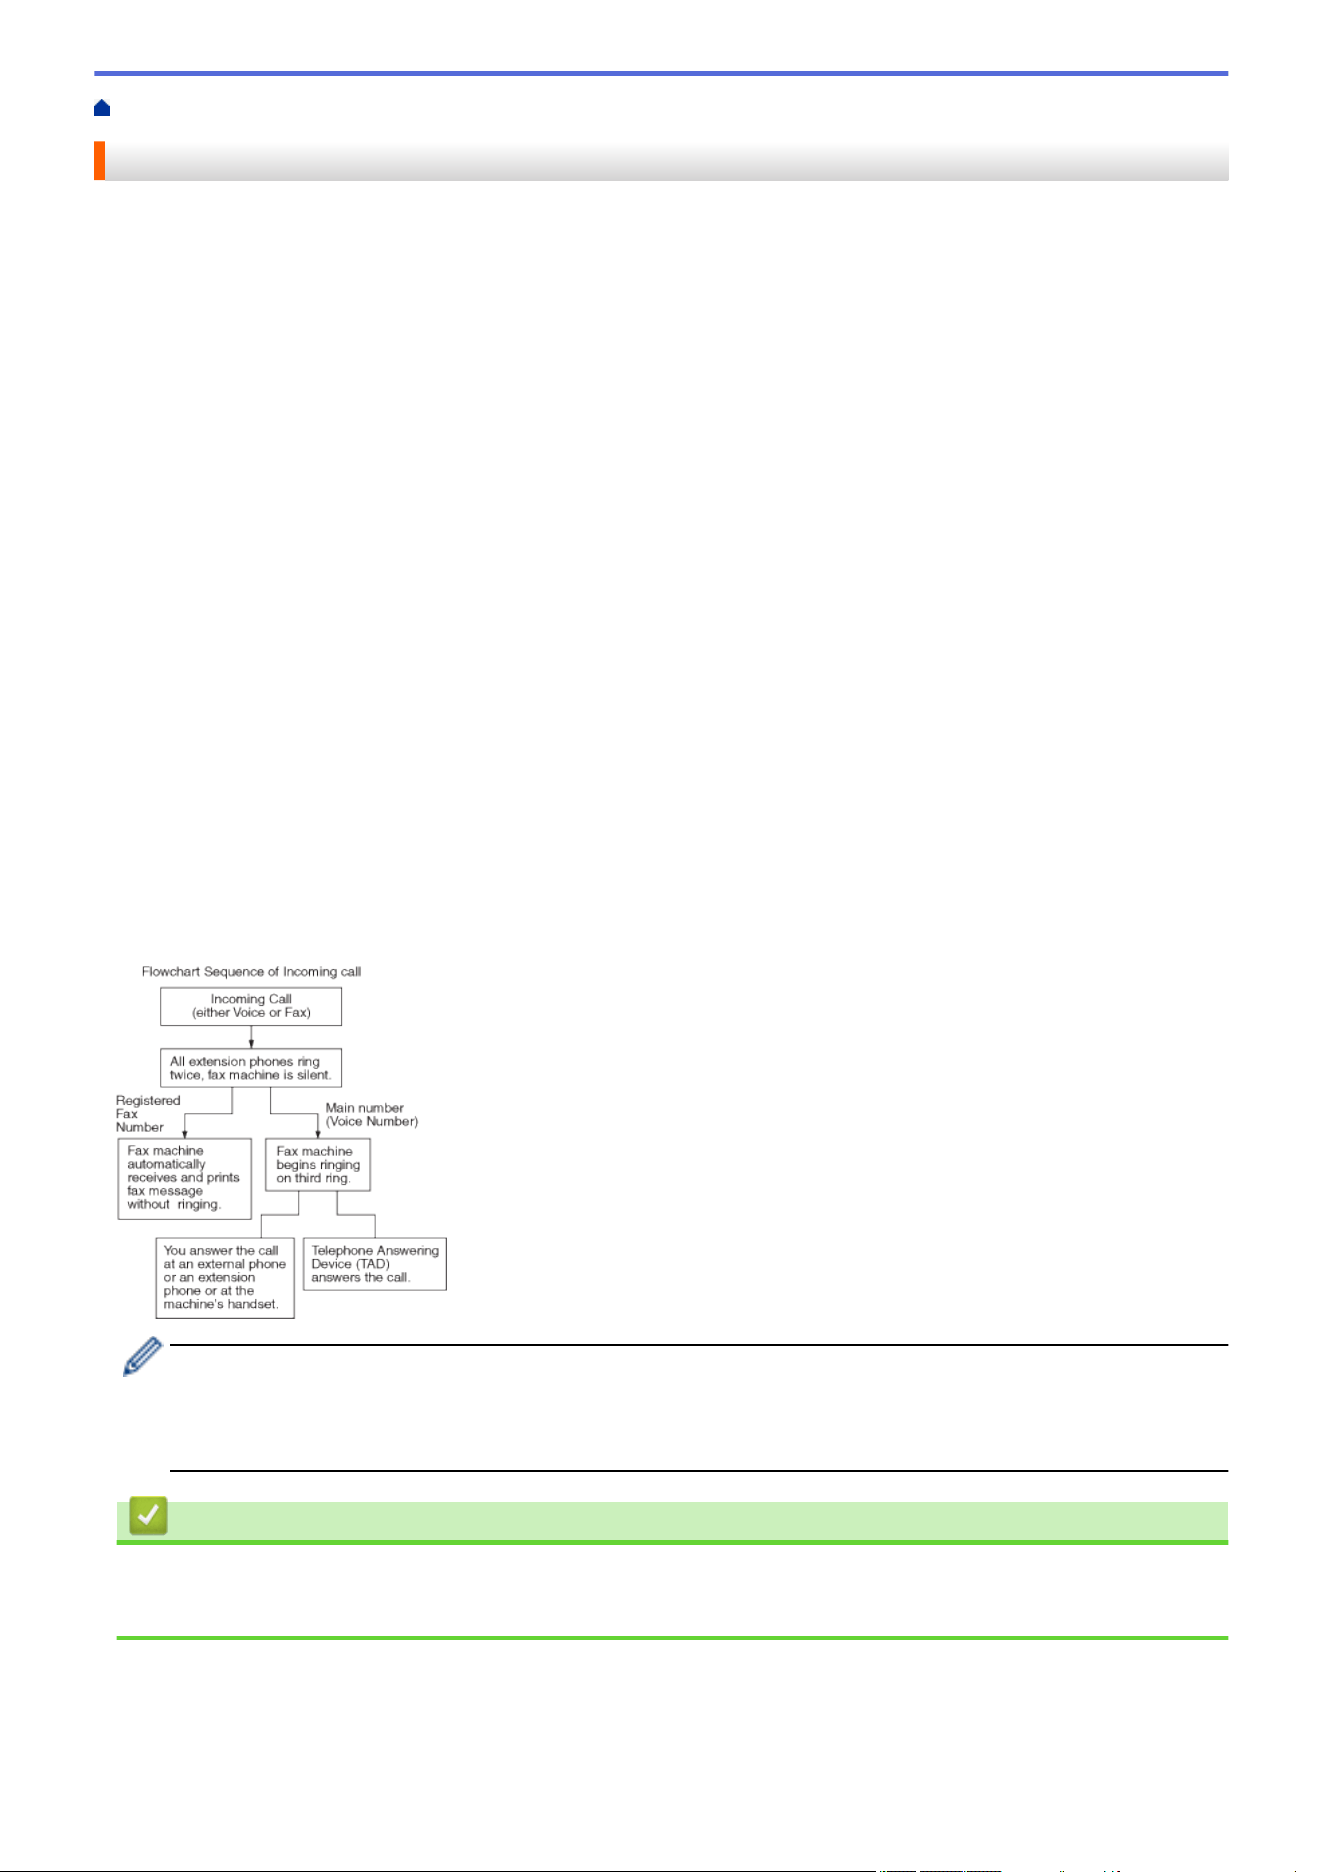
Home > Fax > Telephone Services and External Devices > FaxAbility
FaxAbility
This feature is available only in New Zealand.
FaxAbility is a service offered by Telecom that allows you to have an additional number on one phone line, with
its own distinctive ring pattern. This way, when you get an incoming call, you can identify the number being called
by its ring.
How Will the Fax Machine Treat All Other Numbers?
FaxAbility mode ensures that the machine will answer calls to the FaxAbility (secondary) number. When a call
comes in to your main number, all the phones will ring. You can set an external answering device (TAD) to
answer calls on the other number(s). (See the chart bellow.)
What is the Advantage of Using the FaxAbility Function?
Using FaxAbility is the most efficient way to receive both fax and telephone calls on the same line. It is much
easier for your callers who dial manually. The fax machine will answer with receiving tones so they will not have
to press an activation code. And the people who call to talk on your main number will not have to talk to your fax
machine. Basically, it gives you two independent numbers without the higher cost of a second line.
How Does FaxAbility Work?
For example, Your telephone number will have the standard ring pattern of long, long tone, while the new number
will have a ring pattern of long, silence, long. When FaxAbility is On, you will not hear the first ring of all incoming
calls on the fax machine. Extension phones will ring as usual. If the fax machine recognises the ring pattern, all
ringing will stop and the fax machine will answer and automatically receive the fax message. Otherwise, you will
hear the extension phones and the fax machine continue to ring. The fax machine always listens to the ring
pattern before it answers, so do not pick up the phone during that time. You will quickly learn to recognise the
ring pattern for faxes, so you will not be tempted to answer that number. Either you or a telephone answering
device can answer the main number(s).
Flowchart Sequence of Incoming call
After you have set the FaxAbility feature to on, the receive mode is set to [Manual] automatically. Unless
you have a TAD or Voice Mail set up on the FaxAbility number, Manual mode means you must answer all
the call yourself. You can not change the receive mode to the other mode while the FaxAbility is set to on.
When FaxAbility is on, the LCD will show [D/R] as the Receive Mode.
Related Information
• Telephone Services and External Devices
• Turn FaxAbility Off or On
261
Home > Fax > Telephone Services and External Devices > FaxAbility > Turn FaxAbility Off or On
Turn FaxAbility Off or On
This feature is available only in New Zealand.
The FaxAbility function is designed to accommodate the FaxAbility service provided by Telecom.
Call Waiting beeps caused by incoming calls on your main number can affect fax transmissions. If you have
FaxAbility Service but don’t have Call Waiting, you need do nothing at this stage. If you do have Call Waiting as
well as FaxAbility, set the Call Waiting menu option to On.
1. Press
[Settings] > [All Settings] > [Fax] > [Miscellaneous] > [FaxAbility].
2. Press [On] (or [Off]) to set FaxAbility.
If you have FaxAbility service, press [On].
3. Press [Call Waiting].
4. Press [On] to set Call Waiting.
If you have Call Waiting service, press [On] to avoid the trouble caused by Call Waiting.
5. Press
.
Related Information
• FaxAbility
Related Topics:
• Error and Maintenance Messages
262
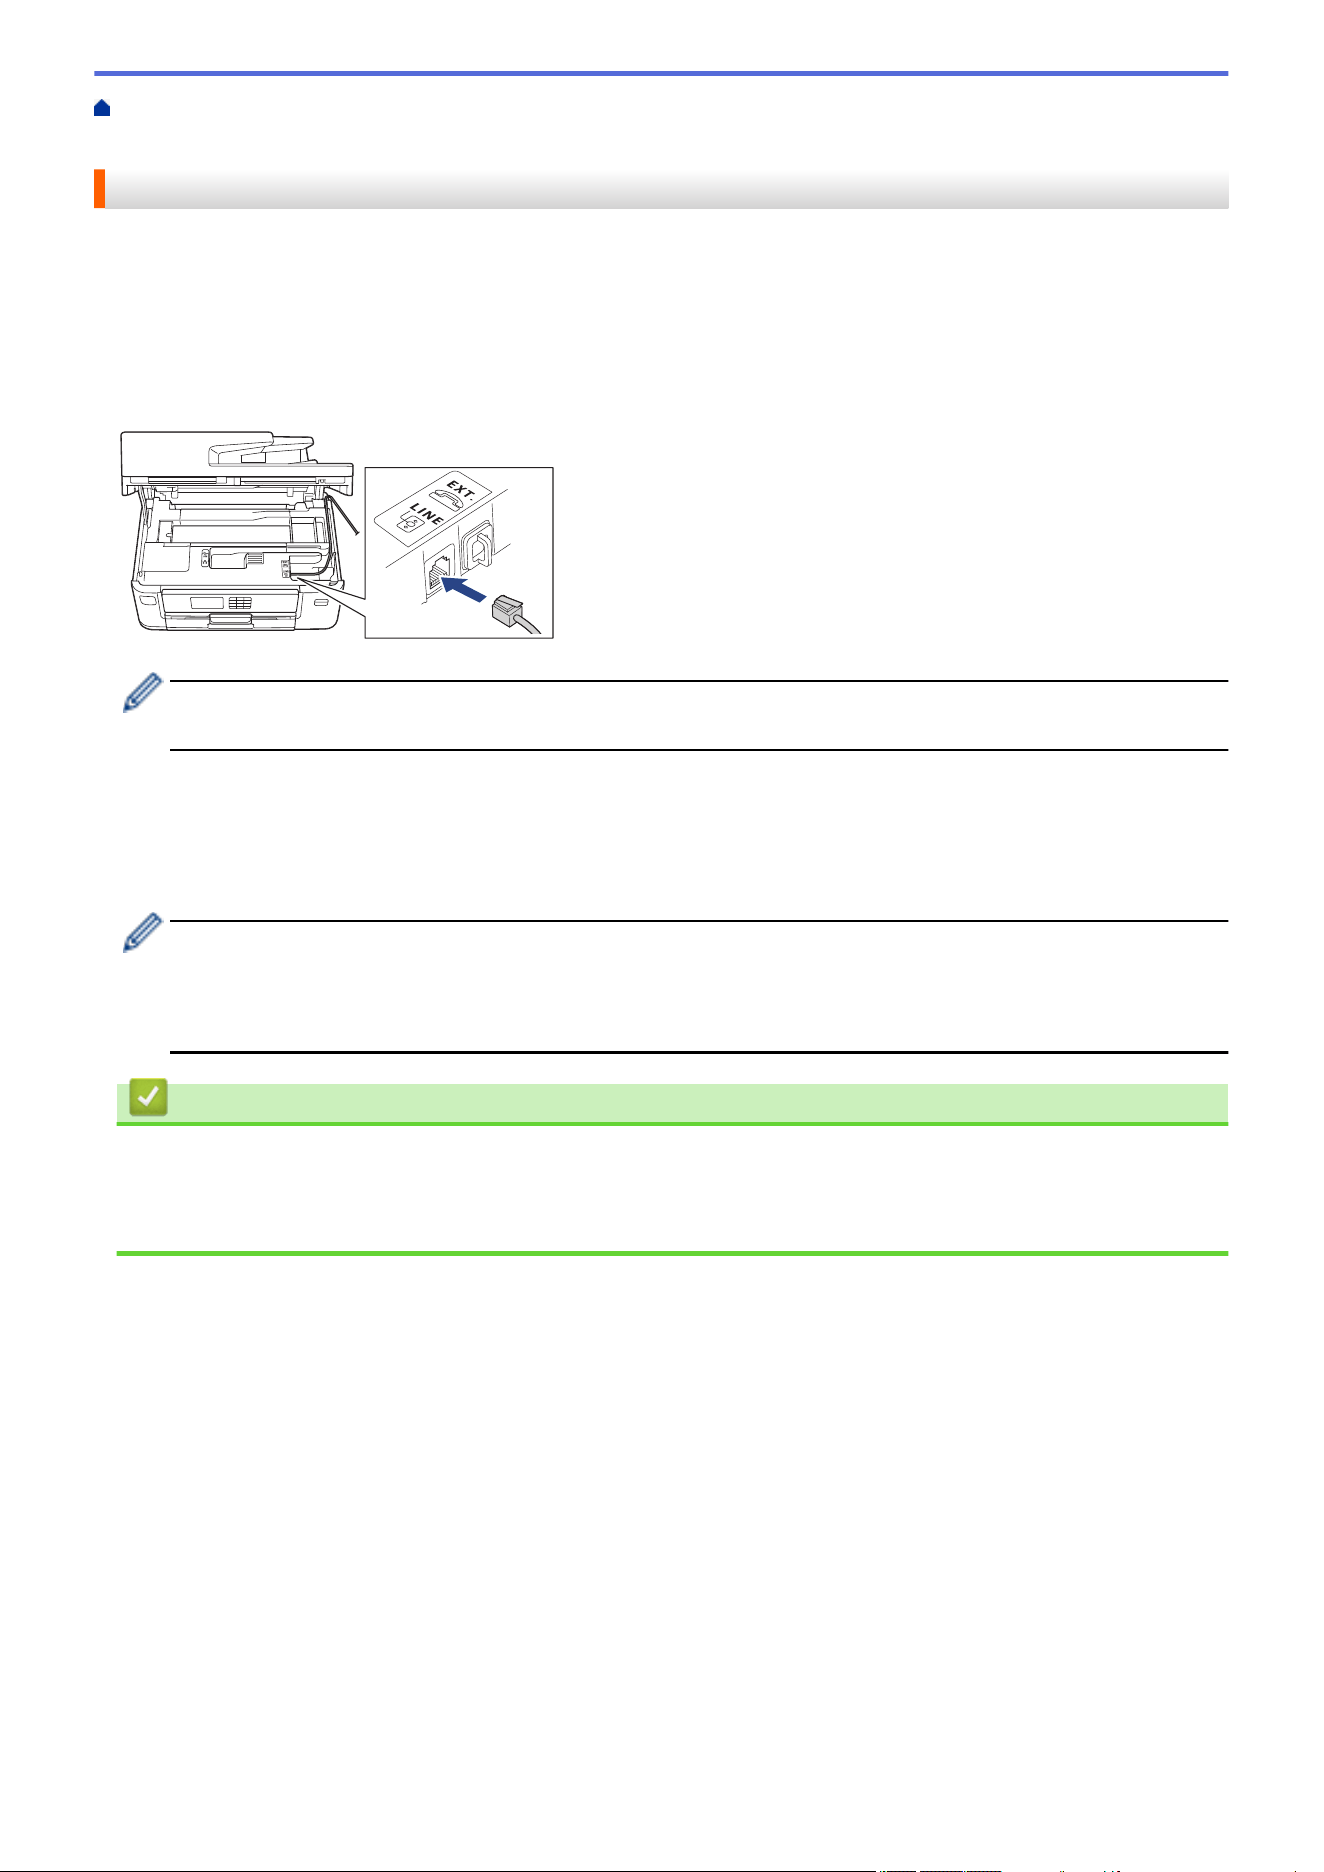
Home > Fax > Telephone Services and External Devices > Voice Over Internet Protocol (VoIP/Telephone
Line Interference)
Voice Over Internet Protocol (VoIP/Telephone Line Interference)
VoIP is a type of phone system that uses an Internet connection instead of a traditional telephone line. Telephone
providers frequently bundle VoIP together with Internet and cable services.
Your machine may not work with some VoIP systems. If you want to use your machine to send and receive faxes
on a VoIP system, make sure one end of your telephone cord is connected to the socket labelled LINE on your
machine. The other end of the telephone cord may be connected to a modem, phone adapter, splitter, or other
such device.
If you have questions about how to connect your machine to the VoIP system, please contact your VoIP
provider.
After you have connected your machine to the VoIP system, check for a dial tone. Lift the external telephone's
handset and listen for a dial tone. If there is no dial tone, please contact your VoIP provider.
If you are having problems sending or receiving faxes over a VoIP system, we recommend changing the
machine’s modem speed to the [Basic(for VoIP)] setting.
• VoIP (Voice over IP) is a type of phone system that uses an Internet connection, rather than a traditional
phone line.
• Brother does not recommend the use of a VoIP line. VoIP limitations in general can cause some
functions of the fax machine not to work correctly.
Related Information
• Telephone Services and External Devices
Related Topics:
• Telephone Line Interference/VoIP
263
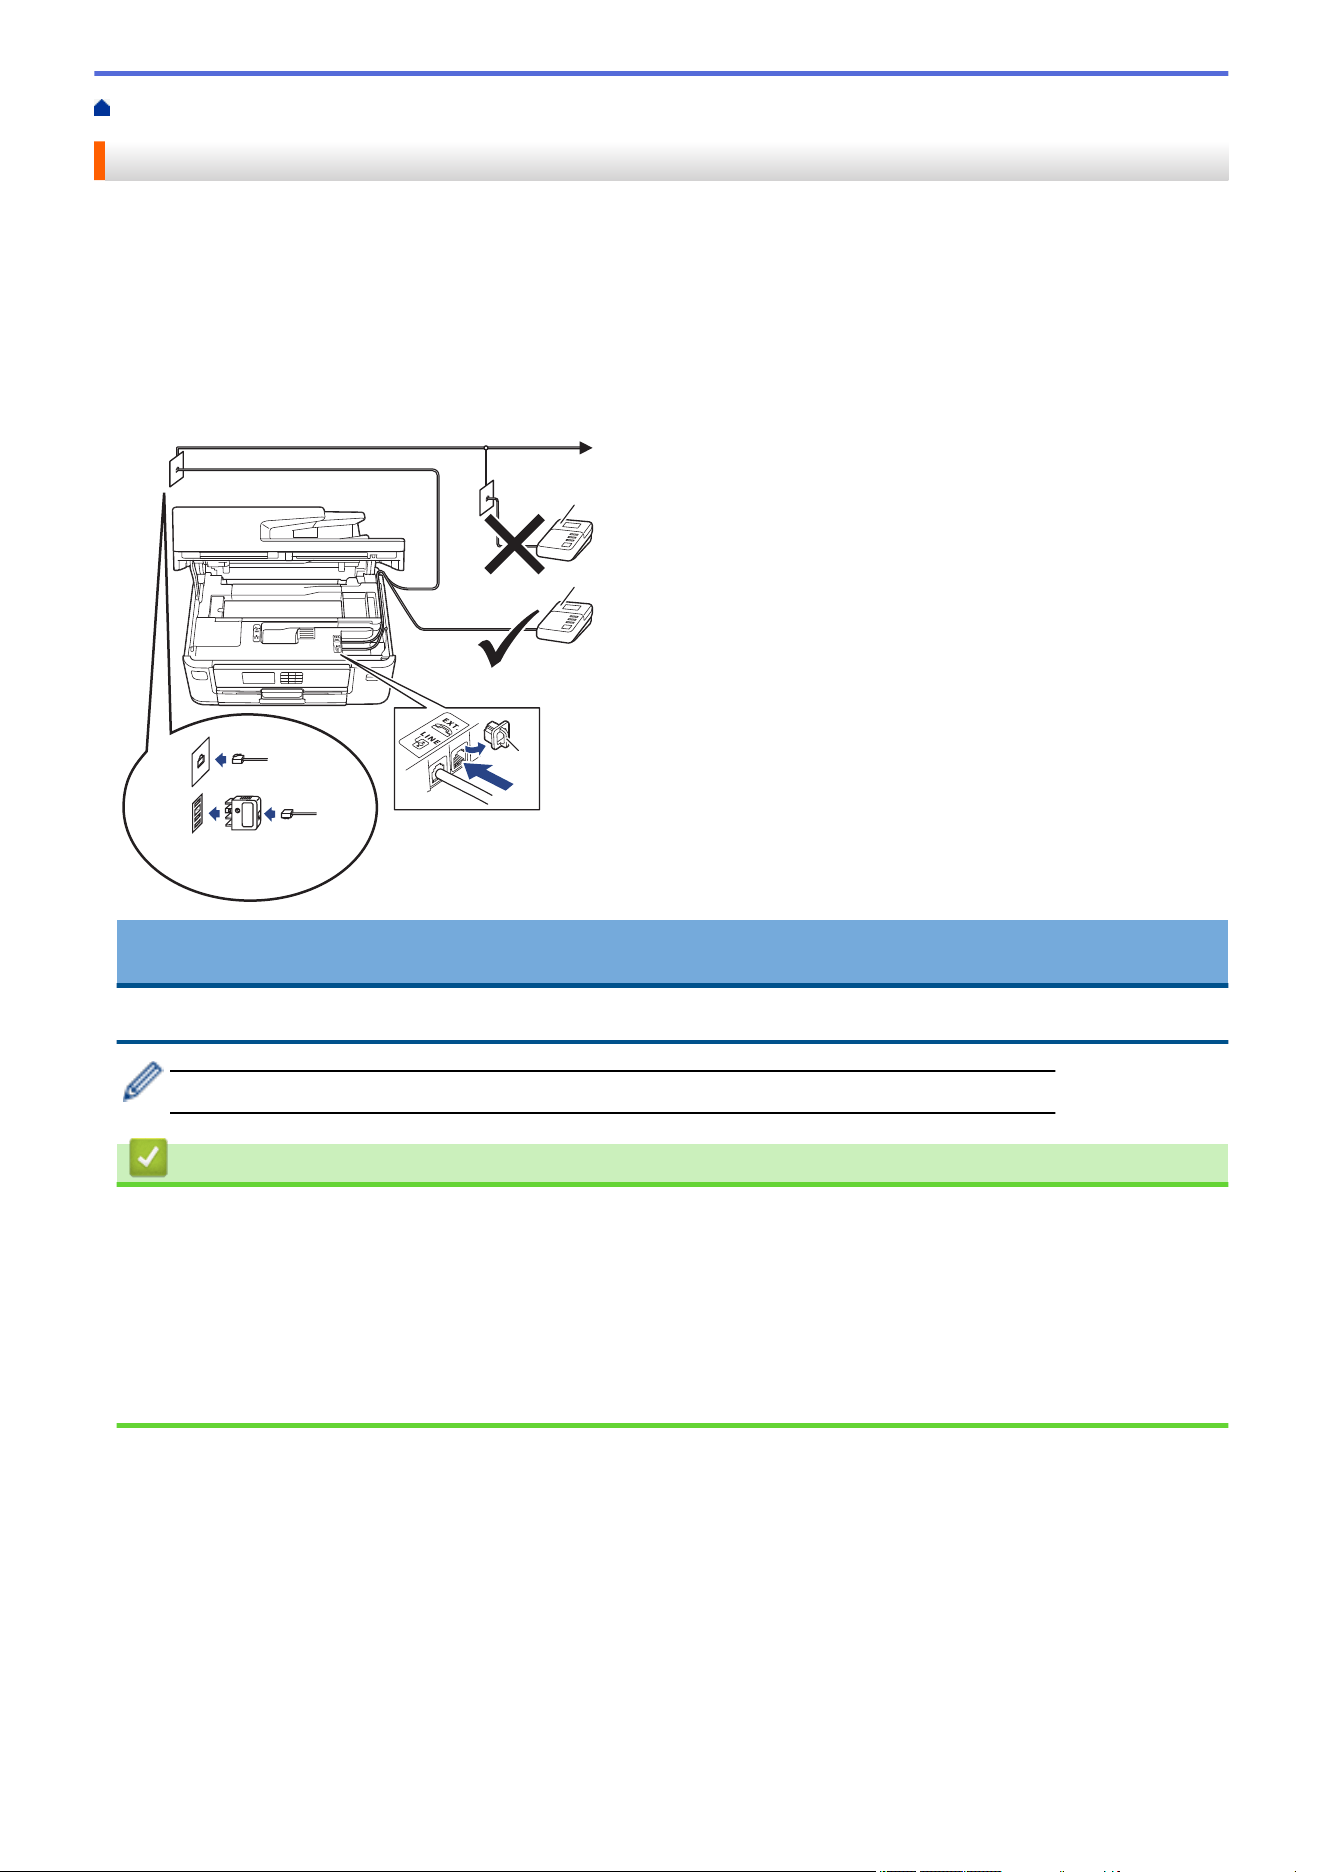
Home > Fax > Telephone Services and External Devices > External TAD (Telephone Answering Device)
External TAD (Telephone Answering Device)
You can connect an external Telephone Answering Device (TAD) to the same line as your machine. When the
TAD answers a call, your machine will “listen” for the CNG (fax calling) tones sent by a sending fax machine. If it
hears them it will take over the call and receive the fax. If it does not hear them, it will let your TAD take a voice
message and the LCD will show [Telephone].
The external TAD must answer within two rings (we recommend setting it to two rings). This is because your
machine cannot hear the CNG tones until the external TAD has picked up the call. The sending machine will
send CNG tones for only eight to ten seconds longer. We do not recommend using the toll saver feature on your
external TAD if it needs more than four rings to activate it.
1
1
2
1 TAD
2 Protective Cap
(Example for Australia)
IMPORTANT
DO NOT connect a TAD elsewhere on the same telephone line.
If you have problems receiving faxes, reduce the Ring Delay setting on your external TAD.
Related Information
• Telephone Services and External Devices
• Connect an External TAD
• Record an Outgoing Message (OGM) on the External TAD
• Multi-line Connections (PABX)
Related Topics:
• Telephone and Fax Problems
264

Home > Fax > Telephone Services and External Devices > External TAD (Telephone Answering
Device) > Connect an External TAD
Connect an External TAD
1. Set your external TAD to the minimum number of rings allowed. For more information, contact your telephone
provider. (The machine’s Ring Delay setting does not apply.)
2. Record the outgoing message on your external TAD.
3. Set the TAD to answer calls.
4. Set the Receive Mode on your machine to [External TAD].
Related Information
• External TAD (Telephone Answering Device)
Related Topics:
• Receive Modes Overview
• Choose the Correct Receive Mode
• Telephone and Fax Problems
265

Home > Fax > Telephone Services and External Devices > External TAD (Telephone Answering
Device) > Record an Outgoing Message (OGM) on the External TAD
Record an Outgoing Message (OGM) on the External TAD
1. Record five seconds of silence at the beginning of your message. This allows your machine time to listen for
fax tones.
We recommend beginning your OGM with an initial five second silence because the machine cannot hear
fax tones over a loud voice. You may try leaving out this pause, but if your machine has trouble receiving
faxes, then you should re-record the OGM to include it.
2. Limit your speaking to 20 seconds.
3. End your 20-second message by giving your Remote Activation Code for people sending manual faxes. For
example: “After the beep, leave a message or press *51 (*91 for New Zealand) and Start to send a fax.”
Related Information
• External TAD (Telephone Answering Device)
266

Home > Fax > Telephone Services and External Devices > External TAD (Telephone Answering
Device) > Multi-line Connections (PABX)
Multi-line Connections (PABX)
Most offices use a central telephone system.
We recommend that all our machines be connected to a discreet (dedicated) line. Although a particular PABX
may appear to work with a particular model of fax machine, we cannot guarantee that the unit will operate
correctly.
While it is often relatively simple to connect a fax machine to a PABX, (Private Automatic Branch Exchange), we
suggest that you contact the company that installed your telephone system and ask them to connect the fax
machine for you.
We do not recommend the use of a PABX line. PABX limitations in general can cause some functions of the fax
machine not to work correctly.
Related Information
• External TAD (Telephone Answering Device)
267

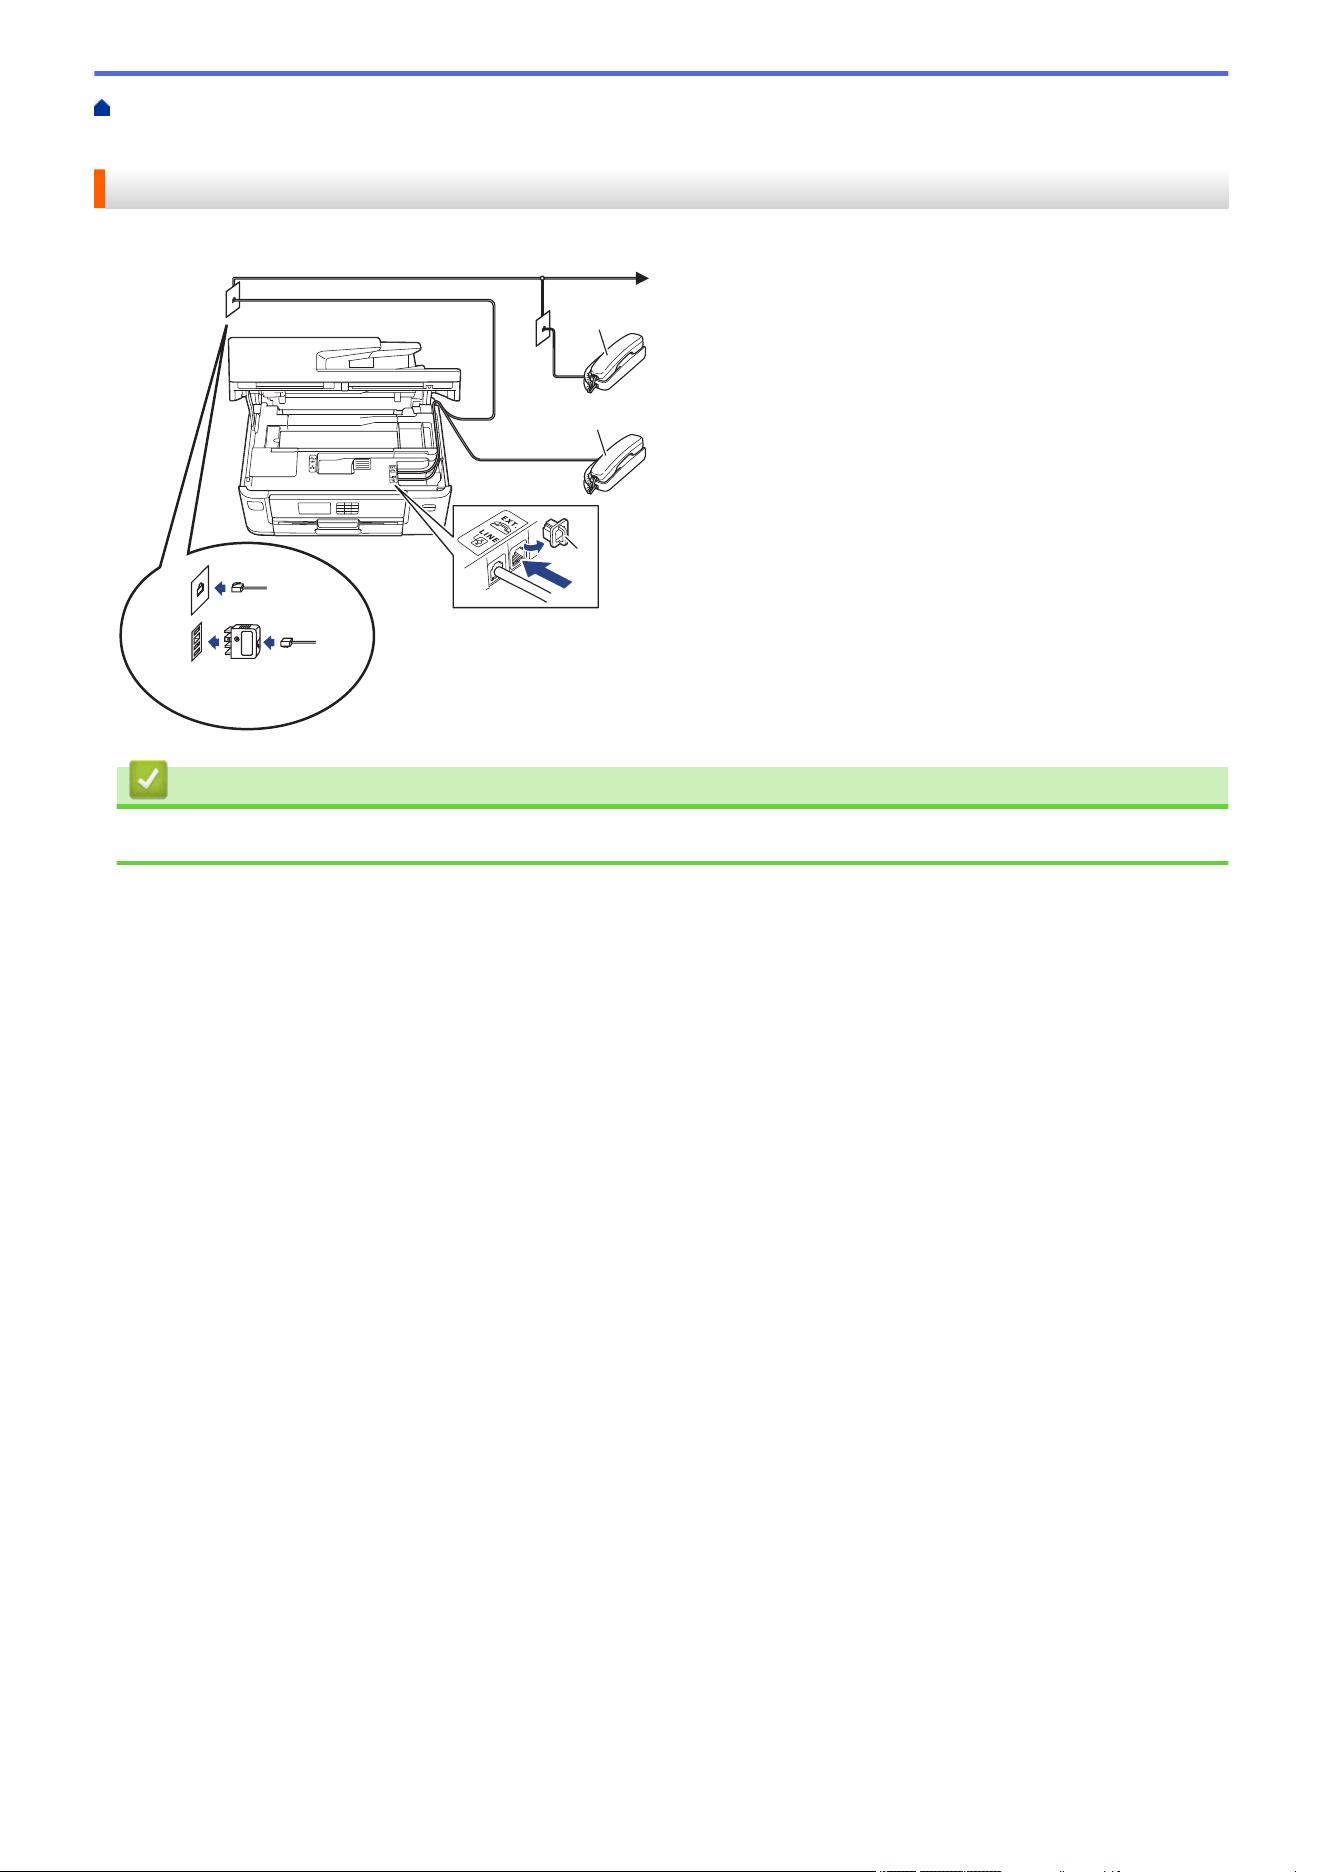
Home > Fax > Telephone Services and External Devices > External and Extension Telephones > Connect
an External or Extension Telephone
Connect an External or Extension Telephone
You can connect a separate telephone to your machine as shown in the diagram below.
1
2
3
1 Extension telephone
2 External telephone
3 Protective Cap
(Example for Australia)
Related Information
• External and Extension Telephones
269
Home > Fax > Telephone Services and External Devices > External and Extension Telephones > Operation
from External and Extension Telephones
Operation from External and Extension Telephones
If you answer a fax call at an extension or an external telephone, you can make your machine take the call by
using the Remote Activation Code. When you press the Remote Activation Code *51 (*91 for New Zealand), the
machine starts to receive the fax.
If the machine answers a voice call and pseudo/double-rings for you to take over, you can take the call at an
extension telephone by pressing the Remote Deactivation Code #51 (#91 for New Zealand).
If you answer a call and no one is on the line:
You should assume that you’re receiving a manual fax.
Press *51 (*91 for New Zealand) and wait for the chirp or until the LCD shows [Receiving], and then hang up.
You can also use the Fax Detect feature to make your machine automatically take the call.
Related Information
• External and Extension Telephones
Related Topics:
• Set the Number of Rings Before the Machine Answers (Ring Delay)
• Set Fax Detect
• Set a Remote Access Code
• Set the F/T Ring Time (Pseudo/Double-ring)
270

Home > Fax > Telephone Services and External Devices > External and Extension Telephones > Use a
Cordless External Telephone
Use a Cordless External Telephone
Once the base unit of the cordless telephone has been connected to the same telephone line as the machine,
you can answer calls on the cordless handset during the Ring Delay.
Related Information
• External and Extension Telephones
271

Home > Fax > Telephone Services and External Devices > External and Extension Telephones > Use the
Remote Codes
Use the Remote Codes
Remote Activation Code
If you answer a fax call on an extension or external telephone, you can tell your machine to receive it by pressing
the Remote Activation Code *51 (*91 for New Zealand). Wait for the chirping sounds then replace the handset.
If you answer a fax call at the external telephone, you can make the machine receive the fax by pressing the
Start button and then selecting the option to receive.
Remote Deactivation Code
If you receive a voice call and the machine is in F/T mode, it will start to sound the F/T ring (pseudo/double-ring)
after the initial Ring Delay. If you pick up the call on an extension telephone you can turn the F/T ring off by
pressing #51 (#91 for New Zealand) (make sure you press this between the rings).
If the machine answers a voice call and pseudo/double-rings for you to take over, you can take the call at the
external telephone by pressing [Pickup].
Related Information
• External and Extension Telephones
• Change the Remote Codes
Related Topics:
• Set a Remote Access Code
• Set Fax Detect
272
Home > Fax > Telephone Services and External Devices > External and Extension Telephones > Use the
Remote Codes > Change the Remote Codes
Change the Remote Codes
The preset Remote Activation Code is *51 (*91 for New Zealand). The preset Remote Deactivation Code is #51
(#91 for New Zealand). If you are always disconnected when accessing your External TAD remotely, try changing
the three-digit remote codes using the numbers 0-9, *, #.
1. Press [Settings] > [All Settings] > [Fax] > [Setup Receive] > [Remote Codes].
2. Do one of the following:
• To change the Remote Activation Code, press [Act.Code]. Enter the new code, and then press [OK].
• To change the Remote Deactivation Code, press [Deact.Code]. Enter the new code, and then press
[OK].
• If you do not want to change the Codes, go to the next step.
• To turn the Remote Codes [Off] (or [On]), press [Remote Codes]. Press [Off] (or [On]).
3. Press .
Related Information
• Use the Remote Codes
273

Home > Fax > Fax Reports > Set the Transmission Verification Report's Style
Set the Transmission Verification Report's Style
You can use the Transmission Verification Report as proof that you sent a fax. This report lists the receiving
party's name or fax number, the time and date of transmission, duration of transmission, number of pages sent,
and whether or not the transmission was successful.
There are several settings available for the Transmission Verification Report:
Option
Description
On
Prints a report after every fax you send.
On(+Image)
Prints a report after every fax you send.
A portion of the fax’s first page appears on the report.
Error only
Prints a report if your fax is unsuccessful due to a transmission error.
Error only(+Image)
Prints a report if your fax is unsuccessful due to a transmission error.
A portion of the fax’s first page appears on the report.
Off
The report will not be printed.
1. Press [Settings] > [All Settings] > [Fax] > [Report Setting] > [XMIT Report].
2. Press the option you want.
If you select [On(+Image)] or [Error only(+Image)], the image will not appear on the Transmission
Verification Report if Real Time Transmission is set to [On]. The image will not appear on the report when
you send a colour fax.
3. Press
.
If the transmission is successful, [OK] appears next to [RESULT] on the Transmission Verification Report. If
the transmission is not successful, [ERROR] appears next to [RESULT].
Related Information
• Fax Reports
275
Home > Fax > Fax Reports > Set the Fax Journal's Interval Period
Set the Fax Journal's Interval Period
You can set the machine to print a Fax Journal at specific intervals (every 50 faxes, 6, 12 or 24 hours, 2 or 7
days).
1. Press [Settings] > [All Settings] > [Fax] > [Report Setting] > [Journal Period].
2. Press [Journal Period].
3. Press a or b to select an interval.
• 6, 12, 24 hours, 2 or 7 days
The machine will print the report at the selected interval and then erase all fax jobs from the Journal's
memory. If the memory becomes full with 200 jobs before the time you selected has passed, the machine
will print the Journal early and then erase all fax jobs from the memory. If you want an extra report before
it is due to print, you can print it without erasing the jobs.
• Every 50 Faxes
The machine will print the Journal when the machine has stored 50 fax jobs.
4. If you selected 6, 12, 24 hours, 2 or 7 days, press [Time] and enter the time of day using the touchscreen.
Press [OK].
5. If you selected [Every 7 Days], press [Day]. Press a or b to display the [Every Monday], [Every
Tuesday], [Every Wednesday], [Every Thursday], [Every Friday], [Every Saturday] or
[Every Sunday] option, and then press the first day of the seven-day countdown.
6. Press
.
Related Information
• Fax Reports
Related Topics:
• Set the Machine to Power Off Automatically
276


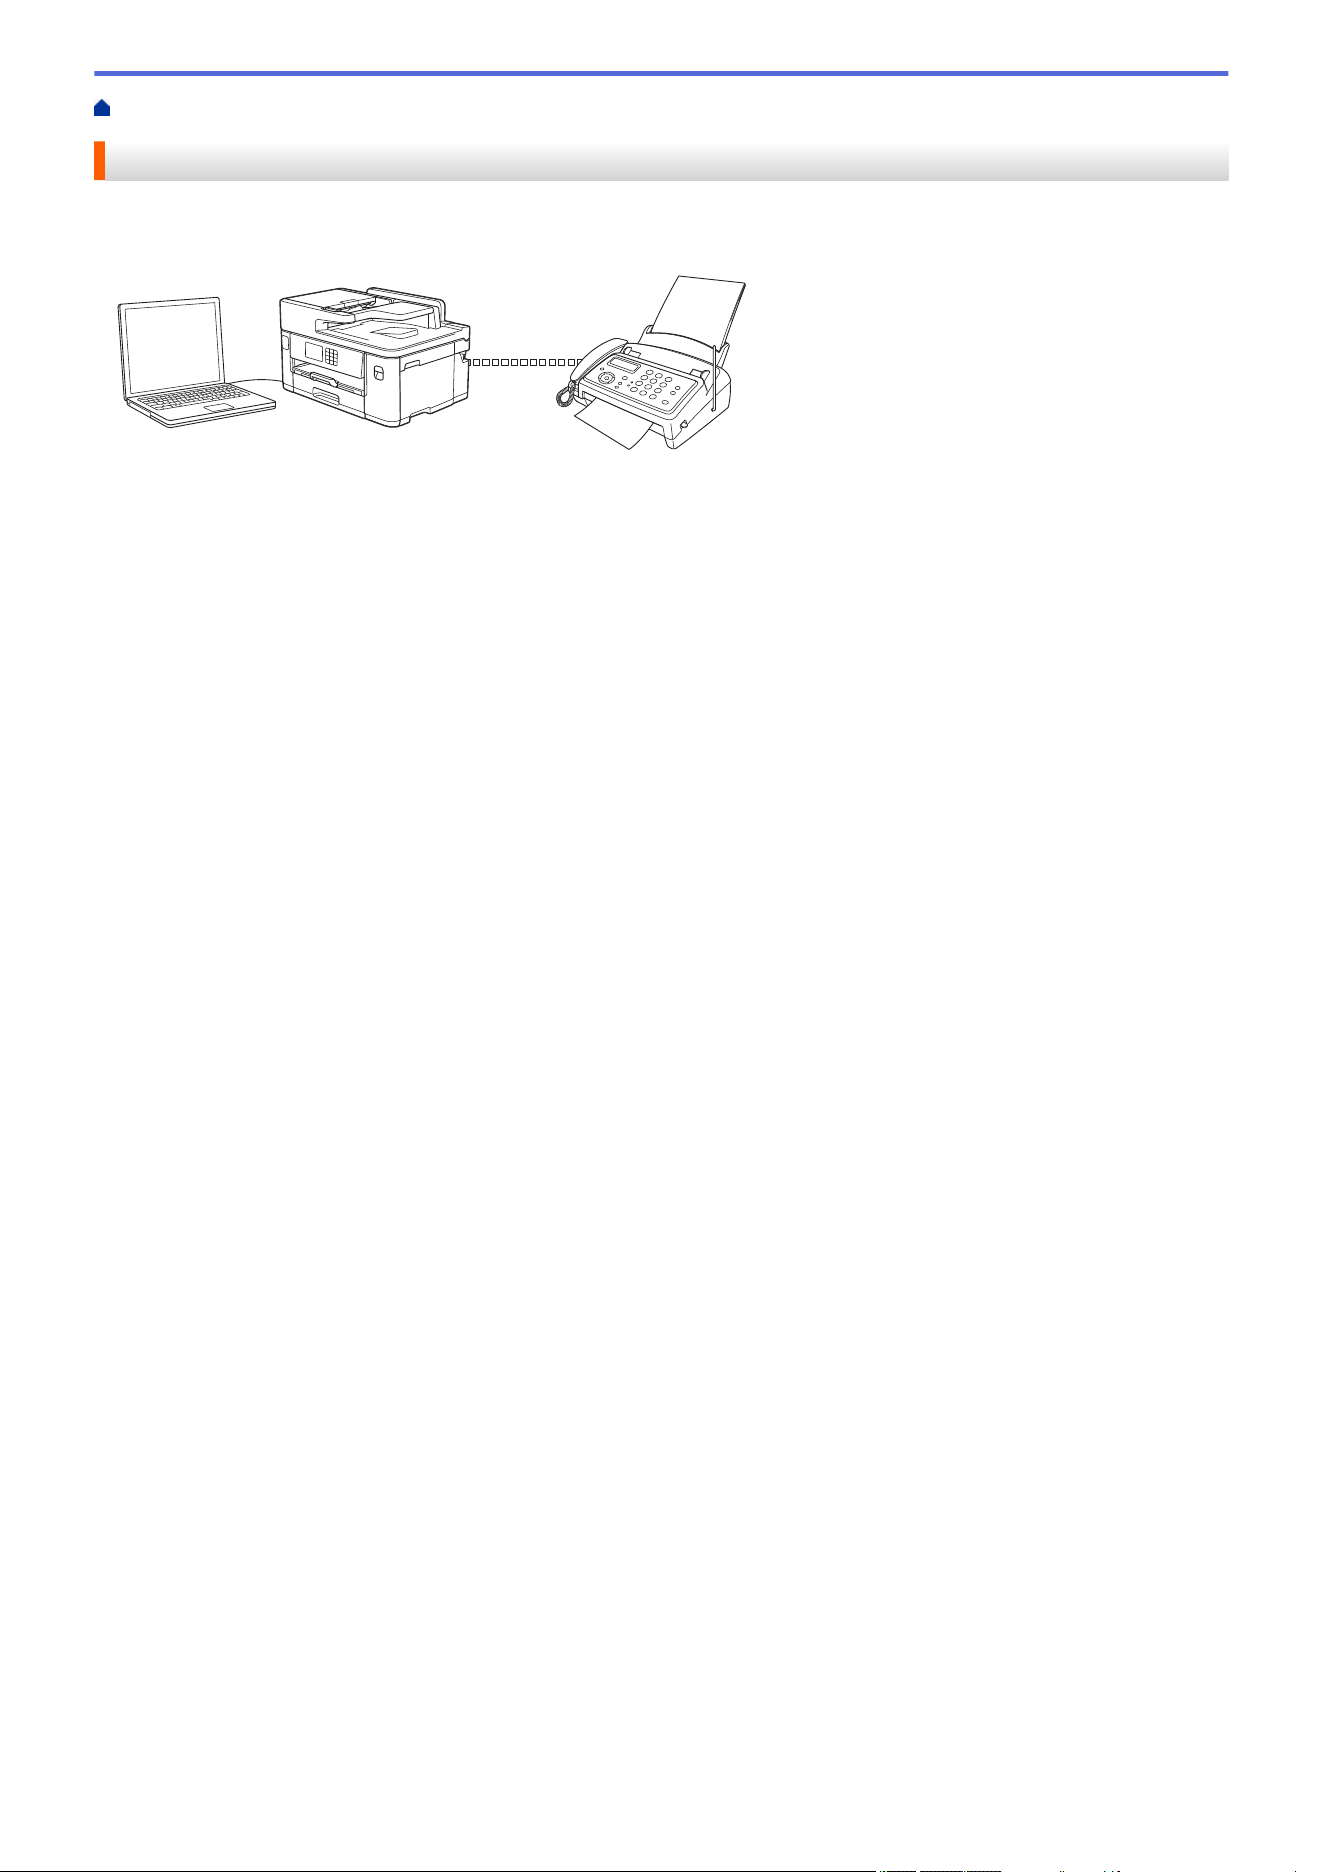
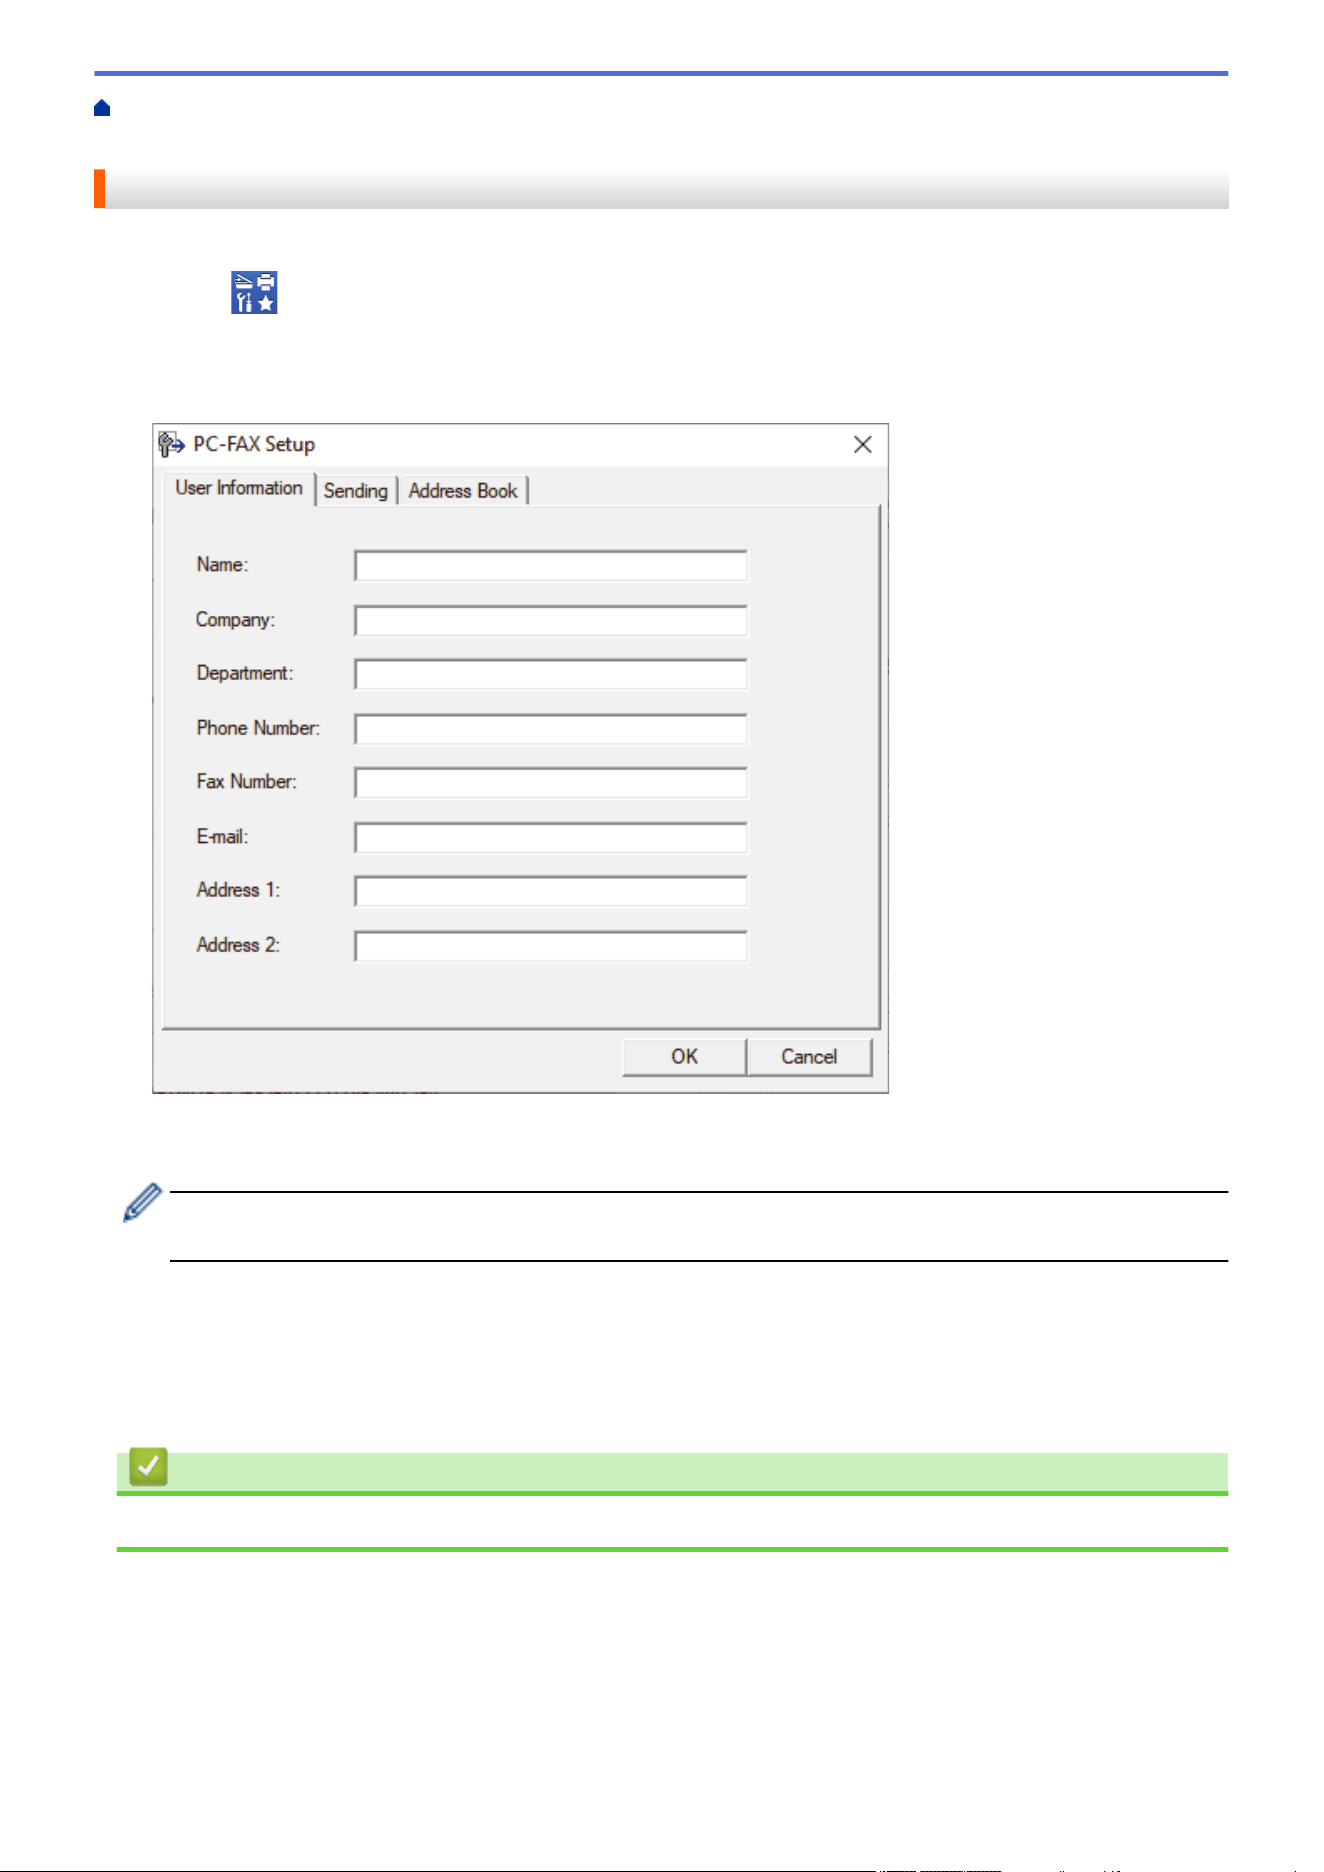
Home > Fax > PC-FAX > PC-FAX for Windows > PC-FAX Overview (Windows) > Configure PC-FAX
(Windows)
Configure PC-FAX (Windows)
Before sending faxes using PC-FAX, personalise the send options in each tab of the PC-FAX Setup dialog box.
1. Launch (Brother Utilities), and then click the drop-down list and select your model name (if not already
selected).
2. Click PC-FAX in the left navigation bar, and then click Setup Sending.
The PC-FAX Setup dialog box appears.
3. Do one of the following:
• Click the User Information tab, and then type your user information in the fields.
Each Microsoft account can have its own customised User Information screen for custom fax headers and
cover pages.
• Click the Sending tab, and then type the number needed to access an outside line (if needed) in the
Outside line access field. Select the Include header checkbox to include the header information.
• Click the Address Book tab, and then select the address book you want to use for PC-FAX from the
Select Address Book drop-down list.
4. Click OK.
Related Information
• PC-FAX Overview (Windows)
280

Home > Fax > PC-FAX > PC-FAX for Windows > PC-FAX Overview (Windows) > Configure your PC-Fax
Address Book (Windows)
Configure your PC-Fax Address Book (Windows)
Add, edit and delete members and groups to personalise your Address Book.
• Add a Member to your PC-FAX Address Book (Windows)
• Create a Group in your PC-FAX Address Book (Windows)
• Edit Member or Group Information in your PC-FAX Address Book (Windows)
• Delete a Member or Group in your PC-FAX Address Book (Windows)
• Export your PC-FAX Address Book (Windows)
• Import Information to your PC-FAX Address Book (Windows)
281
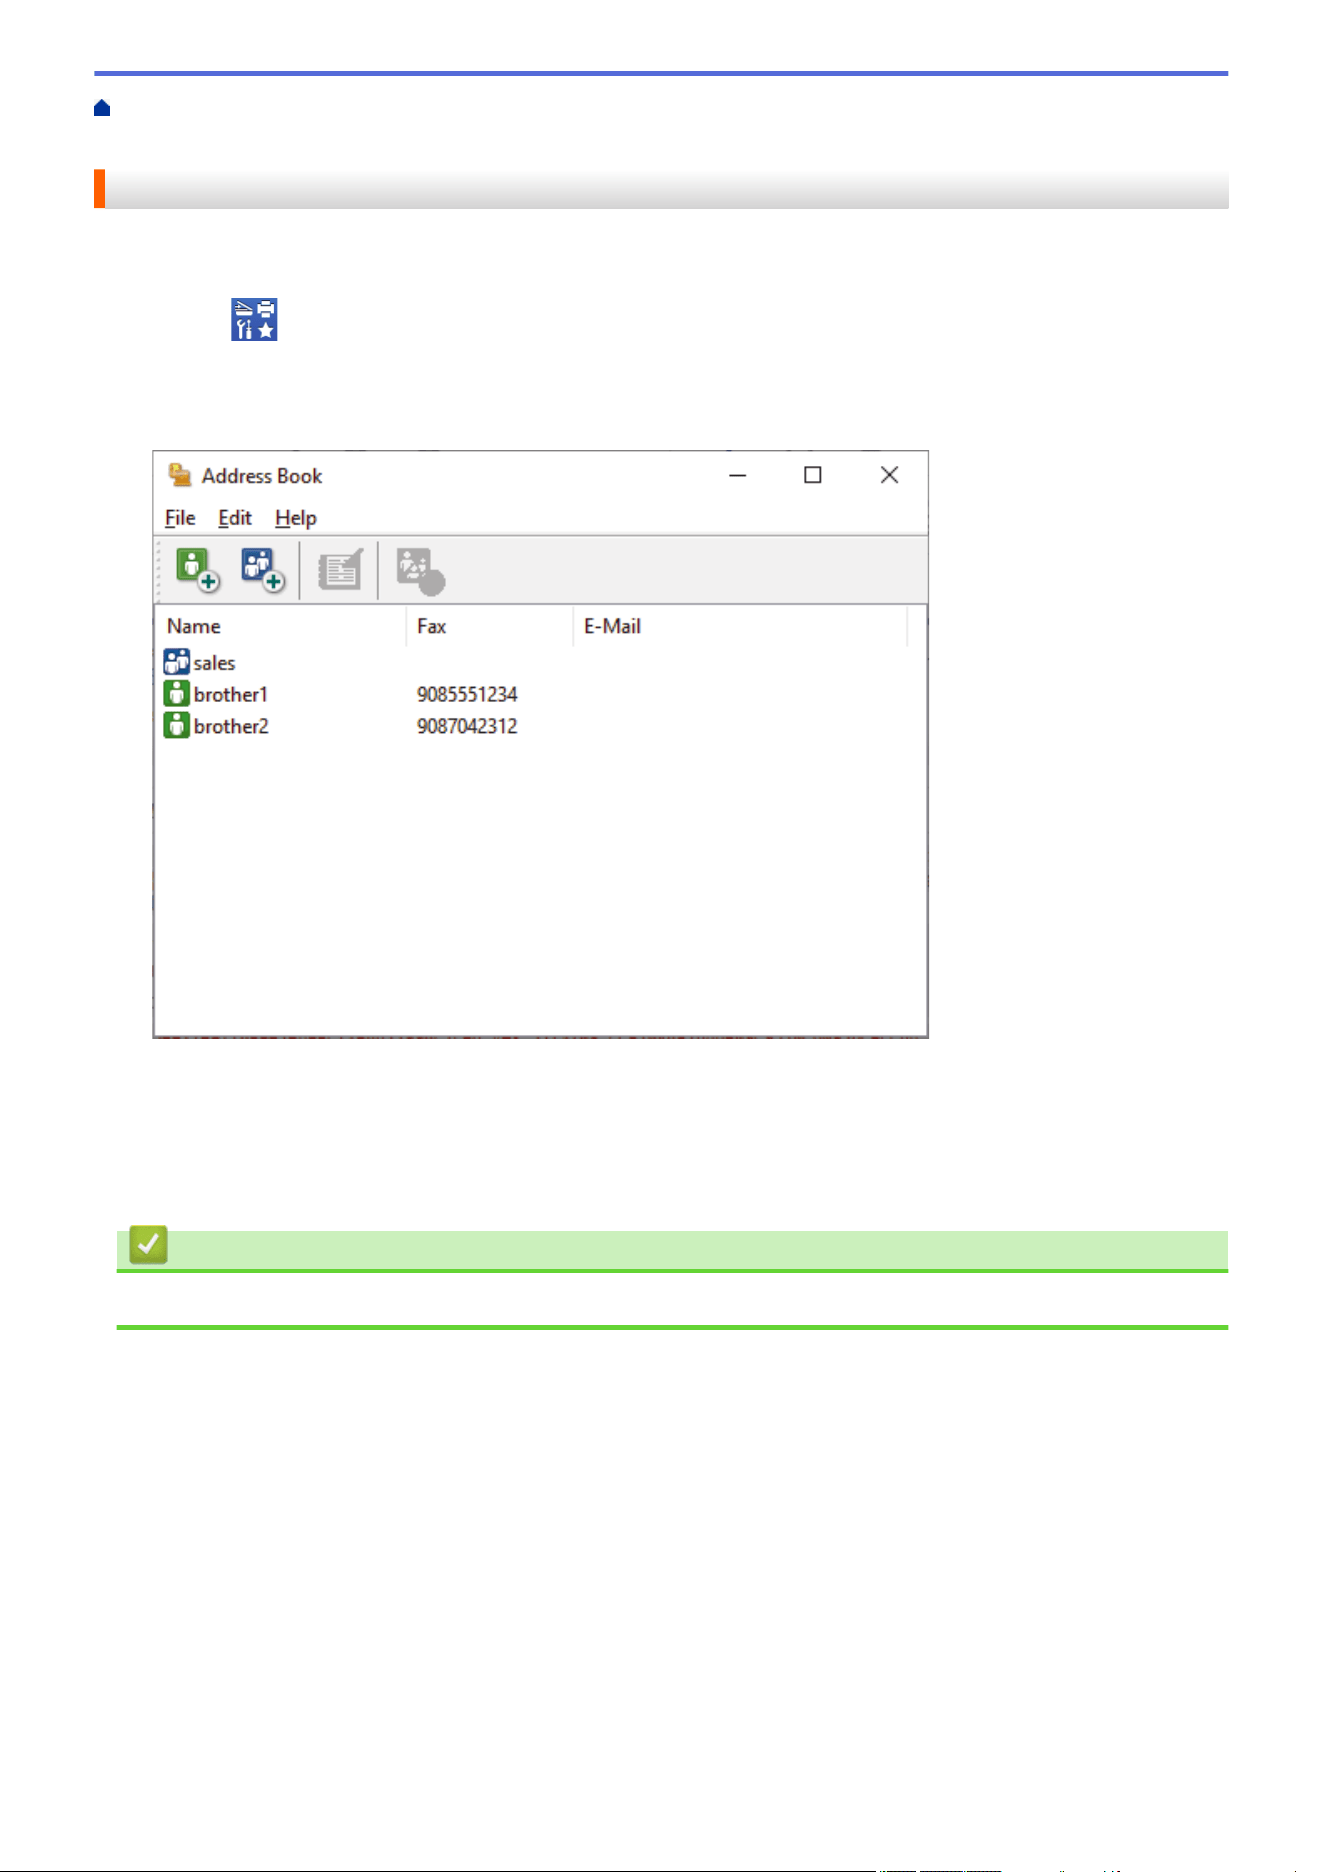
Home > Fax > PC-FAX > PC-FAX for Windows > PC-FAX Overview (Windows) > Configure your PC-Fax
Address Book (Windows) > Add a Member to your PC-FAX Address Book (Windows)
Add a Member to your PC-FAX Address Book (Windows)
Add new people and their fax information to the PC-Fax Address Book if you want to send a fax using the
Brother PC-Fax software.
1. Launch (Brother Utilities), and then click the drop-down list and select your model name (if not already
selected).
2. Click PC-FAX in the left navigation bar, and then click Address Book (Send).
The Address Book dialog box appears.
3. Click .
The Address Book Member Setup dialog box appears.
4. Type the member's information in the corresponding fields. Only the Name field is required.
5. Click OK.
Related Information
• Configure your PC-Fax Address Book (Windows)
282
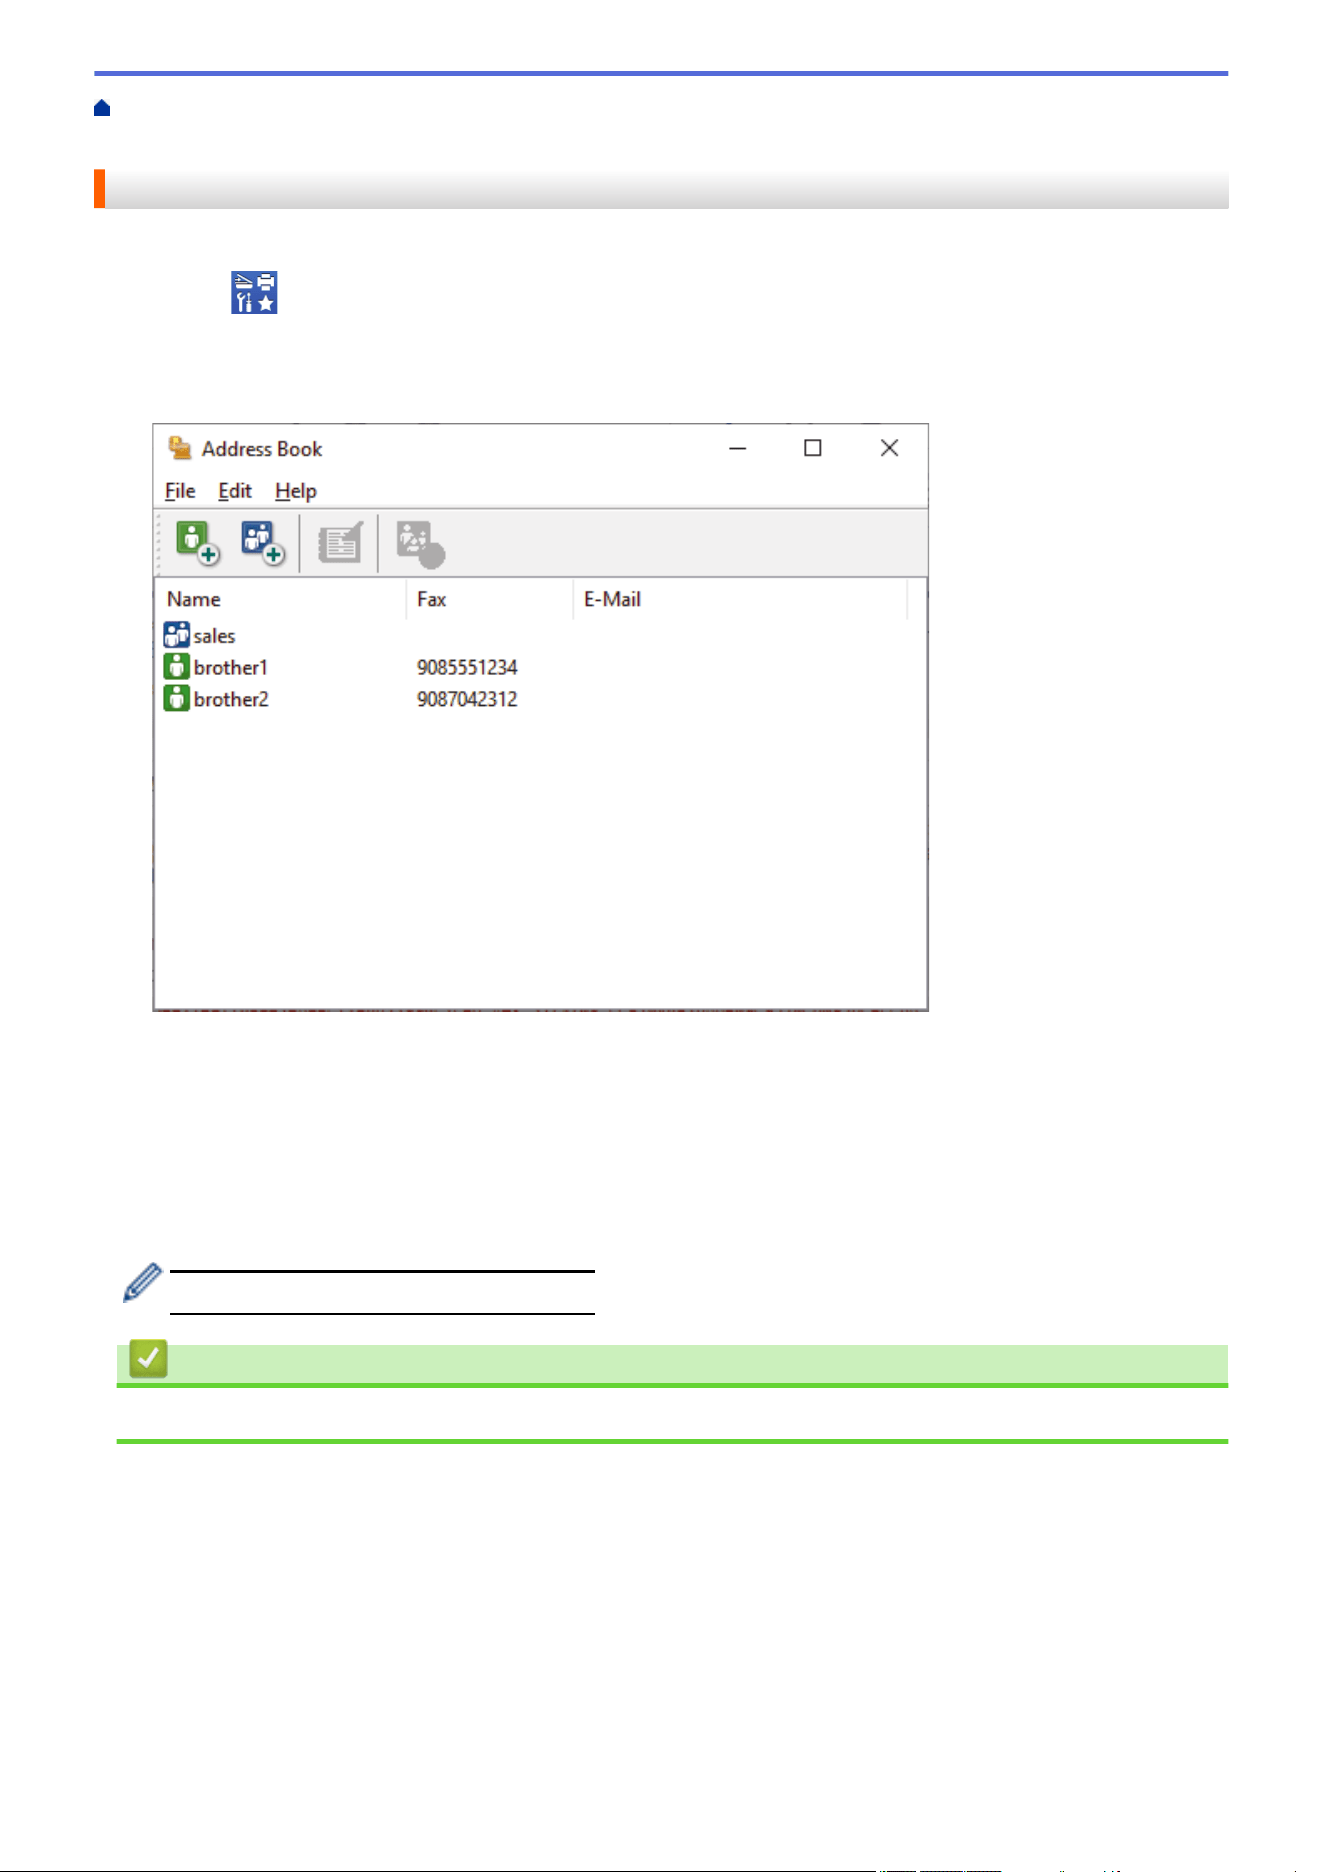
Home > Fax > PC-FAX > PC-FAX for Windows > PC-FAX Overview (Windows) > Configure your PC-Fax
Address Book (Windows) > Create a Group in your PC-FAX Address Book (Windows)
Create a Group in your PC-FAX Address Book (Windows)
Create a group to broadcast the same PC-FAX to several recipients at one time.
1. Launch (Brother Utilities), and then click the drop-down list and select your model name (if not already
selected).
2. Click PC-FAX in the left navigation bar, and then click Address Book (Send).
The Address Book dialog box appears.
3. Click
.
The Address Book Group Setup dialog box appears.
4. Type the name of the new group in the Group Name field.
5. In the Available Names field, select each name you want to include in the group, and then click Add >>.
Members added to the group appear in the Group Members box.
6. When finished, click OK.
Each group can contain up to 50 members.
Related Information
• Configure your PC-Fax Address Book (Windows)
283
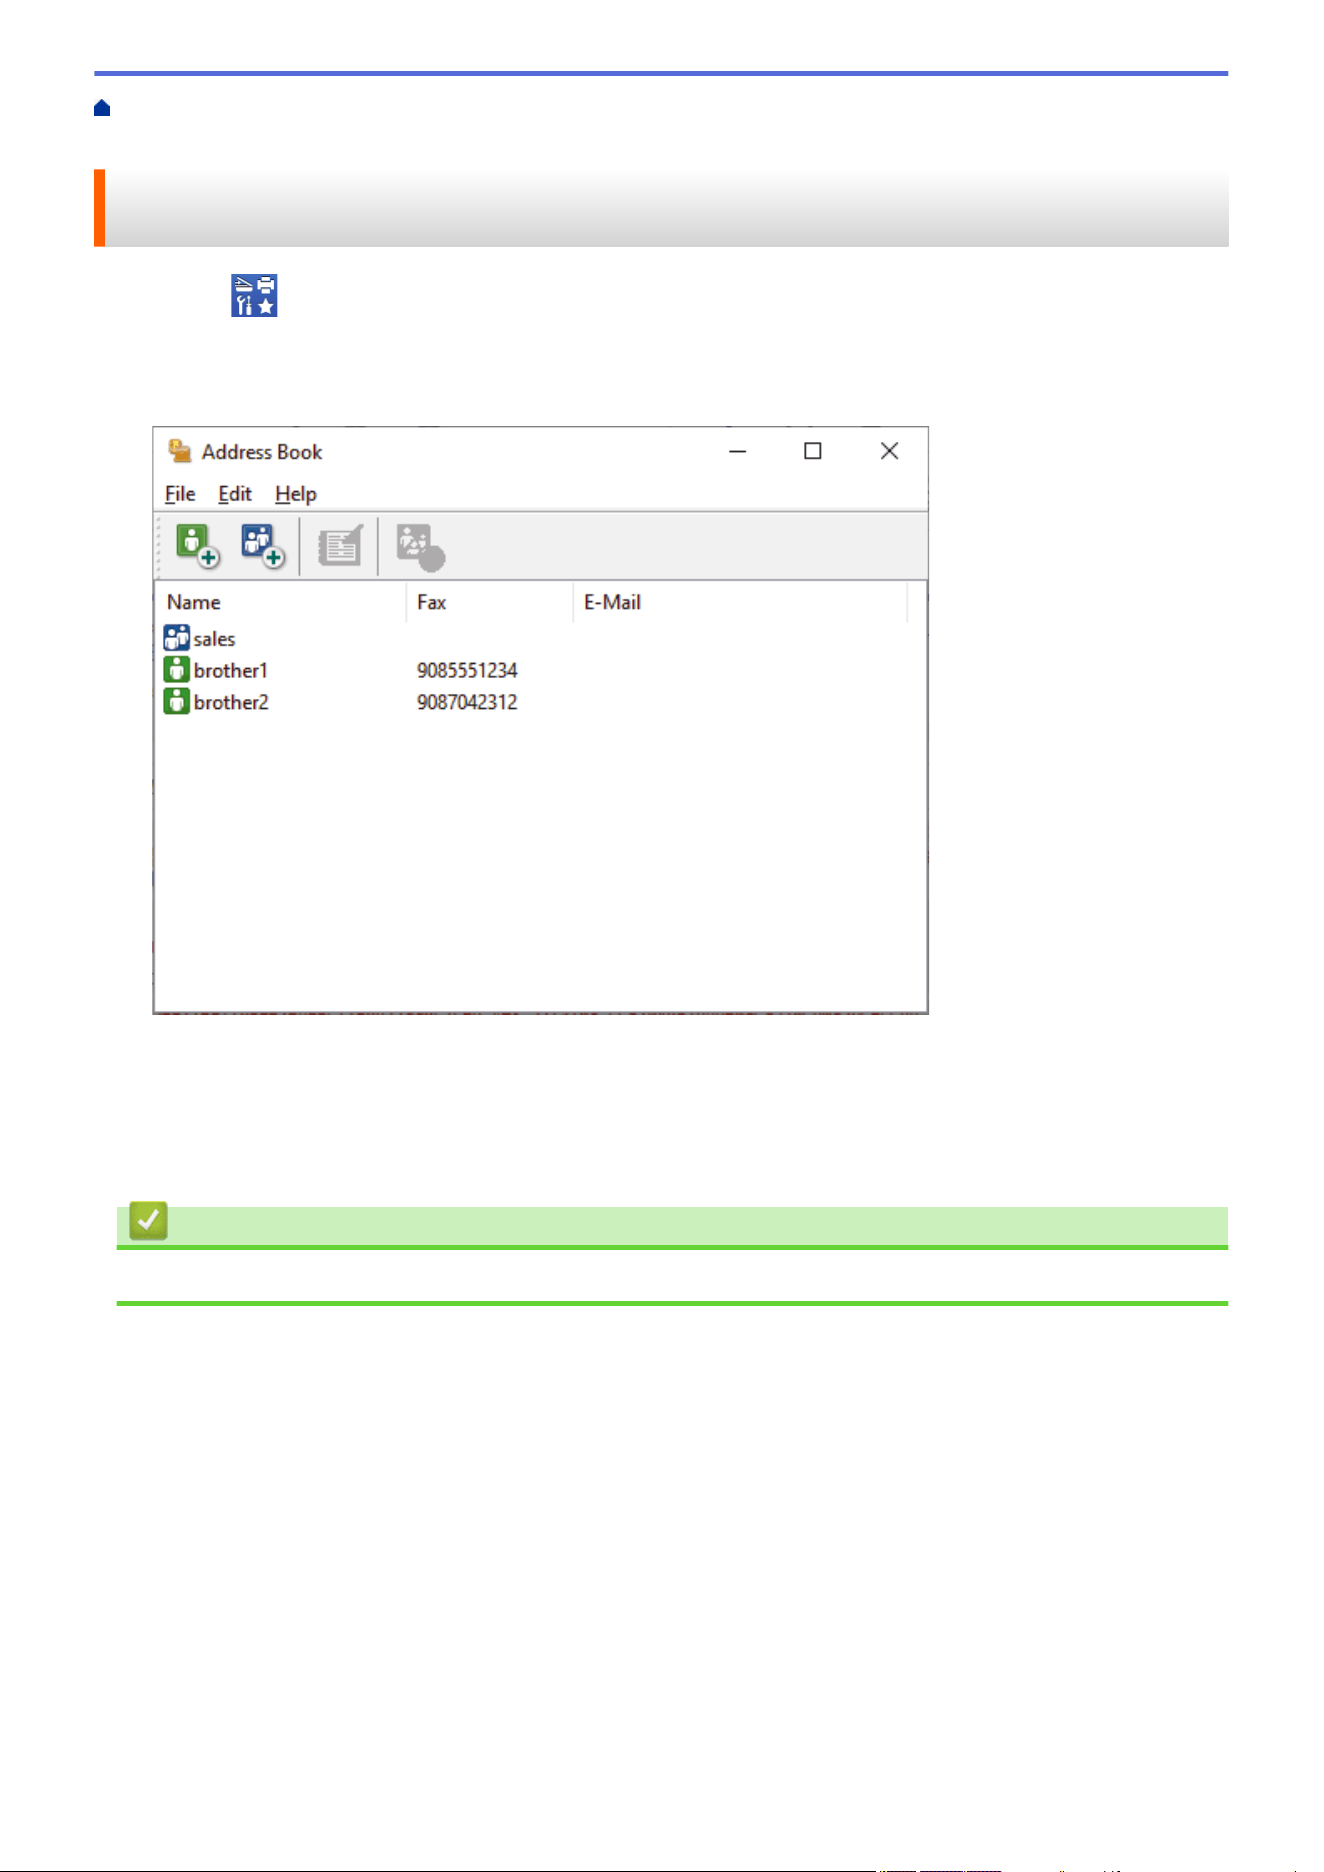
Home > Fax > PC-FAX > PC-FAX for Windows > PC-FAX Overview (Windows) > Configure your PC-Fax
Address Book (Windows) > Edit Member or Group Information in your PC-FAX Address Book (Windows)
Edit Member or Group Information in your PC-FAX Address Book
(Windows)
1. Launch (Brother Utilities), and then click the drop-down list and select your model name (if not already
selected).
2. Click PC-FAX in the left navigation bar, and then click Address Book (Send).
The Address Book dialog box appears.
3. Select the member or group you want to edit.
4. Click
(Properties).
5. Change the member or group information.
6. Click OK.
Related Information
• Configure your PC-Fax Address Book (Windows)
284

Home > Fax > PC-FAX > PC-FAX for Windows > PC-FAX Overview (Windows) > Configure your PC-Fax
Address Book (Windows) > Delete a Member or Group in your PC-FAX Address Book (Windows)
Delete a Member or Group in your PC-FAX Address Book (Windows)
1. Launch (Brother Utilities), and then click the drop-down list and select your model name (if not already
selected).
2. Click PC-FAX in the left navigation bar, and then click Address Book (Send).
The Address Book dialog box appears.
3. Select the member or group you want to delete.
4. Click (Delete).
5. When the confirmation dialog box appears, click OK.
Related Information
• Configure your PC-Fax Address Book (Windows)
285
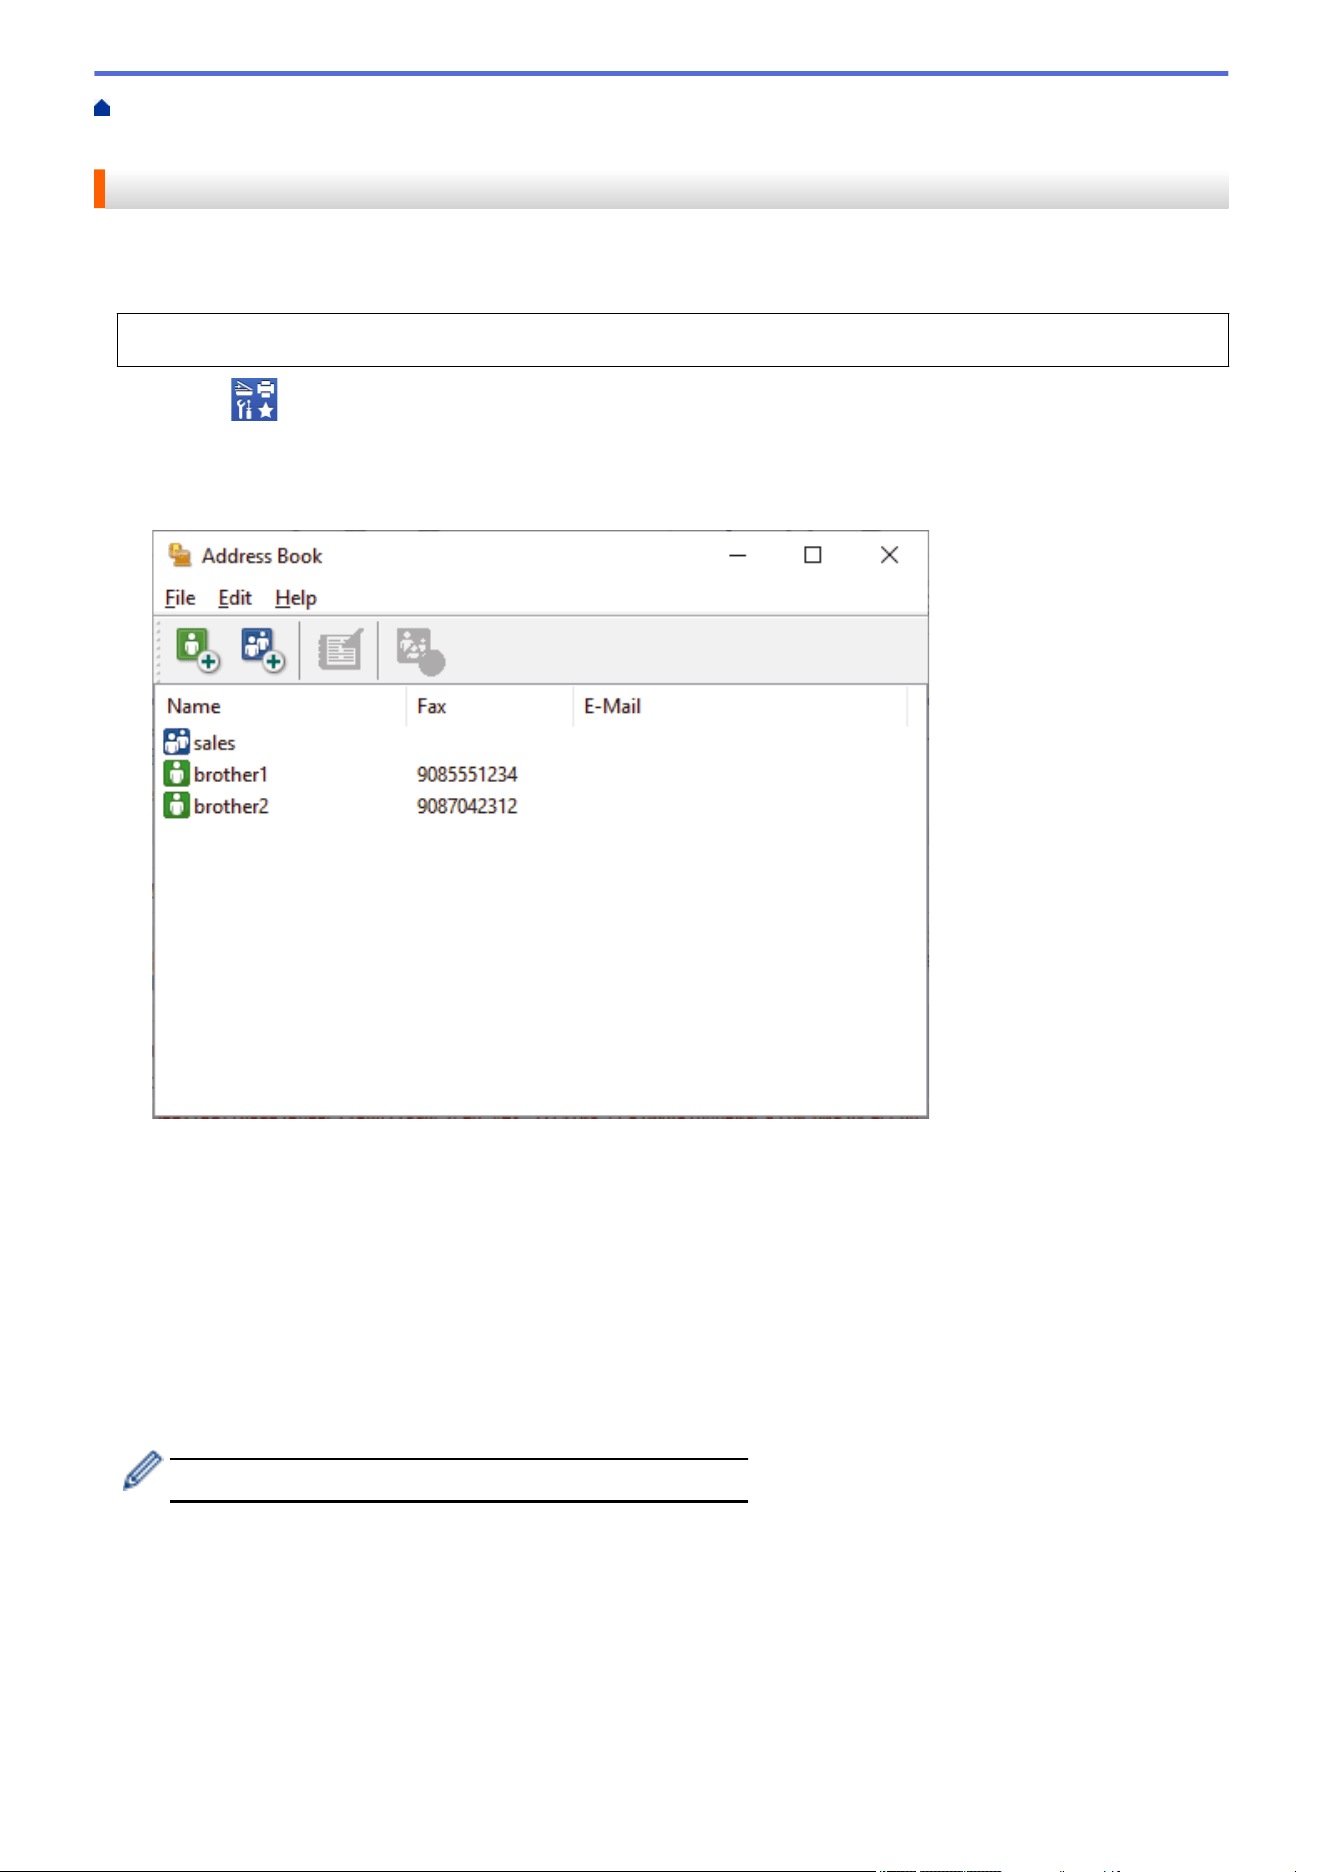
Home > Fax > PC-FAX > PC-FAX for Windows > PC-FAX Overview (Windows) > Configure your PC-Fax
Address Book (Windows) > Export your PC-FAX Address Book (Windows)
Export your PC-FAX Address Book (Windows)
You can export the Address Book as an ASCII text file (*.csv) or a vCard (an electronic business card) and save
it on your computer.
You cannot export the group settings when you export the Address Book data.
1. Launch (Brother Utilities), and then click the drop-down list and select your model name (if not already
selected).
2. Click PC-FAX in the left navigation bar, and then click Address Book (Send).
The Address Book dialog box appears.
3. Click File > Export.
4. Select one of the following:
• Text
The Select Items dialog box appears. Go to the next step.
• vCard
You must select the member you want to export from your address book before selecting this option.
Browse to the folder where you want to save the vCard, type the vCard name in the File name field,
and then click Save.
5. In the Available Items field, select the data you want to export, and then click Add >>.
Select and add the items in the order you want them listed.
6. If you are exporting to an ASCII file, under the Divide Character section, select the Tab or Comma option to
separate the data fields.
7. Click OK.
8. Browse to the folder on your computer where you want to save the data, type the file name, and then click
Save.
286

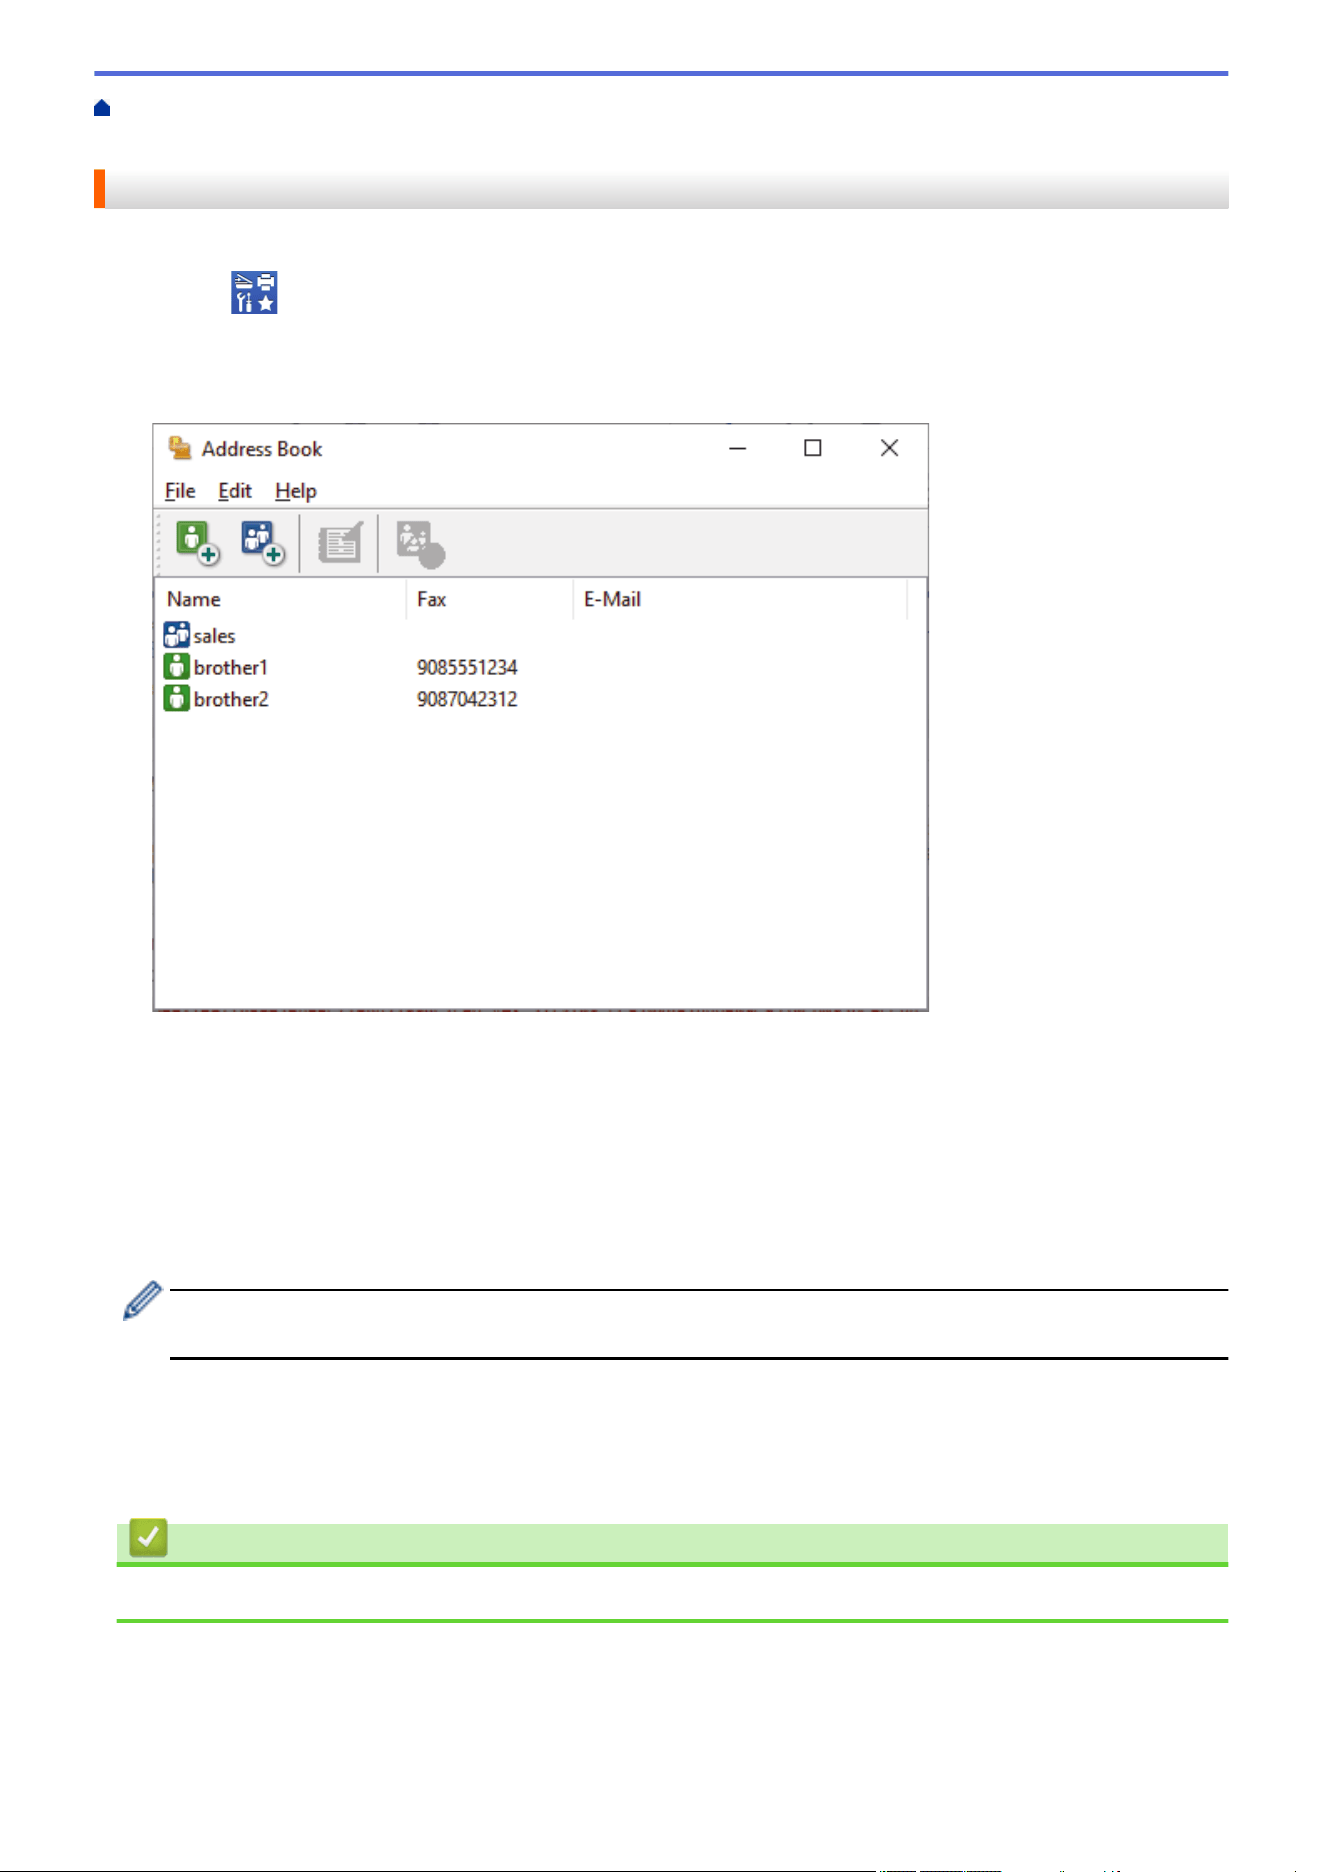
Home > Fax > PC-FAX > PC-FAX for Windows > PC-FAX Overview (Windows) > Configure your PC-Fax
Address Book (Windows) > Import Information to your PC-FAX Address Book (Windows)
Import Information to your PC-FAX Address Book (Windows)
You can import ASCII text files (*.csv) or vCards (electronic business cards) into your Address Book.
1. Launch (Brother Utilities), and then click the drop-down list and select your model name (if not already
selected).
2. Click PC-FAX in the left navigation bar, and then click Address Book (Send).
The Address Book dialog box appears.
3. Click
File > Import.
4. Select one of the following:
• Text
The Select Items dialog box appears. Go to step 5.
• vCard
Go to step 8.
5. In the Available Items field, select the data you want to import, and then click Add >>.
You must select and add fields from the Available Items list in the same order they are listed in the import
text file.
6. If you are importing an ASCII file, under the Divide Character section, select the Tab or Comma option to
separate the data fields.
7. Click OK.
8. Browse to the folder where you want to import the data, type the file name, and then click Open.
Related Information
• Configure your PC-Fax Address Book (Windows)
288
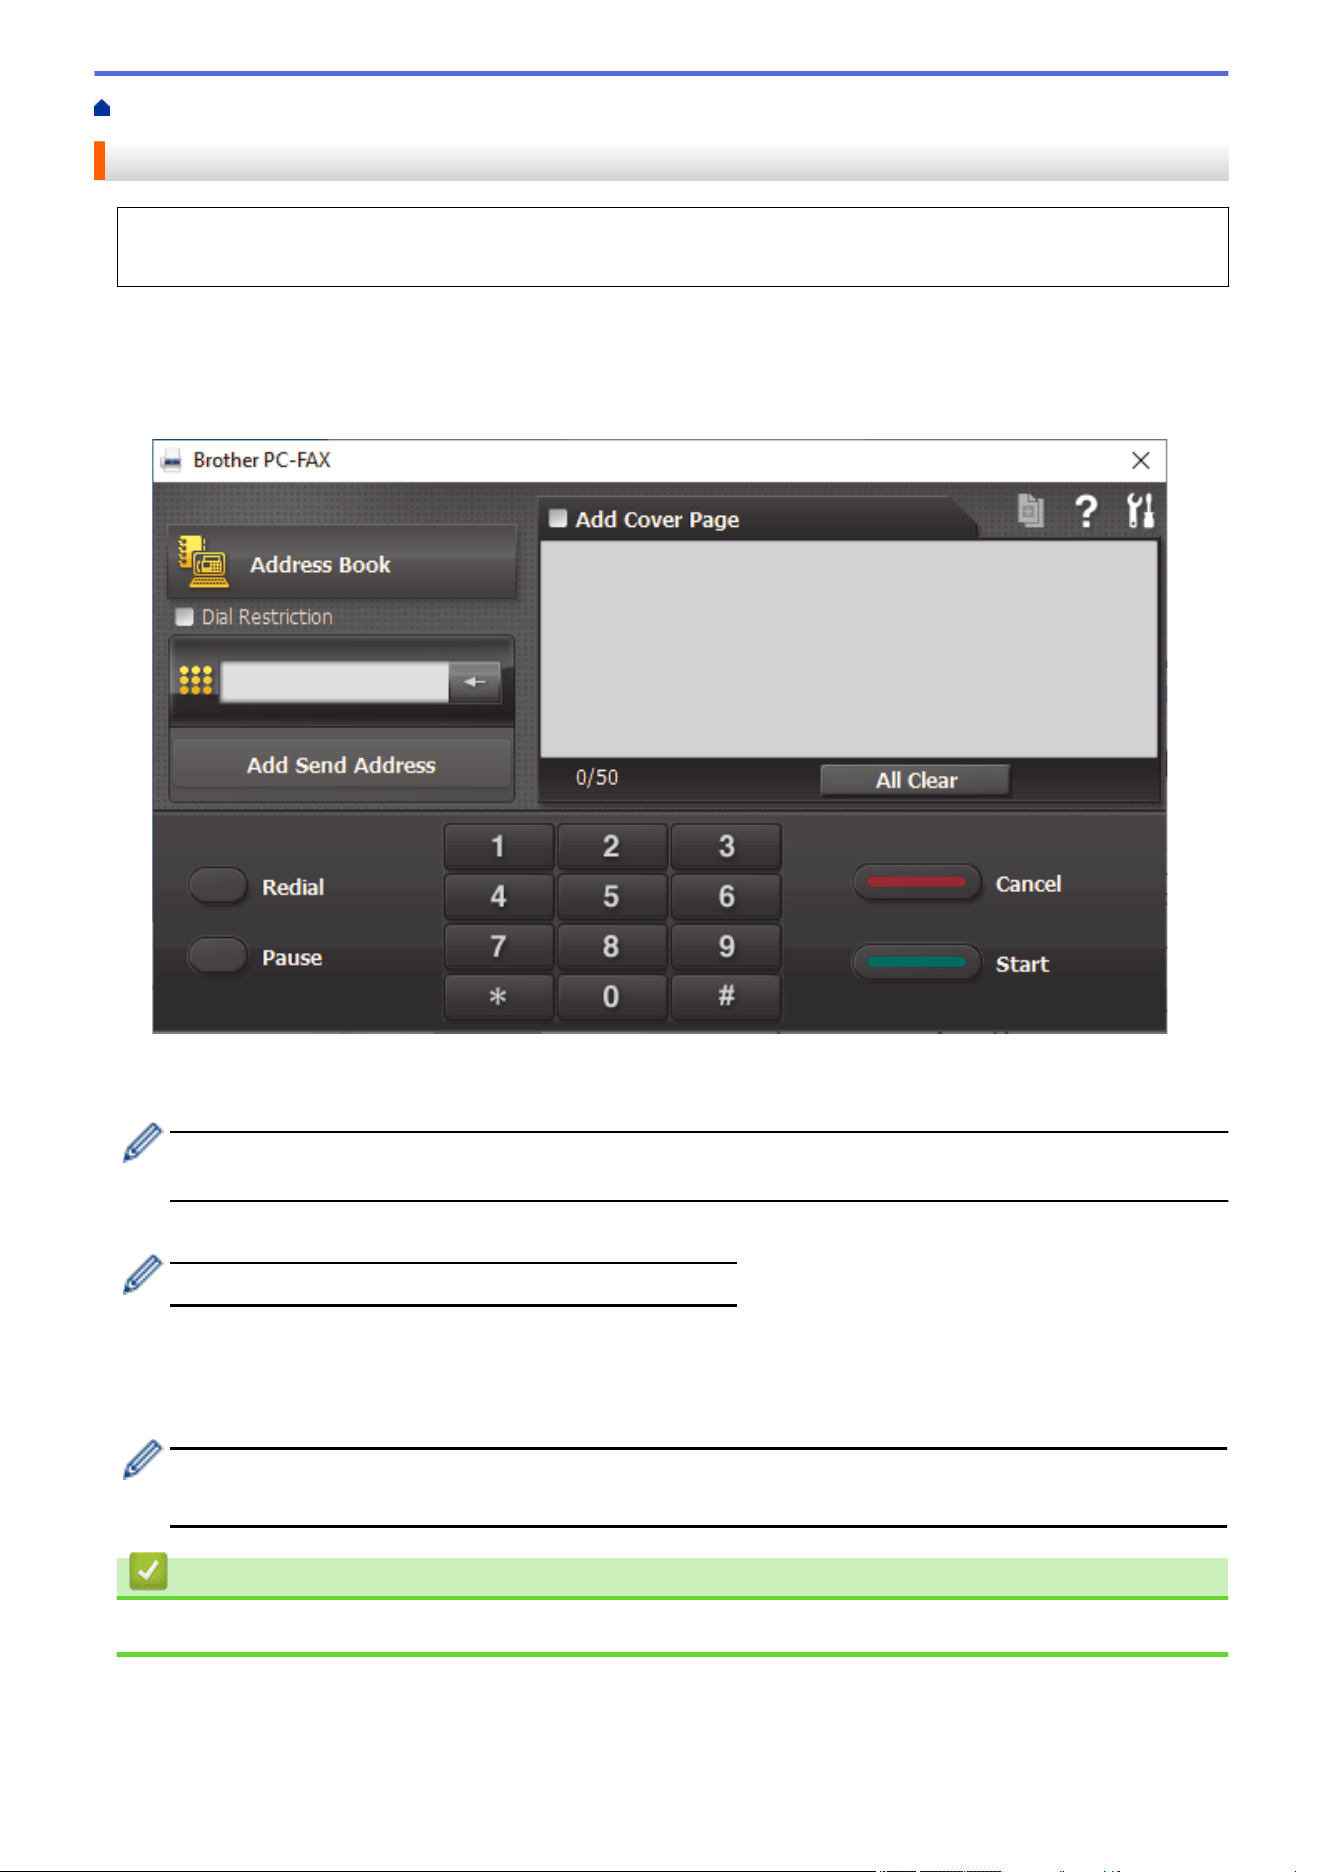
Home > Fax > PC-FAX > PC-FAX for Windows > Send a Fax Using PC-FAX (Windows)
Send a Fax Using PC-FAX (Windows)
PC-FAX supports only monochrome faxes. A monochrome fax will be sent even if the original data is colour
and the receiving fax machine supports colour faxes.
1. Create a file in any application on your computer.
2. Select the print command in your application.
3. Select Brother PC-FAX as your printer, and then complete your print operation.
The Brother PC-FAX dialog box appears.
4. Type a fax number using one of the following methods:
• Click the numbers on the dial pad to type the number, and then click Add Send Address.
If you select the Dial Restriction checkbox, a confirmation dialog box will appear for you to re-type the fax
number using the keyboard. This feature helps to prevent transmissions to the wrong destination.
• Click the Address Book button, and then select a member or group from the Address Book.
If you make a mistake, click All Clear to delete all entries.
5. To include a cover page, select the Add Cover Page checkbox. You can also click to create or edit a
cover page.
6. Click Start to send the fax.
• To cancel the fax, click Cancel.
• To redial a number, click Redial to show the last five fax numbers, select a number, and then click Start.
Related Information
• PC-FAX for Windows
289

Home > Fax > PC-FAX > PC-FAX for Windows > Receive Faxes on Your Computer (Windows) > Receive
Faxes Using PC-FAX Receive (Windows)
Receive Faxes Using PC-FAX Receive (Windows)
The Brother PC-FAX Receive software lets you view and store faxes on your computer. It is automatically
installed when you install your machine's software and drivers and works on locally or network-connected
machines.
PC-FAX Receive supports only monochrome faxes. When you receive a colour fax, your machine prints the
colour fax at your machine but does not send the fax to your computer.
When you turn off your computer, your machine will continue to receive and store faxes in your machine's
memory. The machine's LCD will display the number of stored faxes received. When you start this application,
the software will transfer all received faxes to your computer at once. You can enable the Backup Print option if
you want the machine to print a copy of the fax before the fax is sent to your computer, or before the computer is
switched off. You can configure the Backup Print settings from your machine.
Related Information
• Receive Faxes on Your Computer (Windows)
• Run the Brother PC-FAX Receive on Your Computer (Windows)
• View Received PC-FAX Messages (Windows)
Related Topics:
• Use PC-Fax Receive to Transfer Received Faxes to Your Computer (Windows only)
291
Home > Fax > PC-FAX > PC-FAX for Windows > Receive Faxes on Your Computer (Windows) > Receive
Faxes Using PC-FAX Receive (Windows) > Run the Brother PC-FAX Receive on Your Computer (Windows)
Run the Brother PC-FAX Receive on Your Computer (Windows)
We recommend selecting the Start PC-FAX Receive on computer startup checkbox so that the software
runs automatically and can transfer any faxes upon computer startup.
1. Launch (Brother Utilities), and then click the drop-down list and select your model name (if not already
selected).
2. Click PC-FAX in the left navigation bar, and then click Receive.
3. Confirm the message and click Yes.
The PC-FAX Receive window appears. The
(PC-FAX Receive) icon also appears in your computer task
tray.
Related Information
• Receive Faxes Using PC-FAX Receive (Windows)
• Set Up Your Computer for PC-FAX Receiving (Windows)
• Add Your Machine to PC-FAX Receiving (Windows)
292
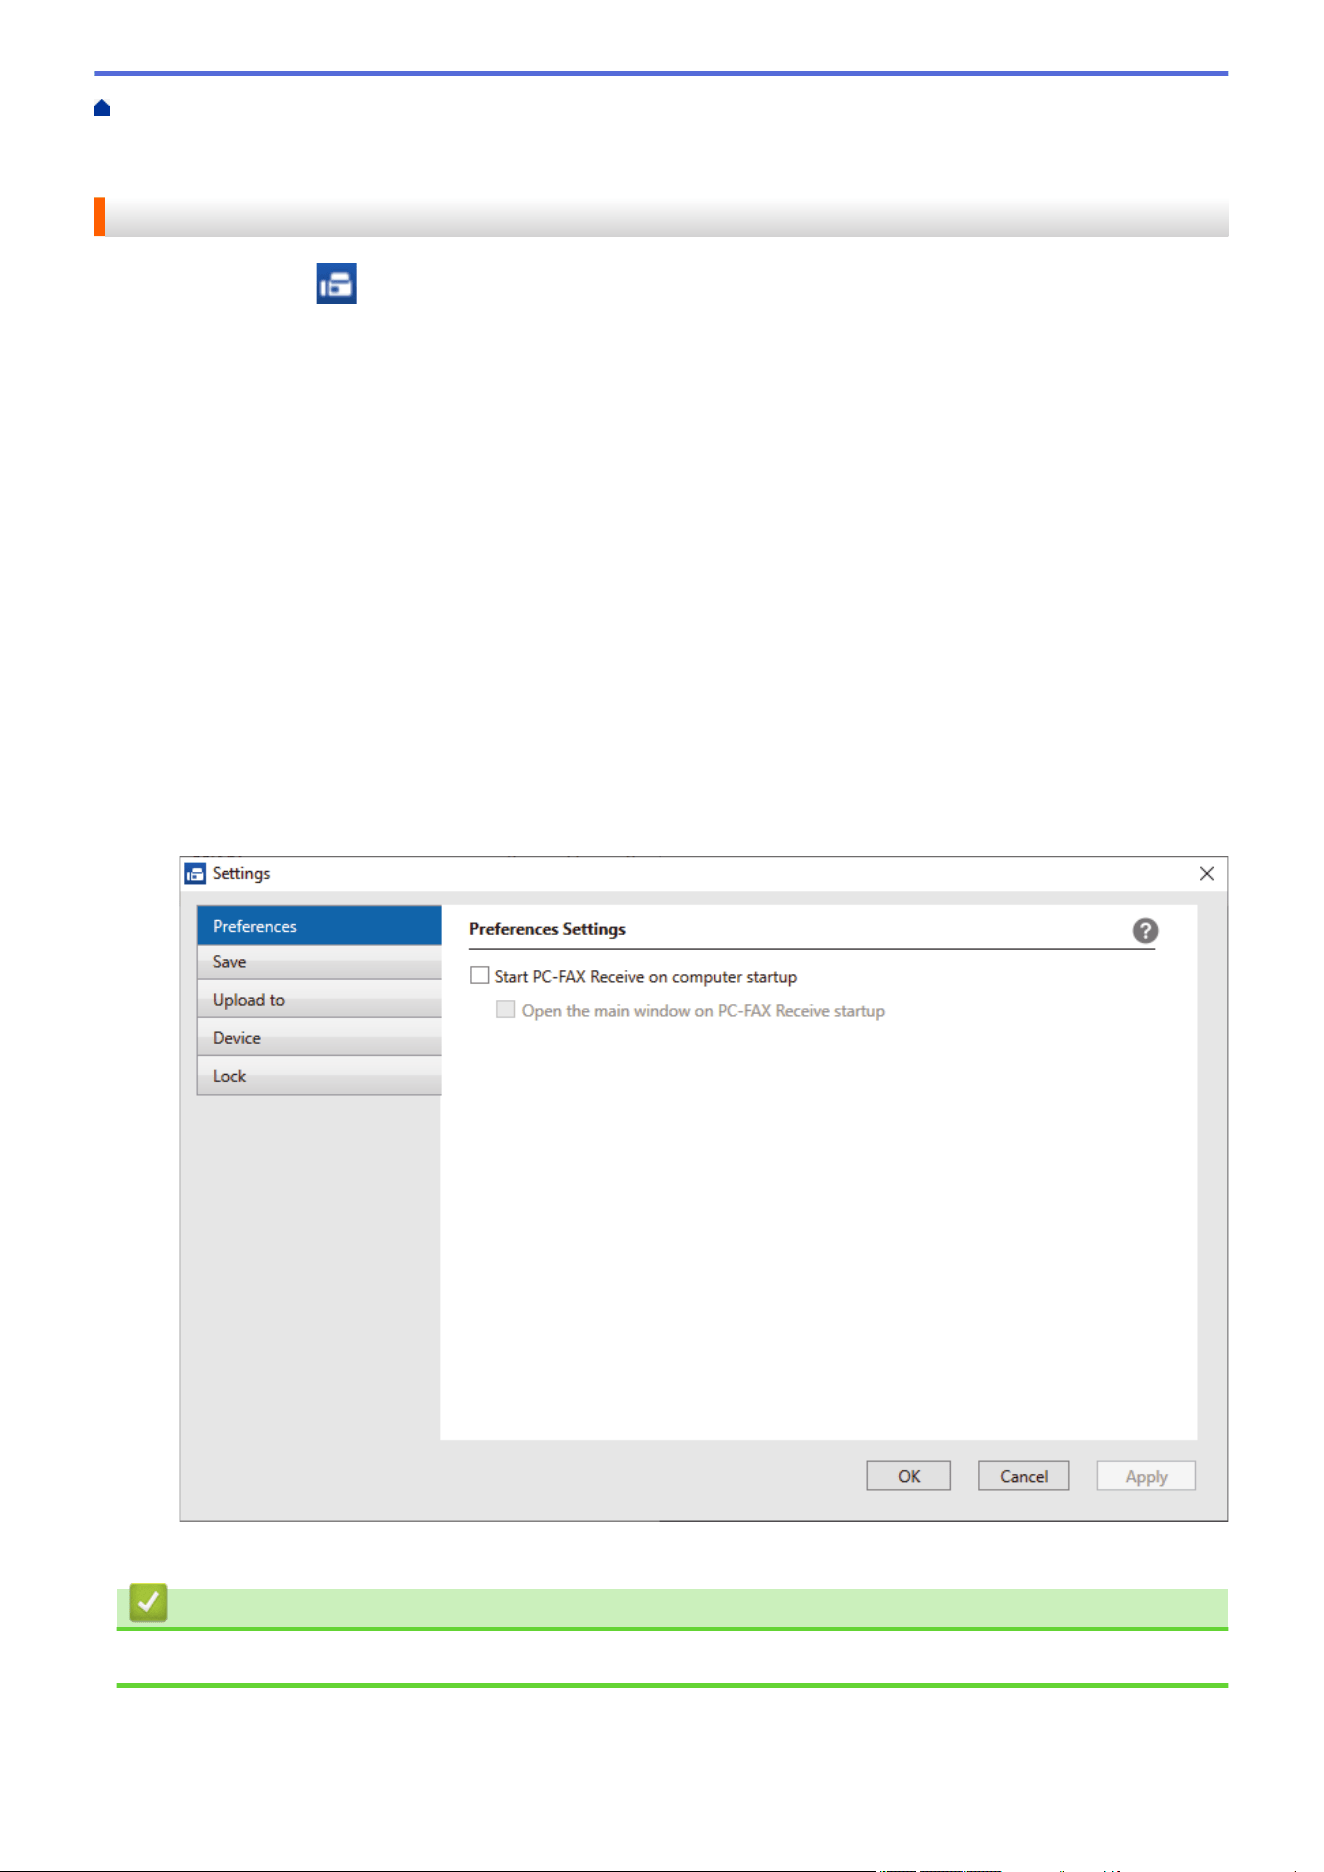
Home > Fax > PC-FAX > PC-FAX for Windows > Receive Faxes on Your Computer (Windows) > Receive
Faxes Using PC-FAX Receive (Windows) > Run the Brother PC-FAX Receive on Your Computer
(Windows) > Set Up Your Computer for PC-FAX Receiving (Windows)
Set Up Your Computer for PC-FAX Receiving (Windows)
1. Double-click the (PC-FAX Receive) icon in your computer task tray.
The PC-FAX Receive window appears.
2. Click Settings.
3. Configure these options as needed:
Preferences
Configure to start PC-FAX Receive automatically when you start Windows.
Save
Configure the path to save PC-FAX files and select the received document format.
Upload to
Configure the path to the server and select the option to upload automatically or manually (available only
for Administrators).
Device
Select the machine where you want to receive PC-FAX files.
Lock (available only for Administrators)
Restrict users who do not have administrator privileges from configuring the settings options shown above.
4. Click OK.
Related Information
• Run the Brother PC-FAX Receive on Your Computer (Windows)
293
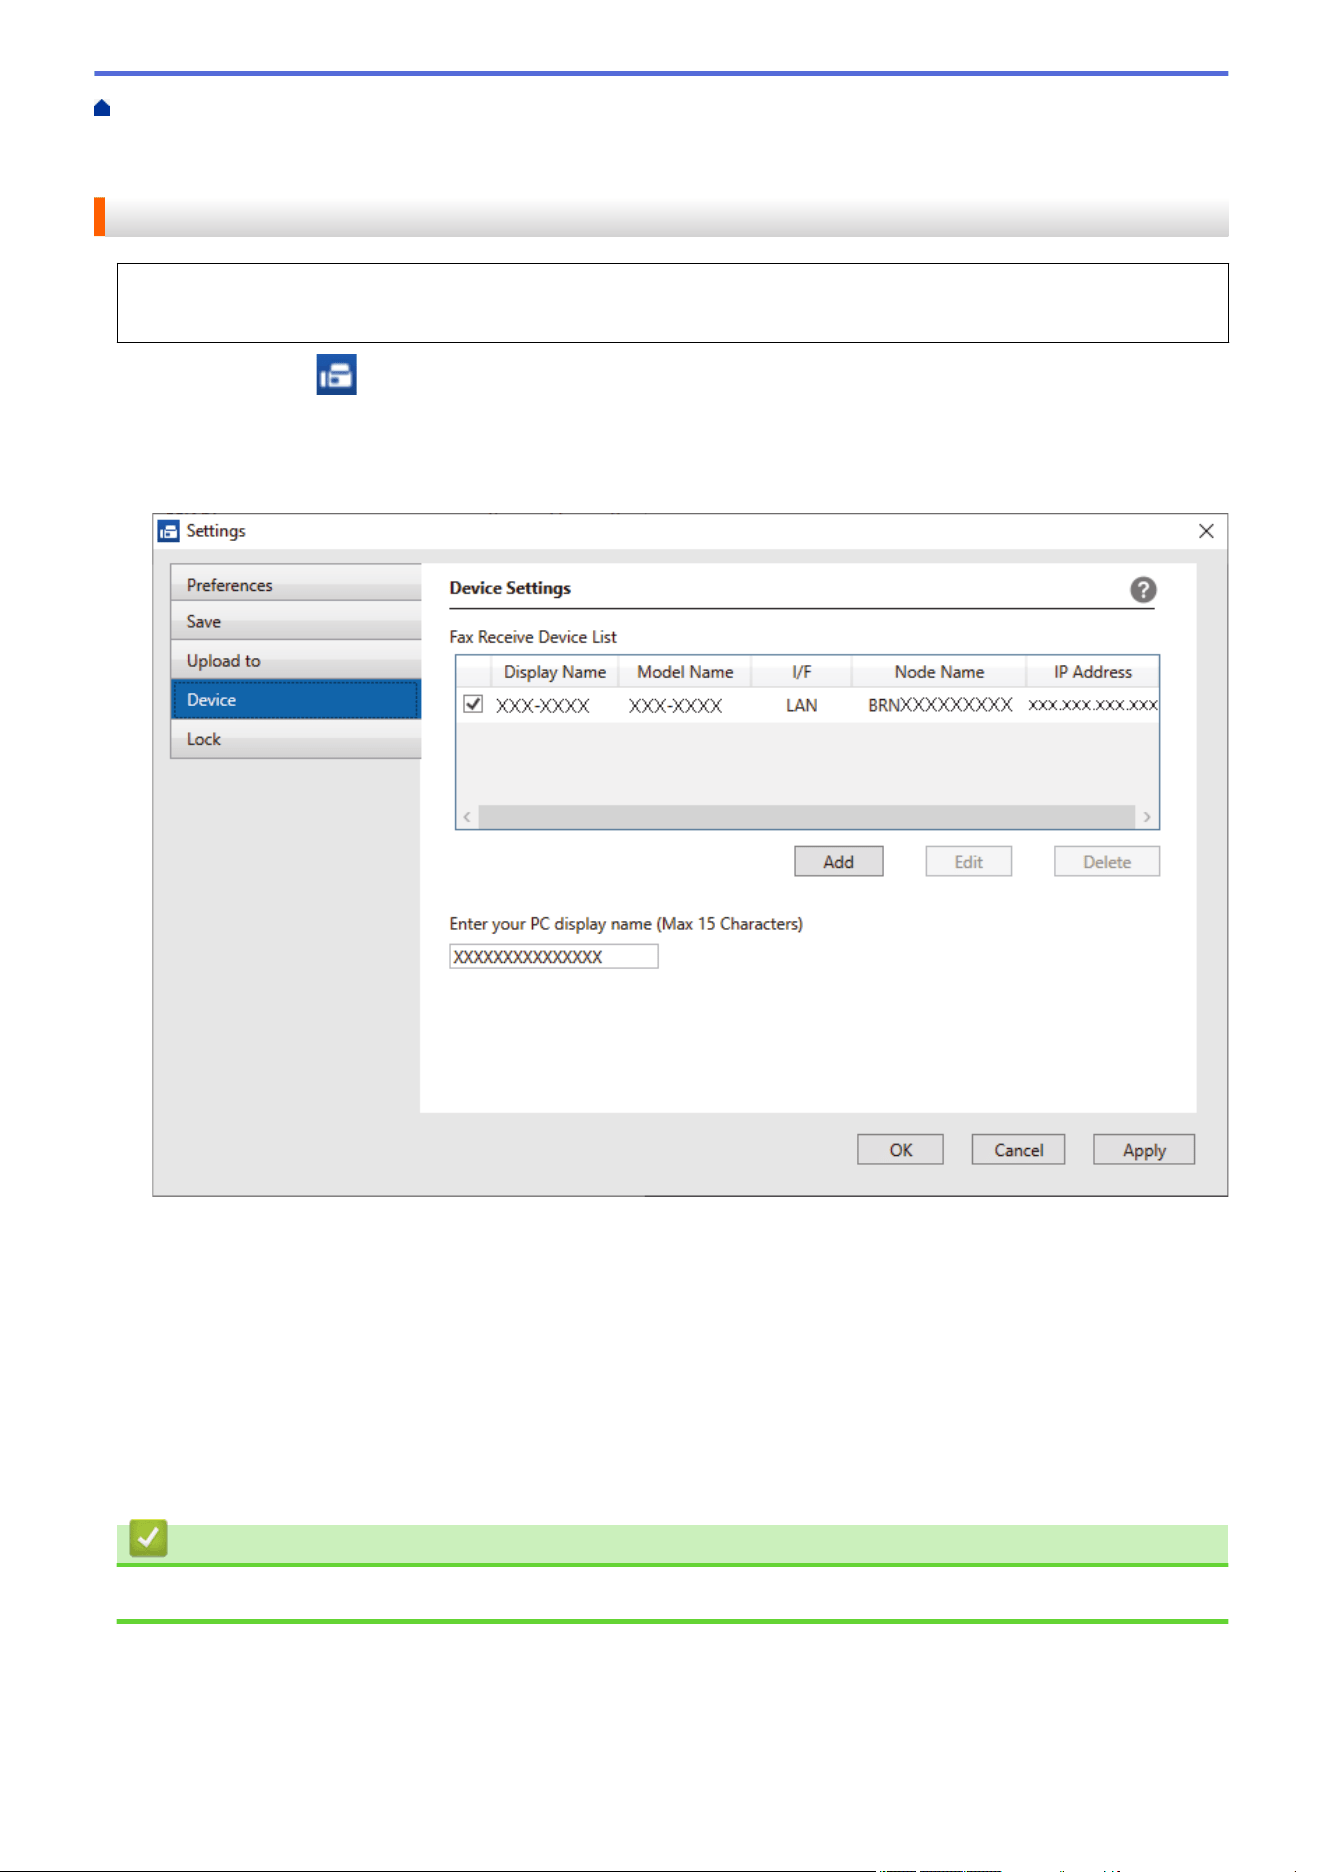
Home > Fax > PC-FAX > PC-FAX for Windows > Receive Faxes on Your Computer (Windows) > Receive
Faxes Using PC-FAX Receive (Windows) > Run the Brother PC-FAX Receive on Your Computer
(Windows) > Add Your Machine to PC-FAX Receiving (Windows)
Add Your Machine to PC-FAX Receiving (Windows)
If you installed the machine following the instructions for a network user, then the machine should already be
configured for your network.
1. Double-click the (PC-FAX Receive) icon in your computer task tray.
The PC-FAX Receive window appears.
2. Click Settings.
3. Click Device > Add.
4. Select the appropriate connection method.
Select your machine from the automatic search results below.
A list of connected machines appears. Select the machine you want. Click OK.
Specify your machine by IP address
Type the machine's IP address in the IP Address field, and then click OK.
5. To change the computer name that will appear on the machine's LCD, type the new name in the Enter your
PC display name (Max 15 Characters) field.
6. Click OK.
Related Information
• Run the Brother PC-FAX Receive on Your Computer (Windows)
294
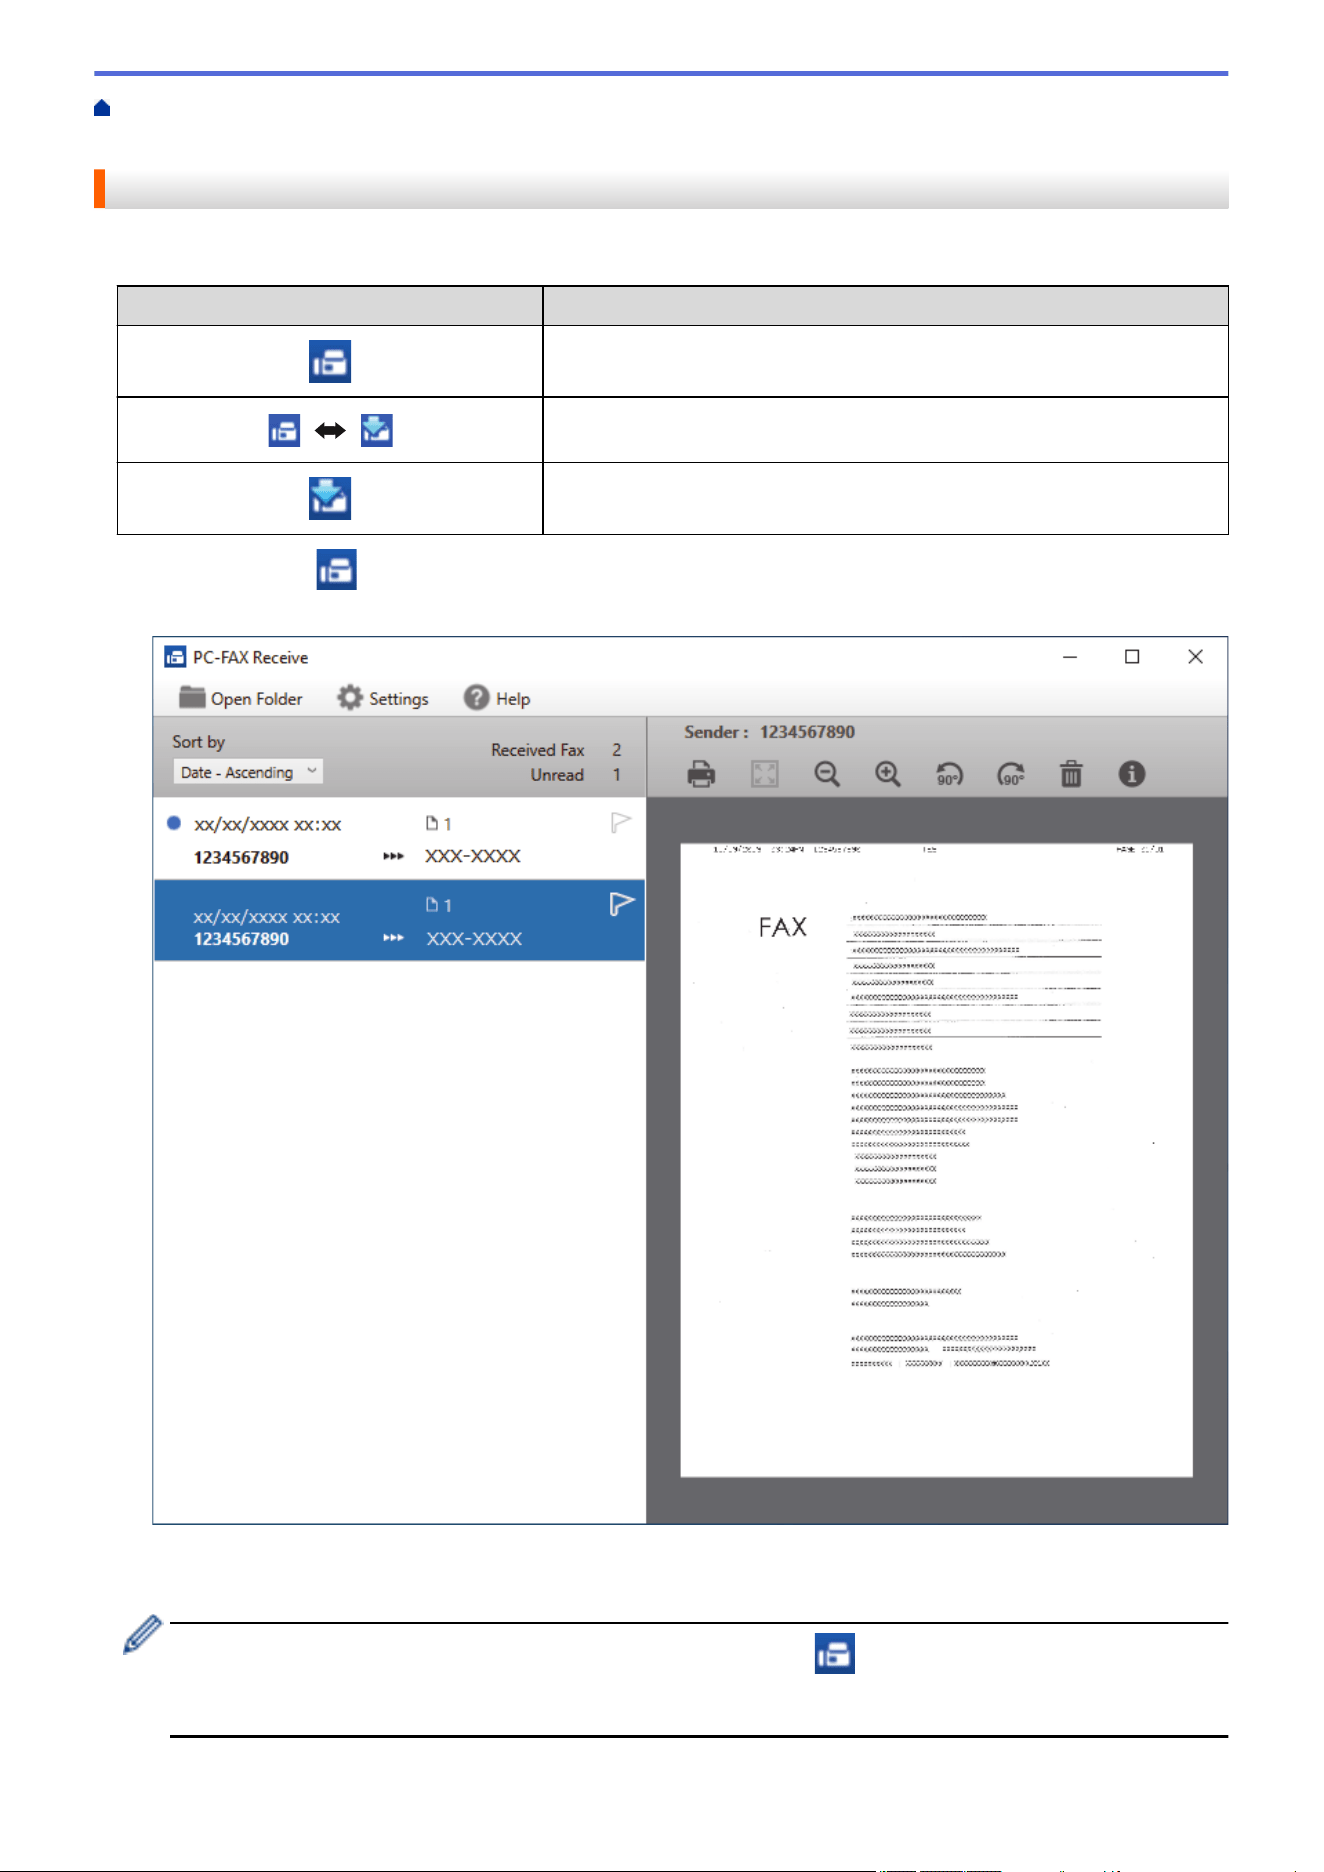
Home > Fax > PC-FAX > PC-FAX for Windows > Receive Faxes on Your Computer (Windows) > Receive
Faxes Using PC-FAX Receive (Windows) > View Received PC-FAX Messages (Windows)
View Received PC-FAX Messages (Windows)
Receiving Status
Icon
Indicated Status
Standby mode
No unread messages
Receiving messages
Messages received
Unread messages
1. Double-click the (PC-FAX Receive) icon in your computer task tray.
The PC-FAX Receive window appears.
2. Click any faxes in the list to view them.
3. When finished, close the window.
Even after closing the window, PC-FAX Receive is active and the (PC-FAX Receive) icon will remain
in your computer task tray. To close PC-FAX Receive, click the icon in the computer task tray and click
Close.
295


Home > Network > Supported Basic Network Features
Supported Basic Network Features
The machine supports various features depending on the operating system. Use this table to see which network
features and connections are supported by each operating system.
Operating Systems Windows Windows Server macOS
Printing Yes Yes Yes
Scanning Yes No Yes
PC Fax Send Yes No Yes
PC Fax Receive Yes No No
Web Based Management
1
Yes Yes Yes
Status Monitor Yes No No
Driver Deployment Wizard Yes Yes No
1
The default password to manage this machine’s settings is located on the back of the machine and marked "Pwd". We recommend
immediately changing the default password to protect your machine from unauthorised access.
When connecting your machine to an outside network such as the Internet, make sure your network
environment is protected by a separate firewall or other means in order to prevent information leaks due to
inadequate settings or unauthorised access by malicious third parties.
Related Information
• Network
Related Topics:
• Set or Change a Login Password for Web Based Management
299

Home > Network > Configure Network Settings > Configure Network Settings Using the Control Panel
Configure Network Settings Using the Control Panel
To configure the machine for your network, use the control panel's [Network] menu selections.
• For information about the network settings you can configure using the control panel, see Related
Information: Settings Tables.
• You can also use management utilities, such as Web Based Management, to configure and change
your Brother machine's network settings.
1. Press [Settings] > [Network].
2. Press a or b to display the network option, and then press it. Repeat this step until you access the menu you
want to configure, and then follow the touchscreen LCD instructions.
Related Information
• Configure Network Settings
Related Topics:
• Settings Tables (2.7"(67.5 mm)/3.5"(87.6 mm) Touchscreen models)
301


Home > Network > Wireless Network Settings > Use the Wireless Network
Use the Wireless Network
• Before Configuring Your Machine for a Wireless Network
• Configure Your Machine for a Wireless Network Using the Setup Wizard from Your
Computer
• Configure Your Machine for a Wireless Network Using the Setup Wizard from Your
Mobile Device
• Configure Your Machine for a Wireless Network Using the Machine's Control Panel
Setup Wizard
• Configure Your Machine for a Wireless Network Using the One Push Method of Wi-Fi
Protected Setup
™
(WPS)
• Configure Your Machine for a Wireless Network Using the PIN Method of Wi-Fi Protected
Setup
™
(WPS)
• Configure Your Machine for a Wireless Network When the SSID is Not Broadcast
• Configure Your Machine for an Enterprise Wireless Network
303
Home > Network > Wireless Network Settings > Use the Wireless Network > Before Configuring Your
Machine for a Wireless Network
Before Configuring Your Machine for a Wireless Network
Before attempting to configure a wireless network, confirm the following:
• If you are using an enterprise wireless network, you must know the User ID and Password.
• To achieve optimum results with normal everyday document printing, place your machine as close to the
wireless LAN access point/router as possible with minimal obstructions. Large objects and walls between the
two devices and interference from other electronic devices can affect the data transfer speed of your
documents.
Due to these factors, wireless may not be the best method of connection for all types of documents and
applications. If you are printing large files, such as multi-page documents with mixed text and large graphics,
you may want to consider selecting wired Ethernet for faster data transfer (supported models only), or USB
for the fastest throughput speed.
• Although your machine can be used in both a wired and wireless network (supported models only), only one
connection method can be used at a time. However, a wireless network connection and Wi-Fi Direct
connection, or a wired network connection (supported models only) and Wi-Fi Direct connection can be used
at the same time.
• If there is a signal in the vicinity, wireless LAN allows you to freely make a LAN connection. However, if
security settings are not correctly configured, the signal may be intercepted by malicious third-parties,
possibly resulting in:
- Theft of personal or confidential information
- Improper transmission of information to parties impersonating the specified individuals
- Dissemination of transcribed communication contents that were intercepted
Make sure you know your wireless router/access point's Network Name (SSID) and Network Key
(Password). If you cannot find this information, consult the manufacturer of your wireless router/access
point, your system administrator, or Internet provider. Brother cannot provide this information.
Related Information
• Use the Wireless Network
304

Home > Network > Wireless Network Settings > Use the Wireless Network > Configure Your Machine for a
Wireless Network Using the Setup Wizard from Your Computer
Configure Your Machine for a Wireless Network Using the Setup Wizard
from Your Computer
1. Do one of the following:
• Windows
Download the installer from your model's Downloads page at
support.brother.com.
• Mac
a. Download the installer from your model's Downloads page at support.brother.com.
b. Start the installer, and then double-click the Start Here Mac icon.
2. Follow the on-screen instructions.
3. Select Wireless Network Connection (Wi-Fi), and then click Next.
4. Follow the on-screen instructions.
You have completed the wireless network setup.
Related Information
• Use the Wireless Network
305

Home > Network > Wireless Network Settings > Use the Wireless Network > Configure Your Machine for a
Wireless Network Using the Setup Wizard from Your Mobile Device
Configure Your Machine for a Wireless Network Using the Setup Wizard
from Your Mobile Device
1. Do one of the following:
• Android
™
devices
Download and install Brother Mobile Connect from Google Play
™
.
• All iOS or iPadOS supported devices including iPhone, iPad and iPod touch
Download and install Brother Mobile Connect from the App Store.
2. Start Brother Mobile Connect, and then follow the on-screen instructions to connect your mobile device to
your Brother machine.
Related Information
• Use the Wireless Network
306
Home > Network > Wireless Network Settings > Use the Wireless Network > Configure Your Machine for a
Wireless Network Using the Machine's Control Panel Setup Wizard
Configure Your Machine for a Wireless Network Using the Machine's
Control Panel Setup Wizard
Before configuring your machine, we recommend writing down your wireless network settings. You will need
this information before you continue with the configuration.
1. Check and record the current wireless network settings of the computer to which you are connecting.
Network Name (SSID)
Network Key (Password)
For example:
Network Name (SSID)
HELLO
Network Key (Password)
12345
• Your access point/router may support the use of multiple WEP keys, but your Brother machine supports
the use of only the first WEP key.
• If you need assistance during setup and want to contact Brother customer service, make sure you have
your SSID (Network Name) and Network Key (Password) ready. We cannot assist you in locating this
information.
• If you do not know this information (SSID and Network Key), you cannot continue the wireless setup.
How can I find this information?
- Check the documentation provided with your wireless access point/router.
- The initial SSID could be the manufacturer's name or the model name.
- If you do not know the security information, consult the router manufacturer, your system
administrator, or your Internet provider.
2. Press [Settings] > [Network] > [WLAN(Wi-Fi)] > [Find Wi-Fi Network].
3. When [Enable WLAN?] appears, press [Yes].
The wireless setup wizard starts. To cancel, press [No].
4. The machine searches for your network and displays a list of available SSIDs. When a list of SSIDs appears,
press a or b to select the SSID you want. Press [OK].
5. Do one of the following:
• If you are using an authentication and encryption method that requires a Network Key, enter the Network
Key you wrote down in the first step, and then press [OK] to apply your settings.
• If your authentication method is Open System and your encryption mode is None, go to the next step.
6. The machine attempts to connect to the wireless device you have selected.
If your wireless device is connected successfully, the LCD displays [Connected].
You have completed the wireless network setup. To install the drivers and software necessary to use your
machine, go to your model's Downloads page at support.brother.com.
307


Home > Network > Wireless Network Settings > Use the Wireless Network > Configure Your Machine for a
Wireless Network Using the One Push Method of Wi-Fi Protected Setup
™
(WPS)
Configure Your Machine for a Wireless Network Using the One Push
Method of Wi-Fi Protected Setup
™
(WPS)
If your wireless access point/router supports WPS (Push Button Configuration), you can use WPS from your
machine's control panel menu to configure your wireless network settings.
1. Press
[Settings] > [Network] > [WLAN(Wi-Fi)] > [WPS/Push Button].
2. When [Enable WLAN?] appears, press [Yes].
The wireless setup wizard starts. To cancel, press [No].
3. When the touchscreen instructs you to start WPS, press the WPS button on your wireless access point/
router. Then press [OK] on your machine. Your machine automatically tries to connect to your wireless
network.
If your wireless device is connected successfully, the LCD displays [Connected].
You have completed the wireless network setup. To install the drivers and software necessary to use your
machine, go to your model's Downloads page at
support.brother.com.
Related Information
• Use the Wireless Network
309
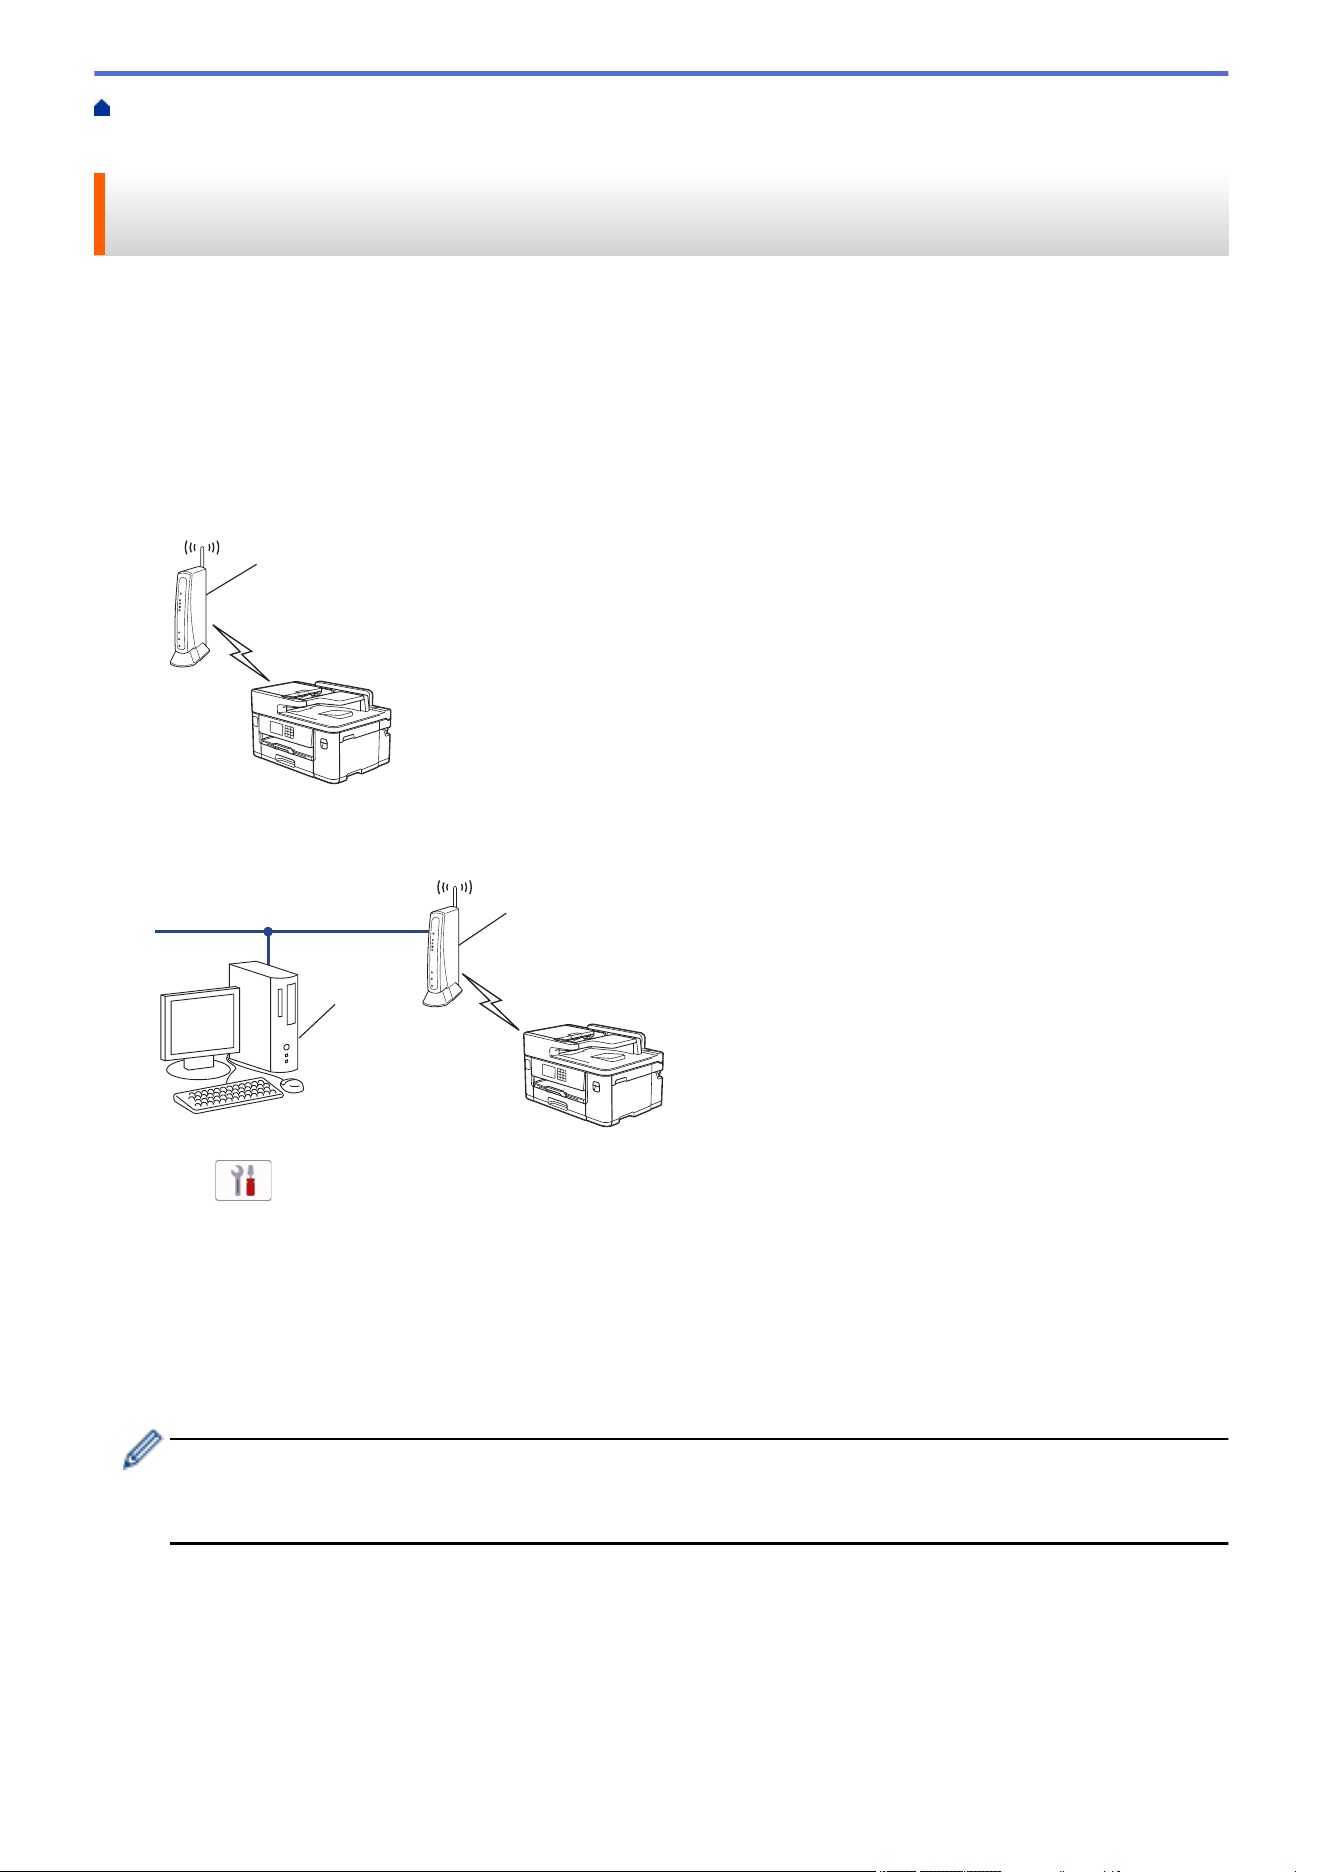
Home > Network > Wireless Network Settings > Use the Wireless Network > Configure Your Machine for a
Wireless Network Using the PIN Method of Wi-Fi Protected Setup
™
(WPS)
Configure Your Machine for a Wireless Network Using the PIN Method
of Wi-Fi Protected Setup
™
(WPS)
If your wireless LAN access point/router supports WPS, you can use the Personal Identification Number (PIN)
Method to configure your wireless network settings.
The PIN Method is one of the connection methods developed by the Wi-Fi Alliance
®
. By submitting a PIN
created by an Enrollee (your machine) to the Registrar (a device that manages the wireless LAN), you can set up
the wireless network and security settings. For more information on how to access WPS mode, see the
instructions provided with your wireless access point/router.
Type A
Connection when the wireless LAN access point/router (1) doubles as the Registrar.
1
Type B
Connection when another device (2), such as a computer, is used as the Registrar.
1
2
1. Press [Settings] > [Network] > [WLAN(Wi-Fi)] > [WPS/PIN Code].
2. When [Enable WLAN?] appears, press [Yes].
The wireless setup wizard starts. To cancel, press [No].
3. The LCD displays an eight-digit PIN and the machine starts searching for a wireless LAN access point/router.
4. Using a computer connected to the network, in your browser's address bar, type the IP address of the device
you are using as the Registrar. (For example: http://192.168.1.2)
5. Go to the WPS settings page and type the PIN, and then follow the on-screen instructions.
• The Registrar is usually the wireless LAN access point/router.
• The settings page may differ depending on the brand of wireless LAN access point/router. For more
information, see the instructions supplied with your wireless LAN access point/router.
If your wireless device is connected successfully, the LCD displays [Connected].
If you are using a Windows 7, Windows 8.1, or Windows 10 computer as a Registrar, complete the
following steps:
6. Do one of the following:
• Windows 10
310
Click > Windows System > Control Panel. In the Hardware and Sound group, click Add a device.
• Windows 8.1
Move your mouse to the lower right corner of your desktop. When the menu bar appears, click Settings >
Control Panel > Hardware and Sound > Devices and Printers > Add a device.
• Windows 7
Click
(Start) > Devices and Printers > Add a device.
• To use a Windows 7, Windows 8.1, or Windows 10 computer as a Registrar, you must register it to your
network in advance. For more information, see the instructions supplied with your wireless LAN access
point/router.
• If you use Windows 7, Windows 8.1, or Windows 10 as a Registrar, you can install the printer driver
after the wireless configuration by following the on-screen instructions. To install the driver and software
necessary to use your machine, go to your model's Downloads page at support.brother.com.
7. Select your machine and click Next.
8. Type the PIN displayed on the machine's LCD, and then click Next.
9. (Windows 7) Select your network, and then click Next.
10. Click Close.
Related Information
• Use the Wireless Network
311
Home > Network > Wireless Network Settings > Use the Wireless Network > Configure Your Machine for a
Wireless Network When the SSID is Not Broadcast
Configure Your Machine for a Wireless Network When the SSID is Not
Broadcast
Before configuring your machine, we recommend writing down your wireless network settings. You will need
this information before you continue with the configuration.
1. Check and write down the current wireless network settings.
Network Name (SSID)
Authentication Method Encryption Mode Network Key (Password)
Open System NONE -
WEP
Shared Key WEP
WPA/WPA2-PSK/WPA3-SAE TKIP (for WPA/WPA2-PSK)
AES
WPA3-SAE AES
For example:
Network Name (SSID)
HELLO
Authentication Method Encryption Mode Network Key (Password)
WPA2-PSK AES 12345678
If your router uses WEP encryption, enter the key used as the first WEP key. Your Brother machine
supports the use of the first WEP key only.
2. Press [Settings] > [Network] > [WLAN(Wi-Fi)] > [Find Wi-Fi Network].
3. When [Enable WLAN?] appears, press [Yes].
The wireless setup wizard starts. To cancel, press [No].
4. The machine searches for your network and displays a list of available SSIDs. Press a or b to display the
[<New SSID>] option, and then press it.
5. Press [OK].
6. Enter the SSID name, and then press [OK].
For more information about how to enter text, see Related Information.
7. Press a or b to select the Authentication Method, and then press it.
8. Do one of the following:
• If you selected the [Open System] option, press either [None] or [WEP].
If you selected the [WEP] option for Encryption type, enter the WEP key, and then press [OK].
• If you selected the [Shared Key] option, enter the WEP key, and then press [OK].
• If you selected the [WPA/WPA2-PSK/WPA3-SAE] option, press either [TKIP+AES] or [AES].
Enter the WPA key, and then press [OK].
• If you selected the [WPA3-SAE] option, press [AES].
312

Enter the WPA key, and then press [OK].
• For more information about how to enter text, see Related Information.
• Your Brother machine supports the use of the first WEP key only.
9. The machine attempts to connect to the wireless device you have selected.
If your wireless device is connected successfully, the LCD displays [Connected].
You have completed the wireless network setup. To install the drivers and software necessary to use your
machine, go to your model's Downloads page at
support.brother.com.
Related Information
• Use the Wireless Network
Related Topics:
• If You Are Having Difficulty with Your Machine's Network
• Enter Text on Your Brother Machine
313
Home > Network > Wireless Network Settings > Use the Wireless Network > Configure Your Machine for an
Enterprise Wireless Network
Configure Your Machine for an Enterprise Wireless Network
Before configuring your machine, we recommend writing down your wireless network settings. You will need
this information before you continue with the configuration.
1. Check and record the current wireless network settings.
Network Name (SSID)
Authentication Method Encryption Mode User ID Password
EAP-FAST/NONE AES
TKIP
EAP-FAST/MS-CHAPv2 AES
TKIP
EAP-FAST/GTC AES
TKIP
PEAP/MS-CHAPv2 AES
TKIP
PEAP/GTC AES
TKIP
EAP-TTLS/CHAP AES
TKIP
EAP-TTLS/MS-CHAP AES
TKIP
EAP-TTLS/MS-CHAPv2 AES
TKIP
EAP-TTLS/PAP AES
TKIP
EAP-TLS AES -
TKIP -
For example:
Network Name (SSID)
HELLO
Authentication Method Encryption Mode User ID Password
EAP-FAST/MS-CHAPv2 AES Brother 12345678
• If you configure your machine using EAP-TLS authentication, you must install the client certificate
issued by a CA before you start configuration. Contact your network administrator about the client
certificate. If you have installed more than one certificate, we recommend writing down the certificate
name you want to use.
• If you verify your machine using the common name of the server certificate, we recommend writing
down the common name before you start configuration. Contact your network administrator about the
common name of the server certificate.
314
2. Press [Settings] > [Network] > [WLAN(Wi-Fi)] > [Find Wi-Fi Network].
3. When [Enable WLAN?] appears, press [Yes].
The wireless setup wizard starts. To cancel, press [No].
4. The machine searches for your network and displays a list of available SSIDs. Press a or b to display the
[<New SSID>] option, and then press it.
5. Press [OK].
6. Enter the SSID name, and then press [OK].
For more information about how to enter text, see Related Information.
7. Press a or b to select the Authentication Method, and then press it.
8. Do one of the following:
• If you selected the [EAP-FAST], [PEAP] or [EAP-TTLS] option, select the Inner Authentication method
[NONE], [CHAP], [MS-CHAP], [MS-CHAPv2], [GTC] or [PAP].
Depending on your Authentication method, the Inner Authentication method selections differ.
Select the encryption type [TKIP+AES] or [AES].
Select the verification method [No Verification], [CA] or [CA + Server ID].
- If you selected the [CA + Server ID] option, enter the server ID, user ID and password (if
required), and then press [OK] for each option.
- For other selections, enter the user ID and Password, and then press [OK] for each option.
If you have not imported a CA certificate into your machine, the machine displays [No Verification].
• If you selected the [EAP-TLS] option, select the encryption type [TKIP+AES] or [AES].
The machine will display a list of available Client Certificates, and then select the certificate.
Select the verification method [No Verification], [CA] or [CA + Server ID].
- If you selected the [CA + Server ID] option, enter the server ID and user ID, and then press [OK]
for each option.
- For other selections, enter the user ID, and then press [OK].
9. The machine attempts to connect to the wireless device you have selected.
If your wireless device is connected successfully, the LCD displays [Connected].
You have completed the wireless network setup. To install the drivers and software necessary to use your
machine, go to your model's Downloads page at
support.brother.com.
Related Information
• Use the Wireless Network
Related Topics:
• Enter Text on Your Brother Machine
315

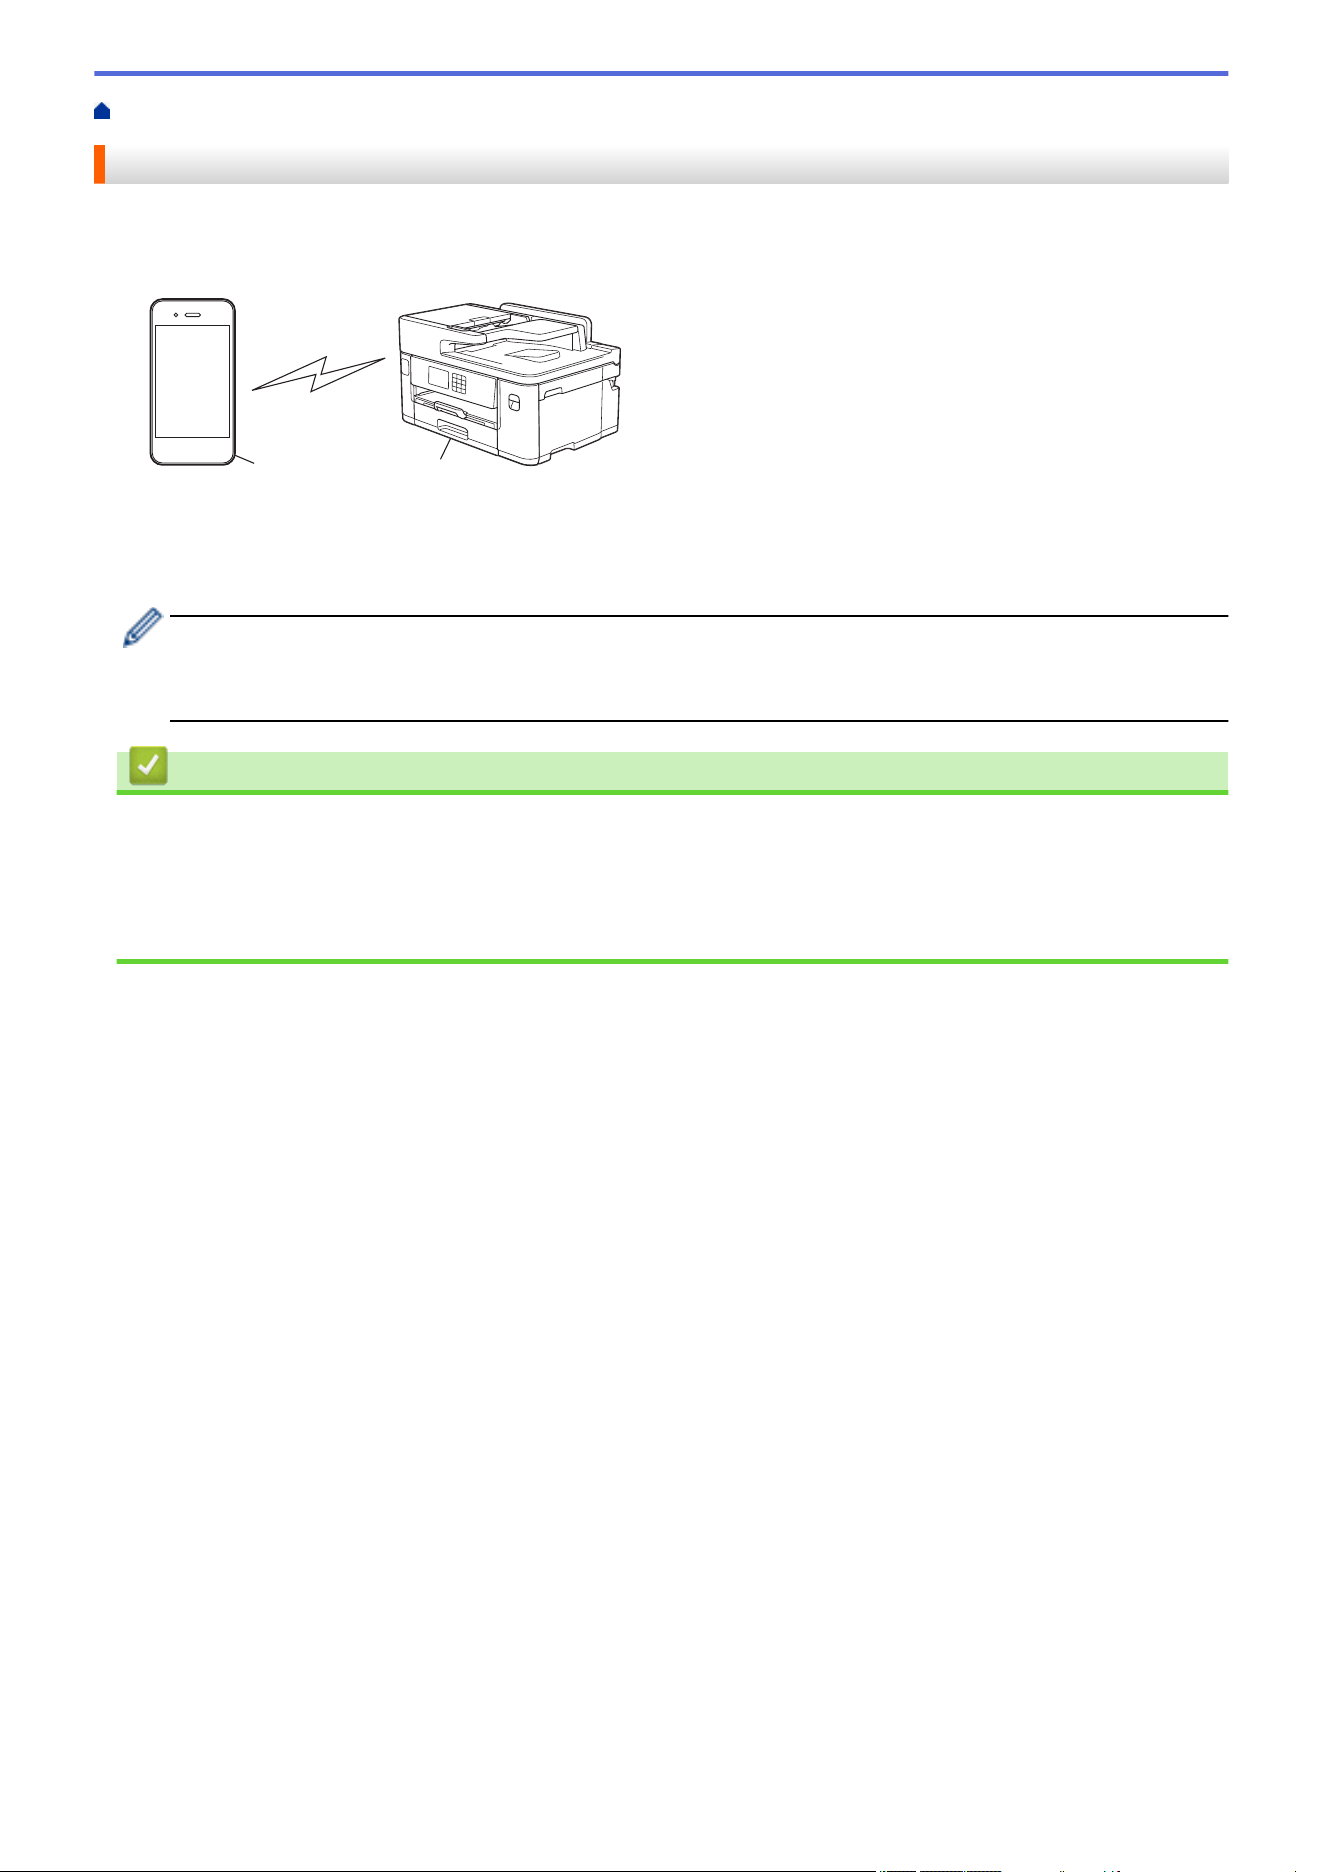
Home > Network > Wireless Network Settings > Use Wi-Fi Direct
®
> Wi-Fi Direct Overview
Wi-Fi Direct Overview
Wi-Fi Direct is one of the wireless configuration methods developed by the Wi-Fi Alliance
®
. It allows you to
securely connect your mobile device to your Brother machine without using a wireless router/access point.
1
2
1. Mobile device
2. Your Brother machine
• You can use Wi-Fi Direct with either the wired or wireless network connection at the same time.
• The Wi-Fi Direct supported device can become a Group Owner. When configuring the Wi-Fi Direct
network, the Group Owner serves as an access point.
Related Information
• Use Wi-Fi Direct
®
Related Topics:
• Configure Your Wi-Fi Direct Network Using the Push Button Method
• Configure a Wi-Fi Direct Network Manually
317
Home > Network > Wireless Network Settings > Use Wi-Fi Direct
®
> Configure Your Wi-Fi Direct Network
Using the Push Button Method
Configure Your Wi-Fi Direct Network Using the Push Button Method
When the machine receives the Wi-Fi Direct request from your mobile device, the message [Wi-Fi
Direct connection request received. Press [OK] to connect.] will appear on the LCD.
Press [OK] to connect.
1. Press [Settings] > [Network] > [Wi-Fi Direct].
2. If your mobile device does not support Wi-Fi Direct, press [Group Owner] > [On].
3. Press [Push Button].
4. When the [Activate Wi-Fi Direct on other device. Then Press [OK].] message appears,
turn your mobile device's Wi-Fi Direct function on (for more information, see your mobile device's user's
guide). Press [OK] on your Brother machine.
5. Do one of the following:
• If your mobile device displays a list of machines with Wi-Fi Direct enabled, select your Brother machine.
• If your Brother machine displays a list of mobile devices with Wi-Fi Direct enabled, select your mobile
device. To search for available devices again, press [Rescan].
When your mobile device connects successfully, the machine displays [Connected].
Related Information
• Use Wi-Fi Direct
®
Related Topics:
• Wi-Fi Direct Overview
• Configure a Wi-Fi Direct Network Manually
318

Home > Network > Wireless Network Settings > Use Wi-Fi Direct
®
> Configure a Wi-Fi Direct Network
Manually
Configure a Wi-Fi Direct Network Manually
Configure the Wi-Fi Direct setting from the machine's control panel.
1. Press
[Settings] > [Network] > [Wi-Fi Direct] > [Manual].
2. The machine will display the SSID (Network Name) and Password (Network Key). Go to your mobile device's
wireless network settings screen, select the SSID, and then enter the password.
When your mobile device connects successfully, the machine displays [Connected].
Related Information
• Use Wi-Fi Direct
®
Related Topics:
• Wi-Fi Direct Overview
• Configure Your Wi-Fi Direct Network Using the Push Button Method
319

Home > Network > Wireless Network Settings > Enable/Disable Wireless LAN
Enable/Disable Wireless LAN
1. Press [Settings] > [Network] > [Network I/F].
2. Do one of the following:
• To enable Wi-Fi, select [WLAN(Wi-Fi)].
• To disable Wi-Fi, select [Wired LAN].
3. Press .
Related Information
• Wireless Network Settings
320

Home > Network > Wireless Network Settings > Print the WLAN Report
Print the WLAN Report
The WLAN Report shows your machine's wireless status. If the wireless connection fails, check the error code on
the printed report.
1. Press
[Settings] > [All Settings] > [Print Reports] > [WLAN Report] > [Yes].
The machine will print the WLAN Report.
If the WLAN Report does not print, check your machine for errors. If there are no visible errors, wait for one
minute and then try to print the report again.
Related Information
• Wireless Network Settings
• Wireless LAN Report Error Codes
Related Topics:
• Configure IEEE 802.1x Authentication for a Wired or a Wireless Network Using Web Based Management
(Web Browser)
• If You Are Having Difficulty with Your Machine's Network
321
Home > Network > Wireless Network Settings > Print the WLAN Report > Wireless LAN Report Error
Codes
Wireless LAN Report Error Codes
If the Wireless LAN Report shows that the connection failed, check the error code on the printed report and see
the corresponding instructions in the table:
Error Code
Problem and Recommended Solutions
TS-01 The WLAN (Wi-Fi) is not enabled.
Check the following points and try to set up your wireless connection again:
• Enable the WLAN setting on your machine.
• If a network cable is connected to your machine, disconnect it.
TS-02 The wireless router/access point cannot be detected.
Check the following points and try to set up your wireless connection again:
• Make sure the wireless router/access point is on.
• Temporarily place your machine closer to the wireless router/access point when you are
configuring the wireless settings.
• If your wireless router/access point is using MAC address filtering, confirm that the MAC
address of the machine is allowed in the filter. You can find the MAC address by printing the
Network Configuration Report.
• If you manually entered the Network Name (SSID) and security information (authentication
method/encryption method), the information may be incorrect. Check the Network Name and
security information again and re-enter the correct information.
• Restart your wireless router/access point. If you cannot find the Network Name (SSID) and
security information, see the documentation provided with your wireless router/access point,
or contact the router manufacturer, your system administrator, or Internet service provider.
TS-03
The wireless enterprise network and security settings you entered may be incorrect.
Check the following points and try to set up your wireless connection again:
Verify the following information:
- Network Name (SSID) you selected to configure your machine.
- Security information you selected to configure your machine (such as the authentication
method, encryption method, or User ID).
If you still cannot find the Network Name (SSID) and security information, see the
documentation provided with your wireless router/access point, or contact the router
manufacturer, your system administrator, or Internet service provider.
TS-04
Your machine does not support the authentication and encryption methods used by the selected
wireless router/access point.
For infrastructure mode (Most common)
Change the authentication and encryption methods of the wireless router/access point. Your
machine supports the following authentication and encryption methods:
• WPA-Personal:
TKIP / AES
• WPA2-Personal:
TKIP / AES
• WPA3-Personal:
AES
• OPEN:
WEP / NONE (without encryption)
• Shared key:
WEP
If your issue is not solved, the Network Name (SSID) or security settings you entered may be
incorrect. Check that all wireless network settings are correct for your network.
322

Error Code Problem and Recommended Solutions
TS-05 The Network Name (SSID) and Network Key (Password) are incorrect.
Check the following points and try to set up your wireless connection again:
• Confirm the Network Name (SSID) and Network Key (Password).
• If your Network Key contains upper-case and lower-case letters, make sure you type them
correctly.
• If you cannot find the Network Name (SSID) and security information, see the documentation
provided with your wireless router/access point, or contact the router manufacturer, your
system administrator, or Internet service provider.
• If your wireless router/access point uses WEP encryption with multiple WEP keys, write
down and use only the first WEP key.
TS-06
The wireless security information (authentication method/encryption method/Network Key
(Password)) is incorrect.
Check the following points and try to set up your wireless connection again:
• Confirm the Network Key. If your Network Key contains upper-case and lower-case letters,
make sure you type them correctly.
• Confirm whether the authentication method entered and the authentication method or
encryption method supported by the wireless router/access point are the same.
• If the network key, authentication method, and encryption method have been confirmed,
restart your wireless router/access point and the machine.
• If your wireless router/access point's Stealth Mode is on, you may need to disable it to
connect to the wireless network.
If you cannot find the Network Name (SSID) and security information, see the documentation
provided with your wireless router/access point, or contact the router manufacturer, your system
administrator, or Internet service provider.
TS-07
The machine cannot detect a wireless router/access point that has WPS (Wi-Fi Protected Setup)
enabled.
Check the following points and try again:
• To check if your wireless router/access point supports WPS, look for the WPS symbol
displayed on the router/access point. For more information, see the documentation provided
with your wireless router/access point.
• To set up your wireless connection using WPS, you must configure both your machine and
the wireless router/access point. For more information, see the user's guide.
• If you do not know how to set up your wireless router/access point using WPS, see the
documentation provided with your wireless router/access point, or contact the router
manufacturer, your system administrator, or Internet service provider.
TS-08
Two or more wireless routers or access points that have WPS enabled are detected.
Check the following points and try again:
• Make sure that only one wireless router/access point within range has WPS enabled, and
then try to connect again.
• Try to connect again after a few minutes to avoid interference from other access points/
routers.
323

How to confirm wireless security information (SSID/authentication method/encryption method/Network Key)
of your WLAN access point/router:
1. The default security settings may be provided on a label attached to the WLAN access point/router. Or
the manufacturer's name or model number of the WLAN access point/router may be used as the default
security settings.
2. See the documentation provided with your WLAN access point/router for information on how to find the
security settings.
• If the WLAN access point/router is set to not broadcast the SSID, the SSID will not automatically be
detected. You will have to manually enter the SSID name.
• The Network key may also be described as the Password, Security Key, or Encryption Key.
If you do not know the SSID and wireless security settings of your WLAN access point/router or how to
change the configuration, see the documentation provided with your WLAN access point/router, ask the
manufacturer of your access point/router or ask your Internet provider or network administrator.
Related Information
• Print the WLAN Report
Related Topics:
• If You Are Having Difficulty with Your Machine's Network
324

Home > Network > Network Features > Print the Network Configuration Report
Print the Network Configuration Report
The Network Configuration Report lists the network configuration, including the network print server settings.
• Node Name: The Node Name appears on the current Network Configuration Report. The default Node
Name is "BRNxxxxxxxxxxxx" for a wired network or "BRWxxxxxxxxxxxx" for a wireless network (where
"xxxxxxxxxxxx" is your machine's MAC Address / Ethernet Address.)
• If the IP Address on the Network Configuration Report shows 0.0.0.0, wait for one minute and try
printing it again.
• You can find your machine's settings, such as the IP address, subnet mask, node name, and MAC
Address on the report, for example:
- IP address: 192.168.0.5
- Subnet mask: 255.255.255.0
- Node name: BRN000ca0000499
- MAC Address: 00-0c-a0-00-04-99
1. Press [Settings] > [All Settings] > [Print Reports] > [Network Configuration] >
[Yes].
The machine prints the current Network Configuration Report.
Related Information
• Network Features
Related Topics:
• Check Your Machine's Network Settings
• Use the Network Connection Repair Tool (Windows)
• Configure IEEE 802.1x Authentication for a Wired or a Wireless Network Using Web Based Management
(Web Browser)
• Error and Maintenance Messages
• If You Are Having Difficulty with Your Machine's Network
326
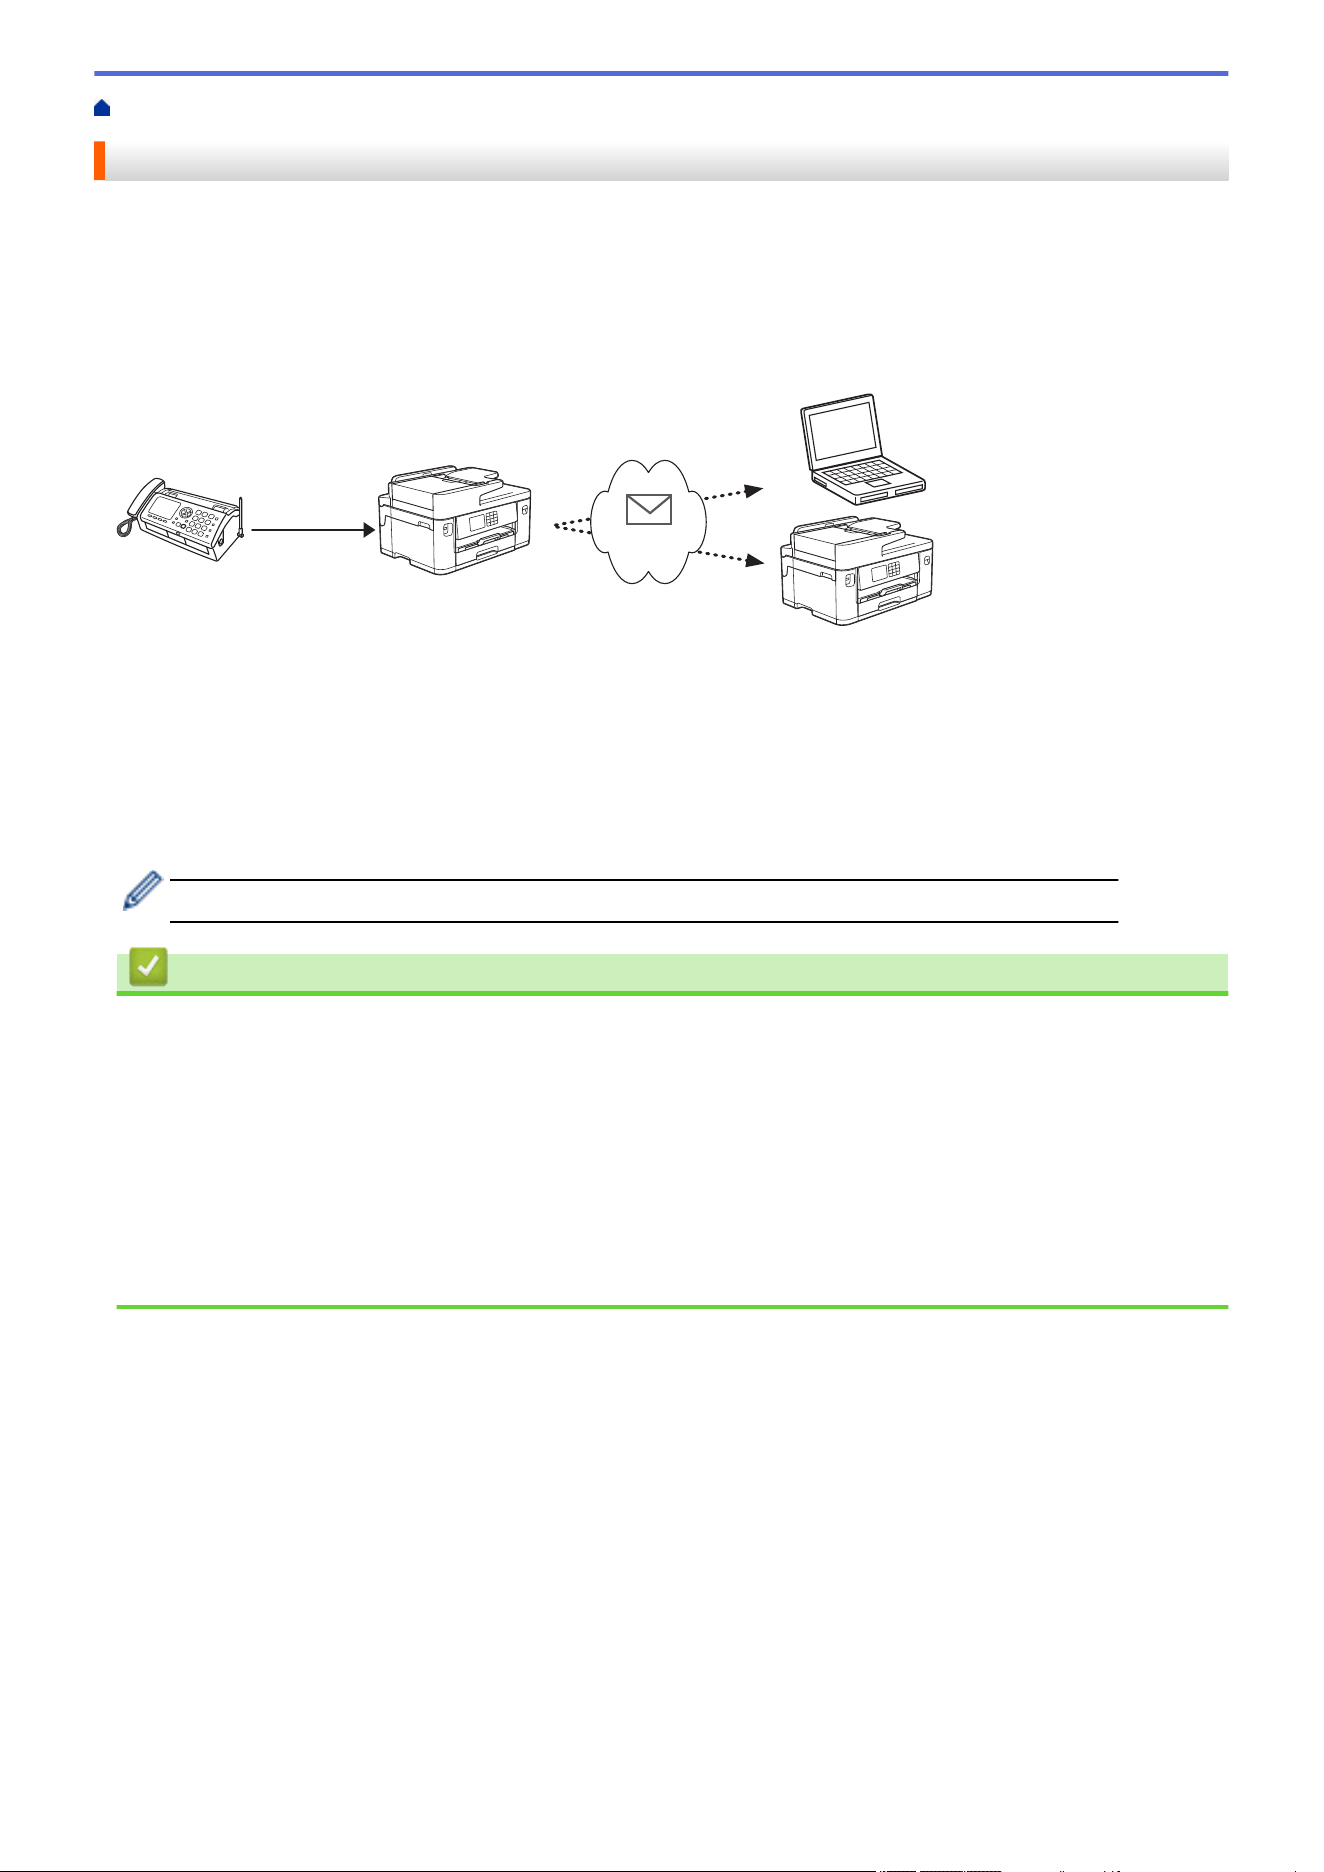
Home > Network > Network Features > Fax Using the Internet (I-Fax)
Fax Using the Internet (I-Fax)
With Brother's I-Fax program, you can send and receive fax documents using the Internet as the transport
mechanism. Documents are transmitted in email messages as attached TIFF files. Your computer can send and
receive documents as long as it has an application that can generate and view TIFF files. You can use any TIFF
viewer application. Documents sent via the Brother machine will be converted into a TIFF format automatically. If
you want to send and receive messages to and from your Brother machine, your computer's email application
must support Multipurpose Internet Mail Extensions (MIME).
1
2
3
4
5
6
1. Fax (Sender)
2. Telephone line
3. Your Brother Machine (Receiver/Sender)
4. The Internet
5. A computer receives a forwarded email
6. A fax machine receives a forwarded fax
I-Fax supports sending and receiving documents in Letter or A4 format and in monochrome only.
Related Information
• Network Features
• Important Information about Internet Fax (I-Fax)
• Configure Your Brother Machine for Email or I-Fax
• Send an I-Fax
• Poll the Server Manually
• I-Fax Options
Related Topics:
• Forward Received Email and Fax Messages
327

Home > Network > Network Features > Fax Using the Internet (I-Fax) > Important Information about
Internet Fax (I-Fax)
Important Information about Internet Fax (I-Fax)
I-Fax communication on a LAN is very similar to communication via email; however, it is different from fax
communication using standard phone lines. The following is important information for using I-Fax:
• Factors such as the receiver's location, structure of the LAN and how busy the circuit (such as the Internet) is
may cause the system to take a longer time than usual to send an error mail.
• When sending confidential documents, we recommend using standard phone lines instead of the Internet
(due to its low level of security).
• If the receiver's mail system is not MIME-compatible, you cannot use I-Fax to send documents. If possible,
find out in advance, and note that some servers will not send an error reply.
• If a document is too large to send via I-Fax, it may not reach the receiver.
• You cannot change the font or size of the text in any Internet mail you receive.
Related Information
• Fax Using the Internet (I-Fax)
328
Home > Network > Network Features > Fax Using the Internet (I-Fax) > Configure Your Brother Machine for
Email or I-Fax
Configure Your Brother Machine for Email or I-Fax
Before using I-Fax, configure your Brother machine to communicate with your network and mail server. You
can configure these items using the machine's control panel or Web Based Management. We recommend
using Web Based Management to configure the optional items.
1. Start your web browser.
2. Type "https://machine's IP address" in your browser's address bar (where "machine's IP address" is the
machine's IP address).
For example:
https://192.168.1.2
3. If required, type the password in the Login field, and then click Login.
The default password to manage this machine’s settings is located on the back of the machine and marked
"Pwd".
4. Go to the navigation menu, and then click Network > Network > Protocol.
Start from , if the navigation menu is not shown on the left side of the screen.
5. In the POP3/IMAP4/SMTP Client field, click Advanced Settings and configure the settings as needed.
If you are unsure of any of these items, contact your system administrator.
6. When finished, click Submit.
The Test Send/Receive E-mail Configuration dialog box appears.
7. Follow the instructions in the dialog box to test the current settings.
Related Information
• Fax Using the Internet (I-Fax)
• Initial Setup for Email or I-Fax
• Receive an I-Fax Automatically
• How Received I-Faxes Appear on a Computer
Related Topics:
• Access Web Based Management
• I-Fax Options
329
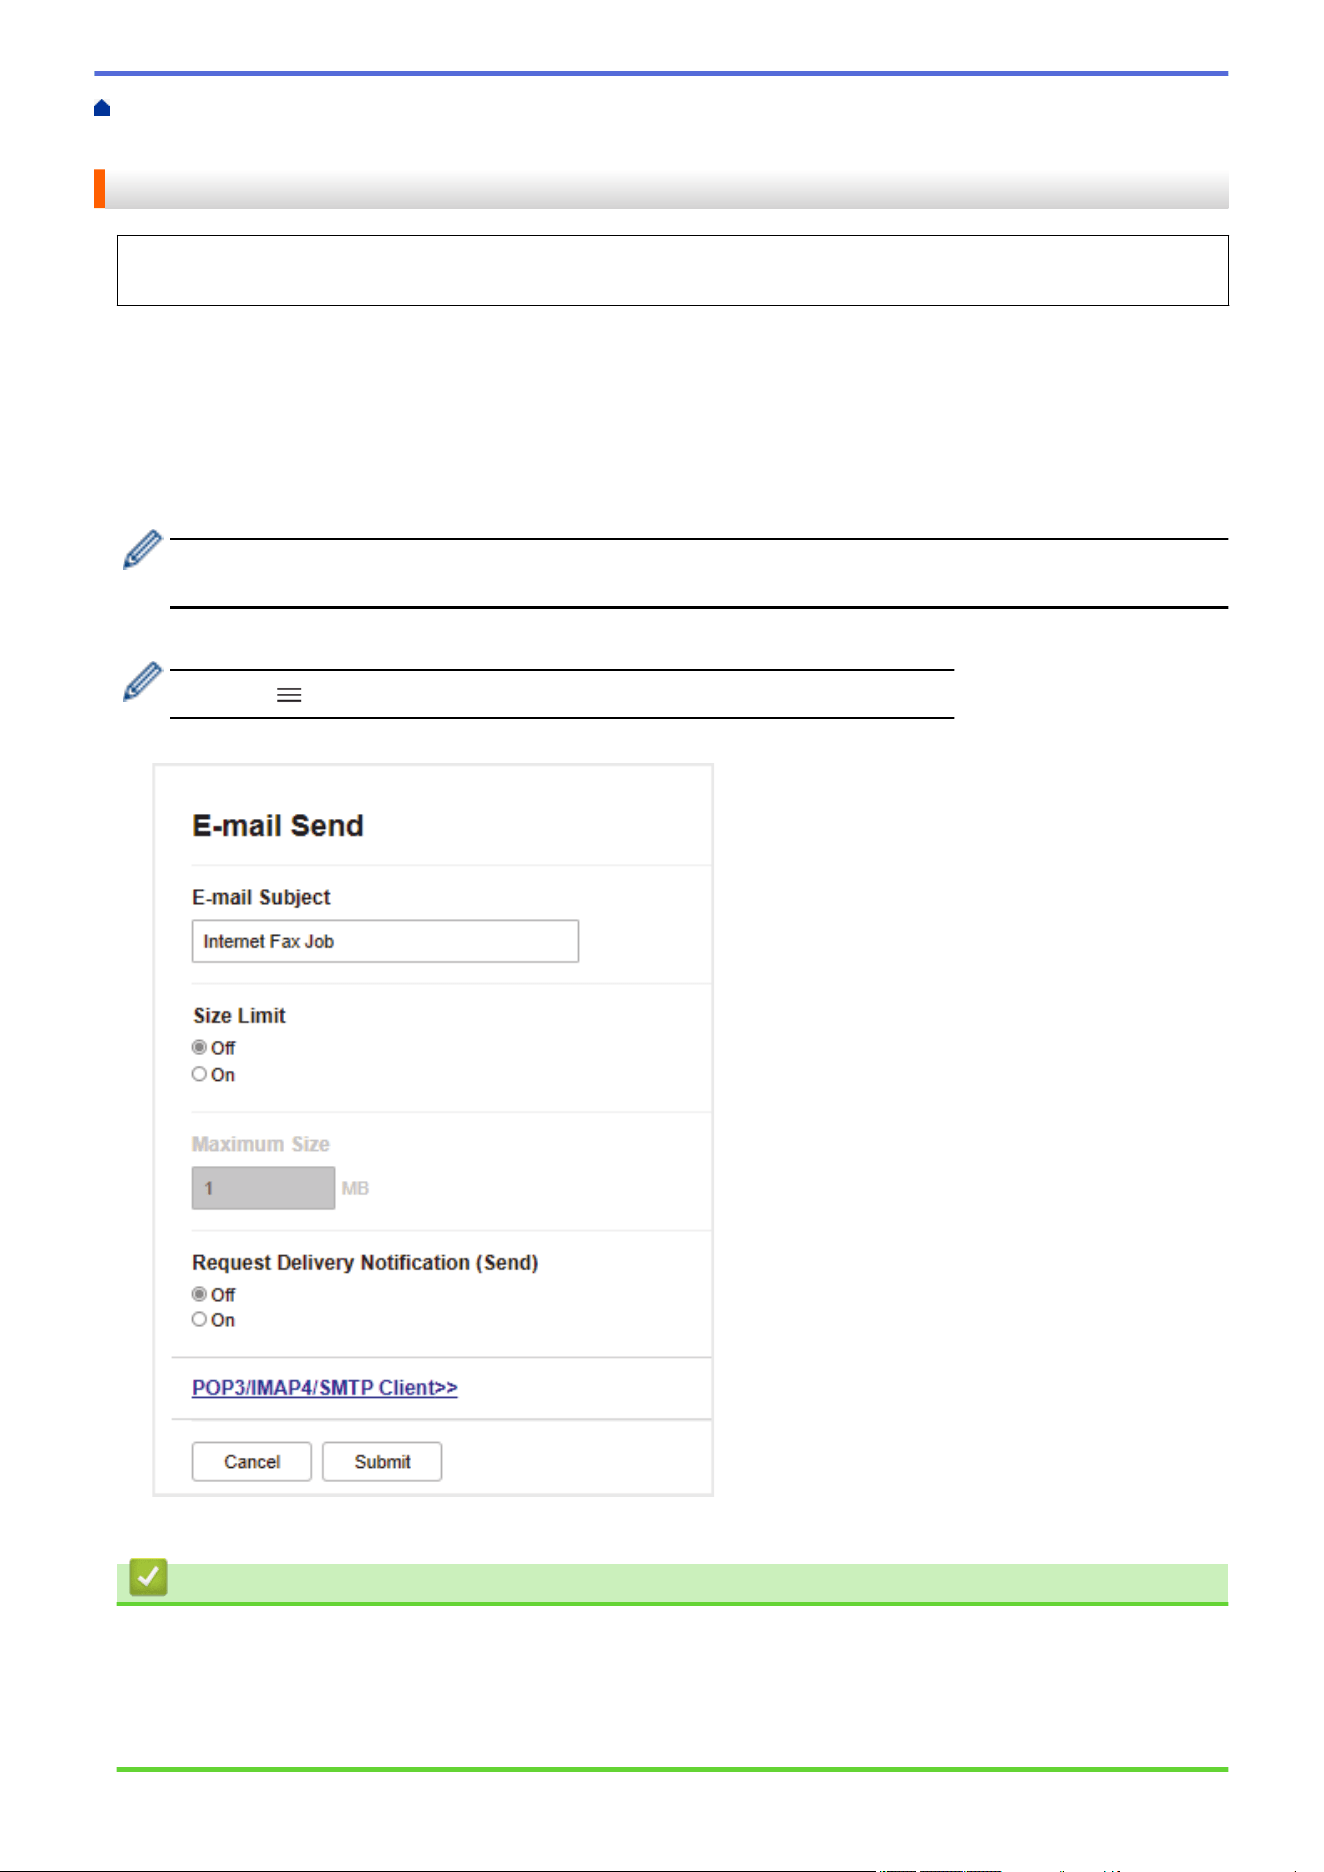
Home > Network > Network Features > Fax Using the Internet (I-Fax) > Configure Your Brother Machine for
Email or I-Fax > Initial Setup for Email or I-Fax
Initial Setup for Email or I-Fax
Before sending your I-Fax, use Web Based Management to configure sending and receiving options, if
needed.
1. Start your web browser.
2. Type "https://machine's IP address" in your browser's address bar (where "machine's IP address" is the
machine's IP address).
For example:
https://192.168.1.2
3. If required, type the password in the Login field, and then click Login.
The default password to manage this machine’s settings is located on the back of the machine and marked
"Pwd".
4. Go to the navigation menu, and then click Fax > E-mail Send.
Start from , if the navigation menu is not shown on the left side of the screen.
5. Configure the settings as needed.
6. When finished, click Submit.
Related Information
• Configure Your Brother Machine for Email or I-Fax
Related Topics:
• Access Web Based Management
• Forward Received Email and Fax Messages
330
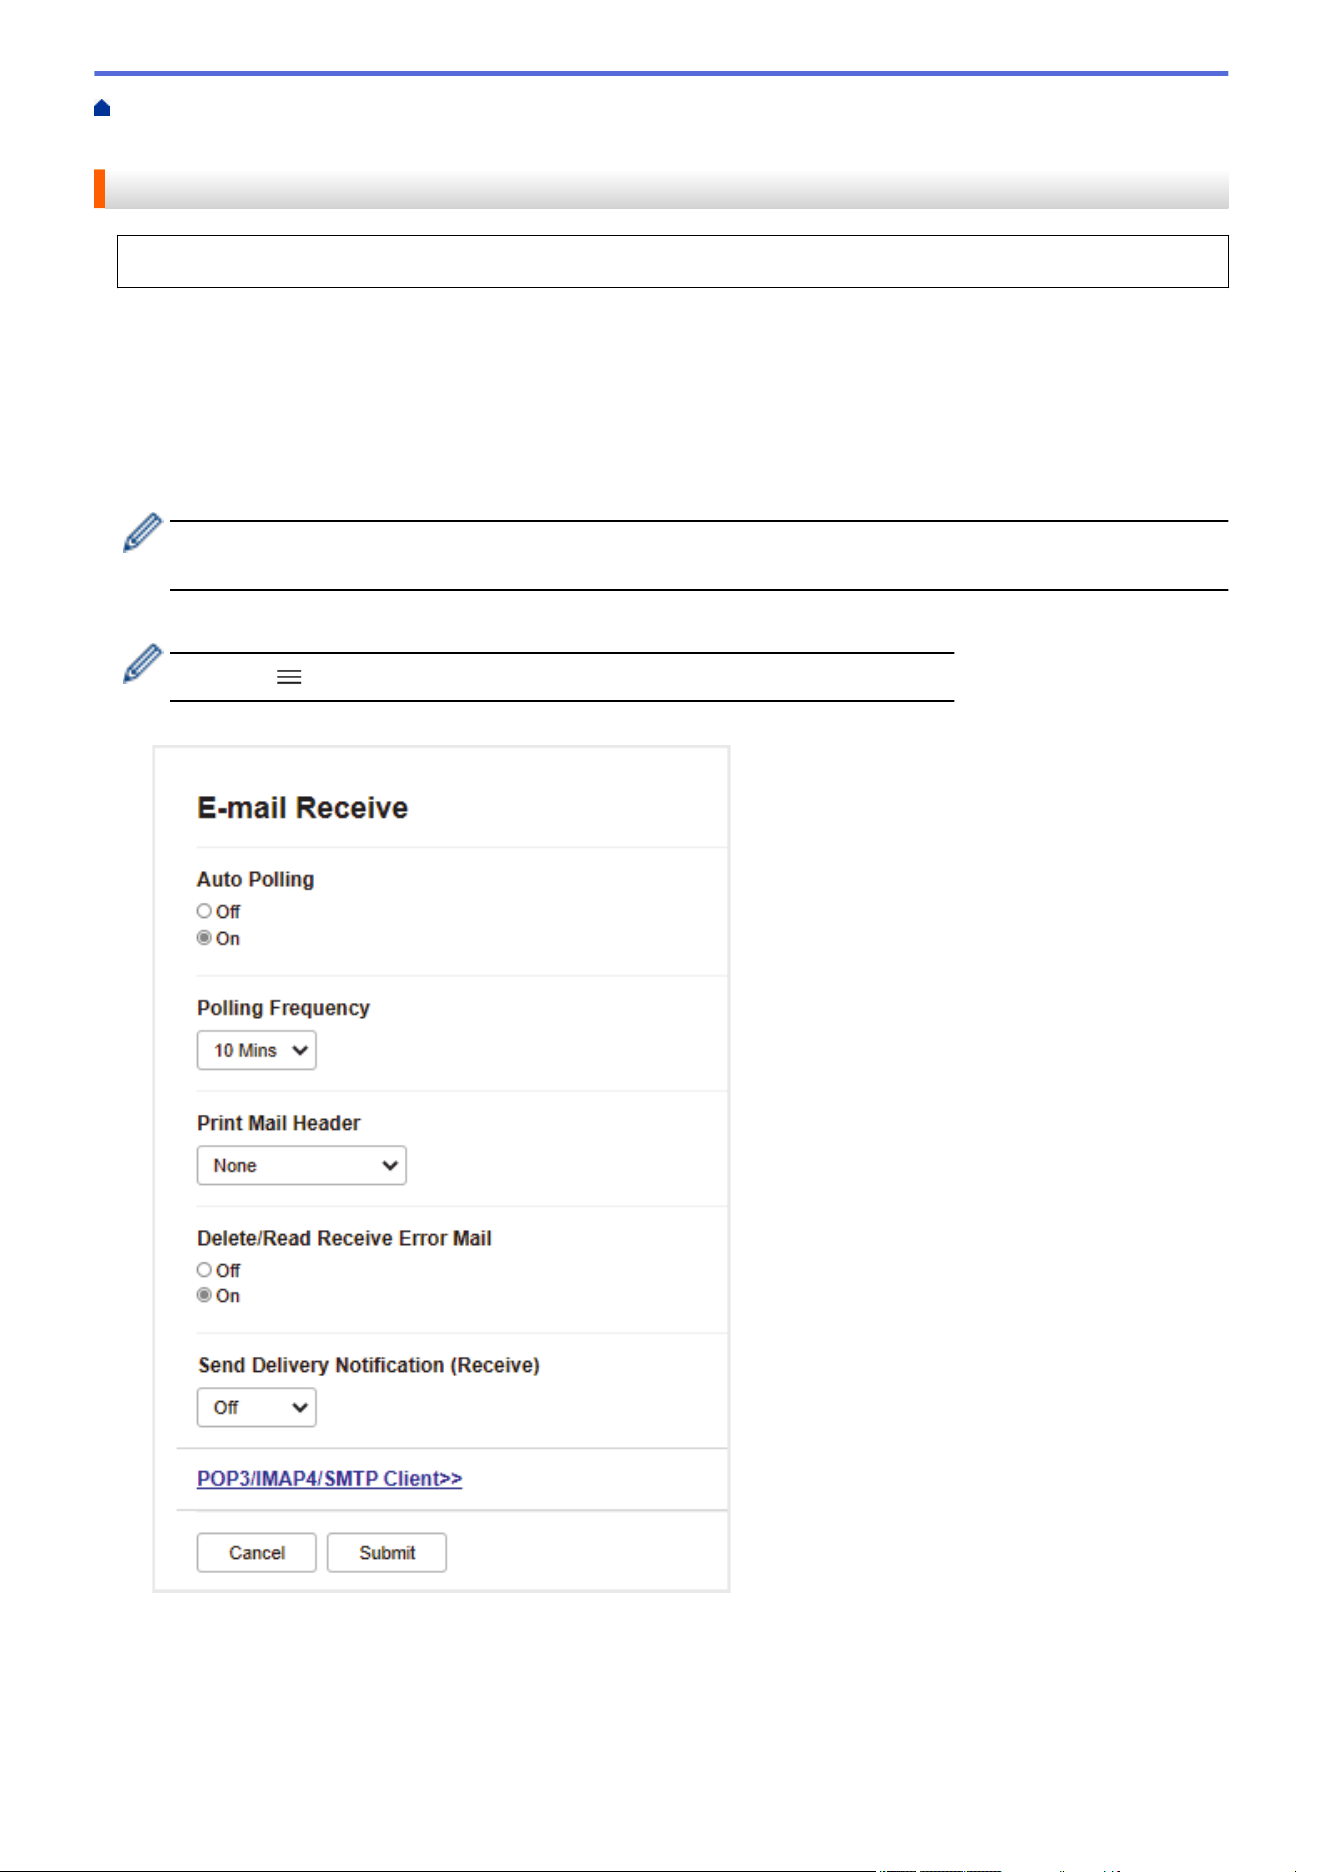
Home > Network > Network Features > Fax Using the Internet (I-Fax) > Configure Your Brother Machine for
Email or I-Fax > Receive an I-Fax Automatically
Receive an I-Fax Automatically
To receive an I-Fax automatically, use Web Based Management to configure receiving options, if needed.
1. Start your web browser.
2. Type "https://machine's IP address" in your browser's address bar (where "machine's IP address" is the
machine's IP address).
For example:
https://192.168.1.2
3. If required, type the password in the Login field, and then click Login.
The default password to manage this machine’s settings is located on the back of the machine and marked
"Pwd".
4. Go to the navigation menu, and then click Fax > E-mail Receive.
Start from , if the navigation menu is not shown on the left side of the screen.
5. Configure the settings as needed.
331

There are two ways to receive email messages:
• POP3/IMAP4 receiving at regular intervals
• POP3/IMAP4 receiving, manually initiated
When using POP3/IMAP4 receiving, the machine polls your email server to receive data. Polling can occur
at set intervals (for example, you can configure the machine to poll the email server every ten minutes) or
you can manually poll the server.
6. When finished, click Submit.
• If your machine starts to receive email data, the LCD will display [Receiving].The email will print
automatically.
• If your machine is out of paper when receiving data, the received data will be held in the machine's
memory. This data will be printed automatically after paper is re-inserted into the machine.
• If the received mail is not in a plain text format, or an attached file is not in the TIFF format, the error
message "ATTACHED FILE FORMAT NOT SUPPORTED." will be printed.
• If the received mail is too large, the error message "E-MAIL FILE TOO LARGE." will be printed.
• If Delete/Read Receive Error Mail is On (default), then the error mail will be deleted (POP3) or read
(IMAP4) from the email server automatically.
Related Information
• Configure Your Brother Machine for Email or I-Fax
Related Topics:
• Access Web Based Management
• How Received I-Faxes Appear on a Computer
• Forward Received Email and Fax Messages
332

Home > Network > Network Features > Fax Using the Internet (I-Fax) > Configure Your Brother Machine for
Email or I-Fax > How Received I-Faxes Appear on a Computer
How Received I-Faxes Appear on a Computer
When a computer receives an I-Fax document, the document is attached to an email message that notifies you
in its Subject: line that your email server has received an I-Fax. You can either wait for your Brother machine to
poll the email server, or you can manually poll the email server to receive the incoming data.
Related Information
• Configure Your Brother Machine for Email or I-Fax
Related Topics:
• Receive an I-Fax Automatically
333
Home > Network > Network Features > Fax Using the Internet (I-Fax) > Send an I-Fax
Send an I-Fax
Sending an I-Fax is like sending a normal fax. Make sure that your recipient's information is saved in your email
address book, and load the document you want to I-Fax into your Brother machine.
If the computer to which you want to send a document is not running Windows, ask the computer's owner to
install software that can view TIFF files.
1. Load your document.
2. Do one of the following:
• If [Fax Preview] is set to [Off], press [Fax].
• If [Fax Preview] is set to [On], press [Fax], and then press [Sending Faxes].
3. To change the fax-sending settings, press [Options].
4. Press a or b to scroll through the fax settings. When the setting you want is displayed, press it and choose
your preference. When you have finished changing settings, press [OK].
5. Do one of the following:
• Press , and then enter the email address.
• Press [Address Book], choose the email address of your recipient, and then press [Apply].
6. Press [Fax Start].
The machine starts scanning. After the document is scanned, it is transmitted to the recipient via your SMTP
server. You can cancel the send operation by pressing during scanning. When the transmission is
finished, the machine will enter standby mode.
Related Information
• Fax Using the Internet (I-Fax)
334

Home > Network > Network Features > Fax Using the Internet (I-Fax) > Poll the Server Manually
Poll the Server Manually
1. Press [Settings] > [All Settings] > [Network] > [E-mail/IFAX] > [Manual Receive] >
[Yes].
2. The LCD will display [Receiving] and your machine will print the data from the email server.
Related Information
• Fax Using the Internet (I-Fax)
Related Topics:
• Forward Received Email and Fax Messages
335

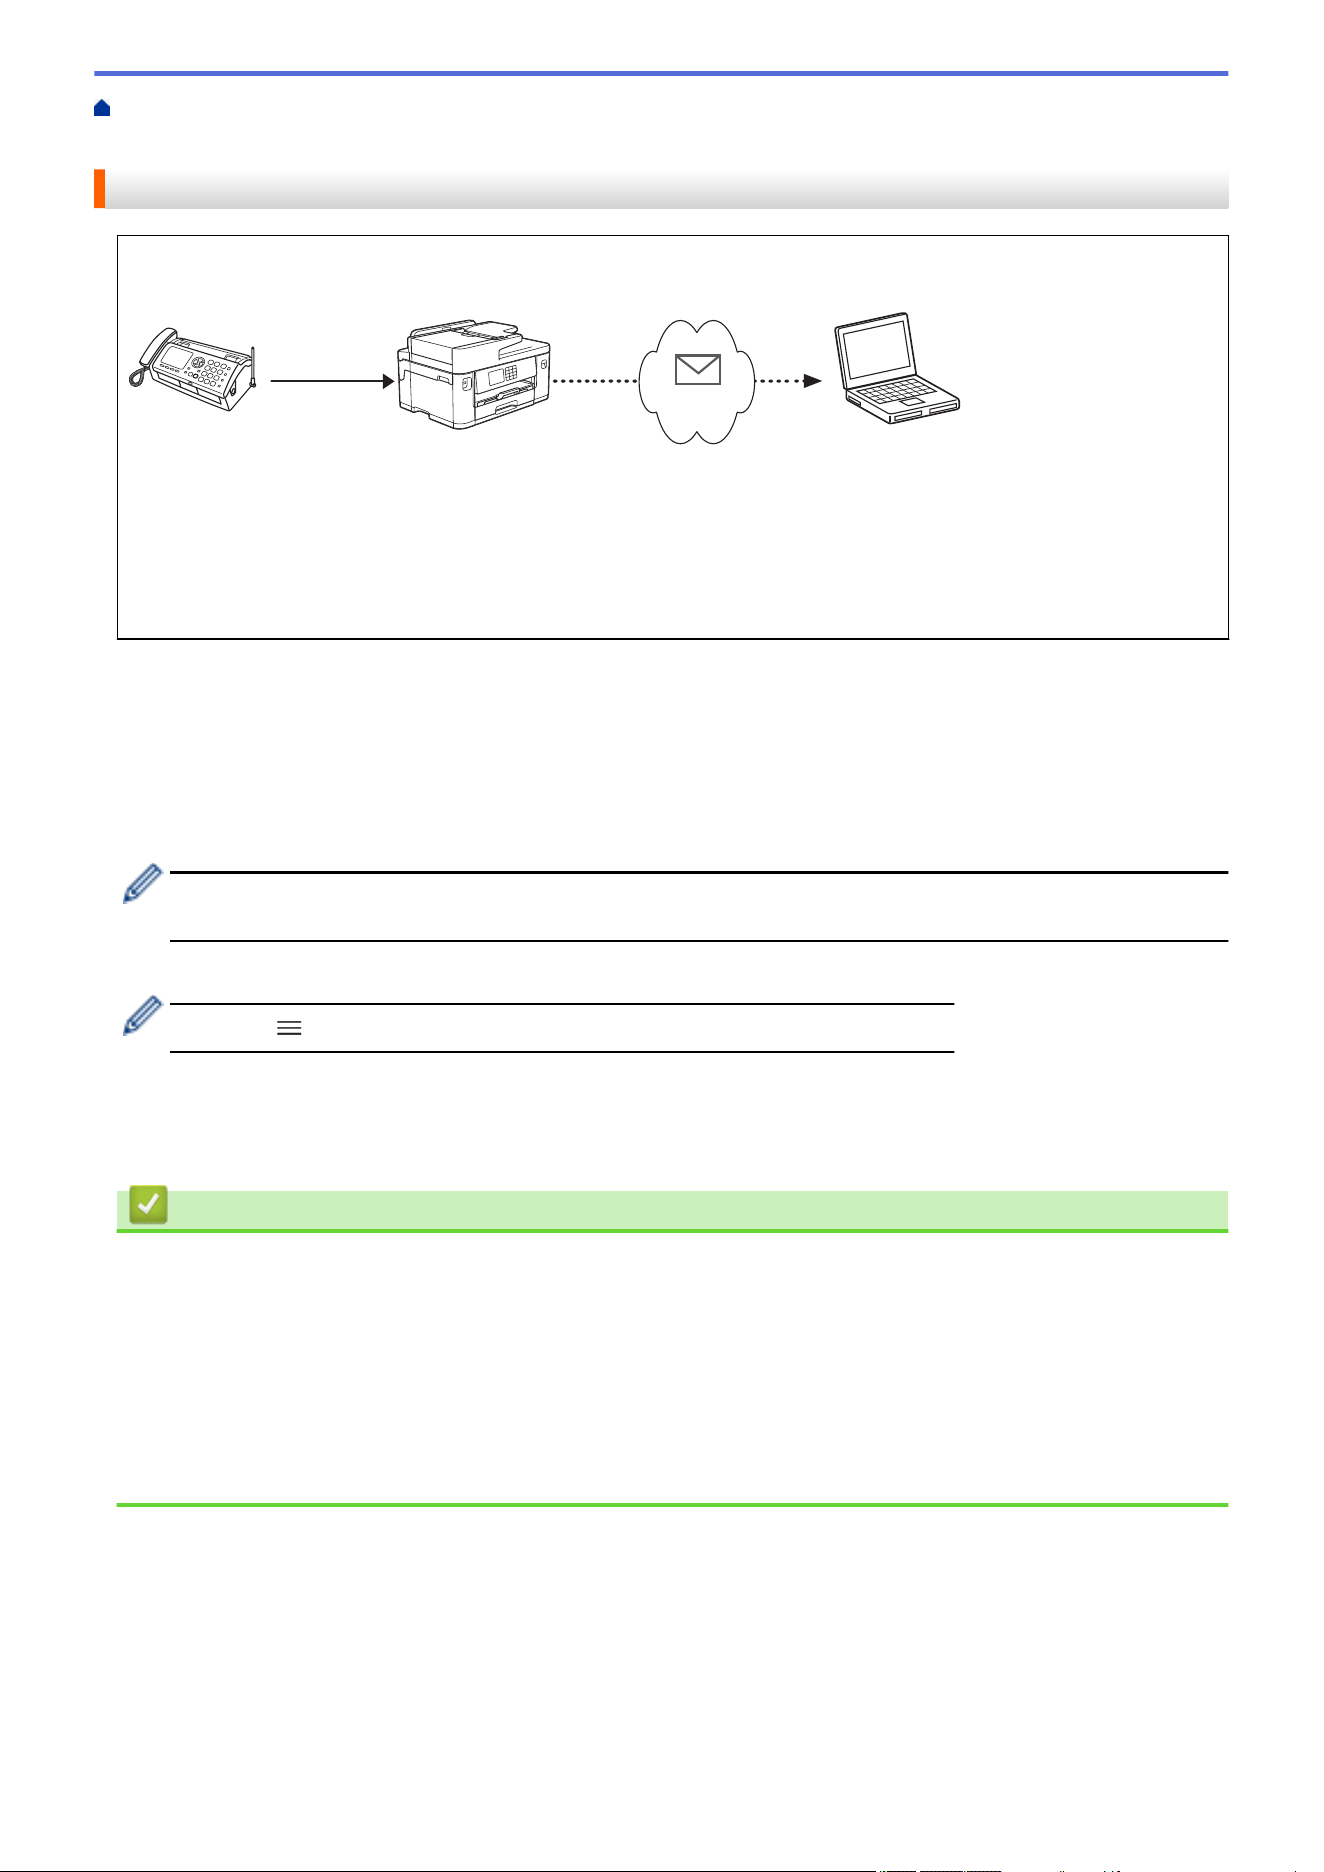
Home > Network > Network Features > Fax Using the Internet (I-Fax) > I-Fax Options > Forward Received
Email and Fax Messages
Forward Received Email and Fax Messages
Use Brother I-Fax to forward email or standard fax messages to another computer, to a fax machine, or to
another I-Fax machine. Enable the Forwarding function using Web Based Management.
1
2
3
5
4
1. Fax (Sender)
2. Telephone line
3. Your Brother Machine (Receiver/Sender)
4. The Internet
5. A computer receives a forwarded email
1. Start your web browser.
2. Type "https://machine's IP address" in your browser's address bar (where "machine's IP address" is the
machine's IP address).
For example:
https://192.168.1.2
3. If required, type the password in the Login field, and then click Login.
The default password to manage this machine’s settings is located on the back of the machine and marked
"Pwd".
4. Go to the navigation menu, and then click Fax > Remote Fax Options.
Start from
, if the navigation menu is not shown on the left side of the screen.
5. Select Fax Forward in the Fwd/Store/Cloud field.
6. Select the E-mail Address option in Fax Forward #, and then type the recipient's email address.
7. When finished, click Submit.
Related Information
• I-Fax Options
Related Topics:
• Access Web Based Management
• Poll the Server Manually
• Fax Using the Internet (I-Fax)
• Initial Setup for Email or I-Fax
• Receive an I-Fax Automatically
337
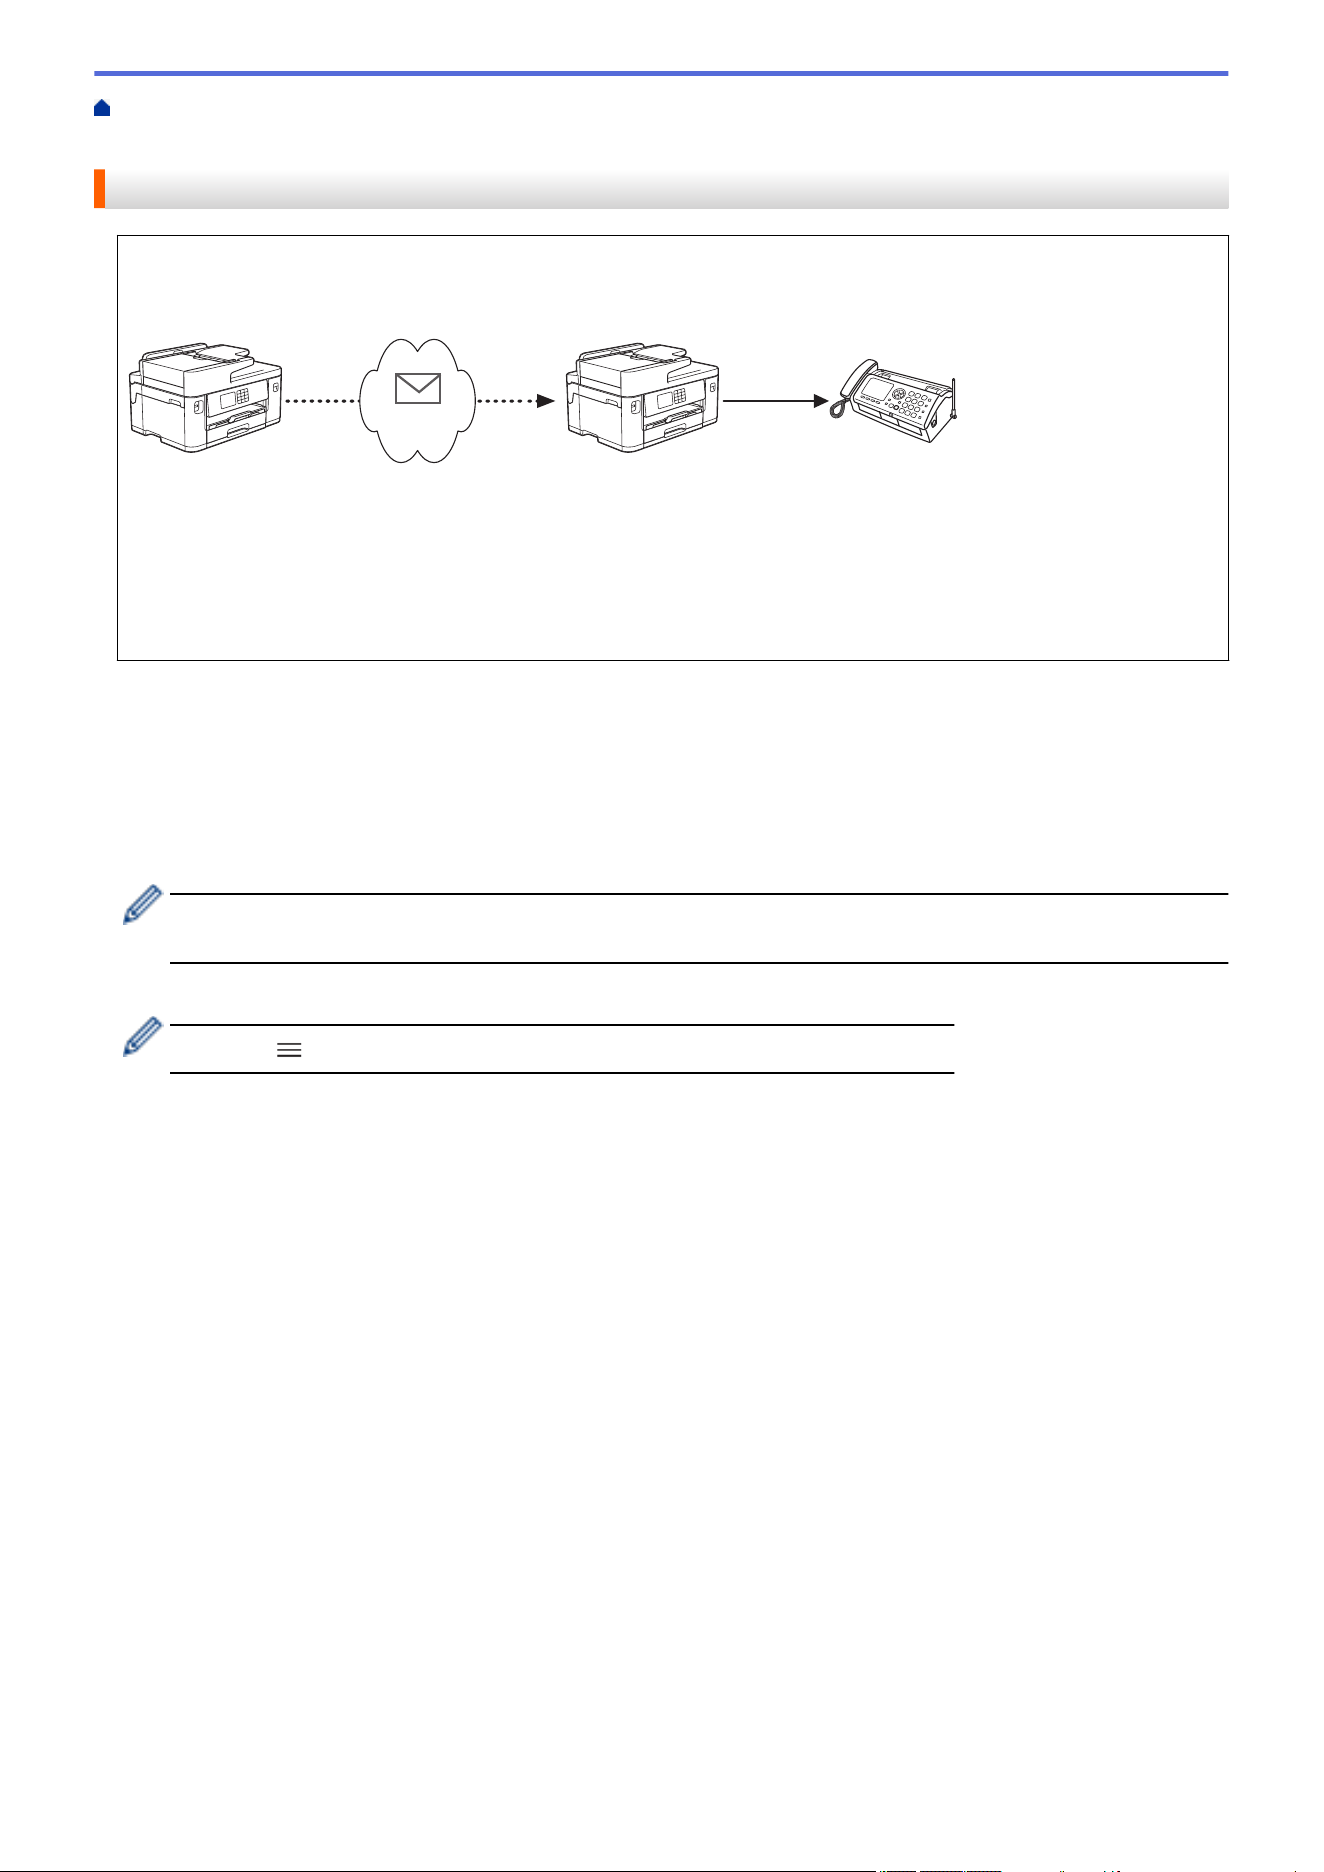
Home > Network > Network Features > Fax Using the Internet (I-Fax) > I-Fax Options > Set Up Relay
Broadcast on Your Brother Machine
Set Up Relay Broadcast on Your Brother Machine
A Relay Broadcast is when your Brother machine receives a message over the Internet and then relays it to
another fax machine using conventional telephone lines. If you must fax a document over a long distance or
abroad, use the "relay broadcast" function to save the communication fee.
1 3
2
5
4
1. Internet-available fax machine
2. The Internet
3. Your Brother Machine
4. Telephone line
5. Fax machine
1. Start your web browser.
2. Type "https://machine's IP address" in your browser's address bar (where "machine's IP address" is the
machine's IP address).
For example:
https://192.168.1.2
3. If required, type the password in the Login field, and then click Login.
The default password to manage this machine’s settings is located on the back of the machine and marked
"Pwd".
4. Go to the navigation menu, and then click Fax > Relay Function.
Start from
, if the navigation menu is not shown on the left side of the screen.
338
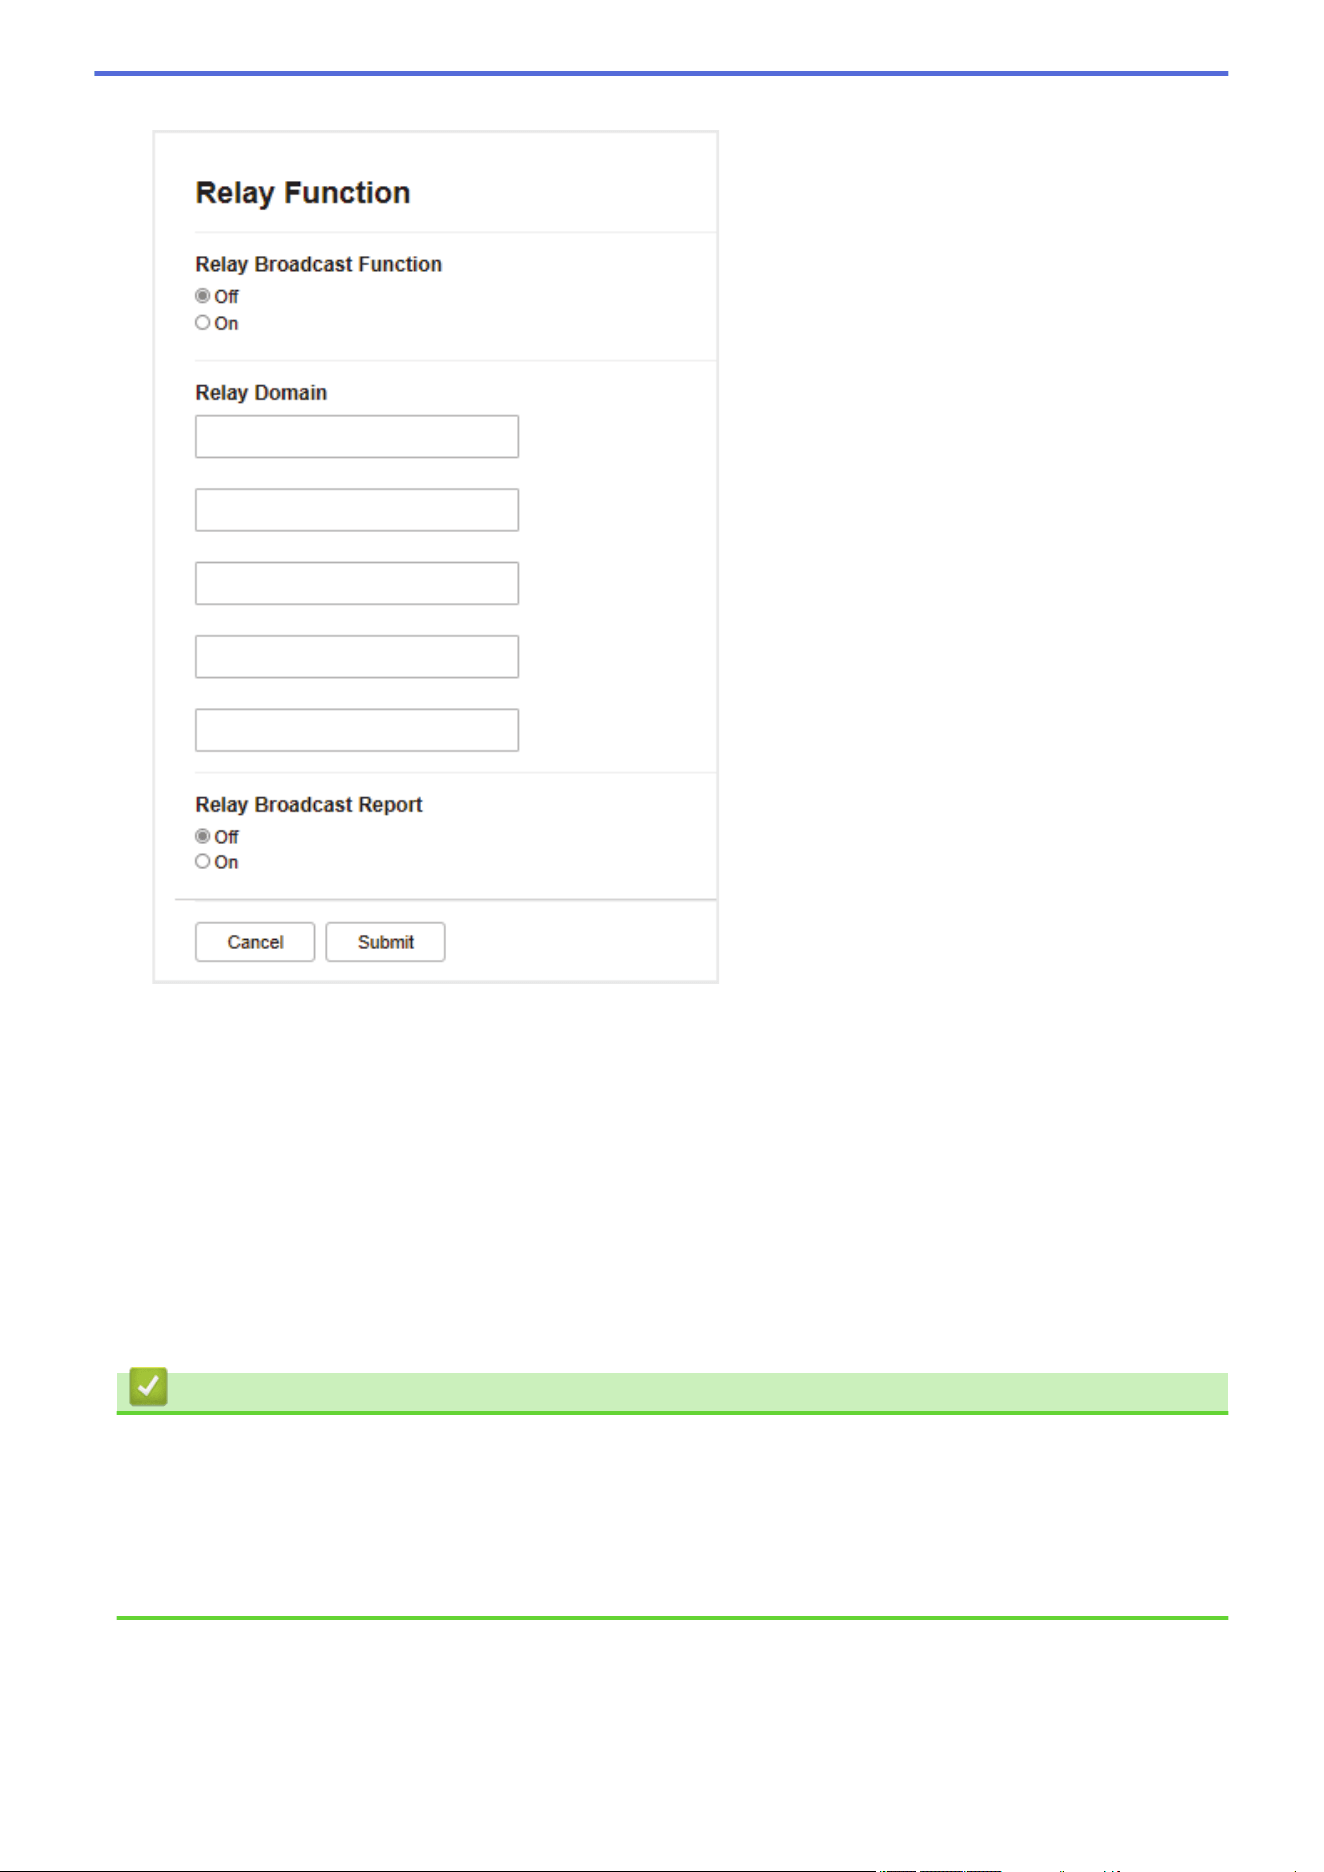
5. Configure settings as needed.
• Relay Broadcast Function
Set the Relay Broadcast Function to On.
• Relay Domain
Configure your machine's domain name on the machine that will broadcast the document to the
conventional fax machine. To use your machine as a relay broadcast device, you must specify the trusted
domain name (the portion of the name after the "@" sign) on the machine. Use care in selecting a trusted
domain: any user on a trusted domain will be able to send a relay broadcast. You can register up to five
domain names.
• Relay Broadcast Report
Specify whether or not you want a report to print after the machine completes the relay broadcast.
6. When finished, click Submit.
Related Information
• I-Fax Options
• Relay Broadcast from Your Brother Machine
• Relay Broadcast from Your Computer
Related Topics:
• Access Web Based Management
339

Home > Network > Network Features > Fax Using the Internet (I-Fax) > I-Fax Options > Set Up Relay
Broadcast on Your Brother Machine > Relay Broadcast from Your Brother Machine
Relay Broadcast from Your Brother Machine
Use the Relay Broadcast Function to send an email from your machine to a conventional fax machine.
Confirm the POP3/IMAP4/SMTP Client and SMTP Server checkboxes are selected in Web Based
Management. If the POP3/IMAP4/SMTP Client and SMTP Server checkboxes are not selected, select the
POP3/IMAP4/SMTP Client and SMTP Server checkboxes. Click Submit, and then restart your machine.
FAX@brother.com UKFAX@brother.co.uk 123456789
1
UKFAX@brother.co.uk(fax#123456789)
1. The Internet
In this example, your machine's email address is FAX@brother.com and you want to send a document from your
machine to a standard fax machine in England with the email address UKFAX@brother.co.uk, and you want your
machine to send the document using a conventional telephone line.
1. Load your document.
2. Do one of the following:
• If [Fax Preview] is set to [Off], press [Fax].
• If [Fax Preview] is set to [On], press [Fax], and then press [Sending Faxes].
3. Press [Options] > [Broadcasting] > [Add Number].
4. You can add email addresses to the broadcast in the following ways:
• Press [Add Number] and press
, enter the email address and press [OK].
• Press [Add from Address book]. Select the checkbox of the email address you want to add to the
broadcast. After you have checked all the email addresses you want, press [OK].
• Press [Search in Address book]. Enter the name and press [OK]. The search results will be
displayed. Press the name and then press the email address you want to add to the broadcast.
The following is an example of how to enter the email address and phone number:
UKFAX@brother.co.uk(fax#123456789)
email address
Fax Phone Number
The word "fax#" must be
included with the phone
number inside the parenthesis.
After you have entered all of the fax numbers, press [OK].
5. Press [Fax Start].
340

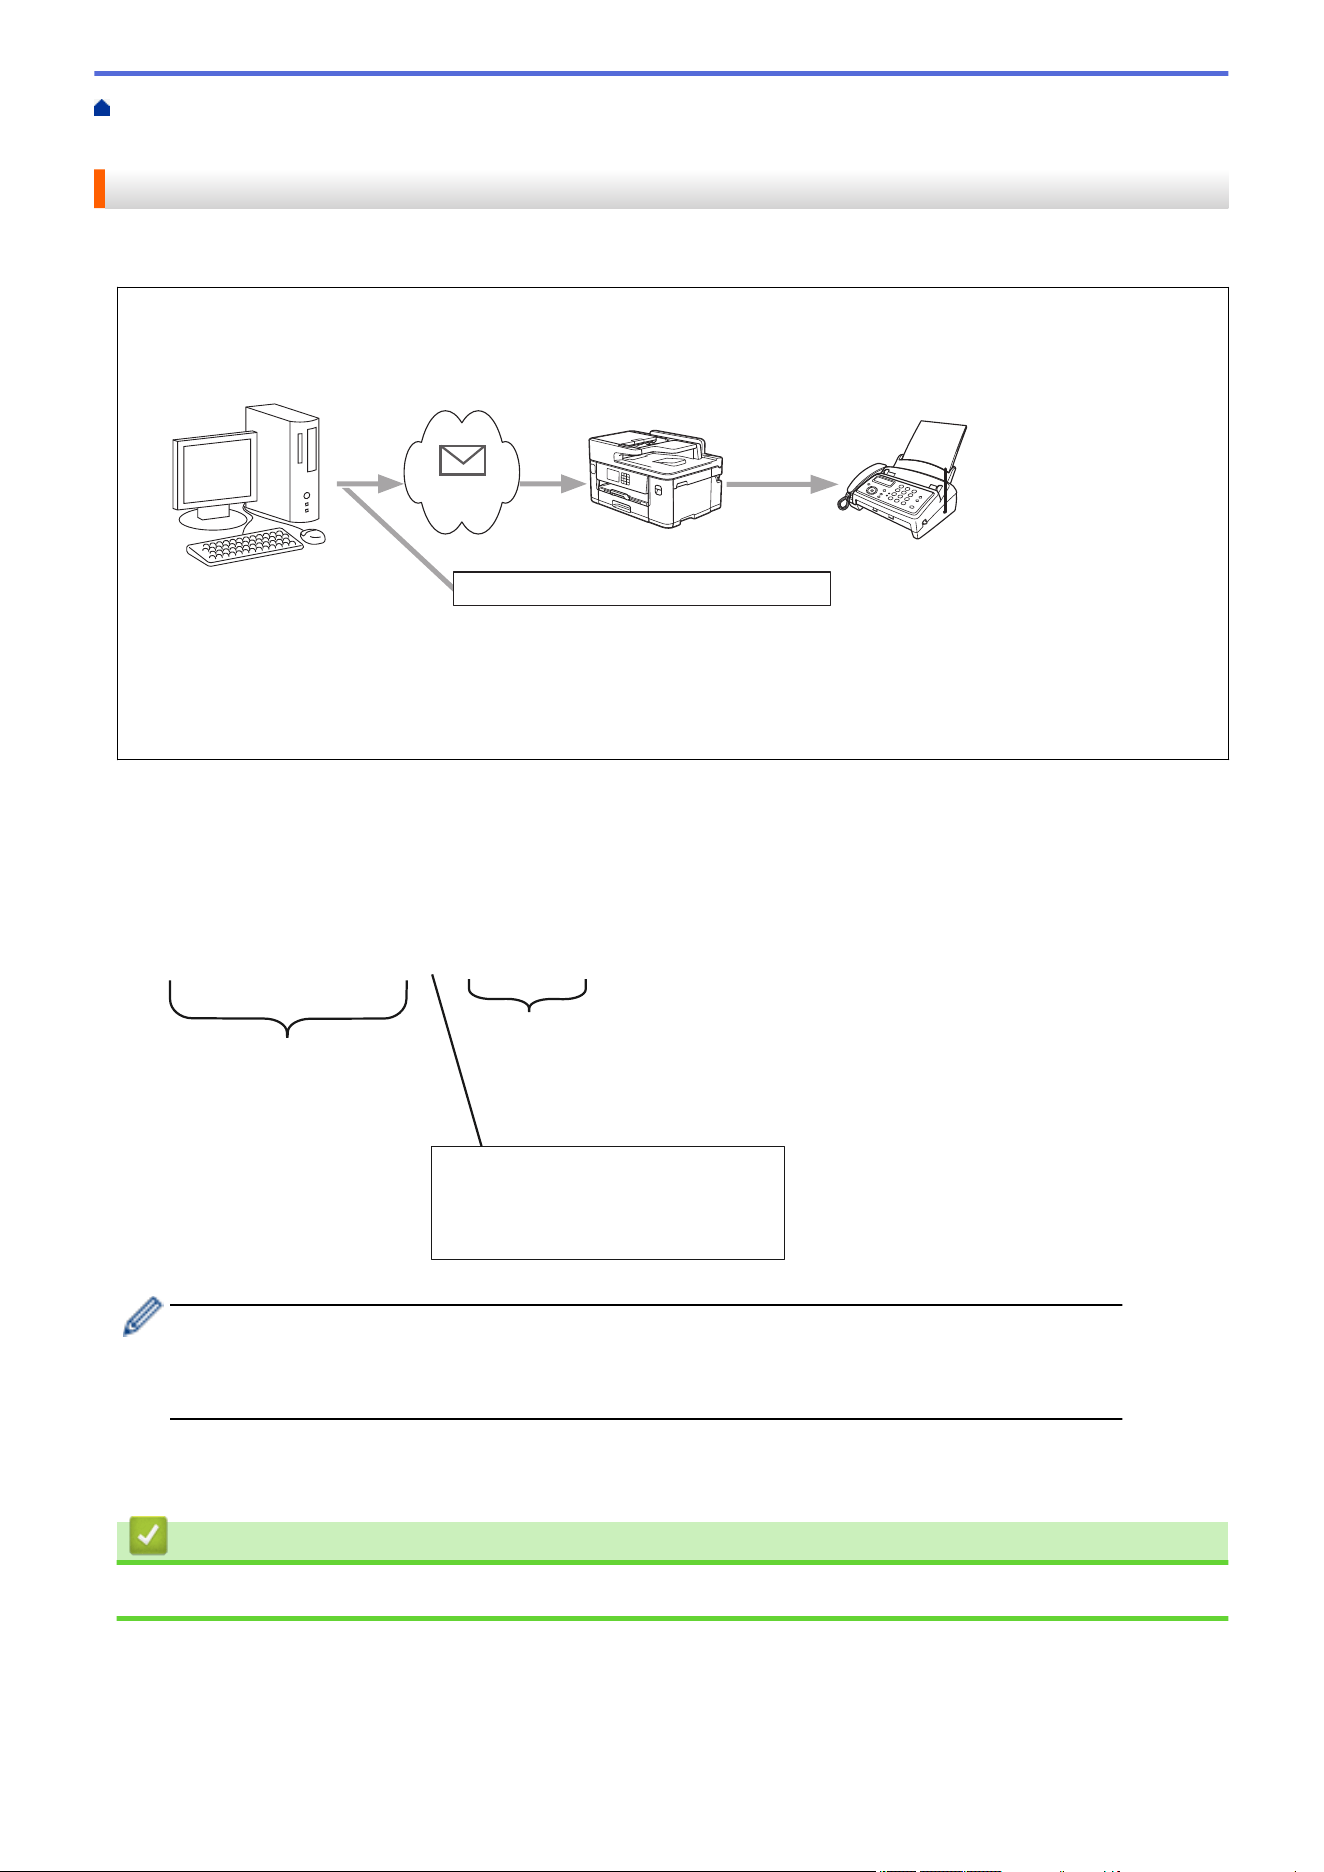
Home > Network > Network Features > Fax Using the Internet (I-Fax) > I-Fax Options > Set Up Relay
Broadcast on Your Brother Machine > Relay Broadcast from Your Computer
Relay Broadcast from Your Computer
Use the Relay Broadcast Function to send email from your computer to a conventional fax machine.
• Some email applications do not support sending an email to multiple fax numbers. If your email application
cannot support multiple fax numbers, you can relay to only one fax machine at a time.
1
UKFAX@brother.co.uk 123456789
UKFAX@brother.co.uk(fax#123456789)
1. The Internet
• Confirm the POP3/IMAP4/SMTP Client and SMTP Server checkboxes are selected in Web Based
Management. If the POP3/IMAP4/SMTP Client and SMTP Server checkboxes are not selected, select the
POP3/IMAP4/SMTP Client and SMTP Server checkboxes. Click Submit, and then restart your machine.
If you are sending an email to a conventional fax machine, the method of entering the fax machine's fax number
will vary, depending on the mail application you are using.
1. In your email application, create a new mail message and type the email address of the relay machine and
fax number of the first fax machine in the "TO" box.
The following is an example of how to enter the email address and fax number:
UKFAX@brother.co.uk(fax#123456789)
email address
Fax Phone Number
The word "fax#" must be
included with the phone
number inside the parenthesis.
For Microsoft Outlook, the address information must be entered into the address book as follows:
Name: fax#123456789
Email address: UKFAX@brother.co.uk
2. Type the email address of the relay machine and fax number of the second fax machine in the "TO" box.
3. Send the email.
Related Information
• Set Up Relay Broadcast on Your Brother Machine
342

Home > Network > Network Features > Fax Using the Internet (I-Fax) > I-Fax Options > Internet Fax (I-
Fax) Verification Mail
Internet Fax (I-Fax) Verification Mail
• Verification Mail for sending allows you to request notification from the receiving station where your I-Fax or
email was received and processed.
• Verification Mail for receiving allows you to transmit a default report back to the sending station after
successfully receiving and processing an I-Fax or email.
To use this feature, set the [Notification] options in the [Setup Mail RX] and [Setup Mail TX]
options of your machine's control panel menu.
Related Information
• I-Fax Options
• Enable Send Notifications for TX Verification Mail
• Enable Receive Notifications for TX Verification Mail
• I-Fax Error Mail
343
Home > Network > Network Features > Fax Using the Internet (I-Fax) > I-Fax Options > Internet Fax (I-
Fax) Verification Mail > Enable Send Notifications for TX Verification Mail
Enable Send Notifications for TX Verification Mail
1. Press [Settings] > [All Settings] > [Network] > [E-mail/IFAX] > [Setup Mail TX] >
[Notification].
2. When switched to [On], an additional field of information is sent with the image data. This field is named
MDN (Message Disposition Notification).
The receiver must support the MDN field to be able to send a notification report, otherwise the request will
be ignored.
3. Press .
Related Information
• Internet Fax (I-Fax) Verification Mail
344
Home > Network > Network Features > Fax Using the Internet (I-Fax) > I-Fax Options > Internet Fax (I-
Fax) Verification Mail > Enable Receive Notifications for TX Verification Mail
Enable Receive Notifications for TX Verification Mail
1. Press [Settings] > [All Settings] > [Network] > [E-mail/IFAX] > [Setup Mail RX] >
[Notification].
2. Press one of the three possible settings:
Option Description
Receive
Notification On
When Receive Notification is On, a fixed message is sent back to the sender to
indicate successful reception and processing of the message.
These fixed messages depend on the operation requested by the sender.
Example:
SUCCESS: Received From <Mail Address>
Receive
Notification MDN
When Receive Notification is MDN, a report to indicate successful reception and
processing is sent back to the sender if the originating station sent a request
confirmation to the MDN field.
Receive
Notification Off
When Receive Notification is Off, all forms of receive notification are disabled and no
message is sent back to the sender regardless of the request.
• To send TX verification mail, the Sender must configure these settings:
- Switch [Notification] in [Setup Mail TX] to [On].
- Switch [Header] in [Setup Mail RX] to [All] or [Subject+From+To].
• To receive TX verification mail, the Receiver must configure these settings:
Switch [Notification] in [Setup Mail RX] to [On].
3. Press .
Related Information
• Internet Fax (I-Fax) Verification Mail
345

Home > Network > Network Features > Fax Using the Internet (I-Fax) > I-Fax Options > Internet Fax (I-
Fax) Verification Mail > I-Fax Error Mail
I-Fax Error Mail
If there is a delivery error while sending an I-Fax, the mail server will send an error message back to the Brother
machine and the error message will be printed.
If there is an error while receiving an I-Fax, an error message will be printed, for example, "The message being
sent to the machine was not in a TIFF format."
To receive the error mail and have it print on your machine, in [Setup Mail RX], switch the [Header] option
to [All] or to [Subject+From+To].
Related Information
• Internet Fax (I-Fax) Verification Mail
346

Home > Network > Network Features > Configure and Operate LDAP Search
Configure and Operate LDAP Search
The LDAP feature allows you to search for information, such as fax numbers and email addresses, on your
server. When you use the Fax, I-Fax, or Scan to Email server feature, you can use the LDAP search to find fax
numbers or email addresses.
• The LDAP feature does not support simplified Chinese, traditional Chinese, or Korean.
• The LDAP feature supports LDAPv3.
• The LDAP feature does not support SSL/TLS.
• You must use Simple Authentication to communicate with your LDAP server.
Related Information
• Network Features
• Change LDAP Configuration Using Web Based Management
• Perform an LDAP Search Using Your Machine's Control Panel
Related Topics:
• Configure the SNTP Protocol Using Web Based Management
347
Home > Network > Network Features > Configure and Operate LDAP Search > Change LDAP
Configuration Using Web Based Management
Change LDAP Configuration Using Web Based Management
Use Web Based Management to configure your LDAP settings in a web browser.
1. Start your web browser.
2. Type "https://machine's IP address" in your browser's address bar (where "machine's IP address" is the
machine's IP address).
For example:
https://192.168.1.2
3. If required, type the password in the Login field, and then click Login.
The default password to manage this machine’s settings is located on the back of the machine and marked
"Pwd".
4. Go to the navigation menu, and then click Network > Network > Protocol.
Start from , if the navigation menu is not shown on the left side of the screen.
5. Select the LDAP checkbox, and then click Submit.
6. Restart your Brother machine to activate the configuration.
7. On your computer, in Web Based Management, go to the navigation menu, and then click Address Book >
LDAP.
• LDAP Search
• LDAP Server Address
• Port (The default port number is 389.)
• Authentication
• Username
This selection will be available depending on the authentication method used.
• Password
This selection will be available depending on the authentication method used.
- If the LDAP server supports Kerberos authentication, we recommend selecting Kerberos for the
Authentication settings. It provides strong authentication between the LDAP server and your machine.
- You must configure the SNTP protocol (network time server), or you must set the date, time and time
zone correctly on the control panel for Kerberos authentication.
• Kerberos Server Address
This selection will be available depending on the authentication method used.
• Search Root
• Timeout for LDAP
• Attribute of Name (Search Key)
• Attribute of E-mail
• Attribute of Fax Number
8. When finished, click Submit. Make sure the Status field reads OK.
Related Information
• Configure and Operate LDAP Search
Related Topics:
• Access Web Based Management
348

Home > Network > Network Features > Configure and Operate LDAP Search > Perform an LDAP Search
Using Your Machine's Control Panel
Perform an LDAP Search Using Your Machine's Control Panel
After you configure LDAP settings, you can use the LDAP search feature to find fax numbers or email addresses
to use for:
• Sending a Fax
• Sending an Internet Fax (I-Fax)
• Scanning to Email Server
• The LDAP feature supports LDAPv3.
• The LDAP feature does not support SSL/TLS.
• You may need to use Kerberos Authentication or Simple Authentication to connect to your LDAP server,
depending on the security policy set by your network administrator.
• You must configure the SNTP protocol (network time server), or you must set the date, time and time
zone correctly on the control panel for Kerberos authentication.
1. Press to search.
2. Enter the initial characters for your search using the LCD.
• You can enter up to 15 characters.
• For more information about how to enter text, see Related Information.
3. Press [OK].
The LDAP search result will be shown on the LCD; the
icon appears before the local address book
search results.
If there is no match on the server or the local address book, the LCD will show [Results cannot be
found.] for about 60 seconds.
4. Press a or b to display the name you want.
5. Press the name.
To view the details of the name, press [Detail].
6. If the result includes more than one fax number or email address, the machine will prompt you to select just
one. Press [Apply]. Do one of the following:
• If you are sending a fax and an I-Fax, press [Fax Start].
• If you are scanning to the email Server, load your document, press [Next], and then press [Start].
Related Information
• Configure and Operate LDAP Search
Related Topics:
• Enter Text on Your Brother Machine
• Synchronize Time with the SNTP Server Using Web Based Management
350

Home > Network > Network Features > Synchronize Time with the SNTP Server Using Web Based
Management
Synchronize Time with the SNTP Server Using Web Based Management
The Simple Network Time Protocol (SNTP) is used to synchronize the time used by the machine for
authentication with the SNTP time server. (This is not the time displayed on the machine's LCD.) You can
automatically or manually synchronize the machine's time with the Coordinated Universal Time (UTC) provided
by the SNTP time server.
• Configure Date and Time Using Web Based Management
• Configure the SNTP Protocol Using Web Based Management
• Change LDAP Configuration Using Web Based Management
• Perform an LDAP Search Using Your Machine's Control Panel
351
Home > Network > Network Features > Synchronize Time with the SNTP Server Using Web Based
Management > Configure Date and Time Using Web Based Management
Configure Date and Time Using Web Based Management
Configure date and time to synchronize the time used by the machine with the SNTP time server.
This feature is not available in some countries.
1. Start your web browser.
2. Type "https://machine's IP address" in your browser's address bar (where "machine's IP address" is the
machine's IP address).
For example:
https://192.168.1.2
3. If required, type the password in the Login field, and then click Login.
The default password to manage this machine’s settings is located on the back of the machine and marked
"Pwd".
4. Go to the navigation menu, and then click Administrator > Date&Time.
Start from , if the navigation menu is not shown on the left side of the screen.
5. Verify the Time Zone settings.
Select the time difference between your location and UTC from the Time Zone drop-down list. For
example, the time zone for Eastern Time in the USA and Canada is UTC-05:00.
6. Select the Synchronize with SNTP server checkbox.
7. Click Submit.
You can also configure date and time manually.
Related Information
• Synchronize Time with the SNTP Server Using Web Based Management
Related Topics:
• Set up a Scan to Network Profile
• Access Web Based Management
352

Home > Network > Network Features > Synchronize Time with the SNTP Server Using Web Based
Management > Configure the SNTP Protocol Using Web Based Management
Configure the SNTP Protocol Using Web Based Management
Configure the SNTP protocol to synchronize the time the machine uses for authentication with the time kept by
the SNTP time server.
1. Start your web browser.
2. Type "https://machine's IP address" in your browser's address bar (where "machine's IP address" is the
machine's IP address).
For example:
https://192.168.1.2
3. If required, type the password in the Login field, and then click Login.
The default password to manage this machine’s settings is located on the back of the machine and marked
"Pwd".
4. Go to the navigation menu, and then click Network > Network > Protocol.
Start from , if the navigation menu is not shown on the left side of the screen.
5. Select the SNTP checkbox to activate the settings.
6. Click Submit.
7. Restart your Brother machine to activate the configuration.
8. Next to the SNTP checkbox, click Advanced Settings.
9. Configure the settings.
Option
Description
Status Displays whether the SNTP protocol is enabled or disabled.
Synchronization Status Confirm the latest synchronization status.
SNTP Server Method Select AUTO or STATIC.
• AUTO
If you have a DHCP server in your network, the SNTP server will
obtain the address from that server automatically.
• STATIC
Type the address you want to use.
Primary SNTP Server Address
Secondary SNTP Server Address
Type the server address (up to 64 characters).
The secondary SNTP server address is used as a backup to the
primary SNTP server address. If the primary server is unavailable,
the machine will contact the secondary SNTP server.
Primary SNTP Server Port
Secondary SNTP Server Port
Type the port number (1-65535).
The secondary SNTP server port is used as a backup to the primary
SNTP server port. If the primary port is unavailable, the machine will
contact the secondary SNTP port.
Synchronization Interval Type the number of hours between server synchronization attempts
(1-168 hours).
10. Click Submit.
Related Information
• Synchronize Time with the SNTP Server Using Web Based Management
Related Topics:
• Access Web Based Management
353
Home > Network > Network Features > Reset the Network Settings to Factory Default
Reset the Network Settings to Factory Default
You can use your machine's control panel to reset the machine's network settings to its default factory settings.
This resets all information, such as the password and IP address.
• This feature restores all wired (supported models only) and wireless network settings to the factory
settings.
• You can also reset the print server to its factory settings using Web Based Management.
1. Press [Settings] > [All Settings] > [Network] > [Network Reset].
2. The reset confirmation message is displayed. Press [OK] for two seconds.
The machine will restart.
Related Information
• Network Features
Related Topics:
• Transfer Your Faxes or Fax Journal Report
354

Home > Security
Security
• Before Using Network Security Features
• Configure Certificates for Device Security
• Use SSL/TLS
• Use SNMPv3
• Use IPsec
• Use IEEE 802.1x Authentication for a Wired or a Wireless Network
• Use Active Directory Authentication
• Use LDAP Authentication
• Use Secure Function Lock 3.0
• Send or Receive an Email Securely
355

Home > Security > Before Using Network Security Features
Before Using Network Security Features
Your machine employs some of the latest network security and encryption protocols available today. These
network features can be integrated into your overall network security plan to help protect your data and prevent
unauthorised access to the machine.
We recommend disabling the FTP and TFTP protocols. Accessing the machine using these protocols is not
secure. However, note that if you disable FTP, the Scan to FTP feature will be disabled.
Related Information
• Security
356

Home > Security > Configure Certificates for Device Security
Configure Certificates for Device Security
You must configure a certificate to manage your networked machine securely using SSL/TLS. You must use Web
Based Management to configure a certificate.
• Supported Security Certificate Features
• Step by Step Guide for Creating and Installing a Certificate
• Create a Self-signed Certificate
• Create CSR and Install a Certificate from a Certificate Authority (CA)
• Import and Export the Certificate and Private Key
• Import and Export a CA Certificate
• Manage Multiple Certificates
357
Home > Security > Configure Certificates for Device Security > Supported Security Certificate Features
Supported Security Certificate Features
Your machine supports the use of multiple security certificates, which allows secure authentication and
communication with the machine. The following security certificate features can be used with the machine:
• SSL/TLS communication
• IEEE 802.1x authentication
• IPsec
The Brother machine supports the following:
• Pre-installed certificate
Your machine has a pre-installed self-signed certificate. This certificate enables you to use SSL/TLS
communication without creating or installing a different certificate.
The pre-installed self-signed certificate protects your communication up to a certain level. We recommend
using a certificate that is issued by a trusted organisation for better security.
• Self-signed certificate
This print server issues its own certificate. Using this certificate, you can easily use the SSL/TLS
communication without creating or installing a different certificate from a CA.
• Certificate from a Certificate Authority (CA)
There are two methods for installing a certificate from a CA. If you already have a certificate from a CA or if
you want to use a certificate from an external trusted CA:
- When using a Certificate Signing Request (CSR) from this print server.
- When importing a certificate and a private key.
• Certificate Authority (CA) Certificate
To use a CA certificate that identifies the CA and owns its private key, you must import that CA certificate
from the CA before configuring the security features of the Network.
• If you are going to use SSL/TLS communication, we recommend contacting your system administrator
first.
• When you reset the print server back to its default factory settings, the certificate and the private key
that are installed will be deleted. If you want to keep the same certificate and the private key after
resetting the print server, export them before resetting, and then reinstall them.
Related Information
• Configure Certificates for Device Security
Related Topics:
• Configure IEEE 802.1x Authentication for a Wired or a Wireless Network Using Web Based Management
(Web Browser)
358

Home > Security > Configure Certificates for Device Security > Step by Step Guide for Creating and
Installing a Certificate
Step by Step Guide for Creating and Installing a Certificate
There are two options when choosing a security certificate: use a self-signed certificate or use a certificate from a
Certificate Authority (CA).
Option 1
Self-Signed Certificate
1. Create a self-signed certificate using Web Based Management.
2. Install the self-signed certificate on your computer.
Option 2
Certificate from a CA
1. Create a Certificate Signing Request (CSR) using Web Based Management.
2. Install the certificate issued by the CA on your Brother machine using Web Based Management.
3. Install the certificate on your computer.
Related Information
• Configure Certificates for Device Security
359
Home > Security > Configure Certificates for Device Security > Create a Self-signed Certificate
Create a Self-signed Certificate
1. Start your web browser.
2. Type "https://machine's IP address" in your browser's address bar (where "machine's IP address" is the
machine's IP address).
For example:
https://192.168.1.2
If you are using a Domain Name System or enable a NetBIOS name, you can type another name, such as
"SharedPrinter" instead of the IP address.
For example:
https://SharedPrinter
If you enable a NetBIOS name, you can also use the node name.
For example:
https://brnxxxxxxxxxxxx
The NetBIOS name can be found in the Network Configuration Report.
3. If required, type the password in the Login field, and then click Login.
The default password to manage this machine’s settings is located on the back of the machine and marked
"Pwd".
4. Go to the navigation menu, and then click Network > Security > Certificate.
Start from
, if the navigation menu is not shown on the left side of the screen.
5. Click Create Self-Signed Certificate.
6. Enter a Common Name and a Valid Date.
• The length of the Common Name is less than 64 bytes. Enter an identifier, such as an IP address, node
name, or domain name to use when accessing this machine through SSL/TLS communication. The node
name is displayed by default.
• A warning will appear if you use the IPPS or HTTPS protocol and enter a different name in the URL than
the Common Name that was used for the self-signed certificate.
7. Select your setting from the Public Key Algorithm drop-down list. The default setting is RSA(2048bit).
8. Select your setting from the Digest Algorithm drop-down list. The default setting is SHA256.
9. Click Submit.
Related Information
• Configure Certificates for Device Security
Related Topics:
• Access Web Based Management
360

Home > Security > Configure Certificates for Device Security > Create CSR and Install a Certificate from a
Certificate Authority (CA)
Create CSR and Install a Certificate from a Certificate Authority (CA)
If you already have a certificate from an external trusted CA, you can store the certificate and private key on the
machine and manage them by importing and exporting. If you do not have a certificate from an external trusted
CA, create a Certificate Signing Request (CSR), send it to a CA for authentication, and install the returned
certificate on your machine.
• Create a Certificate Signing Request (CSR)
• Install a Certificate on Your Machine
361
Home > Security > Configure Certificates for Device Security > Create CSR and Install a Certificate from a
Certificate Authority (CA) > Create a Certificate Signing Request (CSR)
Create a Certificate Signing Request (CSR)
A Certificate Signing Request (CSR) is a request sent to a Certificate Authority (CA) to authenticate the
credentials contained within the certificate.
We recommend installing a Root Certificate from the CA on your computer before creating the CSR.
1. Start your web browser.
2. Type "https://machine's IP address" in your browser's address bar (where "machine's IP address" is the
machine's IP address).
For example:
https://192.168.1.2
If you are using a Domain Name System or enable a NetBIOS name, you can type another name, such as
"SharedPrinter" instead of the IP address.
For example:
https://SharedPrinter
If you enable a NetBIOS name, you can also use the node name.
For example:
https://brnxxxxxxxxxxxx
The NetBIOS name can be found in the Network Configuration Report.
3. If required, type the password in the Login field, and then click Login.
The default password to manage this machine’s settings is located on the back of the machine and marked
"Pwd".
4. Go to the navigation menu, and then click Network > Security > Certificate.
Start from
, if the navigation menu is not shown on the left side of the screen.
5. Click Create CSR.
6. Type a Common Name (required) and add other information about your Organization (optional).
• Your company details are required so that a CA can confirm your identity and verify it to the outside
world.
• The length of the Common Name must be less than 64 bytes. Enter an identifier, such as an IP
address, node name, or domain name to use when accessing this machine through SSL/TLS
communication. The node name is displayed by default. The Common Name is required.
• A warning will appear if you type a different name in the URL than the Common Name that was used for
the certificate.
• The length of the Organization, the Organization Unit, the City/Locality and the State/Province must
be less than 64 bytes.
• The Country/Region should be a two-character ISO 3166 country code.
• If you are configuring an X.509v3 certificate extension, select the Configure extended partition
checkbox, and then select Auto (Register IPv4) or Manual.
7. Select your setting from the
Public Key Algorithm drop-down list. The default setting is RSA(2048bit).
8. Select your setting from the Digest Algorithm drop-down list. The default setting is SHA256.
9. Click Submit.
The CSR appears on your screen. Save the CSR as a file or copy and paste it into an online CSR form
offered by a Certificate Authority.
362

10. Click Save.
• Follow your CA's policy regarding the method to send a CSR to your CA.
• If you are using the Enterprise root CA of Windows Server 2008/2008 R2/2012/2012 R2/2016/2019, we
recommend using the Web Server for the certificate template to securely create the Client Certificate. If
you are creating a Client Certificate for an IEEE 802.1x environment with EAP-TLS authentication, we
recommend using User for the certificate template.
Related Information
• Create CSR and Install a Certificate from a Certificate Authority (CA)
Related Topics:
• Access Web Based Management
363
Home > Security > Configure Certificates for Device Security > Create CSR and Install a Certificate from a
Certificate Authority (CA) > Install a Certificate on Your Machine
Install a Certificate on Your Machine
When you receive a certificate from a CA, follow the steps below to install it into the print server:
Only a certificate issued with your machine's CSR can be installed onto the machine. When you want to create
another CSR, make sure that the certificate is installed before creating another CSR. Create another CSR only
after installing the certificate on the machine. If you do not, the CSR you create before installing will be invalid.
1. Start your web browser.
2. Type "https://machine's IP address" in your browser's address bar (where "machine's IP address" is the
machine's IP address).
For example:
https://192.168.1.2
If you are using a Domain Name System or enable a NetBIOS name, you can type another name, such as
"SharedPrinter" instead of the IP address.
For example:
https://SharedPrinter
If you enable a NetBIOS name, you can also use the node name.
For example:
https://brnxxxxxxxxxxxx
The NetBIOS name can be found in the Network Configuration Report.
3. If required, type the password in the Login field, and then click Login.
The default password to manage this machine’s settings is located on the back of the machine and marked
"Pwd".
4. Go to the navigation menu, and then click Network > Security > Certificate.
Start from
, if the navigation menu is not shown on the left side of the screen.
5. Click Install Certificate.
6. Browse to the file that contains the certificate issued by the CA, and then click Submit.
The certificate has been created successfully and saved in your machine's memory successfully.
To use SSL/TLS communication, the Root Certificate from the CA must be installed on your computer. Contact
your network administrator.
Related Information
• Create CSR and Install a Certificate from a Certificate Authority (CA)
Related Topics:
• Access Web Based Management
364

Home > Security > Configure Certificates for Device Security > Import and Export the Certificate and
Private Key
Import and Export the Certificate and Private Key
Store the certificate and private key on your machine and manage them by importing and exporting them.
• Import a Certificate and Private Key
• Export the Certificate and Private Key
365
Home > Security > Configure Certificates for Device Security > Import and Export the Certificate and
Private Key > Import a Certificate and Private Key
Import a Certificate and Private Key
1. Start your web browser.
2. Type "https://machine's IP address" in your browser's address bar (where "machine's IP address" is the
machine's IP address).
For example:
https://192.168.1.2
If you are using a Domain Name System or enable a NetBIOS name, you can type another name, such as
"SharedPrinter" instead of the IP address.
For example:
https://SharedPrinter
If you enable a NetBIOS name, you can also use the node name.
For example:
https://brnxxxxxxxxxxxx
The NetBIOS name can be found in the Network Configuration Report.
3. If required, type the password in the Login field, and then click Login.
The default password to manage this machine’s settings is located on the back of the machine and marked
"Pwd".
4. Go to the navigation menu, and then click Network > Security > Certificate.
Start from
, if the navigation menu is not shown on the left side of the screen.
5. Click Import Certificate and Private Key.
6. Browse to the file you want to import.
7. Type the password if the file is encrypted, and then click Submit.
The certificate and private key are imported to your machine.
Related Information
• Import and Export the Certificate and Private Key
Related Topics:
• Access Web Based Management
366
Home > Security > Configure Certificates for Device Security > Import and Export the Certificate and
Private Key > Export the Certificate and Private Key
Export the Certificate and Private Key
1. Start your web browser.
2. Type "https://machine's IP address" in your browser's address bar (where "machine's IP address" is the
machine's IP address).
For example:
https://192.168.1.2
If you are using a Domain Name System or enable a NetBIOS name, you can type another name, such as
"SharedPrinter" instead of the IP address.
For example:
https://SharedPrinter
If you enable a NetBIOS name, you can also use the node name.
For example:
https://brnxxxxxxxxxxxx
The NetBIOS name can be found in the Network Configuration Report.
3. If required, type the password in the Login field, and then click Login.
The default password to manage this machine’s settings is located on the back of the machine and marked
"Pwd".
4. Go to the navigation menu, and then click Network > Security > Certificate.
Start from
, if the navigation menu is not shown on the left side of the screen.
5. Click Export shown with Certificate List.
6. Enter the password if you want to encrypt the file.
If a blank password is used, the output is not encrypted.
7. Enter the password again for confirmation, and then click Submit.
8. Click Save.
The certificate and private key are exported to your computer.
You can also import the certificate to your computer.
Related Information
• Import and Export the Certificate and Private Key
Related Topics:
• Access Web Based Management
367

Home > Security > Configure Certificates for Device Security > Import and Export a CA Certificate > Import
a CA Certificate
Import a CA Certificate
1. Start your web browser.
2. Type "https://machine's IP address" in your browser's address bar (where "machine's IP address" is the
machine's IP address).
For example:
https://192.168.1.2
If you are using a Domain Name System or enable a NetBIOS name, you can type another name, such as
"SharedPrinter" instead of the IP address.
For example:
https://SharedPrinter
If you enable a NetBIOS name, you can also use the node name.
For example:
https://brnxxxxxxxxxxxx
The NetBIOS name can be found in the Network Configuration Report.
3. If required, type the password in the Login field, and then click Login.
The default password to manage this machine’s settings is located on the back of the machine and marked
"Pwd".
4. Go to the navigation menu, and then click Network > Security > CA Certificate.
Start from
, if the navigation menu is not shown on the left side of the screen.
5. Click Import CA Certificate.
6. Browse to the file you want to import.
7. Click Submit.
Related Information
• Import and Export a CA Certificate
Related Topics:
• Access Web Based Management
369
Home > Security > Configure Certificates for Device Security > Import and Export a CA Certificate > Export
a CA Certificate
Export a CA Certificate
1. Start your web browser.
2. Type "https://machine's IP address" in your browser's address bar (where "machine's IP address" is the
machine's IP address).
For example:
https://192.168.1.2
If you are using a Domain Name System or enable a NetBIOS name, you can type another name, such as
"SharedPrinter" instead of the IP address.
For example:
https://SharedPrinter
If you enable a NetBIOS name, you can also use the node name.
For example:
https://brnxxxxxxxxxxxx
The NetBIOS name can be found in the Network Configuration Report.
3. If required, type the password in the Login field, and then click Login.
The default password to manage this machine’s settings is located on the back of the machine and marked
"Pwd".
4. Go to the navigation menu, and then click Network > Security > CA Certificate.
Start from
, if the navigation menu is not shown on the left side of the screen.
5. Select the certificate you want to export and click Export.
6. Click Submit.
7. Click b next to Save, and then specify the location where you want to save the file.
Related Information
• Import and Export a CA Certificate
Related Topics:
• Access Web Based Management
370
Home > Security > Configure Certificates for Device Security > Manage Multiple Certificates
Manage Multiple Certificates
The multiple certificate feature allows you to use Web Based Management to manage each certificate installed
on your machine. In Web Based Management, navigate to the Certificate or CA Certificate screen to view
certificate content, delete, or export your certificates.
Maximum Number of Certificates Stored on Brother Machine
Self-signed Certificate or
Certificate Issued by a CA
5
CA Certificate 6
We recommend storing fewer certificates than allowed, reserving an empty spot in case of certificate expiration.
When a certificate expires, import a new certificate into the reserved spot, and then delete the expired certificate.
This ensures that you avoid configuration failure.
• When you use HTTPS/IPPS or IEEE 802.1x, you must select which certificate you are using.
• When you use SSL for SMTP/POP3/IMAP4 communications (only available for certain models), you do
not have to choose the certificate. The necessary certificate will be chosen automatically.
Related Information
• Configure Certificates for Device Security
371


Home > Security > Use SSL/TLS > Introduction to SSL/TLS
Introduction to SSL/TLS
Secure Socket Layer (SSL) or Transport Layer Security (TLS) is an effective method of protecting data sent over
a local or wide area network (LAN or WAN). It works by encrypting data, such as a print job, sent over a network,
so anyone trying to capture it will not be able to read it.
SSL/TLS can be configured on both wired and wireless networks and will work with other forms of security such
as WPA keys and firewalls.
Related Information
• Use SSL/TLS
• Brief History of SSL/TLS
• Benefits of Using SSL/TLS
373

Home > Security > Use SSL/TLS > Introduction to SSL/TLS > Brief History of SSL/TLS
Brief History of SSL/TLS
SSL/TLS was originally created to secure web traffic information, particularly data sent between web browsers
and servers. For example, when you use Internet Explorer for Internet Banking and you see https:// and the little
padlock icon in the web browser, you are using SSL. SSL grew to work with additional applications, such as
Telnet, printer, and FTP software, in order to become a universal solution for online security. Its original design
intentions are still being used today by many online retailers and banks to secure sensitive data, such as credit
card numbers, customer records, etc.
SSL/TLS uses extremely high levels of encryption and is trusted by banks all over the world.
Related Information
• Introduction to SSL/TLS
374

Home > Security > Use SSL/TLS > Introduction to SSL/TLS > Benefits of Using SSL/TLS
Benefits of Using SSL/TLS
The primary benefit of using SSL/TLS is to guarantee secure printing over an IP network by restricting
unauthorised users from reading data sent to the machine. SSL's key selling point is that it can be used to print
confidential data securely. For example, an HR department in a large company may be printing wage slips on a
regular basis. Without encryption, the data contained on these wages slips can be read by other network users.
However, with SSL/TLS, anyone trying to capture the data will see a confusing page of code and not the actual
wage slip.
Related Information
• Introduction to SSL/TLS
375

Home > Security > Use SSL/TLS > Manage Your Network Machine Securely Using SSL/TLS
Manage Your Network Machine Securely Using SSL/TLS
• Configure a Certificate for SSL/TLS and Available Protocols
• Access Web Based Management Using SSL/TLS
• Install the Self-signed Certificate for Windows users with Administrator Rights
• Configure Certificates for Device Security
376

Home > Security > Use SSL/TLS > Manage Your Network Machine Securely Using SSL/TLS > Configure a
Certificate for SSL/TLS and Available Protocols
Configure a Certificate for SSL/TLS and Available Protocols
Configure a certificate on your machine using Web Based Management before you use SSL/TLS
communication.
1. Start your web browser.
2. Type "https://machine's IP address" in your browser's address bar (where "machine's IP address" is the
machine's IP address).
For example:
https://192.168.1.2
If you are using a Domain Name System or enable a NetBIOS name, you can type another name, such as
"SharedPrinter" instead of the IP address.
For example:
https://SharedPrinter
If you enable a NetBIOS name, you can also use the node name.
For example:
https://brnxxxxxxxxxxxx
The NetBIOS name can be found in the Network Configuration Report.
3. If required, type the password in the Login field, and then click Login.
The default password to manage this machine’s settings is located on the back of the machine and marked
"Pwd".
4. Go to the navigation menu, and then click Network > Network > Protocol.
Start from
, if the navigation menu is not shown on the left side of the screen.
5. Click HTTP Server Settings.
6. Select the certificate you want to configure from the Select the Certificate drop-down list.
7. Click Submit.
8. Click Yes to restart your print server.
Related Information
• Manage Your Network Machine Securely Using SSL/TLS
Related Topics:
• Print Documents Securely Using SSL/TLS
• Access Web Based Management
377
Home > Security > Use SSL/TLS > Manage Your Network Machine Securely Using SSL/TLS > Access
Web Based Management Using SSL/TLS
Access Web Based Management Using SSL/TLS
To manage your network machine securely, you must use management utilities with security protocols.
• To use HTTPS protocol, HTTPS must be enabled on your machine. The HTTPS protocol is enabled by
default.
• You can change the HTTPS protocol settings using the Web Based Management screen.
1. Start your web browser.
2. Type "https://machine's IP address" in your browser's address bar (where "machine's IP address" is the
machine's IP address).
For example:
https://192.168.1.2
3. If required, type the password in the Login field, and then click Login.
The default password to manage this machine’s settings is located on the back of the machine and marked
"Pwd".
4. You can now access the machine using HTTPS.
Related Information
• Manage Your Network Machine Securely Using SSL/TLS
Related Topics:
• Access Web Based Management
378
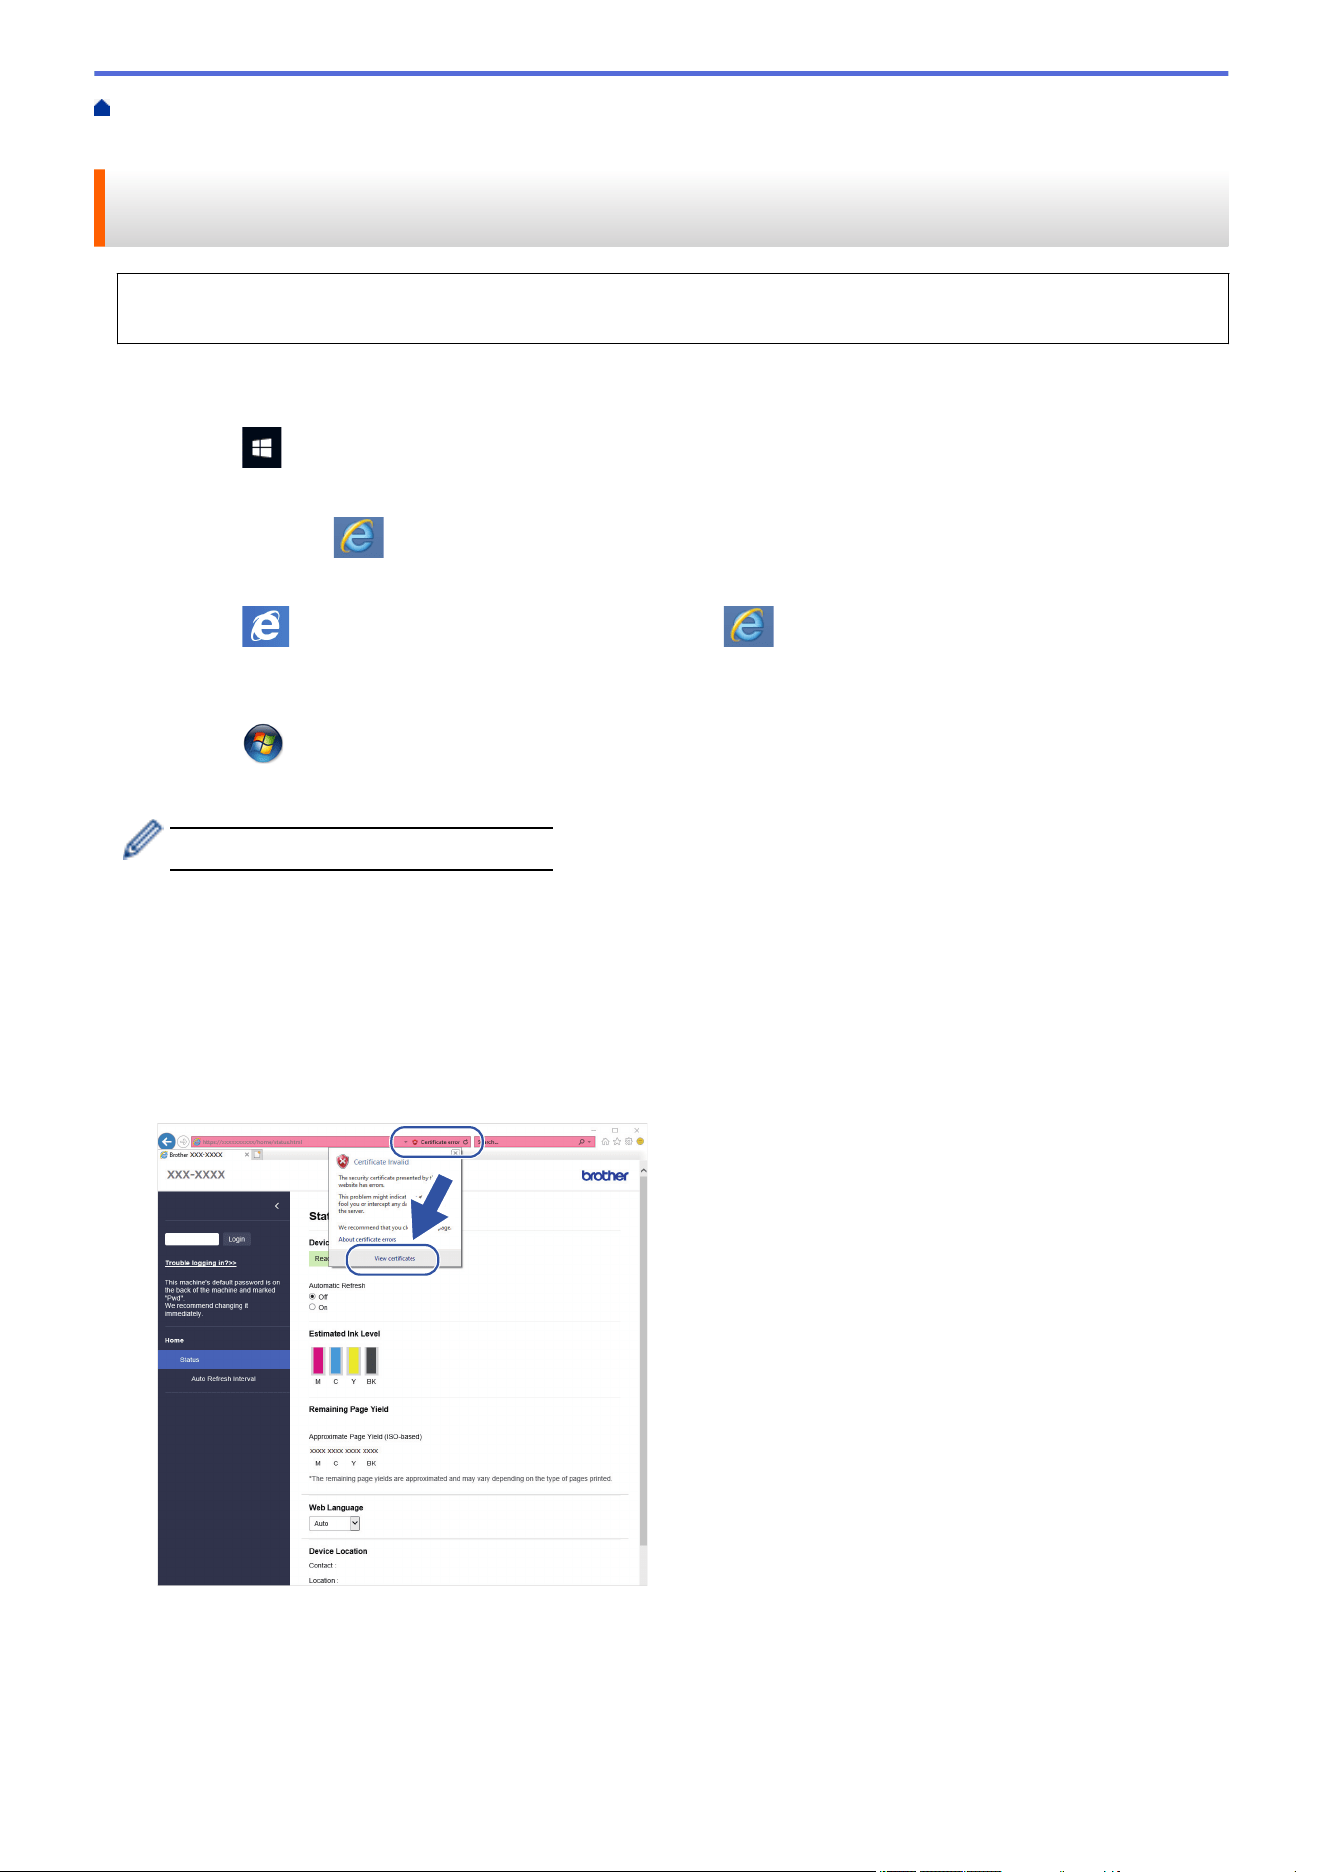
Home > Security > Use SSL/TLS > Manage Your Network Machine Securely Using SSL/TLS > Install the
Self-signed Certificate for Windows users with Administrator Rights
Install the Self-signed Certificate for Windows users with Administrator
Rights
The following steps are for Microsoft Internet Explorer. If you use another web browser, consult the
documentation for your web browser to get help with installing certificates.
1. Do one of the following:
• Windows 10, Windows Server 2016, and Windows Server 2019
Click > Windows Accessories.
• Windows 8.1
Right-click the
(Internet Explorer) icon on the taskbar.
• Windows Server 2012 and Windows Server 2012 R2
Click
(Internet Explorer), and then right-click the (Internet Explorer) icon that appears on the
taskbar.
• Windows 7 and Windows Server 2008
Click
(Start) > All Programs.
2. Right-click Internet Explorer, and then click Run as administrator.
If the More option appears, click More.
If the User Account Control screen appears, click Yes.
3. Type "https://machine's IP address" in your browser's address bar to access your machine (where "machine's
IP address" is the machine's IP address or the node name that you assigned for the certificate).
4. Click More information.
5. Click Go on to the webpage (not recommended).
6. Click Certificate error, and then click View certificates.
7. Click Install Certificate….
8. When the Certificate Import Wizard appears, click Next.
9. Select Place all certificates in the following store, and then click Browse….
10. Select Trusted Root Certification Authorities, and then click OK.
379


Home > Security > Use SSL/TLS > Print Documents Securely Using SSL/TLS > Print Documents Using
SSL/TLS
Print Documents Using SSL/TLS
To print documents securely with IPP protocol, use the IPPS protocol.
1. Start your web browser.
2. Type "https://machine's IP address" in your browser's address bar (where "machine's IP address" is the
machine's IP address).
For example:
https://192.168.1.2
If you are using a Domain Name System or enable a NetBIOS name, you can type another name, such as
"SharedPrinter" instead of the IP address.
For example:
https://SharedPrinter
If you enable a NetBIOS name, you can also use the node name.
For example:
https://brnxxxxxxxxxxxx
The NetBIOS name can be found in the Network Configuration Report.
3. If required, type the password in the Login field, and then click Login.
The default password to manage this machine’s settings is located on the back of the machine and marked
"Pwd".
4. Go to the navigation menu, and then click Network > Network > Protocol.
Start from
, if the navigation menu is not shown on the left side of the screen.
5. Make sure the IPP checkbox is selected.
If the IPP checkbox is not selected, select the IPP checkbox, and then click Submit.
Restart your machine to activate the configuration.
After the machine restarts, return to the machine's web page, type the password, go to the navigation
menu, and then click Network > Network > Protocol.
6. Click HTTP Server Settings.
7. Select the HTTPS (Port 443) checkbox in the IPP, and then click Submit.
8. Restart your machine to activate the configuration.
Communication using IPPS cannot prevent unauthorised access to the print server.
Related Information
• Print Documents Securely Using SSL/TLS
Related Topics:
• Access Web Based Management
382

Home > Security > Use SNMPv3 > Manage Your Network Machine Securely Using SNMPv3
Manage Your Network Machine Securely Using SNMPv3
The Simple Network Management Protocol version 3 (SNMPv3) provides user authentication and data
encryption to manage network devices securely. To manage your network machine securely, we recommend
using the SNMPv3 protocol when you use BRAdmin Professional 4.
1. Start your web browser.
2. Type "https://machine's IP address" in your browser's address bar (where "machine's IP address" is the
machine's IP address).
For example:
https://192.168.1.2
3. If required, type the password in the Login field, and then click Login.
The default password to manage this machine’s settings is located on the back of the machine and marked
"Pwd".
4. Go to the navigation menu, and then click Network > Network > Protocol.
Start from , if the navigation menu is not shown on the left side of the screen.
5. Make sure the SNMP setting is enabled, and then click Advanced Settings.
6. Configure the SNMP settings. There are three options for SNMP Mode of Operation.
Option Description
SNMP v1/v2c
read-write
access
The print server uses version 1 and version 2c of the SNMP protocol. You can use all
Brother applications in this mode. However, it is not secure since it will not authenticate
the user, and data will not be encrypted.
SNMPv3 read-
write access
and v1/v2c
read-only
access
The print server uses the read-write access of version 3 and the read-only access of
version 1 and version 2c of the SNMP protocol.
When you use SNMPv3 read-write access and v1/v2c read-only access
mode, some Brother applications (such as BRAdmin Light) that access the
print server do not work correctly since they authorize the read-only access of
version 1 and version 2c. If you want to use all applications, we recommend
using the SNMP v1/v2c read-write access mode.
SNMPv3 read-
write access
The print server uses version 3 of the SNMP protocol. If you want to manage the print
server securely, use this mode.
When you use the SNMPv3 read-write access mode, note the following:
• You can use only BRAdmin Professional or Web Based Management to
manage the print server.
• Except for BRAdmin Professional, all applications that use SNMPv1/v2c
will be restricted. To allow the use of SNMPv1/v2c applications, use the
SNMPv3 read-write access and v1/v2c read-only access or SNMP
v1/v2c read-write access mode.
7. Click Submit.
Related Information
• Use SNMPv3
384


Home > Security > Use IPsec > Introduction to IPsec
Introduction to IPsec
IPsec (Internet Protocol Security) is a security protocol that uses an optional Internet Protocol function to prevent
data manipulation and ensure the confidentiality of data transmitted as IP packets. IPsec encrypts data carried
over the network, such as print data sent from computers to a printer. Because the data is encrypted at the
network layer, applications that employ a higher-level protocol use IPsec even if the user is not aware of its use.
IPsec supports the following functions:
• IPsec transmissions
According to the IPsec setting conditions, the network-connected computer sends data to and receives data
from the specified device using IPsec. When the devices start communicating using IPsec, keys are
exchanged using Internet Key Exchange (IKE) first, and then the encrypted data is transmitted using the
keys.
In addition, IPsec has two operation modes: the Transport mode and Tunnel mode. The Transport mode is
used mainly for communication between devices and the Tunnel mode is used in environments such as a
Virtual Private Network (VPN).
For IPsec transmissions, the following conditions are necessary:
- A computer that can communicate using IPsec is connected to the network.
- Your machine is configured for IPsec communication.
- The computer connected to your machine is configured for IPsec connections.
• IPsec settings
The settings that are necessary for connections using IPsec. These settings can be configured using Web
Based Management.
To configure the IPsec settings, you must use the browser on a computer that is connected to the network.
Related Information
• Use IPsec
387
Home > Security > Use IPsec > Configure IPsec Using Web Based Management
Configure IPsec Using Web Based Management
The IPsec connection conditions comprise two Template types: Address and IPsec. You can configure up to 10
connection conditions.
1. Start your web browser.
2. Type "https://machine's IP address" in your browser's address bar (where "machine's IP address" is the
machine's IP address).
For example:
https://192.168.1.2
3. If required, type the password in the Login field, and then click Login.
The default password to manage this machine’s settings is located on the back of the machine and marked
"Pwd".
4. Go to the navigation menu, and then click Network > Security > IPsec.
Start from , if the navigation menu is not shown on the left side of the screen.
5. Configure the settings.
Option
Description
Status Enable or disable IPsec.
Negotiation Mode Select Negotiation Mode for IKE Phase 1. IKE is a protocol that is
used to exchange encryption keys in order to carry out encrypted
communication using IPsec.
In Main mode, the processing speed is slow, but the security is high.
In Aggressive mode, the processing speed is faster than Main
mode, but the security is lower.
All Non-IPsec Traffic Select the action to be taken for non-IPsec packets.
When using Web Services, you must select Allow for All Non-IPsec
Traffic. If you select Drop, Web Services cannot be used.
Broadcast/Multicast Bypass Select Enabled or Disabled.
Protocol Bypass Select the checkbox for the option or options you want.
Rules Select the Enabled checkbox to activate the template. When you
select multiple checkboxes, the lower numbered checkboxes have
priority if the settings for the selected checkboxes conflict.
Click on the corresponding drop-down list to select the Address
Template that is used for the IPsec connection conditions. To add an
Address Template, click Add Template.
Click on the corresponding drop-down list to select the IPsec
Template that is used for the IPsec connection conditions. To add an
IPsec Template, click Add Template.
6. Click Submit.
If the machine must be restarted to register the new settings, the restart confirmation screen will appear.
If there is a blank item in the template you enabled in the Rules table, an error message appears. Confirm
your choices and click Submit again.
Related Information
• Use IPsec
Related Topics:
• Access Web Based Management
388

Home > Security > Use IPsec > Configure an IPsec Address Template Using Web Based Management
Configure an IPsec Address Template Using Web Based Management
1. Start your web browser.
2. Type "https://machine's IP address" in your browser's address bar (where "machine's IP address" is the
machine's IP address).
For example:
https://192.168.1.2
3. If required, type the password in the Login field, and then click Login.
The default password to manage this machine’s settings is located on the back of the machine and marked
"Pwd".
4. Go to the navigation menu, and then click Network > Security > IPsec Address Template.
Start from , if the navigation menu is not shown on the left side of the screen.
5. Click the Delete button to delete an Address Template. When an Address Template is in use, it cannot be
deleted.
6. Click the Address Template that you want to create. The IPsec Address Template appears.
7. Configure the settings.
Option
Description
Template Name Type a name for the template (up to 16 characters).
Local IP Address • IP Address
Specify the IP address. Select ALL IPv4 Address, ALL IPv6
Address, ALL Link Local IPv6, or Custom from the drop-down
list.
If you select Custom from the drop-down list, type the IP address
(IPv4 or IPv6) in the text box.
• IP Address Range
Type the starting and ending IP addresses for the IP address
range in the text boxes. If the starting and ending IP addresses
are not standardised to IPv4 or IPv6, or the ending IP address is
smaller than the starting address, an error will occur.
• IP Address / Prefix
Specify the IP address using CIDR notation.
For example: 192.168.1.1/24
Because the prefix is specified in the form of a 24-bit subnet mask
(255.255.255.0) for 192.168.1.1, the addresses 192.168.1.xxx are
valid.
Remote IP Address
• Any
If you select Any, all IP addresses are enabled.
• IP Address
Type the specified IP address (IPv4 or IPv6) in the text box.
• IP Address Range
Type the starting and ending IP addresses for the IP address
range. If the starting and ending IP addresses are not
standardised to IPv4 or IPv6, or the ending IP address is smaller
than the starting address, an error will occur.
• IP Address / Prefix
Specify the IP address using CIDR notation.
For example: 192.168.1.1/24
390

Option Description
Because the prefix is specified in the form of a 24-bit subnet mask
(255.255.255.0) for 192.168.1.1, the addresses 192.168.1.xxx are
valid.
8. Click Submit.
When you change the settings for the template currently in use, restart your machine to active the
configuration.
Related Information
• Use IPsec
Related Topics:
• Access Web Based Management
391
Home > Security > Use IPsec > Configure an IPsec Template Using Web Based Management
Configure an IPsec Template Using Web Based Management
1. Start your web browser.
2. Type "https://machine's IP address" in your browser's address bar (where "machine's IP address" is the
machine's IP address).
For example:
https://192.168.1.2
3. If required, type the password in the Login field, and then click Login.
The default password to manage this machine’s settings is located on the back of the machine and marked
"Pwd".
4. Go to the navigation menu, and then click Network > Security > IPsec Template.
Start from , if the navigation menu is not shown on the left side of the screen.
5. Click the Delete button to delete an IPsec Template. When an IPsec Template is in use, it cannot be
deleted.
6. Click IPsec Template that you want to create. The IPsec Template screen appears. The configuration fields
differ based on the Use Prefixed Template and Internet Key Exchange (IKE) you select.
7. In the Template Name field, type a name for the template (up to 16 characters).
8. If you selected Custom in the Use Prefixed Template drop-down list, select the Internet Key Exchange
(IKE) options, and then change the settings if needed.
9. Click Submit.
Related Information
• Use IPsec
• IKEv1 Settings for an IPsec Template
• IKEv2 Settings for an IPsec Template
• Manual Settings for an IPsec Template
Related Topics:
• Access Web Based Management
392
Home > Security > Use IPsec > Configure an IPsec Template Using Web Based Management > IKEv1
Settings for an IPsec Template
IKEv1 Settings for an IPsec Template
Option Description
Template Name Type a name for the template (up to 16 characters).
Use Prefixed Template Select Custom, IKEv1 High Security or IKEv1 Medium Security. The
setting items are different depending on the selected template.
Internet Key Exchange (IKE) IKE is a communication protocol that is used to exchange encryption
keys in order to carry out encrypted communication using IPsec. To
carry out encrypted communication for that time only, the encryption
algorithm that is necessary for IPsec is determined and the encryption
keys are shared. For IKE, the encryption keys are exchanged using the
Diffie-Hellman key exchange method, and encrypted communication
that is limited to IKE is carried out.
If you selected Custom in Use Prefixed Template, select IKEv1.
Authentication Type
• Diffie-Hellman Group
This key exchange method allows secret keys to be securely
exchanged over an unprotected network. The Diffie-Hellman key
exchange method uses a discrete logarithm problem, not the
secret key, to send and receive open information that was
generated using a random number and the secret key.
Select Group1, Group2, Group5, or Group14.
• Encryption
Select DES, 3DES, AES-CBC 128, or AES-CBC 256.
• Hash
Select MD5, SHA1, SHA256, SHA384 or SHA512.
• SA Lifetime
Specify the IKE SA lifetime.
Type the time (seconds) and number of kilobytes (KByte).
Encapsulating Security
• Protocol
Select ESP, AH, or AH+ESP.
- ESP is a protocol for carrying out encrypted communication
using IPsec. ESP encrypts the payload (communicated
contents) and adds additional information. The IP packet
comprises the header and the encrypted payload, which
follows the header. In addition to the encrypted data, the IP
packet also includes information regarding the encryption
method and encryption key, the authentication data, and so
on.
- AH is part of the IPsec protocol that authenticates the
sender and prevents manipulation (ensures the
completeness) of the data. In the IP packet, the data is
inserted immediately after the header. In addition, the
packets include hash values, which are calculated using an
equation from the communicated contents, secret key, and
so on, in order to prevent the falsification of the sender and
manipulation of the data. Unlike ESP, the communicated
contents are not encrypted, and the data is sent and
received as plain text.
• Encryption
Select DES, 3DES, AES-CBC 128, or AES-CBC 256.
• Hash
Select None, MD5, SHA1, SHA256, SHA384 or SHA512.
393
Option Description
• SA Lifetime
Specify the IKE SA lifetime.
Type the time (seconds) and number of kilobytes (KByte).
• Encapsulation Mode
Select Transport or Tunnel.
• Remote Router IP-Address
Type the IP address (IPv4 or IPv6) of the remote router. Enter this
information only when the Tunnel mode is selected.
SA (Security Association) is an encrypted communication
method using IPsec or IPv6 that exchanges and shares
information, such as the encryption method and encryption key,
in order to establish a secure communication channel before
communication begins. SA may also refer to a virtual encrypted
communication channel that has been established. The SA
used for IPsec establishes the encryption method, exchanges
the keys, and carries out mutual authentication according to the
IKE (Internet Key Exchange) standard procedure. In addition,
the SA is updated periodically.
Perfect Forward Secrecy (PFS)
PFS does not derive keys from previous keys that were used to encrypt
messages. In addition, if a key that is used to encrypt a message was
derived from a parent key, that parent key is not used to derive other
keys. Therefore, even if a key is compromised, the damage will be
limited only to the messages that were encrypted using that key.
Select Enabled or Disabled.
Authentication Method Select the authentication method. Select Pre-Shared Key or
Certificates.
Pre-Shared Key When encrypting communication, the encryption key is exchanged and
shared beforehand using another channel.
If you selected Pre-Shared Key for the Authentication Method, type
the Pre-Shared Key (up to 32 characters).
• Local/ID Type/ID
Select the sender's ID type, and then type the ID.
Select IPv4 Address, IPv6 Address, FQDN, E-mail Address, or
Certificate for the type.
If you select Certificate, type the common name of the certificate
in the ID field.
• Remote/ID Type/ID
Select the recipient's ID type, and then type the ID.
Select IPv4 Address, IPv6 Address, FQDN, E-mail Address, or
Certificate for the type.
If you select Certificate, type the common name of the certificate
in the ID field.
Certificate
If you selected Certificates for Authentication Method, select the
certificate.
You can select only the certificates that were created using the
Certificate page of Web Based Management's Security
configuration screen.
Related Information
• Configure an IPsec Template Using Web Based Management
394
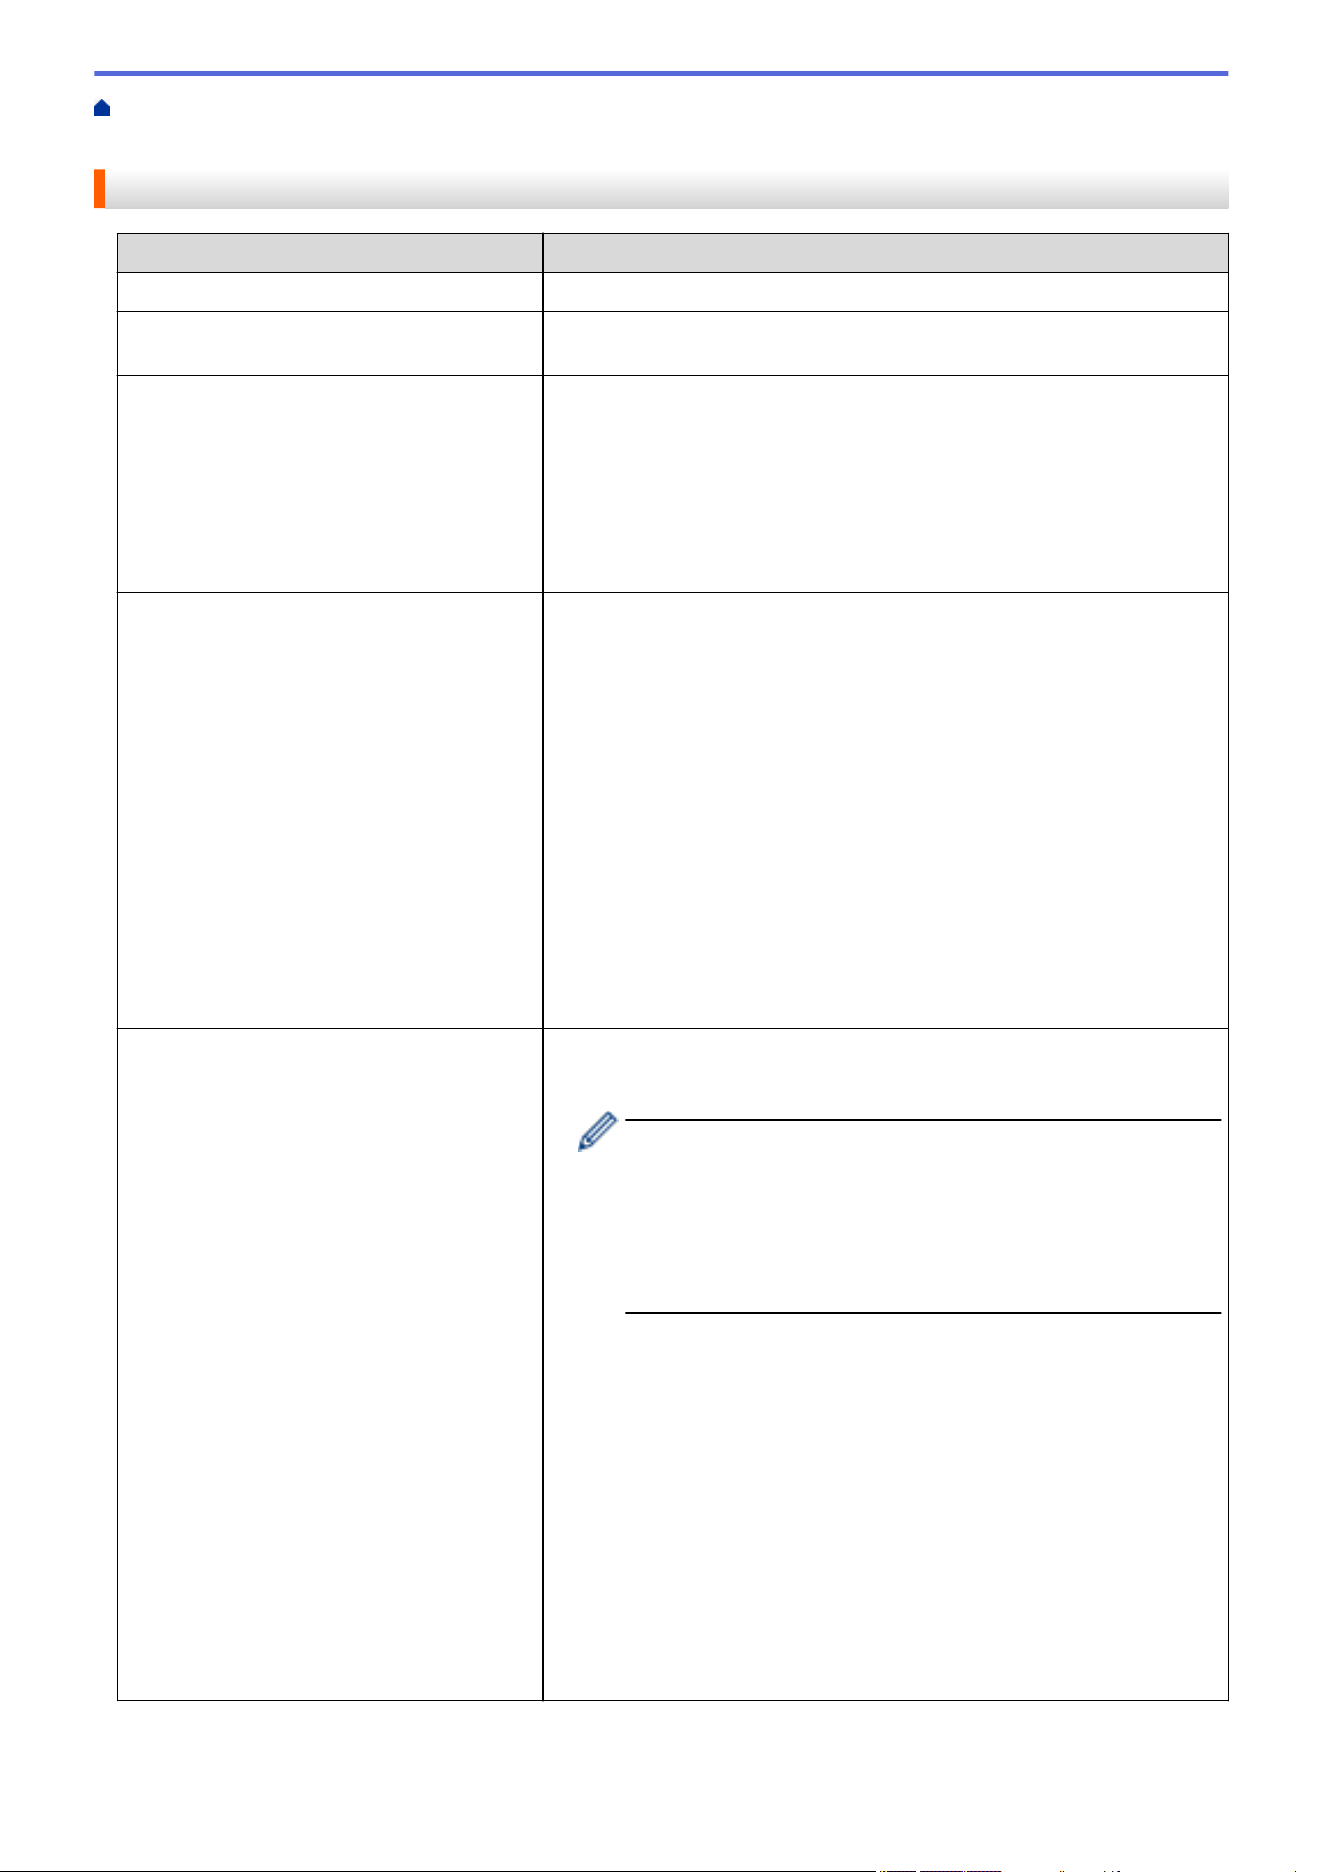
Home > Security > Use IPsec > Configure an IPsec Template Using Web Based Management > IKEv2
Settings for an IPsec Template
IKEv2 Settings for an IPsec Template
Option Description
Template Name Type a name for the template (up to 16 characters).
Use Prefixed Template Select Custom, IKEv2 High Security, or IKEv2 Medium Security.
The setting items are different depending on the selected template.
Internet Key Exchange (IKE) IKE is a communication protocol that is used to exchange encryption
keys in order to carry out encrypted communication using IPsec. To
carry out encrypted communication for that time only, the encryption
algorithm that is necessary for IPsec is determined and the encryption
keys are shared. For IKE, the encryption keys are exchanged using the
Diffie-Hellman key exchange method, and encrypted communication
that is limited to IKE is carried out.
If you selected Custom in Use Prefixed Template, select IKEv2.
Authentication Type
• Diffie-Hellman Group
This key exchange method allows secret keys to be securely
exchanged over an unprotected network. The Diffie-Hellman key
exchange method uses a discrete logarithm problem, not the
secret key, to send and receive open information that was
generated using a random number and the secret key.
Select Group1, Group2, Group5, or Group14.
• Encryption
Select DES, 3DES, AES-CBC 128, or AES-CBC 256.
• Hash
Select MD5, SHA1, SHA256, SHA384 or SHA512.
• SA Lifetime
Specify the IKE SA lifetime.
Type the time (seconds) and number of kilobytes (KByte).
Encapsulating Security
• Protocol
Select ESP.
ESP is a protocol for carrying out encrypted communication
using IPsec. ESP encrypts the payload (communicated
contents) and adds additional information. The IP packet
comprises the header and the encrypted payload, which follows
the header. In addition to the encrypted data, the IP packet also
includes information regarding the encryption method and
encryption key, the authentication data, and so on.
• Encryption
Select DES, 3DES, AES-CBC 128, or AES-CBC 256.
• Hash
Select MD5, SHA1, SHA256, SHA384, or SHA512.
• SA Lifetime
Specify the IKE SA lifetime.
Type the time (seconds) and number of kilobytes (KByte).
• Encapsulation Mode
Select Transport or Tunnel.
• Remote Router IP-Address
Type the IP address (IPv4 or IPv6) of the remote router. Enter this
information only when the Tunnel mode is selected.
395
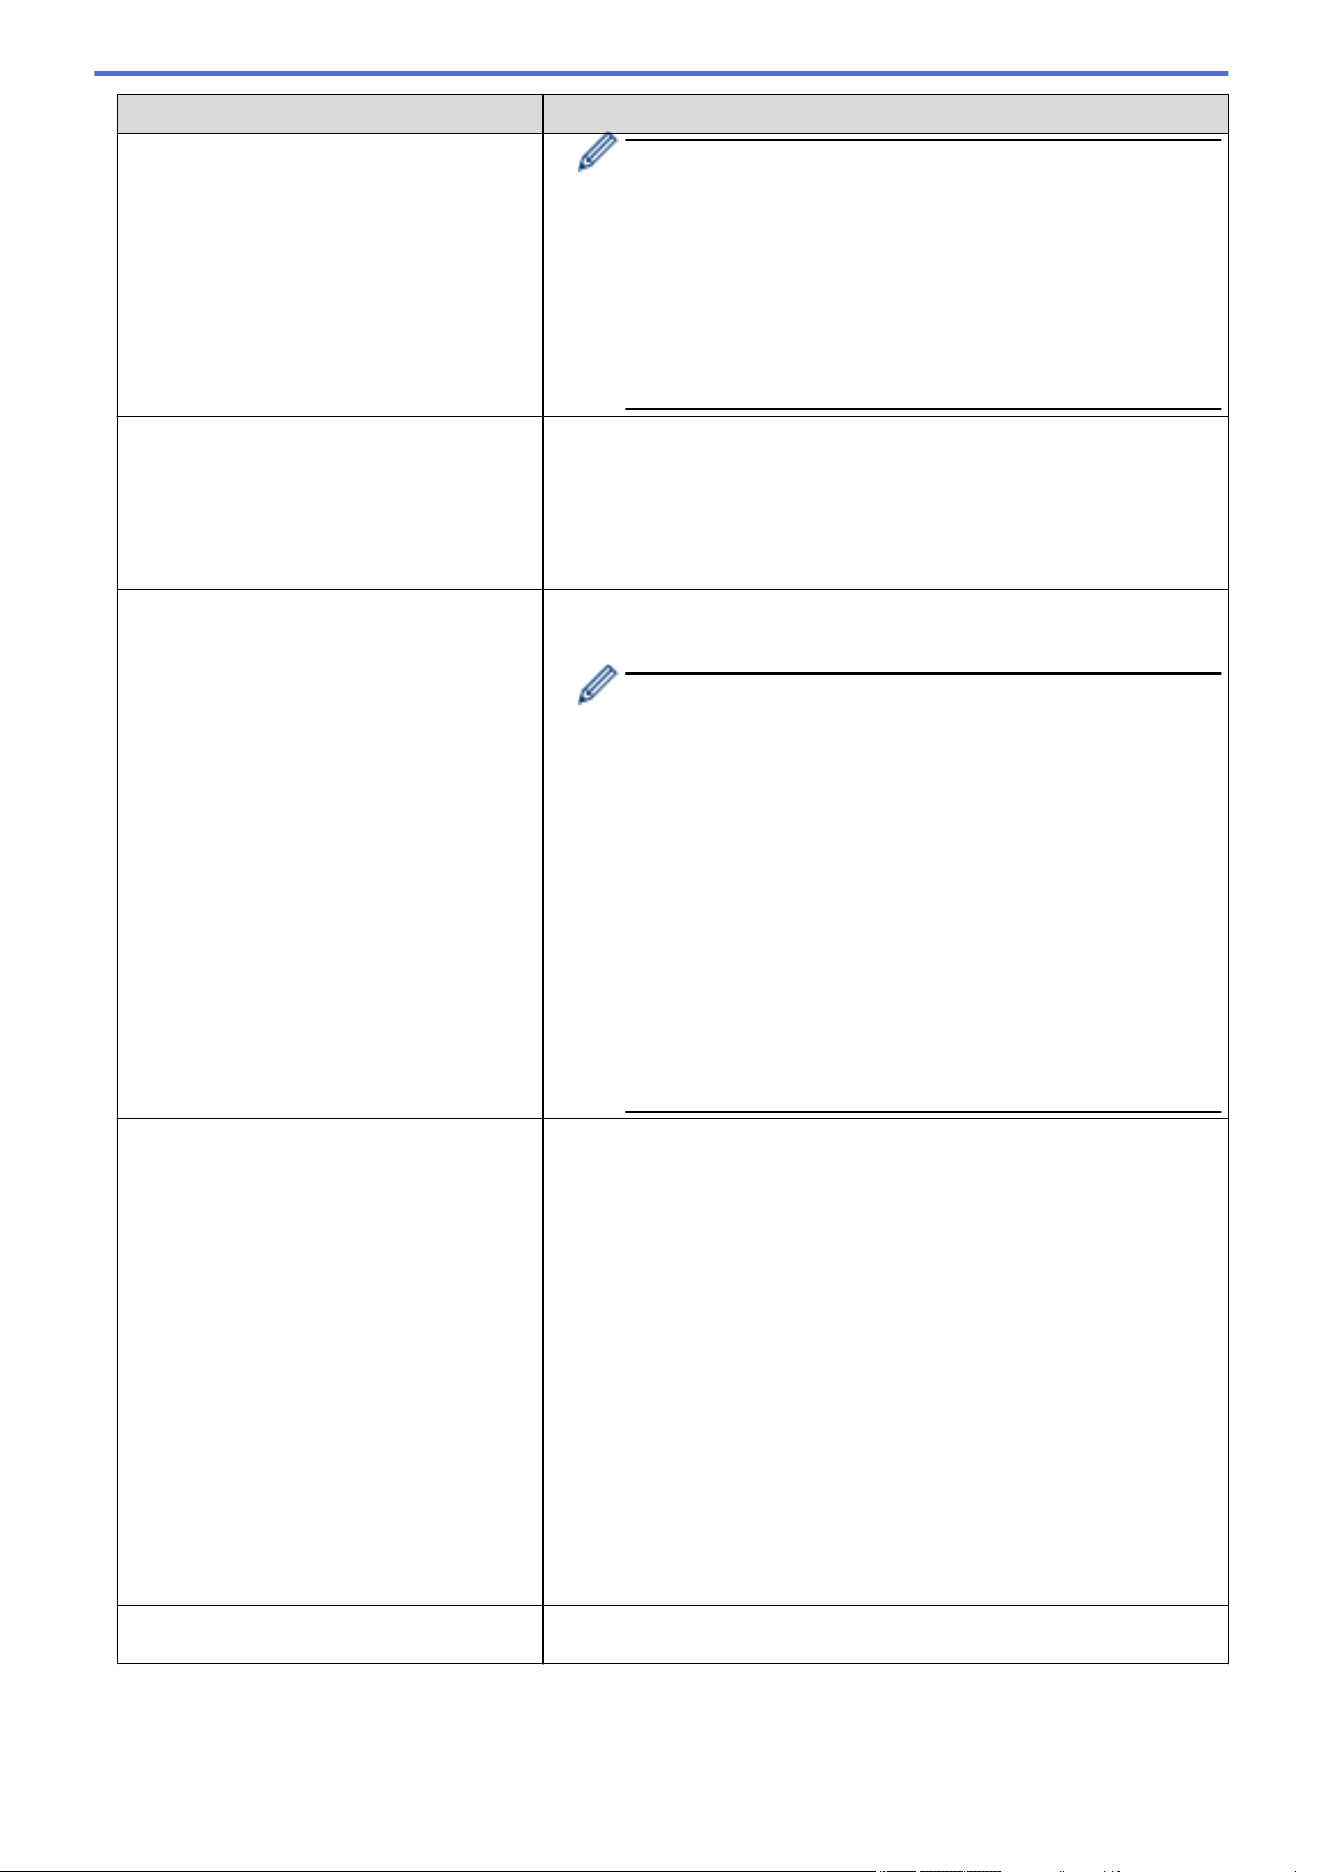
Option Description
SA (Security Association) is an encrypted communication
method using IPsec or IPv6 that exchanges and shares
information, such as the encryption method and encryption key,
in order to establish a secure communication channel before
communication begins. SA may also refer to a virtual encrypted
communication channel that has been established. The SA
used for IPsec establishes the encryption method, exchanges
the keys, and carries out mutual authentication according to the
IKE (Internet Key Exchange) standard procedure. In addition,
the SA is updated periodically.
Perfect Forward Secrecy (PFS)
PFS does not derive keys from previous keys that were used to encrypt
messages. In addition, if a key that is used to encrypt a message was
derived from a parent key, that parent key is not used to derive other
keys. Therefore, even if a key is compromised, the damage will be
limited only to the messages that were encrypted using that key.
Select Enabled or Disabled.
Authentication Method Select the authentication method. Select Pre-Shared Key,
Certificates, EAP - MD5, or EAP - MS-CHAPv2.
EAP is an authentication protocol that is an extension of PPP.
By using EAP with IEEE802.1x, a different key is used for user
authentication during each session.
The following settings are necessary only when EAP - MD5 or
EAP - MS-CHAPv2 is selected in Authentication Method:
• Mode
Select Server-Mode or Client-Mode.
• Certificate
Select the certificate.
• User Name
Type the user name (up to 32 characters).
• Password
Type the password (up to 32 characters). The password
must be entered two times for confirmation.
Pre-Shared Key
When encrypting communication, the encryption key is exchanged and
shared beforehand using another channel.
If you selected Pre-Shared Key for the Authentication Method, type
the Pre-Shared Key (up to 32 characters).
• Local/ID Type/ID
Select the sender's ID type, and then type the ID.
Select IPv4 Address, IPv6 Address, FQDN, E-mail Address, or
Certificate for the type.
If you select Certificate, type the common name of the certificate
in the ID field.
• Remote/ID Type/ID
Select the recipient's ID type, and then type the ID.
Select IPv4 Address, IPv6 Address, FQDN, E-mail Address, or
Certificate for the type.
If you select Certificate, type the common name of the certificate
in the ID field.
Certificate
If you selected Certificates for Authentication Method, select the
certificate.
396

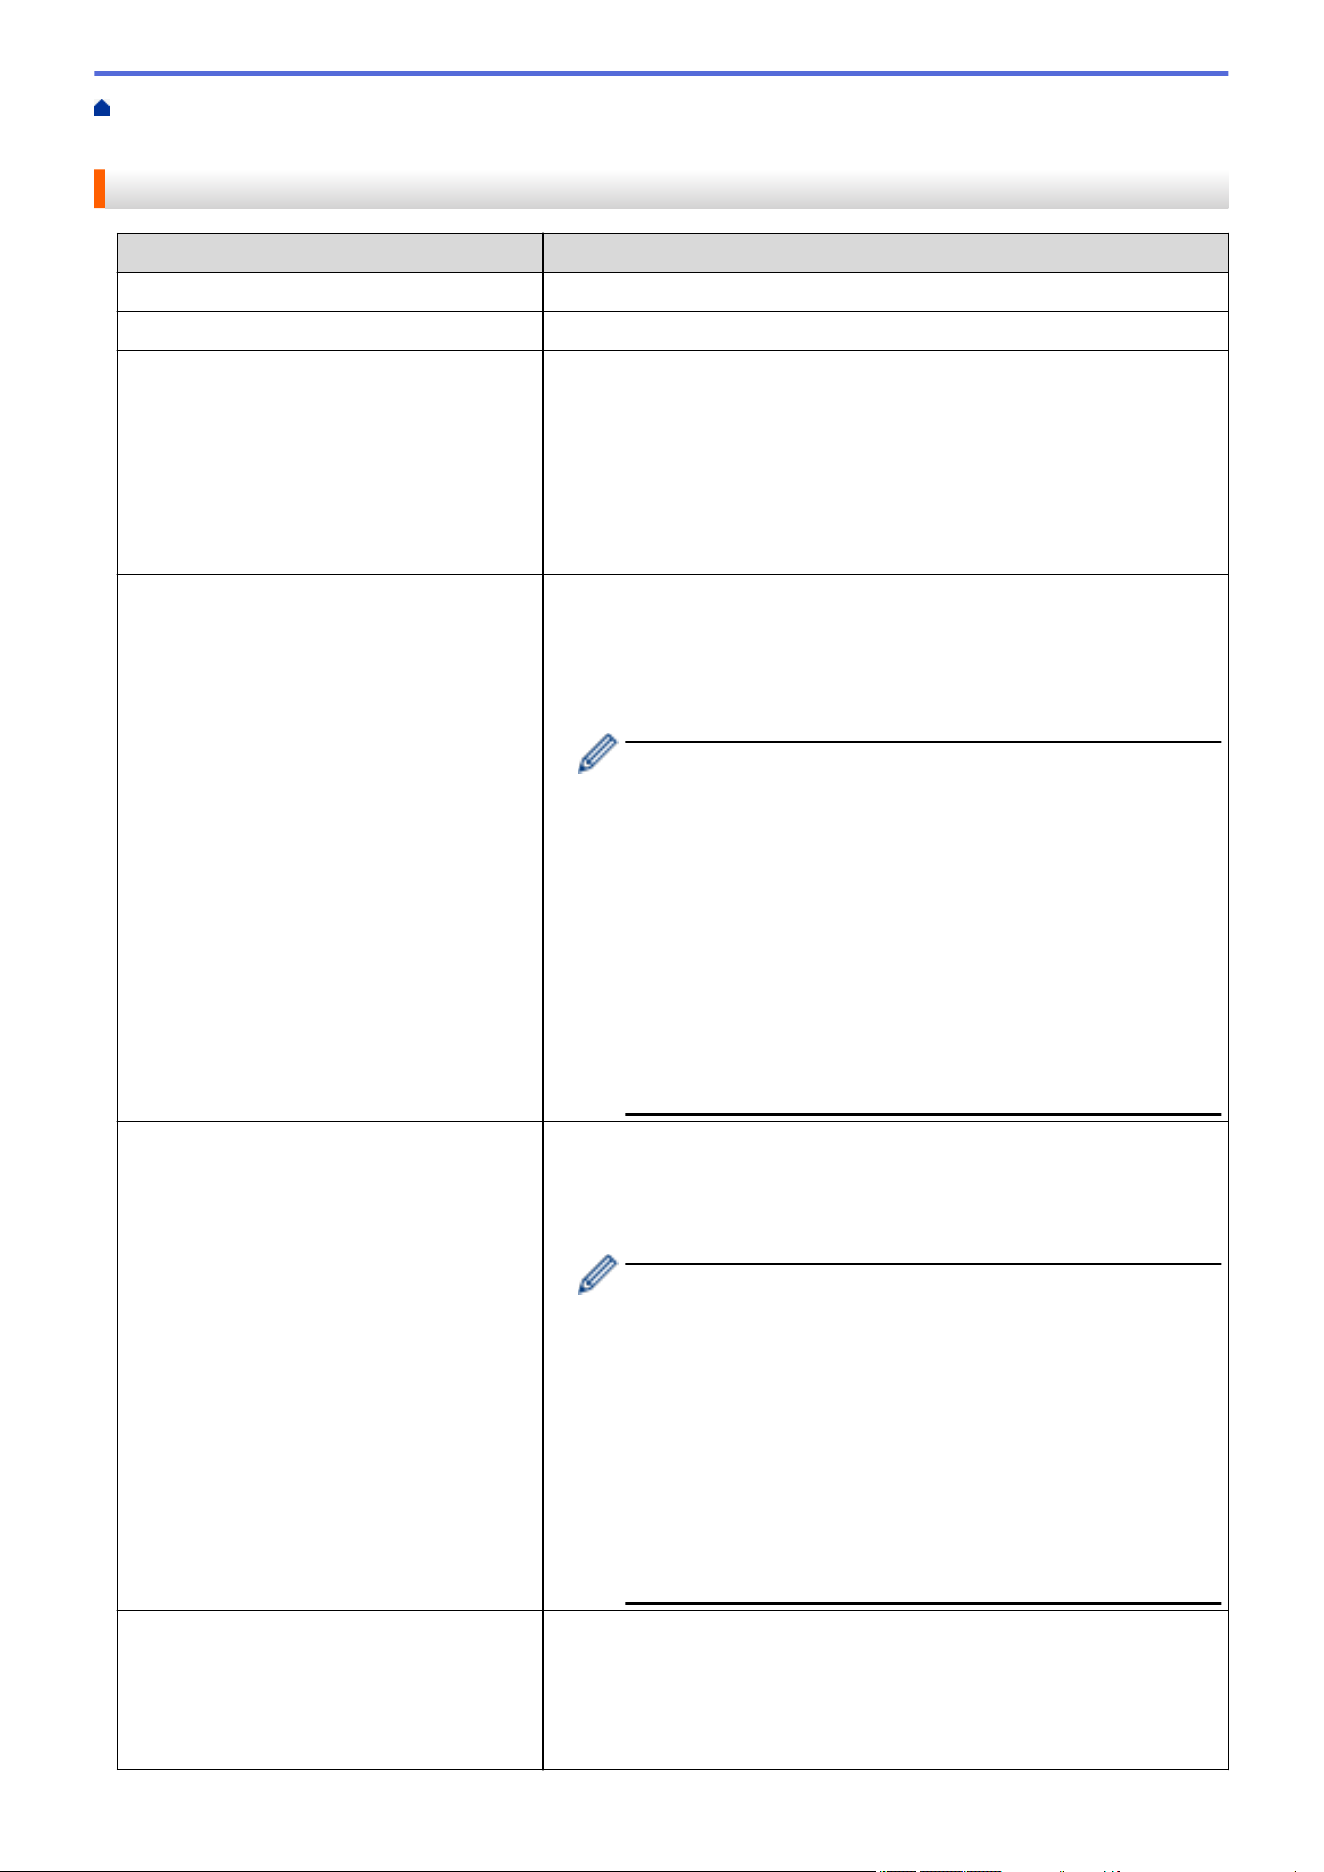
Home > Security > Use IPsec > Configure an IPsec Template Using Web Based Management > Manual
Settings for an IPsec Template
Manual Settings for an IPsec Template
Option Description
Template Name Type a name for the template (up to 16 characters).
Use Prefixed Template Select Custom.
Internet Key Exchange (IKE) IKE is a communication protocol that is used to exchange encryption
keys in order to carry out encrypted communication using IPsec. To
carry out encrypted communication for that time only, the encryption
algorithm that is necessary for IPsec is determined and the encryption
keys are shared. For IKE, the encryption keys are exchanged using the
Diffie-Hellman key exchange method, and encrypted communication
that is limited to IKE is carried out.
Select Manual.
Authentication Key (ESP, AH)
Type the In/Out values.
These settings are necessary when Custom is selected for Use
Prefixed Template, Manual is selected for Internet Key Exchange
(IKE), and a setting other than None is selected for Hash for
Encapsulating Security section.
The number of characters you can set differs depending on the
setting you chose for Hash in the Encapsulating Security
section.
If the length of the specified authentication key is different than
the selected hash algorithm, an error will occur.
• MD5: 128 bits (16 bytes)
• SHA1: 160 bits (20 bytes)
• SHA256: 256 bits (32 bytes)
• SHA384: 384 bits (48 bytes)
• SHA512: 512 bits (64 bytes)
When you specify the key in ASCII Code, enclose the
characters in double quotation marks (").
Code key (ESP)
Type the In/Out values.
These settings are necessary when Custom is selected in Use
Prefixed Template, Manual is selected in Internet Key Exchange
(IKE), and ESP is selected in Protocol in Encapsulating Security.
The number of characters you can set differs depending on the
setting you chose for Encryption in the Encapsulating
Security section.
If the length of the specified code key is different than the
selected encryption algorithm, an error will occur.
• DES: 64 bits (8 bytes)
• 3DES: 192 bits (24 bytes)
• AES-CBC 128: 128 bits (16 bytes)
• AES-CBC 256: 256 bits (32 bytes)
When you specify the key in ASCII Code, enclose the
characters in double quotation marks (").
SPI
These parameters are used to identify security information. Generally, a
host has multiple Security Associations (SAs) for several types of IPsec
communication. Therefore, it is necessary to identify the applicable SA
when an IPsec packet is received. The SPI parameter, which identifies
the SA, is included in the Authentication Header (AH) and
Encapsulating Security Payload (ESP) header.
398
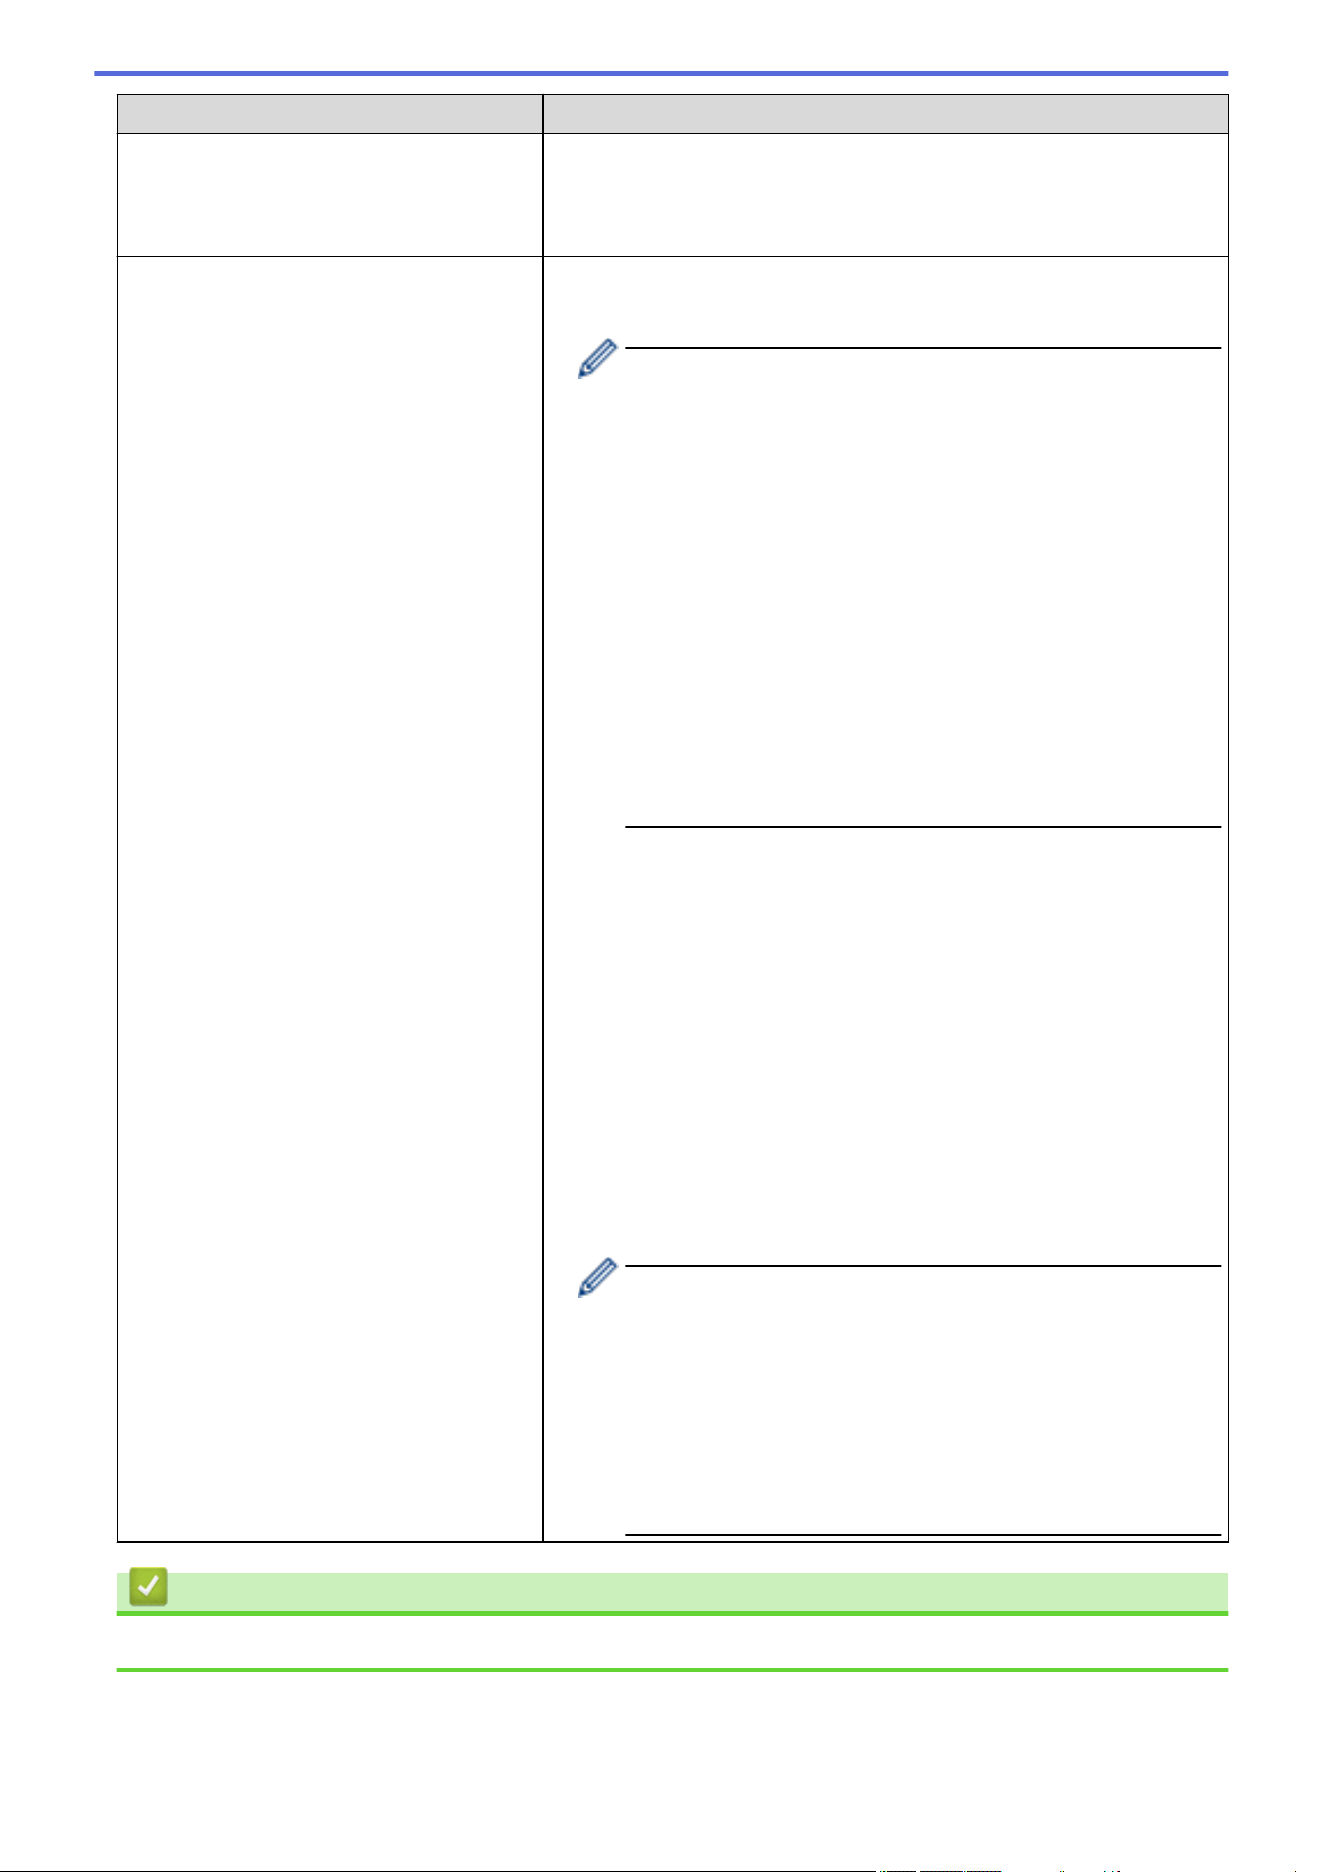
Option Description
These settings are necessary when Custom is selected for Use
Prefixed Template, and Manual is selected for Internet Key
Exchange (IKE).
Enter the In/Out values. (3-10 characters)
Encapsulating Security • Protocol
Select ESP or AH.
- ESP is a protocol for carrying out encrypted communication
using IPsec. ESP encrypts the payload (communicated
contents) and adds additional information. The IP packet
comprises the header and the encrypted payload, which
follows the header. In addition to the encrypted data, the IP
packet also includes information regarding the encryption
method and encryption key, the authentication data, and so
on.
- AH is part of the IPsec protocol that authenticates the
sender and prevents manipulation of the data (ensures the
completeness of the data). In the IP packet, the data is
inserted immediately after the header. In addition, the
packets include hash values, which are calculated using an
equation from the communicated contents, secret key, and
so on, in order to prevent the falsification of the sender and
manipulation of the data. Unlike ESP, the communicated
contents are not encrypted, and the data is sent and
received as plain text.
• Encryption
Select DES, 3DES, AES-CBC 128, or AES-CBC 256.
• Hash
Select None, MD5, SHA1, SHA256, SHA384, or SHA512. None
can be selected only when ESP is selected in Protocol.
• SA Lifetime
Specify the IKE SA lifetime.
Type the time (seconds) and number of kilobytes (KByte).
• Encapsulation Mode
Select Transport or Tunnel.
• Remote Router IP-Address
Type the IP address (IPv4 or IPv6) of the remote router. Enter this
information only when the Tunnel mode is selected.
SA (Security Association) is an encrypted communication
method using IPsec or IPv6 that exchanges and shares
information, such as the encryption method and encryption key,
in order to establish a secure communication channel before
communication begins. SA may also refer to a virtual encrypted
communication channel that has been established. The SA
used for IPsec establishes the encryption method, exchanges
the keys, and carries out mutual authentication according to the
IKE (Internet Key Exchange) standard procedure. In addition,
the SA is updated periodically.
Related Information
• Configure an IPsec Template Using Web Based Management
399

Home > Security > Use IEEE 802.1x Authentication for a Wired or a Wireless Network
Use IEEE 802.1x Authentication for a Wired or a Wireless Network
• What Is IEEE 802.1x Authentication?
• Configure IEEE 802.1x Authentication for a Wired or a Wireless Network Using Web
Based Management (Web Browser)
• IEEE 802.1x Authentication Methods
400

Home > Security > Use IEEE 802.1x Authentication for a Wired or a Wireless Network > What Is IEEE
802.1x Authentication?
What Is IEEE 802.1x Authentication?
IEEE 802.1x is an IEEE standard for wired and wireless networks that limits access from unauthorised network
devices. Your Brother machine (supplicant) sends an authentication request to a RADIUS server (Authentication
server) through your access point or HUB. After your request has been verified by the RADIUS server, your
machine can access the network.
Related Information
• Use IEEE 802.1x Authentication for a Wired or a Wireless Network
401
Home > Security > Use IEEE 802.1x Authentication for a Wired or a Wireless Network > Configure IEEE
802.1x Authentication for a Wired or a Wireless Network Using Web Based Management (Web Browser)
Configure IEEE 802.1x Authentication for a Wired or a Wireless Network
Using Web Based Management (Web Browser)
• If you configure your machine using EAP-TLS authentication, you must install the client certificate issued
by a CA before you start configuration. Contact your network administrator about the client certificate. If
you have installed more than one certificate, we recommend writing down the certificate name you want to
use.
• Before you verify the server certificate, you must import the CA certificate issued by the CA that signed the
server certificate. Contact your network administrator or your Internet Service Provider (ISP) to confirm
whether a CA certificate import is necessary.
You can also configure IEEE 802.1x authentication using Wireless setup wizard from the control panel
(Wireless network).
1. Start your web browser.
2. Type "https://machine's IP address" in your browser's address bar (where "machine's IP address" is the
machine's IP address).
For example:
https://192.168.1.2
If you are using a Domain Name System or enable a NetBIOS name, you can type another name, such as
"SharedPrinter" instead of the IP address.
For example:
https://SharedPrinter
If you enable a NetBIOS name, you can also use the node name.
For example:
https://brnxxxxxxxxxxxx
The NetBIOS name can be found in the Network Configuration Report.
3. If required, type the password in the Login field, and then click Login.
The default password to manage this machine’s settings is located on the back of the machine and marked
"Pwd".
4. Go to the navigation menu, and then click Network.
Start from
, if the navigation menu is not shown on the left side of the screen.
5. Do one of the following:
• For the wired network
Click Wired > Wired 802.1x Authentication.
• For the wireless network
Click Wireless > Wireless (Enterprise).
6. Configure the IEEE 802.1x authentication settings.
402
• To enable IEEE 802.1x authentication for wired networks, select Enabled for Wired 802.1x status on
the Wired 802.1x Authentication page.
• If you are using EAP-TLS authentication, you must select the client certificate installed (shown with
certificate name) for verification from the Client Certificate drop-down list.
• If you select EAP-FAST, PEAP, EAP-TTLS, or EAP-TLS authentication, select the verification method
from the Server Certificate Verification drop-down list. Verify the server certificate using the CA
certificate, imported to the machine in advance, issued by the CA that signed the server certificate.
Select one of the following verification methods from the Server Certificate Verification drop-down list:
Option Description
No Verification The server certificate can always be trusted. The verification is not performed.
CA Cert. The verification method to check the CA reliability of the server certificate, using the
CA certificate issued by the CA that signed the server certificate.
CA Cert. + ServerID The verification method to check the common name
1
value of the server certificate,
in addition to the CA reliability of the server certificate.
7. When finished with configuration, click Submit.
For wired networks: After configuring, connect your machine to the IEEE 802.1x supported network. After a
few minutes, print the Network Configuration Report to check the <Wired IEEE 802.1x> status.
Option Description
Success The wired IEEE 802.1x function is enabled and the authentication was successful.
Failed The wired IEEE 802.1x function is enabled; however, the authentication failed.
Off The wired IEEE 802.1x function is not available.
Related Information
• Use IEEE 802.1x Authentication for a Wired or a Wireless Network
Related Topics:
• Print the Network Configuration Report
• Print the WLAN Report
• Access Web Based Management
• Configure Certificates for Device Security
• Supported Security Certificate Features
1 The common name verification compares the common name of the server certificate to the character string configured for the Server ID.
Before you use this method, contact your system administrator about the server certificate's common name and then configure Server ID.
403

Home > Security > Use IEEE 802.1x Authentication for a Wired or a Wireless Network > IEEE 802.1x
Authentication Methods
IEEE 802.1x Authentication Methods
EAP-FAST
Extensible Authentication Protocol-Flexible Authentication via Secured Tunneling (EAP-FAST) has been
developed by Cisco Systems, Inc., which uses a user ID and password for authentication, and symmetric key
algorithms to achieve a tunnelled authentication process.
The Brother machine supports the following inner authentication methods:
• EAP-FAST/NONE
• EAP-FAST/MS-CHAPv2
• EAP-FAST/GTC
EAP-MD5 (Wired network)
Extensible Authentication Protocol-Message Digest Algorithm 5 (EAP-MD5) uses a user ID and password for
challenge-response authentication.
PEAP
Protected Extensible Authentication Protocol (PEAP) is a version of EAP method developed by Cisco
Systems, Inc., Microsoft Corporation and RSA Security. PEAP creates an encrypted Secure Sockets Layer
(SSL)/Transport Layer Security (TLS) tunnel between a client and an authentication server, for sending a user
ID and password. PEAP provides mutual authentication between the server and the client.
The Brother machine supports the following inner authentications:
• PEAP/MS-CHAPv2
• PEAP/GTC
EAP-TTLS
Extensible Authentication Protocol-Tunneled Transport Layer Security (EAP-TTLS) has been developed by
Funk Software and Certicom. EAP-TTLS creates a similar encrypted SSL tunnel to PEAP, between a client
and an authentication server, for sending a user ID and password. EAP-TTLS provides mutual authentication
between the server and the client.
The Brother machine supports the following inner authentications:
• EAP-TTLS/CHAP
• EAP-TTLS/MS-CHAP
• EAP-TTLS/MS-CHAPv2
• EAP-TTLS/PAP
EAP-TLS
Extensible Authentication Protocol-Transport Layer Security (EAP-TLS) requires digital certificate
authentication both at a client and an authentication server.
Related Information
• Use IEEE 802.1x Authentication for a Wired or a Wireless Network
404

Home > Security > Use Active Directory Authentication
Use Active Directory Authentication
Related Models: MFC-J5855DW/MFC-J5955DW
• Introduction to Active Directory Authentication
• Configure Active Directory Authentication Using Web Based Management
• Log On to Change the Machine Settings Using the Machine's Control Panel (Active
Directory Authentication)
405

Home > Security > Use Active Directory Authentication > Introduction to Active Directory Authentication
Introduction to Active Directory Authentication
Related Models: MFC-J5855DW/MFC-J5955DW
Active Directory Authentication restricts the use of your machine. If Active Directory Authentication is enabled,
the machine's control panel will be locked. You cannot change the machine's settings until you enter a User ID
and password.
Active Directory Authentication offers the following features:
• Stores incoming fax data
• Obtains the email address from the Active Directory server based on your User ID, when sending scanned
data to an email server. To use this feature, select the On option for the Get Mail Address setting and LDAP
+ kerberos authentication method. Your email address will be set as the sender when the machine sends
scanned data to an email server, or as the recipient if you want to send the scanned data to your email
address.
When Active Directory Authentication is enabled, your machine stores all incoming fax data. After you log on, the
machine prints the stored fax data.
You can change the Active Directory Authentication settings using Web Based Management.
Related Information
• Use Active Directory Authentication
406
Home > Security > Use Active Directory Authentication > Configure Active Directory Authentication Using
Web Based Management
Configure Active Directory Authentication Using Web Based
Management
Related Models: MFC-J5855DW/MFC-J5955DW
Active Directory authentication supports Kerberos authentication and NTLMv2 authentication. You must
configure the SNTP protocol (network time server) and DNS server configuration for authentication.
1. Start your web browser.
2. Type "https://machine's IP address" in your browser's address bar (where "machine's IP address" is the
machine's IP address).
For example:
https://192.168.1.2
3. If required, type the password in the Login field, and then click Login.
The default password to manage this machine’s settings is located on the back of the machine and marked
"Pwd".
4. Go to the navigation menu, and then click Administrator > User Restriction Function.
Start from
, if the navigation menu is not shown on the left side of the screen.
5. Select Active Directory Authentication.
6. Click Submit.
7. Select the Active Directory Authentication menu.
8. Configure the following settings:
Option Description
Storage Fax RX Data Select this option to store incoming fax data. You can print all incoming fax
data after you log on to the machine.
Remember User ID Select this option to save your User ID.
Active Directory Server
Address
Type the IP address or the server name (for example: ad.example.com) of
the Active Directory Server.
Active Directory Domain
Name
Type the Active Directory domain name.
Protocol & Authentication
Method
Select the protocol and authentication method.
LDAP Server Port Type the port number to connect the Active Directory server via LDAP
(available only for LDAP + kerberos authentication method).
LDAP Search Root Type the LDAP search root (available only for LDAP + kerberos
authentication method).
Get Mail Address Select this option to obtain logged on user's email address from the Active
Directory server. (available only for LDAP + kerberos authentication
method)
Get User's Home Directory Select this option to obtain your home directory as the Scan to Network
destination. (available only for LDAP + kerberos authentication method)
407

Home > Security > Use Active Directory Authentication > Log On to Change the Machine Settings Using the
Machine's Control Panel (Active Directory Authentication)
Log On to Change the Machine Settings Using the Machine's Control
Panel (Active Directory Authentication)
Related Models: MFC-J5855DW/MFC-J5955DW
When Active Directory Authentication is enabled, the machine's control panel will be locked until you enter
your User ID and password on the machine's control panel.
1. On the machine's control panel, use the touchscreen to enter your User ID and Password.
2. Press [OK].
3. When authentication is successful, the machine's control panel will be unlocked.
Related Information
• Use Active Directory Authentication
409

Home > Security > Use LDAP Authentication > Introduction to LDAP Authentication
Introduction to LDAP Authentication
Related Models: MFC-J5855DW/MFC-J5955DW
LDAP Authentication restricts the use of your machine. If LDAP Authentication is enabled, the machine's control
panel will be locked. You cannot change the machine's settings until you enter a User ID and password.
LDAP Authentication offers the following features:
• Stores incoming fax data
• Obtains the email address from the LDAP server based on your User ID, when sending scanned data to an
email server. To use this feature, select the On option for the Get Mail Address setting. Your email address
will be set as the sender when the machine sends scanned data to an email server, or as the recipient if you
want to send the scanned data to your email address.
When LDAP Authentication is enabled, your machine stores all incoming fax data. After you log on, the machine
prints the stored fax data.
You can change the LDAP Authentication settings using Web Based Management.
Related Information
• Use LDAP Authentication
411
Home > Security > Use LDAP Authentication > Configure LDAP Authentication Using Web Based
Management
Configure LDAP Authentication Using Web Based Management
Related Models: MFC-J5855DW/MFC-J5955DW
1. Start your web browser.
2. Type "https://machine's IP address" in your browser's address bar (where "machine's IP address" is the
machine's IP address).
For example:
https://192.168.1.2
3. If required, type the password in the Login field, and then click Login.
The default password to manage this machine’s settings is located on the back of the machine and marked
"Pwd".
4. Go to the navigation menu, and then click Administrator > User Restriction Function.
Start from , if the navigation menu is not shown on the left side of the screen.
5. Select LDAP Authentication.
6. Click Submit.
7. Click the LDAP Authentication menu.
8. Configure the following settings:
Option Description
Storage Fax RX Data Select this option to store incoming fax data. You can print all incoming fax
data after you log on to the machine.
Remember User ID Select this option to save your User ID.
LDAP Server Address Type the IP address or the server name (for example: ldap.example.com) of
the LDAP server.
LDAP Server Port Type the LDAP server port number.
LDAP Search Root Type the LDAP search root directory.
Attribute of Name (Search
Key)
Type the attribute you want to use as a search key.
Get Mail Address Select this option to obtain the logged user's email address from the LDAP
server.
Get User's Home Directory Select this option to obtain your home directory as the Scan to Network
destination.
9. Click Submit.
Related Information
• Use LDAP Authentication
Related Topics:
• Access Web Based Management
412

Home > Security > Use LDAP Authentication > Log On to Change the Machine Settings Using the
Machine's Control Panel (LDAP Authentication)
Log On to Change the Machine Settings Using the Machine's Control
Panel (LDAP Authentication)
Related Models: MFC-J5855DW/MFC-J5955DW
When LDAP Authentication is enabled, the machine's control panel will be locked until you enter your User ID
and password on the machine's control panel.
1. On the machine's control panel, use the touchscreen to enter your User ID and Password.
2. Press [OK].
3. When authentication is successful, the machine's control panel will be unlocked.
Related Information
• Use LDAP Authentication
413

Home > Security > Use Secure Function Lock 3.0
Use Secure Function Lock 3.0
Secure Function Lock 3.0 increases security by restricting the functions available on your machine.
• Before Using Secure Function Lock 3.0
• Configure Secure Function Lock 3.0 Using Web Based Management
• Scan Using Secure Function Lock 3.0
• Configure Public Mode for Secure Function Lock 3.0
• Additional Secure Function Lock 3.0 Features
• Register a new IC Card Using the Machine's Control Panel
• Register an External IC Card Reader
414

Home > Security > Use Secure Function Lock 3.0 > Before Using Secure Function Lock 3.0
Before Using Secure Function Lock 3.0
Use Secure Function Lock to configure passwords, set specific user page limits, and grant access to some or all
of the functions listed here.
You can configure and change the following Secure Function Lock 3.0 settings using Web Based Management:
• Print
Print includes print jobs sent via AirPrint, Brother iPrint&Scan, and Brother Mobile Connect.
If you register users' logon names in advance, the users will not need to enter their passwords when they use
the print function.
• Copy
• Scan
Scan includes scan jobs sent via Brother iPrint&Scan and Brother Mobile Connect.
• Fax (supported models only)
- Send
- Receive
• Media
- Print from
- Scan to
• Web Connect (supported models only)
- Upload
- Download
• Apps (supported models only)
• Page Limits (*)
• Colour Print
• Page Counters
• Card ID (NFC ID) (supported models only)
Related Information
• Use Secure Function Lock 3.0
415
Home > Security > Use Secure Function Lock 3.0 > Configure Secure Function Lock 3.0 Using Web Based
Management
Configure Secure Function Lock 3.0 Using Web Based Management
1. Start your web browser.
2. Type "https://machine's IP address" in your browser's address bar (where "machine's IP address" is the
machine's IP address).
For example:
https://192.168.1.2
3. If required, type the password in the Login field, and then click Login.
The default password to manage this machine’s settings is located on the back of the machine and marked
"Pwd".
4. Go to the navigation menu, and then click Administrator > Restriction Management or User Restriction
Function.
Start from , if the navigation menu is not shown on the left side of the screen.
5. Select Secure Function Lock.
6. Click Submit.
7. Click the Restricted Functions menu.
8. In the User List / Restricted Functions field, type a group name or user name.
9. In the Print and the other columns, select a checkbox to allow or clear a checkbox to restrict the function
listed.
10. To configure the maximum page count, select the On checkbox in the Page Limits column, and then type the
maximum number in the Max. Pages field.
11. Click Submit.
12. Click the User List menu.
13. In the User List field, type the user name.
14. In the Password field, type a password.
The number of characters you can set differs depending on the model.
15. In the E-mail Address field, type the user's email address (available only for certain models).
16. To register the user's Card ID, type the card number in the Card ID (NFC ID) field (available only for certain
models) .
17. Select User List / Restricted Functions from the drop-down list for each user.
18. Click Submit.
You can also change the user list lockout settings in the Secure Function Lock menu.
Related Information
• Use Secure Function Lock 3.0
Related Topics:
• Access Web Based Management
416
Home > Security > Use Secure Function Lock 3.0 > Scan Using Secure Function Lock 3.0
Scan Using Secure Function Lock 3.0
Setting Scan restrictions (for administrators)
Secure Function Lock 3.0 allows an administrator to restrict which users are allowed to scan. When the Scan
feature is set to Off for the public user setting, only users who have the Scan checkbox selected will be able to
scan.
Using the Scan feature (for restricted users)
• To scan using the machine's control panel:
Restricted users must enter their passwords on the machine's control panel to access Scan mode.
• To scan from a computer:
Restricted users must enter their passwords on the machine's control panel before scanning from their
computers. If the password is not entered on the machine's control panel, an error message will appear on
the user's computer.
If the machine supports IC card authentication, restricted users can also access Scan mode by touching the
NFC symbol on the machine's control panel with their registered IC cards.
Related Information
• Use Secure Function Lock 3.0
417
Home > Security > Use Secure Function Lock 3.0 > Configure Public Mode for Secure Function Lock 3.0
Configure Public Mode for Secure Function Lock 3.0
Use the Secure Function Lock screen to set up Public Mode, which limits the functions available to public users.
Public users will not need to enter a password to access the features made available through Public Mode
settings.
Public Mode includes print jobs sent via Brother iPrint&Scan and Brother Mobile Connect.
1. Start your web browser.
2. Type "https://machine's IP address" in your browser's address bar (where "machine's IP address" is the
machine's IP address).
For example:
https://192.168.1.2
3. If required, type the password in the Login field, and then click Login.
The default password to manage this machine’s settings is located on the back of the machine and marked
"Pwd".
4. Go to the navigation menu, and then click Administrator > Restriction Management or User Restriction
Function.
Start from
, if the navigation menu is not shown on the left side of the screen.
5. Select Secure Function Lock.
6. Click Submit.
7. Click the Restricted Functions menu.
8. In the Public Mode row, select a checkbox to allow or clear a checkbox to restrict the function listed.
9. Click Submit.
Related Information
• Use Secure Function Lock 3.0
Related Topics:
• Access Web Based Management
418
Home > Security > Use Secure Function Lock 3.0 > Additional Secure Function Lock 3.0 Features
Additional Secure Function Lock 3.0 Features
Configure the following features in the Secure Function Lock screen:
All Counter Reset
Click All Counter Reset, in the Page Counters column, to reset the page counter.
Export to CSV file
Click Export to CSV file, to export the current and last page counter including User List / Restricted
Functions information as a CSV file.
Card ID (NFC ID) (supported models only)
Click the User List menu, and then type a users' Card ID in the Card ID (NFC ID) field. You can use your IC
card for authentication.
Last Counter Record
Click Last Counter Record if you want the machine to retain the page count after the counter has been reset.
Counter Auto Reset
Click Counter Auto Reset to configure the time interval you want between page counter reset. Choose a
daily, weekly, or monthly interval.
Related Information
• Use Secure Function Lock 3.0
419
Home > Security > Use Secure Function Lock 3.0 > Register a new IC Card Using the Machine's Control
Panel
Register a new IC Card Using the Machine's Control Panel
Related Models: MFC-J5955DW
1. Touch the Near-Field Communication (NFC) symbol on the machine's control panel with a registered
Integrated Circuit Card (IC Card).
2. Press displayed at the top left of the screen.
3. Press [Register Card].
4. Touch a new IC Card to the NFC symbol.
The new IC Card's number is then registered to the machine.
5. Press [OK].
Related Information
• Use Secure Function Lock 3.0
420
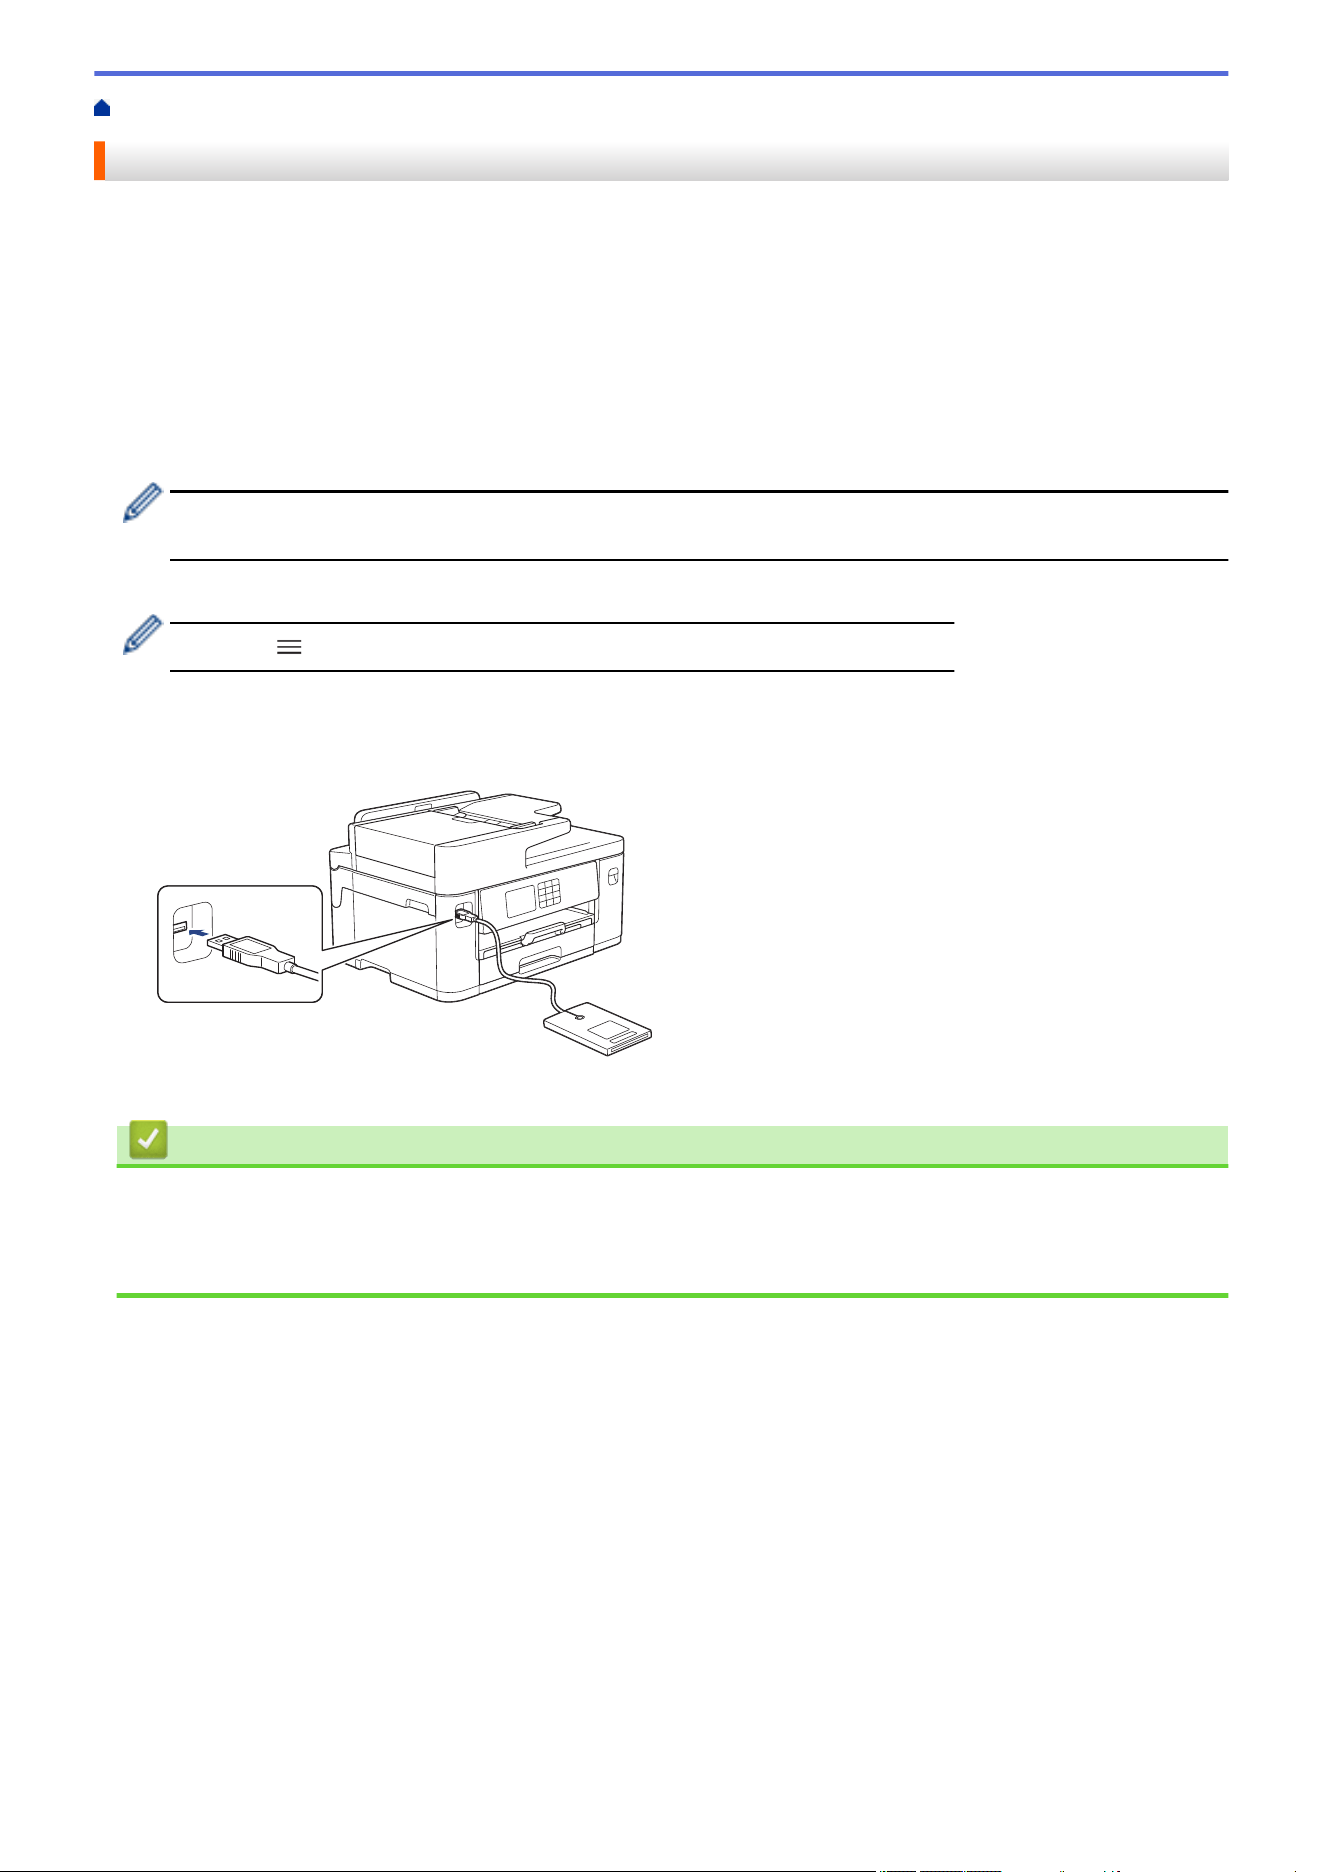
Home > Security > Use Secure Function Lock 3.0 > Register an External IC Card Reader
Register an External IC Card Reader
When you connect an external IC (Integrated Circuit) card reader, use Web Based Management to register the
card reader. Your machine supports HID class driver supported external IC card readers.
1. Start your web browser.
2. Type "https://machine's IP address" in your browser's address bar (where "machine's IP address" is the
machine's IP address).
For example:
https://192.168.1.2
3. If required, type the password in the Login field, and then click Login.
The default password to manage this machine’s settings is located on the back of the machine and marked
"Pwd".
4. Go to the navigation menu, and then click Administrator > External Card Reader.
Start from , if the navigation menu is not shown on the left side of the screen.
5. Enter the necessary information, and then click Submit.
6. Restart your Brother machine to activate the configuration.
7. Connect the card reader to your machine.
8. Touch the card to the card reader when using card authentication.
Related Information
• Use Secure Function Lock 3.0
Related Topics:
• Access Web Based Management
421

Home > Security > Send or Receive an Email Securely > Configure Email Sending or Receiving Using Web
Based Management
Configure Email Sending or Receiving Using Web Based Management
We recommend using Web Based Management to configure secured email sending with user authentication,
or email sending and receiving using SSL/TLS.
1. Start your web browser.
2. Type "https://machine's IP address" in your browser's address bar (where "machine's IP address" is the
machine's IP address).
For example:
https://192.168.1.2
3. If required, type the password in the Login field, and then click Login.
The default password to manage this machine’s settings is located on the back of the machine and marked
"Pwd".
4. Go to the navigation menu, and then click Network > Network > Protocol.
Start from , if the navigation menu is not shown on the left side of the screen.
5. In the POP3/IMAP4/SMTP Client field, click Advanced Settings and make sure the status of POP3/IMAP4/
SMTP Client is Enabled.
6. Configure the POP3/IMAP4/SMTP Client settings.
• Confirm that the email settings are correct after configuration by sending a test email.
• If you do not know the POP3/IMAP4/SMTP server settings, contact your network administrator or Internet
Service Provider (ISP).
7. When finished, click Submit.
The Test Send/Receive E-mail Configuration dialog box appears.
8. Follow the instructions in the dialog box to test the current settings.
Related Information
• Send or Receive an Email Securely
Related Topics:
• Access Web Based Management
• Send or Receive an Email Securely Using SSL/TLS
423
Home > Security > Send or Receive an Email Securely > Send an Email with User Authentication
Send an Email with User Authentication
Your machine supports the SMTP-AUTH method to send email via an email server that requires user
authentication. This method prevents unauthorised users from accessing the email server.
You can use the SMTP-AUTH method for email notification, email reports and I-Fax.
We recommend using Web Based Management to configure the SMTP authentication.
Email Server Settings
You must configure your machine's SMTP authentication method to match the method used by your email server.
For details about your email server settings, contact your network administrator or Internet Service Provider
(ISP).
To enable SMTP server authentication: in the Web Based Management POP3/IMAP4/SMTP Client screen,
under Server Authentication Method, you must select SMTP-AUTH.
Related Information
• Send or Receive an Email Securely
424
Home > Security > Send or Receive an Email Securely > Send or Receive an Email Securely Using
SSL/TLS
Send or Receive an Email Securely Using SSL/TLS
Your Brother machine supports SSL/TLS communication methods. To use an email server that is using SSL/TLS
communication, you must configure the following settings.
We recommend using Web Based Management to configure SSL/TLS.
Verify Server Certificate
Under SSL/TLS, if you choose SSL or TLS, the Verify Server Certificate checkbox will be selected
automatically.
• Before you verify the server certificate, you must import the CA certificate issued by the CA that signed
the server certificate. Contact your network administrator or your Internet Service Provider (ISP) to
confirm if importing a CA certificate is necessary.
• If you do not need to verify the server certificate, clear the Verify Server Certificate checkbox.
Port Number
If you select SSL, or TLS, the Port value will be changed to match the protocol. To change the port number
manually, type the port number after you select SSL/TLS settings.
You must configure your machine's communication method to match the method used by your email server. For
details about your email server settings, contact your network administrator or your ISP.
In most cases, the secured webmail services require the following settings:
SMTP
Port 25
Server Authentication Method SMTP-AUTH
SSL/TLS TLS
POP3 Port 995
SSL/TLS SSL
IMAP4 Port 993
SSL/TLS SSL
Related Information
• Send or Receive an Email Securely
Related Topics:
• Configure Certificates for Device Security
• Configure Email Sending or Receiving Using Web Based Management
425


Home > Administrator > Security Features
Security Features
Your machine uses some of the latest network security and encryption protocols. These network features can be
integrated into your overall network security plan to help protect your data and prevent unauthorised access to
the machine.
• Network Security
• User Authentication
428

Home > Administrator > Security Features > Network Security > Disable Unnecessary Protocols
Disable Unnecessary Protocols
1. Start your web browser.
2. Type "https://machine's IP address" in your browser's address bar (where "machine's IP address" is the
machine's IP address).
For example:
https://192.168.1.2
3. If required, type the password in the Login field, and then click Login.
The default password to manage this machine’s settings is located on the back of the machine and marked
"Pwd".
4. Go to the navigation menu, and then click Network > Network > Protocol.
Start from , if the navigation menu is not shown on the left side of the screen.
5. Clear any unnecessary protocol checkboxes to disable them.
6. Click Submit.
7. Restart your Brother machine to activate the configuration.
Related Information
• Network Security
Related Topics:
• Access Web Based Management
430


Home > Mobile/Web Connect > Brother Web Connect
Brother Web Connect
• Brother Web Connect Overview
• Online Services Used with Brother Web Connect
• Set Up Brother Web Connect
• Scan and Upload Documents Using Brother Web Connect
• Upload a Document from an External Memory Device Using Brother Web Connect
• Download and Print Documents Using Brother Web Connect
• Download and Save a Document to an External Memory Device Using Brother Web
Connect
• FaxForward to Cloud or E-mail
434
Home > Mobile/Web Connect > Brother Web Connect > Brother Web Connect Overview
Brother Web Connect Overview
Certain websites provide services that allow users to upload and view images and files on the website. Your
Brother machine can scan images and upload them to these services, and also download from and print images
that are already uploaded to these services.
1
2
4
3
1. Printing
2. Scanning
3. Photos, images, documents and other files
4. Web Service
To use Brother Web Connect, your Brother machine must be connected to a network that has access to the
Internet, through either a wired or wireless connection.
For network setups that use a proxy server, the machine must also be configured to use a proxy server. If you
are unsure of your network configuration, check with your network administrator.
A proxy server is a computer that serves as an intermediary between computers without a direct Internet
connection, and the Internet.
Press (Web) or (Apps) on the touchscreen to use Brother Web Connect.
Related Information
• Brother Web Connect
• Configure the Proxy Server Settings Using the Machine's Control Panel
• Configure the Proxy Server Settings Using Web Based Management
435
Home > Mobile/Web Connect > Brother Web Connect > Brother Web Connect Overview > Configure the
Proxy Server Settings Using the Machine's Control Panel
Configure the Proxy Server Settings Using the Machine's Control Panel
If your network uses a proxy server, the following proxy server information must be configured on the machine:
• Proxy server address
• Port number
• User Name
• Password
1. Press [Settings] > [All Settings] > [Network] > [Web Connect Settings] > [Proxy
Settings] > [Proxy Connection].
2. Press [On].
3. Press the option that you want to set, and then enter the proxy server information.
Press [OK].
4. Press .
Related Information
• Brother Web Connect Overview
436
Home > Mobile/Web Connect > Brother Web Connect > Brother Web Connect Overview > Configure the
Proxy Server Settings Using Web Based Management
Configure the Proxy Server Settings Using Web Based Management
If your network uses a proxy server, the following proxy server information must be configured using Web
Based Management:
• Proxy server address
• Port number
• User Name
• Password
We recommend Microsoft Internet Explorer 11/Microsoft Edge for Windows, Safari 13 for Mac, Google
Chrome
™
for Android (4.x or later), and Google Chrome
™
/Safari for iOS (10.x or later). Make sure that
JavaScript and Cookies are always enabled in whichever browser you use.
1. Start your web browser.
2. Type "https://machine's IP address" in your browser's address bar (where "machine's IP address" is the
machine's IP address).
For example:
https://192.168.1.2
3. If required, type the password in the Login field, and then click Login.
The default password to manage this machine’s settings is located on the back of the machine and marked
"Pwd".
4. Go to the navigation menu, and then click Network > Network > Protocol.
Start from
, if the navigation menu is not shown on the left side of the screen.
5. Make sure the Proxy checkbox is selected, and then click Submit.
6. In the Proxy field, click Advanced Settings.
7. Enter the proxy server information.
8. Click Submit.
Related Information
• Brother Web Connect Overview
Related Topics:
• Access Web Based Management
437

Home > Mobile/Web Connect > Brother Web Connect > Online Services Used with Brother Web Connect
Online Services Used with Brother Web Connect
Use Brother Web Connect to access online services from your Brother machine. Some of these web services
offer business versions.
To use Brother Web Connect, you must have an account with the online service you want to use. If you do not
already have an account, use a computer to access the service's website and create an account.
You do not need to create an account to use Brother Creative Center. (Brother CreativeCenter is available only
for some models.)
Google Drive
™
An online document storage, editing, sharing and file synchronisation service.
URL:
drive.google.com
Evernote
®
An online file storage and management service.
URL: www.evernote.com
Dropbox
An online file storage, sharing and synchronisation service.
URL: www.dropbox.com
OneDrive
An online file storage, sharing and management service.
URL:
https://onedrive.live.com
Box
An online document editing and sharing service.
URL: www.box.com
OneNote
An online document editing and sharing service.
URL:
www.onenote.com
Brother Creative Center
A website that offers various templates, such as greeting cards, brochures and calendars that you can print on
your Brother machine. (available only for certain countries and models)
https://www.creativecenter.brother/
For more information about any of these services, refer to the respective service's website.
The following table describes which file types can be used with each Brother Web Connect feature:
Accessible Services
Google Drive
™
Evernote
®
Dropbox
OneDrive
Box
OneNote Brother Creative Center
Download and print images
or save them to media
JPEG
PDF
DOCX
XLSX
PPTX
JPEG
PDF
DOCX
XLSX
PPTX
(Print only)
Upload scanned images
JPEG
PDF
JPEG
PDF
-
438
Accessible Services
Google Drive
™
Evernote
®
Dropbox
OneDrive
Box
OneNote Brother Creative Center
DOCX
XLSX
PPTX
TIFF
DOCX
XLSX
PPTX
TIFF
Upload images saved on
media
JPG - -
FaxForward to the online
services
JPEG
PDF
TIFF
JPEG
PDF
TIFF
-
• Not all services are available in all countries.
• For Hong Kong, Taiwan and Korea:
Brother Web Connect supports only file names written in English. Files named in the local language will
not be downloaded.
Related Information
• Brother Web Connect
439

Home > Mobile/Web Connect > Brother Web Connect > Set Up Brother Web Connect
Set Up Brother Web Connect
• Brother Web Connect Setup Overview
• Create an Account for Each Online Service Before Using Brother Web Connect
• Apply for Brother Web Connect Access
• Register an Account on Your Brother Machine for Brother Web Connect
• Set Up Brother Web Connect for Brother CreativeCenter
440
Home > Mobile/Web Connect > Brother Web Connect > Set Up Brother Web Connect > Brother Web
Connect Setup Overview
Brother Web Connect Setup Overview
Configure the Brother Web Connect settings using the following procedure (when using Brother CreativeCenter,
this procedure is not necessary):
Step 1: Create an account with the service you want to use.
Access the service's website using a computer and create an account. (If you already have an account, there
is no need to create an additional account.)
3 2
1
1. User registration
2. Web Service
3. Obtain account
Step 2: Apply for Brother Web Connect access.
Start Brother Web Connect access using a computer and obtain a temporary ID.
3 2
1
1. Enter account information
2. Brother Web Connect application page
3. Obtain temporary ID
Step 3: Register your account information on your machine so you can access the service you want to
use.
Enter the temporary ID to enable the service on your machine. Specify the account name as you would like it
to be displayed on the machine, and enter a PIN if you would like to use one.
1
2
1. Enter temporary ID
2. Web Service
Your Brother machine can now use the service.
441


Home > Mobile/Web Connect > Brother Web Connect > Set Up Brother Web Connect > Create an Account
for Each Online Service Before Using Brother Web Connect
Create an Account for Each Online Service Before Using Brother Web
Connect
To use Brother Web Connect to access an online service, you must have an account with that online service. If
you do not already have an account, use a computer to access the service's website and create an account.
After creating an account, log on and use the account once with a computer before using the Brother Web
Connect feature. Otherwise, you may not be able to access the service using Brother Web Connect.
If you already have an account, there is no need to create an additional account.
After you finish creating an account with the online service you want to use, apply for Brother Web Connect
access.
Related Information
• Set Up Brother Web Connect
443
Home > Mobile/Web Connect > Brother Web Connect > Set Up Brother Web Connect > Apply for Brother
Web Connect Access
Apply for Brother Web Connect Access
To use Brother Web Connect to access online services, you must first apply for Brother Web Connect access
using a computer that has the Brother Software installed.
1. Access the Brother Web Connect application website:
Option Description
Windows Launch (Brother Utilities), and then click the drop-down list and select your model name
(if not already selected).
Click Do More in the left navigation bar, and then click Brother Web Connect.
You can also access the website directly:
Type bwc.brother.com into your web browser's address bar.
Mac Type bwc.brother.com into your web browser's address bar.
The Brother Web Connect page launches.
2. Select the service you want to use.
3. Follow the on-screen instructions and apply for access.
When finished, your temporary ID will appear.
4. Make a note of your temporary ID, as you will need it to register accounts to the machine. The temporary ID
is valid for 24 hours.
5. Close the web browser.
Now that you have a Brother Web Connect access ID, you must register this ID on your machine, and then use
your machine to access the web service you want to use.
Related Information
• Set Up Brother Web Connect
444
Home > Mobile/Web Connect > Brother Web Connect > Set Up Brother Web Connect > Register an
Account on Your Brother Machine for Brother Web Connect
Register an Account on Your Brother Machine for Brother Web Connect
You must enter your Brother Web Connect account information and configure your machine so that it can use
Brother Web Connect to access the service you want.
• You must apply for Brother Web Connect access to register an account on your machine.
• Before you register an account, confirm that the correct date and time are set on the machine's control
panel.
1. Press d or c to display [Web].
Press [Web].
• If information regarding the Internet connection appears on the machine's LCD, read the information
and press [OK].
• Occasionally, updates or announcements about Brother Web Connect's features will appear on the
LCD. Read the information, and then press [OK].
2. Press a or b to display the service with which you want to register.
Press the service name.
3. If information regarding Brother Web Connect appears, press [OK].
4. Press [Register/Delete] > [Register Account].
5. The machine will prompt you to enter the temporary ID you received when you applied for Brother Web
Connect access.
Press [OK].
6. Enter the temporary ID using the LCD, and then press [OK].
An error message will appear on the LCD if the information you entered does not match the temporary ID
you received when you applied for access, or if the temporary ID has expired. Either enter the temporary ID
correctly, or apply for access again and receive a new temporary ID.
7. The machine will prompt you to enter the account name that you want to be displayed on the LCD.
Press [OK].
8. Enter the name using the LCD, and then press [OK].
9. Do one of the following:
• To set a PIN for the account, press [Yes]. (A PIN prevents unauthorised access to the account.) Enter a
four-digit number, and then press [OK].
• If you do not want to set a PIN, press [No].
When the account information you entered appears, confirm that it is correct.
10. Press [Yes] to register your information as entered.
11. Press [OK].
Account registration is complete and your machine can now access the service.
12. Press .
Related Information
• Set Up Brother Web Connect
445

Home > Mobile/Web Connect > Brother Web Connect > Set Up Brother Web Connect > Set Up Brother
Web Connect for Brother CreativeCenter
Set Up Brother Web Connect for Brother CreativeCenter
Brother Web Connect is set up to work with Brother CreativeCenter automatically. No configuration is needed to
create the calendars, business cards, posters and greeting cards available at https://www.creativecenter.brother/.
Brother CreativeCenter is not available in all countries.
Related Information
• Set Up Brother Web Connect
446
Home > Mobile/Web Connect > Brother Web Connect > Scan and Upload Documents Using Brother Web
Connect
Scan and Upload Documents Using Brother Web Connect
Upload your scanned photos and documents directly to a web service without using a computer.
• When scanning and uploading JPEG files or searchable PDF, monochrome scanning is not available.
• When scanning and uploading Microsoft Office files, monochrome scanning and grey scanning are not
available.
• When scanning and uploading JPEG files, each page is uploaded as a separate file.
• Uploaded documents are saved in an album named From_BrotherDevice.
For information regarding restrictions, such as the size or number of documents that can be uploaded, refer to
the respective service's website.
If you are a restricted Web Connect user due to the Secure Function Lock feature (available for certain models),
you cannot upload the scanned data.
1. Load your document.
2. Press d or c to display [Web].
Press [Web].
• You can also press [Scan] > [to Web].
• If information regarding the Internet connection appears on the machine's LCD, read the information
and press [OK].
• Occasionally, updates or announcements about Brother Web Connect's features will appear on the
LCD. Read the information, and then press [OK].
3. Press a or b to display the service that hosts the account to which you want to upload.
Press the service name.
4. Press a or b to display your account name, and then press it.
5. If the PIN entry screen appears, enter the four-digit PIN and press [OK].
6. Press a or b to display [Upload: Scanner].
Press [Upload: Scanner].
If you pressed [Scan] > [to Web], this option does not appear.
7. Follow the on-screen instructions to complete this operation.
Related Information
• Brother Web Connect
447
Home > Mobile/Web Connect > Brother Web Connect > Upload a Document from an External Memory
Device Using Brother Web Connect
Upload a Document from an External Memory Device Using Brother
Web Connect
Documents saved on media (such as a USB flash drive) connected to the machine can be uploaded directly to a
web service.
Uploaded documents are saved in an album named From_BrotherDevice.
For information regarding restrictions, such as the size or number of documents that can be uploaded, refer to
the respective service's website.
If you are a restricted Web Connect user due to the Secure Function Lock feature (available for certain models),
you cannot upload documents saved on media.
IMPORTANT
DO NOT remove the USB flash drive while the message appears on the LCD. Otherwise, the USB flash
drive, or data stored on the USB flash drive could be damaged.
(For Hong Kong, Taiwan and Korea)
Brother Web Connect supports only file names written in English. Files named in the local language will not
be uploaded.
1. Insert a USB flash drive into your machine.
The LCD automatically changes.
2. Press a or b to display the [Web] option, and then press it.
• If information regarding the Internet connection appears on the machine's LCD, read the information
and press [OK].
• Occasionally, updates or announcements about Brother Web Connect's features will appear on the
LCD. Read the information, and then press [OK].
3. Press a or b to display the service that hosts the account to which you want to upload.
Press the service name.
4. Press a or b to display your account name, and then press it.
5. If the PIN entry screen appears, enter the four-digit PIN and press [OK].
6. Press a or b to display [Upload: Media].
Press [Upload: Media].
7. Follow the on-screen instructions to complete this operation.
Related Information
• Brother Web Connect
448
Home > Mobile/Web Connect > Brother Web Connect > Download and Print Documents Using Brother
Web Connect
Download and Print Documents Using Brother Web Connect
Documents that have been uploaded to your account can be downloaded directly to your machine and printed.
Documents that other users have uploaded to their own accounts for sharing can also be downloaded to your
machine and printed, as long as you have viewing privileges for those documents.
To download other users’ documents, you must have access privileges to view the corresponding albums or
documents.
If you are a restricted user for Web Connect due to the Secure Function Lock feature (available for certain
models), you cannot download the data.
The Secure Function Lock Page Limit feature applies to the print job using Web Connect.
For Hong Kong, Taiwan and Korea:
Brother Web Connect supports only file names written in English. Files named in the local language will not
be downloaded.
Related Information
• Brother Web Connect
• Download and Print Using Web Services
• Download and Print Brother CreativeCenter Templates
449

Home > Mobile/Web Connect > Brother Web Connect > Download and Print Documents Using Brother
Web Connect > Download and Print Using Web Services
Download and Print Using Web Services
For information on Brother CreativeCenter Templates, see Related Information.
1. Press d or c to display [Web].
Press [Web].
• If information regarding the Internet connection appears on the machine's LCD, read the information
and press [OK].
• Occasionally, updates or announcements about Brother Web Connect's features will appear on the
LCD. Read the information, and then press [OK].
2. Press a or b to display the service that hosts the document you want to download and print.
Press the service name.
3. Press a or b to display your account name, and then press it. If the PIN entry screen appears, enter the four-
digit PIN and press [OK].
4. Press a or b to display [Download: Print].
Press [Download: Print].
5. Press a or b to display the album you want, and then press it.
• An album is a collection of documents. However, the actual term may differ depending on the service
you use. When using Evernote
®
, you must select the notebook, and then select the note.
• Some services do not require documents to be saved in albums. For documents not saved in albums,
select [See Unsorted Files] to select documents.
6. Press the file name you want to print. Confirm the document on the LCD and press [OK]. Select additional
documents to print (you can select up to 10 documents).
7. When finished, press [OK].
8. Follow the on-screen instructions to complete this operation.
Related Information
• Download and Print Documents Using Brother Web Connect
Related Topics:
• Download and Print Brother CreativeCenter Templates
450

Home > Mobile/Web Connect > Brother Web Connect > Download and Print Documents Using Brother
Web Connect > Download and Print Brother CreativeCenter Templates
Download and Print Brother CreativeCenter Templates
Brother CreativeCenter is not available in all countries.
1. Press d or c to display [Apps].
Press [Apps].
• If information regarding the Internet connection appears on the machine’s LCD, read it, and then press
[OK].
• Occasionally, updates or announcements about Brother Web Connect's features will appear on the
LCD. Read the information, and then press [OK].
2. Press a or b to display [Print "CreativeCenter" Templates].
Press [Print "CreativeCenter" Templates].
3. Press a or b to display the desired category, and then press it.
4. Select the desired file. Enter the number of copies you want to print and then press [OK]. Repeat this step
until you have selected all the files that you want to print.
5. When finished, press [OK].
If information regarding the recommended print settings appears on the machine’s LCD, read the
information and press [OK].
6. Follow the on-screen instructions to complete this operation.
Related Information
• Download and Print Documents Using Brother Web Connect
Related Topics:
• Download and Print Using Web Services
451
Home > Mobile/Web Connect > Brother Web Connect > Download and Save a Document to an External
Memory Device Using Brother Web Connect
Download and Save a Document to an External Memory Device Using
Brother Web Connect
JPEG, PDF and Microsoft Office files can be downloaded from a service and saved directly on media connected
to the machine. Documents that other users have uploaded to their own accounts for sharing can also be
downloaded to your machine as long as you have viewing privileges for those documents.
• Make sure there is enough available space on your USB flash drive.
• To download other users’ documents, you must have access privileges to view the corresponding albums or
documents.
• Downloaded files are renamed based on the current date. For example, the first image saved on July 1,
would be named 07010001.jpg. Note that the region setting also determines the date format of the file name.
• Images are saved in the “BROTHER” folder, which can be found on the root level of the media.
IMPORTANT
DO NOT remove the USB flash drive while the message appears on the LCD. Otherwise, the USB flash
drive, or data stored on the USB flash drive could be damaged.
1. Insert a USB flash drive into your machine.
The LCD automatically changes.
2. Press a or b to display the [Web] option, and then press it.
• If information regarding the Internet connection appears on the machine's LCD, read the information
and press [OK].
• Occasionally, updates or announcements about Brother Web Connect's features will appear on the
LCD. Read the information, and then press [OK].
3. Press a or b to display the service that hosts the document you want to download.
Press the service name.
4. Press a or b to display your account name, and then press it. If the PIN entry screen appears, enter the four-
digit PIN and press [OK].
5. Press a or b to display [Download: Media].
Press [Download: Media].
6. Follow the on-screen instructions to complete this operation.
• An album is a collection of documents. However, the actual term may differ depending on the service
you use. When using Evernote
®
, you must select the notebook, and then select the note.
• Some services do not require documents to be saved in albums. For documents not saved in albums,
select [See Unsorted Files] to select documents.
Related Information
• Brother Web Connect
452
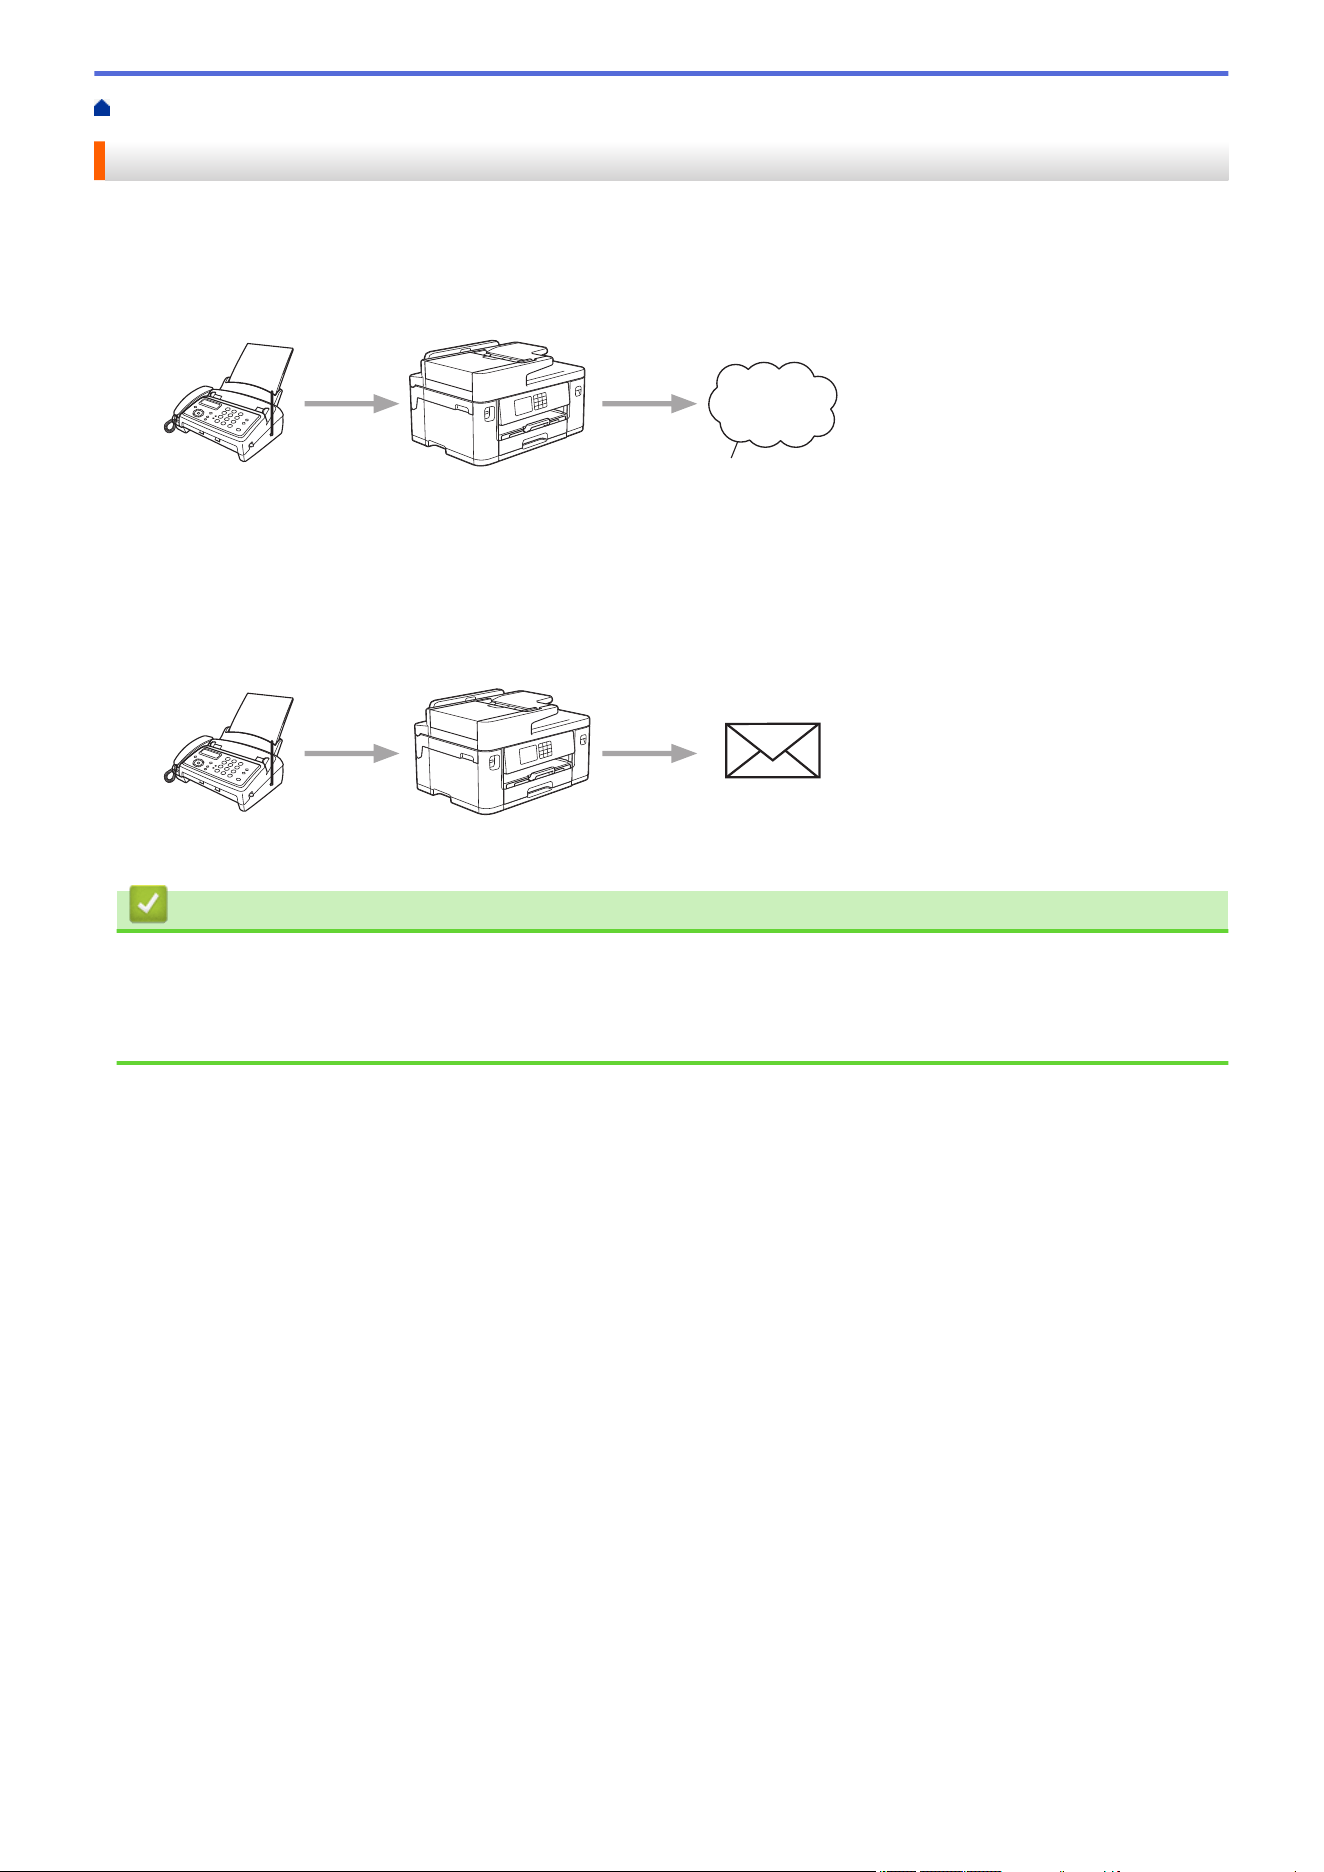
Home > Mobile/Web Connect > Brother Web Connect > FaxForward to Cloud or E-mail
FaxForward to Cloud or E-mail
• Use the FaxForward to Cloud feature to automatically forward incoming faxes to your accounts with the
available online services.
1
1. Web Service
• Use the FaxForward to E-mail feature to automatically forward incoming faxes to an inbox as email
attachments.
Related Information
• Brother Web Connect
• Turn On FaxForward to Cloud or E-mail
• Turn Off FaxForward to Cloud or E-mail
453
Home > Mobile/Web Connect > Brother Web Connect > FaxForward to Cloud or E-mail > Turn On
FaxForward to Cloud or E-mail
Turn On FaxForward to Cloud or E-mail
Turn on the FaxForward feature to automatically forward incoming faxes to either an online service or an inbox
as email attachments.
• This feature is available only for monochrome faxes.
• If you turn on this feature, you cannot use the following features:
- Memory Receive ([Fax Forward], [Fax Storage])
- [PC Fax Receive]
1. Press d or c to display [Apps].
Press [Apps].
• If information regarding the Internet connection appears on the machine’s LCD, read it, and then press
[OK].
• Occasionally, updates or announcements about Brother Web Connect's features will appear on the
LCD. Read the information, and then press [OK].
2. Press a or b to display [FaxForward to Cloud/E-mail].
Press [FaxForward to Cloud/E-mail].
If information regarding [FaxForward to Cloud/E-mail] appears, read it, and then press [OK].
3. Press [On].
4. Press [Forward to Cloud] or [Forward to E-mail].
• If you selected [Forward to Cloud], choose the online service you want to receive the faxes, and
then specify your account name.
• If you selected [Forward to E-mail], select the email address you want to receive the faxes as email
attachments.
5. Follow the on-screen instructions to complete this operation.
Related Information
• FaxForward to Cloud or E-mail
Related Topics:
• Memory Receive Options
454
Home > Mobile/Web Connect > Brother Web Connect > FaxForward to Cloud or E-mail > Turn Off
FaxForward to Cloud or E-mail
Turn Off FaxForward to Cloud or E-mail
Turn off FaxForward when you want to stop incoming faxes from automatically going to either an online service
or an inbox as email attachments.
If there are received faxes still in your machine's memory, you cannot turn off FaxForward.
1. Press d or c to display [Apps].
Press [Apps].
• If information regarding the Internet connection appears on the machine’s LCD, read it, and then press
[OK].
• Occasionally, updates or announcements about Brother Web Connect's features will appear on the
LCD. Read the information, and then press [OK].
2. Press a or b to display [FaxForward to Cloud/E-mail].
Press [FaxForward to Cloud/E-mail].
If information regarding [FaxForward to Cloud/E-mail] appears, read it, and then press [OK].
3. Press [Off].
4. Press [OK].
Related Information
• FaxForward to Cloud or E-mail
455


Home > Mobile/Web Connect > AirPrint > AirPrint Overview
AirPrint Overview
AirPrint is a printing solution for Apple operating systems that allows you
to wirelessly print photos, email, web pages and documents from your
iPad, iPhone, iPod touch and Mac computer without the need to install a
driver.
AirPrint also lets you send faxes directly from your Mac computer without
printing them and lets you scan documents to your Mac computer.
For more information, visit Apple’s website.
Use of the Works with Apple badge means that an accessory has been
designed to work specifically with the technology identified in the badge
and has been certified by the developer to meet Apple performance
standards.
Related Information
• AirPrint
457

Home > Mobile/Web Connect > AirPrint > Before Using AirPrint (macOS)
Before Using AirPrint (macOS)
Before printing using macOS, add your machine to the printer list on your Mac computer.
1. Select System Preferences from the Apple menu.
2. Click Printers & Scanners.
3. Click the + icon below the Printers pane on the left.
The Add screen appears.
4. Select your machine, and then select AirPrint from the Use pop-up menu.
5. Click Add.
Related Information
• AirPrint
458

Home > Mobile/Web Connect > AirPrint > Print Using AirPrint > Print from iPad, iPhone, or iPod touch
Print from iPad, iPhone, or iPod touch
The procedure used to print may vary by application. Safari is used in the example below.
1. Make sure your machine is turned on.
Make sure you have loaded the correct paper in the paper tray and change the paper settings for the paper
tray on your machine.
2. Use Safari to open the page that you want to print.
3. Tap
or .
4. Tap Print.
5. Make sure your machine is selected.
6. If a different machine (or no printer) is selected, tap Printer.
A list of available machines appears.
7. Tap your machine's name in the list.
8. Select the options you want, such as the number of pages to print and 2-sided printing (if supported by your
machine).
9. Tap Print.
Related Information
• Print Using AirPrint
460
Home > Mobile/Web Connect > AirPrint > Print Using AirPrint > Print Using AirPrint (macOS)
Print Using AirPrint (macOS)
The procedure used to print may vary by application. Safari is used in the example below. Before printing,
make sure your machine is in the printer list on your Mac computer.
1. Make sure your machine is turned on.
Make sure you have loaded the correct paper in the paper tray and change the paper settings for the paper
tray on your machine.
2. On your Mac computer, use Safari to open the page that you want to print.
3. Click the File menu, and then select Print.
4. Make sure your machine is selected. If a different machine (or no printer) is selected, click the Printer pop-up
menu, and then select your machine.
5. Select the desired options, such as the number of pages to print and 2-sided printing (if supported by your
machine).
6. Click Print.
Related Information
• Print Using AirPrint
Related Topics:
• Before Using AirPrint (macOS)
461
Home > Mobile/Web Connect > AirPrint > Scan Using AirPrint (macOS)
Scan Using AirPrint (macOS)
Before scanning, make sure your machine is in the scanner list on your Mac computer.
1. Load your document.
2. Select System Preferences from the Apple menu.
3. Click Printers & Scanners.
4. Select your machine from the scanner list.
5. Click the Scan tab, and then click the Open Scanner… button.
The Scanner screen appears.
6. If you place the document in the ADF, select Use Document Feeder checkbox, and then select the size of
your document from the scan size setting pop-up menu.
7. Select the destination folder or destination application from the destination setting pop-up menu.
8. Click Show Details to change the scanning settings if needed.
You can crop the image manually by dragging the mouse pointer over the portion you want to scan when
scanning from the scanner glass.
9. Click Scan.
Related Information
• AirPrint
Related Topics:
• Before Using AirPrint (macOS)
462
Home > Mobile/Web Connect > AirPrint > Send a Fax Using AirPrint (macOS)
Send a Fax Using AirPrint (macOS)
Make sure your machine is in the printer list on your Mac computer. Apple TextEdit is used in the example
below.
• AirPrint supports only monochrome fax documents.
• Your machine supports the Secure Function Lock feature. Sending faxes via AirPrint is not available if
Fax Tx for each user is restricted.
1. Make sure your machine is turned on.
2. On your Mac computer, open the file that you want to send as a fax.
3. Click the File menu, and then select Print.
4. Click the Printer pop-up menu, and then select Brother XXX-XXXX - Fax (where XXX-XXXX is the name of
your model).
5. Type the fax recipient information.
6. Click Fax.
Related Information
• AirPrint
Related Topics:
• Before Using AirPrint (macOS)
463
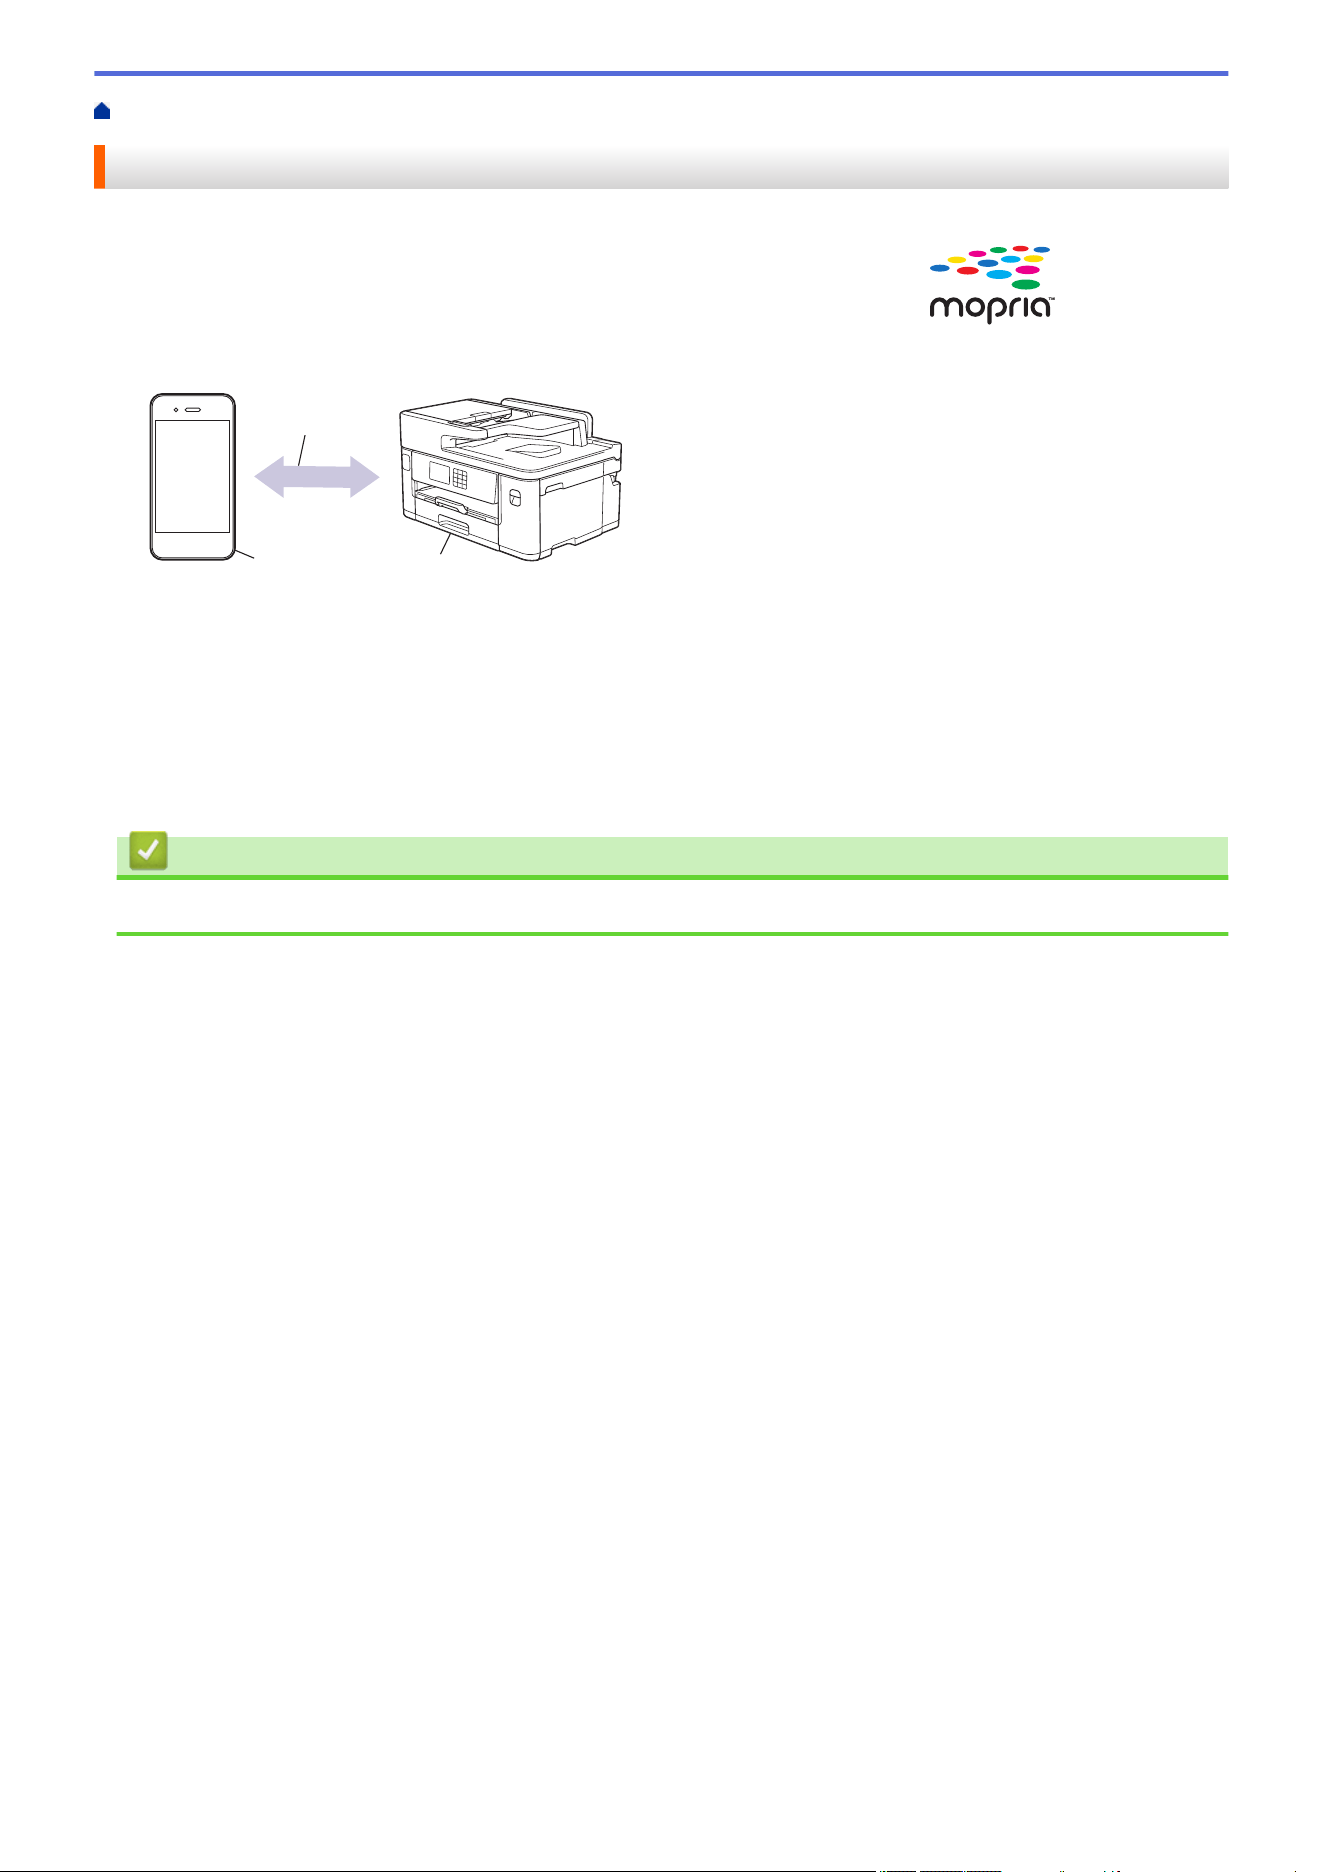
Home > Mobile/Web Connect > Mopria
™
Print Service and Mopria
™
Scan
Mopria
™
Print Service and Mopria
™
Scan
Mopria
™
Print Service is a print feature and Mopria
™
Scan is a scan feature on
Android
™
mobile devices developed by the Mopria Alliance
™
. With this service,
you can connect to the same network as your machine to print and scan without
additional setup.
1
3
2
1. Android
™
Mobile Device
2. Wi-Fi
®
Connection
3. Your Machine
You must download the Mopria
™
Print Service or Mopria
™
Scan from Google Play
™
and install it on your
Android
™
device. Before using this service, you must turn it on.
Related Information
• Mobile/Web Connect
464
Home > Mobile/Web Connect > Brother Mobile Connect
Brother Mobile Connect
Use Brother Mobile Connect to print and scan from your mobile device.
• For Android
™
devices
Brother Mobile Connect allows you to use your Brother machine's features directly from your Android
™
device.
Download and install Brother Mobile Connect from Google Play
™
.
• For all iOS or iPadOS supported devices including iPhone, iPad, and iPod touch
Brother Mobile Connect allows you to use your Brother machine's features directly from your iOS or iPadOS
device.
Download and install Brother Mobile Connect from the App Store.
Related Information
• Mobile/Web Connect
465

Home > Troubleshooting
Troubleshooting
If you think there is a problem with your machine, first check each of the items below, then try to identify the
problem, and follow our troubleshooting tips.
You can correct most problems yourself. If you need additional help, visit support.brother.com for the latest FAQs
and troubleshooting tips:
1. Visit support.brother.com.
2. Click FAQs & Troubleshooting and search for your model name.
First, check the following:
• The machine's power cord is connected correctly and the machine's power is on.
• All of the machine's protective parts have been removed.
• The ink cartridges are installed correctly.
• The Scanner Cover and the Jam Clear Cover are fully closed.
• Paper is inserted correctly in the paper tray.
• The interface cables are securely connected to the machine and the computer, or the wireless connection is
set up on both the machine and your computer.
• (For network models) The access point (for wireless), router, or hub is turned on and its link indicator is
blinking.
• The machine's LCD is displaying messages.
If you did not solve the problem with the checks, identify the problem and then see Related Information.
Related Information
• Error and Maintenance Messages
• Document Jams
• Printer Jam or Paper Jam
• If You Are Having Difficulty with Your Machine
• Check the Machine Information
• Reset Your Machine
Related Topics:
• Paper Handling and Printing Problems
• Telephone and Fax Problems
• Other Problems
• Network Problems
• AirPrint Problems
466
Home > Troubleshooting > Error and Maintenance Messages
Error and Maintenance Messages
As with any sophisticated office product, errors may occur and supply items may have to be replaced. If this
happens, your machine identifies the error or required routine maintenance and shows the appropriate message.
The most common error and maintenance messages are shown in the table.
You can correct most errors and perform routine maintenance yourself. If you need more tips, go to your model's
FAQs & Troubleshooting page at support.brother.com.
Related Information references are at the bottom of this page.
Error Message Cause Action
B&W Print Only
One or more of the colour ink cartridges
have reached the end of their lives.
You can use the machine in monochrome
mode for approximately four weeks
depending on the number of pages you
print.
While this message appears on the LCD,
each operation works in the following way:
• Printing
If the media type is set to Plain Paper
and you selected Greyscale in the
printer driver, you can use the machine
as a monochrome printer.
• Copying
If the paper type is set to Plain
Paper, you can make copies in
monochrome.
• Faxing
If the paper type is set to Plain
Paper, the machine will receive and
print the faxes in monochrome.
Replace the ink cartridges.
See Related Information: Replace the Ink
Cartridges.
Although the Cause column lists options
for using the machine after this error
appears, you may not be able to use the
machine until you replace one or more of
the ink cartridges under the following
condition:
If you unplug the machine or remove the
ink cartridge.
Cannot Clean XX
Cannot Initialise XX
Cannot Print XX
The machine has a mechanical problem.
-OR-
A foreign object, such as a paper clip or a
piece of ripped paper, is in the machine.
Open the scanner cover and remove any
foreign objects and paper scraps from
inside the machine. If the error message
continues, disconnect the machine from
the power for several minutes, and then
reconnect it.
You can try additional clear paper jam
operations.
See Related Information: Remove Paper
Scraps.
(If you cannot print documents and
received faxes, transfer them to another
fax machine or to your computer.)
See Related Information: Transfer Your
Faxes or Fax Journal Report.
Cannot Detect
You installed a new ink cartridge too
quickly and the machine did not detect it.
Take out the new ink cartridge and
reinstall it slowly and firmly until it locks
into place.
See Related Information: Replace the Ink
Cartridges.
An ink cartridge is not installed correctly.
The wrong Brother model ink cartridge
was installed.
Check the model numbers of the ink
cartridges and install the correct ink
cartridges.
467
Error Message Cause Action
Cannot Scan XX
The machine has a mechanical problem. Disconnect the machine from the power
for several minutes, and then reconnect it.
(If you cannot print documents and
received faxes, transfer them to another
fax machine or to your computer.)
See Related Information: Transfer Your
Faxes or Fax Journal Report.
Comm.Error
Poor telephone line quality caused a
communication error.
Send the fax again or connect the
machine to another telephone line. If the
problem continues, contact the telephone
company and ask them to check your
telephone line.
Connection Error
Other devices are trying to connect to the
Wi-Fi Direct network at the same time.
Make sure there are no other devices
trying to connect to the Wi-Fi Direct
network, and then try to configure the Wi-
Fi Direct settings again.
Connection Failed
The Brother machine and your mobile
device cannot communicate during the
Wi-Fi Direct network configuration.
• Move the mobile device closer to your
Brother machine.
• Move your Brother machine and the
mobile device to an obstruction-free
area.
• If you are using the PIN Method of
WPS, make sure you have entered the
correct PIN.
Cover is Open.
The scanner cover is not locked in the
closed position.
Lift the scanner cover and then close it
again.
Make sure the telephone line cord and
interface cable (if used) have been guided
correctly through the cable channel and
out the back of the machine.
The ink cartridge cover is not locked in the
closed position.
Firmly close the ink cartridge cover until it
locks into place.
Data Remaining in
Memory
Print data is left in the machine's memory.
Press . The machine will cancel the
job and clear it from the memory. Try to
print again.
Disconnected
The other person or other person's fax
machine stopped the call.
Try to send or receive again.
If calls are stopped repeatedly and you
are using a VoIP (Voice over IP) system,
try changing the Compatibility to Basic (for
VoIP).
See Related Information: Telephone Line
Interference/VoIP.
Document Jam/too Long
The document was not inserted or fed
correctly, or the document scanned from
the ADF was too long.
Remove the jammed document, and then
press . Set the document in the ADF
correctly.
See Related Information: Load
Documents in the Automatic Document
Feeder (ADF).
See Related Information: Document
Jams.
DR Mode in Use
The machine is in Distinctive Ring mode.
You cannot change the Receive Mode
from Manual to another mode.
Set Distinctive Ring to Off.
See Related Information: Turn off
Distinctive Ring.
468
Error Message Cause Action
FaxAbility On
The machine is in FaxAbility mode. You
cannot change the Receive Mode from
Manual to another mode.
Set FaxAbility to Off.
See Related Information: Turn FaxAbility
Off or On.
High Temperature
The room temperature is too high. After cooling the room, allow the machine
to cool down to room temperature. Try
again when the machine has cooled
down.
Hub is Unusable.
A hub or USB flash drive with hub has
been connected to the USB direct
interface.
Hubs, including a USB flash drive with a
built-in hub, are not supported. Unplug the
device from the USB direct interface.
Ink Absorber NearFull
The ink absorber box is nearly full. The ink absorber box must be replaced
soon. Contact Brother customer service or
your local Brother dealer.
Ink Absorber Pad Full
The ink absorber box is full. These
components are periodic maintenance
items that may require replacement after
a period of time to ensure optimum
performance from your Brother machine.
Because these components are periodic
maintenance items, the replacement is
not covered under the warranty. The need
to replace these items and the time period
before replacement is dependent on the
number of purges and flushes required to
clean the ink system. These boxes
acquire amounts of ink during the different
purging and flushing operations. The
number of times a machine purges and
flushes for cleaning varies depending on
different situations. For example,
frequently powering the machine on and
off will cause numerous cleaning cycles
since the machine automatically cleans
upon power up.
The ink absorber box must be replaced.
Contact Brother customer service or your
local Brother Authorised Service Centre to
have your machine serviced.
The machine cleans itself after:
• You remove the power cord and plug it
back in.
• A paper jam has been cleared.
• Sitting idle for more than 30 days
(infrequent use).
• Ink cartridges of the same colour have
been replaced 12 times.
Ink Low
The ink level is low. If the sending
machine has the ability to convert it, the
colour fax will be printed at your machine
as a monochrome fax.
Prepare a new ink cartridge. You can
continue printing until the touchscreen
displays Replace Ink.
See Related Information: Replace the Ink
Cartridges.
You can still scan even if the ink is low
or needs to be replaced.
Install Ink
An ink cartridge is not installed correctly. Remove the ink cartridge and re-install it
slowly and firmly until it locks into place.
See Related Information: Replace the Ink
Cartridges.
Jam Front/Rear
Jam Front
Jam Rear
Jam MP Tray
Jam Manual Feed Slot
Jam Front/MP Tray
Jam Front/Manual Feed
Slot
Jam Tray2
Repeat Jam XX
The paper is jammed in the machine.
Gently remove the jammed paper.
See Related Information: Printer Jam or
Paper Jam.
If there is a repeat paper jam, try another
paper jam clear operation.
See Related Information: Remove Paper
Scraps.
The paper guides are not set to the
correct paper size.
Make sure the paper guides are set to the
correct paper size.
The machine's paper support is not set
correctly.
Make sure the paper support is fully
inserted into the machine.
469
Error Message Cause Action
See Related Information: Paper is
Jammed in the Front of the Machine.
More than one sheet of paper was placed
in the manual feed slot.
-OR-
Another sheet of paper was placed in the
manual feed slot before the touchscreen
prompted you to load another sheet of
paper.
Do not put more than one sheet of paper
in the manual feed slot at any one time.
Wait until the touchscreen prompts you to
load another sheet of paper before you
feed the next sheet of paper in the manual
feed slot.
Gently remove the jammed paper.
See Related Information: Printer Jam or
Paper Jam.
Paper dust has accumulated on the
surface of the paper pick-up rollers.
Clean the paper pick-up rollers.
See Related Information: Clean the Paper
Pick-up Rollers for Paper Tray #1 or
Clean the Paper Pick-up Rollers for Paper
Tray #2.
Low Temperature
The room temperature is too low. After warming the room, allow the
machine to warm up to room temperature.
Try again when the machine has warmed
up.
Media is Full.
The USB flash drive you are using does
not have enough free space to scan the
document.
Delete unused files from your USB flash
drive to free some space, and then try
again.
No Caller ID
There is no incoming call history. You did
not receive calls or you have not
subscribed to the Caller ID service from
your telephone company.
To use the Caller ID feature, contact your
telephone company.
See Related Information: Caller ID.
No Device
When configuring the Wi-Fi Direct
network, the Brother machine cannot find
your mobile device.
• Make sure your machine and mobile
device are in the Wi-Fi Direct mode.
• Move the mobile device closer to your
Brother machine.
• Move your Brother machine and the
mobile device to an obstruction-free
area.
• If you are manually configuring the Wi-
Fi Direct network, make sure you have
entered the correct password.
• If your mobile device has a
configuration page for how to obtain
an IP address, make sure the IP
address of your mobile device has
been configured via DHCP.
No File
The USB flash drive in the media drive
does not contain a .JPG file.
Reinsert the correct USB flash drive in the
slot.
No Paper Fed
The machine is out of paper or paper is
not correctly loaded in the paper tray.
Do one of the following:
• Refill the paper tray, and then follow
the LCD instructions.
• Remove and reload the paper, and
then follow the LCD instructions.
See Related Information: Load Paper.
The paper was not inserted in the centre
position of the manual feed slot.
The paper was not inserted in the centre
position of the MP tray.
Remove the paper and reinsert it in the
centre of the manual feed slot, and then
follow the LCD instructions.
Remove the paper and reinsert it in the
centre of the MP tray, and then follow the
LCD instructions.
470
Error Message Cause Action
See Related Information: Load Paper in
the Manual Feed Slot.
See Related Information: Load Paper in
the Multi-purpose Tray (MP Tray).
The Jam Clear Cover is not closed
correctly.
Make sure the Jam Clear Cover is closed
evenly at both ends.
See Related Information: Printer Jam or
Paper Jam.
Paper dust has accumulated on the
surface of the paper pick-up rollers.
Clean the paper pick-up rollers.
See Related Information: Clean the Paper
Pick-up Rollers for Paper Tray #1 or
Clean the Paper Pick-up Rollers for Paper
Tray #2.
No Response
The connected USB device is
unresponsive.
Unplug the device from the USB direct
interface.
No Response/Busy
The number you dialled does not answer
or is busy.
Verify the number and try again.
Out of Fax Memory
The fax memory is full. Do one of the following:
• Clear the data from the memory. To
gain extra memory, you can turn off
Memory Receive.
See Related Information: Turn Off
Memory Receive.
• Print the faxes that are in the memory.
See Related Information: Print a Fax
Stored in the Machine's Memory.
Out of Memory
The machine's memory is full. If a fax-sending or copy operation is in
progress:
• Press or Quit and wait until the
other operations that are in progress
finish, and then try again.
• Press Partial Print to copy the
pages scanned so far.
• Clear the data stored in the memory.
To gain extra memory, you can turn
Memory Receive off.
See Related Information: Turn Off
Memory Receive.
• Print the faxes stored in the memory.
See Related Information: Print a Fax
Stored in the Machine's Memory.
Paper Low Tray 1
Paper Low Tray 2
The paper tray is nearly empty. Refill the paper in the paper tray indicated
on the LCD.
Paper Size Mismatch
The paper size setting does not match the
size of paper in the tray.
-OR-
The paper orientation is not correct for the
paper size.
-OR-
You did not set the paper guides in the
tray to the indicators for the paper size
you are using.
1. Check that the paper size you selected
on the machine's display matches the
size of the paper in the tray.
See Related Information: Change the
Paper Size and Paper Type.
2. Make sure you loaded the paper in the
correct orientation and set the paper
guides at the indicators for your paper
size.
See Related Information: Load Paper.
471

Error Message Cause Action
3. After you have checked the paper size
and the paper orientation, follow the
LCD instructions.
If you are printing from your computer,
make sure the paper size you selected in
the printer driver or in the application you
use to print matches the size of paper in
the tray.
See Related Information: Print Settings
(Windows).
Paper Tray not
detected
Paper Tray 1 not
detected
Paper Tray 2 not
detected
The paper tray is not completely inserted. Slowly push the paper tray completely into
the machine.
Paper or a foreign object has prevented
the paper tray from being inserted
correctly.
Pull the paper tray out of the machine,
and remove the jammed paper or foreign
object. If you cannot find or remove the
jammed paper, see Related Information:
Printer Jam or Paper Jam.
Repetitive No Paper
Fed
The machine is out of paper or paper is
not correctly loaded in the paper tray.
Do one of the following:
• Refill the paper tray, and then follow
the LCD instructions.
• Remove and reload the paper, and
then follow the LCD instructions.
See Related Information: Load Paper.
Paper dust has accumulated on the
surface of the paper pick-up rollers.
Clean the paper pick-up rollers.
See Related Information: Clean the Paper
Pick-up Rollers for Paper Tray #1 or
Clean the Paper Pick-up Rollers for Paper
Tray #2.
Repetitive Paper Jams
A foreign object, such as a paper clip or a
piece of ripped paper, is in the machine.
Remove any foreign objects and paper
scraps in the machine.
See Related Information: Remove Paper
Scraps.
Replace Ink
One or more of the ink cartridges have
reached the end of their lives. The
machine will stop all print operations.
While memory is available, monochrome
faxes will be stored in the memory. If the
sending machine has the ability to convert
it, the colour fax will be stored in the
memory as a monochrome fax.
Replace the ink cartridges.
See Related Information: Replace the Ink
Cartridges.
You can still scan even if the ink is low
or needs to be replaced.
The maximum number of
devices are already
connected using Wi-Fi
Direct.
The maximum number of mobile devices
are already connected to the Wi-Fi Direct
network when the Brother machine is the
Group Owner.
After the current connection between your
Brother machine and another mobile
device has shut down, try to configure the
Wi-Fi Direct settings again. You can
confirm the connection status by printing
the Network Configuration Report.
See Related Information: Print the
Network Configuration Report.
Touchscreen Init.
Failed
The touchscreen was pressed before the
power on initialisation was completed.
Make sure nothing is touching or resting
on the touchscreen, especially when
plugging the machine in.
Debris may be stuck between the lower
part of the touchscreen and its frame.
Insert a piece of stiff paper between the
lower part of the touchscreen and its
frame and slide it back and forth to push
out the debris.
472
Error Message Cause Action
Tray Settings
Tray 1 Settings
Tray 2 Settings
MP Tray Settings
This message is displayed when the
setting to confirm the paper type and size
is enabled.
To not display this confirmation message,
change the setting to Off.
See Related Information: Change the
Check Paper Setting.
Unusable Device
Disconnect device
from front connector
& turn machine off &
then on
A broken device is connected to the USB
direct interface.
Unplug the device from the USB direct
interface. Turn the machine off and then
on again.
Unusable Device
Please disconnect USB
device.
A USB device or USB flash drive that is
not supported has been connected to the
USB direct interface.
Unplug the device from the USB direct
interface.
Wrong Ink Cartridge
The ink cartridge model number is not
compatible with your machine.
Verify whether the cartridge model
number will work with your machine.
Wrong Ink Colour
An ink cartridge has been installed in the
wrong position.
Check which ink cartridges are not
matched by colour to their ink cartridge
positions and move them to their correct
positions.
Wrong Tray Settings
The machine's paper size settings and
tray select settings do not match the size
of paper in the tray you are using.
Follow the instructions on the touchscreen
and try to print again.
Configure the paper size setting for the
tray according to the LCD instructions.
Related Information
• Troubleshooting
• Transfer Your Faxes or Fax Journal Report
• Error Messages When Using the Brother Web Connect Feature
Related Topics:
• Touchscreen LCD Overview
• Print the Network Configuration Report
• Replace the Ink Cartridges
• Telephone Line Interference/VoIP
• Load Documents in the Automatic Document Feeder (ADF)
• Document Jams
• Turn FaxAbility Off or On
• Turn off Distinctive Ring
• Caller ID
• Load Paper
• Load Paper in the Manual Feed Slot
• Printer Jam or Paper Jam
• Remove Paper Scraps
• Clean the Paper Pick-up Rollers for Paper Tray #1
• Clean the Paper Pick-up Rollers for Paper Tray #2
• Turn Off Memory Receive
• Print a Fax Stored in the Machine's Memory
• Print Settings (Windows)
• Paper Handling and Printing Problems
• Change the Check Paper Setting
473

Home > Troubleshooting > Error and Maintenance Messages > Transfer Your Faxes or Fax Journal Report
Transfer Your Faxes or Fax Journal Report
If the LCD shows:
• [Cannot Clean XX]
• [Cannot Initialise XX]
• [Cannot Print XX]
• [Cannot Scan XX]
We recommend transferring your faxes to another fax machine or to your computer.
See Related Information: Transfer Faxes to Another Fax Machine.
See Related Information: Transfer Faxes to Your Computer.
You can also transfer the Fax Journal report to see if there are any faxes you must transfer.
See Related Information: Transfer the Fax Journal Report to Another Fax Machine.
Related Information
• Error and Maintenance Messages
• Transfer Faxes to Another Fax Machine
• Transfer Faxes to Your Computer
• Transfer the Fax Journal Report to Another Fax Machine
Related Topics:
• Use PC-Fax Receive to Transfer Received Faxes to Your Computer (Windows only)
• Reset the Network Settings to Factory Default
• Reset Your Machine
• Reset Functions Overview
• Paper is Jammed in the Front of the Machine
• Paper is Jammed in the Back of the Machine
475
Home > Troubleshooting > Error and Maintenance Messages > Transfer Your Faxes or Fax Journal
Report > Transfer Faxes to Another Fax Machine
Transfer Faxes to Another Fax Machine
If you have not set up your Station ID, you cannot enter Fax Transfer mode.
1. Press to clear the error temporarily.
2. Press [Settings] > [All Settings] > [Service] > [Data Transfer] > [Fax Transfer].
3. Do one of the following:
• If the touchscreen displays [No Data], there are no faxes left in the machine’s memory.
Press [Close], and then press .
• Enter the fax number where faxes will be forwarded.
4. Press [Fax Start].
Related Information
• Transfer Your Faxes or Fax Journal Report
Related Topics:
• Set Your Station ID
476
Home > Troubleshooting > Error and Maintenance Messages > Transfer Your Faxes or Fax Journal
Report > Transfer Faxes to Your Computer
Transfer Faxes to Your Computer
You can transfer the faxes from your machine's memory to your computer.
1. Press to clear the error temporarily.
2. Make sure you have installed the Brother software and drivers on your computer, and then turn on PC-FAX
Receive on the computer.
3. Launch
(Brother Utilities), and then click the drop-down list and select your model name (if not already
selected).
4. Click PC-FAX in the left navigation bar, and then click Receive.
5. Read and confirm the instructions on your computer.
Faxes in the machine's memory will be sent to your computer automatically.
When faxes in the machine's memory are not sent to your computer:
Make sure you have set [PC Fax Receive] on the machine.
If faxes are in the machine's memory when you set up PC-Fax Receive, the touchscreen prompts you to
transfer the faxes to your computer.
If Fax Preview is set to Off, you will be asked if you want to print backup copies.
Press [Yes] to transfer all faxes in the memory to your computer.
Related Information
• Transfer Your Faxes or Fax Journal Report
Related Topics:
• Use PC-Fax Receive to Transfer Received Faxes to Your Computer (Windows only)
477

Home > Troubleshooting > Error and Maintenance Messages > Transfer Your Faxes or Fax Journal
Report > Transfer the Fax Journal Report to Another Fax Machine
Transfer the Fax Journal Report to Another Fax Machine
If you have not set up your Station ID, you cannot enter fax transfer mode.
1. Press to clear the error temporarily.
2. Press [Settings] > [All Settings] > [Service] > [Data Transfer] > [Report
Transfer].
3. Enter the fax number where the Fax Journal report will be forwarded.
4. Press [Fax Start].
Related Information
• Transfer Your Faxes or Fax Journal Report
Related Topics:
• Set Your Station ID
478
Home > Troubleshooting > Error and Maintenance Messages > Error Messages When Using the Brother
Web Connect Feature
Error Messages When Using the Brother Web Connect Feature
Your Brother machine displays an error message if an error occurs. The most common error messages are
shown in the chart.
You can correct most errors yourself. If you need more tips, go to your model's FAQs & Troubleshooting page
at support.brother.com.
Connection Error
Error Messages
Cause Action
Connection Error 02
The machine is not connected to a
network.
• Verify that the network connection
is good.
• If the Web or Apps option was
pressed soon after the machine
was turned on, the network
connection may not have been
established yet. Wait and try
again.
Connection Error 03
• Network or server settings are
incorrect.
• There is a problem with the
network or server.
• Confirm that network settings are
correct, or wait and try again later.
• If the Web or Apps option was
pressed soon after the machine
was turned on, the network
connection may not have been
established yet. Wait and try
again.
Connection Error 07
Date and time settings are incorrect. Set the date and time correctly. Note
that if the machine's power cord is
disconnected, the date and time
settings may have reset to factory
settings.
Authentication Error
Error Messages
Cause Action
Authentication Error 01
The PIN you entered to access the
account is incorrect. The PIN is the
four-digit number that was entered
when registering the account to the
machine.
Enter the correct PIN.
Authentication Error 02
The temporary ID that was entered is
incorrect.
Enter the correct temporary ID.
The temporary ID that was entered
has expired. A temporary ID is valid
for 24 hours.
Apply for Brother Web Connect
access again and receive a new
temporary ID, and then use the new
ID to register the account to the
machine.
Authentication Error 03
The name you entered as the display
name has already been registered to
another service user.
Enter a different display name.
479
Server Error
Error Messages Cause Action
Server Error 01
The machine's authentication
information (needed to access the
service) has expired or is invalid.
Apply for Brother Web Connect
access again to receive a new
temporary ID, and then use the new
ID to register the account to the
machine.
Server Error 03
The file you are trying to upload may
have one of the following problems:
• The file exceeds the service's limit
on number of pixels, file size, etc.
• The file type is not supported.
• The file is corrupted.
The file cannot be used:
• Check the service's size or format
restrictions.
• Save the file as a different type.
• If possible, get a new, uncorrupted
version of the file.
Server Error 13
There is a problem with the service
and it cannot be used now.
Wait and try again. If you get the
message again, access the service
from a computer to confirm if it is
unavailable.
Shortcut Error
Error Messages
Cause Action
Shortcut Error 02
The shortcut cannot be used because
the account was deleted after the
shortcut was registered.
Delete the shortcut, and then register
the account and shortcut again.
Related Information
• Error and Maintenance Messages
480

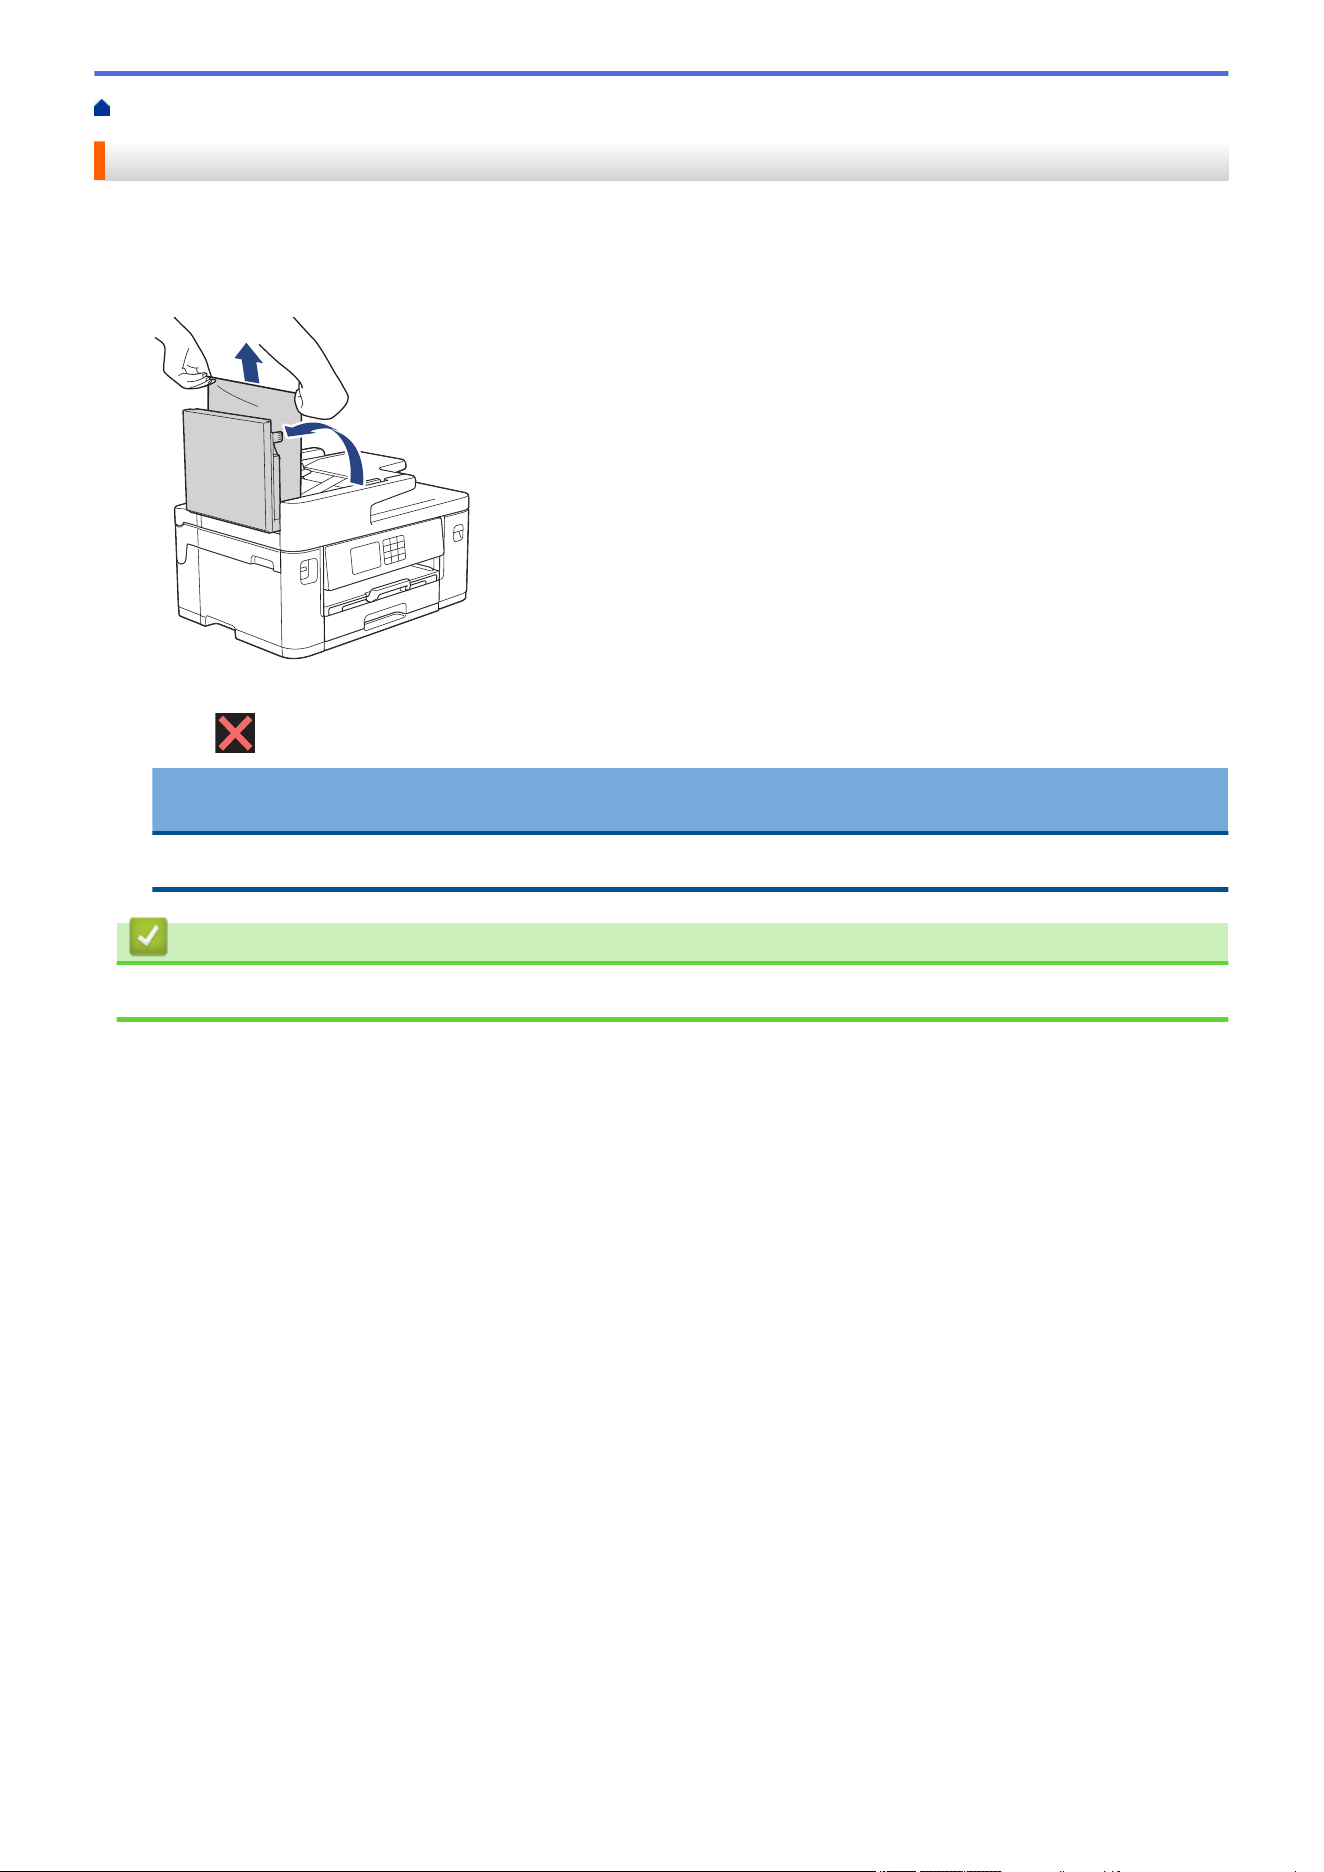
Home > Troubleshooting > Document Jams > Document is Jammed in the Top of the ADF Unit
Document is Jammed in the Top of the ADF Unit
1. Remove any paper from the ADF that is not jammed.
2. Open the ADF cover.
3. Remove the jammed document by pulling it upwards.
4. Close the ADF cover.
5. Press .
IMPORTANT
To avoid future document jams, close the ADF cover correctly by pressing it down in the centre.
Related Information
• Document Jams
482
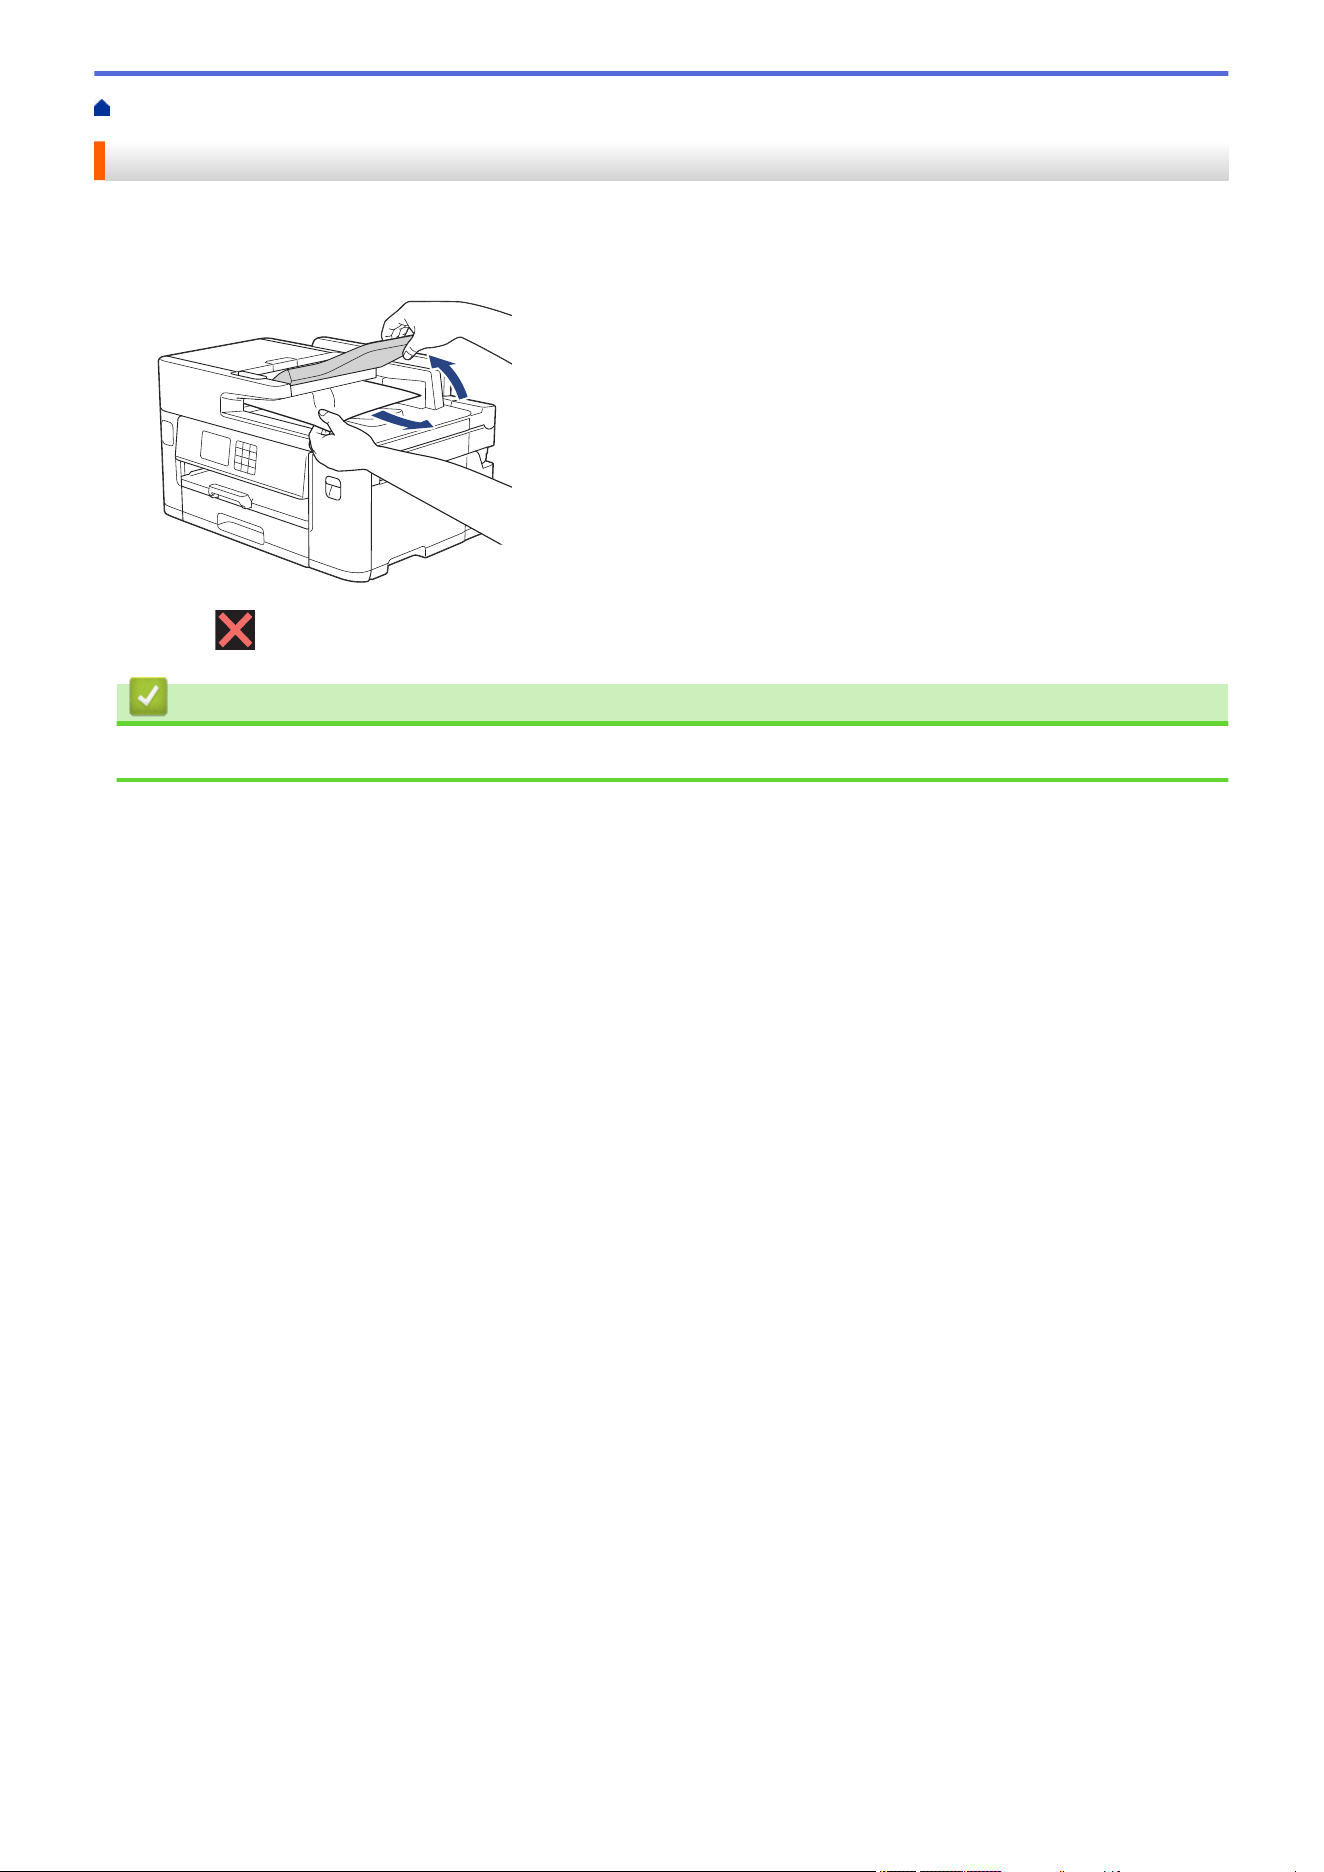
Home > Troubleshooting > Document Jams > Document is Jammed in the Bottom of the ADF Unit
Document is Jammed in the Bottom of the ADF Unit
1. Remove any paper from the ADF that is not jammed.
2. Lift the ADF document support, and remove the jammed paper.
3. Press .
Related Information
• Document Jams
483
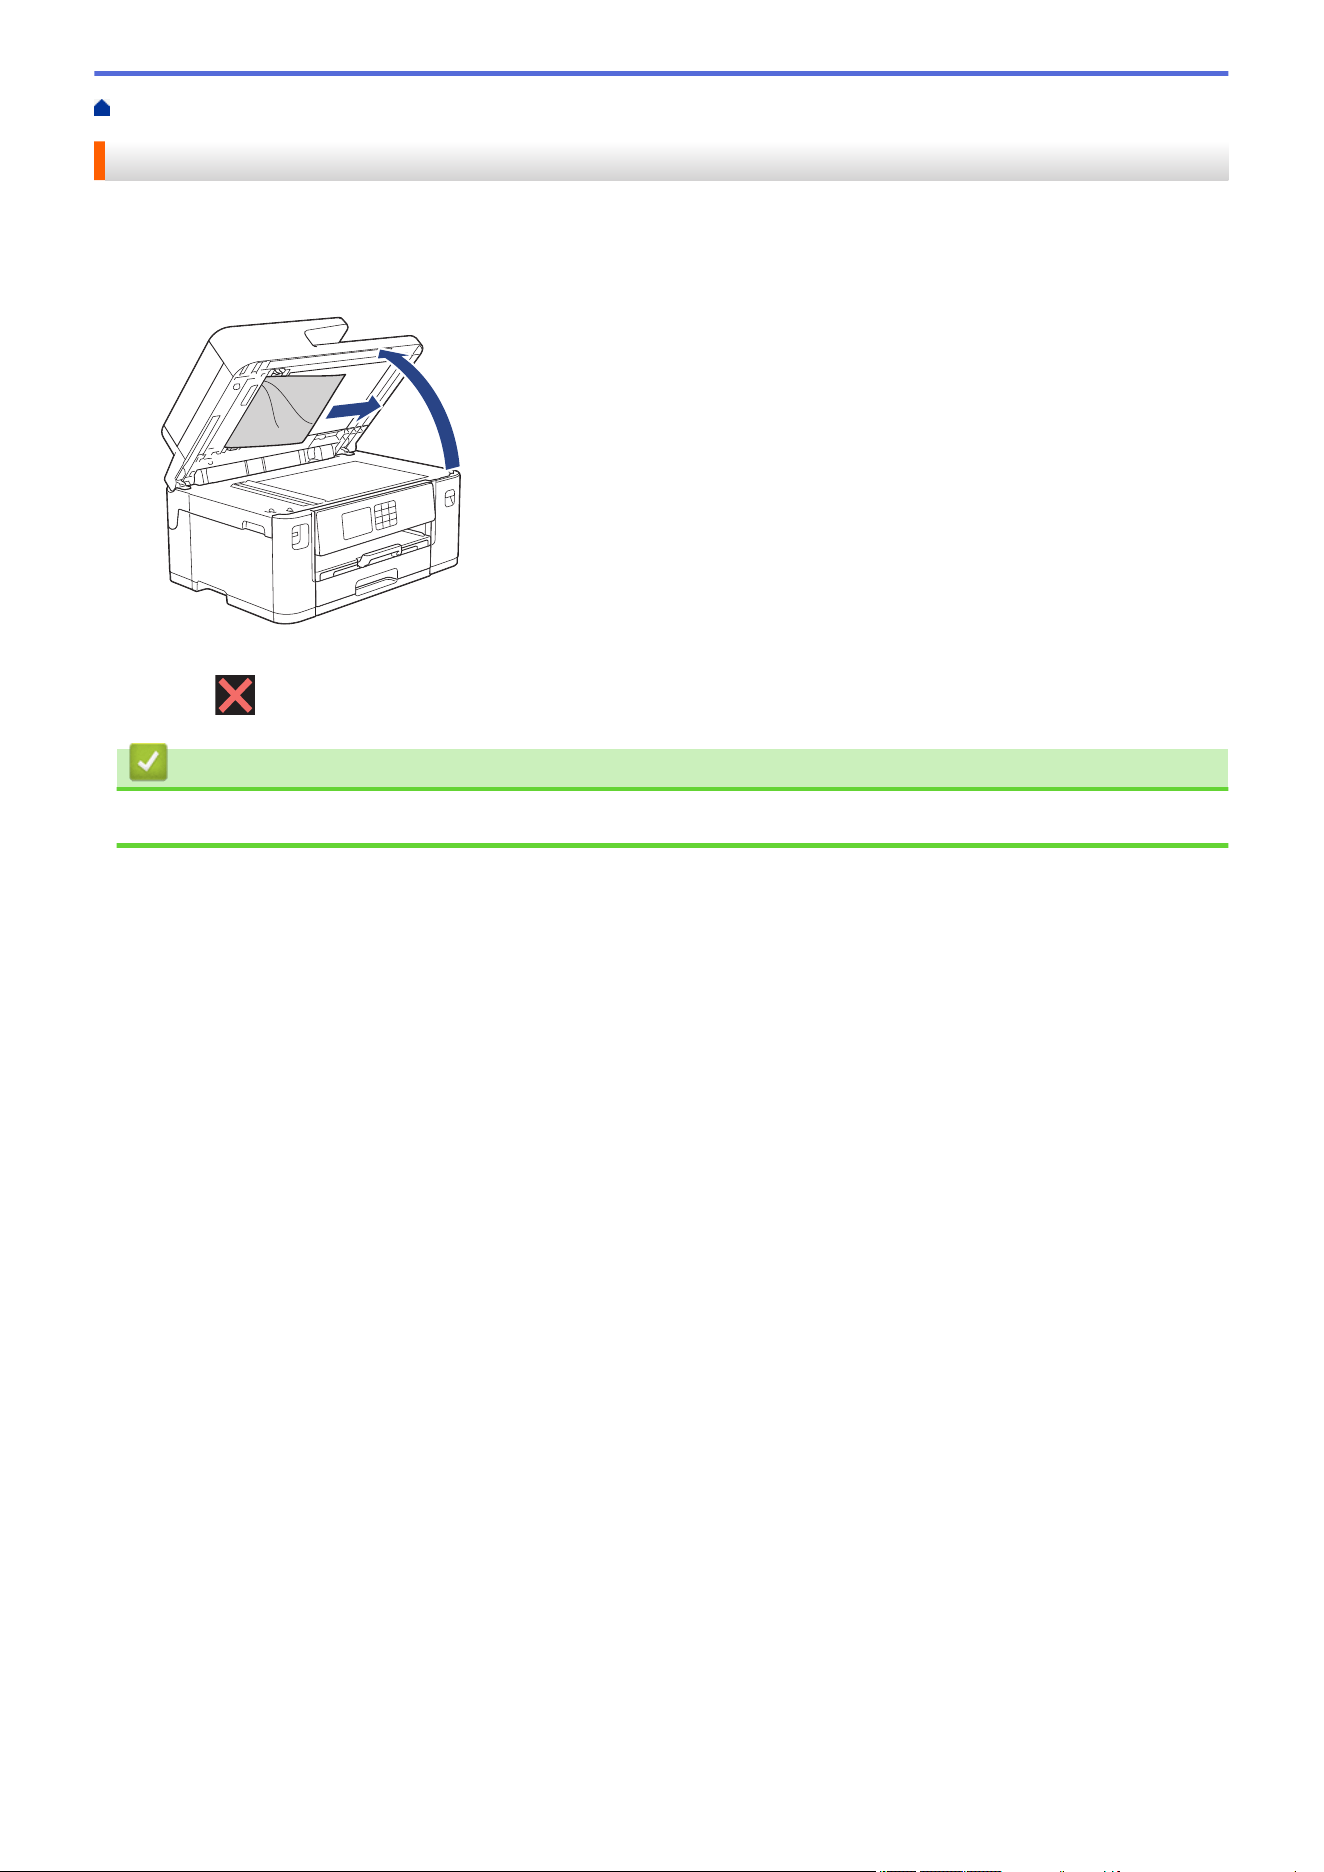
Home > Troubleshooting > Document Jams > Document is Jammed inside the ADF Unit
Document is Jammed inside the ADF Unit
1. Remove any paper from the ADF that is not jammed.
2. Lift the document cover.
3. Pull the jammed document out to the right.
4. Close the document cover.
5. Press .
Related Information
• Document Jams
484
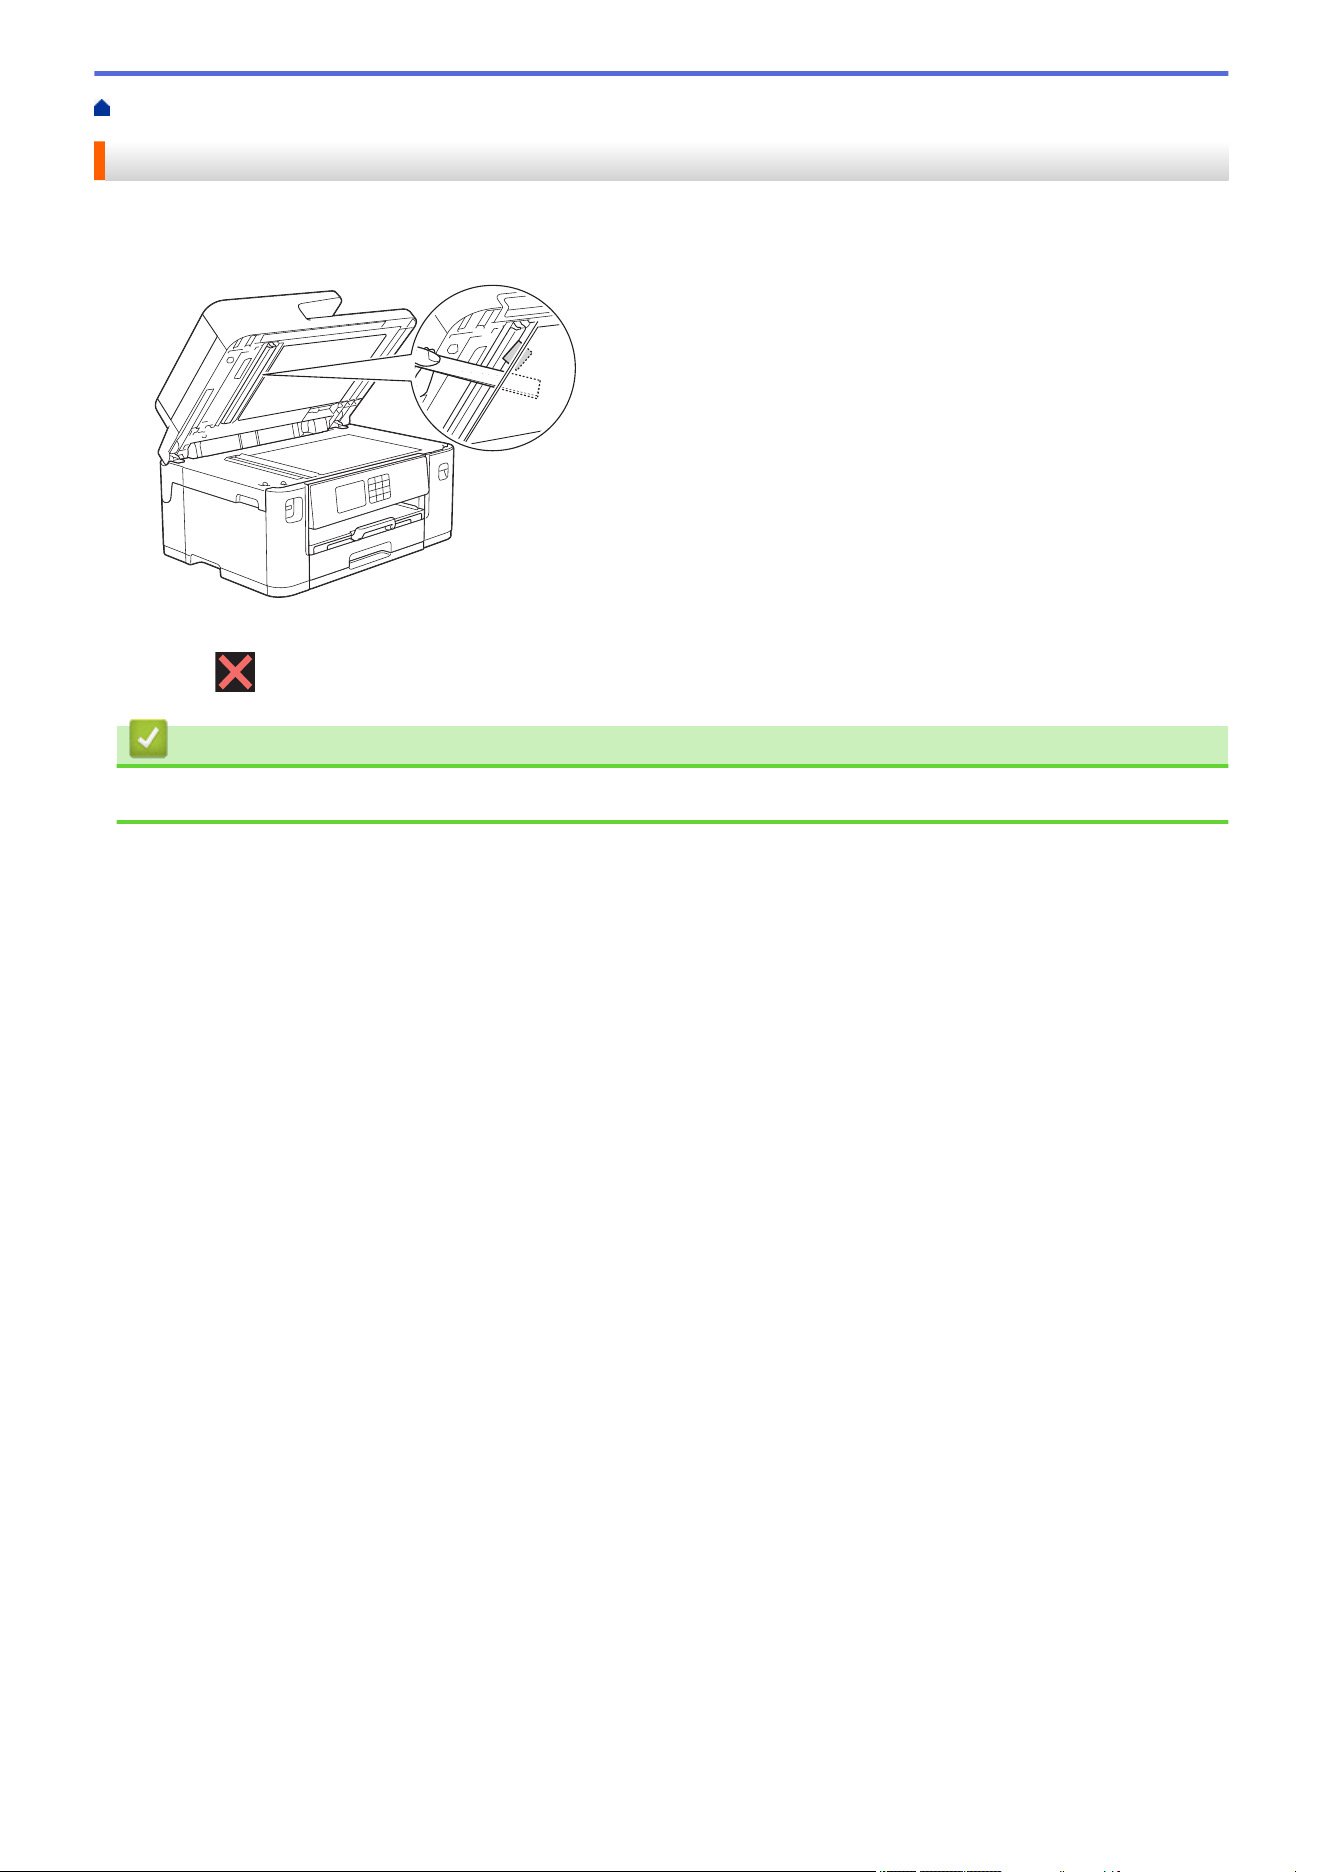
Home > Troubleshooting > Document Jams > Remove Paper Scraps Jammed in the ADF
Remove Paper Scraps Jammed in the ADF
1. Lift the document cover.
2. Insert a piece of stiff paper, such as cardstock, into the ADF to push any small paper scraps through.
3. Close the document cover.
4. Press .
Related Information
• Document Jams
485

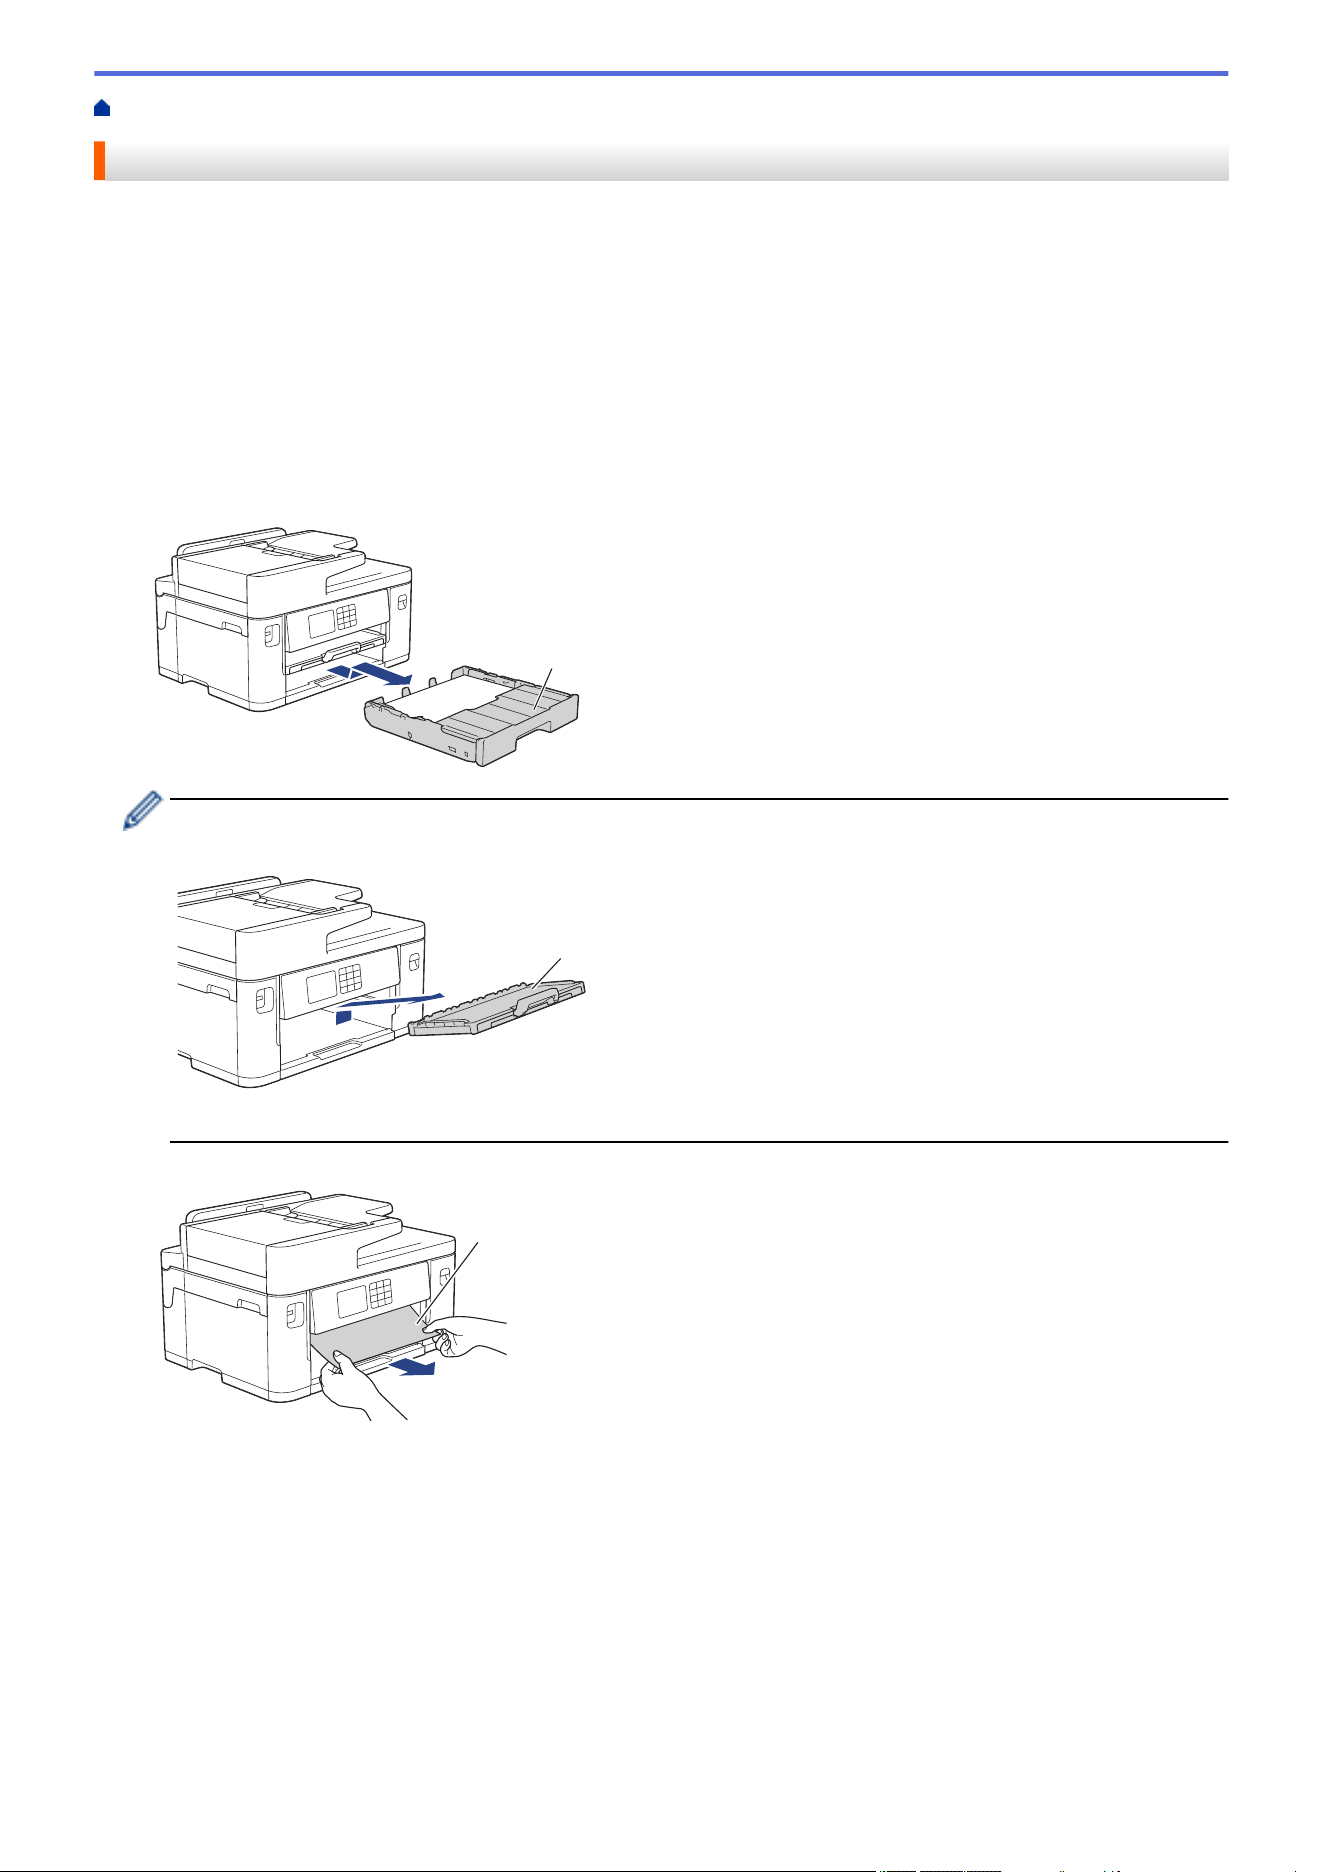
Home > Troubleshooting > Printer Jam or Paper Jam > Paper is Jammed in the Front of the Machine
Paper is Jammed in the Front of the Machine
If the LCD displays the following paper jam messages, follow these steps:
• [Jam Front/Rear], [Repeat Jam Front/Rear]
• [Jam Front], [Repeat Jam Front]
• [Jam Front/MP Tray], [Repeat Jam Front/MP Tray]
• [Jam Front/Manual Feed Slot], [Repeat Jam Front/Manual Feed]
1. Unplug the machine from the electrical socket.
2. If the paper is loaded in the MP tray, remove the paper. (MFC-J2740DW/MFC-J5740DW/MFC-J5855DW/
MFC-J5955DW)
3. Pull Tray #1 (1) completely out of the machine as shown by the arrow.
1
If your LCD displays repeat paper jam messages, for example [Repeat Jam Front/Rear], lift the paper
support (1), and then pull it at an angle completely out of the machine as shown by the arrow.
1
When finished, continue with the next step.
4. Slowly remove the jammed paper (1).
1
487
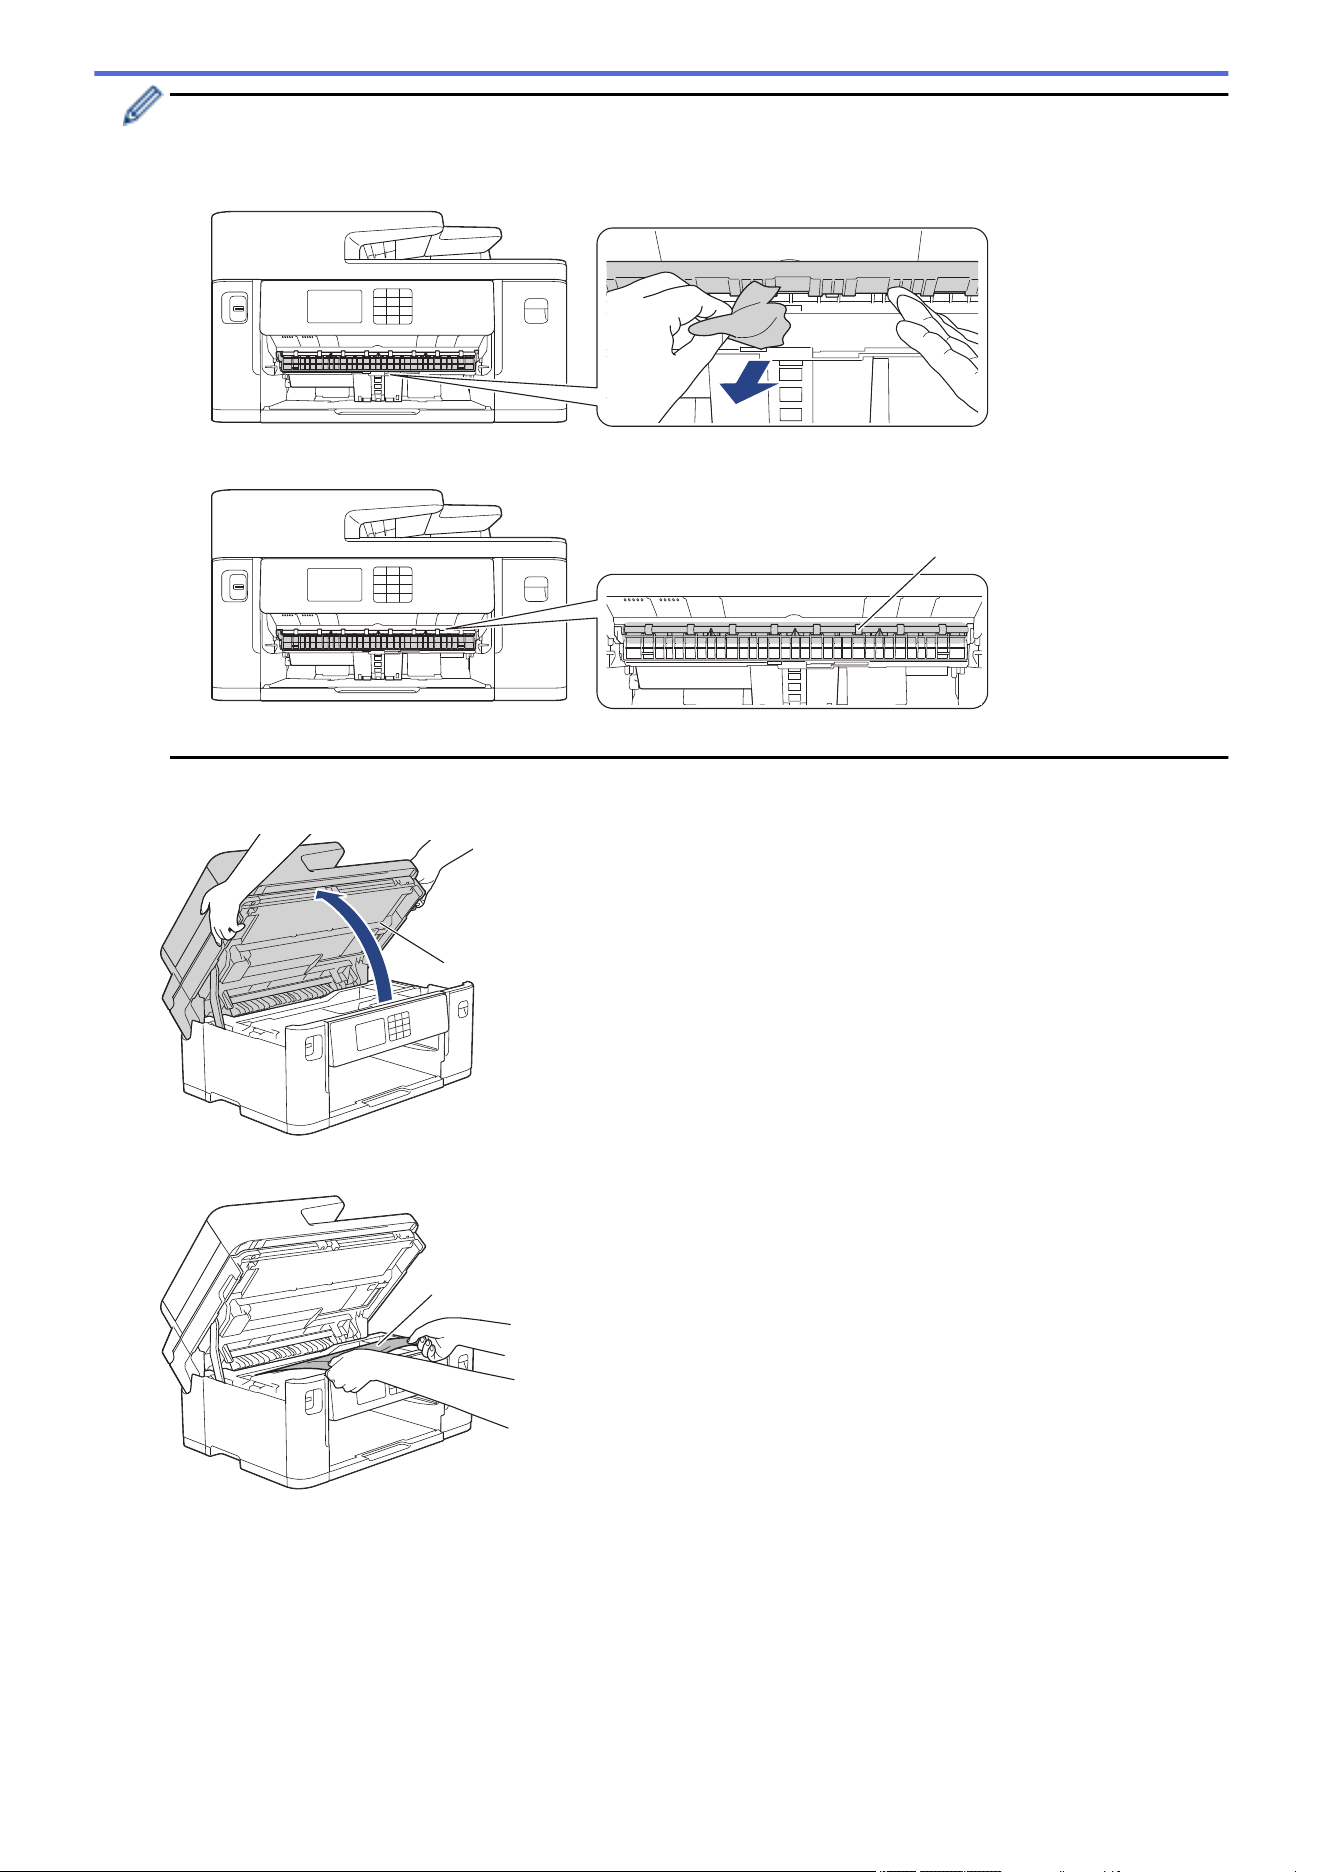
If your LCD displays repeat paper jam messages, for example [Repeat Jam Front/Rear], do the
following:
a. Lift the flap, and remove the jammed paper.
b. Make sure you look carefully inside (1) for any scraps of paper.
1
When finished, continue with the next step.
5. Using both hands, use the finger holds on each side of the machine to lift the scanner cover (1) into the open
position.
1
6. Slowly pull the jammed paper (1) out of the machine.
1
488
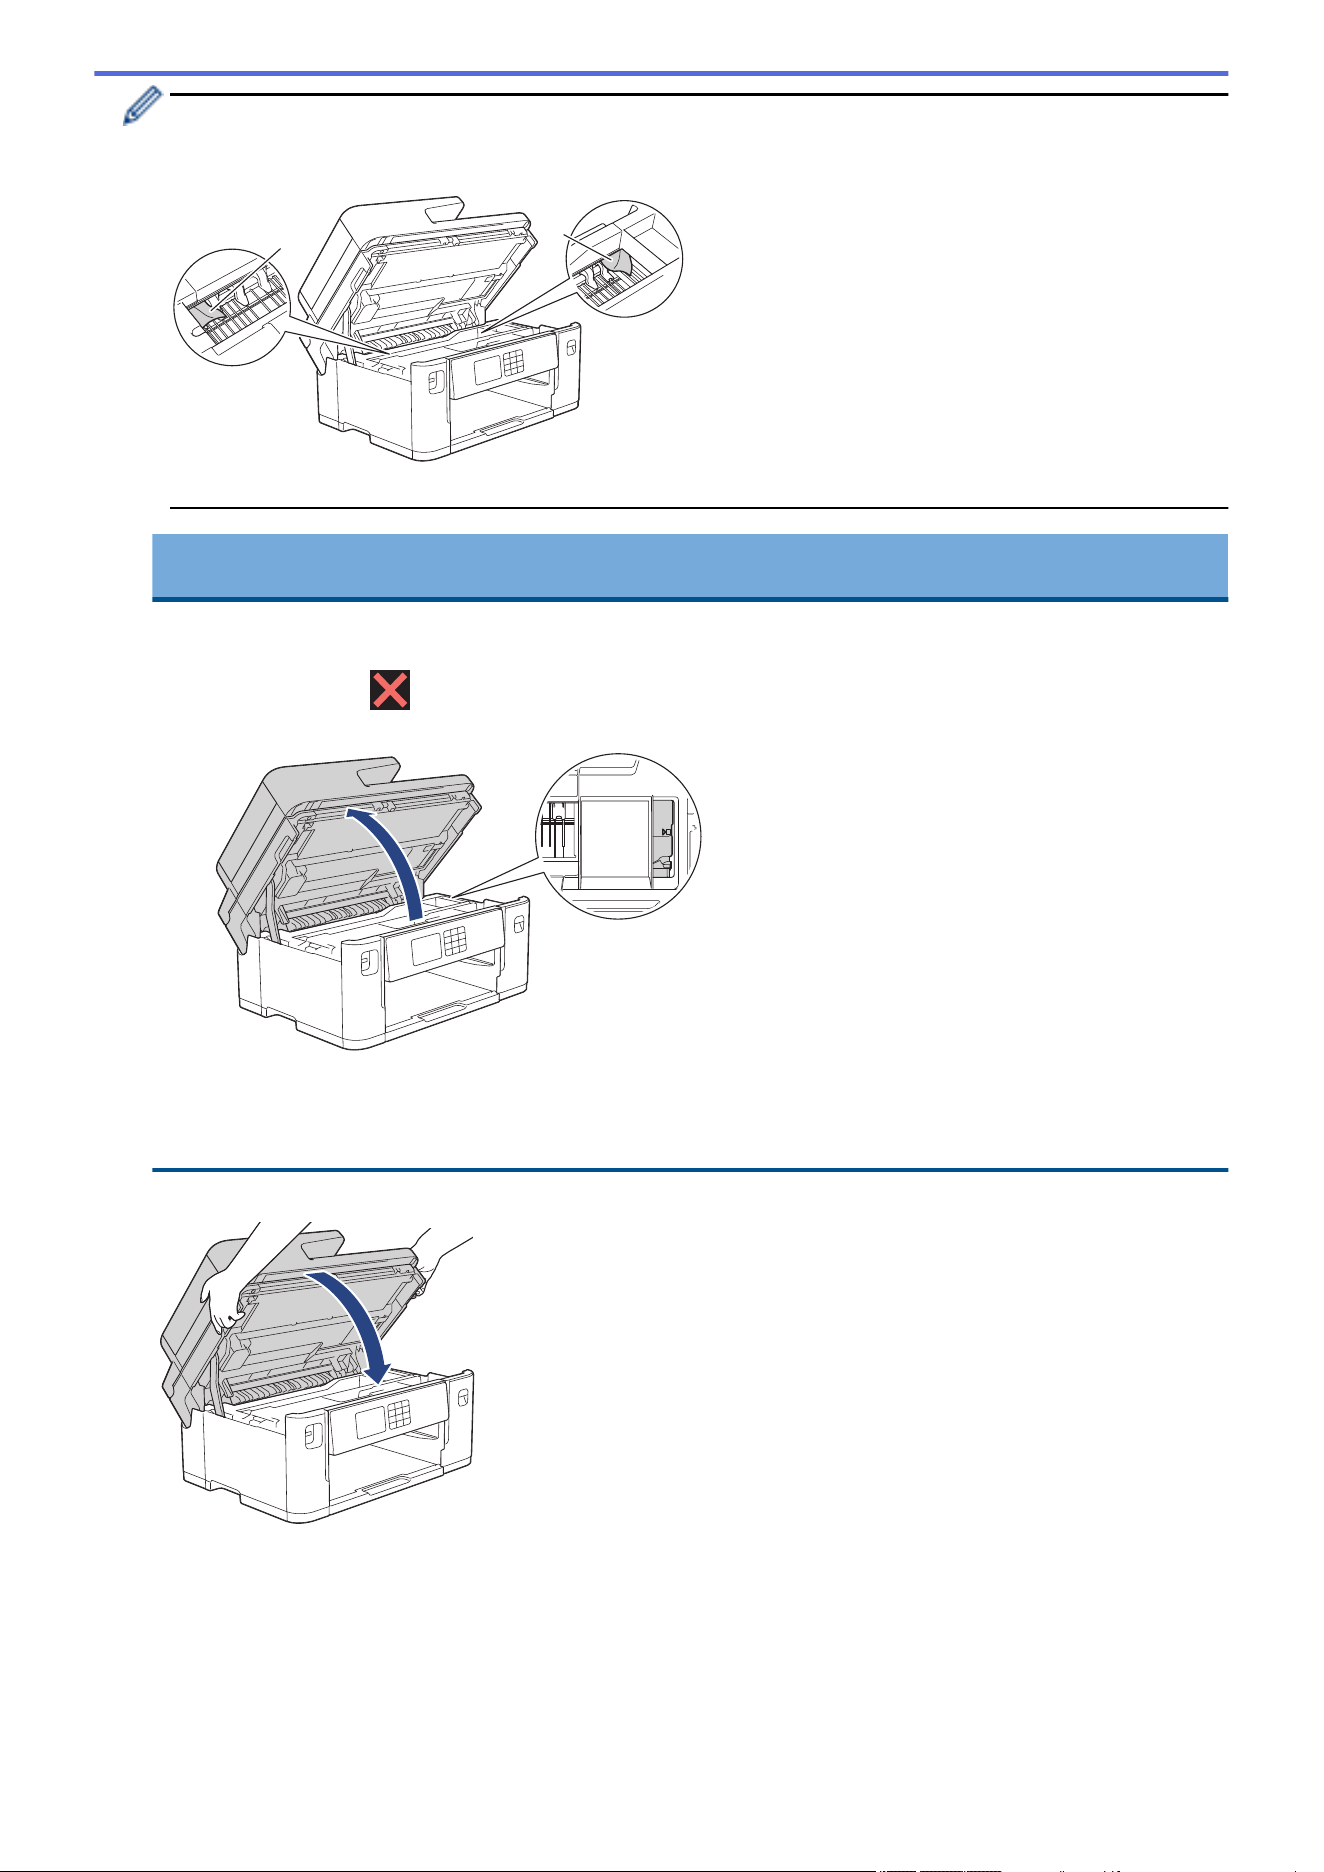
If your LCD displays repeat paper jam messages, for example [Repeat Jam Front/Rear], move the
print head, and then remove any paper remaining in this area. Make sure pieces of paper are not left in the
corners of the machine (1) and (2).
1
2
When finished, continue with the next step.
IMPORTANT
• If the print head is in the right corner as shown in the illustration, you cannot move the print head.
Close the scanner cover, and then reconnect the power cord. Open the scanner cover again, and
then hold down until the print head moves to the centre. Then unplug the machine from the
power source and remove the paper.
• If the paper is jammed under the print head, unplug the machine from the power source, and then
move the print head and remove the paper.
• If ink gets on your skin or clothing, immediately wash it off with soap or detergent.
7. Gently close the scanner cover using the finger holds on each side.
8. If your LCD displays [Jam Front/Rear] or [Repeat Jam Front/Rear], do the following:
489
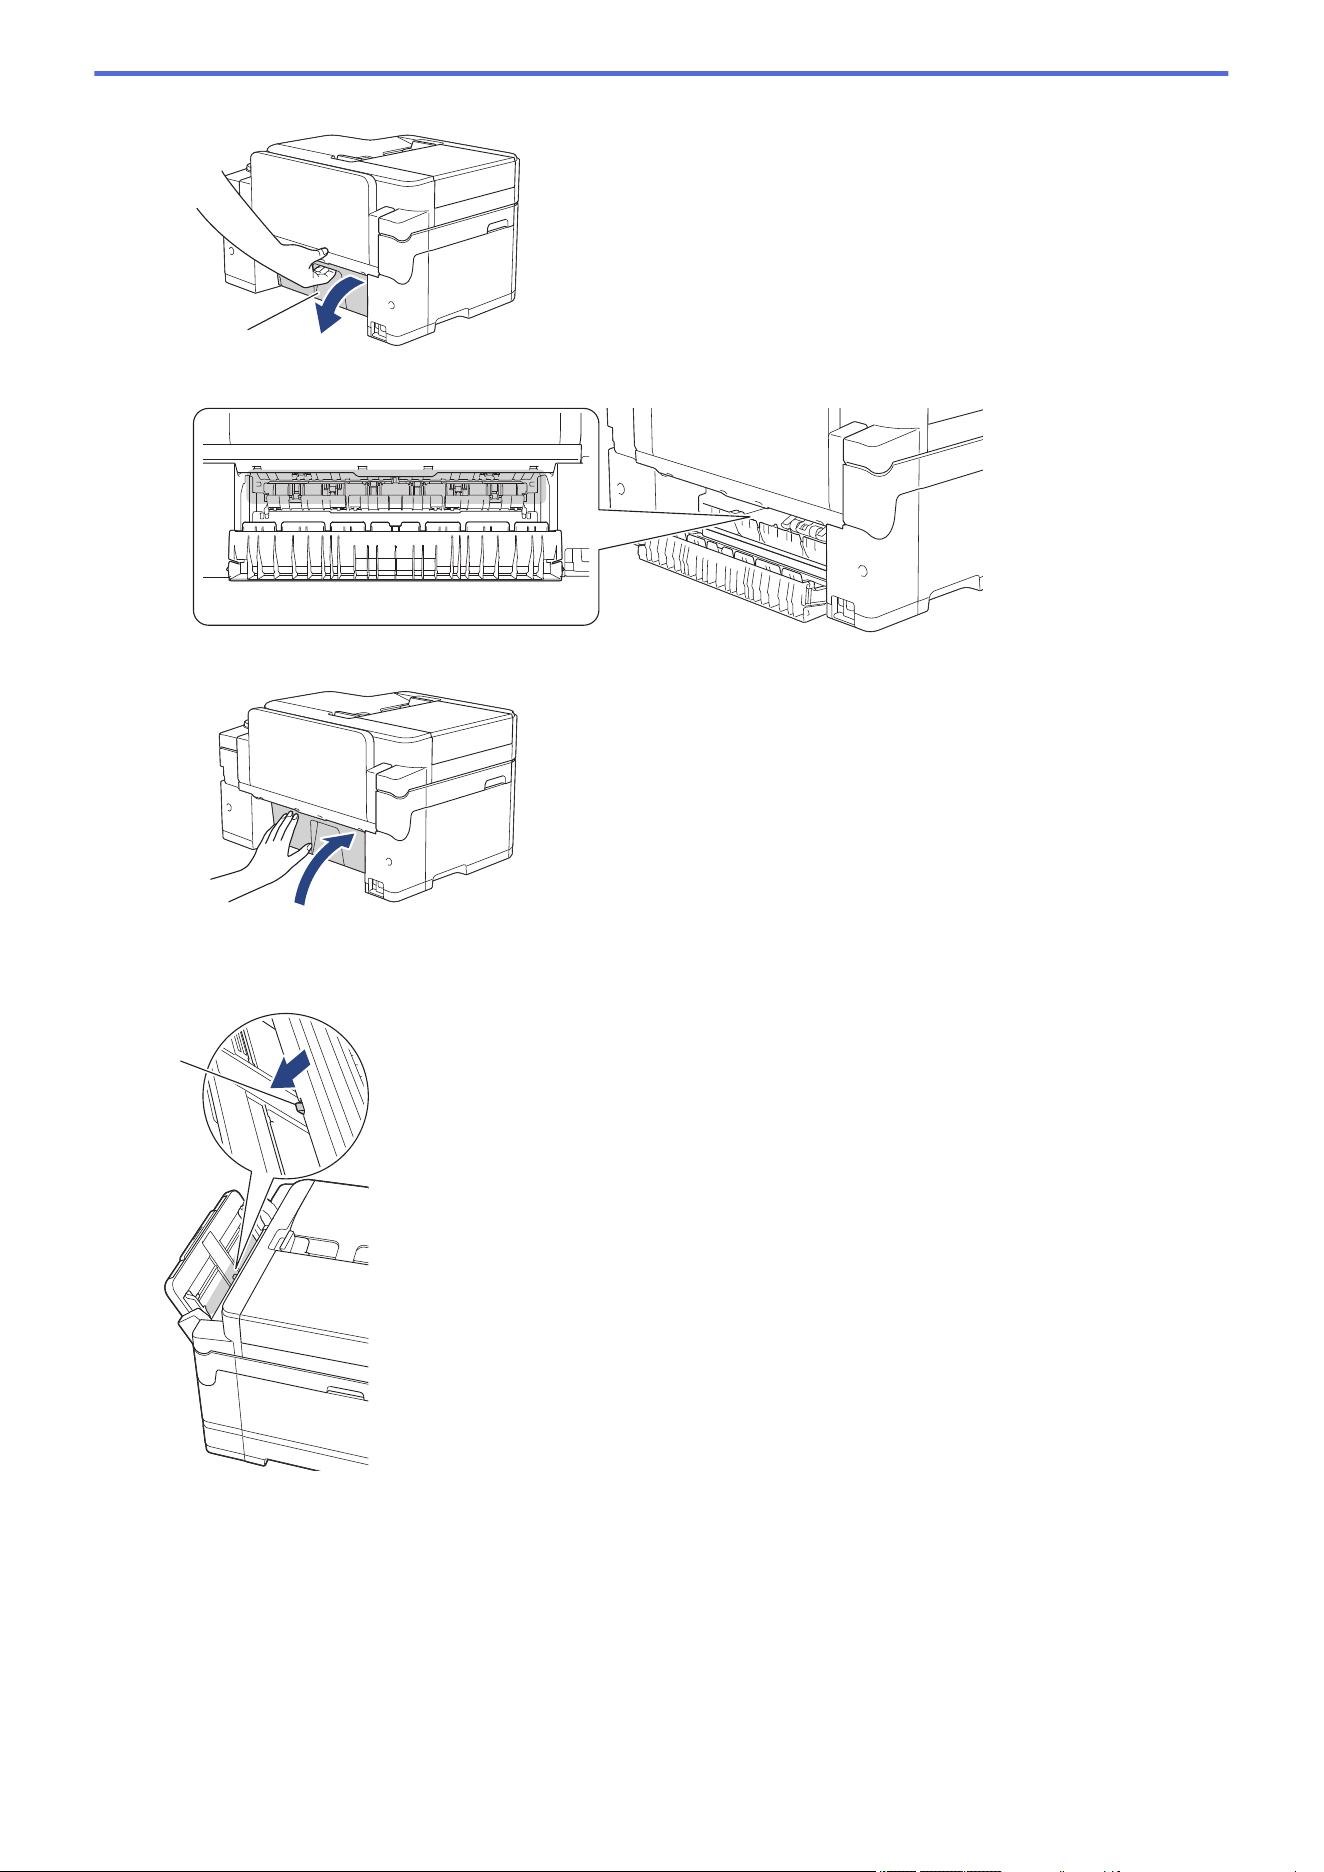
a. Open the Jam Clear Cover (1) at the back of the machine.
1
b. Make sure you look carefully inside for jammed paper and slowly pull it out of the machine.
c. Close the Jam Clear Cover. Make sure the cover is closed completely.
9. If your LCD displays [Jam Front/MP Tray] or [Repeat Jam Front/MP Tray], make sure you look
carefully inside the MP tray for jammed paper. Push the release lever (1) towards the back of the machine,
and then slowly pull the jammed paper out of the MP tray.
1
490
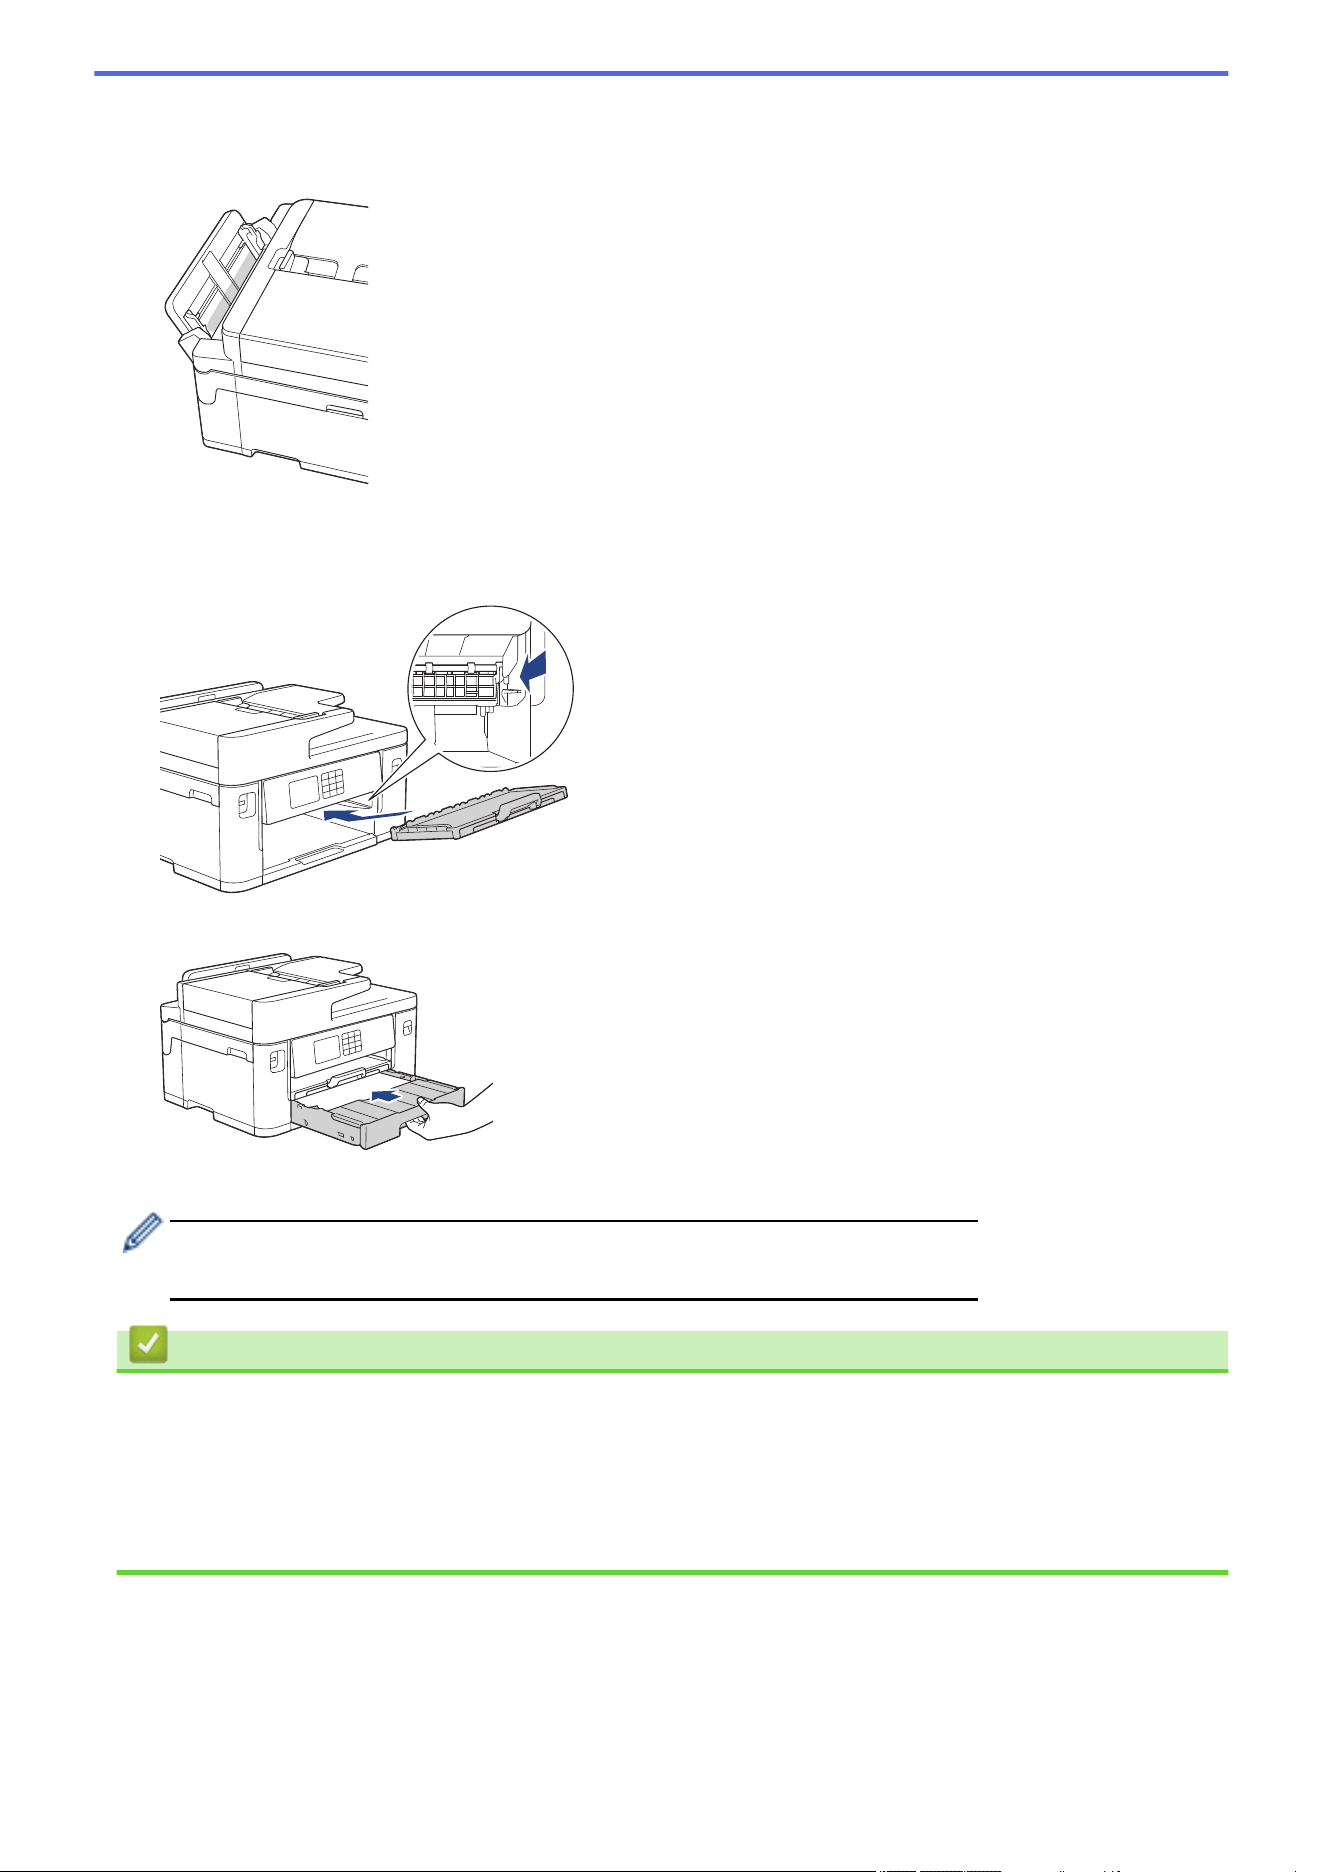
10. If your LCD displays [Jam Front/Manual Feed Slot] or [Repeat Jam Front/Manual Feed],
make sure you look carefully inside the manual feed slot for jammed paper and slowly pull it out of the
machine.
11. If your LCD displays repeat paper jam messages, for example [Repeat Jam Front/Rear], and you
removed the paper support, put it firmly back in the machine. Make sure you fit the paper support into the
channels.
12. Slowly push Tray #1 completely into the machine.
13. Reconnect the power cord.
If there is a repeat paper jam, a small piece of paper may be stuck in the machine.
See Related Information: Remove Paper Scraps.
Related Information
• Printer Jam or Paper Jam
Related Topics:
• Transfer Your Faxes or Fax Journal Report
• Error and Maintenance Messages
• Remove Paper Scraps
491

Home > Troubleshooting > Printer Jam or Paper Jam > Paper is Jammed in the Back of the Machine
Paper is Jammed in the Back of the Machine
If the LCD displays the following paper jam messages, follow these steps:
• [Jam Rear], [Repeat Jam Rear]
• [Jam MP Tray], [Repeat Jam MP Tray]
• [Jam Manual Feed Slot], [Repeat Jam Manual Feed Slot]
• [Jam Tray2], [Repeat Jam Tray2]
1. Unplug the machine from the electrical socket.
2. If the paper is loaded in the MP tray, remove the paper. (MFC-J2740DW/MFC-J5740DW/MFC-J5855DW/
MFC-J5955DW)
3. Pull Tray #1 (1) completely out of the machine as shown by the arrow.
1
(MFC-J2740DW/MFC-J5740DW/MFC-J5955DW) If your LCD displays [Jam Tray2] or [Repeat Jam
Tray2], also pull Tray #2 (2) completely out of the machine as shown by the arrow.
2
When finished, continue with the next step.
4. If your LCD displays
[Jam Rear], [Repeat Jam Rear], [Jam Tray2], or [Repeat Jam Tray2], do
the following:
a. Open the Jam Clear Cover (1) at the back of the machine.
1
492
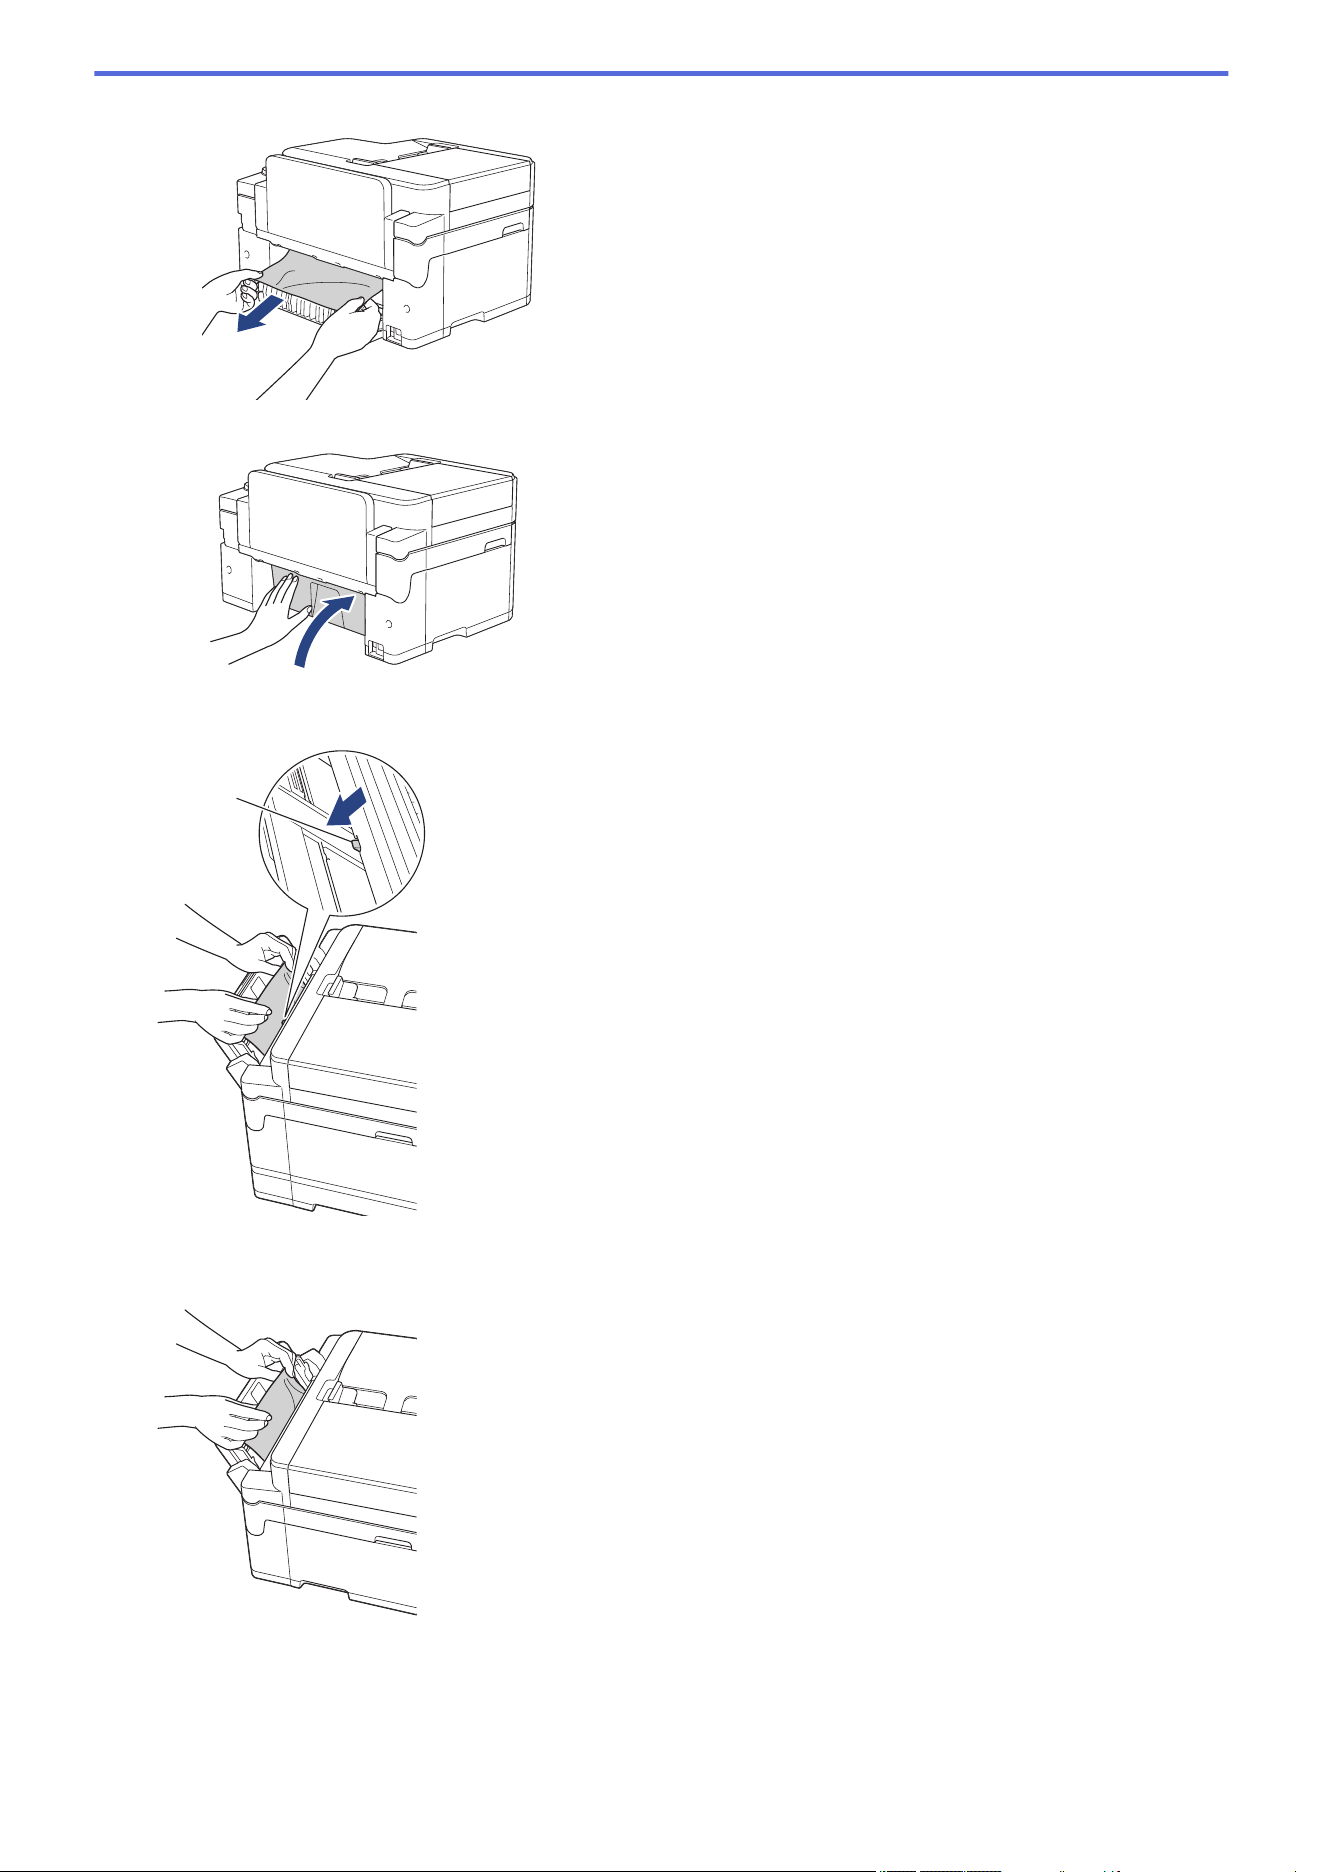
b. Slowly pull the jammed paper out of the machine.
c. Close the Jam Clear Cover. Make sure the cover is closed completely.
5. If your LCD displays [Jam MP Tray] or [Repeat Jam MP Tray], push the release lever (1) towards the
back of the machine, and then slowly pull the jammed paper out of the MP tray.
1
6. If your LCD displays [Jam Manual Feed Slot] or [Repeat Jam Manual Feed Slot], slowly pull the
jammed paper out of the manual feed slot.
493
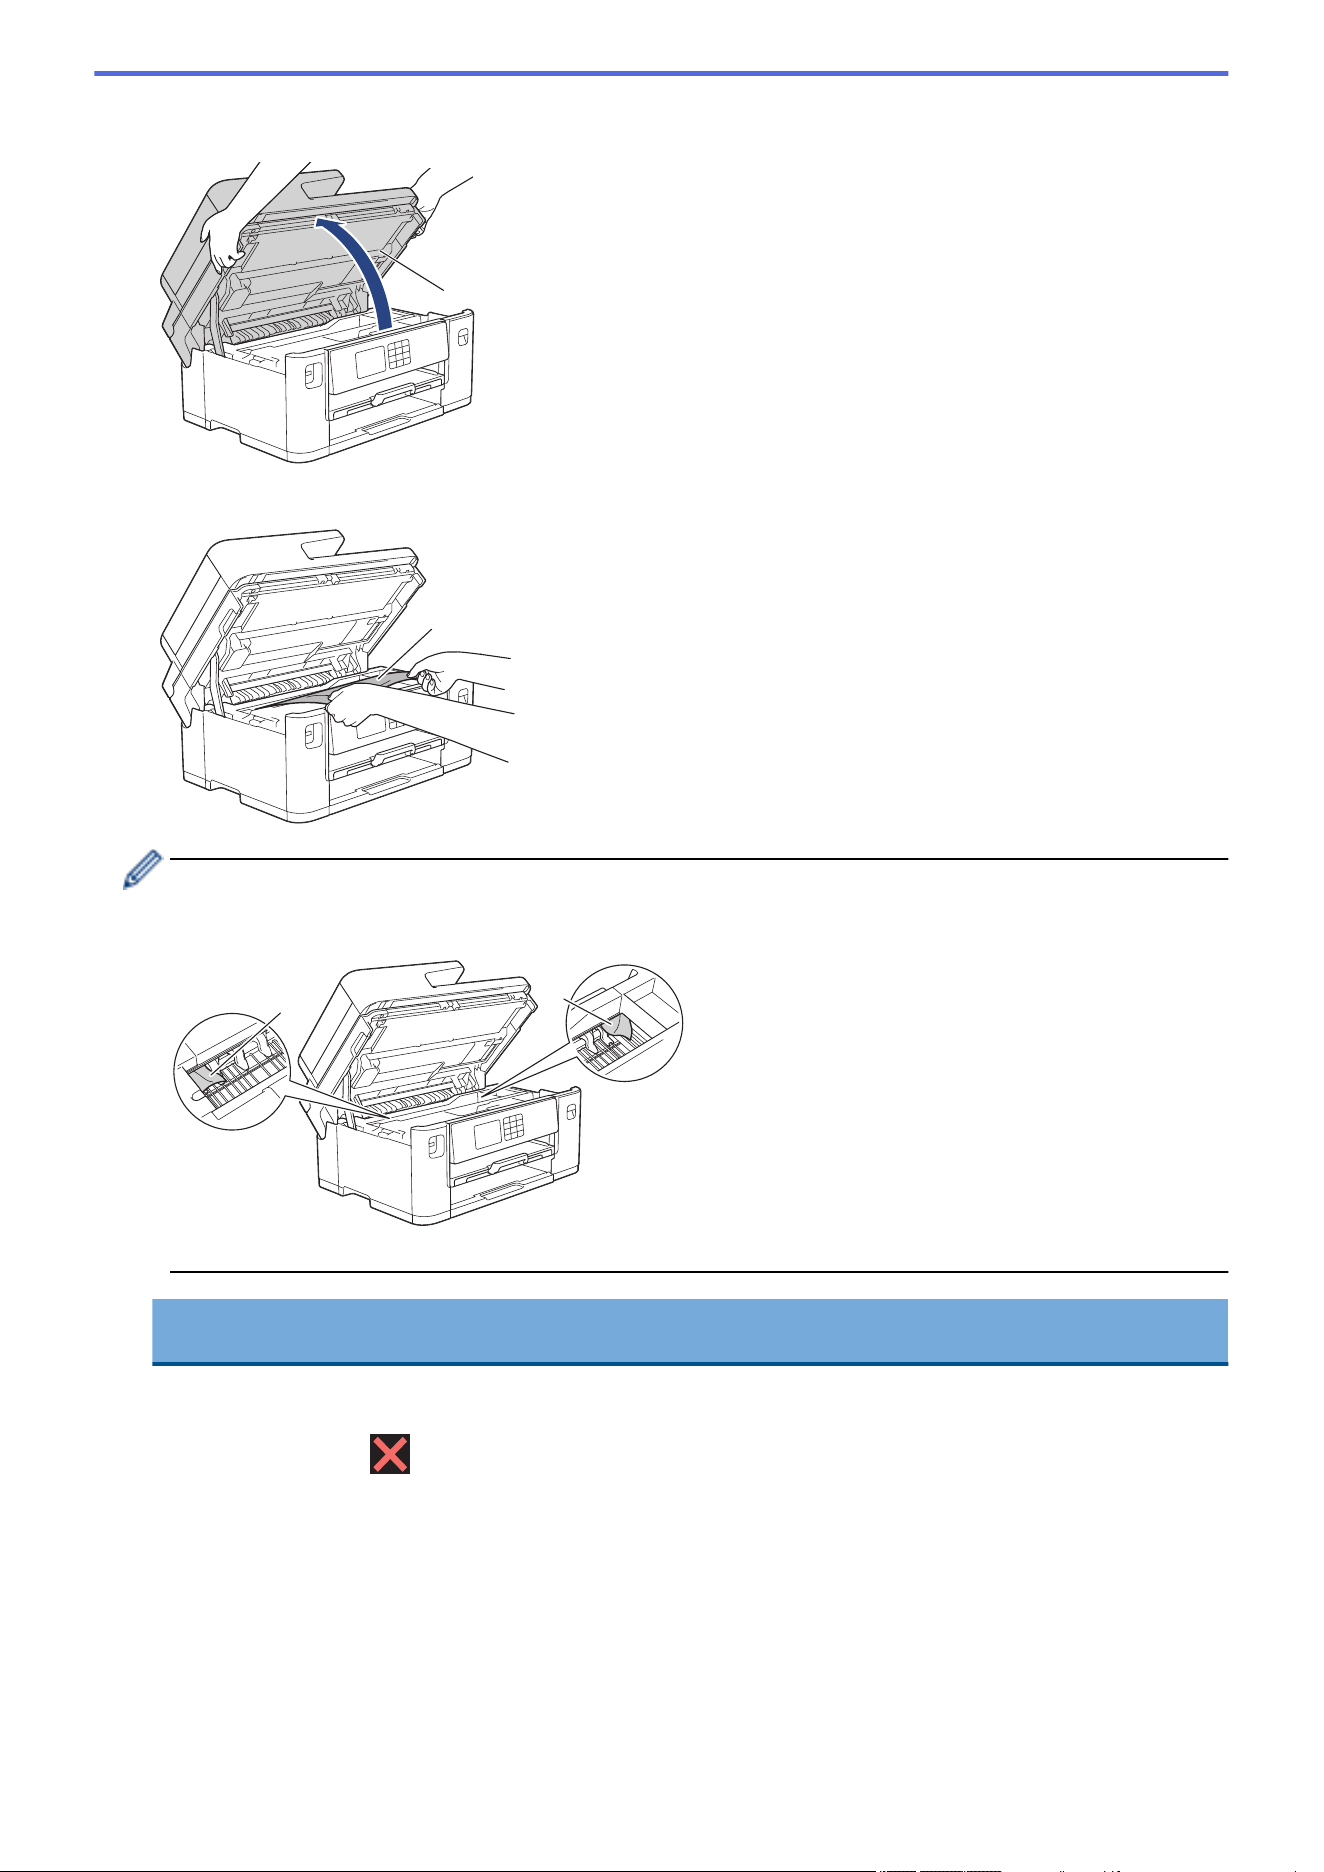
7. Using both hands, use the finger holds on each side of the machine to lift the scanner cover (1) into the open
position.
1
8. Slowly pull the jammed paper (1) out of the machine.
1
If your LCD displays repeat paper jam messages, for example [Repeat Jam Rear], move the print head,
and then remove any paper remaining in this area. Make sure pieces of paper are not left in the corners of
the machine (1) and (2).
1
2
When finished, continue with the next step.
IMPORTANT
• If the print head is in the right corner as shown in the illustration, you cannot move the print head.
Close the scanner cover, and then reconnect the power cord. Open the scanner cover again, and
then hold down until the print head moves to the centre. Then unplug the machine from the
power source and remove the paper.
494
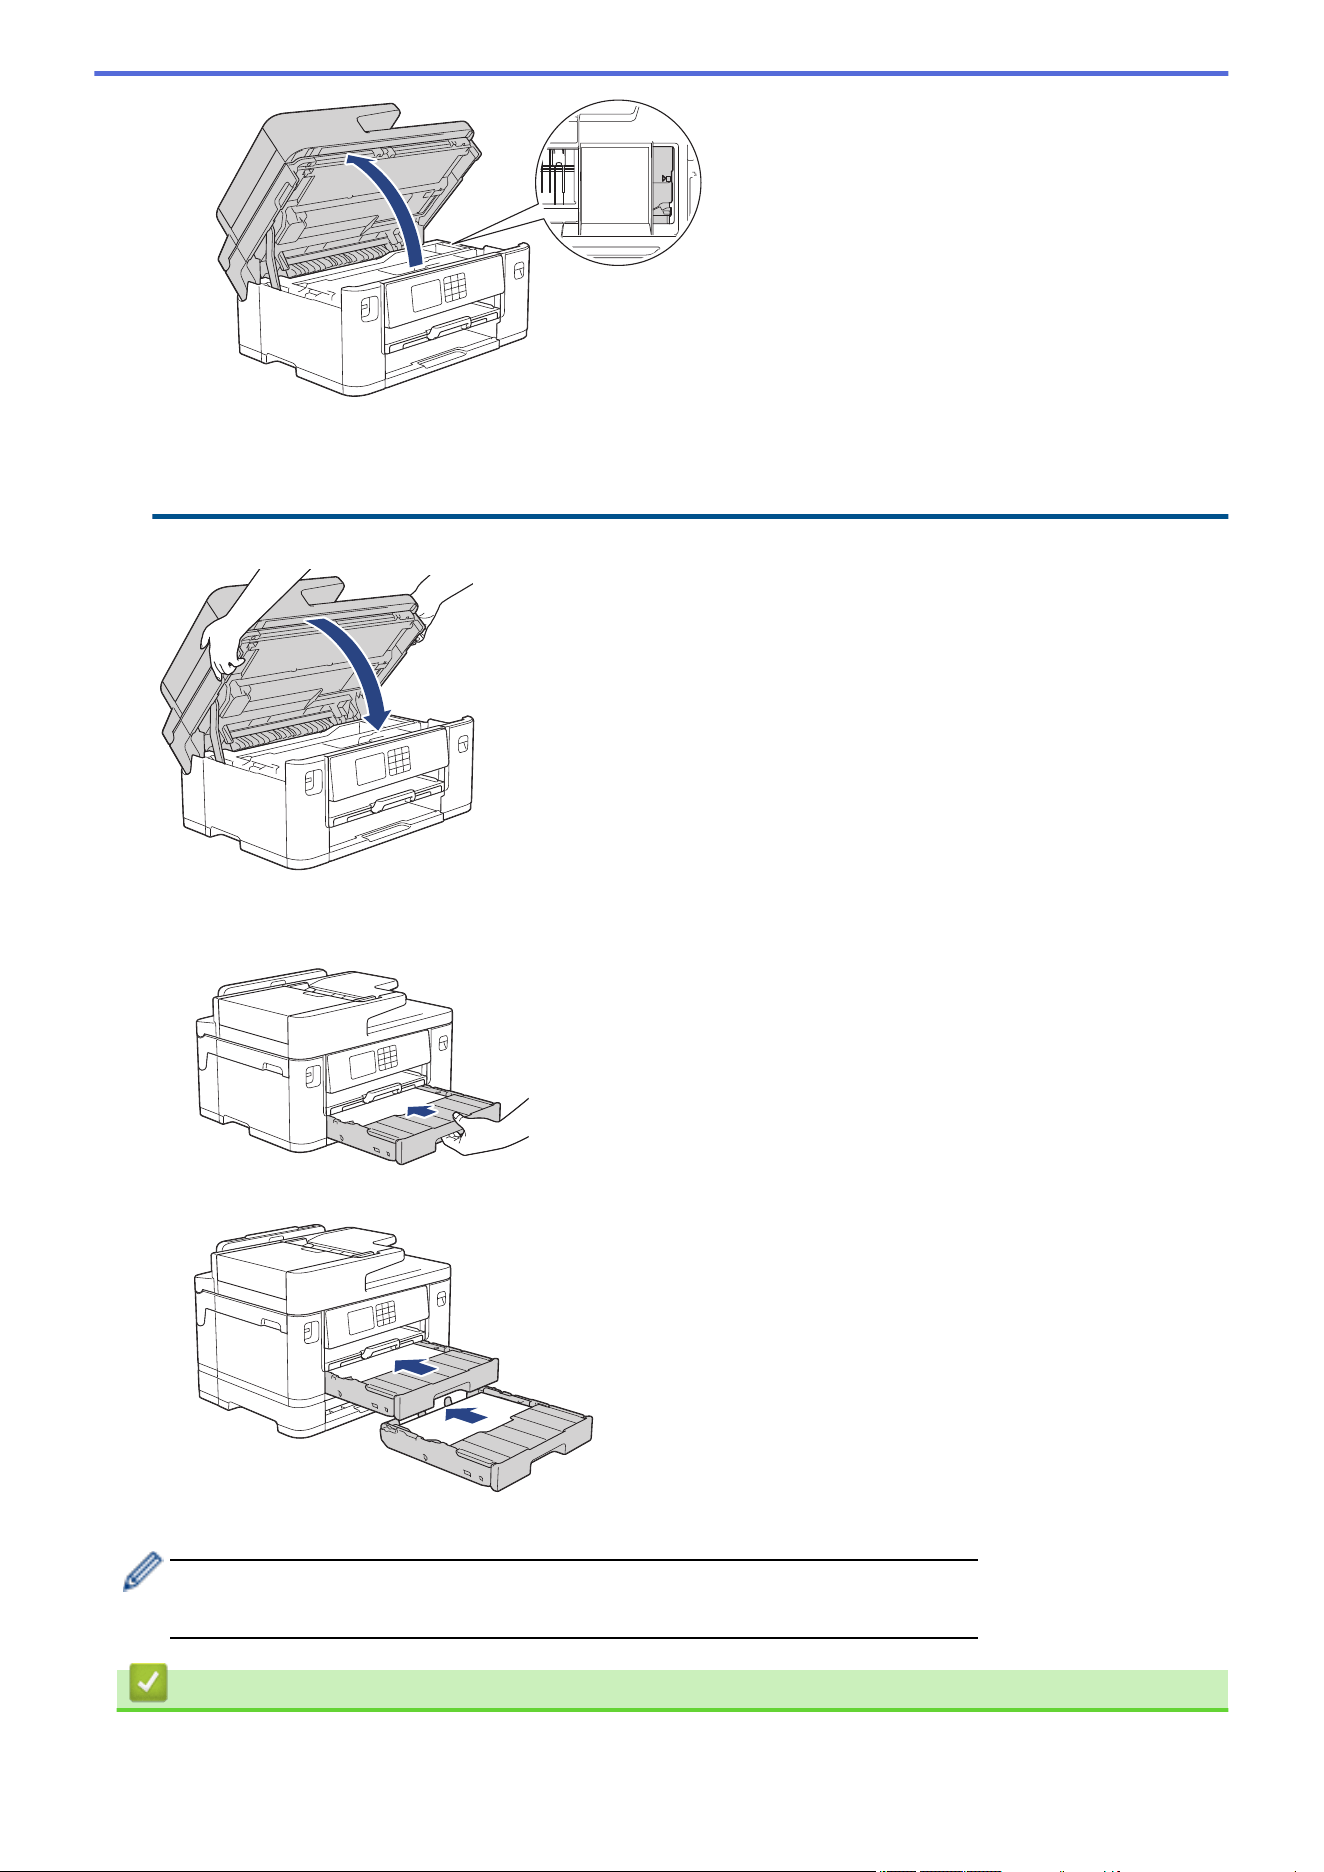
• If the paper is jammed under the print head, unplug the machine from the power source, and then
move the print head and remove the paper.
• If ink gets on your skin or clothing, immediately wash it off with soap or detergent.
9. Gently close the scanner cover using the finger holds on each side.
10. Slowly push the paper trays completely into the machine.
• MFC-J2340DW/MFC-J5340DW/MFC-J5855DW
• MFC-J2740DW/MFC-J5740DW/MFC-J5955DW
11. Reconnect the power cord.
If there is a repeat paper jam, a small piece of paper may be stuck in the machine.
See Related Information: Remove Paper Scraps.
Related Information
• Printer Jam or Paper Jam
495

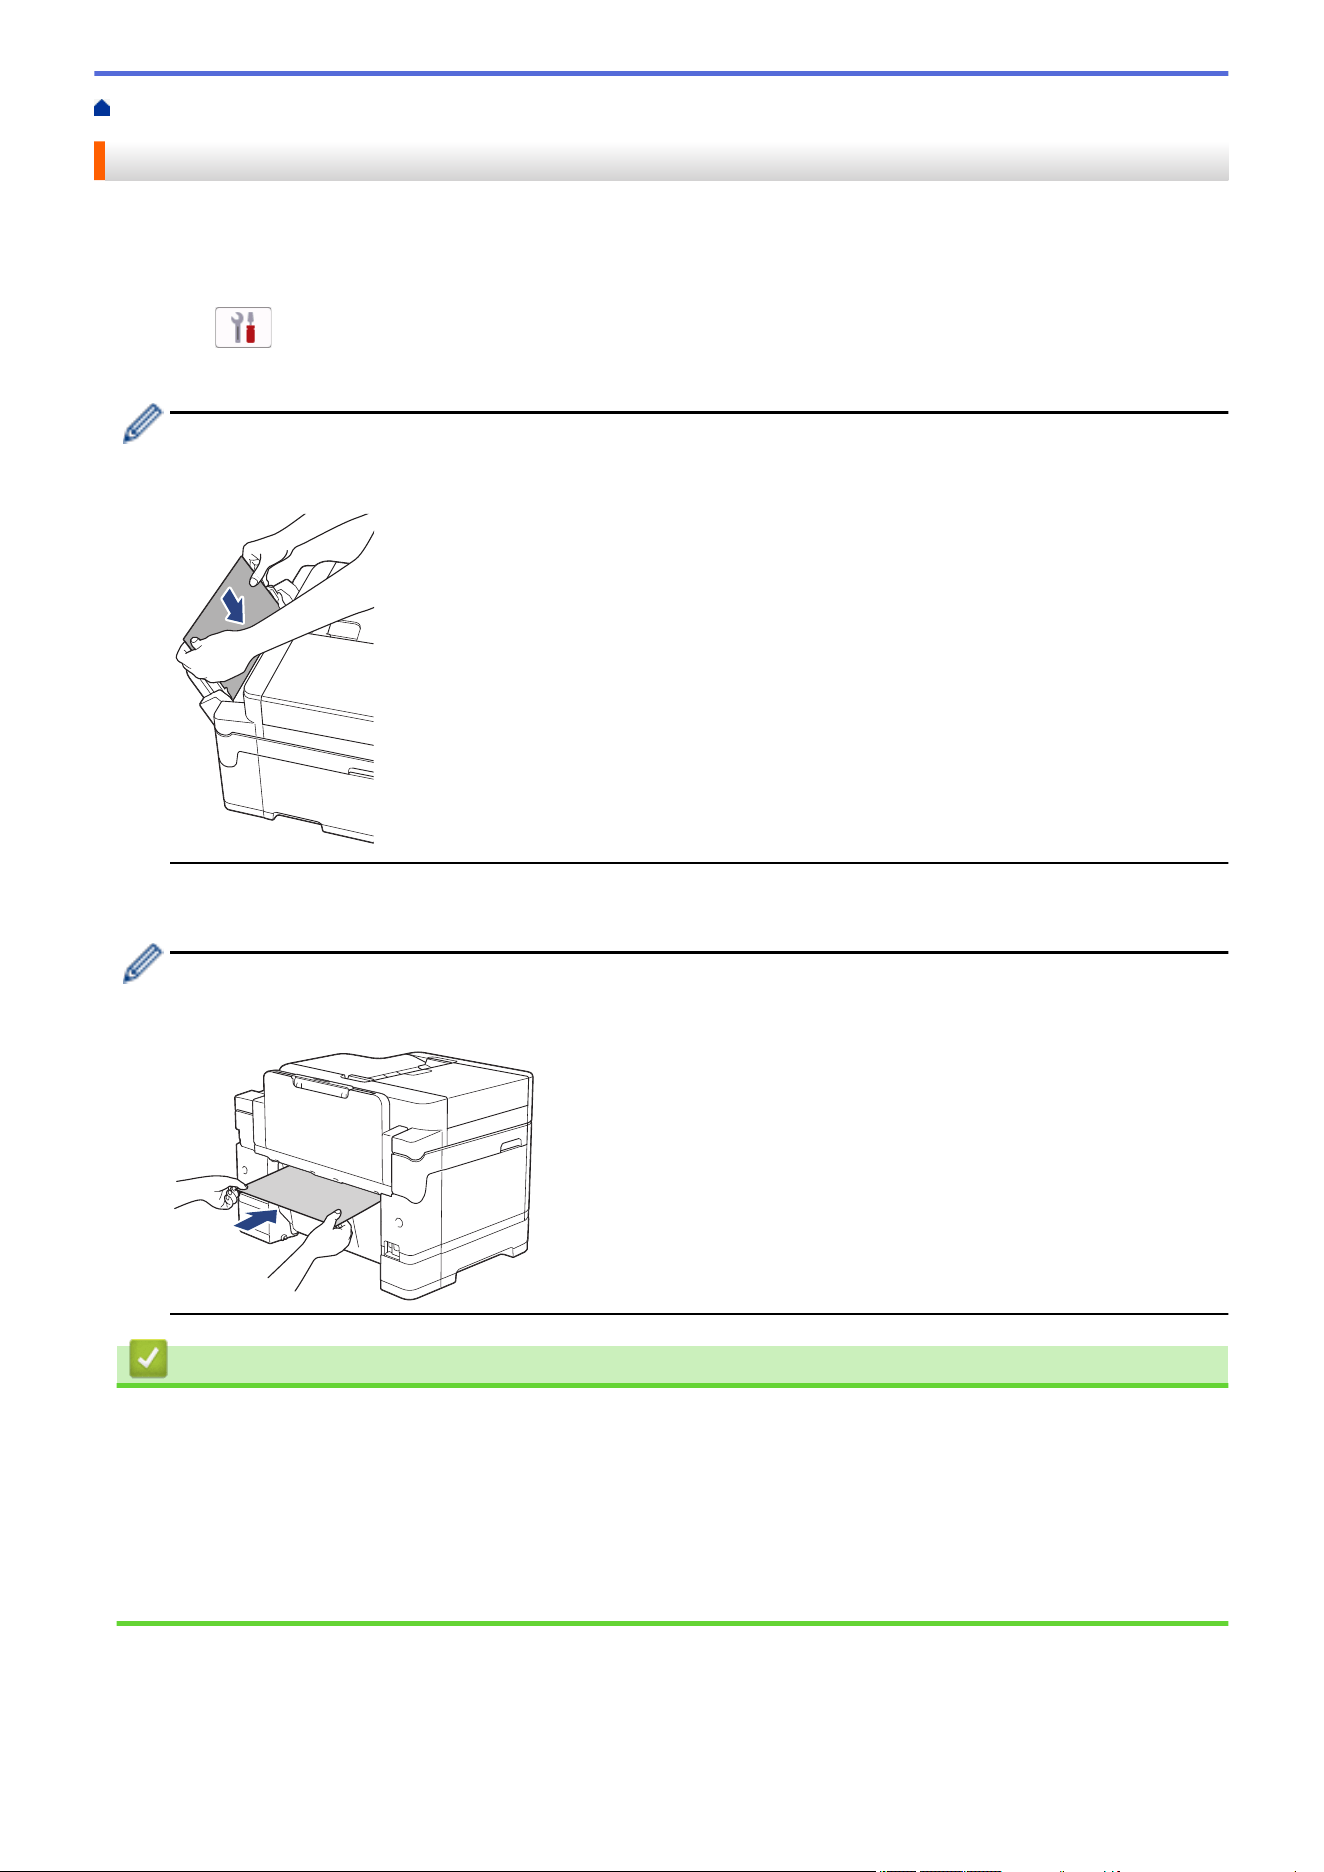
Home > Troubleshooting > Printer Jam or Paper Jam > Remove Paper Scraps
Remove Paper Scraps
1. If you repeatedly experience paper jams (3 times or more), the LCD displays a message asking if you want to
remove the scraps.
Press [Yes] to return to the Home screen.
2. Press [Settings] > [Maintenance] > [Remove Paper Scraps].
3. (MFC-J2340DW/MFC-J5340DW) Follow the instructions on the LCD to locate and remove the jammed paper.
During the procedure, you must load the Maintenance Sheet (included with your machine) in Landscape
orientation in the manual feed slot. (If you do not have the Maintenance Sheet, use one sheet of thick A4 or
Letter size paper, such as glossy paper.)
4. (MFC-J2740DW/MFC-J5740DW/MFC-J5855DW/MFC-J5955DW) Follow the instructions on the LCD to
locate and remove the jammed paper.
During the procedure, you must insert the Maintenance Sheet (included with your machine) into the
machine in Landscape orientation through the opening as shown, until you feel it grab the paper. (If you do
not have the Maintenance Sheet, use one sheet of thick A4 or Letter size paper, such as glossy paper.)
Related Information
• Printer Jam or Paper Jam
Related Topics:
• Error and Maintenance Messages
• Paper Handling and Printing Problems
• Paper is Jammed in the Front of the Machine
• Paper is Jammed in the Back of the Machine
497

Home > Troubleshooting > If You Are Having Difficulty with Your Machine
If You Are Having Difficulty with Your Machine
For technical help, you must contact Brother customer support.
If you think there is a problem with your machine, check the following topics. You can correct most problems
yourself.
If you need additional help, go to your model's FAQs & Troubleshooting page at
support.brother.com.
• Paper Handling and Printing Problems
• Telephone and Fax Problems
• Other Problems
• Network Problems
• AirPrint Problems
498
Home > Troubleshooting > If You Are Having Difficulty with Your Machine > Paper Handling and Printing
Problems
Paper Handling and Printing Problems
If, after reading this table, you still need help, see the latest FAQs & Troubleshooting tips at
support.brother.com.
>> Printing Difficulties
>> Print Quality Difficulties
>> Paper Handling Difficulties
>> Printing Received Faxes
Printing Difficulties
Difficulties
Suggestions
No printout (Windows)
Check that the correct printer driver has been installed and selected.
Check to see if the machine's display is showing an error message.
See Related Information: Error and Maintenance Messages.
Check that the machine is online:
• Windows 10, Windows Server 2016, and Windows Server 2019
Click
> Windows System > Control Panel. In the Hardware and Sound
group, click View devices and printers. Right-click the Brother XXX-XXXX
Printer (where XXX-XXXX is the name of your model). Click See what’s
printing. If printer driver options appear, select your printer driver. Click
Printer in the menu bar and make sure Use Printer Offline is not selected.
• Windows 8.1
Move your mouse to the lower right corner of your desktop. When the menu
bar appears, click Settings > Control Panel. In the Hardware and Sound
group, click View devices and printers. Right-click the Brother XXX-XXXX
Printer (where XXX-XXXX is the name of your model). Click See what's
printing. If printer driver options appear, select your printer driver. Click
Printer in the menu bar and make sure Use Printer Offline is not selected.
• Windows Server 2012 R2
Click Control Panel on the Start screen. In the Hardware group, click View
devices and printers. Right-click the Brother XXX-XXXX Printer (where
XXX-XXXX is the name of your model). Click See what's printing. If printer
driver options appear, select your printer driver. Click Printer in the menu bar
and make sure Use Printer Offline is not selected.
• Windows Server 2012
Move your mouse to the lower right corner of your desktop. When the menu
bar appears, click Settings > Control Panel. In the Hardware group, click
View devices and printers. Right-click the Brother XXX-XXXX Printer
(where XXX-XXXX is the name of your model). Click See what's printing. If
printer driver options appear, select your printer driver. Click Printer in the
menu bar and make sure Use Printer Offline is not selected.
• Windows 7 and Windows Server 2008 R2
Click
(Start) > Devices and Printers. Right-click Brother XXX-XXXX
Printer (where XXX-XXXX is the name of your model) and click See what's
printing. If printer driver options appear, select your printer driver. Click
Printer in the menu bar. Make sure Use Printer Offline is not selected.
• Windows Server 2008
Click
(Start) > Control Panel > Hardware and Sound > Printers. Right-
click Brother XXX-XXXX Printer (where XXX-XXXX is the name of your
model). Make sure Use Printer Online is not listed. If it is listed, click this
option to set the driver Online.
499
Difficulties Suggestions
One or more ink cartridges have reached the end of their life.
See Related Information: Replace the Ink Cartridges.
If old, unprinted data remains in the printer driver spooler, it will prevent new print
jobs from printing. Open the printer icon and delete all data as follows:
• Windows 10, Windows Server 2016, and Windows Server 2019
Click > Windows System > Control Panel. In the Hardware and Sound
group, click View devices and printers > Printers.
• Windows 8.1
Move your mouse to the lower right corner of your desktop. When the menu
bar appears, click Settings > Control Panel. In the Hardware and Sound
group, click View devices and printers > Printers.
• Windows Server 2012 R2
Click Control Panel on the Start screen. In the Hardware group, click View
devices and printers > Printers.
• Windows Server 2012
Move your mouse to the lower right corner of your desktop. When the menu
bar appears, click Settings > Control Panel. In the Hardware group, click
View devices and printers > Printers.
• Windows 7 and Windows Server 2008 R2
Click /Start > Devices and Printers > Printers and Faxes.
• Windows Server 2008
Click (Start) > Control Panel > Hardware and Sound > Printers.
• Mac
Click the System Preferences > Printers & Scanners.
The headers or footers appear
when the document is displayed
on the screen but do not appear
when the document is printed.
There is an unprintable area on the top and bottom of the page. Adjust the top
and bottom margins in your document to allow for this.
See Related Information: Unprintable Area.
Cannot perform ‘Page Layout’
printing.
(Windows )
Check that the paper size setting in the application and in the printer driver are
the same.
Print speed is too slow. (Windows)
Try changing the printer driver setting. The highest resolution needs longer data
processing, sending, and printing time. Try the other quality settings in the printer
driver as follows:
In the printer driver, clear the Colour Enhancement checkbox on the Advanced
tab.
Turn the Borderless feature off. Borderless printing is slower than normal printing.
See Related Information: Print Settings (Windows).
Turn the Quiet Mode setting off. Print speed is slower in Quiet Mode. See
Related Information: Reduce Printing Noise.
Make sure the Media Type setting in the printer drivers, your application, or the
Paper Type setting on the machine matches the type of paper you are using.
See Related Information: Change the Paper Size and Paper Type.
See Related Information: Print Settings (Windows).
Print Quality Difficulties
Difficulties
Suggestions
Poor print quality Check the print quality.
500
Difficulties Suggestions
See Related Information: Check the Print Quality.
Make sure the Media Type setting in the printer drivers, your application, or the
Paper Type setting on the machine matches the type of paper you are using.
See Related Information: Change the Paper Size and Paper Type.
See Related Information: Print Settings (Windows).
Make sure your ink cartridges are fresh. The following may cause ink to clog:
• The expiration date written on the cartridge package has passed.
• The ink cartridge may not have been stored correctly before use.
Make sure you are using one of the recommended types of paper.
See Related Information: Acceptable Print Media.
The recommended environment for your machine is between 20°C to 33°C.
White lines appear in text or
graphics.
Clean the print head.
See Related Information: Clean the Print Head from Your Brother Machine.
See Related Information: Clean the Print Head Using Web Based Management.
See Related Information: Clean the Print Head from Your Computer (Windows).
Check and adjust the paper feed. See Related Information: Correct the Paper
Feed to Clear Vertical Lines.
Try using the recommended types of paper.
See Related Information: Acceptable Print Media.
To prolong print head life, provide the best ink cartridge economy and maintain
print quality, we do not recommend frequently unplugging the machine and/or
leaving the machine unplugged for extended periods of time. We recommend
using to power down the machine. Using allows minimal power to the
machine, resulting in periodic, but less frequent, cleaning of the print head.
Dark lines appear at regular
intervals.
Check and adjust the paper feed.
See Related Information: Correct the Paper Feed to Clear Vertical Lines.
The machine prints blank pages. Check the print quality.
See Related Information: Check the Print Quality.
To prolong print head life, provide the best ink cartridge economy and maintain
print quality, we do not recommend frequently unplugging the machine and/or
leaving the machine unplugged for extended periods of time. We recommend
using to power down the machine. Using allows minimal power to the
machine, resulting in periodic, but less frequent, cleaning of the print head.
Characters and lines are blurred. Check the printing alignment.
See Related Information: Check the Print Alignment from Your Brother Machine.
Change the print options.
See Related Information: Change the Print Options to Improve Your Print
Results.
Printed text or images are
skewed.
Make sure the paper is loaded correctly in the paper tray and the paper guides
are adjusted correctly.
See Related Information: Load Paper.
Make sure the Jam Clear Cover is closed correctly.
501
Difficulties Suggestions
There are smudges or stains at
the top centre of the printed page.
Make sure the paper is not too thick or curled.
See Related Information: Acceptable Print Media.
Printing appears dirty or ink
seems to run.
Make sure you are using the recommended types of paper. Do not handle the
paper until the ink is dry.
See Related Information: Acceptable Print Media.
Make sure the printing surface is face down in the paper tray.
If you are using photo paper, make sure the glossy side of the photo paper is
face down in the tray and you have set the correct paper type. If you are printing
a photo from your computer, set the Media Type in the printer driver or in the
application you use to print.
Ink is smudged or wet when using
glossy photo paper.
Be sure to check the front and back of the paper. Place the glossy surface
(printing surface) face down.
See Related Information: Change the Paper Size and Paper Type.
If you use glossy photo paper, make sure the paper type setting is correct.
Stains appear on the reverse side
or at the bottom of the page.
Make sure the printer platen is not dirty with ink.
See Related Information: Clean the Machine's Printer Platen.
Make sure you are using the paper support flap.
See Related Information: Load Paper.
Make sure the paper feed rollers are not dirty with ink.
See Related Information: Clean the Paper Feed Rollers.
The printouts are wrinkled. (Windows)
In the printer driver, select the Advanced tab, click Other Print Options, and
then click Advanced Colour Settings. Clear the Bi-Directional Printing
checkbox.
Smudge or stain on the reverse
side of the page when using the
automatic 2-sided printing feature.
(Windows)
Change the Reduce Smudge option in your printer driver properties or
preferences.
See Related Information: Prevent Smudged Printouts and Paper Jams
(Windows).
Paper Handling Difficulties
Difficulties
Suggestions
The machine does not feed paper. Make sure the paper tray is pushed in all the way until it locks into place.
Make sure the Jam Clear Cover at the back of the machine is closed.
If the machine's LCD displays a Paper Jam message and you still have a
problem, see Related Information: Error and Maintenance Messages.
If the paper tray is empty, load a new stack of paper into the paper tray.
If there is paper in the paper tray, make sure it is straight. If the paper is curled,
straighten it. Sometimes it is helpful to remove the paper, turn the stack over and
put it back in the paper tray.
Reduce the amount of paper in the paper tray, and then try again.
Clean the paper pick-up rollers.
See Related Information: Clean the Paper Pick-up Rollers for Paper Tray #1 or
Clean the Paper Pick-up Rollers for Paper Tray #2.
Make sure that the paper is within specifications for the machine.
See Related Information: Paper Orientation and Capacity of the Paper Trays.
Photo paper does not feed
correctly.
When you print on photo paper, load one extra sheet of the same photo paper in
the paper tray.
502
Difficulties Suggestions
Machine feeds multiple pages. • Make sure the paper is loaded correctly in the paper tray.
• Remove all the paper from the tray and fan the stack of paper well, then put it
back in the tray.
• Make sure you do not push the paper in too far.
See Related Information: Load Paper.
Make sure the Jam Clear Cover is closed correctly.
See Related Information: Printer Jam or Paper Jam.
Make sure the Base Pad in the paper tray is not dirty.
See Related Information: Clean the Base Pad.
There is a paper jam. See Related Information: Printer Jam or Paper Jam.
Make sure the paper guides are set to the correct paper size.
Use the jam prevention settings.
For copying:
See Related Information: Change the Print Options to Improve Your Print
Results.
For printing:
See Related Information: Prevent Smudged Printouts and Paper Jams
(Windows).
Paper jam reoccurs.
If there is a repeat paper jam, a small piece of paper may be stuck in the
machine. Make sure paper is not still jammed in the machine.
See Related Information: Remove Paper Scraps.
The paper jams when you use 2-
sided print.
If paper jams occur frequently during 2-sided printing, the paper feed rollers may
be stained with ink. Clean the paper feed rollers.
See Related Information: Clean the Paper Feed Rollers.
Printing Received Faxes
Difficulties
Suggestions
• Condensed print
• Horizontal streaks
• Top and bottom sentences are
cut off
• Missing lines
This is usually caused by a poor telephone connection. Make a copy; if your copy
looks good, you probably had a bad connection, with static or interference on the
telephone line. Ask the other party to send the fax again.
Black lines when receiving. The sender’s scanner may be dirty. Ask the sender to make a copy to see if the
problem is with the sending machine. Try receiving from another fax machine.
Left and right margins are cut off
or a single page is printed on two
pages.
If the received faxes are divided and printed on two pages or if you get an extra
blank page, your paper size setting may not be correct for the paper you are
using.
See Related Information: Change the Paper Size and Paper Type.
Turn on Auto Reduction.
See Related Information: Shrink Page Size of an Oversized Incoming Fax.
Received colour fax prints only in
monocrome.
Replace the colour ink cartridges that have reached the end of their life, and then
ask the other person to send the colour fax again.
See Related Information: Replace the Ink Cartridges.
Related Information
• If You Are Having Difficulty with Your Machine
Related Topics:
• Troubleshooting
503

• Error and Maintenance Messages
• Replace the Ink Cartridges
• Check the Print Quality
• Acceptable Print Media
• Clean the Print Head from Your Brother Machine
• Clean the Print Head Using Web Based Management
• Clean the Print Head from Your Computer (Windows)
• Check the Print Alignment from Your Brother Machine
• Load Paper
• Clean the Machine's Printer Platen
• Clean the Paper Feed Rollers
• Clean the Paper Pick-up Rollers for Paper Tray #1
• Clean the Paper Pick-up Rollers for Paper Tray #2
• Printer Jam or Paper Jam
• Shrink Page Size of an Oversized Incoming Fax
• Print Settings (Windows)
• Prevent Smudged Printouts and Paper Jams (Windows)
• Clean the Base Pad
• Change the Print Options to Improve Your Print Results
• Reduce Printing Noise
• Remove Paper Scraps
• Correct the Paper Feed to Clear Vertical Lines
• Unprintable Area
• Change the Paper Size and Paper Type
• Paper Orientation and Capacity of the Paper Trays
504
Home > Troubleshooting > If You Are Having Difficulty with Your Machine > Telephone and Fax Problems
Telephone and Fax Problems
>> Telephone Line or Connections
>> Handling Incoming Calls
>> Receiving Faxes
>> Sending Faxes
Telephone Line or Connections
Difficulties
Suggestions
Dialling does not work. (No dial
tone)
Check all line cord connections. Make sure the telephone line cord is plugged
into the telephone wall socket and the LINE socket of the machine. Make sure
your machine has a dial tone by pressing the Hook button in Fax mode. If you
subscribe to DSL or VoIP services, contact your service provider for connection
instructions.
If you are using a VoIP system, try changing the VoIP setting to Basic (for VoIP).
This will lower modem speed and turn off Error Correction Mode (ECM).
See Related Information: Telephone Line Interference/VoIP.
(Available only for some countries.)
Change the Tone/Pulse setting.
See Related Information: Set Tone or Pulse Dialling Mode.
(Not available for South Africa)
Send a manual fax by pressing the Hook button, and dialing the number. Wait to
hear fax-receiving tones before pressing the Start button.
If there is no dial tone, connect a known working telephone and telephone line
cord to the socket. Then lift the external telephone’s handset and listen for a dial
tone. If there is still no dial tone, ask your telephone company to check the line
and/or wall socket.
The machine does not answer
when called.
Make sure the machine is in the correct receive mode for your setup.
See Related Information: Choose the Correct Receive Mode.
Check for a dial tone. If possible, call your machine to hear it answer. If there is
still no answer, check that the telephone line cord is plugged into the telephone
wall socket and the LINE socket of the machine. Make sure your machine has a
dial tone by pressing the Hook button in Fax mode. If there is no ringing when
you call your machine, ask your telephone company to check the line.
Handling Incoming Calls
Difficulties
Suggestions
The machine ‘Hears’ a voice as a
CNG Tone.
If Fax Detect is set to On, your machine is more sensitive to sounds. It may
mistakenly interpret certain voices or music on the line as a fax machine calling
and respond with fax receiving tones. Deactivate the machine by pressing .
Try avoiding this problem by turning Fax Detect Off.
See Related Information: Set Fax Detect.
Sending a Fax Call to the
machine.
If you answered on an extension or external telephone, press your Remote
Activation Code (the factory setting is *51 (*91 for New Zealand)). If you
answered on the external telephone, press the Start button to receive the fax.
When your machine answers, hang up.
Custom features on a single line. If you have Call Waiting, Call Waiting/Caller ID, Caller ID, Voice Mail, an
answering machine, an alarm system or other custom feature on a single
telephone line with your machine, it may create a problem sending or receiving
faxes.
For Example: If you subscribe to Call Waiting or some other custom service and
its signal comes through the line while your machine is sending or receiving a
505
Difficulties Suggestions
fax, the signal can temporarily interrupt or disrupt the faxes. Brother’s ECM (Error
Correction Mode) feature should help overcome this problem. This condition is
related to the telephone system industry and is common to all devices that send
and receive information on a single, shared line with custom features. If avoiding
a slight interruption is crucial to your business, we recommend using a separate
telephone line with no custom features.
Receiving Faxes
Difficulties Suggestions
Cannot receive a fax. (Not available for South Africa)
Make sure your machine has a dial tone by pressing the Hook button in Fax
mode. If you hear static or interference on your fax line, contact your local
telephone provider.
Check all line cord connections. Make sure the telephone line cord is plugged
into the telephone wall socket and the LINE socket of the machine. If you
subscribe to DSL or VoIP services, contact your service provider for connection
instructions. If you are using a VoIP system, try changing the VoIP setting to
Basic (for VoIP). This will lower modem speed and turn off Error Correction Mode
(ECM).
See Related Information: Telephone Line Interference/VoIP.
Make sure the machine is in the correct Receive Mode. This is determined by the
external devices and telephone subscriber services you have on the same line as
the Brother machine.
See Related Information: Choose the Correct Receive Mode.
• If you have a dedicated fax line and want your Brother machine to
automatically answer all incoming faxes, you should select Fax only mode.
• If your Brother machine shares a line with an external answering machine,
you should select the External TAD mode. In External TAD mode, your
Brother machine will receive incoming faxes automatically and voice callers
will be able to leave a message on your answering machine.
• If your Brother machine shares a line with other telephones and you want it to
automatically answer all incoming faxes, you should select the Fax/Tel mode.
In Fax/Tel mode, your Brother machine will receive faxes automatically and
produce a pseudo/double-ring to alert you to answer voice calls.
• If you do not want your Brother machine to answer any incoming faxes
automatically, you should select the Manual mode. In Manual mode, you must
answer every incoming call and activate the machine to receive faxes.
Another device or service at your location may be answering the call before your
Brother machine answers. To test this, lower the Ring Delay setting:
• If the Receive Mode is set to Fax Only or Fax/Tel, reduce the Ring Delay to
the lowest ring greater than 0.
See Related Information: Set the Number of Rings Before the Machine
Answers (Ring Delay).
• If the Receive Mode is set to External TAD, reduce the number of rings
programmed on your answering machine to two.
• If the Receive Mode is set to Manual, DO NOT adjust the Ring Delay setting.
Have someone send you a test fax:
• If you received the test fax successfully, your machine is operating correctly.
Remember to reset your Ring Delay or answering machine setting back to
your original setting. If receiving problems recur after resetting the Ring Delay,
then a person, device, or subscriber service is answering the fax call before
the machine has a chance to answer.
• If you were not able to receive the fax, then another device or subscriber
service may be interfering with your fax reception or there may be a problem
with your fax line.
506
Difficulties Suggestions
If you are using a telephone answering machine (External TAD mode) on the
same line as the Brother machine, make sure your answering machine is set up
correctly.
See Related Information: Connect an External TAD.
1. Connect the external TAD as shown in the following topic:
See Related Information: External TAD (Telephone Answering Device).
2. Set your answering machine to answer in one or two rings.
3. Record the outgoing message on your answering machine.
• Record five seconds of silence at the beginning of your outgoing message.
• Limit your speaking to 20 seconds.
• End your outgoing message with your Remote Activation Code for people
sending manual faxes. For example: “After the beep, leave a message or
press *51 (*91 for New Zealand) and Start to send a fax.”
4. Set your answering machine to answer calls.
5. Set your Brother machine’s Receive Mode to External TAD.
See Related Information: Choose the Correct Receive Mode.
Make sure your Brother machine’s Fax Detect feature is turned On. Fax Detect is
a feature that allows you to receive a fax even if you answered the call on an
external or extension telephone.
See Related Information: Set Fax Detect.
If you often get transmission errors due to possible interference on the telephone
line or if you are using a VoIP system, try changing the Compatibility setting to
Basic (for VoIP).
See Related Information: Telephone Line Interference/VoIP.
(Available only for some countries.)
If you connect your machine to a PBX or ISDN line, set the menu setting of
Telephone Line Type to your telephone line type.
See Related Information: Set the Telephone Line Type.
Sending Faxes
Difficulties
Suggestions
Cannot send a fax. Check all line cord connections. Make sure the telephone line cord is plugged
into the telephone wall socket and the LINE socket of the machine. Make sure
your machine has a dial tone by pressing the Hook button in Fax mode. If you
subscribe to DSL or VoIP services, contact your service provider for connection
instructions.
If you are using a VoIP system, try changing the VoIP setting to Basic (for VoIP).
This will lower modem speed and turn off Error Correction Mode (ECM).
See Related Information: Telephone Line Interference/VoIP.
Print the Transmission Verification Report and check for an error.
See Related Information: Print Reports.
Contact your administrator to check your Secure Function Lock Settings.
Ask the other party to check that the receiving machine has paper.
Poor sending quality. Try changing your resolution to Fine or S.Fine. Make a copy to check your
machine’s scanner operation. If the copy quality is poor, clean the scanner.
See Related Information: Clean the Scanner.
Transmission Verification Report
says RESULT:NG.
There is probably temporary noise or static on the line. Try sending the fax again.
If you are sending a PC-Fax message and get RESULT:NG on the Transmission
Verification Report, your machine may be out of memory.
To free up extra memory, you can turn off Fax Storage, print fax messages in
memory or cancel a delayed fax.
507
Difficulties Suggestions
If the problem continues, ask the telephone company to check your telephone
line.
See Related Information: Turn Off Memory Receive.
See Related Information: Print a Fax Stored in the Machine's Memory.
See Related Information: Cancel a Fax in Progress.
See Related Information: Check and Cancel a Pending Fax.
(Available only for some countries.)
If you connect your machine to a PBX or ISDN line, set the menu setting of
Telephone Line Type to your telephone line type.
See Related Information: Set the Telephone Line Type.
If you often get transmission errors due to possible interference on the telephone
line or if you are using a VoIP system, try changing the Compatibility setting to
Basic (for VoIP).
See Related Information: Telephone Line Interference/VoIP.
Sent faxes are blank. Make sure you are loading the document correctly.
See Related Information: Load Documents in the Automatic Document Feeder
(ADF).
See Related Information: Load Documents on the Scanner Glass.
Vertical black lines when sending. Black vertical lines on faxes you send are typically caused by dirt or correction
fluid on the glass strip. Clean the glass strip.
See Related Information: Clean the Scanner.
Related Information
• If You Are Having Difficulty with Your Machine
• Set Dial Tone Detection
• Telephone Line Interference/VoIP
Related Topics:
• Troubleshooting
• Set Tone or Pulse Dialling Mode
• Choose the Correct Receive Mode
• Set Fax Detect
• Set the Number of Rings Before the Machine Answers (Ring Delay)
• Connect an External TAD
• External TAD (Telephone Answering Device)
• Set the Telephone Line Type
• Print Reports
• Clean the Scanner
• Turn Off Memory Receive
• Print a Fax Stored in the Machine's Memory
• Cancel a Fax in Progress
• Check and Cancel a Pending Fax
• Load Documents in the Automatic Document Feeder (ADF)
• Load Documents on the Scanner Glass
508

Home > Troubleshooting > If You Are Having Difficulty with Your Machine > Telephone and Fax
Problems > Set Dial Tone Detection
Set Dial Tone Detection
Setting the Dial Tone to [Detection] will shorten the Dial Tone detect pause.
1. Press [Settings] > [All Settings] > [Initial Setup] > [Dial Tone].
2. Press [Detection] or [No Detection].
3. Press .
Related Information
• Telephone and Fax Problems
509
Home > Troubleshooting > If You Are Having Difficulty with Your Machine > Telephone and Fax
Problems > Telephone Line Interference/VoIP
Telephone Line Interference/VoIP
If you are having problems sending or receiving a fax due to possible interference on the telephone line or if you
are using a VoIP system, we recommend changing the modem speed to minimise errors in fax operations.
1. Press [Settings] > [All Settings] > [Initial Setup] > [Compatibility].
2. Press the option you want.
• [Basic(for VoIP)] reduces the modem speed to 9,600 bps and turns off colour fax receiving and
Error Correction Mode (ECM), except for colour fax-sending. Unless interference is a recurring problem
on your telephone line, you may prefer to use it only when needed.
To improve compatibility with most VoIP services, Brother recommends changing the compatibility setting
to [Basic(for VoIP)].
• [Normal] sets the modem speed at 14,400 bps.
• [High] sets the modem speed at 33,600 bps. (MFC-J2740DW/MFC-J5740DW/MFC-J5855DW/
MFC-J5955DW)
3. Press
.
• VoIP (Voice over IP) is a type of phone system that uses an Internet connection, rather than a traditional
phone line.
• Brother does not recommend the use of a VoIP line. VoIP limitations in general can cause some
functions of the fax machine not to work correctly.
Related Information
• Telephone and Fax Problems
Related Topics:
• Voice Over Internet Protocol (VoIP/Telephone Line Interference)
• Error and Maintenance Messages
510
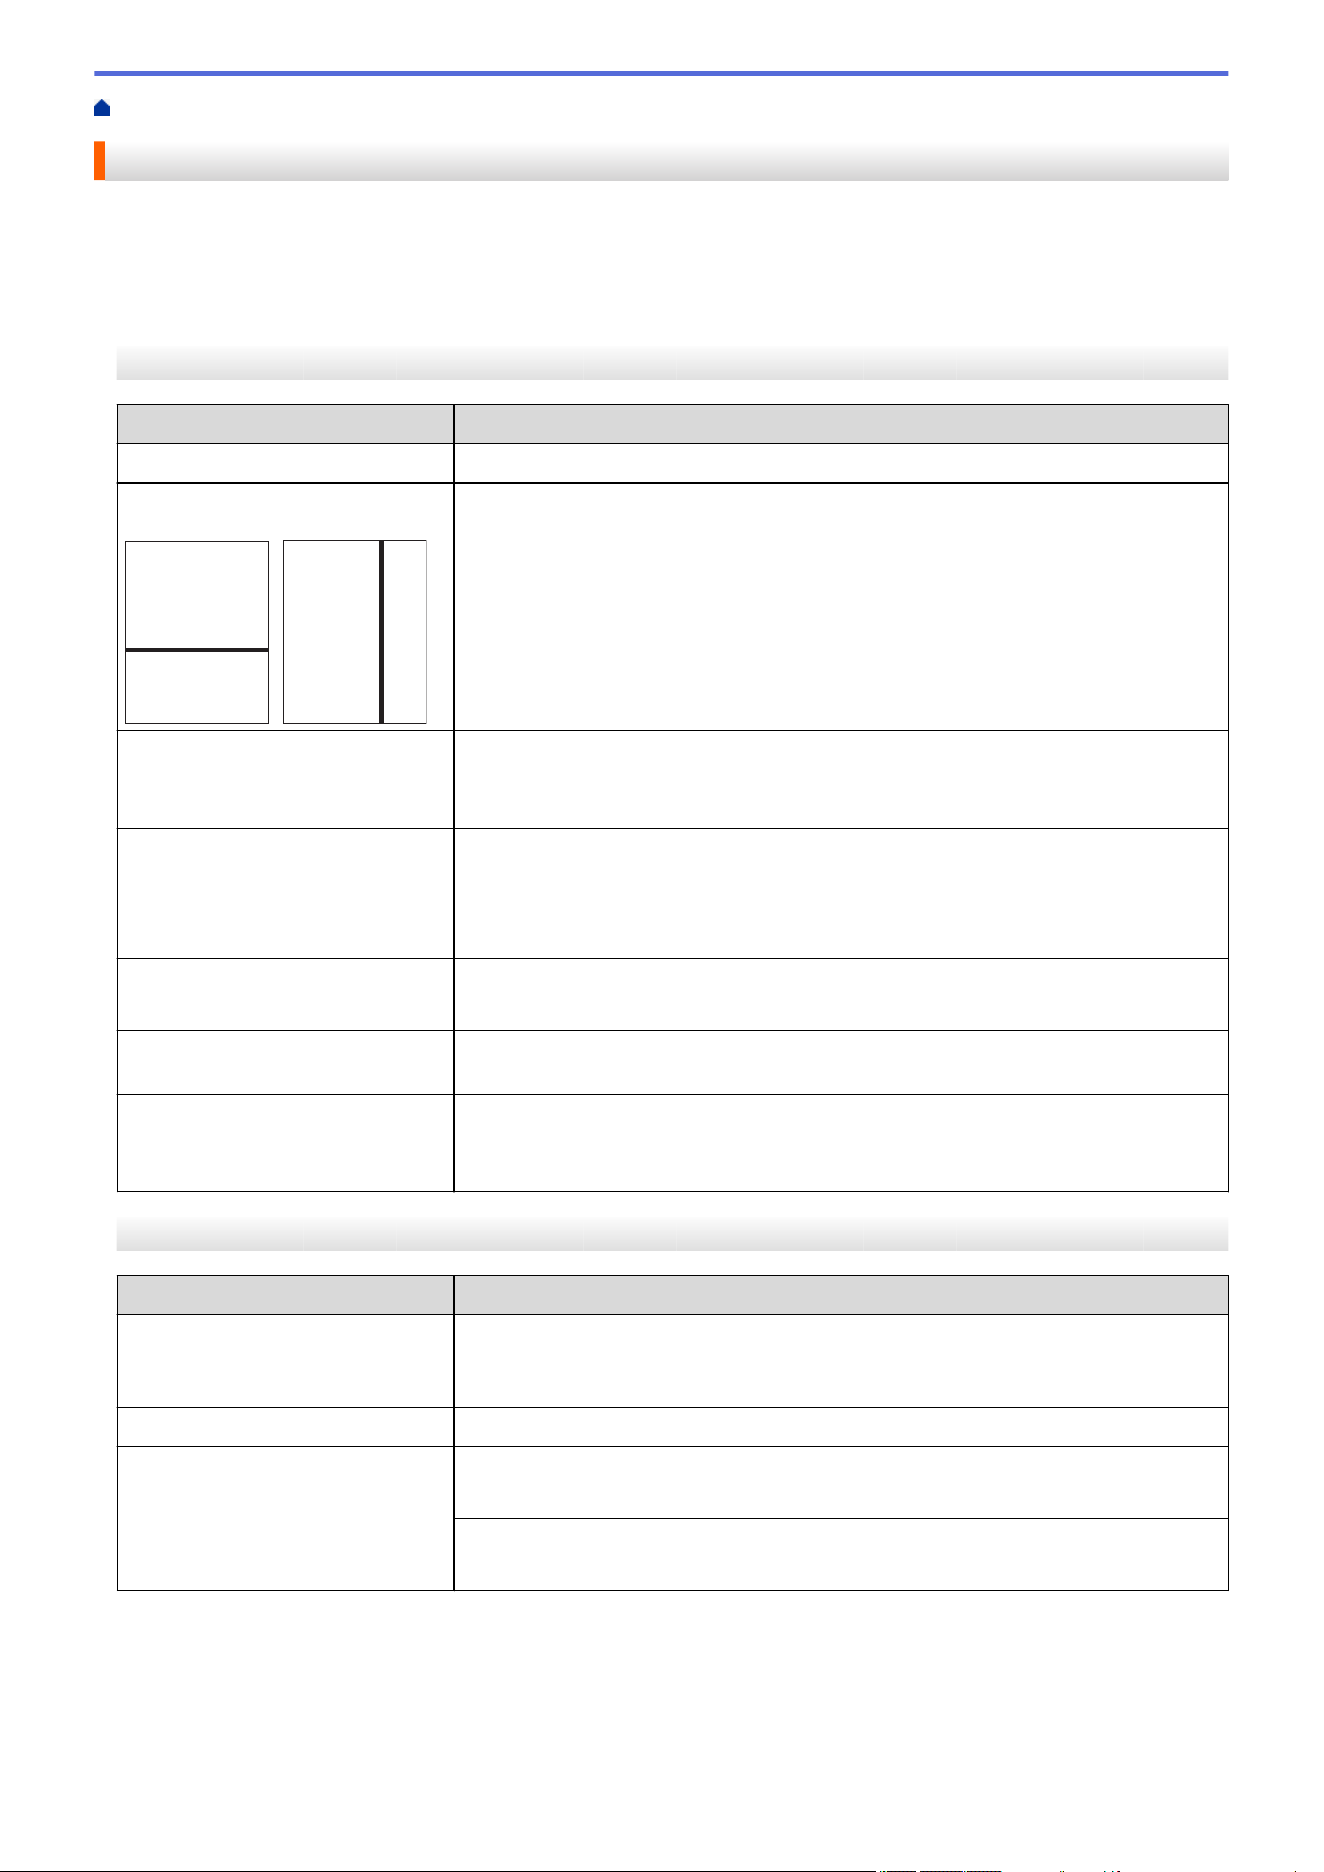
Home > Troubleshooting > If You Are Having Difficulty with Your Machine > Other Problems
Other Problems
>> Copying Difficulties
>> Scanning Difficulties
>> Direct Photo Printing Difficulties
>> Software Difficulties
Copying Difficulties
Difficulties
Suggestions
Cannot make a copy. Contact your administrator to check your Secure Function Lock Settings.
Black lines or streaks appear in
copies.
A
A
Black lines on copies are typically caused by dirt or correction fluid on the glass
strip. Clean the glass strip, scanner glass, and the white bar and white plastic
above them.
See Related Information: Clean the Scanner.
Black marks or spots appear in
copies.
Black marks or spots on copies are typically caused by dirt or correction fluid on
the scanner glass. Clean the scanner glass and white plastic above it.
See Related Information: Clean the Scanner.
Copies are blank. Make sure you are loading the document correctly.
See Related Information: Load Documents in the Automatic Document Feeder
(ADF).
See Related Information: Load Documents on the Scanner Glass.
Poor copy results when using the
ADF.
Try using the scanner glass.
See Related Information: Load Documents on the Scanner Glass.
Fit to Page does not work
correctly.
Make sure the document is not skewed on the scanner glass. Reposition the
document and try again.
Smudge or stain on the reverse
side of the page when using the 2-
sided copy feature.
Change the print options.
See Related Information: Change the Print Options to Improve Your Print
Results.
Scanning Difficulties
Difficulties
Suggestions
TWAIN or WIA errors appear
when starting to scan. (Windows)
Make sure the Brother TWAIN or WIA driver is selected as the primary source in
your scanning application. For example, in Nuance
™
PaperPort
™
14SE, click
Desktop > Scan Settings > Select to choose the Brother TWAIN/WIA driver.
OCR does not work. Try increasing the scanning resolution.
Poor scanning results when using
the ADF. (Black lines appear in
the scanned data.)
Clean the white bar and the glass strip underneath it.
See Related Information: Clean the Scanner.
Try using the scanner glass.
See Related Information: Load Documents on the Scanner Glass.
511
Direct Photo Printing Difficulties
Difficulties Suggestions
Part of my photo is missing when
printed.
Make sure Borderless printing and Cropping are turned off.
See Related Information: Print Borderless Photos from a USB Flash Drive.
See Related Information: Print Photos with Auto Cropping.
Software Difficulties
Difficulties
Suggestions
Cannot print. Uninstall the drivers (Windows) and the Brother software and reinstall the latest
version of both.
“The device is busy.” appears on
the computer screen.
Make sure there is no error message on the machine's display.
Related Information
• If You Are Having Difficulty with Your Machine
Related Topics:
• Troubleshooting
• Clean the Scanner
• Load Documents in the Automatic Document Feeder (ADF)
• Load Documents on the Scanner Glass
• Print Borderless Photos from a USB Flash Drive
• Print Photos with Auto Cropping
• Change the Print Options to Improve Your Print Results
512

Home > Troubleshooting > If You Are Having Difficulty with Your Machine > Network Problems > Use the
Network Connection Repair Tool (Windows)
Use the Network Connection Repair Tool (Windows)
Use the Network Connection Repair Tool to fix the Brother machine's network settings. It will assign the correct
IP address and Subnet Mask.
Make sure your machine is turned on and is connected to the same network as your computer.
1. Launch (Brother Utilities), and then click the drop-down list and select your model name (if not already
selected).
2. Click Tools in the left navigation bar, and then click Network Connection Repair Tool.
3. Follow the on-screen instructions.
4. Check the diagnosis by printing the Network Configuration Report.
The Network Connection Repair Tool will start automatically if you select the Enable Connection Repair
Tool option in the Status Monitor. Right-click the Status Monitor screen, and then click Other Settings >
Enable Connection Repair Tool. This is not recommended when your network administrator has set the
IP address to Static, since it will automatically change the IP address.
If the correct IP address and the Subnet Mask are still not assigned even after using the Network Connection
Repair Tool, ask your network administrator for this information.
Related Information
• Network Problems
Related Topics:
• Print the Network Configuration Report
• If You Are Having Difficulty with Your Machine's Network
514

Home > Troubleshooting > If You Are Having Difficulty with Your Machine > Network Problems > If You Are
Having Difficulty with Your Machine's Network
If You Are Having Difficulty with Your Machine's Network
For technical help, you must contact Brother customer support.
If you think there is a problem with your machine, check the following topics. You can correct most problems
yourself.
If you need additional help, go to your model's FAQs & Troubleshooting page at support.brother.com.
>> I Cannot Complete the Wireless Network Setup Configuration
>> My Brother Machine Cannot Print, Scan, or PC-FAX Receive over the Network
>> I Want to Check that My Network Devices are Working Correctly
I Cannot Complete the Wireless Network Setup Configuration
Turn your wireless router off and back on. Then, try to configure the wireless settings again. If you are unable to
resolve the problem, follow the instructions below:
Investigate the problem using the WLAN Report.
Cause
Action Interface
Your security settings (SSID/
Network Key) are not
correct.
Confirm the security settings using Wireless Setup Helper. For
more information and to download the utility, go to your model's
Downloads page at support.brother.com.
Select and confirm that you are using the correct security settings.
- See the instructions supplied with your wireless LAN access
point/router for information on how to find the security settings.
- The manufacturer's name or model number of the wireless LAN
access point/router may be used as the default security settings.
- Consult with the access point/router manufacturer, your Internet
provider, or network administrator.
Wireless
Your Brother machine's MAC
address is not allowed.
Confirm that the Brother machine's MAC Address is allowed in the
filter. You can find the MAC Address on your Brother machine's
control panel.
Wireless
Your wireless LAN access
point/router is in stealth
mode (not broadcasting the
SSID).
• Enter the correct SSID name or Network Key manually.
• Check the SSID name or the Network Key in the instructions
supplied with your wireless LAN access point/router and
reconfigure the wireless network setup.
Wireless
(For Oceania countries)
The current channel of your
wireless LAN access point/
router is not supported by
your machine when you are
trying to connect your
machine to a 5 GHz Wi-Fi
network.
Change the channel on your wireless LAN access point/router to the
channel supported by your machine.
1. Confirm the channels supported by your machine. See the
Channels Supported by Brother Machines for 5 GHz Wi-Fi
Networks document at support.brother.com/manuals.
2. Check your wireless LAN access point/router's channel setting.
Make sure it is set to one of the channels supported by your
machine and is not set to "Auto" or "Automatic". For more
information about changing the channel setting, see the
instructions supplied with your wireless LAN access point/router.
3. Try to connect your machine to your Wi-Fi network again.
Wireless
Your security settings (SSID/
password) are not correct.
Confirm the SSID and password.
When you are configuring the network manually, the SSID and
password are displayed on your Brother machine. If your mobile
device supports the manual configuration, the SSID and password
will be displayed on your mobile device’s screen.
Wi-Fi Direct
You are using Android
™
4.0.
If your mobile device disconnects (approximately six minutes after
using Wi-Fi Direct), try the one-push configuration using WPS
(recommended) and set the Brother machine as a Group Owner.
Wi-Fi Direct
516
Cause Action Interface
Your Brother machine is
placed too far from your
mobile device.
Move your Brother machine within about 3.3 feet (1 metre) of the
mobile device when you configure the Wi-Fi Direct network settings.
Wi-Fi Direct
There are some obstructions
(walls or furniture, for
example) between your
machine and the mobile
device.
Move your Brother machine to an obstruction-free area. Wi-Fi Direct
There is a wireless
computer, Bluetooth
®
-
supported device,
microwave oven, or digital
cordless phone near the
Brother machine or the
mobile device.
Move other devices away from the Brother machine or the mobile
device.
Wi-Fi Direct
You have checked and tried
all of the above, but your
Brother machine still cannot
complete the Wi-Fi Direct
configuration.
• Turn your Brother machine off and back on. Then, try to
configure the Wi-Fi Direct settings again.
• If you are using your Brother machine as a client, confirm how
many devices are allowed in the current Wi-Fi Direct network,
and then check how many devices are connected.
Wi-Fi Direct
For Windows
If your wireless connection has been interrupted, and you have checked and tried all of the above, we
recommend using the Network Connection Repair Tool.
My Brother Machine Cannot Print, Scan, or PC-FAX Receive over the Network
Cause
Action Interface
Your security software
blocks your machine's
access to the network.
(The Network scanning
feature does not work. )
• Windows
Configure the third-party Security/Firewall Software to allow
Network scanning. To add port 54925 for Network scanning, type
the information below:
- In Name:
Type any description, for example Brother NetScan.
- In Port number:
Type 54925.
Type 137.
Type 161.
- In Protocol:
UDP is selected.
See the instruction manual that came with your third-party
Security/Firewall Software or contact the software manufacturer.
• Mac
(Brother iPrint&Scan)
In the Finder menu bar, click Go > Applications, and then double-
click the Brother iPrint&Scan icon. The Brother iPrint&Scan
window appears. Click the Select your Machine button, and then
follow the on-screen instructions to reselect your network machine.
Wired/Wireless
Your security software
blocks your machine's
access to the network.
(The network PC-Fax
Receive feature does not
work.)
(Windows)
Set the third-party Security/Firewall Software to allow PC-FAX Rx. To
add port 54926 for Network PC-FAX Rx, type the information below:
• In Name:
Type any description, for example Brother PC-FAX Rx.
• In Port number:
Type 54926.
Wired/Wireless
517
Cause Action Interface
• In Protocol:
UDP is selected.
See the instruction manual that came with your third-party Security/
Firewall Software or contact the software manufacturer.
Your security software
blocks your machine's
access to the network.
Some security software might block access without showing a security
alert dialog box even after successful installation.
To allow access, see the instructions for your security software or ask
the software manufacturer.
Wired/Wireless
Your Brother machine was
not assigned an available
IP address.
• Confirm the IP address and the Subnet Mask.
Verify that both the IP addresses and Subnet Masks of your
computer and the Brother machine are correct and located on the
same network.
For more information about how to verify the IP address and the
Subnet Mask, ask your network administrator.
• Windows
Confirm the IP address and the Subnet Mask using the Network
Connection Repair Tool.
• Mac
Check your network devices using the ping command. For more
information on how to confirm your network settings, see Related
Information:Check Network Devices Using the Ping Command.
Wired/Wireless
The failed print job is still
in your computer's print
queue.
• If the failed print job is still in your computer's print queue, delete it.
• Otherwise, double-click the printer icon in the following folder and
cancel all documents:
- Windows 10, Windows Server 2016, and Windows Server 2019
Click > Windows System > Control Panel. In the
Hardware and Sound group, click View devices and printers.
- Windows 8.1
Move your mouse to the lower right corner of your desktop.
When the menu bar appears, click Settings > Control Panel.
In the Hardware and Sound group, click View devices and
printers.
- Windows Server 2012 R2
Click Control Panel on the Start screen. In the Hardware
group, click View devices and printers.
- Windows Server 2012
Move your mouse to the lower right corner of your desktop.
When the menu bar appears, click Settings > Control Panel.
In the Hardware group, click View devices and printers >
Printers.
- Windows 7
Click
(Start) > Devices and Printers.
- Windows Server 2008
Click Start > Control Panel > Printers.
- Mac
Click System Preferences > Printers & Scanners.
Wired/Wireless
Your Brother machine is
not connected to the
wireless network.
Print the WLAN Report to check the error code on the printed report. Wireless
If you have checked and tried all of the above, but your Brother machine still cannot print and scan, uninstall the
drivers (Windows) and the Brother software and reinstall the latest version of both.
518
I Want to Check that My Network Devices are Working Correctly
Check Action Interface
Check that your Brother
machine, access point/
router, or network hub is
turned on.
Check the following:
• The power cord is connected correctly and the Brother machine is
turned on.
• The access point/router or hub is turned on and its link indicator is
blinking.
• All protective packaging has been removed from the machine.
• The ink cartridges are installed correctly.
• The Scanner Cover and the Jam Clear Cover are fully closed.
• Paper is inserted correctly in the paper tray.
• (For wired networks) A network cable is securely connected to the
Brother machine and to the router or hub.
Wired/Wireless
Check that you can
"ping" the Brother
machine from your
computer.
Ping the Brother machine from your computer using the IP address or
the node name in the Windows command prompt or Mac Terminal
application:
ping <ipaddress> or <nodename>.
• Successful: Your Brother machine is working correctly and
connected to the same network as your computer.
• Unsuccessful: Your Brother machine is not connected to the same
network as your computer.
Windows:
Ask your administrator about the IP address and the subnet mask, and
then use the Network Connection Repair Tool.
Mac:
Confirm that the IP address and the Subnet Mask are set correctly.
Wired/Wireless
Check that your Brother
machine is connected to
the wireless network.
Print the WLAN Report to check the error code on the printed report. Wireless
If you have checked and tried all of the above but you are still having problems, see the instructions supplied with
your wireless LAN access point/router to find the SSID (Network Name) and the Network Key (Password)
information and set them correctly.
Related Information
• Network Problems
• Check Network Devices Using the Ping Command
Related Topics:
• Configure Your Machine for a Wireless Network When the SSID is Not Broadcast
• Use Wi-Fi Direct
®
• Print the WLAN Report
• Wireless LAN Report Error Codes
• Print the Network Configuration Report
• Use the Network Connection Repair Tool (Windows)
519
Home > Troubleshooting > If You Are Having Difficulty with Your Machine > Network Problems > If You Are
Having Difficulty with Your Machine's Network > Check Network Devices Using the Ping Command
Check Network Devices Using the Ping Command
Check the IP addresses of both your computer and your Brother machine, and then confirm whether the network
is operating correctly.
>> Configure the IP Address on your computer (Windows)
>> Configure the IP Address on your computer (Mac)
>> Configure the IP Address on your Brother machine
Configure the IP Address on your computer (Windows)
1. Do one of the following:
• Windows 10
Click
> Windows System > Command Prompt.
• Windows 8.1
Move your mouse to the lower right corner of your desktop. When the menu bar appears, click Search >
Command Prompt.
• Windows7
Click (Start) > All Programs > Accessories > Command Prompt.
2. Type "ipconfig" and then press the Enter key on your keyboard.
3. Confirm the values for the IPv4 address and subnet mask.
4. Type "exit" and then press the Enter key on your keyboard.
Configure the IP Address on your computer (Mac)
1. Select System Preferences from the Apple menu.
2. Click Network > Advanced > TCP/IP.
3. Confirm the values for the IPv4 address and subnet mask.
Configure the IP Address on your Brother machine
Print the Network Configuration Report, and confirm the values for the IP address and subnet mask.
Check the IP addresses for both your computer and your Brother machine. Confirm that the network address
portions are the same. For example, if the subnet mask is "255.255.255.0", it is normal for only the host address
portions to be different.
Network Address
Host Address
IP Address 192.168.100. 250 Set the final number, which corresponds to "0" in the
subnet mask, to 1–254.
Subnet Mask 255.255.255. 0 Usually, there are no problems when the subnet mask is
"255.255.255.0". Use the same value for all of your
computers.
Related Information
• If You Are Having Difficulty with Your Machine's Network
520
Home > Troubleshooting > If You Are Having Difficulty with Your Machine > AirPrint Problems
AirPrint Problems
Difficulty Suggestions
My machine is not displayed in the printer list. Make sure your machine is turned on.
Confirm the network settings.
Move the mobile device closer to the wireless access
point/router, or to your machine.
I cannot print. Make sure your machine is turned on.
Confirm the network settings.
I am trying to print a multiple-page document from an iOS
device, but ONLY the first page is printing.
Make sure you are running the latest OS version.
Related Information
• If You Are Having Difficulty with Your Machine
Related Topics:
• Troubleshooting
521
Home > Troubleshooting > Check the Machine Information
Check the Machine Information
Follow these instructions to check your machine's serial number, firmware version, and firmware update.
1. Press
[Settings] > [All Settings] > [Machine Info.].
2. Press one of the following options:
Option Description
Serial No.
Check your machine's serial number.
Firmware Version
Check your machine's firmware version.
Firmware Update
Update your machine to the latest firmware.
Firmware Auto Check
View firmware information on the Home screen.
Page Counter
Check the total number of pages the machine has printed.
3. Press .
Related Information
• Troubleshooting
522

Home > Troubleshooting > Reset Your Machine
Reset Your Machine
1. Press [Settings] > [All Settings] > [Initial Setup] > [Reset].
2. Press the reset option you want to use.
3. Press [OK] for two seconds to reboot the machine.
4. Wait until the machine restarts and the Power LED indicator lights up before disconnecting the machine from
the power source.
Related Information
• Troubleshooting
• Reset Functions Overview
Related Topics:
• Transfer Your Faxes or Fax Journal Report
523
Home > Troubleshooting > Reset Your Machine > Reset Functions Overview
Reset Functions Overview
The following reset functions are available:
1. [Machine Reset]
You can reset all the machine’s settings that you have changed.
The Address Book, Fax Reports, and Call History will remain.
2. [Network]
Reset the print server back to its default factory settings (includes Password and IP Address information).
3. [Address Book & Fax]
Address Book & Fax resets the following settings:
• Address Book and Setup Groups
• Programmed fax jobs in the memory
Delayed Fax and Delayed Batch Transmission
• Station ID
Name and Number
• Memory Receive Options
Fax Forwarding
• Report
Transmission Verification Report, Address Book and Fax Journal
• History
Caller ID History
1
and Outgoing Call
• Faxes in memory
4. [All Settings]
Use this reset function to reset all of the machine's settings to the settings originally set at the factory.
We strongly recommend you perform this operation when you dispose of the machine.
Unplug the interface cable before you select [Network] or [All Settings].
Related Information
• Reset Your Machine
Related Topics:
• Transfer Your Faxes or Fax Journal Report
1 (Not available for Taiwan and some countries)
524

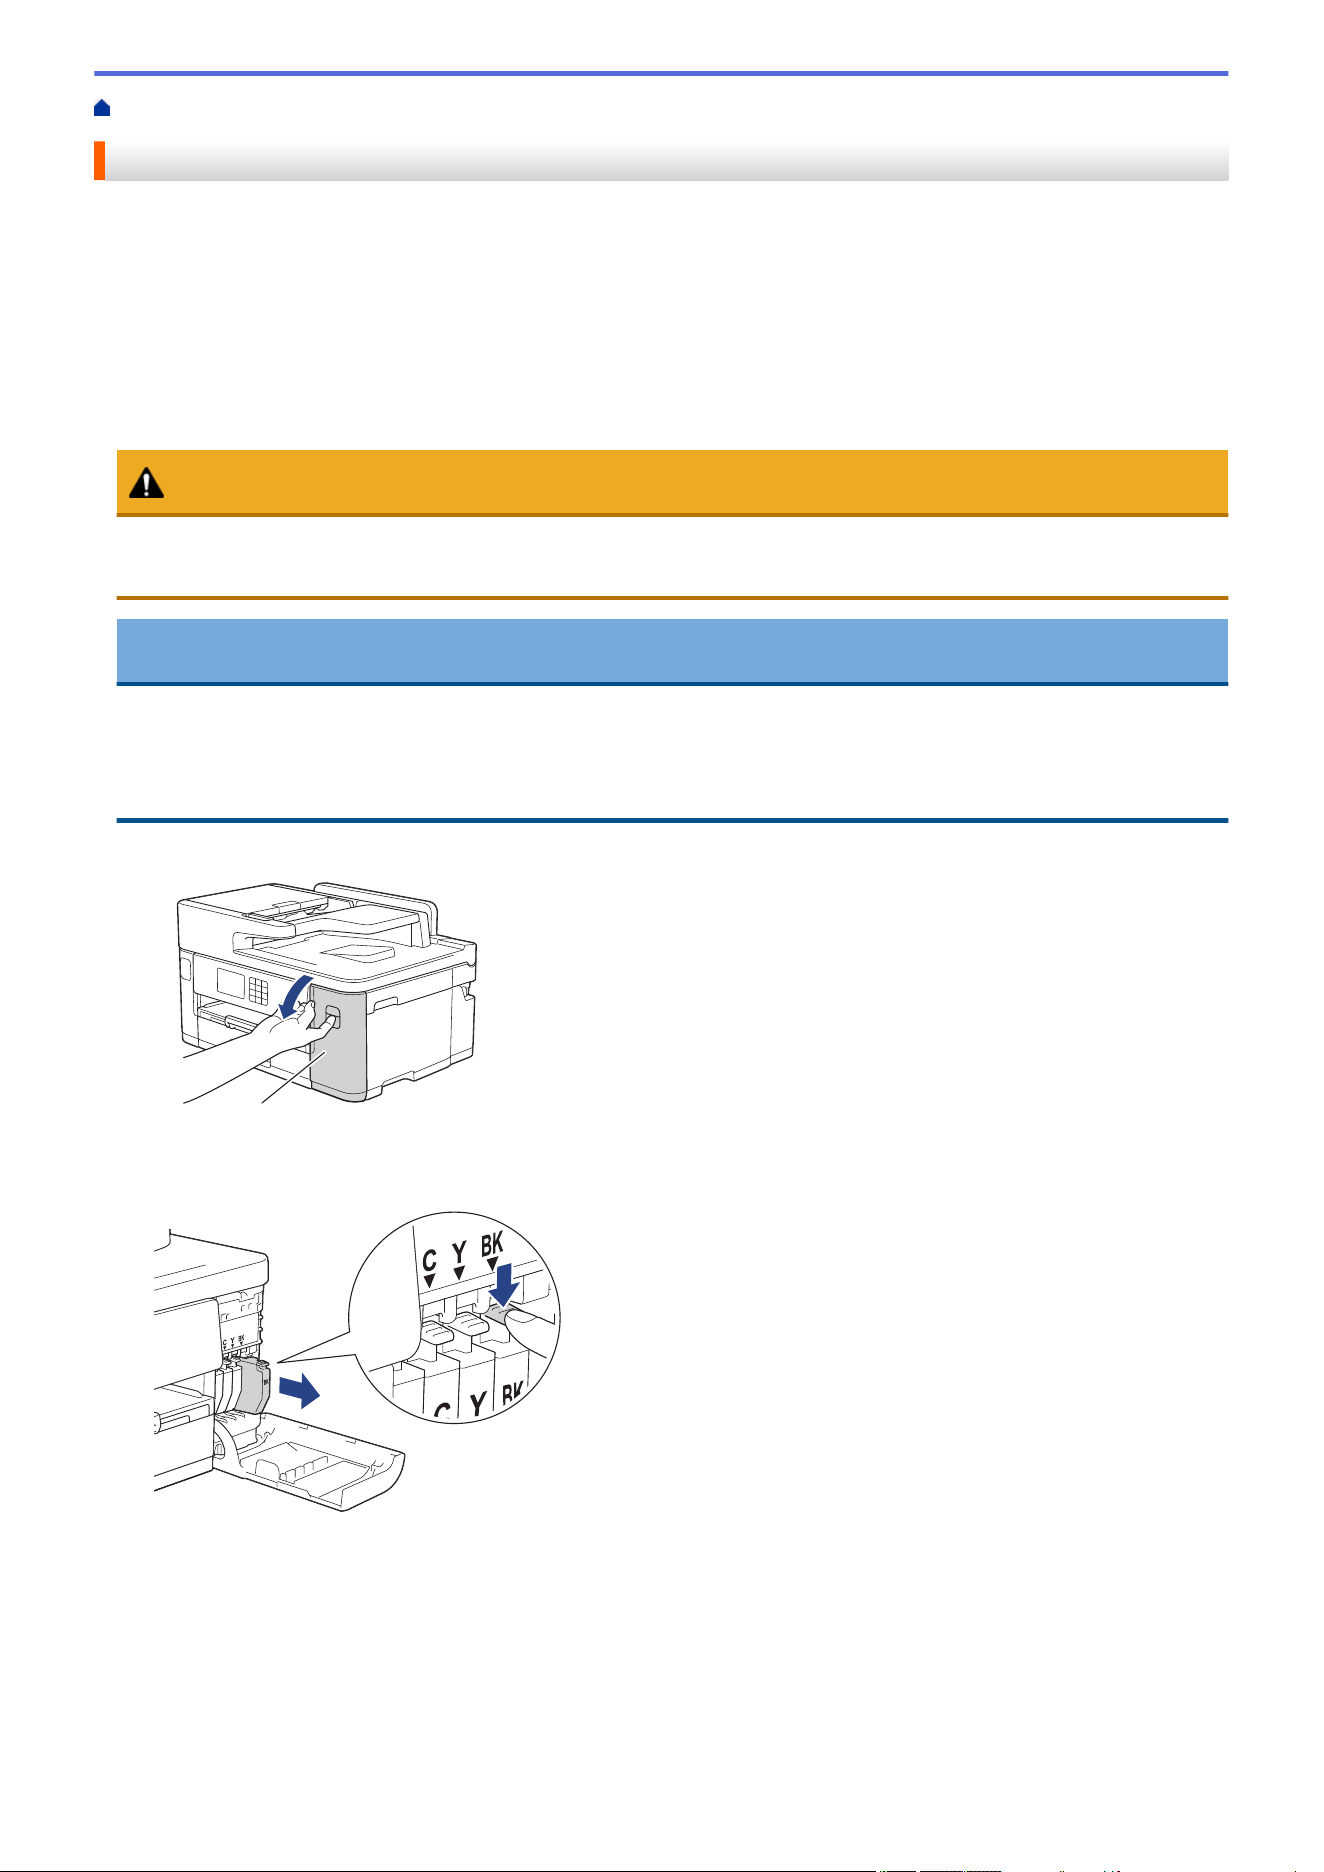
Home > Routine Maintenance > Replace the Ink Cartridges
Replace the Ink Cartridges
Your Brother machine is equipped with an ink dot counter. The ink dot counter automatically monitors the level of
ink in each of the four ink cartridges. When the machine detects that an ink cartridge is running out of ink, the
machine will display a message.
The LCD displays which ink cartridge needs replacing. Be sure to follow the LCD prompts to replace the ink
cartridges in the correct order.
Even though the machine tells you to replace an ink cartridge, there will be a small amount of ink left in the ink
cartridge. (MFC-J2340DW/MFC-J2740DW/MFC-J5340DW/MFC-J5740DW) It is necessary to keep some ink in
the ink cartridge to prevent air from drying out and damaging the print head assembly.
CAUTION
If the ink gets into your eye, rinse it with water immediately. If left as is, it may cause redness or mild
inflammation of the eye. In case of any abnormality, consult with your doctor.
IMPORTANT
We recommend using genuine Brother supplies to ensure stable print quality and performance. Although not
all non-genuine supplies may cause quality issues, it is possible that some may adversely affect print quality
or cause machine malfunction. Brother may charge for repairing your machine if it is proven that non-genuine
supplies caused the damage, even if the machine is still covered by the warranty.
1. Open the ink cartridge cover (1).
1
2. Press the lock release lever to release the ink cartridge colour indicated on the LCD and remove the ink
cartridge from the machine, as shown in the illustration.
526
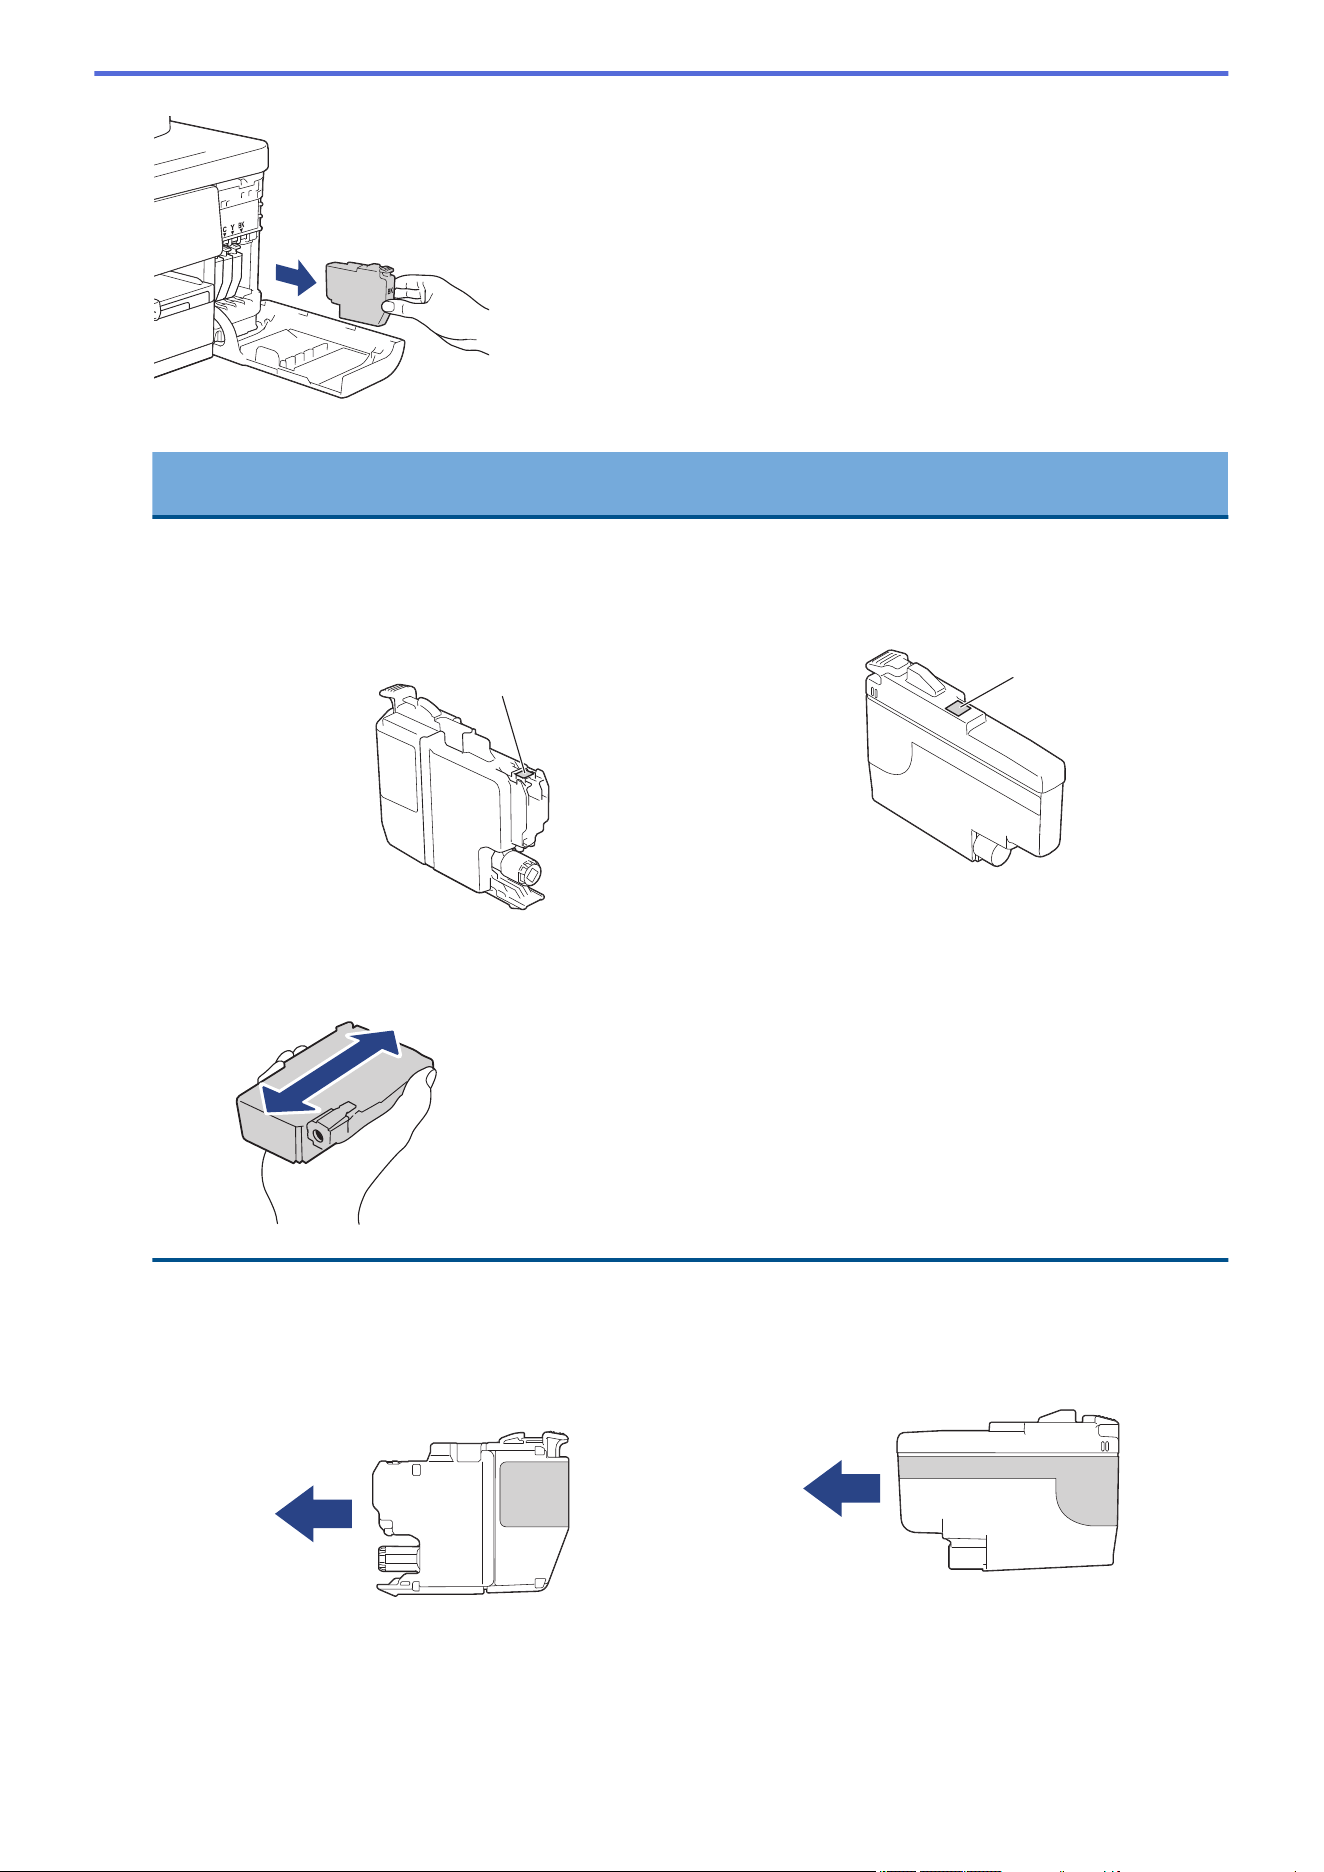
3. Open the new ink cartridge bag for the colour indicated on the LCD, and take out the ink cartridge.
IMPORTANT
• DO NOT touch the ink cartridge in the area indicated (1); this can prevent the machine from detecting
the cartridge.
(MFC-J2340DW/MFC-J2740DW/MFC-J5340DW/
MFC-J5740DW)
1
(MFC-J5855DW/MFC-J5955DW)
1
• Quickly shake just the black ink cartridge horizontally 15 times as shown, before inserting it into the
machine.
4. Insert the ink cartridge in the direction of the arrow on the label.
Each colour has its own correct position.
(MFC-J2340DW/MFC-J2740DW/MFC-J5340DW/
MFC-J5740DW)
(MFC-J5855DW/MFC-J5955DW)
527
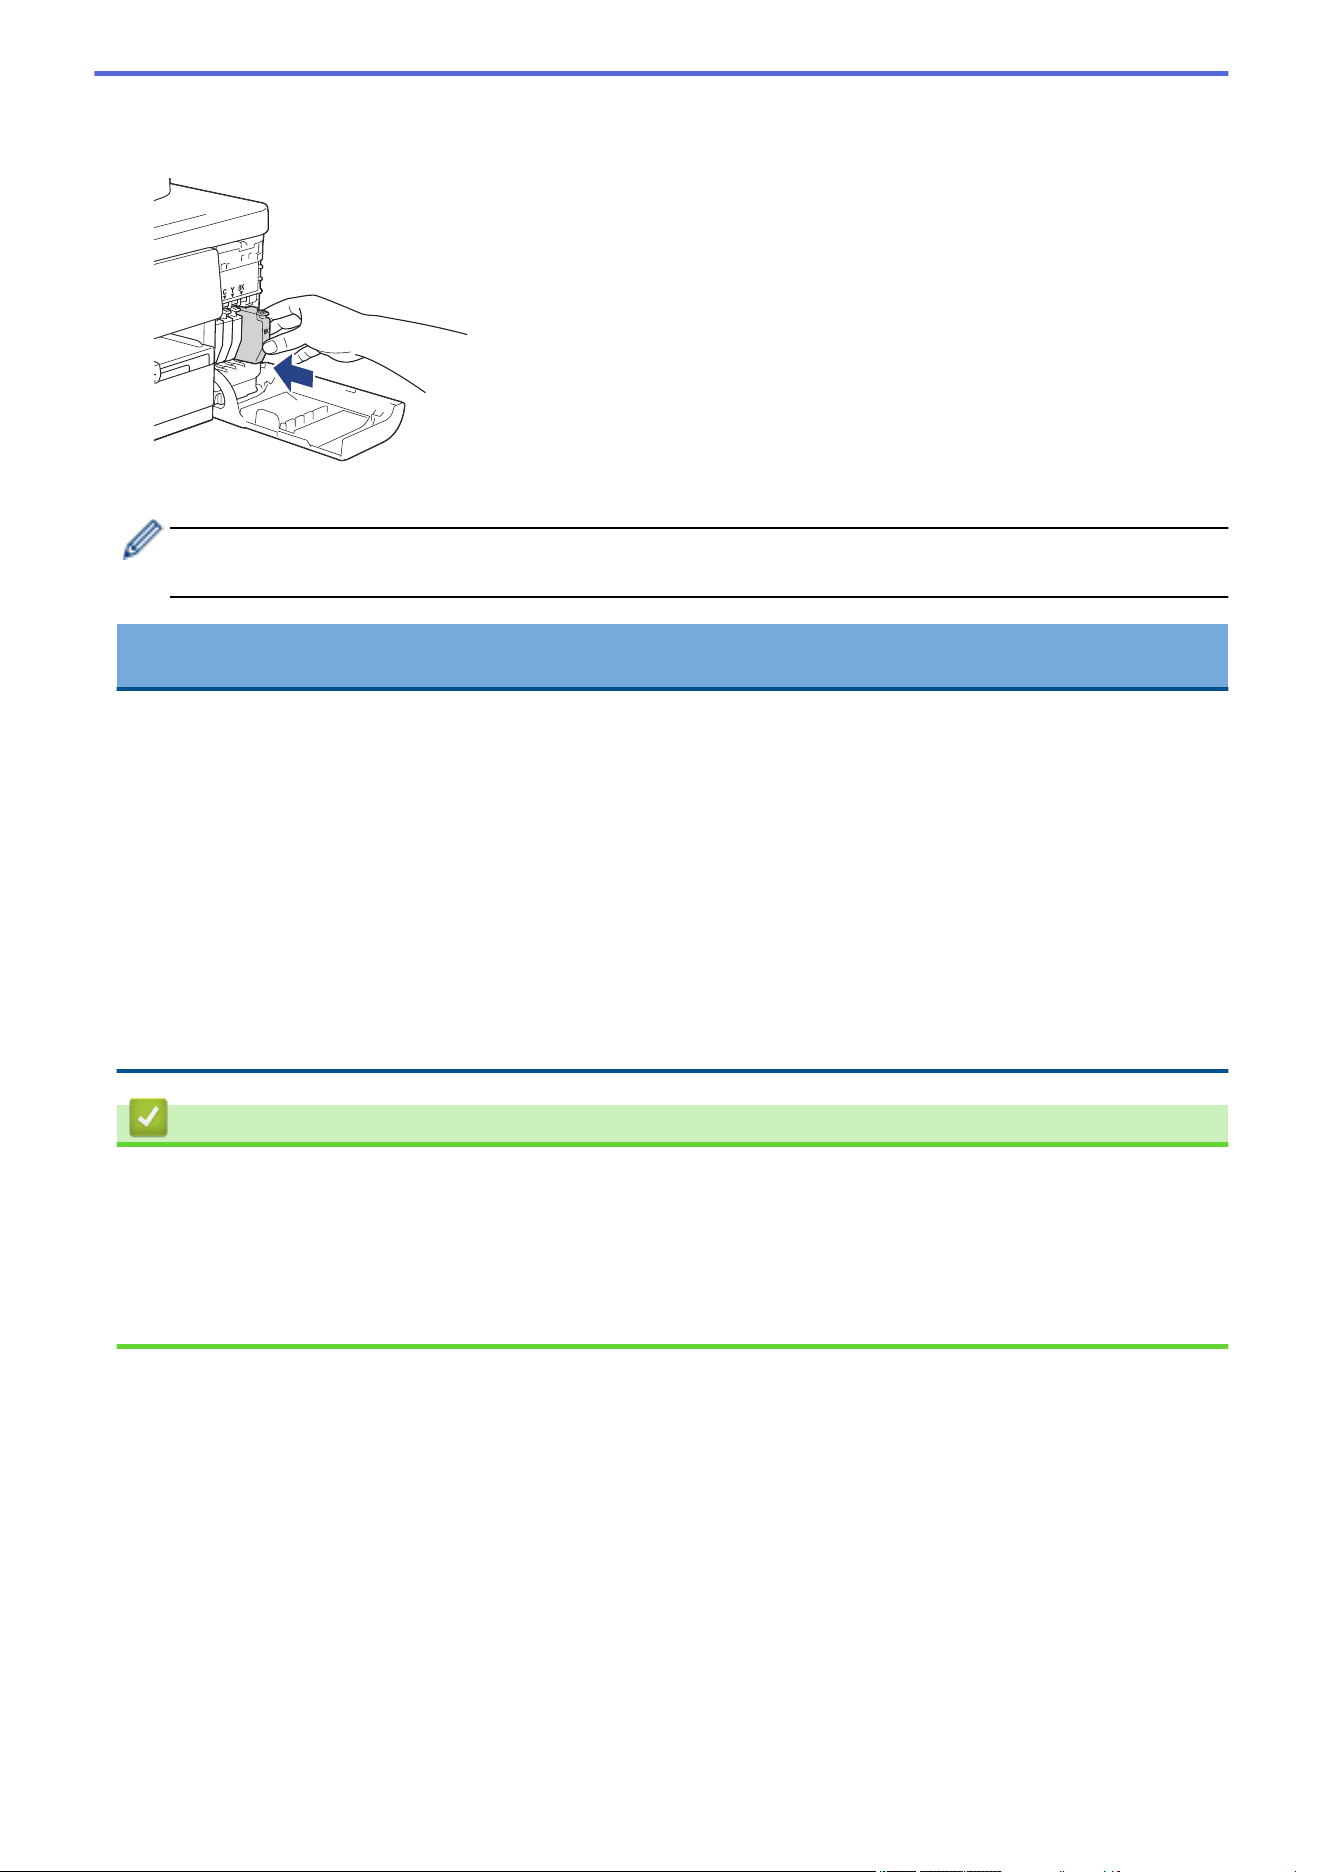
5. Gently push the area marked “PUSH” until the ink cartridge locks into place, and then close the ink cartridge
cover.
The machine resets the ink dot counter.
If the machine does not detect the ink cartridge after you install it, check that the ink cartridge is installed
correctly. Remove the ink cartridge and reinstall it slowly until it locks into place.
IMPORTANT
• DO NOT shake the ink cartridges, once installed into the machine. If ink stains your skin or clothing, wash
with soap or detergent at once.
• DO NOT remove ink cartridges if you do not need to replace them; otherwise, the machine will not know
the ink quantity left in the cartridge.
• DO NOT touch the ink cartridge insertion slots; the ink may stain your skin.
• If you mix the colours by installing an ink cartridge in the wrong position, the LCD shows [Wrong Ink
Colour].
Check which ink cartridges are not matched by colour to their ink cartridge positions and move them to
their correct positions.
• Use unopened ink cartridges by the expiration date written on the ink cartridge package.
• DO NOT dismantle or tamper with the ink cartridge; this can cause the ink to leak out of the ink cartridge.
Related Information
• Routine Maintenance
Related Topics:
• Error and Maintenance Messages
• Paper Handling and Printing Problems
• Pack and Ship Your Machine
528

Home > Routine Maintenance > Clean Your Brother Machine
Clean Your Brother Machine
• Clean the Print Head from Your Brother Machine
• Clean the Print Head Using Web Based Management
• Clean the Print Head from Your Computer (Windows)
• Automatically Detect and Improve the Condition of Print Head Nozzles
• Clean the Scanner
• Clean the Machine's LCD
• Clean the Outside of the Machine
• Clean the Machine's Printer Platen
• Clean the Paper Feed Rollers
• Clean the Base Pad
• Clean the Paper Pick-up Rollers for Paper Tray #1
• Clean the Paper Pick-up Rollers for Paper Tray #2
529
Home > Routine Maintenance > Clean Your Brother Machine > Clean the Print Head from Your Brother
Machine
Clean the Print Head from Your Brother Machine
To maintain good print quality, the machine automatically cleans the print head when needed. If there is a print
quality problem, start the cleaning process manually.
• Clean the print head if there is a horizontal line or a blank space in the text or graphics on printed pages.
• Cleaning the print head consumes ink.
• Cleaning too often uses ink unnecessarily.
IMPORTANT
DO NOT touch the print head. Touching the print head may cause permanent damage and may void the print
head's warranty.
1. Press [Ink] > [Print Head Cleaning].
2. Press [Start].
The machine cleans the print head.
NOTE
If you clean the print head several times and the print has not improved, try the Special cleaning method. The
Special cleaning method uses the most power in cleaning the print head, but also consumes the most ink.
1. Press
[Ink] > [Print Head Cleaning].
2. Press for five seconds.
The machine starts cleaning.
• The Special cleaning method requires a large amount of ink to clean the print head.
• Use the Special cleaning method only if you previously cleaned the print head several times and the
print quality did not improve.
• You can also clean the print head from your computer.
Related Information
• Clean Your Brother Machine
Related Topics:
• Paper Handling and Printing Problems
• Clean the Print Head from Your Computer (Windows)
• Clean the Print Head Using Web Based Management
530

Home > Routine Maintenance > Clean Your Brother Machine > Clean the Print Head Using Web Based
Management
Clean the Print Head Using Web Based Management
To maintain good print quality, the machine automatically cleans the print head when needed. If there is a print
quality problem, start the cleaning process manually.
1. Start your web browser.
2. Type "https://machine's IP address" in your browser's address bar (where "machine's IP address" is the
machine's IP address).
For example:
https://192.168.1.2
3. If required, type the password in the Login field, and then click Login.
The default password to manage this machine’s settings is located on the back of the machine and marked
"Pwd".
4. Go to the navigation menu, and then click General > Print Head Cleaning.
Start from , if the navigation menu is not shown on the left side of the screen.
5. If you have print quality problems, try cleaning the print head several times. If the print quality does not
improve, use the Special option. The Special option uses the most power in cleaning the print head, but also
consumes the most ink.
6. Click Start.
The Special option requires a large amount of ink to clean the print head.
7. Click Yes.
The machine starts cleaning.
(Windows) You can also clean the print head using the printer driver.
Related Information
• Clean Your Brother Machine
Related Topics:
• Paper Handling and Printing Problems
• Access Web Based Management
• Clean the Print Head from Your Brother Machine
• Clean the Print Head from Your Computer (Windows)
531
Home > Routine Maintenance > Clean Your Brother Machine > Clean the Print Head from Your Computer
(Windows)
Clean the Print Head from Your Computer (Windows)
To maintain good print quality, the machine automatically cleans the print head when needed. If there is a print
quality problem, start the cleaning process manually.
1. Do one of the following:
• For Windows 10, Windows Server 2016, and Windows Server 2019
Click
> Windows System > Control Panel. In the Hardware and Sound group, click View devices
and printers.
• For Windows 8.1
Move your mouse to the lower right corner of your desktop. When the menu bar appears, click Settings,
and then click Control Panel. In the Hardware and Sound group, click View devices and printers.
• For Windows Server 2012 R2
Click Control Panel on the Start screen. In the Hardware group, click View devices and printers.
• For Windows Server 2012
Move your mouse to the lower right corner of your desktop. When the menu bar appears, click Settings,
and then click Control Panel. In the Hardware group, click View devices and printers.
• For Windows 7 and Windows Server 2008 R2
Click
(Start) > Devices and Printers.
• For Windows Server 2008
Click (Start) > Control Panel > Hardware and Sound > Printers.
2. Right-click the Brother XXX-XXXX Printer icon (where XXX-XXXX is the name of your model), and then
select Printing preferences. If printer driver options appear, select your printer driver.
The printer driver dialog box appears.
3. Click the Maintenance tab.
4. Select one of the following options:
Option Description
Check Print Quality... Use to print the test page and check the print quality.
Print Head Cleaning... Use to start the cleaning process manually. Select if a line or blank spaces
appear in text or graphics on the test page.
5. Click Start.
Related Information
• Clean Your Brother Machine
Related Topics:
• Paper Handling and Printing Problems
• Clean the Print Head from Your Brother Machine
• Clean the Print Head Using Web Based Management
532
Home > Routine Maintenance > Clean Your Brother Machine > Automatically Detect and Improve the
Condition of Print Head Nozzles
Automatically Detect and Improve the Condition of Print Head Nozzles
If faded or streaked colours and text appear or if text is missing on your printouts, the print head nozzles may be
clogged. When this setting is [On], the machine automatically detects the condition of the print head nozzles
and cleans the print head when needed.
• The default setting is [On].
• Cleaning the print head consumes ink.
1. Press
[Ink] > [Print Quality Auto Check].
2. Press [On] or [Off].
3. Press .
Related Information
• Clean Your Brother Machine
533
Home > Routine Maintenance > Clean Your Brother Machine > Clean the Scanner
Clean the Scanner
1. Unplug the machine from the electrical socket.
2. Lift the document cover (1). Clean the scanner glass (2) and the white plastic (3) with a soft lint-free cloth
moistened with water.
2
1
3
3. In the ADF unit, clean the white bar (1) and the glass strip (2) with a lint-free cloth moistened with water.
1
2
4. (MFC-J2740DW/MFC-J5740DW/MFC-J5955DW) Open the scanner glass cover (1), and clean the white bar
(2) and the glass strip (3) with a soft lint-free cloth moistened with water.
2
1
3
534
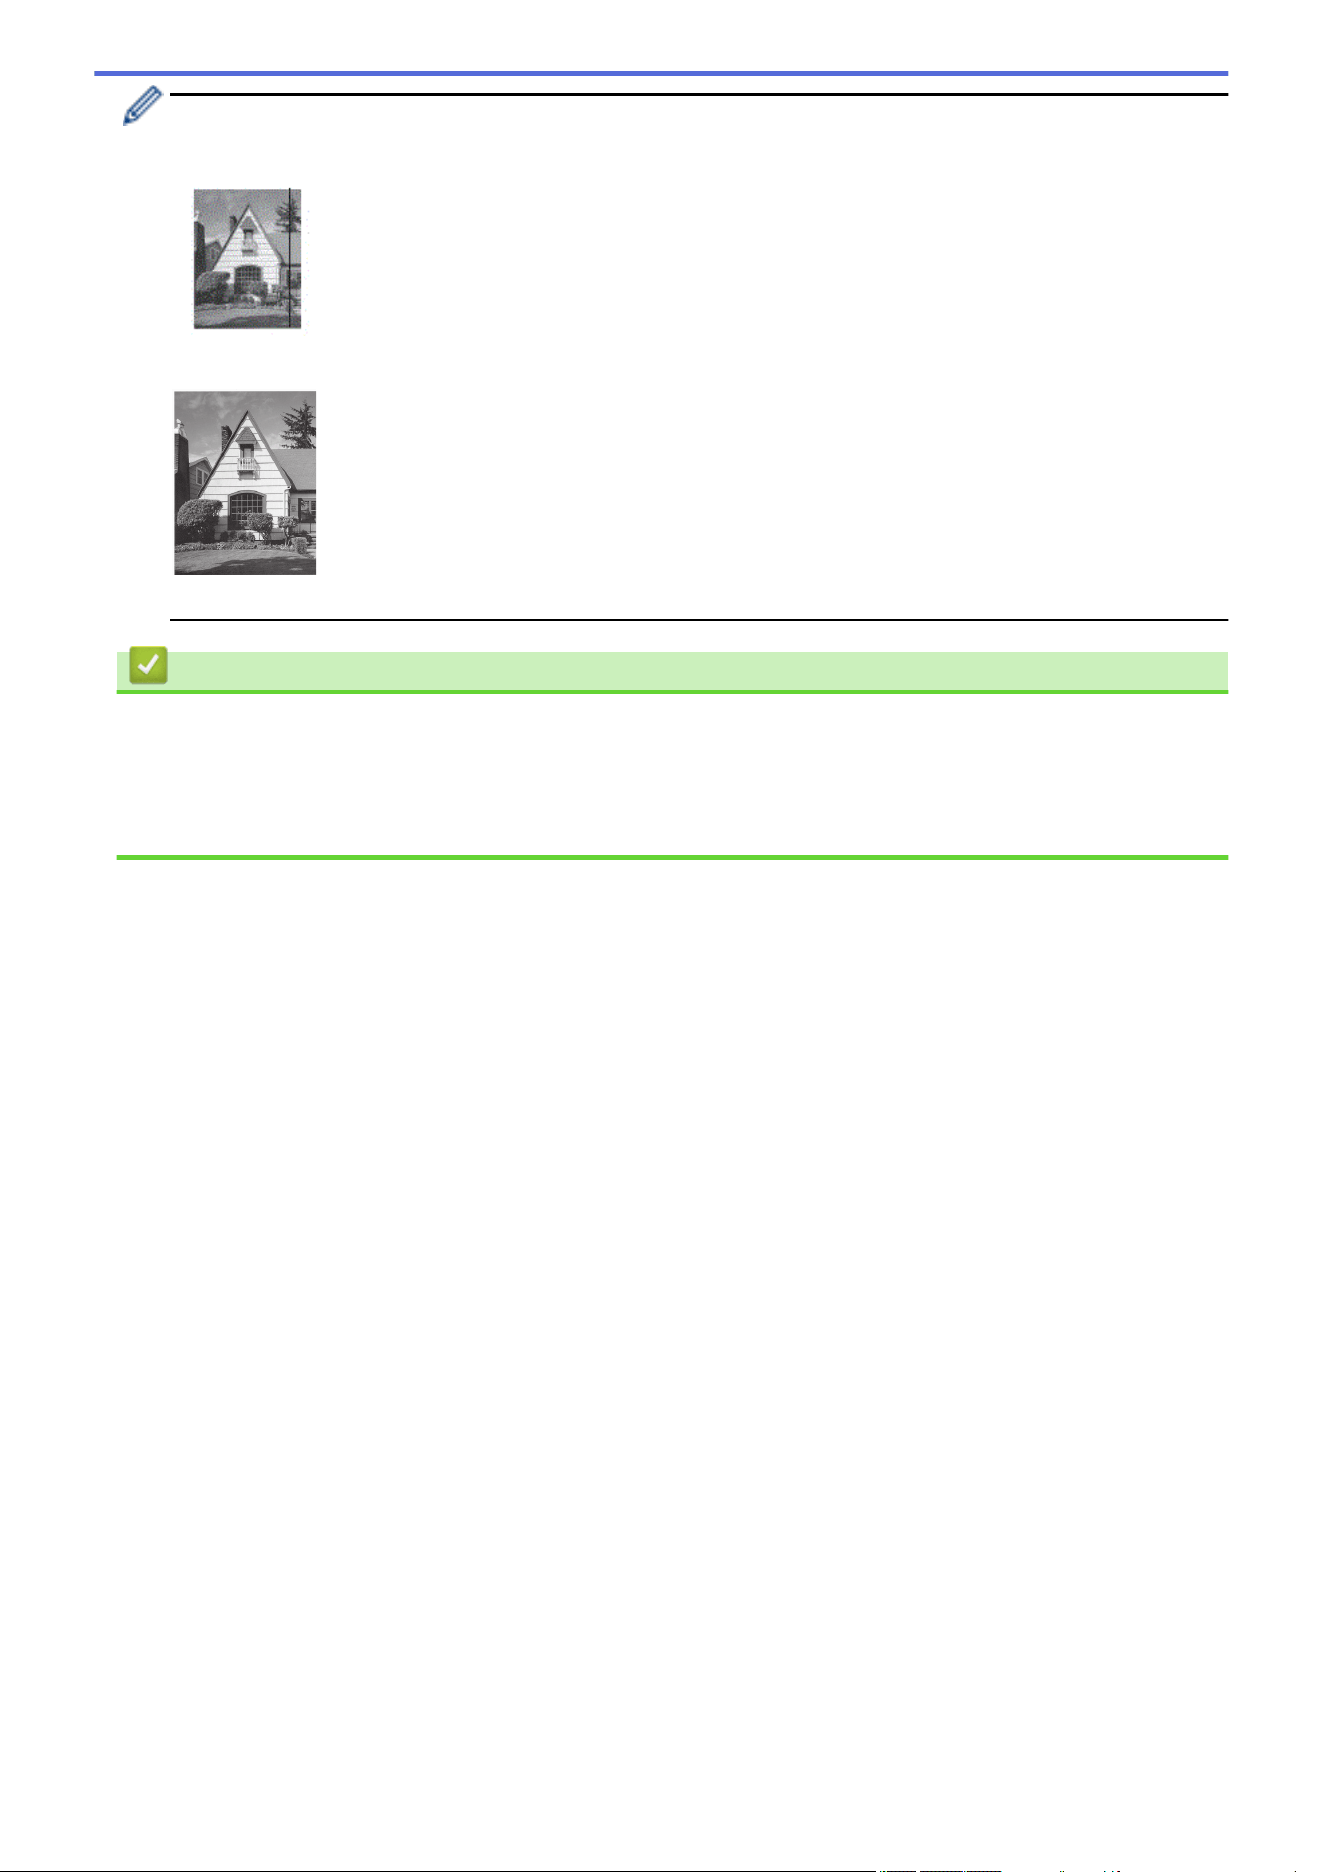
If you feel dirt or debris, clean the glass again. You may need to repeat the cleaning process three or four
times. To test, make a copy after each cleaning attempt.
When there is a spot of dirt or correction fluid on the glass strip, the printed sample shows a vertical line.
After the glass strip is cleaned, the vertical line is gone.
Related Information
• Clean Your Brother Machine
Related Topics:
• Telephone and Fax Problems
• Other Problems
535
Home > Routine Maintenance > Clean Your Brother Machine > Clean the Machine's LCD
Clean the Machine's LCD
IMPORTANT
DO NOT use liquid cleaners (including ethanol).
1. Press and hold down to turn off the machine. The LCD displays [Shutting Down] for a few seconds
before the power goes off.
2. Clean the LCD with a dry, soft lint-free cloth.
Related Information
• Clean Your Brother Machine
536
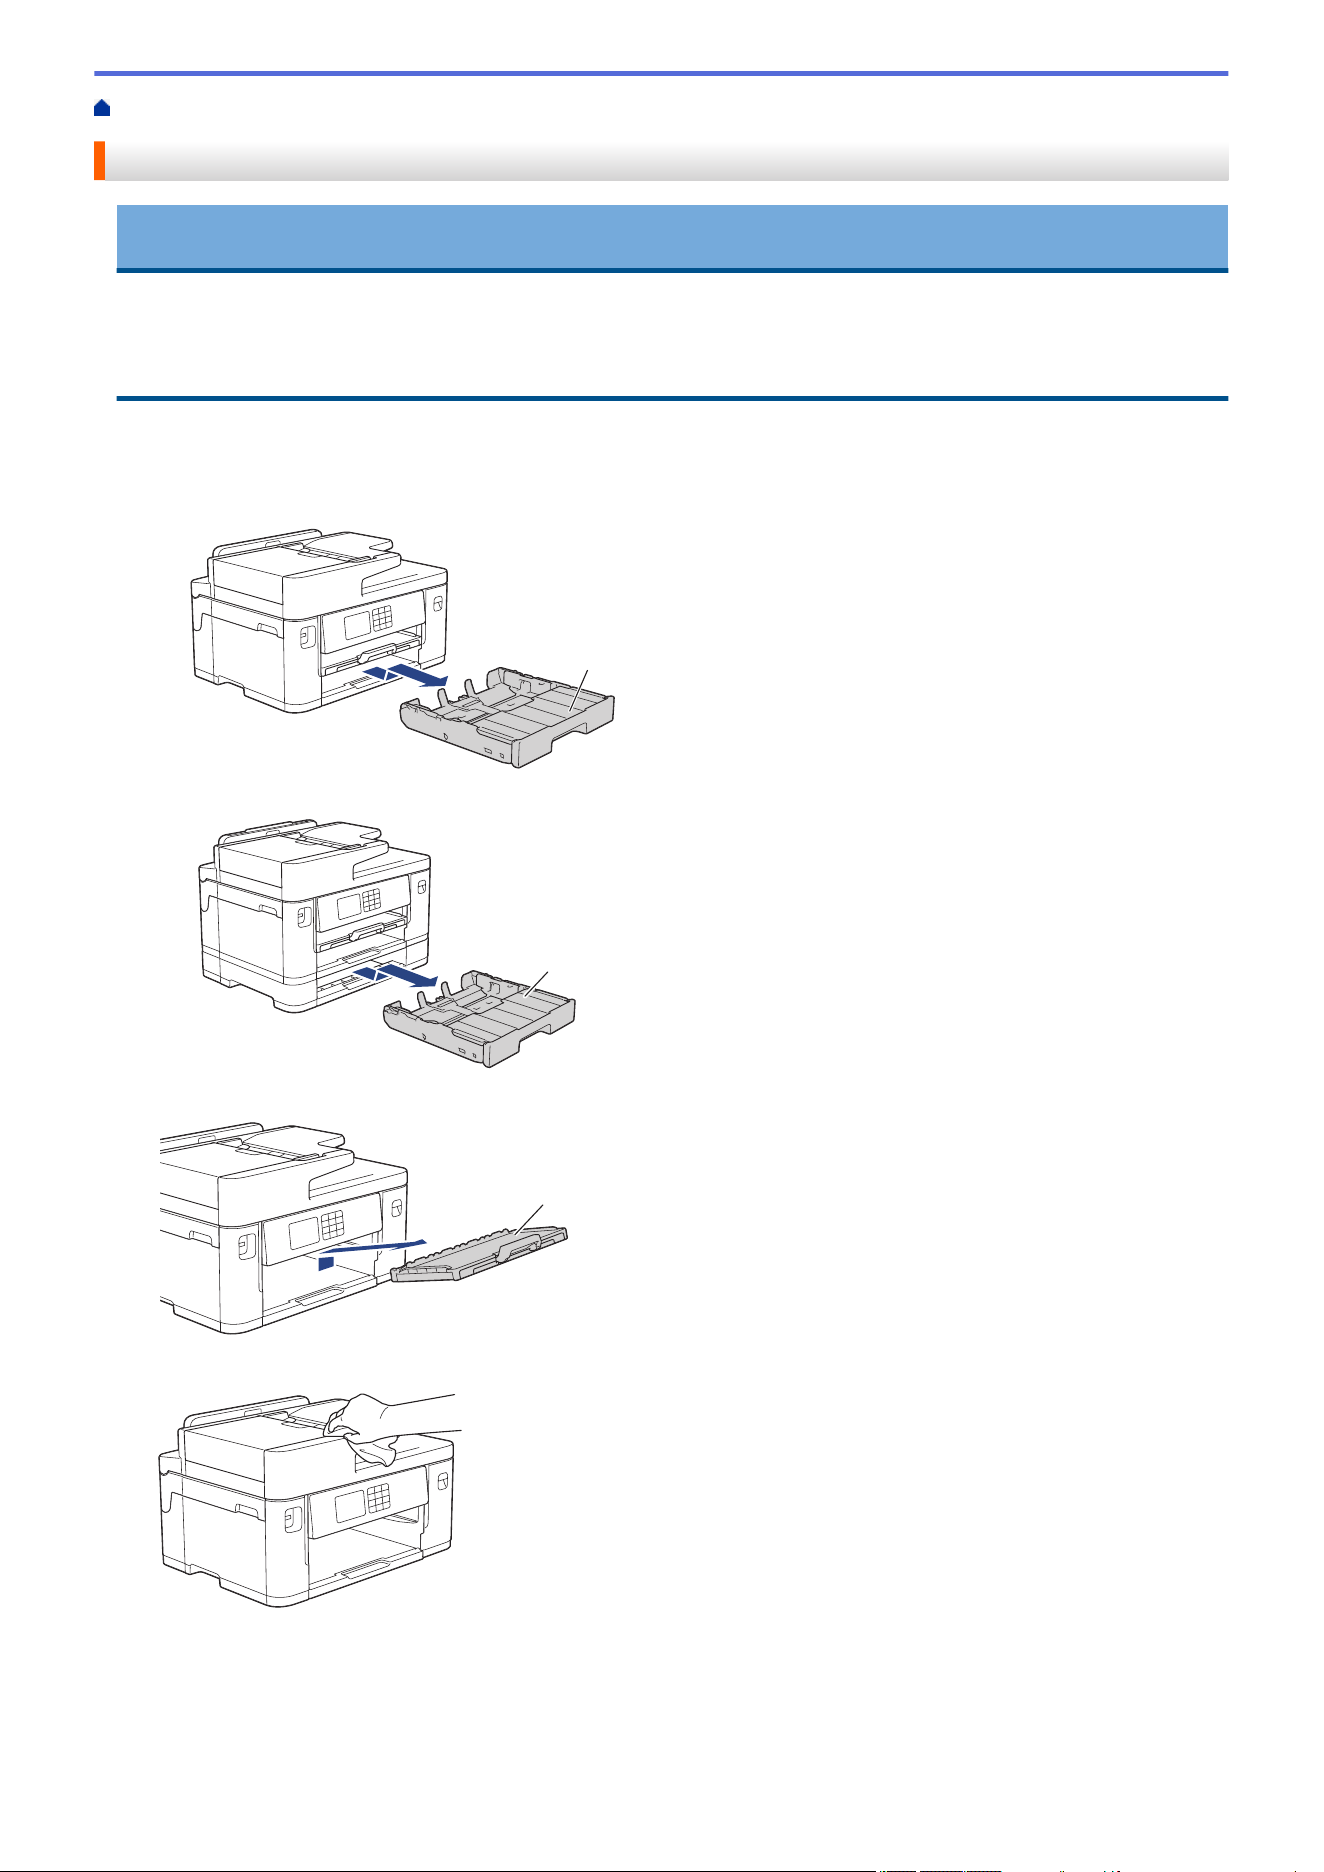
Home > Routine Maintenance > Clean Your Brother Machine > Clean the Outside of the Machine
Clean the Outside of the Machine
IMPORTANT
• Cleaning with volatile liquids such as thinner or benzine will damage the outside surface of the machine.
• DO NOT use cleaning materials that contain ammonia.
• DO NOT use isopropyl alcohol to remove dirt from the control panel. It may crack the panel.
1. If the paper support flap is open, close it, and then close the paper support.
2. Pull the paper trays (1) completely out of the machine as shown by the arrow.
• Tray #1
1
• Tray #2 (MFC-J2740DW/MFC-J5740DW/MFC-J5955DW)
1
3. Lift the paper support (1), and then pull it at an angle completely out of the machine as shown by the arrow.
1
4. Wipe the outside of the machine with a dry, lint-free cloth to remove dust.
537
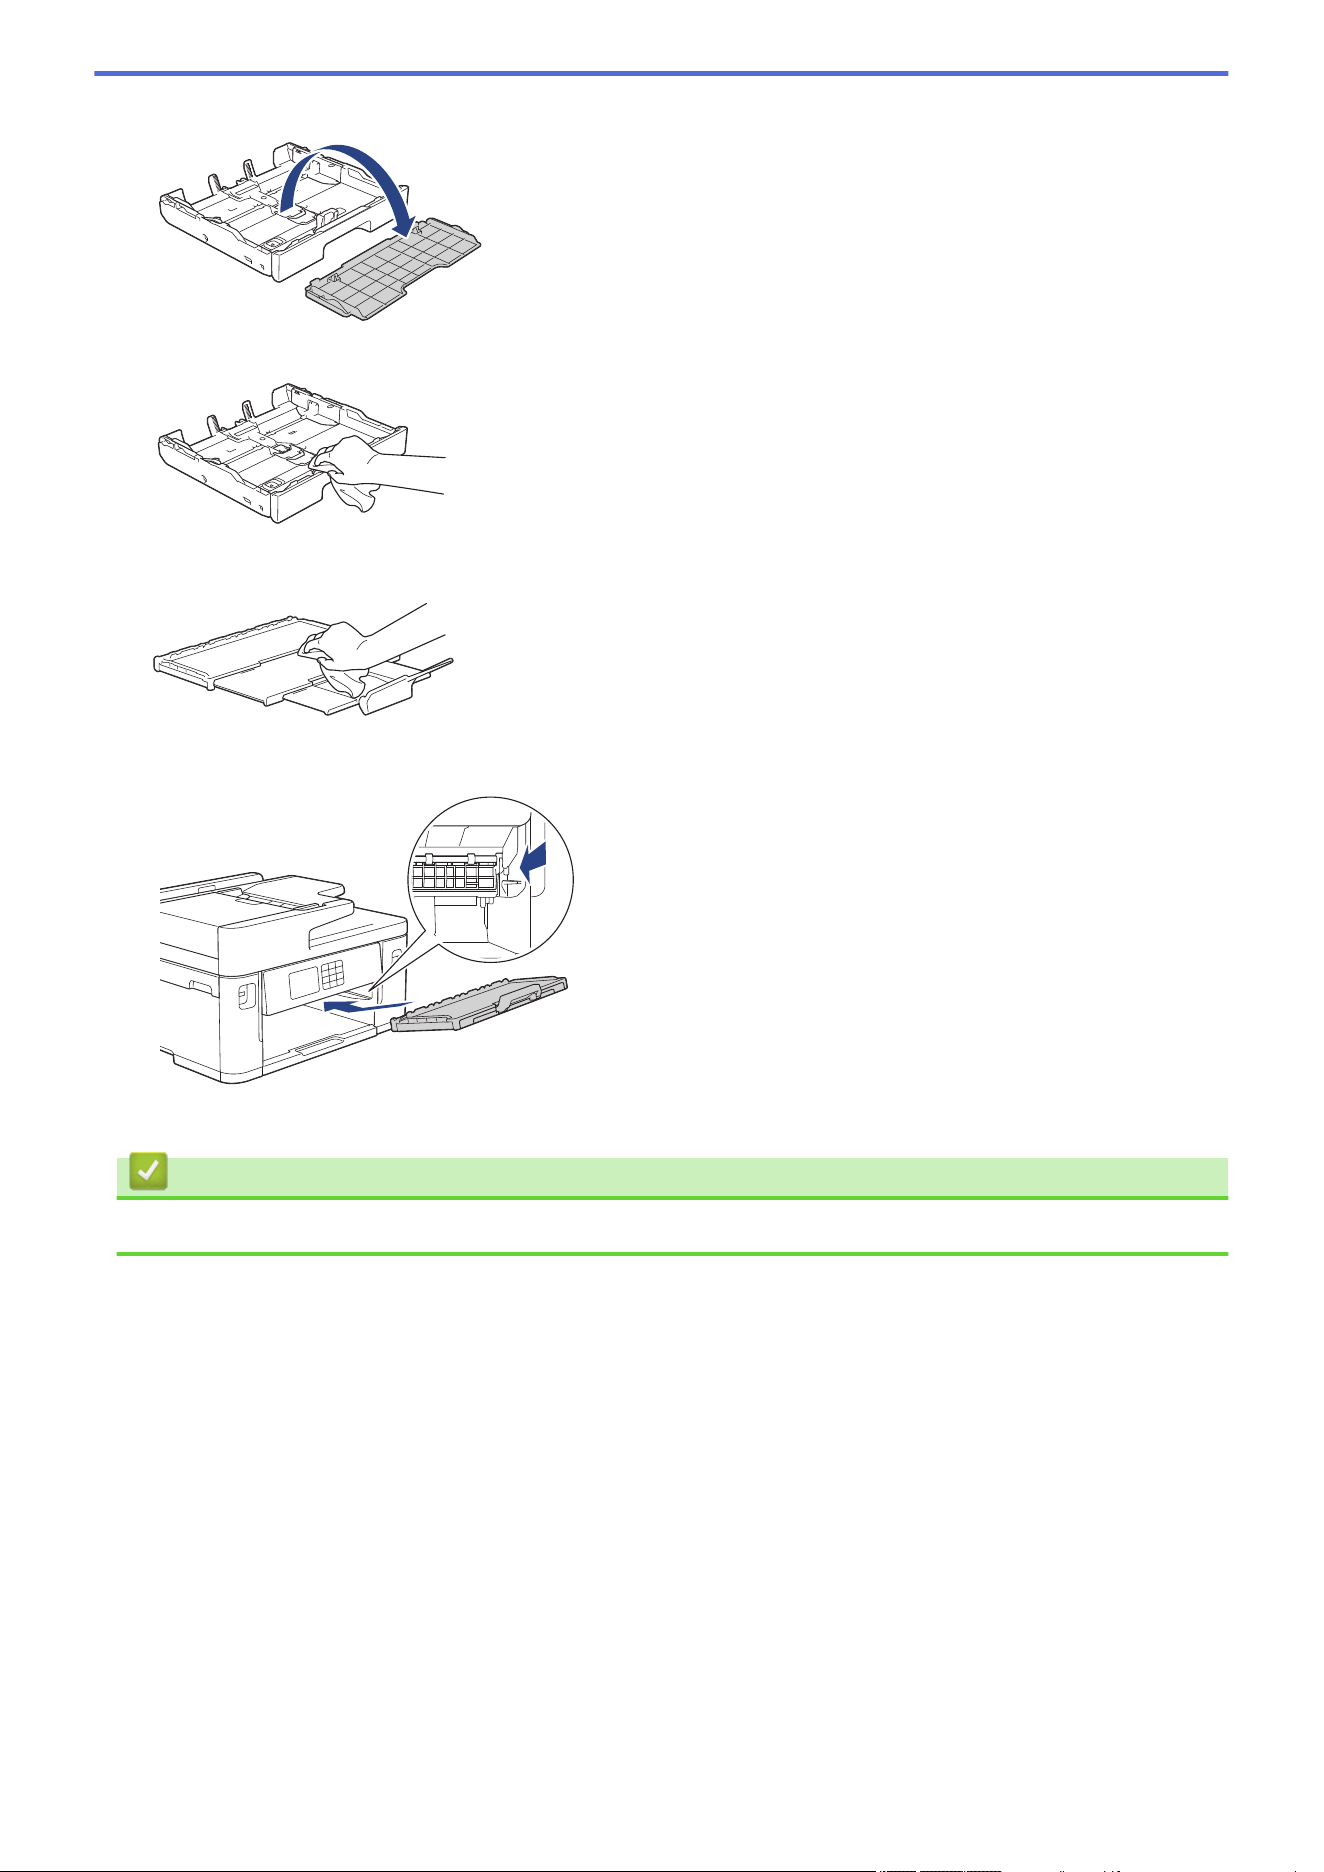
5. Remove the tray top cover and remove anything that is stuck inside the paper tray.
6. Wipe the inside and the outside of the paper tray with a dry, lint-free cloth to remove dust.
7. Wipe the outside of the paper support with a dry, lint-free cloth to remove dust.
8. Place the paper support firmly back in the machine. Make sure you fit the paper support into the channels.
9. Replace the tray top cover and slowly push the paper tray completely into the machine.
Related Information
• Clean Your Brother Machine
538
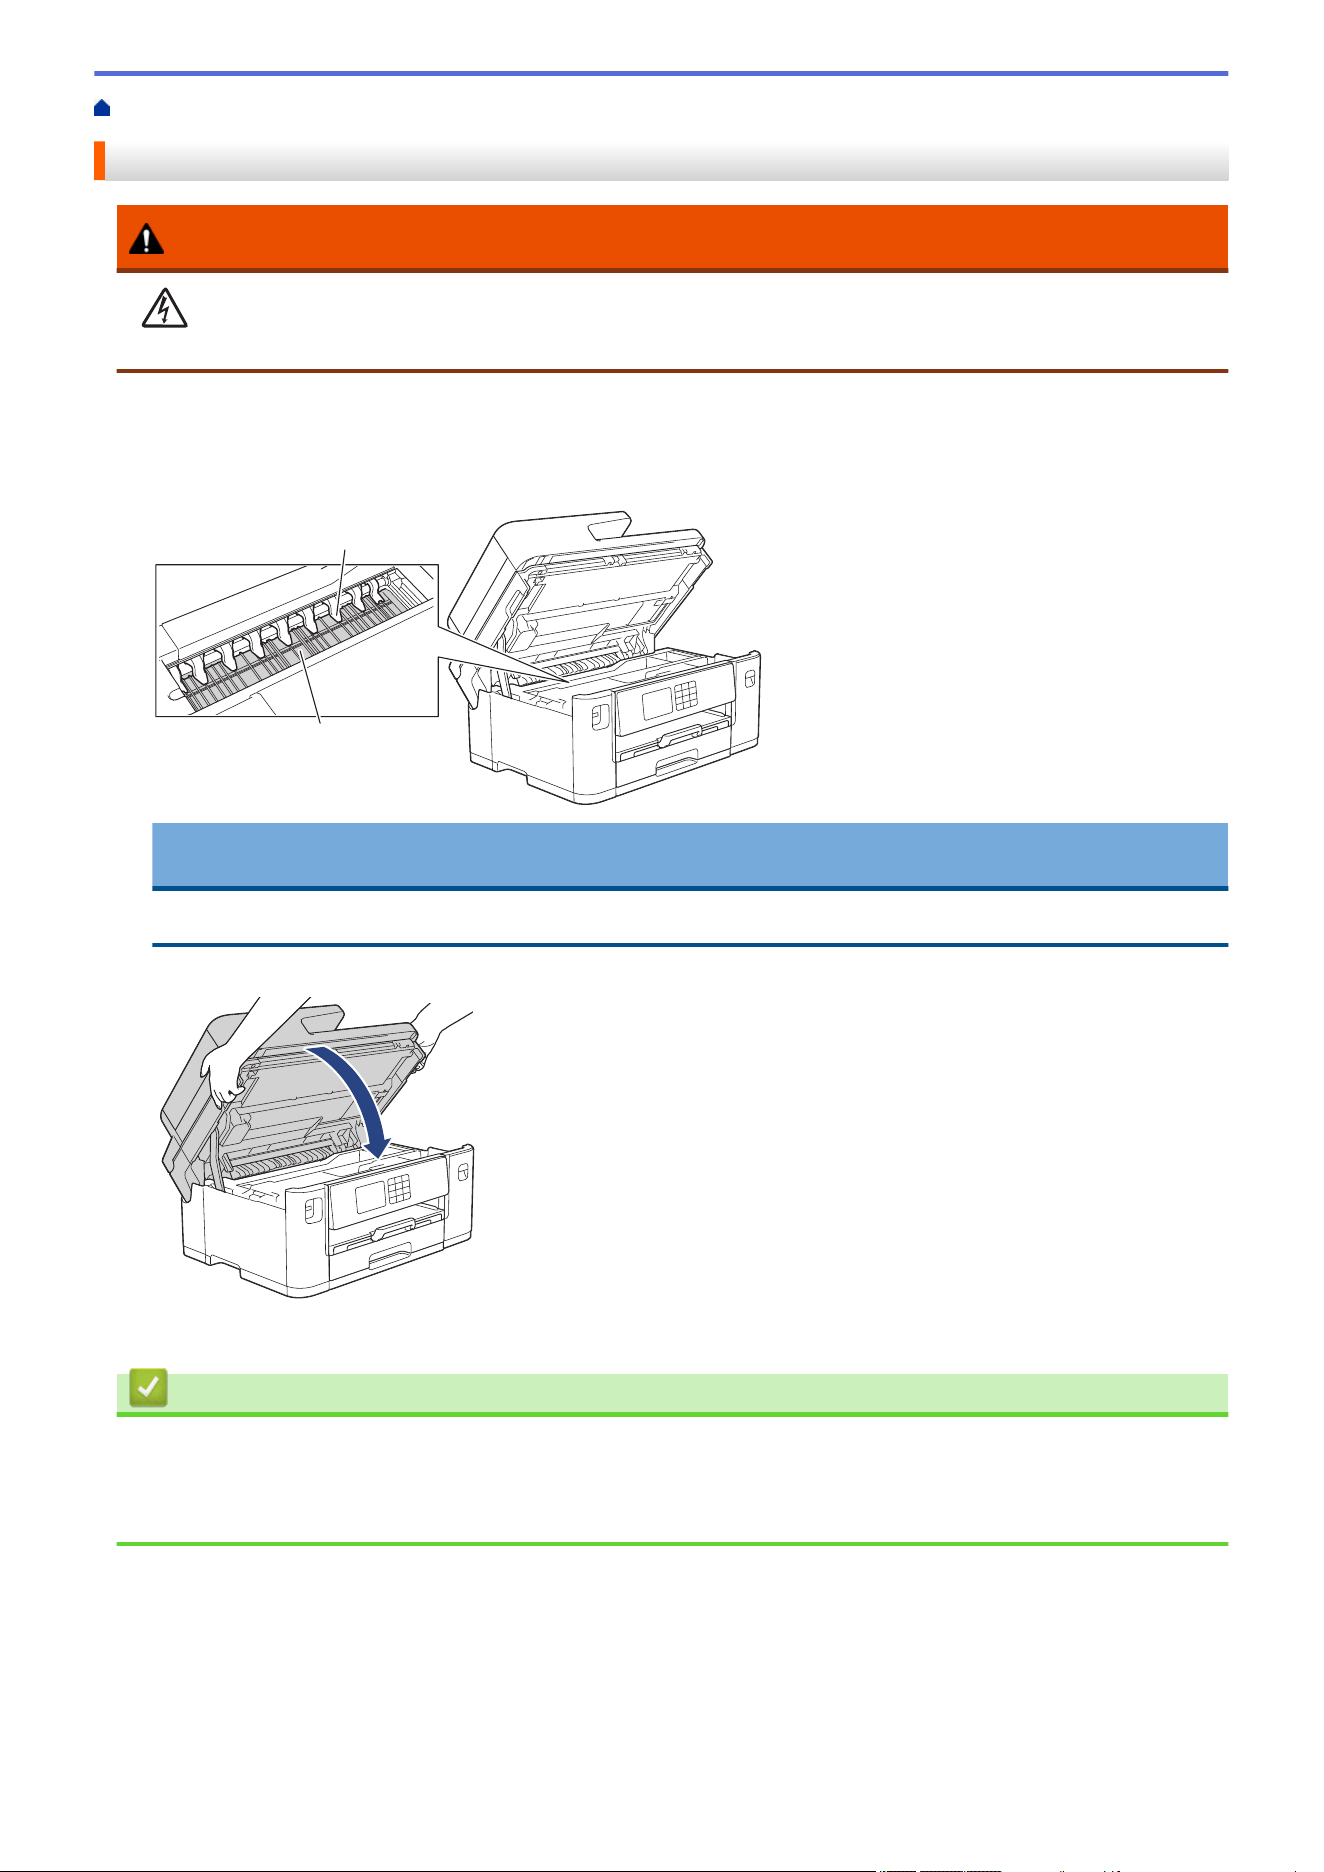
Home > Routine Maintenance > Clean Your Brother Machine > Clean the Machine's Printer Platen
Clean the Machine's Printer Platen
WARNING
Be sure to unplug the machine from the electrical socket before cleaning the printer platen to avoid an
electrical shock.
1. Using both hands, use the finger holds on each side of the machine to lift the scanner cover into the open
position.
2. Clean the machine’s printer platen (1) and the area around it, wiping off scattered ink with a dry, soft lint-free
cloth.
1
2
IMPORTANT
DO NOT bend or apply too much pressure on the nine tabs (2). They could be damaged.
3. Gently close the scanner cover using the finger holds on each side.
4. Reconnect the power cord.
Related Information
• Clean Your Brother Machine
Related Topics:
• Paper Handling and Printing Problems
539
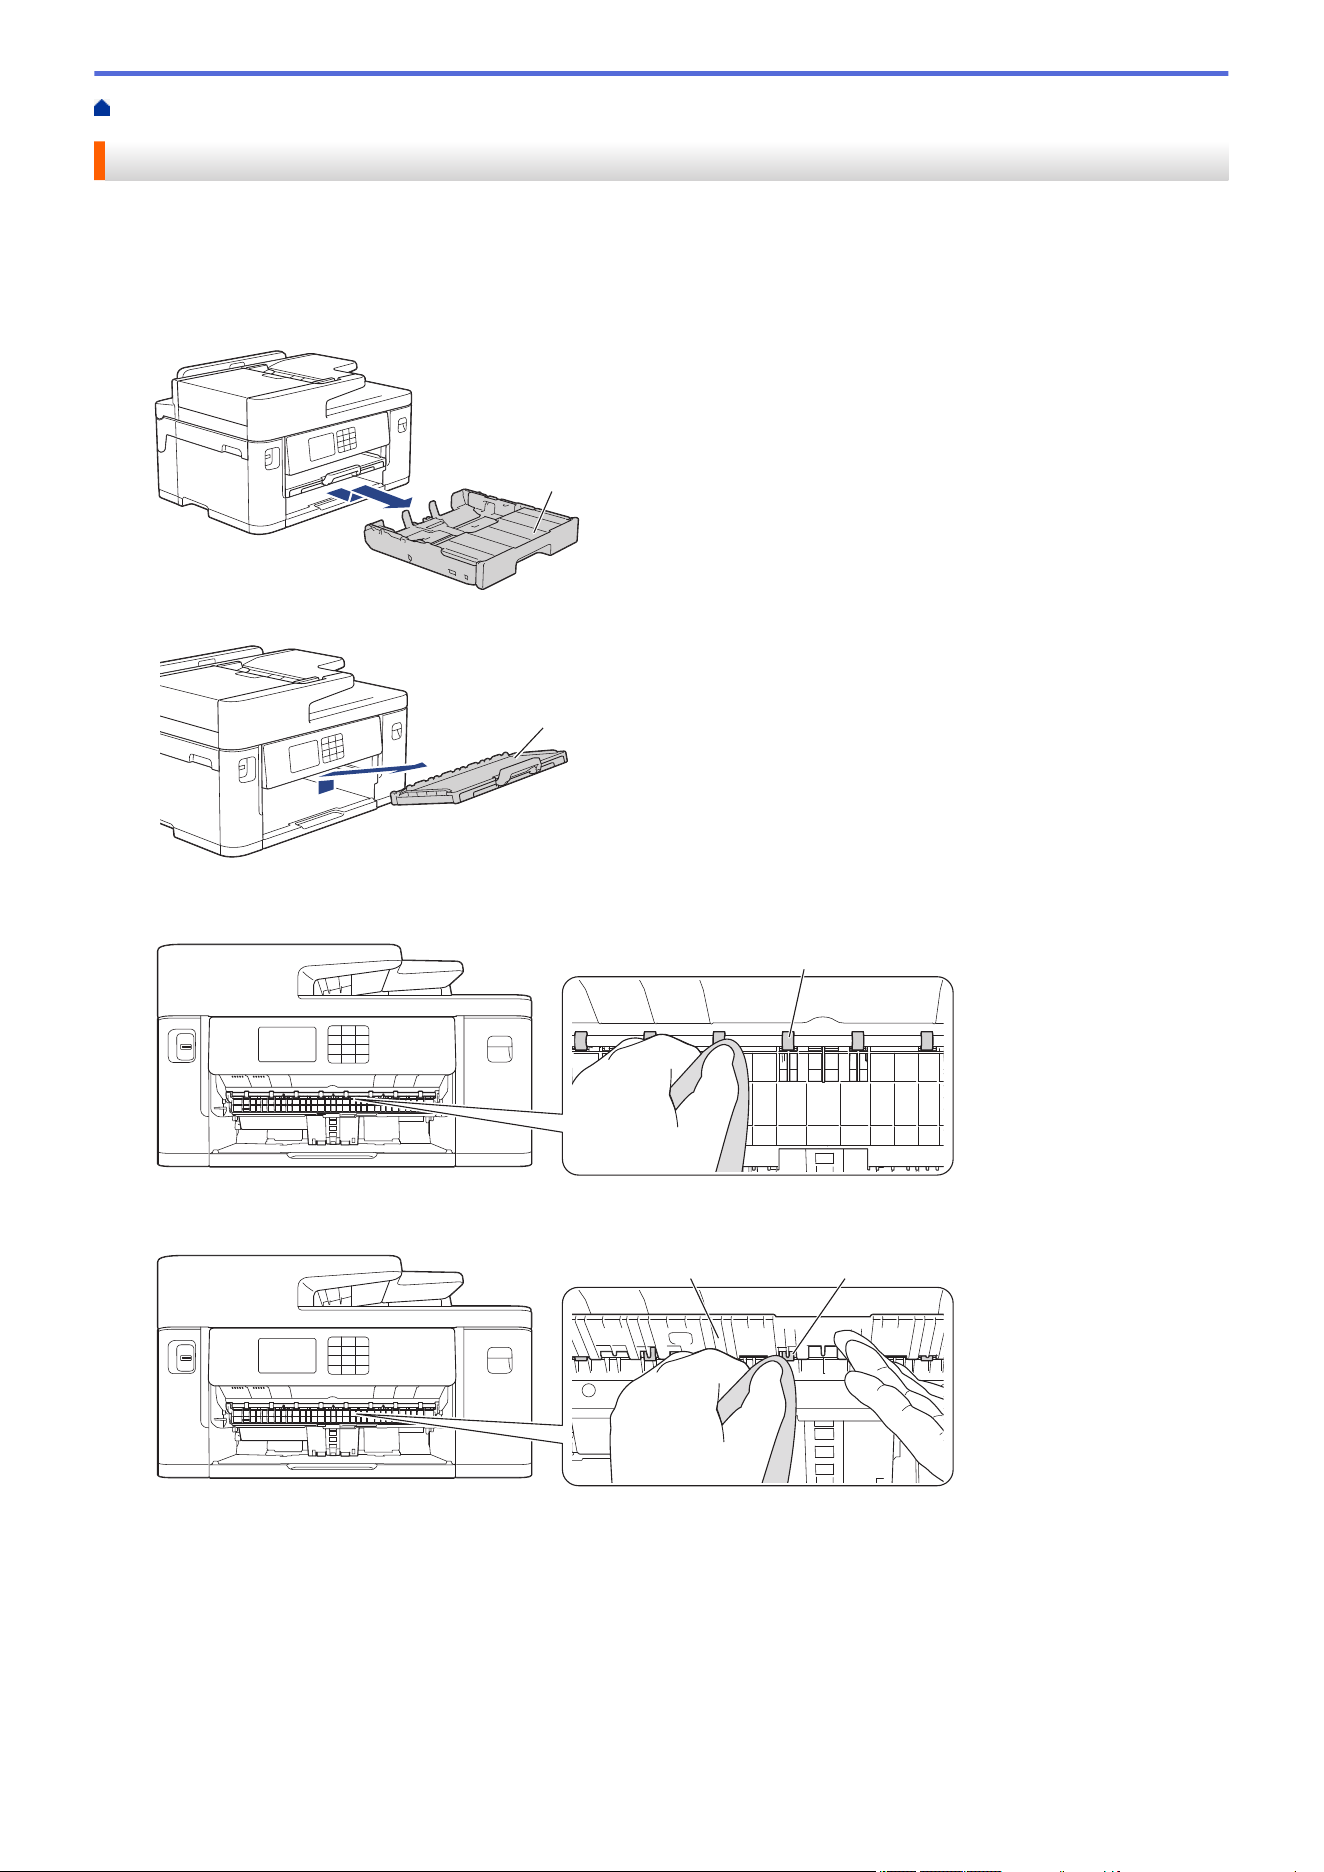
Home > Routine Maintenance > Clean Your Brother Machine > Clean the Paper Feed Rollers
Clean the Paper Feed Rollers
If the paper feed rollers are stained with ink or have a buildup of paper dust, it may cause paper feed problems.
1. Unplug the machine from the electrical socket.
2. If the paper support flap is open, close it, and then close the paper support.
3. Pull the paper tray (1) completely out of the machine as shown by the arrow.
1
4. Lift the paper support (1), and then pull it at an angle completely out of the machine as shown by the arrow.
1
5. Clean the front side of the Paper Feed Rollers (1) with a soft lint-free cloth moistened with water, using a
side-to-side motion. After cleaning, wipe the rollers with a dry, soft lint-free cloth to remove all moisture.
1
6. Lift the flap (2), and then clean the back side of the Paper Feed Rollers (1) with a soft lint-free cloth
moistened with water. After cleaning, wipe the rollers with a dry, soft lint-free cloth to remove all moisture.
12
540
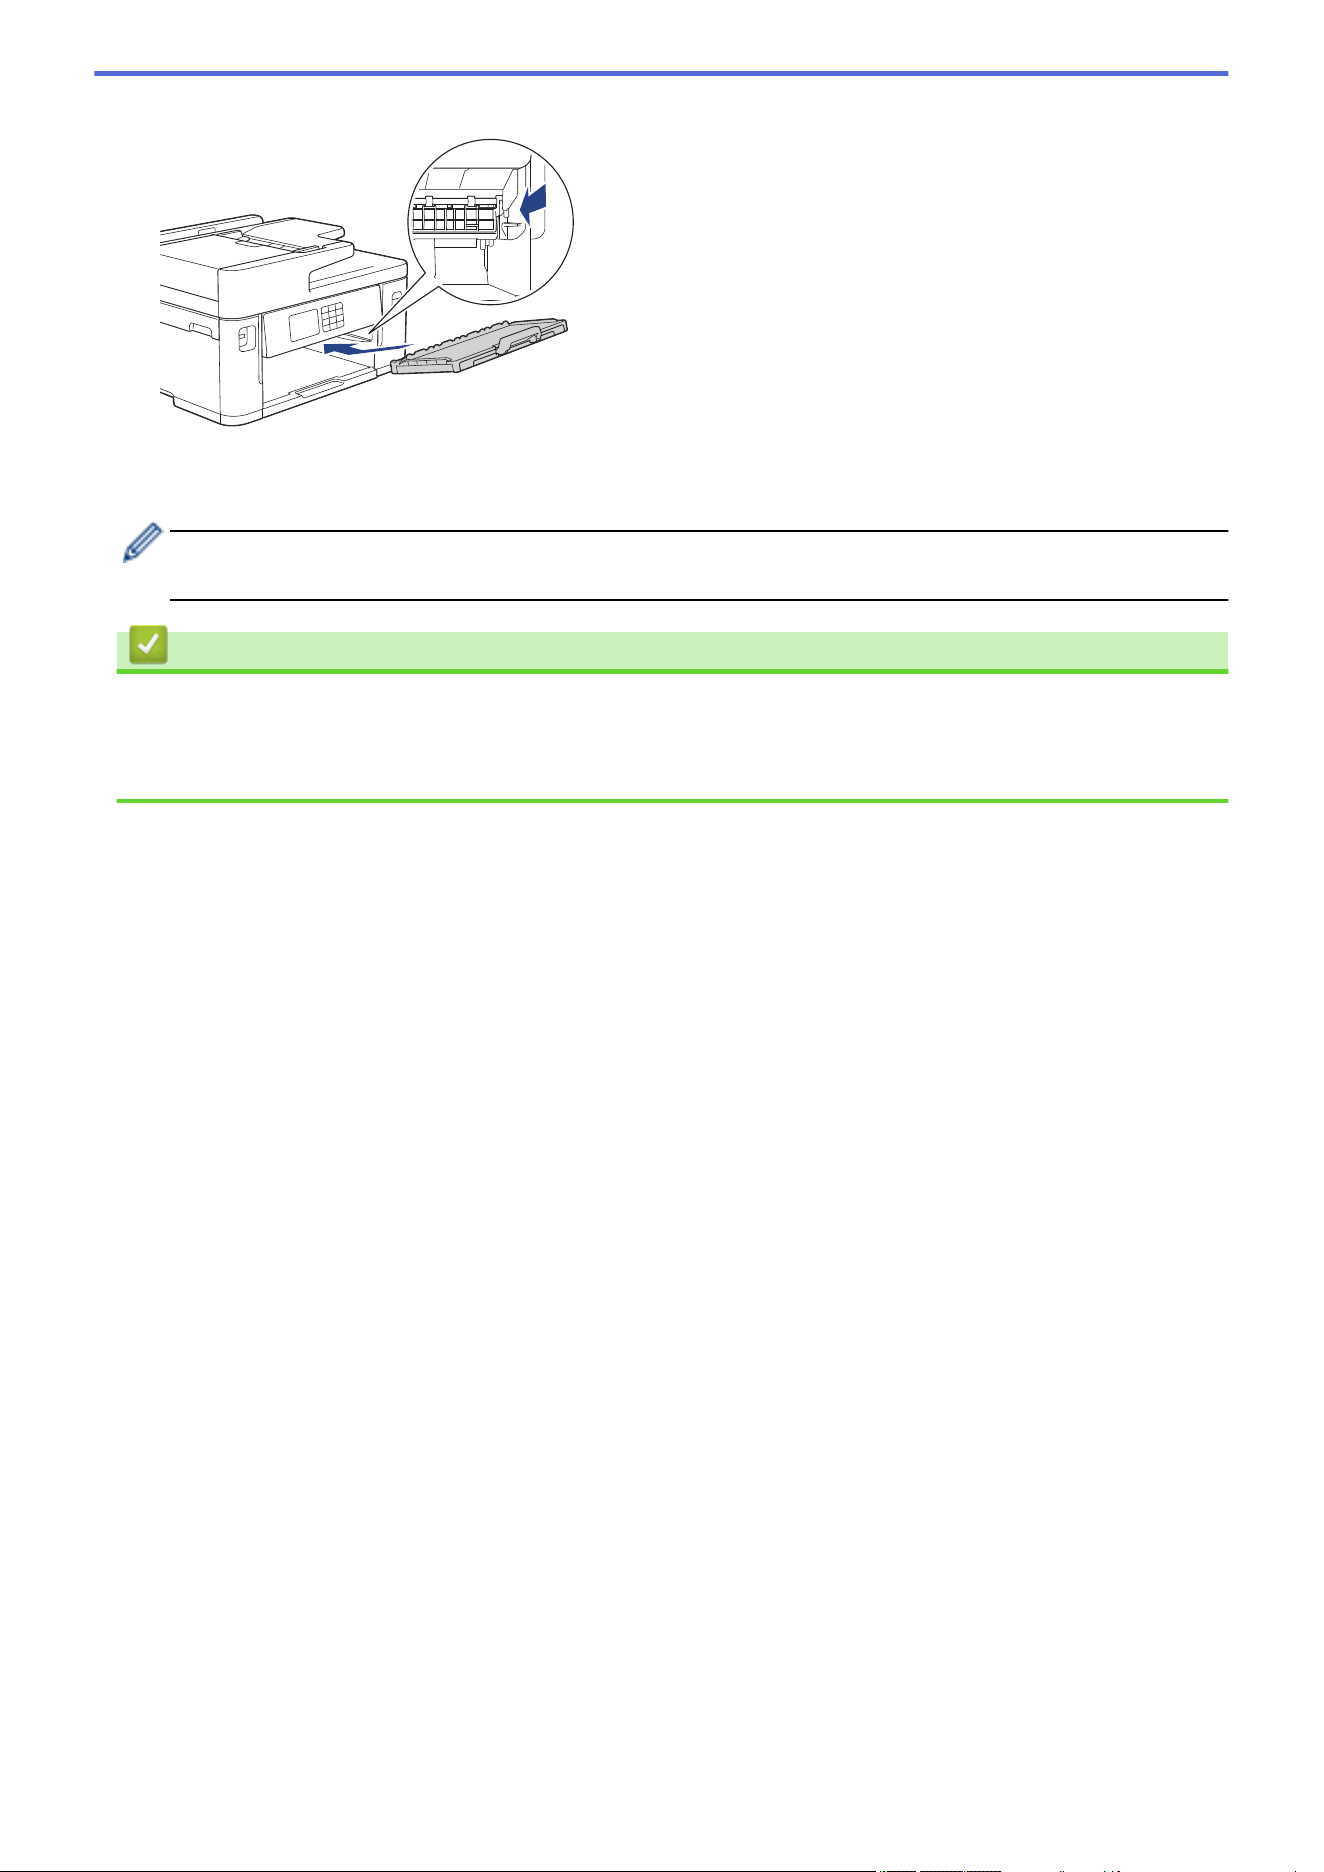
7. Place the paper support firmly back in the machine. Make sure you fit the paper support into the channels.
8. Slowly push the paper tray completely into the machine.
9. Reconnect the power cord.
Do not use the machine again until the rollers are dry. Using the machine before the rollers are dry may
cause paper feed problems.
Related Information
• Clean Your Brother Machine
Related Topics:
• Paper Handling and Printing Problems
541
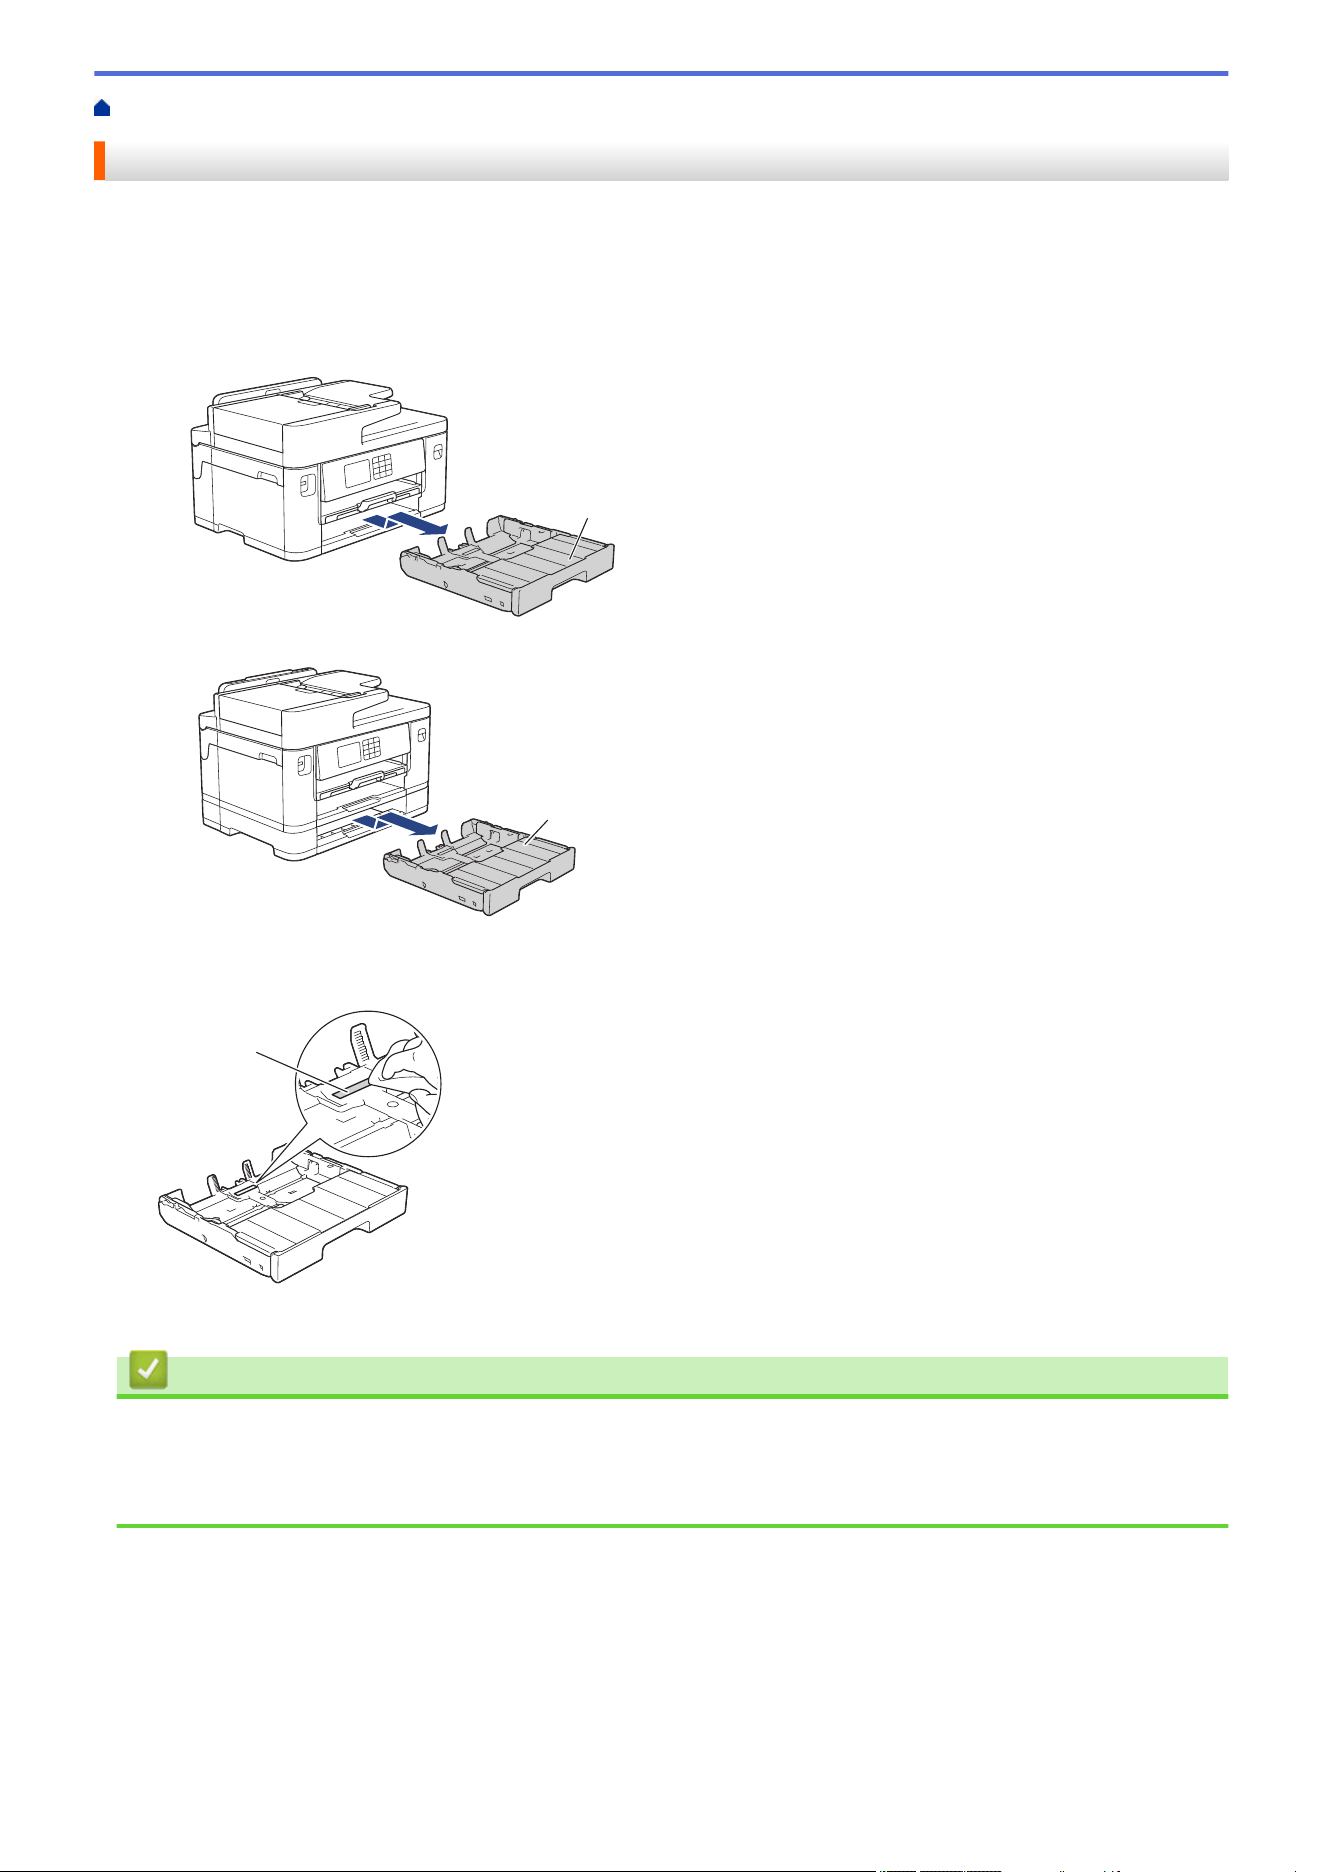
Home > Routine Maintenance > Clean Your Brother Machine > Clean the Base Pad
Clean the Base Pad
Cleaning the Base Pad periodically may prevent the machine from feeding multiple sheets of paper when there
are only a few sheets of paper left in the tray.
1. If the paper support flap is open, close it, and then close the paper support.
2. Pull the paper trays (1) completely out of the machine as shown by the arrow.
• Tray #1
1
• Tray #2 (MFC-J2740DW/MFC-J5740DW/MFC-J5955DW)
1
3. Clean the Base Pad (1) with a soft lint-free cloth moistened with water.
After cleaning, wipe the pad with a dry, soft lint-free cloth to remove any moisture.
1
4. Slowly push the paper tray completely into the machine.
Related Information
• Clean Your Brother Machine
Related Topics:
• Paper Handling and Printing Problems
542
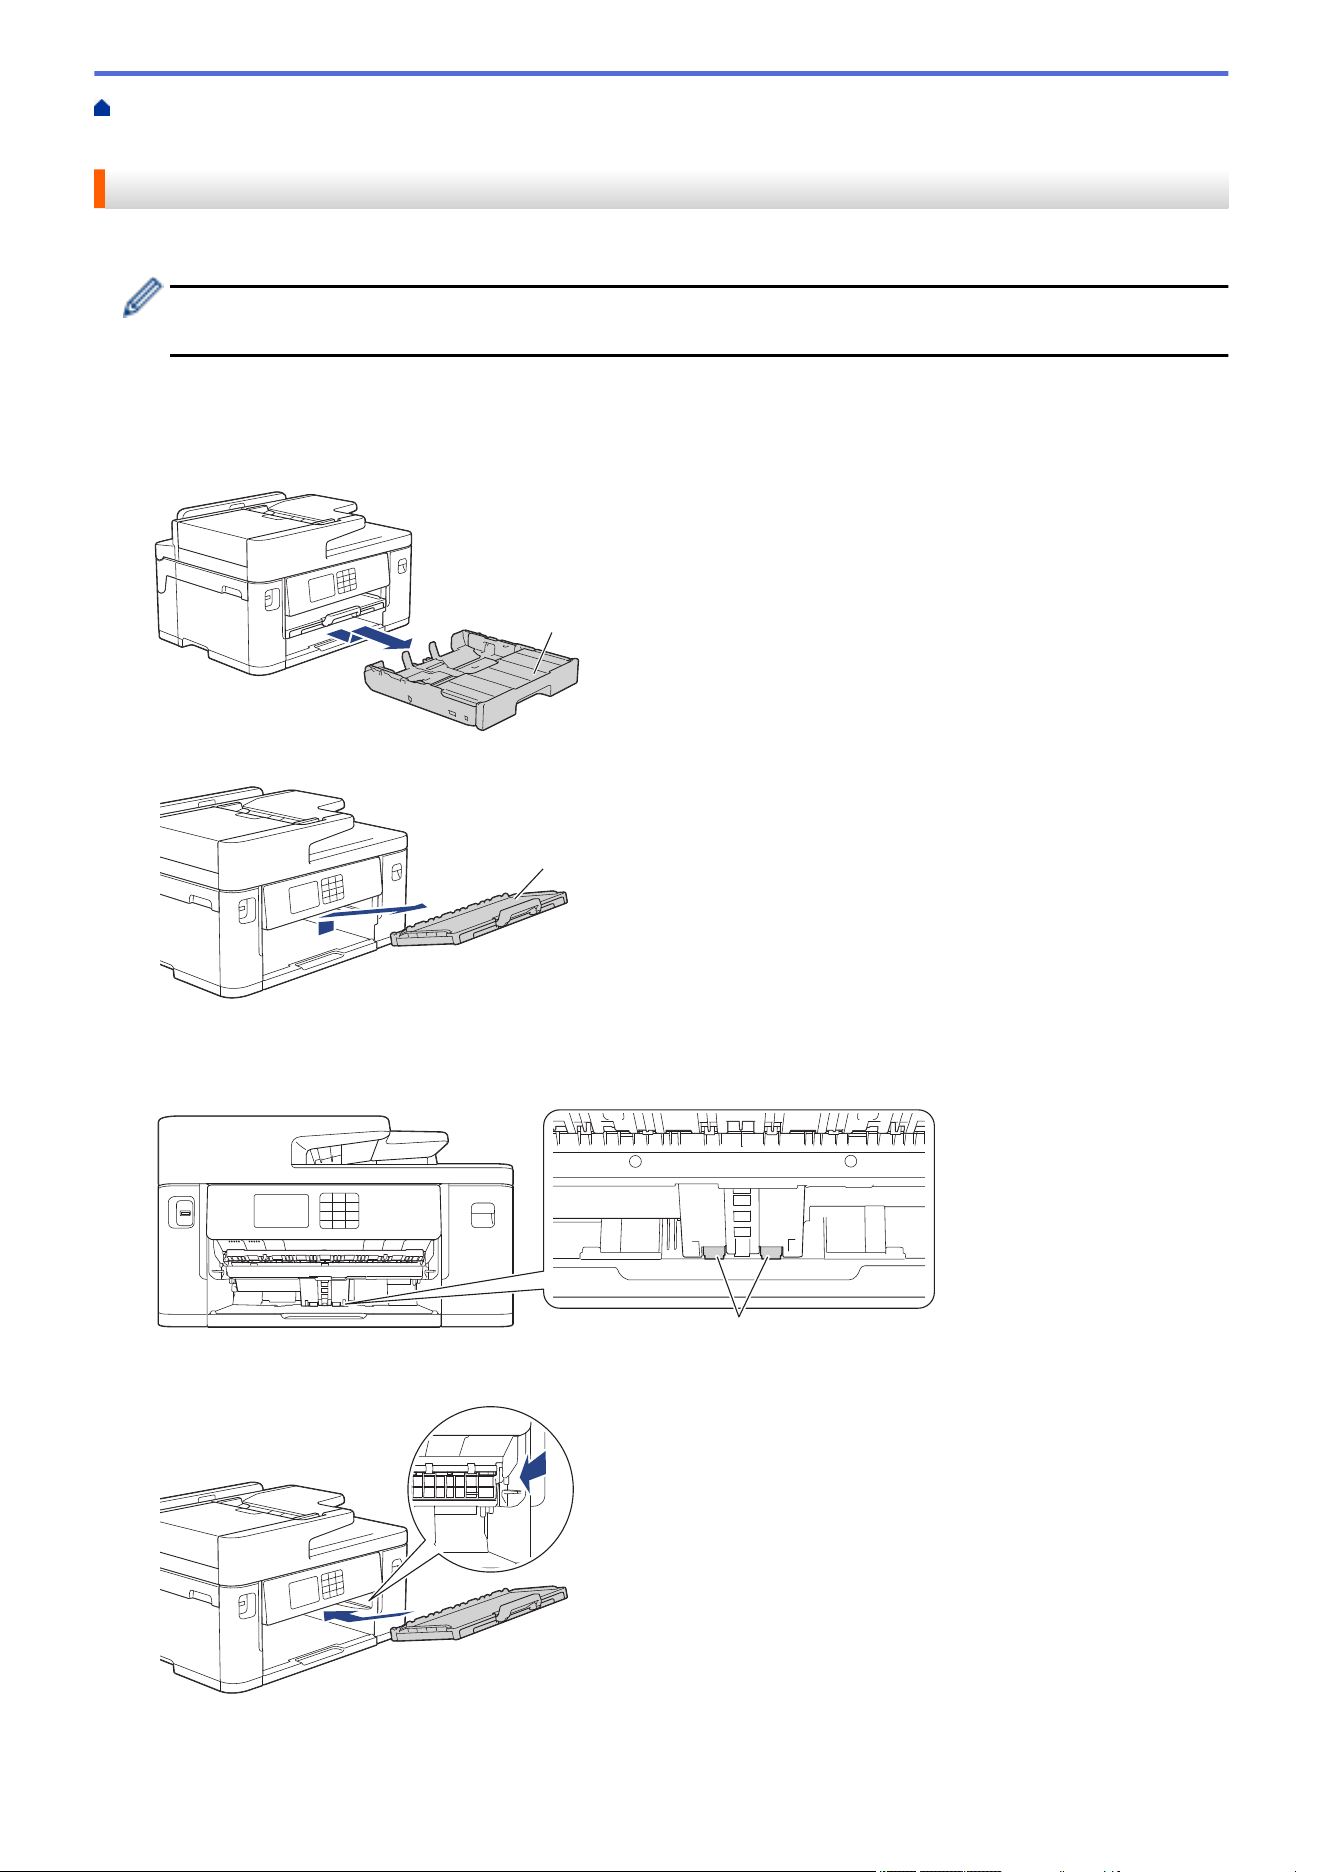
Home > Routine Maintenance > Clean Your Brother Machine > Clean the Paper Pick-up Rollers for Paper
Tray #1
Clean the Paper Pick-up Rollers for Paper Tray #1
Cleaning the paper pick-up rollers periodically may prevent paper jams by ensuring that paper feeds correctly.
(For some countries) A Cleaning Kit for Paper Pick-up Rollers is supplied with your machine. Clean the
paper pick-up rollers using the kit. For more information, see the instructions provided with the cleaning kit.
1. Unplug the machine from the electrical socket.
2. If the paper support flap is open, close it, and then close the paper support.
3. Pull the paper tray (1) completely out of the machine as shown by the arrow.
1
4. Lift the paper support (1), and then pull it at an angle completely out of the machine as shown by the arrow.
1
5. Clean the Paper Pick-up Rollers (1) with a soft lint-free cloth moistened with water. Slowly turn the rollers so
that the whole surface is cleaned. After cleaning, wipe the rollers with a dry, soft lint-free cloth to remove all
moisture.
1
6. Place the paper support firmly back in the machine. Make sure you fit the paper support into the channels.
7. Slowly push the paper tray completely into the machine.
8. Reconnect the power cord.
543


Home > Routine Maintenance > Clean Your Brother Machine > Clean the Paper Pick-up Rollers for Paper
Tray #2
Clean the Paper Pick-up Rollers for Paper Tray #2
Related Models: MFC-J2740DW/MFC-J5740DW/MFC-J5955DW
(For some countries) A Cleaning Kit for Paper Pick-up Rollers is supplied with your machine. Clean the
paper pick-up rollers using the kit. For more information, see the instructions provided with the cleaning kit.
1. Unplug the machine from the electrical socket.
2. If the paper support flap is open, close it, and then close the paper support.
3. Pull Tray #2 (1) completely out of the machine as shown by the arrow.
1
4. Clean the paper pick-up rollers for Tray #2 (1) with a soft lint-free cloth moistened with water. Slowly turn the
rollers so that the whole surface is cleaned. After cleaning, wipe the rollers with a dry, soft lint-free cloth to
remove all moisture.
1
5. Slowly push Tray #2 completely into the machine.
6. Reconnect the power cord.
Related Information
• Clean Your Brother Machine
Related Topics:
• Error and Maintenance Messages
• Paper Handling and Printing Problems
545

Home > Routine Maintenance > Check Your Brother Machine
Check Your Brother Machine
• Check the Print Quality
• Check the Print Alignment from Your Brother Machine
• Check the Ink Volume (Page Gauge)
• Monitor Machine Status from Your Computer (Windows)
• Monitor Machine Status Using Brother iPrint&Scan (Windows/Mac)
546
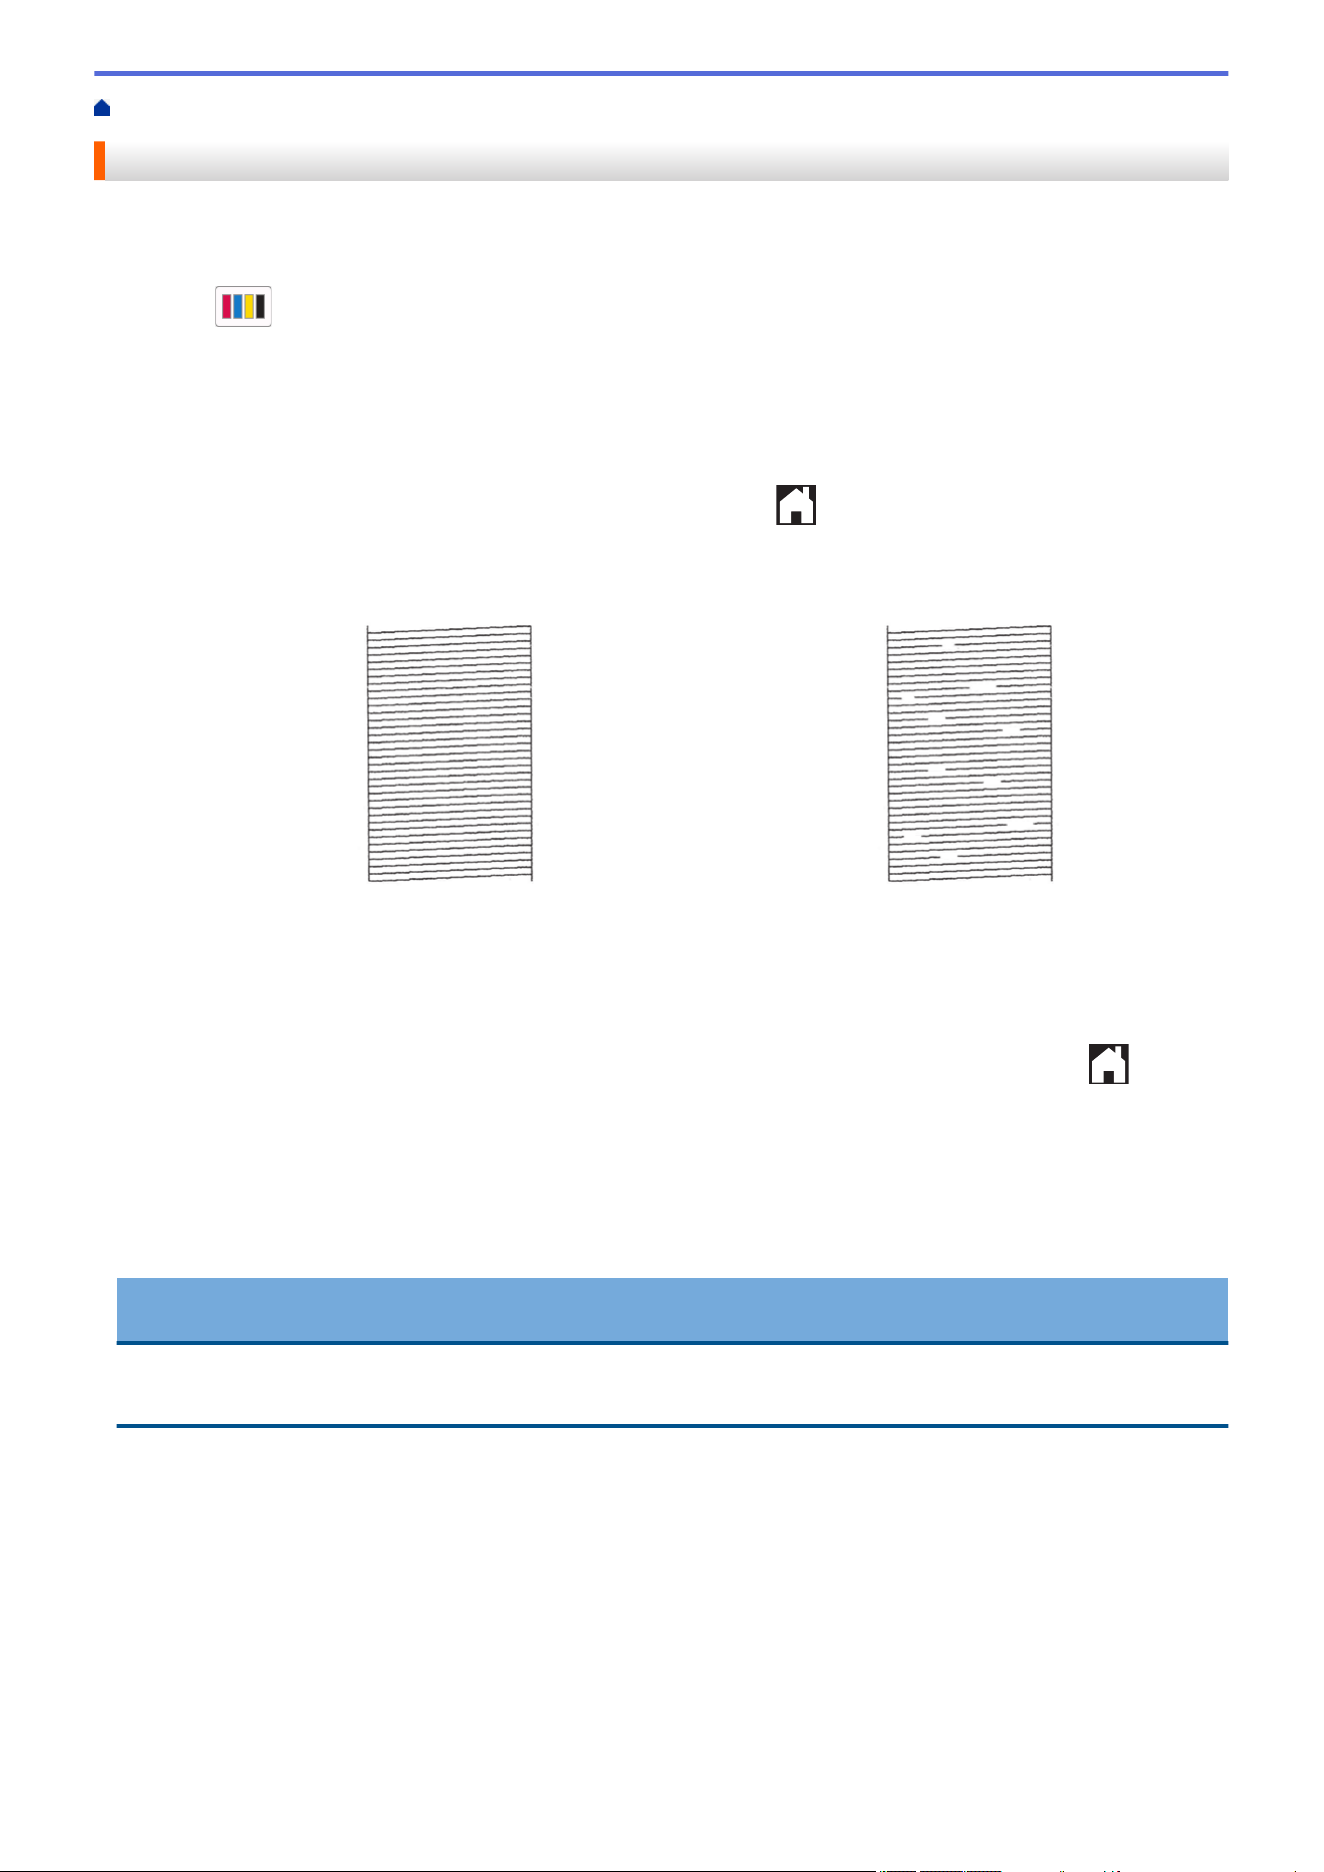
Home > Routine Maintenance > Check Your Brother Machine > Check the Print Quality
Check the Print Quality
If faded or streaked colours and text appear or if text is missing on your printouts, the print head nozzles may be
clogged. Print the check sheet and look at the nozzle check pattern.
1. Press
[Ink] > [Improve Print Quality] > [Check Print Quality].
2. Press [Start].
The machine prints the check sheet.
3. Check the quality of the four colour blocks on the sheet.
4. When an LCD message prompts you to check the print quality, do one of the following:
• If all lines are clear and visible, press [No], and then press
to finish the Print Quality check.
• If lines are missing (see Poor, as follows), press [Yes].
OK
Poor
5. When the LCD message prompts you to check the print quality of each colour, press the number of the
pattern (1–4) that most closely matches the printing result.
6. Do one of the following:
• If print head cleaning is needed, press [Start] to start the cleaning procedure.
• If print head cleaning is not needed, the menu screen reappears on the touchscreen. Press .
7. After the cleaning procedure is finished, the LCD message prompts you to print the check sheet again. Press
[Yes], and then press [Start].
The machine prints the check sheet again. Check the quality of the four colour blocks on the sheet again.
If you clean the print head several times and the print has not improved, try the Special cleaning method. See
Related Information.
IMPORTANT
DO NOT touch the print head. Touching the print head may cause permanent damage and may void the print
head's warranty.
547
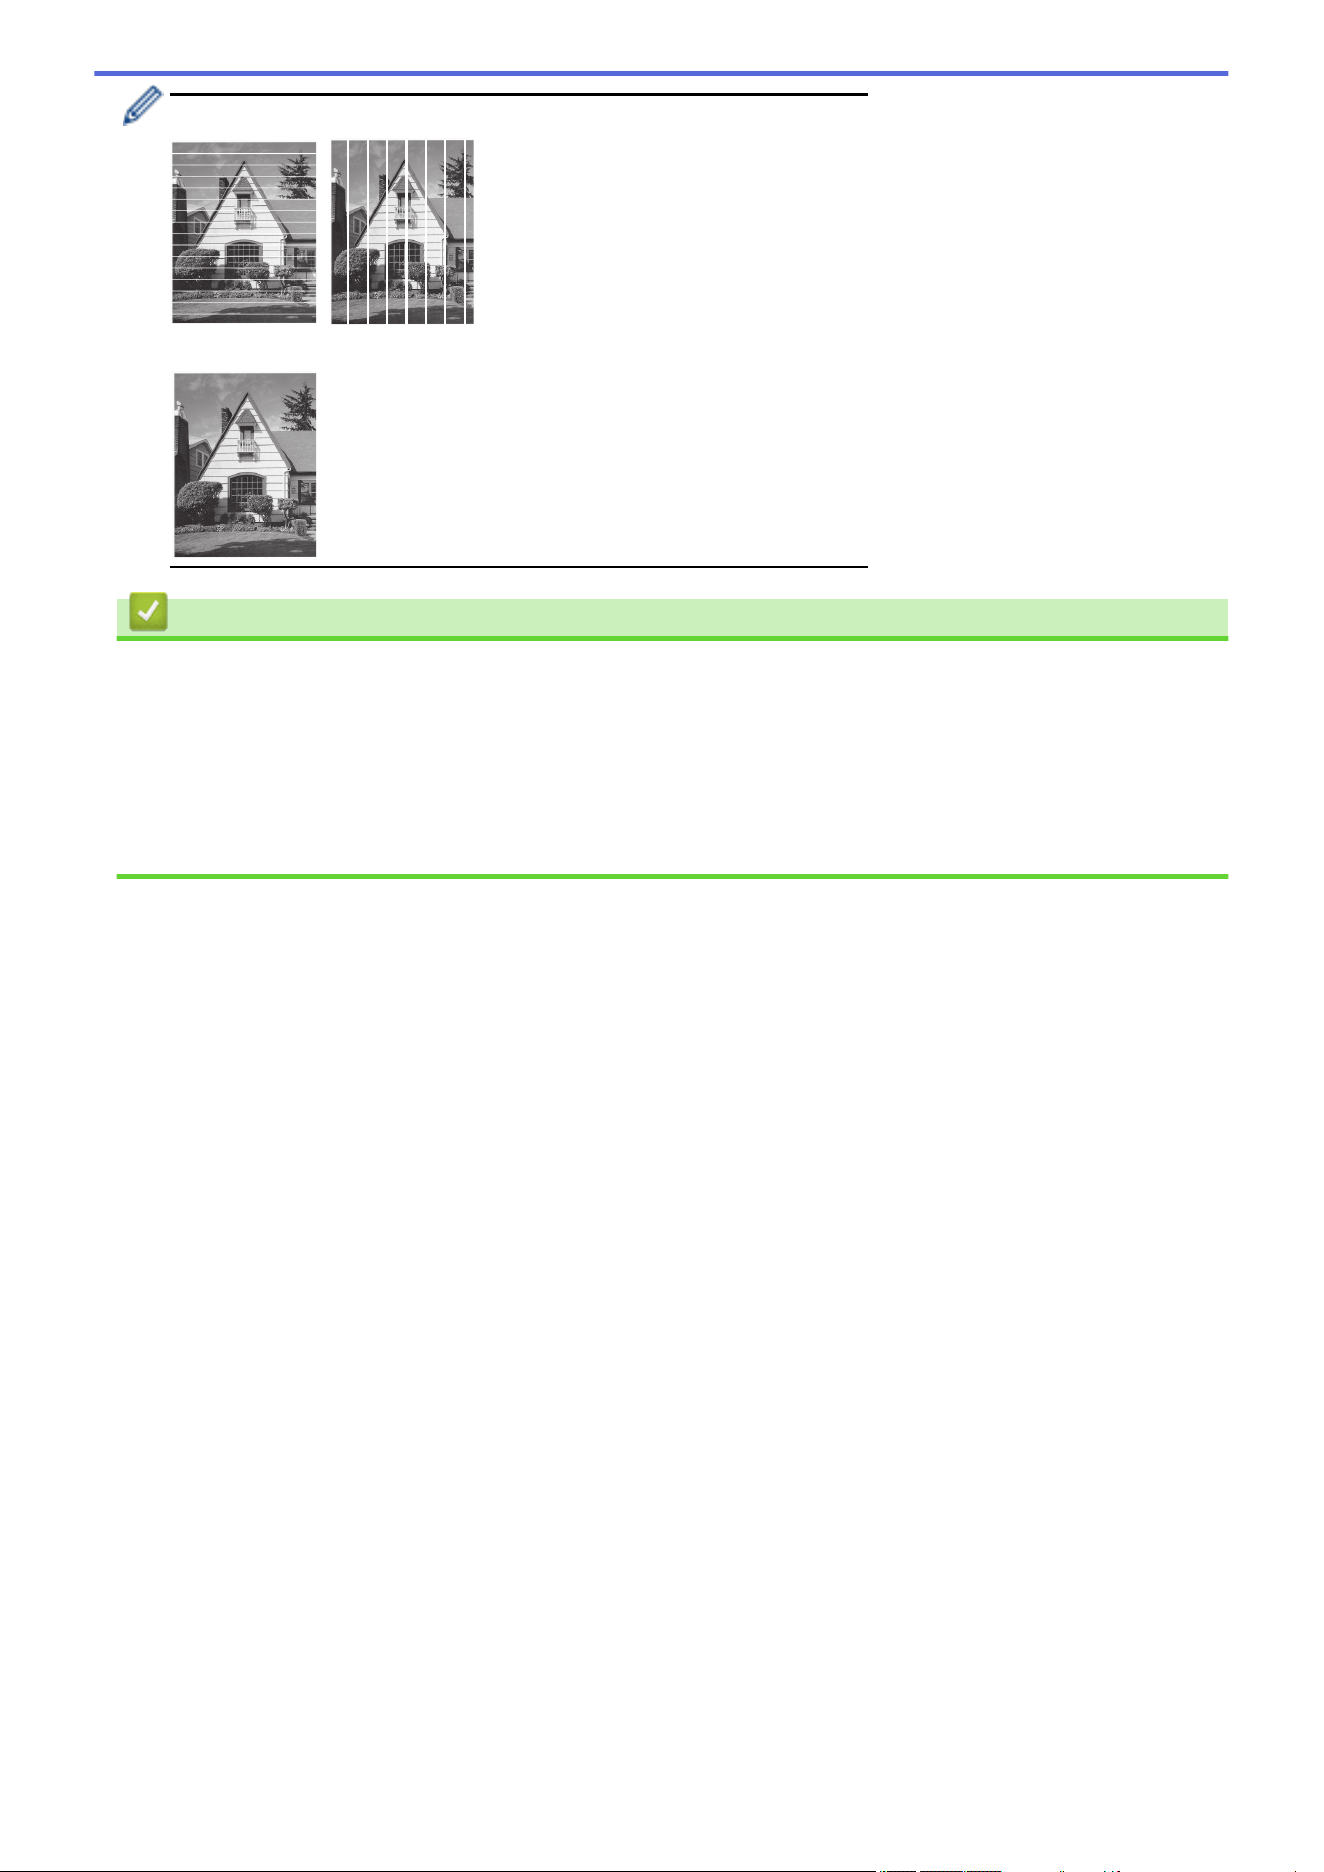
When a print head nozzle is clogged, the printed sample looks like this:
After the print head nozzle is cleaned, the lines are gone:
Related Information
• Check Your Brother Machine
Related Topics:
• Paper Handling and Printing Problems
• Clean the Print Head from Your Brother Machine
• Check the Print Alignment from Your Brother Machine
• Correct the Paper Feed to Clear Vertical Lines
548

Home > Routine Maintenance > Check Your Brother Machine > Check the Print Alignment from Your
Brother Machine
Check the Print Alignment from Your Brother Machine
If your printed text becomes blurred or images become faded after transporting the machine, adjust the print
alignment.
Before adjusting the print alignment, complete a print quality check first by pressing [Ink] > [Improve
Print Quality] > [Check Print Quality].
1. Press [Ink] > [Improve Print Quality] > [Alignment].
2. Press [Next].
3. Press [Yes] after a confirmation message if a print quality check has been completed appears on the LCD.
4. Press [Auto] or [Manual].
• If you select the [Auto] mode, the print alignment is automatically adjusted by scanning the check sheet.
• If you select the [Manual] mode, you need to input information printed on the check sheet manually.
5. Select the paper size to print the check sheet on.
If you selected the [Manual] mode, select either [Basic alignment] or [Advanced alignment] in
the following step.
6. Load specified size paper in the tray, and then press [Start].
The machine prints the check sheet.
7. Follow the instructions on the LCD.
When the print alignment is not adjusted correctly, text looks blurry or crooked, like this:
After the print alignment is adjusted correctly, text looks like this:
Related Information
• Check Your Brother Machine
Related Topics:
• Paper Handling and Printing Problems
549
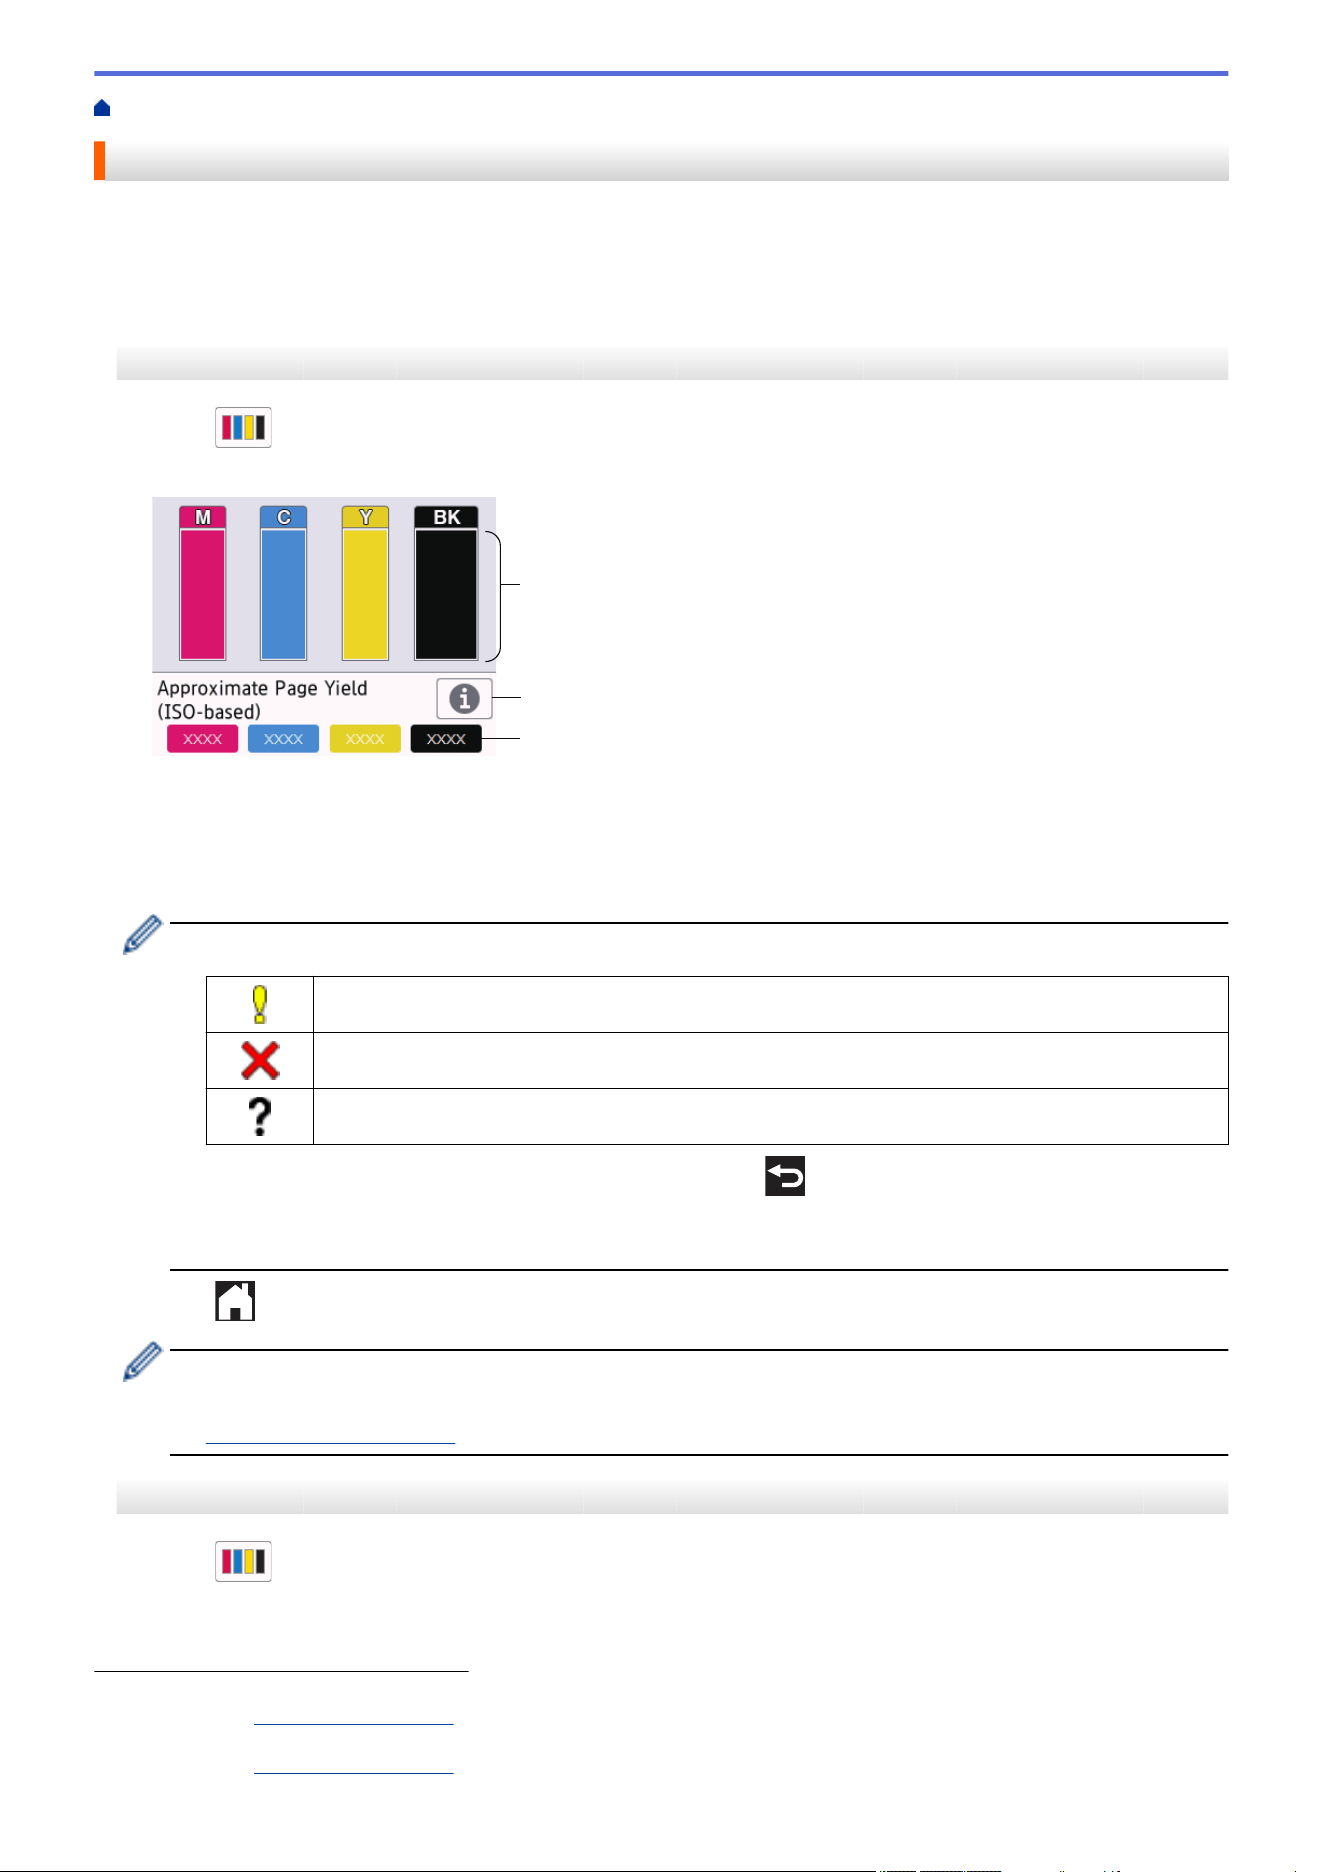
Home > Routine Maintenance > Check Your Brother Machine > Check the Ink Volume (Page Gauge)
Check the Ink Volume (Page Gauge)
Although an ink volume icon appears on the machine's LCD, you can view a larger graph that displays the
approximate ink remaining in each cartridge.
>> MFC-J2340DW/MFC-J2740DW/MFC-J5340DW/MFC-J5740DW
>> MFC-J5855DW/MFC-J5955DW
MFC-J2340DW/MFC-J2740DW/MFC-J5340DW/MFC-J5740DW
1. Press [Ink] > [Ink Volume].
The touchscreen displays the ink volume and the page gauge
1
.
a
b
c ¹
a. Displays the cartridge ink level.
b. Press to change the display settings for the approximate page yield.
c. The page gauge
1
shows the approximate number of remaining pages that can be printed with the
cartridges.
• When the ink cartridge is near the end of its life or having a problem, one of the following icons appears:
The ink level is low.
The ink cartridge needs to be replaced.
There is a problem with the ink cartridge.
• To check or print the ink cartridge model numbers, press (Back) to return to the [Ink] menu
screen.
Press [Ink Cartridge Model], and follow the instructions on the touchscreen.
2. Press .
• You can also check the ink volume from your computer.
• For detailed information about the measuring methods used for the approximate yields, visit
support.brother.com/yield.
MFC-J5855DW/MFC-J5955DW
1. Press [Ink] > [Ink Volume].
The touchscreen displays the ink volume and the page gauge
2
.
1 Page Gauge is an estimate for informational purposes only and does not display the actual remaining page yield. For actual cartridge yield
information, visit support.brother.com/yield.
2 Page Gauge is an estimate for informational purposes only and does not display the actual remaining page yield. For actual cartridge yield
information, visit
support.brother.com/yield.
550
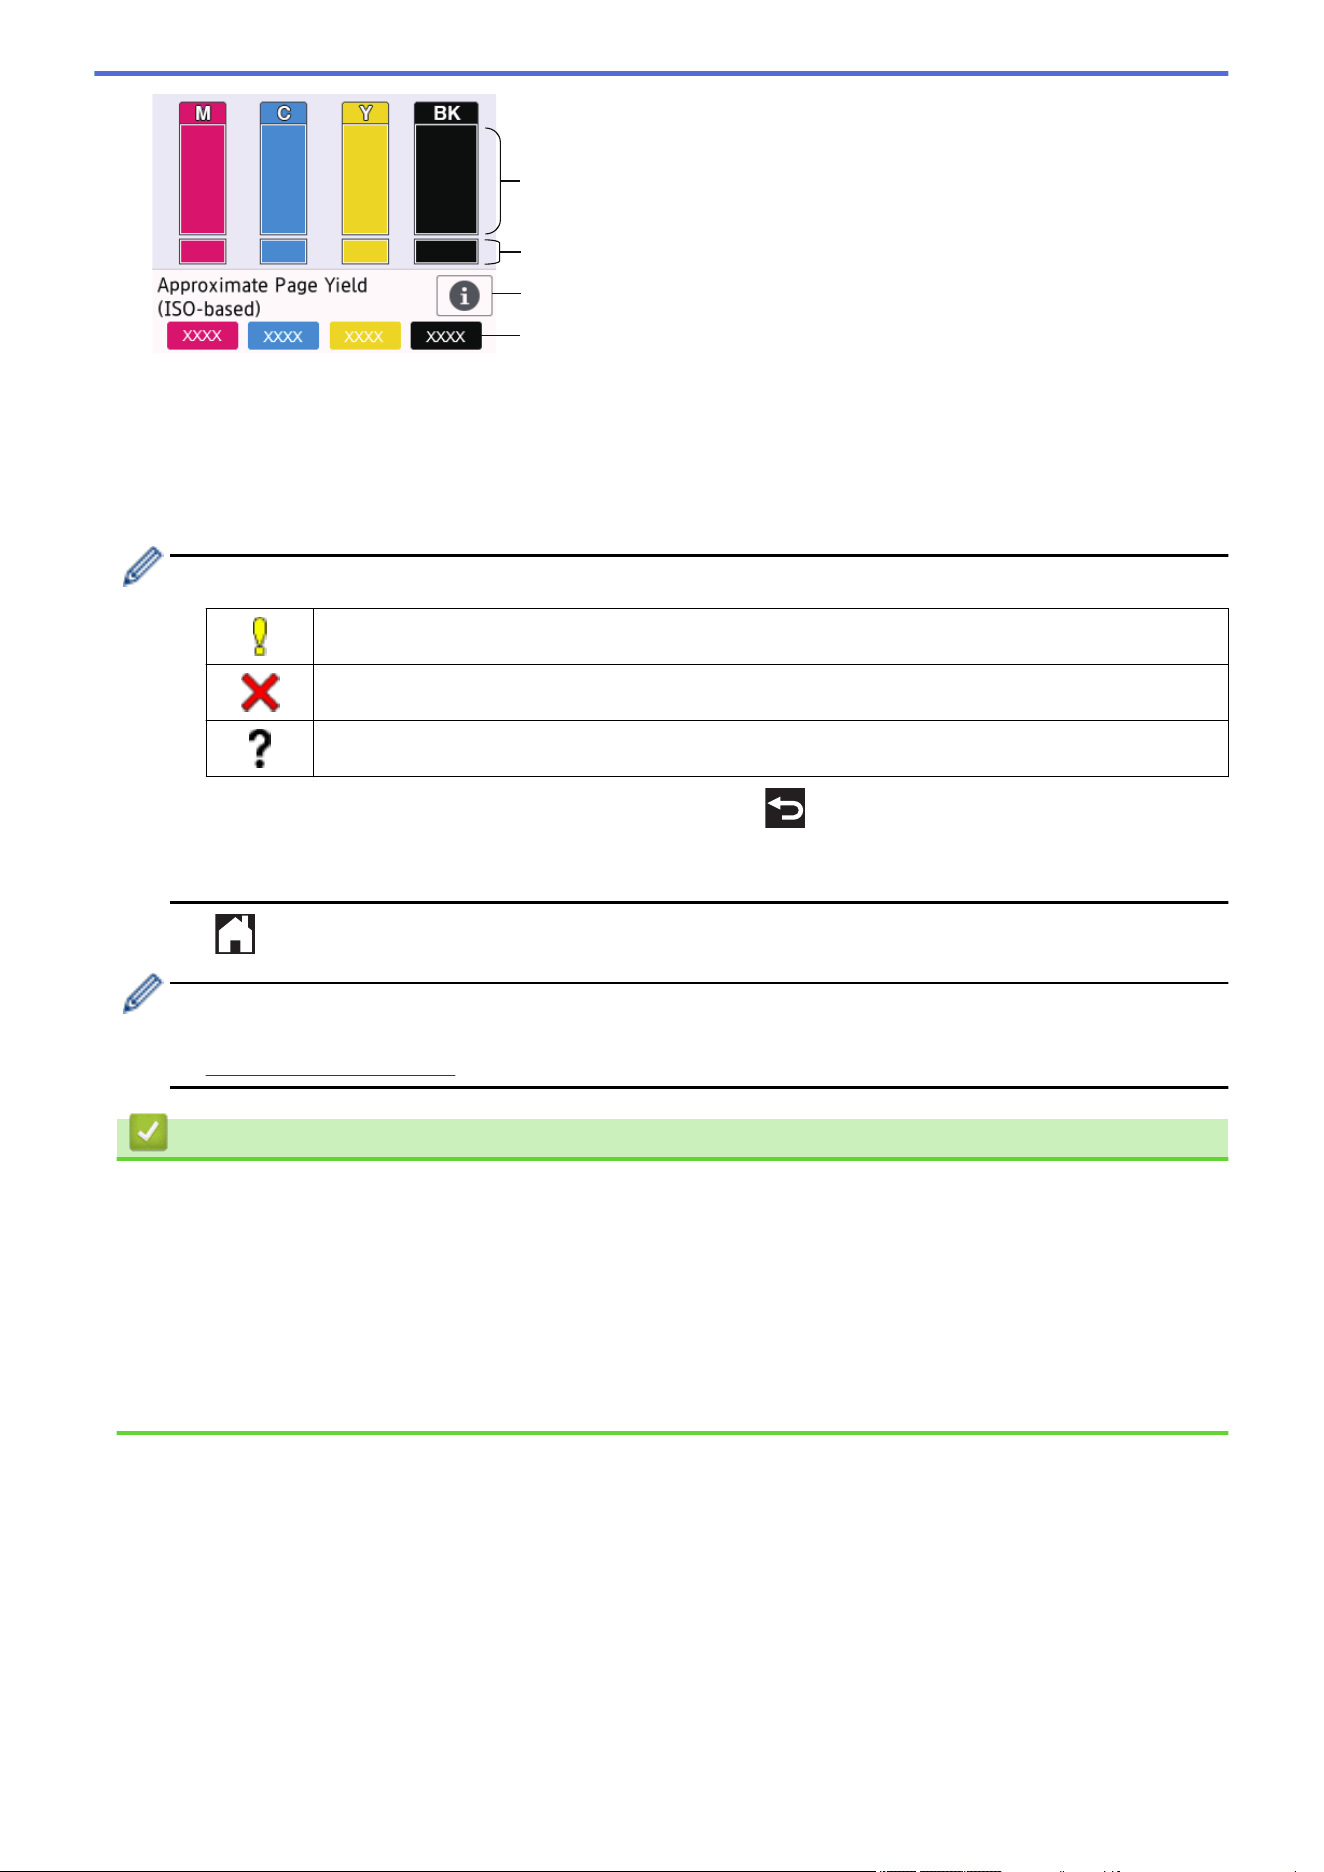
a
b
c
d ¹
a. Displays the cartridge ink level.
b. Displays the ink level remaining in the internal ink reservoir.
c. Press to change the display settings for the approximate page yield.
d. The page gauge
2
shows the approximate number of remaining pages that can be printed with the
cartridges.
• When the ink cartridge is near the end of its life or having a problem, one of the following icons appears:
The ink level is low.
The ink cartridge needs to be replaced.
There is a problem with the ink cartridge.
• To check or print the ink cartridge model numbers, press (Back) to return to the [Ink] menu
screen.
Press [Ink Cartridge Model], and follow the instructions on the touchscreen.
2. Press .
• You can also check the ink volume from your computer.
• For detailed information about the measuring methods used for the approximate yields, visit
support.brother.com/yield.
Related Information
• Check Your Brother Machine
Related Topics:
• Touchscreen LCD Overview
• Settings Screen Overview
• Print a Document (Windows)
• Monitor Machine Status from Your Computer (Windows)
• Monitor Machine Status Using Brother iPrint&Scan (Windows/Mac)
551
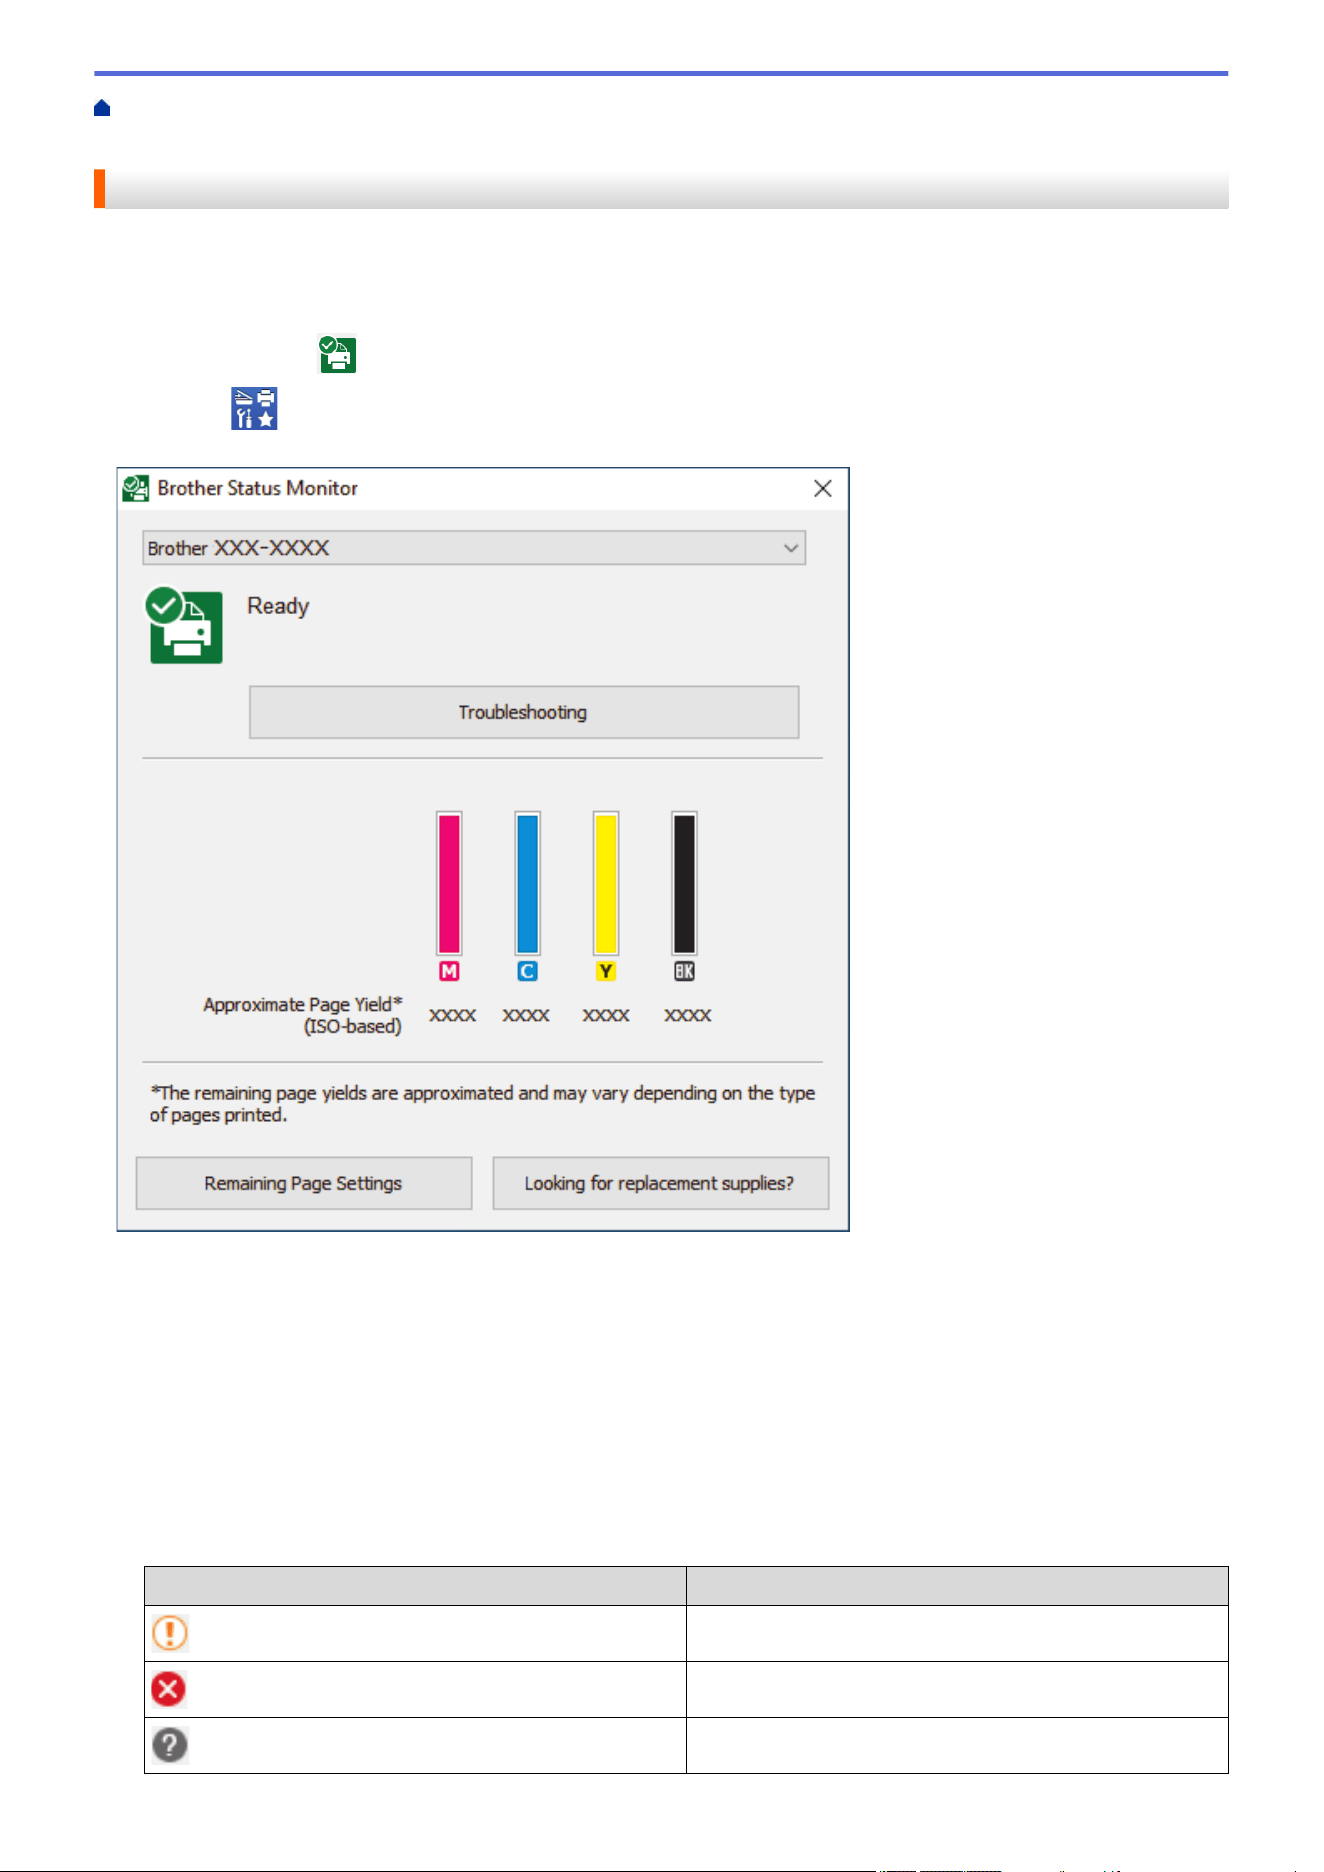
Home > Routine Maintenance > Check Your Brother Machine > Monitor Machine Status from Your
Computer (Windows)
Monitor Machine Status from Your Computer (Windows)
The Status Monitor utility is a configurable software tool for monitoring the status of one or more machines; it
allows you to get immediate notification of errors.
Do one of the following:
- Double-click the
icon in the task tray.
- Launch
(Brother Utilities), and then click the drop-down list and select your model name (if not already
selected). Click Tools in the left navigation bar, and then click Status Monitor.
The actual screen may differ from the screen shown above.
Troubleshooting
Click the Troubleshooting button to access the troubleshooting website.
Remaining Page Settings
Click the Remaining Page Settings button to change the display settings for the approximate page yield.
Looking for replacement supplies?
Click the Looking for replacement supplies? button for more information on Brother original supplies.
Error icons
Icon
Description
The ink level is low.
The ink cartridge needs to be replaced.
There is a problem with the ink cartridge.
552

You can also check the ink amount using Web Based Management.
Related Information
• Check Your Brother Machine
• Status Monitor Indicators and What They Mean (Windows)
• Turn Off the Show Status Monitor Feature (Windows)
• Turn Off the Status Monitor (Windows)
Related Topics:
• Cancel a Print Job (Windows)
• Check the Ink Volume (Page Gauge)
553
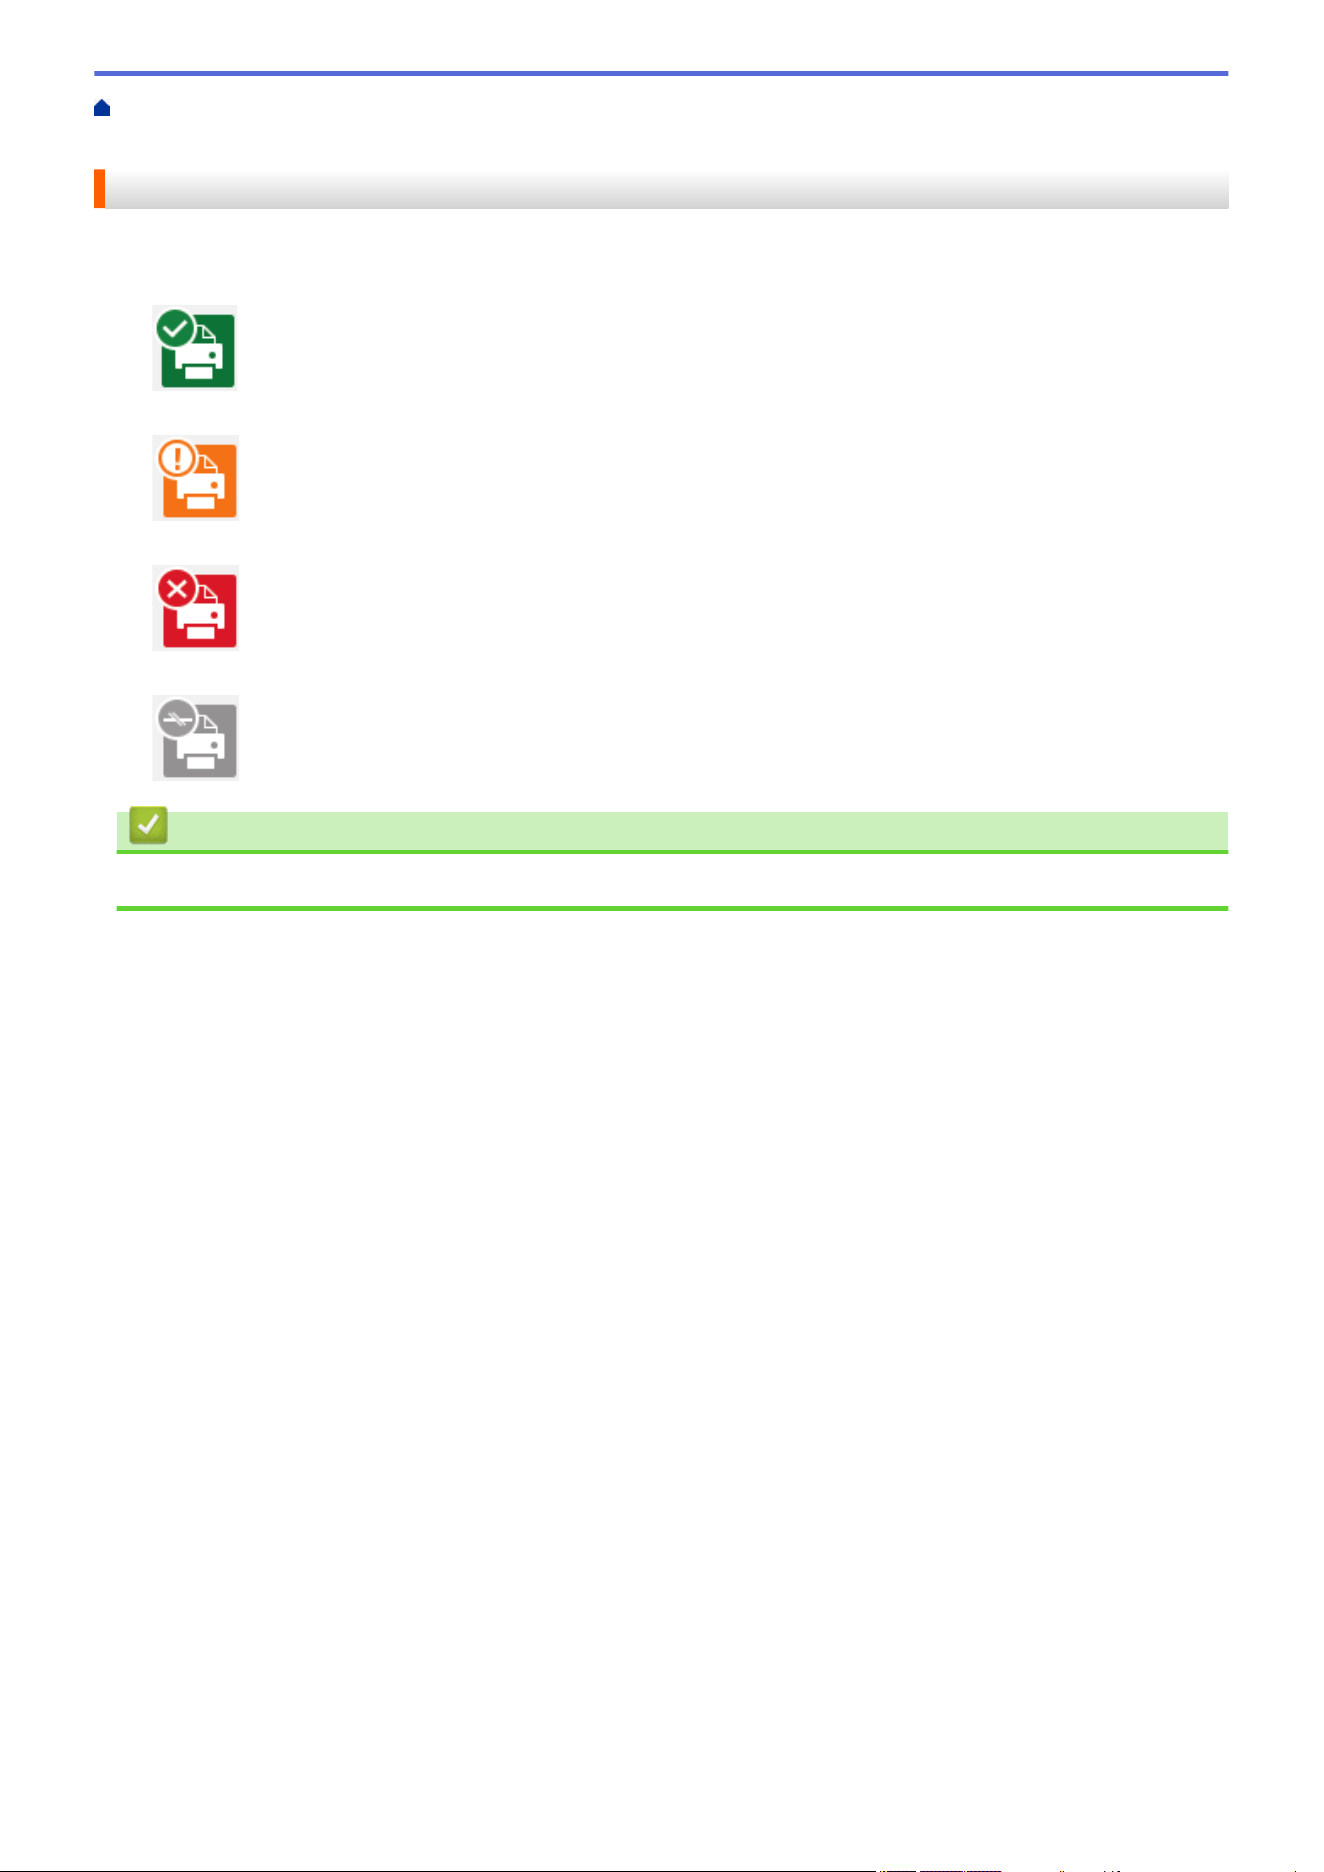
Home > Routine Maintenance > Check Your Brother Machine > Monitor Machine Status from Your
Computer (Windows) > Status Monitor Indicators and What They Mean (Windows)
Status Monitor Indicators and What They Mean (Windows)
When you start up your computer, the Brother Status Monitor icon appears on the task tray.
• A green icon indicates the normal stand-by condition.
• A yellow icon indicates a warning.
• A red icon indicates an error has occurred.
• A grey icon indicates the machine is offline.
Related Information
• Monitor Machine Status from Your Computer (Windows)
554

Home > Routine Maintenance > Check Your Brother Machine > Monitor Machine Status from Your
Computer (Windows) > Turn Off the Show Status Monitor Feature (Windows)
Turn Off the Show Status Monitor Feature (Windows)
The Show Status Monitor feature lets you know if there is a problem with a device that your computer is
monitoring. The default setting is Only when printing from this PC. To turn it off, follow these steps:
1. Right-click the (Brother Status Monitor) icon or window, select the Status Monitor Settings option, and
then click Options.
The Options window appears.
2. Click the Show Status Monitor tab, and then select Off for Status Monitor Display Options:.
3. Click OK.
Even if the Show Status Monitor feature is turned off, you can check the machine’s status at any time by
displaying the Status Monitor.
Related Information
• Monitor Machine Status from Your Computer (Windows)
555

Home > Routine Maintenance > Check Your Brother Machine > Monitor Machine Status from Your
Computer (Windows) > Turn Off the Status Monitor (Windows)
Turn Off the Status Monitor (Windows)
1. Right-click the (Brother Status Monitor) icon or window, and then select Exit.
2. Click OK.
Related Information
• Monitor Machine Status from Your Computer (Windows)
556
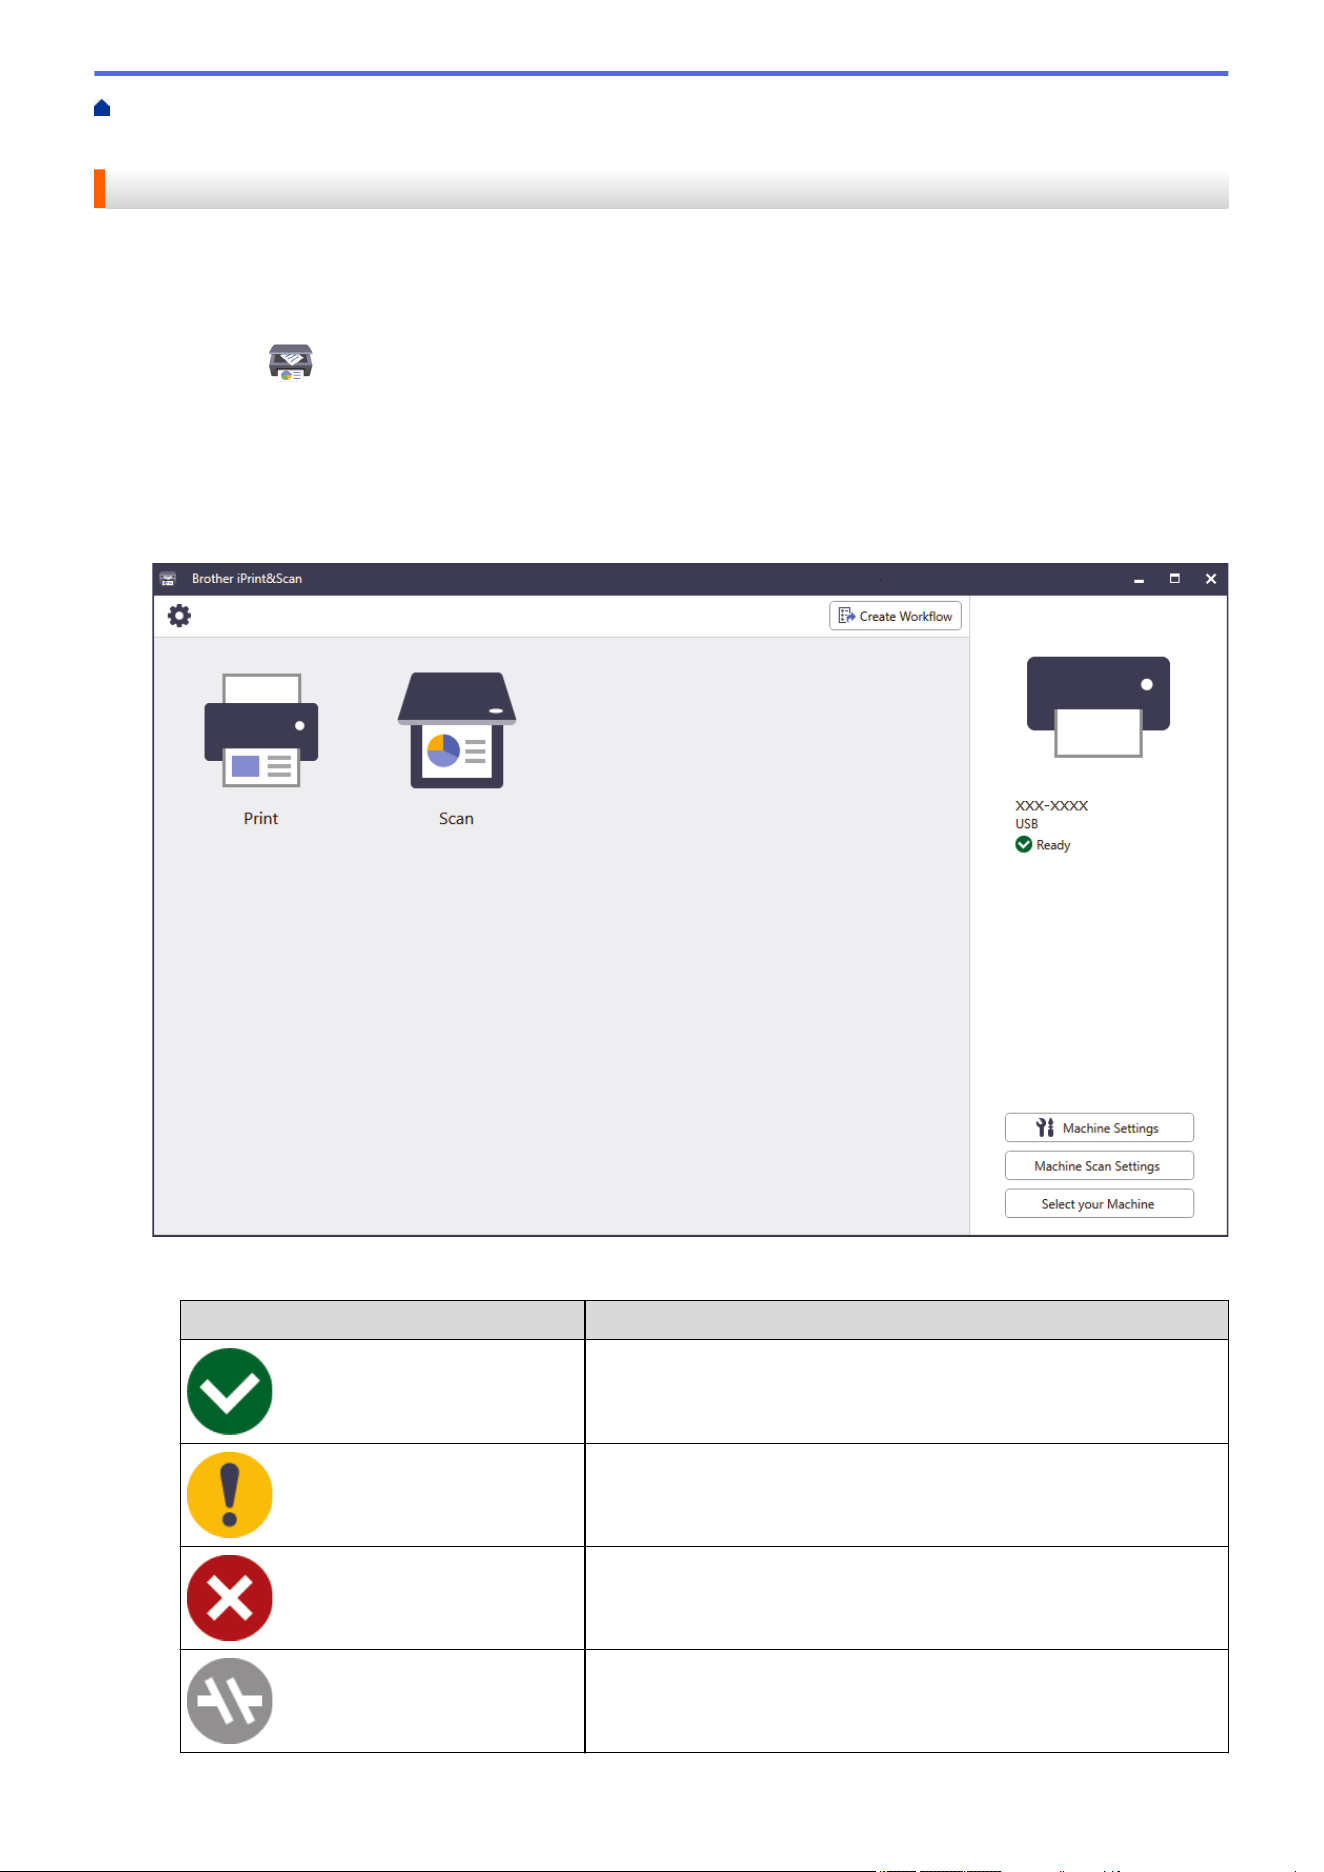
Home > Routine Maintenance > Check Your Brother Machine > Monitor Machine Status Using Brother
iPrint&Scan (Windows/Mac)
Monitor Machine Status Using Brother iPrint&Scan (Windows/Mac)
Brother iPrint&Scan allows you to monitor your Brother machine's status.
1. Start Brother iPrint&Scan.
• Windows
Launch
(Brother iPrint&Scan).
• Mac
In the Finder menu bar, click Go > Applications, and then double-click the iPrint&Scan icon.
The Brother iPrint&Scan screen appears.
2. If your Brother machine is not selected, click the Select your Machine button, and then select your model
name from the list. Click OK.
Status icons
Icon
Description
A green icon indicates the normal stand-by condition.
A yellow icon indicates a warning.
A red icon indicates an error has occurred.
A grey icon indicates the machine is offline.
557
Error icons
Icon Description
The ink level is low.
The ink cartridge needs to be replaced.
There is a problem with the ink cartridge.
• The actual screen may differ depending on the version of the application.
• The remaining ink amount is approximate and may differ from the actual amount of remaining ink.
• You can also check the remaining ink amount using Web Based Management.
Related Information
• Check Your Brother Machine
558
Home > Routine Maintenance > Correct the Paper Feed to Clear Vertical Lines
Correct the Paper Feed to Clear Vertical Lines
Adjust the paper feed to reduce vertical lines.
Before adjusting the paper feed, complete a print quality check first by pressing [Ink] > [Improve
Print Quality] > [Check Print Quality].
1. Press [Ink] > [Improve Print Quality] > [Correct Paper Feed].
2. Press [Next].
3. Press [Yes] after a confirmation message if a print quality check has been completed appears on the LCD.
4. Press [Auto] or [Manual].
• If you select the [Auto] mode, the paper feed is automatically adjusted by scanning the check sheet.
• If you select the [Manual] mode, you need to input information printed on the check sheet manually.
5. Select the paper size to print the check sheet on.
6. Load specified size paper in the tray, and then press [Start].
The machine prints the check sheet.
7. Follow the instructions on the LCD.
Related Information
• Routine Maintenance
Related Topics:
• Paper Handling and Printing Problems
559
Home > Routine Maintenance > Change the Print Options to Improve Your Print Results
Change the Print Options to Improve Your Print Results
If your printouts do not look the way you expect, change the print settings on your Brother machine to improve
printout quality. Print speed may be slower when using these settings.
• These instructions allow you to improve your print results when you are using your machine for copying
or printing from media, or a mobile device.
• If you are experiencing poor print quality when printing from your computer, change the settings in the
printer driver or in the application you use to print.
1. Press [Ink] > [Print Options].
2. Press one of the following options:
Option Description
Reduce Smudging
Select this option according to your paper type and whether you are using 1-sided
or 2-sided printing if you have problems with smudged printouts or paper jams.
Reduce Uneven
Lines
Select this option according to your paper size if you have problems with uneven
lines.
Enhance Print
Select this option if you have problems with blurred printouts.
3. Follow the LCD menus.
4. Press
.
Related Information
• Routine Maintenance
Related Topics:
• Paper Handling and Printing Problems
• Other Problems
• Prevent Smudged Printouts and Paper Jams (Windows)
• Print Settings (Windows)
• Copy on Both Sides of the Paper (2-sided Copy)
560
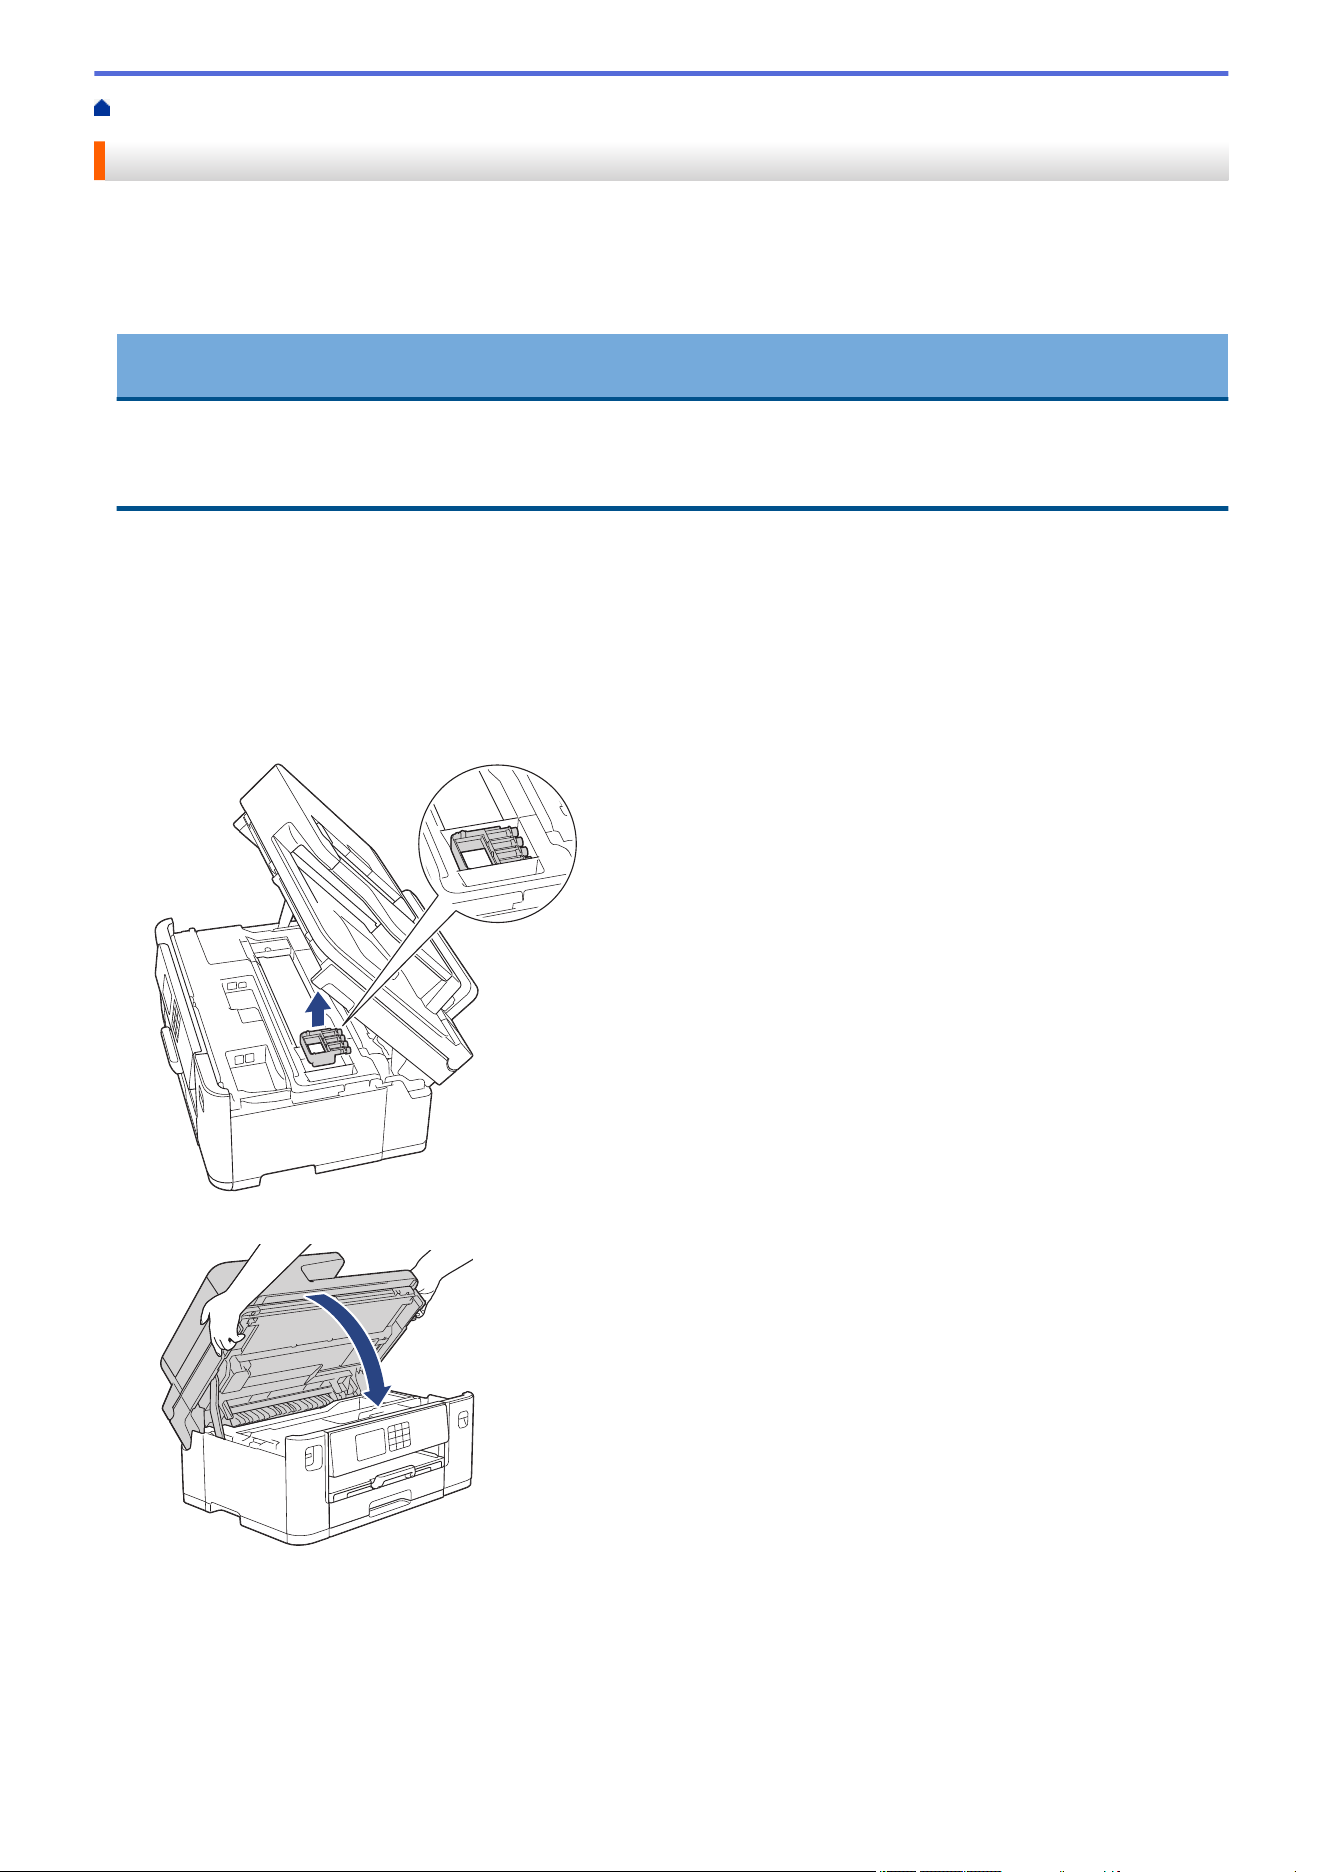
Home > Routine Maintenance > Pack and Ship Your Machine
Pack and Ship Your Machine
• When you transport the machine, use the packing materials that came with your machine. Do not tip or turn
the product upside down. If you do not pack the machine correctly, any damage that may occur in transit may
not be covered by your warranty.
• The machine should be adequately insured with the carrier.
IMPORTANT
It is important to allow the machine to “park” the print head after a print job. Listen carefully to the machine
before unplugging it to make sure that all mechanical noises have stopped. Not allowing the machine to finish
this parking process may lead to print problems and possible damage to the print head.
1. Unplug the machine from the electrical socket.
2. Using both hands, use the finger holds on each side of the machine to lift the scanner cover into the open
position. Then unplug the machine from the telephone wall socket and take the telephone line cord out of the
machine.
3. Unplug the interface cable from the machine, if it is connected.
4. (MFC-J2340DW/MFC-J2740DW/MFC-J5340DW/MFC-J5740DW) Remove the orange protective part from its
storage place inside the machine.
5. Gently close the scanner cover using the finger holds on each side.
6. Open the ink cartridge cover.
561
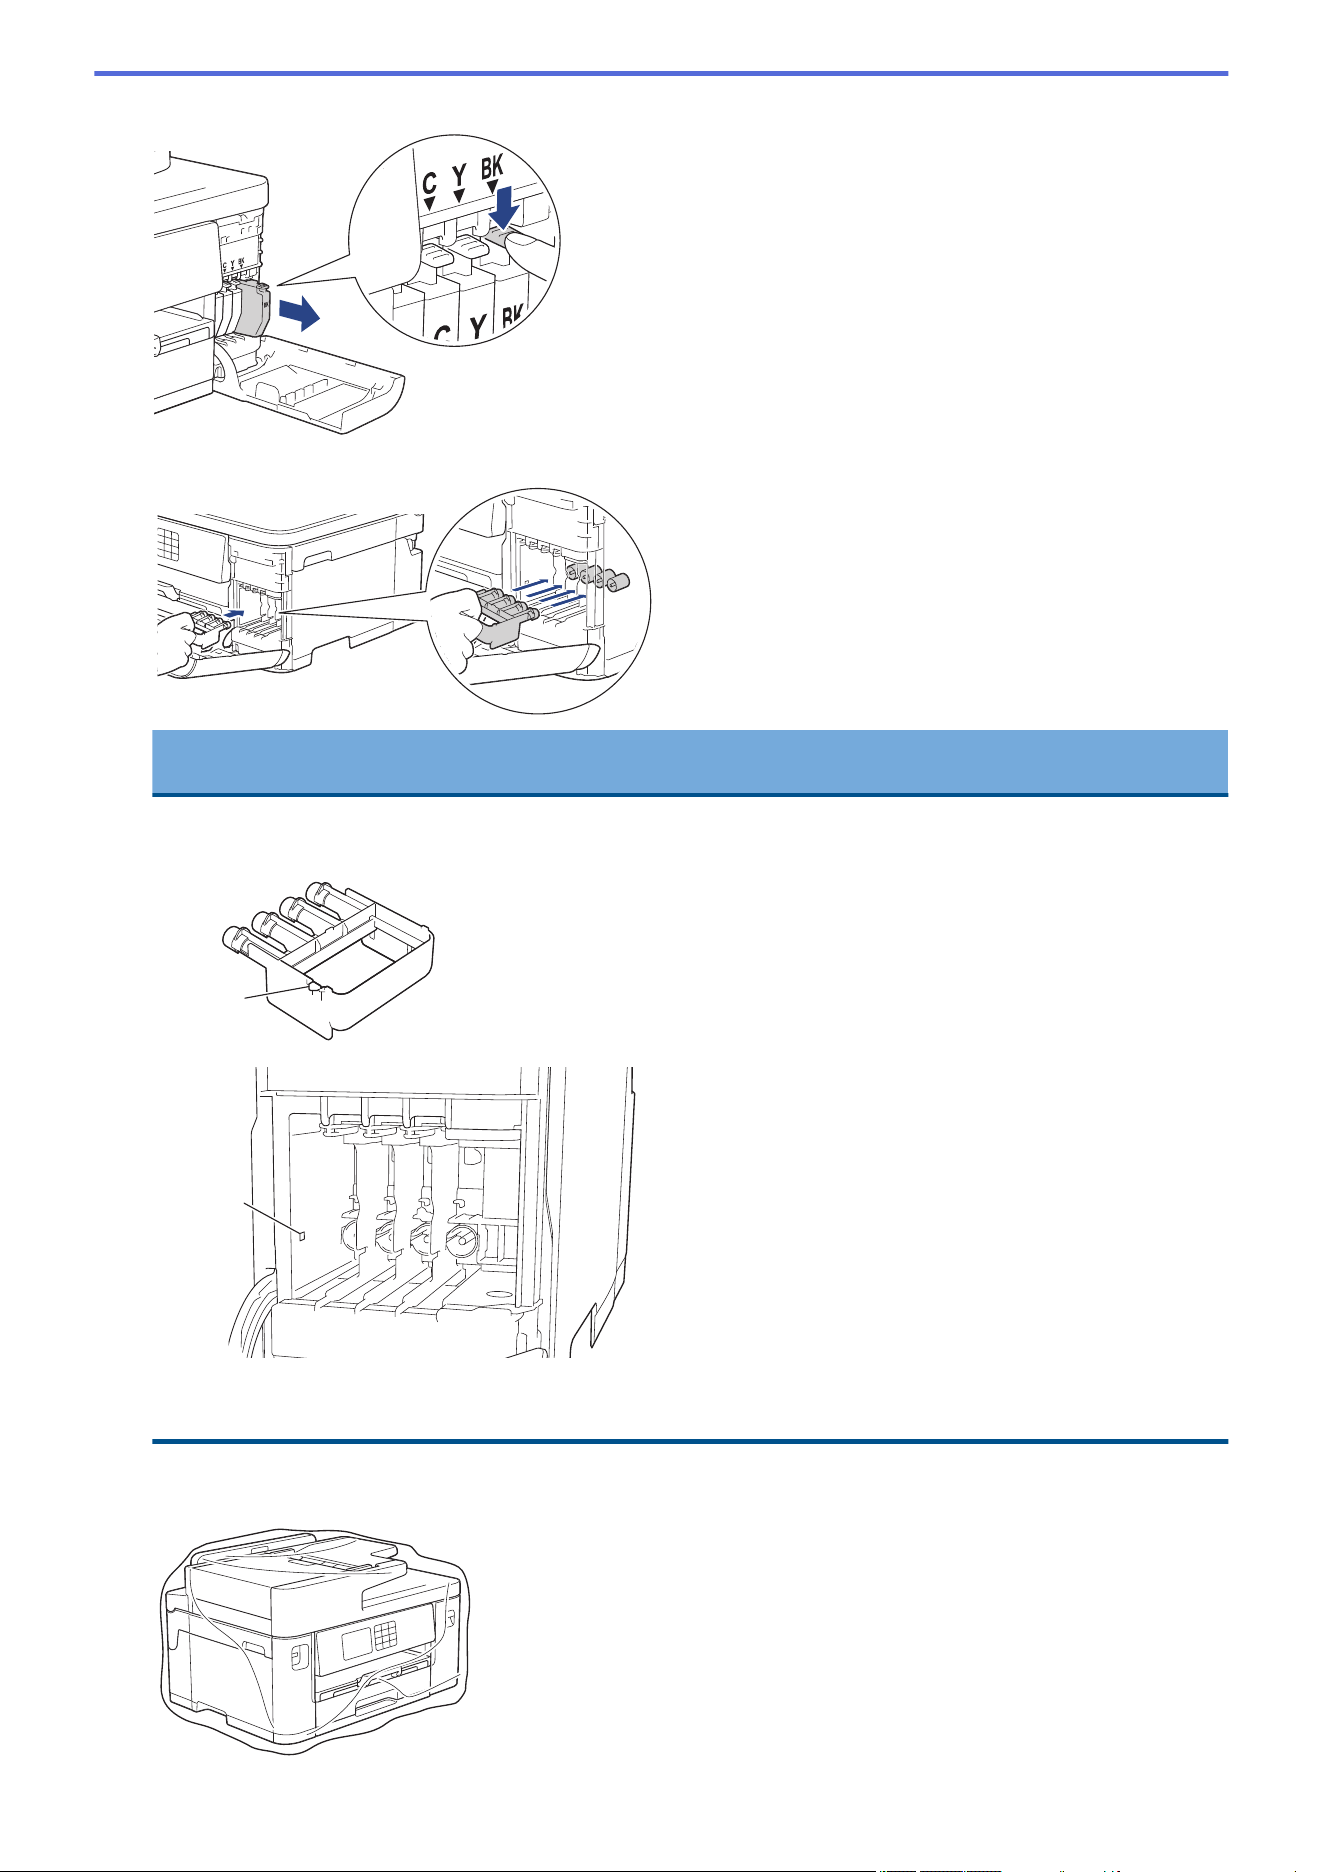
7. Press the ink release levers to release the ink cartridges and then take out the ink cartridges.
8. (MFC-J2340DW/MFC-J2740DW/MFC-J5340DW/MFC-J5740DW) Install the orange protective part.
IMPORTANT
• Make sure the plastic tab on the left side of the orange protective part (1) clicks securely into place
(2).
1
2
• If you are not able to find the orange protective part, ship the machine without it. DO NOT leave the
ink cartridges in the machine during shipping.
9. Close the ink cartridge cover.
10. Wrap the machine in the bag.
562
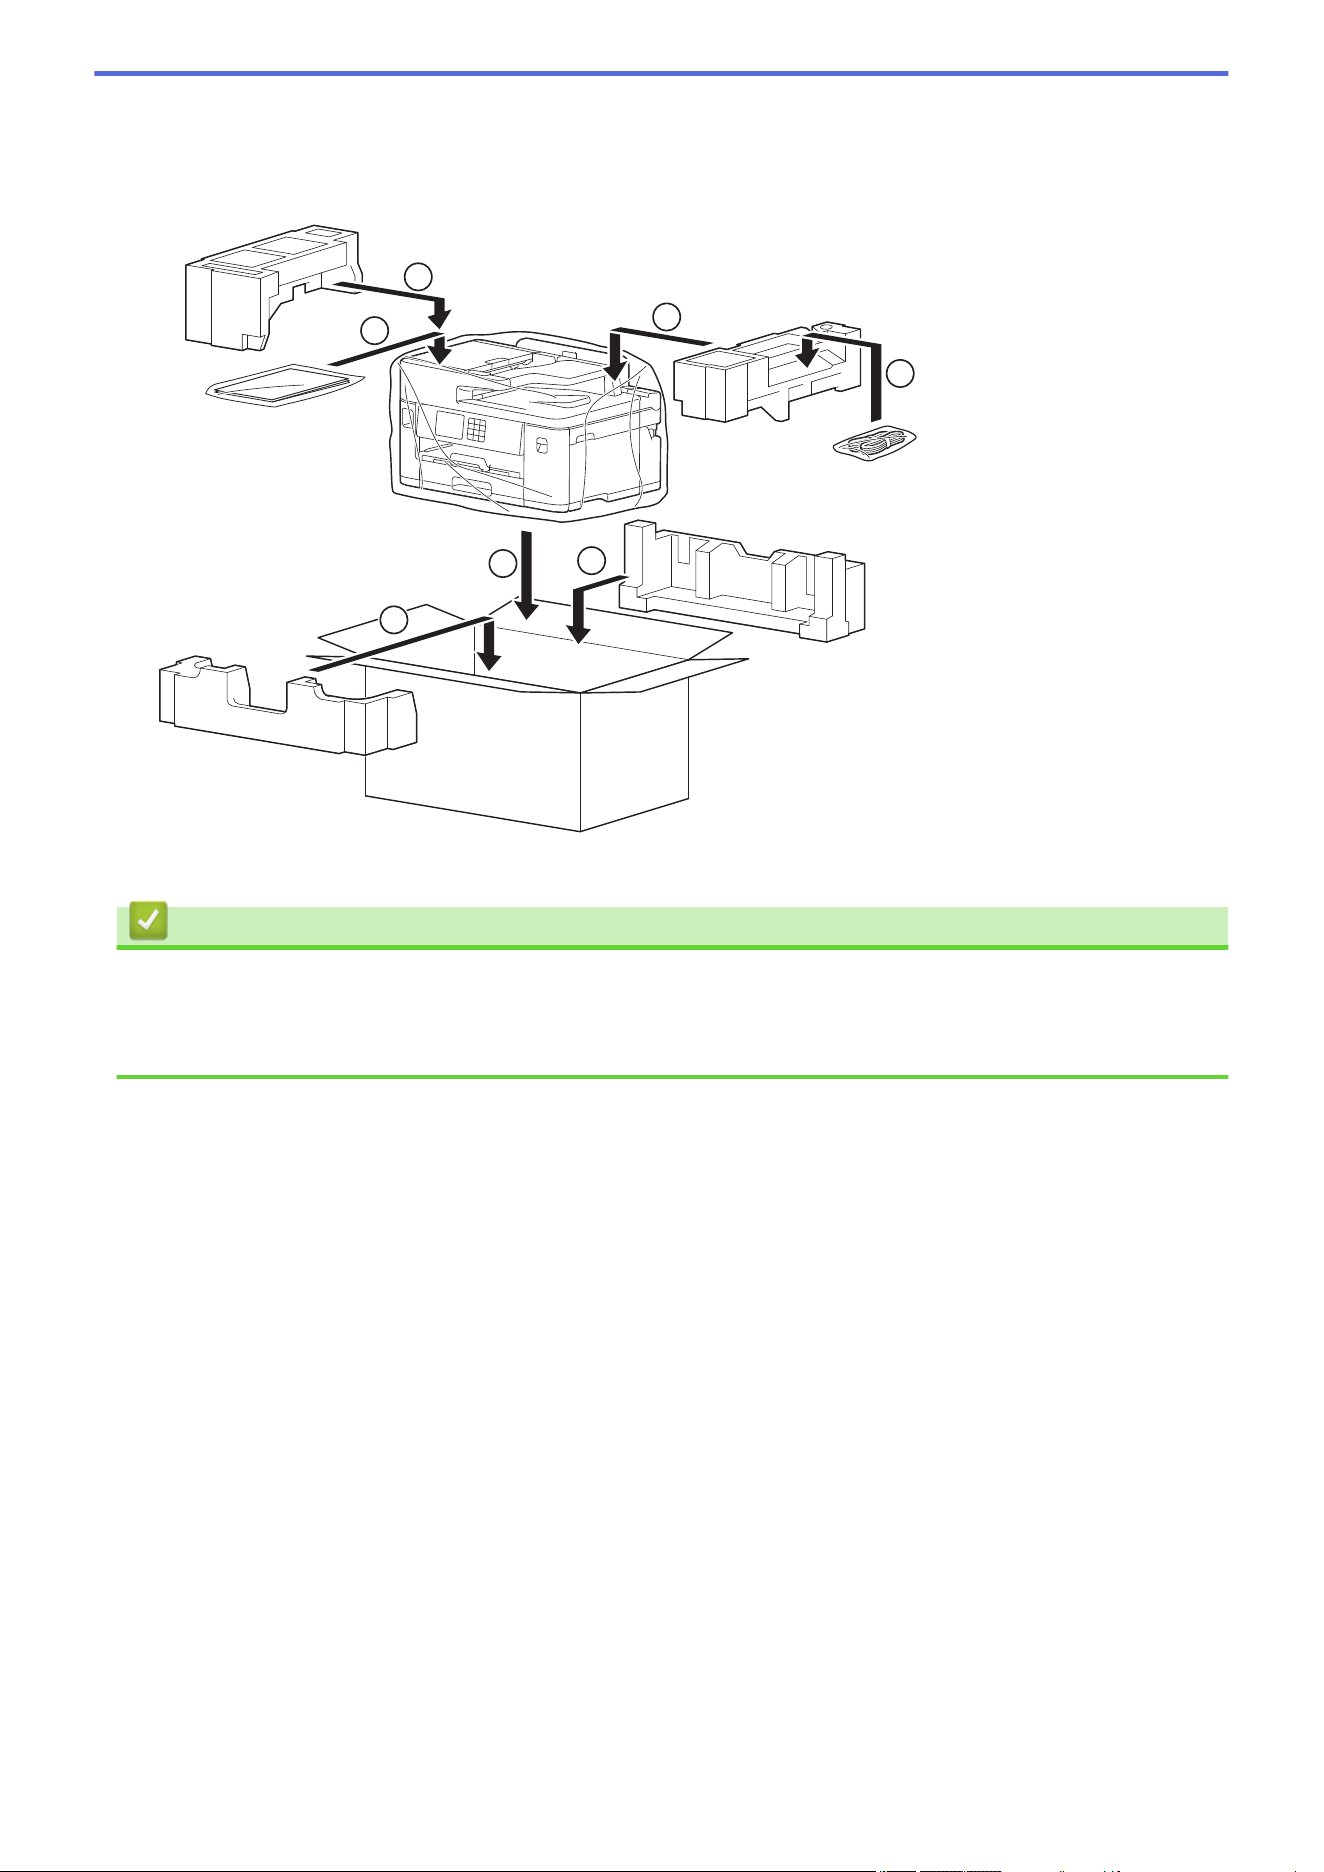
11. Pack the machine in the original carton with the original packing material as shown below. (The original
packing material may differ depending on your country.)
Do not pack the used ink cartridge in the carton.
1
1
2
3
4
5
4
12. Close the carton and tape it shut.
Related Information
• Routine Maintenance
Related Topics:
• Replace the Ink Cartridges
563


Home > Machine Settings > Change Machine Settings from the Control Panel > In the Event of Power
Failure (Memory Storage)
In the Event of Power Failure (Memory Storage)
• Your menu settings are stored permanently and will not be lost.
• Temporary settings (for example: Contrast and Overseas Mode) are lost.
• The date and time and programmed fax timer jobs (for example: Delayed Fax) are retained for approximately
24 hours.
• Other fax jobs in the machine's memory will not be lost.
Related Information
• Change Machine Settings from the Control Panel
566

Home > Machine Settings > Change Machine Settings from the Control Panel > General Settings
General Settings
• Adjust the Machine Volume
• Change for Daylight Saving Time Automatically
• Change for Daylight Saving Time Manually
• Set Sleep Mode Countdown
• Set the Machine to Power Off Automatically
• Set the Date and Time
• Set the Time Zone
• Adjust the LCD Backlight Brightness
• Change How Long the LCD Backlight Stays On
• Set Your Station ID
• Set Tone or Pulse Dialling Mode
• Set a Prefix Dial Before Every Fax Number
• Prevent Dialling a Wrong Number (Dial Restriction)
• Reduce Printing Noise
• Change the Language Displayed on the LCD
• Change the Keyboard Setting
567
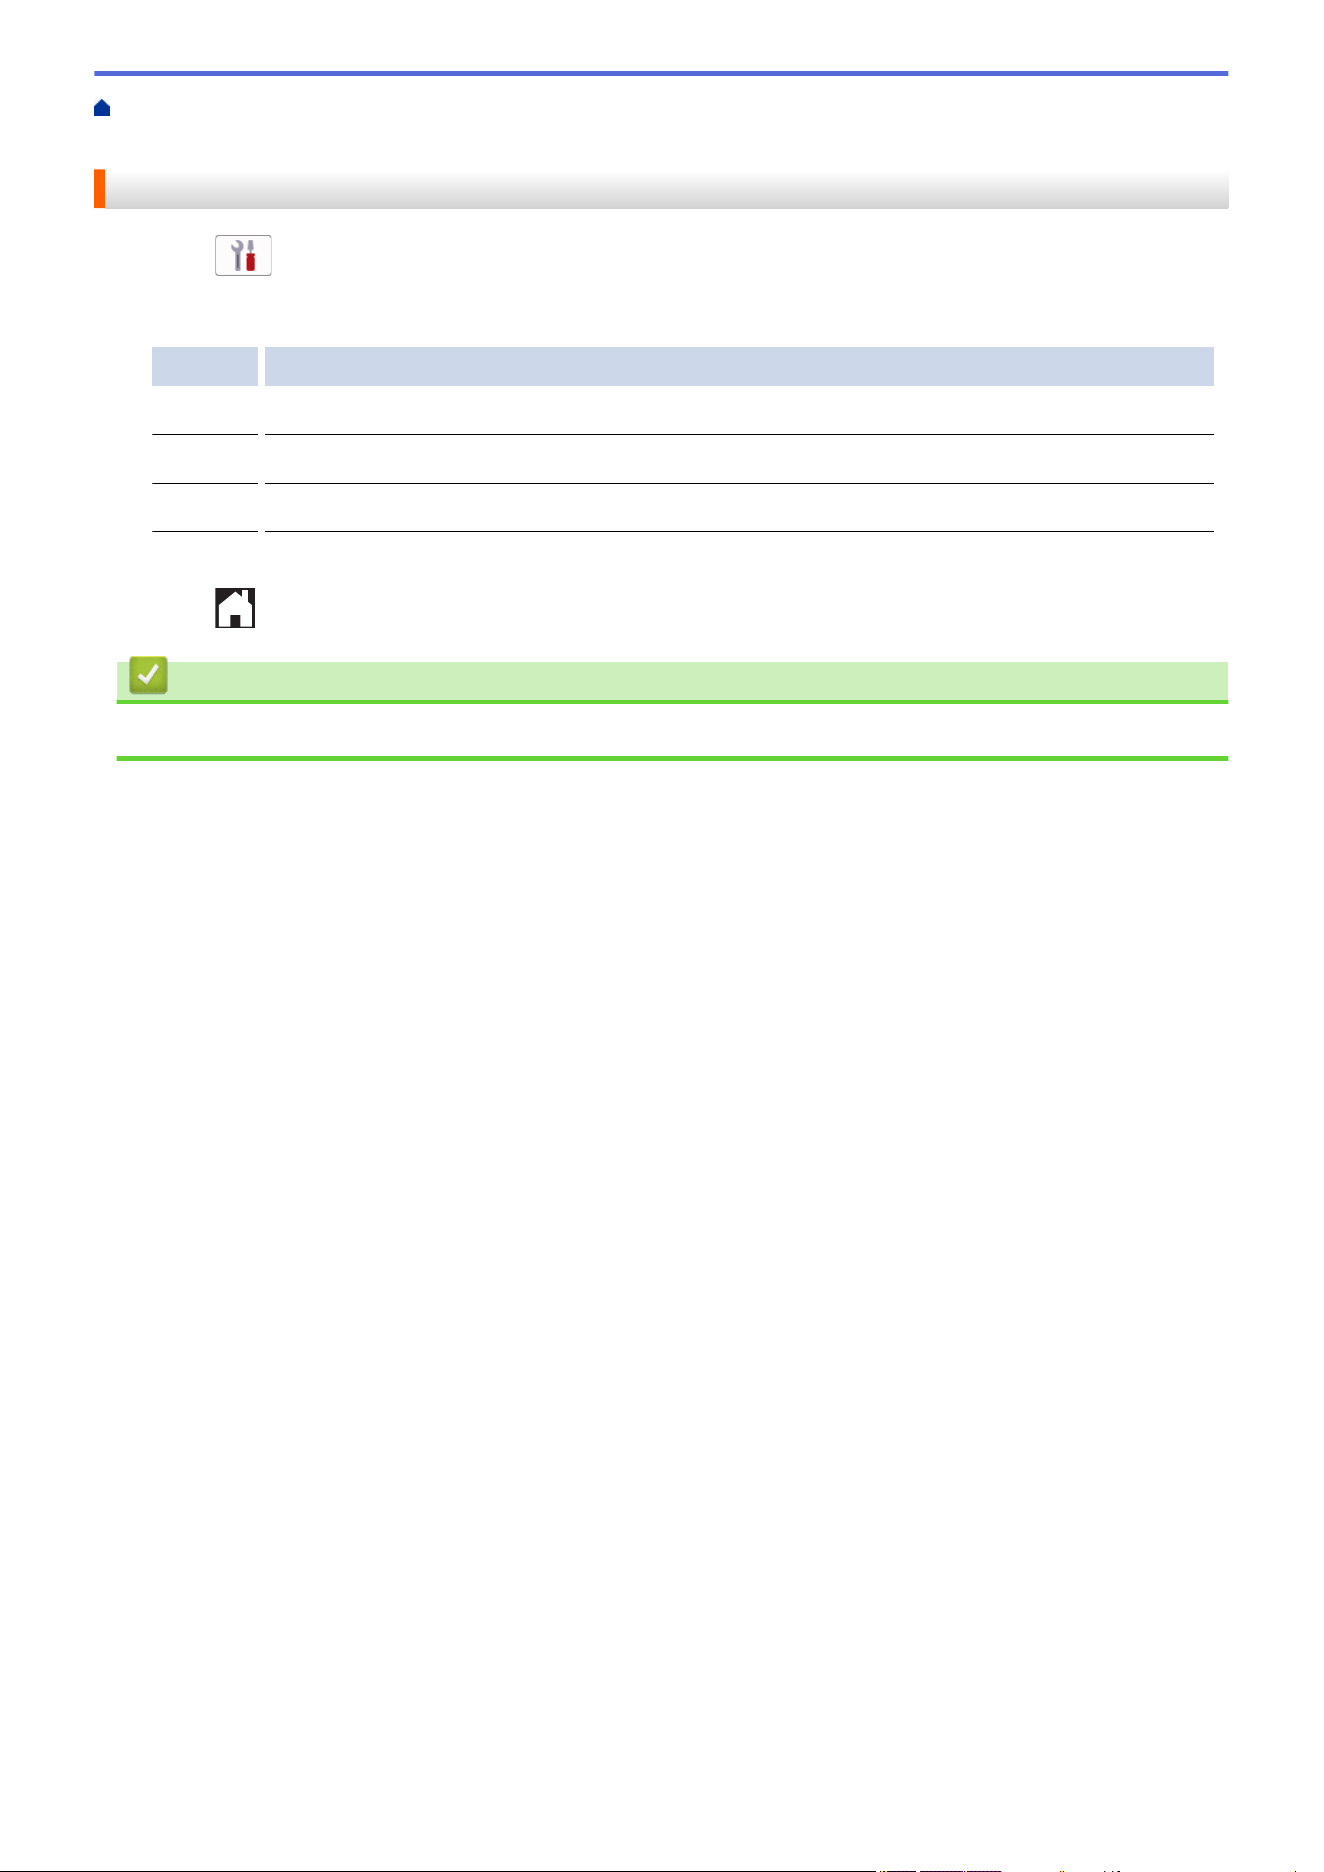
Home > Machine Settings > Change Machine Settings from the Control Panel > General Settings > Adjust
the Machine Volume
Adjust the Machine Volume
1. Press [Settings] > [All Settings] > [General Setup] > [Volume].
2. Press one of the following options:
Option Description
Ring
Adjust the ring volume.
Beep
Adjust the volume when you press a button, make a mistake, or after you send or receive a fax.
Speaker
Adjust the speaker volume.
3. Press a or b to display the [Off], [Low], [Med], or [High] option, and then press the option you want.
4. Press
.
Related Information
• General Settings
568

Home > Machine Settings > Change Machine Settings from the Control Panel > General Settings > Change
for Daylight Saving Time Automatically
Change for Daylight Saving Time Automatically
You can program the machine to change automatically for Daylight Saving Time.
It will reset itself forward one hour in the spring, and backward one hour in the autumn. Make sure you have set
the correct date and time in the [Date & Time] setting.
This feature is available only in some countries.
1. Press
[Settings].
2. Press [Date & Time] > [Auto Daylight].
3. Press [On] or [Off].
4. Press .
Related Information
• General Settings
569
Home > Machine Settings > Change Machine Settings from the Control Panel > General Settings > Change
for Daylight Saving Time Manually
Change for Daylight Saving Time Manually
You can program the machine to change for Daylight Saving Time.
When selecting [Forward Hour] it will forward the time by an hour and backward one hour when selecting
[Backward Hour]. Make sure you have set the correct date and time in the [Date & Time] setting.
This feature is available only in some countries.
1. Press
[Settings].
2. Press [Date & Time] > [Daylight Save].
3. Press [Forward Hour] or [Backward Hour].
4. Press .
Related Information
• General Settings
570
Home > Machine Settings > Change Machine Settings from the Control Panel > General Settings > Set
Sleep Mode Countdown
Set Sleep Mode Countdown
The Sleep Mode (or Power Save Mode) setting can reduce power consumption. When the machine is in Sleep
Mode, it acts as though it is turned off. The machine will wake up and start printing when it receives a print job or
a fax. Use these instructions to set a time delay (countdown) before the machine enters Sleep Mode.
• The timer will restart if any operation is carried out on the machine, such as receiving a fax or a print job.
• The factory setting is three minutes.
1. Press [Settings] > [All Settings] > [General Setup] > [Sleep Time].
2. Enter the number of minutes (1-60) you want to set on the touchscreen, and then press [OK].
3. Press .
When the machine goes into Sleep Mode, the LCD backlight turns off.
Related Information
• General Settings
Related Topics:
• Set the Machine to Power Off Automatically
571
Home > Machine Settings > Change Machine Settings from the Control Panel > General Settings > Set the
Machine to Power Off Automatically
Set the Machine to Power Off Automatically
The Auto Power Off feature can reduce power consumption. Set the amount of time that the machine must be in
Sleep Mode before it automatically powers off. When this feature is set to [Off], you must power off the
machine manually.
To turn on the machine after the Auto Power Off feature has turned it Off, press .
The machine does not power off automatically when:
• The machine is connected to a telephone line.
• The machine is connected to a wired network.
• The machine is connected to a wireless network.
• [WLAN(Wi-Fi)] is selected in the [Network I/F] setting.
• Secure print jobs are stored in the machine's memory. (MFC-J5955DW)
1. Press [Settings] > [All Settings] > [General Setup] > [Auto Power Off].
2. Press a or b to display the [Off], [1 hour], [2 hours], [4 hours], or [8 hours] option, and then
press the option you want.
3. Press
.
Related Information
• General Settings
Related Topics:
• Set the Fax Journal's Interval Period
• Set Sleep Mode Countdown
572
Home > Machine Settings > Change Machine Settings from the Control Panel > General Settings > Set the
Date and Time
Set the Date and Time
The LCD displays the date and time. If they are not current, re-enter them. You can add the date and time to
each fax you send by setting your Station ID.
1. Press [Settings].
2. Press [Date & Time].
3. Press [Date].
4. Enter the last two digits of the year on the touchscreen, and then press [OK].
5. Enter two digits for the month on the touchscreen, and then press [OK].
6. Enter two digits for the day on the touchscreen, and then press [OK].
7. Press [Clock Type].
8. Press [12h Clock] or [24h Clock].
9. Press [Time].
10. To enter the time, do one of the following:
• If you selected [12h Clock], enter the time (in 12-hour format) using the touchscreen, and then press
[AM] or [PM].
Press [OK].
• If you selected [24h Clock], enter the time (in 24-hour format) using the touchscreen.
Press [OK].
(For example, enter 19:45 for 7:45 PM.)
11. Press
.
Related Information
• General Settings
Related Topics:
• Set Your Station ID
573
Home > Machine Settings > Change Machine Settings from the Control Panel > General Settings > Set the
Time Zone
Set the Time Zone
Set the time zone for your location on the machine.
This feature is available only in some countries.
1. Press
[Settings].
2. Press [Date & Time] > [Time Zone].
3. Enter your time zone.
4. Press [OK].
5. Press
.
Related Information
• General Settings
574

Home > Machine Settings > Change Machine Settings from the Control Panel > General Settings > Adjust
the LCD Backlight Brightness
Adjust the LCD Backlight Brightness
If you are having difficulty reading the LCD, changing the brightness setting may help.
1. Press [Settings] > [All Settings] > [General Setup] > [LCD Settings] >
[Backlight].
2. Press the [Light], [Med], or [Dark] option.
3. Press .
Related Information
• General Settings
575

Home > Machine Settings > Change Machine Settings from the Control Panel > General Settings > Change
How Long the LCD Backlight Stays On
Change How Long the LCD Backlight Stays On
Set how long the LCD backlight stays on.
1. Press [Settings] > [All Settings] > [General Setup] > [LCD Settings] > [Dim
Timer].
2. Press a or b to display the [10 Secs], [30 Secs], [1 Min], [2 Mins], [3 Mins], or [5 Mins]
option, and then press the option you want.
3. Press
.
Related Information
• General Settings
576
Home > Machine Settings > Change Machine Settings from the Control Panel > General Settings > Set
Your Station ID
Set Your Station ID
Set the machine's Station ID if you want the date and time to appear on each fax you send.
1. Press [Settings] > [All Settings] > [Initial Setup] > [Station ID].
2. Press [Fax].
3. Enter your fax number (up to 20 digits) on the touchscreen, and then press [OK].
4. Press [Name].
5. Enter your name (up to 20 characters) using the touchscreen, and then press [OK].
• Press to cycle between letters, numbers and special symbols. (The available characters may
differ depending on your country.)
• If you entered an incorrect character and want to change it, press d or c to move the cursor to it. Press
and then enter the correct character.
• To enter a space, press [Space].
6. Press .
Related Information
• General Settings
Related Topics:
• Transfer Faxes to Another Fax Machine
• Transfer the Fax Journal Report to Another Fax Machine
• Enter Text on Your Brother Machine
• Set the Date and Time
577

Home > Machine Settings > Change Machine Settings from the Control Panel > General Settings > Set
Tone or Pulse Dialling Mode
Set Tone or Pulse Dialling Mode
Your machine is set for a Tone dialling service. If you have a Pulse dialling (rotary) service, you must change the
dialling mode.
This feature is not available in some countries.
1. Press
[Settings] > [All Settings] > [Initial Setup] > [Tone/Pulse].
2. Press [Tone] or [Pulse].
3. Press .
Related Information
• General Settings
Related Topics:
• Telephone and Fax Problems
578
Home > Machine Settings > Change Machine Settings from the Control Panel > General Settings > Set a
Prefix Dial Before Every Fax Number
Set a Prefix Dial Before Every Fax Number
The Dial Prefix setting will automatically dial a predefined number before every fax number you dial. For
example: If your telephone system requires a 9 to dial an outside number, use this setting to automatically dial 9
for every fax you send.
• This feature is not available in some countries.
• Use the numbers and symbols from 0 to 9, #, and *. (You cannot use ! with any other numbers or
symbols.)
• If your telephone system requires a time break recall (hookflash), press ! on the LCD.
• (not available for some countries) If pulse dialing mode is on, # and * are not available to use.
1. Press [Settings] > [All Settings] > [Initial Setup] > [Dial Prefix].
2. Press [On] or [Off].
• You can turn off the prefix number by pressing [Off].
• The prefix number will remain off until you press [On].
3. Press [Dial Prefix].
4. Enter the prefix number (up to 5 digits) using the touchscreen, and then press [OK].
To change the prefix number, press d or c to position the cursor to highlight the digit to be deleted and
press the Back Space button . Then press the correct digit.
Repeat until the prefix number is correct, and then press [OK].
5. Press .
Related Information
• General Settings
579
Home > Machine Settings > Change Machine Settings from the Control Panel > General Settings > Prevent
Dialling a Wrong Number (Dial Restriction)
Prevent Dialling a Wrong Number (Dial Restriction)
This feature is to prevent users from sending a fax or call to a wrong number by mistake. You can set the
machine to restrict Dialling when you use the dial pad, Address Book, Shortcuts and LDAP search.
1. Press [Settings] > [All Settings] > [Fax] > [Dial Restriction].
2. Press one of the following options:
• [Dial Pad]
• [Address Book]
If you combine Address Book numbers when dialling, the address will be recognised as dial pad input and
will not be restricted.
• [Shortcuts]
• [LDAP Server] (available only for some countries)
3. Press one of the following options:
Option Description
Enter #
Twice
The machine will prompt you to re-enter the number. If you re-enter the same number
correctly, the machine will start dialling. If you re-enter the wrong number, the touchscreen
will show an error message.
On
The machine will restrict all fax sending and outbound calls for that dialling method.
Off
The machine does not restrict the dialling method.
• The [Enter # Twice] setting will not work if you use an external phone or press [Hook] (Not
available for South Africa) before entering the number. You will not be asked to re-enter the number.
• If you selected [On] or [Enter # Twice], you cannot use the Broadcasting feature.
4. Press .
Related Information
• General Settings
580
Home > Machine Settings > Change Machine Settings from the Control Panel > General Settings > Reduce
Printing Noise
Reduce Printing Noise
The Quiet Mode setting can reduce printing noise. When Quiet Mode is turned on, the print speed becomes
slower.
The factory setting is [Off].
When the Quiet Mode setting is turned on, appears on the Home screen.
1. Press [Settings] > [All Settings] > [General Setup] > [Quiet Mode].
2. Press [On] or [Off].
3. Press .
Related Information
• General Settings
Related Topics:
• Touchscreen LCD Overview
• Paper Handling and Printing Problems
581

Home > Machine Settings > Change Machine Settings from the Control Panel > General Settings > Change
the Language Displayed on the LCD
Change the Language Displayed on the LCD
Change the LCD language if needed.
This feature is not available in some countries.
1. Press
[Settings] > [All Settings] > [Initial Setup] > [Local Language].
2. Press your language.
3. Press
.
Related Information
• General Settings
582

Home > Machine Settings > Change Machine Settings from the Control Panel > General Settings > Change
the Keyboard Setting
Change the Keyboard Setting
You can choose the type of keyboard for the LCD.
1. Press [Settings] > [All Settings] > [General Setup] > [Keyboard Settings].
2. Press [QWERTY] or [ABC].
3. Press .
Related Information
• General Settings
583

Home > Machine Settings > Change Machine Settings from the Control Panel > Save Your Favourite
Settings as a Shortcut > Add Shortcuts
Add Shortcuts
You can add the Fax, Copy, Scan, Web Connect and Apps settings you use most frequently by saving them as
your Shortcuts. Later you can press the Shortcut to apply these settings instead of manually re-entering them.
Some Shortcut menus are not available depending on your model.
These instructions describe how to add a Copy Shortcut. The steps for adding a Fax, Scan, Web Connect or
Apps Shortcut are very similar.
1. If the Home screen appears, press [Shortcuts].
2. Press a tab from [1] to [3].
3. Press where you have not added a Shortcut.
4. Press a or b to display [Copy].
5. Press [Copy].
6. Press [Options].
7. Press a or b to display the available settings, and then press the setting you want to change.
8. Press a or b to display the available options for the setting, and then press the option you want.
Repeat the previous and this steps until you have selected all the settings for this Shortcut. When finished,
press [OK].
9. Press [OK].
10. Read and confirm the displayed list of settings you have selected, and then press [OK].
11. Enter a name for the Shortcut using the LCD, and then press [OK].
When adding Fax or Scan to Shortcuts, you will be asked if you want to make this a One Touch Shortcut.
Follow the LCD instructions.
Related Information
• Save Your Favourite Settings as a Shortcut
585

Home > Machine Settings > Change Machine Settings from the Control Panel > Save Your Favourite
Settings as a Shortcut > Change or Delete Shortcuts
Change or Delete Shortcuts
You can change the settings in a Shortcut.
You cannot change a Web Connect Shortcut or Apps Shortcut. If you need to change them, delete them, and
then add a new Shortcut.
1. If the Home screen appears, press [Shortcuts].
2. Press a tab from [1] to [3] to display the Shortcut you want to change.
3. Press and hold the Shortcut you want to change.
4. Press [Edit].
To delete the Shortcut, press [Delete]. To edit the name of the Shortcut, press [Rename] and follow the
LCD menus.
5. Press [Options].
6. Press a or b to display the available settings, and then press the setting you want to change.
7. Change the settings for the Shortcut you selected. Press [OK].
8. Press [OK] when you have finished changing the settings.
9. Press [OK] to confirm.
When changing Fax or Scan Shortcuts, you will be asked if you want to make this a One Touch Shortcut.
Follow the LCD instructions.
Related Information
• Save Your Favourite Settings as a Shortcut
Related Topics:
• Enter Text on Your Brother Machine
586


Home > Machine Settings > Change Machine Settings from the Control Panel > Save Your Favourite
Settings as a Shortcut > Assign a Shortcut to an IC Card > Assign a Shortcut to an IC Card with NFC
Assign a Shortcut to an IC Card with NFC
Related Models: MFC-J5955DW
You can assign one Shortcut to your IC card. When you touch your IC card to the machine's NFC symbol, your
personal Shortcut automatically appears on the touchscreen.
• You cannot use the same IC card for different Shortcuts.
• To use the IC card for another Shortcut, unregister the card first, and then register it with the new
Shortcut.
1. If the Home screen appears, press [Shortcuts].
2. Press the tab that contains the Shortcut you want to assign to your IC card.
3. Press and hold the Shortcut until the options appear.
4. Press a or b to display the [Register Card/NFC] option, and then press it.
5. Touch the IC card to the NFC symbol.
6. Press [Register].
The Shortcut is assigned to the IC Card.
Related Information
• Assign a Shortcut to an IC Card
588
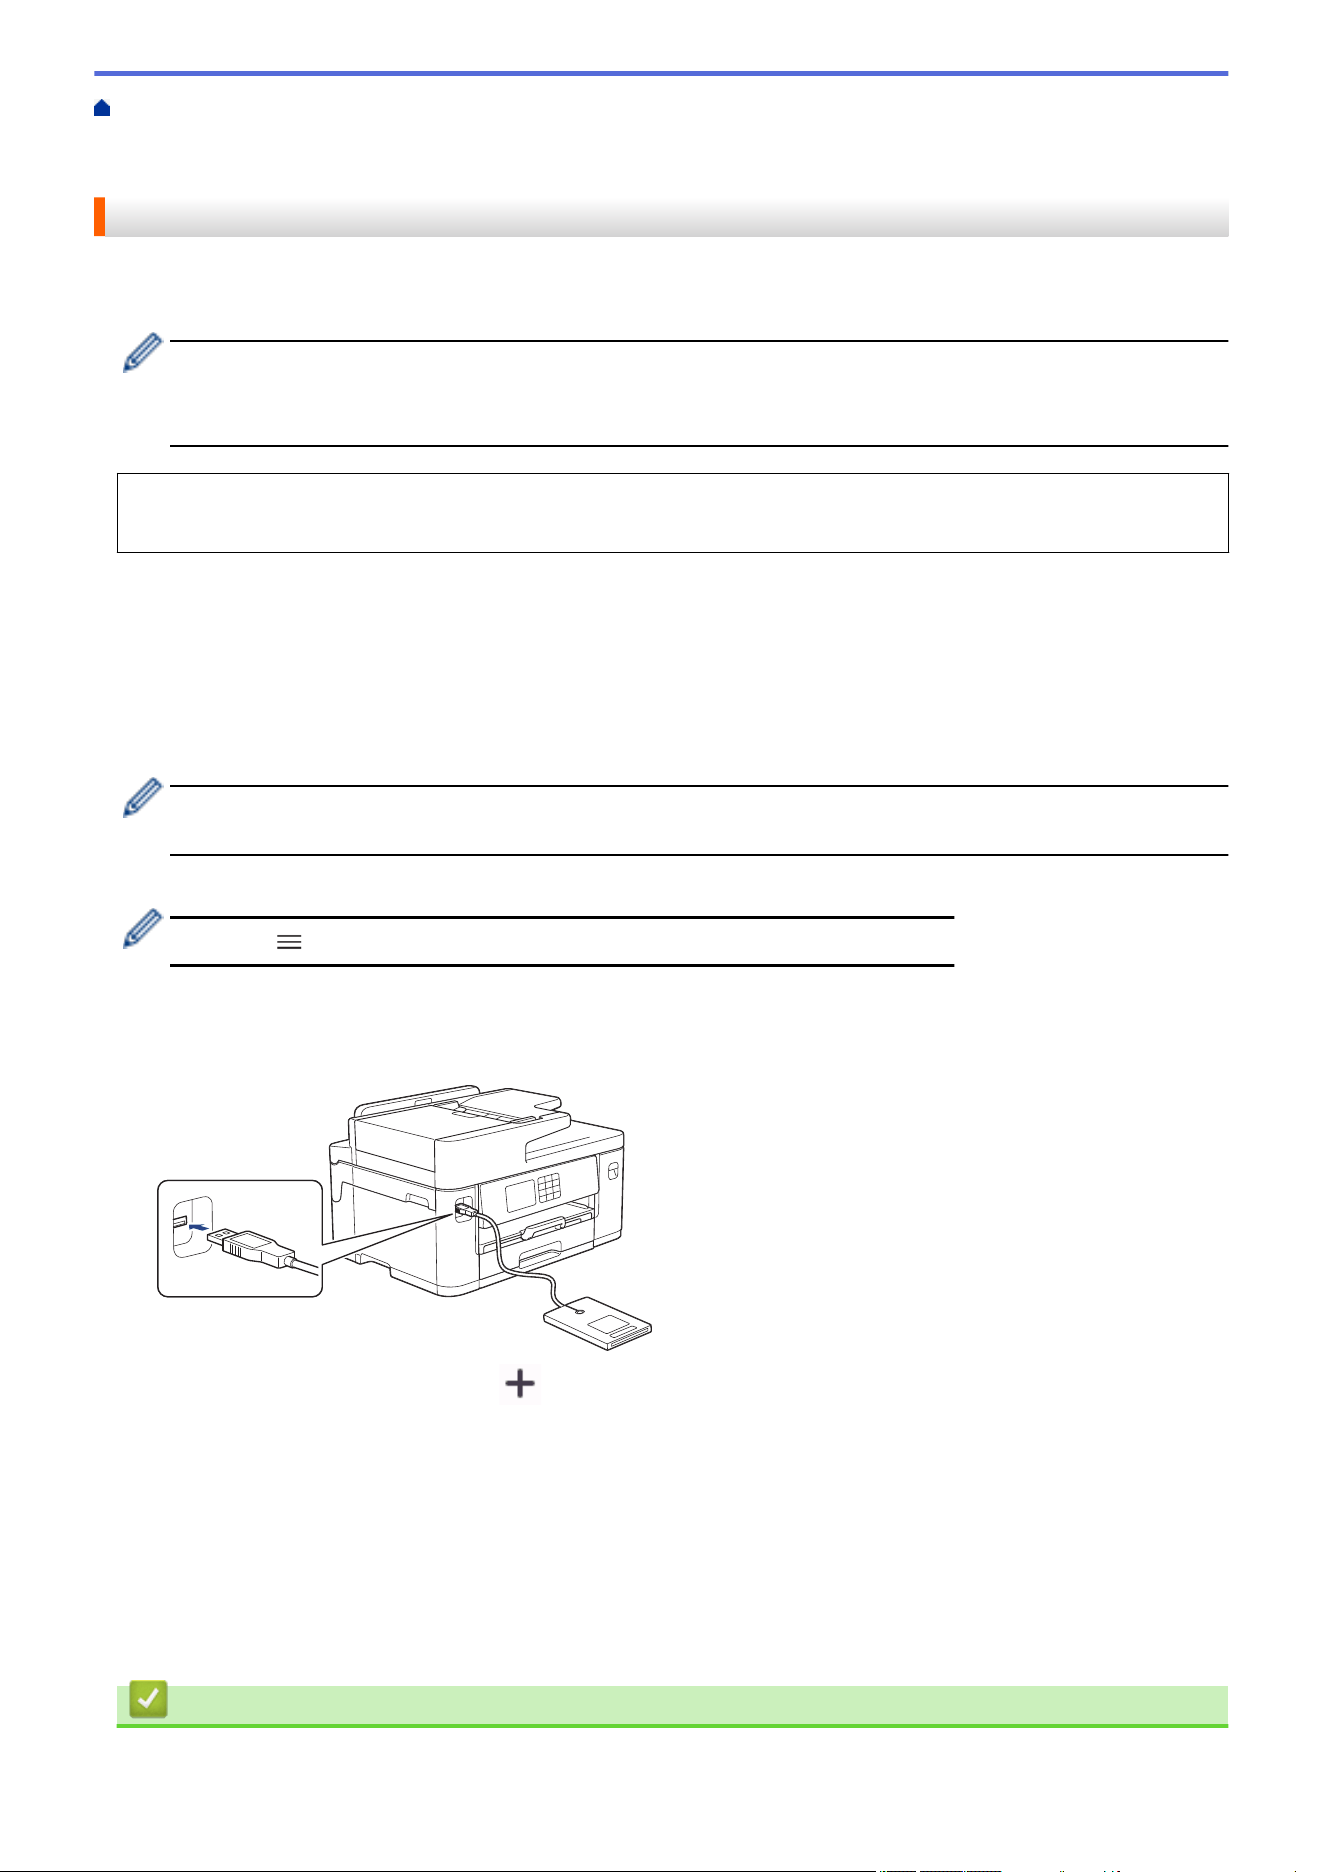
Home > Machine Settings > Change Machine Settings from the Control Panel > Save Your Favourite
Settings as a Shortcut > Assign a Shortcut to an IC Card > Assign a Shortcut to an IC Card with IC Card
Reader
Assign a Shortcut to an IC Card with IC Card Reader
You can assign one Shortcut to your IC card. When you touch your IC card to the IC card reader connected to
your machine, your personal Shortcut automatically appears on the touchscreen.
• You cannot use the same IC card for different Shortcuts.
• To use the IC card for another Shortcut, unregister the card first, and then register it with the new
Shortcut.
Before you assign a shortcut to an IC card, register an external IC card reader. Use Web Based Management
to register the card reader. Your machine supports external IC card readers supporting HID-class drivers.
1. Start your web browser.
2. Type "https://machine's IP address" in your browser's address bar (where "machine's IP address" is the
machine's IP address).
For example:
https://192.168.1.2
3. If required, type the password in the Login field, and then click Login.
The default password to manage this machine’s settings is located on the back of the machine and marked
"Pwd".
4. Go to the navigation menu, and then click Administrator > External Card Reader.
Start from
, if the navigation menu is not shown on the left side of the screen.
5. Enter the necessary information, and then click Submit.
6. Restart your Brother machine to activate the configuration.
7. Connect the card reader to your machine.
8. If the Home screen appears, press [Shortcuts] on the LCD.
9. Press a tab from [1] to [3] to select the Shortcut screens that contains the Shortcut you want to assign to
your IC card.
10. Press and hold the Shortcut until the options appear.
11. Press a or b to display the [Register Card/NFC] option, and then press it.
12. Touch the IC card to the IC card reader connected to your machine.
13. Press [Register].
The Shortcut is assigned to the IC Card.
Related Information
• Assign a Shortcut to an IC Card
589


Home > Machine Settings > Change Machine Settings from the Control Panel > Print Reports > Reports
Reports
The following reports are available:
Transmission Verify
The Transmission Verify prints a Transmission Verification Report for your last transmission.
Address Book
The Address Book report prints a list of names and numbers stored in the Address Book memory.
Fax Journal
The Fax Journal prints a list of information about your last 200 incoming and outgoing faxes. (TX means
Transmit, RX means Receive.)
User Settings
The User Settings report prints a list of your current settings.
Network Configuration (network models)
The Network Configuration report prints a list of your current network settings.
WLAN Report (wireless models)
The WLAN Report prints the wireless LAN connectivity diagnosis.
Caller ID History
The Caller ID History report prints a list of the available Caller ID information for the last 30 received faxes and
telephone calls.
(Not available for Taiwan and some countries)
Related Information
• Print Reports
592

Home > Machine Settings > Change Machine Settings from the Control Panel > Print Reports > Print a
Report
Print a Report
1. Press [Settings] > [All Settings] > [Print Reports].
2. Press a or b to display the report options, and then press the option you want.
3. Press [Yes].
4. Press .
Related Information
• Print Reports
Related Topics:
• Caller ID
593

Home > Machine Settings > Change Machine Settings from the Control Panel > Settings and Features
Tables > Settings Tables (2.7"(67.5 mm)/3.5"(87.6 mm) Touchscreen models)
Settings Tables (2.7"(67.5 mm)/3.5"(87.6 mm) Touchscreen models)
These tables will help you understand your machine's menu selections and options.
>> [Settings]
>> [General Setup]
>> [Shortcut Settings]
>> [Fax]
>> [Printer]
>> [Network]
>> [Print Reports]
>> [Machine Info.]
>> [Initial Setup]
[Settings]
[Settings]
Level 1
Level 2 Level 3 Descriptions
(Date & Time)
- - Access the Date and Time setting menus.
Maintenance
- - Access the Maintenance settings menus.
Network Wired LAN
- Access the Wired LAN setting menus.
WLAN(Wi-Fi)
- Access the WLAN setting menus.
Wi-Fi Direct
- Access the Wi-Fi Direct setting menus.
Network I/F
- Select the network connection type.
Tray Setting
- - Access the tray setting menus.
Fax Preview
- - View received faxes on the LCD.
Wi-Fi Direct
- - Access the Wi-Fi Direct setting menus.
All Settings
- - Configure the detailed settings.
[General Setup]
[All Settings] > [General Setup]
Level 3
Level 4 Level 5 Descriptions
Maintenance Improve Print
Quality
Check Print
Quality
Check and correct the print quality,
alignment and paper feeding
according to the LCD instructions.
Alignment
Correct Paper
Feed
Print Head
Cleaning
- Clean the print head according to the
LCD instructions.
Remove Paper
Scraps
- Remove a piece of paper in the
machine according to the LCD
instructions.
Clean Paper Pick-
up Roller
- Clean the rollers according to the
LCD instructions.
595
Level 3 Level 4 Level 5 Descriptions
Maintenance
(Available only for some
countries.)
Ink Volume
- Check the available ink volume.
Ink Cartridge
Model
- Check your ink cartridge numbers.
Print Options Reduce Smudging
Reduce smudging on the paper or
paper jams during printing.
Reduce Uneven
Lines
Reduce uneven lines on the paper
during printing.
Enhance Print
Improve print quality and reduce
blurriness.
Ink Cartridge
Check
- View your ink cartridge information.
Print Quality Auto
Check
- Automatically detects the Print Head
condition and cleans the Print Head
when needed.
Paper Type
(MFC-J2340DW/
MFC-J5340DW)
- - Set the type of paper in the paper
tray.
Paper Size
(MFC-J2340DW/
MFC-J5340DW)
- - Set the size of paper in the paper tray.
Check Paper
(MFC-J2340DW/
MFC-J5340DW)
- - Check the paper type and paper size
when you pull the tray out of the
machine.
Tray Setting
(MFC-J2740DW/
MFC-J5740DW/
MFC-J5855DW/
MFC-J5955DW)
Tray 1 Paper Type
Set the type of paper in the paper tray
#1.
Paper Size
Set the size of paper in the paper tray
#1.
Tray 2
(MFC-J2740DW/
MFC-J5740DW/
MFC-J5955DW)
Paper Size
Set the size of paper in the paper tray
#2.
MP Tray Paper Type
Set the type of paper in the MP tray.
Paper Size
Set the size of paper in the MP tray.
Tray Setting: Copy Tray Select
Select the tray to be used for copying.
Tray Priority
Change the tray priority for copying.
Tray Setting: Fax Tray Select
Select the tray to be used for faxing.
Tray Priority
Change the tray priority for faxing.
Tray Setting:
Print
Tray Priority
Change the tray priority for printing
from your computer.
Tray Setting: JPEG
Print (Media)
Tray Select
Select the tray to be used for printing
photos from a USB flash drive.
Tray Priority
Change the tray priority for printing
photos from a USB flash drive.
Paper Low Notice
(MFC-J5955DW)
- Select whether to display a message
telling you that the paper tray is nearly
empty.
Check Paper
- Check the paper type and paper size
when you pull the tray out of the
596
Level 3 Level 4 Level 5 Descriptions
Tray Setting
(MFC-J2740DW/
MFC-J5740DW/
MFC-J5855DW/
MFC-J5955DW)
machine or set the paper in the MP
tray.
Quiet Mode
- - Decrease printing noise.
Volume Ring
- Adjust the ring volume.
Beep
- Adjust the beeper volume.
Speaker
- Adjust the speaker volume.
LCD Settings Backlight
- Adjust the brightness of the LCD
backlight.
Dim Timer
- Set how long the LCD backlight stays
on after the last finger press.
Screen Settings Home Screen
- Set the screen that is displayed when
you press .
Scan Screen
- Set the default Scan screen settings.
Notice Settings Document Alert
- Displays the alert when a document is
left on the scanner glass.
Scan Result(Skip
Blank Page)
- Displays the Skip Blank Page scan
results when finished.
Keyboard Settings
- - Select the type of keyboard for the
LCD.
Sleep Time
- - Set how long the machine must be
idle before it goes into Sleep Mode.
Auto Power Off
- - Select how long the machine must
wait before it automatically turns itself
off after entering Sleep Mode.
When set to Off, the machine does
not power off automatically.
[Shortcut Settings]
[All Settings] > [Shortcut Settings]
Level 3
Level 4 Descriptions
(Select a shortcut button.)
Rename
Change the shortcut name.
Edit
Change the shortcut settings.
Delete
Delete the shortcut.
Register Card/NFC
Assign a Shortcut to an IC card.
Delete Card/NFC
Remove a Shortcut from an IC card.
[Fax]
[All Settings] > [Fax]
Level 3
Level 4 Level 5 Descriptions
Setup Receive Ring Delay
- Set the number of rings before the machine answers in
Fax Only or Fax/Tel mode.
Receive Mode
- Select the Receive Mode that best suits your needs.
597
Level 3 Level 4 Level 5 Descriptions
Setup Receive F/T Ring Time
- Set the length of the pseudo/double-ring time in Fax/Tel
mode.
Fax Preview
- View received faxes on the LCD.
Fax Detect
- Receive fax messages automatically when you answer
a call and hear fax tones.
Remote Codes
- Answer calls at an extension or external telephone and
use codes to turn the Remote Codes on or off. You can
personalise the codes.
Auto
Reduction
- Reduce the size of incoming faxes.
PC Fax
Receive
- Set the machine to send faxes to your computer.
You can turn on the Backup Print safety feature.
Memory
Receive
- Set the machine to forward fax messages, to store
incoming faxes in the memory (so you can retrieve
them while you are away from your machine), or the
cloud service.
If you select Fax Forward, or Forward to Cloud, you can
turn on the Backup Print safety feature.
Fax Rx Stamp
- Print the received time and date on the top of incoming
faxes.
Report Setting XMIT Report
- Select the initial setup for the Transmission Verification
Report.
Journal
Period
- Set the interval for automatic printing of the Fax
Journal.
If you select an option other than Off and Every 50
Faxes, you can set the time for the option.
If you select Every 7 Days, you can set the day of the
week.
Print Document
- - Print incoming faxes stored in the machine's memory.
Remote Access
- - Set your own code for Remote Retrieval.
Dial
Restriction
Dial Pad
- Restrict dialling when using the dial pad.
Address Book
- Restrict the dialling when using the Address Book.
Shortcuts
- Restrict the dialling when using a Shortcut.
LDAP Server
(Available only for
some countries.)
- Restrict dialling when using LDAP search.
Remaining Jobs
- - Check which scheduled jobs are in the machine's
memory and cancel selected jobs.
Miscellaneous Distinctive
(For some
countries)
- Use with telephone company distinctive ringing service
allows you to have a voice number and fax number on
the one phone line.
FaxAbility
(For New Zealand
only)
- If you have FaxAbility from Telecom, use this function to
store the ringing pattern of your fax number.
And if you set in to On, you should use the registered
number only.
Call Waiting
(For New Zealand
only)
- If you have Call Waiting service, use this function to
answer second call when you are on the phone and
someone rings you.
598
[Printer]
[All Settings] > [Printer]
(MFC-J5955DW)
Level 3 Level 4 Level 5 Descriptions
Emulation
- - Select the emulation mode.
Print Options Font List HP LaserJet
Print a list of the machine’s internal fonts.
BR-Script 3
Test Print
- Print a test page.
2-sided 2-sided Print
- Enable or disable 2-sided printing and choose long edge or
short edge.
HP Tray Command
- - Select the correct version of HP LaserJet emulation.
Reset Printer
- - Restore the printer settings to the factory settings.
[Network]
[All Settings] > [Network]
Level 3
Level 4 Level 5 Level 6 Descriptions
Wired LAN TCP/IP BOOT Method
- Select the Boot method that
best suits your needs.
IP Address
- Enter the IP address.
Subnet Mask
- Enter the Subnet mask.
Gateway
- Enter the Gateway address.
Node Name
- Enter the Node name.
WINS
Configuration
- Select the WINS
configuration mode.
WINS Server
- Specify the IP address of the
primary or secondary WINS
server.
DNS Server
- Specify the IP address of the
primary or secondary DNS
server.
APIPA
- Set the machine to allocate
the IP address from the link-
local address range
automatically.
IPv6
- Turn the IPv6 protocol on or
off.
Ethernet
- - Select the Ethernet link
mode.
Wired Status
- - View the current wired
status.
MAC Address
- - View the machine's MAC
address.
WLAN(Wi-Fi) Find Wi-Fi
Network
- - Configure your wireless
network settings manually.
TCP/IP BOOT Method
- Select the Boot method that
best suits your needs.
599

Level 3 Level 4 Level 5 Level 6 Descriptions
WLAN(Wi-Fi) TCP/IP IP Address
- Enter the IP address.
Subnet Mask
- Enter the Subnet mask.
Gateway
- Enter the Gateway address.
Node Name
- Enter the Node name.
WINS
Configuration
- Select the WINS
configuration mode.
WINS Server
- Specify the IP address of the
primary or secondary WINS
server.
DNS Server
- Specify the IP address of the
primary or secondary DNS
server.
APIPA
- Set the machine to allocate
the IP address from the link-
local address range
automatically.
IPv6
- Turn the IPv6 protocol on or
off.
WPS/Push Button
- - Configure your wireless
network settings using the
one-button push method.
WPS/PIN Code
- - Configure your wireless
network settings using WPS
with a PIN.
WLAN Status Status
- View the current wireless
network status.
Signal
- View the current wireless
network signal strength.
SSID
- View the current SSID.
Comm. Mode
- View the current
Communication mode.
MAC Address
- - View the machine's MAC
address.
Wi-Fi Direct Manual
- - Configure your Wi-Fi Direct
network settings manually.
Group Owner
- - Set your machine as the
Group Owner.
Push Button
- - Configure your Wi-Fi Direct
network settings using the
one-button push method.
PIN Code
- - Configure your Wi-Fi Direct
network settings using WPS
with a PIN code.
Device
Information
Device Name
- View your machine's device
name.
SSID
- View the Group Owner's
SSID.
When the machine is not
connected, the LCD displays
Not Connected.
IP Address
- View your machine's current
IP Address.
600

Level 3 Level 4 Level 5 Level 6 Descriptions
Wi-Fi Direct Status
Information
Status
- View the current Wi-Fi Direct
network status.
Signal
- View the current Wi-Fi Direct
network signal strength.
When your machine acts as
Group Owner, the LCD
always indicates a strong
signal.
I/F Enable
- - Turn the Wi-Fi Direct
connection on or off.
NFC
(MFC-J5955DW)
- - - Turn the NFC function on or
off.
E-mail/IFAX Mail Address
- - Enter the email address.
(Up to 60 characters)
Setup Server SMTP Server
Enter the SMTP server name
and address.
Port
Enter the SMTP port
number.
Auth. for SMTP
Select the Security method
for email notification.
SSL/TLS
Send or receive an email via
an email server that requires
secure SSL/TLS
communication.
Verify
Certification
Verify the SMTP Server
Certificate automatically.
POP3/IMAP4 Protocol
Select the protocol for
receiving an email from the
server.
Server
Enter the server name and
address.
Port
Enter the port number.
Mailbox Name
Enter the mailbox name.
(Up to 60 characters)
Mailbox
Password
Enter the password to login
to the server.
(Up to 128 characters)
Select Folder
Select the specified folder in
the mailbox using the IMAP4
protocol.
SSL/TLS
Send or receive an email via
an email server that requires
secure SSL/TLS
communication.
Verify
Certification
Verify the Server Certificate
automatically.
APOP
Turn APOP on or off.
Setup Mail RX Auto Polling Auto Polling
Automatically check the
server for new messages.
Poll Frequency
Set the interval for checking
new messages on the
server.
601
Level 3 Level 4 Level 5 Level 6 Descriptions
E-mail/IFAX Setup Mail RX Header
- Select the contents of the
email header to be printed.
Del/Read Error
Mail
- Set the machine to
automatically delete error
mails.
Notification
- Receive notification
messages.
Setup Mail TX Sender Subject
- View the subject.
Size Limit Size Limit
Limit the size of email
documents.
Maximum
Size(MB)
Notification
- Send notification messages.
Setup Relay Relay Broadcast
- Relay a document to another
fax machine.
Relay Domain
- Register the Domain name.
Relay Report
- Print the relay Broadcast
Report.
Manual Receive
- - Manually check the POP3 or
IMAP4 server for new
messages.
Message from
Brother
Message from
Brother
- - Display messages and
notifications from Brother.
Status
- -
Web Connect
Settings
Proxy Settings Proxy
Connection
- Change the Web connection
settings.
Address
-
Port
-
User Name
-
Password
-
Network I/F
- - - Select the network
connection type.
IPsec
- - - IPsec is an optional security
feature of the IP protocol that
provides authentication and
encryption services. We
recommend contacting your
network administrator before
changing this setting.
Network Reset
- - - Restore all network settings
back to the factory settings.
[Print Reports]
[All Settings] > [Print Reports]
Level 3
Descriptions
XMIT Verify
Print a Transmission Verification Report for your last transmission.
Address Book
Print a list of names and numbers stored in the Address Book.
602
Level 3 Descriptions
Fax Journal
Print a list of information about your last 200 incoming and outgoing faxes.
(TX means Transmit. RX means Receive.)
User Settings
Print a list of your settings.
Network Configuration
Print a list of your Network settings.
WLAN Report
Print the wireless LAN connection results.
Caller ID History
(Not available for Taiwan and some
countries)
Print a list of the available Caller ID information of the last 30 received faxes
and telephone calls.
[Machine Info.]
[All Settings] > [Machine Info.]
Level 3
Level 4 Descriptions
Serial No.
- Check your machine's serial number.
Firmware Version Main Version
Check your machine's firmware version.
Security Version
Firmware Update
- Update your machine to the latest firmware.
Firmware Auto Check
- View firmware information on the Home screen.
Page Counter
- Check the total number of pages the machine has printed.
[Initial Setup]
[All Settings] > [Initial Setup]
Level 3
Level 4 Descriptions
Date & Time Date
Add the date and time on the screen and in the headings of the
faxes you send.
Time
Clock Type
Select the time format (12-hour or 24-hour).
Auto Daylight
(Available only for
some countries.)
Set the machine to change automatically for Daylight Saving Time.
Daylight Save
(Available only for
some countries.)
Change for Daylight Saving Time manually.
Time Zone
Set your time zone.
Station ID Fax
Enter your name and fax number so it appears on each page you
fax.
Name
Tone/Pulse
(Available only for some
countries.)
- Select the dialling mode.
Fax Auto Redial
- Set the machine to redial the last fax number if the fax did not go
through because the line was busy.
Dial Tone
- Shorten the dial tone detect pause.
Dial Prefix
(Available only for some
countries.)
- Set a prefix number to be added before the fax number every time
you dial.
603
Level 3 Level 4 Descriptions
Phone Line Set
(Available only for some
countries.)
- Select the telephone line type.
Compatibility
- Adjust the equalisation for transmission difficulties.
VoIP service providers offer fax support using various standards. If
you regularly experience fax transmission errors, select Basic (for
VoIP).
Reset Machine Reset
Restore all the machine's settings that you have changed, such as
Date and Time.
Network
Restore all network settings back to the factory settings.
Address Book &
Fax
Erase all stored phone numbers and fax settings.
All Settings
Restore all the machine's settings back to the factory settings.
Local Language
(Available only for some
countries.)
- Change your LCD language.
Related Information
• Settings and Features Tables
604
Home > Machine Settings > Change Machine Settings from the Control Panel > Settings and Features
Tables > Features Tables (2.7"(67.5 mm)/3.5"(87.6 mm) Touchscreen models)
Features Tables (2.7"(67.5 mm)/3.5"(87.6 mm) Touchscreen models)
These tables will help you understand your machine's feature selections and temporary options.
>> [Fax]
>> [Copy]
>> [Scan]
>> [Secure Print]
>> [Web]
>> [Apps]
>> [USB]
>> [A3 Copy Shortcuts]
>>
[Download Software]
>> [Print Head Cleaning]
>> [Shortcuts]
>> [Ink]
>> Wi-Fi Setup
>> When you have put a USB Flash drive in the USB slot
[Fax]
(When [Fax Preview] is [Off])
Level 3
Level 4 Level 5 Descriptions
Hook
- - (Not available for South Africa)
Press before dialling if you want to listen to make
sure a fax machine has answered, and then press
Fax Start.
Address Book
(Search:)
- When LDAP is off, the search is within the Local
Address Book.
When LDAP is on, the search is within the Local
Address Book and LDAP Server.
Detail
(Appears only when
LDAP is on.)
(Available only for
some countries.)
View detailed information about the selected
address.
Edit
- Store Address Book numbers, set up Group
numbers for Broadcasting, and change and delete
Address Book numbers.
-
Apply
Start sending a fax using the Address Book.
Call History Redial
- Redial the last number you dialled.
Outgoing Call Apply
Select a number from the Outgoing Call history
and then send a fax to it, add it to the Address
Book, or delete it.
Edit
Caller ID History Apply
Select a number from the Caller ID History and
then send a fax to it, add it to the Address Book,
605
Level 3 Level 4 Level 5 Descriptions
Call History
(Not available for
Taiwan and some
countries)
Edit
or delete it.
Options
Fax Resolution
- Set the resolution for outgoing faxes.
Contrast
- Adjust the contrast.
2-sided Fax
(MFC-J2740DW/
MFC-J5740DW/
MFC-J5955DW)
- Set the 2-sided scanning format.
Glass Scan Size
- Adjust the scan area of the scanner glass to the
size of the document.
Broadcasting Add Number
Send the same fax message to more than one fax
number.
Preview
- Preview a fax message before you send it.
Colour Setting
- Set whether faxes are sent in monochrome or
colour.
Delayed Fax Delayed Fax
Set the time of day the delayed faxes will be sent.
Set Time
Batch TX
- Combine delayed faxes to the same fax number
at the same time of day into one transmission.
Real Time TX
- Send a fax without using the memory.
Overseas Mode
- Set to On if you have difficulty sending faxes
overseas.
Call History Redial
Redial the last number you dialled.
Outgoing Call
Select a number from the Outgoing Call history
and then send a fax to it, add it to the Address
Book, or delete it.
Caller ID
History
(Not available for
Taiwan and some
countries)
Select a number from the Caller ID History and
then send a fax to it, add it to the Address Book,
or delete it.
Address Book
(Search:)
When LDAP is off, the search is within the Local
Address Book.
When LDAP is on, the search is within the Local
Address Book and LDAP Server.
Edit
Store Address Book numbers, set up Group
numbers for Broadcasting, and change and delete
Address Book numbers.
Set New Default
- Save your settings as the default.
Factory Reset
- Restore all settings back to the factory settings.
Save as
Shortcut
- - Save the current settings as a shortcut.
(When [Fax Preview] is [On])
Level 3
Level 4 Level 5 Level 6 Descriptions
Sending
Faxes
Hook
- - (Not available for South Africa)
Press before dialling if you want
to listen to make sure a fax
606
Level 3 Level 4 Level 5 Level 6 Descriptions
Sending
Faxes
machine has answered, and then
press Fax Start.
Address Book
(Search:)
- When LDAP is off, the search is
within the Local Address Book.
When LDAP is on, the search is
within the Local Address Book
and LDAP Server.
Detail
(Appears only
when LDAP is
on.)
(Available only
for some
countries.)
View detailed information about
the selected address.
Edit
- Store Address Book numbers, set
up Group numbers for
Broadcasting, and change and
delete Address Book numbers.
-
Apply
Start sending a fax using the
Address Book.
Call History Redial
- Redial the last number you
dialled.
Outgoing Call Apply
Select a number from the
Outgoing Call history and then
send a fax to it, add it to the
Address Book, or delete it.
Edit
Caller ID
History
(Not available for
Taiwan and some
countries)
Apply
Select a number from the Caller
ID History and then send a fax to
it, add it to the Address Book, or
delete it.
Edit
Options
Fax Resolution
- Set the resolution for outgoing
faxes.
Contrast
- Adjust the contrast.
2-sided Fax
(MFC-J2740DW/
MFC-J5740DW/
MFC-J5955DW)
- Set the 2-sided scanning format.
Glass Scan Size
- Adjust the scan area of the
scanner glass to the size of the
document.
Broadcasting Add Number
Send the same fax message to
more than one fax number.
Preview
- Preview a fax message before
you send it.
Colour Setting
- Set whether faxes are sent in
monochrome or colour.
Delayed Fax Delayed Fax
Set the time of day the delayed
faxes will be sent.
Set Time
Batch TX
- Combine delayed faxes to the
same fax number at the same
time of day into one transmission.
607
Level 3 Level 4 Level 5 Level 6 Descriptions
Sending
Faxes
Options
Real Time TX
- Send a fax without using the
memory.
Overseas Mode
- Set to On if you have difficulty
sending faxes overseas.
Call History Redial
Redial the last number you
dialled.
Outgoing
Call
Select a number from the
Outgoing Call history and then
send a fax to it, add it to the
Address Book, or delete it.
Caller ID
History
(Not available for
Taiwan and
some countries)
Select a number from the Caller
ID History and then send a fax to
it, add it to the Address Book, or
delete it.
Address Book
(Search:)
When LDAP is off, the search is
within the Local Address Book.
When LDAP is on, the search is
within the Local Address Book
and LDAP Server.
Edit
Store Address Book numbers, set
up Group numbers for
Broadcasting, and change and
delete Address Book numbers.
Set New Default
- Save your settings as the default.
Factory Reset
- Restore all settings back to the
factory settings.
Save as Shortcut
- - Save the current settings as a
shortcut.
Received
Faxes
Print/Delete Print All(New
Faxes)
- Print the new received faxes.
Print All(Old
Faxes)
- Print the old received faxes.
Delete All(New
Faxes)
- Delete the new received faxes.
Delete All(Old
Faxes)
- Delete the old received faxes.
Address
Book
(Search:)
- - When LDAP is off, the search is
within the Local Address Book.
When LDAP is on, the search is
within the Local Address Book
and LDAP Server.
Detail
(Appears only when
LDAP is on.)
(Available only for
some countries.)
- View detailed information about
the selected address.
Edit
- - Store Address Book numbers, set
up Group numbers for
Broadcasting, and change and
delete Address Book numbers.
-
Apply
- Start sending a fax using the
Address Book.
608
Level 3 Level 4 Level 5 Level 6 Descriptions
Call
History
Redial
- - Redial the last number you
dialled.
Outgoing Call Apply
- Select a number from the
Outgoing Call history and then
send a fax to it, add it to the
Address Book, or delete it.
Edit
-
Caller ID
History
(Not available for
Taiwan and some
countries)
Apply
- Select a number from the Caller
ID History and then send a fax to
it, add it to the Address Book, or
delete it.
Edit
-
[Copy]
Level 3
Level 4 Level 5 Descriptions
Save as
Shortcut
- - Save the current settings as a
shortcut.
ID
- - Make an ID card copy.
Preview
(MFC-J5955DW)
- - Preview the copied result on the LCD
before the machine starts printing.
Options
Quality
- Select the Copy resolution for your
document type.
Document Size
- Select the document size option you
want.
Tray Select
(MFC-J2740DW/MFC-J5740DW/
MFC-J5855DW/MFC-J5955DW)
- Select the tray to be used for Copy
mode.
Paper Type
- Select the paper type that matches
the paper in the tray.
Paper Size
- Select the paper size that matches
the paper in the tray.
Enlarge/Reduce 100%
-
Fit to Page
Adjust the copy size to fit on the
paper size you have set.
Enlarge
Select an enlargement ratio for the
next copy.
Reduce
Select a reduction ratio for the next
copy.
Custom(25-400
%)
Enter an enlargement or reduction
ratio.
Density
- Adjust the density.
Remove Background Colour Black Copy
Settings
Change the amount of background
colour that is removed.
Colour Copy
Settings
2-sided Copy
- Turn off or turn on 2-sided copying
and select flip on long edge or flip on
short edge.
Stack/Sort
- Select to stack or sort multiple copies.
609
Level 3 Level 4 Level 5 Descriptions
Options
Page Layout
- Make N in 1, 2 in 1 ID, or Poster
copies.
Auto Deskew
- Set the machine to correct a skewed
copy.
Advanced Settings
- Select advanced copy settings.
Preview
(MFC-J5955DW)
- Preview a copy result on the LCD,
before the machine starts printing.
Set New Default
- Save your settings as the default.
Factory Reset
- Restore all settings back to the
factory settings.
[Scan]
Level 3
Level 4 Level 5 Level 6 Descriptions
to Media
(When a USB Flash drive is
inserted)
Other Scan
to Actions
- - Scan documents and save
them directly to a USB flash
drive without using a
computer.
Options
- -
Save as
Shortcut
- -
to My E-mail
(MFC-J5855DW/
MFC-J5955DW)
- - - Scan a monochrome or a
colour document to your
email address.
to My Folder
(MFC-J5855DW/
MFC-J5955DW)
- - - Send scanned data to your
folder in the CIFS server on
your local network or on the
Internet.
to PC to File Other Scan to
Actions
- Scan documents and save
them to a folder on your
computer.
(Select USB or
PC)
Options
Save as
Shortcut
to OCR Other Scan to
Actions
- Convert your scanned
document to an editable text
file.
(Select USB or
PC)
Options
Save as
Shortcut
to Image Other Scan to
Actions
- Scan photos or graphics into
your graphics applications.
(Select USB or
PC)
Options
Save as
Shortcut
to E-mail Other Scan to
Actions
- Send a scanned document
as an email attachment.
(Select USB or
PC)
Options
Save as
Shortcut
610
Level 3 Level 4 Level 5 Level 6 Descriptions
to E-mail Server Other Scan
to Actions
- - Send scanned data to an
email server by allowing your
machine to communicate with
your network and email
server.
Manual Next Save as
Shortcut
Preview
(MFC-J5955DW)
Options
Destinations
Add Address
-
Destinations
-
Address
Book
Next Save as
Shortcut
Preview
(MFC-J5955DW)
Options
Destinations
Add Address
-
Destinations
-
to FTP
(MFC-J2340DW/
MFC-J2740DW/
MFC-J5340DW/
MFC-J5740DW)
Other Scan
to Actions
- - Scan documents directly to
an FTP server.
(Select Profile
name)
Options
-
Save as
Shortcut
-
to FTP/SFTP
(MFC-J5855DW/
MFC-J5955DW)
Other Scan
to Actions
- - Send scanned data via FTP/
SFTP.
(Select Profile
name)
Preview
(MFC-J5955DW)
-
Options
-
Save as
Shortcut
-
to Network Other Scan
to Actions
- - Scan documents directly to a
CIFS server on your local
network.
(Select Profile
name)
Preview
(MFC-J5955DW)
-
Options
-
Save as
Shortcut
-
to SharePoint
(MFC-J5855DW/
MFC-J5955DW)
Other Scan
to Actions
- - Send scanned data via a
SharePoint server.
(Select Profile
name)
Preview
-
611
Level 3 Level 4 Level 5 Level 6 Descriptions
to SharePoint
(MFC-J5855DW/
MFC-J5955DW)
(Select Profile
name)
(MFC-J5955DW) Send scanned data via a
SharePoint server.
Options
-
Save as
Shortcut
-
to Web
- - - Upload the scanned data to
an Internet service.
WS Scan
(Appears when you install a
Web Services Scanner,
which is displayed in your
computer’s Network
explorer.)
Other Scan
to Actions
- - Scan data using the Web
Service protocol.
Scan
- -
Scan for
E-mail
- -
Scan for
Fax
- -
Scan for
Print
- -
[Secure Print]
(MFC-J5955DW)
Level 1
Level 2 Level 3 Descriptions
Secure Print
(Select User) - You can print data saved in the machine's memory when you enter your
four-digit password.
Active only when the machine has secure print data.
[Web]
Level 1
Descriptions
Web
Connect the Brother machine to an Internet service.
[Apps]
Level 1
Descriptions
Apps
Connect the Brother machine to the Brother Apps service.
[USB]
Level 3
Level 4 Level 5 Level 6 Descriptions
PDF Print
(MFC-J5955DW)
(Select a PDF
file.)
Print
Settings
- Print a PDF file directly from a USB
flash drive.
JPEG Print Select Files OK
Print
Settings
Adjust your photos with the options.
Print All
- Print all photos in your USB flash
drive.
Index Print Print Index
Sheet
Print
Settings
Print a thumbnail page.
612
Level 3 Level 4 Level 5 Level 6 Descriptions
JPEG Print Index Print Print Photos
Print
Settings
Print photos by choosing the index
numbers.
Scan to
Media
- - - Scan documents into a USB flash
drive.
Web
- - - Connect the Brother machine to an
Internet service.
[A3 Copy Shortcuts]
Level 2
Level 3 Level 4 Descriptions
A3 2in1
A4⇒A3
A4 + Note(L)
A4 + Note(P)
A4 + Grid
A4 + Blank
A4 Centre
Options
Quality
Select the Copy resolution for your
document type.
Document Size
Select the document size option you
want.
Tray Select
(MFC-J2740DW/
MFC-J5740DW/
MFC-J5855DW/
MFC-J5955DW)
Set the machine to automatically
select the tray that contains the most
appropriate paper.
Paper Type
View the available paper type.
Paper Size
Set the size of paper in the paper
tray.
Density
Adjust the density.
Auto Deskew
Set the machine to correct a skewed
copy.
[Download Software]
Level 1
Descriptions
Download Software
Displays information about downloading and installing software for mobile devices and
computers.
[Print Head Cleaning]
Level 1
Descriptions
Print Head Cleaning
Clean the print head according to the LCD instructions.
[Shortcuts]
Level 2
Level 3 Level 4 Descriptions
Add Shortcut
Copy
- Change the settings in the Copy
Options.
Fax
- Change the settings in the Fax Options.
Scan to Media
Scan documents and save them directly
to a USB flash drive without using a
computer.
to PC(File)
Scan documents and save them to a
folder on your computer.
613
Level 2 Level 3 Level 4 Descriptions
Add Shortcut
Scan to PC(OCR)
Convert your scanned document to an
editable text file.
to PC(Image)
Scan photos or graphics into your
graphics applications.
to PC(E-mail)
Send a scanned document as an email
attachment.
to E-mail Server
Scan a monochrome or a colour
document to your email server.
to Network
Send scanned data to a CIFS server on
your local network or on the Internet.
to FTP
(MFC-J2340DW/
MFC-J2740DW/
MFC-J5340DW/
MFC-J5740DW)
Send scanned data via FTP.
to FTP/SFTP
(MFC-J5855DW/
MFC-J5955DW)
Send scanned data via FTP/SFTP.
to SharePoint
(MFC-J5855DW/
MFC-J5955DW)
Send scanned data via a SharePoint
server.
Web
- Connect the Brother machine to an
Internet service.
Apps
- Connect the Brother machine to the
Brother Apps service.
This list appears when each
Shortcut icon is pressed for 2
seconds.
Rename
- Change the shortcut name.
Edit
- Change the shortcut settings.
Delete
- Delete the shortcut.
Register
Card/NFC
- Assign a Shortcut to an IC card.
Delete
Card/NFC
- Remove a Shortcut from an IC card.
Edit/Delete
(Select shortcut
button.)
Rename
Change the shortcut name.
Edit
Change the shortcut settings.
Delete
Delete the shortcut.
Register Card/NFC
Assign a Shortcut to an IC card.
Delete Card/NFC
Remove a Shortcut from an IC card.
[Ink]
Level 2
Level 3 Descriptions
Ink Volume
- Check the available ink volume.
Ink Cartridge Model
- Check your ink cartridge numbers.
Improve Print Quality Check Print
Quality
Check and correct the print quality, alignment and paper feeding
according to the LCD instructions.
Alignment
Correct Paper
Feed
614
Level 2 Level 3 Descriptions
Print Head Cleaning
- Clean the print head according to the LCD instructions.
Remove Paper Scraps
- Remove a piece of paper in the machine according to the LCD
instructions.
Clean Paper Pick-up
Roller
(Available only for some
countries.)
- Clean the rollers according to the LCD instructions.
Print Options Reduce Smudging
Reduce smudging on the paper or paper jams during printing.
Reduce Uneven
Lines
Reduce uneven lines on the paper during printing.
Enhance Print
Improve print quality and reduce blurriness.
Ink Cartridge Check
- View your ink cartridge information.
Print Quality Auto
Check
- Automatically detects the Print Head condition and cleans the
Print Head when needed.
Wi-Fi Setup
Level 2
Descriptions
Find Wi-Fi Network
Configure your wireless network settings manually.
WPS/Push Button
Configure your wireless network settings using the one-button push method.
When you have put a USB Flash drive in the USB slot
Level 1
Descriptions
PDF Print
(MFC-J5955DW)
Print a PDF file directly from a USB flash drive.
JPEG Print
Select photo menu.
Scan to Media
Scan documents into a USB flash drive.
Web
Connect the Brother machine to an Internet service.
Related Information
• Settings and Features Tables
615

Home > Machine Settings > Change Machine Settings Using Web Based Management
Change Machine Settings Using Web Based Management
Web Based Management is a utility that uses a standard web browser to manage your machine using the Hyper
Text Transfer Protocol (HTTP) or Hyper Text Transfer Protocol over Secure Socket Layer (HTTPS).
• What is Web Based Management?
• Access Web Based Management
• Set or Change a Login Password for Web Based Management
• Set Up Your Machine's Address Book Using Web Based Management
616
Home > Machine Settings > Change Machine Settings Using Web Based Management > What is Web
Based Management?
What is Web Based Management?
Web Based Management is a utility that uses a standard web browser to manage your machine using the Hyper
Text Transfer Protocol (HTTP) or Hyper Text Transfer Protocol over Secure Socket Layer (HTTPS).
• We recommend Microsoft Internet Explorer 11/Microsoft Edge for Windows, Safari 13 for Mac, Google
Chrome
™
for Android (4.x or later), and Google Chrome
™
/Safari for iOS (10.x or later). Make sure that
JavaScript and Cookies are always enabled in whichever browser you use.
• You must use the TCP/IP protocol on your network and have a valid IP address programmed into the
print server and your computer.
The actual screen may differ from the screen shown above.
Related Information
• Change Machine Settings Using Web Based Management
617

Home > Machine Settings > Change Machine Settings Using Web Based Management > Access Web
Based Management
Access Web Based Management
• We recommend Microsoft Internet Explorer 11/Microsoft Edge for Windows, Safari 13 for Mac, Google
Chrome
™
for Android (4.x or later), and Google Chrome
™
/Safari for iOS (10.x or later). Make sure that
JavaScript and Cookies are always enabled in whichever browser you use.
• The default password to manage this machine’s settings is located on the back of the machine and marked
"Pwd". We recommend immediately changing the default password to protect your machine from
unauthorised access.You can also find the default password in the Network Configuration Report.
• If the password is entered incorrectly several times, you will not be able to log in for a while. The lockout
settings can be changed in Web Based Management.
• Up to eight computers or mobile devices can be logged in to Web Based Management at the same time. If
you log in a ninth device, the first device will be logged out.
• We recommend using the HTTPS security protocol when configuring settings using Web Based
Management. If you use HTTP when configuring settings using Web Based Management, follow the
screen prompts to switch to a secure HTTPS connection.
• When you use HTTPS for Web Based Management configuration, your browser will display a warning
dialog box. To avoid displaying the warning dialog box, you can install a self-signed certificate to use
SSL/TLS communication. For more detailed information, see Related Information.
>> Start from Your Web Browser
>> Start from Brother iPrint&Scan (Windows/Mac)
>> Start from Brother Utilities (Windows)
>> Start from Brother Mobile Connect
Start from Your Web Browser
1. Start your web browser.
2. Type "https://machine's IP address" in your browser's address bar (where "machine's IP address" is the
machine's IP address).
For example:
https://192.168.1.2
If you are using a Domain Name System or enable a NetBIOS name, you can type another name, such as
"SharedPrinter" instead of the IP address.
For example:
https://SharedPrinter
If you enable a NetBIOS name, you can also use the node name.
For example:
https://brnxxxxxxxxxxxx
The NetBIOS name can be found in the Network Configuration Report.
3. If required, type the password in the Login field, and then click Login.
4. If you want to pin the navigation menu on the left side of the screen, click
and then click .
You can now change the machine settings.
If you change the protocol settings, you must restart the machine after clicking Submit to activate the
configuration.
After configuring the settings, click Logout.
Start from Brother iPrint&Scan (Windows/Mac)
1. Start Brother iPrint&Scan.
618
• Windows
Launch (Brother iPrint&Scan).
• Mac
In the Finder menu bar, click Go > Applications, and then double-click the iPrint&Scan icon.
The Brother iPrint&Scan screen appears.
2. If your Brother machine is not selected, click the Select your Machine button, and then select your model
name from the list. Click OK.
3. Click (Machine Settings).
4. Click All Settings.
Web Based Management appears.
5. If required, type the password in the Login field, and then click Login.
6. If you want to pin the navigation menu on the left side of the screen, click
and then click .
You can now change the machine settings.
If you change the protocol settings, you must restart the machine after clicking Submit to activate the
configuration.
After configuring the settings, click Logout.
Start from Brother Utilities (Windows)
1. Launch
(Brother Utilities), and then click the drop-down list and select your model name (if not already
selected).
2. Click Tools in the left navigation bar, and then click Machine Settings.
Web Based Management appears.
3. If required, type the password in the Login field, and then click Login.
4. If you want to pin the navigation menu on the left side of the screen, click and then click .
You can now change the machine settings.
If you change the protocol settings, you must restart the machine after clicking Submit to activate the
configuration.
After configuring the settings, click Logout.
Start from Brother Mobile Connect
You need to install and set up Brother Mobile Connect on your mobile device.
1. Start Brother Mobile Connect on your mobile device.
2. Tap your model name on the top of the screen.
3. Tap All Machine Settings.
Web Based Management appears.
4. If required, type the password in the Login field, and then tap Login.
5. If you want to pin the navigation menu on the left side of the screen, tap
and then tap .
You can now change the machine settings.
If you change the protocol settings, you must restart the machine after tapping Submit to activate the
configuration.
After configuring the settings, tap Logout.
619

Home > Machine Settings > Change Machine Settings Using Web Based Management > Set or Change a
Login Password for Web Based Management
Set or Change a Login Password for Web Based Management
The default password to manage this machine’s settings is located on the back of the machine and marked
"Pwd". We recommend immediately changing the default password to protect your machine from unauthorised
access.
1. Start your web browser.
2. Type "https://machine's IP address" in your browser's address bar (where "machine's IP address" is the
machine's IP address).
For example:
https://192.168.1.2
If you are using a Domain Name System or enable a NetBIOS name, you can type another name, such as
"SharedPrinter" instead of the IP address.
For example:
https://SharedPrinter
If you enable a NetBIOS name, you can also use the node name.
For example:
https://brnxxxxxxxxxxxx
The NetBIOS name can be found in the Network Configuration Report.
3. Do one of the following:
• If you have previously set your own password, type it, and then click Login.
• If you have not previously set your own password, type the default login password, and then click Login.
4. Go to the navigation menu, and then click Administrator > Login Password.
Start from
, if the navigation menu is not shown on the left side of the screen.
5. If you want to change the password, type your current password in the Enter Old Password field.
6. Following the on-screen Login Password guidelines, type your password in the Enter New Password field.
7. Retype the password in the Confirm New Password field.
8. Click Submit.
You can also change the lockout settings in the Login Password menu.
Related Information
• Change Machine Settings Using Web Based Management
Related Topics:
• Access Web Based Management
621
Home > Machine Settings > Change Machine Settings Using Web Based Management > Set Up Your
Machine's Address Book Using Web Based Management
Set Up Your Machine's Address Book Using Web Based Management
• We recommend using the HTTPS security protocol when configuring settings using Web Based
Management.
• When you use HTTPS for Web Based Management configuration, your browser will display a warning
dialog box.
1. Start your web browser.
2. Type "https://machine's IP address" in your browser's address bar (where "machine's IP address" is the
machine's IP address).
For example:
https://192.168.1.2
If you are using a Domain Name System or enable a NetBIOS name, you can type another name, such as
"SharedPrinter" instead of the IP address.
For example:
https://SharedPrinter
If you enable a NetBIOS name, you can also use the node name.
For example:
https://brnxxxxxxxxxxxx
The NetBIOS name can be found in the Network Configuration Report.
3. If required, type the password in the Login field, and then click Login.
The default password to manage this machine’s settings is located on the back of the machine and marked
"Pwd".
4. Go to the navigation menu, and then click Address Book > Address XX-XX.
Start from
, if the navigation menu is not shown on the left side of the screen.
5. Add or update the Address Book information as needed.
6. Click Submit.
Related Information
• Change Machine Settings Using Web Based Management
Related Topics:
• Access Web Based Management
622

Home > Appendix > Specifications
Specifications
>> General Specifications
>> Document Size Specifications
>> Print Media Specifications
>> Fax Specifications
>> Copy Specifications
>> USB Flash Drive Specifications
>> Scanner Specifications
>> Printer Specifications
>> Interface Specifications
>> Network Specifications
>> Computer Requirements Specifications
General Specifications
Printer Type
Inkjet
Print Head Mono Piezo with 420 nozzles x 1
Colour Piezo with 420 nozzles x 3
Memory Capacity • MFC-J2340DW/MFC-J2740DW/MFC-J5340DW/MFC-J5740DW/
MFC-J5855DW
256 MB
• MFC-J5955DW
512 MB
LCD (liquid crystal display)
1
• MFC-J2340DW/MFC-J5340DW
2.7 in. (67.5 mm) TFT Colour Touchscreen LCD
• MFC-J2740DW/MFC-J5740DW/MFC-J5855DW/MFC-J5955DW
3.5 in. (87.6 mm) TFT Colour Touchscreen LCD
Power Source AC 100 to 120 V 50/60 Hz (Taiwan)
AC 220 to 240 V 50/60 Hz (Australia and other countries)
Power Consumption
2
• MFC-J2340DW (Taiwan)
Copying
3
: Approx. 35 W
Ready
4
: Approx. 4.5 W
Sleep
4
: Approx. 0.9 W
Power Off
4 5
: Approx. 0.02 W
• MFC-J2340DW/MFC-J2740DW/MFC-J5340DW/MFC-J5740DW/
MFC-J5855DW (Australia and other countries)
Copying
3
: Approx. 36 W
Ready
4
: Approx. 5.5 W
Sleep
4
: Approx. 0.9 W
Power Off
4 5
: Approx. 0.03 W
• MFC-J5955DW
Copying
3
: Approx. 36 W
Ready
4
: Approx. 6 W
Sleep
4
: Approx. 0.9 W
Power Off
4 5
: Approx. 0.03 W
624
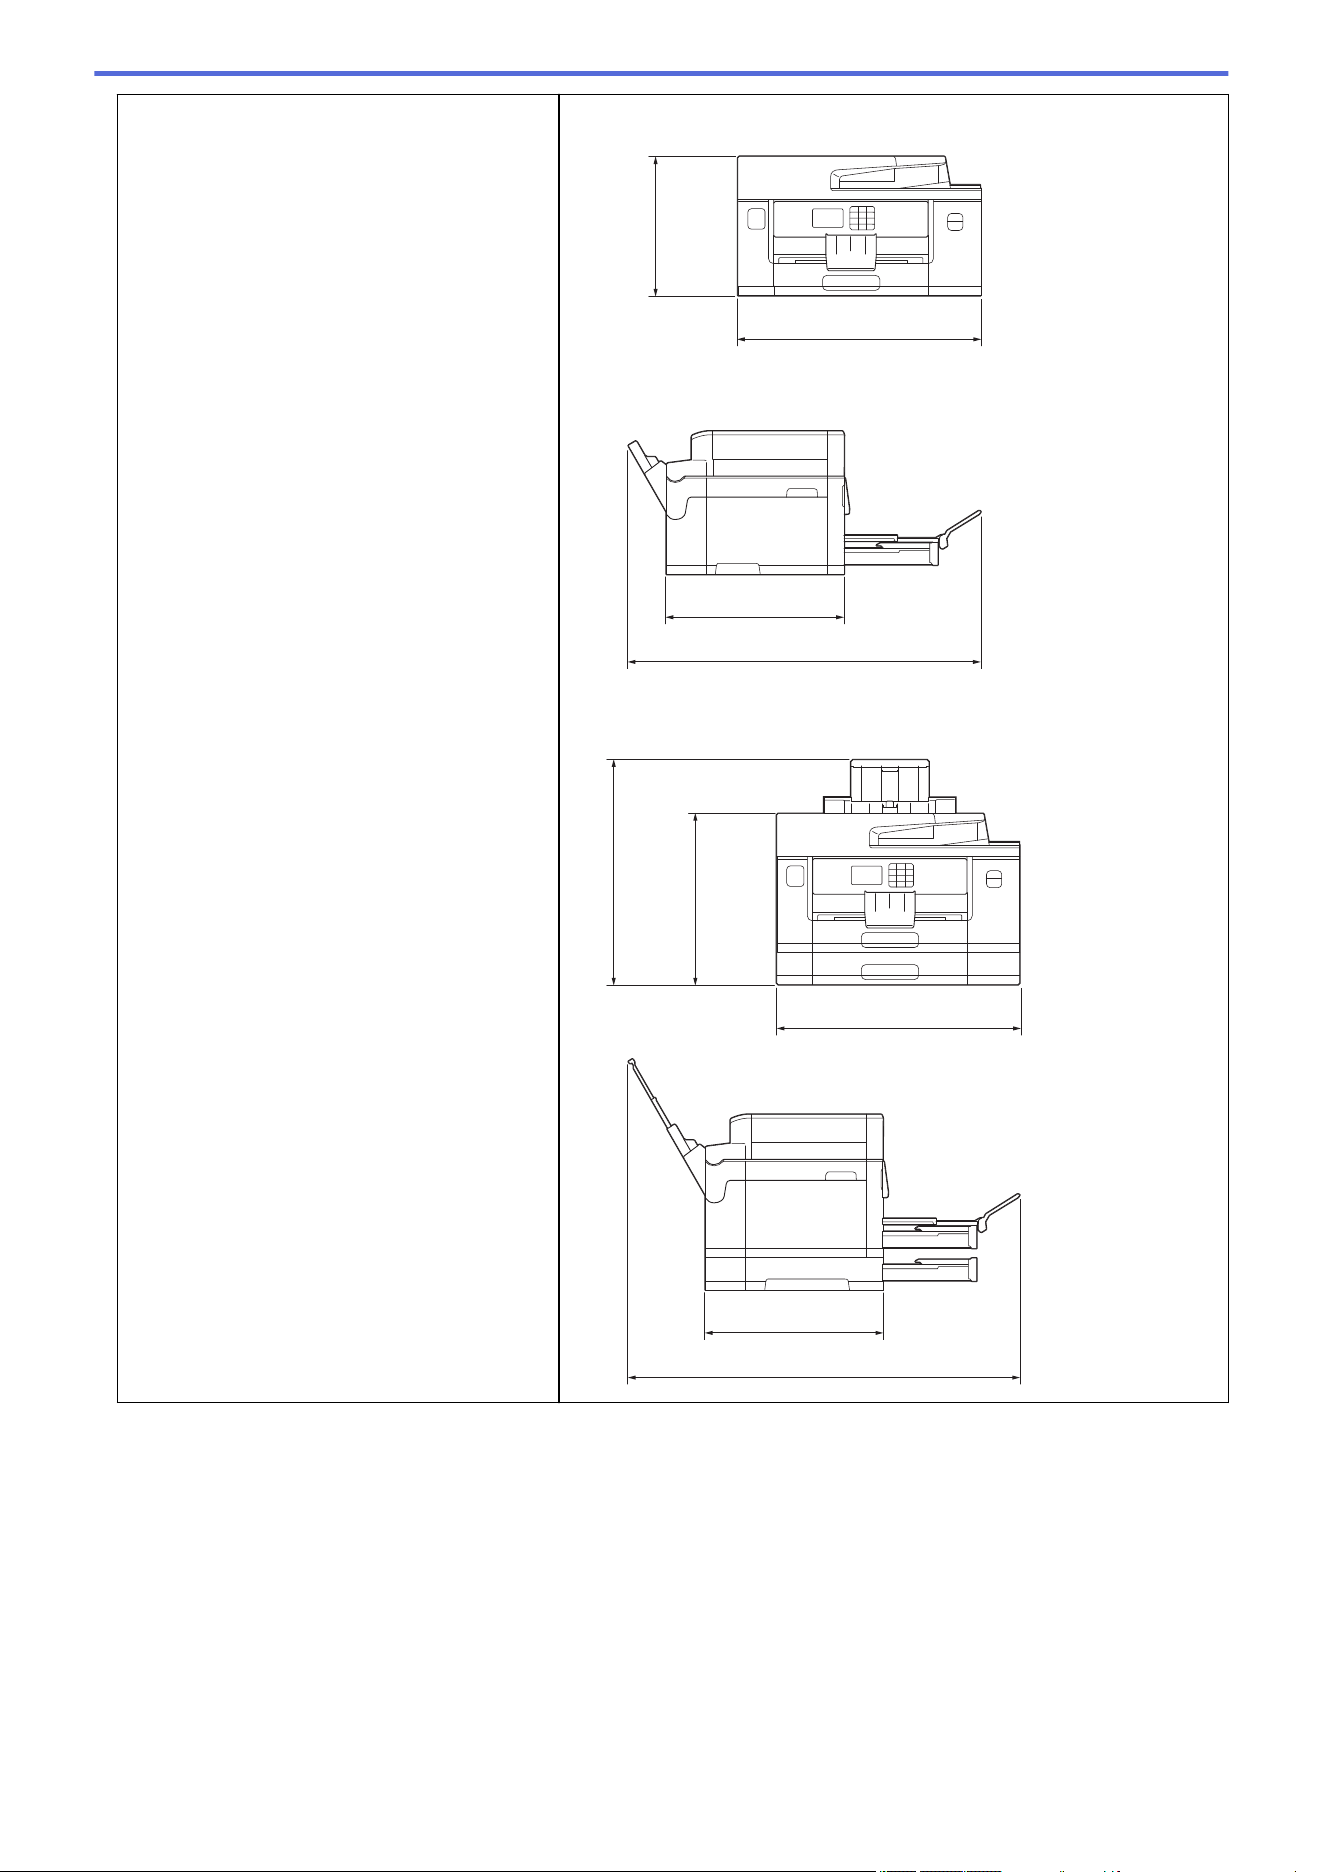
Dimensions • MFC-J2340DW/MFC-J5340DW
530 mm
398 mm
305 mm
741 mm
• MFC-J2740DW/MFC-J5740DW
398 mm
810 mm
530 mm
375 mm
467 mm
625
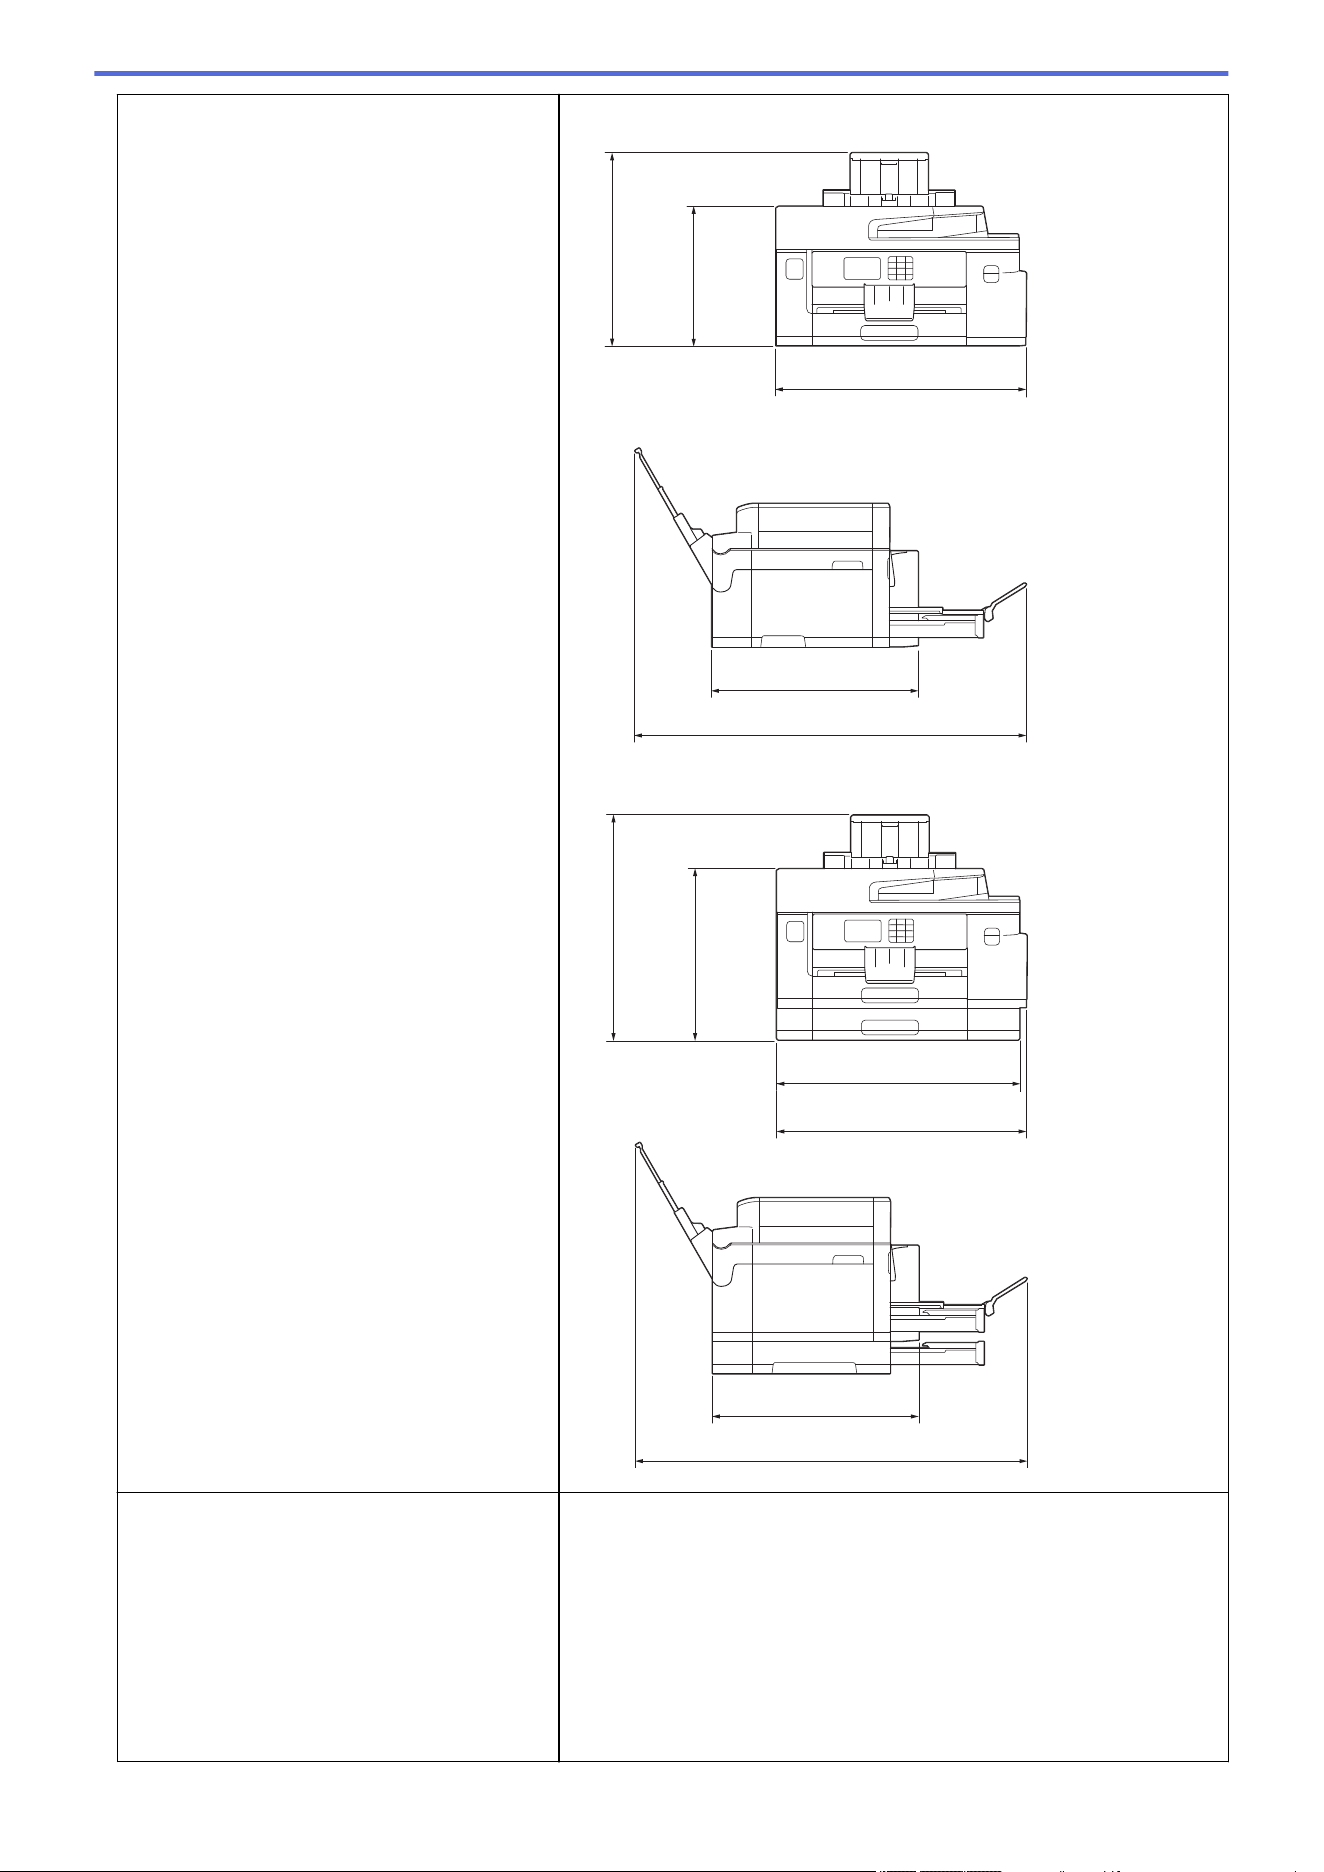
• MFC-J5855DW
810 mm
436 mm
545 mm
397 mm
305 mm
• MFC-J5955DW
810 mm
436 mm
530 mm
465 mm
375 mm
545 mm
Weights
• MFC-J2340DW/MFC-J5340DW
17.0 kg
• MFC-J2740DW/MFC-J5740DW
20.5 kg
• MFC-J5855DW
17.7kg
• MFC-J5955DW
20.9 kg
626
Noise Level Sound Pressure
6
Operating • Printing
51.5 dB (A) (Approx.)
• Copying (using the scanner glass)
52.0 dB (A) (Approx.)
Temperature Operating 10 to 35°C
Best Print Quality 20 to 33°C
Humidity Operating 20 to 80% (without condensation)
Best Print Quality 20 to 80% (without condensation)
Automatic Document Feeder (ADF) Up to 50 pages
Paper: 80 gsm
1
Measured diagonally.
2
Measured when the machine is connected to the USB interface. Power consumption varies slightly depending on the usage environment
or part wear.
3
When using ADF, single-sided printing and scanning, resolution: standard / document: ISO/IEC 24712 printed pattern.
4
Measured according to IEC 62301 Edition 2.0.
5
Even when the machine is turned off, it will automatically turn itself on periodically for print head maintenance, and then turn itself off.
6
Noise depends on printing conditions.
Document Size Specifications
Document Size
ADF Width 105 to 215.9 mm
ADF Length
1
148 to 355.6 mm
Scanner Glass Width Max. 215.9 mm
Scanner Glass Length Max. 297 mm
1
Up to 900 mm when using the long paper function.
Print Media Specifications
Paper Input
Paper Tray #1
Paper Type
1
Plain Paper, Inkjet Paper (coated paper), Glossy Paper,
Recycled Paper
Paper Size
2 3
(Landscape)
A4, Letter, Executive, B5 (JIS)
(Portrait)
A3, Ledger, B4 (JIS), Legal, Mexico Legal, India Legal,
Folio, A5, B6 (JIS), A6, Envelopes (C5, Com-10, DL,
Monarch), Photo (10 x 15 cm), Photo L (9 x 13 cm), Photo
2L (13 x 18 cm), Index card (13 x 20 cm)
Maximum Paper
Capacity
Up to 250 sheets of 80 gsm plain paper
Paper Tray #2
(MFC-J2740DW/
MFC-J5740DW/
MFC-J5955DW)
Paper Type Plain Paper, Recycled Paper
Paper Size
3
(Landscape)
A4, Letter
(Portrait)
A3, Ledger, B4 (JIS), Legal, Mexico Legal, India Legal,
Folio
Maximum Paper
Capacity
Up to 250 sheets of 80 gsm plain paper
Multi-purpose
tray (MP tray)
4
Paper Type
1
Plain Paper, Inkjet Paper (coated paper), Glossy Paper,
Recycled Paper
627
(MFC-J2740DW/
MFC-J5740DW/
MFC-J5855DW/
MFC-J5955DW)
Paper Size
3
/
Maximum Paper
Capacity
(Landscape)
A4, Letter, Executive, B5
(JIS)
(Portrait)
A3, Ledger, B4 (JIS), Legal,
Mexico Legal, India Legal,
Folio, A5, B6 (JIS), A6,
Envelopes (C5, Com-10,
DL, Monarch), Photo (10 x
15 cm), Photo L (9 x 13
cm), Photo 2L (13 x 18 cm),
Index card (13 x 20 cm)
Up to 100 sheets of 80 gsm
Plain Paper
Long Paper (Width: 88.9 -
297 mm / Height: 431.9 -
1200 mm)
Up to 1 sheet
Manual Feed Slot
(MFC-J2340DW/
MFC-J5340DW)
Paper Type
1
Plain Paper, Inkjet Paper (coated paper), Glossy Paper,
Recycled Paper
Paper Size
3
(Landscape)
A4, Letter, Executive, B5 (JIS)
(Portrait)
A3, Ledger, B4 (JIS), Legal, Mexico Legal, India Legal,
Folio, A5, B6 (JIS), A6, Envelopes (C5, Com-10, DL,
Monarch), Photo (10 x 15 cm), Photo L (9 x 13 cm), Photo
2L (13 x 18 cm), Index card (13 x 20 cm)
Maximum Paper
Capacity
Up to 1 sheet
Paper Output
1
• Up to A4/Letter size paper
Up to 100 sheets of 80 gsm Plain Paper (face up print
delivery to the output paper tray)
• Over A4/Letter size paper
Up to 50 sheets of 80 gsm Plain Paper (face up print
delivery to the output paper tray)
1
For glossy paper, remove any printed pages from the output paper tray immediately to avoid smudging.
2
Glossy paper is available up to A4 or Letter size.
3
B6 (JIS), B5 (JIS) and B4 (JIS) size paper are supported only in some countries.
4
We recommend using the MP tray for glossy paper.
Fax Specifications
Compatibility
• MFC-J2340DW/MFC-J5340DW
ITU-T Group 3
• MFC-J2740DW/MFC-J5740DW/MFC-J5855DW/MFC-J5955DW
ITU-T Super Group 3
Modem Speed • MFC-J2340DW/MFC-J5340DW
Automatic Fallback: 14,400 bps
• MFC-J2740DW/MFC-J5740DW/MFC-J5855DW/MFC-J5955DW
Automatic Fallback: 33,600 bps
Scanning Width
(Single-sided document)
ADF: 208 mm (A4)
Scanner Glass: 204 mm (A4)
Scanning Width and Length
(2-sided document)
(MFC-J2740DW/MFC-J5740DW/
MFC-J5955DW)
Width: 208 mm (A4/Letter/Legal) (ADF)
Length: 349.6 mm (ADF)
628
Printing Width 291 mm (A3)
Greyscale Monochrome: 8 bit (256 levels)
Colour: 24 bit (8 bit per colour/ 256 levels)
Resolution
(Horizontal)
203 dpi
Resolution
(Vertical)
Standard:
98 dpi (Mono)
196 dpi (Colour)
Fine:
196 dpi (Mono)
196 dpi (Colour)
Superfine:
392 dpi (Mono)
Photo:
196 dpi (Mono)
Address Book 100 names x 2 numbers or Email addresses
Groups Up to 6
Broadcasting 250 (200 Address Book/50 Manual Dial)
Automatic Redial 3 times at 5 minute intervals
Memory Transmission
Up to 150 pages
1
Out of Paper Reception
Up to 150 pages
1
1
‘Pages’ refers to the ‘ITU-T Test Chart #1’ (a typical business letter, Standard resolution, MMR code).
Copy Specifications
Colour/Monochrome
Yes/Yes
Copy Width
204 mm
1
Multiple Copies Stacks/Sorts up to 999 pages
Enlarge/Reduce 25% to 400% (in increments of 1%)
Resolution Prints up to 1200 × 4800 dpi
Automatic 2-sided
(MFC-J2740DW/MFC-J5740DW/
MFC-J5955DW)
Paper Type Plain Paper, Recycled Paper
Paper Size A4, Letter, A5
1
When copying on A4 size paper.
USB Flash Drive Specifications
Compatible Media
USB Flash drive
1
JPEG Print Resolution Up to 1200 x 4800 dpi
Paper Type Plain Paper, Inkjet Paper (coated paper), Glossy Paper, Recycled Paper
Paper Size A4, Letter, A3, Ledger, Photo (10 x 15 cm), Photo 2L (13 x 18 cm)
File Format JPEG (Progressive JPEG format is not supported)
PDF Print
(MFC-J5955DW)
Resolution Up to 1200 x 1800 dpi
629
Paper Type Plain Paper, Recycled Paper
Paper Size
2
A4, Letter, A3, Ledger, B4 (JIS), Legal, Mexico Legal, India Legal, Folio, B5 (JIS),
A5, A6
File Format PDF version1.7
Scan to Media File Format JPEG, PDF (Colour, Grey)
TIFF, PDF (Monochrome)
1
USB Flash drive is not included. Full-Speed USB 2.0. USB Mass Storage standard. Supported formats: FAT12/FAT16/FAT32/exFAT
2
B5 (JIS) and B4 (JIS) size paper are supported only in some countries.
Scanner Specifications
Colour/Monochrome
Yes/Yes
TWAIN Compliant Yes
(Windows 7 SP1 / Windows 8.1 / Windows 10)
WIA Compliant Yes
(Windows 7 SP1 / Windows 8.1 / Windows 10)
Colour Depth 48 bit colour processing (Input)
24 bit colour processing (Output)
Greyscale 16 bit colour processing (Input)
8 bit colour processing (Output)
Resolution
Up to 19200 × 19200 dpi (interpolated)
1
Up to 1200 × 2400 dpi (optical) (from Scanner Glass)
Up to 600 × 600 dpi (optical) (from ADF)
Scanning Width and Length
(Single-sided document)
(Scanner Glass)
Width: Up to 213.9 mm
Length: Up to 295 mm
(ADF)
Width: Up to 213.9 mm
Length: Up to 353.6 mm
Scanning Width and Length
(2-sided document)
(MFC-J2740DW/MFC-J5740DW/MFC-J5955DW)
Width: Up to 213.9 mm (ADF)
Length: Up to 353.6 mm (ADF)
1
Maximum 1200 × 1200 dpi scanning with the WIA driver in Windows 7 SP1, Windows 8.1 and Windows 10 (resolutions up to 19200 ×
19200 dpi can be selected using the scanner utility).
Printer Specifications
Emulation
(MFC-J5955DW)
PCL6, BR-Script3, PDF version1.7, XPS version 1.0
Resolution Up to 1200 × 4800 dpi
Printing Width
1
291 mm
Borderless
2
: 297 mm
Borderless A4, Letter, A3, Ledger, A6, Photo (10 x 15 cm), Photo L (9 x 13 cm),
Photo 2L (13 x 18 cm), Index card (13 x 20 cm)
Automatic 2-sided Paper Type Plain Paper, Recycled Paper
Paper Size
3
A4, Letter, A5, Executive, B5 (JIS), B6 (JIS)
Print Speed See your model's page on your local Brother website.
630
1
When printing on A3 size paper.
2
When the Borderless feature is set to On.
3
B6 (JIS) and B5 (JIS) size paper are supported only in some countries.
Interface Specifications
USB
1 2
Use a USB 2.0 interface cable that is no longer than 5 m.
LAN Use an Ethernet UTP cable category 5 or greater.
Wireless LAN • (For Oceania countries)
IEEE 802.11a/b/g/n (Infrastructure)
IEEE 802.11a/g/n (Wi-Fi Direct)
• (For ASEAN, Middle East, Africa, South Asian countries and others
3
)
IEEE 802.11b/g/n (Infrastructure)
IEEE 802.11g/n (Wi-Fi Direct)
NFC
(MFC-J5955DW)
Yes
1
Your machine has a USB 2.0 Hi-Speed interface. The machine can also be connected to a computer that has a USB 1.1 interface.
2
Third party USB ports are not supported.
3
Hong Kong, Macau, and Mongolia.
Network Specifications
You can connect your machine to a network for Network Printing, Network Scanning, PC-Fax Send, and
PC-Fax Receive (Windows only).
Network Security (Wired) APOP, SMTP-AUTH, SSL/TLS (IPPS, HTTPS, FTPS, SMTP, POP3,
IMAP4), SNMP v3, 802.1x (EAP-MD5, EAP-FAST, PEAP, EAP-TLS, EAP-
TTLS), Kerberos, IPsec
Network Security (Wireless) APOP, SMTP-AUTH, SSL/TLS (IPPS, HTTPS, FTPS, SMTP, POP3,
IMAP4), SNMP v3, 802.1x (EAP-FAST, PEAP, EAP-TLS, EAP-TTLS),
Kerberos, IPsec
Wireless Network Security
1
WEP 64/128 bit, WPA-PSK (TKIP/AES), WPA2-PSK (TKIP/AES), WPA3-
SAE (AES)
Wireless Setup
Support Utility
WPS Yes
1
Wi-Fi Direct supports WPA2-PSK (AES) only.
Computer Requirements Specifications
Supported Operating Systems And Software Functions
Computer Platform
& Operating System
Version
PC Interface Processor
Hard Disk Space to Install
1
USB
2
Wired LAN WLAN (Wi-Fi) For Drivers For
Applications
(Including
Drivers)
Wind
ows
Oper
ating
Syste
m
Windows 7
SP1
3 4 5
Windows 8.1
3 4
Printing
PC Fax
6
Scanning
32 bit (x86) or
64 bit (x64)
processor
650 MB 1.3 GB
Windows 10
Home
3 4
631
Windows 10
Pro
3 4
Windows 10
Education
3 4
Windows 10
Enterprise
3 4
Windows
Server 2008
5
Printing
Scanning
Printing 50 MB N/A
Windows
Server 2008
R2
5
Windows
Server 2012
Windows
Server 2012
R2
Windows
Server 2016
Windows
Server 2019
64 bit (x64)
processor
Mac
Oper
ating
Syste
m
7
macOS
v10.14.6
macOS
v10.15.x
macOS v11
Printing
PC-Fax (Send)
6
8
Scanning
64 bit
processor
N/A 550 MB
1
An Internet connection is required to install the software if the Brother installation disc is not supplied.
2
Third party USB ports are not supported.
3
For WIA, 1200 x 1200 resolution. Brother Scanner Utility enables enhancing the resolution up to 19200 x 19200 dpi.
4
Nuance
™
PaperPort
™
14SE supports Windows 7 SP1, Windows 8.1, Windows 10 Home, Windows 10 Pro, Windows 10 Education and
Windows 10 Enterprise.
5
Windows 7 SP1 / Windows Server 2008 / Windows Server 2008 R2 supported by Extend Security Updates until Jan 10, 2023.
6
PC-Fax supports black and white only.
7
Mac OS Disclaimer
AirPrint capable: Printing or scanning via macOS requires the use of AirPrint. Mac drivers are not provided for this machine.
8
AirPrint only.
For the latest driver updates, go to your model's Downloads page at
support.brother.com.
All trademarks, brand and product names are the property of their respective companies.
Related Information
• Appendix
632
Home > Appendix > Supply Specifications
Supply Specifications
>> MFC-J2340DW/MFC-J2740DW/MFC-J5340DW/MFC-J5740DW
>> MFC-J5855DW/MFC-J5955DW
MFC-J2340DW/MFC-J2740DW/MFC-J5340DW/MFC-J5740DW
Ink
The machine uses individual Black, Yellow, Cyan and Magenta ink cartridges that are
separate from the print head assembly.
Service Life of Ink
Cartridge
The first time you install a set of ink cartridges the machine will use an amount of ink to
fill the ink delivery tubes for high quality printouts. This process will only happen once.
After this process is complete the cartridges provided with your machine will have a
lower yield than LC432 / LC462 / LC472 cartridges (approximately 65%)
1
. With all
following ink cartridges you can print the specified number of pages.
Replacement Supplies Ink Cartridge Yield (For Oceania
countries)
(For Middle East,
Africa, Pakistan,
Bangladesh, and
Nepal)
(For other countries)
Black -
Approximately 3000
pages
1
Yellow, Cyan and
Magenta -
Approximately 1500
pages
1
<Black>
LC432XLBK
<Yellow> LC432XLY
<Cyan> LC432XLC
<Magenta>
LC432XLM
<Black>
LC472XLBK
<Yellow> LC472XLY
<Cyan> LC472XLC
<Magenta>
LC472XLM
<Black>
LC462XLBK
<Yellow> LC462XLY
<Cyan> LC462XLC
<Magenta>
LC462XLM
Black, Yellow, Cyan
and Magenta -
Approximately 550
pages
1
<Black> LC432BK
<Yellow> LC432Y
<Cyan> LC432C
<Magenta> LC432M
<Black> LC472BK
<Yellow> LC472Y
<Cyan> LC472C
<Magenta> LC472M
<Black> LC462BK
<Yellow> LC462Y
<Cyan> LC462C
<Magenta> LC462M
1
All replacement cartridges will provide approximate page yield stated in accordance with ISO/IEC 24711. For more page yield information,
see
www.brother.com/pageyield.
MFC-J5855DW/MFC-J5955DW
Ink
The machine uses individual Black, Yellow, Cyan and Magenta ink cartridges that are separate
from the print head assembly.
Service Life of
Ink Cartridge
The first time you install a set of ink cartridges the machine will use an amount of ink to fill the ink
delivery tubes for high quality printouts. This process will only happen once.
MFC-J5855DW XL: After this process is complete the cartridges provided with your machine will
have a lower yield than LC436XL cartridges (approximately 89% for Black and 80% for colour)
1
.
With all following ink cartridges you can print the specified number of pages.
MFC-J5955DW: After this process is complete the cartridges provided with your machine will
have a lower yield than the replacement cartridges (approximately 78% of LC436 Black and 39%
of LC436XL colour)
1
. With all following ink cartridges you can print the specified number of
pages.
Replacement
Supplies
<Black> LC436XLBK
<Yellow> LC436XLY
<Cyan> LC436XLC
<Magenta> LC436XLM
Black - Approximately 6000 pages
1
Yellow, Cyan and Magenta - Approximately 5000 pages
1
<Black> LC436BK
<Yellow> LC436Y
633

Replacement
Supplies
<Cyan> LC436C
<Magenta> LC436M
Black - Approximately 3000 pages
1
Yellow, Cyan and Magenta - Approximately 1500 pages
1
1
All replacement cartridges will provide approximate page yield stated in accordance with ISO/IEC 24711. For more page yield information,
see www.brother.com/pageyield.
Related Information
• Appendix
634

Home > Appendix > Brother Help and Customer Support
Brother Help and Customer Support
If you need help with using your Brother product, visit support.brother.com for FAQs and troubleshooting tips.
You can also download the latest software, drivers and firmware, to improve the performance of your machine,
and user documentation, to learn how to get the most from your Brother product.
Further product and support information is available from your local Brother office website. Visit www.brother.com
to find the contact details for your local Brother office and to register your new product.
Related Information
• Appendix
635
OCE/ASA/SAF/GLF
Version A

