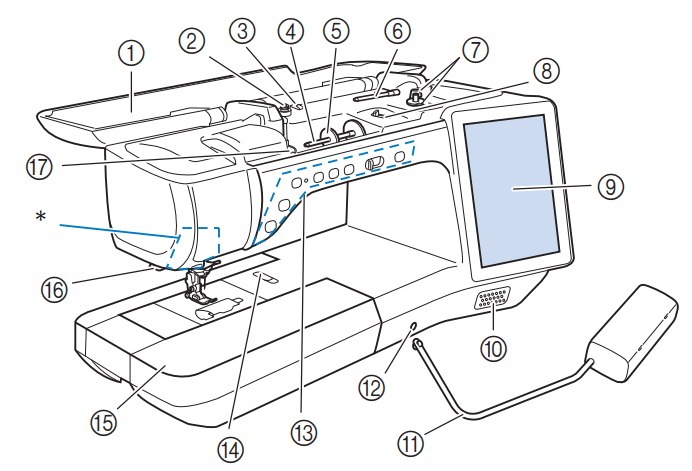
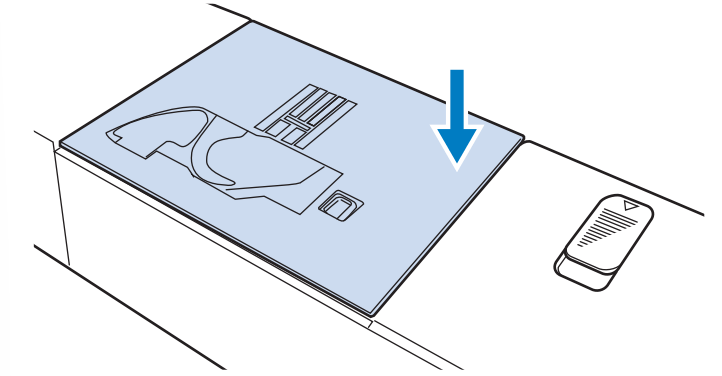
Do not place any object weighing 1 kg (2.2 lb) or more on the top cover, otherwise the cover may be damaged.
Do not touch the camera or projector. Otherwise, it will not display properly.
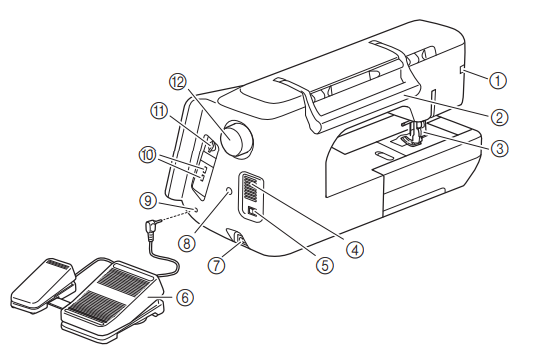
Top cover Open the top cover when threading the machine or winding the bobbin.
Pretension disk Pass the thread around the pretension disk when winding the bobbin thread.
Thread guide for bobbin winding Pass the thread through this thread guide when winding the bobbin thread.
Spool pin Place a spool of thread on the spool pin.
Spool cap Use the spool cap to hold the spool of thread in place.
Supplemental spool pin Use this spool pin to wind the bobbin thread, or to sew with the twin needle.
Bobbin winder Use the bobbin winder when winding the bobbin.
Bobbin winding slider Adjust the amount of thread wound onto the bobbin.
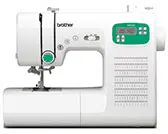
LCD (liquid crystal display) Settings for the selected stitch and error messages appear in the LCD.
Speaker
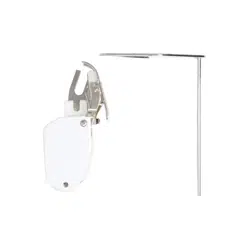
Knee lifter Use the knee lifter to raise and lower the presser foot.
Knee lifter slot Insert the knee lifter into the slot.
Operation buttons (7 buttons) and sewing speed controller Use these buttons and the slide to operate the machine.
Needle plate lever Slide the lever toward you to remove the needle plate.
Flat bed attachment with accessory compartment Store presser feet and bobbins in the accessory compartment of the flat bed attachment. When sewing cylindrical pieces, remove the flat bed attachment.
Thread cutter Pass the threads through the thread cutter to cut them.
Thread guide plate Pass the thread around the thread guide plate when threading upper thread.
Right-side/Rear View
Connector for the presser foot Connect the compact dual feed foot or embroidery foot with LED pointer (sold separately).
Handle Carry the machine by its handle when transporting the machine.
Presser foot lever Raise and lower the presser foot lever to raise and lower the presser foot.
Air vent The air vent allows the air surrounding the motor to circulate. Do not cover the air vent while the machine is being used.
Main power switch Use the main power switch to turn the machine ON and OFF.
Advanced multi-function foot controller Use the advanced multi-function foot controller to operate the machine.
Power cord receptacle Insert the power cord into the machine receptacle.
Dual purpose stylus holder connector Connect the included dual purpose stylus holder.
Foot controller jack Insert the foot controller plug into its jack on the machine.
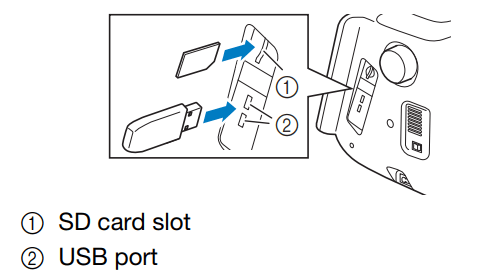
USB port In order to send stitch patterns and embroidery patterns from/ to USB media, plug the USB media directly into the USB port.
SD card slot Insert an SD card into the SD card slot in order to import/export stitch patterns and embroidery patterns.
Handwheel Rotate the handwheel toward you (counterclockwise) to raise and lower the needle. The wheel should be turned toward the front of the machine.
Needle and Presser Foot Section
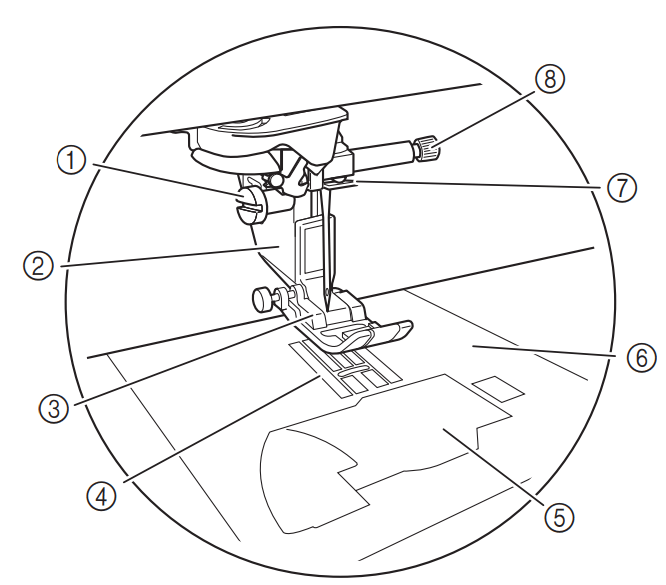
Presser foot holder screw Use the presser foot holder screw to hold the presser foot holder in place
Presser foot holder The presser foot is attached to the presser foot holder.
Presser foot The presser foot consistently applies pressure to the fabric as sewing takes place. Attach the appropriate presser foot for the selected stitch.
Feed dogs The feed dogs feed the fabric in the sewing direction.
Bobbin cover Open the bobbin cover to set the bobbin.
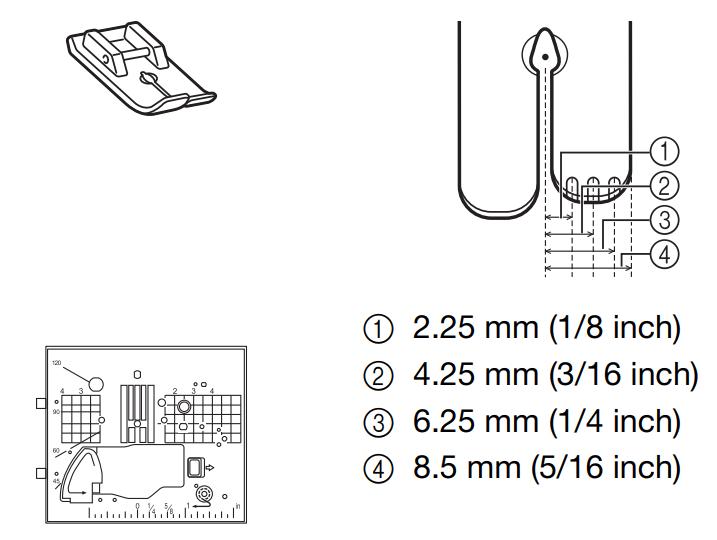
Needle plate The needle plate is marked with guides to help sew straight seams. Remove the needle plate to clean the race.
Needle bar thread guide Pass the upper thread through the needle bar thread guide.
Needle clamp screw Use the needle clamp screw to hold the needle in place.
Embroidery Unit
Carriage The carriage moves the embroidery frame automatically when embroidering.
Release lever (located under the embroidery unit) Press the release lever to remove the embroidery unit.
Embroidery frame holder Insert the embroidery frame into the embroidery frame holder to hold the frame in place.
Frame-securing lever Press the frame-securing lever down to secure the embroidery frame.
Embroidery unit connection Insert the embroidery unit connection into the connection port of the machine (with the machine powered off) when attaching the embroidery unit.
Operation Buttons
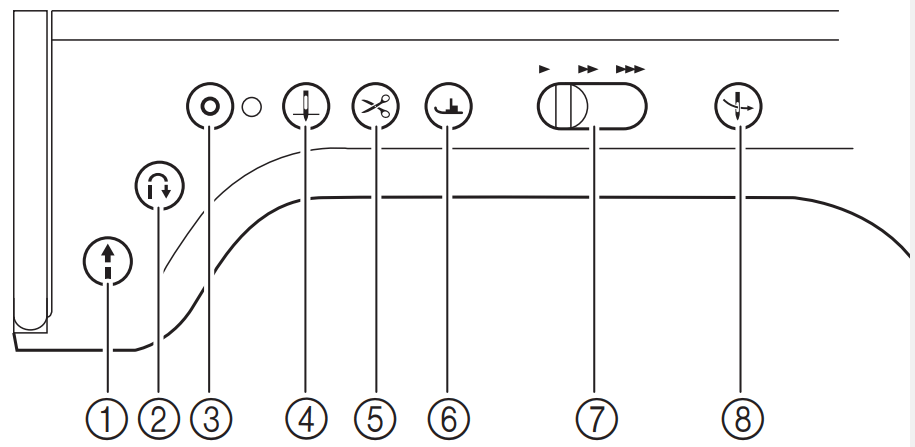
1. “Start/Stop” button
Press this button and the machine will sew a few stitches at a slow speed and then begin sewing at the speed set by the sewing speed controller. Press the button again to stop the machine. Hold the button in to sew at the machine’s slowest speed. The button changes color according to the machine’s operation mode.
Green: The machine is ready to sew or is sewing.
Red: The machine cannot sew.
2. “Reverse Stitch” button
For straight, zigzag, and elastic zigzag stitch patterns that take reverse stitches, the machine will sew reverse stitches at low speed only while holding down the “Reverse Stitch” button.
The stitches are sewn in the opposite position. For other stitches, use this button to sew reinforcement stitches at the beginning and end of sewing. Press and hold this button, and the machine sews 3 stitches in the same spot and stops automatically.
3. “Reinforcement Stitch” button
Use this button to sew a single stitch repeatedly and tie-off. For character/decorative stitches, press this button to end with a full stitch instead of at a mid-point. The LED light beside this button lights up while the machine is sewing a full motif, and automatically turns off when the sewing is stopped. In addition, use this button to sew reinforcement stitches before cutting the thread when changing the bobbin thread in embroidery mode. This will prevent stitches from unraveling.
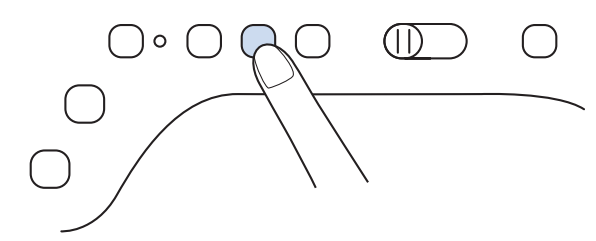
4. “Needle Position” button
Use this button when changing sewing direction or for detailed sewing in small areas. Press this button to raise or lower the needle position. With this button, you can lower and raise the needle to sew a single stitch.
5. “Thread Cutter” button
Press this button after sewing to automatically trim the excess thread.
6. “Presser Foot Lifter” button
Press this button to lower the presser foot and apply pressure to the fabric. Press this button again to raise the presser foot.
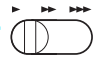
7. Sewing Speed controller
Use this controller to adjust the sewing speed. Move the slide to the left to sew at slower speeds. Move the slide to the right to sew at higher speeds.
8. “Automatic Threading” button
Use this button to automatically thread the needle.
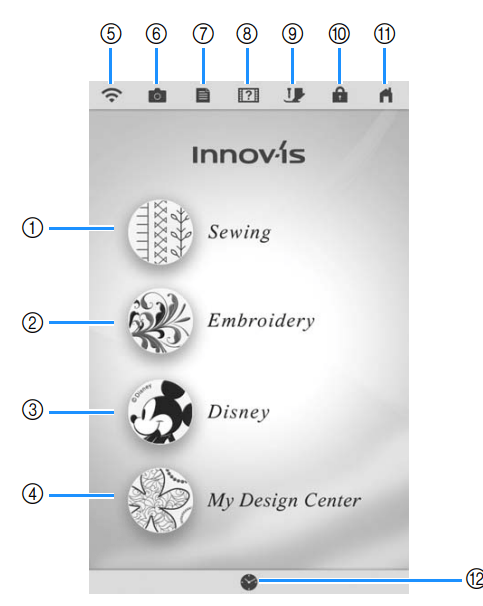
LCD SCREEN
When the machine is turned on. the opening movie is played. Touch anywhere on the screen for the home page screen to be displayed. Touch the LCD screen or a key with your finger. the included dual purpose stylus or fine tipped stylus pen to select a machine function.
IMPORTANT
• Only touch the screen with your finger, the included dual purpose stylus or fine tipped stylus pen. Do not use a sharp pencil, screwdriver, or other hard or sharp object. It is not necessary to press hard on the screen. Pressing too hard or using a sharp object may damage the screen.
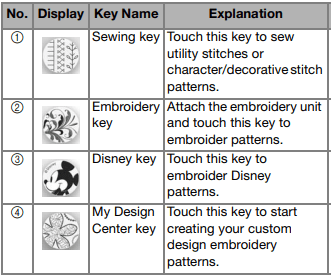
■ Home Page Screen
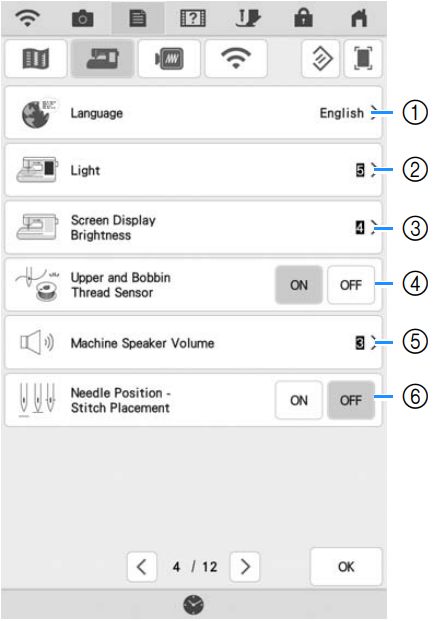
General Settings
Change the display language.
Change the brightness of the needle area and work area lights.
If the screen is not very clear in certain environments, you can adjust the brightness of the screen.
Turn both the upper and bobbin thread sensor [ON] or [OFF]. If it is turned [OFF], the machine can be used without thread.
Change the speaker volume. Increase the number for louder volume, decrease for softer volume.
Select the operation of the [Needle Position - Stitch Placement] to [ON] or [OFF].
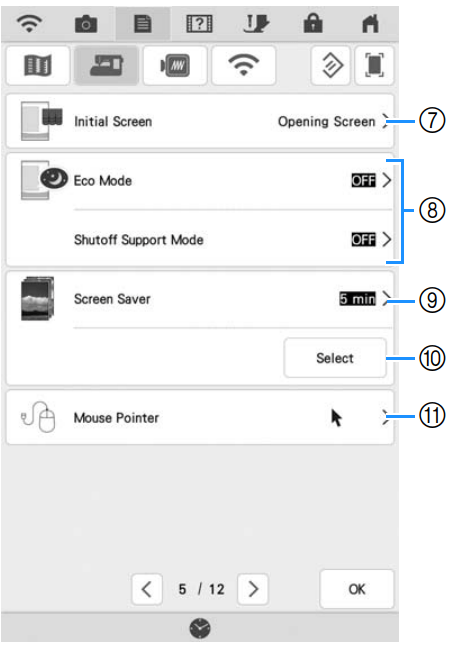
7. Select whether to display the opening screen video when the machine is turned on.
8. Select to save the machine power by setting the [Eco Mode] or the [Shutoff Support Mode].
9. Select the length of time until the screen saver appears.
10. Change the image of the screen saver.
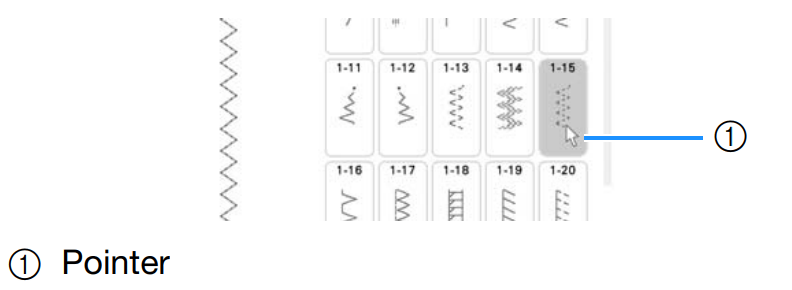
11. Change the shape of the pointer when a USB mouse is used. The setting remains selected even after the machine is turned off.
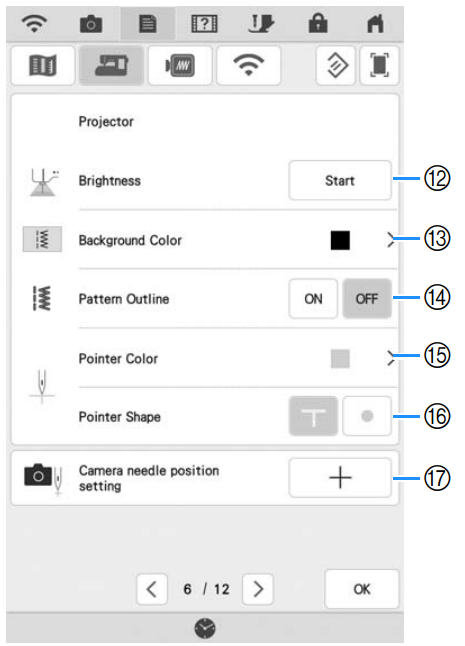
12. Select the brightness of the projector.
13. Select which background color will display when using projector function.
14. Select whether to display outline of the stitch pattern.
15. Select the color of the pointer.
16. Select a T shape or a point as the shape for the guideline marker.
17. Gauge the needle drop point to adjust the accuracy of the camera display area and of the projector projection area.
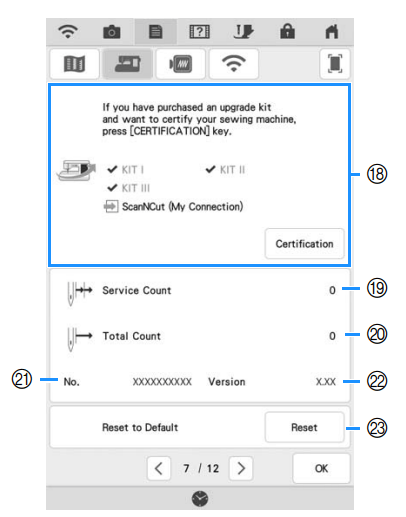
18. Use to certify your machine when you purchase one of the upgrade kits. KITI, KIT II, and KIT III have been certified on this machine. Use to certify your machine when you use [My Connection] function with Brother cutting machine (sold separately). For details, visit the following webpage and refer to the “My Connection” Operation Manual. https://s.brother/cmdab/
19. Display the service count which is a reminder to take your machine in for regular servicing. (Contact your authorized Brother dealer for details.)
20. Display the total number of stitches sewn on this machine.
21. The [No.] is the internal machine number for the machine.
22. Display the program version.
23. Erase all saved data, customized settings and network information in the machine.
■ Selecting the [Eco Mode] or [Shutoff Support Mode]
You can save the machine power by setting the [Eco Mode] and the [Shutoff Support Mode].
If you leave the machine without using for a specified period of time. the machine enters into one of these modes. Touch to display the modes.
[Eco Mode]; Machine will enter a sleep mode. Touch the screen or press the “Start/Stop” button to continue operating.
[Shutoff Support Mode]; Machine will enter the lower power mode after set period of time. Turn machine off and then back on to restart operating.
If you turn off the machine while the machine is in the [Eco Mode] or the [Shutoff Support Mode], wait for about 5 seconds before turning on the machine again.
■ Changing the Screen Saver Image
Instead of the default image. you can select your own personal images for the screen saver of your machine.
Before changing the screen saver image. prepare the image on USB media.
1. Touch . The settings screen appears.
2. Touch . The General settings screen appears.
3. Display page 5 of the General settings screen.
4. Touch Select button.
5. Touch
6. Connect the USB media that contains your personal image to the USB port of the machine.
7. Touch to select the first image.
The images will appear in a list in this screen. Select the desired to specify the image.
Touch to delete the selected image.
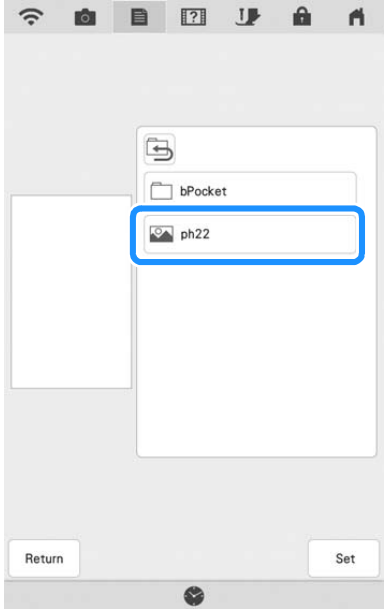
8. Select the device that is connected. => A list of your personal images appear on the screen.
9. Touch a file name to select image and then touch
10. Repeat the procedure from step 7 to select the remaining images.
11. Touch OK to return to the original to return to the original screen
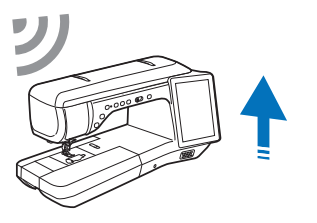
WIRELESS NETWORK CONNECTION FUNCTIONS
Operations Available with a Wireless Network Connection
This machine supports a wireless network connection. The following useful operations will be available if the machine is connected to a wireless network.
■ For upgrading
Directly download the update file to the machine.
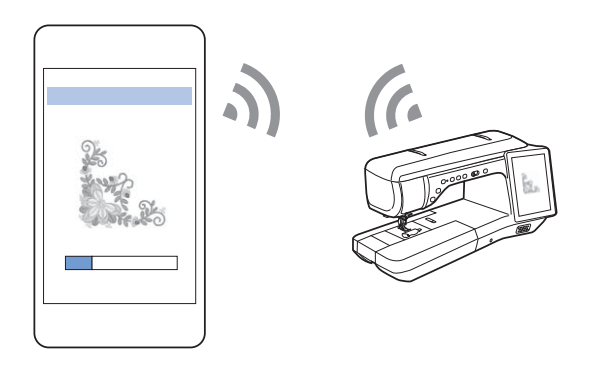
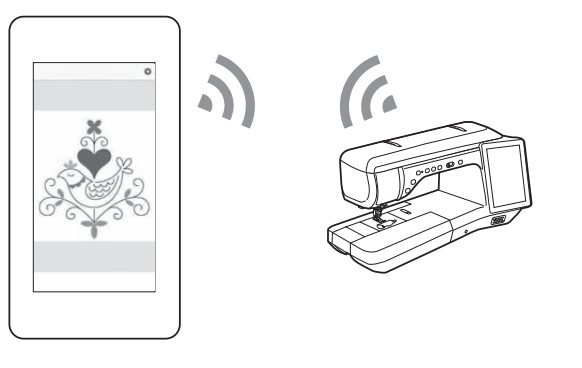
■ For embroidering
Conveniently check the operating status of the machine from your smart device by using the dedicated mobile application (My Stitch Monitor).
Transfer an image from the smart device to the machine to create a design in My Design Center by using the dedicated mobile application (My Design Snap).
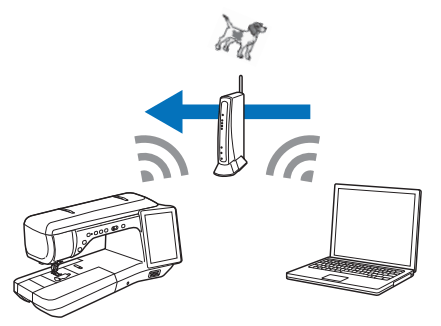
Wirelessly transfer an embroidery pattern from your computer to the machine by using the dedicated Windows application (Design Database Transfer).
The application can be downloaded from the following URL. https://s.brother/cadka/
Settings must be specified in Design Database Transfer. For more information. refer to the manual for Design Database Transfer.
Wirelessly transfer to the machine an embroidery pattern edited with embroidery editing software (PE-DESIGN version 11 or later) on a computer.
Also. transfer to PE-DESIGN an embroidery pattern edited on the machine. Settings must be specified in PE-DESIGN. For more information. refer to the manual for PE-DESIGN.
CONNECTING THE ACCESSORY TO THE MACHINE
Using USB Media/SD Card (Sold Separately)
When sending or reading stitch patterns using the USB media. connect the device to the USB port. When using SD card. insert the SD card into the SD card slot.
Memo
USB media is widely used, however some USB media may not be usable with this machine. Please visit our website for more details.
Depending on the type of USB media being used, either directly plug the USB device into the machine’s USB port or plug the USB media Reader/Writer into the machine’s USB port.
Do not insert anything other than USB media into the USB port. Otherwise, the machine may be damaged.
Do not insert anything other than SD card into the SD card slot. Otherwise, the machine may be damaged.
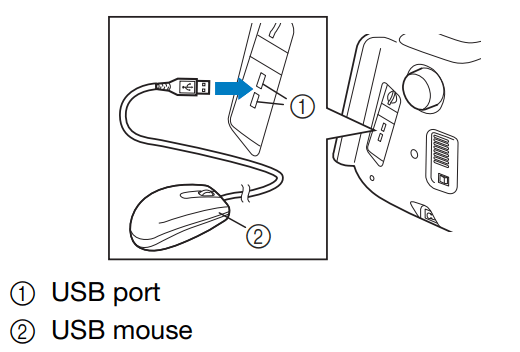
Using a USB Mouse
The USB mouse. connected to the machine. can be used to perform a variety of operations in the screens. Connect a USB mouse to the USB port.
Memo Use a basic computer mouse to operate the machine functions. Some USB mouse devices may not be compatible with this machine.
Memo
The mouse pointer does not appear in the screen saver or opening screen
The left mouse button can be used to perform operations such as choosing a design and choosing menu keys.
■ Clicking a Key
When the mouse is connected. the pointer appears on the screen. Move the mouse to position the pointer over the desired key. and then click the left mouse button.
Memo
•Double-clicking has no effect.
■ Changing Pages
If page numbers and a vertical scroll bar for additional pages are displayed. click the left mouse button with the pointer on to display the previous or next page.
USEFUL FUNCTIONS
Automatic Thread Cutting
After selecting a stitch pattern. turn on the automatic thread cutting function before sewing. and the machine will automatically sew reinforcement stitches (or reverse stitches. depending on the stitch pattern) at the beginning and end of sewing. and trim the threads at the end of sewing. This function is useful when sewing buttonholes and bar tacks.
1. Select a stitch pattern.
2. Touchto set the automatic thread cutting function.
=> The keys will display as and the machine is set for automatic thread cutting function and automatic reverse/reinforcement stitching.
3. Set the needle into the fabric and start sewing
NOTE • If you press the “Start/Stop” button to pause sewing, press the same button again to continue. The beginning reverse/ reinforcement stitches will not be sewn again.
4. Once you have reached the end of the stitching, press “Reverse Stitch” button or “Reinforcement Stitch” button once.
If stitching. such as buttonholes and bar tacking. that includes reinforcement stitching has been selected. this operation is unnecessary.
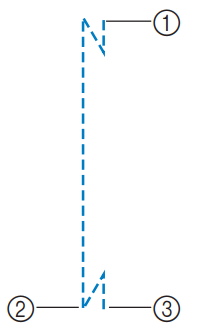
The point where the “Start/Stop” button was pressed.
The point where the “Reverse Stitch” button or the “Reinforcement Stitch” button was pressed.
The thread is cut here
Memo The automatic thread cutting function will not be performed if the “Start/Stop” button is pressed while sewing. Press the “Reverse Stitch” button or the “Reinforcement Stitch” button at the end of the stitching.
Pivoting
If the pivot function is selected, the machine stops with the needle lowered (in the fabric) and the presser foot is automatically raised to an appropriate height when the “Start/Stop” button is pressed. When the “Start/Stop” button is pressed again, the presser foot is automatically lowered and sewing continues. This function is useful for stopping the machine to rotate the fabric.
Using the Knee Lifter
IMPORTANT
• Only change position of the knee lifter handle when knee lifter is not on the machine, otherwise the knee lifter may damage the mounting slot on front of the machine.
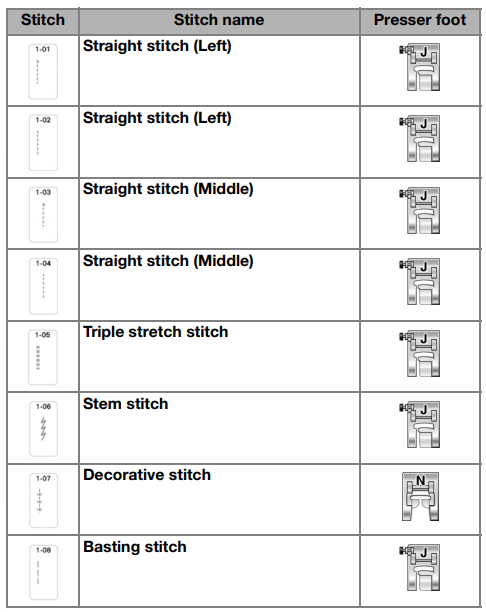
SEWING THE STITCHES
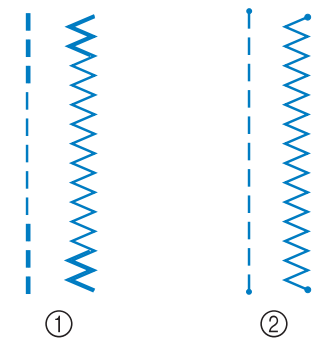
Straight Stitches
(1) Left needle position
(2) Middle needle position
(1) Reverse Stitch
(2) Reinforcement Stitch
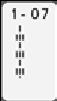
1. Select a stitch
.2 Attach presser foot “J”.
* Attach advanced monogramming foot “N+” when you select (1-07) for optimal performance on some fabrics.
3. Hold the thread tail and fabric with your left hand, and press the “Needle Position” button with your right hand to insert the needle to the fabric
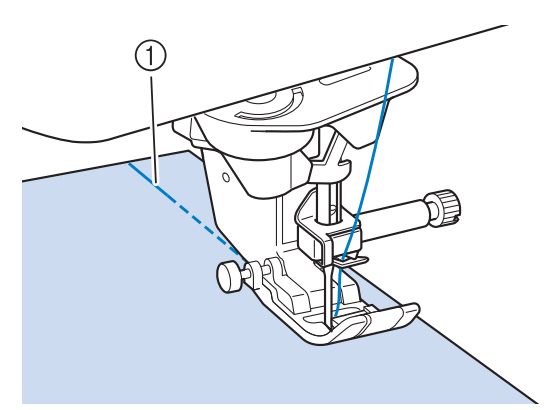
4. Lower the presser foot, Sew 3 to 5 stitches and hold the “Reverse Stitch” or hold the “Reinforcement Stitch” button to sew 3-4 stitches.
=> The machine sews reverse stitches or reinforcement stitches.
5. Press the “start/Stop” button to sew forward
(1) Reverse stitches or reinforcement stitches
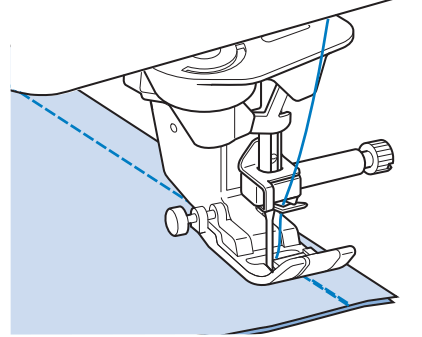
6. When sewing is completed, hold the “Reverse Stitch” or hold the “Reinforcement Stitch” button to sew 3-4 reverse stitches or reinforcement stitches at the end of the seam.
7. After sewing, press the “Thread Cuttur” button to trim the threads.
CAUTION
Be sure the needle does not strike a basting pin. or any other objects. during sewing. The thread could tangle or the needle could break. causing injury.
Memo
• When the automatic thread cutting and automatic reinforcement stitch keys on the screen are selected. reverse stitches or reinforcement stitches will be sewn automatically at the beginning of sewing when the “Start/Stop” button is pressed. Press the “Reverse Stitch” button or the “Reinforcement Stitch” button to sew reverse stitches or reinforcement stitches and to trim the thread automatically at the end of sewing.
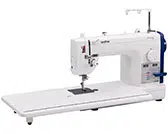
■ Using the Straight Stitch Needle Plate and the Straight Stitch Foot
The straight stitch needle plate and the straight stitch foot can only be used for straight stitches (middle needle position stitches). Use the straight stitch needle plate and the straight stitch foot when sewing thin fabrics or when sewing small pieces which tend to sink into the hole of the regular needle plate during sewing. The straight stitch foot is perfect to reduce puckering on lightweight fabrics. The small opening on the foot provides support for the fabric as the needle travels through the fabric.
CAUTION
Always use the straight stitch foot in combination with the straight stitch needle plate. Otherwise. the needle may break and cause injury.
1. Press the “Needle Position” to raise the needle, raise the presser foot and turn the main power to OFF. And then unplug the machine.
2. Remove the needle and the presser foot
3. Remove the flat bed attachment or the embroidery unit if either are attached.
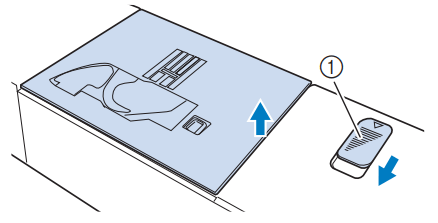
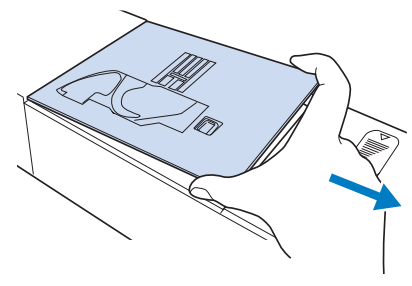
4. Slide the needle plate lever toward you.
5. Slide out the regular needle plate with your right hand to remove it.
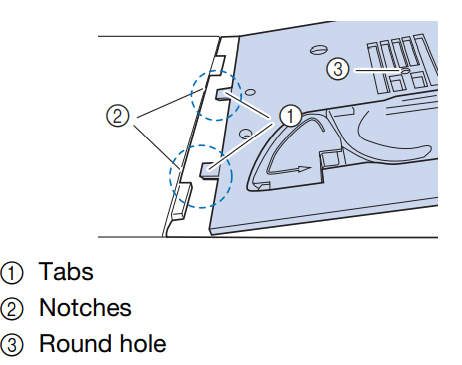
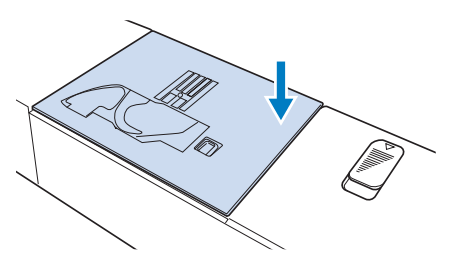
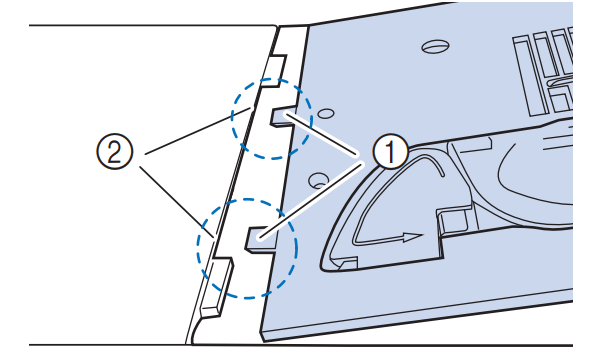
6. Insert the tabs on the stright stitch needle plate into the notches in the machine.
7. Press down on the right side of the straight stitch needle plate to secure it.
8. If necessary, attach the flat bed attachment.
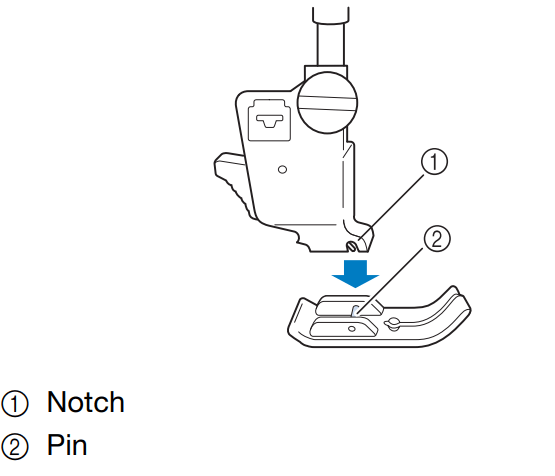
9. Insert needle and attach the straight stitches foot.
10. Select any of the straight stitches.
11. After sewing. make sure to turn off the machine and to remove the straight stitch needle plate and the straight stitch foot. Reinstall the regular needle plate and the presser foot “J”.
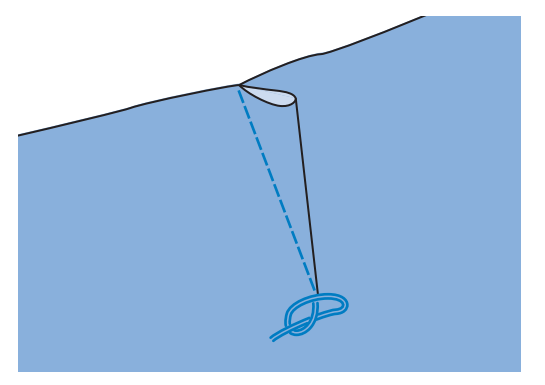
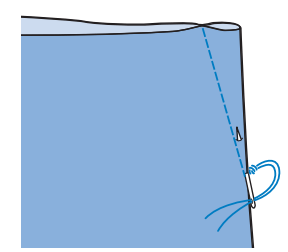
Dart Seam
1. Select and attach presser foot “J”
2. Sew a reverse stitches at the beginning of the dar and then d=sew from the wide end to the other end without stretching the fabric.
3. Cut the thread at the end leaving 50mm and then tie both ends together.
Do not sew a reverse stitch at the end.
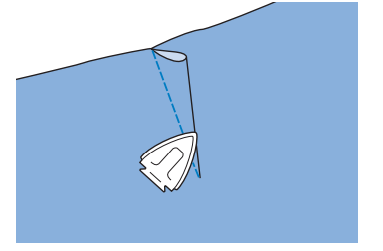
4. Insert the ends of the thread into the dart with a hand sewing needle.
5. Iron the dart to one side so that it is flat.
Gathering
Use on waists of skirts. sleeves of shirts. etc.
Flat Fell Seam
Use for reinforcing seams and finishing edges neatly.
When the automatic thread cutting and automatic reinforcement stitching are preset. reverse stitches will be sewn automatically at the beginning of sewing. Press the “Reinforcement Stitch” button to sew a reinforcement stitch and trim the thread automatically at the end of sewing.
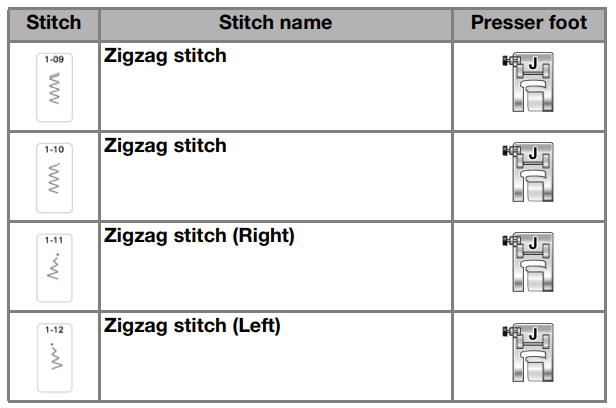
Zigzag Stitches
Zigzag stitches are useful for overcasting. appliqué. patchwork. and many other applications.
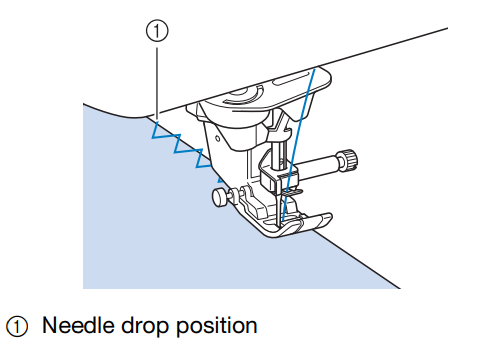
■ Overcasting (Using a Zigzag Stitch)
Sew the overcasting along the edge of the fabric while positioning the right-hand side needle drop point just outside the edge of the fabric.
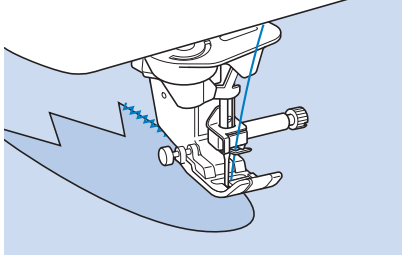
■ Appliqué (Using a Zigzag Stitch)
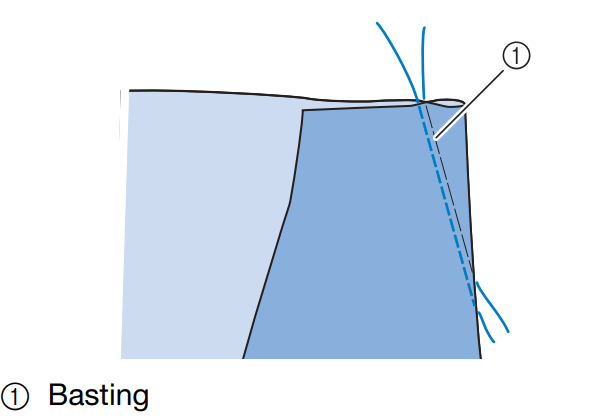
Attach the appliqué material using a temporary spray adhesive or basting. and then sew it. Sew a zigzag stitch while positioning the right-hand side needle drop point just outside the edge of the fabric.
Sew a zigzag stitch while positioning the right'hand side needle drop point just outside the edge of the fabric.
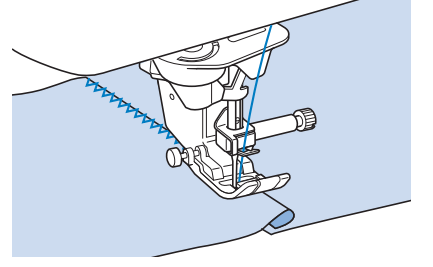
■ Patchwork (for Crazy Quilting)
Turn back the desired width of fabric and position it over the lower fabric. then sew so that the stitch bridges both pieces of fabric.
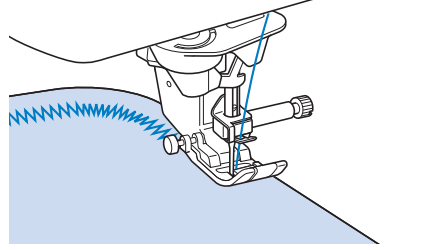
■ Sewing Curves (Using a Zigzag Stitch)
Shorten the stitch length setting to obtain a fine stitch. Sew slowly. keeping the seams parallel with the fabric edge as you guide the fabric around the curve.
■ Cord Guide Bobbin Cover (Using a Zigzag Stitch)
Make sure there are no restrictions when feeding the thread.
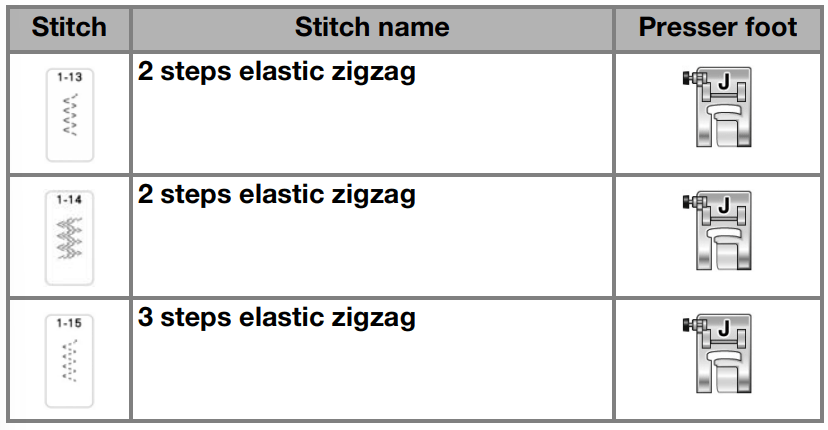
Elastic Zigzag Stitches
Use elastic zigzag stitches for tape attaching. overcasting. darning. or a wide variety of other uses.
1. Select a stitch.
2. Attach presser foot “J”
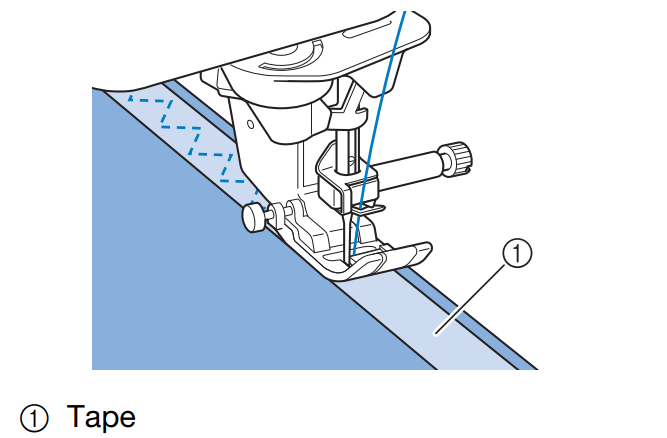
■ Tape Attaching
While stretching the tape flat. sew it to the fabric.
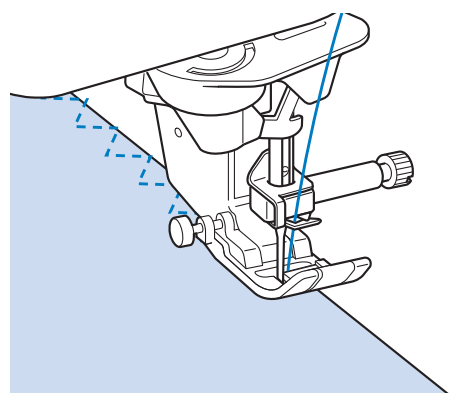
■ Overcasting
Use this stitch to sew overcasting on the edge of stretch fabrics. Sew the overcasting along the edge of the fabric while positioning the right-hand side needle drop point just outside the edge of the fabric.
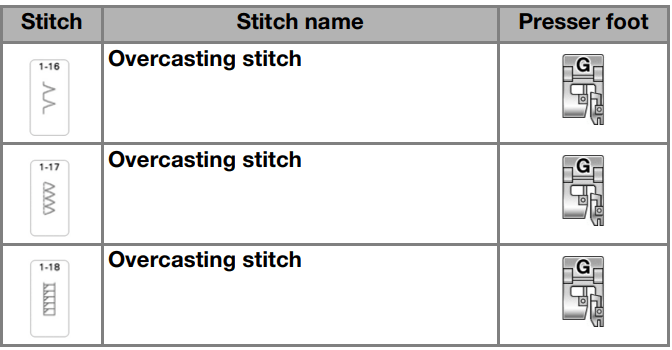
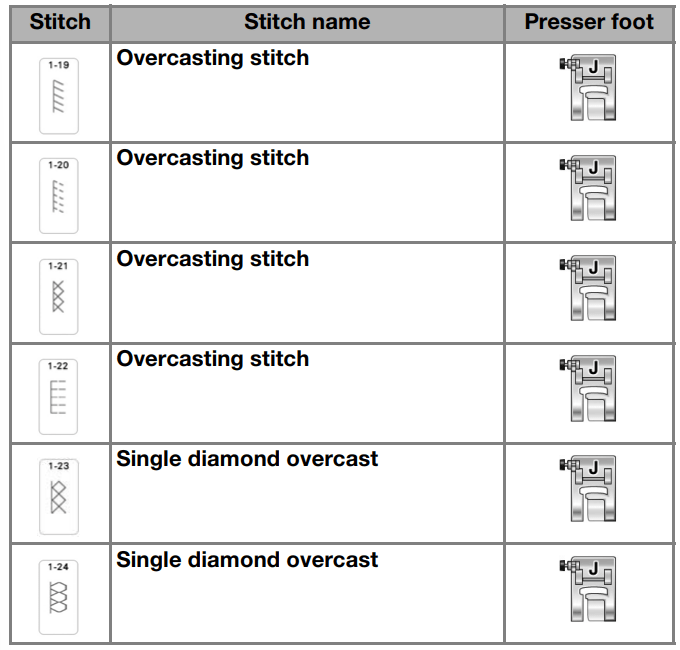
Overcasting
Use for the edge of seams in skirts or trousers. and the edge of all cuttings.
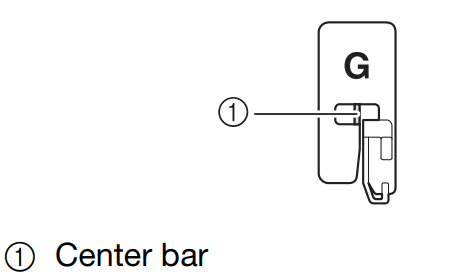
■ Overcasting Using Presser Foot “G”
CAUTION
When using overcasting foot “G”. be sure to select a stitch that can be used with overcasting foot “G”. If you sew with the incorrect stitch. the needle may strike the presser foot and break. and may cause injury.
IMPORTANT
Pull the fabric to the back of the machine after finished sewing. By pulling the fabric to the front or side. the center bar of the presser foot “G” may break.
If thread is tangled on the presser foot, remove the entangled thread, and then raise the presser foot lever to remove the presser foot. If the presser foot is raised while entangled with thread, it may be damaged.
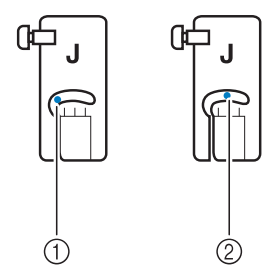
■ Overcasting Using Presser Foot “J”
■ Quilting
Sewing the quilt top. batting. and backing together is called quilting. You can sew the quilt with the compact dual feed foot to keep the quilt top. batting. and backing from sliding. The compact dual feed foot has a motorized belt that moves together with the feed dogs in the needle plate during sewing.
For straight line quilting. use the compact dual feed foot and the straight stitch needle plate. Always select a straight stitch (middle needle position) when using the straight stitch needle plate.
1. Select
2. Attach the compact dual feed foot.
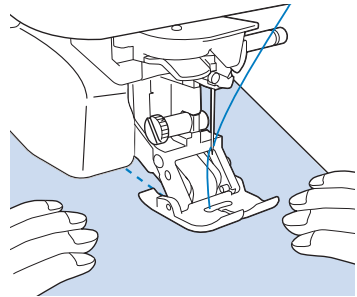
3. Place one hand on each side of the presser foot to hold the fabric secure while sewing.
■ Free Motion Quilting
With free motion quilting. the feed dogs can be
CAUTION
With free motion quilting. control the feeding speed of the fabric to match the sewing speed.
If the fabric is moved faster than the sewing speed. the needle may break and cause injury.
Memo
When starting to sew. the internal sensor detects the thickness of the fabric. and the quilting foot is raised to the height specified in
In order to sew with a balanced tension. it may be necessary to adjust the upper thread tension. Test with a sample piece of fabric that is similar to your chosen fabric.
Do not be discouraged with your initial results. The technique requires practice.
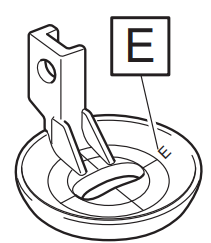
■ Echo Quilting Using the Free Motion Echo Quilting Foot “E”
Sewing quilting lines at equal distances around a motif is called echo quilting. The quilting lines. which appear as ripples echoing away from the motif. are the distinguishing characteristic of this quilting style. Use the free motion echo quilting foot “E” for echo quilting. Using the measurement on the presser foot as a guide. sew around the motif at a fixed interval. We recommend attaching the foot controller and sewing at a consistent speed.
Free motion echo quilting foot “E” measurement
Select
Touch then to set the machine to free motion sewing mode. The key appears as the presser foot is raised to the necessary height, then the feed dogs are lowered for free motion sewing.
Remove presser foot.
Remove presser foot holder and then attach the adapter.
Position the free motion echo quilting foot “E” on the left side of the presser bar with the holes in the quilting foot and presser bar alighed.
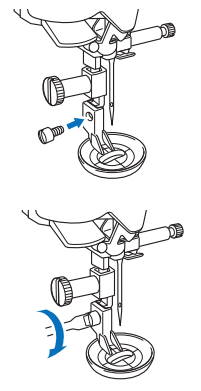
6. Tighten the screw with included screwdriver (large).
CAUTION Be sure to securely tighten the screw with the included multi-purpose screwdriver. Otherwise. the needle may touch the quilting foot. causing it to break and causing injury.
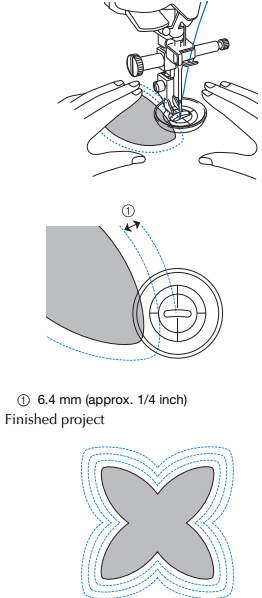
7. Using the measurement on the quilting foot as a guide, sew around the motif.
8. Touch to cancel the free motion d=sewing mode. => Rotate the handwheel toward you (counterclockwise) to raise the feed dogs.
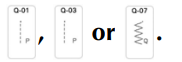
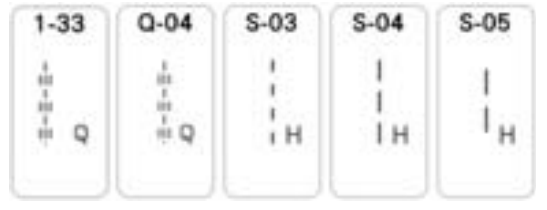
Hand-Look Quilting
Sew hand-look quilting stitch patterns using the threads recommended below: Upper thread: Use transparent nylon thread or lightweight thread that matches the color of the fabric for this thread to appear invisible.
Bobbin thread: Use a color that contrasts with the fabric for the stitch pattern to stand out.
Memo
For most fabrics and threads, using a 90/40 needle will result in a clean finish.
To bring up more of the bobbin thread, increase the thread tension.
S-03, S-04, S-05 are made up of several short stitches.
CAUTION
Be sure to securely tighten the screws with the included screwdriver (large). Otherwise. the needle may touch the quilting foot. causing it to break and causing injury.
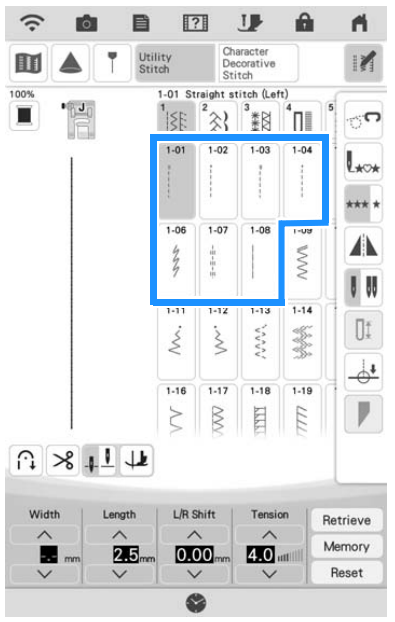
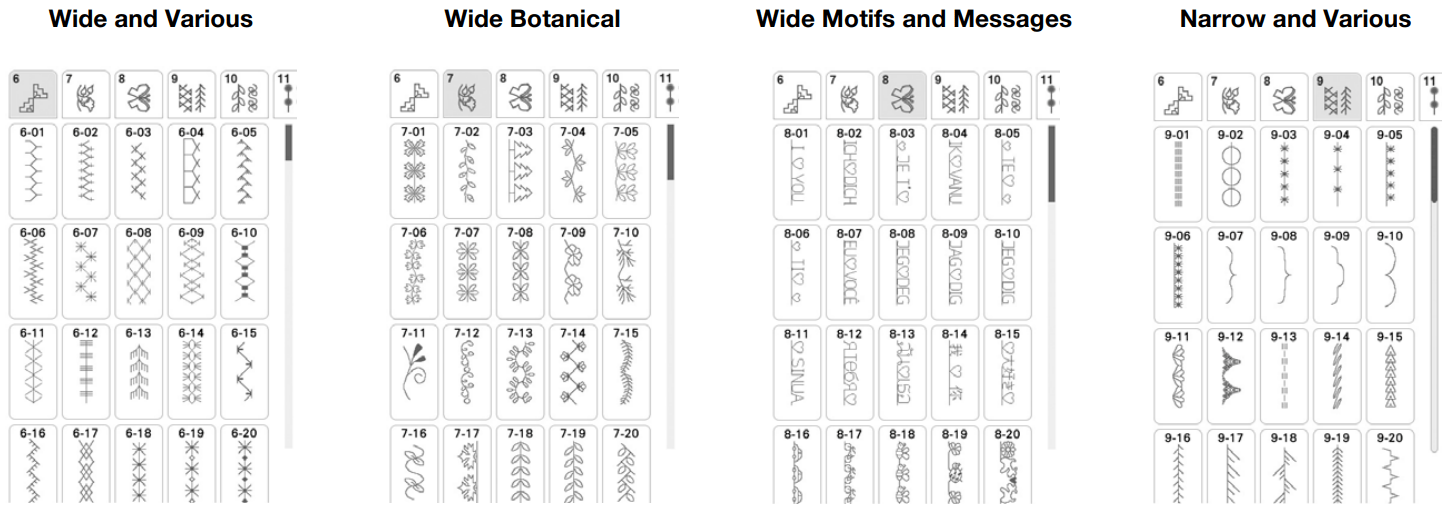
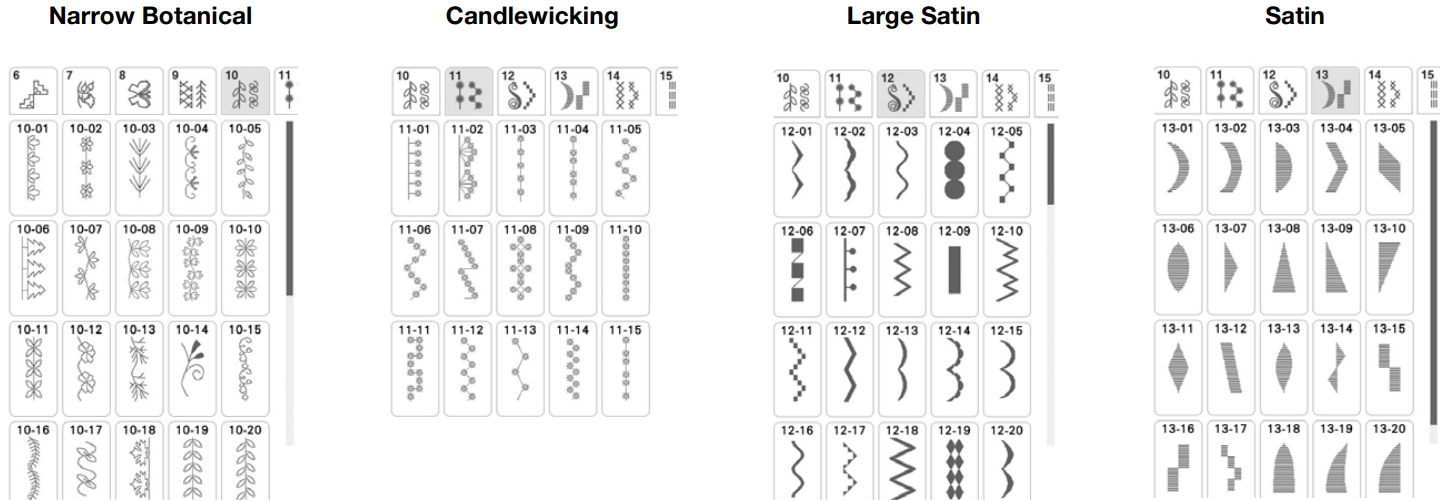
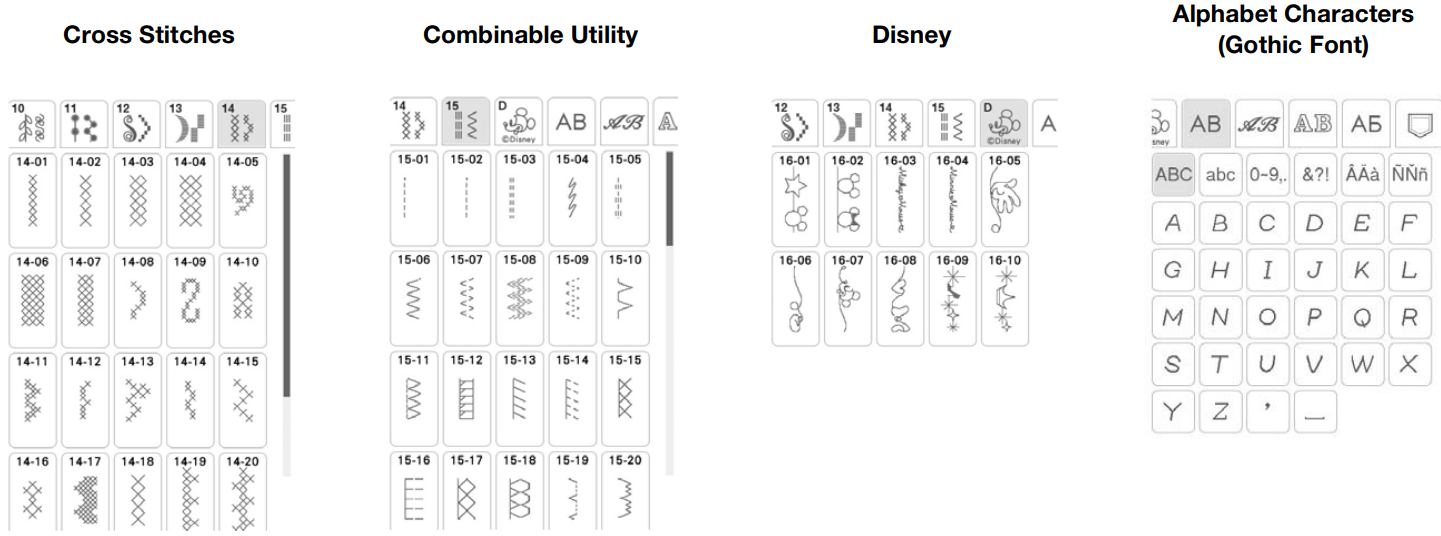
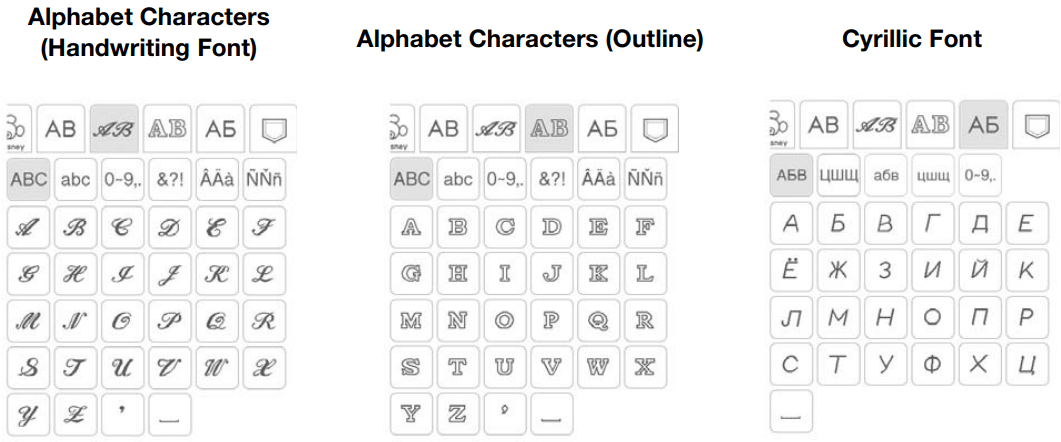
SELECTING STITCH PATTERNS
Touch then to display the screen below.
■ Stitch Selection Screens
CARE AND MAINTENANCE
Restrictions on Oiling
In order to prevent damaging this machine. it must not be oiled by the user. This machine was manufactured with the necessary amount of oil applied to ensure correct operation. making periodic oiling unnecessary.
If problems occur. such as difficulty turning the handwheel or an unusual noise. immediately stop using the machine. and contact your authorized Brother dealer or the nearest Brother authorized service center.
Precautions on Storing the Machine
Do not store the machine in any of the locations described below. otherwise damage to the machine may result. for example. rust caused by condensation.
Exposed to extremely high temperatures
Exposed to extremely low temperatures
Exposed to extreme temperature changes
Exposed to high humidity or steam Near a flame. heater or air conditioner Outdoors or exposed to direct sunlight
Exposed to extremely dusty or oily environments
Cleaning the LCD Screen
If the surface of the LCD is dirty. lightly wipe it with a soft dry cloth.
Cleaning the Machine Casing
When wiping dirt off the machine. firmly wring a soft cloth soaked in (lukewarm) water.
After cleaning the machine. dry it with a soft. dry cloth.
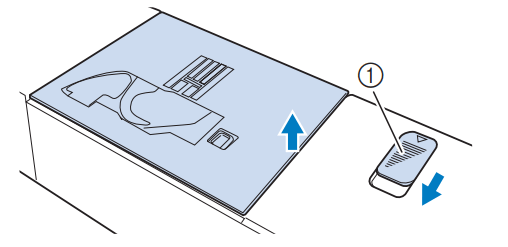
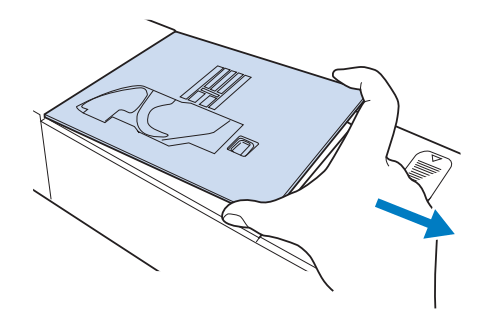
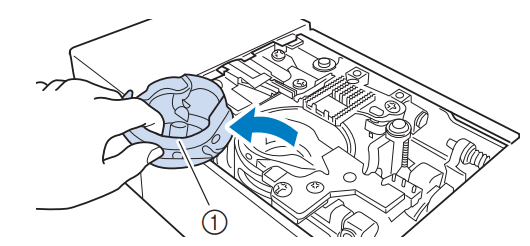
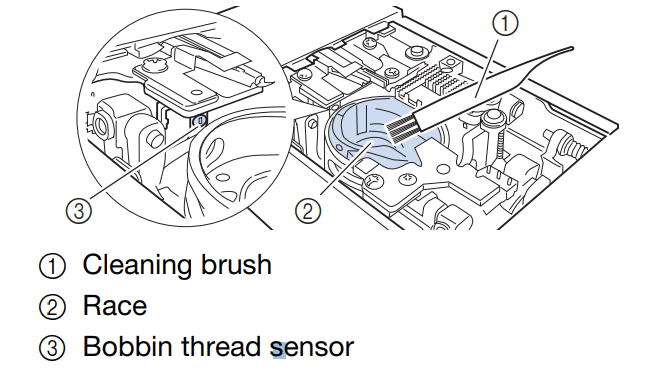
Cleaning the Race
CAUTION Be sure to unplug the machine before cleaning it. Otherwise. injury may result.
Note In order to extend the life of this machine. periodically turn it on and use it. Storing this machine for an extended period of time without using it may reduce its efficiency.
Memo Occasionally, condensation may form on the LCD screen or it may become fogged up; however. this is not a malfunction. After a while, the cloudiness will disappear.
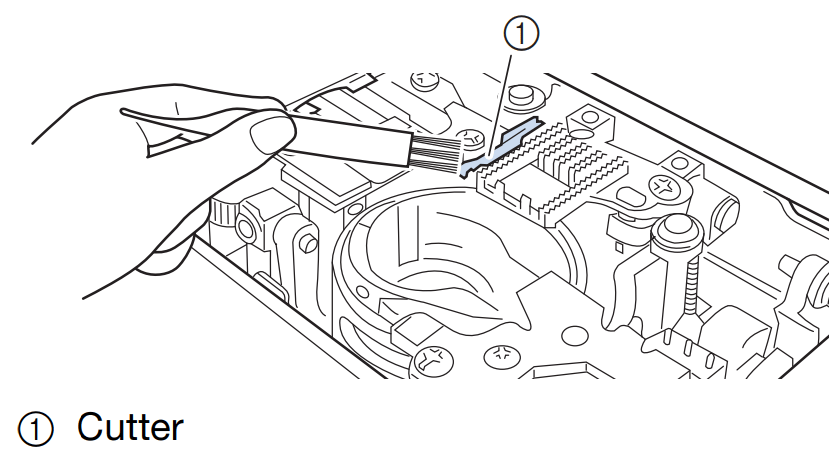
Cleaning the Cutter in the Bobbin Case Area
The cutter below the needle plate should be cleaned. If dust or lint accumulate on the cutter. it will be difficult to cut the thread when the “Thread Cutter” button is pressed or the automatic thread cutting function is used. Clean the cutter when the thread is not easily cut.
CAUTION Do not touch the cutter. otherwise injuries may result.
About the Maintenance Message
Once this message appears. it is recommended to take your machine to an authorized Brother dealer or the nearest Brother authorized service center for a regular maintenance check. Although this message will disappear and the machine will continue to function once you touch the message will display several more times until the appropriate maintenance is performed.
Please take the time to arrange for the maintenance your machine requires once this message appears. Such steps will help to ensure you receive continued. uninterrupted hours of machine operation for the future.
TROUBLESHOOTING
Detailed causes and remedies for common troubleshooting topics are described below. Be sure to refer to this before contacting your authorized Brother dealer.
Upper Thread Is Too Tight
Symptom
Cause
Remedy
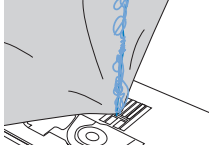
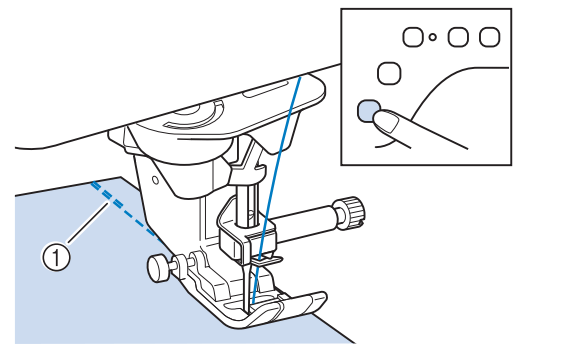
The upper thread appears as a single continuous line.
The lower thread is visible from the upper side of the fabric. (Refer to the illustration below.)
The upper thread has tightened up. and comes out when pulled.
The upper thread has tightened up. and wrinkles appear in the fabric.
The upper thread tension is tight. and the results do not change even after the thread tension is adjusted.
Incorrect lower threading If the lower thread is incorrectly threaded. instead of the appropriate tension being applied to the lower thread. it is pulled through the fabric when the upper thread is pulled up. For this reason. the thread is visible from the upper side of the fabric.
Correctly install the lower thread.
Tangled Thread on Wrong Side of Fabric
Symptom
Cause
Remedy
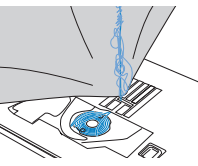
The thread becomes tangled on the lower side of the fabric.
After starting sewing. a rattling noise is made and sewing cannot continue.
Looking under the fabric. there is tangled thread in the bobbin case.
Incorrect upper threading If the upper thread is incorrectly threaded. the upper thread passed through the fabric cannot be firmly pulled up and the upper thread becomes tangled in the bobbin case. causing a rattling noise.
Remove the tangled thread. and then correct the upper threading.
Remove upper thread from the machine
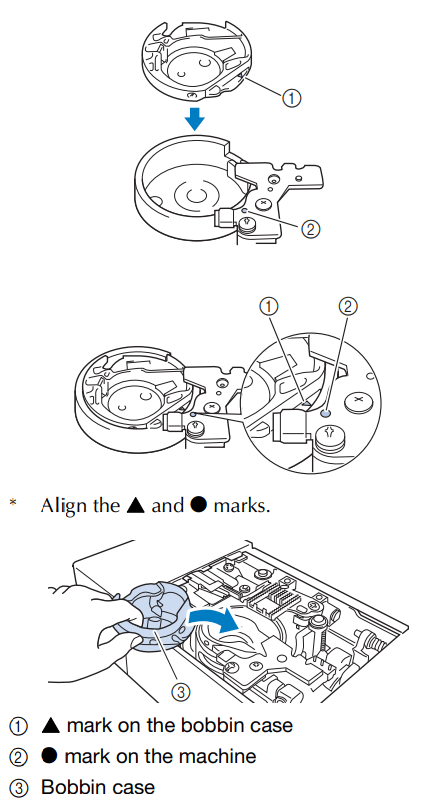
Correct the upper threading. Reinstall correctly the bobbin.
Incorrect Thread Tension
Symptom
Cause
Remedy
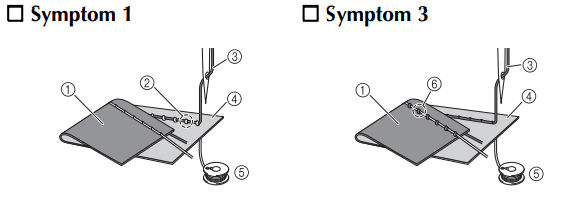
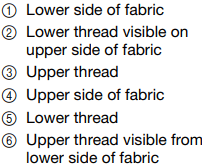
Symptom 1: The lower thread is visible from the upper side of the fabric.
Symptom 2: The upper thread appears as a straight line on the upper side of the fabric.
Symptom 3: The upper thread is visible from the lower side of the fabric.
Symptom 4: The lower thread appears as a straight line on the lower side of the fabric.
Symptom 5: The stitching on the lower side of the fabric is loose or has slack.
Cause 1: The machine is not correctly threaded.
The lower threading is incorrect.
Return the upper thread tension to the standard setting. and then correct lower threading.
The upper threading is incorrect.
Return the upper thread tension to the standard setting. and then to correct the upper threading.
Cause 2: A needle and thread appropriate for the fabric are not being used.
The machine needle that should be used depends on the type of fabric sewn and the thread thickness.
If a needle and thread appropriate for the fabric are not being used. the thread tension will not be adjusted correctly. causing wrinkles in the fabric or skipped stitches. Refer to “Fabric/Thread/Needle Combinations” to check that a needle and thread appropriate for the fabric are being used.
Cause 3: An appropriate upper tension is not selected.
Adjust the upper thread tension to select an appropriate thread tension.
The appropriate thread tension differs according to the type of fabric and thread being used. Adjust the thread tension while test sewing on a piece of scrap fabric that is the same as that used in your project.
When the lower thread is visible on the upper side of the fabric. set the upper thread tension to a lower number. (Loosen the thread tension.) When the upper thread is visible on the lower side of the fabric. set the upper thread tension to a higher number. (Tighten the thread tension.)
Symptom 1 Symptom 3
Note
• If the upper threading and lower threading are incorrect. the thread tension cannot be adjusted correctly. even by adjusting the upper thread tension. Check the upper threading and lower threading first. and then adjust the thread tension.
Fabric Is Caught in the Machine and Cannot be Removed
If the fabric is caught in the machine and cannot be removed. the thread may have become tangled under the needle plate. Follow the procedure described below to remove the fabric from the machine. If the operation could not be completed according to the procedure. instead of attempting to complete it forcefully. contact your authorized Brother dealer or the nearest Brother authorized service center.
■ Removing the Fabric from the Machine
If the needle is lowered into the fabric. turn the handwheel away from you (clockwise) to raise the needle out of the fabric. and then remove the needle. change needle
If the thread is entangled on the presser foot. remove the entangled thread. and then raise the presser foot lever to remove the presser foot. Otherwise. the presser foot may be damaged, change presser foot.
If the fabric can be removed. remove it. Continue with the following steps to clean the race.
If threads remain in the bobbin case. remove them, clean the race
If the needle is in a poor condition. for example. if it is bent. be sure to install a new needle. change needle
■ Checking Machine Operations
If the needle plate has been removed. check machine operations to confirm that installation has been completed correctly.
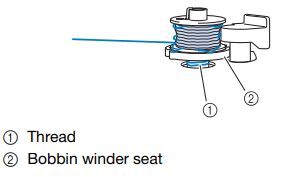
If the Thread Becomes Tangled Under the Bobbin Winder Seat
If the bobbin winding starts when the thread is not passed through the pretension disk correctly. the thread may become tangled beneath the bobbin winder seat.
Wind off the thread according to the following procedure.
List of Symptoms
Problem
Cause
Solution
Cannot thread the needle.
Needle is not in the correct position.
Press the “Needle Position” button to raise the needle.
Needle is installed incorrectly.
Reinstall the needle correctly.
Needle is turned, bent or the point is dull.
Replace the needle.
Upper threading is incorrect.
Check the steps for threading the machine and rethread the machine.
The needle threader hook is bent and does not pass through the eye of the needle.
Contact your authorized Brother dealer.
The needle threader lever cannot be moved or returned to its original position.
Contact your authorized Brother dealer.
A size 65/9 needle is being used.
The needle is incompatible with the needle threader. Manually pass the thread through the eye of the needle.
Cannot lower the presser foot with the presser foot lever.
Presser foot was raised using the “Presser Foot Lifter” button.
Press the “Presser Foot Lifter” button to lower the presser foot.
Bobbin thread does not wind neatly on the bobbin.
The thread is not passed through the bobbin winding thread guide correctly.
Correctly pass the thread through the bobbin winding thread guide.
Bobbin spins slowly.
Touch + in the bobbin winding window to increase the bobbin winding speed.
The thread that was pulled out was not wound onto the bobbin correctly.
Wind the thread that was pulled off around the bobbin 5 or 6 times clockwise.
The empty bobbin was not set on the pin properly.
Set the empty bobbin on the pin and slowly turn the bobbin until you hear it click in place.
While winding the bobbin, the bobbin thread was wound below the bobbin winder seat.
You did not wind the bobbin thread properly when you initially wound the bobbin, or the bobbin thread was not properly set in the guides.
After removing the thread wound below the bobbin winder seat, wind the bobbin correctly. Follow the drawn images on the top of the machine for guidance when threading the machine for bobbin winding.
The bobbin thread cannot be pulled up.
Needle is turned, bent or the point is dull.
Replace the needle.
Bobbin is set incorrectly.
Reset the bobbin thread correctly.
Machine does not operate.
All keys and buttons have been locked by
Touch to unlock all keys and buttons.
Nothing appears in the LCD.
Main power switch is not turned on.
Turn the main power to ON.
The plug of the power cord is not inserted into an electrical outlet.
Insert the plug of the power cord into an electrical outlet.
The LCD screen does not look very clear.
The brightness of the screen is not adjusted.
Adjust the [Screen Display Brightness] in the settings screen.
Nothing happens, even if the LCD display is touched.
The screen has been locked.
Touch either of the following keys to unlock the screen.
The LCD screen is fogged up.
Condensation has formed on the LCD screen.
After a while, the cloudiness will disappear.
The dual purpose stylus cannot be operated.
The dual purpose stylus is dirty.
Clean the light-emitting part of the dual purpose stylus.
The battery is dead.
Replace the battery with a new one.
Machine does not operate.
“Start/Stop” button was not pressed.
Press the “Start/Stop” button.
There is no stitch pattern selected.
Select a stitch pattern.
Presser foot is not lowered.
Lower the presser foot.
“Start/Stop” button was pressed with the foot controller attached.
Remove the foot controller, or use the foot controller to operate the machine.
The “Start/Stop” button was pressed while the machine is set for the sewing speed controller to control the zigzag stitch width.
Use the foot controller instead of the “Start/ Stop” button to operate the machine, or set the [Width Control] to [OFF] in the settings screen.
Needle breaks.
Needle is installed incorrectly.
Reinstall the needle correctly.
Needle clamp screw is not tightened.
Tighten the needle clamp screw.
Needle is turned or bent.
Replace the needle.
Using improper needle or thread for the selected fabric.
Check the “Fabric/Thread/Needle Combinations” chart.
Wrong presser foot was used.
Use the recommended presser foot.
Upper thread tension is too tight.
Adjust the thread tension.
Fabric is pulled during sewing.
Do not pull the fabric during sewing.
Spool cap is set incorrectly.
Check the method for attaching the spool cap, then reattach the spool cap.
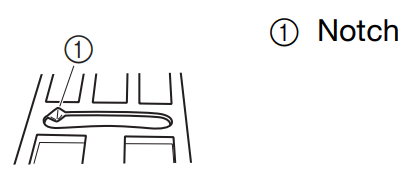
There are scratches around the opening in the needle plate.
* There is a notch on the left side of the opening in the needle plate. This is not a scratch.
Replace the needle plate, or consult your authorized Brother dealer.
There are scratches around the opening in the presser foot.
Replace the presser foot, or consult your authorized Brother dealer.
There are scratches on the bobbin case.
Replace the bobbin case, or consult your authorized Brother dealer.
Needle is defective.
Replace the needle.
A bobbin designed specifically for this machine is not used.
Use a bobbin designed specifically for this machine.
Upper threading is incorrect.
Check the steps for threading the machine and rethread the machine.
Bobbin is set incorrectly.
Reset the bobbin thread correctly.
Presser foot is attached incorrectly.
Attach the presser foot correctly.
Screw of the presser foot holder is loose.
Securely tighten the screw of the presser foot.
Fabric is too thick.
Use fabric that the needle can pierce when the handwheel is turned.
Fabric is fed forcefully when sewing thick fabric or thick seams.
Allow the fabric to be fed without being forcefully pushed.
Stitch length is too short.
Adjust the stitch length.
Bobbin thread is incorrectly wound.
Use a correctly wound bobbin.
Upper thread breaks.
Machine is not threaded correctly (used the wrong spool cap, spool cap is loose, the thread did not catch the needle bar threader, etc.).
Rethread the machine correctly.
Knotted or tangled thread is being used.
Remove any knots or tangles.
The selected needle is not appropriate for the thread being used.
Select a needle that is appropriate for the type of thread being used.
Upper thread tension is too tight.
Adjust the thread tension.
Thread is twisted.
Use scissors, etc., to cut the twisted thread and remove it from the race, etc.
Needle is turned, bent or the point is dull.
Replace the needle.
Needle is installed incorrectly.
Reinstall the needle correctly.
There are scratches around the opening of the needle plate.
* There is a notch on the left side of the opening in the needle plate. This is not a scratch.
Replace the needle plate, or consult your authorized Brother dealer.
There are scratches around the opening in the presser foot.
Replace the presser foot, or consult your authorized Brother dealer.
There are scratches on the bobbin case.
Replace the bobbin case, or consult your authorized Brother dealer.
Using improper needle or thread for the selected fabric.
Check the “Fabric/Thread/Needle Combinations” chart.
While sewing, the thread became knotted or tangled.
Rethread upper and lower thread.
A bobbin designed specifically for this machine is not used.
Use a bobbin designed specifically for this machine.
The thread is tangled on the wrong side of the fabric.
Upper threading is incorrect.
Check the steps for threading the machine and rethread the machine. Be sure that the presser foot is in the raised position when threading the machine so that the upper thread sets properly in the upper tension.
Using improper needle or thread for the selected fabric.
Check the “Fabric/Thread/Needle Combinations” chart.
The upper thread is too tight.
The bobbin thread is incorrectly installed.
Correctly install the bobbin thread.
Bobbin thread breaks.
Bobbin is set incorrectly.
Reset the bobbin thread correctly.
Bobbin thread is incorrectly wound.
Use a correctly wound bobbin.
There are scratches on the bobbin or it doesn’t rotate properly.
Replace the bobbin.
Thread is twisted.
Use scissors, etc. to cut the twisted thread and remove it from the race, etc.
A bobbin designed specifically for this machine is not used.
Use a bobbin designed specifically for this machine.
Fabric puckers.
There is a mistake in the upper or bobbin threading.
Check the steps for threading the machine and rethread it correctly.
Spool cap is set incorrectly.
Check the method for attaching the spool cap, then reattach the spool cap.
Using improper needle or thread for the selected fabric.
Check the “Fabric/Thread/Needle Combinations” chart.
Needle is turned, bent or the point is dull.
Replace the needle.
Stitches are too long when sewing thin fabrics.
Shorten the stitch length.
Thread tension is set incorrectly.
Adjust the thread tension.
Wrong presser foot.
Use the correct presser foot.
The stitch is not sewn correctly.
The presser foot that is used is not appropriate for the type of stitch that you wish to sew.
Attach the presser foot that is appropriate for the type of stitch that you wish to sew.
The thread tension is incorrect.
Adjust the tension of the upper thread.
The thread is tangled, for example, in the bobbin case.
Remove the tangled thread. If the thread is tangled in the bobbin case, clean the race.
Skipped stitches
Machine is threaded incorrectly.
Check the steps for threading the machine and rethread it correctly.
Using improper needle or thread for the selected fabric.
Check the “Fabric/Thread/Needle Combinations” chart.
Needle is turned, bent or the point is dull.
Replace the needle.
Needle is installed incorrectly.
Reinstall the needle correctly.
Needle is defective.
Replace the needle.
Dust or lint has collected under the needle plate.
Remove the dust or lint with the brush.
Thin or stretch fabrics are being sewn.
Sew with one sheet of thin paper under the fabric.
No stitching
Needle is turned, bent or the point is dull.
Replace the needle.
Bobbin is set incorrectly.
Reset the bobbin thread correctly.
Upper threading is incorrect.
Check the steps for threading the machine and rethread the machine.
High-pitched sound while sewing
Dust or lint is caught in the feed dogs.
Remove the dust or lint.
Pieces of thread are caught in the race.
Clean the race.
Upper threading is incorrect.
Check the steps for threading the machine and rethread the machine.
A bobbin designed specifically for this machine is not used.
Use a bobbin designed specifically for this machine.
There are needle holes or friction scratches in the bobbin case.
Replace the bobbin case, or consult your authorized Brother dealer.
Fabric does not feed through the machine.
Feed dogs are set in the down position.
Touch , and then turn the handwheel to raise the feed dogs.
Stitches are too close together.
Lengthen the stitch length setting.
Wrong presser foot was used.
Use the correct presser foot.
Needle is turned, bent or the point is dull.
Replace the needle.
Thread is entangled.
Cut the entangled thread and remove it from the race.
Zigzag foot “J” is slanted on a thick seam at the beginning of stitching.
Use the presser foot locking pin (black button on the left side) on zigzag foot “J” to keep the presser foot level while sewing.
The fabric feeds in the opposite direction.
The feed mechanism is damaged.
Contact your authorized Brother dealer.
The needle contacts the needle plate.
The needle clamp screw is loose.
Firmly tighten the needle clamp screw. If the needle is bent or blunt, replace it with a new one.
Needle is turned, bent or the point is dull.
Replace the needle.
Fabric being sewn with the machine cannot be removed.
Thread is tangled below the needle plate.
Lift up the fabric and cut the threads below it, and clean the race.
A broken needle has fallen into the machine.
Turn off the machine, and then remove the needle plate. If the needle that fell into the machine can be seen, use tweezers to remove it. After removing the needle, return the needle plate to its original position.
Before turning on the machine, slowly turn the handwheel toward you to check that it turns smoothly. If the handwheel does not turn smoothly or the needle that fell into the machine cannot be removed, consult your authorized Brother dealer.
The handwheel feels sluggish when it is turned.
Thread is tangled in the bobbin case.
Remove the tangled thread from the bobbin case. Re-install the bobbin case so it is correctly positioned.
The built-in camera cannot detect the buttonhole foot.
The buttonhole foot is dirty.
Clean the area of the buttonhole foot to be detected.
Mark “A+” or the three dots on the presser foot are shaded or hidden under fabric or your hands.
Make sure that nothing obstructs the detection of mark “A+” or the three dots.
■ After Sewing
Problem
Cause
Solution
Thread tension is incorrect.
Upper threading is incorrect.
Check the steps for threading the machine and rethread the machine.
Bobbin is set incorrectly.
Reset the bobbin. (If needle plate was removed, reinstall needle plate.)
Using improper needle or thread for the selected fabric.
Check the “Fabric/Thread/Needle Combinations” chart.
Presser foot holder is not attached correctly.
Reattach the presser foot holder correctly.
Thread tension is set incorrectly.
Adjust the thread tension.
Bobbin thread is incorrectly wound.
Use a correctly wound bobbin.
Needle is turned, bent or the point is dull.
Replace the needle.
A bobbin designed specifically for this machine is not used.
Use a bobbin designed specifically for this machine.
Character or decorative stitch patterns are misaligned.
Stitch pattern adjustment settings were set incorrectly.
Revise the stitch pattern adjustment settings.
Stitch pattern does not turn out.
Wrong presser foot was used.
Attach the correct presser foot.
Did not use a stabilizer material on thin fabrics or stretch fabrics.
Attach a stabilizer material.
Thread tension is set incorrectly.
Adjust the thread tension.
Fabric was pulled, pushed or fed at an angle while it was being sewn.
Sew while guiding the fabric with your hands so that the fabric is fed in a straight line.
The thread is tangled, for example, in the bobbin case.
Remove the tangled thread. If the thread is tangled in the bobbin case, clean the race.
ERROR MESSAGES
If the operation procedure is incorrect, the machine does not start. An alarm sounds and an error message is displayed on the LCD. If an error message displays, follow the instructions in the message.
Below is an explanation of error messages. Refer to these when necessary (if you touch « or do the operation correctly while the error message is displayed, the message disappears).
Error messages
Cause/solution
1
Attach buttonhole foot “A+”. The built-in camera detects buttonhole foot “A+” by the mark “A+” and the three dots.
This message appears when start sewing buttonhole stitches without attaching buttonhole foot “A+”.
2
Data volume is too large for this pattern.
This message is displayed when the stitch patterns you are editing take up too much memory, or if you are editing too many stitch patterns for the memory.
Reducing the total number of stitch patterns may resolve the issue.
3
Failed to save file.
This message is displayed when no more images can be saved on the USB media. In this case, delete a file from the USB media or use different USB media.
4
Lower the presser foot lever.
This message is displayed when the “Presser Foot Lifter” button is pressed while the presser foot lever is raised and the needle is lowered.
5
Preventive maintenance is recommended.
This message is displayed when the machine needs to be maintained.
6
The “Start/Stop” button does not operate with the foot controller attached. Remove the foot controller.
This message is displayed when the “Start/Stop” button is pressed to sew utility stitches or character/decorative stitches while the foot controller is connected.
7
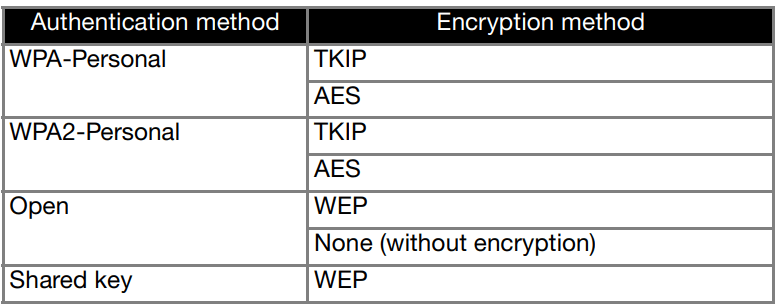
The authentication and encryption methods used by the selected wireless LAN access point/router are not supported by your machine.
The authentication/encryption methods used by the selected wireless access point/router are not supported by your machine.
For infrastructure mode, change the authentication and encryption methods of the wireless access point/router.
Your machine supports the following authentication methods:
If your problem is not solved, the SSID or network settings you entered may be incorrect. Reconfirm the wireless network settings.
Refer to “How Can I Find the Wireless Security Information (SSID and Network Key)”.
8
The bobbin thread is almost empty.
This message is displayed when the bobbin thread is running out. Although a few stitches can be sewn when the “Start/Stop” button is pressed, replace with a wound bobbin immediately.
9
The bobbin winder safety device has activated. Is the thread tangled?
This message is displayed when the bobbin is being wound, and the motor locks because the thread is tangled, etc.
10
The pockets are full.
This message is displayed when no more settings for utility stitches can be saved. In this case, erase settings that have previously been saved in order to save the new settings.
11
The safety device has been activated. Is the thread tangled? Is the needle bent?
This message is displayed when the motor locks due to tangled thread or for other reasons related to thread delivery.
12
The SSID and Network Key are incorrect.
The security information (SSID/network key (password)) is incorrect. Reconfirm the SSID and security information (network key (password)).
Refer to “How Can I Find the Wireless Security Information (SSID and Network Key)”.
13
The wireless LAN access point/router cannot be detected.
The wireless access point/router cannot be detected.
1. Check the following 4 points.
- Make sure that the wireless access point/router is powered on.
- Move your machine to an area where no items can obstruct the wireless network signal, such as metal doors or walls, or closer to the wireless access point/router.
- Temporarily place your machine within about 1 m (3.3 feet) from the wireless access point when you are configuring the wireless settings.
- If your wireless access point/router is using MAC address filtering, confirm the MAC address of this machine is allowed in the filter.
2. If you manually entered the SSID and security information (SSID/ authentication method/encryption method/network key (password)), the information may be incorrect. Reconfirm the SSID and security information and re-enter the correct information as necessary. (page 35) Refer to “How Can I Find the Wireless Security Information (SSID and Network Key)” on page 193.
14
The wireless security information (Authentication method, Encryption method, Network Key) is incorrect.
The wireless security information (authentication method/encryption method/ network key (password)) is incorrect.
Refer to the table for the [The authentication and encryption methods used by the selected wireless LAN access point/router are not supported by your machine.] error message, and reconfirm the wireless security information (authentication method/encryption method/network key (password)).
(page 35)
Refer to “How Can I Find the Wireless Security Information (SSID and Network Key)” on page 193.
15
The wireless setting is not activated.
The wireless network setting is not activated. Activate the wireless network. (page 34)
16
This file cannot be used.
This message appears if the file format is incompatible with this machine. Check the list of compatible file formats. (page 194)
17
This file exceeds the data capacity and cannot be used. Use a suitable size file.
This message is displayed when the file size exceeds the data capacity of the machine. Confirm the file size and format. (page 194)
18
This USB media cannot be used.
This message is displayed when you try to use incompatible media. For a list of compatible USB media, visit “ https://s.brother/cpdab/ ”.
19
Turn off the machine before attaching or removing the needle plate.
This message is displayed when you try to sew with a stitch other than a middle needle position stitch while the straight stitch needle plate is installed. This message is displayed when the needle plate is removed with the machine on or when the machine is turned on and embroidery mode is selected.
20
USB media error
This message is displayed when an error occurs with the USB media. For a list of compatible USB media, visit “ https://s.brother/cpdab/ ”.
21
When the speed controller is set to control the zigzag stitch width, the “Start/Stop” button does not operate.
This message is displayed when the speed control slide is set to control the stitch width, and the “Start/ Stop” button is pressed. Set [Width Control] to [OFF] in the settings screen to use the “Start/Stop” button (page 20), or use the foot controller to operate the machine (page 111).
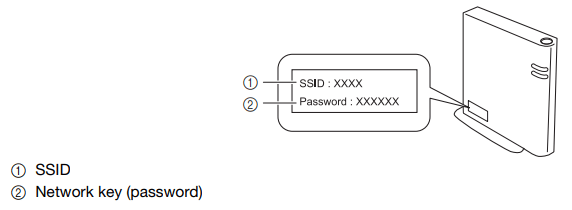
How Can I Find the Wireless Security Information (SSID and Network Key)
+ The network key may also be described as the password. security key or encryption Key.
+ If the wireless access point/router is not broadcasting the SSID. the SSID will not automatically be detected. You will have to manually enter the SSID.
You should see the documentation provided with your wireless access point/router.
The default SSID (wireless network name) could be the manufacturer’s name or the model name.
If you do not know the security information. please consult the router manufacturer. your system administrator. or Internet provider.
Some SSIDs and network keys (passwords) are case (upper case and lower case) sensitive. Please properly record your information.


 to display the modes.
 . The General settings screen appears.
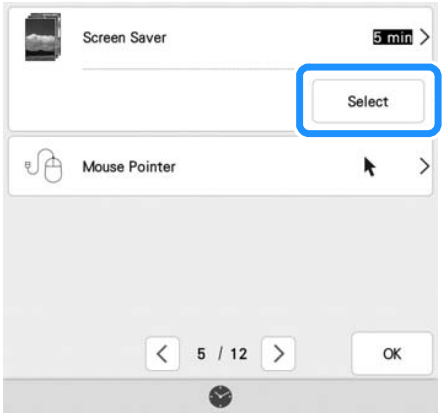

 to select the first image.
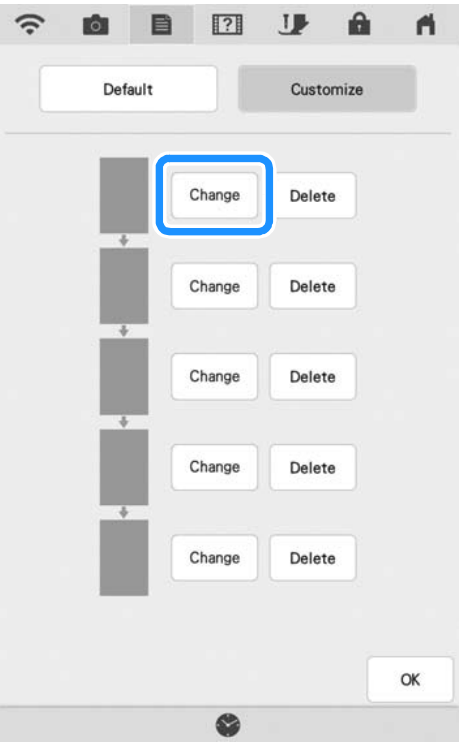
 to delete the selected image.

 to display the previous or next page.
 to set the automatic thread cutting function.
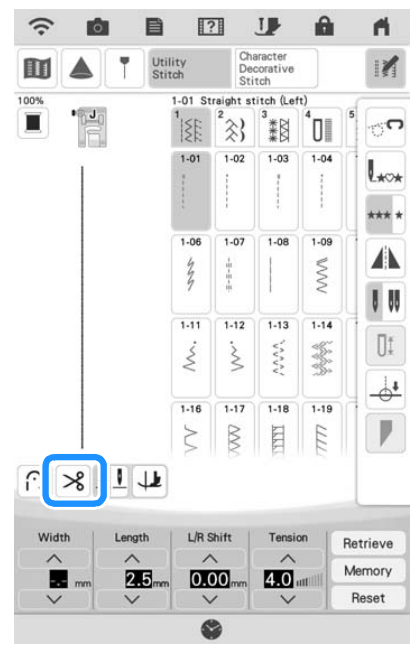
 (1-07) for optimal performance on some fabrics.
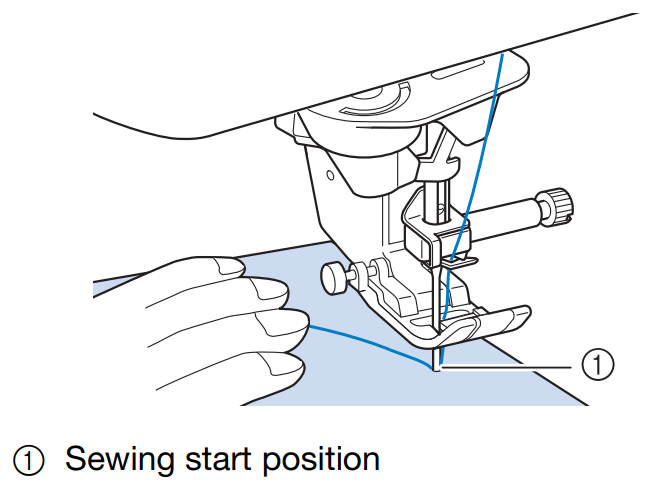


 then
then  to set the machine to free motion sewing mode. The key appears as the presser foot is raised to the necessary height, then the feed dogs are lowered for free motion sewing.
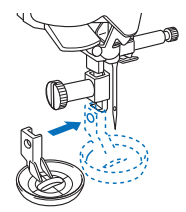
 then
then  to display the screen below.
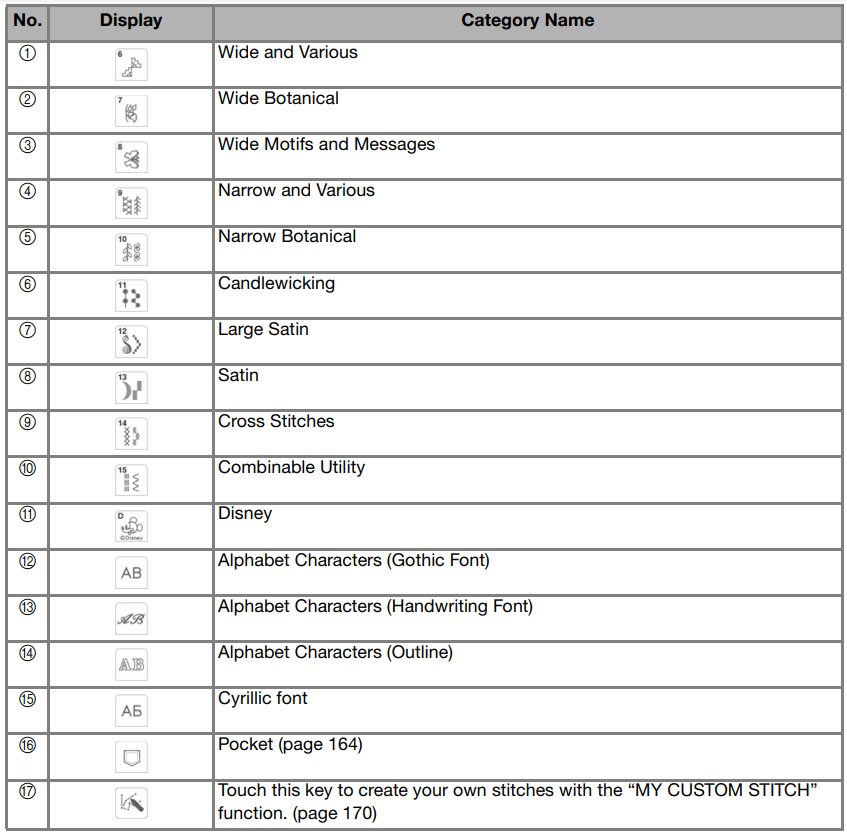
 the message will display several more times until the appropriate maintenance is performed.