Loading ...
Loading ...
Loading ...
18
of the appliance (accessible after removing the drip tray)
is not dirty. If necessary, remove coee deposits with the
brush provided and a sponge.
2. Remove the residues with a vacuum cleaner (g. 36).
Cleaning the water tank
1. Clean the water tank (A13) regularly (about once a month)
with a damp cloth and a little mild washing up liquid.
2. After cleaning the water tank rinse it thoroughly to remo-
ve all washing up liquid residues.
Cleaning the coee spouts
1. Clean the coee spouts with a sponge or cloth (g. 37).
2. Check the holes in the coee spout are not blocked. If ne-
cessary, remove coee deposits with a toothpick (g. 38).
Cleaning the pre-ground coee funnel
Check regularly (about once a month ) that the pre-ground cof-
fee funnel is not blocked. If necessary, remove coee deposits
with the brush provided (A23).
Cleaning the infuser
The infuser (A8) must be cleaned at least once a month.
Important!
The infuser may not be extracted when the machine is on.
1. Make sure the machine is correctly turned o (see section:
“Turning o”).
2. Open the service door (g. 33).
3. Remove the drip tray and grounds container (g. 34).
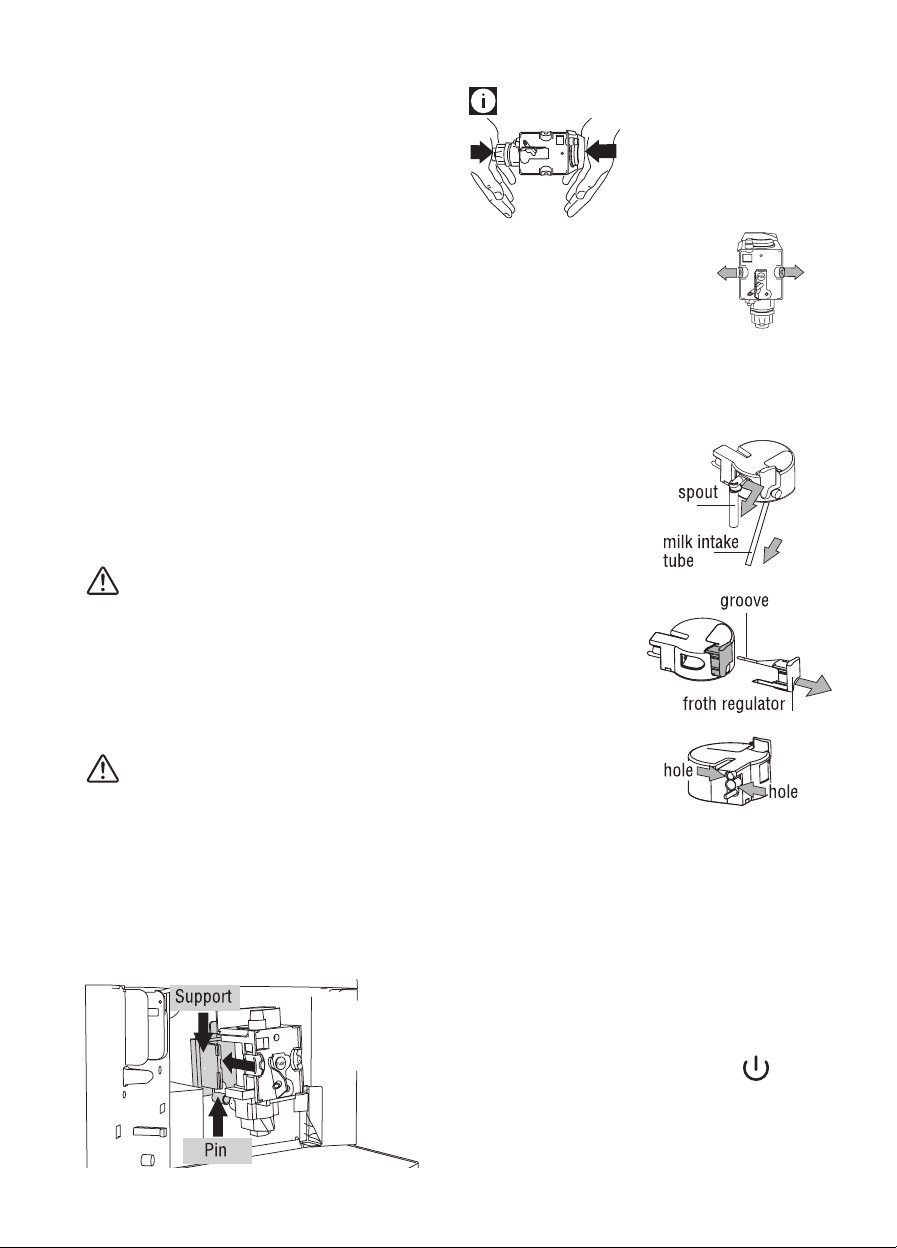
4. Press the two red release buttons inwards and at the same
time pull the infuser outwards (g. 39).
Important!
RINSE WITH WATER ONLY
NO DISH SOAP NO DISH WASHER
Do not use dish soap to clean the infuser as it could cause da-
mage.
5. Soak the infuser in water for about 5 minutes, then rinse
under the tap.
6. After cleaning, replace the infuser by sliding it onto the in-
ternal support and pin at the bottom, then push the PUSH
symbol fully in until it clicks into place.
Please Note!
If you encounter diculty inser-
ting the infuser, before inserting
it you must adapt it to the right
dimension by pressing it forceful-
ly from the bottom and top as
shown in the gure.
7. Once inserted, make sure the two red
buttons have snapped out.
8. Replace the drip tray and grounds con-
tainer.
9. Close the service door.
Cleaning the milk container
Clean the milk container each time you prepare milk as descri-
bed below:
1. Turn the lid of the milk
container clockwise then
remove it.
2. Remove the milk spout and
intake tube.
3. Remove the froth regulator
by pulling it outwards.
4. Wash all the components
thoroughly with hot wa-
ter and mild dish soap.
All components can be
washed in a dishwa-
sher, placing them in
the top basket of the
dishwasher.
Make sure there are no
milk residues left inside
the holes and the groove
on the ne end of the froth regulator.
5. Use the brush supplied (certain models only) or another
brush (not metal) to remove residues from the milk hole.
6. Check that the intake tube and spout are not clogged with
milk residues.
7. Replace the froth regulator, milk spout and intake tube.
8. Replace the lid on the milk container, turning it anti-
clockwise to hook it in place.
Cleaning the graphic touch screen
1. If the machine is on, turn o by pressing the
button
(g. 5) to avoid starting it accidentally during cleaning.
2. Clean the graphic touch screen with a damp cloth. Do not
use solvents, aggressive detergents and/or sharp objects
as they could damage the surface of the screen.
Loading ...
Loading ...
Loading ...