Step 2: Slide and position the adjustment collar tabs
to set the outer boundaries of your coverage
area. The sprinkler head will rotate and spray
water between these two tabs.
Maximum Coverage: Slide the tabs together and
position them o to the side of the spray nozzles.
Add additional Precision Arcs to water more
area in less time
Remove the flow through cap and attach an additional
outdoor garden hose and Precision Arc. Actual water
coverage depends on sprinkler settings and available
water pressure.
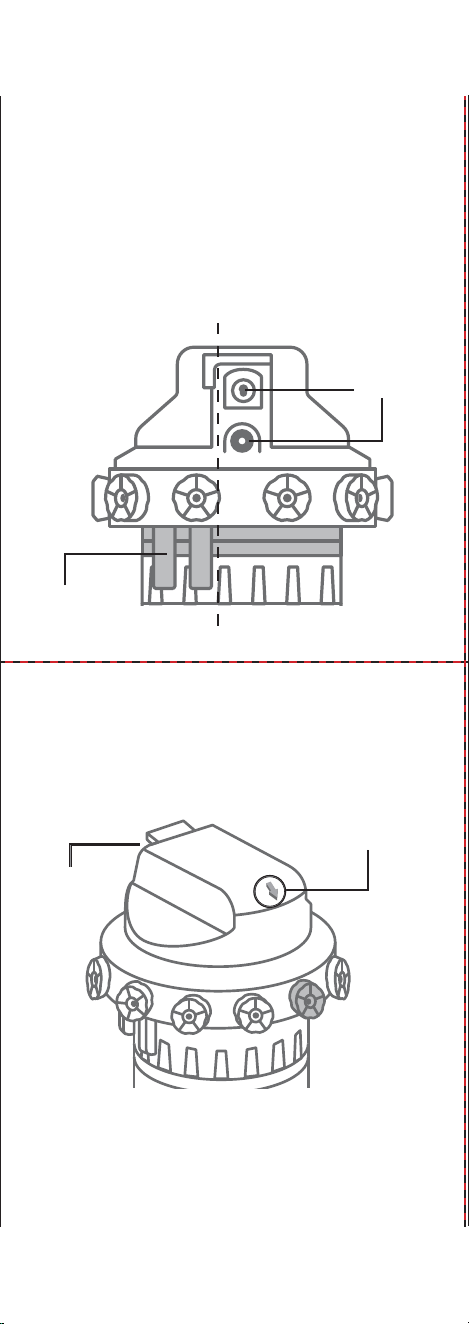
Step 3: Turn on the water and adjust the spray length
for each section in your coverage area using
the distance knobs.
Note: The adjustment arrow points to which distance
knob to turn. The knob is opposite the spray, preventing
you from getting wet while making adjustments.
When expecting freezing temperatures, Precision Arc
should be removed from the hose and stored indoors
to avoid potential freeze damage.
Filter traps dirt particles, prolonging life of your
Precision Arc. Clean filter regularly and replace if worn.
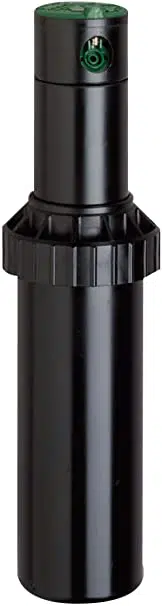
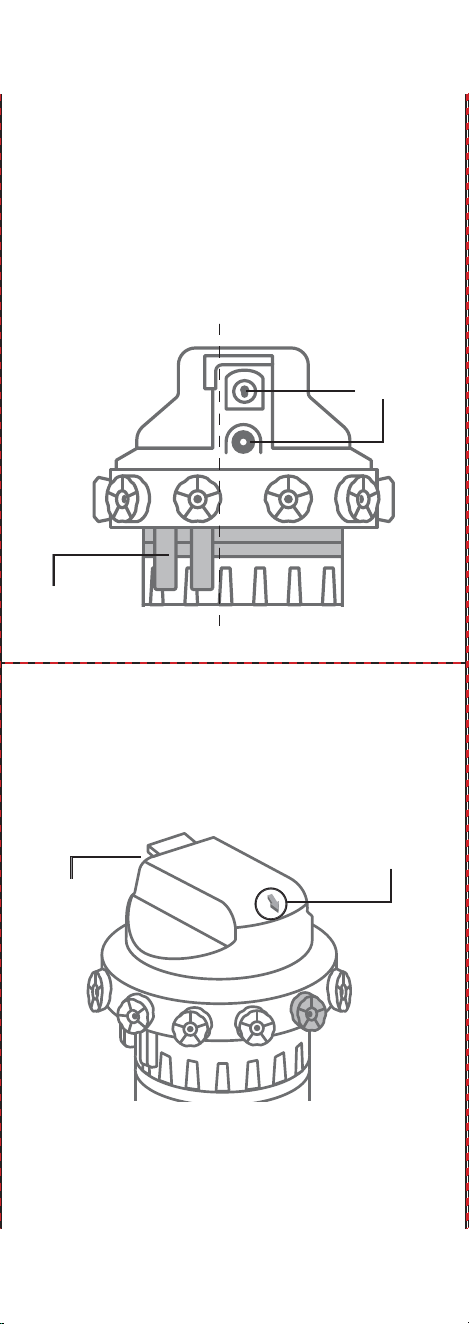
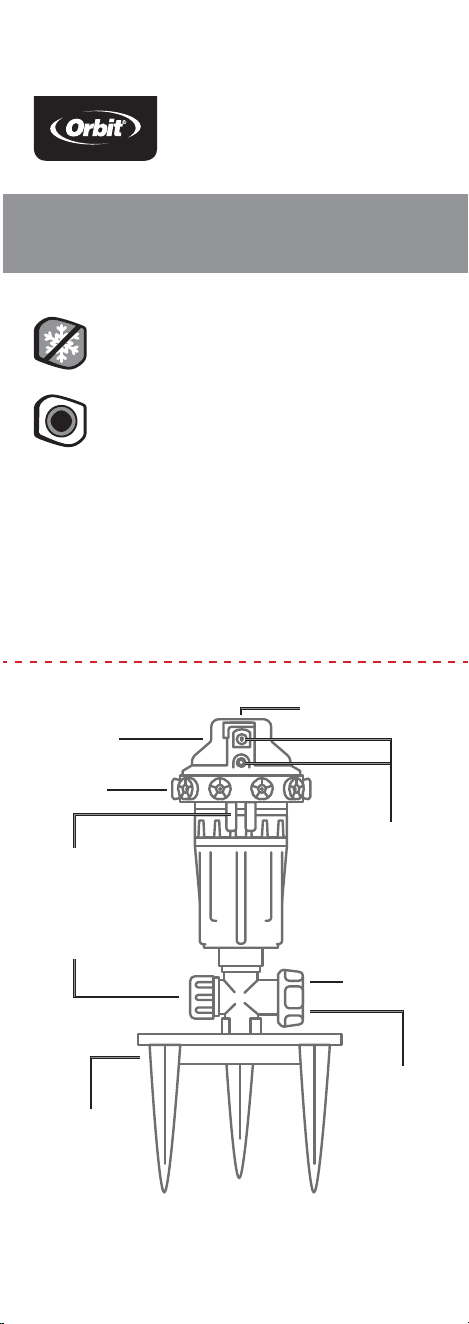
PRECISION ARC SPRINKLER
Adjustment
Arrow
Sprinkler Head
Dual Spray
Nozzles
Adjustment
Collar Tabs
Flow Through Cap
Distance Knobs
Swivel Inlet
Step-Spike
Base
Filter
Orbit
®
North Salt Lake, UT 84054
©2017 Orbit
®
Inc. All rights reserved.
56805-24 rA
Customer Support
1-800-488-6156
orbitonline.com
Tabs
Nozzles
Spray
Nozzles
Adjustment
Arrow
Step 1: Connect an outdoor garden hose to the swivel
inlet and insert the step-spike into the ground
by stepping on the base.
Note: If your ground is hard, soak it with water to
soften the soil before inserting the step-spike.
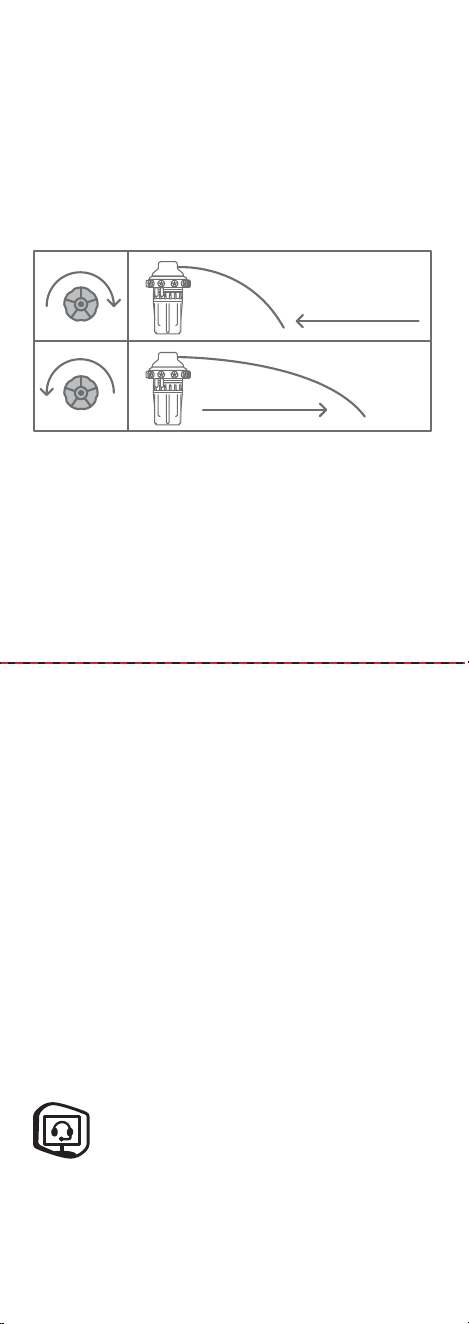
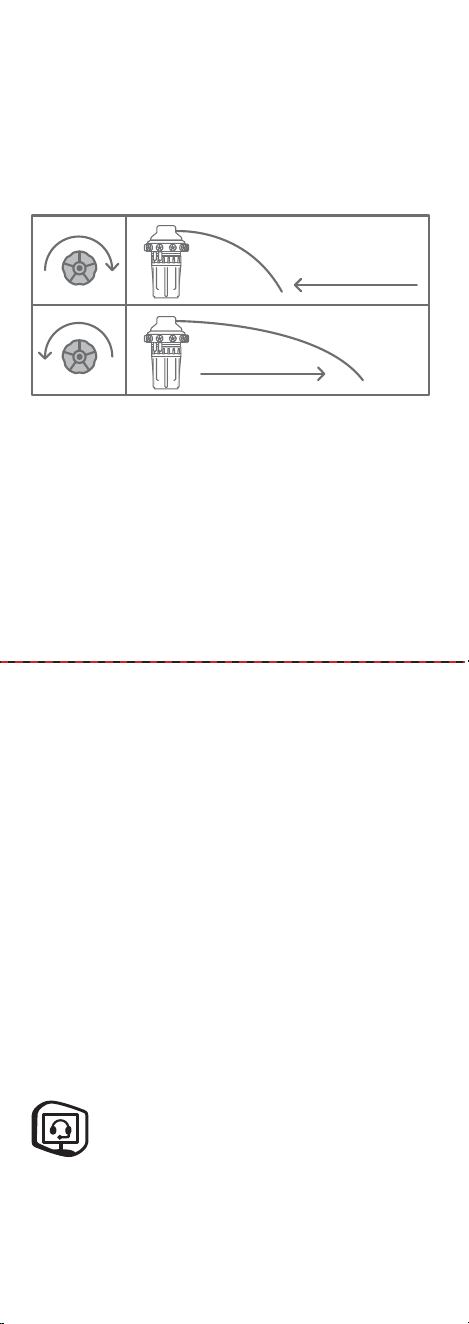
Turn the knob clockwise to shorten the spray distance
and counter clockwise to lengthen the spray distance.
Note: If the spray nozzles have moved past the distance
knob you are currently adjusting, do one of the following:
A) Rotate the sprinkler head back into position by
grabbing the sprinkler head and twisting it to the
spot you want to adjust.
B) Wait for the spray nozzles to return
to that location.
Working Water Pressure
Minimum: 20 PSI
Maximum: 70 PSI
Working Temperature
Maximum: Do not operate at temperatures exceeding 120°F
Minimum: Keep from freezing. To prevent damage from freezing
water, take the Precision Arc inside before the first winter frost.
Warnings:
For cold water outdoor irrigation use only.
Do not spray near electrical connections.
sec
ond ta
b
fi
r
st tab
coverage area
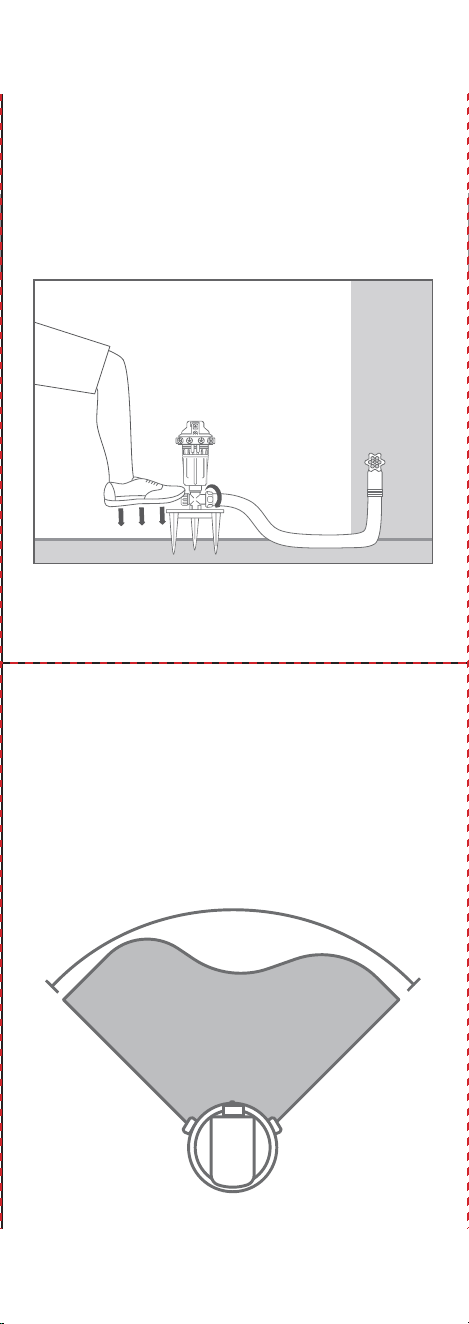
Step 2: Slide and position the adjustment collar tabs
to set the outer boundaries of your coverage
area. The sprinkler head will rotate and spray
water between these two tabs.
Maximum Coverage: Slide the tabs together and
position them o to the side of the spray nozzles.
Add additional Precision Arcs to water more
area in less time
Remove the flow through cap and attach an additional
outdoor garden hose and Precision Arc. Actual water
coverage depends on sprinkler settings and available
water pressure.
Step 3: Turn on the water and adjust the spray length
for each section in your coverage area using
the distance knobs.
Note: The adjustment arrow points to which distance
knob to turn. The knob is opposite the spray, preventing
you from getting wet while making adjustments.
When expecting freezing temperatures, Precision Arc
should be removed from the hose and stored indoors
to avoid potential freeze damage.
Filter traps dirt particles, prolonging life of your
Precision Arc. Clean filter regularly and replace if worn.
PRECISION ARC SPRINKLER
Adjustment
Arrow
Sprinkler Head
Dual Spray
Nozzles
Adjustment
Collar Tabs
Flow Through Cap
Distance Knobs
Swivel Inlet
Step-Spike
Base
Filter
Orbit
®
North Salt Lake, UT 84054
©2017 Orbit
®
Inc. All rights reserved.
56805-24 rA
Customer Support
1-800-488-6156
orbitonline.com
Tabs
Nozzles
Spray
Nozzles
Adjustment
Arrow
Step 1: Connect an outdoor garden hose to the swivel
inlet and insert the step-spike into the ground
by stepping on the base.
Note: If your ground is hard, soak it with water to
soften the soil before inserting the step-spike.
Turn the knob clockwise to shorten the spray distance
and counter clockwise to lengthen the spray distance.
Note: If the spray nozzles have moved past the distance
knob you are currently adjusting, do one of the following:
A) Rotate the sprinkler head back into position by
grabbing the sprinkler head and twisting it to the
spot you want to adjust.
B) Wait for the spray nozzles to return
to that location.
Working Water Pressure
Minimum: 20 PSI
Maximum: 70 PSI
Working Temperature
Maximum: Do not operate at temperatures exceeding 120°F
Minimum: Keep from freezing. To prevent damage from freezing
water, take the Precision Arc inside before the first winter frost.
Warnings:
For cold water outdoor irrigation use only.
Do not spray near electrical connections.
sec
ond ta
b
fi
r
st tab
coverage area
Paso 2: Deslice y coloque las pestañas de la anilla de
ajuste para fijar los límites externos de su área
de cobertura. El cabezal del aspersor girará y
rociará el agua entre estas dos pestañas.
Máxima Cobertura: Deslice las lengüetas juntas y
colóquelas en el lado de las boquillas.
Añada Precision Arcs adicionales para regar
más área en menor tiempo.
Retire el flujo a través de la tapa y fije una manguera
de jardín adicional para exterior y Precision Arc. La
cobertura real del agua depende de la configuración del
aspersor y de la presión de agua disponible.
Paso 3: Abra el suministro de agua y ajuste la longitud
del rocío para cada sección en su área de
cobertura utilizando las perillas de distancia.
Nota: La flecha de ajuste en la parte superior del
aspersor indica hacia cuál distancia gira la perilla. La
perilla está opuesta al rocío, para evitar que usted se
moje mientras realiza los ajustes.
Cuando se esperen temperaturas de congelamiento,
Precision Arc se debe retirar de la manguera y
guardar en interiores para evitar el daño potencial
por congelamiento.
El filtro atrapa partículas de suciedad lo cual prolonga la
vida de su Precision Arc Limpie el filtro regularmente y
cámbielo si está gastado.
PRECISION ARC ASPERSOR
Flecha de Ajuste
Cabezal del
Aspersor
Boquillas de
rocío dobles
Pestañas de las
anillas de ajuste
Flujo a través
de la tapa
Perillas de
distancia
Entrada
giratoria
Base de
espiga con
estribo
Filtro
Orbit
®
North Salt Lake, UT 84054
©2017 Orbit
®
Inc. All rights reserved.
56805-24 rA
Customer Support
1-800-488-6156
orbitonline.com
pestañas
boquillas
Boquillas
de rocío
Flecha de Ajuste
Paso 1: Conecte una manguera de jardín de
exteriores a la entrada giratoria e inserte la
espiga con estribo en la tierra colocándose de
pie en la base.
Nota: Si la tierra está dura, remójela con agua para
suavizar la tierra antes de insertar la espiga con estribo.
Gire la perilla en el sentido horario para acortar la
distancia del rocío y en el sentido antihorario para
prolongar la distancia del rocío.
Si las boquillas de rocío se han desplazado más allá de la
perilla de distancia usted está actualmente ajustando uno
de los siguientes:
A) Gire el aspersor de nuevo en su posición
tomando el cabezal del rociador y girándolo hacia el
punto en que desea ajustar.
B) Espere que las boquillas de rocío regresen
a ese lugar.
Presión de agua de trabajo
Mínima: 20 PSI
Máxima: 70 PSI
Temperatura de trabajo
Máxima: No haga funcionar el dispositivo a temperaturas que superen
los 120°F
Mínima: Evite el congelamiento. Para evitar los daños ocasionados
por el congelamiento del agua, lleve el Precision Arc al interior y
retire la batería antes de la primera helada de invierno.
Advertencias:
Para uso exterior con agua fría solamente.
No rocíe cerca de conexiones eléctricas.
segund
a p
esta
ñ
a
p
rime
r
a pe
s
t
a
ñ
a
área de cobertura