Loading ...
Loading ...
Loading ...
© 2020 United States Stove Company
9
INSTALLATION INFORMATION
• To avoid irreparable damage to the heater or
personal injury, matches, paper, garbage or any
other material must not be placed or thrown on
top of logs or into ames.
• To avoid personal injury, do not touch hot surfaces
when the heater is operating.
• Close supervision is necessary when the heater is
being operated near children.
WARNING:
• THE LOGS ARE MANUFACTURED FROM
BONDED CERAMIC FIBER. THIS IS A
COMMONLY USED MATERIAL IN INDUSTRY
WORLDWIDE. IN EVENT THAT A LOG
SHOULD BE REMOVED, CARE SHOULD
BE TAKEN NOT TO DAMAGE BONDED
MATERIAL. INTENTIONAL MISUSE OR
DELIBERATELY FRAGMENTING MATERIAL
COULD LEAD TO INHALING FIBERS AND BE
HAZARDOUS TO YOUR HEALTH.
• THIS HEATER IS INTENDED FOR USE AS A
GAS HEATER FIREPLACE AS DESCRIBED
IN THESE INSTRUCTIONS. IT SHOULD IT
SHOULD NOT BE USED FOR ANY OTHER
PURPOSE.
• FAILURE TO POSITION PARTS IN
ACCORDANCE WITH THESE DIAGRAMS OR
FAILURE TO USE ONLY PARTS SPECIFICALLY
APPROVED WITH THIS HEATER MAY RESULT
IN PROPERTY DAMAGE OR PERSONAL
INJURY.
WARNING:
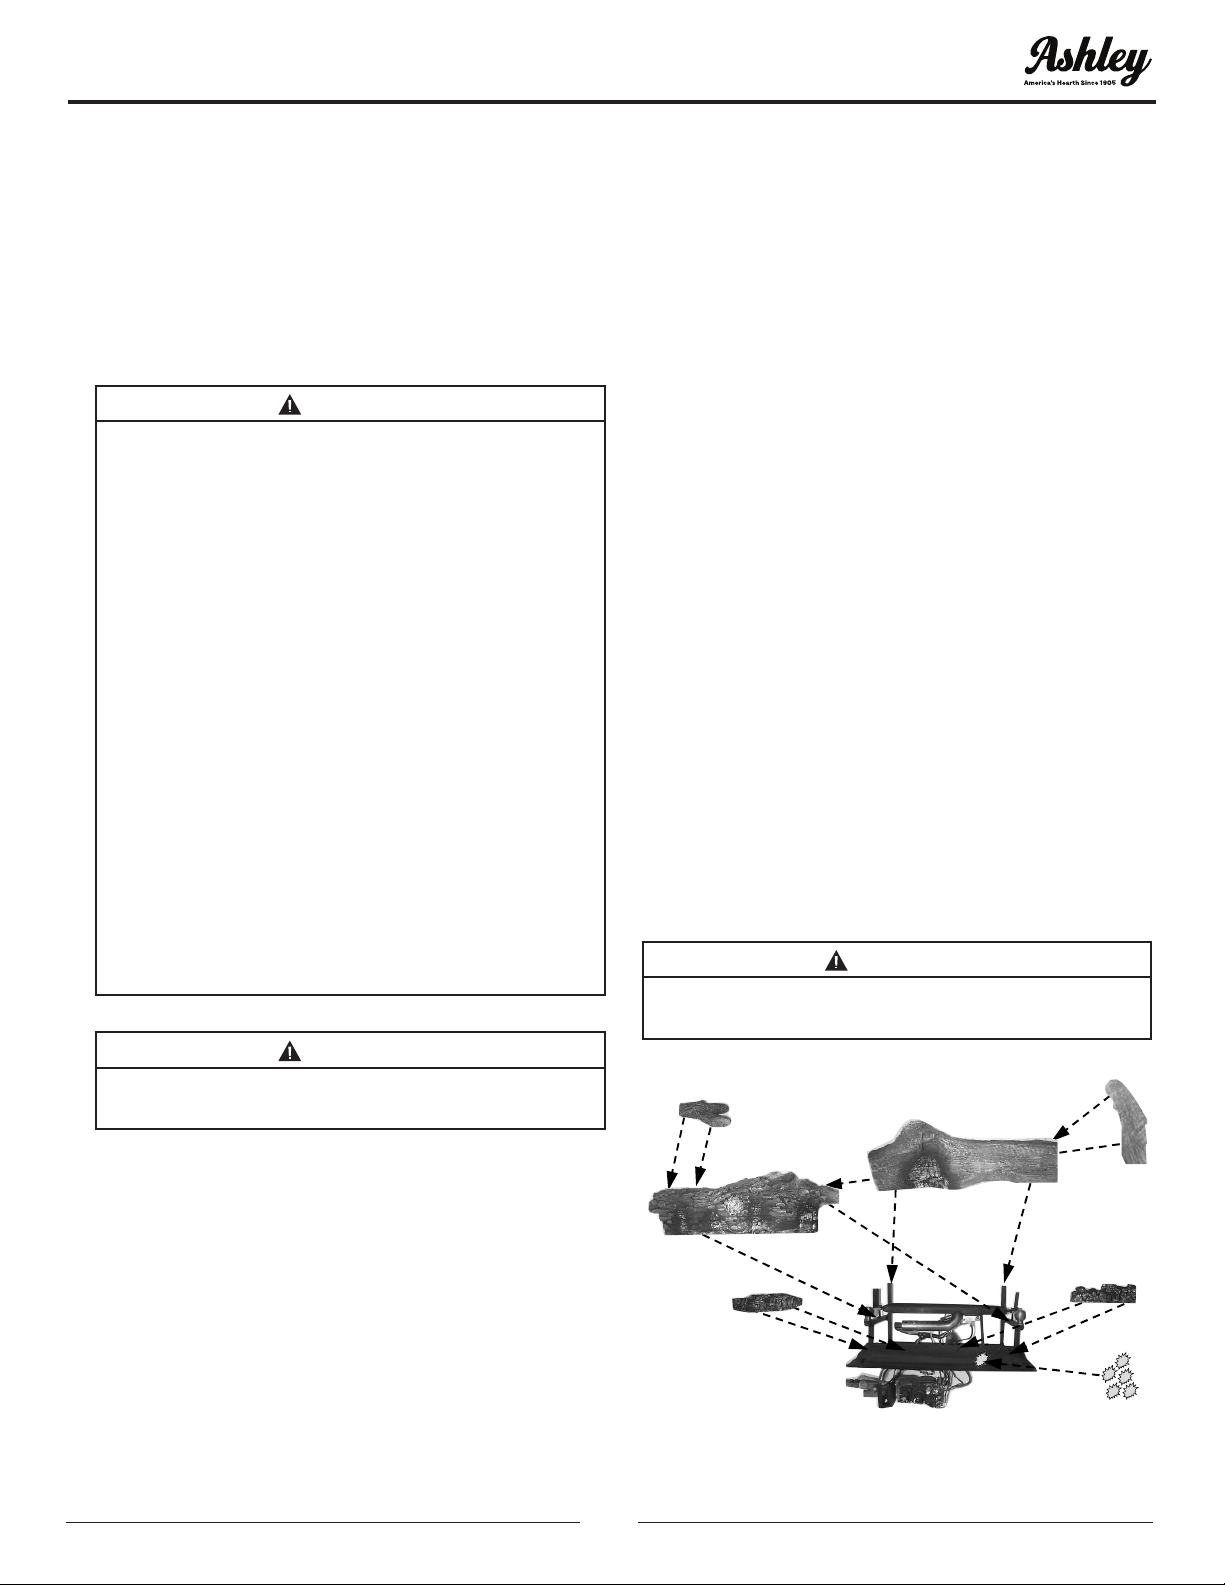
POSITIONING OF LOGS IS VERY CRITICAL SEE
LOG DIAGRAM
(#1) Rear Log, (#2) Middle Log, (#3) Left Front Log,
(#4) Right Front Log, (#5) Left Top Middle Log, (#6)
Right Top Middle Log, (#7) Glowing Embers in front
of #3 & #4 logs.
IMPORTANT: Place log ve on the left and log six on
the right. If they are not properly installed they will
be loose and may cause damage to the appliance.
1. Place rear log #1 on rear log supports. The log
has alignment notches on each rear corner.
2. Place Middle log #2 in front of rear burner tube
and then move log forward. The log should seat
just behind brass knob(s), located in the middle
section of the base between rear burner tube
and front burner pan.
3. Place Left Top Middle log #5 on pins located on
the left top section of Middle log #2.
4. Place Right Top Middle log #6 on pin located on
the right top section of Middle log #2 and align
the notch on right side #6 with side shield on
right.
5. Place Left Front log #3 on locator pins located
on the left middle section of the front burner
pan.
6. Place Right Front log #4 on locator pins located
on the right middle section of the front burner
pan.
7. Provided with your log set is a package of
Glowing Embers (rock wool). Open the package
and tear off small pieces of wool material and
place it over small holes (ports) located on the
front burner pan in front of logs #3 and #4. Cover
the entire section of holes (ports).*Replacement
of loose (Glowing Wool) must be purchased
from the original manufacturer and application
of excess loose material may adversely affect
the performance of the heater.
NOTE: Wash your hands immediately after coming
in contact with wool material. The wool can cause
slight itching or burning in some cases, avoid any
contact with eyes.
WARNING:
ALL PREVIOUSLY APPLIED LOOSE MATERIAL
MUST BE REMOVED PRIOR TO REPLACEMENT.
1
2
5
3
4
6
7
Loading ...
Loading ...
Loading ...