14
3 PK RGB+WHITE
LED PUCK LIGHTS
Sku Numbers: 346-0835
Model Number: 0005-0052
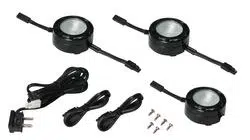
PACKAGE CONTENTS
Note: Hardware not shown to actual size.
Questions, problems, missing parts?
Before returning to your retailer, call our customer service at
1-844-255-9692 Monday – Friday 8:00 a.m. – 5:00 p.m. CST
Questions, problems, missing parts?
Before returning to your retailer, call our customer service at
1-844-255-9692 Monday – Friday 8:00 a.m. – 5:00 p.m. CST
• Do not use chemical solvents or harsh abrasives to clean puck lights.
• LEDs are not serviceable. Do not attempt to open or service LEDs or LED housing.
CARE AND MAINTENANCE
1) Pucks will not light up.
a) Ensure all connections are correct and have not disconnected.
2) Pucks will not respond to remote control.
a) Remote control signal is weak. Replace remote control battery.
b) Remote control is too far from puck lights. Use remote control closer to the puck lights.
c) Plastic safety tab has not been removed. Remove plastic tab from battery drawer.
3) Pucks are out of sync.
a) Unplug pucks and re-connect before trying again.
If unable to x any of the above issues, please consult a certied electrician.
FCC Compliance Statement
This device complies with part 15 of the FCC Rules. Operation is subject to the following two conditions:
1. This device may not cause harmful interference, and
2. This device must accept any interference received, including interference that may
cause undesired operation.
FCC WARNING
This equipment has been tested and found to comply with the limits for a Class B digital device, pursuant to
Part 15 of the FCC Rules. These limits are designed to provide reasonable protection against harmful
interference in a residential installation. This equipment generates, uses and can radiate radio frequency
energy and, if not installed and used in accordance with the instructions, may cause harmful interference to
radio communications. However, there is no guarantee that interference will not occur in a particular
installation. If this equipment does cause harmful interference to radio or television reception, which can be
determined by turning the equipment o and on, the user is encouraged to try to correct the interference by
one or more of the following measures:
• Reorient or relocate the receiving antenna.
• Increase the separation between the equipment and the receiver.
• Connect the equipment into an outlet dierent from that to which the receiver is connected.
• Consult the dealer or an experienced radio/TV technician for help.
TROUBLESHOOTING
RV1841
FIVE-YEAR LIMITED WARRANTY
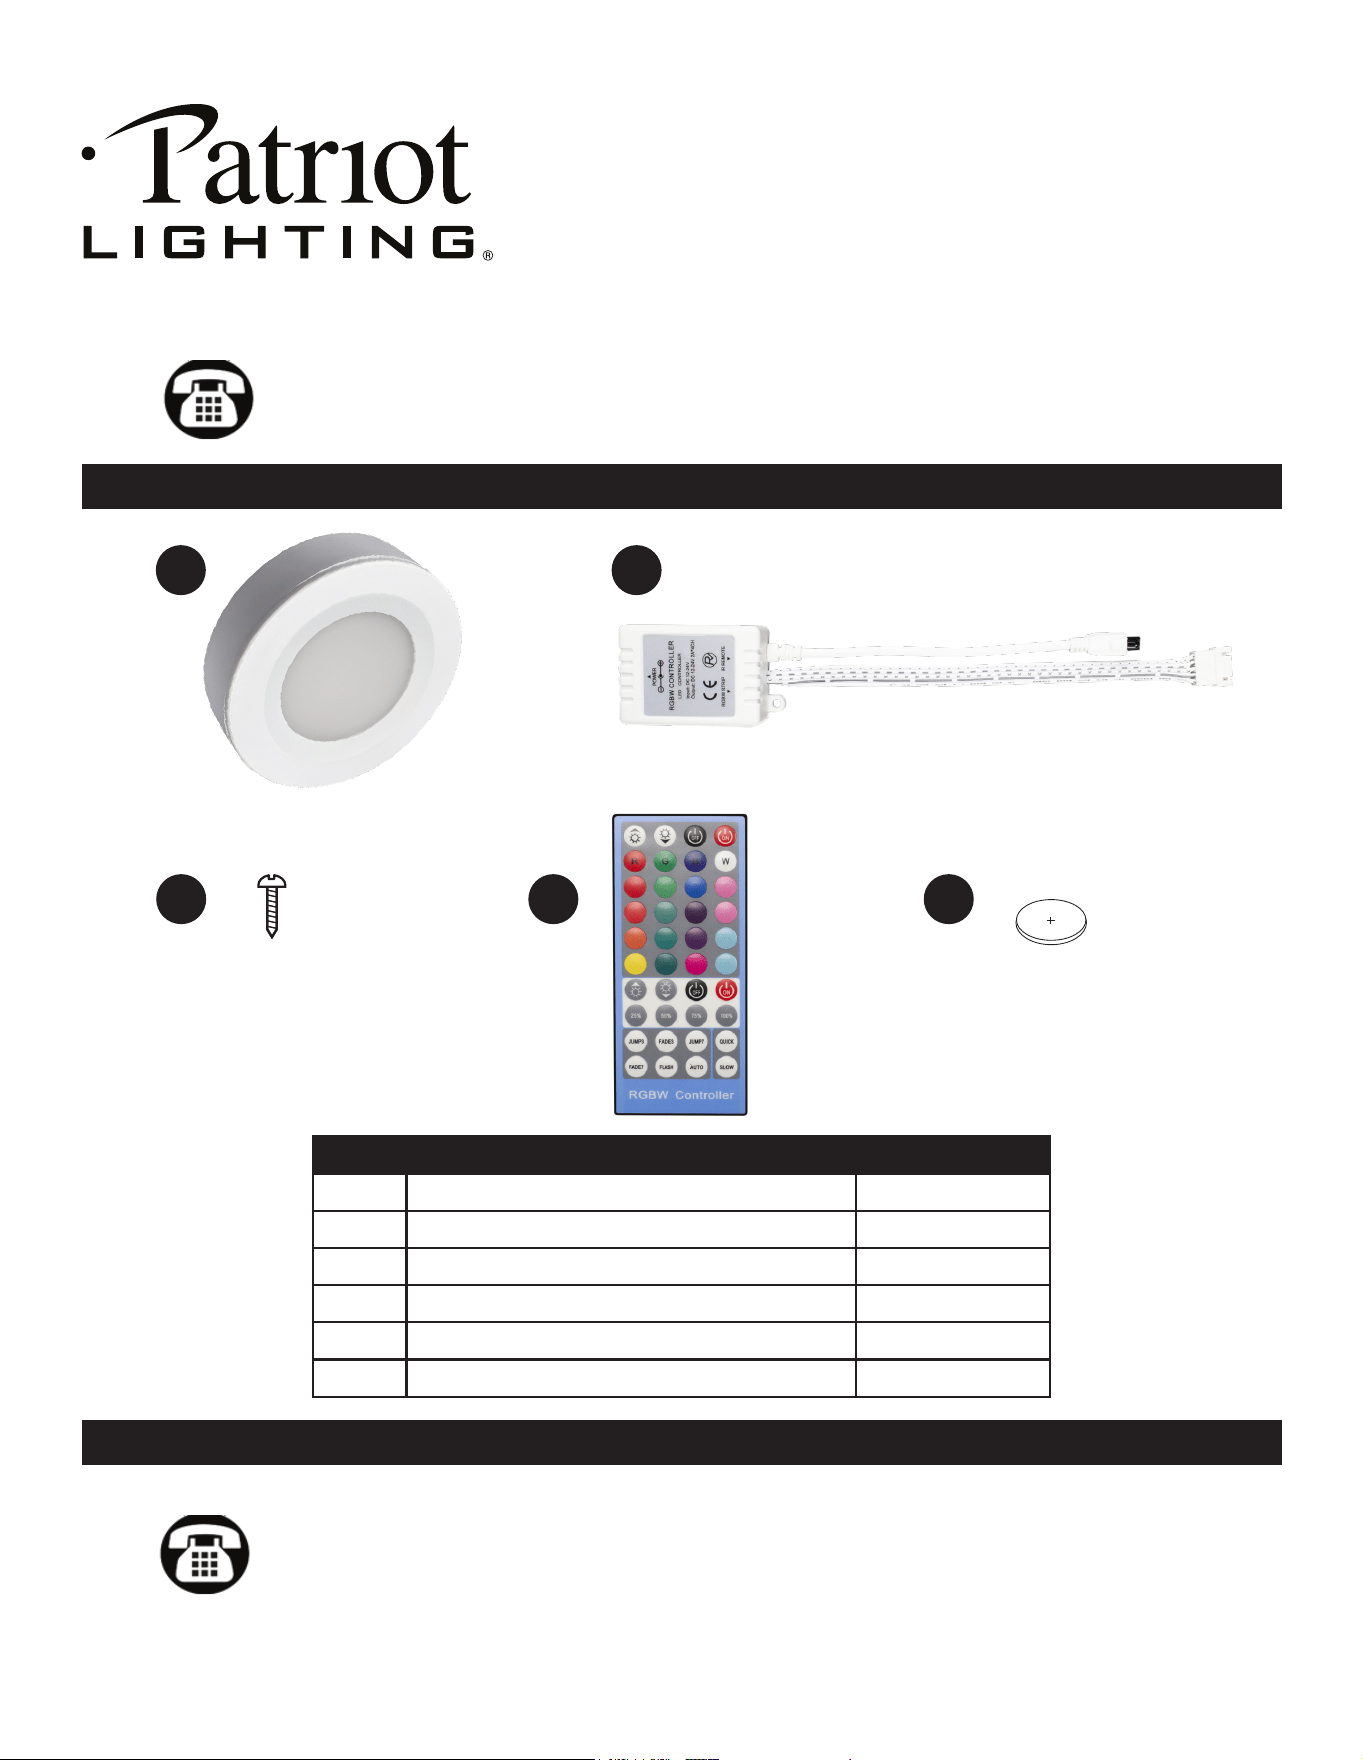
PART DESCRIPTION QUANTITY
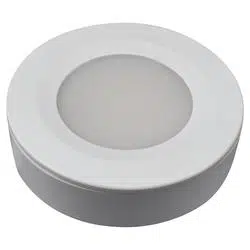
A LED Puck Light 3
B In-Line Receiver 1
C 12V Plug-in Power Supply 1
D Mounting Screws 8
E Handheld Remote Control 1
F CR2025 Battery 1
A
B
D E F
Patriot Lighting® is a registered trademark
of Menard, Inc. All Rights Reserved.
If, during normal use, this PATRIOT LIGHTING
®
lighting xture breaks or fails due to a defect in material and workmanship within
ve (5) years from the date of original purchase, simply bring this lighting xture with your original sales receipt back to your nearest
MENARDS
®
retail store. At its discretion, PATRIOT LIGHTING
®
agrees to have the product or any defective part(s) repaired or
replaced with the same or similar PATRIOT LIGHTING
®
product free of charge, within the stated warranty period, when returned by
the original purchaser with original sales receipt. This warranty; (1) excludes expendable parts including but not limited to light bulbs;
(2) does not cover damage that has resulted from abuse or misuse; and (3) does not cover any losses, labor, injuries to persons/
property or costs. This warranty does give you specic legal rights and you may have other rights, which vary from state to state.

2
Please read and understand this entire manual before attempting to assemble, operate or install the product.
READ AND FOLLOW ALL SAFETY INSTRUCTIONS
WARNING:
• This product is not a toy and contains small parts. Close supervision is necessary when this unit is
used near children. The remote control contains a button battery. If swallowed, it could cause severe
injury or death in just 2 hours. Seek medical attention immediately.
• To reduce the risk of electrical shock, do not put the unit in water or other liquid. Do not place or
store unit where it can fall or be pulled into a tub or sink. Do not open battery compartment with wet
hands.
• Ensure mounting surface is sturdy. Do not mount pucks to moving or unstable surfaces.
• For cleaning, use a soft dry cloth. Do not use alcohol, benzene, thinner, or other caustic chemicals
to clean the puck light. Do not use the light in places which are extremely hot, cold, dusty, or humid.
SAVE THESE INSTRUCTIONS
Before beginning assembly, installation, or operation of product, make sure all parts are present. Compare
parts with package and hardware contents lists on page 1. If any part is missing or damaged, do not attempt
to assemble, install or operate the product. Contact customer service for replacement parts.
Helpful Tools (not included): Tape measure, pencil
Estimated assembly time: 15 minutes
WARNING
• Ensure mounting surface is sturdy. Do not mount pucks to moving or unstable surfaces.
SAFETY INFORMATION
PREPARATION
INSTALLATION INSTRUCTIONS
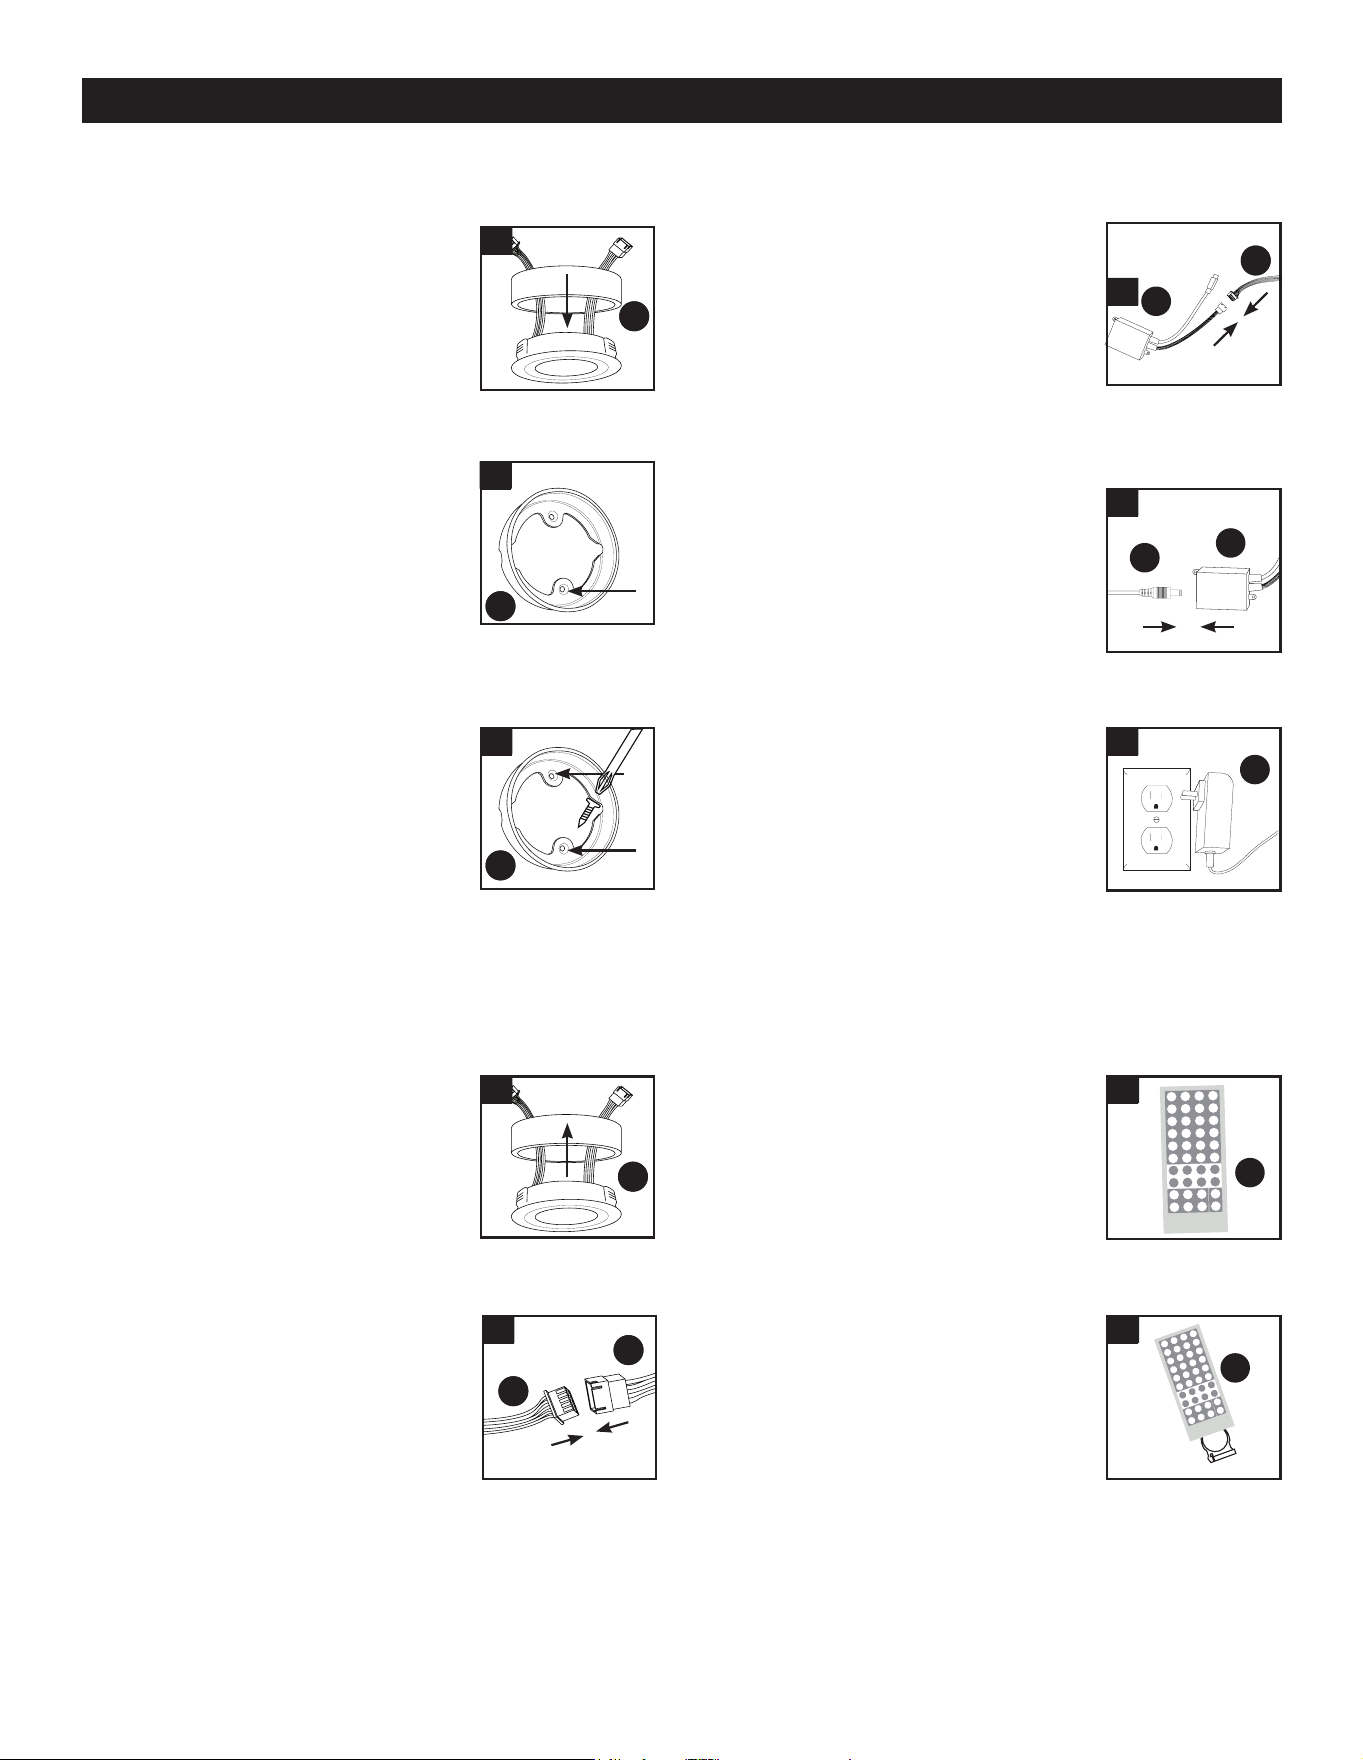
1. Separate the surface ring from
the LED puck light (A) by holding
the surface ring of the puck rmly
with your ngers while the lens is
facing away from you, pressing the
back of the puck light housing with
your thumbs outward.
5. Connect each puck light (A) to
one another by securely fastening
each connector on either end of
the puck light’s (A) lead wires,
starting at the last puck light (A) in
the series.
9. Use remote control (E) for
on/o control, dimming, and color
control. Remove plastic tab from
battery door before use.
10. To replace remote control’s
battery (F), follow directions on
the back of remote control (E) to
slide battery drawer out. Replace
battery (+ side up) and slide battery
drawers back in place.
1
5
9
10
2. Using the surface ring as a
template, mark the locations of the
mounting holes on the mounting
surface. Be sure to orient the side
openings according to where the
puck’s (A) lead wires will be routed
towards adjacent pucks and/or the
nearest power outlet.
6. Connect the in-line receiver
(B) to the rst puck light (A) in the
series by securely fastening each
clip connector on the lead wires.
7. Connect the 12V plug-in power
supply (C) to the receiver by
plugging the DC connection jack
into the input side of the receiver.
8. Plug the 12V plug-in power
supply (C) to an appropriate power
outlet.
3. Secure surface ring to a sturdy
mounting surface using mounting
screws (D) provided. Use an awl or
nail to start screw-holes if needed.
Ensure puck lights (A) are no
more than 23 inches apart and the
rst puck light (A) in the series is
no more than 72 inches from the
nearest power outlet. Repeat this
process for all 3 puck light surface
rings (A).
4. Route the lead wires through
the openings on either side of the
surface ring, then push the puck
light housing into the surface ring.
Repeat this process for all 3 puck
lights (A).
2
6
7
8
3
4
AAA
AAA
AAA
AAA
AAA
AAA
AAA
B
E
E
C
C
B
3
2
Please read and understand this entire manual before attempting to assemble, operate or install the product.
READ AND FOLLOW ALL SAFETY INSTRUCTIONS
WARNING:
• This product is not a toy and contains small parts. Close supervision is necessary when this unit is
used near children. The remote control contains a button battery. If swallowed, it could cause severe
injury or death in just 2 hours. Seek medical attention immediately.
• To reduce the risk of electrical shock, do not put the unit in water or other liquid. Do not place or
store unit where it can fall or be pulled into a tub or sink. Do not open battery compartment with wet
hands.
• Ensure mounting surface is sturdy. Do not mount pucks to moving or unstable surfaces.
• For cleaning, use a soft dry cloth. Do not use alcohol, benzene, thinner, or other caustic chemicals
to clean the puck light. Do not use the light in places which are extremely hot, cold, dusty, or humid.
SAVE THESE INSTRUCTIONS
Before beginning assembly, installation, or operation of product, make sure all parts are present. Compare
parts with package and hardware contents lists on page 1. If any part is missing or damaged, do not attempt
to assemble, install or operate the product. Contact customer service for replacement parts.
Helpful Tools (not included): Tape measure, pencil
Estimated assembly time: 15 minutes
WARNING
• Ensure mounting surface is sturdy. Do not mount pucks to moving or unstable surfaces.
SAFETY INFORMATION
PREPARATION
INSTALLATION INSTRUCTIONS
1. Separate the surface ring from
the LED puck light (A) by holding
the surface ring of the puck rmly
with your ngers while the lens is
facing away from you, pressing the
back of the puck light housing with
your thumbs outward.
5. Connect each puck light (A) to
one another by securely fastening
each connector on either end of
the puck light’s (A) lead wires,
starting at the last puck light (A) in
the series.
9. Use remote control (E) for
on/o control, dimming, and color
control. Remove plastic tab from
battery door before use.
10. To replace remote control’s
battery (F), follow directions on
the back of remote control (E) to
slide battery drawer out. Replace
battery (+ side up) and slide battery
drawers back in place.
1
5
9
10
2. Using the surface ring as a
template, mark the locations of the
mounting holes on the mounting
surface. Be sure to orient the side
openings according to where the
puck’s (A) lead wires will be routed
towards adjacent pucks and/or the
nearest power outlet.
6. Connect the in-line receiver
(B) to the rst puck light (A) in the
series by securely fastening each
clip connector on the lead wires.
7. Connect the 12V plug-in power
supply (C) to the receiver by
plugging the DC connection jack
into the input side of the receiver.
8. Plug the 12V plug-in power
supply (C) to an appropriate power
outlet.
3. Secure surface ring to a sturdy
mounting surface using mounting
screws (D) provided. Use an awl or
nail to start screw-holes if needed.
Ensure puck lights (A) are no
more than 23 inches apart and the
rst puck light (A) in the series is
no more than 72 inches from the
nearest power outlet. Repeat this
process for all 3 puck light surface
rings (A).
4. Route the lead wires through
the openings on either side of the
surface ring, then push the puck
light housing into the surface ring.
Repeat this process for all 3 puck
lights (A).
2
6
7
8
3
4
AAA
AAA
AAA
AAA
AAA
AAA
AAA
B
E
E
C
C
B
3

14
3 PK RGB+WHITE
LED PUCK LIGHTS
Sku Numbers: 346-0835
Model Number: 0005-0052
PACKAGE CONTENTS
Note: Hardware not shown to actual size.
Questions, problems, missing parts?
Before returning to your retailer, call our customer service at
1-844-255-9692 Monday – Friday 8:00 a.m. – 5:00 p.m. CST
Questions, problems, missing parts?
Before returning to your retailer, call our customer service at
1-844-255-9692 Monday – Friday 8:00 a.m. – 5:00 p.m. CST
• Do not use chemical solvents or harsh abrasives to clean puck lights.
• LEDs are not serviceable. Do not attempt to open or service LEDs or LED housing.
CARE AND MAINTENANCE
1) Pucks will not light up.
a) Ensure all connections are correct and have not disconnected.
2) Pucks will not respond to remote control.
a) Remote control signal is weak. Replace remote control battery.
b) Remote control is too far from puck lights. Use remote control closer to the puck lights.
c) Plastic safety tab has not been removed. Remove plastic tab from battery drawer.
3) Pucks are out of sync.
a) Unplug pucks and re-connect before trying again.
If unable to x any of the above issues, please consult a certied electrician.
FCC Compliance Statement
This device complies with part 15 of the FCC Rules. Operation is subject to the following two conditions:
1. This device may not cause harmful interference, and
2. This device must accept any interference received, including interference that may
cause undesired operation.
FCC WARNING
This equipment has been tested and found to comply with the limits for a Class B digital device, pursuant to
Part 15 of the FCC Rules. These limits are designed to provide reasonable protection against harmful
interference in a residential installation. This equipment generates, uses and can radiate radio frequency
energy and, if not installed and used in accordance with the instructions, may cause harmful interference to
radio communications. However, there is no guarantee that interference will not occur in a particular
installation. If this equipment does cause harmful interference to radio or television reception, which can be
determined by turning the equipment o and on, the user is encouraged to try to correct the interference by
one or more of the following measures:
• Reorient or relocate the receiving antenna.
• Increase the separation between the equipment and the receiver.
• Connect the equipment into an outlet dierent from that to which the receiver is connected.
• Consult the dealer or an experienced radio/TV technician for help.
TROUBLESHOOTING
RV1841
FIVE-YEAR LIMITED WARRANTY
PART DESCRIPTION QUANTITY
A LED Puck Light 3
B In-Line Receiver 1
C 12V Plug-in Power Supply 1
D Mounting Screws 8
E Handheld Remote Control 1
F CR2025 Battery 1
A
B
D E F
Patriot Lighting® is a registered trademark
of Menard, Inc. All Rights Reserved.
If, during normal use, this PATRIOT LIGHTING
®
lighting xture breaks or fails due to a defect in material and workmanship within
ve (5) years from the date of original purchase, simply bring this lighting xture with your original sales receipt back to your nearest
MENARDS
®
retail store. At its discretion, PATRIOT LIGHTING
®
agrees to have the product or any defective part(s) repaired or
replaced with the same or similar PATRIOT LIGHTING
®
product free of charge, within the stated warranty period, when returned by
the original purchaser with original sales receipt. This warranty; (1) excludes expendable parts including but not limited to light bulbs;
(2) does not cover damage that has resulted from abuse or misuse; and (3) does not cover any losses, labor, injuries to persons/
property or costs. This warranty does give you specic legal rights and you may have other rights, which vary from state to state.