TOSHIBA
VIDEO Comb Fimt÷r
COMB[ ON COLOR
TELEV[ D VIDEO
RECORDER / DVD VIDEO
W20F51
W24F51
7F51
MANUAL
ETTE
R
PUaybask!
(VCR)
Resordingi
(VCR)i
Hi-Fi
Others
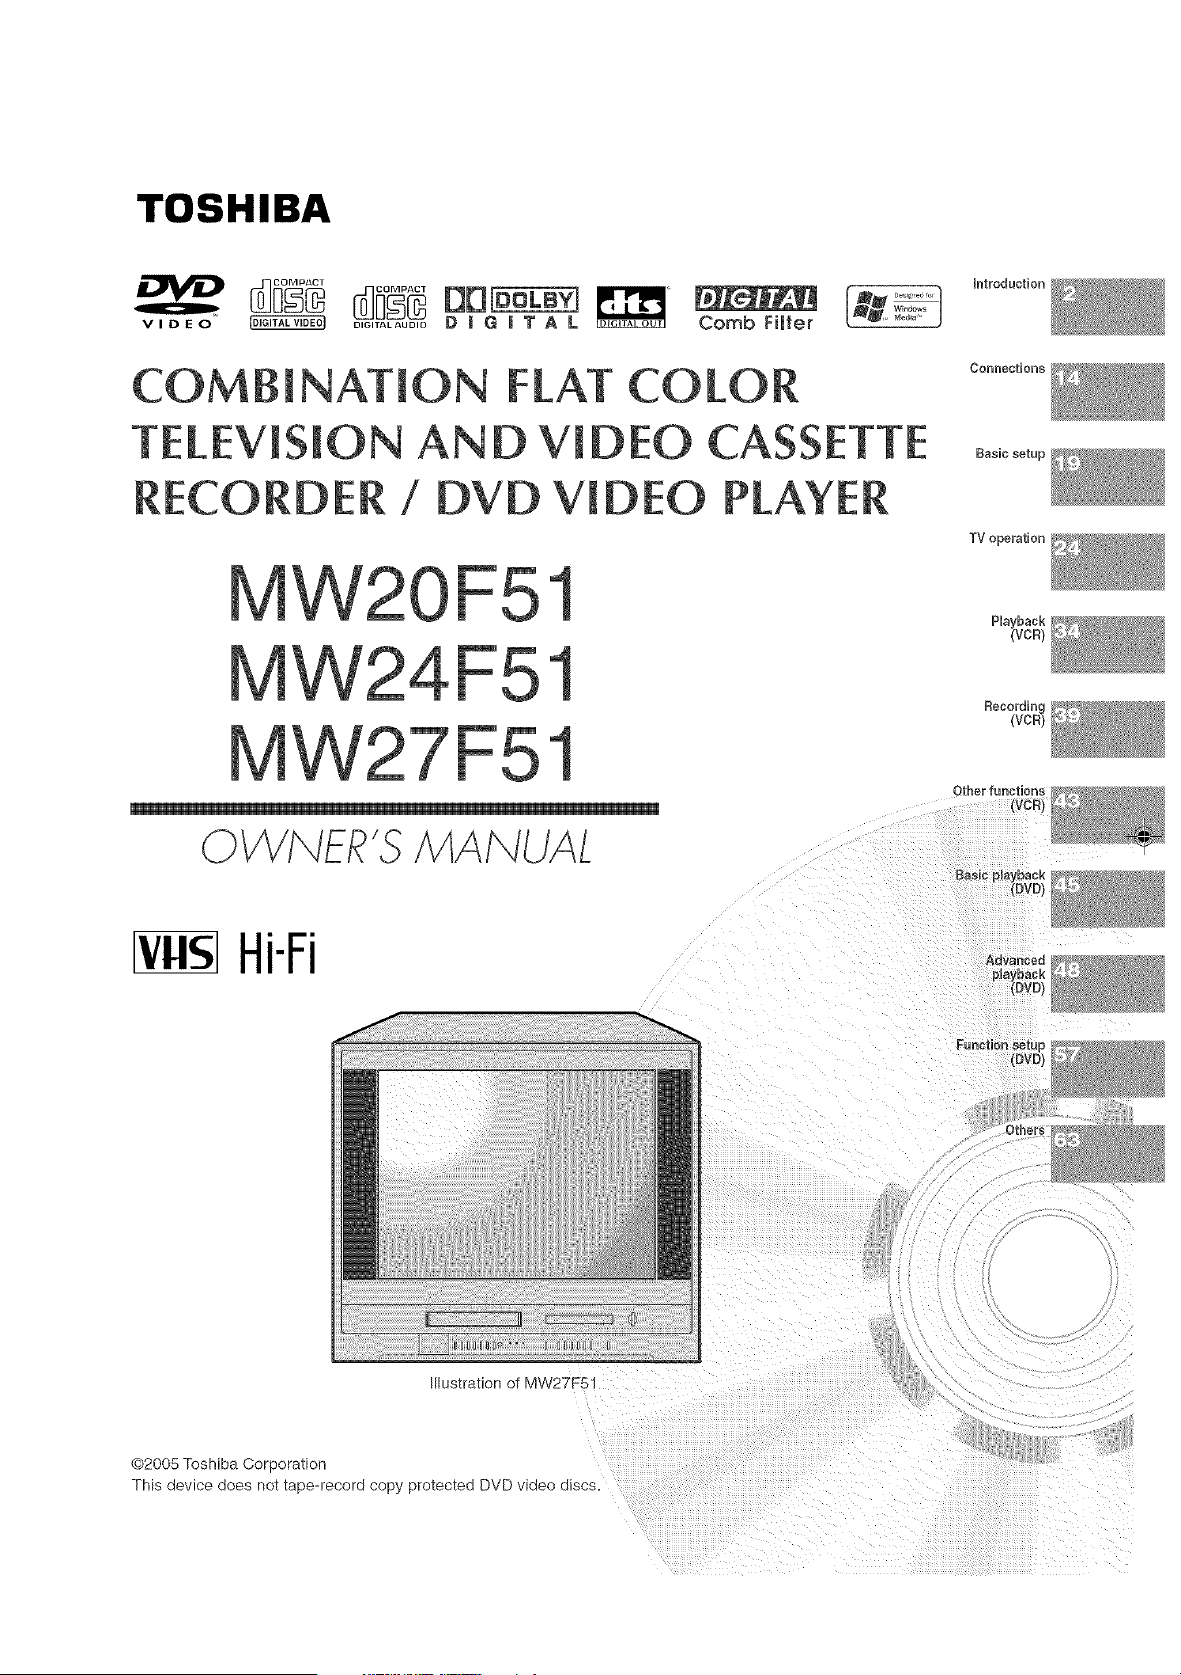
Illustration of MW27F51
@2005 Toshiba Corporation
This device does not tape-record copy protected DVD _aeo alscs.
÷
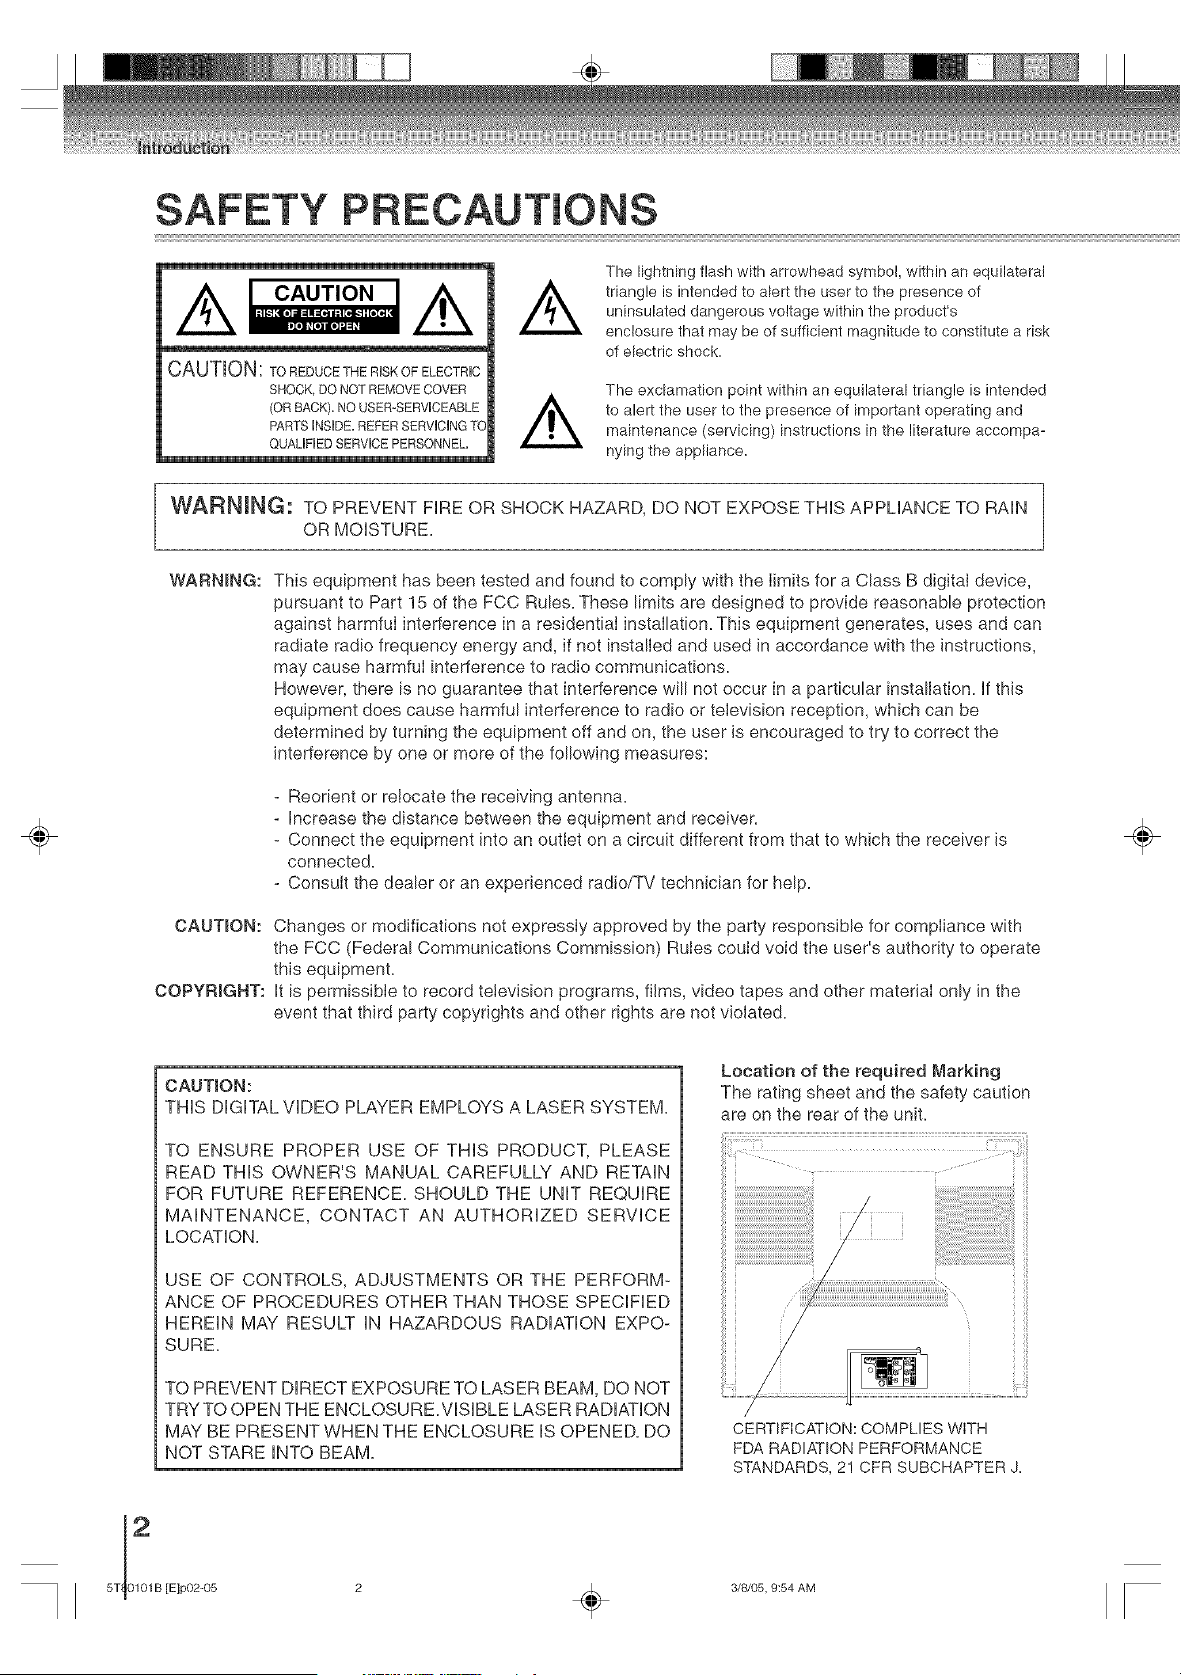
SAFETY PRECAUTIONS
/k cA°z'°"/k
m
CAUTION: TO REDUCE THE RUSKOF ELECTRUC
SHOCK. DO NOT REMOVE COVER
(OR BACK), NO USER-SERVUCEABLE
PARTS INSUDE,REFER SERVUCUNGTC
QUAMFED SERVUCEPERSONNEL,
The lightning flash with arrowhead symbol within an equilateral
triangle is intended to alert the user to the presence of
uninsulated dangerous voltage within the product's
enclosure that may be of sufficient magnitude to constitute a risk
of electric shock.
The exclamation point within an equilateral triangle is intended
to alert the user to the presence of important operating and
maintenance (servicing) instructions in the literature accompa-
nying the appliance.
WARNmNG: TO PREVENT FiRE OR SHOCK HAZARD, DO NOT EXPOSE THiS APPLIANCE TO RAiN
OR MOISTURE.
WARNING: This equipment has been tested and found to comply with the Iimits for a Class B digitaI device,
pursuant to Part 15 of the FCC Rules. These limits are designed to provide reasonable protection
against harmful interference in a residential instailation. This equipment generates, uses and can
radiate radio frequency energy and, if not installed and used in accordance with the instructions,
may cause harmful interference to radio communications.
However, there is no guarantee that interference will not occur in a particular installation. If this
equipment does cause harmful interference to radio or television reception, which can be
determined by turning the equipment off and on, the user is encouraged to try to correct the
interference by one or more of the following measures:
CAUTION:
COPYRIGHT:
- Reorient or relocate the receiving antenna.
- Increase the distance between the equipment and receiver.
Connect the equipment into an outlet on a circuit different from that to which the receiver is
connected.
- Consuit the dealer or an experienced radio/TV technician for help.
Changes or modifications not expressly approved by the party responsible for compliance with
the FCC (Federal Communications Commission) Rules could void the user's authority to operate
this equipment.
It is permissibIe to record television programs, films, video tapes and other material only in the
event that third party copyrights and other rights are not violated.
÷
CAUTION:
THIS DIGITAL VIDEO PLAYER EMPLOYS A LASER SYSTEM.
TO ENSURE PROPER USE OF THiS PRODUCT, PLEASE
READ THiS OWNER'S MANUAL CAREFULLY AND RETAIN
FOR FUTURE REFERENCE. SHOULD THE UNiT REQUIRE
MAINTENANCE, CONTACT AN AUTHORIZED SERVICE
LOCATION.
USE OF CONTROLS, ADJUSTMENTS OR THE PERFORM-
ANCE OF PROCEDURES OTHER THAN THOSE SPECiFiED
HEREIN MAY RESU_ iN HAZARDOUS RADiATiON EXPO-
SURE.
TO PREVENT DIRECT EXPOSURE TO LASER BEAM, DO NOT
TRY TO OPEN THE ENCLOSURE. ViSiBLE LASER RADiATiON
MAY BE PRESENT WHEN THE ENCLOSURE iS OPENED. DO
NOT STARE iNTO BEAM.
Location of the required Marking
The rating sheet and the safety caution
are on the rear of the unit.
CERTIFICATION: COMPLIES WITH
FDA RADIATION PERFORMANCE
STANDARDS, 2! CFR SUBCHAPTER J=
[E]p02-05 2 _ 3/8/05, 9:54 AM
iMPORTANT SAFEGUARDS
÷
1. READ iNSTRUCTIONS
All the safety and operating instructions should be read before the unit is operated.
2. RETAIN iNSTRUCTIONS
The safety and operating instructions should be retained for future reference=
3. HEED WARNINGS
AII warnings on the unit and in the operating instructions should be adhered to.
4. FOLLOW _NSTRUOTIONS
AII operating and use instructions shouid be followed.
5. CLEANING
Unplug this unit from the wall outlet before cleaning= Do not use liquid cleaners or aerosol cleaners=
Use a damp cloth for cleaning the exterior cabinet only.
6. ATTACHMENTS
The manufacturer of this unit does not make any recommendations for attachments, as they may cause
hazards=
7. WATER AND MOISTURE
Do not use this unit near water= For example, near a bathtub, washbowl, kitchen sink, laundry tub, in a wet
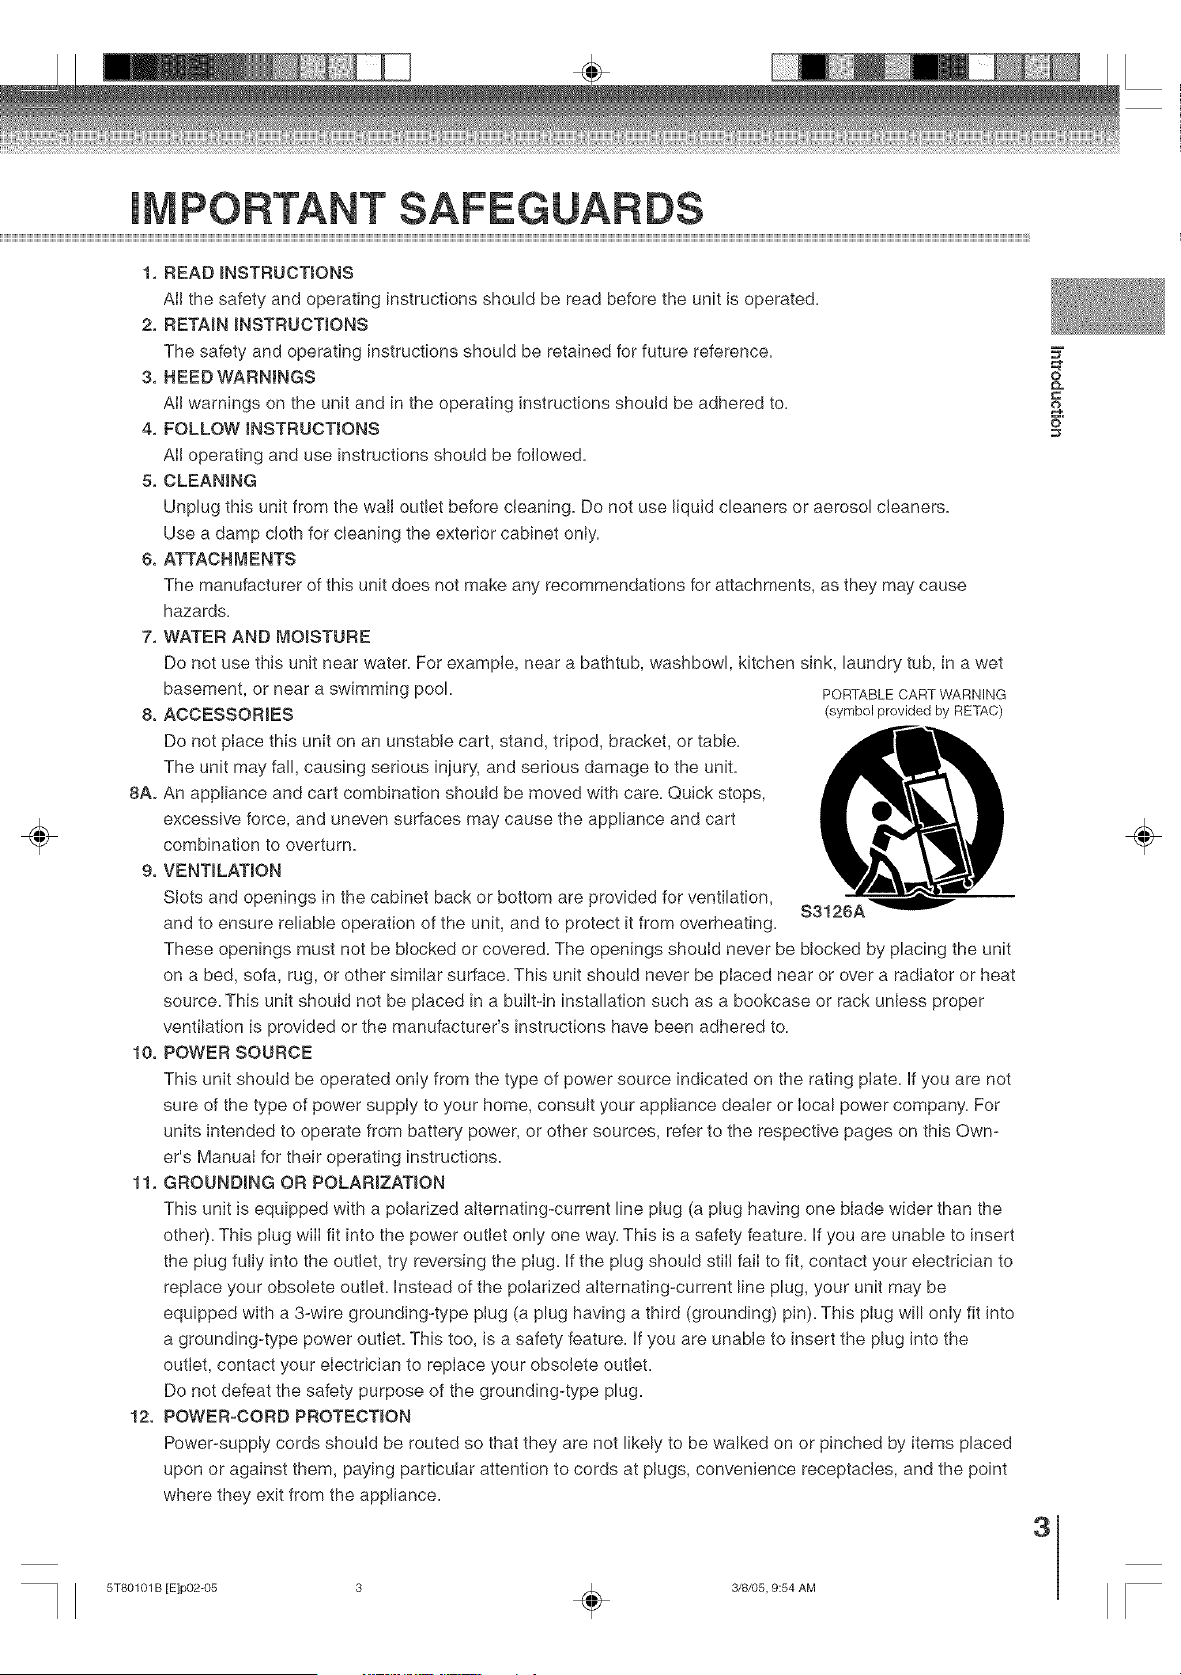
basement, or near a swimming pool= PORTABLECARTWARNING
8. ACCESSORIES (symbol provided by RETAC)
Do not place this unit on an unstable cart, stand, tripod, bracket, or table=
The unit may fall, causing serious injury, and serious damage to the unit=
8A. An appliance and cart combination should be moved with care. Quick stops,
excessive force, and uneven surfaces may cause the appliance and cart
combination to overturn=
9. VENTILAT_ON
Slots and openings in the cabinet back or bottom are provided for ventilation,
S3126A
and to ensure reliable operation of the unit, and to protect it from overheating.
These openings must not be blocked or covered= The openings should never be blocked by placing the unit
on a bed, sofa, rug, or other similar surface= This unit should never be placed near or over a radiator or heat
source= This unit should not be placed in a built-in installation such as a bookcase or rack unless proper
ventilation is provided or the manufacturer's instructions have been adhered to.
10. POWER SOURCE
This unit should be operated only from the type of power source indicated on the rating plate. If you are not
sure of the type of power supply to your home, consult your appliance dealer or local power company= For
units intended to operate from battery power, or other sources, refer to the respective pages on this Own-
er's Manual for their operating instructions=
11. GROUNDING OR POLARiZATiON
This unit is equipped with a polarized alternating-current line plug (a plug having one blade wider than the
other). This plug wilI fit into the power outlet only one way. This is a safety feature, if you are unable to insert
the plug fully into the outlet, try reversing the plug. if the plug should still faiI to fit, contact your electrician to
replace your obsolete outlet, instead of the polarized alternating-current line plug, your unit may be
equipped with a 3-wire grounding-type plug (a plug having a third (grounding) pin). This plug will only fit into
a grounding-type power outlet. This too, is a safety feature, if you are unable to insert the plug into the
outlet, contact your electrician to replace your obsolete outlet.
Do not defeat the safety purpose of the grounding-type plug.
12. POWER-CORD PROTECTION
Power-supply cords should be routed so that they are not likely to be walked on or pinched by items placed
upon or against them, paying particular attention to cords at plugs, convenience receptacles, and the point
where they exit from the appliance.
=_
&
O
3
÷
5T80101 B [E]p02-05 3 _ 3/8/05, 9:54 AM
÷
IMPORTANT SAFEGUARDS
13. LIGHTNING
To protect your unit from a lightning storm, or when it is left unattended and unused for long periods of time,
unplug it from the wall outlet and disconnect the antenna or cable system. This will prevent damage to the
unit due to lightning and power line surges.
14. POWER LINES
An outside antenna system should not be located in the vicinity of overhead power lines or other electric
light or power circuits, or where it can fail onto or against such power lines or circuits. When installing an
outside antenna system, extreme care should be taken to keep from touching such power lines or circuits,
as contact with them might be fatal.
15. OVERLOADING
Do not overload wall outlets and extension cords, as this can result in a risk of fire or electric shock.
16. OBJECT AND UQUID ENTRY
Do not push objects through any openings in this unit, as they may touch dangerous voltage points or short
out parts that could result in fire or electric shock. Never spill or spray any type of liquid into the unit.
17. OUTDOOR ANTENNA GROUNDING
If an outside antenna or cable system is connected to the unit, be sure the antenna or cable system is
grounded to provide some protection against voltage surges and built-up static charges, Section 810 of the
National Electrical Code (NEC), ANSl/NFPA 70, provides information with respect to proper grounding of the
mast and supporting structure, grounding of the lead-in wire to an antenna discharge unit, size of grounding
conductors, location of antenna discharge unit, connection to grounding electrodes, and requirements for
the grounding electrode.
18. SERWC_NG
Do not attempt to service this unit yourself as opening or removing covers may expose you to dangerous
vottage or other hazards. Refer all servicing to quaIified service personnel.
For example:
a. When the power-supply cord or piug is damaged.
/
b. If liquid has been spilled, or objects have failen into the unit. -_-
c. If the unit has been exposed to rain or water.
m
d. If the unit does not operate normaIly by foilowing the operating instructions. Adjust only those
controls that are covered by the operating instructions, as an improper adjustment of other controls may
result in damage and will often require extensive work by a qualified technician to restore the
unit to its normal operation.
e. If the unit has been dropped or the cabinet has been damaged.
L When the unit exhibits a distinct change Jnperformance, this indicates a need for service.
19. REPLACEMENT PARTS
When replacement parts are required, be sure the service technician uses replacement parts specified by
the manufacturer or those that have the same characteristics as the original part.
Unauthorized substitutions may resuIt in fire, electric shock or other hazards.
20. SAFETY CHECK
Upon completion of any service or repairs to this unit, ask the service technician to perform safety checks to
determine that the unit Js in proper operating condition.
21. HEAT
The product shouId be situated away from heat sources such as radiators, heat registers, stoves, or other
products (including amplifiers) that produce heat.
22. D_SCTRAY
Keep your fingers welJ clear of the disc tray as it is closing. It may cause serious personal injury.
23. CONNECTING
When you connect the product to other equipment, turn off the power and unplug aII of the equipment from
the walJ outleL Failure to do so may cause an electric shock and serious personaI injury. Read the owner's
manual of the other equipment carefully and foIJow the instructions when making any connections.
24. SOUND VOLUME
Reduce the volume to the minimum Ievel before you turn on the product. Otherwise, sudden high volume
sound may cause hearing or speaker damage.
SOUND DiSTORTiON
Do not allow the product output distorted sound for a Iongtime. It may cause speaker overheating and fire.
HEADPHONES
When you use the headphones, keep the voJume at a moderate level. If you use the headphones continu-
ously with high volume sound, it may cause hearing damage.
25.
26.
5T]0_1B
[E]p02-05 4 _ 3/8/05, 9:54 AM
IMPORTANT SAFEGUARDS/Power source
27. LASER BEAM
Do not Iook into the opening of the disc tray or ventilation opening of the product to see the source of the
laser beam. It may cause sight damage.
28. DiSC
Do not use a cracked, deformed, or repaired disc. These discs are easily broken and may cause serious
personal injury and product malfunction.
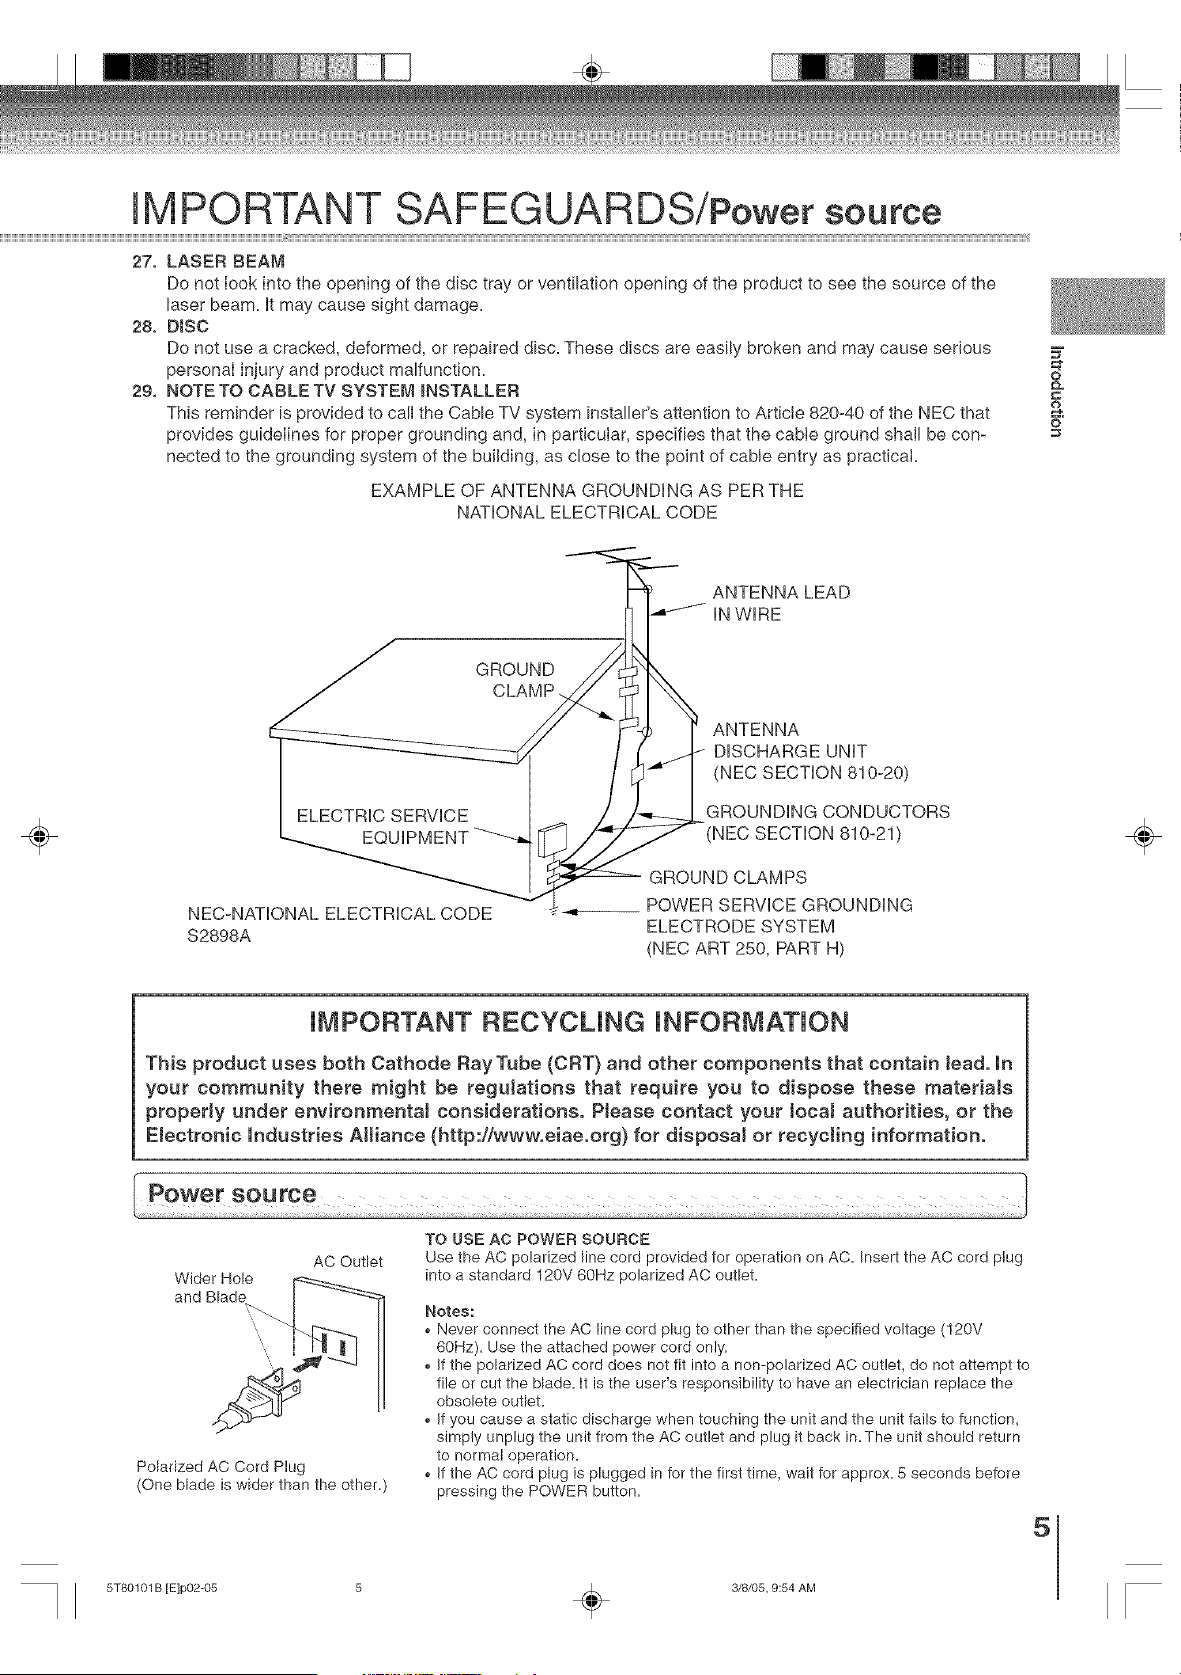
29. NOTE TO CABLE TV SYSTE_'I INSTALLER
This reminder is provided to call the Cable TV system instalbr's attention to ArtJcie 820-40 of the NEC that
provides guideIines for proper grounding and, in particular, specifies that the cable ground shah be con-
nected to the grounding system of the building, as close to the point of cable entry as practical.
EXAMPLE OF ANTENNA GROUNDING AS PER THE
NATIONAL ELECTRICAL CODE
2
O
ANTENNA LEAD
IN WIRE
÷
GROUND
CLAMP.
ELECTRIC SERVICE
NEC-NATIONAL ELECTRICAL CODE
$2898A
ANTENNA
DISCHARGE UNiT
(NEC SECTION 810-20)
GROUNDING CONDUCTORS
(NEC SECTION 810-21)
GROUND CLAMPS
__ POWER SERVICE GROUNDING
ELECTRODE SYSTEM
(NEC ART 250, PART H)
÷
iMPORTANT RECYCUNG iNFORMATiON
This product uses both Cathode Ray Tube (CRT} and other components that contain bad. in
your community there might be regulations that require you to dispose these materials
property under environrnentaJ considerations. PJease contact your locaJ authorities, or the
EJectronic industries AJtiance (http://www.eiae.org) for disposaJ or recycling information.
AC Outlet
Wider Hole i___
Polarized AC Cord Plug
(One blade is wider than the other.)
TO USE AC POWER SOURCE
Use the AC polarized line cord provided for operation on AC. Insert the AC cord plug
into a standard 120V 60Hz polarized AC outlet.
Notes:
* Never connect the AC line cord plug to other than the specified voltage (120V
60Hz). Use the attached power cord only.
, Jfthe polarized AC cord does not fit into a non-polarized AC outlet, do not attempt to
file or cut the blade, it is the user's responsibility to have an electrician replace the
obsolete outlet.
, Jfyou cause a static discharge when touching the unit and the unit fails to function,
simply unplug the unit from the AC outlet and plug it back in.The unit should return
to normal operation.
, Jfthe AC cord plug is plugged in for the first time, wait for approx. 5 seconds before
pressing the POWER button.
5
5T80101 B [E]p02-05 5 _ 3/8/05, 9:54 AM
÷
[] When shipping the unit, the original shipping carton
and packing materials come in handy. For maximum
protection, repack the unit as it was originally packed
at the factory.
[] Do not use volatile liquids, such as insect spray, near
the unit. Do not leave rubber or plastic products in
contact with the unit for a long time. They will leave
marks on the finish.
[] The top and rear panels of the unit may become
warm after a long period of use. This is not a
malfunction.
[] When the unit is not in use, be sure to remove the disc
and the video cassette turn off the power.
[] If you do not use the unit for a long period, the unit
may not function properly in the future. Turn on and
use the unit occasionally.
[] Place the unit on a leve! surface. Do not use it on a
shaky or unstable surface such as a wobbling table or
inclined stand. The loaded disc or the video tape may
come off the proper position and cause damage to
the unit.
[] When you place this unit near a TV, radio, or VCR,
the playback picture may become poor and the sound
may be distorted, in this case, place the unit away
from the TV, radio or VCR.
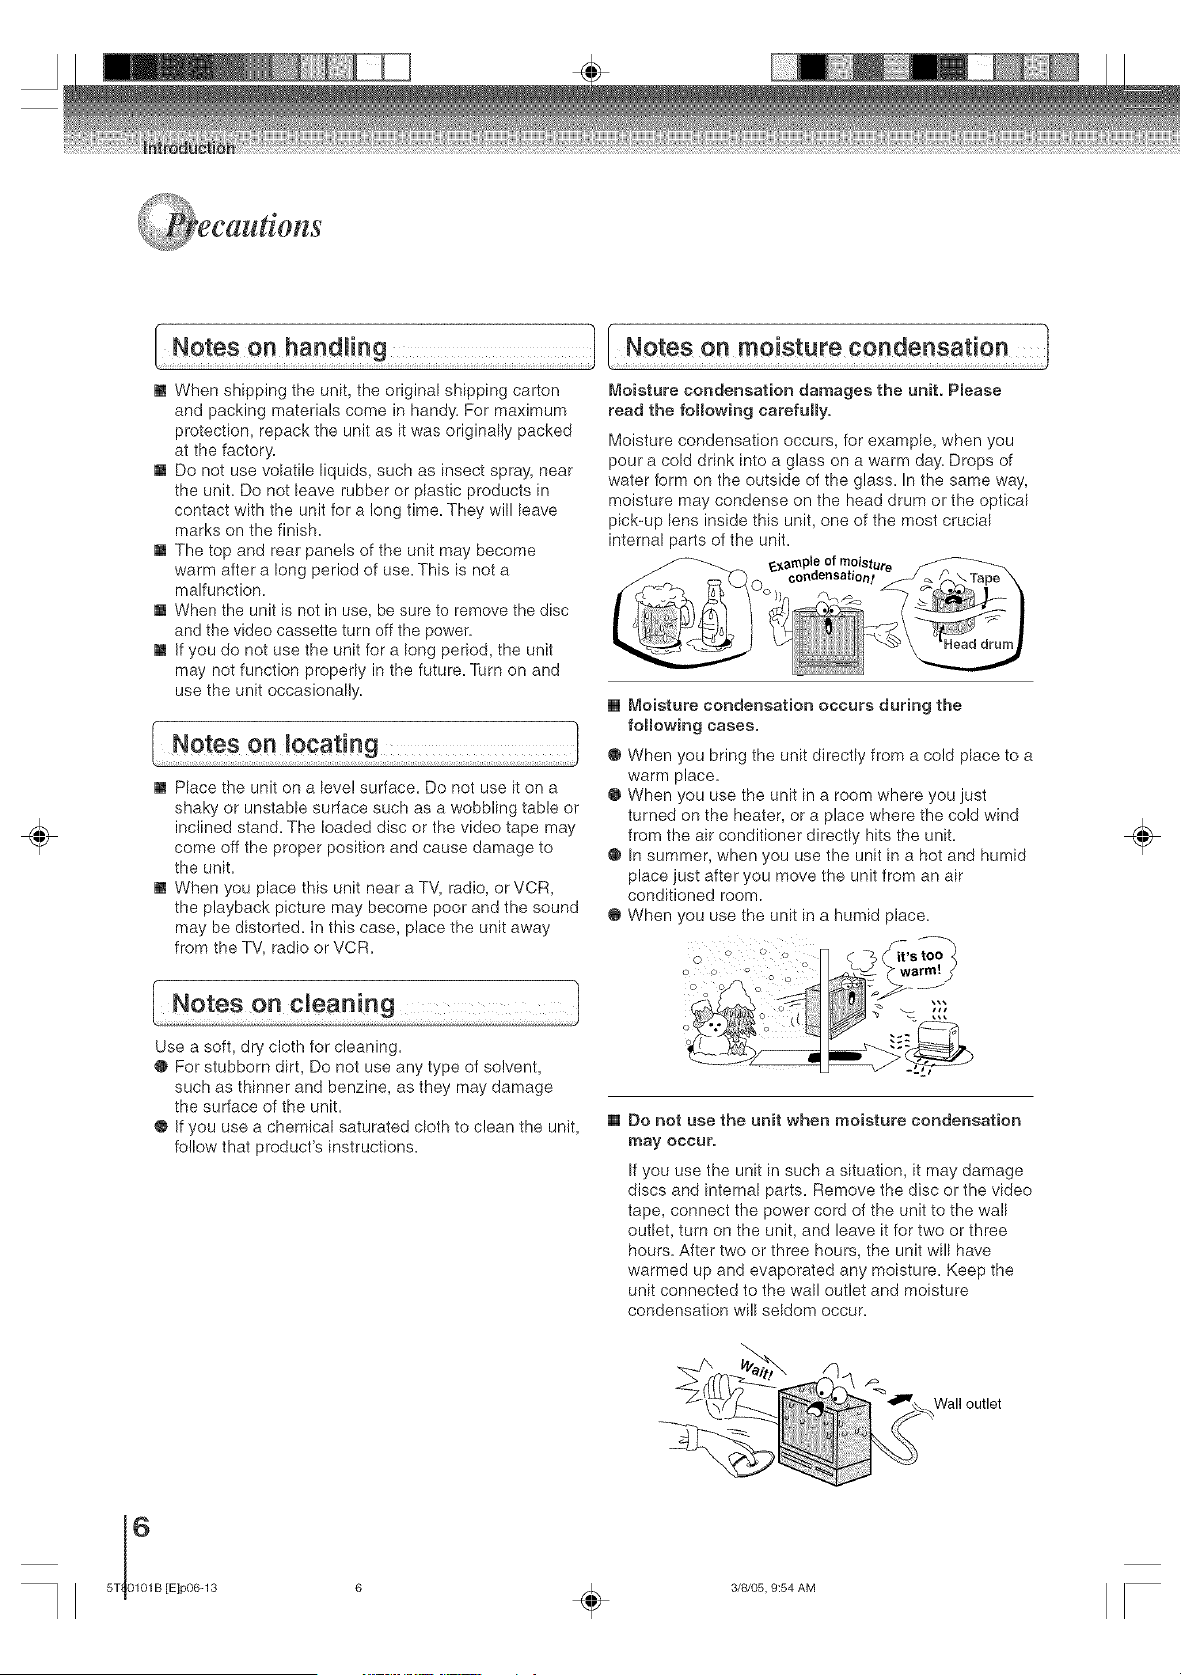
Moisture condensation damages the unit. Please
read the following carefully.
Moisture condensation occurs, for example, when you
pour a cold drink into a glass on a warm day. Drops of
water form on the outside of the glass. In the same way,
moisture may condense on the head drum or the optical
pick-up lens inside this unit, one of the most crucial
internal parts of the unit.
_,ample
[] Moisture condensation occurs during the
following cases.
@ When you bring the unit directly from a cold place to a
warm place.
@ When you use the unit in a room where you just
turned on the heater, or a place where the cold wind
from the air conditioner directly hits the unit.
@ In summer, when you use the unit in a hot and humid
place just after you move the unit from an air
conditioned room.
@ When you use the unit in a humid place.
÷
Use a soft, dry cloth for cleaning.
@ For stubborn dirt, Do not use any type of solvent,
such as thinner and benzine, as they may damage
the surface of the unit.
@ If you use a chemical saturated cloth to clean the unit,
follow that product's instructions.
[] Do not use the unit when moisture condensation
may occur.
If you use the unit in such a situation, it may damage
discs and internal parts. Remove the disc or the video
tape, connect the power cord of the unit to the wall
outlet, turn on the unit, and leave it for two or three
hours. After two or three hours, the unit will have
warmed up and evaporated any moisture. Keep the
unit connected to the wall outlet and moisture
condensation will seldom occur.
f_
Wall outlet
[E]p06-13 6 _ 3/8/05, 9:54 AM

÷
introduction
SEFETY PRECAUTHONS ................................ 2
HMPORTANT SAFEGUARDS ........................... 3
Precautions ...................................................... 6
Contents ........................................................... 7
Notes and information ...................................... 8
identification of controls ................................. 11
Connections
Antenna connections ...................................... 14
Cable TV connections .................................... 15
Connecting to optional equipment .................. 16
Basic setup
Starting setup ................................................. 19
CHocksetting ................................................... 20
Setting the Hanguage ...................................... 23
TV/VCR operation status ............................... 23
TV operation
TV operation ................................................... 24
CHosedcaptions .............................................. 26
To memorize channels ................................... 27
Setting the \/oChip .......................................... 28
To set the on timer .......................................... 30
To set the off timer .......................................... 31
Picture control adjustment .............................. 32
Adjusting the picture preference .................... 32
Sound control adjustment .............................. 33
Stereo and Second Audio Program (SAP) ..... 33
P_ayback (VCR)
Loading and unHoading a cassette tape ......... 34
Cassette tape pHayback .................................. 35
SpeciaHpHayback ............................................ 36
Convenient function ....................................... 37
Recording (VCR)
Recording a TV program ................................ 39
One-touch Timer Recording (OTR) ................ 40
Timer recording .............................................. 41
Other functions (VCR)
Duplicating a video tape ................................. 43
Recording a DVD/CD disc .............................. 44
Basic p_ayback (DVD)
PHayinga disc ................................................. 45
Advanced p_ayback (DVD)
Zooming ......................................................... 48
Locating desired scene .................................. 48
Repeat pHayback ............................................. 49
AoB Repeat pHayback...................................... 49
Program pHayback .......................................... 50
Random pHayback........................................... 50
Changing angles ............................................ 51
TitHeselection ................................................. 51
DVD menu ...................................................... 51
Changing soundtrack Hanguage ..................... 52
SubtitHes ......................................................... 52
Disc status ...................................................... 53
To turn off the PBC ........................................ 53
MP3/WMA/JPEG operation ............................ 54
Function setup (DVD)
Customizing the function settings .................. 57
Temporary disabling of rating HeveHby
DVD disc ........................................................ 62
Others
Language code Mist......................................... 63
Reception disturbances .................................. 64
Troubleshooting ............................................. 65
Specifications ................................................. 67
Limited warranty ............................................. 68
0
÷
7
5T80101 B [E]p06-13 7 _ 3/8/05, 9:54 AM
_,_ tes and Information
÷
[o.,a°,J ° sc l
O Do not touch the playback side of the disc
Playback side
O Do not attach paper or tape to discs
X
@ Fingerprints and dust on the disc cause picture and
sound deterioration Wipe the disc from the center
outwards with a soft cloth Always keep the disc
clean
@ Do not use any type of solvent such as thinner,
benzine, commercially available cleaners or antistatic
spray for vinyl LPs It may damage the disc
@ Do not store discs in a place subject to direct sunlight
or near heat sources
@ Do not store discs in places subject to moisture and
dust such as a bathroom or near a humidifier
@ Store discs vertically in a case Stacking or placing
objects on discs outside of their case may cause
warping
contents
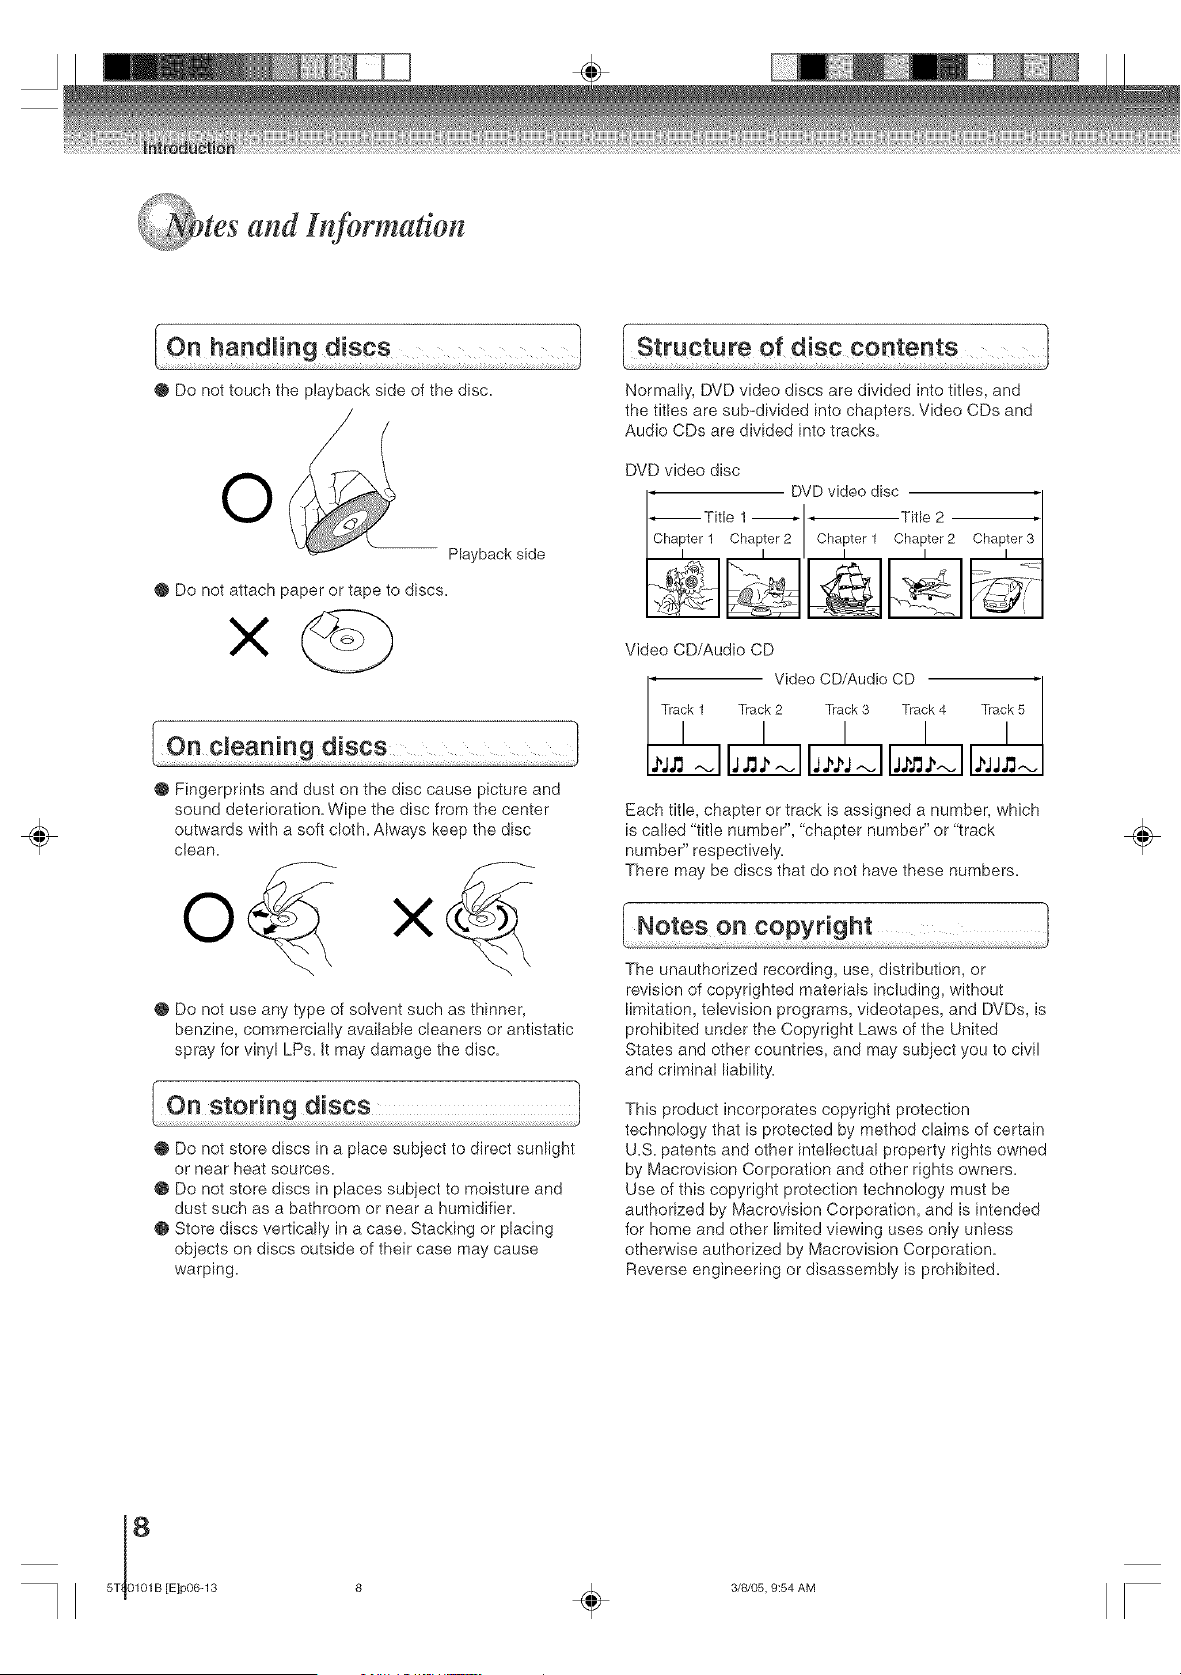
Normally, DVD video discs are divided into titles, and
the titles are sub-divided into chapters Video CDs and
Audio CDs are divided into tracks
DVD video disc
DVD video disc '1
--Title 1 '1' T,tle 2 '-
Chapter1 ChapleI2 I Chaptell Chapter2
Video CD/Audio CD
, Video CD/Audio CD '1
Track 1 Track2 Track 3 Track4
/ / I I
J I
Each title, chapter or track is assigned a number, which
is called "title number", "chapter number" or "track
number" respectively
There may be discs that do not have these numbers
The unauthorized recording, use, distribution, or
revision of copyrighted materials including, without
limitation, television programs, videotapes, and DVDs, is
prohibited under the Copyright Laws of the United
States and other countries, and may subject you to civil
and criminal liability
This product incorporates copyright protection
technology that is protected by method claims of certain
US patents and other intellectual property rights owned
by Macrovision Corporation and other rights owners
Use of this copyright protection technology must be
authorized by Macrovision Corporation, and is intended
for home and other limited viewing uses only unless
otherwise authorized by Macrovision Corporation
Reverse engineering or disassembly is prohibited
÷
[E]p06-13 8 _ 3/8/05, 9:54 AM
÷
This owner's manual explains the basic instructions of
this unit. Some DVD video discs are produced in a
manner that allows specific or limited operation during
playback. As such, the unit may not respond to all
operating commands. This is not a defect in the unit.
Refer to instruction notes of discs.
_ [i may appear on the TV screen during operation.
A" _ "means that the operation is not permitted by the
unit or the disc.
For example, sometimes it is unable to stop the
playback of copyright message of the disc when the
STOP (_) button is pressed. Alternatively, the" _ "
may also indicate that the feature is not available for the
disc.
The region number of this unit is 1. Jf region numbers,
which stand for their playable area, are }tinted on your
DVD video disc and you do not find I, disc
playback will not be allowed by the In this case,
the unit will display a message on-screen.}
This DVD supports Video CDs equipped with the PBC
(Version 2.0) function. (PBC is the abbreviation of
Playback Control.) You can enioy two playback
variations depending on types of discs.
_, Video CD not equipped with PBC function
(Version !.1)
Sound and movie can be played on this DVD in the
same way as an audio CD.
_, Video CD equipped with PBC function
(Version 2.0)
In addition to operation of a Video CD not equipped
with the PBC function, you can enjoy playback of
interactive software with search function by using the
menu displayed on the TV screen (Menu Playback).
Some of the functions described in this owner's
manual may not work with some discs.
This unit can play the following discs.
Disc Maximum
Disc Mark Contents Size playback time
12 cm
Approx.4 hours
(single sided disc)
Audio Approx.8 hours
+ (doublesideddisc
DVD v I D I_O Video
video (moving
discs _ pictures) Approx,80 minutes
(singlesideddisc)
8cm
Approx. 160minute_
(double sided disc
CDs
IDIGITALVlDEOt (moving
pictures)
12 cm Approx, 74 minutes
8 cm Approx. 20 minutes
,oo,o
CDs
DIGITAL AUDIO
12 cm
Audio
8 cm
(CD
single}
Approx, 74 minutes
Approx, 20 minutes
The following discs are also available.
@ DVD-R/RW discs of DVD video format
® CD-R/CD-RW discs of CD-DA or Video CD
@ Kodak picture CD and FUJICOLOR CD format
Some of these discs may be incompatible.
,, You cannot play discs other than those listed above.
,, You cannot play discs of DVD-RAM, DVD-ROM, Photo
CD, etc, or non standardized discs even if they may
be labeled as above.
_, Some CD-R/RWs cannot be played back depending
on the recording conditions.
,, This unit uses the NTSC color system, and cannot
play DVD video discs recorded in any other color
system (PAL, SECAM, etc.).
Because of problems and errors that can occur during the
creation of DVD software and/or the manufacture of DVD
discs, Toshiba cannot guarantee that this player will play
every feature of every DVD bearing the DVD logo. As one
of the creators of DVD technology, Toshiba DVD players
are manufactured using the highest standards of quality,
and as a result, such incompatibilities are rare. If you
happen to experience any difficulty playing a DVD on a
Toshiba DVD player, please feel free to call our Contact
listed in "How to Obtain Warranty Service" (see page 69).
9
O
&
O
÷
5T80101 B [E]p06-13 9 _ 3/8/05, 9:54 AM
tes and Information (Continued)
÷
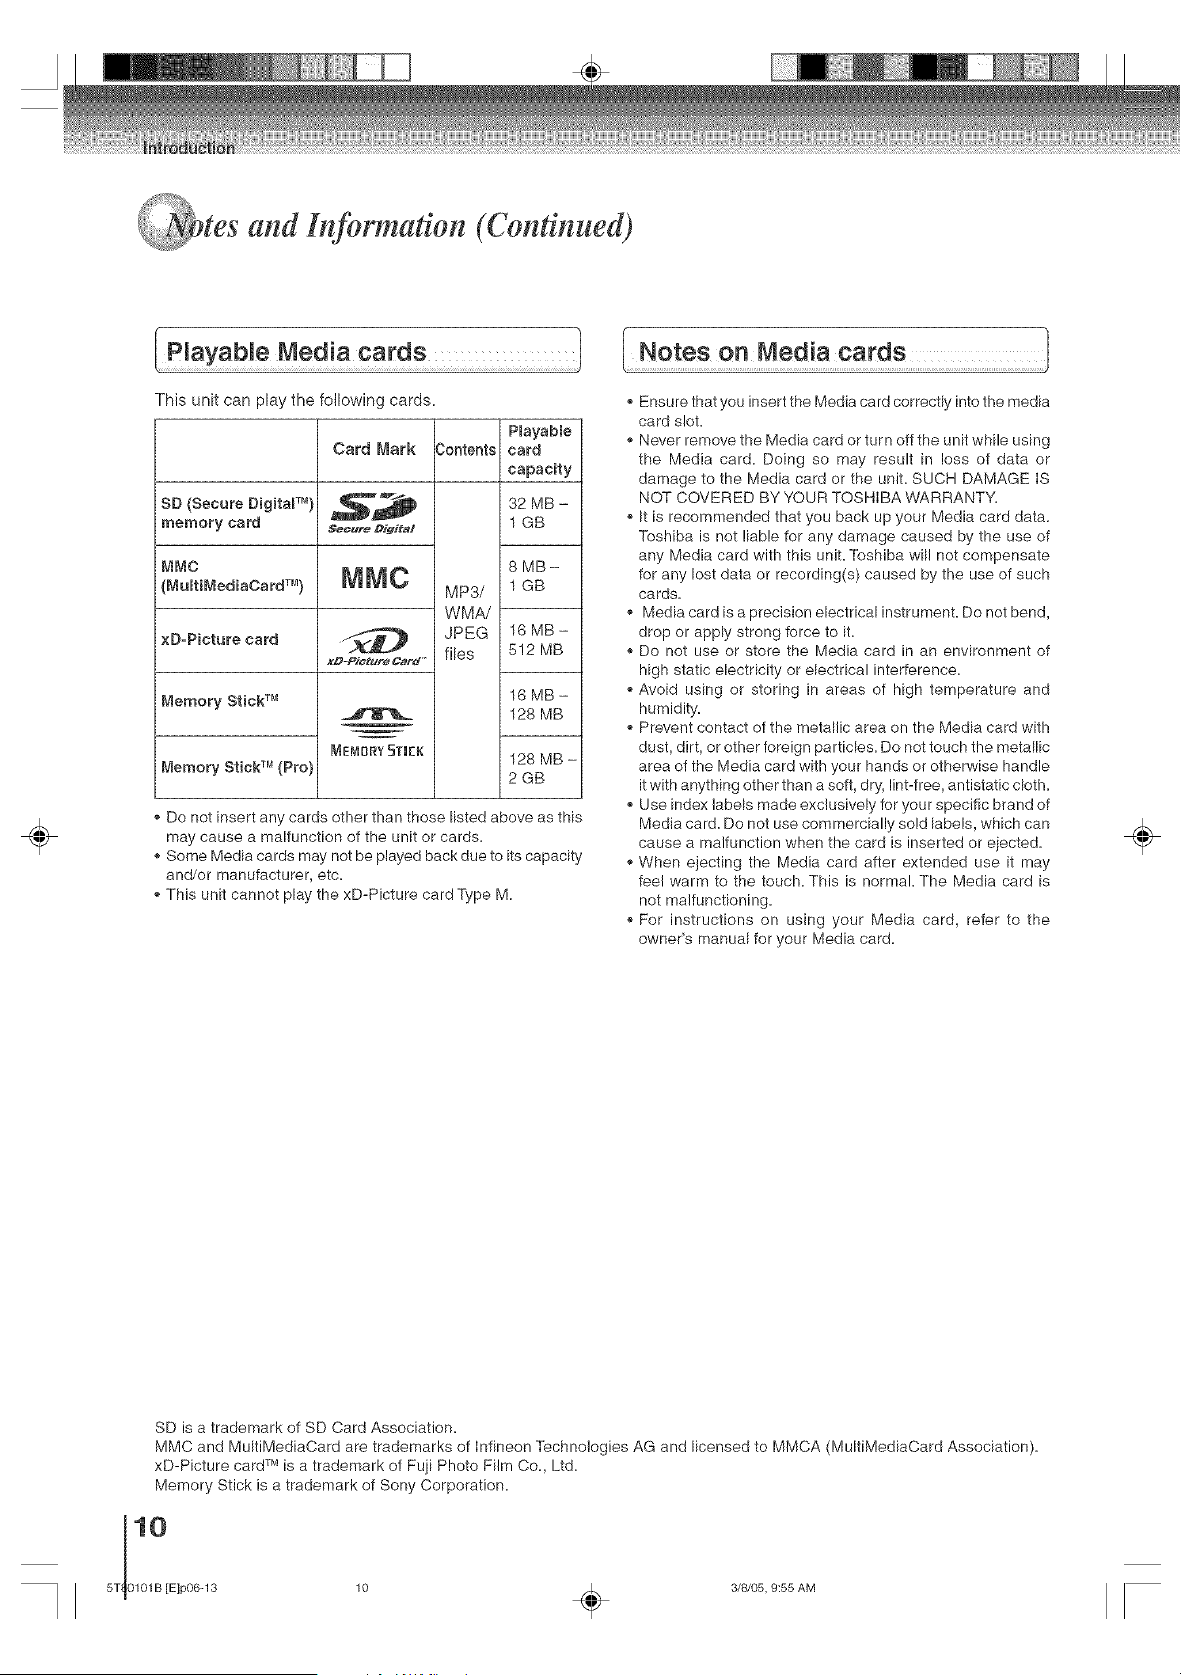
This unit can play the following cards.
SD (Secure Digita_ TM}
memory card
MMC
(MultiMediaCard TM)
xD=Picture card
Memory Stick TM
Memory Stick TM (Pro)
Card Mark 3ontents
Ne_ure DJgJ#al
MNC
MP3/
WMA/
JPEG
x#-Piettdre Card" flies
MEMBI_YSTI[K
Playable
card
capacity
32 MB -
1 GB
8 MB-
1 GB
16 MB -
5!2 MB
16 MB -
128 MB
128 MB -
2GB
Do not insert any cards other than those listed above as this
may cause a malfunction of the unit or cards.
Some Media cards ma'i not be played back due to its capacity
and/or manufacturer, etc.
This unit cannot play the xD-Picture card Type M.
Ensure that you insert the Media card correctly into the media
card slot.
Never remove the Media card or turn off the unit while using
the Media card. Doing so may result in loss of data or
damage to the Media card or the unit. SUCH DAMAGE IS
NOT COVERED BY YOUR TOSHIBA WARRANTY.
It is recommended that you back up your Media card data.
Toshiba is not liable for any damage caused by the use of
any Media card with this unit. Toshiba will not compensate
for any lost data or recording(s) caused by the use of such
cards.
Media card is a precision electrical instrument. Do not bend,
drop or apply strong force to it.
Do not use or store the Media card in an environment of
high static electricity or electrical interference.
Avoid using or storing in areas of high temperature and
humidity.
Prevent contact of the metallic area on the Media card with
dust, dirt, or other foreign particles. Do not touch the metallic
area of the Media card with your hands or otherwise handle
it with anything other than a soft, dry, lint-free, antistatic cloth.
Use index labels made exclusively for your specific brand of
Media card. Do not use commercially sold labels, which can
cause a malfunction when the card is inserted or ejected.
When ejecting the Media card after extended use it may
feel warm to the touch. This is normal. The Media card is
not malfunctioning.
For instructions on using your Media card, refer to the
owner's manual for your Media card.
÷
SD is a trademark of SD Card Association.
MMC and MultiMediaCard are trademarks of Infineon Technologies AG and licensed to MMCA (MultiMediaCard Association).
xD-Picture card TM is a trademark of Fuji Photo Film Co., Ltd.
Memory Stick is a trademark of Sony Corporation.
10
5T 0101B [E]p06-13
÷
3/8/05, 9:55 AM
÷
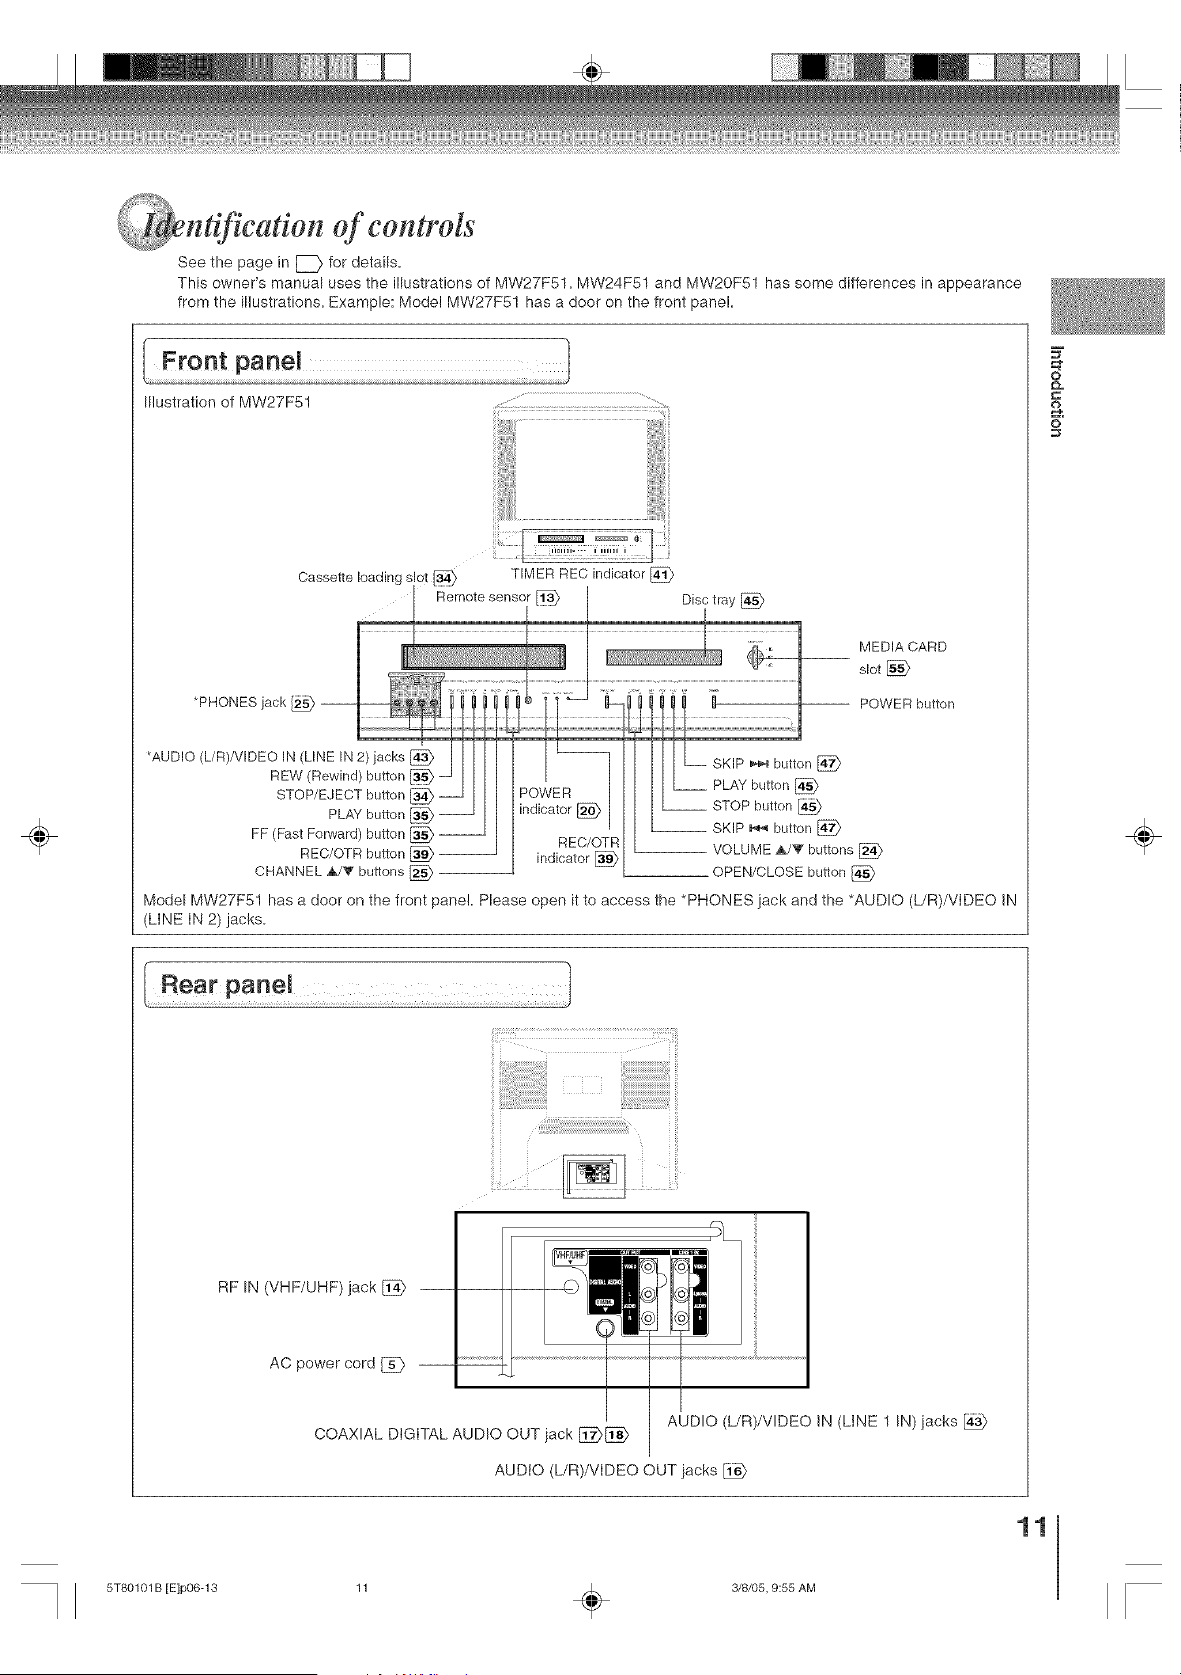
nfificatton of contrds
See the page in [_ for details.
This owner's manual uses the illustrations of MW27F51. MW24F51 and MW20F51 has some differences in appearance
from the illustrations. Example: Model MW27F51 has a door on the front panel.
Illustration of MW27F51
MEDIA CARD
slot
POWER button
FF (Fast Forward) button _ REC/OTR -- VOLUME A/V buttons [_
REC/OTR button _ -- indicator [_
CHANNEL A/V buttons _ __ OPEN/CLOSE button
Model MW27F51 has a door on the front panel. Please open it to access the *PHONES jack and the *AUDIO (L/R)/VIDEO IN
(LINE IN 2) jacks.
=C
O
÷
RF IN (VHF/UHF) jack [_>
AC power cord _ --
AUDIO (L/R)/VIDEO IN (LINE 1 IN) jacks
COAXIAL DIGITAL AUDIO OUT jack [_[_
AUDIO (L/R)/VIDEO OUT jacks
11
5T80101 B [E]p06-13 11 _ 3/8/05, 9:55 AM
of controls (Continued)
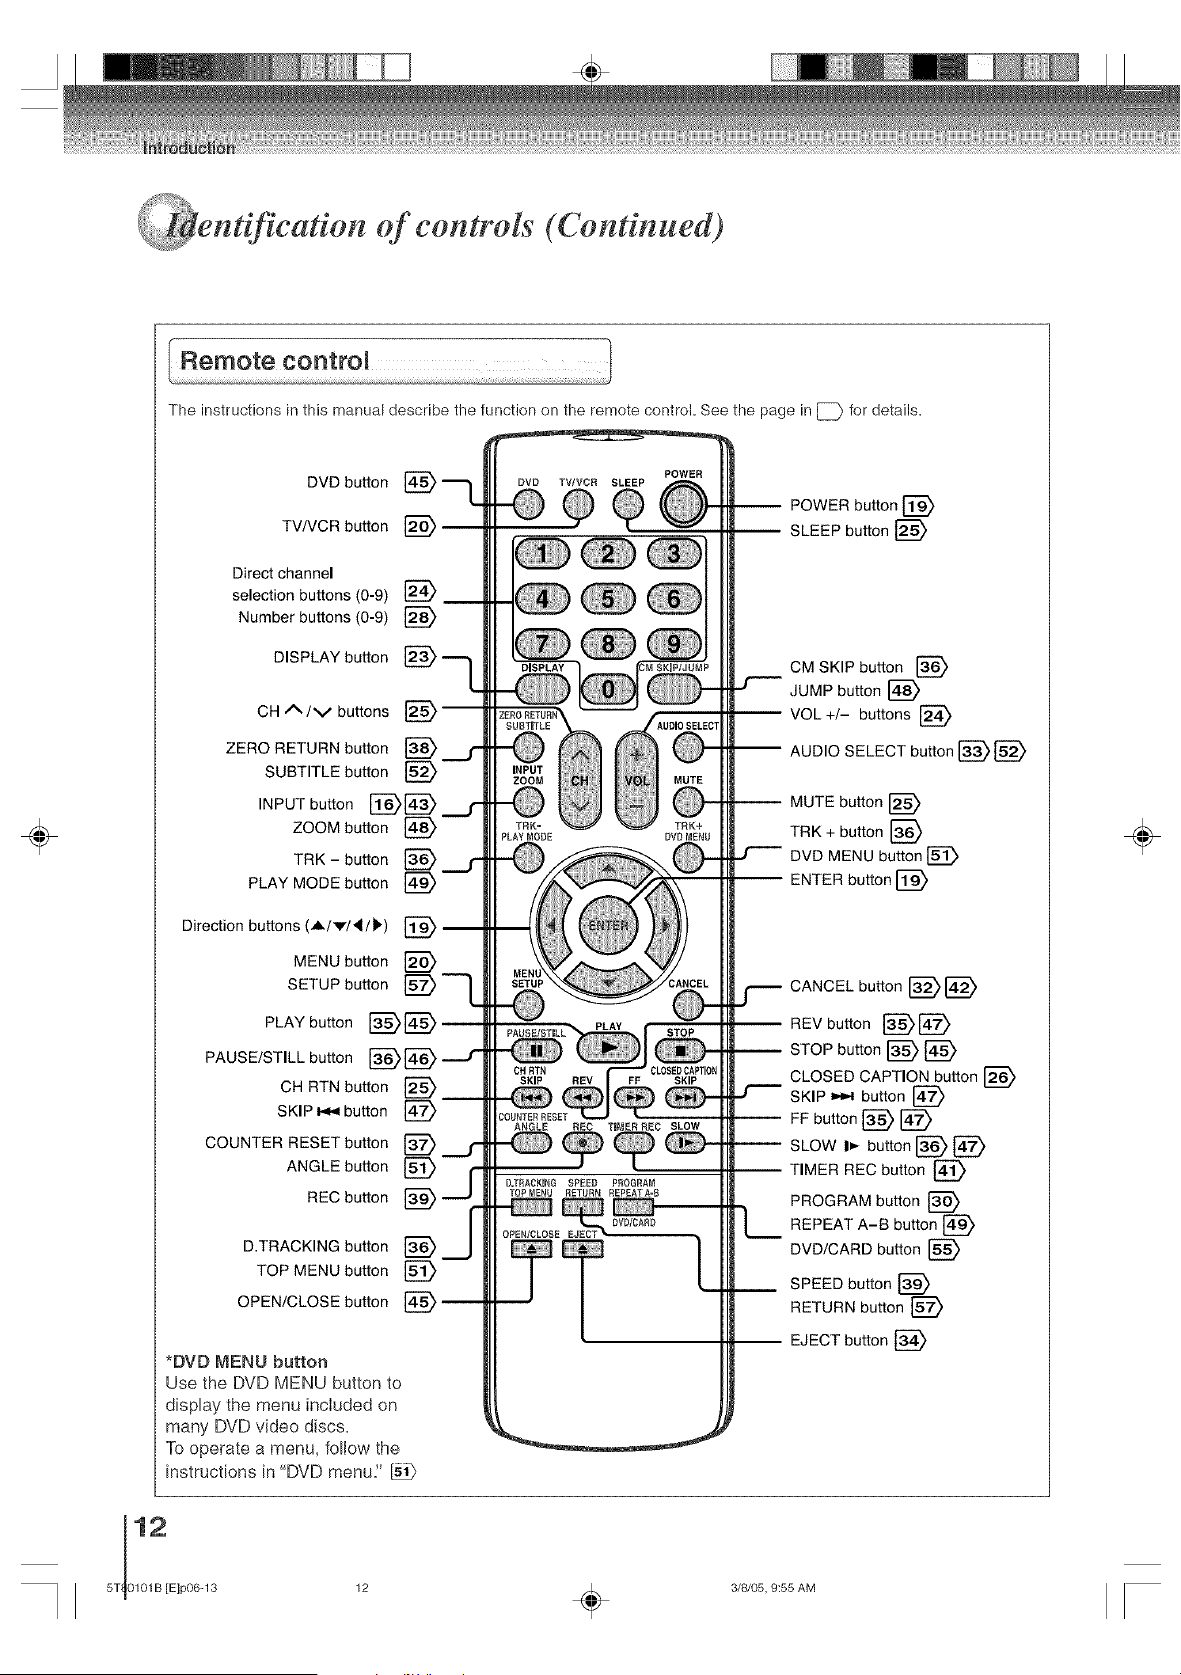
÷
The instructions in this manual describe the function on the remote control. See the page in [_ for details.
DVD button
TVNCR button
Direct channel
selection buttons (0-9)
Number buttons (0-9) [_
DISPLAY button
CH/_/v buttons
ZERO RETURN button [_
SUBTITLE button
INPUT button [_[_
ZOOM button
TRK - button L_ ___,r
PLAY MODE button
Direction buttons (A/v/_/b) [_
MENU button [_
SETUP button [_"--1_
PLAY button
PAUSE/STILL button
CH RTN button [_
SKIP _ button
COUNTER RESET button [_
D
ANGLE button
REC button _
D.TRACKING button L_--
TOP MENU button
OPEN/CLOSE button [_
*DVD MENU button
Use the DVD MENU button to
display the menu included on
many DVD video discs=
To operate a menu, follow the
instructions in "DVD menu."
PLAYMOOE
COURTER RESET
ANGLE REO
D,TRACKmRG SPEED PROGRAM
TOPMENU RETURN EEPEATA=8
OVU/CARO L_
[
POWER button [_
SLEEP button [_
CM SKIP button [_
JUMP button [_
VOL +/- buttons [_
-- AUDIO SELECT button [_[_
MUTE button [_
TRK + button [_
DVD MENU button []_
ENTER button [_
CANCEL button [_
REV button [_[_
STOP button [_ [_
CLOSED CAPTION button
SKIP _ button
FF button [_ [_
SLOWt,- buttonI_ [_
TIMER REC button [_
PROGRAM button [_
REPEAT A-B button [_
DVD/CARD button [_
SPEED button [_
RETURN button [_
EJECT button [_
÷
3/8/05, 9:55 AM
÷
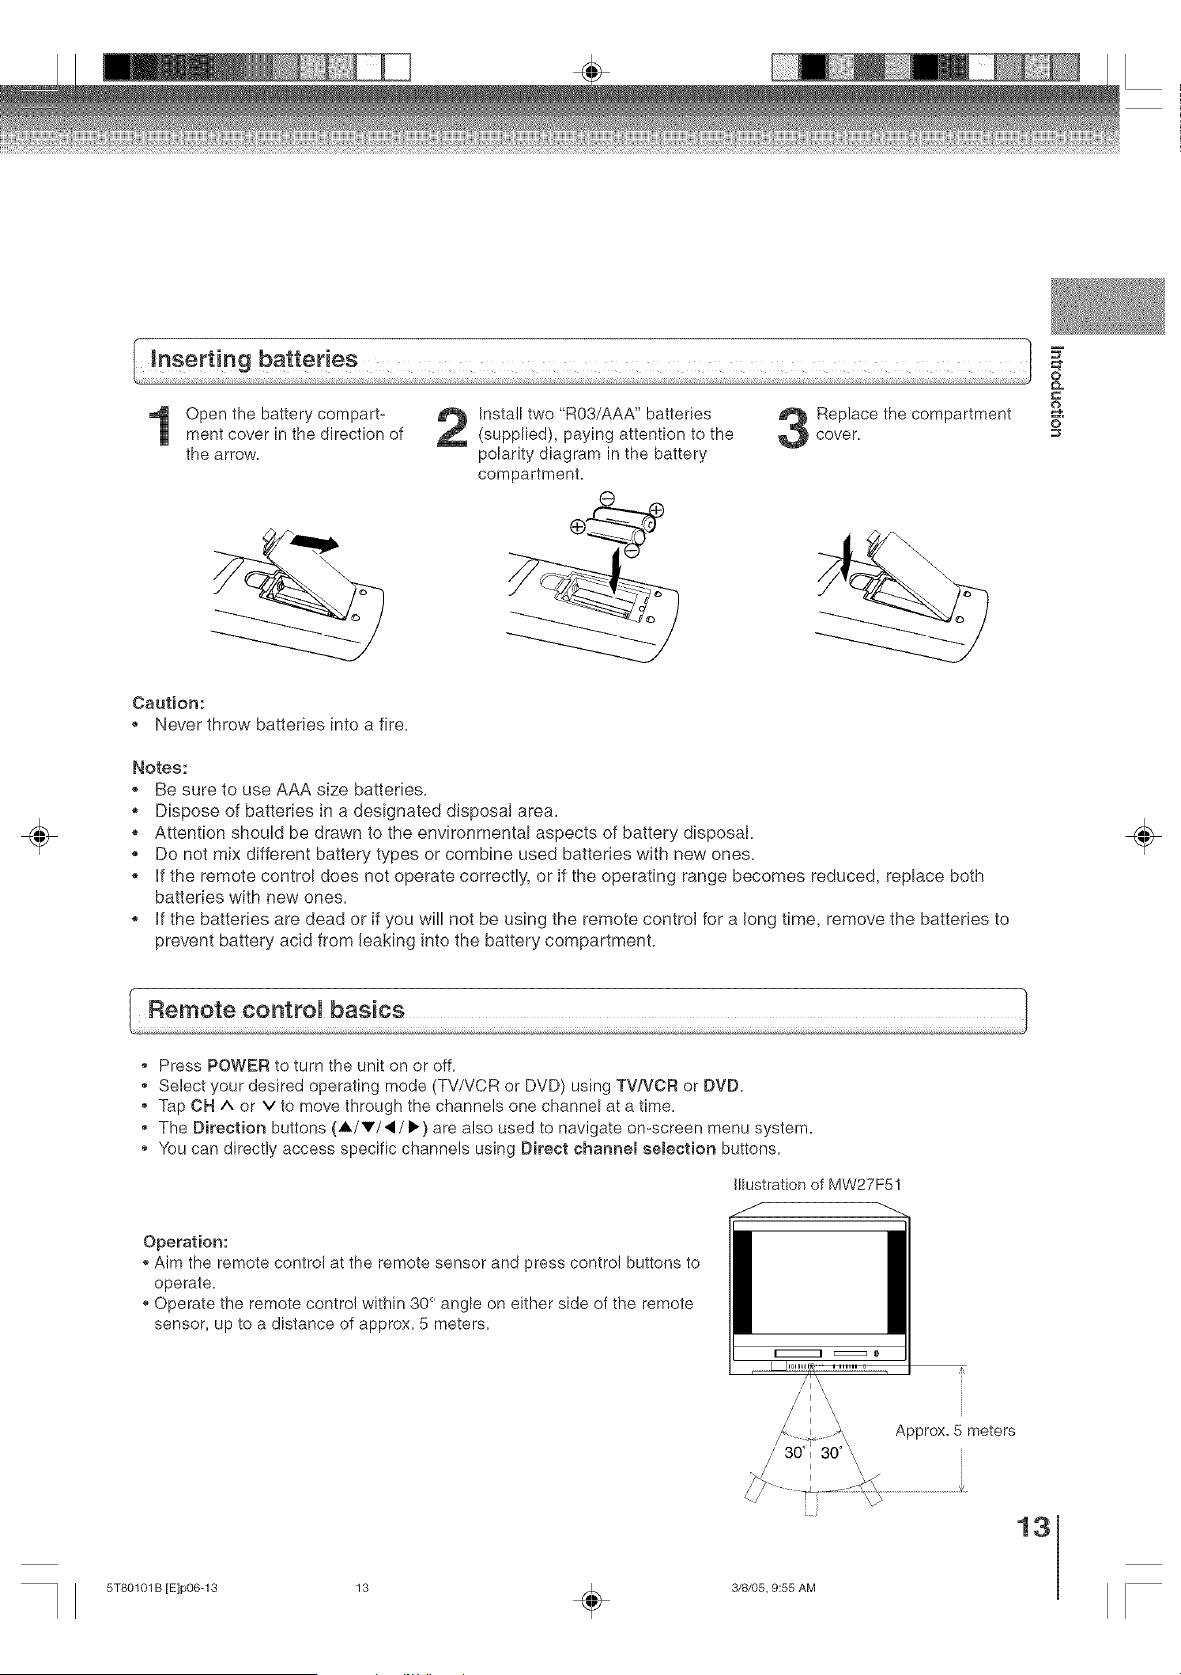
Open the battery compart-
ment cover in the direction of
the arrow,
Install two "R03/AAA" batteries
(supplied), paying attention to the
polarity diagram in the battery
compartment.
=C
Replace the compartment o
O
cover.
÷
Caution:
o Never throw batteries into a fire,
Notes:
,, Be sure to use AAA size batteries.
o Dispose of batteries in a designated disposal area.
o Attention should be drawn to the environmental aspects of battery disposal.
,, Do not mix different battery types or combine used batteries with new ones.
,, if the remote control does not operate correctly, or if the operating range becomes reduced, replace both
batteries with new ones.
o if the batteries are dead or if you will not be using the remote control for a long time, remove the batteries to
prevent battery acid from leaking into the battery compartment.
÷
,, Press POWER to turn the unit on or off.
Select your desired operating mode (TV/VCR or DVD) using TVA,'CR or DVD.
,, Tap ON ^ or v to move through the channels one channel at a time.
,, The Direction buttons (A/V/_I/_.) are also used to navigate on-screen menu system.
,, You can directly access specific channels using Direct channel semection buttons.
INustration of MW27F51
Operation:
,, Aim the remote control at the remote sensor and press control buttons to
operate.
,, Operate the remote control within 30 ° angle on either side of the remote
sensor, up to a distance of approx. 5 meters.
/I I \\
i I I \
/ I \
I i \\
/' 30 _ 30 \\
Approx. 5 meters
13
5T80101 B [E]p06-13 13 _ 3/8/05, 9:55 AM
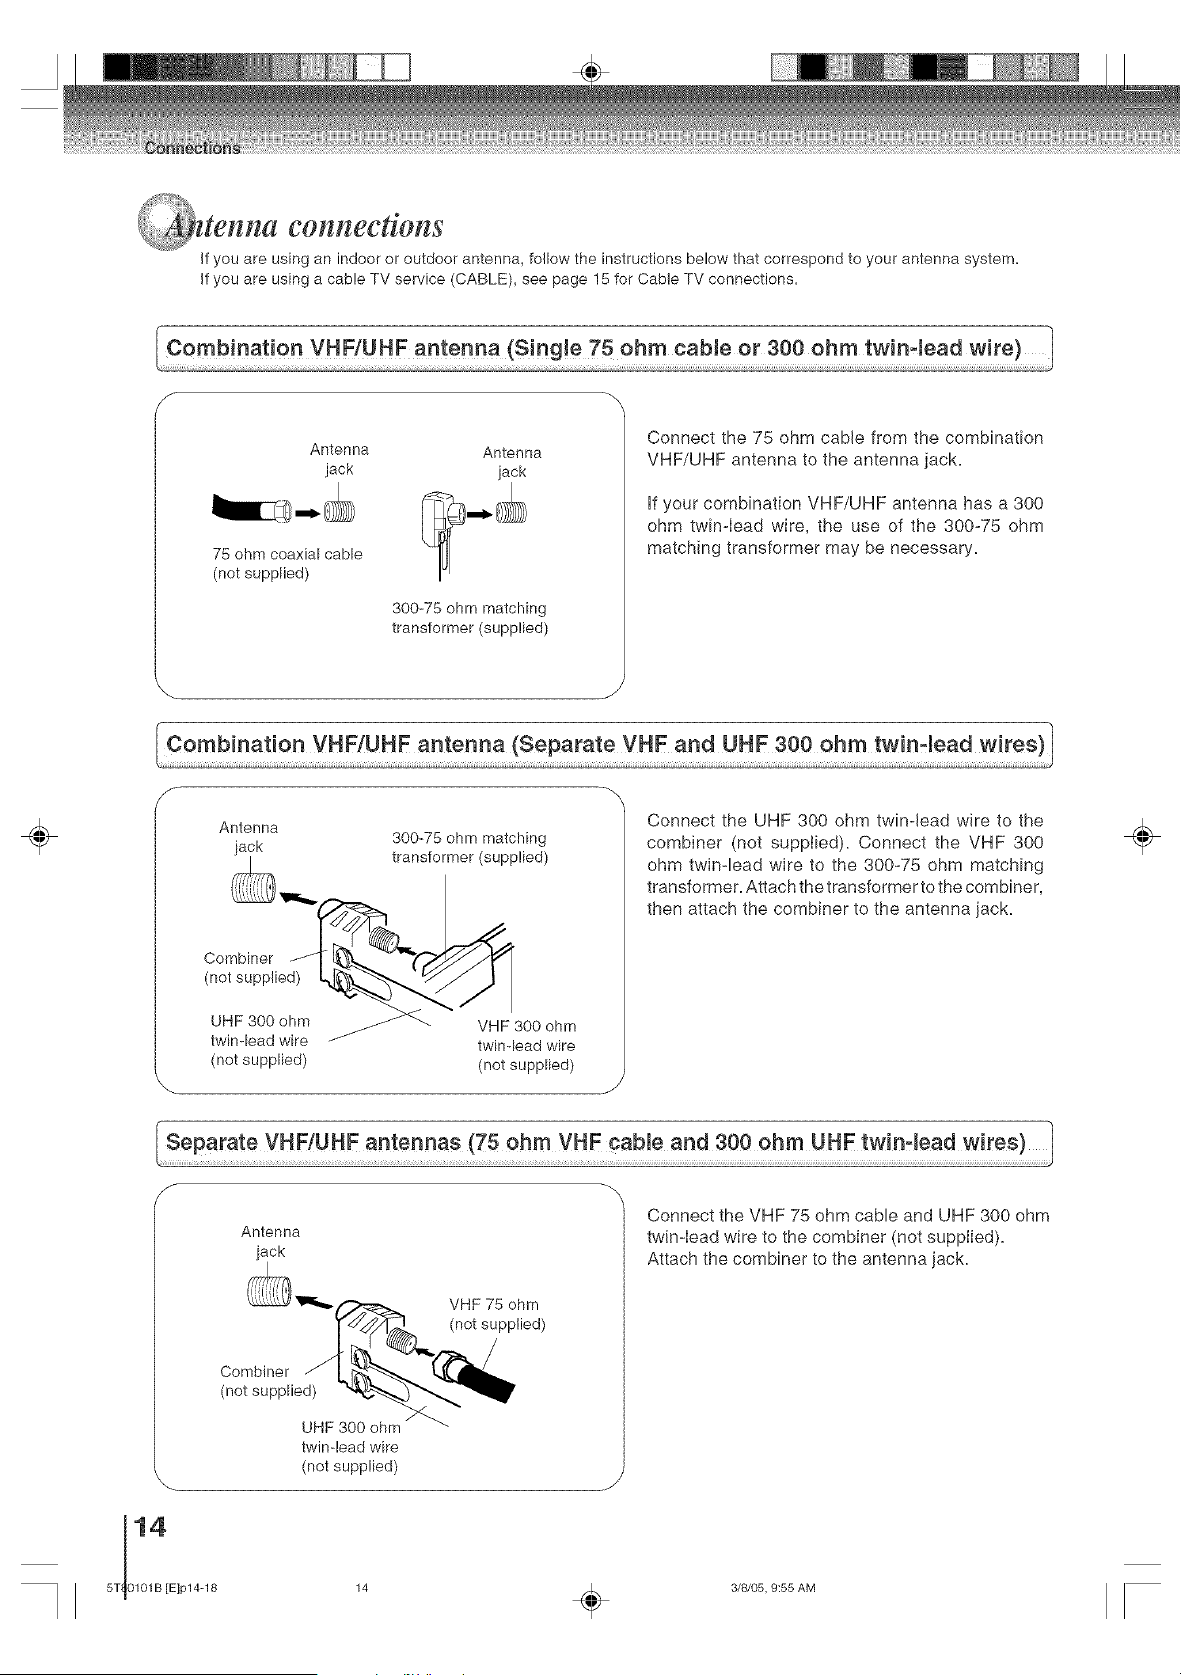
tenna connections
Jfyou are using an indoor or outdoor antenna, follow the instructions below that correspond to your antenna system.
If you are using a cable TV service (CABLE), see page 15 for CableTV connections.
Antenna Antenna
jack jack
75 ohm coaxial cable
(not supplied)
300-75 ohm matching
transformer (supplied)
Connect the 75 ohm cable from the combination
VHF/UHF antenna to the antenna jack.
if your combination VHF/UHF antenna has a 300
ohm twin-Iead wire, the use of the 300-75 ohm
matching transformer may be necessary.
÷
Antenna
jack 300-75 ohm matching
transformer (supplied)
(not supplied) (not supplied)
Connect the UHF 300 ohm twinqead wire to the
combiner (not supplied). Connect the VHF 300
ohm twin-lead wire to the 300-75 ohm matching
transformer. Attach the transformer to the combiner,
then attach the combiner to the antenna jack.
÷
5T 0101B [E]p14-18
Antenna
jack
twin-lead wire
(not supplied)
Connect the VHF 75 ohm cable and UHF 300 ohm
twin-Iead wire to the combiner (not suppiied).
Attach the combiner to the antenna jack.
14 _ 3/8/05, 9:55 AM
_i!i__ .?_!i{_i_
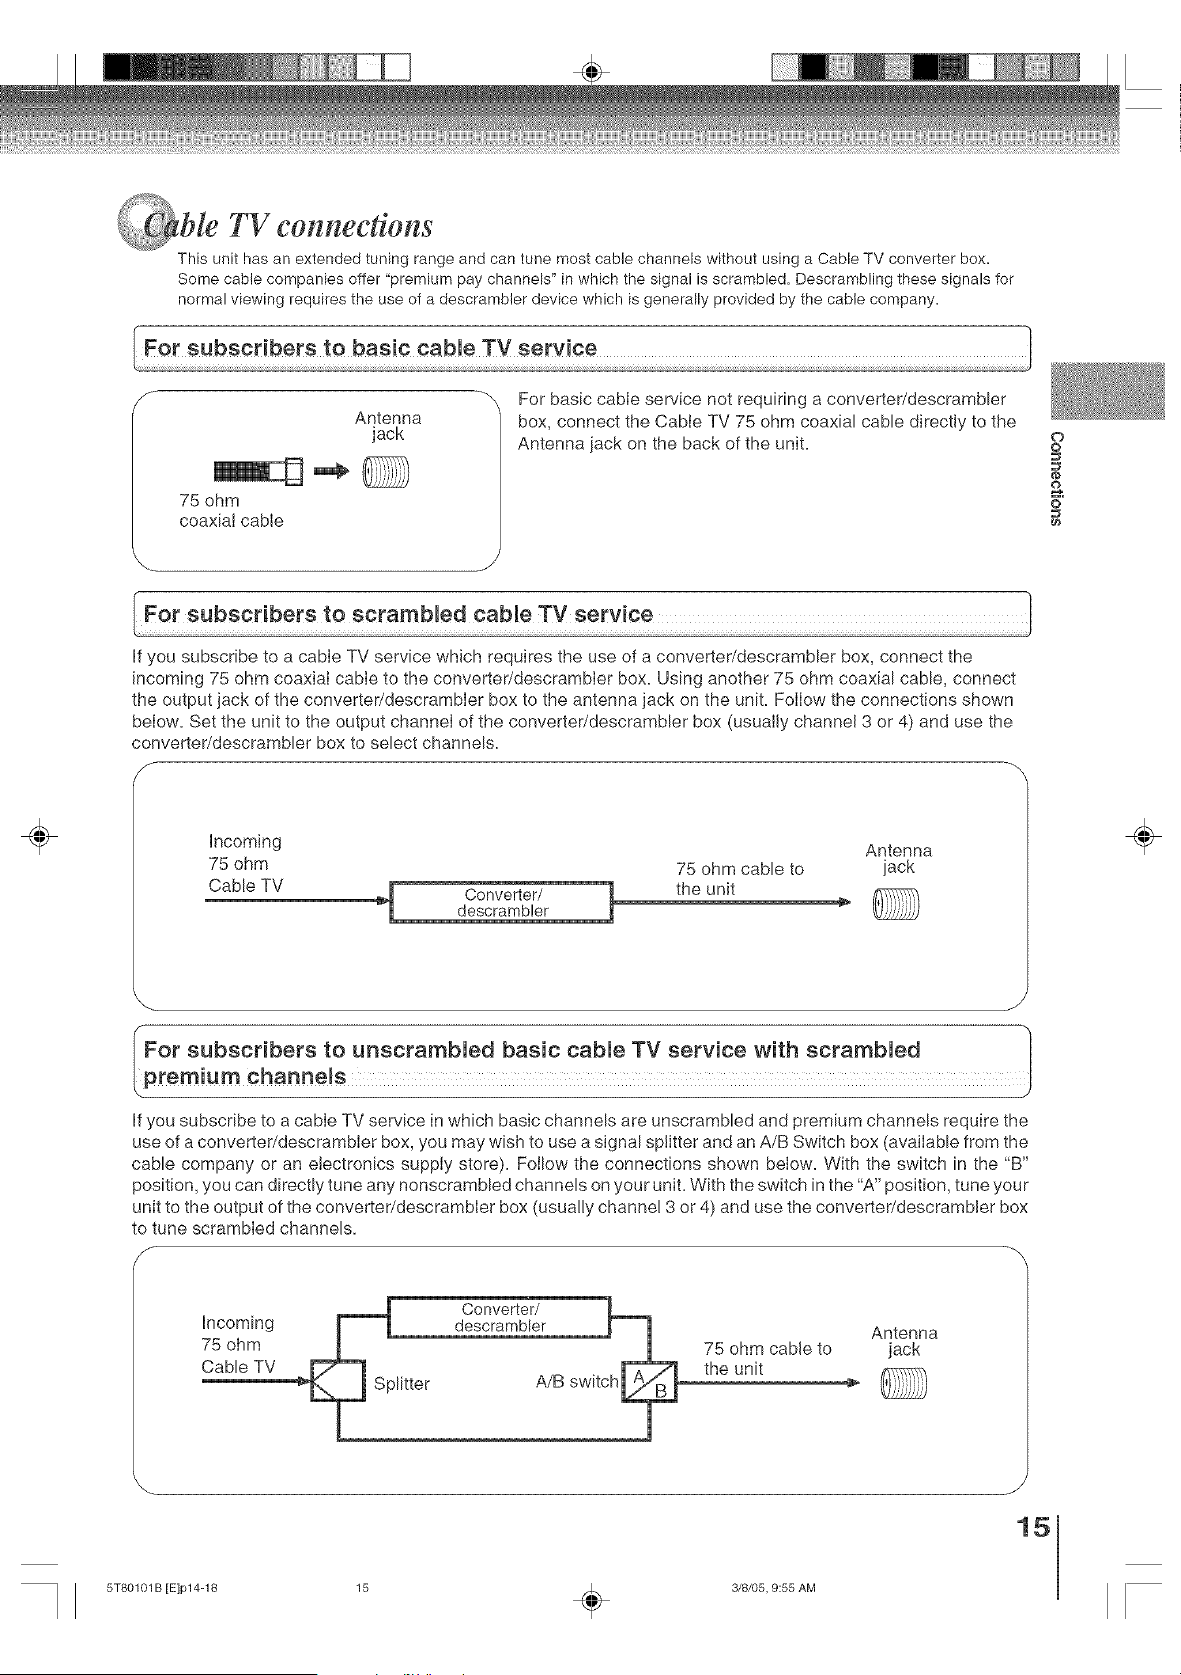
ble TV connecdons
This unit has an extended tuning range and can tune most cable channels without using a Cable TV converter box.
Some cable companies offer "premium pay channels" in which the signal is scrambled. Descrambling these signals for
normal viewing requires the use of a descrambler device which is generally provided by the cable company.
Antenna
jack
75 ohm
coaxial cable
.. J
_" For basic cable service not requiring a converter/descrambler
box, connect the Cable TV 75 ohm coaxial cable directly to the
Antenna jack on the back of the unit.
O
O
o
O
÷
If you subscribe to a cable TV service which requires the use of a converter/descrambler box, connect the
incoming 75 ohm coaxial cable to the converter/descrambIer box. Using another 75 ohm coaxial cable, connect
the output jack of the converter/descrambler box to the antenna jack on the unit. Follow the connections shown
below. Set the unit to the output channel of the converter/descrambler box (usually channel 3 or 4) and use the
converter/descrambler box to select channels.
f
Incoming Antenna
75 ohm 75 ohm cable to iack
Cable TV 4 Converter/ 1 the unit
descrambler '_
÷
For subscribers to unscrambled basic cable TV service with scrambled
premium channels
If you subscribe to a cable TV service in which basic channels are unscrambled and premium channels require the
use of a converteddescrambler box, you may wish to use a signal splitter and an A/B Switch box (available from the
cable company or an electronics supply store). Follow the connections shown below. With the switch in the "B"
position, you can directly tune any nonscrambled channels on your unit. With the switch in the "A" position, tune your
unit to the output of the converter/descrambler box (usually channel 3 or 4) and use the converteddescrambler box
to tune scrambled channels.
f
Incoming Antenna
75 ohm 75 ohm cable to jack
Cable TV the unit
J
15
5T80101B [E]p14-18 15 _ 3/8/05, 9:55 AM
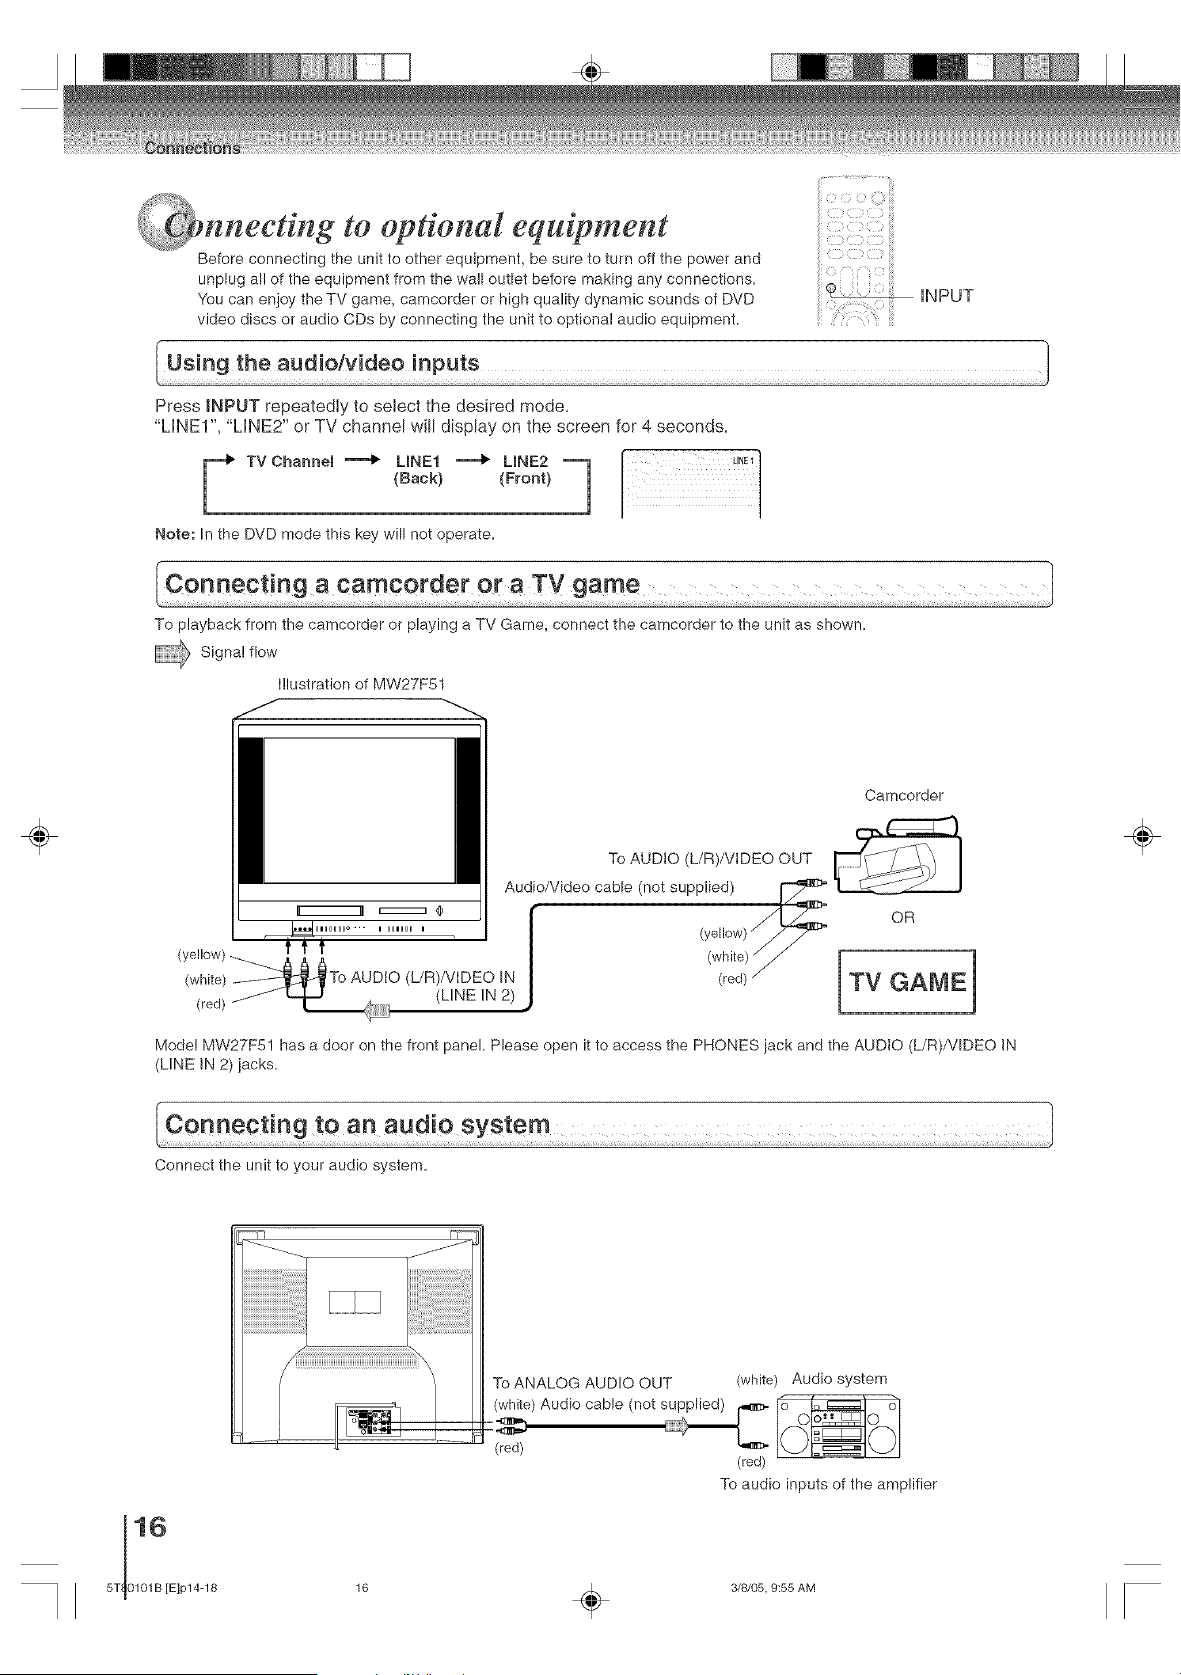
nnedlng to epdona[ equipment
Before connecting the unit to other equipment, be sure to turn off the power and
unplug all of the equipment from the wall outlet before making any connections.
You can enjoy theTV game, camcorder or high quality dynamic sounds of DVD
video discs or audio CDs by connecting the unit to optional audio equipment.
iNPUT
Press INPUT repeatedly to select the desired mode.
"LINE1", "LINE2" or TV channel will display on the screen for 4 seconds.
F TV Channel .........4_LINE1 """""_ LINE2 "-1
(Hack) (Front)
1
Note: In the DVD mode this key will not operate.
To playback from the camcorder or playing a TV Game, connect the camcorder to the unit as shown.
_ Signa! flow
i!lustration of MW27F51
÷
Camcorder
To AUDIO (L/R)/VIDEO OUT
Audio/Video cable (not supplied)
_® (yell°w} "_/7"_
i HIHU I
(yellow)-_ j& _ _ (white)/j
(white) __To AUDIO (L/R)/VlDEO IN (red) ./
(red) J L (LINE iN 2)
OR
TV GAME
Model MW27F51 has a door on the front panel. Please open it to access the PHONES jack and the AUDIO (L/R)/VIDEO IN
(LINE IN 2) jacks.
÷
Connect the unit to your audio system.
To ANALOG AUDIO OUT (white) Audio system
(white) Audio cable (not s_ _
(red) (red)
To audio inputs of the amplifier
16 _ 3/8/05, 9:55 AM
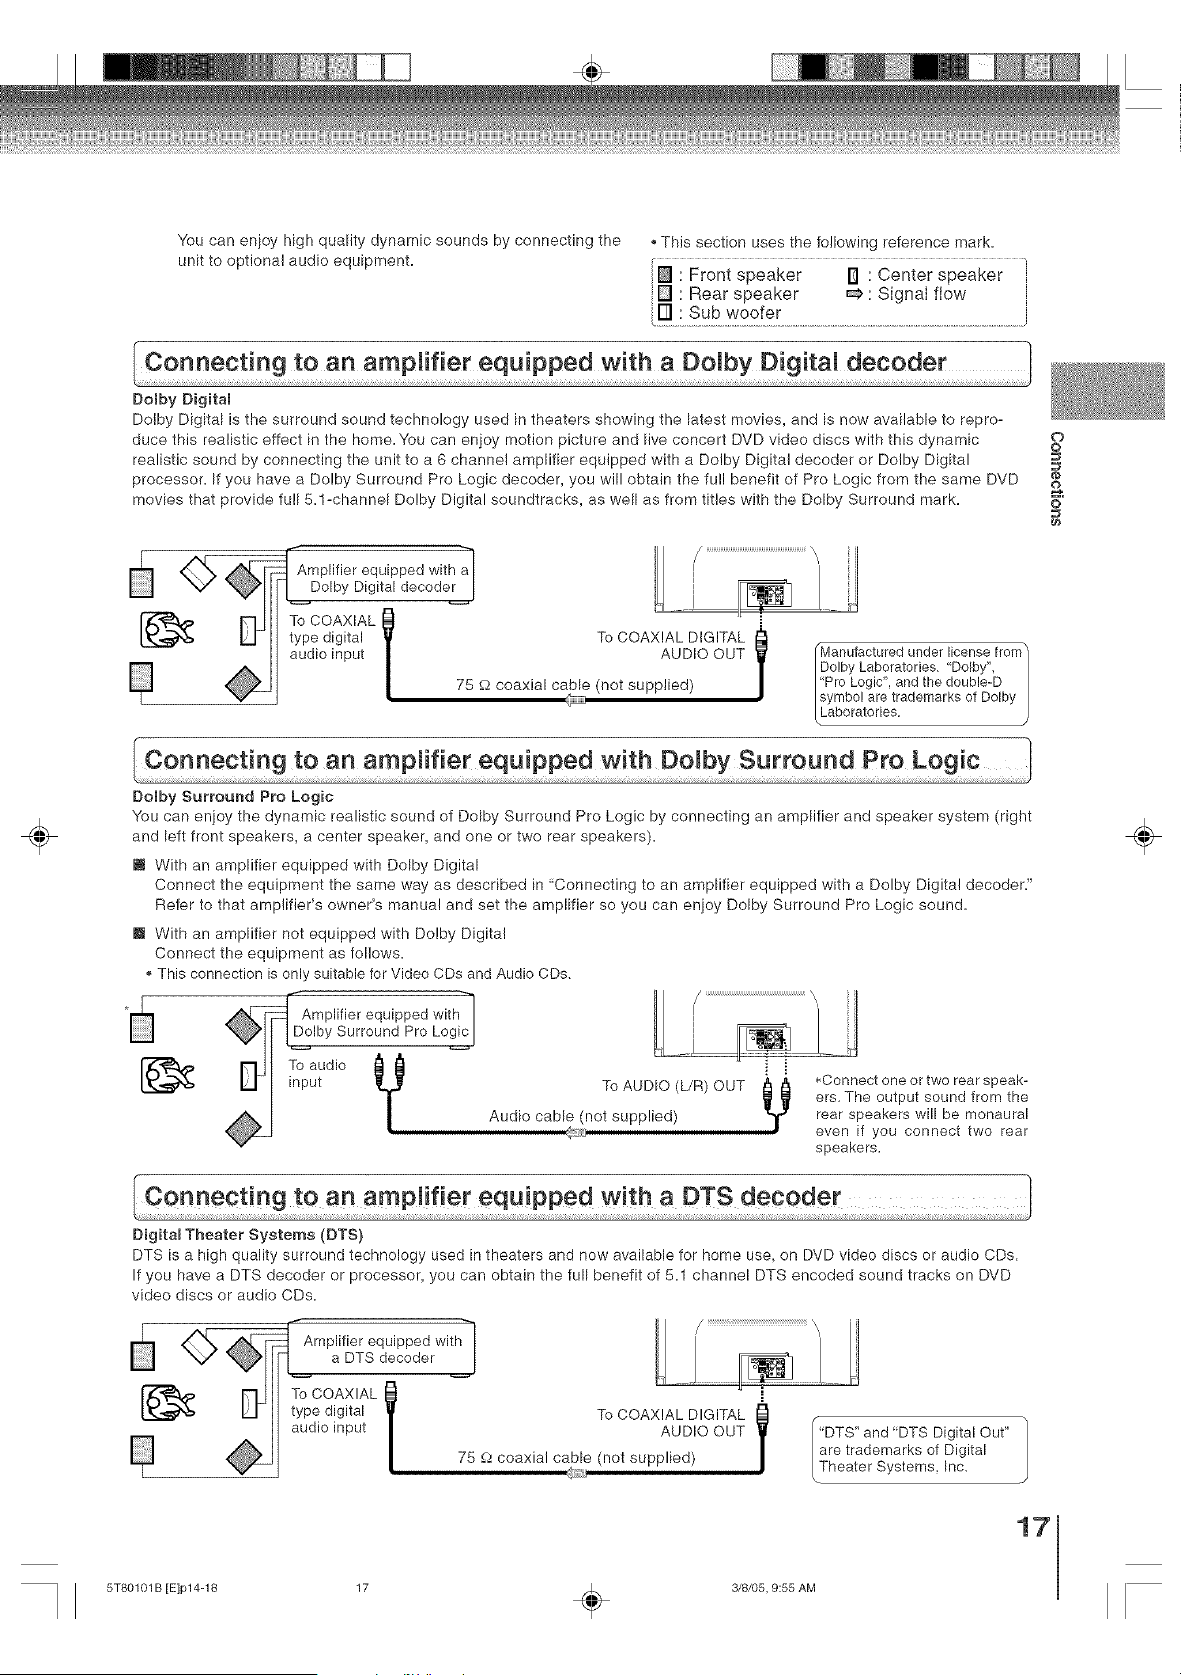
You can enjoy high quality dynamic sounds by connecting the
unit to optional audio equipment.
This section uses the following reference mark.
Front speaker I1 : Center speaker
[] Rear speaker _ : Signal flow
÷
Domby Digital
Dolby Digital is the surround sound technology used in theaters showing the latest movies, and is now available to repro-
duce this realistic effect in the home.You can enjoy motion picture and live concert DVD video discs with this dynamic oO
realistic sound by connecting the unit to a 6 channel amplifier equipped with a Dolby Digital decoder or Dolby Digital
processor. If you have a Dolby Surround Pro Logic decoder, you will obtain the full benefit of Pro Logic from the same DVD
m,
movies that provide full 5.1-channel Dolby Digital soundtracks, as well as from titles with the Dolby Surround mark. o
_Amplifier equipped with a_ iDolby Digital decoder I 1 rl
- IL i
To COAXIAL 0
type digital I11 To COAXIAL DIGITAL
audio input / AUDIO OUT /Manufactured under license trom
1
/
|Dolby Laboratories, Dolby",
75 _-2coaxial cable (not supplied) |"Pro Logic', and the double-D
|symbol are trademarks of Dolby
(.Laboratories
Connecting to an amplifier equipped with Domby Surround Pro Logic
Dolby Surround Pro Logic
You can enjoy the dynamic realistic sound of Dolby Surround Pro Logic by connecting an amplifier and speaker system (right
and left front speakers, a center speaker, and one or two rear speakers).
i With an amplifier equipped with Dolby Digital
Connect the equipment the same way as described in "Connecting to an amplifier equipped with a Dolby Digital decoder."
Refer to that amplifier's owner's manual and set the amplifier so you can enjoy Dolby Surround Pro Logic sound.
m With an amplifier not equipped with Dolby Digital
Connect the equipment as follows.
This connection is only suitable for Video CDs and Audio CDs,
Amplifier equipped with-_
Dolby Surround Pro Logic i
input
To AUDIO (L/R) OUT _ _
Y
Audio cable (not supplied)
*Connect one or two rear speak-
ers. The output sound from the
rear speakers will be monaural
even if you connect two rear
speakers.
÷
Digital Theater Systems (DTS)
DTS is a high quality surround technology used in theaters and now available for home use, on DVD video discs or audio CDs.
If you have a DTS decoder or processor, you can obtain the full benefit of 5.1 channel DTS encoded sound tracks on DVD
video discs or audio CDs.
-1
Amplifier equipped with|
a DTS decoder J
To COAXIAL l
type digital To COAXIAL DIGITAL
audio input AUDIO OUT
75 £._coaxial cable (not supplied)
"DTS" and "DTS Digital Out"
are trademarks of Digital
Theater Systems, Inc,
17
5T80101B [E]p14-18 17 _ 3/8/05, 9:55 AM
to optional equipment (Continued)
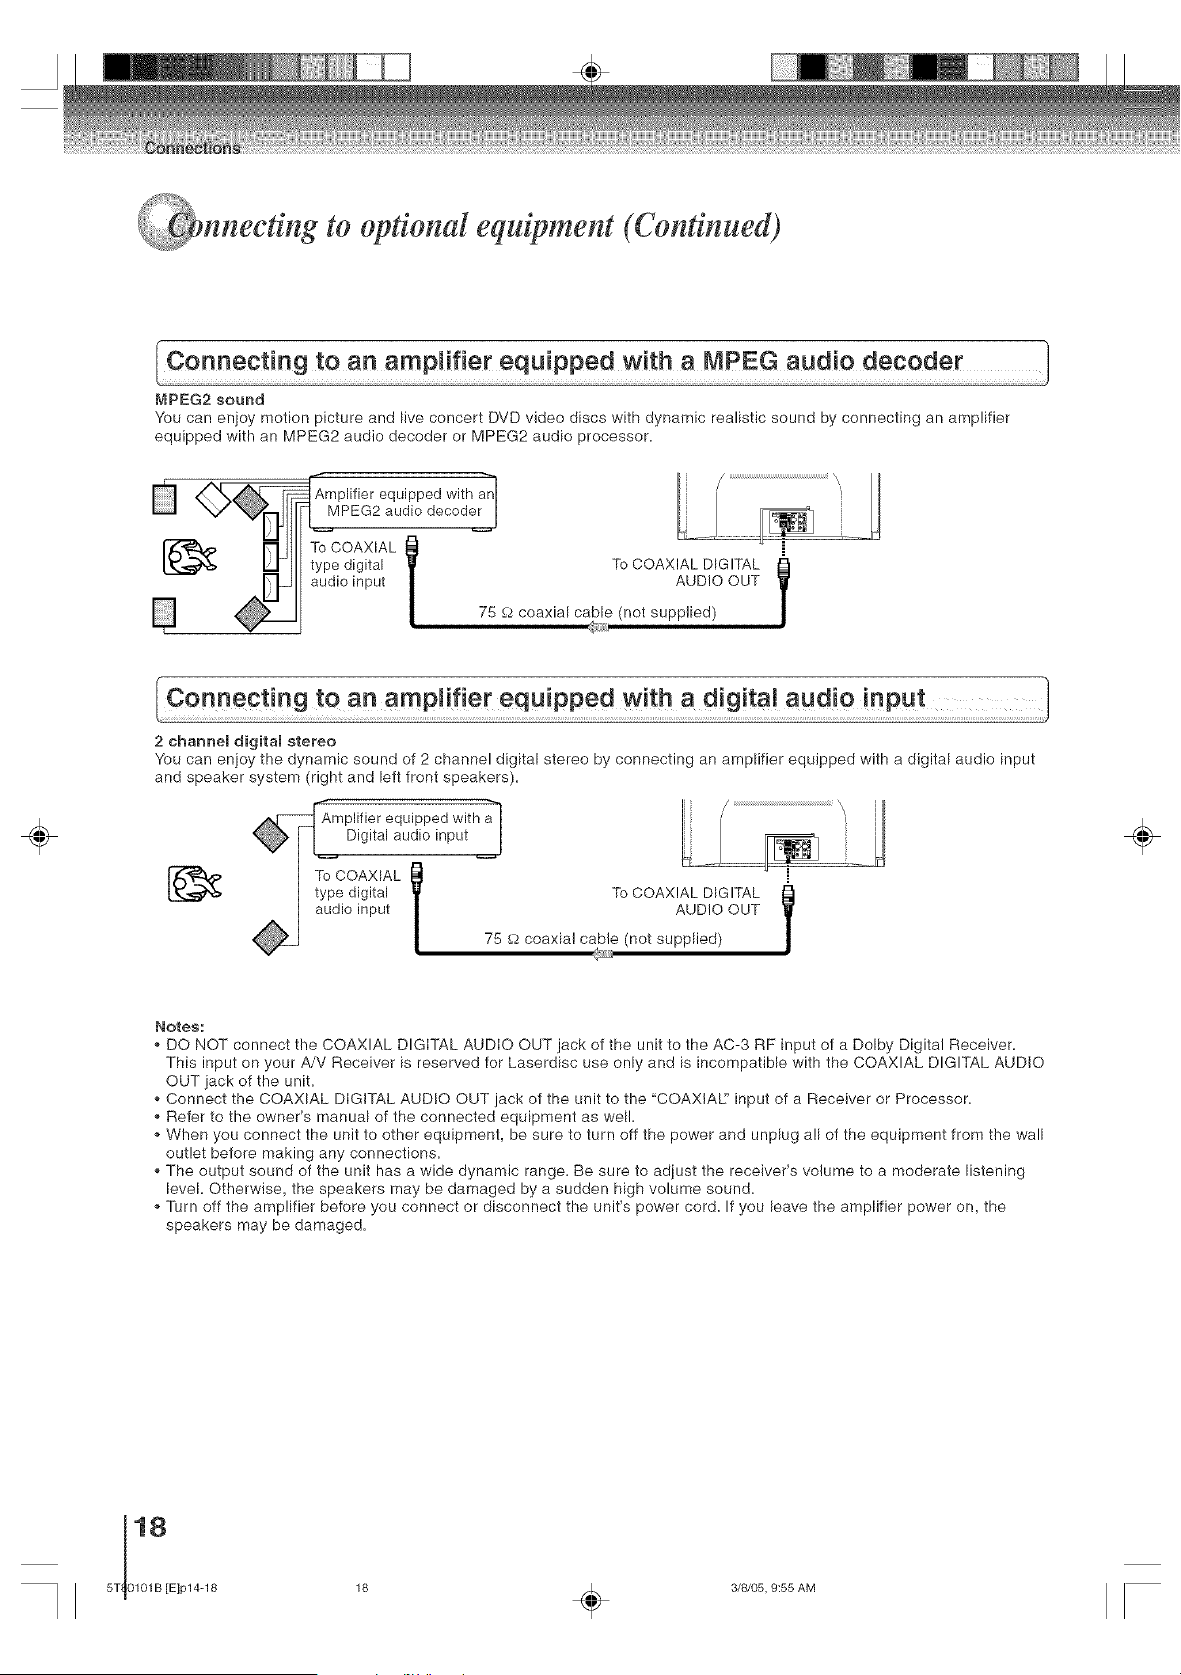
MPEG2 sound
You can enioy motion picture and live concert DVD video discs with dynamic realistic sound by connecting an amplifier
equipped with an MPEG2 audio decoder or MPEG2 audio processor.
Amplifier equipped with anI
MPEG2 audio decoder [
To COAXIAL l
type digital To COAXIAL DIGITAL
audio input AUD!O OUT
75 £2coaxial cable (not supplied)
÷
2 channeB digital stereo
You can enioy the dynamic sound of 2 channel digital stereo by connecting an amplifier equipped with a digital audio input
and speaker system (right and left front speakers).
"h
Amplifier equipped with a[
Digital audio input l
To COAXIAL l
type digital To COAXIAL DIGITAL
audio input AUD!O OUT
75 _2coaxial cable (not supplied)
Y
÷
Notes:
• DO NOT connect the COAXIAL DIGITAL AUDIO OUT jack of the unit to the AC-3 RF input of a Dolby Digital Receiver.
This input on your A/V Receiver is reserved for Laserdisc use only and is incompatible with the COAXIAL DIGITAL AUDIO
OUT jack of the unit.
• Connect the COAXIAL DIGITAL AUDIO OUT jack of the unit to the "COAXIAL:' input of a Receiver or Processor.
• Refer to the owner's manual of the connected equipment as well.
• When you connect the unit to other equipment, be sure to turn off the power and unplug all of the equipment from the wall
outlet before making any connections.
• The output sound of the unit has a wide dynamic range. Be sure to adiust the receiver's volume to a moderate listening
level. Otherwise, the speakers may be damaged by a sudden high volume sound.
• Turn off the amp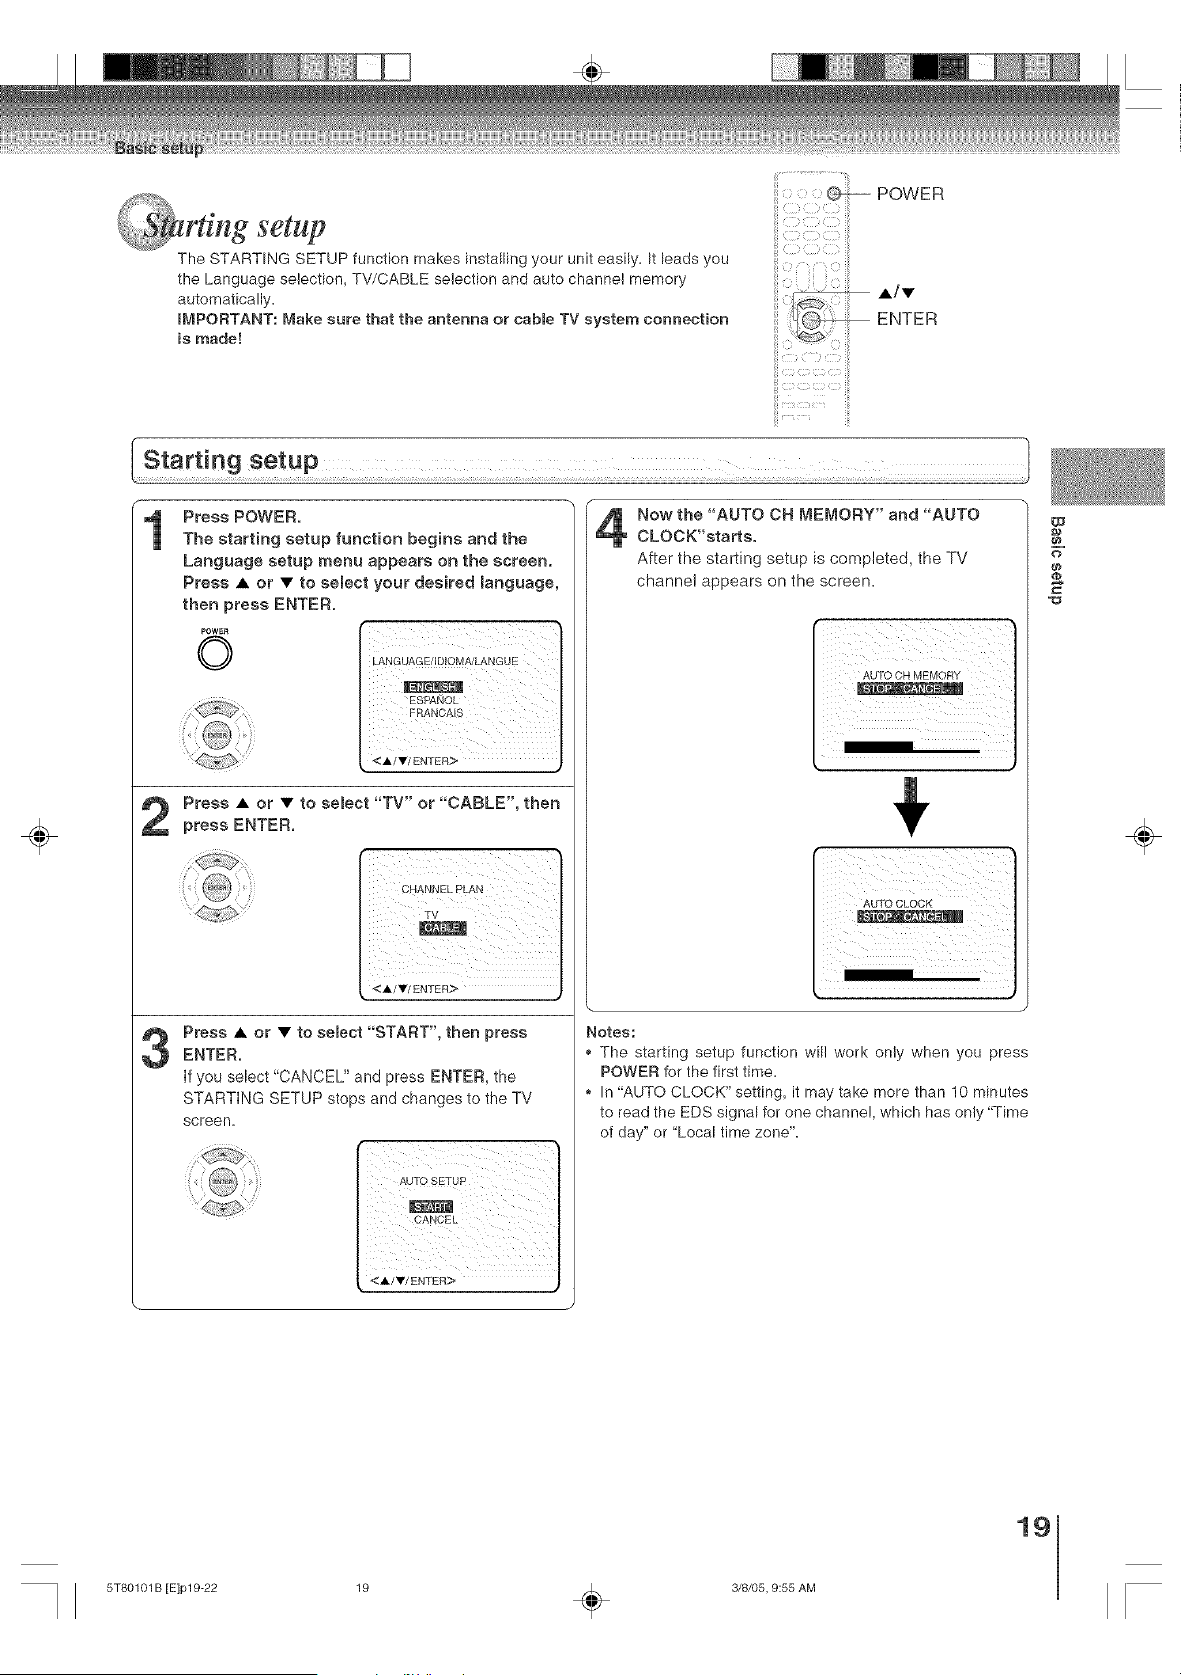
_; _'_t;ii_i_¸
mng setup
The STARTING SETUP function makes installing your unit easily= It leads you
the Language selection, TV/CABLE selection and auto channel memory
automatically=
IMPORTANT: Make sure that the antenna or cable TV system connection
is made!
POWER
•/•
ENTER
÷
1
Press POWER.
The starting setup function begins and the
Language setup menu appears on the screen.
Press • or • to select your desired language,
then press ENTER.
POWER "
O
LANGUAGE/IDJOMA/LANG UE
<i/_r/ENTER>
Press • or • to select "TV" or "CABLE", then
press ENTER.
TV
<./Y/ENTER>
Press • or • to semect "START", then pressENTER.
if you select "CANCEL" and press ENTER, the
STARTING SETUP stops and changes to the TV
screen=
i i i
<A/Y/ENTER>
Now the "AUTO OH MEMORY" and "AUTO
CLOCK'starts.
After the starting setup is completed, the TV
channel appears on the screen.
AUTO CH MEMORY
Notes:
The starting setup function will work only when you press
POWER for the first time=
In "AUTO CLOCK" setting, it may take more than 10 minutes
to read the EDS signal for one channel, which has only "Time
of day" or "Local time zone".
w
o
÷
19
5T80101 B [E]p19-22 19 _ 3/8/05, 9:55 AM
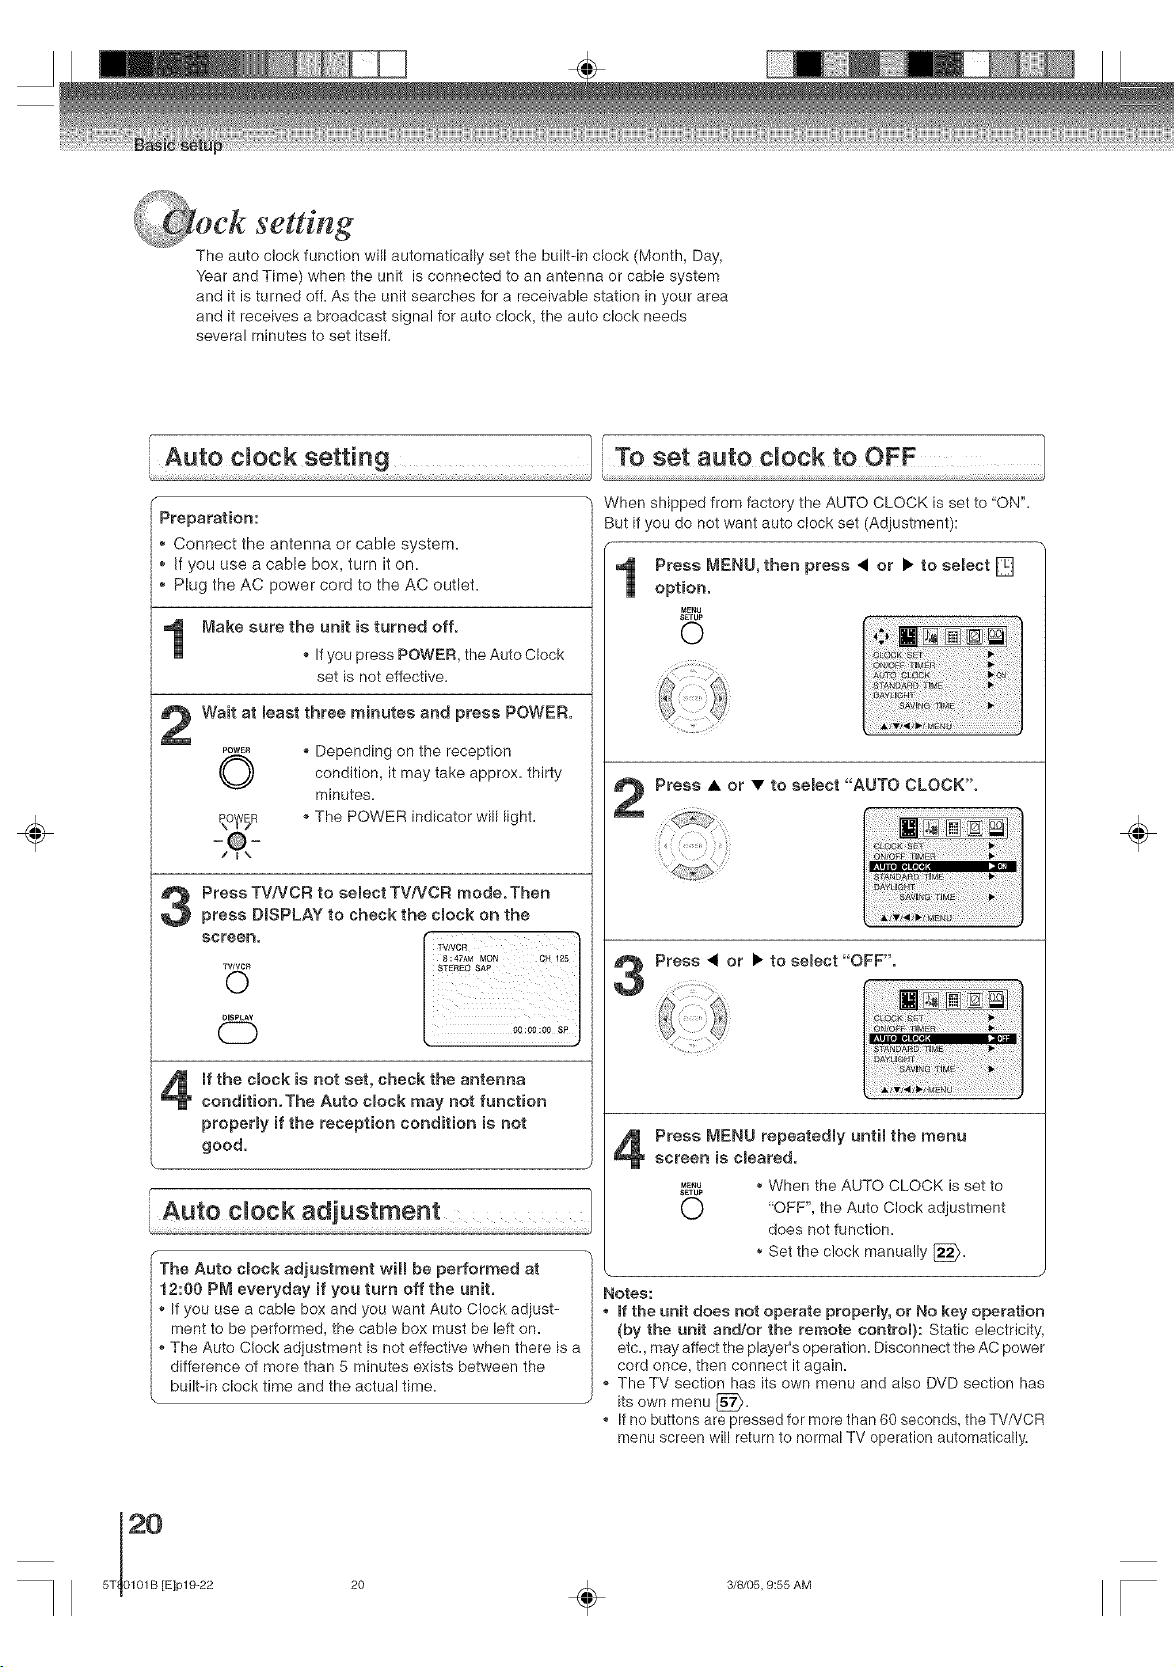
setting
The auto clock function will automatically set the built-in clock (Month, Day,
Year and Time) when the unit is connected to an antenna or cable system
and it is turned off. As the unit searches for a receivable station in your area
and it receives a broadcast signal for auto clock, the auto clock needs
several minutes to set itself.
÷
f r-
Preparation:
Connect the antenna or cable system.
If you use a cable box, turn it on.
Plug the AC power cord to the AC outlet.
Make sure the unit is turned off.
* If you press POWER, the Auto Clock
set is not effective.
Wait at Beast three minutes and press POWER.
POWE_
O
* Depending on the reception
condition, it may take approx= thirty
minutes.
* The POWER indicator will light=
PressTV/VCR to selectTV/VCR mode.Then
press DISPLAY to check the dock on the
mfthe clock is not set, check the antenna
condition.The Auto clock may not function
propermy if the reception condition is not
good.
The Auto dock adjustment will be performed at
12:00 PM everyday if you turn off the unit.
If you use a cable box and you want Auto Clock adiust-
ment to be performed, the cable box must be left on=
The Auto Clock adiustment is not effective when there is a
difference of more than 5 minutes exists between the
builtqn clock time and the actual time.
When shipped from factory the AUTO CLOCK is set to "ON"=
But if you do not want auto clock set (Adiustment):
Press • or • to select "AUTO CLOCK".
Press • or • to semect "OFF".
Press MENU repeatedmyuntil the menu
screen is cmeared.
M_U
SErU_
O
When the AUTO CLOCK is set to
"OFF", the Auto Clock adjustment
does not function.
Set the clock manua!ly [_=
Notes:
. _fthe unit does not operate property, or No key operation
(by the unit and!or the remote control): Static electricity,
etc. may affect the player's operation. Disconnect the AC power
cord once, then connect it again.
. The TV section has its own menu and also DVD section has
ks
OWn menu [_X/.
* If no buttons are pressed for more than 60 seconds, the TV/VCR
menu screen will return to normal TV operation automatically.
÷
20
5T_ 0101B [E]pl 9-22
20 _ 3/8/05, 9:55 AM
iii DISPLAY
÷
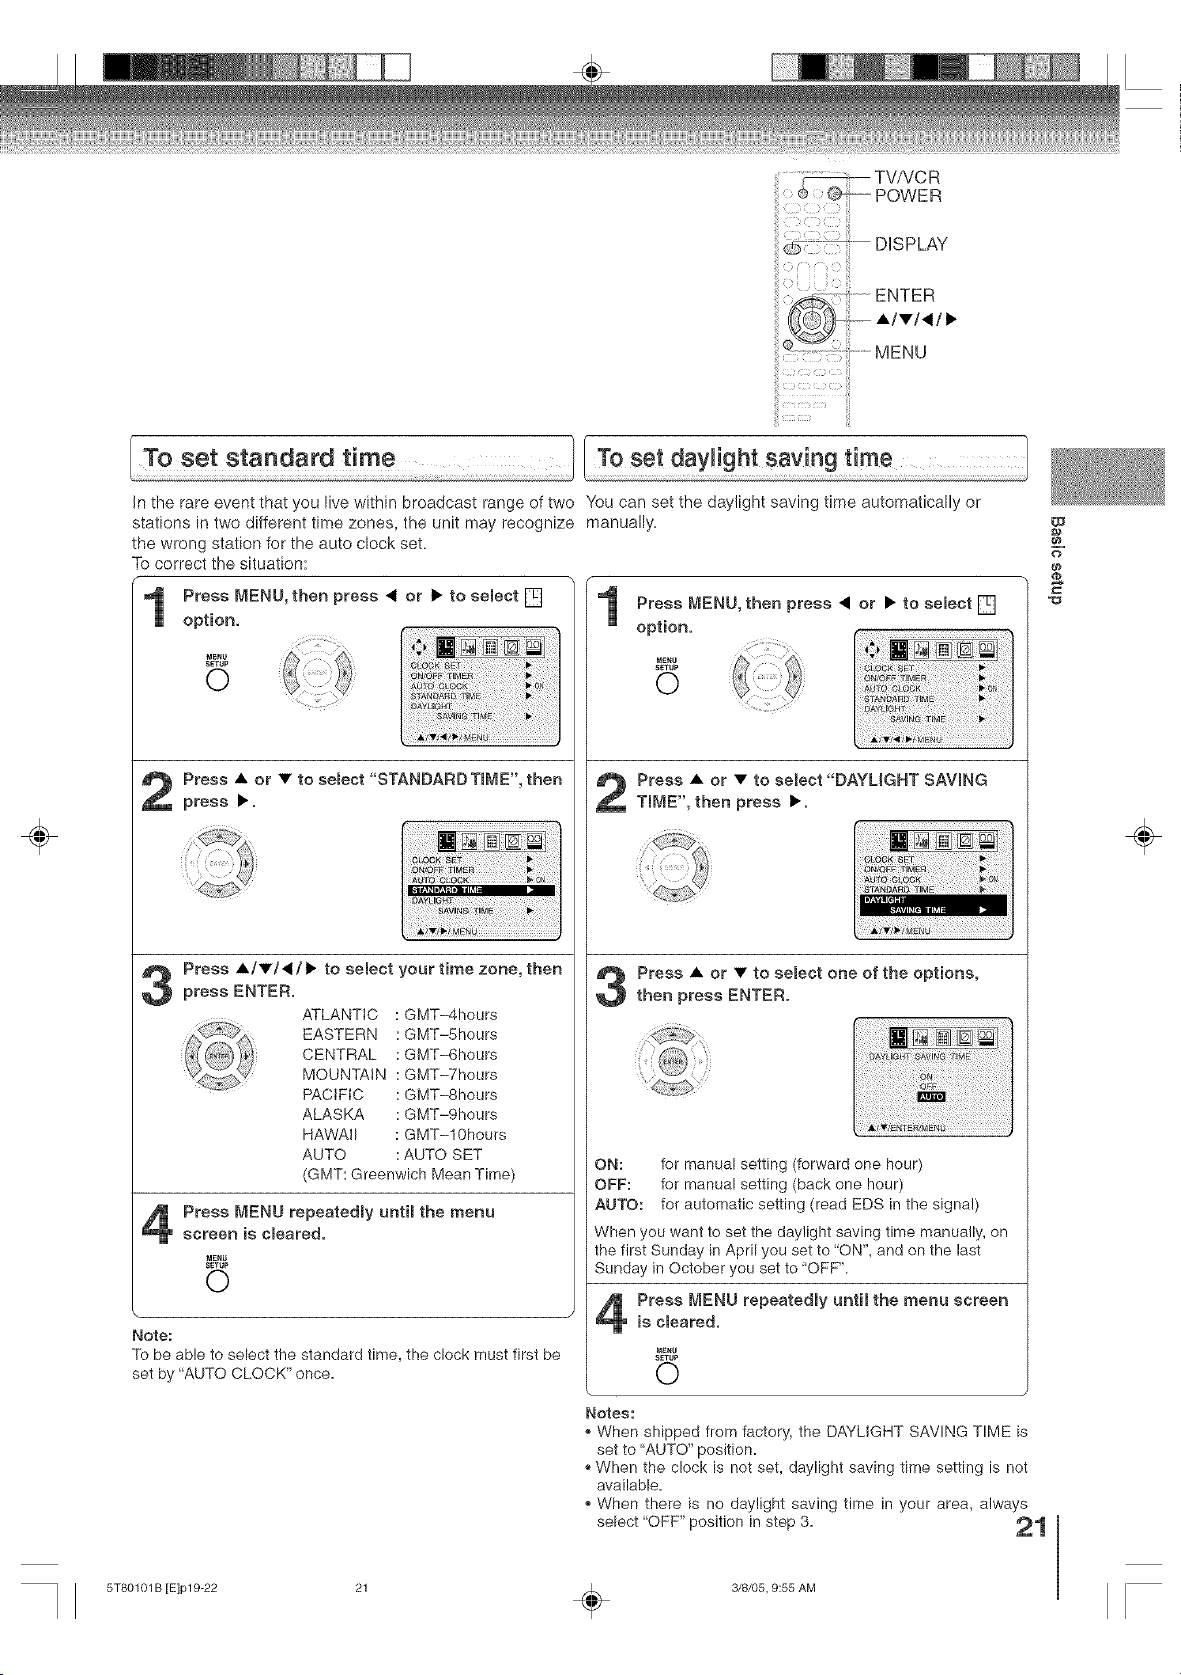
[ To set standard time ..........................................To set dayl!ght say ng time ..........................................................
in the rare event that you live within broadcast range of two "vtou can set the daylight saving time automatically or
stations in two different time zones, the unit may recognize manually.
the wrong station for the auto clock set.
To correct the situation:
r
Press MENU, then press < or • to semect []
option.
_IENU
S_TUP
0
Press • or • to semect"STANDARD TmME",then
press •.
Press A/•/</• to select your time zone, then
press ENTER.
ATLANTIC : GMT-4hours
EASTERN : GMT-5hours
CENTRAL : GMT-6hours
MOUNTAIN : GMT-7hours
PACIFIC : GMT-8hours
ALASKA : GMT-9hours
HAWAII : GMT-10hours
AUTO : AUTO SET
(GMT: Greenwich Mean Time)
Press MENU repeatedmy until the menu
screen is cmeared.
MENU
SETUP
0
Note:
To be able to select the standard time, the clock must first be
set by "AUTO CLOCK" once.
1
Press • or • to select"DAYLIGHT SAVING
TmME",then press •.
Press • or • to semect one of the options,
then press ENTER.
ON: for manual setting (forward one hour)
OFF: for manual setting (back one hour)
AUTO: for automatic setting (read EDS in the signal)
When you want to set the daylight saving time manually, on
the first Sunday in April you set to ON", and on the last
Sunday in October you set to 'OFF".
Press MENU repeatedly until the menu screen
is cmeared.
SETUP
0
Notes:
When shipped from factory, the DAYLIGHT SAVING TIME is
set to "AUTO" position.
When the clock is not set, daylight saving time setting is not
available.
When there is no daylight saving time in your area, always
select "OFF" position in step 3=
w
o
÷
5T80101 B [E]p19-22 21 _ 3/8/05, 9:55 AM
setting (Continued)
_i_13C3, CIII_:iiiii,'iil
ENTER
A/v/_/•
MENU
÷
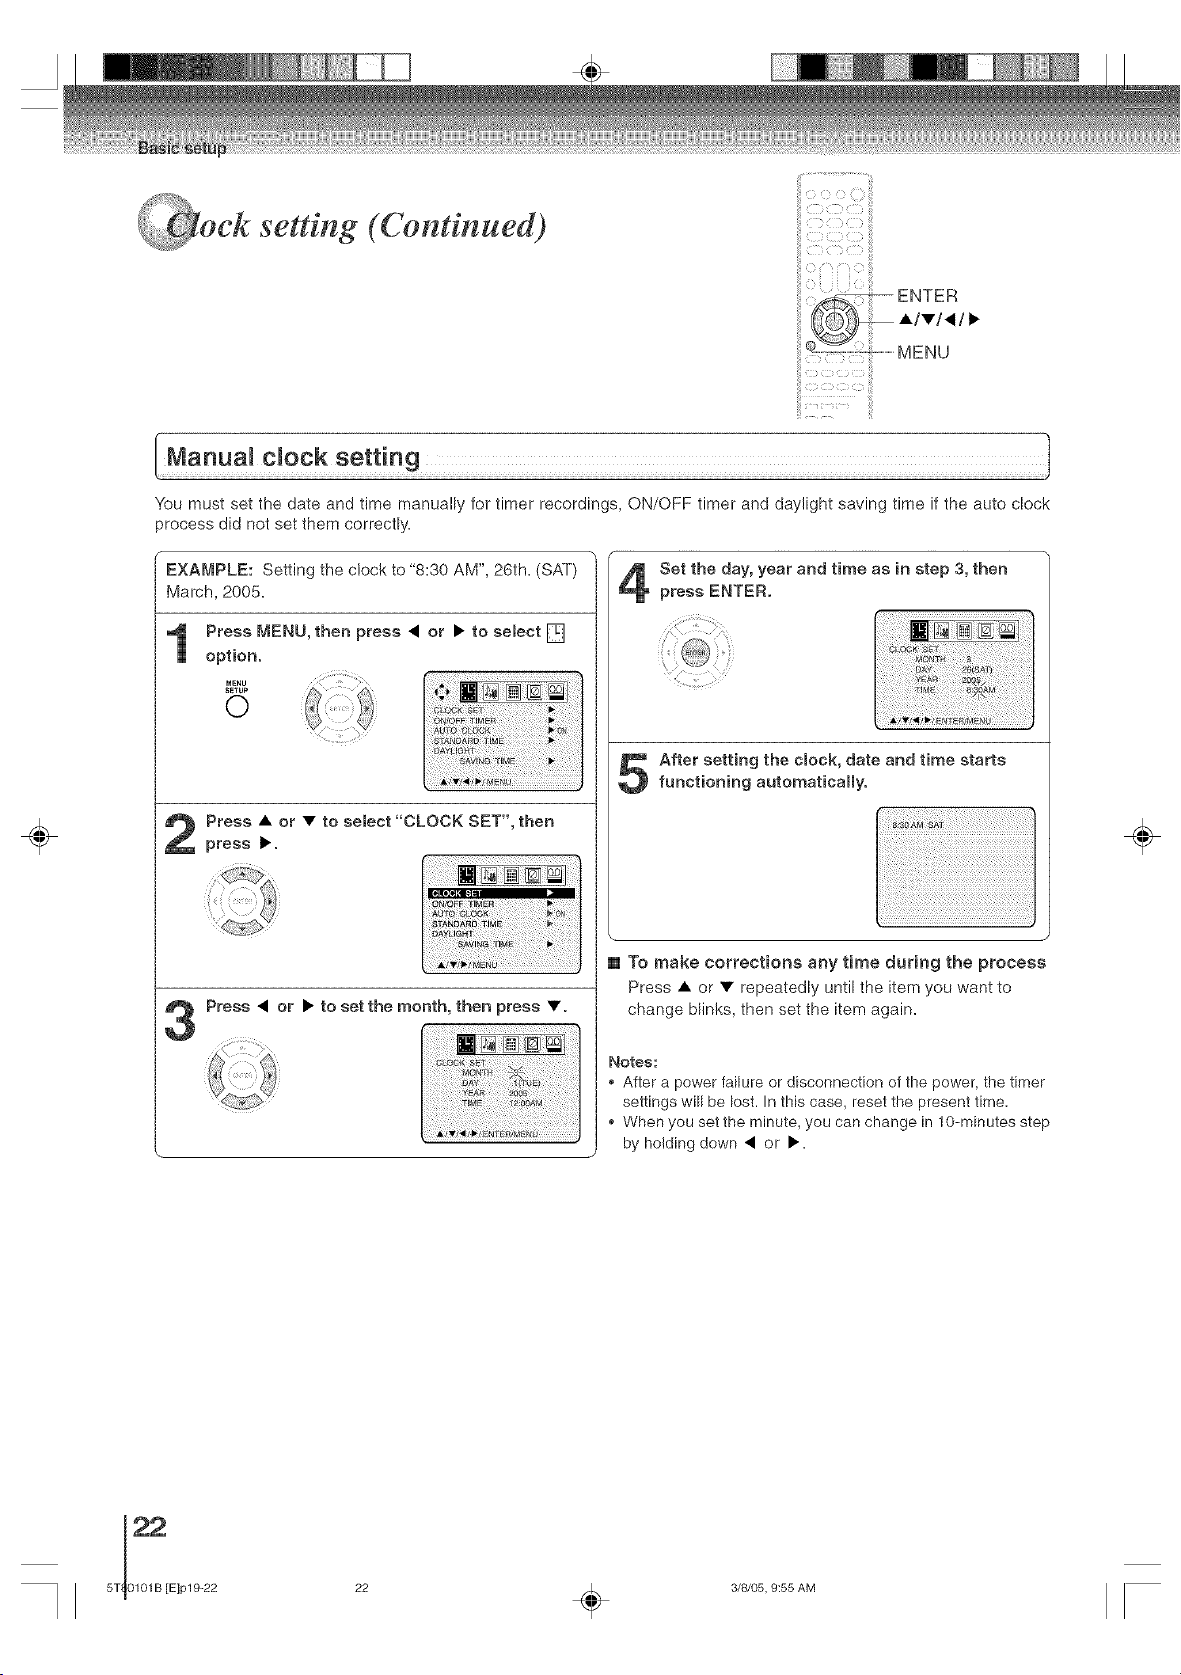
You must set the date and time manually for timer recordings, ON/OFF timer and daylight saving time if the auto clock
process did not set them correctly.
EXA_']PLE: Setting the clock to "8:30 AM", 26th. (SAT)
March, 2005.
Press • or • to select "CLOCK SET", then
press •.
Ellr_u
Press • or • to set the month, then press •.
Set the day, year and time as in step 3, then
press ENTER.
After setting the dock, date and time starts
functioning automatically.
[] To make corrections any time during the process
Press • or • repeatedly until the item you want to
change blinks, then set the item again.
Notes:
,, After a power failure or disconnection of the power, the timer
settings will be lost. In this case, reset the present time.
,, When you set the minute, you can change in t0-minutes step
by holding down • or •.
÷
22 _ 3/8/05, 9:55 AM
@ng the language!
TV!VCR operation status
iiiiiico oOii!i
iiiiiiS 3 :!S!ili
DISPLAY
÷
iiii i_ii
! Setting the Janguage .................. ........TViVCR operation s!atus
This unit can display the on screen language in English,
Spanish or French.
f
Press MENU, then press _ or • to seJect [_
option.
MENU
SETUP
O
Press • or • to semect "LANGUAGE/IDmOMA/
LANGUE", then press •.
[ J
Press • or • to semect the desired Janguage:English (ENGLISH), Spanish (ESPANOL) or
French (FRANCA_S), then press ENTER.
Press MENU repeatedmy until the menu screen
is cleared.
mENU
SETUP
0
Press DISPLAY to display the information on the screen,
To cancel the display, press DmSPLAYagain.
While watching TV
Day of the week
TVNCR _'-r I
nook w0R j
I "_'_8:47AM MON CH 12s-_Channel
secondaudio
program
While operating a tape
-- Hi-Fi stereo
WNCR I_ _-VCR
8:30AM MON qO eration*
_°to repeat
db _:--l-Tape in
[ 00:1sj:12sP-_Tap e speed
I
Real time tape counter
VCR operation*
Recording : @
Rec/Pause : H
Play : I_
Fast-forward :
Rewind :
Stop : •
Eiect : A
W
o
£
÷
23
5T80101 B [E]p23-27 23 _ 3/8/05, 9:55 AM
÷
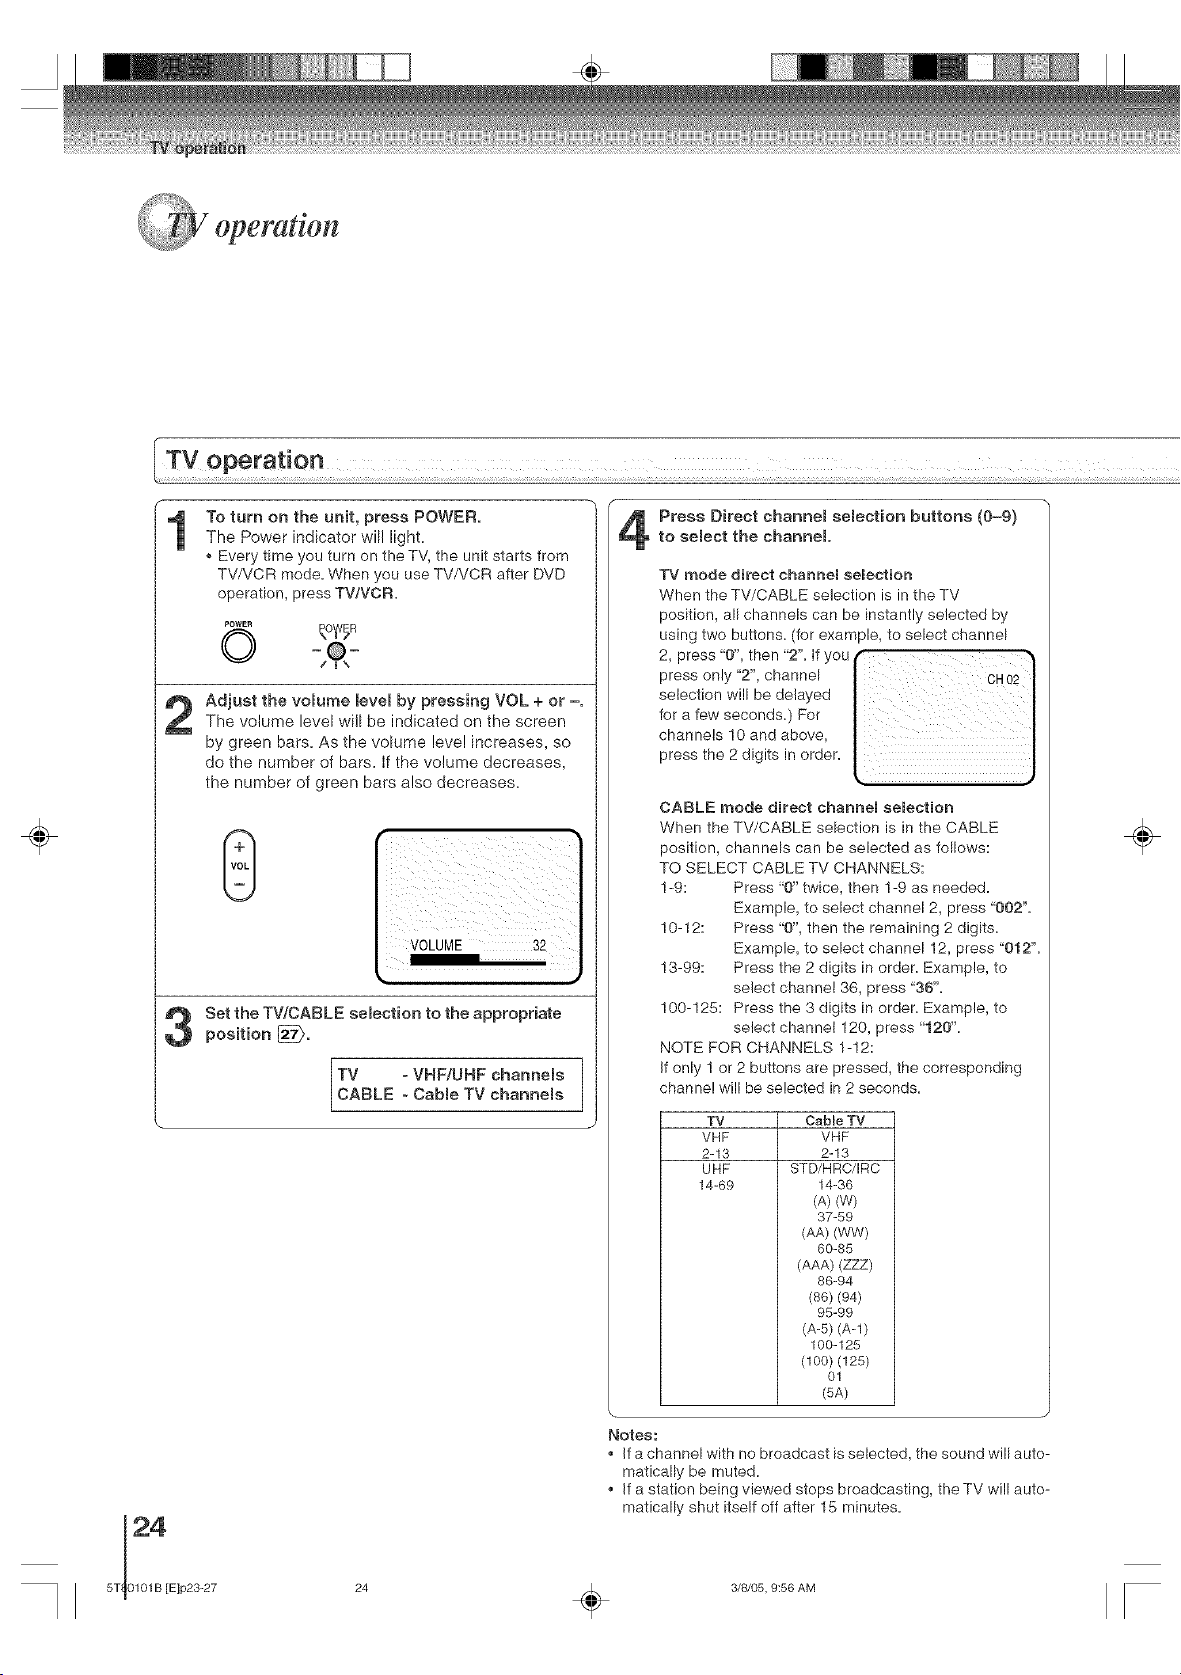
To turn on the unit, press POWER.
The Power indicator will light.
Every time you turn on the TV, the unit starts from
TV/VCR mode. When you use TV/VCR after DVD
operation, press TWVCR.
©
Adjust the volume Bevel by pressing VOL + or =.
The volume level will be indicated on the screen
by green bars. As the volume level increases, so
do the number of bars. If the volume decreases,
the number of green bars also decreases.
Set the TWCABLE selection to the appropriate
position [_.
TV - VHF/UHF channels
CABLE - Cable TV channels
Press Direct channel selection buttons (0-9)
to select the channel.
TV mode direct channel selection
When the TV/CABLE selection is in the TV
position, all channels can be instantly selected by
using two buttons. (for example, to select channel
2, press "0", then "2". If you _
press only "2", channel | CH02|
selection will be delayed / |
for a few seconds.) For | |
channels 10 and above, | /
CABLE mode direct channel selection
When the TV/CABLE selection is in the CABLE
position, channels can be selected as follows:
TO SELECT CABLE TV CHANNELS:
1-9: Press "0" twice, then 1-9 as needed.
Example, to select channel 2, press "002".
10-12: Press "0", then the remaining 2 digits.
Example, to select channel 12, press "0t 2".
13-99: Press the 2 digits in order. Example, to
select channel 36, press "36".
100-125: Press the 3 digits in order. Example, to
select channel 120, press "t 20".
NOTE FOR CHANNELS 1-12:
If only ! or 2 buttons are pressed, the corresponding
channel will be selected in 2 seconds.
TV CaMe TV
VHF VHF
2-13 2-13
UHF STD/HRC/IRC
14-69 14-36
(A) (W)
37-59
(AA) (WW)
60-85
(AAA) (ZZZ)
86-94
(86) (94)
95-99
(A-S) (A-l)
100-125
(100) (125)
01
(5A)
÷
24
5T 0101B [E]p23-27
Notes:
, If a channel with no broadcast is selected, the sound will auto-
matically be muted.
, If a station being viewed stops broadcasting, theTV will auto-
matically shut itself off after 15 minutes.
24 _ 3/8/05, 9:56 AM
- TV/VCR
SLEEP
POWER
0-9
................................................CH A/v
VOL +/-
MUTE
ii
ii6!! ; -: CHRTN
÷
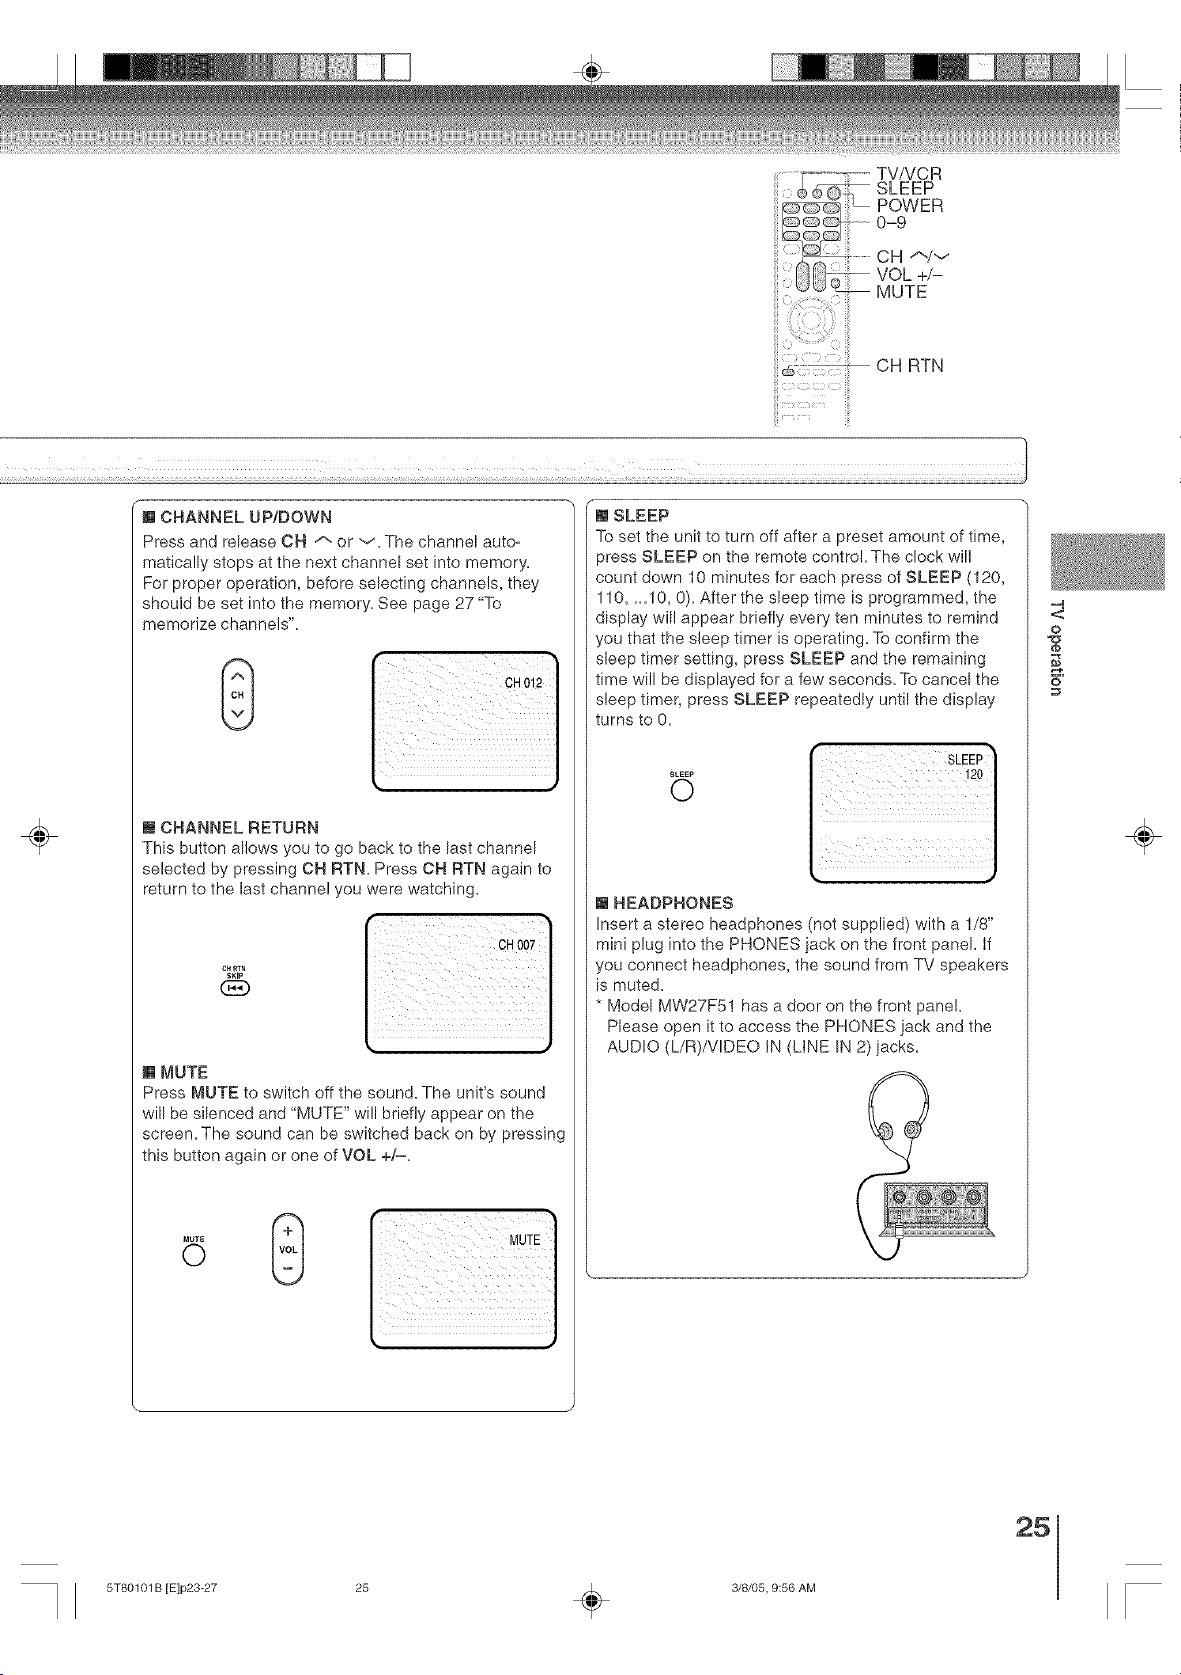
"m CHANNEL UP/DOWN
Press and release CH A or v The channel auto_
matica!ly stops at the next channel set into memory.
For proper operation, before selecting channels, they
should be set into the memory. See page 27 "To
memorize channels".
l CHANNEL RETURN
This button allows you to go back to the last channel
selected by pressing OH RTN. Press OH RTN again to
return to the last channel you were watching.
[] MUTE
CH_
SKIP
Press MUTE to switch off the sound. The unit's sound
will be silenced and "MUTE" will briefly appear on the
screen. The sound can be switched back on by pressing
this button again or one of VOL +/-.
[] SLEEP
To set the unit to turn off after a preset amount of time,
)ress SLEEP on the remote control. The clock will
count down 10 minutes for each press of SLEEP (120,
110, ._10, 0). After the sleep time is programmed, the
display will appear briefly every ten minutes to remind
you that the sleep timer is operating. To confirm the
sleep timer setting, press SLEEP and the remaining
time will be displayed for a few seconds. To cancel the
sleep timer, press SLEEP repeatedly until the display
turns to 0.
SLEEP
O
[] HEADPHONES
Insert a stereo headphones (not supplied) with a 1/8"
mini plug into the PHONES iack on the front panel. If
you connect headphones, the sound from TV speakers
is muted.
* Model MW27F51 has a door on the front panel.
Please open it to access the PHONES jack and the
AUDIO (L/R)/VIDEO IN (LINE IN 2) iacks.
-'4
<:
o
5"
÷
25
5T80101 B [E]p23-27 25 _ 3/8/05, 9:56 AM
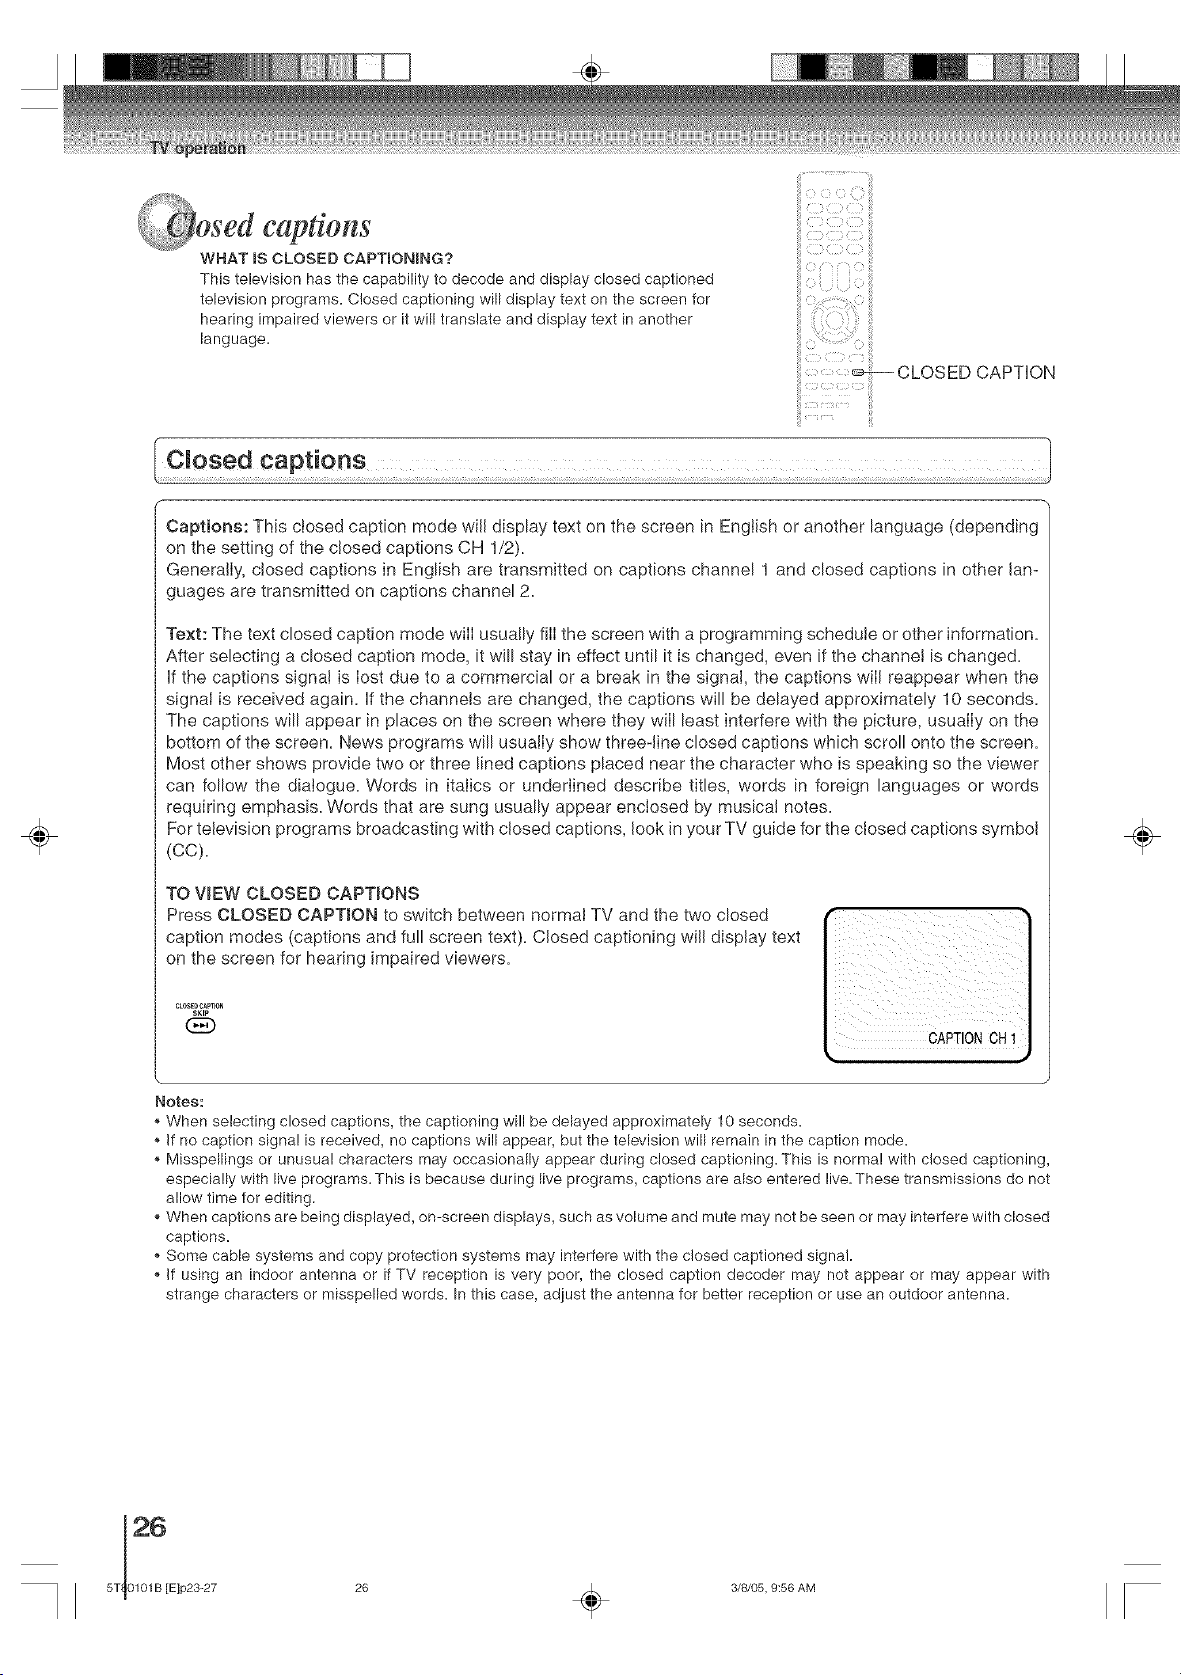
captions
WHAT iS CLOSED CAPTIONING?
This television has the capability to decode and display closed captioned
television programs. Closed captioning will display text on the screen for
hearing impaired viewers or it will translate and display text in another
language.
iii
iii
, • L:Iili
...._CLOSED CAPTION
÷
Captions: This closed caption mode will display text on the screen in Engtish or another language (depending
on the setting of the closed captions CH 1/2).
Generally, closed captions in English are transmitted on captions channel 1 and closed captions in other lan-
guages are transmitted on captions channel 2.
Text: The text closed caption mode will usua!ly fill the screen with a programming schedule or other information.
After selecting a closed caption mode, it will stay in effect until it is changed, even if the channel is changed.
if the captions signal is lost due to a commercial or a break in the signal, the captions wiII reappear when the
signal is received again, if the channels are changed, the captions will be delayed approximately 10 seconds.
The captions will appear in places on the screen where they wiII least interfere with the picture, usually on the
bottom of the screen. News programs will usually show three-line closed captions which scroll onto the screen.
Most other shows provide two or three lined captions placed near the character who is speaking so the viewer
can follow the dialogue. Words in italics or underlined describe titles, words in foreign languages or words
requiring emphasis. Words that are sung usually appear enclosed by musical notes.
For television programs broadcasting with closed captions, look in your TV guide for the closed captions symbol
(cc).
TO VIEW CLOSED CAPTIONS
Press CLOSED CAPTION to switch between normal TV and the two closed
caption modes (captions and full screen text). Closed captioning will display text
on the screen for hearing impaired viewers.
CLOSE_CAPTION
SKIP
CAPTIONCH1
Notes:
When selecting closed captions, the captioning will be delayed approximately 10 seconds.
If no caption signa! is received, no captions will appear, but the television will remain in the caption mode.
Misspellings or unusual characters may occasionally appear during closed captioning. This is normal with closed captioning,
especia!ly with live programs. This is because during live programs, captions are also entered live. These transmissions do not
allow time for editing.
When captions are being displayed, on-screen displays, such as volume and mute may not be seen or may interfere with closed
captions.
Some cable systems and copy protection systems may interfere with the closed captioned signal.
If using an indoor antenna or if TV reception is very poor, the closed caption decoder may not appear or may appear with
strange characters or misspelled words. In this case, adjust the antenna for better reception or use an outdoor antenna.
÷
26 _ 3/8/05, 9:56 AM
÷
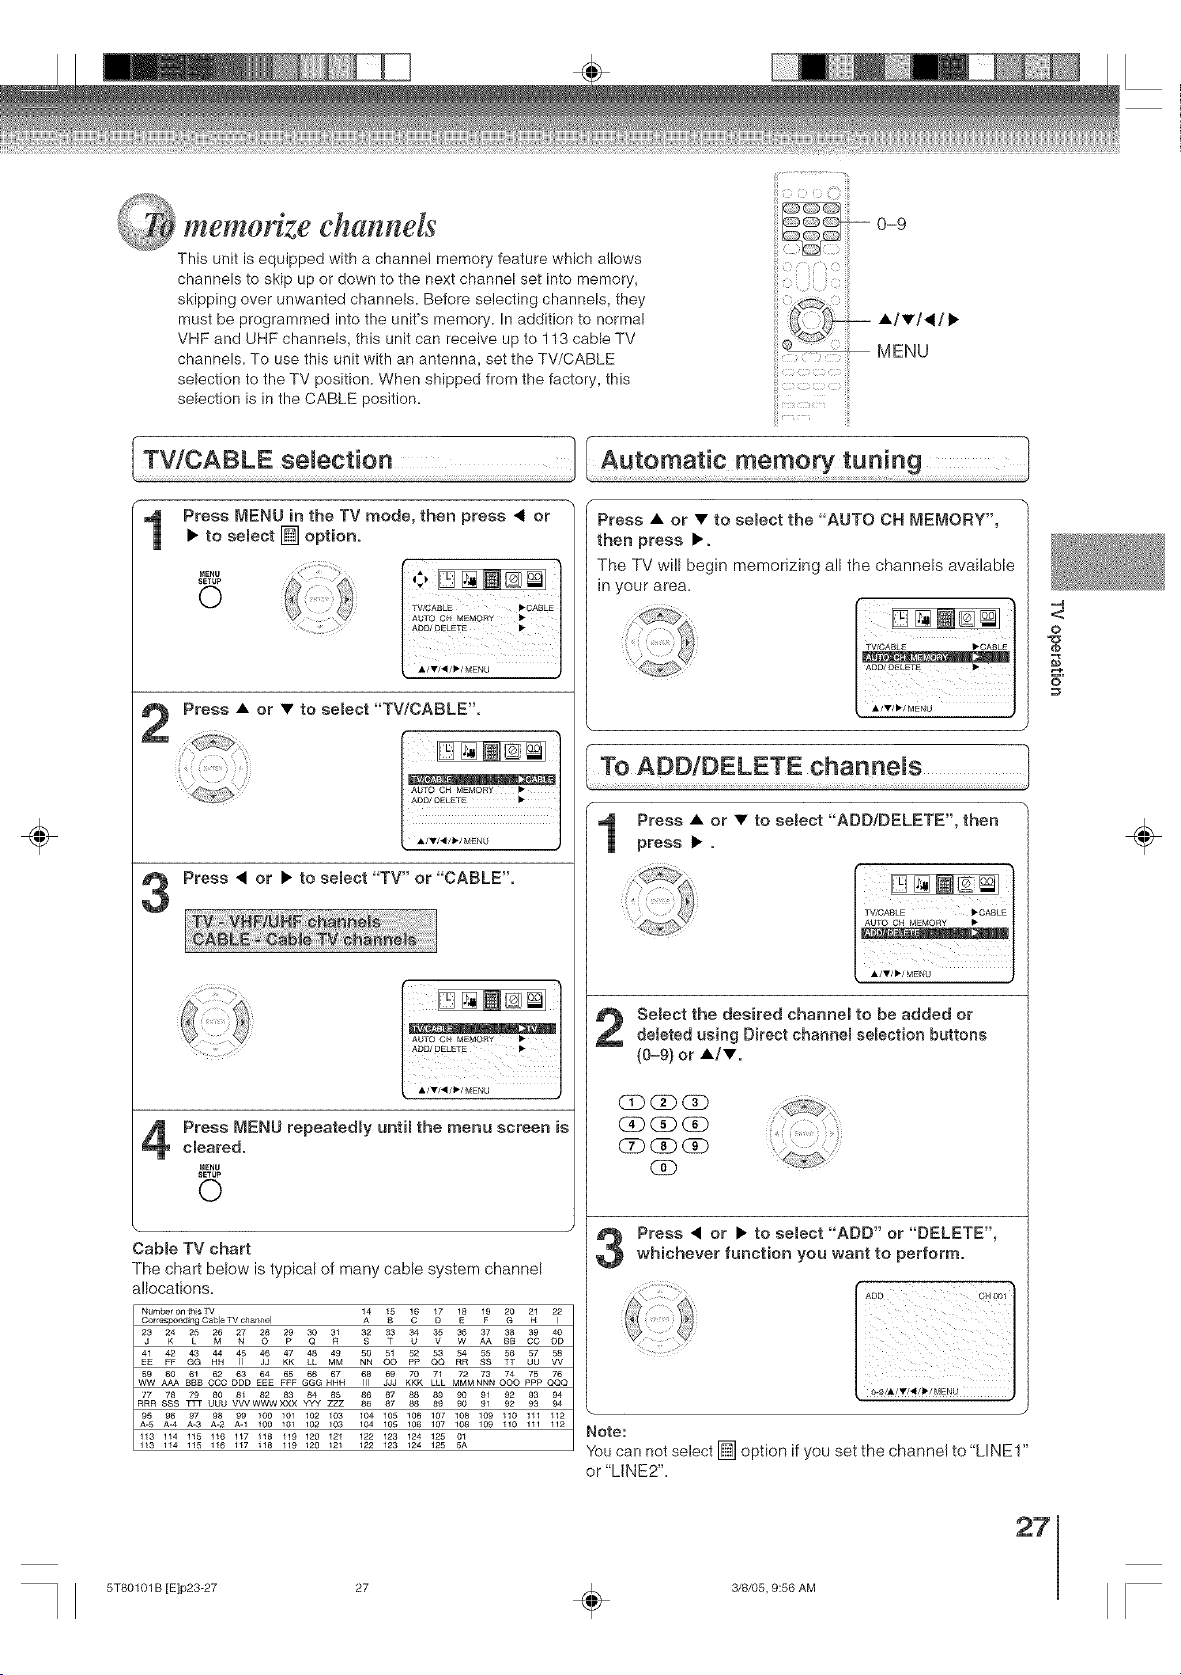
memorize channels
This unit is equipped with a channe! memory feature which allows
channels to skip up or down to the next channel set into memory,
skipping over unwanted channels. Before selecting channels, they
must be programmed into the unit's memory. In addition to normal ,_./V]d/•
VHF and UHF channels, this unit can receive up to 113 cable TV
channels. To use this unit with an antenna, set the TV/CABLE MENU
selection to the TV position. When shipped from the factory, this
selection is in the CABLE position.
iii
Press MENU in the TV mode, then press 4 or
• to semect [] option.
MENU
SETUp
0
1
Press • or • to semect "TV/CABLE'.
At_O CH MEMORY •
ADD/OELETE •
i
Press • or • to semect "TV" or "CABLE".
LO /
AOD/DELETE •
;,,';,.L,U,,,
Press MENU repeatedly until the menu screen is
cleared.
MENU
SETUP
©
3
Press • or • to semect the "AUTO OH MEMORY",
then press •.
all the channels available
The TV will begin memorizing
in your area.
Press • or • to semect "ADD/DELETE', then
press • .
Semectthe desired channel to be added or
deleted using Direct channe_ selection buttons
(0-9) or •/•.
(3DGD (Z)
(3b _ (3b
GD C_) (Z)
Press • or • to select "ADD" or "DELETE",
whichever function you want to perform.
Note:
You can not select [] option if you set the channel to "LINE1"
or "LINE2"=
Cable TV chart
The chart below is typical of many cane system channel
allocations=
Number on ths TV
................. I.......... I 1A4 1_ 16 1D7 1E8 1FJ _ 2N1 212
CO ODAA BB
...... H4_I 45 ........ _ 51 ..............
EE FF GG J3 KK LL MM OO pF' QQ RR SS TT UU VV
5_V9 A_A B6B1B 6........... 618 69 70 K L7L1L 7 .........
MMMNNN OOO p£p QQQCCC DDD EEE FFF GGG HHH JJJ
R,,,, UUU VVVWWWXXX YYY 86 87 88 89 90 91 92 93 94
95 96 97 A.298 A.199 100 ;0; 102 ......... 06 10/ ...............A-5 A-4 A-3 . 100 I02 I03 104105106107108109110111112
113114115116117118119120121 12212312412501
113114115116117 i18119120121 1221231241255A
-4
<
o
÷
27
5T80101 B [E]p23-27 27 _ 3/8/05, 9:56 AM
÷
AP _'_!i_ii_ ,
, ttmg the VoChip
An age limitation can be set to forbid children to watch programs according to
"TV RATING" and "MOVIE RATING" level set. To use the V-Chip function,
you must register a password.
Notes:
[f you forget the password, you cannot set the V-Chip.
To avoid forgetting the password, write it down and keep in
the sate place.
Press L_AENU,then press < or • to select
option.
Press • or • to select "PASSWORD".
Enter the password (4 digits) using Numberbuttons (0-9), then press ENTER.
If you put a wrong number, press
CANCEL.
CD (3D CD
CD CDdD
CD (Z)CD
GD
0"gLENTEn/CANCEL/MENU J
"$" appears instead of the number.
CANCEL
©
OD (Z)(2D
(D (N)(N)
Enter the same password again using Number
buttons (0-9) for safety, then press ENTER.
Now the password was registered
and V=Chip setting menu will appear
on the display.
/
O'9/ENTERICANGEtlMENU )
In theY-CHIP menu, press • or • to select
"CHANGE PASSWORD", then press •.
Enter the new password using Number
buttons (0-9), then press ENTER.
CD (3DCD
CD (Z) (Z)
CD CD dab
(2D
i iiiii
O'£/ENTER/CANC_UM_NU }
Enter the same password again using Number
buttons (0-9) for safety, then press ENTER.
CE) (3D(3b
(3D (Z) dab
CD CD qD
CAb
Press ['4END repeatedly until the menu screen
is cleared.
MENU
SETUP
0
÷
28 _ 3/8/05, 9:56 AM
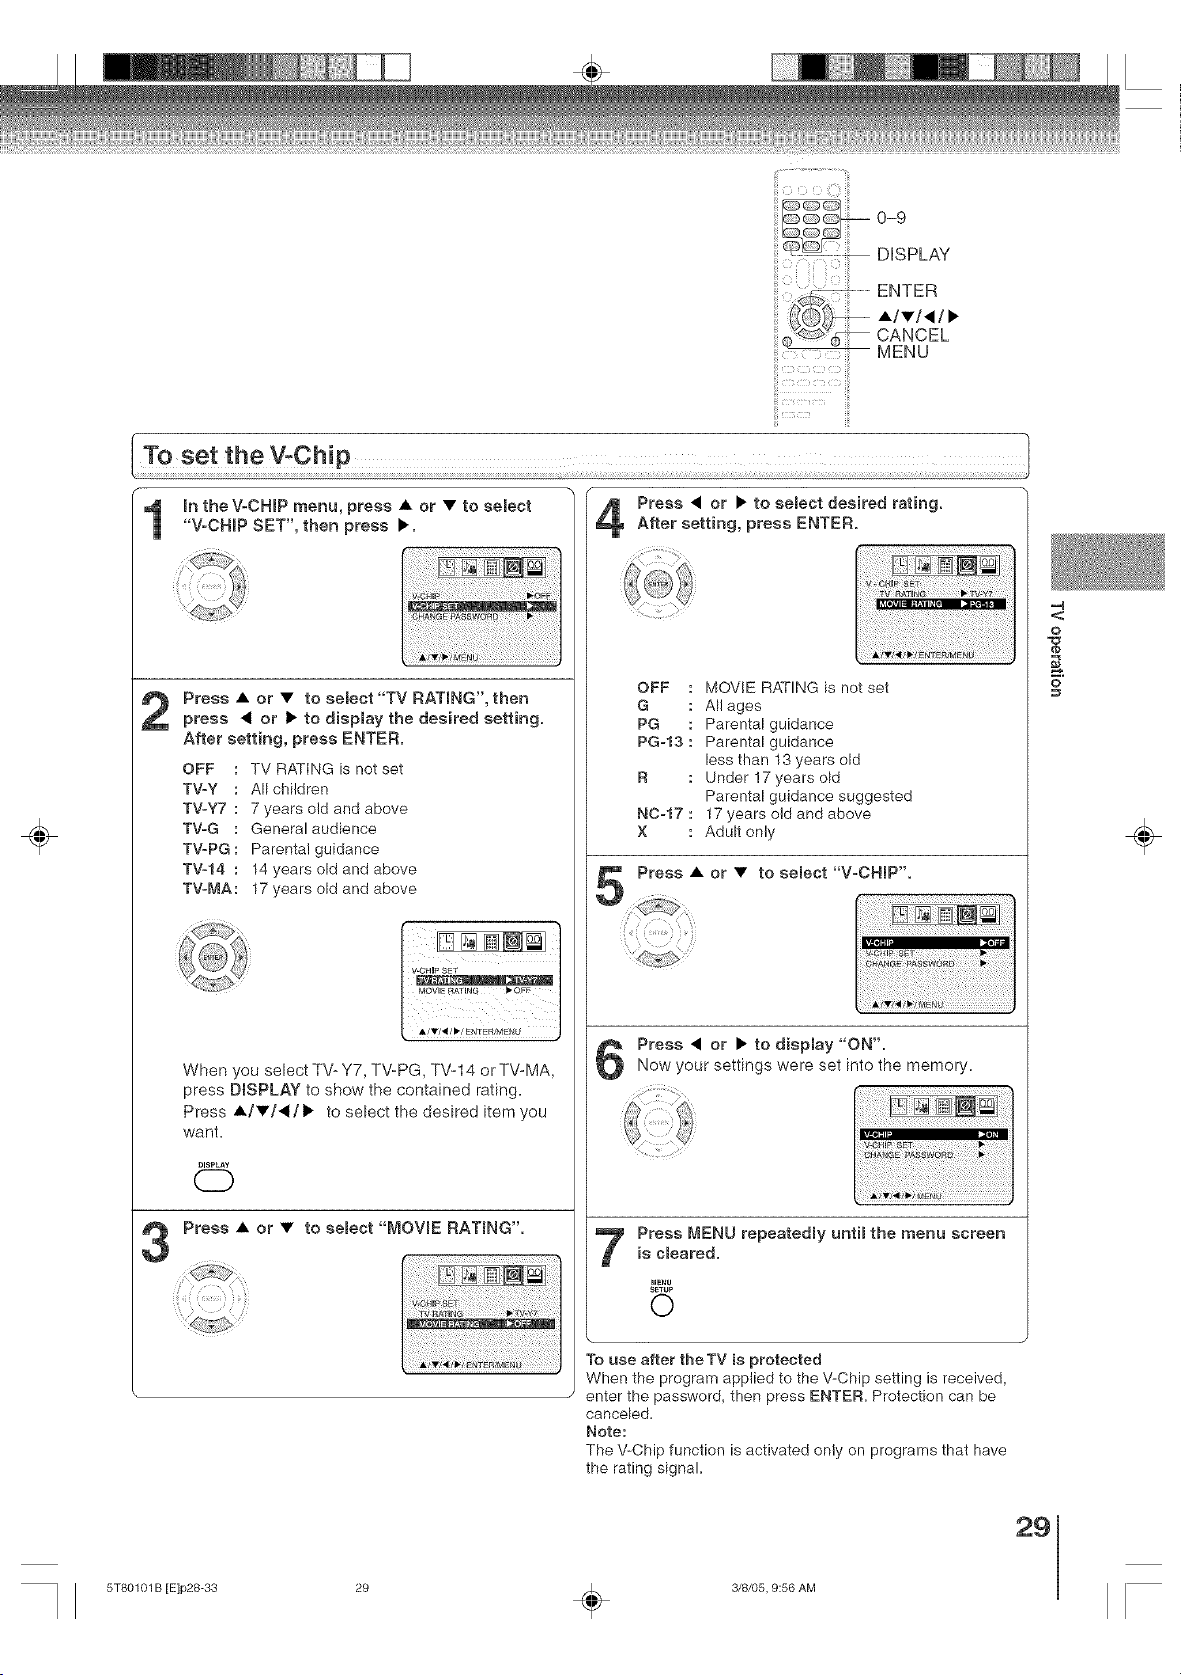
0-9
DISPLAY
ENTER
A/V/</•
CANCEL
MENU
÷
In the VoCNiP menu, press • or • to se(ect
"VoCNBP SET", then press •.
8BA_SE pASSWgr_b I_
Press • or • to se(ect "TV RATmNG', then
press < or • to disp(ay the desired setting.
After setting, press ENTER.
OFF : TV RATING is not set
TVoy : All children
TVoy7 : 7 years old and above
TVoG : General audience
TV=PG: Parental guidance
TV-14 : 14 years old and above
TVoMA: 17 years old and above
When you select TV-Y7, TV=PG, TWl 4 or TV-MA,
press DISPLAY to show the contained rating.
Press •/•/</• to select the desired item you
want.
DISPLAY
C)
Press • or • to se(ect desired rating.
After setting, press ENTER.
OFF
G
PG
PG=13
NC=17
X
MOVE RATING is not set
All ages
Parental guidance
Parental guidance
less than 13 years old
Under !7 years old
Parental guidance suggested
17 years old and above
Adult only
Press • or • to sebct "VoCNmP'.
Press • or • to display "ON".Now your settings were set into the memory,
Press MENU repeated(y until the menu screen
is chafed.
MENU
SETUP
0
To use after the TV is protected
When the program applied to the V-Chip setting is received,
enter the password, then press ENTER. Protection can be
canceled.
Note:
The V-Chip function is activated only on programs that have
the rating signal.
-4
O
O
÷
29
5T80101 B [E]p28-33 29 _ 3/8/05, 9:56 AM
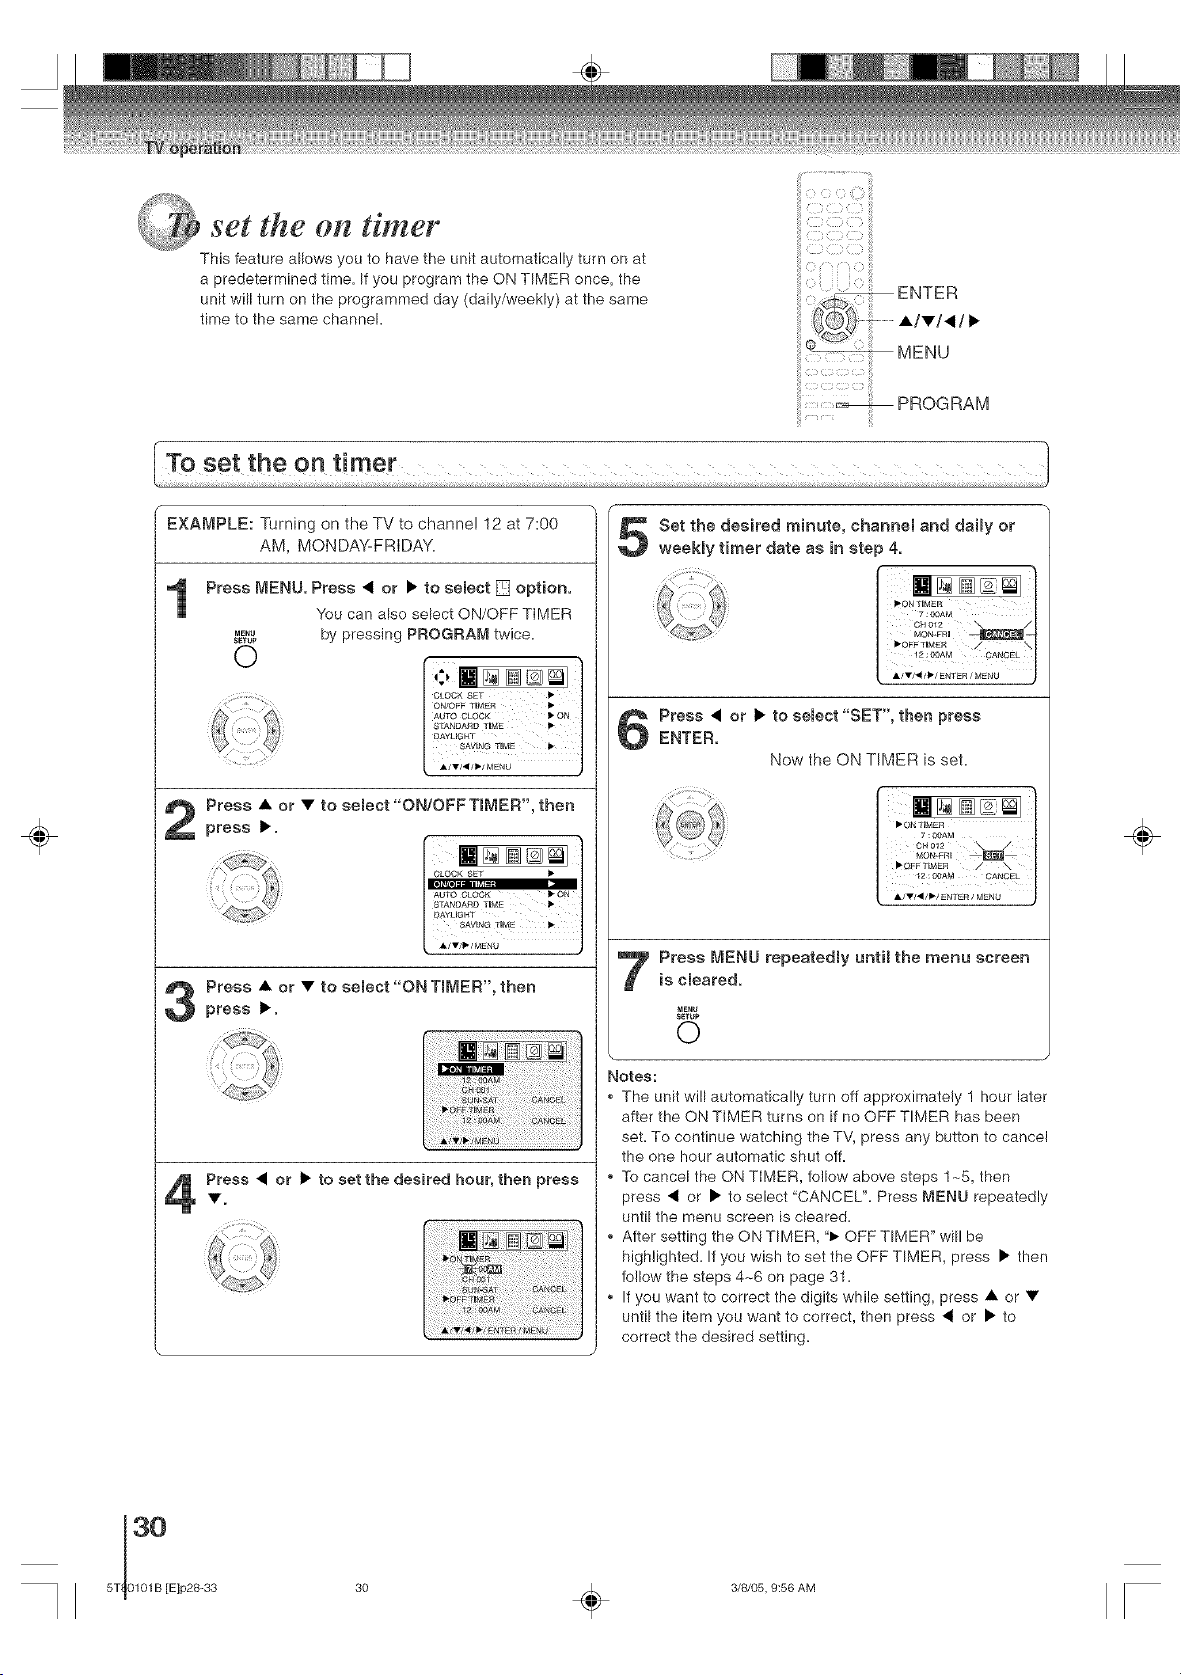
set the on timer
This feature allows you to have the unit automatically turn on at
a predetermined time. If you program the ON TIMER once, the
unit will turn on the programmed day (daily/weekly) at the same
time to the same channel.
::S¸<::} : !i!!
ENTER
A/v/,/_
MENU
..... _ PROGRAM
÷
EXA[_PLE: Turning on the TV to channel 12 at 7:00
AM, MONDA%FRIDAY.
Press MENU. Press • or • to sebct [] option.
You can abe select ON/OFF TIMER
ME,U by pressing PROGRAN twice.
SETUP
0
CLOCK SET _
ON/OFF TDMER 1_
AUTO CLOCK _* ON
8TANDA£D TDME
_AYUGHT
SAVING TUME
Press • or • to select "ON/OFFTmMER', then
press •.
Press • or • to select"ON TIMER', then
press •,
Press • or • to set the desired hour, then press
Set the desired minute, channel and daily or
weekly timer date as in step 4.
7 _00AM /_
0H012 /
MON-FRU
Press • or • to semect "SET", then press
ENTER.
Now the ON TIMER is set.
..2:!i<a
6H012 _ J
I_Q_F TIMER / _ |
12 : 00AM CANCEL
Press MENU repeatedly until the menu screen
is cleared.
MENU
SETUP
0
Notes:
The unit will automatically turn off approximately 1 hour later
after the ON TIMER turns on if no OFF TIMER has been
set. To continue watching the TV, press any button to cancel
the one hour automatic shut off.
To cancel the ON TIMER, follow above steps 1_5, then
press _1 or • to select "CANCEL". Press _ENU repeatedly
until the menu screen is cleared.
After setting the ON TIMER, "1_OFF TIMER" will be
highlighted. If you wish to set the OFF TIMER, press • then
follow the steps 4~6 on page 31.
If you want to correct the digits while setting, press • or •
until the item you want to correct, then press _ or • to
correct the desired setting.
÷
30 _ 3/8/05, 9:56 AM

Cg
set the off timer
This feature allows you to have the unit turn off automatically at a
predetermined time. if you program the OFF TIMER once, the unit will
automatically turn off at the same time everyday.
ii {3 )_ Z iii
•/T/•/•
MENU
PROGRAM
÷
F-
EXAMPLE: Turning off the TV at 11:30 PM.
Press MENU. Press • or • to semect [] option.
You can also select ON/OFF TIMER
by pressing PROGRAN twice.
MENU
S_TUP
o t
.j
AUTO CLOCK _* ON
STANDAND T_ME
DAYLmGHT
SAVING TIME 1_
Press • or • to seJect "ONIOFF TIMER', then
press •.
AUTO CLOCK • ON
STANDARD TIME Ii_
DAYLIGHT
SAVING TIME I_
;V,,;Mi,_
Press • or • to select "OFFTBMER', then
press •.
Press • or • to set the desired hour, then
press •,
Press • or • to set the desired minute, then
press •.
7
Press • or • to se[ect"SET".
Now the OFF TIMER is set.
..../
OH o01
.... SUN'AT CANCEL
• OFFTDMER _
A/T/41/_/ENTER / M_NU )
Press MENU repeatedJy until the menu screen
is cmeared.
M_NU
SETUP
0
Notes:
To cancel the OFF TIMER function:
To cancel OFF TIMER, follow above steps ! ~5, press • or
• to select"CANCEL'. Press MENU repeatedly until the menu
screen is cleared.
To corffirm the ON!OFF TIMER:
Press PROGRAM twice to indicate the programs on the
screen.
-4
<
o
o
÷
31
5T80101 B [E]p28-33 31 _ 3/8/05, 9:56 AM
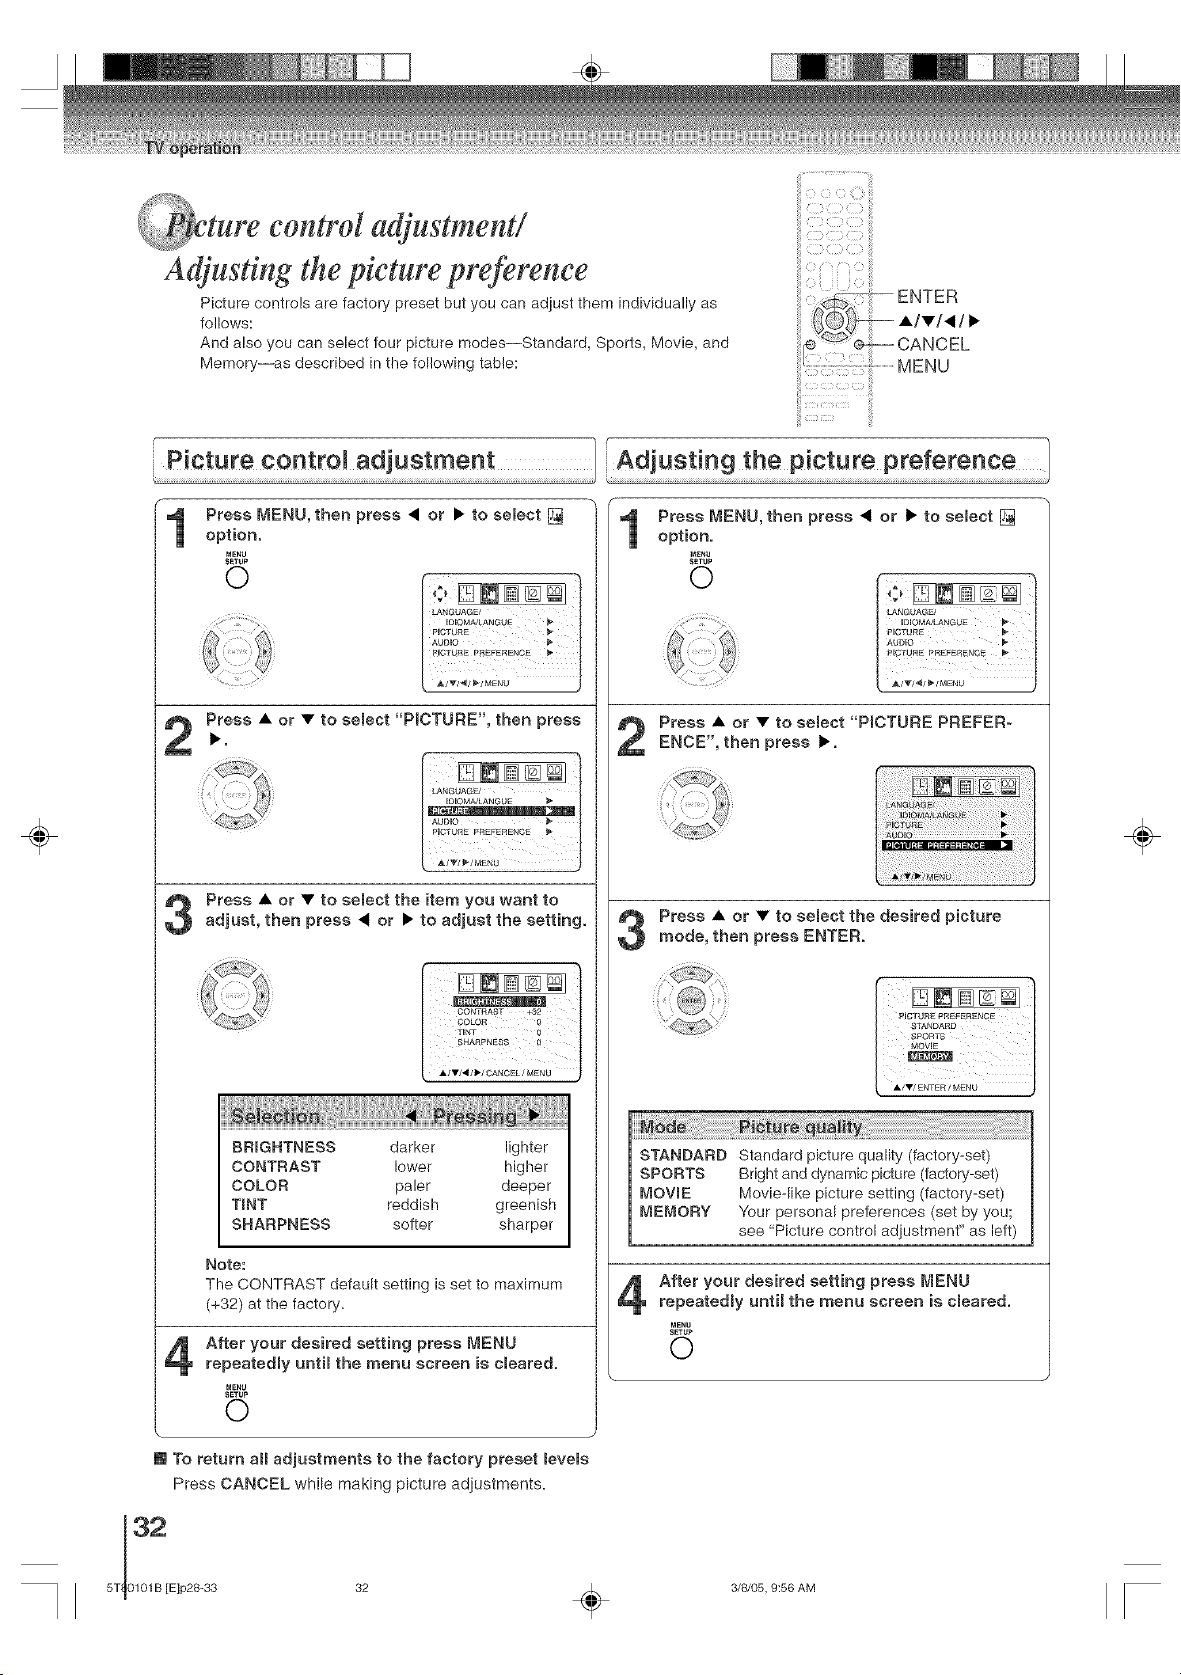
ture control adjustment!
%;@Y
Adjusting the picture preference
Picture controls are factory preset but you can adjust them individually as
follows:
And also you can select four picture modes--Standard, Sports, Movie, and
Memory--as described in the following table: M E N U
÷
Press MENU, then press • or • to select []
option.
MENU
SETUP
O
Press MENU, then press • or • to sebct []
option.
MEnU
SETUP
O
Press • or • to semect"PICTURE', then press
Press • or • to semect the item you want toadjust, then press • or • to adjust the setting.
BRIGHTNESS darker lighter
CONTRAST lower higher
COLOR paler deeper
TINT reddish greenish
SHARPNESS softer sharper
Note:
The CONTRAST default setting is set to maximum
(+32) at the factory,
After your desired setting press MENU
repeatedly until the menu screen is cleared.
MENU
SETUP
©
Press • or • to semect "PICTURE PREFER-
ENCE", then press •.
Press • or • to sebct the desired picture
mode, then press ENTER.
STANDARD Standard picture quality (factory-set)
SPORTS Bright and dynamic picture (factory-set)
MOWE Movie-like picture setting (factory-set)
MEMORY Your personal preferences (set by you;
see "Picture control adjustment" as left)
After your desired setting press MENUrepeatedmy until the menu screen is cleared.
MENU
SETUP
©
m To return aH adjustments to the factory preset _eve_s
Press CANCEL while making picture adjustments.
÷
3/8/05, 9:56 AM
÷
÷
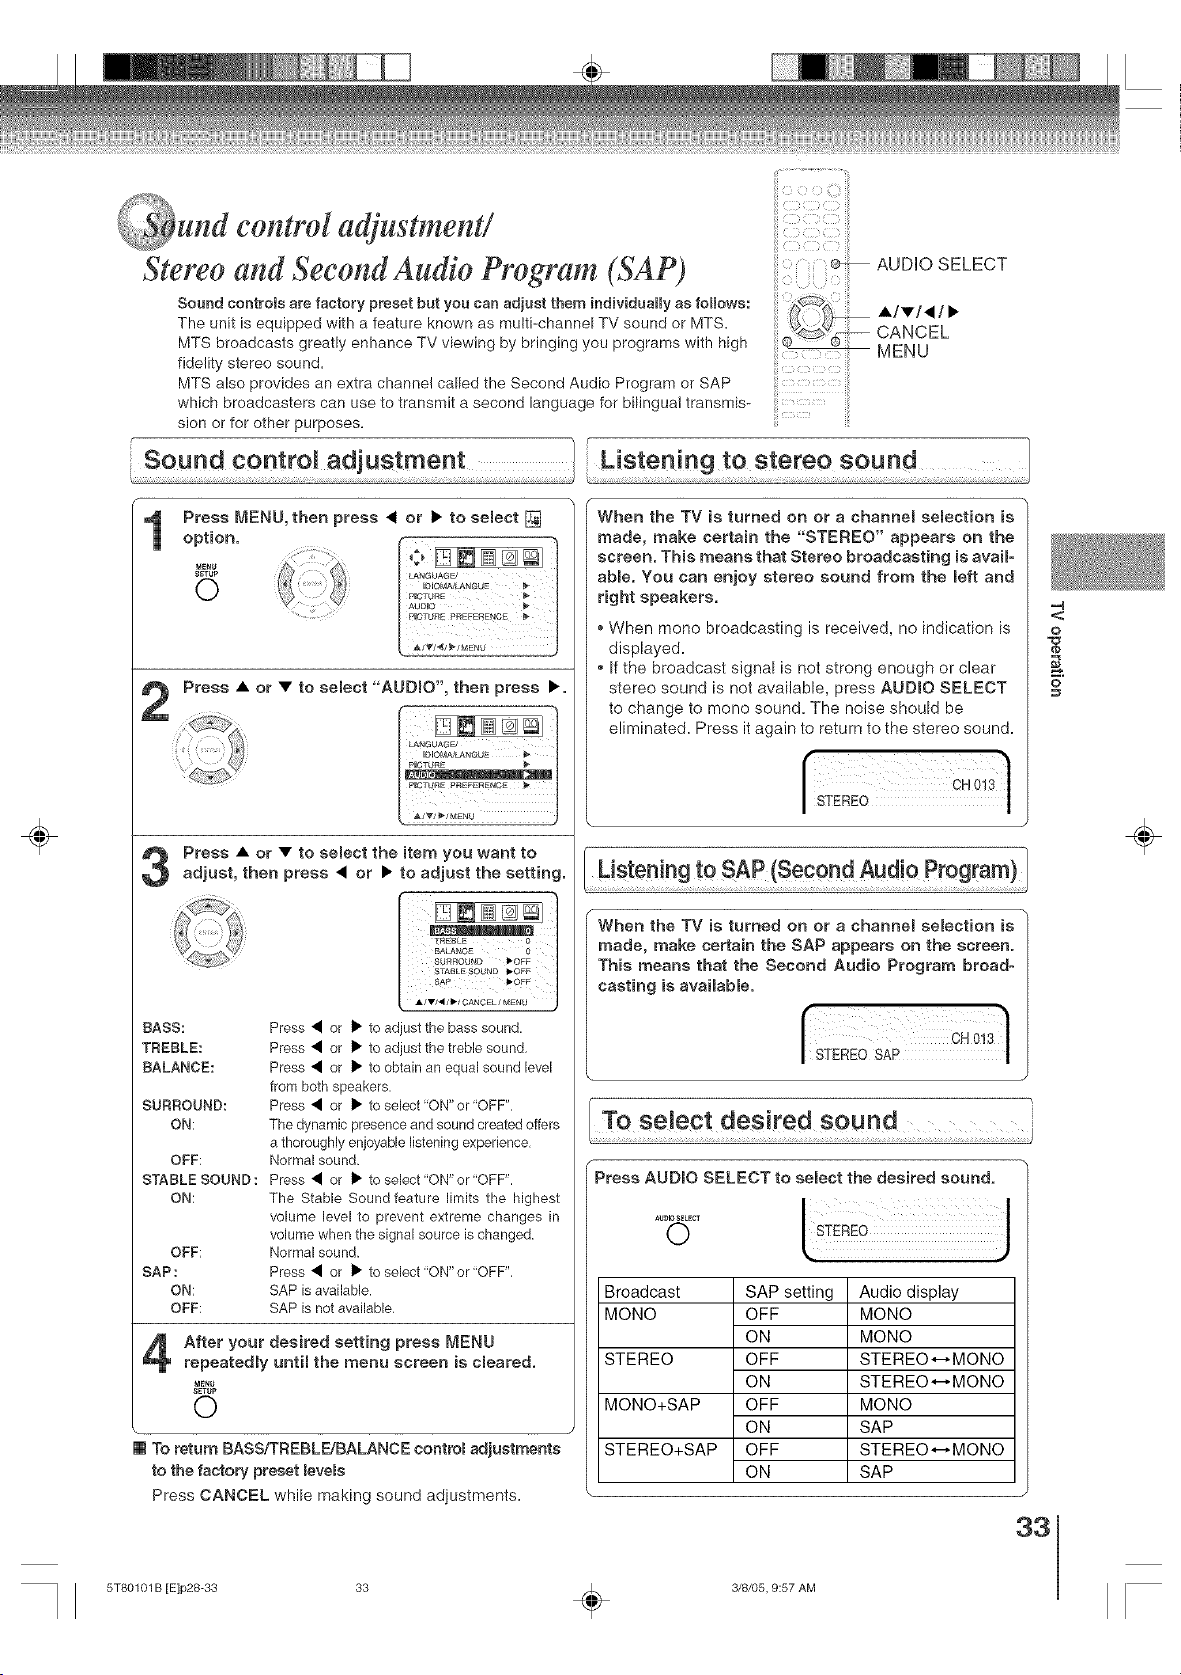
und control a ustment!
Stereo and Seeoftd Audio Program (SAP)
Sound controls are factory preset but you can adjust them individually as follows:
The unit is equipped with a feature known as multi-channel TV sound or MTS.
MTS broadcasts greatly enhance TV viewing by bringing you programs with high
fidelity stereo sound.
MTS also provides an extra channel called the Second Audio Program or SAP
which broadcasters can use to transmit a second language for bilingual transmis*
sion or for other purposes.
AUDIO SELECT
•/•/,/•
CANCEL
MENU
f r
Sound control adjustment
........................ Listening to stereo sound 1
Press MENU, then press < or • to semect []
option.
MENU
S_TUP
O
Press • or • to select "AUDmO', then press ._.
Press • or • to semect the item you want toadjust, then press < or • to adjust the setting.
BASS:
TREBLE:
BALANCE:
SURROUND:
ON:
OFF:
STABLE SOUND :
ON:
OFF:
SAP :
ON:
OFF:
Press • or I_ to a( Jst the bass sound.
Press • or • to a( Jst the treble sound,
Press • or • to obtain an equal sound level
from both speakers.
Press • or • to select ON" or "OFF",
The dynamic presence and sound created offers
a thoroughly enjoyable listening experience,
Normal sound.
Press < or I_ to select "ON" or "OFF".
The Stable Sound feature limits the highest
volume level to prevent extreme changes in
volume when the signal source is changed.
Normal sound.
Press • or _" to select "Of4" or "OFF",
SAP is available.
SAP is not available,
After your desired setting press MENU
repeatedly until the menu screen is cleared.
MEN_
SETUP
O
m To return BASS/TREBLE/BALANCE contm_ adjustments
to the factory preset _eve_s
Press CANCEL while making sound adiustments.
When the TV is turned on or a channel semection is
made, make certain the "STEREO" appears on the
screen. This means that Stereo broadcasting is avaH-
abme. You can enjoy stereo sound from the left and
right speakers.
, When mono broadcasting is received, no indication is
displayed=
, If the broadcast signal is not strong enough or clear
stereo sound is not available, press AUDIO SELECT
to change to mono sound. The noise should be
eliminated= Press it again to return to the stereo sound.
When the TV is turned on or a channem selection is
made, make certain the SAP appears on the screen.
This means that the Second Audio Program broad°
casting is avaimabme.
| STEREO SAP |
I
Press AUDmO SELECT to select the desired sound.
AU010SELECT
O S EREo
Broadcast
MONO
STEREO
MONO+SAP
STEREO+SAP
SAP setting
OFF
ON
OFF
ON
OFF
ON
OFF
ON
Audio display
MONO
MONO
STEREO*-,MONO
STEREO.,-_MONO
MONO
SAP
STEREO*-,MONO
SAP
33
=4
<
o
o
÷
5T80101 B [E]p28-33 33 _ 3/8/05, 9:57 AM
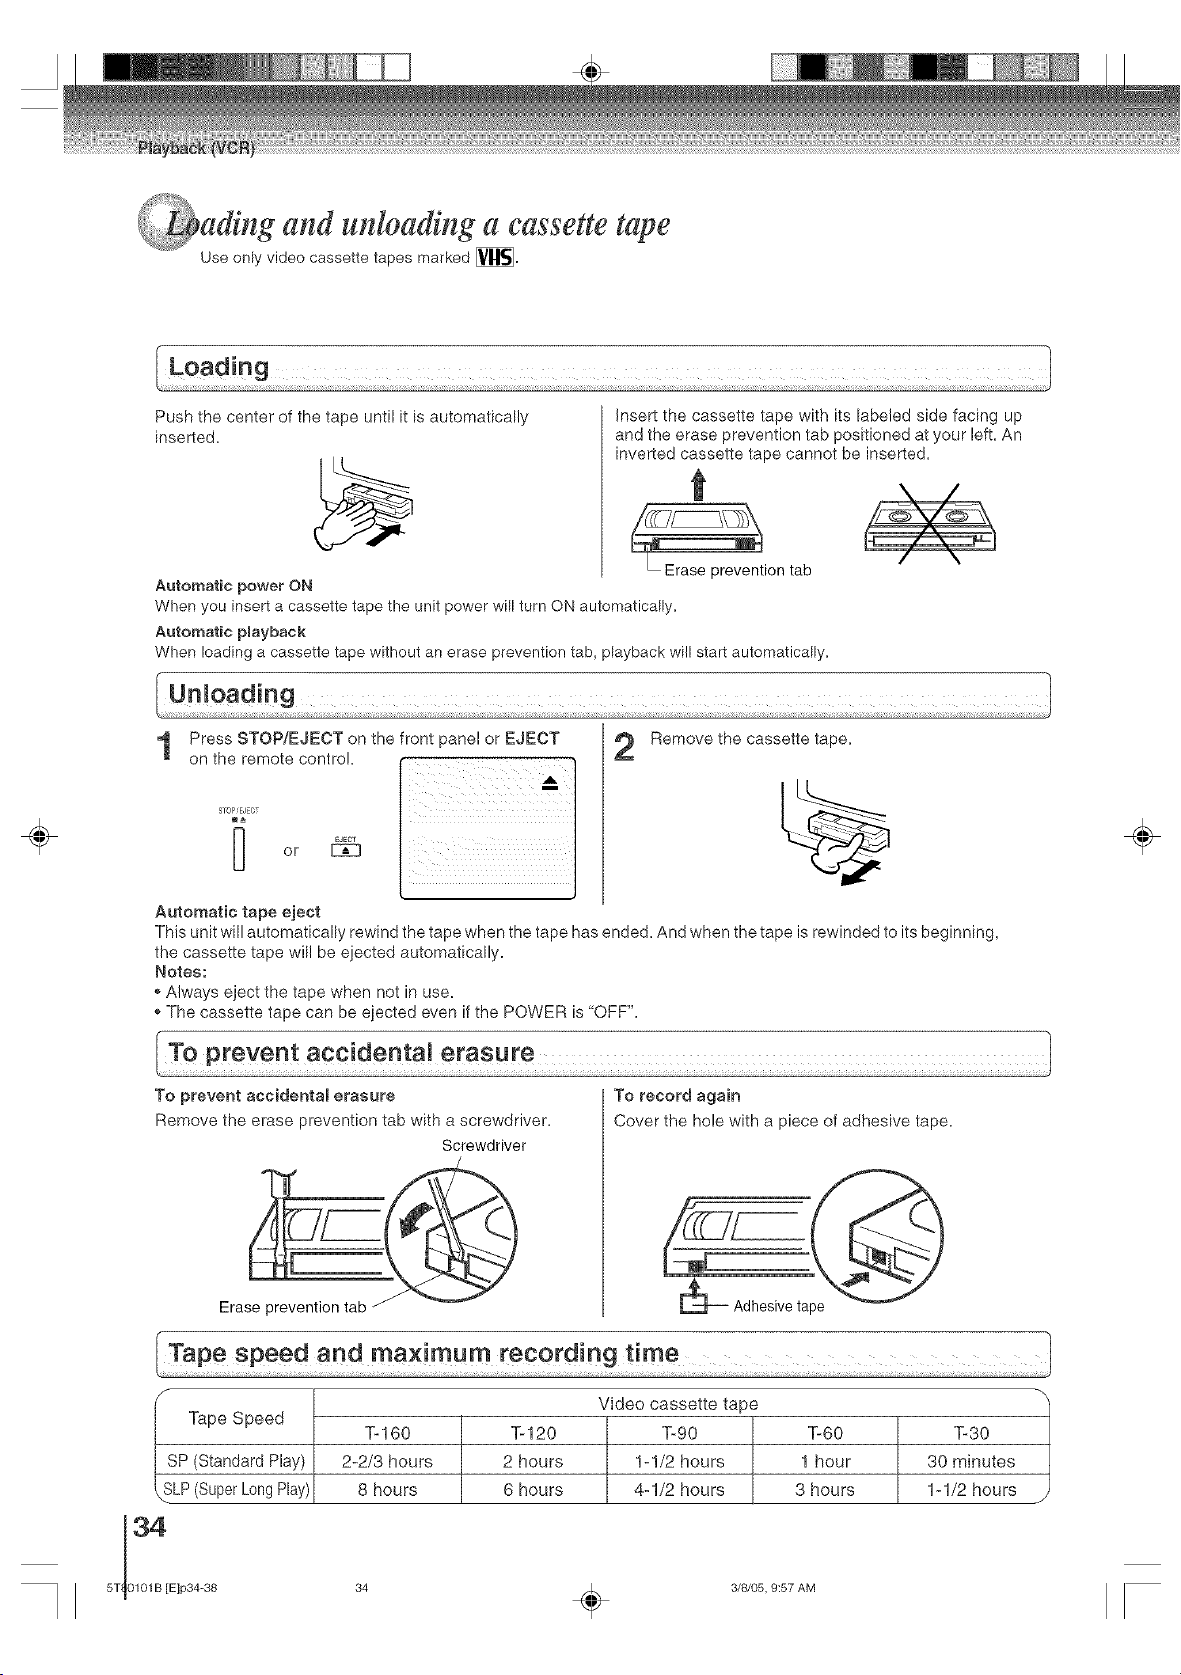
ading and unloading a cassette tape
Use only video cassette tapes marked [_.
Push the center of the tape until it is automatically
inserted.
Insert the cassette tape with its labeled side facing up
and the erase prevention tab positioned at your left. An
inverted cassette tape cannot be inserted.
t
• Erase prevention tab / \
Automatic power ON
When you insert a cassette tape the unit power will turn ON automatically.
Automatic pRayback
When loading a cassette tape without an erase prevention tab, playback will start automatically.
÷
1
STOmEJECT
[_ EJECT
or
Automatic tape eject
Press STOP/EJECT on the front panel or EJECT
on the remote control.
I :1
2
Remove the cassette tape.
This unit will automatically rewind the tape when the tape has ended. And when the tape is rewinded to its beginning,
the cassette tape will be ejected automatically.
Notes:
- Always eject the tape when not in use.
,, The cassette tape can be ejected even if the POWER is "OFF".
÷
To prevent accidental erasure
Remove the erase prevention tab with a screwdriver.
Screwdriver
Erase prevention tab
To record again
Cover the hole with a piece of adhesive tape,
_- Adhesive tape _
F Video cassette tape
u_p_ ope_u
T-160 %120 T-90 T-60 T-30
SP (Standard Play) 2-2/3 hours 2 hours 1-1/2 hours 1 hour 30 minutes
\SLP (Super Long Play) 8 hours 6 hours 4-1/2 hours 3 hours 1-1/2 hours x
5T 0101B [Elp34-38 34 ,_. 3/8/05, 9:57 AM
÷
_i!i__ _,_!i{_i_
ssette tape playback
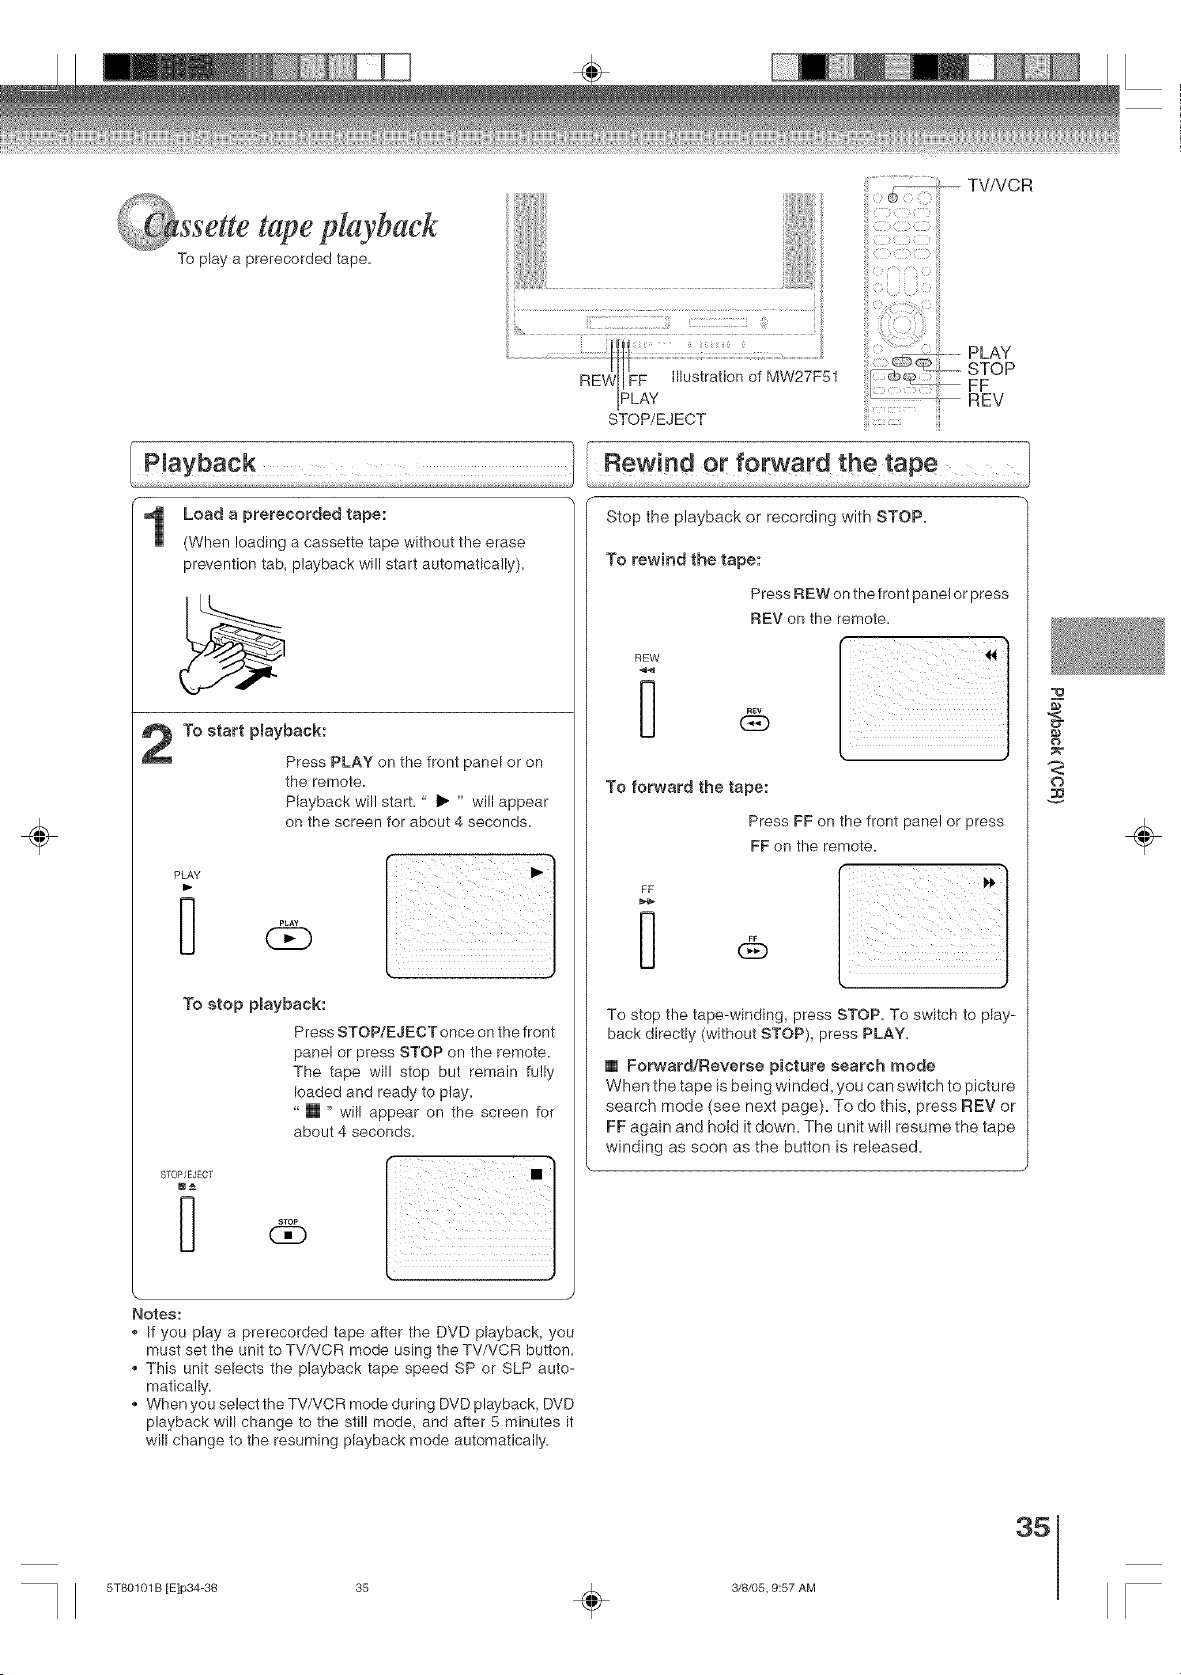
To play a prerecorded tape.
[iil
..... FAy................................ 51
STOP/EJECT
Load a prerecorded tape:
(When loading a cassette tape without the erase
prevention tab, playback will start automatically).
To start pmayback:
Press PLAY on the front panel or on
the remote.
Playback will start. " I_ " will appear
on the screen for about 4 seconds.
PLAY
To stop pmayback:
Press STOP/EJECT once on the front
panel or press STOP on the remote.
The tape will stop but remain fully
loaded and ready to play.
" [] " will appear on the screen for
about 4 seconds.
STOP/EJECT
m_
PLAY
t
FF
..... R EV
Rewind or forward the tape
Stop the playback or recording with STOP.
To rewind the tape:
Press PEW on the front panel or press
REV on the remote.
REW
To forward the tape:
Press FF on the front panel or press
FF on the remote.
FF
To stop the tape-winding, press STOP. To switch to play-
back directly (without STOP), press PLAY.
[] Forward/Reverse picture search mode
When the tape is being winded, you can switch to picture
search mode (see next page). To do this, press REV or
FF again and hold it down. The unit will resume the tape
winding as soon as the button is released.
,<
o
o
÷
Notes:
. If you play a prerecorded tape after the DVD playback, you
must set the unit to TV/VCR mode using the TV/VCR button.
This unit selects the playback tape speed SP or SLP auto-
matically.
When you select the TV/VCR mode during DVD playback, DVD
playback will change to the still mode, and after 5 minutes it
will change to the resuming playback mode automatically.
35
5T80101 B [E]p34-38 35 _ 3/8/05, 9:57 AM
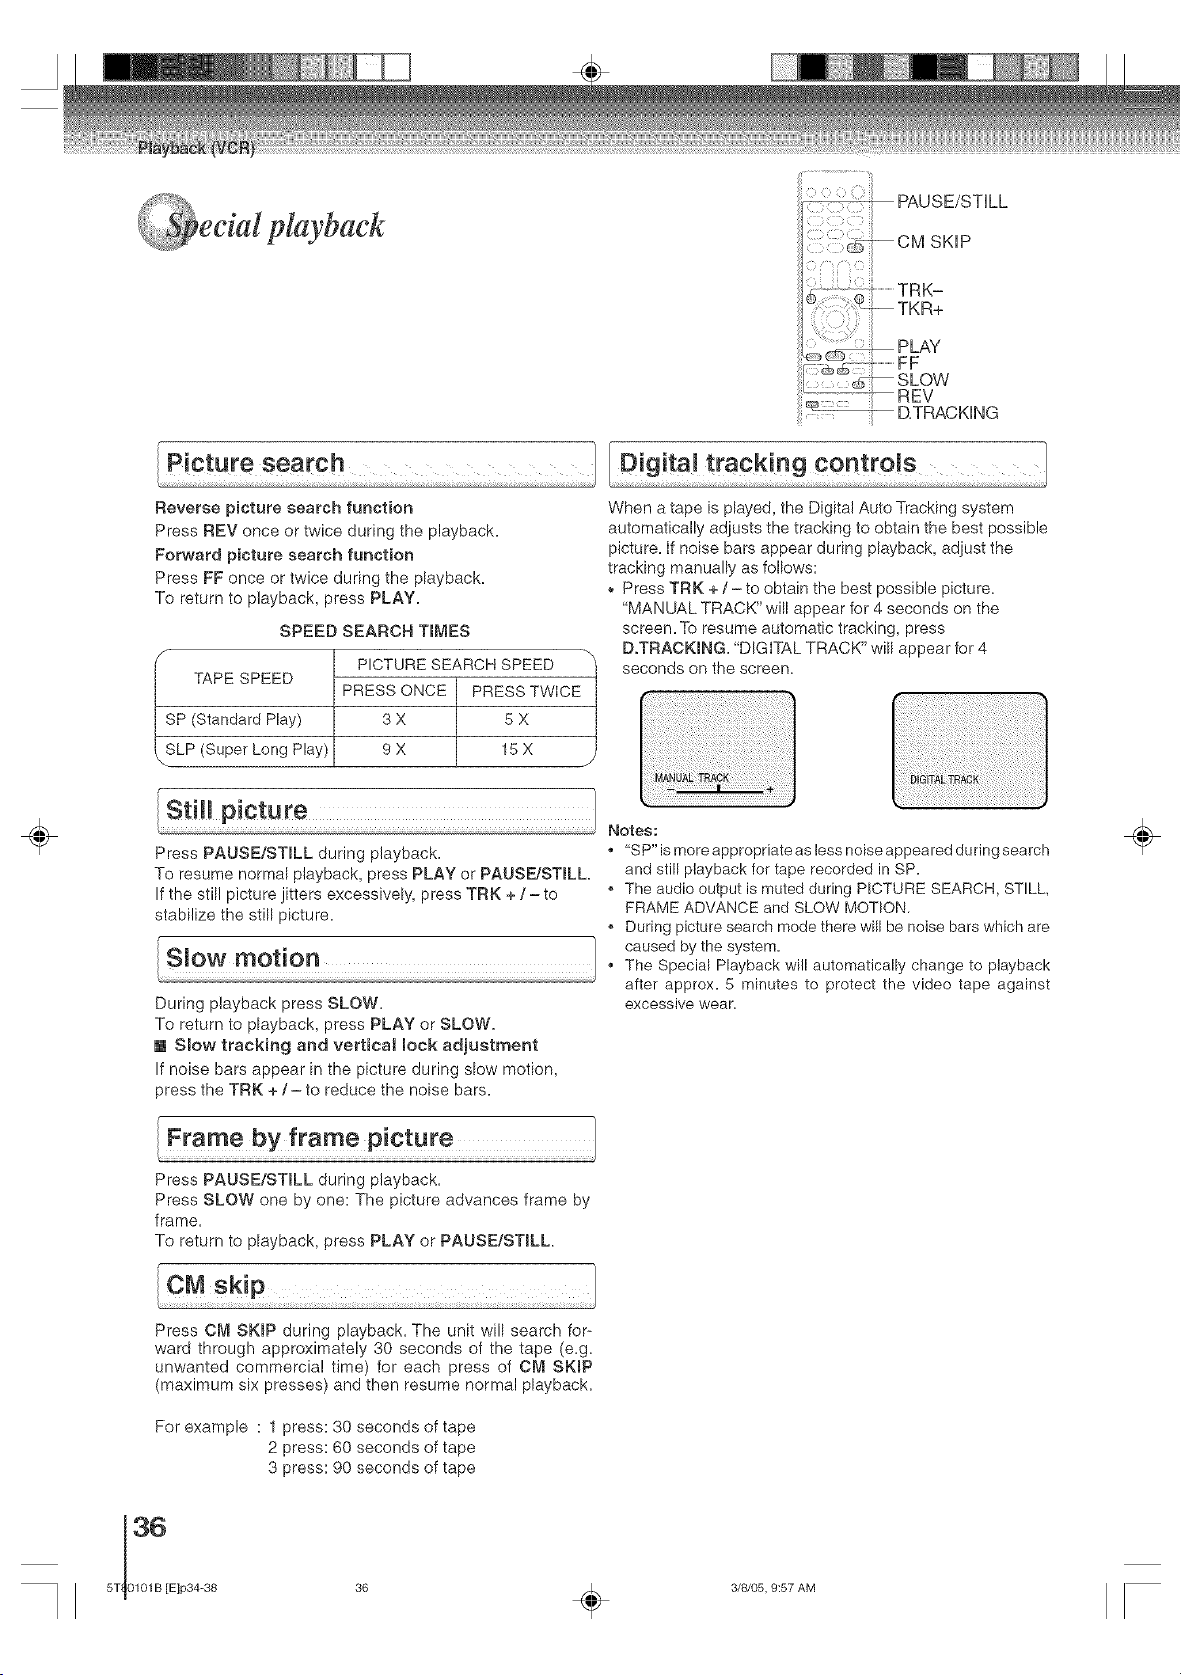
÷
Reverse picture search function
Press REV once or twice during the playback=
Forward picture search function
Press FF once or twice during the playback.
To return to playback, press PLAY.
SPEED SEARCH TIMES
f PICTURE SEARCH SPEED "_
TAPE SPEED PRESS ONCE PRESS TWICE
SP (Standard Play) 3 X 5 X
SLP (Super Long Play) 9 X 15 X
/,
Press PAUSE/STILL during playback.
To resume normal playback, press PLAY or PAUSE!STILL
If the still picture jitters excessively, press TRK + / -to
stabilize the still picture.
During playback press SLOW.
To return to playback, press PLAY or SLOW.
[] Slow tracking and verticat lock adjustment
If noise bars appear in the picture during slow motion,
press the TRK +/- to reduce the noise bars.
When a tape is played, the Digital Auto Tracking system
automatically adjusts the tracking to obtain the best possible
picture, if noise bars appear during playback, adjust the
tracking manually as follows:
Press TRK + / - to obtain the best possible picture.
"MANUAL TRACK" will appear for 4 seconds on the
screen. To resume automatic tracking, press
D.TRACKING= "DIGITAL TRACK" will appear for 4
seconds on the screen.
Notes:
* "SP" is more appropriate as less noise appeared during search
and still playback for tape recorded in SP.
The audio output is muted during PICTURE SEARCH, STILL,
FRAME ADVANCE and SLOW MOTION.
During picture search mode there will be noise bars which are
caused by the system.
The Special Playback will automatically change to playback
after approx. 5 minutes to protect the video tape against
excessive wear.
÷
Press PAUSE/STILL during playback.
Press SLOW one by one: The picture advances frame by
frame.
To return to playback, press PLAY or PAUSE/STILL
Press CM SKmP during playback. The unit will search for-
ward through approximately 30 seconds of the tape (e.g.
unwanted commercial time) for each press of CM SKIP
(maximum six presses) and then resume normal playback=
For example : I press: 30 seconds of tape
2 press: 60 seconds of tape
3 press: 90 seconds of tape
36
5T 0101B [E]p34=38
36 _ 3/8/05, 9:57 AM

DISPLAY
•/T/_/•
MENU
PLAY
COUNTER RESET
REC
÷
The entire video tape will be played until its end. The taps
will automatically rewind to the beginning and the playback
will be repeated.
Press • or • to select "AUTO REPEAT".
Press _ or • to se_ect"ON" or"OFF".
It "ON" is selected, the playback will
be repeated endlessly.
Press MENU repeatedmy until the menu screen
is smeared.
&%$f'm If you press DISPLAY, "0" will
appear on the screen [_=
1"o start the playback, press PLAY.
,_,_ The playback will be repeated endlessly.
[] To cancel repeat mode:
In step 3 above, press • or • to select 'OFF" position. Press
MENU repeatedly until the menu screen is cleared. The repeat
function is canceled automatically when the unit is switched
off=
The omscreen real time taps counter shows the taps
running time in hours, minutes and seconds=You can
easily determine how long the tape has been running or
how much time is left on the tape.
Press DISPLAY.
DISPLAY
CD
Press COUNTER RESET to set the counter to
"00:00:00".
COU_TEH_ESET
0
TVNCR
Begin P_ayback or Recording to start the tape,
the counter will display the e_apsed time.
db
When you wish to make the counter disappear,
press D}SPLAY once again.
DISPLAY
CD
_o
,<
¢)
o
÷
37
5T80101 B [E]p34=38 37 _ 3/8/05, 9:57 AM
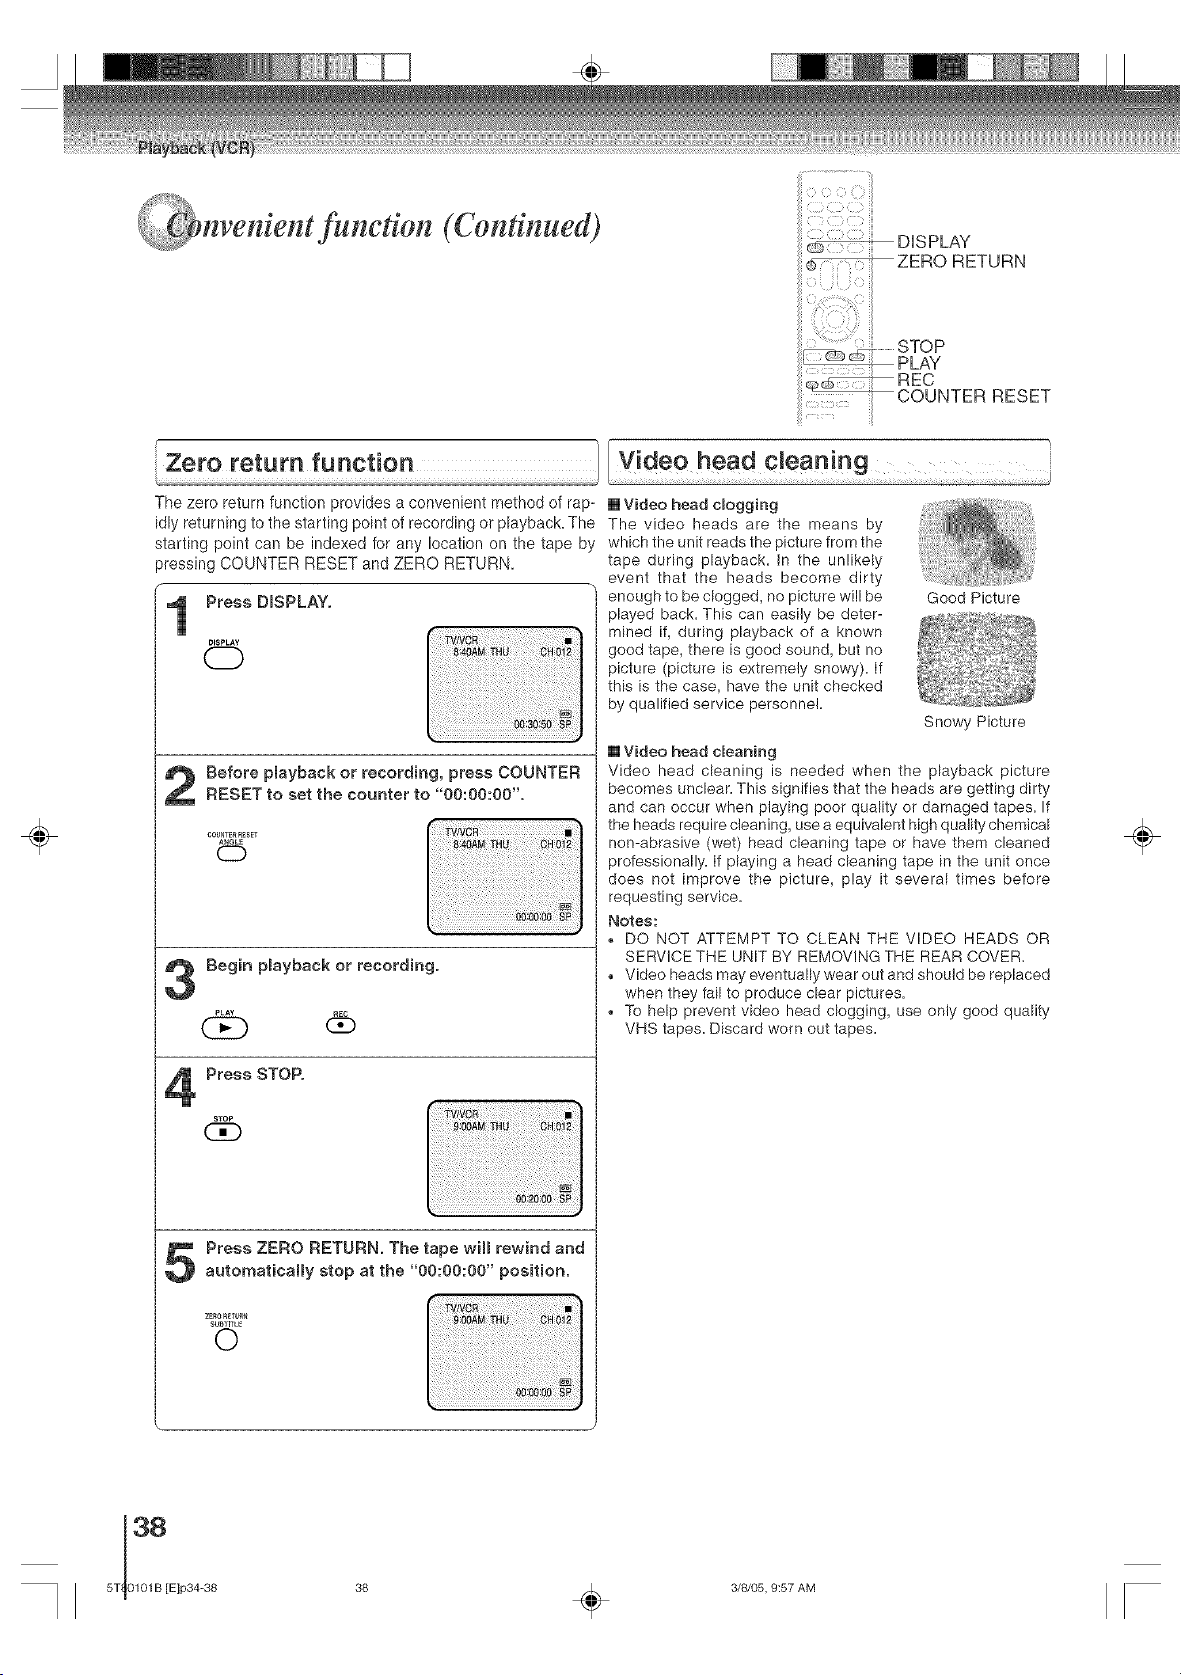
fundton (Continued)
:7:: :_ :ill
DISPLAY
÷
The zero return function provides a convenient method of rap_
idly returning to the starting point of recording or playback. The
starting point can be indexed for any location on the tape by
pressing COUNTER RESET and ZERO RETURN.
Press DISPLAY.
DISPLAY
O
Before pmayback or recording, press COUNTER
RESET to set the counter to 00:00:00 .
A_GL_
0
Begin pmayback or recording.
6
Press STOP.
STOP
(3D
Press ZERO RETURN. The tape win rewind and
automatically stop at the "00:00:00" position.
ZE_O_TUR_
SUbtITLE
0
[] Video head cBogging
The video heads are the means by
which the unit reads the picture from the
tape during playback. In the unlikely
event that the heads become dirty
enough to be clogged, no picture will be
played back. This can easily be deter-
mined if, during playback of a known
good tape, there is good sound, but no
picture (picture is extremely snowy). If
this is the case, have the unit checked
by qualified service personnel.
Good Picture
Snowy Picture
[] Video head cleaning
Video head cleaning is needed when the playback picture
becomes unclear. This signifies that the heads are getting dirty
and can occur when playing poor quality or damaged tapes. If
the heads require cleaning, use a equivalent high quality chemical
non-abrasive (wet) head cleaning tape or have them cleaned
professionally. If playing a head cleaning tape in the unit once
does not improve the picture, play it several times before
requesting service.
Notes:
, DO NOT ATTEMPT TO CLEAN THE VIDEO HEADS OR
SERVICETHE UNIT BY REIVIOVING THE REAR COVER.
,, Video heads may eventually wear out and should be replaced
when they fail to produce clear pictures.
To help prevent video head clogging, use only good quality
VHS tapes. Discard worn out tapes.
÷
38 _ 3/8/05, 9:57 AM
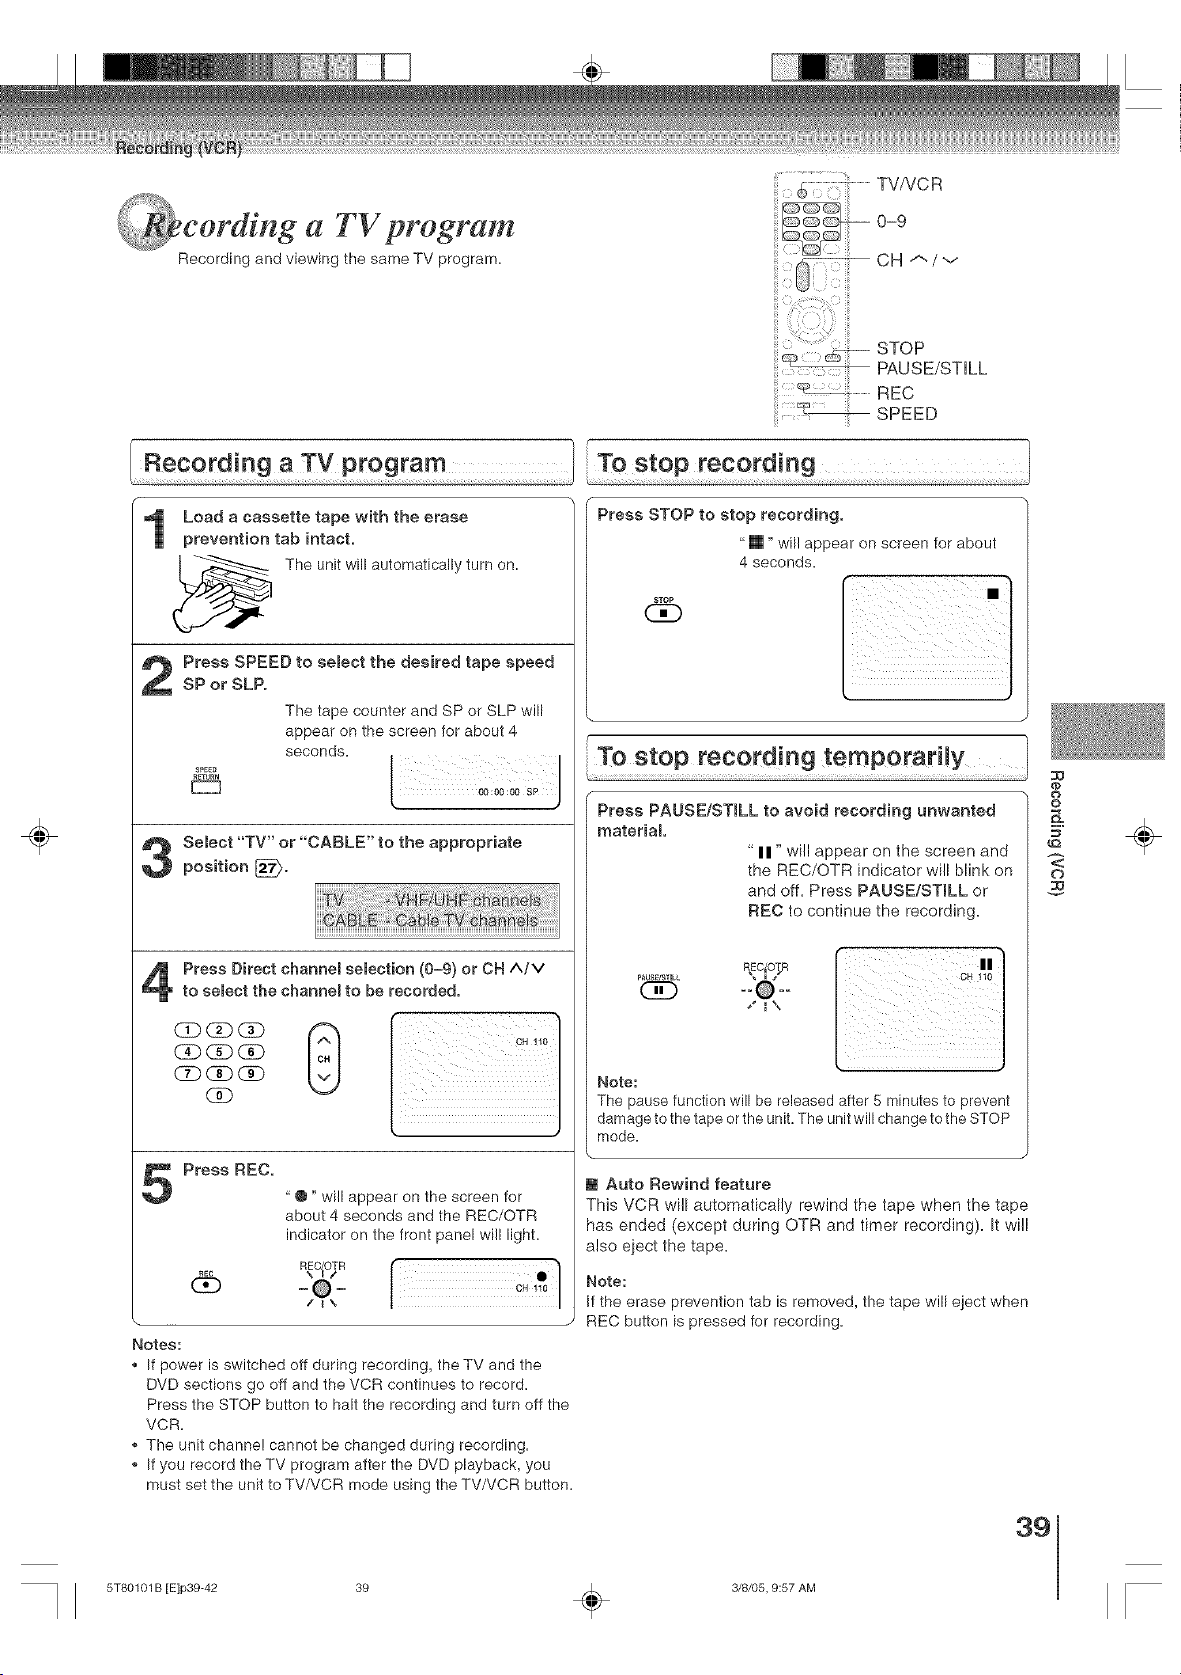
÷
a TVprogram
Recording and viewing the same TV program.
Load a cassette tape with the erase
TV/VCR
0-9CH A/v
STOP
PAUSE/STILL
.................REC
SPEED
f
To stop recording
t ..............
Press STOP to stop recording.
prevention tab intact.
The unit will automatically turn on.
Press SPEED to semect the desired tape speed
SP or SLP.
The tape counter and SP or SLP will
appear on the screen for about 4
STOP
(:]D
"[]" will appear on screen for about
4 seconds.
[
SPEE_
R_TUBN
[_
seconds,
Select "TV" or "CABLE" to the appropriate
position [_.
CD GDCD
(3D CD (_D
C2D_CD
CoD
Press Direct channel selection (0-9) or CH A/V
to select the channel to be recorded,
Press REC.
"@" will appear on the screen for
about 4 seconds and the REC/OTR
indicator on the front panel wi!l light.
Notes:
* !f power is switched off during recording, the TV and the
DVD sections go off and the VCR continues to record.
Press the STOP button to halt the recording and turn off the
VCR.
, The unit channe! cannot be changed during recording.
, If you record the TV program after the DVD playback, you
must set the unit to TV/VCR mode using the TV/VCR button.
To stop recording temporarily
Press PAUSE/STILL to avoid recording unwanted
material
"II" will appear on the screen and
the REC/OTR indicator will blink on
and off. Press PAUSE/STILL or
REC to continue the recording.
PAUSE/S_[LL
(]D
Note:
The pause function will be released after 5 minutes to prevent
damage to the tape orthe unit. The unit wiii change to the STOP
mode.
@ Auto Rewind feature
This VCR will automatically rewind the tape when the tape
has ended (except during OTR and timer recording). It will
also eiect the tape.
Note:
If the erase prevention tab is removed, the tape will eject when
REC button is pressed for recording,
@
¢}
o
g
o
N
39
÷
5T80101 B [E]p39-42 39 _ 3/8/05, 9:57 AM
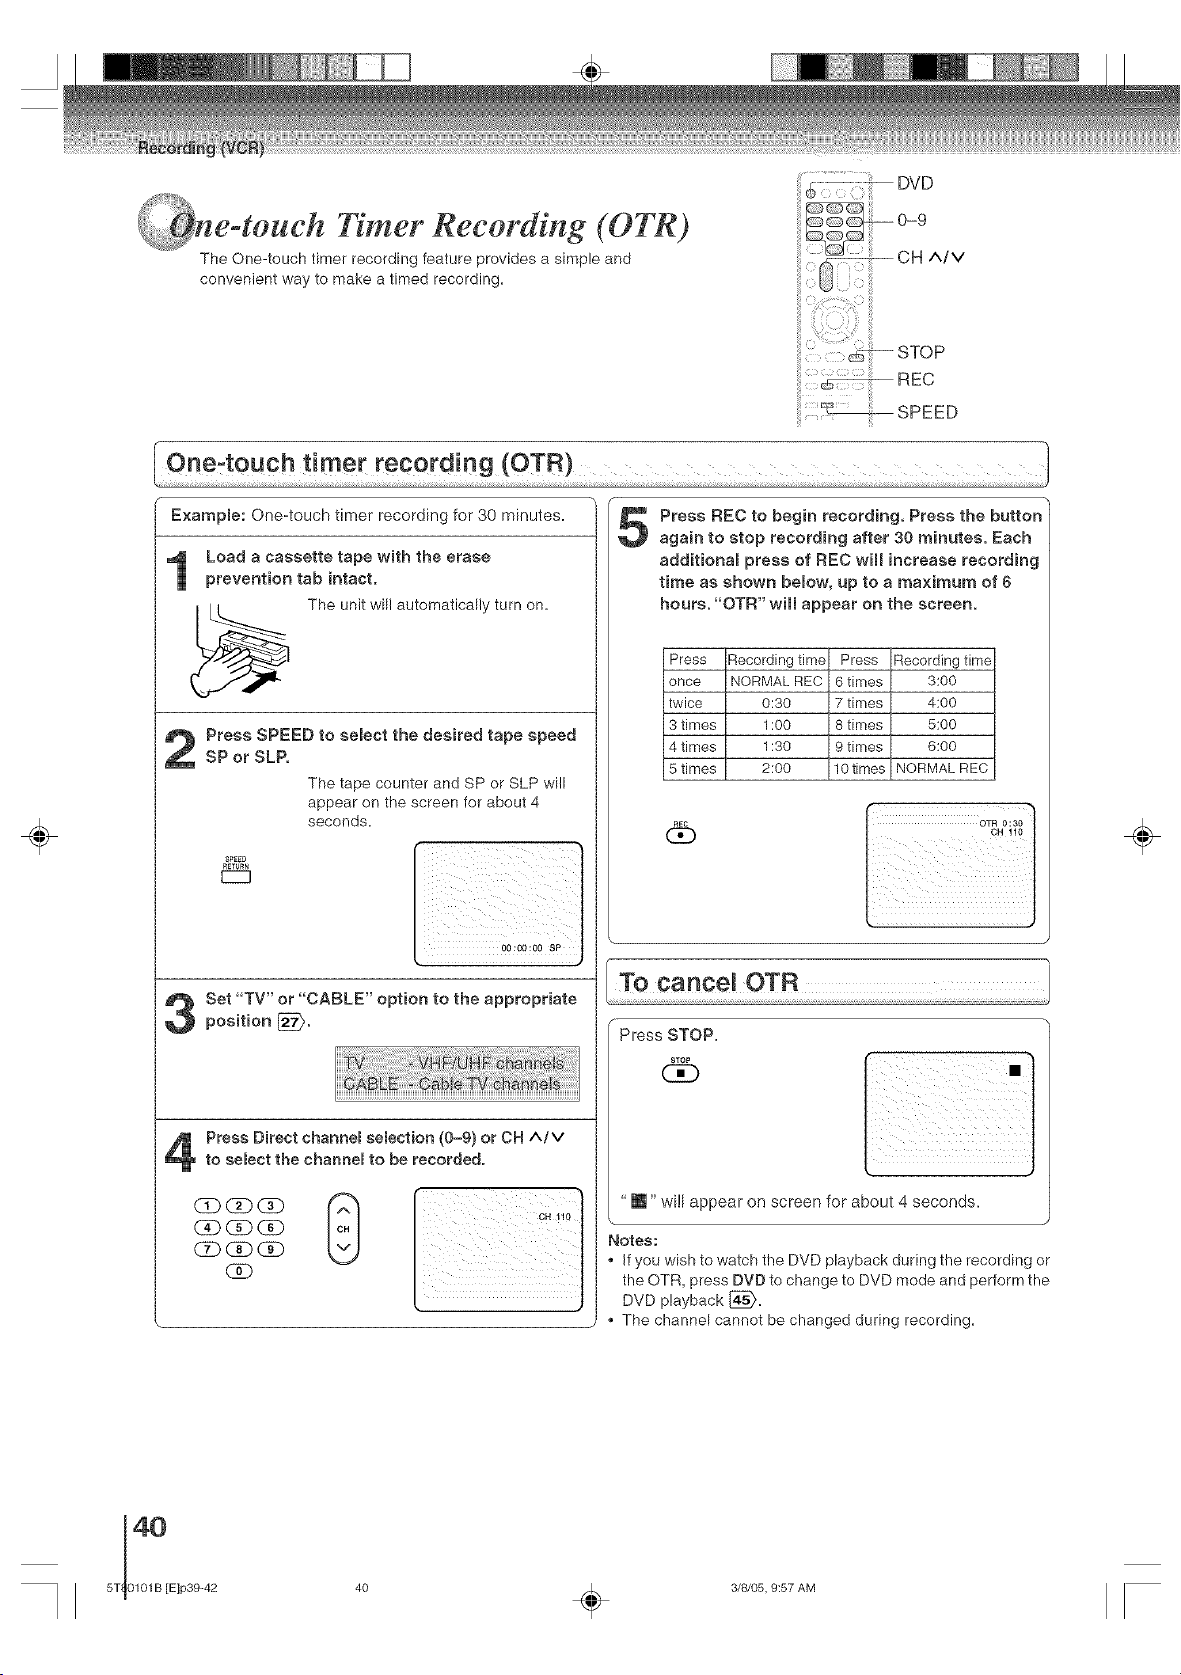
Timer Recording (OTR)
The One-touch timer recording feature provides a simple and
convenient way to make a timed recording.
_:; :i!iz;U DVD
÷
One=touch timer recording (OTR)
Example: One-touch timer recording for 30 minutes.
Load a cassette tape with the erase
prevention tab intact.
The unit will automatically turn on.
Press SPEED to select the desired tape speed
SP or SLR
The tape counter and SP or SLP will
appear on the screen for about 4
seconds.
CZ
Set "TV" or "CABLE" option to the appropriate
position [_.
Press Direct channem semecfion (0-9) or OH AiM
to eemect the channel to be recorded.
(Ab_ (Z)
(Z) CD (3_
(3D
Press REC to begin recording. Press the button
again to stop recording after 30 minutes. Each
addifionam press of REC will increase recording
time as shown below, up to a maximum of 6
hours. "OTR" will appear on the screen.
Press
once
twice
3 times
4 times
5 times
6b
Recording time Press Recording time
NORMAL REC 6 times 3:00
0:30 7 times 4:00
1:00 8 times 5:00
1:30 9 times 6:00
2:00 10 times NORMAL REC
Press STOP.
s_oP
(3E)
"m" will appear on screen for about 4 seconds.
Notes:
If you wish to watch the DVD playback during the recording or
the OTR, press DVD to change to DVD mode and perform the
DVD playback [_.
The channel cannot be changed during recording.
÷
40
5T 0101B [E]p39-42
40 _ 3/8/05, 9:57 AM
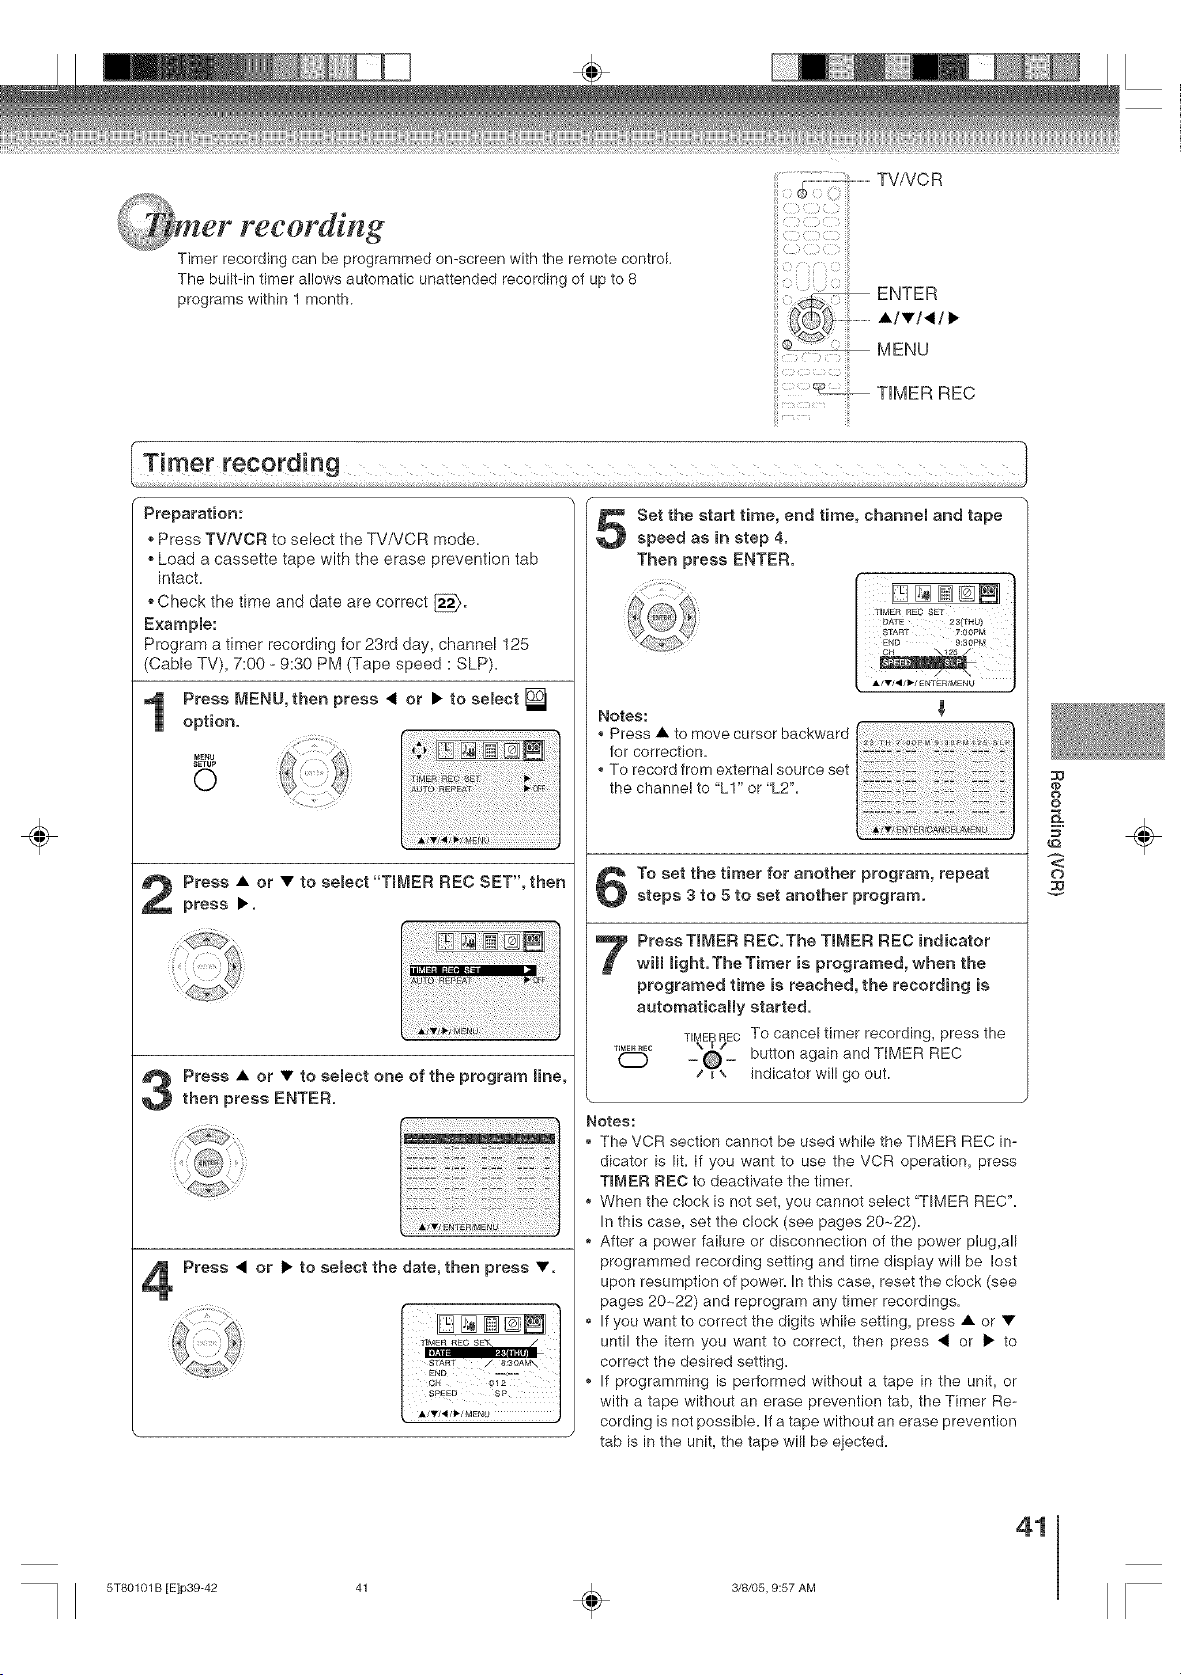
er recording
Timer recording can be programmed on-screen with the remote control
The built-in timer allows automatic unattended recording of up to 8
programs within 1 month.
TV/VC R
_ ENTER
• /•/< / I_
MENU
TIMER REC
÷
Preparation:
Press TV/VCR to select the TVNCR mode.
Load a cassette tape with the erase prevention tab
intact.
Check the time and date are correct _.
Example:
Program a timer recording for 23rd day, channel 125
(Cable TV), 7:00 = 9:30 PM (Tape speed : SLP).
Press MENU, then press < or • to select
option.
M_NU
SETUP
0
Press • or • to semect "TmMER REC SET',then
press •,
Press • or • to select one of the program line,
then press ENTER.
Press < or I_ to select the date, then press •.
Set the start time, end time, channel and tape
speed as in step 4.
Then press ENTER.
Notes:
* Press • to move cursor backward
for correction.
To record from external source set
the channel to "LI" or "L2'L
!ii!i!ii!iiii!iiiii!iiiiiiii!i_iii!iiiiiiiiiiii_iiiiii!iiiii_!iiiiiiiiiii_iiiiii_i
To set the timer for another program, repeat
steps 3 to 5 to set another program.
7 ressT[MER REC,The TIMER REC indicator
wimmHght.TheTimer is programed, when the
programed time is reached, the recording is
automatically started.
TIME RECTO cancel timer recording, press the
TB_aER_E¢ \ _ /
O "-zg\= button again and TIMER REC
indicator will go out.
Notes:
The VCR section cannot be used while the TIMER REC in-
dicator is lit. If you want to use the VCR operation, press
TIMER REC to deactivate the timer.
When the clock is not set, you cannot select "TIMER REC".
In this case, set the clock (see pages 20-22).
After a power failure or disconnection of the power plug,all
programmed recording setting and time display will be lost
upon resumption of power. In this case, reset the clock (see
pages 20--22) and reprogram any timer recordings.
If you want to correct the digits while setting, press • or •
until the item you want to correct, then press 4 or _" to
correct the desired setting.
If programming is performed without a tape in the unit, or
with a tape without an erase prevention tab, the Timer Re-
cording is not possible. If a tape without an erase prevention
tab is in the unit, the tape will be eiected.
@
o
o
g
N
÷
41
5T80101 B [E]p39-42 41 _ 3/8/05, 9:57 AM
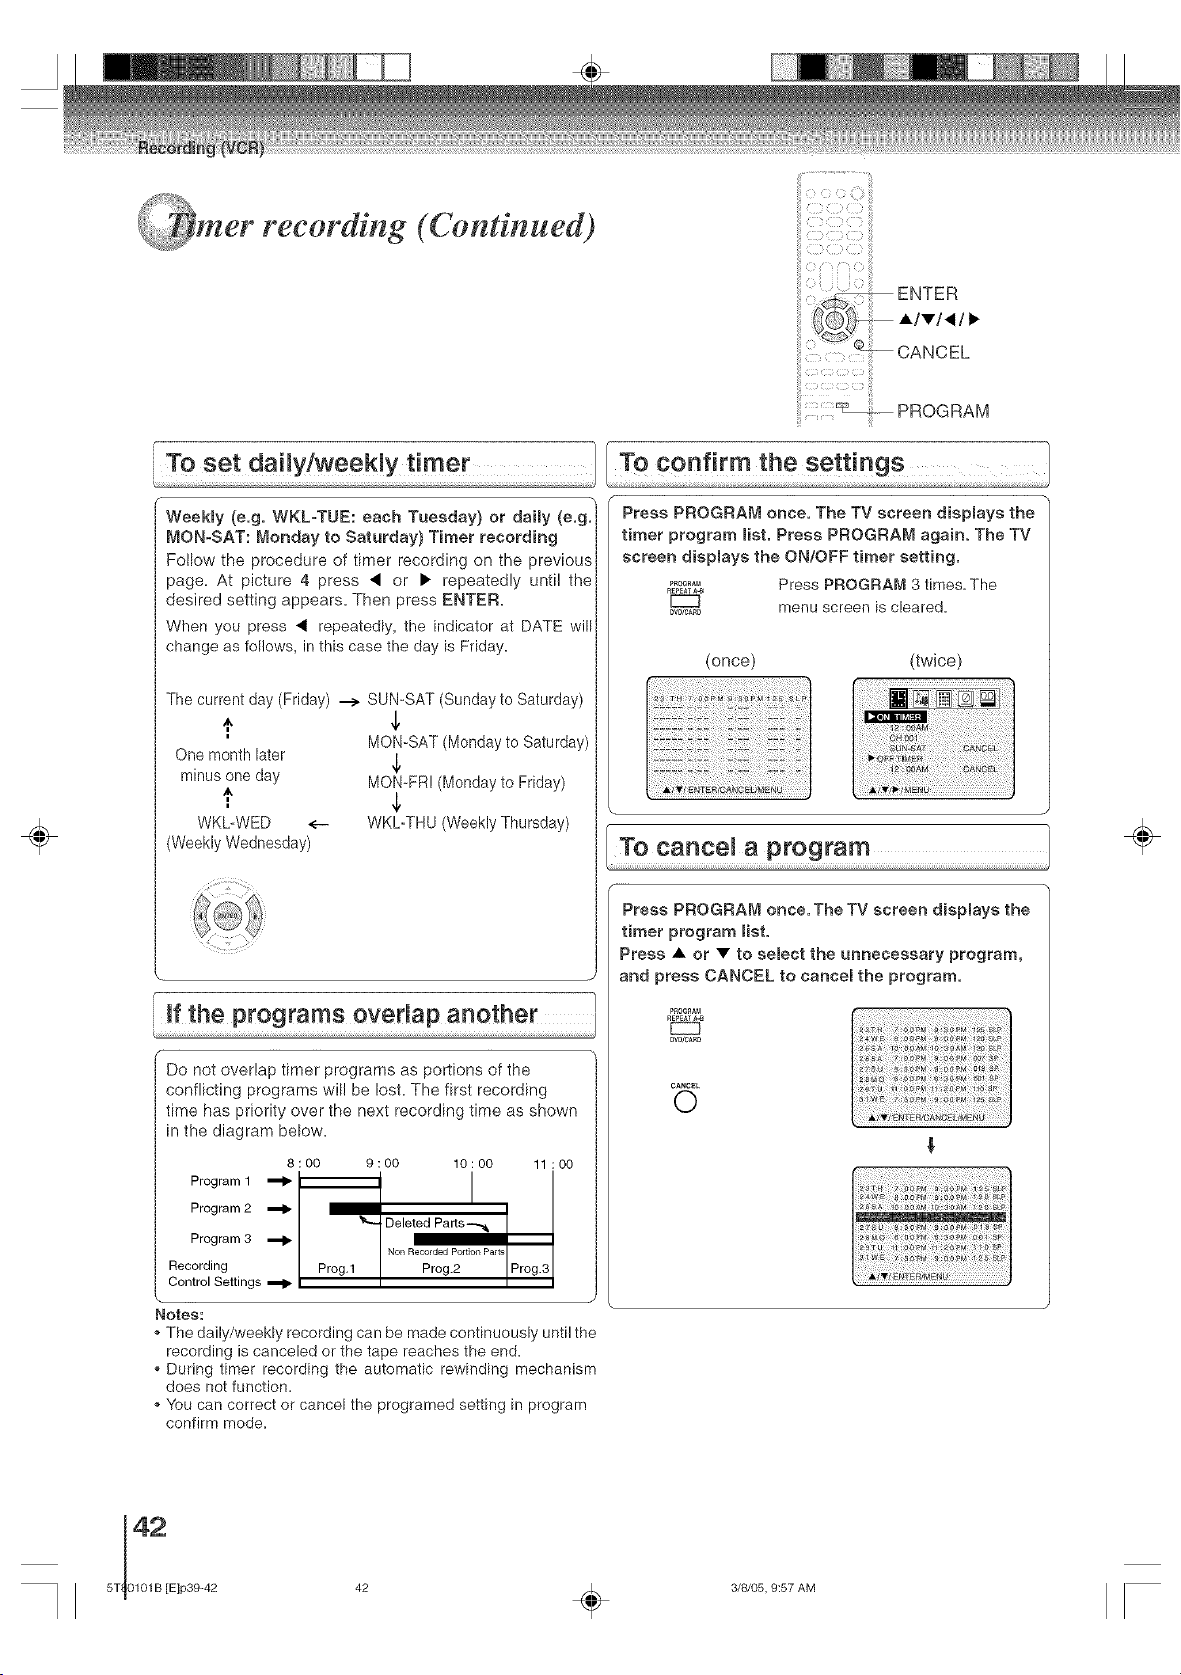
÷
recording (Continued)
To set daimy!weekly timer
Weekmy (e.g. WKL°TUE: each Tuesday) or dally (e.g.
MON°SAT: Monday to Saturday) Timer recording
Follow the procedure of timer recording on the previous
page. At picture 4 press • or • repeatedly until the
desired setting appears. Then press ENTER.
When you press • repeatedly, the indicator at DATE will
change as follows, in this case the day is Friday.
The current day (Friday) --> SUN=SAT (Sunday to Saturday)
MON_SAT (Monday to Saturday)
One month later ,1,
minus one day MON-FR! (Monday to Friday)
WKbWED <-- WKL_THU (Weekly Thursday)
(Weekly Wednesday)
Do not overlap timer programs as portions of the
conflicting programs will be lost. The first recording
time has priority over the next recording time as shown
in the diagram below.
8:00 9:00 10:00 11:00
Program 1 '_ _ I
I
Program 2
Deleted Parts-._
Program 3
Non RecordedPortionPa_t_
Recording Prog.1 Prog.2 Prog.3
Control Settings ,_
Notes:
_,The daily/weekly recording can be made continuously until the
recording is canceled or the tape reaches the end.
,, During timer recording the automatic rewinding mechanism
does not function.
,, You can correct or cancel the programed setting in program
confirm mode.
....................................i;i
: : : :i : b iii
......... "_c:__ PROGRAM
Toc i hesetti
Press PROGRAM once. The TV screen diapmays the
timer program Hat. Press PROGRAM again. The TV
screen diapmaya the ON/OFF timer setting.
_0G_ Press PROGRAM 3 times. The
R[_EATA_
menu screen is cleared.
DV_/CAR_
(ORCe) (twice)
_S_
To cancel a program
Press PROGRAM once. The TV screen displays the
timer program list,
Press • or • to select the unnecessary program,
and press CANCEL to cancel the program.
P_OG_AM
RE_AT_
DVB/C_RD
CANCEL
0
!iiiiiiii!i¸ii!iiiiiii¸iii!ii!iiiiii!ii¸ii!iiii!!iii!!iiii!!iiii!ii!iii!iiiiii!ili¸
g
÷
42
5T 0101B [E]p39-42
42 _ 3/8/05, 9:57 AM
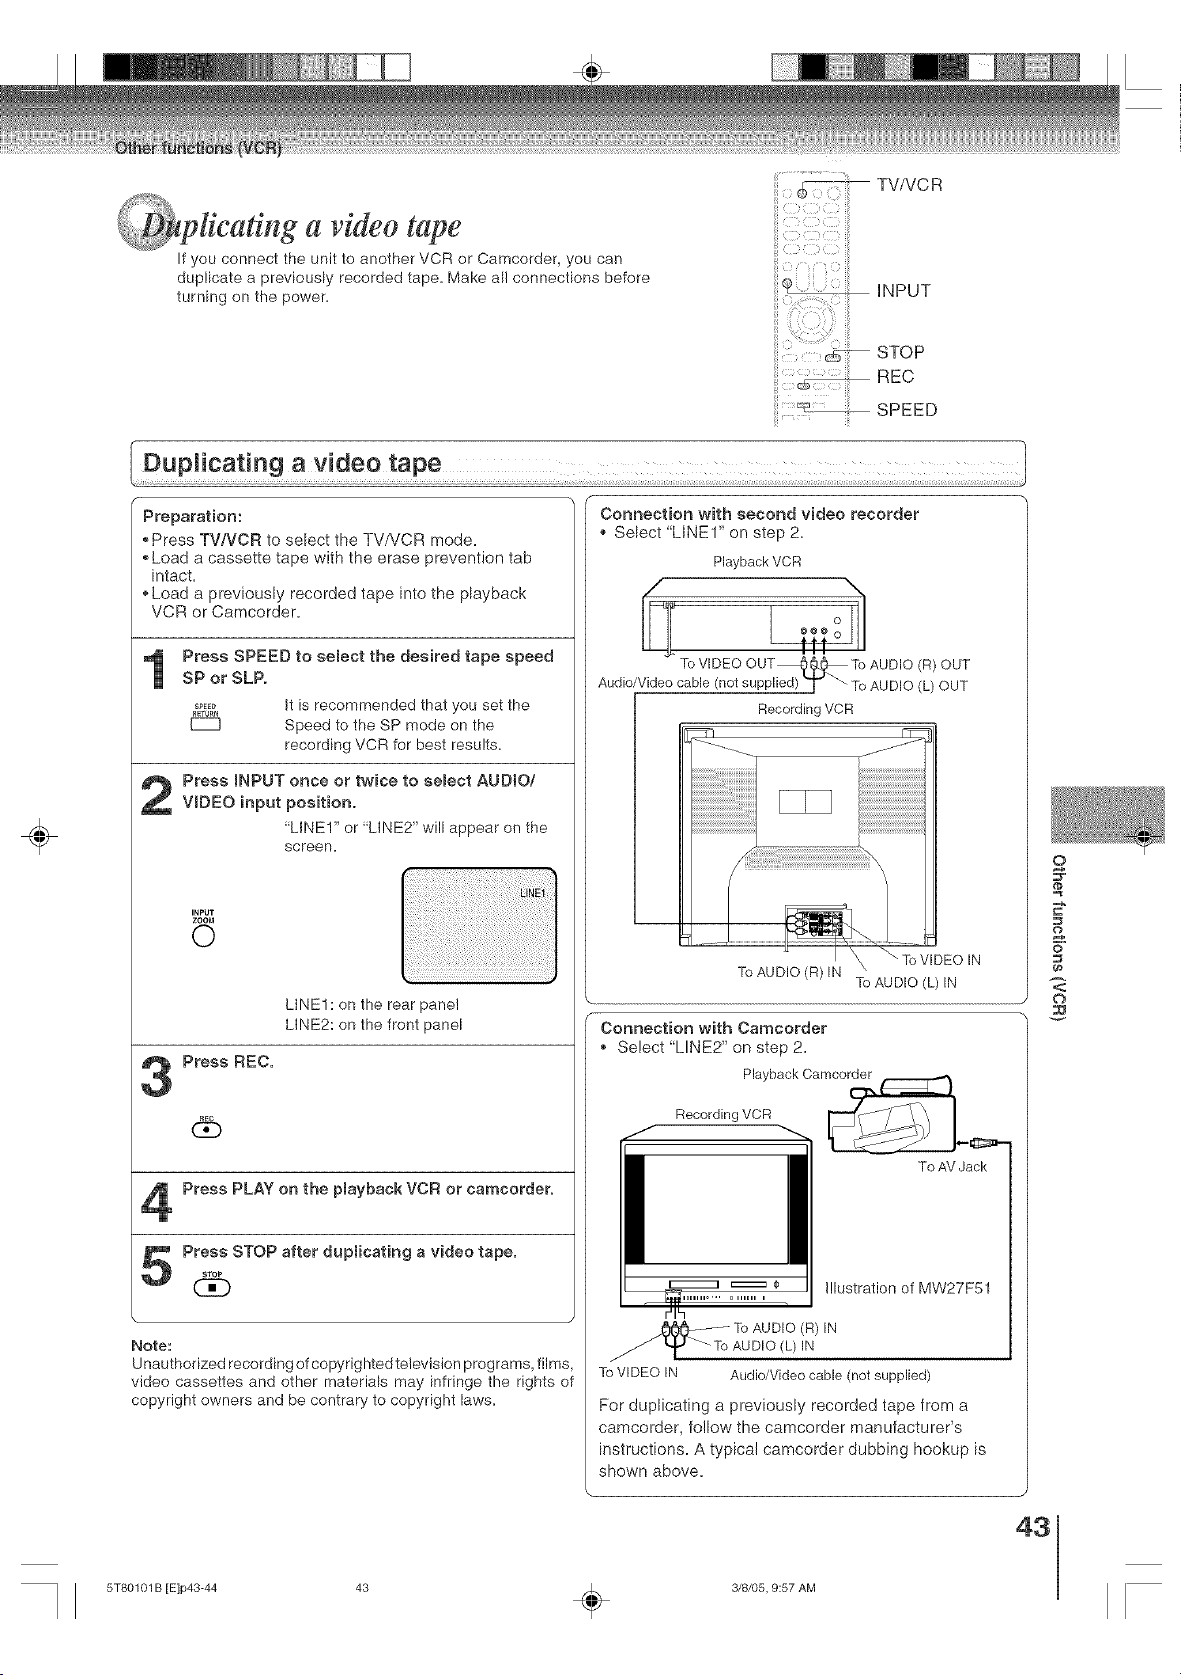
a videotape
If you connect the unit to another VCR or Camcorder, you can
duplicate a previously recorded tape. Make all connections before
turning on the power.
TV/VC R
ii }
i
iNPUT
STOP
cS---
REC
SPEED
÷
Preparation:
• Press TV/VCR to select the TV/VCR mode.
• Load a cassette tape with the erase prevention tab
intact.
• Load a previously recorded tape into the playback
VCR or Camcorder.
Press SPEED to semect the desired tape speed
SP or SLP.
SPEE_ It is recommended that you set the
RETURt_
[Z3 Speed to the SP mode on the
recording VCR for best results.
Press INPUT once or twice to semect AUD{O/
VIDEO input position.
"LINE1" or "LINE2" will appear on the
screen,
INPUT
ZOOM
0
Press REC.
db
LINE1 : on the rear panel
LINE2: on the front panel
Press PLAY on the pmayback VCR or camcorder.
Press STOP after duplicating a video tape.STOp
(:30
Note:
Unauthorized recording of copyrighted television programs, films,
video cassettes and other materials may infringe the rights of
copyright owners and be contrary to copyright laws.
Connection with second video recorder
. Select "LINEr" on step 2.
PlaybackVCR
TO VIDEO OUT_9,._ TOAUDIO (R)OUT
Audio/Videocable(notsupplied)T _ ToAUDIO (L)OUT
Recording VCR
--fq r_
J
j_
iiiiiiiiiiiiiiiiiiiiiiiiiiiiiiiiii
IN
Connection with Camcorder
• Select "LINE2" on step 2,
Playback Camcorder
Recording VCR
To AV Jack
i!lustration of MW27F51
__o o AUDIO (R) IN
AUDIO(L) IN
ToVIDEO IN Audio/Video cable (not supplied)
For duplicating a previously recorded tape from a
camcorder, fo!low the camcorder manufacturer's
instructions. A typical camcorder dubbing hookup is
shown above.
o
E"
o
<:
o
43
5T80101 B [E]p43-44 43 _ 3/8/05, 9:57 AM

a DVD/CD disc
You can record disc material in DVD, Audio CD, etc. onto a video
tape with this unit.
_--- REC
÷
Preparation:
Press TViVCR to select the TV/VCR mode.
Load a cassette tape with the erase prevention tab intact.
Load a DVD/CD disc.
Press SPEED to select the desired tape speed
SP or SLP.
SPEE0
R_TUR_
EC3
Press DVD to semect the DVD mode.
0
Press PLAY to start playback.
_LA¥
CE)
Press REC to start recording.
The unit will change to the VCR mode
automatically and the playback picture
(_ or sound will be duplicated on the
video cassette tape.
Press STOP if you finish recording.
stop It you wish to stop a DVD/CD disc,
press DVD to change the DVD mode,
then press STOP.
Notes:
,, You may not record the beginning of the disc, so start to
playback the disc, then start to record.
* You cannot record the disc with copy guard function. "DISC
iS COPY PROTECTED" will show up on the TV screen for
approx. 4 seconds.
÷
44
5T 0101B [E]p43-44
44 _ 3/8/05, 9:57 AM
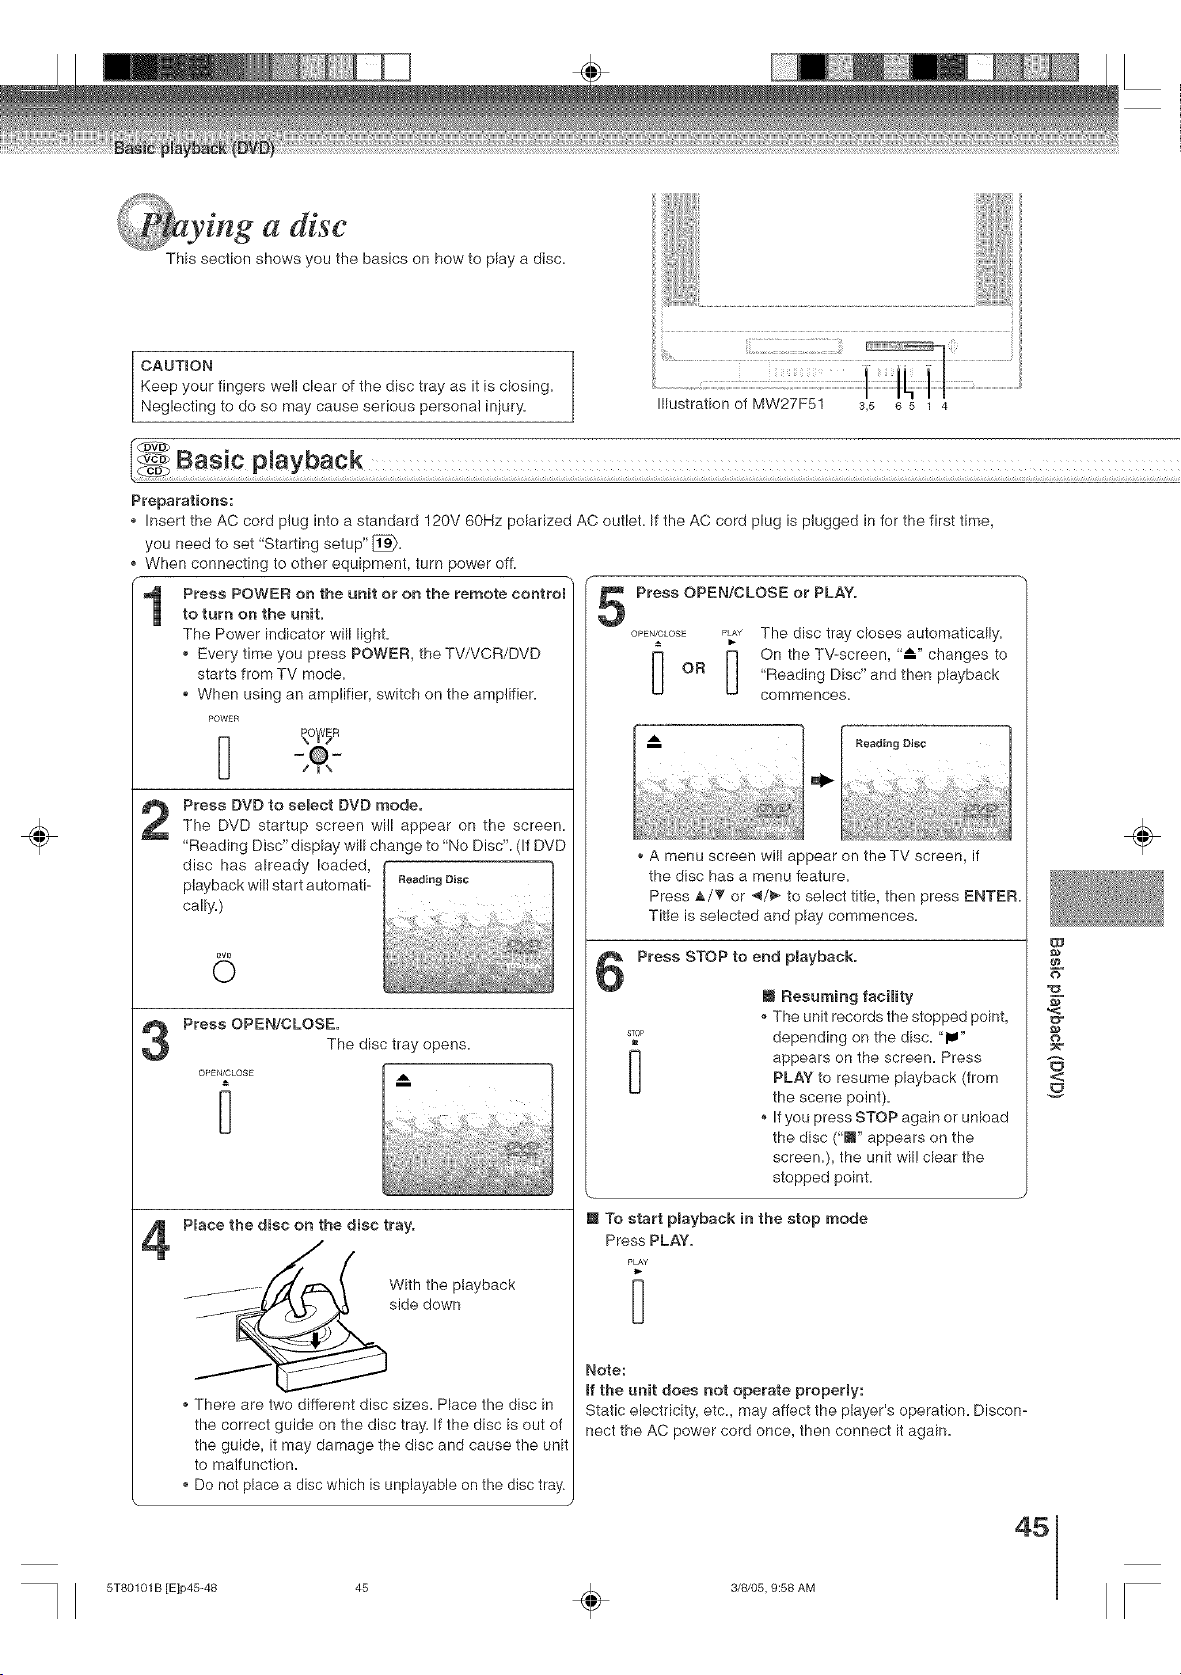
a disc
This section shows you the basics on how to play a disc.
CAUTION
Keep your fingers well clear of the disc tray as it is closing.
Neglecting to do so may cause serious personal iniury.
Illustration of MW27F51 s,5 8 5 1 4
÷
Preparations:
Insert the AC cord plug into a standard 120V 60Hz polarized AC outlet= If the AC cord plug is plugged in for the first time,
you need to set "Starting setup" [_.
When connecting to other equipment, turn power off.
Press POWER on the unit or on the remote control
to turn on the unit.
The Power indicator will light.
• Every time you press POWER, the TV/VCR/DVD
starts from TV mode=
• When using an amplifier, switch on the amplifier=
POWER
Press DVD to select DVD mode.
The DVD startup screen will appear on the screen.
"Reading Disc" display will change to "No Disc". (If DVD
disc has already loaded,
playback will start automati- ReadingDisc
cally.)
0
Press OPEN!CLOSE.
The disc tray opens=
OPEN/CLOSE A
Place the disc on the disc tray.
With the playback
side down
There are two different disc sizes= Place the disc in
the correct guide on the disc tray= If the disc is out of
the guide, it may damage the disc and cause the unit
to malfunction.
Do not place a disc which is unplayable on the disc tray.
Press OPEN/CLOSE or PLAY.
OPEN/CLOSEPLAY The disc tray closes automatically.
I_ _ On the Tv-Screen' _'l_" changes tO
OR "Reading Disc" and then playback
commences.
A menu screen will appear on the TV screen, if
the disc has a menu feature=
Press A/_' or _/_- to select title, then press ENTER
Title is selected and play commences=
Press STOP to end playback.
[] Resuming facility
• The unit records the stopped point,
s_ depending on the disc. "lu"
appears on the screen= PressPLAY to resume playback (from
the scene point)=
If you press STOP again or unload
the disc ('i" appears on the
screen=), the unit will clear the
stopped point.
[] To start playback in the stop mode
Press PLAY=
PLAY
Note:
if the unit does not operate properly:
Static electricity, etc., may affect the player's operation= Discon-
nect the AC power cord once, then connect it again.
d_
$-
,<
o
<:
45
÷
5T80101 B [Elp45-48 45 _ 3/8/05, 9:58 AM
_!i¸¸¸ _J!i!"ii_°
mg a disc (Continued)
÷
Basic playback
[] To pause playback (still mode)
Press PAUSE during playback.
........... To resume normal playback, press
(_ PLAY,
The sound is muted during stil!
mode.
[] To stop playback
Press STOP.
STOP
(3D
[] To remove the disc
Press OPEN/CLOSE.
0eEN/CL0SE
E3E3
Remove the disc after the disc tray
opens completely.
Be sure to press OPEN!CLOSE to close the disc tray
after you remove the disc.
Notes:
*, If a non-compatible disc is loaded, "Incorrect Disc", "Region Code Error" or "Parental Error" will appear on the TV screen
according to the type of loaded disc. In this case, check your disc again (see pages 9 and 61).
*, Some discs may take a minute or so to start playback.
*, When you set a single-faced disc label downwards (ie. the wrong way up) and press OPEN!CLOSE or PLAY on the unit,
"Reading Disc" will appear on the display for a few minutes and then "incorrect Disc" will continue to be displayed.
,_Some discs may not work the resuming facility.
,, Resuming cannot function when you play a PBC-featured Video CD while the PBC is on. To turn off the PBC, see page 53.
,, Some playback operations of DVDs may be intentionally fixed by software producers. Since this unit plays DVDs according
to the disc contents the software producers designed, some playback features may not be available. Also refer to the
instructions supplied with the DVDs.
,, Do not move the unit during playback. Doing so may damage the disc.
*, Use OPEN/CLOSE to open and close the disc tray. Do not push the disc tray while it is moving. Doing so may cause the unit
to malfunction.
*, Do not push up on the disc tray or put any objects other than discs on the disc tray. Doing so may cause the unit to
malfunction.
,, In many instances, a menu screen will appear after playback of a movie is completed. Prolonged display of an on-screen
menu may damage your television set, permanently etching that image onto its screen. To avoid this, be sure to press
POWER on your remote control once the movie is completed.
,, There may be a slight delay between you pressing the button and the function activating.
*, If the Media card is inserted during the playback, playback will stop and change to the CARD mode automatically. If you wish
to change to the DVD mode, press DVD/OARD.
[]
To obtain a higher quality picture
Occasionally, some picture noise not usually visible during a normal broadcast may appear on the TV screen
while playing a DVD video disc because the high resolution pictures on these discs include a lot of information.
While the amount of noise depends on the TV you use with this unit, you should generally reduce the sharpness
adjustment on your TV when viewing DVD video discs.
About @_2u_<1,_ _ d_>
The Cp__c-b'p<cD-#_ icons on the heading bar show the playable discs for the function described under that
heading,
_u_ :You can use this function with DVD video discs,
_ :You can use this function with Video CDs.
C@_ :You can use this function with Audio CDs and CD_R/RW CDs.
:You can use this function with Media cards.
÷
3/8/05, 9:58 AM
÷
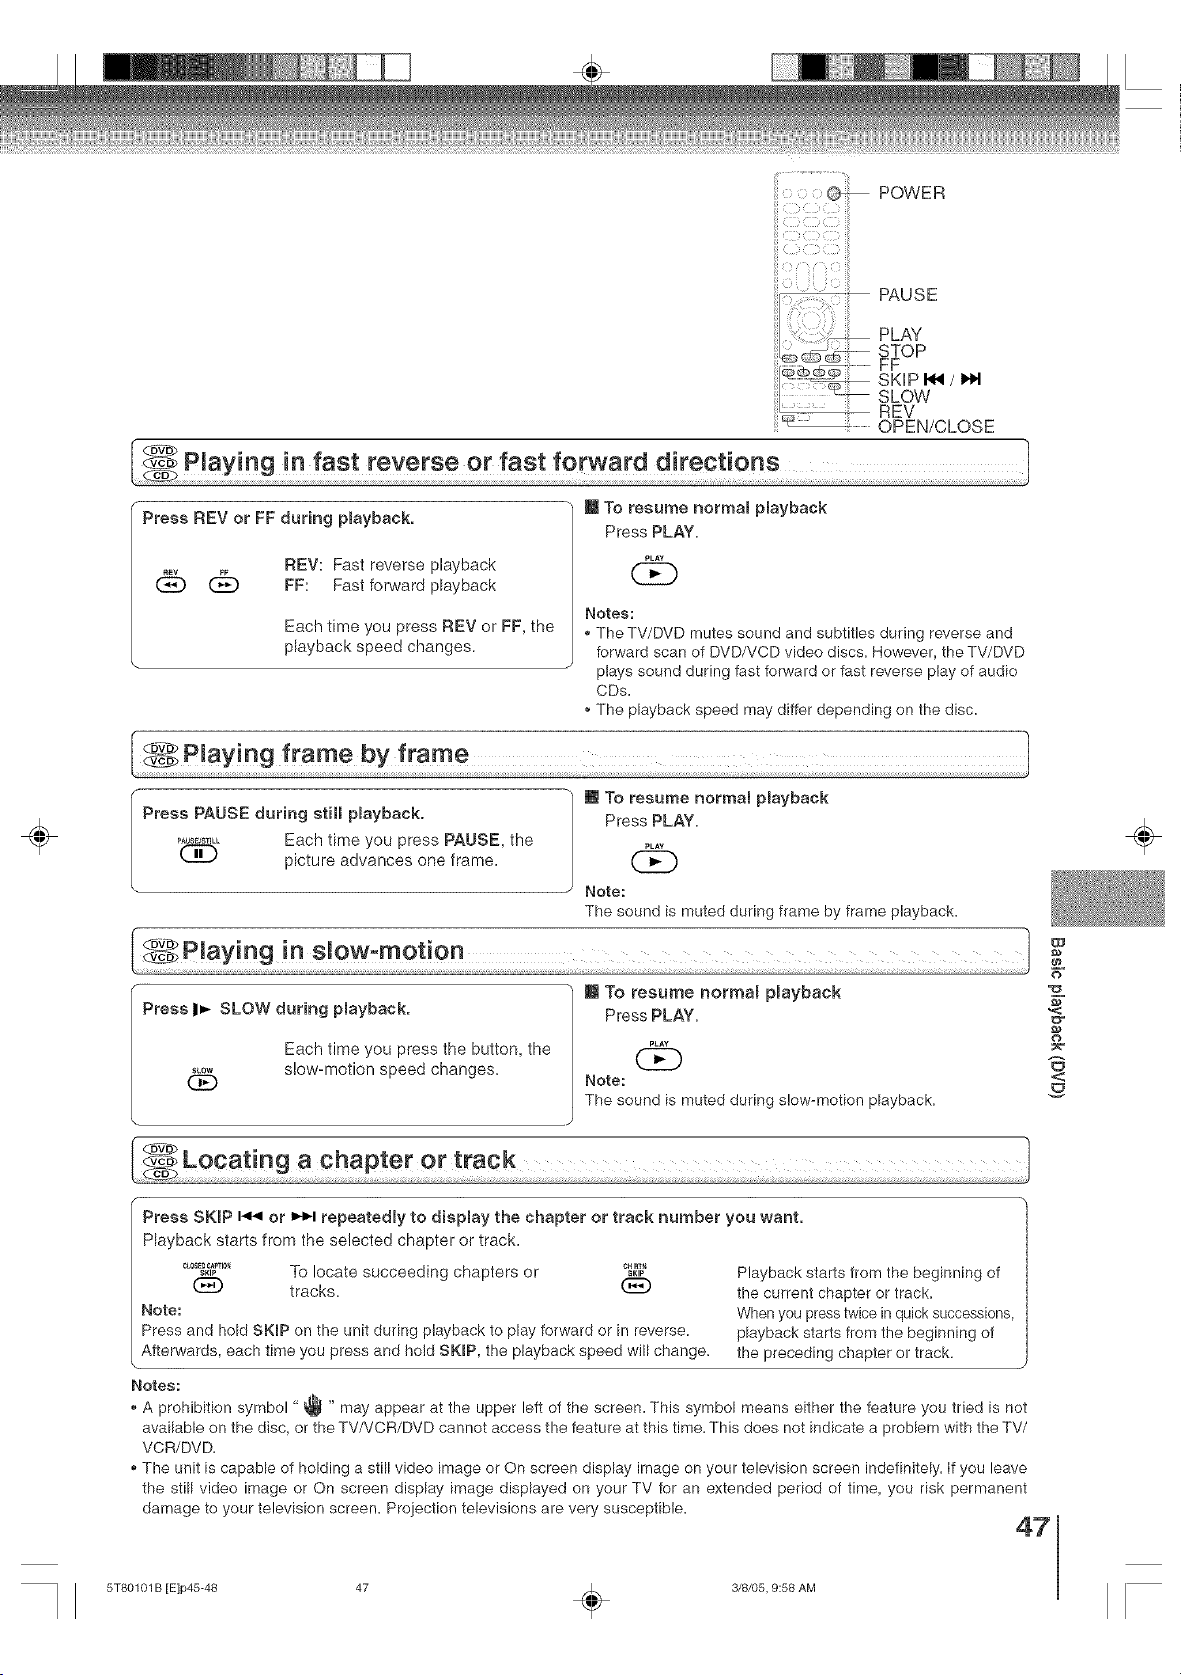
POWEn
_ PAUSE
PLAY
STOP
_::: FF
SKHP I_ / I,M
sLoWREv
OPEN/CLOSE
Press REV or FF during pmayback.
REV: Fast reverse playback
(_ (:_ FF: Fast forward playback
Each time you press REV or FF, the
playback speed changes.
m To resume normal playback
Press PLAY.
_LA¥
Notes:
• The TV/DVD mutes sound and subtitles during reverse and
forward scan of DVD/VCD video discs. However, the TV/DVD
plays sound during fast forward or fast reverse play of audio
CDs.
_,The playback speed may differ depending on the disc.
÷
Press PAUSE during still pmayback.
Each time you press PAUSE, the
_L picture advances one frame.
m To resume normal playback
Press PLAY.
PLAY
Note:
The sound is muted during frame by frame playback.
m To resume normal pmayback
Press ID,- SLOW during pmayback.
Each time you press the button, the
slow-motion speed changes.SLOW
Q£)
Press PLAY.
PLAY
Note:
The sound is muted during slow-motion playback,
uJ
N"
o
<
÷
Press SKiP 14141or iNl,.i repeatedJy to dispmay the chapter or track number you want.
Playback starts from the selected chapter or track.
_°ff_,_'_'°_ To locate succeeding chapters or _G_
tracks.
Note:
Press and hold SKIP on the unit during playback to play forward or in reverse.
Afterwards, each time you press and hold SKIP, the playback speed will change.
Playback starts from the beginning of
the current chapter or track.
When you press twice in quick successions,
playback starts from the beginning of
the preceding chapter or track.
Notes:
A prohibition symbol "@ " may appear at the upper left of the screen. This symbol means either the feature you tried is not
available on the disc, or the TV/VCR/DVD cannot access the feature at this time. This does not indicate a problem with the TV/
VCR/DVD.
• The unit is capable of holding a still video image or On screen display image on your television screen indefinitely, if you leave
the still video image or On screen display image displayed on your TV for an extended period of time, you risk permanent
damage to your television screen. Projection televisions are very susceptible.
47
5T80101 B rE]p45-48 47 _ 3/8/05, 9:58 AM

. .
L mtng/Locattng desired scene
DISPLAY
0-9
_ ill
..............JUMP
ENTER
A/V/I/•
CANCEL
ii!
.......... ZOOM
÷
This unit will allow you to zoom in on the frame image. You
can then make selections by switching the position of the
frame.
[ vtz°°m g ] Locatingdesiredsceoe t
Use the title, chapter and time recorded on the DVD disc to
locate the desired point to play back. In the case of VCD/CD
disc, time and track are used to locate the desired point to
play back.
Press ZOOM during pmayback. To check the title, chapter and time, press DISPLAY.
INPUT
zoo_
©
The center part of the _mage will be
zoomed in.
Each press of ZOOM will change the
ZOOM O,1 (x 1.3), 0,2 (x 1.5) and 0,3
(x 2.0).
Press A/v/_If • to view a different part of the
frame.
You may move the frame from the
center position to UP, DOWN, LEFT
or RIGHT direction.
mnthe zoom mode press ZOOM repeatedly to
return to a 1:1 view (0, Off).
INPUT
ZOOM
O
Notes:
,,You can select the Pause, Slow or Search playback in the zoom
mode.
,,Some discs may not respond to zoom feature.
Press JUMP during pmayback or stop mode.
CM SKIp/,JUMP
CD
Time--:-.:--/.-:-.:_
Title ! ::_--/6 I
Chapter: .... /-
A'_/Enter/0-9/Cancel/Jump
,, "Time" only works in playback or
resume stop mode.
Press • or • to select the "Time", "Title" or"Chapter".
I Time : '-:--:-- '-:--:-,I--:--:--
Title : ZZ "/6 I
Chapter -/-
iT/Enter/0_giCancel/Jump
Press Number buttons (0-9) to change thenumber.
(_D _ I Time : L':,<_, ..:_.:__/._:_.:__
(_)(_(_ I Title ; ----/6 I
Chapter -/-
__ _ AT/Enter/0-9/Cancel/Jump
If you input a wrong number, press
CANCEL=
Refer to the package supplied with
the disc to check the numbers=
Press ENTER. Pmayback starts.
r I ', r el
"i:i
:_"iii(iiiiiii:ii:ii:r_/
,, When you change the title,
playback starts from Chapter 1
of the selected title.
,_ Some discs may not work in the
above operation.
÷
Note:
In case of the Video-CD playback with PBC, the JUMP does not
work. To turn off PBC, see page [_.
48 _ 3/8/05, 9:58 AM
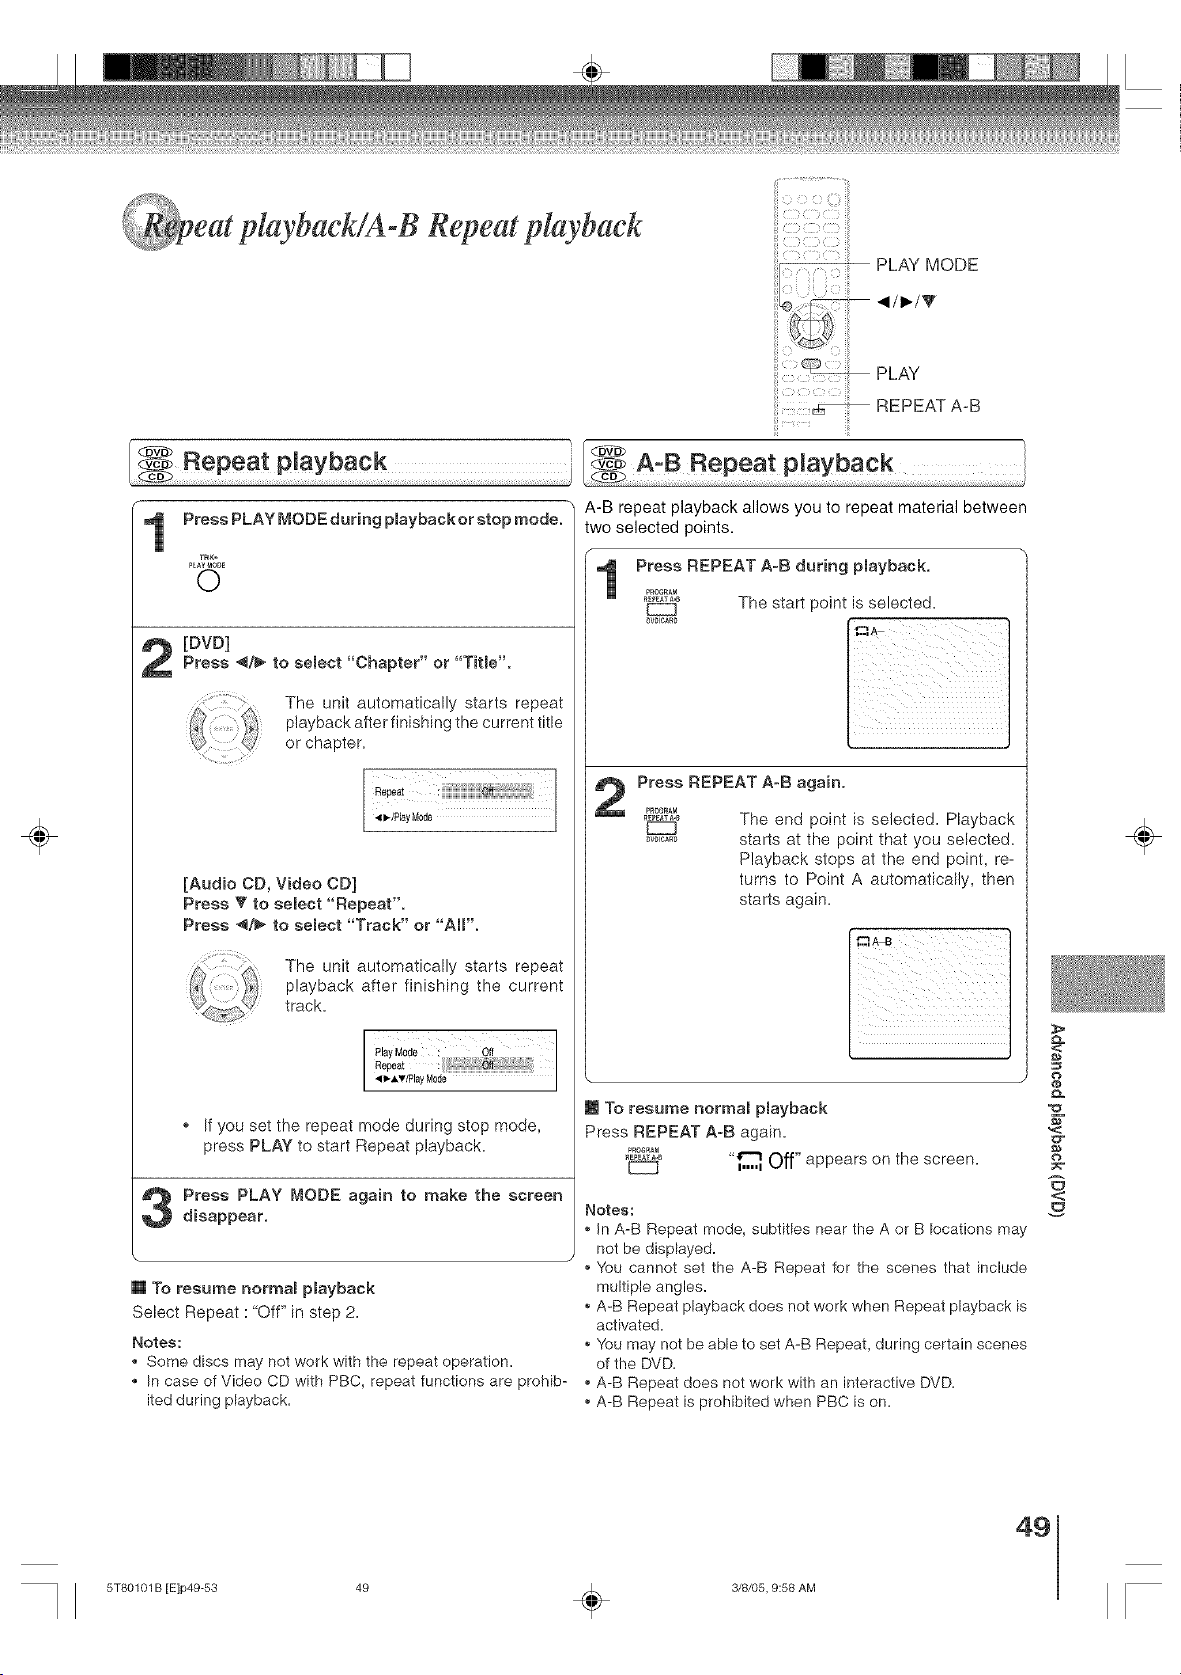
C
eat p/aybackiA-B Repeat playback
PLAY MODE
,/_/V
÷
PLAY
REPEAT A-B
f
Press PLAY MODE during playbackor stop mode.
TRK=
P_AYnODE
O
[DVD]
Press 4/_ to select "Chapter" or "Title'.
The unit automatically starts repeat
playback after finishing the current title
or chapter.
Ro_t :iiii:
[Audio CD, Video CD]
Press T to select "Repeat".
Press ,_/i_ to select "Track" or "AI('.
The unit automatically starts repeat
playback after finishing the current
track.
PlayM0de : Off
Repeat
'qI_-AT/Pe Mede
If you set the repeat mode during stop mode,
press PLAY to start Repeat playback.
Press PLAY MODE again to make the screen
disappear.
[] To resume normal playback
Select Repeat :"Off" in step 2.
Notes:
Some discs may not work with the repeat operation.
In case of Video CD with PBC, repeat functions are prohib-
ited during playback.
A-B repeat playback allows you to repeat material between
two selected points.
/
Press REPEAT A-B during p(ayback.
P_0eR_M
RE_EATA.B
The start point is selected.
Press REPEAT A-B again.
PROG_AM
,_ The end point is selected. Playback
_,_0 starts at the point that you selected.
Playback stops at the end point, re_
turns to Point A automatically, then
starts again.
\
[] To resume norms( p(ayback
Press REPEAT A-B again.
PROGRA_
_EPEATA-B
"_ Off"appears on the screen.
Notes:
in A-B Repeat mode, subtitles near the A or B locations may
not be displayed.
You cannot set the A-B Repeat for the scenes that include
multiple angles.
• A-B Repeat playback does not work when Repeat playback is
activated.
You may not be able to set A-B Repeat, during certain scenes
of the DVD.
• A-B Repeat does not work with an interactive DVD.
• A-B Repeat is prohibited when PBC is on.
<:
o
,<
o
<
÷
49
5T80101 B [E]p49-53 49 _ 3/8/05, 9:58 AM
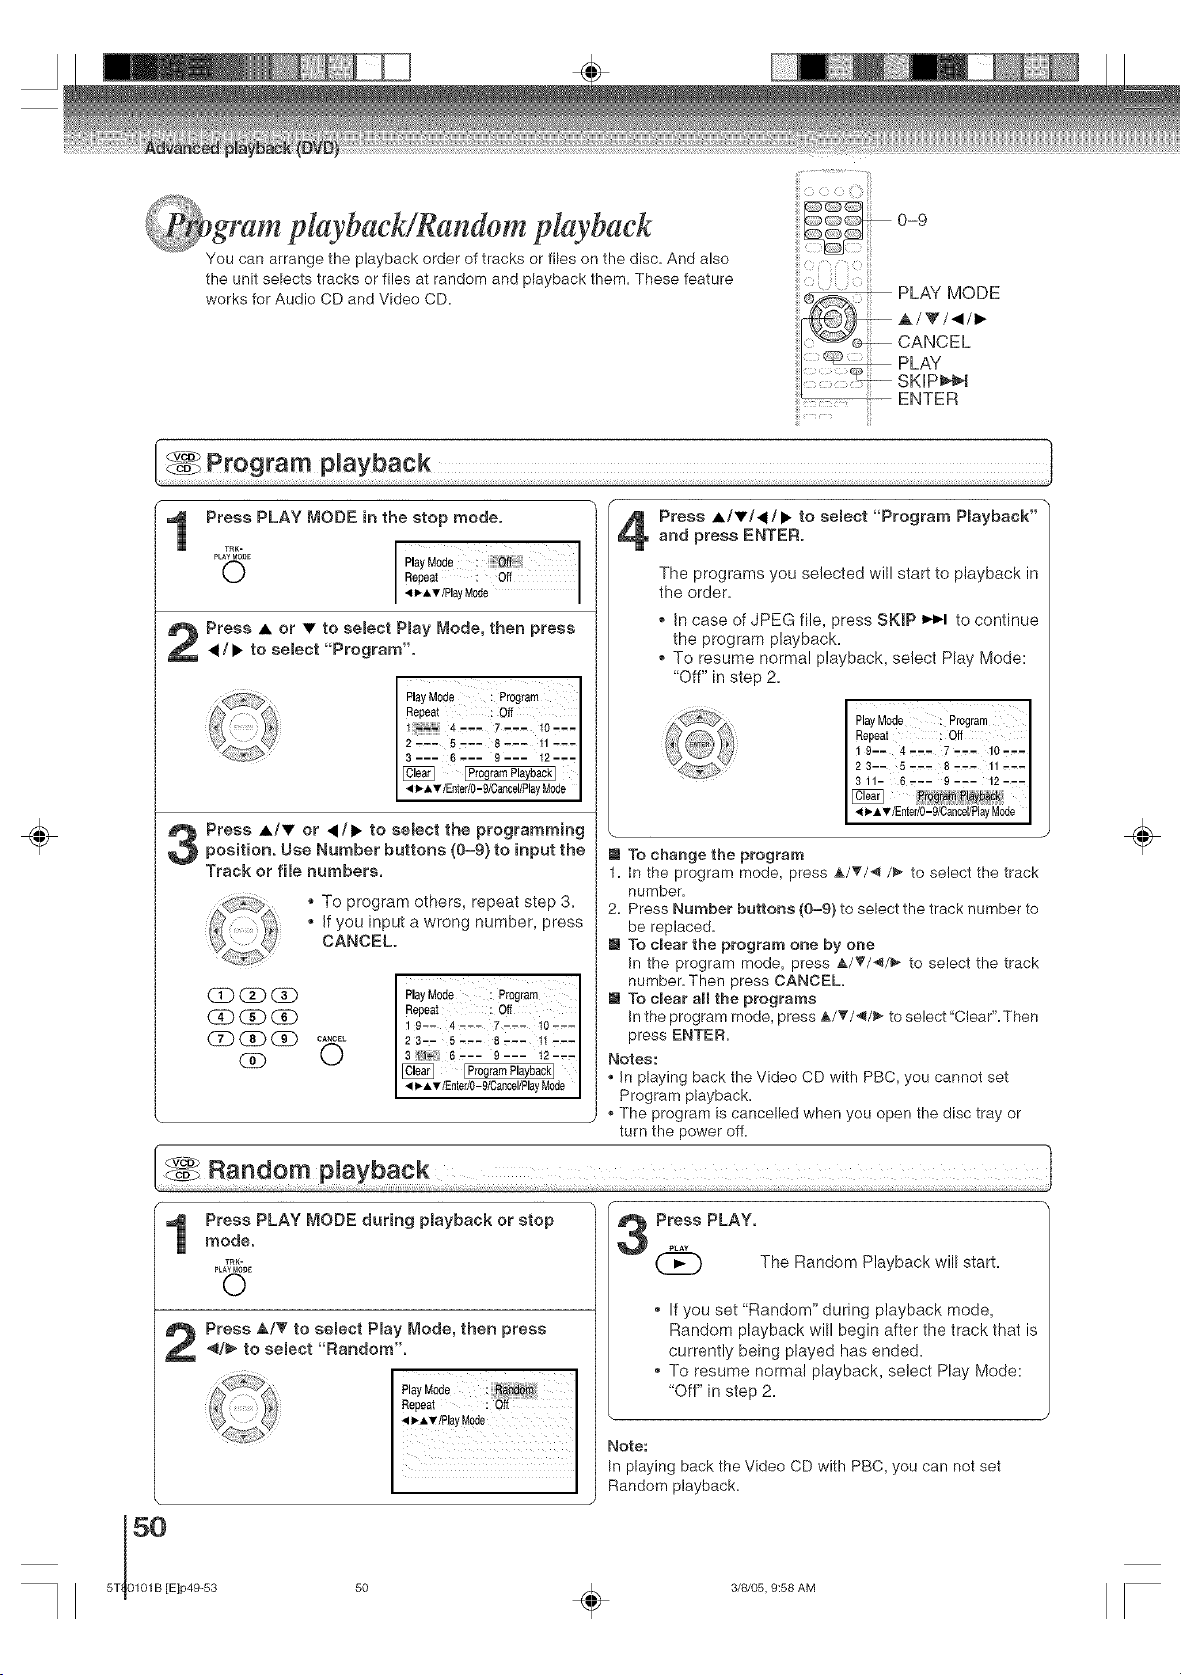
gram playbackigandom playback
You can arrange the playback order of tracks or files on the disc. And also
the unit selects tracks or files at random and playback them. These feature
works for Audio CD and Video CD.
S -¸¸ "" .......... !!i
iii¸¸¸" iiii
÷
Press PLAY MODE in the stop mode.
pLATRMK_E
Play Mode : I
O Repeat : Off
<_AT/Play Mode I
Press • or • to semect Pmay Mode, then press
</1_ to select "Program".
Play M0de i Program
Repeat : Off
4'-- 7..- 10---
2ZCZ _,__ _--__ 11z_.
I 41_A_tnEnterlO-9/CancellPlayM°de I
Press •/• or </1_ to select the programming
position. Use Number buttons (0-9) to input the
Track or file numbers.
. To program others, repeat step 3.
If you input a wrong number, press
CANCEL.
CD_
O
PlayMo_e P_ogramI
Repeat : Off
9-- 4 --- 7--_ 10_-
23.- 5'-- 8---- 11'--
3 6 '-- 9 --- t2 '..
< l_-A'_ lEntedO-91Cancel/PlayMode
Press •/•/</1_ to semect "Program Pmayback"and press ENTER.
The programs you selected will start to playback in
the order.
. In case of JPEG file, press SKiP I_-I to continue
the program playback.
To resume normal playback, select Play Mode:
"Off" in step 2=
1
Play Mode : Program I
Repeat ! Off I
1 9-- 4..- 7-.- 10-..I
I
311- 6_-- 9--- 12-u
m To change the program
1. In the program mode, press A/T/'_ /_ to select the track
number.
2. Press Number buttons (0=9) to select the track number to
be replaced.
m To clear the program one by one
In the program mode, press A/_f/'_/_ to select the track
number. Then press CANCEL.
m To clear aH the programs
In the program mode, press A/T/-_/_- to select"Clear".Then
press ENTER.
Notes:
. In playing back the Video CD with PBC, you cannot set
Program playback.
. The program is cancelled when you open the disc tray or
turn the power off.
÷
Press PLAY MODE during pmayback or stop
mode.
_RK-
PLAYMO#_
©
50
5T 0101B [E]p49-53
Press PLAY.
The Random Playback will start.
. If you set "Random" during playback mode,
Random playback will begin after the track that is
currently being played has ended.
To resume normal playback, select Play Mode:
"Off" in step 2.
Note:
In playing back the Video CD with PBC, you can not set
Random playback.
÷
3/8/05, 9:58 AM
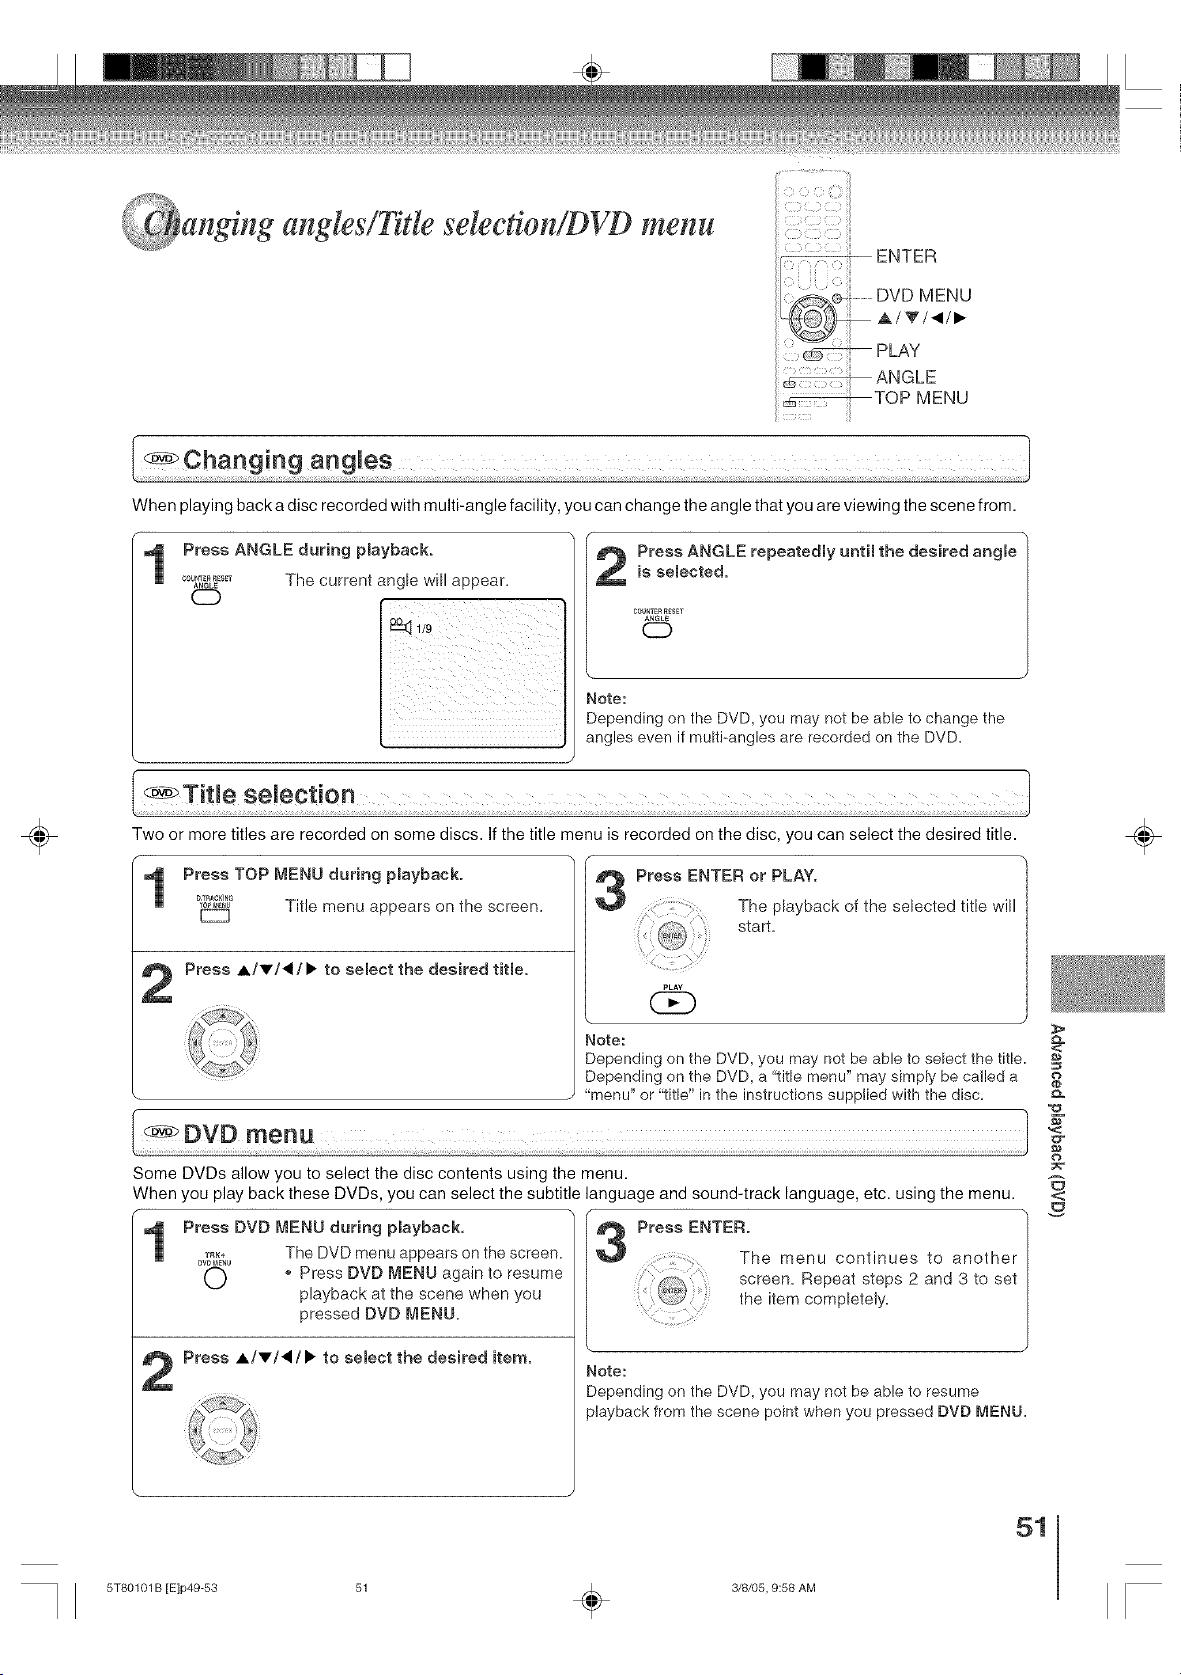
anglng angles!Title seleetion!DVD menu
When playing back a disc recorded with multi-angle facility, you can change the angle that you are viewing the scene from.
Press ANGLE during playback.
00_,_ET_,_L_ The current angle will appear.
CZb
iil _ii ii ii
ifll i i i i
iiii i i
Press ANGLE repeatedly until the desired angle
is semected.
C0U_TERR_SET
©
Note:
Depending on the DVD, you may not be able to change the
angles even if multi-angles are recorded on the DVD.
÷
Two or more titles are recorded on some discs. If the title menu is recorded on the disc, you can select the desired title.
Press TOP MENU during playback.
_ TR_C_ING
Title menu appears on the screen.
Press A/V/_/I,. to select the desired titme.
3
Press ENTER or PLAY.
The playback of the selected title will
start.
PLAY
QEb
\ •
Note:
Depending on the DVD, you may not be able to select the title.
Depending on the DVD, a "title menu" may simply be called a
"menu" or "title" in the instructions supplied with the disc.
Some DVDs allow you to select the disc contents using the menu.
When you play back these DVDs, you can select the subtitle language and sound-track language, etc. using the menu.
Press DVD MENU during playback.
0_%_%1 The DVD menu appears on the screen.
O _ Press DVD MENU again to resume
playback at the scene when you
pressed DVD MENU.
Press A/v/_/_. to select the desired item.
1
pr°ss /
The menu continues to another/
screen. Repeat steps 2 and 3 to set
t_,_,, the item completely.
Note:
Depending on the DVD, you may not be able to resume
playback from the scene point when you pressed DVD MENU.
<:
o
d_
,<
o
<
÷
51
5T80101 B [E]p49-53 51 _ 3/8/05, 9:58 AM
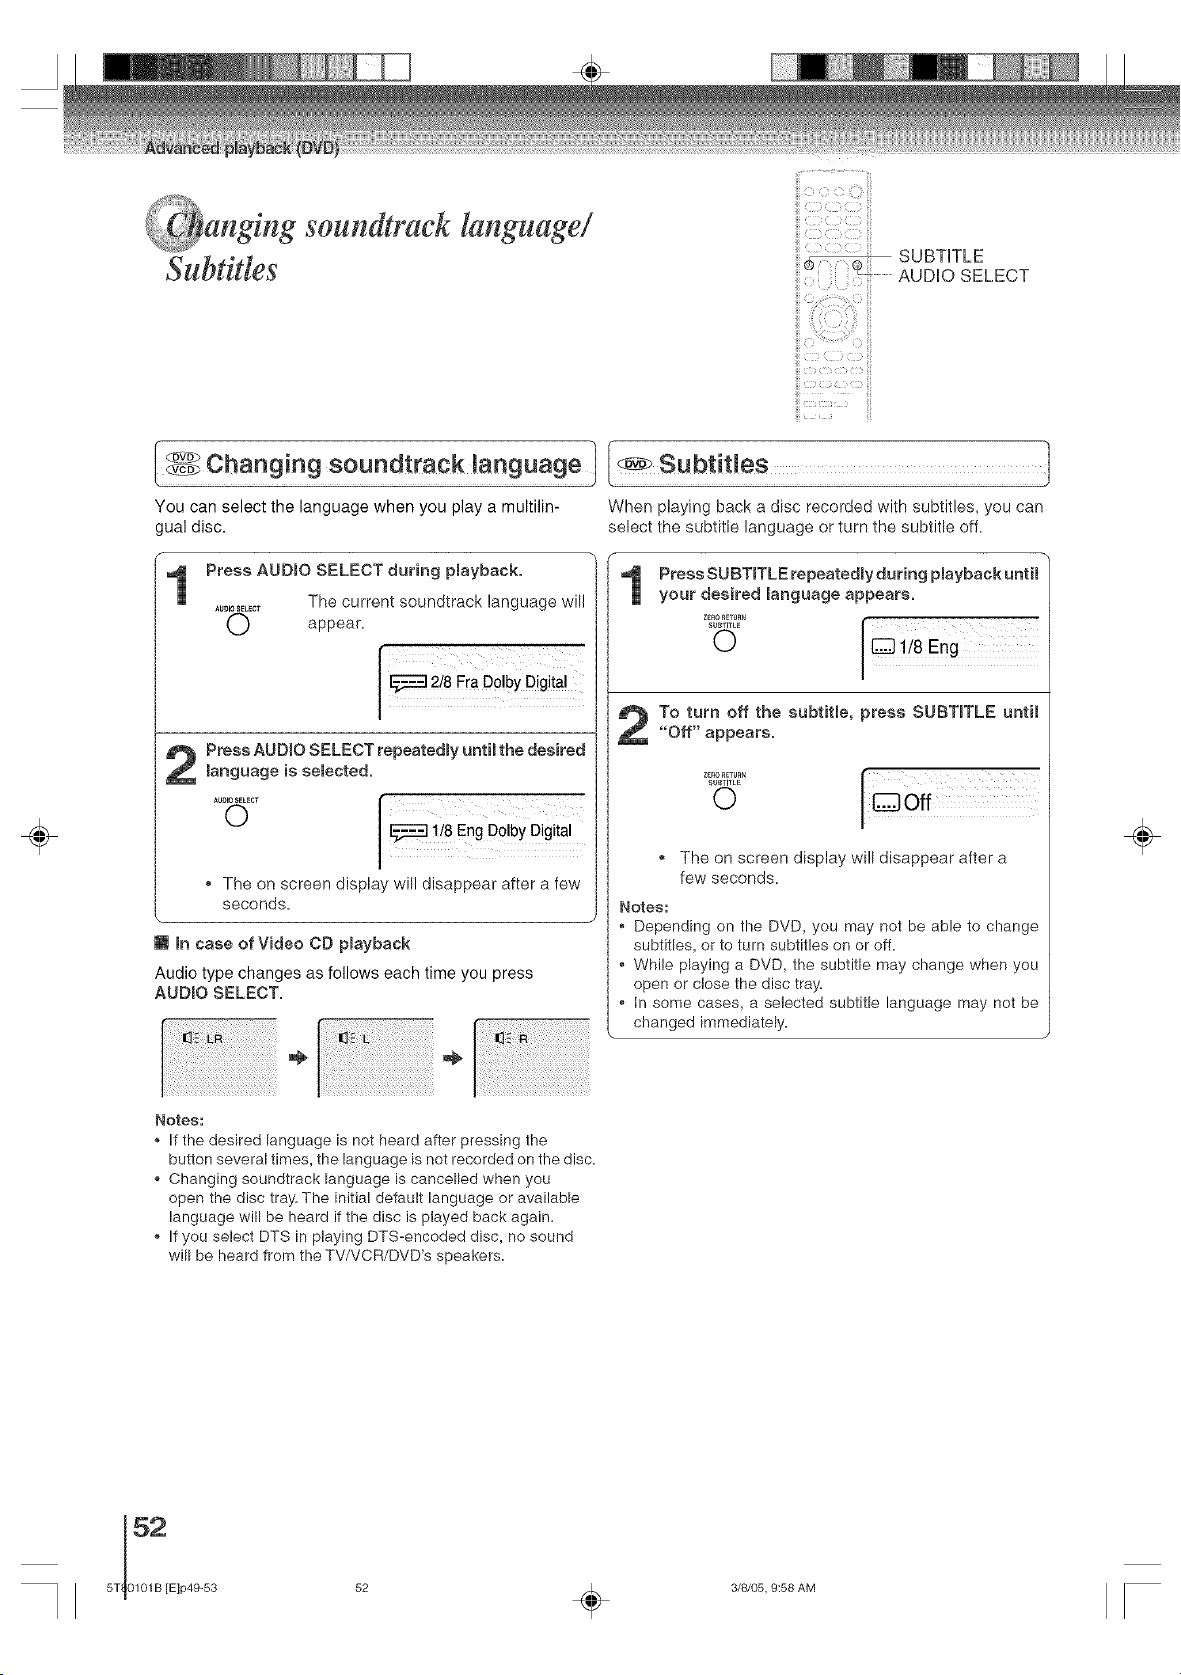
angmg soundtraek language!
I;_4J*
Subtitles
5
5 <
SUBTITLE
AUDIO SELECT
÷
You can select the language when you play a multilin- When playing back a disc recorded with subtitles, you can
gual disc. select the subtitle language or turn the subtitle off.
Press AUDmO SELECT during playback.
The current soundtrack language will
AUDIOSELEC_
O appear.
2 ress AUDIO SELECT repeatedly until the desired
language is selected.
.......... i
o
ii8 Eng Do!bY Digital
The on screen display will disappear after a few
seconds.
[] mncase of Video CD playback
Audio type changes as follows each time you press
AUDmO SELECT,
/
1
Press SUBTITLE repeatedly during playback until
your desired language appears.
O / I:_] 118Eng
To turn off the subtitle, press SUBTmTLE until
"Off" appears.
ZEro_LTURN
SUBTITLE
O
The on screen display will disappear after a
few seconds.
Notes:
Depending on the DVD, you may not be able to change
subtitles, or to turn subtitles on or off.
• While playing a DVD, the subtitle may change when you
open or close the disc tray.
• In some cases, a selected subtitle language may not be
changed immediately.
\
Notes:
• If the desired language is not heard after pressing the
button several times, the language is not recorded on the disc.
• Changing soundtrack language is cancelled when you
open the disc tray. The initial default language or available
language will be heard if the disc is played back again.
• If you select DTS in playing DTS-encoded disc, no sound
will be heard from the TV/VCR/DVD's speakers.
÷
52 _ 3/8/05, 9:58 AM
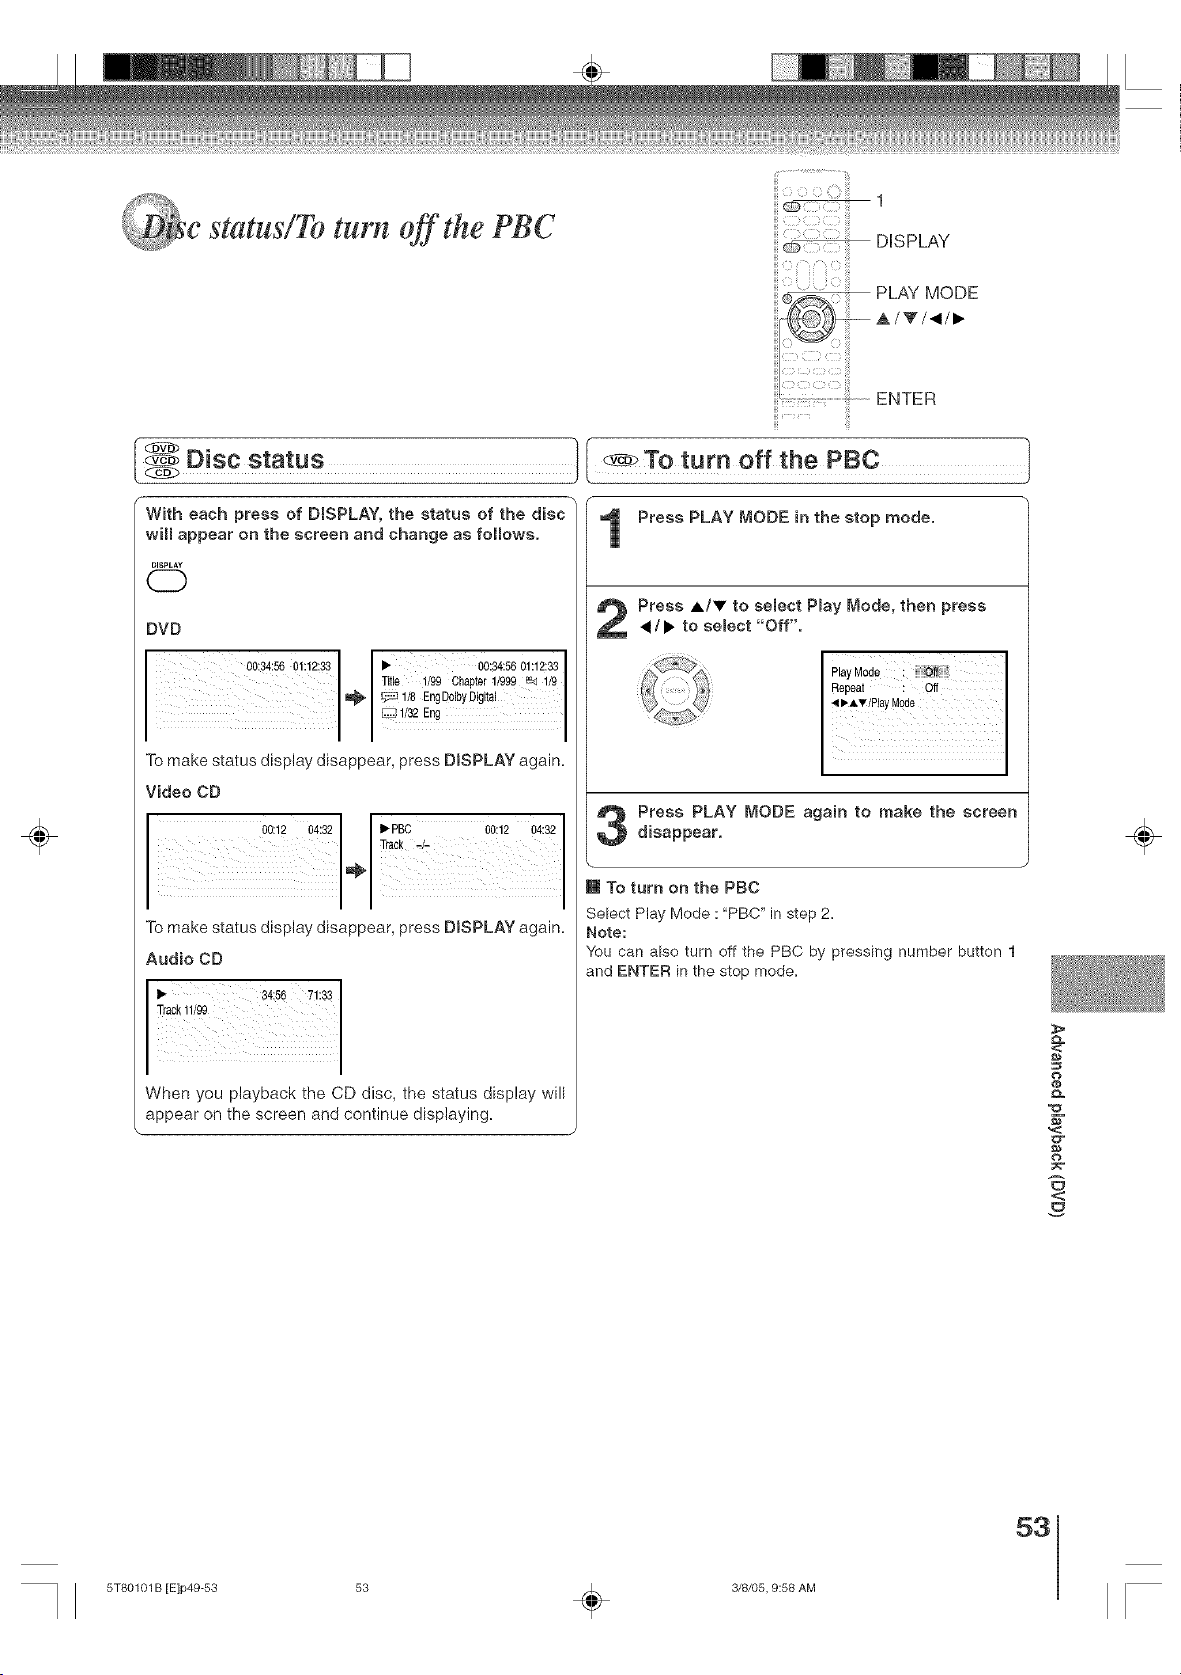
_,_e statu!!To turn off lhe PBC
iiiiii 1
DISPLAY
PLAY MODE
A/V/_/,
÷
ENTER
E
With each press of DISPLAY, the status of the disc
will appear on the screen and change as follows.
UlS_LAY
(55)
Disc status ][ _To turn off the PBC 1
Press PLAY MODE in the stop mode.
DVD
00:34:56 01:12:33 • 00:34:56 01:12:33
To make status display disappear, press DISPLAY again.
Video CD
To make status display disappear, press DISPLAY again.
Audio CD
When you playback the CD disc, the status display will
appear on the screen and continue displaying.
Press A/V to semect Pmay Mode, then press
4/b. to semect "Off".
,,,, P!!Mo,e
Press PLAY MODE again to make the screen
disappear,
I To turn on the PBC
Select Play Mode : "PBC" in step 2.
Note:
You can also turn off the PBC by pressing number button t
and ENTER in the stop mode.
e_
<:
o
$-
o
<
÷
53
5T80101 B [E]p49-53 53 _ 3/8/05, 9:58 AM
4AiJPEG op
eratlon
_Yhis player can play back the MP3/WMA/JPEG-Oata which has been recorded on CD-R, CD-RW or Media card.
Note:
This unit requires discs/recordings to meet certain technical standards in order to achieve optimal playback quality,
Prerecorded DVDs are automatically set to these standards. There are many different types of recordable disc formats
(including CD-R containing MP3/WMA files), Given the fact that technology in this area is still maturing, Toshiba cannot
guarantee that all genre of recordable discs will produce optimal playback quality. The technical criteria set out in this
owner's manual are meant as a guide only.
Please be advised that you must obtain permission from the applicable copyright owners to download copyrighted
content, including music files, in any format, including the MP3 and WMA formats, prior to the downloading thereof.
TOSHIBA has no right to grant and does not grant permission to download any copyrighted content.
÷
Limitations on MP3/WMA/JPEG file playback
MP3/WMA/JPEG file is the disc/card that is standardized by ISO9660, its file name must include 3-digits extension
letters, "mp3", "wma", "jpg".
, MP3/WMA/JPEG file must be correspond to the ISO standardized flies.
This unit can read 600 files per disc/card. If one directory has more than 600 flies, it reads up to 600 files, the
remaining files will be omitted.
, The unit is able to recognize up to a maximum of 50 directories per disc/card.
• MP3/WMA/JPEG files cannot be used for the purpose of recording.
, If the disc/card has both audio tracks and MP3/WMA/JPEG files, only audio tracks are played.
It may take more than one minute for this unit to read MP3/WMA/JPEG flies depending on its structure.
Music recorded by "Joliet Recording Specification" can be played back, the file name is displayed (within 16
letters) on the screen. Long file names will be condensed.
, The music flies recorded by "Hierarchical File System" (HFS) cannot be played.
Limitations on dispmay
• The maximum number for display is 16 letters.
Available letters for display are the following:
capital or small alphabets of A through Z, numbers of 0 through 9, and (under score).
• Other letters than those above are replaced in hyphen.
Notes on MP3/W_,]A/JPEG fimes
To play back MP3/WMA/JPEG file in the recorded order,
1. Use MP3/WMA/JPEG software that records data alphabetically or numerically.
2. Name each file including two-digit or three-digit number (ex. "01" "02" or "001" "002").
3. Refrain from making too many sub-folders.
CAUTION:
, Some MP3A,'VMA/JPEG CDs/Cards cannot be played back depending on the recording conditions.
, The CD/cards that has no music data or non MP3/WMA/JPEG flies cannot be played back.
Standard, sampling frequency, and the bit rate:
MP3 file
MPEG-1 Audio
32kHz, 44.1kHz, 48kHz
32kbps ~ 320kbps (constant bit rate or variable bit rate)
The recommend recording setting for a high-quality sound is 44.1kHz of sampling frequency and 128kbps of
constant bit rate.
WMA file
WMA version 7, and 8
32kHz, 48kbps
44.1kHz, 48kbps _ 192kbps
48kHz, 128kbps _ 192kbps
The file recorded by mend, 48kHz, 48 kbps is not available to this unit.
Microsoft, Windows Media, and Windows Logo are trademarks or registered trademarks of Microsoft
Corporation in both the United States and other countries,
÷
54
5T 0101B [E]p54-56
54 _ 3/8/05, 9:58 AM

CAUTION
Do not insert any foreign obiects into the Media card slot as this
can result in a risk of fire or electric shock.
Place a CD-R/RW on which MP3, WMA or JPEG flies have
been recorded onto the disc tray or insert a Media card on
which MP3, WMA or JPEG files have been recorded into
the media card slot on the front panel.
0-9
ENTER
STOP
PLAY
TOP MENU
DVD/C AR D
÷
r
1
Place a CD-R/RW on which MP3 or WMA files
have been recorded onto the disc tray, or insert
a Media card on which MP3 or WMA times have
been recorded into the media card smot on the
front panel.
Note: When the media card is inserted, the unit is
changed to the CARD mode automaticallya
Press DVDiOAR D to semect the DVD (CD} mode or
the CARD mode.
A fib menu screen will appear on the screen,
Press 4/_ or ENTER to select fomder.
Press &/T/41/_ or Number buttons (0-9) to seo
mect the desired file.
(Z} (3D (D
(Z) (Z) (Z)
(Z} (Z) (2}
In case the folder includes more than 15 files, press .,_
or _ to display next file liSta
When PLAY has been pressed after displaying the file
menu, or when the disc tray has been closed using
PLAY, playback begins automatically starting from the
first ilia. in this case, if the first file is an MP3/WMA file,
only MP3/WMA files are played back in order. If the
first file is a JPEG file, the first JPEG file is played back.
Press ENTER.
The selected file starts playing back.
Press STOP to end playback.
STOP
(]E)
The unit records the stopped point. "11_" appears
on the screena Press PLAY to resume playback
(from the scene point)a
" If yOU press STOP again, unload the disc or change
the DVD mode and CARD mode, the unit will clear
the stopped point.
m To eject the Media card
Confirm the Media card is not in use now. Pull the card out
slowly and straight.
Note:
Do not remove the card while it is in use. If removed while in
use, information on the card may be lost.
About file menu
Elapsed time
Operation I
Media type File number
I I File type I I
C[}I_ _ 1'/94 02:'36
Folder#_ Pops l ]
_ llower
2 _d _VBi(_g; 9 N UesandT'ulb,
3 ,JX!CLOSEMYEYES10_SPb,1
4 _! DIVETOBLUE11D Pb-2
5 &,r2Honey 12D Pie-3
6 ._ BLUE EYES 13D P_-4
7 _ BlurryEyes 14_ P_'5
• _'A V/0-9/Enter/Play Mode/DVD Men
Media type Filetype
CD: CD-R/RW {_ : MP3-file
SD: SD (SecureDigitaP')memorycard _ : WNA-file
MMC: MMC(MultiNediaCardTM) [] :JPEG4ile
xD: xD-PietureCard
MS: MemoryStick_"(Pro)
Notes:
The picture menu is displayed when the FUJICOLOR CD
or the Kodak Picture CD are played. To display the file
menu, press TOP MENU.
In the case of a CD containing a mixture of MP3, WMA and
JPEG files, the files are played back by selecting them from
the file menu.
MP3 or WMA file on the Kodak Picture CD is not recog-
nized on this unit.
Notes:
* During MP3/WMA/JPEG-Playback, you cannot use SEARCH,
A-B Repeat functions,
, You can use Repeat (Track or All), Random functions and
Program playback for MP3/WMA/JPEG Playback [_[_,
55
<:
o
##
o
<
÷
5T80101 B [E]p54-56 55 _ 3/8/05, 9:58 AM
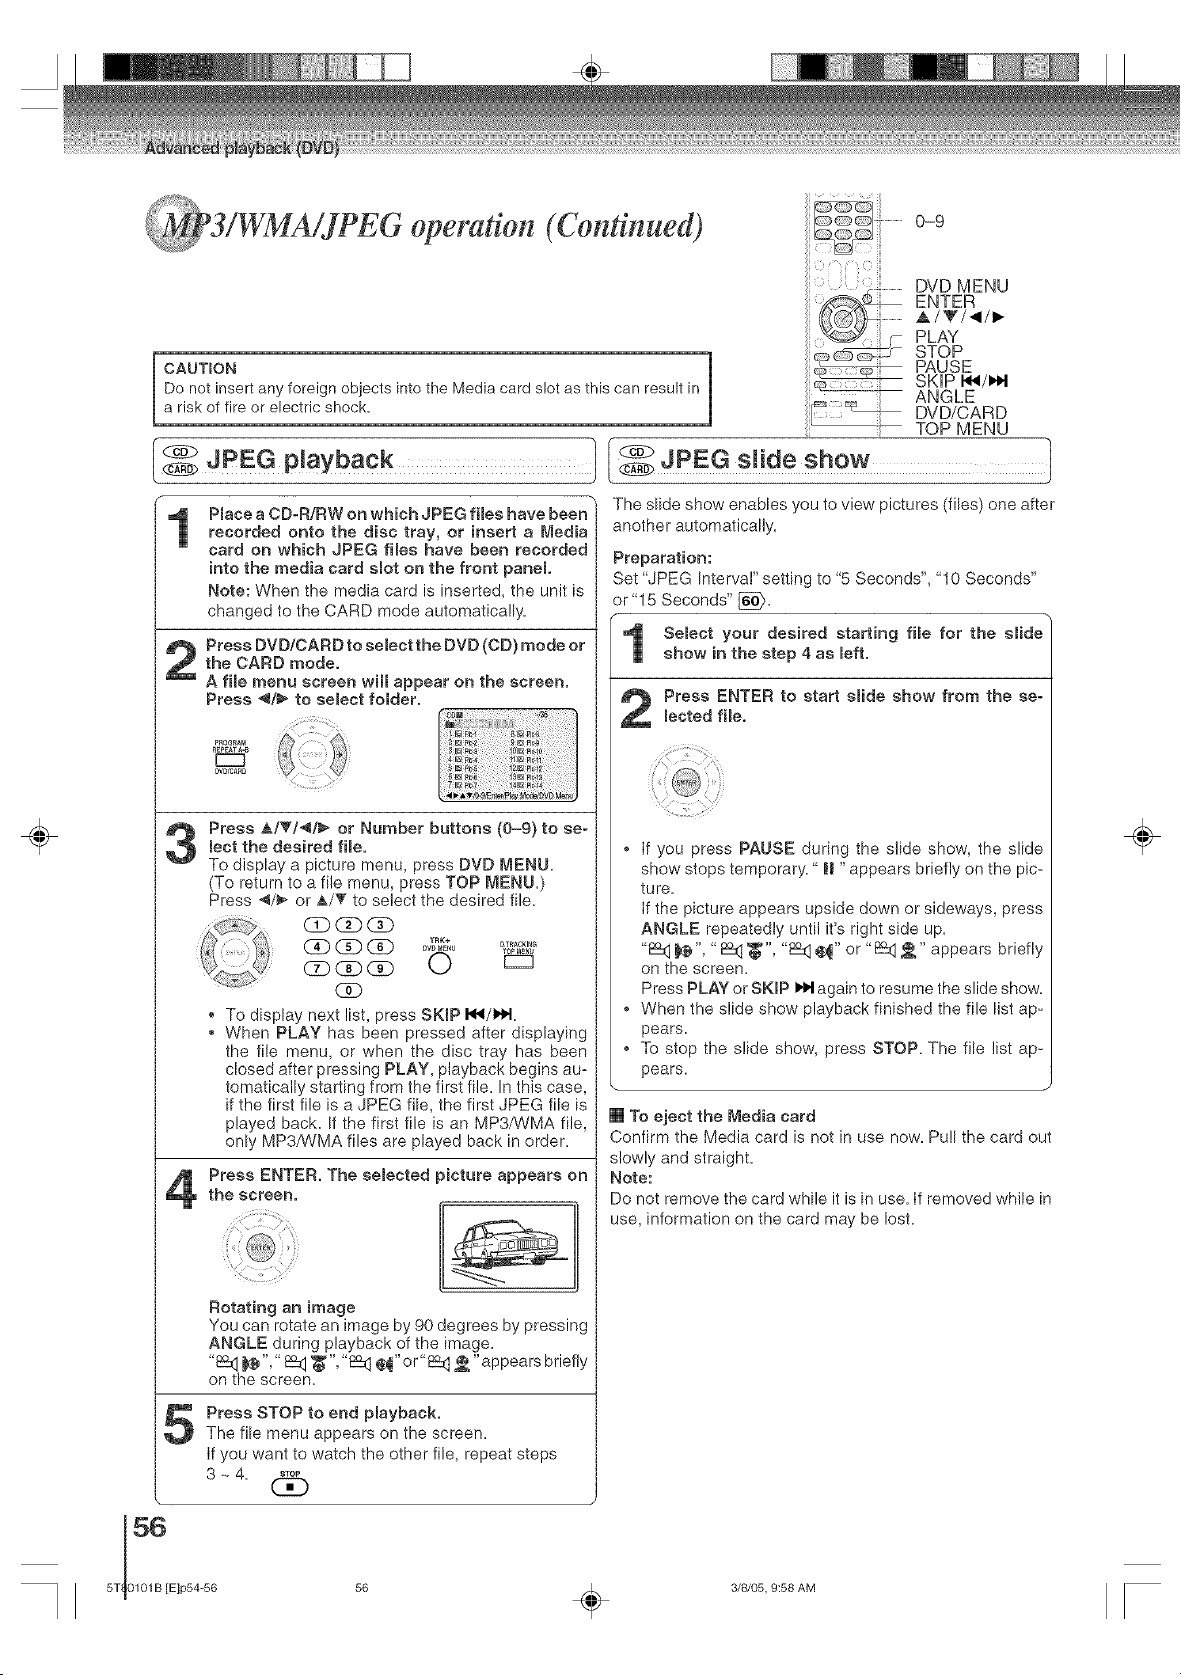
÷
operation (Continued)
CAUTION ]
Do not insert any foreign objects into the Media card slot as this can result in
a risk of fire or electric shock.
0-9
DVD MENU
ENTER
_,/T/_I/I_
PLAY
STOP
PAUSE
SKiP I_/I,i,I
ANGLE
DVD/CARD
7-- TOP MENU
JPEGp aybaok t [ JpEG s.ae
Pmace a CD-R/RW on which JPEG files have been"
recorded onto the disc tray, or insert a Media
card on which JPEG flies have been recorded
into the media card smot on the front panel
Note: When the media card is inserted, the unit is
changed to the CARD mode automatically.
5
Press _./T/_/_ or Number buttons (0-9) to se-
lect the desired file.
To display a picture menu, press DVD MENU.
(To return to a file menu, press TOP MENU.)
Press 4/_ or _,/_' to select the desired file.
(Z) (3D CD
CDCDCD O
CSD
To display next list, press SKIP I_/I,t,.1_
• When PLAY has been pressed after displaying
the file menu, or when the disc tray has been
closed after pressing PLAY, playback begins au-
tomatically starting from the first file. In this case,
if the first file is a JPEG file, the first JPEG file is
played back. If the first file is an MP3/WMA file,
only MP3fWMA files are played back in order.
Press ENTER. The selected picture appears on
the screen.
Rotating an image
You can rotate an image by 90 degrees by pressing
ANGLE during playback of the image.
"_t] _@","_t] '_", "l_t] @_"or"_(] _ "appears briefly
on the screen.
Press STOP to end playback.
The file menu appears on the screen.
if you want to watch the other file, repeat steps
3 _ 4. _o_
(3D
The slide show enables you to view pictures (flies) one after
another automatically.
Preparation:
Set "JPEG Interval" setting to "5 Seconds", "10 Seconds"
or "15 Seconds" [_.
Select your desired starting file for the slide
show in the step 4 as melt.
Press ENTER to start slide show from the se-
lected file.
if you press PAUSE during the slide show, the slide
show stops temporary." _| "appears briefly on the pic-
tu re.
if the picture appears upside down or sideways, press
ANGLE repeatedly until it's right side up.
"£Eq _", " E_ '_", "i5_ _" or "1_ _" appears briefly
on the screen.
Press PLAY or SKIP I_1 again to resume the slide show.
. When the slide show playback finished the file list ap-
pears.
. To stop the slide show, press STOP. The file list ap-
pears.
[] To eject the Media card
Confirm the Media card is not in use now. Pull the card out
slowly and straight.
Note:
Do not remove the card while it is in use. If removed while in
use, information on the card may be lost.
÷
3/8/05, 9:58 AM
÷
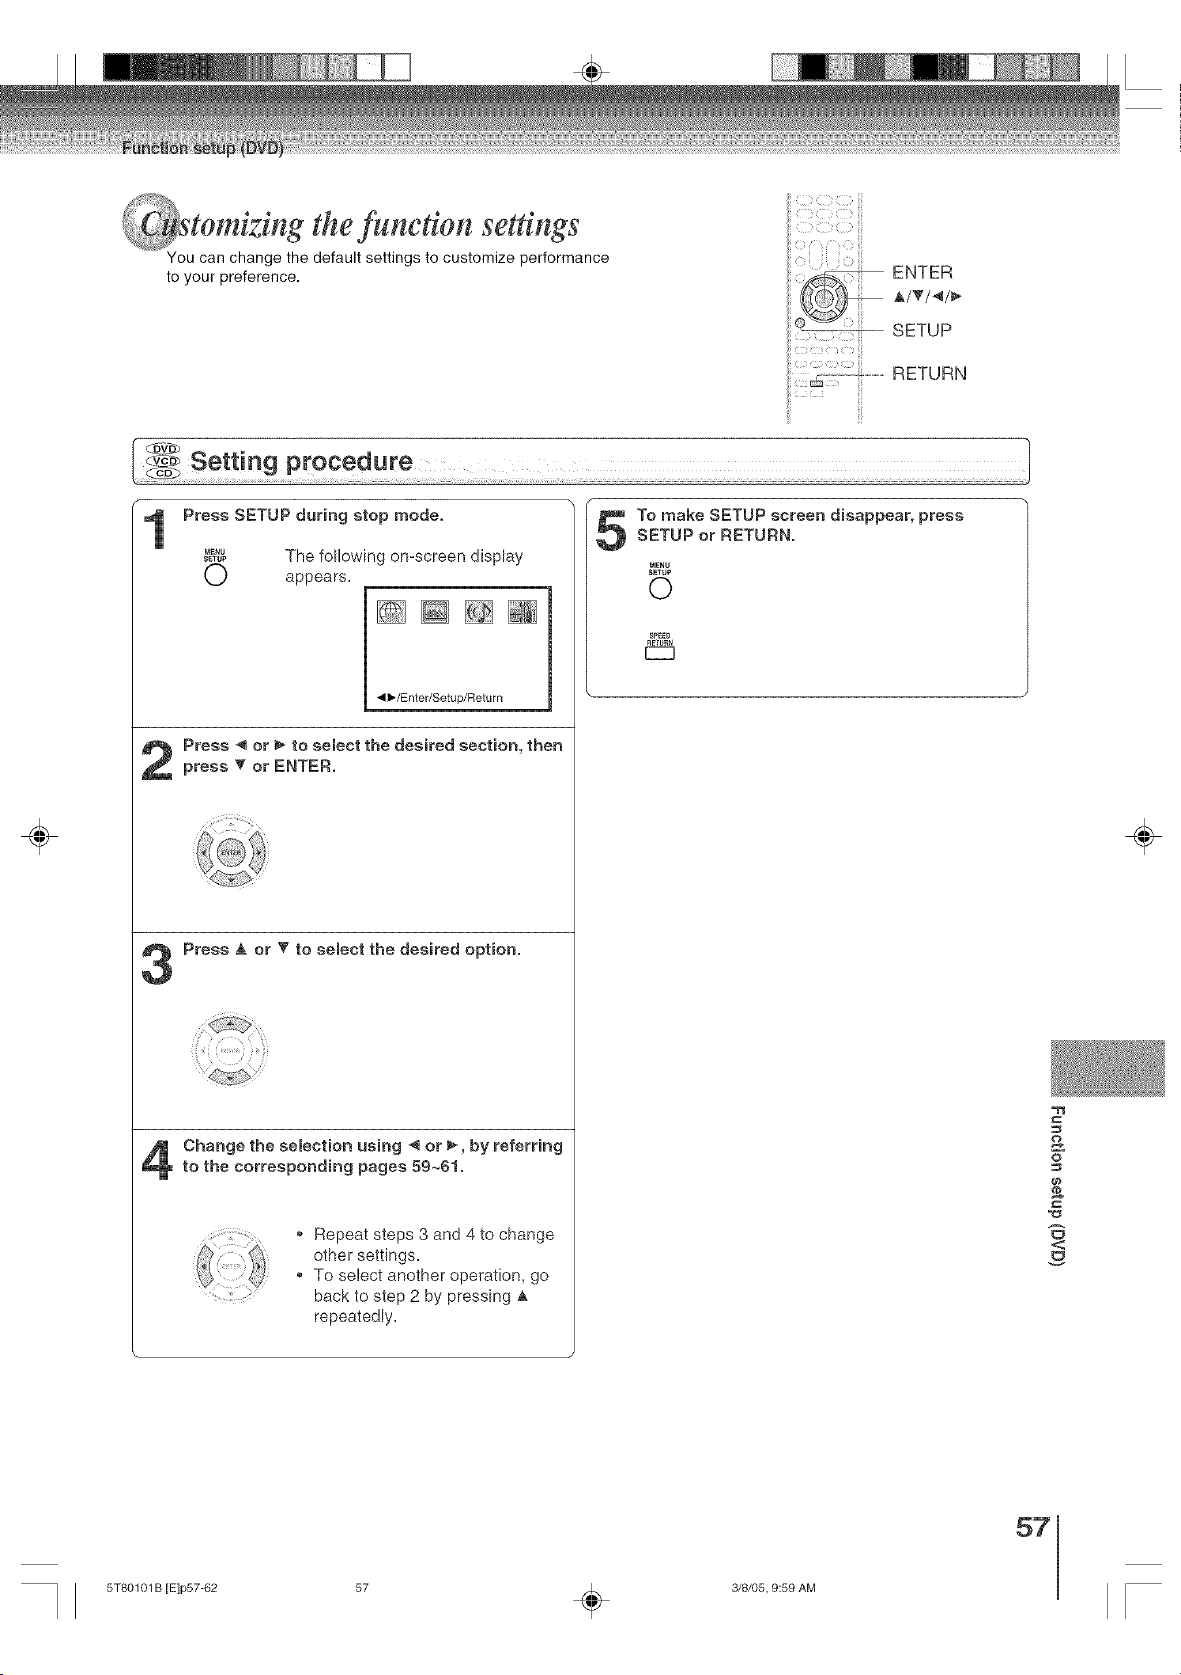
tom_sng the funedon settings
You can change the default settings to customize performance
to your preference.
SSS i_ii
<:
ENTER
SETUP
2
...............................................RETURN
÷
r
1
Press SETUP during stop mode.
#?_ The following on-screen display
0 appears.
4 lb/Enter/Setup/Retu rn
Press -,qor _ to select the desired section, then
press 'V or ENTER.
Press _, or _' to select the desired option.
Change the selection using 4 or _, by referring
to the corresponding pages 59~6!.
¢ iii¸<(_ Repeat steps 3 and 4 to change
other settings.
To select another operation, go
back to step 2 by pressing _,
repeatedly.
To make SETUP screen disappear, press
SETUP or RETURN.
MENU
SETUP
©
SPEED
&
o
£
<
÷
57
5T80101 B [E]p57-62 57 _ 3/8/05, 9:59 AM
fom z ng the fundion se#ings (Continued)
÷
Setting details
Section Details Page
Option
Menu
Subtitme
Audio
To select the language of "Menu", "SubtitIe" and
"Audio" if more than one language are available on
the disc.
TV Screen To select a picture size according to the aspect
ratio of your TV.
- Dispmay To turn on or de-activate the operational status dis-
play on the screen.
Picture Node To select a preferred picture mode from "Video",
Film" or "Auto".
JPEG Jnterva8
DRC
Password
Parentam
Select Fimes
To select a preferred setting for the slide show
playback.
To select On or Off for DRC (Dynamic Range Con-
trol).
Input 4-digit password to set the parental level.
To select a preferred parental level for the parental
setting.
To select a preferred file type for playing back a CD
containing a mixture of file types.
59
59
59
6O
60
6O
61
÷
58
5T 0101B [E]p57-62
58 _ 3/8/05, 9:59 AM
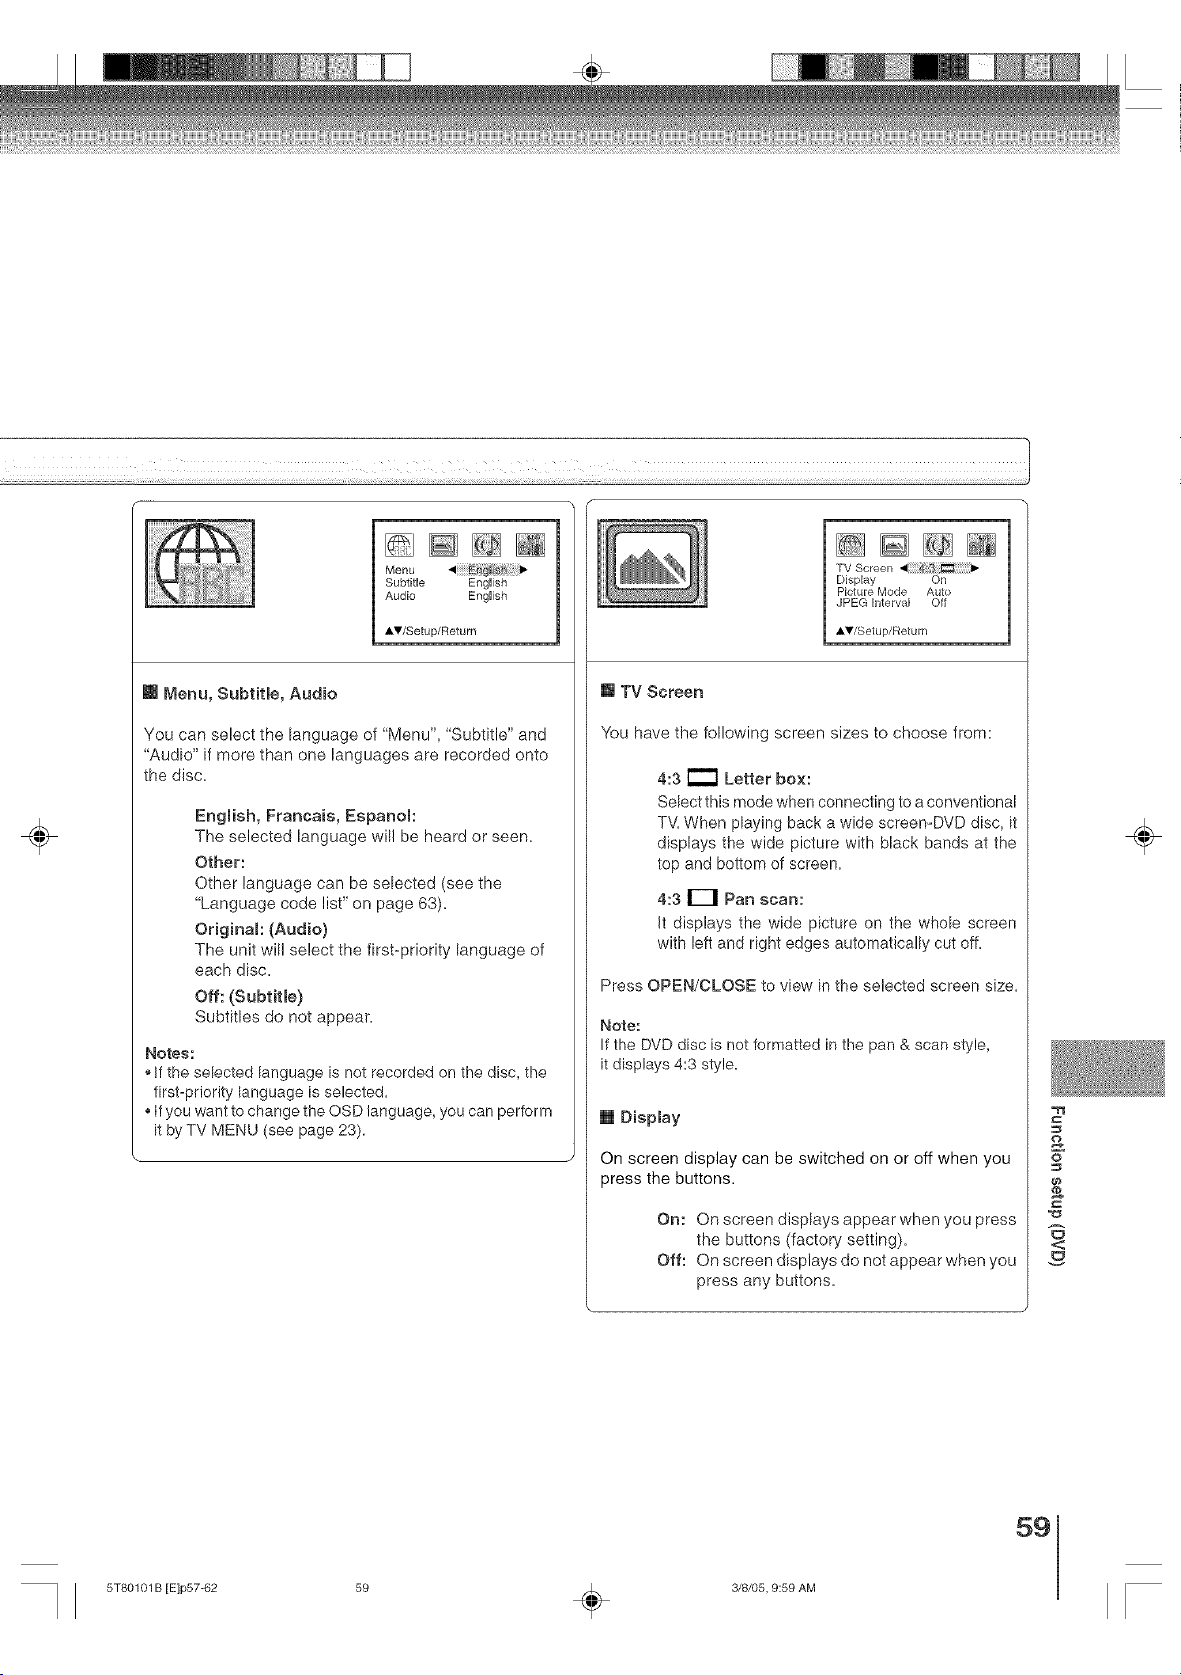
÷
[]@[][]
Menu
Subtitle English
Audio English
AV/Setup/Return
m Menu, Subtitle, Audio
You can select the language of "Menu", "Subtitle" and
"Audio" if more than one languages are recorded onto
the disc.
Engmish, Francais, Espanom:
The selected language will be heard or seen.
Other:
Other language can be selected (see the
"Language code list" on page 63).
Original: (Audio)
The unit will select the first-priority language of
each disc.
Off: (Subtitle)
Subtitles do not appear.
Notes:
• If the selected language is not recorded on the disc, the
first-priority language is selected.
, If you want to change the OSD language, you can perform
it byTV MENU (see page 23).
TV Screen
Display On
Picture Mode Auto
JPEG interval Off
AV/Setup/Return
[] TV Screen
You have the following screen sizes to choose from:
4:3 i_ Letter box:
Select this mode when connecting to a conventional
TV. When playing back a wide screemDVD disc, it
displays the wide picture with black bands at the
top and bottom of screen.
4:3 El Pan scan:
It displays the wide picture on the whole screen
with left and right edges automatically cut off.
Press OPEN/CLOSE to view in the selected screen size.
Note:
If the DVD disc is not formatted in the pan & scan style,
it displays 4:3 style.
[] Display
On screen display can be switched on or off when you
)ress the buttons.
On: On screen displays appear when you press
the buttons (factory setting).
Off: On screen displays do not appear when you
press any buttons.
&
o
£
<:
÷
59
5T80101 B [E]p57-62 59 _ 3/8/05, 9:59 AM
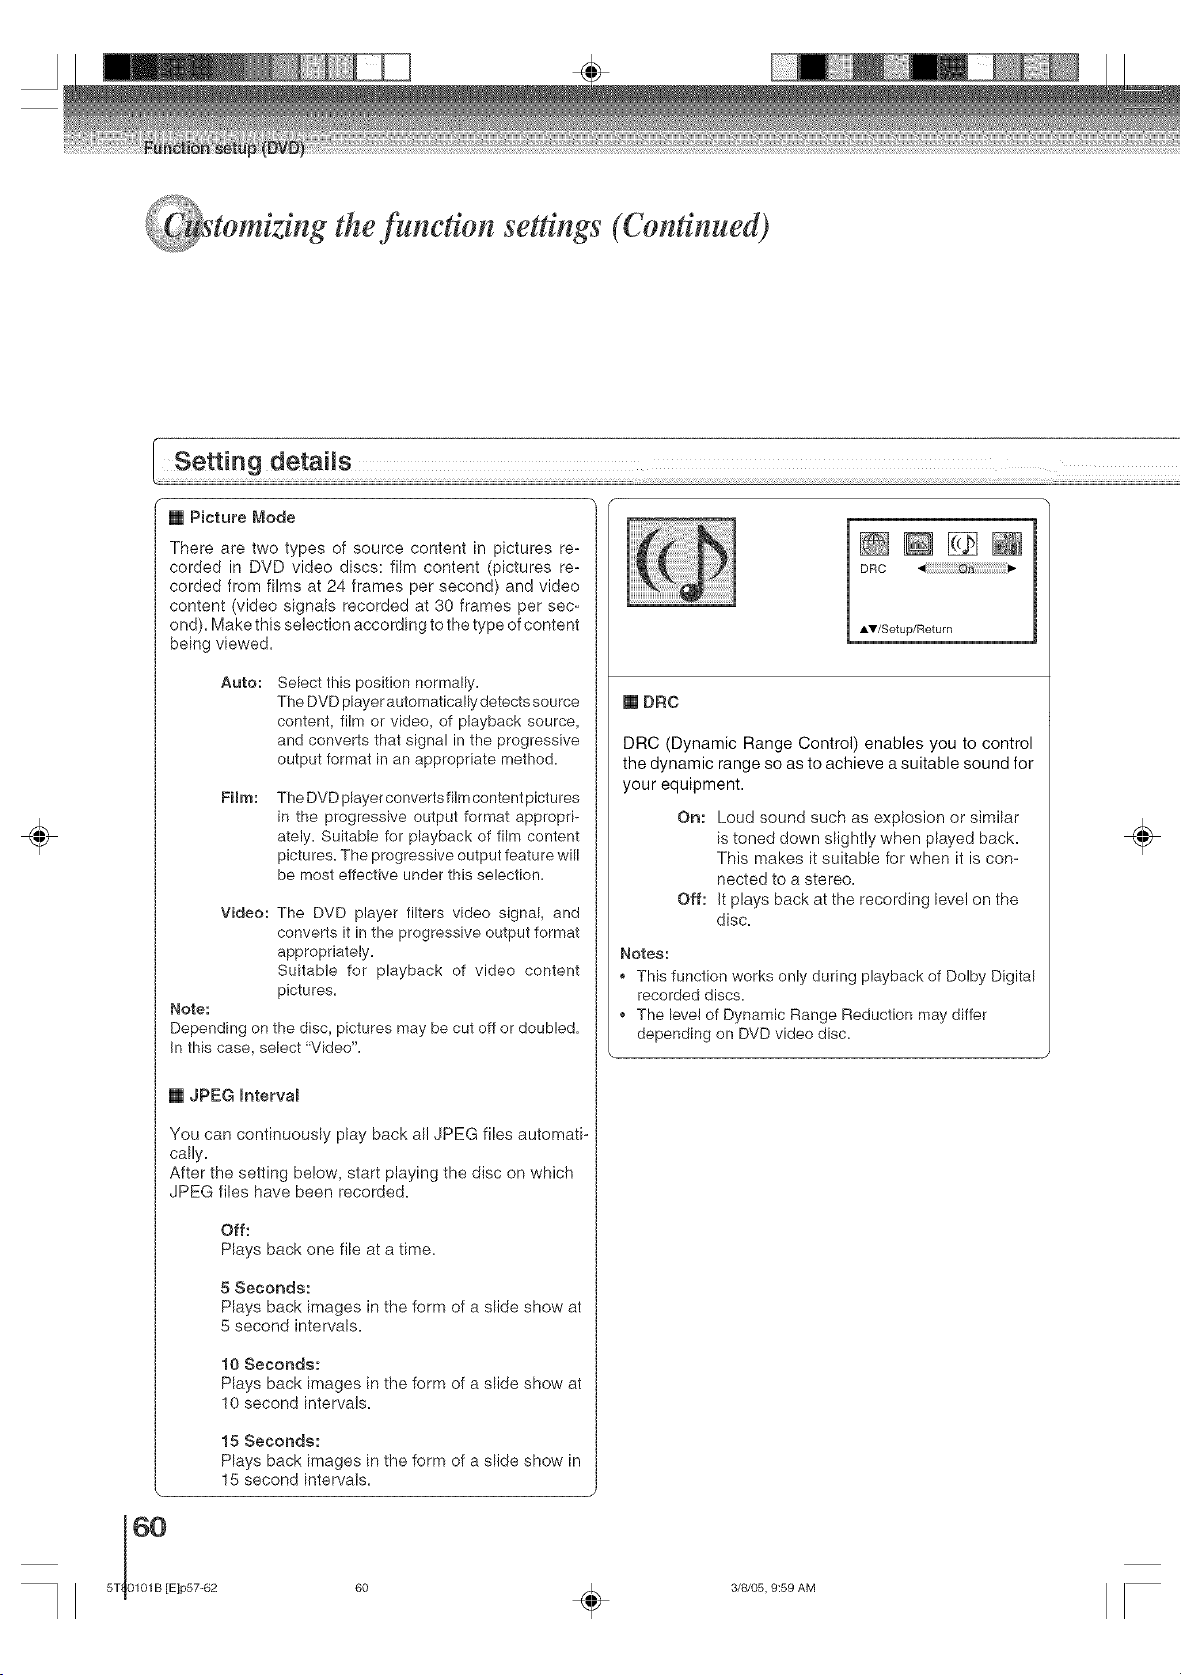
tom ztng the function settings (Continued)
÷
[] Picture Mode
There are two types of source content in pictures re=
corded in DVD video discs: film content (pictures re=
corded from films at 24 frames per second) and video
content (video signals recorded at 30 frames per sec-
ond). Make this selection according to the type of content
being viewed.
Auto:
Select this position normally.
The DVD player automatically detects source
content, film or video, of playback source,
and converts that signal in the progressive
output format in an appropriate method.
Film:
The DVD player converts film content pictures
in the progressive output format appropri-
ately= Suitable for playback of film content
pictures. The progressive output feature will
be most effective under this selection=
Video: The DVD player filters video signal, and
converts it in the progressive output format
appropriately.
Suitable for playback of video content
pictures.
Note:
Depending on the disc, pictures may be cut off or doubled.
In this case, select "Video"=
[] JPEG Intervam
You can continuously play back all JPEG files automati-
cally=
After the setting below, start playing the disc on which
JPEG flies have been recorded=
Off:
Plays back one file at a time=
5 Seconds:
Plays back images in the form of a slide show at
5 second intervals=
10 Seconds:
Plays back images in the form of a slide show at
10 second intervals.
15 Seconds:
Plays back images in the form of a slide show in
15 second intervals.
60
5T 0101B [E]p57-62
÷
DRC
AV/Setup/Return
[] DRC
DRC (Dynamic Range Control) enables you to control
the dynamic range so as to achieve a suitable sound for
your equipment.
On: Loud sound such as explosion or similar
is toned down slightly when played back.
This makes it suitable for when it is con=
nected to a stereo.
Off: It plays back at the recording level on the
disc.
Notes:
,, This function works only during playback of Dolby Digital
recorded discs.
,, The level of Dynamic Range Reduction may differ
depending on DVD video disc.
3/8/05, 9:59 AM
÷
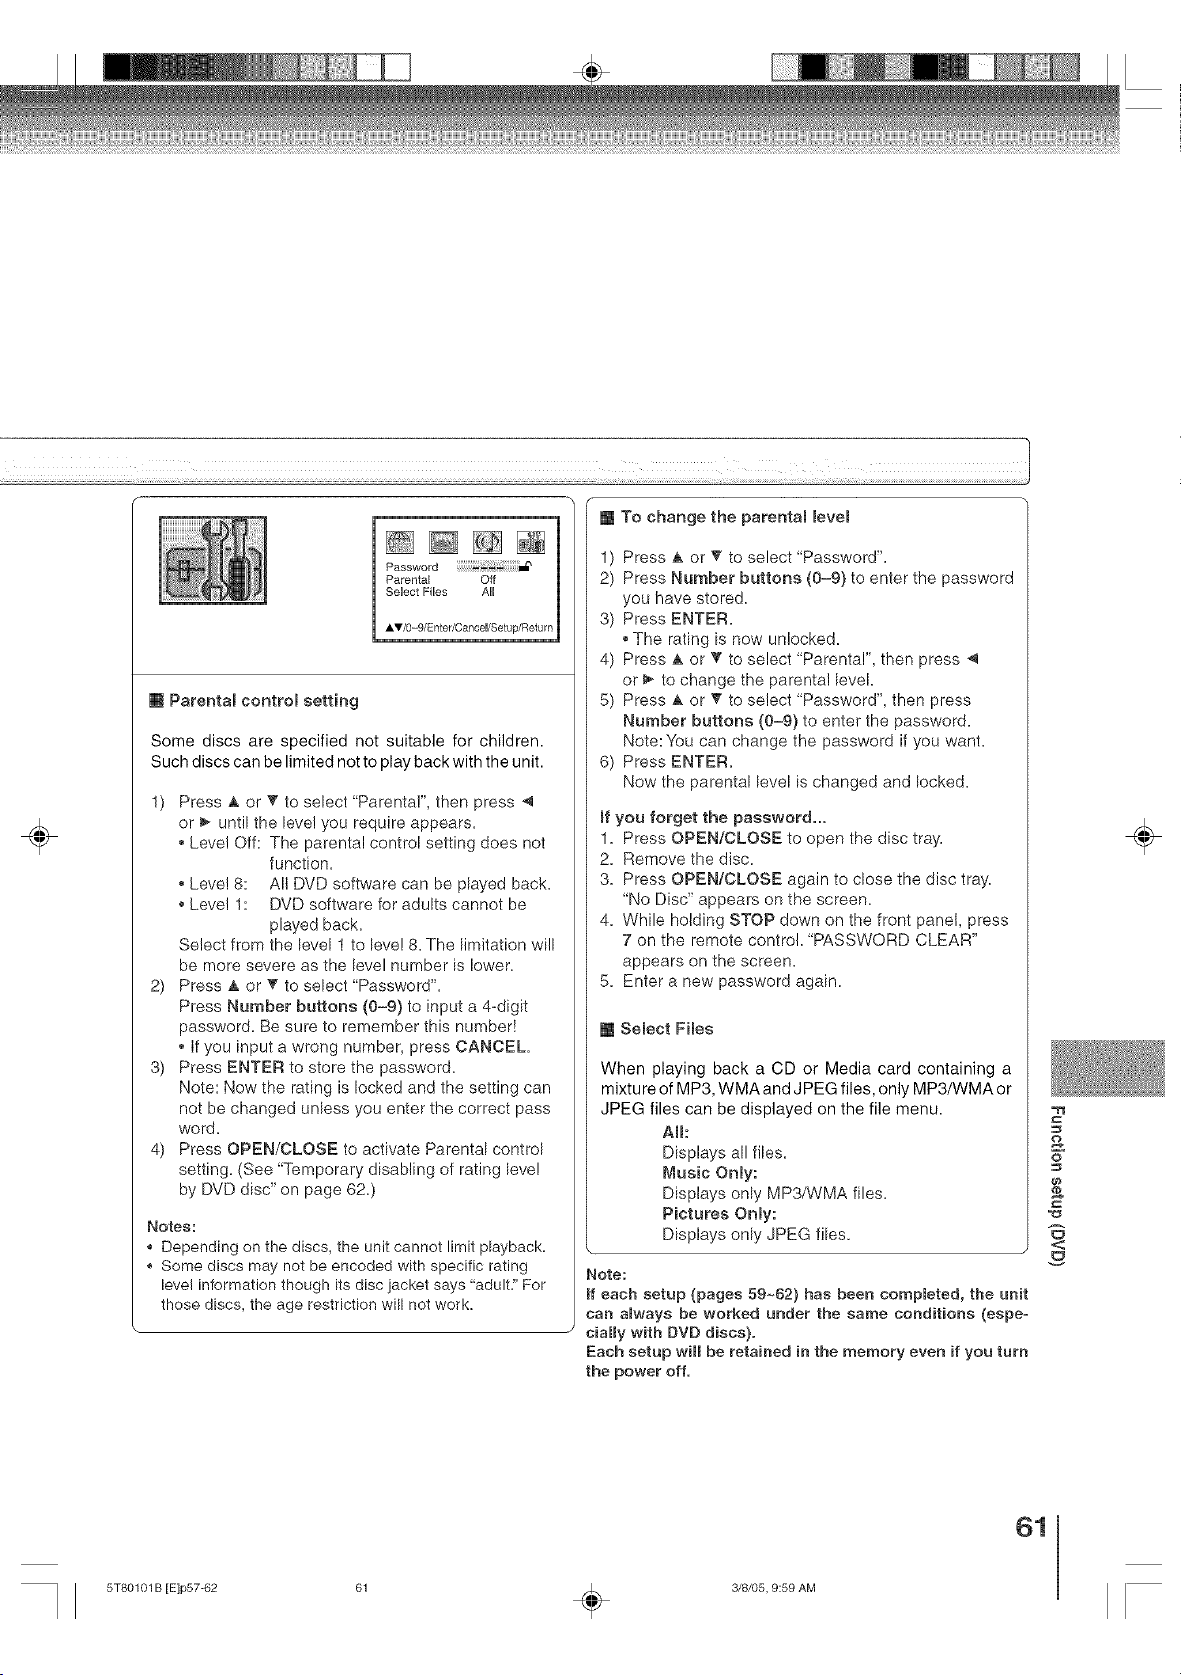
÷
m Parental control setting
Some discs are specified not suitable for children.
Such discs can be limited not to play back with the unit.
1) Press _ or '_ to select "Parental", then press
or _ until the leve! you require appears.
,, Level Off: The parental control setting does not
function=
,, Level 8: All DVD software can be played back.
,, Level 1: DVD software for adults cannot be
played back.
Select from the level 1 to level 8. The limitation will
be more severe as the level number is lower.
2) Press A or _" to select "Password".
Press Number buttons (0-9) to input a 4=digit
password. Be sure to remember this number!
,, if you input a wrong number, press CANCEL.
3) Press ENTER to store the password.
Note: Now the rating is locked and the setting can
not be changed unless you enter the correct pass
word=
4) Press OPEN/CLOSE to activate Parental control
setting. (See "Temporary disabling of rating leve!
by DVD disc" on page 62.)
Notes:
,, Depending on the discs, the unit cannot limit playback=
,, Some discs may not be encoded with specific rating
level information though its disc jacket says "adult=" For
those discs, the age restriction will not work.
[] To change the parentam mevem
1) Press A or T to select "Password".
2) Press Number buttons (0-9) to enter the password
you have stored.
3) Press ENTER.
,, The rating is now unlocked.
4) Press ,A or V' to select "Parental', then press -,q
or _ to change the parental level.
5) Press ,L or T to select "Password', then press
Number buttons (0-9) to enter the password.
Note: You can change the password if you want.
6) Press ENTER.
Now the parental level is changed and locked.
If you forget the password...
1. Press OPEN/CLOSE to open the disc tray.
2. Remove the disc.
3. Press OPEN/CLOSE again to close the disc tray.
"No Disc" appears on the screen.
4. While holding STOP down on the front panel, press
7 on the remote control. "PASSWORD CLEAR"
appears on the screen.
5. Enter a new password again.
[] Select Files
When playing back a CD or Media card containing a
mixture of MP3, WMA and JPEG files, only MP3/WMA or
JPEG files can be displayed on the file menu.
All:
Displays all flies.
Music Only:
Displays only MP3/WMA files.
Pictures Only:
Displays only JPEG flies.
Note:
If each setup (pages 59~62) has been completed, the unit
cab always be worked under the same conditions (espe=
ciaHy with DVD discs}.
Each setup will be retained in the memory even if you turn
the power off.
&
o
<
÷
61
5T80101 B [E]p57-62 61 _ 3/8/05, 9:59 AM
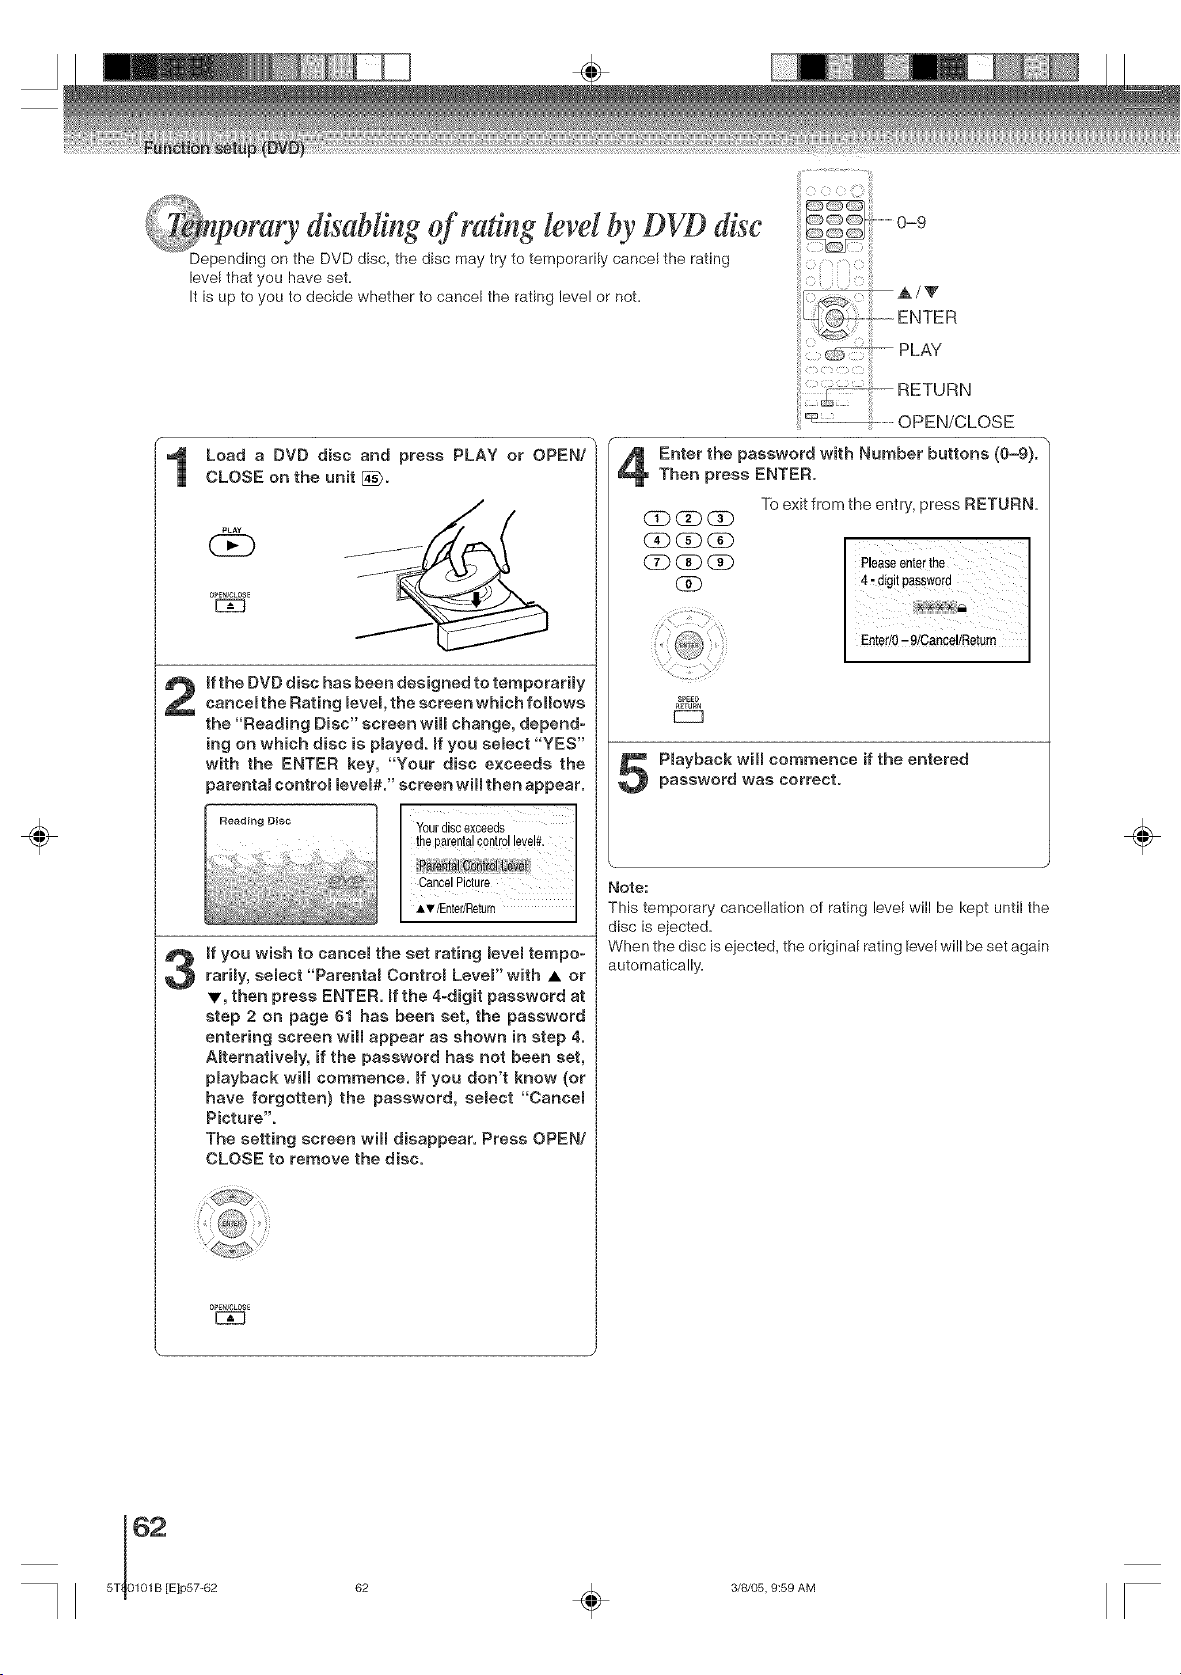
÷
orary disabling of rating [eve[by DVD disc
Depending on the DVD disc, the disc may try to temporarily cancel the rating
level that you have Seta
It is Up to yOU to decide whether to cancel the rating leve! or nOta
Load a DVD disc and press PLAY or OPEN!
CLOSE on the unit [_.
PLAY
QE)
0_EN/CL0_E
3
If the DVD disc has been designed to temporarimy
cancemthe Rating mevem,the screen which follows
the "Reading Disc" screen will change, depend-
ing on which disc is pmayed, ff you select "YES"
with the ENTER key, "Your disc exceeds the
parentaJ control mevel#." screen will then appear.
Reading Disc Yourdiscexceeds I
theparentalcontrollevel#.
Pam_tai##_r6I(_)a!
,_T/Enter/Return l
if you wish to cancem the set rating Bevemtempo°
rarH% semect "Parentam Controm Lever with • or
V, then press ENTER. ffthe 4-digit password at
step 2 on page 61 has been set, the password
entering screen will appear as shown in step 4.
Amternativemy, if the password has not been set,
pmayback will commence, ff you don't know (or
have forgotten} the password, semect "Cancem
Picture".
The setting screen will disappear. Press OPEN/
CLOSE to remove the disc.
OPE_/OL0SE
E3E]
...........................iii
,A/V
ENTER
_-- PLAY
RETURN
.......................OPEN/CLOSE
Enter the password with Number buttons (0--9).
Then press ENTER.
To exit from the entry, press RETURN.
CD(3D _
(A3 _ dE)
CD_CD
GAb
Entefl0 ' 9/CanCel/RetUrn
SPEEb
_[TUBM
Pmayback will commence if the entered
password was correct.
Note:
This temporary cancellation of rating level will be kept until the
disc is ejected.
When the disc is ejected, the original rating level will be set again
automatically.
÷
62 _ 3/8/05, 9:59 AM
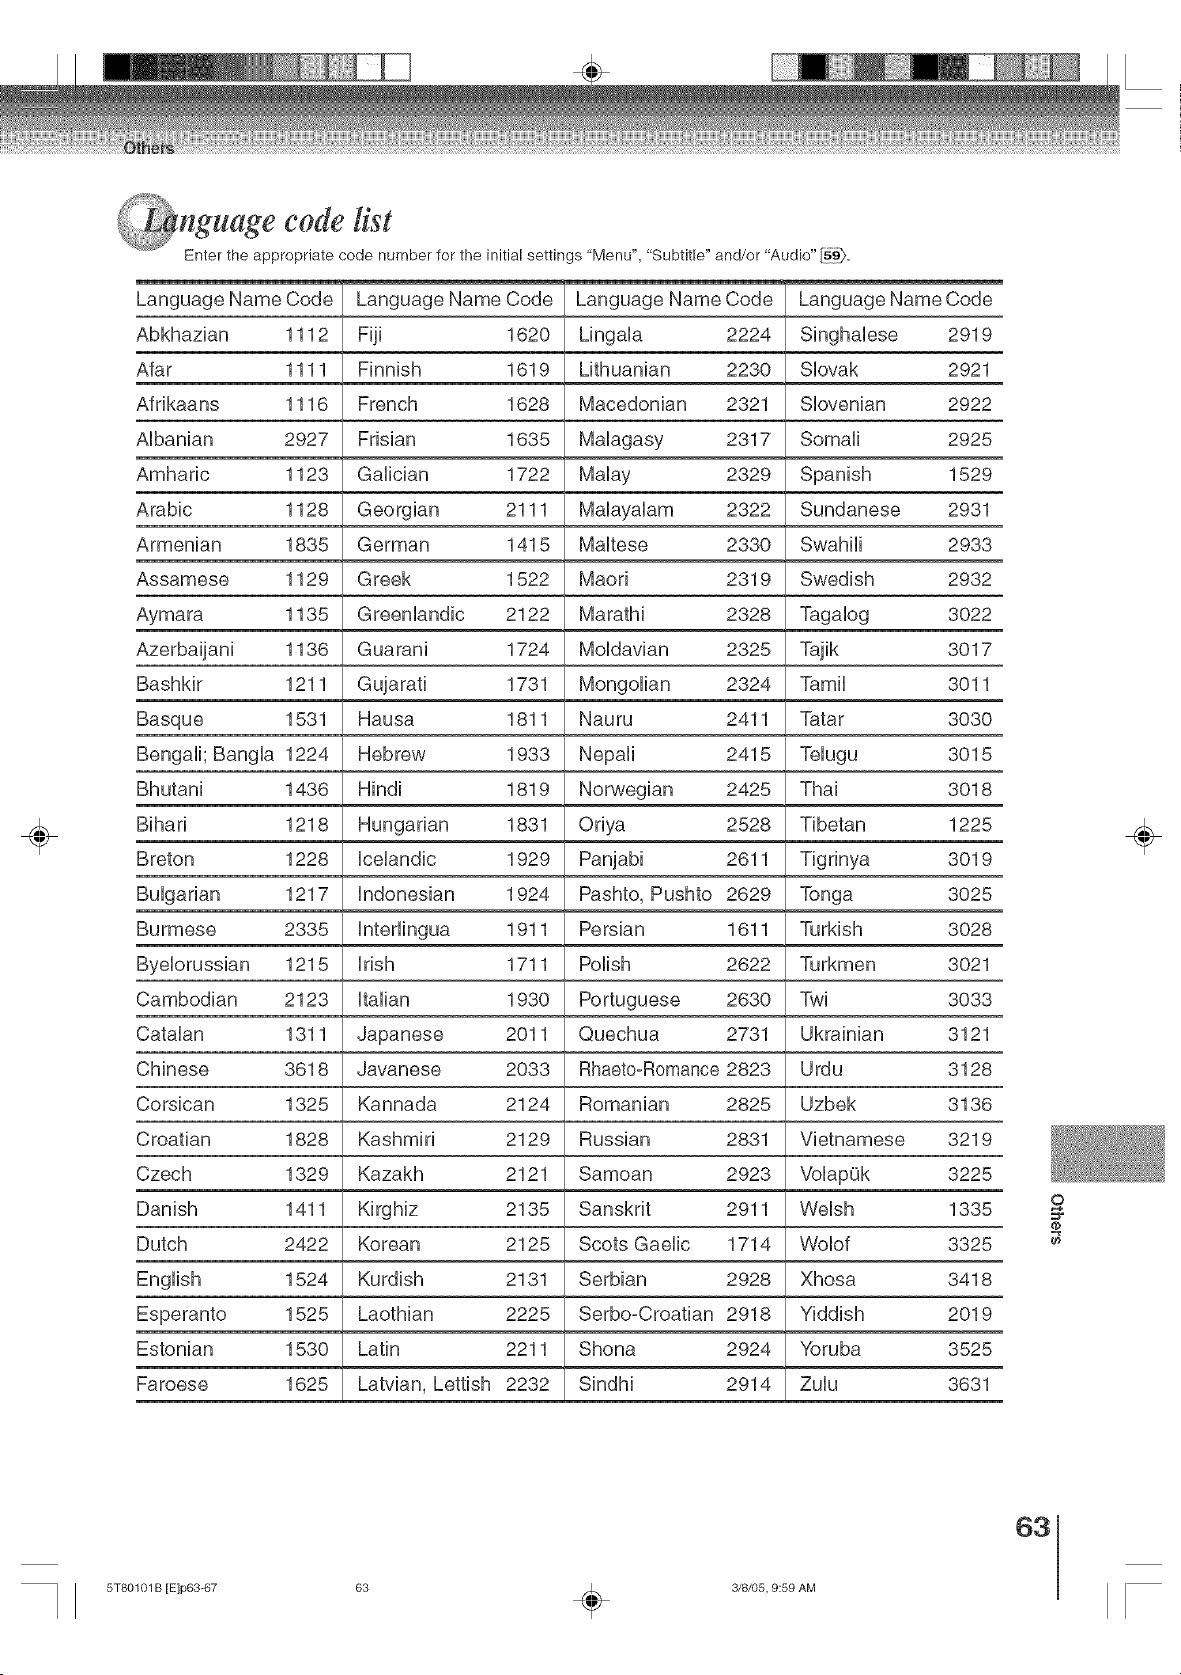
÷
@nguage code list
Enter the appropriate code number for the initial settings "Menu", "Subtitle" and/or "Audio" Igg),
Language Name Code Language Name Code Language Name Code Language Name Code
&bkhazian 1112 Fiji 1620 Lingala 2224 Singhalese 2919
&far 1111 Finnish 1619 Lithuanian 2230 SIovak 2921
&frikaans 1116 French 1628 Macedonian 2321 SIovenian 2922
&lbanian 2927 Frisian 1635 Malagasy 2317 Somali 2925
&mharic 1123 Galician 1722 Malay 2329 Spanish 1529
&rabic 1128 Georgian 2111 Malayalam 2322 Sundanese 2931
&rmenian 1835 German 1415 Maltese 2330 Swahili 2933
&ssamese 1129 Greek 1522 Maori 2319 Swedish 2932
&ymara 1135 Greenlandic 2122 Marathi 2328 Tagalog 3022
&zerbaijani 1136 Guarani 1724 Moldavian 2325 Tajik 3017
Bashkir 1211 Gujarati 1731 Mongolian 2324 Tamil 3011
Basque 1531 Hausa 1811 Nauru 2411 Tatar 3030
Bengali; Bangla 1224 Hebrew 1933 Nepali 2415 Telugu 3015
Bhutani 1436 Hindi 1819 Norwegian 2425 Thai 3018
Bihari 1218 Hungarian 1831 Oriya 2528 Tibetan 1225
Breton 1228 Icelandic 1929 Panjabi 2611 Tig rinya 3019
Bulgarian 1217 indonesian 1924 Pashto, Pushto 2629 Tonga 3025
Burmese 2335 1911 Persian 1611 Turkish 3028
Byelorussian 1215 irish 1711 Polish 2622 Turkmen 3021
Sambodian 2123 Italian 1930 Portuguese 2630 Twi 3033
Satalan 1311 Japanese 2011 Quechua 2731 Ukrainian 3121
Shinese 3618 Javanese 2033 RhaetooRomance 2823 Urdu 3128
Sorsican 1325 Kannada 2124 Romanian 2825 Uzbek 3136
3roatian 1828 Kashmiri 2129 Russian 2831 Vietnamese 3219
3zech 1329 Kazakh 2121 Samoan 2923 VolapOk 3225
Danish 1411 Kirghiz 2135 Sanskrit 2911 Welsh 1335
Dutch 2422 Korean 2125 Scots Gaelic 1714 Wolof 3325
1524 Kurdish 2131 Serbian 2928 Xhosa 3418
Esperanto 1525 Laothian 2225 Serbo-Croatian 2918 Yiddish 2019
Estonian 1530 Latin 2211 Shona 2924 Yoruba 3525
Faroese 1625 Latvian, Lettish 2232 Sindhi 2914 Zulu 3631
o
@
÷
63
5T80101 B [E]p63-67 63 _ 3/8/05, 9:59 AM
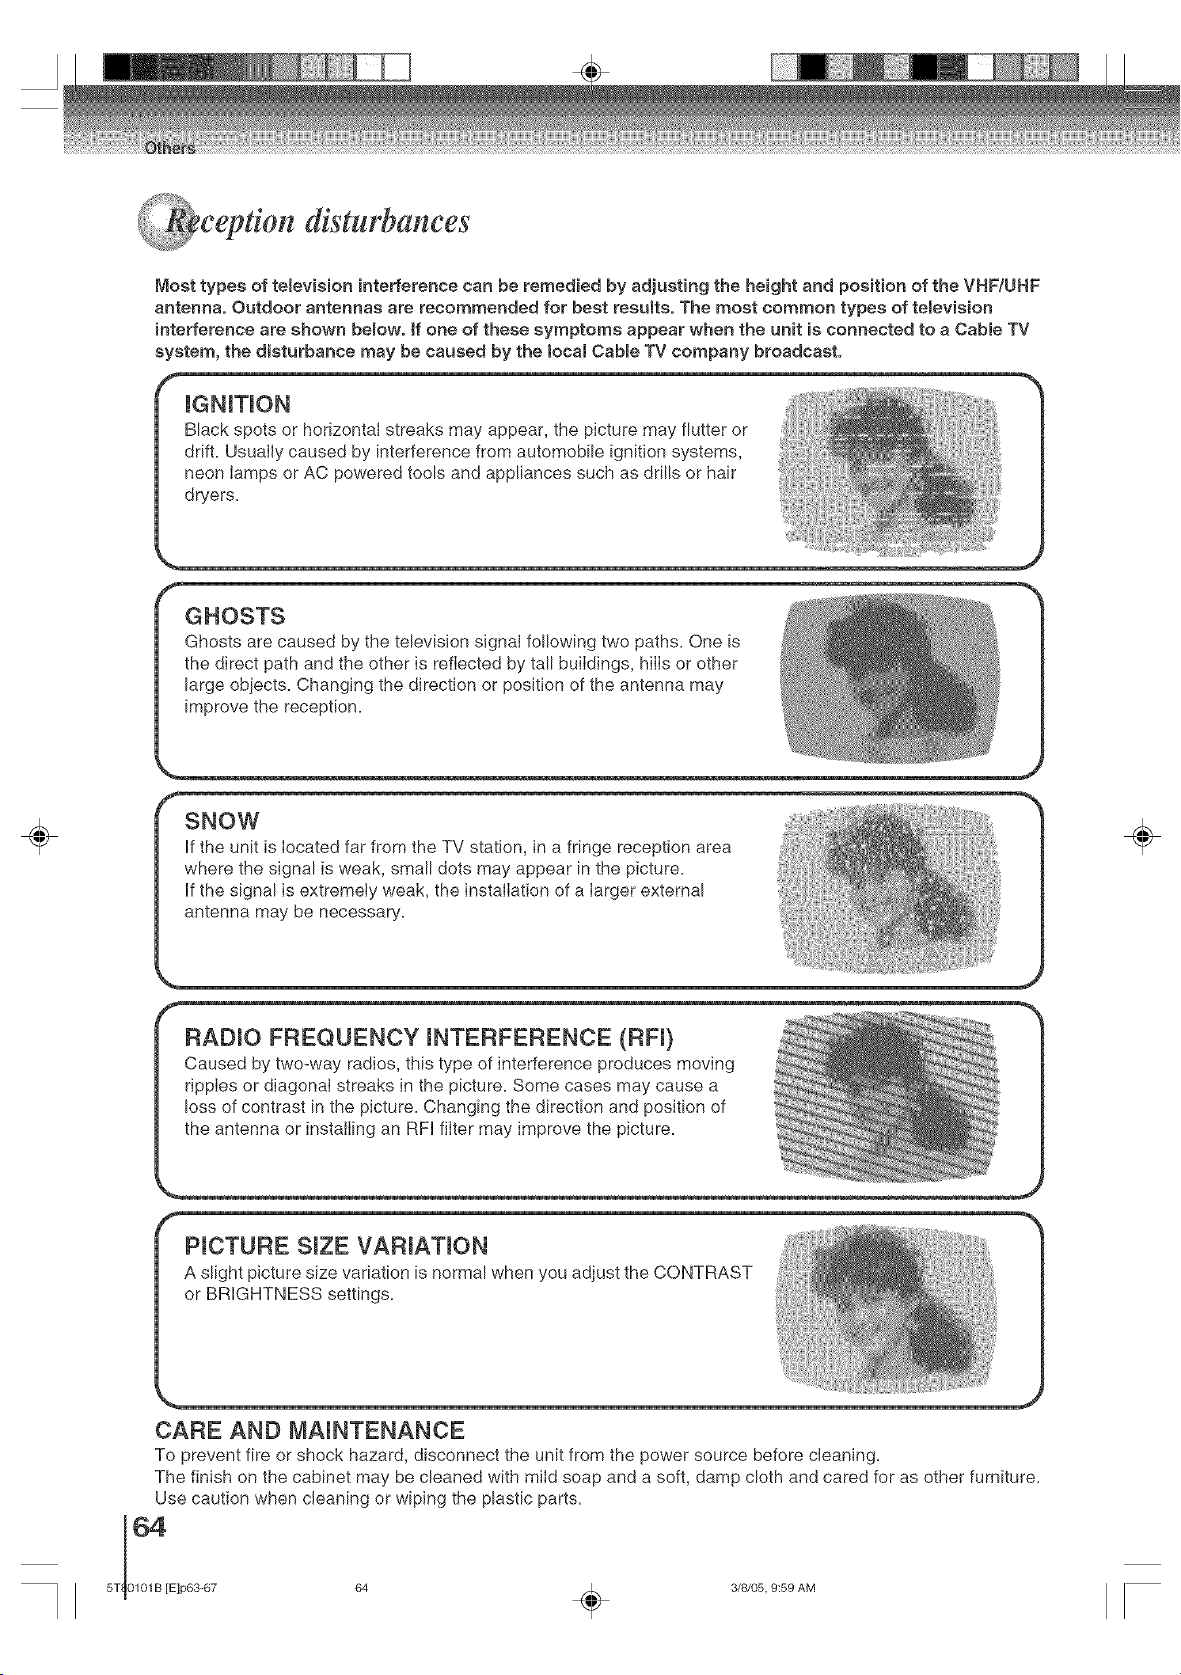
ceptton" disturbances
,%;,j,
Most types of television inte#erence can be remedied by adjusting the height and position of the VHF/UHF
antenna. Outdoor antennas are recommended for best results. The most common types of teBevision
}nterference are shown bemow, ff one of these symptoms appear when the unit }s connected to a Cable TV
system, the disturbance may be caused by the local CaMe TV company broadcast,
mGNmTmON
Black spots or horizontal streaks may appear, the picture may flutter or
drift. Usually caused by interference from automobile ignition systems,
neon lamps or AC powered tools and appliances such as drills or hair
dryers.
÷
SNOW
If the unit is located far from the TV station, in a fringe reception area
where the signal is weak, small dots may appear in the picture.
If the signal is extremely weak, the installation of a larger external
antenna may be necessary.
÷
f
RADIO FREQUENCY mNTERFERENCE (RF0
Caused by two-way radios, this type of interference produces moving
ripples or diagonal streaks in the picture. Some cases may cause a
loss of contrast in the picture. Changing the direction and position of
the antenna or installing an RFI filter may improve the picture.
PICTURE SmZE VARIATmON
A slight picture size variation is normal when you adjust the CONTRAST
or BRIGHTNESS settings.
CARE AND MAINTENANCE
To prevent fire or shock hazard, disconnect the unit from the power source before cleaning=
The finish on the cabinet may be cleaned with mild soap and a soft, damp cloth and cared for as other furniture=
Use caution when cleaning or wiping the plastic parts=
5T 0101B [Elp63-67 64 ,_. 3/8/05, 9:59 AM
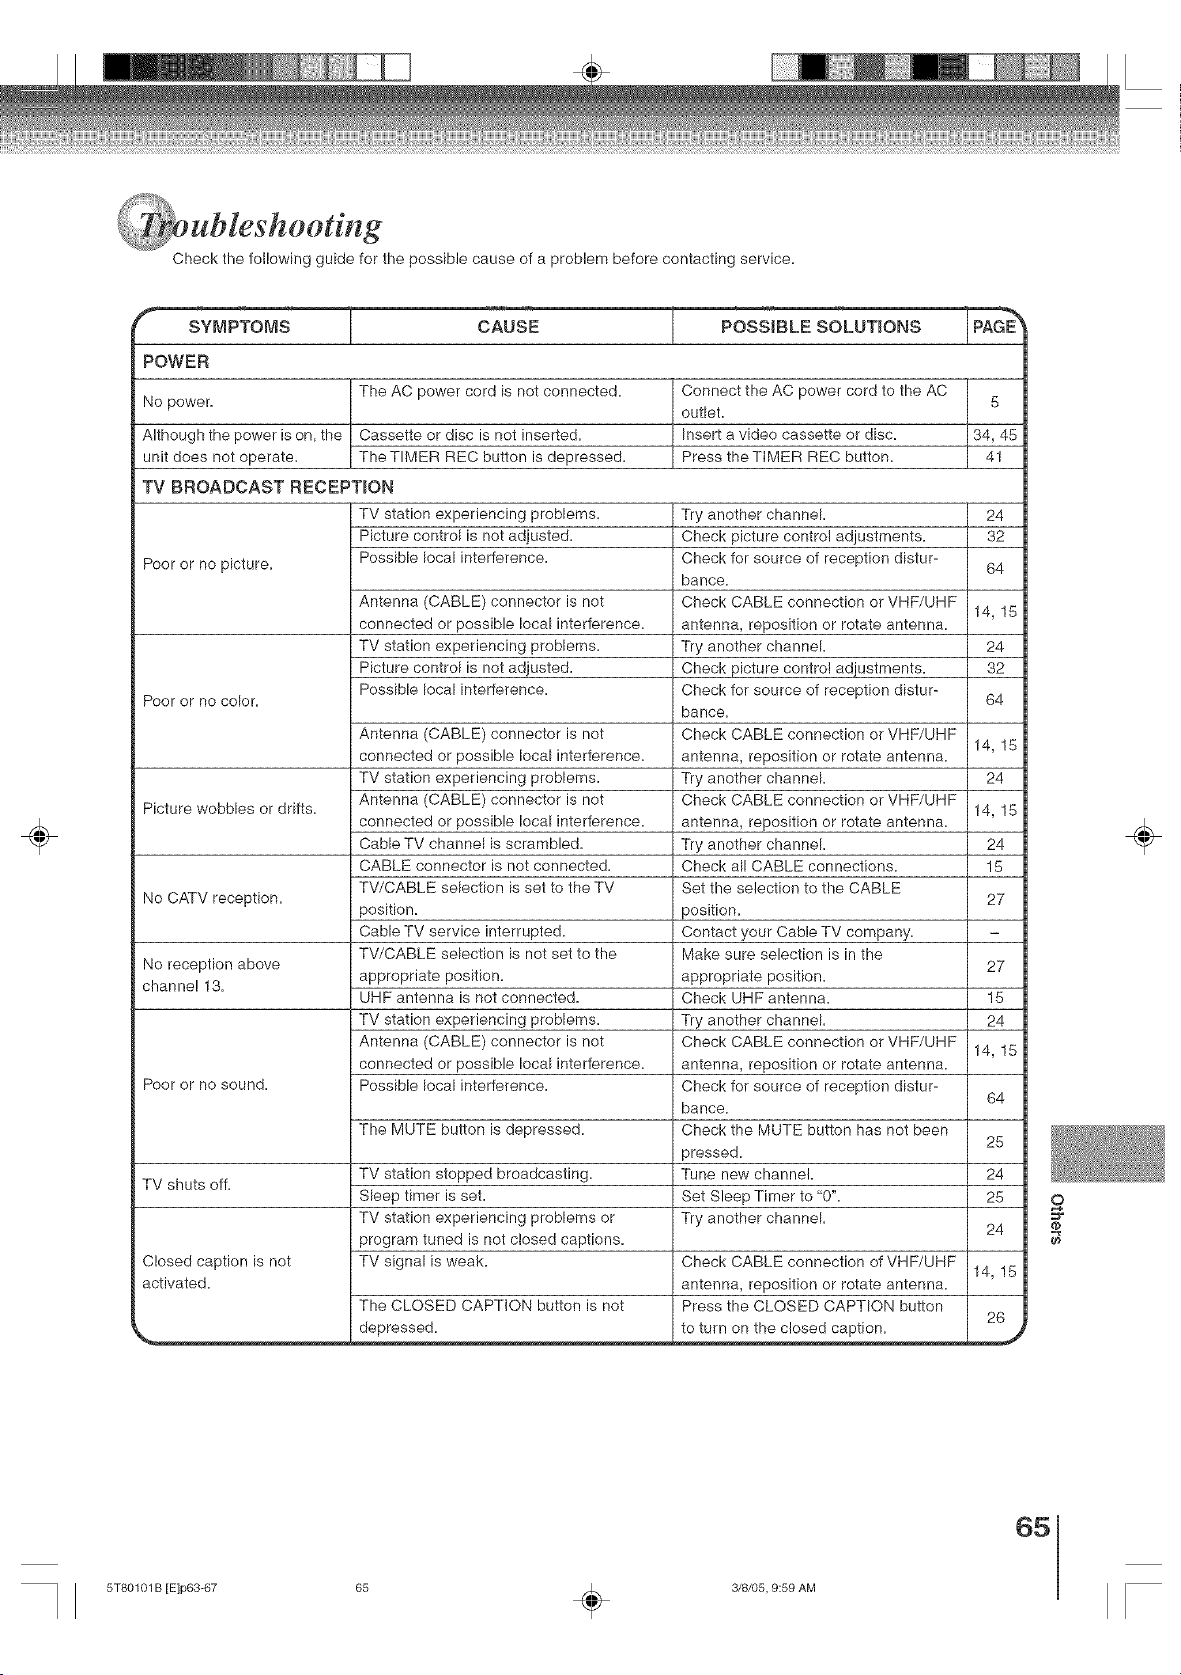
Check the following guide for the possible cause of a problem before contacting service.
÷
sYMPToMs CAUSE POSS,BLESOLBT,O.S
POWER
No power.
Although the power is on, the
unit does not operate.
The AC power cord is not connected.
Cassette or disc is not inserted.
TheTIMER REC button is depressed.
Connect the AC power cord to the AC
5
outlet.
Insert a video cassette or disc. 34, 45
Press theTIMER REC button. 41
TV BROADCAST RECEPTION
Poor or no picture.
Poor or no color.
TV station experiencing problems.
Picture control is not adjusted.
Possible local interference.
Antenna (CABLE) connector is not
connected or possible local interference.
TV station experiencing problems.
Picture control is not adjusted.
Possible local interference.
24
32
64
Try another channel.
Check picture control adjustments.
Check for source of reception distur-
bance.
Check CABLE connection or VHF/UHF
antenna, reposition or rotate antenna.
Try another channel.
Check picture control adjustments.
Check for source of reception distur-
bance.
Check CABLE connection or VHF/UHF
antenna, reposition or rotate antenna.
Try another channel.
Check CABLE connection or VHF/UHF
antenna, reposition or rotate antenna.
Try another channel.
Check all CABLE connections.
Set the selection to the CABLE
position.
Contact your Cable TV company.
Make sure selection is in the
appropriate position.
Check UHF antenna.
Try another channel.
Check CABLE connection or VHF/UHF
antenna, reposition or rotate antenna.
Check for source of reception distur-
bance.
Check the MUTE button has not been
pressed.
Tune new channel.
Set Sleep Timer to "0".
Try another channel.
14, 15
24
32
64
Antenna (CABLE) connector is not
connected or possible local interference. 14, 15
TV station experiencing problems. 24
Picture wobbles or drifts. Antenna (CABLE) connector is not
connected or possible local interference. 14, 15
Cable TV channel is scrambled. 24
CABLE connector is not connected. 15
TV/CABLE selection is set to the TV
No CATV reception. 27
position.
Cable TV service interrupted.
TV/CABLE selection is not set to the
No reception above 27
channel 13. appropriate position.
UHF antenna is not connected. 15
TV station experiencing problems. 24
Antenna (CABLE) connector is not 14, 15
connected or possible local interference.
Poor or no sound. Possible local interference.
64
The MUTE button is depressed. 25
TV shuts off. TV station stopped broadcasting. 24
Sleep timer is set. 25
TV station experiencing problems or 24
program tuned is not closed captions.
Closed caption is not TV signal is weak. Check CABLE connection of VHF/UHF
14, 15
activated, antenna, reposition or rotate antenna.
The CLOSED CAPTION button is not Press the CLOSED CAPTION button
26
__depressed" to turn on the closed caption.
9
@
÷
65
5T80101 B [E]p63-67 65 _ 3/8/05, 9:59 AM
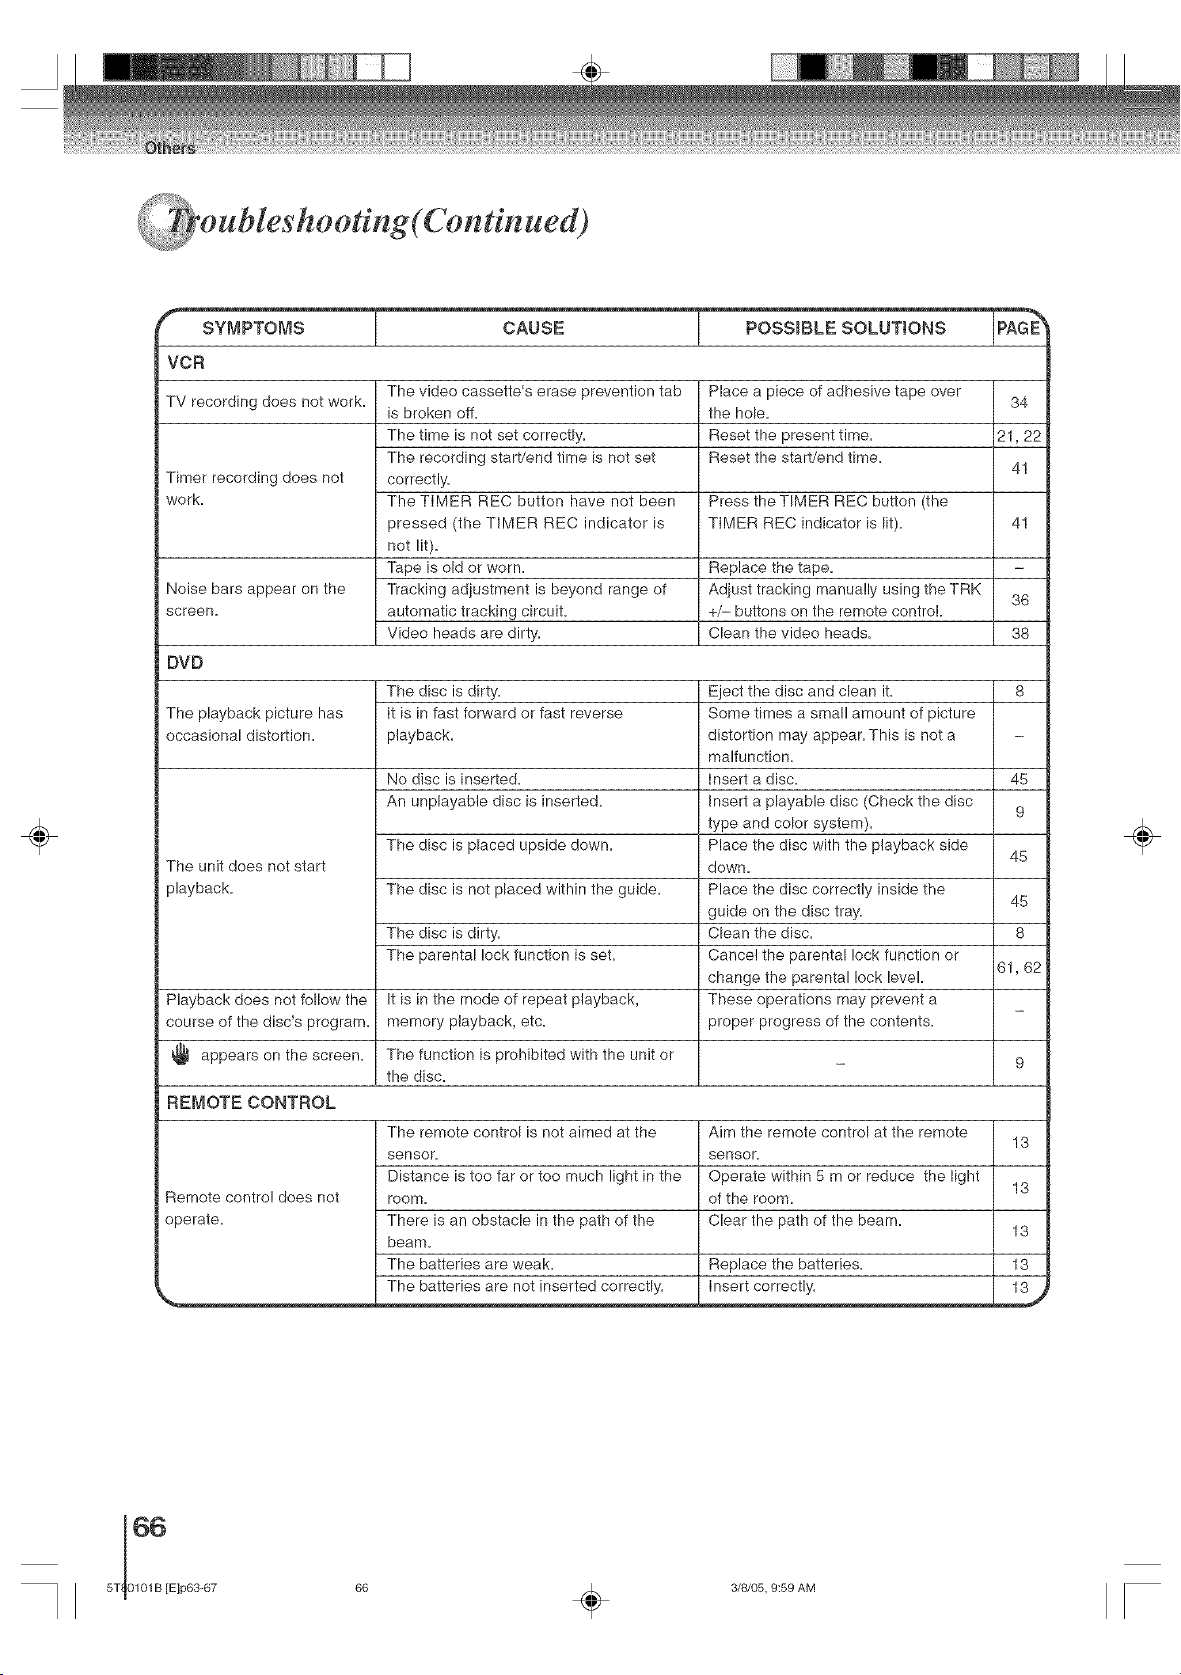
÷
r SYMPTOMS CAUSE POSSIBLE SOLUTIONS IPAGE_
VCR
TV recording does not work.
Timer recording does not
work.
Place a piece of adhesive tape over 34
the hole.
Reset the present time. 21, 22
Reset the start/end time.
41
The video cassette's erase prevention tab
is broken off.
The time is not set correctly.
The recording start/end time is not set
correctly.
The TIMER REC button have not been
pressed (the TIMER REC indicator is
not lit).
Tape is old or worn.
Tracking adiustment is beyond range of
automatic tracking circuit.
Video heads are dirty.
Press the TIMER REC button (the
TIMER REC indicator is lit).
41
Replace the tape.
Noise bars appear on the Adiust tracking manually using the TRK 36
screen. +/- buttons on the remote control.
Clean the video heads. 38
DVD
The playback picture has
occasional distortion.
The unit does not start
playback.
Playback does not follow the
course of the disc's program.
appears on the screen.
- 9
REMOTE CONTROL
The disc is dirty.
It is in fast forward or fast reverse
playback.
No disc is inserted.
An unplayable disc is inserted.
The disc is placed upside down.
The disc is not placed within the guide.
The disc is dirty.
The parental lock function is set.
It is in the mode of repeat playback,
memory playback, etc.
The function is prohibited with the unit or
the disc.
Eject the disc and clean it. 8
Some times a small amount of picture
distortion may appear. This is not a
malfunction.
insert a disc. 45
insert a playable disc (Check the disc
9
type and color system).
Place the disc with the playback side
45
down.
Place the disc correctly inside the
45
guide on the disc tray.
Clean the disc. 8
Cancel the parental lock function or
61, 62
change the parental lock level.
These operations may prevent a
proper progress of the contents.
Remote control does not
operate.
The remote control is not aimed at the
sensor.
Distance is too far or too much light in the
roorYI.
There is an obstacle in the path of the
beam.
The batteries are weak.
The batteries are not inserted correctly.
Aim the remote control at the remote
13
sensor.
Operate within 5 m or reduce the light
13
of the room.
Clear the path of the beam.
13
Replace the batteries. 13
insert correctly ...2_
÷
66
5T 0101B [E]p63-67
66 _ 3/8/05, 9:59 AM

÷
MW20F51 MW24F51 MW27F51
Generat
Power supply AC 120 V 60 Hz
Power consumption
Operation: 110W 135W 145W
Stand by: 4 W
Picture tube 20 in. (508 mm) diagonal* 24 in. (600 mm) diagonal* 27 in. (677 mm) diagonal*
Speaker lq3/16 x 3-7/8 inches (46 x 99 mm), 8 _2 x 2
Audio output power 1.5 W + 1.5 W 2.5 W + 2.5 W
Weight 59.5 Ibs (27 kg) 79.4 Ibs (36 kg) 97.0 Ibs (44 kg)
Dimensions
Width: 22-9/16 inches (573 ram) 25q3/16 inches (655 mm) 29q/8 inches (740 mm)
Height: 20-3/8 inches (517 ram) 22-13/16 inches (580 ram) 25_3/8 inches (645 mm)
Depth: 18q5/16 inches (481 ram) 18_5/8 inches (472.5 ram) 19_7/16 inches (493 ram)
Tuner 181 channel freq. synthesized
VHF 2-13
UHF 14_69
CATV 125 Channels
Antenna input UHF/VHF: 75 _2 coaxial
Color system NTSC
Video head 4 Rotary heads
Audio track Hi-Fi sound _ 2 Tracks / MONO sound _ 1 Track
Hi-Fi frequency response 20 Hz to 20,000 Hz
Hi-Fi dynamic range More than 90 dB
RFWD/REW Approx. 1 minute and 48 seconds (with Tq20 cassette tape)
time at 25°C (77°F)
ApplicaNe disc DVD (12 cm, 8 cm), CD (12 cm, 8 cm)
Frequency range DVD: 4 Hz-22 kHz, CD: 4 Hz-20 kHz
Operating conditions Temperature: 5°C_40°C (41 °Fq04°F), Operating status: Horizontal
input/Output
Video input 1.0 V (p_p), 75 £2, negative sync. pin iack x 2
Video output 1.0 V (p_p), 75 _2, negative sync. pin iack x 1
Audio input -8 dBm, 50 k_2, negative sync. pin jack (L/R) x 2
Audio output -8 dBm, 1 ko, negative sync. pin iack (L/R) x 1
Audio output 0.5 V (p_p), 75 O, pin jack x 1
(DIGITAL COAXIAL)
Supplied accessories
Remote control (WC_SB1) ................................ 1
Batteries (R03/AAA) ......................................... 2
300_75 O matching transformer ........................ 1
Screen size is approximate.
,, This model complies with the above specifications.
• Designs and specifications are subject to change without notice.
,, This model may not be compatible with features and/or specifications that may be added in the future.
o
@
÷
67
5T80101 B [E]p63-67 67 _ 3/8/05, 9:59 AM
÷
÷
_i _¸'" " _!ii_%
ited warranty
Toshiba America Consumer Products, L.L.C. ("TACP") makes the following limited warranties. These limited
warranties extend to the original consumer purchaser or any person receiving this set as a gift from the
original consumer purchaser and to no other purchaser or transferee.
Limited Ninety (90) Day Warranty
TACP warrants this product and its parts against defects in materials or workmanship for a period of ninety
(90) days after the date of original retail purchase. During this period, TACP will repair a defective product or
part, without charge to you. You must deliver the entire set to an Authorized TACP Service Station. You pay for
all transportation and insurance charges for the set to and from the Service Station.
Limited One (!) Year Warranty
TACP further warrants the parts in this product against defects in materials or workmanship for a period of one
year after the date of original retai! purchase. During this period TACP will replace a defective part without
charge to you, except that if a defective part is replaced after ninety (90) days from the date of original retail
purchase you pay labor charges involved in the replacement. You must also deliver the entire product to a
TACP Authorized Service Station. You are responsible for all transportation for the set to and from the Service
Station.
Limited Two (2) Year Warranty of Picture Tube
TACP further warrants the picture tube in this product against defects in materials or workmanship for a period
of two (2) years after the date of original retail purchase. During this period, TACP wiII replace a defective
picture tube without charge to you except that if a defective picture tube is replaced after ninety (90) days from
the date of the original retaiI purchase, you pay labor charges involved in the repIacement. You are respon-
sibb for all charges invoIved in the replacement. You are responsible for all transportation and insurance
charges for the set to and from the Service Station.
Rental Units
The warranty for rental units begins with the first rental or thirty (30) days from the date of shipment to the
rental firm, whichever comes first.
Commercial Units
Products sold and used for commercial use have a limited ninety (90) day warranty for aII parts, labor and picture
tube.
Owner's &,'lanua[ and Demographic Card
You should read this owner's manual thoroughIy before operating this product. You should complete and maiI
the enclosed Demographic card within ten days after you, or the person who has given you this product as a
gift, purchased this product. This is one way to enable TACP to provide you with better customer service and
improved products. Failure to return the Demographic card will not affect your rights under this warranty.
Your Responsibility
The above warranties are subject to the following conditions:
( 1 ) You must retain your biII of sale or provide other proof of purchase.
( 2 )AII warranty servicing of this product must be made by an Authorized TACP Service Station.
( 3 ) These warranties are effective only if the product is purchased and operated in the U=S=A=or Puerto
Rico.
( 4 ) Labor service charges for set installation, set up, adiustment of customer controis and instailation or
repair of antenna systems are not covered by this warranty. Reception problems caused by inadequate
antenna systems are your responsibility.
( 5 ) Warranties extend only to defects in materials or workmanship as limited above and do not extend to any
product or parts which have been lost or discarded by you or to damage to products or parts caused by
misuse, accident, damage caused by Acts of God, such as lightning or fluctuations in electric power,
improper instatIation, improper maintenance or use in violation of instructions furnished by us; or to units
which have been altered or modified without authorization of TACR
÷
TI ,E,p 8_B Ck68
3/8/05, 9:59 AM
÷
m#ed warranty continued)
f %
How to Obtain Warranty Service
If after following all of the operating instructions in this manual and checking the section "Troubleshooting"
and you still find that service is needed;
( 1 ) Call the TACP toll free number 1-800-631-3811 after you find a defective product or part to find the
nearest Toshiba Authorized Service Station.
( 2 ) Please present your bill of sale or other proof to the Authorized Service Station.
"TACP Authorized Service Station personnel will come to your home when warranty service is re-
quired. Depending on the type of repair required, the service will either be performed in your home or
the set will be taken to the TACP Authorized Service Station for repair and returned to your home at no
cost to you".
tn the Continental United States contact:
Tolt Free
1-800-631-3811
÷
AlI warranties impiied by state law, including the impIied warranties of merchantability and fitness for a particular
purpose, are expressly limited to the duration of the limited warranties set forth above. With the exception of
any warranties implied by state law as hereby Iimited, the foregoing warranty is exclusive and in lieu of alI other
warranties, guarantees, agreements and similar obligations of manufacturer or seller with respect to the repair
or replacement of any parts. In no event shalI TACP be liable for consequential or incidental damages.
No person, agent, distributor, dealer or company is authorized to change, modify or extend the terms of these
warranties in any manner whatsoever. The time within which action must be commenced to enforce any
obligation of TACP arising under this warranty or under any statute, or law of the United States or any state
thereof, is here by limited to 90 days from the date you discover or should have discovered, the defect. This
limitation does not apply to implied warranties arising under state law.
This warranty gives you specific legaI rights and you may also have other rights which may vary from state to
state. Some states do not allow limitation on how long an implied warranty lasts, when an action may be
brought, or the exclusion or limitation of incidentaI or consequential damages, so the above provisions may not
apply to you.
÷
9
@
69
5T80101 B [E]p68-Back 69 _ 3/8/05, 9:59 AM
II ÷ II
÷
II
5T 0101B [E]p68-Back 70 3/8/05, 9:59 AM
÷
÷
II
÷
÷
o
71
÷
5T80101 B [E]p68-Back 71 _ 3/8/05, 9:59 AM

÷
÷ ÷
TOSHIBA
J5TS0t01B SH 05/04[_
Printed in Thailand
5T80101 B [E]p68-Back 72 _ 3/8/05, 9:59 AM
