SYLVANIA
19-INCH COLOR TV/VCR
SRC19AC
F_
1
\ __ __ /
This Owner's Manual is made of
recycled paper.
_tQillqin_ thst this product meets
the E_RGY STAI_ guidelines for
e_ergy efficiency. ENERGy STAR e is
a U.S. registered mark,
I INSTRUCCIONES EN ESPANOL INCLUIDAS, I
_'7008CVR
WARNING: 3"0 REI)UCE THE RISK OF FIRE OR ELECTRIC SHOCK, DO NOT EXPOSE THIS APPLIANCE
TO RAIN OR MOISTURE.
CAUTION: TO REDUCE THERISK OF ELECTRIC
SHOCK,DO NOT REMOVE COVER(ORBACK).NO
USER SERVICEABLE PARTS INSIDE. REFER
SERVICING TO QUAL.IFFED SERVICE PERSON-
NEL.
THIS SYMBOL INDICATES THAT DAN-
OEROUS VOLTAGE CONSTITUTING A
RISK OF ELECTRIC SHOCK IS PRESENT
WITHIN THIS UNIT.
THIS SYMBOL INDICATES THAT THERE
ARE IMPORTANT OPERATING AND
MAINTENANCE INSTRUCTIONS IN THE
LITERATURE ACCOMPANYING THE AP-
PLIANCE.
The caution marking is located on the rear of the cabinet.
IMPORTANT SAFEGUARDS
l.Read instrucfiom_-All the safety and operating instruc-
tions should be read befote the appliance is opentted.
2.Retain Instructions-The safety and operating instructions
should be retained for future reference.
3.Heod Warnings-AU warnings on the appliance and in the
operating instructions should be adhered to.
4.Follow Instructions-All operating and use instructions
should be followed.
$.Cleaning-Unplug TVNCR from the wall outlet before
cleaning. Do not use liquid cleaners or aerosol cleaners.
Use a damp cloth for cleaning.
EXCEPTION : Aproductthat is meant for uninterrupted
service and, that for some specific reason, such as the
possibility of the loss of an authorization code for a CATV
converter, is not intended to be unplugged by the user for
cleaning or any other purpose, may exclude the reference
to unplugging the appliance in the cleaning description
otherwise required in item 5.
6.Attachments-Do not use attachments not recommended
by the TV/VCR manufacturer as they may cause hazards,
7.Water and Moisture-Do not use this TV/VCR near water-
for example, near a bath tub, wash bowl, kitchen sink, or
laundry tub, in a wet basement, or near a swimming pool,
and the like.
8.Accessories--Do not place this TV/VCE on an unstable
cart, stand, tripod, bracket, or table. The TV/VCR may fall
causing serious injury to someone, and serious damage to
the appliance. Use only with a cart, stand, tripod, bracket,
or table recommended by the
manufacturer, or sold with the
TVNCR. Any mounting of the
appliance should follow the
manufacturer's instructionsand
should use a mountingaccessory
recommended by the manufac-
turer. An appliance and cart com-
bination should be moved with
care.
Quick stops, excessive force, and uneven surfaces may
cause the appliance and cart combination to overturn.
9.Ventilation-Slots and openings in the cabinet and the back
or bott_n are provided forventilation and to ensure reliable
operation of the TVNCR and to protect it from overheat-
ing, and these openings must not be blocked or covered.
The openings should never be blocked by placing the
TV/VCR on a bed, sofa, rug, or other similar surface. This
TV/VCR should never be placed near or over a radiator or
heat register, This TV/VCR should not be placed in a
built-in installation such as a bookcase or rack unless
proper ventilation is provided or the manufacturer's in-
structions have been adhered to,
10.Power Sour_os-This TV/VCR should be operated only
from the type of power source indicated on the marking
label. If you are not sure of the type of power supply to
your home, consult your appliance dealer or local power
company. For TV/VCRs intended to operate from battery
power, or other sources, refer to the operating instructions.
ll.Grounding or Polarization-This TV/VCR is equipped
with a pola_zed alternating-current line plug(a plug having
one blade wider than the other). This plug will fit into the
power outlet only one way. This is a safety feature. If you
are unable to insert the plug fully into the outlet, try
reversing the plug. If the plug should still fail to fit, contact
your electrician to replace your obsolerc outlet. Do not
defeat the safety purpose of the polarized plug,
12.Power-Cord Protection.Power-supply cords should be
routed so that they arenot likely to be walked on or pinched
by items placed upon or against them, paying particular
attention to cords at plugs, convenience receptacles, and
the point where they exit from the appliance.
-2-
EN
8L15
T7008-UL
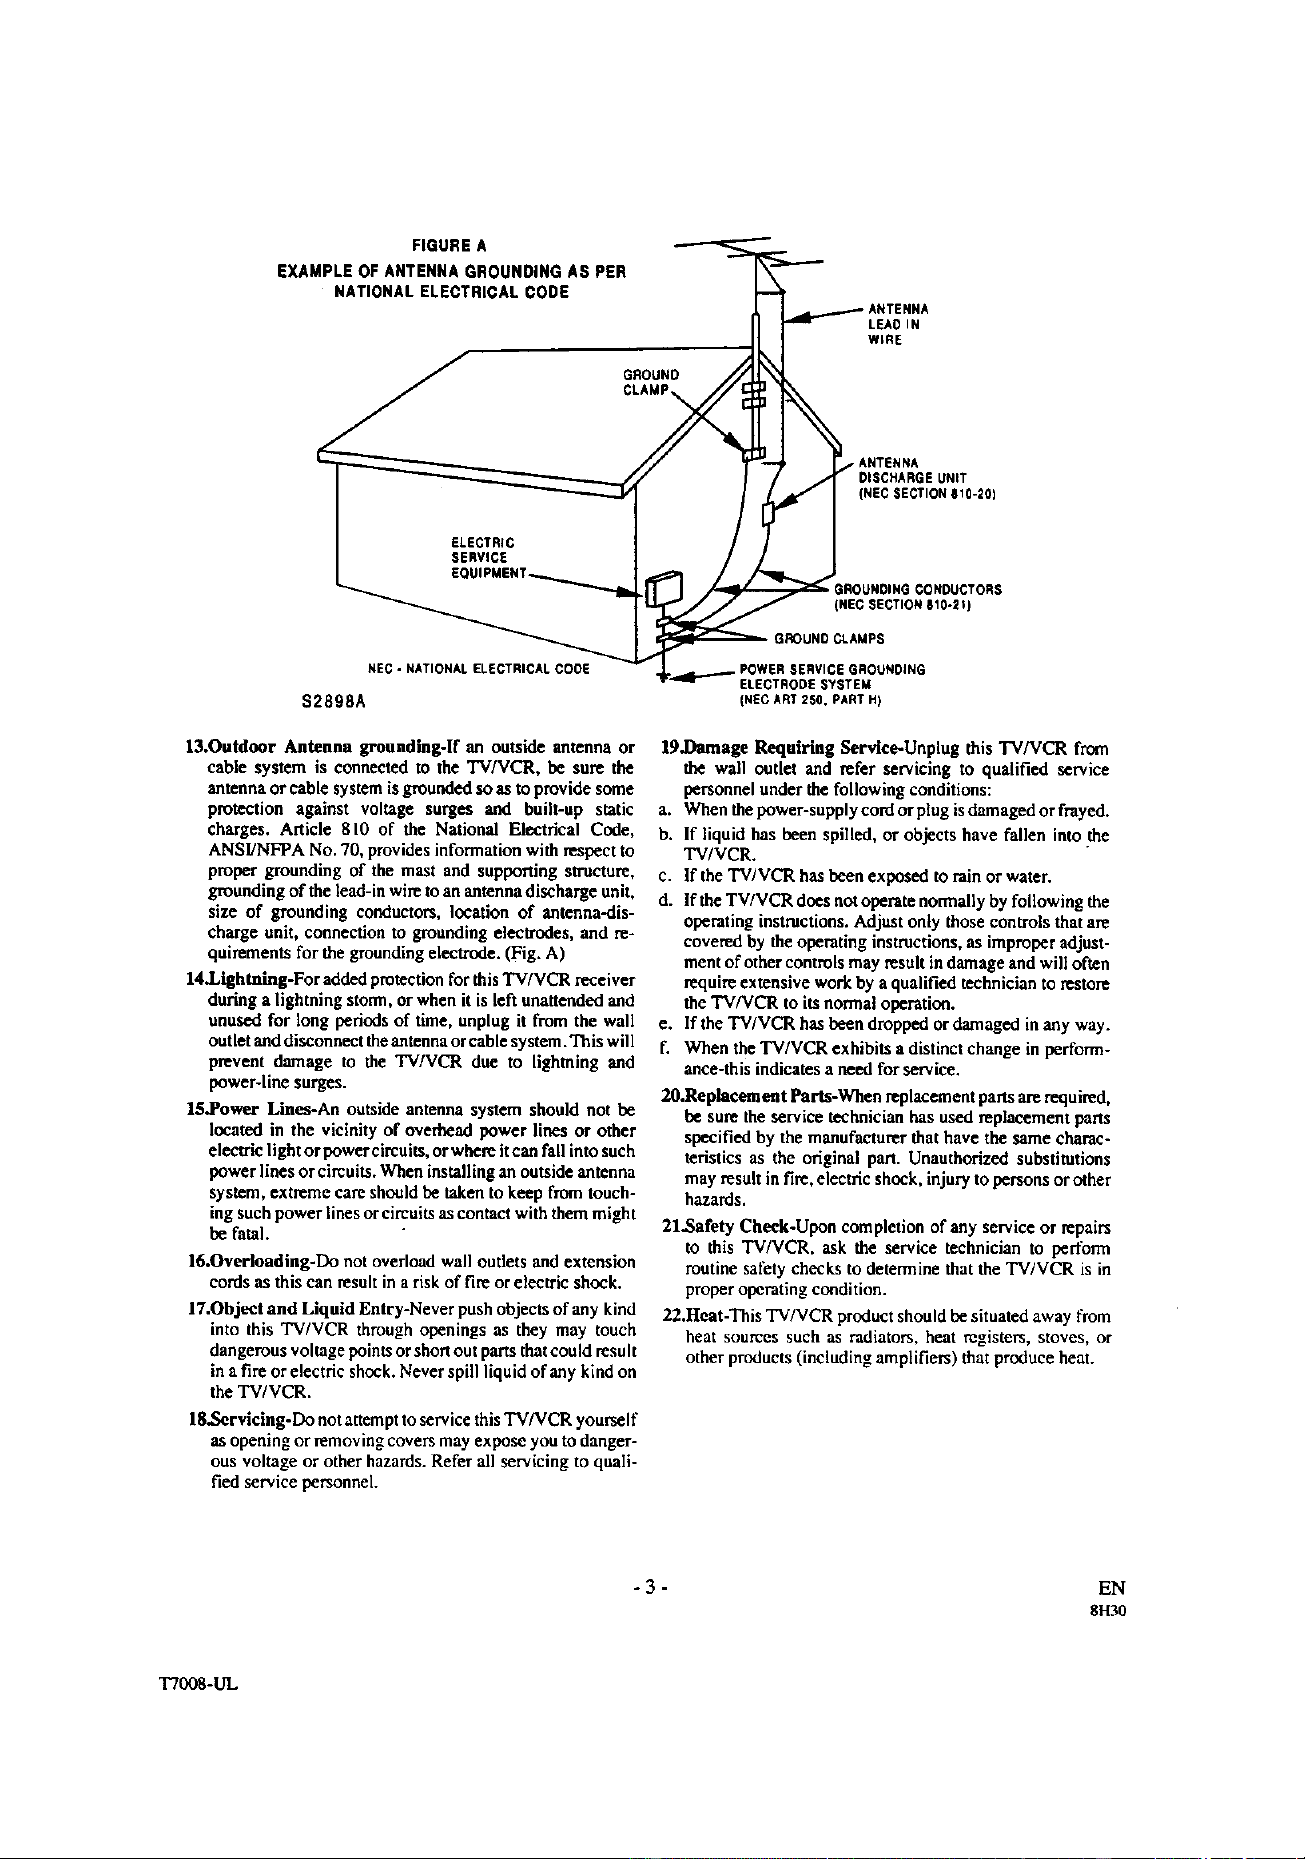
FIGURE A
EXAMPLE OF ANTENNA GROUNDING AS PER
NATIONAL ELECTRICAL CODE
LEAD IN
WERE
• ANTENNA
DISCHARGE UNIT
(NEC SECTION E10-20)
NEC - NATIONAL ELECTRICAL COOE
$2898A
13.Outdoor Antenna groundlng-lf an outside antenna or
cable system is connected to the TV/VCR, be sure the
antenna or cable systemis groundedsoasto provide some
protection against voltage surges and built-up static
charges. Article 810 of the National Electrical Code,
ANSFNFPA No, 70, provides information with respect to
proper grounding of the mast and supporting structure,
grounding of the lead-in wire to an antenna discharge unit,
size of grounding conductors, location of antonna-dis-
charge unit, connection to grounding electrodes, and re-
quirements for the grounding electrode. (Fig. A)
14.Lightning-For added protection for this TV/VCR receiver
during a lightning stnnn, or when it is left unattended and
unused for long periods of time, unplug it from the wall
outlet and disconnect the antenna orcable system. This will
prevent damage to the TV/VCR due to lightning and
power-line surges.
IS.Power Lines-An outside antenna system should not be
located in the vicinity of overhead power lines or other
electric light or power circuits, or where itcan fall into such
power lines or cireuits. When installing an outside antenna
sys_ra, extreme care should be taken to keep from touch-
ing such power lines or circuits as contact with them might
be fatal.
16.Overloading-Do not overload wall outlets and extension
cords as this can result in a risk of fire or electric shock.
17.Object and Liquid Entry-Never push objects of any kind
into this TV/VCR through openings as they may touch
dangerous voltage points or short out parts thatcould result
in a fire or electric shock. Never spill liquid of any kind on
the TV/VCR.
18.Servicing-Do not attempt to service this TVNCR you_elf
as opening or removing covers may expose you to danger-
ous voltage or other hazards. Refer all servicing to quail-
fled service personnel.
GROUNDING CONDUCTORS
(NEC SECTION E10-2_)
GROUND CLAMPS
ELECTRODE SYSTEM
(NEC ART2SO, PART H)
19.1)amage Requiring Service-Unplug this TVNCR from
the wall outlet and _fer servicing to qualified service
personnel under the following conditions:
a. When the power-supply cord or plug is damaged or fraynd.
b, If liquid has been spilled, or objects have fallen into the
TV/VCR.
c. If the TVIVCR has been exposed to rain or water.
d. If the TWVCR does not operate normally by following the
operating instructions. Adjust only those controls that are
covered by the operating instructions, as improper adJust-
ment of other controls may result in damage and wig often
require extensive work by a qualified technician to restore
the TV/VCR to its normal operation.
e. If the TV/VCR has been dropped or damaged in any way.
f. When the TV/VCR exhibits a distinct change in perform-
ance-this indicates a need for service.
20.Replacement Parts-When replacement parts are required,
be sure the service technician has used replacement pans
specified by the manufacturer that have the same charac-
teristics as the original part. Unauthorized substitutions
may result in fire, electric shock, injury to persons or other
hazards,
21.Safety Check-Upon completion of any service or repairs
to this TV/VCR, ask the se_ice technician to perform
routine safety checks to determine that the TV/VCR is in
proper operating condition.
22.Heat -This TV/VCR product should be situated away from
heat sources such as radiators+ heat registers, stoves, or
other products (including amplifiers) that produce heat.
-3-
EN
8H30
T7008-UL

PRECAUTIONS
Forsafe operation andsatisfactoryperformance of yonr
TV/VCR, keep the following in mind when selecting a
placefor its installation:
• Shield itfromdirectsunlightand keep itaway from
sourcesof intense heat.
• Avoid dusty or humid places.
• Avoid places with insufficient ventilation for proper
heat dissipation. Do not block the ventilation holes at
the top and bottom of the unit. Do not place the unit on
acarpet because this will block the ventilation holes.
• Install unit in a horizontal position.
• Avoid locations subject to strong vibration.
• DO not place the TV/VCR near strong magnetic fields.
• Avoid moving TV/VCR to locations where tempera-
ture differences are extreme.
• Do not handle the power cord with wet hands.
• DO not pull on the power cord when disconnecting it
from an AC wall outlet. Grasp it by the plug.
• If, by accident, water is spilled on your unit, unplug
the power cord immediately and take the unit to our
Authorized Service Center for servicing.
• Do not put your fingers or objects into the TV/VCR
cassette holder.
• Do not place anything directly on top of the unit.
Moisture condensation may occur inside the unit when it
is moved from acold #ace to a warm place, or after heating
a cold room or under conditions of high humidity. If a tape
is played in a TV/VCR which has moisture, it may damage
the tape and TV/VCR. Therefore when the condensation
occurs inside the unit, turn the POWER button on and al-
low at least 2 hours for the unit to dry out.
IMPORTANT COPYRIGHT INFORMATION
Unauthorized recording or use of broadcast televi-
sion programming, video tape, film or other copy-
righted material may violate applicable copyright
laws. We assume no responsibility for the unauthor-
ized duplication, use, or other acts which infringe
upon the rights of copyright owners.
FCC WARNING- This equipment may generate
or use radio frequency energy. Changes or modi-
fications to this equipment may cause harmful in-
terference unless the modifications are expressly
approved in the instruction manual. The user
could lose the authority to operate this equipment
if an unauthorized change or modification is
made.
This equipment has been tested and found to comply
with the limits for a Class B digital device, pursuant
to Part 15 of the FCC Rules. These limits are de-
signed to provide reasonable protection against
harmful interference in a residential installation. This
equipment generates, uses, and can radiate radio fre-
quency energy and, if not installed and used in ac-
cordance with the instructions, may cause harmful
interference to radio communications.
However, there is no guarantee that interference will
not occur in a particular installation. If this equip-
ment does cause harmful interference to radio or tele-
vision reception, which can be determined by taming
the equipment off and on, the user is encouraged to
try to correct the interference by one or more of the
following measures:
1) Reorient or relocate the receiving antenna.
2) Increase the separation between the equipment
and receiver.
3) Connect the equipment into an ontlet on a circuit
different from that to which the receiver is con-
nected.
4) Consult the dealer or an experienced radio/TV
technician for help.
The serial number of this product may be found on the back of the unit. No other TV/VCR has the same serial
number as yours. You should record the number and other vital information here and retain this book as a permanent
record of your purchase to aid identification in case of theft. Serial numbers are not kept on file.
Date of Purchase
Dealer Purchase from
Dealer Address
Dealer Phone No.
Model No.
Serial No.
-4- EN
8LI5
T7008-01

TABLE OF CONTENTS
• IMPORTANT SAFEGUARDS ............................ 2
IPRECAUTIONS ................................................. 4
LOCATION .......................................................... 4
AVOID THE HAZARDS OF ELECTRICAL
SHOCK AND FIRE ............................................. 4
WARNING ........................................................... 4
• FEATURES .......................................................... 6
• SUPPLIED ACCESSORIES ............................... 6
• VIDEO CASSETTE ............................................. 7
• OPERATING CONTROLS AND FUNCTIONS.. 8
• PREPARATION FOR USE ..............................I0
ANTENNA/CABLE CONNECTIONS .............I0
INSTALLING THE BATYERIES .....................11
EXTERNAL INPUT MODE ..............................lI
• SET UP FOR USE ............................................. 12
CHANNEL SET UP FOR THE FIRST TIME .. '12
DELETING (OR ADDING) CHANNEL ......... 12
CHANNEL SET UP AGAIN ............................. 13
SELECTING THE LANGUAGE ...................... 13
DAYLIGHT-SAVING'lIME ............................ 13
CLOCK SET UP (AUTO / MANUAL) ............. 14
• ON SCREEN DISPLAY. .................................... 16
• SPECIAL FEATURES ..................................... 16
DEGAUSSING ................................................... 16
REAL TIME TAPE COUNTER ........................ 16
AUTO REWIND-EJECT ................................... 16
• PLAYBACK ....................................................... 19
NORMALPLAYBACK .................................... 19
TRACKINGADJUSTMENT............................ 19
PICTURESEARCH...:....................................... 19
STILLPICTURE................................................ 19
NOISE CANCEL(in the Still mode)................. 19
VERTICALHOLD CONTROL........................ 19
• SPECIAL PLAYBACK ...................................... 20
RENTAL PLAYBACK...................................... 20
AUTO REPEATPLAYBACK .......................... 20
• SEARCH ............................................................ 21
ZERO RETURN ................................................. 21
TIME SEARCH .................................................. 21
• RECORDING .....................................................22
NORMAL RECORDING .................................. 22
SKIPPING UNWANTED SCENES DURING
RECORDING ..................................................... 22
OTR (One Touch Recording) ............................. 23
COPYING A VIDEO CASSETI'E
(Requires a VCR or camcorder) ......................... 23
• TIMER ................................................................ 24
AUTOMATICTIMER RECORDING.............. 24
TIMERPROGRAMEXTENSION ................... 25
HINTS FOR AUTOMATICTIMER
RECORDING..................................................... 26
AUTO RETURN................................................ 26
WAKE UP TIMER ............................................. 26
SLEEPTIMER ................................................... 27
• MAINTENANCE ............................................... 27
• TV OPERATION ......... ....................................... 17
WATCHING A TV PROGRAM ....................... 17
GAME MODE .................................................... 17
PICTURE CONTROL ........................................ 17
CLOSED CAPTION SYSTEM ......................... 18
• TROUBLESHOOTING GUIDE ....................... 28
• SPECIFICATIONS ............................................ 29
• CABLE CHANNEL DESIGNATIONS ......i..... 29
• WARRANTY ........................................ Back Cover
A NOTE ABOUT RECYCLING I
This product s packaging materials are reeyclable and can be reused. Please dispose of any materials in accord-
ante with your local recycling regulations.
Batteries should never be thrown away or incinerated but disposed of in accordance with your local regulations
concern ng chemica wastes.
- 5 - EN
8L15
T7008_I
FEATURES
• Infrared remote control
• Bilingual on screen menu display selentable in
English or Spanish
• Real time counter-This showstheelapsedrecording
or playback time in hours, minutes, and seconds. The
"-" indication will appear when the tape is rewound
further than the tape counter position 'D:00:00".
• 181 channolcapabllity PLLfraquencysyntheslzer
tuner with direct station call- (A convert_rmay be
necessary to view scrambled cable channels.)
• Auto Glcck Setting--Allows you to set the clock
function from a PBS broadcast station.
• Closed caption system-You may view specially
labeled (cc) TV programs, movies, news,
prerecorded tapes, etc. with either a dialogue caption
or text display added to the program.
• Game mode- Automatically sets external input
mode and allows TV/VCR display to be suitable for
use with "IV games.
• Auto power on and off systam-Au tomatically
turns on the TV/VCR when you insert the cassette,
tams off after auto-rewind, and ejects when the
beginning of the tape is reached.
• Auto rewind when the end of a tape Is reached-
This function doesn't occur when using timer recording.
• 2 Step picture search operation-You can view a
video program at a high speed or super high speed in
either a forward or reverse direction in LP and SLP
mode. For SP mode only high speed.
• Three different playback tape speeds: $PILP/sLP
• Two different recording tape speeds : SPISLP
• Zero Return-The tapereturns to counterof 0:00:00
by rewinding or fast forwarding.
• Still-"Freeze"the pictureat anytime, for close
viewing of a particularscene. Only tapes recorded in
SLP modewill show a fairly clearpicture.
• Digital Auto Tracking (DTR)-Automatically
adjuststhe trackingfor eachtape you play.
• Rentalplaymode-Improves playback picture
qualityfromworntapes, such as rental tapes.
• Auto repeat-Allows you to repeat the playing of a
tape indefinitelywithout pressing the PLAY button.
• Time search-Let you set the TV/VCR to advance
the tape by entering the desired playback time you
want to skip.
• OTR (One Touch Recording) Instant timed
recording from 30 to 480 minutes is possible at the
push of the REC_OTR button.
• 1 Year, 8 events (including Daily and Weekly
Timer Recording)--The built-in timer allows you to
record up to 8 programs at different times on different
channels up to 1 year in advance. The Daily timer
allows recordings to be made of daily broadcasts, and
the Weekly timer allows recording to be made once
a week up to the end of the tape.
• Auto rotum-After timer recording is finished, the
TWVCR can return to the beginning of the recording.
• WakeuplSleeptimer-Allows you to have the
TV/VCR automaticallyturnon or offata desiredtime.
• Timer program E_ension-Allow you to shift the
time schedule for automatic timer recording.
SUPPLIED ACCESSORIES
Remote Control rdnit
PART NO. (N0258UD)
2 AA Batteries
• Ifyouneedtoreplacetheseaccessories,pleaserefcr tothePARTNO.under theillustrnfionsandcall 1-800-968-3429.
• Depending on your antenna system, you may need different types of Combiners (Mixer) or Separators (Splitter).
Contact your local electronics store for these items.
• We do not recommend the use ofuniversal remote controls. Not all of the functions may be controlled with a universal
remote control. If you decide to use a universal remote control with this unit, please be aware that the code number
given may not operate this unit. In this case, please call the manufacturer of the universal remote control.
-6- EN
8LI5
T7008-01

VIDEO CASSETTE
This TV/VCR will operate with any cassette that has the _ mark. For best results, we
recommend the use of high-quality tapes. Do not use poor quality or damaged tapes.
PRECAUTIONS
• Avoid moisture. Moisture condensation may occur
on the tape if it is moved from a cold place to a warm
place or visa versa. Before using a tape with these
conditions, to avoid damage of the tape and your
TV/VCR, wait until the tape has warmed to room
temperature and the moisture has evaporated.
• Avoid extreme heat, high humidity and magnetic
fields.
• Do not tamper with the cassette mechanism.
• Do not touch the tape with your fingers.
INSERTING-A CASSETTE
Insert the cassette in the direction as shown. Push in
gently, but continuously, on the center-back of the
cassette until it is drawn into the TV/VCR.
The TV/VCR will automatically turn on.
! / x_ .!
TWO DIFFERENT TAPE SPEEDS
Before recording, select the tape speed from : SP mode
(Standard Play) or SLP mode (Super Long Play).
The table below shows the maximum recording/playback
time using T60, T 120 or T160 tapes in each mode.
Tape Speed Recording/Playback Thne
]Type of tape T60 TI20 TI60
SP mode 1 hour 2 hours 2-2/3 hours
SLP mode 3 hours 6 hours 8 hours
Note: You can play back a taperecorded in LP mode
(LongPlay).
REMOVING A CASSETTE
1) In the Stop mode, press the EJECT button on the
remote control or press the STOP/EJECT button on
the TV/VCR. The cassette will eject.
2) Pull the cassette out of the cassette compartment.
3) Store the cassette in its case as shown.
ERASE PREVENTION
You can prevent accidental _ _
erasing of recording by
breaking off the tab on the
back edge of the cassette.
If you decide to record on
the tape again, cover the
hole with plastic tape.
TransparentTape
-7- EN
8L15
T7008-01

OPERATING CONTROLS AND FUNCTIONS
NOTE:
• We do not recommend the useof universalremote controls. Not all of the functionsmay be controlledwith a
universal remotecontrol.
If you decide to use a universal remotecontrol with thisunit, please be_awarethat thecode numbergiven may
not operatethis unit.In this case, please call themanufacturer of the universalremotecontrol.
- "I'V/VCRFRONT PANEL - [Fig.l]
234 5678910 11 121314
- REMOTE CONTROL - [Fig.2]
CD CD _ C_--
15-- CD CD _
CDCD_
C_ _ G2_
,,!.-
18- ----J _ _"
20-
--25
--4
--24
mll
--12
23
-76
--22
--21
1 EARPHONE jack- Connects to earphones (not
supplied) for personal listening. The size of jack is
I/8" monaural (3.5ram).
2 AUDIO input jack- Connect to the audio output jack
of your audio equipment, video camera or another
VCR.
3 VIDEO input jack- Connect to the video output jack
of your video camera or another VCR.
4 STOP button --Press to stop the tape motion.
EJECT button- Press in the Stop mode to remove
tape from TV/VCR.
• button-
• Press to select setting modes from the on screen
menu.
• Press to enter digits when setting program.
(for example: setting clock or timer program)
5 REW button- Presstorewind thetape, ortoview the
picture rapidly in reverse during playback mode.
(Rewind Search)
<1 button-
• Press to select a mode from a particular menu.
(for example: LANGUAGE or USER'S SET UP)
6 PLAY button- Press to begin playback.
• button-
• Press to select setting modes from the on screen
meuu.
• Press to enter digits when setting program.
(for example: setting clock or timer program)
-8- EN
8L15
T7008-01
- REAR VIEW - [Fig.3]
_._=----_o_I
26 27
7 F.F'WDboron- Pressto rapidlyadvance the tape, or 16 MENUbutton- Press to display the main menu on
to view the picture rapidly in forward during
playback mode. (Forward Search)
I_ boron-
• When setting program (for example: setting clock or
timer program), press to determine your selection
and proceed to the next step you want to inpuL
• Press to determine setting modes from on screen
menu.
• Press to select a mode from a particular menu.
(for example: LANGUAGE or USER'S SET UP)
8 REC boron- Press for manual recording.
OTR boRon-Activates One Touch Recording.
(only on the TV/VCR)
9 RECORD Indicator- Flashes during recording.
Lights up in the Stand-by mode for Timer Recording.
10 Remote _msor Window- Receives the infrared
signals from the remote control.
11 CHANNEL • I • buttons-Press to select the de-
sired channels for viewing or recording.
TRAOKlNGtunction-Press to minimize video
'noise' (lines or dots on screen) during playback
mode. (See page 19.)
12 VOLUMEA I _7borons- Adjust the volume level.
13 POWER button- Press to tam TV/VCR on and off.
Press to activate timerrecording.
14 Cassette compartment
15 Number buRons-Press to select desired channels
for viewing or recording. To select channels from 1
to 9, first press the 0 button and then 1 to 9.
+100 button- When selecting cable channels which
are higher than 99, press this buttonfirst, then press
the last two digits. (To select channel 125, first press
the TV screen.
17 DISPLAY button- Display the counter or the current
channel number and current time on the TV screen.
(See page 16)
18 SPEED button- Press to choose the desired
recording speed:SP/SLP.
19 T-PROG. CLEAR buRon-Pressto cancelasetting of
timer program (See page 25).
COUNTER RESET boron- Press to reset counter to
0:00:00.
20 GAME button-Sets the game mode and external
input mode at the same time. (See page 17.)
21TIME SEARCH button-Press to activate Time
Search mode.
22 PAUSE/STILL button- Pressto temporarily stopthe
tape during the recording or to view a still picture
during playback.
23 MUTE button-Mutes the sound. Pressit again to
resume sound.
24 CHANNEL RETURN button-Press to go backto the
previously viewed channel. For example, pressing
this button once will changechanneldisplay from 3
(presentchannel)to l0 (previouslyviewed channel),
and pressing it a second time will retain from 10 to
3.
25 WAKE UPISLEEPbutton-Scts the Wake up or
Sleep Timer. (See page 26.)
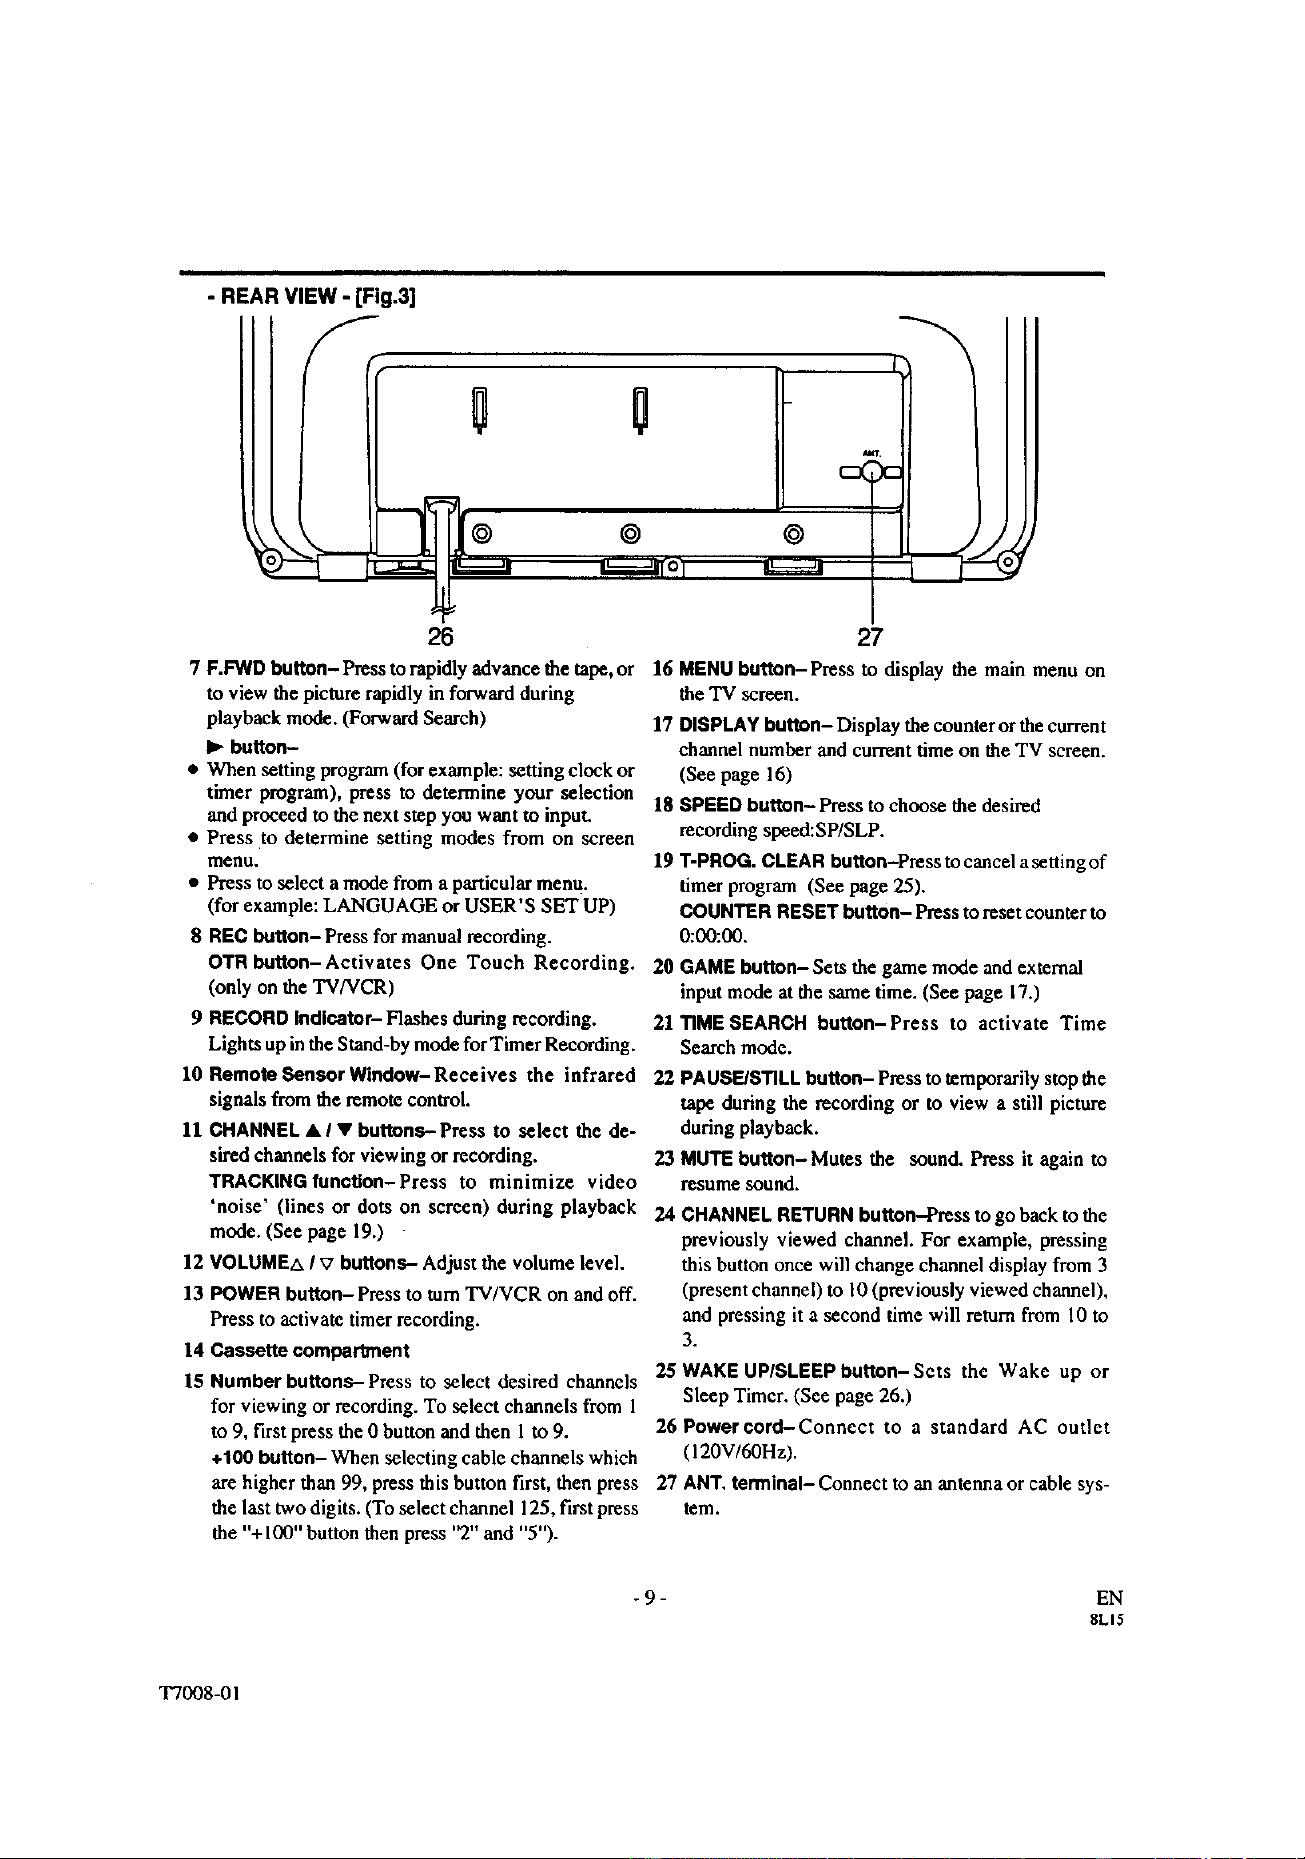
26 Poworcord-Connect to a standard AC outlet
(120V/6OHz).
27 ANT. terminal- Connect to an antenna or cable sys-
tem.
the "+100" button then press"2" and "5").
-9- EN
8L15
T7008-01

PREPARATION FOR USE
VHF/UHF SEPARATE ANTENNAS
In some areas it will be necessary to use an outdoor antenaa.
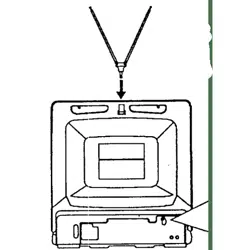
VHFIUHF COMBINED ANTENNA
The VI-IF/UHFRod Antenna(not supplied) is detach-
able. Insertthe stem of the antenna intothe hole on the
upper-back portion of the TV/VCR.
Connect the VHF/UHF Rod Antenna or VHF/UHF
Combination Antenna to the ANT. terminal of the
TVNCR as shown in the diagram below.
For the best reception,fully extend the VHF/UHF Rod
Antenna and make the necessary adjustments. (Avoid
touching the top section when adjusting.)
NOTE :
Before pluggingthe Rodantenna intoantenna terminal,
check that the pin isnotbent. If itis bent, straightenthe
pin as illustrated, then plug thepin into antenna terminal.
Cable Plug
(Needs to be straightened) (Straight pin)
VHF/UHF Antenna (Not supplied
RodAntenna
(NotSupplied)
[Fig.4]
NOTE:
The connection of an indoor antenna may not always
give acceptable TV reception.
VHF Antenna (Notsupplied) UHF
Flattwin-leadcable [Fig.5]
CABLE WITHOUT CONVERTER/
DESCRAMBLER BOX
Use this connection if yourcable system connects
direcdy to yourTVNCR without a converter box.
By using this connection you can:
I) Use theTV/VCR remote to select channels
2) Program one or more unscrambled channels for
Automatic TimerRecording.
NOTE: This unit will ONLY recordand view the same
channel.
FromCableSystem
75.._m Coaxial
Cable(Not
°°pp"ed
[Fig.81
Note toCATVsysteminstaller:
This reminder is provided to call the CATV system installer's attention to Article 820-40 of the NEC that
provides guidelines for proper grounding and, in particular, specifics that the cable ground shall be connected
to the grounding system of the building as close to the point of cable entry as practical.
Antenna/Cable Connections Continued on the Next Page.
- 10- EN
8LI5
T70084)1
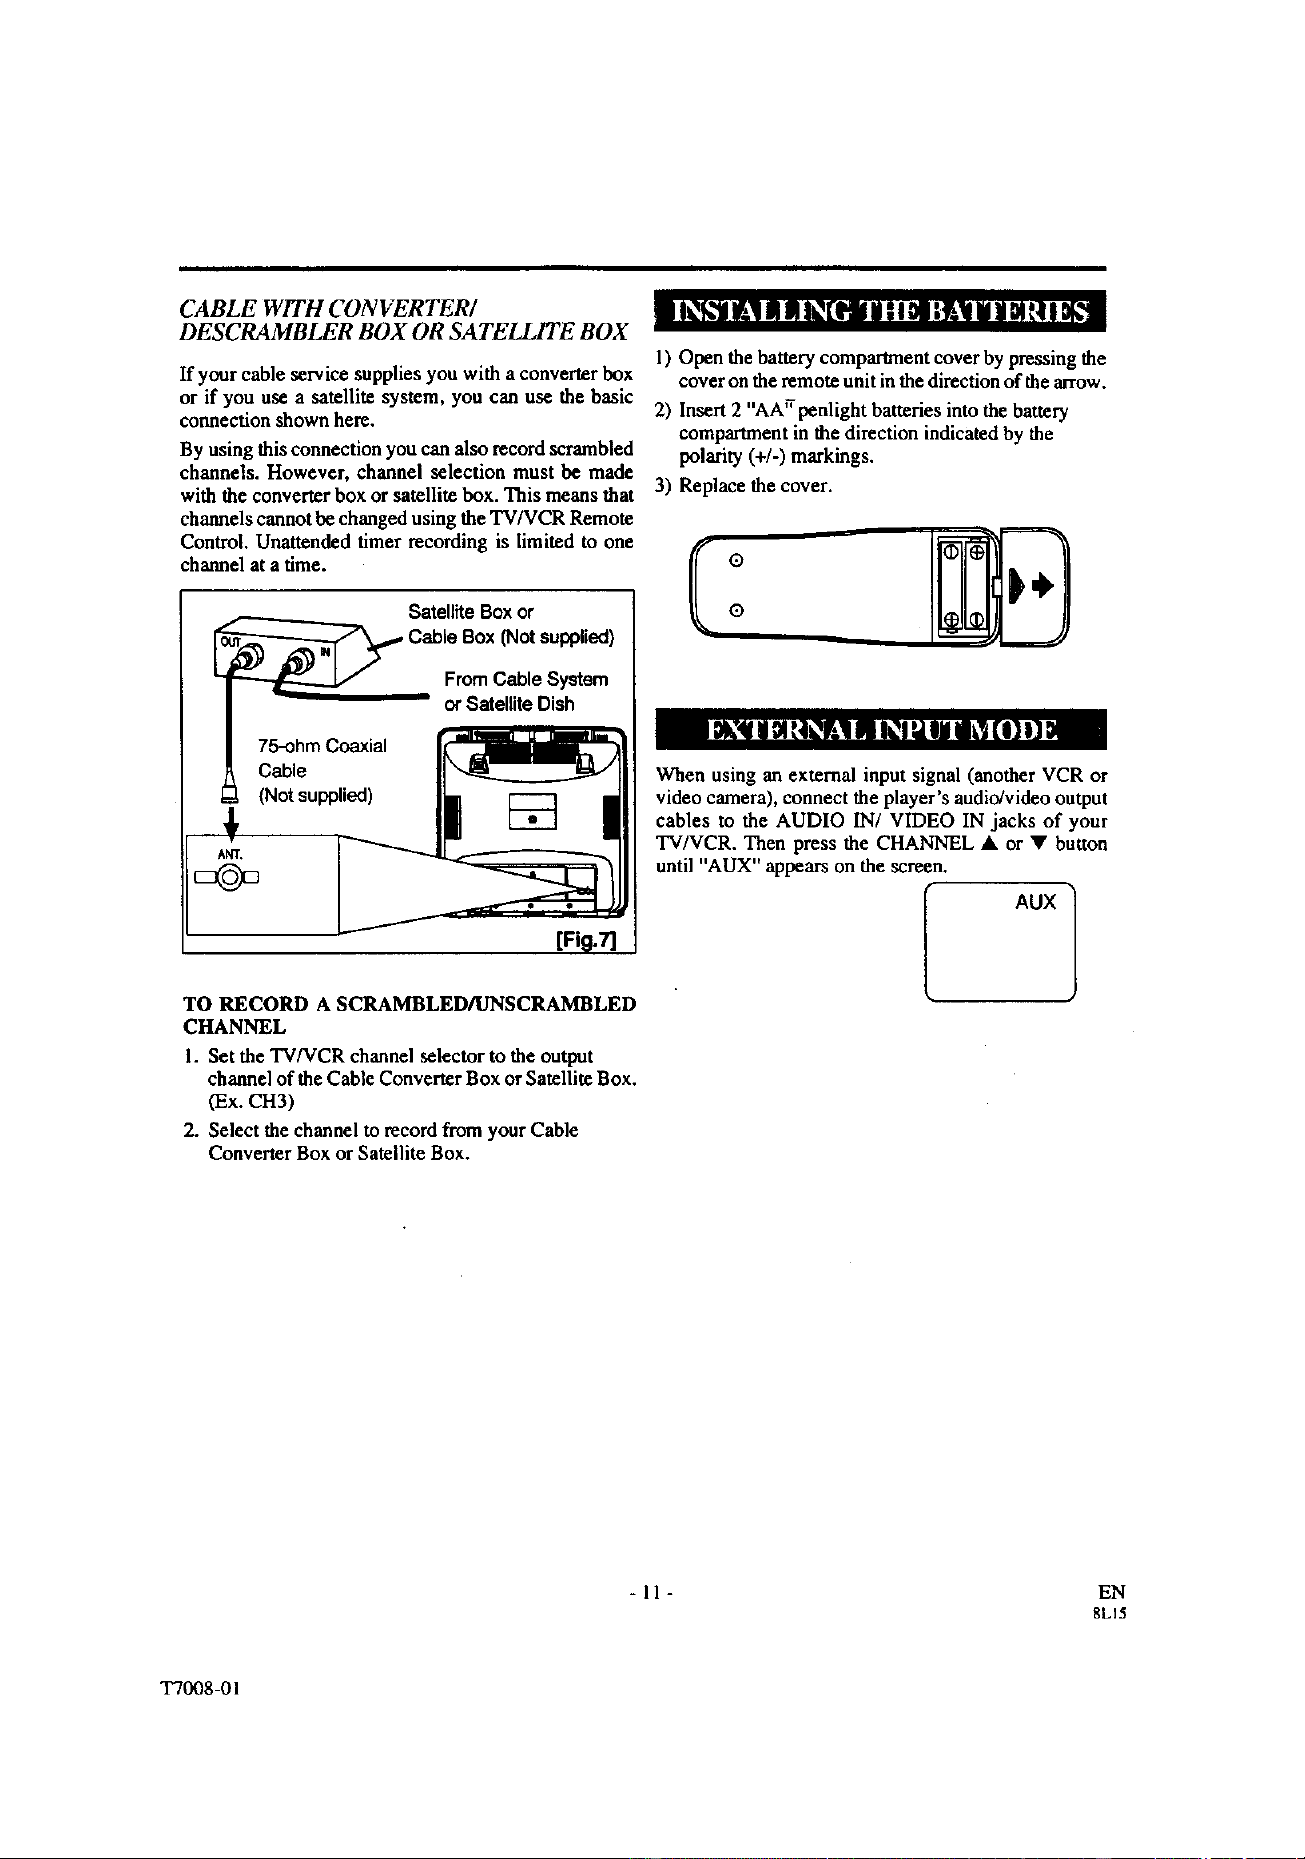
CABLE WITH CONVERTER/
DESCRAMBLER BOX OR SATELLITE BOX
If your cable service suppliesyou with a convener box
or if you use a satellite system, you can use the basic
connection shown here.
By using this connectionyou can also record scrambled
channels. However, channel selection must be made
1) Open the battery comparanent cover by pressingthe
coveron the remote unitin thedirectionofthearrow.
2) Insert2 "AArrpenlight batteriesintothe battery
compartmentin the direction indicatedby the
polarity(+/-) markings.
with the convener box or satellite box. This means that 3) Replace the cover.
channels cannot be changed using the TV/VCR Remote
Control. Unattendedtimer recording is limited to one /_f
channelat a time. l_ ®®
Satellite Boxor
_ Cable Box (Not supplied)
From Cable System
orSatellite Dish
75-ohm Coaxial
Cable
(Not supplied)
TO RECORD A SCRAMBLED/UNSCRAMBLED
CHANNEL
1. Set the TV/VCR channel selector to the output
channel of the Cable Convener Box or Satellite Box.
(Ex. CH3)
2. Select the channel to record from your Cable
Convener Box or Satellite Box.
When using an external input signal (another VCR or
video camera), connect the player's audio/video output
cables to the AUDIO IN/VIDEO IN jacks of your
TV/VCR. Then press the CHANNEL • or • button
until "AUX" appears on the screen,
i-xl
-11- EN
gLI5
T7008-01

SET UP FOR USE
You can programthe tunerto scan allthe channels you receive in your area. You must use the remote control
for the this procedure.
NOTE: Channelmemory programmingis NOTneeded whenconnected to a cable boxor satellitebox. Justselect
the TV/VCR channel selector to the outputchannel of the cable box or satellitebox (Ex CH3). Then select the
channel to be viewed on the CableBox orSatellite Box.
The channels you no longer receive or seldom watch can
l be deleted from the memory. (Of course, you can add
Plug the TV/VCR power cord into a tbe deletedchannel in
standard AC outlet. ..............
2 Turn on the TV/VCR ] Pressthe MENU button. ".....
Press the POWER button to turn on the _ n.m_._
J
TVNCR. : Press the PLAY/A or STOP/V . _,
button to point to "CHANNEL =_o_,_
3 Select "ENGLISH" or "ESPAIqOL"
Select "ENGLISH" or I -_'- 1
"ESPA!_fOL"-Spanish using the " _
F.FWD/I_- or REW/_I button. ,_,,*e_
"[ ]" indicate the selected lan-
guage.
Press the PLAY/A or STOP/• _
button to point to "AUTO ,,_o,,,_.,
PRESET".
Then press the F.FWD/IP"button.
The tuner scans and memorizes all active channels in
your area.
NOTES:
• The TV/VCR distinguishes between standard "IV
channels and cable channels.
• If you want to play or record a video tape BEFORE
presetting the tuner, you must press the MENU
button. To preset the tuner again, see "CHANNEL
SET UP AGAIN" on page 13.
.'L_ter sca_ning
The tuner stops on the lowest memorized channel.
If you want to recall the selected channels, you can
select the desired channel directly with the remote
control number buttons or CHANNEL • or V.
! SETUP".
Then: press t_._F_=WD/I_, button. .......
2 Select"AOD/DF_LETE CH"
Press the PLAY/A or STOP/• ( .=,,.t_=,_,_
I button to point to "ADD/ [_ ,_,_.r,t_ ]
DELETE CH". "_°"_
Press the KFWD/IP. button.
3 Enter _he desired channel number
Press the PLAY/A or STOP/• I 1
button until your desired channel
number appears. (You can also o8
use the number buttons or the ,_0_,_
CHANNEL A/• button to enter
it) (Example: CHS)
4 Delete (or add) it from (into) memory
Press the EFWD/I_ or REW/'<I button. The channel
nu tuber changes to light red. The channel is deleted from
memory.
• To delete another channel, repeat steps [3] and [4].
• If you press the F.FWDaI_ or REW/al button again,
the channel is memorized again.
Added channel: Light blue.
Deleted channel: Light red.
5 Exit t'ae channel setup mode
Press the MENU button to returns to TV mode.
NOTE: To confirm that channel(s) has been deleted or
added, press the CHANNEL • or • button.
- 12- EN
8LI5
T7008-02

Make sure ...
• Press the POWERbuttonto turnon the TV/VCR.
• You must use theremote control for the following steps.
"_ SeleCt"CHANNEL SET UP"
Press the MENU button.
Press the PLAY/A or STOP/V
button to point to "CHANNEL
SET UP".
Then, press the F.FWD,_- button.
CHN4_ SET Up
"=_'= err uP
_w
2 Begin auto preset
Press the PLAY/A or STOP/Y
button to point to "AUTO
PRESET".
Then, lxeas the F.FWD/_ button.
f 1.....
The tuner scans and memorizes all the active channels
in your area.
3 ARer scanning
The tuner stopson thelowest memorized channel
Make sure ...
• Press the POWER button to turn on the TV/VCR.
; NOTE: If for some reason the menu is in Spanish, press
the MENU button, press the PLAY/A button to point to
"IDIOMA[ESPANOL]",thenpresstheF.FWD/• button,
then press the MENU button.
Select this feature and the TWVCR's clock automat-
ically will advance one hour in April, then reverse one
hour in October.
When Daylight-Saving Time is ON, the clock will
change automatically as follows:
• First Sunday of April :At 2 AM the clock immedi-
ately changes to 3 AM. Any dmer programming you
have set to occur between 2 AM and 3 AM will not
record.
• Last Sunday of October : At 2 AM the clock imme-
diately changes to 1 AM.
• Press the POWER button to mm on the TV/VCR.
• You must use the remote control for the;following
steps.
I Select"SETTING CLOCK"
Pressthe MENU button.
Press the PLAY/A or STOP/Y
button to point to "SETTING
CLOCK".
• Youmustusetheremotecontrolforthefollowingsteps, i Then,presstheF.FWD4P.button.
NOTE: This function effects only the language on the
screen menu and not the audio source.
"N|#U" 1
_ o0mta.
uTr t.m _
1 Select "LANGUAGE"
Press the MENU button.
Press the PLAY/A or STOP/Y
button to point to "LAN-
GUAGE".
2 Se!ect "ENGLISH'* cr "ESPA,qQL"
Select "ENGLISH" or '_SPAI_OL"= Spanish using the
F.FWD/II_ or REW/al button.
3 Exit t_e Language mod_
Press the MENU button to return to TV mode.
-USNU- ]
•mslmP_cG_o_
_o.ocg
ut_l M'_uP i
2 Set"D.S.T." (Daylight-Saving Time) to [ON]
button to point to "D.S.T.". ,¢_0._
tarto _ o_ tattro I
Then, press the F.FWD/l_ or
: REW/'_I button until [ON] ap- ,,_¢,o=_g/.
pears.
3 Exit the Dayi cht-Saving Time mode
Press the MENU button to return to TV mode.
TO CA N(. EL TIlE DA YLIGHT-SA VING
TIME
Repeat steps [I] to [2], select [OFF] using the
F.FWD/I_ or REW/al button.
-13-
EN
8L15
T7008-02

Settheclock accurately for proper automatic timer
recording. If the Public Broadcasting Station (PBS) is
available in your area, follow "AUTO CLOCK
SETTING". If it is not, follow "MANUAL CLOCK
SETTING".
AUTO CLOCK SETTING
You can have the TVNCR set theclock automatically
by using thePublicBroadcastingStation(PBS) channel
in your area.Once you have set the clock by using the
following procedure,the TV/VCR will automatically
monitorthecorrecttime anddatebeingbroadcastby the
PBS stationin your area,using a newservice called
Extended Data Service (XDS).
Ma_ sure...
• Use the remote control for this procedure.
• TV/VCR power must be turned on.
• Confirm that the antenna connections are correct.
button2Se'AOTOOLO"t°until,O
Press the EFWD/I_ or REW/'ql _,_,_=o=,_
repeatedt7 o._ _ ]
appears.
3 Enter the channel number for the PBS station
Press the PLAY/A or STOP/Y -,_,_- "l
button to point to "AUTO =,o=o=
t
i Then press the F.FWD/I_ or _'_=_'_ /
REW/al button until the channel ='_ _'_
J
number for your local PBS
station appears.
If you do not know the PBS channel number, leave it set
to ,AUTO] which is located before [2]. The TWVCR will
search automatically all available channels for the local
PBS station, and will select that channel.
4 Exit the Auto Clock Setting
Press the MENU button to return to TV mode.
• The cable converter box must be turned on if your ...............
TV/VCR is connected directly to it. (See NOTES:) 5 Turn off the TVNC R
• The channel is properly set in advance. (See page 13.) Turn the TV/VCR off. Because the Auto Clock func-
tions automatically while the TV/VCR is off.
NOTES:
• Auto clock setting only needs to be set once. But it
can be done again if the clock's time has become
incorrect for some mason.
"* If the TV/VCR is connected directly to a cable
converter box or satellite box_ the local PBS station
must be selected on the cable box itself, and the
TV/VCR must be set to the output channel of the
cable converter box or satellite box
(usually channel 3 or 4), to be able to set up or correct
the clock automatically.
If you do not know what your local PBS station is,
then follow "Manual Clock Settings" on page 15.
The TV/VCR cannot control the channels of the
cable converter box or satellite box.
lS you choose [AUTO],
• the TVNCR must search until the PBS channel is
found. It must scan each channel for a couple of sec-
onds to determine if that channel is transmitting the
XDS signal.
• if the time, that is automatically set by this selected
PBS station is incorrect, it may not be your local PBS
station, but one from a different time zone. Or there
is a case that no channel is broadcasting the XDS
signal in your area, as shown by no time. In these
cases, you must manually enter the correct local PBS
station, or set the clock manually and turn off the
Auto Clock Setting feature.
1 Select"SETT_blG CLOCK"
Press the MENU button.
Press the PLAY/A or STOP/Y
button to point to "SETTING
CLOCK".
Then, press the F.FWD/II_ button.
-M[NU- 1
vt,,tEa
P,_VUPa__
US_'TUP
CA_
ztno
- 14- EN
8L15
T7008-02

MANUAL CLOCK SETTING
Make sure ...
• Use theremote control for this procedure.
• TV/VCR power must be turned on.
In the example below, the clock is to be set to:
DATE March 1st, 1999
SETrlNG TIME 5:40PM
1 select"s E'i-rlNG CLOCK"
Press the MENU button.
Press the PLAY/& or STOP/V
button to point to "SETTING
CLOCK".
Then,pressthe F.FWDfl_-but_n.
"UINU- 1
_m00_tea_
_m
2 Select"MANUAL CLOCK SET"
Press the PLAY/A or STOP/V -"_'_=" ")
button to point to "MANUAL ,_o_0,
J
;,tao ol_l_K o4
CLOCK SET".
tc,t_4Uo. OtC_C $t=r
Then, press the F.FWD/I_ button, o.=T _
3 Select the month
Press the PLAY/A or STOP/.
button until your desired month
appears.
(Example: March --* 03)
Then, press the F.FWDt_- button.
4 Select the day
Press the PLAY/at or STOP/V
button until your desired day
appears. (Example: 1st --->01)
Then, press the EFWD/I_ button.
5 Select the jeer
Press the PLAY/& or STOP/V
button until your desired year
appears. (Example: 1999)
Then, press the F.FWD/II_ button.
]
I I......
*" ",*I¢"......
worn
6 Select the hour [ ..... 1
Press the PLAY/& or STOP/V ,_, _Y ,_ _"o
button until your desired hour
appears.(Example: 5, PM) _ _'_'_,'
_'|% SI%
Then, press the F.FWD/I_ button.
7 Select the minute I ..... 1
Press the PLAY/at or STOP/. _ =' _
button until the desired minute *' '*' "_ ""
appears. (Example: 40) '_" _,1'_
°' "V;_"
8 Startthe clock
Press the MENU button.
Although seconds are not dis-
played, they begin counting from
IX) when you press the MENU
button. Use this feature to
synchronize the clock with the correct time.
NOTE:
When unplugging the AC cord or if there is a power
failure for more than 30 seconds, you may have to reset
the clock.
TO CHANGE CLOCK SETTING
!
i If you want to change the clock,
......... ! I) Follow steps [1] and [2].
I _...... _ ,_,I 2) Select where you want t° change usingtheF.FwD/I_or REW/_I button.
/ "_"=..........--'_ "''_1 ! 3) Enter c°rrect numbers using the PLAY/A°rSTOP/" button.
i 4) Press the MENU button to start the clock.
PLEASE NOTE:
: If there is no local PBS station in your area or on your
i cable system, select "AUTO CLOCK" and press the
F.FWD/I_ or REW/al button to turn [OFF] this func-
'*tion. Then you can manually adjust the clock.
- 15 - EN
8L15
T7008-02
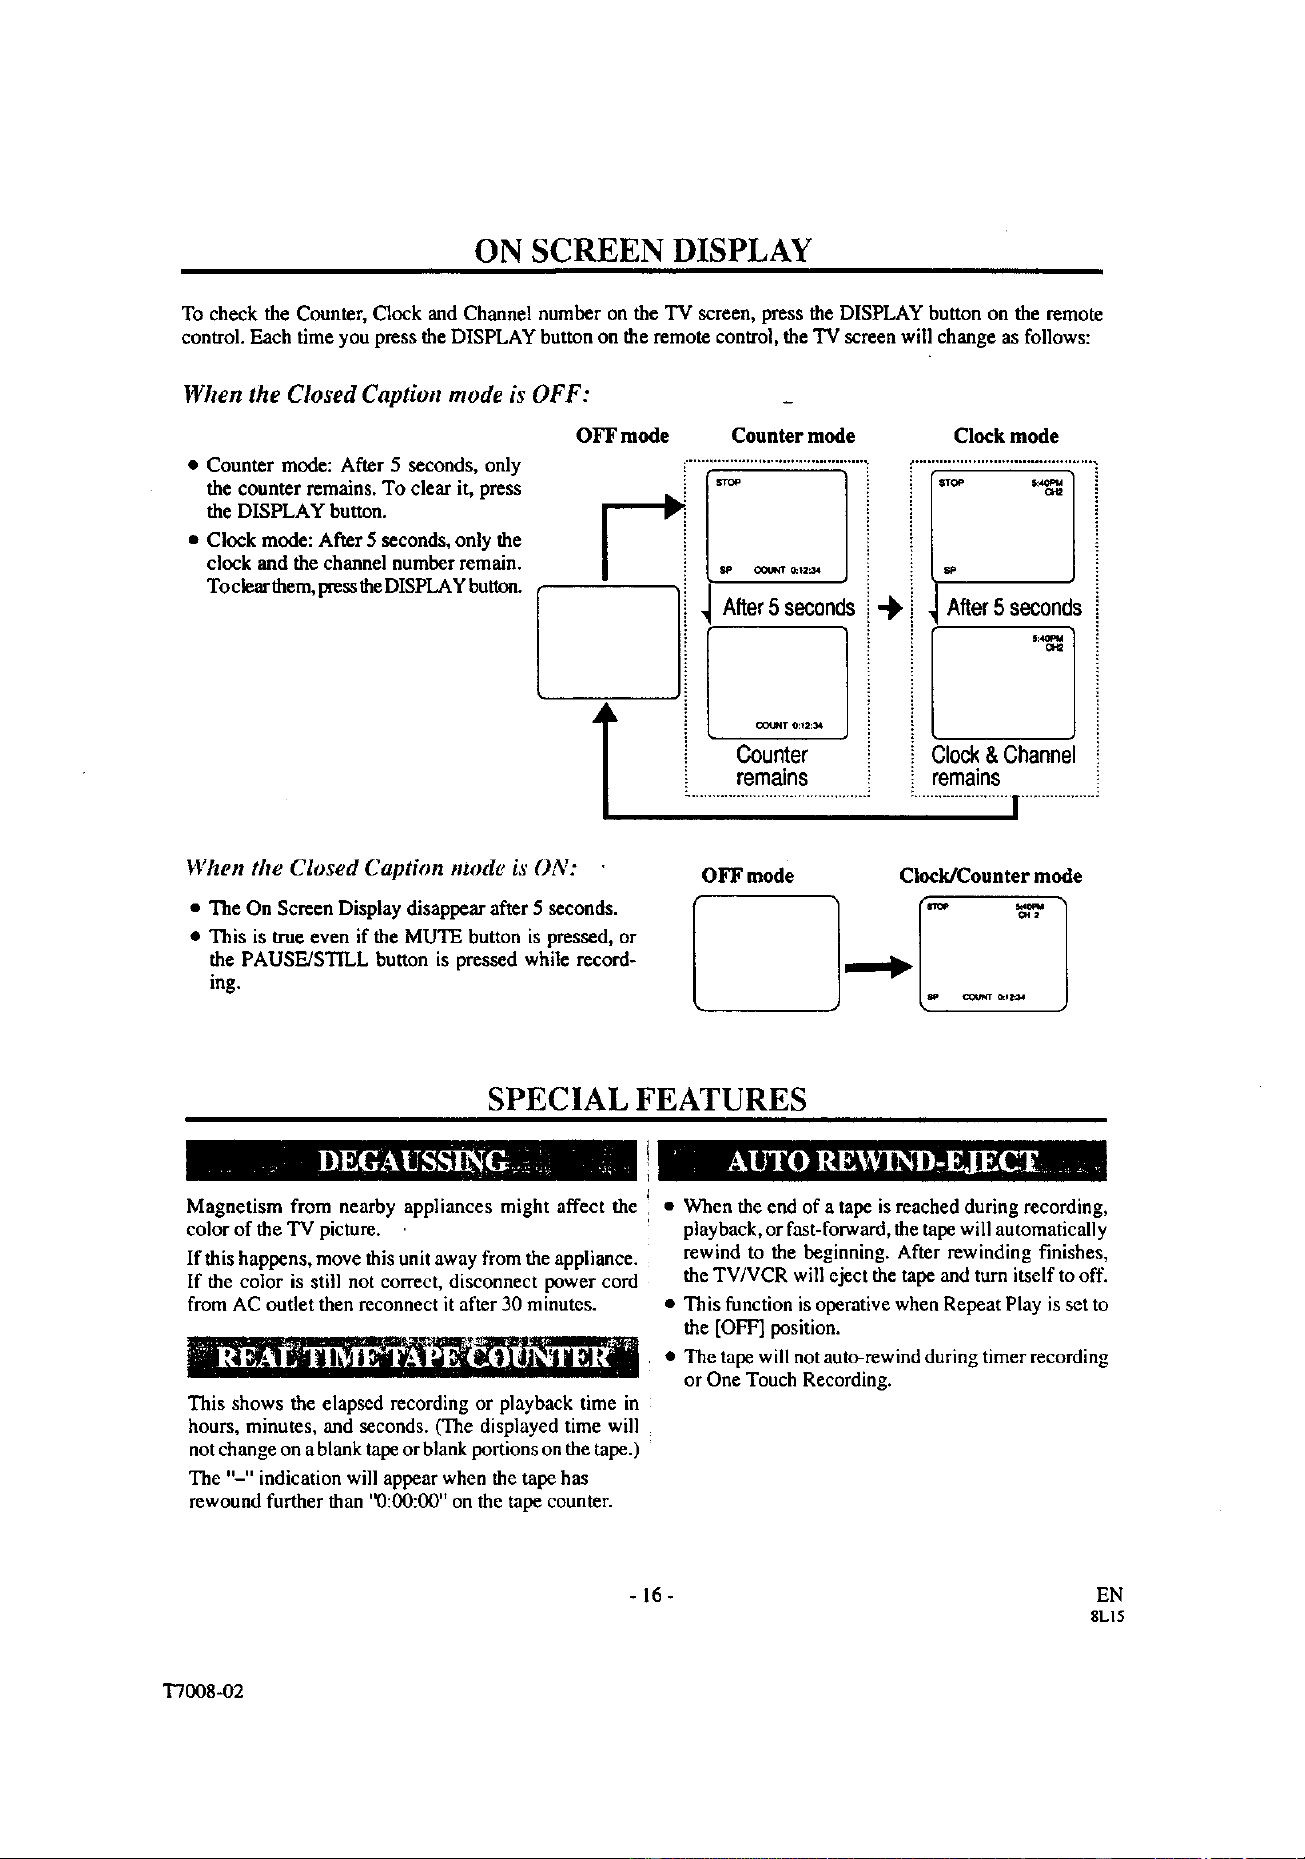
ON SCREEN DISPLAY
To check the Counter, Clock and Channel number on the TV screen, press the DISPLAY button on the remote
control. Each time you press the DISPLAY button on the remote control, the TV screen will change as follows:
When the Closed Caption mode is OFF:
• Counter mode: After 5 seconds, only
the counter remains. To clear it, press
the DISPLAY button.
• Clock mode: After 5 seconds, only the
clock and the channel number remain.
To clear them, press theDISPLAY button.
OFF mode Counter mode Clock mode
tP ooum e_12_4
After5 seconds
Counter
remains
"_ i After5 seconds
i i Clock & Channel
! i remains
...................................................................... ...................
It hen tit* Closed Caption mode ts ON:
• The On Screen Display disappear after 5 seconds.
• This is true even if the MUTE button is pressed, or
the PAUSE/STILL button is pressed while record-
ing.
OFF mode Clock/Counter mode
SPECIAL FEATURES
Magnetism from nearby appliances might affect the • When the end of a tape is reached during recording,
color of the TV picture, playback, or fast-forward, the tape will automatically
If this happens, move this unit away from the appliance.
If the color is still not correct, disconnect power cord
from AC outlet then reconnect it after 30 minutes.
This shows the elapsed recording or playback time in
hours, minutes, and seconds. (The displayed time will
not change on a blank tape or blank portions on the tape.)
The ,,2, indication will appear when the tape has
rewound further than '_):00:00" on the tape counter.
rewind to the beginning. After rewinding finishes,
the TV/VCR will eject the tape and turn itself to off.
• This function is operative when Repeat Play is set to
the [OFF] position.
• The tape will not auto-rewind during timer recording
or One Touch Recording.
- 16-
EN
SLI5
T7008-02
TV OPERATION
1 Turn on the TV/VCR
Pressthe POWER button to turn on the TV/VC_.
2 select the channel number
The TVNCR's picturecontrols-BRIGHT,
COLOR, TINT and SHARPNESS -
are presetto fa,_ory specifications. Althoughthey are
i usually the best, yon may need to make some further
adjustmentsfor a naturallooking image.
NOTES:
Press the CHANNEL• or • buttonto select your
desiredchannelnumberor pressthe numberbuttonson i • Proceduresmustbe followed within 5 seconds orthe
the remotecontrol. PictureControlmode will be cancelled.
Remember: Ifthe TV/VCRis connectedto a cablebox • When setting the Picture Control, the Game mode
or satellitebox, the TV/VCR mustbe on CH3 or CH4, will be cancelled.
thenthe channel to be viewed must be selected on the
cablebox or satellitebox. Make sure ...
............' "" "_ _ °__ • Use the remote control for this procedure.
PresstheVOLUME A or V ..........................................
buttontoadjustthe volume, i 1 Select "PICTURECONTROL"
nnnu_l_°._.... Pressthe MENU button. [" ...... ]
Pressthe PLAY/A or STOP/• [",_,I_"_"_
J
buttonto pointto / _'_.=,,
'TICTURE CONTROL". / _,_-_
This function enables you to decrease the "IV screen i Then, press theF.FWD/II_button.
contrast and making it suitable for use with a TV
GAME.
NOTE: This functioncan not be set during recording.
(
Press the GAME button on the _ =A"/
remotecontrol."GAME"
L J
appearson the screen.
When you pressthe GAME button;
• The TV/VCR comes on automaticallyif it is off.
• The TV/VCR will be in external input mode
automatically.
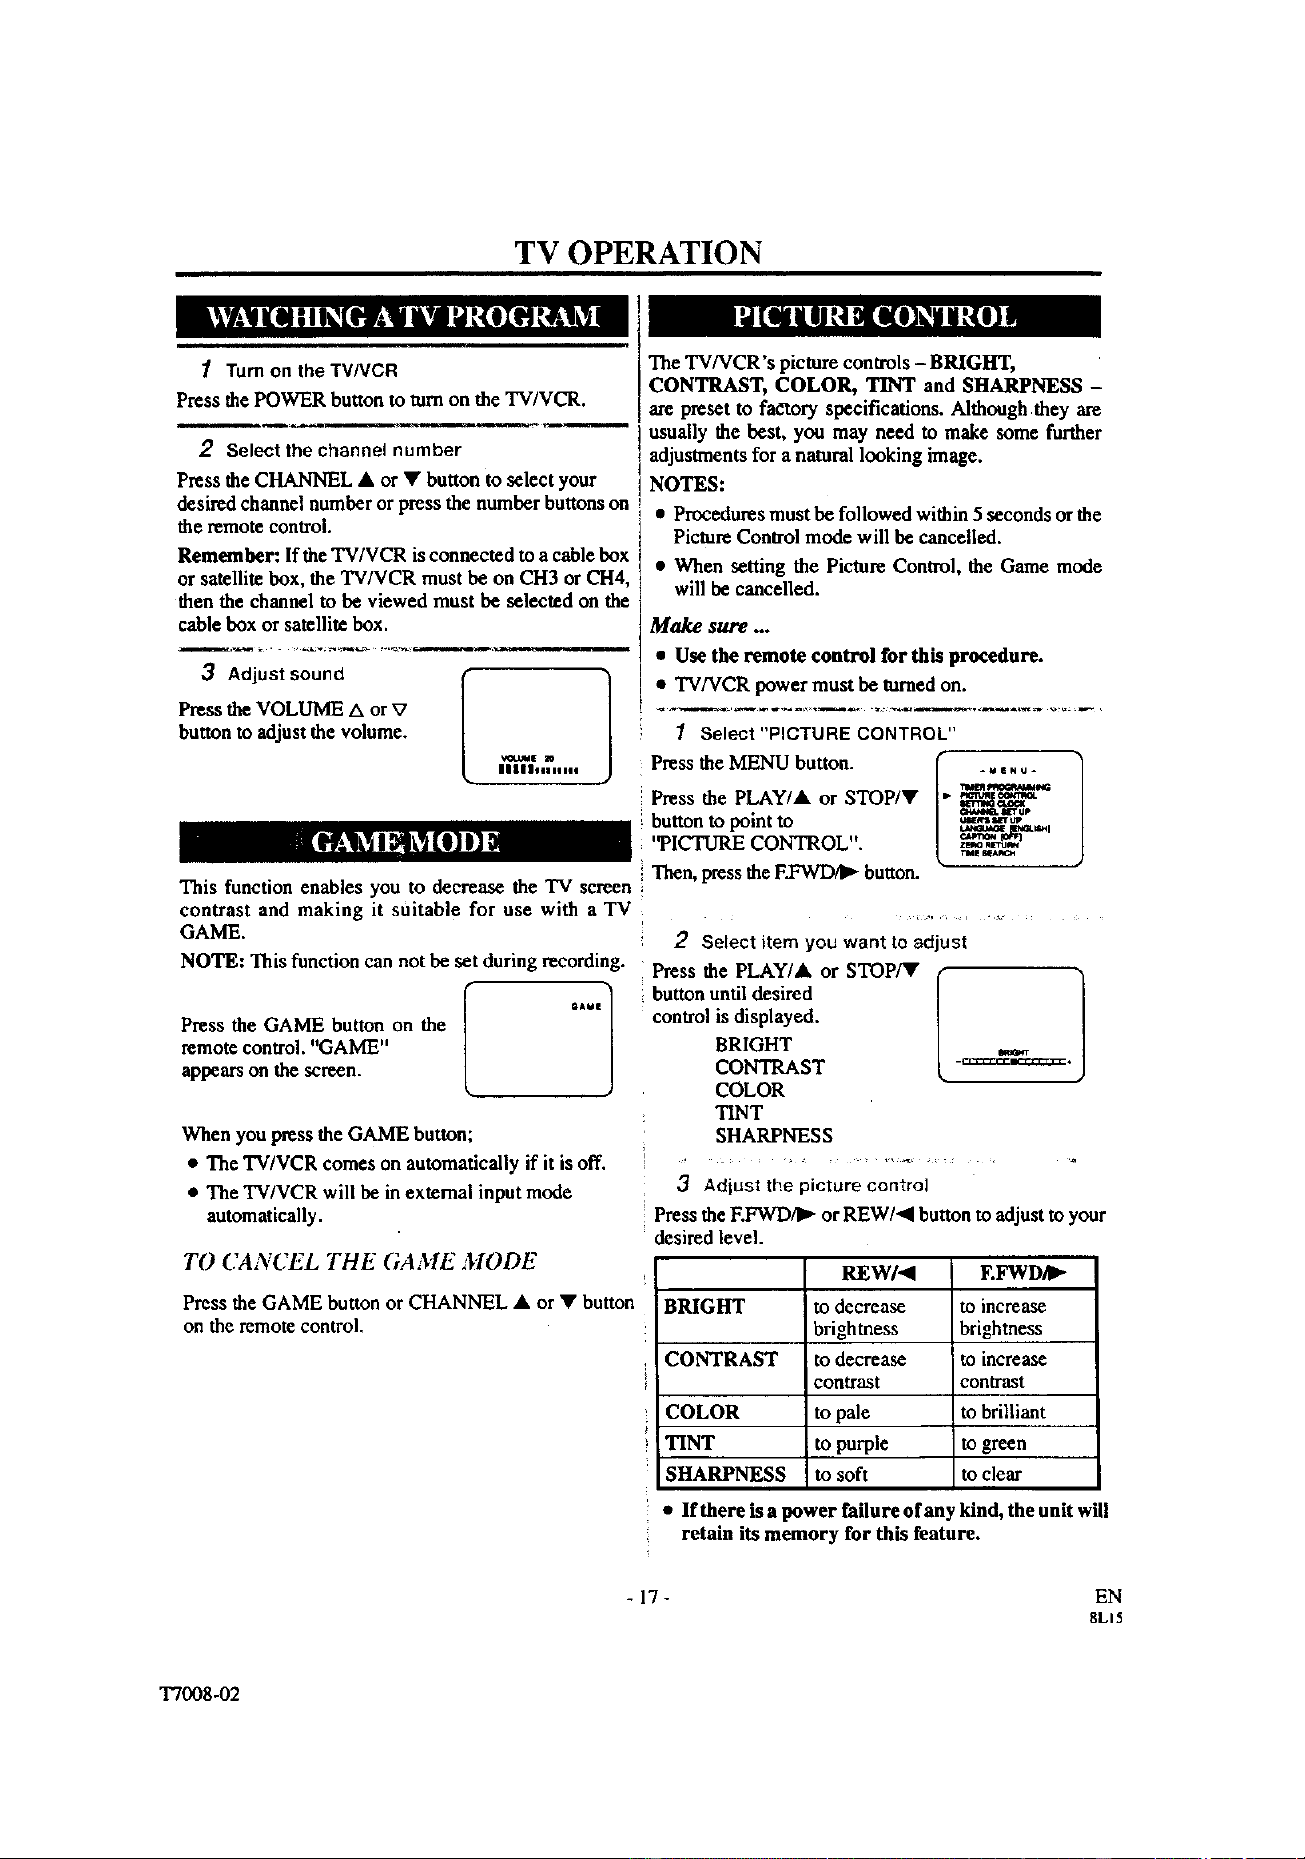
2 Select item you want to adjust
Press the PLAY/• or STOP/• (
buttonuntildesired
L
control is displayed.
BRIGHT
CONTRAST -_==_=_"
COLOR
TINT
SHARPNESS
3 Adiust the picture control
Press theF.FWD/I_ orREW/_IIbutton to adjust to your
desiredlevel.
REW/_I EFWD/I_
BRIGHT todecrease to increase
brightness brightness
CONTRAST to decrease ito increase
contrast contrast
COLOR to pale to brilliant
TINT to purple to green
SHARPNESS to soft to clear
TO CANCEL THE GAME MODE
Press the GAME button or CHANNEL • or • button
on the remote control.
• If there is a power failure of any kind,the unit will
retain its memory for this feature.
- 17-
EN
8LI5
"1"7008-02

1 Select "CAPTION"
i Press the MENU button.
movies, news, pro-recorded tapes with either a dialogue I Press the PLAY/A or STOP/V
caption or text display, button to point
CAPTION mode: By choosing the caption mode, you CAPTION.
can watch dramas, movies and news while !
You can view specially labeled (cc) "IV programs,
captioning the dialogues and the contents of news• J
TEXT mode: By choosingthe text mode, you canwatch 2 Select your desired caption menu
• . . MENU |
half screentext mformauon if you want. Pressthe F.FWD/I_ or REW/<I _ -
1-2: You may get these captionsor text information by I buttonuntil your desired caption ] .,,_"_'_
J
selecting either "1, or "2". Caption"2" is used,usa- ] menu appears. I _'_'_'_'_'_'_'_'_'_'_--
• • ([CAPTIONI], [CAPTION2], " z_o "
aly for a second language favatlable. ] [TEXT1] or [TEXT2]) _ _';
NOTE:
Not all programs are broadcast with closed captions.
Your television is designed to provide error free closed
captions from high quality antenna, cable and VCR sig-
nals. Conversely, poor quality signals are likely to result
in caption errors or no captions at all. Common signal
conditions which may cause captious errors am listed
below:
• Automobile ignition noise
• Electric motor brush noise
• Weak snowy reception on TV screen
• Multiplex signal reception displaying picture ghosts
or airplane flutter.
• Playback of poorly recorded or worn VCR tapes.
NOTE:
i
i 3 Exit the caption setting mode
i Press the MENU button to retum to "IV mode.
TO CANCEL THE CLOSED CAP'I70N
SYSTEM
Repeat steps [1] and [2], select [OFFI using the
F.FWD/1P"orREW/_I button.Press the MENU button
to return to TV mode.
WHEN 7WE CLOSED CAPTION MODE
IS ON
If theTV/VCR displays a black
box on the TV screen, this means
that the TV/VCR is set to the
TEXT mode. To clear screen, se-
lect [CAPTION1], [CAPTION2]
or [OFF].
The On-ScreenDisplay will disappear after5 seconds.
• This is also truewhen the MUTE buttonis pressed,
and when the PAUSE/STILLbuttonis pressedwhile
recording.
• If there is a power failure of any kind, the unit will
retain its memory for this feature.
Make sure ...
• Use the remote control for this procedure.
• TV/VCR power must be turned on.
-18-
EN
8LI5
T7008-02
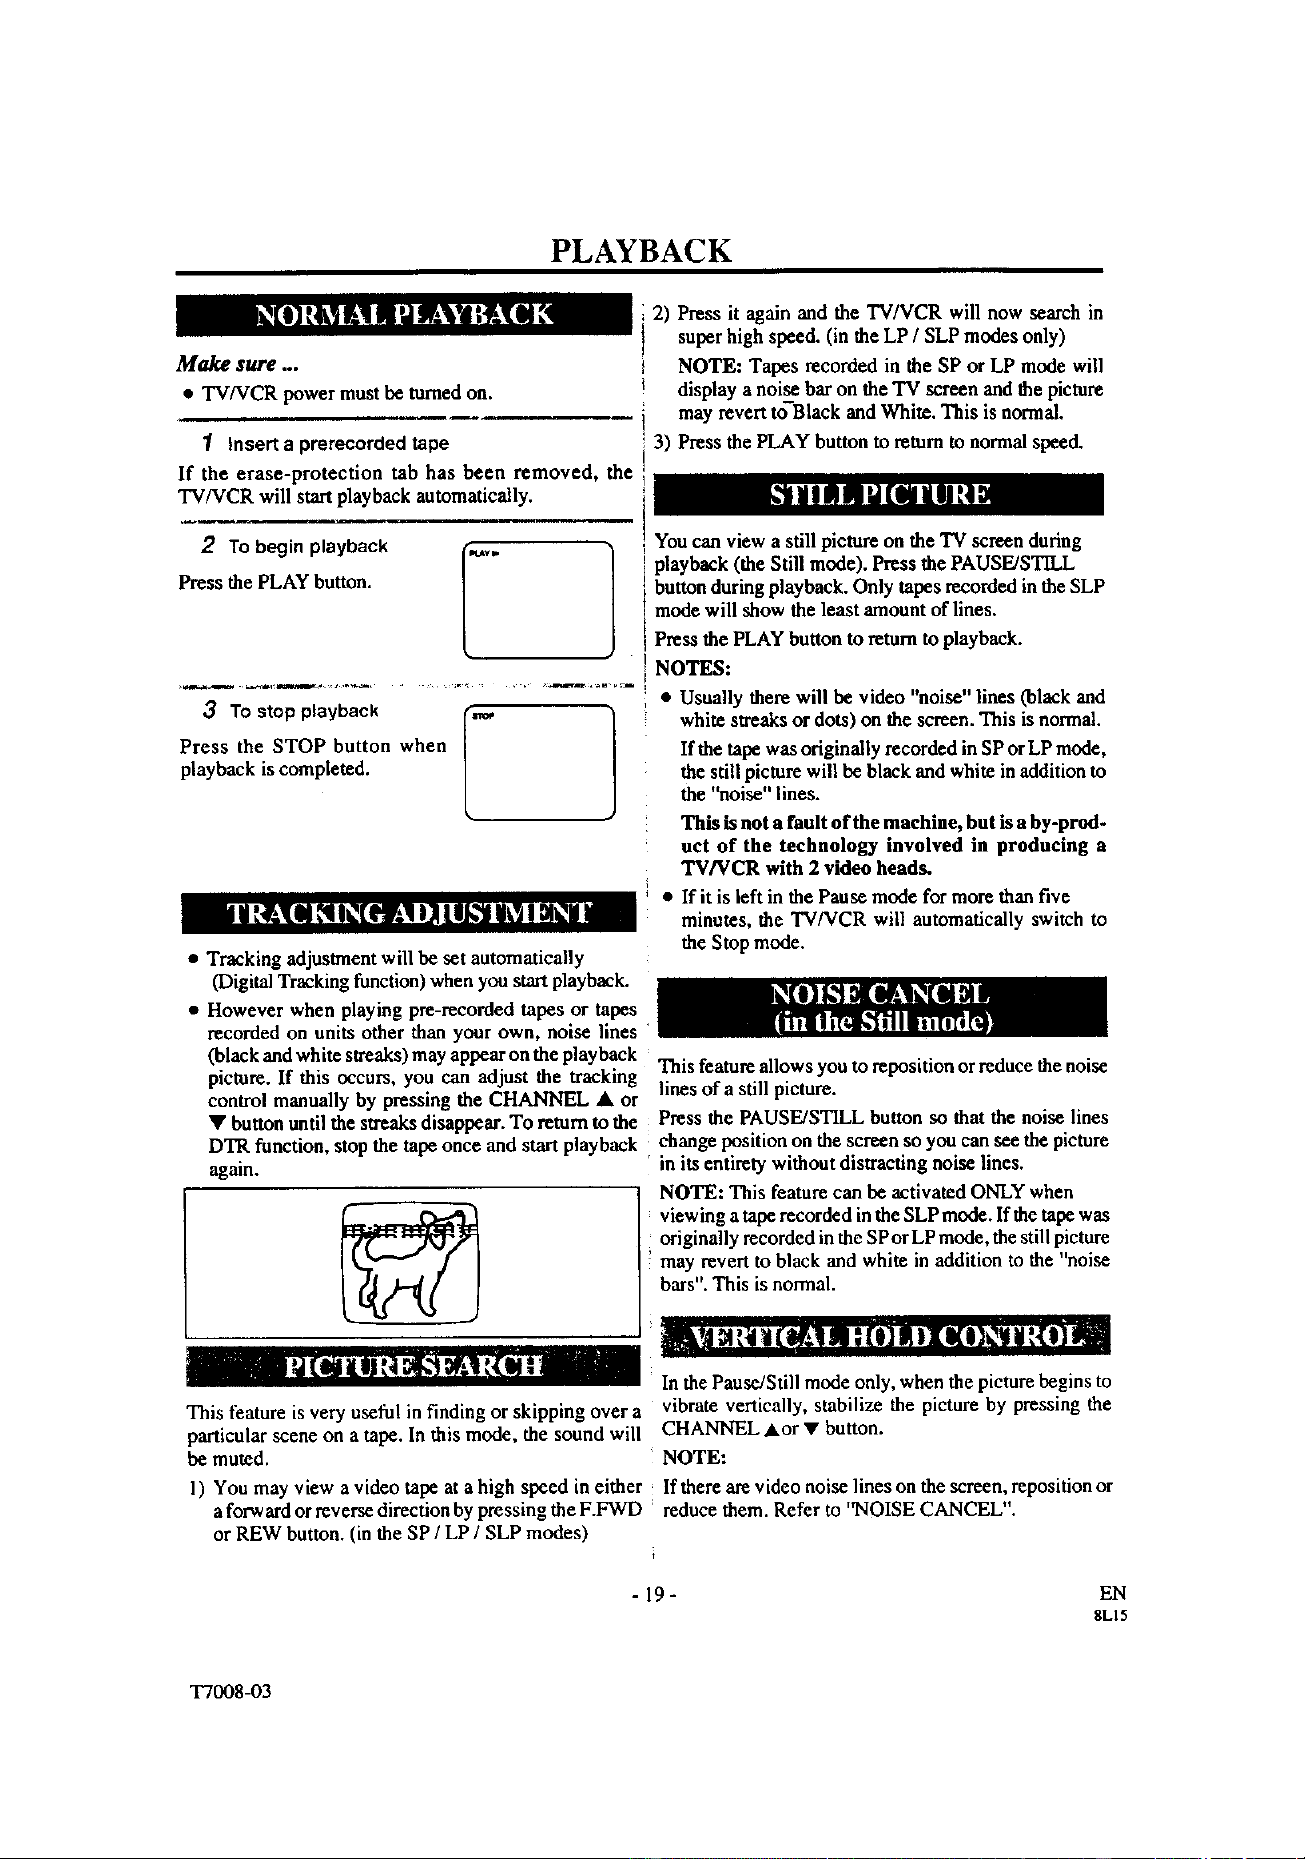
PLAYBACK
Make sure ...
• TVNCR power mustbe mined on.
1 Insert a prerecorded tape
If the erase-protection tab has been removed, the
TVNCR will start playback automatically.
2 To begin playback
Pressthe PLAY button.
Press the STOP button when
playback is completed.
• Tracking adjustment will be set automatically
(Digital Tracking function) when you start playback.
• However when playing pre-recorded tapes or tapes
recorded on units other than your own, noise lines
(black and white streaks) may appear on the playback
picture. If this occurs, you can adjust the tracking
control manually by pressing the CHANNEL • or
• button until the streaks disappear. To return to the
DTR function, stop the tape once and start playback
again.
2) Press it again and the TV/VCR will now search in
super high speed. (in the LP / SLP modes only)
NOTE: Tapes recorded in the SP or LP mode will
display a noise bar on the "IV screen and the picture
may revert to Black and White. This is normal.
3) Press thePLAY button to mtam to normal speed.
You can view a still picture on the 'IV screen during
playback (the Still mode). Press the PAUSE/STILL
button during playback. Only tapes recorded in the SLP
mode will show the least amount of lines.
Press the PLAY buttonto returnto playback.
NOTES:
• Usually there will be video "noise" lines (black and
white streaks or dots) on the screen. This is normal.
If the tape was originally recorded in SP or LP mode,
the still picture will be black and white in addition to
the "noise" lines.
This is not a fault of the machine, but isa by-prod-
uct of the technology involved in producing a
TV/VCR with 2 video heads.
• If it is left in the Pause mode for more than five
minutes, the TV/VCR will automatically switch to
the Stop mode.
This feature allows you to reposition or reduce the noise
lines of a still picture.
Press the PAUSE/STILL button so that the noise lines
change position on the screen so you can see the picture
in its entirety without distracting noise lines.
NOTE: This feature can be activated ONLY when
viewing a tape recorded in the SLP mode. If the tape was
originally recorded in the SPOrLP mode, the still picture
may revert to black and white in addition to the "noise
bars". This is normal.
In the Pause/Still mode only, when the picture begins to
This feature is very useful in finding or skipping over a vibrate vertically, stabilize the picture by pressing the
particular scene on a tape. In this mode, the sound will CHANNEL ,&or • button.
be muted. NOTE:
1) You may view a video tape at a high speed in either If there am video noise lines on the screen, reposition or
a forward or reverse direction by pressing the F.FWD reduce them. Refer to "NOISE CANCEL".
or REW button. (in the SP / LP / SLP modes)
i
-19- EN
8L15
"1"7008-03

SPECIAL PLAYBACK
Make sure ...
• Use the remote control for this procedure.
• TV/VCR power mustbe turnedon.
• Inserta prerecordedtape.
• Before playback, follow steps below.
This function enables you to improve the picture quality
when playing back worn cassettes such as rented tapes.
1 Select"USER'S SET UP"
Press the MENU button.
Press the PLAY/A or STOP/V
button to point to "USER'S SET
UP".
Then, press the F.FWD/II* button.
2 Sea"RENTAL" to [ON]
Press the PLAY/A or STOP/V
button to point to "RENTAL".
Press the EFWD/I_" or REW/4
button until [ON] appears.
**|4_
P
Exlt the Rents', settJn_
Press the MENU button to return to the TV mode.
4 Start playback
Press the PLAY button to start playback. ''RENTAL
PLAYI_" appears.
• Once you select the Rental mode, it stays in effect
even after you turn off the TV/VCR.
TO CA NCEL THE RENTAL MODE
Repeat steps [I] and [2], select [OFF] using the
F.FWD/I_ or REW/4 button on the remote control.
Press the MENU button to return toTV mode.
If there is a power failure of any kind, the unit will
retain its memory for this feature.
The TV/VCR has the auto repeat function that allows
you to repeat a tape indefinitely without touching the
PLAY button. -
ALLREPEAT:Repeat playbackfrom the beginning to
the end of the tape.
BLANKREPEAT:Repeat playback fromthe beginning
to a blank part, which is blankfor morethan 10
seconds.
1 Select "USER'S SET UP" I" 1
.MtNU.
Press the MENU button. "_"_"--_
KWrI_ _
Pressthe PLAY/A or STOP/V _
button to point to "USER'S SET _"_,_'_
UPj, 'ml f&asa'l
Then, press the F.FWD/I_ button.
2 Setect"ALL" or"BLANK"
Press the PLAY/&. or STOP/T button to point to
Press the F.FW'D/I_ or REW/4 _ ,_, ._
i button repeatedly until your
desired selection [ALL] or
BLANK] appears.
3 Exit the Repeat Play setting
Press the MENU button to return to the TV mode,
4_ Start playback
, Press the PLAY button to startthe RepeatPlay.
"REPEATPLAY I1_"appears.
• Once you select the Repeat Play mode, it stays in
effect even after you tam off the TV/VCR.
• If the Rental mode is set [ON], the "RENTAL
PLAYI_" display has priority.
TO CANCEL THE REPEAT PLA Y MODE
Repeat steps [11 and [2], select [OFF] using the
F.FWD/I_ or REW/_I button on the remote control.
Press the MENU button to return to TV mode.
If there is a power failure of any kind, the unit will
retain its memory for this feature.
- 20 -
EN
8L15
T7008-03

SEARCH
Make sure ...
• Use theremote controlforthis procedure.
• TV/VCR power must be tamed on.
• Inserta tape.
This function allows you to search easily a beginning
point that you want to review by rewinding or fast for-
warding.
NOTE:
Zero Return WILL NOT work on a blank tape or a
blank portion of a tape.
1 Stop a tape at your desired point
Rewind or fast forward the tape to the beginning point
at which you want to review.
2 Reset the counter to 0:00:00
Press the COUNTER RESET button repeatedly.
3 Begin recording or playback
Press the RECORD or PLAY button.
• This function will not operate inrecording mode.
• This function is not operative when a cassette tape is
not inserted in the TV/VCR.
In the example below: To watch a program after 2 hour
50 minutes from the present position, in either direction.
1 Inserta tape.
2 Select "TIME SEARCH" mode
Pressthe TIME SEARCH button (with each push it will
increase by 10 minute)
OR
I 1......
Press the MENU button. ,_w_,,6
Press the PLAY/A or STOP/Y M',',m,a_
tm_atl i[r U_
button to point to "TIME _o.,_h__
SEARCH". =,._,_
i Then, the F.FWD_ button.
press
Press the STOP button when recording or playback is
completed.
4 To activate"ZERO RETURN" mode
Press the MENU button.
Press the PLAY/A or STOP/V
button to point to "ZERO RE-
TURN".
Then, press the F/eWD/I_
button.
_utNu_ ]
.p 2-
The counter will appear on the TV screen.
The tape will automatically stop when the counter
returns to 0:00:00.
The Time Search function makes it possible to quickly
advance the tape to your desired position simply by
entering the exact amount of playback time you want to
skip.
NOTES:
• Time Search can be set up to a maximum of 9 hours
50 minutes (9:50) by 10 minutes at a time.
3 Enter yGur desired time [-_. ]
Press the PLAY/A or STOP/V |
J
button until your desired time |
appears. (Example: "2:50"|
i stands for 2 hours 50 minutes) "
If you wish to cancel the Time Search at this point, press
the MENU button.
4 6egin Time Search
By pressing the REW/<I or F.FWD/I_ button, the
TV/VCR will rewind or fast forward to the specified point.
The time counts down as the searching progresses.
When 0:00 is reached, the tape will start playback
automatically.
TO CANCEL THE TIME SEARCH at thi.v
i point
Press the STOP/EJECT button on the TV/VCR or the
' remote control. This will delete the selected time.
- 21 - EN
8L15
T7008-03

RECORDING
Make sure ...
• TV/VCR powermustbe turnedon.
• Insert a cassettetapewith itserase preventiontab in place. (Ifnecessary,rewind orfastforwardthe tape to the
point atwhichyou want tobegin recording.)
NOTE: This unitwill ONLYrecord and view the same channel.
You canONLY watch thesameTV programthat isbeing
recorded.
Se *hechann*°beIrecordo01
Press the number but_ns on the
remote control or the
CHANNEL • or • button.
Remember: If the TVNCR is connected to a cable box
or satellite box, the TV/VCR must be on CH3 or CH4,
then the channel to be recorded must be selected on the
cable box or satellite box.
2 Select the tape speed
Press the SPEEDbutton to select
the desired tape speed (SP/SLP).
]
3 Begin recording
Press the RECORD button.
Press the PAUSE/STILL button [,,,-_ 1
to temporarily stop recording.
Press the PAUSE/STILL or
RECORD button to resume
recording. '_
NOTES:
* After five minutes, the TVNCR will automatically
switch to the Recording mode to prevent tape damage.
o If "CLOSED CAPTION (ON)" is selected, the On-
Screen Display will appear for 5 seconds, then dis-
appear.
4 Stop recorcting
Press the STOP button when recording is completed.
- 22 -
EN
8LI5
T7008-03
I II • i J" i _ ,_ i
This function enables yon to set a recording length simply J
by pressing the REC/OTR button on the TV/VCR. I
Make sure ...
• TV/VCR power must be turned on.
• Insert a cassette tape with its erase prevention tab in
place. (If necessary, rewindor fast forwardthe tape
to the point at whichyou want to begin recording.)
NOTES:
• This fanction CANNOT be dor_ fromthe remo_ control.
• Recording starts immediately when the REC/OTR
button is pressed.
• Whenthe REC/OTRbutton is pressed 18 times, the
TV/VCR returnsto the Normal Recordingmode.
• To stop theOTR operation,press the STOP button
on the TV,'VCRoron the remote control.
• To show the remaining time, pressthe DISPLAY button
on tbe remote control so that '(YrR" appears on the TV
soeen. (It will show up momentarily then disappear.)
• Recording stops when 0:00 is reached.
• Please note that in the SLP mode maximum recording
time, assuming the tape is started at the beginning,
is 8 hours using T-160 (or 6 hours using T-120).
• If the tape runs out before the end time,the TV/VCR
will switch to the Stop mode immediately, ejects the
tape and tams itself off.
1 Select the channel to be recorded
Press the numberbuttonson the remote controlor the
CHANNEL • or • button.
Remember: If the TV/VCR is connected to a cable box
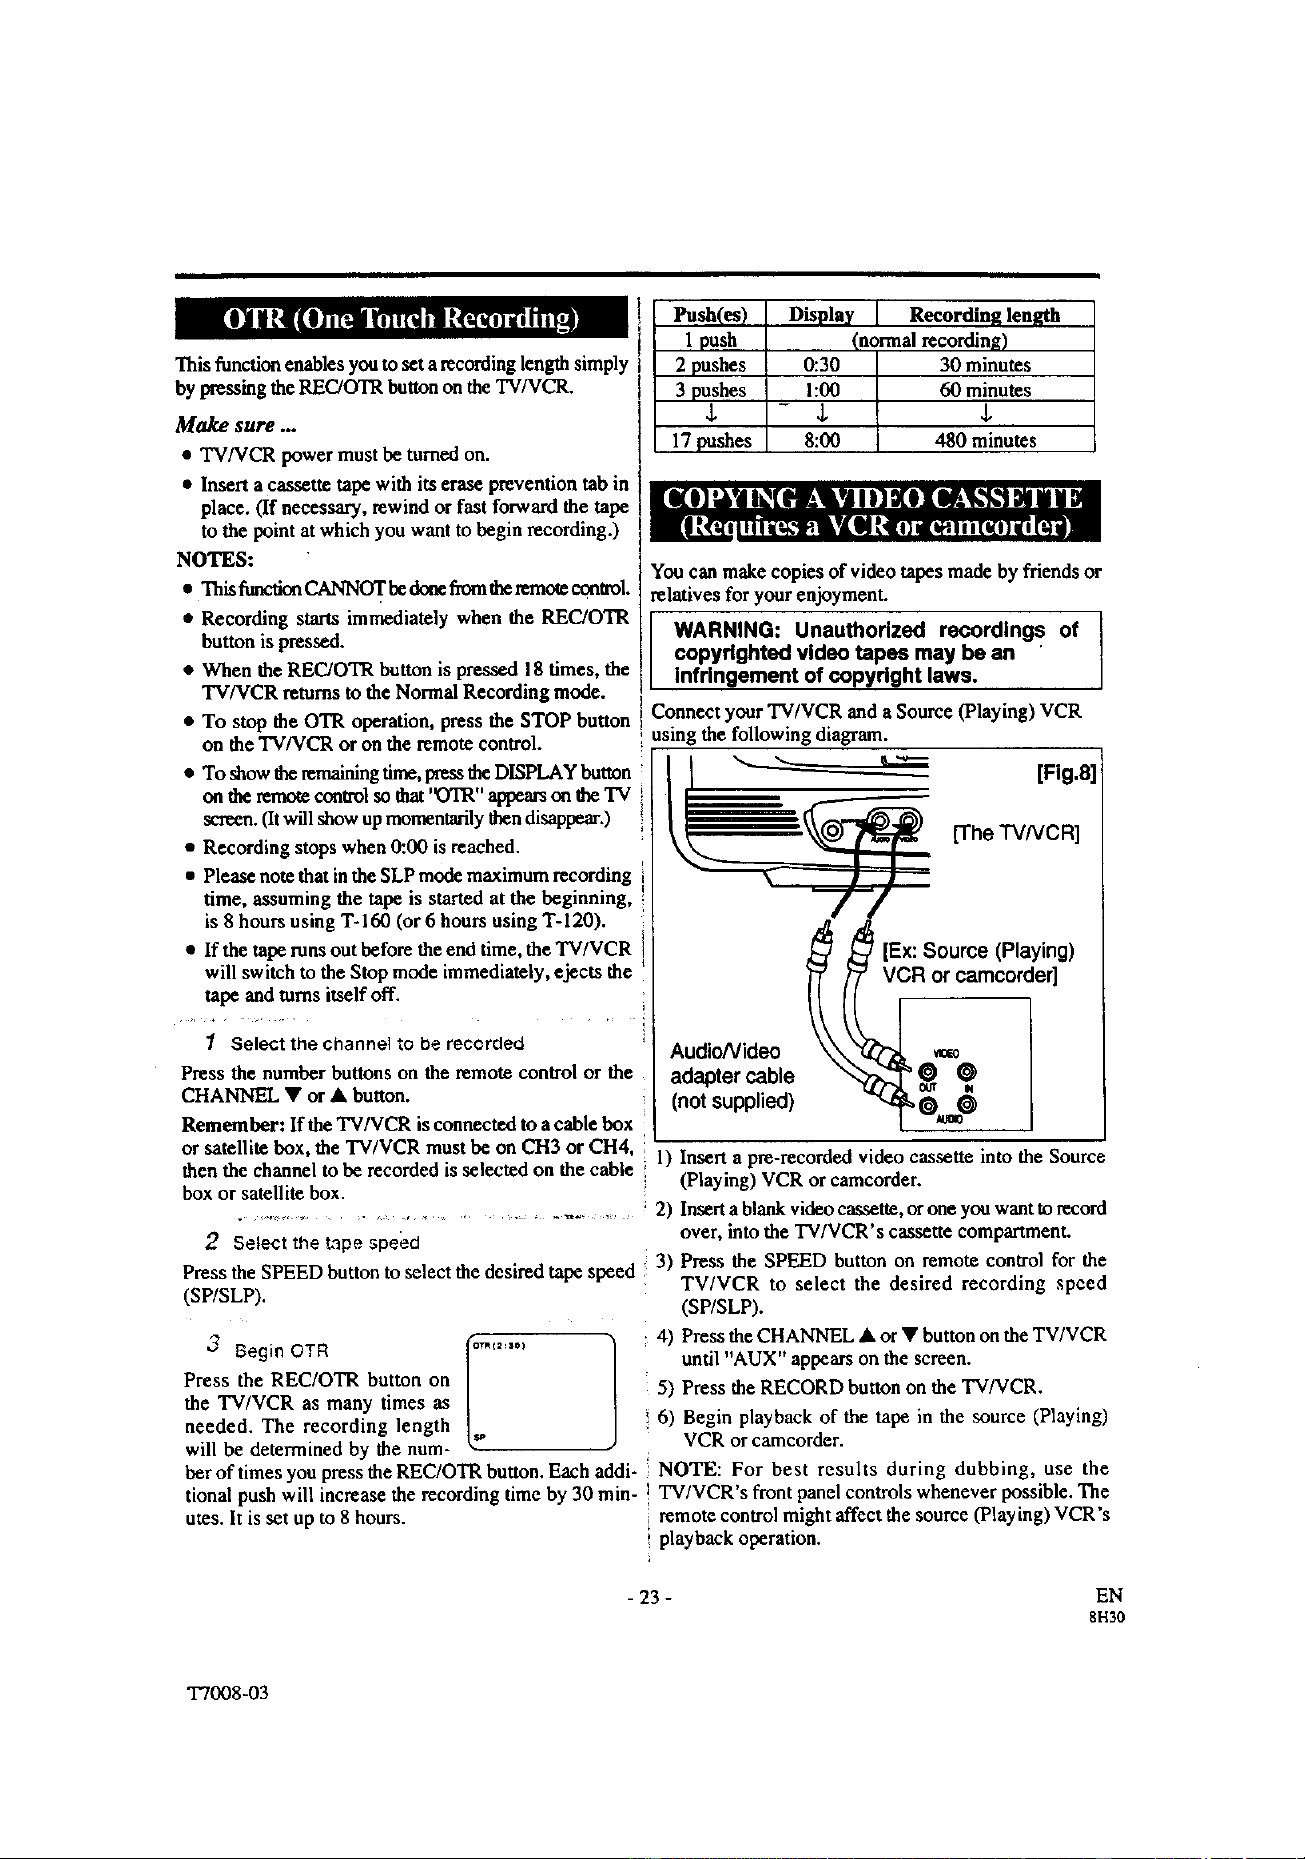
l sa(es)
1 push
2 pushes
3 pushes
$
17 pushes
Display Recording length
(normal recording)
0:30 30 minutes
1:00 60 minutes
- $ $
8:00 480 minutes
You canmake copies of video tapes made by friendsor
relatives for your enjoyment.
WARNING: Unauthorized recordings of
copyrighted video tapes may be an
Infringement of copyright laws.
Connect TV/VCR and Source VCR
your
(Playing)
a
: using the following diagram.
[Fig.8]
[The TVNCR]
AudioNideo
adapter cable
(not supplied)
--/-/
[Ex:Source (Playing)
mcorder]
or satellite box, the TV/VCR must be on ell3 or CH4, 1) Insert a pre-recorded video cassette into the Source
then the channel to he recorded is selected on the cable ;
box or satellite box. (Playing) VCR or camcorder.
..................................... 2) Insert a blank video cassette, or one you want to record
2 Selectthetapespeed over, into the TV/VCR's cassette compartment.
lect the desired ta s ed 3) Press the SPEED button on remote control for the
Press the SPEED button to se pe pe TV/VCR to select the desired recording speed
(SP/SLP). (SP/SLP).
Press the REC/OTR button on
the TV/VCR as many times as
needed. The recording length
will be determined by the num-
ber of times you press the REC/OTR button. Each addi-
tional push will increase the recording time by 30 min-
utes. It is set up to 8 hours.
4) Press the CHANNEL • or • button on the TWVCR
until "AUX" appears on the screen.
5) Press the RECORD button on the TV/VCR.
i 6) Begin playback of the tape in the source (Playing)
VCR or camcorder.
NOTE: For best results during dubbing, use the
I TV/VCR's front panel controls whenever possible. The
remote control might affect the source (Playing) VCR's
i playback operation.
- 23 -
EN
8H30
T7008-03

TIMER
You may set the TVNCR to start and end a recording
while you are away. You can set 8 programs to record
on specific days, daily or weekly within a 1 year period.
In the example below, the timer is being set to record:
DATE: MAY 6th, 1999
SETI'ING TIME: from 7:30PM to 8:50PM
CHANNEL: CH61
TAPE SPEED: SP
Make sRre ...
• Use the remote control for this procedure.
• If a cable box or satellite box is connected with the
TV/VCR you will be limited to record only one
channel. And the channel selector on the TV/VCR
must be selected to the output channel of the boxes
CH 3 or CH 4 and then the actual channel to be re-
corded must be selected on the boxes.
• Clock must be set to the correct time and date before
setting the timer.
• TV/VCR power must be _n on to program it.
• Insert a cassette tape with its erase prevention tab in
place. (If necessary, rewind or fast forward the tape
to the point at which you want to begin recording.)
• The channel you want to record is properly set in
advance. (See page 13.)
Avoid over lap of programs ...
There is a chance that a program will not be recorded.
when programs overlap;
• The program with an earlier start has priority.
And press the F.FWD/I_ button.
• If you have not yet set the
clock, "MANUAL CLOCK
SET" appears. If so, follow
stops [3] to [8] on page 15.
Then set the timerrecording.
-MtNU* 1
O_B. a_'r Up
_'S SETUp
I
2 Select your desired program position (1~8)
Press the PLAY/A or STOP/V f -_.,,,o_,_. "_
¢4m imm II_
buttontoselectthedesiredprogram :: _: ::: _ :: ::
position.
Then,presstheF_rW'D button. 5"-=: :"
Setthechnnenumberf :
Press the PLAY/A or STOPfW
button until the desired channel . ..,_. -"
number appears.
(Example: CH61) :: "-: ::: =: =: :
Then, press the F.FWD/I_ button.
Remember: If the T'V/VCR is connected to a cable box
or satellite box, the TV/VCR mast be on CH3 or CH4,
then the channel to be recorded is selected on the cable
box or satellite box.
4 Select once, every day or weekly recording
For once renording :
Press the PLAY/A (up) button _ _ -..m _ -.
untilthedesireddateappears. _ ___z:,__:=: ::
(Example: "5/06"for May "___"_+_._.:=: :-
....... =_ =- __
6th). Then, press the l ............ _)
F.FWD/I_" button.
• Once the earliest program finishes, the overlapping
programs will begin recording in sequence. For every day recording : To record a TV program at
• The illustration below demonstrates the sequence of ': the same time on the same channelevery day. (Example:
recordings. Monday through Sunday)
Program 1 10:00AM - 11:00AM Press the STOP/. (down)[ _-:"--=-]
Program 2 9:00AM - 10:00AM button until "EVRY DAY" i: _:_ :,:i,_:'_-_i -"
Program 3 9:30AM - 12:00PM appears. I'-',-",,-""_ _ ": ::: ::1
Then,pressthe ÷:i
,j
k
_t
[_O_Jd'P-I_OCAM _
_oemms
[_'_4M le,N/,M IS_uM 1_4
"] Select"TIMER PROGRAMMING"
Press the MENU button.
button until "EVRY" and
your desired day of the week
appear together.
Then, press the F.FWD/_
button.
Confirm 'q'IMER PROGRAMMING" is pointed by
pressing the PLAY/A button.
button.
For weekly recording : To record a TV program at the
same time on the same channel every week. (Example:
every Monday)
Press the STOP/V (down)
=7 __77_7 _.
;5;ij
- 24 - EN
8LI5
T7008d)3
...... !|nanam=',mut(omminim = ek,"ltO)(I
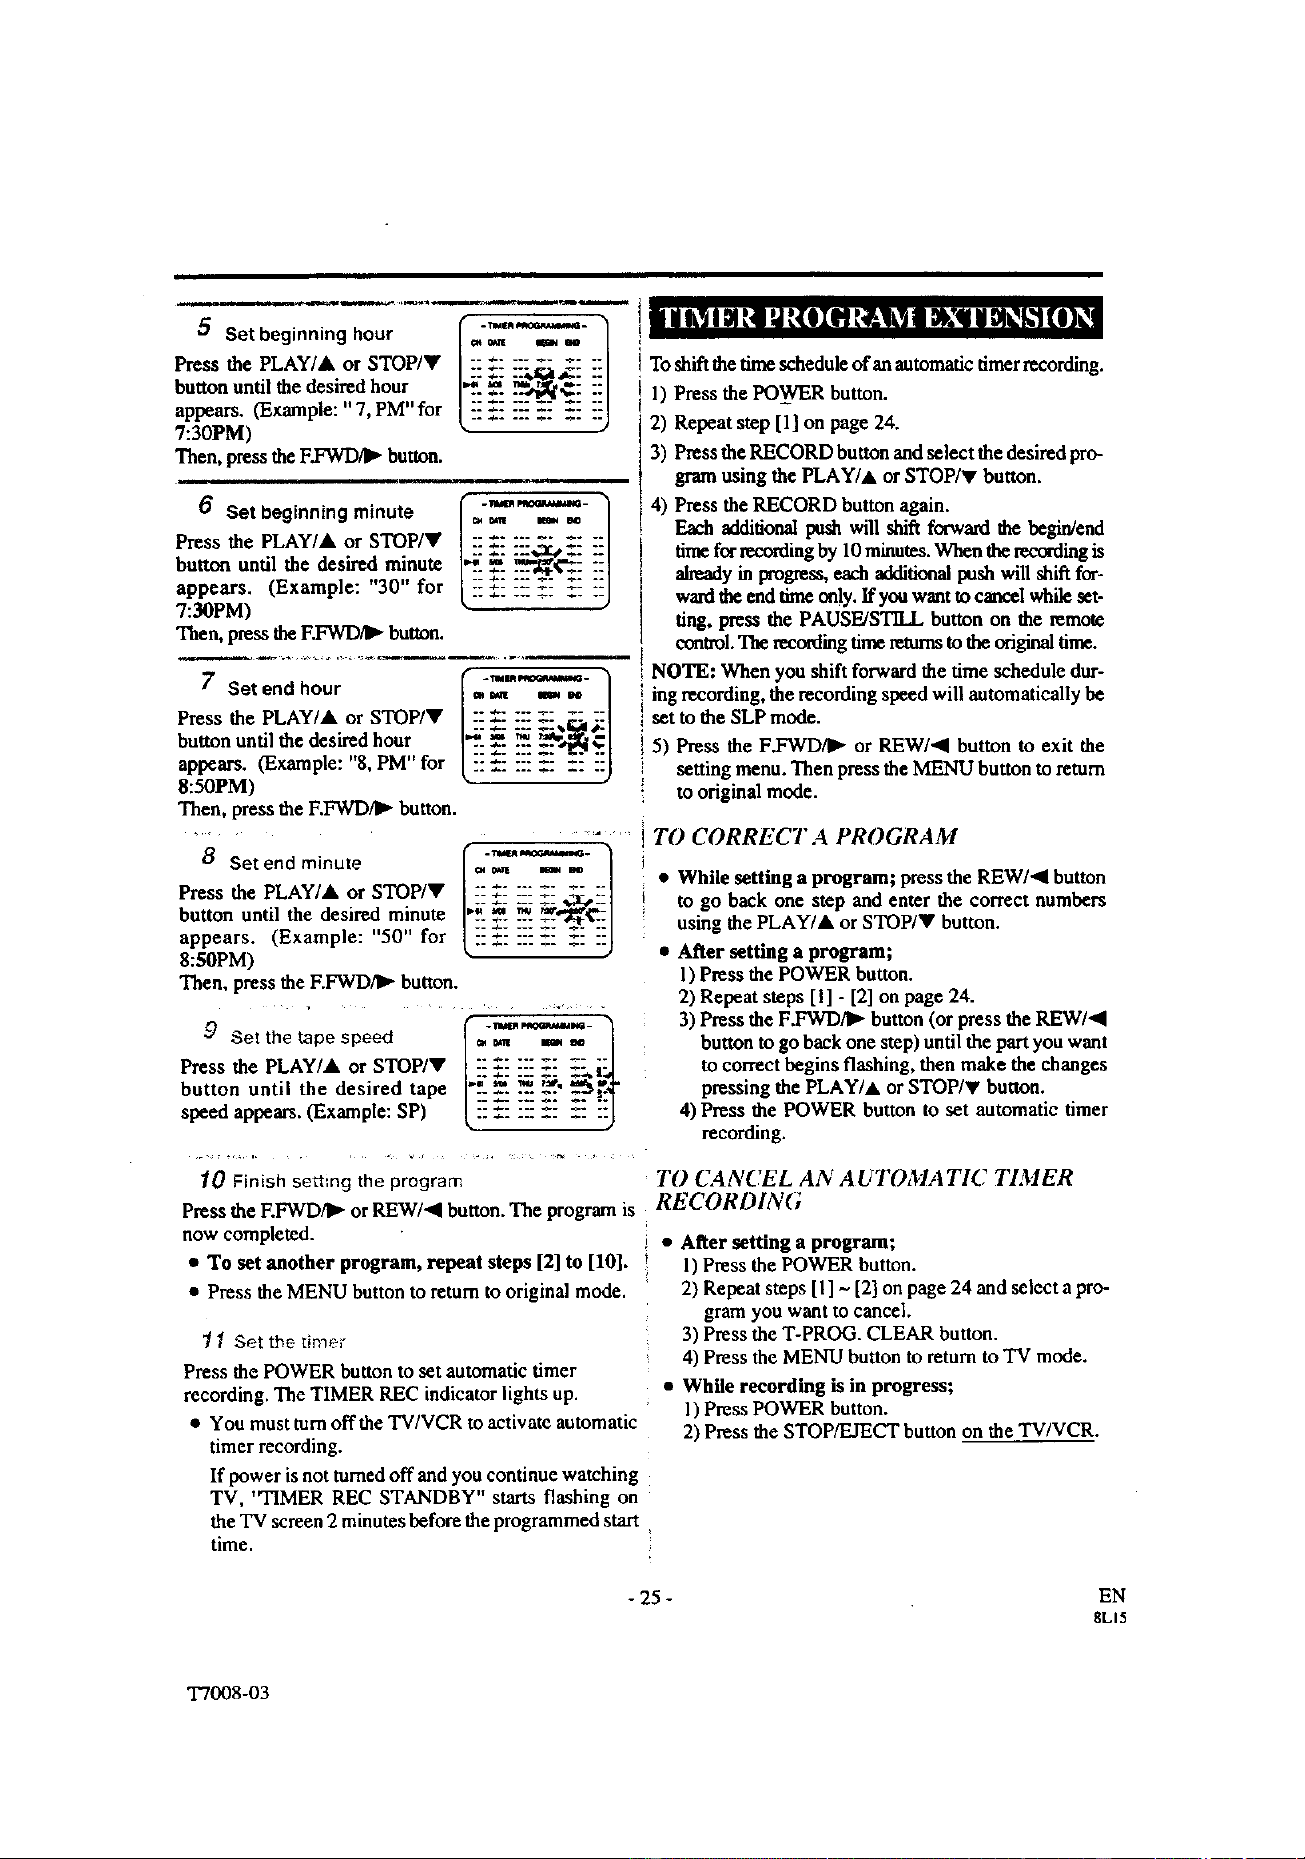
Set beginning hour i" """
Press the PLAY/& or STOP/• /:: ÷: ::: =z .: ::1 i Toshiflthetimescheduleofauautomadc dmerrecordiag.
but_on until the desired bour l_'_--_ _ -"-'!l ' 1"IPm,_theP_W_ hnttnn
_-- _- --_,_ - -'_ .............. R ......
appears. (Example: " 7, PM"for /:'_..: "=_.: _," _.:1 I .... T, .-
7"30PM) k- ) z) Kepeat step tii on page z,_.
"i'hen, press the F.FWD/_ button. 3) Press the RECORD button and select the desired pro-
- ------ t gram using the PLAY/A or STOP/T button.
6 Set beginning mirtute (=,'_-) i 4) P_ress_eRECORDbutton, a.ga!n.
• / _. _ . / _ additional imsa wiu shirt forward the begin/eno
Press the PLAY/&. or STOP/ :: _.: ::: " _: = .....
• . . ] .... :x,.3cs ,. ::l tone for recorduag by 10 minutes. When the recording is
buttxm unUl the desnred minute 12-_- ...'Y2"_€'=-":1 ot,_oa • ,,,,-h _ta;a,,,,,t _h "noh'_
,, ., • :: .- ::: _- _: :-'1 _y m progress......... pa.. wt.. =u.. for-
appears. (Example: 30 for ( :: _.: ::: =: :: ::] ward the end tmte only. lfyouwanttocancelwhileset-
7:30PM) ring, press the PAUSE/STILL button on the remote
Then, press the F.FWD/I_ button.
7 Set end hour
Press the PLAY/&. or STOP/•
button until the desired hour
appears. (Example: "8, PM" for
8:50PM)
Then, press the F.FWD/IP"button.
8 Set end minute
Press the PLAY/&. or STOP/•
button until the desired minute
appears. (Example: "50" for
8:50PM)
Then, press the F.FWD/I_- button.
f "--" 1
9 Set the tape speed = _ ,1= m
Press the PLAY/&. or STOP/• |_ _.__:__! Xkl- _
button until the desired tape I"1:E _ _" ='_-_€
speed appears. (Example: SP) L:: :: ::: :: :: ::J
control. The recording time returnsto the original time.
[ NOTE: When you shift forward the time schedule dur-
ing recording, the recording speed will automatically be
set to the SLP mode.
5) Press the F.FWD/I_ or REW/al button to exit the
setting menu. Then press the MENU button to return
to original mode.
TO CORRECT A PROGRAM
• While setting a program; press the REW/_I button
to go back one step and enter the correct numbers
using the PLAY/& or STOP/• button.
• After setting a program;
l) Press the POWER button.
2) Repeat steps I!l - [2] on page 24.
3) Press the F.FWD/I_ button (or press the REW/al
button to go back one step) until the part you want
to correct begins flashing, then make the changes
pressing the PLAY/A or STOP/V button.
4) Press the POWER button to set automatic timer
recording.
_0 Finish setting the program
Press the F.FWD/I_ or REW/al button. The program is
now completed.
• To set another program, repeat steps [2] to [10].
• Press the MENU button to return to original mode.
'/ Set th_ ':ime;
Press the POWER button to set automatic timer
recording. The TIMER REC indicator lights up.
• You must turn offthe TV/VCR to activate automatic
timer recording.
If power is not turned off and you continue watching
TV, "TIMER REC STANDBY" starts flashing on
the TV screen 2 minutes before the programmed start
time.
TO CANCEL AN AUTOMATIC TIMER
RECORDING
• After setting a program;
1) Press the POWER button.
2) Repeat steps [I ] ~ [2] on page 24 and select a pro-
gram you want to cancel.
3) Press the T-PROG. CLEAR button.
4) Press the MENU button to return to TV mode.
• While recording is in progress;
1) Press POWER button.
2) Press the STOP/EJECT button on the TV/VCR.
- 25 -
EN
8LI5
T7008-03
TO CHECK THE BEGIN/END TIME
I) Pressthe POWERbuttonso that the REC indicator
goes off.
2) Pressthe MENU"button.
3) Confirm"TIMER PROGRAMMING"is pointed.
4) Press the F.FWD/I_ button.The details of programs
appearon the TV screen.
5) Press the MENU"buttontoreturn to TV mode.
n Make sure thechannelyou wantto record is properly
set in advance.
• It is not necessary to press the RECORD button for
timer recording.
• Recording begins automatically at the Start time.
• If you am recording using a Timer mode, you may
not operate the unit manually.
• The erase-prevention tab on the cassette must be in
place (or you must put tape over the hole).
• If the erase-prevention tab is removed, the cassette
will be ejected when the POWER button is pressed
to off.
• If the taperunsoutbefore the end time, the TV/VCR
will switch to the Stop mode immediately, and the
tape will be ejected.
With this feature,after timer recording is finished, the
beginning of the recorded program(s)canbe searched
for automatically.
• Use the remote control for this procedure.
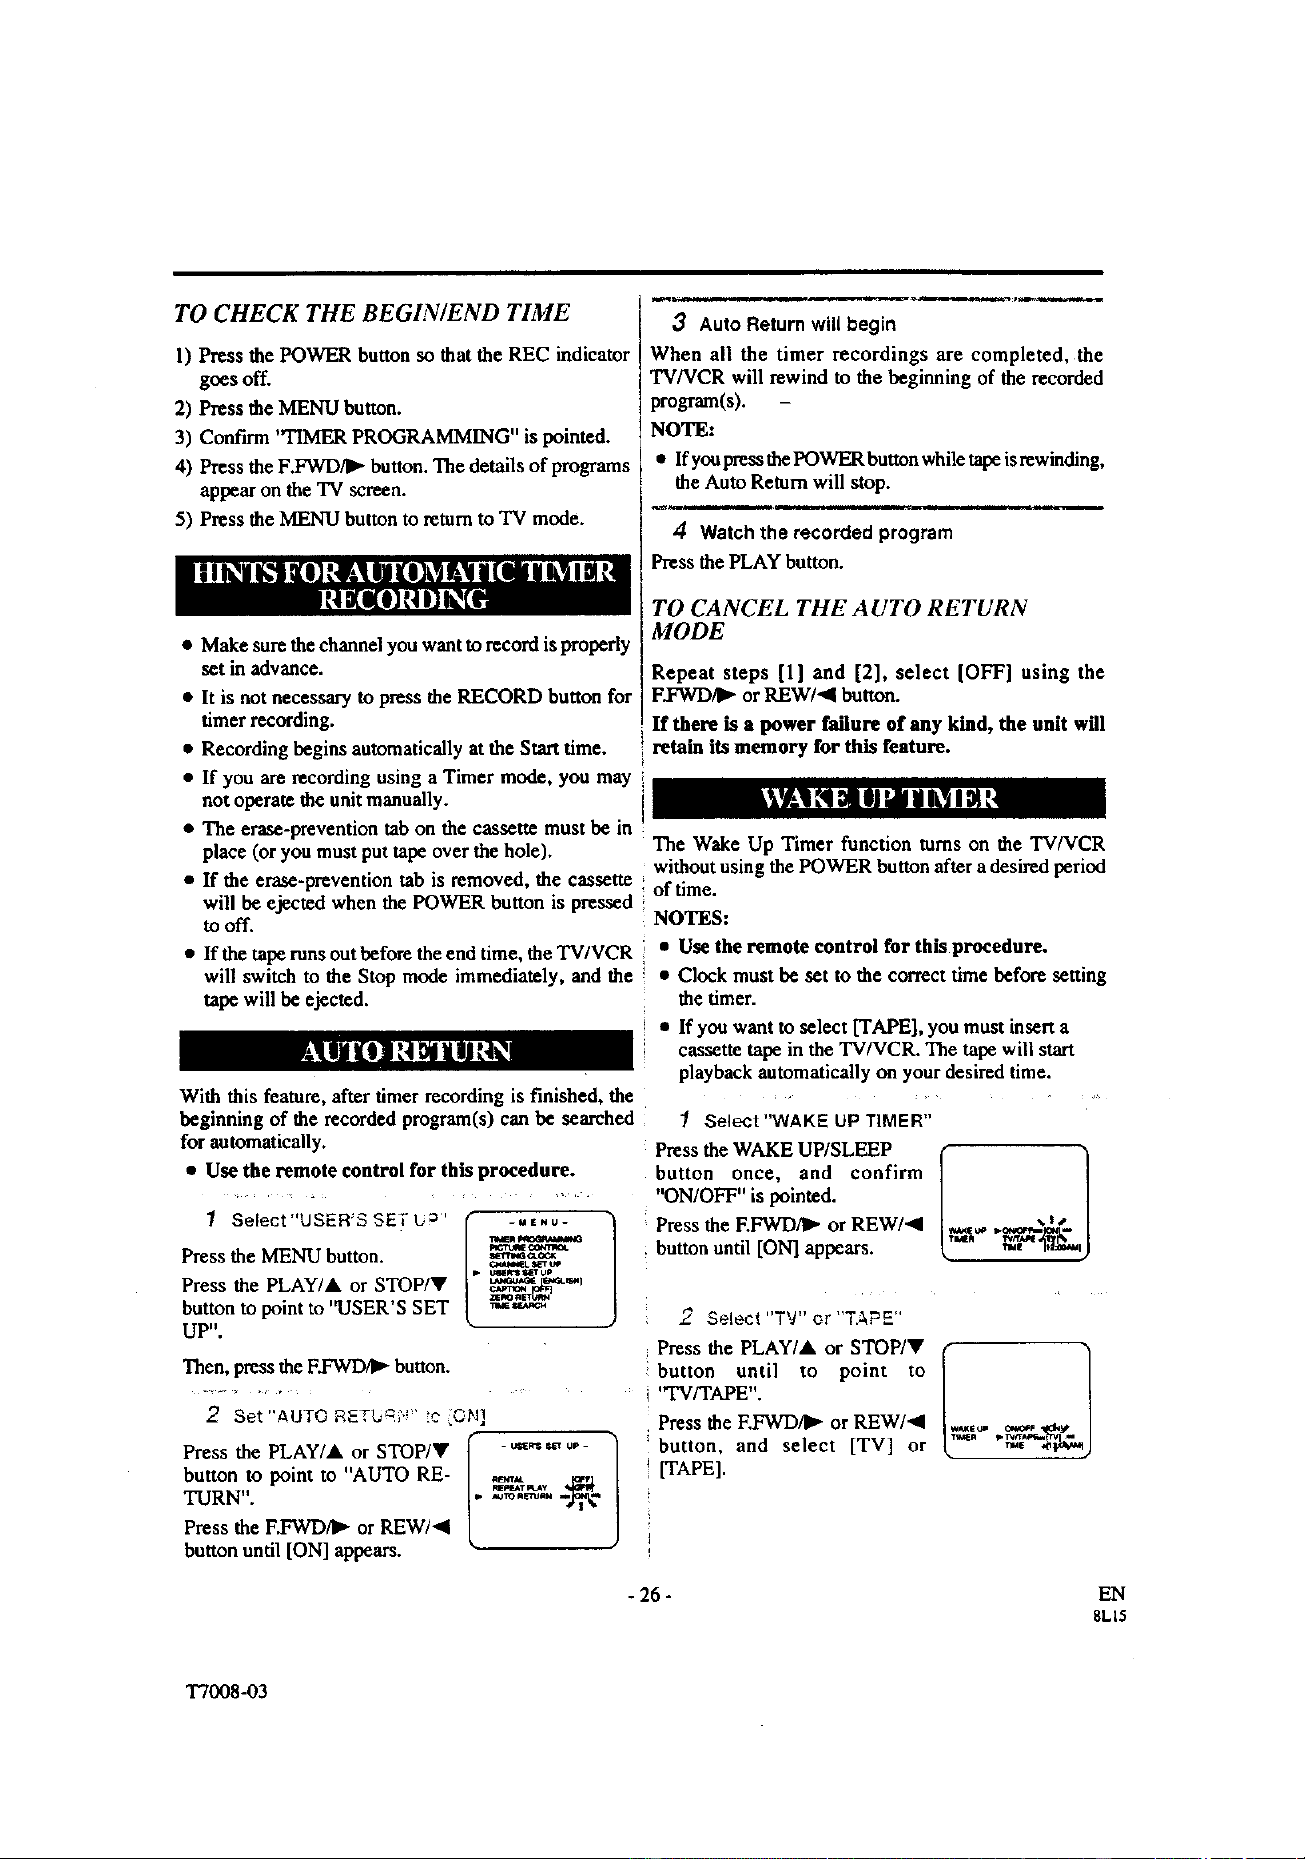
I Select"USER'S SE_"U _'
Press the MENU button.
Press the PLAY/&. or STOP/V
button to point to "USER'S SET
UP".
I=. -MENU"
p_'tU;E oalcmo.
uu_up
3 Auto Return will begin
When all the timer recordings are completed, the
TV/VCR will rewind to the beginning of the recorded
pro_(s).
NOTE:
• If you press the POWER button while tape is rewinding,
the Auto Return will stop.
4 Watch the recorded program
Press the PLAY button.
TO CANCEL THE AUTO RETURN
MODE
Repeat steps [l] and [2], select [OFF] using the
F.FWD/I_ or REW/41 button.
If there is a power failure of any kind, the unit will
retain its memory for this feature.
Then, press the F.FWD4_ button.
2 Set"AUTO R_Tb_-; .!' c ON]
Press the PLAY/&. or STOP/V r - _,,_ _ o,- ]
button to point to "AUTO RE- [_ _g_,h ._.
TURN".
L
Press the F.FWD/_" or REW/4
button until [ON] appears.
The Wake Up Timer function tarns on the TV/VCR
without using the POWER button aftera desiredperiod
of time.
NOTES:
• Use the remote control for this procedure.
• Clock must be set to the correct time before setting
the timer.
• If you want to select [TAPE], you must insert a
cassette tape in the TV/VCR. The tape will start
playback automatically on your desired time.
1 Select"WAKE UP TIMER"
Press the WAKE UP/SLEEP [ 1
button once, and confirm
"ON/OFF" is pointed.
%|,#
Press the F.FWD/I_ or REW/4 ,.%_1""g,_,,_'_'_
buttonuntil [ON]appears.
2 SeLect "TV" or "TAPE"
Press the PLAY/&. or STOP/Y ( "_
button until to point to
/
'q'V/TAPE".
Press the EFWD,_ or REW/4 _o,. ,._,,.._ .__
button, and select [TV] or k _e .ov_,_)
[TAPE].
- 26 - EN
8L15
T7008-03

3 Setwake up time
button until to point to "lIME".
Press the F.FWD/I_ or REW/_I
button until your desired wake _. ,_,_
up time appears.
Each additional push will
increase (or decrease) thetime by 10 minutes.
4 Exit the Wake Up Timer setting
Press the MENU buttonto returnto TV mode.
TO CANCEL THE WAKE UP TIMER
Repeat step [1]but select [OFF].
The Sleep Tuner function turns off the TV/VCR without
using the POWER button after a desired period of time.
NOTE:
• This function does not operate during Recording
mode.
1 Select"SLEEP TIMER"
Press the WAKE UP/SLEEP button on the remote con-
trol until "SLEEP TIMER" appears.
Press the PLAY/A, STOP/Y,
F.FWD/I_" or REW/<I button
until your
desired sleep time appears. ,_,,w _,_
Each additional push will inczeaze the time by 30
minutes up to 120minutes.
Press the MENUbuttonto exit the SleepTuner setting.
TO CANCEL THE SLEEP TIMER
Press the WAKE UP/SLEEP button on the remote
control until "SLEEP TIMER" appears.
Then, press the PLAY/A, STOP/V, F.FWD/I_- or
REW/al button and select [OFF].
To view the time left for sleep timer press the WAKE
UP/SLEEP button twice then the MENU button to exit
the sleep timer setting.
MAINTENANCE
CABINET CLEANING
• Wipe the front panel and other exterior surfaces of
the TV/VCR with a soft cloth immersed in lukewarm
water and wrong dry.
• Never use a solvent or alcohol. Do not spray
insecticide liquid near the TV/VCR. Such chemicals
may cause damage and discoloration to the exposed
surfaces.
HEAD CLEANING
• Playback picture may become blurred of interrupted
while the TV program reception is clear. Dirt accumu-
lated on the video heads after long periods of use, or the
usage of rental or worn tapes can cause this problem.
If a streaky or snowy picture appears during play-
back, the video heads in your TV/VCR may need to
be cleaned.
1. Please visit your local Audio/Video store and pur-
chase a good quality VHS Video Head Cleaner.
2. If a Video Head Cleaner does not solve the problem,
please call our help line at 1-800-968-3429, to locate
an Authorized Service Center.
NOTES:
• Remember to read the instructions included with the
video head cleaner before use.
• Clean video heads only when problems occur.
SER WCING
• Should your TV/VCR become inoperative, do not try
to correct the problem by yourself. There are no
user-serviceable parts inside. Turn off, unplug the
power cord, and please call our help line at 1-800-
968-3429, to locate an Authorized Service Center.
- 27 -
EN
8L15
T7008 -03

TROUBLESHOOTING GUIDE
If you have followed the instructions contained in this manual and have difficulty in operating your TV/VCR,
locate the PROBLEM in the left column below. Check the corresponding CORRECTIVE ACTION column to
remedy the problem.
PROBLEM CORRECTIVE ACTION
No power. • Make sure the AC cord is connected to an AC outlet.
No picture and sound.
No picture or poor picture on
TV/VCR.
No sound orpoor sound.
Timerrecording is notpossible.
Cannot go into Record mode.
Playback picture is partially noisy.
No picture but the audio is OK in
playback.
No operation by infrared Remote
Control.
Video or color fades in and out when
making a copy of a video tape.
• Make sure the power is tamed on.
• Make sure the AC cord is connected to an AC outlet.
u Check antenna connection.
• Let the T'vTVCR pro_'arn its' tuner memory.
• Adjust direction or replace antenna.
• Adjust picture cnnuols.
• Adjust volume control on remote control or main unit.
• Press the MUTE button to restore sound.
u Make sure the timer recording is set correctly.
• Make sure the power is off.
• Make sure the TV/VCR clock is set correctly.
• Make sure the tape has an erase-prevention tab. If need, cover the
hole with plastic tape.
• Adjust tracking control for a better picture using the CHANNEL •
or • button on the TV/VCR.
• Head cleaning may be necessary. Refer to "HEAD CLEANING" on
pa_e 27.
• Make sure the AC cord is connected to an AC outlet.
• Check batteries in remote control.
• You can not copy a copyrighted video tape. You are experiencing
copy guard protection.
CLOSED CAPTION
PROBLEM
My TV/VCR is showing captions
that are misspelled.
My TV/VCR will not show the text
in its entirety or there is a delay of
what is being said.
My captions are scrambled with
white boxes on the TV screen.
My program guide listed a TV show
as being closed captioned but none
of the captions were displayed.
My prerecorded video tape does not
show any captions. The tape box
mentions it being closed captioned.
My TV screen shows a black box on
certain channels.
POSSIBLE REMEDY
• You are watching a live broadcast and spelling errors made by the
closed captioning production company may pass through
uncorrected. A prerecorded program will not show any misspelled
words because of the normal time available for editing the captions.
• Captions that are delayed a few seconds behind the actual dialogue are
common for live broadcasts. Most captioning production companies can
display a dialogue to a maximu m of 220 words per minute. If a dialogue
exceeds that rate, selective editing is used to insure that the captions
remain up-to,late with the current TV screen dialogue.
• Interference caused by building, power lines, thunderstorms, etc. ma
cause scrambled or incomplete captions to appear.
• Broadcasters may at times use a time compression process to speed
up the actual program so that additional advertising time can be
given. Since the decoder cannot read the compressed information,
captions will be lost.
• The video tape was either an illegal copy or the tape duplicating
company accidentally left out the captioning signals during the
copying process.
• You are in the TEXT mode. Select CAPTION mode to CAPTION
[OFF].
- 28 - EN
8L15
T7008-04

SPECIFICATIONS
GENERAL SPECIFICATIONS
ELECTRICAL SPECIFICATIONS
CRT:
Television system : NTSC-M
Closed caption system :§ 15.119/FCC
Video Heads : Rotary two-head
Tape width : 1/2 inch
Tape speed
SP : 33.40mm/sec.
LP : 16.67mm/sec.
SLP : 11.12mm/sec.
Tuner channel
19inch in-linegun,90° deflectiontube Video inputlevel : 0,5_2,0Vpp
Audio inputlevel : -15dBs
Video S/N ratio: Morethan 46dB
Audio S/N ratio: Morethan 43dB
TV VHF Low : #2-#6
VHF/UHF 75 ohmsunbalanced
RCA connector× 1
RCA connectorx 1
1/8"monaural(3.5 rare)
TV VHF High : #'/-.4_13
TV UHF: #14--#69
CATV
VHF: 5A
MID band : AS~A 1,A~I
SUPER band : J~W
HYPER band : W+l~W+84
Terminals
Antenna input :
Video input :
Audio input :
Earphone :
OTHER SPECIFICATIONS
Power requirement : AC 120V/60Hz
Power consumption : 90W
Dimensions : H : 1%11/16" (500mm)
W : 19-7/16" (494mm)
D : 18-5/16" (465mm)
Weight : 44,1 lbs (20kg)
• Designs and specifications are subject to change
without notice and without our legal obligation.
• If there is a discrepancy between languages, the
default language will be English.
CABLE CHANNEL DESIGNATIONS
If you subscribe to cable TV, the channels are displayed as 1-125. Cable companies often designate channels with
letters or letter-number combinations. Please check with your local cable company. The following is a chart of
common cable channel designations.
CAWchanr_ 5+4 2 3 4 5 6 7 8 9 10 11 12 13 A B
..........................................................................................................
W Display 1 2 3 4 5 6 7 8 9 10 11 12 13 14 15
._CA_.1_....c..ha_...n_,..C ..... D ..... .E...... F.._.G ..... H ..... !...... J..... K ..... L.__.M .... N ..... O ..... P..... Q--.
"IVDisplay 16 17 18 19 20 21 22 23 24 25 26 27 28 29 30
CAW channel R S T U V W W+l W+2 W+3 W+4 W-h5 W+6 W+7 W+8 W+9
TVDisplay 31 32 33 34 35 36 37 38 39 40 41 42 43 44 45
CAWchan_iW+10 W111 W÷12 W÷13 W114 W115 W+16 W+17 W118 W+19 W+2O W121 W+22 W+2: W124
TVDisplay 46 47 48 49 50 51 52 53 54 55 56 57 58 59 60
CATVchannelW+25 W+26 W+27 W+28:W+29 W+30 W÷31 W+32 W+33 W+34 W+35 W+36 W+37 W+38 W+39
TVDisplay 61 62 63 64 65 66 67 68 69 70 71 72 73 74 75
CATVchanneW+40 W141 W142 W143 W_t4 W145 W146 W147 W148 W+49 W+50 W151 W+52 W+53 W+54
.......................................................................................................
"ivCisplay 76 77 78 79 80 81 82 83 84 85 86 87 88 89 90
_w_,_s.s___w.+s+__w_+_s_7..w_,_m__ .._A:L.A-I..wtp. W++2w+mw+-m
w Display 91 92 93 94 95 96 97 98 99 100 101 1_ 103 104 105
CATVchannelW+65 W166 W+67 W+68 W+69 W+70 W+71 W+72 W+73 W+74 W+75 W+76 W+77 W+78 W+79
........... p ..... _ ...... ) ...... r ..... I__+._oI ...........................................
TVDisplay 106 107 108 109 110 111 112 113 114 115 116 117 118 119 120
CATVch_'_ne_W+80 W+81 W+82 W183 W+84
TVDisplay 121 122 123 124 125
-29-
EN
8LI5
T7008-04

. - I¸1 ?? _
SVI.VAilIIA
FU_I O_P. will _pair th_ SYLVA_ I_ f_ _€d_vgc inE_ USA ind_ ev_t o( _ m_ _ _ m f_
DURATION:
PARTS:
FUNA] CO.RI_:willprovide _ to _lace defectiye par__withoutc.hargeforone ( 1)yearfromthe
date of original reran purchase. Two (:z) years for Picture Tube. C.ertam pans are excluded from this
walTaflP_.
LABOR: FUNAI CORP. will provide the labor without charge for a period of ninety (90) days from the date
of original retail purchase.
LIMITS AND EXCLUSIONS:
Thisvnr_mykex_udedcely tothe_iginal r_ail _. Apun:ha_e_,eelptor_ _ _ _g_ _1 _ _11_ _u_ _
w_ melxedu_mot_in serviceu=derthiswmmly.
"ibis w_'_ty sh_l not be _le_ed Io my _her penum or _.
Th_ wm'mty i_vold mdd ao effect if my sedal munbe_ on the produ_ we _k_ _ _ _ Min_ _b _VAN_ _h_ _
does n_ Wply to my the pmduc__,_ pe_hased _d mcd in fl_e_ni_ed Se,m.
Th_ wummy mVj covetsfaihuesdue to_ h_ma_'iul orv_'kmmddp whkh occurdu_ _ _. h _ _ _ _ _ _
m zh_L orfailme_ which mecau.'_dbyre_ zherad_)s orp_da_ not_1_ _ _NAI _p.. _ _ _kh _ _ _
_. mi_za_gi_., miz_ppli_,zion._erazio_ faulty hmat_io_, rmwoperUa_e. comme_cid_ suchm howLmmal_ _ useof
_-_ zhlsixodu.__ damasewhichm_ from fa-e.Rood. li_hmingor od_erac_ _ God.
"rills WARRANTY DOESNOT COVER PACIGNG MATERIALS. ANY ACCESSORIES (EXCEPT REMOTE CONI"ROL), ANY COSMETIC
: PARTS. O0_IFLETE ASSEMBLY PARTS, DEMO OR FLOOR MODELS.
':'_ FUNAI CORP. AND iTS REPRESENTATIVES OR AGENT'S SHALL IN NO EVENT BE LIABLE FOR ANY GENERAL, INDIRECT OR
:'_ C'O_EQUENTIAL I_MA_._ ARISING OUt.OR OCC._IONED RY TNE USE _ ORTItE EqAB_ _ _E _IS _O_. _IS
WARRANTY IS MADE _ LmU OF AU. OTHER WAREANTW_. EX_ OR IMI_IED. AND OF ALL OTHER LI_RILrn_ ON THE
'_i PART _ _UNAI, ALL OTHr_ WARRA_ Ir_'_UDI_ TI4E WARI_N'P¢ _ Mr_I_I_ARILffY, A_ _ _R A _R_-
CULAR PURPOSE, ARE HEREBY DI_-'_IMED BY N..tNAI AND iTS RI_I_NNTATIV_ IN THE UNrl_D STATES.
"_-, ALL WARRAN'I'YII_l_rl'R_,_ AND REPAIRS MUST BEP_RIN_ _ BY FUNAI AUTI_R[_ SI_ VICE _T_, _ IS WA_ N-
_ TY ISVALIG WHEN THE UNIT L_CARRIED-IN TO FUNA[ AUTHOR_._.D SERVICE FACK.ITY.
;_ _.!i WH_ YOU ARE RETURNING THE PRODUCT FOR SERVICE TO TIFIEFACTORY SERVICE CE_ PLEA.SE CONTACT THE
_,)'_ FUNAI SERVICE DEPARTMENT TO RECEIVE A R.A. _RI_PAIR AUTHORIZATION) NUMBER PRIOR TO SHIPMNG. ANY
• ARE SHIPPER'S R_NSIRILrlW.
' ; CARE_yLLYPACK_TH_R_p_E_PACIGNGMAT_R_AL_R_E1_`A_L_[_NTH_RIG_NALCAR_AND__
_i! A_X_ w_rrr_ _M_rrx_oN o_a_ _E e_._am,'m _E OUmVEO__ OE_E _.
_ THE PRODUCT MUST BEACCOMPANIED RY ACOPY O_ THEOIGGINAL RETAIL PURCHASE R_I_. _ NO _F _ _RC_E
i': IS ATYACHED. THE WARRAIqTY WILL NOT REHONORED AND REPAIRSCI_6"YSWILL RECHARGED.
_! IMPORTANT:
THLSLIMrrED WARRANTY GIVES YOU SPECIFIC LEGAL RIGHTS, YOU MAY HAVE OTHER RIOHTS THAT VARY FROM STATE TO
STATE, IF, AT ANY TIME _URING THE WARRANTY PERIOD, YOU ARE UNABLE TO ORTAIN SATISFACTION W[TH THE REPAIR
OF THIS PRODUCT, PLEASE CONTACT FUNA[ CORP.
_'_ ATTENTION: :_
FUNA I CORP. RESERVESTHE RR3HTTO MODIffY ANY DESIGN OF THIS PRODUCT WITHOUT PEIOR NOTIC'[:.. _
_ To locateyour nearestSYLVANIA Authorized ServiceCenter or for generalserviceprocedure,pleasecall _(_
_,_] 1-800-968-3429 or write to the following: _
Tel :1-8Q0.:968-3429 _I
Printed in Malaysia 0EMN01497
T'/00guJ "k"k-k-k-_
TT008BCV