SYLVANIA
COLOR TV/VCR/DVD TRIPLE
727 (27 inch)
O
I INSTRUCClONES EN ESPANOL INCLUIDAS. I
WARNING: TO REDUCE THE RISK OF FIRE OR ELECTRIC SHOCK, DO NOT EXPOSE THIS APPLIANCE
TO RAIN OR MOISTURE.
CAUTION
CAUTION: TO REDUCE THE RISK OF ELECTRIC
SHOCK, DO NOT REMOVE COVER (OR BACK). NO
USER SERVICEABLE PARTS INSIDE. REFER
SERVICING TO QUALIFIED SERVICE PERSONNEL.
The caution marking is located on the rear of the cabinet.
THIS SYMBOL INDICATES THAT
DANGEROUS VOLTAGE
CONSTITUTING A RISK OF ELECTRIC
SHOCK IS PRESENT WITHIN THIS UNIT.
THIS SYMBOL INDICATES THAT THERE
ARE IMPORTANT OPERATING AND
MAINTENANCE INSTRUCTIONS IN THE
LITERATURE ACCOMPANYING THE
APPLIANCE.
IMPORTANT SAFEGUARDS
1. Read instructions - All tile salety and operating instruc-
tions should be read before the appliance is operated.
2. Retain Instructions - The safety and operating instruc-
tions should be retained lot future relerence.
3. Heed Warnings - All warnings on the appliance and in
the operating instructions should be adhered to.
4. Follow Instructions - All operating and use instructions
should be followed.
5. Cleaning - Unphlg tile unit from the wall outlet before
cleaning. Do not use liquid cleaners or aerosol cleaners.
Use a damp cloth for cleaning.
EXCEPTION: A product that is meant lot uninterrupted
service and, that lbr some specific reason, such as the
possibility of the loss of an authorization code IL,r a
CATV converter_ is not intended to be unplugged by the
user lot cleauing or any other purpose, may exclude the
reference to unplugging the appliance in the cleaning
description otherwise required in item 5.
6. Attachments - Do not use attachments not recolnlnend-
ed by the unit lnanufacturer as they lnay cause hazards.
7. Water and Moistm'e - Do not use this unit near water-
for example, near a bath tub, wash bowl, kitchen sink, or
laundry tub, in a wet basement, or near a swimming
pool, and the like.
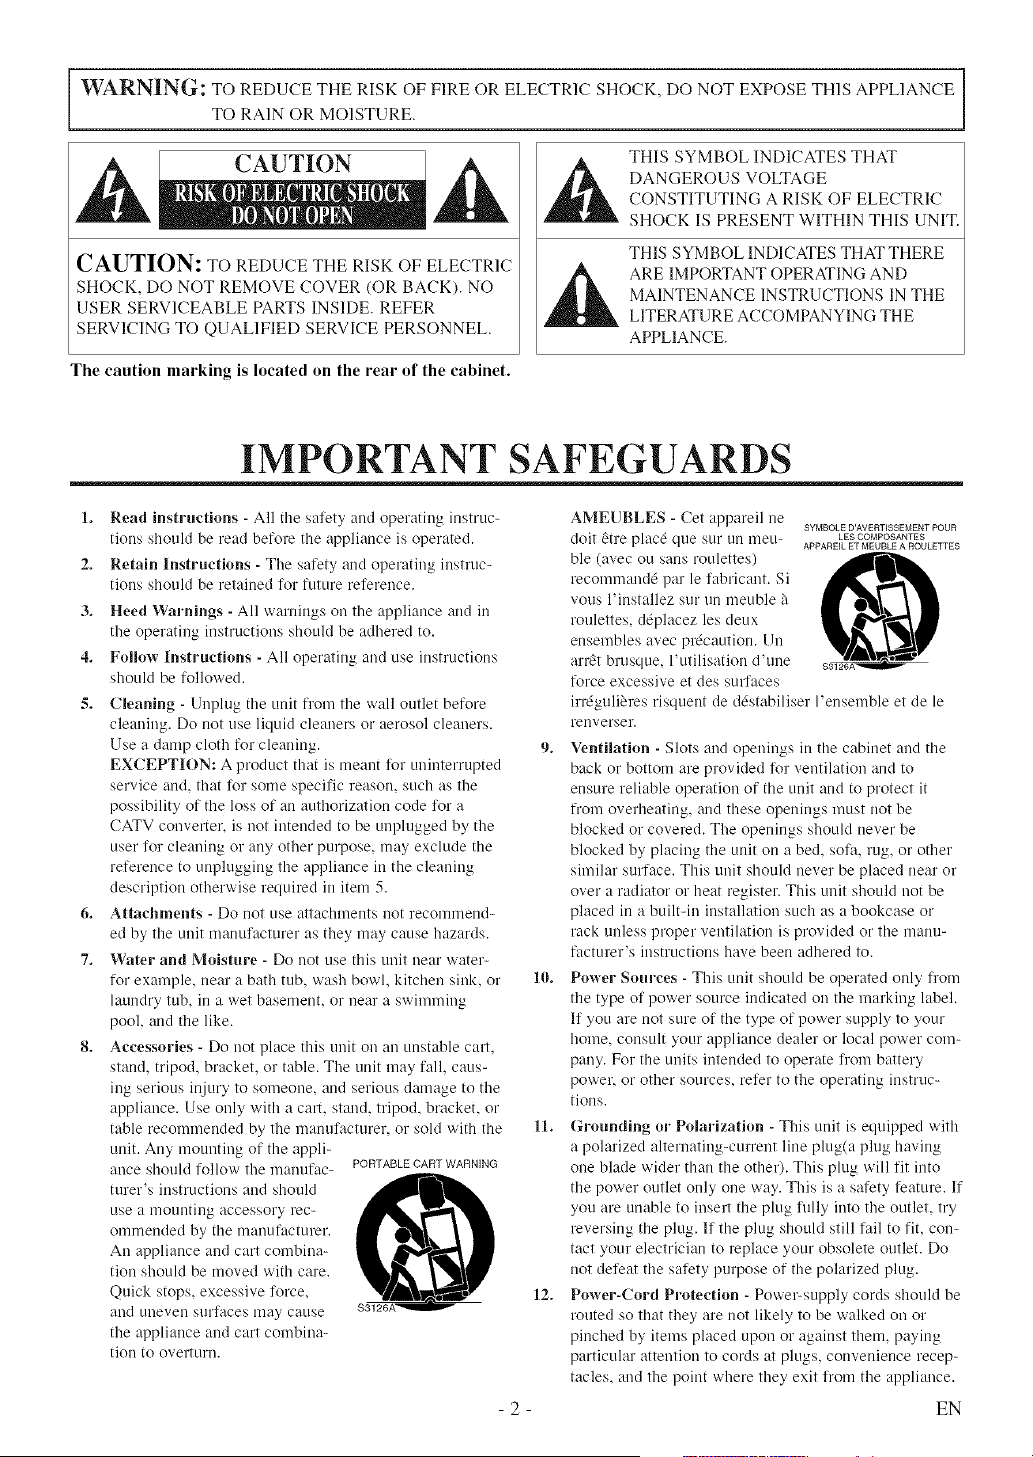
8. Accessories - Do not place this unit on an unstable cart,
stand_ tripod, bracket, or table. The unit may fall, caus-
ing serious injury to someone, and serious damage to the
appliance. Use only with a cart, stand, tripod, bracket_ or
table recommended by the manufacturer, or sold with the
unit. Any mounting of the appli-
ance shouldfollow the manufac- PORTABLECARTWARNING
turer's instluctions and should ,_"_,
use a mounting accessory rec-
oulrneuded by tile ulauufacturer.
An appliance and cart combina-
tion should be moved with care.
Quick stops, excessive lorce,
and uneven surlaces lllay cause
the appliance and cart combina-
tion to overturn.
-2-
AMEUBLES - Cet appareil lie SYMBOLKD'AVERTISSKMENTPOUR
doit 6ire plac4 que SUl"uu lneu- LESCOMPOSANTES
APPAREIL ET MEUBLE A ROULETTES
ble (avec ou sans roulettes)
recommand_ par le labricant. Si
vous l'installez sur un meuble a
roulettes, d@lacez les deux
ensembles avec pr&aution. Uu
arr_t brusque, l'utilisation d'une
force excessive et des surfaces
irr6guli_res risquent de d6stabiliser l'ensemble et de le
rellverser.
9. Ventilation - Slots and openiugs in tile cabinet and the
back or bottom are provided for ventilation and to
ensure reliable operation of tile unit and to protect it
from overheating, and these openings must not be
blocked or covered. The openings shoLdd never be
blocked by placing tile unit on a bed. sofa rug, or other
similar surface. This uuit should uever be placed near or
over a radiator or heat register. This unit should not be
placed in a built-in iustallation such as a bookcase or
rack unless proper ventilation is provided or the lnanu-
facturer's iustructions have been adhered to.
10. Power Som'ees - This unit should be operated only lrom
the type of power source indicated on the markiug label.
11you are not sure of the type of power supply to your
home, consult your appliance dealer or local power com-
pany. For the units intended to operate lrom battery
power, or other sources, refer to the operating instruc-
tions.
11. Grounding or Polarization - This unit is ecluipped with
a polarized alternatiug-cun'ent line plug(a plug having
one blade wider than the other). This plug will fit into
the power outlet only one way. This is a safety feature. If
you are unable to insert the plug hilly iuto the outlet, try
reversing the plug. II the plug should still lail to fit, con-
tact your electrician to replace your obsolete outlet. Do
not deleat the salety purpose of the polarized plug.
12. Power-Cord Protection - Power-supply cords should be
routed so that they are not likely to be walked on o1"
pinched by items placed upon or against theln, paying
particular attention to cords at plugs, convenience recep-
tacles, and the point where they exit froln the appliance.
EN
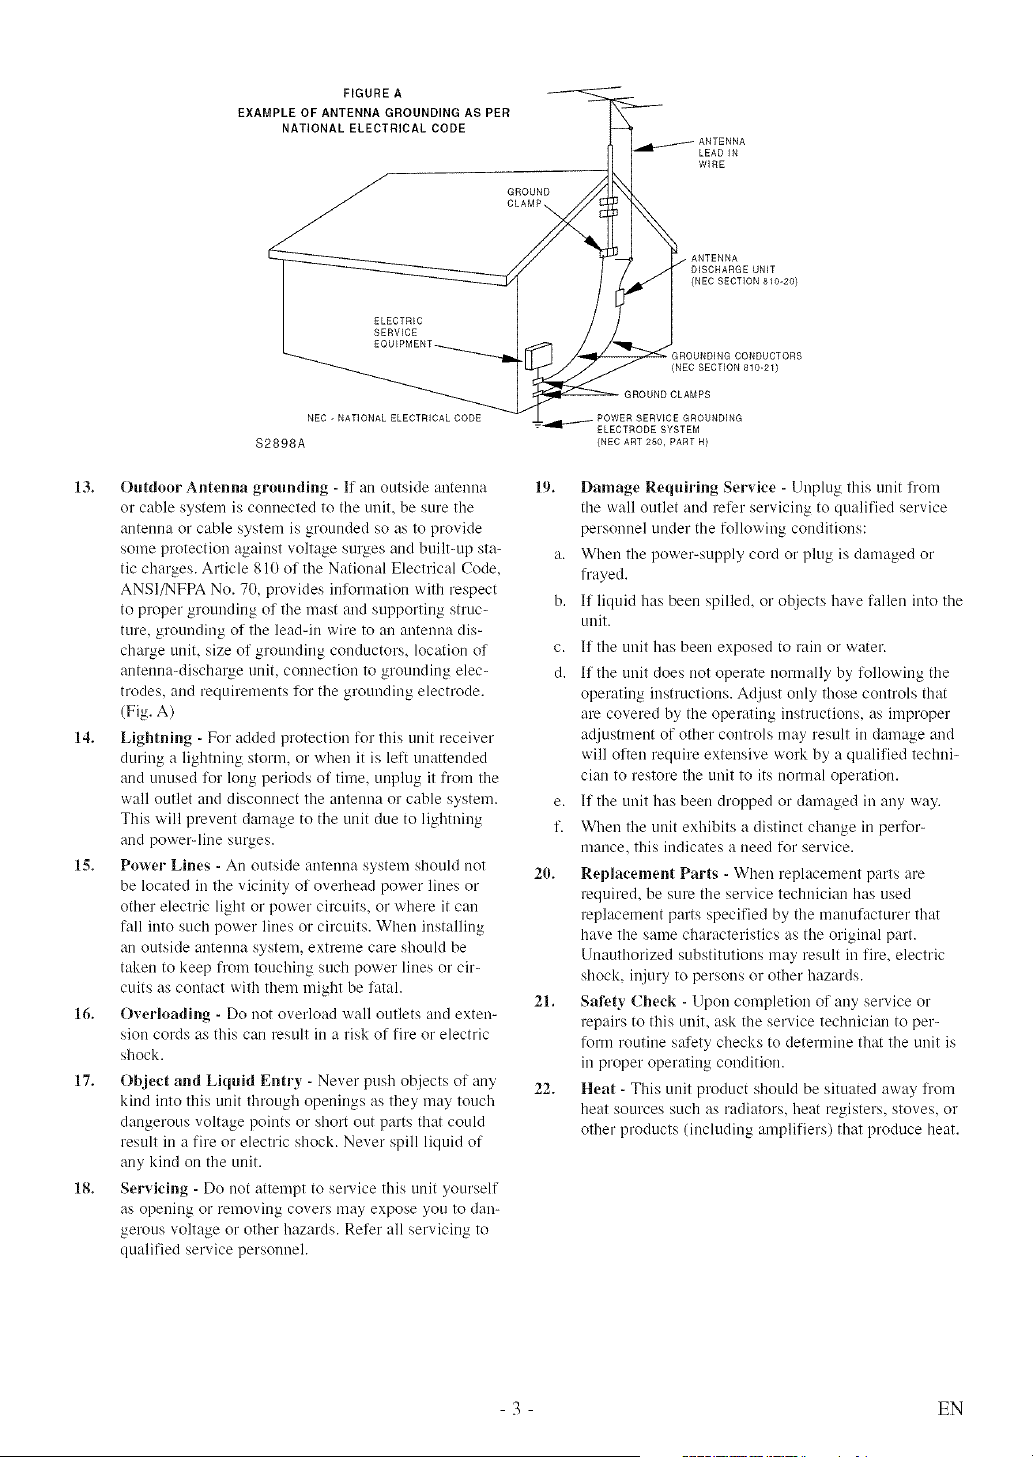
FIGURE A
EXAMPLE OF ANTENNA GROUNDING AS PER
NATIONAL ELECTRICAL CODE
GROUND
CLAMP_
LEAD IN
WIRE
ELECTRIC
SERVICE
• ANTENNA
DISCHARGE UNIT
(NEC SECTION 810-20)
GROUNDING CONDUCTORS
(NEC SECTION 810-21)
NEC - NATIONAL ELECTRICAL CODE
$2898A
13. Outdoor Antenna grounding - If an outside antenna
o1"cable system is connected to tile unit, be sure tire
antenna or cable system is grounded so as to provide
some protection against voltage sm_es and built-up sta-
tic charges. Article 810 of the National Electrical Code,
ANSID4FPA No. 70, provides inlL_rlnationwith respect
to proper grounding of the mast and supporting struc-
ture, grounding of the lead-in wire to an antenna dis-
charge unit, size of grounding conductors, location of
antenna-dischal_e unit, connection to grounding elec-
trodes, and requirelnents li.}rthe groundillg electrode.
(Fig. A)
14. Lightning - For added protection for this unit receiver
during a lightning storm, o1"when it is leR unattended
and unused li__rlong periods ol time, ullplug it fl'oln the
wall outlet and disconnect the amenna or cable system.
This will prevent dalnage to the unit due to lightning
and poweMine SUlkZes.
18. Power Lines - An outside antenna system should not
be located in the vicinity of overhead power lines or
other electric light or power cilvuits, or where it can
fan into such power lines or circuits. When installing
an outside antenua system, extreme care should be
taken to keep from touching such power lines or cir-
cuits as contact with them might be latal.
16o Overloading - Do not overload wall outlets and exten-
sion cords as this can result in a risk of fire or electric
shock.
17. Object and Liquid Entry - Never push objects of any
kind into this unit through openings as they may touch
dangerous voltage points or short out parts that could
result in a fire or electric shock. Never spill liquid of
any kind on the unit.
18. Servicing - Do not attempt to service this unit yourself
as opening or removing covers may expose you to dan-
gerous voltage or other hazards. Re%r all servicing to
qualified service personueh
POWER SERVICE GROUNDING
_dl-_" ELECTRODE SYSTEM
(NEC ART 250, PART R)
19. Damage Reqnhqng Service - Unplug this unit from
tire wall outlet and refer servicing to qualified service
personnel under tile following conditions:
a. When the power-supply cord or plug is damaged or
frayed.
b. II liquid has been spilled, or ohjects have fallen into the
unit.
c. 11the unit has been exposed to rain or water.
d. If the unit does not operate normally by following the
operating instructions. Adjust only those controls that
are covered by the operating instructions, as improper
adjustrnent of other controls may result in damage and
will olten require extensive work by a qualilied teclmi-
clan to restore the unit to its normal operation.
e. 11the unit has been dropped or damaged in any way.
f. When the unit exhibits a distinct change in perfor-
mance, this indicates a need for service.
20. Replacement Parts - When replacement parts are
required, be sure the service technician has used
replacement parts specified by tile manufacturer that
have the same characteristics as the original part.
Unauthorized substitutions lnay result in fire, electric
shock, injury to persons or other hazards.
21. Safety Cheek - Upon completion of any service or
repairs to this unit, ask the service technician to per-
florin routine salety checks to (leterlnille that the unit is
in proper operating condition.
22. Heat - This unit product should be situated away ll"oln
heat sources such as radiators, heat l'egisters_stoves, or
other products (including alnplifiers) that produce heat.
- 3 - EN
IMPORTANT COPYRIGHT INFORMATION
Unauthorized copying, broadcasting, public perfor-
m_mce mad lending of discs are prohibited.
This product incorporates copyright protection tech-
nology that is protected by U.S. patents and other
intellectual property rights. Use of this copyright
protection technology must be authorized by
Macrovision, mad is intended for home and other
limited viewing uses only unless otherwise autho-
rized by Macrovision. Reverse engineering or dis-
assembly is prohibited.
FCC WARNING- This equipment may gener-
ate or use radio frequency energy. Changes or
modifications to this equipment may cause
harmful interference unless the modifications
are expressly approved in the instruction man-
ual. The user could lose the authority to oper-
ate this equipment if an unauthorized change
or modification is made.
RADIO-TV INTERFERENCE
This equipment has been tested grad found to com-
ply with the limits for a Class B digital device, pur-
sugmt to Part 15 of the FCC Rules. These limits are
designed to provide reasonable protection against
harmful interference in a residential installation.
This equipment generates, uses, and cmr radiate
radio frequency energy and, if not installed mad
used in accor&mce with the instructions, may cause
harmful interference to radio communications.
However, there is no guarantee that interference
will not occur in a particular installation. If this
equipment does cause harmful interference to
radio or television reception, which can be deter-
mined by tunfing the equipment off and on, the
user is encouraged to try to correct the interfer-
ence by one or more of the following measures:
1) Reorient or relocate the receiving antenna.
2) Increase the separation between the equipment
and receiver.
3) Connect tire equipment into an outlet on a cir-
cuit different from that to which the receiver is
connected.
4) Consult the dealer or an experienced radio/TV
technician for help.
LASER SAFETY
This unit employs a laser. Only a qualified service
person should remove the cover or attempt to ser-
vice this device, due to possible eye injury.
CAUTION: USE OF CONTROLS OR ADJUST-
MENTS OR PERFORMANCE OF PROCE-
DURES OTHER THAN THOSE SPECIFIED
HEREIN MAY RESULT IN HAZARDOUS
RADIATION EXPOSURE.
CAUTION: VISIBLE AND INVISIBLE LASER
RADIATION WHEN ()PEN AND INTERLOCK
DEFEATED. DO NOT STARE INTO BEAM.
LOCATION: INSIDE, NEAR THE DECK
MECHANISM.
This Class B digital apparatus complies with
Canadian ICES-003.
Cet appareil num4rique de la classe Best con-
forme 'a la norme NMB-O03 du Canada.
CAUTION: TO PREVENT ELECTRIC SHOCK,
MATCH WIDE BLADE OF PLUG TO WIDE
SLOT, FULLY INSERT.
ATTENTION: POUR ]EVITER LES CHOC
I_LECTRIQUES, INTRODUIRE LA LAME LA
PLUS LARGE DE LA FICHE DANS LA
BORNE CORRESPONDANTE DE LA PRISE
ET POUSSER JUSQU'AU FOND.
A NOTE ABOUT RECYCLING
Batteries should never be thrown away or inciner-
ated but disposed of in accordance with your local
regulations concerning chemical wastes.
Tire serial number of this product may be found on the back of the unit. No other unit has the same serial
number as yours. You should record the number _md other vital information here mid retain this book as a per-
manent record of your purchase to aid identification in case of theft. Serial numbers are not kept on file.
Date of Purchase
Dealer Purchase from
Dealer Address
Dealer Phone No.
Model No.
Serial No.
- 4 - EN
Forsafeoperationandsatisfactoryperformanceof
yourunit,keepthefollowingin mindwhenselecting
aplaceforitsinstallation:
® Shield it from direct sunlight and keep it away from
sources of intense heat.
* Avoid dusty or humid places.
* Avoid places with insufficient ventilation for proper
heat dissipation. Do not block the ventilation holes at
the top or bottom of the unit. Do not place the unit
on a carpet because this will block the ventilation
holes.
* Install unit in a horizontal position.
,, Avoid locations subject to strong vibration.
* Do not place the unit ne_u"strong magnetic fields.
- Avoid moving the unit to locations where tempera-
turn differences am extreme.
* Be sure to remove disc _mdunplug the AC power
cord from the outlet before carrying the unit.
* Do not h_mdle the power cord with wet hands.
,, Do not pull on the power cord when disconnecting
it from ml AC wall outlet. Grasp it by the plug.
* If by accident, water is spilled on your unit, unplug
the power cord immediately and take the unit to our
Authorized Service Center for servicing.
® Do not put your fingers or objects into the unit disc
loading tray.
- Do not place anything directly on top of the unit.
Moisture condensation may occur inside the unit
when it is moved from a cold place to a warm place
or after heating a cold room or under conditions of
high humidity. If a DVD is played in a unit which has
moisture, it may damage the DVD and the unit.
Therefore when the condensation occurs inside the
unit, turn the unit on _md allow at least 2 hours for the
unit to dry out.
The following symbols below appear in some head-
ings and notes in this manual, with the following
meanings.
[TV/VCR ]
: Description refers to TV/VCR operation (in the
TV/VCR mode).
: Description refers to playback of DVD video discs
(in the DVD mode).
: Description refers to playback of Audio CDs
(in the DVD mode).
: Description refers to the items to be set by the
QUICK mode (in the DVD mode).
SUPPL ED ACCESSORIES
Remote Control Unit Batteries Owner's Manual
NE209UD 2 AA Batteries IEMN20316
If you need to replace these accessories, please refer to the PART NO. under the ilklstrations and call our
help line mentioned on the front page.
* Depending on your antenna system, you may need different types of Combiners (Mixer) or Separators
(Splitter). Contact your local electronics store for these items.
- 5 - EN
] ( ......... ,[ABLE ))iC )NIENIS
m IMPORTANT SAFEGUARDS ..... 2
m PRECAUTIONS ................ 4
LOCATION ................... 5
AVOID THE HAZARDS OF
ELECTRICAL SHOCK AND FIRE .5
WARNING .................... 5
SYMBOLS USED 1N THIS
MANUAL ..................... 5
m SUPPLIED ACCESSORIES ....... 5
m TABLE OF CONTENTS .......... 6
m FEATURES .................... 7
m OPERATING CONTROLS AND
FUNCTIONS ................... 9
INSTALLING THE BATTERIES . .11
m PREPARATION" FOR USE ....... 12
ANTENNA/CABLE
CONNECTION ................ 12
CONNECTING TO FRONT A/V
INPUT JACKS ................ 13
CONNECTING TO A STEREO
AMPLIFIER EQUIPPED WITH DIGL
TAL INPUT JACKS (for DVD) ...l 3
CONNECTING TO A DOLBY
DIGITAL DECODER (t_r DVD) . .14
TWVCR SECTION
m TV OPERATION AND SETTINGS .15
WATCHING A TV PROGRAM . . .15
DEGALJSS1NG ................ 15
PICTURE CONTROL ........... 15
SLEEP TIMER ................ 16
CLOSED CAPTION SYSTEM .... 16
CHANNEL SET UP ............ 17
CLOCK SET UP
IAUTO / MANUAL) ............ 18
DAYLIGHT-SAVING TIME ...... 19
V-CHIP SET UP ............... 20
TV RATING SET UP ......... 20
MPAA RATING SET tIP ...... 21
CHANGE ACCESS CODE ..... 21
MENU LANGUAGE ........... 21
m MTS (Multi-Channel Television
sound) SYSTEM ............... 22
CHECKING THE SELECTED
MTS MODE .................. 22
MTS RECORDING/MONITOR
MODE ...................... 22
SELECTING THE MTS SYSTEM .23
m VIDEO CASSETTE ............. 24
m PLAYBACK ................... 25
NORMAL PLAYBACK ......... 25
TRACKING ADJUSTMENT ..... 25
SLOW MOTION .............. 25
STILL PICTURE .............. 25
VERTICAL HOLD CONTROL ...25
m SPECIAL PLAYBACK .......... 26
RENTAL PLAYBACK .......... 26
AUTO REPEAT PLAYBACK ..... 26
m SEARCH ..................... 27
ZERO RETURN ............... 27
PICTURE SEARCH ............ 27
TIME SEARCH ............... 27
INDEX SEARCH .............. 28
m SPECIAL FEATURES .......... 28
REAL TIME TAPE COUNTER ...28
ALITO REWIND-EJECT ........ 28
m RECORDING ................. 29
NORMAL RECORDING ........ 29
SKIPPING UNWANTED SCENES
DURING RECORDING ......... 29
OTR (One Touch Recording) ...... 30
COPYING A VIDEO CASSETTE
(Requires a VCR or camcorder) ...30
m TIMER RECORDING ........... 31
AUTOMATIC
TIMER RECORDING .......... 31
AUTO RETURN ............... 33
m ON SCREEN" DISPLAY ......... 34
m CABLE CHANNEL
DESIGNATIONS .............. 34
DVD SECTION
m ABOUT THE DISCS ............ 35
PLAYABLE DISCS ............ 35
UNPLAYABLE DISCS .......... 35
m PLAYING A DISC .............. 36
BASIC PLAYBACK ............ 36
GENERAL FEATURES ......... 36
DISC MENU ................. 36
TITLE MENU ................. 36
RESUME .................... 37
PAUSE ...................... 37
STEP BY STEP PLAYBACK ..... 37
FAST FORWARD /
FAST REVERSE .............. 37
SLOW FORWARD /
SLOW REVERSE .............. 37
ZOOM ...................... 37
m SEARCH FUNCI7ON. .......... 38
TRACK SEARCH ............. 38
TITLE / CHAPTER SEARCH .... 38
TIME SEARCH ............... 38
MARKER SETUP SCREEN ...... 38
m SPECIAL PLAYBACK FUNCTION ...39
REPEAT ..................... 39
PROGRAM ................... 39
RANDOM PLAYBACK ......... 39
m CHANGING THE SETTINGS .... 40
SUBTITLE LANGUAGE ........ 40
AUDIO LANGUAGE ........... 40
STEREO SOUND MODE ........ 40
CAMERA ANGLE ............. 4 l
BLACK LEVEL SETTING ....... 4 l
VIRTUAL SURROUND ......... 41
m THE ON-SCREEN INFORMATION . .42
m CHANGING THE DVD SET UP
ITEMS ....................... 43
CUSTOM MENU .............. 43
LANGUAGE SETTING ....... 43
DISPLAY SETTING .......... 44
AUDIO SETTING ........... 44
PARENTAL CONTROL ....... 45
OTHER SETTINGS .......... 45
INITIALIZE .................. 45
m TROUBLESHOOTING GUIDE ...46
m MAINTENANCE ............... 49
DISC HANDLING ............. 49
m SPECIFICATIONS . ............ 50
m ESPANOL .................... 51
m WARRANTY ........... Back Cover
- 6 - EN
[ TV/VCR Mode ]
® Hi-F[ system - The Hi-Fi stereo recording system
offers you excellent sound quality with a dynamic
range of 80dB, frequency response from 20Hz to
20kHz trod 0.005% wow and flutter.
• Rotary 4-head Record/Playback System - Four
heads ensure excellent picture quality and special
effects playback.
,, index Search - Fast-forwards to start of next record-
ing.
• Slow Motion - View recorded program at slower
thin1 normal speed.
• infrared remote control
• Trilingual on screen TV/VCR setup display
selectable in English, Spanish or French
® Real time counter - This shows the elapsed record-
ing or playback time in hours, minutes and seconds.
The "-" indication will appear when the tape is
rewound further than the tape counter position
"0:00:00".
• 181 channel capability PLL frequency synthesiz-
er tuner with direct station call (A converter may
be necessary to view scrambled cable ch_mnels.)
,, Auto Clock Setting - Allows you to set the clock
function from a PBS broadcast station.
,, Closed Caption Decoder - You may view special-
ly labeled (cc) TV programs, movies, news, prere-
corded tapes, etc. with either a dialogue caption or
text display added to the program.
• Auto power on and off system - Automatically
turns on the unit when you insert the cassette, turns
off after auto-rewind and ejects when the begin-
ning of the tape is roached.
• Auto rewind when the end of a tape is reached
(This function doesn't occur when using timer
recording.)
• Smooth mode change - TV/VCR mode and DVD
mode automatically chtmges without control.
• 2 Step picture search operation - You can view a
video program at a high speed or super lfigh speed
in either a forward or reverse direction in LP _md
SLP mode. For SP mode, only high speed is avail-
able.
• Three different playback tape speeds : SP/LP/SLP
• Two different recording tape speeds : SP/SLP
® Auto Head Cleaner - Automatically cleans video
heads as you insel _,or remove a cassette.
,, Zero Return - The tape retm-ns to counter of
0:00:00 by rewinding or fast forwarding.
,, Still - "Freeze" the picture at any thne, for close
viewing of a pallicular scene.
® Digital Auto Tracking (DTR) - Automatically
adjusts the tracking for each tape you play.
,, Rental play mode - Improves playback picture
quality from worn tapes, such as rental tapes.
,, Auto repeat - Allows you to repeat the playing of
a tape indefinitely without hitting [PLAY D].
® Time search - Lets you set the unit to adwmce the
tape by entering the desired playback time you want
to skip.
® OTR (One Touch Recording) - Instant timed
recording from 30 to 480 minutes is possible by
hitting [REC/OTR].
• 1 Year, 8 events (including Daily and Weekly)
Timer Recording - The built-in timer allows you
to record up to 8 programs at different times on
different channels up to 1 year in adwmce. The
Daily timer allows recordings to be made of daily
broadcasts and the Weekly timer allows mcoNing
to be made once a week up to the end of the tape.
,, Auto return - After timer recoNing is finished, the
unit cml return to the beginning of the recording.
,, Sleep timer - Allows you to have the unit auto-
matically turn off at a desired time.
• Timer Program Extension - Allows you to shift
the time schedule for automatic timer recording.
,, V-CHIP - Enables parents to prevent their children
from watching inappropriate material on TV.
- 7 - EN
] DVD Mode]
• Dolby Digital sound
This unit can handle Dolby Digital surround sound
having 5.1 channels when connected to a Dolby
Digital decoder.
• Still/fast/slow/step playback
Vafinus playback modes are awfilable including still
pictures, fast forward/reverse, slow motion and step
frames.
• Random playback for Audio CD
This unit c_ul shuffle the order of tracks to play them
in rm_dom order.
• Program playback for Audio CD
You c_m program the order of tracks tn play them in
__ulydesired ordm:
• DVD menus in a desired language
You can display DVD menus in a desired language,
if available on a DVD.
• Screen saver/Auto power-off functions
The screen saver program starts when there is no
input from the unit for 5 minutes in the stop mode.
After the screen saver program is actiwtted for 15
minutes, the power automatically turns off.
• Subtitles in a desired language
You can select a desired language for the display
subtitles, if that language is available on a disc.
• Selecting a camera angle
You can select the desired camera angle, if a disc
contains sequences recorded fiom different angles.
• Choices for audio language and sound mode
You can select the desired audio language mid sound
mode, if different languages __uldmodes are available
on a disc.
• Parental lock
You can set the control level tn limit playback of
discs which may not be suitable for children.
• Automatic detection of discs
This unit automatically detects if the loaded disc is
DVD or Audio CD.
• On-screen display
Information about the current operation cgm be dis-
played on a TV semen, allowing you to confirm the
currently active functions (such as program play-
back), on the TV semen using the remote control.
• Search
Chapter search / Title search / Track search / Time
search
• Repeat
Chapter / Title / Track / All / A-B
• Zoom
Magnified screen c_m be displayed.
• Marker
The part designated by user can be called back.
• Resume Play
User can resume to playback from the part at which
the play was stopped.
• Virtual Surround
• Bit rate indication
• DRC (Dynamic range control)
You can control the r_mge of sound volume.
- 8 - EN
()PERAT[N(; CONTR()I,S AND [,N(. [ )NS
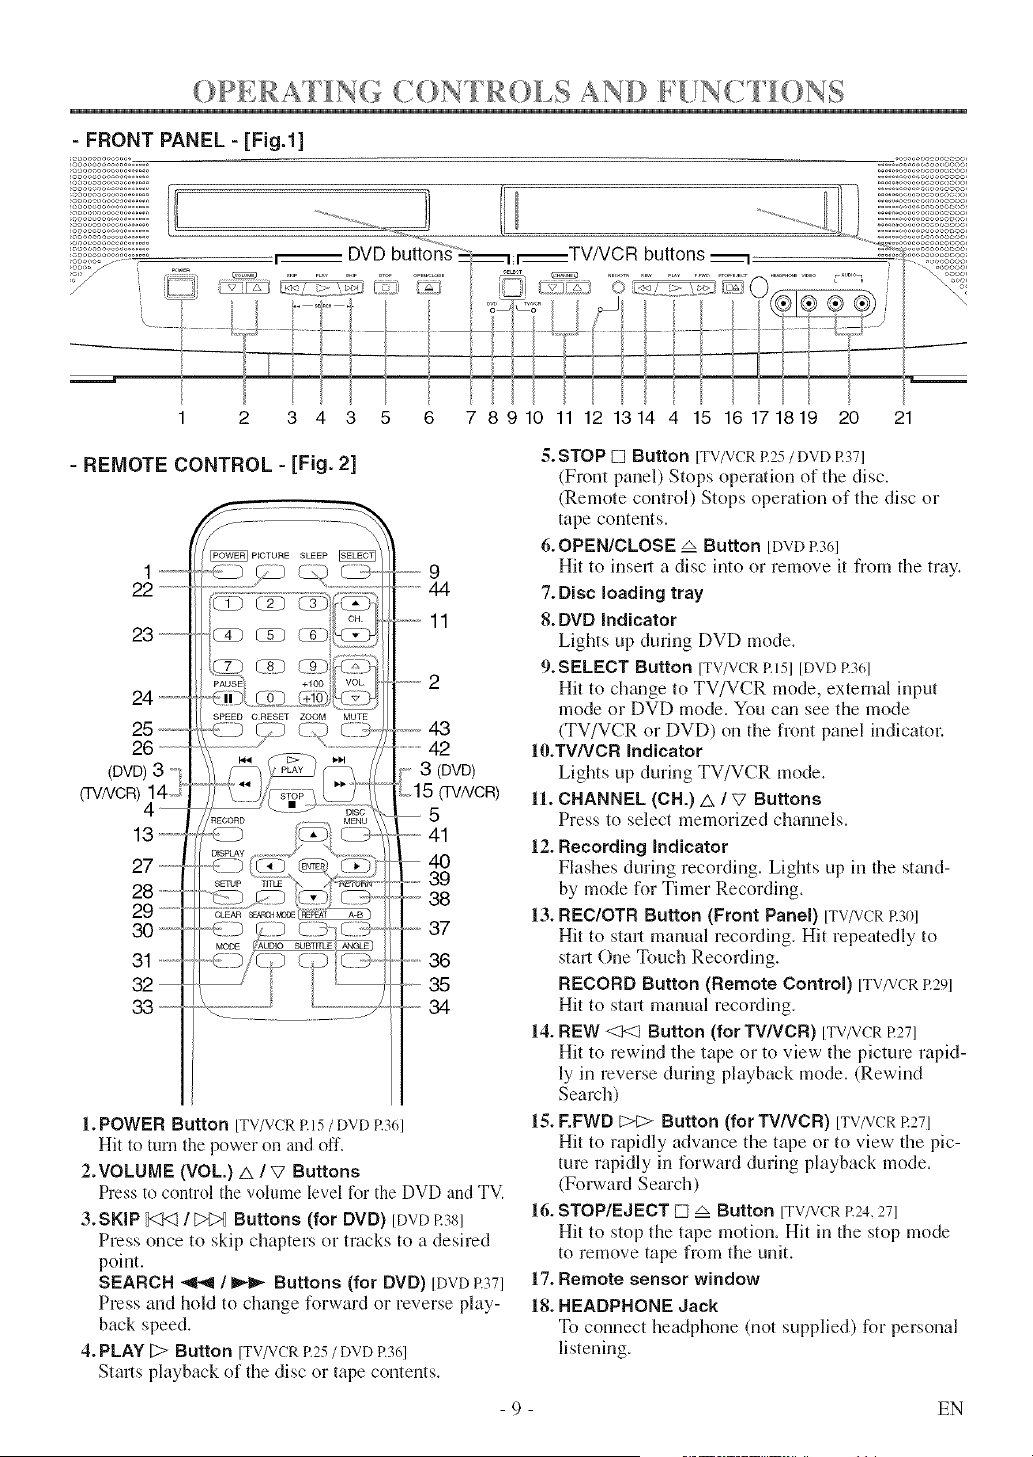
- FRONT PANEL - [Fig.l]
,ooo-x, oo ° _
coo oo oo,o.......
J, oo,_oo ooo......
ooo o,,,,o=,,oo......
, ,ooooo _,o,, .......
oo ooo<,oo_,......
ooa,,, oo ...........
< ,o oo,..., ......
.ooo-oo,oo oo ,, o,ooo ,<,, _ ......................... ..............................
);oo oooo(.-_o......
;_oo ;_; o ;oo ......
,'-;8....
DVD buttons
• _ b'_iio" "'_ _I_TVNC R I "--",'°_
1
_oooooooooo_oo_,
...... oo_ooooooooooo,
...... ooooooooooeooo,
,o-,oaooocooo,
2 3 4 3 5 6 7 8910 11 12 1314 4 15 16171819 20 21
- REMOTE CONTROL - [Fig. 2]
.......
22 ...............
3 ........
24--
25,,,,,,,,,
26
(DVD)3 -'
(TVNOR)14 J
13 ,,,,,,,,,,,,
27 -,,-,-
28
29 --
30"""
31 .........
32
33-,,,,,,,,,,
PICTURE SLEEP
SPEED ORESET ZOOM MUTE
"%...................................
"-{:D £}} ......
MODE /AUDIO SUBTITLE _E)
i i
........
.............4-
........11
.......
--43
...................2
3 (DVD)
to15 (TV/VCR)
5
....41
40
.......39
°" 38
.--37
......36
_-- 35
_ 34
1. POWER Button [TV/VCR P.15 / DVD P.361
Hit to turn the power on and off.
2.VOLUME (VOL) & /V Buttons
Press to control the volume level tor the DVD and TV.
3.SKIP t<_<!/ _>_ Buttons (for DVD) [DVD17381
Press once to skip chapters or tracks to a desired
point.
SEARCH _,_ / _ Buttons (for DVD) [DVDP.371
Press and hold to change forward or reverse play-
back speed.
4. PLAY [;> Button [TV/VCR R25 / DVD R361
Stmls playback of the disc or tape contents.
5. STOP [] Button [TV/VCRP.25/ DVD R371
(Front panel) Stops operation of the disc.
(Remote control) Stops operation of the disc or
tape contents.
6.OPEN/CLOSE zx Button [DVD R361
Hit to insert a disc into or remove it from the tray.
7. Disc loading tray
8. DVD indicator
Lights up during DVD mode.
9.SELECT Button [TV/VCRRI51 [DVD R361
Hit to chgmge to TV/VCR mode, external input
mode or DVD mode. You cm, see the mode
(TV/VCR or DVD) on the front panel indicator:
IO.TWVCR indicator
Lights up during TV/VCR mode.
11. CHANNEL (CH.) A / W Buttons
Press to select memorized channels.
12. Recording indicator
Flashes during recording. Lights up in the st_md-
by mode for Timer Recording.
13. REC/OTR Button (Front Panel) ITV/VCRP.301
Hit to sta_l manual recording. Hit repeatedly to
start One Touch Recording.
RECORD Button (Remote Contro0 [TV/VCRP.29]
Hit to stml manual recording.
14. REW <1<1 Button (for TWVCR) [TV/VCR R271
Hit to rewind the tape or to view the picture rapid-
ly in reverse during playback mode. (Rewind
Search)
15. F.FWD C>t:> Button (for TV/VCR) [TV/VCR R271
Hit to rapidly advance the tape or to view the pic-
ture rapidly in forward during playback mode.
(Forward Search)
16. STOP/EJECT [] zx Button [TV/VCRR24,271
Hit to stop the tape motion. Hit in the stop mode
to remove tape from the unit.
17. Remote sensor window
18. HEADPHONE Jack
To connect l_eadphone (not supplied) for personal
listening.
- 9 - EN
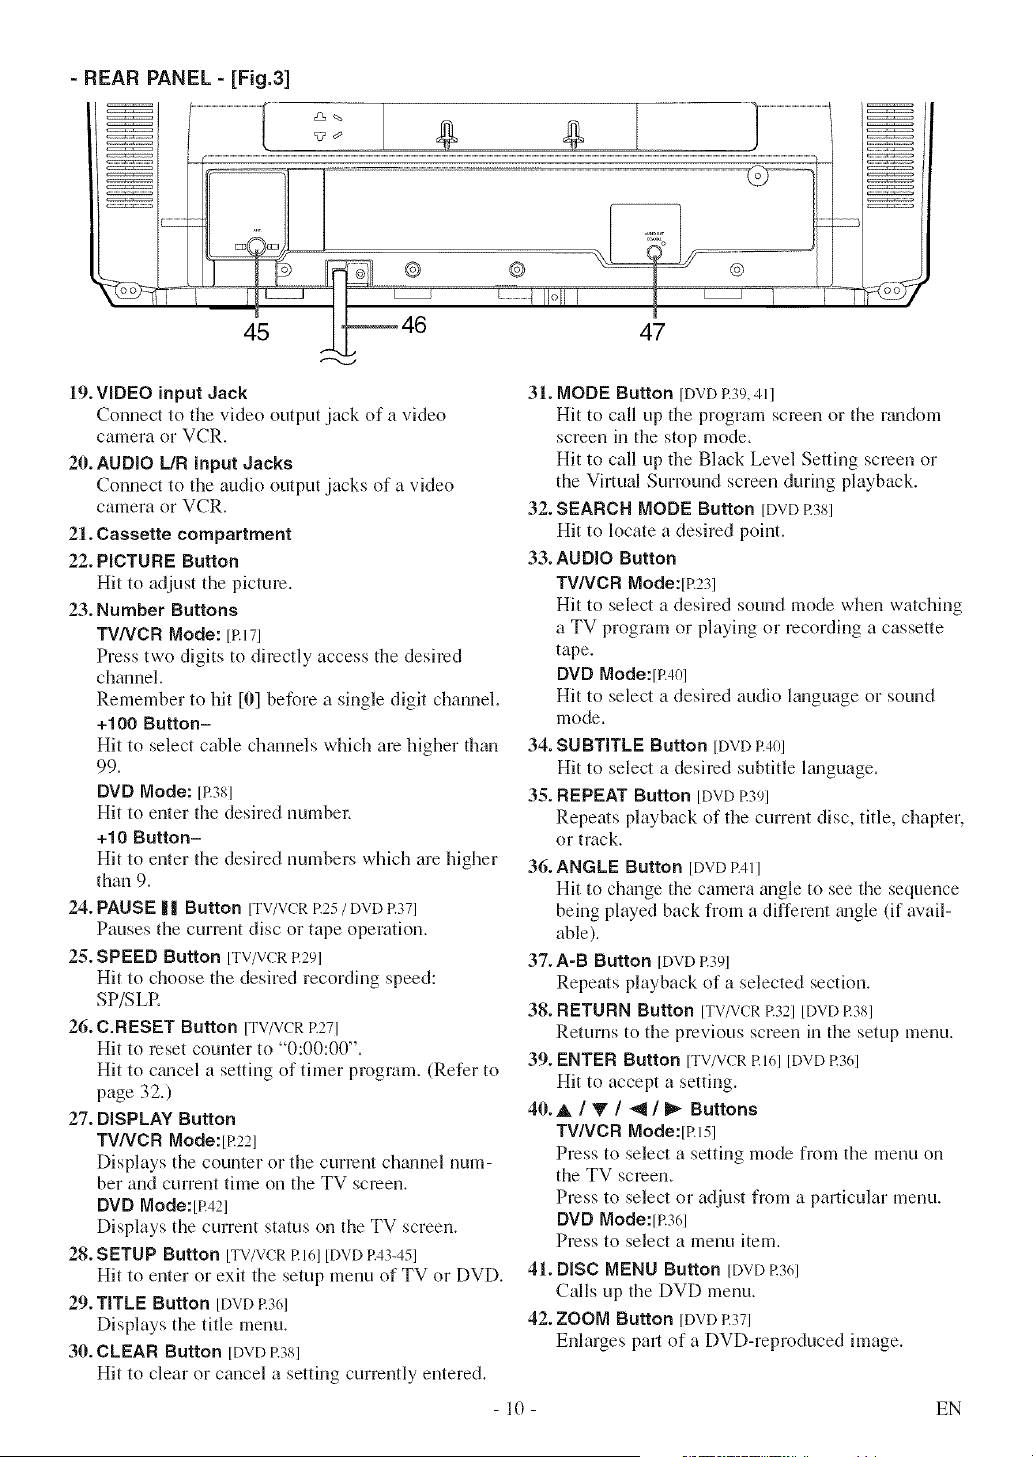
- REAR PANEL - [Fig.3]
19. VIDEO input Jack
Connect to the video output jack of a video
camera or VCR.
20. AUDIO L/R input Jacks
Connect to the audio output jacks of a video
camera or VCR.
21. Cassette compartment
22. PICTURE Button
Hit to adjust the picture.
23. Number Buttons
TV/VCR Mode: [P.171
Press two digits to directly access the desired
channel.
Remember to hit [0] before a single digit channel.
+100 Button-
Hit to select cable channels which are higher than
99.
DVD Mode: [17381
Hit to enter the desired numbe):
+10 Button-
Hit to enter the desired numbers which are higher
than 9.
24. PAUSE | | Button [TV/VCRP.25/ DVD17371
Pauses the currant disc or tape operation.
25. SPEED Button [TV/VCRR291
Hit to choose the desired recording speed:
SP/SLR
26. C.RESET Button [TV/VCRR271
Hit to reset counter to "0:00:00".
Hit to c_mcel a setting of timer program. (Refer to
page 32.)
27. DISPLAY Button
TV/VCR Mode:it?221
Displays the counter 12)1the current chgmnel num-
ber and current time on the TV screen.
DVD Mode:[R421
Displays the current status on the TV screen.
28. SETUP Button [TV/VCR R 161[DVD 1743-451
Hit to enter or exit the setup menu of TV or DVD.
29. TITLE Button [DVD17361
Displays the title menu.
30. CLEAR Button [DVD17381
Hit to clear or cancel a setting currently entered.
47
31. MODE Button [BvB 1739.411
Hit to call up the program screen or the r_mdom
screen in the stop mode.
Hit to call up the Black Level Setting semen or
the Virtual Surround screen during playback.
32. SEARCH MODE Button [DVD17381
Hit to locate a desired point.
33. AUDIO Button
TV/VCR Mode:it?231
Hit to select a desired sound mode when watching
a TV program or playing or recording a cassette
tape.
DVD Mode:it?401
Hit to select a desired audio language or sound
mode.
34. SUBTITLE Button [DVD 17401
Hit to select a desired subtitle Emguage.
35. REPEAT Button [BVD 17391
Repeats playback of the current disc, title, chapter,
or track.
36.ANGLE Button [DVD 174_1
Hit to change the camera angle to see the sequence
being played back from a different _mgle (if avail-
able).
37. A-B Button [DVD17391
Repeats playback of a selected section.
38. RETURN Button [TV/VCR17321[DVD 17381
Returns to the previous screen in the setup menu.
39. ENTER Button [TV/VCR1716][DVD 1736]
Hit to accept a setting.
40. A/V/_/_ Buttons
TV/VCR Mode:it?J51
Press to select a setting mode from the menu on
the TV screen.
Press to select or adjust from a particular menu.
DVD Mode:[p.361
Press to select a menu item.
41. DiSC MENU Button [DVD17361
Calls up the DVD menu.
42. ZOOM Button [DVD P.37]
Enlarges pa)*, of a DVD-reproduced image.
- 10 - EN
43. MUTE Button [TV/VCRRI5I
Mutes the sound. Hit it again to restore sound.
44. SLEEP Button [TV/VCRRI61
Sets the Sleep Timer.
45. ANT(ENNA). Jack [P.121
Connect to an antenna, cable system or satellite
system.
46. Power cord [P.]51
Connect to a standard AC outlet (120V/60Hz).
NOTE:
® Remove the power cord from the hook to
avoid breaking a wire before you connect to a
standard AC outlet.
47. AUDIO OUT COAXIAL Jack [P.13l
Connect to the digital input of _m external
amplifier or decoder (for DVD Audio only).
NOTE:
• We do not recommend the use of universal remote controls. Not all of the functions may be controlled with
a universal remote control.
If you decide to use a universal remote control with this unit, please be aware that the code number given
may not operate this unit. In this case, please call the mgmufacturer of the universal remote control.
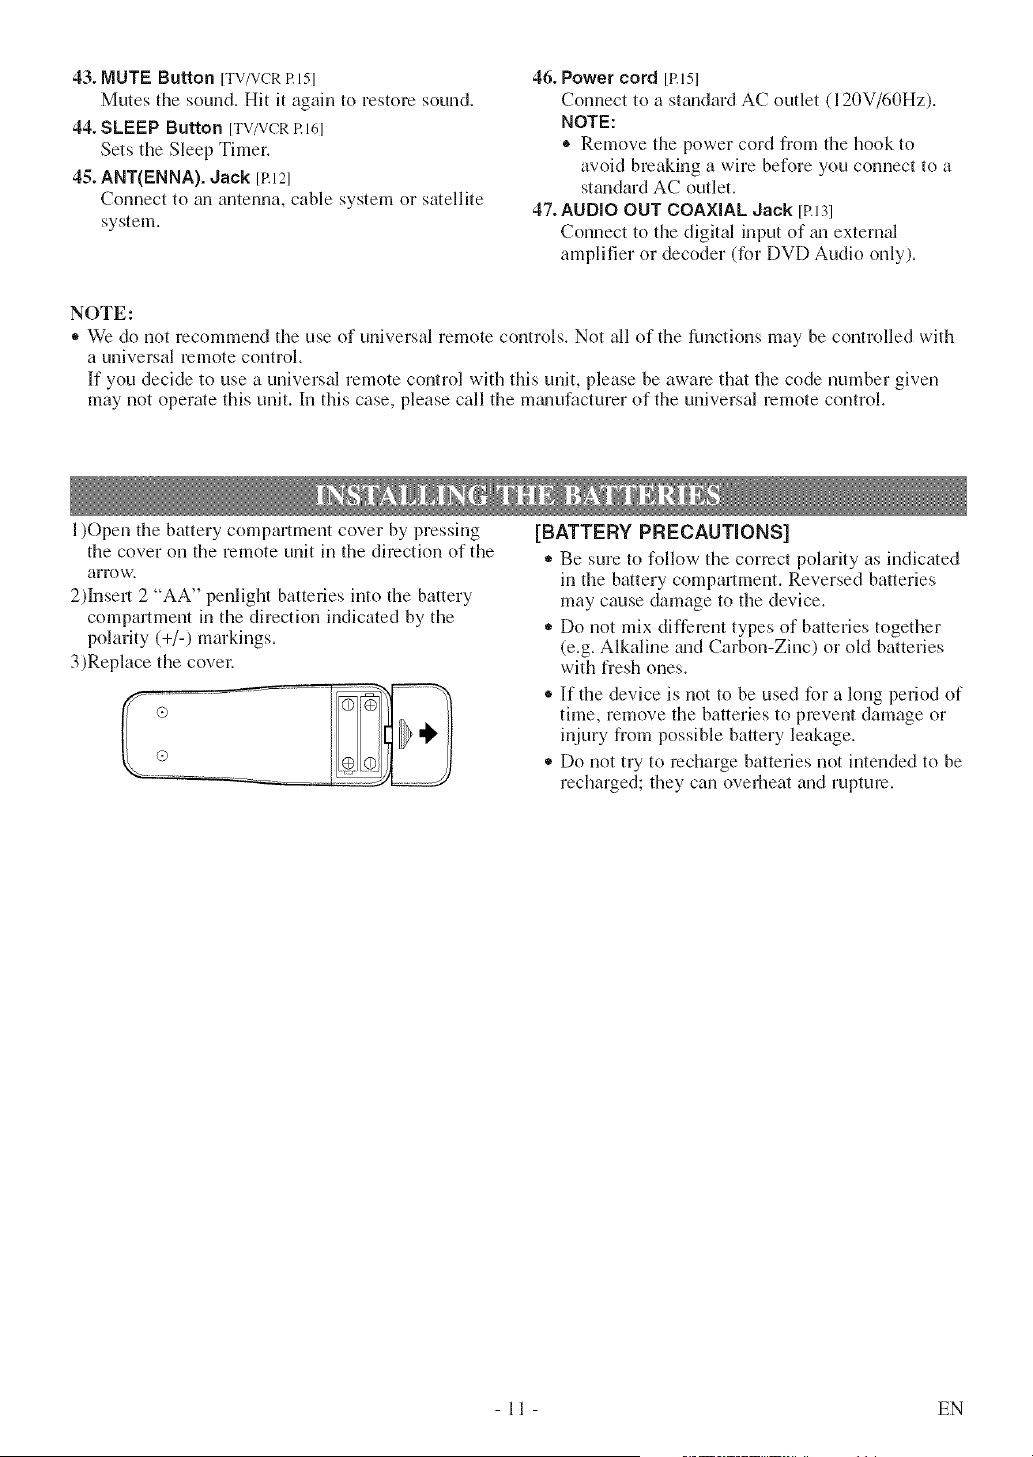
1)Open the battery compartment cover by pressing
the cover on the remote unit in the direction of the
art'()w+
2)Insert 2 "AA" penlight batteries into the battery
compartment in the direction indicated by the
polarity (+/-) markings+
3)Replace the covet+
[BATTERY PRECAUTIONS]
• Be sure to follow the correct polarity as indicated
in the battery compartment+ Reversed batteries
may cause damage to the device+
,, Do not mix different types of batteries together
(e+g.Alkaline +uldCarbon-Zinc) or old batteries
with fresh ones+
®If the device is not to be used for a long period of
thne, remove the batteries to prevent damage or
injury from possible battery leakage+
,, Do not try to recharge batteries not intended to be
recharged; they can overheat and rupture.
11 EN
PRLPARA [ [()N )R [!SE
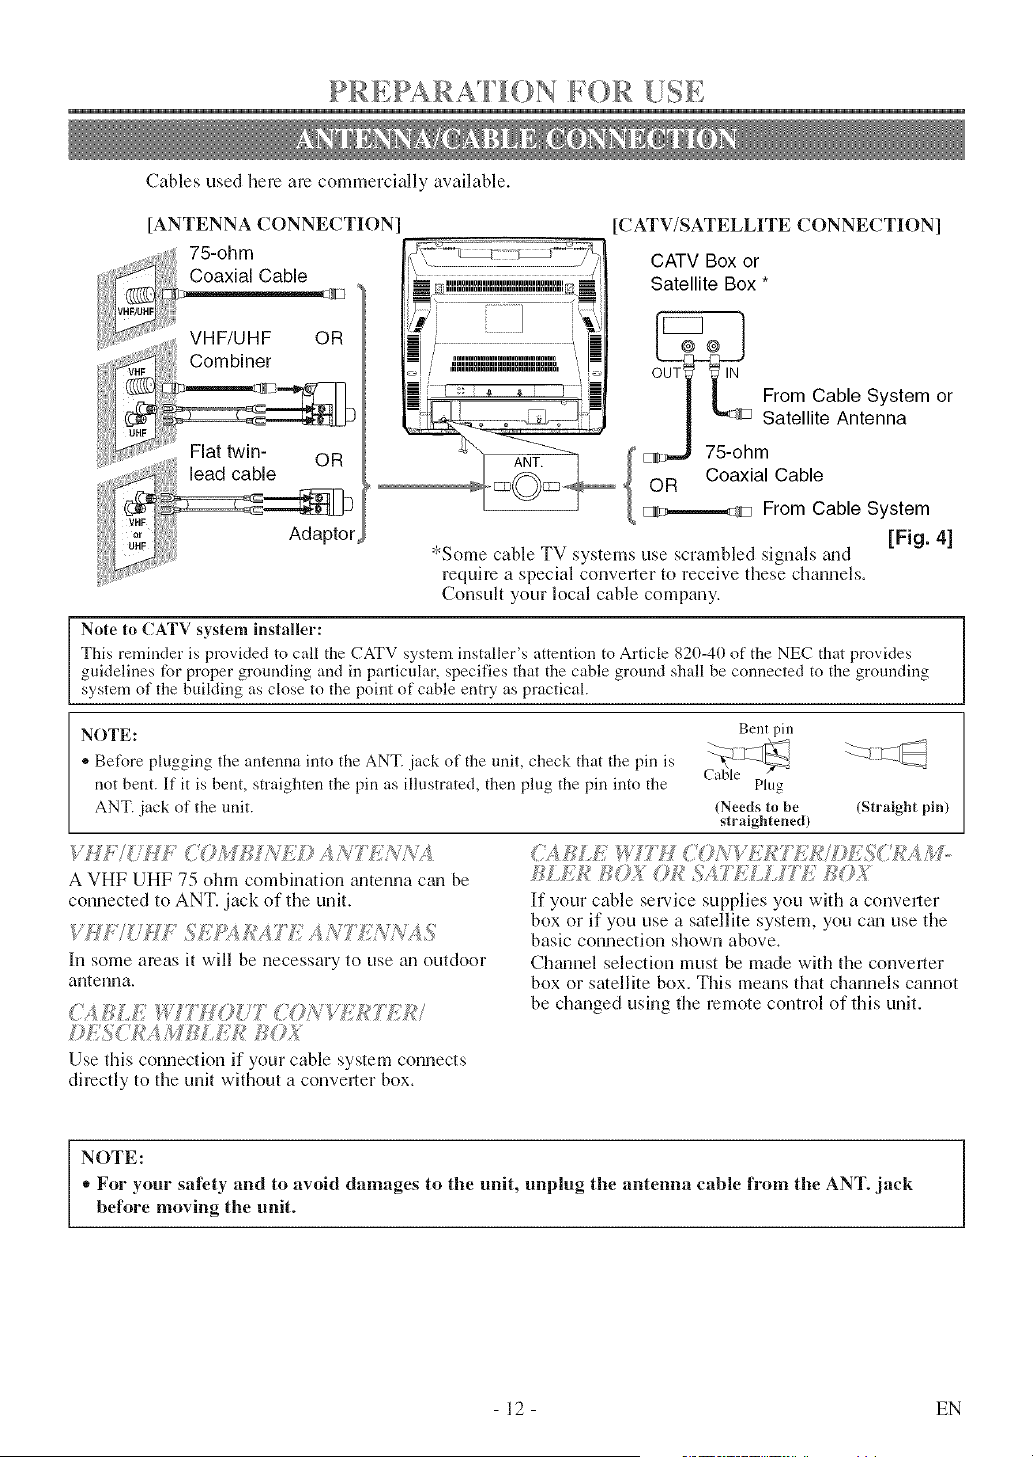
Cables used here are commercially available.
[ANTENNA CONNECTION
VHF/UHF OR
Combiner
Flat twin- OR
lead cable
AdaptoL
[CATV/SATELLITE CONNECTION]
f
_ ullnnlllnnlllnnlnnnlnnnlnnnlm _.
_ ulmmlmmlmmnumnumnuumul :_
i mmuumuumuumuumuumul
CATV Box or
Satellite Box *
From Cable System or
Satellite Antenna
hm
Coaxial Cable
OR
_;J_,-.,,.,-_ From Cable System
[Fig. 4]
*Some cable TV systems use scrambled signals _uld
require a special conveller to receive these channels.
Consult your local cable company.
Note to CATV system installer:
This reminder is provided to call the CATV system installer's attention to Article 820-40 of the NEC that provides
guidelines for proper grounding and in particular, specifies that the cable ground shall be connected to the grounding
system of the building as close to the point of cable entry as practical.
NOTE: Bent pin
,_ Before plugging the antenna into the ANT. jack of the unit, check that the pin is
not bent. If it is bent, straighten the pin as illustrated, then plug the pin into the Plug
ANT. jack of the unit. (Needs to be (Straight pin)
straightened)
VffJ / ft_Y U ?MCUNA© A?_,_Ft;?R%,A
A VHF UHF 75 ohm combination antenna can be
connected to ANT. jack of the unit.
W_W"/7HZ; ._7:,'+!_Rh YT;"A NT;"7(7_'N,4.,%
In some areas it will be necessary to use an outdoor
antenna.
(/\4 f_L£ _ffTHOU7 (7(?A,7£7_'77(7£/
bL%C?2.4/;LJi'Lkik_170.;?
Use thisconnectionifyourcablesystem connects
directly to tile unit withont a conveller box.
_;<.;_;g;UE _Y T' f {<Ok_<:VJ+;'&_77('f,UJ;_f77,SC_MM,.
JU.U£ fKg;_; _)f_!''_f._77.(S.AZ77£770.;%(
If your cable service supplies you with a conveller
box or if you use a satellite system, you ctu] use tile
basic connection shown above.
Channel selection must be made with the converler
box or satellite box. This means that channels cannot
be changed using tile remote control of tills unit.
NOTE:
,, For your safety and to avoid damages to the unit, unplug the antenna cable from the ANT. jack
before moving the unit.
I
- 12 - EN

Whenyouwatchaprogramrecordedonanothersource(VCRorvideocamera),usethe
AUDIO/VIDEOinputjacksonthefrontoftheunit.
ConnecttheAudio/VideooutputjacksofgmothersourcetotileAUDIOL/RandVIDEO
jacksofthisunit.
Thenpress[SELECT]or [CH.A / V] until "AUX" appears on the screen.
AUX
exi
To the Video output jack _ [Front of the unit]
/
<[7>
" (OUT) Video Cable (IN)
(commercially available) [Fig. 5]
NOTE:
• When you connect a monaural VCR (another source) to this unit, connect the Audio output jack of the
monaural VCR (another source) to the AUDIO L jack of this unit. The audio will output in both L and R
chgmnel equally.
Use an audio coaxial digital cable (commercially available) for the audio connections.
Connect to an amplifier equipped with digital input jacks such as MD Deck or DAT Deck.
ex.
MDdeck,DATdeck,etc.
ii 'l
...................................... i i_ _
To AUDIO OUT
To Coaxial digital COAXIAL jack
Audio input jack (Only DVD AUDIO OUT)
(OUT)
Audio coaxial digital cable
(IN) (commercially available) [Fig. 6]
NOTES:
• The audio soume on a disc in a 5.1 channel Dolby Digital surround format cgmnot be recorded as digital
sound by an MD or DAT deck.
• Be sure to turn off the power to all components in the system before connecting another component.
,, Refer to the Owner's Mgmuals for the components to be connected to the unit.
® Set °°DOLBY DIGITAL" to "PCM" for audio output in the setup mode. Playing a unit using incorrect set-
tings may generate noise distortion and may also damage the speakers. (Refer to page 44.)
13 EN
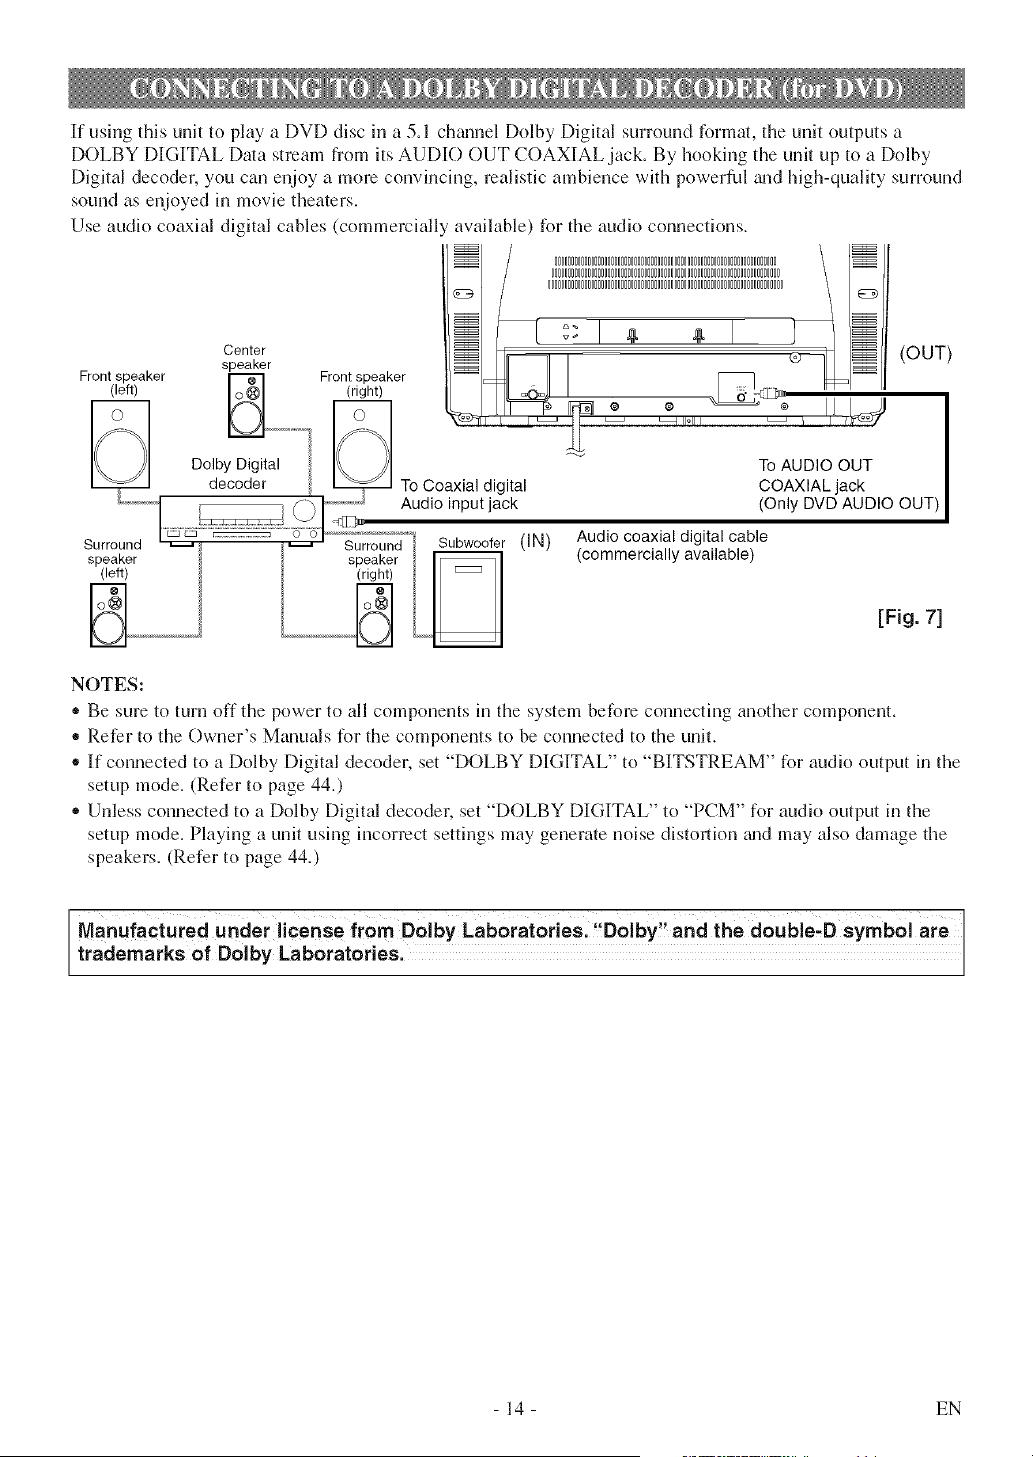
If using this unit to play a DVD disc in a 5.1 chmmel Dolby Digital surround format, the unit outputs a
DOLBY DIGITAL Data stream from its AUDIO OUT COAXIAL jack. By hooking the unit up to a Dolby
Digital decoder, you can enjoy a more convincing, realistic ambience with powerful wld high-quality surround
sound as enjoyed in movie theaters.
Use audio coaxial digital cables (commercially available) for the audio connections.
0000000000000000000000000000000000000000000000000000000000000000000
000000000000000000000000000000000000000000000000000000000000000000000
00000000000000000000000000000000000000000000000000000000000000000000000
@ @
(OUT)
To AUDIO OUT
COAXIAL jack
(Only DVD AUDIO OUT)
Audio coaxial digital cable
(commercially available)
[Fig. 7]
NOTES:
,, Be sure to turn off the power to all components in the system before connecting another component.
• Refer to the Owner's Manuals for the components to be connected to the unit.
• If connected to a DoWy Digital decoder, set "DOLBY DIGITAL" to "BITSTREAM" for audio output in the
setup mode. (Refer to page 44.)
,, Unless connected to a Dolby Digital decoder, set "DOLBY DIGITAL" to "PCM" for audio output in the
setup mode. Playing a unit using incorrect settings may generate noise distortion wld may also damage the
speakers. (Refer to page 44.)
Manufactured under license from Dolby Laboratories. "Dolby" and the double,D symbol are
trademarks of Dolby Laboratories.
- 14 - EN
F V O PE R AT () N A ND SETT [ N G S
[TV/VCR]
screen, hit [POWER] without unplug-
ging the power cord.
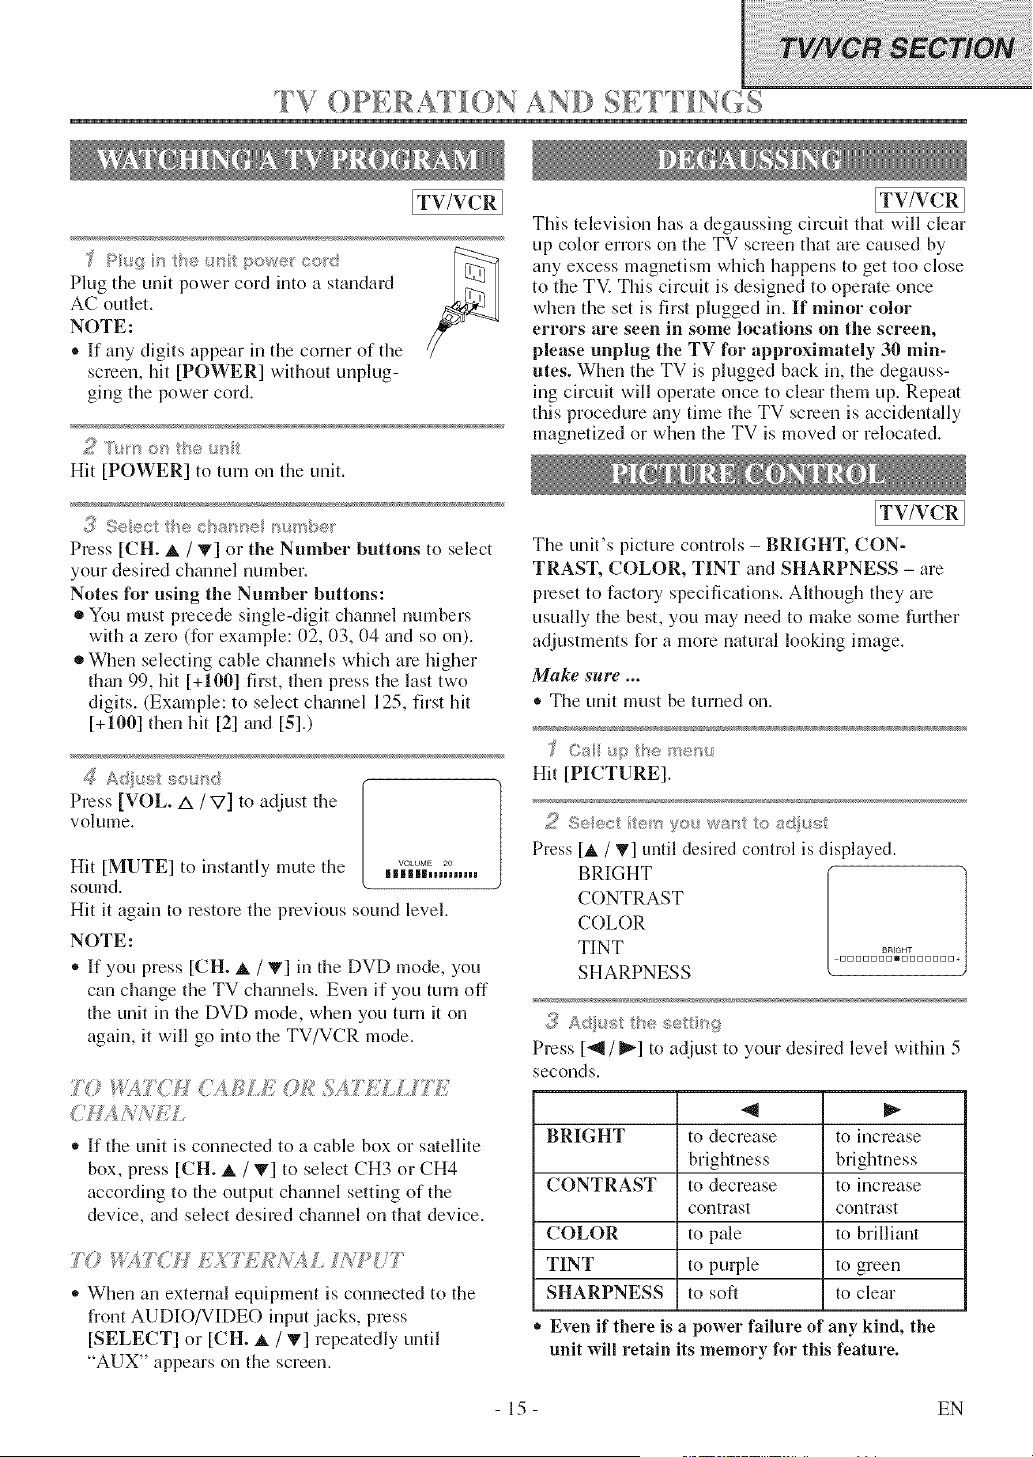
Hit [POWER] to turn on the unit.
;_ Seect th® char<® _+++>be+
Press [CH. A / T] or the Number buttons to select
your desired charnel number.
Notes for using the Number buttons:
• You must precede single-digit channel numbers
with a zero (for example: 02, 03, 04 _mdso on).
• When selecting cable channels which are higher
them 99, hit [+100] first, then press the last two
digits. (Example: to select ch_mnel 125, first hit
[+100] then hit [2] and IS].)
Adiust sobered
Press [VOL. A / V] to adjust the
volume.
Hit [MUTE] to instantly mute the n_°_]]],,]].....
sound.
Hit it again to restore the previous sound level.
NOTE:
* If you press [CH. _. / V] in the DVD mode, you
can change the TV channels. Even if you turn off
the unit in the DVD mode, when you turn it on
again, it will go into the TV/VCR mode.
,, If the unit is connected to a cable box or satellite
box, press [CH. A / T] to select CH3 or CH4
according to the output ch_mnel setting of the
device, and select desired channel on that device.
'F(? Xf4TC£ £X77(£NX£ IN/_TT
,, When an external equipment is connected to the
front AUDIO/VIDEO input jacks, press
[SELECT] or [CH. A / T] repemedly until
"AUX" appears on the screen.
[TV/VCR ]
This television has a degaussing circuit that will clear
up color errors on the TV screen that are caused by
any excess magnetism whM_ happens to get too close
to the TV. This circuit is designed to operate once
when the set is first plugged in. If minor color
errors are seen in some locations on the screen,
please unplug the TV for approximately 30 min-
utes. When the TV is plugged back in, the degauss-
ing circuit will operate once to clear them up. Repeat
this procedure any time the TV screen is accidentally
magnetized or when the TV is moved or relocated.
[TV/VCR]
The unit's picture controls - BRIGHT, CON-
TRAST, COLOR, TINT and SHARPNESS - are
preset to factory specifications. Although they are
usually the best, you may need to make some further
adjustments for a more natural looking image.
Make sure ...
® The unit must be turned on.
Hit [PICTURE].
:,>ee,:£te<_ you wa_ o s_::},sst
Press [_ / T] until desired control is displayed.
BRIGHT
CONTRAST
COLOR
TINT
DDDDDDDmDDDDDDD+
SHARPNESS
Press ["111/ _"] to adjust to your desired level within 5
second s.
BRIGHT to decrease to increase
brightness brightness
CONTRAST to decrease to increase
contrast contrast
COLOR to pale to brilliant
TINT to puq_le to green
SHARPNESS to soft to clear
Even if there is a power failure of any kind, the
unit will retain its memory for this feature.
15 EN
ITV/VCRI
The Sleep Timer function turns off the unit without
using [POWER] after a desired period of time.
NOTE:
® This function does not work during the record-
ing mode.
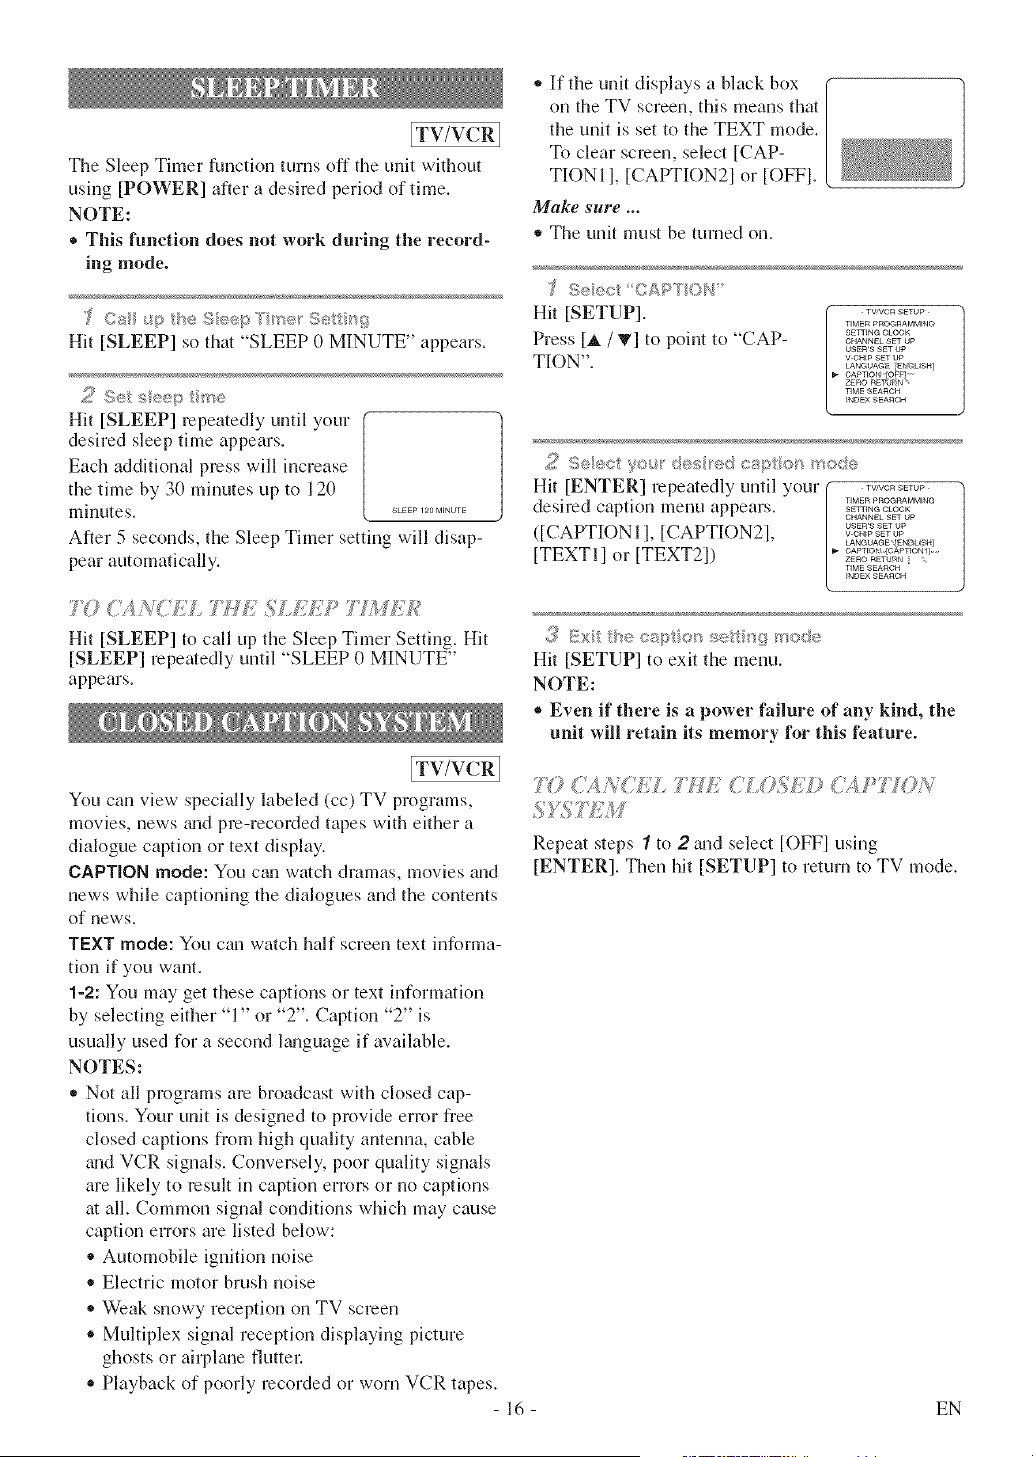
Hit [SLEEP] so that "SLEEP 0 MINUTE" appears.
Hit [SLEEP] repeatedly until your
desired sleep time appears.
Each additional press will increase
the time by 30 minutes up to 120
minutes. _p 1_0,_,_
After 5 seconds, the Sleep Timer setting will disap-
pear automatically.
' & ¢" u, ff
7¢} (4 ,,_,I / S::; ¢ :; > ')_ 4 _' ',:,:
s _
Hit [SLEEP] to call tip the Sleep Timer Setting. Hit
[SLEEP] repeatedly until "SLEEP 0 MINUTE"
appears.
,, If the unit displays a black box
on the TV screen, this means that
the unit is set to the TEXT mode.
To clear screen, select [CAP-
TIONI], [CAPTION2] or [OFF].
Make sure ...
,, The unit must be tumed on.
_,_Seiect CAP'/ION
Hit [SETUP].
Press [_. / T] to point to "CAP-
TION".
TV:VCR SETUP
TIMER PROC_aAMMtq@
SETTING QOeK
CHANNEL SET UP
USEWS SET UP
V-CHtP gET I:P
LANGUA_ iE_ _USH]
CAPTION OFF
ZERO RBT_ N
TIME ,qEA_qCH
_NDEX SEAIqCH
,<< SAec Vsu desiedca)ti _}m:_;/e
Hit [ENTER] repeatedly until your •..........
desired caption menu appears. •=_,_...............o_oo_
CHANNEL S_T UP
USERrs SF UP
([CAPTIONI l, [CAPTION21, v_........°='__' °_:E=,_=,=_
[TEXTI 1 or [TEXT21) _=o..........=_,,,_........ _......
TIME ,q EARCH
INDEX SEARCH
.:!_Exi/eeap o/s set sgmode
Hit [SETUP] to exit the menu.
NOTE:
® Even if there is a power failure of any kind, the
unit will retain its memory for this feature.
ITWVC I
You can view specially labeled (cc) TV programs,
movies, news _md pre-recorded tapes with either a
dialogue caption or text display.
CAPTION mode: You ctm watch dramas, movies and
news while captioning the dialogues and the contents
of news.
TEXT mode: You can watch half screen text informa-
tion if you want.
1-2: You may get these captions or text information
by selecting either "1" or "2". Caption "2" is
usually used for a second l_mguage if available.
NOTES:
,, Not all programs are broadcast with closed cap-
tions. Your unit is designed to provide error free
closed captions from high quality antenna, cable
gradVCR signals. Conversely, poor quality signals
are likely to result in caption errors or no captions
at all. Common signal conditions which may cause
caption errors are listed below:
,, Automobile ignition noise
* Electric motor brush noise
* Weak snowy reception on TV screen
® Multiplex signal reception displaying picture
ghosts or airplane flutter:
,, Playback of poorly recorded or worn VCR tapes.
-16-
?{? (i', N{7);L 7¢£' _ ........1(/ £1;} ;417,7 )N
Repeat steps "/to 2 a_d select [OFFI using
[ENTER]. Then hit [SETUP] to return to TV mode.
EN
Make sure ...
® The unit must be turned on.
[TV/VCR]
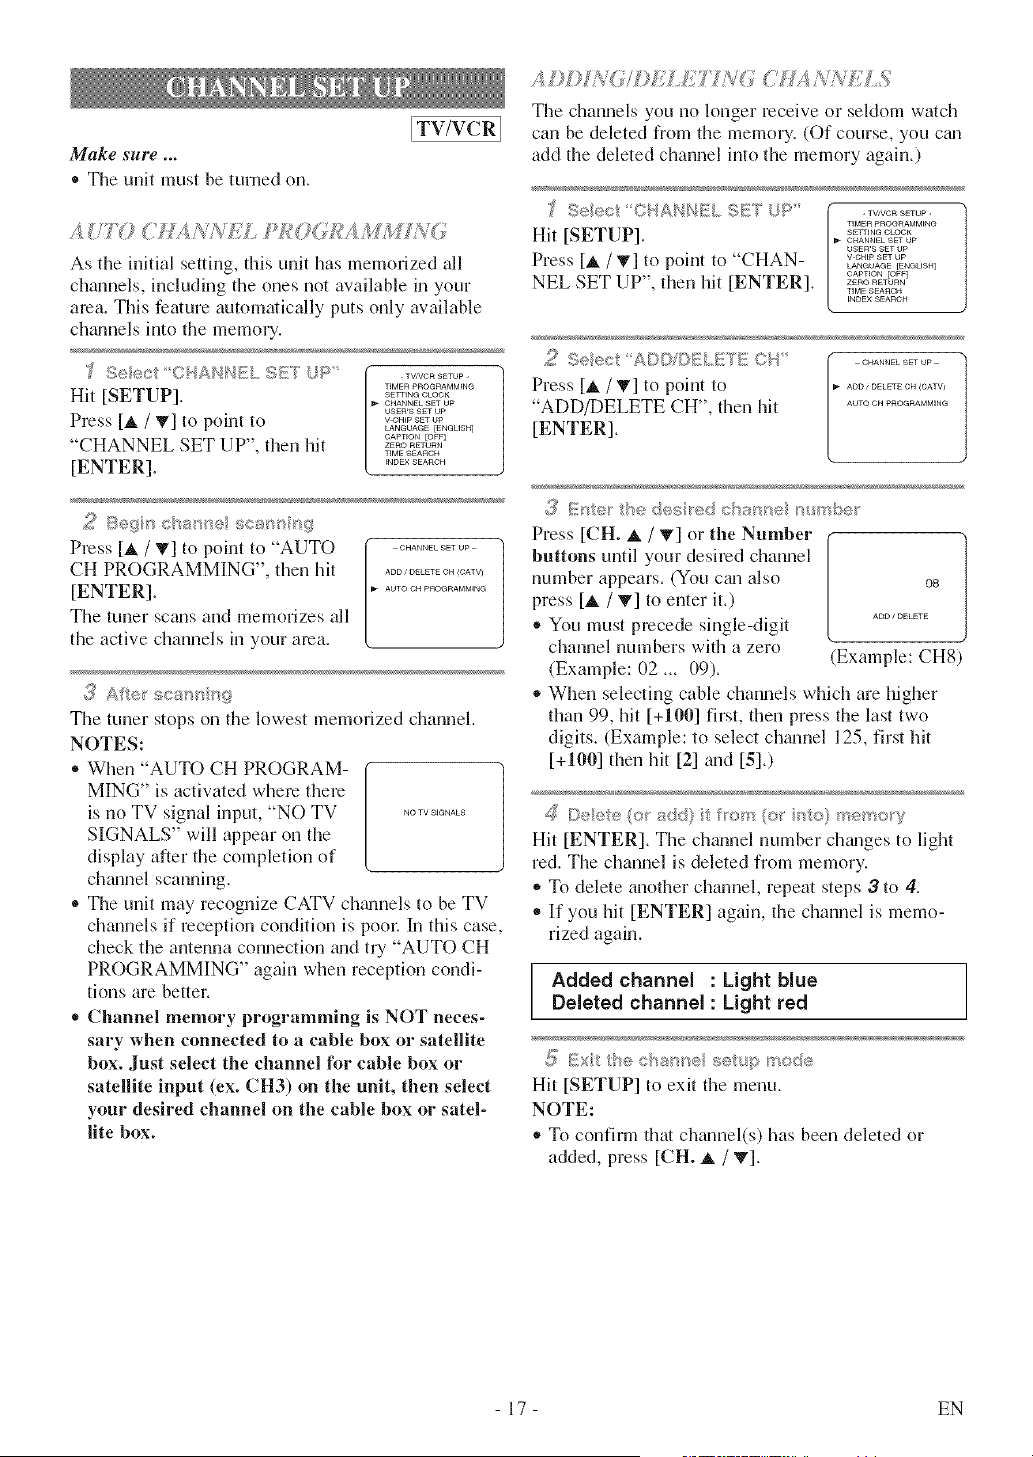
A UTO CHA;<Mi/J,TfV?O<M;AM 7 i<;
As the initial setting, this unit has memorized all
channels, including the ones not available in your
area. This feature automatically puts only available
cll_umels into the memory.
TIMER pROGRAMMING
Hit [SETUP]. _..........
CHANNEL SET OP
OSER'S SET Up
Press [J, / T/to point to ...........
LANGO;,GB [ENGUSH]
GAPT[ON [OFF]
"CHANNEL SET UP", then hit ..........
TIME .qEAROH
[ENTER]. _..........
2 Begn cbss<_e scss_g
Press [A / T/to point to "AUTO ............
CH PROGRAMMING", then hit ............ _o_,_)
[ENTER]. _................
The tuner scums and memorizes all
the active channels in your area.
3 A_e__ecss _;@
The tuner stops on the lowest memorized cham_el.
NOTES:
• When "AUT() CH PROGRAM-
M]NG" is activated where there
is no TV signal input, "NO TV ...........
SIGNALS" will appear on the
display after the completion of
channel scanning.
® The unit may recognize CATV chgmnels to be TV
channels if reception condition is poor. In this case,
check the antenna connection mid try "AUTO CH
PROGRAMMING" again when reception condi-
tions are better.
,, Channel memory programming is NOT neces-
sary when connected to a cable box or satellite
box. Just select the channel Jbr cable box or
satellite input (ex. CH3) on the unit, then select
your desired channel on the cable box or satel-
lite box.
ADDDd< !L ELET IA'(; (" HA/<iI#E S/
The channelsyouno longerreceiveorseldomwinch
can bedeletedfromthememory,(Ofcourse,you c{m
add thedeletedchannelintothememory again.)
TIMEFt PROGFtAMM_N@
Hit [SETUP]. _.........
CHANN[L SET OP
os_n'a SET UP
Press [_, / _] to point to "CHAN ............
LANGOAGE {ENGLISH/
CAPTION [OFF]
NEL SET UP", then hit [ENTER]. •.........
TIME SEAROH
_NDEX SEAnGH
2 Seec ADD/©}_{/ETE©94" o...........
Press[A /Y] topointto ............<o_v>
"ADD/DELETE CH", thenhit .................
[ENTER],
3 Fnte_ he des+red char>re _++++sbe+
Press [CH. _, / '!v/or the Number
buttons until your desired channel
number appears. (You c_malso os
press [_, / T/to enter it.)
® You must precede single-digit _.........
channel numbers with a zero
(Example: (12 _. 09). (Example: CH8)
When selecting cable channels which are higher
than 99, hit [+100] first, then press the last two
digits. (Example: to select ch_umel 125, first hit
[+100] then hit [2] mad [5].)
Deee {o_ sd4} fl'or_ (or r_:/o) _'semo y
Hit [ENTER]. The channel number ch_mges to light
red. The channel is deleted from memory.
,_ To delete another channel, repeat steps $ to 4.
• If you hit [ENTER] again, the channel is memo-
rized again.
Added channel : Light blue
Deleted channel : Light red
_7 Ex _he ehu_qe ee _,_pre®de
Hit [SETUP] to exit the menu.
NOTE:
• To confirm thin channel(s) has been deleted or
added, press [CH. _, / V].
17 EN
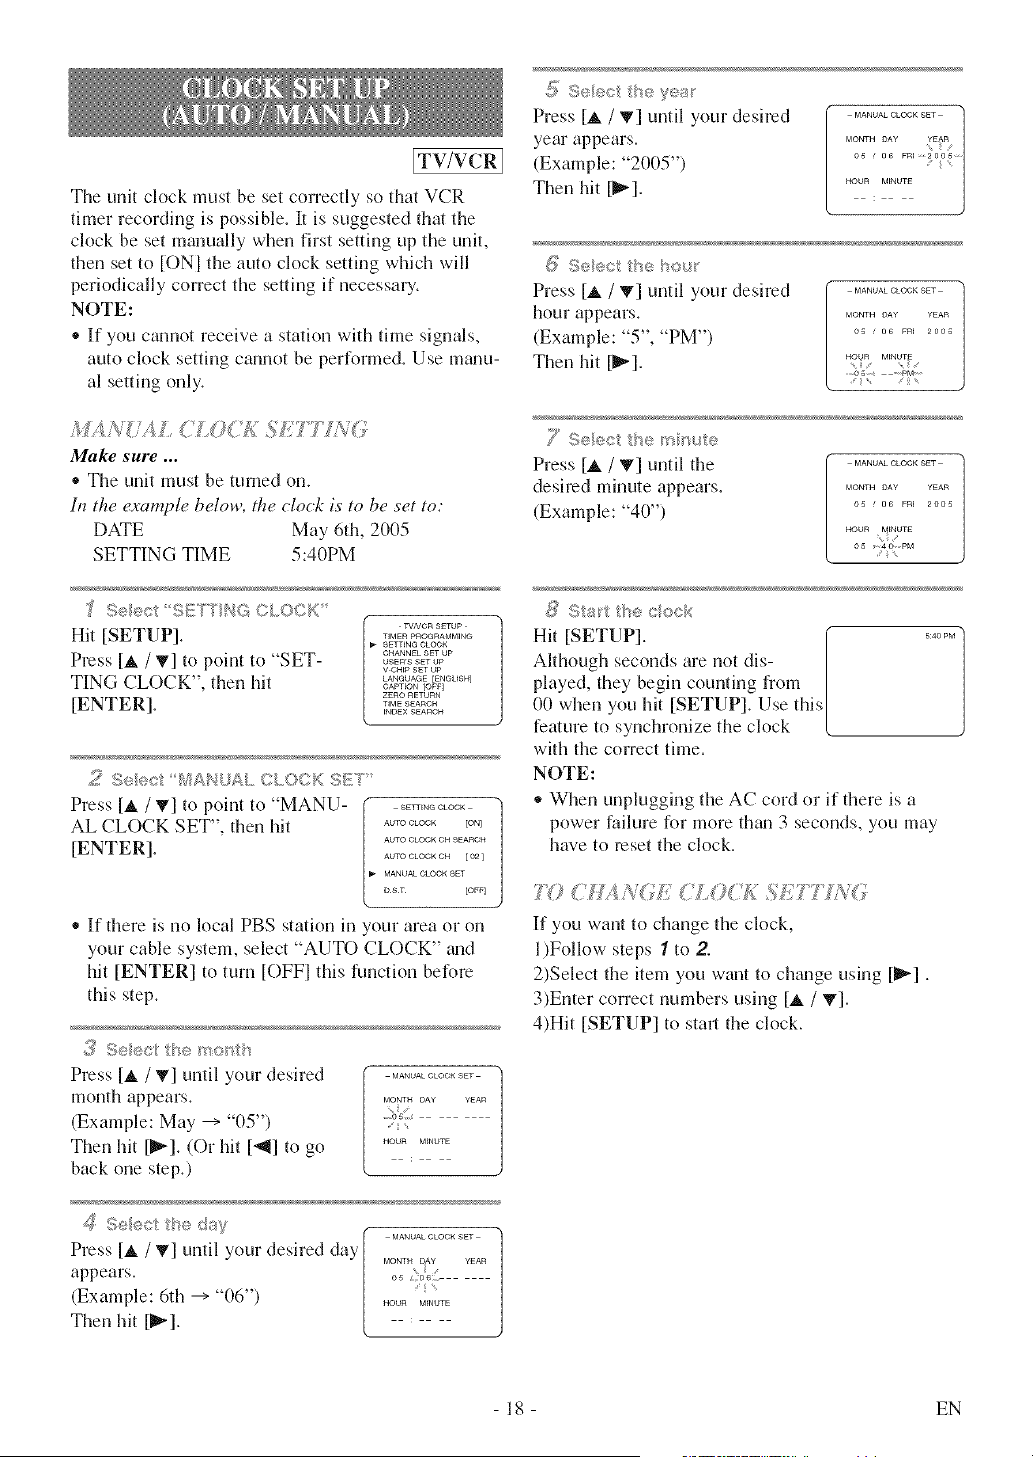
ITV/VCRI
The unit clock must be set correctly so that VCR
timer recording is possible, It is suggested that the
clock be set manually when first setting up the unit,
then set to ION] the auto clock setting which will
periodically correct the setting if necessary,
NOTE:
* If you cannot receive a station with time signals,
auto clock setting cannot be performed, Use m_mu-
al setting only,
Make sure ...
,, The unit must be turned on.
Ii_ the examph, below, the clock is to be set to:
DATE May 6th, 2005
SETTING TIME 5:40PM
'£ Seect SUCTNG CLOCK
Hit [SETUP].
Press[_. / T[ to point to "SET-
TING CLOCK", then hit
[ENTER].
TV,VCR SETUP -
TIMER PnOGRAMMIN@
SETTING CLOCK
CHANNEL SET UP
USEIq'S SET UP
V CH_P SET UP
LANeUAGE [EN@USH]
CAPTEON [OFF[
ZEnO RETURN
TIME SEARCH
_NDEX SEARCH
5_.;Se{®ct I_4ANUAL CLOCK SET'
Press [A /T[ to point to "MANU- ( ...........
AL CLOCK SET", then hit , ........ Eo,_
AUTOCLOCKC_ SEA_CH
[ENTER]. _.......... I0_l
B,_ MANUAL CLOOK SET
i) sr [OFF]
* If there is no local PBS station in your area or on
your cable system, select "AUTO CLOCK" m,d
hit [ENTER] to turn [OFFI this function before
this step.
Press [_. /T[ until your desired ...............
month appears .............
i /
(Example: May --+ "05") ........,
Then hit [1_,_].(Or hit [_,_] to go ..........
back one step.)
S_:@ctt'_e day ( ..............
Press [_ / _] until your desired day [ ..... _ .....
appears. [ o_
(Example: 6th --+"06") [ *'
HOL_Iq M_NUTE
Then hit [_"]. L
d_ ,_ ,_ _
Press [_ / _] until your desired ..............
year appears. _o_,o_, r_
<
(Example: "2005") ...................
Then hit [_]. ,.........
Press [_. / _'] until your desired
hour appears.
(Example: "5", "PM")
Then hit [_].
MANUALCLOCK SEt
MONTH DAY 'gEAR
0_ ' O6 FRI 2005
HO_R M_NUTE
....05 PM
7 S®÷ct tb,e m "_,A®
Press [_, / T[ until the
desired minute appears.
(Example: "40")
MANUALCLOCK SET
MONTH OA¥ YEAR
0S _ 06 F_I 2008
HOUR M_NUrE
_} Sta_ tt_÷ cock
Hit [SETUP]. [ ......
Although seconds are not dis- [
played, they begin counting fiom [
00 when you hit [SETUP]. Use this[
feature to synchronize the clock (
with the correct time.
NOTE:
,, When unplugging the AC cord or if there is a
power failure for more them 3 seconds, you may
have to reset the clock.
77? CSLI?'/GE {ILO( £ S£7"' Y
If you want to change the clock,
l)Follow steps 7 to 2
2)Select the item you want to chgmge using [1_-].
3)Enter correct numbers using [_ / _'].
4)Hit [SETUP] to starJ the clock.
- 18 - EN
A /TOM T <7; 0C£
Make sure...
® The unit must be tinned on.
• Confirm the unit is receiving a RF (Radio
Frequency) signal from either an antenna or cable
system connection using the ANT. jack on the rear
of the unit.
NOTES:
® If a cable converter box is being used, make sure it
is powered on.
• You must use the remote control to perform the
clock setting wocedure.
• If the unit is connected directly to a cable conveller
box or satellite box, the local PBS station must be
selected on the cable box itself and the unit must
be set to the output channel of the cable conveller
box or satellite box (usually channel 3 or 4), to be
able to set up or correct the clock automatically.
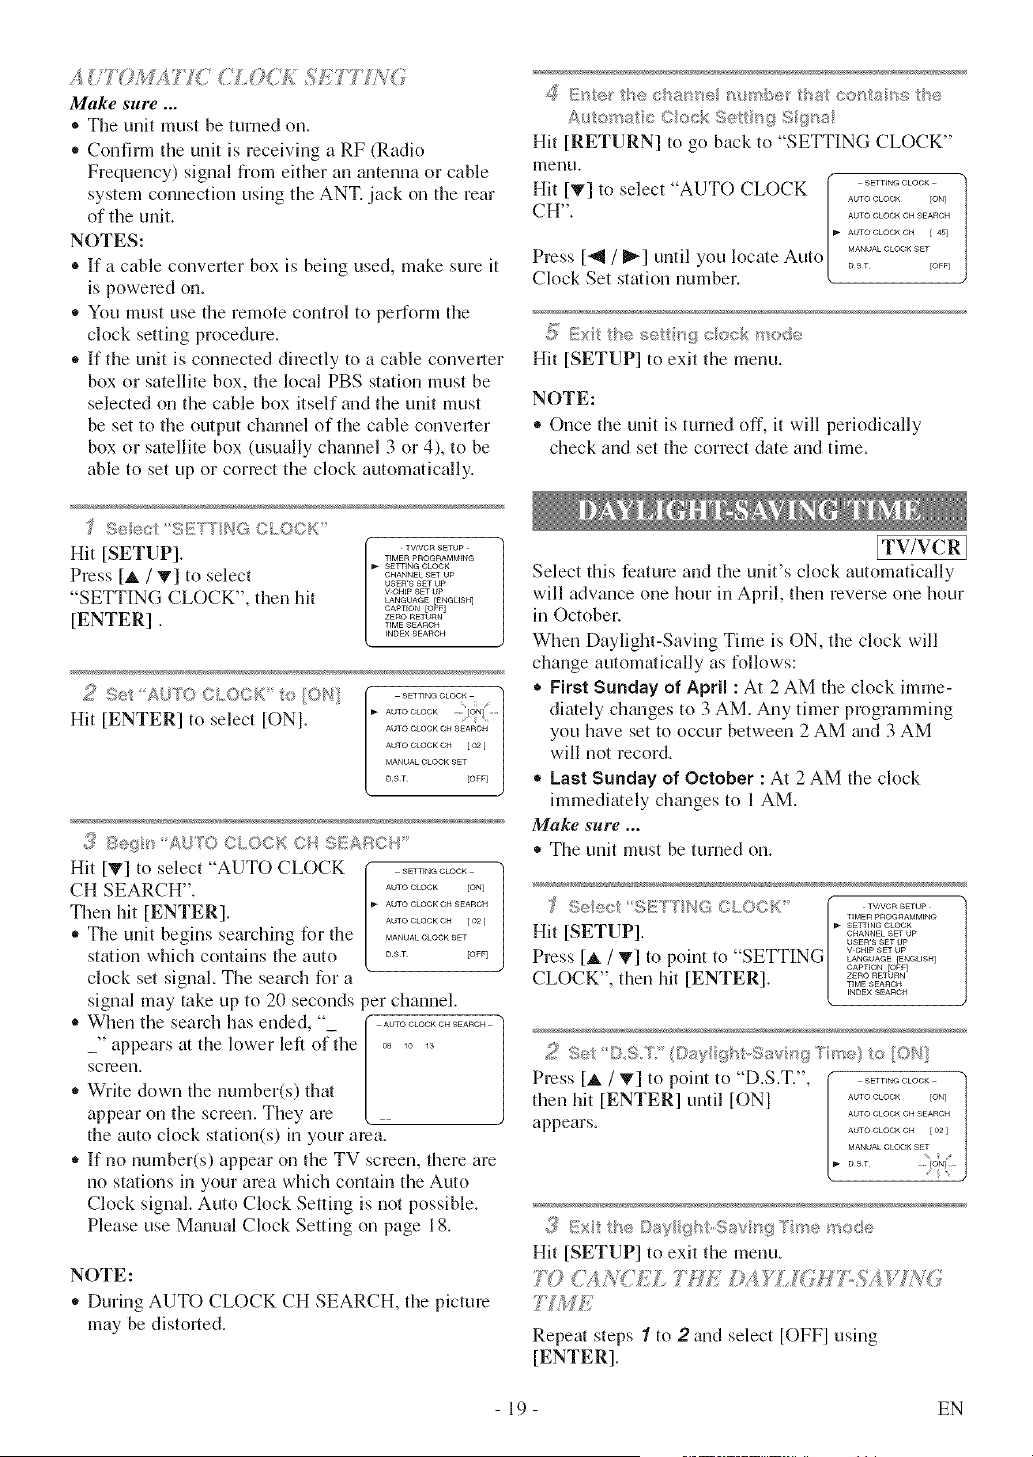
Seec S{!!TY'NG CLOC{< _
Hit [SETUP]. •...........
• IMER PROGRAMMtNa
SETTING CLOCK
Press [_, / 'V] to select ............
USEWS SET UP
"SETTING CLOCK", then hit ........._u__,%ou,_
CAPTION
[ENTER] ....... b%T
• •_MESeAnCH
INDEX SEARCH
52 S;e AUK> CLOCK o[ON}
Hit [ENTER] to select [ONI.
3 Beg AUK) CLOCK ©, S_ARCb
Hit [_'] to select "AUTO CLOCK ............
CH SEARCH". ........ io_l
AU•O CLOCK OH SEARCH
Then hit [ENTER]. _.......... t<
_, The unit begins searching for the ..............
station which contains the auto °_' Eo<
clock set signal. The search for a
signal may take up to 20 seconds per channel.
• When the search has ended, " ( .................
_" appears at the lower left ofthe ......
screen.
_, Write down the number(s) that
appear on the screen. They are
the auto clock station(s) in your area.
,, If no number(s) appear on the TV screen, there are
no stations in your area which contain the Auto
Clock signal. Auto Clock Setting is not possible.
Please use Mgmual Clock Setting on page 18.
NOTE:
,, During AUTO CLOCK CH SEARCH, the picture
may be distorted.
,_ Ester _he eha>_e r_mbe_ sa_ oo_s2am:;he
Aulo'_a e Cock Sets{# S {_a
Hit [RETURN] to go back to "SETTING CLOCK"
menu.
Hit IT] to select "AUTO CLOCK ( ............
Press ['_ / _] until you locate Auto [ o,_, Eo<
Clock Set station number. <
{'57 Ex lhese( ngcockmode
Hit [SETUP] to exit the menu.
NOTE:
® Once the unit is turned off, it will periodically
check and set the correct date and time.
[TV/VCR]
Select this feature and the unit's clock automatically
will advance one hour in April, then reverse one hour
in October.
When Daylight-Saving Time is ON, the clock will
change automatically as follows:
® First Sunday of April : At 2 AM the clock hnme-
diately ch_mges to 3 AM. Any timer programming
you have set to occur between 2 AM _md3 AM
will not record.
• Last Sunday of October : At 2 AM the clock
immediately ch_mges to 1 AM.
Make sure ...
• The unit must be turned on.
]_' Seec ©L,<)OK _ •..........
• IMER pROGRAt,4Mfiq@
Hit [SETUP]. _ ...........
CHANNEL SET Up
USEW8 SET UP
Press [J, / 'V] to point to "SETTING ...........LANGUAGE {ENGLISH]
CAPTION [OFF]
CLOCK", then hit [ENTER]. •,ME•........._E.,,_o.
_NDE× SEAlqCH
2 Set DSW (©sy{ght,Sav'_gTme}t>[ON]
Press [_. / T] to point to "D.S.T.', ( ............ "]
then hit [ENTER] until [ONI [,. ......... _o_ t
AU•© CLOCK GH SEARCH
appears. _o•oo_oo_o. _0_1
MANUAL CLOCK S_T ....
,/,i£Ext the Day ghtSsv_;gTme mode
Hit [SETUP] to exit the menu.
']7"} (APe'&EL ']_'( &,_YL 6'HT:d/A$C?u<'/
7k;fE
Repeat steps 1 to 2 and select [OFFI using
[ENTER].
19 EN
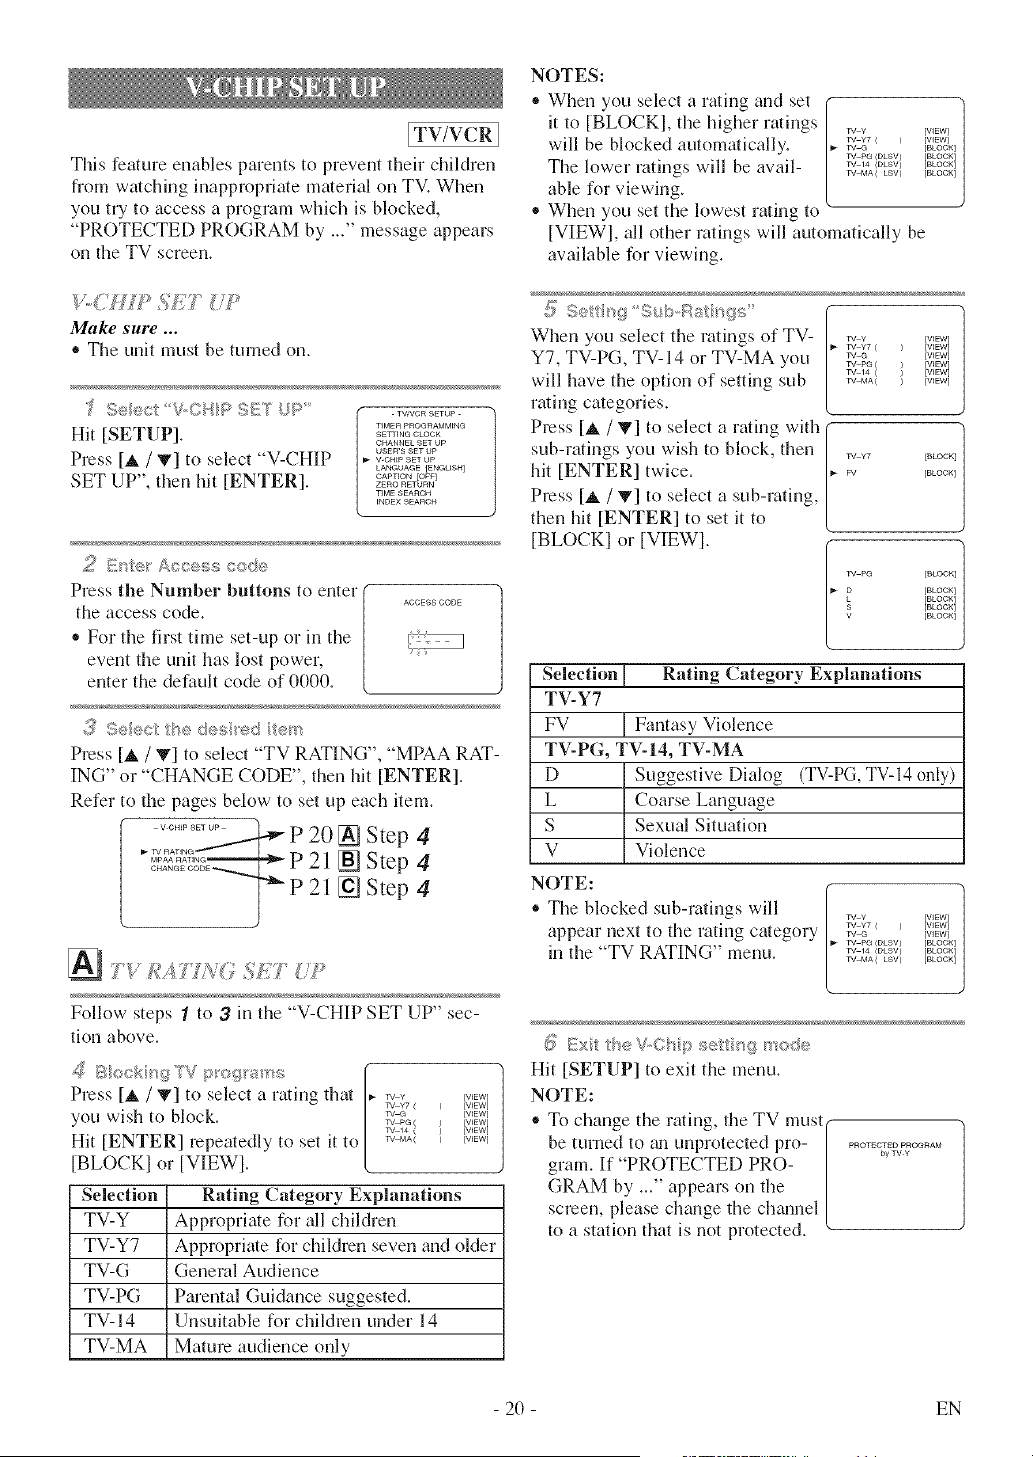
ITV/VCal
This feature enables parents to prevent their children
from watching inapprnpriate material on TV. When
you tU to access a program which is blocked,
"PROTECTED PROGRAM by ..." message appears
on the TV screen.
Make sure ...
* The unit must be turned on.
]I Se/_:_ciV°; IP !:£1"[U >'
TV(qO R SITUI
TIMEIq PROGRAMMfiUG
Hit [SETUP]. s..........
CHANNEL SET UP
USER'S SET Up
Press [A / T] to select "V-CHIP ............
LANGUAGE {ENGUSH]
SET UP", then hit [ENTER]. _=o°......=_o=_E°<
TIME SEARCH
_NDEXSEAnGH
2 E_er Accsss code
Press the Number buttons to enter ( ..........
the access code. /
* For the first time set-up or in the
event the unit has lost power, |
enter the default code of 0000.
,3 Seec '<_<4es e< re>
Press [_, / T] to select "TV RATING", "MPAA RAT-
ING" or "CHANGE CODE", then hit [ENTER].
Refer to the pages below to set up each item.
........ _ P 20 [] Step 4
"=_I_?,_--------4-_p 21 [] Step 4
°_-_---JTP 2l [_ Step 4
Follow steps "/to 3 in the "V-CHIP SET UP" sec-
tinn above.
_5 Blockir_9 TV p'og_'s_ss
Press [_, / V] to select a rating that
you wish to block.
Hit [ENTER] repeatedly to set it to
[BLOCKI or [VIEWI.
Selection
TV-Y
TV-Y7
TV-G
TV-PG
TV-14
TV-MA
rv y [WEW]
TV Y7 _ ) [WEW]
TV _ [WEW]
TV PG ( [WEW]
TV 14 ( [WEW]
TV MA( [WEW]
Rating Category Explanations
Appropriate for all children
Apprnpriate for children seven and older
General Audience
Parental Guidance suggested.
Unsuitable for children under 14
Mature audience only
NOTES:
* When you select a rating and set
it to [BLOCKI, the higher rmings
will be blocked automatically.
The lower ratings will be avail-
able for viewing.
* When you set the lowest rating to
1
TV ¥ [VIEW] |
w ¥7 ( ) [VIEW]
TVG [BLOCK]
rV PG(DLSV) [BLOCK]
rv 14 (DLSV) [BLOCK]
TVMA(LSV) [BLOCK]
[VIEWI, all other ratings will automatically be
available for viewing.
:5 %_, ii}g .... s," ....
:_<I/)- } ,I III_){)_:,
When you select the ratings of TV- _ ¥ _v,==_
TV Y7 ( ) [WEW]
YV G [WEW]
TV PG ( ) [WE_4]
TV 14 ( ) [WEWI
YV MA( ) [WEW]
Y7, TV-PG, TV- 14 or TV-MA you
will have the option of setting sub
rating categories.
Press [_, / T] to select a rating with
sub-ratings you wish to block, then
hit [ENTER] twice.
Press [_ / V] to select a sub-rating,
then hit [ENTER] to set it to
[BLOCKI or [VIEWI.
1
rv ¥7 [BLOO_] ]
FV [BLOCK]
TV pQ [BLOO_] 1
J
[BLOCK]
[BLOCK]
9 [BLOCK]
V [BLOCK]
Selection Rating Category Explanations
TV-Y7
FV Fantasy Violence
TV-PG, TV-14, TV-MA
D Suggestive Dialog (TV-PG, TV-14 only)
L Coarse Language
S Sexual Situation
V Violence
NOTE:
* The blocked sub-ratings will
appear next to the rating category
in the "TV RATING" menu.
1
TV ¥ [VIEW] /
TV ¥7 _ ] [VIEW]
TV @ [VIEW]
rv P£(DLSV) [BLOCK]
rv 14 (DLSV] [BLOCK]
TVMA(LSV) [BLOCK]
{_iExi I'e V,,O ip sel is<if_so:Se
Hit [SETUP] to exit the menu.
NOTE:
* To change the rating, the TV must(
be turne_!,tu _munprotected pro- [ ...... _ ....
gram. If PROTECTED PRO- ]
GRAM by ..." appears on the [
screen, please change the chmmel [
to a station that is not protected, v_
- 20 - EN
N'_> _'£?/?
Follow steps 1 to 3 in the "V-CHIP SET UP" sectinn
on page 2(1.
Press [A / T] to point to your
desired item, then hit [ENTER] to
select [BLOCKI or [VIEWI.
_a [v_ew]
[WEW]
PG IS [V_EW]
R [BLOCK]
_C 17 [BLOCK]
[BLOC_q
Rating Category Explanations
General Audience
Parental Guidance suggested.
Unsuitable for children under 13
Restricted; under 17 requires accompa-
nying parent or adult guardian
No one under 17 admitted
Mature audience only
Selection
G
PG
PG-13
R
NC-17
X
- When you select a rating and set it to [BLOCKI,
the higher ratings will be blocked automatically.
The lower ratings will be available for viewing.
® When you set the lowest rating to [VIEW], all
other ratings will automatically be available for
viewing.
Hit [SETUP] to exit the menu.
....g ,1 , i {,_{) {
Follow steps 1 to ,3 in the "V-CHIP SET UP" sec-
tion on page 20.
NEW OODE
Press the Number buttons to enter
your desired access code in the
"NEW CODE" space, then enter
the same code in the "CONFIRM
CODE" space. When completed, the menu will
return to "V-CHIP SET UP".
,, Make sure you enter exactly the same new code in
the "CONFIRM CODE" space as one in the
"NEW CODE" space. If they are different, the
"NEW CODE" space is cleared for redoing.
{7 E×t BeVC>_:> set_:_sg ode
Hit [SETUP] to exit the menu.
NOTE:
® Your personal access code will be erased and will
return to the default (0000) when a power failure
occurs or when you turn off the power using a
wall switch. If you have forgotten the code, unplug
the power cord for 10 seconds to restore the access
code to 0000.
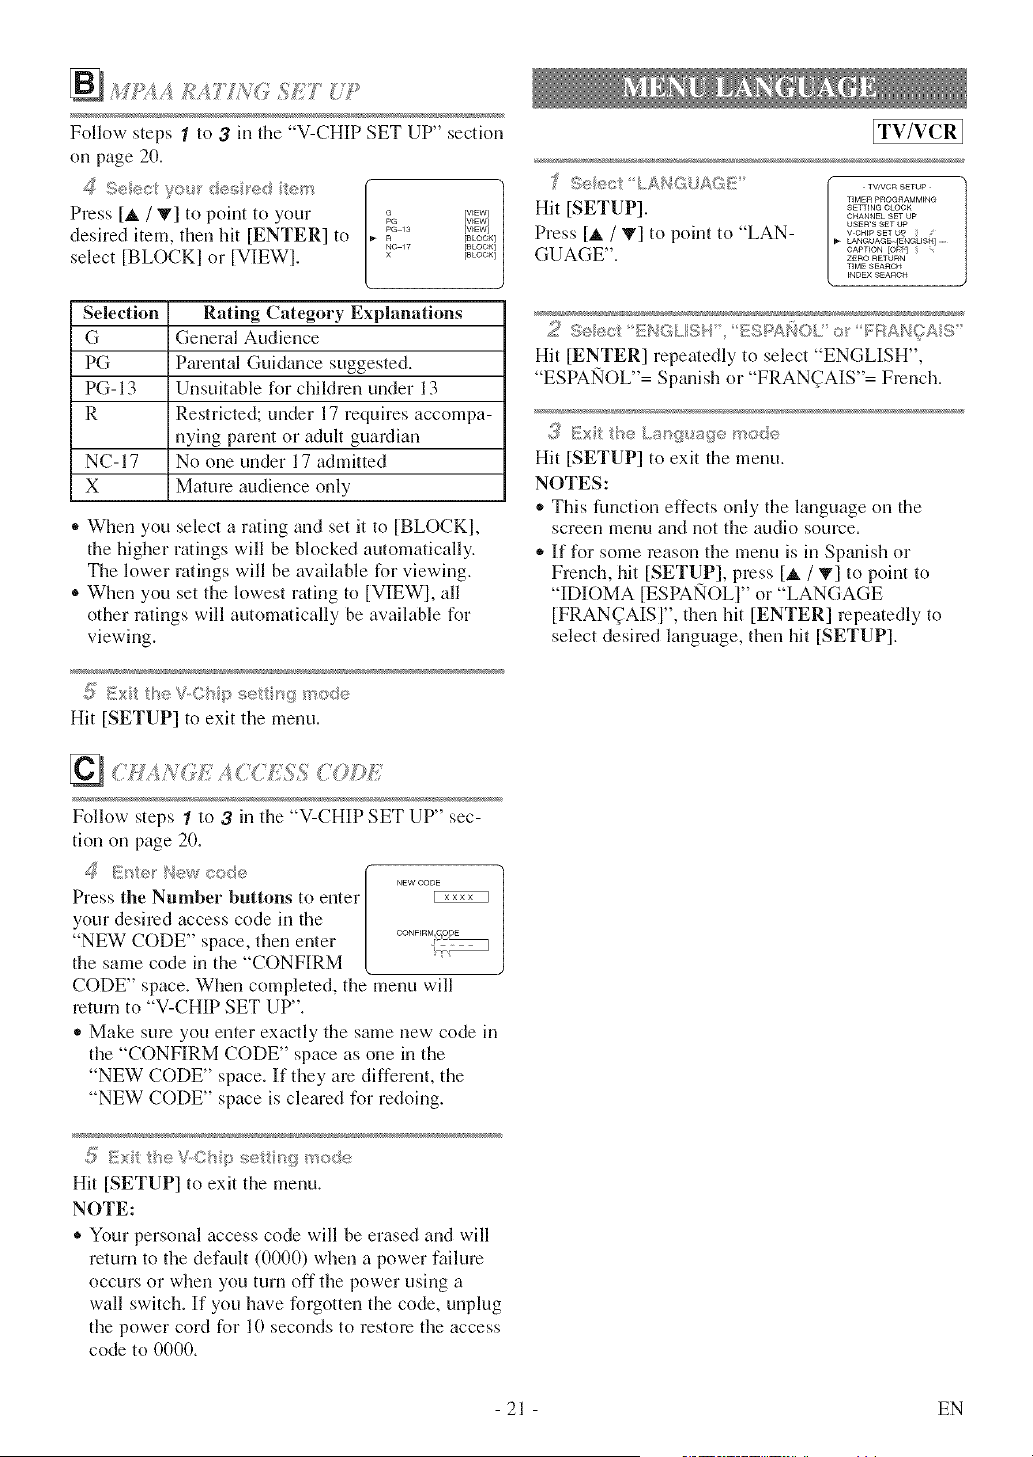
[TV/VCR]
S <_¢ '(> S':
Hit [SETUP].
Press [_ / _] to point to "LAN-
LANGUAGe, {ENGU,qH],
GUAGE". _o......._o_I°_'l,
TIME G_AI:tGH
_NDEX SgAIq Ol_
_ S®ec ESPA_O// or F?ANCAS _
Hit [ENTER] lepeatedl 3 to select ENGLISH ,
ESPANOL = Span. h or "FRAN(]AIS"= French.
Hit [SETUP] to exit the menu.
NOTES:
,, This function effects only the language on the
screen menu and not the audio source.
- If for some reason the menu is in SDmish or
French, hit [SETUP], press [_, / T] to point to
"IDIOMA [ESPAlqOLI" or "LANGAGE
[FRAN(]AISI", then hit [ENTER] repeatedly to
select desired language, then hit [SETUP].
21 EN
MTS (MH tL Cha : e £k4evisio soH : d} SYSTEM
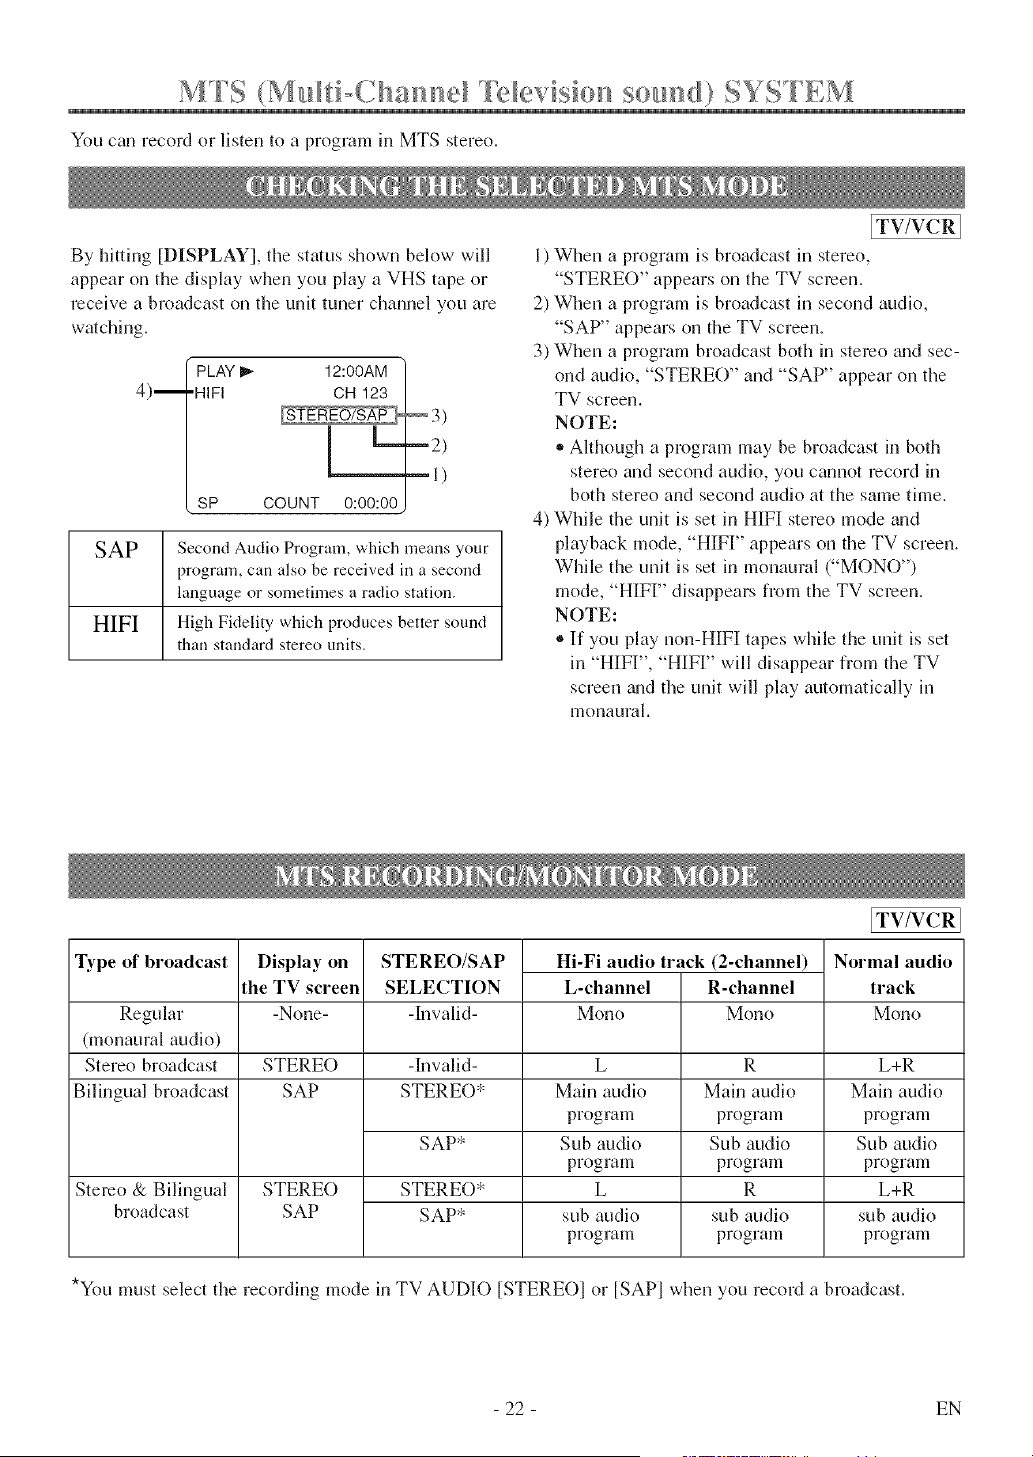
You can record or listen to a program in MTS stereo.
By hitting [DISPLAY], the status shown below will
appear on the display when you play a VHS tape or
receive a broadcast on tile unit tuner channel you are
watching.
4)m
PLAY I_ 12:00AM
•HIFI OH 123
_2)
--1)
SP COUNT 0:00:00
SAP Second Audio Program, which means your
program, can also be received in a second
language or sometimes a radio station.
HIFI High Fidelity which produces better sound
than standard stereo units.
[TV/VCR]
1) When a program is broadcast in stereo,
"STEREO" appears on the TV screen.
2) When a program is broadcast in second audio,
"SAP" appears on the TV screen.
3) When a program broadcast both in stereo _mdsec-
ond audio, "STERE()" and "SAP" appear on the
TV screen.
NOTE:
* Although a program may be broadcast in both
stereo and second audio, you cannot record in
both stereo and second audio at the same time.
4) While the unit is set in HIFI stereo mode and
playback mode, "HIFI" appears on the TV screen.
While the unit is set in monaural ("MONO")
mode, "HIFF' disappears from the TV screen.
NOTE:
®If you play non-HIF][ tapes while the unit is set
in "H][FI", "HIF[" will disappear from the TV
screen _mdthe unit will play automatically in
monaural.
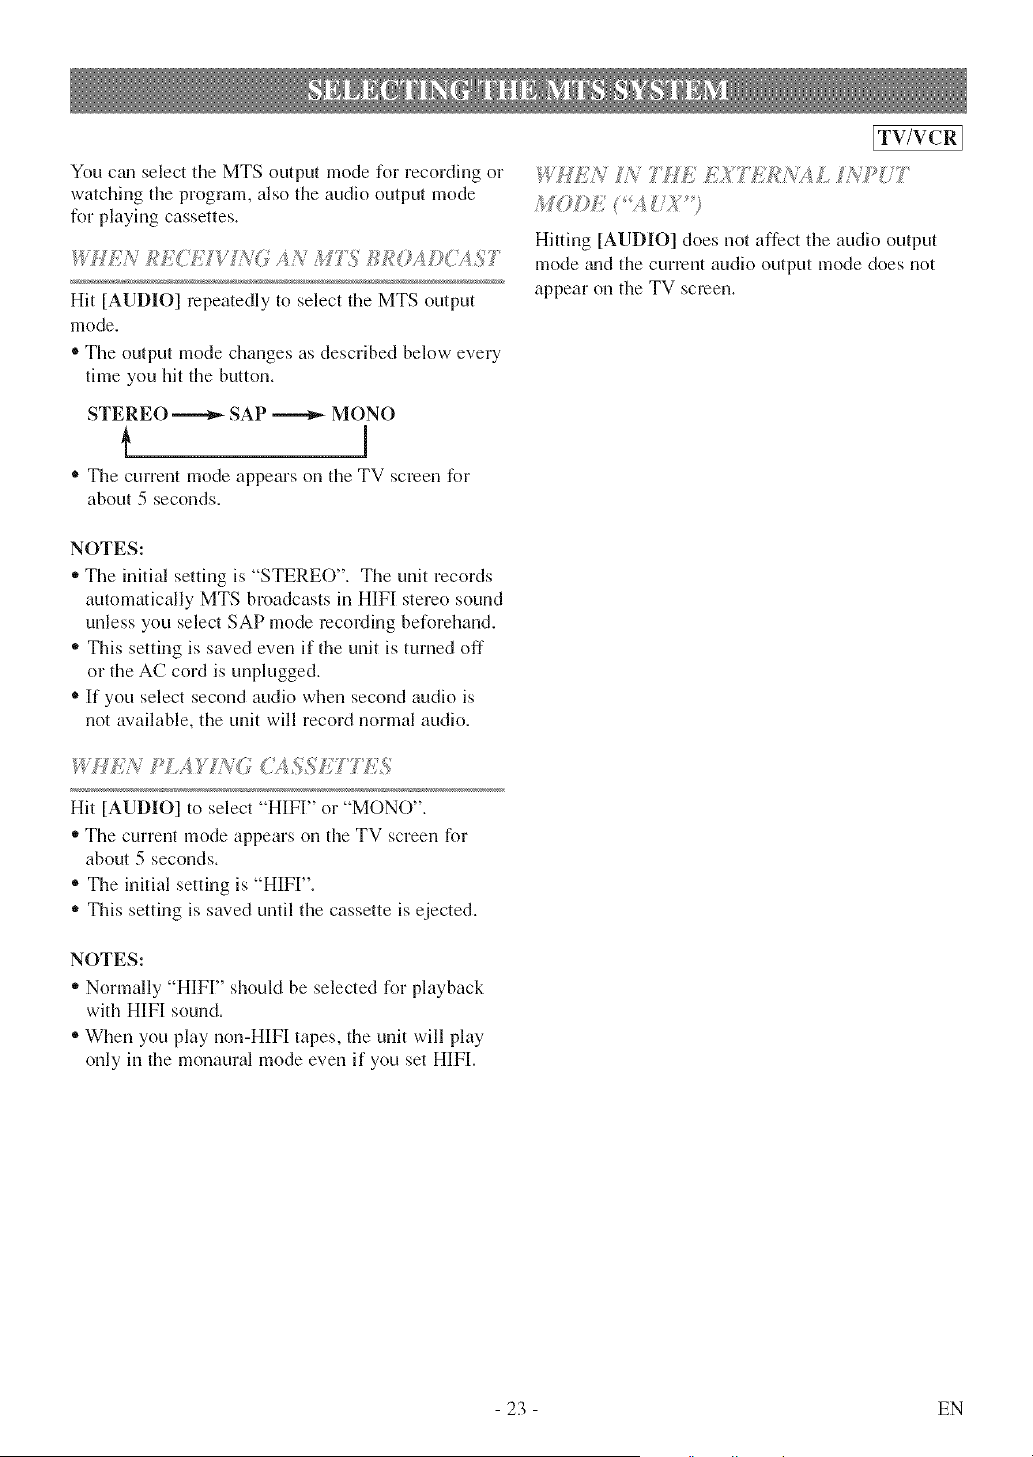
Type of broadcast Display on
the TV screen
-None-
STEREO/SAP
SELECTION
-Invalid-
Hi-Fi audio track (2-channel)
L-channel R-channel
Regular Mono Mono
(monaural audio)
Stereo broadcast STERE() -Invalid-
Bilingual broadcast SAP STERE()*
Stereo & Bilingual
broadcast
SAP*
STERE()
SAP
L
Main audio
program
Sub audio
program
L
sub audio
program
R
Main audio
program
Sub audio
program
R
sub audio
program
[TV/VCR
Normal audio
track
Mono
L+R
Main audio
program
Sub audio
program
L+R
sub audio
program
*You must select the recording mode in TV AUDIO [STEREOI or [SAPI when you record a broadcast.
- 22 - EN
You can select the MTS output mode for recording or
watching the program, also the audio output mode
for playing cassettes.
Ii_HEkI__RE T<]_']%{;A?';k Zk!;{_R{?AD_';4S7
Hit [AUDIO] repeatedly to select the MTS output
mode.
®The output mode changes as described below every
time you hit tile button.
STEREO _ SAP _ MONO
• The current mode appears on the TV screen for
about 5 seconds.
NOTES:
• The initial setting is "STEREO". The unit records
automatically MTS broadcasts in HIFI stereo sound
unless you select SAP mode recoMing beforehand.
'_ This setting is saved even if the unit is turned off
or the AC cord is unplugged.
• If you select second audio when second audio is
not available, the unit will record normal audio.
IdUKN I#LA) Ii_..O(;J,%SETTL,%
Hit [AUDIO] to select "HIFI" or "MONO",
'_ The current mode appears on the TV screen for
about 5 seconds,
® The initial setting is "HIFI'L
'_ This setting is saved until the cassette is ejected,
NOTES:
'_Normally "HIFI" should be selected for playback
with HIFI sound.
®When you play non-HIFI tapes, the unit will play
only in the monaural mode even if you set HIFL
[TV/VCR]
%'HEk 771EEXT ]'ikV<ALIiVP(;7
M<?I>E<4 UX
Hitting [AUDIO] does not affect the audio output
mode _md the current audio output mode does not
appear on the TV screen.
23 EN
r _ ..... _ "t _1 "_ _ _"[DE ) L, ASSE F 1E
This unit will operate with any cassette that has the _ mark, For best results, we recommend the use of
high-quality tapes, Do riot use poor quafity or damaged tapes,
- Avoid moisture. Moisture condensation may occur
on the tape if it is moved from a cold place to a
warm place or vice versa. Before using a tape with
these conditions, to avoid damage of the tape mid
your unit, wait until the tape has warmed to room
temperature and the moisture has evaporated.
,, Avoid extreme heat, high humidity grad magnetic
fields.
® Do not tamper with the cassette mechanism.
,, Do not touch the tape with your fingers.
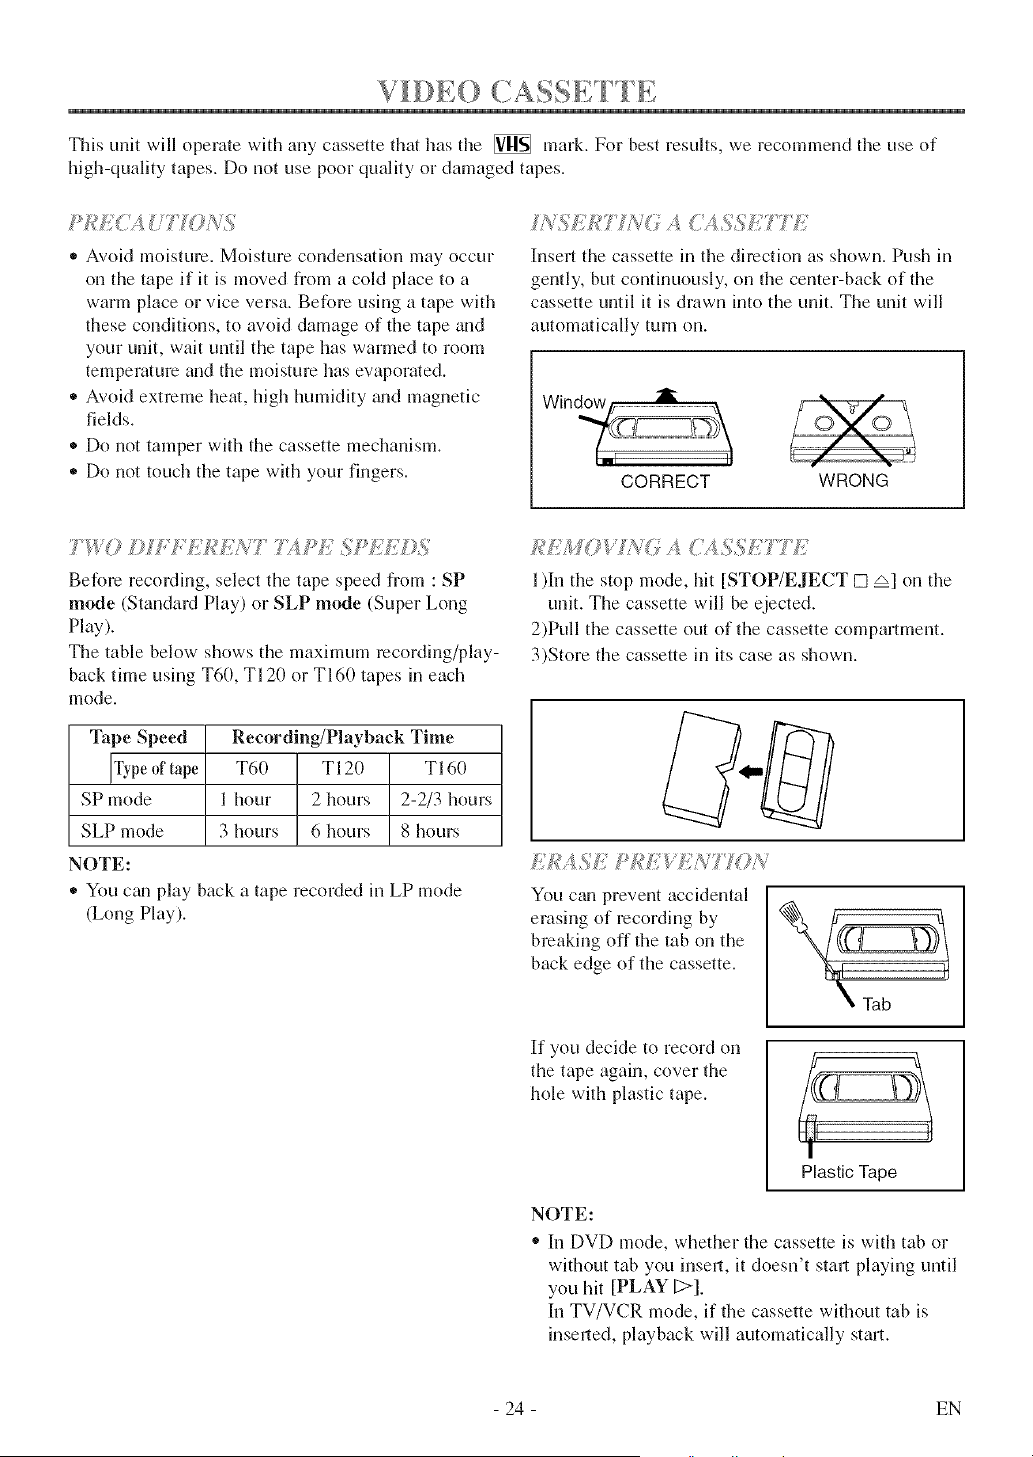
Insert the cassette in the direction as shown. Push in
gently, but continuously, on the center-back of the
cassette until it is drawn into the unit. The unit will
automatically turn on.
I
CORRECT WRONG
7 ,f) D T 7;4;>ESPi/(
Before recording, select the tape speed from : SP
mode (Standard Play) or SLP mode (Super Long
Play).
The table below shows the maximum recording/play-
back time using T60, T120 or TI60 tapes in each
mode.
Tape Speed
Fypeof tape
SP mode
SLP mode
NOTE:
Recording/Playback Time
T60 TI20 TI60
1 hour 2 hours 2-2/3 hours
3 hours 6 hours 8 hours
- You can play back a tape recorded in LP mode
(Long Play).
/?SM©V A SSJ,I777(
1)In the stop mode, hit [STOP/EJECT [] zx] on the
unit. The cassette will be ejected.
2)Pull the cassette out of the cassette compartment.
3)Store the cassette in its case as shown.
HdA Sk #q?b; _#?N7 I( N
You can prevent accidental
erasing of recording by
breaking off the tab on the
back edge of the cassette.
Tab
If you deckle to record on
the tape again, cover the
hole with plastic tape,
!
Plastic Tape
NOTE:
" In DVD mode, whether the cassette is with tab or
without tab you insell, it doesn't stml playing until
you hit [PLAY D],
In TV/VCR mode, if the cassette without tab is
inserted, playback will automatically start,
- 24 - EN
[TV/VCRI
Make sure ...
• The unit must be turned on.
If the erase-prevention tab llas been removed, the
unit will stari playback automatically.
[
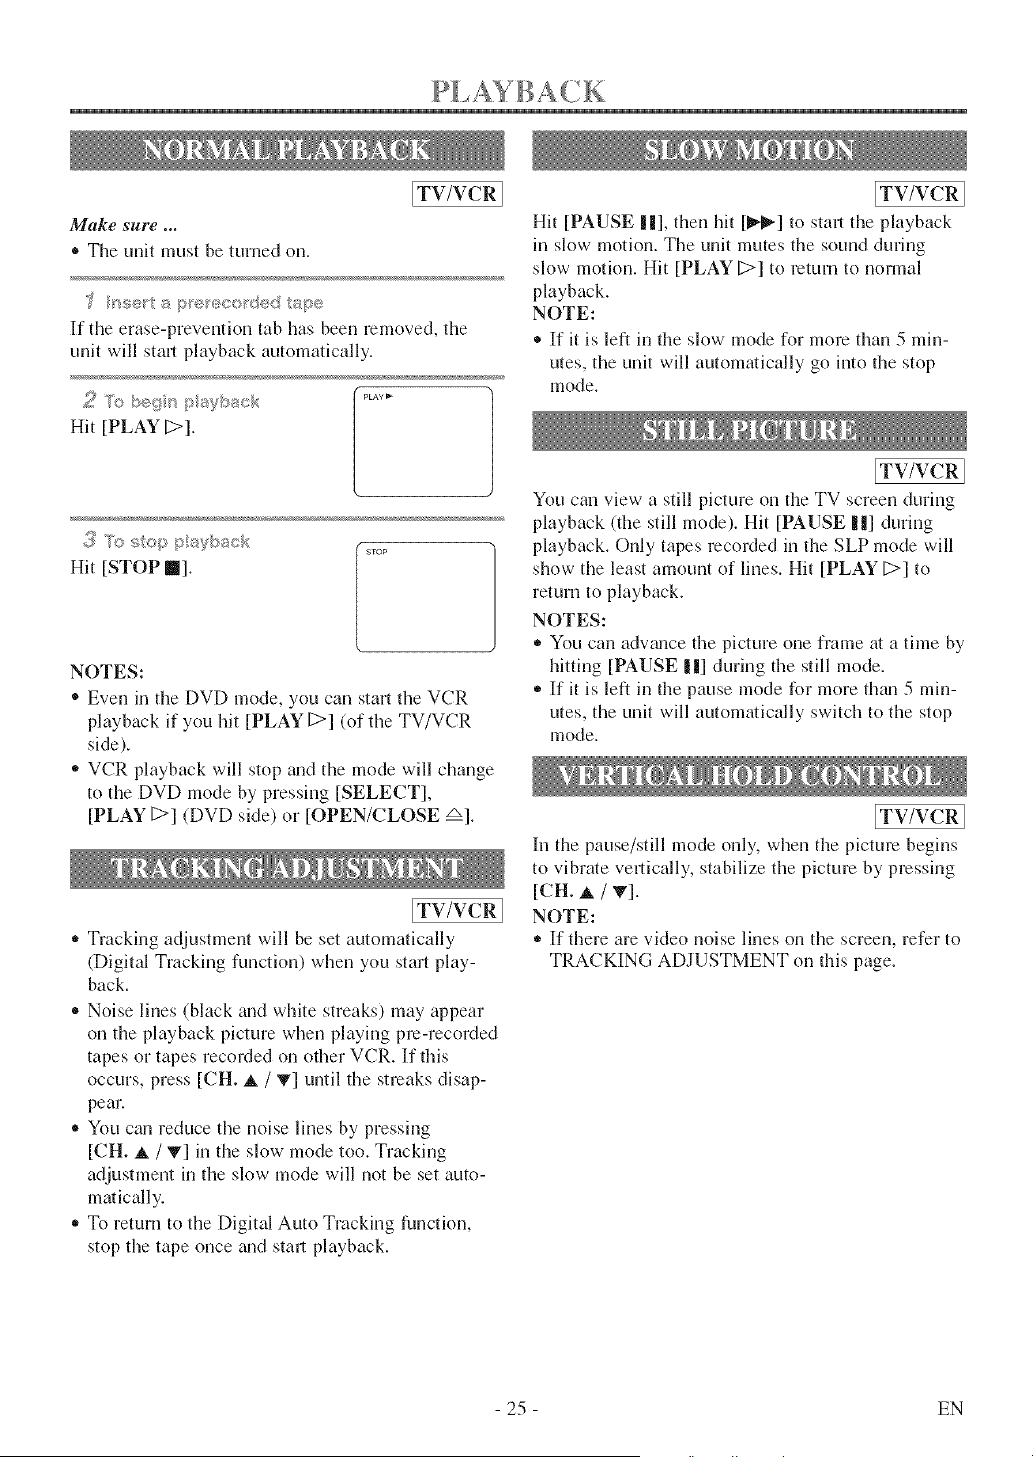
Hit [PLAY [>].
.... _o y ........... (sTop
Hit [STOP II].
NOTES:
® Even in the DVD mode, you can start the VCR
playback if you hit [PLAY [>] (of the TV/VCR
side).
'_ VCR playback will stop mid the mode will change
to the DVD mode by pressing [SELECT],
[PLAY [>] (DVD side) or [OPEN/CLOSE _].
[TV/VCR 1
,_ Tracking adjustment will be set automatically
(Digital Tracking function) when you start play-
back.
• Noise lines (black and white streaks) may appear
on the playback picture when playing pre-recorded
tapes or tapes recorded on other VCR. If this
occurs, press [CH. _, / V] until the streaks disap-
pear.
• You can reduce the noise lines by pressing
[CH. _, / V] in the slow mode too. Tracking
adjustment in the slow mode will not be set auto-
matically.
,_ To return to the Digital Auto Tracking function,
stop the tape once gradstart playback.
[TV/VCR
Hit [PAUSE ||], then hit [ll_!_] to start the playback
in slow motion. The unit mutes the sound during
slow motion. Hit [PLAY [>] to return to normal
playback.
NOTE:
® If it is left in the slow mode for more than 5 min-
utes, the unit will automatically go into the stop
mode.
[TV/VCR
You can view a still picture on the TV screen during
playback (the still mode). Hit [PAUSE 1|] during
playback. Only tapes recorded in the SLP mode will
show the least amount of lines. Hit [PLAY [>] to
return to playback.
NOTES:
,_ You can adwmce the picture one frame at a time by
hitting [PAUSE |l] during the still mode.
,_ If it is left in the pause mode for more thml 5 min-
utes, the unit will automatically switch to the stop
mode.
[TV/VCR
In the pause/still mode only, when the picture begins
to vibrate vertically, stabilize the picture by pressing
[CH. A / v].
NOTE:
,_ If there are video noise lines on the screen, refer to
TRACKING ADJUSTMENT on this page.
25 EN
SPECIAL PI,AYBACk
Make sure .,,
• The unit must be turned on,
® Insert a prerecorded tape,
ITV/VCRI
This function enables you to hnprove the picture
quality when playing back worn cassettes such as
rented tapes,
f Se_c /)SERSS!E7 .!>'
[_ TVNCR SETUP
Hit [SETUP]. _,,_'...............o_oo_<
CHANNEL SET UP
Press [A / T] to point to "USER'S _o,,_'......_ o_
LANGUAGE [ENGUSH]
SET UP". then hit [ENTER]. z_o°......,_.o,_°<
T}ME SEARCH
INDEX ,qEARC H
[TV/VCR 1
The unit has the auto repeat function that allows you to
repeat a t@e indefinitely without hitting [PLAY _].
ALL REPEAT: Repeat playback from the beginning
to the end of the tape.
BLANK REPEAT: Repeat playback from the begin-
ning to a blank part, whbh is blank for more them
10 seconds.
;.:;_ee<:2S/=RS !},_E _J_, •..........
TIMER PROGRAMMING
Hit [SETUP]. _..........
CIqANNELgET UP
USEWS gET Up
Press [_ / T] to point to "USER'S ..........
LANGUAGE [ENGLISH]
SET UP", then hit [ENTER]. =,_o°......_F,_,_°_
T_ME SEARCH
_NI)EXSEARCH
© , /*} * "f_ , *( 1
Press [_, / T] to point to .... ....
RENTAL ..... ON]
"RENTAL". ............
mJTO RETURN [OF_]
Hit [ENTER] until [ONI appears.
Hit [SETUP] to return to the TV mode.
_{ Stair p aybsck
Hit [PLAY [;>] to start playback.
"RENTAL PLAY _" appears.
® Once you select the rental mode, it stays in effect
even after you turn off the unit.
7Y/<;%NCEL TIE £EATXL MODE
Repeat steps 1 to 2 and select [OFF] using
[ENTER]. Hit [SETUP] to return to TV mode.
Even if there is a power failure of any kind, the
unit will retain its memory lbr this feature.
...... _ _ _l_ •_
._ Seec 'ALL/of %..,._s,K ....,......
Press [_ / T] to point to "REPEAT
RENTAL OE_
PLAY". .......................
AUT© RETURN {OaP
Hit [ENTER] repeatedly until your
desired selection [ALL] or
[BLANK] appears.
_, Ex£ th:÷/s,epeat ?*s_ :-;e:tf_g
Hit [SETUP] to return to the TV mode.
_{ Star p sybsck
Hit [PLAY [>] to start the Repeat Play.
"REPEAT PLAY _" appears.
® Once you select the repeat play mode, it stays in
effect even after you turn off the unit.
,, If the rental mode is set [ONh the "RENTAL
PLAY _" display has priority.
7'{'/C'!,,A,CEL 7'HE ?/ ?"MODE
Repem steps 1 to 2 and select [OFF] using
[ENTER]. Hit [SETUP] to return to TV mode.
Even if there is a power failure of any kind, the
unit will retain its memory for this feature.
- 26 - EN
Make sure ...
• The unit must be turned on.
® Insell a tape.
NOTE:
® Tapes recorded in the SP or LP mode will normally
display a noise bar on the TV screen and the pic-
ture may revert to Black mad White.
[TV/VCR 1
This function allows you to search easily a beginning
point that you want to review by rewinding or fast
forwarding.
NOTE:
• Zero Return WILL NOT work on a bkmk tape or
a blank portion of a tape.
Rewind or fast forward the tape to the beginning
point at which you wmlt to review.
Hit [C.RESET] repeatedly.
,,_ Beg_ etcH3 _g o pk_ybsct,_
Press [RECORD] or [PLAY [>].
Hit [STOP II] when recording or playback is com-
pleted.
R;_acw_÷ ZERO _!!'T_¢RN
Hit [SETUP] ............
Press [A / .] to point tu "ZERO _'.(C72_{{(_(....
USER'S SET UP
RETURN", then hit [ENTER]. &%'_L_%_u_._
The unit will begin rewinding and - %;%?g_
TIME SEARCH
the counter will appear on the TV ...........
screen.
The tape will automatically stop when the counter
returns to 0:00:00 (approx.).
[TV/VCR 1
This feature is very useful in findhlg or skipping over
a particular scene on a tape. In this mode, the sound
will be muted.
During playback, press [1_-] or [_] to view- at a
high speed (in forward/reverse).
Hit [PLAY [>].
[TV/VCR ]
The Time Search function makes it possible to quick-
ly adwmce the tape to your desired position simply
by entering the exact amount of playback time you
want to skip.
NOTE:
,, Time Seamh can be set up to a maximum of 9
hours 50 minutes (9:50) by 10 minutes at a time.
In the ccvample below: To watch a program before/
after 2 hour 50 minutes from the present position, in
either direction.
rIMER PROGR4MMIN@
Hit [SETUP]. _..........CIqANNEL SET Up
USER'S S_T Up
Press [at / T] to point to "TIME ..........LANGUAG_ [_NE_USH]
CAPTION [OFF]
SEARCH", then hit [ENTER]. _ ,,_z........._o.
_NDFX SFARCH
,_;,;; yo/ '<@s/'e( ti '_e
F
Press [at / _'] until your desired time/'!%_{{U"
appears. (Example: 2:50" stands for _]
2 hours 50 minutes) [
If you wish to cancel the Time [
Search at this point, hit [SETUP].
t
By pressing [_1/_], the unit will rewind or fast for-
ward to the specified point.
The time counts down during the search. When the
display shows "0:00", the tape will star_ playback
automatically.
7@ CAN(Tf' D /£/AG 7 /i f£ 5f'A£(7;
Press [STOP/EJECT [] zx] on the ul_itor [STOP II].
This will delete the selected time.
2 ©hssgesesch 'g_,_eed
Press [_'_] or ['_'_] again to view at super high
speed (in the LP/SLP modes only).
- 27 - EN

ITWVCRI
This feature provides a method of indexing the start-
ing point so that it can be easily returned to in either
fast forwaM or rewind mode.
,, The index mark will be made automatically when
[RECORD] is hit. It will also be marked at the
starting point of Timer recording and OTR.
* The index mark will not be recoMed if [PAUSE 1|]
is hit and released during recoMing.
,, The time gap between making the index marks on
the tape should be greater than 1 minute for SP
recording, 2 minutes for LP recording and 3 min-
utes for SLP recording.
,, In some cases, the index mark at the beginning of
video tape cannot be detected.
Example: You arc watching program number 4 and
want to fast forward to program number 7. You
must skip three programs.
CURRENT PLAYBACK PROGRAM
Beginning of l End of
the tape • the tape
F4 3 2 1 1 2 3
INDEX MARK
"£ ,,:,e_:_, 4A,oX ............
< .... ' ;EARC!"
TIMER PROGRAMMING
SETTING CLOGK
Hit [SETUP] .............
{JSKIq'S SET tip
V CIq_p SET tip
Press [A / V] to point to "INDEX ......... [....... ]
CAPTEOtq lOFt]
SEARCH", then hit [ENTER]. ,,._•........._o.
_NDE× SB_IqCH
2 K'{e' y©,f desi e /'"D'_)_°"
Press [_, / _] until the number of [
programs that you want to skip
appears.
(Example: "03" for 3 programs)
'_ The Index Search mode will be canceled if the pro-
cedures are not activate<] in 30 seconds.
,_£Beg_s _d®x Sea_cf_
Press [_ / _]. The unit begins rewinding or fast for-
warding to the beginning of desired program.
NOTE:
® Eve U time an index signal is skipped, the number
in the program indicator decreases by one.
g Afl®_ _dex S®a_cs
When the preset program is reached, the unit will
start playback automatically.
,, A video cassette must be inserted in the unit for
this function to work.
® The number of Index Searches can be set up to 20.
This function will not operate in the recording mode.
,, When you want to cgmcel the Index Search while
in progress, hit [STOP II].
SPECIAL FEATURES
ITV/VCRI
This shows the elapsed recording or playback time in
hours, minutes, and seconds. (The displayed time will
not ch_mge on a bl_mk tape or bhmk portions on the
tape.) The "-" indication will appear when the tape
has rewound fresher them "0:00:00" on the tape
CouuteL
[TV/VCR]
,, When the end of a tape is reached during record-
ing, playback, or fast-forward, the tape will auto-
matically rewind to the beginning. After rewinding
finishes, the unit will eject the tape and turn itself
off.
,, This function is operative when Repeat Play is set
to the [OFFI position.
* The tape will not auto-rewind during timer record-
ing or One Touch Recording.
- 28 - EN
Make sure _.
,, The unit must be turned on.
® ][nsell a cassette tape with its erase-prevention tab in place. (If necessary, rewind or fast forward tile tape to
the point at which you want to begin recording.)
NOTES:
,, This unit will ONLY record and view the same channel.
® This unit cannot record the contents from the built-in DVD.
[TV/VCR 1
You czmONLY watch the same TV program that is
being recorded.
Press the Number buttons or CH10
[CH. A / v].
NOTE:
,, ]Ifthe unit is connected to a cable box or satellite
box, the unit must be on CH3 or CH4, then the
channel to be recorded must be selected on the
cable box or satellite box.
!
Hit [SPEED] to select the desired
tape speed (SP/SLP).
sp
!
Hit [RECORD].
SF
Hit [STOP _].
[TV/VCR
Hit [PAUSE | 1] to temporarily stop ( .....
recording. [
Press [PAUSE ||] or [RECORD] /
to resume recording. /
NOTES: [_
• After 5 minutes, the unit will
automatically switch to the recording mode to pre-
vent tape damage.
® If Closed Caption mode is on, the On-Screen
Display will appear for 5 seconds, then disappear.
29 EN
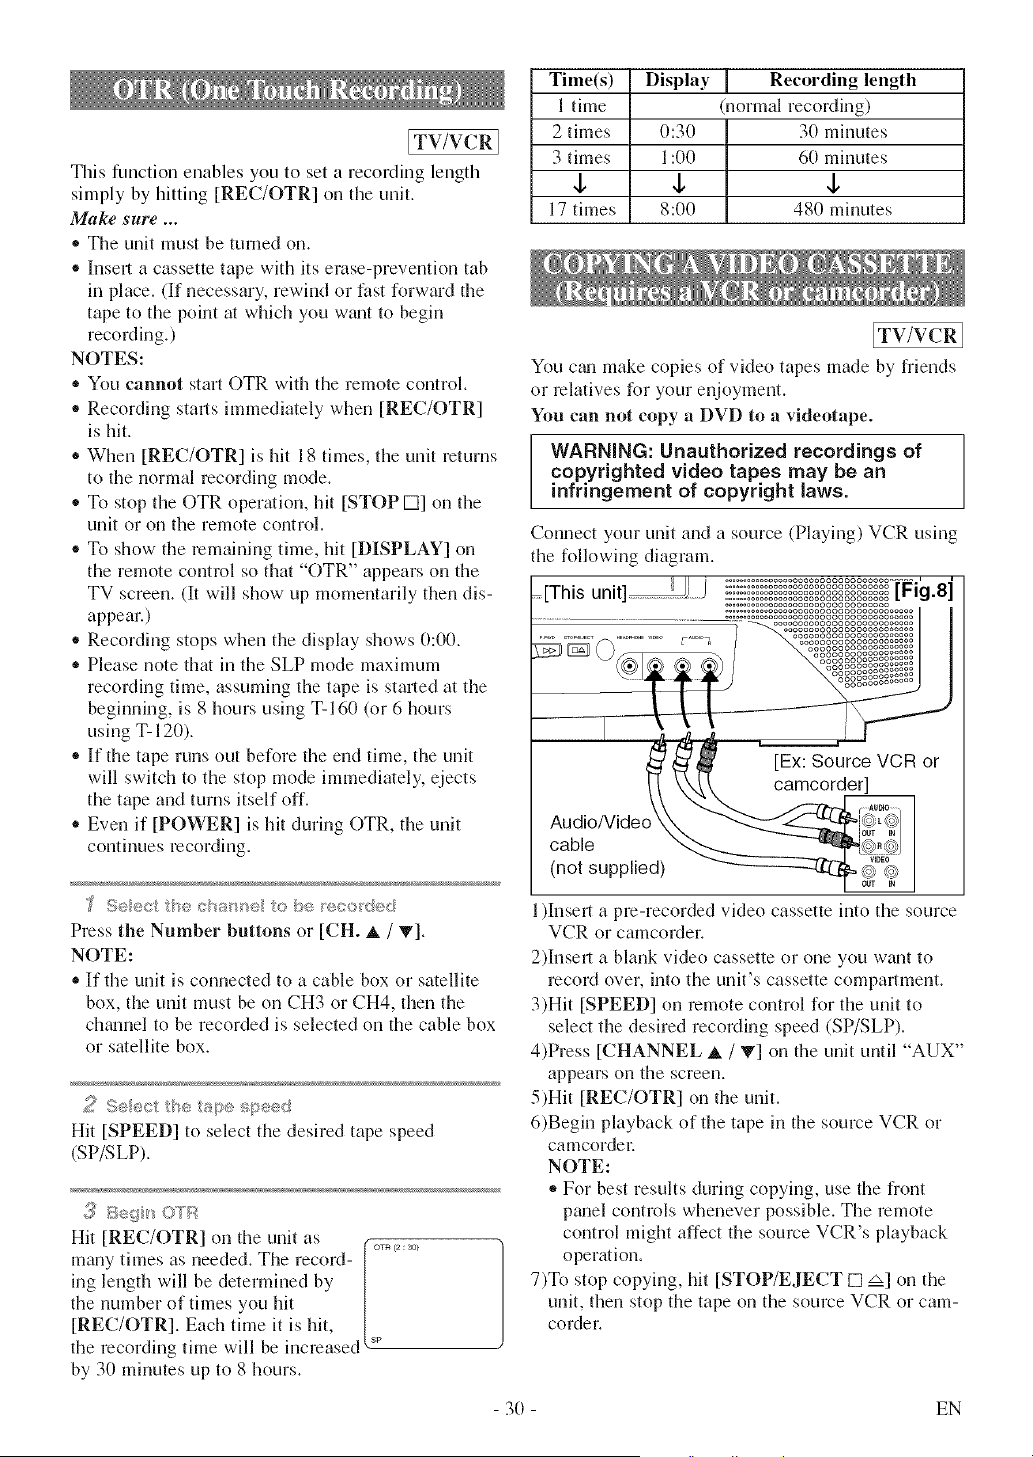
ITV/VCRI
This function enables you to set a recording length
simply by hitting [REC/OTR] on tile unit.
Make sure ...
,, The unit must be turned on.
®Insell a cassette tape with its erase-prevention tab
in place. (If necessary, rewind or fast forward the
tape to tile point at which you wzmt to begin
recording.)
NOTES:
,, You cannot start OTR with the remote control.
®Recording starts immediately when [REC/OTR]
is hit.
+ When [REC/OTR] is hit 18 times, tile unit returns
to the normal recording mode.
,, To stop tile OTR opermion, hit [STOP D] on tile
unit or on the remote control.
®To show the remaining time, hit [DISPLAY] on
the remote control so that "OTR" appears on the
TV screen. (It will show up momentarily then dis-
appear.)
+ Recording stops when the display shows 0:00.
,, Please note that in the SLP mode maximum
recording time, assuming the tape is staried at the
beginning, is 8 hours using T-160 (or 6 hours
using T- 120).
,, If the tape runs out before the end time, the unit
will switch to the stop mode immediately, ejects
the tape and turns itself off.
+ Even if [POWER] is hit during OTR, the unit
continues recording.
; Seec ++e c++a+s+se+o be ++i_co++<ed
Press the Number buttons or [CH. _, / T].
NOTE:
,, If the unit is connected to a cable box or satellite
box, the unit must be on CH3 or CH4, then the
chtumel to be recorded is selected on the cable box
or satellite box.
2 Seect t}/_+tape speed
Hit [SPEED] to select the desired tape speed
(SP/SLP).
[REC/OTR] on the unit as
iH_ny times as needed. The record-[o_<_:_0>
ing length will be determined by /
the number of times you hit |
[REC/OTR]. Each time it is hit, {,_
the recording time will be increased v
by 30 minutes up to 8 hours.
Time(s) Display Recording length
1 time normal recording)
2 times 0:30 30 minutes
3 times 1:00 60 minutes
,b ,b ,b
17 times 8:00 480 minutes
[TV/VCR 1
You czul make copies of video tapes made by friends
or relatives for your enjoyment.
You can not copy a DVD to a videotape.
WARNING: Unauthorized recordings of
copyrighted video tapes may be an
infringement of copyright laws.
Connect your unit and a source (Playing) VCR using
the following diagram.
=[This unit]_J / ::::::sssaas=gagggggggggggsg$°°°_°"'
.................... o o oooooooooooooooooooooo F 8
................................. [ g ]
........... oooooooooooooooooooooo
...... o_o_ooooooooaoooooo ooooooooooooo
......................................... SiiooO_ooO!oSo_o_o_o_oL:_
_ (_) ogggggggggggggaagga
ooooooooooooooooo
oooooooooooooooo
ooooooo%gooooo
ooooooo ooooo
ooooooOOOOOOO
t! \k._,_ camcorder]
(not supplied)
1)Instal a pre-recorded video cassette into the source
VCR or camcorder.
2)Instal a blank video cassette or one you want to
record over, into the unit's cassette compartment.
3)Hit [SPEED] on remote control for tile unit to
select the desired recording speed (SP/SLP).
4)Press [CHANNEL A / V] on the unit until "AUX"
appears on the screen.
5)Hit [REC/OTR] on the unit.
6)Begin playback of the tape in the soume VCR or
camcorde_:
NOTE:
,, For best results during copying, use the front
pm_el controls whenever possible. Tile remote
control might affect the soume VCR's playback
operation.
7)To stop copying, hit [STOP/EJECT [] zx] on the
unit, then stop the tape on the soume VCR or cam-
corder.
- 3O - EN
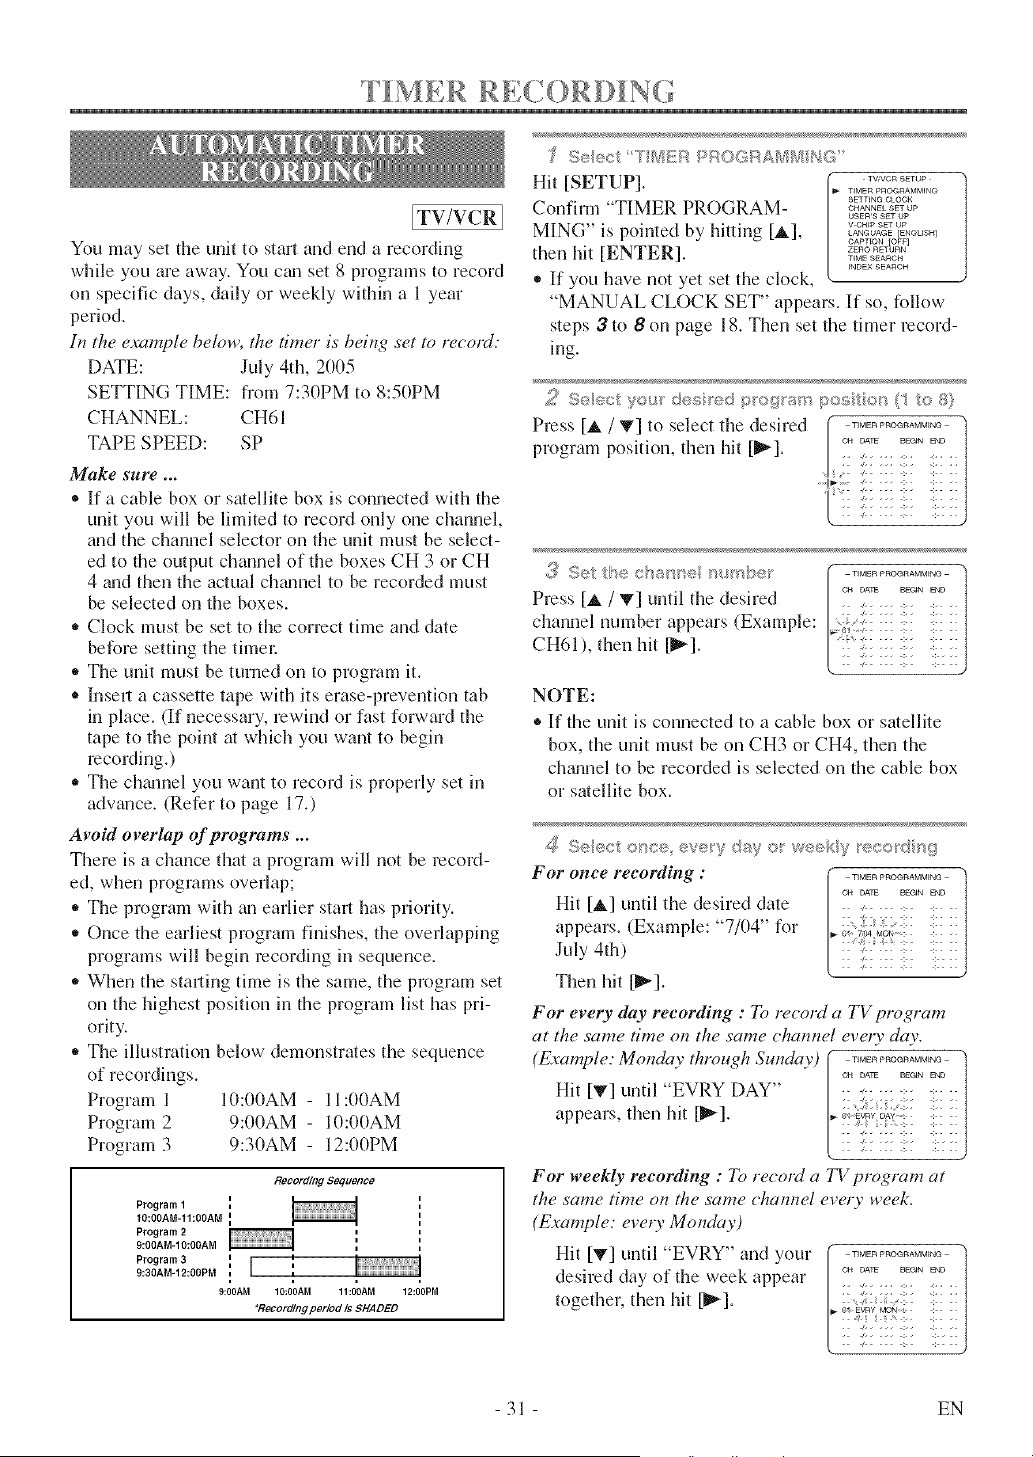
F I M E R R [,,£ 0 R D [ N (:0
[TV/VCRI
You may set the unit to start and end a recording
while you are away, You cm_ set 8 programs to record
on specific days, daily or weekly within a 1 year
period,
In the example below, the timer is being set to record:
DATE: July 4th, 2005
SETTING TIME: from 7:30PM to 8:50PM
CHANNEL: CH61
TAPE SPEED: SP
Make sure ...
® If a cable box or satellite box is connected with the
unit you will be limited to record only one channel,
and the channel selector on the unit must be select-
ed to the output channel of the boxes CH 3 or CH
4 grad then the actual chmmel to be recorded must
be selected on the boxes.
,, Clock must be set to the correct time and date
before setting the timm:
,, The unit must be turned on to program it.
* Inseri a cassette tape with its erase-prevention tab
in place. (If necessary, rewind or fast forward the
tape to the point at which you want to begin
recording.)
,, The chmmel you want to record is properly set in
advance. (Refer to page 17.)
Avoid overlap of programs ...
There is a chauce that a program will not be record-
ed, when programs overlap;
,, The program with an earlier start has priority.
,, Once the earliest program fflfishes, the overlapping
programs will begin recording in sequence.
,, When the stmling time is the same, the program set
on the highest position in the program list has pri-
ority.
,, The illustration below demonstrates the sequence
of recordings.
Program 1 10:00AM - II:00AM
Program 2 9:00AM - 10:00AM
Program 3 9:30AM - 12:00PM
RecordingSequ_¢o
Program 1 {
10:0gAM-11:00AM {
Program 29:00AM-10:0OAM
Program 3 {
9:30AM-12:00PM i
9:00AM 10:00AM 11:00AM 12:00PM
_RecordlngpeHod is SHADED
'_ Seect 7'[_i[2RPROGRA ?_MG
Hit [SETUP]. , ...........
TIMER PROGRAMMIN@
SETTING CLOCK
Confirm "TIMER PROGRAM .............
USEWS SET Up
MING" is pointed by hitting [A], _.........
LANGUAGE [ENGUSH]
CAPTtON /OFN
then hit [ENTER]. ,,_•........._o.
_NDEX SEAnCH
,, If you have not yet set the clock,
"MANUAL CLOCK SET" appears. If so, follow
steps 3 to 8 on page 18. Then set the timer record-
ing.
2 S÷,_< yoga'des e< }gfogr m pos o/':,_ te
.............t
Press [_ / V] to select the desired _ _.......
program position, then hit [_].
2
Press [_, / _] until the desired . ;..... :-- :- .
channel nun%er appears (Example: [::
CH61), then hit [_'q. : :_ : x !::::
NOTE:
®If the unit is connected to a cable box or satellite
box, the unit must be on CH3 or CH4, then the
ch_mnel to be recorded is selected on the cable box
or satellite box.
£_ S<ect o!_ce eve_y da? e_ wee e_:;:ofs
For once recording :
Hit [A] until the desired date
appears. (Example: "7/04" for
July 4th)
Then hit [_].
"qM_R PRO_RAMMtNG l
C_ DAT¢ BF@N END
. /..... >. :..
- -Jk.{{ .:.. <. ..
• :x ::
For every day recording : To record a TV program
at the same time on the same chamwl every day.
(Example: Monday through Sunday) ................ "]
c_ DATe _@N END
1
Hit [T] until "EVRY DAY" - -::
appears, then hit [_-]. •_d&;2_: ::
For weekly recording : To record a TV program at
the same time on the same chamwl every week.
(Example: every Monday)
Hit [V] _ntil 'EVRY" a]d your
desired day of the week appear
together, then hit [_].
31 EN
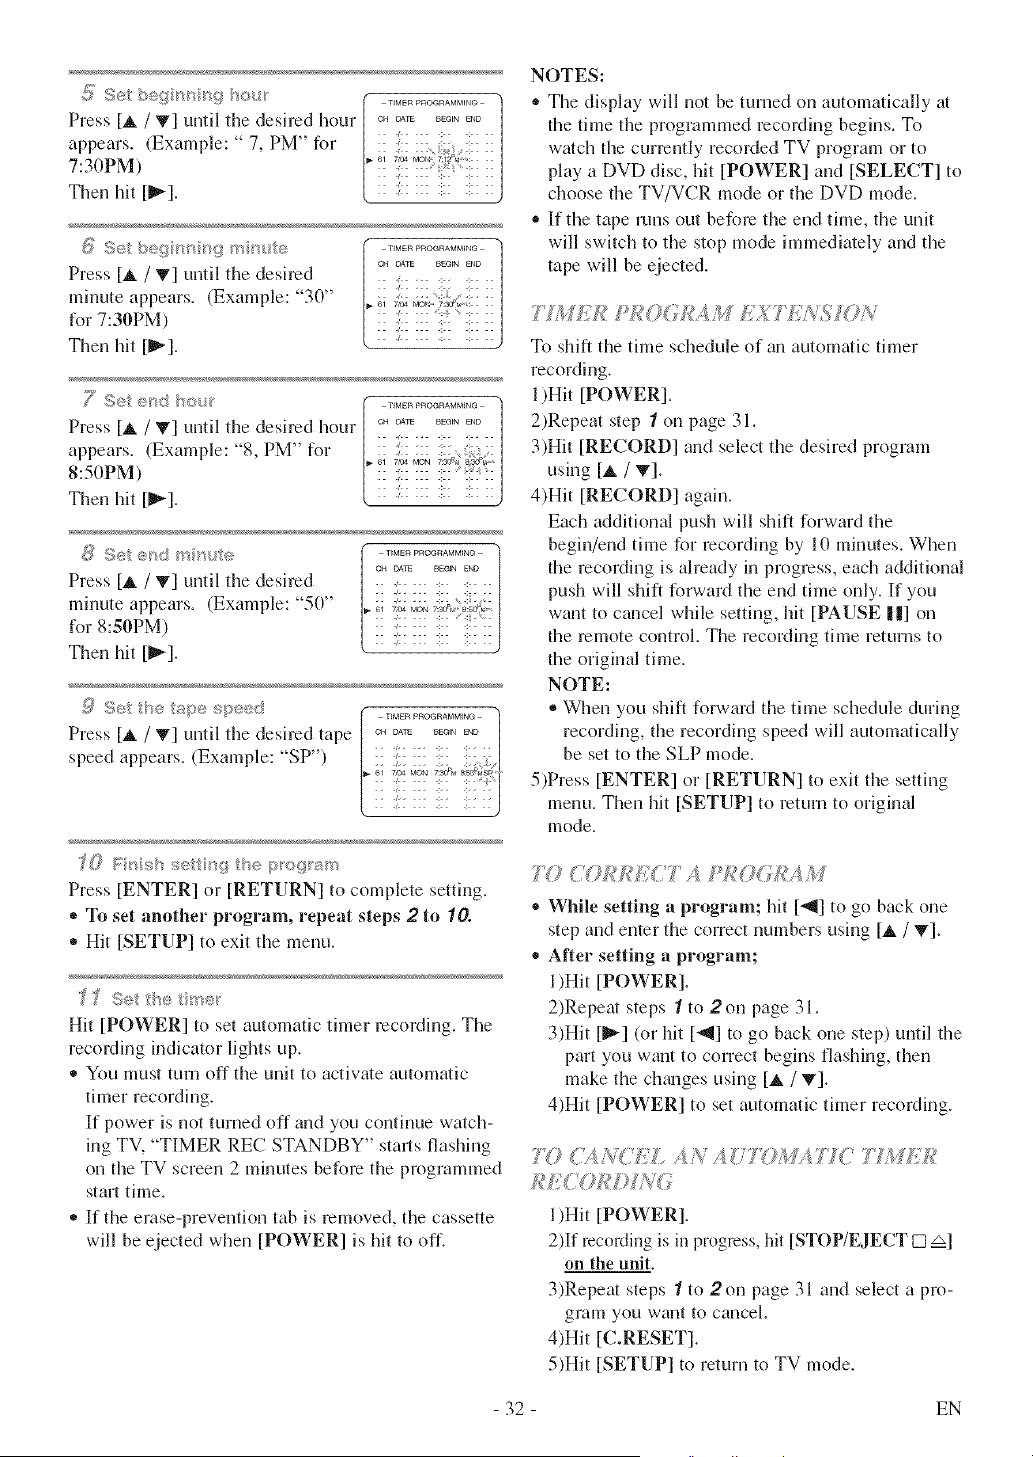
_{i:Set /" ................ /x
PressIA/V]unt.thedesiredhour[........... !
appears. (Example: " 7. PM" for | ! :, : ]
3 _ 61 7;94 MO/, 71_%,_:
7:.0PM) ['::::: :: *':::::1
Then hit [_'_]. [ :: ::'::::: :::: ::::::j
;>o beq _,' _¢(} r_MERPROaRAMM_G
Press [A / T] until the desired } CH oi_ ........
minute appears. (Example: "3 "' :: :;: ::: ::: ::: ::
for 7:3OPM)
Then hit [_].
SS " S" ) OH OArE BEGN aqD
Pre,v [_, / V] until the de,'ned h(ur | ............ |
appears. (Example: "8. PM" for m_:: 2: ::: :::, : ://
8:
Then hit [_]. ( .... )
i! "/
EZ oo72E7°
Press [A / V] until the desired :i:: i|i i| i
minute appears. (Example: "50" 7, ....... _@li _[_0_
for 8:SePM)
Then hit [_].
Press [_, / _'] until the desired tape
speed appears. (Example: "SP')
f0 Fresh _:tt r _ the pro!_r_am
Press [ENTER] or [RETURN] to complete setting.
,, To set another program, repeat steps 2 to 10.
* Hit [SETUP] to exit the menu.
Hit [POWER] to set automatic timer recording. The
recording indicator lights up.
You must turn off the unit to actiwfe automatic
thner recording.
If power is not turned off and you continue watch-
ing TV, "TIMER REC STANDBY" starts flashing
on the TV screen 2 minutes before the programmed
start time.
,, If the erase-prevention tab is removed, the cassette
will be ejected when [POWER] is hit to off.
NOTES:
,, The display will not be turned on automatically at
the thne the programmed recording begins. To
watch the currently recorded TV program or to
play a DVD disc, hit [POWER] and [SELECT] to
choose the TV/VCR mode or the DVD mode.
,, If the tape runs out before the end time, the unit
will switch to the stop mode immediately and the
tape will be ejected.
71MEB ,gkfO< EXT£",,%IO/ ,
To shift the time schedule of an autommic timer
recording.
1)Hit [POWER].
2)Repeat step 1 on page 31.
3)Hit [RECORD] and select the desired program
using [_, / T].
4)Hit [RECORD] again.
Each additional push will shift forward the
begin/end time for recording by 10 minutes. When
the recording is already in progress, each additional
push will shift forward the end time only. If you
want to cm_cel while setting, hit [PAUSE I|] on
the remote control. The recording time returns to
the original time.
NOTE:
®When you shift forward the time schedule during
recording, the recording speed will automatically
be set to the SLP mode.
5)Press [ENTER] or [RETURN] to exit the setting
menu. Then hit [SETUP] to mtum to original
mode.
7i0 COkREC T i At?OGBAM
* While setting a program; hit [-_] to go back one
step and enter the correct numbers using [_, / _'].
* After setting a program;
1)Hit [POWER].
2)Repeat steps 1 to 2 on page 31.
3)Hit [_] (or hit ['_l] to go back one step) until the
part you want to correct begins flashing, then
make the ch_mges using [_, / T].
4)Hit [POWER] to set automatic timer recording.
?Y? CA?<C :DgAN AUTOMA'77C TI;4[Ek I
1)Hit [POWER].
2)If recording is in progress, hit [STOP/EJECT [] zx]
on the unit.
3)Repeat steps 1 to 2on page 31 and select a pro-
gram you want to cancel.
4)Hit [C.RESET].
5)Hit [SETUP] to return to TV mode.
- 32 - EN
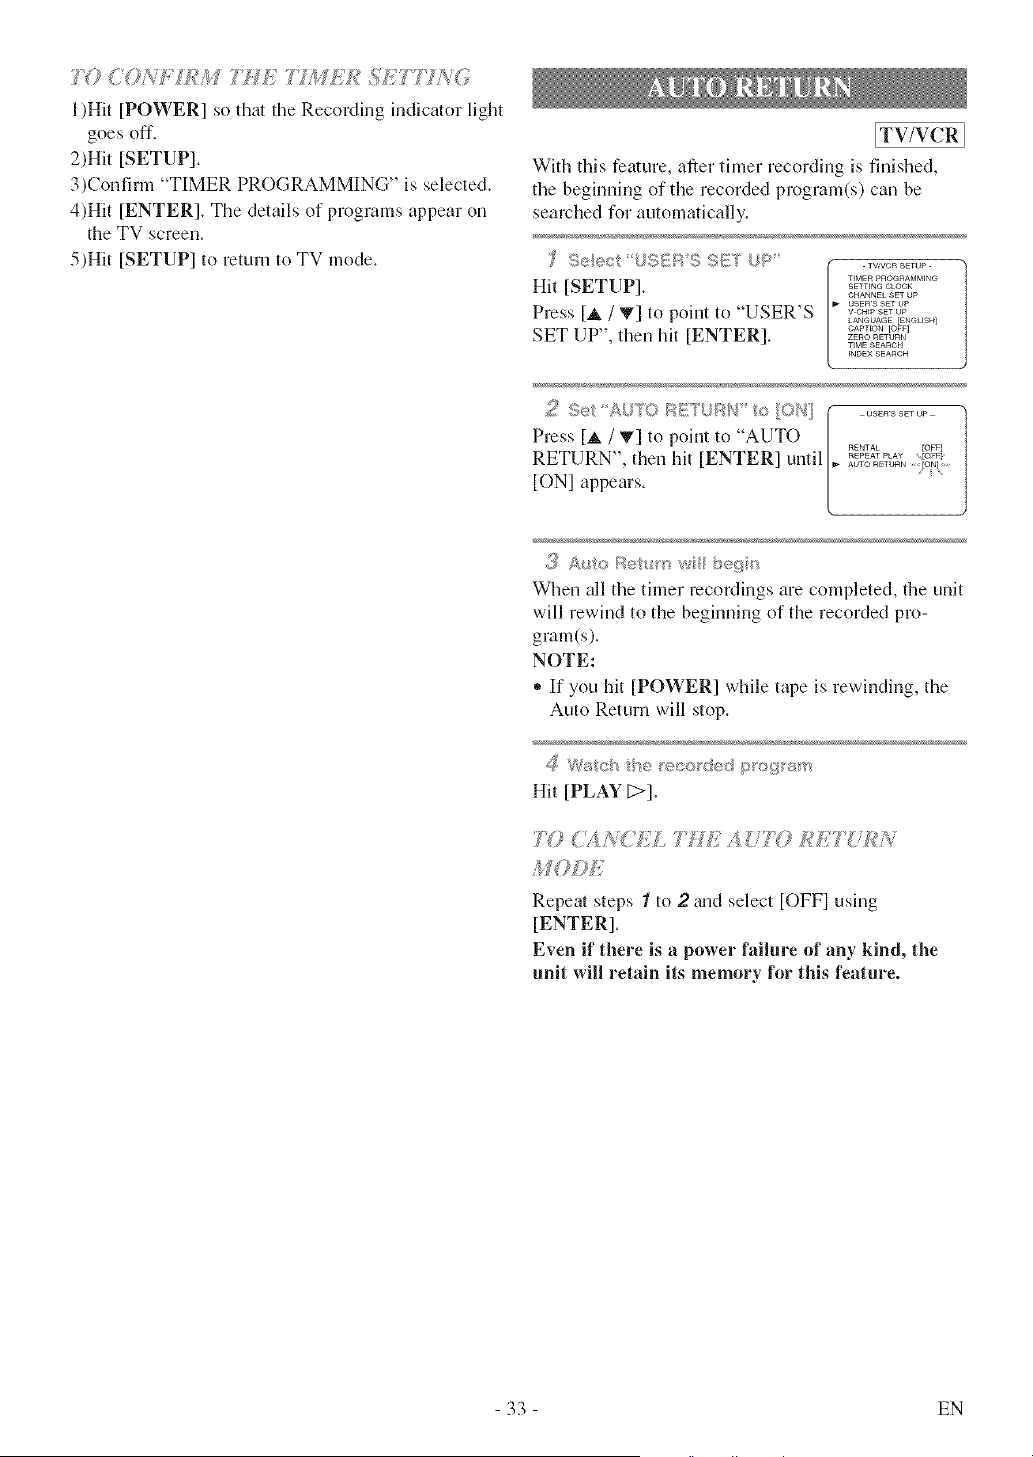
7Y}COiY]"£kl7,'HE77JWED:<SE77 A<W
l )Hit [POWER] so thin the Recording indicmor light
goes off,
2)Hit [SETUP],
3)Confirm "TIMER PROGRAMMING" is selected,
4)Hit [ENTER], The details of programs appear on
the TV screen,
5)Hit [SETUP] to return to TV mode,
[TV/VCR I
With this feature, after timer recording is finished,
the beginning of the recorded program(s) can be
searched for automatically.
TV[VC R SETUp
TIMER p_qOG_qAMMIN@
Hit [SETUP]. _............
CHANNEL SET UP
usEwa SET UP
Press [A / T] to point to "USER'S ..........
LANGUAGE [ENGU$H]
CAPnON [OFF]
SET UP", then hit [ENTER] ...........
TIME ,qEA[qC H
INDEX SEARCH
Press [_, / 'Iv] to point to "AUTO / ...... toF_
RETURN", then hit [ENTER] until I,_............. to:_AUTO RETURN [O_4 .....
[ONI appears. /
t
When all the timer recordings are completed, the unit
will rewind to the beginning of the recorded pro-
gram(s).
NOTE:
,, If you hit [POWER] while tape is rewinding, the
Auto Return will stop.
Hit [PLAY [>].
7 } ( > ."_. [...... //_... _'
Repeat steps "/to 2 m_d select [OFFI using
[ENTER].
Even if there is a power failure of any kind, the
unit will retain its memory for this feature.
33 EN
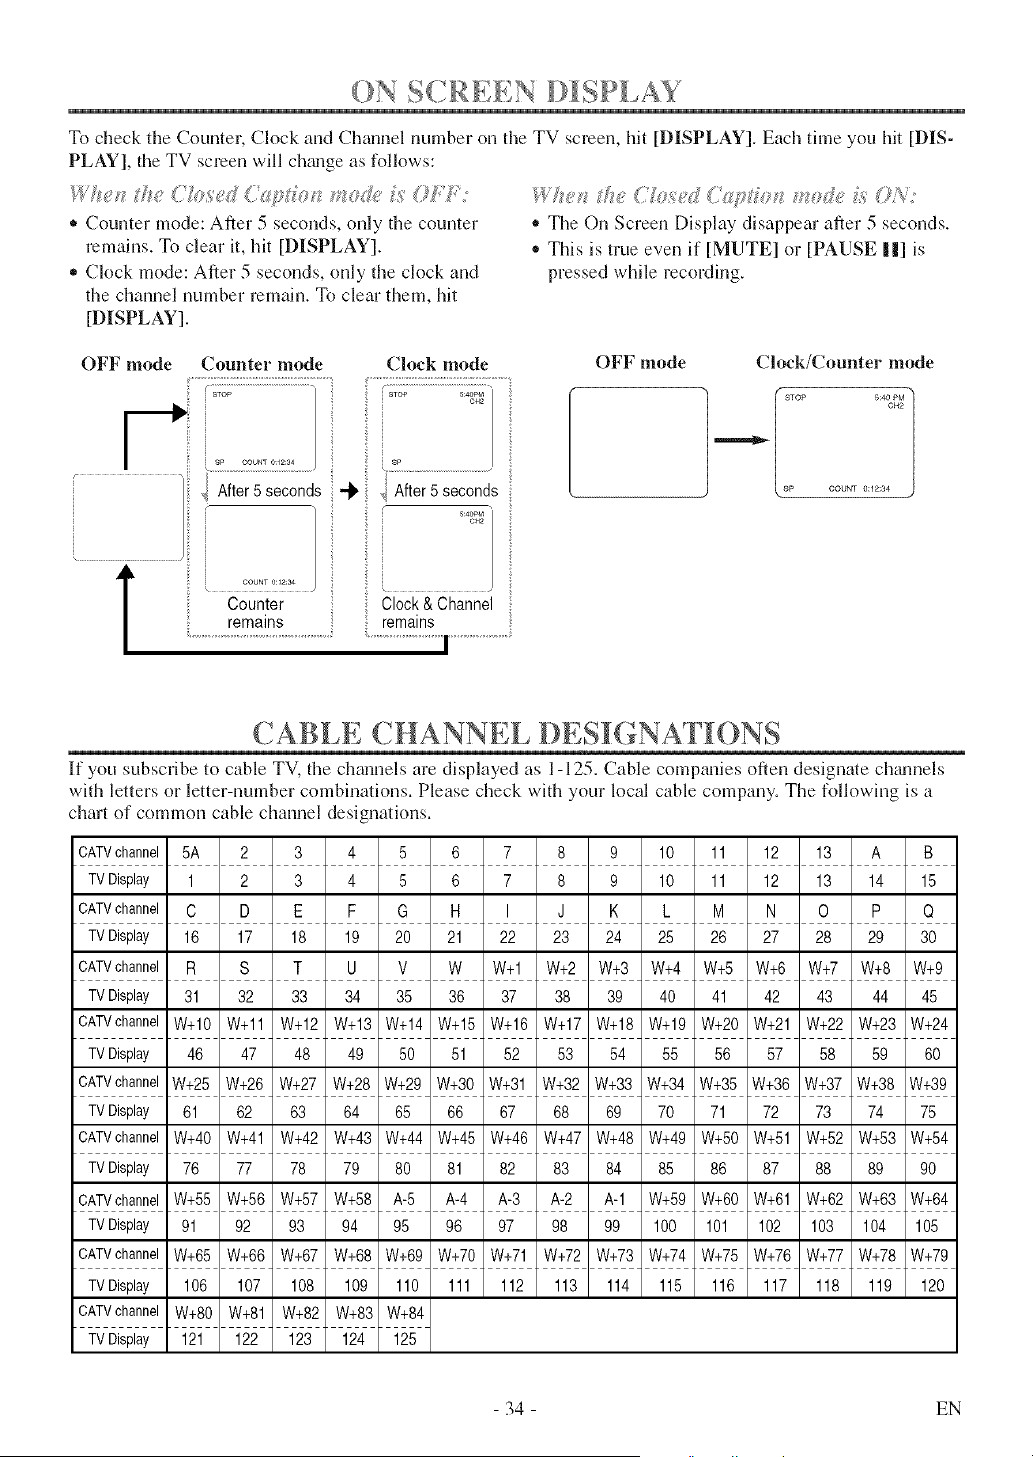
()N SCREEN DISPI AY
To check the Counter, Clock and Channel nnmber on the TV screen, hit [DISPLAY], Each thne you hit [DIS-
PLAY], the TV screen will chmlge as follows:
* Counter mode: After 5 seconds, only the counter
remains. To clear it, hit [DISPLAY].
* Clock mode: After 5 seconds, only the clock and
the channel number remain. To clear them, hit
[DISPLAY].
• The On Screen Display disappear after 5 seconds.
• This is true even if [MUTE] or [PAUSE ||] is
pressed while recording.
OFF mode Counter mode Clock mode
OFF mode Clock/Counter mode
,,! fter seco0ds+ i fter seco0 s
T i............
Counter i
Clock & Channel
remains :: remains
STOP 5:4Op_4
OH2
I
sP COUNT O:12:34
"t ..... _ "1 "!
CABLE CHANNEL DESI( NATIONS
If you subscribe to cable TV, the channels are displayed as 1-125. Cable companies often designate ch_mnels
with letters or letter-number combinations. Please check with your local cable company. The following is a
chart of common cable channel designations.
CATVchannel 5A 2 3 4 5 6 7 8 9 10 11 12 13 A B
TVDisplay 1 2 3 4 5 6 7 8 9 10 11 12 13 14 15
CATVchannel C D E F G H I J K L M N O P Q
TVDisplay 16 17 18 19 20 21 22 23 24 25 26 27 28 29 30
CATVchannel R S T U V W W+l W+2 W+3 W+4 W+5 W+6 W+7 W+8 W+9
TVDisplay 31 32 33 34 35 36 37 38 39 40 41 42 43 44 45
CATVchannelW+10 W+11 W+12 W+13 W+14 W+15 W+16 W+17 W+18 W+19 W+20 W+21 W+22 W+23 W+24
TVDisplay 46 47 48 49 50 51 52 53 54 55 56 57 58 59 60
CATVchannelW+25 W+26 W+27 W+28 W+29 W+30 W+31 W+32 W+33 W+34 W+35 W+36 W+37 W+38 W+39
TVDisplay 61 62 63 64 65 66 67 68 69 70 71 72 73 74 75
CATVchannelW+40 W+41 W+42 W+43 W+44 W+45 W+46 W+47 W+48 W+49 W+50 W+51 W+52 W+53 W+54
TVDisplay 76 77 78 79 80 81 82 83 84 85 86 87 88 89 90
CATVchannelW+55 W+56 W+57 W+58 A-5 A-4 A-3 A-2 A-1 W+59 W+60 W+61 W+62 W+63 W+64
TVDisplay 91 92 93 94 95 96 97 98 99 100 101 102 103 104 105
CATVchannelW+65 W+66 W+67 W+68 W+69 W+70 W+71 W+72 W+73 W+74 W+75 W+76 W+77 W+78 W+79
TVDisplay 106 107 108 109 110 111 112 113 114 115 116 117 118 119 120
CATVchannelW+80 W+81 W+82 W+83 W+84
TVDisplay 121 122 123 124 125
- 34 - EN
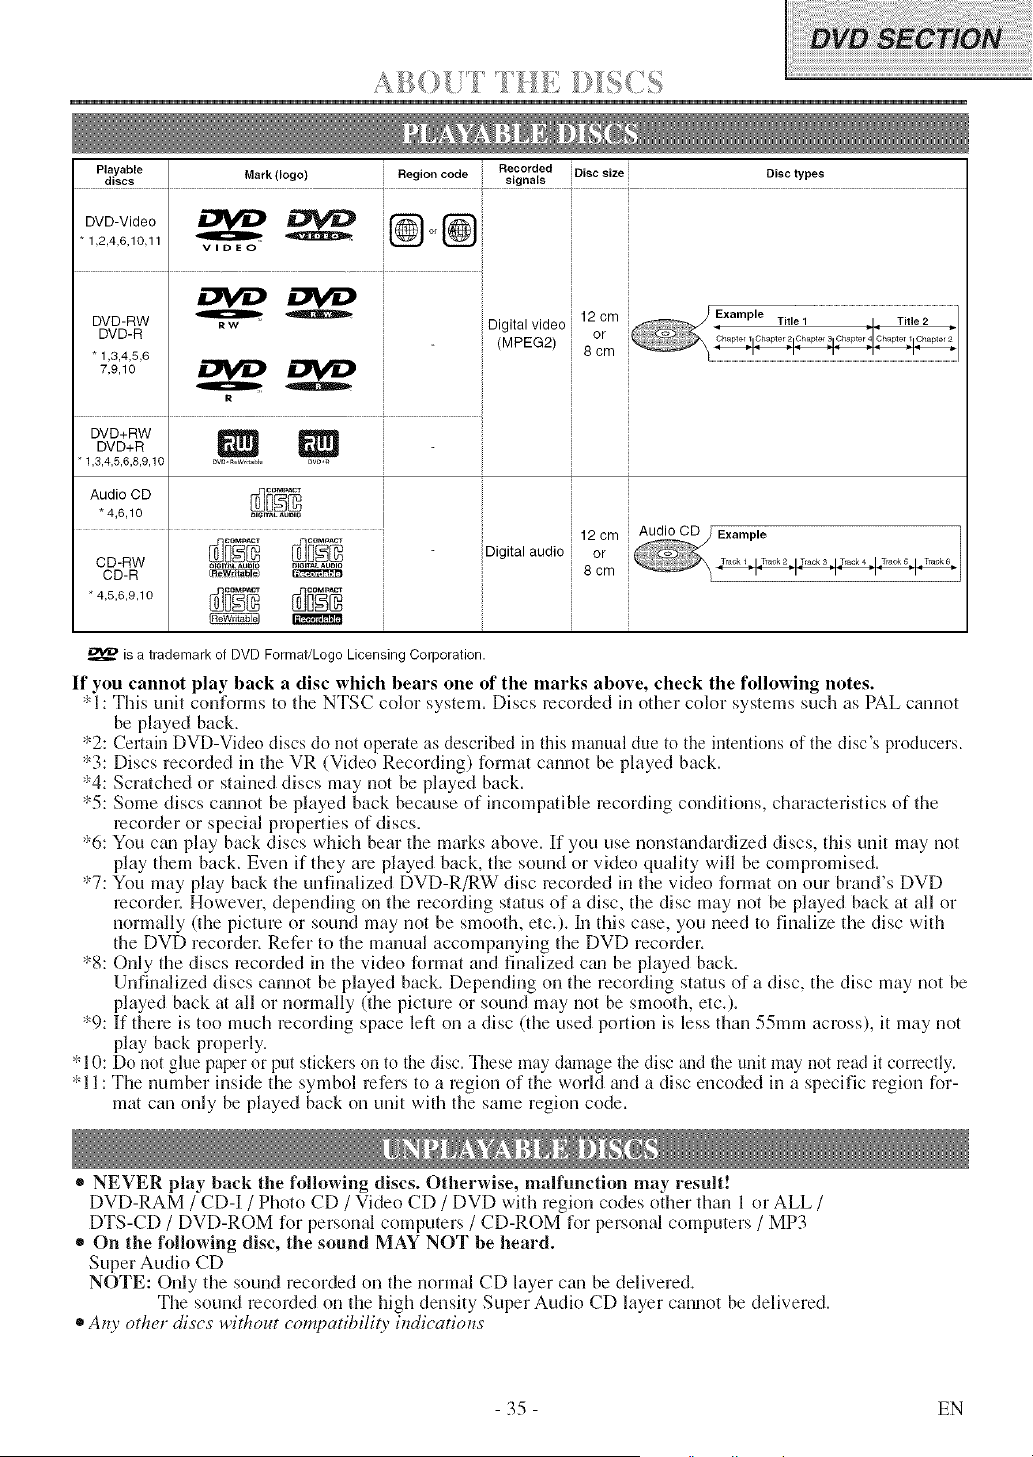
........... ............._
Playablediscs Mark(logo) i Regi .... de Recordedsignals i Disc size Disc types
DVDV,deo @°,@
* 1,2,4,6,10,II
v,..o
.... ............................................................................................................................
_ i ;;Digital video i 12 om ;; 1 ,I. Title 2 _]
DVD-RW
DVD-R (MPEG2) i or Chapte/31Cha_ter 41Chapter 11Chapter 2 II I
"1,3,4,5,6 __ _ - i 8 cm ..........................."1
7.9.1o i i i
ov°.w2NNi:
DVD+R
* 1,3,4,5,6,6,9,10
Audio CD
"4,6,10
CD-RW
CD-R
* 4,5,6,9,1 o
DiGi*_ _UDm
I
i
;; 12 cm
Digital audio i or
8 cm
is a trademark of DVD Format/Logo Licensing Corporation.
If you cannot play hack a disc which hears one of the marks above, check the following notes.
*1: This unit conforms to the NTSC color system. Discs recorded in other color systems such as PAL cannot
be played back.
*2: Certain DVD-Video discs do not operate as described in this manual due to the intentions of the disc's producers.
*3: Discs recorded in the VR (Video Recording) format cannot be played back.
*4: Scratched or stained discs may not be played back.
*5: Some discs cannot be played back because of incompatible recording conditions, characteristics of the
recorder or special properties of discs.
*6: You can play back discs which bear the marks above. If you use nonstandardized discs, this unit may not
play them back. Even if they are played back, the sound or video quality will be compromised.
*7: You may play back the unfinalized DVD-R/RW disc recorded in the video format on our brm_d's DVD
mcordel: However, depending on the recording status of a disc, the disc may not be played back at all or
normally 0he picture or sound may not be smooth, etc.). In this case, you need to finalize the disc with
the DVD recorder. Refer to the manual accompanying the DVD recorder.
*8: Only the discs recorded in the video format and finalized cml be played back.
Unfinalized discs cannot be played back. Depending on the recording status of a disc, the disc may not be
played back at all or normally (the picture or sound may not be smooth, etc.).
*9: If them is too much recording space left on a disc (the used portion is less than 55mm across), it may not
play back properly.
* 10: Do not glue paper or put stickers on to the disc. These may damage the disc and the unit may not read it correctly.
*11: The number inside the symbol refers to a region of the world m_d a disc encoded in a specific region for-
mat can only be played back on unit with the same region code.
* NEVER play back the following discs. Otherwise, malfunction may result!
DVD-RAM / CD-I / Photo CD / Video CD / DVD with region codes other than 1 or ALL /
DTS-CD / DVD-ROM for personal computers / CD-ROM for personal computers / MP3
* On the following disc, the sound MAY NOT be heard.
Super Audio CD
NOTE: Only the sound recorded on the normal CD layer can be delivered.
The sound recorded on the high density Super Audio CD layer cannot be delivered.
®Any other discs' v*,ittzoutcompatibili O' indications
35 EN
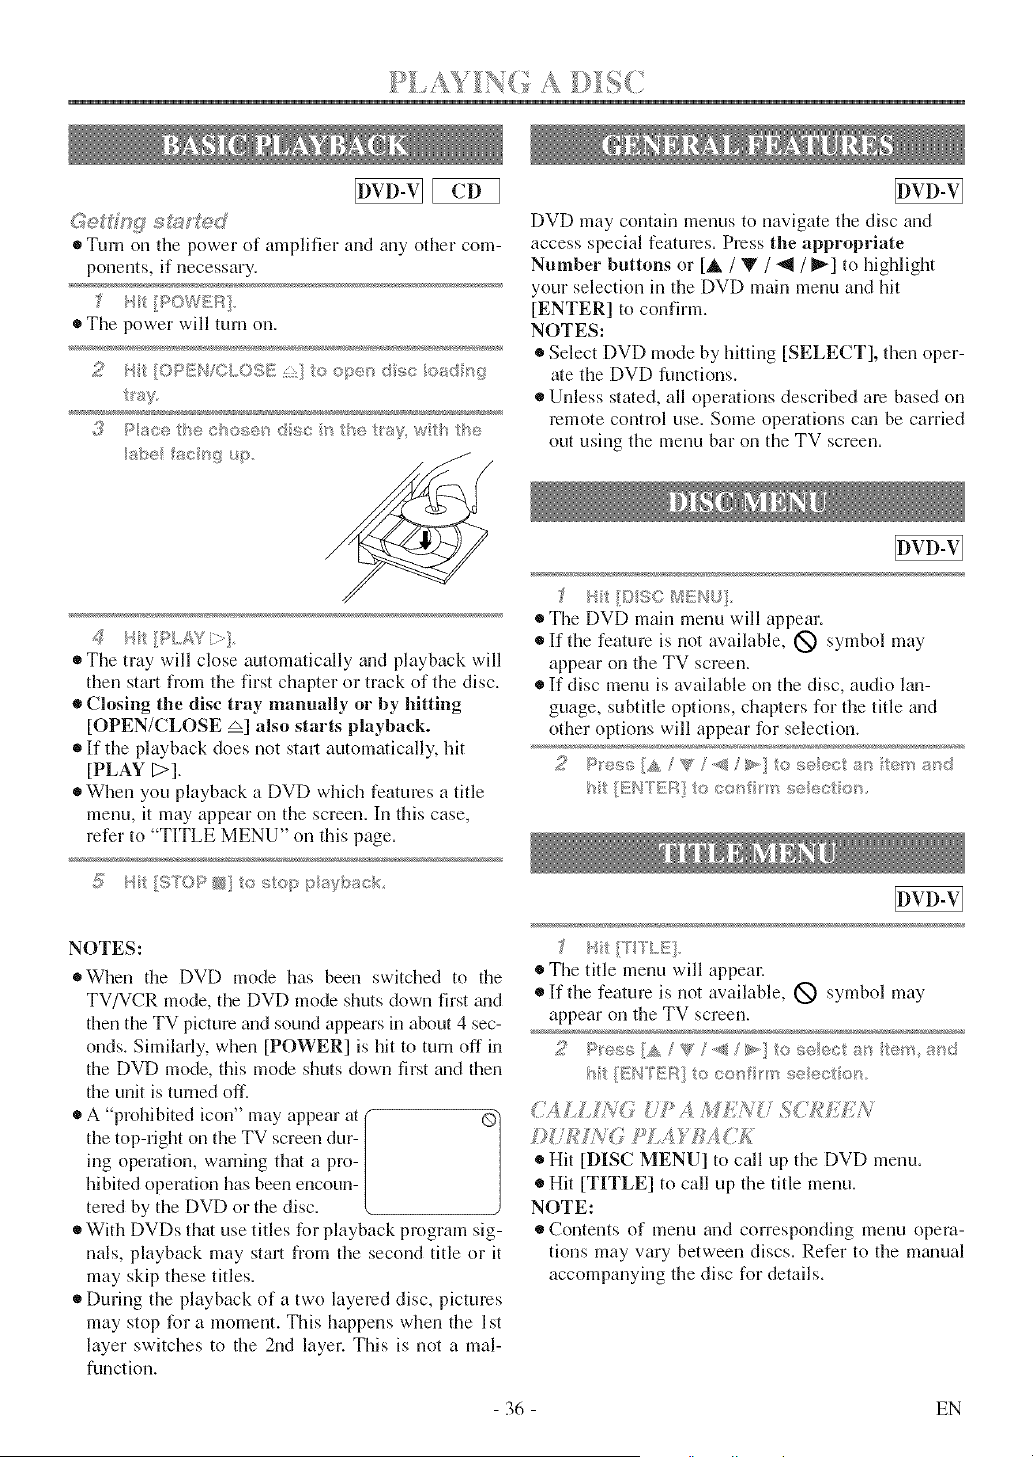
}>I £ VINT(4 A _-v_£g-_
®Turn on the power of amplifier and any other com-
ponents, if necessary.
• The power will turn on.
2 bit[OP[N/CLOS[ ] to o9®'_._;_sc[©ad _'_9
_'alf
;_ Pace g"_ecl'_osenOsc '_the 1'_,_%w::'_flu>
4 P.../WC>II,
• The traywillcloseautomaticallyand playbackwill
thenstartfrom thefirstchapteror trackofthe disc.
• Closing the disc tray manually or by lfitting
[OPEN/CLOSE _] also starts playbaek.
• If the playback does not start automatically, hit
[PLAY D],
®When you playback a DVD which features a title
menu, it may appear on the screen. In this case,
refer to "TITLE MENU" on this page.
NOTES:
o When the DVD mode has been switched to the
TV/VCR mode, the DVD mode shuts down first _md
then the TV picture mid sound appears in about 4 sec-
onds. Similarly, when [POWER] is hit to turn off in
the DVD mode, this mode shuts down first and then
the unit is turned off.
A p]nlnb ted icon" may appear at ®
/
the tnp-right on the TV screen dur-
ing operation, warning that a pro-
hibited operation has been erlcoun-
tered by the DVD or the disc.
• With DVDs that use titles for playback program sig-
nals, playback may start from the second title or it
may skip these titles.
• During the playback of a two layered disc, pictures
may stop for a moment. This happens when the 1st
layer switches to the 2nd layer. This is not a mal-
function.
DVD may contain menus to navigate the disc and
access special features. Press the appropriate
Number buttons or [A, / Y / "_l / _] to highlight
your selection in the DVD main menu and hit
[ENTER] to confirm.
NOTES:
• Select DVD mode by hitting [SELECT], then oper-
ate the DVD funcfions.
• Unless stated, all operations described am based on
remote contrnl use. Some operations cm, be carried
out using the menu bar on the TV screen.
;_ /'Ht [©9C B_::Nt]
• The DVD main menu will appean
• If the feature is not available, (_) symbol may
appear on the TV screen.
• If disc menu is available on the disc, audio lan-
guage, subtitle options, chapters for the title and
other options will appear for selection.
I ._[rTLq.
The title menu will appeal:
If the feature is not available, (_ symbol may
appear on the TV screen.
t _:{iI'C°I!:I_So co_ _'>seec os.
"fA 57. ,¢v
£[.£ > SAI S7" > ....
Hit [DISC MENU] to call up the DVD menu.
• Hit [TITLE] to call up the title menu.
NOTE:
®Contents of menu and corresponding menu opera-
tions may vary between discs. Refer to the mgumal
accompanying the disc for details.
- 36 - EN
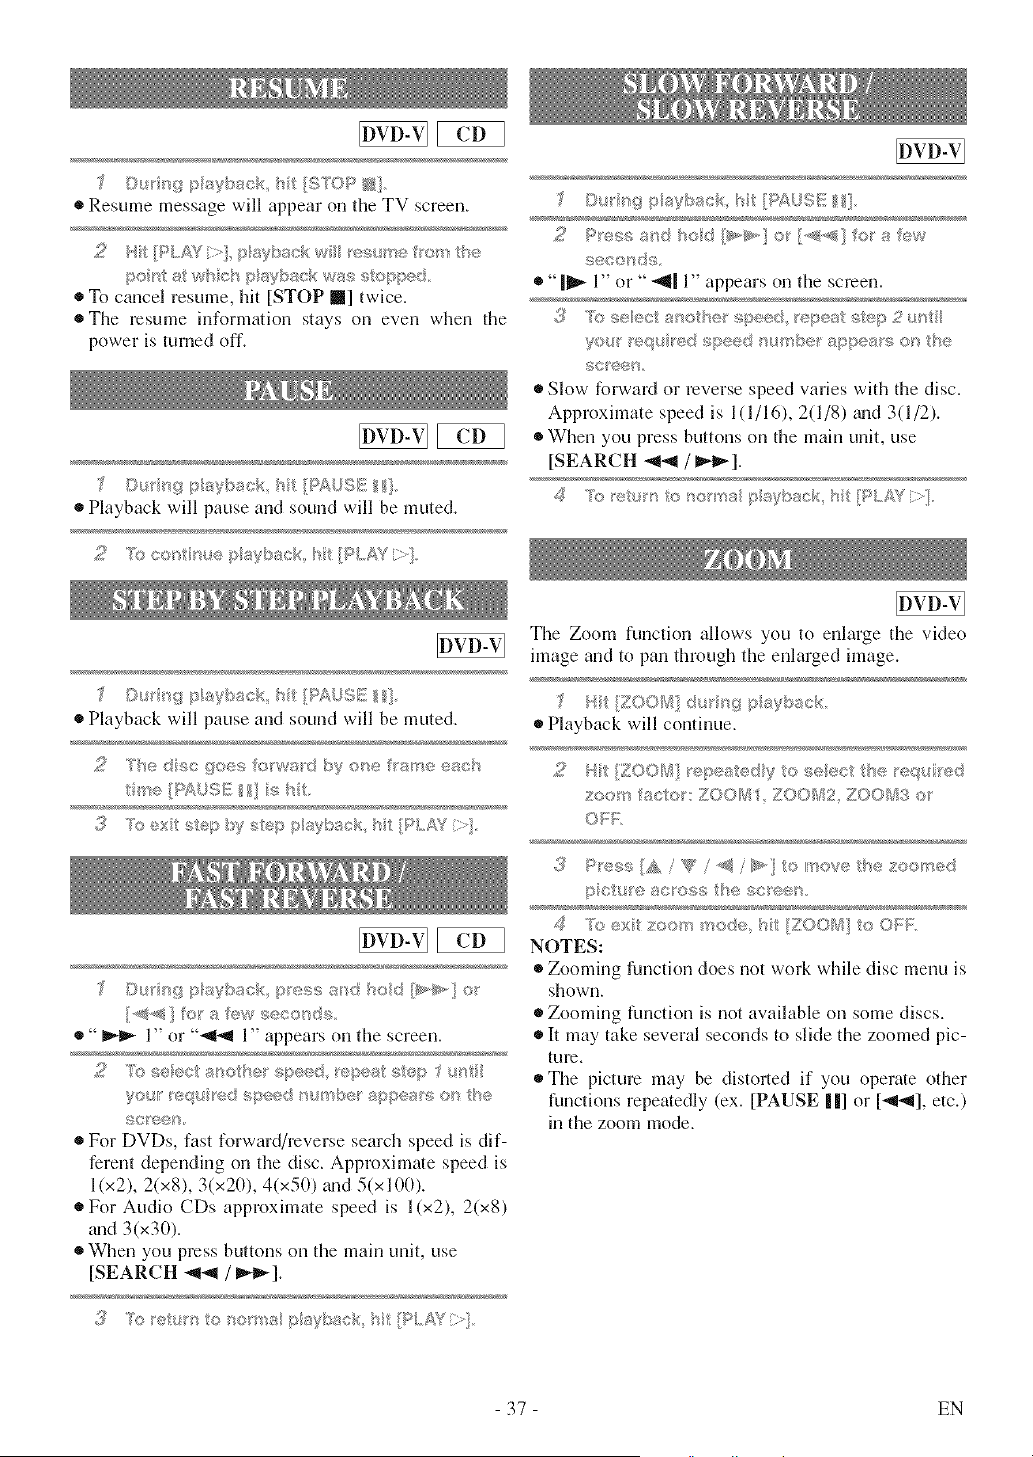
E2E3
Du_n{_ i;_aybse b [S'T©P @}
• Resume message will appear on the TV screen.
2 [P.,AY ::},psT_xtc :w est/>e r_'m_ the
pc, _2_;t_wh h psyback w;>/,s opp_d
®To cancel resume, hit [STOP m] twice.
• The resume information stays on even when the
power is turned off.
E2E3
[)__ _wi_>ss/bs_ck ilPA/ S/£/},
• Playback will pause and sound will be muted.
s: "R:_eo/'R_!,;_ep_:_yssck, FLAY " _
O_ sgpu_ybsck t [P£USE: ]
• Playback will pause and sound will be muted.
2 T_e dsc gecs otw_'_ d by ot_¢ tar<_ ,;_;,aeh
t_'te PY&/.SE s I'
3 ?e ex sep :_y s_ep p/_yb,>ck hi [P/.A/'/>]
D_tkg/stsyback p'ess asd held _>@÷,] 0_
[-,_s,,a}or a ew seconds
"_ 1>_or °°_-_1 l >_appears on the screen.
£ "R) seec_ asciiel; spe_xd epest sep !as
%/e r /eqs led speed 1_4_"tq_et appe_,._sof_ he
sc/eey_
For DVDs, fast forward/reverse search speed is dif-
ferent depending on the disc. Approximate speed is
1(x2), 2(x8), 3(x20), 4(x50) grad 5(x 100).
For Audio CDs approximate speed is 1 (x2), 2(x8)
m_d 3(x30).
When you press buttons on the main unit, use
[SEARCH -,11-,11/ _].
Du'it_g IAayback lit [IVAJSEI11.
l@illisll/l+_ 1_ @ l#wi/w/6_£ £iwiiiiiii
,2 I':_,"<'_s,;_.....a'.=_dNolI 11*I_,] o 1*'_"<Ile' :: "......
seools( e.
" I_ 1>_or °° "_J 1>_appears o_1 the screen.
1[_ L_csseec ane'@e speed esest step 2 us
yo}" pequ ed speed nu_'fs_be_" sppes/s ors he
sceen
®Slow forward or reverse speed wtries with tile disc.
Approximate speed is 1(1/l 6), 2(1/8) grad3(1/2).
When you press buttons on the main unit, use
[SEARCH -_1-_/ I_].
The Zoom function allows you to enlarge the video
hnage and to pan through the enlarged image.
Playback will continue.
£ S iZOOI_] / epeaedy eseect he/'e(:pa ed
s:eet_s lictor ZOOB ZOO[s / ZOOB3 e_
ON;:
3 Press/A / {_' / ,4_ / >,,} Io '/'_eve he £e©tqed
po eacess _escee
,5 %o exi/; s:eer< i"sede ht [ZOO/, ] o O::F
NOTES:
Zooming function does not work whte disc menu is
shown.
®Zooming function is not available on some discs.
• I/may take several seconds to slide the zoomed pic-
ture.
The picture may be distorted if you operate other
functions repemedly (ex. [PAUSE ||] or [-_-_], etc.)
in the zoom mode.
37 EN
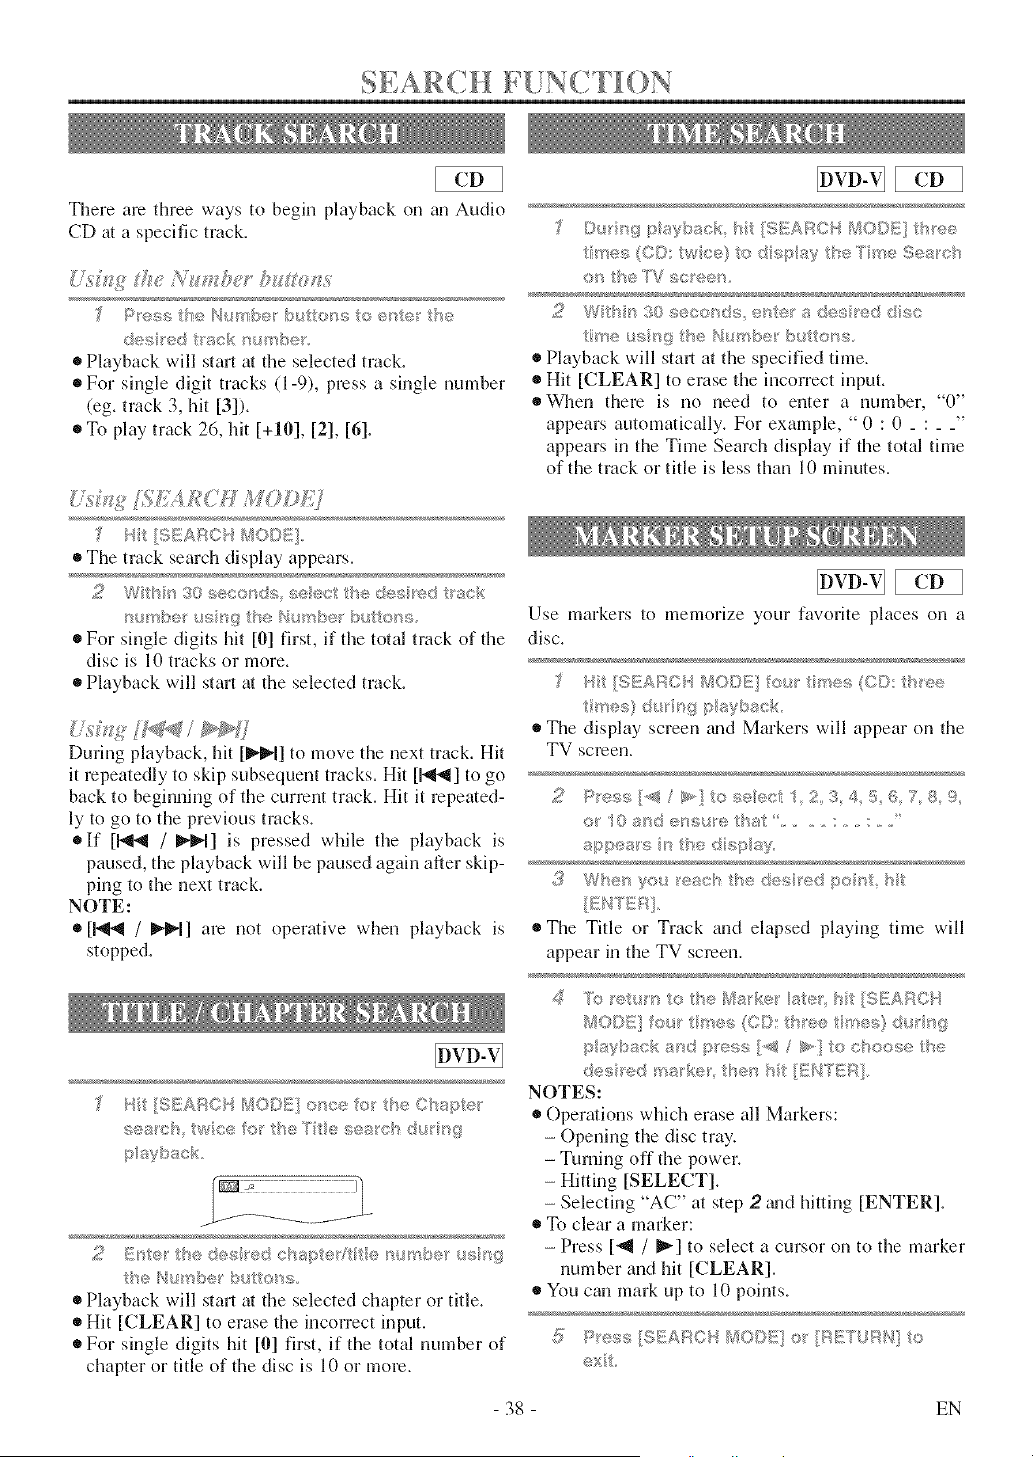
SEARC[[
There are three ways to begh_ playback on an Audio
CD at a specific track.
P'ess the Humbe' b_ _i_e_s to e_te_ t/}e
des red t}sck _us_ ;_e_,
• Playback will start at the selected track.
• For single digit tracks (1-9), press a single number
(eg. track 3, hit [3]).
®To play track 26, hit [+10], [2], [6].
"/,;u£ ;%#,'4£(iH Fff(?D ;'
H [S_!ARCH K1OD@]
®The track search display appears.
2 W/b'/30 s,e<;o/'_d s<_<<;/he des/'ed r;;_ /,,;
• For single digits hit [0] first, if the total track of the
disc is 10 tracks or more.
• Playback will start at the selected track.
%g [ /
During playback, hit [_1] to move the next track. Hit
it repeatedly to skip subsequent tracks. Hit [1_1_1]to go
back to beginning of the current track. Hit it repeated-
ly to go to the previous tracks.
olf libel / _1_1] is pressed while the playback is
paused, the playback will be paused again after skip-
ping to the next track.
NOTE:
• [1"_1 / _1] am not operative when playback is
stopped.
H [%£_AP,OH BIOOE] o_ce for Be Cbaper
sea 'cb _wce for/he Tie ses_cB dur[_g
p_sybsck
9 ...... /.!_ _,,., /_S Cg_: l}!:t!_,' _,,,::, .... C #!st@,_'/Rgre > ®_'
be N_/ _be_ but o_s
Playback will start at the selected chapter or title.
Hit [CLEAR] to erase the incorrect input.
For single digits hit [0] first, if the total number of
chapter or title of the disc is 10 or more.
[)_ r_'g....I 8ybsck s [S[:;_AF©[q Bf/O,,,s[_],,h'ee
i'ses(C©:h/ ce} ods_;_y se/ seSesc/'_
os _7: ['V sc_ee ,
tree _ss/'}g he H[s_shber bu s©/'_s
Playback will start at the specified time.
® Hit [CLEAR] to erase the incorrect input.
*Vq_en there is no need to enter a number, "0"
appears automatically. For example, " 0 : 0 .... "
appears in the Time Search display if the total time
of the track or title is less than 10 minutes.
Use markers to memorize your favorite places on a
disc,
trees}@ ngpaybsck
The display screen {rod Markers will appear on the
TV screen.
2 Pre_:;s[,_[_<! oae<<'4/£ S 4 5 6 7' _ %
sppe's [[,, the dhq:> sy
(_ Wsenye_,/ eats hedes_edpen_ s
® The Title or Track and elapsed playing time will
appear in the TV screen.
NO/)ff] _:_r >es (©0: _Jee rues} du'rt_;
p syback 8_'sdpress [,,,:_/ >,] to c _oese/be
des; ed '(<;_lke_ Sben [_f£NY}_!IR]
NOTES:
® Operations which erase all Markers:
- Opening the disc tray.
- Turning off the power.
- Hitting [SELECT].
- Selecting "AC" at step 2 grad hitting [ENTER].
To clear a marker:
- Press [-_ / _] to select a cursor on to the marker
number and hit [CLEAR].
® You can mark up to l0 points.
_ Pm_,<; 8EARO!{ MODE or/8@_URH] o
ext
- 38 - EN
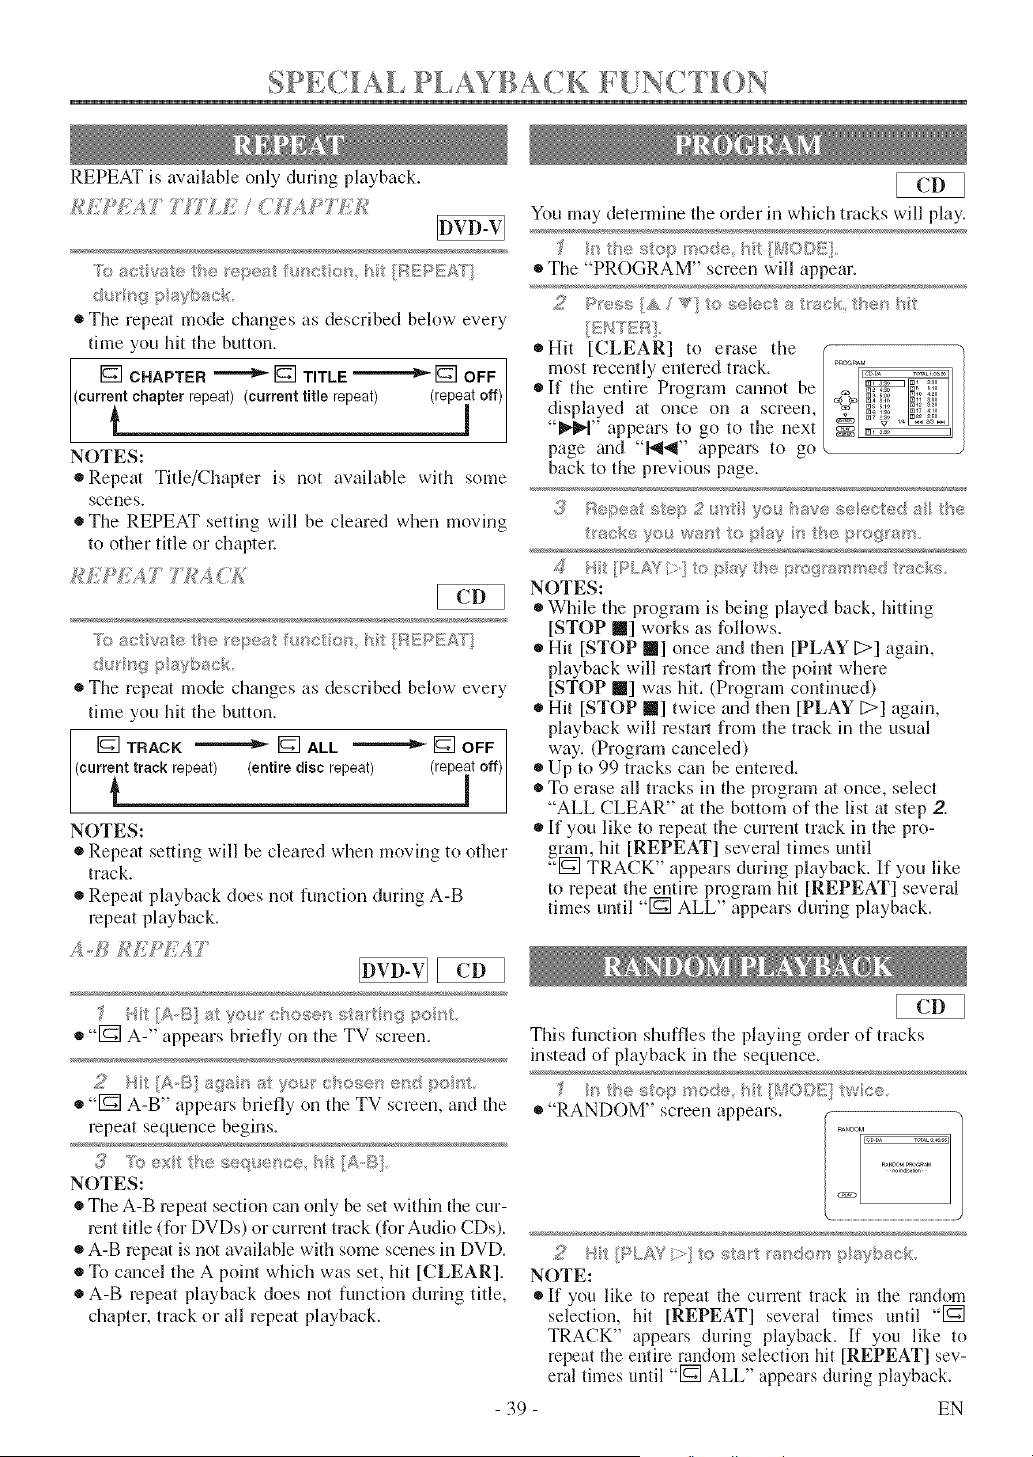
SPECIAL PI,AYBACk F{!NCTH)N
REPEAT is available only during playback.
Teac vateth® e ea ht[F;_BPEAi(]
d_ '_rg payback
• The repeat mode changes as described below every
time you hit the button.
[] CHAPTER "''""'_ [] TITLE """"""'_ [] OFF /
NOTES:
®Repeat Title/Chapter is not available with some
scenes.
®The REPEAT setting will be cleared when moving
to other title or chaptm,
To aevae he {'epeat fu_c on hTt [[X}£/q£A_]']
du [_gpayback
• The repeat mode changes as described below every
thne you hit the button.
[]TRACK []ALL []OFF]
eurrint track repeat) (entire disc repeat) (rep]t off)i
NOTES:
• Repeat setting will be cleared when moving to other
track.
®Repeat playback does not function during A-B
repeat playback.
A../_/U{ *K,'WT"
f J [A-S at y®I._"ehesc_;:s aI"pq_poet.
• "1_] A-" appears briefly on the TV screell.
• -r_NA-B" appearsbrieflyon theTV screen,and the
repeat sequence begins.
3 Yo ux he _J;eq_>:<ce,h [A,IT_
NOTES:
• The A-B repeatsectioncan onlybe setwithinthecur-
renttitle(forDVDs) orcurrenttrack(forAudio CDs).
• A-B repeat is not aw@able with some scenes in DVD.
• To cancel the A point which was set, hit [CLEAR].
®A-B repeat playback does not function during title,
chapter, track or all repeat playback.
You may determine the order in which tracks will play.
_'_ stop rr, de /:70/3_:_,
_lThe "PROGRAM" screen will appear.
,;,, V" e .;eecls 'a k '[_;
*Hit [CLEAR] to erase @e ",.oo,M
most recerltly entered track. _
If the entire Program cannot be _ _s
displayed at once on a screen, ? _s:
appears to go to the next _1 .....
page m_(I "1_1_1" appears to go
back to the previous page.
,(_ Repeat step 2 t_t ye4_ save seected a the
tac[;sVe_i wa_sttopay <_thepegam.
,_ U/: [/PLAi_'>] to p_%, the p_'of#_am_sed tacks
NOTES:
While the program is being played back, hitting
[STOP I] works as follows.
®Hit [STOP Ill] once m_d then [PLAY [>] again,
playback will festal1 from the point where
[STOP I] was hit. (Program continued)
®Hit [STOP Ill] twice m_d then [PLAY [;:>] again,
playback will restarl from the track in the usual
way. (Program cm_celed)
®Up to 99 tracks can be entered.
To erase all tracks in the program at once, select
"ALL CLEAR" at the bottom of the list at step 2.
If you like to repeat the current track in the pro-
gram, hit [REPEAT] several times until
"1_1 TRACK' appears during playback. If you like
to repeat the entire program hit [REPEAT] several
thnes until "[_] ALL" appears during playback.
This function shuffles the playing order of tracks
instead of playback in the sequence.
"RANDOM" screeri appears.
2 H [PLAY >} to sta_ _asdem p aybaek
NOTE:
If ynu like to repeat the current track in the random
selection, hit [REPEAT] several times until "1_]
TRACK" appears during playback. If you like to
repeat the entire random selection hit [REPEAT] sev-
eral times until "1_] ALL" appears during playback.
39 EN
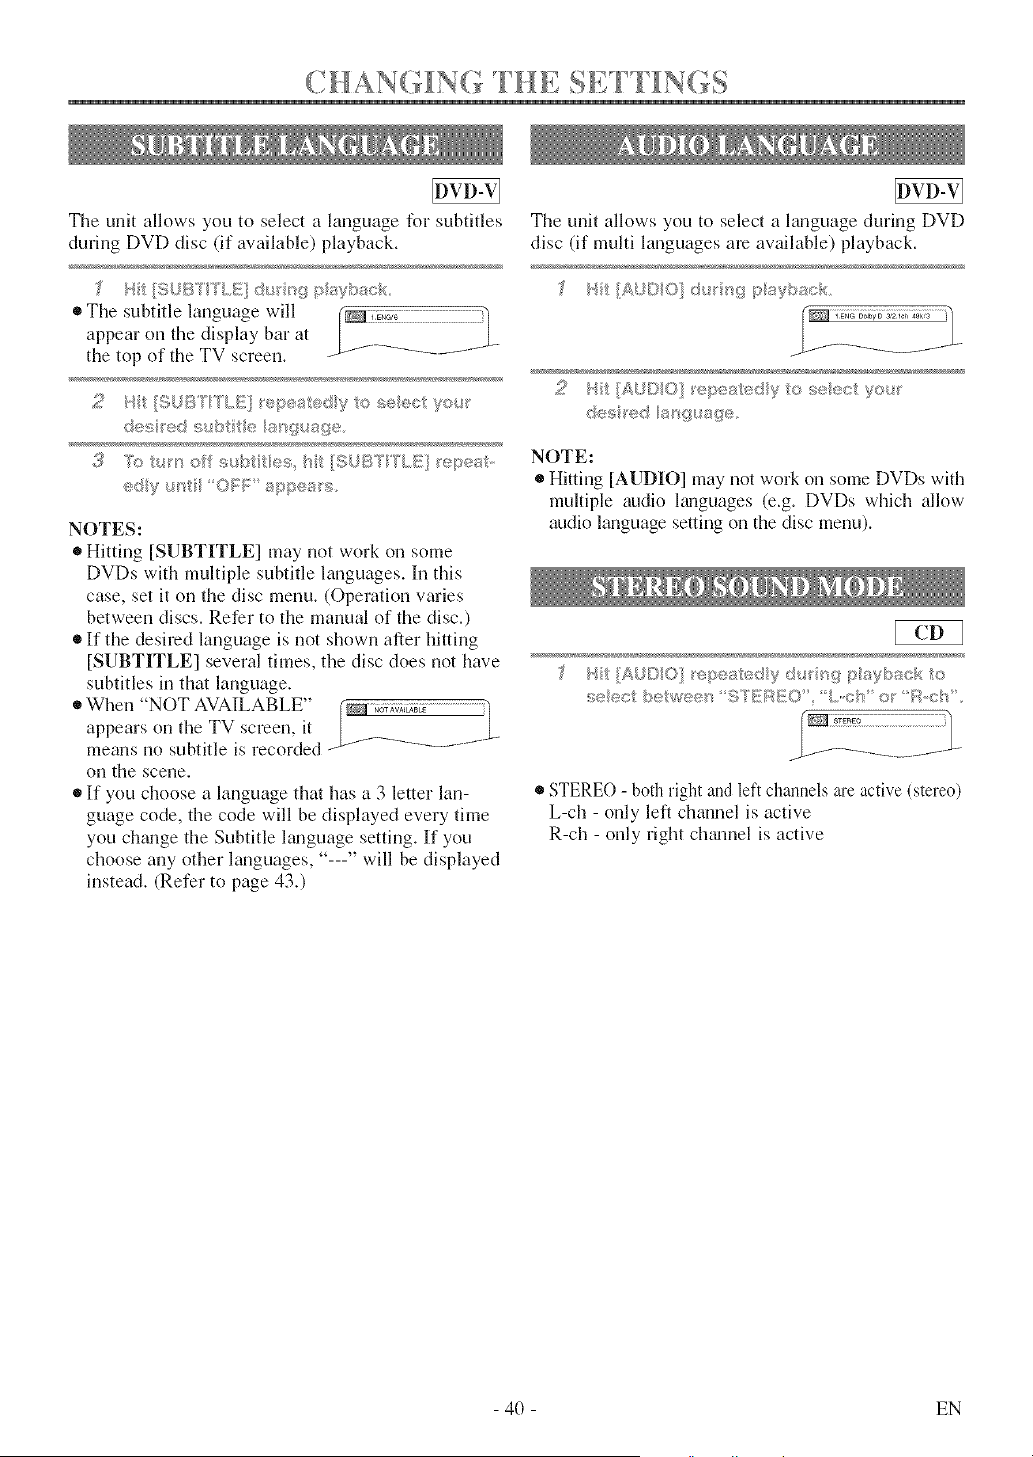
"_ T N "{ "4 -7 _ _- _ _ -{
(,HAN{ [NG IHE SE F 1[NGS
The unit allows you to select a language for subtitles
during DVD disc (if available) playback,
• The subtitle language will
appear on the display bar at
the top of the TV screen,
des _ed s_bt_ e e_'_go_age
3 7of y_offs_bttes h[f[$UB'T'[_'L[5(I _epea,
ed[yu_[ "OFF: sppeas
NOTES:
®Hitting [SUBTITLE] may not work on some
DVDs with multiple subtitle languages. In this
case, set it on the disc menu, (Operation varies
between discs, Refer to the manual of the disc,)
• If the desired language is not shown after hitting
[SUBTITLE] several times, the disc does not have
subtitles in that language,
• Whenappears"NOTontheAVAILABLE"TVscreen, it (_;_;i_;_ ................................}
means no subtitle is recorded/-------_ ........
on the scene.
• If you choose a language that has a 3 letter lan-
guage code, the code will be displayed every time
you chtmge the Subtitle kmguage setting. If you
choose any other languages, "---" will be displayed
instead. (Refer to page 43.)
The unit allows you to select a language during DVD
disc (if multi languages are available) playback.
_ ]_NG DolbyD 3_2]@ 4ak'a
<@ a¢¢ ' "
2 P _[A!2©O} 'ep,e_:e y <,,,,_, };:>_r
(:_e9 'ed[a'9,gg_
NOTE:
®Hitting [AUDIO] may not work on some DVDs with
multiple audio l_u_guages (e.g. DVDs which allow
audio language setting on the disc menu).
s s
,_; _,./ >e we®p_ "f: S'//_ _i_i:O',,'L,,c:'?' of _:?c * ',
STEREO - both right and left chalmels are active (stereo)
L-ch - only left channel is active
R-ch - only right charnel is active
- 40 - EN
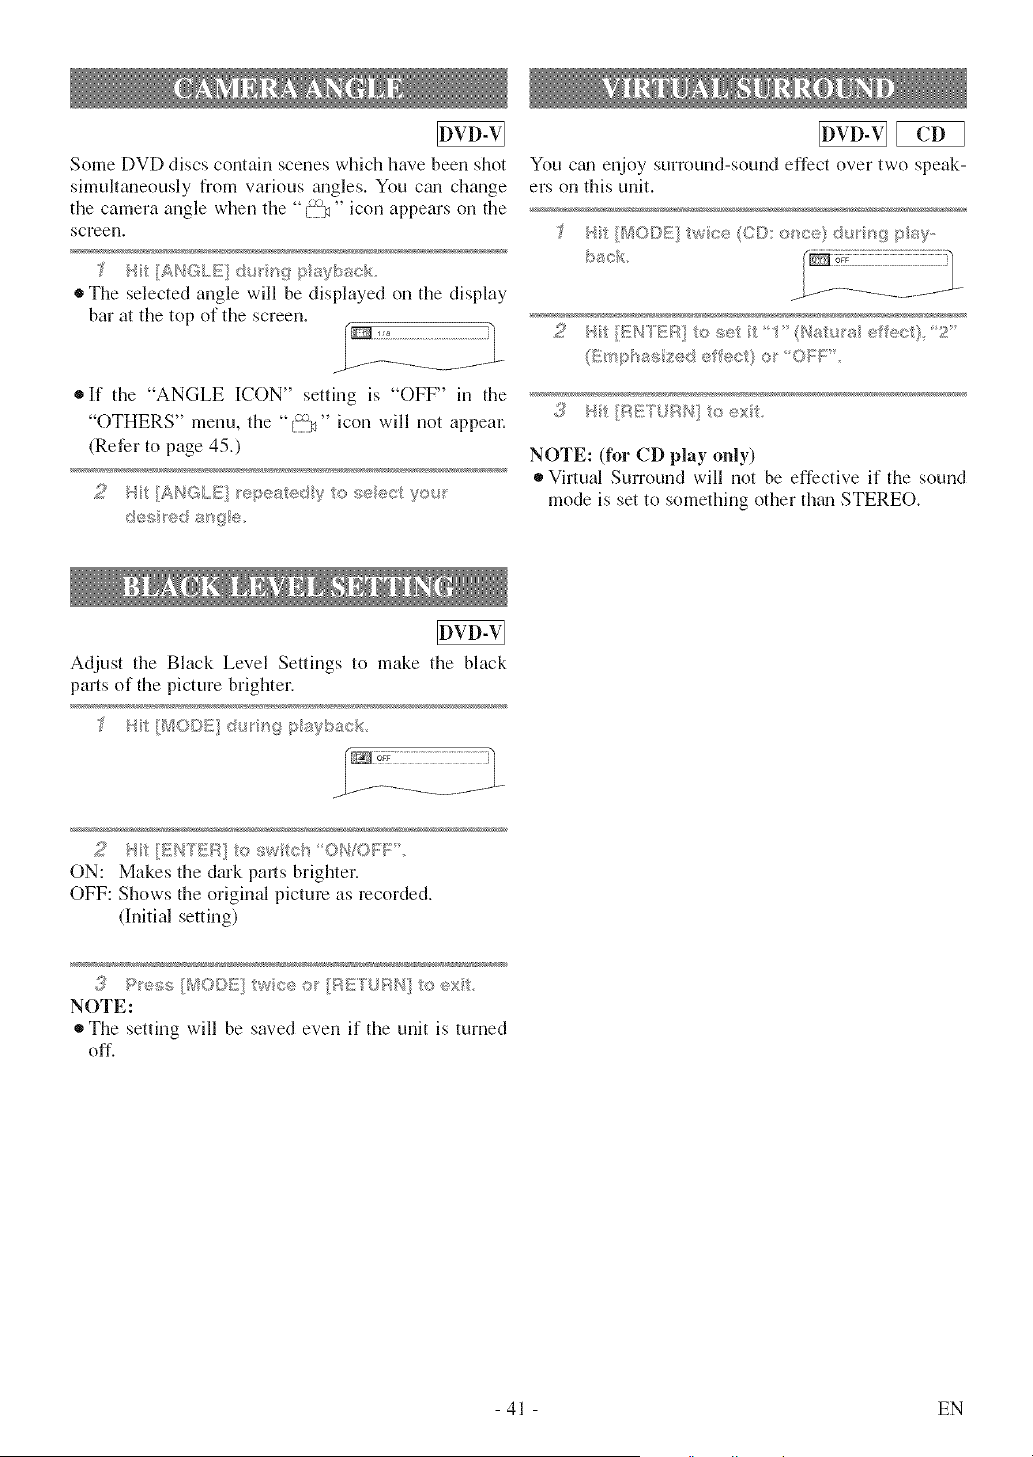
Some DVD discs contain scenes which lmve been shot
simultaneously from various m_gles. You cml change
the camera angle when the °°{_" icon appears on the
screen.
'_ _,i ANGLE d_u'u_ p_Wbac_,,_
• The selected angle will be displayed on the display
bar at the top of the screen.
®If the "ANGLE ICON" setting is °°OFF' in the
"OTHERS" menu, the "'i_:9" icon will not appeal:
(Refer to page 45.)
2 H [_HG/t£irep_sed_ <,_<:ec yo_.!r
You cgm enjoy surround-sound effect over two speak-
ers on this unit.
{ /
2 't{t I/i=H-EF;;1t< #_#,'_t 1' (qitu' _:_.1,:_,...................._
, .......... ,, < +
F/E"f., :d_q ext
NOTE: (for CD play only)
Virtual Surround will not be effective if the sound
mode is set to something other th+m STERE().
Adjust the Black Level Settings to make the black
parts of the picture brighter.
2 t [ENTER] to swtch OH/ON =
ON: Makes the dark pa_lsbrighter.
OFF: Shows the original picture as recorded.
(Initial setting)
3 P_e_;s [!%¢O©E]twce o [AE'?UAN] to e×t
NOTE:
The setting will be saved even if the unit is turned
off.
- 41 - EN
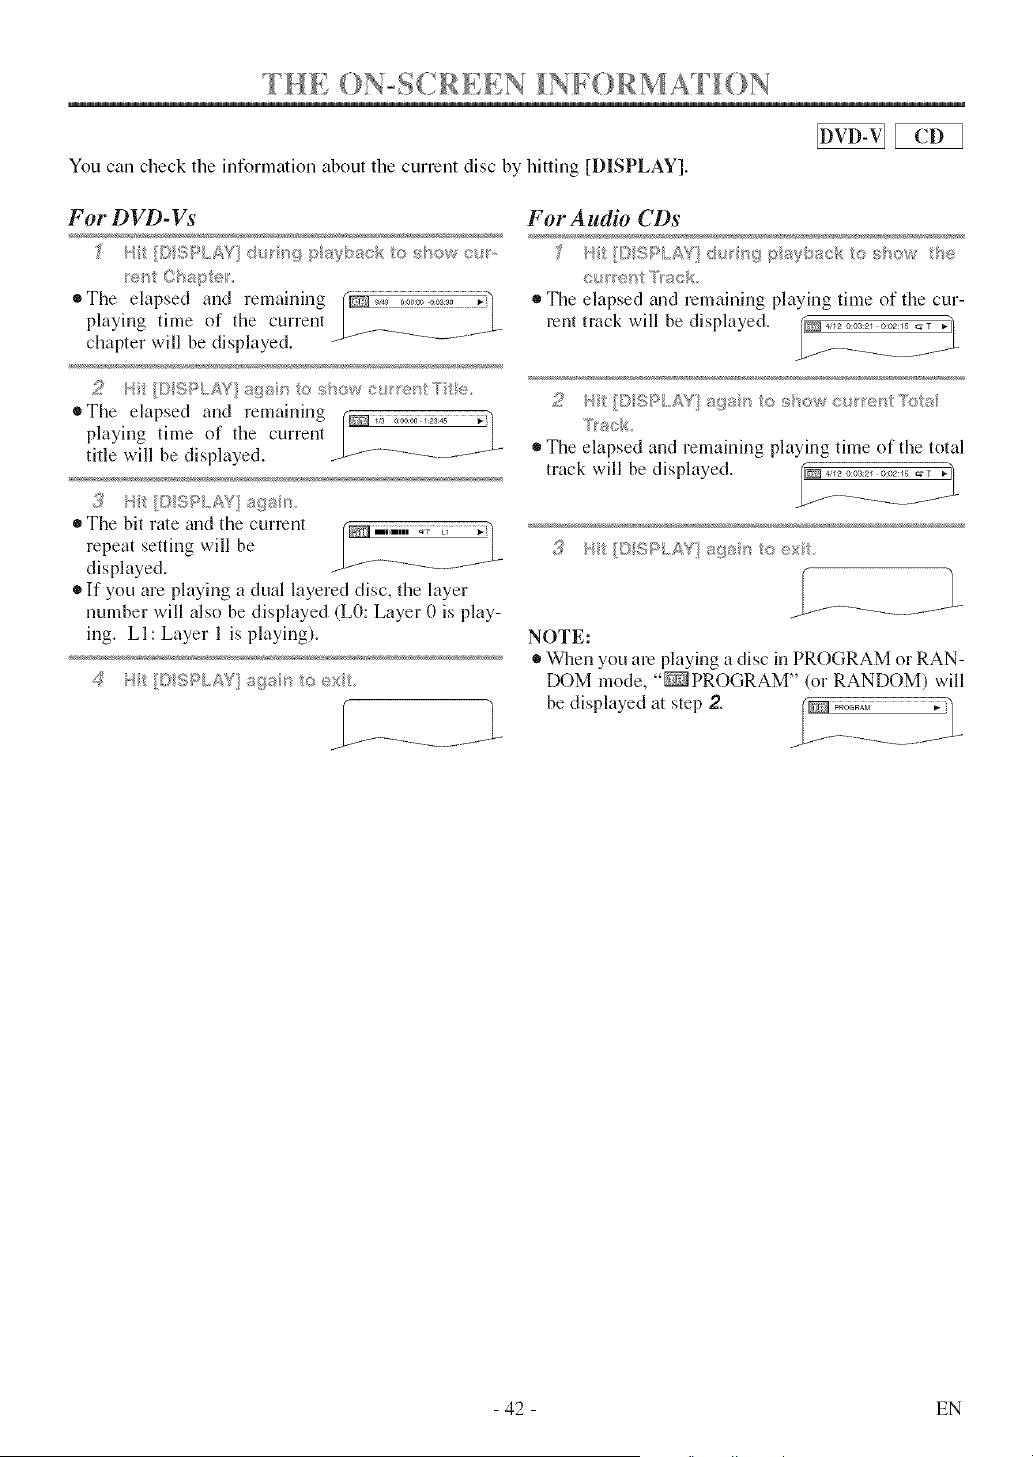
THE (}N°S(.RLEN IN i (}RMA l()N....
You can check the information about the cnrrent disc by hitting [DISPLAY].
For DVD-Vs
[} 3PLAV} @,; _gps_h_ack os'<_w_x,m,
;<> C wq;_;;_;
• The elapsed and lemainillg
playing time of the current
chapter will be displayed. _f -_'-_" ...... -
• The elapsed and remaining I_i;;_ ;;_o:i_:_ ,.]pla}dng time of tl_e current
title will be displayed. _;--_-_-_ 1-f ....
The bit rate m_d the current
repeat setting will be
displayed.
If you are playing a dual layered disc, the layer
number will also be displayed (L0: Layer 0 is play-
ing. LI: Layer 1 is playing).
For Audio CDs
_:<rr_? Track.
The elapsed _md remaining playing time of the cur-
rent track will be displayed.
2 q [I;SP/.,,AV ags ' os'owc,;:_'e /:ts_s
T'ac,
The elapsed and remaining playing time of the total
track will be displayed.
{_ Ht/© SPLAYI/sgs _'_to ex
NOTE:
When you am playing a disc in PROGRAM or RAN-
DOM mode, "_PROGRAM" (or RANDOM) will
be displayed at step 2. (m _a_ ;
|
- 42 - EN
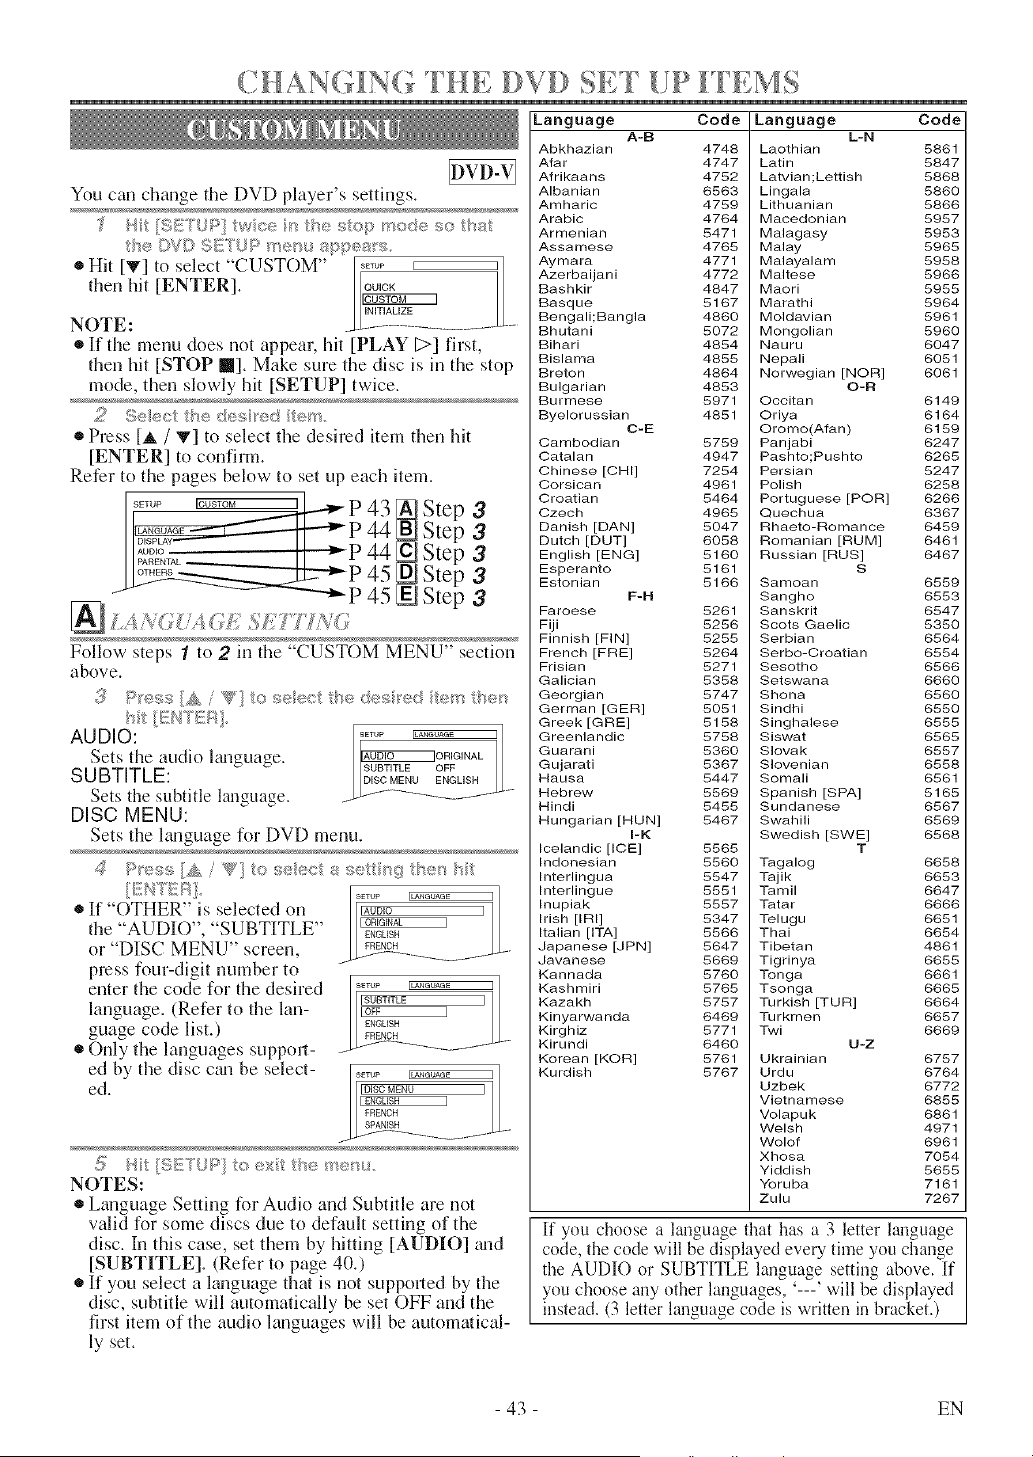
CHANGING IHE D VD SET [!P FFEMS
You can change tile DVD player's settings.
the OV© SU/°L P mer>_ sppea;s
®Hit [T] to select "CUSTOM"
then hit [ENTER].
NOTE:
• If the menu does not appean hit [PLAY [;>] first,
then hit [STOP []]. Make sure the disc is in the stop
mode, then slowly hit [SETUP] twice.
2 Se_t?/he de_::_red era.
• Press [_, / V] to select the desired item then hit
[ENTER] to confirm.
Refer to the pages below to set up each item.
S_TU_ _ l ] _ p A 3 I_ qt,_
14........ ""_'_P 44 BD£ten 3
II;,°g'-°,_ II - 1"44 _Lkjbtep 3
...... -.7_ _ "--P 45 n_ Ste" 3
N Ste ;3
Follow steps I to 2 in the "CUSTOM MENU" section
above.
AUDIO: ..... _
Sets the audio ltmguage, l_ °RIGIN_Ll
SUBTITLE: gU_SUBTITLEOFF
DISC MENU ENGLISH
Sets the subtitle language. Ll-f-------- ......... "
DISC MENU:
Sets the hmguage for DVD menu.
®If "OTHER" is selected on
the "AUDIO", "SUBTITLE"
or "DISC MENU" screen,
press four-digit number to
enter the code for the desired
language. (Refer to the lan-
guage code list.)
Only the languages suppori-
ed by the disc c_m be select- , .... _
_ .......... _L
NOTES:
• Language Setting for Audio and Subtitle are not
valid for some discs due to default setting of the
disc. In this case, set them by hitting [AUDIO] gum
[SUBTITLE]. (Refer to page 40.)
• If you select a language that is not suppo_led by the
disc, subtitle will automatically be set OFF and the
first item of the audio languages will be automatical-
ly set.
Language Code
A-B
Abkhazian 4748
Afar 4747
Afrikaans 4752
Albanian 6563
Amharic 4789
Arabic 4764
Armenian 8471
Assamese 4765
Aymara 4771
Azerbaijani 4772
Bashkir 4847
Basque 8167
Bengali;Bangla 4660
Bhutani 8072
Bihari 4884
Bislama 4885
Breton 4864
Bulgarian 4853
Burmese 8971
Byelorussian 4881
C-E
Cambodian 8759
Catalan 4947
Chinese [CHI] 7254
Corsican 4961
Croatian 8464
Czech 4965
Danish [DAN] 8047
Dutch [DUT] 6058
English [ENG] 8160
Esperanto 8161
Estonian 8166
F-H
Faroese 8261
Fiji 8256
Finnish [FIN] 5255
French [FRE] 5264
Frisian 5271
Galician 5358
Georgian 5747
German [GER] 5051
Greek [GRE] 5156
Greenlandic 5756
Guarani 5360
Gujarati 5367
Hausa 5447
Hebrew 5569
Hindi 5455
Hungarian [HUN] 5467
I-K
Icelandic [ICE] 5565
Indonesian 5560
Interlingua 5547
Interlingue 5551
Inupiak 5557
Irish [IRI] 5347
Italian [ITA] 5566
Japanese [JPN] 5647
Javanese 5669
Kannada 5760
Kashmiri 5765
Kazakh 5757
Kinyarwanda 6469
Kirghiz 5771
Kirundi 6460
Korean [KOR] 5761
Kurdish 5767
Language Code
L-N
Laothian 5861
Latin 5847
Latvian;Lettish 5868
Lingala 5860
Lithuanian 5866
Macedonian 5987
Malagasy 5953
Malay 5965
Malayalam 5988
Maltese 5966
Maori 5955
Marathi 5964
Moldavian 5961
Mongolian 5960
Nauru 6047
Nepali 6051
Norwegian [NOR] 6061
O-R
Occitan 6149
Oriya 6164
Oromo(Afan) 6159
Panjabi 6247
Pashto;Pushto 6268
Persian 5247
Polish 6258
Portuguese [POR] 6266
Quechua 6367
Rhaeto-momance 6459
Romanian [RUM] 6461
Russian [RUS] 6467
S
Samoan 6559
Sangho 6553
Sanskrit 6547
Scots Gaelic 5350
Serbian 6564
Serbo-Oroatian 6554
Sesotho 6566
Setswana 6660
Shona 6560
Sindhi 6550
Singhalese 6555
Siswat 6565
S]ovak 6557
S]ovenian 6558
Somali 6561
Spanish [SPA] 5168
Sundanese 6567
Swahili 6569
Swedish [SWE] 6568
T
Tagalog 6658
Tajik 6653
Tamil 6647
Tatar 6666
Telugu 6651
Thai 6654
Tibetan 4861
Tigrinya 6655
Tonga 6661
Tsonga 6665
Turkish [TUR] 6664
Turkmen 6657
Twi 6669
U-Z
Ukrainian 6757
Urdu 6764
Uzbek 6772
Vietnamese 6885
Volapuk 6861
Welsh 4971
Wolof 6961
Xhosa 7054
Yiddish 5655
Yoruba 7161
Zulu 7267
[f you choose a language that has a 3 letter language
code, the code will be displayed every time you change
the AUDIO or SUBTITLE language setting above. If
you choose any other languages, '---' will be displayed
instead. (3 letter language code is written in bracket.)
- 43 - EN
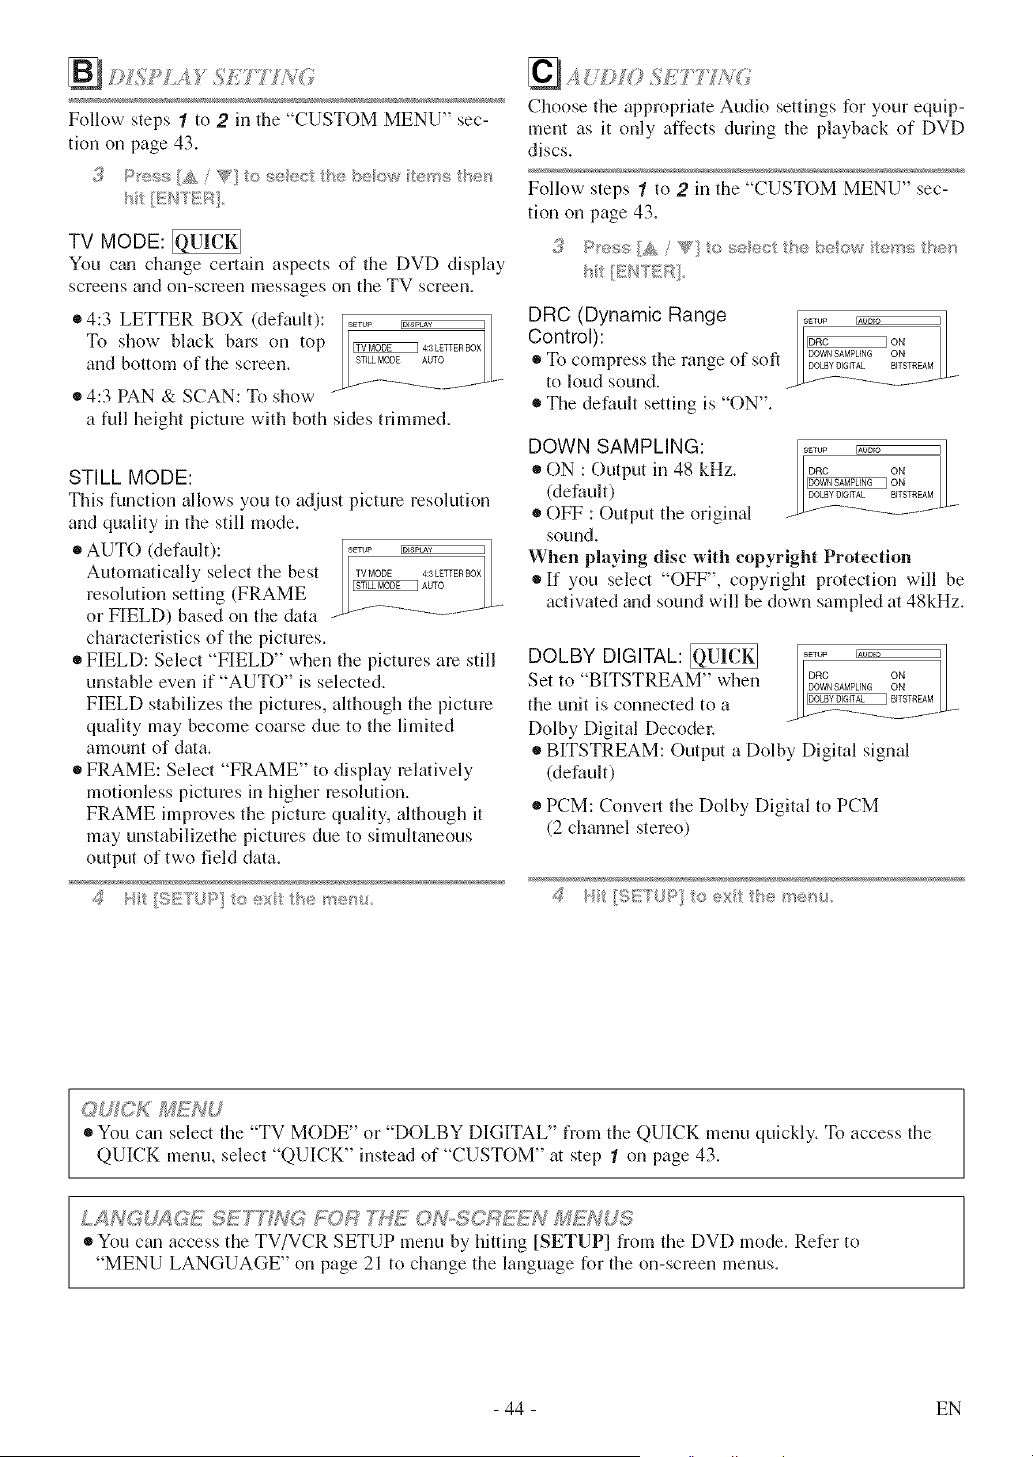
;>L L_,=,
Follow- steps 1 to 2 in the "CUSTOM MENU" sec-
tion on page 43.
ht /EF,17ER]
TV MODE:
You c_m chgmge certain aspects of tile DVD display
screens gradon-semen messages on tile TV screen.
• 4:3 LETTER BOX (default):
To show black bars oil top
and bottom of the screen.
• 4:3 PAN & SCAN: To show
a full height picture with both sides trimmed.
STILL MODE:
This function allows you to adjust picture resolution
and quality in tile still mode.
®AUTO(defatdt): J
Automatically select tile best TVMODE4:3LETTERBOX
resolution setting (FRAME ._*UTO // ..
or FIELD) based on the data
characteristics of the pictures.
• FIELD: Select "FIELD" when the pictures am still
unstable even if "AUTO" is selected.
FIELD stabilizes the pictures, although the picture
quality may become coarse due to file limited
amount of data.
®FRAME: Select "FRAME" to display relatively
motionless pictures in higher resolution.
FRAME improves tile picture quality, although it
may unstabilizethe pictures due to simultaneous
output of two field data.
d <<'q _;
,,.,,, . © @); _b@ I'(/@'_{4
Choose the appropriate Audio settings for your equip-
ment as it only affects during tile playback of DVD
discs.
Follow steps 1 to 2 in the "CUSTOM MENU" sec-
tion on page 43.
DRC (Dynamic Range .....
Control): __
To compresstile mllge of soft _O_ILN BO]TNsEAMDOWNSAMPUNGONDOLBYDIGffAL BITSTREAM
to.=dsound.
The default setting is "ON".
DOWN SAMPLING: .....
® ON : Output in 48 kHz. o_c o.
(default) DOLBYOlGffAt. BITSTREAM
® OFF : Output tile original _>--f----_ ...........
sound.
When playing disc with copyright Protection
If you select "OFF", copyright protection will be
activated and sound will be down sampled at 48kHz.
DOLBY DIGITAL:_, "w ..... _l
Set to BITSTREAM he_ D_C o.
DOWNSAMPLING ON
BITSTREAM
the urfit is cormected to a _.._..__..__ ........
Dolby Digital Decodec
® BITSTREAM: Output a Dolby Digital signal
(default)
® PCM: Convert tile Dolby Digital to PCM
(2 channel stereo)
# 14it :;ST P] (_ex the noo ;_
OUfCK U
®You can select the "TV MODE" or "DOLBY DIGITAL" from the QUICK menu quickly. To access the
QUICK menu, select "QUICK" instead of "CUSTOM" m step 1 on page 43.
LANGU_tGE SET YOR _G_77<OI%SC}F_61EW M_VUS
You c_ui access the TV/VCR SETUP menu by hitting [SETUP] from the DVD mode. Refer to
"MENU LANGUAGE" on page 21 to chgmge the language for file on-screen menus.
- 44 - EN
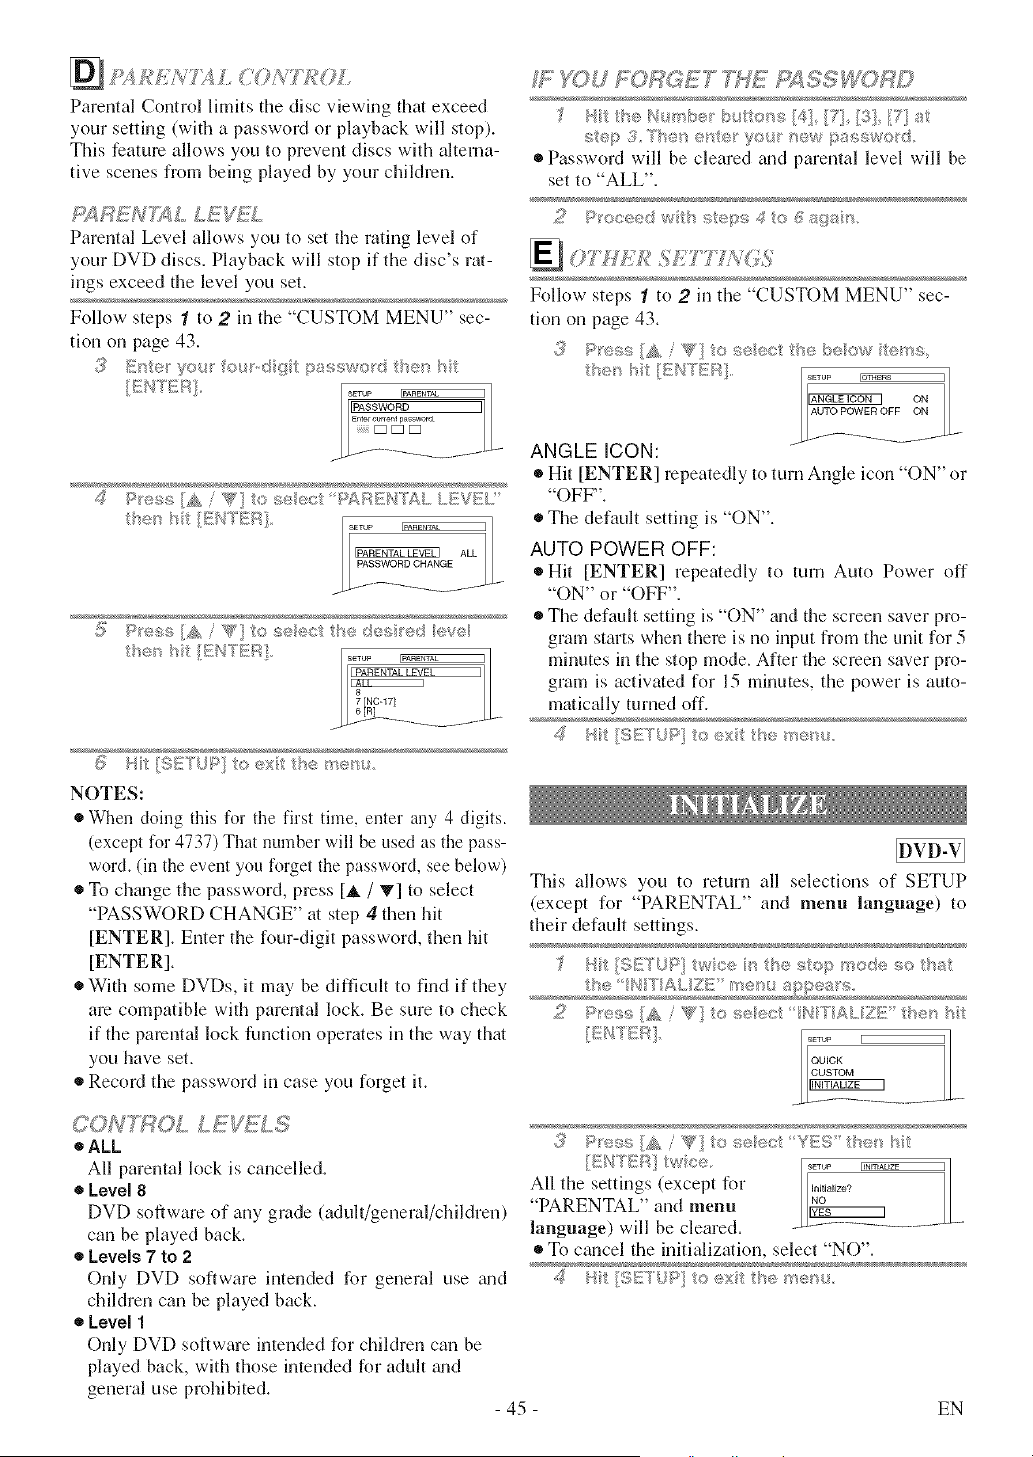
ParentalControllimitsthediscviewingthatexceed
yoursetting(withapasswordorplaybackwillstop).
Thisfcatm'eallowsyoutopreventdiscswithalterna-
tivescenesfrombeingplayedbyyourchildren.
£/4RENTXL LEntiL
Parental Level allows you to set the rating level of
your DVD discs. Playback will stop if the disc's rat-
ings exceed the level you set.
Follow steps 1 to 2 in the "CUSTOM MENU" sec-
tion on page 43.
.......... SETUP
IIP_ASSWORD I
Enter cunent password
::::: D D D
,_ I;Sy@S!: " , I:s :: _;:£,"r
A "_"cs ,>,_._c £_: ......d..I_EVSL.?
ALL
_ Pyess W" . ....... /s e
s_ru_ _ 3
7 [NC-171
_ }'it [S[;!TUP] to ext the me_u
NOTES:
When doing this for the first time, enter any 4 digits.
(except for 4737) That number will be used as the pass-
word. (in the event you forget the password, see below)
®To ch_mge the password, press [_i,/ T] to select
"PASSWORD CHANGE" at step 4 then hit
[ENTER]. Enter the four-digit password, then hit
[ENTER].
With some DVDs, it may be difficult to find if they
are compatible with parental lock. Be sure to check
if the parental lock function operates in the way that
you have set.
Record the password in case you forget it.
#_ _OU FORGET _SS RD
' tthet, r_:e b!. te_s[4., *;q.,[3 7[ s
step 3 The,_ e/4e' yo_ _ew pasa_o_d
Password will be cleared _md parental level will be
set to "ALL".
.. ..I:,..,,,S f} _@_s_.
N
Follow steps 1 to 2 in the "CUSTOM MENU" sec-
tion on page 43.
3 Pre_s/A / _g} to sooe_ he/,u_, ew _ms
' o
I_ ON
AUTO POWER OFF ON
ANGLE ICON:
Hit [ENTER] repeatedly to turn Angle icon "ON" or
"OFF'L
®The default setting is "ON".
AUTO POWER OFF:
Hit [ENTER] repeatedly to turn Auto Power off
"ON" or "OFF".
The default setdng is "ON" and the screen saver pro-
gram starts when there is no input from the unit for 5
minutes in the stop mode. After the screen saver pro-
gram is activated for 15 minutes, the power is auto-
matically turned off.
This allows you to return all selections nf SETUP
(except for "PARENTAL" and menu language) to
their default settings,
t_e /t'e _,_appe s
_? c,"u.+,,,::_ / '_] ® .......... .
...........A . s_ c,c:'I" H "YA :Z_!:"h_,n '
_>4rk:N.
C ON "T;;:_O L L E _£ S
_ALL
All parental lnck is cancelled.
Level 8
DVD software of any grade (adult/general/chikh'en)
can be played back.
Levels 7 to 2
Only DVD software intended for general use guid
children can be played back.
Level 1
Only DVD software intended for childreri can be
played back, with those intended for adult grad
general use prohibited.
- 45 -
3 ""_''"::.,,,}A _d'o. seest YES" the_"}
/G',K_7;R] twce,
All the settings (except for
"PARENTAL" and menu
language) will be cleared.
®To cancel the initialization, select "NO".
4 P!_ {$[fTUPI o ex he/"_>n_.
EN
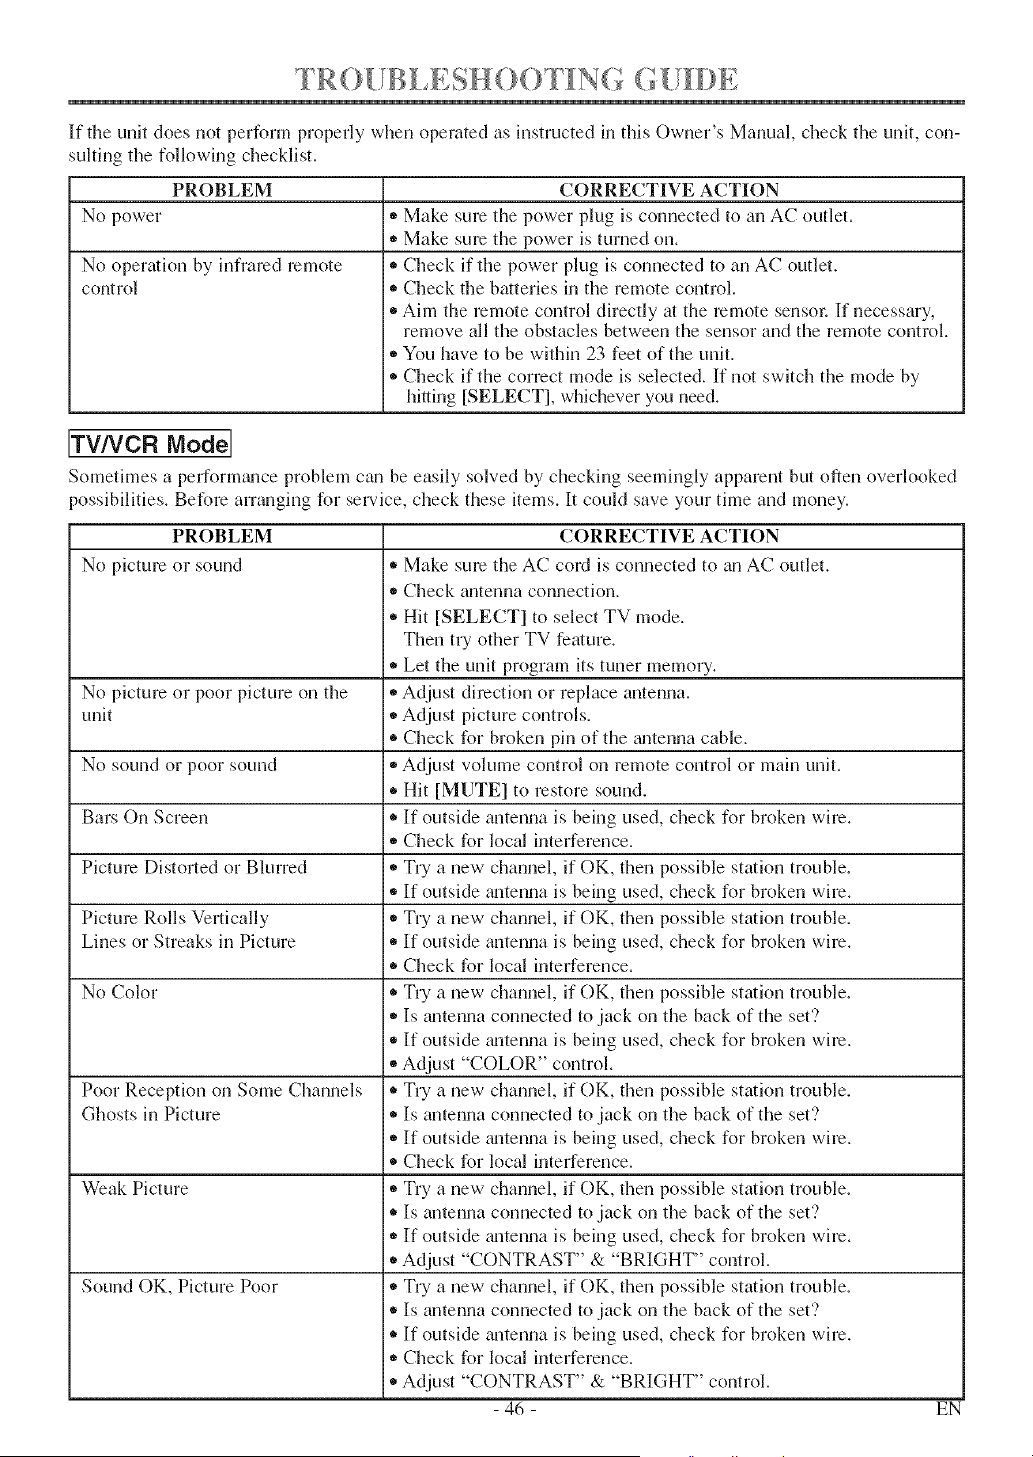
G
If the unit does not perform properly when operated as instructed in this Ow 1el s Manual, check the unit, con-
suiting tile following checklist.
PROBLEM
No power
No operation by infrared remote
control
CORRECTIVE ACTION
,, Make sure the power plug is connected to an AC outlet.
,, Make sum the power is turned on.
,, Check if tlle power plug is connected to an AC outlet.
,, Check the batteries in the remote control.
• Aim the remote control directly at the remote sensol: If necessary,
remove all tile obstacles between the sensor and tile remote control.
,, You have to be within 23 feet of the unit.
®Check if the correct mode is selected. If not switch the mode by
hiuing [SELECT], whichever you need.
ITV/VCR Model
Sometimes a perform_ulce problem can be easily solved by checking seemingly apparent but often overlooked
possibilities. BeR)re arranging R)r sel-vice, check these items. It could save your time and money.
CORRECTIVE ACTION
• Make sure the AC cord is connected to an AC outlet.
,, Check antenna connection.
• Hit [SELECT] to select TV mode.
Then tU other TV feature.
• Let the unit program its tuner memo U.
No picture or poor picture on the ,, Adjust direction or replace antenna.
unit _,Adjust picture controls.
®Check for broken pin of the gmtenna cable.
No sound or poor sound * Adjust volume control on remote control or main unit.
• Hit [MUTE] to restore sound.
Bars On Screen * If outside antenna is being used, check for broken wire.
• Check for local interference.
Picture Distorted or Blurred _,Try a new channel, if OK, then possible station trouble.
,, If outside _mtenna is being used, check for broken wire.
Picture Rolls Vertically _,Try a new channel, if OK, then possible station trouble.
Lines or Streaks in Picture * If outside antenna is being used, check for broken wire.
• Check for local interference.
No Color * Try a new channel, if OK, then possible station trouble.
• Is gmtenna connected to jack on tile back of the set'?
• If outside gmtenna is being used, check for broken wire.
• Adjust "COLOR" control.
Poor Reception on Some Channels * Try a new channel, if OK, then possible station trouble.
Ghosts in Picture * Is antenna connected to jack on the back of the set'?
_,If outside gmtenna is being used, check for broken wire.
®Check for local interference.
Weak Picture ,, Try a new channel, if OK, then possible station trouble.
• Is mltenna connected to jack on the back of the set'?
_,If outside matenna is being used, check for broken wire.
• Adjust "CONTRAST" & "BRIGHT" control.
Sound OK, Picture Poor ,, Try a new channel, if OK, then possible station trouble.
• Is antenna connected to jack on the back of the set'?
• If outside antenna is being used, check for broken wire.
,, Check for local interference.
• Adjust "CONTRAST" & "BRIGHT" control.
- 46 - EN
PROBLEM
No picture or sound
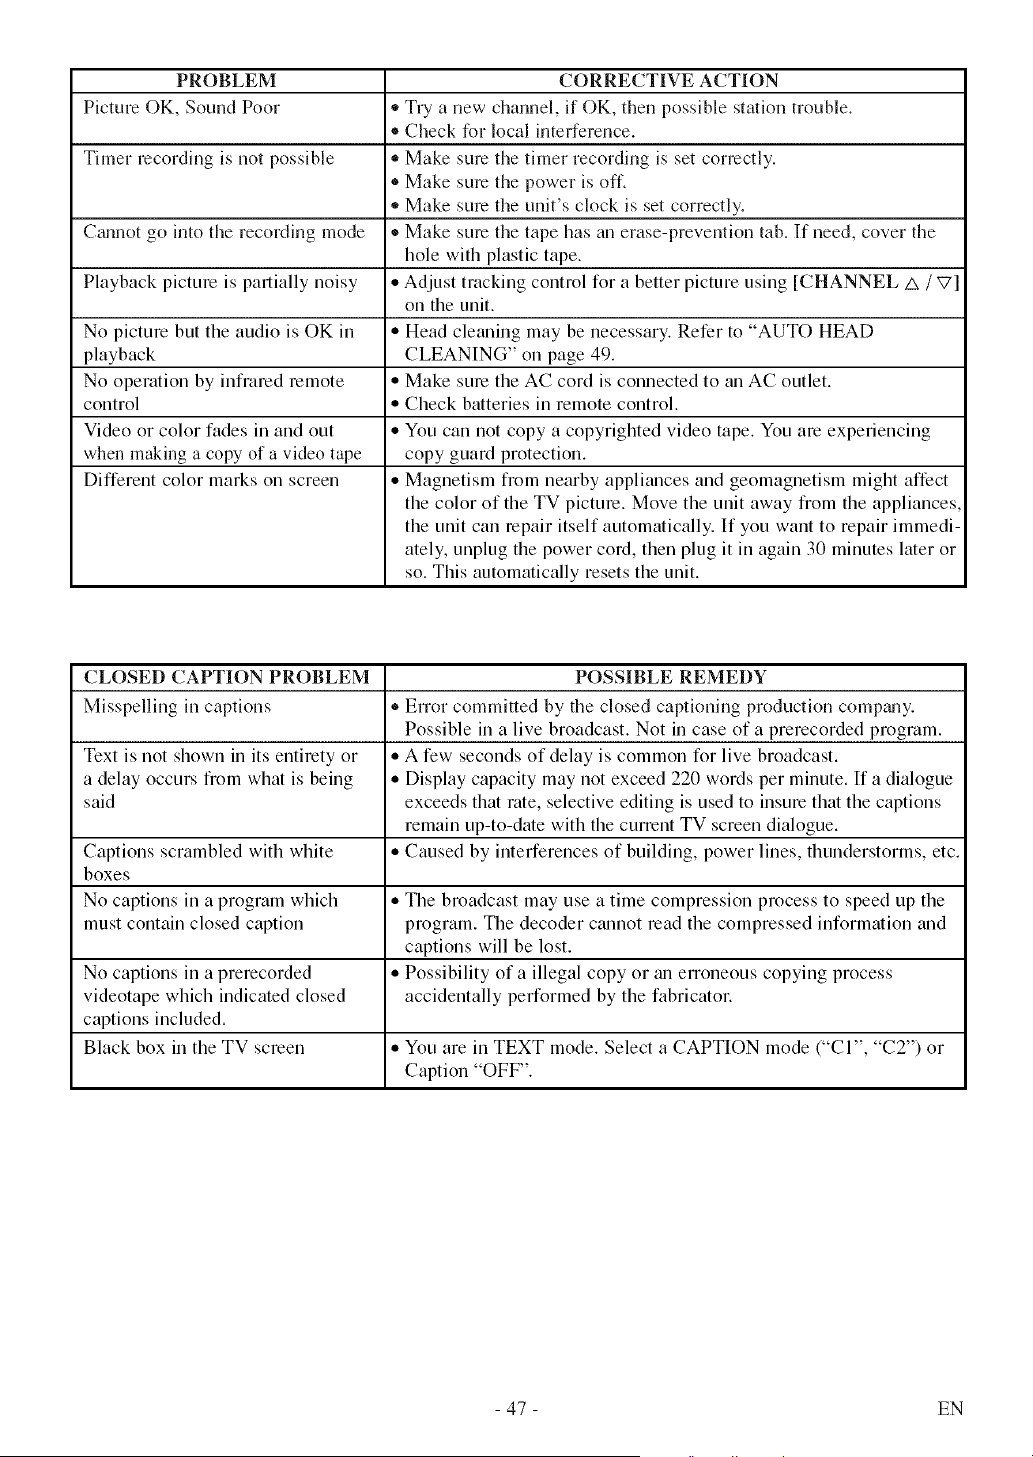
PROBLEM CORRECTIVE ACTION
Picture OK, Sound Poor • Try a new channel, if OK, then possible station trouble.
• Check for local interference.
Timer recording is not possible • Make sure the timer recording is set correctly.
• Make sure the power is off.
• Make sure the unit's clock is set correctly.
Ctmnot go into tile recording mode * Make sure tile tape has an erase-prevention tab. If need, cover the
hole with plastic tape.
Playback picture is partially noisy • Adjust tracking control for a better picture using [CHANNEL A / V]
oil tile unit.
No picture but tile audio is OK in • Head cleaning may be necessary. Refer to "AUTO HEAD
playback CLEANING" on page 49.
No operation by infrared remote • Make sure tile AC cord is connected to an AC outlet.
control • Check batteries in remote control.
Video or color fades in and out • You can not copy a copyrighted video tape. You are experiencing
when making a copy of a video tape copy guard protection.
Different color marks on screen • Magnetism from nearby appliances and geomagnetism might affect
tile color of tile TV picture. Move tile unit away from tile appliances,
tile unit can repair itself automatically. If you want to repair immedi-
ately, unplug tile power cord, then plug it in again 30 minutes later or
so. This automatically resets tile unit.
CLOSED CAPTION PROBLEM POSSIBLE REMEDY
Misspelling in captions • Error committed by the closed captioning production comp_my.
Possible in a live broadcast. Not in case of a prerecorded program.
Text is not shown in its entirety or • A few seconds of delay is common for live broadcast.
a delay occurs from what is being • Display capacity may not exceed 220 words per minute. If a dialogue
said exceeds that rote, selective editing is used to insure that tile captions
remain up-to-date with the current TV screen dialogue.
Captions scrambled with white • Caused by interferences of building, power lines, thunderstorms, etc.
boxes
No captions in a program which • The broadcast may use a time compression process to speed up the
must contain closed caption program. Tile decoder ctmnot read tile compressed information and
captions will be lost.
No captions in a prerecorded • Possibility of a illegal copy or ml erroneous copying process
videotape which indicated closed accidentally performed by tile fabricator.
captions included.
Black box in the TV screen • You are in TEXT mode. Select a CAPTION mode ("CI", "C2") or
Caption "OFF".
- 47 - EN
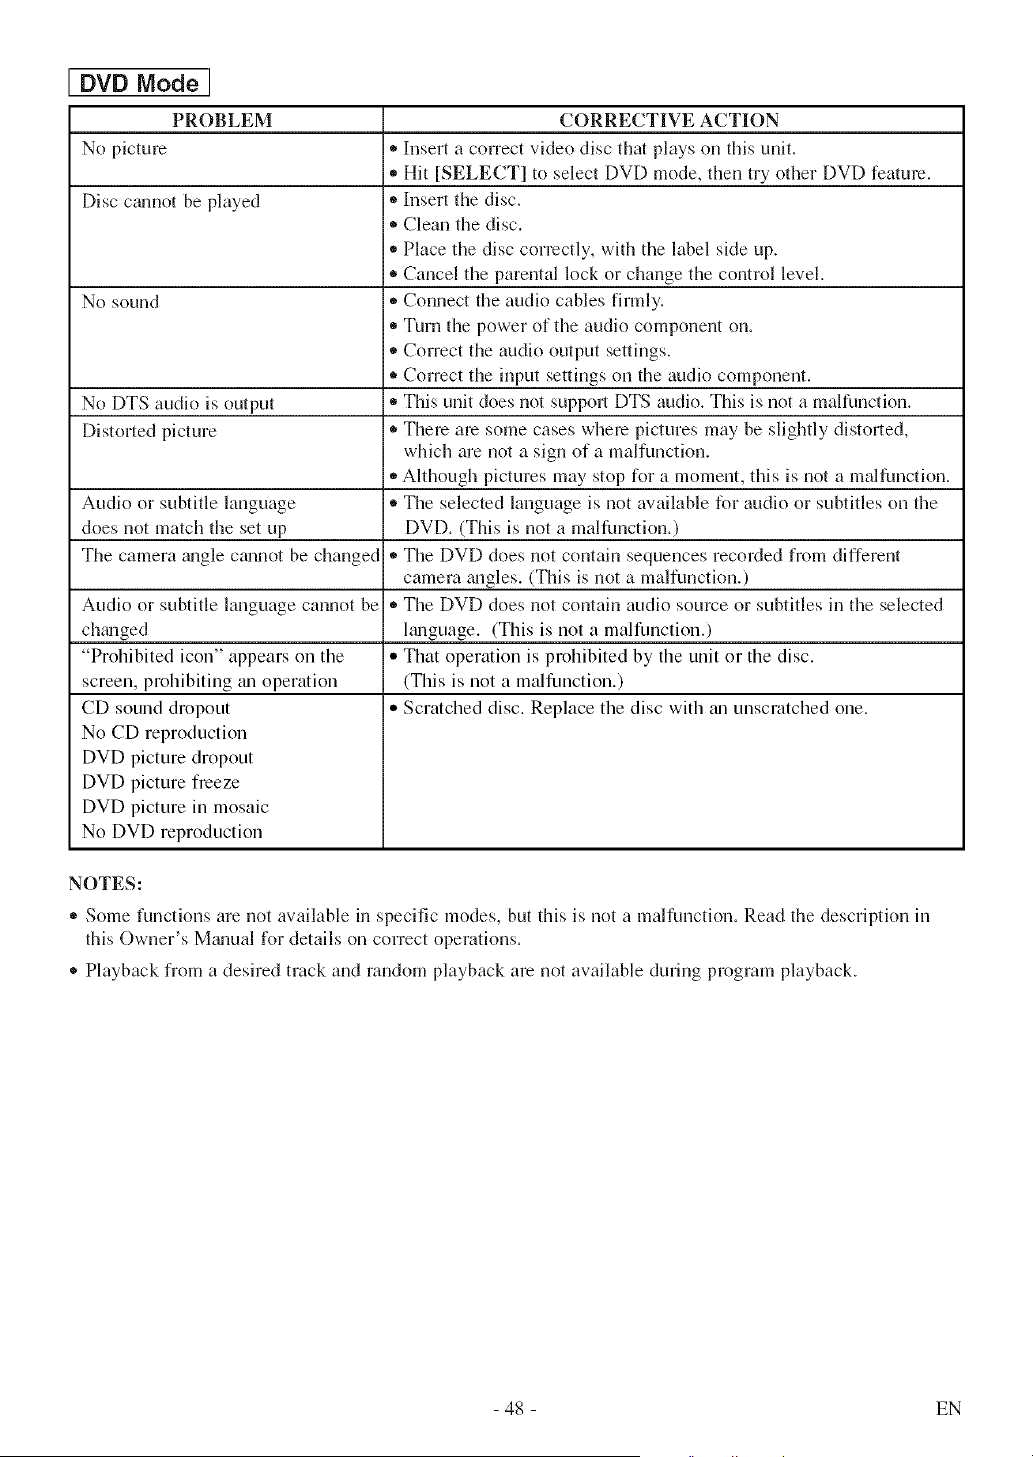
DVD Mode]
PROBLEM
No picture
Disc c_mnot be played
No sound
No DTS audio is output
Distorted picture
Audio or subtitle language
does not match the set up
The camera gmgle cgmnot be changed
Audio or subtitle language cannot be
chgmged
"Prohibited icon" appears on the
screen, prohibiting _u3 operation
CD sound dropout
No CD reproduction
DVD picture dropout
DVD picture freeze
DVD picture in mosaic
No DVD reproduction
CORRECTIVE ACTION
• Insert a correct video disc that plays on this unit.
,, Hit [SELECT] to select DVD mode, then try other DVD feature.
• Insert the disc.
• Clean the disc.
,, Place the disc correctly, with the label side up.
• Cancel the parental lock or change the control level.
,, Connect the audio cables firmly.
• Turn the power of the audio component on.
,, Correct the audio output settings.
• Correct the input settings on the audio component.
• This unit does not supporl DTS audio. This is not a malfunction.
• Them am some cases where pictures may be slightly distorted,
which are not a sign of a malfunction.
,, Although pictures may stop for a moment, this is not a malfunction.
®The selected language is not available for audio or subtitles on the
DVD. (This is not a malfunction.)
,, The DVD does not contain sequences recorded from different
camera gmgles. (This is not a malfunction.)
,, The DVD does not contain audio source or subtitles in the selected
l_3guage. (This is not a malfunction.)
,, That operation is prohibited by the unit or the disc.
(This is not a malfunction.)
,, Scratched disc. Replace the disc with m3unscmtched one.
NOTES:
,, Some functions are not available in specific modes, but this is not a malfunction. Read the description in
this Owner's M_mual for details on correct operations.
® Playback from a desired track and random playback are not available during program playback.
- 48 - EN
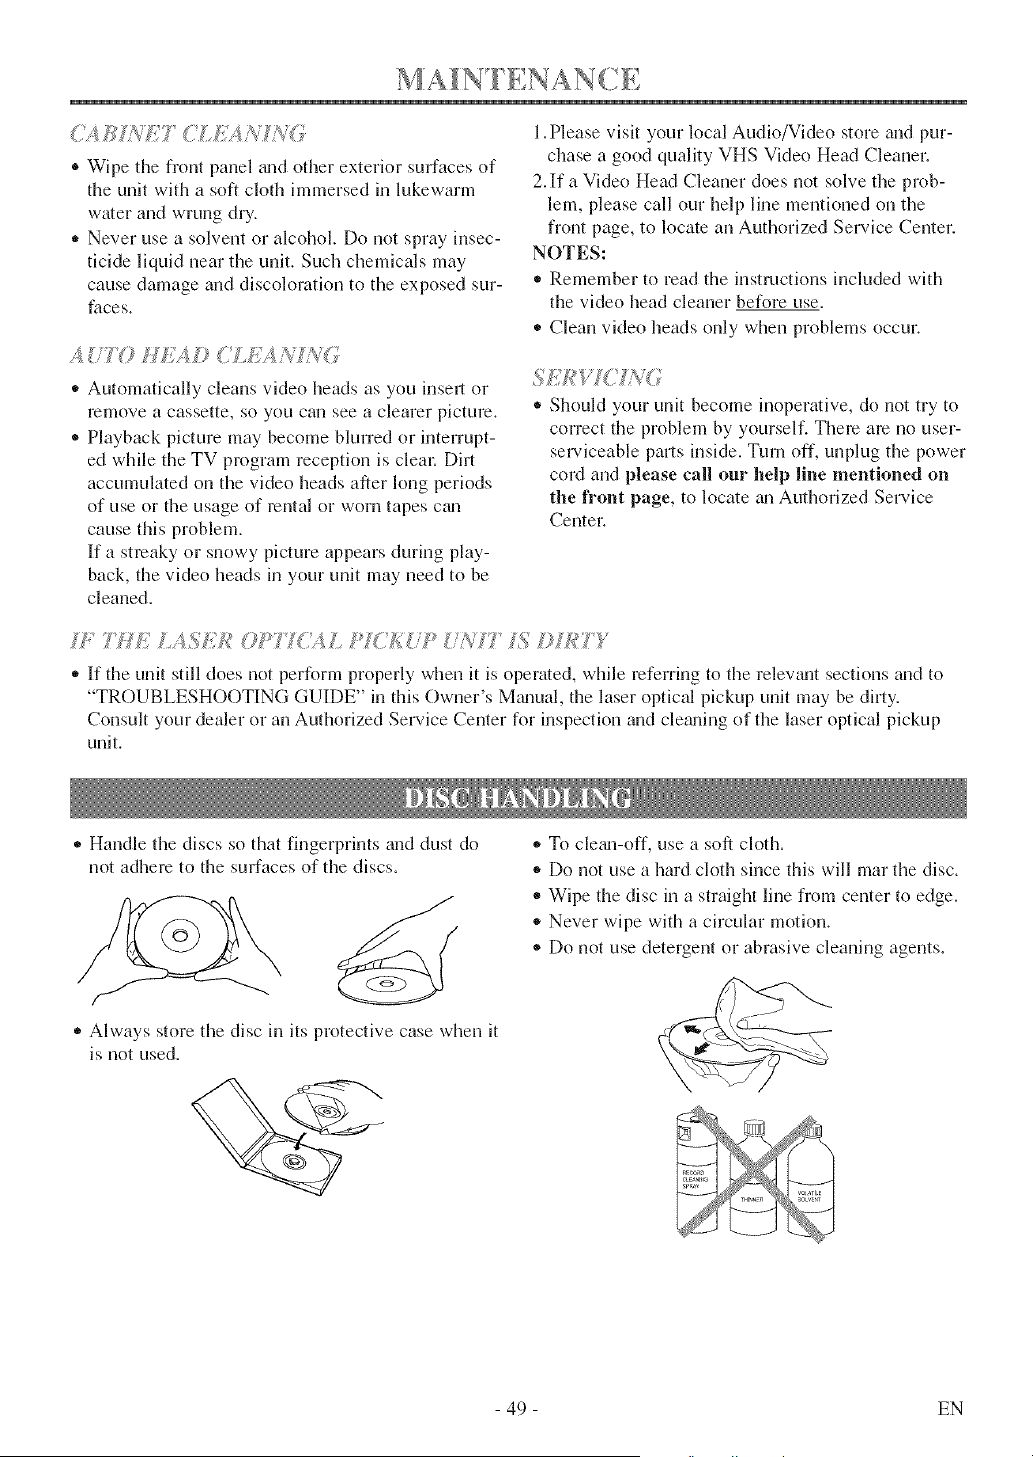
_ _; _,'ET CLi,',9 N_G
® Wipe the front panel trod other exterior surfaces of
the unit with a soft cloth immersed in lukewarm
water and wrung dU.
- Never use a solvent or alcohol. Do not spray insec-
ticide liquid near the unit. Such chemicals may
cause damage and discoloration to the exposed sur-
faces.
* Automatically cleans video heads as you insert or
remove a cassette, so you can see a clearer picture.
* Playback picture may become blurred or interrupt-
ed while the TV program reception is clem: Dirt
accumulated on the video heads after long periods
of use or the usage of rental or worn tapes c_m
cause this problem.
If a streaky or snowy picture appears during play-
back, the video heads in your unit may need to be
cleaned.
l.Please visit your local Audio/Video store m_d pur-
chase a good quality VHS Video Head Cleaner.
2.If a Video Head Cleaner does not solve the prob-
lem, please call our help line mentioned on the
front page, to locate an Authorized Service Center.
NOTES:
,, Remember to read the instructions included with
the video head cleaner before use.
- Clean video heads only when problems occur.
* Should your unit become inoperative, do not try to
correct the problem by yourself. There are no user-
serviceable parts inside. Turn off, unplug the power
coM and please call our help line mentioned on
the front page, to locate gmAuthorized Service
Center.
,, If the unit still does not perform properly when it is operated, while referring to the relevtmt sections and to
"TROUBLESHOOTING GUIDE" in this Owner's Mmmal, the laser optical pickup unit may be dirty.
Consult your dealer or an Authorized Service Center for inspection and clemling of the laser optical pickup
unit.
* Handle the discs so that fingerprints mid dust do
not adhere to the surfaces of the discs.
* Always store the disc in its protective case when it
is not used.
* To clegm-off, use a soft cloth.
* Do not use a hard cloth since this will mar the disc.
* Wipe the disc in a straight line from center to edge.
* Never wipe with a circular motion.
® Do not use detergent or abrasive cleaning agents.
- 49 - EN
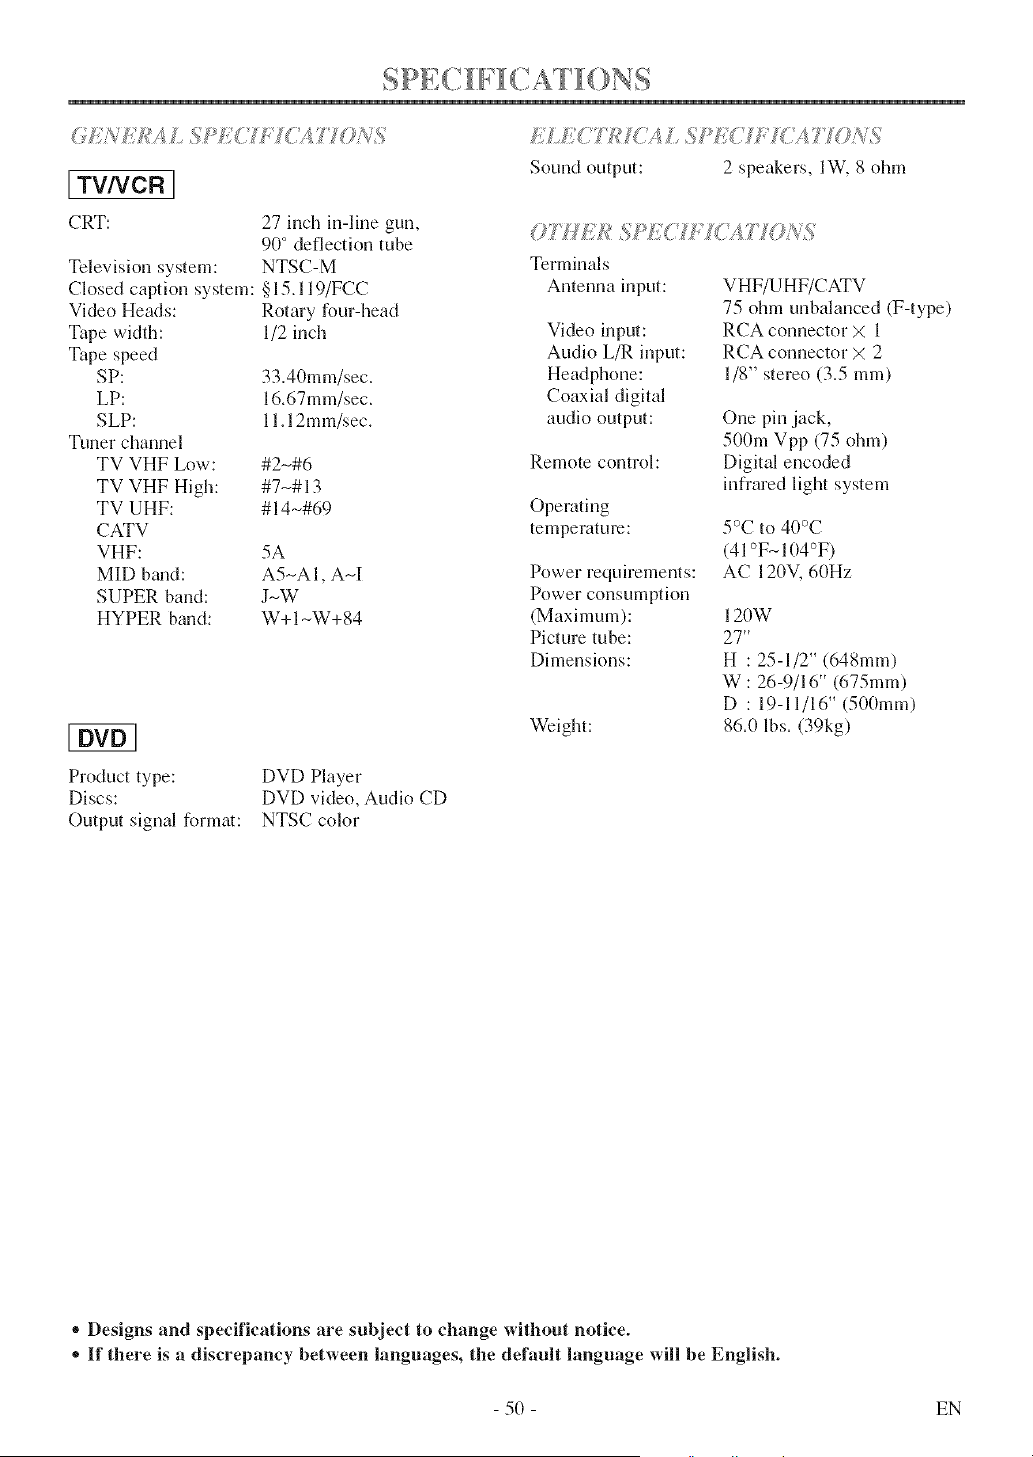
I TV/VCR ]
CRT:
Television system:
Closed caption system:
Video Heads:
Tape width:
Tape speed
SP:
LP:
SLP:
Tuner channel
TV VHF Low:
TV VHF High:
TV UHF:
CATV
VHF:
MID braid:
SUPER band:
HYPER band:
27 inch in-line gun,
90° deflection tube
NTSC-M
§15.119/FCC
Rotary four-head
1/2 inch
33.40mm/sec.
16.67mm/sec.
11.12mm/sec.
#2-#6
#7-# 13
#14-#69
5A
A5-AI, AM
J-W
W+ 1-W+ 84
Product type:
Discs:
Output signal format:
DVD Player
DVD video, Audio CD
NTSC color
EC77? '['ASSPE<H ONS;
Sound output: 2 speakers, lW, 8 ohm
OTHE, ;
Terminals
Antenna input:
Video input:
Audio L/R input:
Headphone:
Coaxial digital
audio output:
Remote control:
Operating
temperature:
Power requirements:
Power consumption
(Maximum):
Picture tube:
Dimensions:
Weight:
VHF/UHF/CATV
75 ohm unbalanced (F-type)
RCA connector X 1
RCA connector X 2
1/8" stereo (3.5 ram)
One pin jack,
500m Vpp (75 ohm)
Digital encoded
infrared light system
5°C to 40°C
(41°F-104°F)
AC 120V, 60Hz
120W
27"
H : 25-1/2" (648mm)
W : 26-9/16" (675mm)
D : 19-11/16" (500mm)
86.0 lbs. (39kg)
®Designs and specifications are subject to change without notice.
,_If there is a discrepancy between languages, the default language will be English.
- 50 - EN
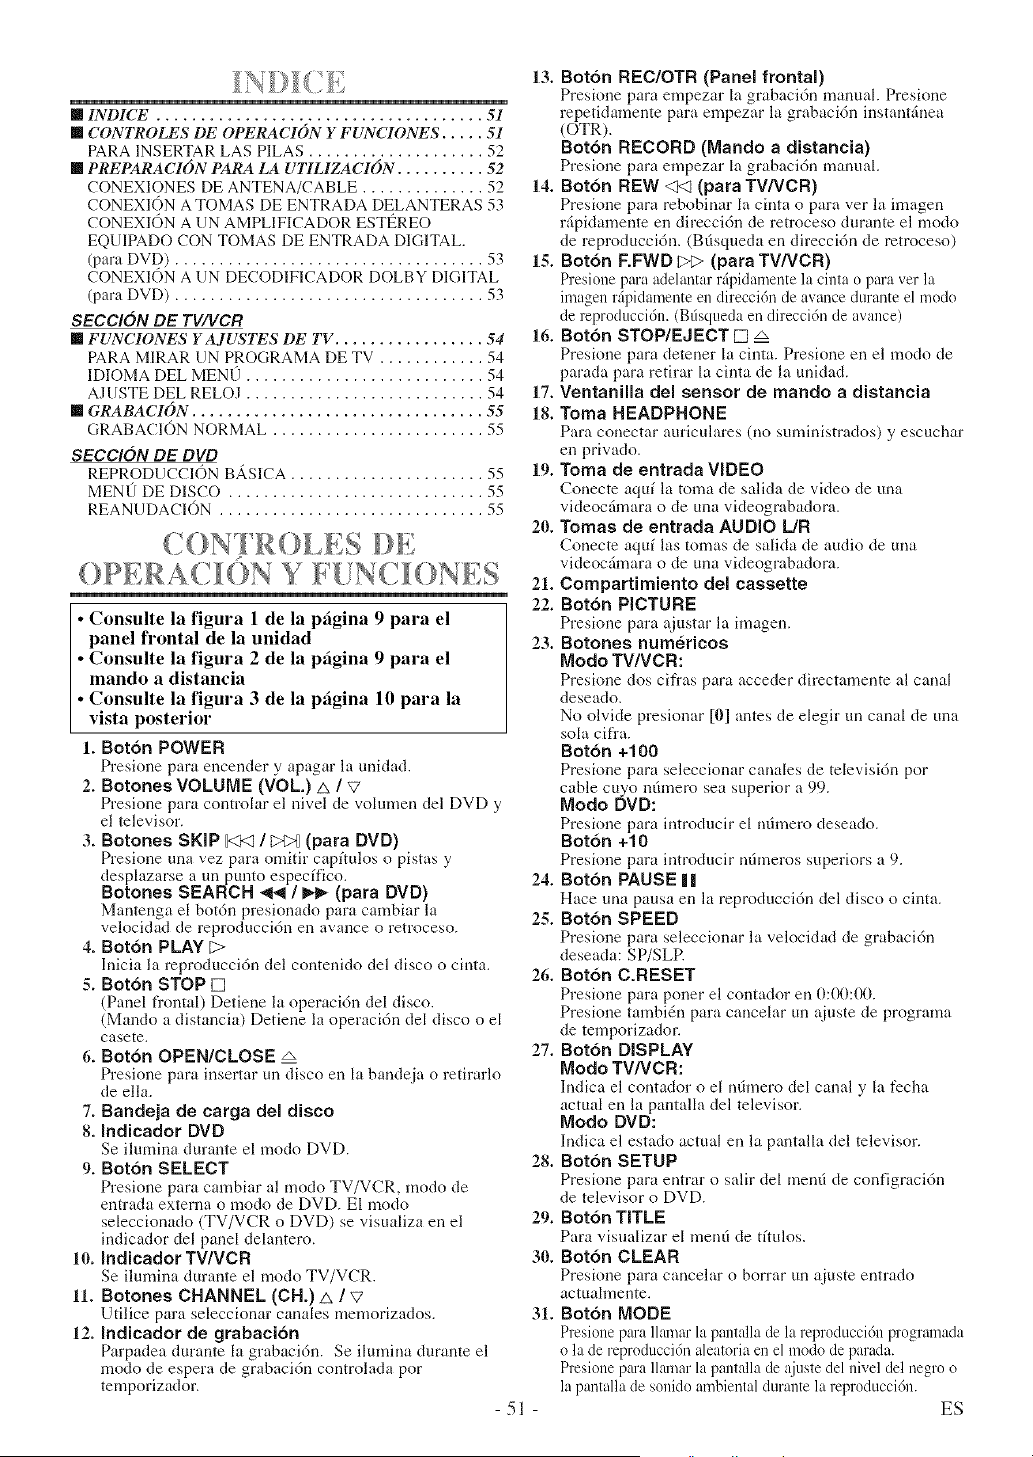
[] INDICE ..................................... 51
[] CONIT{OLES DE OPERACION Y FUNCIONES ..... 51
PARA INSERTAR LAS PILAS .................... 52
[] PREPARACION PARA LA UTILIZACION .......... 52
CONEXIONES DE ANTENA/CABLE .............. 52
CONEXION A TOMAS DE ENTRADA DELANTERAS 53
CONEXI()N A UN AMPLIFICADOR ESTI_REO
EQUIPADO CON TOMAS DE ENTRADA DIGITAL.
(para DVD) ................................... 53
CONEXION A UN DECODIFICADOR DOLBY DIGITAL
(para DVD) ................................... 53
SECCION DE TU/VCR
[] FUNCIONES YAJUSTES DE TV ................. 54
PARA M1RAR UN PROGRAMA DE TV ............ 54
IDIOMA DEL MEN(J ........................... 54
AJUSTE DEL RELOJ ........................... 54
[] GRABACION ................................. 55
GRABACI()N NORMAL ........................ 55
SECCION DE DVD
REPRODUCCION BASICA ...................... 55
MEN(J DE DISCO ............................. 55
REANUDACION .............................. 55
C ONT R 0 ES DE
()PERAC ON Y Ii [!N(JONES
Consulte la figura 1 de la pagina 9 para el
panel frontal de la unidad
Consulte la figura 2 de la pagina 9 para el
mando a distancia
Consulte la figura 3 de la pagina 10 para la
vista posterior
1. Bot6n POWER
Presione para encender y apagar la unidad.
2. Botones VOLUME (VOL.) A /V
Presione para controlar el nivel de volumen del DVD y
el televisor.
3. Botones SKIP g3<l / _ (para DVD)
Presione una vez para omitir capftulos o pistas y
desplazarse a uu punto especffico.
Botones SEARCH .,_l / _.1,- (para OVO)
Mantenga el botdn presionado para cambiar la
velocidad de reproducci6n en avance o retroceso.
4. Botdn PLAY [2>
lnicia la reproduccidn del contenido del disco o cinta.
5. Botdn STOP []
(Panel fl'ontal) Detiene la operacidn del disco.
(Mando a distancia) Detiene la operaci6n del disco o el
casete.
6. Botdn OPEN/CLOSE =_
Presione para insertar tin disco en la bandcja o retirarlo
de ella.
7. Bandeja de carga del disco
8. Indicador DVD
Se ilumina durante el modo DVD.
9. Botdn SELECT
Presione para cambiar al modo TV/VCR, modo de
entrada externa o modo de DVD. El modo
seleccionado (TV/VCR o DVD) se visualiza en el
indicador del panel delantero.
10. Indicador TWVCR
Se ilmnina durante el modo TV/VCR.
11oBotones CHANNEL (CH.) A / V
Utilice para seleccionar canales memorizados.
12. Indicador de grabacidn
Parpadea duraute la grabacidn. Se ilumina durante el
modo de espera de grabacidn controlada por
temporizador.
13. Bot6n REC/OTR (Panel frontal)
Presione para empezar la grabacidn manual. Presione
repetidamente para empezar la grabaci6n instant_inea
(OTR).
Bot6n RECORD (Mando a distancia)
Presione para empezar la grabacidn manual.
14. Bot6n REW <N (para TVNCR)
Presione para rebobinar la cinta o para ver la imagen
rfipidamente en direccidn de retroceso durante el modo
de reproduccidn. (Bllsqueda en direccidn de retroceso)
15. Botdn F.FWD _ (para TV/VCR)
Presione para adelantar r_ipidalnente la cinta o para ver la
imagen rfipidamente en direccidn de avance durante el modo
de mproducci6n. (Bfisqueda en direcci6n de avance)
16. Botdn STOP/EJECT [] =_
Presione para detener la cinta. Presione en el modo de
parada para retirar la cinta de la unidad.
17. Ventanilla del sensor de mando a distancia
18. Toma HEADPHONE
Para conectar auriculares (no suminismulos) y escuchar
en privado.
19. Toma de entrada VIDEO
Conecte aquf la toma de salida de video de una
videocfimara o de una videograbadora.
20. Tomas de entrada AUDIO L/R
Conecte aquf las tomas de salida de audio de una
videoc5mara o de una videograbadora.
21. Compartimiento del cassette
22. Bot6n PICTURE
Presione para ajustar la imagen.
23. Botones numericos
Modo TV/VCR:
Presione dos cifras para acceder directamente al canal
deseado.
No olvide presionar [0] antes de elegir un canal de una
sola cifra.
Botdn +100
Presione para seleccionar canales de televisidn por
cable cuyo mhnem sea superior a 99.
Modo DVD:
Presione para introducir el ndmero deseado.
Boton +10
Presione para introducir ndmeros superiors a 9.
24. Botdn PAUSE ||
Hace una pausa en la reproduccidn del disco o cinta.
25. Boton SPEED
Presione para seleccionar la velocidad de grabaci6n
deseada: SP/SLP.
26. Bot6n C.RESET
Presione para poner el contador en 0:00:00.
Presione tambidn para cancelar un _tiuste de programa
de temporizador.
27. Botdn DISPLAY
Modo TV/VCR:
Indica el contador o el ndmero del canal y la fccha
actual en la pantalla del televisor.
Modo DVD:
Indica el estado actual en la pantalla del televisor.
28. Botdn SETUP
Presione para entrar o salir del mend de configracidn
de televisor o DVD.
29. Botdn TITLE
Para visualizar el metal de tfmlos.
30. Botdn CLEAR
Presione para cancelar o borrar un ajuste entrado
actualmente.
31. Botdn MODE
Plvsione para ]lamar la panta]la de ]a rcproducci6n programada
o la de reproduccidn aleatoria en el modo de parada.
Prcsione para lhunar la pantalla de ajuste del nivel del negro o
la pantalla de sonido ambiental durante la rcproduccidn.
51 ES
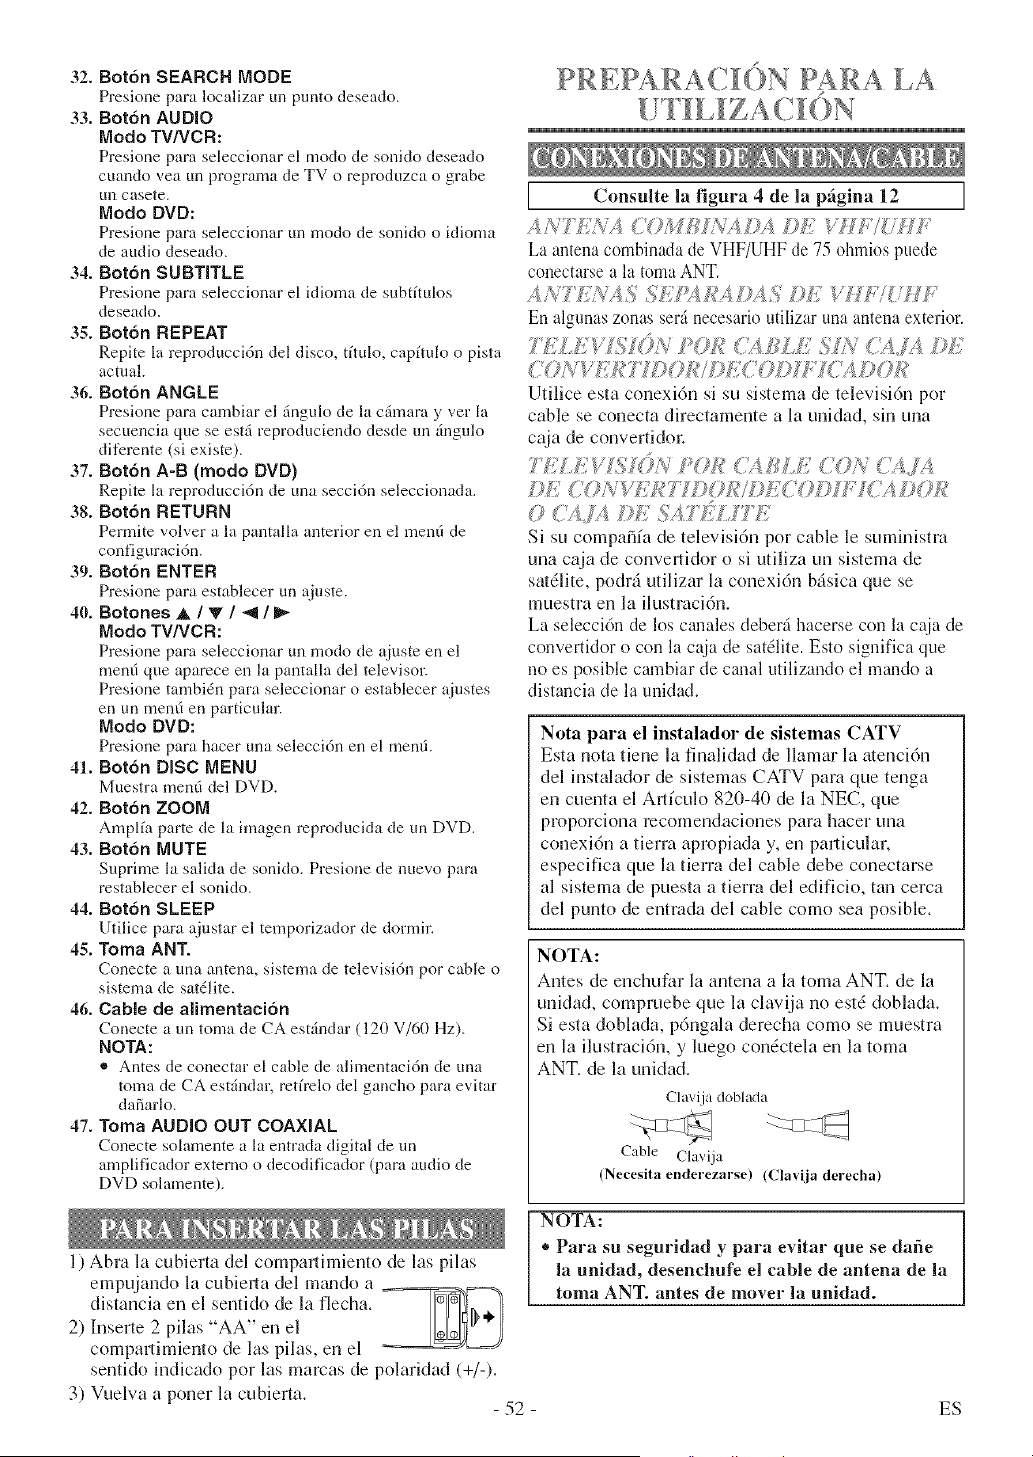
32. Boton SEARCH MODE
Presione para localizar un punto deseado.
33. Botdn AUDIO
Modo TV/VCR:
Presione para seleccionar el modo de sonido deseado
cuando yea un programa de TV o reproduzca o grabe
[In casete.
Modo DVD:
Presione para seleccionar un modo de sonido o idioma
de audio deseado.
34. Botdn SUBTITLE
Presione pare seleccionar el idioma de subtftulos
deseado.
35. Botdn REPEAT
Repite la reproduccidn del disco, tftulo, capftulo o pista
actual.
36. Botdn ANGLE
Presione pare cambiar el dngulo de la cgmam y vet la
secuencia que se estd reproduciendo desde un 5ngulo
difcrente (si existe).
37. Botdn A-B (modo DVD)
Repite la reproduccidn de una seccidn seleccionada.
38. Botdn RETURN
Permite volver a la pantalla anterior en el men6 de
configuracidn.
39. Botdn ENTER
Presione para esmblecer un ajuste.
40. Botones ,L / 'V / _ /
Modo TV/VCR:
Presione para seleccionar un modo de ajuste en el
metal que aparece en la pantalla del televisor.
Presione tambidn para seleccionar o establecer ajustes
en un metal en particular.
Modo DVD:
Presione para Imcer una seleccidn en el metal.
41. Botdn DISC MENU
Muestra men6 del DVD.
42. Botdn ZOOM
Amplfa parte de la imagen reproducida de un DVD.
43. Botdn MUTE
Suprime la salida de sonido. Presione de nuevo pare
restablecer el sonido.
44. Botdn SLEEP
Utilice para ajustar el temporizador de dormir.
45. Toma ANT.
Conecte auna antena, sistema de televisidn por cable o
sistema de satdlite.
46. Cable de alimentacidn
Conecte atm toma de CA est&Mar (120 V/60 Hz).
NOTA:
® Antes de conectar el cable de alimentacidn de una
toma de CA est_ndar, retfrelo del gancho para evitar
dafiarlo.
47. Toma AUDIO OUT COAXIAL
Conecte solamente a la entrada digital de un
amplificador externo o decodificador (para audio de
DVD solamente).
1) Abra la cubierta del comparthniento de las pilas
p
PR/, PARAQION PARA LA
I Consulte la figura 4 de la pfigina 12 I
,4/'C?_ COJW_;_',_]b¢ ;OJ: Wti7_; ;M]-"
La antena combinada de VHF/UHF de 75 ohmios puede
conectarse a la toma ANT.
.4/_,'TL7<.4SSk :%B'_I)._5 ©[.i V ] 7 7MF
En algunas zonas seal necesario ntilizar una antena exterior.
?7:_k;gl% ()k <?k_ _)¢B' I;)_ ?_ _414 JL
<<OAVF i TW)OI,I:/Ldi<('OIA].[C! I)(TB
Utilice esta conexi6n si su sistema de televisidn pot
cable se conecta directamente a la unidad, sin una
caja de convertidm:
?TiLl:'g#<_¢)_<I_!;_R _"AI;'L_;< 0/_ C/i]4
;q: LOiVW: I_:',?"I_< /¢I/IAJCOL).F]TC;_ ]:_0.1,1
0 ('.%IA l)H SA77_'L[77i
Si su compaifa de televisidn pot cable le suministra
una caja de convertidor o si utiliza un sistema de
satdlite, podrd utilizar la conexi6n bfisica que se
muestra en la ilustraci6n.
La seleccidn de los canales deberfi hacerse con la caia de
convertidor o con la caja de satdlite. Esto significa que
no es posible cambiar de canal utilizando el mando a
distancia de la unidad.
Nota para el instalador de sistemas CATV
Esta nota tiene la finalidad de llamar la atenci6n
del instalador de sistemas CATV para que tenga
en cuenta el Allfculo 820-40 de la NEC, que
proporciona mcomendaciones para hacer una
conexidn a tierra apropiada y, en pallicular,
especifica que la tierra del cable debe conectarse
al sistema de puesta a tierra del edificio, tan cerca
del punto de entrada del cable como sea posible.
NOTA:
Antes de enchufar la antena a la toma ANT. de la
unidad, compmebe que la clavija no estd doblada.
Siesta doblada, p6ngala derecha como se muestra
en la ilustracidn, y luego condctela en la toma
ANT. de la unidad.
Clavija doblada
Cable Clavija
(Necesita enderezarse) (Clavija derecha)
empujando la cubierm del mgmdo a
distancia en el sentido de la flecha. [_[_ ,/i
2) Inserte 2 pilas "AA" en el
comparfimiento de las pilas, en el
sentido indicado pot las marcas de polmJdad (+/-).
3) Vuelva a poner la cubierta.
- 52 -
NOTA:
* Para su seguridad y para evitar que se dafie
la unidad, desenchufe el cable de antena de la
toma ANT. antes de mover la unidad.
ES
Cuandoyeaunprogramagrabadoenotrafuente
(videograbadoraovideoc_mara),utilicelastomasde
entradaAUDIO/VIDEOdela partedelanteradela
unidad.
Conecte las tomas de salida de audio/vfdeo de otra
fuente alas tomas AUDIO L/R y VIDE() de esta
unidad.
Despu4s, presione [SELECT] o [CH. A / V] basra
que aparezea "AUX" en la pantalla.
[ Consulte la figura 5 de la pllgina 13 ]
NOTA:
® Cuando conecte una videograbadora monof6nica
(otra fuente) a esta unidad, conecte la toma de
salida de audio de la videograbadora monof6nica
(otra fuente) a la toma AUDIO L de esta unidad. El
audio saldrfi iguahnente pot los canales izquierdo y
derecho.
Utilice un cable digital coaxial de audio (disponible en
el comemio) para hacer las conexiones de audio.
Conexi6n a un amplificador equipado con tomas de
entrada digital, platina MD o platina DAT.
Consulte la figura 6 de la pfigina 13 ]
NOTAS:
• La fuente de audio de un disco grabado en formato
de sonido envolvente Dolby Digital de 5,1 cmmles
no se puede grabar como sonido digital mediante
ulna platina MD o DAT.
® Asegfimse de apagar todos los componentes del
sistema mites de conectar otro componente.
• Consulte los manuales de instrucciones de los
componentes que va a conectar a la unidad.
" Ajuste la funci6n "DOLBY DIGITAL" a "PCM"
para salida de audio en el modo de configuraci6n.
La reproduccidn en una unidad utiliz_mdo ajustes
incorrectos puede generar ruido y distorsidn, y
tambi6n puede provocar dafios a los altavoces.
Si utiliza esta unidad para mproducir un disco DVD
grabado en fommto de souido envolvente Dulby
Digital de 5,1 canales, la unidad emitir6 un flujo de
datos DOLBY DIGITAL desde su toma AUDIO
OUT COAXIAL. Si conecta la unidad a un
decodificador Dolby Digital, podrfi disfrutar de una
tonafidad mils convincente y real, con un sonido
envolvente potente y de alta calidad similar al de los
cines.
Utilice cables digitales coaxiales de audio
(disponibles en el comercio) para hacer las
conexiones de audio.
I Consulte la figura 7 de la pfigina 14 ]
NOTAS:
* Asegdrese de apagar todos los componentes del
sistema antes de conectar otro componente.
* Consulte los mzmuales de instrucciones de los
componentes que va a conectar a la unidad.
* Si conecta un decodificador Dolby Digital, ajuste
la funci6n "DOLBY DIGITAL" a "BITSTREAM"
para salida de audio en el modo de configuraci6n.
® A menos que se haga la conexi6n a un
decodificador Dolby Digital, ajuste la funcidn
"DOLBY DIGITAL" a "PCM" para salida de
audio en el modo de configuracidn. La
reproducci6n en una unidad utilizando ajustes
incorrectos puede generar ruido y distorsi6n, y
tambi6n puede provocar &uSos a los altavoces.
Fabrieado bajo licencia de Oolby ]
Laboratories. Dolby y el simbolo de !a
done D son marcas comerciales de Dolby /
Laboratories, ]
53 ES
FUNCIONES Y AJUSTES
DE TV
ITV/VCR]
[TV/VCR 1
J S®ecco_e /.ANGUAG_!2'
Presione [SETUP].
Presione [_, / V] para apuntar a "LANGUAGE".
}P E_c_'_ e cab<? ®6otto
Enchufe el cable el6ctrico de la unidad en un
tomacorriente de CA del hogal:
NOTA:
,, Si apamcen ndmeros en la esquina de la pantalla,
presione [POWER] sin desenchufar el cable
el@trico.
2 Ence'_da a _m<a_
Presione [POWER] para encender la ulddad.
Pmsione [CH. A / _€] o los botones numdricos para
seleccionar su ndmero de c_maldeseado.
Nora para el uso de los botones numdrieos:
* Debe colocar un cero grates de los ndmerns de cgmal
de una sola cifra (pot eiemplo: 02, 03, 04, etc.).
* Cuando seleccione canales de cable de mds de 99,
presione primero [+100] y desp@s las dos dltimas
ciflas. (Ejemplo: para seleccionar el canal 125,
primero presione [+1001 y desp@s presione [21y [51.)
d A_K:ee sondc_
Pmsione [VOL A / V] para ajustar el volmnen.
Pmsione [MUTE] para silenciar instant(meamente el
sonido.
Pmsione nuevamente para recuperar el nivel de
sonido m_terior.
NOTA:
®Si presiona [CH. A / T] en el modo DVD, puede
cambiar los canales de TV. Incluso si apaga la
unidad en el modo DVD, cugmdo vuelva a
encender, volverd al modo TV/VCR.
J_:_/6<IWYI£ _.._/%_/£_5 ©li CA/J/.; 0
,, Si la unidad estd conectada a una caja de cable o
caja de satdlite, presione [CIt. A / V] para
seleccionar CH3 o CH4 de acueMo con el ajuste
de cgmal de salida del dispositivo y seleccione el
cmml deseado en el disposifivo.
_s j. '&'. _',,;'A')4 sA _ _'" _''%.'£-. Wi£ ........,........ ..
®Cuando se conecta un equipo externo en las tomas
de entrada AUDIO/VIDEO frontales, presione
[SELECT] o [CH. _ / _'] repetidamente basra que
aparezca °°AUX" en la pantalla.
Presione [ENTER] repetidamente para seleccionar
"ENGLISH" = inglds, "ESPANOL" o
"FRAN(]AIS" = franc&.
.3 Sagade mode de dons
Presione [SETUP] para salir del mend.
NOTAS:
Esta funcidn afecta s61o el idioma en el mend de la
pantalla y no la fuente de audio.
® Si pot alguna raz6n, el mend estd en franc&,
presione [SETUP], presione [_, / V] para apuntar
al "LANGAGE [FRAN(TAISI" y presione
[ENTER] repetidamente para seleccionar el
idioma deseado y presione [SETUP].
[TV/VCR]
..'IJY;7"/ik.L4i_<iAL,_U{_'££' (.U
Aseg_rese ...
® La unidad debe estar encendida.
En el siguie_te ejemplo, el reloj debe estar e#r
FECHA 6 de mayo, 2005
HORA DE AJUSTE 5:40PM
Seeeeo}_e AJUS'TE AELOJ'
Presione [SETUP].
Presione [_ / V] para seleccionar "AJUSTE RELOJ"
y presione [ENTER].
2 Se{eceer_e A_{)gsTE_V_AH{)A/.};_ELOJ'
Presione [at / V'] para seleccionar "AJUSTE
MANUAL RELOJ" y presione [ENTER].
Presione [at /_] hasta que aparezca el rues deseado.
(Ejemplo: Mayo --+"05")
Presione [l_]. (O presione [_11 para volver un paso.)
/_ See eor_ee {Ja
Presione [at /V] hasta que aparezca el dfa deseado.
(Ejemplo: 6-0--+"06")
Presione [_].
- 54 - ES
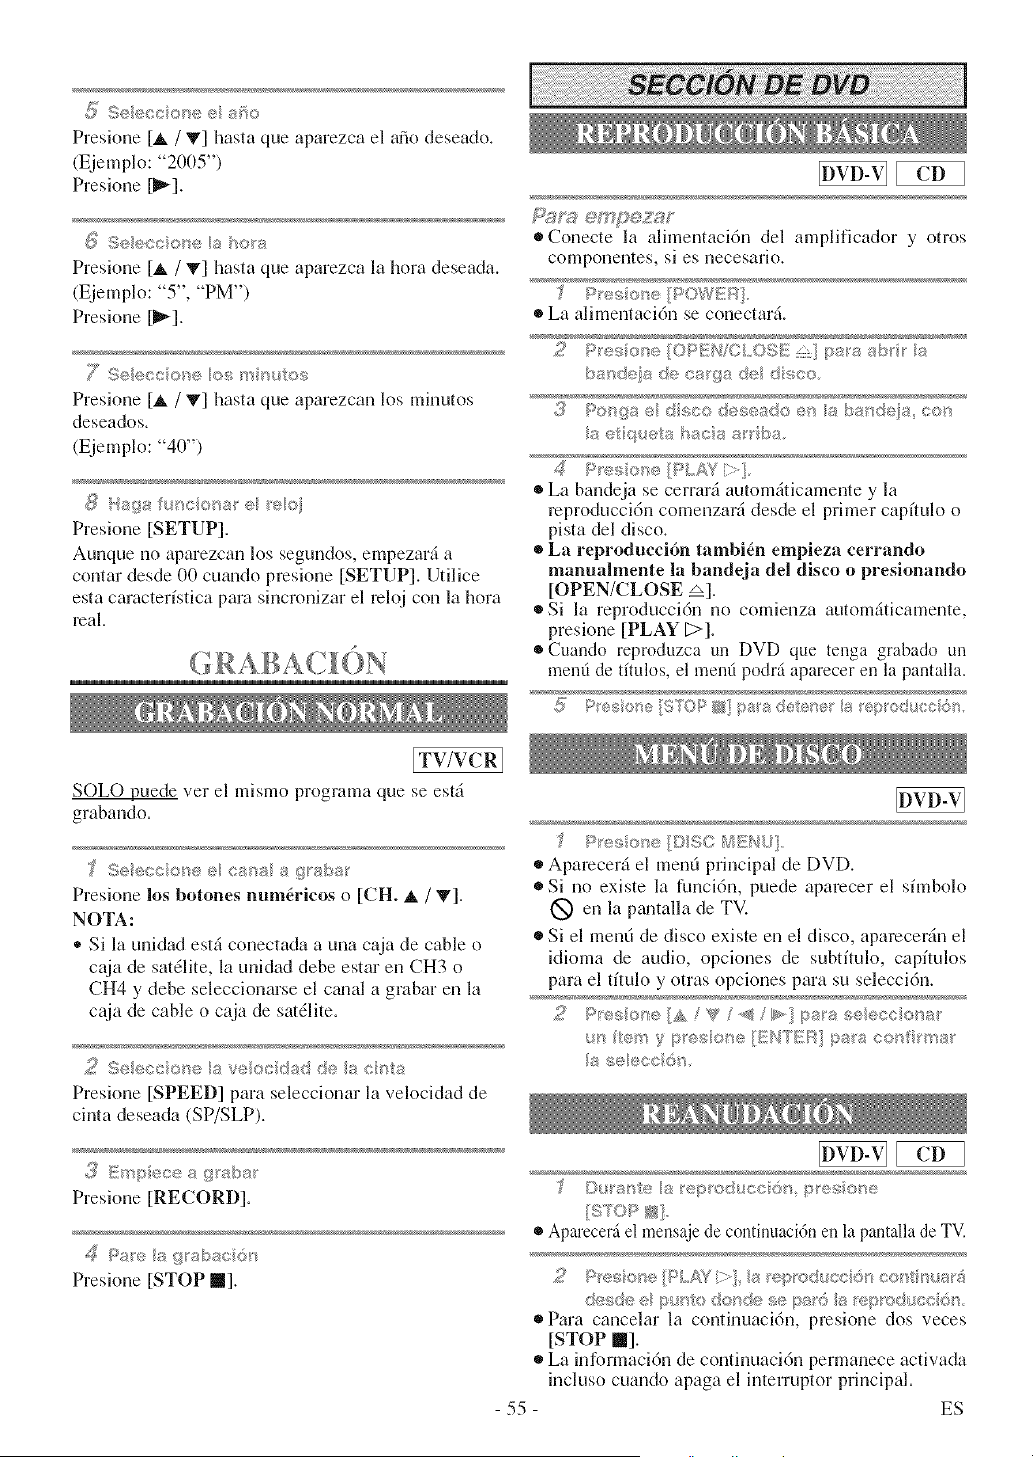
Presione[A / V] hasta que aparezca el guSodeseado.
(Ejemplo: "2005")
Presione [_].
#5 Seeccon÷ a hors
Presione [_ / V] hasta que aparezca la hora deseada.
[Ejemplo: "5", °°PM")
Presione [_].
Presione [A / T] hasta que aparezcan los minutos
deseados.
(Ejemplo: "40")
Presione [SETUP].
Aunque no aparezcan los segundos, empezar_ a
contar des& 00 cuando pmsione [SETUP]. Utilice
esta caracterfstica para sincronizar el mloj con la hora
real.
®Conecte la alimentaci6n del amplificador 3' otros
componentes, si es necesario.
...... s .....
La alimentacidn se conectar&
d P'e@o< [tsL£Y i::;'1
La bandeja se cerrar4 automdticamente y la
reproducci6n comenzarfi desde el primer captulo o
pista del disco.
La reproduccidn tambi4n empieza cerrando
manua|mente la bandeja dd disco o presionando
[OPEN/CLOSE zx].
Si la reproduccidn no comienza automfiticamente,
presione [PLAY [2>1.
Cuando reproduzca Uli DVD que tenga grabado un
ment_ de tftulos, el lnent_podrfi aparecer ell la pantalla.
[TV/VCRJ
SOLO puede vet el mismo programa que se est_
grabando.
Presione los botones num6ricos o [CH. _ / V].
NOTA:
* Si la unidad estfi conectada a una caja de cable o
caja de satdlite, la unidad debe estar en CH3 o
CH4 y debe seleccionarse el cgmal a grabar en la
caja de cable o caja de sa_dlite.
Presione [SPEED] para selecciouar la velocidad de
cinta deseada (SP/SLP).
Presione [RECORD].
'>I_>_.... g bac:d
Presione [STOP II].
Presio_e [DISC I4/!@IU}=
Apamceri el men0 principal de DVD.
Si no existe la funci6n, puede aparecer el sfmbolo
(_ en la pgmtalla de TV.
Si el menO de disco existe en el disco, aparecerdn el
idioma de audio, opciones de subtitulo, capflulos
para el tflulo y otras opciones para su selecci6n.
¢;t se ecc 6 '_
55
I #1 " 'pl i> /
o ,A @./,
* Aparecer_iel mensaje de continuacidn en la pantalla de TV.
g22222222/_ _/WZggg_4
@?_s,@_1:'pI/_ : @" d_: "_,, '4 " ... .........
Para cancelar la continuacidn, presione dos veces
[STOP II].
®La informaci6n de continuaci6n permanece activada
incluso cuando apaga el interruptor principal.
ES

SYLVANIA
LIMITED WARRANTY
FUNAI CORP. will repair this SYLVANIA product, free of charge in the USA in the event of defect in materials or
workmanship as follows:
DURATION:
PARTS:
LABOR:
FUNAI CORP. will provide parts to replace defective parts without charge for one (I) year fl'om the
date of original retail purchase. Two (2) years for Picture Tube. Certain parts are excluded from this
warranty.
FUNAI CORP. will provide the labor without charge for a period of ninety (90) days from the date of
original retail purchase.
LIMITS AND EXCLUSIONS:
THIS WARRANTY IS EXTENDED ONLY TO THE ORIGINAL RETAIL PURCHASER. A PURCHASE
RECEIPT OR OTHER PROOF OF ORIGINAL RETAIL PURCHASE WILL BE REQUIRED TOGETHER WITH
THE PRODUCT TO OBTAIN SERVICE UNDER THIS WARRANTY.
This warranty shall not be extended to any other person or transferee.
This warranty is void and of no effect if any serial numbers on the product are altered, replaced, defaced, missing
or if service was attempted by an unauthorized service center. This SYLVANIA Limited warranty does not apply to
any product not purchased and used in the United States.
This warranty only covers failures due to defects in material or workmanship which occurs during normal use. It
does not cover damage which occurs in shipment, or failures which are caused by repairs, alterations or product not
supplied by FUNAI CORP., or damage which results from accident, misuse, abuse, mishandling, misapplication,
alteration, faulty installation, improper maintenance, commercial use such as hotel, rental or office use of this
product or damage which results from fire, flood, lightning or other acts of God.
THIS WARRANTY DOES NOT COVER PACKING MATERIALS, ANY ACCESSORIES (EXCEPT REMOTE
CONTROL), ANY COSMETIC PARTS, COMPLETE ASSEMBLY PARTS, DEMO OR FLOOR MODELS.
FUNAI CORP. AND ITS REPRESENTATIVES OR AGENTS SHALL IN NO EVENT BE LIABLE FOR ANY
GENERAL, INDIRECT OR CONSEQUENTIAL DAMAGES ARISING OUT OF OR OCCASIONED BY THE
USE OF OR THE INABILITY TO USE THIS PRODUCT. THIS WARRANTY IS MADE 1N LIEU OF ALL
OTHER WARRANTIES, EXPRESS OR IMPLIED, AND OF ALL OTHER LIABILITIES ON THE PART OF
FUNAI, ALL OTHER WARRANTIES INCLUDING THE WARRANTY OF MERCHANTABILITY AN[)
FITNESS FOR A PARTICULAR PURPOSE, ARE HEREBY DISCLAIMED BY FUNA1 AND ITS
REPRESENTATIVES IN THE UNITED STATES.
ALL WARRANTY INSPECTIONS AND REPAIRS MUST BE PERFORMED BY A FUNAI AUTHORIZED
SERVICE CENTER. THIS WARRANTY IS ONLY VALID WHEN THE UNIT IS CARRIED-IN TO A FUNAI
AUTHORIZED SERVICE FACILITY.
IMPORTANT:
THIS LIMITED WARRANTY GIVES YOU SPECIFIC LEGAL RIGHTS. YOU MAY HAVE OTHER RIGHTS
THAT VARY FROM STATE TO STATE. IF. AT ANY TIME DURING THE WARRANTY PERIOD, YOU ARE
UNABLE TO OBTAIN SATISFACTION WITH THE REPAIR OF THIS PRODUCT. PLEASE CONTACT FUNAI
CORP.
ATTENTION:
FUNAI CORE RESERVES THE RIGHT TO MODIFY ANY DESIGN OF THIS PRODUCT
WITHOUT PRIOR NOTICE.
To locate your nearest SYLVANIA Authorized Service Center or for general service inquiries,
please call or write to the following:
FUNAI CORPORATION, INC.
SERVICE (;ENTER
19900 Van Ness Avenue, Torrance, CA 90501
Tel :1-800-968-3429
http://www.SylvaniaConsumerElectronics.com
Head Office: 100 North Street. Teterboro. NJ 07608
PLEASE DO NOT SHIP YOUR UNIT T() THE TETERBORO ADDRESS.
Printed in Malaysia 1EMN20316
T2135UF _