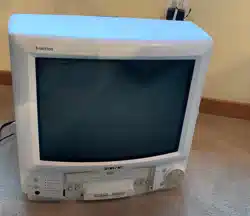

Operating Guide
& Warranty
19" Color TV/VCR Combination
SLV1940S
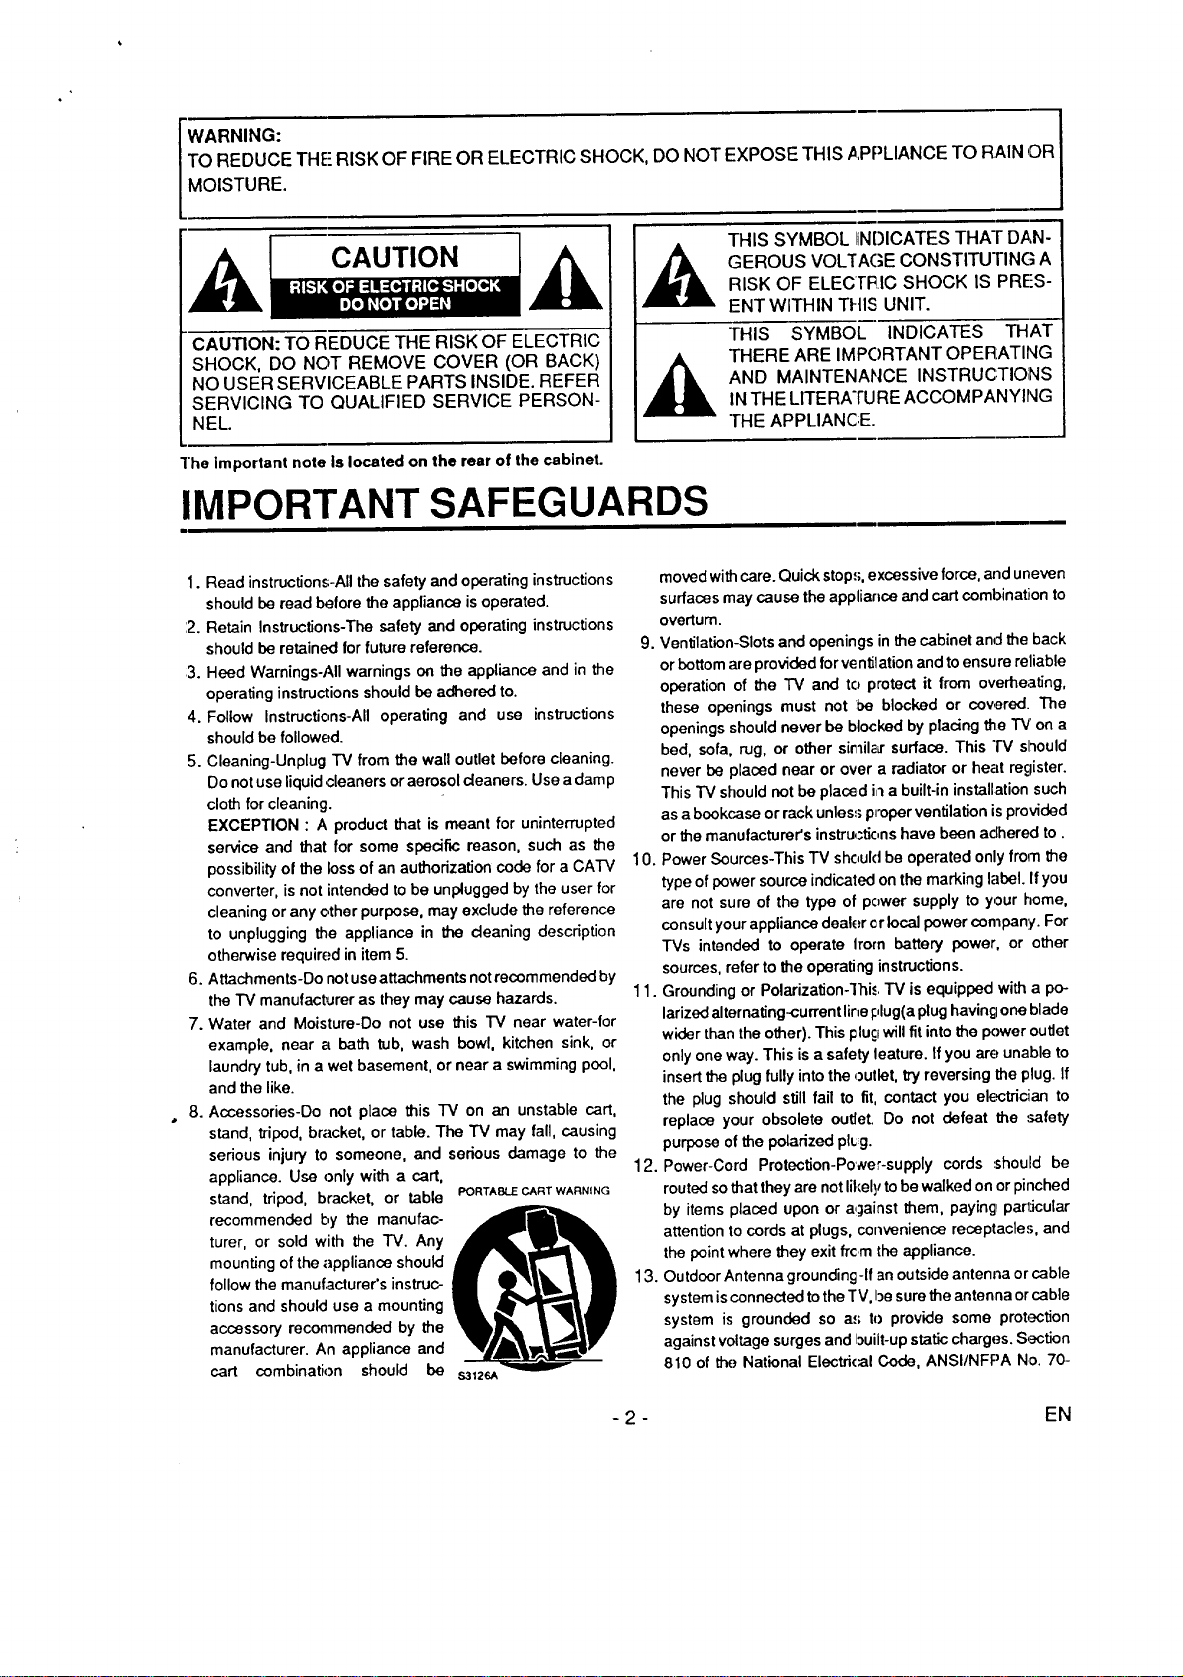
WARNING:
TO REDUCE THE RISK OF FIRE OR ELECTRIC SHOCK, DO NOT EXPOSE THIS APPLIANCE TO RAIN OR
MOISTURE.
CAUTION
CAUTION: TO REDUCE THE RISK OF ELECTRIC
SHOCK, DO NOT REMOVE COVER (OR BACK)
NO USER SERVICEABLE PARTS INSIDE. REFER
SERVICING TO QUALIFIED SERVICE PERSON-
NEL.
THIS SYMBOL liNDICATES THAT DAN-
GEROUS VOLTAGE CONSTITUTING A
RISK OF ELECI"I_IC SHOCK IS PRES-
ENT WITHIN THIS UNIT.
THIS SYMBOL INDICATES THAT
THERE ARE IMPORTANT OPERATING
AND MAINTENANCE INSTRUCTIONS
IN THE LITERATURE ACCOMPANYING
THE APPLIANCE.
]'he Important note Is located on the rear of the cabinet.
IMPORTANT SAFEGUARDS
1. Read instructions-All the safety and operating instructions
should be read before the appliance is operated.
:2. Retain Instructions-The safety and operating instructions
should be retained for future reference.
:3. Heed Warnings-All warnings on the appliance and in the
operating instructions should be adhered to.
4. Follow Instructions-All operating and use instructions
should be followed.
5. Cleaning-Unplug TV from the wall outlet before cleaning.
Do not use liquid cleaners or aerosol deaners. Use a damp
cloth for cleaning.
EXCEPTION : A product that is meant for uninterrupted
service and that for some specific reason, such as the
possibility of the loss of an authorization code for a CA'IV
converter, is not intended to be unplugged by the user for
cleaning or any other purpose, may exclude the reference
to unplugging the appliance in the deaning description
otherwise required in item 5.
6. Attachments-Do not use attachments notrecemmended by
the TV manufacturer as they may cause hazards.
7. Water and Moisture-Do not use this "iV near water-for
example, near a bath tub, wash bowl, kitchen sink, or
laundry tub, in a we! basement, or near a swimming pool,
and the like.
8. Accessories-Do not place this TV on an unstable cart,
stand, tripod, bracket, or table. The TV may fall, causing
serious injury to someone, and serious damage to the
appliance. Use only with a cart,
stand, tripod, bracket, or table
recommended by the manufac-
turer, or sold with the TV. Any
mounting of the appliance should
follow the manufacturer's instruc-
tions and should use a mounting
accessory recommended by the
manufacturer. An appliance and
cart combination should be
PORTABLE CART WARNING
moved withcare. Quick stop.,;,excessive force, and uneven
surfaces may cause the appliance and cart combination to
overturn.
9. Ventilation-Slots and openings in the cabinet and the back
or bottom are provided for ventilation and to ensure reliable
operation of the TV and to protect it from overheating,
these openings must not be blocked or covered. The
openings should never be blocked by plating the "IV' on a
bed, sofa, rug, or other si_il_Lr surface. This "IV slhould
never be placed near or over a radiator or hell register.
This TV should not be placed i,')a built-in installation such
as a bookcase or rack unless;proper ventilation isprovided
or the manufacturer's instructions have been adhered to.
10. Power Sources-This TV should be operated only from the
type of power source indicated on the marking label. If you
are not sure of the type of power supply to your home,
consult your appliance dealer cr local power company. For
TVs intended to operate Irom battery power, or other
sources, refer to the operating instructions.
11. Grounding or Polarization-'ihi<.. "IV is equipped with a po-
larized alternating-current line I:,lug(a plug havin_;Ione blade
wider than the other). This plugwill fit into the power outlet
only one way. This is a safety leature. If you are unable to
insert the plug fully into the outlet, try reversing the plug. If
the plug should still fail to fit, contact you electriciian to
replace your obsolete outlet. Do not defeat the safety
purpose of the polarized pl_g.
12. Power-Cord Protection-Po',ver-supply cords ,,should be
routed so that they are not likely to be walked on or pinched
by items placed upon or against them, paying particular
attention to cords at plugs, convenience receptacle.,;, and
the point where they exit frc m the appliance.
13. Outdoor Antenna grounding-If an outside antenna or cable
system is connected to the TV, be sure the antenna or cable
system is grounded so a.,; to provide some protection
against voltage surges and built-up static charges. Section
810 of the National Electri(:al Code, ANSI/NFPA No. 70-
- 2 - EN
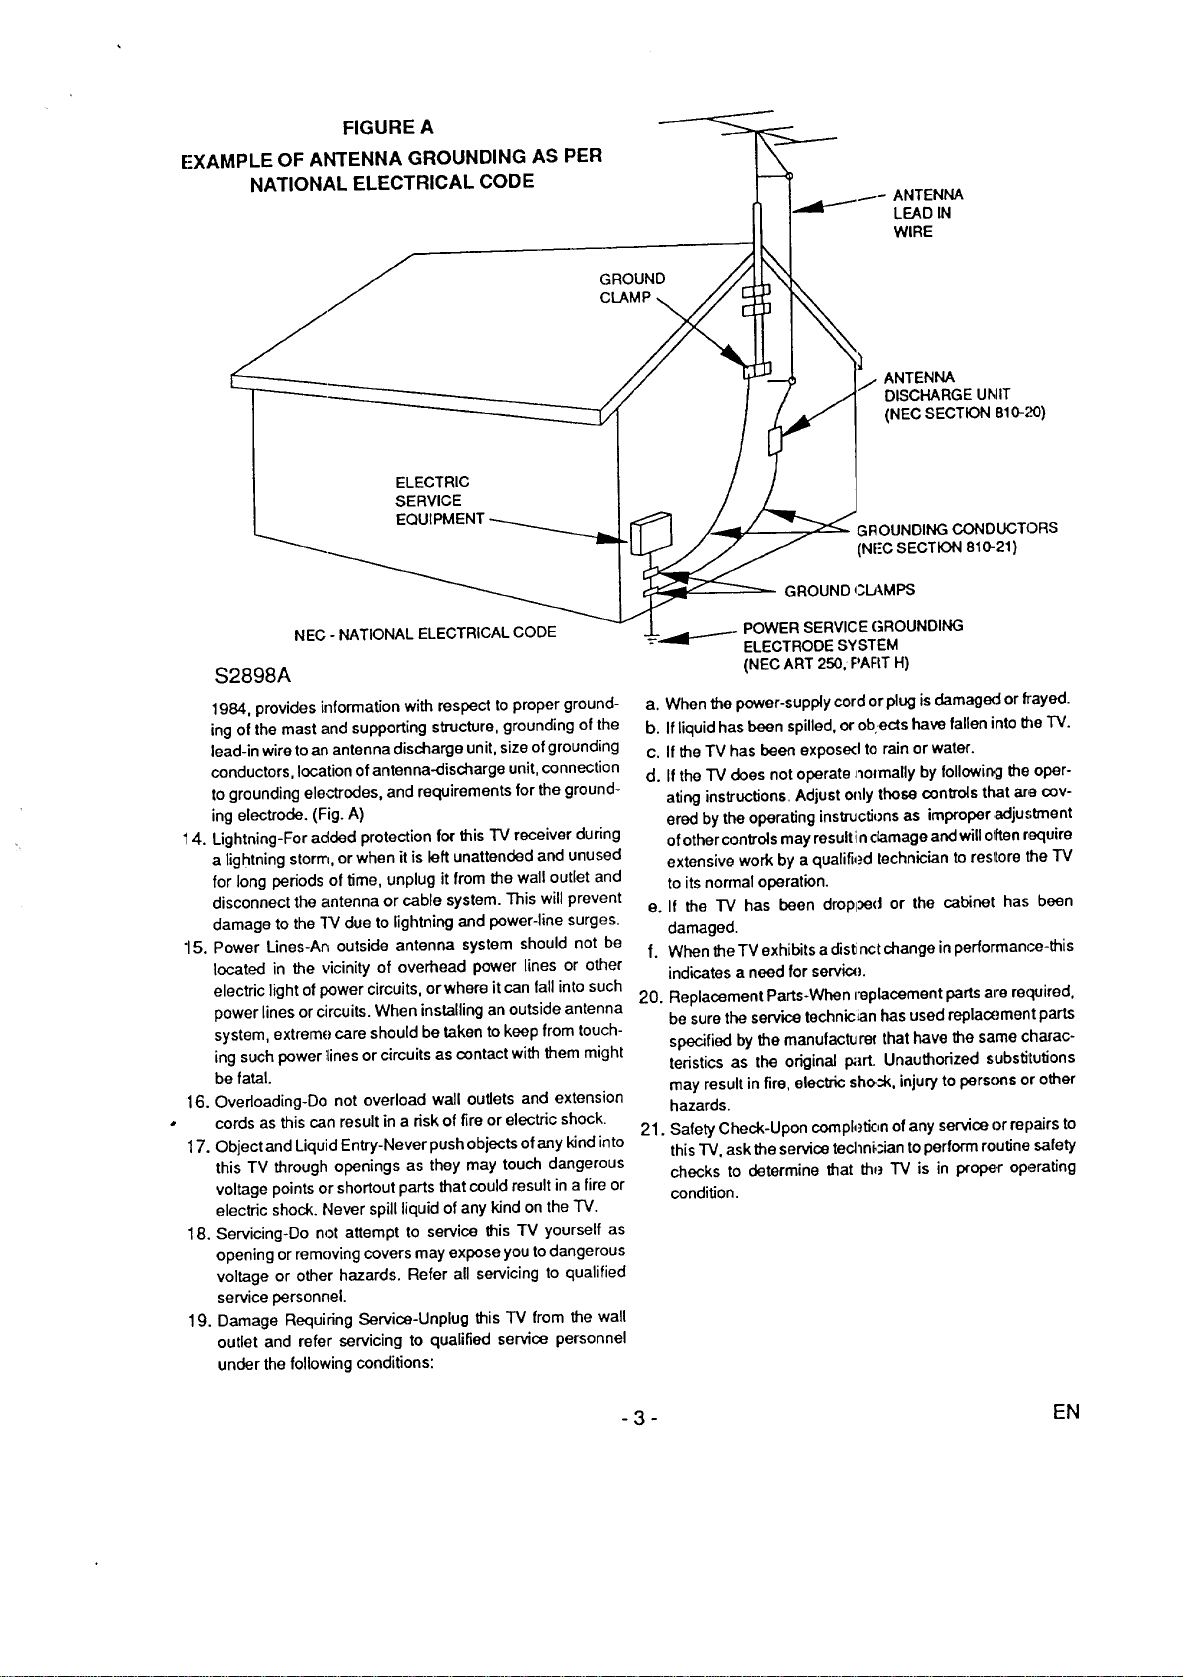
FIGURE A
EXAMPLE OF ANTENNA GROUNDING AS PER
NATIONAL ELECTRICAL CODE
GROUND
CLAMP
ELECTRIC
SERVICE
EQUIPMENT
NEC - NATIONAL ELECTRICAL CODE
$2898A
1984, provides information with respect to proper ground-
ing of the mast and supporting structure, grounding of the
lead-in wire to an antenna discharge unit, size of grounding
conductors, location of antenna-discharge unit, connection
to grounding electrodes, and requirements for the ground-
ing electrode. (Fig. A)
4. Lightning-For added protection for this TV receiver during
a lightning storm, or when it is left unattended and unused
for long periods of time, unplug it from the wall outlet and
disconnect the antenna or cable system. This will prevent
damage to the "IV due to lightning and power-line surges.
15. Power Lines-An outside antenna system should not be
located in the vicinity of overhead power lines or other
electric light of power circuits, or where it can fall into such
power lines or circuits. When installing an outside antenna
system, extreme care should be taken to keep from touch-
ing such power _inesor circuits as contact with them might
be fatal.
16. Overloading-Do not overload wall outlets and extension
cords as this can result in a risk of fire or electric shock.
17. Object and Liquid Entry-Never push objects of any kind into
this TV through openings as they may touch dangerous
voltage points or shortout parts that could result in a fire or
electric shock. Never spill liquid of any kind onthe TV.
18. Servicing-Do not attempt to service this TV yourself as
opening or removing covers may expose you to dangerous
voltage or other hazards. Refer all servicing to qualified
service personnel.
19. Damage Requiring Service-Unplug this TV from the wall
outlet and refer servicing to qualified service personnel
under the following conditions:
ANTENNA
LEAD IN
WIRE
ANTENNA
DISCHARGE UNIT
(NEC SECTION B10-;_)
GROUNDING CONDUCTORS
(NFC SECTION 810-21)
GROUND _.3LAMPS
SERVICE GROUNDING
ELECTRODE SYSTEM
(NEC ART 250, PART H)
a. When the power-supply cord or plug is damaged or frayed.
b. If liquid has been spilled, or ob:ects have fallen into the TV.
c. If the "rv has been exposed te rain or water.
d. If the TV does not operate _olmally by following the oper-
ating instructions. Adjust only those controls that are cov-
ered by the operating instructionsas improper adjustment
of other controls may resultin damage and will o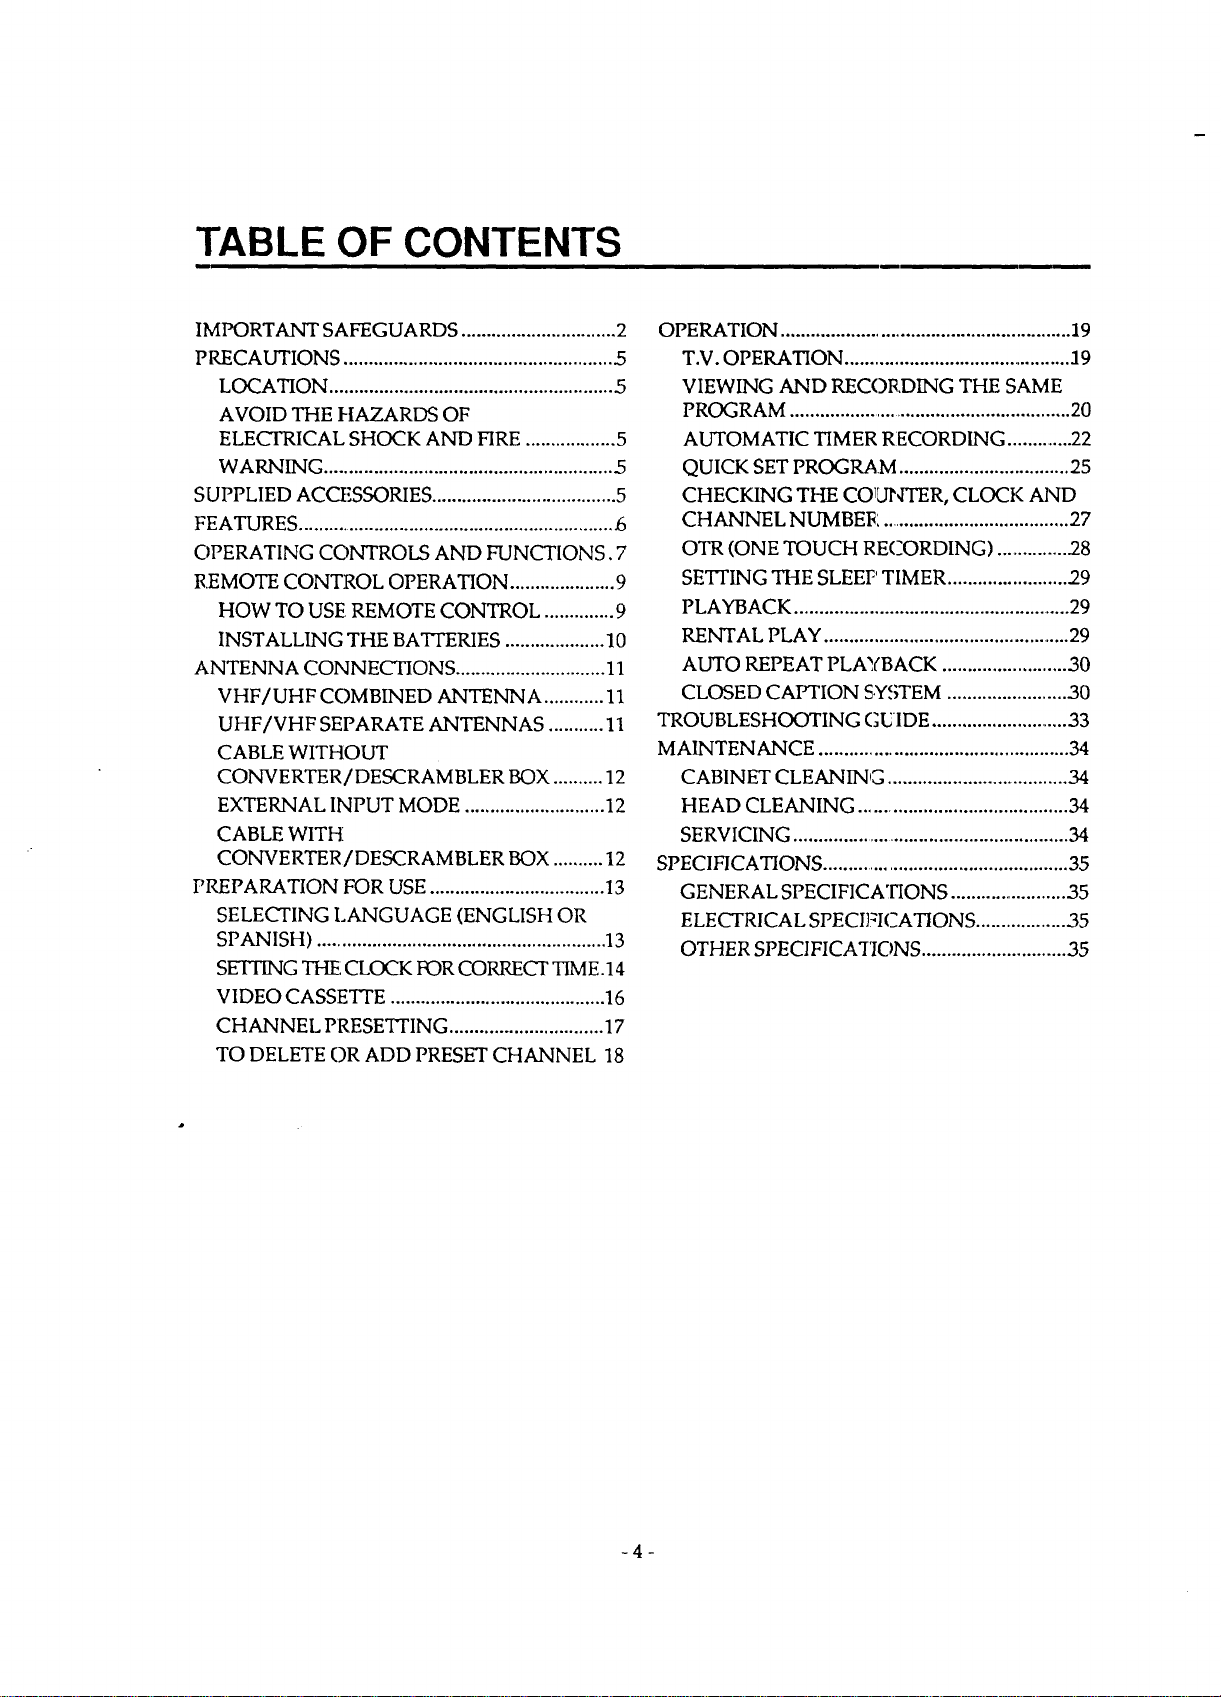
TABLE OF CONTENTS
IMPORTANT SAFEGUARDS ............................... 2
PRECAUTIONS ...................................................... .5
LOCATION ......................................................... 5
AVOID THE HAZARDS OF
ELECTRICAL SHOCK AND FIRE .................. 5
WARNING .......................................................... .5
SUPPLIED ACCF,SSORIES ..................................... 5
FEATURES ................................................................ _5
OPERATING CONTROLS AND FUNCT[ONS. 7
REMOTE CONTROL OPERATION ..................... 9
HOW TO USE REMOTE CONTROL .............. 9
INSTALLING THE BATTERIES .................... 10
ANTENNA CONNECTIONS .............................. 11
VHF/UHF COMBINED ANTENNA ............ 11
UHF/VHF SEPARATE ANTENNAS ........... 11
CABLE WITHOUT
CONVERTER / DESCRAM BLER BOX .......... 12
EXTERNAL INPUT MODE ............................ 12
CABLE WITH
CONVERTER / DE,SCRAMBLER BOX .......... 12
PREPARATION FOR USE ................................... 13
SELECTING LANGUAGE (ENGLISH OR
SPANISH) .......................................................... 13
SETTING THE:CLOCK FOR CORRECT TIME.14
VIDEO CASSETrE ........................................... 16
CHANNEL PRESETTING ............................... 17
TO DELETE OR ADD PRESET CHANNEL 18
OPERATION .......................................................... 19
T.V. OPERATION .............................................. :19
VIEWING AND REC(3RDING THE SAME
PROGRAM ......................................................... 20
AUTOMATIC TIMER RECORDING ..............22
QUICK SET PROGRAM .................................. 25
CHECKING THE COUNTER, CLOCK AND
CHANNEL NUMBER ...................................... 27
OTR (ONE TOUCH RECORDING) .............. .28
SET]'ING THE SLEEP TIMER ........................ 29
PLAYBACK ........................................................ 29
RENTAL PLAY .................................................. 29
AUTO REPEAT PLAYBACK ......................... 30
CLOSED CAPTION SYSTEM ........................ 30
TROUBLESHOOTING GUIDE ............................ 33
MAINTENANCE .................................................. 34
CABINET CLEANING ..................................... 34
HEAD CLEANING .......................................... 34
SERVICING ........................................................ 34
SPECIFICATIONS .................................................. 35
GENERAL SPECIFICATIONS ........................ 35
ELECTRICAL SPECIFICATIONS ................... ,35
OTHER SPECIFICATIONS ............................. 35
-4-
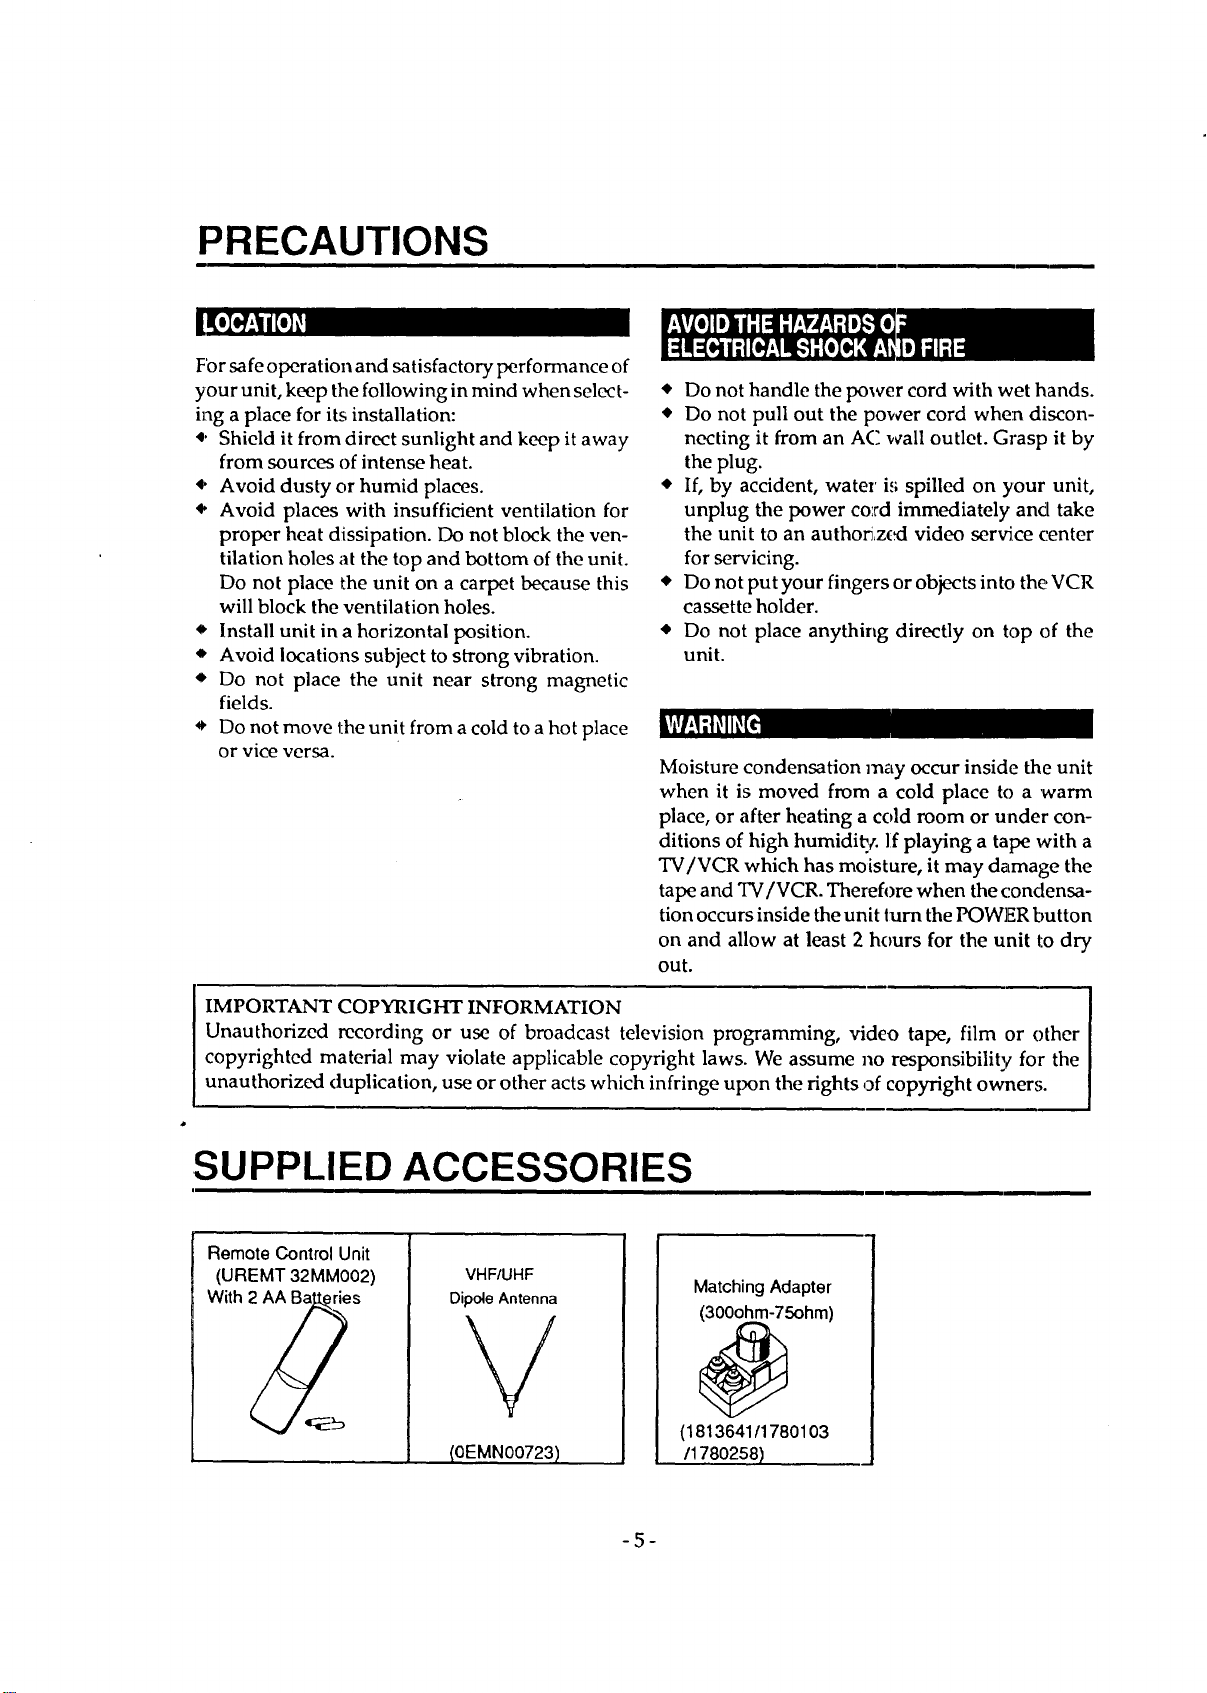
PRECAUTIONS
I[o
For safe operation and satisfactory performance of
your unit, keep the following in mind when select-
ing a place for its installation:
4. Shield it from direct sunlight and keep it away
from sources of intense heat.
• Avoid dusty or humid places.
• Avoid places with insufficient ventilation for
proper heat dissipation. Do not block the ven-
tilation holes at the top and bottom of the unit.
Do not place the unit on a carpet because this
will block the ventilation holes.
• Install unit in a horizontal position.
'* Avoid locations subject to strong vibration.
• Do not place the unit near strong magnetic
fields.
• Do not move the unit from a cold to a hot place
or vice versa.
• Do not handle the power cord with wet hands.
• Do not pull out the power cord when discon-
necting it from an AC wall outlet. Grasp it by
the plug.
• If, by accident, water i,; spilled on your unit,
unplug the power co'rd immediately and take
the unit to an autho_,zcxt video service center
for servicing.
• Do not put your fingers or objects into the VCR
cassette holder.
• Do not place anything directly on top of the
unit.
Moisture condensation may occur inside the unit
when it is moved from a cold place to a 'warm
place, or after heating a cold room or under con-
ditions of high humidi_¢, l:fplaying a tape with a
TV/VCR which has moisture, it may damage the
tape and TV/VCR. Thereh)re when the condensa-
tion occurs inside the unit turn the POWER button
on and allow at least 2 hours for the unit to dry
out.
IMPORTANT COPYRIGHT INFORMATION
Unauthorized recording or use of broadcast television programming, video tape, film or other
copyrighted material may violate applicable copyright laws. We assume no responsibility for the
unauthorized duplication, use or other acts which infringe upon the rights of copyright owner,,;.
SUPPLIED ACCESSORIES
Remote Control Unit
(UREMT 32MM002)
With 2 _ries
VHF/UHF
Dipole Antenna
(OEMNOO723)
MatchingAdapter
(300ohm-75ohm)
(1813641/1780103
/178O258)
-5-
FEATURES
4 Rotary Head Record/Playback System- 4
rotary heads to ensure excellent picture quality
and special effects playback.
Auto Power On and Off system- Automati-
cally turns the TV/VCR on as you insert the
cassette, and turns off after auto-rewind, ejects
when reaches beginning of the tape.
• Three Different Record/Playback Speed- Se-
lect the SP mode (Standard play), LP mode
(Long play) and SLP mode (Super long play)
for up to eight hours of recording/playback
with a T-160 tape.
• On-Screen-Display- All major operating and
programming functions appear on your TV
screen for operating convenience.
• On Screen Selectable language for English or
Spanish
Automatic Playback Speed Selection- Auto-
matically selects the proper playback speed
even if you set speed select to different mode.
• 1 Year, 8 Events Timer (including daily and •
weekly)- The built-in timer allows you to re-
cord up to 7 programs at different times on
different channels up to 1 year in advance. The
Quick Set Program feature uses program hum- •
her 8. Also a daily timer will allow recordings
to be made of daily broadcasts and the weekly
timer will allow recording to be made once a
week up to the end of the tape.
Quick Set Program- The Quick Set Program
allows you toeasily ro'_olrd one program within
24 hours.
Picture Search- You m_Lyview the video pro-
gram at a high speed in either a forward or
reverse direction.
Slow Motion- Allows _u to view t_e video
program at aslower than normal playback speed.
STILL- "Freeze" the picture at any time, for
close viewing of a particular scene.
PLL Frequency Synthesizer Tuner with 181
Channel Cable-compatible with D!Lrec_sta-
tion Call- (A CATV Bo_ may be necessary to
view pay CATV channels.)
32 Buttons Infrared Remote control- Allows
you to use most of co:_trol from a remote loca-
tion.
Rental Play Mode- I_proves playback picture
quality of worn tapes e:_pecially rental tapes.
Auto Repeat Play back- Let you set the
TV/VCR to automatically repeat a tape 'when
it reaches the end.
CCS (Closed Caption System)- You may
watch dramas, movies and news etc. with cap-
tioning the dialogues and the contents of news
if you want.
-6-
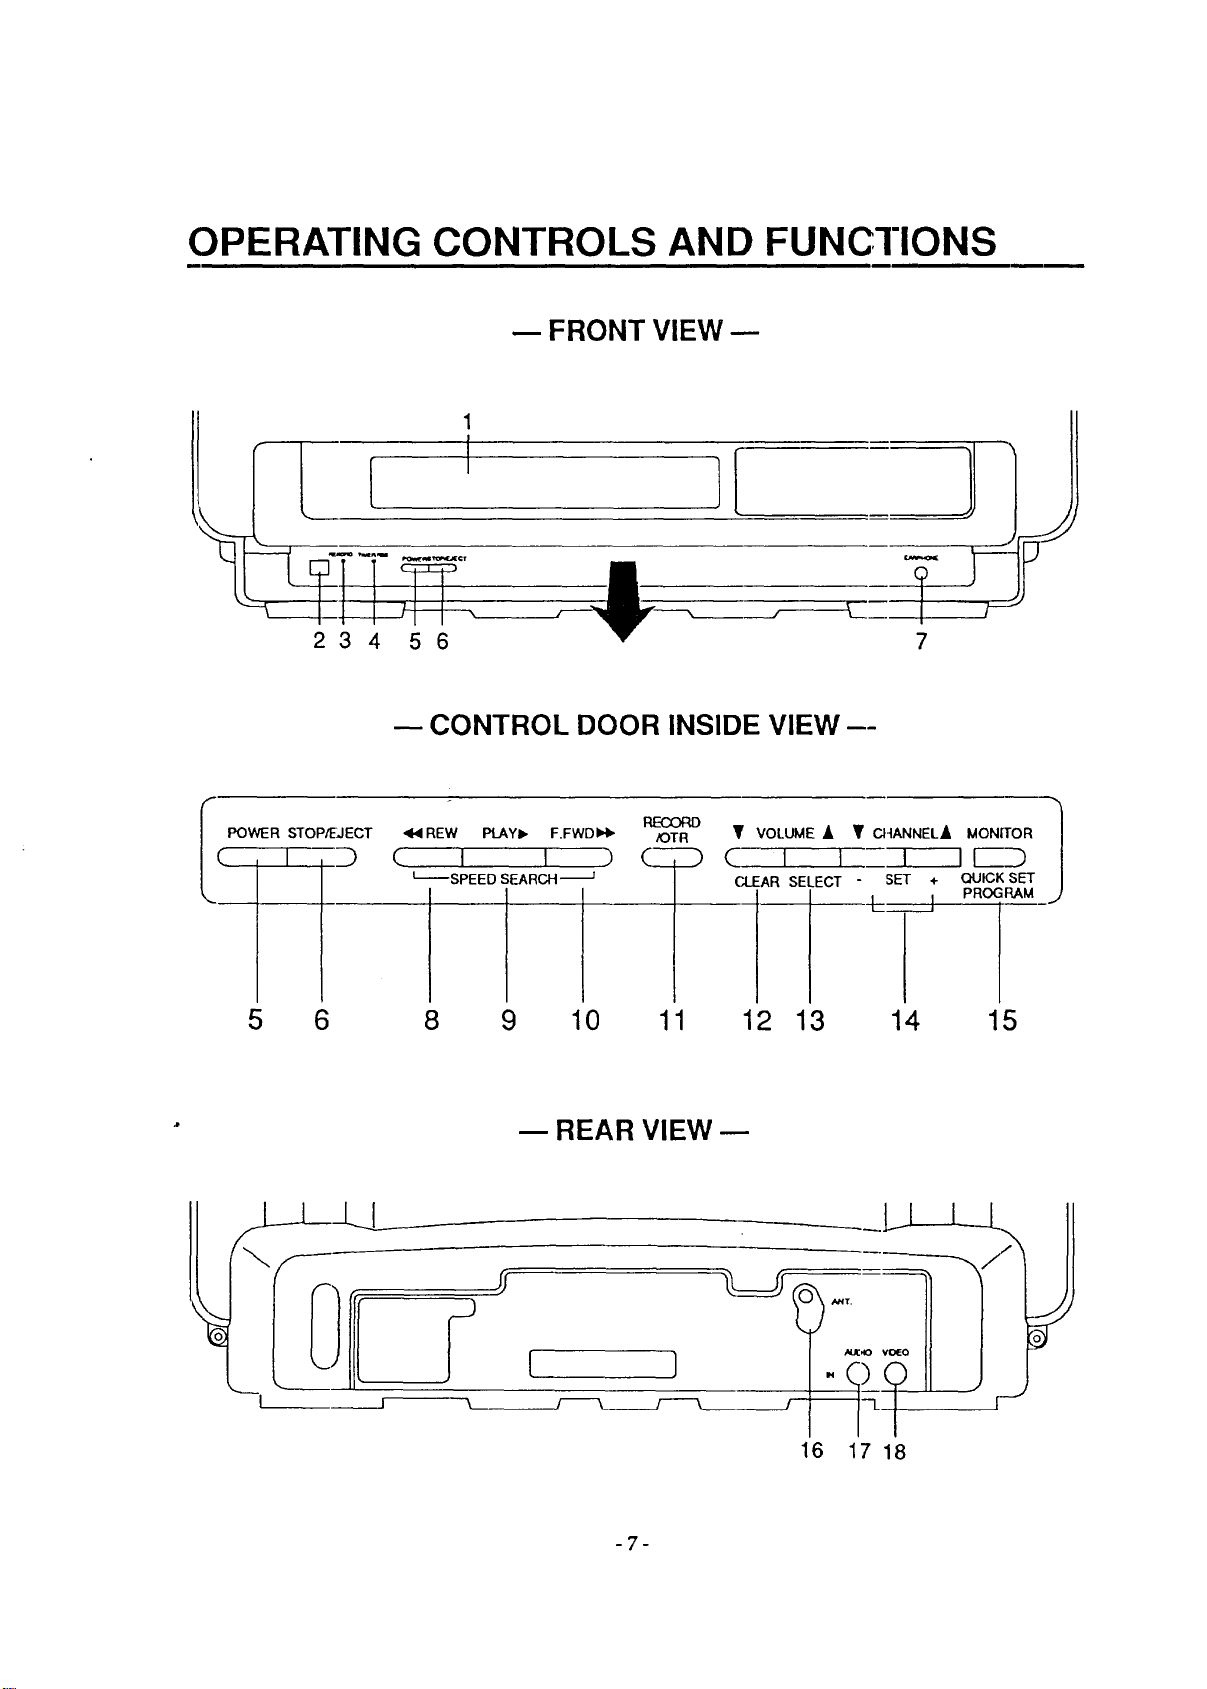
OPERATING CONTROLS AND FUNCTIONS
-- FRONT VIEW
L
i
1
I
CONTROL DOOR INSIDE VIEW --
I POWER STOP_JECT
c I D
L_"-SPEED SEARCH'--
RECORD
REW PLAYI_ F.FWDIb_ /OTR
I
5 6 8 9 10 11
V VOLUME • V CI4ANNEL• MONITOR |
C I I _--_ F-]D
J
ECT - jF___.S
12 13 14 15
m REAR VIEW
11
)
fi
-7-
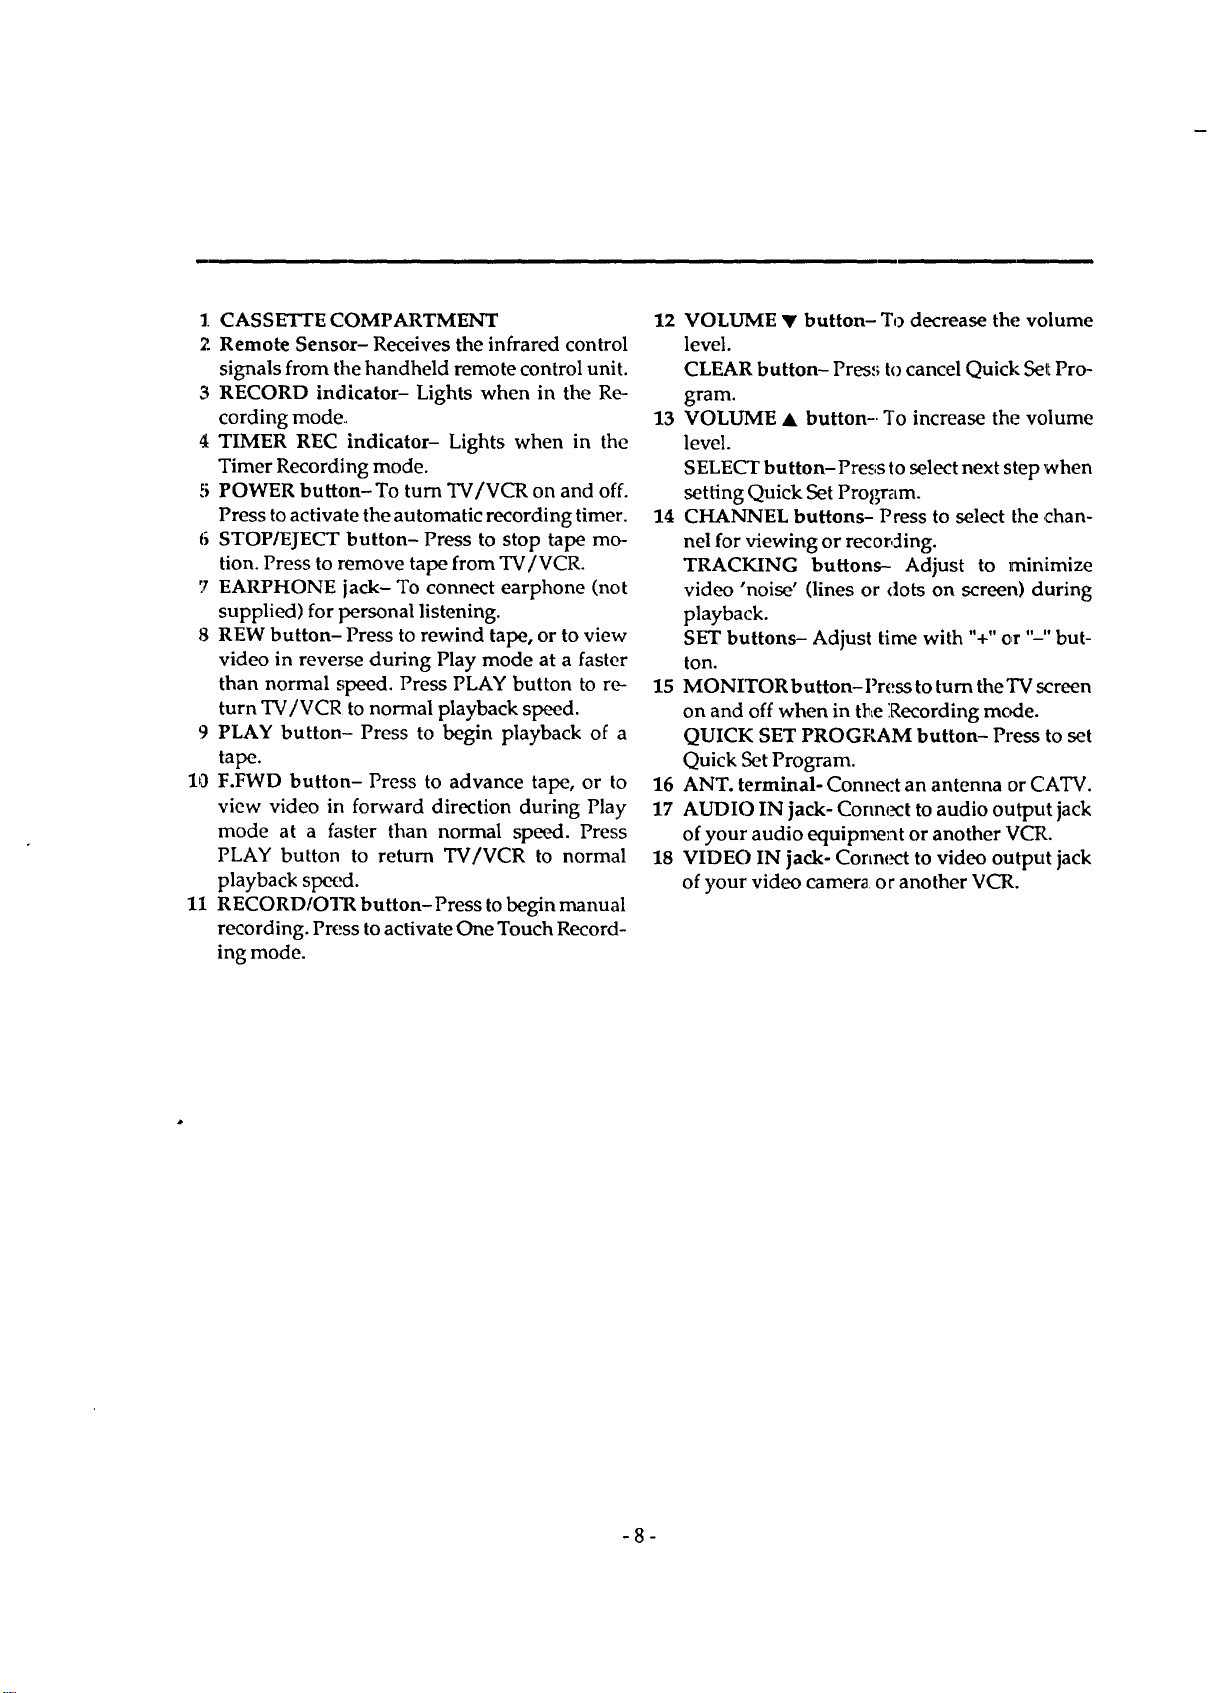
1. CASSETTE COMPARTMENT
2 Remote Sensor- Receives the infrared control
signals from the handheld remote control unit.
3 RECORD indicator- Lights when in the Re-
cording mode.
4 TIMER REC indicator- Lights when in the
Timer Recording mode.
5 POWER button-To turn TV/VCR on and off.
Press to activate the automatic recording timer.
6 STOP/EJECT button- Press to stop tape mo-
tion. Press to remove tape from TV/VCR.
7 EARPHONE jack- To connect earphone (not
supplied) for personal listening.
8 REW button- Press to rewind tape, or to view
video in reverse during Play mode at a faster
than normal speed. Press PLAY button to re-
turn TV/VCR to normal playback speed.
9 PLAY button- Press to begin playback of a
tape.
10 F.FWD button- Press to advance tape, or to
view video in forward direction during Play
mode at a faster than normal speed. Press
PLAY button to return TV/VCR to normal
playback speed.
11 RECORDfOTR button-Press to begin manual
recording. Press to activate One Touch Record-
ing mode.
12 VOLUME • button- To decrease the volume
level.
CLEAR button- Press to cancel Quick Set Pro-
gram.
13 VOLUME • button-. To increase the volume
level.
SELECT button-Press to select next step when
setting Quick Set Program.
14 CHANNEL buttons- Press to select the chan-
nel for viewing or recording.
TRACKING buttons-- Adjust to minimize
video 'noise' (lines or (tots on screen) during
playback.
SET buttons- Adjust time with "+"or "-" but-
ton.
15 MONITOR button- Press to turn the TV screen
on and off when in the Recording mcKle.
QUICK SET PROGRAM button- Press to set
Quick ,SetProgram.
16 ANT. terminal- Connect an antenna or C.ATV.
17 AUDIO IN jack- Connect to audio output jack
of your audio equipment or another VCR.
18 VIDEO IN jack- Connl_t to video output jack
of your video camera or another VCR.
-8-
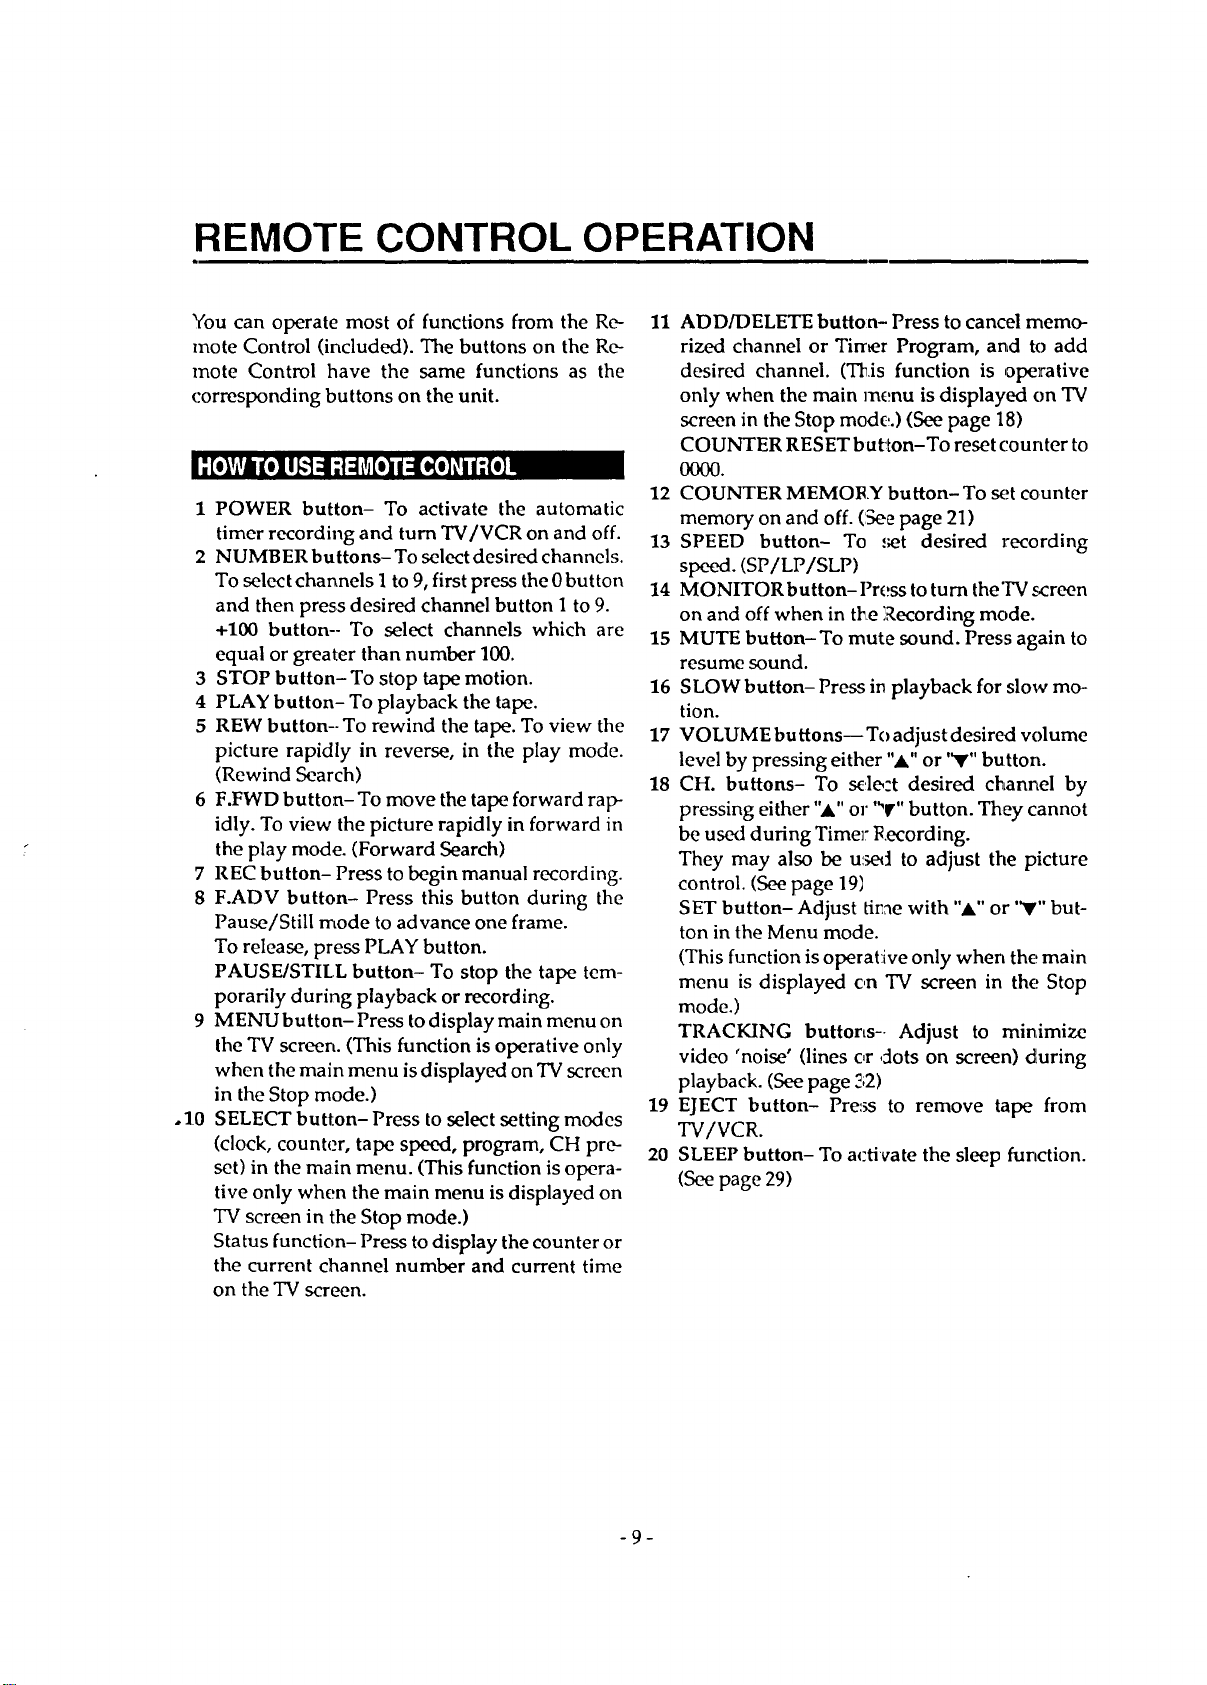
REMOTE CONTROL OPERATION
You can operate most of functions from the Re-
mote Control (included). The buttons on the Re-
mote Control have the same functions as the
corresponding buttons on the unit.
.1.0
1 POWER button- To activate the automatic
timer recording and turn TV/VCR on and off.
2 NUMBERbuttons-To select desired channels.
To select channels 1 to 9, first press the 0 button
and then press desired channel button 1 to 9.
+100 button-- To select channels which are
equal or greater than number 100.
3 STOP button-To stop tape motion.
4 PLAY button- To playback the tape.
5 REW button-- To rewind the tape. To view the
picture rapidly in reverse, in the play mode.
(Rewind Search)
6 F.FWD button-To move the tape forward rap-
idly. To view the picture rapidly in forward in
the play mode. (Forward Search)
7 REC button- Press to begin manual recording.
8 F.ADV button- Press this button during the
Pause/Still mode to advance one frame.
To release, press PLAY button.
PAUSE/STILL button- To stop the tape tem-
porarily during playback or recording.
9 MENU button- Press to display main menu on
the TV screen. (This function is operative only
when the main menu is displayed on TV screen
in the Stop mode.)
SELECT button- Press to select setting modes
(clock, counter, tape speed, program, CH pre-
set) in the main menu. (This function is opera-
tive only when the main menu is displayed on
TV screen in the Stop mode.)
Status function- Press to display the counter or
the current channel number and current time
on the TV screen.
11 ADD/DELETE button- Press to cancel memo-
rized channel or Tirr,_r Program, and to add
desired channel. (Tl_is function is operative
only when the main menu is displayed on TV
screen in the Stop mode.) (See page 18)
COUNTER RESET button-To reset counter to
0000.
12 COUNTER MEMORY button-To set counter
memory on and off. (See page 21)
13 SPEED button-To set desired recording
speed. (SP/LP/SLP)
14 MONITOR button- Press to turn the'IV s_:reen
on and off when in tl_e Recording mode.
15 MUTE button- To mute sound. Press again to
resume sound.
16 SLOW button- Press in playback for slow mo-
tion.
17 VOLUMEbuttons--Toadjustdesired volume
level by pressing either ",A."or '_'" button.
18 CH. buttons- To selo:t desired channel by
pressing either "j." or '_V"button. They cannot
be used during Timel: Recording.
They may also be u'_ed to adjust the picture
control. (See page 19}
SET button- Adjust tir.ae with "A" or "V" but-
ton in the Menu mode.
(This function is operat:ive only when the main
menu is displayed on TV screen in the Stop
mode.)
TRACKING buttons-. Adjust to minimize
video 'noise' (lines or .dots on screen) during
playback. (See page 32)
19 EJECT button- Pre.3s to remove tape from
TV/VCR.
20 SLEEP button- To activate the sleep function.
(See page 29)
-9-
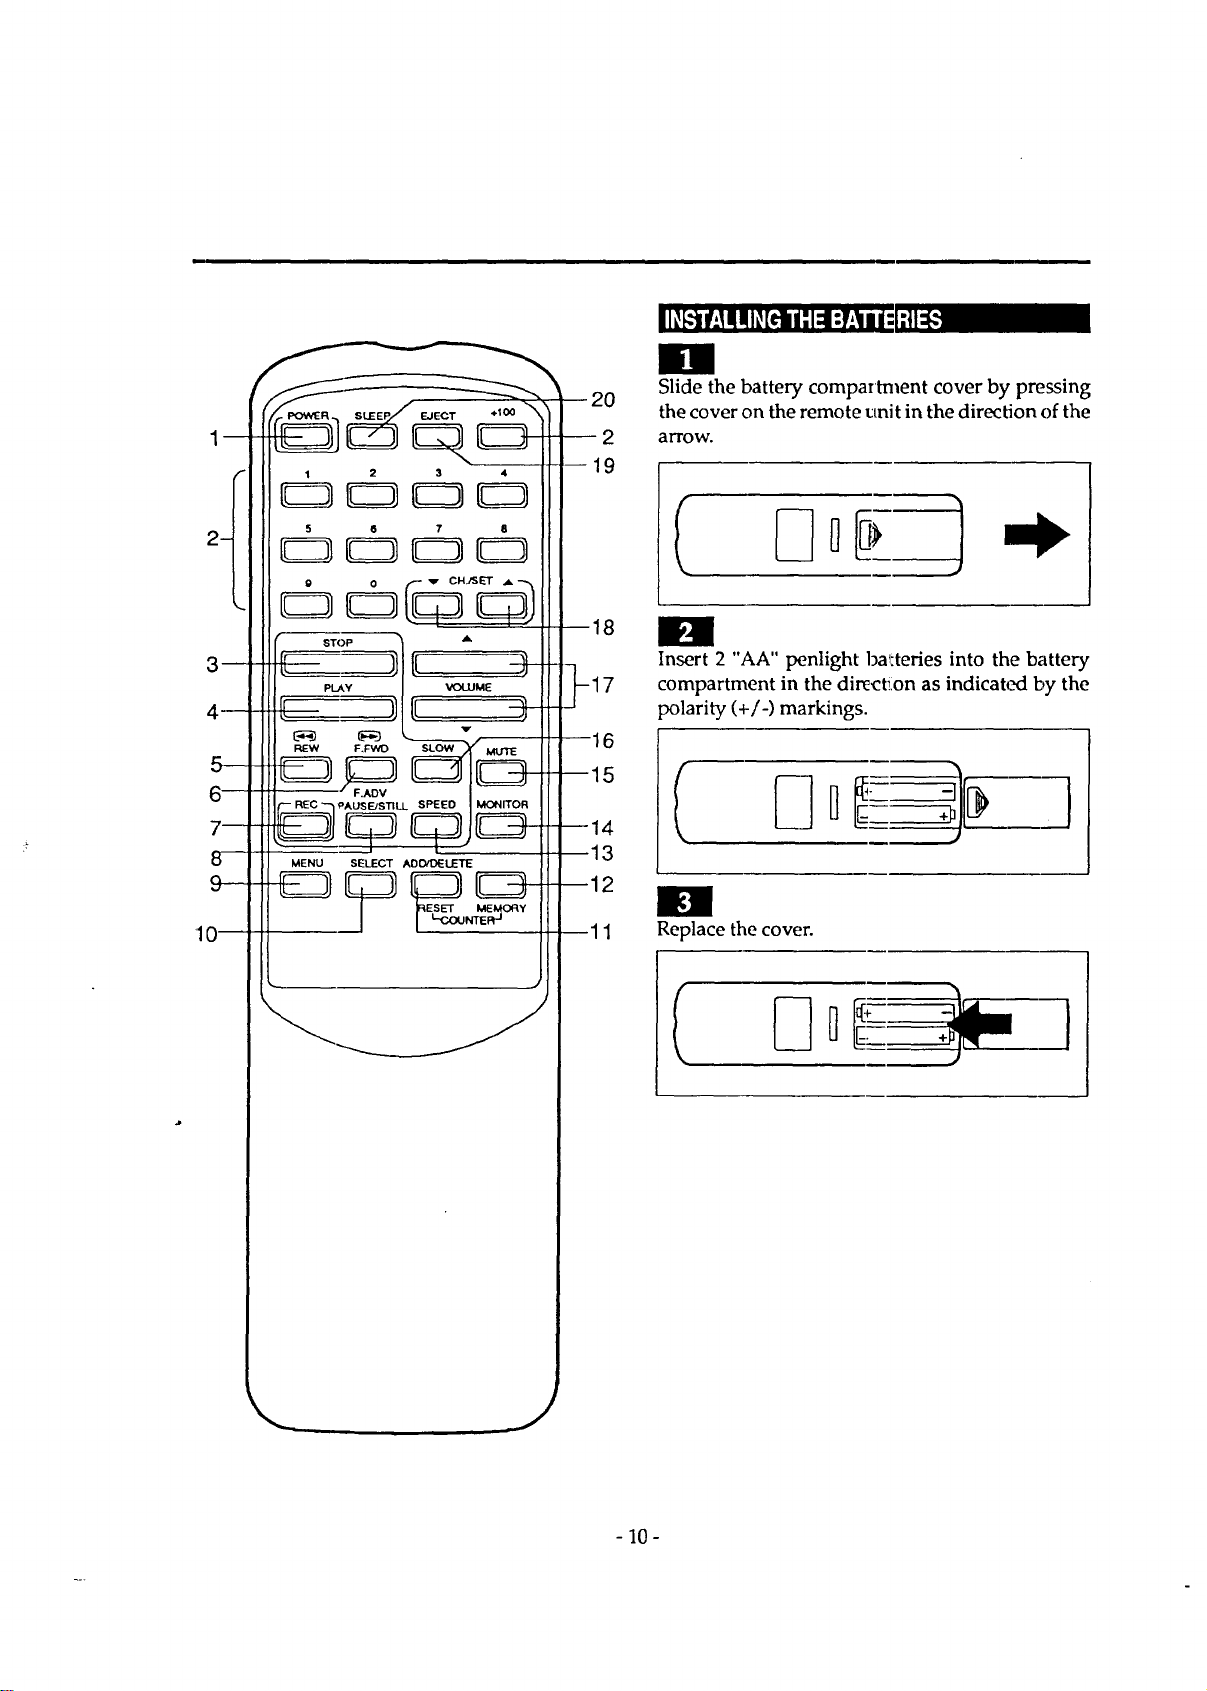
1
2 3
5 6 7 8
F,Fwo s_ow X
MENU SELECT AD O/DE LETE
20
--2
--19
18
16
15
14
13
12
11
Slide the battery compartment cover by pressing
the cover on the remote unit in the direction of the
arrow.
H
Insert 2 "AA" penlight ba_tteries into the battery
compartment in the dire_:t_on as indicat,.Kl by the
polarity (+/-) markings.
Replace the cover.
I
- 10-
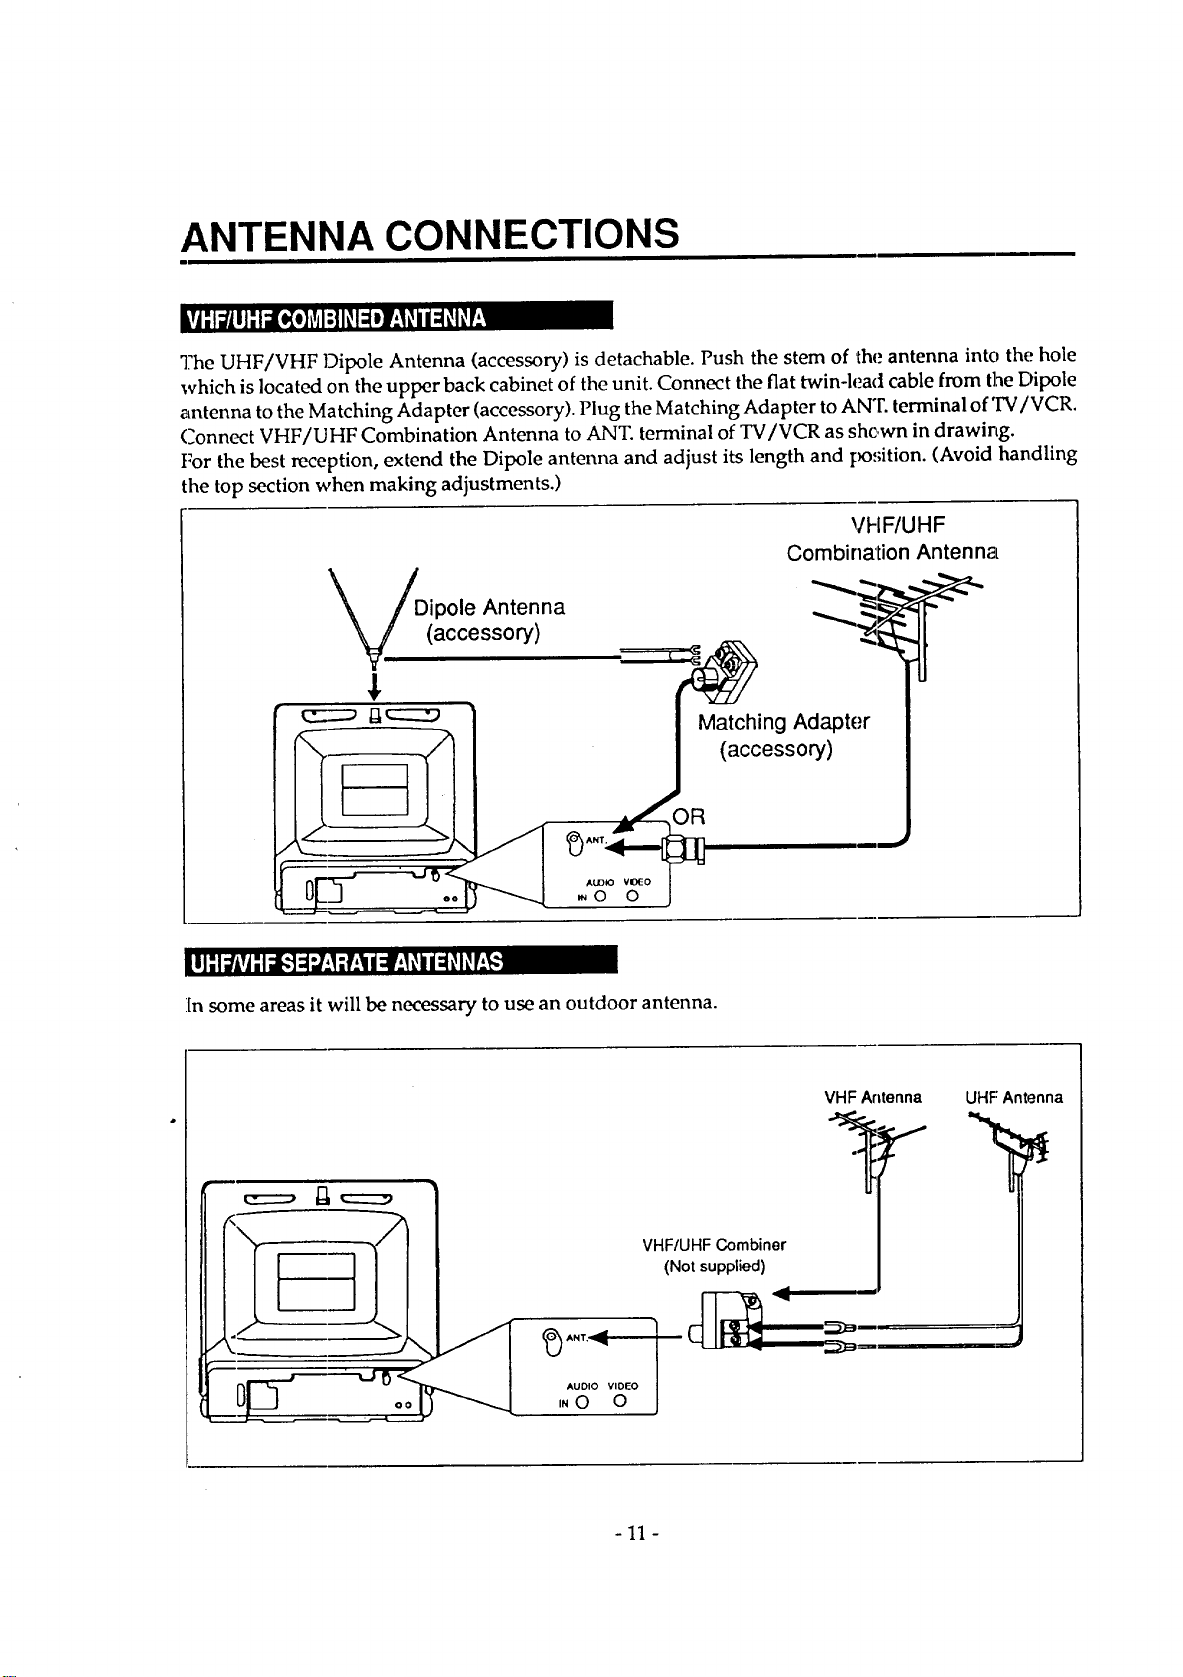
ANTENNA CONNECTIONS
The UHF/VHF Dipole Antenna (accessory) is detachable. Push the stem of the antenna into the hole
which is located on the upper back cabinet of the unit. Connect the flat twin-lead cable from the Dipole
antenna to the Matching Adapter (accessory). Plug the Matching Adapter to ANT. terminal of TV/VCR.
Connect VHF/UHF Combination Antenna to ANT. terminal of TV/VCR as shown in drawing.
For the best reception, extend the Dipole antenna and adjust its length and po,;ition. (Avoid handling
the top section when making adjustments.)
VFIF/UHF
Combination Antenna
Dipole Antenna _"_ _
(accessory) -'_:_
In some areas it will be necessary to use an outdoor antenna.
c=::=, ,===
AUDIO VIDEO J
iN0 0
VHF Antenna UHF Antenna
VHF/UHF Combiner
(Not supplied)
-11 -
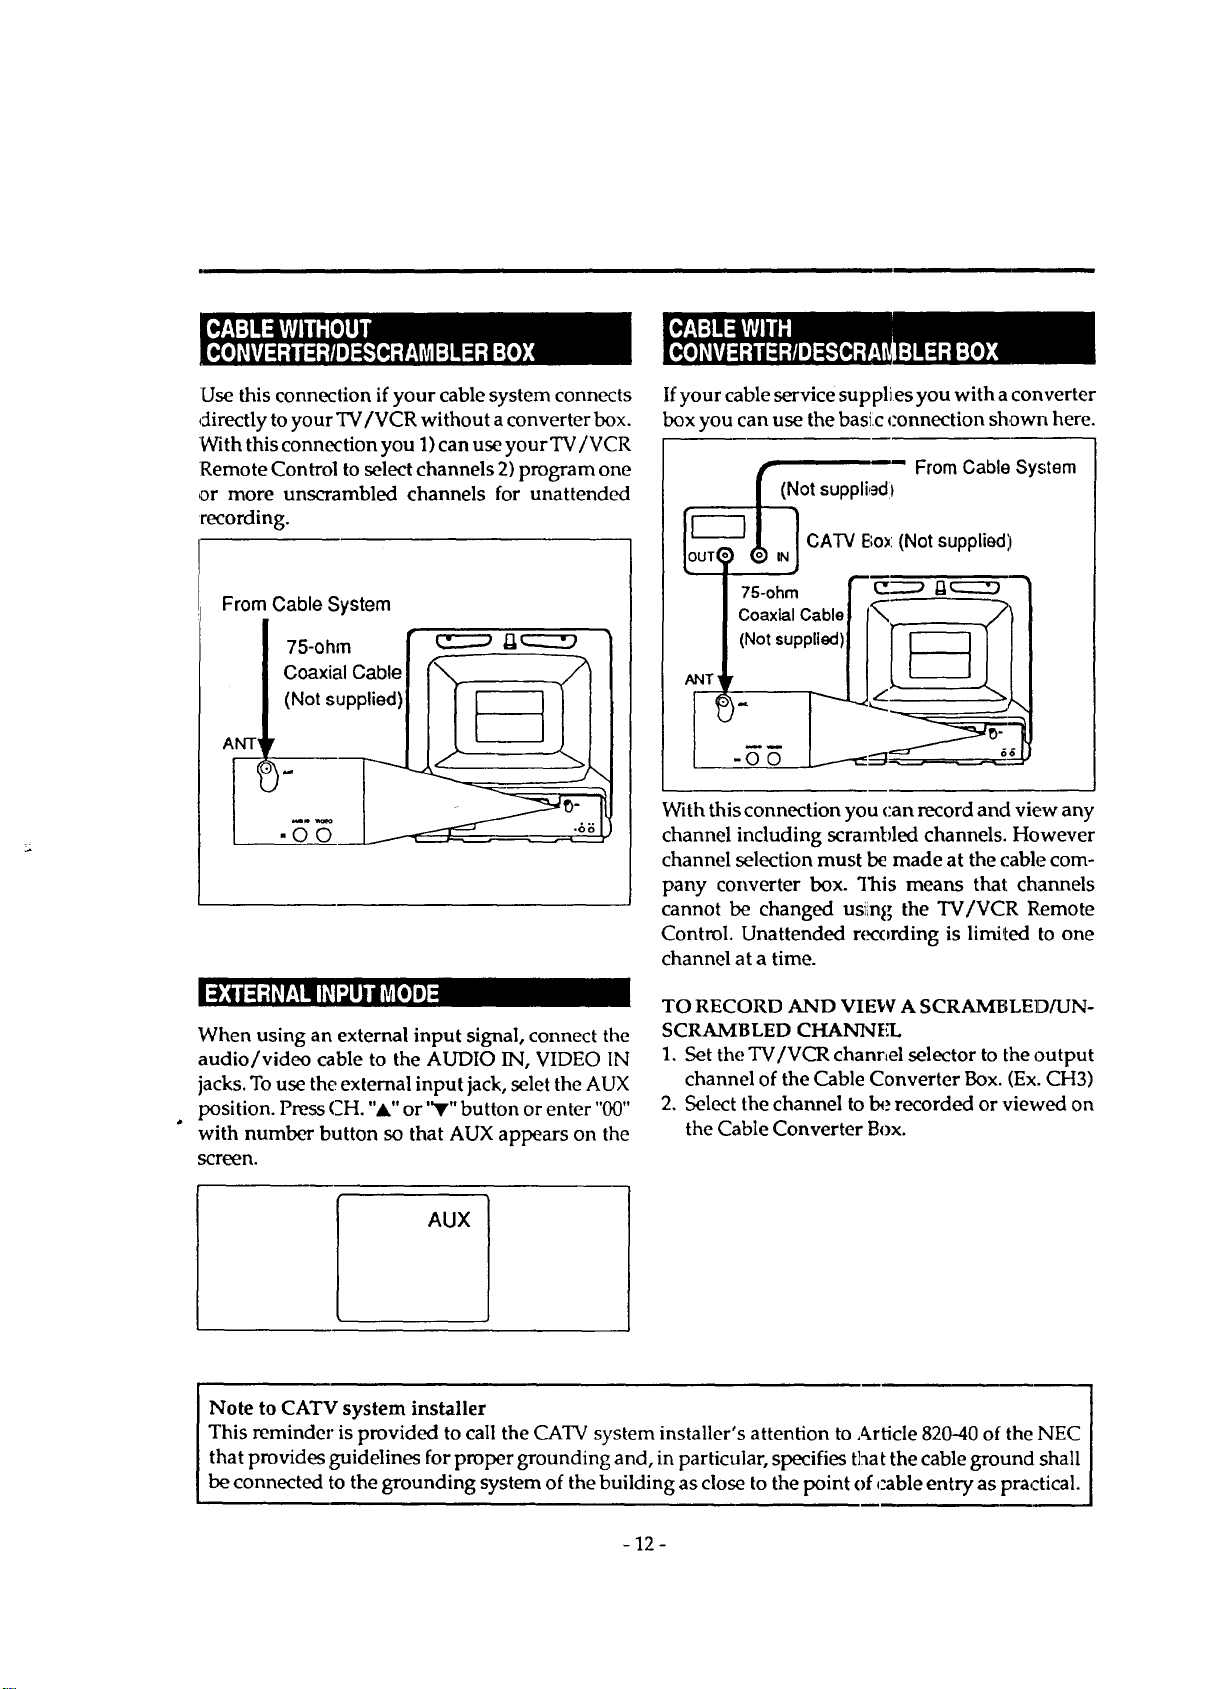
Use this connection if your cable system connects
directly to your TV/VCR without a converter box.
With this connection you 1) can use your TV/VCR
Remote Control to select channels 2) program one
or more unscrambled channels for unattended
recording.
From Cable System
_l_n'_! IF_I_ _oI_/:l
When using an external input signal, connect the
audio/video cable to the AUDIO IN, VIDEO IN
jacks. To use the external input jack, selet the AUX
position. Press CH. "A" or '_r"button or enter "00"
with number button so that AUX appears on the
scr_n.
If your cable service supplies you with a converter
box you can use the basic _'onnection shown here.
(Not supplbd? From Cable System
__T___,)__ CATV Be>:(Notsupplied)
/ 75-ohm F"__ -
I Coa_,Cablelf___
With this connection you can record and view any
channel including scrambled channels. However
channel selection must be made at the cable com-
pany converter box. This means thai: channels
cannot be changed usi_ng the TV/VCR Remote
Control. Unattended recording is limited to one
channel at a time.
TO RECORD AND VI EW A SCRA_MBLED/UN-
SCRAMBLED CHANNEL
1. Set the TV/VCR chant,el selector to the output
channel of the Cable Converter Box. (Ex. CH3)
2. Select the channel to l:,.,recorded or viewed on
the Cable Converter Box.
AUX
Note to CATV system installer
This reminder is provided to call the CATV system installer's attention to Article 820-40 of the NEC
that provides guidelines for proper grounding and, in particular, specifies that the cable ground shall
be connected to the grounding system of the building as close to the point of cable entry as practical.
-12-
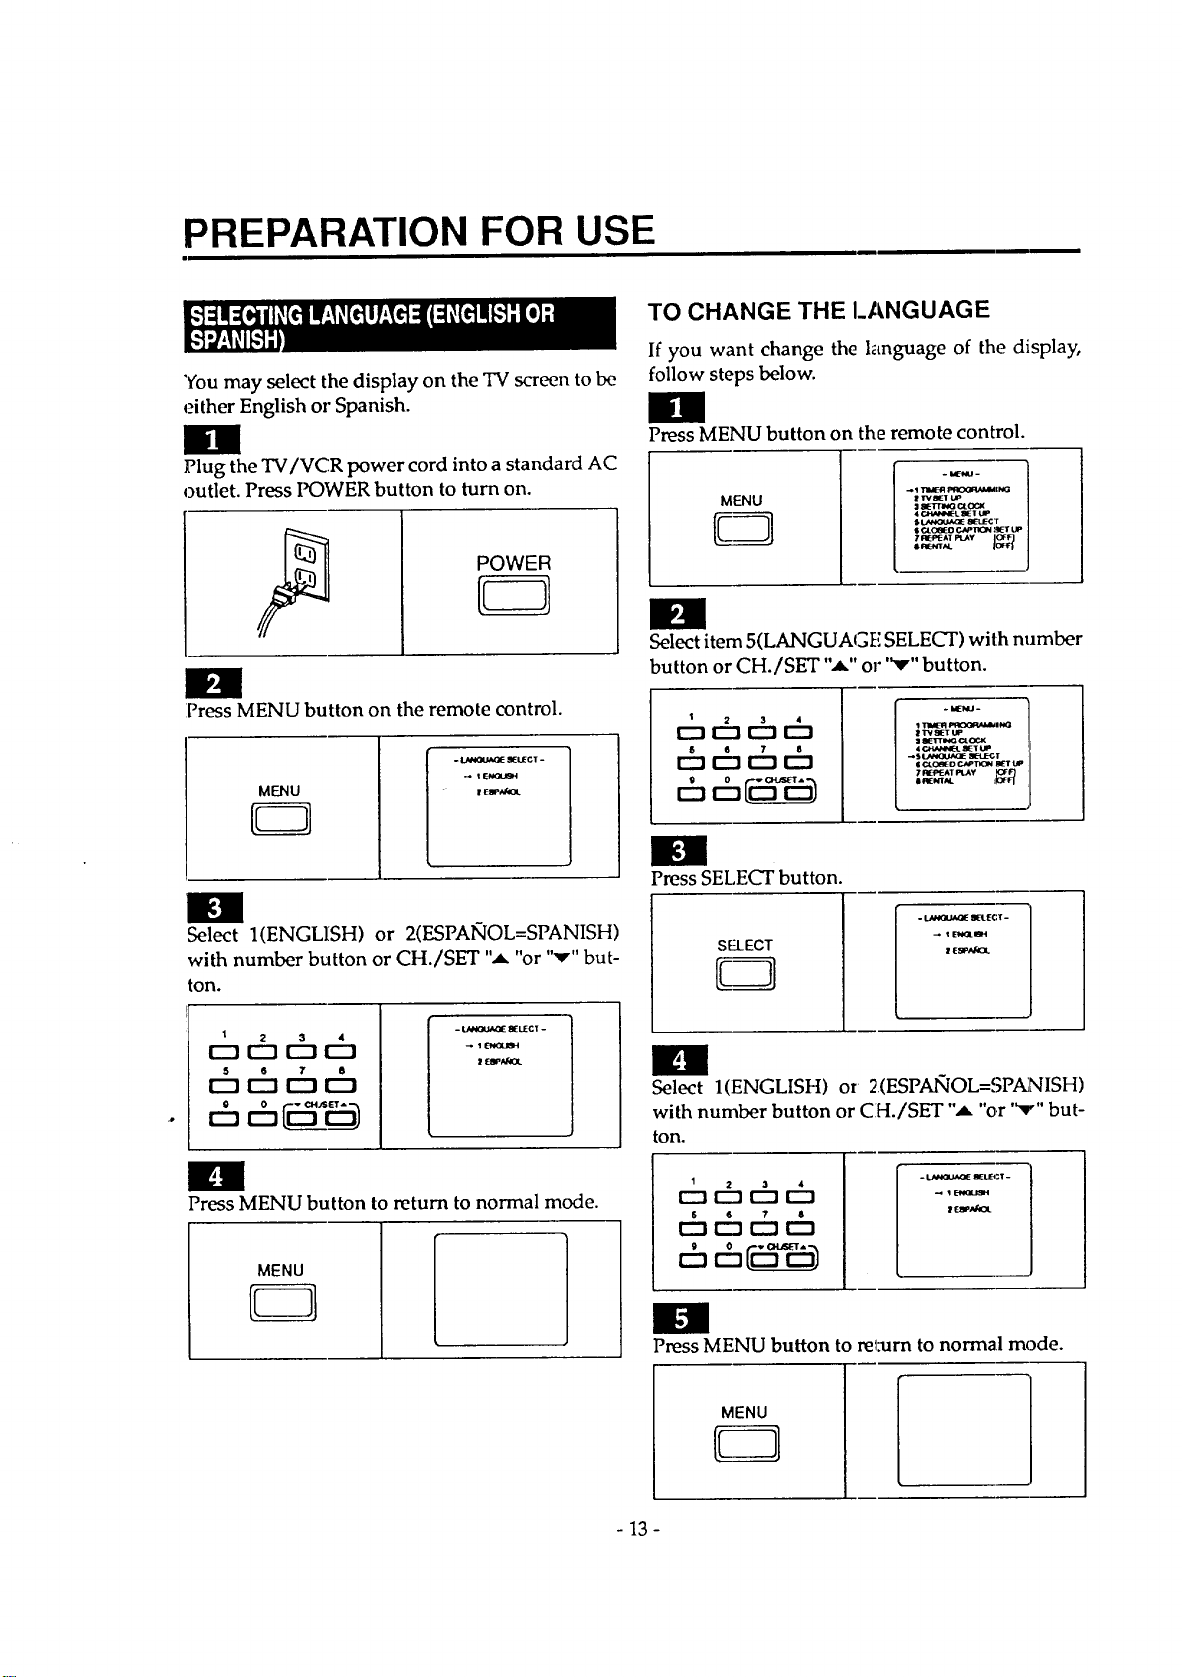
PREPARATION FOR USE
"Youmay select the display on the TV screen to be
either English or Spanish.
g
Plug the TV/VCR power cord into a standard AC
outlet. Press POWER button to turn on.
POWER
E3
O
Press MENU button on the remote control.
MENU
- _ gI_LIECT-
_ 'l EklGUge4
er ee,_f4oL
g
Select 1(ENGLISH) or 2(ESPAIqOL=SPANISH)
with number button or CH./SET ",a, "or '"v"but-
ton.
1
oth6ch
s 6 7 8
r--t E_ r"-t E_
6 6_
- LANGUAOE _UECT -
_ 1 ENGUBH
| ESf'Ak_L
im
Press MENU button to return to normal mode.
MENU
TO CHANGETHEI_ANGUAGE
If you want change the language of the display,
follow steps below.
g
Press MENU button on the remote control.
i _ P_OQ_'ddMl_
sOLC_EO CN'InCN .'_T UP
# _'VAL
Select item 5(LANGUAGFi SELECT) with number
button or CH./SET ",a," or '_r" button.
1
Dchcht_
th ththt:h
c5th____
111maoR_n_
_ TVSETUP
= 8Elr'rml,_OL_
| o,.oe_ o CAPTIOM BL_'TLm
7fl[_'EAT I=L.AY _OF"F'_
0 I_.NTAL J!Oeq
n
Press SELECT button.
S-ELECT
_EIe_LI_H
ill
Select I(ENGLISH) or 2(ESPAIqOL=SPANISH)
with number button or CH./SET ",a, "or "v" but-
ton.
r---1r--1 r--'!
t_ r-hr-hr-h
t:5t:h_
- ; -
t.N_U_IE _Lr_ T
Im
Press MENU button to reL-urn to normal mode.
MENU
- 13-
i.-l:i m| I_,[_ill| :I::I[_Ko[_,'41;[o];[_o] ;l;l_+l II| htjl=II
Set the clock accurately for proper automatic timer
recording.
Note: The instructions refer to the TV's on-screen
display indicators. Some of the indications on the
TV/VCR's display vary slightly.
In the example below, the clock is to be set to:
DATE March 1st, 1993
SETTING TIME 5:40PM.
• You must use the remote control unit for the
following steps.
Press POWER button to turn on the TV/VCR.
Power ="
ml
Press SELECT button.
'_SETI3NG CLOCK" appears on the TV screen. The
MONTH digits flash.
SELECT
€lk
Enter the desired month with number button or
the CH./SET "A," or "v" button. (Example: 03)
I 2 3 4
0 CZ] 0 IZ)
5 6 7 8
DAV _aR
• After 1 second the DAY digits flash.
Press MENU button.
The main menu display appears on the TV screen.
MENU
Q
- I,E_.
_1 TIMERI'_O<_l_+,l_Na
:! TVEIETUP
s SEt_IG Crock
$I._IOL+IA_ _t£:CT
I O+J_IED ClFtION _ Lm
• ,Select item 3 (SETFING CLOCK) with number
button or the CH./SET "A" or "V" button.
- MEI_d-
I "l'V_IETUm
4 (:+_tal,lhrct_l_t I.IP
• L,*i_]Lk,_E SEUECT
i _tO_l_D C4OI)oi _t tF
7I_I_EAI PLAY K_P1
• R_NT_
I 2 3 4
r-'_U2] 0 0
S • T
r-'_[22]0 0
Enter the desired day with number button ,Drthe
CH./SET ",a," or '_" button. (Example: 01)
1
o6c d=
r--_0 [:U]r'-_
6,-h
/1"_
• After 1 ,second the YEAR digits flash.,
Enter the desired year with number button or the
CH./SET "*-" or "v" button. (Example: 1993)
1
o6c c
$ • ? 8 _t i t! _t#Im--
• After 1 second the HOUR digits flash.
- 14 -
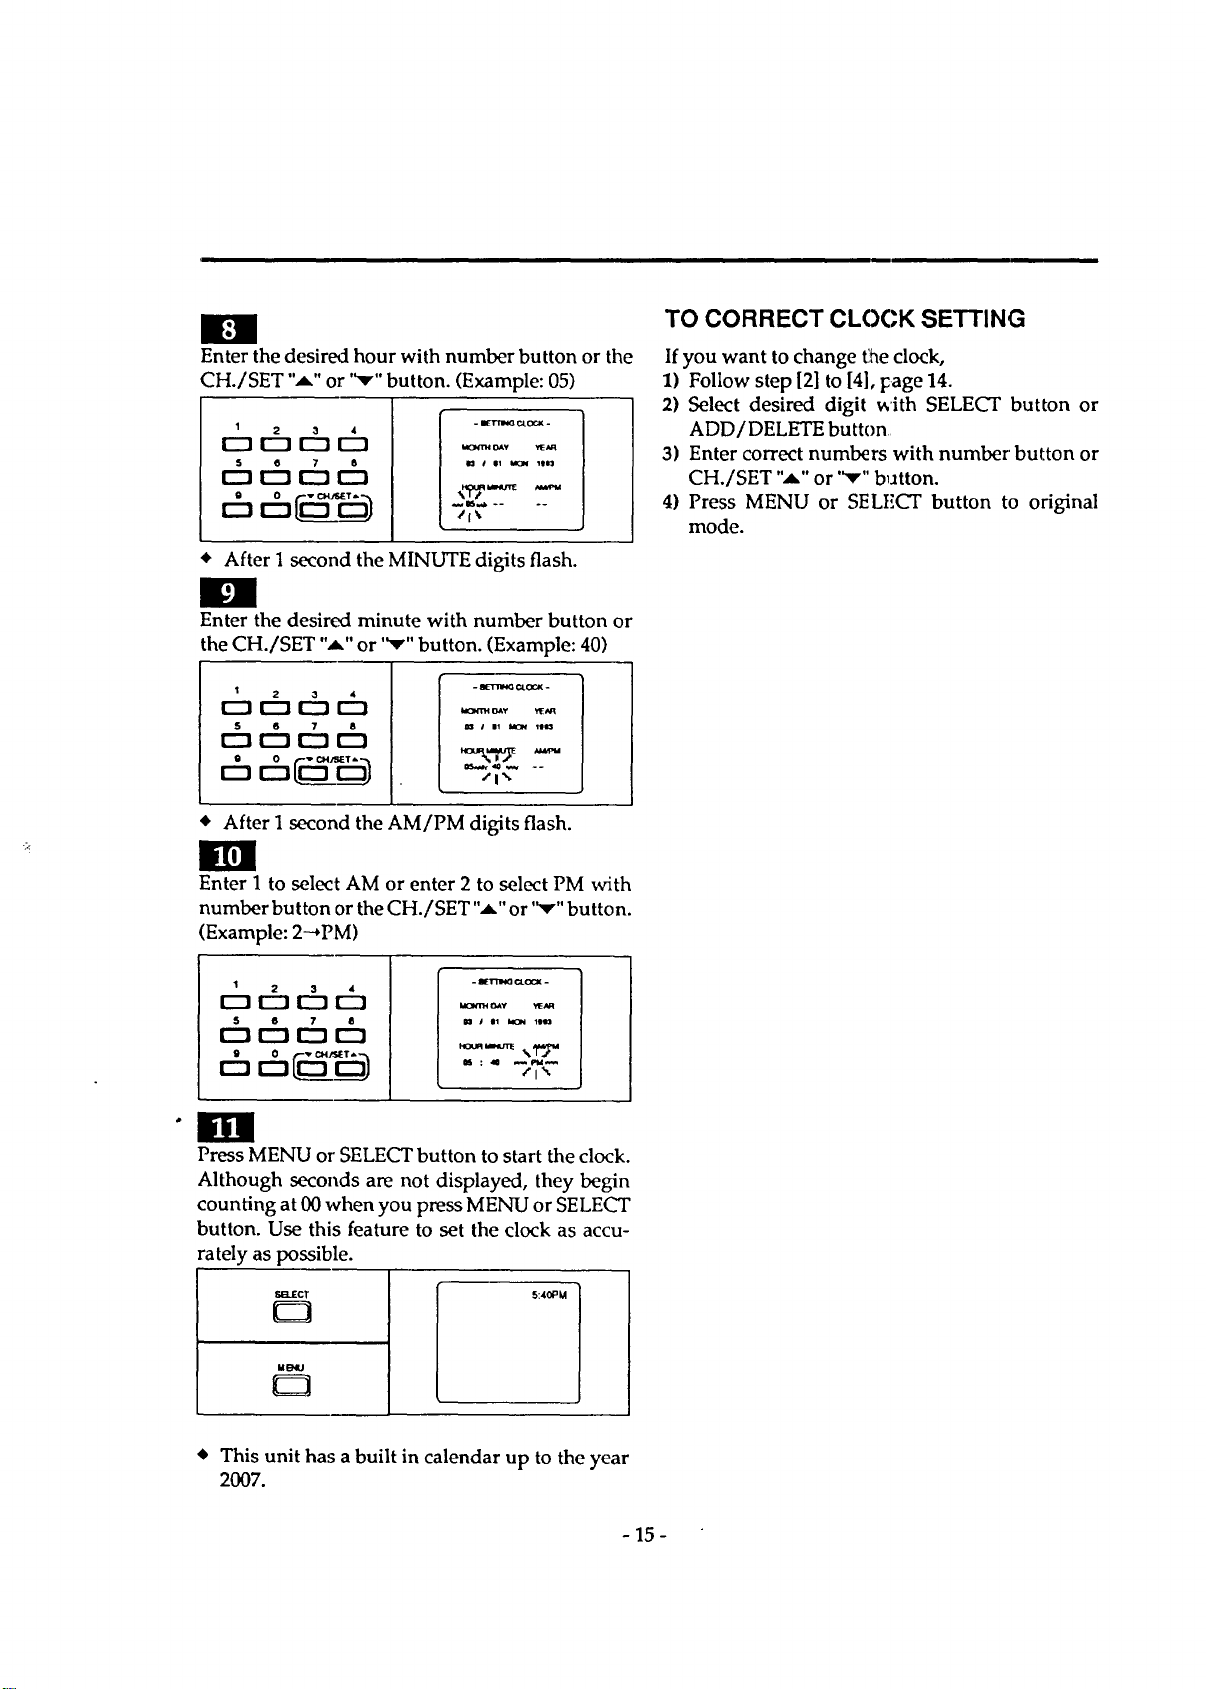
Enter the desired hour with number button or the
CH./SET "_" or '_r" button. (Example: 05)
1
o6 ch
5 e 7 6
[_ r'-I 1---1C_
- IIETTm_ _OCX -
_,mt OAY ,t_aR
/l\
• After 1 second the MINUTE digits flash.
g
Enter the desired minute with number button or
the CH./SET "_" or "_r" button. (Example: 40)
r rhchch
6ch6
- _Tr'm_ c_ocx -
OAY _IE_u_
s el _ 11113
/1'_.
• After I second the AM/PM digits flash.
Enter 1 to select AM or enter 2 to select PM with
number button or the CH./SET "_" or "v" button.
(Example: 2_PM)
I 2 3 4
[Z] r-_ r--1 r-n
S 6 7 6
r"-t r'-'l r'-I r'-t
bO_H GAY YEN_
m J Ol MCN 11113
/i _
Press MENU or SELECT button to start the clock.
Although seconds are not displayed, they begin
counting at 00 when you press MENU or SELECT
button. Use this feature to set the clock as accu-
rately as possible.
V_d_CT
M_
E3
5:40_M
TO CORRECT CLOCK SETTING
If you want to change the clock,
1) Follow step [2] to [4], Fage 14.
2) Select desired digit _'ith SELECT button or
ADD/DELETE button
3) Enter correct numbers with number button or
CH./SET "_" or '_'" b_atton.
4) Press MENU or SELECT button to original
mode.
• This unit has a built in calendar up to the year
2007.
- 15 -
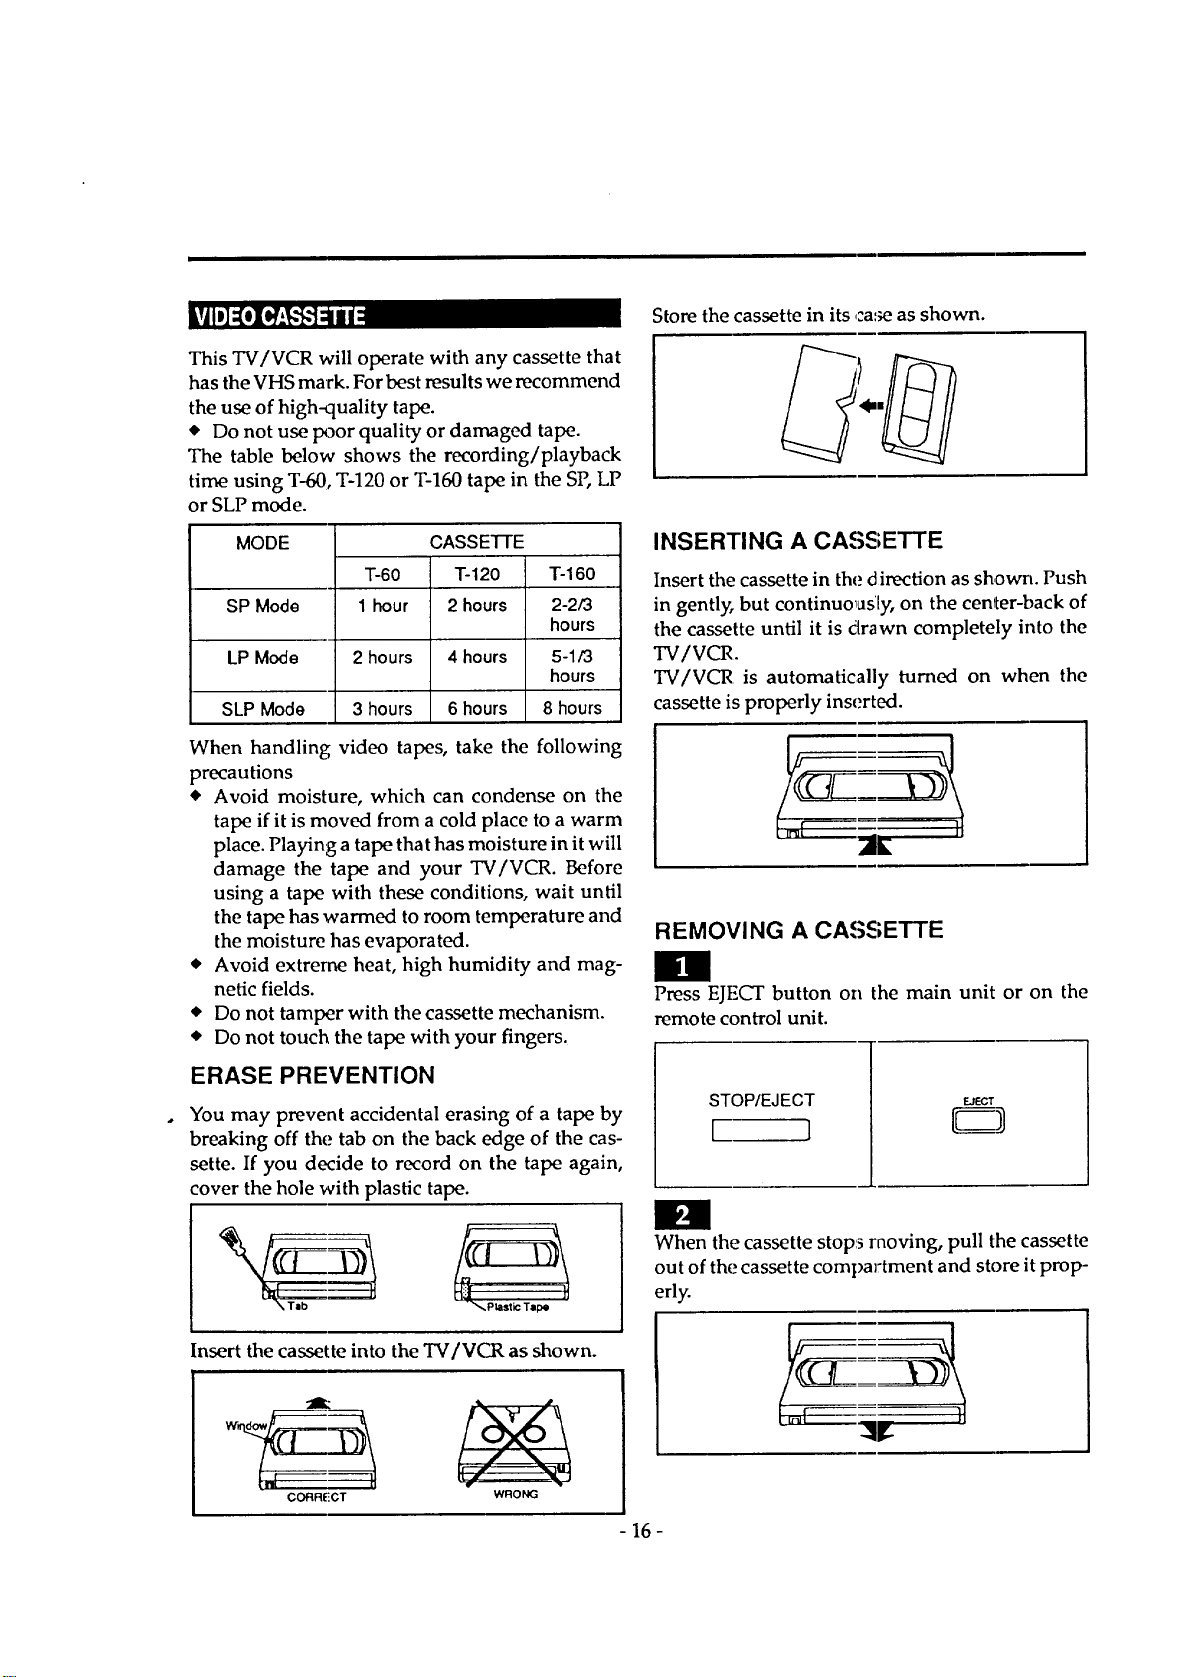
Storethecassettein its case as shown.
This TV/VCR will operate with any cassette that
has the VHS mark. For best results we recommend
the use of high-quality tape.
• Do not use poor quality or damaged tape.
The table below shows the recording/playback
time using T-60, T-120 or T-160 tape in the SP, LP
or SLP mode.
MODE
SP Mode
LP Mode
SLP Mode
T-60
1 hour
CASSETTE
T-120
2 hours
2 hours 4 hours
3 hours 6 hours
T-160
2-2/3
hours
5-1/3
hours
8 hours
When handling video tapes, take the following
precautions
• Avoid moisture, which can condense on the
tape if it is moved from a cold place to a warm
place. Playing a tape that has moisture in it will
damage the tape and your TV/VCR. Before
using a tape with these conditions, wait until
the tape has warmed to room temperature and
the moisture has evaporated.
• Avoid extreme heat, high humidity and mag-
netic fields.
• Do not tamper with the cassette mechanism.
• Do not touch the tape with your fingers.
ERASE PREVENTION
You may prevent accidental erasing of a tape by
breaking off the tab on the back edge of the cas-
sette. If you decide to record on the tape again,
cover the hole with plastic tape.
Insert the cassette into the TV/VCR as shown.
t
CORR(iCT
WRONG
INSERTING A CASSETTE
Insert the cassette in the direction as sh,own. Push
in gentl_ but continuously, on the center-back of
the cassette until it is dlrawn completely into the
TV/VCR.
TV/VCR is automatically turned on when the
cassette is properly inserted.
REMOVING A CASSETTE
IBI
Press EJECT button on the main unit or on the
remote control unit.
STOP/EJECT
[__1
EJECT
El
When the cassette stops moving, pull the cassette
out of the cassette compartment and store it prop-
erly.
- 16-
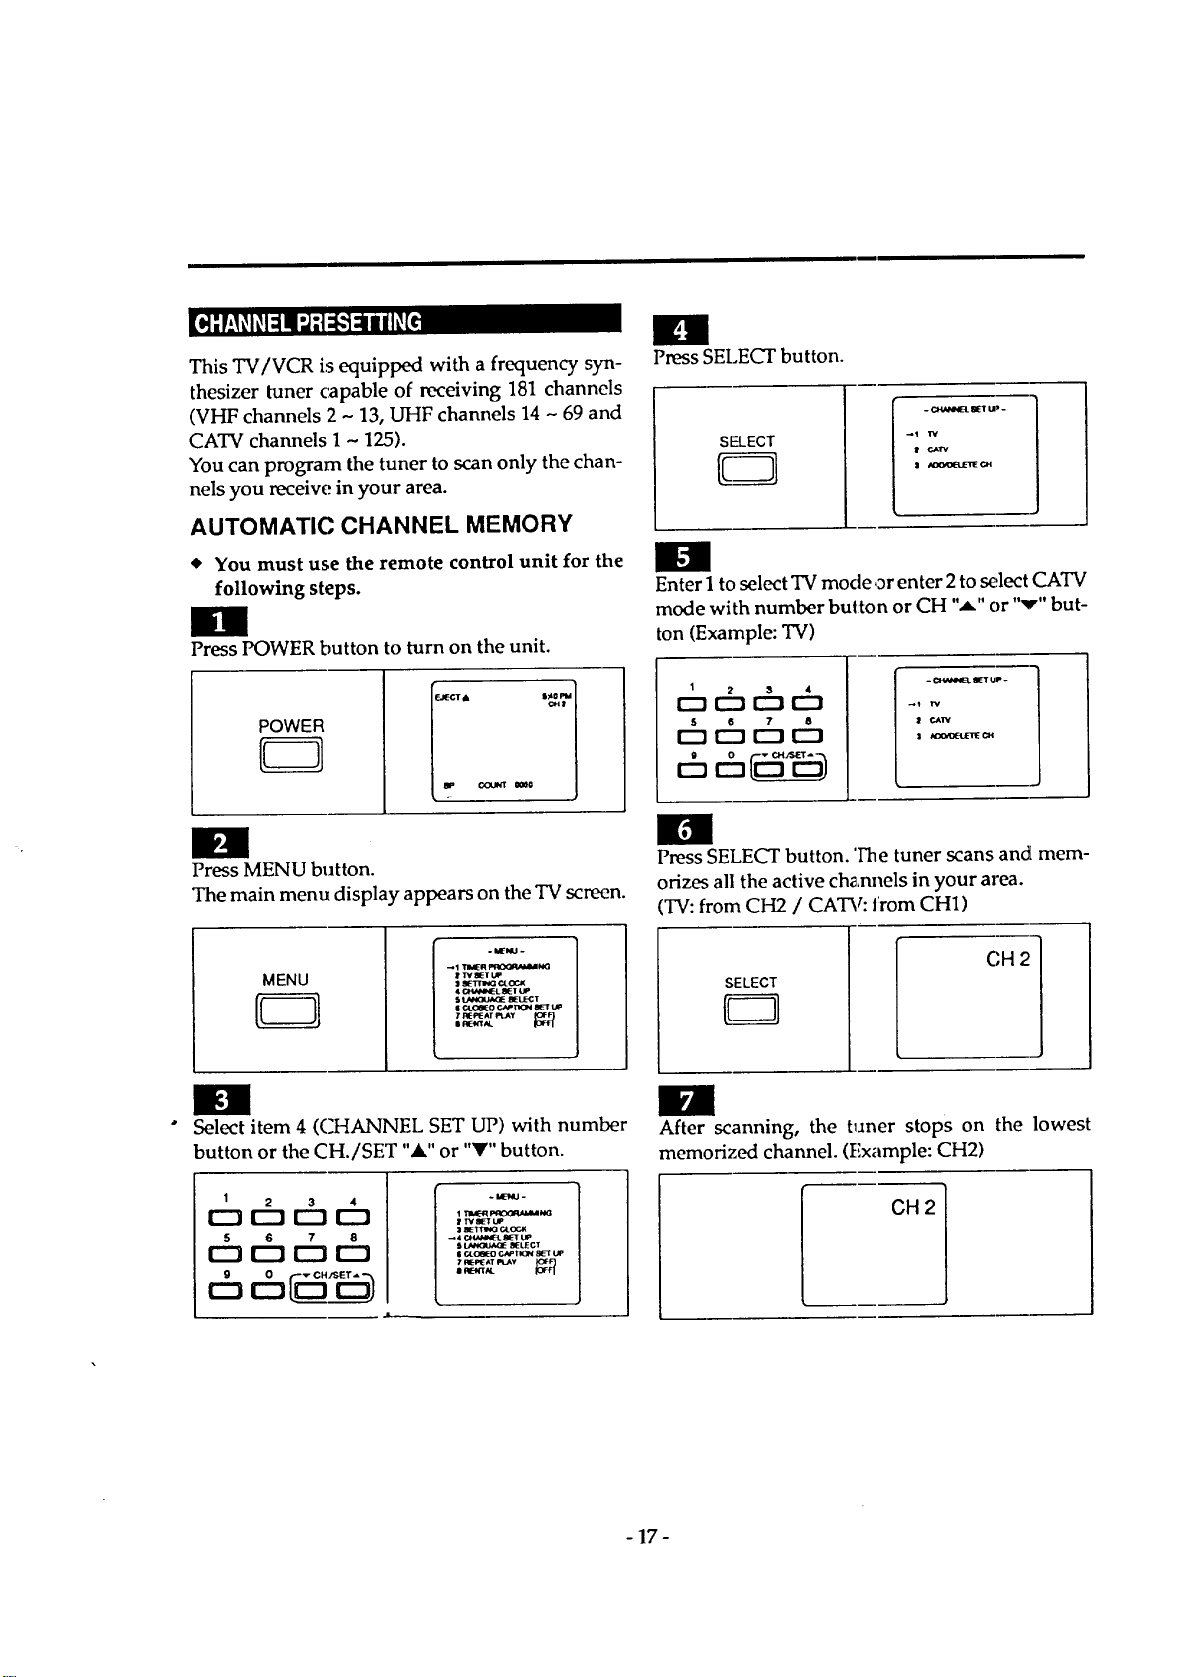
This TV/VCR is equipped with a frequency syn-
thesizer tuner capable of receiving 181 channels
(VHF channels 2 - 13, UHF channels 14 - 69 and
CATV channels 1 - 125).
You can program the tuner to scan only the chan-
nels you receive in your area.
AUTOMATIC CHANNEL MEMORY
You must use the remote control unit for the
following steps.
Press POWER button to turn on the unit.
POWER
Press MENU button.
The main menu display appears on the TV screen.
MENU
Press SELECT button.
SELECT
C_'4_Pe4ELSlETU
_1 'rv
! r.._lr'v
,1 #d[XZ_L_*__nECH
tm
Enter 1 to select TV mode or enter 2 to select CATV
mode with number button or CH "A" or "v" but-
ton (Example: TV)
1 2 3 4
D D r"-z r"'t
- C_Ve_L SET UP.
_) rv
CAI_
I _C_(tJETE _
Press SELECT button. 'Fine tuner scans and mem-
orizes all the active ch_,nnels in your area.
TV:from CH2 / CATV: from CH1)
SELECT
CH 2
Select item 4 (CHANNEL SET UP) with number
button or the CH./SET "&" or "Y" button.
1 2 3 4
0 I--IF-_ f--1
5 6 7 8
:1_ c4.ocK
_ 4 CZ_,INEt. _E_t"UP
s _ _LEC_r
II C4_OOEOC,_PTI(3N 8_t UP
H
After scanning, the tuner stops on the lowest
memorized channel. (Example: CH2)
CH 2
- 17-
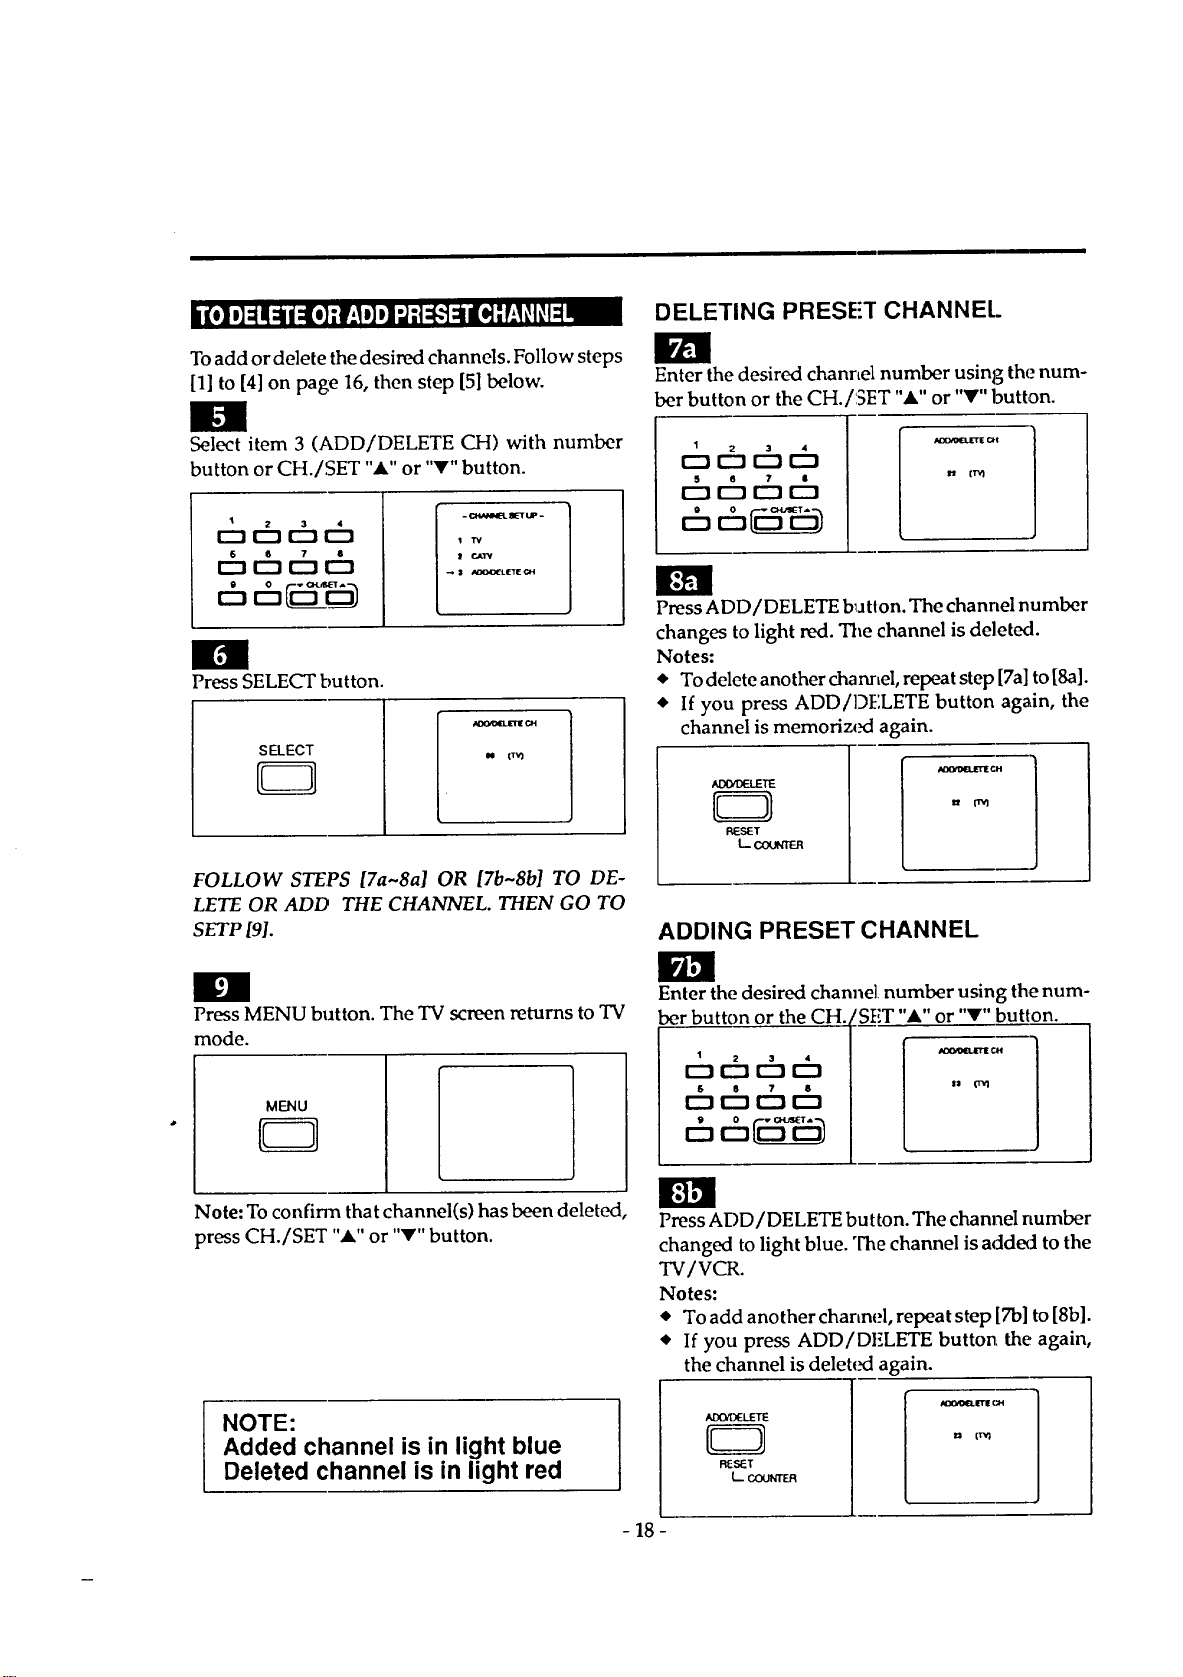
Toadd or delete the desired channels. Follow steps
[1] to [4] on page 16, then step [5] below.
Select item 3 (ADD/DELETE CH) with number
button or CH./SET "." or "V" button.
1
_¢hchch
¢h_chch
II
Press SELECT button.
SELECT
CB
FOLLOW STEPS [7a~8a] OR [7b~8b] TO DE-
LETE OR ADD THE CHANNEL. THEN GO TO
SETP [91.
I
Press MENU button. The TV screen returns to TV
mode.
MENU
EZ3
Note: To confirm that channel(s) has been deleted,
press CH./SET "_." or "V" button.
NOTE:
Added channel is in light blue
Deleted channel is in light red
DELETING PRESE'T CHANNEl.
Enter the desired channel number using the num-
ber button or the CH./SET "A" or "V" button.
1
ot:h t:bt_
th t:bt:hth
Press ADD/DELETE b_atton.The channel number
changes to light red. The channel is deleted.
Notes:
* To delete another channel, repeat step [7a] to [8a].
• If you press ADD/DELETE button again, the
channel is memorized again.
AIXttDELETE
D
L_
ADDING PRESET CHANNEL
Enter the desired channel number using the num-
ber button or the CH. tSET "_" or "V" button.
1
_cht_D
_chthth
ch__
- 18 -
Press ADD/DELETE button. The channel number
changed to light blue. The channel is added to the
TV/VCR.
Notes:
• To add another charmel, repeat step [Tb] to [8b].
• If you press ADD/DELETE button the again,
the channel is deleted again.
-1 ....
R_'r
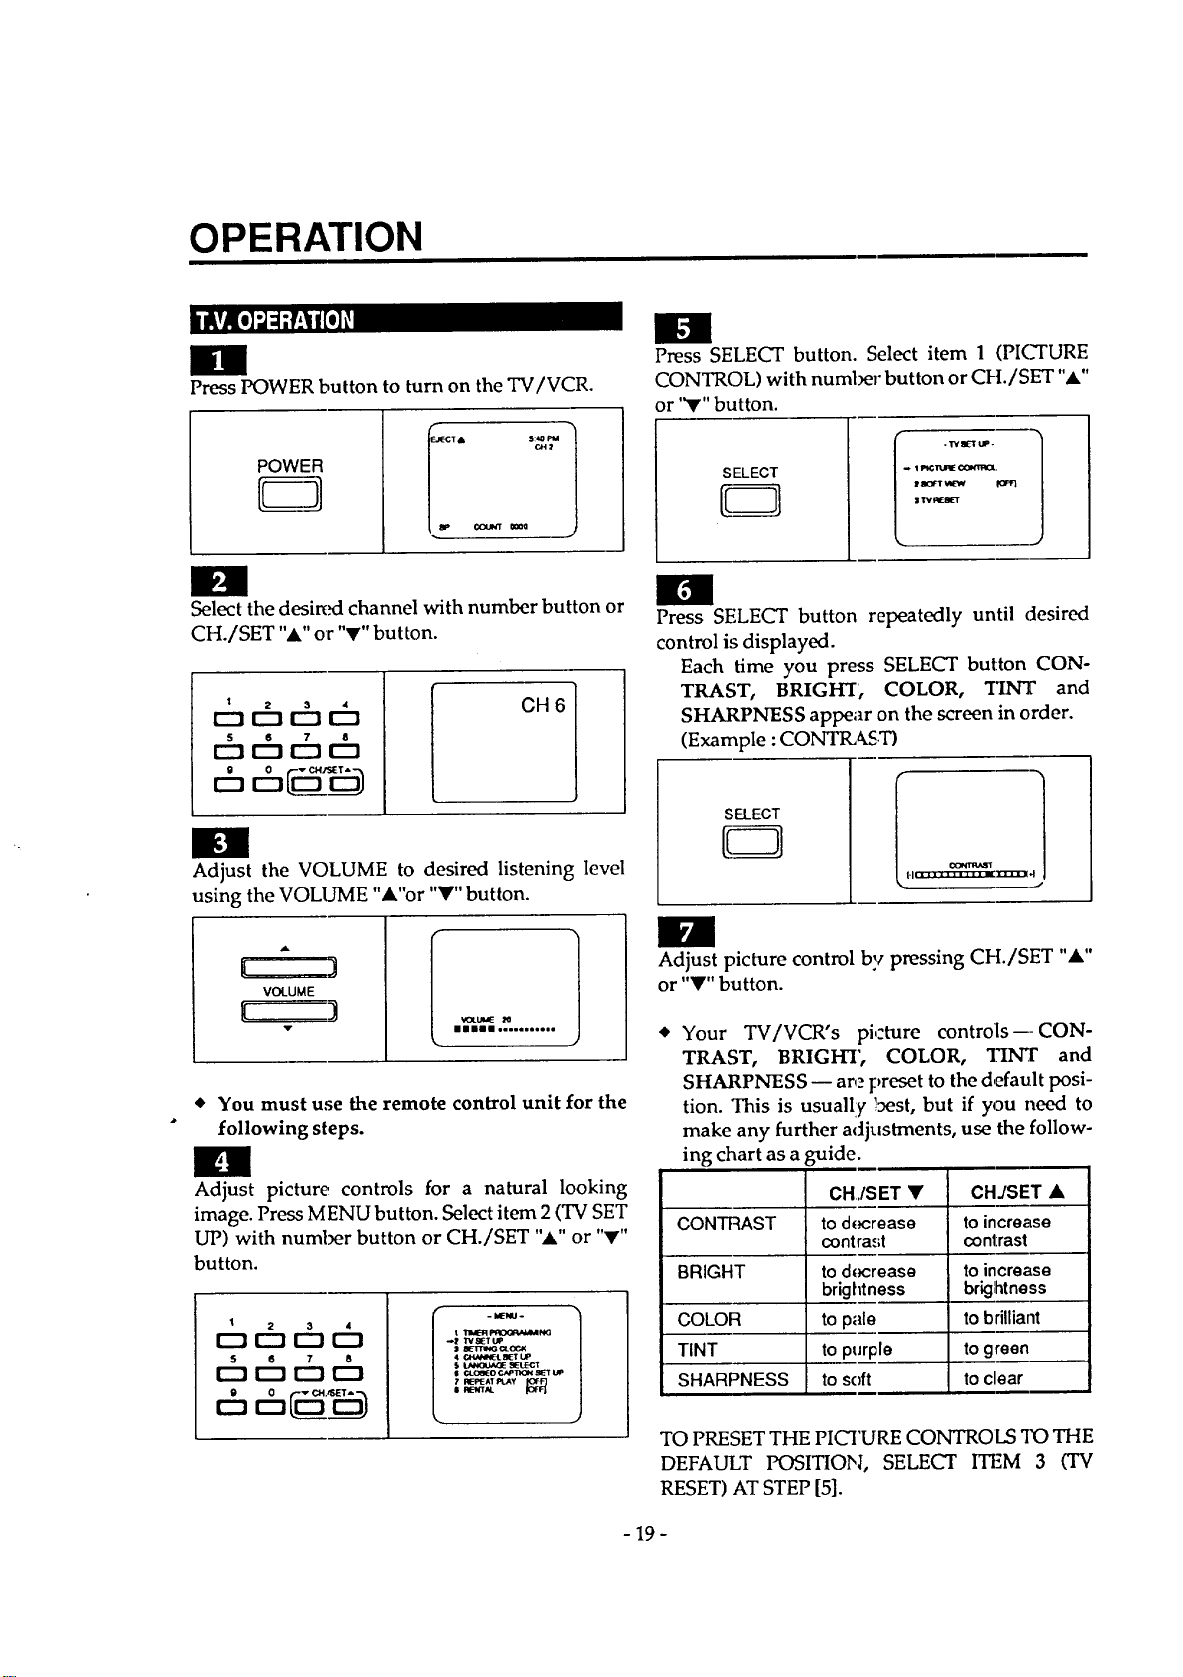
OPERATION
mm
Press POWER button to turn on the TV/VCR.
POWER
T• 5:4Om
Ctt:r
I_eJNT 0_0
im
_elect the desired channel with number button or
CH./SET "A" or "V" button.
1
c=c5 c5
S 6 7 8
r'-! IZ] r"l I_]
CH 6
n
Adjust the VOLUME to desired listening level
using the VOLUME "A"or "Y" button.
[
(
A
VOLUME
_XUME _0
illll Jo...,,_e,,
You must use the remote control unit for the
following steps.
n
Adjust picture controls for a natural looking
image. Press MENU button. Select item 2 (TV SET
UP) with number button or CH./SET ",_."or "V"
button.
I 2 3 4
[_ r--J r--mr-n
5 6 7 8
- blE'NU-
t Tam_qF'RCG_,MM N<;
._ try SET UP
S BETTINGCROCK
• O_qN_L BET UP
$ LAN(]Ua_E _E1LEC1
$ ¢4_cei_oc,N, 1ton I_T uP
7 REPEATPLAY
• A_TAL
Press SELECT button. Select item 1 (PI(_URE
CONTROL) with number button or CI-L/SET "A"
or '_" button.
SELECT
CB
l . TVI1 UP-
! ao_l 'AE_ fORt}
II
Press SELECT button repeatedly until (desired
control is displayed.
Each time you press SELECT button CON-
TRAST, BRIGHT, COLOR, *lINT and
SHARPNESS appear on the screen in order.
(Example : CONTIL_ST)
SELECT
J
/
Adjust picture control by pressing CH./SET "&"
or "_" button.
Your TV/VCR's picture controls---CON-
TRAST, BRIGHT', COLOR, TINT and
SHARPNESS -- are preset to the default posi-
tion. This is usually best, but if you need to
make any further adjustments, use the follow-
ing chart as a .guide.
CH,/SET •
CONTRAST to decrease
contra.,;t
BRIGHT to docrease
brightness
to pale
to purple
to soft
COLOR
TINT
SHARPNESS
CHJSET •
to increase
contrast
to increase
briglhtness
to brilliant
to green
to clear
TO PRESET THE PICTURE CONTROLS 3"0 THE
DEFAULT POSITION, SELECT ITF,M 3 (TV
RESET) AT STEP [5].
- 19-
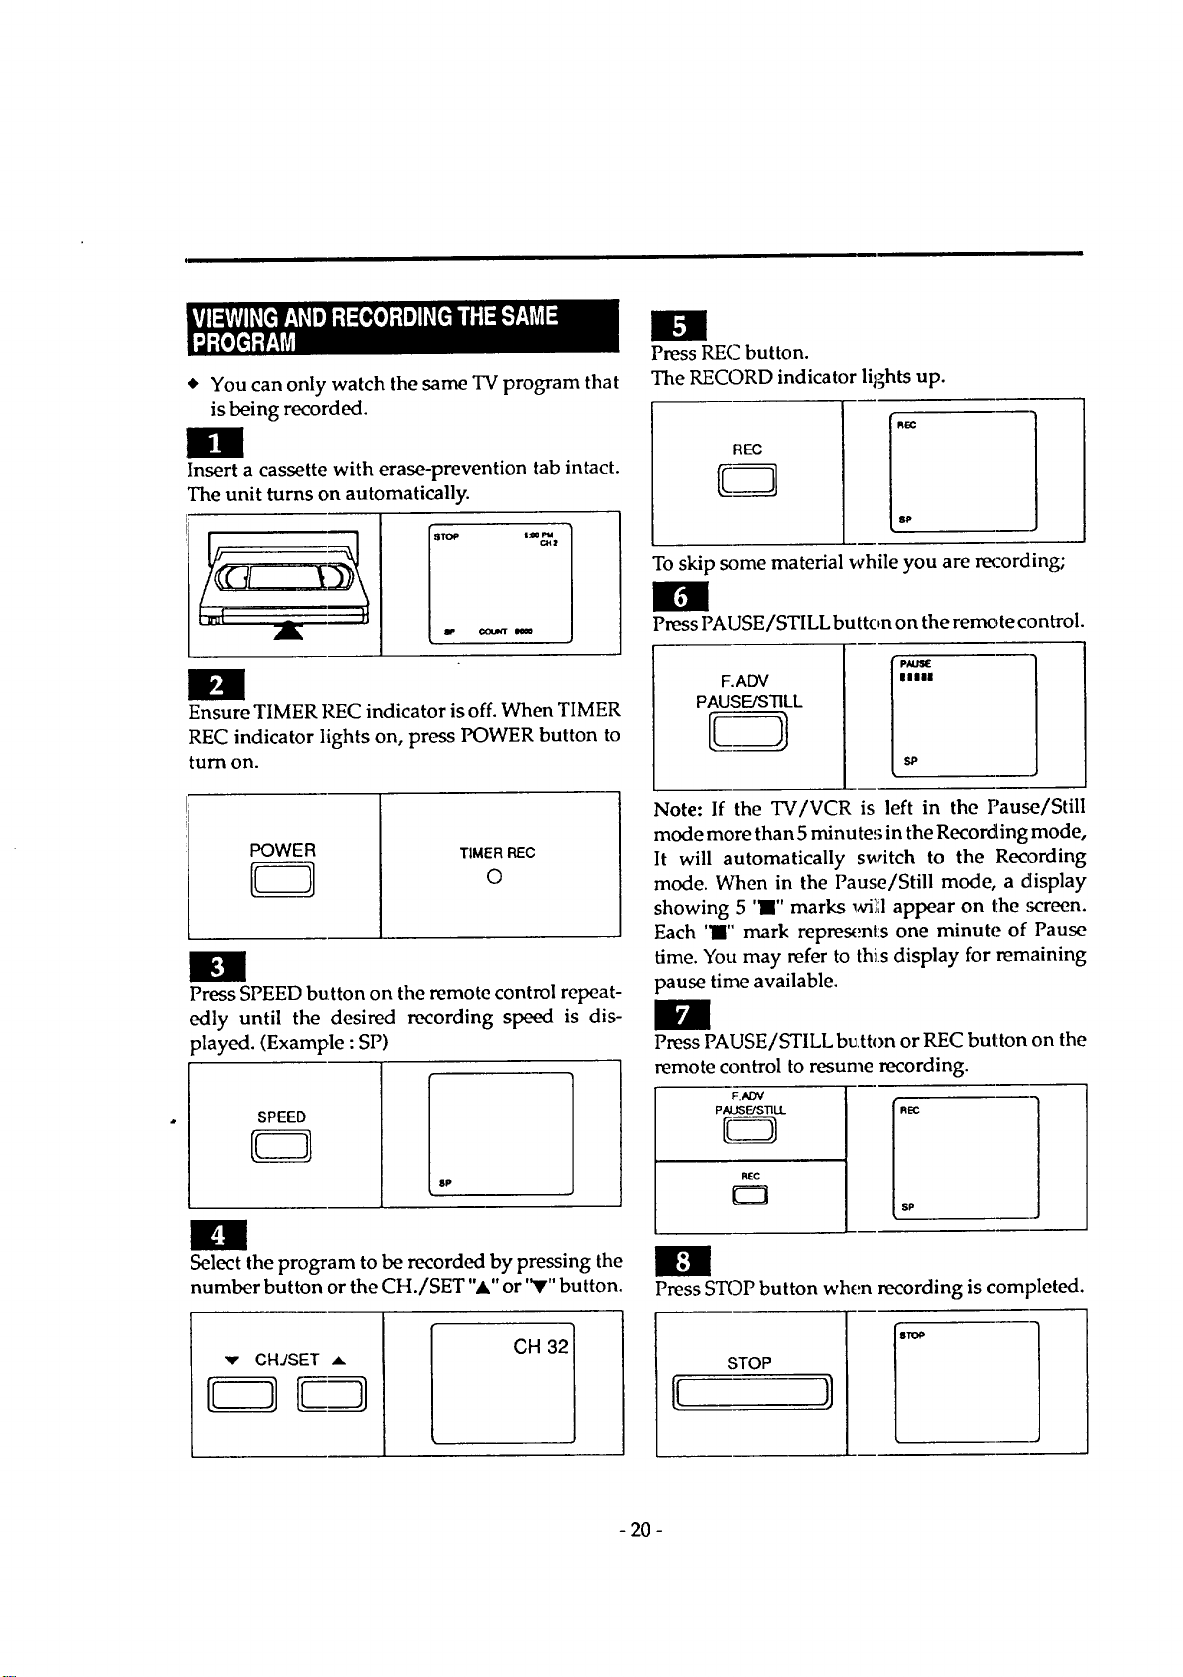
* YoucanonlywatchthesameTVprogramthat
isbeingrecorded.
Insert a cassette with erase-prevention tab intact.
The unit turns on automatically.
imm
Ensure TIMER REC indicator is off. When TIMER
REC indicator lights on, press POWER button to
turn on.
POWER
CB
TIMER REC
O
Press SPEED button on the remote control repeat-
edly until the desired recording speed is dis-
played. (Example : SP)
SPEED
8P
n
Select the program to be recorded by pressing the
number button or the CH./SET "A" or "V" button.
CH 321
Press REC button.
The RECORD indicator lights up.
REC
To skip some material while you are recording;
Press PAUSE/STILL button on the remote control.
F.ADV
PAUSE/STILL
Note: If the TV/VCR is left in the Pause/Still
mode more than 5 minutes in the Recording mode,
It will automatically switch to the Reo3rding
mode. When in the Pause/Still mode, a display
showing 5 'l" marks _hri';,lappear on the screen.
Each 'l" mark repres(:nl:s one minute of Pause
time. You may refer to this display for remaining
pause time available.
Press PAUSE/STILL bu,tton or REC button on the
remote control to resume recording.
_.ADV
PAUSFJSTILL
REC
Press STOP button when recording is completed.
STOP
- 20 -
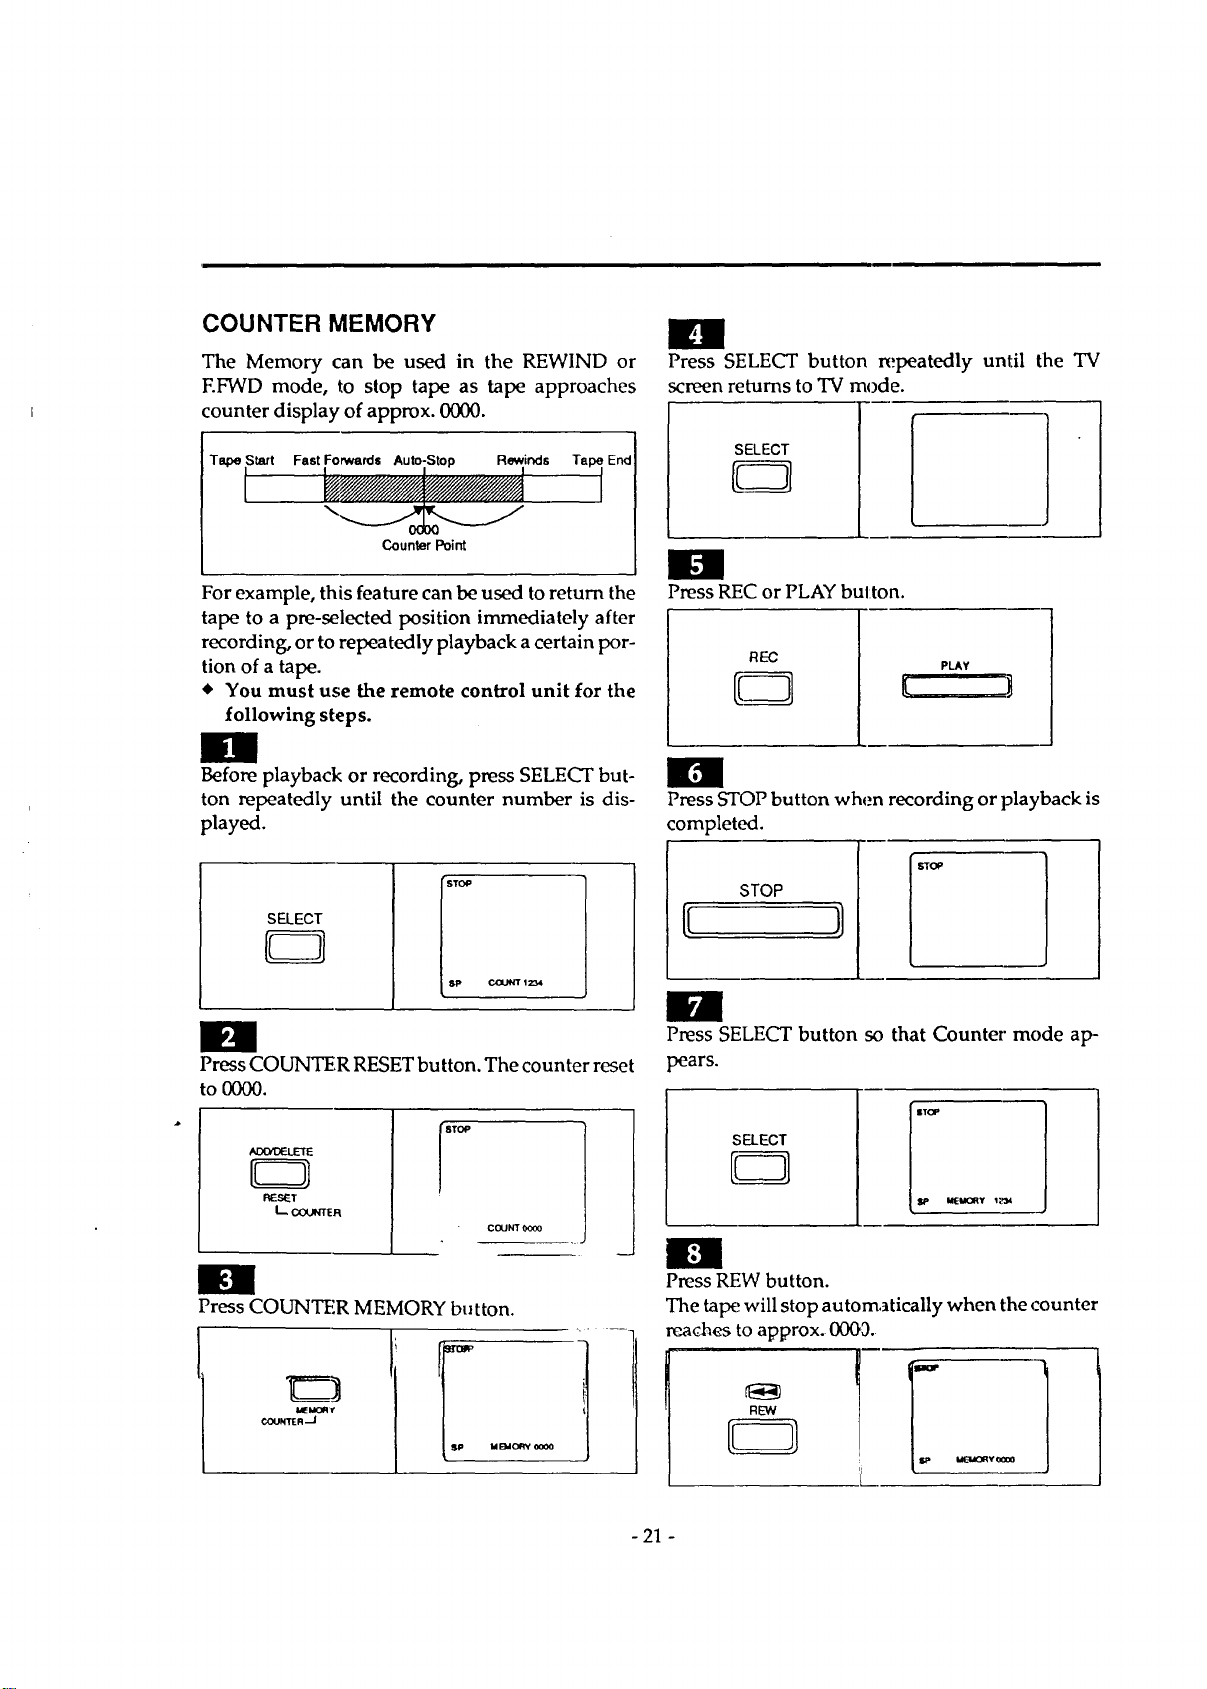
COUNTER MEMORY
The Memory can be used in the REWIND or
EFWD mode, to stop tape as tape approaches
counter display of approx. 0000.
Tape Start Fast Forwards Auto-Stop Rewinds Tape End
Counter Point
For example, this feature can be used to return the
tape to a pre-selected position immediately after
recording, or to repeatedly playback acertain por-
tion of a tape.
You must use the remote control unit for the
following steps.
Before playback or recording, press SELECT but-
ton repeatedly until the counter number is dis-
played.
SELECT
STOP
sp
Ccx.M_ 1234
Press COUNTER RESET button. The counter reset
to 0000.
AOtYOELEIE
RESET
L C(XJl,n_R
COUNT 0000
Press COUNTER MEMORY button.
MEMOR €
COUNTER -J
Press SELECT button repeatedly until the TV
screen returns to TV mode.
SELECT
Press REC or PLAY button.
Press STOP button when recording or playback is
completed.
STOP
STOP
B
Press SELECT button so that Counter" mode ap-
pears.
SELECT
Press REW button.
The tape will stop automatically when the counter
reaches to approx. 0003.
NEW
- 21 -
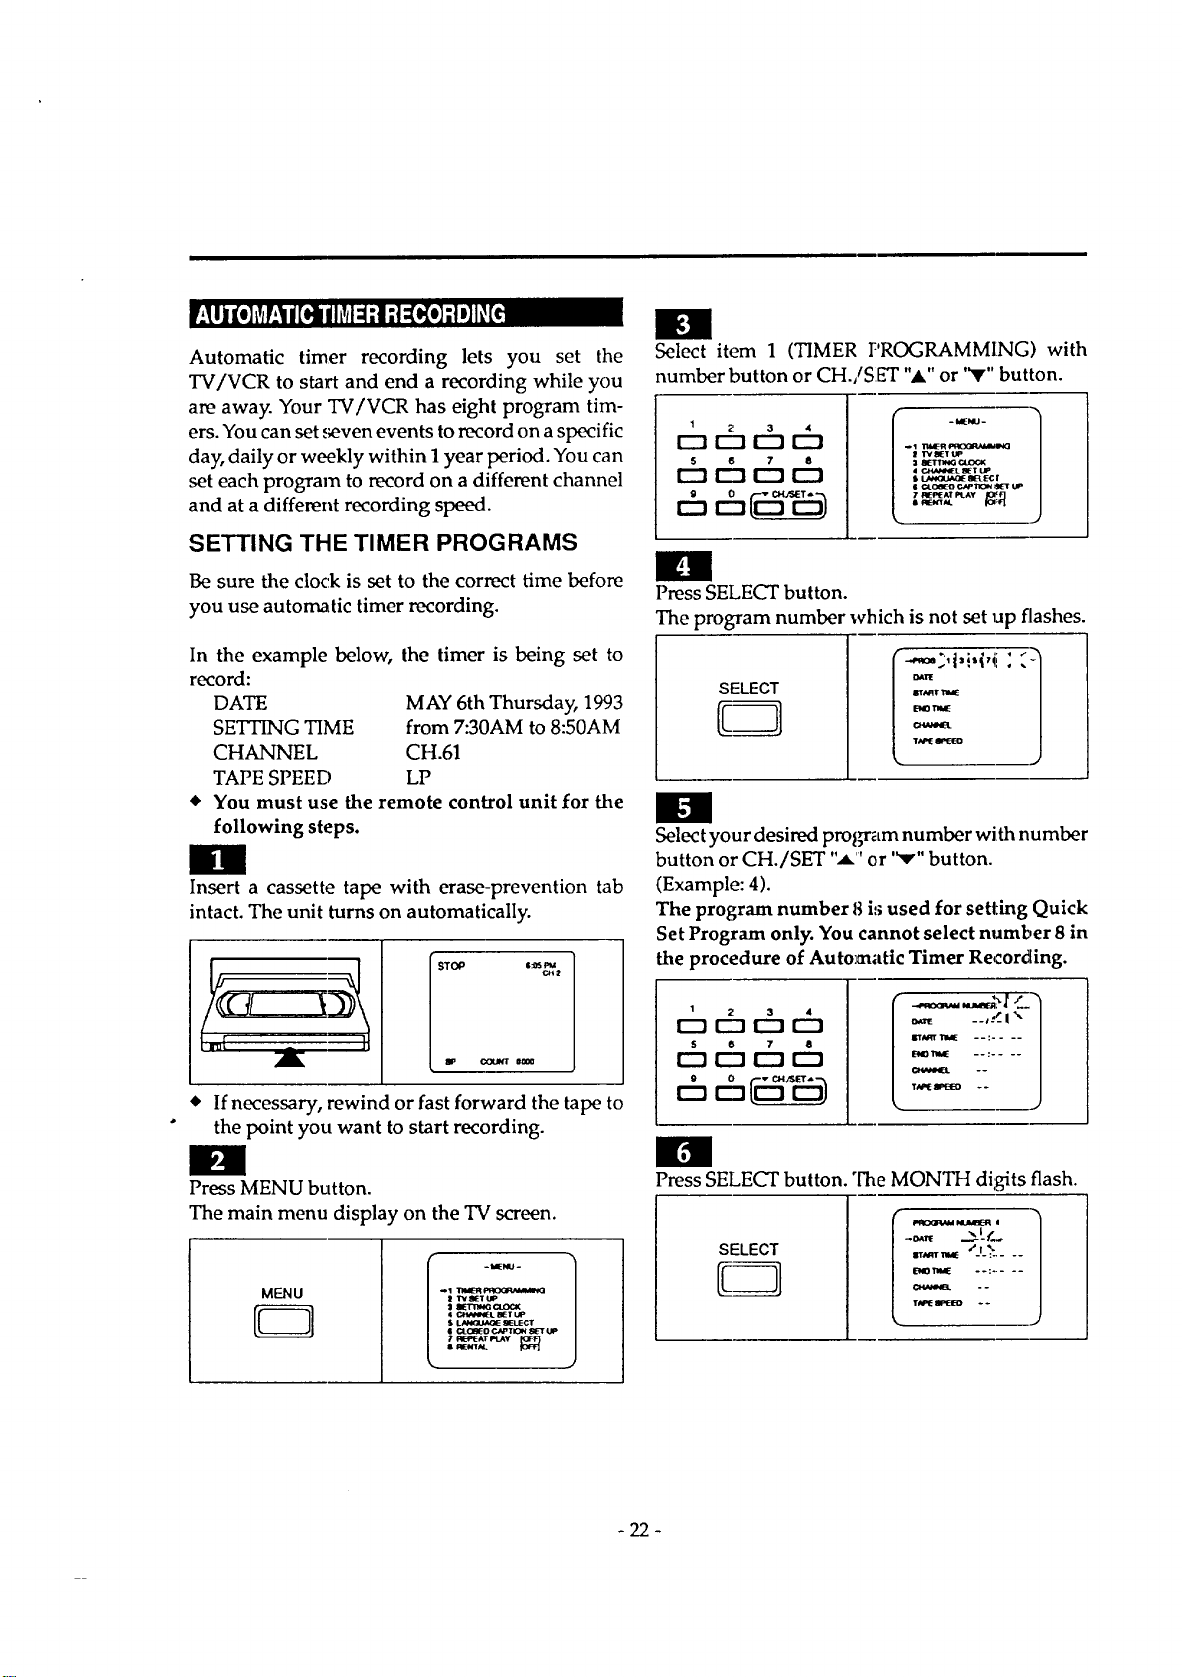
Automatic timer recording lets you set the
TV/VCR to start and end a recording while you
are away. Your TV/VCR has eight program tim-
ers. You can set ,;even events to record on a specific
day, daily or weekly within 1 year period. You can
set each program to record on a different channel
and at a different recording speed.
SETTING THE TIMER PROGRAMS
Be sure the clock is set to the correct time before
you use automatic timer recording.
In the example below, the timer is being set to
record:
DATE MAY 6th Thursday, 1993
SETUNG TIME from 7:30AM to 8:50AM
CHANNEL CH.61
TAPE SPEED LP
• You must use the remote control unit for the
following steps.
Insert a cassette tape with erase-prevention tab
intact. The unit turns on automatically.
_2
• If necessary, rewind or fast forward the tape to
the point you want to start recording.
Press MENU button.
The main menu display on the TV screen.
MENU
D
Select item 1 (TIMER PROGRAMMING) with
number button or CH./SET "_." or '_" button.
1 2 3 4
r--I 1_3 r'l IZ3
5 6 7 8
I--'1 r-'l r'l U:]
Press SELECT button.
The program number which is not set up flashes.
SELECT
H
Select your desired program number with number
button or CH./SET ",i" or "v" button.
(Example: 4).
The program number 8 i:;used for setting Quick
Set Program only. You cannot select number 8 in
the procedure of Automatic Timer Recording.
_j 2 3 4
i--1 r-'l r-'1
5 6 7 8
r'-t _--_ 1::3 r'-_
%.
ENOItl_ --: ....
im
Press SELECT button. "['heMONTH digits flash.
SELECT
,,,,,,,_ *J__....
,,,,,,,,,_:,>-7.
-22-
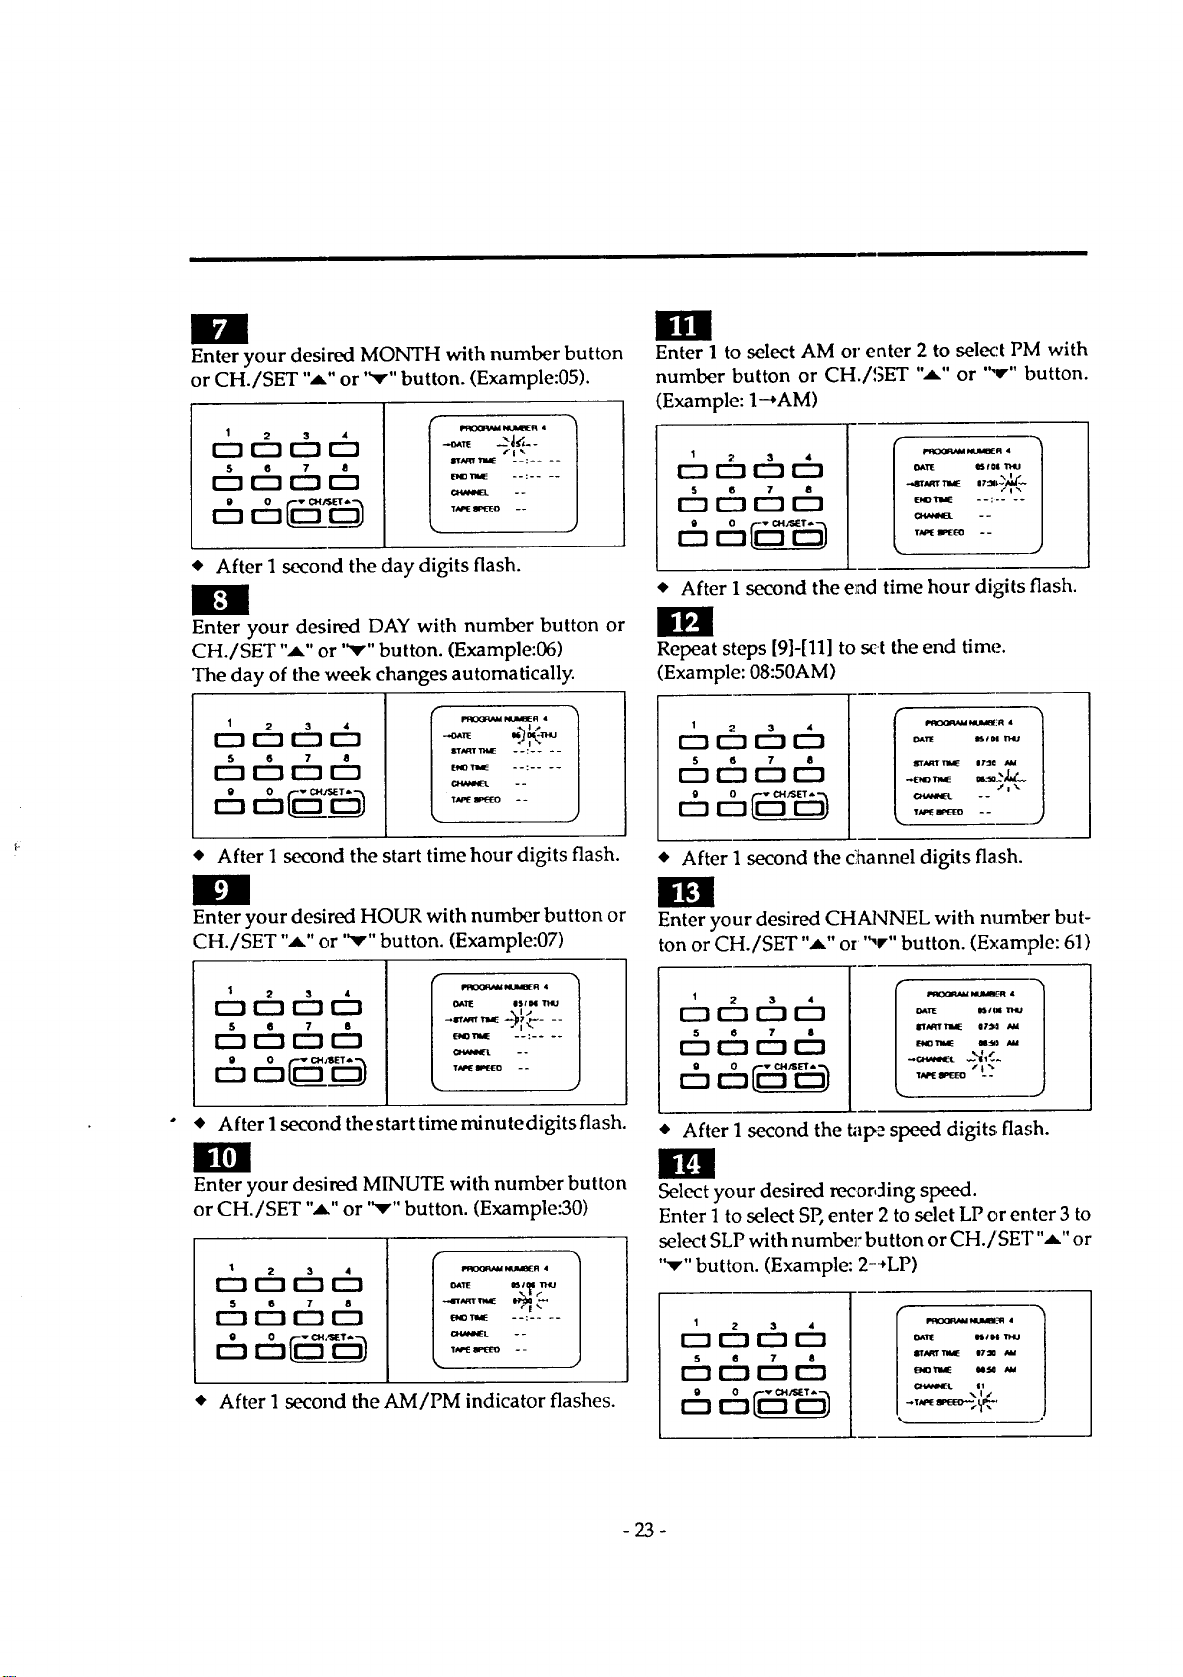
Ill
Enter your desired MONTH with number button
or CH./SET ",a," or "Y" button. (Example:05).
1
o66t
S 6 7 8
IZ] I:_ r"l IZ]
P_OO_,_4 NUhmER •
-._r_ _. -
IrlN_,l lrllaE --: ....
END_ --: ....
* After 1 second the day digits flash.
Enter your desired DAY with number button or
CH./SET "A" or '_,'" button. (Example:06)
The day of the week changes automatically.
1
o,-q,-%,-q
5 6 7 8
r--1 r--1 r"l r'-'!
* After 1 second the start time hour digits flash.
Enter your desired HOUR with number button or
CH./SET "A" or '_'" button. (Example:07)
1 2 3 4
r--_ r--! r--t I:_
S e 7 8
12_ r'-'t r-"l r-'!
I'ROOR_4 NUM_R 4 1
_11E esta
÷!"
_TW, E --: ....
--
%
• After 1second the start time rninute digits flash.
Ilrl
Enter your desired MINUTE with number button
or CH./SET ",a." or '_,'" button. (Example:30)
t 66ch
5 6 7 8
r"l l--s r-_ C::]
• After 1 second the AM/PM indicator flashes.
I111
Enter 1 to select AM or enter 2 to select PM with
number button or CH./SET "m" or "v" button.
(Example: 1--+AM)
1 2 3 4
r--] r--t r'-_ [22223
S 6 7 8
r"-I r-'l r"l I:_
Ixt'It l_rol mu
i
END11ME --: ....
TN'E BPEIEO * -
• After 1 second the end time hour digits flash.
Repeat steps [9]-[11] to set the end tim(.'.
(Example: 08:50AM)
t 66D
5 6 7 8
[_ !--'1 r'-_
-7%7
• After 1 second the c]hannel digits flash.
Enter your desired CHANNEL with number but-
ton or CH./SET ",a," or ",r" button. (Example: 61)
1
5 6 7 8
r'-"tr"_ r-"-a r""-a
[::2S i-
• After 1 second the tape speed digits flash.
ill
Select your desired recording speed.
Enter 1 to select SP, enter 2 to selet LP or enter 3 to
select SLP with numbe]: button or CH./SET",a," or
"Y" button. (Example: 2-+LP)
1 2 3 d
[_] IZ] r-_ I_]
s 6 7 8
i,s_x_m+,_l muidul_q +1
o+tl_ ntl, i THU
-23-
Press MENU or SELECT button on the remote
control unit. Program 4 is now completed.
To set another program, repeat steps [2] to [15].
v=l
_[tECT
£:3
;
Press POWER button on the TV/VCR or on the
remote control unit. The TIMER REC indicator
lights up.
POWER
TIMER REC
0
While watching TV, 'TIMER REC STANDBY"
starts flashing on the TV/VCR screen 2 minutes
before the programmed start time.
You must turn off the TV/VCR to activate auto-
matic timer recording.
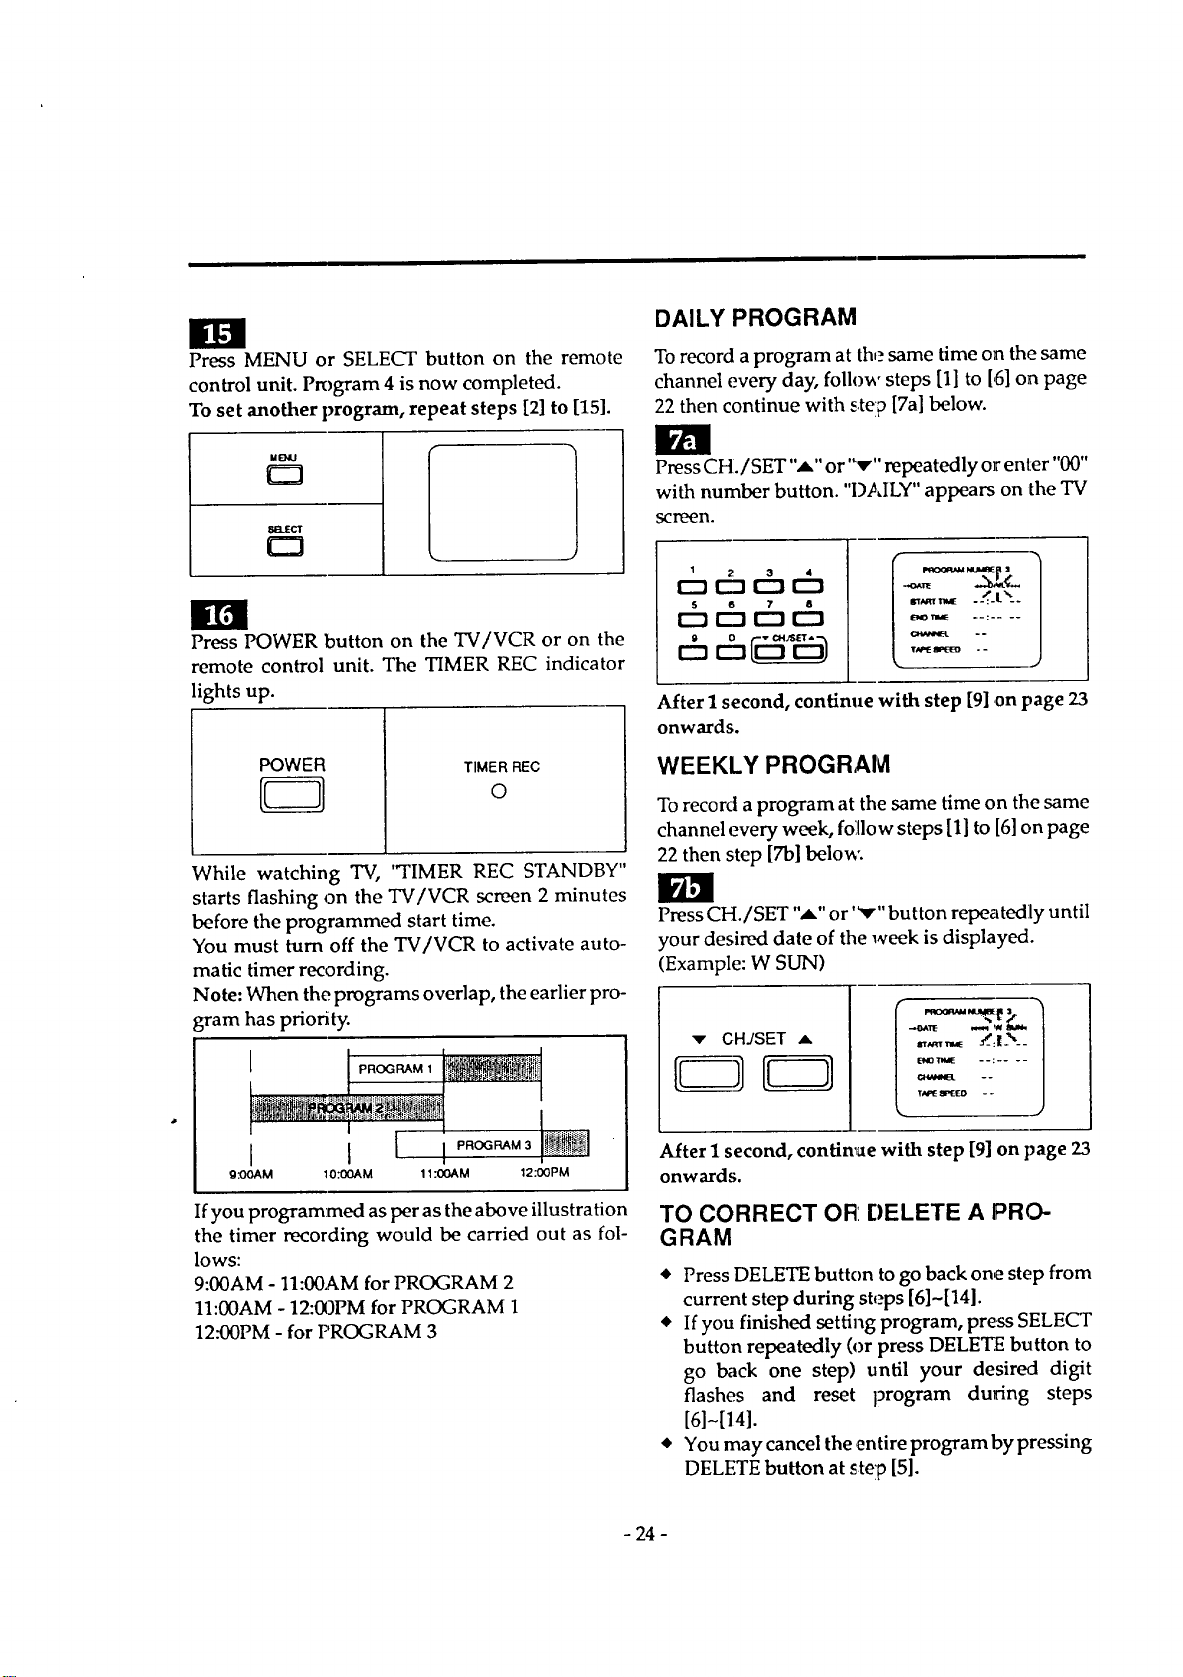
Note: When the programs overlap, the earlier pro-
gram has priority.
I I
9 .'OOAM IO.'OOAM 11.'OOAM 12:00PM
Ifyou programmed as per as the above illustration
the timer recording would be carried out as fol-
lows:
9:00AM- 11:00AM for PROGRAM 2
11:00AM - 12:00PM for PROGRAM 1
12:00PM - for PROGRAM 3
DAILY PROGRAM
To record a program at the same time on the same
channel every day, follow steps [1] to [,5]on page
22 then continue with stelp [7a] below.
PressCH./SET "-,_"or "_r" repeatedly or enter "00"
with number button. "D.,_,ILY"appears on the TV
scrLN2N.
6 6
5 6 7 8
E_ r--1 r-'! r--!
=_,.E - _-l_--
--......
After I second, continue with step [9] .on page 23
onwards.
WEEKLY PROGRAM
To record a program at the same time on the same
channel every week, foillow steps [1] to [6]on page
22 then step [7b] below:
Press CH./SET "_" or '_'" button repeatedly until
your desired date of the week is displayed.
(Example: W SUN)
::.....
After I second, continue with step [9] on page 23
onwards.
TO CORRECT OR: DELETE A PRO-
GRAM
• Press DELETE button to go back one step from
current step during steps [6]~[14].
• If you finished setting program, press SELECT
button repeatedly (or press DELETE button to
go back one step) until your desired digit
flashes and reset program during steps
[6]-[14].
• You may cancel the entire program by pressing
DELETE button at step [5].
- 24 -
"'e " 'll
You may set the TV/VCR to start and end recording
one program within 24 hours by simply pressing
QUICK SET PROGRAM button on the TV/VCR.
It is easy for you to record today's TV program.
Power must be on to set Quick Set Program.
Clock must be set to the correct time before
setting the timer.
Quick Set Program is memorized to program
number 8.
In the example below, the Quick Set Program is
being set to record:
SETTING TIME from 10:00PM to 11:00PM
CHANNEL CH10
TAPE SPEED SP
Current time is 8:00PM.
Note: This function is not operative with the
remote control.
Insert a cassette tape with its erasure prevention
tab in place, if necessary, rewind or fast forward
the tape to the point at which you want to begin
recording.
Press QUICK SET PROGRAM button on the
TV/VCR.
MONITOR
QUICK SET
PROGRAM
,_ _,_'.t_ ..
_ m
NOTE:
1)Key Inputs fou steps [2]~[10] should be
done within 2 _seoords, otb_
mode wlll, forvm_,d to rm_mmde.
_'_M q_a_q_wa_l to next Sltlpa_aem_
press SELECT button on ttTell_,/_C_P,.
3)When you press CLEAR button on'the
TV/VCR, al/input data will be erased
and return to Initial display (step.[2]).
IEN
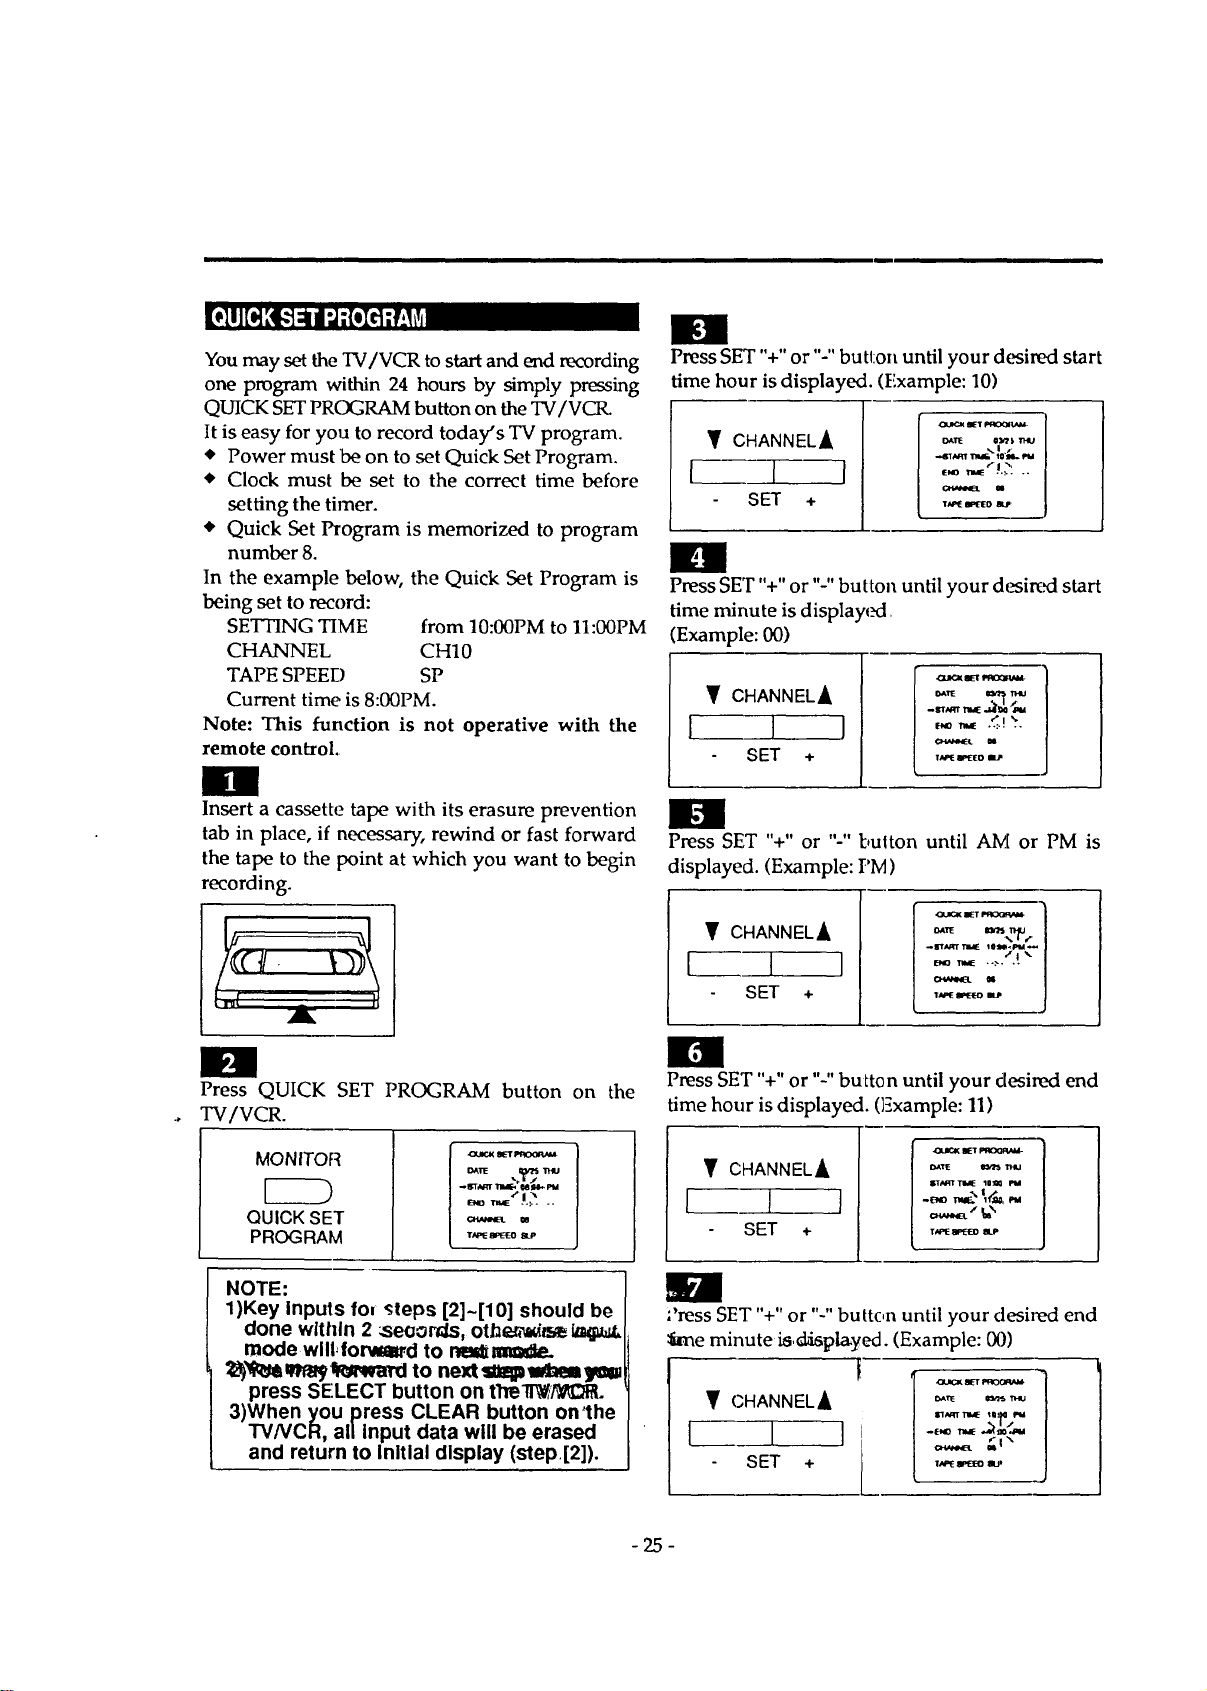
Press SET "+" or "-" button until your desired start
time hour is displayed. (Example: 10)
CHANNEL_
1 I
SET +
%|f
•.,61_ _ t0"mL.P,a
e,,o _".L.': ..
_ u
n
PressSET"+" or "-" button until your d(_ired start
time minute is displayed.
(Example: 00)
• CHANNELA
I I I
SET +
E,_r_ ._.!_..
_ N
Press SET "+" or "-" bulton until AM or PM is
displayed. (Example: PM)
• CHANNEL_,
l, 1 I
SET +
M
Press SET "+" or "-" button until your desired end
time hour is displayed. (Example: 11)
• CHANNEL_
1 I I
SET +
T_mEW"_ elLP
;'ress SET "+" or "-" button until your desired end
_me minute is,displayed. (Example: 00)
• CHANNELA
T_ _ IP
-25-
Press SET '%" or "-" button until AM or PM is
displayed. (Example: PM)
Y CHANNELA
I I 1
SET +
OUI_'( I_yr t_IOORAM.
I_aRT'maE _=_ I'M
m "*1%
Press SET"+"or"-" button until your desired channel
number is displayed. (Example: 10)
Y CHANNELA
I I --7
SET +
Sr,lJ_TI_aE _0_0 rt4
ir¢ll
Press SET "+" or "-"button until your desired tape
speed is displayed. (Example: SP)
CHANNEL_
I I I
SET +
_DUO( gET _
_TWJ
arrAqT11_E I0:_ F_
Press QUICK SET PROGRAM button or MENU
button on the remote control.
MONn'OR
EZD
QUICK SET
PROGRAM
laB_U
O
Press POWER button to set Quick Set Program.
The TIMER REC indicator lights up.
When the programs o,_erlap, Quick Set Program
has priority.
/ _--| ..
---- I ;, +, I+....
I I i+O0 l
g:O0 10:00 11 0.00
If you program as per the illustration the timer
recording would be carried out as follows.
9:00-11:00 for PROGRA,_ 1
11._0-0:00 for QUICK SET PROGRAM (PRO-
GRAM 8)
0:00- for PROGRAM 2
TO CANCEL A QUICK SET PRO-
GRAM WHILE IN PF{OGRESS
Press STOP/EJECT button on the TV/VCR. The
program will be canceled and the display returns
to original mode.
STOP/EJECT
I )
CHECKING THE S'I"ART/END TIME
To check the start/end time and channel number,
follow steps 1) ~ 5) below.
1) Press MENU button cn the remote control.
2) Select item I(TIMER PROGRAMMING) with
number button or CH./SET C+" or "-") button.
3) Press SELECT button,
4) Select program number 8 with number button
or CH./SET ("+" or "-") button. "QUICK SET
PROGRAM" appears on the TV scr,_n.
5) Press MENU button. "]'hescreen returns to orig-
inal mode.
- 26 -
AUTOMATIC TIMER RECORDING
HINTS
• If there a power failure or the TV/VCR is un-
plugged for more than 10 seconds, the clock
setting and all timer settings are lost. At this
time, display will automatically return to the
Clock Set mc_ie when you choose program set
mode.
• If two timer programs overlap, the one that
starts first has priority. When the first program
ends, the TV/VCR switches to record the re-
mainder of the second program.
Make sure the channel you want to record is
properly tuned in advance.
4, The erase-prevention tab on the cassette must
be in place (or you must put tape over the hole).
Note: A cassette without erase-prevention tab
will be ejected when in the Timer Rec mode.
It is not necessary to press REC button for timer
recording.
• Recording begins automatically at the set Start
time.
• If you are recording using the Automatic Timer
Programme(i, you may not operate the unit
manually, but, you may still stop the recording
by pressing STOP button on the TV/VCR.
Note: STOP button on the remote control unit
will not function in this mode.
• If the tape runs out before the end time, the
TV/VCR will switch to the Stop mode im-
mediately, and tape will be ejected.
• If a tape is not loaded or the erase-protection
tab is removed, the TIMER REC indicator
flashes and automatic timer recording cannot
occur. Press POWER button to stop the flash-
ing. Then, load a tape that allows recording.
CHECKING TIMER PROGRAMS
Tocheck aprogram that:is to be recorded using the
Automatic 1]mer Prog_ram when the TV/VCR is
in the "l]mer Record mode, turn on the TV/VCR.
Press POWER button to exit the Timer Record
mode. Then follow inslxt;ctions in steps 2 to 5 on
page 22. Information which was set for p1_ogram
will now appear.
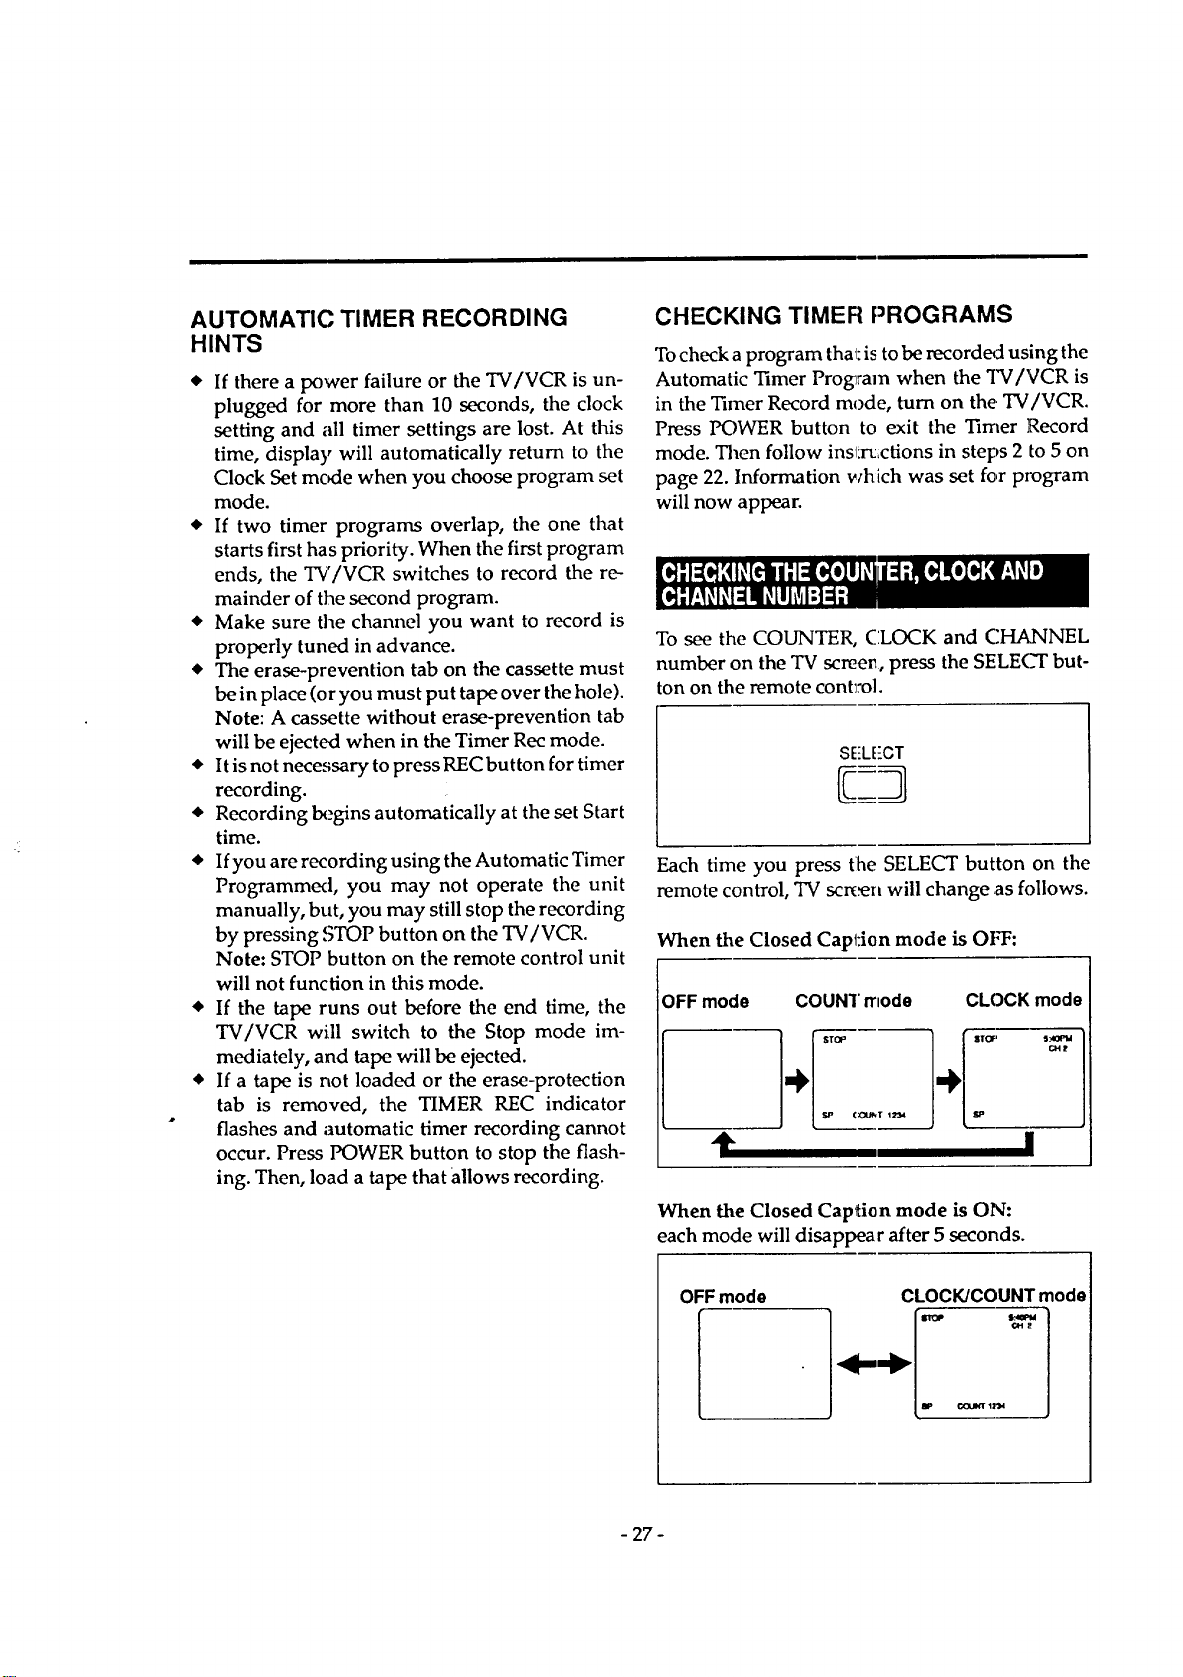
To see the COUNTER, CLOCK and CHANNEL
number on the TV screen, press the SELECT but-
ton on the remote cont_'o].
SEL['CT
Each time you press [he SELECT button on the
remote control, TV semen will change ,as follows.
When the Closed Capi:ion mode is OFF:
OFF mode
11" I
When the Closed Caption mode is ON:
_ach mode will disappear after 5 seconds.
OFFmode CLOCK/COUNT mode
-"
m,_ i_uJlrlr 1_,,1
- 27-
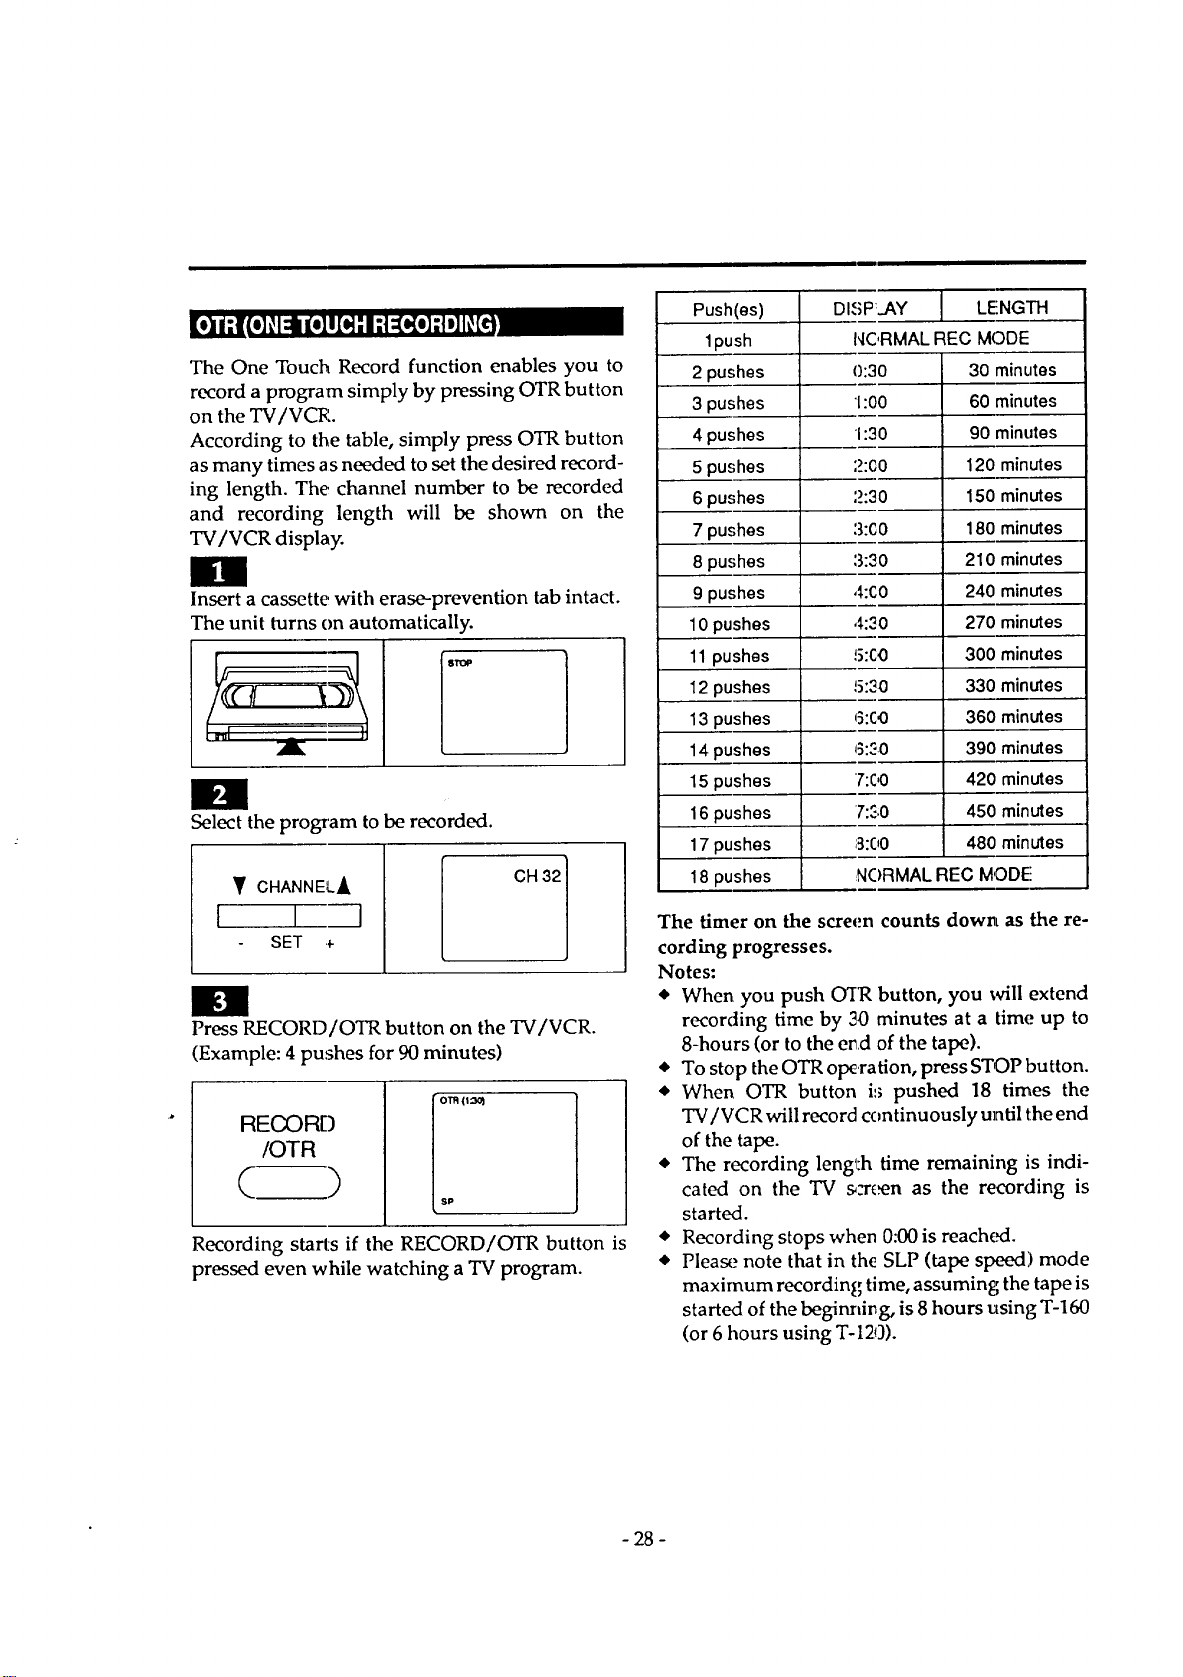
The One Touch Record function enables you to
record a program simply by pressing OTR button
on the TV/VCR.
According to the table, simply press OTR button
as many times as needed to set the desired record-
ing length. The channel number to be recorded
and recording length will be shown on the
TV/VCR display.
Insert a cassette with erase-prevention tab intact.
The unit turns on automatically.
Select the program to be recorded.
Y CHANNELA
I I I
SET +
CH 32
El
Press RECORD/OTR button on the TV/VCR.
(Example: 4 pushes for 90 minutes)
RECORD
/OTR
( )
o'm (I::_
sP
Recording starts if the RECORD/OTR button is
pressed even while watching a TV program.
/
Push(es) DISPLAY .[ LENGTH
1push NC,RMALREC MODE
2 pushes 0:30 30 minutes
3 pushes 1:00 60 minutes
4 pushes 1:30 90 minutes
5 pushes ',_>:CO 120 minutes
6 pushes :_>:30 150 minutes
7 pushes :3:(;0 180 minutes
8 pushes :3:30 210 minutes
9 pushes 4:C0 240 minutes
10 pushes 4:30 270 minutes
11pushes 5:C0 300 minutes
12pushes 15:30 330 minutes
13pushes 6:CO 360 minutes
14pushes _:_.0 390 minutes
15 pushes 7:00 420 minutes
16 pushes 7:_;0 450 minutes
17 pushes 3:00 480 minutes
18 pushes NC)RMALREC MODE
The timer on the screen counts down, as the re-
cording progresses.
Notes:
• When you push O'IR button, you will extend
recording time by 30 minutes at a time up to
8-hours (or to the e_d of the tape).
• To stop the OTR olxration, press STOP button.
• When OTR button is pushed 18 times the
TV/VCR will record continuously until the end
of the tape.
• The recording lenff:h time remaining is indi-
cated on the TV s,-rcen as the recording is
started.
• Recording stops when 0:00 is reached.
• Please note that in the SLP (tape speed',) mode
maximum recording time, assuming the tape is
started of the beginning, is 8 hours using T-160
(or 6 hours using T-I20).
- 28 -
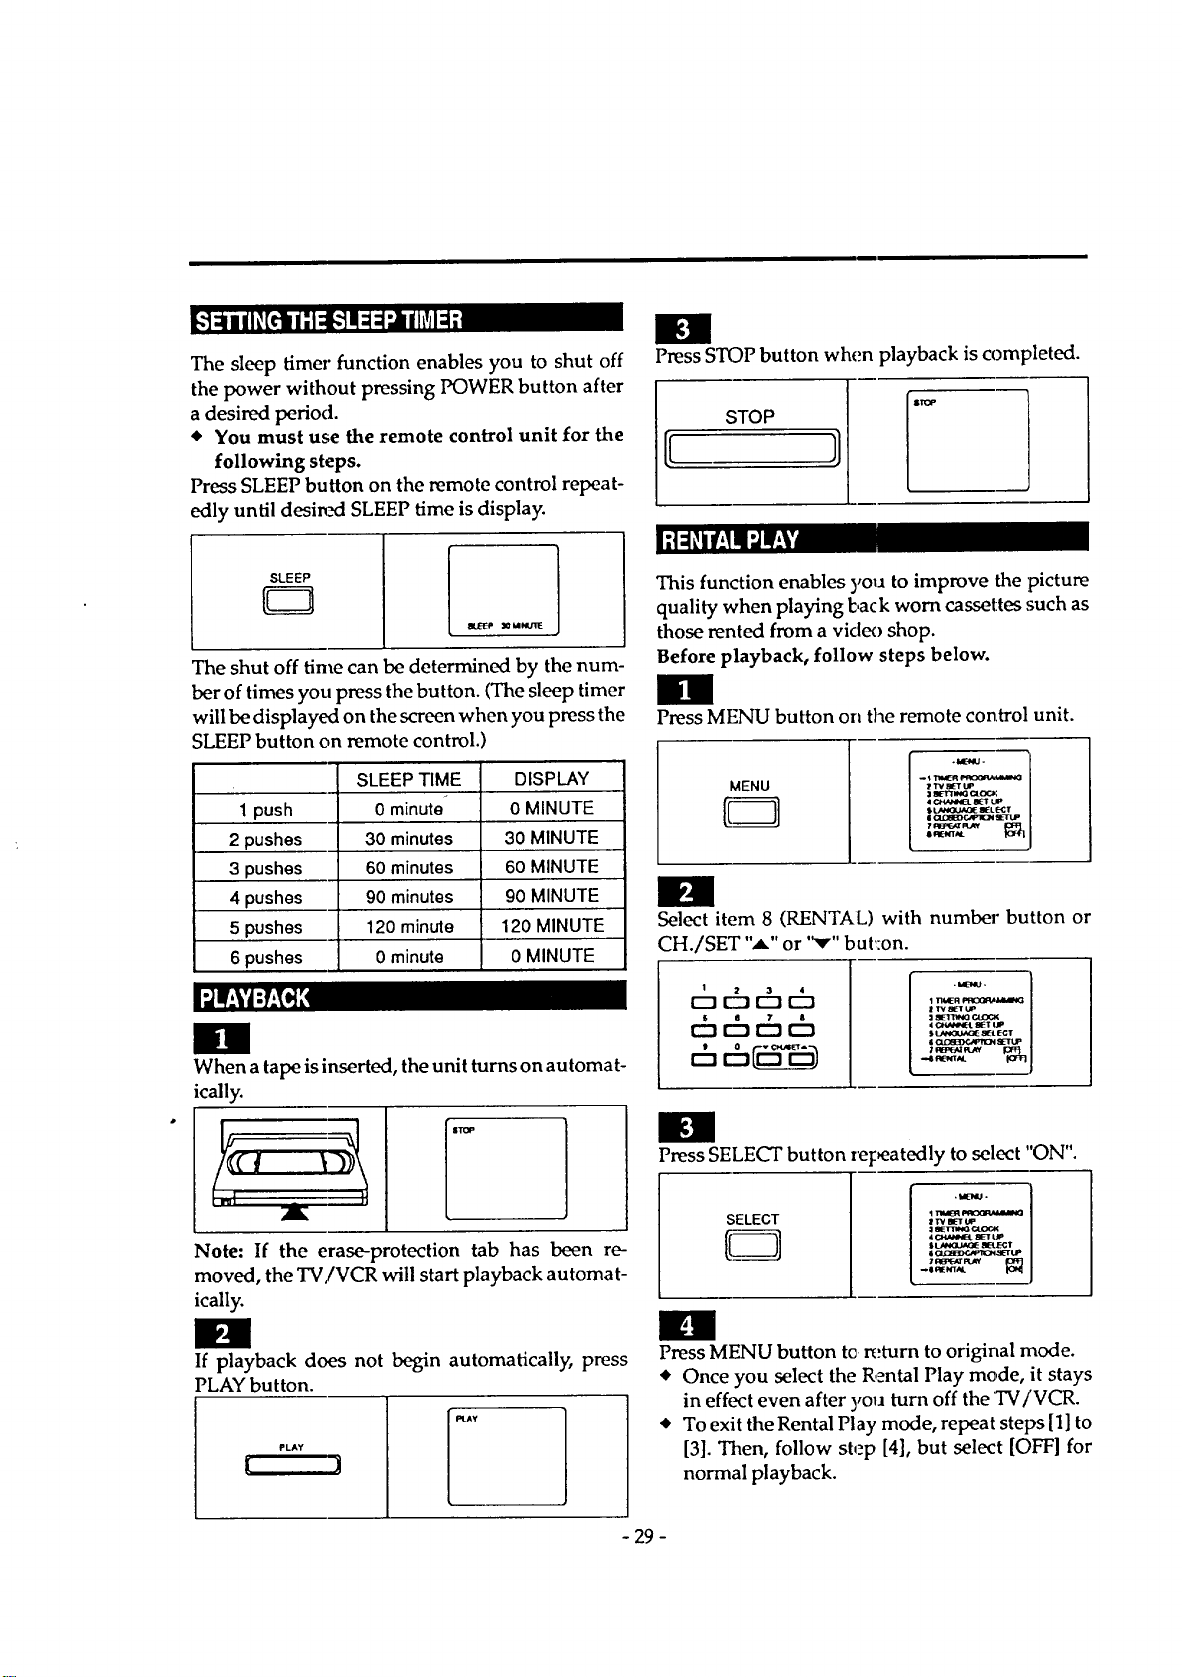
The sleep timer function enables you to shut off
the power without pressing POWER button after
a desired period.
• You must use the remote control unit for the
following steps.
Press SLEEP button on the remote control repeat-
edly until desin_ SLEEP time is display.
Ill
Press STOP button when playback is completed.
STOP
SLEEP
_ _ MNUllE
The shut off time can be determined by the num-
ber of times you press the button. (The sleep timer
will be displayed on the screen when you press the
;LEEPbutton on remote control.
SLEEP TIME DISPLAY
1push 0 minute _ 0 MINUTE
2 pushes 30 minutes 30 MINUTE
3 pushes 60 minutes 60 MINUTE
4 pushes 90 minutes 90 MINUTE
5 pushes 120 minute 120 MINUTE
6 pushes 0 minute 0 MINUTE
0
When a tape is inserted, the unit turns on automat-
ically.
Note: If the erase-protection tab has been re-
moved, the TV,/VCR will start playback automat-
ically.
Il!
If playback does not begin automatically, press
PLAY button.
PLAY
This function enables you to improve the picture
quality when playing l:,ack worn cassettes such as
those rented from a video shop.
Before playback, follow steps below.
Press MENU button on the remote control unit.
MENU
. _l"waER _qOab_,_lu_Q
ZT'V aETUP
SL_ a_L_Z
Select item 8 (RENTAL) with number button or
CH./SET ",_" or "v" but:on.
1 2 3
1 Tlt_R F'R(_P._kS,W_
I TV_TUP
,I 4_ W_T tJP
,..4 R_NT_L I0_ J
im
Press SELECT button repeatedly to select "ON".
SELECT
_TV BETUP
:1_TT_G CUPri€
-o _IE_T,qL
n
Press MENU button tc return to original mode.
• Once you select the Rental Play mode, it stays
in effect even after yo_J turn off the TV/VCR.
• To exit theRental Play mode, repeat steps [1] to
[3]. Then, follow step [4], but select [OFF] for
normal playback.
- 29 -
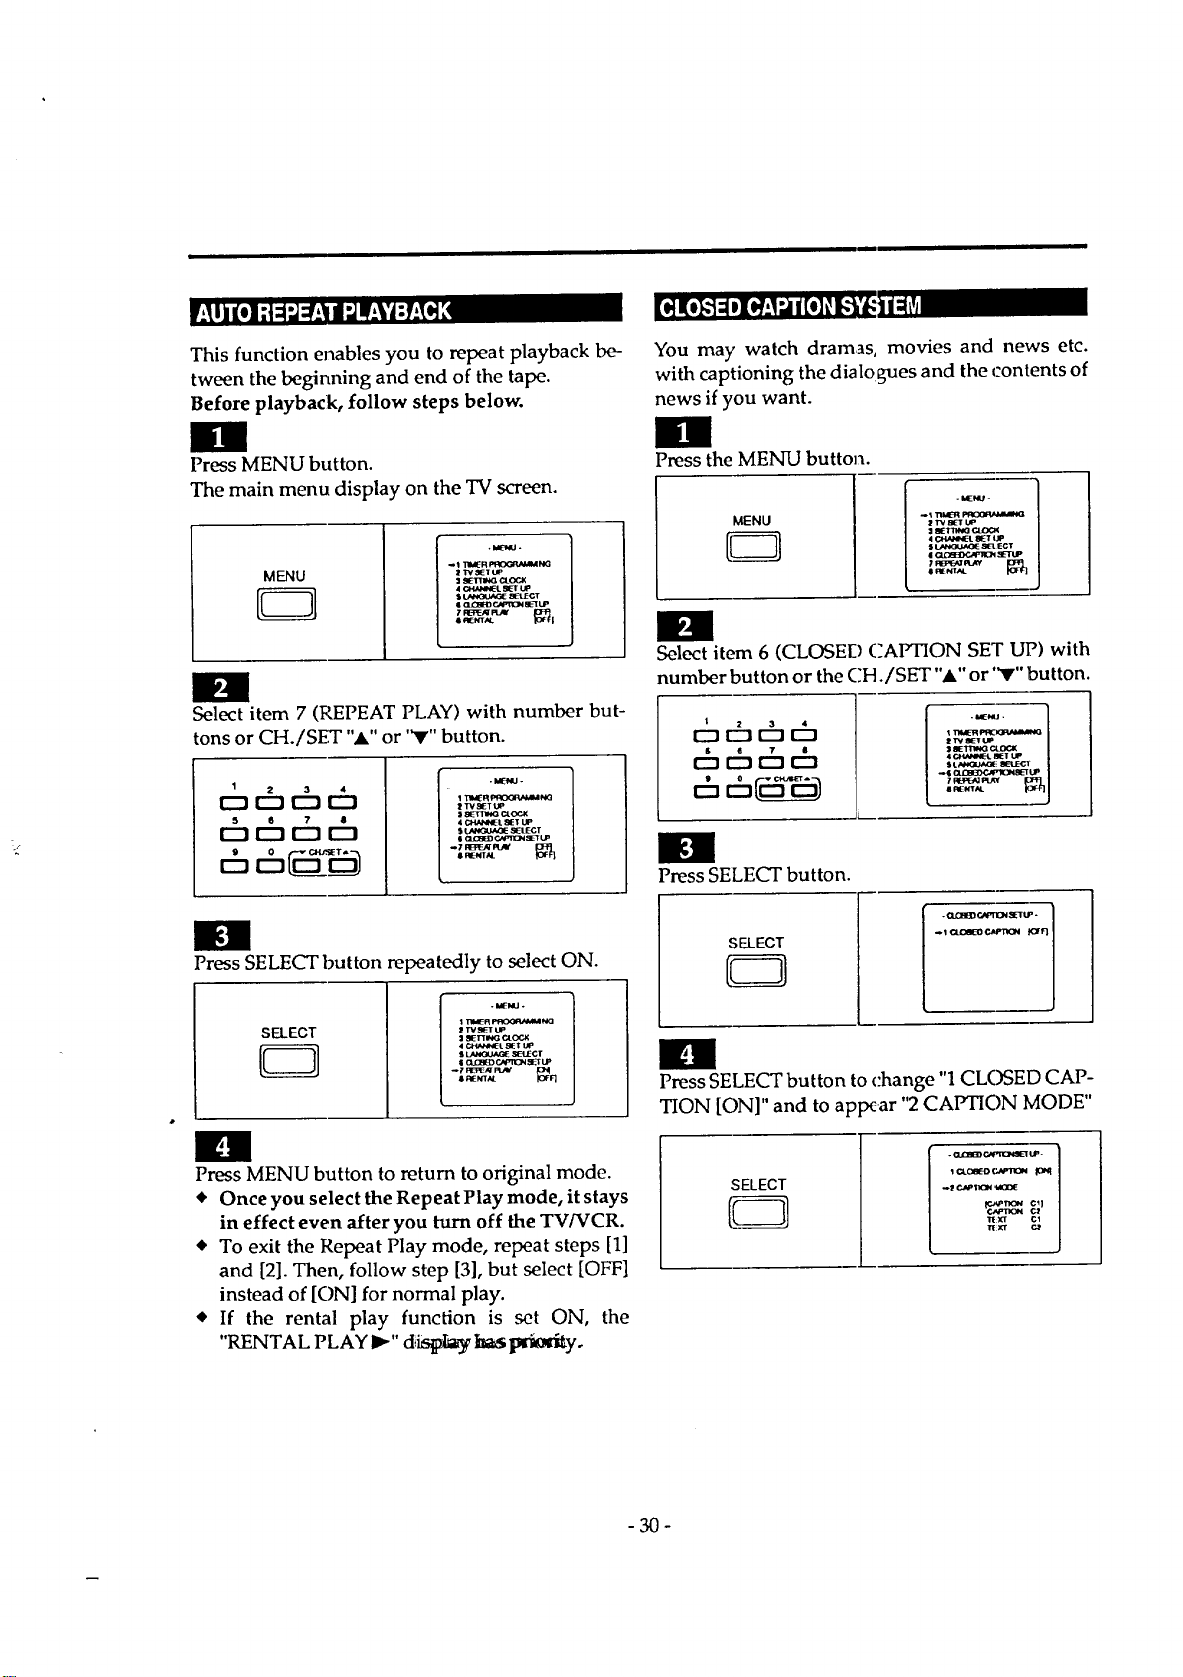
Thisfunction enables you to repeat playback be-
tween the beginning and end of the tape.
Before playback, follow steps below.
Press MENU button.
The main menu display on the "IV screen.
MENU
5
-taEUJ -
-1 "I_R I_NG
I'rV_T_
3SE13V4GCI_OC_K
4CHANNEL8E1"I..IP
I _ e-.,_ICN eel[LP
7_PLazr _t_
Select item 7 (REPEAT PLAY) with number but-
tons or CH./SET "_k" or '_r" button.
1
Ehcb
I TIeR _h_3
ZTV_TUP
| 8ETZ1NG C4.(_JX
4 CI_L _T L.IP
I (ZC;ZBED¢_nQN _T LP
SRENTAL
Press SELECT button repeatedly to select ON.
SELECT
-I_-I, Ll.
$"rm,_-R_N,o
2"rvsL_lrup
4.C_ANNI_'L_IEI" lip
sLAN<)_,I,_ SB_:¢r
Press MENU button to return to original mode.
• Once you select the Repeat Play mode, it stays
in effect even after you turn off the TV/VCR.
• To exit the Repeat Play mode, repeat steps [1]
and [2]. Then, follow step [3], but select [OFF]
instead of [ON] for normal play.
• If the rental play function is set ON, the
"RENTAL PLAY I_" diislt_ ba_ _Q_i_yo
You may watch dramas, movies and news etc.
with captioning the dialo _ues and the contents of
news if you want.
Press the MENU button.
MENU
2 TVS_T UP
4(_V4_EL SETtJp
sI./MV_UAO_ _l ECT
Select item 6 (CLOSED CAPTION SET UP) with
number button or the CH,/SET "," or "V" button.
I
c5 c5¢5 ¢h
21_ _[UP
7W:3PT:_Iq_Y
#l_eCT_t
Press SELECT button.
SELECT
. CL(_flD_.,_rz2N _ZETt.la.
_1 _ CaPI"K)H K:FF]
IOI
Press SELECT button to change "1CLOSED CAP-
TION [ON]" and to appear "2CAPTION MODE"
SELECT
I O_Oe(-D C,VqlO_
-30-
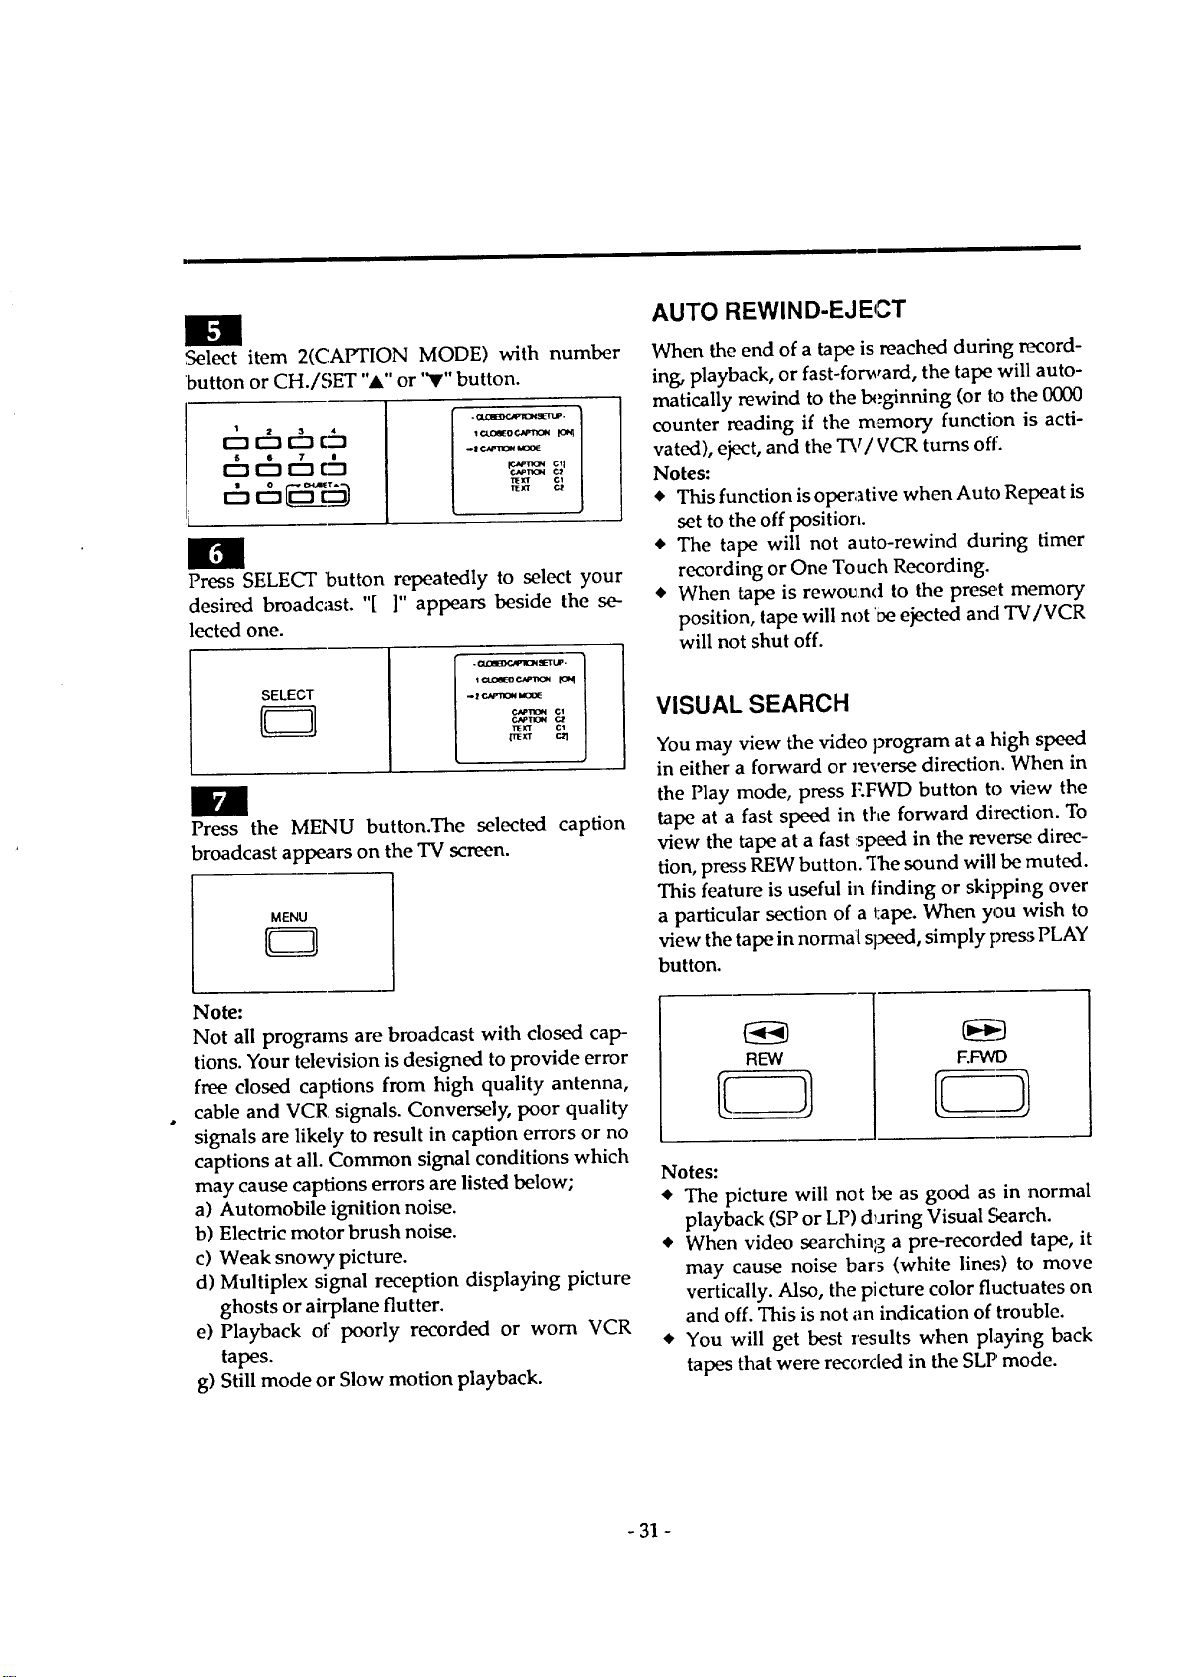
,Select item 2(CAPTION MODE) with number
'button or CH./SET "A" or "V" button.
chchcho
chch r&
.I ¢._v'lon la0o_
P.,AP_
"rlE_ cl
l_k'T C_
Press SELECT button repeatedly to select your
desired broadcast. "[ ]" appears beside the se-
lected one.
SELECT
- (_cm_g_pl_4 _ETU_.
. t e..,aa.1_ laol_
TIEJfr
Press the MENU button.The selected caption
broadcast appears on the TV screen.
MENU
Note:
Not all programs are broadcast with closed cap-
tions. Your television is designed to provide error
free dosed captions from high quality antenna,
cable and VCR signals. Conversely, poor quality
signals are likely to result in caption errors or no
captions at all. Common signal conditions which
may cause captions errors are listed below;
a) Automobile ignition noise.
b) Electric motor brush noise.
c) Weak snowy, picture.
d) Multiplex signal reception displaying picture
ghosts or airplane flutter.
e) Playback of poorly recorded or worn VCR
tapes.
g) Still mode or Slow motion playback.
AUTO REWIND-EJECT
When the end of a tape is reached during record-
ing, playback, or fast-forward, the tape will auto-
matically rewind to the beginning (or to the 0000
counter reading if the memory function is acti-
vated), eject, and the TV/VCR turns oft:.
Notes:
_' This function is operative when Auto Repeat is
set to the off position.
• The tape will not auto-rewind during timer
recording or One Touch Recording.
• When tape is rewo_an<t to the preset memory
position, tape will not 'Deejected and TV/VCR
will not shut off.
VISUALSEARCH
You may view the video program at a high speed
in either a forward or reverse direction. When in
the Play mode, press I:.FWD button to view the
tape at a fast speed in the forward direction. To
view the tape at a fast :speed in the reverse, direc-
tion, press REW button. "Ihe sound will be muted.
This feature is useful in finding or skipping over
a particular section of a tape. When you wish to
view the tape in normal sl_K_d, simply pre_ PLAY
button.
REW
F.FWD
Notes:
• The picture will not be as good as in normal
playback (SP or LP) dTJringVisual Search.
• When video searching a pre-recorded tape, it
may cause noise bars (white lines) to move
vertically. Also, the picture color fluctuates on
and off. This is not an indication of trouble.
• You will get best results when playing back
tapes that were recorded in the SLP mode.
-31 -
SUPER HIGH SPEED SEARCH
(LP/SLP MODE)
For Visual Search in super high speed, press either
F.FWD or REW button while the unit is in the Play
mode. Then press again. The unit will now search
in super high sl_d. Press once more either EFWD
or REW button back to high speed search. For
normal playback, simply press PLAY button.
Note: Tape recorded in the LP, SLP mode will
display a noise bar on the TV screen and the
picture may revert to Black and White. This is
normal.
STILL FRAME DURING PLAYBACK
If you press PAUSE/STILL button during play-
back, the picture will "freeze" on the TV screen.
Only recorded tape in SLP mode shows clear pic-
ture. You may use this feature to study details of a
particular screen. Press PLAY button again to con-
tinue playback.
Note: The TV/VCR will automatically switch to
the Stop mode, if it is left in the Pause mode for
more than five minutes.
VERTICAL HOLD CONTROL
Adjust to stabilize the picture when picture begins
to vibrate.
This adjustments work_ only in the Still mode
with CH A or v button,
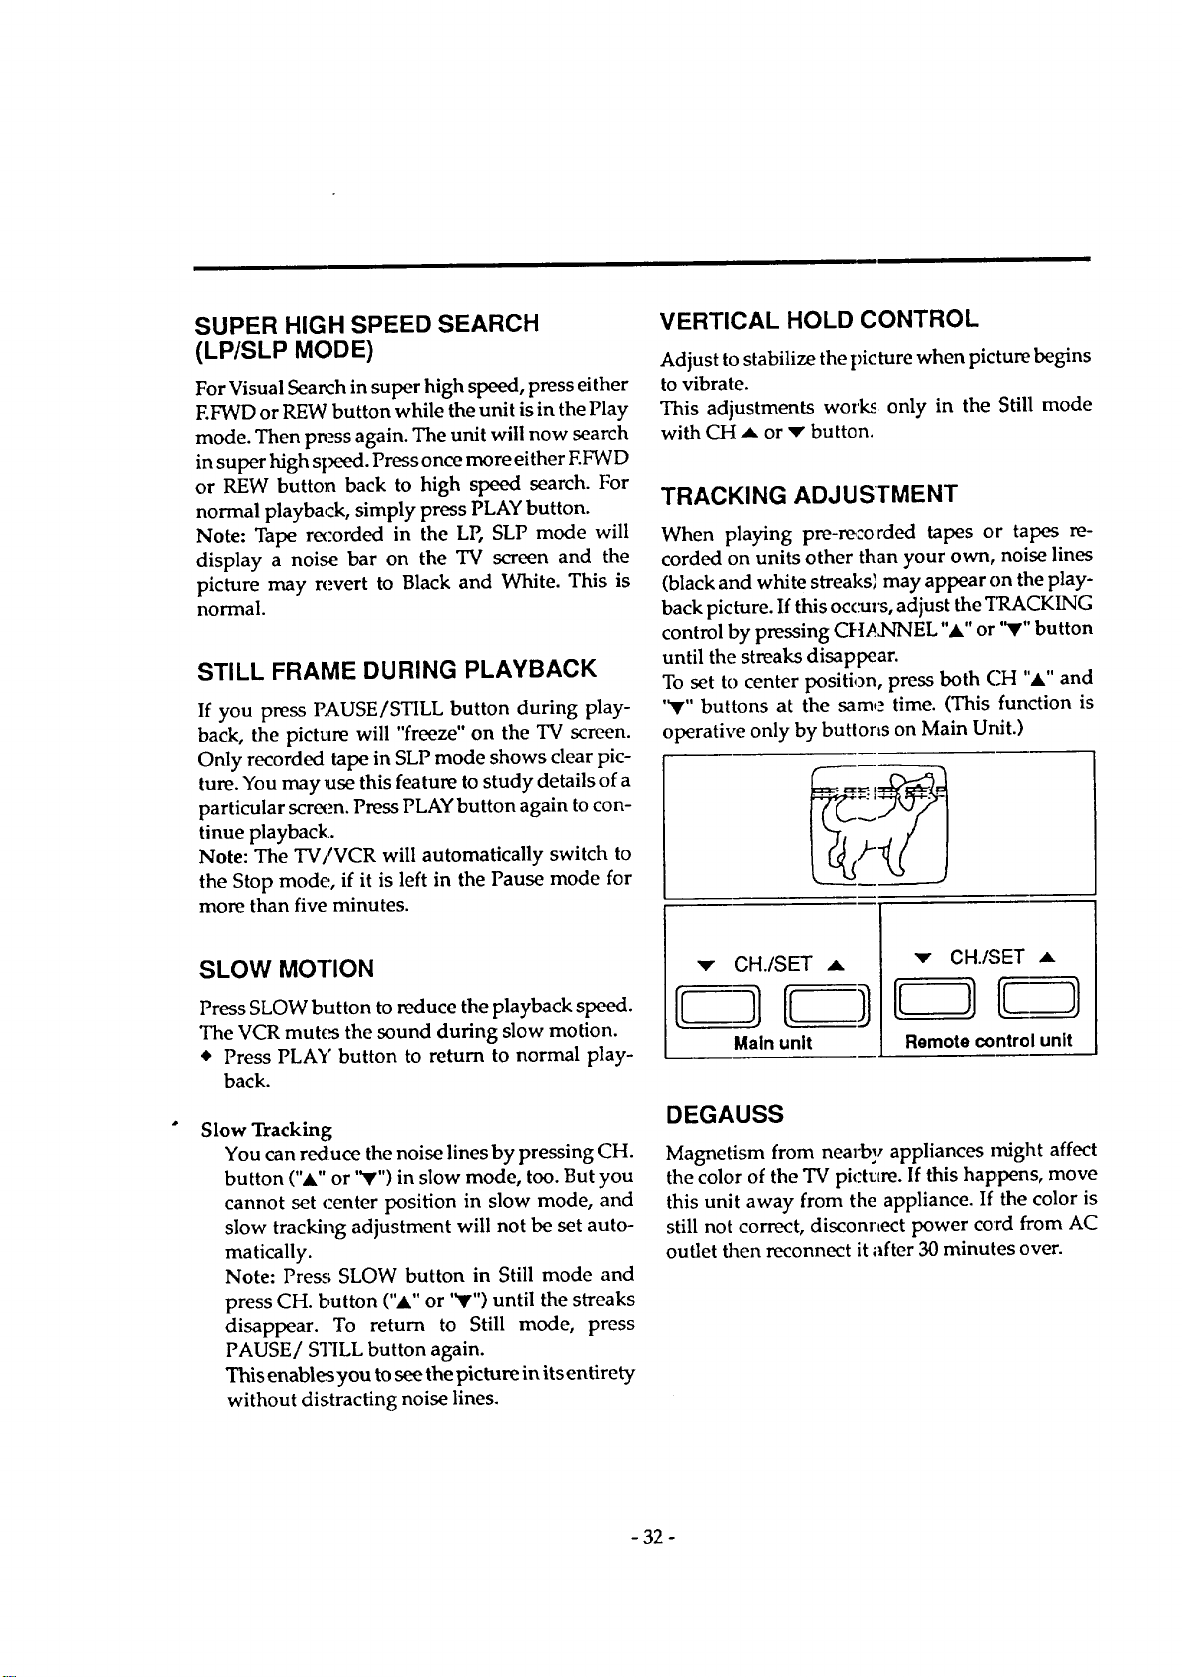
TRACKING ADJUSTMENT
When playing pre-recorded tapes or tapes re-
corded on units other than your own, noise lines
(black and white streaks_ may appear on the play-
back picture. If this occurs, adjust the TRACKING
control by pressing CIqA3qNEL ",A,"or '_r" button
until the streaks disappear.
To set to center position, press both CH ",a," and
'_r" buttons at the same time. (This function is
operative only by buttons on Main Unit.)
SLOW MOTION
Press SLOW button to reduce the playback speed.
The VCR mutes the sound during slow motion.
* Press PLAY button to return to normal play-
back.
Slow Tracking
You can reduce the noise lines by pressing CH.
button (",t" or "V'") in slow mode, too. But you
cannot set ,:enter position in slow mode, and
slow tracking adjustment will not be set auto-
matically.
Note: Press SLOW button in Still mode and
press CH. button ("A" or '_r") until the streaks
disappear. To return to Still mode, press
PAUSE/STILL button again.
This enables you to see the picture in its entirety
without distracting noise lines.
'v" CH./SET ,,L
Main unit
_" CH./SET .,=
Remote control unit
DEGAUSS
Magnetism from nearby appliances Irfight affect
the color of the TV picttlre. If this happens, move
this unit away from the appliance. If the color is
still not correct, disconnect power cord &om AC
outlet then reconnect it after 30 minutes over.
- 32 -
TROUBLESHOOTING GUIDE
If you have followed the instructions contained in this manual and have diff:,culty in operating your
unit, locate the SYMPTOM in the left column below. Check the corresponding POSSIBLE CAUSE and
CORRECTIVE ACTION columns to remedy the problem.
SYMPTOM CORRE,CTIVE ACTION
No power. • • Connect power cord to AC outlet.
• • Press PO_ button to ON.
No picture and sound• • • Plug power cord into an active AC outlet.
Sound OK; poor
pictu re.
Picture OK; poor or no
sound.
POSSIBLE CAUSE
Power cord is not connected.
The power isturned OFF.
iV is not plugged into an active ACl
outlet.
Antenna is not connected.
No channel in memory.
Direction or condition of antenna is
not good.
Picture control is not good.
Interconnecting cable is connected to!
another source.
Volume control on remote control unit
or main unit is in minimum position.
MUTE button on the remote control
unit is in the ON position.
The timer program is set incorrectly.
• Check ante connection.
• Program tur=er's memory.
• Adjust directio_ or replace antenna•
• Adjust pictu _ntrols.
• Connect incoming antenna directly to the
television.
• Adjust volu control on remote control
unit or set.
Press MUT I:,utton.
Timer recording is not • • Set the tim( I:,rogram correctly.
possible.
• The power is turned ON• • Press POV_ on to OFF.
Record mode cannot be • The erase-prevention tab on cassette • Place a pie of household transparent
engaged, is missing, tape over missing erase-prevention tab
on the tape cassette.
Picture is poor on • The TRACKING control is not set to • Adjust TRACKING control for better
playback, best position, picture.
Noise in picture on • Video heads are dirty. • Head clean g is necessary, consult the
playback, nearest Sears Service Center.
No operation by • No power to TV/VCR. • Make sure thq_AC cord is connected to
infrared Remote Control. an AC outl_
• Weak battery. • Check the batteries in infrared Remote
Control•
- 33 -
MAINTENANCE
* Wipe the front panel and other exterior surfaces
of the unit with a soft cloth immersed in luke-
warm water and wrung dry.
* Never use a solvent or alcohol. Do not spray
insecticide liquid near the unit. Such chemicals
may cause damage and discoloration to the
exposed surfaces.
Should your unit beceme inoperative, do not
try to correct the problem by yourself. There are
no user-serviceable |)arts inside. Switch power
off, unplug the power cord, and take the unit to
your nearest Sears Service Center for servicing.
Picture playback may become blurred or inter-
rupted while the TV program received is clear.
This does not mean that the recorded program
has been erased. However, this problem may
be caused by dirt.
Being accumulated on the videoheads after
long periods of use, or usage of rental or old
tapes. In this case, head cleaning requires
highly technical attention, therefore consult the
nearest Sears Service Center. Clean heads only
when problems occur.
-34-

SPECIFICATIONS
CRT
Television system
Video heads
Tape width
Tape speed
SP
LP
SLP
Tuner channel
TV VHF Low
TV VHF High
TV UHF
CATV
VHF
MID band
SUPER band
HYPER band
Terminals:
Antenna input
Video input
Audio input
: 19 inch in-line gun,
90" deflection tube
:_-M
: Rotary 4-head Double
Azimuth Video System
: 1/2 inch
:33.40mm/sec.
: 16.67mm/sec.
: ll.12mm/sec.
:#2-#6
: #7-#13
: #14-#69
: 5A
:A5-A1, A-I
:J-W
: W4-1~W+84
:yHF/UHF 75 ohms
t_nbalanced
:]RCA connector
:RCA connector
Video input level
Audio input level
Video S/N ratio
Audio S/N ratio
:0.5~2.0Vp-p
:-15dBs
: More than 46riB
:More than 43dB
Power requirement
Power consumption
Dimensions
Weight
Accesofies
:AC 120V/60Hz
:95W
: H : 18-3/4" (477mm)
W : 19" (482mm)
D :-17-7/8'" (455mm)
: 44 Ibs (20 kg)
:Remote Control
2 "AA" Batteries
Dipole Antenna
Mwatching Adaptor
ners Manual
Design and spedfications are subject to
change without ne ti_:e.
- 35 -
TV/VCR COMBINATION
LIMITED WARRANTY
This product is exclusive to and is warranted solely by Sears. For 90 days from the
date of purchase, Sears will repair any defect in material or workmanship in this
TV/VCR combination, free of charge. For one year from the date of purchase, .Sears
will supply; at no charge, replacement for defective parts.
This above warranty coverage applies only to TV/VCR cornbinations which are
used for private household purposes.
LIMITED WARRANTY ON PICTURE TUBE
After one year from the date of purchase and up to two years, Sears will furnish, free
of charge, a replacement for the picture tube, if defective. You pay for labor.
Warranty service is available by returning the TV/VCR combination to the nearest
Sears Service Center/Department in the United States. This warranty applies only
while this product is in use in the United States. For service after the warranty
expires, it is recommended that this product be returned to the nearest Sears Service
Center.
This warranty gives you specific legal rights, and you may al,;o have other rights
which vary from state to state.
Should a need ever exist for repair parts
or service:
For repair service:
Call 1-800-4-Repair
(1-800-473.-7247)
Sears, Roebuck and Company; Dept.817WA
Hoffman Estates, IL 60179
MI
For replacement parts information and
ordering:
Call 1-800-FON-Part
(1-800-366-7278)
0EMN00721
B7306UG_gr_r
Printed in Malaysia