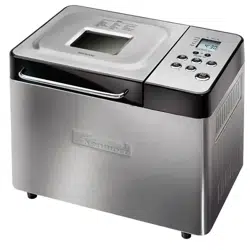
Kenmore 23848480 bread maker
Product's Documents
Below are documents related to this product, you can read online or download:
- Owner's manual - (English) Read Online | Download pdf
User Manual Kenmore 23848480 bread maker
When using electrical appliances, especially when children are present, basic safety precautions should always be followed, including the following:
READ ALL INSTRUCTIONS BEFORE USING.
1. Do not touch hot surfaces. Use handles or knobs, Always use oven mitts when handling hot materials and allow metal parts to coo! before cleaning.
2, Unplug this product from wall outlet when not in use and before cleaning, Allow to cool thoroughly before putting on or taking off parts.
3. Do not immerse appliance in water or any other liquid.
4. Close supervision is necessary when any appliance is used by or near children.
5, Do not allow anything to rest on the power cord, Do not plug in cord where persons may wa!k or trip on it
6. Do not operate this or any appliance with a frayed or damaged cord or plug or after the appliance malfunctions or has been dropped or damaged in any manner, Return appliance to the nearest authorized service facility for examination, repair, or adjustment.
7, Avoid contact with any moving parts.
8. The use of accessory attachments not recommended by the manufacturer may result in fire, electric shock, or injury to persons,
9. This appliance is intended for household use only. Do not use outdoors or for commercial purposes.
10, Do not let the cord hang over the edge of a table or counter, or touch hot surfaces, Do not place on an unsteady or cloth-covered surface,
1!, Do not place the appliance near a hot gas or electric burner, or in a heated oven,
12. Do not use the appliance for other than its intended use.
13, Keep the appliance at least 2 inches away from walls or any other objects when in use
t4, To disconnect, grip the plug and pull the plug from the wall outlet. Never pull on the cord.
This appliance is for HOUSEHOLD USE ONLY and may be plugged into any t20V AC electrical outlet. Do not use any other type of outlet.
POLARIZED PLUG
This appliance has a polarized plug (one blade is wider than the other). To reduce the risk of electric shock, this plug is intended to fit into a polarized outlet only one way. if the plug does not fit fully into the outlet, reverse the plug. if it still does not fit, contact a qualified electrician, Do not attempt to modify the plug inany way.
SHORT POWER CORD
The Breadmaker's power cord is short to reduce your risk of becoming entangled in or tripping over a long cord. You can obtain a longer, detachable power-supply cord or extension cord, but be careful when using breadmaker equipped with extra cord length.
if you are using a longer detachable powersupply cord or extension cord, (1) the marked electrical rating of the extension cord should be at least as great as the electrical rating of the appliance, and (2) arrange the longer cord so that it will not drape over the counter top or table top where it can be pulled on by children or tripped over unintentionally.
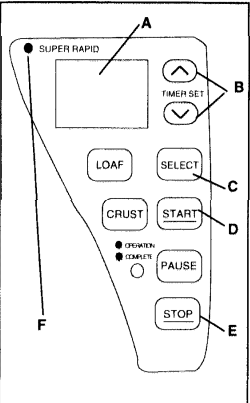
A. Display Window
Shows your selection and timer setting.
B, Timer
Use these buttons to change time shown in Display Window,
C, Select
Press this button to select the desired Baking cycle, Each time you press this button, the indicator arrow moves to the next selection. Press this button until your choice is indicated.
D. Start
Press this button to start the Baking cycle and the Timer. The PAUSE function can be activated only after the machine has started a program, For complete details, see "USING THE PAUSE FEATURE."
E. Stop
Press this button for a full second to stop Baking cycle, Timer setting, or program.
F, Super Rapid
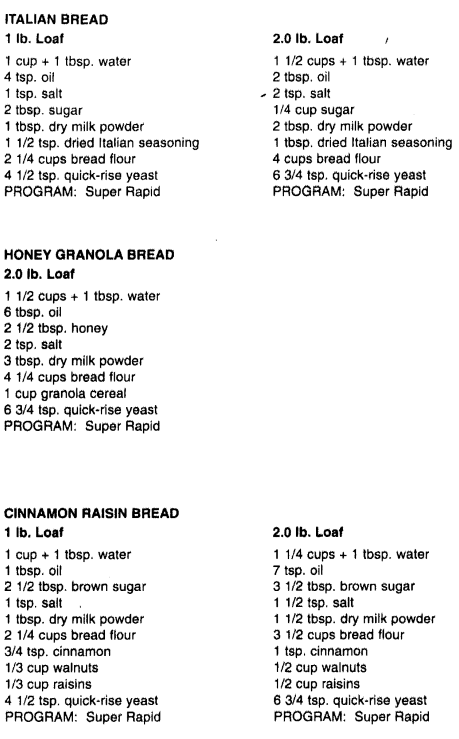
The Super Rapid program is convenient for baking a hot fresh loaf of bread in under an hour.
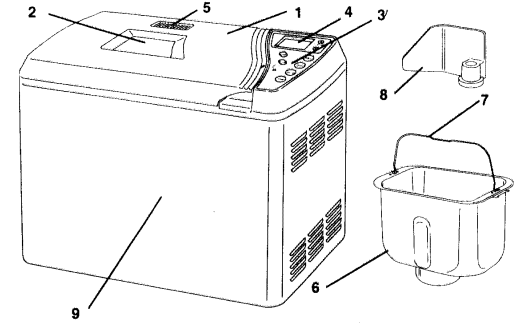
BREAD PAN INSTRUCTIONS
CAUTION: The Kneading Paddle may be very hot. Never remove it from hot bread with bare hands, Take care not to scratch the Kneading Paddle.
!, 2, 3! 1, 2, 3!
We'll say this again, because it's so important, Always put your ingredients into the Bread Pan in this order:
Step 1. Remove Bread Pan
Open Lid and remove Bread Pan, Using the Bread Pan Handle, lift Bread Pan straight out of the machine.
Step 2. Position Kneading Paddle
Position Kneading Paddle on Drive Shaft. Match the flat side of the Drive Shaft to the flat part of the hole in the Kneading Paddle, Be sure the paddie is in place, although the fit may seem slightly loose.
Step 3. Place ingredients into Bread Pan
Place ingredients into Bread Pan. For best results, add all liquid ingredients first; then, beginning with salt, add all dry ingredients EXCEPT yeast.
Step 4. Add yeast
Yeast can be the "make or break" ingredient in your recipe. Follow these simple steps and you shouldn't have any yeast problems in baking.
Yeast is always the last ingredient to go in the Bread Pan, Make a shallow well in the direct center of the dry mixture sitting in the pan; no deeper than the first joint of your index finger,
Double check that the yeast is not past the date code on its envelope or label. Add the called-for measure of yeast directly into the shallow welt you made ifi the Bread Pan,
Always be sure to keep yeast from water/liquids and salt. Premature mixing with either of these two ingredients will have a dramatic effect on the yeast, Keep yeast away from liquids (or it will start to activate immediately) and salt (or it may not activate at all). For more details, see "Troubleshooting" at the end of this manual,
Always follow proper ingredient order-- especially on delay bake preparations.
Step 5. insert Bread Pan into Oven Case
Place Bread Pan into Oven Case. (See "INSERTING AND REMOVING BREAD PAN.") Close lid and plug Breadmaker into a 120V wall outlet. Once plugged in, the Breadmaker display window automatically opens to Basic White Bread, 2 lb., Medium Crust.
Step 6. Select Bread Cycle
Press the SELECT button to choose the bread cycle you would like. Beginning with Basic (white), the selec. tot will move through the types of bread settings in the following order:
Basic (white)
Whole Wheat
Fruit and Nut (sweet)
French*
Cake/Batter Bread
Jam
Pizza Dough
Bread Dough
Bake Only
*The French cycle is for breads with crisper crusts, especially those that are lowest in sweeteners, such as French and italian breads.
Step 7 : Select Loaf Size
Press the LOAF button to choose the size loaf you want to bake. You may either choose a 2 Ib or 1,5 Lb bread. This cycle can be prompted for 48 settings.
NOTE: LOAF control cannot be activated for: Batter Bread, Cake, Jam, Dough, Pizza Dough, or Bake Only.
Step 8. Select Crust Color
Press the CRUST button to choose light, medium, or dark crust, You may choose crust types on Basic White, Whole Wheal Fruit and Nut, and French breads only.
Step 9. Start Cycle
Press START to act rate the Breadmaker, The breadmaker has already calculated your various settings and selections, and your recipe is now on its way to being prepared.
First, the machine mixes the ingredients, Then, it begins the Kneading process, During this process, the yeast begins to activate, The Viewing Window may begin to "fog" with condensation, This is a normal part of the process, The condensation wi!! gradual. ly disappear during baking.
Whole Wheat cycles have a "rest" period for up to 30 minutes before kneading begins, No movement occurs in the pan, This is normal.
For special cycles, such as Jam, the Breadmaker follows the processes outlined in the cycle charts at the end of this manual.
Step 10. Stop Cycle/ Remove Bread Pan
When the bread is done, the machine will beep, Press and hold the STOP button, Put on protective oven mitts and remove Bread Pan,
Remember that the Bread Pan and the bread loaf are both very hot after the Baking Cycle! DO NOT place either on a tablecloth, plastic surface, or other surface which might scorch or melt
If STOP is not pressed, a Keep Warm Cycle begins. This wil! help keep the bread from becoming soggy, For best results, remove bread immediately after Baking cycle is complete.
The Keep Warm Cycle does not apply to Dough, Batter Breads/Cakes and Jam cycles
Step 11: Remove Bread from Bread Pan
Remove loaf of bread from Bread Pan as soon as the Breadmaker has completed the baking cycle.
Hold Bread Pan upside down a few inches from countertop and gently shake out the loaf of bread.
Place loaf of bread on a wire rack or other ventilated cooling surface to coot. Allow bread to cool !5.30 minutes before slicing.
Step 12, Remove Kneading Paddle
Be sure to remove Kneading Paddle before slicing,
CAUTION: The Kneading Paddle may be very hot, Never remove it from hot bread with bare hands.
The Kneading Paddle may stick in the loaf of bread, If it does, use a non-metal utensil to gently remove it from the bread, taking care not to scratch the paddle. Use a knife with a serrated edge for best slicing.
Step 13. Unplug Breadmaker
Always unplug your Automatic Breadmaker immediately after use
The Super Rapid program, with hotter rise and bake temperatures, is convenient for baking a hot fresh loaf of bread in under an hour. The longer bread programs, with lower rise and bake temperatures, will bake a taller more developed loaf of bread.
Step 1
Add ingredients to the bread pan in the order listed. Refer to "For Best Baking Results" for measuring information. Place the bread pan in the bread maker.
Step 2
Close the lid. Select the Super Rapid START.
Step 3
When finished baking, remove bread pan from the bread maker, invert and shake to remove the loaf, Allow loaf to cool stand- ing upright on a wire rack before slicing.
We suggest starting your Super Rapid bread baking with this White Bread Recipe, Refer to "For Best Baking Results" for measuring information. Follow each step carefully, noticing the water temperatures must be between 110°-115'F/43°-46°C and that QuickRise TM, RapidRise TM, Bread Machine or instant Active Dry yeast must be used.
Method:
DELAYED BAKING
You can program the Breadmaker to delay preparing and baking the loaf for up to 13 hours from the time you press the START button,
Set the timer for the number of hours there wilt be between the time you set it and the time you want the bread to finish baking. For example:
It's 8:15 a.m, and you want the bread to be finished at 7:00 p.m, the same day. The time difference from 8:!5 a,m. to 7:00 p,m, is 10 hours, 45 minutes. Set the timer for 10 hours, 45 minutes.
It's 9:00 p,m. and you want breakfast bread ready at 6;30 a.m. the next morning. The number of hours + minutes from 9:00 p.m. to 6:30 a.m. is 9 hours, 30 minutes.
Set the timer for 9 hours, 30 minutes.
CAUTION: DO NOT use delayed baking for recipes containing perishable ingredients such as Dairy Products (eggs, milk, cheese, yogurt), Meats (cooked or uncooked), Flsh, or Poultry, These ingredients may begin to spoil before baking begins and create a health hazard if eaten
1, 2, 3! 1, 2, 3!
Remember to always put your ingredients into the Bread Pan in the following order:
1. Wet -- water, milk, oils, fats
2. Dry - salt, powdered milk, grains, sugar, flour
3. Yeast -- Do not use yeast past expiration date.
Keep yeast away from liquids (or it will start to activate immediately) and salt (or it may not activate at all).
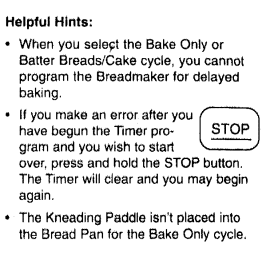
To Program Delayed Baking
Step 1.
Add ingredients, as usual, taking care not to let the yeast and liquid ingredients mix,
Step 2.
Close Breadmaker lid and plug it into a 120V electrical outlet,
Step 3,
Select the desired cycle, loaf size, and crust color,
Step 4
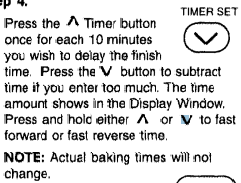
Step 5
Press START to begin Timer, countdown, The colon (:) in the time shown in the Display Window wilt begin to flash, This lets you know that the Timer has started, When the Display Window shows 0:00, baking is complete
NOTE: Always set timer for the shortest time possible. Because ingredients are partia!ly combined in the Bread Pan, the dough may tend to deteriorate if left unbaked for too many hours, especially on a warm or humid day.
BAKE ONLY
You can set the Timer to bake breads from store-bought frozen dough or dough you have made and saved, You can also warm up a previously made loaf.
To Program Bake Only
Step 1.
Select the Bake Only cycle
Step 2.
Use the Up and Down arrows to set the baking time you want within a time range from t5 minutes to 1 hour, 50 minutes.
Step 3.
Press START, The bread-maker will "beep" when baking is completed. Then, follow the instructions in steps 10 and 11 from the "MAKING DOUGH AND BAKING BREAD" section.
Helpful Hints
This Automatic Breadmaker requires little maintenance. It contains no user-serviceable parts inside the housing. Contact qualified personnel if the product requires servicing.
CAUTION: To avoid electric shock, unplug Breadmaker before cleaning!
The Bread Pan and Kneading Paddle have non-stick surfaces for easy clean-up,
1. After baking each loaf of bread, unplug Breadmaker and discard any crumbs,
2. Remove Bread Pan from Oven Case. Remove Kneading Paddle from Bread Pan, Wash the Bread pan and Kneading paddle, inside and out, with warm, soapy water and a plain sponge or cloth. Avoid scratching the non-stick surfaces. DO NOT PUT BREAD PAN OR KNEADING PADDLE IN A DISHWASHER OR SOAK IT IN WATER FOR LONG PERIODS OF TIME.
3_ Wipe inside of Lid and oven Case with a damp cloth or sponge. !f residue has scorched on heating plate, scrub with a non-abrasive scrubbing pad and wipe clean. Do not immerse appliance in water or any other liquids. The Lid can be removed for cleaning. DO NOT PUT LID IN DISHWASHER, This wilL cause the lid to warp.