Bread Maker
User Manual
Questions or Concerns?
Email us at [email protected]
Scan QR code using mobile device


CONTENT
Cleaning & Maintenance
Troubleshooting
Product & Parts
Questions & Answers
Important Safety Instructions
Getting To Know Your Bread Machine
Specifications
Product Features
Parts
Control Panel
Buttons
Display Timer
Accessories
Tips On Making Bread
Ingredients
Program Cycle Times
Menu 1: Basic Program
Menu 2: Quick Program
Menu 3: Sweet Program
Menu 4: Whole Wheat Program
Menu 5: Gluten-free Program
Menu 6: Dough Program
Menu 7: Knead Program
Menu 8: Cake Program
Menu 9: Jam Program
Menu 10: Yogurt Program
Menu 11: Bake Program
Menu 12: Custom Program
BEFORE USE
USING YOUR BREAD MACHINE
PRODUCT SUPPORT
2-5
6
6
6
7
8
9
10
11
12
13-14
15
16-18
19-20
21-22
23-24
25
26-27
28-29
30
31-32
33-35
36-37
38-39
40-42
46-47
48-49
43-45

IMPORTANT SAFETY INSTRUCTIONS
Follow safety precautions when using electrical appliances to reduce the
risks of fire, damage, shock, and injury.
General Precautions
• Read all instructions: Before using your bread maker, read all the
instructions provided in this manual.
• Avoid hot surfaces:
◦ Do not touch the hot surfaces of the appliance.
◦ Always use the handles or knobs.
◦ Use oven mitts or pot holders to handle the hot bread pan or freshly
baked bread.
◦ No hand inside the oven: After removing the bread pan, do not put your
hand inside the oven chamber.
• Avoid electric shock: To protect against electric shock, refrain from
immersing the cord, plug, or bread maker in water or any other liquid.
• Close supervision around children: Always supervise the appliance when
it's used near or by children.
• Unplug when not in use and before cleaning: Unplug the bread maker
when not in use or before cleaning. Allow it to cool down before adding
or removing parts.
• Do not use if damaged: Do not operate the bread maker if it has a
damaged cord or plug, if it malfunctions, or if it has been damaged in any
manner.
• Use recommended accessories: Using accessory attachments not
recommended by the manufacturer may result in fire, electrical shock,
or personal injury.
• Indoor use only: The bread maker is for indoor use only. Do not use it
outdoors.
2

Usage Precautions
• Proper cord management: Do not let the cord hang over the edge of the
table, counter, or touch hot surfaces
• Proper placement of appliance: Do not place the appliance on or near
a hot gas or electric burner, or in a heated oven.
• Use for intended purpose only: Use the bread maker for its intended use
only.
• Proper disconnection of power: To disconnect power, press the stop
button to turn the control off, then remove the plug from the wall outlet.
Do not pull the cord to disconnect.
• Be cautious when moving: Exercise extreme caution when moving the
appliance during operation.
WARNINGS
• Fire hazard: Never leave the bread maker unattended while it is in
operation. Unattended cooking may cause a fire.
• Burn hazard: Avoid touching hot surfaces directly. Use the handles and
knobs at all times.
◦ Use oven mitts when handling hot parts.
◦ Allow the appliance to cool before touching parts.
◦ Wear gloves when removing the bread pan.
◦ Open the lid carefully to avoid steam burns.
• Electrical shock hazard: To protect against electrical shock, do not
immerse the cord, plug, or the bread maker itself in water or any other
liquid.
◦ Use a 120V AC power source that aligns with the nameplate.
Ensure proper grounding.
◦ Avoid placing the power cord near hot appliances, under heavy items,
or squeezed between objects.
◦ Refrain from using or modifying any damaged components.
◦ Use an electrical outlet rated at 15A minimum, without overloading it.
◦ Ensure the power plug is securely inserted.
3

◦ In case of serious damage, burning smell, electric shock, or power
fluctuation, stop using the product and contact Saki Services
immediately.
◦ Maintain a minimum 10-inch clearance from the radiator.
◦ Do not touch the device or power cord with wet hands.
• Child safety: This bread maker should not be used by children and care
should be taken when used near children.
• Appliance misuse: Only use the bread maker for its intended use.
Misuse can lead to injury or damage to the appliance.
CAUTIONS
• Placement: Do not place the bread maker near the edge of a countertop
or table. Do not place it near a hot gas or electric burner, or in a heated
oven.
• Cord: Do not let the cord hang over the edge of the table or counter,
or touch hot surfaces.,
• Attachments: Use only the manufacturer-recommended attachments
to avoid hazards.
• Moving the appliance: Be very cautious when moving the appliance
during operation to prevent spillage or injury.
• Cleaning: Unplug the bread maker and allow it to cool before cleaning.
Do not immerse the appliance in water or any other liquid.
• Damage: In case of damage or malfunction, stop using the appliance
immediately and contact the manufacturer or a certified repair shop.
• Do not attempt to repair or modify the bread maker yourself. If repairs
are needed, contact customer service or a qualified repair technician.
4

OTHER IMPORTANT WARNINGS
• Air circulation: Ensure adequate air circulation around the appliance.
Avoid blocking or covering air vents on the lid or sides.
• Handling the baking pan: Hold the baking pan with both hands when
removing bread.and avoid placing fingers in the receptacle to prevent
injury and burns. Don't forcibly remove the bread pan during operation
to avoid burns or product malfunction.
• Location and setting: Avoid using the product in direct sunlight, damp
places, or near heat sources. Do not place it over direct heat to prevent
fire, damage, or breakdown.
• Ingredient and item use: Don't exceed the product's capacity with
excessive ingredients or large items, which may cause damage or electric
shock.
• Before first use: Remove all packaging, labels, stickers, and foreign
matter.
• Cleaning: Don't submerge the bottom of the baking pan in water to
prevent corrosion or damage to the rotating shaft.
• Intended use: Use the bread maker only for its designated purposes
• For safe and efficient use of your bread maker, follow these safety
guidelines along with those provided in the user manual. In case of any
issues or queries, please contact our customer service team at
5

GETTING TO KNOW YOUR BREAD MACHINE
Specifications
SAKI Artisan Bread Machine
Power: 850W
Voltage & Frequency: AC 110-120V / 50-60 Hz
Dimensions: 10.5"(L) x 17" (W) x 14" (H)
Capacity: 3lb (1500g)
Weight: 14.7 lb (6.7 kg)
Model Name:
PRODUCT FEATURES
• Baking programs:
Features 12 automatic baking programs: Basic, Quick, Sweet, Whole Wheat,
Gluten-Free, Dough, Knead, Cake, Jam, Yogurt, Bake, Custom.
• Timer and memory features:
15-hour advance timer
10-minute power-off memory
1-hour post-baking warm function
• Accessories:
Includes ceramic bread pan, kneading paddle (2), measuring cup, hook.
• Bread and crust options:
Bread size options: 1000g, 1250g, 1500g.
• Crust color settings: light, medium, dark.
• Display and controls:
Large LCD display with touch keys, self-locking function.
• 7 easy buttons:
Menu, Color, Time (+), Time (-), Loaf Size,
Start/Stop/Pause, Power On/Off.
• Baking process and timer:
5-phase baking process: Mixing, Kneading,
Rising, Proofing, Baking. Timer displays
remaining bake cycle time.
• Cleaning and maintenance:
Non-stick ceramic bread pan for easy cleaning.
• Motor:
High-performance, quiet AC motor.
6
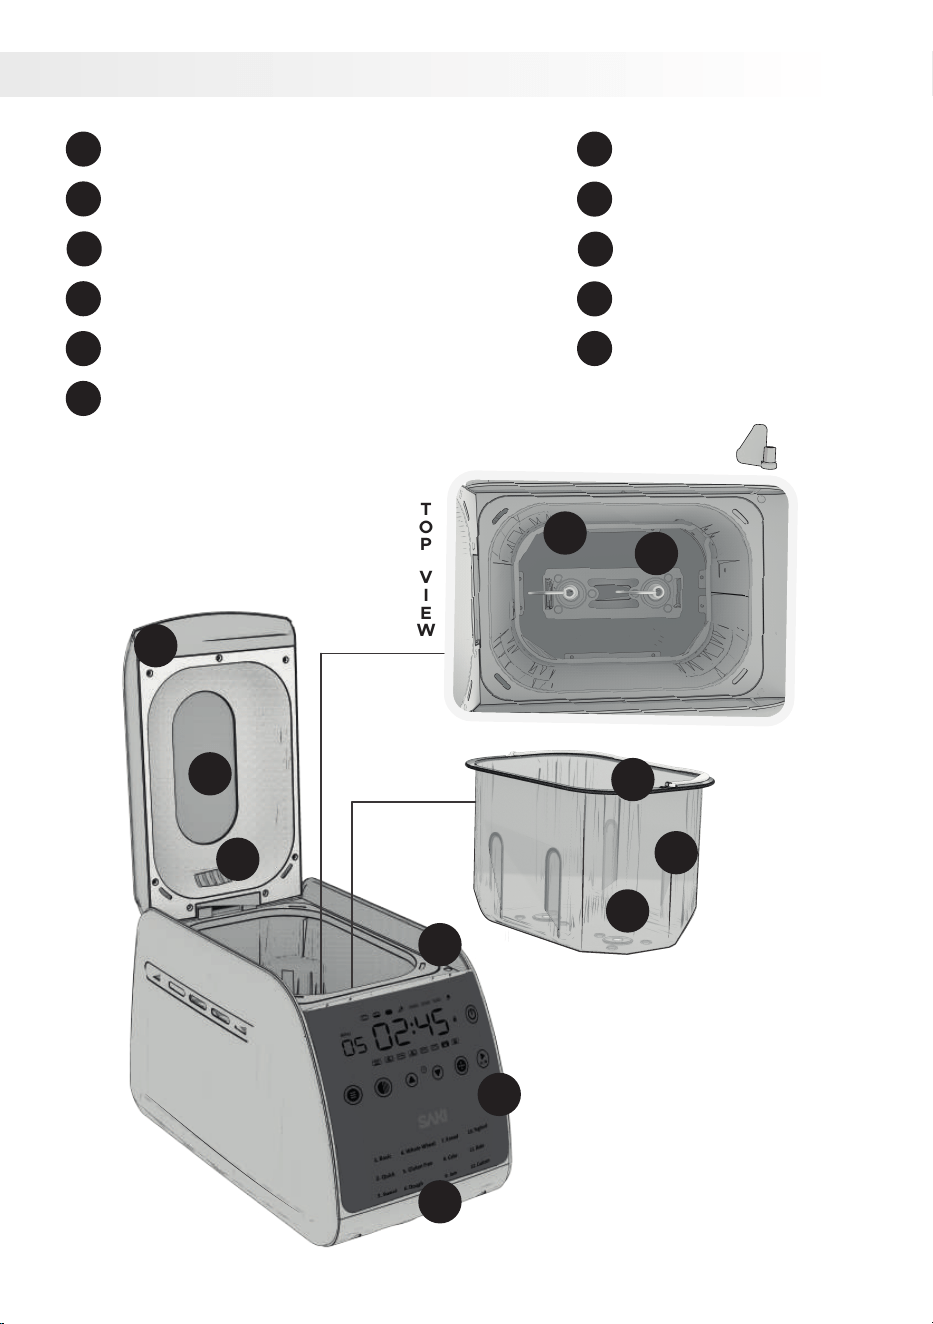
PARTS
TOPVIEW
1
2
3
4
5
6
7
8
9
10
11
Transparent Window
1
Top Lid
2
Steam Vent
3
Main Body
4
Control Panel
5
Heat System
6
Baking Pan Handle
Baking Pan
Baking Pan Receptacle
Main Heater
Kneading Paddles
7
8
9
10
11
7
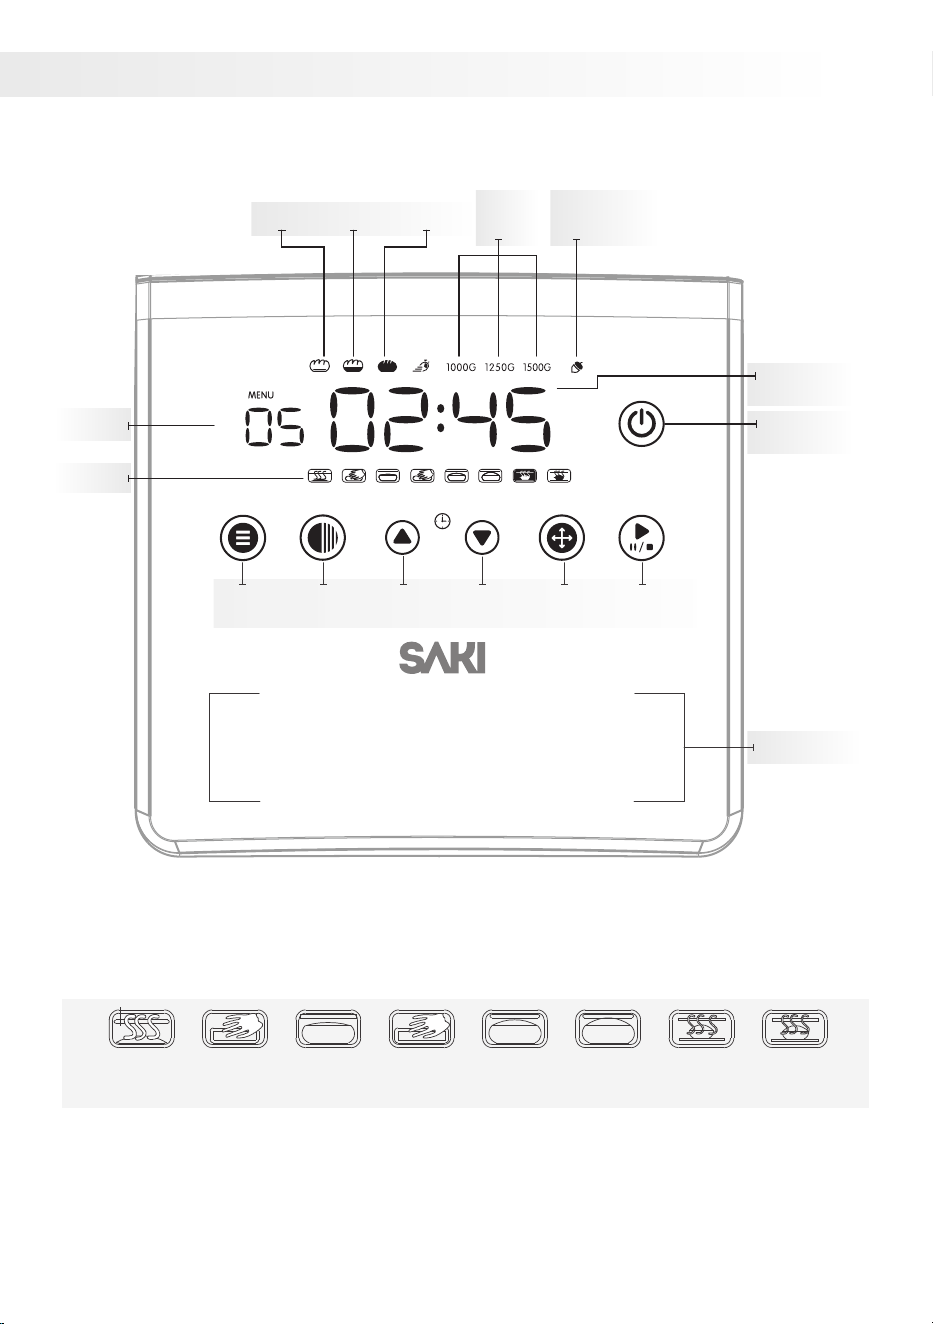
CONTROL PANEL
Stages of Bread-Making*
The production stage in progress is indicated by flashing symbols.
SIZE START / STOP
LIGHT MEDIUM
EXTRA
INGREDIENTS
LOAF
SIZE
DARK
WORKING
TIME
POWER
ON/OFF
PROGRAMS
MENU
STAGES
MENU TIME + TIME – START/STOP
PAUSE
COLOR LOAF
SIZE
Yogurt10.
Bake11.
Custom12.
Knead7.
Cake8.
Jam9.
Whole-Wheat4.
Gluten Free5.
Dough6.
Basic1.
Quick2.
Sweet3.
1
2
preheat
1
knead
rest
2, 3, 4
knead rest
1, 2, 3
rise bake keep
warm
8

BUTTONS
Start/ Stop/ Pause Button
The Start/stop/pause button has multiple functions:
• Pressing it starts the program with a flashing colon.
• A quick press pauses the program with a flashing time and colon.
• Holding the button for about 3 seconds stops the program.
• The same applies when stopping the temperature maintenance mode.
• Caution: Limit the PAUSE function to 5 minutes maximum. During the
pause, use a spatula to push the dough towards the bottom of the bread
pan. Extended pauses can negatively impact dough processing and
baking results.
Menu Button
Use the MENU button to select a program. Press it repeatedly to scroll
through the menu options. The display screen and beeps will indicate the
available programs. Stop when you see the desired program number and
time. If you pass it, keep pressing until the program number appears again.
Crust Color Selection
Use the COLOR button to select a LIGHT, MEDIUM, or DARK crust for your
bread. Keep in mind that this feature is not available for DOUGH, KNEAD,
JAM, or YOGURT programs.
Rapid
Additionally, in the BASIC, SWEET, and WHOLE-WHEAT programs, you
can use the COLOR button to speed up the baking time.
Loaf Size Selection
Use the LOAF SIZE button to select the desired loaf size - 2 lb (1000g),
2.5lb (1250g), or 3 lb. (1500g). The program durations will adjust
accordingly, and the display screen will show the duration information.
Note: The LOAF SIZE button is compatible only with BASIC, QUICK, SWEET,
WHOLE-WHEAT, and GLUTEN FREE programs. It does not work with
DOUGH, KNEAD, CAKE, JAM, YOGHURT, BAKE, or CUSTOM programs.
9

Enhancing Flavors And Adding Ingredients:
There are three ways to achieve this:
• Add extra ingredients to the bread pan.
• When you hear 10 beeps and see a notification ( ), open the lid to add
more ingredients.
• For the DOUGH program, knead in extra ingredients by hand before
shaping and baking.
HOW TO SET DISPLAY TIMER
To set the display timer, follow these steps:
• Press the TIMER button on the appliance.
• Use the arrow buttons or plus/minus buttons to adjust the desired time.
• Press the TIMER button again to confirm and start the timer.
• The display will show the set time and begin counting down.
• Once the set time elapses, an alert or signal will notify you.
Delay Function
To set a delayed start time for your bread:
• Select the program, loaf size, and crust color.
• Use the TIME+ button to add the desired delay time (up to 15 hours).
• Press START/STOP to activate the delay function.
• The display will show the countdown.
• Your bread will be ready at the specified time. If left inside, keep warm
mode active for 1 hour.
Important Notes:
• Avoid using the delay function with ingredients that can spoil, such as
eggs, milk, fruit, onions, cream, or cheese.
• Not suitable for the GLUTEN-FREE program.
• Not recommended for bread mixes.
• Not available for KNEAD, CAKE, JAM, YOGURT, or BAKE programs.
*The TIME buttons can also be used to set the program time for KNEAD,
YOGURT, and BAKE programs, as well as the individual processing phases
in the CUSTOM program.
10

ACCESSORIES
Bread Machine Accessories:
Liquid measuring cup (1):
Use this cup to accurately measure liquids for your bread-making
recipes.
Bread removing hook (1):
The bread removing hook is a handy tool for safely and easily
taking out the bread from the machine after baking. It helps in
removing the kneading blades when they get stuck with the hot
bread.
Measuring spoon (1):
This spoon helps you measure small amounts of ingredients with
precision. Suitable for dry yeast,salt, sugar and other ingredients
measuring usage.
Recipe book and tips:
The guides and tips offer instructions and suggestions for making
delicious bread with your machine. They cover ingredient ratios,
program settings, and provide additional recipe ideas.
For more tips, refer to the "Hints & Tips on Making Bread"
section in the user manual.
Find recipes at www.saki.us
11

TIPS ON MAKING BREAD
For consistent results, follow these guidelines when baking bread, despite
possible variations in height and shape.
◦ Use fresh ingredients: Old or stale ingredients can affect the taste and
texture of your bread.
◦ Measure your ingredients accurately: For accurate measurements, use
a kitchen scale if possible. When using Saki's measuring cups or spoons,
fill them to the brim and level off without tapping or packing tightly.
◦ Be cautious when adjusting the water temperature for your bread:
Consider the season or room temperature. If the room temperature is
high (77°F, 25°C), use colder water (41°F, 5°C) to prevent unintended
rising. If the bread doesn't rise enough due to low room temperature
(50°F, 10°C), use warmer water (68°F, 20°C).
◦ Use the correct type of flour: The type of flour you use will affect the
taste and texture of your bread. For example, bread flour will produce
a loaf of bread with a higher gluten content, which will make it chewier.
◦ Add the ingredients in the correct order: The order in which you add
the ingredients can affect the outcome of your bread. For example, if
you add the yeast to the wet ingredients first, it may not activate
properly.
◦ Knead the dough for the correct amount of time: Kneading helps to
develop the gluten in the dough, which gives the bread its structure.
◦ Let the dough rise in a warm place: The ideal temperature for bread
making is between 75 and 85 degrees Fahrenheit.
◦ Do not overmix the dough: Overmixing can break down the gluten in
the dough, which can make it tough.
◦ Bake the bread for the correct amount of time: If you bake the bread
for too long, it will become dry and hard.
◦ Let the bread cool completely before slicing and serving: Slicing and
serving a warm loaf of bread will make it more crumbly.
◦ To avoid overflow and burning, do not exceed the capacity of the
baking pan: This can cause a burning odor or smoke from the heater.
Additionally, avoid placing large and hard ingredients in the baking pan
to prevent damage to the non-stick coating and kneading blades.
Reminder:
◦ Clean the bread maker after each use. This will help to prevent the
build-up of bacteria and mold.
◦ Store the bread maker in a cool, dry place. Storing the bread maker in
a cool, dry place will help to extend its lifespan.
12

INGREDIENTS
Here are some common ingredients used in bread making and their effects
on the bread:
• Flour: The main ingredient in bread, flour provides structure and texture.
Different types of flour have different properties, which will affect the
taste and texture of the bread.
◦ Bread flour: Bread flour is a type of flour that has a high gluten content.
Gluten is a protein that gives bread its structure and elasticity. Bread
flour is often used for making white bread, but it can also be used for
making other types of bread, such as sourdough bread.
◦ Whole wheat flour: Whole wheat flour is made from the entire wheat
kernel, including the bran and germ. This gives whole wheat flour a
higher fiber content than other types of flour. Whole wheat flour can be
used to make bread, but it may result in a denser loaf of bread.
◦ All-purpose flour: All-purpose flour is a type of flour that has a medium
gluten content. It is a good all-purpose flour that can be used for making
a variety of baked goods, including bread, cakes, and pastries.
◦ Gluten-free flour: Gluten-free flour is made from a variety of flours, such
as rice flour, tapioca flour, and potato starch. Gluten-free flour can be
used to make bread, but it may require some additional ingredients, such
as xanthan gum, to give the bread structure.
• Yeast: Yeast is a living organism that produces carbon dioxide gas, which
causes the dough to rise. The amount of yeast you use will affect the rise
of the bread.
◦ Dry yeast: Dry yeast is a dehydrated type of yeast commonly used in
bread making. It must be dissolved in warm water before use. Store
opened yeast in the fridge and use within 48 hours. Use the
recommended amount in the recipe to avoid overflow.
◦ Instant yeast: Instant yeast is a type of yeast that has been
pre-hydrated. It can be added directly to dry ingredients without having
to be dissolved in water first. Instant yeast is often used in bread
machines because it is more convenient.
• Water: Water is essential for bread making. It helps to activate the yeast
and gives the dough its structure. The amount of water you use will affect
the consistency of the dough.
• Salt: Salt enhances the flavor of bread and helps to control the rising of
the dough. The amount of salt you use will affect the taste of the bread.
Table salt, sea salt or kosher salt all can be used.
13

• Sugar: Sugar adds sweetness and helps brown the crust of the bread.
The amount used affects the bread's sweetness. Avoid substituting with
powdered sugar, brown sugar, or artificial sweeteners, unless specified.
If the recipe doesn't specify, you can use honey, brown sugar, golden or
similar alternatives.
• Oil or Butter: Oil or butter contributes richness, flavor, and moisture to
bread. The quantity used influences the bread's texture, with more oil or
butter resulting in increased tenderness. Unless stated otherwise in the
recipe, vegetable oil or olive oil can be substituted for butter.
• Eggs: Eggs enhance richness and flavor, while also binding the
ingredients in bread. The amount of eggs affects the bread's texture,
with more eggs yielding a denser result. Use room
• temperature eggs, unless instructed otherwise. Avoid using fresh eggs
with the delay function.
• Dairy Products: Dairy products like milk, yogurt, or sour cream enhance
the richness, flavor, and moisture of bread. The choice of dairy product
influences the taste and texture. Milk creates a lighter bread, while
yogurt or sour cream result in a denser texture.
• Other Ingredients: Various ingredients can be incorporated into bread
making, including nuts, seeds, fruits, vegetables, and spices. These
additions contribute to the flavor, texture, and nutritional value of the
bread.
14
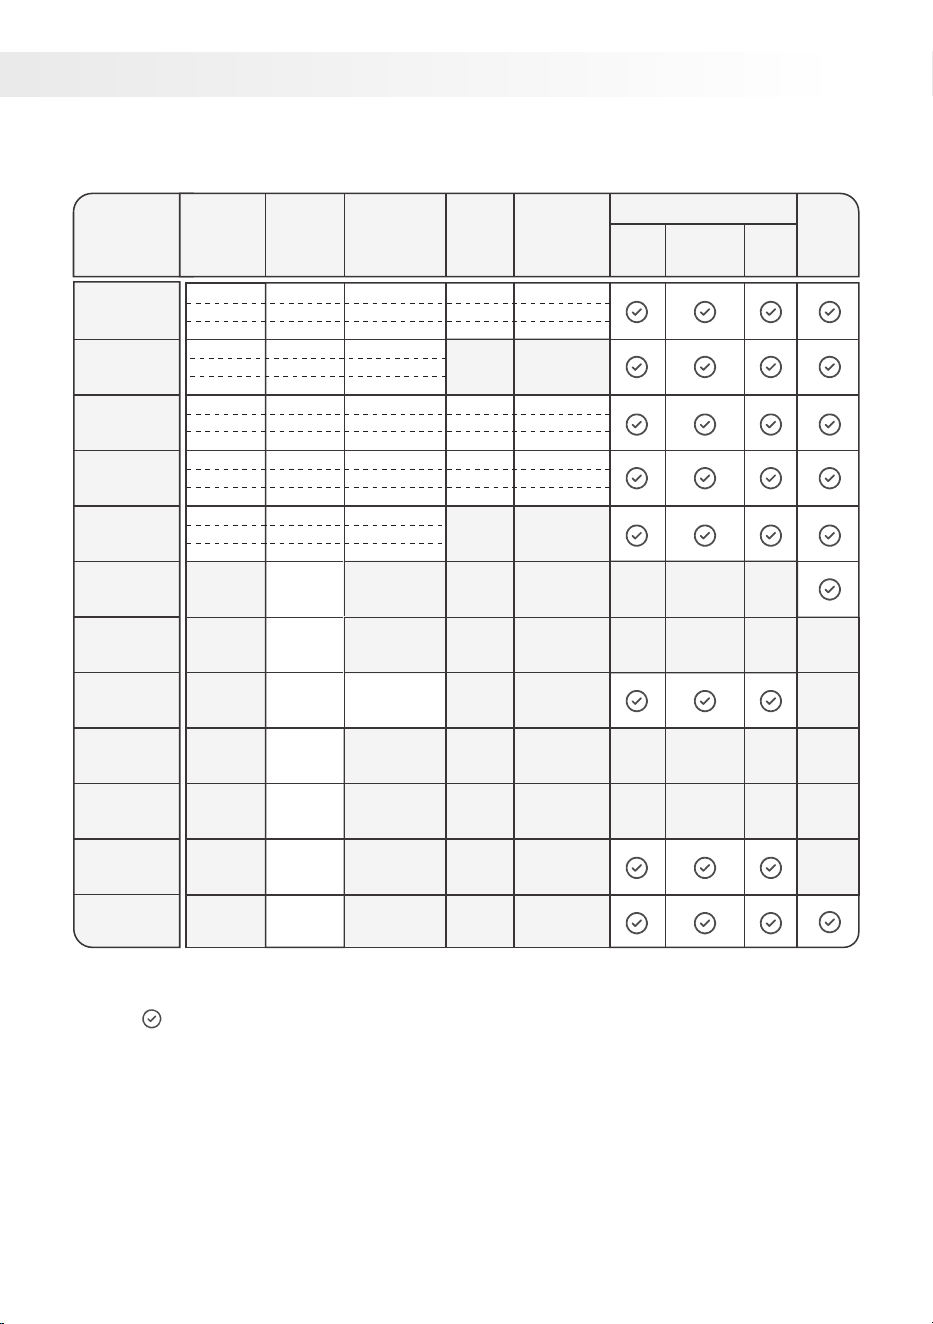
PROGRAM CYCLE TIMES
1. Basic
2. Quick
3. Sweet
4. Whole
Wheat
5. Gluten
Free
6. Dough
7. Knead
8. Cake
9. Jam
10. Yogurt
11. Bake
12. Custom
1.50
0.10
1.50 1.35
1.20
10.00
1.00
3.10
Program
Name
Loaf
Size
Timings
Time to
Add
Ingredients
Time to
Add
Ingredients
Light Medium
Crust Color
Dark
Delay
Timer
Rapid
Time
1.45
1.50
1.55
1.35
1.40
1.45
1.35
1.40
1.45
1.55
2.00
2.05
2.05
2.10
2.15
2.05
2.10
2.15
2 Ib
2.5 Ib
3 Ib
2 Ib
2.5 Ib
3 Ib
2 Ib
2.5 Ib
3 Ib
2 Ib
2.5 Ib
3 Ib
2 Ib
2.5 Ib
3 Ib
3.05
3.10
3.15
2.05
2.10
2.15
3.25
3.30
3.35
3.05
3.10
3.15
2.30
2.35
2.40
2.40
2.45
2.50
1.45
1.50
1.55
2.25
2.30
2.35
2.00
2.05
2.10
2.20
2.25
2.30
• The time is shown as HOUR.MINUTE
• The figure indicates the availability of the option.
15
The basic bread program on your bread maker is specifically designed for
baking a simple loaf of bread. It features a longer rise time and a moderate
baking temperature. This is because basic breads, without any special
ingredients, require more time to rise and develop their flavor.
Basic Bread Recipe
Here's a sample recipe for basic white bread using the basic program:
Baking Time: 3 hours 5 minutes
Ingredients:
• 1 1/4 cups warm water
• 1 tablespoon vegetable oil
• 1 teaspoon salt
• 1 teaspoon sugar
• 2 cups bread flour
• 1 teaspoon active dry yeast
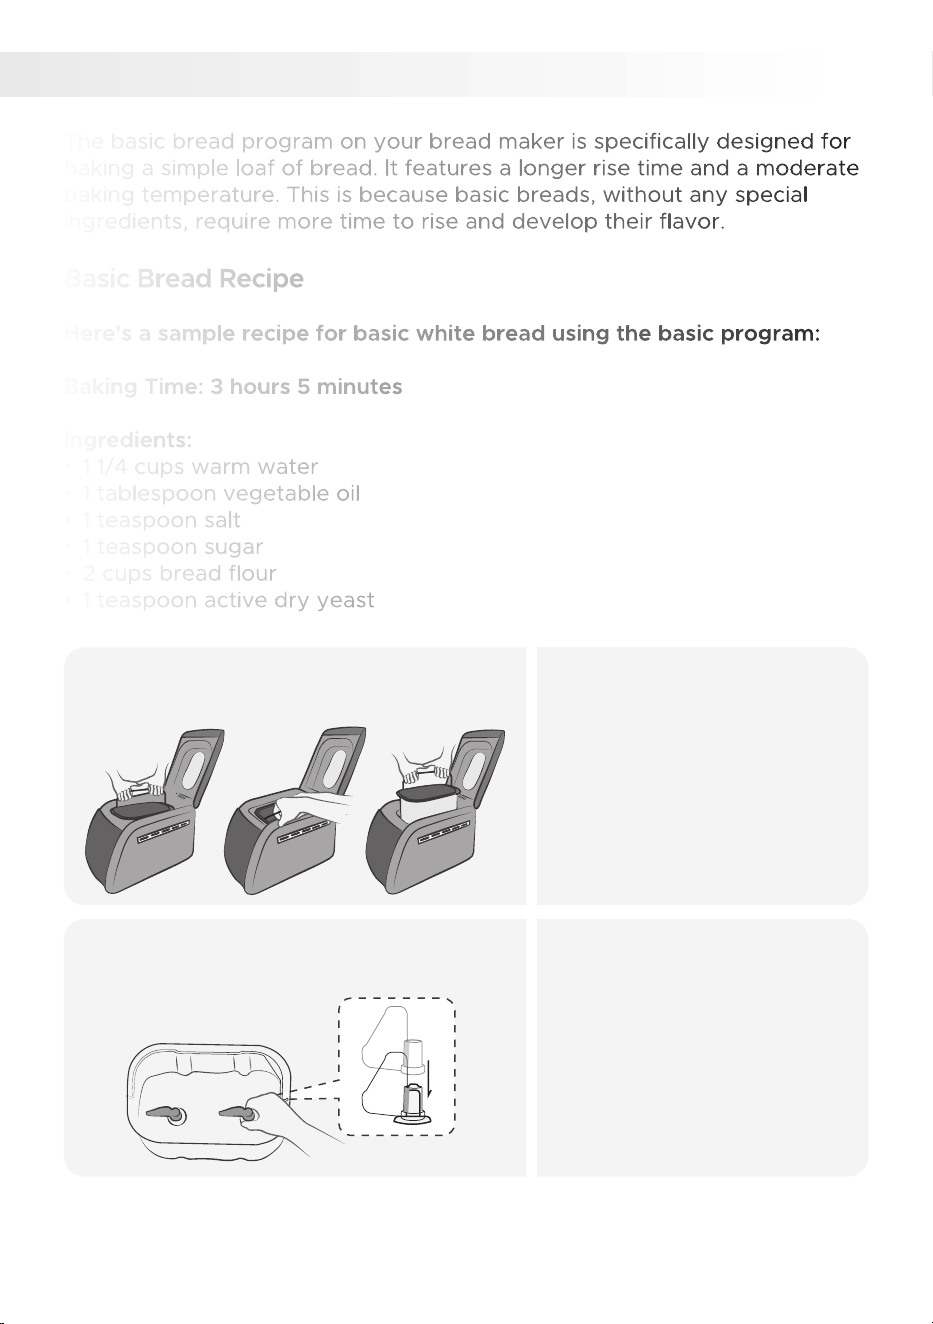
MAKING BASIC BREAD
1.
I.
• While wearing oven mitts,
hold the bread pan's metal
handle with both hands from
each end.
• Tilt the bread pan towards
you to unlatch it.
• Then, tilt the bread pan
upward to remove it.
II. III.
Remove the baking pan from
the machine.
1.
• Clean the pan and paddles
before use.
• Attach the paddles securely
to the rotating shafts as
shown.
• Note that the paddles may
have slight movement when
attached.
Attach the kneading paddles to the
shafts in the baking pan.
2.
16
• Add ingredients in this order
and measure precisely:
◦ Liquids (water, milk,eggs*),
◦ Oil or butter, Bread flour,
◦ Sugar, powdered milk, salt.
◦ Make a hole in the flour for
the yeast, ensuring it doesn't
touch any liquid.
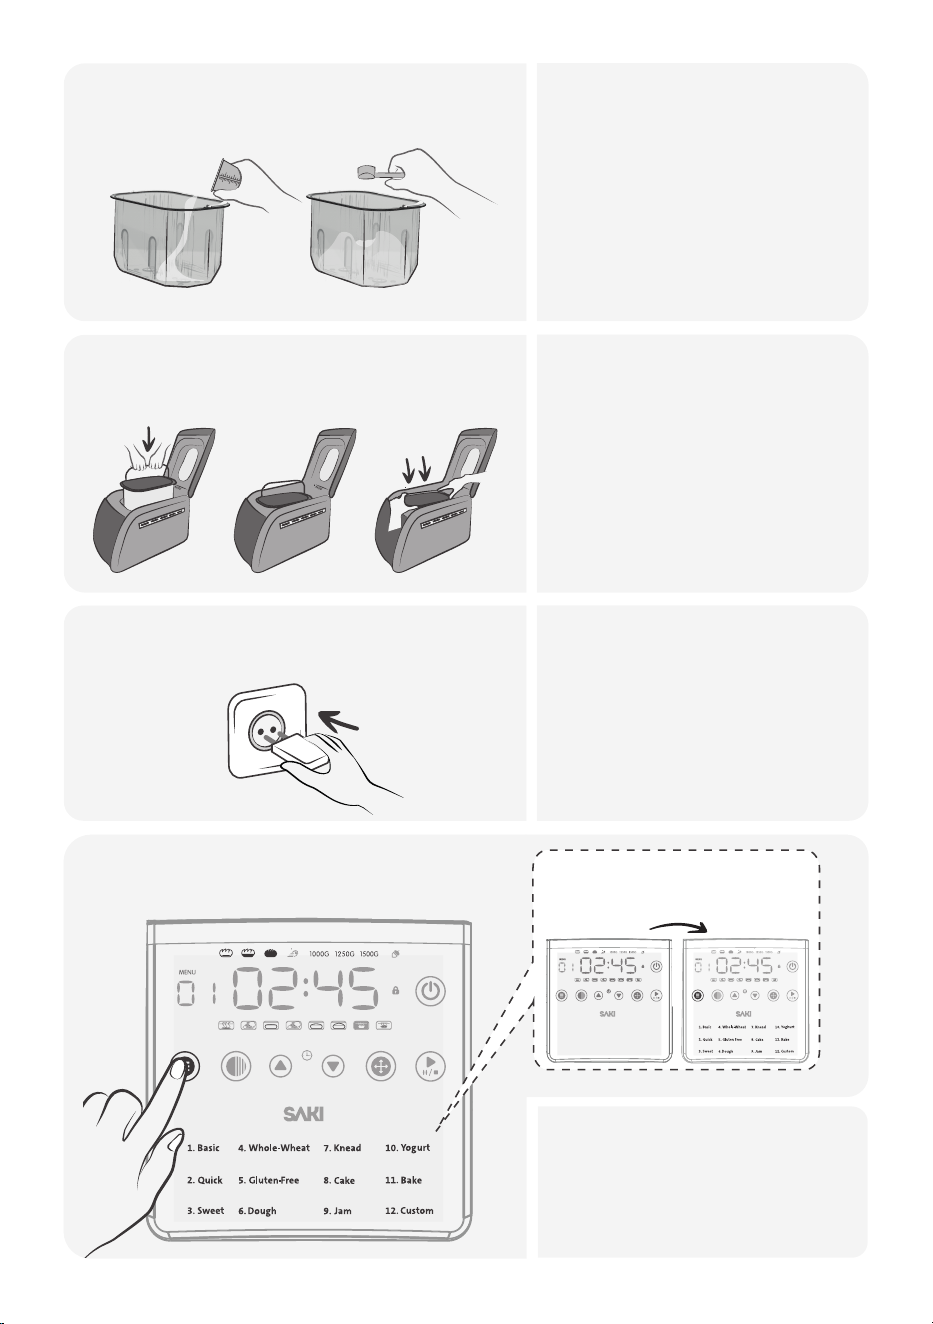
Add ingredients listed into the
baking pan.
3.
• Hold the bread pan handle
securely.
• Place the pan in the baking
chamber without using the
handle for insertion.
• Firmly push down on both
ends of the pan until it clicks
into place using your fingers.
Place the baking pan into the machine
and close the lid.
4.
I.
III.II.
x
• Ensure your hands are dry
before touching the power
cord.
• Insert the power plug fully,
avoiding a loos connection.
Insert the power plug into an
electrical outlet.
5.
Press MENU and select program
1 (BASIC).
6.
MENU COLOR TIME + TIME - SIZE START / STOP
When you choose a menu,
the baking time will be shown
on the screen.
MENU COLOR TIME + TIME - SIZE START / STOP
• Press MENU button select
program #1 (BASIC).
• Select LOAF SIZE.
• Select CRUST COLOR.
17
• To start the baking program,
press the start/stop button.
• If the cycle doesn't start after
a short press, ensure that the
lid is completely closed.
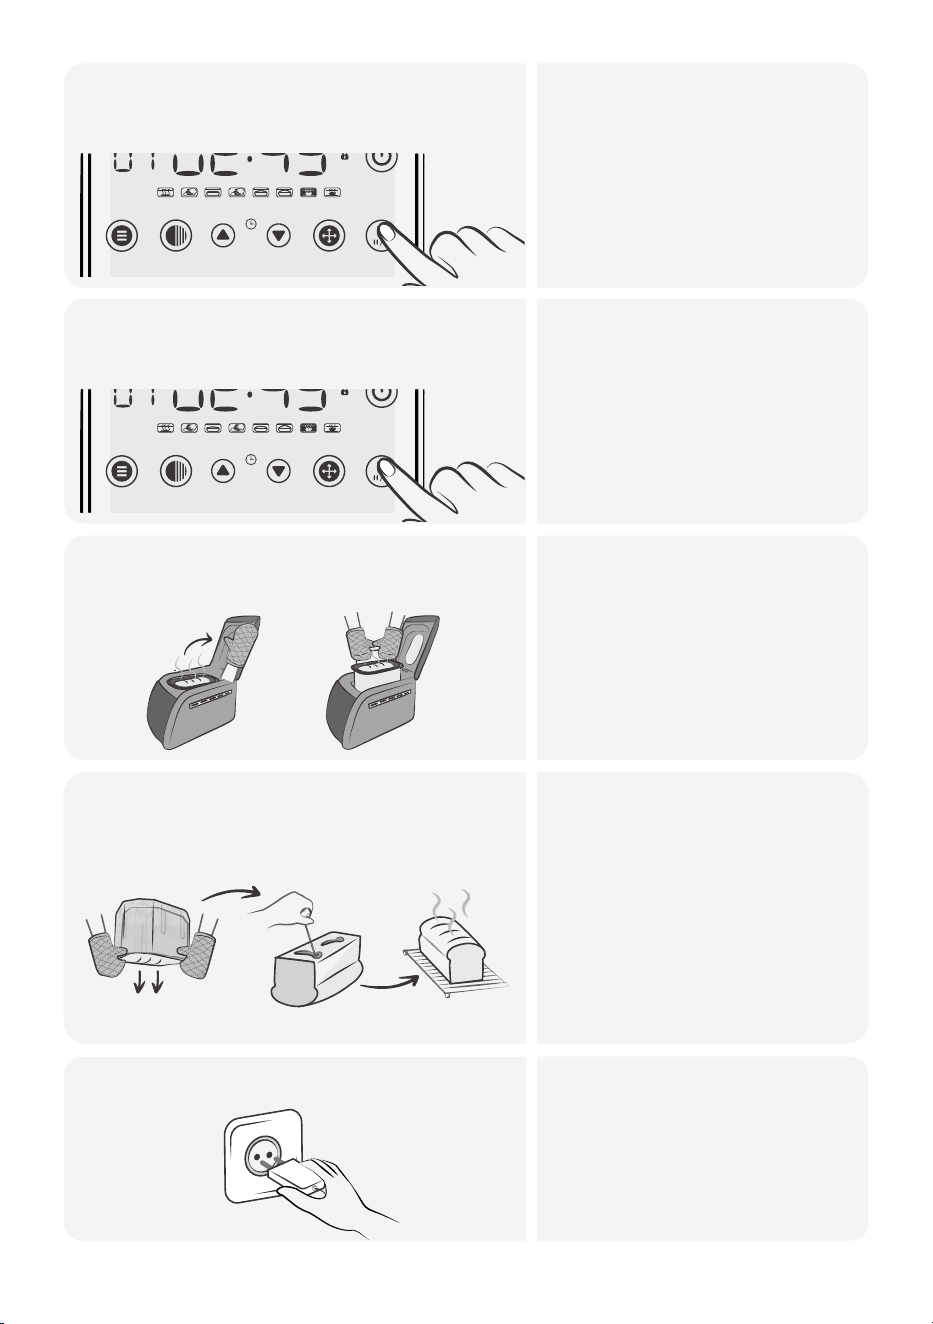
Press the start/stop button to
start cycle.
7.
MENU COLOR TIME + TIME - SIZE START / STOP
• To start the baking program,
press the start/stop button.
• If the cycle doesn't start after
a short press, ensure that the
lid is completely closed.
Press the start/stop button after
program ends.
8.
MENU COLOR TIME + TIME - SIZE START / STOP
• Protect yourself from burns
by wearing oven mitts or
using a towel.
• Open the lid and remove the
baking pan as
instructed.
Open the lid and take out the
baking pan.
9.
• After bread making, unplug
the power cord from the
outlet.
• Always hold and unplug by
the power plug, not the cord.
Unplug the power cord.11.
• Carefully flip the baking pan
over to remove the bread
using the hook.
• Wear oven mitts for safety.
• Use the hook to remove the
paddles.
• Place the hot loaf on a
heat-resistant surface to
release moisture and cool
down.
Remove the bread from the
baking pan.
10.
18

The quick bread program on your bread maker is a specialized setting for
baking quick breads such as white, wheat and rye bread. Quick breads are
typically made with baking powder or baking soda instead of yeast,
allowing for shorter rising times. This makes them perfect when time is
limited.
Quick Bread Recipe
Here's a sample recipe for quick bread using the quick program:
Baking Time: 2 hours 5 minutes
Ingredients:
• 1 1/2 cups all-purpose flour
• 1/2 cup granulated sugar
• 1 teaspoon baking powder
• 1/2 teaspoon baking soda
• 1/2 teaspoon salt
• 1/2 cup milk
• 1/4 cup vegetable oil
• 1 egg
• 1 teaspoon vanilla extract
• Optional: 1 cup of your choice of mix-ins (e.g., chocolate chips,
nuts, dried fruits)
QUICK PROGRAM
2.
• Add ingredients to the bread pan
following the recommended order:
liquids first, then dry ingredients, and
finally yeast.
• Optionally, include mix-ins like
chocolate chips or nuts on top. Place
the pan in the bread maker.
• Select the quick program setting,
adjust loaf size or crust color, and
start.
Select
loaf size,
crust color
and start
the cycle.
1.
19
• Start the bread machine and let it
complete the quick bread program
cycle. The machine will handle the
mixing, kneading, and baking
process.
• When the bread is finished baking, the
bread maker will beep. Press the stop
button at that time.
Press the stop button after
the cycle ends.
2.
MENU COLOR TIME + TIME - SIZE START / STOP
Remove the bread from the
baking pan.
3.
• When baking is done, use oven mitts
or hot pads to remove the hot pan
from the machine.
• Let the sweet bread cool in the pan
for a fewminutes, then transfer it to a
wire rack for complete cooling before
slicing.
• Quick breads are delicious for
breakfast or as a snack.
20

SWEET PROGRAM
3.
The sweet bread program on a bread maker is designed for baking sweet
bread. It has a longer rise time, higher baking temperature, and shorter
kneading time. Sweet breads contain more sugar, which affects rising and
dough consistency.
Sweet Bread Recipe
Here's a sample recipe for sweet bread using the sweet program:
Baking Time: 3 hours 25 minutes
Ingredients:
• 1 cup warm milk
• 1/4 cup granulated sugar
• 3 tablespoons unsalted butter, softened
• 1 large egg
• 3 1/2 cups all-purpose flour
• 2 teaspoons active dry yeast
• 1/2 teaspoon salt
• Optional: 1/2 cup dry fruits, nuts, fruit zest or chocolate chips for
added flavor or brush the top with a warm honey
Select loaf
size, crust
color and
start the
cycle.
1.
• Add ingredients to the bread pan as
directed: usually liquids first, then dry
ingredients, and finally yeast.
• Put the pan in the bread maker.
• Select the sweet program setting,
adjust loaf size or crust color, and
press start.
Press the stop button after
the cycle ends.
2.
• Start the bread machine and let it
complete the quick bread program
cycle. The machine will handle the
mixing, kneading, and baking process.
• When the bread is finished baking, the
bread maker will beep. Press the stop
button at that time.
MENU COLOR TIME + TIME - SIZE START / STOP
21

Remove the bread from the
baking pan.
3.
• When baking is done, use oven mitts
or hot pads to remove the hot pan
from the machine.
• Let the sweet bread cool in the pan
for a few minutes, then transfer it to a
wire rack for complete cooling before
slicing.
• Enjoy the bread plain or with butter,
jam, or other toppings.
22

The whole wheat bread program on a bread maker is a specific setting
designed to help you bake whole wheat bread. This setting typically
includes a longer rise time and a higher baking temperature because
whole wheat flour absorbs more liquid and produces a denser dough
than white flour.
Sourdough Bread Recipe
Here's a sample recipe for sourdough bread using the whole-wheat
program:
Prep Time: 10 minutes
Baking Time: 3 hours 5 minutes
Ingredients:
• 1 cup of sourdough starter
• 1 1/4 cups of water
• 3 cups of whole wheat flour
• 1 1/2 teaspoons of salt
• 1 tablespoon of sugar or honey
• 2 tablespoons of olive oil
• 1 1/2 teaspoons of dry active yeast (optional, can help with rise)
WHOLE-WHEAT PROGRAM
4.
Select loaf
size, crust
color and
start the
cycle.
1.
• Add ingredients to the bread pan as
directed: usually liquids first, then dry
ingredients, and finally yeast.
• Put the pan in the bread maker.
• Select the sweet program setting,
adjust loaf size or crust color, and
press start.
Press the stop button after
the cycle ends.
2.
• Check the dough during the kneading
cycle; it should form a smooth ball.
• If it's too dry or too wet, adjust by
adding a bitof water or flour.
• When the bread is finished baking,
the bread maker will beep.
• Press the stop button at that time.
MENU COLOR TIME + TIME - SIZE START / STOP
23

Remove the bread from the
baking pan.
3.
• Once the bread is done, carefully
remove it from the bread maker and
let it cool on a wire rack before slicing.
• Unplug the power cord.
Note: The use of sourdough starter in combination with whole wheat flour
might require some adjustments and experimentation, as the behavior of
sourdough can vary based on many factors, including the maturity of your
starter and the temperature and humidity of your environment.
24
• 1 1/2 cups warm water
• 2 tablespoons sugar
• 2 teaspoons active dry yeast
• 2 tablespoons olive oil, plus more for greasing the bread pan
• 2 large eggs
• 2 teaspoons xanthan gum
• 1 teaspoon salt
• 3 cups gluten-free flour blend
• 1 1/2 cups warm water
• 2 tablespoons sugar
• 2 teaspoons active dry yeast
• 2 tablespoons olive oil, plus more for greasing the bread pan
• 2 large eggs
• 2 teaspoons xanthan gum
• 1 teaspoon salt
• 3 cups gluten-free flour blend
5.
GLUTEN-FREE PROGRAM
The gluten-free setting on your bread maker changes the mix, rise, andThe gluten-free setting on your bread maker changes the mix, rise, and
bake times for gluten-free flours. Pick a gluten-free flour blend you like,bake times for gluten-free flours. Pick a gluten-free flour blend you like,
add more liquid than usual, and tweak as needed. A typical gluten-free loaf,add more liquid than usual, and tweak as needed. A typical gluten-free loaf,
denser and less-risen than regular bread, takes 2 hours 35 minutes to bake.denser and less-risen than regular bread, takes 2 hours 35 minutes to bake.
Gluten-Free Bread RecipeGluten-Free Bread Recipe
Here's a sample recipe for gluten-free bread using the gluten-freeHere's a sample recipe for gluten-free bread using the gluten-free
program:program:
Ingredients:Ingredients:
Add all ingredients and start
the cycle.
1.
• Oil the bread pan.
• Mix warm water, sugar, and yeast in it
and let sit until foamy (about 5 minutes).
• Add olive oil, eggs, xanthan gum, salt,
and gluten-free flour.
• Choose the gluten-free setting on your
bread maker and start it.
MENU COLOR TIME + TIME - SIZE START / STOP
Remove the bread from the
pan and enjoy!
2.
• The bread maker mixes, rises, and
bakes the bread.
• The bread maker beeps when the
bread is finished baking. Remove the
bread from the pan and let it cool
before slicing.
• Gluten-free baking can take practice.
• Don't worry if it's not perfect at first.
Good luck!
25

The bread maker's dough program mixes, kneads, and rises dough.
It combines ingredients, develops structure, and allows the dough to rise
and become elastic. Use it for various recipes like pizza. After rising, bake
in an oven or shape and bake in the bread machine without kneading
blades, adding desired ingredients.
Pizza Dough Recipe
Here's a sample recipe for making pizza dough using the dough program:
Prep Time: 1 hour 50 minutes
Bake Time: 20-25 minutes
Ingredients
• 1 cup warm water
• 2 tablespoons olive oil, plus more for greasing the bowl
• 1 teaspoon salt
• 3 cups all-purpose flour, plus more for dusting the work surface
• 2 teaspoons active dry yeast
• Your favorite pizza toppings
DOUGH PROGRAM
6.
Add all ingredients and start
the cycle.
1.
• Oil the bread pan.
• Mix warm water, sugar, and yeast in it
and let sit until foamy (about 5 minutes).
• Add olive oil, eggs, xanthan gum, salt,
and gluten-free flour.
• Choose the gluten-free setting on your
bread maker and start it.
COLOR TIME + TIME - SIZE START / STOP
I. II.
After the cycle, transfer the
dough to a greased bowl,
cover, and let it rise.
2.
• Once the dough cycle finishes,
transfer the dough to a floured surface.
• Shape it into a ball and place it in a
greased bowl.
• Cover with plastic wrap and let it rise in
a warm place for 1 hour until doubled in
size.
• Unplug the bread machine's power
cord.
26
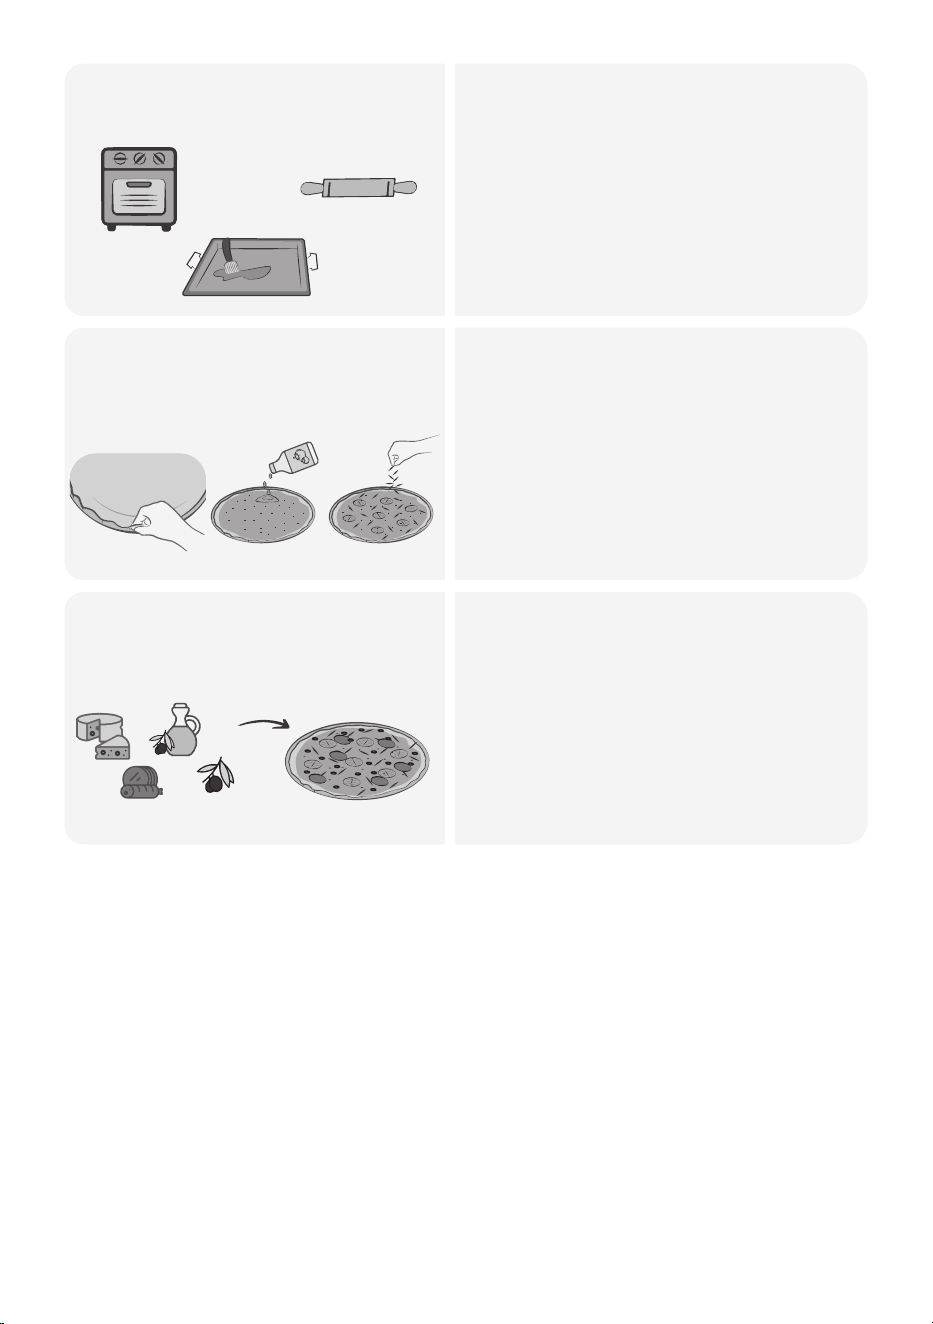
Baking the dough.3.
• Preheat the oven to 450 degrees
Fahrenheit.
• Roll out the pizza dough to desired
shape and thickness.
• Place it on a baking sheet or pizza
stone.
I.
II.
III.
Pinch the edges and spread
the tomato sauce
4.
• Pinch the edges of the dough.
• Spread tomato puree evenly over the
dough and sprinkle with oregano.
• Arrange sliced tomatoes on top and
sprinkle grated cheese.
II. III.I.
Add preferred toppings.5.
• Add your desired toppings such as
tomato sauce, cheese, vegetables,
and meats.
• Bake the pizza for 15-20 minutes until
the crust is golden brown, the cheese
is melted and bubbly.
• Remove from the oven, cool briefly,
slice, and enjoy your homemade pizza!
+
+
+
27
The knead program in a bread maker is designed to combine and knead
dough. It involves mixing, kneading, and resting steps. Mixing blends the
ingredients, kneading develops gluten for structure, and resting allows the
dough to become more elastic as the gluten relaxes.
Pasta Dough Recipe
Here's a sample recipe for making pizza dough using the dough program:
Prep Time: 10 minutes
Ingredients
• 2 cups of all-purpose flour
• 3 large eggs
• 1 tablespoon of olive oil
• 1/2 teaspoon of salt
Here are some additional tips for making this recipe:
• Use your preferred type of flour for this recipe.
• If the dough is too sticky, you can add a little more flour.
• If the dough is too dry, you can add a little more water.
• To prevent the dough from sticking to the work surface, dust it with flour.
• To prevent the pasta from sticking to each other, cook it in a large pot of
boiling water and stir constantly.
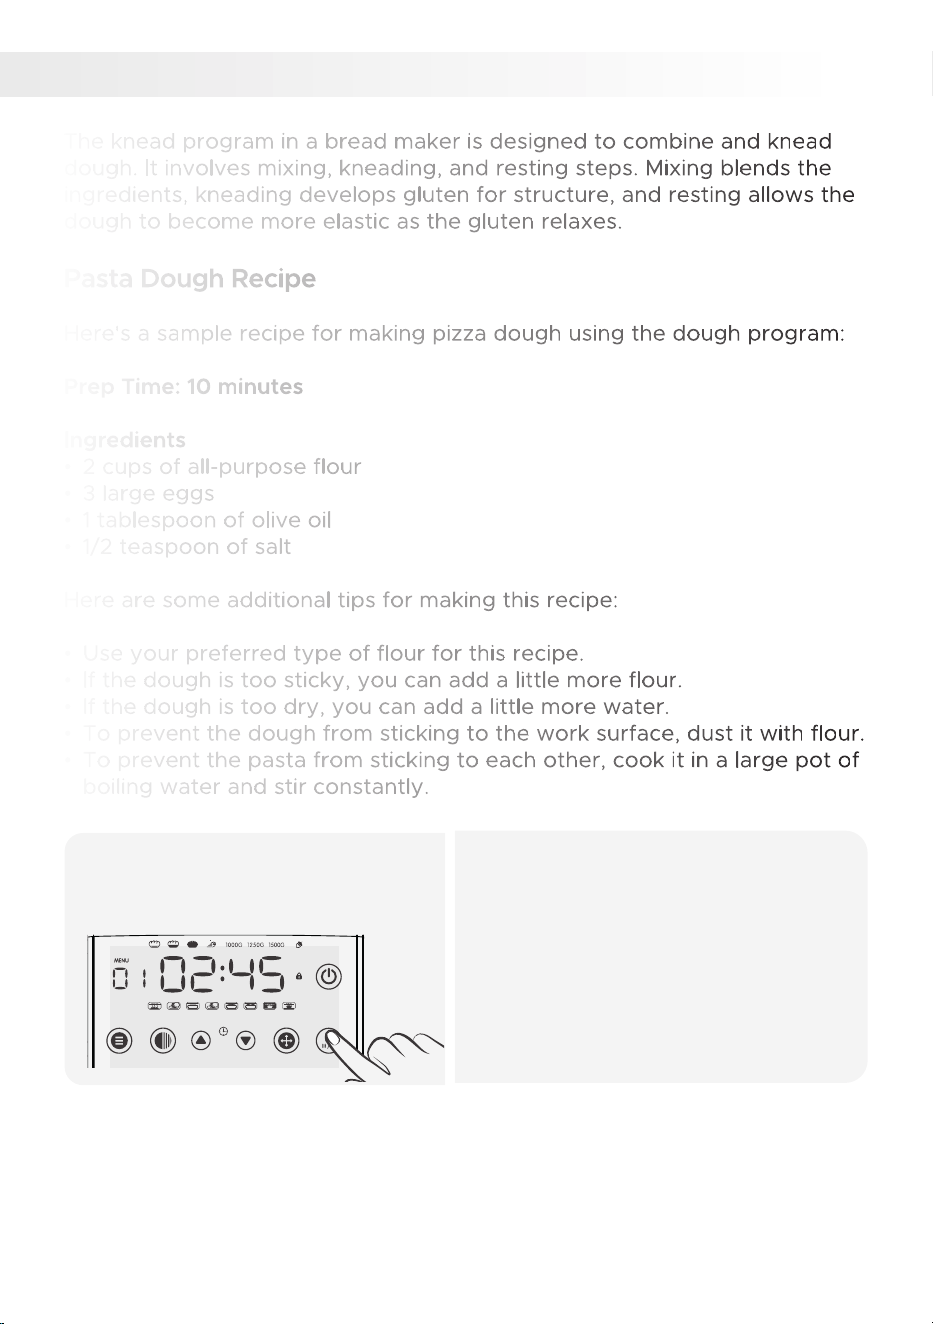
KNEAD PROGRAM
7.
Add all ingredients and start
the cycle.
1.
• Add ingredients to the bread maker
pan in the listed order.
• Close the lid, select the dough setting
(7), and press start.
• Let the bread maker knead and mix
the ingredients until a smooth dough
forms.
• Adjust the consistency by adding a
small amount of water or flour if
necessary.
MENU COLOR TIME + TIME - SIZE START / STOP
28
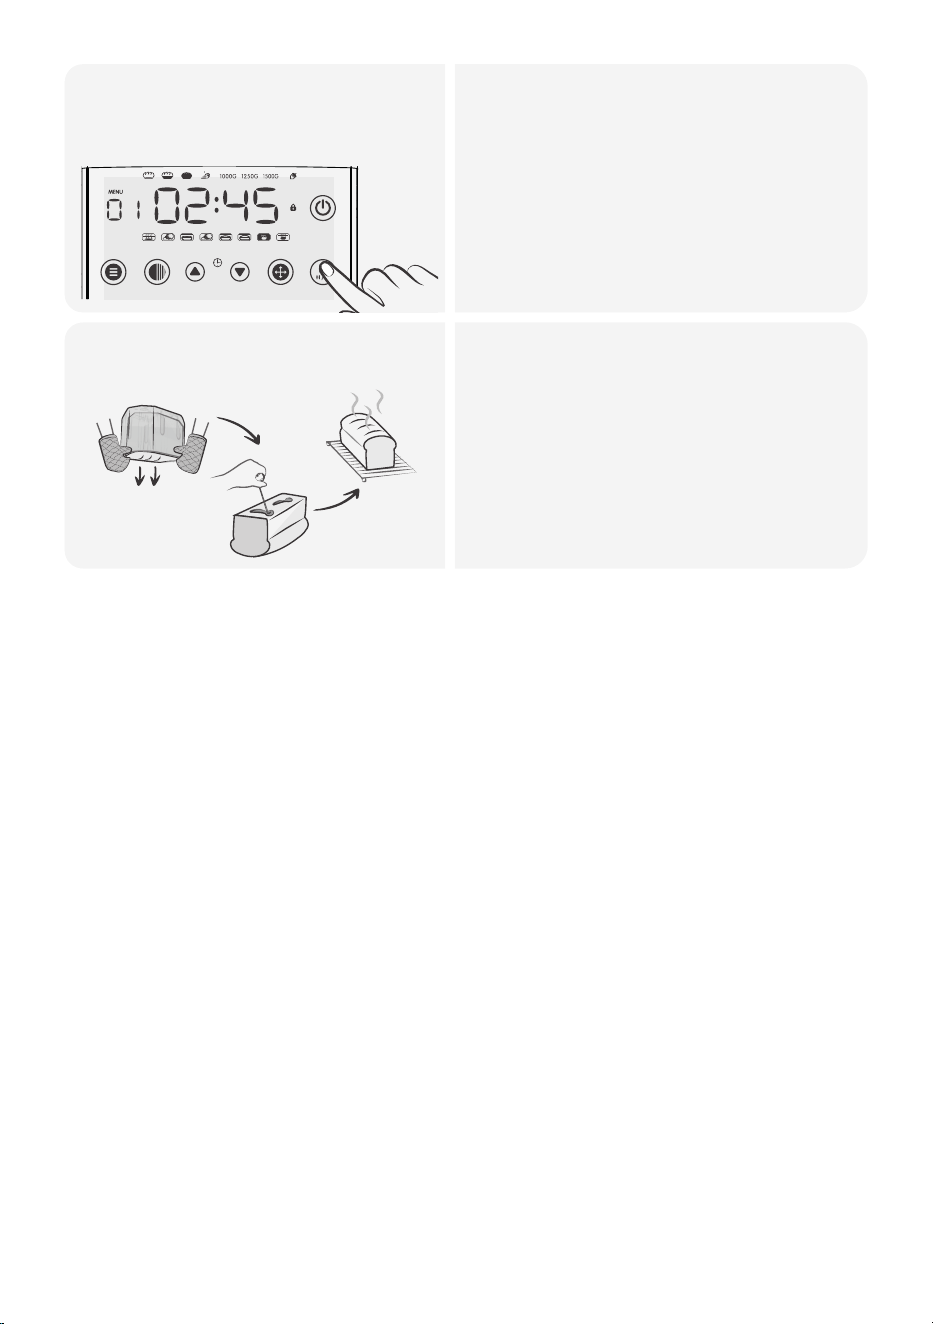
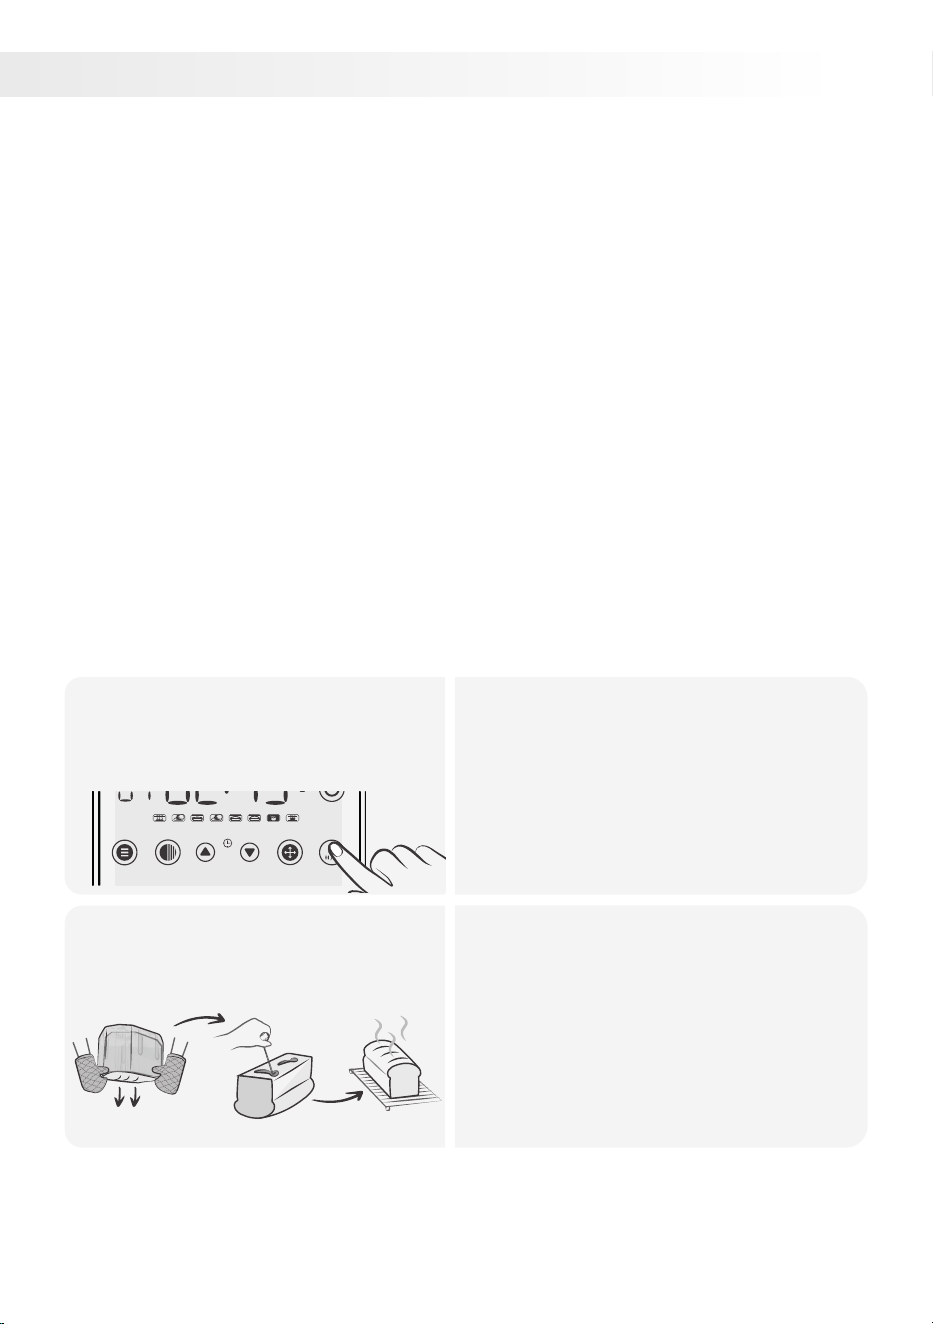
Stop the cycle when the
dough is ready.
2.
• The program beeps 10 times when
the dough is ready.
• Press the start/stop button to end
the cycle.
• Remove the dough from the bread
maker and transfer it to a floured
surface.
Shape the dough as desired,
boil it, and enjoy!
3.
• Divide the dough and roll each portion
to the desired thickness with a rolling
pin or pasta machine.
• Cut the rolled dough into desired
pasta shapes.
• Cook the fresh pasta in boiling water
for a few minutes until al dente.
• Drain the cooked pasta and serve with
your preferred sauce or toppings.
• Enjoy your homemade pasta!
MENU COLOR TIME + TIME - SIZE START / STOP
29
• 1 cup of strong brewed tea
• 1 cup of sugar
• 2 cups of mixed dried fruit (raisins, currants, candied peel, etc.)
• 2 cups of self-raising flour
• 1 large egg
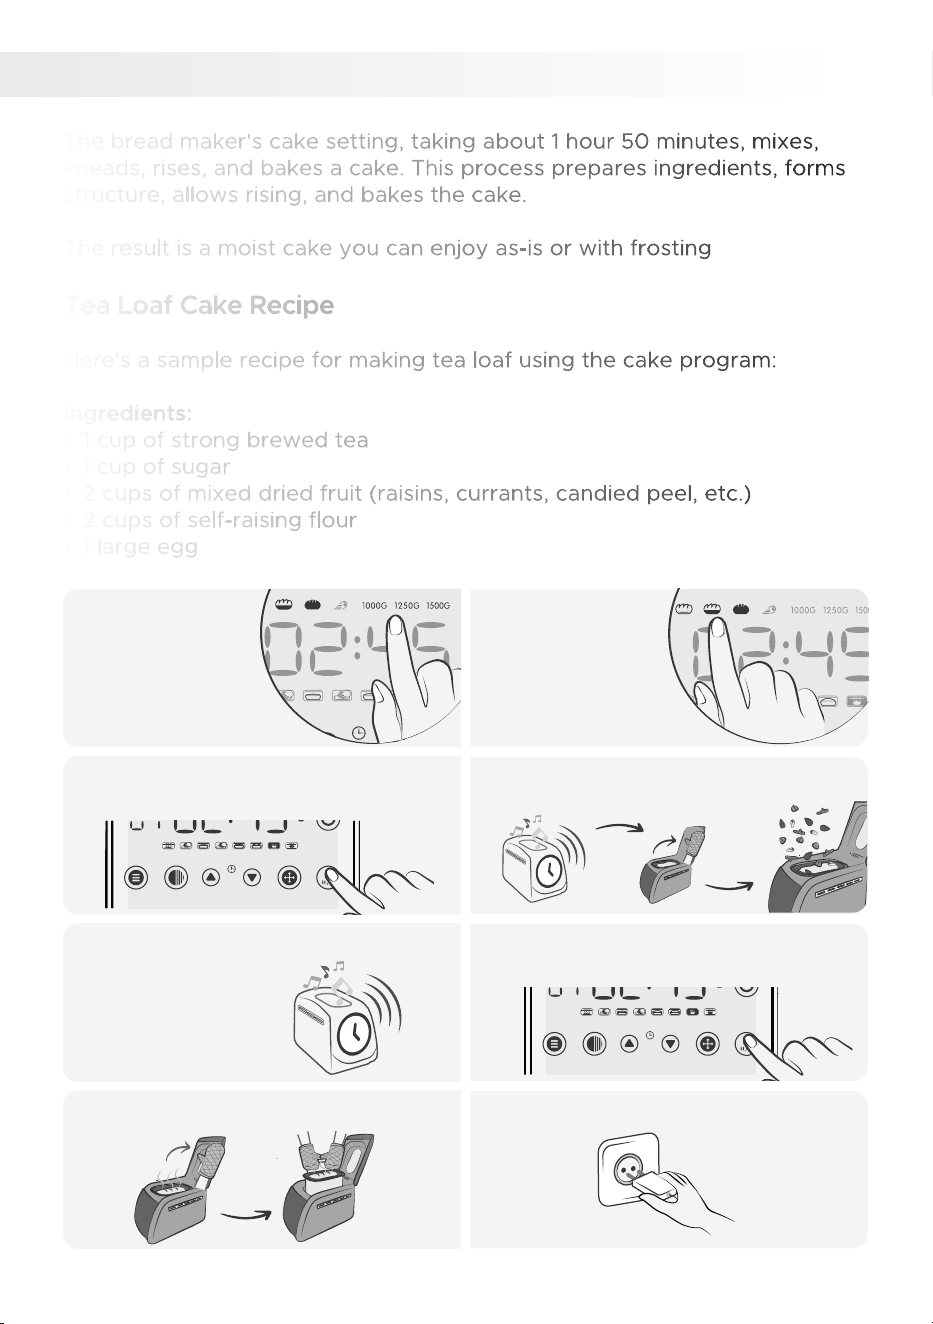
8.
CAKE PROGRAM
The bread maker's cake setting, taking about 1 hour 50 minutes, mixes,
kneads, rises, and bakes a cake. This process prepares ingredients, forms
structure, allows rising, and bakes the cake.
The result is a moist cake you can enjoy as-is or with frosting
Tea Loaf Cake R
ecipe
Here's a sample recipe for making tea loaf using the cake program:
Ingredients:
Select loaf
size
1. Choose the
desired crust
color
2.
The program beeps 10 times when
the cake is ready.
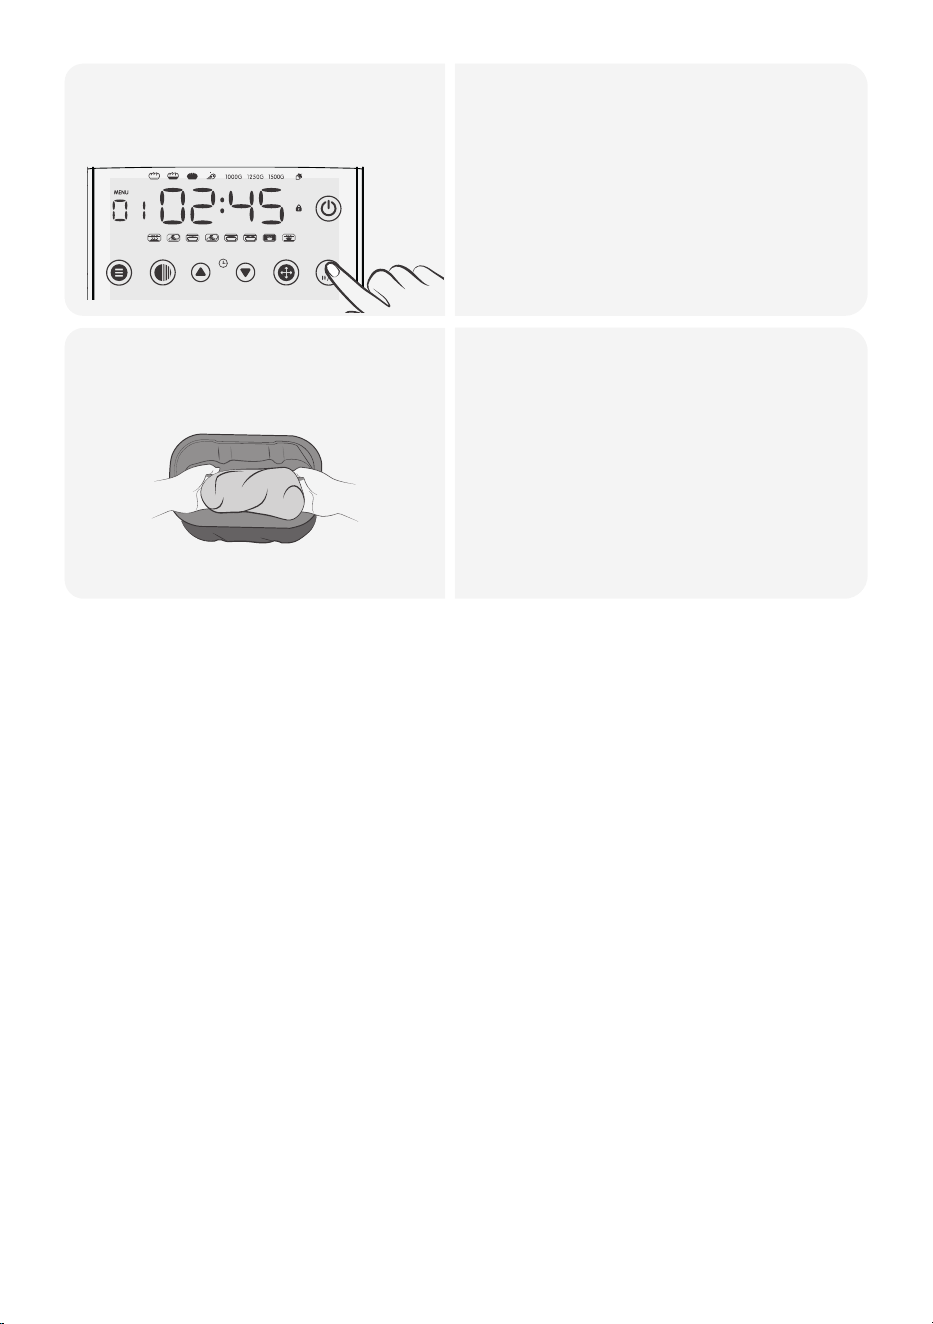
5. Press the stop button once the cycle
is finished.
6.
Let the baking pan cool down.7. Unplug the power cord. 8.
Press the start button to begin the
cycle.
3. When the nut icon appears and
beeps, add the mixed fruits.
4.
MENU COLOR TIME + TIME - SIZE START / STOP
MENU COLOR TIME + TIME - SIZE START / STOP
30
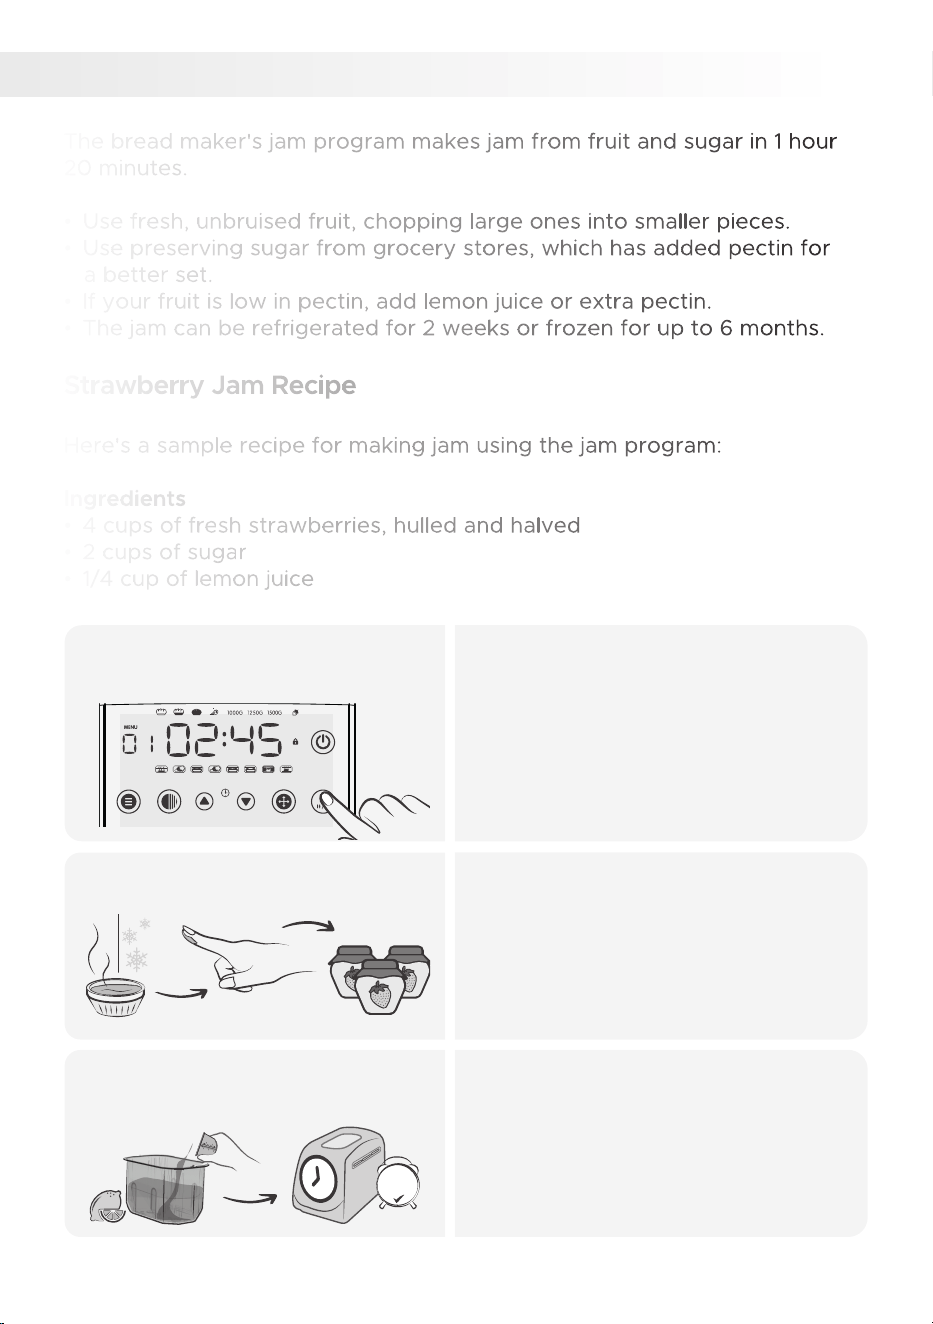
• Use fresh, unbruised fruit, chopping large ones into smaller pieces.
• Use preserving sugar from grocery stores, which has added pectin for
a better set.
• If your fruit is low in pectin, add lemon juice or extra pectin.
• The jam can be refrigerated for 2 weeks or frozen for up to 6 months.
Strawberry Jam Recipe
Here's a sample recipe for making jam using the jam program:
Ingredients
• 4 cups of fresh strawberries, hulled and halved
• 2 cups of sugar
• 1/4 cup of lemon juice
9.
JAM PROGRAM
The bread maker's jam program makes jam from fruit and sugar in 1 hour
20 minutes.
Select the jam program (9),
and start the cycle.
1.
• Place the strawberries into the bread
machine pan.
• Sprinkle the sugar over the
strawberries.
• Pour the lemon juice over the sugar.
• Close the lid of the bread machine and
select the jam program (9), then press
start.
MENU COLOR TIME + TIME - SIZE START / STOP
Test the jam's consistency.2.
• After the cycle, test the jam's
consistency.
• Cool a small sample on a saucer;
if it wrinkles when you swipe your
finger across it, it's ready to jar.
If the jam hasn't reached the
desired thickness.
3.
• If the jam doesn't set, add extra
lemon juice or pectin and cook
longer using the BAKE setting.
• Choose bake program (11), hit TIME,
and bake 0 more minutes or until it
reaches the right consistency.
30
mins
31

Remove the pan and transfer
the jam into a jar.
4.
• Carefully remove the hot bread pan
and pour the jam into a sterilized,
pre-warmed jar.
• Seal and let it cool.
• If the jam isn't set enough, use the
BAKE setting as described earlier.
• Unplug the power cord, holding the
protected plug head.
To use the jam program in a bread maker, you will need to gather the
following ingredients:
• Fruit: Any type of fruit can be used to make jam, but some popular
choices include strawberries, blueberries, raspberries, and peaches.
• Sugar: The amount of sugar you need will depend on the type of fruit
you are using and your desired sweetness level. A good starting point is
1 cup of sugar per 3 cups of fruit.
• Pectin: Pectin is a natural thickener that adds structure to jam.
High-pectin fruits may not require additional pectin, but for low-pectin
fruits, add 1 tablespoon of pectin per 3 cups of fruit.
Here are some additional tips for making jam in a bread maker:
• If you are using a low-pectin fruit, you may need to cook the jam for
a longer period of time.
• If the jam is too runny, you can thicken it by adding a little more sugar
or pectin.
• To prevent the jam from crystallizing, let it cool completely before
storing it.
• Enjoy your homemade jam!
32
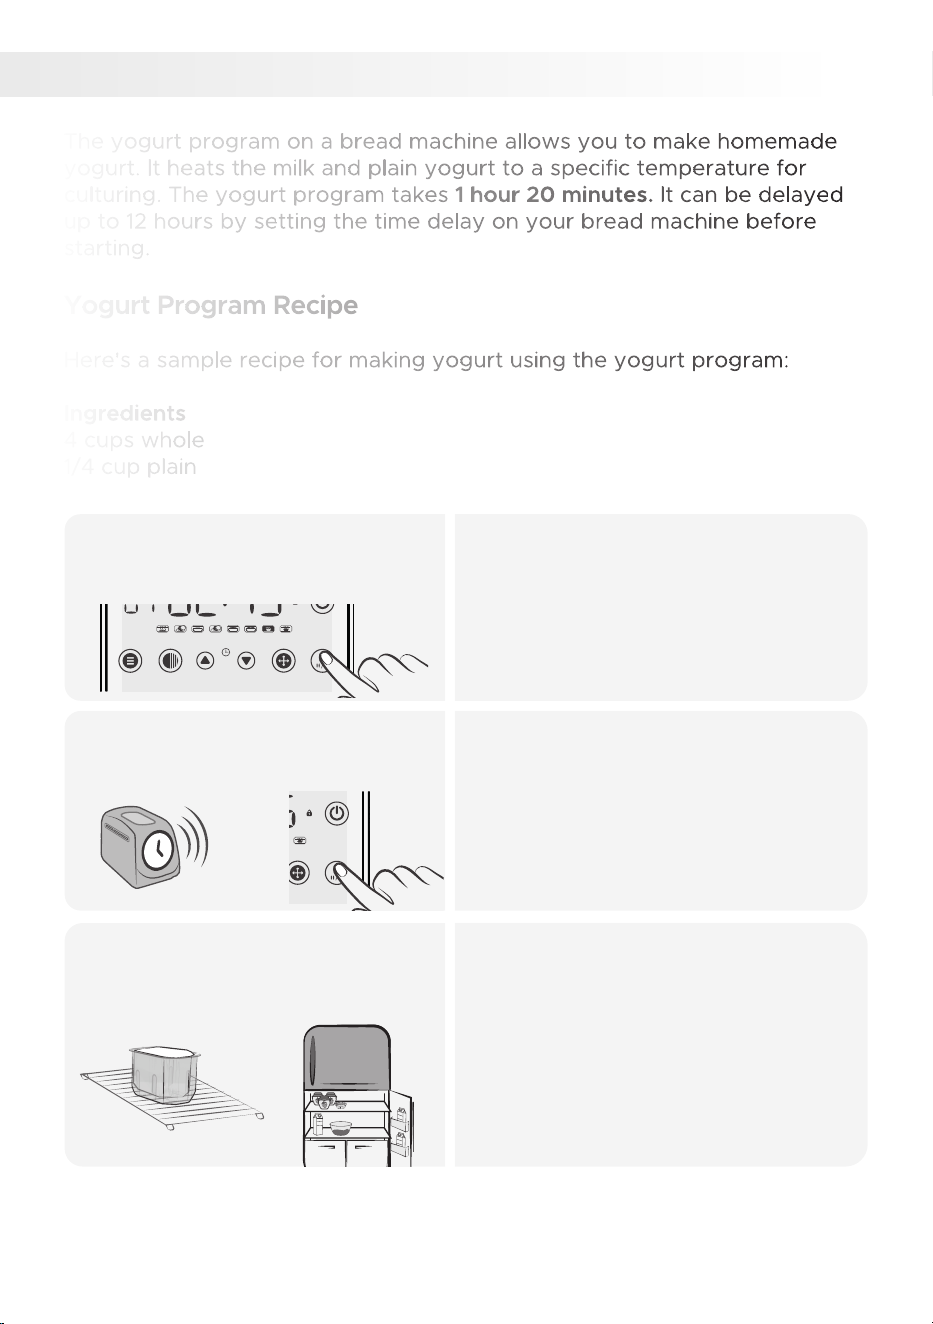
The yogurt program on a bread machine allows you to make homemade
yogurt. It heats the milk and plain yogurt to a specific temperature for
culturing. The yogurt program takes 1 hour 20 minutes. It can be delayed
up to 12 hours by setting the time delay on your bread machine before
starting.
Yogurt Program Recipe
Here's a sample recipe for making yogurt using the yogurt program:
milk
Ingredients:
4 cups whole
1/4 cup plain
yogurt
with active cultures
YOGURT PROGRAM
10.
Select the yogurt program (10),
and start the cycle.
1.
• Put the ingredients into the bread
pan in the specified order and close
the lid.
• Press MENU and select program 10
(YOGHURT).
• Press START/STOP to
MENU COLOR TIME + TIME - SIZE START / STOP
After the cycle is finished, stop
the program and open the lid.
2.
• The program will continue and beep
10 times when finished.
• Press START/STOP and open the lid.
• Unplug the power cord, holding the
protected plug head.
MENU COLOR TIME + TIME - SIZE START / STOP
Remove the pan and
refrigerate it.
3.
• Once the program is finished, remove
the pan from the machine and cover
it with a clean kitchen towel.
• Refrigerate the pan to cool and
thicken the yogurt for at least 4 hours
or overnight.
• After chilling, your homemade yogurt
is ready to enjoy.
Milk
Milk
Milk
33

WARNING: Do not store yogurt in the refrigerator for more than 4 days after
making it. Ensure you use fresh ingredients and avoid using expired milk in
the appliance.
Here are tips for using the yogurt program:
• Use whole milk for best results.
• Use plain yogurt with active cultures.
• Avoid adding excessive sugar, as it can hinder the culturing process.
• Allow the yogurt to cool completely before refrigerating.
• The yogurt program on a bread machine is a convenient way to make a
variety of yogurt flavors.
34
• Flavorings should be added to the yogurt after it is made, not
beforehand.
• For the freshest taste, add fruit or flavorings just before consuming
the yogurt.
• Flavored yogurt can be stored in the refrigerator for up to 4 days.
• The recipes provided below are for making a single cup of yogurt.
• Sweeten your yogurt as desired using honey, maple syrup, or sugar.
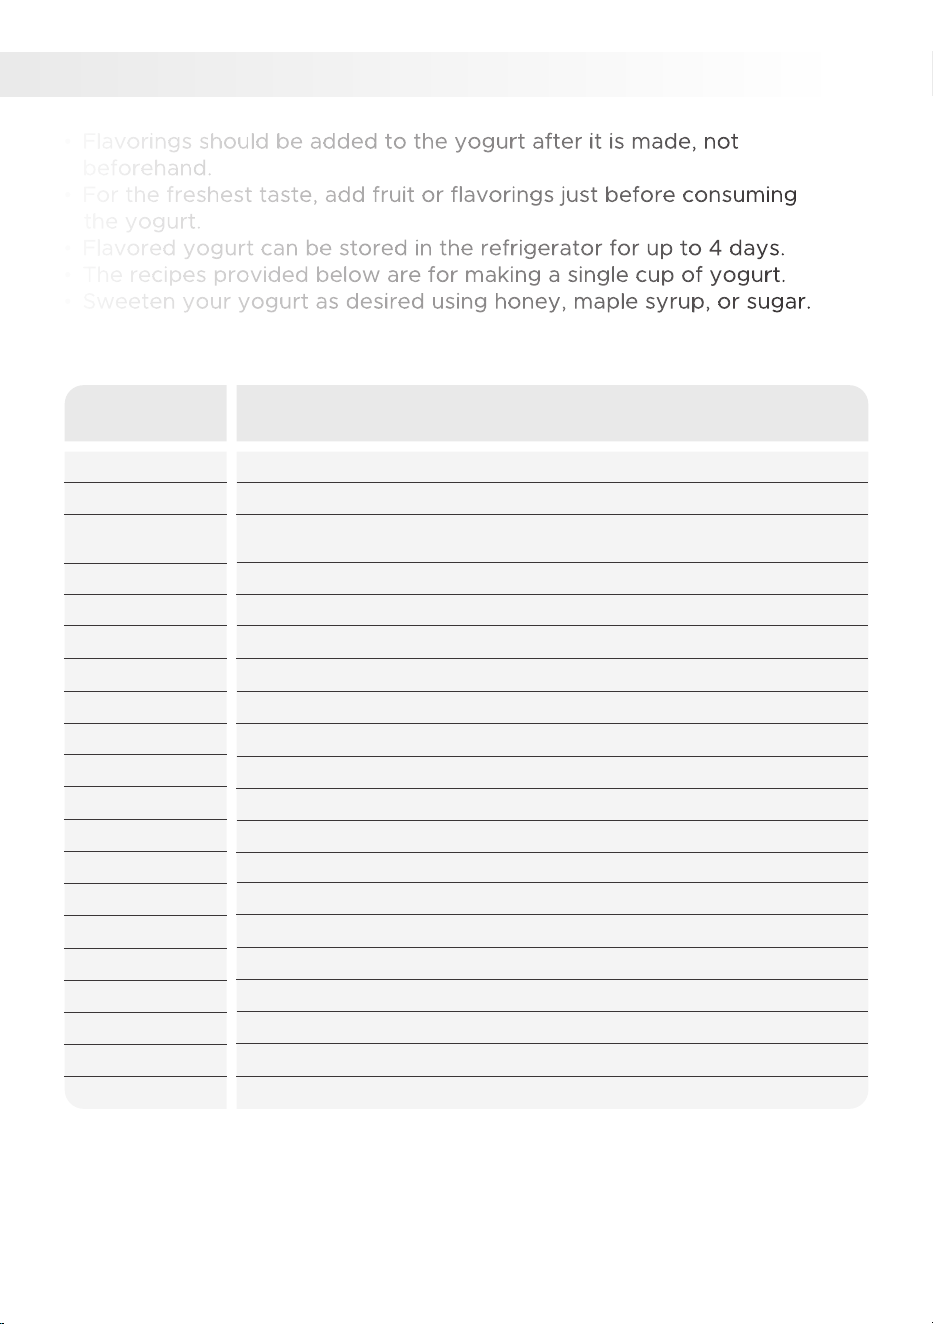
YOGURT SERVING SUGGESTIONS
Strawberry
Vanilla
Raspberry
Prune
Orange
Suggestions
Apple
Blueberry
Chocolate
Honey
Lemon
Lime
Maple-Nut
Almond
Apricot
Banana
Cherry
Coffee
Peach
Pear
Plum
Ingredients
¼ small apple
1 tbsp blueberry preserve
2 tbsp chocolate syrup / 1 tbsp chocolate milk powder / 1 tsp
shaved chocolate (optional)
1 tbsp honey
2 tsp fresh lemon juice
2 tsp fresh lime juice
2 tbsp orange marmalade or chopped orange
2 prunes, chopped
1 tsp maple syrup, 2-4 tbsp finely chopped nuts
1 tbsp raspberry jam
1 tbsp strawberry jam or 2 tbsp strawberries, sliced
1 tsp vanilla extract
1 tbsp almonds chopped, 8 drops almond extract
3 dried apricots, chopped
1½ tbsp honey, ¹⁄
3
cup banana, peeled and chopped
1 tbsp cherry jam, 6 cherries, chopped and stones removed
1 tsp instant coffee, dissolved in ½ tsp water
1 tbsp peach jam or 5 slices of peeled peach
5 thin slices of pear, chopped
2 small fresh plums, sliced
35
The bread machine's bake program offers an effortless way to bake
homemade bread without hand-kneading or a stand mixer. It's suitable for
a variety of bread recipes like white bread, whole wheat bread, sourdough
bread, sweet breads, quick breads, rolls, and pizza dough.
Sun-Dried Tomato, Cheese, and Olive Bread Recipe
Here's a sample recipe for Sun-Dried Tomato, Cheese, and Olive Bread to
use with the dough and bake program on your bread machine.
Please note the estimated baking times:
Dough: 1 hour 50 min.
Baking Time: 1 hour
Ingredients:
• 1 cup warm water
• 3 cups bread flour
• 2 tablespoons olive oil
• 2 tablespoons sugar
• 1 teaspoon salt
• 2 teaspoons active dry yeast
• 1/3 cup sun-dried tomatoes, chopped
• 1/2 cup shredded cheese (such as cheddar or mozzarella)
• 1/4 cup sliced olives (black or green)
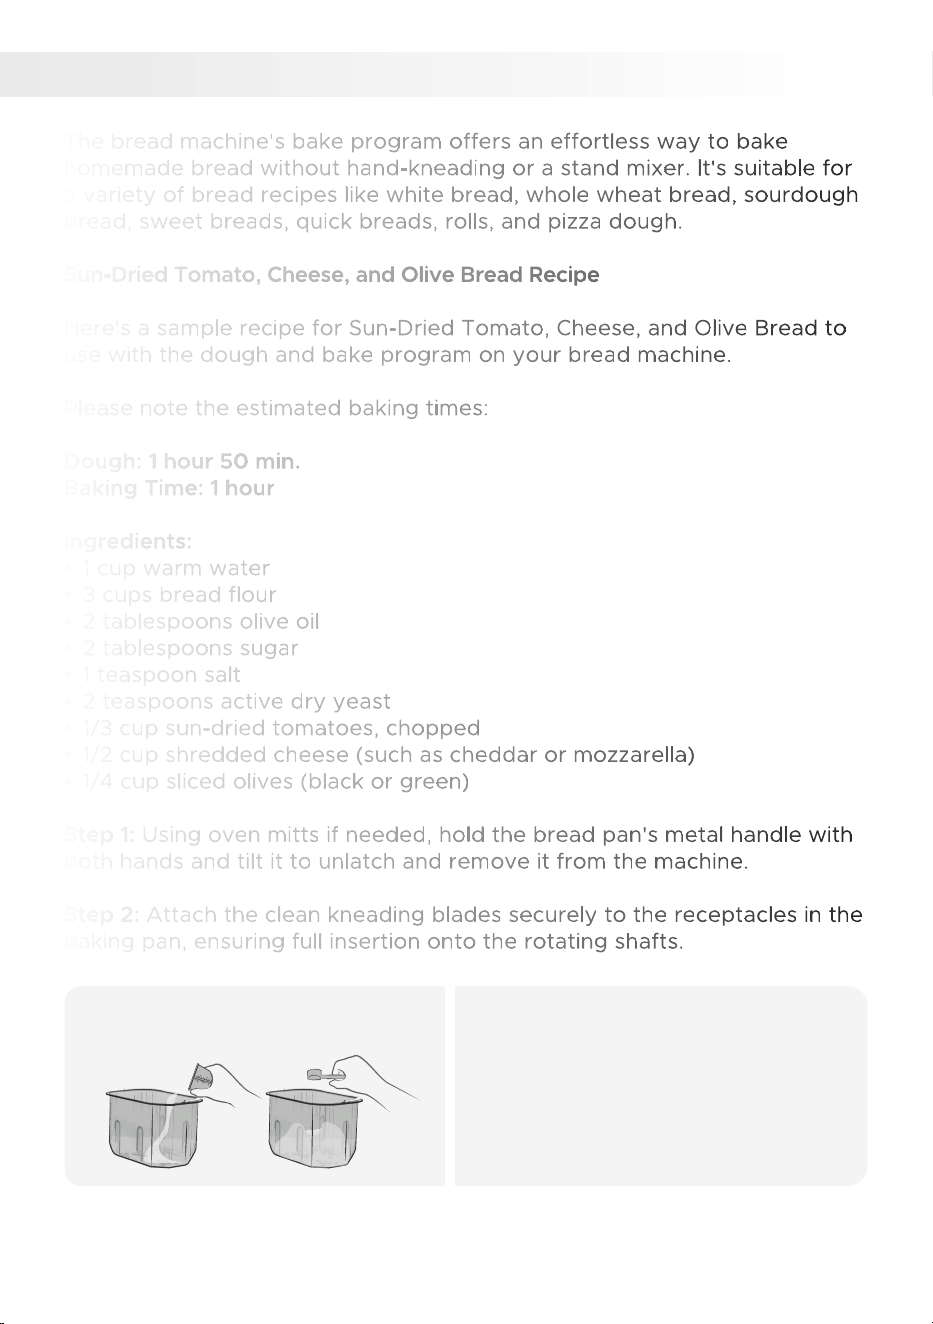
Step 1: Using oven mitts if needed, hold the bread pan's metal handle with
both hands and tilt it to unlatch and remove it from the machine.
Step 2: Attach the clean kneading blades securely to the receptacles in the
baking pan, ensuring full insertion onto the rotating shafts.
BAKE PROGRAM
11.
Add ingredients to pan.1.
• Add accurately measured ingredients
in the specified order of the recipe.
• Create a cavity in the flour and place
yeast inside without touching liquids.
• Place the pan into the bread maker
and close the lid.
36
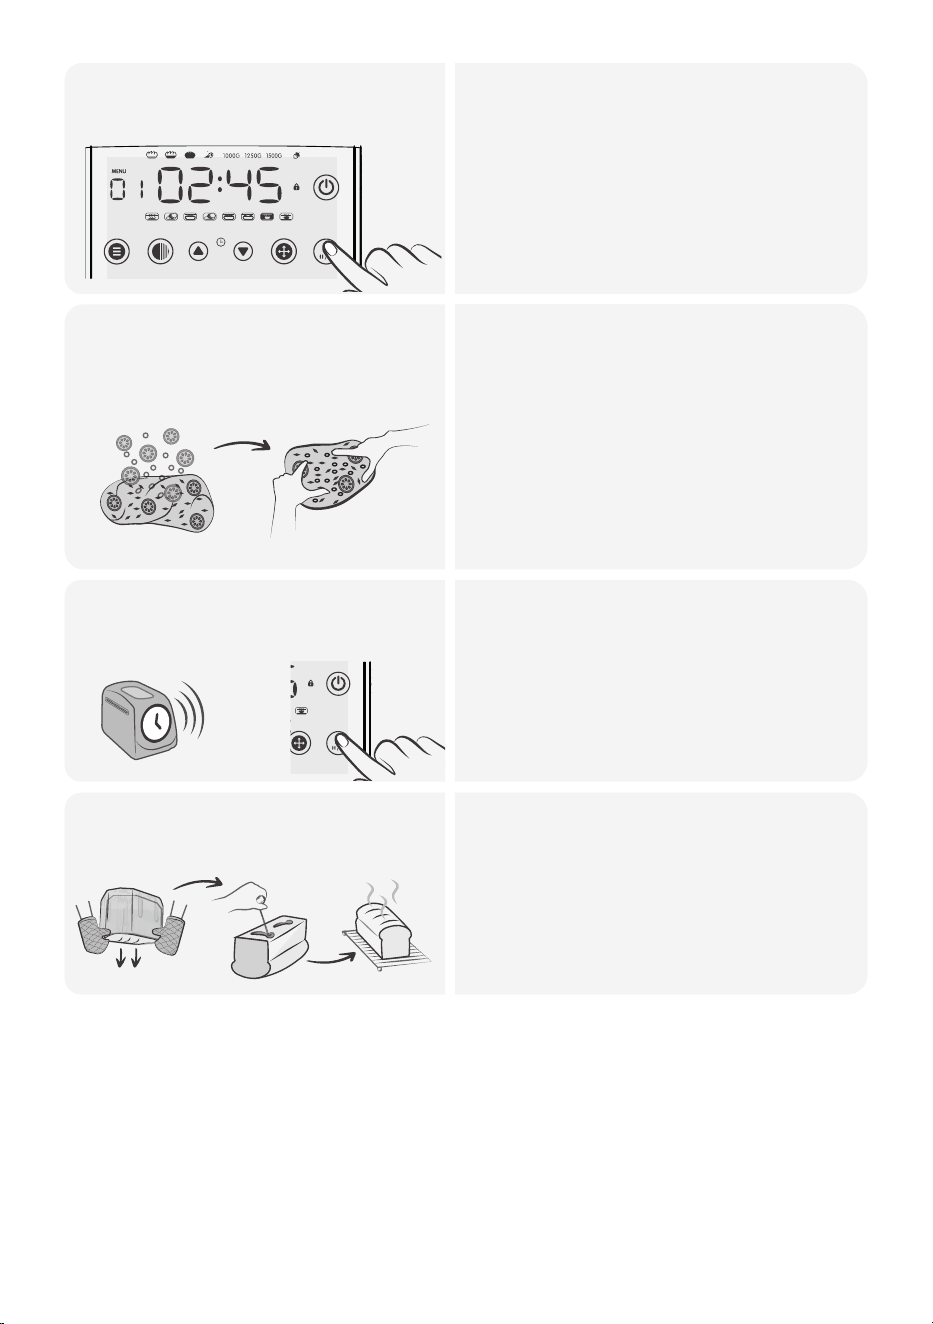
Select program 6 (dough)
and begin the cycle.
2.
• Start by preparing the dough using the
bread machine's dough program (6).
• This typically takes around 1 hour and
50 minutes.
• Once the dough program is complete,
remove the dough from the machine
and place it on a lightly floured surface.
• Wear oven mitts or protective gear.
Remove the dough from the
pan and add the remaining
ingredients.
3.
• Remove the kneading blades if
attached.
• Add the chopped sun-dried tomatoes,
• shredded cheese, and sliced olives to
the dough, gently kneading them into
the mixture.
• Shape the dough into a loaf and place
it back into the pan without the
kneading paddles and close the lid.
Select the Program 11 (Bake)
and start baking.
4.
• Select the Bake program (11) and
bake thebread for 1 hour.
• When the bread is ready, the timer
will reach 0:00 and beep 10 times.
The Keep Warm function will activate
automatically.Press the start/stop
button, open the lid.
MENU COLOR TIME + TIME - SIZE START / STOP
Remove the bread from the
pan and enjoy!
5.
• Remove the bread from the oven and
let it cool in the loaf pan for a few
minutes.
• Transfer it to a wire rack to cool
completely before slicing.
• Unplug the power cord, holding the
protected plug head.
MENU COLOR TIME + TIME - SIZE START / STOP
37
CUSTOM PROGRAM
12.
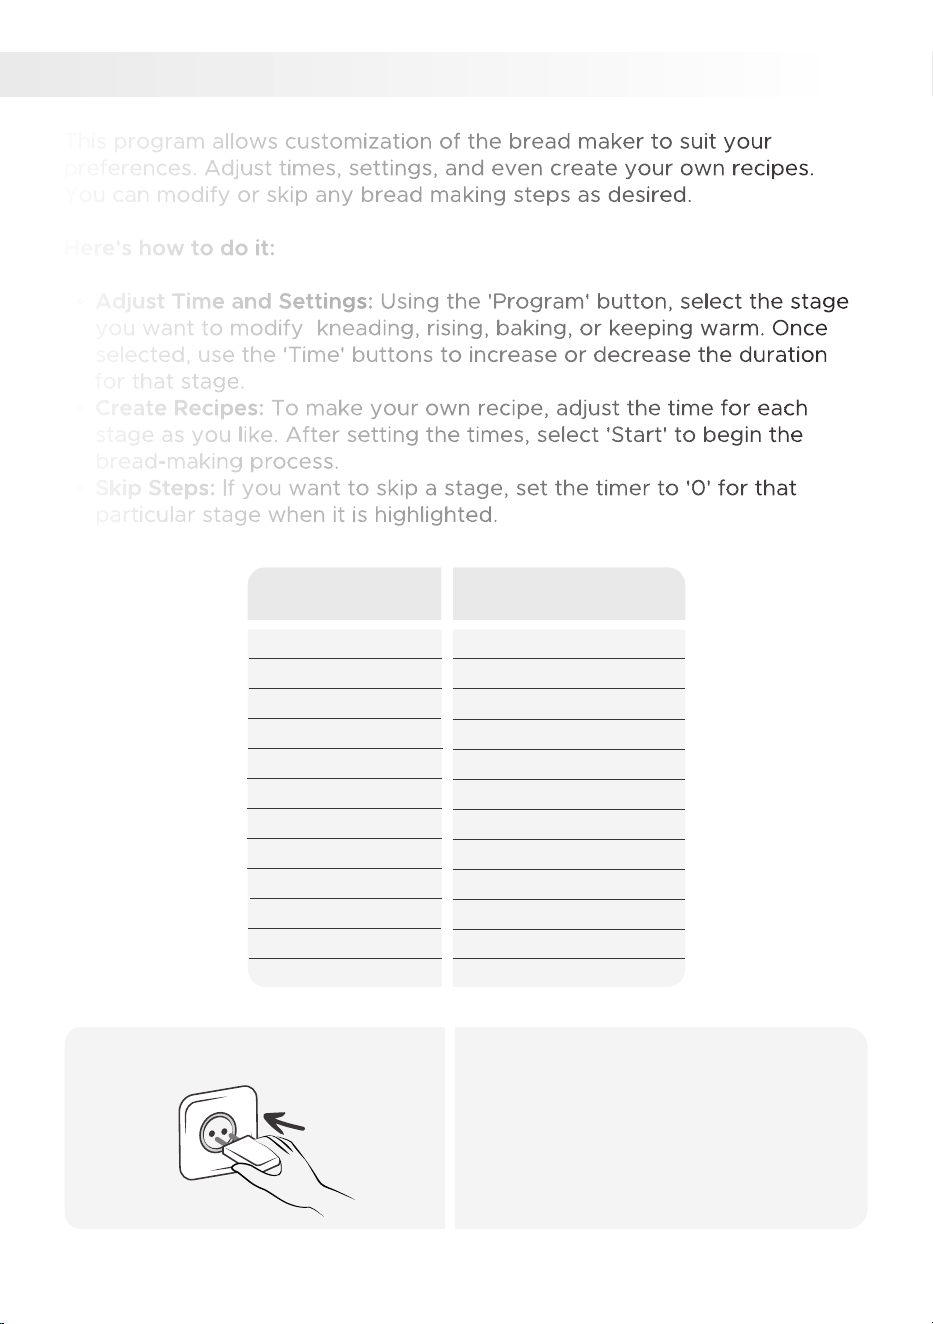
This program allows customization of the bread maker to suit your
preferences. Adjust times, settings, and even create your own recipes.
You can modify or skip any bread making steps as desired.
Here's how to do it:
◦ Adjust Time and Settings: Using the 'Program' button, select the stage
you want to modify kneading, rising, baking, or keeping warm. Once
selected, use the 'Time' buttons to increase or decrease the duration
for that stage.
◦ Create Recipes: To make your own recipe, adjust the time for each
stage as you like. After setting the times, select 'Start' to begin the
bread-making process.
◦ Skip Steps: If you want to skip a stage, set the timer to '0' for that
particular stage when it is highlighted.
Time
0 - 30 minutes
0 - 30 minutes
0 - 30 minutes
0 - 30 minutes
0 - 25 minutes
0 - 30 minutes
0 - 25 minutes
0 - 60 minutes
0 - 60 minutes
0 - 60 minutes
0 - 80 minutes
0 - 60 minutes
Program Stage
Knead 1
Rest 1
Knead 2
Rest 2
Knead 3
Rest 3
Knead 4
Rise 1
Rise 2
Rise 3
Bake
Keep Warm
Plug in the power cord.1.
• Ensure your hands are dry and firmly
insert the plug into the outlet.
38
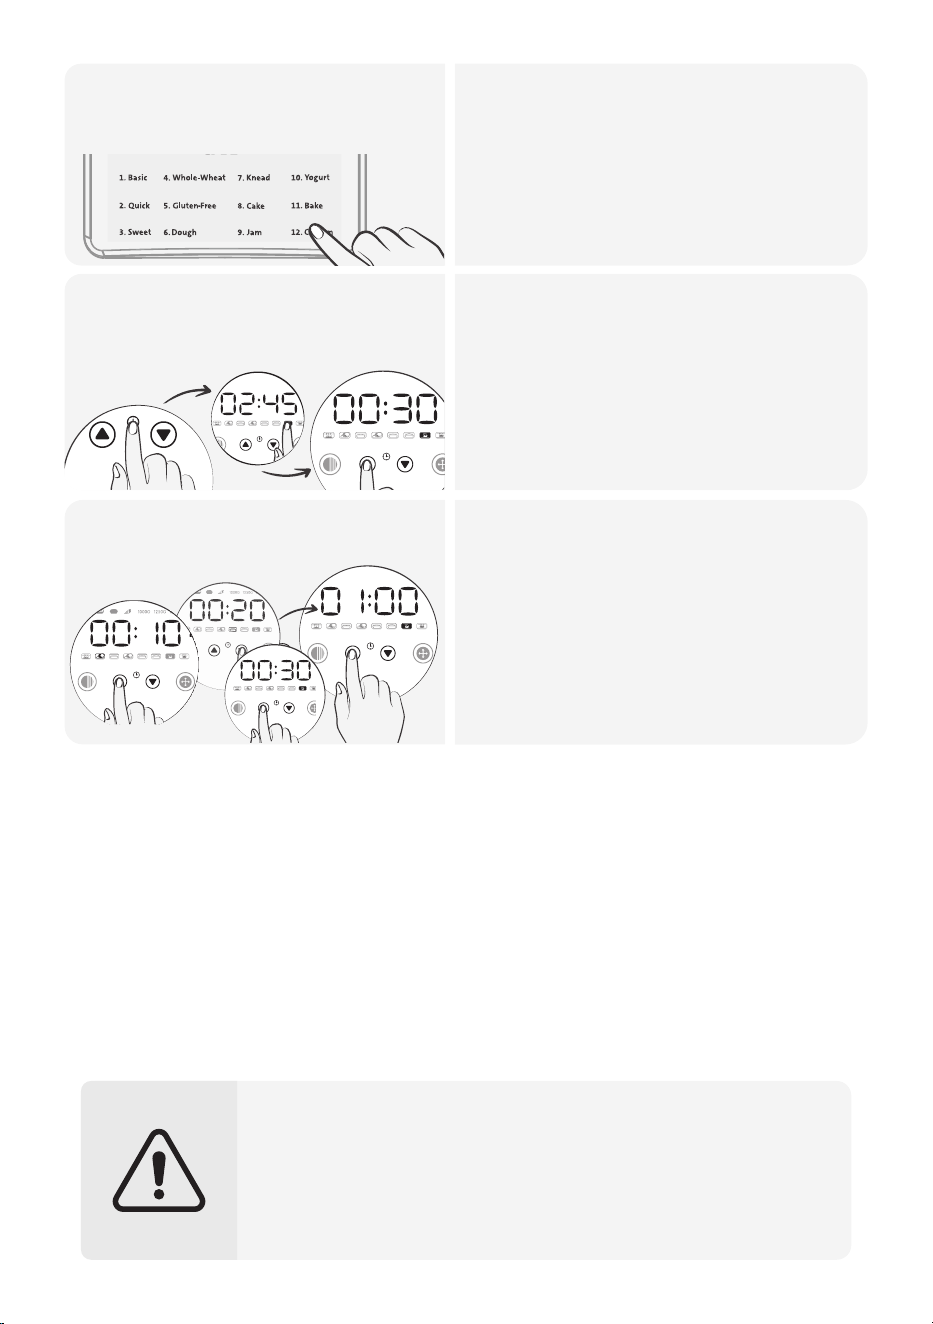
Select the Program 12
(Custom).
2.
• Choose Program 12 (Custom).
• Use the COLOR button to set crust
darkness at the beginning or end of
your settings.
MENU COLOR TIME + TIME - SIZE START / STOP
• Set the baking cycle time by using
the TIME buttons when the time
digits are flashing.
• Press the SIZE button to confirm the
set time and proceed to the next
preparation stage.
• Follow the same method to select all
your desired settings.
Customize the baking
stages
3.
• After selecting and confirming the
time for the final baking stage, the
time digits will stop flashing, and the
total program duration will be
displayed on the screen.
• The display indicates the selected
stage.
• Please note that in this program, you
cannot adjust the size of the loaf.
• Remember to unplug the appliance from the electrical outlet once
the bread is done.
• The machine will be hot after baking, so wear oven mitts to protect
yourself from burns.
• Avoid placing ingredients in the machine that exceed the baking
pan capacity. Overloading the machine can lead to overflow,
burning, and the production of burnt odors and smoke.
+
+
39
Start baking4.

CLEANING & MAINTENANCE
Here's a step-by-step guide on how to clean your bread maker:
Safety Precautions
Bread Maker's Interior and Exterior
1. Use a damp, soft cloth or sponge to wipe down the interior, lid, viewing
window, and exterior If needed, a mild detergent can be used on the
exterior.
2.Make sure to clean the heating element to prevent any burning smells
during baking.
3.Dry thoroughly with a soft cloth to prevent water spots.
Cleaning the Bread Pan and Kneading Paddles:
Remove the bread pan and kneading paddles: Once the bread maker has
cooled down completely, remove the bread pan and the kneading paddles.
Before starting any cleaning or maintenance, ensure that the
following safety precautions are taken and check for any damage
after every use.
1. Disconnect the bread maker from the power source.
2.Let the bread maker cool down completely if it was recently in use.
3.Never immerse the bread maker in water or any other liquid.
4.Do not use abrasive cleaners or scouring pads on any part of the
bread maker.
5.The product is not suitable for use in a dishwasher.
Pour warm or room-temperature
water into baking pan.
1.
Soak:
• If the kneading paddles are stuck,
pour warm or room-temperature
water into the bread pan to help
loosen them.
• Let it soak for about 10-15 minutes.
• Avoid leaving the water in for too
long, and do not immerse the bread
pan in water.
Kneading
blade
Drain the water and remove
kneading paddles.
2.
Remove the kneading paddles:
• After soaking, drain the water from
the bread pan.
• If the kneading paddles are still
attached, gently wiggle the drive
shaft at the bottom of the pan until
the paddles come off.
Baking pan side view
Remove
40

• Clean: Use a bamboo skewer to remove leftover bread from the paddles.
Clean them and the bread pan with a soft sponge and mild detergent.
Avoid abrasive tools to protect the non-stick coating.
• Dry: Let all parts dry thoroughly before reassembling them. Avoid drying
under direct sunlight as this can damage the non-stick coating.
• Check the non-stick coating: Over time, the non-stick coating may
discolor or peel off. This is not harmful and will not affect the
performance. To replace these parts, visit SAKI's website or email
Customer Service at [email protected].
Cleaning the Accessories (Measuring Cup, Hook, Measuring
Spoon):
• Soak and scrub: Soak these accessories in a basin of hot water mixed
with mild dish soap. After a few minutes, scrub them gently with a soft
sponge or dishcloth.
• Rinse: Rinse the accessories under hot running water to ensure all soap
residue is removed.
• Dry: Thoroughly dry each accessory with a clean dish towel or let them
air dry. Ensure they are completely dry before storing them to prevent
bacteria or mold growth.
Maintenance:
• Regularly inspect the bread maker, bread pan, and kneading paddle for
signs of wear or damage. Replace any worn or damaged parts promptly.
• Take care when removing bread and the paddle to avoid scratching the
pan's non-stick coating.
• Check the drive shaft for debris and ensure it moves freely.
• Store the bread maker in a cool, dry place, covered to prevent dust or
dirt accumulation.
• Avoid wrapping the cord around the appliance; instead, coil it loosely by
the side.
• Handle the bread maker with care to prevent damage.
Remember, regular cleaning and maintenance will extend the appliance's
lifespan and improve bread quality.
Using & Assembling Saki Bread Maker for the First Time
During the initial use of the bread maker, you may notice a slight burning
smell due to the new heating element. To prevent the smell from affecting
your bread, run the bread maker empty for the first use.
41

Pour warm or room-temperature
water into baking pan.
• Clean the bread pan and kneading
paddles with hot, soapy water. Rinse
thoroughly and ensure they are
completely dry.
• Place the bread maker on a flat, dry,
heat-resistant surface.
• Hold the pan's handle with both
hands and position it in the baking
chamber without using the handle.
Push down firmly on both ends until
it clicks into place.
I.
III.II.
x
• Attach the kneading paddles to the
shafts in the baking pan and close
the lid.
• Make sure the paddles are securely
attached, even if they can move
loosely in either direction when
connected to the rotating shafts.
• Finallly, plug the bread maker into an
electric outlet to begin using it.
Attach the kneading paddles to
the shafts and close the lid
42

Here are common bread maker problems and troubleshooting tips.
For further inquiries, email us at [email protected].
TROUBLESHOOTING
BAKING RESULTS
Loaf Size & Shapes
If there is a collapse in the
middle of the bread:
• Avoid adding too much water or using
insufficient flour.
• Use fresh flour suitable for the
program and the right type and
amount of yeast.
• Maintain appropriate room and
ingredient temperatures.
• Do not exceed the capacity of the
bread pan.
bread
bread pan
If the bread rises too much:
• Use the correct water and flour
measurements.
• Avoid high gluten bread flour,
excessive sugar, and insufficient
salt.
• Use the appropriate amount and type
of yeast.
• Maintain proper room and ingredient
temperatures.
If the bread does not rise
sufficiently:
• Use accurate water and flour
measurements.
• Use fresh flour suitable for the
program.
• Add enough sugar or an appropriate
sweetener.
• Follow the recommended amount
and type of yeast.
• Maintain proper room and ingredient
temperatures.
• Avoid opening the lid during the rising
cycle.
43

If the loaf is short and heavy:
• Check that yeast is added and no
power failures occurred during
operation.
• Use water at the correct temperature,
sufficient salt, and keep yeast and salt
separate before kneading.
• Avoid excessive water temperature
and yeast moisture before kneading
If the sides of the loaf are
sunken:
• Remove the bread pan promptly after
the baking cycle is complete.
Bread Texture
44
Dense or
heavy bread:
• Check the flour measurement and avoid using excessive flour.
• Ensure that the liquid measurement is sufficient for proper hydration.
• Adequately knead the dough to develop gluten structure.
• Consider using the appropriate flour type for the desired texture.
Rough or
tough bread:
• Double-check the flour measurement and avoid excessive amounts.
• Ensure proper kneading and avoid overmixing the dough.
• Use the appropriate flour type for the desired texture.
Sticky bread:
• Verify that the liquid measurement is not excessive.
• Ensure sufficient kneading to develop proper gluten structure.
• Check if the flour type used is suitable for the desired texture.
• Confirm that there is enough flour in the dough.
• Ensure adequate kneading to develop gluten structure.
• Avoid overmixing the dough.
• Verify that the flour type used is appropriate for the desired texture.
• Verify that the liquid measurement is not excessive.
• Ensure that the dough is adequately kneaded and rises sufficiently.
• Avoid using the wrong flour type, as it may affect the structure
and rise.
Cratered
bread:
Crumbly
bread:

Troubleshooting tips for bread texture problems:
• Use the correct amount of flour and liquid, considering the flour type used.
• Knead the dough for the recommended duration to develop gluten.
• Avoid overmixing the dough to prevent toughness.
• Allow sufficient rising time to develop air bubbles.
• Choose the appropriate flour type for desired texture.
Bread Crust Color & Thickness
Unsatisfactory Results of Other Menu Programs
Crust too
light:
• Verify that you are using sufficient flour in the dough.
• Ensure proper kneading and rising times to allow for proper browning.
• Check if the flour type used is suitable for achieving a desired
crust color.
Crust too
dark:
• Double-check the flour measurement and avoid excessive amounts.
• Ensure the kneading and rising times are appropriate for the recipe.
• Avoid prolonged rising that can lead to excessive browning.
• Check if the flour type used is suitable for achieving the desired
crust color.
Crust too
thick:
• Check the flour measurement and avoid excessive amounts.
• Ensure proper kneading and rising times to prevent excessive
crust thickness.
• Avoid prolonged rising that can contribute to a thicker crust.
• Verify if the flour type used is suitable for achieving the desired
crust thickness.
Insufficiently
risen cake:
• Use the appropriate amount of yeast and let the dough rise in a
warm place (75-85°F).
• Avoid overmixing the dough to maintain gluten structure.
• Adjust the consistency by adding more flour if the dough is too wet.
• Use the right amount of fruit and adjust the sweetness with more
sugar.
• Cook the jam for a longer time or use thickeners like pectin or
cornstarch.
• Refrigerate the jam to help it thicken.
Watery jams:
45

PRODUCT & PARTS
Product Troubleshooting:
Power Issues:
◦ The bread maker does not turn on: Ensure that the bread maker is
plugged in and switched
to the "On" position.
◦ The bread maker stops during the baking cycle: Check if the bread
maker is overheating. If so, unplug it and allow it to cool down before
using it again.
Kneading and Mixing:
◦ The bread maker does not knead the dough: Ensure that the kneading
paddle is properly inserted into the bread pan.
◦ The bread maker does not mix the ingredients: Verify that the
ingredients are added in the correct order and that the bread maker is
not overloaded.
Baking Issues:
◦ The bread maker does not bake the bread properly: Confirm that the
bread maker is set to the correct baking time and temperature.
Removing Kneading Blades:
◦ Kneading blades cannot be removed from the baking pan: Follow the
cleaning instructions of the user manual. Pour warm water into the
baking pan, wait for 10 minutes, and then drain the water.
Smoke and Odor:
◦ Smoke and burning odor from the radiator when baking: Check if any
ingredients are touching the electric heat pipe. Ensure that the baking
chamber is clean and free from any spilled ingredients.
Display Issues:
◦ H:HH on the display screen: This indicates a high temperature inside
the bread machine or it is still hot from the previous operation. Allow it
to cool down before using it again.
◦ E:E0 on the display screen: This indicates a temperature sensor
malfunction. Contact customer service for assistance.
Bread Sticking:
◦ Bread sticking to the pan: Lightly wipe the inside of the pan with
vegetable oil to prevent sticking.
46

Parts Troubleshooting:
Kneading Paddle:
◦ The kneading paddle is damaged: If the kneading paddle is damaged, it
may not properly knead the dough. Replace the kneading paddle with a
new one to ensure proper functionality.
Bread Pan:
◦ The bread pan is damaged: If the bread pan is damaged, it may not hold
the dough properly during the baking process. Replace the bread pan
with a new one to maintain optimal
performance.
47

QUESTIONS & ANSWERS
Q: What are some of the most common problems with bread makers?
A: Some of the most common problems encountered with bread
makers are:
• Rising Issues: Improper rising may occur due to expired or insufficient
yeast, or incorrect water temperature for yeast activation.
• Density: Dense bread can result from excessive flour or insufficient
liquid in the dough. Accurate measurements and following the recipe
can help avoid this.
• Dryness/Wetness: Incorrect ingredient measurements, especially
water, can lead to dry or wet bread. Adjusting liquid amounts can help
achieve the desired texture.
• Bread Maker Stops: Unexpected mid-cycle stops may be due to
power, overheating, or component issues. Check power, allow cooling,
or
contact support.
• Refer to the user manual for machine-specific troubleshooting steps
and recommendations.
Q: How can I troubleshoot common bread maker problems?
A: When encountering common bread maker problems, consider the
following troubleshooting tips:
• Verify ingredients and measurements as specified in the recipe to
ensure correct proportions, as incorrect ones can affect texture and
rise.
• Ensure the kneading paddle is properly inserted and securely
positioned in the bread pan to avoid uneven mixing or kneading.
• Thoroughly clean the bread pan and kneading paddles after each
use to prevent residue or debris from impacting future baking
results.
• Consult the user manual for your bread maker for troubleshooting
steps and specific guidance to address common problems.
• If the issue persists or you need further assistance, contact us at
48

Q: What are some tips for making a good loaf of bread in a bread maker?
A: Here are some tips to ensure a good loaf of bread when using a
bread maker:
• Use fresh and high-quality ingredients for the best flavor and texture.
• Measure your ingredients accurately, following the recipe instructions
precisely.
• Pay attention to the order in which ingredients are added to the
bread pan, typically starting with liquid ingredients first.
• Follow the recipe instructions closely, including any specific settings
or
program recommendations.
• If trying a new recipe, consider making a small batch first to test and
adjust as needed.
• Regularly clean and maintain your bread maker according to the
manufacturer's instructions to ensure optimal performance.
Q: How long does it take to make bread in a bread maker?
A: Bread baking time in a bread maker can vary depending on the recipe
and program selected. Typically, the complete bread-making process,
including mixing, kneading, and baking, takes approximately 2-3 hours.
Q: What are some of the accessories that can be used with a bread maker?
A: Enhance your bread-making with accessories like additional kneading
paddles, liners,
measuring tools, recipe books, and storage bags. They provide convnience
for measuring, storing, and exploring new recipes.
Q: Why seasonal variations affect baking results?
A: Seasonal variations affect baking due to room temperature changes.
Higher temperatures cause over-rising and a collapsed center, while lower
temperatures result in insufficient rising. Adjust water temperature to
balance these effects.
Q: What is the maximum usage frequency of product?
A: Allow the product to cool for about 1 hour after each use to ensure
optimal baking results for subsequent uses.
49

To fully benefit from your product's warranty and stay informed
about important updates, please registeryour bread maker online.
It's a simple and quick process. Here's how:
WARRANTY REGISTRATION
1. Click the warranty registration tab under the support page or
visit www.saki.us/pages/warranty.
2. Complete the required fields in the registration form, making
sure to provide accurate information.
3. Submit the form.
4. After submitting the form, you can access your warranty card
through your account's profile tab on the website.

Scan to access warranty registration


100 Bayview Cir Suite 100, Newport Beach, CA 92660
Email: [email protected]
If you have any questions or concerns about your product,
please contact our helpful Customer Support Team.
*Please have your order number ready before contacting our team
CUSTOMER SUPPORT