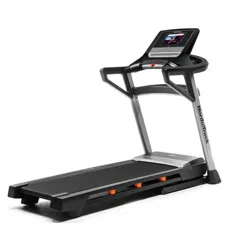
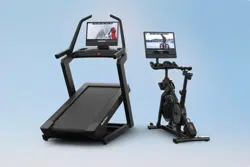
Nordictrack NTL29222 Elite
Product's Documents
Below are documents related to this product, you can read online or download:
- Owner's manual - (English) Read Online | Download pdf
User Manual Nordictrack NTL29222 Elite
Use a Surge Suppressor
Your treadmill, like other electronic equipment, can be damaged by sudden voltage changes in your home’s power. Voltage surges, spikes, and noise interference can result from weather conditions or from other appliances being turned on or off. To decrease the risk of damaging the treadmill, always use a surge suppressor (A) with the treadmill. To purchase a surge suppressor, see precaution 15 on page 3.
Use only a surge suppressor (A) that is UL 1449 listed as a transient voltage surge suppressor (TVSS). The surge suppressor must have a UL suppressed voltage rating of 400 volts or less and a minimum surge dissipation of 450 joules. The surge suppressor must also be electrically rated for 120 volts AC and 15 amps. There must be a monitoring light on the surge suppressor to indicate whether it is functioning properly. Failure to use a properly functioning surge suppressor could result in damage to the control system of the treadmill and serious injury to users.
Plug in the Power Cord
The treadmill must be grounded. If it should malfunction or break down, grounding provides a path of least resistance for electric current to reduce the risk of electric shock. The treadmill power cord (B) has a plug with a grounding pin (C) (see drawing 1 on this page).
Plug the power cord (B) into a surge suppressor (A), and plug the surge suppressor into an appropriate outlet (D) that is properly installed and grounded in accordance with all local codes and ordinances. The outlet must be on a nominal 120-volt circuit capable of carrying 15 or more amps. To avoid overloading the circuit, do not plug other electrical devices, except for low-power devices such as cell phone chargers, into the surge suppressor or into an outlet on the same circuit. IMPORTANT: If the treadmill is connected to an AFCI-equipped outlet and your circuit breaker trips repeatedly when the treadmill is used, see the front cover of this manual to purchase an arc filter.
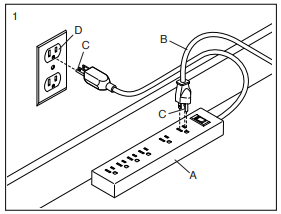
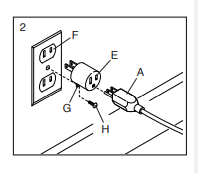
A temporary adapter (E) may be used to connect the surge suppressor (A) to a 2-pole receptacle (F) if a properly grounded outlet is not available.
The lug (G) or wire extending from the adapter must be connected with a metal screw (H) to a permanent ground such as a properly grounded outlet box cover. Some 2-pole receptacle outlet box covers are not grounded. Before using an adapter, contact a qualified electrician to determine whether the outlet box cover is grounded. The temporary adapter should be used only until a properly grounded outlet can be installed by a qualified electrician.
CONSOLE DIAGRAM
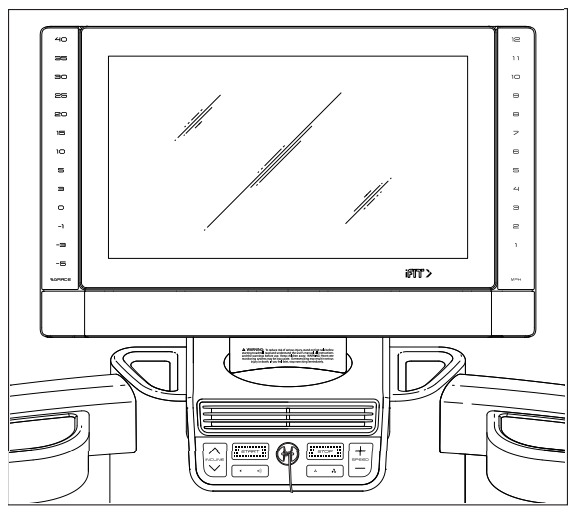
FEATURES OF THE CONSOLE
The advanced treadmill console offers a selection of features designed to make your workouts more effective and enjoyable.
The console features wireless technology that enables the console to connect to iFIT and provide you with a rotating selection of featured iFIT workouts. Each workout automatically changes the speed and incline of the treadmill as an iFIT coach guides you through the workout.
With an iFIT subscription, you can enjoy unlimited access to iFIT’s library of thousands of studio and destination workouts. You can even create your own workouts, record your workout results, set and track fitness goals, and access many other features.
When you use the manual mode of the console, you can change the speed and incline of the treadmill with the touch of a button. As you exercise, the console will display instant exercise feedback.
You can also measure your heart rate when you use a compatible heart rate monitor. See page 30 to purchase a heart rate monitor.
To turn on the power, see page 21. To learn how to use the touch screen, see page 21. To set up the console see page 22.
IMPORTANT: If the treadmill has been exposed to cold temperatures, allow it to warm to room temperature before you turn on the power. If you do not do this, you may damage the console displays or other electrical components.
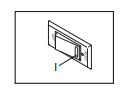
Plug in the power cord (see page 19). Next, locate the power switch on the treadmill frame near the power cord. Press the power switch into the reset position (I).
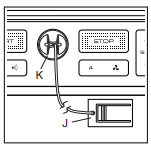
Next, stand on the foot rails of the treadmill. Locate the clip (J) attached to the key (K), and slide the clip securely onto the waistband of your clothes. Then, insert the key into the console. Note: It may take some time for the console to be ready for use. IMPORTANT: In an emergency, the key can be pulled from the console, causing the walking belt to slow to a stop. Test the clip by carefully taking a few steps backward; if the key is not pulled from the console, adjust the position of the clip
Note: The console can display speed and distance in either miles or kilometers. To find which unit of measurement is selected, see HOW TO CHANGE CONSOLE SETTINGS on page 28. For simplicity, all instructions in this section refer to miles.
The console features a tablet with a full-color touch screen. The following information will help you become familiar with the tablet’s advanced technology:
Before using the treadmill for the first time, set up the console.
1. Connect to your wireless network.
To access the internet, download iFIT workouts, and use several other features of the console, you must connect the console to a wireless network. Follow the prompts on the screen to connect the console to your wireless network.
2. Customize settings.
Fill in the form on the screen to set the console to display the desired unit of measurement and your time zone. Note: If you need to change these settings later, see HOW TO CHANGE CONSOLE SETTINGS on page 28.
3. Log into or create an iFIT account.
Provide your email address, and follow the prompts on the screen to sign up for or log into your iFIT account.
4. Check for firmware updates
First, touch the menu button (three horizontal lines symbol), touch Settings, touch Maintenance, and then touch Update. The console will check for firmware updates. See step 5 on page 29 for more information.
5. Calibrate the incline system.
First, touch the menu button (three horizontal lines symbol), touch Settings, touch Maintenance, touch Calibrate Incline, and then touch Begin to calibrate the incline system. See step 6 on page 29 for more information.
The console is now ready for you to begin working out. The following pages explain the various workouts and other features that the console offers.
To use the manual mode, see page 23. To use the sled push feature, see page 24. To use a featured workout, see page 25. To create a draw-your-ownmap workout, see page 26. To use an iFIT workout, see page 27.
To view or change console settings, see page 28. To connect to a wireless network, see page 29.
IMPORTANT: If there are sheets of plastic on the console, remove the plastic. To prevent damage to the walking platform, wear clean athletic shoes while using the treadmill. The first time you use the treadmill, observe the alignment of the walking belt, and center the walking belt if necessary (see page 33).
1. Insert the key into the console
See HOW TO TURN ON THE POWER on page 21.
Note: It may take some time for the console to be ready for use.
2. Select the home screen.
When you turn on the console, the home screen will appear on the screen after the console boots up.
If you are in a workout, touch the screen and follow the prompts to end the workout and return to the home screen. If you are in the settings menus, touch the back button (arrow symbol) to return to the home screen.
Note: If you plan to use a wearable heart rate monitor with the console, you must put on the heart rate monitor before you start the walking belt. The console will automatically search for the heart rate monitor for 30 seconds when you start the walking belt at the beginning of each workout. See page 30 for information about purchasing a wearable heart rate monitor.
3. Start the walking belt and adjust the speed
Touch Manual Start on the screen or press the Start button on the console to start the walking belt. The walking belt will begin to move at a low speed. As you exercise, change the speed of the walking belt as desired by pressing the speed increase and decrease buttons. Each time you press one of the buttons, the speed setting will change by 0.1 mph; if you hold down the button, the speed setting will change in increments of 0.5 mph.
If you press one of the numbered speed buttons, the walking belt will gradually change speed until it reaches the selected speed setting. To select a speed setting that includes a decimal, press two numbered buttons in succession. For example, to select a speed setting of 3.5 mph, press the 3 button and then immediately press the 5 button. Note: This feature will not function when the console is set to metric units.
4. Change the incline of the treadmill as desired
To change the incline of the treadmill, press the incline increase and decrease buttons or one of the numbered incline buttons. Each time you press one of the buttons, the incline will gradually change until it reaches the selected incline setting.
Note: If the walking belt is moving at a high speed and you adjust the incline below 0% or above 15.5%, the speed of the walking belt may automatically decrease.
IMPORTANT: The first time you use the treadmill, you must calibrate the incline system (see step 6 on page 29).
5. Monitor your progress with the display modes.
While you walk or run on the treadmill, a selection of workout information will be displayed:
Additional information is also available. To view or browse additional statistics and charts, swipe down from the top of the screen. You can also touch the + button on the screen to view stats or charts. Note: If you wear a compatible heart rate monitor (see page 30), your heart rate will also be displayed.
If desired, adjust the volume by pressing the volume buttons on the console
To stop the walking belt, press the Stop button or tap the screen and touch the pause symbol. To restart the walking belt, press the Start button or touch the play symbol on the screen.
6. Turn on the fan if desired.
The fan features several speed settings, as well as an auto speed mode. Press the fan buttons repeatedly to select the desired speed or mode, or to turn on or turn off the fan.
7. When you are finished exercising, remove the key from the console.
Step onto the foot rails and press the Stop button on the console or tap the screen and touch the pause symbol. Then, touch the stop symbol on the screen or press the Stop button again. A workout summary will appear on the screen. If you wish to save your workout for future use, you can add it as a favorite by touching the heart icon on the screen. You may also be able to either save or publish your results using one of the options on the screen. Touch Finish to exit to the home screen. Then, remove the key from the console and put it in a secure place.
When you are finished using the treadmill, press the power switch into the off position and unplug the power cord. IMPORTANT: If you do not do this, the treadmill’s electrical components may wear prematurely
1. Insert the key into the console.
2. Select the home screen
3. Start the walking belt and adjust the speed to 1 mph. Then, adjust the incline to 0%.
4. Grip the handrails with both hands.
5. Use your body to manually move the walking belt at the desired speed.
6. When you are finished exercising, remove the key from the console.
1. Insert the key into the console.
See HOW TO TURN ON THE POWER on page 21. Note: It may take a few moments for the console to be ready for use.
2. Select the home screen or the workout library
When you turn on the console, the home screen will appear after the console boots up.
If you are in a workout, touch the screen and follow the prompts to end the workout and return to the home screen. If you are in the settings menus, touch the back button (arrow symbol) to return to the home screen.
Touch the buttons at the bottom of the screen to select either the home screen (Home button) or the workout library (Browse button).
3. Select a workout.
To select a workout from the home screen or the workout library, simply touch the desired workout button on the screen. Slide or flick the screen to scroll as necessary.
The featured workouts on your console will change periodically. To save one of the featured workouts for future use, you can add it as a favorite by touching the favorites button (heart symbol). You must be logged into your iFIT account to save a featured workout (see step 3 on page 27).
To draw your own map for a workout, see HOW TO CREATE A DRAW-YOUR-OWN-MAP WORKOUT on page 26.
When you select a workout, the screen will show an overview of the workout that includes details such as the duration and distance of the workout and the approximate number of calories you will burn during the workout.
4. Start the workout
Touch Start Workout to start the workout.
During some workouts, an iFIT coach will guide you through a video workout. Tap the screen to select separate music, trainer voice, and volume options for the workout.
During some workouts, the screen will show a map of the route and a marker indicating your progress. Touch the buttons on the screen to select the desired map options.
If the speed or incline is too high or too low, you can press the increase or decrease buttons to activate Smart Adjust and scale the intensity of the workout. To return to the programmed settings of the workout, touch the screen, and then turn off Smart Adjust.
Note: The calorie goal shown in the workout description is an estimate of the number of calories that you will burn during the workout. The actual number of calories that you burn will depend on various factors, such as your weight. In addition, if you manually change the speed or incline during the workout, the number of calories you burn will be affected.
To pause the workout, simply touch the screen and touch the pause symbol. To continue the workout, touch the play symbol.
To end the workout, touch the screen to pause the workout, and then follow the prompts on the screen to end the workout and return to the home screen.
When the workout ends, a workout summary will appear on the screen. If desired, you can select options such as adding the workout to your schedule (see HOW TO USE AN IFIT WORKOUT on page 27) or adding the workout to your favorites list. Then, touch Finish to return to the home screen.
5. Use headphones if desired.
To connect your headphones to the console, first turn on your headphones, place them in pairing mode, and place them near the console. Then, touch the screen in any open space, touch the option to connect your headphones, and select your headphones from the list on the screen.
When your headphones and the console pair successfully, the audio from the console will play through your headphones.
6. Follow your progress.
7. Turn on the fan if desired.
8. When you are finished exercising, remove the key from the console.
Note: To create a draw-your-own-map workout, the console must be connected to a wireless network (see HOW TO CONNECT TO A WIRELESS NETWORK on page 30). An iFIT account is also required.
1. Insert the key into the console.
2. Select a draw your own map workout.
To select a draw your own map workout, touch Create on the screen.
3. Draw your map
Navigate to the area on the map where you want to draw your workout by sliding your fingers on the screen. Tap the screen to add the start point for your workout. Then, tap the screen to add the end point for your workout. Note: If you want to start and end the workout at the same point, use the Close Loop or Out & Back options. You can also select whether you want your workout to snap to the road.
If you make a mistake, you can touch Undo.
The screen will display the elevation and distance for your workout. If desired, you can change the default speed.
4. Save your workout.
Touch Save New Workout on the screen. If desired, change the title of the workout or add a description.
5. Start the workout
Touch Start Workout on the screen to start the workout. A moment after you touch the button, the walking belt will begin to move. Hold the handrails and begin walking. See step 4 on page 25 for more information.
6. Follow your progress
7. Turn on the fan if desired.
8. When you are finished exercising, remove the key from the console.
To use an iFIT workout, the console must be connected to a wireless network (see HOW TO CONNECT TO A WIRELESS NETWORK on page 30). An iFIT account is also required.
1. Insert the key into the console.
2. Select the home screen.
When you turn on the console, the home screen will appear on the screen after the console boots up.
If you are in a workout, touch the screen and follow the prompts to end the workout and return to the home screen. If you are in the settings menus, touch the back button (arrow symbol) to return to the home screen.
3. Log in to your iFIT account.
If you have not already done so, touch the menu button (three horizontal lines symbol) on the screen and then touch Log in to log in to your iFIT account. Follow the prompts on the screen to enter your username and password.
To switch users within your iFIT account, touch the menu button, touch Settings, and then touch Manage Accounts. If more than one user is associated with the account, a list of users will appear. Touch the name of the desired user.
4. Select an iFIT workout from the home screen or the workout library
Touch the buttons at the bottom of the screen to select either the home screen (Home button) or the workout library (Browse button).
To select an iFIT workout from the home screen or the workout library, simply touch the desired workout button on the screen. Slide or flick the screen to scroll upward or downward if necessary.
The featured iFIT workouts shown on the home screen will change periodically.
The workout library contains all of the iFIT workouts available for the treadmill, organized into categories. To search the workout library, touch the search button (magnifying glass symbol), and select the desired filtering options.
When you select an iFIT workout, the screen will show an overview of the workout that includes details such as the duration of the workout and the approximate number of calories you will burn during the workout.
You can also select options such as adding the workout to your schedule (see step 5) or marking the workout as a favorite (see step 6).
5. Schedule an iFIT workout on the calendar if desired.
If desired, you can schedule an iFIT workout for a future date. Simply view the overview or workout summary of the desired iFIT workout, touch Schedule, and then select the desired date on the calendar.
When the selected date arrives, the iFIT workout that you scheduled will appear on the home screen.
6. Create a list of favorite iFIT workouts if desired.
To mark an iFIT workout as a favorite, simply view the overview or workout summary of the desired iFIT workout and touch the favorites button (heart symbol).
To view a list of iFIT workouts that you have marked as your favorites, select the workout library (Browse button), and then touch My List.
7. Start the workout.
Touch Start Workout on the screen to start the workout. A moment after you touch the button, the walking belt will begin to move. Hold the handrails and begin walking. See step 4 on page 25 for more information.
8. Use headphones if desired.
To connect your headphones to the console, first turn on your headphones, place them in pairing mode, and place them near the console. Then, touch the screen in any open space, touch the option to connect your headphones, and select your headphones from the list on the screen.
When your headphones and the console pair successfully, the audio from the console will play through your headphones.
9. Follow your progress.
10. Turn on the fan if desired.
11. When you are finished exercising, remove the key from the console.
Regular maintenance is important for optimal performance and to reduce wear. Inspect and properly tighten all parts each time the treadmill is used. Replace any worn parts immediately. Use only manufacturer-supplied parts.
Regularly clean the treadmill and keep the walking belt clean and dry. First, press the power switch into the off position and unplug the power cord. Wipe exterior parts of the treadmill with a damp cloth and a small amount of mild soap. IMPORTANT: Do not spray liquids directly onto the treadmill. To avoid damage to the console, keep liquids away from the console. Then, thoroughly dry the treadmill with a soft towel.
Most treadmill problems can be solved by following the simple steps below. Find the symptom that applies, and follow the steps listed. If further assistance is needed, see the front cover of this manual.
SYMPTOM: The power does not turn on
a. Make sure that the power cord is plugged into a surge suppressor and that the surge suppressor is plugged into a properly grounded outlet (see page 19). Use only a surge suppressor that meets all of the specifications described on page 19. IMPORTANT: If the treadmill is connected to an AFCI-equipped outlet and your circuit breaker trips repeatedly when the treadmill is used, see the front cover of this manual to purchase an arc filter.
b. After the power cord has been plugged in, make sure that the key is inserted into the console.
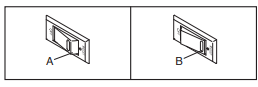
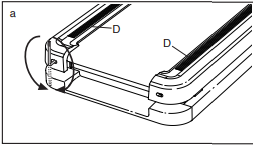
c. Check the power switch located on the treadmill frame near the power cord. If the switch protrudes as shown (A), the switch has tripped. To reset the power switch, wait for five minutes and then press the switch back in (B).
SYMPTOM: The power turns off during use
a. Check the power switch (see drawing c above). If the switch has tripped, wait for five minutes and then press the switch back in.
b. Make sure that the power cord is plugged in. If the power cord is plugged in, unplug it, wait for five minutes, and then plug it back in.
c. Remove the key from the console, and then reinsert it.
d. If the treadmill still will not run, please see the front cover of this manual.
SYMPTOM: The treadmill will not connect to the wireless network
a. Make sure that the wireless settings on the console are correct (see page 30).
b. Make sure that the settings for your wireless network are correct.
c. If you still have questions, go to support.iFIT.com.
SYMPTOM: The walking belt slows when walked on
a. Use only a surge suppressor that meets all of the specifications described on page 19.
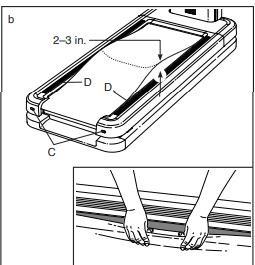
b. If the walking belt is overtightened, treadmill performance may decrease and the walking belt may become damaged. Remove the key and UNPLUG THE POWER CORD. Using the hex key, turn both idler roller screws (C) counterclockwise, 1/4 of a turn. When the walking belt is properly tightened, you should be able to lift each edge of the walking belt 2 to 3 in. (5 to 7 cm) off the walking platform. Pinch near the foot rail (D) to expose and lift the edge of the walking belt (see the inset drawing). Make sure to tuck the edge of the walking belt back under the foot rail after checking the tension. Be careful to keep the walking belt centered. Then, plug in the power cord, insert the key, and walk on the treadmill for a few minutes. Repeat until the walking belt is properly tightened
c. Your treadmill features a walking belt coated with high-performance lubricant. IMPORTANT: Never apply silicone spray or other substances to the walking belt or the walking platform unless instructed to do so by an authorized service representative. Such substances may deteriorate the walking belt and cause excessive wear. If you suspect that the walking belt needs more lubricant, see the front cover of this manual.
d. If the walking belt still slows when walked on, see the front cover of this manual.
SYMPTOM: The walking belt is off-center or slips when walked on
a. If the walking belt is off-center, first remove the key and UNPLUG THE POWER CORD. If the walking belt has shifted to the left, use the hex key to turn the left idler roller screw clockwise 1/2 of a turn; if the walking belt has shifted to the right, turn the left idler roller screw counterclockwise 1/2 of a turn. Be careful not to overtighten the walking belt. Then, plug in the power cord, insert the key, and walk on the treadmill for a few minutes. Repeat until the walking belt is centered. The walking belt is centered when both edges are covered by the foot rails (D)
b. If the walking belt slips when walked on, first remove the key and UNPLUG THE POWER CORD. Using the hex key, turn both idler roller screws clockwise, 1/4 of a turn. When the walking belt is correctly tightened, you should be able to lift each edge of the walking belt 2 to 3 in. (5 to 7 cm) off the walking platform (see drawing b on page 33). Be careful to keep the walking belt centered. Then, plug in the power cord, insert the key, and walk on the treadmill for a few minutes. Repeat until the walking belt is properly tightened.

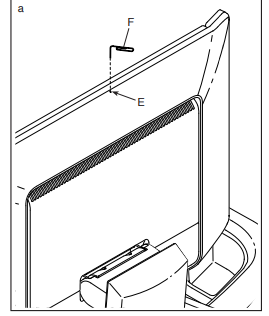
SYMPTOM: The displays of the console do not function properly
a. If the console does not boot up properly, or if the console freezes and does not respond, reset the console to the factory default settings. IMPORTANT: Doing this will erase all of the custom settings you have made to the console. Resetting the console requires two people. First, press the power switch into the off position. Next, locate the small reset opening (E) on the top of the console. Using a bent paper clip (F), press and hold the reset button inside the opening, and have a second person press the power switch into the on (reset) position. Continue holding the reset button (E) until the console turns on. When the reset operation is complete, the console will turn off and then turn back on. If it does not, use the power switch to turn the treadmill off and then on again. Once the console turns on, check for firmware updates (see step 5 on page 29). Note: It may take a few minutes for the console to be ready for use.