Loading ...
Loading ...
Loading ...
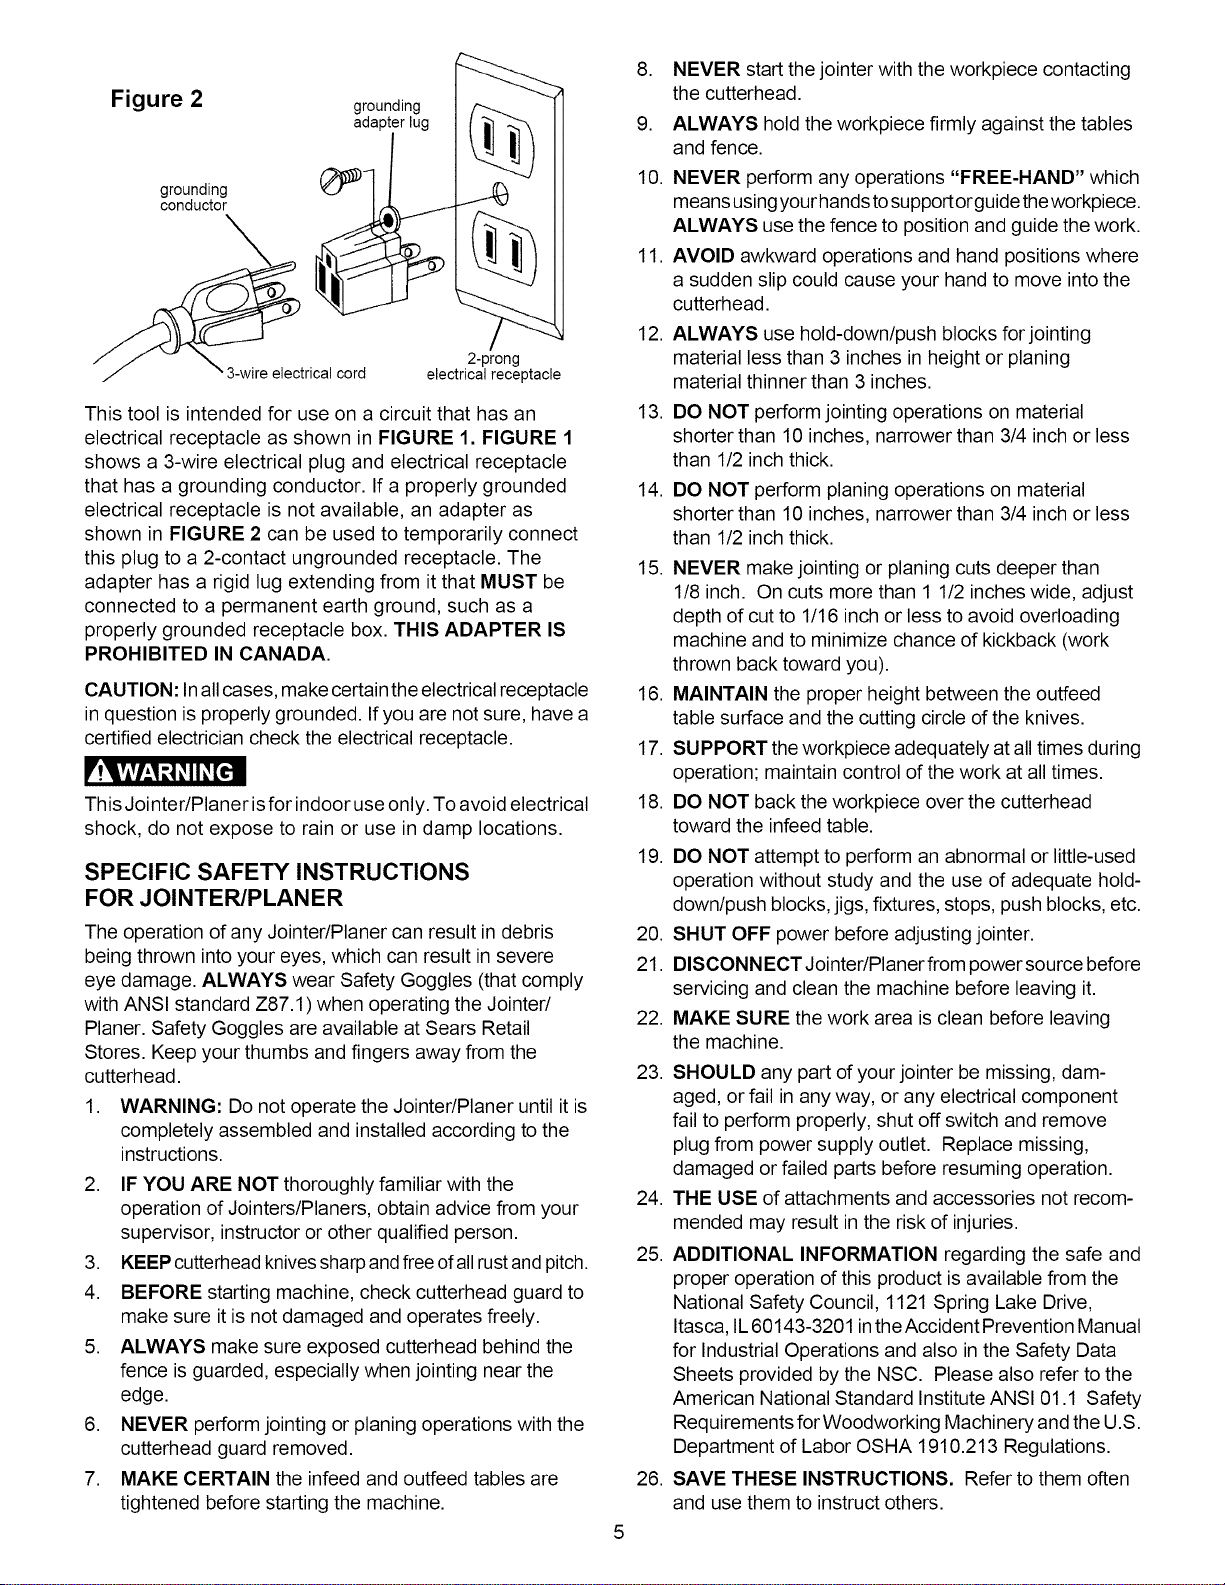
Figure 2
grounding
adapter lug
grounding
conductor
__m _trical cord
2-prong
electrical receptacle
This tool is intended for use on a circuit that has an
electrical receptacle as shown in FIGURE 1. FIGURE 1
shows a 3-wire electrical plug and electrical receptacle
that has a grounding conductor. If a properly grounded
electrical receptacle is not available, an adapter as
shown in FIGURE 2 can be used to temporarily connect
this plug to a 2-contact ungrounded receptacle. The
adapter has a rigid lug extending from it that MUST be
connected to a permanent earth ground, such as a
properly grounded receptacle box. THIS ADAPTER IS
PROHIBITED IN CANADA.
CAUTION: Inall cases, make certain the electrical receptacle
in question is properly grounded. Ifyou are not sure, have a
certified electrician check the electrical receptacle.
F'!,vlv/:1;3 _11_[ell
This Jointer/Planer isfor indoor use only. To avoid electrical
shock, do not expose to rain or use in damp locations.
SPECIFIC SAFETY INSTRUCTIONS
FOR JOINTER/PLANER
The operation of any Jointer/Planer can result in debris
being thrown into your eyes, which can result in severe
eye damage. ALWAYS wear Safety Goggles (that comply
with ANSI standard Z87.1) when operating the Jointeri
Planer. Safety Goggles are available at Sears Retail
Stores. Keep your thumbs and fingers away from the
cutterhead.
,
WARNING: Do not operate the Jointer/Planer until it is
completely assembled and installed according to the
instructions.
2. IF YOU ARE NOT thoroughly familiar with the
operation of Jointers/Planers, obtain advice from your
supervisor, instructor or other qualified person.
3. KEEP cutterhead knivessharp and freeof all rustand pitch.
4. BEFORE starting machine, check cutterhead guard to
make sure it is not damaged and operates freely.
5. ALWAYS make sure exposed cutterhead behind the
fence is guarded, especially when jointing near the
edge.
6. NEVER perform jointing or planing operations with the
cutterhead guard removed.
7. MAKE CERTAIN the infeed and outfeed tables are
tightened before starting the machine.
5
,
9.
10.
11.
12.
13.
14.
NEVER start the jointer with the workpiece contacting
the cutterhead.
ALWAYS hold the workpiece firmly against the tables
and fence.
NEVER perform any operations "FREE-HAND" which
means usingyour hands tosupport orguide theworkpiece.
ALWAYS use the fence to position and guide the work.
AVOID awkward operations and hand positions where
a sudden slip could cause your hand to move into the
cutterhead.
ALWAYS use hold-down/push blocks for jointing
material less than 3 inches in height or planing
material thinner than 3 inches.
DO NOT perform jointing operations on material
shorter than 10 inches, narrower than 3/4 inch or less
than 1/2 inch thick.
DO NOT perform planing operations on material
shorter than 10 inches, narrower than 3/4 inch or less
than 1/2 inch thick.
15. NEVER make jointing or planing cuts deeper than
1/8 inch. On cuts more than 1 1/2 inches wide, adjust
depth of cut to 1/16 inch or less to avoid overloading
machine and to minimize chance of kickback (work
thrown back toward you).
16. MAINTAIN the proper height between the outfeed
table surface and the cutting circle of the knives.
17. SUPPORT the workpiece adequately at all times during
operation; maintain control of the work at all times.
18. DO NOT back the workpiece over the cutterhead
toward the infeed table.
19.
DO NOT attempt to perform an abnormal or little-used
operation without study and the use of adequate hold-
down/push blocks, jigs, fixtures, stops, push blocks, etc.
20. SHUT OFF power before adjusting jointer.
21. DlSCONNECTJointer/Planerfrom powersource before
servicing and clean the machine before leaving it.
22. MAKE SURE the work area is clean before leaving
the machine.
23.
SHOULD any part of your jointer be missing, dam-
aged, or fail in any way, or any electrical component
fail to perform properly, shut off switch and remove
plug from power supply outlet. Replace missing,
damaged or failed parts before resuming operation.
24. THE USE of attachments and accessories not recom-
mended may result in the risk of injuries.
25. ADDITIONAL INFORMATION regarding the safe and
proper operation of this product is available from the
National Safety Council, 1121 Spring Lake Drive,
Itasca, IL60143-3201 intheAccident Prevention Manual
for Industrial Operations and also in the Safety Data
Sheets provided by the NSC. Please also refer to the
American National Standard Institute ANSI 01.1 Safety
Requirements for Woodworking Machinery and the U.S.
Department of Labor OSHA 1910.213 Regulations.
26. SAVE THESE INSTRUCTIONS. Refer to them often
and use them to instruct others.
Loading ...
Loading ...
Loading ...