Loading ...
Loading ...
Loading ...
EN
W415-2978 / A / 10.07.21
31
11.0 maintenance
We recommend that the burner be inspected semi-annually by a qualifi ed technician.
The burner must be replaced prior to the appliance being put into operation if it is evident that the burner is dam-
aged. Use only replacement parts as supplied by the appliance manufacturer.
!
WARNING
• Turn off the gas and electrical power before servicing the appliance.
• Appliance may be hot. Do not service until appliance has cooled.
• Do not use abrasive cleaners on glass.
• Do not paint the pilot assembly.
This appliance and its venting system should be inspected before use and at least annually by a qualifi ed
service person. The following suggested checks should be performed by a qualifi ed technician. The appliance
area must be kept clear and free of combustible materials, gasoline, or other fl ammable vapors and liquids.
The fl ow of combustion and ventilation air must not be obstructed.
1. In order to properly clean the burner and pilot assembly, remove the logs, rocks and/or glass to ex-
pose both assemblies.
2. Keep the control compartment, media, burner, air shutter opening and the area surrounding the appli-
ance clean by vacuuming or brushing, at least once a year.
3. Check to see that all burner ports are burning. Clean out any of the ports which may not be burning
or are not burning properly.
4. Check to see that the pilot fl ame is large enough to engulf the fl ame sensor and/or thermocouple /
thermopile as well as it reaches the burner.
5. If your appliance is equipped with a safety barrier, cleaning may be necessary due to excessive lint /
dust from carpeting, pets, etc. simply vacuum using the brush attachment.
6. If your appliance is equipped with relief doors, ensure the system performs effectively. Check that the
gasket is not worn or damaged. Replace if necessary.
7. Replace the cleaned logs, rocks or glass. Failure to properly position the media may cause carboning
which can be distributed in the surrounding living area, inside the fi rebox and on exterior surfaces sur-
rounding vent termination.
8. Check to see that the main burner ignites completely on all ports when turned on. A 5 to 10 second
total light-up period is satisfactory. If ignition takes longer, consult your local authorized dealer / dis-
tributor.
9. Visually inspect the appliance for carbon build up. Using a small whisk or brush, brush off the carbon
and vacuum up or sweep into garbage.
10. This step is not applicable for Vent Free appliances: Check to see that the appliance is vent-
ing correctly. Ensure chimney system is safe and unobstructed. (If for any reason the vent air intake
system is disassembled, re-install and re-seal per the instructions provided for the initial installation).
Caution: Label all wires prior to disconnection when servicing controls. Wiring errors can cause improper and
dangerous operation. Verify proper operation after servicing.
note:
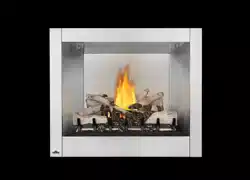
Stainless steel tends to oxidize or stain in the presence of chlorides and sulfi des, particularly in coastal areas and
other harsh environments, such as the warm, highly humid atmosphere around pools and hot tubs. These stains
could be perceived as rust, but can be easily removed or prevented. To provide stain prevention and removal,
wash all stainless steel surfaces every 3-4 weeks or as often as required with fresh water and/or stainless steel
cleaner.
CLEANING THE STAINLESS STEEL SURFACE:
Do not use abrasive cleaners or steel wool on the stainless steel parts. Doing so will scratch the fi nish. Surfaces
should be cleaned with warm soapy water while the metal is still warm to the touch. To clean stainless surfaces,
use a stainless steel or non-abrasive cleaner. Always wipe in the direction of the grain. Over time, stainless steel
parts discolour when heated, usually to a golden or brown hue. This discolouration is normal and does not affect
the performance of the appliance.
Loading ...
Loading ...
Loading ...