User Manual Oven Convection
Safety Instructions
Warning!
A child or adult can tip the range and be killed. Verify the anti-tip bracket has been properly installed and engaged per installation instructions. Re-engage anti-tip bracket if range is moved. Do not operate range without anti-tip bracket installed and engaged. Failure to follow these instructions can result in death or serious burns to children and adults.
To verify the anti-tip bracket is installed and engaged:
- Slide range forward.
- Look for the anti-tip bracket securely attached to floor or wall.
- Slide range back so rear range foot is under anti-tip bracket.
- See installation instructions for details.
State of California Proposition 65 Warnings:
- This product contains one or more chemicals known to the State of California to cause cancer.
- This product contains one or more chemicals known to the State of California to cause birth defects or other reproductive harm.
Feature Guide
Warning!
Food Poisoning Hazard Do not let food sit in oven more than one hour before or after cooking. Doing so can result in food poisoning or sickness.
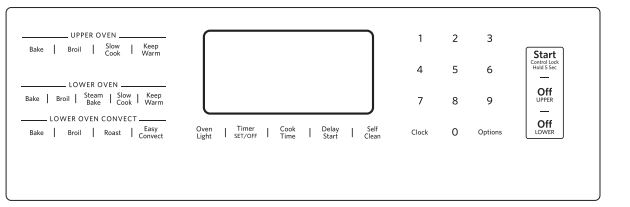
CLOCK (Clock)
This clock can use a 12- or 24-hour cycle. See “Electronic Oven Controls” section.
- Press CLOCK.
- Press “3” for AM or “6” for PM.
- Press the number keypads to set the time of day.
- Press CLOCK or START.
OVEN LIGHT (Oven cavity light)
While the oven doors are closed, press OVEN LIGHT to turn the lights on and off. The oven lights will come on when an oven door is opened.
TIMER SET/OFF (Oven timer)
The Timer can be set in hours or minutes up to 9 hours and 59 minutes.
- Press TIMER SET/OFF.
- Press the number keypads to set the length of time in hr-min-min. Leading zeros do not have to be entered. For example, for 2 minutes, enter “2.”
- Press TIMER SET/OFF to begin the countdown. If enabled, end-of-cycle tones will sound at the end of countdown. The display will return to the time of day at the end of countdown.
- Press TIMER SET/OFF to cancel the Timer and return to the time of day. Do not press the Off keypads because the oven will turn off.
START (Cooking start)
The Start keypad begins any oven function. If Start is not pressed within 2 minutes after pressing a keypad, the function is canceled and the time of day is displayed.
OFF UPPER OFF LOWER (Range function)
The upper and lower Off keypads stop any oven function except the Clock, Timer, and Control Lock in the selected oven.
BAKE UPPER - BAKE LOWER (Baking and roasting)
- Press BAKE for the desired oven.
- Press the number keypads to set the desired temperature. If the temperature entered is not in the range of the temperatures allowed, the minimum or maximum allowed temperature will be displayed. Enter a temperature in the allowable range.
- Press START.
- To change the temperature, repeat Step 2. Press START for the selected oven for the change to take effect.
- Press OFF for the selected oven when finished.
BROIL UPPER - BROIL LOWER (Broiling)
- Press BROIL for the desired oven.
- Press the number keypads as instructed by the scrolling text to set the desired temperature.
- Press START, and then allow the oven to preheat for 5 minutes.
- Position the cookware in the oven and leave the door open 41 /2" (11.4 cm) at the broil stop position.
- Press OFF for the selected oven when finished.
CONVECT BAKE (Convection cooking)
- Press CONVECT BAKE.
- Press the number keypads to set the desired temperature. If the temperature entered is not in the range of the temperatures allowed, the minimum or maximum allowed temperature will be displayed. Enter a temperature in the allowable range.
- Press START.
- To change the temperature, repeat Step 2. Press START for the change to take effect.
- Press OFF LOWER when finished.
CONVECT ROAST (Convection cooking)
- Press CONVECT ROAST.
- Press the number keypads to set the desired temperature. If the temperature entered is not in the range of the temperatures allowed, the minimum or maximum allowed temperature will be displayed. Enter a temperature in the allowable range.
- Press START.
- To change the temperature, repeat Step 2. Press START for the change to take effect.
- Press OFF LOWER when finished.
CONVECT BROIL (Convection cooking)
- Press CONVECT BROIL.
- Press the number keypads to set the desired temperature. If the temperature entered is not in the range of the temperatures allowed, the minimum or maximum allowed temperature will be displayed. Enter a temperature in the allowable range.
- Press START.
- To change the temperature, repeat Step 2. Press START for the change to take effect.
- Press OFF LOWER when finished.
EASY CONVECT (Recipe conversion for convection cooking)
NOTE: For best results, preheat your oven to the required temperature prior to using EasyConvect™ Conversion. After preheating is complete, press OFF LOWER before using EasyConvect™ Conversion.
- Press EASY CONVECT until the desired EasyConvect™ option is displayed (MEATS, BAKED GOODS, or OTHER).
- Press START.
- Press the number keypads to enter the standard cook temperature, and then press START.
- Enter the standard cook time, and then press START.
- Place food in the oven at the appropriate time. Check food for doneness before the stop time is reached. If food will not be done when stop time is reached, add more cooking time before time elapses. See “Cook Time” section. At the end of the stop time, the oven will automatically turn off.
- Press OFF LOWER when finished. Refer to the “EasyConvect™ Conversion” section for more information.
SLOW COOK UPPER - SLOW COOK LOWER (Slow cooking)
It is not necessary to preheat the oven.
- Place food in the upper or lower oven.
- Press SLOW COOK for the desired oven.
- Press the number keypads to set the desired temperature. If the temperature entered is not in the range of temperatures allowed, the minimum or maximum allowed temperature will be displayed. Enter a temperature in the allowable range.
- Press START.
- Press OFF for the selected oven when finished.
STEAM BAKE (Steam bake)
- Insert the steam rack with water reservoir in the oven.
- Pour 11 /2 cups (350 mL) of warm water into the water reservoir.
NOTE: Do not fill past the MAX mark.
- Press STEAM BAKE.
- Press the number keypad to select the desired food option.
- Press the number keypads to set the temperature.
- Press START.
- (Optional) Press COOK TIME. Press the number keypads to set the cook time.
- Press START.
- Insert food when preheating finishes.
- Press OFF LOWER when finished.
NOTE: Let oven cool before removing and emptying water reservoir.
KEEP WARM UPPER - KEEP WARM LOWER (Hold warm)
Food must be at serving temperature before placing it in the warmed oven.
- Press KEEP WARM for the desired oven.
- Press the number keypads to set the desired temperature. If the temperature entered is not in the range of the temperatures allowed, the minimum or maximum allowed temperature will be displayed. Enter a temperature in the allowable range.
- Press START.
- Press OFF for the selected oven when finished.
DELAY START (Delayed start)
The Delay Start keypad is used to enter the starting time for an oven function with a delayed start. Delay Start should not be used for foods such as breads and cakes because they may not bake properly.
To set a Cook Time or a Delayed Cook Time, see the “Cook Time” section.
COOK TIME (Timed cooking)
Cook Time allows the oven to be set to turn on at a certain time of day, cook for a set length of time, and/or shut off automatically.
To set a Cook Time or Delayed Cook Time, see the “Cook Time” section.
START CONTROL LOCK hold 5 sec. (Oven control lockout)
- Check that the ovens and timers are OFF.
- Press and hold START for 5 seconds.
- If enabled, a tone will sound, and “CONTROL LOCKED” will be displayed.
- Repeat to unlock. No keypads will function when the control is locked.
OPTIONS (Oven use functions)
Enables you to personalize the audible tones and oven operation to suit your needs. See the “Oven Use” section.
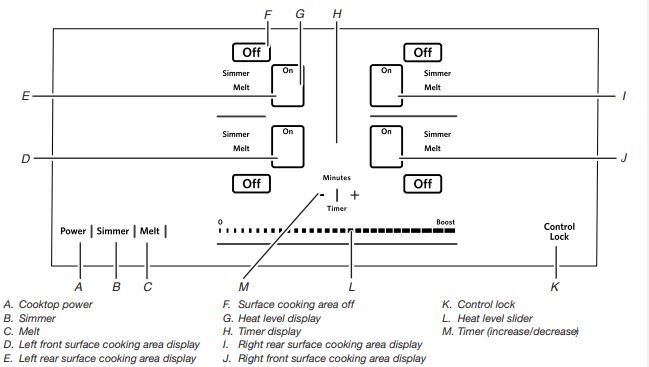
Cooktop Use
Cookware
Only ferromagnetic pans can be used for induction cooking.
Ferromagnetic Materials Include:
- Enameled steel
- Cast iron
- Stainless steel designed for induction cooking
Non-Ferromagnetic Materials Include:
These types of pans will not work with induction cooking.
- Stainless steel
- Glass
- Ceramic
- Copper or aluminum pans
To find out whether your pans can be used with an induction cooktop, flip the pan over, hold a magnet to the bottom of the pan, and then see whether it sticks. If the magnet sticks to the bottom of the pan, the pan is ferromagnetic and can be used for induction cooking. In addition, many manufacturers are now placing an “induction compatible” symbol on the bottom of their cookware or they will note compatibility on their packaging. See the following symbol.

Home Canning
Canning can be performed on the induction cooktop. See the “Cookware” section to check if the canner will work on the induction cooktop. When canning for long periods, alternate the use of surface cooking areas or elements between batches. This allows time for the most recently used areas to cool.
- Center the canner on the largest surface cooking area or element. On electric cooktops, canners should not extend more than 1 /2" (1.3 cm) beyond the surface cooking area or element.
- Do not place canner on 2 surface cooking areas or elements at the same time.
- On ceramic glass models, use only flat-bottomed canners to avoid damage to the cooktop and elements.
- For more information, contact your local agricultural extension office or refer to published home canning guides. Companies that manufacture home canning products can also offer assistance.
Oven Use
Odors and smoke are normal when the oven is used the first few times or when it is heavily soiled.
IMPORTANT: The health of some birds is extremely sensitive to the fumes given off. Exposure to the fumes may result in death to certain birds. Always move birds to another closed and wellventilated room.
Electronic Oven Controls
Control Display
The display will flash when powered up or after a power loss. When the oven is not in use, the time of day is displayed.
Tones
Tones are audible signals, indicating the following:
One Tone
- Valid keypad press
- Oven is preheated (long tone).
- Kitchen timer (long tone with reminder tone every minute)
- Function has been entered.
Three Tones
Four Tones
- End of cycle (with reminder tone every minute). Use the Options keypad to change the tone settings.
Audible Tones Disable
Turns off all tones, including the end of cycle tone and keypress tones.
- Press OPTIONS until “SOUND” is displayed.
- The current setting will be displayed.
- Press the “1” keypad to adjust the setting.
- Press OFF UPPER or OFF LOWER to exit and display the time of day.
Sound Volume
Sets the pitch of the tone to either high or low.
- Press OPTIONS until “SOUND VOLUME” is displayed.
- The current setting will be displayed.
- Press the “1” keypad to adjust the setting.
- Press OFF UPPER or OFF LOWER to exit and display the time of day.
End of Cycle Tone
Activates or turns off the tones that sound at the end of a cycle.
- Press OPTIONS until “END TONE” is displayed.
- The current setting will be displayed.
- Press the “1” keypad to adjust the setting.
- Press OFF UPPER or OFF LOWER to exit and display the time of day.
Keypress Tones
Activates or turns off the tones when a keypad is pressed.
- Press OPTIONS until “KEYPRESS TONE” is displayed.
- The current setting will be displayed.
- Press the “1” keypad to adjust the setting.
- Press OFF UPPER or OFF LOWER to exit and display the time of day.
Reminder Tones Disable
Turns off the short repeating tone that sounds every 1 minute after the end-of-cycle tones.
- Press OPTIONS until “REMINDER TONE” is displayed.
- The current setting will be displayed.
- Press the “1” keypad to adjust the setting.
- Press OFF UPPER or OFF LOWER to exit and display the time of day.
Languages - Scrolling Display Text
Language options are English, Spanish, and French.
- Press OPTIONS until “LANGUAGE” is displayed.
- The current setting will be displayed.
- Press the number keypad to adjust the setting.
- Press OFF UPPER or OFF LOWER to exit and display the time of day
Energy Save
The Energy Save mode deactivates the display to reduce energy consumption. The setting will be activated after being idle for several minutes. Any mode may be used with the range in Energy Save by selecting the desired mode.
- Press OPTIONS until “ENERGY SAVE” is displayed.
- The current setting will be displayed.
- Press the “1” keypad to adjust the setting.
- Press OFF UPPER or OFF LOWER to exit and display the time of day.
Oven Temperature Offset Control
IMPORTANT: Do not use a thermometer to measure oven temperature.
To Adjust Oven Temperature:
- Press OPTIONS until “TEMP CALIB” is displayed.
- The current setting will be displayed. Press the “1” keypad to toggle between the upper and lower ovens.
- Press START to select the choice displayed in Step 2. Wait 10 seconds for the display to change or press START, and then continue with Step 4.
- Press the “3” keypad to increase the temperature in 5°F (3°C) increments, or press the “6” keypad to decrease the temperature in 5°F (3°C) increments. The range is from -30°F to +30°F (-18°C to +18°C).
- Press START.
- Press OFF UPPER or OFF LOWER to exit and display the time of day.
Keep warm
To Use:
- Press KEEP WARM for the desired oven.
- Press the number keypads to set the desired temperature. If the temperature entered is not in the range of the temperatures allowed, the minimum or maximum allowed temperature will be displayed. Enter a temperature in the allowable range.
- Press START.
- Place food in the oven.
- Press OFF for the selected oven when finished.
- Remove food from the oven.
To Cancel Keep Warm:
- Press OFF for the selected oven.
- Remove food from oven
Sabbath Mode
To Enable Sabbath Mode Capability (one time only):
- Press OPTIONS until “SABBATH” is displayed.
- Press the “1” keypad. Sabbath mode can be activated for baking.
- Press OFF UPPER or OFF LOWER to save the setting and exit to display the time of day.
NOTE: To disable the Sabbath mode, repeat steps 1 through 3 to change the status from “SABBATH ON” to “SABBATH OFF.”
To Activate Sabbath Mode:
- Press BAKE for the desired oven.
- Press the number keypads to set the desired temperature. If the temperature entered is not in the range of the temperatures allowed, the minimum or maximum allowed temperature will be displayed. Enter a temperature in the allowable range.
- Press START.
For timed cooking in Sabbath mode, press COOK TIME, and then press the number keypads to set the desired cook time. Press START.
- (Optional) If Sabbath mode is to be used for both ovens, repeat steps 1 through 3 for the second oven.
- Press OPTIONS. Three tones will sound. Then press “7.” “SAb” will appear in the display.
Range Care
Self-Cleaning Cycle
To Self-Clean:
- Close the oven doors, and then press SELF CLEAN.
- Press the number “1” or “2” keypad to select the desired oven to clean.
- Choose the clean level desired by pressing the appropriate number keypad.
- Press START. The oven doors will automatically lock. When the Self-Cleaning cycle is complete and the oven cools, the oven doors will unlock.
- When the oven is completely cooled, remove ash with a damp cloth.
General Cleaning
EXTERIOR PORCELAIN ENAMEL SURFACES
Glass cleaner, mild liquid cleaner, or nonabrasive scrubbing pad: Gently clean around the model/serial/rating plate because scrubbing may remove numbers.
STAINLESS STEEL
Rub in direction of grain to avoid damaging
METALLIC PAINT
Do not use abrasive cleaners, cleaners with bleach, rust removers, ammonia, or sodium hydroxide (lye) because paint surface may stain.
CERAMIC GLASS
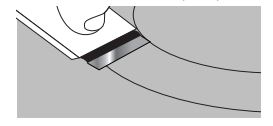
- Remove food/residue with the Cooktop Scraper.
- Apply a few dime-sized drops of affresh® Cooktop Cleaner to the affected areas.

- Polish with a clean, dry cloth or a clean, dry paper towel.

- Repeat steps 1 through 3 as necessary for stubborn or burned-on stains.
COOKTOP CONTROLS
- To avoid damage to the cooktop controls, do not use steel wool, abrasive cleansers, or oven cleaner.
- Do not soak knobs. When replacing knobs, make sure knobs are in the OFF position. On some models, do not remove seals under knobs.
- Use soap and water: Pull knobs straight away from control panel to remove.
CONTROL PANEL AND OVEN DOOR EXTERIOR
- To avoid damage to the control panel, do not use abrasive cleaners, steel-wool pads, gritty washcloths, or abrasive paper towels.
- Glass cleaner and soft cloth or sponge: Apply glass cleaner to soft cloth or sponge, not directly on panel.
OVEN RACKS
- Steel-wool pad
- For racks that have discolored and are harder to slide, a light coating of vegetable oil applied to the rack guides will help them slide.
- Dishwasher (steam rack water reservoir only, not racks): Although the water reservoir is durable, it may lose its shine and/or discolor when washed in a dishwasher.
OVEN CAVITY
- Do not use oven cleaners.
- Food spills should be cleaned when oven cools.
- At high temperatures, foods react with porcelain.
- Clean cycle
Oven Lights
To Replace:
- Unplug range or disconnect power.
- Turn the glass bulb cover in the back of the oven counterclockwise to remove.
- Turn bulb counterclockwise to remove from socket.
- Replace bulb and then bulb cover by turning clockwise.
- Plug in range or reconnect power.
Troubleshooting
Nothing will operate
- Power supply cord is unplugged: Plug into a grounded outlet.
- Household fuse is blown or a circuit breaker is tripped: Replace the fuse or reset the circuit breaker. If the problem continues, call an electrician.
Cooktop will not operate
- The control is set incorrectly: Touch the display area on the control panel to select a cooking surface before selecting a function.
- The cooktop control lockout is set: See “Control Lock” in the “Cooktop Use” section.
- Cooktop is turned off: The Power keypad was unintentionally touched. Press POWER again. Reset the cooktop.
Cooktop cooking results not what expected
- Improper cookware being used: See the “Cookware” section.
- Cooktop control set to incorrect heat level: See “Cooktop Controls” in the “Cooktop Use” section.
- Range is not level: Level the range. See the Installation Instructions.
Oven will not operate
- Delay Start is set: See the “Cook Time” section.
- Control is locked: Press and hold START for 5 seconds to unlock.
- Control is in Demo mode: Demo mode is used for display models in a showroom.
- Electronic oven control set incorrectly: See “Electronic Oven Controls” section.
Oven temperature too high or too low
- Oven temperature needs adjustment
Oven indicator lights flash
Power to range is turned on or restored: See “Control Display” in the “Electronic Oven Controls” section. If the indicator lights keep flashing, call for service.
Oven control displays messages
- Power failure (display shows flashing time): Clear the display. On some models, reset the clock, if needed. See “Clock” keypad feature in the “Feature Guide” section.
- Error code (display shows letter followed by number): Depending on your model, press OFF UPPER or OFF LOWER to clear the display. See “Control Display” in the “Electronic Oven Controls” section.
- If it reappears, call for service.
Cooktop display shows messages
- Improper pan being used (“replace pan” animation showing in the display when you place a saucepan on an induction surface cooking area) Check that the saucepan is ferromagnetic. Check that the diameter of the saucepan is large enough. Center the saucepan on the surface cooking area. Allow the saucepan to cool down in the event that it has become hot when used. Switch the surface cooking area off, then on again. If the display still does not light up, turn power off at the circuit breaker. Wait 20 seconds and turn power back on.
- Long cooking time (Performance Boost function display flashing and switching off): The Performance Boost function operates the surface cooking area with the most power. During long cooking times, it is possible that the function will switch the surface cooking area off to keep the cooktop from overheating. You can continue to use the cooktop if the display is not flashing.
- Error code (display flashing “Er” and numbers): If an “Er” and a series of numbers appear in the display panel, turn power off at the circuit breaker. Turn on again. If problem continues, call customer service. See the “Warranty” section for contact information.
Cooktop has turned off and is beeping every 10 seconds
An object, liquids or soils are putting pressure on the control panel: Thoroughly wipe or remove any object on touch keys.
Clean cycle did not work on all spills
Several cooking cycles between clean cycles or spills on oven walls and doors: Run additional clean cycles. Can be used for stubborn soils.
Oven cooking results not what expected
- Range is not level: Level the range.
- The set temperature was incorrect: Double-check the recipe in a reliable cookbook.
- Oven temperature is calibrated incorrectly: See “Oven Temperature Control” in the “Electronic Oven Controls” section.
- Oven was not preheated: See “Baking and Roasting” section.
- Racks were positioned improperly: See “Positioning Racks and Bakeware” section.
- Not enough air circulation around bakeware: See “Positioning Racks and Bakeware” section.
- Darker browning of food caused by dull or dark bakeware: Lower oven temperature 25°F (15°C) or move rack to a higher position in the oven.
- Lighter browning of food caused by shiny or light colored bakeware: Move rack to a lower position in the oven.
- Batter distributed unevenly in pan: Check that batter is level in the pan.
- Incorrect length of cooking time was used: Adjust cooking time.
- Oven door was not closed: Be sure that the bakeware does not keep the door from closing.
- Oven door was opened during cooking: Oven peeking releases oven heat and can result in longer cooking times.
- Rack is too close to bake burner, making baked items too brown on bottom: Move rack to higher position in the oven.
- Pie crusts browning too quickly: Use aluminum foil to cover the edge of the crust and/or reduce baking temperature.
If “F” or “C” and a number are alternately flashing on the display, refer to the following for possible solutions:
- F42, F43 : The power voltage is too low or too high
Turn off the cooktop. Wait 5 seconds, and then turn it back on. If this continues, contact a qualified electrician.
- C81, C82, C83: The surface cooking area has overheated
The surface cooking area automatic shutoff was activated. Wait 5 minutes for it to cool down, and then turn it back on.
- F12, F21, F25, F36, F37, F40, F47, F56, F58, 560, F61, F62, F63, F64
Call for service. See the “Warranty” section for contact information.
Noise
- Low humming: This occurs when cooking at high power. The cause of this is the amount of energy that is transmitted from the appliance to the cookware
- Crackling: Cookware is used that consists of different materials. The noise is caused by vibrations in the joint faces between the different layers
- Fan noise: The electronics require a controlled temperature in order to function reliably