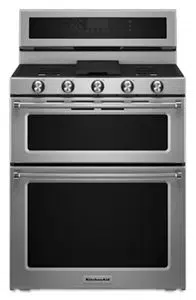
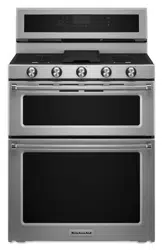
User manual Range
CONTROL GUIDE
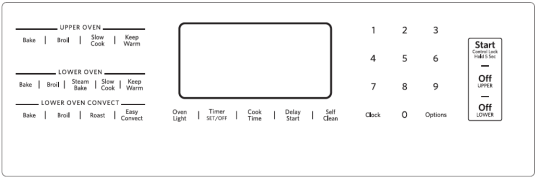
| KEYPAD |
FEATURE |
INSTRUCTIONS |
| CLOCK |
Clock |
This clock can use a 12 or 24 hour cycle. See “Electronic Oven Controls” section.
1. Press the CLOCK.
2. Press “3” for AM or “6” for PM or Time/Temp + keypad for AM or - keypad for PM.
3. Press the number keypads or Time/Temp + or - to set the time of day. Press and hold to scroll quickly.
4. Press the Clock keypad, START UPPER or START LOWER / Press CLOCK or START.
|
| Oven Light |
Oven cavity light |
While the oven doors are closed, press OVEN LIGHT to turn the lights on or off. The oven lights will come on when an oven door is opened. |
| TIMER SET/OFF |
Oven timer |
The Timer can be set in hours or minutes up to 9 hours and 59 minutes.
1. Press TIMER SET/OFF.
2. Press the number keypads to set the length of time in hr-min-min. Leading zeros do not have to be entered. For example, for 2 minutes, enter “2.”
3. Press TIMER SET/OFF to begin the countdown. If enabled, end-of-cycle tones will sound at the end of countdown. The display will return to the time of day at end of countdown.
4. Press TIMER SET/OFF to cancel the Timer and return to the time of day. Do not press the off keypad because the oven will turn off.
|
| START |
Cooking start |
The Start keypad begins any oven function. If Start is not pressed within 2 minutes after pressing a keypad, the function is canceled and the time of day is displayed. |
|
OFF UPPER
OFF LOWER
|
Range function |
The upper and lower Off keypads stop any oven function except the Clock, Timer, and Control Lock in the selected oven. |
|
BAKE UPPER
BAKE LOWER
|
Baking and roasting |
1. Press BAKE for the desired oven.
2. Press the number keypads to set the desired temperature. If the temperature entered is not in the range of the temperatures allowed, the minimum or maximum allowed temperature will be displayed. Enter a temperature in the allowable range.
3. Press START.
4. To change the temperature, repeat Step 2. Press START for the change to take effect.
5. Press OFF for the selected oven when finished.
|
|
BROIL UPPER
BROIL LOWER
|
Broiling |
1. Press BROIL for the desired oven.
2. Press the number keypads to set the desired temperature. If the temperature entered is not in the range of the temperatures allowed, the minimum or maximum allowed temperature will be displayed. Enter a temperature in the allowable range.
3. Press START. No preheating is necessary.
4. Position the cookware in the oven. Close the door.
5. Press OFF for the selected oven when finished.
|
| CONVECT BAKE |
Convection cooking |
1. Press CONVECT BAKE.
2. Press the number keypads to set the desired temperature. If the temperature entered is not in the range of the temperatures allowed, the minimum or maximum allowed temperature will be displayed. Enter a temperature in the allowable range.
3. Press START.
4. To change the temperature, repeat Step 2. Press START for the change to take effect.
5. Press OFF LOWER when finished.
|
| CONVECT ROAST |
Convection cooking |
1. Press CONVECT ROAST.
2. Press the number keypads or Time/Temp + or - keypad to set the desired temperature. Press and hold to scroll quickly. If the temperature entered is not in the range of the temperatures allowed, the minimum or maximum temperature will be displayed. Enter a temperature in the allowable range.
3. Press START.
4. To change the temperature, repeat Step 2. Press START for the change to take effect.
5. Press CANCEL LOWER or OFF LOWER when finished.
|
| CONVECT BROIL |
Convection cooking |
1. Press CONVECT BROIL.
2. Press the number keypads to set the desired temperature. If the temperature entered is not in the range of temperatures allowed, the minimum or maximum allowed temperature will be displayed. Enter a temperature in the allowable range.
3. Press START.
4. To change the temperature, repeat Step 2. Press START for the change to take effect.
5. Press OFF LOWER when finished.
|
| EASY CONVECT |
Recipe conversion for convection cooking |
NOTE: For best results, preheat your oven to the required temperature prior to using EasyConvect™ Conversion. After preheating is complete, press the OFF LOWER key before using EasyConvect™ Conversion.
1. Press EASY CONVECT until the desired EasyConvect™ option is displayed (MEATS, BAKED GOODS or OTHER).
2. Press START.
3. Press the number keypads to enter the standard cook temperature, and then press START.
4. Enter the standard cook time, and then press START.
5. Place food in the oven at the appropriate time. Check food for doneness before the stop time is reached. If food will not be done when stop time is reached, add more cooking time before time elapses. See “Cook Time” section. At the end of the stop time, the oven will automatically turn off.
6. Press OFF LOWER when finished. Refer to the “EasyConvect™ Conversion” section for more information.
|
|
SLOW COOK UPPER
SLOW COOK LOWER
|
Slow cooking |
It is not necessary to preheat the oven.
1. Place food in the upper or lower oven.
2. Press SLOW COOK for the desired oven.
3. Press the number keypads to set the desired temperature. If the temperature entered is not in the range of temperatures allowed, the minimum or maximum allowed temperature will be displayed. Enter a temperature in the allowable range.
4. Press START.
5. Press OFF for the selected oven when finished.
|
| STEAM BAKE |
Steam bake |
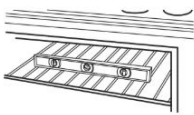
1. Insert the steam rack with water reservoir in the oven.
2. Pour 11/2 cups (350 mL) of warm water into the water reservoir. NOTE: Do not fill past the MAX mark.
3. Press STEAM BAKE.
4. Press the number keypad to select the desired food option.
5. Press the number keypads to set the temperature. 6. Press START.
7. (Optional) Press COOK TIME. Press the number keypads to set the cook time.
8. Press START.
9. Insert food when preheating finishes.
10. Press OFF LOWER when finished.
NOTE: Let oven cool before removing and emptying water reservoir.
|
|
KEEP WARM UPPER
KEEP WARM LOWER
|
Hold warm |
Food must be at serving temperature before placing it in the warmed oven.
1. Press KEEP WARM for the desired oven.
2. Press the number keypads to set the desired temperature. If the temperature entered is not in the range of the temperature allowed, the minimum or maximum temperature will be displayed. Enter a temperature in the allowable range.
3. Press START.
4. To change the temperature, repeat steps 2 and 3.
5. Press OFF for the selected oven when finished.
|
| DELAY START |
Delayed start |
The Delay Start keypad is used to enter the starting time for an oven function with a delayed start. Delay Start should not be used for foods such as breads and cakes because they may not bake properly.
To set a Cook Time or a Delayed Cook Time, see the “Cook Time” section.
|
| COOK TIME |
Timed cooking |
Cook Time allows the oven to be set to turn on at a certain time of day, cook for a set length of time, and/or shut off automatically.
To set a Cook Time or a Delayed Cook Time, see the “Cook Time” section.
|
| SELF CLEAN |
Self-cleaning cycle |
See the “Self-Cleaning Cycle” section in the Owner’s Manual. |
| START LOWER LOCK |
Oven control lockout |
1. Check that the ovens and timers are OFF.
2. Press and hold START LOWER for 5 seconds.
3. If enabled, a tone will sound and “CONTROL LOCKED” will be displayed.
4. Repeat to unlock. No keypads will function when the control is locked.
|
| OPTIONS |
Oven use functions |
Enables you to personalize the audible tones and oven operation to suit your needs. See the “Oven Use” section. |
RANGE MAINTENANCE AND CARE
Self-Cleaning Cycle
IMPORTANT: The health of some birds is extremely sensitive to the fumes given off during the Self-Cleaning cycle. Exposure to the fumes may result in death to certain birds. Always move birds to another closed and well-ventilated room.
Keep the kitchen well-ventilated during the Self-Cleaning cycle to help get rid of heat, odors, and smoke.
Do not block the oven vent(s) during the Self-Cleaning cycle. Air must be able to move freely. Depending on your model, see “Oven
Vent” or “Oven Vents” section in your Quick Start Guide.
Do not clean, rub, damage, or move the oven door gasket.
Prepare Range:
- Remove the broiler pan, grid, cookware and bakeware, all cooking utensils, oven racks, aluminum foil, and, on some models, the temperature probe from the oven.
- Use a damp cloth to clean inside door edge and the 11/2" (38 mm) area around the inside oven cavity frame, being certain not to move or bend the gasket.
- Wipe out any loose soil to reduce smoke and avoid damage. At high temperatures, foods react with porcelain. Staining, etching, pitting, or faint white spots can result. This will not affect cooking performance.
- Remove plastic items from the cooktop because they may melt.
NOTE: The cooktop burners will not function during the SelfCleaning cycle.
IMPORTANT:
- Oven temperature must be below 500°F (260°C) to program a clean cycle.
- Only 1 oven can be cleaned at a time.
- Both oven doors will lock when either oven is running the SelfCleaning cycle.
How the Cycle Works
IMPORTANT: The heating and cooling of porcelain on steel in the oven may result in discoloring, loss of gloss, hairline cracks, and popping sounds.
The Precise Clean™ (on some models) Self-Cleaning cycle is a “one-touch” step that uses very high temperatures and dissolves soil to a powdery ash. The Precise Clean™ feature will automatically determine the length of cleaning time needed based on the number of times the oven has been used since the last Self-Cleaning cycle. The maximum clean time is 4 hours and the minimum clean time is 2 hours.
Once the oven has completely cooled, remove ash with a damp cloth. To avoid breaking the glass, do not apply a cool damp cloth to the inner door glass before it has completely cooled.
The oven light is disabled during the Self-Cleaning cycle.
To stop the Self-Cleaning cycle at anytime, press CANCEL UPPER/OFF UPPER or CANCEL LOWER/OFF LOWER. If the temperature is too high, the oven doors will remain locked.
When “LOCK” shows in the display, the doors of the oven cannot be opened. To avoid damage to the doors, do not force the doors open when “LOCK” is displayed.
Before self-cleaning, make sure the doors are completely closed or the doors will not lock and the Self-Cleaning cycle will not begin.
NOTE: Only one oven can use the Self-Cleaning cycle at a time, and 12 hours must pass before the next Self-Cleaning cycle can begin.
The oven is preset for a 2 hour or 3 hour clean cycle; however, the time can be changed. Suggested clean times are 2 hours for light soil and between 3 hours and 4 hours for average to heavy soil.
Use the following chart as a guide to determine the desired cleaning level.
| Cleaning Level |
Recommended Cleaning Time (Includes a 30 Minute Cool-Down Time) |
| 1 (Quick) |
2 hours |
| 2 |
2 hours 30 minutes |
| 3 |
3 hours |
| 4 (Reg) |
3 hours 30 minutes |
| 5 |
4 hours |
| 6 (Max) |
4 hours 30 minutes |
To Self-Clean:
1. Close the oven doors, and then press SELF CLEAN/ PRECISE CLEAN.
2. Press the number “1” or “2” or Time/Temp “+” or “-” keypad to select the desired oven to clean.
3. Press the number or Time/Temp “+” or “-” keypads to enter the total cleaning time/clean level.
4. Press START for the selected oven. The oven doors will automatically lock. When the Self-Cleaning cycle is complete and the oven cools, the oven doors will unlock.
5. When the oven is completely cooled, remove ash with a damp cloth.
To Delay Start Self-Clean:
1. Close the oven doors, and then press DELAY START/START TIME.
2. Press the number “1” or “2” or Time/Temp “+” or “-” keypad to select the desired oven.
3. Press the number or Time/Temp “+” or “-” keypads to enter the desired amount of time by which you want to delay the start.
4. Press SELF CLEAN/PRECISE CLEAN.
5. Press the number or Time/Temp “+” or “-” keypads to enter the total cleaning time/clean level.
6. Press START for the selected oven.
The oven doors will automatically lock after the Start Time countdown.
When the Self-Cleaning cycle is complete and the oven cools, the oven doors will unlock.
7. When the oven is completely cooled, remove ash with a damp cloth.
General Cleaning
IMPORTANT: Before cleaning, make sure all controls are off and the oven and cooktop are cool. Always follow label instructions on cleaning products.
Soap, water, and a soft cloth or sponge are suggested first, unless otherwise noted.
EXTERIOR PORCELAIN ENAMEL SURFACES (on some models)
Food spills containing acids, such as vinegar and tomato, should be cleaned as soon as the entire range is cool. These spills may affect the finish.
Cleaning Method:
- Glass cleaner, mild liquid cleaner, or nonabrasive scrubbing pad: Gently clean around the model/serial/rating plate because scrubbing may remove numbers.
- Affresh® Kitchen and Appliance Cleaner Part Number W10355010 (not included).
See the Quick Start Guide for ordering information.
STAINLESS STEEL (on some models)
NOTE: To avoid damage to stainless steel surfaces, do not use soap-filled scouring pads, abrasive cleaners, affresh® Cooktop Cleaner, steel-wool pads, gritty washcloths, or abrasive paper towels. Damage may occur to stainless steel surfaces, even with one-time or limited use.
Cleaning Method:
Rub in direction of grain to avoid damaging.
- Affresh® Stainless Steel Cleaner Part Number W10355016 (not included).
See the Quick Start Guide for ordering information.
METALLIC PAINT (on some models)
Do not use abrasive cleaners, cleaners with bleach, rust removers, ammonia, or sodium hydroxide (lye) because paint surface may stain.
PORCELAIN-COATED GRATES AND CAPS
Food spills containing acids, such as vinegar and tomato, should be cleaned as soon as the cooktop, grates, and caps are cool. These spills may affect the finish.
To avoid chipping, do not bang grates and caps against each other or hard surfaces such as cast-iron cookware.
Do not reassemble caps on burners while wet.
Cleaning method:
- Nonabrasive plastic scrubbing pad and mildly abrasive cleanser: Clean as soon as cooktop, grates, and caps are cool.
- Dishwasher (grates only, not caps): Use the most aggressive cycle. Cooked-on soils should be soaked or scrubbed before going into a dishwasher.
- Gas Grate and Drip Pan Cleaner Part Number 31617A
SURFACE BURNERS
To Clean:
NOTE: Before cleaning, make sure all controls are off and the oven and cooktop are cool. Do not use oven cleaners, bleach, or rust removers.
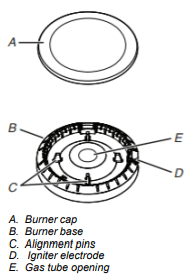
1. Remove the burner cap from the burner base and clean according to the “General Cleaning” section.
2. Clean the gas tube opening with a damp cloth.
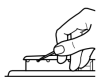
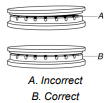
3. Clean clogged burner ports with a straight pin as shown. Do not enlarge or distort the port. Do not use a wooden toothpick. If the burner needs to be adjusted, contact a trained repair specialist.
4. Replace the burner cap, making sure the alignment pins are properly aligned with the burner cap.
5. Turn on the burner. If the burner does not light, check cap alignment. If the burner still does not light, do not service the sealed burner yourself. Contact a trained repair specialist.
- See “Sealed Surface Burners” section in your Control Guide for more information.
COOKTOP CONTROLS
To avoid damage to the cooktop controls, do not use steel wool, abrasive cleansers, or oven cleaner.
To avoid damage, do not soak knobs. When replacing knobs, make sure knobs are in the Off position.
On some models, do not remove seals under knobs.
Cleaning Method:
- Soap and water: Pull knobs straight away from control panel to remove
GRIDDLE
Cleaning method:
CONTROL PANEL AND OVEN DOOR EXTERIOR
To avoid damage to the control panel, do not use abrasive cleaners, steel-wool pads, gritty washcloths, or abrasive paper towels.
Cleaning Method:
- Glass cleaner and soft cloth or sponge: Apply glass cleaner to soft cloth or sponge, not directly on panel.
- Affresh® Kitchen and Appliance Cleaner Part Number W10355010 (not included)
OVEN RACKS
Cleaning Method:
- Steel-wool pad
- For racks that have discolored and are harder to slide, a light coating of vegetable oil applied to the rack guides will help them slide
- Dishwasher (steam rack water reservoir only, not racks): Although the water reservoir is durable, it may lose its shine and/or discolor when washed in a dishwasher.
OVEN CAVITY
Do not use oven cleaners.
Food spills should be cleaned when oven cools. At high temperatures, foods react with porcelain. Staining, etching, pitting, or faint white spots can result.
Cleaning Method:
- Clean cycle: See the “Self-Cleaning Cycle” section.
INSTALLATION
Unpack Range
1. Remove shipping materials, tape and film from the range. Keep cardboard bottom under range.
2. Remove oven racks and parts package from inside oven.
3. To place range on its back, take 4 cardboard corners from the carton. Stack one cardboard corner on top of another. Repeat with the other 2 corners. Place them lengthwise on the floor behind the range to support the range when it is laid on its back.
4. Using 2 or more people, firmly grasp the range and gently lay it on its back on the cardboard corners.
5. Pull cardboard bottom firmly to remove.
6. Use an adjustable wrench to loosen the leveling legs.
7. Place cardboard or hardboard in front of range. Using 2 or more people, stand range back up onto cardboard or hardboard.
Verify Anti-Tip Bracket Is Installed and Engaged
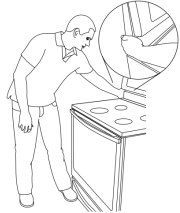
1. Place the outside of your foot against the bottom front of the oven door to keep the range from moving, and grasp the lower right or left side of the control panel as shown.
NOTE: If your countertop is mounted with a backsplash, it may be necessary to grasp the range higher than is shown in the illustration.
2. Slowly attempt to tilt the range forward. If you encounter immediate resistance, the range foot is engaged in the anti-tip bracket.
3. If the rear of the range lifts more than 1/2" (1.3 cm) off the floor without resistance, stop tilting the range and lower it gently back to the floor. The range foot is not engaged in the anti-tip bracket.
IMPORTANT: If there is a snapping or popping sound when lifting the range, the range may not be fully engaged in the bracket. Check to see if there are obstructions keeping the range from sliding to the wall or keeping the range foot from sliding into the bracket. Verify that the bracket is held securely in place by the mounting screws.
4. Slide the range forward, and verify that the anti-tip bracket is securely attached to the floor or wall.
5. Slide range back so the rear range foot is inserted into the slot of the anti-tip bracket.
IMPORTANT: If the back of the range is more than 2" (5.1 cm) from the mounting wall, the rear range foot may not engage the bracket. Slide the range forward and determine if there is an obstruction between the range and the mounting wall. If you need assistance or service, refer to the Quick Start Guide for contact information.
6. Repeat steps 1 and 2 to ensure that the range foot is engaged in the anti-tip bracket.
If the rear of the range lifts more than 1/2" (1.3 cm) off the floor without resistance, the anti-tip bracket may not be installed correctly. Do not operate the range without anti-tip bracket installed and engaged. Refer to the Quick Start Guide for contact information.
Level Range
1. Place rack in oven.
2. Place level on rack and check levelness of range, first side to side; then front to back.
3. If range is not level, pull range forward until rear leveling leg is removed from the anti-tip bracket.
4. Use wrench to adjust leveling legs up or down until range is level. Push range back into position.
5. Check that rear leveling leg is engaged in anti-tip bracket. Check that the flexible conduit or power supply cord are not bent.
NOTE: Range must be level for satisfactory baking performance.
Electronic Ignition System
Initial lighting and gas flame adjustments
Cooktop and oven burners use pilotless igniters in place of standing pilots. When the cooktop control knob is turned to the “IGNITE” or “LITE” position system creates a spark to light the burner. This sparking continues, as long as the control knob is turned to “IGNITE” or “LITE”.
When the oven control is turned to the desired setting, a glow bar igniter heats and ignites the gas.
Check Operation of Cooktop Burners
Standard Surface Burners
Push in and turn each control knob to the “IGNITE” position. The flame should light within 4 seconds. The first time a burner is lit, it may take longer than 4 seconds to light because of air in the gas line.
If burners do not light properly:
- Turn cooktop control knob to the “OFF” position.
- Check that the range is plugged in and the circuit breaker has not tripped or the household fuse has not blown.
- Check that the gas shutoff valve is set to the “open” position.
- Check that burner caps are properly positioned on burner bases.
Repeat start-up. If a burner does not light at this point, turn the control knobs to “OFF” and contact your dealer or authorized service company for assistance.
Check Operation of Both Oven Bake Burners
1. Press BAKE for the desired oven.
"BAKE" scrolls down in the upper text display area or scrolls up in the lower text display area, depending on oven selection, and 350°F is displayed. After 3 seconds "Set temp" scrolls in the selected oven text display area, followed by "Push START."
2. Press START for the desired oven. "Baking" scrolls in the selected oven text display area. Then, after 3 seconds, "Preheating" scrolls in the display.
The igniter used to light the bake burner will glow. Once the igniter is hot, the oven bake burner should light. Under certain conditions, it may take up to 60 seconds for it to light.
If burners do not light properly:
- Press CANCEL for the desired oven to turn off the oven.
- Check that the range is plugged in and circuit breaker has not tripped or the household fuse has not blown.
- Check that the gas shutoff valve is set to the "open" position.
Repeat start-up. If burner does not light, press OFF/CANCEL for the desired oven to turn off the oven and contact your dealer or authorized service company for assistance.
Check Operation of Oven Broil Burner
1. Press BROIL for the upper oven. “BROIL” scrolls down in the upper text display area, and 550°F is displayed. After 3 seconds, “Set temp” scrolls in the upper oven text display area, followed by “Push START.”
2. Press START for the upper oven. “Broiling” scrolls in the upper oven text display area and remains there until the set temperature is reached. The igniter used to light the broil burner will glow. Once the igniter is hot, the oven burner should light. Under certain conditions, it may take up to 60 seconds for it to light.
If burners do not light properly:
- Press CANCEL for the upper oven to turn off the oven.
- Check that the range is plugged in and circuit breaker has not tripped or the household fuse has not blown.
- Check that the gas shutoff valve is set to the “open” position.
Repeat start-up. If burner does not light, press CANCEL for the upper oven to turn off the oven and contact your dealer or authorized service company for assistance.
POWER FAILURE
In case of a prolonged power failure, the surface burners cannot be lit manually. No attempt should be made to operate the appliance during a power failure.
Complete Installation
1. Check that all parts are now installed. If there is an extra part, go back through the steps to see which step was skipped.
2. Check that you have all of your tools.
3. Dispose of/recycle all packaging materials.
4. Check that the range is level. See the “Level Range” section.
5. Use a mild solution of liquid household cleaner and warm water to remove waxy residue caused by shipping material. Dry thoroughly with a soft cloth. For more information, see the “Range Maintenance Care” section.
6. Read the Quick Start Guide.
7. Turn on surface burners and oven. See the Quick Start Guide for specific instruction on range operation.
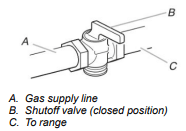
8. When the range has been on for 5 minutes, check for heat. If the range is cold, turn off the range and check that the gas supply line shutoff valve is open.
If range does not operate, check the following:
- Household fuse is intact and tight, or circuit breaker has not tripped.
- Range is plugged into the appropriate grounded outlet.
- Gas pressure regulator shutoff valve is in the “on” position.
- Electrical supply is connected.
- See Online Troubleshooting section.
- If the gas supply line shutoff valve is closed, open it, then repeat the 5-minute test as outlined above.
- If the gas supply line shutoff valve is open, press the CANCEL button on the oven control panel and contact a qualified technician.
Adjust Leveling Legs
1. If range height adjustment is necessary, use a wrench or pliers to loosen the 4 leveling legs. This may be done with the range on its back or with the range supported on 2 legs after the range has been placed back to a standing position.
NOTE: To place range back up into a standing position, put a sheet of cardboard or hardboard in front of range. Using 2 or more people, stand range back up onto the cardboard or hardboard.
2. Adjust the leveling legs to the correct height. Leveling legs can be loosened to add up to a maximum of 1" (2.5 cm). A minimum of 3/16" (5.0 mm) is needed to engage the anti-tip bracket.
NOTE: If height adjustment is made when range is standing, tilt the range back to adjust the front legs, then tilt forward to adjust the rear legs.
3. When the range is at the correct height, check that there is adequate clearance under the range for the anti-tip bracket. Before sliding range into its final location, check that the anti tip bracket will slide under the range and onto the rear leveling leg prior to anti-tip bracket installation.
GAS CONVERSIONS
Gas conversions from Natural gas to propane gas or from propane gas to Natural gas must be done by a qualified installer.
Propane Gas Conversion
1. Turn manual shutoff valve to the closed position.
2. Unplug range or disconnect power.
To Convert Gas Pressure Regulator (Natural gas to Propane)
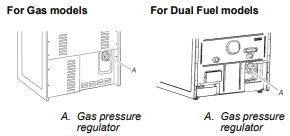
1. Locate gas pressure regulator at the rear of the range.
IMPORTANT: Do not remove the gas pressure regulator.
2. Unscrew the regulator cap, and then remove the plastic cover.
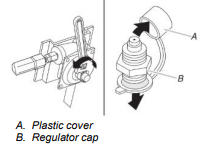
3. Flip the regulator pin over, and then replace the plastic cover.
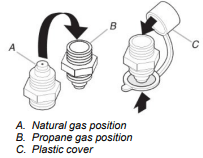
4. Screw the regulator cap securely back into place. Do not overtighten
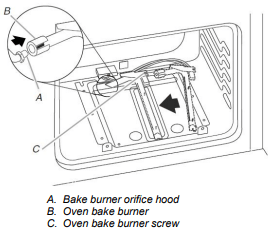
To Convert Oven Bake Burners (Natural gas to Propane)
To Convert Lower Oven Bake Burner:
1. Remove oven racks from inside the oven cavity.
2. Remove oven door. See the Oven Door Removal Guide for oven door removal instructions.
3. Push the bake burner cover to the right.
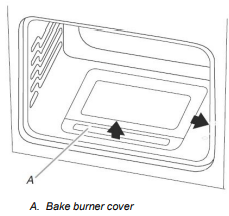
4. Lift up and remove oven bake burner cover.
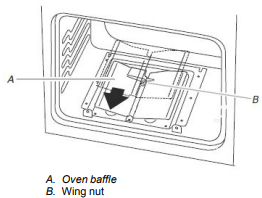
5. Unscrew wing nut and remove oven baffle.
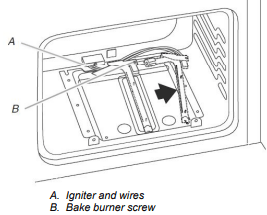
6. Remove the oven bake burner screw and set aside.
7. Gently set the bake burner to the side.
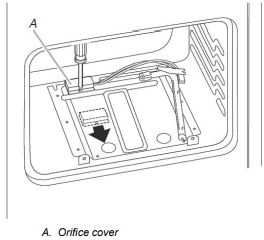
8. Unscrew and remove the cover over the orifice.
9. Turn the Number 0.070 Natural gas orifice hood counterclockwise to remove.
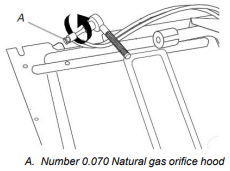
10. Install the Number 0.044 Propane gas orifice hood, turning it clockwise 4 or 5 turns. Do not overtighten.
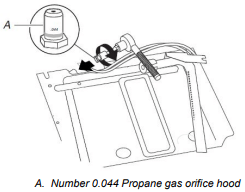
11. Position the oven bake burner over the orifice hood and reinstall using screw.
To Convert Upper Oven Bake Burner
12. Repeat steps 1 through 8 above for conversion of the upper oven bake burner.
13. Remove the Number 0.055 Natural gas orifice spud in the upper oven and replace with a Number 0.037 Propane gas orifice spud.
14. Reverse steps to reinstall the orifice covers, oven bake burners, oven baffles and oven bake covers in both ovens.
To Convert Oven Broil Burner (Natural gas to Propane)
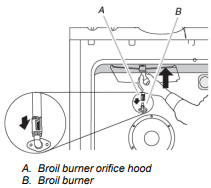
1. Remove broil burner screw and set aside.
2. Remove the broil burner from the broil burner orifice hood. The broil burner will hang in the back of the oven while changing the orifice hood.
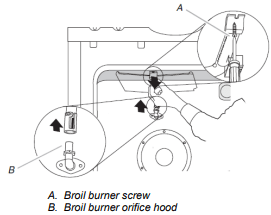
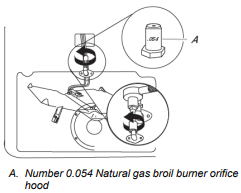
3. Turn the Number 0.054 Natural gas broil burner orifice hood counterclockwise to remove.
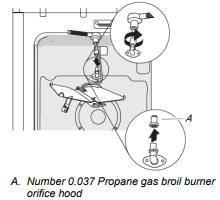
4. Install the green Number 0.037 Propane gas broil burner orifice hood, turning it clockwise 4 or 5 turns. Do not overtighten.
5. Place the broil burner on the broil burner orifice hood. Insert the broil burner locator pin in the hole in the oven back.
6. Position the broil burner against the roof of the oven cavity and attach with screw.
To Convert Surface Burners (Natural gas to Propane)
1. Remove burner cap.
2. Remove the burner base.
3. Apply masking tape to the end of a 9/32" (7 mm) nut driver to help hold the gas orifice spud in the nut driver while changing it. Press nut driver down onto the gas orifice spud and remove by turning it counterclockwise and lifting out. Set gas orifice spud aside.

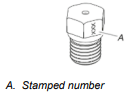
4. Remove the orifice spuds shipped in the literature package in the oven. Gas orifice spuds are stamped with a number and have a groove in the hex area. Replace the Natural gas orifice spud with the correct Propane gas orifice spud.
Refer to the following chart for correct Propane gas orifice spud ratings and to spud holder card for proper placement.
Propane Gas Orifice Spud Chart for Surface Burner
| Burner Rating |
Number |
| 4,000 BTU |
064AM |
| 7,000 BTU |
080AM |
| 9,100 BTU |
096AM |
| 14,000 BTU |
108AM |
NOTE: Refer to the Model Number and Serial Number Plate located on the oven frame behind the top right side of the oven door for proper sizing of spuds for each burner location.
5. Place Natural gas orifice spuds in the orifice spud bag. IMPORTANT: Keep the Natural gas orifice spuds in case of reinstallation with Natural gas.
6. Replace the burner base.
7. Replace burner cap.
8. Repeat steps 1-7 for the remaining burners.