Loading ...
Loading ...
Loading ...
21
• Once you have configured all settings, the device automat-
ically enters standby mode and automatically switches off
after approx. 2 minutes.
•
Alternatively you can switch off the device immediately by
pressing the Start/stop button .
2. At any time:
• Press the
button to display the current user memory as
well as the date and time.
• Press and hold the button again for about 5 seconds to
reach "Date and time" mode.
• Configure the settings as described above.
5. Measuring blood pressure
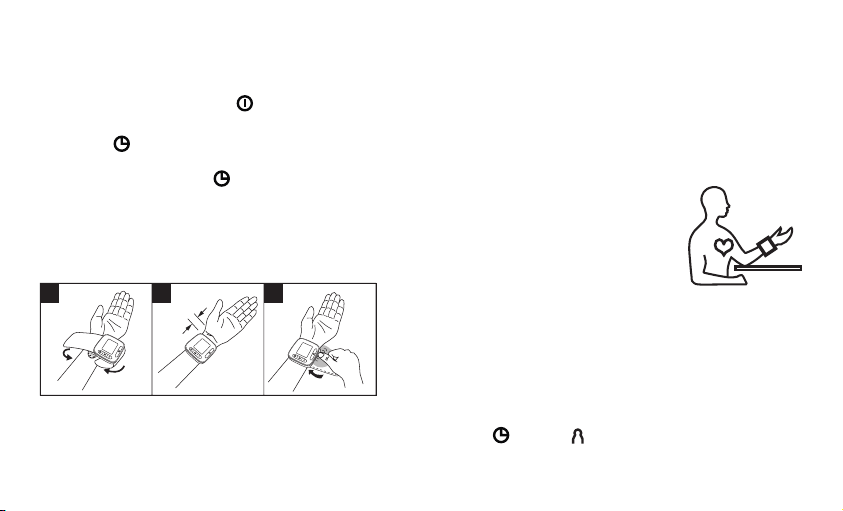
Attaching the cuff
• Expose your left wrist. Ensure that the circulation of the arm
is not hindered by tight clothing or similar.
• Place the cuff on the inside of your wrist.
•
Close the cuff with the hook-and-loop fastener such that the
upper edge of the device is positioned approx. 1 cm under-
neath the heel of the hand.
•
The cuff must be fitted tightly around the wrist, but must
not constrict.
Adopting the correct posture
•
B
efore every measurement, relax for about five minutes.
Otherwise deviations can occur.
•
Y
ou can take the measurement while
sitting or lying. To take your blood pres-
sure, make sure you are sitting comfort-
ably with your arms and back leaning
on something. Do not cross your legs.
Place your feet flat on the ground. Make
sure to rest your arm and move it. Al-
ways make sure that the cuff is at heart level. Otherwise sig-
nificant deviations can occur. Relax your arm and the palm
of your hand.
•
T
o avoid falsifying the measurement, it is important to remain
still during the measurement and not to speak!
Selecting memory
Press the button or to display the date/time and current
user memory. Select the desired user memory by pressing the
1 2 3
1 cm
• • • • • • • • • • • • •
Loading ...
Loading ...
Loading ...