D :Blutdruckmessgerät
Gebrauchsanweisung ........................................ 2 – 14
G:Blood pressure monitor
Instructions for use ........................................... 15-26
F:Tensiomètre
Mode d’emploi ................................................. 27-38
I :Misuratore di pressione
Istruzioni per l’uso ............................................ 39-50
r :Прибор для измерения кровяного давления
Инструкция по применению .......................... 51-64
Electromagnetic Compatibility Information ....... 65-68
SBC 22
0483
2
Bitte lesen Sie diese Gebrauchsanleitung aufmerksam durch,
bewahren Sie sie für späteren Gebrauch auf, machen Sie sie
anderen Benutzern zugänglich und beachten Sie die Hinweise.
1. Kennenlernen
Das Handgelenk-Blutdruckmessgerät dient zur nichtinvasiven
Messung und Überwachung arterieller Blutdruckwerte von er-
wachsenen Menschen. Sie können damit schnell und einfach
Ihren Blutdruck messen, die Messwerte abspeichern und sich
den Verlauf der Messwerte anzeigen lassen. Bei eventuell vor-
handenen Herzrhythmusstörungen werden Sie gewarnt.
Die ermittelten Werte werden eingestuft und grafisch beurteilt.
DEUTSCH
1. Kennenlernen ...................................................................2
2. Wichtige Hinweise ............................................................ 2
3. Gerätebeschreibung ......................................................... 6
4. Messung vorbereiten ........................................................ 7
5. Blutdruck messen.............................................................8
6. Messwerte speichern und abrufen ................................. 11
7. Speicherwerte löschen ................................................. 11
8. Fehlermeldung/Fehlerbehebung ...................................12
9. Gerät und Manschette reinigen und aufbewahren .......12
10. Technische Angaben ....................................................12
11. Garantie ........................................................................ 13
Inhalt
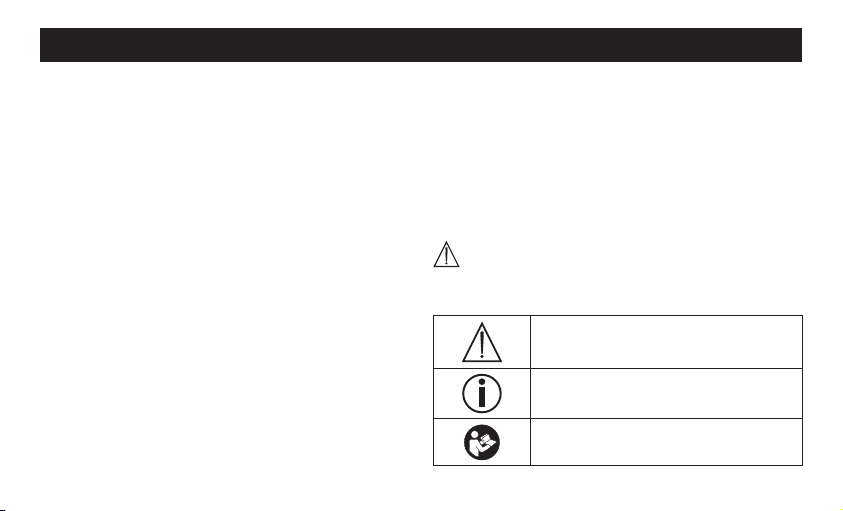
2. Wichtige Hinweise
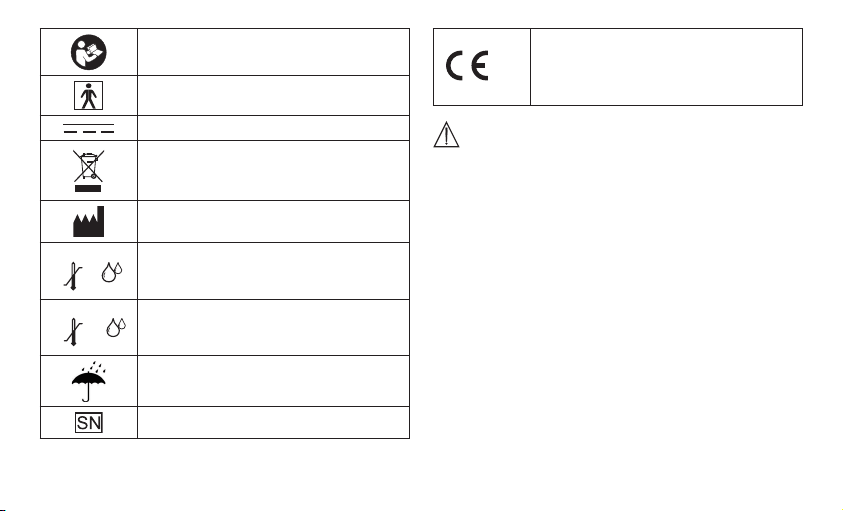
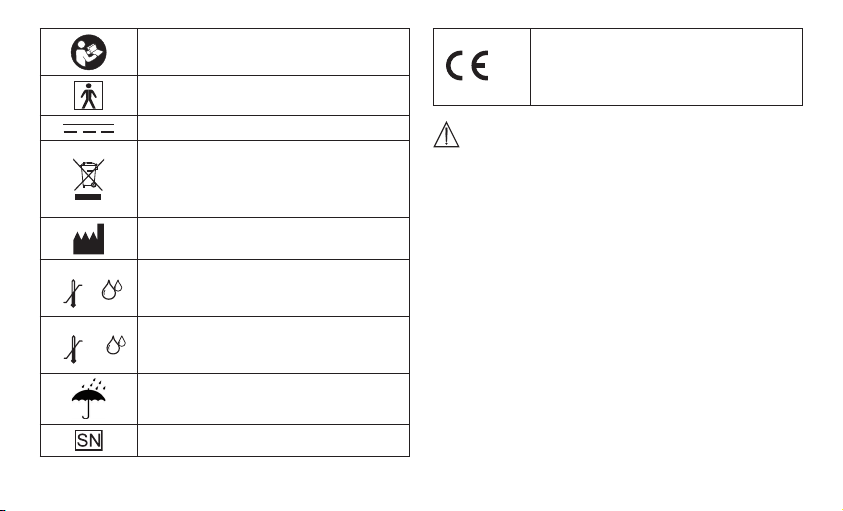
Zeichenerklärung
In der Gebrauchsanweisung, auf der Verpackung und auf dem
Typschild des Geräts und des Zubehörs werden folgende Sym-
bole verwendet:
Vorsicht
Hinweis
Hinweis auf wichtige Informationen

3
Gebrauchsanweisung beachten
Anwendungsteil Typ BF
Gleichstrom
Entsorgung gemäß Elektro- und Elektronik-
Altgeräte EG-Richtlinie WEEE (Waste Elec-
trical and Electronic Equipment)
Hersteller
Storage
-25°C
70°C
RH ≤93%
Zulässige Lagerungstemperatur und
- luftfeuchtigkeit
Operating
5°C
40°C
RH 15-93%
Zulässige Betriebstemperatur und
- luftfeuchtigkeit
Vor Nässe schützen
Seriennummer
0483
Die CE-Kennzeichnung bescheinigt die
Konformität mit den grundlegenden An-
forderungen der Richtlinie 93/42/EEC für
Medizinprodukte.
Hinweise zur Anwendung
•
U
m eine Vergleichbarkeit der Werte zu gewährleisten, mes-
sen Sie Ihren Blutdruck immer zu gleichen Tageszeiten.
•
R
uhen Sie sich vor jeder Messung ca. 5 Minuten aus!
•
W
enn Sie mehrere Messungen an einer Person durchführen
möchten, warten Sie zwischen den einzelnen Messungen
jeweils 5 Minuten.
•
M
indestens 30 Minuten vor der Messung sollten Sie nicht
essen, trinken, rauchen oder sich körperlich betätigen.
•
W
iederholen Sie die Messung im Falle zweifelhaft gemes-
sener Werte.
•
D
ie von Ihnen selbst ermittelten Messwerte können nur zu
Ihrer Information dienen – sie ersetzen keine ärztliche Un-
tersuchung!
•
Besprechen Sie Ihre Messwerte mit dem Arzt, begründen Sie
daraus auf keinen Fall eigene medizinische Entscheidungen
(z.B. Medikamente und deren Dosierungen)!
•
D
ieses Gerät ist nicht dafür bestimmt, durch Personen (ein-
schließlich Kinder) mit eingeschränkten physischen, senso-

4
rischen oder geistigen Fähigkeiten oder mangels Erfahrung
und/oder mangels Wissen benutzt zu werden, es sei denn,
sie werden durch eine für Ihre Sicherheit zuständige Person
beaufsichtigt oder erhielten von ihr Anweisungen, wie das
Gerät zu benutzen ist. Kinder sollten beaufsichtigt werden,
damit sie nicht mit dem Gerät spielen.
•
V
erwenden Sie das Blutdruckmessgerät nicht bei Neugebo-
renen und Präeklampsie-Patientinnen.
•
V
or Anwendung des Blutdruckmessgerätes in der Schwan-
gerschaft empfehlen wir eine Abstimmung mit dem Arzt.
•
B
ei Einschränkungen der Durchblutung an einem Arm auf
Grund chronischer oder akuter Gefäßerkrankungen (unter
anderem Gefäßverengungen), ist die Genauigkeit der Hand-
gelenksmessung eingeschränkt. Weichen Sie in diesem Fall
auf ein am Oberarm messendes Blutdruckmessgerät aus.
•
E
rkrankungen des Herz-Kreislaufsystems können zu Fehl-
messungen bzw. zu Beeinträchtigungen der Messgenauigkeit
führen. Ebenso der Fall ist dies bei sehr niedrigem Blutdruck,
Diabetes, Durchblutungs- und Rhythmusstörungen sowie bei
Schüttelfrost oder Zittern.
•
D
as Blutdruckmessgerät darf nicht im Zusammenhang mit
einem Hochfrequenz-Chirurgiegerät verwendet werden.
•
V
erwenden Sie das Gerät nur bei Personen mit dem für das
Gerät angegebenen Umfangbereich des Handgelenks.
•
B
eachten Sie, dass es während des Aufpumpens zu einer
Funktionsbeeinträchtigung des betroffenen Gliedmaßes kom-
men kann.
•
D
ie Blutzirkulation darf durch die Blutdruckmessung nicht
unnötig lange unterbunden werden. Bei einer Fehlfunktion
des Gerätes, nehmen Sie die Manschette vom Arm ab.
•
V
erhindern Sie einen anhaltenden Druck in der Manschette
sowie häufige Messungen. Eine dadurch resultierende Be-
einträchtigung des Blutflusses kann zu Verletzungen führen.
•
A
chten Sie darauf, dass die Manschette nicht an einem Arm
angelegt wird, deren Arterien oder Venen in medizinischer
Behandlung sind, z.B. intravaskulärer Zugang bzw. eine int-
ravaskuläre Therapie oder ein arteriovenöser (A-V-) Neben-
schluss.
•
L
egen Sie die Manschette nicht bei Personen an, die eine
Brustamputation hatten.
•
L
egen Sie die Manschette nicht über Wunden an, da dies zu
weiteren Verletzungen führen kann.
•
L
egen Sie die Manschette ausschließlich am Handgelenk
an. Legen Sie die Manschette nicht an anderen Stellen des
Körpers an.
•
S
ie können das Blutdruckmessgerät ausschließlich mit Bat-
terien betreiben.
5
•
D
ie Abschaltautomatik schaltet das Blutdruckmessgerät zur
Schonung der Batterien aus, wenn innerhalb 2 Minuten keine
Taste betätigt wird.
•
D
as Gerät ist nur für den in dieser Gebrauchsanweisung be-
schriebenen Zweck vorgesehen. Der Hersteller haftet nicht für
Schäden, die durch unsachgemäßen oder falschen Gebrauch
verursacht wurden.
Hinweise zur Aufbewahrung und Pflege
•
D
as Blutdruckmessgerät besteht aus Präzisions- und Elek-
tronik-Bauteilen. Die Genauigkeit der Messwerte und Le-
bensdauer des Gerätes hängt ab vom sorgfältigen Umgang:
– Schützen Sie das Gerät vor Stößen, Feuchtigkeit, Schmutz,
starken Temperaturschwankungen und direkter Sonnen-
einstrahlung.
– Lassen Sie das Gerät nicht fallen.
– Benutzen Sie das Gerät nicht in der Nähe von starken
elektromagnetischen Feldern, halten Sie es fern von Funk-
anlagen oder Mobiltelefonen.
•
F
alls das Gerät über einen längeren Zeitraum nicht benutzt
wird, wird empfohlen die Batterien zu entfernen.
Hinweise zum Umgang mit Batterien
•
Wenn Flüssigkeit aus einer Batteriezelle mit Haut oder Augen
in Kontakt kommt, die betroffene Stelle mit Wasser auswa-
schen und ärztliche Hilfe aufsuchen.
•
Verschluckungsgefahr! Kleinkinder könnten Batterien
verschlucken und daran ersticken. Daher Batterien für Klein-
kinder unerreichbar aufbewahren!
• Auf Polaritätskennzeichen Plus (+) und Minus (-) achten.
•
Wenn eine Batterie ausgelaufen ist, Schutzhandschuhe
anziehen und das Batteriefach mit einem trockenen Tuch
reinigen.
• Schützen Sie Batterien vor übermäßiger Wärme.
•
Explosionsgefahr! Keine Batterien ins Feuer werfen.
•
Batterien dürfen nicht geladen oder kurzgeschlossen werden.
•
Bei längerer Nichtbenutzung des Geräts die Batterien aus
dem Batteriefach nehmen.
•
Verwenden Sie nur denselben oder einen gleichwertigen
Batterietyp.
• Immer alle Batterien gleichzeitig auswechseln.
• Keine Akkus verwenden!
• Keine Batterien zerlegen, öffnen oder zerkleinern.
6
Hinweise zu Reparatur und Entsorgung
•
B
atterien gehören nicht in den Hausmüll. Bitte entsorgen
Sie die verbrauchten Batterien an den dafür vorgesehenen
Sammelstellen.
•
Ö
ffnen Sie das Gerät nicht. Bei Nichtbeachten erlischt die
Garantie.
•
D
as Gerät darf nicht selbst repariert oder justiert werden.
Eine einwandfreie Funktion ist in diesem Fall nicht mehr ge-
währleistet.
•
R
eparaturen dürfen nur vom Kundenservice oder autorisier-
ten Händlern durchgeführt werden. Prüfen Sie jedoch vor
jeder Reklamation zuerst die Batterien und tauschen Sie die-
se gegebenenfalls aus.
• Im Interesse des Umweltschutzes darf das Gerät am Ende
seiner Lebensdauer nicht mit dem Hausmüll entsorgt werden.
• Die Entsorgung kann über entsprechende Sammel-
stellen in Ihrem Land erfolgen. Entsorgen Sie das
Gerät gemäß der Elektro- und Elektronik Altgeräte
EG-Richtlinie – WEEE (Waste Electrical and Elect-
ronic Equipment).
• Bei Rückfragen wenden Sie sich an die für die Entsorgung
zuständige kommunale Behörde.
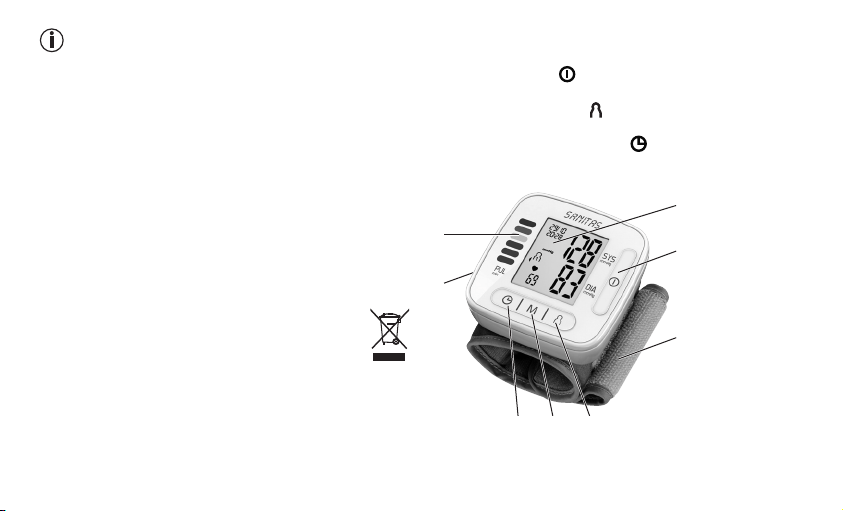
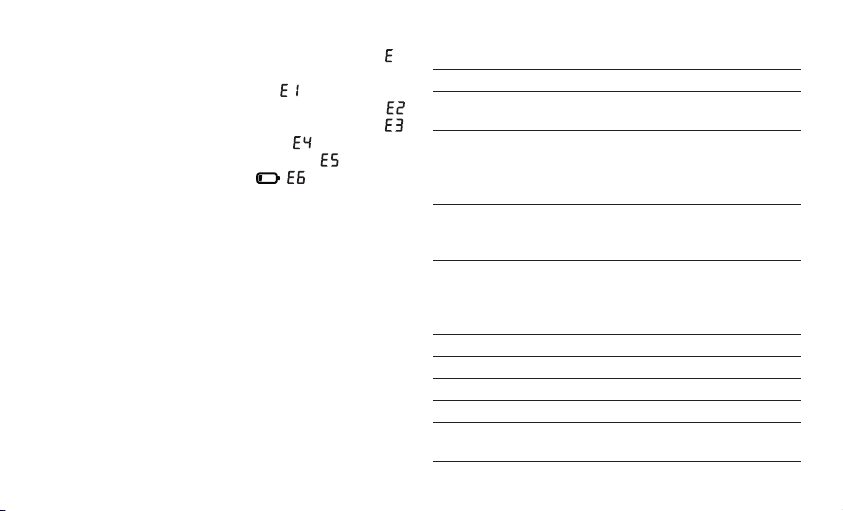
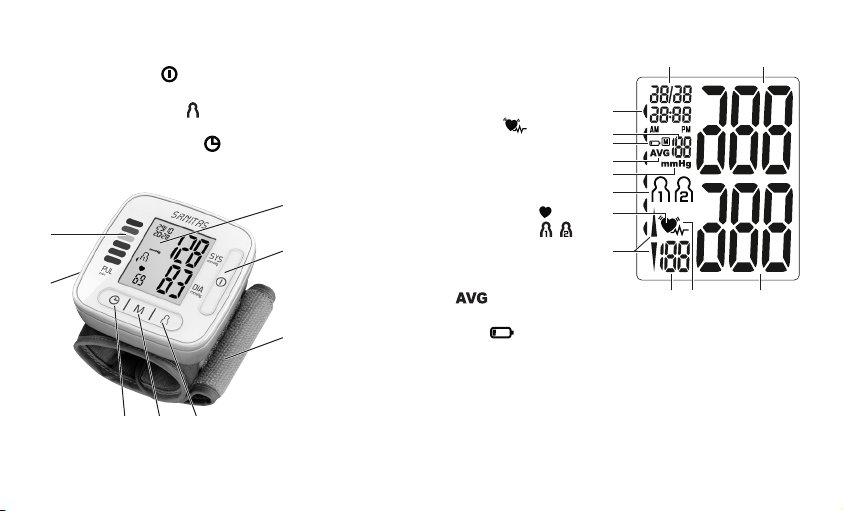
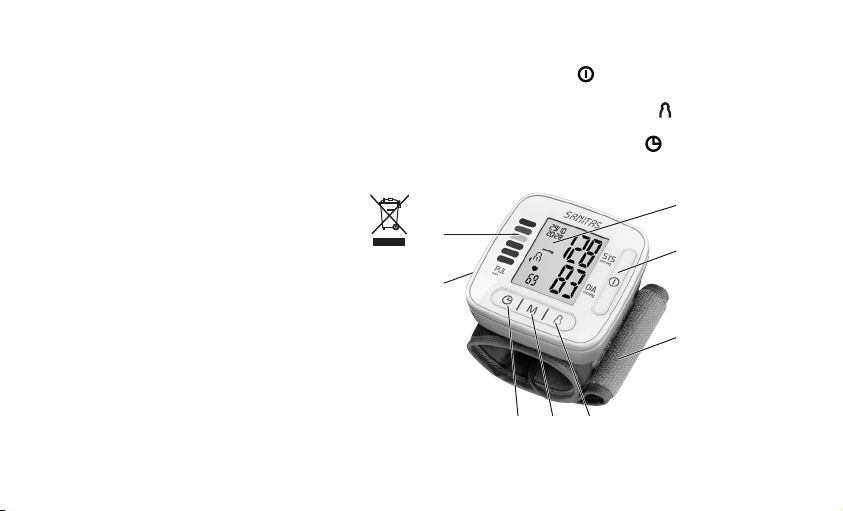
3. Gerätebeschreibung
1. Display
2.
Start-/Stopp-Taste
3. Handgelenks manschette
4. Taste Benutzerauswahl
5. Speichertaste M
6. Taste Datums-/Zeiteinstellung
7. Batteriefach abdeckung
8. Skala zur Einstufung der Messergebnisse
7
8
1
2
3
456
7
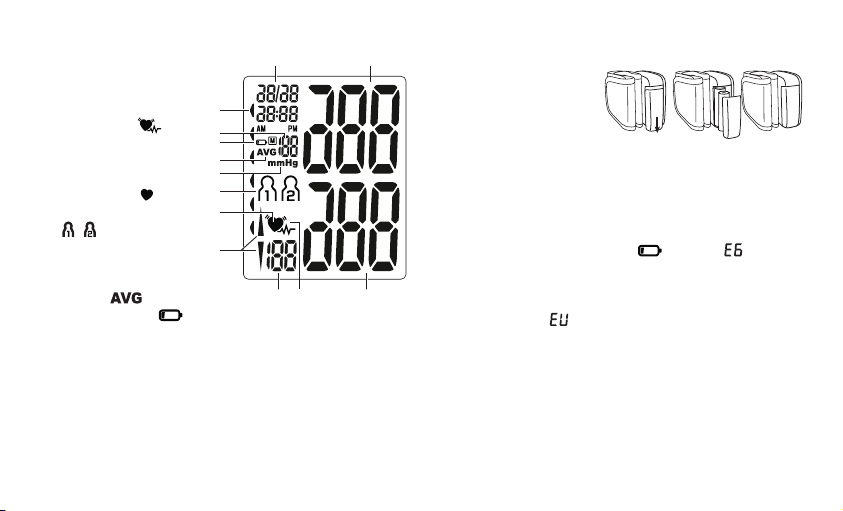
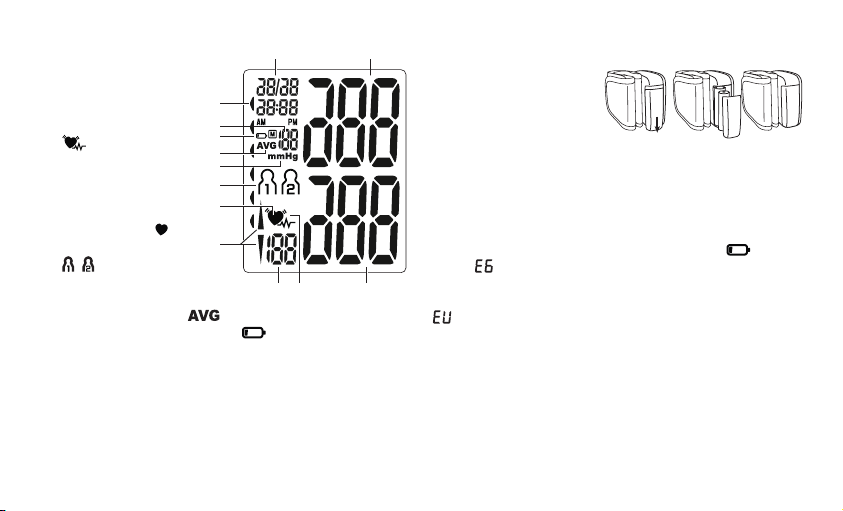
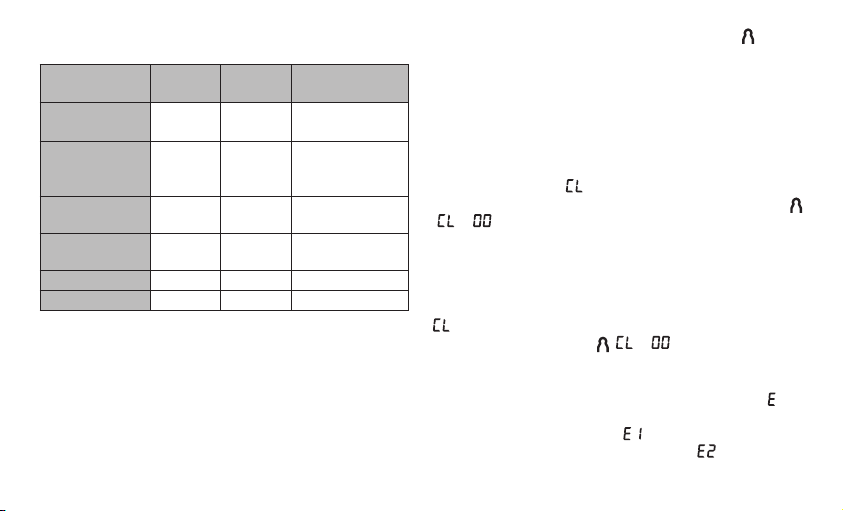
Anzeigen auf dem Display:
1. Uhrzeit und Datum
2. Systolischer Druck
3. Diastolischer Druck
4. Symbol Herzrhyth-
musstörung
5. Ermittelter Pulswert
6. Aufpumpen, Luft
ablassen (Pfeil)
7. Symbol Puls
8. Benutzerspeicher
/
9. Einheit mmHg
10. Durchschnittswert
der letzten 3 Mes-
sungen
11. Batterieanzeige
12. Nummer des Speicherplatzes
13. Einstufung der Messergebnisse
4. Messung vorbereiten
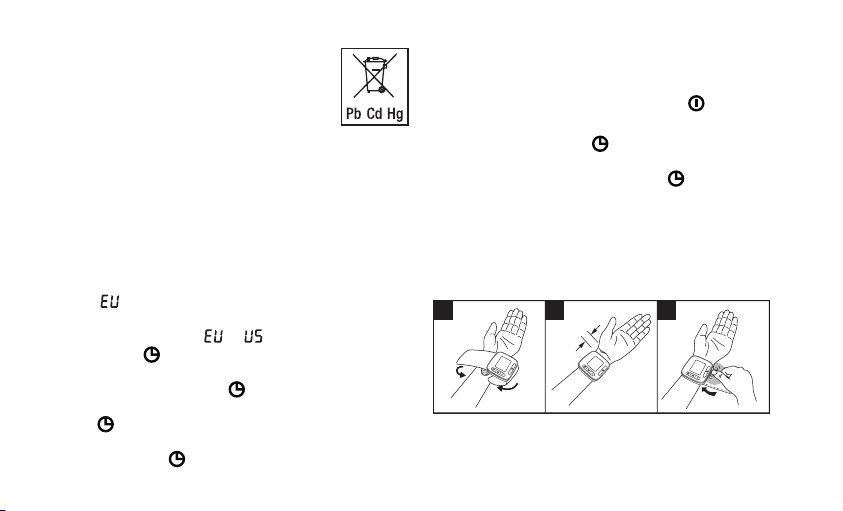
Batterie einlegen
•
E
ntfernen Sie den De-
ckel des Batteriefaches
auf der linken Seite des
Gerä tes.
•
L
egen Sie zwei Batterien
vom Typ 1,5 V Micro (Alkaline Type LR03) ein.
•
Achten Sie unbedingt darauf, dass die Batterien entspre-
chend der Kennzeichnung mit korrekter Polung eingelegt
werden. Verwenden Sie keine wiederaufladbaren Akkus.
•
S
chließen Sie den Batteriefachdeckel wieder sorgfältig.
Wenn das Symbol Batteriewechsel blinkt und erscheint,
ist keine Messung mehr möglich und Sie müssen alle Batte-
rien erneuern.
Nach dem Einsetzen der Batterien erscheint das Volldisplay,
anschließend wird angezeigt. Nun können Sie zwischen
EU- und US-Anzeige wählen und Datum und Uhrzeit einstellen.
•
D
ie verbrauchten, vollkommen entladenen Batterien müssen
Sie über speziell gekennzeichnete Sammelbehälter, Sonder-
müllannahmestellen oder über den Elektrohändleentsorgen.
Sie sind gesetzlich dazu verpflichtet, die Batterien zu ent-
sorgen.
11
12
13
10
9
8
7
6
5 4 3
1 2
8
•
D
iese Zeichen finden Sie auf schadstoffhaltigen Batterien:
Pb = Batterie enthält Blei,
Cd = Batterie enthält Cadmium,
Hg = Batterie enthält Quecksilber.
Datum und Uhrzeit einstellen
Sie sollten Datum und Uhrzeit unbedingt einstellen. Nur so kön-
nen Sie Ihre Messwerte korrekt mit Datum und Uhrzeit spei-
chern und später abrufen. Sie können zwischen 24-Stunden-
Format und 12-Stunden-Format wählen.
Zur Einstellung von Datum und Uhrzeit gehen Sie wie folgt vor:
1. Nach dem Einlegen der Batterien:
•
N
ach dem Prüfen des Displays, wobei alle Segmente erschei-
nen, blinkt auf dem Display.
•
M
it der Taste M können Sie grundsätzlich einzustellende
Werte erhöhen. Stellen Sie das Format oder ein und
bestätigen Sie die Eingabe mit der Taste .
• Anschließend blinkt das Jahr. Stellen Sie nun mit der Taste
M das Jahr ein. Bestätigen sie mit der Taste .
•
S
tellen Sie nun mit der Taste M den Monat ein. Bestätigen
Sie mit der Taste .
•
S
tellen Sie Tag/Stunde/Minute ein und bestätigen Sie jeweils
mit der Taste
.
•
N
achdem alle Einstellungen vorgenommen wurden geht das
Gerät automatisch in den Standby-Modus und schaltet sich
nach ca. 2 Minuten automatisch aus.
•
Alternativ können Sie durch Drücken der Start-/Stopp-Taste
das Gerät sofort ausschalten.
2. Zu jeder Zeit:
•
D
rücken Sie die Taste , der aktuelle Benutzerspeicher so
-
wie Datum/Uhrzeit werden angezeigt.
•
D
rücken Sie erneut und halten Sie ca. 5 Sekunden lang die
Taste , um in den Einstellmodus „Datum und Uhrzeit“ zu
gelangen.
•
F
ahren Sie mit der Einstellung wie oben beschrieben fort.
5. Blutdruck messen
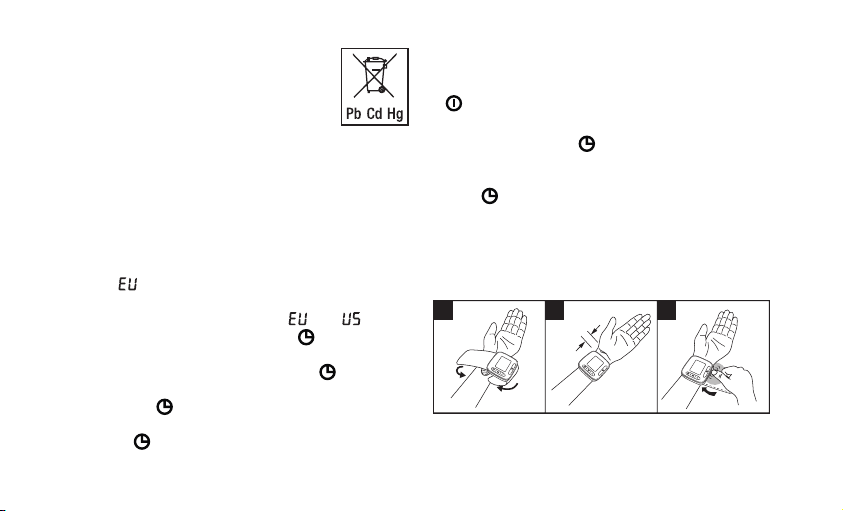
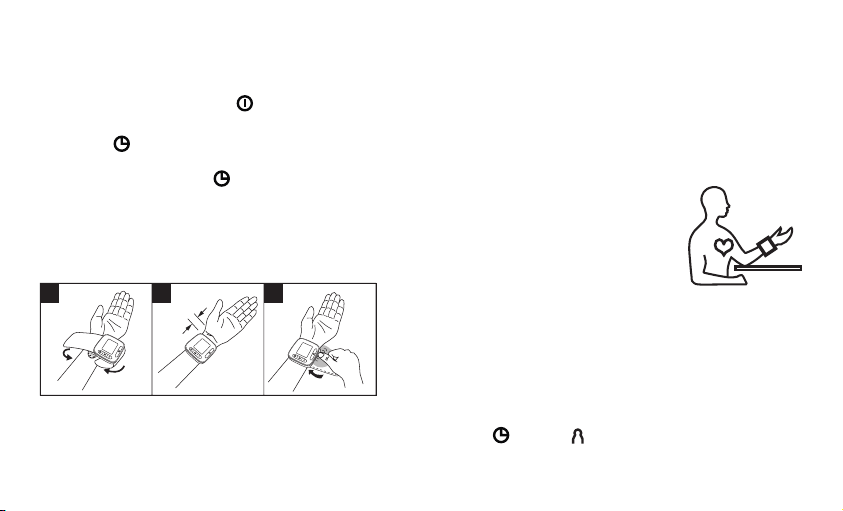
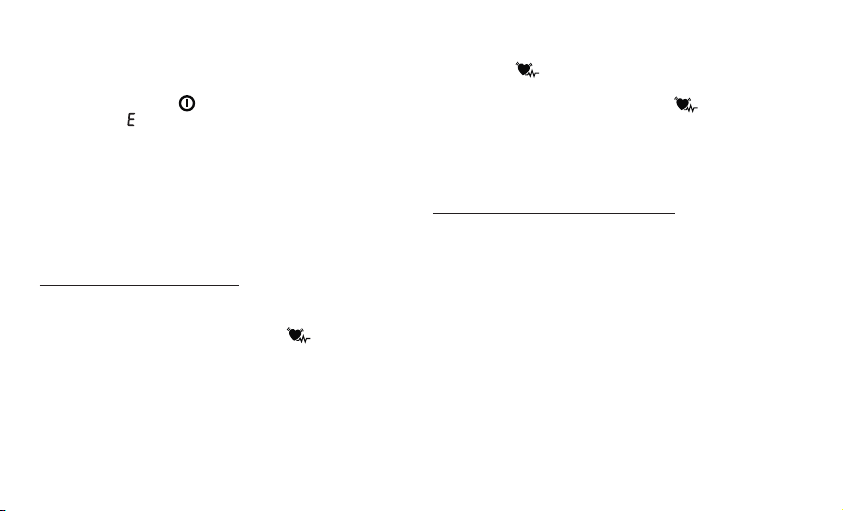
Manschette anlegen
•
E
ntblößen Sie Ihr linkes Handgelenk. Achten Sie darauf, dass
die Durchblutung des Arms nicht durch zu enge Kleidungs-
stücke oder Ähnliches eingeengt ist.
1 2 3
1 cm
9
•
Legen Sie die Manschette auf der Innenseite Ihres Hand-
gelenkes an.
•
S
chließen Sie die Manschette mit dem Klettverschluss, so-
dass die Oberkante des Gerätes ca. 1 cm unter dem Hand-
ballen sitzt.
•
D
ie Manschette muss eng um das Handgelenk anliegen, darf
aber nicht einschnüren.
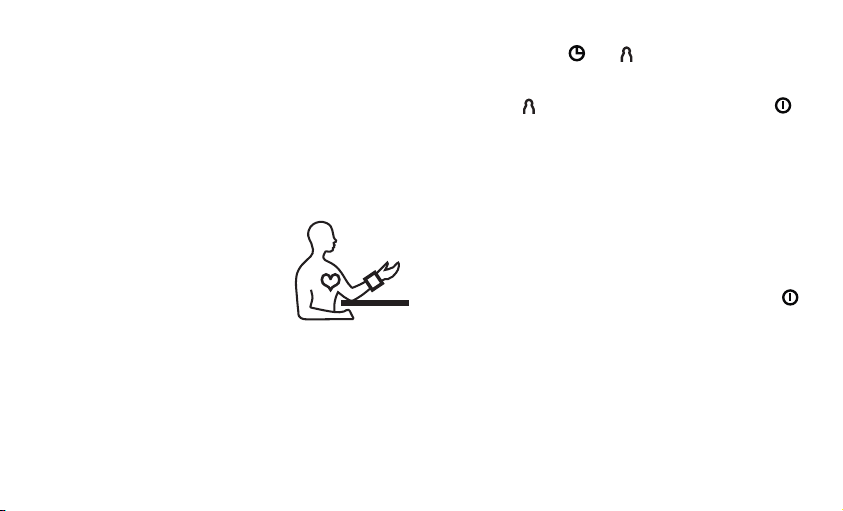
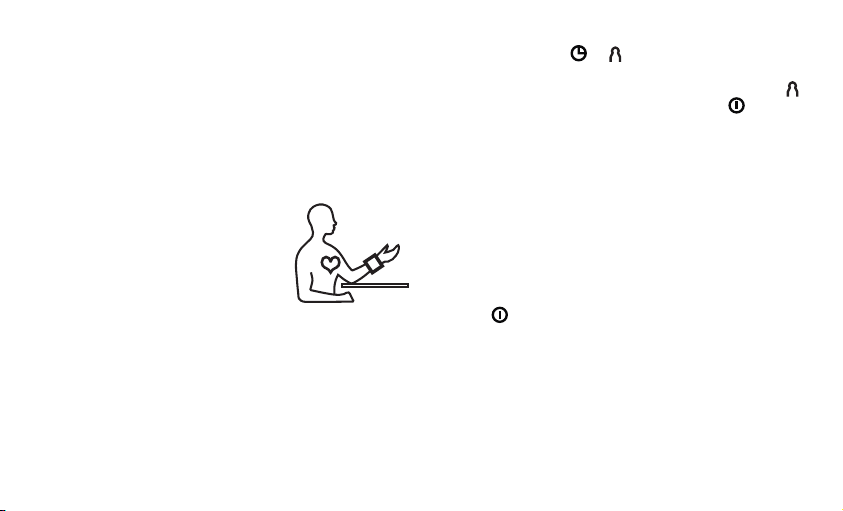
Richtige Körperhaltung einnehmen
•
R
uhen Sie sich vor jeder Messung ca. 5 Minuten aus!
Ansonsten kann es zu Abweichungen kommen.
•
S
ie können die Messung im Sitzen oder
im Liegen durchführen. Sitzen Sie zur
Blutdruckmessung bequem. Lehnen Sie
Rücken und Arme an. Kreuzen Sie die
Beine nicht. Stellen Sie die Füße flach
auf den Boden. Stützen Sie Ihren Arm
unbedingt ab und winkeln ihn an. Ach-
ten Sie in jedem Fall darauf, dass sich die Manschette in
Herzhöhe befindet. Ansonsten kann es zu erheblichen Ab-
weichungen kommen. Entspannen Sie Ihren Arm und die
Handflächen.
•
U
m das Messergebnis nicht zu verfälschen ist es wichtig,
sich während der Messung ruhig zu verhalten und nicht zu
sprechen.
Speicher wählen
Drücken Sie die Taste oder
, Datum/Uhrzeit und der ak-
tuelle Benutzerspeicher werden angezeigt. Wählen Sie den
gewünschten Benutzerspeicher durch Drücken der Taste Be-
nutzerauswahl . Bestätigen Sie Ihre Wahl mit der Taste .
Sie haben zwei Speicher á 60 Speicherplätze um die Mess-
ergebnisse von 2 verschiedenen Personen getrennt von-
einander abzuspeichern oder Messungen morgens und abends
separat abzuspeichern.
Blutdruckmessung durchführen
•
L
egen Sie, wie zuvor beschrieben, die Manschette an und
nehmen Sie die Haltung ein, in der Sie die Messung durch-
führen wollen.
•
W
ählen Sie den Benutzerspeicher wie oben beschrieben aus.
Um den Messvorgang zu starten drücken Sie die Taste .
Nach dem Prüfen des Displays erscheint ein Pfeil und der
aktuelle Speicherplatz und Datum/Uhrzeit werden angezeigt.
Die Manschette pumpt sich automatisch auf. Während des
Aufpumpens ermittelt das Gerät bereits Messwerte, die zur
Abschätzung des nötigen Aufpumpdruckes dienen. Sollte
dieser Druck nicht ausreichen, pumpt das Gerät automa-
tisch nach.
•
D
ann wird der Druck in der Manschette langsam abgelassen
und der Puls erfasst.
• • • • • • • • • • • • •
10
•
W
enn die Messung beendet ist, wird der restliche Luftdruck
sehr schnell abgelassen. Der Puls, der systolische und der
diastolische Blutdruck werden angezeigt.
•
S
ie können die Messung jederzeit durch das Drücken der
Taste abbrechen.
•
D
as Symbol
_
erscheint, wenn die Messung nicht ordnungs-
gemäß durchgeführt werden konnte. Beachten Sie das Kapi-
tel Fehlermeldung/Fehlerbehebung in dieser Gebrauchsan-
leitung und wiederholen Sie die Messung.
•
D
as Gerät schaltet nach 2 Minuten automatisch ab.
Warten Sie vor einer erneuten Messung mindestens 5 Minuten!
Ergebnisse beurteilen
Herzrhythmusstörungen:
Dieses Gerät kann während der Messung eventuelle Störungen
des Herzrhythmus identifizieren und weist gegebenenfalls nach
der Messung mit dem Symbol darauf hin.
Dies kann ein Indikator für eine Arrhythmie sein. Arrhythmie ist
eine Krankheit, bei der der Herzrhythmus aufgrund von Fehlern
im bioelektrischen System, das den Herzschlag steuert, anor-
mal ist. Die Symptome (ausgelassene oder vorzeitige Herz
-
schläge, langsamer oder zu schneller Puls) können u.a. von
Herzerkrankungen, Alter, körperlicher Veranlagung, Genuss-
mitteln im Übermaß, Stress oder Mangel an Schlaf herrühren.
Arrhythmie kann nur durch eine Untersuchung bei Ihrem Arzt
festgestellt werden.
Wiederholen Sie die Messung, wenn das Symbol nach der
Messung auf dem Display angezeigt wird. Bitte achten sie da-
rauf, dass Sie sich 5 Minuten ausruhen und während der Mes-
sung nicht sprechen oder bewegen. Sollte das Symbol oft
erscheinen, wenden Sie sich bitte an Ihren Arzt. Selbst diagnose
und -behandlung aufgrund der Messergebnisse können gefähr-
lich sein. Befolgen Sie unbedingt die Anweisungen Ihres Arztes.
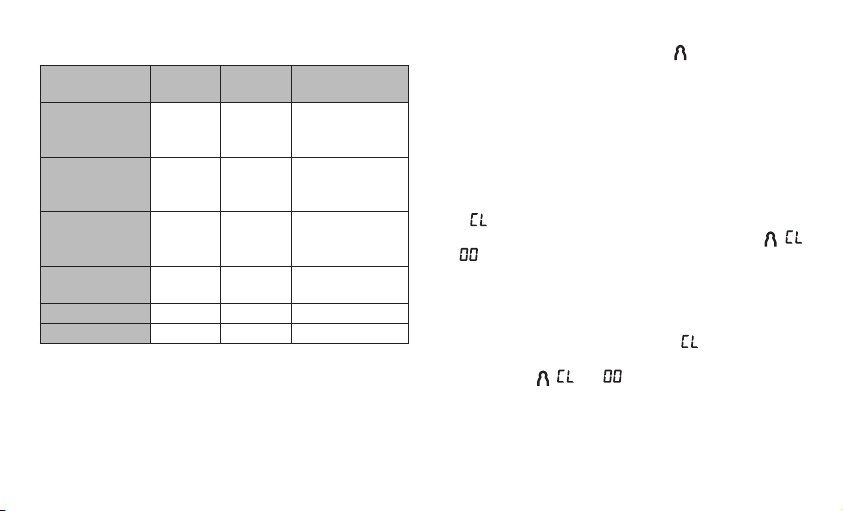
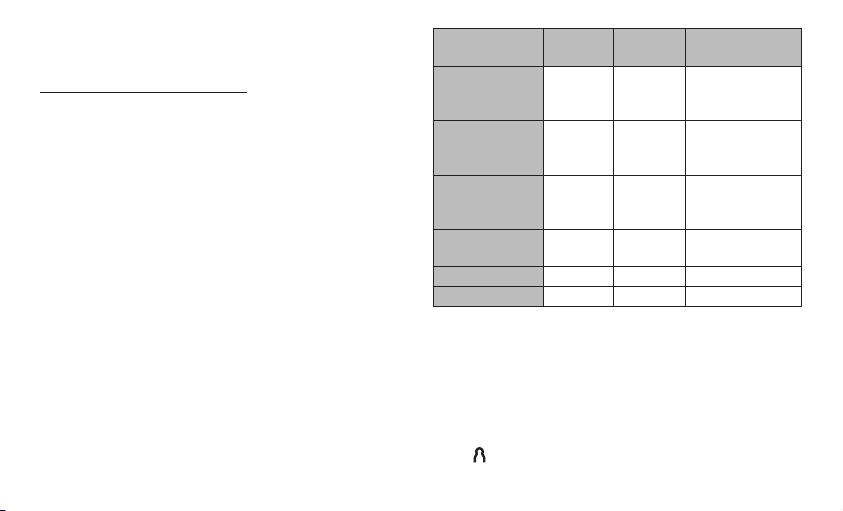
Einstufung der Messergebnisse:
Die Messergebnisse, lassen sich gemäß nachfolgender Tabelle
einstufen und beurteilen.
Diese Standardwerte dienen jedoch lediglich als allgemeine
Richtlinie, da der individuelle Blutdruck bei verschiedenen Per-
sonen und unterschiedlichen Altersgruppen usw. abweicht.
Es ist wichtig, dass Sie Ihren Arzt in regelmäßigen Abständen
zu Rate ziehen. Ihr Arzt teilt Ihnen Ihre individuellen Werte für
einen normalen Blutdruck sowie den Wert mit, ab dem die Höhe
des Blutdrucks als gefährlich einzustufen ist.
Die Balkengrafik im Display und die Skala auf dem Gerät geben
an, in welchem Bereich sich der ermittelte Blutdruck befindet.
Sollte sich der Wert von Systole und Diastole in zwei unter-
schiedlichen Bereichen befinden (z.B. Systole im Bereich Hoch
normal und Diastole im Bereich Normal), dann zeigt Ihnen die
11
grafische Einteilung auf dem Gerät immer den höheren Bereich
an, im beschriebenen Beispiel „Hoch normal“.
Bereich der
Blutdruckwerte
Systole
(in mmHg)
Diastole
(in mmHg)
Maßnahme
Stufe 3:
starke
Hypertonie
≥ 180 ≥ 110
einen Arzt
auf suchen
Stufe 2:
mittlere
Hypertonie
160 – 179 100 – 109
einen Arzt
auf suchen
Stufe 1:
leichte
Hypertonie
140 – 159 90 – 99
regelmäßige Kon-
trolle beim Arzt
Hoch normal 130 – 139 85 – 89
regelmäßige Kon-
trolle beim Arzt
Normal 120 – 129 80 – 84 Selbstkontrolle
Optimal < 120 < 80 Selbstkontrolle
Quelle: WHO, 1999 (World Health Organization)
6. Messwerte speichern und abrufen
•
D
ie Ergebnisse jeder erfolgreichen Messung werden zusam-
men mit Datum und Uhrzeit abgespeichert. Bei mehr als 60
Messdaten gehen die jeweils ältesten Messdaten verloren.
•
D
urch
Drücken der Taste M gelangen Sie sofort zu den ge-
speicherten Messwerten. Mit der Taste können sie den Be-
nutzerspeicher wechseln. Durch Drücken der Taste M wird der
Durchschnittswert der letzten 3 gespeicherten Messwerte des
Benutzerspeichers angezeigt.
Durch weiteres Drücken der
Speichertaste M werden die jeweils letzten Einzelmesswerte
mit Datum und Uhrzeit angezeigt.
7. Speicherwerte löschen
Um den einzelnen Messwert zu löschen, wählen Sie diesen
bitte zunächst aus. Drücken und halten Sie die Speichertaste
M bis auf dem Display erscheint. Anschließend bestätigen
Sie bitte die Löschung mit der Taste Benutzerauswahl (
und erscheinen auf dem Display).
Um alle Messwerte eines Benutzerspeichers zu löschen, wählen
Sie diesen bitte zunächst aus. Drücken Sie die Taste Speicher-
taste M und der Durchschnittswert der letzten 3 gespeicherten
Messwerte wird angezeigt, anschließend drücken und halten
Sie bitte erneut die Speichertaste M bis auf dem Display
erscheint. Bestätigen Sie bitte die Löschung mit der Taste
Benutzer auswahl ( und erscheinen auf dem Display).
12
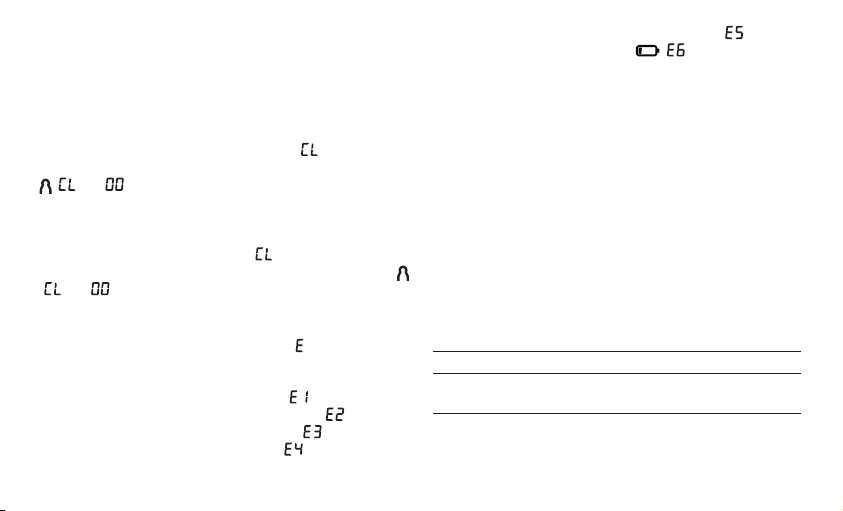
8. Fehlermeldung/Fehlerbehebung
Bei Fehlern erscheint auf dem Display die Fehlermeldung
_
.
Fehlermeldungen können auftreten, wenn
•
d
er Puls nicht erfasst werden konnte: ;
•
S
ie sich während der Messung bewegen oder sprechen: ;
•
d
ie Manschette zu stark bzw. zu schwach angelegt ist: ;
•
F
ehler während der Messung auftreten: ;
•
d
er Aufpumpdruck höher als 300 mmHg ist: ;
•
d
ie Batterien fast verbraucht sind : .
Wiederholen Sie in diesen Fällen die Messung. Achten Sie
da rauf, dass Sie sich nicht bewegen oder reden. Setzen Sie
gegebenenfalls die Batterien neu ein oder ersetzen Sie diese.
9. Gerät und Manschette reinigen und
aufbewahren
•
R
einigen Sie das Gerät und die Manschette vorsichtig nur
mit einem leicht angefeuchteten Tuch.
•
V
erwenden Sie keine Reinigungs- oder Lösungsmittel.
•
S
ie dürfen Gerät und Manschette auf keinen Fall unter Was-
ser halten, da sonst Flüssigkeit eindringen kann und das Ge-
rät und die Manschette beschädigt.
•
W
enn Sie Gerät und Manschette aufbewahren, dürfen keine
schweren Gegenstände auf dem Gerät und der Manschet-
te stehen. Entnehmen Sie die Batterien. Der Manschetten-
schlauch darf nicht scharf abgeknickt werden.
10. Technische Angaben
Modell-Nr. SBC 22
Type SBC 29
Messmethode Oszillometrisch, nicht invasive Blut-
druckmessung am Handgelenk
Messbereich Manschettendruck 0-300 mmHg,
systolisch 50-250 mmHg,
diastolisch 30-200 mmHg,
Puls 40-180 Schläge /Minute
Genauigkeit der
Anzeige
systolisch ± 3 mmHg,
diastolisch ± 3 mmHg,
Puls ± 5 % des angezeigten Wertes
Messunsicherheit max. zulässige Standardabweichung
gemäß klinischer Prüfung:
systolisch 8 mmHg /
diastolisch 8 mmHg
Speicher 2 x 60 Speicherplätze
Abmessungen L 74 mm x B 72 mm x H 24,5 mm
Gewicht Ungefähr 100 g (ohne Batterien)
Manschettengröße
135 bis 195 mm
Zul. Betriebs-
bedingungen
+5 °C bis +40 °C, 15-93 % relative
Luftfeuchte (nicht kondensierend)

13
Zul. Aufbewahrungs-
bedingungen
-25 °C bis +70 °C, ≤ 93 % relative
Luftfeuchte, 700-1050 hPa Umge-
bungsdruck
Stromversorgung 2 x 1,5 V
AAA Batterien
Batterie-Lebensdauer
Für ca. 300 Messungen, je nach Höhe
des Blutdrucks bzw. Aufpumpdruck
Zubehör Gebrauchsanweisung, 2 x 1,5 V AAA
Batterien, Aufbewahrungsbox
Klassifikation Interne Versorgung, IPX0, kein AP
oder APG, Dauerbetrieb, Anwen-
dungsteil Typ BF
•
Dieses Gerät entspricht der europäischen Norm EN60601-1-
2 und unterliegt besonderen Vorsichtsmaßnahmen hinsicht-
lich der elektromagnetischen Verträglichkeit. Bitte beachten
Sie dabei, dass tragbare und mobile HF-Kommunikations-
einrichtungen dieses Gerät beeinflussen können. Genauere
Angaben können Sie unter der angegebenen Kundenservice-
Adresse anfordern oder am Ende der Gebrauchsanweisung
nachlesen.
• Das Gerät entspricht der EU-Richtlinie für Medizinprodukte
93/42/EEC, dem Medizinproduktegesetz und den Normen
EN1060-1 (nicht invasive Blutdruckmessgeräte Teil 1: Allge-
meine Anforderungen), EN1060-3 (nicht invasive Blutdruck-
messgeräte Teil 3: Ergänzende Anforderungen für elektro
-
mechanische Blutdruckmesssysteme) und IEC80601-2-30
(Medizinische elektrische Geräte Teil 2-30: Besondere Fest-
legungen für die Sicherheit einschließlich der wesentlichen
Leistungsmerkmale von automatisierten nicht invasiven Blut-
druckmessgeräten).
• Die Genauigkeit dieses Blutdruckmessgerätes wurde sorg-
fältig geprüft und wurde im Hinblick auf eine lange nutzbare
Lebensdauer entwickelt.
•
Bei Verwendung des Gerätes in der Heilkunde sind Mess-
technische Kontrollen mit geeigneten Mitteln durchzuführen.
Genaue Angaben zur Überprüfung der Genauigkeit können
unter der Service-Adresse angefragt werden.
11. Garantie
Wir leisten 2 Jahre Garantie ab Kaufdatum für Material- und
Fabrikationsfehler des Produktes. Die Garantie gilt nicht:
•
I
m Falle von Schäden, die auf unsachgemäßer Bedienung
beruhen.
•
F
ür Verschleißteile.
•
B
ei Eigenverschulden des Kunden.
•
S
obald das Gerät durch eine nicht autorisierte Werkstatt
geöffnet wurde.

14
Die gesetzlichen Gewährleistungen des Kunden bleiben durch
die Garantie unberührt. Für Geltendmachung eines Garantiefal-
les innerhalb der Garantiezeit ist durch den Kunden der Nach-
weis des Kaufes zu führen. Die Garantie ist innerhalb eines
Zeitraumes von 2 Jahren ab Kaufdatum gegenüber der Hans
Dinslage GmbH, Uttenweiler (Germany) geltend zu machen.
Bitte wenden Sie sich im Falle von Reklamationen an
unseren Service unter folgendem Kontakt:
Service Hotline:
Tel.: +49 (0) 7374-915766
E-Mail: [email protected]
www.sanitas-online.de
Fordern wir Sie zur Übersendung des defekten Produktes
auf, ist das Produkt an folgende Adresse zu senden:
NU Service GmbH
Lessingstraße 10 b
89231 Neu-Ulm
Germany
Irrtum und Änderungen vorbehalten

15
ENGLISH
1. Getting to know your device ..........................................15
2. Important notes .............................................................. 15
3. Device description ..........................................................19
4. Preparing the measurement ...........................................20
5. Measuring blood pressure ..............................................21
6. Saving and displaying measurements ..........................23
7. Deleting stored values ..................................................24
8. Error messages/troubleshooting ..................................24
9. Cleaning and storing the device and cuff .....................24
10. Technical specifications ...............................................24
Contents
Please read these instructions for use carefully and keep them
for later use, be sure to make them accessible to other users
and observe the information they contain.
1. Getting to know your device
The wrist blood pressure monitor is used to carry out non-in-
vasive measurement and monitoring of arterial blood pressure
values in human adults. This allows you to quickly and easily
measure your blood pressure, save the measurements and
display the development of the measurements. You are also
warned of possible existing cardiac arrhythmia.
The recorded values are classified and evaluated graphically.
2. Important notes
Signs and symbols
The following symbols are used in these instructions for use,
on the packaging and on the type plate for the device and the
accessories:
Attention
Note
Note on important information
16
Observe the instructions for use
Application part, type BF
Direct current
Disposal in accordance with the Waste
Electrical and Electronic Equipment EC
Directive – WEEE
Manufacturer
Storage
-25°C
70°C
RH ≤93%
Permissible storage temperature and
humidity
Operating
5°C
40°C
RH 15-93%
Permissible operating temperature and
humidity
Protect from moisture
Serial number
0483
The CE labelling certifies that the product
complies with the essential requirements
of Directive 93/42/EEC on medical pro-
ducts.
Notes on use
• In order to ensure comparable values, always measure your
blood pressure at the same time of day.
• Before every measurement, relax for about five minutes.
• If you want to perform several measurements on the same
person, wait five minutes between each measurement.
•
Do not take a measurement within 30 minutes of eating,
drinking, smoking or exercising.
• Repeat the measurement if you are unsure of the measured
value.
•
The measurements taken by you are for your information only
– they are no substitute for a medical examination!
•
Discuss the measured values with your doctor and never
base any medical decisions on them (e.g. medicines and
their administration).
• This device is not intended for use by people (including chil-
dren) with restricted physical, sensory or mental skills or a
lack of experience and/or a lack of knowledge, unless they
are supervised by a person who is responsible for their safety

17
or are instructed by such a person in how to use the device.
Supervise children around the device to ensure they do not
play with it.
• Do not use the blood pressure monitor on newborns or pa-
tients with preeclampsia.
• We recommend consulting a doctor before using the blood
pressure monitor during pregnancy.
• In the case of restricted circulation on the arm as a result of
chronic or acute vascular diseases (including vascular con-
striction), the accuracy of the wrist measurement is limit-
ed. In this case you should avoid using an upper arm blood
pressure monitor.
•
Cardiovascular diseases may lead to incorrect measurements
or have a detrimental effect on measurement accuracy. The
same also applies to very low blood pressure, diabetes, circu-
latory disorders and arrhythmias as well as chills or shaking.
• The blood pressure monitor must not be used in connection
with a high-frequency surgical unit.
• Only use the device on people who have the specified wrist
measurement for the device.
• Please note that when inflating, the functions of the limb in
question may be impaired.
•
During the blood pressure measurement, the blood circu-
lation must not be stopped for an unnecessarily long time.
If the device malfunctions, remove the cuff from the arm.
•
Do not allow sustained pressure in the cuff or frequent meas-
urements. The resulting restriction of the blood flow may
cause injury.
• Make sure that the cuff is not placed on an arm in which the
arteries or veins are undergoing medical treatment, e.g. intra-
vascular or therapy, or an arteriovenous (AV) shunt.
• Do not use the cuff on people who have undergone a mas-
tectomy.
•
Do not place the cuff over wounds as this may cause fur-
ther injury.
•
Place the cuff on your wrist only. Do not place the cuff on
other parts of the body.
• The blood pressure monitor can only be operated with bat-
teries.
•
To conserve the batteries, the blood pressure monitor switch-
es off automatically if you do not press any buttons for 2
minutes.
•
The device is only intended for the purpose described in
these instructions for use. The manufacturer is not liable for
damage resulting from improper or careless use.
Instructions for storage and maintenance
•
The blood pressure monitor is made from precision and elec-
tronic components. The accuracy of the measured values
and service life of the device depend on its careful handling:
18
– Protect the device from impacts, humidity, dirt, marked
temperature fluctuations and direct sunlight.
– Do not drop the device.
– Do not use the device in the vicinity of strong electromag-
netic fields and keep it away from radio systems or mobile
telephones.
• We recommend that the batteries be removed if the device
will not be used for a prolonged period of time.
Notes on handling batteries
•
If your skin or eyes come into contact with battery fluid, rinse
the affected areas with water and seek medical assistance.
•
Choking hazard! Small children may swallow and
choke on batteries. Store the batteries out of the reach of
small children.
• Observe the plus (+) and minus (−) polarity signs.
• If a battery has leaked, put on protective gloves and clean
the battery compartment with a dry cloth.
• Protect batteries from excessive heat.
•
Risk of explosion! Never throw batteries into a fire.
• Do not charge or short-circuit batteries.
•
If the device is not to be used for a relatively long period, take
the batteries out of the battery compartment.
• Use identical or equivalent battery types only.
• Always replace all batteries at the same time.
• Do not use rechargeable batteries.
• Do not disassemble, split or crush the batteries.
Instructions for repairs and disposal
• Batteries do not belong in household waste. Please dispose
of empty batteries at the collection points intended for this
purpose.
•
Do not open the device. Failure to comply will result in voiding
of the warranty.
• Do not repair or adjust the device yourself. Proper operation
can no longer be guaranteed in this case.
•
Repairs must only be carried out by Customer Services or
authorised suppliers. Before making a claim, please check
the batteries first and replace them if necessary.
• For environmental reasons, do not dispose of the device in
the household waste at the end of its useful life.
•
Dispose of the device at a suitable local collection
or recycling point. Dispose of the device in accord-
ance with EC Directive – WEEE (Waste Electrical and
Electronic Equipment).
•
If you have any questions, please contact the local authorities
responsible for waste disposal.
19
3. Device description
1. Display
2. Start/stop button
3. Wrist cuff
4. User selection button
5. Memory button M
6. Date/time setting button
7. Battery compartment lid
8. Scale for classifying the measurements
Information on the display:
1. Time and date
2. Systolic pressure
3. Diastolic pressure
4. Cardiac arrhythmia
symbol
5. Calculated pulse
value
6. Pump up, release air
(arrow)
7. Pulse symbol
8. User memory /
9. Unit in mmHg
10. Average value of the
last 3 measurements
11. Battery status indi-
cator
12. Memory space number
13. Classification of measurements
7
8
1
2
3
456
11
12
13
10
9
8
7
6
5 4 3
1 2
20
4. Preparing the measurement
Inserting the batteries
•
Remove the battery com-
partment lid on the left
side of the device.
•
I
nsert two 1.5 V micro
(alkaline type LR03) bat-
teries.
•
M
ake sure that the batteries are inserted the correct way
round. Do not use rechargeable batteries.
•
C
lose the battery compartment lid again carefully.
If the battery change symbol
is flashing and appears,
no more measurements are possible and you must replace
all batteries.
After inserting the batteries the full display is shown, after which
is displayed. You can now select either the EU or US display
and set the date and time.
•
Empty, completely flat batteries must be disposed of through
specially designated collection boxes, recycling points or
electronics retailers. You are legally required to dispose of
the batteries.
•
T
he codes below are printed on batteries containing
harmful substances:
Pb = Battery contains lead
Cd = Battery contains cadmium
Hg = Battery contains mercury
Setting the date and time
It is essential to set the date and time. Otherwise, you will not
be able to save your measured values correctly with a date
and time and access them again later. You can select either
24-hour or 12-hour format.
To set the date and time, proceed as follows:
1. After inserting the batteries:
• Following the display check, during which all segments ap-
pear,
flashes on the display.
•
Using the M button, you can increase the basic values to
be set. Set the format or and confirm the entry by
pressing the button.
• The year then flashes. Now set the year using the M button.
Confirm by pressing the button.
• Now set the month using the M button. Confirm by pressing
the button.
• Set the day/hour/minute and confirm each by pressing the
button.
21
• Once you have configured all settings, the device automat-
ically enters standby mode and automatically switches off
after approx. 2 minutes.
•
Alternatively you can switch off the device immediately by
pressing the Start/stop button .
2. At any time:
• Press the
button to display the current user memory as
well as the date and time.
• Press and hold the button again for about 5 seconds to
reach "Date and time" mode.
• Configure the settings as described above.
5. Measuring blood pressure
Attaching the cuff
• Expose your left wrist. Ensure that the circulation of the arm
is not hindered by tight clothing or similar.
• Place the cuff on the inside of your wrist.
•
Close the cuff with the hook-and-loop fastener such that the
upper edge of the device is positioned approx. 1 cm under-
neath the heel of the hand.
•
The cuff must be fitted tightly around the wrist, but must
not constrict.
Adopting the correct posture
•
B
efore every measurement, relax for about five minutes.
Otherwise deviations can occur.
•
Y
ou can take the measurement while
sitting or lying. To take your blood pres-
sure, make sure you are sitting comfort-
ably with your arms and back leaning
on something. Do not cross your legs.
Place your feet flat on the ground. Make
sure to rest your arm and move it. Al-
ways make sure that the cuff is at heart level. Otherwise sig-
nificant deviations can occur. Relax your arm and the palm
of your hand.
•
T
o avoid falsifying the measurement, it is important to remain
still during the measurement and not to speak!
Selecting memory
Press the button or to display the date/time and current
user memory. Select the desired user memory by pressing the
1 2 3
1 cm
• • • • • • • • • • • • •
22
user selection button . Confirm your selection by pressing
button .
You have 2 memories with 60 memory spaces each to store the
measurements of 2 different people separately or to separate
measurements taken in the morning and at night.
Performing the blood pressure measurement
• As described above, attach the cuff and adopt the posture
in which you want to perform the measurement.
•
Select the user memory as described above. To start the
measurement, press the button. Following the display
check, an arrow appears and the current memory space and
the date and time are displayed. The cuff pumps itself up au-
tomatically. Whilst the cuff is pumping up, the device already
calculates measurements for estimating the necessary pump
pressure. If this pressure is insufficient, the device automati-
cally pumps more pressure.
•
Then the pressure in the cuff is slowly released and the pulse
is detected.
•
When the measurement has been taken, the remaining air
pressure dissipates very quickly. The pulse, the systolic and
diastolic blood pressure are displayed.
• Measuring can be cancelled at any time by pressing the
button.
•
The symbol _ appears if the measurement could not be
performed properly. Observe the chapter on error messag-
es/trouble-shooting in these instructions for use and repeat
the measurement.
•
T
he device switches off automatically after 2 minutes.
Wait at least 5 minutes before taking another measurement!
Evaluating results
Cardiac arrhythmia:
This device can identify potential disruptions of the heart
rhythm when measuring and if necessary, indicates this after
the measurement with the symbol .
This can be an indicator for arrhythmia. Arrhythmia is an illness
in which the heart rhythm is abnormal because of flaws in the
bioelectrical system that regulates the heartbeat. The symp-
toms (skipped or premature heart beats, pulse being slow or
too fast) can be caused by factors such as heart disease, age,
physical make-up, excess stimulants, stress or lack of sleep.
Arrhythmia can only be determined through an examination
by your doctor.
If the symbol is shown on the display after the measure-
ment has been taken, repeat the measurement. Please ensure
that you rest for 5 minutes beforehand and do not speak or
move during the measurement. If the symbol appears fre-
quently, please consult your doctor. Self-diagnosis and treat-
23
ment based on the measurements can be dangerous. Always
follow your GP’s instructions.
Classification of measurements:
The measurements can be classified and evaluated in accord-
ance with the following table.
However, these standard values serve only as a general guide-
line, as the individual blood pressure varies in different people
and different age groups etc.
It is important to consult your doctor regularly for advice. Your
doctor will tell you your individual values for normal blood pres-
sure as well as the value above which your blood pressure is
classified as dangerous.
The bar chart on the display and the scale on the unit show
which category the recorded blood pressure values fall into. If
the values of systole and diastole fall into two different cate-
gories (e.g. systole in the ’High normal’ category and diastole
in the ’Normal’ category), the graphical classification on the
device always shows the higher category; for the example given
this would be ’High normal’.
Blood pressure
value category
Systole
(in mmHg)
Diastole
(in mmHg)
Action
Setting 3:
severe hyper-
tension
≥ 180 ≥ 110
seek medical
attention
Setting 2:
moderate hyper-
tension
160 – 179 100 – 109
seek medical
attention
Setting 1:
mild hyperten-
sion
140 – 159 90 – 99
regular monitoring
by doctor
High normal 130 – 139 85 – 89
regular monitoring
by doctor
Normal 120 – 129 80 – 84 self-monitoring
Optimal < 120 < 80 self-monitoring
Source: WHO, 1999 (World Health Organization)
6. Saving and displaying measurements
•
The results of every successful measurement are stored
together with the date and time. If there are more than 60
measurements, the oldest measurements are lost.
•
Pressing the M button takes you directly to the stored meas-
urements. You can change the user memory by pressing
the button. Pressing the M button displays the average
24
value of the 3 most recent measurements stored in the user
memory. If you continue to press the memory button M, the
most recent individual measured values are displayed in turn
with the date and time.
7. Deleting stored values
To delete individual measurements, you must first select them.
Press and hold the memory button M until appears in the
display. Then confirm the deletion with the user selection button
( and appear on the display).
To delete all measurements from a user memory, you must first
select them. Press the memory button M and the average val-
ue of the last 3 saved measurements is displayed. Then press
and hold the memory button M until appears in the display.
Confirm the deletion by pressing the user selection button
( and appear on the display).
8. Error messages/troubleshooting
In the event of errors, the error message _ appears on the
display.
Error messages may appear if:
• It was not possible to record the pulse:
;
• You move or speak during the measurement: ;
• The cuff is fastened too tightly or loosely: ;
• Errors occur during the measurement: ;
• The pump pressure is higher than 300 mmHg:
;
• The batteries are almost empty : .
In such cases, repeat the measurement. Ensure that you do not
move or speak. If necessary, reinsert or replace the batteries.
9. Cleaning and storing the device and cuff
•
C
lean the device and cuff carefully using a slightly damp
cloth only.
•
D
o not use any cleaning agents or solvents.
•
U
nder no circumstances hold the device and cuff under wa-
ter, as this can cause liquid to enter and damage the device
and cuff.
•
I
f you store the device and cuff, do not place heavy objects
on the device and cuff. Remove the batteries. The cuff line
should not be bent sharply.
10. Technical specifications
Model No. SBC 22
Type SBC 29
Measurement me-
thod
Oscillometric, non-invasive blood
pressure measurement on the wrist

25
Measurement range Cuff pressure 0-300 mmHg,
Systolic 50-250 mmHg,
Diastolic 30-200 mmHg,
Pulse 40-180 beats/minute
Display accuracy Systolic ± 3 mmHg,
Diastolic ± 3 mmHg,
Pulse ± 5 % of the value shown
Measurement inac-
curacy
Max. permissible standard deviation
according to clinical testing:
Systolic 8 mmHg /
Diastolic 8 mmHg
Memory 2 x 60 memory spaces
Dimensions L 74 mm x W 72 mm x H 24.5 mm
Weight Approximately 100 g (without bat-
teries)
Cuff size
135 to 195 mm
Permissible operating
conditions
+5°C to +40°C, 15-93% relative humi-
dity (non-condensing)
Permissible storage
conditions
-25°C to +70°C, ≤ 93% relative humi-
dity, 700-1050 hPa ambient pressure
Power supply 2 x 1.5V
AAA batteries
Battery life For approx. 300 measurements, de-
pending on levels of blood pressure
and pump pressure
Accessories Instructions for use, 2 x 1.5V AAA
batteries, storage box
Classification Internal supply, IPX0, no AP or APG,
continuous operation, application part
type BF
•
This device complies with European Standard EN60601-1-2
and is subject to particular precautions with regard to electro
-
magnetic compatibility. Please note that portable and mobile
HF communication systems may interfere with this unit. More
details can be requested from the stated Customer Services
address or found at the end of the instructions for use.
• The device complies with the EU Medical Devices Directive
93/42/EEC, the German Medical Devices Act (Medizinpro-
duktgesetz) and the standards EN1060-1 (Non-invasive sphy-
gmomanometers – Part 1: General requirements), EN1060-3
(Non-invasive sphygmomanometers – Part 3: Supplemen
-
tary requirements for electro-mechanical blood pressure
measuring systems) and IEC80601-2-30 (Medical electrical
equipment – Part 2-30: Particular requirements for the basic
safety and essential performance of automated non-invasive
sphygmomanometers).

26
• The accuracy of this blood pressure monitor has been care-
fully checked and developed with regard to a long useful life.
•
If using the device for commercial medical purposes, it must
be regularly tested for accuracy by appropriate means. Pre-
cise instructions for checking accuracy may be requested
from the service address.
Subject to errors and changes

27
Lisez attentivement cette notice, conservez-la pour un usage
ultérieur, mettez-la à disposition des autres utilisateurs et suivez
les consignes qui y figurent.
1. Présentation
Le tensiomètre de poignet est conçu pour la mesure non in-
vasive et la surveillance des valeurs de tension artérielle des
personnes adultes. Il vous permet de mesurer votre tension
rapidement et facilement, d’enregistrer les valeurs et d’afficher
l’évolution des valeurs. Vous êtes averti en cas d’éventuels
troubles du rythme cardiaque.
Les valeurs calculées sont classées et évaluées sous forme
graphique.
FRANÇAIS
1. Présentation ...................................................................27
2. Conseils importants........................................................27
3. Description de l’appareil .................................................31
4. Préparer la mesure .........................................................32
5. Mesurer la tension ..........................................................33
6. Enregistrement et consultation des mesures ...............36
7. Effacer des valeurs enregistrées ..................................36
8. Message d’erreur/Résolution des erreurs ....................36
9.
Nettoyage et rangement de l’appareil et de la manchette ..3
7
10. Caractéristiques techniques ......................................... 37
Sommaire
2. Conseils importants
Symboles utilisés
Les symboles suivants sont utilisés sur le mode d’emploi, sur
l’emballage et sur la plaque signalétique de l’appareil et des
accessoires:
Attention:
Remarque
Indication d’informations importantes
28
Respecter les consignes du mode
d’emploi
Appareil de type BF
Courant continu
Élimination conformément à la directive
européenne WEEE (Waste Electrical and
Electronic Equipment) relative aux déchets
d’équipements électriques et électroniques
Fabricant
Storage
-25°C
70°C
RH ≤93%
Température et taux d’humidité de stocka-
ge admissibles
Operating
5°C
40°C
RH 15-93%
Température et taux d’humidité
d’utilisation admissibles
Protéger contre l’humidité
Numéro de série
0483
Le sigle CE atteste de la conformité aux
exigences fondamentales de la directive
93/42/EEC relative aux dispositifs médi-
caux.
Conseils d’utilisation
•
Mesurez toujours votre tension au même moment de la jour-
née afin que les valeurs soient comparables.
•
Avant toute mesure, reposez-vous pendant environ 5mi-
nutes!
•
Lorsque vous devez effectuer plusieurs mesures sur une
personne, patientez à chaque fois 5minutes entre chaque
mesure.
• Évitez de manger, boire, fumer ou de pratiquer des activités
physiques pendant au moins 30minutes avant la mesure.
• Effectuez une nouvelle mesure si vous avez un doute sur les
valeurs mesurées.
•
Les mesures que vous avez établies servent juste à vous
tenir informé de votre état, elles ne remplacent pas un exa-
men médical!
•
Communiquez vos résultats à votre médecin, vous ne devez
prendre en aucun cas des décisions d’ordre médical sur la
base de ces seules mesures (par ex. le choix de médicaments
et de leurs dosages)!

29
•
Cet appareil n’est pas conçu pour être utilisé par une per-
sonne (y compris les enfants) dont les capacités physiques,
sensorielles ou intellectuelles sont limitées, ou n’ayant pas
l’expérience et/ou les connaissances nécessaires. Le cas
échéant, cette personne doit, pour sa sécurité, être surveillée
par une personne compétente ou doit recevoir vos recom-
mandations sur la manière d’utiliser l’appareil. Surveillez les
enfants afin de les empêcher de jouer avec l’appareil.
•
N’utilisez pas le tensiomètre sur des nouveau-nés et des
patientes atteintes de pré-éclampsie.
•
Nous recommandons de consulter le médecin avant d’utiliser
le tensiomètre pendant la grossesse..
• En cas de limitation de la circulation sanguine dans un bras
en raison de maladies chroniques ou aiguës des vaisseaux
(entre autres vasoconstriction), l’exactitude de la mesure au
poignet est limitée. Dans ce cas, passez à un tensiomètre
au bras.
•
Les maladies cardio-vasculaires peuvent entraîner des er-
reurs de mesure ou des mesures imprécises. C’est également
le cas lors d’une tension très basse, de diabète, de troubles
de la circulation et du rythme cardiaque et de frissons de
fièvre ou de tremblements.
•
Le tensiomètre ne doit pas être utilisé parallèlement à un
appareil chirurgical haute fréquence.
•
Utilisez uniquement l’appareil sur des personnes dont le pé-
rimètre du poignet correspond à celui indiqué pour l’appareil.
•
Veuillez noter que la fonction du membre concerné peut être
entravée lors du gonflage.
•
Il ne faut pas bloquer la circulation sanguine plus longtemps
que nécessaire au cours de la prise de tension. Si l’appareil
ne fonctionne pas bien, retirez le brassard du bras.
•
Évitez des mesures trop fréquentes ou une pression continue
de la manchette. Elles entraînent une réduction de la circula-
tion sanguine et constituent un risque de blessure.
•
Veillez à ne pas placer la manchette sur un bras, dont les
artères ou les veines sont soumises à un traitement médical,
par exemple en présence d’un dispositif d’accès intravas-
culaire destiné à un traitement intravasculaire ou en cas de
shunt artérioveineux.
• N’utilisez pas la manchette sur des personnes qui ont subi
une mastectomie.
•
Ne placez pas la manchette sur des plaies, son utilisation
peut les aggraver.
• Placez la manchette uniquement au niveau du poignet. Ne
placez pas la manchette sur d’autres parties du corps.
• Vous ne pouvez utiliser le tensiomètre qu’avec des piles.
•
L’arrêt automatique permet de faire passer le tensiomètre
en mode économie d’énergie lorsqu’aucune touche n’est
manipulée pendant un délai de 2minutes.
30
• L’appareil est conçu pour l’utilisation décrite dans ce mode
d’emploi. Le fabricant ne peut être tenu pour responsable
des dommages causés par une utilisation inappropriée ou
non conforme.
Consignes de rangement et d’entretien
• Le tensiomètre est constitué de composants de précision et
électroniques. La précision des valeurs mesurées et la du-
rée de vie de l’appareil dépendent d’un maniement soigné:
– Protégez l’appareil contre les chocs, l’humidité, les sale-
tés, les fortes variations de température et l’ensoleillement
direct.
– Ne laissez pas tomber l’appareil.
– N’utilisez pas l’appareil à proximité de champs électroma
-
gnétiques puissants, tenez-le éloigné des installations de
radio et des téléphones mobiles.
•
Si l’appareil n’est pas utilisé pendant une période prolongée,
il est recommandé de retirer les piles.
Remarques relatives aux piles
•
Si du liquide de la cellule de pile entre en contact avec la
peau ou les yeux, rincez la zone touchée avec de l’eau et
consultez un médecin.
•
Risque d’ingestion! Les enfants en bas âge pourraient
avaler des piles et s’étouffer. Veuillez donc conserver les piles
hors de portée des enfants en bas âge!
• Respectez les signes de polarité plus (+) et moins (−).
•
Si une pile a coulé, enfilez des gants de protection et net-
toyez le compartiment à piles avec un chiffon sec.
• Protégez les piles d’une chaleur excessive.
•
Risque d’explosion! Ne jetez pas les piles dans le feu.
• Les piles ne doivent être ni rechargées, ni court-circuitées.
• En cas de non utilisation prolongée de l’appareil, sortez les
piles du compartiment à piles.
• Utilisez uniquement des piles identiques ou équivalentes.
• Remplacez toujours l’ensemble des piles simultanément.
• N’utilisez pas de batterie!
• Ne démontez, n’ouvrez ou ne cassez pas les piles.
Consignes de réparation et d’élimination
• Les piles ne doivent pas être jetées avec les ordures ména-
gères. Veuillez jeter les piles usées dans les points de collecte
prévus à cet effet.
•
N’ouvrez pas l’appareil. Le non-respect de cette consigne
annulera la garantie.
31
• Vous ne devez pas réparer ou régler l’appareil vous-même.
Le bon fonctionnement de l’appareil n’est plus garanti si tel
était le cas.
•
Seul le service client ou un opérateur autorisé peut procéder
à une réparation. Cependant, avant toute réclamation, veuil-
lez contrôler au préalable l’état des piles et les remplacer le
cas échéant.
• Dans l’intérêt de la protection de l’environnement, l’appareil
ne doit pas être jeté avec les ordures ménagères à la fin de
sa durée de service.
• L’élimination doit se faire par le biais des points de
collecte compétents dans votre pays. Veuillez éli-
miner l’appareil conformément à la directive euro-
péenne – WEEE (Waste Electrical and Electronic Equipment)
relative aux appareils électriques et électroniques usagés.
•
Pour toute question, adressez-vous aux collectivités locales
responsables de l’élimination et du recyclage de ces pro-
duits.
3. Description de l’appareil
1. Écran
2. Touche Marche/Arrêt
3. Manchette de poignet
4. Touche de sélection de l’utilisateur
5. Touche mémoire M
6. Touche de réglage date et heure
7. Couvercle du compartiment à piles
8. Échelle pour classement des résultats de mesure
7
8
1
2
3
456
32
Données affichées à l’écran:
1. Heure et date
2. Pression systolique
3. Pression diastolique
4. Symbole du trouble
du rythme cardiaque
5. Valeur du pouls
mesurée
6. Pompage, dégon-
flage (flèche)
7. Symbole Pouls
8. Mémoire utilisateur
/
9. Unité mmHg
10. Valeur moyenne des
3dernières mesures
11. Affichage du niveau des piles
12. Numéro de l’emplacement de sauvegarde
13. Classement des mesures
4. Préparer la mesure
Insertion des piles
•
Retirez le couvercle du
compartiment à piles sur
le côté gauche de l’ap-
pareil.
•
I
nsérez deux piles micro
de 1,5V (alcalines de type LR03).
•
V
eillez impérativement à insérer les piles en respectant la
polarité indiquée. N’utilisez pas de batteries rechargeables.
•
R
efermez soigneusement le couvercle du compartiment à
piles.
Lorsque le symbole de remplacement des piles clignote
et que apparaît, vous ne pouvez plus effectuer de mesure
et vous devez remplacer les piles.
Après avoir inséré les piles, l’affichage plein écran apparaît puis
s’affiche. Vous pouvez désormais choisir entre le format
européen et le format américain et régler la date et l’heure.
•
Les piles usagées et complètement déchargées doivent être
mises au rebut dans des conteneurs spéciaux ou aux points
de collecte réservés à cet usage ou bien déposées chez un
revendeur d’appareils électriques. L’élimination des piles est
une obligation légale qui vous incombe.
11
12
13
10
9
8
7
6
5 4 3
1 2
33
•
C
es pictogrammes se trouvent sur les piles à substances
nocives:
Pb = pile contenant du plomb,
Cd = pile contenant du cadmium,
Hg = pile contenant du mercure.
Régler la date et l’heure
Vous devez impérativement régler la date et l’heure. Sans ces
réglages, il est impossible d’enregistrer et de consulter correc-
tement vos mesures avec la date et l’heure. Vous pouvez choisir
entre les formats 24heures et 12heures.
Procédez comme suit pour régler la date et l’heure:
1. Après avoir remplacé les piles:
• Après le contrôle de l’affichage, où tous les segments s’af-
fichent,
clignote à l’écran.
• Ma touche M vous permet d’augmenter les valeurs lors du
réglage. Réglez le format ou et confirmez votre choix
avec la touche .
•
L’année clignote ensuite. Réglez alors l’année avec la touche
M. Confirmez avec la touche .
•
Réglez alors le mois avec la touche M. Confirmez avec la
touche .
•
Réglez le jour, l’heure, les minutes et confirmez à chaque
fois avec la touche .
• Après avoir effectué tous les réglages, l’appareil passe au-
tomatiquement en mode veille et s’éteint ensuite au bout
de 2minutes.
•
Vous pouvez également éteindre immédiatement l’appareil
en appuyant sur la touche Marche/Arrêt .
2. Pour régler l’heure:
•
Appuyez sur la touche , la date, l’heure et la mémoire
utilisateur actuelle s’affichent.
•
Appuyez de nouveau sur la touche et maintenez pen-
dant 5 secondes pour accéder au mode de réglage «Date
et heure».
• Procédez au réglage comme décrit ci-dessus.
5. Mesurer la tension
Positionner la manchette
•
Mettez votre poignet gauche à nu. Faites attention à ce que la
circulation du sang ne soit pas restreinte par des vêtements
trop serrés ou autres.
1 2 3
1 cm
34
• Placez la manchette sur l’intérieur de votre poignet.
• Fermez la manchette avec la fermeture auto-agrippante de
manière à ce que le bord supérieur de l’appareil se trouve à
env. 1cm de la paume de la main.
•
La manchette doit être bien serré autour du poignet sans
l’étrangler.
Adopter une position adéquate
•
A
vant toute mesure, reposez-vous pendant environ
5minutes! Sinon, cela pourrait entraîner des erreurs.
•
L
a mesure peut se faire en position as-
sise ou allongée. Installez-vous confor-
tablement avant de prendre votre ten
-
sion. Faites en sorte que votre dos et
vos bras soient bien appuyés sur le
dossier et les accoudoirs. Ne croisez
pas les jambes. Posez les pieds bien à
plat sur le sol. Soutenez impérativement votre bras et pliez-le.
Faites attention, dans tous les cas, à ce que la manchette se
trouve au niveau du cœur. Sinon, cela pourrait entraîner des
erreurs considérables. Détendez votre bras et les paumes.
•
P
our ne pas fausser le résultat, il est important de rester
calme durant la mesure et de ne pas parler.
Sélectionner une mémoire
Appuyez sur la touche ou , la date, l’heure et la mémoire
utilisateur actuelle s’affichent. Sélectionnez l’utilisateur sou-
haité en appuyant sur la touche de sélection de l’utilisateur .
Confirmez votre choix en appuyant sur la touche .
Vous disposez de deux mémoires de chacune 60emplace-
ments de sauvegarde pour enregistrer séparément les mesures
de 2personnes différentes ou pour enregistrer séparément les
mesures du matin et du soir.
Mesurer la tension artérielle
• Positionnez la manchette comme décrit plus haut et instal-
lez-vous dans la position de votre choix pour effectuer la
mesure.
•
Choisissez la mémoire utilisateur A ou B comme décrit
ci-dessus. Pour commencer la mesure, appuyez sur la
touche . Après le contrôle de l’affichage, une flèche ap-
paraît et la mémoire utilisateur actuelle et la date/l’heure s’af-
fichent à l’écran. La manchette se gonfle automatiquement.
Pendant le gonflage, l’appareil donne déjà des valeurs de
mesure servant à évaluer la pression de gonflage nécessaire.
Si cette pression ne suffit pas, l’appareil continue automati-
quement de pomper.
•
Ensuite, la pression dans la manchette diminue lentement et
le pouls est mesuré.
• • • • • • • • • • • • •
35
• Lorsque la mesure est terminée, la pression restante est re-
lâchée très rapidement. Le pouls et les pressions systolique
et diastolique s’affichent.
•
Vous pouvez interrompre la mesure à tout moment en ap-
puyant sur la touche .
•
Le symbole _ s’affiche lorsque la mesure n’a pas pu être
effectuée correctement. Lisez le chapitre Message d’erreur/
Résolution des erreurs de ce mode d’emploi et recommen-
cez la mesure.
•
L
’appareil s’éteint automatiquement au bout de 2minutes.
Attendez au moins 5minutes avant d’effectuer une nouvelle
mesure!
Évaluer les résultats
Troubles du rythme cardiaque:
Cet appareil est capable d’identifier d’éventuels troubles du
rythme cardiaque au cours de la mesure et le signale le cas
échéant après la mesure, par le symbole .
Cela peut indiquer une arythmie. L’arythmie est une maladie
qui se caractérise par une anoamalie du rythme cardiaque, en
raison de perturbations du système bioélectrique. Les symp-
tômes (battements cardiaques en retard ou en avance, pouls
plus rapide ou plus lent) peuvent être induits notamment par
une pathologie cardiaque, par l’âge, par des prédispositions
naturelles, par une alimentation trop riche, par le stress ou
encore par un manque de sommeil. Une arythmie ne peut être
établie que par une consultation médicale.
Si le symbole s’affiche après la mesure, recommencez-la.
Veillez à vous reposer pendant 5minutes et à ne pas parler ni
bouger pendant la mesure. Si le symbole apparaît souvent,
veuillez consulter un médecin. Il peut être dangereux d’effec-
tuer un autodiagnostic et une automédication sur la base des
résultats de la mesure. Suivez impérativement les instructions
de votre médecin.
Classement des résultats de mesure:
Les résultats de mesure sont classés et évalués selon le ta-
bleau suivant.
Ces valeurs ne doivent être utilisées qu’à titre indicatif car la
tension artérielle varie selon les personnes, les âges, etc.
Il est important de consulter votre médecin de manière régu-
lière. Votre médecin vous donnera vos valeurs personnelles
pour une tension artérielle normale et la valeur à laquelle la
tension artérielle est considérée comme dangereuse.
Le graphique à barres qui s’affiche ainsi que l’échelle de l’ap-
pareil permettent d’établir la plage dans laquelle se trouve la
tension mesurée. Si les valeurs de systole et de diastole se
trouvent dans deux plages différentes (par ex. systole en plage
«normale haute» et diastole en plage «normale»), la gra-
36
duation graphique indique toujours la plage la plus haute sur
l’appareil, à savoir «normale haute» dans le présent exemple.
Plage des va-
leurs de tension
Systole
(enmmHg)
Diastole
(enmmHg)
Mesures
Niveau 3:
forte hypertonie
≥ 180 ≥ 110
consulter un mé-
decin
Niveau 2:
hypertonie mo-
yenne
160 – 179 100 – 109
consulter un mé-
decin
Niveau 1:
légère hypertonie
140 – 159 90 – 99
examen régulier
par un médecin
Normale haute 130 – 139 85 – 89
examen régulier
par un médecin
Normale 120 – 129 80 – 84 Auto-contrôle
Optimale < 120 < 80 Auto-contrôle
Source: OMS, 1999 (Organisation Mondiale de la Santé)
6. Enregistrement et consultation des
mesures
• Le résultat de chaque mesure réussie est enregistré avec la
date et l’heure. Au-delà de 60valeurs enregistrées, les plus
anciennes sont supprimées.
• Appuyez sur la touche M pour accéder immédiatement aux
mesures enregistrées. Vous pouvez passer d’une mémoire
utilisateur à une autre en appuyant sur la touche . En ap-
puyant sur la touche M, la moyenne des trois dernières me-
sures enregistrées dans la mémoire utilisateur s’affiche. En
appuyant encore une fois sur la touche mémoire M, les der-
nières valeurs de mesure s’affichent avec la date et l’heure.
7. Effacer des valeurs enregistrées
Pour supprimer une valeur mesurée, veuillez d’abord la sélec-
tionner. Appuyez sur la touche mémoire M et maintenez-la en-
foncée jusqu’à ce que s’affiche à l’écran. Confirmez ensuite
la suppression avec la touche de sélection de l’utilisateur
( et s’affichent à l’écran).
Pour supprimer toutes les valeurs mesurées d’une mémoire
utilisateur, veuillez d’abord les sélectionner. Appuyez sur la
touche mémoire M et la moyenne des 3dernières valeurs me-
surées enregistrées s’affiche, ensuite, appuyez de nouveau sur
la touche mémoire M et maintenez-la enfoncée jusqu’à ce que
s’affiche à l’écran. Confirmez la suppression avec la touche
de sélection de l’utilisateur ( et s’affichent à l’écran).
8. Message d’erreur/Résolution des erreurs
En cas d’erreur, un message d’erreur s’affiche à l’écran _.
Des messages d’erreur peuvent s’afficher lorsque
• le pouls n’a pas pu être pris:
;
• vous bougez ou parlez durant la mesure: ;

37
• la manchette est trop ou pas assez serrée:
;
• des problèmes surviennent au moment de la mesure: ;
• la pression de gonflage est supérieure à 300mmHg: ;
• les piles sont presque vides
: .
Dans ce cas, réitérez la mesure. Veillez à ne pas bouger ni
parler. Le cas échéant, remettez les piles ou remplacez-les.
9. Nettoyage et rangement de l’appareil et de
la manchette
•
N
ettoyez soigneusement l’appareil et la manchette, unique-
ment à l’aide d’un chiffon légèrement humide.
•
N
’utilisez pas de détergent ni de solvant.
•
N
e passez jamais l’appareil ni la manchette sous l’eau, qui
pourrait s’infiltrer à l’intérieur de l’appareil ou la manchette
et l’endommager.
•
N
e posez pas d’objets lourds sur l’appareil ni sur la man-
chette lorsqu’ils sont rangés. Retirez les piles. Ne pliez pas
le tuyau de la manchette.
10. Caractéristiques techniques
N° du modèle SBC22
Type SBC29
Mode de mesure Mesure de la tension artérielle au
poignet, oscillométrique et non
invasive
Plage de mesure Pression dans la manchette
0-300mmHg
Pression systolique 50-250mmHg
Pression diastolique 30-200mmHg
Pouls 40-180pulsations/minute
Précision de
l’indicateur
systolique ±3mmHg
diastolique ±3mmHg
pouls ±5% de la valeur affichée
Incertitude de
mesure
écart type max. admissible selon des
essais cliniques:
systolique 8mmHg
diastolique 8mmHg
Mémoire 2x60emplacements de mémoire
Dimensions L74 mm x l72 mm x H24,5 mm
Poids Environ 100 g (sans les piles)
Taille de la manchette
135 à 195 mm
Conditions de
fonctionnement adm.
+5°C à +40°C, 15-93% d’humidité
relative de l’air (sans condensation)

38
Conditions de
stockage admissibles
-25°C à +70°C, ≤ 93 % d’humidité de
l’air relative, 700-1050hPa de pressi-
on ambiante
Alimentation
électrique
2x piles AAA 1,5V
Durée de vie de la
batterie
Environ 300mesures, selon
l’élévation de la tension artérielle ainsi
que la pression de gonflage
Accessoires Mode d’emploi, 2 x piles AAA 1,5V,
boîte de rangement
Classement Alimentation interne, IPX0, pas d’AP
ni d’APG, utilisation continue, appareil
de type BF
•
Cet appareil est en conformité avec la norme européenne
EN 60601-1-2 et répond aux exigences de sécurité spéciales
relatives à la compatibilité électromagnétique. Veuillez noter
que les dispositifs de communication HF portables et mo-
biles sont susceptibles d’influer sur cet appareil. Pour plus de
détails, veuillez contacter le service après-vente à l’adresse
mentionnée ou vous reporter à la fin du mode d’emploi.
• Cet appareil est conforme à la directive européenne 93/42/
EEC sur les produits médicaux, à la loi sur les produits mé-
dicaux ainsi qu’aux normes européennes EN1060-1 (ten-
siomètres non invasifs, partie1: exigences générales),
EN1060-3 (tensiomètres non invasifs, partie 3: exigences
complémentaires sur les tensiomètres électromécaniques)
et EC80601-2-30 (appareils électromédicaux, partie 2-30:
exigences particulières pour la sécurité et les performances
essentielles des tensiomètres non invasifs automatiques).
•
La précision de ce tensiomètre a été correctement testée
et sa durabilité a été conçue en vue d’une utilisation à long
terme.
•
Dans le cadre d’une utilisation médicale de l’appareil, des
contrôles techniques de mesure doivent être menés avec
les moyens appropriés. Pour obtenir des informations
précises sur la vérification de la précision de l’appareil,
vous pouvez faire une demande par courrier au service
après-vente.
Sous réserve d’erreurs et de modifications
39
La preghiamo di leggere attentamente le presenti istruzioni per
l’uso, conservarle per impieghi futuri, renderle accessibili ad
altri utenti e attenersi alle indicazioni.
1. Introduzione
Il misuratore di pressione da polso consente la misurazione
e il monitoraggio non invasivi dei valori di pressione arteriosa
nelle persone adulte. Permette di misurare in modo rapido e
semplice la propria pressione, memorizzare i valori misurati e
visualizzare l’andamento dei valori. Segnala inoltre eventuali
disturbi del ritmo cardiaco.
I valori rilevati vengono classificati e valutati graficamente.
ITALIANO
1. Introduzione ....................................................................39
2. Indicazioni importanti .....................................................39
3. Descrizione dell’apparecchio .........................................43
4. Preparazione della misurazione ......................................44
5. Misurazione della pressione ...........................................45
6. Memorizzazione ricerca dei valori misurati .....................48
7. Cancellazione dei valori memorizzati ...........................48
8. Messaggi di errore/Soluzioni ........................................ 48
9. Pulizia e conservazione dell’apparecchio e del
manicotto ......................................................................49
10. Dati tecnici ....................................................................49
Contenuto
2. Indicazioni importanti
Spiegazione dei simboli
I seguenti simboli sono utilizzati nelle istruzioni per l’uso,
sull’imballo e sulla targhetta dell’apparecchio e degli accessori:
Attenzione
Nota
Indicazione di importanti informazioni
Seguire le istruzioni per l’uso
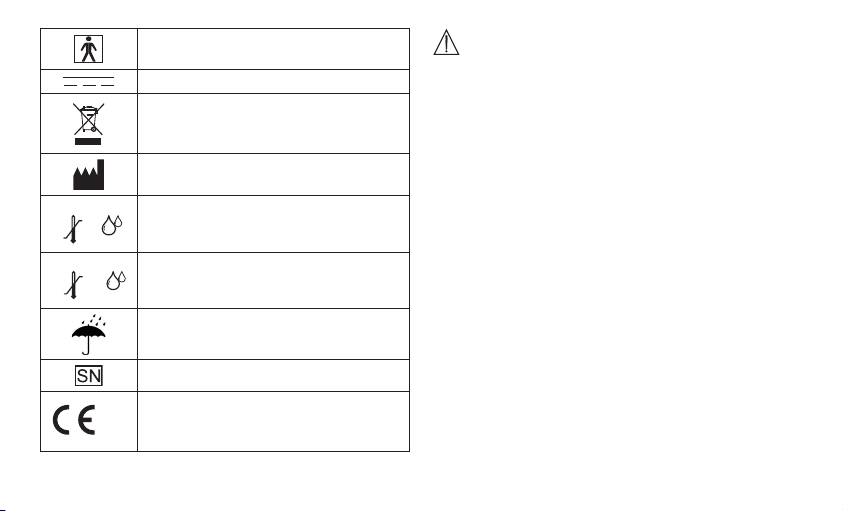
40
Parte applicativa tipo BF
Corrente continua
Smaltimento secondo le norme previste
dalla Direttiva CE sui rifiuti di apparecchia-
ture elettriche ed elettroniche (RAEE)
Produttore
Storage
-25°C
70°C
RH ≤93%
Temperatura e umidità di stoccaggio
consentite
Operating
5°C
40°C
RH 15-93%
Temperatura e umidità di esercizio con-
sentite
Proteggere dall’umidità
Numero di serie
0483
Il marchio CE certifica la conformità ai
requisiti di base della direttiva 93/42/EEC
sui dispositivi medici.
Indicazioni per l’uso
•
Misurare la pressione sempre allo stesso orario della giornata,
affinché i valori siano confrontabili.
• Prima di ogni misurazione rilassarsi per ca. 5 minuti.
• Per effettuare più misurazioni su una stessa persona, atten-
dere 5 minuti tra una misurazione e l’altra.
•
Evitare di mangiare, bere, fumare o praticare attività fisica
almeno nei 30 minuti precedenti alla misurazione.
• In caso di valori dubbi, ripetere la misurazione.
• I valori misurati autonomamente hanno solo scopo informa-
tivo, non sostituiscono i controlli medici.
•
Comunicare al medico i propri valori, non intraprendere in
alcun caso terapie mediche definite autonomamente (ad es.
impiego di farmaci e relativi dosaggi)!
• L’apparecchio non deve essere utilizzato da persone (com-
presi bambini) con ridotte capacità fisiche, percettive o in-
tellettive o non in possesso della necessaria esperienza e/o
conoscenza, se non sotto la supervisione di una persona
responsabile per la loro sicurezza o che fornisca loro le indi-
cazioni per l’uso dell’apparecchio. Controllare che i bambini
non utilizzino l’apparecchio per gioco.
•
Non utilizzare il misuratore di pressione su neonati e pazienti
con preeclampsia.

41
• Prima di utilizzare il misuratore di pressione in gravidanza, si
consiglia di consultare il medico.
•
In caso di difficoltà di circolazione a un braccio a causa di pa-
tologie vascolari croniche o acute (tra cui vasocostrizioni), la
precisione della misurazione al polso è limitata. In tal caso si
consiglia di optare per un misuratore di pressione da braccio.
•
In caso di patologie del sistema cardiovascolare possono ve-
rificarsi errori di misurazione o una riduzione della precisione
di misurazione. Gli stessi problemi si possono verificare in
caso di pressione molto bassa, diabete, disturbi della circo-
lazione e del ritmo cardiaco nonché in presenza di brividi di
febbre o tremiti.
• Non utilizzare il misuratore di pressione insieme ad altri ap-
parecchi chirurgici ad alta frequenza.
•
Utilizzare il misuratore di pressione solo su un polso con
misura compresa nell’intervallo indicato.
•
Tenere conto che durante il pompaggio può verificarsi una
riduzione delle funzioni dell’arto interessato.
• La misurazione delle pressione non deve impedire la circo-
lazione del sangue per un tempo inutilmente troppo lungo.
In caso di malfunzionamento dell’apparecchio, rimuovere il
manicotto dal braccio.
• Evitare di mantenere una pressione costante nel manicotto
e di effettuare misurazioni troppo frequenti che causereb-
bero una riduzione del flusso sanguigno con il conseguente
rischio di lesioni.
•
Accertarsi che il manicotto non venga applicato su brac-
cia con arterie o vene sottoposte a trattamenti medici, quali
dispositivo di accesso o terapia intravascolare o shunt ar-
terovenoso.
• Non applicare il manicotto a persone che hanno subito una
mastectomia (asportazione della mammella).
•
Non applicare il manicotto su ferite per evitare rischi di ul-
teriori lesioni.
•
Indossare il manicotto esclusivamente sul polso. Non indos-
sare il manicotto su altre parti del corpo.
•
Il misuratore di pressione può essere utilizzato esclusiva-
mente a batterie.
• Se per 2 minuti non vengono utilizzati pulsanti, il dispositivo
di arresto automatico spegne l’apparecchio per preservare
le batterie.
•
L’apparecchio è concepito solo per l’uso descritto nelle pre-
senti istruzioni per l’uso. Il produttore non risponde di danni
causati da un uso inappropriato o non conforme.
Indicazioni per la conservazione e la cura
• Il misuratore di pressione è composto da moduli elettronici
di precisione. La precisione dei valori misurati e la durata

42
dell’apparecchio dipendono da un utilizzo attento e scru-
poloso:
– Non esporre l’apparecchio a urti, umidità, sporcizia, forti
sbalzi di temperatura e direttamente alla luce solare.
– Non far cadere l’apparecchio.
– Non utilizzare l’apparecchio in prossimità di forti campi
elettromagnetici, tenerlo lontano da impianti radio o tele-
foni cellulari.
• In caso di non utilizzo dell’apparecchio per lunghi periodi, si
raccomanda di rimuovere le batterie.
Avvertenze sull’uso delle batterie
•
Se il liquido della batteria viene a contatto con la pelle e
con gli occhi, sciacquare le parti interessate con acqua e
consultare il medico.
•
Pericolo d’ingestione! I bambini possono ingerire le
batterie e soffocare. Tenere quindi le batterie lontano dalla
portata dei bambini!
• Prestare attenzione alla polarità positiva (+) e negativa (−).
•
In caso di fuoriuscita di liquido dalla batteria, indossare guan-
ti protettivi e pulire il vano batterie con un panno asciutto.
• Proteggere le batterie dal caldo eccessivo.
•
Rischio di esplosione! Non gettare le batterie nel
fuoco.
• Le batterie non devono essere ricaricate o mandate in cor-
tocircuito.
• Qualora l’apparecchio non dovesse essere utilizzato per un
periodo prolungato, rimuovere le batterie dal vano batterie.
• Utilizzare solo tipologie di batterie uguali o equivalenti.
• Sostituire sempre tutte le batterie contemporaneamente.
• Non utilizzare batterie ricaricabili!
• Non smontare, aprire o frantumare le batterie.
Indicazioni per la riparazione e lo smaltimento
•
Le batterie non sono rifiuti domestici. Smaltire le batterie
esauste negli appositi punti di raccolta.
•
Non aprire l’apparecchio. In caso contrario la garanzia de-
cade.
•
L’apparecchio non deve essere riparato o tarato personal-
mente. In tal caso non si garantisce più il corretto funzio-
namento.
•
Le riparazioni possono essere effettuate solo dal Servizio
clienti o da rivenditori autorizzati. Prima di inoltrare eventuali
reclami, testare le batterie e, se necessario, sostituirle.
• A tutela dell’ambiente, al termine del suo utilizzo l’apparec-
chio non deve essere smaltito nei rifiuti domestici.
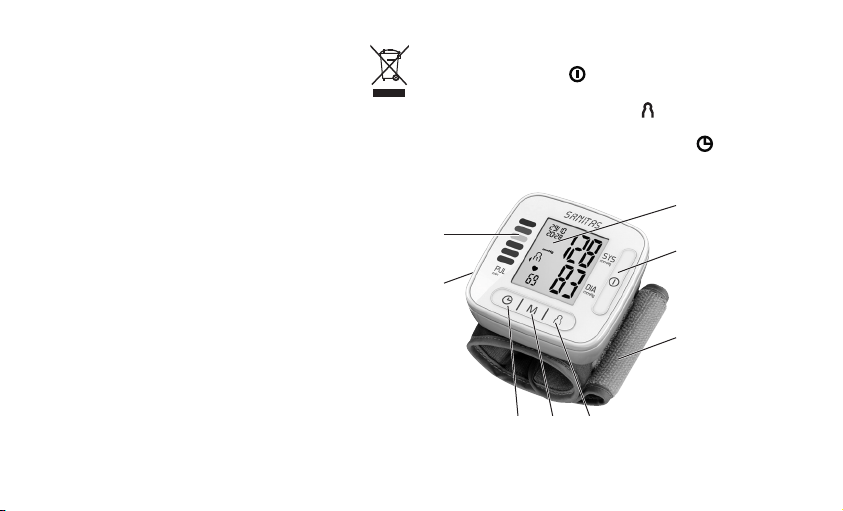
43
•
Lo smaltimento va effettuato negli appositi centri di raccolta.
Smaltire l’apparecchio secondo la direttiva europea
sui rifiuti di apparecchiature elettriche ed elettroniche
(RAEE).
•
In caso di dubbi, rivolgersi agli enti comunali respon-
sabili in materia di smaltimento.
3. Descrizione dell’apparecchio
1. Display
2. Pulsante Start/Stop
3. Manicotto da polso
4. Pulsante per la selezione utente
5. Pulsante per la memorizzazione M
6. Pulsante per l’impostazione di data e ora
7. Sportello vano batterie
8. Scala per la classificazione dei risultati di misurazione
7
8
1
2
3
456
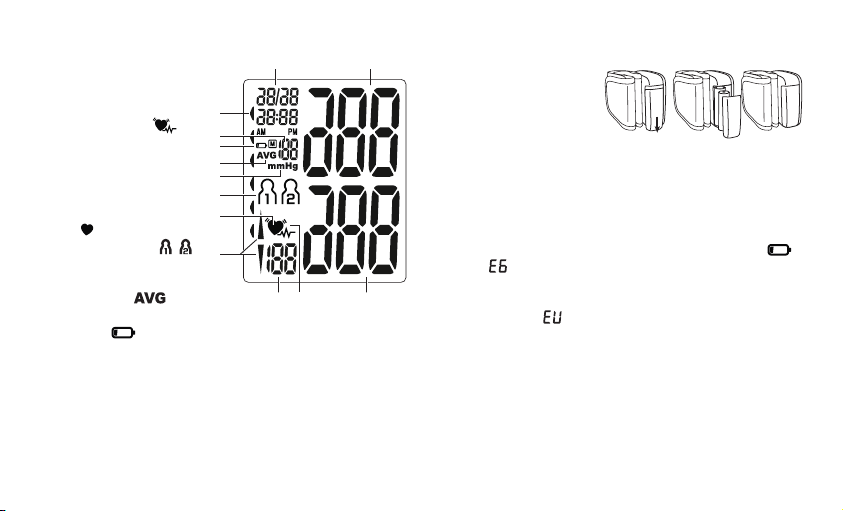
44
Indicatori sul display
1. Ora e data
2. Pressione sistolica
3. Pressione diastolica
4. Icona disturbo del
ritmo cardiaco
5. Battito cardiaco
rilevato
6. Pompaggio, scarico
aria (freccia)
7. Icona battito cardia-
co
8. Memoria utente /
9. Unità mmHg
10. Media delle ultime 3
misurazioni
11. Indicatore della
batteria
12. Numero della posizione di memoria
13. Classificazione dei risultati di misurazione
4. Preparazione della misurazione
Inserimento della batteria
•
Rimuovere il coperchio
del vano batterie sul lato
sinistro dell’apparecchio.
•
I
nserire due batterie Mi-
cro da 1,5 V (tipo alcalino
LR03).
•
V
erificare che le batterie siano inserite correttamente, con
i poli posizionati in base alle indicazioni. Non utilizzare bat-
terie ricaricabili.
•
R
ichiudere attentamente il coperchio del vano batterie.
Quando lampeggia l’icona di sostituzione delle batterie
e
compare , non è più possibile effettuare alcuna misurazione
ed è necessario sostituire le batterie.
Una volta inserite le batterie, compare il display completo, poi
viene visualizzato . Ora è possibile selezionare la visualiz-
zazione EU o US e impostare data e ora.
• Smaltire le batterie esauste e completamente scariche negli
appositi punti di raccolta, nei punti di raccolta per rifiuti tossici
o presso i negozi di elettronica. Lo smaltimento delle batterie
è un obbligo di legge.
11
12
13
10
9
8
7
6
5 4 3
1 2
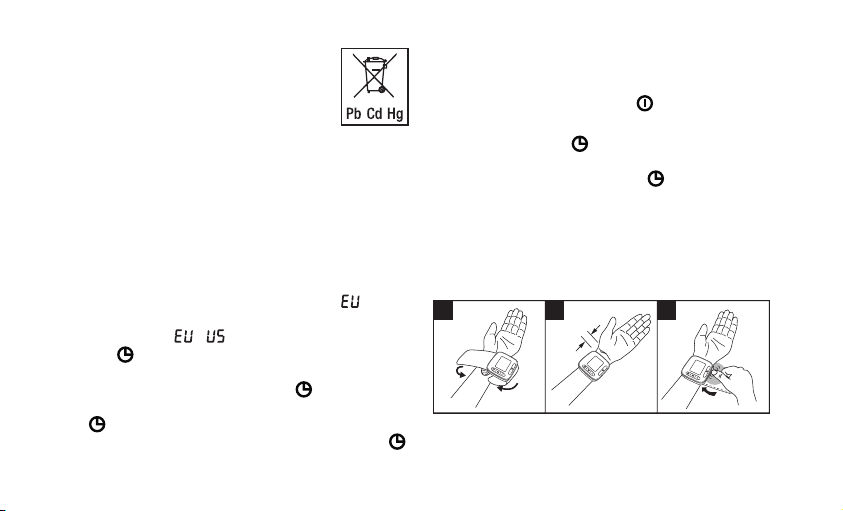
45
•
I
simboli riportati di seguito indicano che le batterie
contengono sostanze tossiche.
Pb = batteria contenente piombo
Cd = batteria contenente cadmio
Hg = batteria contenente mercurio
Impostazione di data e ora
La data e l’ora devono essere assolutamente impostate. Solo
in questo modo è possibile memorizzare correttamente le mi-
surazioni con data e ora per poterle richiamare in seguito. È
possibile selezionare il formato 24 ore o 12 ore.
Per impostare data e ora, procedere come segue:
1. Una volta inserite le batterie:
• Dopo una verifica del display, durante la quale vengono vi-
sualizzati tutti i segmenti, sul display lampeggia
.
•
Il pulsante M consente di incrementare i valori da impostare.
Impostare il formato o e confermare l’immissione con
il pulsante .
• A questo punto lampeggia l’anno. Con il pulsante M impo-
stare l’anno. Confermare con il pulsante .
• Con il pulsante M impostare il mese. Confermare con il pul-
sante .
•
Impostare giorno/ora/minuti e confermare con il pulsante .
•
Una volta terminate le impostazioni, l’apparecchio passa
automaticamente in standby e si spegne automaticamente
dopo circa 2 minuti.
•
In alternativa l’apparecchio può essere spento in qualsiasi
momento premendo il pulsante .
2. In qualsiasi momento:
•
Premere il pulsante , vengono visualizzate la memoria
utente in uso nonché data/ora.
•
Premere nuovamente il pulsante e tenerlo premuto per
circa 5 secondi per passare alla modalità d’impostazione
"Data e ora".
• Per l’impostazione, procedere come sopra descritto.
5. Misurazione della pressione
Applicazione del manicotto
• Denudare il polso sinistro. Verificare che la circolazione del
braccio non sia costretta da indumenti o simili.
• Applicare il manicotto all’interno del polso.
1 2 3
1 cm

46
•
Chiudere il manicotto con la chiusura a strappo in modo che
il bordo superiore dell’apparecchio sia ca. 1 cm dal palmo
della mano.
• Il manicotto deve aderire al polso senza stringere.
Postura corretta
•
P
rima di ogni misurazione rilassarsi per ca. 5 minuti. In
caso contrario le misurazioni potrebbero non essere
corrette.
•
L
a misurazione può essere effettuata
da seduti o da sdraiati. Sedersi in posi-
zione comoda per la misurazione della
pressione. Appoggiare la schiena e le
braccia. Non incrociare le gambe. Ap-
poggiare la pianta dei piedi al pavimen-
to. Il braccio deve essere appoggiato e
piegato ad angolo. Verificare sempre che il manicotto si trovi
all’altezza del cuore. In caso contrario le misurazioni potreb
-
bero essere molto imprecise. Rilassare il braccio e le mani.
•
P
er non falsare l’esito, è importante restare tranquilli e non
parlare durante la misurazione.
Selezione della memoria
Premere il pulsante o per visualizzare data/ora e la me-
moria utente in uso. Selezionare la memoria utente desiderata
premendo il pulsante di selezione utente
. Confermare la se-
lezione mediante il pulsante .
Sono disponibili due memorie, ognuna da 60 posizioni, per po-
ter memorizzare separatamente le misurazioni di due persone
diverse o le misurazioni mattutine e serali.
Esecuzione della misurazione della pressione
•
Applicare il manicotto e sistemarsi nella posizione in cui si
desidera eseguire la misurazione.
• Selezionare la memoria utente come descritto precedente-
mente. Per avviare la misurazione, premere il pulsante .
Dopo la verifica del display compare una freccia e vengono
visualizzati la memoria utente in uso e data/ora. Il manicotto
si gonfia automaticamente. Durante il pompaggio l’apparec-
chio rileva già i valori necessari a determinare la pressione
di gonfiaggio necessaria. Se la pressione risulta insufficien-
te, l’apparecchio provvede automaticamente al gonfiaggio.
•
Poi la pressione all’interno del manicotto viene rilasciata len-
tamente e viene misurato il battito cardiaco.
• Al termine della misurazione la restante pressione viene rila-
sciata velocemente. Vengono visualizzati il battito cardiaco
e la pressione sistolica e diastolica.
•
La misurazione può essere interrotta in qualsiasi momento
premendo il pulsante .
• • • • • • • • • • • • •

47
•
S
e la misurazione non è stata effettuata correttamente, com
-
pare l’icona _. Consultare il capitolo Messaggi di errore/
Soluzioni delle presenti Istruzioni per l’uso e ripetere la mi-
surazione.
•
L
’apparecchio si spegne automaticamente dopo 2 minuti.
Attendere almeno 5 minuti prima di effettuare una nuova mi-
surazione!
Interpretazione dell’esito
Disturbi del ritmo cardiaco
Questo apparecchio è in grado di individuare eventuali disturbi
del ritmo cardiaco durante la misurazione e in tal caso al termi-
ne della misurazione ne segnala la presenza con l’icona .
Può essere un’avvisaglia di aritmia. L’aritmia è una patologia
in cui il ritmo cardiaco è anormale a causa di errori nel sistema
bioelettrico, che controlla il battito cardiaco. I sintomi (battiti
cardiaci accelerati o anticipati, polso rallentato o troppo veloce)
possono essere determinati tra l’altro da patologie cardiache,
età, costituzione, sovralimentazione, stress o mancanza di ri-
poso. Un’aritmia può essere diagnosticata solo dal medico.
Ripetere la misurazione nel caso compaia sul display l’icona
dopo una prima misurazione. Assicurarsi di aver osservato
5 minuti di riposo prima di effettuare l’esame e di non parlare né
muoversi durante la misurazione. Rivolgersi al proprio medico
nel caso l’icona compaia frequentemente. Diagnosi e tera-
pie definite autonomamente in base agli esiti delle misurazioni
possono rivelarsi pericolose. Attenersi sempre alle indicazioni
del proprio medico.
Classificazione dei risultati di misurazione:
I risultati di misurazione possono essere classificati e valutati
in base alla tabella seguente.
Tali valori standard costituiscono tuttavia solo un riferimento
generale in quanto la pressione individuale presenta differenze
a seconda della persona e dell’età.
È importante consultare regolarmente il proprio medico per
sapere qual è la propria pressione normale e il limite supera-
to il quale il livello di pressione viene considerato pericoloso.
Il grafico a barre sul display e la scala graduata sul misuratore
di pressione indicano la classe nella quale rientra la pressione
misurata. Nel caso in cui il valore sistolico e quello diastolico
rientrino in due classi diverse (ad es. sistole nella classe "Nor-
male alto" e diastole nella classe "Normale"), la graduazione
grafica dell’apparecchio indica sempre la classe più alta, in
questo caso "Normale alto".
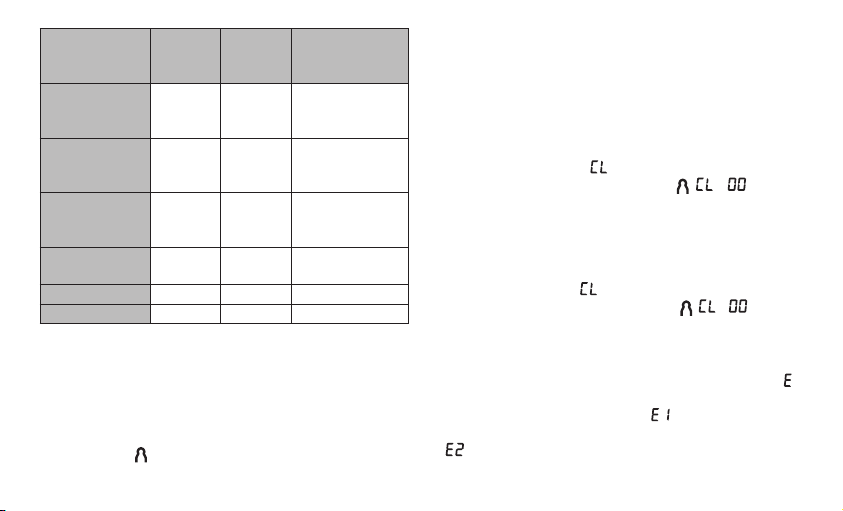
48
Intervallo dei
valori di pres-
sione
Sistole (in
mmHg)
Diastole
(in mmHg)
Misura da adot-
tare
Livello 3:
forte iperten-
sione
≥ 180 ≥ 110
Rivolgersi a un
medico
Livello 2:
moderata iper-
tensione
160 – 179 100 – 109
Rivolgersi a un
medico
Livello 1:
leggera iperten-
sione
140 – 159 90 – 99
Controlli medici
regolari
Normale alto 130 – 139 85 – 89
Controlli medici
regolari
Normale 120 – 129 80 – 84 Autocontrollo
Ottimale < 120 < 80 Autocontrollo
Fonte: OMS, 1999 (Organizzazione mondiale della sanità)
6. Memorizzazione ricerca dei valori misurati
•
Gli esiti di ogni misurazione corretta vengono memorizzati
con data e ora. Quando i dati misurati superano le 60 unità,
vengono eliminati i dati più vecchi.
•
Premendo il pulsante M si passa subito ai valori memorizza-
ti. Il pulsante consente di modificare la memoria utente.
Premendo il pulsante M viene visualizzata la media degli ul-
timi tre valori memorizzati nella memoria utente. Premendo
nuovamente il pulsante per la memorizzazione M vengono
visualizzati i singoli valori di misurazione con data e ora.
7. Cancellazione dei valori memorizzati
Per cancellare i singoli valori misurati, selezionarli. Premere e
tenere premuto il pulsante per la memorizzazione M finché sul
display viene visualizzato . Quindi confermare la cancella-
zione con il pulsante di selezione utente ( e vengono
visualizzati sul display).
Per cancellare tutti i valori misurati di una memoria utente,
selezionarli. Premendo il pulsante per la memorizzazione M
viene visualizzata la media degli ultimi 3 valori misurati. Quindi
premere e tenere premuto il pulsante per la memorizzazione M
finché viene visualizzato sul display. Confermare la cancel-
lazione con il pulsante di selezione utente ( e vengono
visualizzati sul display).
8. Messaggi di errore/Soluzioni
In caso di errori sul display compare il messaggio di errore _.
I messaggi di errore possono essere visualizzati quando
• non è possibile misurare il battito:
;
• durante la misurazione la persona si è mossa o ha parlato:
;
49
• il manicotto è troppo stretto o troppo allentato:
;
• si è verificato un errore durante la misurazione: ;
• la pressione di gonfiaggio è superiore a 300 mmHg: ;
• le batterie sono quasi scariche
: .
In questi casi ripetere la misurazione. Non muoversi o parlare.
Se necessario reinserire le batterie o sostituirle.
9. Pulizia e conservazione dell’apparecchio e
del manicotto
•
P
ulire con attenzione l’apparecchio e il manicotto utilizzando
solo un panno leggermente inumidito.
•
N
on utilizzare detergenti o solventi.
•
L
’apparecchio e il manicotto non devono per nessun moti-
vo essere immersi nell’acqua, in quanto il liquido potrebbe
infiltrarsi e danneggiarli.
•
N
on posizionare oggetti pesanti sull’apparecchio e sul ma-
nicotto. Rimuovere le batterie. Non piegare eccessivamente
il tubo del manicotto.
10. Dati tecnici
Codice SBC 22
Tipo SBC 29
Metodo di misura-
zione
Misurazione oscillante e non invasiva
della pressione al polso
Range di misurazione Pressione manicotto 0-300 mmHg,
sistolica 50-250 mmHg,
diastolica 30-200 mmHg,
pulsazioni 40-180 battiti/minuto
Precisione
dell’indicazione
Sistolica ±3 mmHg,
Diastolica ±3 mmHg,
Pulsazioni ±5% del valore indicato
Tolleranza Scostamento standard massimo am-
messo rispetto a esame clinico:
sistolica 8 mmHg /
diastolica 8 mmHg
Memoria 2 x 60 posizioni di memoria
Dimensioni Lung. 74 mm x larg. 72 mm x alt.
24,5 mm
Peso ca. 100 g (senza batterie)
Dimensioni del ma-
nicotto
da 135 a 195 mm
Condizioni di funzio-
namento ammesse
da +5 °C a +40 °C, 15-93% umidità
relativa (senza condensa)
Condizioni di stoc-
caggio ammesse
da -25 °C a +70 °C, < 93% umidità
relativa, 700-1050 hPa di pressione
ambiente

50
Alimentazione 2 x batterie AAA 1,5 V
Durata delle batterie ca. 300 misurazioni, in base alla pres-
sione sanguigna e di pompaggio
Accessori Istruzioni per l’uso, 2 batterie AAA da
1,5 V, custodia
Classificazione Alimentazione interna, IPX0, non fa
parte della categoria AP/APG, funzi-
onamento continuo, parte applicativa
tipo BF
•
L’apparecchio è conforme alla norma europea EN60601-1-2
e necessita di precauzioni d’impiego particolari per quanto
riguarda la compatibilità elettromagnetica. Apparecchiature
di comunicazione HF mobili e portatili possono influire sul
funzionamento di questo apparecchio. Per informazioni più
dettagliate, rivolgersi all’Assistenza clienti oppure consultare
la parte finale delle istruzioni per l’uso.
•
L’apparecchio è conforme alla direttiva CE per i dispositivi
medici 93/42/EEC, alla legge sui dispositivi medici e alle nor-
me europee EM1060-1 (Sfigmomanometri non invasivi Parte
1: Requisiti generali), EN1060-3 (Sfigmomanometri non inva-
sivi Parte 3: Requisiti integrativi per sistemi elettromeccanici
per la misurazione della pressione arteriosa) e IEC80601-2-30
(Apparecchi elettromedicali Parte 2-30: Prescrizioni parti-
colari relative alla sicurezza fondamentale e alle prestazioni
essenziali di misuratori di pressione automatici non invasivi).
•
La precisione di questo misuratore di pressione è stata accu-
ratamente testata ed è stata sviluppata per una lunga durata
di vita utile.
•
Se l’apparecchio viene utilizzato a scopo professionale, è
necessario effettuare controlli tecnici con gli strumenti ade-
guati. Richiedere informazioni dettagliate sulla verifica della
precisione all’indirizzo indicato del servizio assistenza.
Salvo errori e modifiche
51
Внимательно прочтите данную инструкцию по применению,
сохраните ее для последующего использования, храните ее
вместе, доступном для других пользователей, иследуйте
ее указаниям.
1. Знакомство сприбором
Прибор для измерения кровяного давления на запястье
служит для неинвазивного измерения иконтроля артери-
ального давления взрослых людей. Сего помощью Вы смо-
жете легко ибыстро измерять кровяное давление, сохра-
нять результаты измерений впамяти ивыводить на экран
кривую измерений. При наличии нарушений сердечного
ритма Вы получите предупреждение.
РУССКИЙ
1. Знакомство сприбором ..............................................51
2. Важные указания ..........................................................51
3. Описание прибора ........................................................56
4. Подготовка кизмерению .............................................57
5. Измерение кровяного давления ..................................58
6. Сохранение ивызов измеренных значений ...............61
7. Удаление сохраненных данных .................................61
8. Сообщение об ошибке/устранение ошибок .............62
9. Очистка ихранение прибора иманжеты .................62
10. Технические данные ...................................................62
11. Гарантия ......................................................................64
Оглавление
Полученные результаты измерений классифицируются
иотображаются вграфическом виде.
2. Важные указания
Пояснения ксимволам
Винструкции поприменению, наупаковке инатиповой
табличке прибора ипринадлежностей используются сле-
дующие символы.
Осторожно!
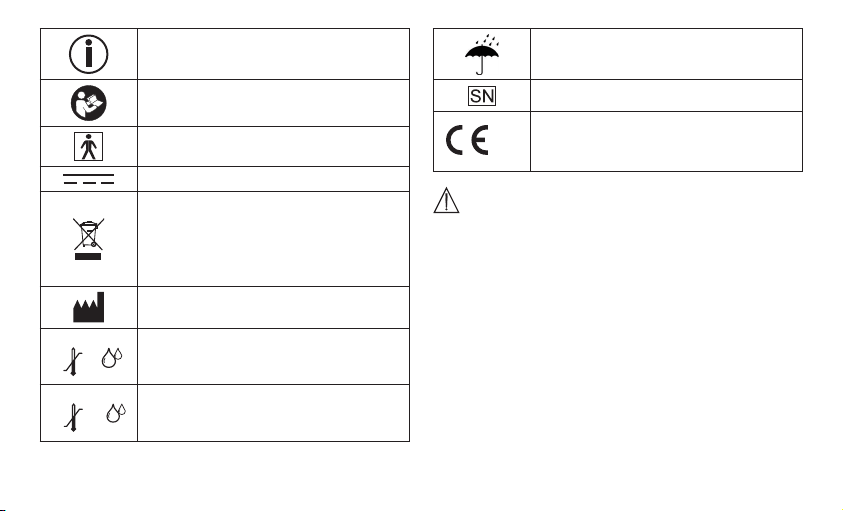
52
Указание
Важная информация.
Следуйте инструкции по применению.
Рабочая часть типа BF.
Постоянный ток
Утилизация прибора всоответствии
сДирективой ЕС по отходам
электрического иэлектронного
оборудования— WEEE (Waste Electrical
and Electronic Equipment)
Производитель
Storage
-25°C
70°C
RH ≤93%
Допустимая температура хранения
ивлажность воздуха
Operating
5°C
40°C
RH 15-93%
Допустимая рабочая температура
ивлажность воздуха
Хранить всухом месте
Серийный номер
0483
Символ CE подтверждает соответствие
основным требованиям директивы
омедицинских изделиях 93/42/EEC.
Указания по применению
•
Чтобы обеспечить сопоставимость данных, всегда из-
меряйте кровяное давление водно ито же время суток.
•
Отдыхайте втечение 5минут перед каждым измерением
давления!
• При проведении нескольких сеансов измерения уодно-
го пользователя интервал между измерениями должен
составлять 5минут.
•
Втечение как минимум 30минут перед измерением сле-
дует воздерживаться от приема пищи ижидкости, куре-
ния или физических нагрузок.
•
При наличии сомнений относительно полученных резуль-
татов повторите измерение.

53
•
Результаты измерений, полученные Вами самостоятель-
но, служат исключительно для Вашей информации ине
могут заменить медицинского обследования!
•
Результаты измерений следует обсуждать с врачом, их ни
в коем случае нельзя использовать для принятия само-
стоятельных решений относительно лечения (например,
о приеме лекарств и их дозировке)!
• Данный прибор не предназначен для использования ли-
цами (включая детей) сограниченными физическими,
сенсорными или умственными способностями, снедоста-
точными знаниями или опытом, за исключением случаев,
когда за ними осуществляется надлежащий надзор или
они получили инструкции по использованию прибора.
Необходимо следить за детьми ине разрешать им играть
сприбором.
•
Не используйте прибор для измерения кровяного дав-
ления уноворожденных детей иу женщин, страдающих
преэклампсией.
•
Перед использованием прибора для измерения кровя-
ного давления во время беременности рекомендуется
проконсультироваться сврачом.
•
Вслучае ограничений кровоснабжения на одной руке
врезультате хронических или острых заболеваний крове-
носных сосудов (втом числе сужения сосудов) точность
измерения артериального давления на запястье также
ограничена. Вэтом случае используйте прибор для из-
мерения кровяного давления на плече.
• Заболевания системы кровообращения могут привести
кнеправильным результатам измерения или снижению
точности измерения. Погрешности врезультатах измере-
ния также возможны при пониженном кровяном давле-
нии, диабете, нарушениях кровоснабжения исердечного
ритма, при ознобе или треморе.
•
Не используйте прибор для измерения кровяного давле-
ния вместе свысокочастотным хирургическим прибором.
•
Применяйте прибор только для лиц собхватом запястья,
предусмотренным параметрами прибора.
•
Обратите внимание на то, что во время накачивания
может быть нарушена подвижность соответствующей
части тела.
•
Во время измерения кровяного давления не допускается
прерывание циркуляции крови на длительное время. При
сбое вработе прибора снимите манжету сруки.
•
Избегайте длительного давления вманжете ичастых из-
мерений. Вызванное ими нарушение кровообращения
может привести ктравмам.
•
Убедитесь втом, что ккровеносным сосудам руки, на
которую накладывается манжета, не подсоединено ме-
дицинское оборудование (через внутрисосудистый до-
54
ступ, артериовенозный шунт или при внутрисосудистой
терапии).
•
Не используйте манжету уженщин, перенесших ампу-
тацию груди.
•
Во избежание дальнейших повреждений не накладывайте
манжету на раны.
•
Накладывайте манжету только на запястье. Не наклады-
вайте манжету на другие части тела.
• Работа прибора возможна исключительно от батареек.
•
Вцелях экономии энергии батареек прибор для изме
-
рения кровяного давления отключается автоматически,
если втечение 2 минут не была нажата ни одна кнопка.
•
Допускается использование прибора только вцелях, опи-
сываемых вданной инструкции поприменению. Изгото-
витель не несет ответственности за ущерб, вызванный
неквалифицированным или ненадлежащим использова-
нием прибора.
Указания по хранению иуходу
•
Прибор для измерения кровяного давления состоит из
прецизионных иэлектронных компонентов. Точность из-
мерений исрок службы прибора зависят от бережного
обращения сним:
— Защищайте прибор от ударов, влажности, загрязне-
ния, сильных колебаний температуры ипрямых сол-
нечных лучей.
— Не роняйте прибор.
— Не используйте прибор вблизи сильных электромаг-
нитных полей, держите его на значительном рассто-
янии от радиоаппаратуры или мобильных телефонов.
• Если прибор не используется длительное время, извле-
ките батарейки.
Указания по обращению сбатарейками
•
При попадании жидкости из аккумулятора на кожу или
вглаза необходимо промыть соответствующий участок
большим количеством воды иобратиться кврачу.
•
Опасность проглатывания мелких частей! Ма-
ленькие дети могут проглотить батарейки иподавиться
ими. Поэтому батарейки необходимо хранить внедоступ-
ном для детей месте!
• Обращайте внимание на обозначение полярности: плюс
(+) иминус (–).
•
Если батарейка потекла, очистите отделение для батаре-
ек сухой салфеткой, надев защитные перчатки.
•
Защищайте батарейки от чрезмерного воздействия теп
-
ла.

55
•
Опасность взрыва! Не бросайте батарейки вогонь.
• Не заряжайте ине замыкайте батарейки накоротко.
• Если прибор длительное время не используется, извле-
ките батарейки из отделения для батареек.
•
Используйте батарейки только одного типа или равно-
ценных типов.
• Всегда заменяйте все батарейки сразу.
• Не используйте аккумуляторы!
•
Не разбирайте, не вскрывайте ине разбивайте бата-
рейки.
Указания по ремонту иутилизации
• Не выбрасывайте батарейки вбытовой мусор. Утилизи-
руйте использованные батарейки впредусмотренных для
этого пунктах сбора.
•
Не разбирайте прибор. Несоблюдение этого требования
ведет кпотере гарантии.
•
Ни вкоем случае не ремонтируйте ине регулируйте при-
бор самостоятельно. Впротивном случае надежность
работы прибора больше не гарантируется.
•
Ремонтные работы должны производиться только сер-
висной службой или авторизованными торговыми пред-
ставителями. Перед предъявлением претензий проверь-
те ипри необходимости замените батарейки.
•
Вцелях защиты окружающей среды поокончании срока
службы следует утилизировать прибор отдельно отбы-
тового мусора.
•
Утилизация может производиться через соответству-
ющие пункты сбора вВашей стране. Прибор
следует утилизировать согласно Директиве ЕС
поотходам электрического иэлектронного обо-
рудования— WEEE (Waste Electrical and Electronic
Equipment).
•
При возникновении вопросов обращайтесь вкоммуналь
-
ную организацию, занимающуюся утилизацией.
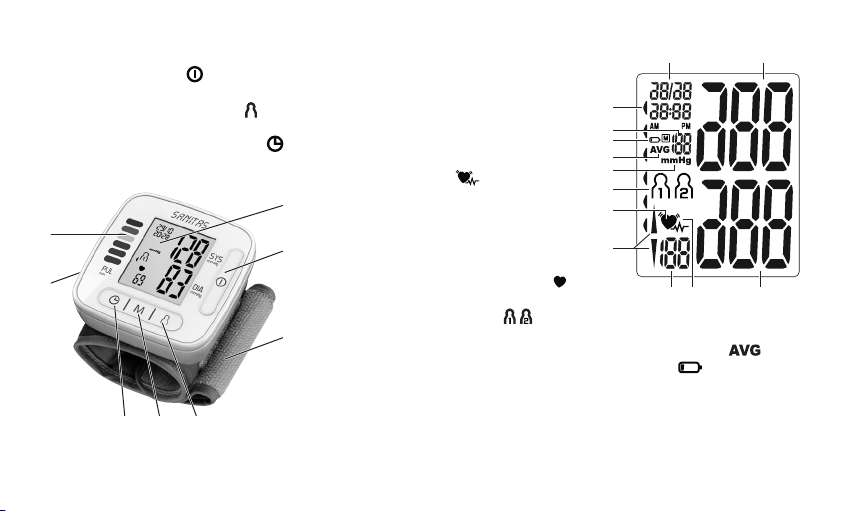
56
3. Описание прибора
1. Дисплей
2. Кнопка ВКЛ./ВЫКЛ.
3. Манжета на запястье
4. Кнопка выбора пользователя
5. Кнопка сохранения M
6. Кнопка настройки даты/времени
7. Крышка отделения для батареек
8. Шкала оценки результатов измерения
Индикация на дисплее:
1. Время идата
2. Систолическое
давление
3. Диастолическое
давление
4. Символ нарушения
сердечного ритма
5. Измеренное значе-
ние пульса
6. Накачивание, вы-
пускание воздуха
(стрелка)
7. Символ пульса
8. Пользовательская
память /
9. Единица: мм ртутного столба
10. Среднее значение последних 3 измерений
11. Индикатор уровня заряда батареи
12. Номер ячейки памяти
13. Оценка результатов измерений
7
8
1
2
3
456
11
12
13
10
9
8
7
6
5 4 3
1 2
57
4. Подготовка кизмерению
Установка батареек
•
Снимите крышку от-
деления для батареек
с левой стороны при-
бора.
•
В
ставьте две алкалино-
вые батарейки 1,5В Micro (тип LR03).
•
О
бязательно проследите за тем, чтобы батарейки были
установлены справильной полярностью всоответствии
смаркировкой. Не используйте заряжаемые аккумуля-
торы.
•
С
нова тщательно закройте крышку отделения для ба-
тареек.
Если на дисплее мигает символ смены батарейки ипо-
является , то проведение измерений невозможно, сле-
дует заменить все батарейки.
Когда батарейки будут вставлены, дисплей станет доступен
полностью, затем на нем отобразится . Можно выбрать
индикацию для ЕС или США инастроить дату ивремя.
•
Утилизируйте использованные иполностью разряженные
батарейки вконтейнеры со специальной маркировкой,
сдавайте впункты приема спецотходов или вмагазины
электрооборудования. Закон обязывает пользователей
обеспечить утилизацию батареек.
•
Э
ти знаки предупреждают оналичии вбатарейках
токсичных веществ:
Pb = батарейка содержит свинец,
Cd = батарейка содержит кадмий,
Hg = батарейка содержит ртуть.
Настройка даты ивремени
Обязательно установите дату ивремя. Только так можно
корректно сохранять измеренные значения сдатой ивре-
менем ипозже выводить их на экран. Можно выбрать
24-часовой режим или 12-часовой режим.
Для настройки даты ивремени действуйте следующим
образом:
1. После установки батареек:
•
После проверки дисплея, во время которой на нем долж-
ны отобразиться все сегменты, на дисплее замигает .
•
Спомощью кнопки MВы можете увеличивать устанавли-
ваемые значения. Установите формат или ипод-
твердите настройку нажатием кнопки .
•
Начнет мигать год. Теперь при помощи кнопки Mустано-
вите месяц. Для подтверждения нажмите на кнопку .
•
Теперь при помощи кнопки Mустановите месяц. Для под-
тверждения нажмите на кнопку .
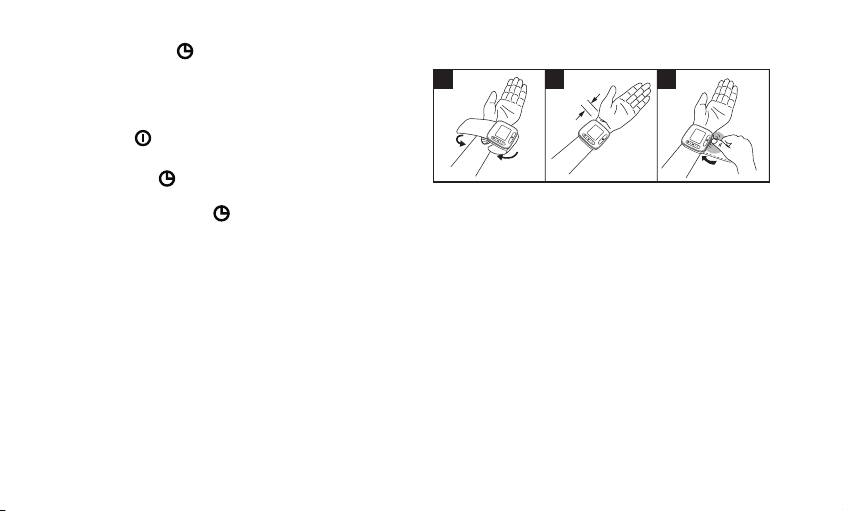
58
•
Установите день/час/минуты, каждый раз подтверждая
настройку кнопкой .
•
После выполнения всех настроек прибор автоматически
перейдет врежим ожидания, ачерез 2минуты отклю-
чится.
•
Вы также можете выключить прибор нажатием кнопки
ВКЛ./ВЫКЛ. .
2. Влюбое время:
•
Нажмите кнопку , отобразится текущая пользователь-
ская память идата/время.
•
Заново нажмите кнопку иудерживайте ее нажатой
примерно втечение 5 секунд, чтобы получить доступ
кнастройкам «Дата ивремя».
• Произведите настройки, как описано выше.
5. Измерение кровяного давления
Накладывание манжеты
•
Оголите левое запястье. Следите за тем, чтобы кро-
воснабжение руки не было нарушено из-за слишком
узкой одежды ит.п.
• Наложите манжету на внутреннюю сторону запястья.
•
Зафиксируйте манжету спомощью застежки-липучки
таким образом, чтобы верхний край прибора находил-
ся ниже подушечки уоснования большого пальца руки
примерно на 1см.
•
Манжета должна плотно облегать запястье, но не стя
-
гивать его.
1 2 3
1 cm
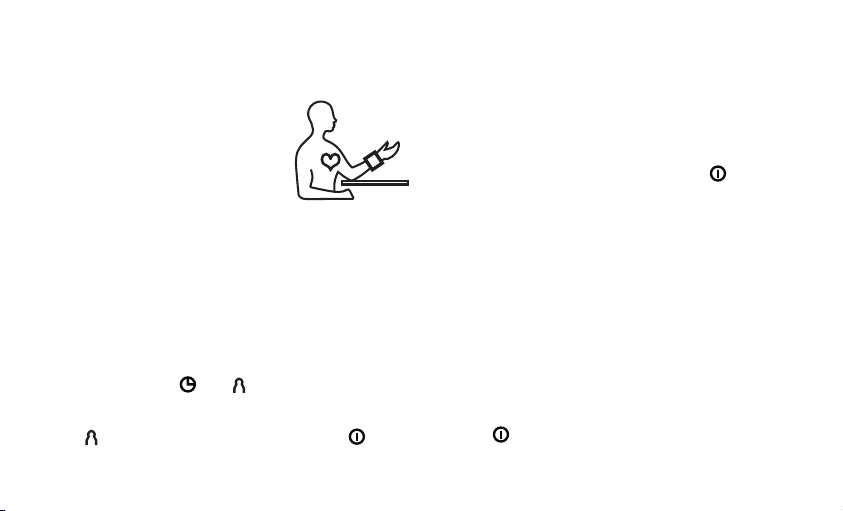
59
Правильное положение тела
•
О
тдыхайте втечение 5минут перед каждым
измерением давления! Впротивном случае возможны
отклонения результатов измерения.
•
В
ы можете проводить измерение
в положении сидя или лежа. Для
измерения кровяного давления зай-
мите удобное положение сидя. Спи-
на ируки должны иметь опору. Не
скрещивайте ноги. Поставьте ступни
ровно на пол. Необходимо подпереть
руку исогнуть ее влокте. Обязательно следите за тем,
чтобы манжета находилась на уровне сердца. Впротив-
ном случае возможны значительные отклонения резуль-
татов измерения. Расслабьте руку иладони.
•
Ч
тобы избежать искажения результатов измерения, во
время измерения следует вести себя спокойно ине раз-
говаривать.
Выбор памяти
При нажатии кнопки или отобразится дата/время
итекущая пользовательская память. Выберите нужную
пользовательскую память, нажав кнопку выбора пользо-
вателя . Подтвердите выбор нажатием кнопки .
Имеется две памяти с60 ячейками вкаждой, чтобы можно
было раздельно сохранять результаты измерения для 2
человек или утренние ивечерние измерения.
Измерение кровяного давления
•
Наложите манжету, как описано выше, изаймите удобное
для измерения положение.
• Выберите пользовательскую память, как описано выше.
Чтобы начать измерение, нажмите кнопку . После про-
верки дисплея появится стрелка, отобразится текущая
ячейка памяти идата/время. Манжета автоматически на-
полнится воздухом. Уже во время накачивания прибор
определяет значения измерения, которые служат для
оценки требуемого давления накачивания. Если этого
давления недостаточно, прибор автоматически увели-
чит его.
•
После этого давление вманжете начинает медленно опу-
скаться ипроизводится подсчет пульса.
•
После окончания измерения остаточное воздушное дав
-
ление очень быстро снижается. На дисплее отобража-
ются пульс, систолическое идиастолическое кровяное
давление.
• Вы можете влюбой момент прервать измерение, нажав
кнопку .
• • • • • • • • • • • • •
60
•
Символ _ появляется, если измерение не удалось вы-
полнить правильно. Прочитайте главу «Сообщение об
ошибке/устранение неисправностей» вданной инструк-
ции по применению иповторите измерение.
•
П
рибор автоматически выключается через 2 минуты.
Перед повторным измерением подождите не менее 5 минут!
Оценка результатов
Нарушения сердечного ритма:
Данный прибор во время измерения может идентифици-
ровать возможные нарушения сердечного ритма ипри их
наличии сообщает оних после измерения символом .
Это может указывать на аритмию. Аритмия— это болезнь,
при которой возникает аномальный сердечный ритм, вы-
званный сбоями вбиоэлектрической системе, регули-
рующей биение сердца. Симптомы (неравномерное или
преждевременное сердцебиение, медленный или слишком
быстрый пульс) могут быть вызваны заболеваниями сердца,
возрастом, предрасположенностью ксоответствующим
заболеваниям, чрезмерным употреблением кофе, никотина
иалкоголя, стрессом или недостатком сна. Аритмия может
быть выявлена только врезультате обследования уврача.
Если после первого измерения на дисплее отображается
символ , повторите измерение. Обратите внимание на
то, что втечение 5минут перед измерением нельзя зани-
маться активной деятельностью, аво время измерения
нельзя говорить или двигаться. Если символ появляет-
ся часто, обратитесь кврачу. Самодиагностика исамолече-
ние на основе результатов измерения могут быть опасны.
Обязательно следуйте рекомендациям своего врача.
Оценка результатов измерений:
Оценку результатов измерений можно провести спомощью
таблицы, представленной ниже.
Однако эти стандартные значения служат только общим
ориентиром, так как индивидуальные значения кровяного
давления уразных людей варьируются взависимости от
принадлежности ктой или иной возрастной группе ит.п.
Важно регулярно консультироваться сврачом. Врач опре-
делит Ваши индивидуальные значения нормального кровя-
ного давления, атакже значения, выше которых кровяное
давление следует классифицировать как опасное.
Столбчатая диаграмма на дисплее ишкала на приборе
показывают, вкаком диапазоне находится измеренное
давление. Если значения систолического идиастоличе-
ского давления находятся вразных диапазонах (напри-
мер, систолическое давление— высокое вдопустимых
пределах, адиастолическое— нормальное), то графиче-
ское деление на приборе всегда будет отображать более
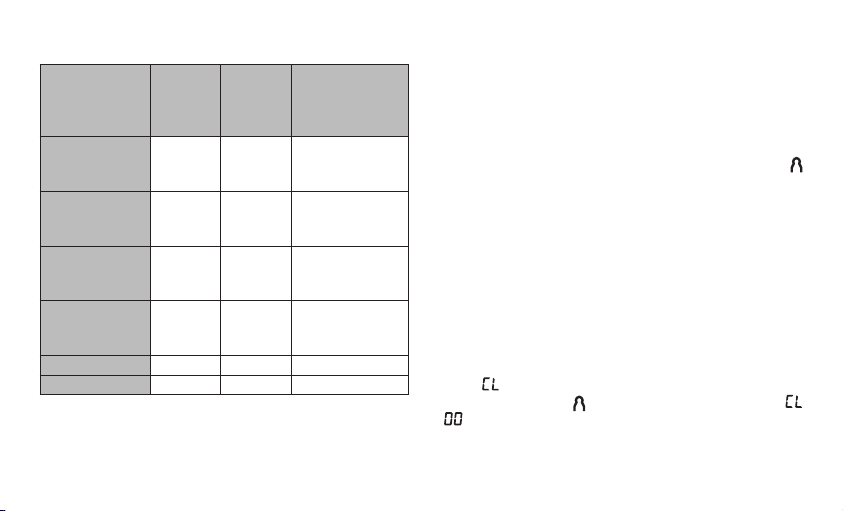
61
высокие пределы, как вописанном примере: высокое вдо-
пустимых пределах.
Диапазон зна-
чений кровя-
ного давления
Систоли-
ческое
(в мм рт.
ст.)
Диасто-
лическое
(в мм рт.
ст.)
Рекомендуемые
меры
Степень3:
тяжелая
гипертония
≥ 180 ≥ 110
Обращение
кврачу
Степень2:
пограничная
гипертония
160–179 100–109
Обращение
кврачу
Степень1:
слабая степень
гипертонии
140–159 90–99
Регулярное
посещение
врача
Высокое
вдопустимых
пределах
130–139 85–89
Регулярное
посещение
врача
Нормальное 120–129 80–84 Самоконтроль
Оптимальное < 120 < 80 Самоконтроль
Источник: ВОЗ (World Health Organization), 1999.
6. Сохранение ивызов измеренных
значений
• Результаты каждого успешного измерения сохраняются
суказанием даты ивремени измерения. Когда количе-
ство сохраненных результатов измерения превысит 60,
наиболее ранние данные будут автоматически удалены.
•
Путем нажатия на кнопку MВы сразу же перейдете ксо-
храненным результатам измерения. Спомощью кнопки
можно сменить пользовательскую память. Если нажать
кнопку M, то отобразится среднее значение последних
3 сохраненных вданной пользовательской памяти ре-
зультатов измерений. При дальнейшем нажатии кнопки
сохранения Mкаждый раз будут отображаться послед-
ние результаты отдельных измерений суказанием даты
ивремени.
7. Удаление сохраненных данных
Чтобы удалить отдельный результат измерения, сначала
выберите его. Нажмите кнопку сохранения Mи удержи-
вайте ее нажатой до тех пор, пока на дисплее не появится
символ . Затем подтвердите удаление нажатием кнопки
выбора пользователя (на дисплее появятся символы
и ).
Чтобы удалить все результаты измерений из пользователь-
ской памяти, сначала выберите память. Нажмите кнопку
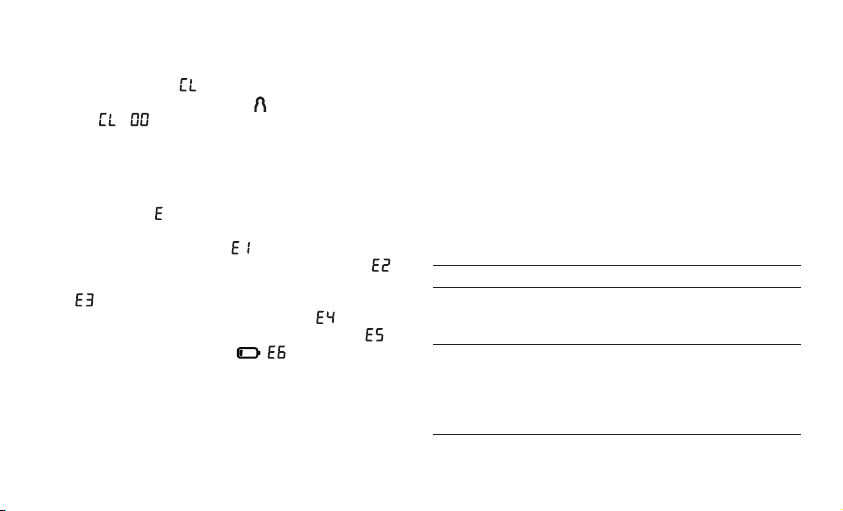
62
сохранения M. Появится среднее значение 3 последних
сохраненных результатов измерения. Затем снова нажмите
кнопку сохранения Mи удерживайте ее нажатой, пока на
дисплее не появится . Подтвердите удаление нажати
-
ем кнопки выбора пользователя (на дисплее появятся
символы и ).
8. Сообщение об ошибке/устранение
ошибок
При возникновении ошибок на дисплее появляется сооб-
щение об ошибке
_.
Сообщения об ошибках появляются, если
• не удалось измерить пульс:
;
• во время измерения Вы двигаетесь или говорите: ;
•
манжета прилегает слишком плотно или слишком сла-
бо: ;
• во время измерения произошли ошибки: ;
• давление накачивания превышает 300 ммрт.ст.: ;
• батарейки почти разряжены : .
Втаких случаях выполните повторное измерение. Помни-
те, что Вы не должны двигаться или говорить впроцессе
измерения. При необходимости установите батарейки на
место заново или замените их.
9. Очистка ихранение прибора иманжеты
•
П
роизводите очистку прибора иманжеты состорожно-
стью. Используйте только слегка увлажненную салфетку.
•
Н
е используйте чистящие средства или растворители.
•
Н
и вкоем случае не опускайте прибор иманжету вводу,
так как попадание воды приведет кповреждению при-
бора иманжеты.
•
П
ри хранении на приборе иманжете не должны стоять
тяжелые предметы. Извлеките батарейки. Нельзя слиш-
ком сильно сгибать шланг манжеты.
10. Технические данные
№ модели SBC 22
Тип SBC 29
Метод измерения Осциллометрическое неинвазивное
измерение кровяного давления на
запястье
Диапазон
измерения
Давление вманжете
0–300ммрт.ст.,
систолическое 50–250ммрт.ст.,
диастолическое 30–200ммрт.ст.,
пульс 40–180ударов/мин

63
Точность индикации ± 3ммрт.ст. для систолического,
± 3ммрт.ст. для диастолического,
пульс ± 5% от указываемого
значения
Погрешность
измерения
Максимально допустимое
стандартное отклонение по
результатам клинических
испытаний:
8ммрт.ст. для систолического/
8ммрт.ст. для диастолического
давления
Память 2 блока по 60ячеек памяти
Размеры Д74ммxШ72ммxВ24,5мм
Вес Около 100г (без батареек)
Размер манжеты
От 135 до 195мм
Допустимые
условия
эксплуатации
от +5 до +40°C, относительная
влажность воздуха 15–93% (без
образования конденсата)
Допустимые
условия хранения
От -25 до +70°C, относительная
влажность воздуха ≤ 93%,
давление окружающей среды
700–1050гПа
Электропитание 2батарейки типа ААА, 1,5В
Срок службы
батареек
Примерно 300измерений,
взависимости от высоты
кровяного давления или давления
накачивания
Принадлежности Инструкция по применению,
2батарейки типа ААА 1,5В,
коробка для хранения
Классификация Внутреннее питание, IPX0, без
AP или APG, продолжительное
использование, рабочая часть
типа BF
• Данный прибор соответствует европейскому стандарту
EN60601-1-2 итребует особых мер предосторожности
вотношении электромагнитной совместимости. Следует
учесть, что переносные имобильные высокочастотные
коммуникационные устройства могут повлиять на работу
данного прибора. Более точные данные можно запро-
сить по указанному адресу сервисной службы или найти
вконце инструкции по применению.
•
Прибор соответствует требованиям директивы ЕС 93/42/
EEC омедицинском оборудовании, закона омедицин-
ском оборудовании, атакже европейских стандартов
EN1060-1 (неинвазивные приборы для измерения кро
-
вяного давления, часть1: общие требования), EN1060-3

64
(неинвазивные приборы для измерения кровяного дав
-
ления, часть3: дополнительные требования кэлектро-
механическим системам измерения кровяного давления)
иIEC80601-2-30 (медицинские электрические приборы,
часть 2-30: особые предписания по обеспечению без-
опасности, включая основные характеристики автома-
тизированных неинвазивных приборов для измерения
кровяного давления).
•
Точность данного прибора для измерения кровяного
давления была тщательно проверена, прибор был раз-
работан срасчетом на длительный срок эксплуатации.
• При использовании прибора вмедицинских учреждени-
ях следует выполнять метрологический контроль спо-
мощью соответствующих средств. Точные данные для
проверки точности прибора можно запросить всервис-
ном центре.
11. Гарантия
Мы предоставляем гарантию на дефекты материалов и из-
готовления этого прибора на срок 24 месяцев со дня прода-
жи через розничную сеть.
Гарантия не распространяется:
– на случаи ущерба, вызванного неправильным использо-
ванием,
– на быстроизнашивающиеся части (батарейки, манжета),
– на дефекты, о которых покупатель знал в момент покупки,
– на случаи собственной вины покупателя.
Товар подлежит декларированию:
Срок эксплуатации изделия: минимум 5 лет
Фирма-изготовитель: Бойрер Гмбх,
Софлингер штрассе 218,
89077-УЛМ, Германия
для фирмы Ханс Динслаге ЛТд
88524 Уттенвайлер, Германия
Фирма-импортер: OOO БОЙРЕР, 109451 г. Москва,
ул. Перерва 62, корп. 2, офис 3
Сервисный центр: 109451 г. Москва,
ул. Перерва 62, корп. 2
Тел(факс) 495–658 54 90
Дата продажи
Подпись продавца
Штамп магазина
Подпись покупателя
Возможны ошибки иизменения

65
Electromagnetic Compatibility Information
Table 1
For all ME EQUIPMENT and ME SYSTEMS
Guidance and manufacture’s declaration – electromagnetic emissions
The SBC29 is intended for use in the electromagnetic environment specified below. The customer of the user of the SBC29 should assure that it is
used in such and environment.
Emission test Compliance Electromagnetic environment – guidance
RF emissions CISPR 11 Group 1
The
SBC29
uses RF energy only for its internal function. Therefore, its RF emissions are very
low and are not likely to cause any interference in nearby electronic equipment.
RF emission CISPR 11 Class B The
SBC29
is suitable for use in all establishments, including domestic establishments and
those directly connected to the public low-voltage power supply network that supplies buil
-
dings used for domestic purposes.
Table 2
For all ME EQUIPMENT and ME SYSTEMS
Guidance and manufacturer’s declaration – electromagnetic immunity
The SBC29 is intended for use in the electromagnetic environment specified below. The customer or the user of SBC29 should assure that it is used
in such an environment.
Immunity test IEC 60601 test level Compliance level Electromagnetic environment - guidance
Electrostatic discharge (ESD)
IEC 61000-4-2
± 6 kV contact
± 8 kV air
± 6 kV contact
± 8 kV air
Floors should be wood, concrete or ceramic
tile. If floor are covered with synthetic material,
the relative humidity should be at least 30%.
Power frequency (50Hz) magne-
tic field
IEC 61000-4-8
3 A/m 3 A/m Power frequency magnetic fields should be at
levels characteristic of a typical location in a
typical commercial or hospital environment.
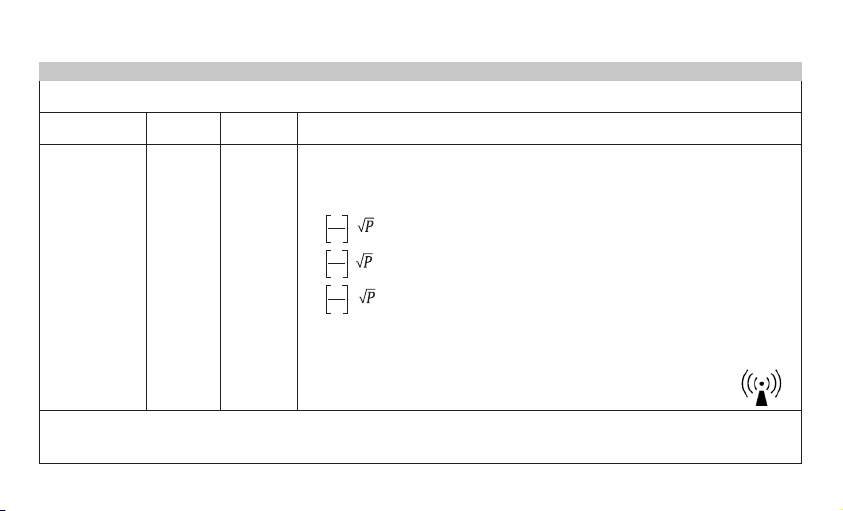
66
Table 3
For ME EQUIPMENT and ME SYSTEMS that are not LIFE-SUPPORTING
Guidance and manufacturer’s declaration – electromagnetic immunity
The SBC29 is intended for use in the electromagnetic environment specified below. The customer or the user of SBC29 should assure that it is used
in such an environment.
Immunity test
IEC 60601
test level
Compliance
level
Electromagnetic environment - guidance
Portable and mobile RF communications equipment should be used no closer to any part of
the
SBC29
, including cables, than the recommended separation distance calculated from the
equation applicable to the frequency of the transmitter.
Recommended separation distance:
d =
3.5
V
d =
3.5
E
1
80 MHz to 800 MHz
d =
7
E
1
80 MHz to 2.5 GHz
Where P is the maximum output power rating of the transmitter in watts (W) according to the
transmitter manufacturer and d is the recommended separation distance in meters (m).
Field strengths from fixed RF transmitters, as determined by an electromagnetic site survey,
a
should be less than the compliance level in each frequency range
.b
. Interference
may occur in the vicinity of equipment marked with the following symbol:
Conducted RF
IEC 61000-4-6
3 V
rms
150 kHz to
80 MHz
3
Vrms
Radiated RF
IEC 61000-4-3
3 V/m
80 MHz to
2.5 GHz
3
Vrms
NOTE 1 At 80 MHz and 800 MHz, the higher frequency range applies.
NOTE 2 These guidelines may not apply in all situations. Electromagnetic propagation is affected by absorption and reflection from structures,
objects and people.
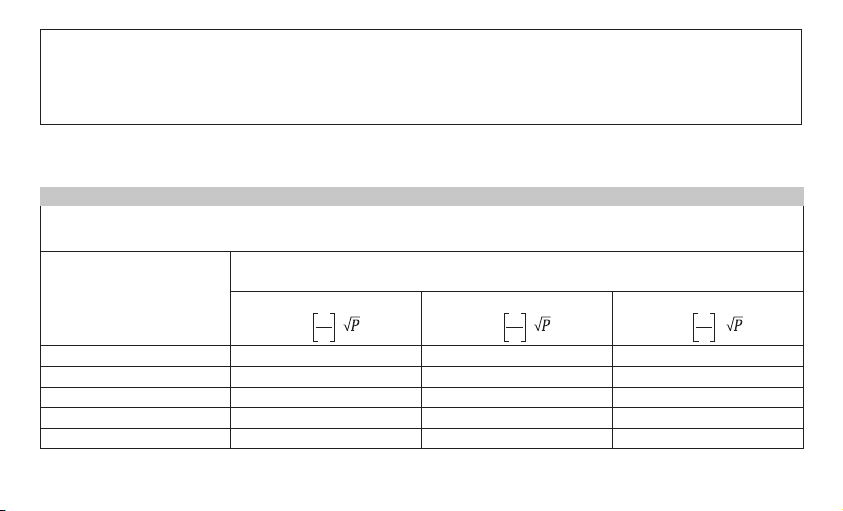
67
a
Field strengths from fixed transmitters, such as base stations for radio (cellular/cordless) telephones and land mobile radios, amateur radio, AM
and FM radio broadcast and TV broadcast cannot be predicted theoretically with accuracy. To assess the electromagnetic environment due to
fixed RF transmitters, an electromagnetic site survey should be considered. If the measured field strength in the location in which the SBC29 is
used exceeds the applicable RF compliance level above, the SBC29 should be observed to verify normal operation. If abnormal performance is
observed, additional measures may be necessary, such as re-orienting or relocating the SBC29.
b
Over the frequency range 150 kHz to 80 MHz, field strengths should be less than 3 V/m.
Table 4
For ME EQUIPMENT and ME SYSTEMS that are not LIFE-SUPPORTING
Recommended separation distances between portable and mobile RF communications equipment and the SBC29
The SBC29 is intended for use in an electromagnetic environment in which radiated RF disturbances are controlled. The customer or the user of the SBC29
can help prevent electromagnetic interference by maintaining a minimum distance between portable and mobile RF communications equipment (transmitters)
and the SBC29 as recommended below, according to the maximum output power of the communications equipment.
Rated maximum output
power of transmitter
W
Separation distance according to frequency of transmitter
(m)
150 kHz to 80 MHz
d =
3.5
V
1
80 MHz to 800 MHz
d =
3.5
E
1
800 MHz to 2.5 GHz
d =
7
E
1
0,01 0.117 0.1167 0.2334
0,1 0.370 0.3689 0.7378
1 1.170 1.1667 2.3334
10 3.700 3.6893 7.3786
100 11.7 11.6667 23.3334
68
For transmitters rated at a maximum output power not listed above, the recommended separation distance d in meters (m) can be determined
using the equation applicable to the frequency of the transmitter, where P is the maximum output power rating of the transmitter in watts (W)
according to the transmitter manufacturer.
NOTE 1 At 80 MHz and 800 MHz, the separation distance for the higher frequency range applies.
NOTE 2 These guidelines may not apply in all situations. Electromagnetic propagation is affected by absorption and reflection from structures,
objects and people.
758.293 - 0716
Hans Dinslage GmbH, Riedlinger Straße 28, 88524 Uttenweiler, Germany
www.sanitas-online.de
0483