D
Blutdruckmessgerät
Gebrauchsanweisung .................................... 2
G
Blood pressure monitor
Instructions for use ......................................18
F
Tensiomètre
Mode d’emploi .............................................34
I
Misuratore di pressione
Istruzioni per l’uso ........................................50
r
Прибор для измерения кровяного
давления на запястье
Инструкция по применению ......................66
Q
Ciśnieniomierz
Instrukcja obsługi ........................................ 84
O
Bloeddrukmeter
Gebruiksaanwijzing .................................... 100
SBC 15
Lieferumfang
•
Blutdruckmessgerät mit Manschette
•
2 x 1,5V AAA Batterien LR03
•
Aufbewahrungsbox
•
Gebrauchsanweisung
Bitte lesen Sie diese Gebrauchsanweisung aufmerk-
sam durch, bewahren Sie sie für späteren Gebrauch
auf, machen Sie sie anderen Benutzern zugänglich und
beachten Sie die Hinweise.
1. Kennenlernen
Überprüfen Sie das Gerät auf äußere Unversehrtheit der
Verpackung und auf die Vollständigkeit des Inhalts. Vor
dem Gebrauch ist sicherzustellen, dass das Gerät und
Zubehör keine sichtbaren Schäden aufweisen und jegli-
ches Verpackungsmaterial entfernt wird. Benutzen Sie es
im Zweifelsfall nicht und wenden Sie sich an Ihren Händ-
ler oder an die angegebene Service-Adresse.
Das Handgelenk-Blutdruckmessgerät dient zur nichtin-
vasiven Messung und Überwachung arterieller Blut-
druckwerte von erwachsenen Menschen. Sie können
damit schnell und einfach Ihren Blutdruck messen, die
Messwerte abspeichern und sich den Verlauf der Mess-
werte anzeigen lassen. Bei eventuell vorhandenen Herz-
rhythmusstörungen werden Sie gewarnt.
Die ermittelten Werte werden eingestuft und grafisch
beurteilt.
DEUTSCH
1. Kennenlernen ..............................................................2
2. Wichtige Hinweise ....................................................... 3
3. Gerätebeschreibung .................................................... 8
4. Messung vorbereiten ...................................................9
5. Blutdruck messen .....................................................10
6. Ergebnisse beurteilen ................................................12
7. Messwerte speichern, abrufen und löschen ...........14
8. Fehlermeldung / Fehlerbehebung .............................15
9. Gerät und Manschette reinigen und aufbewahren .. 16
10. Technische Angaben ............................................... 16
11. Garantie/Service ......................................................17
Inhalt
2
2. Wichtige Hinweise
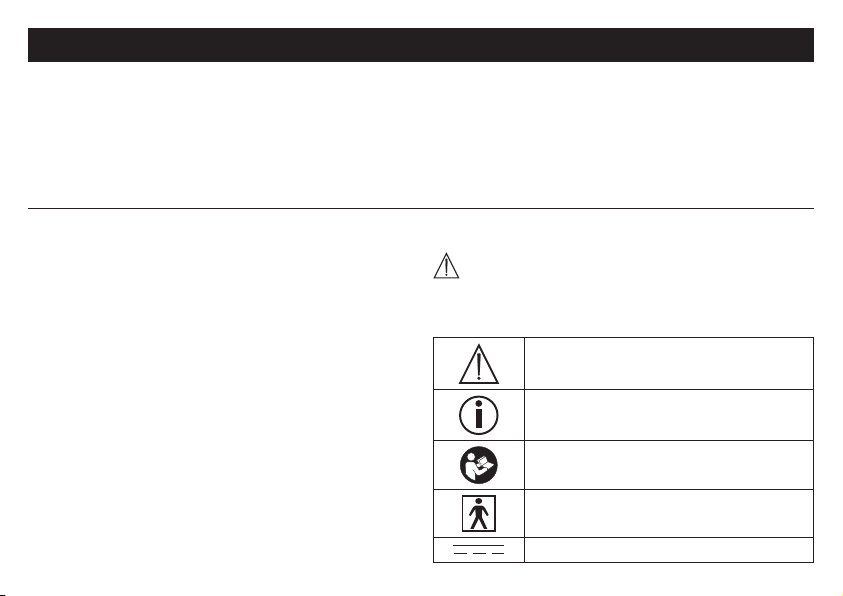
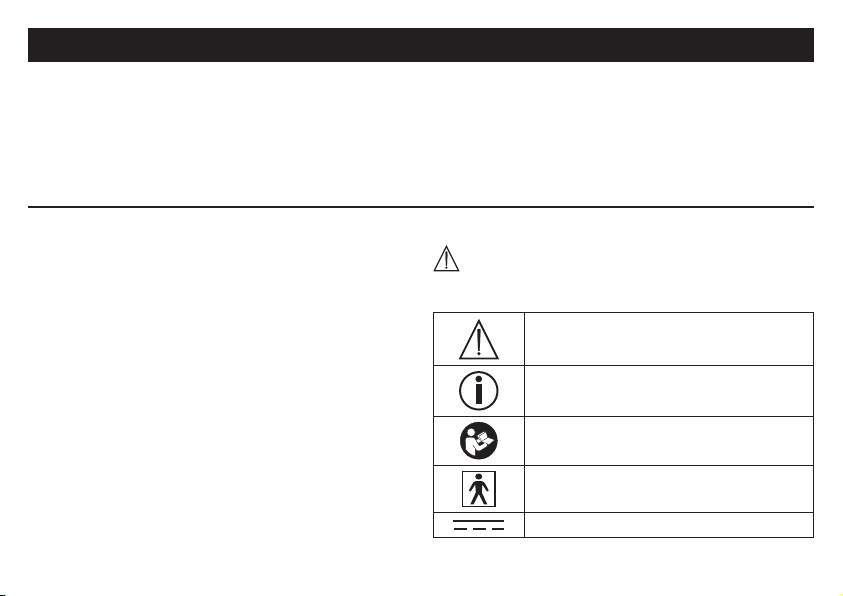
Zeichenerklärung
In der Gebrauchsanweisung, auf der Verpackung und
auf dem Typschild des Geräts und des Zubehörs werden
folgende Symbole verwendet:
Vorsicht
Produktinformation
Hinweis auf wichtige Informationen
Anleitung beachten
Vor Beginn der Arbeit und /oder dem
Bedienen von Geräten oder Maschinen
die Anleitung lesen
Isolierung der Anwendungsteile
Typ BF
Galvanisch isoliertes Anwendungsteil
(F steht für floating), erfüllt die Anforde-
rungen an Ableitströme für den Typ B
Gleichstrom
Gerät ist nur für Gleichstrom geeignet
Entsorgung gemäß Elektro- und Elektro-
nik-Altgeräte EG-Richtlinie WEEE (Waste
Electrical and Electronic Equipment)
Verpackungskomponenten trennen
und entsprechend der kommunalen
Vorschriften entsorgen.
B
A
Kennzeichnung zur Identifikation des
Verpackungsmaterials.
A = Materialabkürzung,
B = Materialnummer:
1-7 = Kunststoffe,
20-22 = Papier und Pappe
Hersteller
Storage/Transport
Zulässige Lagerungs- und Transport-
temperatur und -luftfeuchtigkeit
Operating
Zulässige Betriebstemperatur und
- luftfeuchtigkeit
IP22
IP-Klasse
Gerät geschützt gegen Fremdkörper
≥12,5 mm und gegen schräges Tropf-
wasser
3
S
N
Seriennummer
Artikelnummer
Medizinprodukt
CE-Kennzeichnung
Dieses Produkt erfüllt die Anforderun-
gen der geltenden europäischen und
nationalen Richtlinien.
Produkt und Verpackungskomponen-
ten trennen und entsprechend der
kommunalen Vorschriften entsorgen.
Hinweise zur Anwendung
•
Um eine Vergleichbarkeit der Werte zu gewährleisten,
messen Sie Ihren Blutdruck immer zu gleichen Tages-
zeiten.
•
Mindestens 30 Minuten vor der Messung sollten Sie
nicht essen, trinken, rauchen oder sich körperlich
betätigen.
•
Ruhen Sie sich vor der ersten Blutdruckmessung
immer 5 Minuten aus!
•
Wenn Sie darüber hinaus mehrere Messungen nach-
einander durchführen möchten, warten Sie zwischen
den einzelnen Messungen jeweils immer mindestens
1Minute.
•
Wiederholen Sie die Messung im Falle zweifelhaft
gemessener Werte.
•
Die von Ihnen selbst ermittelten Messwerte können
nur zu Ihrer Information dienen – sie ersetzen keine
ärztliche Untersuchung! Besprechen Sie Ihre Mess-
werte mit dem Arzt, begründen Sie daraus auf keinen
Fall eigene medizinische Entscheidungen (z.B. Medi-
kamente und deren Dosierungen)!
•
Eine Verwendung des Blutdruckmessgeräts außer-
halb des häuslichen Umfelds oder unter dem Einfluss
von Bewegung (z.B. während der Fahrt in einem Auto,
Krankenwagen oder Helikopter sowie während der
Ausübung von körperlichen Aktivitäten wie Sport) kann
die Messgenauigkeit beeinflussen und zu Messfehlern
führen.
•
Verwenden Sie das Blutdruckmessgerät nicht bei Neu-
geborenen, Schwangeren und Präeklampsie-Patientin-
nen.
•
Bei Einschränkungen der Durchblutung an einem Arm
aufgrund chronischer oder akuter Gefäßerkrankungen
(unter anderem Gefäßverengungen) ist die Genauigkeit
der Handgelenksmessung eingeschränkt. Weichen Sie
in diesem Fall auf ein am Oberarm messendes Blut-
druckmessgerät aus.
4
•
Dieses Gerät ist nicht dafür bestimmt, durch Perso-
nen (einschließlich Kinder) mit eingeschränkten physi-
schen, sensorischen oder geistigen Fähigkeiten oder
mangels Erfahrung und/oder mangels Wissen benutzt
zu werden, es sei denn, sie werden durch eine für Ihre
Sicherheit zuständige Person beaufsichtigt oder erhiel-
ten von ihr Anweisungen, wie das Gerät zu benutzen
ist. Kinder sollten beaufsichtigt werden, damit sie nicht
mit dem Gerät spielen.
•
Erkrankungen des Herz-Kreislaufsystems können zu
Fehlmessungen bzw. zu Beeinträchtigungen der Mess-
genauigkeit führen. Ebenso der Fall ist dies bei sehr
niedrigem Blutdruck, Diabetes, Durchblutungs- und
Rhythmusstörungen sowie bei Schüttelfrost oder Zit-
tern.
•
Das Blutdruckmessgerät darf nicht im Zusammenhang
mit einem Hochfrequenz-Chirurgiegerät verwendet
werden.
•
Verwenden Sie das Gerät nur bei Personen mit dem
für das Gerät angegebenen Umfangbereich des Hand-
gelenks.
•
Beachten Sie, dass es während des Aufpumpens
zu einer Funktionsbeeinträchtigung des betroffenen
Gliedmaßes kommen kann.
•
Die Blutzirkulation darf durch die Blutdruckmessung
nicht unnötig lange unterbunden werden. Bei einer
Fehlfunktion des Gerätes nehmen Sie die Manschette
vom Arm ab.
•
Verhindern Sie einen anhaltenden Druck in der Man-
schette sowie häufige Messungen. Eine dadurch resul-
tierende Beeinträchtigung des Blutflusses kann zu Ver-
letzungen führen.
•
Achten Sie darauf, dass die Manschette nicht an
einem Arm angelegt wird, dessen Arterien oder Venen
in medizinischer Behandlung sind, z.B. intravaskulä-
rer Zugang bzw. eine intravaskuläre Therapie oder ein
arteriovenöser (A-V-) Nebenschluss.
•
Legen Sie die Manschette nicht bei Personen an, die
eine Brustamputation hatten.
•
Legen Sie die Manschette nicht über Wunden an, da
dies zu weiteren Verletzungen führen kann.
•
Legen Sie die Manschette ausschließlich am Handge-
lenk an. Legen Sie die Manschette nicht an anderen
Stellen des Körpers an.
•
Sie können das Blutdruckmessgerät ausschließlich mit
Batterien betreiben.
•
Die Abschaltautomatik schaltet das Blutdruckmess-
gerät zur Schonung der Batterien aus, wenn innerhalb
einer Minute keine Taste betätigt wird.
5
•
Das Gerät ist nur für den in dieser Gebrauchsanwei-
sung beschriebenen Zweck vorgesehen. Der Hersteller
haftet nicht für Schäden, die durch unsachgemäßen
oder falschen Gebrauch verursacht wurden.
Hinweise zur Aufbewahrung und Pflege
•
Das Blutdruckmessgerät besteht aus Präzisions- und
Elektronik-Bauteilen. Die Genauigkeit der Messwerte
und Lebensdauer des Gerätes hängt ab vom sorgfälti-
gen Umgang:
– Schützen Sie das Gerät vor Stößen, Feuchtigkeit,
Schmutz, starken Temperaturschwankungen und
direkter Sonneneinstrahlung.
– Lassen Sie das Gerät nicht fallen.
– Benutzen Sie das Gerät nicht in der Nähe von star-
ken elektromagnetischen Feldern, halten Sie es fern
von Funkanlagen oder Mobiltelefonen.
•
Falls das Gerät über einen längeren Zeitraum nicht
benutzt wird, wird empfohlen die Batterien zu entfernen.
Hinweise zum Umgang mit Batterien
•
Wenn Flüssigkeit aus einer Batteriezelle mit Haut oder
Augen in Kontakt kommt, die betroffene Stelle mit
Wasser auswaschen und ärztliche Hilfe aufsuchen.
•
Verschluckungsgefahr! Kleinkinder könnten Bat-
terien verschlucken und daran ersticken. Daher Batte-
rien für Kleinkinder unerreichbar aufbewahren!
•
Auf Polaritätskennzeichen Plus (+) und Minus (-) achten.
•
Wenn eine Batterie ausgelaufen ist, Schutzhandschuhe
anziehen und das Batteriefach mit einem trockenen
Tuch reinigen.
•
Schützen Sie Batterien vor übermäßiger Wärme.
•
Explosionsgefahr! Keine Batterien ins Feuer wer-
fen.
•
Batterien dürfen nicht geladen oder kurzgeschlossen
werden.
•
Bei längerer Nichtbenutzung des Geräts die Batterien
aus dem Batteriefach nehmen.
•
Verwenden Sie nur denselben oder einen gleichwerti-
gen Batterietyp.
•
Immer alle Batterien gleichzeitig auswechseln.
•
Keine Akkus verwenden!
•
Keine Batterien zerlegen, öffnen oder zerkleinern.
Hinweise zu Reparatur und Entsorgung
•
Batterien gehören nicht in den Hausmüll. Bitte entsor-
gen Sie die verbrauchten Batterien an den dafür vor-
gesehenen Sammelstellen.
•
Öffnen Sie nicht das Gerät. Bei nicht beachten erlischt
die Garantie.
6
•
Das Gerät darf nicht selbst repariert oder justiert wer-
den. Eine einwandfreie Funktion ist in diesem Fall nicht
mehr gewährleistet.
•
Reparaturen dürfen nur vom Kundenservice oder auto-
risierten Händlern durchgeführt werden.
Prüfen Sie jedoch vor jeder Reklamation zuerst die
Batterien und tauschen Sie diese gegebenenfalls aus.
•
Im Interesse des Umweltschutzes darf das Gerät
am Ende seiner Lebensdauer nicht mit dem
Hausmüll entfernt werden. Die Entsorgung
kann über entsprechende Sammelstellen
in Ihrem Land erfolgen. Entsorgen Sie das
Gerät gemäß der Elektro- und Elektronik-Altgeräte
EG-Richtlinie – WEEE (Waste Electrical and Electronic
Equipment). Bei Rückfragen wenden Sie sich an die
für die Entsorgung zuständige kommunale Behörde.
Hinweise zu Elektromagnetischer Verträglichkeit
•
Das Gerät ist für den Betrieb in allen Umgebungen
geeignet, die in dieser Gebrauchsanweisung aufge-
führt sind, einschließlich der häuslichen Umgebung.
•
Das Gerät kann in der Gegenwart von elektromag-
netischen Störgrößen unter Umständen nur in einge-
schränktem Maße nutzbar sein. Infolgedessen können
z.B. Fehlermeldungen oder ein Ausfall des Displays/
Gerätes auftreten.
•
Die Verwendung dieses Gerätes unmittelbar neben
anderen Geräten oder mit anderen Geräten in gesta-
pelter Form sollte vermieden werden, da dies eine
fehlerhafte Betriebsweise zur Folge haben könnte.
Wenn eine Verwendung in der vorgeschriebenen Art
dennoch notwendig ist, sollten dieses Gerät und die
anderen Geräte beobachtet werden, um sich davon zu
überzeugen, dass sie ordnungsgemäß arbeiten.
•
Die Verwendung von anderem Zubehör, als jenem,
welches der Hersteller dieses Gerätes festgelegt oder
bereitgestellt hat, kann erhöhte elektromagnetische
Störaussendungen oder eine geminderte elektroma-
gnetische Störfestigkeit des Gerätes zur Folge haben
und zu einer fehlerhaften Betriebsweise führen.
•
Eine Nichtbeachtung kann zu einer Minderung der
Leistungsmerkmale des Gerätes führen.
7
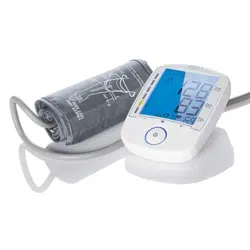
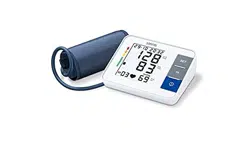
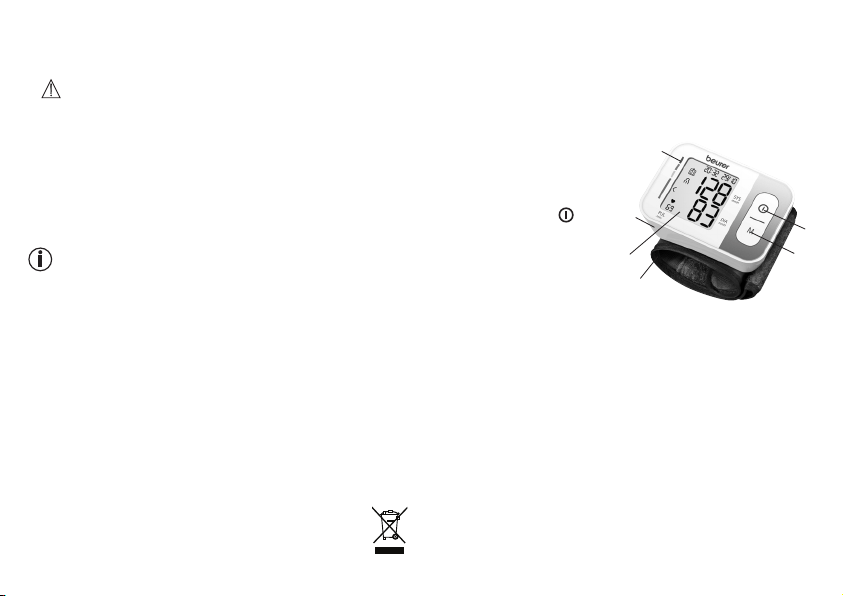
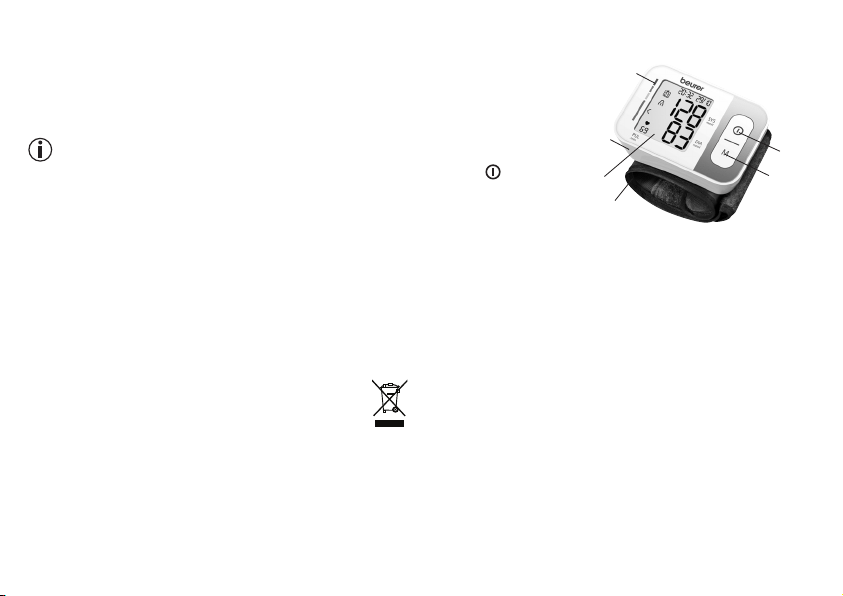
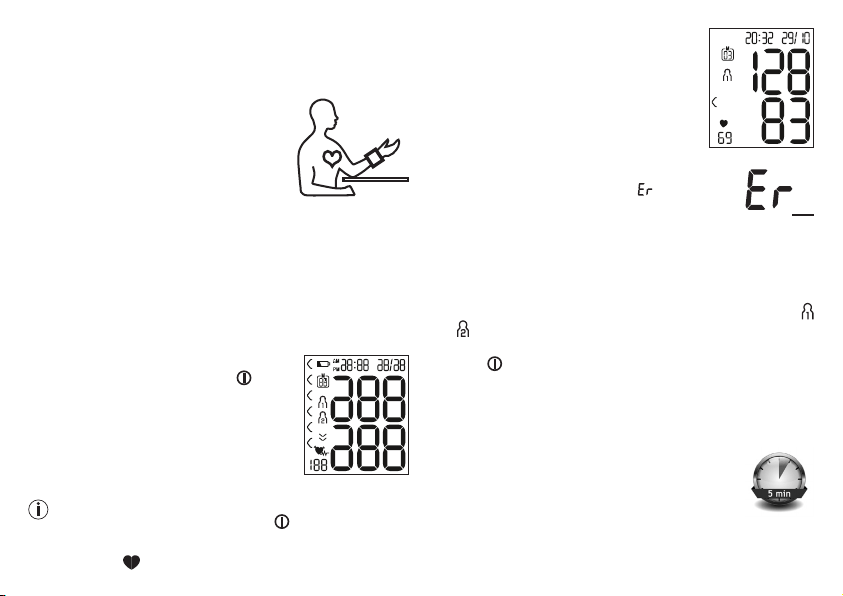
3. Gerätebeschreibung
1
6
5
3
4
2
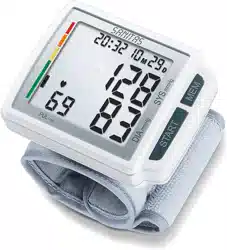
1. Display
2. Handgelenks manschette
3. Risiko-Indikator
4. Start/Stopp-Taste
5. Speicherabruftaste M
6. Batteriefach abdeckung
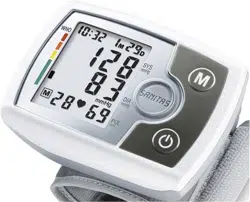
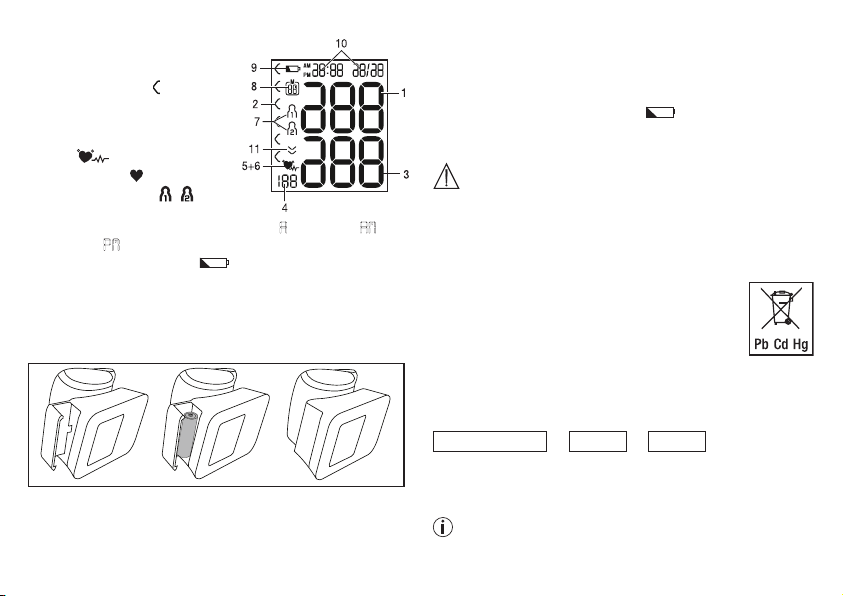
Anzeigen auf dem Display:
1. Systolischer Druck
2. Risiko-Indikator
3. Diastolischer Druck
4. Ermittelter Pulswert
5. Symbol Herzrhythmus-
störungen
6. Symbol Puls
7. Benutzerspeicher /
8. Nummer des Speicher-
platzes / Speicher-
anzeige Durchschnittswert (
A A
), morgens (
AM AM
),
abends(
PM PM
)
9. Symbol Batteriewechsel
10. Uhrzeit und Datum
11. Luft ablassen (Pfeil)
8
4. Messung vorbereiten
Batterie einlegen
• Entfernen Sie den Deckel des Batteriefaches auf der
linken Seite des Gerätes.
• Legen Sie zwei Batte rien vom Typ 1,5 V Micro (Alkaline
Type LR03) ein.
Achten Sie unbedingt darauf, dass die Batterien ent-
sprechend der Kennzeichnung mit korrekter Polung
eingelegt werden. Verwenden Sie keine wiederauflad-
baren Akkus.
• Schließen Sie den Batteriefachdeckel wieder sorgfältig.
Wenn das Symbol Batteriewechsel erscheint, ist
keine Messung mehr möglich und Sie müssen alle Bat-
terien erneuern.
Batterie Entsorgung
• Die verbrauchten, vollkommen entladenen Batterien
müssen Sie über speziell gekennzeichnete Sammelbe-
hälter, Sondermüllannahmestellen oder über den Elek-
trohändler entsorgen. Sie sind gesetzlich dazu ver-
pflichtet, die Batterien zu entsorgen.
• Diese Zeichen finden Sie auf schadstoff-
haltigen Batterien:
Pb = Batterie enthält Blei,
Cd = Batterie enthält Cadmium,
Hg = Batterie enthält Quecksilber.
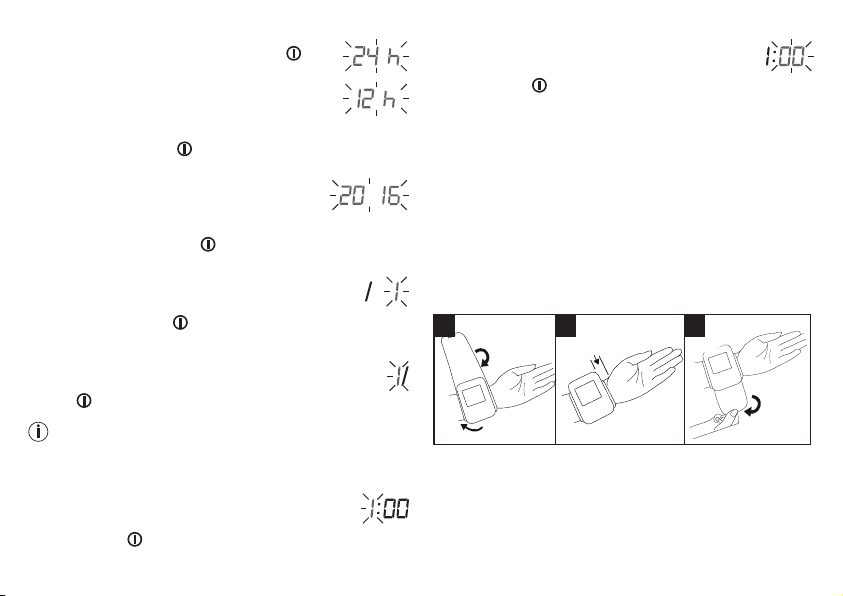
Stundenformat, Datum und Uhrzeit einstellen
Sie sollten Datum und Uhrzeit unbedingt einstellen. Nur
so können Sie Ihre Messwerte korrekt mit Datum und
Uhrzeit speichern und später abrufen.
Das Menü zum Vornehmen der Einstellungen können
Sie auf zwei verschiedene Wege aufrufen:
• Vor der ersten Nutzung und nach jedem Batteriewech-
sel:
Wenn Sie Batterien in das Gerät einlegen, gelangen
Sie automatisch in das entsprechende Menü.
• Bei bereits eingelegten Batterien:
Halten Sie am ausgeschalteten Gerät die START/
STOPP-Taste
für ca. 5 Sekunden gedrückt.
9
In diesem Menü können Sie die folgenden Einstellungen
nacheinander vornehmen:
Stundenformat
➔
Datum
➔
Uhrzeit
Stundenformat
•
Halten Sie die START/STOPP-Taste für
5 Sekunden gedrückt oder legen Sie die Bat-
terien ein. Das Volldisplay wird angezeigt.
•
Wählen Sie mit der Speichertasten M Ihr
gewünschtes Stundenformat und bestätigen
Sie mit der START/STOPP- Taste .
Datum
Im Display blinkt die Jahreszahl.
•
Wählen Sie mit der Speichertaste
M Ihre gewünschte Jahreszahl und
bestätigen Sie mit der START/STOPP-
Taste .
Im Display blinkt die Monatsanzeige.
•
Wählen Sie mit
der Speichertaste M
Ihren
gewünschten Monat und bestätigen Sie mit
der START/STOPP-Taste .
Im Display blinkt die Tagesanzeige.
•
Wählen Sie mit der Speichertaste M Ihren
gewünschten Tag und bestätigen Sie mit der
START/STOPP-Taste .
Wenn als Stundenformat 12h eingestellt ist, ist die
Reihenfolge der Tages- und Monatsanzeige ver-
tauscht.
Uhrzeit
Im Display blinkt die Stundenzahl.
•
Wählen Sie mit der Speichertaste M Ihr
gewünschte Stundenzahl und bestätigen
Sie mit der START/STOPP-Taste
.
Im Display blinkt die Minutenzahl.
•
Wählen Sie mit der Speichertaste M Ihr
gewünschte Minutenzahl und bestätigen
Sie mit der START/STOPP-Taste .
Nachdem alle Daten eingestellt wurden, schaltet sich
das Gerät automatisch aus.
5. Blutdruck messen
Bringen Sie das Gerät vor der Messung auf Raumtem-
peratur. Sie können die Messung am linken oder rechten
Handgelenk durchführen.
10
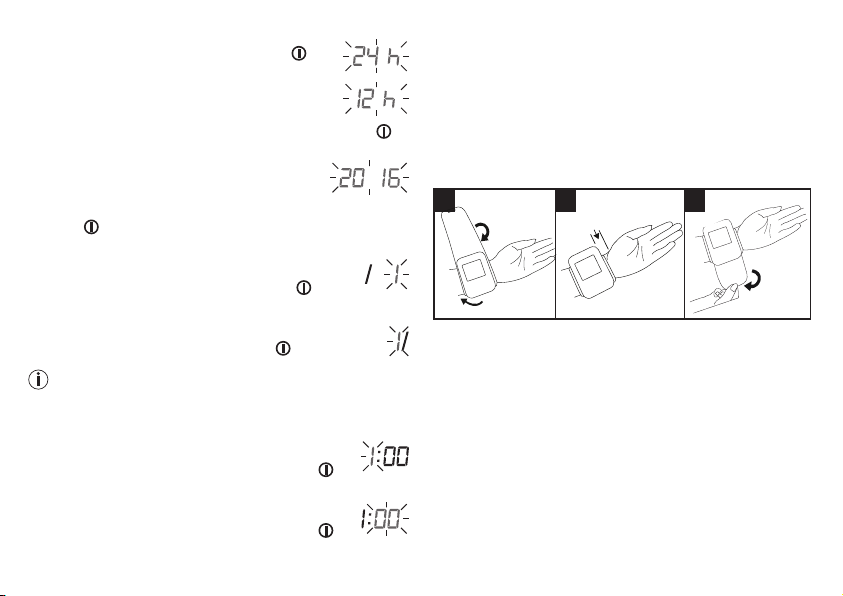
Manschette anlegen
1 2 3
1 cm
•
Entblößen Sie Ihr Handgelenk. Achten Sie darauf, dass
die Durchblutung des Arms nicht durch zu enge Klei-
dungsstücke oder Ähnliches eingeengt ist.
Legen Sie die Manschette auf der Innenseite Ihres
Handgelenkes an.
•
Schließen Sie die Manschette mit dem Klettver-
schluss, sodass die Oberkante des Gerätes ca. 1 cm
unter dem Handballen sitzt.
•
Die Manschette muss eng um das Handgelenk anlie-
gen, darf aber nicht einschnüren.
Der Blutdruck kann sich zwischen dem rechten und lin-
ken Arm unterscheiden, daher können auch die gemes-
senen Blutdruckwerte unterschiedlich sein. Führen Sie
die Messung immer am selben Arm durch.
Falls sich die Werte zwischen den beiden Armen sehr
deutlich unterscheiden, sollten Sie mit Ihrem Arzt abspre-
chen, welchen Arm Sie für die Messung verwenden.
Richtige Körperhaltung einnehmen
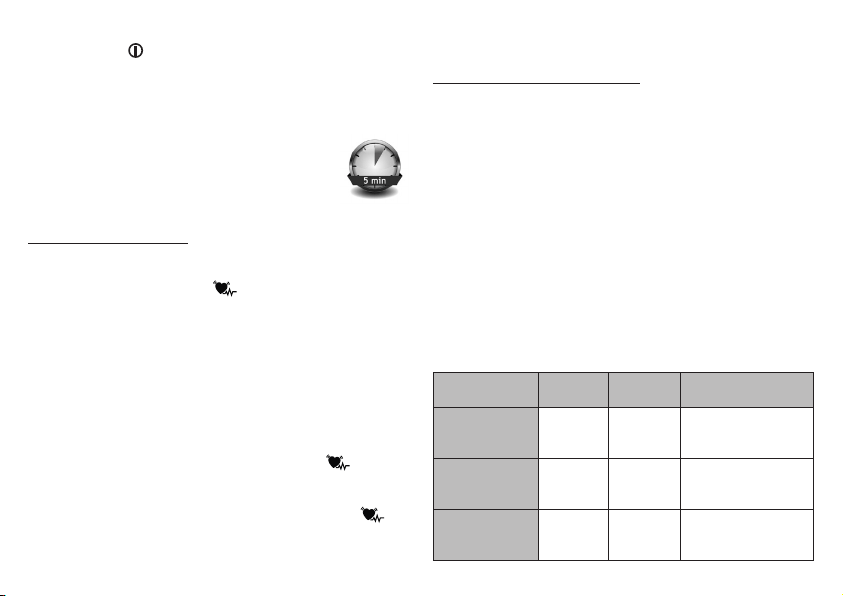
•
Ruhen Sie sich vor der ersten Blutdruckmessung
immer 5 Minuten aus! Ansonsten kann es zu Abwei-
chungen kommen.
•
Sie können die Messung im Sitzen
oder im Liegen durchführen. Sitzen
Sie zur Blutdruckmessung
bequem. Lehnen Sie Rücken und
Arme an. Kreuzen Sie die Beine
nicht. Stellen Sie die Füße flach auf
den Boden. Stützen Sie Ihren Arm unbedingt ab und
winkeln ihn an. Achten Sie in jedem Fall darauf, dass
sich die Manschette in Herzhöhe befindet. Ansonsten
kann es zu erheblichen Abweichungen kommen. Ent-
spannen Sie Ihren Arm und die Handflächen.
•
Um das Messergebnis nicht zu verfälschen, ist es
wichtig, sich während der Messung ruhig zu verhalten
und nicht zu sprechen.
•
Warten Sie vor einer erneuten Messung mindestens
1Minute!
11

Blutdruckmessung durchführen
Legen Sie, wie zuvor beschrieben, die Manschette an
und nehmen Sie die Haltung ein, in der Sie die Messung
durchführen wollen.
•
Um das Blutdruckmessgerät zu
starten, drücken Sie die START/
STOPP-Taste . Alle Displayan-
zeigen leuchten kurz auf.
• Der letzte Messwert wird angezeigt
und nach 3 Sekunden beginnt das
Bludruckmessgerät automatisch
mit der Messung.
Sie können die Messung jederzeit durch das Drücken
der START/STOPP-Taste abbrechen
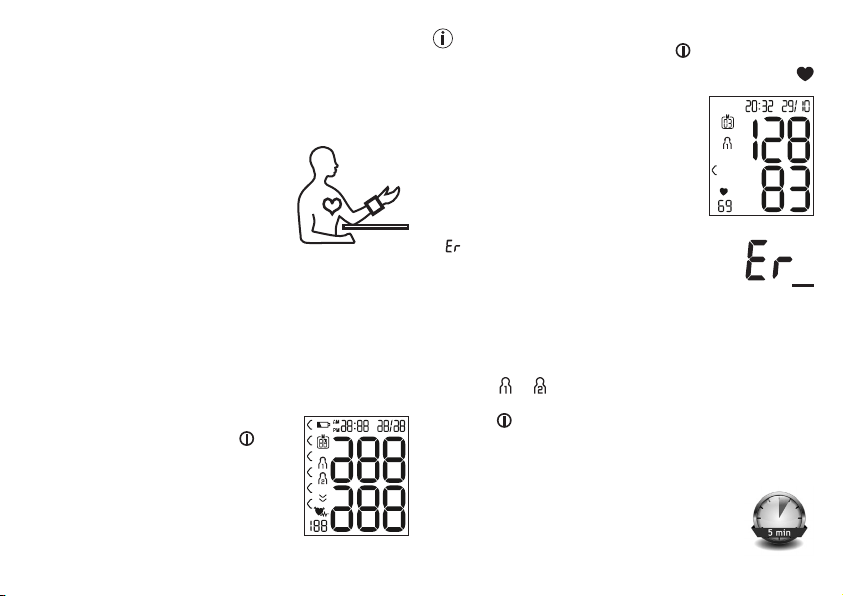
Sobald ein Puls zu erkennen ist, wird das Symbol Puls
angezeigt.
•
Die Messergebnisse systolischer
Druck, diastolischer Druck und
Puls werden angezeigt.
•
_
erscheint wenn die Messung nicht ordnungsge-
mäß durchgeführt werden konnte. Beach-
ten Sie das Kapitel Fehlermeldung/Fehler-
behebung in dieser Gebrauchsanweisung
und wiederholen Sie die Messung.
•
Wählen Sie nun durch Drücken der Speichertasten
M den gewünschten Benutzerspeicher aus. Wenn
Sie keine Auswahl des Benutzerspeichers vorneh-
men, wird das Mess ergebnis dem zuletzt verwendeten
Benutzerspeicher zur Speicherung zugewiesen. Das
entsprechende Symbol oder erscheint im Display.
•
Schalten Sie das Blutdruckmessgerät mit der START/
STOPP-Taste aus. Damit wird das Messergebnis im
ausgewählten Benutzerspeicher abgespeichert.
Wenn Sie vergessen das Gerät auszuschalten, schaltet
sich das Gerät nach ca. 1 Minute automatisch aus.
Auch in diesem Fall wird der Wert im ausgewählten oder
zuletzt verwendeten Benutzerspeicher ab-
gespeichert.
Warten Sie vor einer erneuten Messung
mindestens 1Minute!
6. Ergebnisse beurteilen
Herzrhythmusstörungen
Dieses Gerät kann während der Messung eventuelle
Störungen des Herzrhythmus identifizieren und weist
12

gegebenenfalls nach der Messung mit dem Symbol
darauf hin.
Dies kann ein Indikator für eine Arrhythmie sein. Arrhyth-
mie ist eine Krankheit, bei der der Herzrhythmus auf-
grund von Fehlern im bioelektrischen System, das den
Herzschlag steuert, anormal ist. Die Symptome (ausge-
lassene oder vorzeitige Herzschläge, langsamer oder zu
schneller Puls) können u.a. von Herzerkrankungen, Alter,
körperliche Veranlagung, Genussmittel im Übermaß,
Stress oder Mangel an Schlaf herrühren. Arrhythmie kann
nur durch eine Untersuchung bei Ihrem Arzt festgestellt
werden.
Wiederholen Sie die Messung, wenn das Symbol
nach der Messung auf dem Display angezeigt wird. Bitte
achten Sie darauf, dass Sie sich 5 Minuten ausruhen
und während der Messung nicht sprechen oder bewe-
gen. Sollte das Symbol
oft erscheinen, wenden Sie
sich bitte an Ihren Arzt. Selbstdiagnose und -behandlung
aufgrund der Messergebnisse können gefährlich sein.
Befolgen Sie unbedingt die Anweisungen Ihres Arztes.
Risiko-Indikator
Die Messergebnisse lassen sich gemäß nachfolgender
Tabelle einstufen und beurteilen.
Diese Standardwerte dienen jedoch lediglich als allge-
meine Richtlinie, da der individuelle Blutdruck bei ver-
schiedenen Personen und unterschiedlichen Altersgrup-
pen usw. abweicht.
Es ist wichtig, dass Sie Ihren Arzt in regelmäßigen
Abständen zu Rate ziehen. Ihr Arzt teilt Ihnen Ihre indi-
viduellen Werte für einen normalen Blutdruck sowie den
Wert mit, ab dem die Höhe des Blutdrucks als gefährlich
einzustufen ist.
Die Einstufung im Display und die Skala auf dem Gerät
geben an, in welchem Bereich sich der ermittelte Blut-
druck befindet. Sollte sich der Wert von Systole und
Diastole in zwei unterschiedlichen Bereichen befinden
(z.B. Systole im Bereich „Hoch Normal“ und Diastole im
Bereich „Normal“) dann zeigt Ihnen die grafische Eintei-
lung auf dem Gerät immer den höheren Bereich an, im
beschriebenen Beispiel „Hoch Normal“.
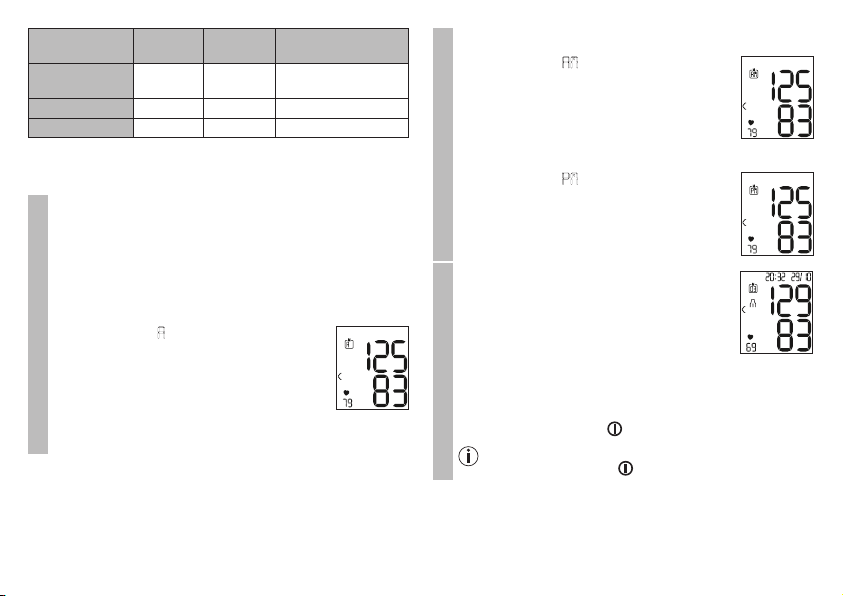
Bereich der
Blutdruckwerte
Systole
(in mmHg)
Diastole
(in mmHg)
Maßnahme
Stufe 3:
starke
Hypertonie
≥ 180 ≥ 110
einen Arzt auf-
suchen
Stufe 2:
mittlere
Hypertonie
160 – 179 100 – 109
einen Arzt auf-
suchen
Stufe 1:
leichte
Hypertonie
140 – 159 90 – 99
regelmäßige Kon
-
trolle beim Arzt
Hoch normal 130 – 139 85 – 89
regelmäßige Kon
-
trolle beim Arzt
13

Bereich der
Blutdruckwerte
Systole
(in mmHg)
Diastole
(in mmHg)
Maßnahme
Normal 120 – 129 80 – 84 Selbstkontrolle
Optimal < 120 < 80 Selbstkontrolle
Quelle: WHO, 1999 (World Health Organization)
7. Messwerte speichern, abrufen und
löschen
Benutzerspeicher
Die Ergebnisse jeder erfolgreichen Messung werden
zusammen mit Datum und Uhrzeit abgespeichert.
Bei mehr als 60 Messdaten wird jeweils die älteste
Messung überschrieben.
•
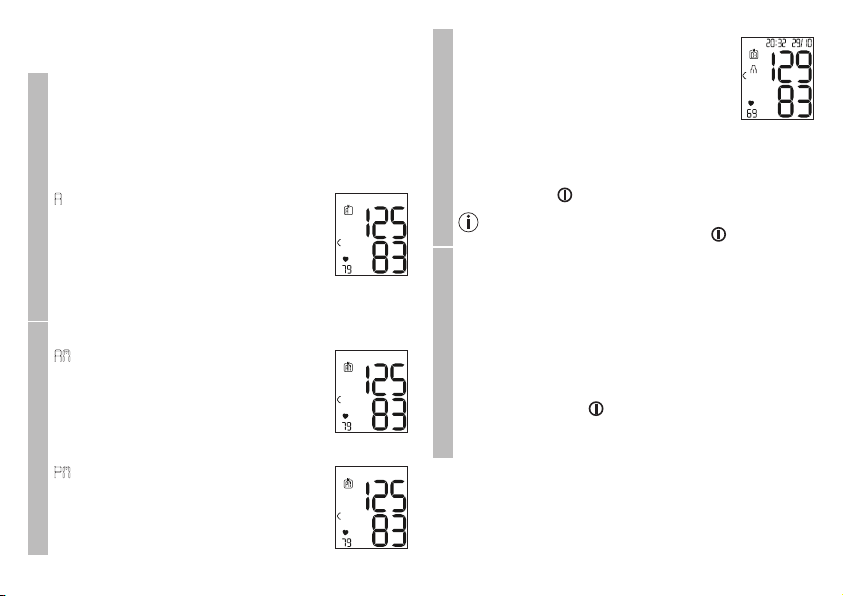
Um das Messergebnis abzurufen, drücken Sie die
Speichertaste M.
Im Display blinkt
AA
.
Es wird der Durchschnittswert aller
gespeicherten Messwerte dieses
Benutzerspeichers angezeigt.
Zum Wechseln des Benutzerspeichers halten Sie die
Speichertaste M ca. 2 Sekunden lang gedrückt.
Durchschnittswerte
•
Drücken Sie die Speichertaste M.
Im Display blinkt
AMAM
.
Es wird der Durchschnittswert der
letzten 7 Tage der Morgen-Mes-
sungen angezeigt ( Morgen: 5.00 Uhr
– 9.00 Uhr).
•
Drücken Sie die Speichertaste M.
Im Display blinkt
PMPM
.
Es wird der Durchschnittswert der
letzten 7 Tage der Abend-Messungen
angezeigt (Abend: 18.00 Uhr – 20.00
Uhr).
Einzelmesswerte
•
Wenn Sie die Speichertaste M
erneut drücken, wird im Display
die letzte Einzelmessung angezeigt
(hier im Beispiel Messung 03).
•
Wenn Sie die Speichertaste M wieder drücken,
können Sie jeweils Ihre gemessenen Einzelmess-
werte einsehen.
•
Um das Gerät wieder auszuschalten, drücken Sie
die START/STOPP-Taste .
Sie können das Menü jederzeit durch Drücken
der START/STOPP-Taste verlassen.
14

Messwerte löschen
•
Um den Speicher des jeweiligen Benutzerspei-
chers zu löschen, wählen Sie zunächst einen
Benutzerspeicher aus.
•
Starten Sie die Abfrage der Durchschnittsmess-
werte. Im Display blinkt A, es wird der Durch-
schnittswert aller gespeicherten Messwerte dieses
Benutzerspeichers angezeigt.
•
Halten Sie die Speichertaste M und die START/
STOPP-Taste für 5 Sekunden gedrückt, abhän-
gig in welchem Nutzerspeicher Sie sich befinden.
Alle Werte des gegenwärtigen Benut-
zerspeichers werden gelöscht und
das Gerät schaltet sich aus.
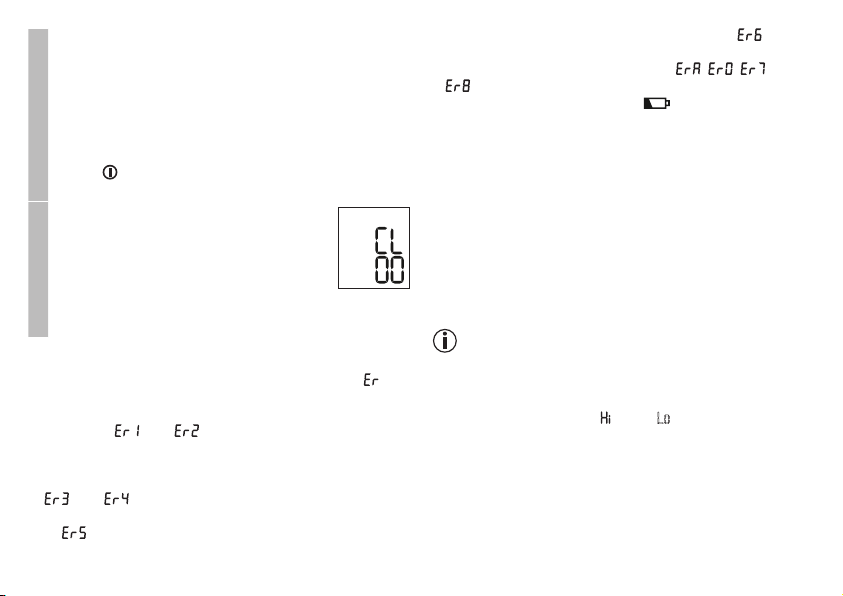
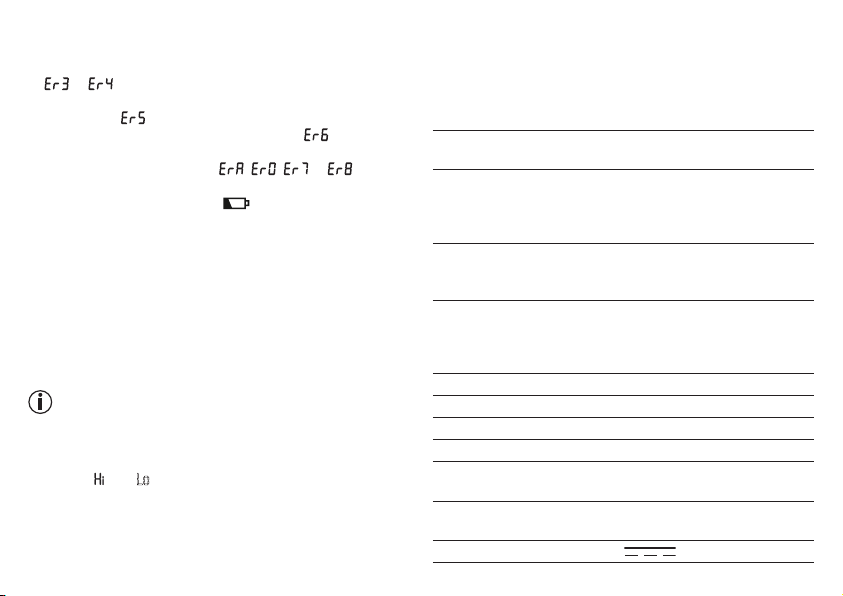
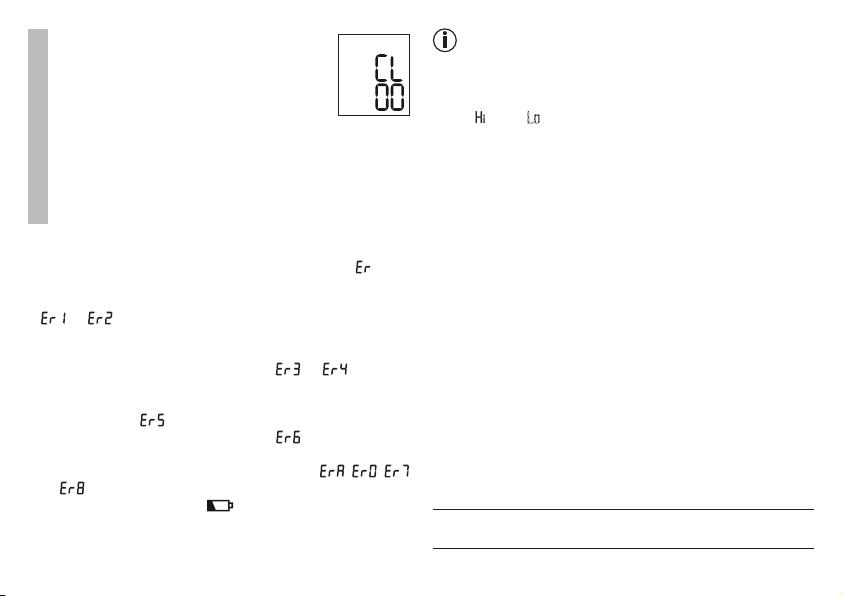
8. Fehlermeldung / Fehlerbehebung
Bei Fehlern erscheint auf dem Display die Fehlermeldung
_.
Fehlermeldungen können auftreten, wenn
• der systolische oder diastolische Druck nicht gemessen
werden konnte (
bzw.
erscheint im Display),
• der systolische oder diastolische Druck außerhalb des
Messbereichs liegt (
„Hi“
bzw.
„Lo“
erscheint im Dis-
play),
• die Manschette zu stark bzw. zu schwach angelegt ist
(
bzw.
erscheint im Display),
• der Blutdruck für mehr als 1,5 Sekunden höher als 300
mmHg ist ( erscheint im Display),
• das Aufpumpen länger als 180 Sekunden dauert (
erscheint im Display),
• ein System- oder Gerätefehler vorliegt (
, ,
oder
erscheint im Display),
• die Batterien fast verbraucht sind .
Wiederholen Sie in diesen Fällen die Messung. Achten
Sie darauf, dass Sie sich während der Messung nicht
bewegen oder reden. Setzen Sie gegebenenfalls die Bat-
terien neu ein oder ersetzen Sie diese.
Technischer Alarm – Beschreibung
Sollte der gemessene Blutdruck (systolisch oder diasto-
lisch) außerhalb der im Abschnitt Technische Angaben
angegebenen Grenzen liegen, erscheint auf dem Display
der technische Alarm in Form der Anzeige „
“ bzw. „Lo Lo “.
In diesem Fall sollten Sie einen Arzt aufsuchen bzw. die
Richtigkeit Ihrer Bedienvorgänge überprüfen.
Die Grenzwerte für den technischen Alarm sind ab Werk
fest eingestellt und können nicht angepasst oder deak-
tiviert werden. Diesen Alarmgrenzwerten wird im Rah-
men der Norm IEC 60601-1-8 untergeordnete Priorität
beigemessen.
15
Der technische Alarm ist ein nicht selbsthaltender Alarm
und muss nicht zurückgesetzt werden. Das auf dem Dis-
play angezeigte Signal verschwindet nach rund 8 Sekun-
den automatisch.
9. Gerät und Manschette reinigen und
aufbewahren
•
Reinigen Sie das Gerät und die Manschette vorsichtig
nur mit einem leicht angefeuchteten Tuch.
•
Verwenden Sie keine Reinigungs- oder Lösungsmittel.
•
Sie dürfen Gerät und Manschette auf keinen Fall unter
Wasser halten, da sonst Flüssigkeit eindringen kann
und das Gerät und die Manschette beschädigt.
•
Wenn Sie Gerät und Manschette aufbewahren, dürfen
keine schweren Gegenstände auf dem Gerät und der
Manschette stehen. Entnehmen Sie die Batterien.
10. Technische Angaben
Modell-Nr. SBC 15
Messmethode Oszillometrisch, nicht invasive Blut-
druckmessung am Handgelenk
Messbereich Manschettendruck 0 – 300 mmHg,
systolisch 60-260 mmHg,
diastolisch 40-199 mmHg,
Puls 40 –180 Schläge /Minute
Genauigkeit der
Anzeige
systolisch ± 3 mmHg,
diastolisch ± 3 mmHg,
Puls ± 5 % des angezeigten Wertes
Messunsicherheit max. zulässige Standardabweichung
gemäß klinischer Prüfung:
systolisch 8 mmHg /
diastolisch 8 mmHg
Speicher 2 x 60 Speicherplätze
Abmessungen L 83,8 mm x B 59,9 mm x H 29,4 mm
Gewicht Ungefähr 92 g (ohne Batterien, mit
Manschette)
Manschetten-
größe
140 bis 195 mm
Zul. Betriebs-
bedingungen
+ 10°C bis +40 °C, ≤85 % relative
Luftfeuchte (nicht kondensierend)
Zul. Aufbewah-
rungsbedingun-
gen
-20 °C bis +50 °C, ≤ 85 % relative
Luftfeuchte, 800 – 1050 hPa Umge-
bungsdruck
Stromversorgung
2 x 1,5 V
AAA Batterien
Batterie-Lebens-
dauer
Für ca. 170 Messungen, je nach
Höhe des Blutdrucks bzw. Aufpump-
druck
16
Klassifikation Interne Versorgung, IP22, kein AP
oder APG, Dauerbetrieb, Anwen-
dungsteil Typ BF
Änderungen der technischen Angaben ohne Benachrich-
tigung sind aus Aktualisierungsgründen vorbehalten.
•
Dieses Gerät entspricht der europäischen Norm
EN60601-1-2 (Übereinstimmung mit CISPR11,
EN61000-4-2, EN61000-4-3, EN61000-4-8) und
unterliegt besonderen Vorsichtsmaßnahmen hinsicht-
lich der elektromagnetischen Verträglichkeit. Bitte
beachten Sie dabei, dass tragbare und mobile HF-
Kommunikationseinrichtungen dieses Gerät beeinflus-
sen können.
•
Das Gerät entspricht der EU-Richtlinie für Medizin-
produkte 93/42/EEC, dem Medizinproduktegesetz
und den Normen EN1060-1 (nicht invasive Blut-
druckmessgeräte Teil 1: Allgemeine Anforderungen),
EN1060-3 (nicht invasive Blutdruckmessgeräte Teil 3:
Ergänzende Anforderungen für elektromechanische
Blutdruckmesssysteme) und IEC80601-2-30 (Medizi-
nische elektrische Geräte Teil 2 – 30: Besondere Fest-
legungen für die Sicherheit einschließlich der wesent-
lichen Leistungsmerkmale von automatisierten nicht
invasiven Blutdruckmessgeräten).
•
Die Genauigkeit dieses Blutdruckmessgerätes wurde
sorgfältig geprüft und wurde im Hinblick auf eine
lange nutzbare Lebensdauer entwickelt. Bei Verwen-
dung des Gerätes in der Heilkunde sind Messtechni-
sche Kontrollen mit geeigneten Mitteln durchzuführen.
Genaue Angaben zur Überprüfung der Genauigkeit
können unter der Service-Adresse angefragt werden.
11. Garantie/Service
Nähere Informationen zur Garantie und den Garantie-
bedingungen finden Sie im mitgelieferten Garantie-Falt-
blatt.
Irrtum und Änderungen vorbehalten
17
Included in delivery
•
Blood pressure monitor with cuff
•
2 x 1.5 V LR03 AAA batteries
•
Storage box
•
Instructions for use
Please read these instructions for use carefully and keep
them for later use, be sure to make them accessible to
other users and observe the information they contain.
1. Getting to know your device
Check that the device packaging has not been tampered
with and make sure that all contents are present. Before
use, ensure that there is no visible damage to the device
or accessories and that all packaging material has been
removed. If you have any doubts, do not use the device
and contact your retailer or the specified Customer Ser-
vices address.
The wrist blood pressure monitor is used to carry out
non-invasive measurement and monitoring of arterial
blood pressure values in human adults. This allows you
to quickly and easily measure your blood pressure, save
the measurements and display the development of the
measurements. You are also warned of possible existing
cardiac arrhythmia.
The recorded values are classified and evaluated graphi-
cally.
ENGLISH
1. Getting to know your device .....................................18
2. Important notes ......................................................... 19
3. Unit description ......................................................... 23
4. Preparing for the measurement .................................24
5. Measuring blood pressure ........................................26
6. Evaluating results ......................................................28
7. Saving, displaying and deleting measured values ..29
8. Error messages/troubleshooting .............................30
9. Cleaning and storing the device and cuff ................31
10. Technical specifications ..........................................31
11. Warranty / Service ...................................................33
Contents
18
2. Important notes
Signs and symbols
The following symbols are used in these instructions
for use, on the packaging and on the type plate for the
device and the accessories:
Attention
Product information
Note on important information
Observe the instructions
Read the instructions before start-
ing work and/or operating devices or
machines
Isolation of applied parts
Type BF
Galvanically isolated applied part
(F stands for “floating”); meets the
requirements for leakage currents for
type B
Direct current
The device is suitable for use with
direct current only
Disposal in accordance with the Waste
Electrical and Electronic Equipment EC
Directive – WEEE
Separate the packaging elements and
dispose of them in accordance with
local regulations.
B
A
Marking to identify the packaging
material.
A = Material code,
B = Material number:
1-7 = Plastics,
20-22 = Paper and cardboard
Manufacturer
Storage/Transport
Permissible storage and transport tem-
perature and humidity
Operating
Permissible operating temperature and
humidity
IP22
IP class
Device protected against foreign
objects ≥ 12.5 mm and against water
dripping at an angle
19
S
N
Serial number
Item number
Medical device
CE labelling
This product satisfies the require-
ments of the applicable European and
national directives.
Separate the product and packag-
ing elements and dispose of them in
accordance with local regulations.
Notes on use
•
In order to ensure comparable values, always measure
your blood pressure at the same time of day.
•
Do not take a measurement within 30 minutes of eat-
ing, drinking, smoking or exercising.
•
Before the initial blood pressure measurement, make
sure always to rest for about 5 minutes.
•
Furthermore, if you want to take several measure-
ments in succession, make sure always to wait for at
least 1 minute between the individual measurements.
•
Repeat the measurement if you are unsure of the
measured value.
•
The measured values taken by you are for your infor-
mation only – they are no substitute for a medical
examination. Discuss the measured values with your
doctor and never base any medical decisions on them
(e.g. medicines and their administration).
•
Using the blood pressure monitor outside your home
environment or whilst on the move (e.g. whilst travel-
ling in a car, ambulance or helicopter, or whilst under-
taking physical activity such as playing sport) can
influence the measurement accuracy and cause incor-
rect measurements.
•
Do not use the blood pressure monitor on newborns,
pregnant women or patients with pre-eclampsia.
•
In the case of restricted circulation on the arm as a
result of chronic or acute vascular diseases (including
vascular constriction), the accuracy of the wrist meas-
urement is limited. In this case you should avoid using
an upper arm blood pressure monitor.
•
This device is not intended for use by people (includ-
ing children) with restricted physical, sensory or men-
tal skills or a lack of experience and/or a lack of knowl-
edge, unless they are supervised by a person who has
responsibility for their safety or they receive instruc-
tions from this person on how to use the device.
Supervise children around the device to ensure they
do not play with it.
20
•
Cardiovascular diseases may lead to incorrect meas-
urements or have a detrimental effect on measurement
accuracy. The same also applies to very low blood
pressure, diabetes, circulatory disorders and arrhyth-
mias as well as chills or shaking.
•
The blood pressure monitor must not be used in con-
nection with a high-frequency surgical unit.
•
Only use the device on people who have the specified
wrist measurement for the device.
•
Please note that when inflating, the functions of the
limb in question may be impaired.
•
During the blood pressure measurement, the blood
circulation must not be stopped for an unnecessarily
long time. If the device malfunctions remove the cuff
from the arm.
•
Do not allow sustained pressure in the cuff or frequent
measurements. The resulting restriction of the blood
flow may cause injury.
•
Make sure that the cuff is not placed on an arm in
which the arteries or veins are undergoing medical
treatment, e.g. intravascular access or intravascular or
therapy, or an arteriovenous (AV) shunt.
•
Do not use the cuff on people who have undergone a
mastectomy.
•
Do not place the cuff over wounds as this may cause
further injury.
•
Place the cuff on your wrist only. Do not place the cuff
on other parts of the body.
•
The blood pressure monitor can only be operated with
batteries.
•
To conserve the batteries, the blood pressure monitor
switches off automatically if you do not press any but-
tons for one minute.
•
The device is only intended for the purpose described in
these instructions for use. The manufacturer is not liable
for damage resulting from improper or careless use.
Instructions for storage and maintenance
•
The blood pressure monitor is made from preci-
sion and electronic components. The accuracy of the
measured values and service life of the device depend
on its careful handling:
– Protect the device from impacts, humidity, dirt,
marked temperature fluctuations and direct sunlight.
– Do not drop the device.
– Do not use the device in the vicinity of strong elec-
tromagnetic fields and keep it away from radio sys-
tems or mobile telephones.
•
We recommend that the batteries be removed if the
device will not be used for a prolonged period of time.
21
Notes on handling batteries
•
If your skin or eyes come into contact with battery
fluid, rinse the affected areas with water and seek
medical assistance.
•
Choking hazard! Small children may swallow and
choke on batteries. Store the batteries out of the reach
of small children.
•
Observe the plus (+) and minus (-) polarity signs.
•
If a battery has leaked, put on protective gloves and
clean the battery compartment with a dry cloth.
•
Protect batteries from excessive heat.
•
Risk of explosion! Never throw batteries into a fire.
•
Do not charge or short-circuit batteries.
•
If the device is not to be used for a relatively long
period, take the batteries out of the battery compart-
ment.
•
Use identical or equivalent battery types only.
•
Always replace all batteries at the same time.
•
Do not use rechargeable batteries!
•
Do not disassemble, split or crush the batteries.
Instructions for repairs and disposal
•
Batteries do not belong in household waste. Please
dispose of empty batteries at the collection points
intended for this purpose.
•
Do not open the device. Failure to comply will invali-
date the warranty.
•
Do not repair or adjust the device yourself. Proper
operation can no longer be guaranteed in this case.
•
Repairs must only be carried out by Customer Ser-
vices or authorised suppliers.
Before making a claim, please check the batteries first
and replace them if necessary.
•
For environmental reasons, do not dispose of the
device in the household waste at the end of
its useful life. Dispose of the device at a
suitable local collection or recycling point.
Dispose of the device in accordance with EC
Directive – WEEE (Waste Electrical and Electronic
Equipment). If you have any questions, please contact
the local authorities responsible for waste disposal.
22
Notes on electromagnetic compatibility
•
The device is suitable for use in all environments listed
in these instructions for use, including domestic envi-
ronments.
•
The use of the device may be limited in the presence
of electromagnetic disturbances. This could result in
issues such as error messages or the failure of the dis-
play/device.
•
Avoid using this device directly next to other devices
or stacked on top of other devices, as this could lead
to faulty operation. If, however, it is necessary to use
the device in the manner stated, this device as well as
the other devices must be monitored to ensure they
are working properly.
•
The use of accessories other than those specified
or provided by the manufacturer of this device can
lead to an increase in electromagnetic emissions or
a decrease in the device’s electromagnetic immunity;
this can result in faulty operation.
•
Failure to comply with the above can impair the perfor-
mance of the device.
3. Unit description
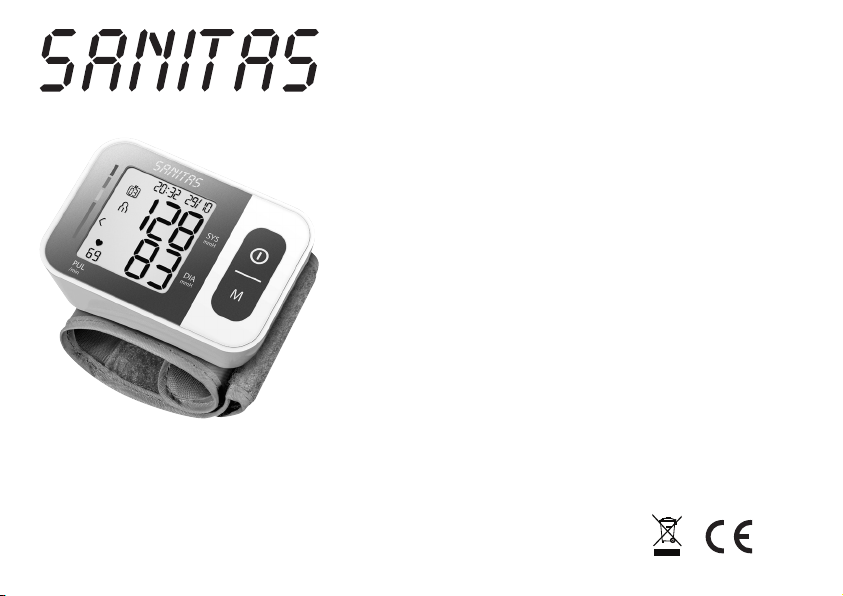
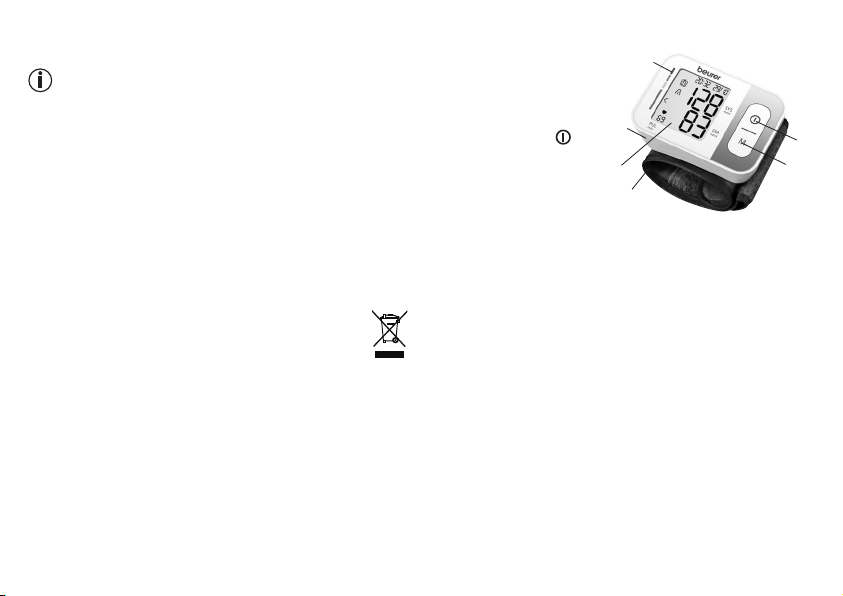
1
6
5
3
4
2
1. Display
2. Wrist cuff
3. Risk indicator
4. Start/stop button
5. Memory button M
6. Battery compartment lid
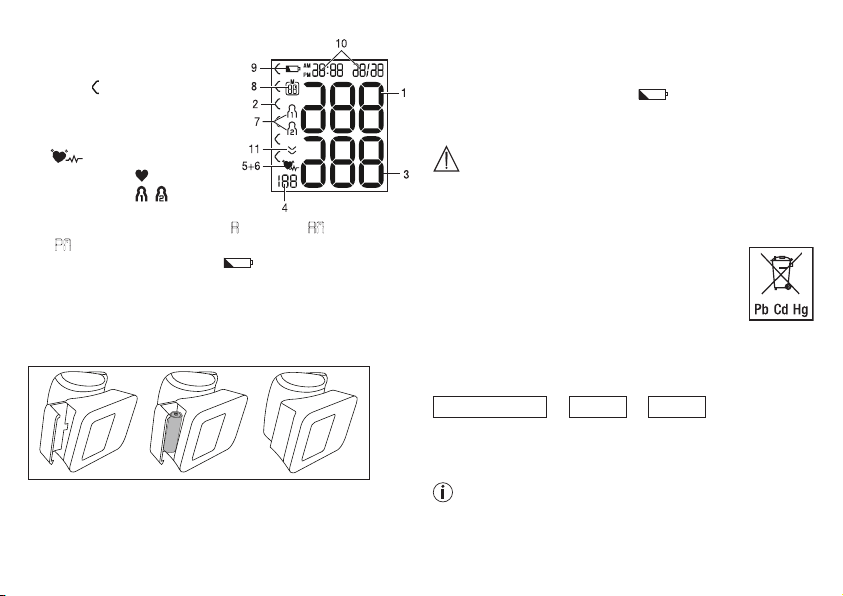
23

Information on the display:
1. Systolic pressure
2. Risk indicator
3. Diastolic pressure
4. Calculated pulse value
5. Cardiac arrhythmia
symbol
6. Pulse symbol
7. User memory /
8. Memory space num-
ber/memory display for
average value (
A A
), morning (
AM AM
), evening (
PM PM
)
9. Battery replacement symbol
10. Time and date
11. Release air (arrow)
4. Preparing for the measurement
Inserting the batteries
• Remove the battery compartment lid on the left side of
the device.
• Insert two 1.5 V micro (alkaline type LR03) batteries.
• Make sure that the batteries are inserted the correct
way round in accordance with the markings. Do not
use rechargeable batteries.
• Carefully close the battery compartment lid again.
If the battery replacement symbol
is displayed,
you can no longer perform any measurements and must
replace all batteries.
Battery disposal
• The empty, completely flat batteries must be disposed
of through specially designated collection boxes, recy-
cling points or electronics retailers. You are legally
required to dispose of the batteries.
24
• The codes below are printed on batteries
containing harmful substances:
Pb = Battery contains lead,
Cd = Batter contains cadmium,
Hg = Battery contains mercury.
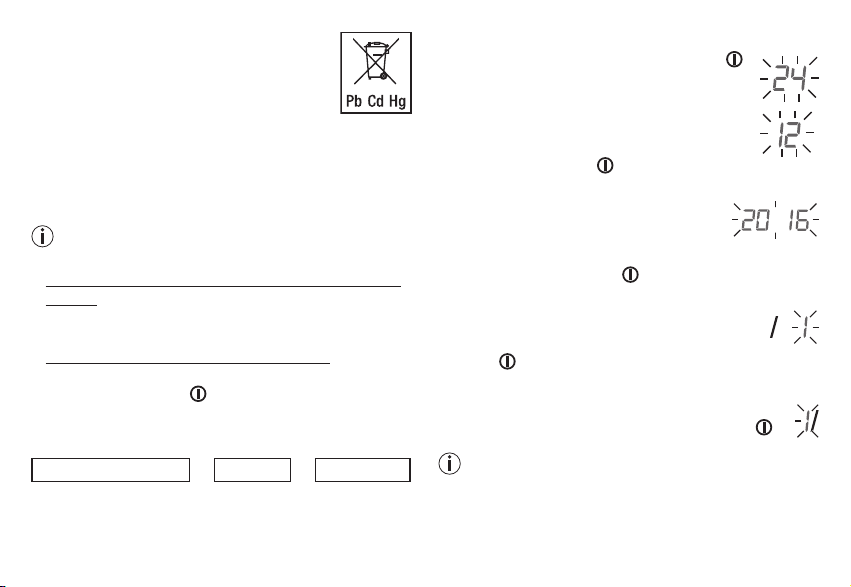
Setting the hour format, date and time
It is essential that you set the date and time. Otherwise,
you will not be able to save your measured values cor-
rectly with a date and time and access them again later.
There are two different ways to access the menu
from which you can adjust the settings:
• Before initial use and after each time you replace the
battery:
When inserting the batteries into the device you will be
taken to the relevant menu automatically.
• If the batteries have already been inserted:
With the device switched off press and hold the
START/STOP button
for approx. 5 seconds.
In this menu you can adjust the following settings in suc-
cession:
Hour format
➔
Date
➔
Time
Hour format
•
Press and hold the START/STOP button
for 5seconds or insert the batteries. The full
display appears.
•
Select the desired hour format using the
memory button M and confirm with the
START/STOP button .
Date
The year flashes on the display.
•
Select the desired year using the
memory button M and confirm with
the START/STOP button .
The month flashes on the display.
•
Select the desired month with
the memory
button M
and confirm with the START/STOP
button .
The day flashes on the display.
•
Select the desired day with the memory button
M and confirm with the START/STOP button .
If the hour format is set as 12h, the day/month
display sequence is reversed.
25
Time
The hours flash on the display.
•
Select the desired hour using the mem-
ory button M and confirm with the START/
STOP button .
The minutes flash on the display.
•
Select the desired minute using the mem-
ory button M and confirm with the START/
STOP button .
Once all the data has been set, the device switches off
automatically.
5. Measuring blood pressure
Ensure the device is at room temperature before measu-
ring. The measurement can be performed on the left or
right wrist.
Attach the cuff
1 2 3
1 cm
•
Expose your wrist. Ensure that the circulation of the
arm is not hindered by tight clothing or similar.
Place the cuff on the inside of your wrist.
•
Close the cuff with the hook-and-loop fastener so that
the upper edge of the device is positioned approx.
1cm underneath the heel of the hand.
•
The cuff must be fitted tightly around the wrist, but
must not constrict.
Blood pressure may vary between the right and left arm,
which may mean that the measured blood pressure
values are different. Always perform the measurement
on the same arm.
If the values between the two arms are significantly dif-
ferent, please consult your doctor to determine which
arm should be used for the measurement.
26

Adopting the correct posture
•
Before the initial blood pressure measurement, make
sure always to rest for about 5 minutes. Otherwise
deviations can occur.
•
You can take the measurement while sitting or lying
down. To take your blood pres-
sure, make sure you are sitting
comfortably with your arms and
back leaning on something. Do not
cross your legs. Place your feet
flat on the ground. Make sure to
rest your arm and move it. Always make sure that the
cuff is at heart level. Otherwise significant deviations
can occur. Relax your arm and the palm of your hand.
•
To avoid falsifying the measurement, it is important to
remain still during the measurement and not to speak.
•
Wait for at least 1 minute before taking another meas-
urement.
Performing the blood pressure measurement
As described above, attach the cuff and adopt the pos-
ture in which you want to perform the measurement.
•
Press the START/STOP button
to start the blood pressure moni-
tor. All displays will illuminate
briefly.
• The last measured value is dis-
played and the blood pressure
monitor automatically begins the
measurement after 3 seconds.
You can cancel the measurement at any time by
pressing the START/STOP button
As soon as a pulse is found, the pulse symbol will be
displayed.
•
The systolic pressure, diastolic
pressure and pulse rate measure-
ments are displayed.
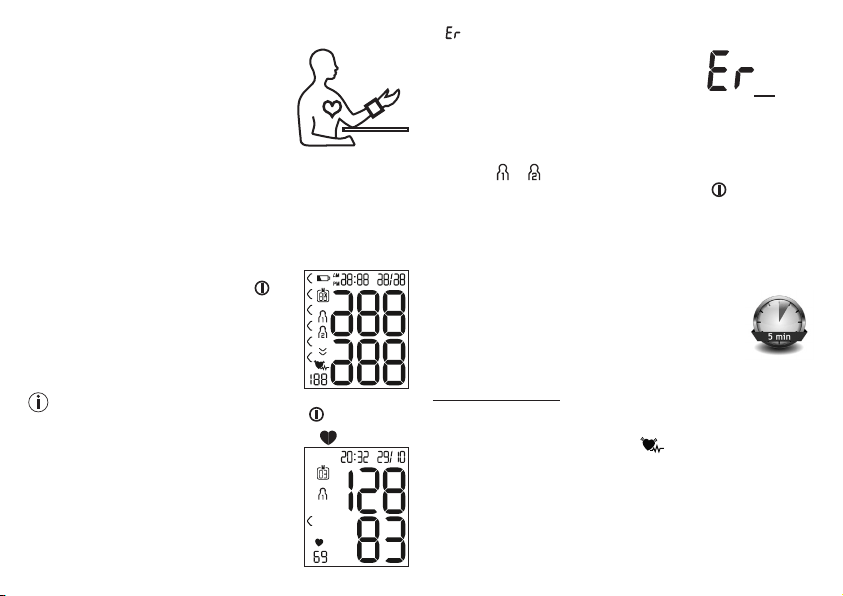
•
_
appears if the measurement has
not been performed properly. Observe
the chapter on error messages/trouble-
• • • • • • • • • • • • •
27

shooting in these instructions for use and repeat the
measurement.
•
Now select the desired user memory by pressing the
memory button M. If you do not select a user memory,
the measurement is stored in the most recently used
user memory. The relevant or symbol appears on
the display.
•
Press the START/STOP button to switch off the
blood pressure monitor. The measurement is then
stored in the selected user memory.
If you forget to turn off the device, it will switch off auto-
matically after approx. 1 minute.
In this case too, the value is stored in the selected or
most recently used user memory.
Wait for at least 1 minute before taking
another measurement.
6. Evaluating results
Cardiac arrhythmia
This device can identify potential disruptions of the heart
rhythm when measuring and if necessary, indicates this
after the measurement with the symbol
.
This can be an indicator for arrhythmia. Arrhythmia is an
illness in which the heart rhythm is abnormal because of
flaws in the bioelectrical system that regulates the heart-
beat. The symptoms (skipped or premature heart beats,
pulse being slow or too fast) can be caused by factors
such as heart disease, age, physical make-up, excess
stimulants, stress or lack of sleep. Arrhythmia can only
be determined through an examination by your doctor.
If the symbol
is shown on the display after the
measurement has been taken, repeat the measurement.
Please ensure that you rest for 5 minutes beforehand
and do not speak or move during the measurement.
If the symbol appears frequently, please consult
your doctor. Self-diagnosis and treatment based on the
measurements can be dangerous. Always follow your
GP’s instructions.
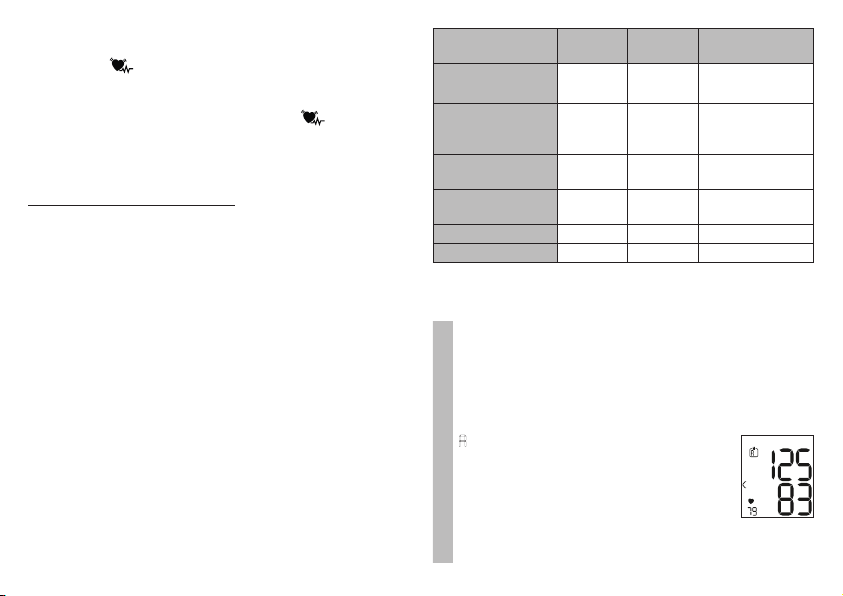
Risk indicator
The measurements can be classified and evaluated in
accordance with the following table.
However, these standard values serve only as a general
guideline, as the individual blood pressure varies in differ-
ent people and different age groups etc.
It is important to consult your doctor regularly for advice.
Your doctor will tell you your individual values for normal
blood pressure as well as the value above which your
blood pressure is classified as dangerous.
The classification on the display and the scale on the unit
show which category the recorded blood pressure val-
ues fall into. If the values of systole and diastole fall into
two different categories (e.g. systole in the ’High nor-
mal’ category and diastole in the ’Normal’ category), the
28
graphical classification on the device always shows the
higher category; for the example given this would be
’High normal’.
Blood pressure
value category
Systole
(in mmHg)
Diastole
(in mmHg)
Action
Setting 3:
severe hypertension
≥ 180 ≥ 110
seek medical
attention
Setting 2:
moderate hyper
-
tension
160 – 179 100 – 109
seek medical
attention
Setting 1:
mild hypertension
140 – 159 90 – 99
regular monito
-
ring by doctor
High normal 130 – 139 85 – 89
regular monito
-
ring by doctor
Normal 120 – 129 80 – 84 self-monitoring
Optimal < 120 < 80 self-monitoring
Source: WHO, 1999 (World Health Organization)
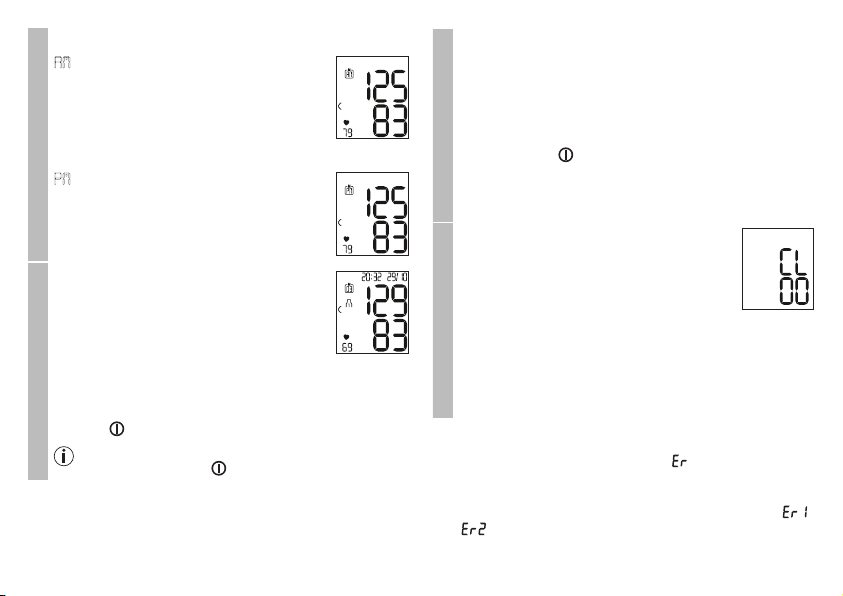
7. Saving, displaying and deleting
measured values
User memory
The results of every successful measurement are
stored together with the date and time. The oldest
measurement is overwritten in the event of more
than 60 measurements.
•
To retrieve the measurement, press the memory
button M.
AA
flashes on the display.
The average value of all saved
measured values in this user memory
is displayed.
To change the user memory, press and hold the
memory button M for approx. 2 seconds.
Average values
•
Press the memory button M.
AMAM
flashes on the display.
The average value of the morning
measurements for the last 7 days is
displayed (morning: 5.00 a.m. – 9.00
a.m.).
29

Average values
•
Press the memory button M.
PMPM
flashes on the display.
The average value of the evening
measurements for the last 7 days is
displayed (evening: 6.00 p.m. – 8.00
p.m.).
Individual measured values
•
When you press the memory button
M again, the last individual measure-
ment is displayed (in this example,
measurement 03).
•
When the memory button M is pressed again, you
can view your individual measurements.
•
To switch the device off again, press the START/
STOP button .
You can exit the menu at any time by pressing
the START/STOP button .
Delete the measured values
•
To clear the memory of the relevant user memory,
you must first select a user memory.
•
Start the retrieval of the average measured values.
A flashes on the display and the average value of
all saved measured values in this user memory is
displayed.
•
Press and hold the memory button M and the
START/STOP button for 5 seconds, depending
on the user memory you are in.
All values of the current user memory
are deleted and the device switches
off.
8. Error messages/troubleshooting
In the event of errors, the error message _ appears on
the display.
Error messages may appear if
• the systolic or diastolic pressure could not be meas-
ured (
or
appears on the display)
• the systolic or diastolic pressure was outside the meas-
urement range (
“Hi”
or
“Lo”
appears on the display)
• the cuff is fastened too tightly or too loosely
(
or
appears on the display)
30
• the blood pressure is higher than 300 mmHg for more
than 1.5 seconds ( appears on the display)
• pumping up takes longer than 180 seconds (
appears on the display)
• there is a system or unit error (
, , or
appears on the display)
• the batteries are almost empty
.
In such cases, repeat the measurement. Ensure that you
do not move or speak during the measurement. If neces-
sary, reinsert or replace the batteries.
Technical alarm – description
Should the recorded blood pressure (systolic or diastolic)
lie outside the limits specified in the section “Technical
specifications”, the technical alarm will appear on the
display indicating either “
” or “ Lo Lo ”. In such cases, you
should seek medical assistance and check the accuracy
of your procedure.
The limit values for the technical alarm are factory set
and cannot be adjusted or deactivated. These alarm limit
values are accorded second priority under the standard
IEC 60601-1-8.
The technical alarm is a non-locking alarm and must not
be reset. The signal shown on the display will disappear
automatically after about 8 seconds.
9. Cleaning and storing the device and
cuff
•
Clean the device and cuff carefully using a slightly
damp cloth only.
•
Do not use any cleaning agents or solvents.
•
Under no circumstances hold the device and cuff
under water, as this can cause liquid to enter and
damage the device and cuff.
•
If you store the device and cuff, do not place heavy
objects on the device and cuff. Remove the batteries.
10. Technical specifications
Model No. SBC 15
Measurement
method
Oscillometric, non-invasive blood
pressure measurement on the wrist
Measurement
range
Cuff pressure 0 – 300mmHg,
Systolic 60-260mmHg,
Diastolic 40-199mmHg,
Pulse 40 –180 beats/minute
Display accuracy Systolic ± 3mmHg,
Diastolic ± 3mmHg,
Pulse ± 5 % of the value shown
31
Measurement inac-
curacy
Max. permissible standard devia-
tion according to clinical testing:
Systolic 8 mmHg /
Diastolic 8 mmHg
Memory 2 x 60 memory spaces
Dimensions L 83.8mmx W59.9mmx
H29.4mm
Weight Approximately 92g (without batter-
ies, with cuff)
Cuff size 140 to 195mm
Permissible operat-
ing conditions
+ 10°C to +40°C, ≤85% relative
humidity (non-condensing)
Permissible storage
conditions
-20°C to +50 °C, ≤ 85% relative
humidity, 800 – 1050hPa ambient
pressure
Power supply
2 x 1.5V
AAA batteries
Battery life For approx. 170 measurements,
depending on levels of blood pres-
sure and pump pressure
Classification Internal supply, IP22, no AP or
APG, continuous operation, appli-
cation part type BF
Technical information is subject to change without notifi-
cation to allow for updates.
•
This device complies with European Stand-
ard EN60601-1-2 (in accordance with
CISPR11,
EN61000-4-2, EN61000-4-3, EN61000-4-8
) and is
subject to particular precautions with regard to electro-
magnetic compatibility. Please note that portable and
mobile HF communication systems may interfere with
this unit.
•
The device complies with the EU Medical Devices
Directive 93/42/EEC, the German Medical Devices Act
(Medizinproduktgesetz) and the standards EN1060-1
(Non-invasive sphygmomanometers – Part1: General
requirements), EN1060-3 (Non-invasive sphygmoma-
nometers – Part 3: Supplementary requirements for
electro-mechanical blood pressure measuring sys-
tems) and IEC80601-2-30 (Medical electrical equip-
ment – Part 2 – 30: Particular requirements for the
basic safety and essential performance of automated
non-invasive sphygmomanometers).
•
The accuracy of this blood pressure monitor has been
carefully checked and developed with regard to a long
useful life. If using the device for commercial medical
purposes, it must be regularly tested for accuracy by
appropriate means. Precise instructions for checking
accuracy may be requested from the service address.
32
Subject to error and changes
11. Warranty / Service
Further information on the guarantee and guarantee con-
ditions can be found in the guarantee leaflet supplied.
33
Contenu
•
Tensiomètre avec manchette
•
2piles AAA LR03 de 1,5V
•
Boîte de rangement
•
Mode d’emploi
Lisez attentivement ce mode d’emploi, conservez-le
pour un usage ultérieur, mettez-le à disposition des
autres utilisateurs et suivez les consignes qui y figurent.
1. Présentation
Vérifiez si l’emballage extérieur de l’appareil est intact et
si tous les éléments sont inclus. Avant l’utilisation, assu-
rez-vous que l’appareil et les accessoires ne présentent
aucun dommage visible et que la totalité de l’embal-
lage a bien été retirée. En cas de doute, ne l’utilisez pas
et adressez-vous à votre revendeur ou au service client
indiqué.
Le tensiomètre de poignet est conçu pour la mesure non
invasive et la surveillance des valeurs de tension arté-
rielle des personnes adultes. Il vous permet de mesurer
votre tension rapidement et facilement, d’enregistrer les
valeurs et d’afficher l’évolution des valeurs. Vous êtes
averti en cas d’éventuels troubles du rythme cardiaque.
Les valeurs calculées sont classées et évaluées sous
forme graphique.
FRANÇAIS
1. Présentation ..............................................................34
2. Conseils importants ..................................................35
3. Description de l’appareil ...........................................40
4. Préparation de la mesure ..........................................41
5. Mesurer la tension ..................................................... 43
6. Évaluer les résultats ..................................................44
7. Enregistrer, récupérer et supprimer les valeurs de
mesure ....................................................................46
8. Message d’erreur/Résolution des erreurs ............... 47
9. Nettoyage et rangement de l’appareil et du
brassard ..................................................................48
10. Caractéristiques techniques ....................................48
11. Garantie / Maintenance ...........................................49
Sommaire
34

2. Conseils importants
Symboles utilisés
Les symboles suivants sont utilisés sur le mode d’em-
ploi, sur l’emballage et sur la plaque signalétique de
l’appareil et des accessoires:
Attention:
Information sur le produit
Indication d’informations importantes
Suivre le mode d’emploi
Lire le mode d’emploi avant de com-
mencer le travail et/ou de faire fonc-
tionner les appareils ou les machines
Isolation de l’appareil de
type BF
Isolation galvanique (F signifie floating),
répond aux exigences de type B en
matière de courant de fuite
Courant continu
L’appareil n’est adapté qu’au courant
continu
Élimination conformément à la direc-
tive européenne WEEE (Waste Electri-
cal and Electronic Equipment) relative
aux déchets d’équipements élec-
triques et électroniques
Séparer les composants d’emballage
et les éliminer conformément aux pres-
criptions communales.
B
A
Étiquette d’identification du matériau
d’emballage.
A = Abréviation de matériau,
B = Référence de matériau:
1 – 7 = plastique,
20 – 22 = papier et carton
Fabricant
Storage/Transport
Température et taux d’humidité de
stockage et de transport admissibles
Operating
Température et taux d’humidité d’utili-
sation admissibles
35
IP22
Indice IP
Appareil protégé contre les corps
solides ≥ 12,5mm et contre les chutes
de gouttes d’eau en biais
S
N
Numéro de série
Référence de l’article
Dispositif médical
Signe CE
Ce produit répond aux exigences des
directives européennes et nationales
en vigueur.
Séparer le produit et les composants
d’emballage et les éliminer conformé-
ment aux prescriptions communales.
Conseils d’utilisation
•
Mesurez toujours votre tension au même moment de
la journée afin que les valeurs soient comparables.
•
Évitez de manger, boire, fumer ou de pratiquer des
activités physiques pendant au moins 30minutes
avant la mesure.
•
Avant toute mesure de la tension, reposez-vous pen-
dant environ 5minutes!
•
Lorsque vous devez effectuer plusieurs mesures sur
une personne, patientez à chaque fois 1 minute entre
chaque mesure.
•
Effectuez une nouvelle mesure si vous avez un doute
sur les valeurs mesurées.
•
Les mesures que vous avez établies servent unique-
ment d’information – elles ne remplacent pas un exa-
men médical! Communiquez vos résultats à votre
médecin, vous ne devez prendre en aucun cas des
décisions d’ordre médical sur la base de ces seules
mesures (par ex. le choix de médicaments et de leurs
dosages)!
•
L’utilisation du tensiomètre en dehors de l’environne-
ment domestique ou sous l’influence de mouvements
(par ex. pendant la conduite en voiture, en ambulance
ou en hélicoptère ainsi que pendant l’exercice d’activi-
tés physiques telles que le sport) peut affecter l’exacti-
tude de la mesure et entraîner des erreurs de mesure.
•
N’utilisez pas le tensiomètre sur des nouveau-nés,
des femmes enceintes et des patientes atteintes de
pré-éclampsie.
•
En cas de limitation de la circulation sanguine dans un
bras en raison de maladies chroniques ou aiguës des
vaisseaux (entre autres vasoconstriction), l’exactitude
de la mesure au poignet est limitée. Dans ce cas, pas-
sez à un tensiomètre au bras.
36

•
Cet appareil n’est pas conçu pour être utilisé par une
personne (y compris les enfants) dont les capacités
physiques, sensorielles ou intellectuelles sont limitées,
ou n’ayant pas l’expérience et/ou les connaissances
nécessaires. Le cas échéant, cette personne doit, pour
sa sécurité, être surveillée par une personne compé-
tente ou doit recevoir de cette dernière des recom-
mandations sur la manière d’utiliser l’appareil. Sur-
veillez les enfants afin de les empêcher de jouer avec
l’appareil.
•
Les maladies cardio-vasculaires peuvent entraîner des
erreurs de mesure ou des mesures imprécises. C’est
également le cas lors d’une tension très basse, de dia-
bète, de troubles de la circulation et du rythme car-
diaque et de frissons de fièvre ou de tremblements.
•
Le tensiomètre ne doit pas être utilisé parallèlement à
un appareil chirurgical haute fréquence.
•
Utilisez uniquement l’appareil sur des personnes dont
le périmètre du poignet correspond à celui indiqué
pour l’appareil.
•
Veuillez noter que la fonction du membre concerné
peut être entravée lors du gonflage.
•
Il ne faut pas bloquer la circulation sanguine plus long-
temps que nécessaire au cours de la prise de tension.
Si l’appareil ne fonctionne pas bien, retirez le brassard
du bras.
•
Évitez des mesures trop fréquentes ou une pression
continue du brassard. Elles entraînent une réduction
de la circulation sanguine et constituent un risque de
blessure.
•
Veillez à ne pas placer le brassard sur un bras dont les
artères ou les veines sont soumises à un traitement
médical, par ex. en présence d’un dispositif d’accès
intravasculaire destiné à un traitement intravasculaire
ou en cas de shunt artério-veineux.
•
N’utilisez pas le brassard sur des personnes qui ont
subi une mastectomie.
•
Ne placez pas le brassard sur des plaies, son utilisa-
tion peut les aggraver.
•
Placez le brassard uniquement au niveau du poignet.
Ne placez pas le brassard sur d’autres parties du
corps.
•
Vous ne pouvez utiliser le tensiomètre qu’avec des
piles.
•
L’arrêt automatique permet de faire passer le ten-
siomètre en mode économie d’énergie lorsqu’au-
cune touche n’est manipulée pendant un délai d’une
minute.
•
L’appareil est conçu pour l’utilisation décrite dans ce
mode d’emploi. Le fabricant ne peut être tenu pour
responsable des dommages causés par une utilisation
inappropriée ou non conforme.
37
Consignes de rangement et d’entretien
•
Le tensiomètre est constitué de composants de préci-
sion et électroniques. La précision des valeurs mesu-
rées et la durée de vie de l’appareil dépendent d’un
maniement soigné:
– Protégez l’appareil contre les chocs, l’humidité, les
saletés, les fortes variations de température et l’en-
soleillement direct.
– Ne laissez pas tomber l’appareil.
– N’utilisez pas l’appareil à proximité de champs élec-
tromagnétiques puissants, tenez-le éloigné des ins-
tallations de radio et des téléphones mobiles.
•
Si l’appareil n’est pas utilisé pendant une période pro-
longée, il est recommandé de retirer les piles.
Remarques relatives aux piles
•
Si du liquide de la cellule de pile entre en contact avec
la peau ou les yeux, rincez la zone touchée avec de
l’eau et consultez un médecin.
•
Risque d’ingestion! Les enfants en bas âge
pourraient avaler des piles et s’étouffer. Veuillez donc
conserver les piles hors de portée des enfants en bas
âge!
•
Respectez les signes de polarité plus (+) et moins (-).
•
Si une pile a coulé, enfilez des gants de protection et
nettoyez le compartiment à piles avec un chiffon sec.
•
Protégez les piles d’une chaleur excessive.
•
Risque d’explosion! Ne jetez pas les piles dans
le feu.
•
Les piles ne doivent être ni rechargées ni court-circui-
tées.
•
En cas de non-utilisation prolongée de l’appareil, sor-
tez les piles du compartiment à piles.
•
Utilisez uniquement des piles identiques ou équiva-
lentes.
•
Remplacez toujours l’ensemble des piles simultané-
ment.
•
N’utilisez pas de batterie!
•
Ne démontez, n’ouvrez ou ne cassez pas les piles.
Consignes de réparation et d’élimination
•
Les piles ne doivent pas être jetées avec les ordures
ménagères. Veuillez jeter les piles usées dans les
points de collecte prévus à cet effet.
•
N’ouvrez pas l’appareil. Le non-respect de cette
consigne annulera la garantie.
•
Vous ne devez pas réparer ou ajuster l’appareil vous-
même. Le bon fonctionnement de l’appareil n’est plus
garanti si tel était le cas.
•
Seul le service client ou un opérateur autorisé peut
procéder à une réparation.
38
Cependant, avant toute réclamation, veuillez contrô-
ler au préalable l’état des piles et les remplacer le cas
échéant.
•
Dans l’intérêt de la protection de l’environnement,
l’appareil ne doit pas être jeté avec les
ordures ménagères à la fin de sa durée de
service. L’élimination doit se faire par le biais
des points de collecte compétents dans
votre pays. Éliminez l’appareil conformément à la
directive européenne – WEEE (Waste Electrical and
Electronic Equipment) relative aux appareils élec-
triques et électroniques usagés. Pour toute question,
adressez-vous aux collectivités locales responsables
de l’élimination et du recyclage de ces produits.
Informations sur la compatibilité
électromagnétique
•
L’appareil est prévu pour fonctionner dans tous les
environnements indiqués dans ce mode d’emploi, y
compris dans un environnement domestique.
•
En présence d’interférences électromagnétiques, vous
risquez de ne pas pouvoir utiliser toutes les fonc-
tions de l’appareil. Vous pouvez alors rencontrer, par
exemple, des messages d’erreur ou une panne de
l’écran/de l’appareil.
•
Éviter d’utiliser cet appareil à proximité immédiate
d’autres appareils ou en l’empilant sur d’autres appa-
reils, car cela peut provoquer des dysfonctionne-
ments. S’il n’est pas possible d’éviter le genre de
situation précédemment indiqué, il convient alors de
surveiller cet appareil et les autres appareils afin d’être
certain que ceux-ci fonctionnent correctement.
•
L’utilisation d’accessoires autres que ceux spécifiés
ou fournis par le fabricant de cet appareil peut provo-
quer des perturbations électromagnétiques accrues
ou une baisse de l’immunité électromagnétique de
l’appareil, et donc causer des dysfonctionnements.
•
Le non-respect de cette consigne peut entraîner une
réduction des performances de l’appareil.
39

3. Description de l’appareil
1
6
5
3
4
2
1. Écran
2. Brassard de poignet
3. Indicateur de risque
4. Touche Marche/Arrêt
5. Touche de consultation de mémoire M
6. Couvercle du compartiment à piles
Données affichées à l’écran:
1. Pression systolique
2. Indicateur de risque
3. Pression diastolique
4. Valeur du pouls
mesurée
5. Symbole troubles du
rythme cardiaque
6. Symbole Pouls
7. Mémoire utilisateur
/
8. Numéro de l’emplacement de sauvegarde / valeur de
la mémoire moyenne (
A A
), matin (
AM AM
), soir (
PM PM
)
9. Symbole de changement des piles
10. Heure et date
11. Dégonflage (flèche)
40
4. Préparation de la mesure
Insertion des piles
• Retirez le couvercle du compartiment à piles sur le
côté gauche de l’appareil.
• Insérez deux piles micro de 1,5V (alcalines de type
LR03).
• Veillez impérativement à insérer les piles en respectant
la polarité indiquée. N’utilisez pas de batteries rechar-
geables.
• Refermez soigneusement le couvercle du comparti-
ment à piles.
Si le symbole de changement des piles
apparaît, il
n’est plus possible d’effectuer de mesure et vous devez
changer toutes les piles.
Élimination des piles
• Les piles usagées et complètement déchargées
doivent être mises au rebut dans des conteneurs spé-
ciaux ou aux points de collecte réservés à cet usage
ou bien déposées chez un revendeur d’appareils élec-
triques. L’élimination des batteries est une obligation
légale qui vous incombe.
• Ces pictogrammes se trouvent sur les piles à subs-
tances nocives:
Pb = pile contenant du plomb,
Cd = pile contenant du cadmium,
Hg = pile contenant du mercure.
Régler le format de l’heure, la date et l’heure
Vous devez impérativement régler la date et l’heure.
Sans ces réglages, il est impossible d’enregistrer et de
consulter correctement vos mesures avec la date et
l’heure.
Il existe deux façons d’accéder au menu des para-
mètres:
• Avant la première utilisation et après chaque change-
ment de pile:
lorsque vous insérez les piles dans l’appareil, vous
accédez automatiquement au menu correspondant.
41
• Lorsque les piles sont insérées:
Alors que l’appareil est éteint, maintenez la touche
MARCHE/ARRÊT enfoncée pendant environ
5secondes.
Dans ce menu, vous pouvez régler successivement les
paramètres suivants:
Format de l’heure
➔
Date
➔
Heure
Format de l’heure
•
Maintenez la touche MARCHE/ARRÊT
enfoncée
pendant 5secondes ou insérez
les piles. L’affichage plein écran apparaît.
•
À l’aide de la touche mémoire M, sélection-
nez le format d’heure que vous souhaitez et
confirmez avec la touche MARCHE/ARRÊT
.
Date
L’année clignote à l’écran.
•
À l’aide de la touche mémoire M
sélectionnez l’année que vous sou-
haitez et confirmez avec la touche
MARCHE/ARRÊT .
Le mois clignote à l’écran.
•
À l’aide de la
touche mémoire M
sélection-
nez le mois que vous souhaitez et confirmez
avec la touche MARCHE/ARRÊT .
Le jour clignote à l’écran.
•
À l’aide de la touche mémoire M, sélectionnez
le jour que vous souhaitez et confirmez avec la
touche MARCHE/ARRÊT .
Si le format de l’heure est réglé sur 12h, l’ordre d’af-
fichage du jour et du mois est inversé.
Heure
L’heure clignote à l’écran.
•
À l’aide de la touche mémoire M sélection-
nez l’heure que vous souhaitez et confirmez
avec la touche MARCHE/ARRÊT .
Les minutes clignotent à l’écran.
•
À l’aide de la touche mémoire M sélection-
nez les minutes que vous souhaitez et confir-
mez avec la touche MARCHE/ARRÊT .
Une fois toutes les dates réglées, l’appareil s’éteint auto-
matiquement.
42
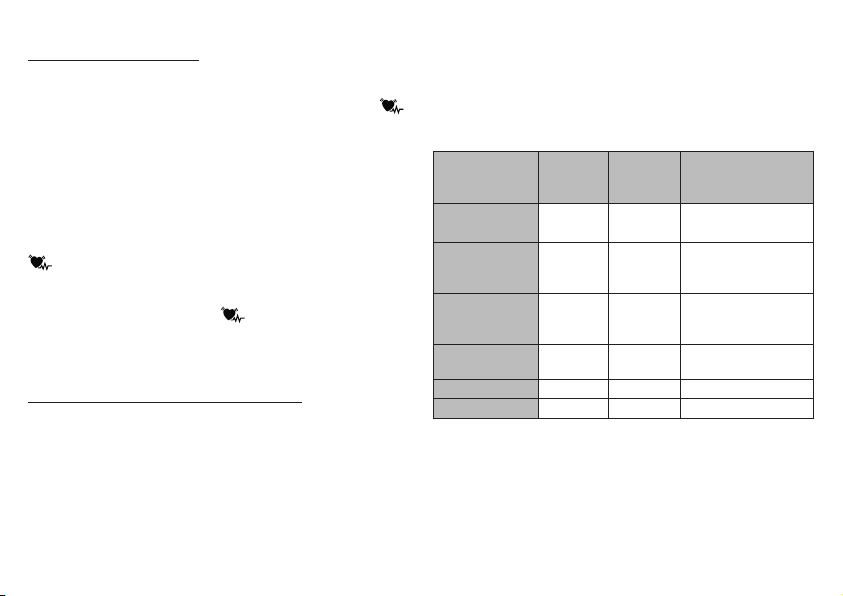
5. Mesurer la tension
Avant la mesure, placez l’appareil à température
ambiante. Vous pouvez effectuer la mesure sur le poi-
gnet gauche ou droit.
Positionner le brassard
1 2 3
1 cm
•
Mettez votre poignet à nu. Faites attention à ce que la
circulation du sang ne soit pas restreinte par des vête-
ments trop serrés ou autres.
Placez le brassard sur l’intérieur de votre poignet.
•
Fermez le brassard avec la fermeture auto-agrippante
de manière à ce que le bord supérieur de l’appareil se
trouve à environ 1 cm de la paume de la main.
•
Le brassard doit être bien serré autour du poignet sans
l’étrangler.
La tension peut être différente entre le bras droit et le
gauche, les valeurs de tension mesurées peuvent donc
également être différentes. Effectuez toujours la mesure
sur le même bras.
Si les valeurs entre les deux bras sont très différentes,
vous devez déterminer avec votre médecin quel bras uti-
liser pour la mesure.
Adopter une position adéquate
•
Avant toute mesure de la tension, reposez-vous pen-
dant environ 5minutes! Sinon, cela pourrait entraîner
des erreurs.
•
La mesure peut se faire en position assise ou allongée.
Installez-vous confortablement
avant de prendre votre tension.
Faites en sorte que votre dos et
vos bras soient bien appuyés sur
le dossier et les accoudoirs. Ne
croisez pas les jambes. Posez les
pieds bien à plat sur le sol. Soutenez impérativement
votre bras et pliez-le. Faites attention, dans tous les
cas, à ce que le brassard se trouve au niveau du cœur.
Sinon, cela pourrait entraîner des erreurs considé-
rables. Détendez votre bras et les paumes.
•
Pour ne pas fausser le résultat, il est important de res-
ter calme durant la mesure et de ne pas parler.
•
Patientez au moins 1 minute avant d’effectuer une
nouvelle mesure !
• • • • • • • • • • • • •
43
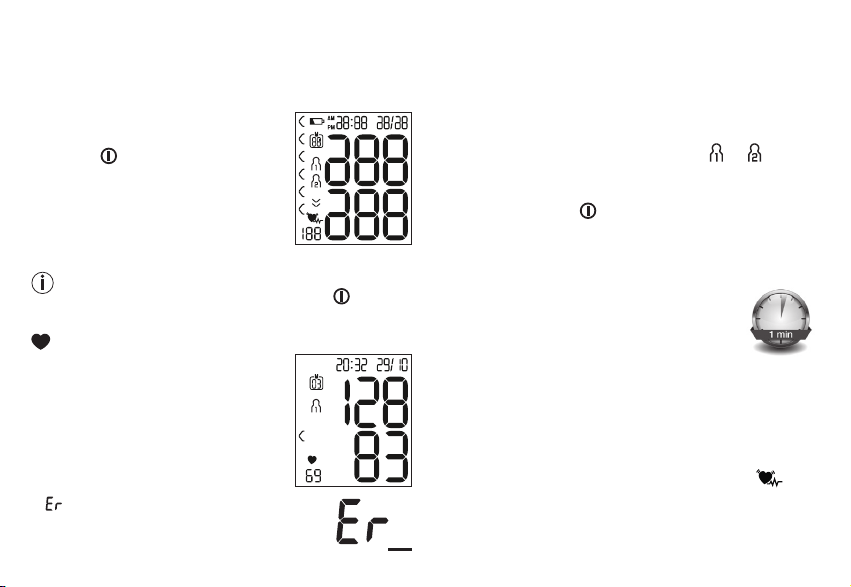
Mesurer la tension artérielle
Positionnez le brassard tel que décrit plus haut et instal-
lez-vous dans la position de votre choix pour effectuer
la mesure.
•
Pour démarrer le tensiomètre,
appuyez sur la touche MARCHE/
ARRÊT . Tous les affichages
s’allument brièvement.
• La dernière mesure s’affiche et,
après 3secondes, le tensiomètre
commence automatiquement la
mesure.
Vous pouvez interrompre la mesure à tout moment
en appuyant sur la touche START/STOP .
Dès qu’un pouls est reconnaissable, le symbole Pouls
s’affiche.
•
Les résultats de mesure de la
pression systolique, de la pression
diastolique et du pouls sont affi-
chés.
•
_
s’affiche lorsque la mesure n’a pas pu
être effectuée correctement. Lisez le cha-
pitre Message d’erreur/Résolution des
erreurs de ce mode d’emploi et recommencez la
mesure.
•
En appuyant sur la touche mémoire M, sélection-
nez maintenant la mémoire utilisateur de votre choix.
Si vous ne choisissez pas de mémoire utilisateur, le
résultat de la mesure est attribué au dernier utilisateur
enregistré. Le symbole correspondant ou s’af-
fiche à l’écran.
•
Éteignez le tensiomètre en appuyant sur la touche
MARCHE/ARRÊT . Ainsi, le résultat de la mesure
est enregistré dans la mémoire utilisateur choisie.
Si vous oubliez d’éteindre l’appareil, il s’éteindra auto-
matiquement après environ 1minute.
Dans ce cas, la valeur est attribuée à
l’utilisateur de la mémoire choisie ou utilisée
en dernier.
Patientez au moins 1 minute avant d’ef-
fectuer une nouvelle mesure !
6. Évaluer les résultats
Troubles du rythme cardiaque:
Cet appareil est capable d’identifier d’éventuels troubles
du rythme cardiaque au cours de la mesure et le signale
le cas échéant après la mesure, par le symbole
.
Cela peut indiquer une arythmie. L’arythmie est une
maladie qui se caractérise par une anomalie du rythme
cardiaque, en raison de perturbations du système bioé-
44
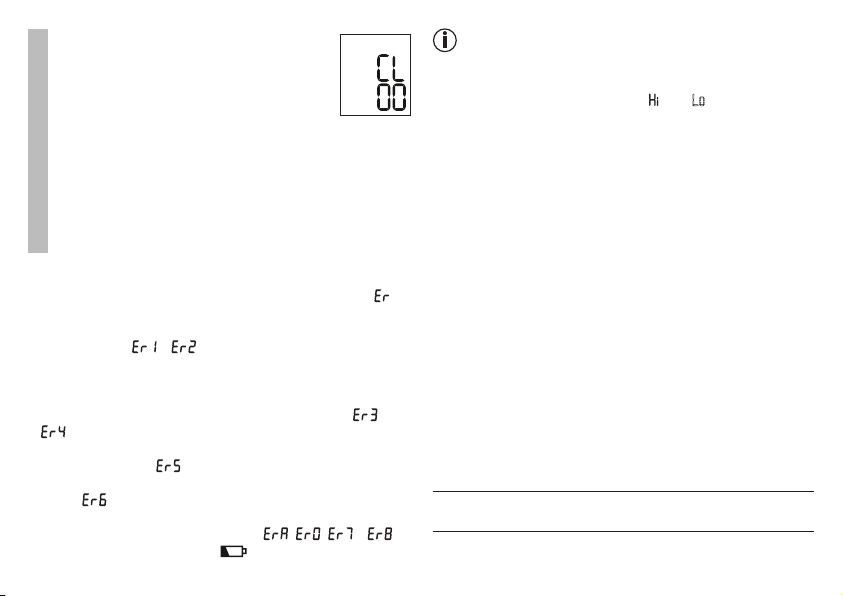
lectrique. Les symptômes (battements cardiaques en
retard ou en avance, pouls plus rapide ou plus lent)
peuvent être induits notamment par une pathologie car-
diaque, par l’âge, par des prédispositions naturelles, par
une alimentation trop riche, par le stress ou encore par
un manque de sommeil. Une arythmie ne peut être éta-
blie que par une consultation médicale.
Si le symbole s’affiche après la mesure, recommen-
cez-la. Veillez à vous reposer pendant 5minutes et à ne
pas parler ni bouger pendant la mesure. Si le symbole
apparaît souvent, veuillez consulter un médecin. Il
peut être dangereux d’effectuer un autodiagnostic et une
automédication sur la base des résultats de la mesure.
Suivez impérativement les instructions de votre médecin.
Indicateur de risque
Les résultats de mesure sont classés et évalués selon le
tableau suivant.
Ces valeurs ne doivent être utilisées qu’à titre indica-
tif, car la tension artérielle varie selon les personnes, les
âges, etc.
Il est important de consulter votre médecin de manière
régulière. Votre médecin vous donnera vos valeurs per-
sonnelles pour une tension artérielle normale et la valeur
à laquelle la tension artérielle est considérée comme
dangereuse.
Le classement qui s’affiche ainsi que l’échelle de l’appa-
reil permettent d’établir la plage dans laquelle se trouve
la tension mesurée. Si les valeurs de systole et de dias-
tole se trouvent dans deux plages différentes (par ex.
systole en plage «normale haute» et diastole en plage
«normale»), la graduation graphique indique toujours
la plage la plus haute sur l’appareil, à savoir «normale
haute» dans le présent exemple.
Plage des
valeurs de
tension
Systole
(en mmHg)
Diastole
(en mmHg)
Mesures
Niveau 3:
forte hypertonie
≥ 180 ≥ 110
consulter un
médecin
Niveau 2: hyper
-
tonie moyenne
160 – 179 100 – 109
consulter un
médecin
Niveau 1:
légère hypertonie
140 – 159 90 – 99
examen régu
-
lier par un
médecin
Normale haute 130 – 139 85 – 89
examen régu
-
lier par un
médecin
Normale 120 – 129 80 – 84 Auto-contrôle
Optimale < 120 < 80 Auto-contrôle
Source: WHO, 1999 (World Health Organization)
45

7. Enregistrer, récupérer et supprimer les
valeurs de mesure
Mémoire utilisateur
Le résultat de chaque mesure réussie est enregistré
avec la date et l’heure. Lorsqu’il y a plus de 60don-
nées de mesure, la mesure la plus ancienne est
écrasée.
•
Pour afficher le résultat de mesure, appuyez sur la
touche mémoire M.
Mémoire utilisateur
AA
clignote à l’écran.
La valeur moyenne de toutes les
valeurs mesurées enregistrées pour
cet utilisateur est affichée.
Pour changer de mémoire utilisateur, maintenez la
touche mémoire M pendant environ 2secondes.
Valeurs moyennes
•
Appuyez sur la touche mémoire M.
AMAM
clignote à l’écran.
La valeur moyenne des mesures
matinales des 7 derniers jours est
affichée (matin: 5h00 – 9h00).
•
Appuyez sur la touche mémoire M.
PMPM
clignote à l’écran.
La valeur moyenne des mesures du
soir des 7 derniers jours est affichée
(soir: 18:00 – 20:00).
Valeurs mesurées individuelles
•
Si vous appuyez de nouveau sur
la touche mémoire M, la dernière
mesure s’affiche à l’écran (ici par
exemple la mesure 03).
•
Si vous appuyez de nouveau sur la touche
mémoire M, vous pouvez consulter vos mesures
individuelles.
•
Pour éteindre l’appareil, appuyez sur la touche
MARCHE/ARRÊT .
Vous pouvez quitter le menu à tout moment en
appuyant sur la touche MARCHE/ARRÊT .
46
Effacer les valeurs mesurées
•
Pour effacer tous les enregistrements d’une
mémoire utilisateur donnée, sélectionnez d’abord
une mémoire utilisateur.
•
Démarrez la consultation de la valeur moyenne
des mesures. A clignote à l’écran, la valeur
moyenne de toutes les valeurs mesurées enregis-
trées pour cet utilisateur est affichée.
•
Maintenez la touche mémoire M et la touche
MARCHE/ARRÊT enfoncées pendant
5secondes, selon la mémoire utilisateur que vous
utilisez.
Toutes les valeurs de la mémoire
utilisateur actuelle sont supprimées
et l’appareil s’éteindra.
8. Message d’erreur/Résolution des
erreurs
En cas d’erreur, un message d’erreur s’affiche à l’écran
_.
Des messages d’erreur peuvent s’afficher lorsque
• la pression systolique ou diastolique n’a pas pu être
mesurée (
ou
s’affiche à l’écran);
• la pression systolique ou diastolique se trouve hors de
la plage de mesure (
«Hi»
ou
«Lo»
s’affiche à l’écran);
• le brassard est trop serré ou trop lâche (
ou
s’affiche à l’écran);
• la tension artérielle est supérieure à 300mmHg pen
-
dant plus de 1,5seconde ( s’affiche à l’écran);
• le gonflage dure plus de 180secondes ( s’affiche
à l’écran);
• il existe une erreur sur le système ou l’appareil (
,
, ou
s’affiche à l’écran);
• les piles sont presque vides .
Dans ce cas, réitérez la mesure. Veillez à ne pas bouger
ni parler pendant la mesure. Le cas échéant, remettez
les piles ou remplacez-les.
Alarme technique – Description
Si la tension artérielle (systolique ou diastolique) mesu-
rée se situe hors de l’intervalle donné dans le para-
graphe Caractéristiques techniques, l’alarme technique
affiche à l’écran le message «
» ou «LoLo». Dans ce cas,
consultez un médecin ou vérifiez que vous utilisez cor-
rectement l’appareil.
Les valeurs limites de l’alarme technique sont des valeurs
d’usine fixes et ne peuvent être ni modifiées, ni désac-
tivées. Dans le cadre de la norme IEC 60601-1-8, ces
valeurs limites de l’alarme ont une priorité secondaire.
47
L’alarme technique n’est pas une alarme verrouil-
lée et n’a pas besoin d’être réinitialisée. Le signal affi-
ché à l’écran disparaît automatiquement au bout de
8secondes environ.
9. Nettoyage et rangement de l’appareil et
du brassard
•
Nettoyez soigneusement l’appareil et le brassard, uni-
quement à l’aide d’un chiffon légèrement humide.
•
N’utilisez pas de détergent ni de solvant.
•
Ne passez jamais l’appareil ni le brassard sous l’eau,
qui pourrait s’infiltrer à l’intérieur de l’appareil ou du
brassard et l’endommager.
•
Ne posez pas d’objets lourds sur l’appareil ni sur le
brassard lorsqu’ils sont rangés. Retirez les piles.
10. Caractéristiques techniques
N° du modèle SBC 15
Mode de mesure Mesure de la tension artérielle au poi-
gnet, oscillométrique et non invasive
Plage de mesure Pression dans le brassard 0 –
300mmHg
Pression systolique 60 – 260mmHg
Pression diastolique 40 – 199mmHg
Pouls 40 – 180pulsations/minute
Précision de l’in-
dicateur
systolique ±3mmHg
diastolique ±3mmHg
pouls ±5% de la valeur affichée
Incertitude de
mesure
écart type max. admissible selon des
essais cliniques:
systolique 8mmHg
diastolique 8mmHg
Mémoire 2x60emplacements de mémoire
Dimensions L 83,8mmx l59,9mmx H29,4mm
Poids Environ 92g (sans les piles, avec la
manchette)
Taille du bras-
sard
140 à 195mm
Conditions de
fonctionnement
adm.
+ 10°C à +40°C, ≤85% d’humidité
relative de l’air (sans condensation)
Conditions de
stockage admis-
sibles
-20°C à +50°C, ≤ 85% d’humidité
de l’air relative, 800 – 1050hPa de
pression ambiante
Alimentation
électrique
2x piles AAA 1,5V
Durée de vie de
la batterie
Environ 170mesures, selon l’éléva-
tion de la tension artérielle ainsi que la
pression de gonflage
48

Classement Alimentation interne, IP22, pas d’AP
ni d’APG, utilisation continue, appareil
de type BF
Des modifications pourront être apportées aux caracté-
ristiques techniques sans avis préalable à des fins d’ac-
tualisation.
•
Cet appareil est en conformité avec la norme euro-
péenne EN60601-1-2 (en conformité avec
CISPR11,
EN61000-4-2, EN61000-4-3, EN61000-4-8
) et
répond aux exigences de sécurité spéciales relatives
à la compatibilité électromagnétique. Veuillez noter
que les dispositifs de communication HF portables et
mobiles sont susceptibles d’influer sur cet appareil.
•
Cet appareil est conforme à la directive européenne
93/42/EEC sur les produits médicaux, à la loi sur les
produits médicaux ainsi qu’aux normes européennes
EN1060-1 (tensiomètres non invasifs, partie1: exi-
gences générales), EN1060-3 (tensiomètres non
invasifs, partie 3: exigences complémentaires sur les
tensiomètres électromécaniques) et IEC80601-2-30
(appareils électromédicaux, partie 2-30: exigences
particulières pour la sécurité et les performances
essentielles des tensiomètres non invasifs automa-
tiques).
•
La précision de ce tensiomètre a été correctement tes-
tée et sa durabilité a été conçue en vue d’une utilisation
à long terme. Dans le cadre d’une utilisation médicale de
l’appareil, des contrôles techniques de mesure doivent
être menés avec les moyens appropriés. Pour obtenir
des informations précises sur la vérification de la préci-
sion de l’appareil, vous pouvez faire une demande par
courrier au service après-vente.
11. Garantie / Maintenance
Pour plus d’informations sur la garantie et les conditions
de garantie, consultez la fiche de garantie fournie.
Sous réserve d’erreur et de modifications
49
Fornitura
•
Misuratore di pressione con manicotto
•
2 batterie AAA da 1,5 V LR03
•
Custodia
•
Istruzioni per l’uso
Leggere attentamente le presenti istruzioni per l’uso,
conservarle per impieghi futuri, renderle accessibili ad
altri utenti e attenersi alle indicazioni.
1. Introduzione
Controllare l’integrità esterna della confezione e del con-
tenuto. Prima dell’uso assicurarsi che l’apparecchio e gli
accessori non presentino nessun danno palese e che il
materiale di imballaggio sia stato rimosso. Nel dubbio
non utilizzare l’apparecchio e consultare il proprio riven-
ditore o contattare il Servizio clienti indicato.
Il misuratore di pressione da polso consente la misura-
zione e il monitoraggio non invasivi dei valori di pres-
sione arteriosa nelle persone adulte. Permette di misu-
rare in modo rapido e semplice la propria pressione,
memorizzare i valori misurati e visualizzare l’andamento
dei valori. Segnala inoltre eventuali disturbi del ritmo
cardiaco.
I valori rilevati vengono classificati e valutati grafica-
mente.
ITALIANO
1. Introduzione ..............................................................50
2. Indicazioni importanti ................................................51
3. Descrizione dell’apparecchio ....................................55
4. Preparazione della misurazione .................................56
5. Misurazione della pressione ...................................... 58
6. Interpretazione dell’esito ...........................................60
7. Memorizzazione, ricerca e cancellazione dei valori
misurati .................................................................... 61
8. Messaggi di errore/Soluzioni ................................... 62
9. Pulizia e conservazione dell’apparecchio e del
manicotto ................................................................63
10. Dati tecnici ..............................................................63
11. Garanzia / Assistenza ..............................................65
Indice
50
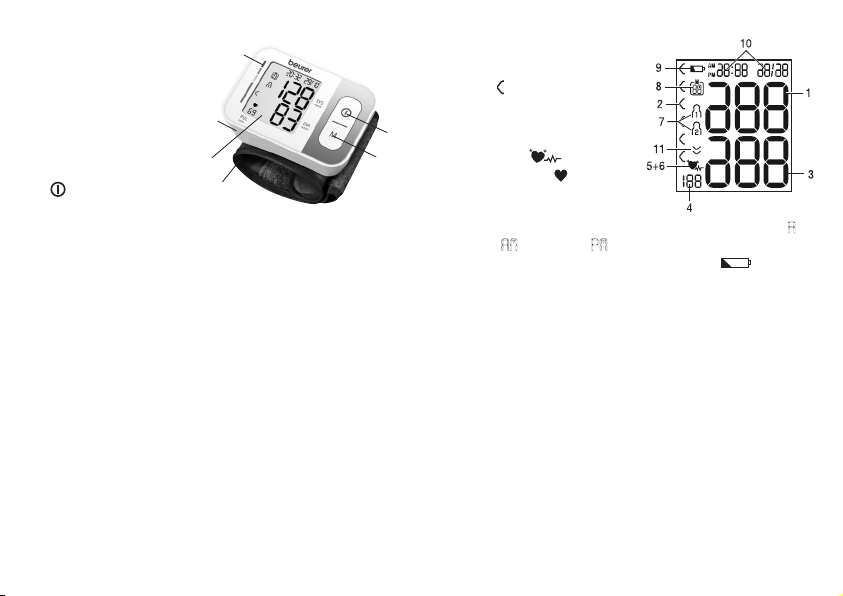
2. Indicazioni importanti
Spiegazione dei simboli
I seguenti simboli sono utilizzati nelle istruzioni per l’uso,
sull’imballo e sulla targhetta dell’apparecchio e degli
accessori:
Attenzione
Informazioni sul prodotto
Indicazione di informazioni importanti
Seguire le istruzioni
Prima dell'inizio dei lavori e/o dell'u-
tilizzo di apparecchi o macchine, leg-
gere le istruzioni
Isolamento delle parti applicate di
tipo BF
Parte applicata isolata galvanicamente
(F sta per floating), soddisfa i requi-
siti delle correnti di dispersione per il
tipo B
Corrente continua
L'apparecchio è adatto solo a un uso
con corrente continua
Smaltimento secondo le norme previ-
ste dalla Direttiva CE sui rifiuti di appa-
recchiature elettriche ed elettroniche
(WEEE)
Separare i componenti dell'imballaggio
e smaltirli secondo le norme comunali.
B
A
Etichetta di identificazione del mate-
riale di imballaggio.
A = abbreviazione del materiale,
B = codice materiale:
1-7 = plastica, 20-22 = carta e cartone
Produttore
Storage/Transport
Temperatura e umidità di trasporto e
stoccaggio consentite
Operating
Temperatura e umidità di esercizio
consentite
IP22
Classe IP
Apparecchio protetto contro la pene-
trazione di corpi solidi ≥12,5 mm e
contro la caduta inclinata di gocce
d'acqua
51
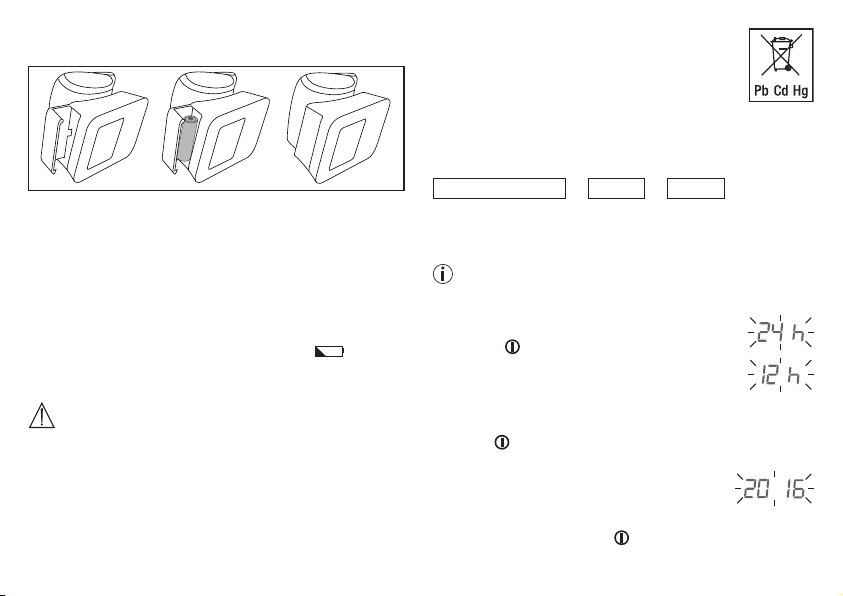
S
N
Numero di serie
Codice articolo
Dispositivo medico
Marchio CE
Il presente prodotto soddisfa i requisiti
delle direttive europee e nazionali
vigenti.
Separare il prodotto e i componenti
dell'imballaggio e smaltirli secondo le
norme comunali.
Indicazioni per l’uso
•
Misurare la pressione sempre allo stesso orario della
giornata, affinché i valori siano confrontabili.
•
Evitare di mangiare, bere, fumare o praticare attività
fisica almeno nei 30 minuti precedenti alla misurazione.
•
Prima della prima misurazione rilassarsi sempre com-
pletamente per 5 minuti!
•
Inoltre, per effettuare in successione più misurazioni,
attendere sempre almeno 1minuto tra una misura-
zione e l'altra.
•
In caso di valori dubbi, ripetere la misurazione.
•
I valori misurati autonomamente hanno solo scopo
informativo, non sostituiscono i controlli medici.
Comunicare al medico i propri valori, non intrapren-
dere in alcun caso terapie mediche definite autonoma-
mente (ad es. impiego di farmaci e relativi dosaggi)!
•
L’utilizzo del misuratore di pressione al di fuori dell’am-
bito domestico o sotto l’influsso del movimento (ad es.
durante un viaggio in auto, ambulanza o elicottero non-
ché durante attività fisiche come lo sport) può influire
sulla precisione e determinare errori di misurazione.
•
Non utilizzare il misuratore di pressione su neonati,
gestanti e pazienti con preeclampsia.
•
In caso di difficoltà di circolazione a un braccio a
causa di patologie vascolari croniche o acute (tra cui
vasocostrizioni), la precisione della misurazione al
polso è limitata. In tal caso si consiglia di optare per
un misuratore di pressione da braccio.
•
L’apparecchio non deve essere utilizzato da persone
(compresi bambini) con ridotte capacità fisiche, per-
cettive o intellettive o non in possesso della necessaria
esperienza e/o conoscenza, se non sotto la supervi-
sione di una persona responsabile per la loro sicurezza
o che fornisca loro le indicazioni per l’uso dell’appa-
recchio. Controllare che i bambini non utilizzino l’ap-
parecchio per gioco.
52
•
In caso di patologie del sistema cardiovascolare pos-
sono verificarsi errori di misurazione o una riduzione
della precisione di misurazione. Gli stessi problemi si
possono verificare in caso di pressione molto bassa,
diabete, disturbi della circolazione e del ritmo cardiaco
nonché in presenza di brividi di febbre o tremiti.
•
Non utilizzare il misuratore di pressione insieme ad altri
apparecchi chirurgici ad alta frequenza.
•
Utilizzare il misuratore di pressione solo su un polso
con misura compresa nell’intervallo indicato.
•
Tenere conto che durante il pompaggio può verificarsi
una riduzione delle funzioni dell’arto interessato.
•
La misurazione della pressione non deve impedire
inutilmente la circolazione del sangue per un tempo
troppo lungo. In caso di malfunzionamento dell’appa-
recchio, rimuovere il manicotto dal braccio.
•
Evitare di mantenere una pressione costante nel mani-
cotto e di effettuare misurazioni troppo frequenti che
causerebbero una riduzione del flusso sanguigno con
il conseguente rischio di lesioni.
•
Accertarsi che il manicotto non venga applicato su
braccia con arterie o vene sottoposte a trattamenti
medici, quali dispositivo di accesso o terapia intrava-
scolare o shunt arterovenoso.
•
Non applicare il manicotto a persone che hanno subito
una mastectomia (asportazione della mammella).
•
Non applicare il manicotto su ferite per evitare rischi di
ulteriori lesioni.
•
Indossare il manicotto esclusivamente sul polso. Non
indossare il manicotto su altre parti del corpo.
•
Il misuratore di pressione può essere utilizzato esclusi-
vamente a batterie.
•
Se per un minuto non vengono utilizzati pulsanti, il
dispositivo di arresto automatico spegne l’apparec-
chio per preservare le batterie.
•
L’apparecchio è concepito solo per l’uso descritto
nelle presenti istruzioni per l’uso. Il produttore non
risponde di danni causati da un uso inappropriato o
non conforme.
Indicazioni per la conservazione e la cura
•
Il misuratore di pressione è composto da moduli elet-
tronici di precisione. La precisione dei valori misurati
e la durata dell’apparecchio dipendono da un utilizzo
attento e scrupoloso:
– Non esporre l’apparecchio a urti, umidità, sporcizia,
forti sbalzi di temperatura e direttamente alla luce
solare.
– Non far cadere l’apparecchio.
– Non utilizzare l’apparecchio in prossimità di forti
campi elettromagnetici, tenerlo lontano da impianti
radio o telefoni cellulari.
•
In caso di non utilizzo dell’apparecchio per lunghi
periodi, si raccomanda di rimuovere le batterie.
53
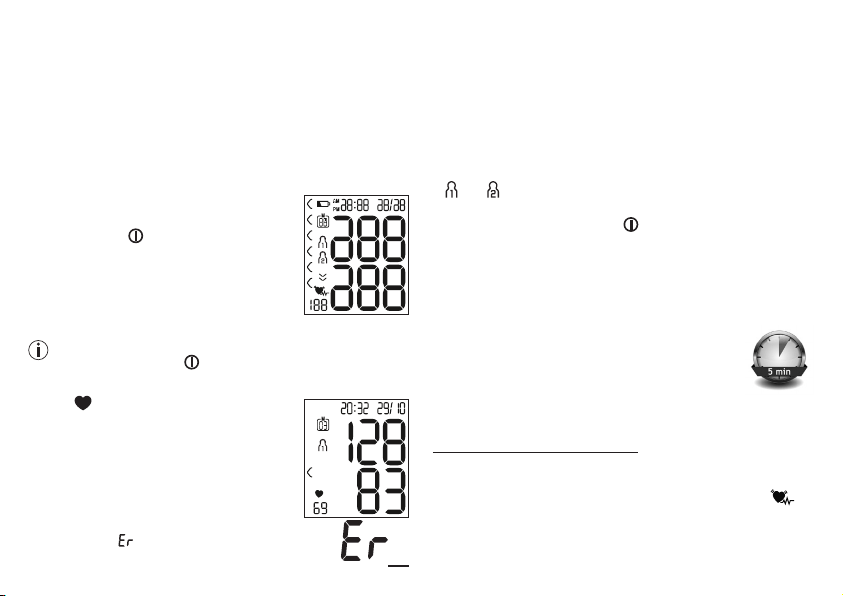
Avvertenze sull’uso delle batterie
•
Se il liquido della batteria viene a contatto con la pelle
e con gli occhi, sciacquare le parti interessate con
acqua e consultare il medico.
•
Pericolo d’ingestione! I bambini possono ingerire
le batterie e soffocare. Tenere quindi le batterie lon-
tano dalla portata dei bambini!
•
Prestare attenzione alla polarità positiva (+) e negativa
(-).
•
In caso di fuoriuscita di liquido dalla batteria, indos-
sare guanti protettivi e pulire il vano batterie con un
panno asciutto.
•
Proteggere le batterie dal caldo eccessivo.
•
Rischio di esplosione! Non gettare le batterie nel
fuoco.
•
Le batterie non devono essere ricaricate o mandate in
cortocircuito.
•
Qualora l’apparecchio non dovesse essere utilizzato
per un periodo prolungato, rimuovere le batterie dal
vano batterie.
•
Utilizzare solo tipologie di batterie uguali o equivalenti.
•
Sostituire sempre tutte le batterie contemporanea-
mente.
•
Non utilizzare batterie ricaricabili!
•
Non smontare, aprire o frantumare le batterie.
Indicazioni per la riparazione e lo smaltimento
•
Le batterie non sono rifiuti domestici. Smaltire le batte-
rie esauste negli appositi punti di raccolta.
•
Non aprire l’apparecchio. In caso contrario, decade la
garanzia.
•
L’apparecchio non deve essere riparato o tarato per-
sonalmente. In tal caso non si garantisce più il corretto
funzionamento.
•
Le riparazioni possono essere effettuate solo dal Ser-
vizio clienti o da rivenditori autorizzati.
Prima di inoltrare eventuali reclami, testare le batterie
e, se necessario, sostituirle.
•
A tutela dell’ambiente, al termine del suo utilizzo l’ap-
parecchio non deve essere smaltito nei rifiuti
domestici. Lo smaltimento va effettuato negli
appositi centri di raccolta. Smaltire l’apparec-
chio secondo la direttiva europea sui rifiuti di
apparecchiature elettriche ed elettroniche (WEEE). Per
eventuali chiarimenti, rivolgersi alle autorità comunali
competenti per lo smaltimento.
54
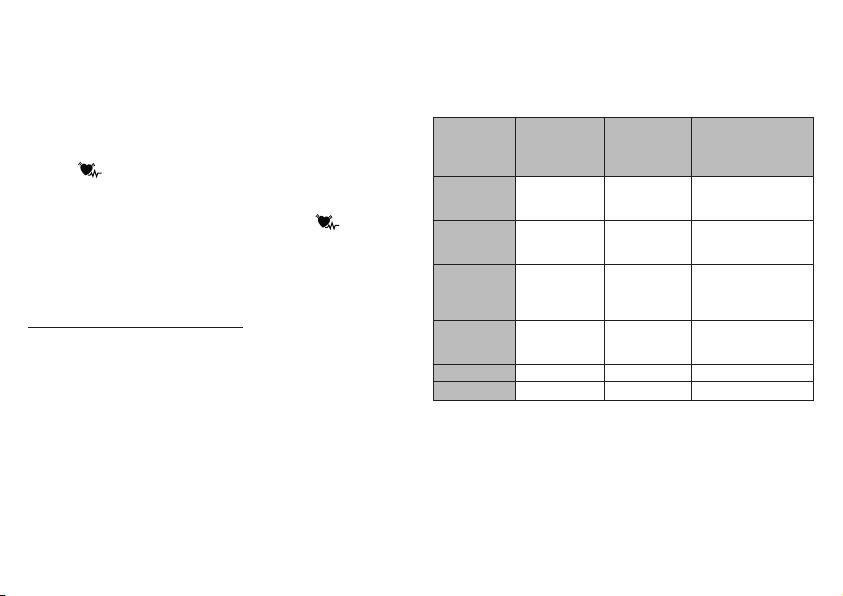
Avvertenze sulla compatibilità elettromagnetica
•
L’apparecchio è idoneo per l’utilizzo in qualsiasi
ambiente riportato nelle presenti istruzioni per l’uso,
incluso l’ambiente domestico.
•
In determinate circostanze, in presenza di disturbi elet-
tromagnetici l’apparecchio può essere utilizzato solo
limitatamente. Ne possono conseguire ad es. mes-
saggi di errore o un guasto del display/apparecchio.
•
Evitare di utilizzare il presente apparecchio nelle imme-
diate vicinanze di altri apparecchi o con apparecchi in
posizione impilata, poiché ciò potrebbe determinare
un funzionamento non corretto. Qualora fosse comun-
que necessario un utilizzo nel modo prescritto, è
opportuno tenere sotto controllo questo apparecchio e
gli altri apparecchi in modo da assicurarsi che funzio-
nino correttamente.
•
L’utilizzo di altri accessori diversi da quelli stabiliti dal
produttore dell’apparecchio o in dotazione con l’ap-
parecchio può comportare la comparsa di significa-
tive emissioni elettromagnetiche di disturbo o ridurre
la resistenza dell’apparecchio alle interferenze elettro-
magnetiche e a un funzionamento non corretto dello
stesso.
•
La mancata osservanza può ridurre le prestazioni
dell’apparecchio.
3. Descrizione dell’apparecchio
1
6
5
3
4
2
1. Display
2. Manicotto da polso
3. Indicatore di rischio
4. Pulsante Start/Stop
5. Pulsante per richiamare la memoria
M
6. Sportello vano batterie
55

Indicatori sul display:
1. Pressione sistolica
2. Indicatore di rischio
3. Pressione diastolica
4. Battito cardiaco
rilevato
5. Icona disturbi del ritmo
cardiaco
6. Icona battito cardiaco
7. Memoria utente /
8. Numero della posizione di memoria/indicazione
memoria valore medio (
A A
), mattino (
AM AM
), sera (
PM PM
)
9. Icona sostituzione delle batterie
10. Ora e data
11. Scarico aria (freccia)
4. Preparazione della misurazione
Inserimento della batteria
• Rimuovere il coperchio del vano batterie sul lato sini-
stro dell'apparecchio.
• Inserire due batterie Micro da 1,5 V (tipo alcalino
LR03).
• Verificare che le batterie siano inserite correttamente,
con i poli posizionati in base alle indicazioni. Non uti-
lizzare batterie ricaricabili.
• Richiudere attentamente il coperchio del vano batterie.
Quando compare l'icona di sostituzione delle batterie
non è più possibile effettuare alcuna misurazione
ed è necessario cambiare le batterie.
Smaltimento delle batterie
• Smaltire le batterie esauste e completamente scariche
negli appositi punti di raccolta, nei punti di raccolta per
rifiuti tossici o presso i negozi di elettronica. Lo smalti-
mento delle batterie è un obbligo di legge.
56
• I simboli riportati di seguito indicano che le batterie
contengono sostanze tossiche:
Pb = batteria contenente piombo
Cd = batteria contenente cadmio
Hg = batteria contenente mercurio
Impostazione del formato dell'ora, della
data e dell'ora
La data e l'ora devono essere assolutamente impostate.
Solo in questo modo è possibile memorizzare corretta-
mente i valori misurati con data e ora per poterli richia-
mare in seguito.
È possibile richiamare il menu da cui eseguire le
impostazioni in due modi diversi:
• Prima del primo utilizzo e dopo ogni sostituzione delle
batterie:
quando si inseriscono le batterie nell'apparecchio si
accede automaticamente al menu corrispondente.
• Con le batterie già inserite:
sull’apparecchio spento tenere premuto il pulsante
START/STOP
per circa 5 secondi.
Attraverso questo menu è possibile effettuare in succes-
sione le seguenti regolazioni:
Formato ora
➔
Data
➔
Ora
Formato ora
•
Tenere premuto il pulsante START/STOP
per 5secondi oppure inserire le batterie.
Viene visualizzato il display completo.
•
Con il pulsante per la memorizzazione M
selezionare il formato dell’ora desiderato e
confermare con il pulsante START/STOP .
Data
Sul display lampeggia il numero
dell’anno.
•
Con il pulsante per la memorizzazione
M selezionare l’anno desiderato e con-
fermare con il pulsante START/STOP .
Sul display lampeggia l’indicazione del mese.
•
Con il pulsante
per la memorizzazione M
selezionare il mese desiderato e confermare
con il pulsante START/STOP
.
Sul display lampeggia l’indicazione del giorno.
•
Con il pulsante per la memorizzazione M sele-
zionare il giorno desiderato e confermare con il
pulsante START/STOP .
Se si imposta il formato dell’ora in 12 h, la sequenza
dell’indicazione del giorno e del mese è invertita.
57

Ora
Sul display lampeggia l’ora.
•
Con il pulsante per la memorizzazione M
selezionare l’ora desiderata e confermare
con il pulsante START/STOP .
Sul display lampeggia l’indicazione dei minuti.
•
Con il pulsante per la memorizzazione M
selezionare i minuti desiderati e confermare
con il pulsante START/STOP .
Dopo avere impostato tutti i dati, l’apparecchio si spe-
gne automaticamente.
5. Misurazione della pressione
Prima della misurazione portare l’apparecchio a tempe-
ratura ambiente. La misurazione può essere eseguita sul
polso destro o sinistro.
Applicazione del manicotto
1 2 3
1 cm
•
Denudare il polso. Verificare che la circolazione del
braccio non sia costretta da indumenti o simili.
Applicare il manicotto all’interno del polso.
•
Chiudere il manicotto con la chiusura a strappo in
modo che il bordo superiore dell’apparecchio sia ca. 1
cm al di sotto del palmo della mano.
•
Il manicotto deve aderire al polso senza stringere.
La pressione può variare dal braccio destro al sinistro e
di conseguenza anche i valori di misurazione possono
essere diversi. Eseguire la misurazione sempre sullo
stesso braccio.
Qualora i valori dovessero variare significativamente da
un braccio all’altro, concordare con il proprio medico
quale braccio usare per la misurazione.
58

Postura corretta
•
Prima della prima misurazione rilassarsi sempre com-
pletamente per 5 minuti! In caso contrario le misura-
zioni potrebbero non essere corrette.
•
La misurazione può essere effettuata da seduti o da
sdraiati. Sedersi in posizione
comoda per la misurazione della
pressione. Appoggiare la schiena
e le braccia. Non incrociare le
gambe. Appoggiare la pianta dei
piedi al pavimento. Il braccio deve
essere appoggiato e piegato ad angolo. Verificare
sempre che il manicotto si trovi all’altezza del cuore. In
caso contrario le misurazioni potrebbero essere molto
imprecise. Rilassare il braccio e le mani.
•
Per non falsare l’esito, è importante restare tranquilli e
non parlare durante la misurazione.
•
Attendere almeno 1 minuto prima di effettuare una
nuova misurazione!
Esecuzione della misurazione della pressione
Applicare il manicotto e sistemarsi nella posizione in cui
si desidera eseguire la misurazione.
•
Per avviare il misuratore di pres-
sione, premere il pulsante START/
STOP . Tutte le spie del display
si accendono brevemente.
• Viene visualizzato l’ultimo valore
misurato e dopo 3 secondi il misura-
tore di pressione inizia automatica-
mente a misurare la pressione.
La misurazione può essere interrotta in qualsiasi
momento premendo il pulsante START/STOP
.
Appena è rilevabile il battito cardiaco, viene visualizzata
l’icona corrispondente .
•
Vengono visualizzati i valori misu-
rati per pressione sistolica e dia-
stolica e battito cardiaco.
•
Se la misurazione non è stata effettuata
correttamente, compare l’icona
_
. Con-
sultare il capitolo Messaggi di errore/Solu-
• • • • • • • • • • • • •
59
zioni delle presenti Istruzioni per l’uso e ripetere la
misurazione.
•
Con il pulsante per la memorizzazione M impostare
quindi la memoria utente desiderata. Se non si sce-
glie alcuna memoria utente, la misurazione viene sal-
vata nella memoria utente usata per ultima. Sul display
viene visualizzata la relativa icona o .
•
Spegnere il misuratore di pressione con il pulsante
START/STOP . In questo modo la misurazione viene
memorizzata nella memoria utente selezionata.
Se si dimentica di spegnere l’apparecchio, questo si
spegne automaticamente dopo circa 1 minuto.
Anche in questo caso il valore viene memorizzato nella
memoria utente selezionata o in quella
utilizzata per ultima.
Attendere almeno 1 minuto prima di effet-
tuare una nuova misurazione!
6. Interpretazione dell’esito
Disturbi del ritmo cardiaco
Questo apparecchio è in grado di individuare eventuali
disturbi del ritmo cardiaco durante la misurazione e in tal
caso al termine della misurazione ne segnala la presenza
con l’icona
.
Può essere un’avvisaglia di aritmia. L’aritmia è una pato-
logia in cui il ritmo cardiaco è anormale a causa di errori
nel sistema bioelettrico, che controlla il battito cardiaco.
I sintomi (battiti cardiaci accelerati o anticipati, polso ral-
lentato o troppo veloce) possono essere determinati tra
l’altro da patologie cardiache, età, costituzione, sovrali-
mentazione, stress o mancanza di riposo. Un’aritmia può
essere diagnosticata solo dal medico.
Ripetere la misurazione nel caso compaia sul display
l’icona
dopo una prima misurazione. Assicurarsi
di aver osservato 5 minuti di riposo prima di effettuare
la misurazione e di non parlare né muoversi durante la
misurazione. Rivolgersi al proprio medico nel caso l’i-
cona compaia frequentemente. Diagnosi e terapie
definite autonomamente in base agli esiti delle misura-
zioni possono rivelarsi pericolose. Attenersi sempre alle
indicazioni del proprio medico.
Indicatore di rischio
I risultati di misurazione possono essere classificati e
valutati in base alla tabella seguente.
Tali valori standard costituiscono tuttavia solo un riferi-
mento generale in quanto la pressione individuale pre-
senta differenze a seconda della persona e dell’età.
È importante consultare regolarmente il proprio medico
per sapere qual è la propria pressione normale e il limite
superato il quale il livello di pressione viene considerato
pericoloso.
La classificazione sul display e la scala graduata sul
misuratore di pressione indicano la classe nella quale
60
rientra la pressione misurata. Nel caso in cui il valore
sistolico e quello diastolico rientrino in due classi diverse
(ad es. sistole nella classe "Normale alto" e diastole nella
classe "Normale"), la graduazione grafica dell’apparec-
chio indica sempre la classe più alta, in questo caso
"Normale alto".
Intervallo dei
valori di pres
-
sione
Sistole
(in mmHg)
Diastole
(in mmHg)
Misura da
adottare
Livello 3:
forte ipertensione
≥ 180 ≥ 110
Rivolgersi a un
medico
Livello 2:
moderata iper
-
tensione
160 – 179 100 – 109
Rivolgersi a un
medico
Livello 1:
leggera iperten
-
sione
140 – 159 90 – 99
Controlli medici
regolari
Normale alto 130 – 139 85 – 89
Controlli medici
regolari
Normale 120 – 129 80 – 84 Autocontrollo
Ottimale < 120 < 80 Autocontrollo
Fonte: WHO, 1999 (World Health Organization)
7. Memorizzazione, ricerca e
cancellazione dei valori misurati
Memoria utente
Gli esiti di ogni misurazione corretta vengono memo-
rizzati con data e ora. Quando i dati misurati supe-
rano le 60 unità, vengono eliminati i dati più vecchi.
•
Per richiamare il valore della misurazione, premere
il pulsante per la memorizzazione M.
Sul display lampeggia l’indicazione
AA
.
Viene visualizzato il valore medio di
tutti i valori misurati della memoria
utente selezionata.
Per cambiare memoria utente, tenere premuto il pul-
sante per la memorizzazione M per ca. 2 secondi.
Valori medi
•
Premere il pulsante per la memorizzazione M.
Sul display lampeggia l’indicazione
AMAM
.
Viene visualizzato il valore medio degli
ultimi 7 giorni di misurazioni mattutine
(mattina: dalle 5.00 alle 9.00).
61
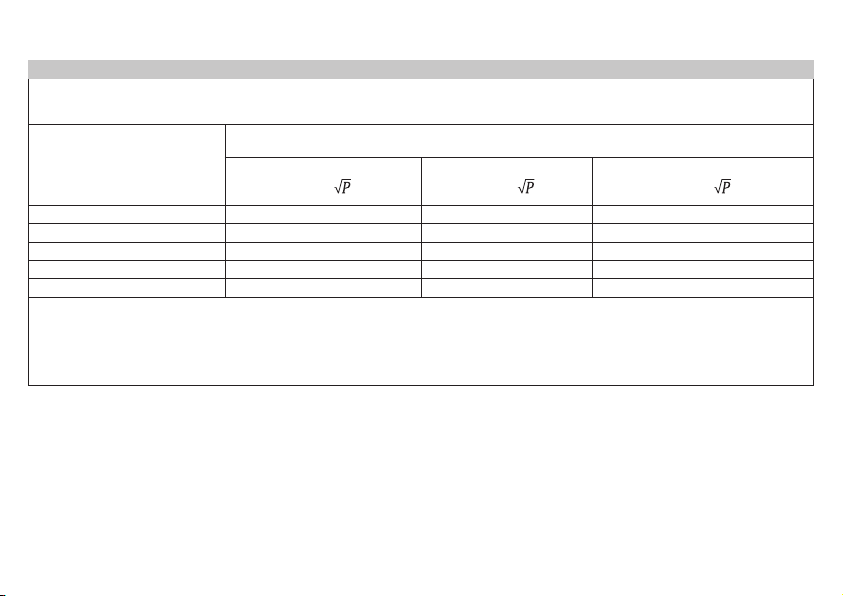
Valori medi
•
Premere il pulsante per la memorizzazione M.
Sul display lampeggia l’indicazione
PMPM
.
Viene visualizzato il valore medio degli
ultimi 7 giorni di misurazioni serali
(sera: dalle 18.00 alle 20.00).
Valori di misurazione singoli
•
Premendo nuovamente il pulsante
per la memorizzazione M il display
visualizza l’ultima misurazione sin-
gola (nell’esempio la misurazione
03).
•
Premendo nuovamente il pulsante per la memo-
rizzazione M, è possibile consultare i singoli valori
misurati.
•
Per spegnere nuovamente l’apparecchio, premere
il pulsante START/STOP .
È possibile uscire dal menu in qualsiasi
momento premendo il pulsante START/STOP
.
Cancellazione dei valori misurati
•
Per cancellare una posizione di memoria di una
determinata memoria utente è necessario innanzi-
tutto selezionare la memoria utente.
•
Avviare l’interrogazione dei valori di misurazione
medi. Sul display lampeggia A, viene visualizzato
il valore medio di tutti i valori misurati di questa
memoria utente.
•
Tenere premuti il pulsante per la memorizzazione
M e il pulsante START/STOP per 5 secondi,
aseconda di quale sia la memoria utente attiva.
Tutti i valori dell’attuale memo-
ria utente vengono cancellati e
l’apparecchio si spegne.
8. Messaggi di errore/Soluzioni
In caso di errori sul display compare il messaggio di
errore _.
I messaggi di errore possono essere visualizzati quando
• la pressione sistolica o diastolica non può essere misu-
rata (sul display appare
o
),
• la pressione sistolica o diastolica rilevata risulta oltre il
range di misurazione (sul display appare
Hi
o
Lo
),
62

• il manicotto è stato indossato in modo troppo stretto o
troppo allentato (sul display compare il messaggio di
errore
o
),
• la pressione è superiore a 300 mmHg per più di
1,5secondi (sul display appare ),
• il pompaggio dura più di 180 secondi (sul display viene
visualizzato ),
• è presente un errore di sistema o dell’apparecchio (sul
display compare il messaggio di errore
, ,
o
),
• le batterie sono quasi esaurite .
In questi casi ripetere la misurazione. Non muoversi o
parlare durante la misurazione. Se necessario reinserire
le batterie o sostituirle.
Allarme tecnico – Descrizione
Se la pressione sanguigna (sistolica o diastolica) risulta
al di fuori dei limiti indicati nel paragrafo “Dati tecnici”,
sul display viene visualizzato l’allarme tecnico “
„ o
„ LoLo“. In tal caso si consiglia di consultare un medico o di
verificare la correttezza del procedimento.
I valori limite dell’allarme tecnico sono preimpostati in
fabbrica e non possono essere modificati o disattivati.
Questi valori assumono la priorità ai sensi della norma
IEC 60601-1-8.
L’allarme tecnico non si arresta automaticamente e
non deve essere reimpostato. Il segnale visualizzato
sul display scompare automaticamente dopo circa
8secondi.
9. Pulizia e conservazione
dell’apparecchio e del manicotto
•
Pulire con attenzione l’apparecchio e il manicotto uti-
lizzando solo un panno leggermente inumidito.
•
Non utilizzare detergenti o solventi.
•
L’apparecchio e il manicotto non devono per nessun
motivo essere immersi nell’acqua, in quanto il liquido
potrebbe infiltrarsi e danneggiarli.
•
Non posizionare oggetti pesanti sull’apparecchio e sul
manicotto. Rimuovere le batterie.
10. Dati tecnici
Codice SBC 15
Metodo di misura-
zione
Misurazione oscillante e non inva-
siva della pressione al polso
Range di misurazione Pressione manicotto
0-300mmHg,
sistolica 60-260mmHg,
diastolica 40-199mmHg,
pulsazioni 40-180 battiti/minuto
63

Precisione dell’indi-
cazione
Sistolica ±3 mmHg,
Diastolica ±3 mmHg,
Pulsazioni ±5% del valore indi-
cato
Tolleranza Scostamento standard massimo
ammesso rispetto a esame cli-
nico:
sistolica 8 mmHg /
diastolica 8 mmHg
Memoria 2 x 60 posizioni di memoria
Dimensioni L 83,8mmx L59,9mmx
H29,4mm
Peso Circa 92g (senza batterie, con
manicotto)
Dimensioni del mani-
cotto
Da 140 a 195mm
Condizioni di funzio-
namento ammesse
+ 10°C - +40 °C, ≤85% umidità
relativa (senza condensa)
Condizioni di stoc-
caggio ammesse
-20 °C - +50 °C, ≤ 85% umidità
relativa, 800 – 1050hPa pressione
ambiente
Alimentazione
2 x batterie AAA 1,5 V
Durata delle batterie Ca. 170 misurazioni, in base alla
pressione sanguigna e di pom-
paggio
Classificazione
Alimentazione interna, IP22, non
fa parte della categoria AP/APG,
funzionamento continuo, parte
applicativa tipo BF
Ai fini dell’aggiornamento i dati tecnici sono soggetti a
modifiche senza preavviso.
•
L’apparecchio è conforme alla norma euro-
pea EN60601-1-2 (conformità con
CISPR11,
EN61000-4-2, EN61000-4-3, EN61000-4-8
) e neces-
sita di precauzioni d’impiego particolari per quanto
riguarda la compatibilità elettromagnetica. Apparec-
chiature di comunicazione HF mobili e portatili possono
influire sul funzionamento di questo apparecchio.
•
L’apparecchio è conforme alla direttiva CE per i
dispositivi medici 93/42/EEC, alla legge sui dispo-
sitivi medici e alle norme europee EN1060-1 (Sfig-
momanometri non invasivi Parte 1: Requisiti gene-
rali), EN1060-3 (Sfigmomanometri non invasivi
Parte3: Requisiti integrativi per sistemi elettromec-
canici per la misurazione della pressione arteriosa) e
IEC80601-2-30 (Apparecchi elettromedicali Parte 2 -
30: Prescrizioni particolari relative alla sicurezza fon-
64

damentale e alle prestazioni essenziali di misuratori di
pressione automatici non invasivi).
•
La precisione di questo misuratore di pressione è stata
accuratamente testata ed è stata sviluppata per una
lunga durata di vita utile. Se l’apparecchio viene uti-
lizzato a scopo professionale, è necessario effettuare
controlli tecnici con gli strumenti adeguati. Richiedere
informazioni dettagliate sulla verifica della precisione
all’indirizzo indicato del servizio assistenza.
11. Garanzia / Assistenza
Per ulteriori informazioni sulla garanzia e sulle condizioni
di garanzia, consultare la scheda di garanzia fornita.
Con riserva di errori e modifiche
65

Комплект поставки
•
Прибор для измерения кровяного давления с ман-
жетой
•
2батарейки ААА,1,5В LR03
•
Коробка для хранения
•
Инструкция по применению
Внимательно прочтите данную инструкцию по при-
менению, сохраняйте ее для последующего исполь-
зования, храните ее вместе, доступном для других
пользователей, иследуйте ее указаниям.
1. Знакомство сприбором
Убедитесь в том, что упаковка прибора не повре-
ждена, и проверьте комплектность поставки. Перед
использованием убедитесь втом, что прибор иего
принадлежности неимеют видимых повреждений,
иудалите все упаковочные материалы. При наличии
сомнений не используйте прибор и обратитесь к про-
давцу или по указанному адресу сервисной службы.
Прибор для измерения кровяного давления на запя-
стье служит для неинвазивного измерения икон-
троля артериального давления взрослых людей.
Сего помощью Вы сможете легко ибыстро измерять
кровяное давление, сохранять результаты измерений
впамяти ивыводить на экран кривую измерений.
При наличии нарушений сердечного ритма Вы полу-
чите предупреждение.
Полученные результаты измерений классифициру-
ются иотображаются вграфическом виде.
РУССКИЙ
1. Знакомство сприбором .........................................66
2. Важные указания ....................................................67
3. Описание прибора ..................................................72
4. Подготовка кизмерению ........................................73
5. Измерение кровяного давления ............................75
6. Оценка результатов .................................................77
7. Сохранение, просмотр и удаление результатов
измерения ..............................................................79
8.
Сообщение об ошибке/устранение ошибки .........80
9. Очистка ихранение прибора иманжеты ............81
10. Технические данные ..............................................81
11. Гарантия/Сервисное Обслуживание ....................83
Содержание
66
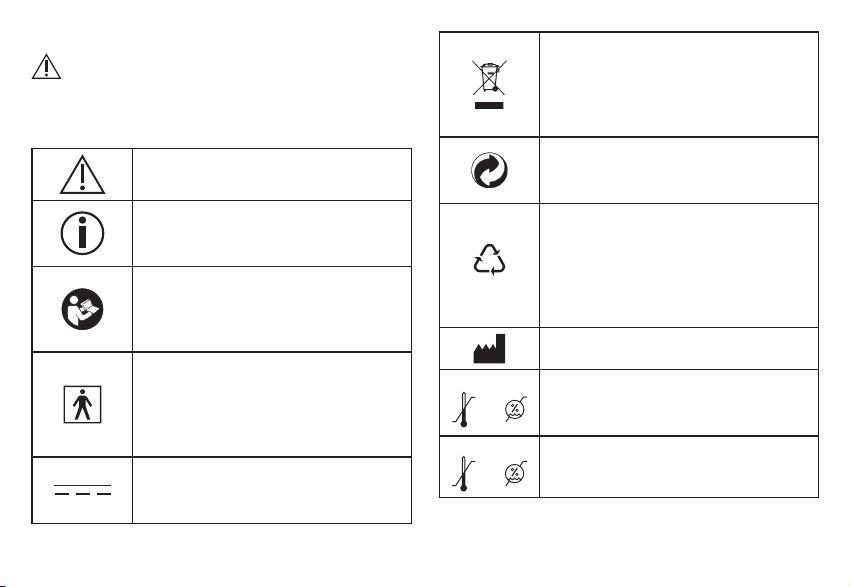
2. Важные указания
Пояснения ксимволам
Винструкции поприменению, наупаковке инатипо-
вой табличке прибора ипринадлежностей использу-
ются следующие символы.
Осторожно!
Информация об изделии
Обращает внимание на важную
информацию
Соблюдайте инструкцию
Перед началом работы и/или
использованием прибора или
устройства изучите инструкцию
Изоляция рабочих частей
Тип BF
Гальванически изолированная рабо-
чая часть (F обозначает floating—
плавающий)
Постоянный ток
Прибор предназначен только для
сети постоянного тока
Утилизация прибора всоответствии
сДирективой ЕС по отходам элек-
трического иэлектронного оборудо-
вания— WEEE (Waste Electrical and
Electronic Equipment)
Удалите элементы упаковки иути-
лизируйте их всоответствии смест-
ными предписаниями.
B
A
Маркировка для идентификации
упаковочного материала.
A= сокращенное обозначение мате-
риала, B= номер материала:
1-7= пластик,
20-22= бумага и картон
Производитель
Storage/Transport
Допустимая температура и влаж-
ность воздуха при хранении и транс-
портировке
Operating
Допустимая рабочая температура
ивлажность воздуха
67

IP22
Степень защиты IP
Прибор защищен от проникновения
твердых тел размером ≥12,5мм и
капель воды, падающих под углом
S
N
Серийный номер
Артикул
Медицинское изделие
Знак СЕ
Это изделие соответствует требо-
ваниям действующих европейских
инациональных директив.
Снимите упаковку сизделия иути-
лизируйте ее всоответствии смест-
ными предписаниями.
Указания по применению
•
Чтобы обеспечить сопоставимость данных, всегда
измеряйте кровяное давление водно ито же
время суток.
•
Втечение как минимум 30минут перед измере-
нием следует воздерживаться от приема пищи
ижидкости, атакже от курения или физических
нагрузок.
•
Отдохните втечение пяти минут перед первым
измерением артериального давления!
•
При проведении нескольких последовательных
сеансов измерения интервал между ними должен
составлять неменее минуты.
•
При наличии сомнений относительно полученных
результатов повторите измерение.
•
Результаты измерений, полученные Вами самосто-
ятельно, предназначены исключительно для Вас
ине могут заменить медицинского обследования!
Результаты измерений следует обсуждать врачом,
их ни вкоем случае нельзя использовать для при-
нятия самостоятельных решений относительно
лечения (например, оприеме лекарств иих дози-
ровке)!
•
Использование прибора для измерения кровяного
давления вне домашних условий или при движе-
нии (например, во время поездки в автомобиле, в
машине или вертолете скорой помощи, а также во
время физических упражнений) может повлиять на
точность и привести к ошибкам измерения.
•
Не используйте прибор для измерения кровяного
давления уноворожденных детей, беременных
женщин иу пациенток спреэклампсией.
68

•
В случае ограниченного кровоснабжения одной
руки в результате хронических или острых забо-
леваний кровеносных сосудов (в том числе суже-
ния сосудов) точность измерения артериального
давления на запястье ограничена. В этом случае
используйте прибор для измерения кровяного дав-
ления в плечевой артерии.
•
Данный прибор не предназначен для использо-
вания лицами (включая детей) сограниченными
физическими, сенсорными или умственными спо-
собностями, или лиц снедостаточными знаниями
или опытом, за исключением случаев, когда за
ними осуществляется надлежащий надзор со сто-
роны ответственного за них лица, либо они полу-
чили от этого лица указания по использованию
прибора. Необходимо следить за детьми ине раз-
решать им играть сприбором.
•
Сердечно-сосудистые заболевания могут при-
вести кнеправильным результатам измерения
или снижению точности измерения. Погрешно-
сти врезультатах измерения также возможны при
пониженном кровяном давлении, диабете, нару-
шениях кровоснабжения исердечного ритма, при
ознобе или треморе.
•
Не используйте прибор для измерения кровяного
давления вблизи высокочастотных приборов.
•
Применяйте прибор только для лиц собхватом
запястья, предусмотренным параметрами прибора.
•
Обратите внимание на то, что во время накачива-
ния может быть нарушена подвижность соответ-
ствующей части тела.
•
Во время измерения кровяного давления не допу-
скается прерывание циркуляции крови на длитель-
ное время. При сбое вработе прибора снимите
манжету сруки.
•
Избегайте длительного давления вманжете, атакже
частых измерений. Вызванное ими нарушение кро-
вообращения может привести ктравмам.
•
Убедитесь втом, что ккровеносным сосудам руки,
на которую накладывается манжета, не подсоеди-
нено медицинское оборудование (например, обо-
рудование для внутрисосудистого доступа или вну-
трисосудистой терапии, атакже артериовенозный
шунт).
•
Не используйте манжету уженщин, перенесших
ампутацию груди.
•
Во избежание дальнейших повреждений не накла-
дывайте манжету на раны.
•
Накладывайте манжету только на запястье. Не
накладывайте манжету на другие части тела.
•
Питание прибора для измерения кровяного давле-
ния производится исключительно от батареек.
69
•
Вцелях экономии заряда батареек прибор отклю-
чается автоматически, если не были нажаты
кнопки втечение минуты.
•
Допускается использование прибора только
вцелях, описываемых вданной инструкции по при-
менению. Изготовитель не несет ответственности
за ущерб, вызванный неквалифицированным или
ненадлежащим использованием прибора.
Указания по хранению иуходу
•
Прибор для измерения кровяного давления
состоит из прецизионных иэлектронных компо-
нентов. Точность измерений исрок службы при-
бора зависят от бережного обращения сним:
— Защищайте прибор от ударов, влажности,
загрязнения, сильных колебаний температуры
ипрямых солнечных лучей.
— Не роняйте прибор.
— Не используйте прибор вблизи сильных элек-
тромагнитных полей, держите его на значи-
тельном расстоянии от радиоаппаратуры или
мобильных телефонов.
•
Если прибор не используется длительное время,
извлеките батарейки.
Указания по обращению сбатарейками
•
При попадании жидкости из аккумулятора на кожу
или вглаза необходимо промыть соответствующий
участок большим количеством воды иобратиться
кврачу.
•
Опасность проглатывания мелких дета-
лей! Маленькие дети могут проглотить батарейки
иподавиться ими. Поэтому батарейки необходимо
хранить внедоступном для детей месте!
•
Обращайте внимание на обозначение полярности:
плюс (+) иминус (–).
•
Если батарейка потекла, очистите отделение для
батареек сухой салфеткой, предварительно надев
защитные перчатки.
•
Защищайте батарейки от чрезмерного воздействия
тепла.
•
Опасность взрыва! Не бросайте батарейки
вогонь.
•
Не заряжайте ине замыкайте батарейки накоротко.
•
Если прибор длительное время не используется,
извлеките батарейки из отделения для батареек.
•
Используйте батарейки только одного типа или
равноценных типов.
•
Заменяйте все батарейки сразу.
•
Не используйте перезаряжаемые аккумуляторы!
70

•
Не разбирайте, не вскрывайте ине разбивайте
батарейки.
Указания по ремонту иутилизации
•
Не выбрасывайте использованные батарейки
вбытовой мусор. Утилизируйте использованные
батарейки впредусмотренных для этого пунктах
сбора.
•
Не разбирайте прибор. Несоблюдение этого требо-
вания ведет кпотере гарантии.
•
Ни вкоем случае не ремонтируйте ине регули-
руйте прибор самостоятельно. Впротивном случае
надежность работы прибора больше не гарантиру-
ется.
•
Ремонтные работы должны производиться только
сервисной службой или авторизованными торго-
выми представителями.
Перед предъявлением претензий проверьте ипри
необходимости замените батарейки.
•
Винтересах защиты окружающей среды поокон-
чании срока службы следует утилизиро-
вать прибор отдельно отбытового мусора.
Утилизация должна производиться через
соответствующие пункты сбора вВашей
стране. Прибор следует утилизировать согласно
Директиве ЕС поотходам электрического иэлек-
тронного оборудования— WEEE (Waste Electrical
and Electronic Equipment). Припоявлении вопросов
обращайтесь вместную коммунальную службу,
ответственную заутилизацию отходов.
Указания по электромагнитной
совместимости
•
Прибор предназначен для работы в условиях,
перечисленных в настоящей инструкции по приме-
нению, в том числе в домашних условиях.
•
При наличии электромагнитных помех возможно-
сти использования прибора могут быть ограни-
чены. В результате, например, могут появляться
сообщения об ошибках или произойдет выход из
строя дисплея/самого прибора.
71
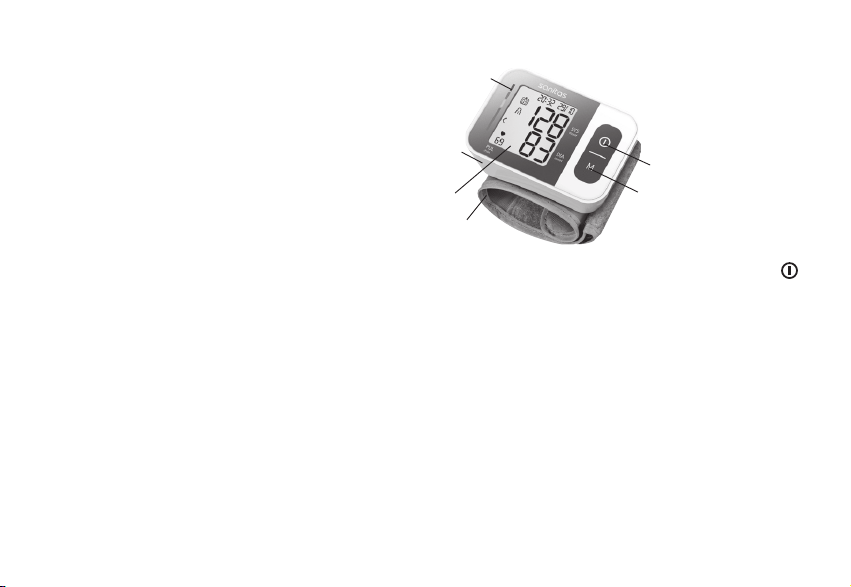
•
Не используйте данный прибор рядом сдругими
устройствами и не устанавливайте его на дру-
гие приборы, это может вызвать ошибки в работе.
Однако, если использование прибора все-таки
необходимо в том виде, как описано выше, следует
наблюдать за ним и другими устройствами, чтобы
убедиться, что они работают надлежащим образом.
•
Применение сторонних принадлежностей, отли-
чающихся от прилагаемого к данному прибору,
может привести к росту электромагнитных помех
или ослаблению помехоустойчивости прибора и
тем самым вызвать ошибки в работе.
•
Несоблюдение данного указания может отрица-
тельно сказаться на характеристиках мощности
прибора.
3. Описание прибора
1
6
5
3
4
2
1. Дисплей
2. Манжета на запястье
3. Индикатор риска
4. Кнопка ВКЛ./ВЫКЛ.
5. Кнопка вызова памяти M
6. Крышка отделения для
батареек
72
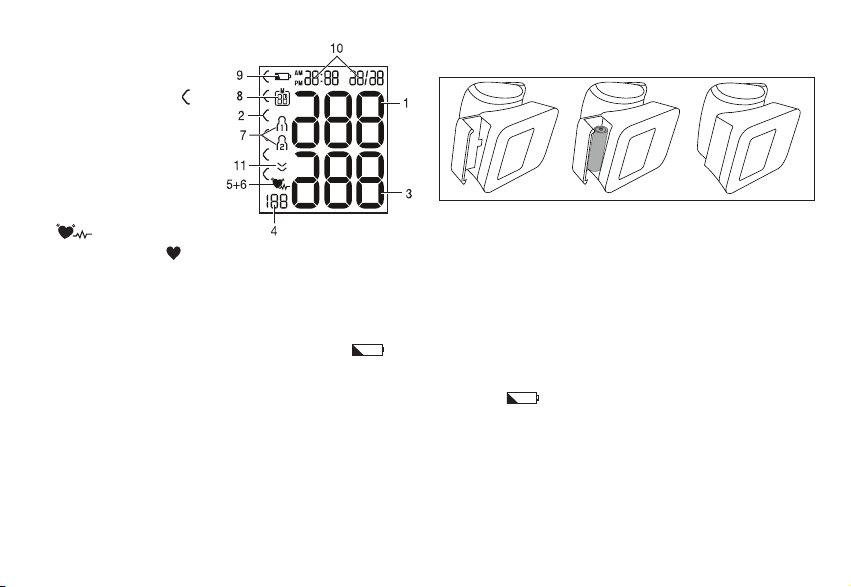
Индикация на дисплее:
1. Систолическое дав-
ление
2. Индикатор риска
3. Диастолическое дав-
ление
4. Измеренное значение
пульса
5. Символ нарушений
сердечного ритма
6. Символ пульса
7. Пользовательская память
8. Номер ячейки памяти/индикация среднего зна-
чения из сохраненных впамяти (
A A
), утром (
AM AM
),
вечером (
PM PM
)
9. Символ необходимости замены батареек
10. Время идата
11. Выпуск воздуха (стрелка)
4. Подготовка кизмерению
Установка батарейки
•
Снимите крышку отсека для батареек слевой сто-
роны прибора.
•
Вставьте две алкалиновые батарейки 1,5ВMicro
(тип LR03).
•
При установке батареек соблюдайте полярность
согласно маркировке. Неиспользуйте заряжаемые
аккумуляторы.
•
Аккуратно закройте крышку отсека для батареек.
При отображении символа необходимости замены
батареек
проведение измерений невозможно;
следует заменить все батарейки.
73
Утилизация батареек
• Выбрасывайте использованные, полностью раз-
ряженные батарейки вспециальные контейнеры,
сдавайте впункты приема спецотходов или вмага-
зины электрооборудования. Закон обязывает поль-
зователей обеспечить утилизацию батареек.
• Следующие знаки предупреждают оналичии
вбатарейках токсичных веществ:
Pb = батарейка содержит свинец,
Cd = батарейка содержит кадмий,
Hg = батарейка содержит ртуть.
Настройка часового формата, даты
ивремени
Обязательно установите дату ивремя. Только так
можно сохранять впамять ивыводить наэкран
измеренные значения справильной датой ивреме-
нем.
Меню для выполнения настроек вызывается
двумя различными способами.
•
Перед первым использованием ипосле каждой
замены батареек:
после установки батареек вприбор Выавтомати-
чески попадаете всоответствующее меню.
•
Если батарейки уже установлены:
при выключенном приборе нажмите кнопку ВКЛ./
ВЫКЛ. иудерживайте еенажатой втечение
5секунд.
Вэтом меню Выможете последовательно выставить
следующие настройки.
Часовой формат
➔
Дата
➔
Время
Формат времени
•
Нажмите иудерживайте кнопку ВКЛ./
ВЫКЛ. в
течение 5секунд или устано-
вите батарейки. Отображается дисплей
полностью.
•
Спомощью кнопки сохранения Mвыбе-
рите нужный часовой формат иподтвер-
дите выбор нажатием кнопки ВКЛ./ВЫКЛ.
Дата
На дисплее замигает индикация года.
•
Спомощью кнопки сохранения
Mвыберите нужный год иподтвер-
дите выбор нажатием кнопки ВКЛ./
ВЫКЛ.
74
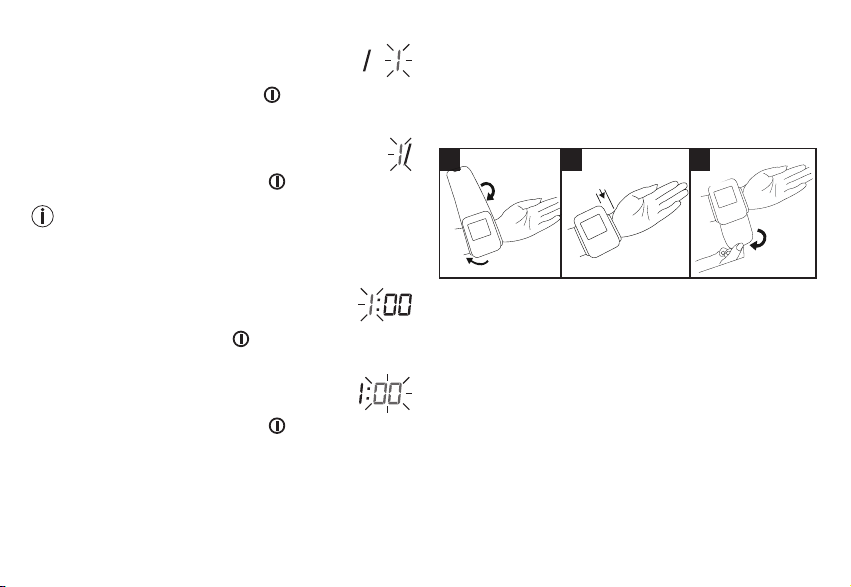
На дисплее замигает индикация месяца.
•
Спомощью
кнопки сохранения M
выбе-
рите нужный месяц иподтвердите выбор
нажатием кнопки ВКЛ./ВЫКЛ.
На дисплее замигает индикация дня.
•
Спомощью кнопки сохранения Mвыберите
необходимый день иподтвердите выбор
нажатием кнопки ВКЛ./ВЫКЛ.
Если выбирается 12-часовой формат, последова-
тельность отображения дня имесяца меняется.
Время
Надисплее замигает индикация часов.
•
Спомощью кнопки сохранения Mуста-
новите часы иподтвердите выбор нажа-
тием кнопки ВКЛ./ВЫКЛ.
Надисплее замигает индикация минут.
•
Спомощью кнопки сохранения Mуста-
новите минуты иподтвердите выбор
нажатием кнопки ВКЛ./ВЫКЛ.
После установки всех данных прибор автоматически
отключится.
5. Измерение кровяного давления
Для проведения измерений температура прибора
должна соответствовать комнатной. Измерение
можно осуществлять на левом или правом запястье.
Накладывание манжеты
1 2 3
1 cm
•
Оголите запястье. Следите за тем, чтобы кро-
воснабжение руки не было нарушено из-за слиш-
ком узкой одежды ит.п.
Наложите манжету на внутреннюю сторону запя-
стья.
•
Зафиксируйте манжету спомощью застежки-ли-
пучки таким образом, чтобы верхний край прибора
находился ниже подушечки уоснования большого
пальца руки примерно на 1см.
•
Манжета должна плотно облегать запястье, но не
стягивать его.
Давление влевой иправой руке может отличаться,
что объясняет возможное различие врезультатах
75
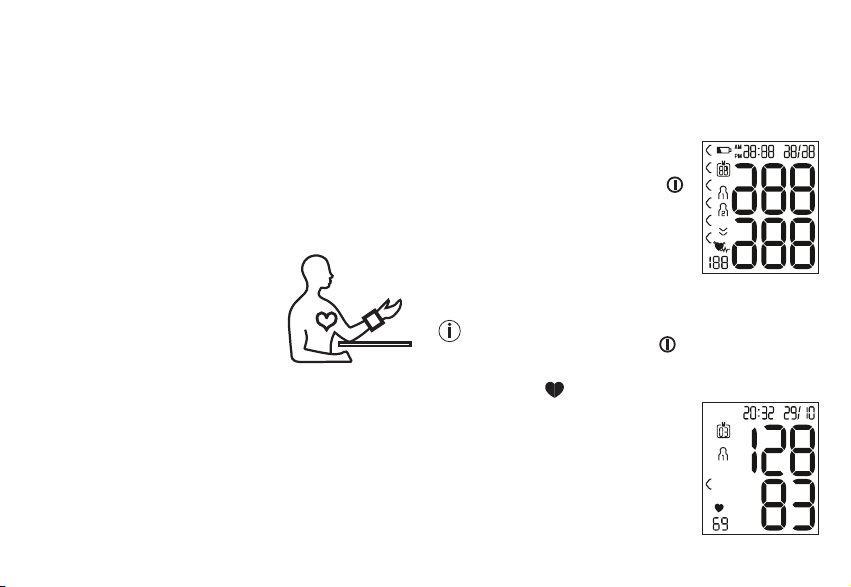
измерений. Всегда проводите измерение на одной
итой же руке.
Если различие врезультатах слишком велико, необ-
ходимо обсудить сврачом, на какой руке будут про-
водиться измерения.
Правильное положение тела
•
Отдохните втечение пяти минут перед первым
измерением артериального давления! В противном
случае возможны отклонения результатов измере-
ния.
•
Вы можете проводить измерение вположении сидя
или лежа. Для измерения кровя-
ного давления займите удобное
положение сидя. Спина ируки
должны иметь опору. Не скре-
щивайте ноги. Поставьте ступни
ровно на пол. Необходимо
подпереть руку исогнуть ее влокте. Обязательно
следите за тем, чтобы манжета находилась на
уровне сердца. Впротивном случае возможны
значительные отклонения результатов измерения.
Расслабьте руку иладони.
•
Чтобы избежать искажения результатов, во время
измерения следует вести себя спокойно ине раз-
говаривать.
•
Перед повторным измерением подождите неменее
минуты!
Измерение кровяного давления
Наложите манжету, как описано выше, изаймите
удобное для измерения положение.
•
Для запуска прибора для изме-
рения кровяного давления
нажмите кнопку ВКЛ./ВЫКЛ.
На короткое время на дисплее
загорятся все индикаторы.
• Отобразится последнее изме-
ренное значение, через 3 секунды
прибор автоматически начнет
измерение.
Измерение можно прервать влюбой момент,
нажав кнопку ВКЛ./ВЫКЛ.
Как только прибор распознает пульс, отобразится
символ пульса .
•
Отобразятся результаты изме-
рения систолического давления,
диастолического давления
ипульса.
• • • • • • • • • • • • •
76
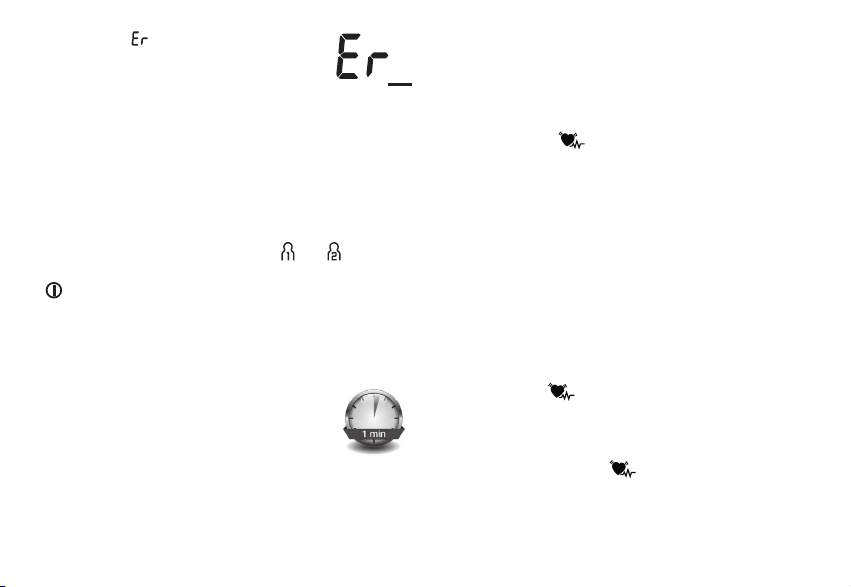
•
Сообщение
_
появляется, если
измерение не удалось выполнить пра-
вильно. Прочитайте главу «Сообщение
об ошибке/устранение ошибки» вдан-
ной инструкции по применению иповторите изме-
рение.
•
Теперь при помощи кнопки сохранения Mвыбе-
рите нужную пользовательскую память. Если Вы
не выбрали пользовательскую память, то резуль-
тат измерения будет сохранен впользовательской
памяти последнего пользователя. На дисплее появ-
ляется соответствующий символ или .
•
Выключите прибор, нажав кнопку ВКЛ./ВЫКЛ.
Таким образом ввыбранной пользовательской
памяти сохранится результат измерения.
Если Вы забудете выключить прибор, он выключится
автоматически через 1минуту.
Даже в этом случае результат измерения будет
сохранен в выбранной или последней ячейке исполь-
зованной пользовательской памяти.
Перед повторным измерением подождите
неменее минуты!
6. Оценка результатов
Нарушения сердечного ритма
Данный прибор во время измерения может иден-
тифицировать возможные нарушения сердечного
ритма ипри их наличии сообщает оних после изме-
рения символом
.
Это может указывать на аритмию. Аритмия— это
болезнь, при которой возникает аномальный сердеч-
ный ритм, вызванный сбоями вбиоэлектрической
системе, регулирующей биение сердца. Симптомы
(неравномерное или преждевременное сердцебие-
ние, медленный или слишком быстрый пульс) могут
быть вызваны заболеваниями сердца, возрастом,
предрасположенностью кзаболеваниям, избытком
кофе иалкоголя, стрессом или недостаточным сном.
Аритмия может быть выявлена только врезультате
обследования уврача.
Если после первого измерения на дисплее отобра-
жается символ , повторите измерение. Обра-
тите внимание на то, что втечение 5минут перед
измерением нельзя заниматься активной деятель-
ностью, аво время измерения нельзя говорить или
двигаться. Если символ появляется часто, обра-
титесь кврачу. Самодиагностика исамолечение на
основе результатов измерения могут быть опасны.
Обязательно следуйте рекомендациям своего врача.
77

Индикатор риска
Оценку результатов измерений можно провести
спомощью таблицы, представленной ниже.
Однако эти стандартные значения служат только
общим ориентиром, так как индивидуальные значе-
ния кровяного давления уразных людей варьируются
взависимости от принадлежности ктой или иной
возрастной группе ит.п.
Важно регулярно консультироваться сврачом. Врач
определит Ваши индивидуальные значения нормаль-
ного кровяного давления, атакже значения, выше
которых кровяное давление следует классифициро-
вать как опасное.
Градация на дисплее ишкала на приборе показывают,
вкаком диапазоне находится измеренное давление.
Если значения систолического идиастолического
давления находятся вразных диапазонах (например,
систолическое давление — высокое вдопустимых
пределах, адиастолическое — нормальное), то гра-
фическое деление на приборе всегда будет отобра-
жать более высокие пределы, как вописанном при-
мере: высокое вдопустимых пределах.
Диапазон зна-
чений кровя-
ного давления
Систолическое
давление
(в мм рт. ст.)
Диастолическое
давление
(в мм рт. ст.)
Рекомендуе-
мые меры
Степень3:
тяжелая
гипертония
≥ 180 ≥ 110
Обращение
кврачу
Степень2:
пограничная
гипертония
160–179 100–109
Обращение
кврачу
Степень1:
слабая сте
-
пень гипер-
тонии
140–159 90–99
Регулярное
посещение
врача
Высокое
вдопустимых
пределах
130–139 85–89
Регулярное
посещение
врача
Нормальное 120–129 80–84 Самоконтроль
Оптимальное < 120 < 80 Самоконтроль
Источник: WHO, 1999 (World Health Organization).
78
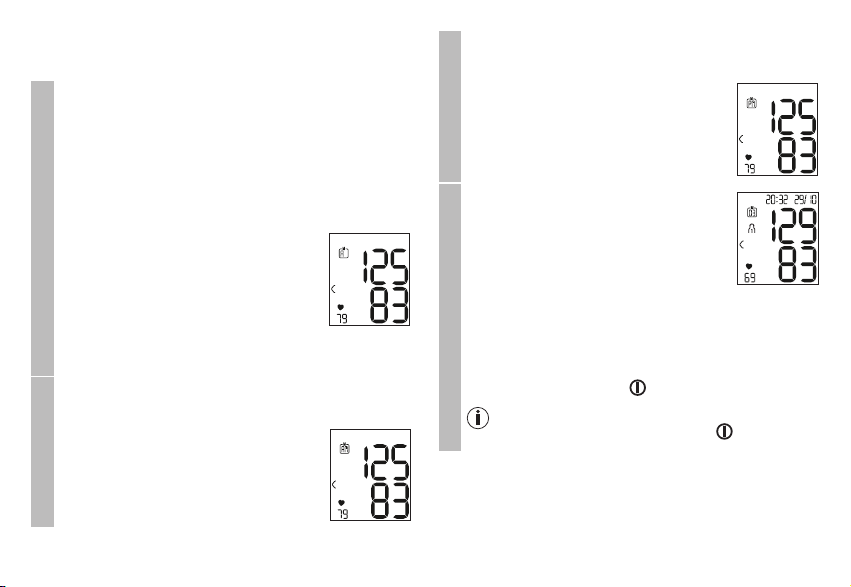
7. Сохранение, просмотр и удаление
результатов измерения
Пользовательская память
Результаты каждого успешного измерения
сохраняются с указанием даты и времени
измерения. Когда количество сохраненных
результатов измерения превышает 60, более
ранние данные заменяются последующими.
•
Чтобы снова вызвать результаты измерения на
дисплей, нажмите на кнопку сохранения M.
На дисплее замигает
AMAM
.
Отобразится среднее значение
всех сохраненных вданной
пользовательской памяти
результатов измерений.
Чтобы сменить пользовательскую память, удер-
живайте кнопку сохранения Mоколо 2 секунд.
Средние значения
•
Нажмите кнопку сохранения M.
На дисплее замигает
AMAM
.
Отобразится среднее значение
результатов утренних измерений
за последние 7дней (утро: 5:00
– 9:00).
Средние значения
•
Нажмите кнопку сохранения M.
На дисплее замигает
PMPM
.
Отобразится среднее значение
результатов вечерних измерений
за последние 7дней (вечер: 18:00
– 20:00).
Результаты отдельных измерений
•
При повторном нажатии кнопки
сохранения Mнадисплее ото-
бразится результат последнего
измерения (вкачестве примера
используется измерение 03).
•
Если еще раз нажать кнопку сохранения M,
можно просмотреть результаты отдельных
измерений.
•
Чтобы вновь выключить прибор, нажмите
кнопку ВКЛ./ВЫКЛ.
Из меню можно влюбое время выйти
нажатием кнопки ВКЛ./ВЫКЛ.
79
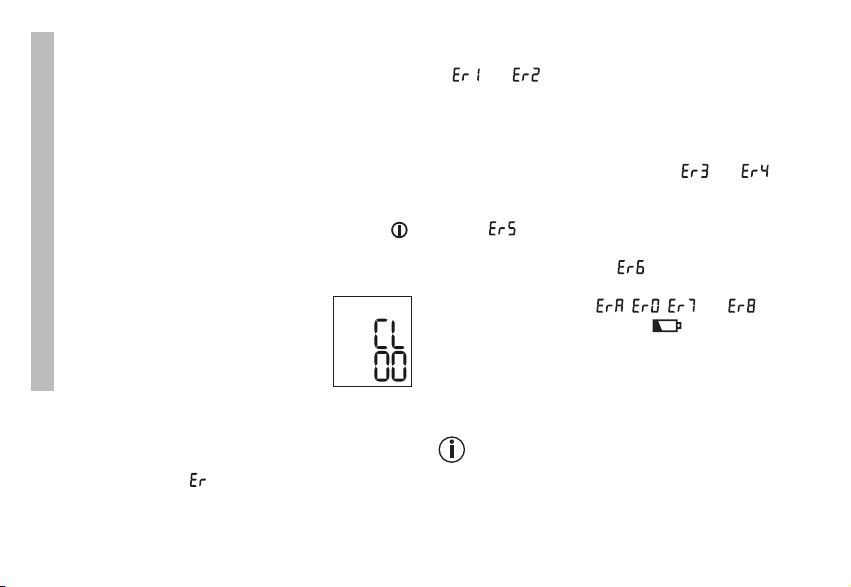
Удаление результатов измерения
•
Для удаления содержимого соответствующей
пользовательской памяти выберите пользова-
тельскую память.
•
Запустите запрос средних результатов изме-
рений. На дисплее замигает A и отобразится
среднее значение всех сохраненных вданной
пользовательской памяти результатов измере-
ний.
•
Удерживайте нажатой втечение 5 секунд
кнопку сохранения Mи кнопку ВКЛ./ВЫКЛ.
в зависимости от того, в какой пользователь-
ской памяти Вы находитесь.
Все значения текущей
пользовательской памяти будут
удалены, априбор выключится.
8.
Сообщение об ошибке/устранение
ошибки
При возникновении ошибок на дисплее появляется
сообщение об ошибке _.
Сообщения об ошибках появляются, если
• не удалось измерить систолическое или диастоли
-
ческое давление (на дисплее появляется надпись
или
),
• значения измерения систолического или диастоли-
ческого давления не входят вдиапазон измерения
(на дисплее появляется надпись
Hi
или
Lo
),
• манжета затянута слишком слабо или слишком туго
(на дисплее появляется надпись
или
),
• втечение более, чем 1,5 секунд, кровяное давление
выше 300ммрт.ст. (на дисплее появляется над
-
пись ),
• накачивание длится более 180секунд (на дисплее
появляется сообщение ),
• произошел сбой вработе системы или прибора (на
дисплее появляется
, , или
),
• батарейки почти разряжены .
В таких случаях выполните повторное измерение.
Помните, что Вы не должны двигаться или говорить
во время измерения. При необходимости установите
батарейки заново или замените их.
Сигнал тревоги при несоблюдении
технических данных — описание
Если измеренное значение артериального давления
(систолического или диастолического) находится за
пределами границ, указанных в разделе «Техниче-
ские данные», на дисплее отобразится сигнал тре-
80

воги, имеющий вид сообщения « » или «LoLo». В этом
случае следует обратиться к врачу или проверить
правильность процедуры измерения.
Граничные значения сигнала тревоги установлены
на предприятии-изготовителе и не могут быть изме-
нены или деактивированы. Согласно стандарту
IEC 60601-1-8, эти значения обладают низким прио-
ритетом.
Сигнал тревоги при несоблюдении технических дан-
ных не требует сброса и отключается самостоя-
тельно. Отображаемый на дисплее сигнал исчезает
автоматически примерно через 8 секунд.
9. Очистка ихранение прибора
иманжеты
•
Производите очистку прибора иманжеты состорож-
ностью. Используйте только слегка увлажненную
салфетку.
•
Не используйте чистящие средства или раствори-
тели.
•
Ни вкоем случае не опускайте прибор иманжету
вводу, так как попадание воды приведет кповреж-
дению прибора иманжеты.
•
При хранении на приборе иманжете не должны
стоять тяжелые предметы. Извлеките батарейки.
10. Технические данные
№ модели SBC 15
Метод измерения Осциллометрическое неинва-
зивное измерение кровяного
давления на запястье
Диапазон изме-
рения
Давление вманжете
0–300ммрт.ст.,
систолическое
60–260ммрт.ст.,
диастолическое
40–199ммрт.ст.,
пульс 40–180ударов/мин
Точность индикации ± 3ммрт.ст. для систоличе-
ского,
± 3ммрт.ст. для диастоличе-
ского,
пульс ± 5% от указываемого
значения
Погрешность изме-
рения
Максимально допустимое стан-
дартное отклонение по резуль-
татам клинических испытаний:
8ммрт.ст. для систолического/
8ммрт.ст. для диастоличе-
ского давления
Память 2 блока по 60 ячеек памяти
81

Размеры Д83,8ммx Ш59,9ммx
В29,4мм
Вес Примерно 92г (без батареек,
сманжетой)
Размер манжеты от 140 до 195мм
Допустимые усло-
вия эксплуатации
от + 10°Cдо +40 °Cпри отно-
сительной влажности воздуха
≤85 % (без образования кон-
денсата)
Допустимые усло-
вия хранения
от -20 °Cдо +50 °Cпри отно-
сительной влажности воздуха
≤ 85 % идавлении окружающей
среды 800 – 1050гПа
Электропитание 2батарейки типа ААА, 1,5В
Срок службы бата-
реек
Примерно 170 измерений, в
зависимости от уровня кровя-
ного давления или давления
накачивания
Классификация Внутреннее питание, IP22, без
AP или APG, продолжительное
использование, рабочая часть
типа BF
Всвязи сусовершенствованием продукта компания
оставляет за собой право на изменение технических
характеристик без предварительного уведомления.
•
Данный прибор соответствует европейскому стан-
дарту EN60601-1-2 (в соответствии с CISPR11,
EN61000-4-2, EN61000-4-3, EN61000-4-8) итре-
бует особых мер предосторожности вотношении
электромагнитной совместимости. Следует учесть,
что переносные имобильные высокочастотные
коммуникационные устройства могут повлиять на
работу данного прибора.
•
Прибор соответствует требованиям директивы
ЕС93/42/EEC омедицинском оборудовании, закона
омедицинском оборудовании, атакже европей-
ских стандартов EN1060-1 (неинвазивные при-
боры для измерения кровяного давления, часть1:
общие требования), EN1060-3 (неинвазивные при-
боры для измерения кровяного давления, часть3:
дополнительные требования кэлектромеханиче-
ским приборам для измерения кровяного давления)
иIEC80601-2-30 (медицинские электрические при-
боры, часть2-30: особые предписания по обеспе-
чению безопасности, включая основные характери-
стики автоматизированных неинвазивных приборов
для измерения кровяного давления).
•
Точность данного прибора для измерения кровя-
ного давления была тщательно проверена, прибор
82

Возможны ошибки и изменения
был разработан срасчетом на длительный срок
эксплуатации. При использовании прибора вмеди-
цинских учреждениях следует выполнять метроло-
гический контроль спомощью соответствующих
средств. Точные данные для проверки точности
прибора можно запросить всервисном центре.
11. Гарантия/Сервисное Обслуживание
Более подробная информация по гарантии/сервису
находится в гарантийном/сервисном талоне, который
входит в комплект поставки.
83

Zawartość opakowania
•
Ciśnieniomierz zmankietem
•
2 baterie AAA 1,5 VLR03
•
Pudełko do przechowywania
•
Instrukcja obsługi
Należy dokładnie przeczytać niniejszą instrukcję obsługi,
zachować ją iprzechowywać wmiejscu dostępnym dla
innych użytkowników oraz przestrzegać podanych wniej
wskazówek.
1. Informacje ourządzeniu
Urządzenie należy sprawdzić pod kątem zewnętrznych
uszkodzeń opakowania oraz kompletności zawartości.
Przed użyciem upewnić się, że urządzenie iakcesoria nie
wykazują żadnych widocznych uszkodzeń, awszystkie
elementy opakowania zostały usunięte. Wrazie wątpli-
wości nie używać urządzenia iskontaktować się zprzed-
stawicielem handlowym lub napisać na podany adres
serwisu.
Ciśnieniomierz na nadgarstek służy do nieinwazyj-
nego pomiaru imonitorowania ciśnienia tętniczego
krwi udorosłych. Umożliwia on łatwy iszybki pomiar
ciśnienia krwi, atakże zapisanie zmierzonych warto-
ści iwyświetlenie ich wformie wykresu. Urządzenie
ostrzega użytkownika wrazie wystąpienia zaburzeń
rytmu serca.
Zmierzone wartości są klasyfikowane ioceniane wfor-
mie graficznej.
POLSKI
1. Informacje ourządzeniu ............................................ 84
2. Ważne wskazówki .....................................................85
3. Opis urządzenia .........................................................89
4. Przygotowanie do pomiaru .......................................90
5. Pomiar ciśnienia krwi ................................................92
6. Interpretacja wyników ...............................................94
7. Zapis, odczyt iusuwanie wyników pomiaru ............ 96
8. Komunikaty błędów / usuwanie błędów .................97
9. Czyszczenie iprzechowywanie urządzenia oraz
mankietu ..................................................................98
10. Dane techniczne ......................................................98
11. Gwarancja/serwis .................................................... 99
Spis treści
84
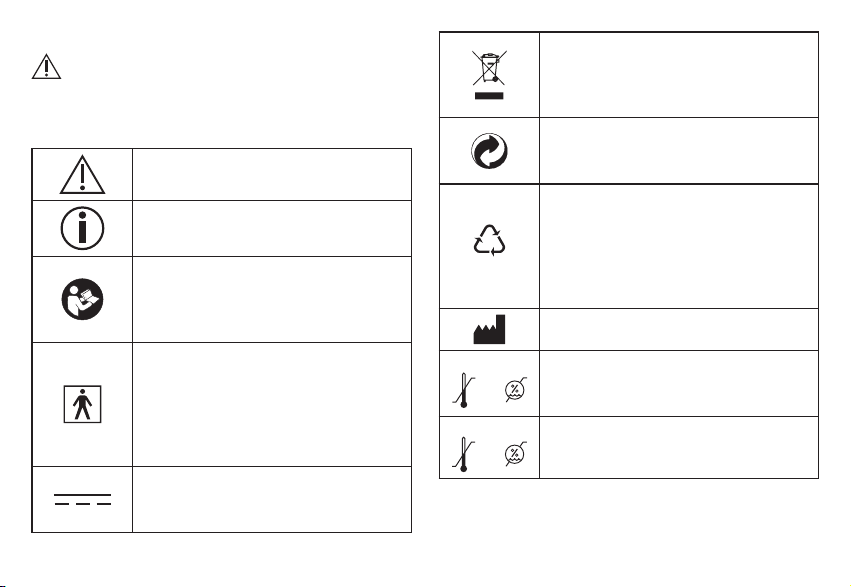
2. Ważne wskazówki
Objaśnienie symboli
Winstrukcji obsługi, na opakowaniu itabliczce zna-
mionowej urządzenia oraz akcesoriów są umieszczone
następujące symbole:
Uwaga
Informacja o produkcie
Wskazówka z ważnymi informacjami.
Przestrzegać instrukcji
Przed rozpoczęciem pracy /
użytkowania urządzeń lub maszyn
należy przeczytać instrukcję
Izolacja miejsca zastosowania
Typ BF
Stanowisko izolowane barierą
galwaniczną (BF oznacza Body Float),
spełnia wymagania dotyczące prądu
upływu w typie B.
Prąd stały
Urządzenie jest przeznaczone
wyłącznie do zasilania prądem stałym.
Utylizacja zgodnie zdyrektywą WE
ozużytych urządzeniach elektrycznych
ielektronicznych – WEEE (Waste
Electrical and Electronic Equipment)
Oddzielić elementy opakowania i zuty-
lizować je zgodnie z lokalnymi prze-
pisami.
B
A
Oznakowanie identyfikujące materiał
opakowaniowy.
A = skrót nazwy materiału,
B = numer materiału:
1-7 = tworzywa sztuczne,
20-22 = papier i tektura
Producent
Storage/Transport
Dopuszczalna temperatura iwilgotność
powietrza podczas przechowywania
oraz transportu.
Operating
Dopuszczalna temperatura iwilgotność
powietrza podczas pracy
85

IP22
Klasyfikacja IP
Ochrona urządzenia przed ciałami
obcymi owielkości ≥12,5 mm
ikroplami wody spadającymi ukośnie
S
N
Numer seryjny
Numer artykułu.
Produkt medyczny
Oznakowanie CE
Niniejszy produkt spełnia wymagania
obowiązujących dyrektyw europejskich
i krajowych.
Oddzielić produkt i elementy opakowa-
nia i zutylizować je zgodnie z lokalnymi
przepisami.
Wskazówki dotyczące użytkowania
•
Ciśnienie należy mierzyć zawsze otej samej porze
dnia, aby zmierzone wartości były porównywalne.
•
Przez co najmniej 30 minut przed wykonaniem
pomiaru nie należy jeść, pić, palić ani podejmować
wysiłku fizycznego.
•
Przed pierwszym pomiarem ciśnienia krwi należy
zawsze odpocząć przez ok. 5 minut!
•
Jeśli użytkownik chce wykonać kolejno większą liczbę
pomiarów, należy zachować przerwy między pomia-
rami wynoszące przynajmniej 1 minutę.
•
Pomiar należy powtórzyć, jeśli zmierzona wartość
budzi wątpliwości.
•
Zmierzone wartości mają wyłącznie charakter infor-
macyjny – pomiar ciśnienia nie zastępuje badania
lekarskiego! Wyniki pomiaru ciśnienia należy skonsul-
tować zlekarzem. Na podstawie pomiaru wżadnym
wypadku nie wolno samodzielnie podejmować decyzji
medycznych (np. dotyczących stosowania leków iich
dawkowania)!
•
Używanie ciśnieniomierza poza domem lub wruchu
(np. podczas podróży wsamochodzie, karetce lub
śmigłowcu bądź wtrakcie wykonywania ćwiczeń
fizycznych, np. sportu) może wpływać na dokładność
pomiaru iprowadzić do błędów pomiaru.
•
Nie wolno używać ciśnieniomierza do pomiaru ciśnie-
nia tętniczego unoworodków ikobiet ciężarnych oraz
cierpiących na zatrucie ciążowe.
•
Wprzypadku problemów zukrwieniem ręki wwyniku
przewlekłych lub ostrych schorzeń naczyniowych
(m.in. zwężenia naczyń krwionośnych) dokładność
pomiaru ciśnieniomierza nadgarstkowego jest ograni-
czona. Wtakiej sytuacji należy zastosować ciśnienio-
mierz naramienny.
86

•
Urządzenie nie może być obsługiwane osoby (wtym
dzieci) oograniczonej sprawności fizycznej, rucho-
wej oraz umysłowej lub zbrakiem doświadczenia i/
lub wiedzy, chyba że znajdują się one pod nadzorem
odpowiedniej osoby odpowiedzialnej za ich bezpie-
czeństwo lub otrzymały od niej instrukcje, jak należy
korzystać zurządzenia. Należy uważać, aby dzieci nie
bawiły się urządzeniem.
•
Choroby układu krążenia mogą powodować błędy
pomiaru lub zaburzać jego dokładność. Dotyczy to
także bardzo niskiego ciśnienia krwi, cukrzycy, zabu-
rzeń rytmu serca iukrwienia, atakże dreszczy idrga-
wek.
•
Ciśnieniomierza nie wolno używać razem zurządze-
niem chirurgicznym wysokiej częstotliwości.
•
Urządzenie należy stosować wyłącznie uosób opoda-
nym obwodzie nadgarstka.
•
Podczas pompowania urządzenia może dojść do
zaburzenia sprawności kończyny, na której jest doko-
nywany pomiar.
•
Nie wolno zakłócać cyrkulacji krwi przez zbyt długi
pomiar ciśnienia. Wprzypadku nieprawidłowego dzia-
łania urządzenia należy zdjąć mankiet zramienia.
•
Unikać utrzymywania ciśnienia wmankiecie oraz czę-
stych pomiarów. Wynikające ztego zaburzenie prze-
pływu krwi może spowodować uszczerbek na zdrowiu.
•
Mankietu nie należy zakładać na ramię, wktórym
leczone są tętnice iżyły, np. stosowana jest angiopla-
styka / terapia naczyń krwionośnych, lub występuje
przetoka tętniczo-żylna (AV).
•
Nie zakładać mankietu osobom po amputacji piersi.
•
Nie zakładać mankietu na rany, aby nie spowodować
dalszych obrażeń.
•
Zakładać mankiet wyłącznie na nadgarstek. Nie zakła-
dać mankietu winnych miejscach ciała.
•
Ciśnieniomierz może być zasilany wyłącznie bateriami.
•
Jeśli przez minutę nie zostanie naciśnięty żaden przy-
cisk, nastąpi automatyczne wyłączenie ciśnieniomie-
rza wcelu oszczędzania baterii.
•
Urządzenie jest przeznaczone wyłącznie do używania
wcelu określonym wniniejszej instrukcji obsługi. Pro-
ducent nie ponosi odpowiedzialności za szkody wyni-
kające zniewłaściwego użytkowania urządzenia.
Wskazówki dotyczące przechowywania
ikonserwacji
•
Ciśnieniomierz zawiera precyzyjne podzespoły elektro-
niczne. Zurządzeniem należy się obchodzić ostrożnie,
aby zapewnić jego trwałość idokładność pomiarów:
– Urządzenie należy chronić przed wstrząsami, wilgo-
cią, zanieczyszczeniem, dużymi wahaniami tempera-
tury ibezpośrednim nasłonecznieniem.
– Urządzenie należy chronić przed upadkiem.
87
– Nie używać ciśnieniomierza wpobliżu silnych pól
elektromagnetycznych, awzwiązku ztym nie zbliżać
go do nadajników radiowych ani telefonów komórko-
wych.
•
Jeśli urządzenie nie będzie używane przez dłuższy
czas, należy wyjąć baterie.
Wskazówki dotyczące postępowania zbateriami
•
Jeśli dojdzie do kontaktu elektrolitu ze skórą lub
zoczami, należy przemyć podrażnione miejsca wodą
iskontaktować się zlekarzem.
•
Niebezpieczeństwo połknięcia! Małe dzieci
mogą połknąć baterie iudusić się nimi. Dlatego należy
przechowywać baterie wmiejscach niedostępnych dla
małych dzieci!
•
Należy przestrzegać znaków polaryzacji plus (+)
iminus (–).
•
Jeśli zbaterii wycieknie elektrolit, należy założyć ręka-
wice ochronne iwyczyścić komorę baterii suchą
szmatką.
•
Chronić baterie przed nadmiernym działaniem wyso-
kiej temperatury.
•
Zagrożenie wybuchem! Nie wrzucać baterii do
ognia.
•
Nie wolno ładować ani zwierać baterii.
•
Wprzypadku niekorzystania zurządzenia przez dłuż-
szy czas należy wyjąć baterie zkomory baterii.
•
Należy używać tylko tego samego lub równoważnego
typu baterii.
•
Zawsze należy wymieniać jednocześnie wszystkie
baterie.
•
Nie wolno używać akumulatorów!
•
Nie wolno rozmontowywać, otwierać ani rozdrabniać
baterii.
Wskazówki dotyczące naprawy iutylizacji
•
Nie wolno wyrzucać baterii do zwykłego pojemnika na
śmieci. Zużyte baterie należy oddawać do odpowied-
niego punktu gromadzenia odpadów.
•
Nie otwierać urządzenia. Otwarcie urządzenia powo-
duje utratę gwarancji.
•
Nie naprawiać ani nie regulować samodzielnie urzą-
dzenia. Wprzeciwnym razie nie można zagwaranto-
wać prawidłowego działania.
•
Naprawy mogą być wykonywane tylko przez serwis
producenta lub autoryzowanego dystrybutora.
•
Przed złożeniem reklamacji należy zawsze sprawdzić
baterie, awrazie potrzeby je wymienić.
•
Wzwiązku zwymogami wzakresie ochrony środowi-
ska urządzenia po zakończeniu eksploatacji
nie należy wyrzucać wraz zodpadami domo-
wymi. Należy je oddać do utylizacji wodpo-
wiednim punkcie gromadzenia odpadów.
Zutylizować urządzenie zgodnie zdyrektywą WE
88
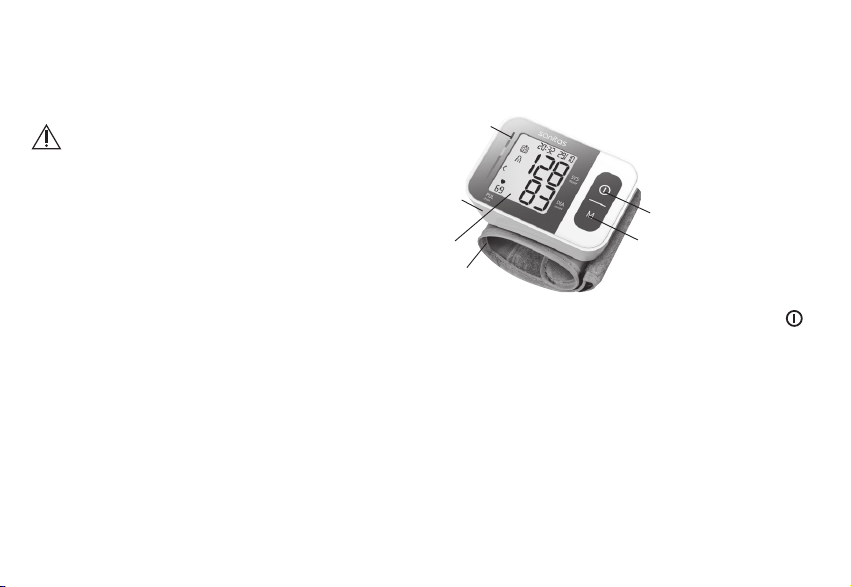
ozużytych urządzeniach elektrycznych ielektronicz-
nych – WEEE (Waste Electrical and Electronic Equip-
ment). Wrazie pytań zwrócić się do właściwej lokalnej
instytucji odpowiedzialnej za utylizację.
Wskazówki dotyczące kompatybilności
elektromagnetycznej
•
Urządzenie jest przeznaczone do użytkowania wkaż-
dym środowisku wymienionym wniniejszej instrukcji
obsługi, łącznie ze środowiskiem domowym.
•
Wprzypadku zakłóceń elektromagnetycznych wpew-
nych warunkach urządzenie może być użytkowane
tylko wograniczonym zakresie. Wrezultacie może
dojść np. do pojawienia się komunikatów obłędach
lub awarii wyświetlacza/urządzenia.
•
Należy unikać stosowania tego urządzenia bezpo-
średnio obok innych urządzeń lub wraz zinnymi
urządzeniami ustawionymi jedno na drugim, ponie-
waż mogłoby to skutkować nieprawidłowym działa-
niem. Jeśli użytkowanie wwyżej opisany sposób jest
konieczne, należy obserwować to iinne urządzenia,
aby się upewnić, że wszystkie działają prawidłowo.
•
Stosowanie innych akcesoriów niż te określone lub
udostępnione przez producenta urządzenia może pro-
wadzić do zwiększenia zakłóceń elektromagnetycz-
nych lub zmniejszenia odporności elektromagnetycz-
nej urządzenia oraz do jego nieprawidłowego działania.
•
Nieprzestrzeganie tej instrukcji może prowadzić do
obniżenia parametrów pracy urządzenia.
3. Opis urządzenia
1
6
5
3
4
2
1. Wyświetlacz
2. Mankiet nadgarstkowy
3. Wskaźnik ryzyka
4. Przycisk Start/Stop
5. Przycisk wywoływania
pamięci M
6. Pokrywa komory
baterii
89
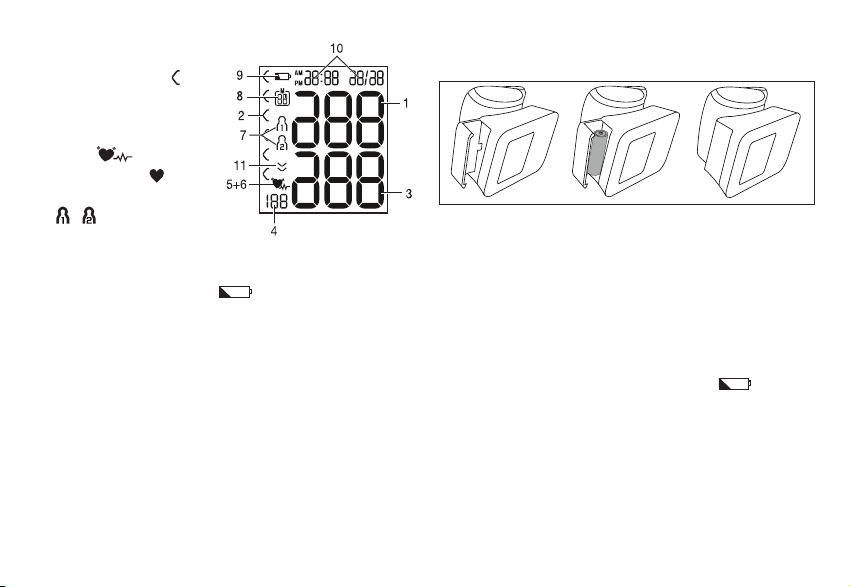
Wskazania na wyświetlaczu:
1. Ciśnienie skurczowe
2. Wskaźnik ryzyka
3. Ciśnienie rozkurczowe
4. Zmierzone tętno
5. Symbol zaburzeń rytmu
serca
6. Symbol tętna
7. Pamięć użytkownika
/
8. Numer pozycji
wpamięci / wskaźnik pamięci wartości średniej (AA),
rano (AMAM), po południu (PMPM)
9. Symbol wymiany baterii
10. Godzina idata
11. Wypuszczanie powietrza (strzałka)
4. Przygotowanie do pomiaru
Wkładanie baterii
•
Zdjąć pokrywę komory baterii znajdującą się po lewej
stronie urządzenia.
•
Włożyć dwie baterie typu 1,5Vmikro (alkaliczne, typ
LR03).
Pamiętać ozachowaniu prawidłowej biegunowości
zgodnie zoznakowaniem. Nie używać baterii akumula-
torowych.
•
Dokładnie zamknąć pokrywę komory baterii.
Po wyświetleniu symbolu wymiany baterii
nie
można już zmierzyć ciśnienia. Należy wymienić wszyst-
kie baterie.
90
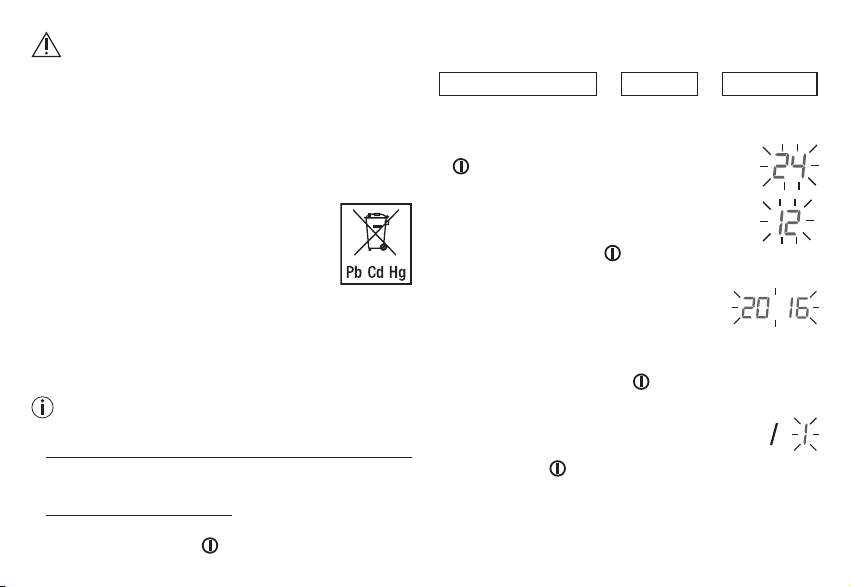
Utylizacja baterii
•
Zużyte, całkowicie rozładowane baterie należy wyrzu-
cić do specjalnie oznakowanych pojemników zbior-
czych, przekazać do punktów zbiórki odpadów
specjalnych lub sklepu ze sprzętem elektrycznym.
Użytkownik jest zobowiązany do utylizacji baterii przez
regulacje ustawowe.
•
Na bateriach zawierających szkodliwe
związki znajdują się następujące
oznaczenia:
Pb = bateria zawiera ołów,
Cd = bateria zawiera kadm,
Hg = bateria zawiera rtęć.
Ustawienie formatu godziny, daty igodziny
Należy koniecznie ustawić datę igodzinę. Tylko wten
sposób można poprawnie zapisywać ipóźniej odczyty-
wać wartości pomiaru wraz zdatą igodziną.
Menu, wktórym zmienia się ustawienia, można
wywołać na dwa sposoby:
•
Przed pierwszym użyciem ipo każdej wymianie baterii:
P
o włożeniu baterii do urządzenia użytkownik automa-
tycznie przechodzi do odpowiedniego menu.
•
Jeśli baterie są już włożone:
p
rzy wyłączonym urządzeniu wcisnąć na 5 sekund
przycisk START/STOP .
Wtym menu można kolejno wybierać następujące usta-
wienia:
Format godziny
➔
Data
➔
Godzina
Format godziny
•
Naciśnij iprzytrzymaj przycisk START/STOP
przez 5 sekund lub włóż baterie. Wyświe-
tla się wskaźnik poziomu baterii.
•
Przyciskiem pamięci Mustaw odpowiedni
format godziny, anastępnie potwierdź przy-
ciskiem START/STOP .
Data
Na wyświetlaczu zacznie migać wska-
zanie roku.
•
Przyciskiem pamięci Mustaw odpo-
wiedni rok, anastępnie potwierdź
przyciskiem START/STOP .
Na wyświetlaczu zacznie migać wskazanie miesiąca.
•
Przyciskiem pamięci Mustaw odpowiedni
miesiąc, anastępnie potwierdź przyciskiem
START/STOP .
91
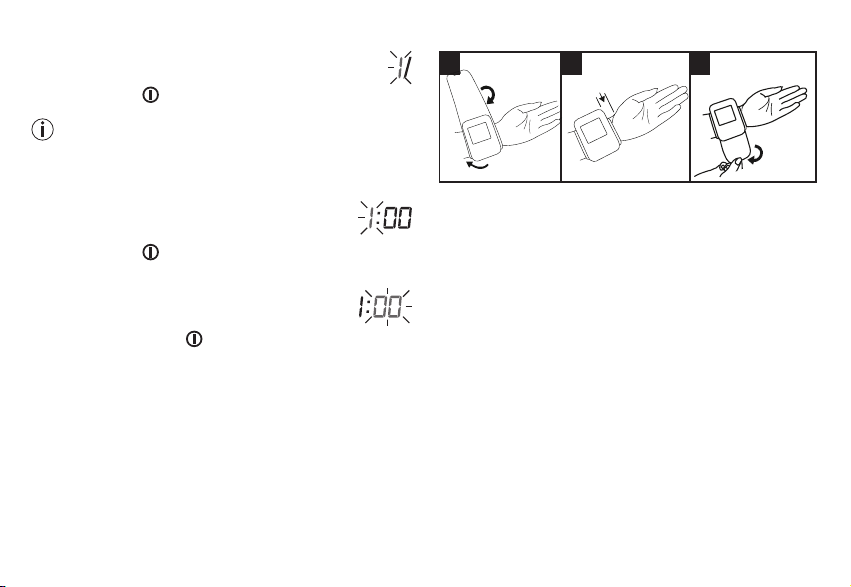
Na wyświetlaczu zacznie migać wskazanie dnia.
•
Za pomocą przycisku pamięci Mustaw odpo-
wiedni dzień, anastępnie potwierdź przyciskiem
START/STOP .
Jeśli jako format godziny ustawiono 12h, nastąpi
zmiana kolejności wyświetlania dnia imiesiąca.
Godzina
Na wyświetlaczu zacznie migać wskazanie godziny.
•
Przyciskiem pamięci Mustaw odpowiednią
godzinę, anastępnie potwierdź przyciskiem
START/STOP .
Na wyświetlaczu zacznie migać wskazanie minut.
•
Przyciskiem pamięci Mustaw odpowiednią
liczbę minut, anastępnie potwierdź przyci-
skiem START/STOP .
Po ustawieniu wszystkich danych urządzenie wyłączy się
automatycznie.
5. Pomiar ciśnienia krwi
Przed przystąpieniem do pomiaru urządzenie powinno
osiągnąć temperaturę pokojową. Pomiar można przepro-
wadzać na lewym lub prawym nadgarstku.
Zakładanie mankietu
1 2 3
1 cm
•
Odkryj nadgarstek. Zwróć uwagę, aby przepływ krwi
wręce nie był ograniczony przez zbyt ciasną odzież
itp.
Umieść mankiet na wewnętrznej stronie nadgarstka.
•
Zapnij mankiet za pomocą zapięcia na rzep, tak aby
górna krawędź ciśnieniomierza znajdowała się wodle-
głości ok. 1 cm od dłoni.
•
Mankiet musi ściśle przylegać do nadgarstka, lecz nie
powinien być zapięty zbyt mocno.
Ciśnienie krwi może się różnić wzależności od tego, czy
pomiar jest wykonywany na prawym czy lewym ramie-
niu. Przeprowadzaj pomiary zawsze na tym samym
ramieniu.
Jeśli wartości znacznie się różnią na obu rękach, należy
ustalić zlekarzem, na której ręce przeprowadzać pomiar.
92
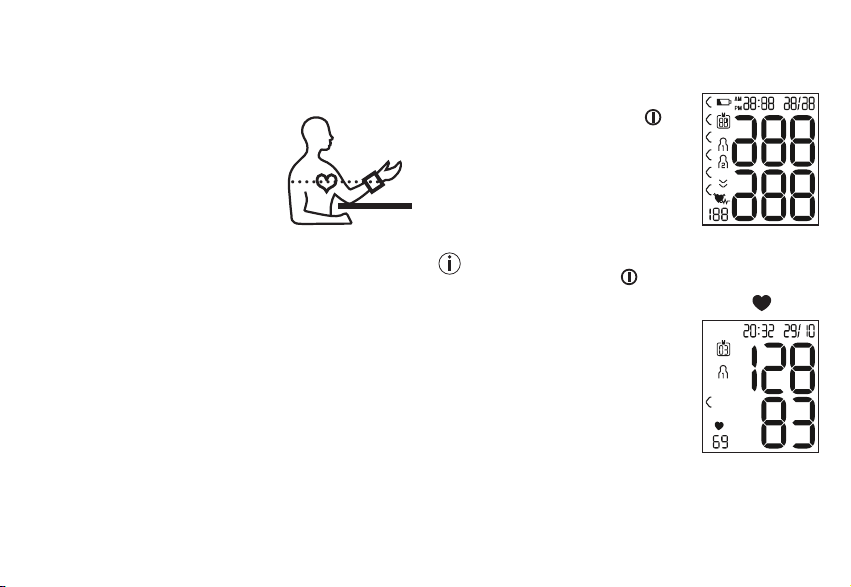
Przyjmowanie prawidłowej pozycji ciała
•
Przed pierwszym pomiarem ciśnienia krwi należy
zawsze odpocząć przez ok. 5 minut! Wprzeciwnym
razie pomiar może być niedokładny.
•
Ciśnienie można mierzyć wpozycji
siedzącej lub leżącej. Usiądź
wygodnie do pomiaru ciśnienia.
Zapewnij podparcie dla pleców
irąk. Nie zakładaj nogi na nogę.
Połóż stopy płasko na podłodze.
Ramię musi być podparte iugięte. Zwróć uwagę na to,
aby mankiet znajdował się zawsze na wysokości
serca. Wprzeciwnym razie mogą wystąpić duże nie-
dokładności pomiaru. Ręka idłoń powinny być rozluź-
nione.
•
Podczas pomiaru nie należy się ruszać ani rozmawiać,
aby nie doszło do zaburzenia wyniku.
•
Przed rozpoczęciem kolejnego pomiaru należy odcze-
kać co najmniej 1 minutę!
Pomiar ciśnienia tętniczego krwi
Założyć mankiet zgodnie zpowyższym opisem iprzyjąć
pozycję, wktórej ma być wykonywany pomiar.
•
Aby włączyć ciśnieniomierz, naci-
snąć przycisk START/STOP .
Na wyświetlaczu pojawią się na
chwilę wszystkie symbole.
•
Wyświetlą się wyniki ostatniego
pomiaru, apo 3 sekundach ciśnie-
niomierz automatycznie rozpocz-
nie pomiar.
Pomiar można wkażdej chwili przerwać, naciskając
przycisk START/STOP .
Po rozpoznaniu tętna pojawia się symbol tętna
.
•
Wyświetlane są wyniki pomiaru
ciśnienia skurczowego, rozkurczo-
wego itętna.
93
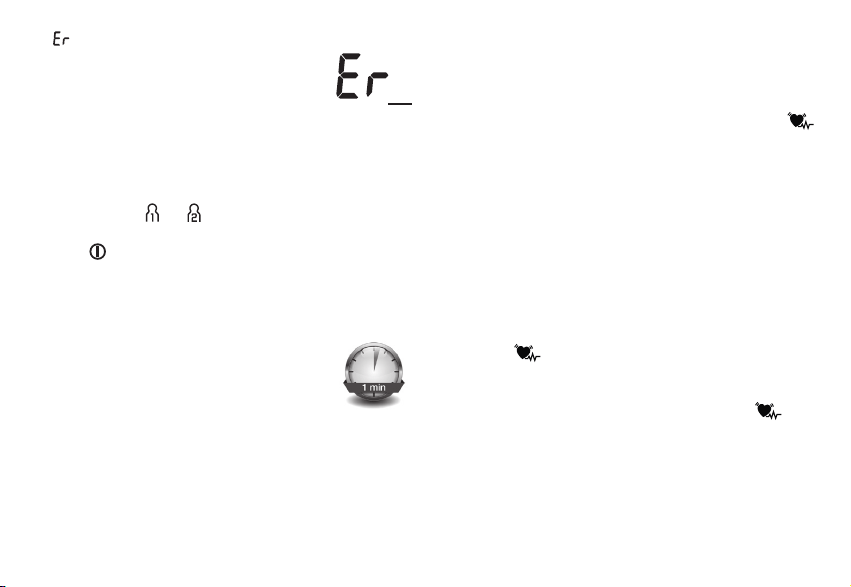
•
_ pojawia się, jeśli pomiar był wykonany nieprawi-
dłowo. Należy przeczytać rozdział „Komu-
nikaty błędów / usuwanie błędów” niniej-
szej instrukcji obsługi, anastępnie
powtórzyć pomiar.
•
Naciskając przycisk pamięci M, wybierz żądaną
pamięć użytkownika. Jeśli nie zostanie wybrana żadna
pamięć, wynik pomiaru zostanie zapisany wostat-
nio użytej pamięci. Na wyświetlaczu pojawi się odpo-
wiedni symbol lub .
•
Wyłącz ciśnieniomierz za pomocą przycisku START/
STOP . Spowoduje to zapisanie wyniku pomiaru
wwybranej pamięci.
Jeśli użytkownik zapomni owyłączeniu urządzenia, wyłą-
czy się ono automatycznie po upływie około 1minuty.
Również wtakim przypadku wynik pomiaru
zostanie zapisany wwybranej lub ostatnio
używanej pamięci użytkownika.
Przed rozpoczęciem kolejnego pomiaru
należy odczekać co najmniej 1minutę!
6. Interpretacja wyników
Zaburzenia rytmu serca
Podczas pomiaru urządzenie może wykryć ewentualne
zaburzenia rytmu serca. Użytkownik jest informowany
otym po zakończeniu pomiaru za pomocą symbolu
.
Może to być objaw arytmii serca. Arytmia to choroba
polegająca na zaburzeniach rytmu serca wskutek nie-
prawidłowości wukładzie bioelektrycznym sterującym
biciem serca. Objawami tej choroby są przedwczesne
uderzenia serca lub ich opuszczanie, atakże zbyt wolne
lub zbyt szybkie tętno. Przyczyny to m.in. choroby serca,
podeszły wiek, predyspozycje wynikające zbudowy
ciała, nadmierne spożycie używek, stres lub zbyt mała
ilość snu. Arytmię może stwierdzić tylko lekarz po prze-
prowadzeniu odpowiedniego badania.
Jeśli po zakończeniu pomiaru na wyświetlaczu pojawi
się symbol , należy powtórzyć pomiar. Przed roz-
poczęciem pomiaru należy odpocząć co najmniej 5
minut, awjego trakcie nie rozmawiać ani się nie ruszać.
Wprzypadku częstego pojawiania się symbolu
skontaktować się zlekarzem. Samodzielne diagnozo-
wanie ileczenie woparciu owyniki pomiarów może być
niebezpieczne dla zdrowia. Należy bezwzględnie prze-
strzegać zaleceń lekarskich.
94

Wskaźnik ryzyka
Wyniki pomiarów można klasyfikować ioceniać zgodnie
zponiższą tabelą.
Podane wartości standardowe służą jedynie jako ogólne
wytyczne, ponieważ indywidualne wartości ciśnienia dla
różnych osób iróżnych grup wiekowych są odmienne.
Wzwiązku ztym ważne są regularne konsultacje zleka-
rzem. Podczas konsultacji lekarz określi normalne warto-
ści ciśnienia tętniczego oraz wartości, od których ciśnie-
nie należy uznać za niebezpiecznie wysokie.
Klasyfikacja na wyświetlaczu iskala na urządzeniu infor-
mują, wjakim zakresie mieści się zmierzone ciśnie-
nie. Jeśli wartość ciśnienia skurczowego irozkurczo-
wego znajdzie się wdwóch różnych zakresach (np.
ciśnienie skurczowe wzakresie „Normalne podwyż-
szone”, aciśnienie rozkurczowe wzakresie „Normalne”),
wyświetlany jest zawsze wyższy zakres – wopisywa-
nym przykładzie będzie to ciśnienie „Normalne podwyż-
szone”.
Zakres wartości
ciśnienia
Ciśnienie
skurczowe
(wmmHg)
Ciśnienie
rozkur
-
czowe
(wmm Hg)
Zalecenie
Poziom 3:
wysokie
nadciśnienie
≥180 ≥ 110
Udać się do
lekarza
Poziom 2:
umiarkowane
nadciśnienie
160-179 100-109
Udać się do
lekarza
Poziom 1:
lekkie
nadciśnienie
140-159 90-99
Regularna
kontrola lekarska
Normalne
podwyższone
130-139 85-89
Regularna
kontrola lekarska
Normalne 120-129 80-84
Samodzielna
kontrola
Optymalne <120 <80
Samodzielna
kontrola
Źródło: WHO, 1999 (World Health Organization)
95
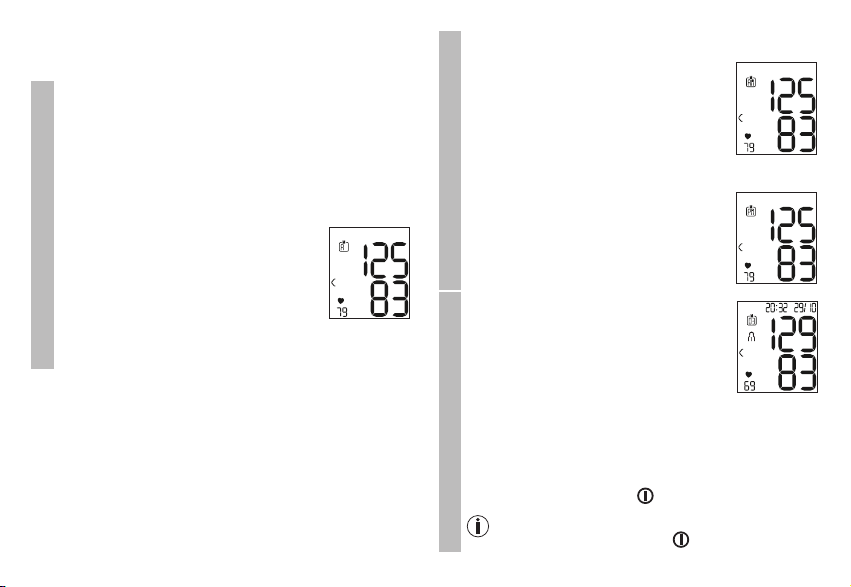
7. Zapis, odczyt iusuwanie wyników
pomiaru
Pamięć użytkownika
Wyniki każdego udanego pomiaru są zapisywane
łącznie zdatą igodziną. Jeśli liczba wyników prze-
kroczy 60, nadpisywane są zawsze najstarsze dane
pomiarowe.
•
Aby wyświetlić wyniki pomiarów, należy nacisnąć
przycisk pamięci M.
Na wyświetlaczu miga symbol
AA.
Wyświetlana jest średnia wartość
wszystkich pomiarów zapisanych
wtej pamięci użytkownika.
Aby zmienić użytkownika, należy przytrzymać przy-
cisk pamięci Mprzez ok. 2 sekundy.
Średnie wyniki pomiarów
•
Nacisnąć przycisk pamięci M.
Na wyświetlaczu miga symbol
AMAM.
Zostanie wyświetlona średnia war-
tość porannych pomiarów zostatnich
7 dni (rano: godz. 5:00-9:00).
•
Naciśnąć przycisk pamięci M.
Na wyświetlaczu miga symbol
PMPM.
Zostanie wyświetlona średnia war-
tość wieczornych pomiarów zostat-
nich 7 dni (wieczór: godz. 18:00-
20:00).
Pojedyncze wyniki pomiaru
•
Po ponownym naciśnięciu przy-
cisku pamięci Mna wyświetla-
czu pojawi się ostatni pojedyn-
czy pomiar (tutaj przykładowo
pomiar03).
•
Po ponownym naciśnięciu przycisku pamięci
Mbędzie możliwe wyświetlenie zmierzonych jed-
nostkowych wartości pomiarowych.
•
Aby ponownie wyłączyć urządzenie, nacisnąć
przycisk START/STOP .
Wkażdej chwili można opuścić menu, naciska-
jąc przycisk START/STOP .
96
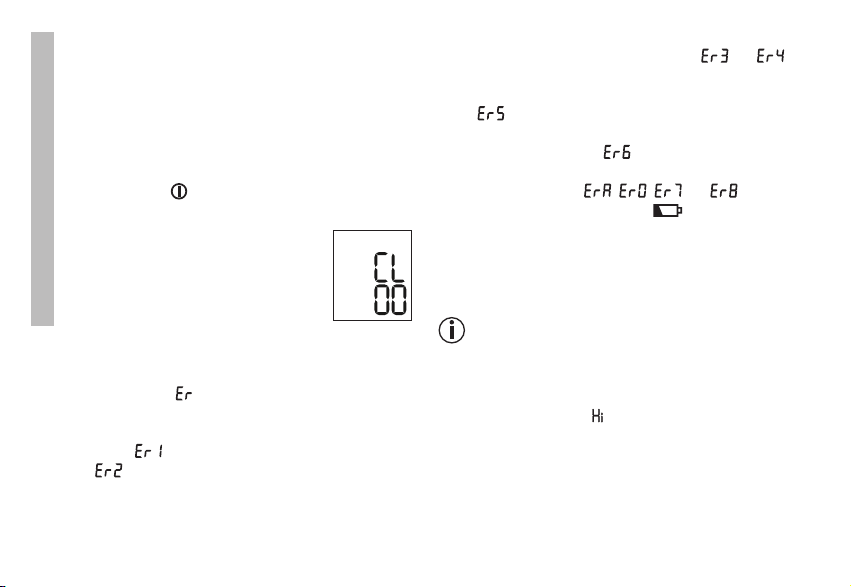
Kasowanie wyników pomiaru
•
Aby skasować wybraną pamięć użytkownika,
należy ją najpierw wybrać.
•
Rozpocząć wyświetlanie wartości średnich. Na
wyświetlaczu miga A, wyświetlana jest śred-
nia wartość wszystkich pomiarów zapisanych
wpamięci tego użytkownika.
•
Przytrzymać przycisk pamięci Moraz przycisk
START/STOP przez 5 sekund wzależności od
tego, która pamięć użytkownika jest otwarta.
Wszystkie wartości aktualnej pamięci
użytkownika zostaną wykasowane,
aurządzenie wyłączy się.
8. Komunikaty błędów / usuwanie błędów
Wprzypadku wystąpienia błędów na wyświetlaczu
pojawi się komunikat _.
K
omunikaty obłędzie mogą się pojawić, jeśli:
•
niemożliwy jest pomiar ciśnienia skurczowego lub roz-
kurczowego ( na wyświetlaczu pojawia się sym-
bol lub );
•
ciśnienie skurczowe lub rozkurczowe nie mieści się
wobszarze pomiaru (na wyświetlaczu pojawia się
symbol „Hi” lub „Lo“),
•
mankiet został zaciśnięty zbyt słabo lub zbyt mocno
(na wyświetlaczu pojawia się symbol lub );
•
ciśnienie krwi przez więcej niż 1,5 sekundy jest wyż-
sze niż 300 mmHg (na wyświetlaczu pojawia się sym-
bol
);
•
pompowanie trwa dłużej niż 180 sekund (na wyświetla-
czu pojawi się symbol );
•
wystąpił błąd systemu lub urządzenia (na wyświetlaczu
pojawia się symbol , , lub );
•
baterie są prawie wyczerpane .
Wtakich przypadkach pomiar należy powtórzyć. Należy
pamiętać otym, aby podczas pomiaru nie ruszać się ani
nie rozmawiać. Wrazie potrzeby należy włożyć ponow-
nie baterie lub je wymienić.
Alarm techniczny – opis
Jeśli zmierzone ciśnienie (skurczowe lub rozkurczowe)
przekroczy granice określone wsekcji danych tech-
nicznych, na wyświetlaczu pojawi się alarm techniczny
wpostaci oznaczenia „
” lub „Lo”. „Lo Lo ” Wtakim przy-
padku należy skontaktować się zlekarzem lub spraw-
dzić, czy urządzenie działa prawidłowo.
Wartości graniczne zostały ustawione fabrycznie inie da
się ich zmienić ani wyłączyć. Wartości te zostały usta-
lone woparciu onormę IEC 60601-1-8.
97

Alarm techniczny nie jest wyświetlany wsposób nieprze-
rwany inie trzeba go resetować. Symbol wyświetlany na
wyświetlaczu znika automatycznie po 8 sekundach.
9. Czyszczenie iprzechowywanie
urządzenia oraz mankietu
•
Urządzenie imankiet należy czyścić ostrożnie, wyłącz-
nie za pomocą lekko zwilżonej szmatki.
•
Nie należy używać środków czyszczących ani roz-
puszczalników.
•
Wżadnym wypadku nie wolno zanurzać urządzenia ani
mankietu wwodzie, ponieważ ciecz może się dostać
do wewnątrz iuszkodzić urządzenie oraz mankiet.
•
Podczas przechowywania urządzenia imankietu nie
wolno stawiać na nich ciężkich przedmiotów. Należy
wyjąć baterie.
10. Dane techniczne
Nr modelu SBC 15
Metoda pomiaru Oscylometryczny, nieinwazyjny
pomiar ciśnienia na nadgarstku
Zakres
pomiarowy
Ciśnienie wmankiecie 0–300mmHg,
ciśnienie skurczowe 60–260 mmHg,
ciśnienie rozkurczowe 40–199 mmHg,
tętno 40–180 uderzeń/min
Dokładność
wskazania
Ciśnienie skurczowe ±3mmHg,
ciśnienie rozkurczowe ±3mmHg,
tętno ±5% wyświetlanej wartości
Odchylenia
pomiaru
Maks. dopuszczalne odchylenie
standardowe zgodnie zkontrolą kli-
niczną:
ciśnienie skurczowe 8mmHg /
ciśnienie rozkurczowe 8mmHg
Pamięć 2 x60 pomiarów
Wymiary Dł. 83,8 mm × szer. 59,9 mm × wys.
29,4 mm
Masa Około 92 g(bez baterii zmankietem)
Wielkość
mankietu
od 140 mm do 195 mm
Dopuszczalne
Warunki
eksploatacji
od +10°Cdo +40°C, ≤85% względ-
nej wilgotności powietrza (bez zjawi-
ska kondensacji)
Dopuszczalne
warunki
przechowywania
-20°Cdo +50°C, ≤85% względna
wilgotność powietrza, ciśnienie
otoczenia 800-1050 hPa
Źródło zasilania
2 xbateria 1,5V
AAA
Żywotność baterii Ok. 170 pomiarów, wzależności od
wysokości ciśnienia tętniczego lub
ciśnienia pompowania
98

Klasyfikacja Zasilanie wewnętrzne, IP22, nie jest
to urządzenie kategorii AP ani APG,
praca ciągła, część aplikacyjna typu
BF
Producent zastrzega sobie prawo do zmiany danych
technicznych wwyniku aktualizacji bez konieczności
powiadamiania.
•
To urządzenie spełnia wymogi europejskiej normy
EN60601-1-2 (zgodność zCISPR11, EN61000-4-2,
EN61000-4-3, EN61000-4-8) iwymaga zachowania
szczególnych środków ostrożności wodniesieniu do
kompatybilności elektromagnetycznej. Należy pamię-
tać, że przenośne urządzenia komunikacyjne itelefony
komórkowe mogą mieć wpływ na pracę tego urządze-
nia.
•
Urządzenie spełnia wymogi dyrektywy UE 93/42/EWG
dotyczącej wyrobów medycznych, ustawy owyro-
bach medycznych oraz norm EN1060-1 (Nieinwa-
zyjne ciśnieniomierze – Część 1: Wymagania ogólne),
EN1060-3 (Nieinwazyjne ciśnieniomierze – Część3:
Wymagania dodatkowe dotyczące elektromecha-
nicznych systemów do pomiaru ciśnienia krwi) oraz
IEC80601-2-30 (Medyczne urządzenia elektryczne
– Część 2–30: Wymagania szczegółowe dotyczące
bezpieczeństwa podstawowego oraz funkcjonowania
zasadniczego automatycznych nieinwazyjnych ciśnie-
niomierze).
•
Dokładność niniejszego ciśnieniomierza została sta-
rannie sprawdzona idostosowana do długiego okresu
użytkowania. Wprzypadku korzystania zurządzenia
wpraktyce lekarskiej należy przeprowadzać kontrole
pomiarowe za pomocą odpowiednich środków. Szcze-
gółowe dane dotyczące sprawdzania dokładności
można uzyskać, kontaktując się zserwisem.
11. Gwarancja/serwis
Szczegółowe informacje na temat gwarancji i warun-
ków gwarancji znajdują się w załączonej ulotce gwa-
rancyjnej.
Zastrzega się prawo do pomyłek iwprowadzania zmian
99

Omvang van de levering
•
Bloeddrukmeter met manchet
•
2 AAA-batterijen van 1,5V, type LR03
•
Opbergbox
•
Gebruiksaanwijzing
Lees deze gebruiksaanwijzing aandachtig door, bewaar
deze voor later gebruik, laat deze ook door andere geb-
ruikers lezen en neem alle aanwijzingen in acht.
1. Kennismaking
Controleer of de buitenkant van de verpakking van
het apparaat intact is en of alle onderdelen aanwezig
zijn. Alvorens het apparaat te gebruiken, moet worden
gecontroleerd of het apparaat en de toebehoren zicht-
baar beschadigd zijn en moet al het verpakkingsmate-
riaal worden verwijderd. Wij adviseren u het apparaat bij
twijfel niet te gebruiken en contact op te nemen met de
verkoper of met de betreffende klantenservice.
De polsbloeddrukmeter is bedoeld voor het non-in-
vasief meten en controleren van de arteriële bloeddruk-
waarden bij volwassen mensen. U kunt hiermee snel
en eenvoudig uw bloeddruk meten, de meetwaarden
opslaan en het verloop van de meetwaarden bekijken.
Bij eventueel aanwezige hartritmestoornissen wordt u
gewaarschuwd.
De vastgestelde waarden worden geclassificeerd en
grafisch beoordeeld.
NEDERLANDS
1. Kennismaking .......................................................... 100
2. Belangrijke aanwijzingen ......................................... 101
3. Beschrijving van het apparaat .................................105
4. Meting voorbereiden ...............................................106
5. Bloeddruk meten ..................................................... 108
6. Resultaten beoordelen ............................................110
7. Meetwaarden opslaan, opvragen en wissen ......... 111
8. Foutmeldingen/storingen verhelpen ......................112
9. Apparaat en manchet reinigen en opbergen ......... 113
10. Technische gegevens ............................................113
11. Garantie/service ....................................................115
Inhoud
100
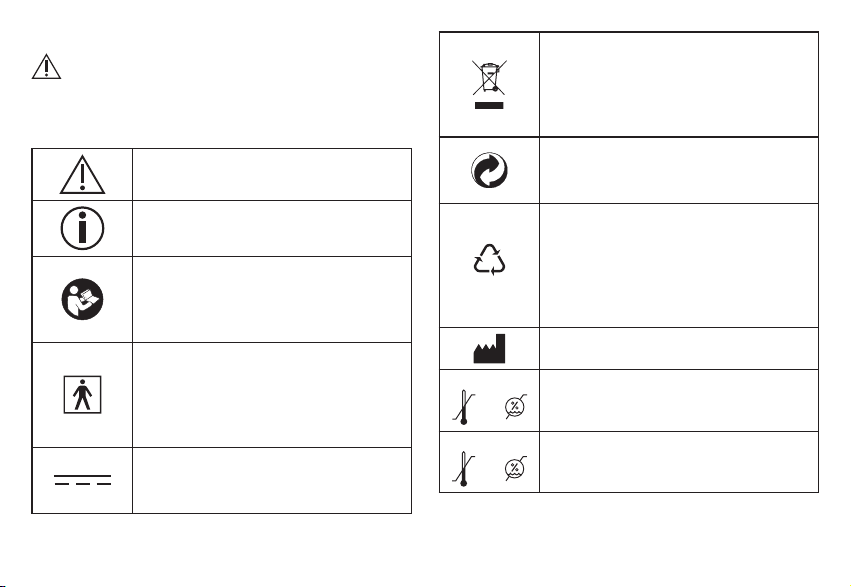
2. Belangrijke aanwijzingen
Verklaring van de symbolen
In de gebruiksaanwijzing, op de verpakking en op het
typeplaatje van het apparaat en de toebehoren worden
de volgende symbolen gebruikt:
Voorzichtig
Productinformatie
Verwijzing naar belangrijke informatie.
Handleiding in acht nemen
Lees voor aanvang van het werk en/
of het bedienen van apparaten of
machines de handleiding.
Scheiding van de toegepaste delen
type BF
Galvanisch gescheiden toegepast deel
(F staat voor floating), voldoet aan de
eisen aan lekstromen voor type B.
Gelijkstroom
Het apparaat is alleen geschikt voor
gelijkstroom.
Verwijder het apparaat conform de
EU-richtlijn voor afgedankte elektrische
en elektronische apparatuur – WEEE
(Waste Electrical and Electronic
Equipment).
Scheid de verpakkingscomponen-
ten en voer het afval volgens de lokale
voorschriften af.
B
A
Aanduiding voor de identificatie van
het verpakkingsmateriaal.
A = materiaalafkorting,
B = materiaalnummer:
1-7 = kunststoffen,
20-22 = papier en karton
Fabrikant
Storage/Transport
Toegestane temperatuur en lucht-
vochtigheid bij opslag en transport
Operating
Toegestane temperatuur en
luchtvochtigheid bij gebruik
101
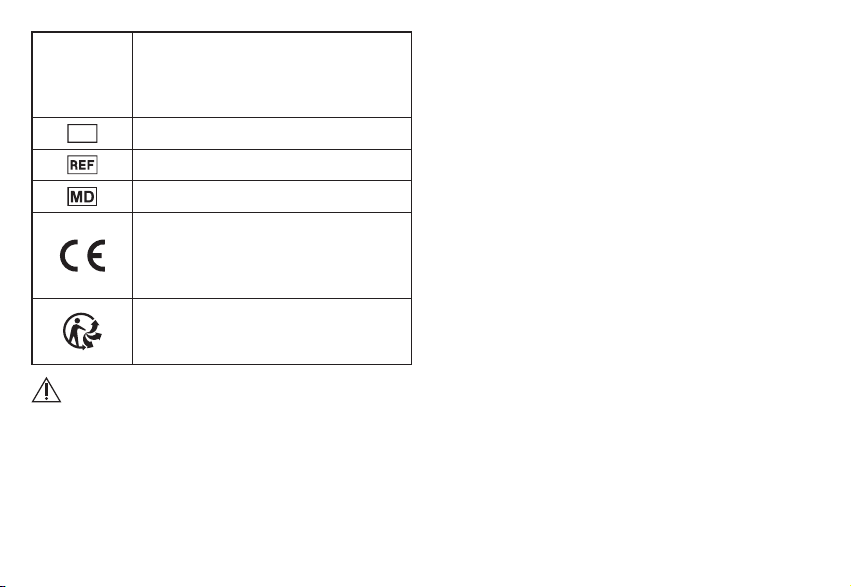
IP22
IP-klasse
Het apparaat is beschermd tegen
voorwerpen van ≥12,5 mm en tegen
schuin neervallende druppels.
S
N
Serienummer
Artikelnummer
Medisch hulpmiddel
CE-markering
Dit product voldoet aan de eisen
van de geldende Europese en natio-
nale richtlijnen.
Scheid het product en de verpakkings-
componenten en voer het afval vol-
gens de lokale voorschriften af.
Aanwijzingen met betrekking tot het gebruik
•
Meet uw bloeddruk altijd op hetzelfde tijdstip van de
dag, zodat de gemeten waarden met elkaar verge-
leken kunnen worden.
•
Ten minste 30 minuten voor de meting mag u
niet eten, drinken of roken en geen lichamelijke
inspanningen verrichten.
•
Rust voorafgaand aan de eerste bloeddrukmeting
altijd 5 minuten uit!
•
Als u vervolgens nog meer metingen na elkaar wilt uit-
voeren, moet tussen de afzonderlijke metingen telkens
minstens 1minuut rust worden gehouden.
•
Herhaal de meting wanneer u twijfelt over de gemeten
waarden.
•
De waarden die u hebt gemeten, dienen slechts
als indicatie – ze vormen geen vervanging van een
medisch onderzoek! Bespreek uw gemeten waarden
met uw arts. Neem in geen geval zelf medische
beslissingen op basis van deze waarden (bijv. met
betrekking tot medicijnen en de doseringen daarvan)!
•
Het gebruik van de bloeddrukmeter buiten de thu-
isomgeving of terwijl u in beweging bent (bijv. tijdens
een rit in een auto of een ambulance, tijdens een
vlucht in een helikopter of tijdens lichamelijke inspan-
ning zoals sport), kan de meetnauwkeurigheid beïnv-
loeden en foutieve metingen veroorzaken.
•
Gebruik de bloeddrukmeter niet bij baby’s, zwangere
vrouwen en vrouwen met pre-eclampsie.
•
Bij een verminderde doorbloeding van een arm
wegens chronische of acute aderziekten (onder andere
adervernauwing) is de polsmeting minder nauwkeurig.
Kies in dat geval voor een bloeddrukmeter waarmee
metingen bij de bovenarm worden uitgevoerd.
102

•
Dit apparaat mag niet worden gebruikt door personen
(waaronder kinderen) met een beperkt fysiek, zintuiglijk
of geestelijk vermogen of gebrek aan ervaring of ken-
nis. Gebruik door deze personen is alleen toegestaan
wanneer het plaatsvindt onder toezicht van een voor
hun veiligheid verantwoordelijke persoon, of wanneer
zij van deze persoon aanwijzingen hebben ontvangen
over het gebruik van het apparaat. Er dient toezicht te
worden gehouden op kinderen, zodat zij niet met het
apparaat spelen.
•
Aandoeningen aan hart en bloedvaten kunnen
leiden tot foutieve metingen of kunnen de meetnau-
wkeurigheid beïnvloeden. Dit is ook het geval bij een
zeer lage bloeddruk, diabetes, doorbloedings- en rit-
mestoornissen en bij koude rillingen of trillingen.
•
De bloeddrukmeter mag niet in combinatie met een
chirurgisch apparaat met hoge frequenties worden
gebruikt.
•
Gebruik het toestel alleen bij personen met een pol-
somvang die binnen de grenswaarden ligt voor het
apparaat.
•
Let op dat de functie van het betreffende ledemaat tij-
dens het oppompen kan worden beïnvloed.
•
De bloedsomloop mag niet onnodig lang worden afge-
bonden door de bloeddrukmeting. Haal bij storingen
van het apparaat de manchet van de arm.
•
Voorkom een aanhoudende druk in de manchet en
veelvuldige metingen. De belemmering van de bloed-
doorstroming die daardoor ontstaat, kan leiden tot
verwondingen.
•
Let op dat de manchet niet om een arm wordt aange-
bracht waarvan de (slag)aderen een medische behan-
deling ondergaan, zoals intravasculaire toegang, intra-
vasculaire therapie of een arterioveneuze shunt.
•
Plaats de manchet niet bij personen die een borstam-
putatie hebben ondergaan.
•
Plaats de manchet niet over wonden, omdat dit kan
leiden tot meer verwondingen.
•
Breng de manchet uitsluitend om de pols aan. Breng
de manchet niet om andere delen van het lichaam aan.
•
De bloeddrukmeter werkt uitsluitend op batterijen.
•
Om de batterijen te sparen, wordt de bloeddrukme-
ter automatisch uitgeschakeld als er een minuut lang
geen toets wordt ingedrukt.
•
Het apparaat is alleen bedoeld voor het in deze geb-
ruiksaanwijzing beschreven gebruik. De fabrikant is
niet aansprakelijk voor schade die is veroorzaakt door
oneigenlijk of verkeerd gebruik.
Aanwijzingen met betrekking tot opslag en
onderhoud
•
De bloeddrukmeter bestaat uit elektronische onder-
delen en precisieonderdelen. De nauwkeurigheid van
103
de meetwaarden en de levensduur van het apparaat
zijn afhankelijk van de zorgvuldige hantering van het
apparaat:
– Stel het apparaat niet bloot aan schokken, vocht,
vuil, sterke temperatuurschommelingen en direct
zonlicht.
– Laat het apparaat niet vallen.
– Gebruik het apparaat niet in de buurt van sterke
elektromagnetische velden en houd het uit de buurt
van radioapparatuur of mobiele telefoons.
•
Als het apparaat langere tijd niet wordt gebruikt, advis-
eren wij u de batterijen uit het apparaat te halen.
Aanwijzingen met betrekking tot het gebruik van
batterijen
•
Als vloeistof uit een batterijcel in aanraking komt met
de huid of de ogen, moet u de betreffende plek met
water spoelen en een arts raadplegen.
•
Gevaar voor inslikken! Kleine kinderen kunnen
batterijen inslikken, met verstikking als gevolg. Bewaar
batterijen daarom buiten bereik van kleine kinderen!
•
Neem de aanduiding van de polariteit (plus (+) en min
(-)) in acht.
•
Als er een batterij is gaan lekken, moet u veiligheid-
shandschoenen aantrekken en het batterijvak met een
droge doek reinigen.
•
Bescherm batterijen tegen overmatige hitte.
•
Explosiegevaar! Werp batterijen niet in vuur.
•
Batterijen mogen niet worden opgeladen en niet
worden kortgesloten.
•
Haal de batterijen uit het batterijvak als u het apparaat
langere tijd niet gebruikt.
•
Gebruik alleen hetzelfde of een gelijkwaardig type bat-
terij.
•
Vervang altijd alle batterijen tegelijk.
•
Gebruik geen accu’s!
•
Haal batterijen niet uit elkaar, open ze niet en hak ze
niet in stukken.
Aanwijzingen met betrekking tot reparatie en
verwijdering
•
Batterijen mogen niet met het huisvuil worden weg-
gegooid. Deponeer de lege batterijen bij de daarvoor
bedoelde inzamelpunten.
•
Open het apparaat niet. Wanneer u deze instructie niet
in acht neemt, vervalt de garantie.
•
U mag het apparaat niet zelf repareren of afstellen.
Wanneer u dit toch doet, kan een storingsvrije werking
niet langer worden gegarandeerd.
•
Reparaties mogen alleen door de klantenservice of
geautoriseerde verkopers worden uitgevoerd.
Controleer voordat u een klacht indient altijd eerst de
batterijen en vervang deze als dat nodig is.
104
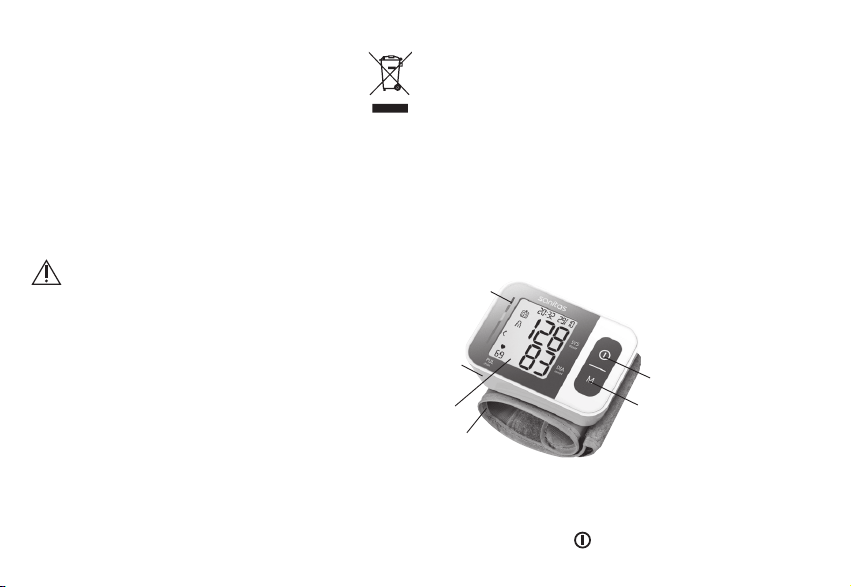
•
Met het oog op het milieu mag het apparaat aan het
einde van zijn levensduur niet met het
gewone huisvuil worden weggegooid. U kunt
het apparaat inleveren bij gespecialiseerde
inzamelpunten in uw land. Verwijder het
apparaat conform de EU-richtlijn voor afgedankte
elektrische en elektronische apparatuur – WEEE
(Waste Electrical and Electronic Equipment). Voor
meer informatie kunt u contact opnemen met de
verantwoordelijke instanties voor afvalverwijdering in
uw gemeente.
Aanwijzingen met betrekking tot
elektromagnetische compatibiliteit
•
Het apparaat is geschikt voor gebruik in alle omgevin-
gen die in deze gebruiksaanwijzing worden vermeld,
waaronder de thuisomgeving.
•
Het apparaat kan bij de aanwezigheid van elektromag-
netische storingen onder omstandigheden mogelijk
slechts beperkt worden gebruikt. Als gevolg daarvan
kunnen bijv. foutmeldingen ontstaan of kan het dis-
play/apparaat uitvallen.
•
Het gebruik van dit apparaat direct naast andere
apparaten of opgestapeld met andere apparaten moet
worden vermeden, omdat dit een onjuiste werking tot
gevolg kan hebben. Als gebruik op de hiervoor bes-
chreven wijze noodzakelijk is, moeten dit apparaat en
de andere apparaten in de gaten worden gehouden
om er zeker van te zijn dat ze correct werken.
•
Het gebruik van andere toebehoren dan de toebe-
horen die de fabrikant van dit apparaat vastgelegd of
beschikbaar gesteld heeft, kan verhoogde elektro-
magnetische storingen of een verminderde bestand-
heid tegen storingen tot gevolg hebben, waardoor het
apparaat mogelijk niet correct werkt.
•
Als deze instructies niet in acht worden genomen, kan
dit de prestatiekenmerken van het apparaat negatief
beïnvloeden.
3. Beschrijving van het apparaat
1
6
5
3
4
2
1. Display
2. Polsmanchet
3. Risico-indicator
4. Start/stop-toets
5. Geheugen-
oproeptoets M
6. Deksel van het
batterijvak
105
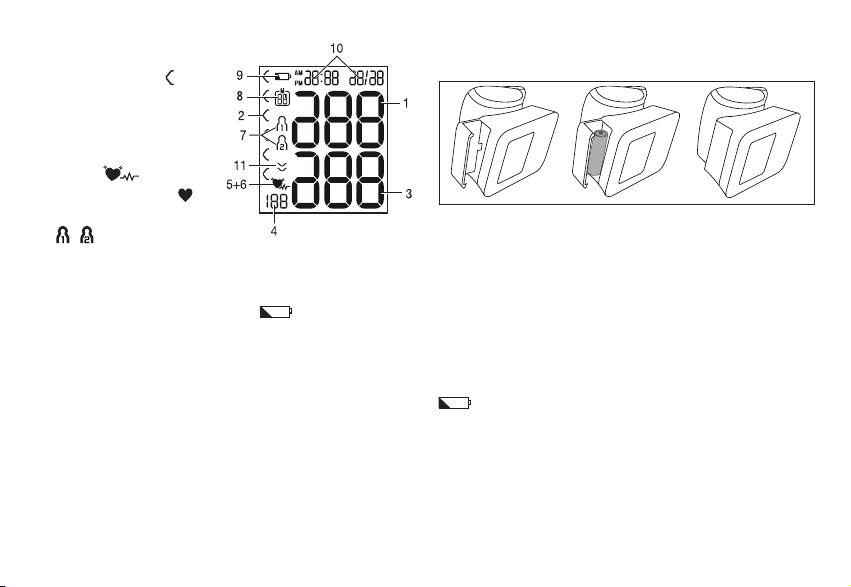
Weergaven op het display:
1. Systolische druk
2. Risico-indicator
3. Diastolische druk
4. Gemeten hartslag-
waarde
5. Symbool hartritmestoor-
nissen
6. Symbool hartslag
7. Gebruikersgeheugen
/
8. Nummer van de geheugenplaats/geheugenweer-
gave gemiddelde waarde ( A A ), ’s ochtends ( AM AM ),
’savonds( PM PM )
9. Symbool batterijen vervangen
10. Tijd en datum
11. Lucht laten weglopen (pijl)
4. Meting voorbereiden
Batterij plaatsen
•
Verwijder het deksel van het batterijvak aan de linker-
kant van het apparaat.
•
Plaats twee microbatterijen van 1,5V (alkaline, type
LR03) in het batterijvak.
Let goed op dat de batterijen met de juiste polariteit
worden geplaatst, zoals aangeduid. Gebruik geen
oplaadbare accu’s.
•
Sluit het deksel van het batterijvak weer zorgvuldig.
Als het symbool voor het vervangen van de batterijen
verschijnt, kan er niet meer gemeten worden en
moet u alle batterijen vervangen.
106
Batterijen verwijderen
•
Deponeer de gebruikte, volledig lege batterijen in de
daarvoor specifiek bestemde afvalbakken of bied ze
bij het afvalverwerkingsstation of de elektriciteitszaak
aan als chemisch afval. U bent wettelijk verplicht de
batterijen correct te verwijderen.
•
Deze tekens kunt u aantreffen op batterijen
met schadelijke stoffen:
Pb = batterij bevat lood
Cd = batterij bevat cadmium
Hg = batterij bevat kwik
Uurweergave, datum en tijd instellen
De datum en de tijd moeten absoluut worden ingesteld.
Alleen zo kunnen uw meetwaarden met de juiste
datum en tijd worden opgeslagen en later weer worden
opgevraagd.
Het menu voor het configureren van de instellingen
kunt u op twee manieren openen:
•
Voor het eerste gebruik en na het vervangen van de
batterijen:
A
ls u batterijen in het apparaat plaatst, gaat u automa-
tisch naar het betreffende menu.
•
Als de batterijen al zijn geplaatst:
H
oud als het apparaat uitgeschakeld is de START/
STOP-toets ca. 5 seconden ingedrukt.
In dit menu kunt u achtereenvolgens de volgende
instellingen configureren:
Uurweergave
➔
Datum
➔
Tijd
Uurweergave
•
Houd de START/STOP-toets 5 seconden
ingedrukt of plaats de batterijen in het appa-
raat. Het volledige display wordt weergege-
ven.
•
Selecteer met de geheugentoets M de
gewenste uurweergave en bevestig uw
selectie met de START/STOP-toets .
Datum
Op het display knippert het jaartal.
•
Selecteer met de geheugentoets M
het gewenste jaartal en bevestig uw
selectie met de START/STOP-toets .
Op het display knippert de maand.
•
Selecteer met de geheugentoets M de
gewenste maand en bevestig uw selectie
met de START/STOP-toets .
107
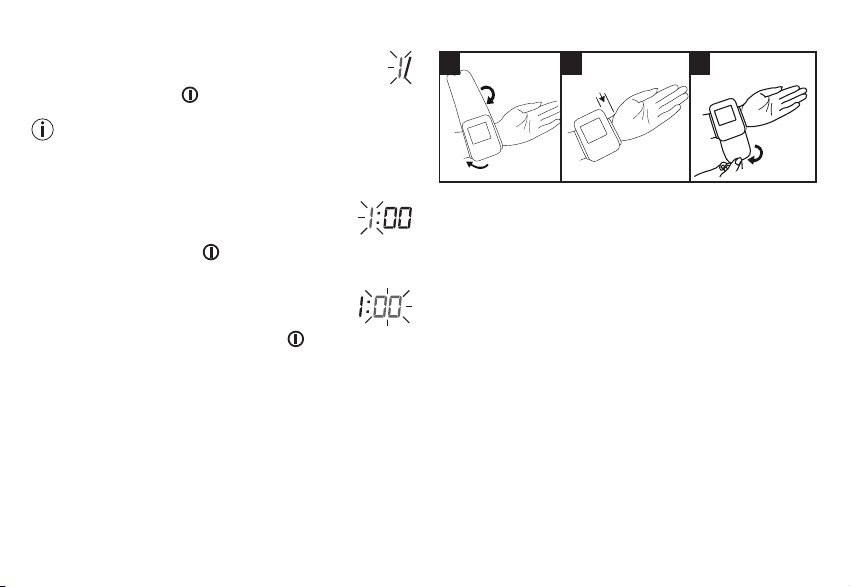
Op het display knippert de dag.
•
Selecteer met de geheugentoets M de
gewenste dag en bevestig uw selectie met de
START/STOP-toets .
Als de uurweergave 12h is ingesteld, worden de dag
en de maand andersom weergegeven.
Tijd
Op het display knippert het uur.
•
Selecteer met de geheugentoets M het
gewenste uur en bevestig uw selectie met
de START/STOP-toets .
Op het display knipperen de minuten.
•
Selecteer met de geheugentoets M het
gewenste aantal minuten en bevestig uw
selectie met de START/STOP-toets .
Nadat u alle gegevens hebt ingesteld, wordt het appa-
raat automatisch uitgeschakeld.
5. Bloeddruk meten
Laat het apparaat op kamertemperatuur komen voordat
u met de meting begint. U kunt de meting bij de linker-
of de rechterpols uitvoeren.
Manchet aanbrengen
1 2 3
1 cm
•
Ontbloot uw pols. Zorg ervoor dat de doorbloeding
van de arm niet wordt belemmerd door bijvoorbeeld te
strakke kledingstukken.
Breng de manchet aan de binnenkant van uw pols aan.
•
Sluit de manchet met de klittenbandsluiting, zodat de
bovenkant van het apparaat zich ongeveer 1 cm onder
de bal van de hand bevindt.
•
De manchet moet strak rond de pols zitten, maar mag
niet knellen.
De bloeddruk kan verschillen bij de rechter- en de linker-
arm en daardoor kunnen de gemeten bloeddrukwaarden
ook verschillen. Voer de meting altijd bij dezelfde arm uit.
Als het verschil tussen de waarden van beide armen zeer
groot is, dient u met uw arts te overleggen welke arm u
voor de meting moet gebruiken.
108
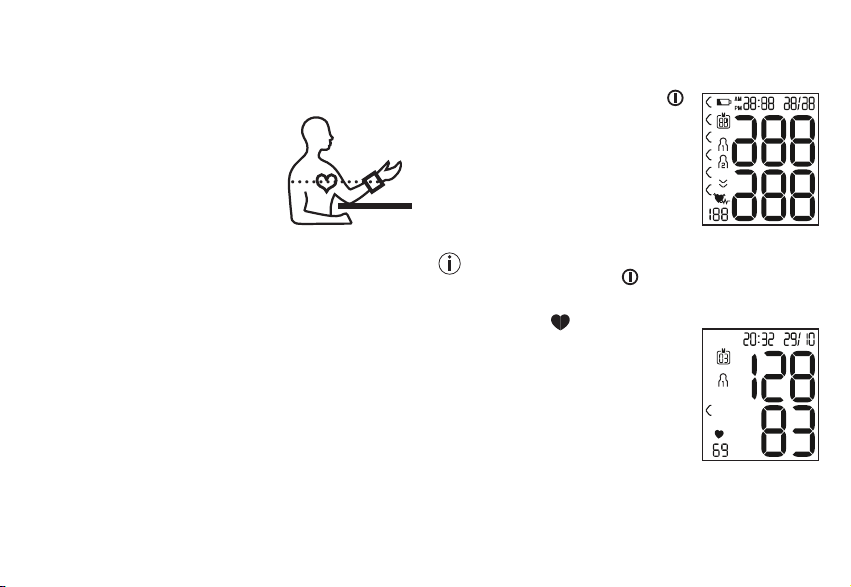
Juiste lichaamshouding aannemen
•
Rust voorafgaand aan de eerste bloeddrukmeting
altijd 5 minuten uit! Anders ontstaan er mogelijk afwi-
jkingen.
•
U kunt de meting zittend of liggend
uitvoeren. Zorg ervoor dat u tij-
dens de bloeddrukmeting com-
fortabel zit. Ondersteun uw rug en
armen. Ga niet met gekruiste
benen zitten. Plaats uw voeten
plat op de grond. Ondersteun en buig uw arm. Zorg er
in ieder geval voor dat de manchet zich ter hoogte van
uw hart bevindt. Anders ontstaan er mogelijk aanzien-
lijke afwijkingen. Ontspan uw arm en de handpalmen.
•
Om een juist resultaat te verkrijgen, is het belangrijk
dat u tijdens de meting rustig blijft en niet spreekt.
•
Wacht ten minste 1minuut voordat u een nieuwe met-
ing uitvoert!
Bloeddrukmeting uitvoeren
Breng zoals eerder beschreven de manchet aan en
neem de houding aan waarin u de meting wilt uitvoeren.
•
Druk op de START/STOP-toets
om de bloeddrukmeter in te
schakelen. Alle displayweergaven
worden kort verlicht.
•
De laatste meetwaarde wordt
weergegeven en na 3 seconden
begint de bloeddrukmeter automa-
tisch met de meting.
U kunt de meting op elk moment afbreken door op
de START/STOP-toets te drukken.
Zodra er een hartslag wordt herkend, wordt het symbool
voor de hartslag
weergegeven.
•
De meetresultaten voor systolische
druk, diastolische druk en hartslag
worden weergegeven.
109
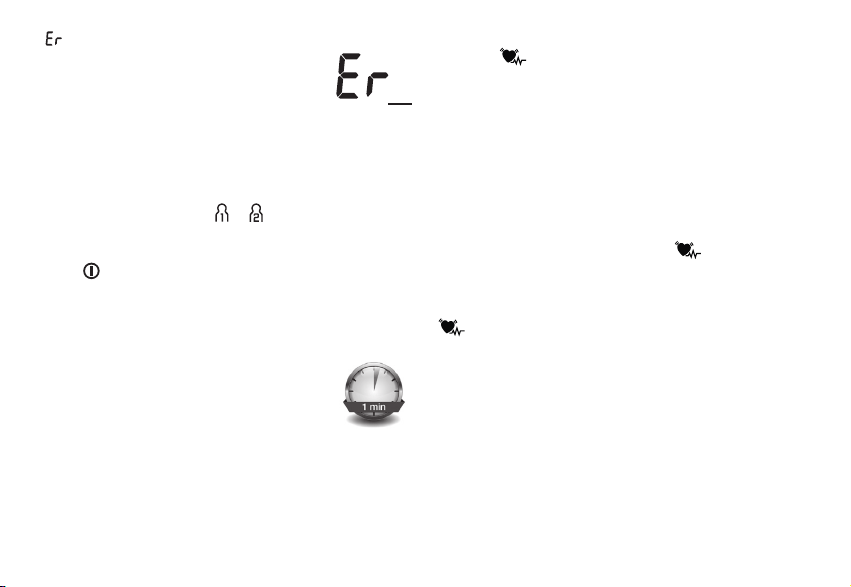
•
_ wordt weergegeven als de meting niet juist kon
worden uitgevoerd. Lees het hoofdstuk
“Foutmeldingen/storingen verhelpen” in
deze gebruiksaanwijzing en herhaal de
meting.
•
Selecteer nu het gewenste gebruikersgeheugen door
op de geheugentoets M te drukken. Als u geen geb-
ruikersgeheugen selecteert, wordt het meetresultaat in
het laatst gebruikte gebruikersgeheugen opgeslagen.
Het betreffende symbool of wordt op het display
weergegeven.
•
Schakel de bloeddrukmeter uit met de START/ STOP-
toets . Daarbij wordt het meetresultaat in het gese-
lecteerde gebruikersgeheugen opgeslagen.
Als u vergeet het apparaat uit te schakelen, dan wordt
het na ongeveer 1 minuut automatisch uitgeschakeld.
Ook in dit geval wordt de waarde in het gese-
lecteerde of het laatst gebruikte gebruikers-
geheugen opgeslagen.
Wacht minstens 1minuut voordat u een
nieuwe meting uitvoert!
6. Resultaten beoordelen
Hartritmestoornissen
Dit apparaat kan tijdens de meting eventuele hartrit-
mestoornissen identificeren. Indien dergelijke stoornis-
sen worden vastgesteld, wordt dit na de meting met het
symbool
aangegeven.
Dit kan wijzen op aritmie. Aritmie is een aandoening
waarbij het hartritme abnormaal is als gevolg van fouten
in het bio-elektrische systeem dat de hartslag stuurt. De
symptomen (overslaand hart of voortijdige hartslagen,
langzame of te snelle hartslag) kunnen onder meer het
gevolg zijn van hartaandoeningen, ouderdom, lichameli-
jke aanleg, overmatig gebruik van genotmiddelen, stress
of slaapgebrek. Aritmie kan uitsluitend worden vast-
gesteld door medisch onderzoek.
Herhaal de meting als het symbool na de met-
ing op het display wordt weergegeven. Let erop dat u 5
minuten rust moet nemen en dat u tijdens de meting niet
spreekt of beweegt. Raadpleeg uw arts als het symbool
vaak wordt weergegeven. Zelf een diagnose stellen
of een behandeling starten op basis van de meetresul-
taten kan gevaarlijk zijn. Volg altijd de aanwijzingen van
uw arts op.
Risico-indicator
De meetresultaten kunnen overeenkomstig de volgende
tabel geclassificeerd en beoordeeld worden.
Deze standaardwaarden mogen echter uitsluitend
worden opgevat als algemene richtlijn, omdat de bloed-
druk per persoon en ook per leeftijdsgroep enz. kan ver-
schillen of afwijken.
110
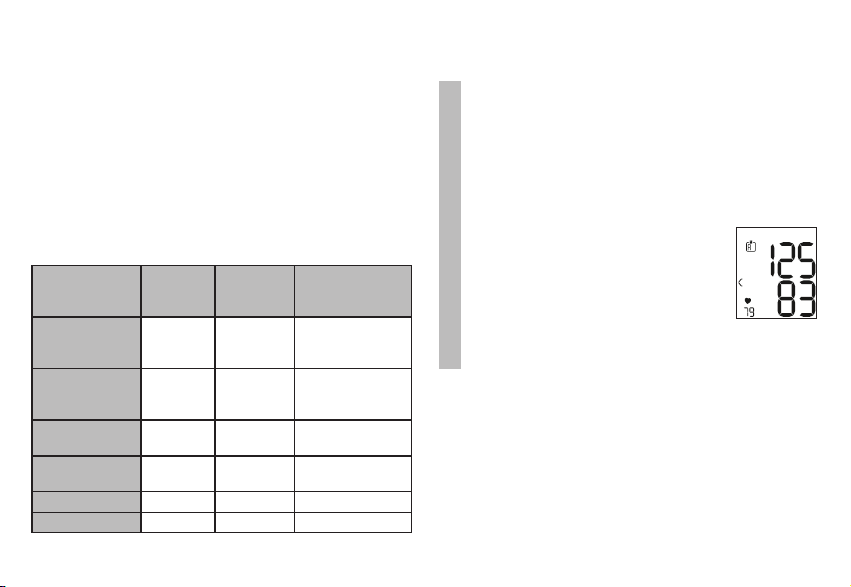
Raadpleeg daarom regelmatig uw arts. Uw arts brengt
u op de hoogte van uw persoonlijke waarden voor een
normale bloeddruk en van de waarde vanaf wanneer de
bloeddruk als gevaarlijk moet worden geclassificeerd.
De indeling op het display en de schaalverdeling op
het apparaat geven aan binnen welk gebied de geme-
ten bloeddruk zich bevindt. Als de systolische en dia-
stolische waarden zich in twee verschillende gebieden
bevinden (bijv. systolisch in het gebied “hoog-normaal”
en diastolisch in het gebied “normaal”), dan geeft de
grafische classificatie op het apparaat altijd het hoogste
gebied weer; in dit voorbeeld is dat “hoog-normaal”.
Gebied van
de bloeddruk-
waarden
Systolisch
(in mmHg)
Diastolisch
(in mmHg)
Maatregel
Niveau 3:
ernstige
hypertonie
≥ 180 ≥ 110
Raadpleeg een
arts
Niveau 2:
gemiddelde
hypertonie
160 – 179 100 – 109
Raadpleeg een
arts
Niveau 1:
lichte hypertonie
140 – 159 90 – 99
Regelmatige con
-
trole door een arts
Hoog-normaal 130 – 139 85 – 89
Regelmatige con
-
trole door een arts
Normaal 120 – 129 80 – 84 Zelfcontrole
Optimaal < 120 < 80 Zelfcontrole
Bron: WHO, 1999 (World Health Organization)
7. Meetwaarden opslaan, opvragen en
wissen
Gebruikersgeheugen
De resultaten van elke succesvolle meting worden
samen met de datum en de tijd opgeslagen. Bij
meer dan 60 meetgegevens wordt telkens de oud-
ste meting overschreven.
•
Druk op de geheugentoets M om het meetresul-
taat op te vragen.
Op het display knippert
AA.
Het gemiddelde van alle in dit geb-
ruikersgeheugen opgeslagen meet-
waarden wordt weergegeven.
Houd de geheugentoets M ongeveer 2 seconden
ingedrukt om van gebruikersgeheugen te wisselen.
111
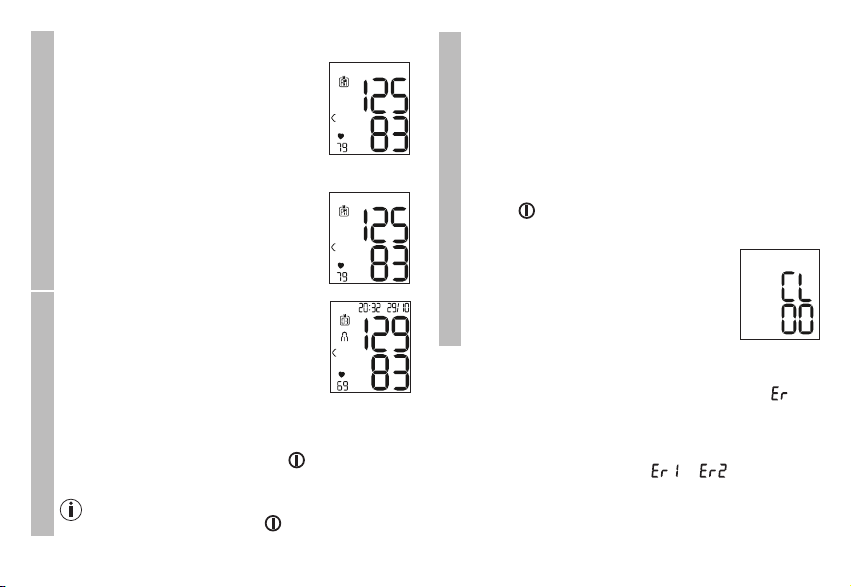
Gemiddelde waarden
•
Druk op de geheugentoets M.
Op het display knippert
AMAM.
De gemiddelde waarde van de ocht-
endmetingen van de laatste 7dagen
wordt weergegeven (ochtend:
05.00uur – 09.00 uur).
•
Druk op de geheugentoets M.
Op het display knippert
PMPM.
De gemiddelde waarde van de
avondmetingen van de laatste
7dagen wordt weergegeven (avond:
18.00 uur – 20.00 uur).
Afzonderlijke meetwaarden
•
Als u nogmaals op de geheugen-
toets M drukt, wordt de laatste
afzonderlijke meting op het display
weergegeven (in dit voorbeeld met-
ing 03).
•
Als u nogmaals op de geheugentoets M drukt,
kunt u de afzonderlijke meetwaarden bekijken.
•
Druk op de START/STOP-toets om het appa-
raat weer uit te schakelen.
U kunt het menu op elk moment verlaten door
op de START/STOP-toets te drukken.
Meetwaarden wissen
•
Om het betreffende gebruikersgeheugen te wis-
sen, moet u eerst een gebruikersgeheugen
selecteren.
•
Start het laden van de gemiddelde meetwaarden.
Op het display knippert A, de gemiddelde waarde
van alle opgeslagen meetwaarden van dit gebrui-
kersgeheugen wordt weergegeven.
•
Houd de geheugentoets M en de START/ STOP-
toets 5 seconden ingedrukt, afhankelijk van het
gebruikersgeheugen waarin u zich bevindt.
Alle waarden van het huidige gebrui-
kersgeheugen worden gewist en het
apparaat wordt uitgeschakeld.
8. Foutmeldingen/storingen verhelpen
Bij storingen wordt op het display de foutmelding _
weergegeven.
F
outmeldingen kunnen optreden als
•
de systolische of diastolische druk niet gemeten kan
worden (op het display wordt of weerge-
geven),
•
de systolische of diastolische druk buiten het meet-
bereik valt (op het display wordt “Hi” of “Lo” weerge-
geven),
112

•
de manchet te strak of te los is aangebracht (op het
display wordt of weergegeven),
•
de bloeddruk langer dan 1,5 seconden hoger dan
300mmHg is (op het display wordt weergegeven),
•
het oppompen meer dan 180 seconden duurt (op het
display wordt weergegeven),
•
er een systeem- of apparaatfout is opgetreden (op het
display wordt , , of weergegeven),
•
de batterijen bijna leeg zijn .
Herhaal in deze gevallen de meting. Let erop dat u tij-
dens het meten niet beweegt of spreekt. Plaats de bat-
terijen indien nodig opnieuw of vervang ze.
Technisch alarm – beschrijving
Wanneer de gemeten bloeddruk (systolisch of dia-
stolisch) buiten de in de paragraaf “Technische
gegevens” beschreven grenzen ligt, verschijnt op het
display een technisch alarm in de vorm van de weergave
“
” of “Lo Lo ”. In dat geval moet u een arts raadplegen of
controleren of u het apparaat op de juiste wijze hebt
bediend.
De grenswaarden voor het technische alarm zijn af fab-
riek ingesteld en kunnen niet worden aangepast of uit-
geschakeld. In het kader van de norm IEC 60601-1-8
hebben deze alarmgrenswaarden minder prioriteit.
Het technische alarm blijft niet oneindig zichtbaar en
hoeft niet te worden gereset. Het op het display weerge-
geven signaal verdwijnt na ongeveer 8 seconden autom-
atisch.
9. Apparaat en manchet reinigen en
opbergen
•
Reinig het apparaat en de manchet voorzichtig met
alleen een licht bevochtigde doek.
•
Gebruik geen reinigings- of oplosmiddelen.
•
Dompel het apparaat en de manchet nooit onder in
water, omdat er anders vocht kan binnendringen,
waardoor het apparaat en de manchet beschadigd
kunnen raken.
•
Zorg ervoor dat er geen zware voorwerpen op het
apparaat en de manchet worden geplaatst als u deze
opbergt. Haal de batterijen uit het apparaat.
10. Technische gegevens
Modelnr. SBC 15
Meetmethode Oscillometrische, non-invasieve
bloeddrukmeting aan de pols
Meetbereik Manchetdruk 0-300 mmHg,
systolisch 60-260 mmHg,
diastolisch 40-199 mmHg,
polsslag 40-180 slagen/minuut
113

Nauwkeurigheid
van de weergave
Systolisch ± 3 mmHg,
diastolisch ± 3 mmHg,
hartslag ± 5% van de weergegeven
waarde
Meetonzekerheid Max. toelaatbare standaardafwijking
conform klinische controle:
systolisch 8 mmHg /
diastolisch 8 mmHg
Geheugen 2 x 60 geheugenplaatsen
Afmetingen L 83,8 mm x b 59,9 mm x h 29,4 mm
Gewicht Ongeveer 92 g (zonder batterijen,
met manchet)
Manchetmaat 140 tot 195 mm
Toegestane
omstandigheden
bij gebruik
+ 10 °C tot +40 °C, ≤85% relatieve
luchtvochtigheid (niet condenserend)
Toegestane
omstandigheden
voor opbergen
-20 °C tot +50 °C,≤ 85% relatieve
luchtvochtigheid, 800-1050 hPa
omgevingsdruk
Stroom-
voorziening
2 x 1,5 V
AAA-batterijen
Levensduur
batterijen
Voor ongeveer 170 metingen, afhan-
kelijk van de hoogte van de bloed-
druk en de oppompdruk
Classificatie Interne voeding, IP22, geen AP of
APG, ononderbroken werking, toege-
past deel type BF
Wijzigingen van de technische gegevens zonder kennis-
geving zijn om actualiseringsredenen voorbehouden.
•
Dit apparaat voldoet aan de Europese norm
EN60601-1-2 (overeenstemming met CISPR11,
EN61000-4-2, EN61000-4-3, EN61000-4-8) en is
onderworpen aan bijzondere veiligheidsmaatregelen
op het gebied van elektromagnetische compatibiliteit.
Let er daarbij op dat draagbare en mobiele HF-com-
municatieapparatuur dit apparaat negatief kan beïnv-
loeden.
•
Het apparaat voldoet aan de EU-richtlijn 93/42/EEC
voor medische hulpmiddelen, de Duitse wet inzake
medische hulpmiddelen en de normen EN1060-1
(Niet-invasieve bloeddrukmeters deel 1: Algemene
eisen), EN1060-3 (Niet-invasieve bloeddrukme-
ters deel 3: Aanvullende eisen voor elektromecha-
nische bloeddrukmeetsystemen) en IEC80601-2-30
(Medische elektrische toestellen deel 2 – 30: Speciale
eisen voor basisveiligheid en essentiële prestaties van
niet-invasieve bloeddrukmeters).
•
De nauwkeurigheid van deze bloeddrukmeter is
zorgvuldig gecontroleerd en het apparaat is ontwik-
114

keld met het oog op een lange gebruiksduur. Wan-
neer het apparaat in de geneeskunde wordt gebruikt,
moeten meettechnische controles met daarvoor ges-
chikte middelen worden uitgevoerd. Uitgebreide infor-
matie over het controleren van de nauwkeurigheid kan
worden aangevraagd via het servicepunt.
11. Garantie/service
Meer informatie over de garantie en de garantievoor-
waarden vindt u in het meegeleverde garantieblad.
Fouten en wijzigingen voorbehouden
115

Hans Dinslage GmbH, Riedlinger Str. 28, 88524 Uttenweiler, Germany
www.sanitas-online.de
650.45_SBC15_2022-03-14_06_IM1_SAN
116