Documents: Go to download!
User Manual
- User Manual - (English)
- Quick Reference Guide - (English)
- Notification about included accessories - (English)
- Accessories catalog - (English)
- NAMES OF MACHINE PARTS AND THEIR FUNCTIONS
- USING YOUR SEWING MACHINE
- SEWING BASICS
- MAINTENANCE
- TROUBLESHOOTING
- ERROR MESSAGES
Table of contents
Operation Manual Sewing Machine
NAMES OF MACHINE PARTS AND THEIR FUNCTIONS
The illustrations in this operation manual may differ from the actual machine.
The main parts

1.Bobbin winder (page 15)
This winds the thread onto the bobbin for use as the lower thread.
2. Upper tension-control dial (page 41)
This controls the tension of the upper thread.
3. Bobbin-winding thread guide and pretension disc (page 15)
Pass the thread under this thread guide and around the pretension disc when winding the bobbin thread.
4. Thread take-up lever (page 25)
5. Thread cutter (page 40)
Pass the threads through the thread cutter to cut them.
6. Flat bed attachment with accessory compartment (page 7 and 44)
7. Operation buttons (page 9)
The operation buttons differ depending on the sewing machine model.
8. Operation panel (page 10)
This is used to select the stitch and specify the various settings. Design and position of the operation panel differs depending on the sewing machine model.
9. Spool pin (page 10, 15 and 23)
This holds the spool of thread.
10. Handwheel
This is used to manually raise and lower the needle.
11. Air vent This vent allows the air surrounding the motor to circulate.
Do not cover the air vent while the sewing machine is being used.
12. Main power and sewing light switch (page 12)
You can turn the main power and sewing light switch on and off.
13. Jack/socket connector (page 12)
Insert the plug on the power supply cord into the jack/ socket connector.
14. Foot controller (page 13)
You can use this to control the sewing speed, and to start and stop sewing.
15. Foot controller jack/socket (page 13)
Plug in the foot controller plug.
16. Feed dog position lever (page 55 and 65)
Use the feed dog position lever to lower the feed dogs.
17. Presser foot lever (page 23)
This is used to raise and lower the presser foot.
18. Thread guide (page 16 and 25)
This is used when winding the thread onto the bobbin and then threading the machine.
19. Thread guide cover (page 17 and 23)
Pass the thread under this thread guide when winding the bobbin thread and threading the machine.
20. Handle
Carry the sewing machine by its handle when transporting the machine.
Needle and presser foot section

1.Needle threader (for models equipped with the needle threader) (page 26)
2. Buttonhole lever
Lower the buttonhole lever when sewing buttonholes and bar tacks.
3. Presser foot holder
The presser foot is installed onto the presser foot holder.
4. Presser foot holder screw
Use the presser foot holder screw to hold the presser foot holder in place.
5. Presser foot
The presser foot applies pressure consistently on the fabric as the sewing takes place. Attach the appropriate presser foot for the selected stitching.
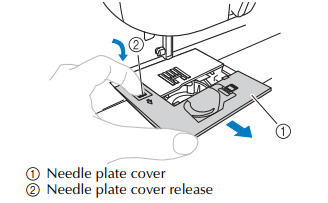
6. Needle plate cover release
Use when removing the needle plate cover.
7. Needle plate cover
Remove the needle plate cover to clean the race.
8. Feed dogs
The feed dogs feed the fabric in the sewing direction.
9. Quick-set bobbin (for models equipped with the quickset bobbin)
You can start sewing without pulling up the bobbin thread.
10. Bobbin cover
Open the bobbin cover to set the bobbin.
11. Needle plate
The needle plate is marked with guides for sewing straight seams.
12. Needle bar thread guide
Pass the upper thread through the needle bar thread guide.
13. Presser foot lever
Raise and lower the presser foot lever to raise and lower the presser foot.
14. Needle clamp screw
Use the needle clamp screw to hold the needle in place.
Operation buttons
The operation buttons help you to easily perform various basic sewing machine operations.
The operation buttons differ depending on the sewing machine model.

1.Reverse/reinforcement stitch button 
Press the reverse/reinforcement stitch button to sew reverse stitches. Reverse stitches are sewn by keeping the button pressed down to sew in the opposite direction. For details, refer to “Sewing reinforcement stitches” (page 40).
■ Buttons provided on some models
2. Start/stop button  (for models equipped with the start/stop button)
Press the start/stop button to start or stop sewing. The machine sews at a slow speed at the beginning of sewing while the button is depressed. When sewing is stopped, the needle is lowered in the fabric. For details, refer to “Starting to sew” (page 39).
3. Needle position button  (for models equipped with the needle position button)
Press the needle position button to raise or lower the needle. Be sure to raise the needle before threading the needle. Use this button to change the sewing direction or for detailed sewing in small areas. Pressing the button twice sews one stitch.
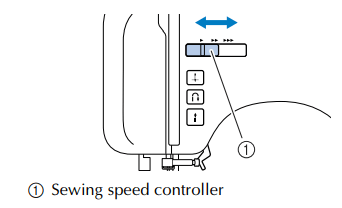
4. Sewing speed controller (for models equipped with the sewing speed controller)
Slide the sewing speed controller to adjust the sewing speed.
Operation panel
The operation panel, located on the front of the sewing machine, allows you to select a stitch and specify how the stitch will be sewn.
The operation panel differs depending on the sewing machine model.

1.LCD (liquid crystal display)
The number of the selected stitch (1), the presser foot type to be used (2), the stitch length (mm) (3), and the stitch width (mm) (4) are displayed here. The display location (2) of the presser foot type differs depending on the model.
This manual shows, as an example, the LCD (illustration above) of models where the presser foot type appears above the number of the selected stitch.
2. Stitch selection keys
Press the stitch selection keys, and then select the number for the stitch that you wish to use. For details, refer to “Selecting a stitch” (page 37).
3. Stitch length adjustment key
Press this key to adjust the stitch length. (Press the “–” side to reduce the stitch length; press the “+” side to increase the stitch length.)
4. Stitch width adjustment key
Press this key to adjust the stitch width. (Press the “–” side to reduce the stitch width; press the “+” side to increase the stitch width.)
Spool pin
As shown, press down on the spool pin lever with your finger to raise the spool pin.

■ Storing the spool cap
The enclosed spool cap (large, medium, small) can be stored by attaching it to the spool pin as shown in the illustration. When attaching the spool cap, position it with the rounded side toward the spool pin.
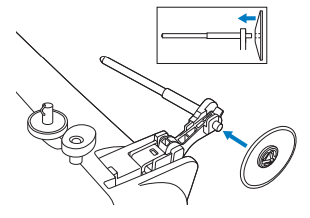
■ Storing the spool pin
When placing the cover on the sewing machine before storing or if the spool pin will not be used, return the spool pin to its storage position.
Remove the spool from the spool pin, and then fold up the spool pin, as shown in the illustration, until it snaps into place to secure it.

■ Installing the spool pin
1.If the spool pin has been removed from the machine, insert the tab on the spool pin into the hole on the back of the machine, as shown.
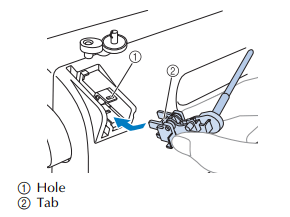
2. Push the spool pin down until it locks into place.

USING YOUR SEWING MACHINE
Power supply
1.Insert the plug into a wall outlet.

2. Set the main power switch to “I”.

The sewing lamp comes on when the machine is turned on.
3. To turn off the machine, set the main power switch to “O”.
The sewing lamp goes off when the machine is turned off.
Foot controller
Insert the foot controller plug into its jack/socket on the rear side of the sewing machine.

When you press the foot controller down lightly, the machine will run at a low speed. When you press harder, the machine’s speed will increase. When you take your foot off the foot controller, the machine will stop.

You should make sure that nothing is placed on the foot controller when the machine is not in use.
Sewing speed controller (for models equipped with the start/stop button)
1.Slide the sewing speed controller to the left or right to select the desired sewing speed.
Slide the sewing speed controller to the left to sew at a slower speed, or slide the speed controller to the right to sew at a faster speed.
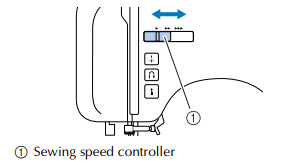
• The speed set using the sewing speed controller is the foot controller’s maximum sewing speed.
Changing the needle stop position
Normally, the sewing machine is set to leave the needle in the fabric when sewing is stopped. Instead, the machine can be set to leave the needle raised when sewing is stopped.
1.Turn off the sewing machine.

2. Hold down the “–” side of  stitch selection key) on the left and turn on the sewing machine.
After turning on the sewing machine, release the “–” side of  stitch selection key).

The needle stop position changes to the raised position.
Changing the initial needle position
Normally, the straight stitch (left needle position) is automatically selected when the sewing machine is turned on. The machine can be set so that the straight stitch (center needle position) is automatically selected when it is turned on.
1.Turn off the sewing machine.

2. Hold down the “+” side of  (stitch selection key) on the left and turn on the sewing machine.
After turning on the sewing machine, release the “+” side of (stitch selection key).

The initial needle position changes to the center needle position.
Cancelling the operation beep (for models equipped with the operation beep)
When the sewing machine is purchased, it is set to beep each time a key is pressed. This setting can be changed so that the machine does not beep
1.Turn off the sewing machine.

2. Hold down the “–” side of  (stitch width adjustment key) and turn on the sewing machine.
After turning on the sewing machine, release the “-” side of (stitch width adjustment key).
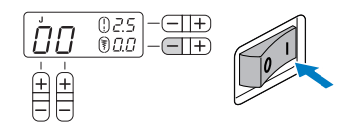
The machine is now set so that it will not beep.
SEWING BASICS
General sewing procedure
Follow the basic procedures below to sew.
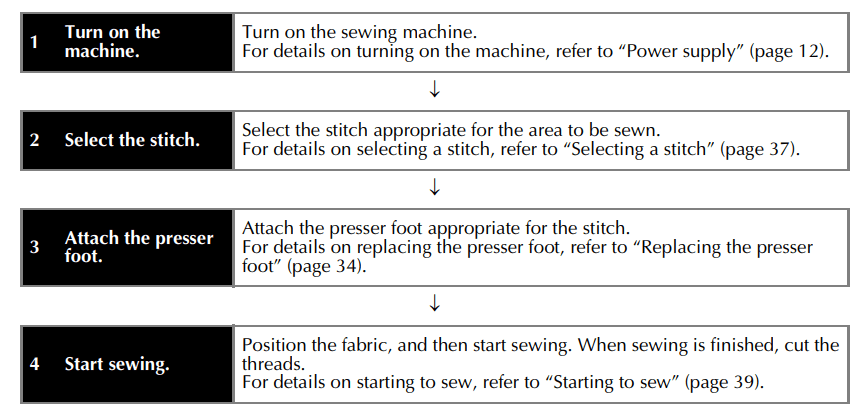
Selecting a stitch
1.Turn on the sewing machine.

2. Press  (stitch selection keys). The number of the selected stitch is displayed.
Press the “+” or “–” side of  to increase or reduce the number by one. Pressing
  on the right changes the digit on the right and pressing
  on the left changes the digit on the left.

3. Attach the presser foot indicated in the LCD.
The display location of the presser foot type differs depending on the model.
This manual shows, as an example, the LCD (illustration above) of models where the presser foot type appears above the number of the selected stitch.

4. If necessary, adjust the stitch length and width.
• For details on sewing with each of the utility stitches, refer to the following example.
Adjusting the stitch length and width
■ [Example] Selecting stitch  .
.
1.Press the stitch selection keys to select stitch 04.
With  on the right, select “4”, and with
  on the left, select “0”

2. Press the “+” or “–” side of  (stitch length adjustment key) to increase or reduce the stitch length

3. Press the “+” or “–” side of  (stitch width adjustment key) to increase or reduce the stitch width.

Starting to sew
1.Raise the needle by turning the handwheel toward you (counterclockwise) so that the mark on the wheel points up. (With models equipped with  (needle position button), raise the needle by pressing
  once or twice.)

2. Raise the presser foot lever.

3. Place the fabric under the presser foot, pass the thread under the presser foot, and then pull out about 5 cm (2 inches) of thread toward the rear of the machine.

4. While holding the end of the thread and the fabric with your left hand, turn the handwheel toward you (counterclockwise) with your right hand to lower the needle to the starting point of the stitching.

5. Lower the presser foot lever.

6. On models equipped with a sewing speed controller, slide the sewing speed controller to the left or right to adjust the sewing speed. Refer to “Sewing speed controller (for models equipped with the start/stop button)” (page 13).
7. Slowly press down on the foot controller. (With models equipped with  (start/stop button), if the foot controller is not connected, press
  once.)

8. Take your foot off the foot controller, or press  (start/stop button) once (if the machine was started by pressing
  (start/stop button)) (for models equipped with the start/stop button).
9. Raise the needle by turning the handwheel toward you (counterclockwise) so that the mark on the wheel points up. (With models equipped with  (needle position button), raise the needle by pressing
  once or twice.)
This procedure is not necessary if the needle stop position has been set to the raised position (page 13).
10. Raise the presser foot lever.
11. Pull the fabric to the left side of the machine, and then pass the threads upward from below through the thread cutter to cut them.

MAINTENANCE
Simple sewing machine maintenance operations are described below.
Restrictions on oiling
In order to prevent damaging this machine, it must not be oiled by the user.
This machine was manufactured with the necessary amount of oil applied to ensure correct operation, making periodic oiling unnecessary
If problems occur, such as difficulty turning the handwheel or an unusual noise, immediately stop using the machine, and contact your authorized dealer or the nearest authorized service center.
Precautions on storing the machine
Do not store the machine in any of the locations described below, otherwise damage to the machine may result, for example, rust caused by condensation.
• Exposed to extremely high temperatures
• Exposed to extremely low temperatures
• Exposed to extreme temperature changes
• Exposed to high humidity or steam
• Near a flame, heater or air conditioner
• Outdoors or exposed to direct sunlight
• Exposed to extremely dusty or oily environments
Cleaning the machine surface
If the surface of the machine is dirty, lightly soak a cloth in neutral detergent, squeeze it out firmly, and then wipe the surface of the machine. After cleaning it once with a wet cloth, wipe it again with a dry cloth.
Cleaning the race
Sewing performance will suffer if dust collects in the race therefore, it should be cleaned periodically.
1.Switch the machine off and unplug it.
2. Raise the needle and the presser foot.
3. Loosen the presser-foot screw and the needle clamp screw to remove the presser-foot holder and the needle.

4. Slide the needle plate cover release toward you to remove the needle plate cover.
5. Remove the bobbin case. Grasp the bobbin case, and then pull it out.

6. Use the cleaning brush or a vacuum cleaner to remove any dust from the race and its surrounding area.

7. Insert the bobbin case so that the  mark on the bobbin case aligns with the
  mark on the machine.

• Make sure that the indicated points are aligned before installing the bobbin case.
8. As shown, insert the tab on the needle plate cover into the hole in the needle plate, and then correctly position of the needle plate cover.

• Check that the needle plate cover is flush with the top surface of the machine.
9. From the front, slide the needle plate cover back into position.

TROUBLESHOOTING
Upper thread tightened up
■ Symptom
- The upper thread appears as a single continuous line.
- The lower thread is visible from the upper side of the fabric. (Refer to the illustration below.)
- The upper thread has tightened up, and comes out when pulled.
- The upper thread has tightened up, and wrinkles appear in the fabric.
- The upper thread tension is tight, and the results do not change even after the thread tension is adjusted.
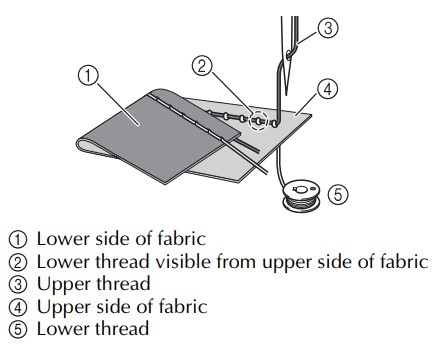
■ Cause
Incorrect lower threading
If the lower thread is incorrectly threaded, instead of the appropriate tension being applied to the lower thread, it is pulled through the fabric when the upper thread is pulled up. For this reason, the thread is visible from the upper side of the fabric.
■ Remedy/check details
Correctly install the lower thread.
- Turn off the sewing machine.
- Remove the bobbin from the bobbin case.
- Place the bobbin in the bobbin case so that the thread unwinds in the correct direction.
- Hold the bobbin with your right hand with the thread unwinding to the left, and hold the end of the thread with your left hand. Then, with your right hand, place the bobbin in the bobbin case.

If the bobbin is inserted with the thread unwinding in the wrong direction, sewing will be done with an incorrect thread tension.
4. While holding the bobbin in place with your finger, pass the thread through the slit in the needle plate.
- Hold down the bobbin with your right hand, and then pull the end of the thread around the tab with your left hand.

On models equipped with the quick-set bobbin, pull the thread to pass it through the slit in the needle plate, then cut it with the cutter.

Sewing with the correct thread tension is possible after the bobbin has been correctly installed in the bobbin case.
Tangled thread on wrong side of fabric
■ Symptom
- The thread becomes tangled on the lower side of the fabric.

- After starting sewing, a rattling noise is made and sewing cannot continue.
- Looking under the fabric, there is tangled thread in the bobbin case.

■ Cause
Incorrect upper threading
If the upper thread is incorrectly threaded, the upper thread passed through the fabric cannot be firmly pulled up and the upper thread becomes tangled in the bobbin case, causing a rattling noise.
■ Remedy/check details
Remove the tangled thread, and then correct the upper threading
1. Remove the tangled thread. If it cannot be removed, cut the thread with scissors.
- For details, refer to “Cleaning the race” on page 80.
2. Remove the upper thread from the machine.
3. Refer to the following steps to correct the upper threading.
- If the bobbin was removed from the bobbin case, refer to “Lower threading” (page 20) and “Remedy/check details” in the section “Upper thread tightened up” (page 83) to correctly install the bobbin.
4. Raise the presser foot using the presser foot lever.
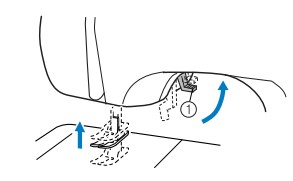
- If the presser foot is not raised, the sewing machine cannot be threaded correctly.
5. Raise the needle by turning the handwheel toward you (counterclockwise) so that the mark on the wheel points up, or press  (needle position button) (for models equipped with the needle position button) once or twice to raise the needle.

6. Pull some thread off the spool, and then pass the thread under the thread guide.

7. Pass the thread under the thread guide cover from the back to the front.
Hold the thread with your right hand so that there is no slack in the thread that is pulled out, and then pass the thread under the thread guide cover with your left hand.

8. Feed the upper thread as shown in the illustration below.

9. Make sure you guide the thread through the thread take-up lever from right to left as shown in the illustration below.
Sewing is possible only if the thread is securely hooked on the thread take-up lever.

- Make sure that the thread is securely hooked on the thread take-up lever.
10. Put the thread behind the needle bar thread guide above the needle.
The thread can easily be passed behind the needle bar thread guide by holding the thread in your left hand, then feeding the thread with your right hand.

11. Thread the needle according to steps 13 and 14 in “Upper threading” (page 26) or steps 2 through 9 in “Using the needle threader (for models equipped with the needle threader)” (page 26).
Incorrect thread tension
■ Symptoms
- Symptom 1: The lower thread is visible from the upper side of the fabric.
- Symptom 2: The upper thread appears as a straight line on the upper side of the fabric.
- Symptom 3: The upper thread is visible from the lower side of the fabric.
- Symptom 4: The lower thread appears as a straight line on the lower side of the fabric.
- Symptom 5: The stitching on the lower side of the fabric is loose or has slack.

■ Cause/remedy/check details
Cause 1 The machine is not correctly threaded. <With symptoms 1 and 2 described above> The lower threading is incorrect. Return the upper tension-control dial to “4”, and then refer to “Upper thread tightened up” (page 83) to correct the threading <With symptoms 3 through 5 described above> The upper threading is incorrect. Return the upper tension-control dial to “4”, and then refer to “Tangled thread on wrong side of fabric” (page 84) to correct the upper threading | Cause 2 A needle and thread appropriate for the fabric are not being used. The sewing machine needle that should be used depends on the type of fabric sewn and the thread thickness. If a needle and thread appropriate for the fabric are not being used, the thread tension will not be adjusted correctly, causing wrinkles in the fabric or skipped stitches.
|
Cause 3
An appropriate setting on the upper tension-control dial is not selected.
Turn the upper tension-control dial to select an appropriate thread tension.
The appropriate thread tension differs according to the type of fabric and thread being used.
* Adjust the thread tension while test sewing on a piece of scrap fabric that is the same as that used in your project.
| • When the lower thread is visible from the upper side of the fabric. Turn the upper tension-control dial to a lower number (toward the left). (Loosen the thread tension.) | • When the upper thread is visible from the lower side of the fabric. Turn the upper tension-control dial to a higher number (toward the right). (Tighten the thread tension.) |
 |  |
Fabric is caught in the machine and cannot be removed
If the fabric is caught in the sewing machine and cannot be removed, the thread may have become tangled under the needle plate. Follow the procedure described below to remove the fabric from the machine. If the operation could not be completed according to the procedure, instead of attempting to complete it forcefully, contact your nearest authorized service center.
■ Removing the fabric from the machine
1. aImmediately stop the sewing machine.
2. Turn off the sewing machine.
3. Remove the needle
If the needle is lowered into the fabric, turn the handwheel away from you (clockwise) to raise the needle out of the fabric, and then remove the needle.
- Refer to “Replacing the needle” (page 30).
4. If the needle is lowered into the fabric, turn the handwheel away from you (clockwise) to raise the needle out of the fabric, and then remove the needle.
- Refer to “Replacing the needle” (page 30).
5. Lift up the fabric and cut the threads below it. If the fabric can be removed, remove it. Continue with the following steps to clean the race.
6. Remove the needle plate cover.
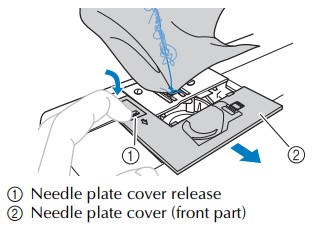
7. Cut out the tangled threads, and then remove the bobbin.
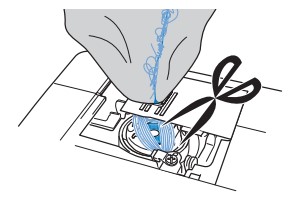
8. Remove the bobbin case.
If threads remain in the bobbin case, remove them.

9. Use the cleaning brush or a vacuum cleaner to remove any dust from the race and its surrounding area.
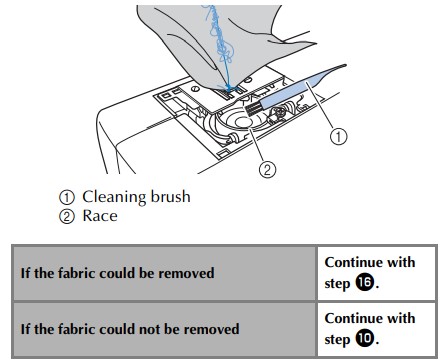
10. Use the enclosed disc-shaped screwdriver to loosen the two screws on the needle plate.
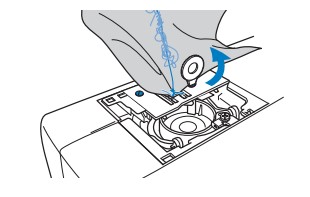
11. Slightly lift up the needle plate, cut any tangled threads, and then remove the needle plate.
Remove the fabric and threads from the needle plate.

If the fabric cannot be removed, even after completing these steps, contact your nearest authorized service center.
12. Remove any threads in the race and around the feed dogs.
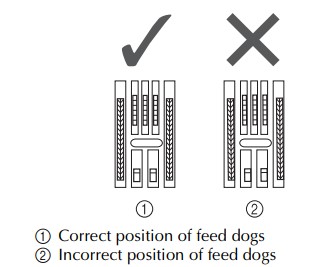
13. Turn the handwheel to raise the feed dogs.
14.Align the two screw holes in the needle plate with the two holes at the needle plate mounting base, and then fit the needle plate onto the machine.
15. Lightly finger-tighten the screw on the right side of the needle plate. Then, use the discshaped screwdriver to firmly tighten the screw on the left side. Finally, firmly tighten the screw on the right side.

Turn the handwheel to check that the feed dogs move smoothly and do not contact the edges of the slots in the needle plate.
16. Insert the bobbin case so that the  mark on the bobbin case aligns with the
 mark on the machine.

- Align the
 and
and  marks.
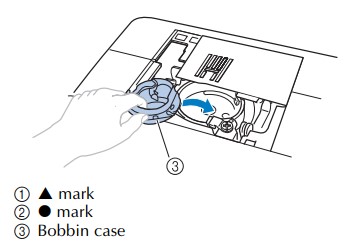
- Make sure that the indicated points are aligned before installing the bobbin case.
17. Attach the needle plate cover according to steps 8 and 9 in “Cleaning the race” (page 82).
18. Check the condition of the needle, and then install it.
If the needle is in a poor condition, for example, if it is bent, be sure to install a new needle.
- Refer to “Checking the needle” (page 30) and “Replacing the needle” (page 30).
■ Checking machine operations
If the needle plate has been removed, check machine operations to confirm that installation has been completed correctly
1. Turn on the machine.
2. Select  (middle needle position stitch).
3. Slowly turn the handwheel toward you (counterclockwise), and look from all sides to check that the needle falls at the center of the hole in the needle plate.
If the needle contacts the needle plate, remove the needle plate, and then install it again, starting with step 13 in “Removing the fabric from the machine” (page 89).

4. Select zigzag stitch  . At this time, increase the stitch length and width to their maximum settings.
- For details on changing the settings, refer to “Adjusting the stitch length and width” (page 38).
5. Slowly turn the handwheel toward you (counterclockwise) and check that the needle bar and feed dogs operate correctly.
If the needle or feed dogs contact the needle plate, the machine may be malfunctioning; therefore, contact your nearest authorized service center.
6. Turn off the machine, and then install the bobbin and presser foot.
- Refer to “Lower threading” (page 20) and “Replacing the presser foot” (page 34).
7. Correctly thread the machine.
- For details on threading the machine, refer to “Upper threading” (page 23).
8. Perform trial sewing with normal fabric.
List of symptoms
■ Before sewing
| Symptom | Possible cause | How to put it right | Reference |
|---|---|---|---|
| The needle threader can not be used. (For models equipped with the needle threader lever.) | You have not moved the needle holder to its highest position. | Raise the needle either by turning the handwheel toward you (counterclockwise) so that the mark on the wheel points up or by pressing  (needle position button) once or twice. (needle position button) once or twice. | page 23 |
| The needle is incorrectly installed. | Correctly install the needle. | page 30 | |
| The sewing light does not come on. | The sewing lamp is damaged. | Contact your retailer or the nearest authorized service center. | – |
| The machine is not turned on. | Turn on the machine. | page 12 | |
| Bobbin thread does not wind neatly on the bobbin. | The thread is not passed through the bobbin-winding thread guide correctly. | Correctly pass the thread through the bobbin-winding thread guide. | page 17 |
| Bobbin spins slowly. (for models equipped with the sewing speed controller.) | Move the sewing speed controller to the right (so that the speed will be fast). | page 19 | |
| The thread that was pulled out was not wound onto the bobbin correctly. (For models equipped with the fast bobbin winding system.) | Wind the thread that was pulled off round the bobbin five or six times clockwise. | page 18 | |
| The thread does not pass through the eye of the needle. (For models equipped with the needle threader lever.) | You have not moved the needle holder to its highest position. | Raise the needle either by turning the handwheel toward you (counterclockwise) so that the mark on the wheel points up or by pressing  (needle position button) once or twice. (needle position button) once or twice. | page 23 |
| The needle is incorrectly installed. | Correctly install the needle. | page 30 | |
| The needle threader lever does not lower to the correct position. (For models equipped with the needle threader lever.) | The needle has not been raised to the correct position. | Press the needle position button. | page 23 |
| While winding the bobbin, the bobbin thread was wound below the bobbin winder seat. | You have not wound the bobbin thread properly. | After removing the thread wound below the bobbin winder seat, wind the bobbin correctly. | page 15 |
■ While sewing
| Symptom | Possible cause | How to put it right | Reference |
|---|---|---|---|
| The sewing machine does not work. | The machine is not plugged in. | Plug the machine in. | page 12 |
| The main power switch is turned off. | Turn on the main power switch. | page 12 | |
| The bobbin winder shaft is pushed to the right. | Move the bobbin winder shaft to the left. | page 18, 19 | |
| You have not used the foot controller properly. | Use the foot controller properly. | page 13 | |
| The foot controller or the start/stop button was not pressed (for models equipped with the start/stop button). | Press the foot controller or the start/ stop button. | page 39 | |
| The presser foot lever is raised. | Lower the presser foot lever. | page 39 | |
| The start/stop button was pressed, even though the foot controller is connected. (for models equipped with the start/stop button) | Do not use the start/stop button when the foot controller is connected. To use the start/stop button, disconnect the foot controller. | page 39 | |
| Fabric being sewn with the machine cannot be removed. | Thread is tangled below the needle plate. | Lift up the fabric and cut the threads below it, and clean the race. | page 88 |
| The needle breaks. | The spool or spool cap is incorrectly installed. | Correctly install the spool or spool cap. | page 24 |
| The upper thread was not threaded correctly. | Correct the upper threading. | page 23 | |
| The needle is incorrectly installed. | Correctly install the needle. | page 30 | |
| The needle clamp screw is loose. | Use the disc-shaped screwdriver to firmly tighten the screw. | page 31 | |
| The needle is bent or blunt. | Replace the needle. | page 30 | |
| You have not used the right combination of fabric, thread and needle. | Choose a thread and needle that are appropriate for the type of fabric. | page 29 | |
| The presser foot you are using is not appropriate for the type of stitch that you want to sew. | Attach the presser foot that is correct for the type of stitch that you want to sew. | page 73 | |
| The upper thread tension is too tight. | Loosen the upper thread tension. | page 41 | |
| You are pulling the fabric too much. | Lightly guide the fabric. | – | |
| The area around the hole in the needle plate is scratched. | Replace the needle plate. Contact your retailer or the nearest authorized service center. | – | |
| The area around the hole in the presser foot is scratched. | Replace the presser foot. Contact your retailer or the nearest authorized service center. | – | |
| The bobbin case is scratched. | Replace the bobbin case. Contact your retailer or the nearest authorized service center. | – | |
| You have not used a bobbin that has been designed for this machine. | Incorrect bobbins will not work properly. Only use a bobbin that has been designed for this machine. | page 15 | |
| The upper thread breaks. | The upper thread was not threaded correctly (for example, the spool is not installed correctly, the spool cap is too big for the spool being used, or the thread has come out of the needle bar thread guide.) | Correct the upper threading. Use the spool cap that best fits the size of the spool being used. | page 23 |
| There are knots or tangles in the thread. | Remove any knots or tangles. | – | |
| The needle is not appropriate for the thread you are using. | Choose a needle that is appropriate for the type of stitch. | page 29 | |
| The upper thread tension is too tight. | Loosen the upper thread tension. | page 41 | |
| The thread is tangled, for example, in the race. | Remove the tangle thread. If the thread is tangled in the race, clean the race. | page 80, 84 | |
| The needle is bent or blunt. | Replace the needle. | page 30 | |
| The needle is incorrectly installed. | Correctly install the needle. | page 30 | |
| The area around the hole in the needle plate is scratched. | Replace the needle plate. Contact your retailer or the nearest authorised service center. | – | |
| The area around the hole in the presser foot is scratched. | Replace the presser foot. Contact your retailer or the nearest authorised service center. | – | |
| The bobbin case is scratched, or has a burr on it. | Replace the bobbin case. Contact your retailer or the nearest authorised service center. | – | |
| You have not used a bobbin that has been designed for this machine. | Incorrect bobbins will not work properly. Only use a bobbin that has been designed for this machine. | page 15 | |
| The lower thread is tangled or breaks. | You have not wound the bobbin thread properly. | Wind the bobbin thread properly. | page 15 |
| The bobbin is scratched or does not turn smoothly. | Replace the bobbin. | – | |
| The thread is tangled. | Remove the tangled thread and clean the race. | page 80, 84 | |
| You have not used a bobbin that has been designed for this machine. | Incorrect bobbins will not work properly. Only use a bobbin that has been designed for this machine. | page 15 | |
| Bobbin is set incorrectly. | Reset the bobbin thread correctly. | page 20, 21 | |
| The fabric is wrinkled. | You have not threaded the upper thread properly or fitted the bobbin properly. | Thread the upper thread and wind the bobbin thread properly | page 20, 21, 23 |
| The spool or spool cap is incorrectly installed. | Correctly install the spool or spool cap. | page 24 | |
| You have not used the right combination of fabric, thread and needle. | Choose a thread and needle that are appropriate for the type of fabric. | page 29 | |
| The needle is bent or blunt. | Replace the needle. | page 30 | |
| If thin fabrics are being sewn, the stitch is too long or the fabric is not being fed correctly. | Sew with the stabilizer material under the fabric. | page 44 | |
| If thin fabrics are being sewn, the stitch is too coarse. | Shorten the stitch length, or sew with stabilizer material under the fabric. | page 38, 44 | |
| The fabric is wrinkled. | The presser foot you are using is not appropriate for the type of stitch that you want to sew. | Attach the presser foot that is correct for the type of stitch that you want to sew. | page 73 |
| The thread tension is incorrect. | Adjust the tension of the upper thread. | page 41, 87 | |
| Stitches are skipped. | You have not threaded the upper thread properly. | Correct the upper threading. | page 23 |
| You have not used the right combination of fabric, thread and needle. | Choose a thread and needle that are appropriate for the type of fabric. | page 29 | |
| The needle is bent or blunt. | Replace the needle. | page 30 | |
| The needle is incorrectly installed. | Correctly install the needle. | ||
| Dust has accumulated under the needle plate or in the race. | Remove the needle plate cover and clean the plate and the race. | page 80 | |
| There is a highpitched noise while sewing. | Dust has built up in the feed dogs or in the race. | Remove the needle plate cover and clean the plate and the race. | page 80 |
| You have not threaded the upper thread properly. | Correct the upper threading. | page 23 | |
| The bobbin case is scratched. | Replace the bobbin case. Contact your retailer or the nearest authorized service center. | – | |
| You have not used bobbin that has been designed for this machine. | Incorrect bobbins will not work properly. Only use a bobbin that has been designed for this machine. | page 15 | |
| The fabric does not feed. | The feed dogs are lowered. | Slide the feed dog position lever to | page 55, 65 |
| The stitch is too fine. | Lengthen the stitch length. | page 38 | |
| You have not used the right combination of fabric, thread and needle. | Choose a thread and needle that are appropriate for the type of fabric. | page 29 | |
| The thread is tangled, for example, in the race. | Remove the tangle thread. If the thread is tangled in the race, clean the race. | page 80, 84 | |
| The presser foot you are using is not appropriate for the type of stitch that you want to sew. | Attach the presser foot that is correct for the type of stitch that you want to sew. | page 73 | |
| The needle is bent or blunt. | Replace the needle. | page 30 | |
| Zigzag foot “J” is slanted on a thick seam at the beginning of stitching. | Use the presser foot locking pin (black button on the left side) on zigzag foot “J” to keep the presser foot level while sewing. | page 43 | |
| The fabric feeds in the opposite direction. | The feed mechanism is damaged. | Contact your retailer or the nearest authorized service center. | – |
■ After sewing
| Symptom | Possible cause | How to put it right | Reference |
| The upper thread has tightened up | The bobbin thread is incorrectly installed. | Correctly install the bobbin thread. | page 20, 83 |
| The thread tension is incorrect. | You have not threaded the upper thread properly. | Correct the upper threading. | page 23 |
| You have not wound the bobbin thread properly. | Wind the bobbin thread properly. | page 15 | |
| The bobbin thread is incorrectly installed. | Correctly install the bobbin thread. | page 20 | |
| You have not threaded the right combination of thread and needle for the fabric you are using. | Choose a thread and needle that are appropriate for the type of fabric. | page 29 | |
| You have not attached the presserfoot holder properly. | Attach the presser-foot holder properly. | page 35 | |
| The thread tension is incorrect. | Adjust the tension of the upper thread. | page 41, 87 | |
| You have not used a bobbin that has been designed for this machine. | Incorrect bobbins will not work properly. Only use a bobbin that has been designed for this machine. | page 15 | |
| Bobbin is set incorrectly. | Reset the bobbin thread correctly. | page 20, 21 | |
| The thread is tangled on the wrong side of the fabric. | You have not threaded the upper thread properly. | Correct the upper threading. | page 23, 84 |
| The stitch is not sewn correctly. | The presser foot you are using is not appropriate for the type of stitch that you want to sew. | Attach the presser foot that is correct for the type of stitch that you want to sew. | page 73 |
| The thread tension is incorrect. | Adjust the tension of the upper thread. | page 41, 87 | |
| The thread is tangled, for example, in the race. | Remove the tangle thread. If the thread is tangled in the race, clean the race. | page 80, 84 |
ERROR MESSAGES
If an operation is performed incorrectly before the sewing machine is set up, an error message appears on the operation panel. Follow the instructions indicated in the table.
If you press the stitch selection key or do the operation correctly while the error message is displayed, the message disappears.
| Error Message | Probable Cause | Solution |
 | The foot controller was pressed (or the start/ stop button was pressed if the foot controller is not connected) and the reverse/ reinforcement stitch button was pressed while the presser foot is raised. | Lower the presser foot lever before continuing the operation. |
 | A stitch other than the buttonhole or bar tack stitch was selected and the foot controller was pressed (or the start/stop button was pressed if the foot controller is not connected) while the buttonhole lever is lowered. | Raise the buttonhole lever before continuing the operation. |
 | The buttonhole or bar tack stitch was selected and the foot controller was pressed (or the start/stop button was pressed if the foot controller is not connected) while the buttonhole lever is raised. | Lower the buttonhole lever before continuing the operation. |
 | The reverse/reinforcement stitch button or needle position button was pressed while the bobbin winder shaft is moved to the right. | Move the bobbin winder shaft to the left before continuing the operation. |
 | The start/stop button was pressed while the foot controller was connected. | Disconnect the foot controller, and then press the start/stop button. Otherwise, operate the machine by using the foot controller. |
 | The motor locked up because the thread is tangled. | Clean the race to remove the tangled thread (p.84). After cleaning the race, insert the bobbin case properly. If the needle is bent or broken, replace the needle. Then, thread the upper thread properly, and continue the operation. |
Note
● If error message “F1” through “F9” appears in the LCD while the sewing machine is being used, the machine may be malfunctioning. Contact your nearest authorized service center.
Operation beep (for models equipped with the operation beep)
Each time a key is pressed you will hear one beep. If a non-functioning key is pressed or an incorrect operation is performed you will hear two or four beeps (only for models equipped with the operation beep).
■ If a key is pressed (correct operation)
One beep sounds.
■ If an incorrect operation is performed or a non-functioning key is pressed
Two or four beeps sound.
■ If the machine locks up, for example, because the thread is tangled
The sewing machine beeps for four seconds and the machine automatically stops. Be sure to check for the cause of the error, and correct it before continuing to sew.
See other models: SE1800 INNOV-IS XV8500D MFC-J6935DW DS-620 TD-4420DN
