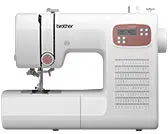
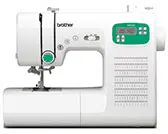
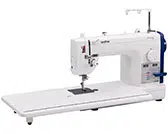
User Manual for Sewing Machine
Names of Machine Parts
Main parts
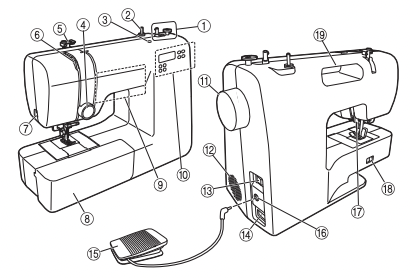
1 Bobbin winder (page 8)
2 Spool pin (page 7)
3 Hole for extra spool pin (page 14)
4 Thread tension dial (page 17)
5 Thread guide (pages 8, 10)
6 Thread take-up lever (page 10)
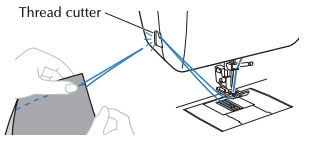
7 Thread cutter (page 16)
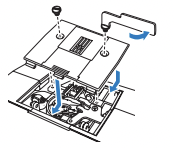
8 Flat bed attachment with accessory compartment (page 4)
9 Operation buttons (page 4)
10 Operation panel (page 6)
11 Handwheel
This is used to manually raise and lower the needle.
12 Air vent
This vent allows the air surrounding the motor to circulate. Do not cover the air vent while the machine is being used.
13 Main power switch (page 6)
14 Power supply jack (page 6)
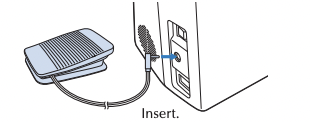
15 Foot controller (page 6)
16 Foot controller jack (page 6)
17 Presser foot lever (pages 8, 9, 16)
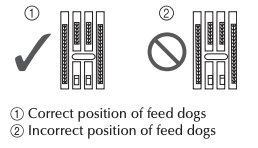
18 Feed dog position switch (page 21)
19 Handle Carry the machine by its handle.
Needle and presser foot section
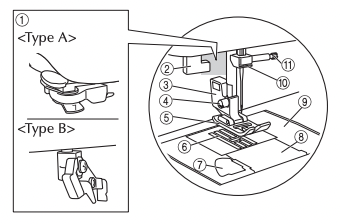
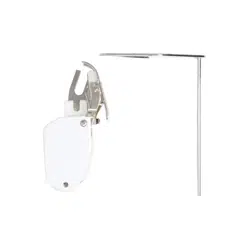
1 Needle threader (page 10) ★
2 Buttonhole lever (page 20) ★
3 Presser foot holder (page 15)
4 Presser foot holder screw (page 15)
5 Presser foot
The presser foot applies pressure consistently on the fabric as the sewing takes place. Attach the appropriate presser foot for the selected stitching.
6 Feed dogs
The feed dogs feed the fabric in the sewing direction.
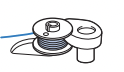
7 Quick-set bobbin (page 11) ★
8 Bobbin cover (page 8)
9 Needle plate
The needle plate is marked with guides for sewing straight seams.
10 Needle bar thread guide (page 10)
11 Needle clamp screw
Operation buttons
The operation buttons differ depending on the machine model.
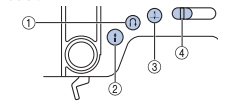
1 Reverse/Reinforcement stitch button (page 16)
Reverse stitches are sewn by keeping this button pressed down to sew in the opposite direction.
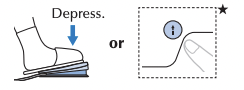
2 “Start/Stop” button 
Press this button to start or stop sewing.
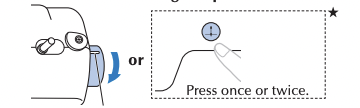
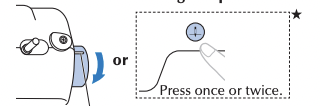
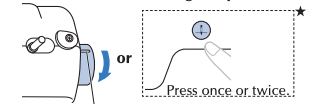
3 Needle position button  Press this button to raise or lower the needle. Pressing the button twice sews one stitch.
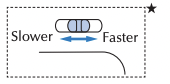
4 Sewing speed controller ★
Slide this controller to adjust the sewing speed. The controller also sets the maximum sewing speed of the foot controller.
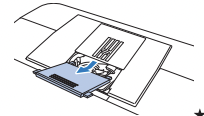
Flat bed attachment
Accessories such as presser foot, bobbins, and needles can be stored inside the flat bed attachment.
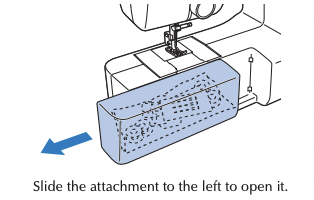
Note
- Before storing accessories inside the flat bed attachment, put accessories in a kind of zipper plastic bags. If accessories are not in a bag, they may fall out, and be lost or damaged.
Using Your Machine
WARNING
- Use only regular household electricity for the power source. Using other power sources may result in fire, electric shock, or damage to the machine.
- Make sure that the power plugs are firmly inserted into the electrical outlet and the power supply jack on the machine. Otherwise, a fire or electric shock may result.
- Do not insert the power plug into an electrical outlet that is in poor condition.
- Turn off the main power and remove the plug in the following circumstances:
- When you are away from the machine
- After using the machine
- When the power fails during use
- When the machine does not operate correctly due to a bad connection or a disconnection
- During electrical storms
CAUTION
- Use the power cord included with this machine.
- Do not use extension cords or multi-plug adapters with many other appliances plugged in to them. Fire or electric shock may result.
- Do not touch the plug with wet hands. Electric shock may result.
- When unplugging the machine, always turn off the main power first. Always grasp the plug to remove it from the outlet. Pulling on the cord may damage the cord, or lead to fire or electric shock.
- Do not allow the power cord to be cut, damaged, modified, forcefully bent, pulled, twisted, or bundled. Do not place heavy objects on the cord. Do not subject the cord to heat. These may damage the cord and cause fire or electric shock. If the cord or plug is damaged, take the machine to your authorized dealer for repairs before continuing use.
- Unplug the power cord if the machine is not to be used for a long period of time. Otherwise a fire may result.
- (For U.S.A. only)
This appliance has a polarized plug (one blade wider than the other). To reduce the risk of electrical shock, this plug is intended to fit in a polarized electrical outlet only one way.
If the plug does not fit fully in the electrical outlet, reverse the plug. If it still does not fit, contact a qualified electrician to install the proper electrical outlet. Do not modify the plug in any way
Power supply
1 Insert the plug into a household electrical outlet
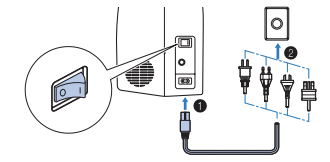
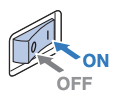
2 Turn on the machine.
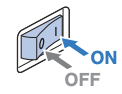
Press the “I” mark on the main power switch to turn on the main power, sewing light, and LCD.
To turn off the machine, press the “O” mark on the main power switch.
- The machine will make a sound. This is not a malfunction.
Foot controller
CAUTION
- When inserting the foot controller plug, be sure to turn off the machine in order to prevent the machine from accidentally being started.
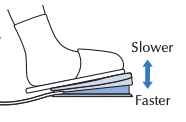
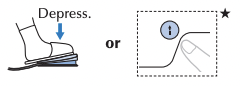
Slowly depress the foot controller to start sewing, and adjust the sewing speed by changing the pressing force.
Note
- (For U.S.A. only) Foot controller: Model T This foot controller can be used on the machine with product code 888-N00/N02/N20/N22/ N40/N42. The product code is mentioned on the machine rating plate.
- When the foot controller is connected,
 (“Start/ Stop” button) is disabled. ★
Operation panel
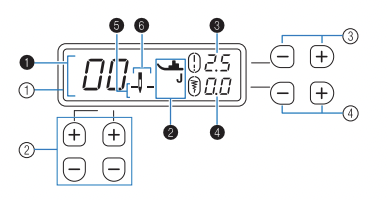
- 1 LCD (Liquid crystal display)
The selected stitch (1), presser foot that should be used (2), stitch length in millimeters (3), stitch width in millimeters (4), needle stop position (5), and single/twin needle mode (6) are displayed.
- 2 Stitch selection keys (page 15)
Press keys to change the stitch pattern.
- 3 Stitch length keys (page 15)
Press keys to change the stitch length of the selected stitch pattern.
- 4 Stitch width keys (page 15)
Press keys to change the stitch width of the selected stitch pattern.
Settings/Functions
You can change settings of the following functions. The settings are stored even when the power switch is turned off.
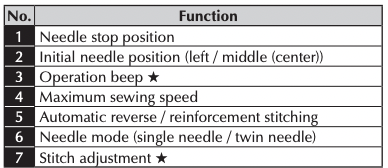

1 Changing the needle stop position
You can change the needle stop position to either the lowered (in the fabric) or raised position.
(Default: Lowered position)
- Turn off the machine. 2
- Holding down 1, turn on the machine. 3
- After the machine has turned on, release 1.
- The needle stop position is changed.
 : Lowered position
 : Raised position
★: Only for some models.
2 Changing the initial needle position
You can change the stitch selected when the machine is turned on to either “straight stitch left needle position)” or “straight stitch (middle center) needle position)”. (Default: )
- Turn off the machine.
- Holding down 2, turn on the machine.
- After the machine has turned on, release 2.
- The initial needle position is changed.
The currently selected stitch can be confirmed by the stitch number in the LCD.
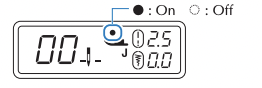
3 Turning on/off the operation beep ★
You can turn on/off the operation beep.
( Default: On)
- Turn off the machine.
- Holding down 3, turn on the machine.
- After the machine has turned on, release 3.
- The operation beep setting is changed.
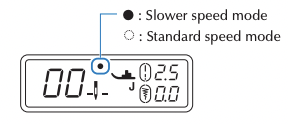
4 Changing the maximum sewing speed
You can change the maximum sewing speed to either the standard or slower speed.
( Default: Standard speed mode)
When the slower speed mode is selected, the maximum speed adjusted with the sewing speed controller becomes slower. ★
- Turn off the machine.
- Holding down 4, turn on the machine.
- After the machine has turned on, release 4.
- The maximum sewing speed is changed.
5 Turning on/off the automatic reverse/ reinforcement stitching
You can set the machine to automatically sew reverse or reinforcement stitches at the beginning and end of stitching. (Default: Off)
- Turn off the machine.
- Holding down 5, turn on the machine.
- After the machine has turned on, release 5.
- The automatic reverse/reinforcement stitching is turned on or off.
* For details, refer to "Automatic reverse/reinforcement stitching" (page 17).
6 Changing the needle mode
You can change the needle mode to either the single or twin needle mode.
( Default: Single needle mode)
- Turn off the machine.
- Holding down 6, turn on the machine.
- After the machine has turned on, release 6.
- The needle mode is changed.
 : Single needle mode
 : Twin needle mode
* For details, refer to "Sewing with the twin needle" (page 13).
7 Stitch adjustment ★
With some stitches, a stitch pattern may turn out poorly depending on the type of fabric. In such a case, you can make adjustments. (Default: 0)
1 Turn off the machine.
2 Holding down 7, turn on the machine.
3 After the machine has turned on, release 7.
- The machine turns into the stitch pattern adjustment mode.
* For details, refer to "Making Adjustment" (page 23).
Threading the Machine
CAUTION
• Make sure the power is off while threading the machine. If you accidentally step on the foot controller and the machine starts to sew, you could be injured.
• Be sure to use the included bobbins (part code: SA156, SFB: XA5539-151) or the same type. SA156 is Class 15 type bobbin.
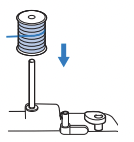
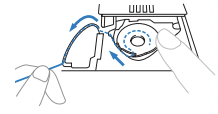
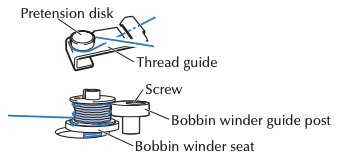
1 Pull up the spool pin as far as possible, and put a spool of thread on this pin.

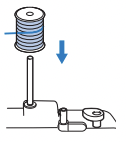
Make sure that the thread unwinds as shown.
CAUTION
• If the spool of thread is not in the right place, the thread may tangle on the spool pin.
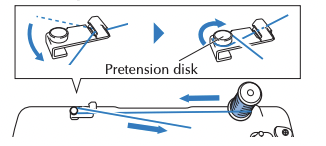
2 Pass the thread under the thread guide and around the pretension disk, front to back.
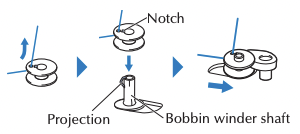
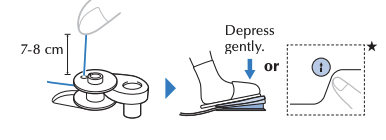
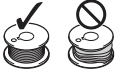
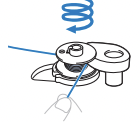
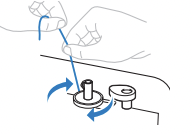
3 Passing the thread through a hole on the bobbin, set the bobbin on the bobbin winder shaft, and then slide the shaft to the right. Make sure the notch fits the projection.
Memo
• Checking the orientation of the bobbin will be helpful in later procedures. By placing the bobbin into the bobbin case in the same orientation that it was on the bobbin winder shaft, the bobbin can be installed with the correct winding direction of the bobbin thread.
The “b” mark on one side of the bobbin included with this machine can be used as a reference.
4 Turn on the machine.
5 While holding the end of the thread, start the machine to wind the thread around the bobbin a few times.
6 Stop the machine and trim the excess thread.

7 Slide the sewing speed controller to adjust the bobbin winding speed. ★
8 Start the machine.
Note
• We recommend winding stretch thread, such as transparent nylon thread, at a low speed since the thread may stretch.
9 When the bobbin seems full and begins spinning slowly, stop the machine.
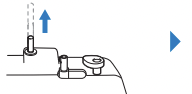
10 Cut the thread, slide the bobbin winder shaft to the left and remove the bobbin.
CAUTION
• Make sure you follow the instructions carefully. If you do not cut the thread completely and the bobbin is wound, when the thread runs low, it may tangle around the bobbin and cause the needle to break.
• Not winding the bobbin properly may cause the thread tension to loosen, and may break the needle.
11 Raise the needle to its highest position, and then raise the presser foot lever.
12 Turn off the machine.
13 Open the bobbin cover.
★: Only for some models
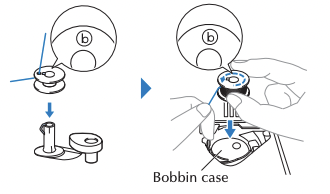
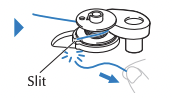
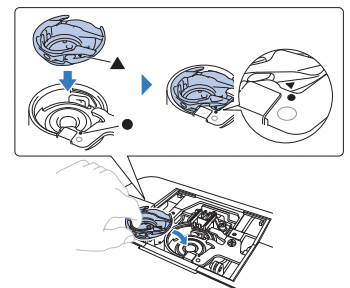
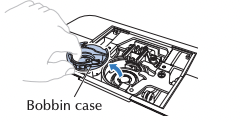
14 Put the bobbin in, hold the end of the thread, push the bobbin down with your finger, and then pass the thread though the slit as shown.
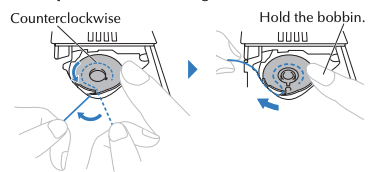
* Follow this instruction so that the thread is correctly inserted through the tension spring of the bobbin case.
For models equipped with the quick-set bobbin ★
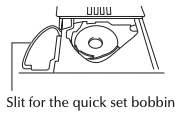
Feed the end of the thread through the slit, and then pull the thread to cut it.
* The thread feeding direction is indicated by arrows on the needle plate.
- You can begin sewing without drawing up the bobbin thread. When pulling up the bobbin thread before sewing, refer to “Drawing up the bobbin thread” (page 11).
CAUTION
• Be sure to hold down the bobbin with your finger and unwind the bobbin thread correctly, otherwise the thread may break or the thread tension will be incorrect.
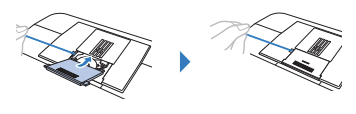
15 Reattach the bobbin cover.
* Make the end of the thread come out from the left side of the cover.
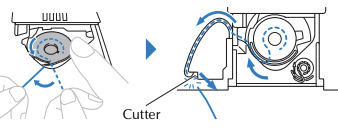
For models equipped with the cutter ★
1 Follow steps 1 to 2 of “Winding/Installing the bobbin”.
2 Set the bobbin on the bobbin winder shaft, and then slide the shaft to the right.
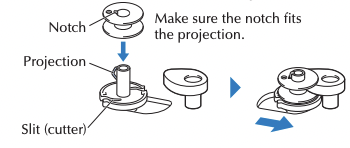
* Check the installation orientation of the bobbin by using the "b" mark on one side of the bobbin as a reference. When placing the bobbin in the bobbin case, be sure to place it in the same orientation.
3 Wind five or six times. Pull the thread. The thread is cut at the slit.
CAUTION
• Be sure to cut the thread as described. If the bobbin is wound without cutting the thread using the cutter built into the slit in the bobbin winder seat, the thread may become tangled in the bobbin or the needle may bend or break when the bobbin thread starts to run out.
4 Turn on the machine.
5 Follow steps 7 to 15 of “Winding/Installing the bobbin”.
Upper threading
CAUTION
- Make sure you thread the machine properly. Otherwise, the thread could tangle and break the needle.
- Never use a thread weight of 20 or lower.
- Use the needle and the thread in the correct combination. (page 12)
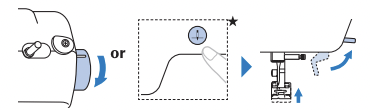
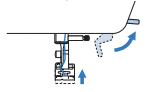
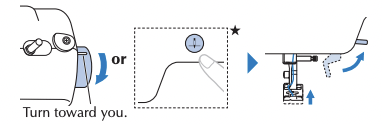
1 Raise the presser foot lever.
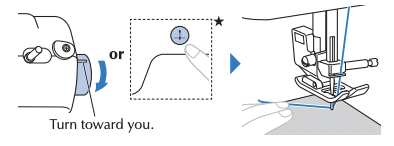
2 Raise the needle to its highest position.
Turn toward you so that this mark points up to the highest position.
3 If the power of the machine is on, turn it off.
4 Pull up the spool pin as far as possible, and put a spool of thread on this pin.
Make sure that the thread unwinds as shown.
5 Pass the thread through the thread channel in the order shown below.
* Follow the numbered path printed on the machine.
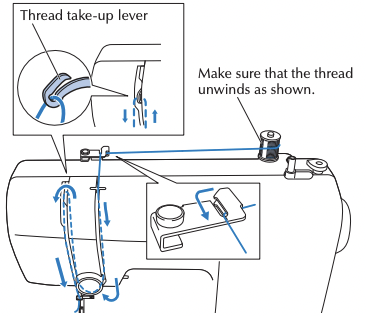
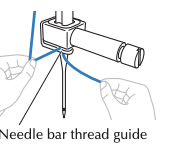
6 Slide the thread behind the needle bar thread guide.
7 Insert the thread through the eye of the needle from front to back, and then pass the thread under the presser foot.

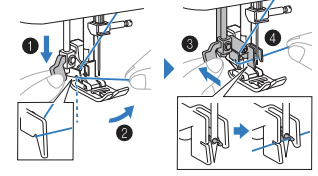
Using the needle threader ★
CAUTION
• The needle threader can only be used with home sewing machine needles size 75/11- 100/16. If you are using transparent nylon monofilament thread, you can only use needles in the range of 90/14-100/16.
• You cannot use the needle threader if you are using decorative threads or special needles, such as the twin needle and wing needle. If you are using those types of threads or needles, thread the eye of the needle by hand. Make sure the main power switch is off when threading the needle.
1 Follow steps 1 to 6 of “Upper threading”.
2 < Type A >
a) Pass the thread behind the guide (1), and insert the thread into the slit of the thread guide disk (2) firmly. Next, cut the thread with the thread cutter (3).
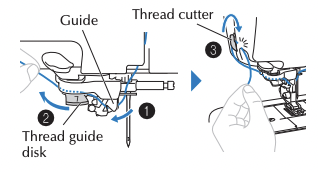
b) Lower the presser foot lever.
c) Lower the needle threader lever fully until it stops (4), and push it back slowly until it stops (5).
* Make sure that the hook passes through the eye of the needle, and catch the thread.
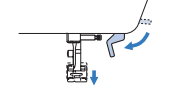
a) Lower the presser foot lever.

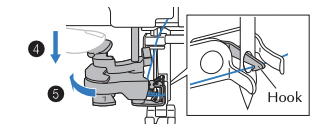
b) While lowering the needle threader lever fully (1), hook the thread onto the guide (2). Next, push back the needle threader lever until it stops (3), and pass the thread in front of the needle. Make sure that the thread is under the hook that has come through the eye of the needle and the hook catches the thread. (4).
3 Return the needle threader lever to the front slowly, and then release the lever slowly
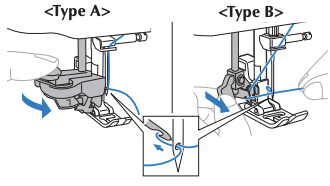
4 Raise the presser foot lever.
5 Pull the loop of the thread, and pass the end of the thread as illustrated below.
Drawing up the bobbin thread
1 Refer to “Upper threading” (page 9) to thread the machine with the upper thread and thread the needle.
2 Follow steps 11 to 13 of “Winding/Installing the bobbin” (page 7) for installing the bobbin and to insert the bobbin into the bobbin case.
3 Pass the thread along the slit in the direction of the arrow, and leave it there without cutting it.

4 Lightly hold the end of the upper thread.
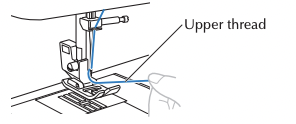
5 While holding the end of the upper thread, lower and raise the needle to draw up the bobbin thread.
Turn towards you one full turn until this mark points up to the highest position.
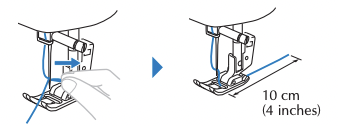
6 Pull on the upper thread to draw up the bobbin thread. Next, pull out about 10 cm (4 inches) of both threads toward the back under the presser foot.

For models equipped with the quick-set bobbin ★
You can begin sewing without drawing up the bobbin thread. (page 9)
Note
- When you sew gathers or finish up the threads at the beginning of sewing, draw up the bobbin thread.
Fabric/Thread/Needle Combination
• Needles that can be used with this machine: Home sewing machine needles (size 65/9 - 100/16)
* The larger the number, the larger the needle. As the numbers decrease, the needles get finer.
• Thread that can be used with this machine: 30 - 90 weight
* Never use thread of 20 weight or lower. It may cause machine to malfunction.
* The smaller the number, the heavier the thread. As the numbers increase, the thread gets finer.
• The machine needle and thread that should be used depends on the type and thickness of the fabric. Refer to the following table when choosing the thread and needle appropriate for the fabric that you wish to sew.
- The combinations shown in the table provide a general guideline. Be sure to sew trial stitches on the actual number of layers and type of fabric to be used in your project.
- The machine needles are consumables. For safety and best results, we recommend replacing the needle regularly. For details on when to replace the needle, refer to “Checking the needle” (page 13).
• In principle, use a fine needle and thread with lightweight fabrics, and a larger needle and heavier thread with heavyweight fabrics.
• Select a stitch appropriate for the fabric, and then adjust the stitch length. When sewing lightweight fabrics, make the stitch length finer (shorter).
When sewing heavyweight fabrics, make the stitch length coarser (longer). (page 15)
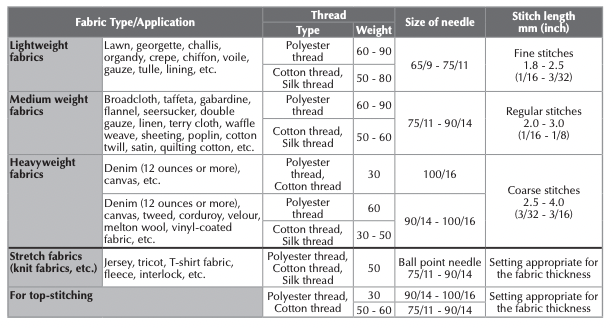
Use a home sewing machine topstitching needle, regardless of the fabric or thread.
- Sewing decorative stitch patterns (needles and threads) ★
When sewing lightweight, medium weight or stretch fabrics, use a ball point needle (gold colored) 90/14. When sewing heavyweight fabrics, use a home sewing machine needle 90/14. In addition, #50 to #60 thread should be used.
CAUTION
- The appropriate fabric, thread and needle combinations are shown in the preceding table. If the combination of the fabric, thread and needle is not correct, particularly when sewing heavy fabrics such as denim) with thin needles (such as 65/9 to 75/11), the needle may bend or break. In addition, the stitching may be uneven or puckered or there may be skipped stitches.
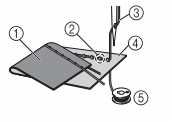
Starting to sew
Baste the fabric before starting to sew.
1 Raise the needle to its highest position.
Turn toward you so that this mark points up to the highest position.
2 Raise the presser foot lever.
3 Set the fabric under the presser foot, and then hold the fabric and the end of the thread with your left hand.

4 Lower the needle to the starting point of the stitching.
5 Lower the presser foot lever.
6
 Adjust the sewing speed.
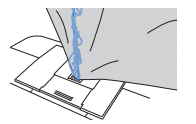
7 Start sewing.
* Guide the fabric lightly by hand
8 Stop sewing
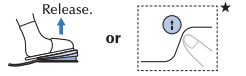
9 Raise the needle, and then raise the presser foot lever.
10 Pull the fabric and cut the threads.
Care and Maintenance
Restrictions on oiling
In order to prevent damaging this machine, it must not be oiled by the user. This machine was manufactured with the necessary amount of oil applied to ensure correct operation, making periodic oiling unnecessary.
If problems occur, such as difficulty turning the handwheel or an unusual noise, immediately stop using the machine, and contact your authorized Brother dealer or the nearest Brother authorized service center.
Precautions on storing the machine
Do not store the machine in any of the locations described below, otherwise damage to the machine may result, for example, rust caused by condensation.
- Exposed to extremely high or low temperatures
- Exposed to extreme temperature changes
- Exposed to high humidity or steam
- Near a flame, heater or air conditioner
- Outdoors or exposed to direct sunlight
- Exposed to extremely dusty or oily environments
Note
- In order to extend the life of this machine, periodically turn it on and use it. Storing this machine for an extended period of time without using it may reduce its efficiency.
Cleaning the machine surface
CAUTION
- Unplug the power supply cord before cleaning the machine, otherwise injuries or an electric shock may occur.
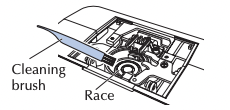
Cleaning the race
Sewing performance will suffer if dust collects in the bobbin case.
CAUTION
• Make sure you unplug the machine before you clean it. Otherwise, you may get an electric shock or be injured.
1 Turn off the machine and unplug the power cord.
2 Raise the needle and remove the presser foot.
3 Remove the needle (1) and the presser foot holder (2). Next, loosen the two screws (3) and remove the needle plate.
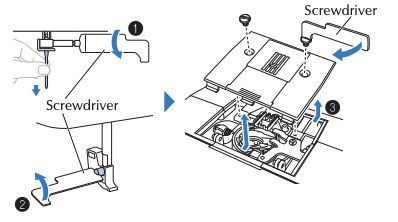
Note
• Be careful not to drop the removed screws in the machine.
4 Remove the bobbin case, and remove any dust from the race and its surrounding area.
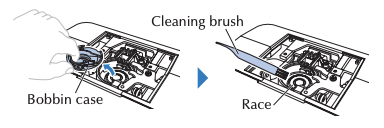
* Do not put oil on the bobbin case.
Note
• Compressed can air is not recommended to be used.
5 Insert the bobbin case so that the  and
and  marks align.
CAUTION
• Never use a bobbin case that is scratched, otherwise the upper thread may become tangled, the needle may break or sewing performance may suffer. For a new bobbin case, contact your nearest Brother authorized service center.
• Make sure that you fit the bobbin case properly, otherwise the needle may break.
6 Attach the needle plate, and then tighten the screws.
Troubleshooting
If the machine stops operating correctly, check the following possible problems before requesting service. You can solve most problems by yourself. If you need additional help, the Brother support website offers the latest FAQs and troubleshooting tips
If the problem persists, contact your Brother dealer or the nearest Brother authorized service center.
Frequent troubleshooting topics
Detailed causes and remedies for common troubleshooting topics are as follows. Be sure to refer to this before contacting us.
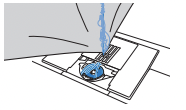
Upper thread tightened up
Symptom
- The upper thread appears as a single continuous line.
- The bobbin thread is visible from the upper side of the fabric. (Refer to the illustration below.)
- The upper thread has tightened up, and comes out when pulled.
- The upper thread has tightened up, and wrinkles appear in the fabric.
- The upper thread tension is tight, and the results do not change even after the thread tension is adjusted.
1 Wrong side of fabric
2 Bobbin thread visible from right side of fabric
3 Upper thread
4 Right side of fabric
5 Bobbin thread
Cause
Incorrect bobbin threading
If the bobbin thread is incorrectly threaded, instead of the appropriate tension being applied to the bobbin thread, it is pulled through the fabric when the upper thread is pulled up. For this reason, the thread is visible from the right side of the fabric.
Remedy/check details
Correctly install the bobbin thread. (page 9)
Tangled thread on wrong side of fabric
Symptom
• The thread becomes tangled on the wrong side of the fabric.
• After starting sewing, a rattling noise is made and sewing cannot continue.
• Looking under the fabric, there is tangled thread in the bobbin case.
Cause
Incorrect upper threading
If the upper thread is incorrectly threaded, the upper thread passed through the fabric cannot be firmly pulled up and the upper thread becomes tangled in the bobbin case, causing a rattling noise.
Remedy/check details
- Remove the tangled thread, and then correct the upper threading. Remove the tangled thread. If it cannot be removed, cut the thread with scissors.
- For details, refer to "Cleaning the race" (page 24).
2. Remove the upper thread from the machine.
3. Correct the upper threading by following the instructions in “Upper threading” (page 9).
- If the bobbin was removed from the bobbin case, refer to "Winding/Installing the bobbin" (page 7) to correctly install the bobbin.
Incorrect thread tension
Symptoms
- The bobbin thread is visible from the right side of the fabric. (Refer to the illustration below.)
- The upper thread appears as a straight line on the right side of the fabric.
- The upper thread is visible from the wrong side of the fabric. (Refer to the illustration below.)
- The bobbin thread appears as a straight line on the wrong side of the fabric.
- The stitching on the wrong side of the fabric is loose or has slack.
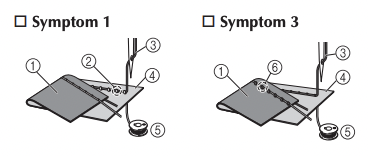
1 Wrong side of fabric
2 Bobbin thread visible from right side of fabric
3 Upper thread
4 Right side of fabric
5 Bobbin thread
6 Upper thread visible from wrong side of fabric
Cause/remedy/check details
Cause 1
The machine is not correctly threaded.
The bobbin threading is incorrect. Return the thread tension dial to “4”, and then refer to “Winding/Installing the bobbin” (page to correct the threading.
The upper threading is incorrect. Return the thread tension dial to “4”, and then refer to “Upper threading” (page 9) to correct the upper threading.
Cause 2
A needle and thread appropriate for the fabric are not being used.
The machine needle that should be used depends on the type of fabric sewn and the thread thickness.
If a needle and thread appropriate for the fabric are not being used, the thread tension will not be adjusted correctly, causing wrinkles in the fabric or skipped stitches.
- Refer to "Fabric/Thread/Needle Combination" (page to check that a needle and thread appropriate for the fabric are being used.
Cause 3
An appropriate upper tension is not selected.
Select an appropriate thread tension.
Refer to “Thread tension” (page 17).
The appropriate thread tension differs depending on the type of fabric and thread being used.
- Adjust the thread tension while test sewing on a piece of scrap fabric that is the same as that used in your project.
Note
- If the upper threading and bobbin threading are incorrect, the thread tension cannot be adjusted correctly. Check the upper threading and bobbin threading first, and then adjust the thread tension.
If the bobbin thread is visible from the right side of the fabric Turn the thread tension dial counterclockwise to loosen the upper thread tension.
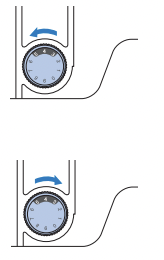
If the upper thread is visible from the wrong side of the fabric Turn the thread tension dial clockwise to tighten the upper thread tension.
If the fabric is caught in the machine and cannot be removed, the thread may have become tangled under the needle plate. Follow the procedure described below to remove the fabric from the machine. If the operation cannot be completed according to the procedure, instead of attempting to remove it forcefully, contact your nearest Brother authorized service center.
- Removing the fabric from the machine
- 1 Immediately stop the machine.
- 2 Turn off the machine.
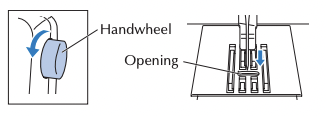
- 3 Remove the needle. If the needle is lowered into the fabric, turn the handwheel away from you (clockwise) to raise the needle out of the fabric, and then remove the needle.
* Refer to "Replacing the needle" (page 13).
- 4 Remove the presser foot and presser foot holder. If the thread is entangled on the presser foot, remove the entangled thread, and then raise the presser foot lever to remove the presser foot. Otherwise, the presser foot may be damaged.
* Refer to "Replacing the presser foot" (page 14).
- 5 Lift up the fabric and cut the threads below it. If the fabric can be removed, remove it. Continue with the following steps to clean the race.
- 6 Remove the needle plate cover.
* Refer to "Cleaning the race" (page 24).
- 7 Cut out the tangled threads, and then remove the bobbin.
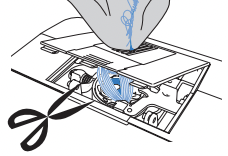
- 8 Remove the bobbin case. If threads remain in the bobbin case, remove them.
- 9 Use the cleaning brush or a vacuum cleaner mini attachment to remove any lint or dust from the race and its surrounding area.
• If the fabric could be removed  Continue to step 11.
• If the fabric could not be removed Continue to step 10.
Note
• Compressed can air is not recommended to be used.
- 10 Remove the fabric and threads from the needle plate. If the fabric cannot be removed, even after completing these steps, contact your nearest Brother authorized service center.
- 11 Insert the bobbin case by following step 5 in “Cleaning the race” (page 24).
- 12 Attach the needle plate cover by following step 6 in “Cleaning the race” (page 24).
- 13 Turn the handwheel to check that the feed dogs move smoothly and do not contact the edges of the slots in the needle plate.
- 14 Check the condition of the needle, and then install it. If the needle is in a poor condition, for example, if it is bent, be sure to install a new needle.
* Refer to "Checking the needle" (page 13) and "Replacing the needle" (page 13).
Memo
• Since the needle may have been damaged when the fabric was caught in the machine, we recommend replacing it with a new one.
- Checking machine operations
If the needle plate has been removed, check machine operations to confirm that installation has been completed correctly.
- 1 Turn on the machine.
- 2 Select the straight stitch (
 middle (center) needle position).
Note
• Do not yet install the presser foot and thread.
- 3 Slowly turn the handwheel toward you (counterclockwise), and look from all sides to check that the needle falls at the center of the opening in the needle plate. If the needle contacts the needle plate, remove the needle plate, and then install it again, starting with step 13 in “Fabric is caught in the machine and cannot be removed” (page 27).
- 4 Select stitch
 . At this time, increase the stitch length and width to their maximum settings. * For details on changing the settings, refer to "Setting the stitch length and stitch width" (page 15).
- 5 Slowly turn the handwheel toward you (counterclockwise) and check that the needle bar and feed dogs operate correctly. If the needle or feed dogs contact the needle plate, the machine may be malfunctioning; therefore, contact your nearest Brother authorized service center.
- 6 Turn off the machine, and then install the bobbin and presser foot. Never use a scratched or damaged presser foot. Otherwise, the needle may break, or sewing performance may suffer.
* Refer to "Winding/Installing the bobbin" (page 7) and "Replacing the presser foot" (page 14).
- 7 Correctly thread the machine.
* For details on threading the machine, refer to "Upper threading" (page 9).
- 8 Perform trial sewing with cotton fabric.
Note
• Incorrect sewing may be the result of incorrect upper threading or sewing thin fabrics. If there are poor results from the trial sewing, check the upper threading or the type of fabric being used.
If the thread becomes tangled under the bobbin winder seat ★
If the bobbin winding starts when the thread is not passed under the pretension disk of the thread guide correctly, the thread may become tangled under the bobbin winder seat.
CAUTION
• Do not remove the bobbin winder seat even if the thread become tangled under the bobbin winder seat. Otherwise, the cutter in the bobbin winder seat may be damaged. (for models equipped with the cutter).
• Do not remove the screw on the bobbin winder guide post, otherwise the machine may be damaged; you cannot wind off the thread by removing the screw.
- Stop the bobbin winding.
- Cut the thread with scissors beside the thread guide.
- Slide the bobbin winder shaft to the left, and then remove the bobbin from the shaft and cut the thread leading to the bobbin in order to be able to completely remove the bobbin from the shaft.
- Hold the thread end with your left hand, and wind off the thread clockwise from under the bobbin winder seat with your right hand.
List of symptoms
If the reference page is “*”, contact your authorized Brother dealer or the nearest Brother authorized service center.
Symptom, Cause/solution ------ Reference
The machine does not work.
- The machine is not plugged in. 6
- The main power switch is turned off. 6
- The bobbin winder shaft is pushed to the right. 8
- The foot controller is not used properly. 6
The needle breaks.
- The needle is not fitted properly. 13
- The needle clamp screw is loose. 13
- The needle is turned, bent or the point is dull. 13
- The needle or thread is improper for the fabric. 12
- The presser foot is not appropriate for the selected stitch. 14
- The upper thread tension is too tight. 17
- The fabric is pulled, pushed, or fed at an angle. Lightly guide the fabric. 16
- The area around the opening in the needle plate is scratched. This is not a scratch. *
- The area around the opening in the presser foot is scratched. *
- The bobbin case is scratched. *
- A bobbin designed for this machine is not used. 7
The upper thread breaks.
- Upper threading is incorrect. (For example, the spool is not fitted properly, or the thread comes out of the thread channel.) 9
- There are knots or tangles in the thread. Remove any knots or tangles. -
- The needle is not appropriate for the thread you are using. 12
- The upper thread tension is too tight. 17
- The thread is tangled, for example, in the bobbin case. 27
- The needle is turned, bent or the point is dull. 13
- The needle is not installed properly. 13
- The area around the opening in the needle plate is scratched. This is not a scratch. *
- The area around the opening in the presser foot is scratched. *
- The bobbin case is scratched, or has a burr on it. *
- A bobbin designed for this machine is not used. 7
The bobbin thread is tangled or breaks.
- The bobbin thread is wound improperly. 7
- The bobbin is scratched or does not turn smoothly. 7
- The thread is tangled. 25
- A bobbin designed for this machine is not used. 7
- The bobbin is installed incorrectly. 9
The thread tension is incorrect.
- Upper threading is incorrect. 9
- The bobbin thread is wound improperly. 7
- The needle or thread is improper for the fabric. 12
- The presser foot is not attached properly. 15
- The presser foot holder is not attached properly. 15
- The thread tension is incorrect. 17
- A bobbin designed for this machine is not used. 7
- The bobbin is installed incorrectly. 9
The fabric is wrinkled.
- Upper threading or the bobbin installation is incorrect. 7, 9
- The spool is not fitted properly. 7
- The needle or thread is improper for the fabric. 12
- The needle is turned, bent or the point is dull. 13
- If you are sewing thin fabric, the stitch is too thick. Sew with stabilizer material under the fabric. -
- The thread tension is incorrect. 17
Stitches are skipped.
- Upper threading is incorrect. 9
- The needle or thread is improper for the fabric. 12
- The needle is turned, bent or the point is dull. 13
- The needle is not installed properly. 13
- Dust has accumulated under the needle plate or in the bobbin case. 24
The thread is tangled on the wrong side of the fabric.
- Upper threading is incorrect. 9
- The needle or thread is improper for the fabric. 12
There is a high-pitched noise while sewing.
- Dust has built up in the feed dogs or in the bobbin case. 24
- Upper threading is incorrect. 9
- The bobbin case is scratched. *
- A bobbin designed for this machine is not used. 7
The needle threader cannot be used. ★
- The needle is not in the highest position. 10
- The needle is installed incorrectly. 13
- The needle is turned, bent or the point is dull. 13
- Upper threading is incorrect. 9
- The needle threader hook is bent and does not pass through the eye of the needle. *
- The needle threader lever cannot be moved or returned to its original position. *
- A size 65/9 needle is being used. The needle is incompatible with the needle threader. Manually pass the thread through the eye of the needle. 10
The stitch is not sewn correctly.
- The presser foot is not appropriate for the selected stitch. 14
- The thread tension is incorrect. 17
- The thread is tangled, for example, in the bobbin case. 27
The fabric does not feed
- The feed dogs are lowered. ★ Slide the feed dog position switch to
 . 21
. 21
- The stitch is too fine. 15
- The needle or thread is improper for the fabric. 12
- The thread is tangled, for example, in the bobbin case. 27
While winding the bobbin, the bobbin thread was wound below the bobbin winder seat. ★
- The thread was incorrectly passed under the pretension disk on the thread guide. Remove any entangled thread, and then wind the bobbin. 8, 28
The bobbin thread cannot be pulled up.
- The needle is turned, bent or the point is dull. 13
- The bobbin is installed incorrectly. 9
The sewing light bulb does not come on.
- The sewing light is damaged. *
The fabric feeds in the opposite direction.
- The feed mechanism is damaged. *
The needle contacts the needle plate.
- The needle clamp screw is loose. 13
- The needle is turned, bent or the point is dull. 13
Fabric being sewn with the machine cannot be removed.
- Thread is tangled below the needle plate. 27
A broken needle has fallen into the machine.
- Turn off the machine, and remove the needle plate. If the needle that fell into the machine can be seen, use tweezers to remove it. After removing the needle, return the needle plate to its original position and insert a new needle. Before turning on the machine, slowly turn the handwheel toward you to check that it turns smoothly and that the new needle enters through the center of the needle plate opening. If the handwheel does not turn smoothly or the needle that fell into the machine cannot be removed, consult your authorized Brother dealer or the nearest Brother authorized service center. 24
The handwheel does not turn smoothly.
- Thread is tangled in the bobbin case. 27
Decorative stitch patterns are misaligned. ★
- A wrong presser foot is used. 14
- Stitch adjustment is set incorrectly. 23
Error Messages
E1
- The foot controller was pressed (or (“Start/Stop” button) was pressed if the foot controller is not connected ★) or (Reverse/Reinforcement stitch button) was pressed while the presser foot is raised.
- Lower the presser foot lever before continuing the operation.
E2
- A stitch other than the buttonhole or bar tack stitch was selected and the foot controller was pressed (or (“Start/Stop” button) was pressed if the foot controller is not connected ★) while the buttonhole lever is lowered.
- Raise the buttonhole lever before continuing the operation.
E3
- The buttonhole or bar tack stitch was selected and the foot controller was pressed (or (“Start/Stop” button) was pressed if the foot controller is not connected ★) while the buttonhole lever is raised.
- Lower the buttonhole lever before continuing the operation.
E4
- (Reverse/Reinforcement stitch button) (or
 (Needle position button) ★) was pressed while the bobbin winder shaft is moved to the right.
- Move the bobbin winder shaft to the left before continuing the operation.
E5
- (“Start/Stop” button) was pressed while the foot controller is connected. ★
- Disconnect the foot controller or use the foot controller. ★
E6
- The motor locked up because the thread is tangled.
- Remove the tangled thread before continuing the operation.
E7
- The stitch only for the single needle was selected and the foot controller was pressed (or (“Start/Stop” button) was pressed if the foot controller is not connected ★) while the twin needle mode is active.
- Select a stitch for the twin needle.
F1- F9
- The machine may be malfunctioning.
- Contact your nearest Brother authorized service center.
Operation beep ★
- When the machine is turned on or a key is pressed correct operation)
One beep
- When the machine is turned on while a setting is changed (page 6)
Two beeps
- If an incorrect operation is performed or a nonfunctioning key is pressed
Two or four beeps
- If the machine locks up, for example, because the thread is tangled
Beeps for four seconds and the machine automatically stops.
Be sure to check for the cause of the error, and correct it before continuing to sew.