Documents: Go to download!
- User Manual - (English, French, Spanish)
- Quick Start Guide - (English)
- Connections
- Using Button
- Using Remote Control
- Settings
- Troubleshooting
Table of contents
Owner's Guide Television
Connections
You can connect various external devices to the TV. For more information on external device’s connection, refer to the manual provided with each device.
Antenna/Cable
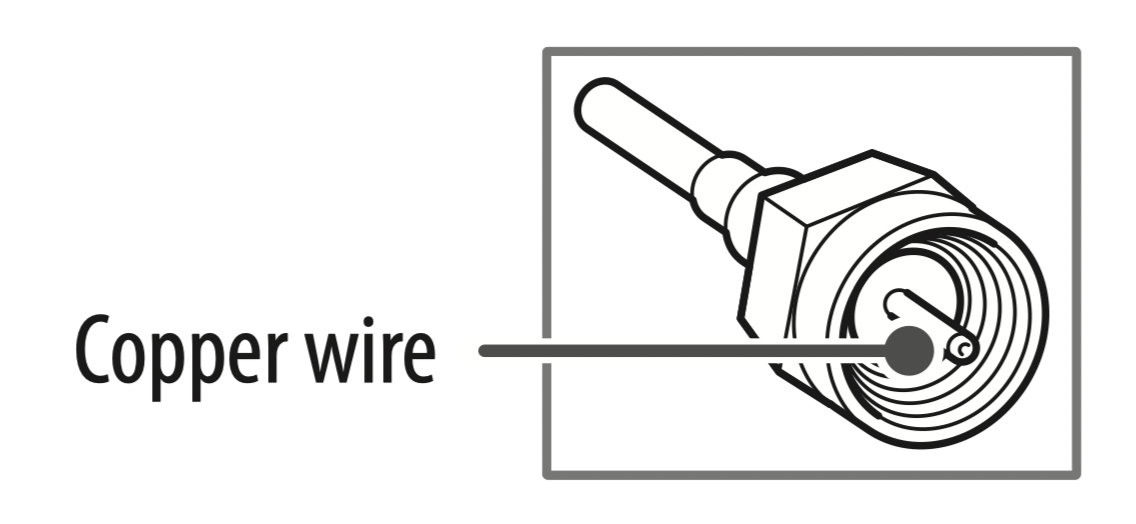
Connect an antenna, cable, or cable box to watch TV while referring to the following. The illustrations may differ from the actual items and an RF cable is optional.
- Make sure not to bend the copper wire of the RF cable.

- Complete all connections between devices, and then connect the power cord to the power outlet to prevent damage to your TV.
- Use a signal splitter to use 2 TVs or more.
- DTV Audio Supported Codec: MPEG, Dolby Digital, HE-AAC
Other connections
Connect your TV to external devices. For the best picture and audio quality, connect the external device and the TV with the HDMI cable.
HDMI
- When connecting the HDMI cable, the product and external devices should be turned off and unplugged.
- HDMI Audio Supported Format: (Depending upon model) AC3 (32 kHz / 44.1 kHz / 48 kHz), PCM (32 kHz / 44.1 kHz / 48 kHz / 96 kHz)
External Devices
Supported external devices are: Blu-ray player, HD receivers, DVD players, VCRs, audio systems, USB storage devices, PC, gaming devices, and other external devices. For more information on external device’s connection, refer to the manual provided with each device.
- If you record a TV program on a Blu-ray/DVD recorder or VCR, make sure to connect the TV signal input cable to the TV through a DVD recorder or VCR. For more information about recording, refer to the manual provided with the connected device.
- The external device connections shown may differ slightly from illustrations in a manual.
- Connect external devices to the TV regardless about the order of the TV port.
- If you connect a gaming device to the TV, use the cable supplied with the gaming device.
- Refer to the external equipment’s manual for operating instructions.
- In PC mode, there may be noise associated with the resolution, vertical pattern, contrast or brightness. If noise is present, change the PC output to another resolution, change the refresh rate to another rate or adjust the brightness and contrast on the [Picture] menu until the picture is clear.
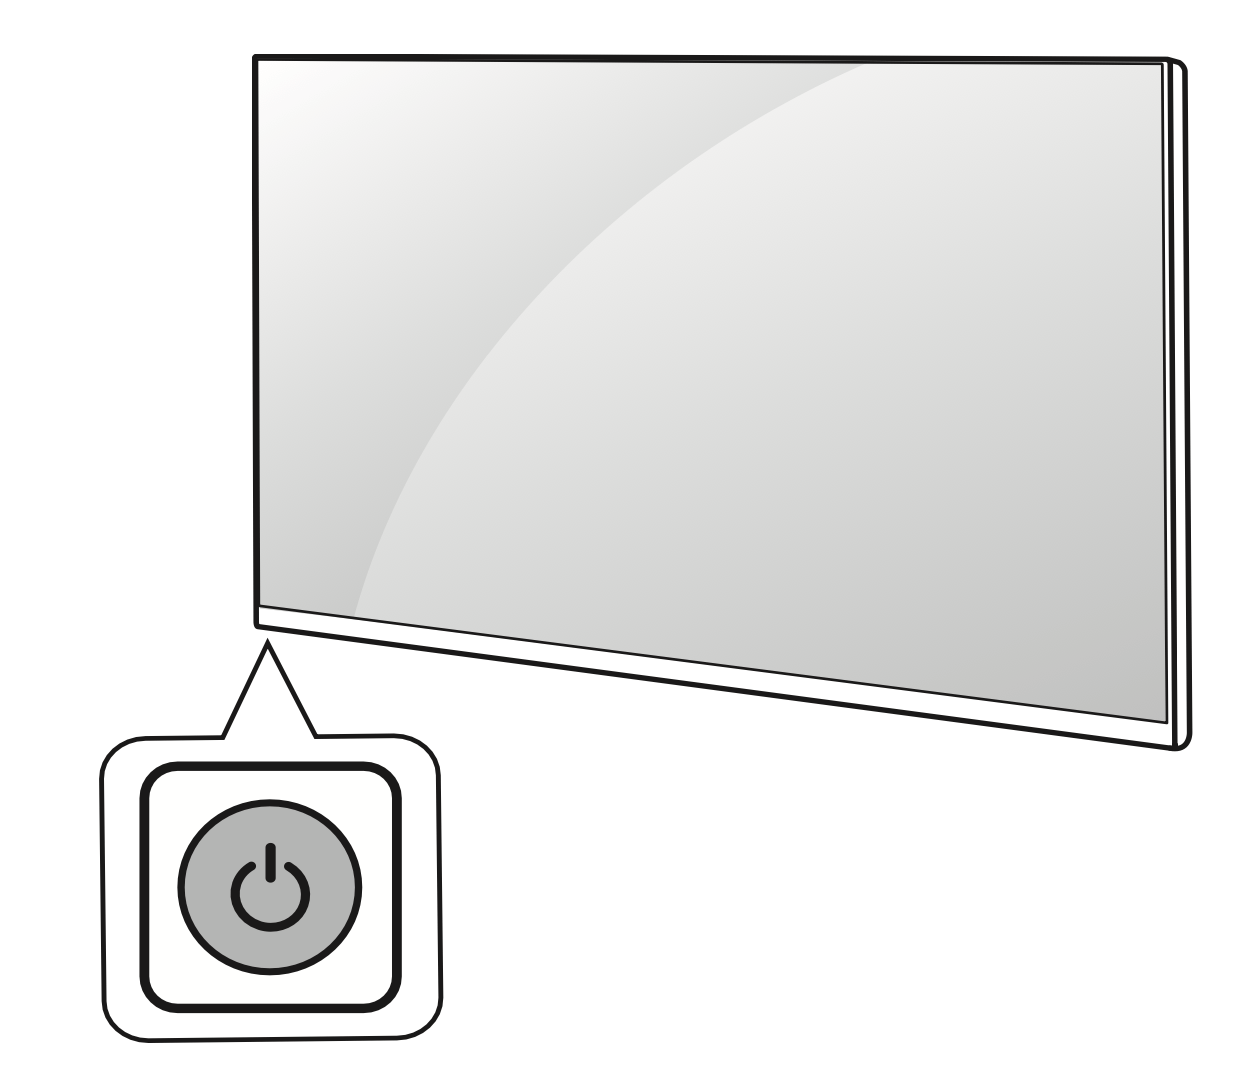
Using Button
You can simply operate the TV functions, using the button.

Basic functions

Using Remote Control
(Depending upon model)
The descriptions in this manual are based on the buttons on the remote control. Please read this manual carefully and use the TV correctly.
To install batteries, open the battery cover, replace batteries (1.5 V AAA) matching the  and
and  ends to the label inside the compartment, and close the battery cover. To remove the batteries, perform the installation actions in reverse. This remote uses infrared light. When in use, it should be pointed in the direction of the TV’s remote sensor.
Make sure to point the remote control toward the remote control sensor on the TV.

 (POWER) Turns the TV on or off.
TV Returns to the last TV channel.
CC/SUB Activates or deactivates the subtitles.
RATIO  Resizes an image.
 INFO Shows information on the current program.
 (Input) Changes the input source.
Number buttons Enters numbers.
 (Dash) Inserts a dash between numbers such as 2-1 and 2-2.
LIST Accesses the saved channel list.
Q.VIEW Alternates between the two last channels selected (pressing repeatedly).
+ VOL - Adjusts the volume level.
FAV Accesses your favorite channel list.
GUIDE/  Displays the program event according to time scheduler. (Depending upon model)
 (MUTE) Mutes all sounds.
 CH
CH  Scrolls through the saved channels.
 PAGE
PAGE  Moves to the previous or next screen.
PICTURE Changes the picture mode.
 (Home) Accesses the Home menu.
SOUND Changes the sound mode.
 (Settings) Accesses the Settings menu.
Q.MENU Accesses the quick menu.
Navigation buttons (up/down/left/right) Scrolls through menus or options.
 (OK) Selects menus or options and confirms your input.
BACK Returns to the previous screen.
EXIT Clears all on-screen displays and returns to TV viewing.
SAP/  Enables SAP (Secondary Audio Program) Feature. (Depending upon model)
REC/ Starts to record. (Only Time Machine Ready supported model) (Depending upon model)
 Control buttons for media contents
 ,
,  ,
,  ,
,  These access special functions in some menus.
CAUTION:
- Do not mix new batteries with old batteries. This may cause the batteries to overheat and leak.
- Failure to match the correct polarities of the battery may cause the battery to burst or leak, resulting in fire, personal injury, or ambient pollution.
- This apparatus uses batteries. In your community there might be regulations that require you to dispose of these batteries properly due to environmental considerations. Please contact your local authorities for disposal or recycling information.
- Batteries inside or inside the product shall not be exposed to excessive heat such as sunshine, fire or the like.
Settings
To select Picture Mode
 (Settings) → [Picture] → [Picture Mode Settings] → [Picture Mode]
Select the picture mode optimized for the viewing environment or the program.
- [Vivid]: Heightens contrast, brightness, and sharpness to display vivid images.
- [Standard]: Displays images in standard levels of contrast, brightness and sharpness.
- [Cinema] / [Game]: Displays the optimum picture for movie or game.
- [Sports]: Optimised picture mode for football matches. The pitch and kits are presented in vibrant colors, with crystal-clear images even for fast movements.
- Depending upon the input signal, the available range of picture modes may differ.
Setting the Picture Mode
 (Settings) → [Picture] → [Picture Mode Settings]
This feature allows you to adjust the selected picture mode in detail.
- [Backlight]: Controls the level of screen brightness by adjusting the backlight. The closer to 100, the brighter the screen. Decrease the Backlight to reduce energy consumption.
- [Contrast]: Adjusts the contrast of the bright and dark areas of the picture. The closer to 100, the higher the contrast.
- [Brightness]: Adjusts the overall screen brightness. The closer to 100, the brighter the screen.
- [Sharpness]: Adjusts the sharpness of the image. The closer to 50, the sharper and clearer the image.
- [Color]: Tones down or up the colors displayed on the screen. The closer to 100, the deeper the color.
- [Tint]: Adjusts the color balance between red and green displayed on the screen. The closer to Red 50, the more red the color will be. The closer to Green 50, the more green the color will be.
- [Color Temperature]: Adjusts the overall tone of the screen as desired. In Expert mode, detailed fine-tuning can be set via Gamma method, etc.
- The settings you specify only applies to the currently selected input mode. To apply your current picture settings to all input modes, select [Apply to all inputs].
- Depending upon input signal or other picture settings, the range of detailed items for adjustment may differ.
To set expert control
 (Settings) → [Picture] → [Picture Mode Settings] → [Expert Controls]
For each picture mode, the screen can be calibrated; or for a special screen, picture settings can be adjusted. Select the desired [Picture Mode].
- [Dynamic Contrast]: Adjusts the contrast to the optimal level according to the image’s brightness.
- [Dynamic Color]: Adjusts colors to make the image appear in more natural colors.
- [Gamma]: Sets the gradation curve according to the output of picture signal in relation to the input signal.
- Depending upon input signal or other picture settings, the range of detailed items for adjustment may differ.
To set additional picture options
 (Settings) → [Picture] → [Picture Mode Settings] → [Picture Options]
Adjusts detailed setting for images.
- [Noise Reduction]: Eliminates noise in the picture.
- [MPEG Noise Reduction]: Eliminates noise generated while creating digital picture signals.
- [Black Level]: Adjusts the brightness and contrast of the screen to suit the black level.
- [Real Cinema]: Optimizes the screen for movie viewing.
- Depending upon input signal or other picture settings, the range of detailed items for adjustment may differ.
Initializing picture settings
 (Settings) → [Picture] → [Picture Mode Settings] → [Picture Reset]
Initializes picture settings that the user customizes. Each picture mode is reset. Select the desired picture mode to reset.
Setting the Screen Size
 (Settings) → [Picture] → [Aspect Ratio]
Selects the screen aspect ratio.
- [16:9]: Displays an aspect ratio of [16:9].
- [Original]: Changes the aspect ratio to [4:3] or [16:9] depending upon the input video signal.
- [4:3]: Displays an aspect ratio of [4:3].
- [Zoom]: Resizes the image to fit the screen width. The top and bottom parts of the image may be cut off.
- [Just Scan]: Displays video images in the original size without removing parts of the edge of the image. (This function works in DTV/Component/HDMI (720p / 1080i / 1080p) Mode.)
- If you select [Just Scan], you may see image noises at the edge of the original signal.
- Viewing content from an external device or, for an extended period of time, having fixed text such as the program name or using an aspect ratio of [4:3] may result in image sticking.
- Available picture size may differ depending upon the input signal.
To use Energy Saving Feature
 (Settings) → [Picture] →
  [Energy Saving]
Reduces power consumption by adjusting peak screen brightness.
- [Off]: Turns off the Energy Saving.
- [Minimum] / [Medium] / [Maximum]: Applies the pre-set Energy Saving.
- [Screen Off]: Screen is turned off and only sound is played. Press any button on the remote control to turn the screen back on.
To use picture test
 (Settings) → [Picture] → [Picture Test]
Conducts Picture Test first to verify that image signal output is normal. When the test image is normal, check connected external devices or broadcast signal.
Selecting Sound Mode
 (Settings) → [Sound] → [Sound Mode Settings] → [Sound Mode]
Adjusts TV audio to an optimal level based on a selected sound mode.
- [Standard]: Optimizes the sound for all types of content.
- [Cinema]: Optimizes the sound for cinemas.
- [Sports]: Optimizes the sound for sports.
- [Music]: Optimizes the sound for music.
- [Game]: Optimizes the sound for gameplay.
To adjust audio balance
 (Settings) → [Sound] → [Sound Mode Settings] → [Balance]
Adjust the volume of the left and right speakers.
Using the Sound Effect function
 (Settings) → [Sound] → [Sound Mode Settings]
The user can select various sound effects.
- [Treble]: Controls the dominant sounds in the output. When you turn up the treble, it will increase the output to the higher frequency range.
- [Bass]: Controls the softer sounds in the output. When you turn up the bass, it will increase the output to the lower frequency range.
- [Reset]: Reset the sound effect settings.
- This is only available if [Sound Mode] is set to [Standard].
To set Auto Volume
 (Settings) → [Sound] → [Auto Volume]
Sets [Auto Volume] to [On] and volume output from channel to channel is automatically adjusted for convenient TV watching when clicking through different channels.
Playing audio through the TV’s internal speakers
 (Settings) → [Sound] → [Sound Out] → [Internal TV Speaker]
Audio is played through the TV’s internal speakers.
Connecting and Using an Audio Device Supporting Optical
 (Settings) → [Sound] → [Sound Out] → [Audio Out (Optical)]
You can connect an audio device that supports Optical to the optical digital audio output port to enjoy your TV’s sound in richer quality and greater convenience.
- Only available for models with an optical digital port.
- You can use the TV remote control to adjust the volume of the connected device.
Using Internal TV Speaker + Optical
 (Settings) → [Sound] → [Sound Out] → [Internal TV Speaker + Audio Out (Optical)]
Audio is played through the TV’s built-in speakers and the audio device connected to the digital optical audio output port simultaneously.
Configuring digital sound output settings
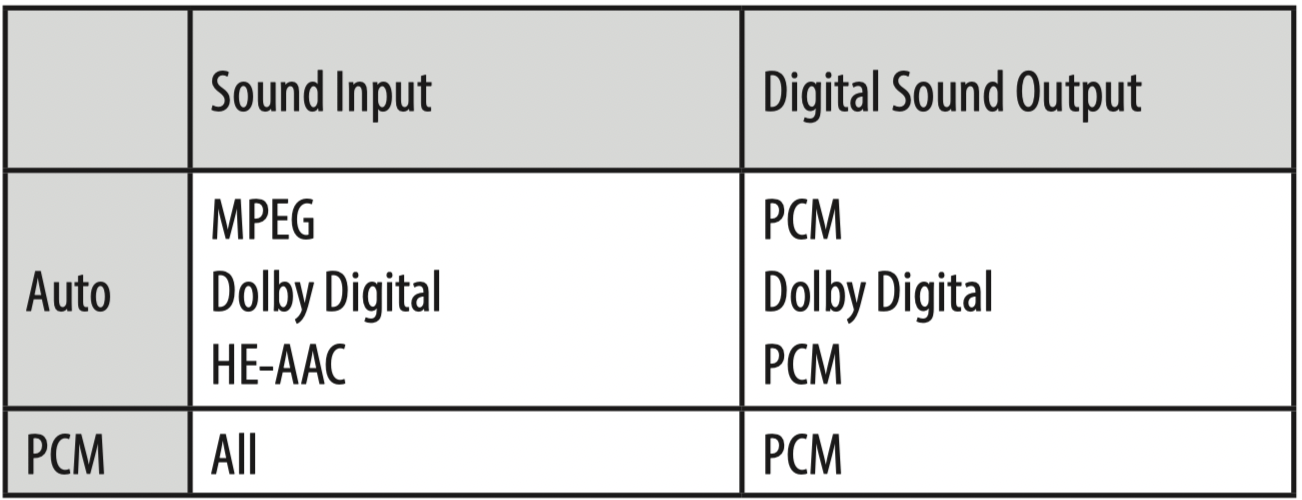
 (Settings) → [Sound] → [Sound Out] → [Digital Sound Out]
You can configure the [Digital Sound Out] settings.
- These settings are available only when an Optical is selected.

To use sound test
 (Settings) → [Sound] → [Sound Test]
Try Sound Test to verify that sound signal output is normal. When the test sound is normal, check connected external devices or broadcast signal.
To set up the channels automatically
 (Settings) → [Channels] → [Auto Tuning]
Memorizes automatically the channels being broadcast.
- The channels will not be memorized properly if the antenna/cable is not installed correctly.
- [Auto Tuning] memorizes the channels that are currently being broadcast.
- If [Lock System] is turned on, a pop-up window will appear asking for password.
To set up the channels at manually
 (Settings) → [Channels] → [Manual Tuning]
Adjusts channels manually and saves the results. For digital broadcasting, signal strength, etc. can be checked.
Editing the channels
 (Settings) → [Channels] → [Channel Manager]
Edits the saved channels.
To set Language
 (Settings) → [General] → [Language]
You can select the language of the menu displayed on the screen and the digital sound broadcasting.
- [Menu Language]: Selects a language for the display text.
- [Audio Language]: (In Digital mode Only) Selects the desired language when watching digital broadcasting containing several voice languages.
To set current time
 (Settings) → [General] → [Time & Date] → [Set Automatically]
Checks or changes the time while watching TV.
- Synchronizes the TV clock to the digital time information sent by the TV station.
- [Time] / [Date] / [Time Zone]: Sets the time and date manually if the auto setup does not correspond to the current time or region.
- [Daylight Saving]: Daylight Saving Time refers to the practice of setting the clocks forward one hour from standard time during the summer months.
To use Sleep Timer
 (Settings) → [General] → [Timers] → [Sleep Timer]
Turns off the TV after a prescribed number of minutes.
- To deactivate the [Sleep Timer], select [Off].
To turn on/off the TV
 (Settings) → [General] → [Timers] → [Timer Power On] / [Timer Power Off]
You can set the Power On/Off time for the TV.
- Select [Off] if you are not going to set [Timer Power On] / [Timer Power Off].
- To set [Timer Power On] / [Timer Power Off], set the current time correctly.
Requesting service
 (Settings) → [General] → [About This TV]
For information on requesting service, refer to the TV’s menu.
To set Power Indicator
 (Settings) → [General] → [Standby Light]
Turns on/off the standby light in the front panel of the TV.
To change the TV Mode
 (Settings) → [General] → [Home/Store Mode]
Selects [Home Mode] or [Store Mode].
- When in use in home, please select [Home Mode].
- [Store Mode] is for store display.
To return to initial settings
 (Settings) → [General] → [Reset to Initial Settings]
Returns to initial default mode by deleting all optional setup. Once initialization is completed, the TV will turn off and on by itself.
- When [Lock System] is in place, a pop-up window appears and asks for password.
- Do not turn off the power during initialization.
To set the password
 (Settings) → [Safety] → [Set Password]
Set or change the TV password.
- The initial password is set to 0000.
To set the Lock System
 (Settings) → [Safety] → [Lock System]
Permits only specific programs by blocking channels or external input.
At first, set [Lock System] to [On].
- Set the movie and TV rating level by select relevant option from [Movie Lock], [Children TV Program Locks] and [General TV Program Locks]. For downloadable videos, select [Downloadable Rating] to set up the rating level.
- A channel can be blocked by setting up [Channel Locks].
- A input source can be blocked by setting up [Input Locks].
To set the caption
 (Settings) → [Accessibility] → [Closed Caption]
View captions when the TV station provides captioned programming. Program captions work only on digital/analog broadcasts or external input.
Change [Closed Caption] to [On] and select caption settings.
- Mode
- [CC 1-4] (Closed Captioning) / [Text 1-4]: Displays the audio portion of a TV program as text on the TV screen. CC1 is the most common mode in use. Field 1 data channels: two Captions (CC1, CC2), two Text (T1, T2).
- Field 2 data channels: two Captions (CC3, CC4), two Text (T3, T4). [Service 1-6]: This is only available for the digital broadcasting system.
- [Digital Mode Options]: Set up the size and color of the captions on [Digital Mode Options]. Please select [Set By Program] or [Custom]. Select [Custom] to adjust minute options such as the captions’ size and color.
To use Audio Guidance
 (Settings) → [Accessibility] → [Audio Guidance]
When the Audio Guidance is set to On, the TV will announce its current status (Channel, Volume) by voice.
To remove the USB device
Q.MENU → [USB Device]
Once the message that the USB device was removed is displayed, remove the device from the TV.
- After selecting to remove USB device, the USB storage device cannot be read. Remove the USB storage device and then reconnect it.
Warning when using USB storage devices
- USB storage devices with a built-in auto recognition program or its own driver may not work.
- Some USB storage devices may not work or may work improperly.
- Use only those USB storage devices formatted with FAT16, FAT32 or NTFS File System provided by Windows.
- For external USB HDD, use devices with less than 5V-rated voltages and 500 mA-rated current.
- It is recommended to use USB flash drive with 32 GB or less and USB HDD with 2 TB or less.
- If a USB HDD with power-saving function does not work properly, turn the power off and on. For more information, refer to the user manual of USB HDD.
- Data in the USB storage device can be damaged so back up important files in other devices. Data maintenance is the user’s responsibility. The manufacturer is not responsible for data loss.
My Media Supported Files
- External supported subtitle formats: .srt (SubRip), .ssa/.ass (SubStation Alpha), .smi (SAMI), .sub (SubViewer1 , MicroDVD, DVDSubtitleSystem, SubIdx(VobSub)), .txt (TMPlayer) 1 SubViewer: SubViewer 1.0 & 2.0 Only
- Internal supported subtitle formats: .dat/.mpg/.mpeg/.vob (DVD Subtitle), .ts/.trp/.tp (DVB Subtitle), .mp4 (DVD Subtitle, UTF-8 Plain Text), .mkv (ASS, SSA, UTF-8 Plain Text, VobSub, DVD Subtitle), .avi (XSUB, XSUB+ )
Troubleshooting
Cannot control the TV with the remote control.
- Check if anything such as tape has been placed over the receiver.
- Check if there is any obstacle between the product and the remote control.
- Replace the batteries with new fresh ones.
No image display and no sound is produced.
- Check if the product is turned on.
- Check if the power cord is connected to a wall outlet.
- Check if there is a problem in the wall outlet by connecting other products.
The TV turns off suddenly.
- Check the power control settings. The power supply may be interrupted.
- Check if the auto-off function is activated in the settings menu.
- If there is no signal while the TV is on, the TV will turn off automatically after 15 minutes of inactivity.
Abnormal Display
- If the TV feels cold to the touch, there may be a small flicker when it is turned on. This is normal; there is nothing wrong with TV. Some minute dot defects may be visible on the screen, appearing as tiny red, green, or blue spots. However, they have no adverse effect on the TV’s performance. Avoid touching the LCD screen or holding your finger(s) against it for long periods of time. Doing so may produce some temporary distortion effects on the screen.
- This panel is an advanced product that contains millions of pixels. In a very few cases, you could see fine dots on the screen while you’re viewing the TV. Those dots are deactivated pixels and do not affect the performance and reliability of the TV.
- Displaying a still image for a prolonged period of time may cause an image sticking. Avoid displaying a fixed image on the TV screen for a extended length of time.
Generated Sound
- Cracking noise: A cracking noise that occurs when watching or turning off the TV is generated by plastic thermal contraction due to temperature and humidity. This noise is common for products where thermal deformation is required.
- Electrical circuit humming/panel buzzing: A low level noise is generated from a high-speed switching circuit, which supplies a large amount of current to operate a product. It varies depending upon the product. This generated sound does not affect the performance and reliability of the product.
CAUTION:
- When cleaning the product, be careful not to allow any liquid or foreign objects to enter the gap between the upper, left or right side of the panel and the guide panel, (Depending upon model).

- Make sure to wring any excess water or cleaner from the cloth.
- Do not spray water or cleaner directly onto the TV screen.
- Make sure to spray just enough of water or cleaner onto a dry cloth to wipe the screen.
See other models: LGUS110 LGVM670 SK3B LD-6105TB CR5765GD

