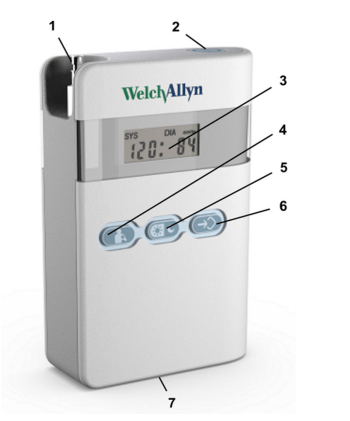
The ON/OFF button turns the ABPM 7100 on and off. To prevent unintended activation, the ABPM 7100 turns on or turns off only when the button is pressed for more than 2 seconds.
START
The START button serves to
initiate a manual measurement to ascertain whether the ABPM 7100 is working correctly.
initiate a 24-hour measurement.
perform a measurement outside the specified measurement cycle.
DAY/NIGHT
The DAY/NIGHT button is used to differentiate between waking and sleeping phases during the measurement, which is important for statistics and the graphic displays.
The patient is instructed to press the DAY/NIGHT button upon going to bed and again, when getting up in the morning. This individually adapts the measurement interval to the patient and assists you in the analysis of the blood pressure profile.
EVENT
The patient uses the EVENT button to document the time of medication or to record any events which may cause the blood pressure to rise or fall. Pressing the button will trigger a measurement, the patient should note the reason for pressing the EVENT button in the event log.
LCD Display
The LCD display is located on the front of the ABPM 7100 casing. It displays useful information for the doctor and the patient regarding measurement data, monitor settings and measurement errors. When the START button is pressed, the number of previously registered measurements will be shown before starting a manual measurement.
Audible signals
Individual or multiple beeps of audible signals are used. The following table explains the meaning of the beeps:
1 beep
Switching ON/OFF
Starting and ending a measurement (except at night intervals)
Removal of the interface cable
Establishing and ending Bluetooth® communication
Measurement errors
3 beeps
System errors
Continuous beeps
Severe system errors (e.g. cuff pressure is higher than 15 mmHg for longer than 10 seconds outside the measurement)
Combined beeps
Manual deletion of measurement, 1 beep followed by 5 beeps 2 seconds later
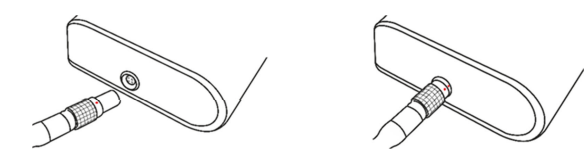
Cuff connection
The cuff connection is located at the top of the ABPM 7100 casing.
The cuff is connected to the ABPM 7100 via a metal connector.
Measurement errors
The cuff connection must always engage with an audible “CLICK“. A poor connection between the ABPM 7100 and cuff will result in measurement errors.
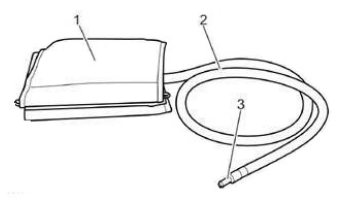
The Arm Cuff
The arm cuff
Air tube
Air tube connection
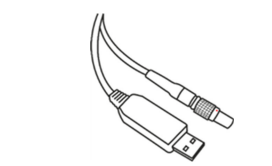
PC Interface Cable
In order to read data from the ABPM 7100, the interface cable must be connected to an USB slot on a PC.
PC Interface Cable Port
The connecting port for the PC interface cable is located at the bottom of the ABPM 7100 casing.
The red dot on the plug must align with the red dot on the port before plugging.
To disconnect, pull on the knurled ring of the connector.
Connecting the ABPM 7100 to the PC
To transfer the data from the ABPM 7100, ensure that the interface cable is connected correctly to an USB port on the PC and to the interface cable port on the device.
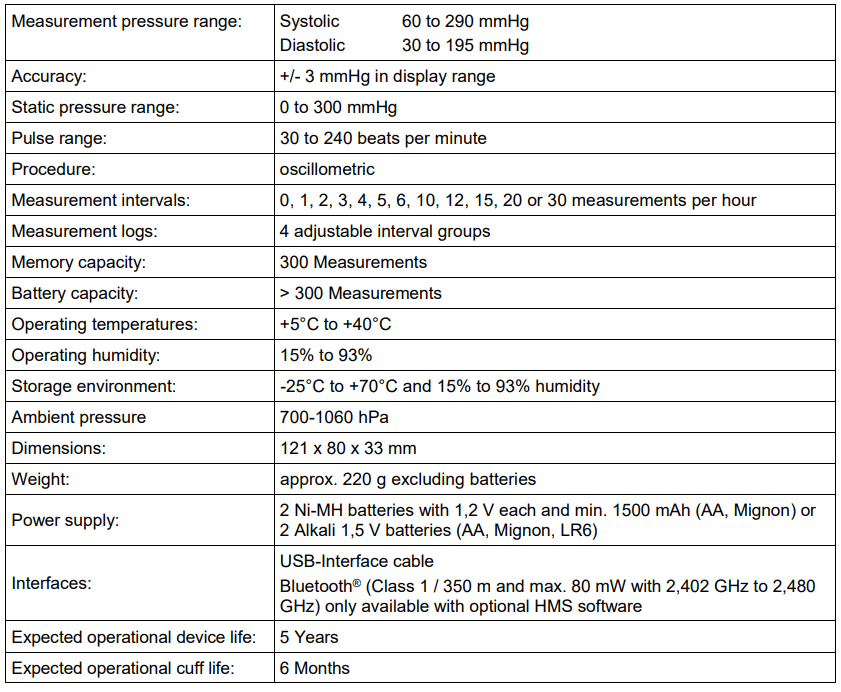
Technical Data
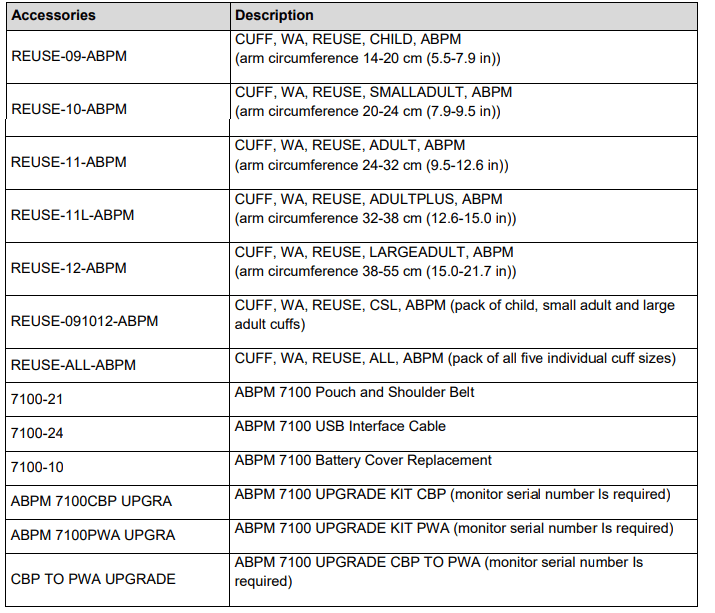
Accessories
Preparing the ABPM 7100
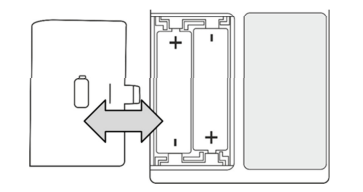
Inserting the batteries
Device function
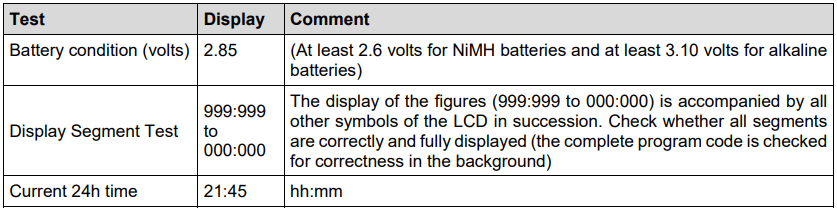
Although zinc-carbon batteries may indicate sufficient voltage during a battery test, their output is frequently insufficient to perform 24-hour measurements. Ensure sufficient battery voltage. At least 2.6 volts for NiMH batteries and at least 3.10 volts for alkaline batteries!
Damage to device
Do not open the casing. Once the device is opened, all warranties will lapse.
Open the batteries compartment on the rear of the ABPM 7100 casing to insert the batteries into the ABPM 7100 according to the battery polarities (+ / -) and close the compartment.
Internal memory battery
If after changing the external battery the display shows “rEboot”, the internal memory battery may be empty. Please contact your dealer.
Activating the device
Attention
Damage to device
Do not wear the ABPM 7100 while showering. If you suspect that liquid has entered the device while cleaning or using it, the device shall no longer be used on the patient.
If the device was exposed to moisture, switch off the device and remove the batteries.
Inform your service immediately and send the device in for inspection.
The device may not be operated around MRI scanners or in the immediate vicinity of other medical electrical equipment.
During a defibrillator discharge, the device shall not be in contact with the patient. Such a discharge may damage the ABPM 7100 and cause it to display incorrect values.
This device should not be used directly adjacent to other devices or stacked with other devices, as this may result in malfunction. If it is nonetheless necessary to operate the device in the manner described above, you should observe this and the other devices during use and convince yourself that they are working properly.
The ABPM 7100 is not suitable for simultaneous use with HF surgical equipment.
Measurement can be interrupted at any stage by pushing a random button. This deflates the cuff and the device can be removed
Attention
Hygiene
Ensure hygiene in accordance with the maintenance schedule.
Always check the condition of the ABPM 7100 by observing the initial display shown on the device shortly after turning it on and before handing it to a patient. The ABPM 7100 performs a self-test. In addition, a beep sounds to check the speaker. The following should be displayed in this sequence:
If the internal test detects an error, the ABPM 7100 will indicate “E004” on the display and emit an audible signal. For safety reasons, the use of the ABPM 7100 will be locked. The faulty ABPM 7100 unit should be send back immediately for repairs to your dealer or to Welch Allyn.
Setting the time / date
The ABPM 7100 has an internal buffer battery allowing the time to continue even if the batteries have been removed. Nevertheless the time and the date should be checked before every measurement series.
The time and date can be set automatically with the patient management software.
Alternatively the time and date can be set manually. Press and hold the START button and then press the EVENT buttons to enter the Set Time mode. Use the START button to select the appropriate item and use the EVENT button to jump to the next display item.
Clearing the memory
The device memory must be cleared before every measurement series, i.e. blood pressure data form the previous patient must not remain in the memory.
If there are existing data, the memory can be cleared with the delete function of the analysis software.
Alternatively the data can be cleared manually. Press and hold the START button for a minimum of 5 seconds until “cLr” is displayed. Within the next 5 seconds press and hold the EVENT button for at least 2 seconds to confirm the deletion of the stored measurements. The device emits a single beep to indicate that the memory is cleared.
Transferring patient data (ID)
The ABPM 7100 must be prepared by transferring patient data (ID) with the help of the patient management software, so that correct data allocation is possible when it is read out after measurement. Please refer to the respective patient management software manual for how to transfer patient data (ID) to the ABPM 7100.
Setting measurement logs
In the patient management software you can optionally choose between eleven (1-11) logs. A log serves to set the measurement intervals. As soon as you have conducted a measurement, the log can only be changed once you have fully deleted all data.
Manual log settings
For manual log setting, press and hold the DAY/NIGHT button while simultaneously pressing the EVENT button. Use the START button to change the log and confirm with the EVENT button.
Setting the logs via software
To set the logs via software please refer to the respective patient management software manual.
Note
Logs 1, 2, 10 and 11 are set by default but can be changed via the patient management software
Log 5 is suitable for nighttime activities (night shift)
Log 9 is designated as “Schellong-Test”.
Log 10 automatically sends the measurement values to your doctor’s PC via Bluetooth®. Bluetooth® communication is not supported with the CPWS software.
Log 11 is only available to upgraded ABPM 7100 systems in connection with HMS from version 5.0. Blood pressure measurement intervals and the 24h PWA can be set separately here. Please contact Welch Allyn for further information.
Selecting a suitable cuff
Caution: Risk of injury caused by incorrect application of the cuff.
The doctor must ensure that, due to the patient’s medical condition, the use of the device and the cuff does not result in impaired blood circulation.
If the patient is has limited cognitive abilities, the device may only be used under supervision.
When used on children, the device must only be applied with special care and under permanent supervision.
It is imperative that you instruct the patient in the correct seating of the cuff.
Inform the patient that the cuff may only be used on the upper arm.
Ensure that neither the shoulder strap nor the cuff tubing can ever wrap around the patient’s neck. Always place the cuff tubing under the outer clothing (even at night).
Instruct the patient to place the device in such a way that, while the cuff is inflated, the tubing is not compressed or kinked, especially during sleep.
Petechiae, haemorrhages or subcutaneous haematoma may occur in some patients.
Instruct the patient to turn off the device, remove the cuff, and notify the doctor if they are experiencing pain, swelling, redness or numbness in the limb where the cuff is placed. (It is expected that the patient may experience some mild to moderate discomfort during a blood pressure measurement.)
The correct cuff size is important for correct blood pressure measurement. To obtain reproducible measurements, standardized measuring conditions are needed. Measure the circumference of the upper arm and select the appropriate cuff:
Applying the ABP Monitor and cuff:
Position the carrying pouch on the right side of the patient. By varying the length of the pouch strap, it can be worn around the hips or around the shoulders.
Alternatively a normal belt matching the clothes can be used.
Fit the cuff onto the patient. The correct cuff seating is very important for correct blood pressure measurement.
Align the cuff so that no part of the cuff tubing is kinked. In this regard, the tube connection on the cuff must face upwards.
Align the cuff so that the lower edge of the cuff is approximately 2 cm (0.8 in) above the inside of the patient’s elbow.
Tighten the cuff around the upper arm until one finger can be introduced under the cuff.
It is imperative that the artery symbol is positioned on the brachial artery. If you have aligned the cuff correctly, the metal bar will lie on the outside of the upper arm (on the elbow side), whereby the cuff sleeve must cover the skin under the metal bar.
Guide the tubing through the shirt’s row of buttons and out of the clothing, behind the nape of the neck to the ABPM 7100 on the right side of the body.
The cuff can be worn on the naked upper arm or over a thin shirt sleeve.
The placement of the pressure tube must guarantee the upper arm’s free motion.
Connecting the cuff tubing to the ABPM 7100
Push the tube firmly onto the connection, with the cuff tubing engaging with an audible “CLICK” (to detach, simply pull back the knurled ring).
Before measurement, check to ensure that tubing, ABPM 7100 and cuff are positioned correctly. The ABPM 7100 is ready for measurement only once this is ensured.
Care and Maintenance
To ensure the optimal functionality of the ABPM 7100 regular care and maintenance of the unit is required.
Attention
Damage to device
Do not open the casing. Once the device is opened, all warranties will lapse.
Cleaning
Cleaning the ABP Monitor and carrying pouch
Read the safety instructions carefully and observe them closely before cleaning.
Only use a cotton cloth moistened with lukewarm water and mild detergents to clean the ABPM 7100 and the pouch.
Attention
Damage to the ABP Monitor and carrying pouch caused by the use of solvents
Do not use strong or solvent-based additives.
Ensure that no liquid enters the device.
If liquid does penetrate the device, switch if off immediately and return it to your Welch Allyn specialist for inspection.
Cleaning the cuff sleeve, bladder and tubing
Read the safety instructions carefully and observe them closely before cleaning.
Before washing, carefully remove the bladder and tubing from the cuff sleeve.
When cleaning the cuff sleeve, bladder and tubing, use only mild detergents in lukewarm water without fabric softener.
Attention
Damage to the cuff sleeve during washing
Always close the Velcro strip before washing!
It is possible to wash the cuff sleeve in the washing machine at max. 30°C. Do not spin.
Do not use fabric softeners or other washing aids (e.g. hygiene rinses, textile deodorants). These agents can leave behind residues and damage the material.
The cuff sleeve is not suitable for drying in a dryer.
Disinfection
Attention
Damage to the cuff sleeve, bladder and tubing caused by disinfectants
Do not submerge the cuff sleeve in disinfectants.
Avoid disinfecting the cuff bladder and connected rubber tubing.
The bladder and tubing can be damaged by disinfectants. Wipe down the bladder with lukewarm water and add a mild detergent, if necessary.
Ensure that no liquid enters the tube opening.
The user (doctor) decides whether and when the ABP Monitor and the cuff sleeve should be disinfected for hygienic reasons (e.g. after every use).
The following agents are recommended for disinfecting the ABP Monitor and the cuff sleeve:
Terralin Liquid (Manufacturer: Schülke & Mayr)
Isopropyl alcohol (70%)
For full effectiveness, moisten the ABPM 7100 and cuff sleeve with the disinfectant for at least 5 minutes.
The use of disinfectants not recommended in the directions for use shall render the user responsible for proof of safe application.
Note: It is imperative that you observe the manufacturer’s information regarding the use of these products. Allow the agents to dry off completely.
Maintenance plan
Attention
Damage to device
Do not open the casing. Once the device is opened, all warranties will lapse.
Weekly Maintenance
Analysis review:
1. Review the print-out of your measurement analysis for:
Correctly entered times and intervals in accordance with the log.
Times of day/night transitions.
Correct standard values (nocturnal decrease).
2. Check the device, cuff and the cuff tubing for superficial soiling and clean it as specified in the Cleaning section.
3. Check the cuff and the cuff tubing for superficial damage. In the event of damages return it to your Welch Allyn specialist for inspection.
Checking battery voltage:
Always use fully charged or new batteries.
The battery voltage appears on the display of the ABPM 7100 for approximately 3 seconds after the device is switched on. The battery voltage must be at least 2.6 volt to ensure a 24-hour measurement.
Maintenance every 2 years
As proof of continuous compliance to “Basic Requirements” pursuant to Directive 93/42/EEC, the ABPM 7100 must be subjected to calibration checks every two years. In certain countries, this requirement may be regulated by national laws or regulations.
Welch Allyn offers to provide calibration checks and the servicing comprising of the following:
Calibration check
Software updates (if required)
Functional check: Electronics, pump and pneumatic circuit
Except the calibration check, no further maintenance work for electronic compatibility are necessary.
Troubleshooting
Attention
Damage to device
Do not open the casing. Once the device is opened, all warranties will lapse.
Basic error sources
The following may cause error measurements or unintended events:
The patient’s arm movement during measurement
Incorrect cuff size
Cuff displacement while wearing it
Omitted successful initial measurement by the doctor
Wrong log set by the user
Empty, incorrectly charged or outdated batteries
Kinked or knotted cuff tubing
Severe arrhythmia
Transmission error
The ABPM 7100 reviews the transmitted data to prevent errors. If an error occurs, “E004” will be shown on the display.
Checklist
Please review the following checklist for any errors occurring during the operation of the ABPM 7100. Many errors have simple causes:
Check to see that all cables are connected correctly.
Check to see whether the ABPM 7100 and the computer are switched on.
Check to see whether the batteries have sufficiently voltage.
Note: Some errors are combined with a continuous alarm for safety reasons. The continuous alarm can be cancelled by pressing any button. If there is residual pressure inside the cuff, open the cuff immediately.
Error codes
Error description of the ABPM 7100
Error symptom
Possible cause
Remedy
Time and date are not updated following a longer period without power supply from power packs or batteries.
The internal buffer battery is depleted.
Date and time can be reset after every power pack or battery replacement. Send the device to your Welch Allyn specialist.
Measurement data can no longer be called up/displayed.
An error occurred during patient data storage.
Delete the respective patient (menu bar) and recreate it.
The connection between the ABPM 7100 and the PC is faulty.
The incorrect COM interface is set.
Set the correct interface in the service programs.
Cable plug or socket is defective.
Inspect the plug and the socket on the ABPM 7100. Ensure that the pins are straight to guarantee contact.
The ABPM 7100 is not in transmitting mode (the displays shows the time).
Switch the ABPM 7100 off and then on again without removing the connecting cable.
No patient number.
The ABP Monitor is not initialized, i.e. the patient number was not transferred during the preparation for a 24-hour measurement.
The patient number can also be transmitted after the measurement. This does not influence the measurement data.
No measurements were conducted during the nocturnal phase.
The battery packs or batteries were prematurely depleted.
The power packs or batteries may be defective (please contact your Welch Allyn specialist).
The patient has switched off the ABPM 7100.
Draw the patient’s attention to the urgency of a complete 24-hour measurement.
The display does not show “co” or “bt”.
You are not in transmitting mode.
Communication via cable: Switch the ABPM 7100 off and then on again without pulling the plug.
Communication via BT: Press and hold the START button and then press the DAY/NIGHT button. Select “bt” using the START button.
No automatic measurements will be performed.
No manual measurements performed after application.
Valid manual measurement must always be performed after the device has been positioned.
Incorrect log set.
Set log 1 or 2.
The measurement interval does not meet your expectations.
Incorrect log set.
The programmed log does not correspond with the set log in the ABPM 7100. Check the log manually on the device.
No manual measurements performed after application.
Conduct manual measurement to activate the set log
Error symptom
Possible cause
Remedy
Err 1
The patient displays severe arrhythmia.
ABP Monitor not applicable.
The arm was moved during measurement.
Keep the arm still during measurement.
Insufficient valid pulse rate detected.
Place the cuff on your arm again.
Err 2
The arm was moved during measurement.
Keep the arm still during measurement.
Cuff does not fit the arm snugly.
Check the seating of the cuff and that of the
device.
Err 3
Blood pressure beyond the measurement range.
Permanent notification renders the ABP Monitor unsuitable for the patient.
Strong arm movements.
Keep the arm still during measurement.
Problems with the pneumatics.
If the error persists permanently, send the device to your Welch Allyn specialist.
Err 4
Data transmission cable incorrectly inserted in ABP Monitor.
Insert the cable into the ABP Monitor correctly.
Pins in the plug of the data transmission cable are mechanically damaged.
Check the plug to see whether the pins on the inside are damaged. If they are, contact your Welch Allyn specialist.
Measurement value was not correctly transmitted.
Restart the transmission.
Err 5 bAtt
Power pack or battery voltage too low.
Replace the power packs or batteries.
Power packs or batteries are defective.
The power pack or battery voltage is correct but “bAtt” is displayed during cuff inflation. Replace the power packs.
Battery contacts are corroded.
Clean the battery contacts with a cotton cloth and a little alcohol.
Err 6 +
Possible continuous alarm until a button is pressed.
Build-up 29 fair.
Check the cuff for a build-up of air or a kink in the tubing. If the cuff tubing is kinked, straighten the tubing. Otherwise send the device in for inspection immediately.
Blood pressure cuff incorrectly connected.
Connect the cuff to the device.
Leaky points in the cuff or the cuff tubing.
If necessary, replace the cuff.
Err 7
The memory of the blood pressure measurement device is full, (a maximum of 300 measurements and events can be stored)
Delete the data in the ABP Monitor but ensure that the data was stored on your PC first.
Err 8
Measurement cancelled with a pressed button.
Err 9 +
Possible continuous alarm until a button is pressed.
Residual pressure inside the cuff
Wait for the cuff to deflate completely.
Zero point comparison was unsuccessful.
Send the device to your specialist for inspection immediately or directly to your Welch Allyn specialist.
Error symptom
Possible cause
Remedy
Err 10 +
Continuous alarm until a button is pressed.
Severe error caused by accumulated pressure outside the measurement process.
Send the device to your specialist for inspection and repair immediately or directly to your Welch Allyn specialist.
These error messages all show a severe error in the program code.
The analysis unit does not react to data transmission but the display shows “co”.
Data transmission cable not correctly inserted in the PC. (also refer to Err 4)
Check whether the 9-pin plug of the data transmission cable is securely seated in the device’s interface socket, (also refer to Err 4)
The ABPM 7100 measures every two minutes.
Log 9 is set in the AB PM 7100.
Set log 1 or 2.
The desired log cannot be set with the button combination.
The last patient’s measurement values are still contained in the memory.
Delete the data in the ABP Monitor but ensure that the data was stored first.
The ABP Monitor cannot be switched on.
The battery packs or batteries were incorrectly inserted.
Reinsert either power packs or batteries and ensure correct polarity.
Power pack or battery voltage too low.
Replace the power packs or batteries.
Defective display.
Send the device to your specialist for repair or directly to your Welch Allyn specialist.
An error occurs during the first measurement.
The cuff size is not suitable for the patient’s arm circumference.
Measure the patient’s arm circumference and compare this with the imprint on the cuff. You may require a different cuff size.
Communication error ABPM 7100 Bluetooth Interface
Error symptom
Possible cause
Remedy
Code 1
Bluetooth® interface of the ABPM 7100 was not started correctly.
Possible hardware fault.
Send the device to your Welch Allyn specialist for inspection.
Code 2
Bluetooth® interface of the ABPM 7100 could not be configured correctly.
(Communication problem between ABPM 7100 and the Bluetooth® module.)
Try again. If the error persists, send the device to your Welch Allyn specialist for inspection.
Code 3
The status of the Bluetooth® interface of the ABPM 7100 could not be determined. (Communication problem between ABPM 7100 and the Bluetooth® module.)
Try again. If the error persists, send the device to your Welch Allyn specialist for inspection.
Code 4
The Bluetooth® interface of the ABPM 7100 has not yet been paired with the analysis software.
Reconnect the device via Bluetooth®.
Code 5
The Bluetooth® interface of the ABPM 7100 could not connect to the Bluetooth dongle on the computer.
Try again. If the error persists, send the device to your Welch Allyn specialist for inspection.
Code 6
The measurement value memory of the ABPM 7100 contains unsent blood pressure values.
These will be sent once further measurements have been performed.
Code 7
The ABPM 7100 is paired with a cell phone or GSM modem, which is technically incapable of transmitting measurement values, is outside the network range or is incorrectly configured.
Try again. If the error persists, contact your Welch Allyn specialist.