HEM-907-STAND
ASSEMBLY INSTRUCTIONS
1. Failure to assemble and/or use as directed may result in
injury, and will void the user warranty.
2. Choose a level surface for assembling and using this
stand.
3. Follow each step in the sequence. Do not skip ahead.
4. Make sure all fasteners are secure.
5. Prior to use, test and inspect the stand to ensure smooth
operation.
6. Refer to additional warning notices and information
posted on the equipment.
WARNING
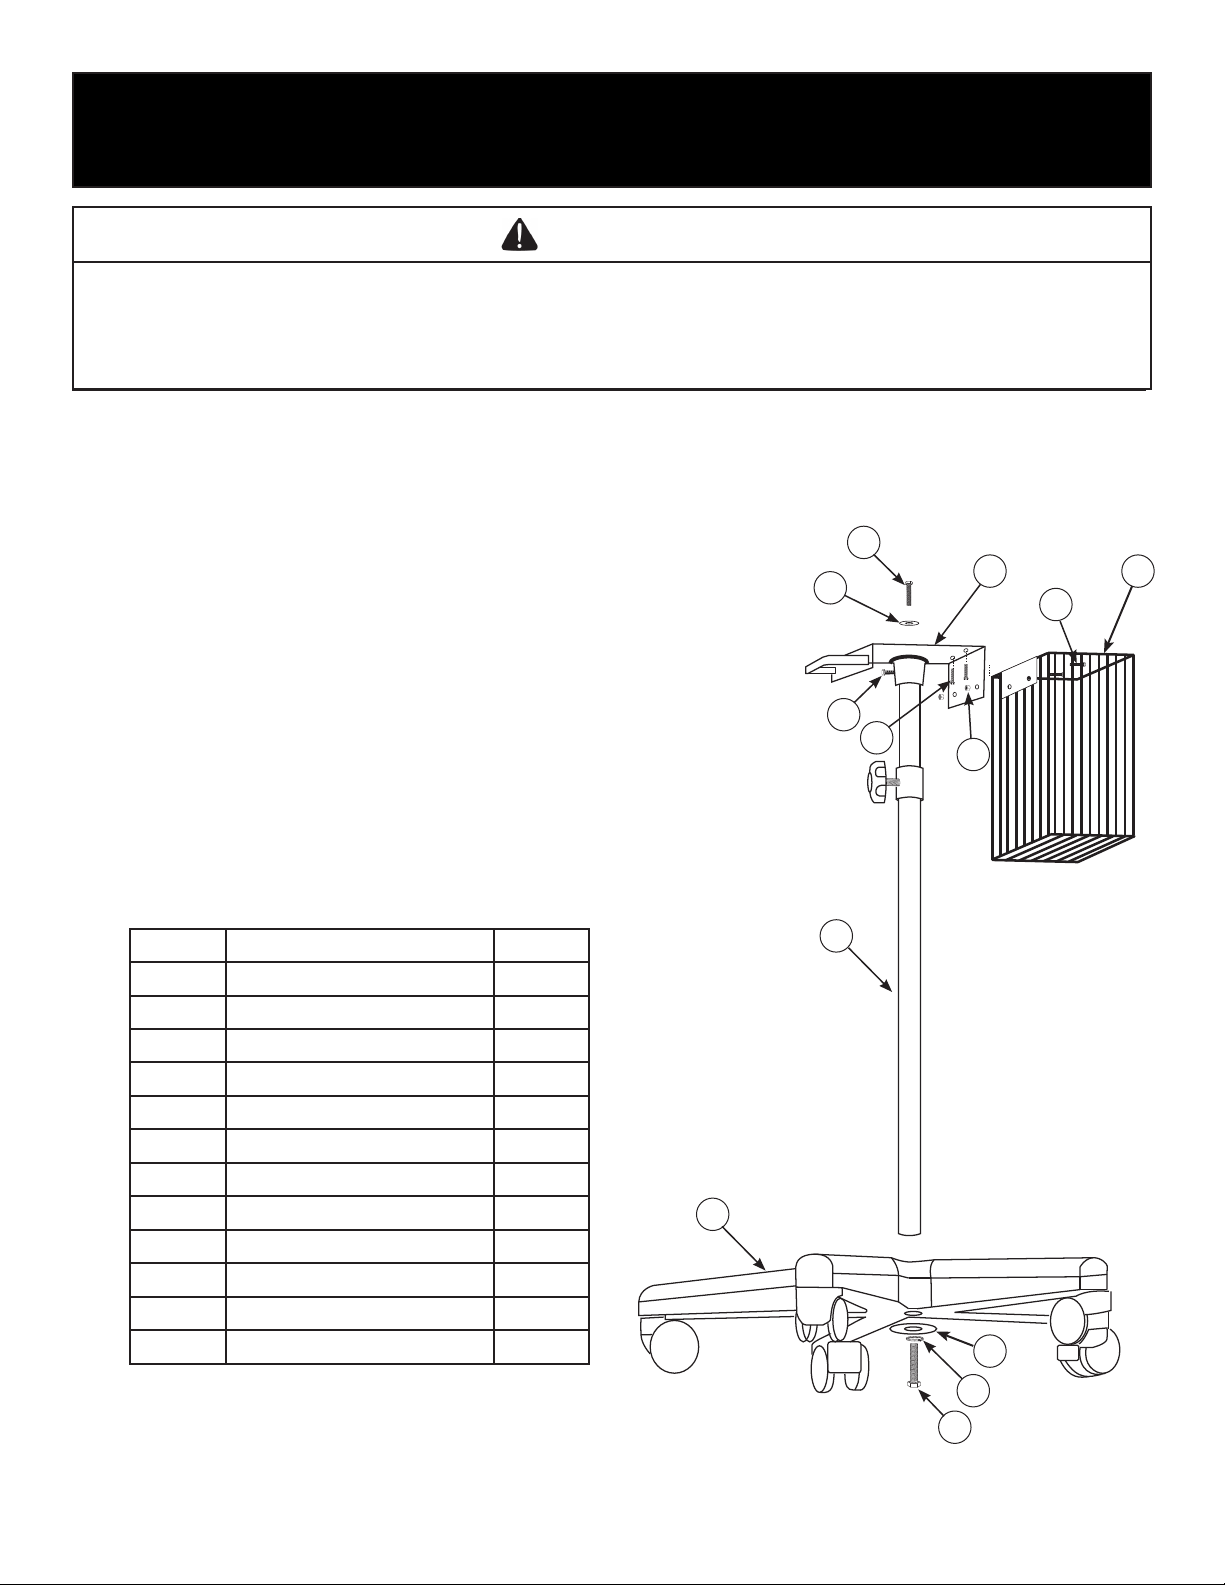
• Usingrmpressure,insertthepoleassembly(#3)intothecenterofthebase(#9)assembly.
• Onthebottomsideofthebaseplacethelargewasher(#10)onthebottomofthebasefollowedbythelock
washer(#11).Usethebolt(#12)tosecurethesepartsintoplacebyturningtheboltclock-wiseusingthesupplied
atwrench.
• Inserttheplatform(#1)ontopofthepole
assembly.Installscrew(#4)andwasher(#5)
and tighten it securely using the supplied Allen
wrench.Tightenthetwoscrews(#7)looselyuntil
both screws touch the pole. Once the screws are
touching the pole use the supplied Allen wrench to
tighten.
• Attachthebasket(#2)totheplatformusingthesut
under the platform.
• Usescrews(#8)toattachtheinstrumenttothe
stand. Please review the instrument instructions
prior to installation
Item Description Qty
1 Platform 1
2 Basket 1
3 Pole Assembly 1
4 Screw-Medium 3
5 Washer-Lock 1
6 Nut 2
7 Screw-Short 2
8 Screw-Long 2
9 Base W/Wheels 1
10 Washer-Large 1
11 Washer-Lock 1
12 Bolt 1
9
10
11
12
1
4
4
2
6
8
7
3
5

This HEM-907 STAND is warranted to be free from defects in material and workmanship appearing within one
year from the date of purchase, when used in accordance with assembly instructions provided with the stand. This
warranty extends only to the original retail purchaser. We will, at our option, repair or replace without charge any
stand covered by the warranty above. Repair or replacement is our only responsibility and your only remedy under
this warranty.
ToobtainwarrantyservicecontactCustomerServicebycalling1-877-216-1336fortheaddressoftherepair
location and the return shipping and handling fee.
Enclose the Proof of Purchase, include a letter, with your name, address, phone number, and description of the
specicproblem.Packtheproductcarefullytopreventdamageintransit.Becauseofpossiblelossintransit,we
recommend insuring the product with return receipt requested.
THE FOREGOING IS THE SOLE WARRANTY PROVIDED BY OMRON IN CONNECTION WITH THIS
PRODUCT, AND OMRON HEREBY DISCLAIMS ANY OTHER WARRANTIES, EXPRESSED OR IMPLIED,
INCLUDING IMPLIED WARRANTIES OF MERCHANTABILITY AND FITNESS FOR PARTICULAR PURPOSE,
IMPLIED WARRANTIES AND OTHER TERMS THAT MAY BE IMPOSED BY LAW, IF ANY, ARE LIMITED IN
DURATION TO THE PERIOD OF THE ABOVE EXPRESS WARRANTY.
OMRON SHALL NOT BE LIABLE FOR LOSS OF USE OR ANY OTHER SPECIAL, INCIDENTAL,
CONSEQUENTIAL OR INDIRECT COSTS, EXPENSES OR DAMAGES.
Thiswarrantyprovidesyouwithspeciclegalrights,andyoumayhaveotherrightsthatvarybyjurisdiction.
Because of special local requirements, some of the above limitations and exclusions may not apply to you.
FOR CUSTOMER SERVICE
Visit our web site at: www.omronhealthcare.com
Calltollfree:1-877-216-1336
Distributed by:
OMRON HEALTHCARE, INC.
1925 West Field Court
Lake Forest, IL 60045 U.S.A.
© 2012 OMRON HEALTHCARE, INC. 907 Stand-Inst RevF
Limited One Year Warranty