Loading ...
Loading ...
Loading ...
En
26
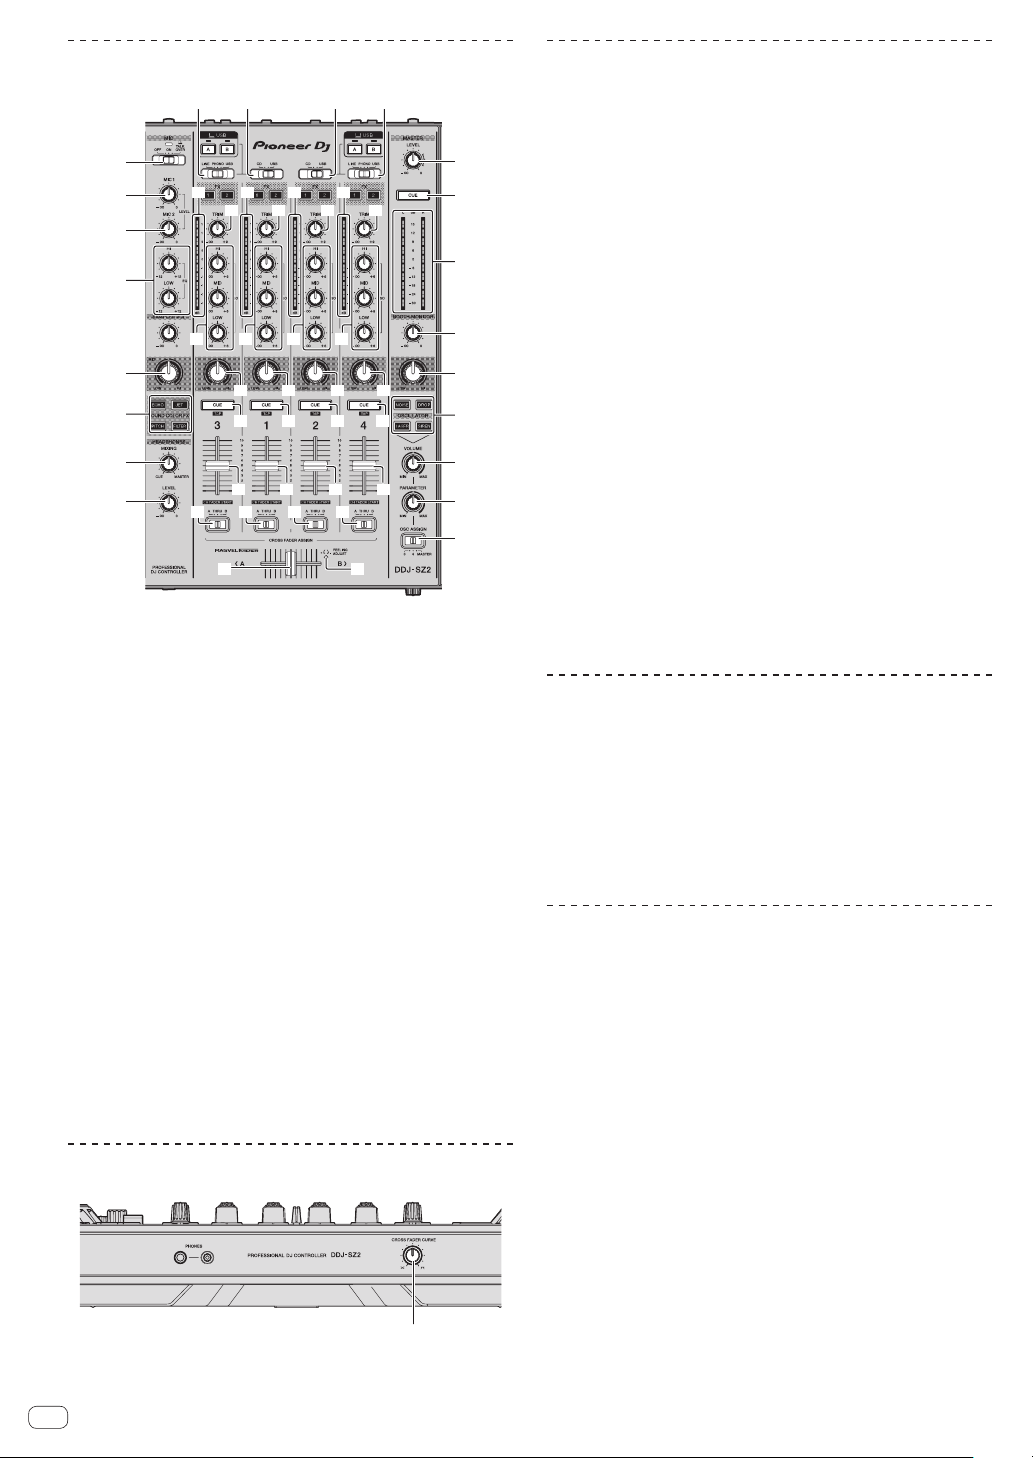
Mixer section
a
b
c
d
e
f
g
h
i
k
l
m
n
o o o o
p
q q q q
sr
p p p
n n n
m m m
l l l
k k k
ij j
1
2
4
3
5
6
7
9
8
1 MASTER LEVEL control
2 MASTER CUE button
3 Master level indicator
4 BOOTH MONITOR control
5 MASTER OUT COLOR control
6 OSCILLATOR SELECT buttons
7 OSCILLATOR VOLUME control
8 OSCILLATOR PARAMETER control
9 OSC ASSIGN selector switch
a HEADPHONES LEVEL control
b HEADPHONES MIXING control
c SOUND COLOR FX buttons
d MIC COLOR control
e EQ (HI, LOW) controls
f MIC2 control
g MIC1 control
h OFF, ON, TALK OVER selector switch
i LINE, PHONO, USB selector switch
j CD, USB selector switch
k Channel Level Indicator
l TRIM control
m ISO (HI, MID, LOW) controls
n COLOR control
o Headphones CUE button
p Channel fader
q Crossfader assign selector switch
r Crossfader
s FEELING ADJUST adjustment hole
Front panel
1
1 CROSS FADER CURVE selector switch
Using a microphone
1 Connect a microphone to the [MIC1] or [MIC2]
terminal.
2 Set the [OFF, ON, TALK OVER] selector switch to [ON]
or [TALK OVER].
— [ON]: The indicator lights.
— [TALK OVER]: The indicator flashes.
! When set to [TALK OVER], the sound of channels other than the
[MIC1] channel is attenuated by 18 dB (default) when a sound of –10
dB or greater is input to the microphone.
! The sound attenuation level while [TALK OVER] is selected can be
changed in utility mode. For the method to effect that change, see
Changing the talk over function level on page 29 .
! The talk over mode can be switched to the normal mode or the
advanced mode. For instructions on changing it, see Changing the
talk over function setting on page 28 .
3 Turn the [MIC1] or [MIC2] control.
Adjust the level of the sound output from the [MIC1] channel.
! Pay attention that rotating to the extreme right position outputs a
very loud sound.
4 Input audio signals to the microphone.
Adjusting the sound quality
Turn the [EQ (HI, LOW)] controls.
The adjustable ranges for the respective controls are as shown below.
! [HI]: –12 dB to +12 dB (10 kHz)
!
[LOW]: –12 dB to +12 dB (100 Hz)
Mixing the sound of a DJ player, etc.
1 Connect the DJ player or other line level output
device to the [CD] or [LINE] terminals.
2 Set the [LINE, PHONO, USB] selector switch or [CD,
USB] selector switch to [LINE] or [CD].
3 Operate the [TRIM] control and channel fader to
adjust the sound level output from each channel.
Mixing the sound of an analog turntable,
etc.
1 Connect the analog player or other phono level (for
MM cartridges) output device to the [PHONO] terminals.
2 Set the [LINE, PHONO, USB] selector switch to
[PHONO].
3 Operate the [TRIM] control and the channel faders to
adjust the audio level output from the respective decks.
Loading ...
Loading ...
Loading ...